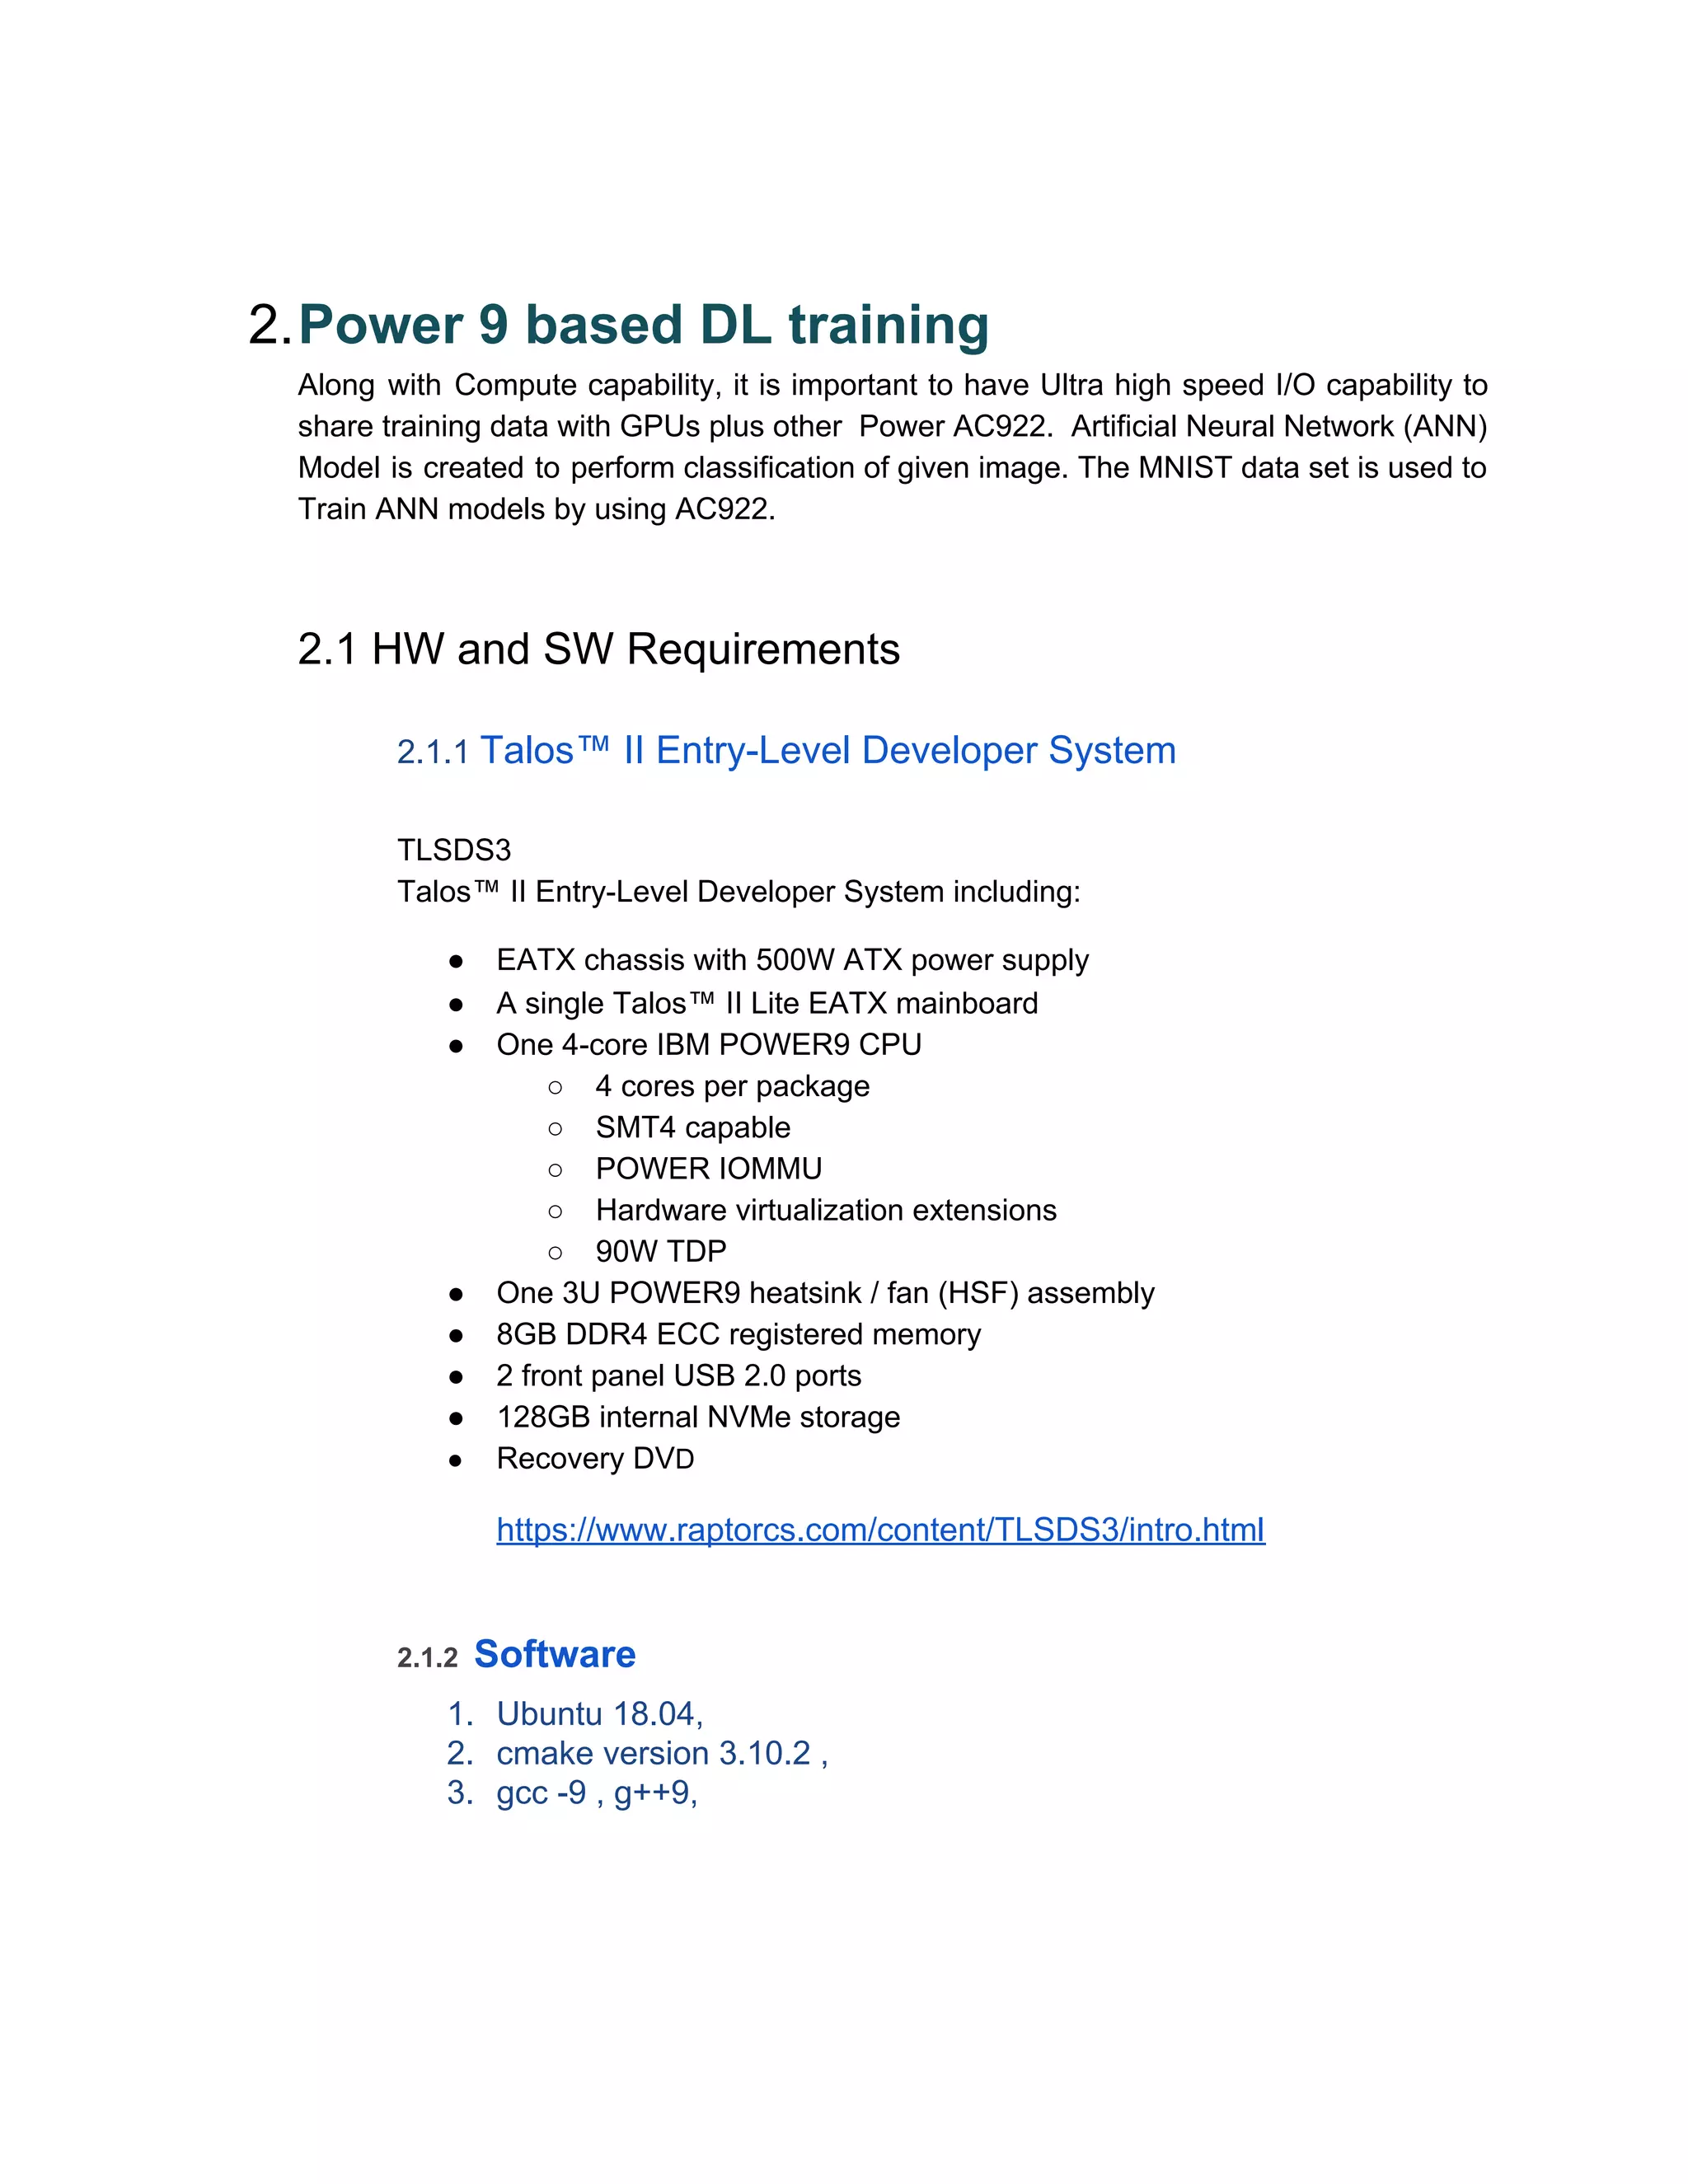
The document discusses deep learning applications design, development and deployment in IoT edge. It describes using a Power9 system to train artificial neural network models using the MNIST dataset. It also covers building inference engines for Android phones and deploying visual recognition models to IBM Watson Studio.

![3.3 Single Project using Power AC922 and GPU
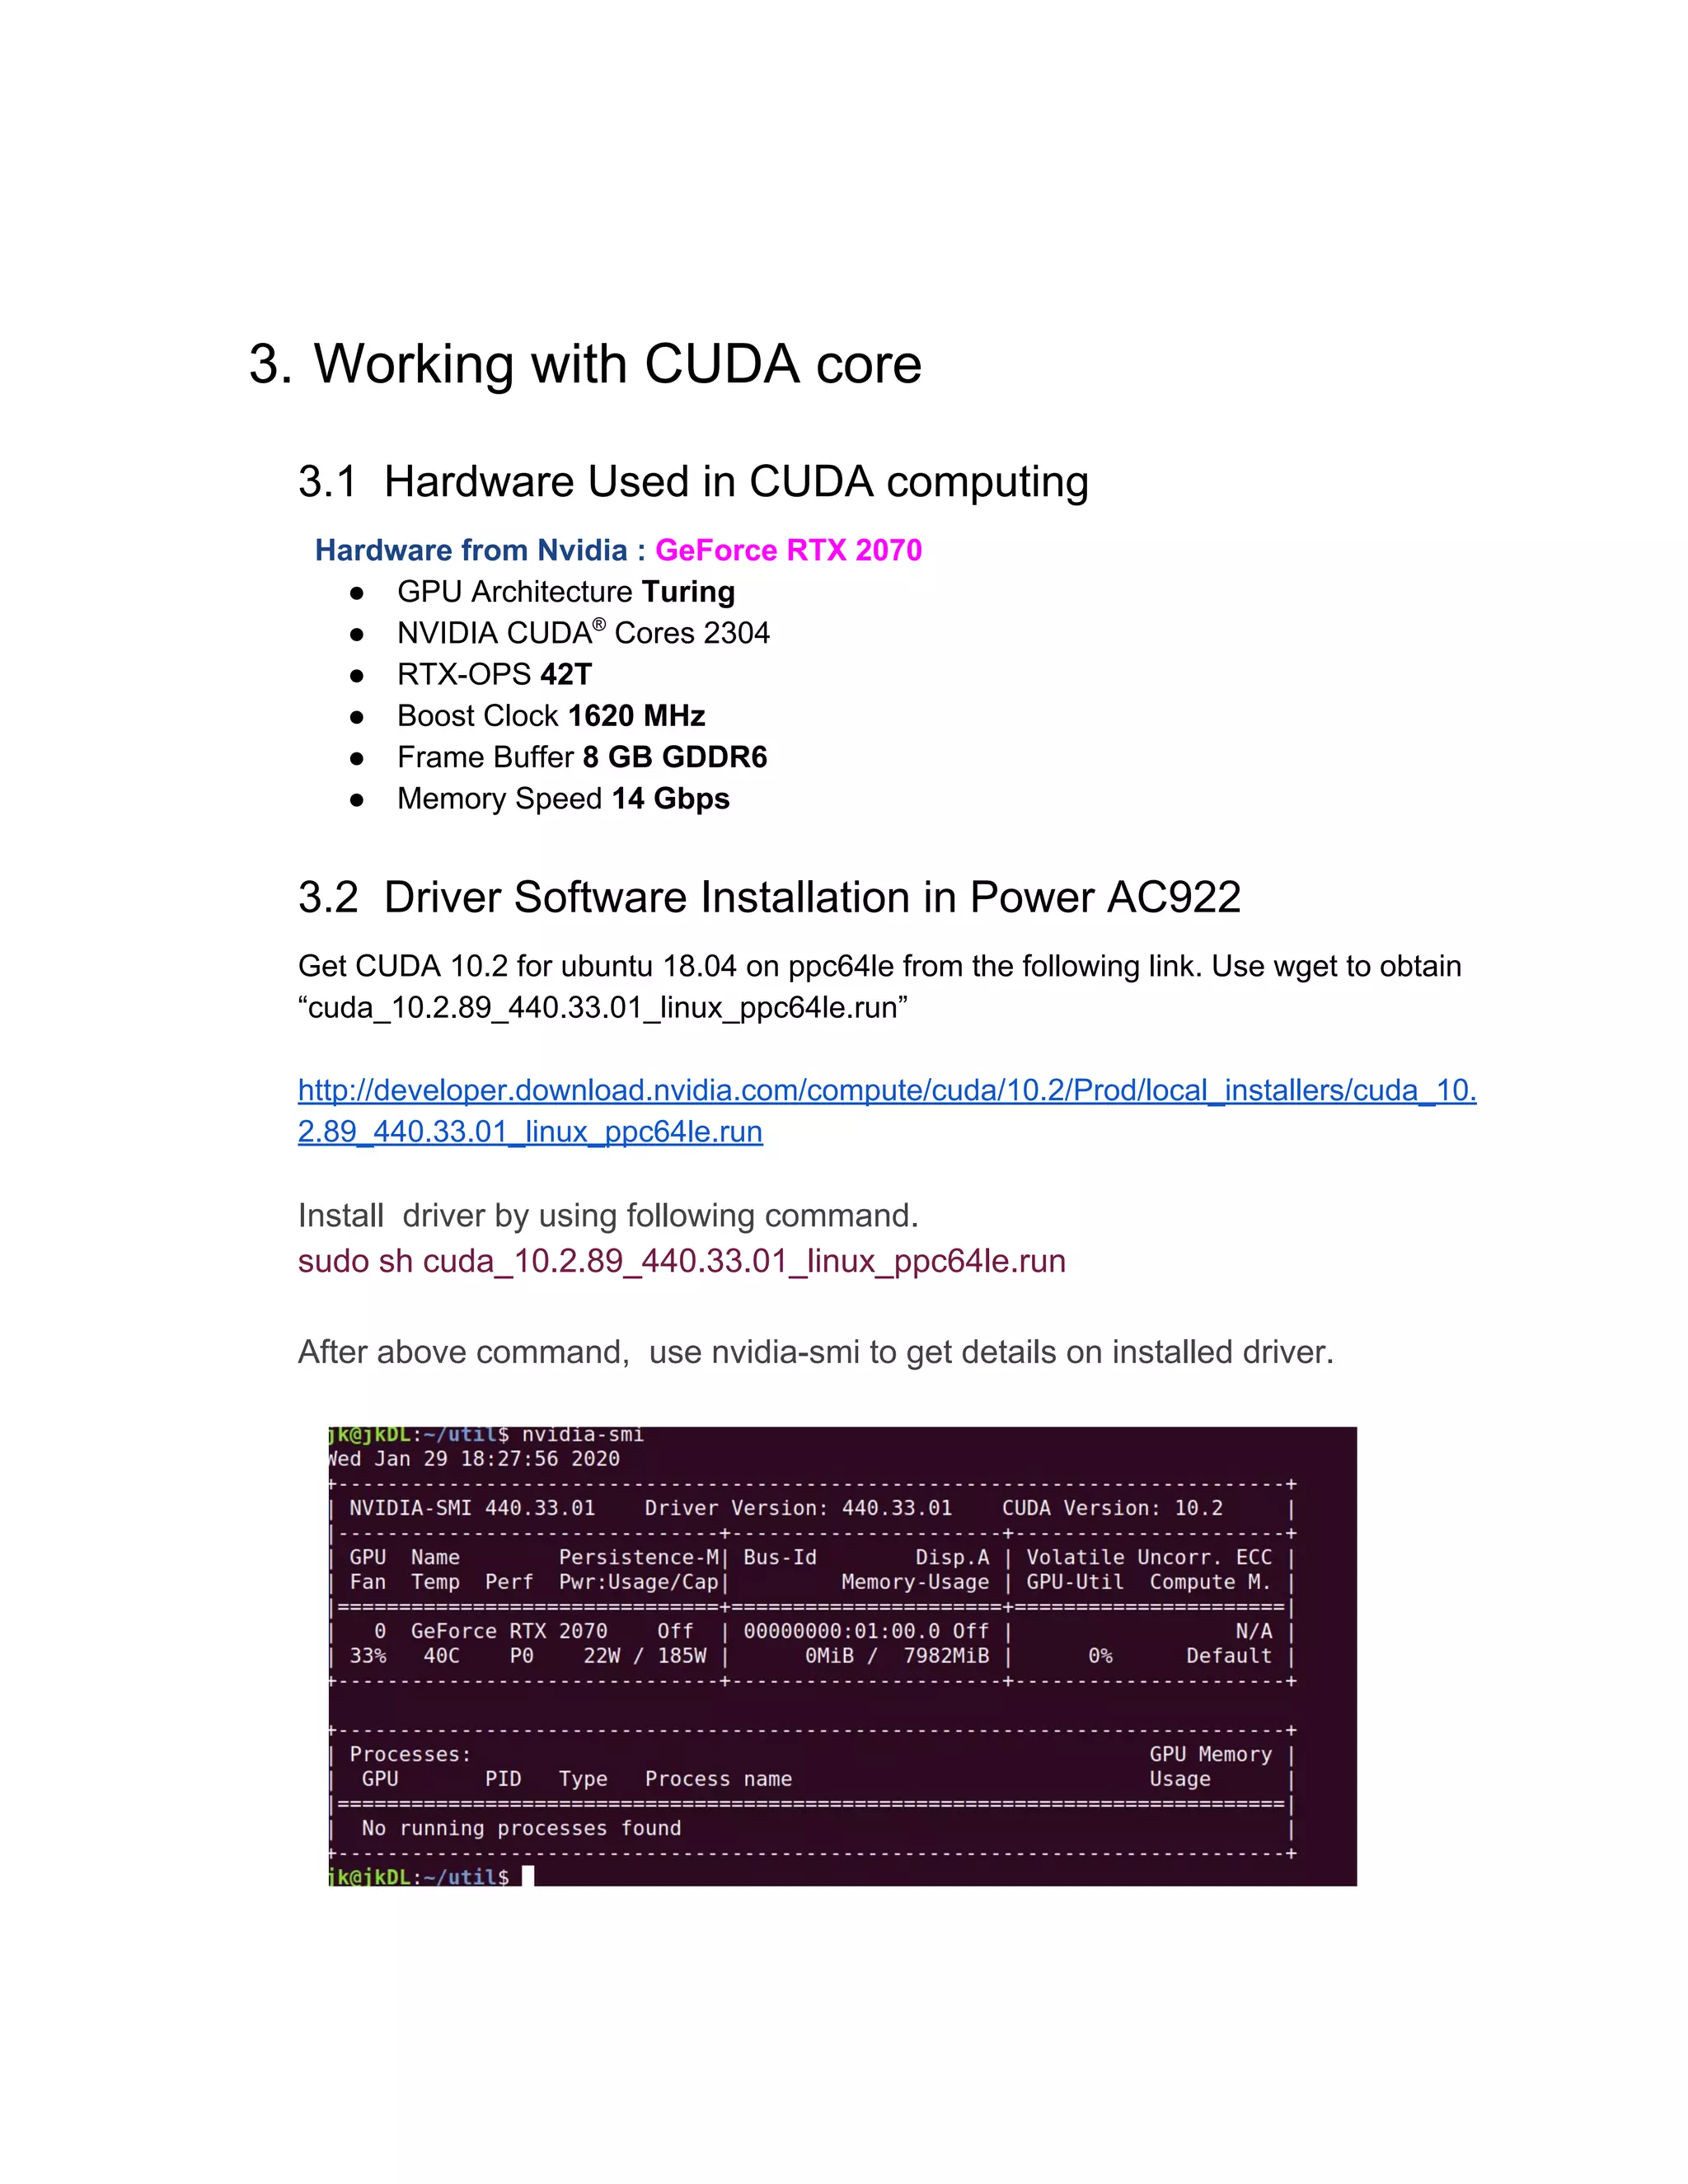
3.3.1 Build Application
File with *.cu extension is used to build application that runs partly in AC922 and also
partly in CUDA core of GPU
For GPU
nvcc is NVIDIA (R) Cuda compiler driver and its version “Cuda compilation tools,
release 10.1, V10.1.243 “
For Host CPU
g++ (Ubuntu 7.4.0-1ubuntu1~18.04.1) 7.4.0
Use make ( gnu make 4.1 is used) tool to build applications.
jk@jkDL:~/NVIDIA_CUDA-10.1_Samples/0_Simple/vectorAdd$ make
/usr/local/cuda/bin/nvcc -ccbin g++ -m64 -gencode arch=compute_30,code=sm_30
-gencode arch=compute_35,code=sm_35 -gencode arch=compute_37,code=sm_37
-gencode arch=compute_50,code=sm_50 -gencode arch=compute_52,code=sm_52
-gencode arch=compute_60,code=sm_60 -gencode arch=compute_61,code=sm_61
-gencode arch=compute_70,code=sm_70 -gencode arch=compute_75,code=sm_75
-gencode arch=compute_75,code=compute_75 -o vectorAdd vectorAdd.o
mkdir -p ../../bin/ppc64le/linux/release
cp vectorAdd ../../bin/ppc64le/linux/release
Above make process creating “vectorAdd” and the same is executed as given below.
jk@jkDL:~/NVIDIA_CUDA-10.1_Samples/0_Simple/vectorAdd$ ./vectorAdd
[Vector addition of 50000 elements]
Copy input data from the host memory to the CUDA device
CUDA kernel launch with 196 blocks of 256 threads
Copy output data from the CUDA device to the host memory
Test PASSED
Done](https://image.slidesharecdn.com/dliniotedge-200310222843/75/Deep-Learning-Edge-8-2048.jpg)
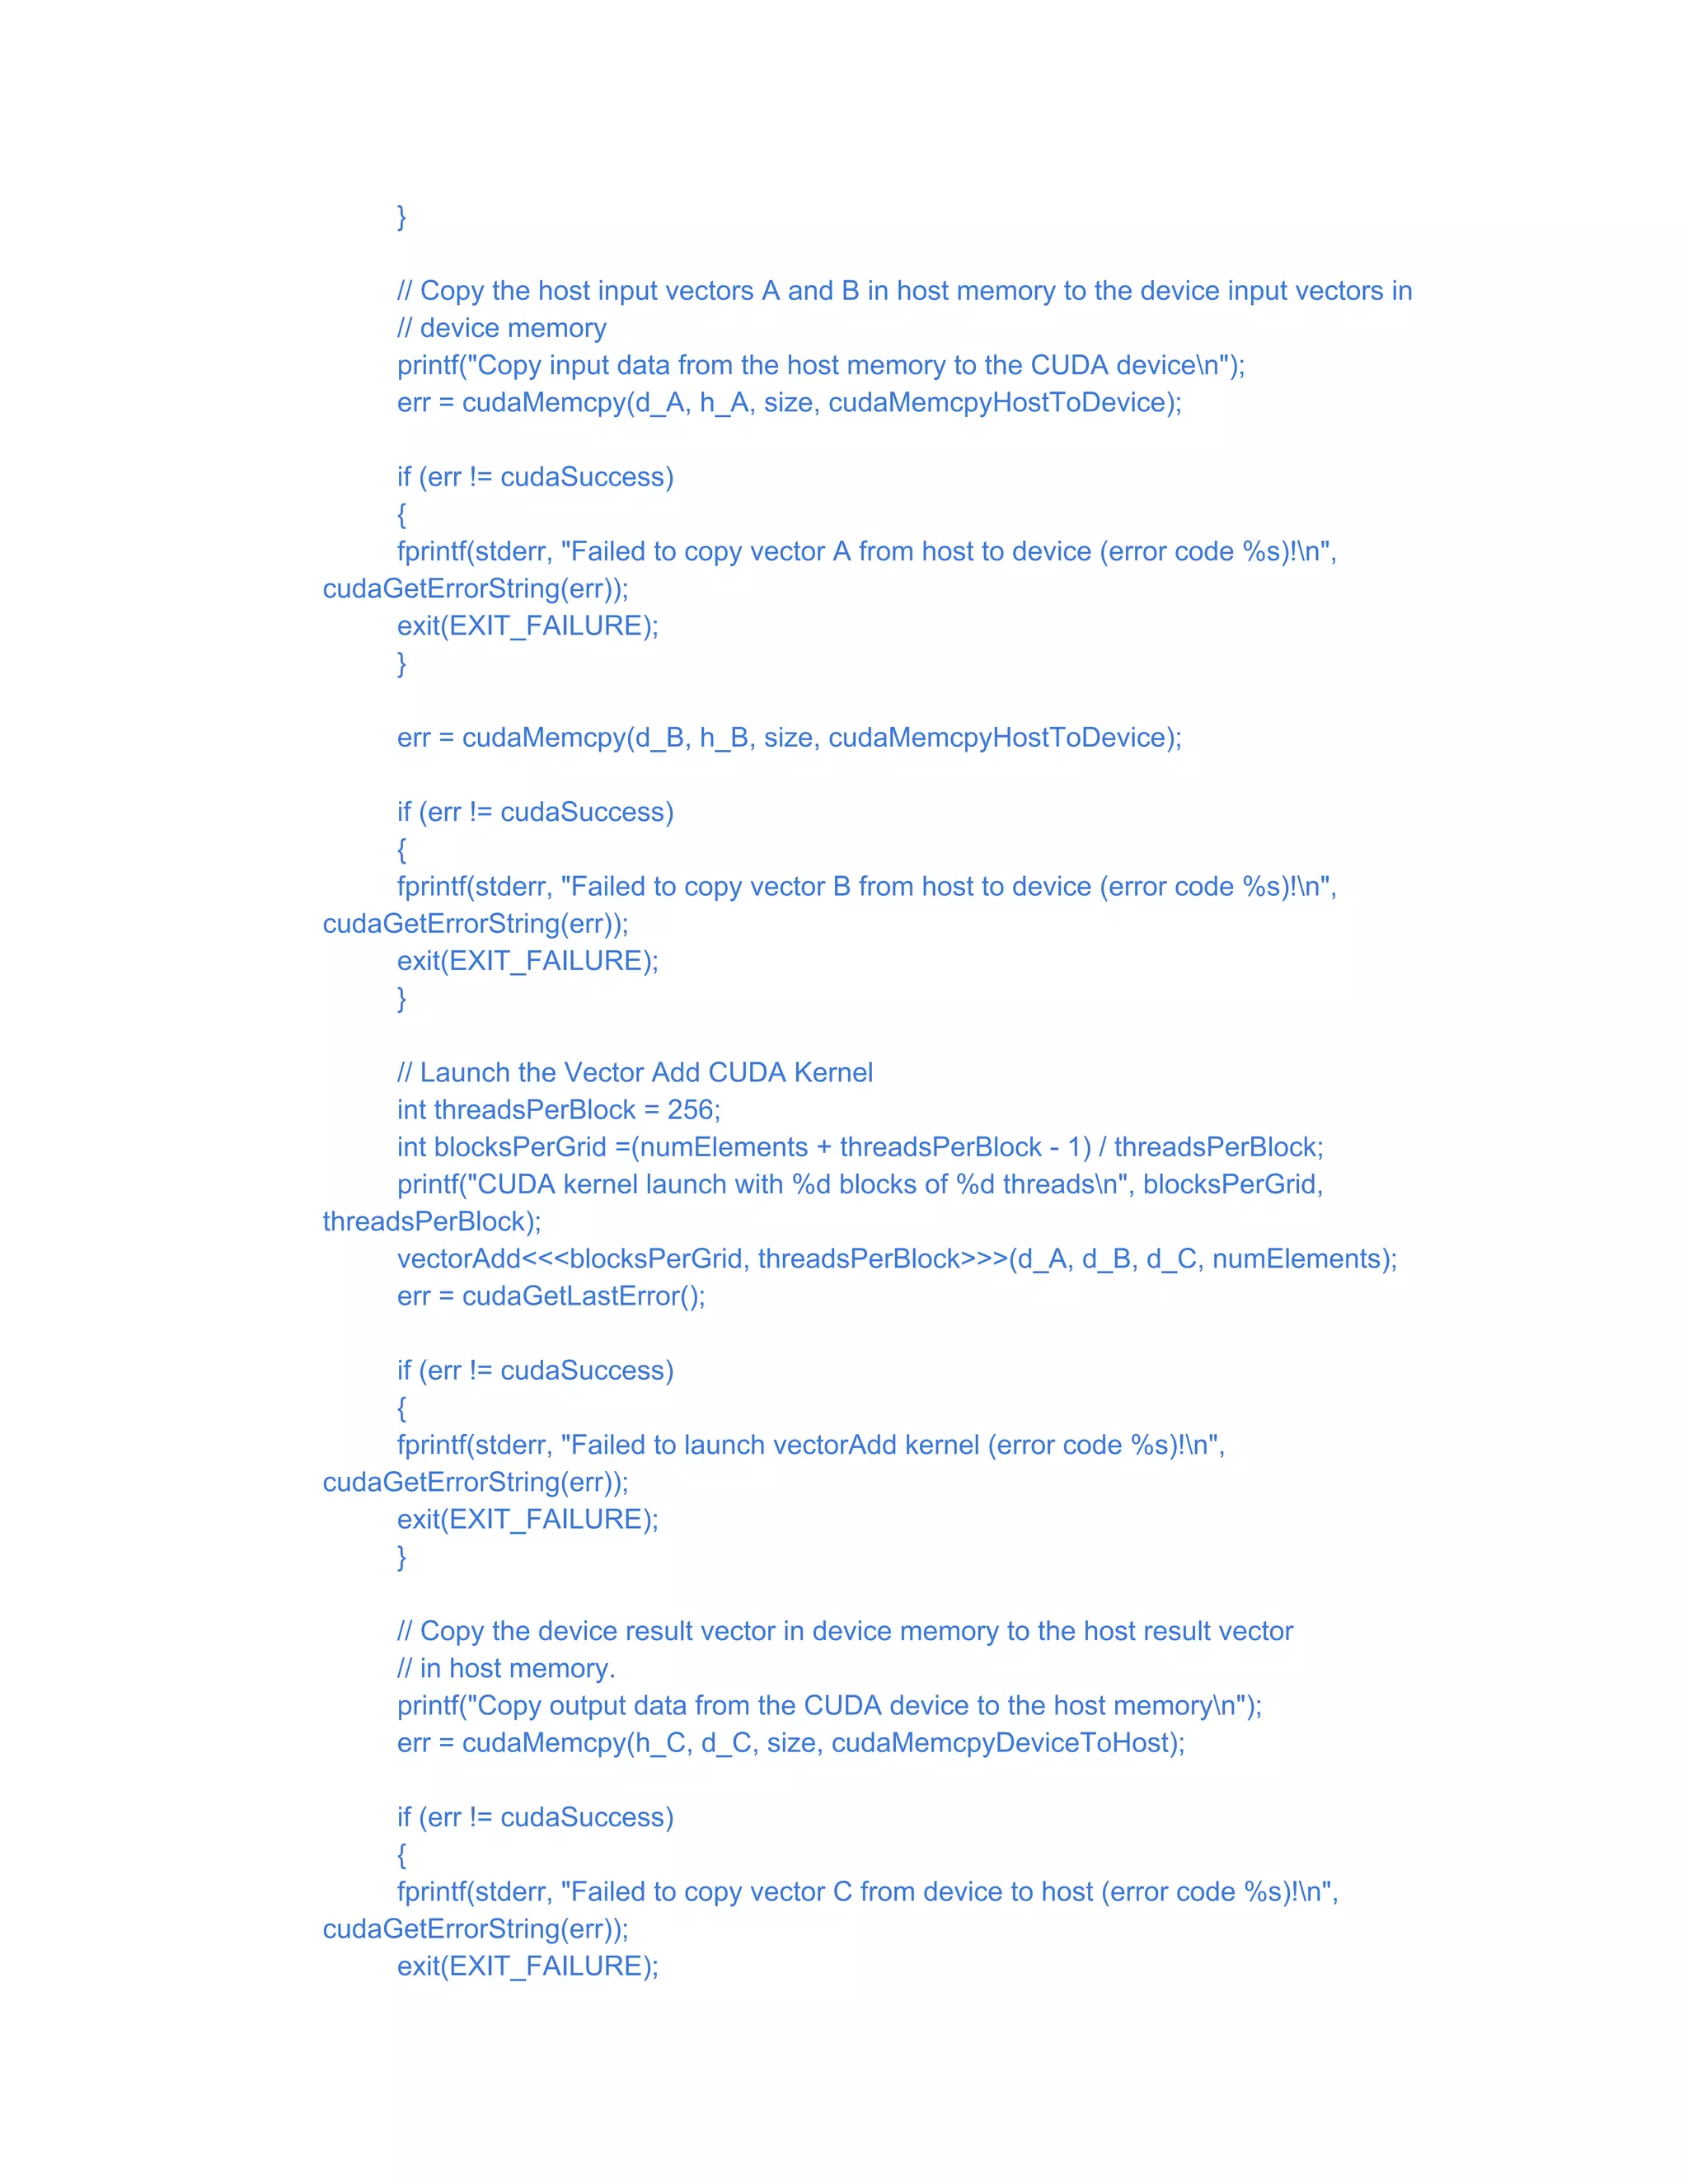
![3.3.2 Sample Code in cu
In the following sample source code is given.
#include <stdio.h>
// For the CUDA runtime routines (prefixed with "cuda_")
#include <cuda_runtime.h>
#include <helper_cuda.h>
/**
* CUDA Kernel Device code
*
* Computes the vector addition of A and B into C. The 3 vectors have the same
* number of elements numElements.
*/
__global__ void
vectorAdd(const float *A, const float *B, float *C, int numElements)
{
int i = blockDim.x * blockIdx.x + threadIdx.x;
if (i < numElements)
{
C[i] = A[i] + B[i];
}
}
/**
* Host main routine
*/
int
main(void)
{
// Error code to check return values for CUDA calls
cudaError_t err = cudaSuccess;
// Print the vector length to be used, and compute its size
int numElements = 50000;
size_t size = numElements * sizeof(float);
printf("[Vector addition of %d elements]n", numElements);
// Allocate the host input vector A
float *h_A = (float *)malloc(size);
// Allocate the host input vector B
float *h_B = (float *)malloc(size);](https://image.slidesharecdn.com/dliniotedge-200310222843/75/Deep-Learning-Edge-9-2048.jpg)
![// Allocate the host output vector C
float *h_C = (float *)malloc(size);
// Verify that allocations succeeded
if (h_A == NULL || h_B == NULL || h_C == NULL)
{
fprintf(stderr, "Failed to allocate host vectors!n");
exit(EXIT_FAILURE);
}
// Initialize the host input vectors
for (int i = 0; i < numElements; ++i)
{
h_A[i] = rand()/(float)RAND_MAX;
h_B[i] = rand()/(float)RAND_MAX;
}
// Allocate the device input vector A
float *d_A = NULL;
err = cudaMalloc((void **)&d_A, size);
if (err != cudaSuccess)
{
fprintf(stderr, "Failed to allocate device vector A (error code %s)!n",
cudaGetErrorString(err));
exit(EXIT_FAILURE);
}
// Allocate the device input vector B
float *d_B = NULL;
err = cudaMalloc((void **)&d_B, size);
if (err != cudaSuccess)
{
fprintf(stderr, "Failed to allocate device vector B (error code %s)!n",
cudaGetErrorString(err));
exit(EXIT_FAILURE);
}
// Allocate the device output vector C
float *d_C = NULL;
err = cudaMalloc((void **)&d_C, size);
if (err != cudaSuccess)
{
fprintf(stderr, "Failed to allocate device vector C (error code %s)!n",
cudaGetErrorString(err));
exit(EXIT_FAILURE);](https://image.slidesharecdn.com/dliniotedge-200310222843/75/Deep-Learning-Edge-10-2048.jpg)
![}
// Verify that the result vector is correct
for (int i = 0; i < numElements; ++i)
{
if (fabs(h_A[i] + h_B[i] - h_C[i]) > 1e-5)
{
fprintf(stderr, "Result verification failed at element %d!n", i);
exit(EXIT_FAILURE);
}
}
printf("Test PASSEDn");
// Free device global memory
err = cudaFree(d_A);
if (err != cudaSuccess)
{
fprintf(stderr, "Failed to free device vector A (error code %s)!n", cudaGetErrorString(err));
exit(EXIT_FAILURE);
}
err = cudaFree(d_B);
if (err != cudaSuccess)
{
fprintf(stderr, "Failed to free device vector B (error code %s)!n", cudaGetErrorString(err));
exit(EXIT_FAILURE);
}
err = cudaFree(d_C);
if (err != cudaSuccess)
{
fprintf(stderr, "Failed to free device vector C (error code %s)!n", cudaGetErrorString(err));
exit(EXIT_FAILURE);
}
// Free host memory
free(h_A);
free(h_B);
free(h_C);
printf("Donen");
return 0;
}](https://image.slidesharecdn.com/dliniotedge-200310222843/75/Deep-Learning-Edge-12-2048.jpg)

![}
]
}
],
"image": "sasi.jpeg"
}
],
"images_processed": 1,
"custom_classes": 3
}
Sample code for Client Application
…………………………. Pyrhan code ……………
pip
pip install --upgrade "watson-developer-cloud>=2.1.1"
Authentication
from watson_developer_cloud import VisualRecognitionV3
visual_recognition = VisualRecognitionV3(
version='{version}',
iam_apikey='{iam_api_key}'
)
Authentication (for instances created before May 23, 2018)
from watson_developer_cloud import VisualRecognitionV3
visual_recognition = VisualRecognitionV3(
version='{version}',
api_key='{api_key}'
)
Classify an image
import json
from watson_developer_cloud import VisualRecognitionV3
visual_recognition = VisualRecognitionV3(
'2018-03-19',
iam_apikey='{iam_api_key}')
with open('./fruitbowl.jpg', 'rb') as images_file:
classes = visual_recognition.classify(
images_file,
threshold='0.6',
classifier_ids='DefaultCustomModel_967878440').get_result()
print(json.dumps(classes, indent=2))
…………………………………………………………](https://image.slidesharecdn.com/dliniotedge-200310222843/75/Deep-Learning-Edge-18-2048.jpg)


![[01][gpu 컴퓨팅을 위한 언어, 도구 및 api] miller languages tools](https://cdn.slidesharecdn.com/ss_thumbnails/01gpuapimillerlanguagestools-110106231409-phpapp01-thumbnail.jpg?width=640&height=640&fit=bounds)