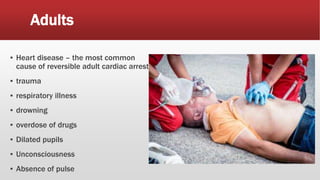
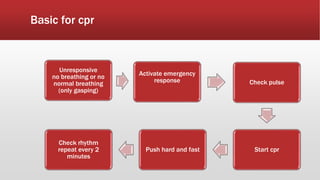
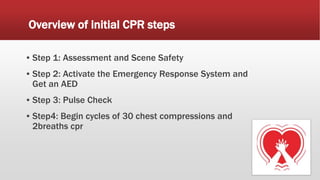
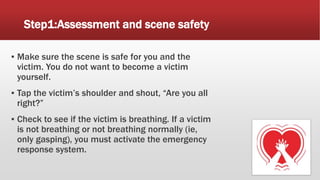
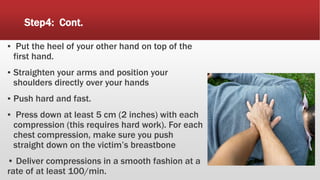
2. ▪ Cardiopulmonary resuscitation (CPR) is a lifesaving
technique that’s useful in many emergencies, such as a
heart attack or near drowning, in which someone’s
breathing or heartbeat has stopped.
▪ The American Heart Association recommends starting
CPR with hard and fast chest compressions. This hands-
only CPR recommendation applies to both untrained
bystanders and first responders.
Defination of CPR
4. 2.Respiratory arrest
Drowning
Stroke
Foreign-body airway obstruction
Smoke inhalation
Drug overdose
Electroculation/injury by lightning
Suffocation
Accident/injury
Coma
5. Babies and children
▪ sudden unexpected death in infants (SUDI and SIDS)
▪ sleeping accidents
▪ choking
▪ cuts
▪ poisoning
▪ burns
▪ near drowning
▪ driveway accidents
6. Adults
▪ Heart disease – the most common
cause of reversible adult cardiac arrest
▪ trauma
▪ respiratory illness
▪ drowning
▪ overdose of drugs
▪ Dilated pupils
▪ Unconsciousness
▪ Absence of pulse
7. • In the A-B-C sequence, chest compressions were
often delayed while the rescuer opened the
airway to give mouth-to-mouth breaths,
retrieved a barrier device, or gathered and
assembled ventilation equipment. By changing
the sequence to C-A-B, rescuers can start chest
compressions sooner, and the delay in giving
breaths should be minimal .
Change in sequence to cab ,not ABC
9. Unresponsive
no breathing or no
normal breathing
(only gasping)
Activate emergency
response Check pulse
Start cpr
Push hard and fast
Check rhythm
repeat every 2
minutes
Basic for cpr
10. Overview of initial CPR steps
▪ Step 1: Assessment and Scene Safety
▪ Step 2: Activate the Emergency Response System and
Get an AED
▪ Step 3: Pulse Check
▪ Step4: Begin cycles of 30 chest compressions and
2breaths cpr
11. Step1:Assessment and scene safety
▪ Make sure the scene is safe for you and the
victim. You do not want to become a victim
yourself.
▪ Tap the victim’s shoulder and shout, “Are you all
right?”
▪ Check to see if the victim is breathing. If a victim
is not breathing or not breathing normally (ie,
only gasping), you must activate the emergency
response system.
12. Agonal gasping
▪ Agonal gasps are not normal breathing.
Agonal gasps may be present in the first
minutes after sudden cardiac arrest.
▪ A person who gasps usually looks like he is
drawing air in very quickly. The mouth may be
open and the jaw, head, or neck may move
with gasps.
▪ The gasp may sound like a snort, snore, or
groan.
▪ Gasping is not normal breathing. It is a sign of
cardiac arrest in someone who doesn’t
respond.
13. Step 2:Activate the emergency response system
and get an aed
▪ If you are alone and find an unresponsive victim not
breathing, shout for help. If no one responds, activate the
emergency response system, get an AED (or defibrillator)
if avail- able, and then return to the victim to check a
pulse and begin CPR (C-A-B sequence).
14. Step3:pulse check
▪ Locate the trachea, using 2 or 3 fingers
▪ Slide these 2 or 3 fingers into the groove
between the trachea and the muscles at
the side of the neck, where you can feel
the carotid pulse
▪ Feel for a pulse for at least 5 but no more
than 10 seconds. If you do not definitely
feel a pulse, begin CPR, starting with chest
compressions( c-a-b sequence)
15. Step4: begin Cycles of 30 chest compressions and 2 breaths (cpr)
▪ Position yourself at the victim’s side.
▪ Make sure the victim is lying faceup on a firm,
flat surface. If the victim in lying facedown,
carefully roll him faceup. If you suspect the
victim has a head or neck injury, try to keep
the head, neck, and torso in a line when
rolling the victim to a faceup position.
▪ Put the heel of one hand on the center of the
victim’s chest on the lower of the breastbone .
16. ▪ Put the heel of your other hand on top of the
first hand.
▪ Straighten your arms and position your
shoulders directly over your hands
▪ Push hard and fast.
▪ Press down at least 5 cm (2 inches) with each
compression (this requires hard work). For each
chest compression, make sure you push
straight down on the victim’s breastbone
• Deliver compressions in a smooth fashion at a
rate of at least 100/min.
Step4: Cont.
17. ▪ At the end of each compression, make sure you
allow the chest to recoil (re-expand) completely.
▪ Chest recoil allows blood to flow into the heart
and is necessary for chest compressions to
create blood flow.
▪ Incomplete chest recoil is harmful because it
reduces the blood flow created by chest
compressions .
▪ Chest compression and chest recoil/relaxation
times should be approximately equal.
▪ Minimize interruptions
Step4: Cont.
18. Alternate technique for chest compressions
▪ If you have difficulty pushing deeply
during compressions, put one hand on
the breastbone to push on the chest.
Grasp the wrist of that hand with your
other hand to support the first hand as
it pushes the chest This technique is
helpful for rescuers with arthritis.
▪ Moving the victim only when necessary
19. CPR for children 1 year to age of puberty
▪ Check the child for a response and check
breathing. If there is no response
▪ and no breathing or only gasping, shout for
help.
▪ Check the child’s pulse.
▪ Place 2 fingers in the inner thigh, midway
between the hipbone and the pubic bone
and just below the crease where the leg
meets the abdomen
▪ Take at least 5 but no more than 10
seconds you may try to feel the child’s
carotid or femoral pulse.
20. ▪ If within 10 seconds you don’t definitely feel a pulse
or if, despite adequate oxygenation and ventilation,
the heart rate is <60/min with signs of poor
perfusion, perform cycles of compressions and
breaths (30:2 ratio), starting with compressions.
▪ When second rescuer arrives ,use the compressions
to breath ratio of 15:2
▪ After 5 cycles, if someone has not already done so,
activate the emergency response system and get the
AED (or defibrillator). Use the AED as soon as it is
available
21. CPR for infants
• Check the infant for a response and
check breathing. If there is no
response and no breathing or only
gasping, shout for help.
• If someone responds, send that
person to activate the emergency
response system and get the AED (or
defibrillator).
• Check the infant’s brachial pulse
(take at least 5 but no more than 10
seconds).
22. 2 finger chest compression technique
▪ Place the infant on a firm, flat surface.
▪ Place 2 fingers in the center of the infant’s
chest just below the nipple line. Do not press
on the bottom of the breastbone.
▪ Push hard and fast. To give chest
compressions, press the infant’s breast- bone
down at least one third the depth of the chest
(approximately 4 cm [1½ inches]). Deliver
compressions in a smooth fashion at a rate of
at least 100/min.
▪ At the end of each compression, make sure
you allow the chest to recoil (reexpand)
completely.
23. 2thumb encircling hand chest compressions technique
• Place both the thumbs on the infants
chest on the lower half of the
breastbone.
• Compression should be one third
depth of the infat chest approximately
4cm (1½inch)
• Continue compressions and breaths in
a ratio of 15.2 (for 2 rescuers).
Switching roles every 2 minutes to
avoid rescuer fatigue
28. Contraindications
▪ If a person has trauma to the chest wall.
▪ Do-not-resuscitate order (DNR)
▪ Head Injury
▪ Inability to patient to extend head
▪ Moderate trauma to the cervical spine or neck
▪ Infection to the epiglottis
▪ Mild hypoxia
▪ Oropharyngeal hemorrhage
▪ Intact tracheostomy
29. When to cease cpr
▪ A general approach is to stop CPR after 20 minutes if there is no
return of spontaneous circulation (ROSC) or viable cardiac rhythm
re-established, and no reversible factors present that would
potentially alter outcome.
30. When not to stop cpr
▪ Continue in young people who have persistent VF until reversible
factors have been fixed
▪ hypothermia (“not dead until warm and dead”)
▪ asthma (need to correct dynamic hyperinflation)
▪ toxicological arrest (full neurological recovery after >4 hours CPR
is possible; asystole may be a direct drug effect that will recover in
time)
▪ thrombolytics given during CPR (should continue up to 2 hours
post-administration)
▪ pregnancy prior to resuscitative caesarean section