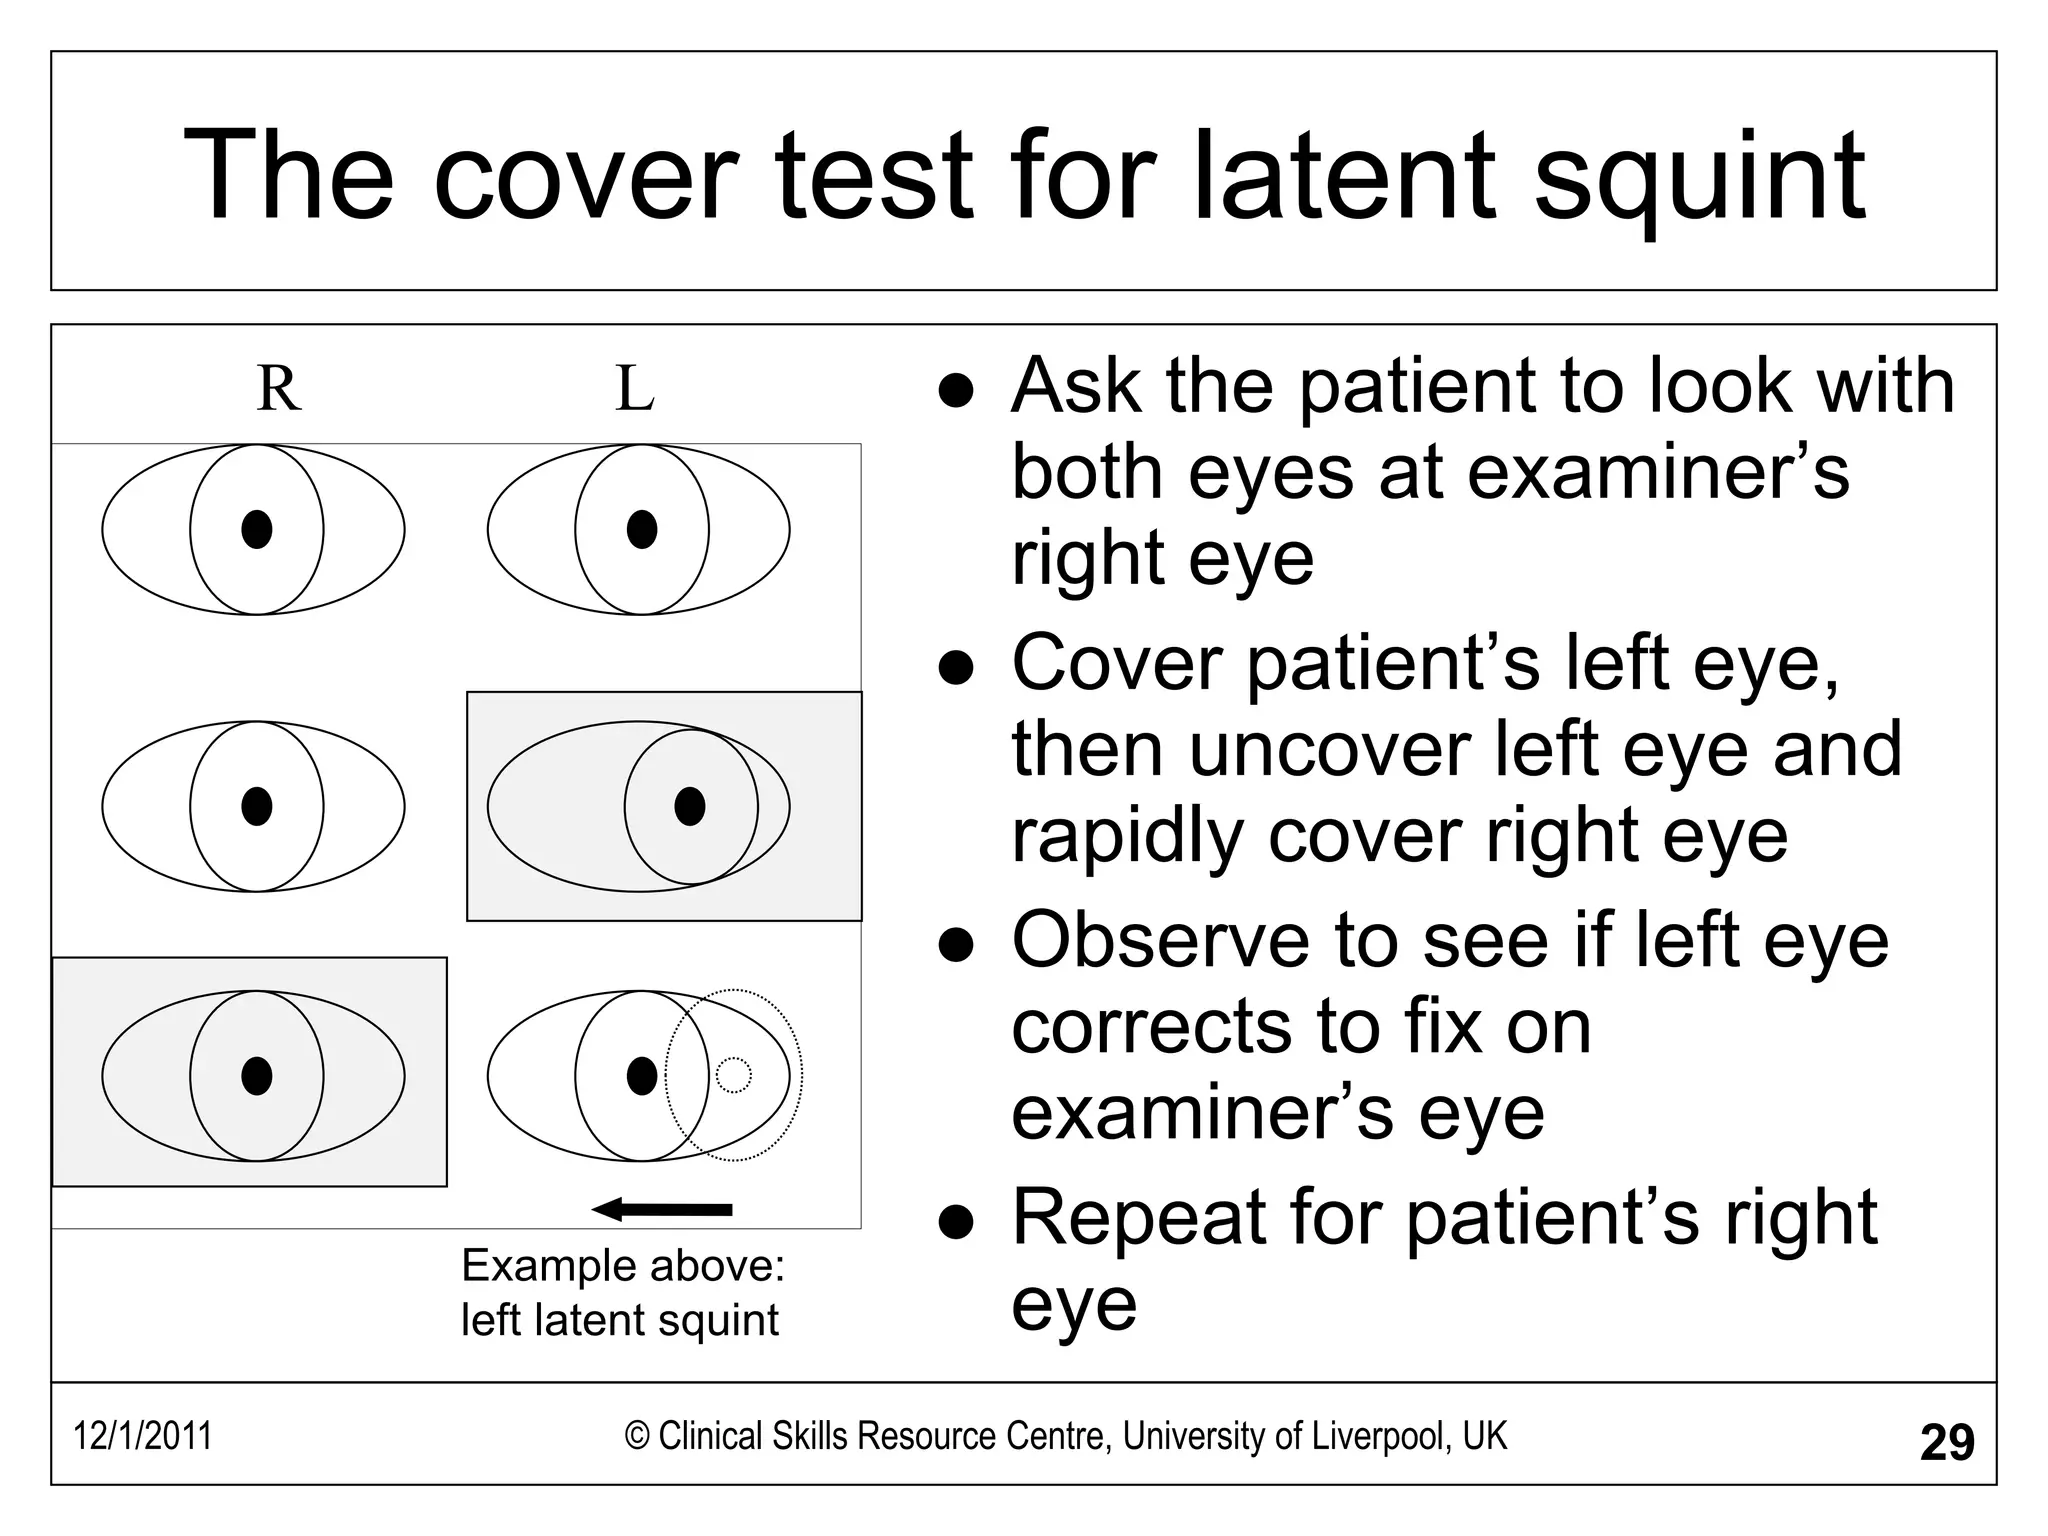
12/1/2011 © Clinical Skills Resource Centre, University of Liverpool, UK 1
Examining the cranial nerves
I Olfactory
II Optic
III Oculomotor
IV Trochlear
V Trigeminal
VI Abducens
VII Facial
VIIIAcoustic (auditory & vestibular)
IX Glossopharyngeal
X Vagus
XI Accessory
XII Hypoglossal
12/1/2011 © Clinical Skills Resource Centre, University of Liverpool, UK 2
1st (Olfactory) nerve
 Responsible for the sense of smell
 Sense of smell may be lost as a result of
 trauma
 infection
 ageing
 Smell is an important component of the
appreciation of taste (which may be the principal
complaint of a patient)
 Crude bedside test may be to identify the odour of
coffee or fresh orange
12/1/2011 © Clinical Skills Resource Centre, University of Liverpool, UK 3
1st (Olfactory) nerve- formal test
 One nostril at a time - occlude the other
 Use several test smells.
 Ask patient to sniff and signal detection
 Prompt response needed, else spreads to other
side
 Few can identify the classic test smells
 Exclude misinterpretation / malingering
 Ammonia - detected through nasal pain fibres
 Should still taste sugar, salt, vinegar, quinine
12/1/2011 © Clinical Skills Resource Centre, University of Liverpool, UK 4
The 2nd (Optic) nerve
 Various tests are possible which depend to
some extent (though not exclusively) on the
integrity of the optic nerve(s)
 These include
 Ophthalmoscopy (See separate study guide)
 pupillary reflexes
 visual acuity
 visual fields
12/1/2011 © Clinical Skills Resource Centre, University of Liverpool, UK 5
The pupils - Inspection
 Size and shape
 Regularity in outline and equality of both
sides
 Defects in iris
 Foreign bodies in anterior chamber
 Obvious cataract
12/1/2011 © Clinical Skills Resource Centre, University of Liverpool, UK 6
Pupillary light reflexes
 Ask patient to look at a distant object.
 Swing light beam in from behind onto one eye, or
switch on from in front. Ensure abrupt stimulus.
 Shield other eye effectively.
 Direct response- constriction of pupil to light shone
into that eye.
 Consensual response - constriction of pupil to light
shone in opposite eye.
12/1/2011 © Clinical Skills Resource Centre, University of Liverpool, UK 7
Pupillary light reflexes 2
 Shield the non-examined eye
 Move light beam abruptly in
from the side, or switch on from
the front
 Direct reflex - ipsilateral pupil
constricts
 Consensual reflex -
contralateral pupil constricts
Direct
Consensual
12/1/2011 © Clinical Skills Resource Centre, University of Liverpool, UK 8
Pupillary accommodation reflex
 Ask patient to fix on a distant object and then
to focus on finger held about 10 cms from
face. Keep target high or eyelids will obscure
the pupil.
 The eyes should converge
 The pupils should constrict equally
12/1/2011 © Clinical Skills Resource Centre, University of Liverpool, UK 9
Accommodation
 The person fixes on
a distant object
 The person is then
asked to look at a
close object - their
eyes converge and
pupils constrict
Documenting P.E.R.L.A.
 The acronym P.E.R.L.A. is used to both help remind us
what tests we should do and for documentation purposes.
 Pupils
 Equal and
 Reactive to Light and
 Accommodation
When documenting, it is permissible to write PERLA this
signifies that it was checked and is ok.
If there was a problem then you should document in full
what the problem is.
12/1/2011 © Clinical Skills Resource Centre, University of Liverpool, UK 10
12/1/2011 © Clinical Skills Resource Centre, University of Liverpool, UK 11
Visual acuity testing
 A series of different sized
letters on the chart
 Viewed at 6 metres (half
sized charts are viewed at 3
metres)
 Under each line is a number
that represents in metres
the distance from which that
size letter would be visible
in someone with normal
eyesight
12/1/2011 © Clinical Skills Resource Centre, University of Liverpool, UK 12
Visual acuity test results
 The result of the test is recorded as
the distance from which the patient
was positioned (in metres) over the
smallest set of letters that can be read
on a chart
 6/6 (capable of reading letters
expected to be visible at 6 metres
whilst looking from a distance of 6
meters)
 6/60 (only capable of reading letters
expected to be visible at 60 metres at
6 metres)
 For general examination purposes, if
the patient wears glass’s they can be
kept on but their lens prescription
should be documented
Small
numbers
above
letters
indicate
the
distance at
which a
person
with
normal
vision can
identify
them
12/1/2011 © Clinical Skills Resource Centre, University of Liverpool, UK 13
Visual acuity measurement
 Ask the patient to cover each eye in turn and determine the smallest
print size that can be read
 Record separately for each eye e.g. R = 6/6 L = 6/5.
 For short-sighted patients glasses should be worn, but if not available
reading through a pin-hole will help to compensate.
 For patient unable to read the 60 print size, move them nearer to the
chart (e.g. 3 metres) and record acuity as 3/xx.
 For patients unable to read the chart as close as 1 metre record acuity
as:
 For children and illiterate patients there are charts showing shapes
rather than letters
CF = Count fingers (Hold hand 0.5 of a metre from the patient )
HM = Hand movement
PL = Perceives light
NPL = No perception of light
12/1/2011 © Clinical Skills Resource Centre, University of Liverpool, UK 14
Visual field testing
 The “bedside” test: face the
patient at a distance of
about 1 metre. Keep
patient’s visual background
uncluttered, with light
behind patient
 To test the right eye
 Close or cover your right
eye. Say “cover your left
eye and look at my left
eye”. This matches the
visual fields.
Fig 1
Fig 2
12/1/2011 © Clinical Skills Resource Centre, University of Liverpool, UK 15
Visual field testing 2
 Ensure patient doesn’t look away
from your eye
 Keeping in a plane midway
between you and the patient,
bring a white pin head from the
extreme of vision (arm’s length)
in towards pupil. Test each
quadrant using diagonal track
bisecting the quadrant. Establish
rough boundary then define with
slower target movements (see
Fig. 1-4)
Fig 3
Fig 4
12/1/2011 © Clinical Skills Resource Centre, University of Liverpool, UK 16
Visual field testing 3
 Ask the patient to indicate when they first appreciate
the white ball entering their visual field
 Compare this to your own detection
 Produce a more detailed “map” of a defect by
increasing the number of spokes used
 The field is limited superiorly by the supra-orbital ridge
and medially by the nose
 Any defect should be assessed formally
12/1/2011 © Clinical Skills Resource Centre, University of Liverpool, UK 17
The blind spot = optic disc
 Align patients visual
horizontal with yours. Close
(eg)your right eye. Tell
patient “cover your left eye,
and gaze at my left eye”.
 Use a red pinhead (approx
1cm diameter). Check
patient can see target
when aligned with pupil.
 Move target slowly,
horizontally and laterally
from pupil, ask the patient
to signal when it
disappears and reappears.
Sit approx. 1 metre apart, fix gaze on
each other’s open eye (right to left). Move
the pin slowly across the axis of fixation.
The red pin will disappear when it
coincides with the optic disc.
Left RightTemporalTemporal
Nasal
A B
C
D E
F
A
B
C
D
E
Light from images in the temporal region stimulates
the nasal fibres of the retina and visa versa.
left
eye
Optic nerve
Optic chiasm
Optic radiation
F
Optical
cortex
nose
right
eye
12/1/2011 © Clinical Skills Resource Centre, University of Liverpool, UK 19
Eye movements (3rd, 4th & 6th)
The arrows indicate the direction of movement of the eyes and
not necessarily the position of the muscles.
Medial Lateral
Up
Down
Superior Rectus III
Left eye
Inferior Rectus IIISuperior Oblique IV
Inferior oblique III
Medial
Rectus
III
Lateral
Rectus
VI
Muscle nerve links
 A way to remember which muscle is controlled
by which nerve is LR 6 SO4 EE 3
 LR 6 Lateral rectus muscle is controlled by
6th nerve. Abducens.
 SO4 Superior oblique muscle is controlled
by 4th nerve. Trochlear.
 EE 3 Everything else is controlled by the
3rd nerve. Oculomotor
12/1/2011 © Clinical Skills Resource Centre, University of Liverpool, UK 20
12/1/2011 © Clinical Skills Resource Centre, University of Liverpool, UK 21
Rectus Muscles
© 2002 Sinauer Associates
12/1/2011 © Clinical Skills Resource Centre, University of Liverpool, UK 22
Testing eye movements
 Hold a pen or similar object 50 cm
from the patient in the midline and
on a level with the patient’s eyes
 Lateral gaze - vertical target
Up / down gaze - horizontal target
 Ask patient to follow object (“with
your eyes”), keeping head still, and
to report any double vision
 Move the object slowly
 side to side
 up and down centrally, then at
extremes of lateral gaze
 stay in binocular range
12/1/2011 © Clinical Skills Resource Centre, University of Liverpool, UK 23
Eye movements
Observe
range of movement
smoothness and speed
whether conjugate (moving together)
nystagmus (see 8th nerve for details)
If obvious dysconjugate eye movements
Is there double vision?
If present, establish muscle(s) affected
If not, test for latent squint
12/1/2011 © Clinical Skills Resource Centre, University of Liverpool, UK 24
Diplopia – which eye and muscle?
If patient reports diplopia remember:
 False image is from the affected eye
 Outer image is the false one
 Double vision is maximal in the direction of gaze of
the affected muscle
12/1/2011 © Clinical Skills Resource Centre, University of Liverpool, UK 25
Diplopia – which eye and muscle?
 For each direction of gaze with diplopia
 establish position where images are widest apart
 cover each eye in turn and confirm binocular diplopia
(present only with both eyes looking).
 cover one eye and if outer image disappears that eye
and the muscle turning it that way are the abnormal
ones.
 cross-check by covering the other eye. Inner image
should disappear.
12/1/2011 © Clinical Skills Resource Centre, University of Liverpool, UK 26
3rd (Oculomotor) nerve palsy
Resting
Ptosis
On lifting ptosis,
the eye deviated
laterally and
downwards
Affected eye (left)
In complete palsy, pupil dilated and unreactive
12/1/2011 © Clinical Skills Resource Centre, University of Liverpool, UK 27
4th (Trochlear) nerve palsy
Resting
Looking to right and
downwards
Affected eye (left)
12/1/2011 © Clinical Skills Resource Centre, University of Liverpool, UK 28
6th (Abducens) nerve palsy
Resting position
Look to L
On command to look to the left the affected eye (LEFT) does not
move
Affected eye
12/1/2011 © Clinical Skills Resource Centre, University of Liverpool, UK 29
The cover test for latent squint
 Ask the patient to look with
both eyes at examiner’s
right eye
 Cover patient’s left eye,
then uncover left eye and
rapidly cover right eye
 Observe to see if left eye
corrects to fix on
examiner’s eye
 Repeat for patient’s right
eye
R L
Example above:
left latent squint
12/1/2011 © Clinical Skills Resource Centre, University of Liverpool, UK 30
The 5th (Trigeminal) nerve
 The trigeminal nerve supplies
 Sensory divisions
 Ophthalmic (V1)
 Maxillary (V2)
 Mandibular (V3)
 Motor
 Muscles of mastication
12/1/2011 © Clinical Skills Resource Centre, University of Liverpool, UK 31
Sensory branches of 5th nerve
 Ophthalmic
 Maxillary
 Mandibular
Test light touch with
cotton wool
For pain use sharp
end of a neuro tip
Use the blunt end to
act as a discriminator
if the patient is
unable to readily
sense pain
Compare sides
12/1/2011 © Clinical Skills Resource Centre, University of Liverpool, UK 32
 Sensation - trigeminal nerve
 Motor - facial nerve
 Twist a wisp of cotton wool to a
point.
 Ask the patient to look up and in
 Touch the lateral cornea
 Both eyes should blink
 Be careful to touch the peripheral
cornea and not the conjunctiva
 Avoid the central cornea.
 Don’t drag the cotton across the
cornea
Corneal reflex
Unlikely to work on people who
wear contact lenses
12/1/2011 © Clinical Skills Resource Centre, University of Liverpool, UK 33
Testing 5th nerve motor function
 Place your fingers on muscles first.
Ask patient to clench teeth and you
feel masseter and temporalis
contracting.
 Ask patient to open mouth to left,
and stop you trying to push the open
jaw back to midline. Repeat for right
side. Testing power of lateral and
medial pterygoids.
 Jaw jerk
 ask the patient to open their
mouth slightly
 place a finger on the chin
 percuss the finger
 observe and feel jaw movement
Testing the jaw reflex
12/1/2011 © Clinical Skills Resource Centre, University of Liverpool, UK 34
The 7th (Facial) nerve
 The facial nerve supplies
 Muscles of facial expression
 Stapedius muscle in the ear
 Taste to the anterior 2/3rds of the tongue
 Parasympathetic nerves to the lacrimal gland
 LMN lesions affect all facial muscles on that
side (final common pathway).
 Unilateral UMN lesions spare the forehead
(bilateral cortical representation).
12/1/2011 © Clinical Skills Resource Centre, University of Liverpool, UK 35
Tests of facial nerve function
 Ask person to
 Show their teeth
 Purse lips
 Blow out cheeks
 Close eyes tightly
 Open eyes as wide as they can
12/1/2011 © Clinical Skills Resource Centre, University of Liverpool, UK 36
Tests of facial nerve power
 With eyes tightly shut
 attempt to gently pull the eyelids apart
 With eyebrows raised
 attempt to pull eyebrows downwards
 With lips pursed tightly
 attempt to pull lips apart
 With cheeks blown out
 press against the cheek to assess strength
12/1/2011 © Clinical Skills Resource Centre, University of Liverpool, UK 37
The 8th (Acoustic) nerve
 The 8th nerve has two functions
 Auditory (hearing)
 Vestibular (balance)
12/1/2011 © Clinical Skills Resource Centre, University of Liverpool, UK 38
Tests of auditory function
 Test each ear, one at a time
 Block the opposite ear
 Use a watch or rubbing
fingers together (in a quiet
environment), judge how far
away the sound can be
detected
 If impaired in either ear
perform Rinne’s and Weber’s
test
12/1/2011 © Clinical Skills Resource Centre, University of Liverpool, UK 39
Rinne’s test 1a
 Use a 512 Hz tuning fork,
set it vibrating by gently
tapping on your knee
 Place on mastoid process
(bone conduction)
 Ask the person to tell you
when they can no longer
“hear” the sound
12/1/2011 © Clinical Skills Resource Centre, University of Liverpool, UK 40
Rinne’s test 1b
 Then place fork in front
of ear directly over the
auditory meatus (air
conduction)
 Ask the patient again if
they can hear the
sound (normally louder
as air conduction is
better than bone
conduction)
12/1/2011 © Clinical Skills Resource Centre, University of Liverpool, UK 41
Interpretation of Rinnes (method 1)
 In a normal hearing the sound will be heard better when the
tuning fork is placed in front of the ear
 In conductive deafness (the sounds cannot conduct from the
external to the inner ear) the sound will not be heard when
the tuning fork is placed in front of the ear
 In partial sensorineural deafness (due to damage to the
cochlea, auditory nerve or auditory centres of the brain) the
sound may be heard when the tuning fork is placed in front
of the ear (but at a higher pitch normal hearing).
 In complete sensorineural deafness no sound will be heard
when the tuning for is placed in either position. (although
there are exceptions to this)
12/1/2011 © Clinical Skills Resource Centre, University of Liverpool, UK 42
Rinne’s 2
 Alternatively
 Place base of tuning fork
on mastoid process
 Confirm it can be heard
 Then immediately place
prongs in front of external
auditory meatus
 Ask patient which is louder
- “behind the ear or in
front?
12/1/2011 © Clinical Skills Resource Centre, University of Liverpool, UK 43
Interpretation of Rinnes (method 2)
 In normal hearing the sound is loudest when the
tuning fork is placed in front of the ear
 In conductive deafness the sound is loudest on the
mastoid process
 In partial sensorineural deafness the sound is
loudest when the tuning fork is placed in front of the
ear (but at a higher pitch than in normal hearing).
 In complete sensorineural deafness no sound will
be heard at the mastoid process or in front of the
ear.
12/1/2011 © Clinical Skills Resource Centre, University of Liverpool, UK 44
Weber’s test
 Hold the base of the
512 Hz tuning fork on
the vertex of the
patient’s head.
 Ask which ear seems
to hear it louder.
12/1/2011 © Clinical Skills Resource Centre, University of Liverpool, UK 45
Interpretation of Webers
 In normal hearing the sound is equal in both
ears
 In conductive deafness then the sound will
be loudest in the affected ear (as all external
sound is removed and effected ear picks up
the vibrating sound more acutely)
 In sensorineural deafness all sounds are
diminished or absent.
12/1/2011 © Clinical Skills Resource Centre, University of Liverpool, UK 46
Interpreting hearing tests
(an overview)
Interpretation of Rinne and Weber tests
Normal Conductive
deafness
Partial
sensorineural
deafness
Weber Equal in both Deaf ear >
good ear
Good ear >
deaf ear
Rinne Air conduction
> bone
Bone
conduction >
air
Air conduction
> bone
Loss of hearing may be conductive (transmission of sound to the nerves
of hearing fails)
Sensorineural deafness reflects disorders of the nerve tissues)
12/1/2011 © Clinical Skills Resource Centre, University of Liverpool, UK 47
Vestibular function of the 8th nerve
 Gait
 Ask patient to walk heel to toe
 Gait veers to the affected side and is
unsteady
 Usually worse with eyes shut
12/1/2011 © Clinical Skills Resource Centre, University of Liverpool, UK 48
Nystagmus
 Involuntary rhythmic eye movements
 Peripheral or central vestibular, or cerebellum
 Tested during eye movement assessment
 Look in central position
 Look during up, down and lateral movement
 Hold the target steady at the limit of binocular
vision in each direction
 Care: Normal people may have a few jerks at extreme lateral
gaze, especially if the target is outside the field of binocular
vision - ensure it is visible to both eyes.
12/1/2011 © Clinical Skills Resource Centre, University of Liverpool, UK 49
Nystagmus types
 May be rotary or linear
 Jerk - slow drift of eye position in one
direction with a fast correction in the opposite
direction.
 Nystagmus direction is that of fast phase
 Pendular – oscillations roughly equal in both
directions
12/1/2011 © Clinical Skills Resource Centre, University of Liverpool, UK 50
Points to note if nystagmus present
 Eye position and gaze direction when nystagmus occurs
 Direction of the fast movement and plane - horizontal,
vertical, rotatory
 Is the abducting eye affected more than the adducting?
 Does it occurs in other directions of gaze?
 Typical description: linear nystagmus, fast phase to the left,
in both eyes on left lateral gaze.
12/1/2011 © Clinical Skills Resource Centre, University of Liverpool, UK 51
Hallpike’s test
Examiner supports head
Hallpike’s
test
 Used in testing for positional vertigo
 Sit person up in a position so that when (s)he
lies down, the head will extend over the end of
couch
 Turn the head to one side, ask person to look
over the shoulder to that side.
 Lie the patient back quickly, so that head
extends and is supported by the examiner
 Ensure continues to look over shoulder (now
towards floor)
 Ask about sensation of vertigo. Observe for
nystagmus in direction of gaze, whether it
fatigues with repeating the test.
 Repeat for other side
12/1/2011 © Clinical Skills Resource Centre, University of Liverpool, UK 52
Hallpike’s test interpretation
 No vertigo, no nystagmus - normal
 Vertigo plus nystagmus
 Central (brainstem) vestibular
 non-fatigable
 persists indefinitely during test posture
 Repeatable indefinitely
 Peripheral vestibular
 Delayed-onset rotatory nystagmus
 Fatigues
 wears off in < 4 minutes
 Repeat test less intense, shorter duration features
12/1/2011 © Clinical Skills Resource Centre, University of Liverpool, UK 53
9th (Glossopharyngeal) nerve
 Sensory
 posterior 1/3rd of tongue, the pharynx and
middle ear
 Motor
 stylopharyngeus
 Autonomic
 parotid salivary gland
 afferents from carotid baroreceptors
12/1/2011 © Clinical Skills Resource Centre, University of Liverpool, UK 54
Testing the 9th nerve (sensory)
Gag reflex (not routinely done); test both sides
 Afferent – glossopharyngeal; efferent – vagus (10th)
 touch pharyngeal wall behind the pillars of the fauces
 ask if patient can feel it, and observe any gag
 no feeling or gag may mean ipsilateral 9th nerve
dysfunction.
 deviation of uvula one way indicates weakness on the
other side = UMN / LMN lesion of vagus, 10th nerve –
not 9th
 Uvula moves on saying “Ahh” but not on gag
 isolated 9th nerve palsy (rare)
12/1/2011 © Clinical Skills Resource Centre, University of Liverpool, UK 55
The 10th (Vagus) nerve
 Sensory
 tympanic membrane, external auditory canal,
external ear
 Motor
 muscles of palate, pharynx and larynx
 Autonomic
 parasympathetic supply to and from thorax and
abdomen
12/1/2011 © Clinical Skills Resource Centre, University of Liverpool, UK 56
Testing the 10th nerve
 Look at the uvula (use tongue depressor if
necessary)
 Ask patient to say “Ahh”
 Deviation to one side indicates weakness on
the other side (muscle normally “pulls”)
 upper or lower motor neurone lesion
 Does not move on saying “Ahh” or gag
 bilateral palatal muscle paresis
12/1/2011 © Clinical Skills Resource Centre, University of Liverpool, UK 57
11th (Accessory) nerve
 Purely motor
 Each cerebral hemisphere supplies
 the ipsilateral sternomastoid muscle
 the contralateral trapezius muscle
 Therefore, a lesion on one side can give rise
to signs on both sides
12/1/2011 © Clinical Skills Resource Centre, University of Liverpool, UK 58
Testing the 11th nerve
 Sternomastoid
 Ask patient to turn their head to one side. Stabilise
patient with shoulder counterpressure. Then put your
hand against patient’s chin and cheek and ask patient to
resist your rotating their head back to midline. Watch the
opposite sternomastoid contract, and test its power.
 Trapezius
 Ask the patient to shrug shoulders, push down against
movement. Do one side at a time.
12/1/2011 © Clinical Skills Resource Centre, University of Liverpool, UK 59
Testing the 11th nerve
Inspect both
sternomastoid and
trapezius muscles for
wasting and fasciculation
Upward shrug
of shoulders -
test of trapezius
Turning head - test
of contralateral
sternomastoid
 Weakness of
sternomastoid and
trapezius on the same side
- ipsilateral peripheral
accessory nerve lesion
 Weakness of
sternomastoid and
contralateral trapezius -
upper motor neurone
lesion on the side of the
sternomastoid
12/1/2011 © Clinical Skills Resource Centre, University of Liverpool, UK 60
12th (Hypoglossal) nerve
 Motor: intrinsic muscles of the tongue
 Testing the 12th nerve
 Open mouth. Examine tongue at rest inside mouth.
 Fasciculation and / or wasting (atrophy)
LMN lesion (one side = nerve, both usually = bulbar palsy).
 Put out tongue
 Deviation to one side indicates weakness on that side (tongue
muscle “pushes”).
 Fasciculation during active movement is normal.
 Waggle tongue (demonstrate to patient)
 Normal smooth bulk, poor movement control, usually bilateral
UMN lesion (“pseudobulbar” palsy).
 To test power: patient pushes tongue against cheek and examiner
presses against skin - repeat for the other side.

Continuation of Cranial Nerve Exam

  • 1.
    12/1/2011 © ClinicalSkills Resource Centre, University of Liverpool, UK 1 Examining the cranial nerves I Olfactory II Optic III Oculomotor IV Trochlear V Trigeminal VI Abducens VII Facial VIIIAcoustic (auditory & vestibular) IX Glossopharyngeal X Vagus XI Accessory XII Hypoglossal
  • 2.
    12/1/2011 © ClinicalSkills Resource Centre, University of Liverpool, UK 2 1st (Olfactory) nerve  Responsible for the sense of smell  Sense of smell may be lost as a result of  trauma  infection  ageing  Smell is an important component of the appreciation of taste (which may be the principal complaint of a patient)  Crude bedside test may be to identify the odour of coffee or fresh orange
  • 3.
    12/1/2011 © ClinicalSkills Resource Centre, University of Liverpool, UK 3 1st (Olfactory) nerve- formal test  One nostril at a time - occlude the other  Use several test smells.  Ask patient to sniff and signal detection  Prompt response needed, else spreads to other side  Few can identify the classic test smells  Exclude misinterpretation / malingering  Ammonia - detected through nasal pain fibres  Should still taste sugar, salt, vinegar, quinine
  • 4.
    12/1/2011 © ClinicalSkills Resource Centre, University of Liverpool, UK 4 The 2nd (Optic) nerve  Various tests are possible which depend to some extent (though not exclusively) on the integrity of the optic nerve(s)  These include  Ophthalmoscopy (See separate study guide)  pupillary reflexes  visual acuity  visual fields
  • 5.
    12/1/2011 © ClinicalSkills Resource Centre, University of Liverpool, UK 5 The pupils - Inspection  Size and shape  Regularity in outline and equality of both sides  Defects in iris  Foreign bodies in anterior chamber  Obvious cataract
  • 6.
    12/1/2011 © ClinicalSkills Resource Centre, University of Liverpool, UK 6 Pupillary light reflexes  Ask patient to look at a distant object.  Swing light beam in from behind onto one eye, or switch on from in front. Ensure abrupt stimulus.  Shield other eye effectively.  Direct response- constriction of pupil to light shone into that eye.  Consensual response - constriction of pupil to light shone in opposite eye.
  • 7.
    12/1/2011 © ClinicalSkills Resource Centre, University of Liverpool, UK 7 Pupillary light reflexes 2  Shield the non-examined eye  Move light beam abruptly in from the side, or switch on from the front  Direct reflex - ipsilateral pupil constricts  Consensual reflex - contralateral pupil constricts Direct Consensual
  • 8.
    12/1/2011 © ClinicalSkills Resource Centre, University of Liverpool, UK 8 Pupillary accommodation reflex  Ask patient to fix on a distant object and then to focus on finger held about 10 cms from face. Keep target high or eyelids will obscure the pupil.  The eyes should converge  The pupils should constrict equally
  • 9.
    12/1/2011 © ClinicalSkills Resource Centre, University of Liverpool, UK 9 Accommodation  The person fixes on a distant object  The person is then asked to look at a close object - their eyes converge and pupils constrict
  • 10.
    Documenting P.E.R.L.A.  Theacronym P.E.R.L.A. is used to both help remind us what tests we should do and for documentation purposes.  Pupils  Equal and  Reactive to Light and  Accommodation When documenting, it is permissible to write PERLA this signifies that it was checked and is ok. If there was a problem then you should document in full what the problem is. 12/1/2011 © Clinical Skills Resource Centre, University of Liverpool, UK 10
  • 11.
    12/1/2011 © ClinicalSkills Resource Centre, University of Liverpool, UK 11 Visual acuity testing  A series of different sized letters on the chart  Viewed at 6 metres (half sized charts are viewed at 3 metres)  Under each line is a number that represents in metres the distance from which that size letter would be visible in someone with normal eyesight
  • 12.
    12/1/2011 © ClinicalSkills Resource Centre, University of Liverpool, UK 12 Visual acuity test results  The result of the test is recorded as the distance from which the patient was positioned (in metres) over the smallest set of letters that can be read on a chart  6/6 (capable of reading letters expected to be visible at 6 metres whilst looking from a distance of 6 meters)  6/60 (only capable of reading letters expected to be visible at 60 metres at 6 metres)  For general examination purposes, if the patient wears glass’s they can be kept on but their lens prescription should be documented Small numbers above letters indicate the distance at which a person with normal vision can identify them
  • 13.
    12/1/2011 © ClinicalSkills Resource Centre, University of Liverpool, UK 13 Visual acuity measurement  Ask the patient to cover each eye in turn and determine the smallest print size that can be read  Record separately for each eye e.g. R = 6/6 L = 6/5.  For short-sighted patients glasses should be worn, but if not available reading through a pin-hole will help to compensate.  For patient unable to read the 60 print size, move them nearer to the chart (e.g. 3 metres) and record acuity as 3/xx.  For patients unable to read the chart as close as 1 metre record acuity as:  For children and illiterate patients there are charts showing shapes rather than letters CF = Count fingers (Hold hand 0.5 of a metre from the patient ) HM = Hand movement PL = Perceives light NPL = No perception of light
  • 14.
    12/1/2011 © ClinicalSkills Resource Centre, University of Liverpool, UK 14 Visual field testing  The “bedside” test: face the patient at a distance of about 1 metre. Keep patient’s visual background uncluttered, with light behind patient  To test the right eye  Close or cover your right eye. Say “cover your left eye and look at my left eye”. This matches the visual fields. Fig 1 Fig 2
  • 15.
    12/1/2011 © ClinicalSkills Resource Centre, University of Liverpool, UK 15 Visual field testing 2  Ensure patient doesn’t look away from your eye  Keeping in a plane midway between you and the patient, bring a white pin head from the extreme of vision (arm’s length) in towards pupil. Test each quadrant using diagonal track bisecting the quadrant. Establish rough boundary then define with slower target movements (see Fig. 1-4) Fig 3 Fig 4
  • 16.
    12/1/2011 © ClinicalSkills Resource Centre, University of Liverpool, UK 16 Visual field testing 3  Ask the patient to indicate when they first appreciate the white ball entering their visual field  Compare this to your own detection  Produce a more detailed “map” of a defect by increasing the number of spokes used  The field is limited superiorly by the supra-orbital ridge and medially by the nose  Any defect should be assessed formally
  • 17.
    12/1/2011 © ClinicalSkills Resource Centre, University of Liverpool, UK 17 The blind spot = optic disc  Align patients visual horizontal with yours. Close (eg)your right eye. Tell patient “cover your left eye, and gaze at my left eye”.  Use a red pinhead (approx 1cm diameter). Check patient can see target when aligned with pupil.  Move target slowly, horizontally and laterally from pupil, ask the patient to signal when it disappears and reappears. Sit approx. 1 metre apart, fix gaze on each other’s open eye (right to left). Move the pin slowly across the axis of fixation. The red pin will disappear when it coincides with the optic disc.
  • 18.
    Left RightTemporalTemporal Nasal A B C DE F A B C D E Light from images in the temporal region stimulates the nasal fibres of the retina and visa versa. left eye Optic nerve Optic chiasm Optic radiation F Optical cortex nose right eye
  • 19.
    12/1/2011 © ClinicalSkills Resource Centre, University of Liverpool, UK 19 Eye movements (3rd, 4th & 6th) The arrows indicate the direction of movement of the eyes and not necessarily the position of the muscles. Medial Lateral Up Down Superior Rectus III Left eye Inferior Rectus IIISuperior Oblique IV Inferior oblique III Medial Rectus III Lateral Rectus VI
  • 20.
    Muscle nerve links A way to remember which muscle is controlled by which nerve is LR 6 SO4 EE 3  LR 6 Lateral rectus muscle is controlled by 6th nerve. Abducens.  SO4 Superior oblique muscle is controlled by 4th nerve. Trochlear.  EE 3 Everything else is controlled by the 3rd nerve. Oculomotor 12/1/2011 © Clinical Skills Resource Centre, University of Liverpool, UK 20
  • 21.
    12/1/2011 © ClinicalSkills Resource Centre, University of Liverpool, UK 21 Rectus Muscles © 2002 Sinauer Associates
  • 22.
    12/1/2011 © ClinicalSkills Resource Centre, University of Liverpool, UK 22 Testing eye movements  Hold a pen or similar object 50 cm from the patient in the midline and on a level with the patient’s eyes  Lateral gaze - vertical target Up / down gaze - horizontal target  Ask patient to follow object (“with your eyes”), keeping head still, and to report any double vision  Move the object slowly  side to side  up and down centrally, then at extremes of lateral gaze  stay in binocular range
  • 23.
    12/1/2011 © ClinicalSkills Resource Centre, University of Liverpool, UK 23 Eye movements Observe range of movement smoothness and speed whether conjugate (moving together) nystagmus (see 8th nerve for details) If obvious dysconjugate eye movements Is there double vision? If present, establish muscle(s) affected If not, test for latent squint
  • 24.
    12/1/2011 © ClinicalSkills Resource Centre, University of Liverpool, UK 24 Diplopia – which eye and muscle? If patient reports diplopia remember:  False image is from the affected eye  Outer image is the false one  Double vision is maximal in the direction of gaze of the affected muscle
  • 25.
    12/1/2011 © ClinicalSkills Resource Centre, University of Liverpool, UK 25 Diplopia – which eye and muscle?  For each direction of gaze with diplopia  establish position where images are widest apart  cover each eye in turn and confirm binocular diplopia (present only with both eyes looking).  cover one eye and if outer image disappears that eye and the muscle turning it that way are the abnormal ones.  cross-check by covering the other eye. Inner image should disappear.
  • 26.
    12/1/2011 © ClinicalSkills Resource Centre, University of Liverpool, UK 26 3rd (Oculomotor) nerve palsy Resting Ptosis On lifting ptosis, the eye deviated laterally and downwards Affected eye (left) In complete palsy, pupil dilated and unreactive
  • 27.
    12/1/2011 © ClinicalSkills Resource Centre, University of Liverpool, UK 27 4th (Trochlear) nerve palsy Resting Looking to right and downwards Affected eye (left)
  • 28.
    12/1/2011 © ClinicalSkills Resource Centre, University of Liverpool, UK 28 6th (Abducens) nerve palsy Resting position Look to L On command to look to the left the affected eye (LEFT) does not move Affected eye
  • 29.
    12/1/2011 © ClinicalSkills Resource Centre, University of Liverpool, UK 29 The cover test for latent squint  Ask the patient to look with both eyes at examiner’s right eye  Cover patient’s left eye, then uncover left eye and rapidly cover right eye  Observe to see if left eye corrects to fix on examiner’s eye  Repeat for patient’s right eye R L Example above: left latent squint
  • 30.
    12/1/2011 © ClinicalSkills Resource Centre, University of Liverpool, UK 30 The 5th (Trigeminal) nerve  The trigeminal nerve supplies  Sensory divisions  Ophthalmic (V1)  Maxillary (V2)  Mandibular (V3)  Motor  Muscles of mastication
  • 31.
    12/1/2011 © ClinicalSkills Resource Centre, University of Liverpool, UK 31 Sensory branches of 5th nerve  Ophthalmic  Maxillary  Mandibular Test light touch with cotton wool For pain use sharp end of a neuro tip Use the blunt end to act as a discriminator if the patient is unable to readily sense pain Compare sides
  • 32.
    12/1/2011 © ClinicalSkills Resource Centre, University of Liverpool, UK 32  Sensation - trigeminal nerve  Motor - facial nerve  Twist a wisp of cotton wool to a point.  Ask the patient to look up and in  Touch the lateral cornea  Both eyes should blink  Be careful to touch the peripheral cornea and not the conjunctiva  Avoid the central cornea.  Don’t drag the cotton across the cornea Corneal reflex Unlikely to work on people who wear contact lenses
  • 33.
    12/1/2011 © ClinicalSkills Resource Centre, University of Liverpool, UK 33 Testing 5th nerve motor function  Place your fingers on muscles first. Ask patient to clench teeth and you feel masseter and temporalis contracting.  Ask patient to open mouth to left, and stop you trying to push the open jaw back to midline. Repeat for right side. Testing power of lateral and medial pterygoids.  Jaw jerk  ask the patient to open their mouth slightly  place a finger on the chin  percuss the finger  observe and feel jaw movement Testing the jaw reflex
  • 34.
    12/1/2011 © ClinicalSkills Resource Centre, University of Liverpool, UK 34 The 7th (Facial) nerve  The facial nerve supplies  Muscles of facial expression  Stapedius muscle in the ear  Taste to the anterior 2/3rds of the tongue  Parasympathetic nerves to the lacrimal gland  LMN lesions affect all facial muscles on that side (final common pathway).  Unilateral UMN lesions spare the forehead (bilateral cortical representation).
  • 35.
    12/1/2011 © ClinicalSkills Resource Centre, University of Liverpool, UK 35 Tests of facial nerve function  Ask person to  Show their teeth  Purse lips  Blow out cheeks  Close eyes tightly  Open eyes as wide as they can
  • 36.
    12/1/2011 © ClinicalSkills Resource Centre, University of Liverpool, UK 36 Tests of facial nerve power  With eyes tightly shut  attempt to gently pull the eyelids apart  With eyebrows raised  attempt to pull eyebrows downwards  With lips pursed tightly  attempt to pull lips apart  With cheeks blown out  press against the cheek to assess strength
  • 37.
    12/1/2011 © ClinicalSkills Resource Centre, University of Liverpool, UK 37 The 8th (Acoustic) nerve  The 8th nerve has two functions  Auditory (hearing)  Vestibular (balance)
  • 38.
    12/1/2011 © ClinicalSkills Resource Centre, University of Liverpool, UK 38 Tests of auditory function  Test each ear, one at a time  Block the opposite ear  Use a watch or rubbing fingers together (in a quiet environment), judge how far away the sound can be detected  If impaired in either ear perform Rinne’s and Weber’s test
  • 39.
    12/1/2011 © ClinicalSkills Resource Centre, University of Liverpool, UK 39 Rinne’s test 1a  Use a 512 Hz tuning fork, set it vibrating by gently tapping on your knee  Place on mastoid process (bone conduction)  Ask the person to tell you when they can no longer “hear” the sound
  • 40.
    12/1/2011 © ClinicalSkills Resource Centre, University of Liverpool, UK 40 Rinne’s test 1b  Then place fork in front of ear directly over the auditory meatus (air conduction)  Ask the patient again if they can hear the sound (normally louder as air conduction is better than bone conduction)
  • 41.
    12/1/2011 © ClinicalSkills Resource Centre, University of Liverpool, UK 41 Interpretation of Rinnes (method 1)  In a normal hearing the sound will be heard better when the tuning fork is placed in front of the ear  In conductive deafness (the sounds cannot conduct from the external to the inner ear) the sound will not be heard when the tuning fork is placed in front of the ear  In partial sensorineural deafness (due to damage to the cochlea, auditory nerve or auditory centres of the brain) the sound may be heard when the tuning fork is placed in front of the ear (but at a higher pitch normal hearing).  In complete sensorineural deafness no sound will be heard when the tuning for is placed in either position. (although there are exceptions to this)
  • 42.
    12/1/2011 © ClinicalSkills Resource Centre, University of Liverpool, UK 42 Rinne’s 2  Alternatively  Place base of tuning fork on mastoid process  Confirm it can be heard  Then immediately place prongs in front of external auditory meatus  Ask patient which is louder - “behind the ear or in front?
  • 43.
    12/1/2011 © ClinicalSkills Resource Centre, University of Liverpool, UK 43 Interpretation of Rinnes (method 2)  In normal hearing the sound is loudest when the tuning fork is placed in front of the ear  In conductive deafness the sound is loudest on the mastoid process  In partial sensorineural deafness the sound is loudest when the tuning fork is placed in front of the ear (but at a higher pitch than in normal hearing).  In complete sensorineural deafness no sound will be heard at the mastoid process or in front of the ear.
  • 44.
    12/1/2011 © ClinicalSkills Resource Centre, University of Liverpool, UK 44 Weber’s test  Hold the base of the 512 Hz tuning fork on the vertex of the patient’s head.  Ask which ear seems to hear it louder.
  • 45.
    12/1/2011 © ClinicalSkills Resource Centre, University of Liverpool, UK 45 Interpretation of Webers  In normal hearing the sound is equal in both ears  In conductive deafness then the sound will be loudest in the affected ear (as all external sound is removed and effected ear picks up the vibrating sound more acutely)  In sensorineural deafness all sounds are diminished or absent.
  • 46.
    12/1/2011 © ClinicalSkills Resource Centre, University of Liverpool, UK 46 Interpreting hearing tests (an overview) Interpretation of Rinne and Weber tests Normal Conductive deafness Partial sensorineural deafness Weber Equal in both Deaf ear > good ear Good ear > deaf ear Rinne Air conduction > bone Bone conduction > air Air conduction > bone Loss of hearing may be conductive (transmission of sound to the nerves of hearing fails) Sensorineural deafness reflects disorders of the nerve tissues)
  • 47.
    12/1/2011 © ClinicalSkills Resource Centre, University of Liverpool, UK 47 Vestibular function of the 8th nerve  Gait  Ask patient to walk heel to toe  Gait veers to the affected side and is unsteady  Usually worse with eyes shut
  • 48.
    12/1/2011 © ClinicalSkills Resource Centre, University of Liverpool, UK 48 Nystagmus  Involuntary rhythmic eye movements  Peripheral or central vestibular, or cerebellum  Tested during eye movement assessment  Look in central position  Look during up, down and lateral movement  Hold the target steady at the limit of binocular vision in each direction  Care: Normal people may have a few jerks at extreme lateral gaze, especially if the target is outside the field of binocular vision - ensure it is visible to both eyes.
  • 49.
    12/1/2011 © ClinicalSkills Resource Centre, University of Liverpool, UK 49 Nystagmus types  May be rotary or linear  Jerk - slow drift of eye position in one direction with a fast correction in the opposite direction.  Nystagmus direction is that of fast phase  Pendular – oscillations roughly equal in both directions
  • 50.
    12/1/2011 © ClinicalSkills Resource Centre, University of Liverpool, UK 50 Points to note if nystagmus present  Eye position and gaze direction when nystagmus occurs  Direction of the fast movement and plane - horizontal, vertical, rotatory  Is the abducting eye affected more than the adducting?  Does it occurs in other directions of gaze?  Typical description: linear nystagmus, fast phase to the left, in both eyes on left lateral gaze.
  • 51.
    12/1/2011 © ClinicalSkills Resource Centre, University of Liverpool, UK 51 Hallpike’s test Examiner supports head Hallpike’s test  Used in testing for positional vertigo  Sit person up in a position so that when (s)he lies down, the head will extend over the end of couch  Turn the head to one side, ask person to look over the shoulder to that side.  Lie the patient back quickly, so that head extends and is supported by the examiner  Ensure continues to look over shoulder (now towards floor)  Ask about sensation of vertigo. Observe for nystagmus in direction of gaze, whether it fatigues with repeating the test.  Repeat for other side
  • 52.
    12/1/2011 © ClinicalSkills Resource Centre, University of Liverpool, UK 52 Hallpike’s test interpretation  No vertigo, no nystagmus - normal  Vertigo plus nystagmus  Central (brainstem) vestibular  non-fatigable  persists indefinitely during test posture  Repeatable indefinitely  Peripheral vestibular  Delayed-onset rotatory nystagmus  Fatigues  wears off in < 4 minutes  Repeat test less intense, shorter duration features
  • 53.
    12/1/2011 © ClinicalSkills Resource Centre, University of Liverpool, UK 53 9th (Glossopharyngeal) nerve  Sensory  posterior 1/3rd of tongue, the pharynx and middle ear  Motor  stylopharyngeus  Autonomic  parotid salivary gland  afferents from carotid baroreceptors
  • 54.
    12/1/2011 © ClinicalSkills Resource Centre, University of Liverpool, UK 54 Testing the 9th nerve (sensory) Gag reflex (not routinely done); test both sides  Afferent – glossopharyngeal; efferent – vagus (10th)  touch pharyngeal wall behind the pillars of the fauces  ask if patient can feel it, and observe any gag  no feeling or gag may mean ipsilateral 9th nerve dysfunction.  deviation of uvula one way indicates weakness on the other side = UMN / LMN lesion of vagus, 10th nerve – not 9th  Uvula moves on saying “Ahh” but not on gag  isolated 9th nerve palsy (rare)
  • 55.
    12/1/2011 © ClinicalSkills Resource Centre, University of Liverpool, UK 55 The 10th (Vagus) nerve  Sensory  tympanic membrane, external auditory canal, external ear  Motor  muscles of palate, pharynx and larynx  Autonomic  parasympathetic supply to and from thorax and abdomen
  • 56.
    12/1/2011 © ClinicalSkills Resource Centre, University of Liverpool, UK 56 Testing the 10th nerve  Look at the uvula (use tongue depressor if necessary)  Ask patient to say “Ahh”  Deviation to one side indicates weakness on the other side (muscle normally “pulls”)  upper or lower motor neurone lesion  Does not move on saying “Ahh” or gag  bilateral palatal muscle paresis
  • 57.
    12/1/2011 © ClinicalSkills Resource Centre, University of Liverpool, UK 57 11th (Accessory) nerve  Purely motor  Each cerebral hemisphere supplies  the ipsilateral sternomastoid muscle  the contralateral trapezius muscle  Therefore, a lesion on one side can give rise to signs on both sides
  • 58.
    12/1/2011 © ClinicalSkills Resource Centre, University of Liverpool, UK 58 Testing the 11th nerve  Sternomastoid  Ask patient to turn their head to one side. Stabilise patient with shoulder counterpressure. Then put your hand against patient’s chin and cheek and ask patient to resist your rotating their head back to midline. Watch the opposite sternomastoid contract, and test its power.  Trapezius  Ask the patient to shrug shoulders, push down against movement. Do one side at a time.
  • 59.
    12/1/2011 © ClinicalSkills Resource Centre, University of Liverpool, UK 59 Testing the 11th nerve Inspect both sternomastoid and trapezius muscles for wasting and fasciculation Upward shrug of shoulders - test of trapezius Turning head - test of contralateral sternomastoid  Weakness of sternomastoid and trapezius on the same side - ipsilateral peripheral accessory nerve lesion  Weakness of sternomastoid and contralateral trapezius - upper motor neurone lesion on the side of the sternomastoid
  • 60.
    12/1/2011 © ClinicalSkills Resource Centre, University of Liverpool, UK 60 12th (Hypoglossal) nerve  Motor: intrinsic muscles of the tongue  Testing the 12th nerve  Open mouth. Examine tongue at rest inside mouth.  Fasciculation and / or wasting (atrophy) LMN lesion (one side = nerve, both usually = bulbar palsy).  Put out tongue  Deviation to one side indicates weakness on that side (tongue muscle “pushes”).  Fasciculation during active movement is normal.  Waggle tongue (demonstrate to patient)  Normal smooth bulk, poor movement control, usually bilateral UMN lesion (“pseudobulbar” palsy).  To test power: patient pushes tongue against cheek and examiner presses against skin - repeat for the other side.