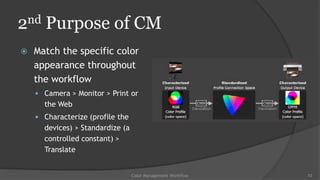
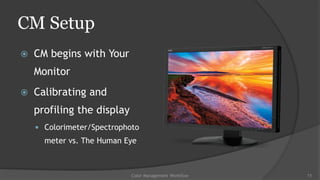
Nathaniel Tubb
CVCC Education Committee
    www.nathanieltubb.ca
The Goal of Color Management
   To process a digital image from capture to final
    presentation state as efficiently and accurately
    as possible

   Note that color management may appear as CM throughout this presentation.


                                    Color Management Workflow                   2
A Bit of Background
   “… color management as a solution rather than a
    meaningless punishment.”
   The Scenario: your final print doesn‟t match what
    you see on your display


                        Color Management Workflow       3
Color Management Workflow   4
Light, and How it is Displayed
   Red, Green, Blue Values
       R + G + B = White > (255, 255,
        255)

   Cyan, Magenta, Yellow
    Values
       C + M + Y = Black-ish
       + K = Black

   Displaying Color
       Monitors are Backlit
       Prints are Reflective


                                         Color Management Workflow   5
Light, and How it is Displayed
   “Different scanners and cameras will produce different RGB
    values when… confronted with the same original or scene.”
   Likewise, different monitors will produce different colors
    when given the same RGB values.
   Scanners and cameras use different filter sets just as
    displays use different LEDs to produce the color.
   Notice the problem???


                            Color Management Workflow            6
1st Purpose for CM
   Render ambiguous RGB values unambiguous
     By associating them with a specific color as perceived by
      humans, color appearance

   CM achieves this by assigning a profile to the
    image.


                              Color Management Workflow           7
Typical Image Profile Color Gamuts
   ProPhoto RGB, Adobe
    RGB (1998), sRGB


                       Color Management Workflow   8
Camera Capture
   Digital cameras* are not limited to sRGB capture
   Camera sensors are often capable of capturing
    colors outside Adobe RGB
   *Some compact point „n‟ shoot cameras may only
    support saving as sRGB


                        Color Management Workflow      9
2nd Purpose of CM
   Match the specific color
    appearance throughout
    the workflow
     Camera > Monitor > Print or
      the Web
     Characterize (profile the
      devices) > Standardize (a
      controlled constant) >
      Translate


                                  Color Management Workflow   10
CM Setup
   CM begins with Your
    Monitor
   Calibrating and
    profiling the display
     Colorimeter/Spectrophoto
      meter vs. The Human Eye


                            Color Management Workflow   11
Color Management Workflow   12
Calibration/Profiling Devices
   X-Rite
       i1 Photo Pro 2 $1300
       ColorMunki Design $500
       ColorMunki Photo $400
       ColorMunki Display $170

   Pantone
       Huey Pro $100

   Datacolor
       Spyder Studio $560
       Spyder 4 Elite $250
       Spyder 4 Pro $170
       Spyder 4 Express $120
       Spyder Print $350


                                  Color Management Workflow   13
The Working Environment
   Tips to keeping a consistent viewing area:
     Monitors work best in low light

     Avoid automatic dimming

     D5000 (daylight balanced) light bulbs

     Avoid direct light sources falling on your monitor

     Remove colorful or other distracting objects from around the
      workstation


                               Color Management Workflow             14
Settings for Photoshop CS
   Edit > Color Settings
   North American Prepress 2 Defaults
       Gray Working Space = Gamma of your RGB
        working space
       Convert To Working Spaces
       Deselect > Profile Mismatches: Ask When
        Opening
       Deselect > Profile Mismatches: Ask When
        Pasting
       Select > Missing Profiles: Ask When Opening


                                              Color Management Workflow   15
Settings for Ps Elements
   Edit > Color Settings
   Not as much control
   Optimise for Printing
     Adobe RGB


                            Color Management Workflow   16
Previewing Prints
   WYSIWYG; sorry, not entirely possible
   No printing technology* can reproduce the bright, saturated
    colors like your monitor displays
   Equally, monitors cannot display metallics, fluorescents,
    nor dark saturated colors as can print
   *Brands such as Epson have developed proprietary inks that
    are capable of a much boarder color gamut than traditional
    CMYK inks.


                            Color Management Workflow             17
Previewing Prints in Photoshop CS
   aka. Soft Proofing
   View > Proof Setup
     Printer + Paper ICC Profiles

     Check > Use Black Point
      Compensation
     Printing to Canvas? > Paper
      White and Black Ink


                                Color Management Workflow   18
Color Management Workflow   19
Previewing Prints in Ps Elements
   Does not natively
    support Soft Proofing
   PsE Requires Add-ons
     Elements+

     QImage


                        Color Management Workflow   20
Adjusting the Soft Proof
   Duplicate the image and display side-by-side
     Image > Duplicate, Window > Arrange

     (PsE) File > Duplicate

   Use Adjustment Layers such as
    Brightness/Contrast, Curves or Levels, or
    Vibrance/Saturation


                               Color Management Workflow   21
Color Management Workflow   22
Finally to Print
   Photoshop Manages
    Color
   Printer + Paper Profile
   Relative Colorimetric
    or Perceptual


                         Color Management Workflow   23
PsE Print Dialog


              Color Management Workflow   24
Publishing to the Web
   Monitor Majority Rules
       Very few people calibrate their monitors

   Tagged (profile assigned) vs. Untagged
       Do your images have embedded profiles (sRGB or Adobe RGB)?

   Not all web browsers are color-managed
       Many browsers ignore embedded color profiles or ignore your monitor profile

   Keep your working Adobe RGB images for editing/printing but
    upload sRGB images for now, until more browsers are on board


                                      Color Management Workflow                       25
Resources
   Adobe Color-Managed RAW Workflow
       Find link on my site…

   The Adobe Photoshop CS5 Book for Digital Photographers,
    by Scott Kelby
       kelbytraining.com/books

   London Drugs Photo Lab ICC Profiles
       http://www.londondrugs.com/PhotoLab/content.aspx?id=3012167b-1b04-
        495c-bed7-9a9ab82f1393

   nathanieltubb.ca > tech blog > Color Management Workflow

                                  Color Management Workflow                  26

Color Management Workflow

  • 1.
    Nathaniel Tubb CVCC EducationCommittee www.nathanieltubb.ca
  • 2.
    The Goal ofColor Management  To process a digital image from capture to final presentation state as efficiently and accurately as possible  Note that color management may appear as CM throughout this presentation. Color Management Workflow 2
  • 3.
    A Bit ofBackground  “… color management as a solution rather than a meaningless punishment.”  The Scenario: your final print doesn‟t match what you see on your display Color Management Workflow 3
  • 4.
  • 5.
    Light, and Howit is Displayed  Red, Green, Blue Values  R + G + B = White > (255, 255, 255)  Cyan, Magenta, Yellow Values  C + M + Y = Black-ish  + K = Black  Displaying Color  Monitors are Backlit  Prints are Reflective Color Management Workflow 5
  • 6.
    Light, and Howit is Displayed  “Different scanners and cameras will produce different RGB values when… confronted with the same original or scene.”  Likewise, different monitors will produce different colors when given the same RGB values.  Scanners and cameras use different filter sets just as displays use different LEDs to produce the color.  Notice the problem??? Color Management Workflow 6
  • 7.
    1st Purpose forCM  Render ambiguous RGB values unambiguous  By associating them with a specific color as perceived by humans, color appearance  CM achieves this by assigning a profile to the image. Color Management Workflow 7
  • 8.
    Typical Image ProfileColor Gamuts  ProPhoto RGB, Adobe RGB (1998), sRGB Color Management Workflow 8
  • 9.
    Camera Capture  Digital cameras* are not limited to sRGB capture  Camera sensors are often capable of capturing colors outside Adobe RGB  *Some compact point „n‟ shoot cameras may only support saving as sRGB Color Management Workflow 9
  • 10.
    2nd Purpose ofCM  Match the specific color appearance throughout the workflow  Camera > Monitor > Print or the Web  Characterize (profile the devices) > Standardize (a controlled constant) > Translate Color Management Workflow 10
  • 11.
    CM Setup  CM begins with Your Monitor  Calibrating and profiling the display  Colorimeter/Spectrophoto meter vs. The Human Eye Color Management Workflow 11
  • 12.
  • 13.
    Calibration/Profiling Devices  X-Rite  i1 Photo Pro 2 $1300  ColorMunki Design $500  ColorMunki Photo $400  ColorMunki Display $170  Pantone  Huey Pro $100  Datacolor  Spyder Studio $560  Spyder 4 Elite $250  Spyder 4 Pro $170  Spyder 4 Express $120  Spyder Print $350 Color Management Workflow 13
  • 14.
    The Working Environment  Tips to keeping a consistent viewing area:  Monitors work best in low light  Avoid automatic dimming  D5000 (daylight balanced) light bulbs  Avoid direct light sources falling on your monitor  Remove colorful or other distracting objects from around the workstation Color Management Workflow 14
  • 15.
    Settings for PhotoshopCS  Edit > Color Settings  North American Prepress 2 Defaults  Gray Working Space = Gamma of your RGB working space  Convert To Working Spaces  Deselect > Profile Mismatches: Ask When Opening  Deselect > Profile Mismatches: Ask When Pasting  Select > Missing Profiles: Ask When Opening Color Management Workflow 15
  • 16.
    Settings for PsElements  Edit > Color Settings  Not as much control  Optimise for Printing  Adobe RGB Color Management Workflow 16
  • 17.
    Previewing Prints  WYSIWYG; sorry, not entirely possible  No printing technology* can reproduce the bright, saturated colors like your monitor displays  Equally, monitors cannot display metallics, fluorescents, nor dark saturated colors as can print  *Brands such as Epson have developed proprietary inks that are capable of a much boarder color gamut than traditional CMYK inks. Color Management Workflow 17
  • 18.
    Previewing Prints inPhotoshop CS  aka. Soft Proofing  View > Proof Setup  Printer + Paper ICC Profiles  Check > Use Black Point Compensation  Printing to Canvas? > Paper White and Black Ink Color Management Workflow 18
  • 19.
  • 20.
    Previewing Prints inPs Elements  Does not natively support Soft Proofing  PsE Requires Add-ons  Elements+  QImage Color Management Workflow 20
  • 21.
    Adjusting the SoftProof  Duplicate the image and display side-by-side  Image > Duplicate, Window > Arrange  (PsE) File > Duplicate  Use Adjustment Layers such as Brightness/Contrast, Curves or Levels, or Vibrance/Saturation Color Management Workflow 21
  • 22.
  • 23.
    Finally to Print  Photoshop Manages Color  Printer + Paper Profile  Relative Colorimetric or Perceptual Color Management Workflow 23
  • 24.
    PsE Print Dialog Color Management Workflow 24
  • 25.
    Publishing to theWeb  Monitor Majority Rules  Very few people calibrate their monitors  Tagged (profile assigned) vs. Untagged  Do your images have embedded profiles (sRGB or Adobe RGB)?  Not all web browsers are color-managed  Many browsers ignore embedded color profiles or ignore your monitor profile  Keep your working Adobe RGB images for editing/printing but upload sRGB images for now, until more browsers are on board Color Management Workflow 25
  • 26.
    Resources  Adobe Color-Managed RAW Workflow  Find link on my site…  The Adobe Photoshop CS5 Book for Digital Photographers, by Scott Kelby  kelbytraining.com/books  London Drugs Photo Lab ICC Profiles  http://www.londondrugs.com/PhotoLab/content.aspx?id=3012167b-1b04- 495c-bed7-9a9ab82f1393  nathanieltubb.ca > tech blog > Color Management Workflow Color Management Workflow 26

Editor's Notes

  • #3 The goal of CM is to process a digital image from capture to final presentation state as efficiently and accurately as possible.
  • #4 A bit of background is needed to understand why there is the need for proper color management and to view CM as a solution rather than a meaningless punishment.One key scenario that I experienced numerous times while at the LD Photo Lab, is that of the customer receiving their prints only to exclaim that the prints look nothing like what they saw at home on their computer.
  • #5 Our digital images are made up of millions of pixels. Each of these pixels are represented with three values; red, green and blue.
  • #6 For example, the RGB value 255, 255, 255 equals white. These RGB values control the amount of red, green, or blue light being emitted from our monitor’s LEDs.In print ink is applied in layers to a medium whether it is paper, canvas, or other type. We see the apparent color by ambient “white” light being filtered by the ink layers and the remaining light reflecting off the medium.
  • #7 Just as everyone one of us is a different human being, different devices are going to capture and produce color differently. This creates a big problem, the RGB values end up becoming totally ambiguous and the solution has to be some kind of system or standard.
  • #8 The first purpose for CM is to render the ambiguous RGB values unambiguous by associating them with a specific perceived color. We call this color appearance. This is achieved by assigning a color profile to the digital image.Our cameras do this without many of us knowing. By default most cameras are set to assign the sRGB profile to all photos taken.
  • #9 Here are a couplegraphic models depicting the relative color space available to the top color profile standards.
  • #11 In the days of film, photographers had the original film as reference for the intended color. Today digital capture is much more ambiguous and CM is necessary to know what you have captured.
  • #12 kuhl-uh-rim-i-ter and spek-troh-foh-tom-i-terSo just consider for a second how you process your images. You download them from your memory card, back them up of course, and then start the selection and editing process. While you are selecting and editing your images, you are making hundreds of judgment calls. When editing, you are taking the original scene and artistic vision from your head and then virtually comparing that with what your monitor is displaying.While most folks will have the typical consumer display that came with your desktop or of course your laptop, those who have pricier monitors such as the Apple Cinema display or iMac or even a professional graphics monitor still should not feel too comfortable with the out-of-the-box color accuracy. These high-end devices are sold with tags that claim “40% more color” and “vivid color”; but this doesn’t mean that the displays a telling truth. Despite being capable of displaying a wider gamut of colors, this $1000 professional-grade monitor from NEC only displays 98% or the Adobe RGB 1998 color gamut.Calibrating your display using the built-in applications on either Windows OS or Mac OS relies on your own sight to judge whether a two graphics match. Although not all of us may have 20/20 eyesight, we each see color slightly differently and therefore I am more willing to rely on a tool that has been tuned to provide consistent results.
  • #14 Here are some of the calibration devices available on the consumer market. Their price and functionality do range quite a bit. Some will only calibrate and profile your monitor, some will only calibrate and profile your printer/paper combinations, while others will do both.The basic function of the calibration device is that of metering a selection of color swatches displayed on the screen and then creating a correctional color profile by comparing the measured results against the standard.
  • #15 Besides creating custom profiles for your displays, keep in mind the environment where you’re are doing your processing. Monitors work best in a low ambient light situation. When there is artificial light present, using daylight-balanced lighting will help create a more neutral space. Dimming or brightening your display inadvertently defeats the purpose of the custom profiling. Also be sure to avoid direct light sources interrupting or creating glare on your screen.
  • #16 Now that is all fine and dandy, but what about my software.Not all applications are color-managed; or in other words, work with your monitor profile and the image profile to accurately display the colors. Some non-color-managed applications include: Windows Explorer, Mac Finder, Internet Explorer, Chrome, Safari, etc. These applications ignore the image profiles and ‘make-up’ the color appearance.Applications like Adobe Lightroom, Adobe Bridge, Adobe Photoshop (and Elements), and Mozilla Firefox are color-managed.These settings will help keep things consistent throughout your image creation and processing workflow.
  • #18 What you see is what you get; sorry not really.The issue with printing as with other type of output is that you are dealing with yet another device that is going to act differently than both your monitor and your camera.As a general rule, print is much more limited than your monitor for displaying your range of colors. Some manufacturers such as Epson have created a proprietary ink systems that expand the gamut of the printer beyond that of the standard CMYK gamut.Also different types of paper will produce different results even run on the same printer.
  • #19 We need a way to preview what our printer is going to display so that we can correct our image before hitting print.Many people who do not have a proper color management system and tools in place will spend huge amounts of money on ink and paper just trying to get the right result.Luckily, Photoshop provides us with a tool to Soft Proof our images. This process takes the image’s profile, the monitor’s profile, and the printer/paper profile and displays a composite of the final output. This composite preview allows you to make adjustments to correct the outputted image.In order to make sure you have an accurate preview you must select the ICC profile for your actual printer and paper configuration. Those who may print on both glossy, matte, and canvas would have to obtain three different profiles. These are usually either available for download from the manufacturers website or included on the software disk. However if you are using an Epson printer with a third party paper, you would have to create the profile yourself using a calibration tool that supports printer profiling like the some of the ones mentioned earlier.
  • #20 This example shows how you can duplicate the image and display it side-by-side to compare the Soft Proof to the original. This was using the LD Canvas Enlargement profile and the White Paper and Black Ink options. As you can see it appears quite flat, lacking the richness of black tones. Glossy and even Semi-Gloss papers tend to provide wider gamuts and better deep tones.
  • #22 Now that we see the final result via the Soft Proof, we can make final adjustments with Adjustment Layers to try and bring the image closer to the original. Usually this means tweaking the contrast, brightness, and saturation.
  • #23 Here is my quick attempt at correcting the Soft Proof. Remember that I am still proofing for the Canvas profile; and that Glossy, Semi-Gloss, and even Matte profiles would not be quite so far off. This is a more extreme example.
  • #24 When we go to print our image we want to use the same settings as we had for the Soft Proof preview. Firstly we are going to tell Photoshop to manage our color rather than our printer. Then choose our printer and paper profile, and check on Black point compensation just as we had before.
  • #25 The PsE print options are pretty much the same.
  • #26 Okay, so besides printing our final master pieces, we all like to share our photos either by Google+, Facebook, Picasa Web, Flickr, the list goes on. The unfortunate thing about sharing via the internet is that your work is at the mercy of the viewer’s device and even the application they are using to view it. As we have learned earlier in this presentation, most people take what they see on their monitors to be the truth especially if they are not comparing devices side-by-side.Also only a few of the top web browsers fully support color management. So this means that it is a shot in the dark as to what your viewers are actually seeing. Browsers that don’t fully support color management will ignore profiles and assume that all images are sRGB. For the meantime, until the web browsers catch up, I would suggest converting your images to sRGB before uploading them. This will give you a slightly more controlled outcome.