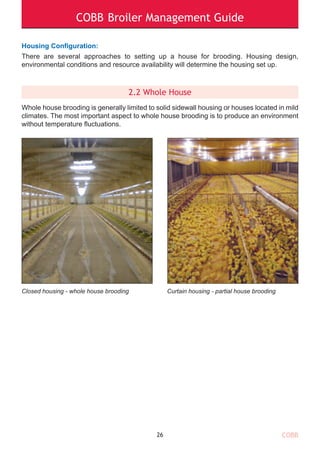
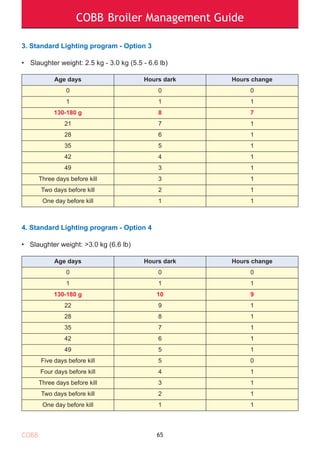
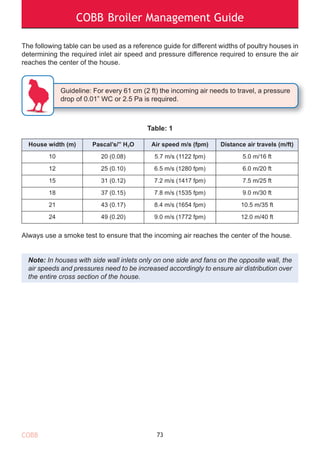
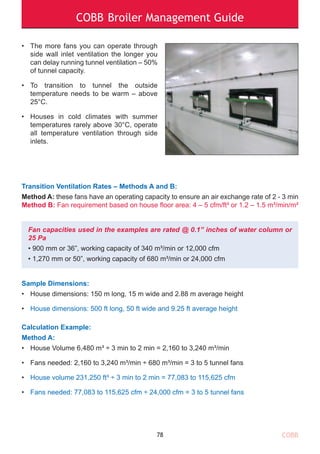
C O B B - V A N T R E S S . C O M
COBB Broiler Management Guide
COBB
Introduction
The Cobb commitment to genetic improvement continues to increase the performance
potential in all areas of broiler and broiler breeder production. However, to attain both genetic
potential and consistent flock production, it is important that the flock manager has a good
management program in place. The worldwide success of Cobb has provided considerable
experience over a wide range of climatic conditions, controlled environment and open
housing. The Cobb Broiler Management Guide is designed to assist you in developing your
management program no matter your housing or environmental conditions.
Management must not only meet the basic needs of the birds but must also be finely tuned
to benefit fully from the breed’s potential. Some of the guidelines may need to be adapted
according to your local experience with assistance from our technical teams.
The Cobb Broiler Management Guide is part of our technical information service, which
includes Hatchery, Grand Parent, Breeder, Vaccination & Nutrition Guides, Technical Bulletins
and a full range of performance charts. Our recommendations are based on current scientific
knowledge and practical experience from around the world. You should always be aware of
local legislation, which may influence the management practice that you choose to adopt.
The Cobb Broiler Management Guide is intended as a reference source and supplement to
your own flock management skills so that you can apply your local knowledge and experience
to obtain consistent good results from the Cobb family of products.
Key points
Look for this symbol throughout the guide that highlights Key Points that
emphasize important aspects of husbandry and critical procedures.
COBB Broiler Management Guide
COBB
Contents
Page
1. Key Energy Efficient HOUSE DESIGN requirements 1
1.1 Roof Design and Insulation 2-3
1.2 Curtain Installation 4
1.3 Inlet Installation 5-6
1.4 Circulation Fan Installation Options 7-8
1.5 Evaporative Pad Design 9-12
1.6 Fogging Systems 13-14
1.7 Equipment 15-24
2. House Preparation - Pre-Placement 25
2.1 Stocking Density 25-26
2.2 Whole House 26
2.3 Partial House Brooding Setup Options 27
2.4 Brooding Chamber 27-30
2.5 Litter Management 31-33
2.6 Pre-Placement Checklist 33-36
3. Chick Placement 37
3.1 Key Management Requirements 37
3.2 Chick Quality 38-39
3.3 Brooding Management 40
3.4 Internal Chick Temperature 41-42
4. Post Placement of Chicks 43
4.1 Post Placement Checklist 43-47
4.2 Flushing 47
5. Growing Phase 48
5.1 Uniformity 48-50
5.2 Temperature 50-58
5.3 Lighting Programs 59-65
5.4 Lighting Program Benefits 66
COBB Broiler Management Guide
COBB
Contents
Page
6. Ventilation Management 67
6.1 Minimum Ventilation 67-68
6.2 Fans Needed for Minimum Ventilation 69-71
6.3 Negative Pressure - Key Requirement for Minimum Ventilation 72-73
6.4 Simple Negative Pressure Test 74
6.5 Inlet Management and Installation 75-76
6.6 Transitional Ventilation 77-79
6.7 Tunnel Ventilation 80-84
6.8 Evaporative Cooling 85-88
6.9 Natural Ventilation 89-92
7. Water Management 93
7.1 Mineral Content 93
7.2 Microbial Contamination 93
7.3 Water Sanitation and System Cleanout 94-95
7.4 Total Dissolved Solids 96
7.5 Drinking System Cleanout Between Flocks 97
7.6 Water Testing 98
8. Nutrition Management 99-102
9. Catching Procedures 103-108
10. Biosecurity and Farm Sanitation 109
10.1 Biosecurity 109-111
10.2 Farm Sanitation 111-113
11. Bird Health 114
11.1 Vaccination 114-119
12. Record Keeping 120-121
13. Appendices 122-123
14. Notes 124-125
COBB Broiler Management Guide
COBB
1. Key Energy Efficient HOUSE DESIGN requirements
There are many things to consider when selecting the most suitable type of broiler housing
and related equipment. Though economic constraints are generally foremost, factors such
as equipment availability, after sales service and life of the products are also critical. Housing
should be cost and energy efficient, durable and provide a controllable environment.
When planning the construction of a broiler house, one should first select a well-drained site
that has plenty of natural air movement. The house should be oriented on an east-west axis
to reduce the effect of direct sunlight on the sidewalls during the hottest part of the day. The
main objective is to reduce the temperature fluctuation during any 24-hour period. Good
temperature control always enhances feed conversion and growth rate.
The following are the five key components of any new broiler house:
1. A roof that is well insulated.
2. Heating system with sufficient capacity in accordance with the climate.
3. Ventilation system designed to provide sufficient oxygen, maintain litter
moisture conditions, and provide optimal cooling capability for the birds.
4. Lighting system should provide an even distribution of light at floor level.
5. Energy efficient choice of the above components: insulation, fans, heating
and lighting.
1
COBB Broiler Management Guide
COBB
1.1 Roof Design and Insulation
Key to maximizing bird performance is the provision of a consistent house environment. This
will help to conserve heating costs, reduce solar energy penetration and prevent
condensation. Large fluctuations in house temperature will cause stress on the chick and
affect feed consumption. Furthermore, these fluctuations will result in additional energy
expenditure to maintain body temperature.
The most important insulation requirements are in the roof. A well-insulated roof will reduce
solar heat penetrating the house on warm days, thus decreasing the heat load on the birds.
In cold weather a well-insulated roof will reduce heat loss and energy consumption needed
to maintain the correct environment for the chick during the brooding phase, the most
important time in the development of the chick. The roof overhang should be 1.25 m (4 ft).
The insulating ability of materials is measured in R or U - values. The higher the R
value the greater the insulating properties of the material. When selecting any
insulation material, cost per R-value rather than cost per thickness of material is the
most important consideration.
The roof should be insulated to a minimum R-value of 20-25 (climate dependant).
U value - coefficient of heat transmission, is a measure of the rate of non-solar heat
loss or gain through a material. U-values gauge how well a material allows heat to pass
through. The lower the U-value, the greater a product’s resistance to heat flow and the
better its insulating value. The inverse of the U-value is the R-value.
The required roof U-value 0.05 - 0.04 (climate dependent).
Following are some insulating materials and their respective R- values.
2
COBB Broiler Management Guide
COBB
Insulating materials and values:
3
Insulation R-Value (US) per 2.5 cm (1”)
Insulation Thickness (cm)
for R20 (SI R3.5)
Expanded Polystyrene
(beadboard)
4.0 17 cm
Cellulose Blown 3.13 14 cm
Fiberglass batt 3.14 16 cm
Polystyrene, extruded plain
(pink board)
5.0 10 cm
Polyurethane foam, un-faced 6.25 8 cm
COBB Broiler Management Guide
COBB4
1.2 Curtain Installation
• The top of the curtain must overlap a solid surface to prevent leaks; an overlap of at least
15 cm (6”).
• A 25 cm (10”) mini curtain installed on the outside of the house at eave height will further
prevent leaks over the top of the curtain.
• The curtains should fit into an envelope which is a 25 cm (10”) mini curtain that seals the
curtain vertically on both ends.
• Curtains should be triple hemmed.
• Curtains need to be sealed at the base to prevent air leaks at floor level.
• All holes and tears in sidewall and/or inlet curtains must be repaired.
• Curtains work most efficiently if operating automatically using both temperature and wind
speed as criteria for opening and closing.
• The optimum dwarf wall height is 0.50 m (1.6 ft).
25 cm curtain envelope
25 cm mini envelope
COBB Broiler Management Guide
COBB
1.3 Inlet Installation
• Inlets in tunnel housing should be installed close to the ceiling as possible – about 30 cm
(12”) below the sidewall eaves. If the ceiling has structural obstructions such as beams, a
directional flap can be used on the top of the inlet and a solid “air ramp” needs to be
installed to aid the air in passing the obstruction – see image below.
• All inlets require wind proofing covers on the outside of the house.
• The inlet cover should be at least 30% more than the cross sectional area of the inlet to
minimize air restriction.
5
Obstructions
deflect air jets
The result is cold air at bird level
Adjust height/opening of inlet
Air ramp over the top of the
obstructions to aid the incoming
air to the top center of the house
COBB Broiler Management Guide
COBB
• The leeward side of the house will always create a negative pressure on the outside. The
windward side of the house will always create a positive pressure on the outside. Wind
proofing will prevent heat being drawn out of the house on the leeward side.
• Without wind proofing, the mechanical pressure control system of the house cannot
properly adjust the pressure or inlet openings to accomplish the correct air speed across
the inlets to prevent condensation on the walls and floor or wind chill at bird level.
• Inlet drive motors should be installed in the center of the side wall to reduce inlet opening
variation. Cables used to control inlets often stretch causing varying inlet opening and
poor air distribution. Solid 8 mm (0.3”) steel rods expand less, making them the best option
for long houses.
6
8 mm rod
COBB Broiler Management Guide
COBB
1.4 Circulation Fan Installation Options
Circulation fans assist in reducing the temperature differential between the
ceiling and the floor by pushing heat to floor level.
Essential in cold climates for reducing heating costs and keeping litter dry.
Placement rules and operation of circulation fans:
Circulation fan requirement:
Capacity: approximately 10-15% house volume
Typical circulation fan capacity: 450 mm (18”) fans with capacity of 70 m³/minute (2500 cfm)
Houses wider than 15 m or 50 ft two rows of circulation fans will be required.
Note: Larger 600 mm (24”) fans – 140 m³/minute (5000 cfm) should be on speed control.
Example 1 - 12m (40 ft) wide house:
• 12 m (40 ft) x 152 m (500 ft) x 3 m (9.5 ft) = 5472 m³ (190,000 ft³)
• 5472 m³ (190,000 ft³) × 10% = 547 m³/minute (19,000 cfm) stir fan capacity
• 547 m³/minute (19,000 cfm) ÷ 70 m³/minute (2,500 cfm) = 7.6 or 8 fans
7
Tilted Slightly Upwards
COBB Broiler Management Guide
COBB
Layout Example - 12 m (40 ft) wide house
Layout Example 2 - 20 m (66 ft) wide house:
• 20 m (66 ft) x 183 m (600 ft) x 3 m (9.5 ft) = 10,980 m³ (376,200 ft³)
• 10,980 m³ (376,200 ft³) x 10% = 1098 m³ (37,620 cfm)
• 1098 m³ (37,620 cfm) ÷ 70 m³/minute (2500 cfm) = 15 or 16 fans
Layout Example - 20 m (66 ft) wide house
8
12m(40ft)
Brooding Chamber
150 m (500 ft)
20m(66ft)
Brooding
Chamber
180 m (600 ft)
Always smoke test the system and see what you think.
These are only 2 examples of numerous configurations.
COBB Broiler Management Guide
COBB
1.5 Evaporative Pad Design
The pad space surface area must match the fan capacity to ensure correct airflow and
evaporation. The evaporative pads most suitable in the modern high speed house are 15 cm
(6”) with 45°/15° angle flutes with a 75% cooling efficiency:
The following is the optimal evaporative pad house design. The pad area should always be
in line with the tunnel inlet opening.
Evaporative Pad House Design
9
1.78 m/s or
350 fpm
Triple Hemmed Inlet Curtain
Automatic Inlet Machine
15 cm Evaporative
Cooling Pads
COBB Broiler Management Guide
COBB
Important design requirements:
• A triple hemmed curtain is required. The curtain needs to be sealed - see section 1.2 (page
4) on curtain design.
• If using tunnel inlet doors, they need to be well sealed along the perimeter. The roof/ceiling
of the cool pad house must be insulated.
• The cool pad house should be a minimum of 0.6-1 m (2-3 ft) wide.
• The water recovery system must be above ground to ensure easy access for cleaning and
maintenance.
• Protect standing water in tank from direct sunlight (tank lid) to reduce algae growth.
• Modern high speed houses with large evaporative pads should have the pumps installed
in the middle of the pad to improve the wetting distribution of the pads.
• Avoid placing any structures or shading in front of cooling pads that will cause a pressure
increase. The opening should match the pad area. see the picture below.
10
Restrictive opening
COBB Broiler Management Guide
COBB
1.5.1 Evaporative Pad Area Requirement Calculation
Example: House Airspeed of 3.0 m/s (600 fpm) and Air Exchange of less than 1 min
15 cm (6”) Evaporative Pad Air speed requirement:
• 1.78 m/s (350 fpm)
Note: Always use fan capacity at pressure of minimum 25 Pa or 0.10” WC when
calculating pad area requirement.
Fans Capacities Used in the examples are rated @ 0.1” of water column or 25 Pa
• 900 mm or 36”, working capacity of 340 m³/min or 12,000 cfm
• 1,270 mm or 50”, working capacity of 680 m³/min (11.3 m³/s) or 24,000 cfm
Step 1: Determine basic house dimensions
• House dimensions: 150 m long, 15 m wide and 2.88 m average height
• House dimensions: 500 ft long, 50 ft wide and 9.25 ft average height
• Cross section: 15 m wide x 2.88 m average height = 43.2 m²
• Cross section: 50 ft wide × 9.25 ft average height = 462.5 ft²
Step 2: Fan capacity required to achieve an airspeed of 3.0 m/s (600 fpm) @ 25 Pa or
0.10” WC
• Required fan capacity: Cross section × Airspeed
43.2 m² x 3.0 m/s = 129.6 m³/s or 7,776 m³/min
• 462.5 ft² × 600 fpm = 277,500 cfm
• Number of 1.27 m (50”) fans required:
• 7,776 m³/min ÷ 680 m³/min = 11.4 or 12 fans or
• 277,500 cfm ÷ 24,000 cfm = 11.6 or 12 fans
11
COBB Broiler Management Guide
COBB
Step 3: What is the total pad area required:
• Total tunnel fan capacity ÷ 1.78 m/s (350 fpm)
• (12 × 11.3 m³/s) ÷ 1.78 m/s = 136 m³/s ÷ 1.78 m/s = 76 m² pad area
• (12 × 24,000 cfm) ÷ 350 fpm = 288,000 cfm ÷ 350 fpm = 823 ft² pad area
• 76 m² ÷ 1.5 m (standard pad height) = 51 m of pad or 25.5 m per side
• 823 ft² ÷ 5 ft (standard pad height) = 165 ft of pad or 82 ft per side
12
COBB Broiler Management Guide
COBB
1.6 Fogging Systems
Examples of important design and installation requirements:
• In houses less than 14 m (45 ft) wide there should be two rows of nozzles throughout the
house with each line being ⅓ the distance from each side wall.
• Low pressure fogging systems operate at 7.6 l/hour (2 gal/hour).
• The nozzles are installed pointing straight down at 3.1 m (10 ft) centers on each line and
staggered from side-to-side throughout the house.
• The fogging lines should be installed in a loop throughout the house.
• An automatic drain valve should be installed on each line to drain the water to the outside
of the house when the pump is off. Drain valves prevent dripping when the system is not
in operation.
• In tunnel ventilated houses, a line should be teed off the two main lines in front of
the tunnel inlet; 1.2 m (4 ft) from the inlet opening with 7.6 l/hour (2 gal/hour) nozzles on
1.5 m (5 ft) centers.
• There should be a 2 cm (¾”) water supply line from the pump to the main fogging line.
The pump should be controlled by both temperature and humidity.
• Foggers should start running at 28°C (82°F).
• Low pressure fogging systems operate at 7-14 bar (100-200 psi) producing a droplet size
greater than 30 microns.
• High pressure fogging systems operate at 28-41 bar (400-600 psi) producing a droplet
size of 10-15 microns.
Moisture should never be directly added to the inlet opening when the air velocity is more
than 3.0 m/s (600 ft/min) - the inlet area nozzles should be positioned where the air velocity
is under 3.0 m/s (600 ft/min) to prevent floor and bird wetting.
If the mist from one nozzle combines with that of the next nozzle, there may be too many
nozzles or too narrow spacing between nozzles. This situation will cause high humidity and
increase bird stress at the fan end of the house.
13
COBB Broiler Management Guide
COBB
House: 12 m Wide (40 ft)
14
Recommended installation specifications:
• Pump - mainline: 2 cm (¾”) pipe.
• Inside Loop - 1.25 cm (½”) pipe.
• Loop configuration is needed to avoid dripping during operation. Drain valves prevent
dripping while system is off.
House: 15 m Wide (50 ft)
Automatic
Drain Valve
Automatic
Drain Valve
Solenoid valve: >30°C
COBB Broiler Management Guide
COBB
1.7 Equipment
1.7.1 Drinker Systems
Providing clean, cool water with adequate flow rate is fundamental to good poultry production.
Without adequate water intake, feed consumption will decline and bird performance will be
compromised. Both closed and open watering systems are commonly used.
Bell or Cup Drinkers (Open Systems)
While there is a cost advantage of installing an open drinker system, problems associated
with litter quality, condemnations and water hygiene are more prevalent. Water purity with
open systems is difficult to maintain as birds will introduce contaminants into the reservoirs
resulting in the need for daily cleaning. This is not only labor intensive but also wastes water.
Installation recommendations:
• Bell drinkers should provide at least 0.6 cm (0.24”) per bird of drinking space.
• All bell drinkers should have a ballast to reduce spillage.
Management recommendations:
• Bell and cup drinkers should be suspended to ensure that the level of the lip of the drinker
is equal to the height of the birds’ back when standing normally.
• Height should be adjusted as the birds grow in order to minimize contamination.
• Water should be 0.5 cm (0.20”) from the lip of the drinker at day old and gradually
decreased to a depth of 1.25 cm (0.50”) after seven days of age, about the depth of a
thumbnail.
15
COBB Broiler Management Guide
COBB
Nipple Systems (Closed systems)
There are two types of nipple drinkers commonly used:
• High flow nipple drinkers operate at 80-90 ml/min (2.7 to 3 fl. oz/min). They provide a
bead of water at the end of the nipple and have a cup to catch any excess water that may
leak from the nipple. Generally 12 birds per nipple with high flow rate systems are
recommended.
• Low flow rate nipple drinkers operate at a flow rate of 50-60 ml/min (1.7 to 2 fl. oz/min).
They typically do not have cups, and pressure is adjusted to maintain water flow to meet
the broiler’s requirements. Generally 10 birds per nipple with low flow rate systems are
recommended.
Installation recommendations:
• Nipple systems need to be pressurized either by installing a header tank or pump system.
• Header tank pressure should be minimum 2 bar or 30 psi.
• Pump supplier – 2.8 bar or 40 psi supplied to the control room. Pump systems will need
an inline pressure reduction valve to ensure constant pressure of 2 bar is supplied to the
nipple system.
• Birds should not have to travel more than 3 m (10 ft) to find water. Nipples should be placed
at a maximum of 35 cm (14”) centers.
16
COBB Broiler Management Guide
COBB
Management recommendations:
• Nipple drinkers must be adjusted to suit chick height and water pressure.
• For systems with stand pipes, pressure adjustments should be made in 5 cm (2”)
increments - as per manufacturer’s recommendations. Systems with drip trays should be
managed that birds never drink from the drip trays. If water is present in drip trays the
pressure is too high in the system.
• For optimal broiler performance, it is recommended to use a closed drinker system. Water
contamination in a closed nipple drinker system is not as likely as with open drinker
systems. Wasting water is also less of a problem. In addition, closed systems offer the
advantage of not requiring the daily cleaning necessary with open drinking systems.
However, it is essential to regularly monitor and test flow rates as more than a visual
assessment is required to determine whether all nipples are operational.
When floors have a slope, a slope regulator should be installed every 10 cm (4”) of fall to
ensure even water flow down the length of the house.
• Higher water pressure does not mean higher consumption.
• Too low water pressure can reduce consumption by as much as 20%.
• If the pressure is too low the bird needs more time to obtain its required volume, but birds
will always spend the same amount of time drinking whether the volume is high or low
(under 1 minute).
How to use the Cobb Water Flow Meter
• Place under an active drinker line, where birds are drinking.
• The gauze chimney should be placed touching the nipple, preferably at an angle, so that
the water flows freely.
• Take the sample with a stopwatch for 30 seconds and record volume.
17
As a general rule birds should always have to slightly reach up and never
stoop down to reach the trigger pin - feet must be flat on the floor at all times.
Reduced water intake = Reduced feed intake = Reduced weight gain
COBB Broiler Management Guide
COBB
• The 30 seconds volume required in relation to age is:
1.7.2 Water Meters
Monitoring water consumption through the use of water meters is an excellent means of
gauging feed consumption, as the two are highly correlated. Water meters should be sized
the same as the incoming water supply line to ensure adequate flow rate. Water consumption
should be evaluated at the same time each day to best determine general performance trends
and bird well-being.
Note: install a water meter bypass, to be utilized during flushing – water used during regular
flushing procedures should not be included in the daily water intake reading.
18
1. Water consumption per bird should be recorded every 24 hours.
2. Any substantial change in water usage should be investigated as this may
indicate a water leak, health challenge or feed issue. A drop in water
consumption is often the first indicator of a flock problem.
Age Flow per 30 seconds
0-7 days 20 ml
8-14 days 25 ml
15-21 days 30 ml
22-28 days 35 ml
29-35+ days 45 ml
25 mm (1”) medicator valves
25 mm (1”) pressure regulator
25 mm (1”) water meter
COBB Broiler Management Guide
COBB 19
1.7.3 Water Storage Tanks
Adequate water storage should be provided on the farm in the event that the main system
fails. A farm supply of water equal to the maximum 48 hour demand is ideal. The storage
capacity is based on the number of birds plus the volume required for the evaporative cooling
system.
When designing or upgrading a farm, understanding water supply and layout is critical.
Separate water supplies for both the birds and cooling systems should be installed for each
house. The following must be taken into account:
• Peak drinking demand requirements.
• Evaporative cooling system demand.
The following is an example of a 4 house farm water supply layout:
• Pump pressure at source: 3.5 – 4 bar or 50 – 60 psi
• A = 75 mm (3”) and 300 l/min
• B = 50 mm (2”) and 150 l/min
• C = 40 mm (1.5”) and 75 l/min
• Control room: 2.8 bar or 40 psi - Minimum
• Drinkers: 2 bar or 30 psi
COBB Broiler Management Guide
COBB
Storage tanks should be housed in a separate insulated building, or alternatively shaded and
insulated.
If the source of water is a well or holding tank, the supply pump capacity should match the
birds’ maximum water consumption and also the maximum needs of the fogging and/or
evaporative cooling systems.
The following is a table indicating estimated flow rates for different pipe sizes:
Evaporative cooling pad water requirements will depend on outside temperature and relative
humidity. The following table is an example of how evaporation increases with a drop in
relative humidity at 35°C or 95°F:
20
Storage and Pump Station
Drinker Supply
Evap. Cooling Supply
Main Line or Well
Flow rate (l/min) Pipe Size (mm and ”)
20 l/min 20 mm or 0.75”
38 l/min 25 mm or 1”
76 l/min 40 mm or 1.5”
150 l/min 50 mm or 2”
230 l/min 65 mm or 2.5”
300 l/min 75 mm or 3”
15 cm (6”) Evaporative Pad Water Requirement @ 35°C (95°F)
Per 100,000 cfm (2832 m³/min)
Humidity 50% 40% 30% 20%
10 l/min 12 l/min 14 l/min 17 l/min
COBB Broiler Management Guide
COBB
The following table is an example of the maximum cooling pad water requirement of a modern
tunnel ventilated broiler house operating at an airspeed of 3 m/s (600 fpm).
21
15 cm (6”) Evaporative Pad Water Requirement
Pads evaporate 10 l/min per 100,000 cfm (2.6 gallon) at 35°C (95°F)
House
Width
Air
Speed
Tunnel Fan Capacity
No Fans
(790 m³/min or
28,000 cfm)
Pad
Requirement
12 m (40 ft) 3 m/s (600 fpm) 6456 m³/min (228,000 cfm) 8 45 l/min
15 m (50 ft) 3 m/s (600 fpm) 8093 m³/min (285,800 cfm) 10 53 l/min
18 m (60 ft) 3 m/s (600 fpm) 9684 m³/min (342,000 cfm) 12 64 l/min
20 m (66 ft) 3 m/s (600 fpm) 10653 m³/min (376,200 cfm) 13 72 l/min
COBB Broiler Management Guide
COBB
1.7.4 Feeding Systems
Regardless of which type of feeding system is used, feeding space is absolutely critical. If
feeder space is insufficient, growth rates will be reduced and uniformity severely
compromised. Feed distribution and the proximity of the feeder to the birds are key to
achieving target feed consumption rates. All feeder systems should be calibrated to allow for
sufficient feed volume with minimal waste.
Automatic Feeder Pans:
• 50-70 birds per 33 cm (12”) diameter pan is recommended.
Pan feeders are generally recommended as they allow for unrestricted bird movement
throughout the house, have a lower incidence of feed spillage and improved feed conversion.
Feeder pans should be primed on each entry to the house to keep the system full.
If birds are “tipping” the pans to reach the feed, then the pans are set too high.
Chain Feeders:
• Either suspended (winched) or on legs. Winching systems allow easier adjustment.
• Minimum feed space of 2.5 - 4 cm per bird.
• The lip of the track should always be adjusted to be level with the birds back.
• Chain feeding systems can become a barrier in the house if the height is not
adjusted accordingly.
• Feed depth is controlled by feed slides in the hoppers and should be closely monitored to
prevent feed wastage.
22
House Width Number of Feed Lines
Up to 12.8 m (42 ft) 2 lines
13 m (43 ft) to 15 m (50 ft) 3 lines
16 m (51 ft) to 20 m (65 ft) 4 lines
21 m (70 ft) to 25 m (85 ft) 5 lines
Require overflow (flood) setting for chick start
COBB Broiler Management Guide
COBB
• Maintenance of the feed track should be carried out between flocks – corner maintenance
and chain tension are very important to prevent breakdowns.
• When switching to pellets, feed depth should be reduced to 1 cm above the chain.
• Chain speed in important to insure uniformity - 18 m/minute (60 fpm) is recommended.
• If more than one circuit is required, install the extra track running in reverse direction.
• Less fines are common in chain feeding systems because birds are encouraged to clean
the track before the next feed rotation.
Feed Storage Bins:
• Feed storage bins should have a holding capacity equal to 5 days of feed consumption.
• To reduce the risk of mold and bacterial growth, it is essential that bins are watertight.
• It is recommended that two feed bins be installed for each house. This allows for a rapid
change in feed if it becomes necessary to medicate or meet feed withdrawal requirements.
• Bulk feed bins should be cleaned between flocks.
1.7.5 Heating Systems
The key to maximizing bird performance is providing a consistent housing environment - a
consistent ambient and floor temperature for young birds. The heating capacity requirement
depends on ambient temperature, roof insulation and the degree of house sealing.
Recommendation:
23
Forced Air Heating System Requirement kW/m³
Tropical Climates 0.05 kW/m³
Temperate Climates 0.075 kW/m³
Cold Climates 0.10 kW/m³
COBB Broiler Management Guide
COBB
The following heating systems are available:
• Forced air heaters: These heaters need to be placed where the air movement is slow
enough to allow optimum heating of the air, normally in the middle of the house. These
heaters should be placed at a height of 1.4-1.5 m from the floor - a height which will not
cause drafts on the chicks. Forced air heaters should never be placed near the air inlet
because it is impossible for them to heat air that is moving too fast. Heaters placed at the
inlets will lead to an increase in heating energy usage and cost.
• Radiant / Spot brooders: Either traditional pancake brooders or radiant brooder systems
are used to heat the litter within the house. These systems allow the chicks to find their
comfort zone. Water and feed should be in close proximity.
• Under Floor Heating: This system operates with hot water circulating through pipes in a
concrete floor. The heat exchange within the floor warms the litter and the brooding area.
Recommendation: Radiant brooders can be used in conjunction with space heaters. Radiant
brooders are used as a primary heat source during brooding while space heaters provide
supplemental heat in cold weather. As the flock matures, birds develop the ability to regulate
their internal body temperature. At approximately 14 days of age, forced air heaters can
become the primary heat source. Generally, radiant type heaters should be used as the
primary heat source in poorly insulated houses, while forced air heating as the primary source
should only be used in well insulated solid wall houses.
24
Too low heating capacity can cause uneven temperature and cold/warm spots
resulting in migration, affecting uniformity and performance, and increase fuel
consumption.
COBB Broiler Management Guide
COBB 25
2. House Preparation - Pre-Placement
2.1 Stocking Density
Correct stocking density is essential to the success of a broiler production system by ensuring
adequate room for optimal performance. In addition to the performance and profit
considerations, correct stocking density also has important welfare implications. To accurately
assess stocking density, factors such as climate, housing types, ventilation systems,
processing weight and welfare regulations must be taken into account. Incorrect stocking
density can lead to leg problems, scratching, bruising and mortality. Furthermore, litter
integrity will be compromised.
Thinning a portion of the flock is one approach to maintaining optimum bird density. In some
countries, a higher number of birds are placed in a house and reared to two different weight
targets. At the lower weight target, 20-50% of the birds are removed to satisfy sales in this
market segment. The remaining birds then have more space and are reared to a heavier
weight.
Many different stocking densities are employed around the world. In warmer
climates a stocking density of 30 kg/m² is closer to ideal. General
recommendations are:
House Type Ventilation Type Equipment
MAXIMUM
Stocking Density
Open Sided Natural Stir Fans 30 kg/m² (6.2 lb/ft²)
Open Sided Positive Pressure Side wall fans @ 60° 35 kg/m² (7.2 lb/ft²)
Solid Wall Cross Ventilation European Set-up
35 - 42 kg/m²
(7.2 - 8.6 lb/ft²)
Solid Wall Tunnel Ventilation Foggers 39 kg/m² (8.0 lb/ft²)
Solid Wall Tunnel Ventilation Evaporative Cooling 42 kg/m² (8.6 lb/ft²)
COBB Broiler Management Guide
COBB
Housing Configuration:
There are several approaches to setting up a house for brooding. Housing design,
environmental conditions and resource availability will determine the housing set up.
2.2 Whole House
Whole house brooding is generally limited to solid sidewall housing or houses located in mild
climates. The most important aspect to whole house brooding is to produce an environment
without temperature fluctuations.
26
Closed housing - whole house brooding Curtain housing - partial house brooding
COBB Broiler Management Guide
COBB
2.3 Partial House Brooding Setup Options
Partial house brooding is commonly practiced in an attempt to reduce heating costs. By
reducing the amount of space dedicated to brooding, one can conserve the amount of heat
required and reduce energy costs. In addition, correct temperatures are more easily
maintained in a small area.
The aim of partial house brooding should be to use as large a brooding space as heating
capacity and house insulation will allow in order to maintain desired house temperature
depending on local weather conditions.
Increasing the brooding area depends on heating capacity, house insulation and outside
weather conditions. The goal is to increase the brooding area as soon as possible, as long
as the desired house temperature is being achieved. Prior to opening, the unused brooding
area needs to be heated and ventilated to the desired bird requirement at least 24 hours
before releasing birds into the new area.
2.4 Brooding Chamber
In poorly insulated buildings, one can reduce temperature fluctuations by building a mini tent
inside the house. The mini tent is comprised of a false ceiling that runs from eave to eave.
This false ceiling will greatly reduce heat loss and make temperature control easier. A second
internal curtain one meter from the outside curtain needs to be installed. The internal curtain
will completely seal from the floor to the false ceiling at the eaves. This curtain must open
from the top and never from the bottom. The slightest air movement at floor level will cause
chilling on the chicks. This second curtain can be used for early ventilation.
27
COBB Broiler Management Guide
COBB
Below are some examples of partial house brooding:
1. Conventional House:
• When we work with a positive pressure system, preferably the brooding area is placed in
the central part of the house, like the figure below:
2. Tunnel House – no side wall inlets:
• If the house is a negative pressure system with no inlets, the best option is to place this
reception area near to the air entrance, to guarantee that the incoming fresh air will enter
inside the brooding area during the ventilation cycle.
• The incoming air to the brooding area needs to enter preferably over the tops of the
curtains, because this will avoid the generation of wind speed at chick level.
• In both scenarios, on the extremities of the brooding area are placed two sections (1 and
2). These sections have the function to minimize the loss of heat produced by the heater(s)
placed in the brooding area.
• The space between the curtains that form the limit of the chamber, need to be at 1 – 3 m
wide.
• The double curtain in sections 1 and 2 has the function of a double insulation barrier for
the heat produced on the brooding area.
• To help pre-heat the incoming air from the tunnel inlet, an additional heater can be placed
in section 1.
28
Mixed Air
Incoming
Air
Outgoing
Air
Brooding Area
1 2
Brooding Area
Brooding Area
COBB Broiler Management Guide
COBB
2. Tunnel House:
Several partition curtain designs for house division are employed worldwide. Floor to ceiling
curtains are the most commonly used to divide a house. A solid 20 cm (8”) barrier should be
placed on the floor in front of the curtain ensuring that no drafts disturb the chicks.
• The advantages of center house brooding is being able to split birds evenly between the
front and back halves of the house from placement. A migration fence(s) is always placed
as a divider in the middle of the brood area. The center house configuration makes it easier
turning the birds out to the full house as they don’t have as far to travel moving from the
center to both ends. The migration fences/dividers ensure equal distribution of chicks over
the length of the house.
• The red X’s indicate those inlets which are not being used. The inlets in the brood chamber
are utilized to achieve the correct air exchange in the brood chamber during minimum
ventilation.
• The choice of extraction fan position will depend on house design – side wall extraction or
end wall extraction:
Side wall extraction:
• Many house have incorporated minimum ventilation fans on both ends of the building so
we are pulling air in both directions away from the brood/chick chamber and do not bring
in cool air from the area behind the curtains. See the diagram below.
End walls extraction:
29
COBB Broiler Management Guide
COBB
The goal is to increase the brooding area as soon as possible, as long as the desired house
temperature is being achieved.
The placement density will depend on the brooding area being utilized. Initial stocking should
not exceed more than 50 - 60 birds/m² during the winter and 40 - 50 birds/m² during the
summer. Ensure adequate drinking space, especially during summer placements - do not
exceed 20 - 25 birds per nipple.
Generally the house should be totally open after 14 to 16 days old - varying according to the
final density capacity and house structure conditions.
30
Brood Chamber Stocking Density
Age (days) Density (birds/m²)
0 to 3 55 to 60
4 to 6 40 to 45
7 to 9 30 to 35
10 to 12 20 to 25
13 to 15 10 to 15?
Prior to expansion, the unused brooding area needs to be heated and
ventilated to the desired bird target temperature at least 24 hours before
releasing birds into the new area.
COBB Broiler Management Guide
COBB
2.5 Litter Management
Seldom given sufficient emphasis, litter management is another crucial aspect of
environmental management. Correct litter management is fundamental to bird health,
performance and final carcass quality which subsequently impacts the profit of both growers
and integrators.
The litter is the primary residue of the broiler house. Re-use of litter is practiced in a number
of countries with a degree of success. Health and economic aspects beyond the
environmental legislation must be taken into account before deciding to re-use the litter.
The following are some key points to consider when re-using the litter:
• All wet caked litter to be removed during down time.
• In the case of a disease challenge, it is never recommended to re-use the litter.
• The availability and cost to replace old litter.
When re-using litter, maintaining good litter quality is essential to achieving optimal
performance. The litter should be replaced as necessary, preferable after 4 cycles and at
least annually.
2.5.1 Important Functions of Litter
Important functions of litter include the ability:
• To absorb moisture.
• To dilute excreta, thus minimizing bird to manure contact.
• To provide an insulation layer between the chicks and the cold floor temperatures.
Though several alternatives may be available for litter material, certain criteria should apply.
Litter must be absorbent, lightweight, inexpensive and non-toxic.
31
Litter choice criteria should always include post production suitability as a
compost, fertilizer or fuel.
Down time between flocks should be at least 14 days to maintain good litter
quality.
COBB Broiler Management Guide
COBB
2.5.2 Litter Alternatives
2.5.3 Litter Evaluation
A practical way to evaluate litter moisture is to pick up a handful and gently squeeze it. The
litter should slightly adhere to the hand and break down when dropped to the floor. If moisture
is in excess it will stay compacted even when dropped. If litter is too dry it will not adhere to
your hand when squeezed. Excessive litter moisture (>35%) may cause welfare and/or health
challenges. An increased incidence of breast blisters, skin burns, condemnations and
downgrades may result. Litter with high moisture content may also contribute to elevated
ammonia levels.
If litter becomes wet beneath drinkers, water
pressure and drinker height should be
evaluated. After the cause has been identified
and addressed, fresh litter or dry litter must be
applied to the problem areas. This will
encourage birds to utilize this area of the
house.
32
Material Properties
Pine Sawdust (kiln dried) Excellent absorptive qualities.
Hardwood Shavings
May contain tannins which cause toxicity concerns and splinters that
may cause crop damage.
Sawdust
Often high in moisture, prone to mold growth and the presence of
aspergillosis.
Chopped straw
Wheat straw is preferred to barley straw for absorptive qualities. Coarse
chopped straw has a tendency to cake in the first few weeks.
Paper
Difficult to manage when wet; may have a slight tendency to cake and
glossy paper does not work well.
Rice Hulls
An inexpensive option in some areas, rice hulls are a good litter
alternative.
Peanut Hulls Tend to cake and crust but are manageable.
COBB Broiler Management Guide
COBB
2.5.4 Minimum Litter Depth Requirements
Note: The above are recommendations for housing with concrete floors.
For housing with earth floors, a minimum depth of 10 cm (4”) is advised, in order to provide
insulation from the ground and to provide adequate moisture holding capacity.
Plastic slats offer an alternative flooring system where cost and availability of good quality
litter materials is a concern. Inherent to the use of slats is the difficulty in controlling moisture,
due to poor air movements, below the slats, which could result in fly control issues.
2.6 Pre-Placement Checklist
The key to successful broiler rearing starts with having a systematic and efficient
management program in place. This program must start well before the chicks arrive on-site.
Pre-placement house preparation as part of a management program provides a basis for an
efficient and profitable flock of broilers. The following checks need to be made:
I. Equipment Check:
After confirming that the equipment capabilities meet the number of chicks to be placed,
install the necessary brooding equipment and check that all equipment is functional. Ensure
that all water, feed, heat and ventilation systems are properly adjusted.
II. Heater Checks:
Verify that all heaters are installed at the recommended height and are operating at maximum
output. Heaters should be checked and serviced BEFORE pre-heating commences.
33
Litter Type Minimum Depth OR Volume
Dry Sawdust 2.5 cm (1”)
Chopped Straw 1 kg/m² (0.2 lb/ft²)
Straw Pellets 800 g - 1 kg/m² (0.15 - 0.2 lb/ft²)
Rice Hulls 5 cm (2”)
Sunflower Husks 5 cm (2”)
COBB Broiler Management Guide
COBB34
III. Thermostats or Probe Check:
• Placed at bird height and in the center of the brooding area.
• Minimum/maximum thermometers should be placed adjacent to thermostat.
• Temperature ranges should be recorded daily and not deviate by more than 2°C (4°F)
over a 24 hour period.
• These should be calibrated at least annually, or sooner if doubt exists about accuracy.
IV. Floor temperature Check:
• Houses should be preheated so that both the floor and ambient temperatures and humidity
are stabilized 24 hours before placement.
• To achieve the above targets, pre-heating needs to commence at least 48 hours before
chick placement.
• Concrete temperature should be 28 - 30°C.
• Pre-heating time is dependent on climate conditions, house insulation and heating capacity
and will vary from farm to farm.
• The chick is highly dependent upon the manager to provide the correct litter temperature.
If the litter and air temperatures are too cold, internal body temperature will decrease,
leading to increased huddling, reduced feed and water intake, stunted growth and
susceptibility to disease.
• At placement, litter temperatures should be 30 - 32°C (86 - 90°F) (30-50% RH) with forced
air heating. If radiant heaters / brooder stoves are used, floor temperatures should be
40.5°C (105°F) under the heat source.
Litter temperature should be recorded before each placement. This will help
to evaluate the effectiveness of pre-heating.
Chicks do not have the ability to regulate body temperature for the first 5 days
and thermoregulation is not fully developed until 14 days of age.
COBB Broiler Management Guide
COBB
V. Minimum Ventilation Check:
• Minimum ventilation should be activated as soon as the preheating begins, in order to
remove waste gases and any excess moisture.
• Seal air leaks to eliminate drafts on chicks.
VI. Drinker Check:
• 14-16 drinkers/1,000 chicks (includes supplemental) should be provided within the
brooding area of which 8-10 can be bell type drinkers.
• All drinkers should be flushed to remove any residual sanitizer.
• Adjust pressure to produce a droplet of water visible on each nipple, without dripping.
• Check for water leaks and air locks.
• Ensure that nipple drinkers are at the chicks’ eye level.
• Water must be clean and fresh.
• Supplemental drinkers should be placed in such a way that the chicks will make the
association between supplemental drinkers and the primary source.
VII. Feeder Check:
• Remove all water remaining from cleanout prior to filling.
• Where full house brooding is practiced, 75 g of feed per chick should be placed on the
papers. The feed and paper need to last for at least 96 hours post placement.
• Where partial house brooding is practiced, supplementary feed should be provided for the
first 7-10 days in the form of turbo feeders / trays and papers.
• Turbo feeders should be provided at a rate of at least one per 75 chicks.
• Trays should be provided at a rate of one per 50 chicks.
• Additionally, 50 g of feed per chick should be placed on the papers.
35
COBB Broiler Management Guide
COBB
• Supplemental feeders should be placed between the main feed and drinker lines and
adjacent to the brooders.
• It is of utmost importance that the supplementary feeding system does not run empty as
this will place great stress on the chick and reduce yolk sac absorption.
• The base of the supplementary feeders should never be exposed - keep full at all times!
• Supplemental feeders should be refreshed three times daily until all the chicks are able to
gain access to the main feeding system.
• Feed should be provided as a good quality crumble.
• Do not place feed or water directly under the heat source as this may reduce feed and
water intake.
• The automatic system should be placed on the floor to make access easier for the chicks.
Where possible, flood the automatic feeding systems with feed.
• When using paper, the feed area should be a minimum of 50% of the brooding area. The
paper should be placed near the automatic drinking system so that the chicks have easy
access to both feed and water.
• It is ideal (if the environment, temperature and air quality is correct) to have a row of paper
either side of each drinker line.
36
COBB Broiler Management Guide
COBB
3. Chick Placement
3.1 Key Management Requirements
• Place chicks from similar age and flock source in a single house (a maximum of 5 weeks’
difference is recommended if you need to mix donor flocks).
• Placement per farm should ensure an “all in-all out” regime.
• Delays in placement can contribute to the dehydration of chicks, resulting in higher chick
mortality and reduced growth rate.
• Transportation must provide ideal conditions for the chicks and the delivery time should
be as short as possible. (Refer to the Cobb Hatchery and Optimum Broiler Development
Guides).
• Reduce the light intensity during chick placement to reduce stress.
• Chicks must be carefully placed and evenly distributed near feed and water throughout
the brooding area. When using supplemental feed on paper, place chicks on the paper.
• Weigh 5% of the boxes to determine day old chick weight.
• Lights should be brought to full intensity (minimum 25 lux) within the brooding area once
all chicks have been placed.
• Following a 1-2 hour acclimation period, check all systems and make adjustments if
necessary.
• Monitor the distribution of the chicks closely during the first few days. This can be used as
an indicator for any problems in feeder, drinker, ventilation or heating systems.
37
COBB Broiler Management Guide
COBB38
3.2 Chick Quality
Hatcheries can have a tremendous impact on the success of broiler rearing. The hatch
process from egg to farm can be stressful. Efforts to minimize stress are fundamental in
maintaining good chick quality.
Characteristics of a good quality chick:
• Well-dried, long-fluffed down.
• Bright, round, active eyes.
• Look active and alert.
• Have completely healed navels.
• Legs should be bright and waxy to the touch.
• Free of red hocks.
• Chicks should be free from deformities (i.e. crooked legs, twisted necks and cross beaks).
COBB Broiler Management Guide
COBB 39
Navels
Legs
Hocks
A B C
Characteristic
A
Excellent
B
Acceptable
C
Cull
1. Reflex
Chick can flip over
within 3 seconds
Chick flips back over
between 4-10 seconds
Over 10 seconds or fails
to flip over
2. Navel Clean and well healed
Closed but slight
abrasiveness
Not closed/string/button
attached or discolored
3. Legs Clean, waxy legs Some dryness/pale
Dehydrated with vein
protruding
4. Hocks Clean, no blemishes Slight blushing Red color/heavy blushing
5. Defects Clean, no blemishes Slight blushing
Missing eye/blind, legs with
cuts/abrasions, spraddled legs,
cross beaks, poor feathering,
clubbed down
COBB Broiler Management Guide
COBB
3.3 Brooding Management
The importance of the brooding period cannot be over emphasized. The first 14 days of a
chick’s life sets the precedent for good performance. Extra effort during the brooding phase
will be rewarded in the final flock performance.
Check chicks 2 hours after placement. Ensure they are comfortable. See the Proper Brooding
Illustration:
Proper Brooding
40
Just Right
Constantly
cheeping chicks
evenly spread
Too Cold
Noisy chicks
huddled under
brooder
Key
Chicks
Brooder
Too Drafty
Noisy chicks
huddled together
away from draught
Too Hot
Drowsy chicks
spread around
perimeter
Influence of
Bright Light
draft or noise
COBB Broiler Management Guide
COBB
3.4 Internal Chick Temperature
1. Chick internal temperature can be measured using a small rectal probe thermometer.
2. Hatched chick internal temperature should be 40 – 40.6ºC (104 - 105ºF).
3. Chick internal temperature above 41ºC (106ºF) in first 4 days will lead to panting.
4. Chick internal temperature below 40ºC (104ºF) indicates that the chick is too cold.
5. Chick internal temperature increases over the first five days to 41 - 42ºC (106 - 108ºF).
6. A comfortable chick will breathe through its nostrils and lose 1-2 g of moisture in the first
24 hours.
7. The yolk also contains 1-2 g of moisture so the chick will lose weight but not become
dehydrated.
8. If chicks start panting they can lose 5-10 g of moisture in the first 24 hours and then
dehydration will occur.
9. Higher relative humidity will reduce moisture loss but also impair heat loss, so correct
temperature is vital.
10. Chicks from smaller eggs (younger breeder flocks) require higher brooding temperatures
because they produce less heat.
11. The yolk contains ⅔ fat and ⅓ protein - fat for energy and protein for growth.
12. If early feed consumption doesn’t take place the chick will use both fat and protein in the
yolk for energy, resulting in inadequate protein levels for growth.
41
COBB Broiler Management Guide
COBB
• Effect of feed intake on internal chick temperature - the chick at Spot 1 - 34.1°C (93.38°F)
has eaten and the chick at Spot 2 - 32°C (89.6°F) has not.
42
Spot 1 34.6°C / 94.3°F
Spot 2 32.0°C / 89.6°F
COBB Broiler Management Guide
COBB
4. Post Placement of Chicks
4.1 Post Placement Checklist
Ensure that both feeders and drinkers are in adequate supply, relative to the stocking density,
and in close proximity to each other. It’s important that these areas have the correct ambient,
floor and litter temperature, protecting the chicks’ “thermal comfort zone.”
I. Mini Drinker Check (Supplemental):
• Should be provided at a rate of 6-8/1,000 chicks.
• Should never be allowed to run dry.
• Must be cleaned and refilled as necessary.
• Maintain maximum water levels until chicks are large enough to create spillage.
• Should be removed approximately 48 hours after placement.
• Should be placed slightly higher than the litter to maintain water quality yet not so high
that access is impeded.
II. Bell Drinker Check:
• Height should be maintained such that the lip is at the level of the birds’ back.
• Frequent assessment and adjustment is essential.
• Must be cleaned daily to prevent buildup of contaminants. If necessary, in hot climates,
flush the water system at least two or three times daily to maintain a good water
temperature.
• All bell drinkers should be ballasted to reduce spillage.
43
Water should be 0.5 cm (0.20”) from the lip of the drinker at day of age and
reduced gradually after seven days to a depth of 1.25 cm (0.5”) or thumbnail
depth.
COBB Broiler Management Guide
COBB
III. Nipple Drinker Check:
• Height should be at chicks’ eye level for the first 2-3 hours of age and then maintained
slightly above chicks’ head.
• Pressure should be such that there is a droplet of water suspended from the nipple but no
leakage.
• The birds’ feet should always be flat on the litter and a bird should never have to stand on
its toes to drink.
• As a general guide, a nipple flow rate of 40 ml/minute is recommended in the first week.
However, always refer to the manufacturer’s instructions.
• Flush the lines as necessary, for good hygiene and water temperature control.
IV. Feeder Check:
• Feed should be provided in crumb form and placed on trays or papers.
• Feeders should be placed in a fashion that maximizes accessibility.
• For brooding, feeders should be placed on the ground, down in the litter, and set on
overflow (flooding of pans) where possible.
• Feeders need to be raised incrementally throughout the growing period so that the lip of
the trough or pan is level with the birds back at all times.
• The feed level within the feeders should be set so that feed is readily available while
spillage is minimized.
44
Never allow the feeders to run empty at any time.
COBB Broiler Management Guide
COBB
V. Crop Fill Evaluation:
The main objective of management during the first
hours after placement on the farm is to achieve as
much intake of both feed and water in as many
chicks as possible.
Failure to achieve this objective will lead to
irreversible compromised flock performance and
will express itself as poor growth, poor feed
conversion and poor flock uniformity.
• An excellent indicator of floor temperature is the
temperature of the chick’s feet.
• If the chick’s feet are cold, the internal body temperature of the chick is also reduced.
• Cold chicks will be seen huddling with reduced activity and resulting in reduced feed and
water intake and therefore reduced growth rate.
• By placing the chicks feet against your neck or cheek one can readily learn how warm or
cold the chick is.
• If they are comfortably warm, the chicks should be evenly and actively moving around the
brooding area.
• If the crops of the chicks are checked eight hours after placement a minimum of 85% of
examined chicks should have both feed and water present.
• A minimum of 95% of the bird’s crops should be filled upon examination the morning after
placement.
45
• Evaluate crop fill and indicate results on form as below:
• Sample 100 chicks per brood area.
• Check: temperature of feet against neck or cheek.
• If the feet are cold, re-evaluate pre-heating temperature.
Crop fill No. of chicks Full - Pliable
Feed & Water
Full - Hard
Only feed
Full - Soft
Only water
Empty
Evaluation
COBB Broiler Management Guide
COBB
VI. Seven-day Bodyweight and Feed Conversion Check:
• Mortality percentage is a good indicator of chick quality, hatching process, house set up
and early brooding management.
• Maximum seven day mortality should not exceed 1% cumulative.
• Measuring seven-day weights will give an indication of how successful the brooding
management has been.
• Failure to achieve good seven-day weights will mean an inferior result at the end of the
growing cycle.
• For every extra gram gained by day 7 we should target an increase of 6 - 7 g at 35
days.
• The objective is to achieve 4.6 times the day old weight at seven days of age-minimum.
• Minimum water consumption of 1 ml/bird (3.4 oz/100 chicks) per hour for the first twenty
four hours after placement.
46
Chicks should not be encouraged to drink from the drip trays after the first
day of placement - water in the drip trays is easily contaminated from the
environment and wasted onto the litter.
COBB Broiler Management Guide
COBB
Water consumption should equal approximately 1.6-2 times that of feed by mass, but will
vary depending on environmental temperature, feed quality and bird health.
• Water consumption increases by 6% for every increase in 1 degree in temperature
between 20-32°C.
• Water consumption increases by 5% for every increase in 1 degree in temperature
between 32-38°C.
• Feed consumption decreases by 1.23% for every increase in 1 degree in temperature
above 20°C.
Relation between ambient temperature and water feed ratio
Singleton (2004)
4.2 Flushing
All modern poultry watering systems need to be flushed, best practiced on a daily basis to
remove bio film, but as a minimum three times per week. High pressure flushing requires
having adequate volume and pressure. One to two bars (14-28 psi) of water pressure will
create the velocity and turbulence in the pipe work to remove bio film. Flush 2 seconds per
meter (3.3 feet) of drinker line in flush mode.
Note: 2 seconds of flushing per meter of drinker line in flush mode.
In warm/hot climates it might be necessary to flush more than once a day to cool the water
temperature. There are automatic flushing systems that make the flushing job easier, saving
the grower time and ensuring the water flushing happens.
47
Temperature °C / °F Ratio water and feed
4°C / 39°F 1.7:1
20°C / 68°F 2:1
26°C / 79°F 2.5:1
37°C / 99°F 5:1
COBB Broiler Management Guide
5. Growing Phase
Broiler producers must place added emphasis on supplying a feed that will produce a product
to meet their customers’ specifications. Growth management programs optimizing flock
uniformity, feed conversion, average daily gain and livability are most likely to produce a
broiler that meets these specifications and maximizes profitability. These programs may
include modification of lighting and/or feeding regimes.
5.1 Uniformity
Uniformity is a measure of the variability of bird size in a flock. This can be measured by
various means, such as:
1. Visual and subjective evaluation
2. By weight +/- 10%
3. By coefficient of variation
4. Post slaughter – carcass yield evaluations
How to calculate flock uniformity:
• Divide the house into three sections.
• Take a random sample of approximately 100 birds from each section or 1% of the total
population.
• Weigh and record the individual weights.
• It is important to weigh all birds within the catch pen, excluding culls.
• Count the number of birds 10% either side of the average body weight of the 100 bird
sample.
• The number as a percentage of the sample represents the flock uniformity percentage.
48 COBB
COBB Broiler Management Guide
Coefficient of Variation (CV)
The coefficient of variation (CV) is commonly used to describe variability within a population.
A low CV indicates a uniform flock. A high CV indicates an uneven flock.
Variation can be expressed either in terms of:
• average bird weight
• standard deviation of body weight
• coefficient of variation in body weight
The coefficient of variation is a comparative measure of variation that allows the change in
variation during the growth of the flock to be monitored. The standard deviation is a measure
of how widely values are dispersed around the average value (the mean). In a normal flock,
approximately 95% of the individual birds will fall in a band +/- two standard deviations either
side of the average body weight.
49
CV Uniformity Evaluation
8 80% Uniform
10 70% Average
12 60% Poor Uniformity
An acceptable broiler as-hatched flock uniformity has a CV of 8-10 (day old
chick average uniformity CV 7.88).
COBB
COBB Broiler Management Guide
CV% = (Standard deviation (g) ÷ average body weight (g)) x 100
The following table gives an approximation of flock uniformity (% within +/- 10%) into CV%.
5.2 Temperature
• Floor temperatures are critical for the first two weeks as the chicks tend to lose significant
heat through their feet.
Cold Chicks vs Hot Chicks
50
% Uniformity CV (%)
95.4 5
90.4 6
84.7 7
78.8 8
73.3 9
68.3 10
63.7 11
58.2 12
55.8 13
52.0 14
49.5 15
46.8 16
min ~24.1°C
min ~75.4°F
35.0°C, 95.0°F 35.0°C, 95.0°F
22.0°C, 71.6°F 22.0°C, 71.6°F
min ~36.9°C
min ~98.4°F
COBB
COBB Broiler Management Guide
• Water spillage and wastage should be kept to a minimum especially in winter time because
of lower air exchange during these months.
• Place drinker lines at a height that the birds have to stretch slightly to reach.
Note: Ideal water temperature is between 10-14°C (50-57°F), however birds can
tolerate a wide range of water temperature; even so water temperature should never
be allowed to be less than 5°C (41°F) or greater than 25°C (77°F). If this occurs the
drinking system must be flushed at least 3 times per day.
51
Spot 1 31.6°C / 88.9°F
Spot 2 35.7°C / 96.2°F
Water temperature at placement (31.6°C / 88.9°F).
At placement a bead of water should be visible on the end of the nipple to
encourage water consumption - this is achieved by setting the pressure low
in the drinking system. After the first hours and once you are sure that water
consumption has been adequately achieved in the flock, increase the
pressure setting in the drinking system to prevent spillage and wet litter.
COBB
COBB Broiler Management Guide
52
Pre-heat house for 48 hours before chicks arrive, with brooding temperatures
stabilized for 24 hours before placement to heat the litter and house
temperature to 32°C (89.6°F) (blow type heaters) and 40.5°C (104.9°F) (for
radiant heaters - under the brooder) providing a minimum concrete
temperature of 28°C (82.4°F).
Example of good concrete temperature from adequate pre-heating
and uniform distribution of heat by the minimum ventilation system
Spot 29.2°C / 84.6°F
RH(%) 45.2
Air 33.6
COBB
COBB Broiler Management Guide
• As concrete temperature
increases feed intake
increases. The maximum
concrete temperature
should be 32°C (90°F).
With any further increases
in temperature, feed
intake decreases, and at
35°C (95°F) stops
altogether.
• Often concrete/litter temperature is measured quickly at chick placement in a few random
areas, which is not representative of the true uniformity of concrete/litter temperatures.
The best way to measure is to take a reading (both concrete/litter) every six meters in
length of the poultry house and in three rows across the width of the house.
53
Feed intake in relation to concrete temperature
FeedIntake
Concrete Temperature
82.4°F
28.0°C
86.0°F
30.0°C
89.6°F
32.0°C
93.2°F
34.0°C
95.0°F
35.0°C
96.8°F
36.0°C
C
E
N
T
E
R
R
I
G
H
T
L
E
F
T
Measure every 6 m (19.69 ft) and in three rows across the house
COBB
COBB Broiler Management Guide
• These readings can then be entered in excel to produce a contour graph.
54
Poor uniformity of concrete temperature
Excellent uniformity of concrete temperature
Left
Center
Concrete Temperature °C (°F)
Right
Left
Center
Right
2 4 6 8 10 12 14 16 18 20 22 24 26
Bays
66.2 - 69.8°F
19 - 21°C
69.8 - 73.4°F
21 - 23°C
73.4 - 77.0°F
23 - 25°C
77.0 - 80.6°F
25 - 27°C
80.6 - 82.4°F
27 - 28°C
66.2 - 71.6°F
19 - 22°C
71.6 - 77.0°F
22 - 25°C
77.0 - 82.4°F
25 - 28°C
82.4 - 87.8°F
28 - 31°C
87.8 - 91.4°F
31 - 33°C
2 4 6 8 10 12 14 16 18 20 22 24 26 27
Bays
• Concrete temperature has a big impact on early performance especially mortality, weight
gain and flock uniformity.
COBB
COBB Broiler Management Guide
55
2150
4.74
2140
4.72
2130
4.70
2120
4.67
2110
4.65
2100
4.63
2090
4.61
2080
4.59
2070
4.56
Finalweight(g/lb)
Less than 28°C
(82.4°F)
Greater than 28°C
(82.4°F)
Concrete Temperature °C (°F)
Final weight increases to 2,142 g (4.72 lb) from 2,098 g (4.62 lb) when concrete
temperature at placement is GREATER THAN 28°C (82.4°F).
Final Weight v Concrete Temperature
1.40
1.20
1.00
0.80
0.60
0.40
0.20
0.00
7daymortality%
Less than 28°C
(82.4°F)
Greater than 28°C
(82.4°F)
Concrete Temperature °C (°F)
7 Day Mortality % v Concrete Temperature
190
0.42
185
0.41
180
0.40
175
0.39
170
0.37
165
0.36
160
0.35
7dayweight(g/lb)
Less than 28°C
(82.4°F)
Greater than 28°C
(82.4°F)
Concrete Temperature °C (°F)
7 Day Weight % v Concrete Temperature
7 day mortality increases to 1.31% from 0.96% when concrete temperature at
placement is LESS THAN 28°C (82.4°F).
7 day weight increases from 171 g (0.38 lb) to 186 g (0.41 lb) when concrete
temperature at placement is GREATER THAN 28°C (82.4°F).
COBB
COBB Broiler Management Guide
• The minimum temperature for the first 14
days should not fall more than 1°C (1.8°F)
below the set point.
• Ensure heaters have been serviced.
• Calibrate sensors before placement.
• Ensure you have adequate heating
capacity.
• Radiant heating - ensure the correct
number of chicks per heater.
• Install back up thermometers to confirm
environment.
• Place sensors at bird height.
56
185
0.41
180
0.40
175
0.39
170
0.37
165
0.36
160
0.35
155
0.34
150
0.33
7dayweight(g/lb)
<0.05 0.05>
Heating Capacity kW/m3
7 Day Weight v Heating Capacity kW/m3
2,500
5.51
2,450
5.40
2,400
5.29
2,350
5.18
2,300
5.07
2,250
4.96
2,200
4.85
2,150
4.74
Finalweight(g/lb)
<0.05 0.05>
Heating Capacity kW/m3
Final Weight v Heating Capacity kW/m3
1.60
1.40
1.20
1.00
0.80
0.60
0.40
0.20
0.00
7daymortality%
<0.05 0.05>
Heating Capacity kW/m3
7 Day Mortality % v Heating Capacity kW/m3
Forced air heating - where winter outside minimum temperatures are above
0°C a minimum heating capacity of 0.075 kW/m³ of house volume is required.
If outside temperature fall below 0°C, a minimum heating capacity of 0.10
kW/hour per cubic meter of house volume is required.
COBB
COBB Broiler Management Guide
Activity Check: Every time you enter a poultry house you should always observe the following
activities:
• Birds eating • Birds playing
• Birds drinking • Birds “talking”
• Birds resting • Birds should never be huddling
Temperature guide
57
Age
days
Relative humidity
%
Temperature °C (°F) (for
chicks from 30 week old
parent flocks or younger)
Temperature °C (°F) (for
chicks from 30 week old
parent flocks or older)
0 30-50 34 (93.2) 33 (91.4)
7 40-60 31 (87.8) 30 (86.0)
14 40-60 27 (80.6) 27 (80.6)
Chicks from pre-peak breeder flocks are smaller and have a higher need for
external heat to maintain their optimal body temperature compared to larger
chicks. Smaller chicks have increased surface to body weight ratio and
therefore body heat loss is greater than larger chicks.
Stocking Density and Role in Temperature Management
Any time stocking densities increase above 28 kg/m² heat trapped below the birds can build
up very quickly. If this excess heat is not removed the birds will become too hot and resort to
increased panting. Increased bird temperatures will result in higher levels of panting, reduce
feed intake and subsequent decreases in daily gains. Higher levels of panting means energy
required for growth is being used for heat dissipation resulting in increased feed conversions.
Stocking densities in excess of 42 kg/m² should be avoided because bird heat removal by
the ventilation system becomes very difficult.
COBB
COBB Broiler Management Guide
Stocking densities above 28 kg/m² require the stockman to constantly monitor bird behavior,
feed intake and internal bird temperature. Adjustments in air exchange rates, air velocity and
house set points need to be made to ensure the bird comfort. These adjustments are going
to depend on whether the house has tunnel ventilation capabilities, and does not take into
account the “wind chill factor”. For example 3.5 kg bird at a density of 38 kg/² would require
a set point guideline temperature of 17-18°C regardless of age.
The following table is a temperature guideline based on stocking densities:
58
Temperature Guide based on Stocking Density
Density kg/m² Target Temp. Range (°C) Target Temp. Range (°F)
28 22-24 72-75
30 21-23 70-73
32 20-22 68-72
34 19-21 66-70
36 18-20 64-68
38 17-19 63-66
40 16-18 61-64
42 15-17 59-63
42+ 14-16 57-61
COBB
COBB Broiler Management Guide
5.3 Lighting Programs
Lighting programs are a key factor for good broiler performance and flock welfare. Lighting
programs are typically designed with changes occurring at predetermined ages and tend to
vary according to the final target market weight of the broilers. Lighting programs designed
to prevent excessive growth between 7 and 21 days have been shown to reduce mortality
due to ascites, sudden death, leg problems, pendulous crop and spiking mortality. Research
indicates that lighting programs which include 6 hours of continuous darkness will improve
the development of the immune system.
One standard lighting program will not be successful for all parts of the world. Therefore, the
lighting program recommendations listed in this guide should be customized based on the
environmental conditions, house type and overall stockman objectives. Lighting programs
inappropriately employed may impair average daily gain (ADG) and compromise flock
performance. Careful observations of flock performance, nutrient density and intake are also
important in designing lighting programs. If accurate ADG information can be acquired, a
program based on average weight gains is preferred.
59COBB
COBB Broiler Management Guide
The intensity and distribution of light alters broiler activity. Correct stimulation of activity during
the first 5-7 days of age is necessary for optimal feed consumption, digestive and immune
system development. Reducing the energy required for activity during the growing period will
improve feed efficiency.
Uniform distribution of light throughout the house is essential to the success of any lighting
program:
• Light intensity - 25 lux (2.5 foot-candles) in the darkest part of the house, as measured at
chick height, should be the minimum used during brooding to encourage early feed intake
and early weight gains.
• Light intensity should not vary more than 20% from brightest to darkest place at floor level.
• After 7 days of age, or at 130 - 180 g body weight, light intensities should be reduced
gradually to 5-10 lux (0.5-1 fc). See lighting programs section for more details.
Note: Lowering light intensity below 5 lux during the growing phase to improve feed
conversion ratio (FCR), risks the reduction of daily feed consumption and a decrease
in the average daily gain.
60
Local government legislation may affect the lighting program that can be
used. All operations must comply fully with local animal welfare regulations.
COBB
COBB Broiler Management Guide
61
60 watt
equivalent
LED bulb
Compact
fluorescent
spotlight 60 watt
equivalent
Old style
compact
fluorescent
bulb
Soft output
60 watt
incandescent
bulb
Clear 40 watt
incandescent bulb
LED lamp
equivalent to
60 watt
halogen bulb
Dimmable
corn LED
bulb
60 watt
compact
fluorescent
Fluorescent tube
Examples of light sources that can be used in the broiler house.
COBB
COBB Broiler Management Guide
5.3.1 Key Points to Consider When Using a Lighting Program
• Test any lighting program before making it firm policy.
• Provide 24 hours light on the first day of placement to ensure adequate feed and water
intake.
• Turn the lights off on the second night to establish when that off time will be. Once set,
this time must never change for the life of the birds.
• Once the switch off time has been established for the flock, any adjustment should be by
adjusting the on time only. Birds soon get used to when the off time is approaching and
will “crop-up” and drink before the lights go off.
• Use a single block of darkness in each 24-hour period.
• Start increasing the dark period when the birds reach 130-180 g.
• If partial house brooding is practiced, delay dimming until the full house is utilized.
• Allow the birds to feed ad libitum to ensure they go into the dark period full of feed and
water and can eat and drink immediately when the lights turn back on. This helps prevent
dehydration and reduces stress.
• As much as is possible, the darkness should be provided at night to ensure the dark
periods are truly dark and that adequate inspection of the flock is possible during the day.
• The birds should be weighed at least weekly and on days that the program is scheduled
to be adjusted. The lighting program should be adjusted according to the average weight
of the birds. Past experience of a particular farm’s performance should also be considered.
• The length of the dark period should be increased in steps and not in gradual hourly
increases (see programs).
62 COBB
COBB Broiler Management Guide
• Reducing the dark period before catching reduces “flightiness.”
• If progressive depopulation is practiced it is good policy to reintroduce 6 hours darkness
the first night after depopulation.
• Reduce the darkness in times of warm weather if the birds are being stressed during the
day and feed intake has been reduced.
• In winter time coincide the off time with dusk so the birds are awake during the coldest
part of the night.
• In the summer time the on time should coincide with sunrise to encourage feed intake
before the peak heat of the day.
• Make sure that there are no drafts or wet litter at the end of the house where demand
pans are installed. This could result in empty feeding systems leading to panic and
scratching when lights switch on.
• Do not turn the feed and water off during the dark period.
• Best to begin increasing/decreasing light prior to on/off periods over a one hour period
using a dawn to dusk dimming system.
• Broiler producers with clear curtain housing have limited alternatives. They need to design
their lighting programs to coincide with natural daylight.
• 48 hours prior to catch, increase light intensity to 10/20 lux to acclimate the birds to
catching - only if daylight catching is practiced!
63COBB
COBB Broiler Management Guide
5.3.2 Four Lighting Programs
1. Standard Lighting program - Option 1
• Slaughter weight: <2.5 kg (5.5 lb)
2. Standard Lighting program - Option 2
• Slaughter weight: <2.5 kg (5.5 lb)
64
Age days Hours dark Hours change
0 0 0
1 1 1
130-180 g 6 5
Five days before kill 5 1
Four days before kill 4 1
Three days before kill 3 1
Two days before kill 2 1
One day before kill 1 1
Age days Hours dark Hours change
0 0 0
1 1 1
130-180 g 6 5
21 5 1
28 4 1
35 3 1
Two days before kill 2 1
One day before kill 1 1
COBB
COBB Broiler Management Guide
3. Standard Lighting program - Option 3
• Slaughter weight: 2.5 kg - 3.0 kg (5.5 - 6.6 lb)
4. Standard Lighting program - Option 4
• Slaughter weight: >3.0 kg (6.6 lb)
65
Age days Hours dark Hours change
0 0 0
1 1 1
130-180 g 8 7
21 7 1
28 6 1
35 5 1
42 4 1
49 3 1
Three days before kill 3 1
Two days before kill 2 1
One day before kill 1 1
Age days Hours dark Hours change
0 0 0
1 1 1
130-180 g 10 9
22 9 1
28 8 1
35 7 1
42 6 1
49 5 1
Five days before kill 5 0
Four days before kill 4 1
Three days before kill 3 1
Two days before kill 2 1
One day before kill 1 1
COBB
COBB Broiler Management Guide
5.4 Lighting Program Benefits
• A period of darkness is a natural requirement for all animals.
• Energy is conserved during resting, leading to an improvement in feed conversion.
• Mortality is reduced, and skeletal defects are reduced.
• The light/dark period increases melatonin production, which is important in immune system
development.
• Bird uniformity is improved.
• Growth rate can be equal to or better than that of birds reared on continuous light when
compensatory gain is attained.
• Birds with the adequate dark/rest period have a calmer behavior and fewer
tendencies to present crowds, scratches and lesions.
66 COBB
COBB Broiler Management Guide
6. Ventilation Management
6.1 Minimum Ventilation
Definition:
Minimum ventilation systems are designed to manage oxygen levels and moisture using fans
on a cycle timer.
The system is independent of temperature - operating any time the house temperature
is at or below set temperature.
The minimum air exchange required must ensure adequate supply of oxygen while removing
the waste products of growth and combustion from the environment.
67
Key functions:
1. Provide oxygen to meet the bird’s metabolic demand
2. Moisture and humidity control
3. Maintenance of good litter conditions
Air exchange with minimal air movement at chick level <0.30 m/s
The maximum level of CO² allowed at any time in the chicken house is 3,000
ppm. If the house environment exceeds 3,000 ppm of CO² or less than 19.6%
O² then the ventilation rate must be increased.
Air quality guidelines
Oxygen % > 19.6%
Carbon Dioxide (CO
²
) < 0.3% / 3000 ppm
Carbon Monoxide < 10 ppm
Ammonia < 10 ppm
Inspirable Dust < 3.4 mg/m³ (.0001 oz/35.3 ft³)
Relative Humidity < 70%
COBB
COBB Broiler Management Guide
5 Minute timer cycle:
The timer fans should provide an air exchange capability of approximately 12.5% or 8 min
exchange rate based on house volume, or a capacity of 1 – 2 cfm per 1 ft² of floor area or 0.3
- 0.61 m³/min/m² floor area.
Note: always match fans as close to requirement as possible.
The minimum start run time needs to be approximately 60 seconds to ensure adequate mixing
of the cold incoming air with the warm internal air.
• A 5-minute cycle is preferred and should not exceed 10 min.
• Any time the air quality begins to deteriorate, the ON time must be increased - cycle time
always remains constant.
• Humidity should be maintained below 60 – 65% where possible.
• Increases in ON times should be made in small increments – 10 to 15 seconds and
monitored for 24 hours.
• Correct operation of the side wall inlets is vital in achieving good air volume and
distribution.
• The inlets should react to the fans and work on pressure, NOT on percentage of opening
or temperature.
• The inlet capacity should match the fan capacity at the fans working pressure based on
the width of the house – see Table: 1 on page 74.
68
Minimum Ventilation Timer Settings - Seconds
Day ON OFF
1 60 (20%) 240
3 60 240
5 75 225
8 90 210
11 105 195
14 120 180
18 135 165
22 150 150
25 165 135
30 180 (60%) 120
COBB
COBB Broiler Management Guide
6.2 Fans Needed for Minimum Ventilation
The minimum ventilation system should be able to operate for the full life of the flock, during
winter conditions. The following are 2 methods on how to calculate the number of fans
required:
Method A. Cobb Minimum Ventilation Fan Requirement Calculation :
• These fans should be fixed volume and not variable speed.
• The capacity of fans on the timer should be able to give a total air exchange range from 8
(12.5%) to 5 min (20%).
• Note: the 5 min (20%) capacity will only be needed for producers in cold climates growing
a large broiler.
• The number of fans required for an air exchange every 8 min. is as follows:
Note: All examples that follow are in metric and imperial:
House Volume:
• House Volume: length x width x average height = House Volume (m³/ ft³).
• Note: Average Height = height of side wall + ½ height from eave to peak of the roof.
Fans Capacities used in the examples are rated @ 0.1” inches of water column or
25 pa
• 900 mm or 36”, working capacity of 340 m³/min or 12,000 cfm.
• 1,270 mm or 50”, working capacity of 680 m³/min or 24,000 cfm.
69COBB
COBB Broiler Management Guide
Sample Dimensions:
• House dimensions: 150 m long, 15 m wide and 2.88 m average height
• House dimensions: 500 ft long, 50 ft wide and 9.25 ft average height
Calculation Example:
• House volume = 150 m x 15 m x 2.88 m = 6,480 m³
• Fan capacity for a 900 mm fan = 340m³/ min
• Air exchange range 8 - 5 min
• 6,480 m³ ÷ 8/5 = 810/1,296 m³/min
• 810 m³/min ÷ 340 m³/min = 2.38 or 2 fans (900 mm fans)
• 1,296 m³/min ÷ 340 m³/min = 3.8 or 4 fans (900 mm fans)
• House volume = 500 ft x 50 ft x 9.25 ft = 231,250 ft³
• Fan capacity for a 36” fan = 12,000 cfm
• Air exchange range 8 - 5 min
• 231,250 ft³ ÷ 8/5 = 28,906/46,250 cfm
• 28,906 cfm ÷ 12,000 cfm = 2.4 or 2 fans (36” fans)
• 46,250 cfm ÷ 12,000 cfm = 3.9 or 4 fans (36” fans)
70
0.75 m / 2.5 ft
2.5 m / 8 ft
Average height = 2.5 m + (0.5 x 0.75 m) = 2.88 m
Average height = 8 ft + (0.5 x 2.5 ft) = 9.25 ft
150 m / 500 ft
15 m / 50 ft
COBB
COBB Broiler Management Guide
Method B. Typical US Tunnel House Minimum Ventilation Fan Requirement Calculation
Minimum ventilation fan capacity to be installed 1 – 2 cfm per 1 ft² of floor area or 0.3 - 0.61
m³/min/m² floor area.
Note: the 2 cfm/ft² capacity will only be needed for producers in cold climates growing a
large broiler.
Calculation Example:
• House area: 150 m (500 ft) × 15 m (50 ft) = 2,250 m² (25,000 ft²)
• Air exchange range: 0.3 m³/min/m²
o 2,250 m² × 0.3 m³/min/m² = 675 m³/min
o 675 ÷ 340 m³/min = 1.98 or 2 fans
• Air exchange range: 1 to 2 cfm/ft²
o 25,000 ft² × 1 to 2 cfm/ft² = 25,000 cfm to 50,000 cfm
o 25,000 cfm ÷ 12,000 cfm = 2.1 or 2 fans
Note: Minimum ventilation calculations are only guidelines. Daily adjustments should be
made based on air quality and humidity. The range and capacity of fans to be used for cycle
ventilation will increase over time until all installed minimum ventilation fans are used.
71COBB
COBB Broiler Management Guide
6.3 Negative Pressure - Key Requirement for Minimum Ventilation
The most efficient way to accomplish air distribution for minimum ventilation is by using a
negative pressure ventilation system. This system should direct the incoming air into the peak
of the house. The pressure drop across the inlets should be adjusted to ensure that the
incoming air reaches the peak of the house where the heat has accumulated.
The pressure drop selected will depend on the width of the house or how far the air has to
travel once it enters the house. Correct air pressure is achieved by matching the inlet area
and the fan capacity.
Air inlets should be pressure controlled to maintain a constant air speed throughout the
ventilation stages. These inlets should close and seal completely when the fans are off.
When open, the air should only enter over the top of the inlet and not from the sides or through
the bottom of the inlet. Inlets that leak air through the sides and bottom will direct cold air to
the floor, resulting in chilled birds and condensation.
In open truss houses, the angle of the inlet opening must be such that the air is not directed
onto a purling. Obstructions such as a purling or electrical conduit should be avoided because
they interrupt the air flow, forcing the air to the floor.
72
Spot 1 11.78°C / 53.2°F
Spot 2 17.22°C / 63.0°F
Spot 3 23.00°C / 73.4°F
Spot 4 24.28°C / 75.7°F
COBB
COBB Broiler Management Guide
The following table can be used as a reference guide for different widths of poultry houses in
determining the required inlet air speed and pressure difference required to ensure the air
reaches the center of the house.
Table: 1
Always use a smoke test to ensure that the incoming air reaches the center of the house.
Note: In houses with side wall inlets only on one side and fans on the opposite wall, the
air speeds and pressures need to be increased accordingly to ensure air distribution over
the entire cross section of the house.
73
House width (m) Pascal’s/” H
²
O Air speed m/s (fpm) Distance air travels (m/ft)
10 20 (0.08) 5.7 m/s (1122 fpm) 5.0 m/16 ft
12 25 (0.10) 6.5 m/s (1280 fpm) 6.0 m/20 ft
15 31 (0.12) 7.2 m/s (1417 fpm) 7.5 m/25 ft
18 37 (0.15) 7.8 m/s (1535 fpm) 9.0 m/30 ft
21 43 (0.17) 8.4 m/s (1654 fpm) 10.5 m/35 ft
24 49 (0.20) 9.0 m/s (1772 fpm) 12.0 m/40 ft
Guideline: For every 61 cm (2 ft) the incoming air needs to travel, a pressure
drop of 0.01” WC or 2.5 Pa is required.
COBB
COBB Broiler Management Guide
6.4 Simple Negative Pressure Test
To effectively generate a negative pressure system, a controlled environment must be
created. The house needs to be as air tight as possible. Typically, leaks are located along
the roof ridge, close to the fans, around doors and along stem walls.
Test the effectiveness of how well the house is sealed by closing all the inlets, then open a
door slightly ajar or crack open an inlet. Turn on the equivalent of 1cfm per 1 ft² or 0.30 m³/min
(18 m³/hr) per 1 m² of floor area should record a pressure in excess of 37.5 Pa (0.15” WC)
across the opening. If the pressure is < 25 Pa or 0.10” WC, it’s an indication the house is
poorly sealed.
On any new housing, the test results should be in excess of 50 Pa or 0.20” WC. The following
is an example of pressure readings in a new house in full tunnel operation during a test.
74
Front Wall Tunnel Inlet ¼ House ½ House Fan End
15 Pa
0.06” WC
20 Pa
0.08” WC
32 Pa
0.13” WC
37.5 Pa
0.15” WC
42 Pa
0.17” WC
Turn on the equivalent of 1 cfm per 1 ft² or 0.30 m³/min (18 m³/hr) per 1 m² of
floor area should record a pressure in excess of 37.5 Pa (0.15” WC) across
the opening. If the pressure is < 25 Pa or 0.10” WC, it’s an indication the
house is poorly sealed.
COBB
COBB Broiler Management Guide
6.5 Inlet Management and Installation
The inlets need to open enough to achieve the required static pressure and airflow.
A minimum opening of 2.5 cm - 5 cm (1 - 2”) is required to ensure cold air reaches the center
– depending on the inlet design.
75
Oxygen at bird level, floors dry and heating costs low
Ideal air flow for negative ventilation
RH-50%,
16°C (60.8°F)
RH-75%,
10°C (50°F)
RH-100%,
4°C
(39.2°F)
Hottest air in the house
RH-25%,
27°C (80.6°F)
COBB
COBB Broiler Management Guide
76
Poor litter, cold birds, more stress, more mortality,
higher energy costs, higher feed conversion
RH-75%,
10°C (50°F)RH-100%,
4°C
(39.2°F)
Hot air pocket
COBB
COBB Broiler Management Guide
6.6 Transitional Ventilation
• Transition ventilation is a temperature control stage.
• These fans operate on a thermostat.
• A vital stage of ventilation to ensure daily feed intake with young birds, especially
in hot climates.
Fan capacity requirement for full transition:
The transitional ventilation system typically utilises 40% - 50% of the total tunnel ventilation
capacity.
• These fans use side wall inlets evenly distributed on each side wall the full length of the
house. The inlets are most efficient when controlled by negative pressure.
• This system gives excellent temperature control and reduced risk of chilling of the chicks
and is a valuable part of any ventilation system.
• The final stage of transition or full transition, the tunnel inlet will open.
How many inlets for full transition:
• Depends on - how much air can we pull through a single inlet?
• Depends on - how many fans do you want to operate through the inlets?
• In Cold climates without a tunnel ventilation system all ventilation will be through the
side wall inlets. These houses have a maximum air exchange capacity in the region of
1.5 minutes.
77
Key function: to increase house air exchange and manage temperature
without creating high air speeds across the birds.
Maximum airspeeds range from 25% of full tunnel ventilation: 0.5 – 0.8 m/s
(100 – 150 fpm)
COBB
COBB Broiler Management Guide
Transition Ventilation Rates – Methods A and B:
Method A: these fans have an operating capacity to ensure an air exchange rate of 2 - 3 min
Method B: Fan requirement based on house floor area: 4 – 5 cfm/ft² or 1.2 – 1.5 m³/min/m²
Fan capacities used in the examples are rated @ 0.1” inches of water column or
25 Pa
• 900 mm or 36”, working capacity of 340 m³/min or 12,000 cfm
• 1,270 mm or 50”, working capacity of 680 m³/min or 24,000 cfm
Sample Dimensions:
• House dimensions: 150 m long, 15 m wide and 2.88 m average height
• House dimensions: 500 ft long, 50 ft wide and 9.25 ft average height
Calculation Example:
Method A:
• House Volume 6,480 m³ ÷ 3 min to 2 min = 2,160 to 3,240 m³/min
• Fans needed: 2,160 to 3,240 m³/min ÷ 680 m³/min = 3 to 5 tunnel fans
• House volume 231,250 ft³ ÷ 3 min to 2 min = 77,083 to 115,625 cfm
• Fans needed: 77,083 to 115,625 cfm ÷ 24,000 cfm = 3 to 5 tunnel fans
78
• The more fans you can operate through
side wall inlet ventilation the longer you
can delay running tunnel ventilation – 50%
of tunnel capacity.
• To transition to tunnel the outside
temperature needs to be warm – above
25°C.
• Houses in cold climates with summer
temperatures rarely above 30°C, operate
all temperature ventilation through side
inlets.
COBB
COBB Broiler Management Guide
79
Method B:
• Floor area × 1.2 – 1.5 m³/min per m² (4 – 5 cfm per ft²)
• 2,250 m² × 1.2 to 1.5 m³/min = 2,700 to 3,375 m³/min = 4 or 5 fans needed
• 25,000 ft² × 4 to 5 cfm/ft² = 100,000 – 125,000 cfm = 4 or 5 fans needed
Inlet Requirement Calculation Example:
• House width: 15 m (50 ft)
• Pressure requirement based on table 1 page 74: 31 Pa or 0.12” WC
• Air velocity requirement based on table 1 page 74: 7.2 m/s or 1417 fpm
How many inlets are needed?
Example:
• Inlet capacity: 24.2 m³/min or 855 cfm @ 20 Pa
• Fan capacity for transition: 4 × or 680 m³/min (24,000 cfm) = 2,720 m³/min or 96,000 cfm
• Number of inlets: Total Transition Fan Capacity ÷ Inlet Capacity
2,720 m³/min (96,000 cfm) ÷ 24.22 m³/min (855 cfm) = 112 inlets
Or 56 inlets per side
Note: If inlet capacity is unknown use the following assumptions:
Standard Inlet capacity: 750 cfm per ft² of inlet opening or 229 m³/min per m²
of inlet opening at 25 Pa (0.10” WC).
COBB
COBB Broiler Management Guide
6.7 Tunnel Ventilation
Air Exchange: < 1min.
Air velocity or air exchange will depend on bird size and stocking density. The tunnel
ventilation fans are placed at one end of the house with air intake at the opposite end.
The airflow creates a wind-chill effect, which reduces the effective temperature over a wide
range depending on air speed by 1-8°C (1-15°F). Bird effective temperatures should be
maintained below 30°C (86°F).
Fans capacities used in the examples are rated @ 0.1” of water column or 25 Pa
• 900 mm or 36”, working capacity of 340 m³/min or 12,000 cfm
• 1,270 mm or 50”, working capacity of 680 m³/min or 24,000 cfm
Tunnel Ventilation Rates – Methods A and B:
Method A:
Step 1: Determine basic house dimensions
• House dimensions: 150 m long, 15 m wide and 2.88 m average height
• House dimensions: 500 ft long, 50 ft wide and 9.25 ft average height
• Cross section: 15 m wide x 2.88 m average height = 43.2 m²
• Cross section: 50 ft wide × 9.25 ft average height = 462.5 ft²
80
Airspeeds requirements are in the following ranges: 3.0 – 4.0 m/s (600 – 800
fpm)
Tunnel ventilation is the final stage of cooling and used in hot weather for the
removal of bird metabolic heat.
COBB
COBB Broiler Management Guide
Step 2: Fan capacity required to achieve an airspeed of 3.0 m/s (600 fpm) @ 25 Pa
(0.10” WC)
• Required fan capacity: Cross section × Airspeed
• 43.2 m² x 3.0 m/s = 129.6 m³/s or 7,776 m³/min
• 462.5 ft² × 600 fpm = 277,500 cfm
• Number of 1.27 m (50”) fans required:
• 7,776 m³/min ÷ 680 m³/min = 11.4 or 12 fans
• 277,500 cfm ÷ 24,000 cfm = 11.6 or 12 fans
Step 3: Is the air exchange < 1 min?
• Air Exchange: House Volume ÷ Total Fan Capacity
• House Volume 6,480 m³ ÷ (12 x 680 m³/min) = 6,480 m³ ÷ 8,160 m³/min = 0.79 min or 48
seconds
• House volume 231,250 ft³ ÷ (12 × 24,000 cfm) = 231,250 cfm ÷ 288,000 cfm = 0.80 min
or 48 seconds
Step 4: Is the air speed > 3.0 m/s?
• Air Speed: Total Fan Capacity (m³/min) ÷ Cross Section Area (m²)
(12 x 680 m³/min) ÷ 43.2 m² = 188.9 m/min or 3.15 m/s
• Air Speed: Total Fan Capacity (ft³/min) ÷ Cross Section Area ft²)
(12 x 24,000 ft³/min) ÷ 462.5 ft² = 623 fpm
Method B – Fan Requirement based on floor area:
The following are some general tunnel fan requirements for an insulated and sealed tunnel
house. This air exchange capacity as a rule should ensure an absolute maximum temperature
pickup or differential (ΔT) of 2.8°C or 5°F, on the hottest day with large birds:
• 9 - 11 cfm/ft²
• 2.75 - 3.5 m³/min
• 165 - 210 m³h/m²
81COBB
COBB Broiler Management Guide
The following are some general guidelines in understanding negative pressure
measurements in full tunnel mode.
• The pressure readings will increase from the front to the extraction end of the house.
• The pressure reading at the extraction end is a sum of the following pressure drops:
o Pad pressure
o Tunnel inlet curtain or door pressure drop
o Transition or “squeeze” pressure and
o Pipe pressure
82
Step 1: Determine house floor area:
• House area: 150 m (500 ft) long x 15 m (50 ft) wide = 2,250 m² or 25,000 ft²
Step 2: Fan capacity required:
• Required fan capacity: Floor area x 3.04 m³/min per m² (10 cfm/ft²)
• 2,250 m² (25,000 ft²) x 3.04 m³/min (10 cfm/ft²) = 6,840 m³/min (250,000 cfm)
• or 10 fans
There should be no more than 10 Pa or 0.05” WC increase in pressure from
the ¼ house to extraction end.
COBB
COBB Broiler Management Guide
The following are examples of different operating airspeeds and the expected operating
pressures:
83
Tunnel Ventilation Operating Pressures
Air Velocity Static Pressure Air Velocity Static Pressure
2.0 m/s 22 – 27 Pa 400 fpm 0.09 – 0.11” WC
2.5 m/s 25 – 30 Pa 500 fpm 0.10 – 0.12” WC
3.0 m/s 32 – 37 Pa 600 fpm 0.13 – 0.15” WC
3.5 m/s 40 – 45 Pa 700 fpm 0.16 – 0.18” WC
4.0 m/s 45 – 50 Pa 800 fpm 0.18 – 0.20” WC
Estimated Fan Operating Pressure:
• Pad pressure + tunnel door + transition + pipe
• = 0.05” + 0.01” + 0.04” + 0.04”
• = 0.14”
Estimated Fan Operating Pressure:
• Pad pressure + tunnel door + transition + pipe
• = 12.5 Pa + 2.5 Pa+ 10 Pa + 10 Pa
• = 35 Pa
COBB
COBB Broiler Management Guide
Note:
• The fans most suitable for a tunnel ventilation system are high capacity cone fans with
minimum diameters ranging from 1.2 m (48”) to 1.42 m (56”)
• All ratings must be at a minimum pressure: 0.10” or 25 Pa
• Energy efficiency 23 cfm per Watt or 0.0109 m³/s per Watt
• Air flow ratio: > 0.75 indicator of how well the fan holds up under high static pressures
(0.05” – 0.2” WC / 12.5 – 50 Pa)
• Fans must be purchased on efficiency – not price
84
LOW PRESSURE and AIR SPEED
UNEVEN AIR DISTRIBUTION
HIGH AIR SPEED
Still Air
Still Air
StillAir
DEAD SPOTS
CORRECT PRESSURE
CORRECT PRESSURE EVEN AIR DISTRIBUTION
The following two diagrams illustrate the importance of maintaining the correct
airspeed and negative pressure drop at the tunnel inlet curtain or door. Very low inlet
airspeeds and pressure drops will result in increased “dead spots” areas.
COBB
COBB Broiler Management Guide
85
6.8 Evaporative Cooling
• The primary role of the evaporative cooling system is to maintain house temperature below
28°C.
• Enough pad area needs to be installed so fan performance is not severely reduced.
For every 1°C cooling, the % RH of the air will increase approximately 4.5%.
(1°F = 2.5% RH increase)
6.8.1 Evaporative Pad Management
• All fans should be on before operating cooling pads!
• Pads should not be used at temperatures below 28 – 29°C.
• House humidity not to exceed 85 – 90%.
• Do not use fogging in conjunction with pads if RH is above 75%.
• Generally pads to be used from 9am – 6pm due to natural daily humidity cycles – Night
time operation will increase heat stress.
• Avoid using evaporative cooling prior to 25 days of age.
COBB
COBB Broiler Management Guide
COBB 86
• During high temperatures pads can be used with chicks in the 1st 2 weeks:
• Wetting of the pads must be limited through the use of an interval timer.
• Pads are used only to temper the incoming air.
• Tunnel inlet curtains or doors need to be opened to approximately 85% of the cool
pad area in full tunnel ventilation.
• Pad system should be flushed weekly.
• Monitor water quality and pH. Maintain hardness levels below 110 ppm and pH in the sump
between 7 and 9. Bleed off the system continuously as per manufacturers
recommendations. Higher levels of salts will require more frequent bleed-off.
• Avoid using pads on a timer cycle to avoid excessive build-up of solids in the pad surface.
Note: The use of evaporative cooling should be evaluated for its effectiveness when
outside RH is above 75%.
Interval timer example: <30 seconds On and 10 minutes Off
COBB Broiler Management Guide
6.8.2 Evaporative Pad Cooling Potential
Two Examples – ambient temperature 32°C and ambient RH 30 and 60%:
1. 32°C and 30% RH: Potential reduction in house temperature is 9.4°C
o Added humidity: 4.5% × 9.4°C = 42%
o New combined humidity: 30% (outside) + 42% = 72%
2. 32°C and 60% RH: Potential reduction in house temperature is 4.7°C
o Added humidity: 4.5% × 4.7°C = 21%
o New combined humidity: 60% (outside) + 21% = 81%
87
Expected Cooling Produced by 15 cm/6” Pad System
% 
RH
100 18.3 21.1 23.9 26.7 29.4 32.2 35.0 37.8 40.6 43.3
95 17.9 20.7 23.4 26.2 28.9 31.7 34.4 37.2 39.9 42.7
90 17.5 20.2 22.9 25.7 28.4 31.1 33.8 36.6 39.3 42.0
85 17.1 19.8 22.4 25.2 27.8 30.6 33.2 35.9 38.6 41.3
80 16.7 19.3 21.9 24.6 27.3 29.9 32.6 35.3 37.9 40.6
75 16.2 18.8 21.4 24.1 26.7 29.3 31.9 34.6 37.2 39.8
70 15.7 18.3 20.9 23.5 26.1 28.7 31.3 33.9 36.4 39.1
65 15.3 17.8 20.4 22.9 25.4 28.0 30.6 33.1 35.7 38.3
60 14.8 17.3 19.8 22.3 24.8 27.3 29.8 32.3 34.9 37.4
55 14.3 16.8 19.2 21.7 24.2 26.6 29.1 31.6 31.4 36.6
50 13.8 16.2 18.7 21.1 23.4 25.9 28.3 30.7 33.2 35.6
45 13.3 15.7 18.1 20.4 22.7 25.1 27.5 29.8 32.2 34.6
40 12.8 15.1 17.4 19.7 22.0 24.3 26.6 28.9 31.3 33.6
35 12.3 14.5 16.8 19.0 21.2 23.4 25.7 28.0 30.2 32.5
30 11.7 13.9 16.1 18.3 20.4 22.6 24.8 26.9 29.2 31.3
25 11.2 13.3 15.4 17.5 19.6 21.7 23.8 25.9 28.0 30.1
20 10.6 12.7 14.7 16.7 18.7 20.7 22.8 24.8 26.8 28.8
15 10.0 12.0 13.9 15.9 17.8 19.7 21.7 23.6 25.5 27.4
10 9.4 11.3 13.2 15.1 16.9 18.7 20.5 22.3 24.1 25.9
18 21 24 27 29 32 35 38 41 43
Temperature °C
COBB
COBB Broiler Management Guide
6.8.3 Pump Management
• Avoid using a cycle timer if water source is high in scale. Continuous drying can result in
the rapid formation of scale on the pad surfaces especially in areas with high levels of
salts in the ground water.
• Only use chemicals recommended by the manufacturer.
• NO CHLORINE OR BROMINE.
• Refer to manufactures guidelines.
6.8.4 Common Ventilation Causes for Wet Litter and High Humidity
• Not enough pad area for fan capacity.
• High stocking densities due to bird migration – too many birds in the cool pad area.
• Running the pumps with too low air speed – all tunnel fans should be on.
• Running pumps when temperature is below 28°C (82ºF).
• Running pumps when relative humidity in the house is above 75%.
88 COBB
COBB Broiler Management Guide
6.9 Natural Ventilation
Natural ventilation is common in temperate regions where the climatic conditions are similar
to the desired production requirements. It is not recommended to employ this system in
regions with climatic extremes.
Successful natural ventilation is dependent on house location. Houses should be built in an
east to west orientation to avoid solar heating of the sidewalls during the hottest part of the
day. Prevailing winds should be used advantageously. A reflective roof surface with a
minimum insulation R-value of 10-20 (see insulation values, pages 2-3) and a 1.5 m roof
overhang needs to be considered.
6.9.1 Management Techniques in Hot Conditions
1. Walk the birds gently and regularly to encourage air circulation around the birds and
stimulate water consumption.
2. Remove feed from the birds by lifting the feeding system six hours before the hottest part
of the day. This reduces the birds’ heat output due to feed metabolism. Feed can be
returned early evening.
6.9.2 Key Points When Installing Cooling Fans in a Naturally Ventilated House
• Minimum size: not less than 900 mm (36”) direct drive fans, with an operating capacity of
5.75 m³/sec or 345 m³/min (10,500 cfm) at 50 Pa.
• A 900 mm (36”) fan will only draw air from 1 m (3.3 ft) and move air 12 m (40 ft). Maximum
dispersion that a 900 mm fan will distribute air is 2.2 m (7.2 ft).
• Fans should be suspended perpendicular and 1 m (3.3 ft) above the floor.
89COBB
COBB Broiler Management Guide
90
GROUP 1
28 days 35 days 42 days
Fan Line Group 1 25°C 22°C 20°C
Fan Line Group 2 27°C 24°C 22°C
Fogger Line Group 1 30°C 27°C 27°C
Fogger Line Group 2 32°C 29°C 29°C
6.9.3 Example - Stirring Fan and Fogger Operation Guideline
• Avoid using stirring fans in the first 14 days!
• Fans divided into two groups - see diagram below.
• Group 1 On 2°C above set point
• Group 2 On 4°C above set point
• Foggers On 6°C above set point
GROUP 2
FOGGERS
COBB
COBB Broiler Management Guide
6.9.4 Curtain Management Techniques
In open sided houses, the curtain management is fundamental to maintaining a healthy flock
status throughout the whole production period. Good ventilation management techniques will
ensure minimal temperature fluctuations.
1. In different sections of the house you could have temperature variations.
2. Ventilation at all ages is needed to remove excess heat, humidity and/or CO². CO² is
important in the first week when the house is well sealed. The level of CO² should never
exceed 3,000 ppm. See air quality guidelines.
3. Good curtain management is vital to avoid respiratory conditions and ascites in cold
climatic conditions.
4. Minimize 24 hour temperature fluctuations, especially at night. Better temperature control
will improve feed conversion and enhance growth rate.
91
MIXED AIR
COBB
COBB Broiler Management Guide
92
Heat as Insulator
Positive Negative
1.5 m
2.40 m
6.9.5 Curtain Ventilation Techniques
1. Take the wind direction into account in the morning, opening the curtain on the leeward
side first.
2. To improve air exchange and increase the air speed entering the house, the curtain on
the windward side should be open 25% of the opening on the leeward side.
3. To lower the house air exchange and slow the air entering the house, the windward side
should be open four times the leeward side.
4. To achieve maximum air speed across the birds, the curtain should be open the same on
both sides and as low as possible.
5. Until 14 days of age, the curtains should be opened to provide air exchange in the house
but no air speed at chick or floor level. Air speed across the chicks in the first fourteen
days of age leads to chilling, decreased feed and water consumption and increased energy
consumption for heat production.
COBB
COBB Broiler Management Guide
93
7. Water Management
Water is an essential nutrient that impacts virtually all physiological functions. Water
comprises 68-76% of the body composition of a bird depending on age. Factors including
temperature, relative humidity, diet composition and rate of body weight gain influence water
intake. Good water quality is vital to efficient broiler production. Measurements of water quality
include pH, mineral levels and the degree of microbial contamination. It is essential that water
consumption increases over time. If water consumption decreases at any point, bird health,
environment and/or managerial techniques should be re-assessed.
7.1 Mineral Content
Although broilers are tolerant of some minerals in excess, (calcium and sodium, for example),
they are very sensitive to the presence of others. Iron and manganese tend to give water a
bitter taste that may decrease consumption. In addition, these minerals support the growth
of bacteria. If iron is a concern, filtration systems and chlorination are effective controls. It is
advisable to filter the water supply using a filter with a mesh of 40-50 microns. The filter needs
to be checked and cleaned at least weekly.
Calcium and magnesium in the water are measured by hardness. These minerals in
combination can form scale or deposits that will compromise the effectiveness of a drinker
system. This is especially true of closed systems. Water softeners can be incorporated into
a system to mitigate calcium and magnesium effects. However, sodium levels should be
assessed before a salt-based product is used.
Broiler performance can be impeded by as little as 10 ppm nitrates. Unfortunately, there are
currently no cost effective options for removal. Water should be tested for nitrates because
elevated levels may indicate sewage or fertilizer contamination.
7.2 Microbial Contamination
Chronic poor performance may indicate contaminated water and requires prompt testing.
When testing water, evaluating the total coliform bacterial count is important, as high levels
can cause disease. Assessing the total bacteria through a plate count will reflect the
effectiveness of the water sanitation program. Microbial contamination can be introduced
from the source of water forward. If an effective water sanitation program is not in place,
proliferation of bacteria will readily occur. The water should be tested always when you see
noticeable change in color, odor or taste, flooding has occurred near the well, person or
animal becomes sick from waterborne disease, maintenance on water supply system,
persistently poor performance or loss of pressure in water system.
COBB
COBB Broiler Management Guide
7.3 Water Sanitation and System Cleanout
A regular water sanitation and water line cleaning program can provide protection against
microbial contamination and the build-up of slimy bio-films in water lines. While bio-films may
not be a source of problem to birds, once established in water lines, bio-films provide a place
for more detrimental bacteria and viruses to hide from disinfectants and also act as a food
source for harmful bacteria. Products which contain hydrogen peroxide have proven to be
outstanding for the removal of bio-films in water lines. Biofilms have influence on natural
contaminants, - iron, sulfur, etc, - vitamins, electrolytes, organic acids, kool-aid, jello, sugar
water, vaccines and stabilizers, antibiotics and probiotics can all contribute to the growth of
bio-film and special attention to internal drinker line cleanliness should be initiated after the
use of any of these products.
7.3.1 Oxidation-Reduction Potential (ORP)
Another important factor is the ORP value of the water. ORP stands for oxidation-reduction
potential and it simply refers to the property of sanitizers such as chlorine to be a strong
oxidizer. A strong oxidizer literally burns up viruses, bacteria and other organic material
present, leaving water microbiologically safe.
An ORP value in the range of 650 mV (Milli volts) or greater indicates good quality water.
The lower the value, such as 250 mV, indicates a heavy organic load that will most likely
overwhelm the ability of chlorine to properly disinfect the water.
The ORP meter can be a useful tool for identifying and maintaining adequate chlorine supplies
without overusing chlorine.
Warning: Swimming pool chlorine test kits do not distinguish between free and bound
chlorine. A heavy organic load would result in a greater percentage of bound chlorine resulting
in a poor sanitizer even though a test kit might indicate chlorine levels of 4-6 ppm.
Chlorine is most effective when used in water with a pH of 6.0 to 7.0. This pH level results in
a greater percentage of active hypochlorous ions that are a strong sanitizer.
Inorganic acids such as sodium bisulfate reduce water pH without tainting the water.
Free chlorine residual levels are not considered useful as sanitizers unless there is at least
85% hypochlorus acid present. Most common source of chlorine includes:
• Sodium hypochlorite (NaOCl, household bleach) increases water pH so it is a poor option
as a water sanitizer.
• Trichlor (trichoro-s triazinetrione) which is 90% available chlorine and is in the form of
tablets which slowly release chlorine over a period of time; these actually reduce water
pH so it is a good option as a water sanitizer.
• Chlorine gas is 100% available chlorine and is the purest form of chlorine, but it can be
dangerous and is restricted in its use.
94 COBB
COBB Broiler Management Guide
7.3.2 pH
• pH is the measure of how many hydrogen ions are in solution and is measured on a scale
of 1.0 to 14.0 with 7.0 being neutral.
• pH below 7.0 indicates an acid while numbers above 7.0 indicate an alkaline.
• pH above 8.0 can impact taste by causing bitterness, thus reducing water consumption.
• High water pH can be reduced by using inorganic acids. Organic acids can also negatively
affect water consumption and so are discouraged.
• pH impacts water quality and the effectiveness of disinfectants such as chlorine.
• At a pH above 8.0, the chlorine is present mainly as chloric ions, which have very little
sanitizing quality.
Impact of pH on the Ratio of Hypochlorus (HOCL) to Chloric Ion (OCL)
The ideal drinking water pH for a disinfection water program is between 5 to 6.5
95
pH % Hypochlorus Acid - HOCI % Hypochlorite Ion - OCI
8.5 10 90
8.0 21 79
7.5 48 52
7.0 72 28
6.5 90 10
6.0 96 4
5.0 100 0
COBB
COBB Broiler Management Guide
96
7.4 Total Dissolved Solids
Measurement of total dissolved solids (TDS), or salinity, indicates levels of inorganic ions
dissolved in water. Calcium, magnesium and sodium salts are the primary components that
contribute to TDS. High levels of TDS are the most commonly found contaminants
responsible for causing harmful effects in poultry production. The following table provides
guidelines suggested by the National Research Council (1974) for the suitability for poultry
water with different concentrations of total dissolved solids (TDS), which are the total
concentration of all dissolved elements in the water.
Suitability of Water with Different Concentrations of Total Dissolved Solids (TDS)
Source: Nutrients and Toxic Substances in Water for Livestock and Poultry, National
Academy of Sciences, Washington, DC. National Research Council (1974).
TDS - ppm Comments
Less than 1,000
1,000 to 2,999
Water suitable for any class of poultry.
Water suitable for any class of poultry. It may cause watery
droppings (especially at higher levels) but with no affect on health
or performance.
3,000 to 4,999 Water not suitable for any class of poultry. Can cause watery
droppings, increased mortality, and decreased growth.
5,000 to 6,999 Water not suitable for any class of poultry. Will almost always
cause some type of problem, especially at the upper limits, where
decreased growth and production or increased mortality probably
will occur.
7,000 to 10,000 Water unfit for poultry but may be suitable for other livestock.
More than 10,000 Water should not be used for any livestock or poultry.
COBB
COBB Broiler Management Guide
7.5 Drinking System Cleanout Between Flocks
• Drain drinking system and header tanks.
• Determine the capacity of the drinking system.
• Prepare the cleaning solution to the manufacturer’s recommendation.
• Where possible, remove header tank and scrub it clean.
• Introduce the solution into the water system, usually in the header tank.
• Make sure protective clothing and eyewear are worn when using chemicals.
• Turn on the tap at the end of the drinking line and let the water run through until the
sanitizing solution appears, then close the end tap.
• Raise each drinker line.
• Allow the solution to circulate through the drinking system.
• If circulation is not possible, let the sanitizing solution stand for at least 12 hours.
• After draining the system, flush the system thoroughly to remove bio-film and sanitizing
chemical.
97COBB
COBB Broiler Management Guide
7.6 Water Testing
Water testing should be performed on a periodic basis but at least yearly. Samples should
be collected at both the well house and at the end of a drinker line using a sterile container
and analyzed at an accredited lab. When taking the water sample, it is important not to
contaminate the water sample.
Water Quality Standards for Poultry
Source: Muirhead, Sarah, Good, clean water is critical component of poultry production,
Feedstuffs, 1995.
Water Sampling Technique:
1. Sterilize the end of the tap or nipple by using an open flame for 10 seconds. Never use a
chemical for this process as it may affect the sample.
2. In the absence of an open flame, run the water for a few minutes before taking the sample.
98
Contaminant, mineral
or ion
Level Considered
Average
Maximum Acceptable
Level
Bacteria
Total bacteria 0 CFU/ml 100 CFU/ml
Coliform bacteria 0 CFU/ml 50 CFU/ml
Acidity and hardness
pH 6.8 - 7.5 6.0 - 8.0
Total hardness 60 - 180 ppm 110 ppm
Naturally occurring elements
Calcium (Ca) 60 mg/L
Chloride (Cl) 14 mg/L 250 mg/L
Copper (Cu) 0.002 mg/L 0.6 mg/L
Iron (Fe) 0.2 mg/L 0.3 mg/L
Lead (Pb) 0 0.02 mg/L
Magnesium (Mg) 14 mg/L 125 mg/L
Nitrate 10 mg/L 25 mg/L
Sulfate 125 mg/L 250 mg/L
Zinc 1.5 mg/L
Sodium (Na) 32 mg/L 50 mg/L
Note: The water supplied to the birds should be fit for human consumption.
A swab sample should be taken to measure how effectiveness of the line
sanitation program.
COBB
COBB Broiler Management Guide
8. Nutrition Management
Broiler diets are formulated to provide the energy and nutrients essential for health and
efficient broiler production. The basic nutritional components required by the birds are water,
amino acids, energy, vitamins and minerals. These components must act in concert to assure
correct skeletal growth and muscle deposition. Ingredient quality, feed form and hygiene
directly affect the contribution of these basic nutrients. If raw ingredients or milling processes
are compromised or there is an imbalance in the nutrient profile of the feed, performance can
be decreased. Because broilers are grown to a wide range of end weights, body compositions
and production strategies, it is impractical to present a single set of nutritional requirements.
Therefore any expression of nutrient requirements should only be viewed as a set of
guidelines from which to work. These guidelines must be adjusted as necessary to address
specific scenarios from one producer to another.
Selection of the optimum diets should take into consideration these key factors:
• Raw material availability and cost.
• Separate sex growing.
• Live weights required by the market.
• The value of meat and carcass yield.
• Fat levels required by specific market needs such as oven-ready, cooked and further-
processed products.
• Skin color.
• Meat texture and flavor.
• Feed mill capabilities.
Feed form varies greatly as diets may be prepared as a mash, crumble, pelleted or extruded
product. Blending the manufactured feed with whole grains prior to feeding is also common
in some areas of the world. Further processing of feed is often preferable as there are both
nutritional and managerial benefits. Pelleted or extruded diets generally have a greater ease
of handling when compared to mash feeds. Nutritionally, further-processed feeds show a
noted improvement in flock efficiency and growth rates when compared with mash feeds.
99COBB
COBB Broiler Management Guide
Crude Protein:
The broiler requirement for crude protein actually describes the requirements for amino acids,
the building blocks of protein. Proteins are found as structural components in tissues ranging
from feathers to muscle.
Energy:
Energy is not a nutrient but a means to describe the metabolism of energy yielding nutrients.
Energy is necessary for maintaining the bird’s basic metabolic functions and body weight
growth. Traditionally, the metabolizable energy system has been used to describe the energy
content of poultry diets. Metabolizable energy (ME) describes the gross amount of energy of
a feed consumed minus the gross amount of energy excreted.
Micronutrients:
Vitamins are routinely supplemented in most poultry feeds and can be classified into either
water-soluble or fat-soluble. Water-soluble vitamins include the B-complex vitamins. Vitamins
classified as fat-soluble include A, D, E and K. The fat-soluble vitamins can be stored in the
liver and other parts of the body.
Minerals are inorganic nutrients and are classified as major or trace elements. The major
minerals include calcium, phosphorus, potassium, sodium, chlorine, sulphur and magnesium.
Trace minerals include iron, iodine, copper, manganese, zinc and selenium.
100 COBB
COBB Broiler Management Guide
Feed Testing:
A systematic approach to feed sampling on the farm is a “best practice” policy. A good feed
sampling technique is important if the results of the analysis are to reflect the real nutrient
content of the feed. A sample must be representative of the feed from which it was taken.
This cannot be achieved by “grabbing” a sample of feed from the trough or pan. In order to
collect a representative feed sample it is necessary to take sub-samples and combine them
into a composite sample. It is recommended that five sub-samples from each delivery of feed
be taken. Sampling from the feed lines is not recommended as sifting of ingredients or fines
will skew results. Samples should be stored in a refrigerator until the flock is processed. Each
sample should be recorded with the date, feed type and delivery ticket number. If problems
arise during production and feed is suspected, samples should be analyzed. Lab reports
should be compared with nutrient specifications for the respective diets.
Phase Feeding:
Nutrient requirements generally decline with broiler age. From a classical standpoint, starter,
grower and finisher diets are incorporated into the growing program of broilers. However, bird
nutrient needs do not change abruptly on specific days, but rather they change continuously
over time. Most companies feed multiple feeds in an attempt to match bird nutrient
requirements. The greater the number of feeds a bird receives, the closer the producer can
feed his birds to the requirement. The number of feeds is limited by economic and logistical
factors, including feed mill capacity, transportation costs and farm resources.
Dietary nutrient concentrations are based on the objectives of the producer. There are three
main objectives of feeding broilers and most producers use a combination of these.
Diet Type 1:
Nutrient-rich to optimize live weight gain and feed conversion. This approach may promote
additional carcass lipid content. In addition, diet cost will be high.
Diet Type 2:
Lowered energy content but optimal crude protein and amino acid content. This approach
will result in less lipid gain but maximize lean mass production. Live weight and feed
conversion will be negatively affected but cost per lean mass will be optimal.
Diet Type 3:
Low nutrient concentration. This approach will result in lower live weight growth and higher
feed conversion but cost per live weight may be optimum.
Feed Withdrawal:
During this period, special attention should be directed towards medication withdrawal dates
to ensure there is no residue retained in the carcass at processing. Carefully kept records
are essential.
101COBB
COBB Broiler Management Guide
Supplemental Whole Wheat Feeding:
The feeding of supplemental whole wheat to broiler chickens is being practiced in many
countries around the world. Benefits observed include a reduction in feed cost and therefore
cost per kg (lb) of live weight, improvements in gizzard development resulting in improved
digestive efficiency and the ability to manipulate the nutrient intake on a daily basis if
necessary. Possible disadvantages are reduced growth rate, reductions in lean gain and
poorer uniformity if adjustments to the compound feed are not made.
Supplemental wheat may be added either at the feed mill or at the farm. While adding whole
wheat at the farm is preferable due to the increased flexibility it offers, this requires an on-
farm feed proportioning system as well as additional bulk bins. At the feed mill, whole wheat
may be added in the mixer or during the loading of the feed truck. Adding the whole wheat at
the feed mill also allows for the potential of some processing, if available, such as roller
milling.
Typically beginning around day 7, or when birds weigh 160 g, supplemental whole wheat is
added at a level of 1%-5%. This can be increased up to approximately 30% using gradual
increases of 1%-5%. The maximum percent used will depend on the compound feed quality
and nutrient density, wheat quality, desired performance and the performance of the individual
flock.
It is important to take into account the dilution effect of adding supplemental whole wheat to
the diet. Any medications will need to be adjusted as needed to ensure they are fed at the
correct levels. Regular monitoring of bird live weight is important to determine the effect whole
wheat addition has on a particular flock. The supplemental whole wheat should be removed
48 hours before slaughter to avoid contamination of the carcass during evisceration.
102 COBB
COBB Broiler Management Guide
9. Catching Procedures
Logistics
The goal of the planning and coordination of the catching process is to insure low DOA (dead
on arrival), minimal shrink, and high animal welfare standards. If done properly this is a very
complex process that will require the coordination of farm starting times, multiple catching
crews and processing plant schedules. The benefits of good planning in terms of improved
mortality shrink and plant yield are very real and make it worth the effort.
The catching process requires good communication and planning that must include the
following key areas:
• Plant processing schedule - To insure that birds are available to slaughter with minimal
holding time.
• Transportation and driving distance from farm to plant - Coordinate the transportation
assets to maximize their utilization.
• Catching crew schedule - Ensure that crews are scheduled to catch the birds.
• Farm set up - Time frames to shut off and raise feeders and water.
Feed and Water Withdrawal
The feed withdrawal and water withdrawal process is critical in optimizing feed conversion,
plant yield, and preventing holding shrink and plant contamination. The purpose of feed
withdrawal is to empty the digestive tract, preventing ingested feed and fecal material from
contaminating the carcasses during the evisceration process.
Always allow access to water as long as possible prior to catching. Only raise the water after
the catchers get to the house and start setting up. On multiple house farms only withdraw
water just prior to commencing catching.
Optimum recommended time off feed is a window of 8 hours to 12 hours. Less than 8 hours
will result in excess feed and fecal residues in the digestive tract. This is a waste of the
undigested feed as there will be no conversion to meat. The excess feed residue will cause
yield and processing problems in the plant. Fecal residues cause contamination of plant
equipment. Feed withdrawal in excess of 12 hours causes the intestines to lose their tensile
strength, making them easy to tear and rupture. The intestinal contents will become viscous
due to the start of intestinal cell necrosis. This condition will cause major equipment
contamination in the plant and continue to get worse with time.
103COBB
COBB Broiler Management Guide
In a properly planned program the feeders should be raised in the broiler house so the first
load from the house will be unloaded and started kill as close to the 8 hour mark as possible
with the last load from the house being killed as close to being inside the 12 hour mark as
possible.
Also in the planning process it should be considered that product held at the plant even in a
good holding shed or holding area will continue to lose weight at a rate of .25% or more of
body weight per hour from natural shrink. Part of the logistical planning should include
minimizing this holding time.
It is important to refer to local legislation for feed withdrawal restrictions.
Preparation
Regardless of method of catch or
type of containers used there are
some common general operating
procedures that should be followed.
• Birds should be carefully placed
in clean crates or modules to
a density that complies with
manufacturer’s recommendations.
These densities should be reduced
in summer months.
• Minimize light intensity reduce bird
activity. Light in the house should
be only enough to see to do the
job. If dimming is not feasible, the
use of blue or green lights will calm
birds and reduce activity.
• When possible schedule catching
at night to reduce bird activity.
104
The drinking system must remain down until the start of catch.
COBB
COBB Broiler Management Guide
• When catching during the day it is recommended to utilize curtains and other methods to
keep the houses as dark as possible. In cases where light cannot be restricted migration
fences and gates must be used to restrict bird crowding. Coops can be used with great
effect by building pens from the coops to restrict bird movement. Calm birds facilitate better
ventilation, reduce bird stress and diminish the risk of piling.
• The use of a catching tunnel should be used during day time catching where possible.
• Reduce as much as possible pre catch activity. Make sure all feeders and water are rolled
up. Make sure any unnecessary equipment or items that might interfere are out of the
house.
105COBB
COBB Broiler Management Guide
• Make sure the proper number of head per coop or module compartment is communicated
to the catching crew. This number is determined by container type, bird size and seasonal
conditions.
• If there is time between loads, turn up the lights, replace the water and gently walk through
the birds.
Preparation for catching
Welfare considerations should be of utmost importance during catching. Special care should
be given to minimize bruising and downgrades. The stockman should be present during the
catching operation to ensure that the correct procedures are followed.
Possible causes of downgrades in the processing plant
106
Causes Scratching Bruising Broken limbs
Blisters-
hock/breast
Too high stocking density ● ● ● ●
Feeding system break down ●
Incorrect lighting program ●
High light intensity ●
Aggressive movement by
stockman
● ● ●
Poor feathering ● ●
Aggressive catching ● ● ●
Poor litter ●
Incorrect nutrition ● ● ●
Plucking machines ●
Ventilation ● ●
Drinker management ●
COBB
COBB Broiler Management Guide
Monitoring bruising color can give an indication of when it happened and how to cure
the problem.
Machine Catching
As with all technology, machine catching equipment is being improved every year.
Machine catching is a viable option to manual catching in areas where labor is not available
or other factors make manual catching not an attractive option.
With machine catching it is important to implement a good preventative maintenance
program. Maintenance and repair cost need to be considered when implementing a machine
catching program.
107
Color of bruise Age of bruise
Red 2 minutes
Dark red and purple 12 hours
Light green and purple 36 hours
Yellow green and orange 48 hours
Yellow orange 72 hours
Slight yellow 96 hours
Black and blue 120 hours
COBB
COBB Broiler Management Guide
Manual Catching
The two most common methods of manual catching are by the feet or by the back. With both
machine and manual catching, crew training is essential to ensure correct bird handling with
minimal damage.
The vast majority of companies catch by the feet. The following handling limits need to be
enforced:
• Grip only the shank to limit drum bruising.
• Handling limits - depends on bird size and crate/module design:
• No more than 3 large birds per hand - >2.6 kg (5.75 lb).
• Smaller birds – up to 6 birds per hand.
• Limit handling birds more than once – do not pass birds between catchers.
• Back catching is limited to 2 birds – common practice when coops are used. This limits
wing damage.
108 COBB
COBB Broiler Management Guide
10. Biosecurity and Farm Sanitation
10.1 Biosecurity
Bio-security is the term used to describe an overall strategy or succession of measures
employed to exclude infectious diseases from a production site. Maintaining an effective
biosecurity program, employing good hygiene practices and following a comprehensive
vaccination program are all essential to disease prevention. A comprehensive biosecurity
program involves a sequence of planning, implementing and control. Remember, it is
impossible to sterilize a house or the premises. The key is to reduce pathogens and prevent
their reintroduction.
Outlined below are various key points to a successful biosecurity program:
• Limit non-essential visitors to the farm. Keep a record of all visitors and their previous farm
visits.
• Farm supervisors should visit the youngest flocks at the beginning of the day and working
by age to the oldest flock for the last visit in that day.
• Avoid contact with noncompany poultry, particularly backyard poultry.
• If equipment must come from another farm, it should be thoroughly cleaned and disinfected
before it comes onto the farm.
• Provide wheel dips or wheel spraying facilities at the farm entrance and allow only
necessary vehicles on site.
• Farms should be fenced.
• Keep doors and gates locked at all times.
• Absolutely no other poultry should be kept on the same farm as your poultry unit. Farm
animals other than poultry should be fenced separately and have a different entrance from
the poultry farm enterprise.
• No pet animals should be allowed in or around the poultry housing.
• All farms should have a vermin control plan which includes frequent monitoring of rodent
activity. Adequate supplies of rodent bait must be maintained.
• All houses should be vermin proof.
• The area around the poultry house should be free from vegetation, debris and unused
equipment that could harbor vermin.
• Clean up feed spills as quickly as possible and fix any leaking feed bins or feed pipes.
• Farms should have toilet and hand washing facilities separate from the poultry house.
109COBB
COBB Broiler Management Guide
• Ideally poultry farms should be built away from other poultry farms and away from rivers
and ponds to limit any exposure to wild birds.
• If equipment does need to be brought onto the farm then it should be subjected to
disinfection by Ultra-Violet light in a sanitizing box that has been constructed with suitable
protective sides and bottom.
• Best practice is to have feed delivered to a central bin from outside the farm perimeter
fence and then using dedicated farm vehicles for moving the feed from the central bin to
each house feed bin.
• Provide hand-sanitizing facilities at the entrance to each house.
• Provide well-maintained footbaths at the entrance to each poultry house.
• Footbaths placed outside must have a lid to prevent dilution of disinfectant by rain and
prevent contamination from the environment.
• Clean footwear before using footbath to remove organic material, which could inactivate
the disinfectant.
• The choice of disinfectant for the footbath needs to be one that has a broad spectrum of
activity and be fast acting because of limited contact time.
• Incorporate a boot-change or boot cover system at each entry to the poultry house.
• Single-age broiler farms are highly recommended to reduce the cycling of pathogens
and/or vaccine agents within the farm.
• Birds should be placed from similar age parent flocks of the same vaccination status.
• Depletion of birds should be complete before arrival of new chicks.
• Catching crews should be provided with protective clothing. Equipment such as coops/
crates and forklifts should be washed and disinfected before entry to the farm, especially
if partial depopulation is practiced.
• Absolute minimum downtime of three days must be observed from last disinfection on the
farm to first placement of birds on a farm. Farms reusing litter require a minimum of 14
days downtime.
110
A dedicated changing facility for protective clothing and footwear should be
sited at the farm entrance. Note: Ideally a “shower on and shower off” policy
is regarded as best practice. A timed five minute hot shower using the
necessary sanitizing agents is recommended.
COBB
COBB Broiler Management Guide
10.2 Farm Sanitation
The single most important factor in keeping poultry healthy is maintaining good hygiene.
Healthy parents and hygienic hatchery conditions contribute greatly to disease-free chicks.
Good hygiene standards will reduce disease challenge.
Farm sanitation does not just mean the choice of the right disinfectant. The key to farm
sanitation is effective cleaning. Disinfectants will be inactivated by organic material. The
following points are the basic steps for effective farm sanitation. However, these steps are
not applicable when litter is re-used.
Key points of a successful farm sanitation program:
• At the end of each flock remove all the birds from the farm.
• Apply an insecticide. This is best carried out immediately after depopulation and before
the litter and building cool. Heavy insect infestations may require an additional insecticide
application after the disinfection process is complete.
• Maintain the rodent control program after depopulation.
• Remove all unused feed from the feed system, including all bins and augers.
• Carefully consider the health status of the depleted flock before moving the feed to another
flock.
• Clean out all the litter from each house and remove it in covered vehicles.
• Clean all the dust and dirt from the building, paying special attention to less obvious places
such as air inlets, fan boxes and the tops of walls and beams.
• Dry clean any equipment that cannot be washed directly and cover it completely to protect
it from the washing process.
111COBB
Drinking systems should be drained and flushed with an approved
disinfectant before flock placement. Ensure that the system is again flushed
with clean water before placement to remove any residue
• If litter is re-used between flocks, all damp or caked litter should be removed and heat
turned on in time to release any built up ammonia and to encourage drying of litter prior
to placement of next batch of chicks.
• Test water annually for mineral levels and microbial quality.
COBB Broiler Management Guide
• Open up any drainage holes and water runoff pathways and wash down all interior
surfaces of the house and fixed equipment with a general detergent through a pressure
washer. If using a foam or gel, allow the recommended soak time to allow the product
adequate time to work. The process should be carried out in a predetermined fashion,
washing from the top to the bottom of the house (ceiling to the floor). If the fans are in the
roof they should be washed before the ceiling.
• In curtain sided houses, special attention should be given to cleaning both the inside and
outside of the curtain.
• The house should be washed from one end to the other (paying special attention to fans
and air inlets) and washed to the end with the best drainage. There should be no standing
water around the poultry house and each farm should have adequate drainage that meets
local legal requirements.
• House control rooms should be carefully cleaned as water may damage electricity control
systems. Power air blowers, vacuums and wiping with a damp cloth (where possible and
with safety in mind), may be helpful in such areas.
• If a water storage or header tank is present, where possible open it and scrub it clean with
a detergent.
• Drain the drinking system and header tank completely before adding cleaning solution.
• Removed equipment should be cleaned first with a detergent (or, if needed, a scale
remover) and then thoroughly disinfected.
• Any equipment or materials such as a fiber chick guard or feeder lids that cannot be
cleaned should not be reused for the next crop and should be safely destroyed.
112
It is best, if possible, to circulate the sanitizing solution in your drinking
system. If not, leave it to stand in the drinking system for a minimum of 12
hours before completely flushing the system with clean water.
COBB
COBB Broiler Management Guide
• External areas such as gutters, fan boxes, roofs, pathways and concrete areas should be
cleaned and maintained. Remove any washed out litter or organic matter from the farm
compound. Unused and unneeded equipment should be removed from the farm.
• Carry out any equipment or facility repairs at this point and re-plug/fill any drainage holes
opened up prior to washing.
• Outside concrete areas and ends of the house should be washed completely.
• Drying down after washing is advantageous. Heat and/or fans can be used to aid in the
speed of this process.
• Staff areas, canteens, changing areas and offices should also be thoroughly cleaned. All
footwear and clothing should be given a complete washing and disinfection at this point.
• Apply an effective broad-spectrum disinfectant through a pressure washer with a fan jet
nozzle. Thoroughly soak all the interior surfaces and equipment working from top to
bottom. Fan boxes, inlets, support beams and posts require special attention.
• After disinfection, biosecurity controls at house entrances must be reinstated.
• Adequate downtime between flocks will increase the effectiveness of the hygiene program.
• When choosing which disinfection product to use check what environment temperature
the product is effective in working in.
To monitor the effectiveness of the sanitation program, a visual inspection and microbial
culture are suggested. The effectiveness of the sanitation program can be measured using
quantitative laboratory tests. Sterilization of the facilities is not realistic but microbiological
monitoring can confirm that non-desired organisms such as salmonella have been eliminated.
A documented audit including microbiological monitoring and attention to the performance of
subsequent flocks can help to determine the effectiveness and value of the sanitation
program.
Swabbing to monitor cleaning and disinfection:
The residual bacterial counts or total viable count (TVC), is used to monitor the effectiveness
of the cleaning out process.
No salmonella should be isolated after cleaning out procedure is completed.
A minimum of ten swabs per house should be taken.
113
The maximum total viable count in colony forming units per cm² of floor area
should not exceed 1,000 (TVC) and maximum 100 (TVC) for all other
surfaces.
COBB
COBB Broiler Management Guide
11. Bird Health
Prevention is by far the most economical and best method of disease control. Disease
prevention is best achieved by the implementation of an effective biosecurity program in
conjunction with appropriate immunization. However, diseases can overcome these
precautions and when they do, it is important to prevent the spread to other flocks/farms.
Caretakers and service personnel should be trained to recognize problems that may be
attributed to disease. These include water and feed consumption patterns, litter conditions,
excessive mortality, bird activity and behavior. Prompt action to address the problem is
essential.
11.1 Vaccination
Parent stock breeders are vaccinated for a number of diseases to effectively pass on maternal
antibodies to broiler chicks. These antibodies serve to protect the chicks during the early
portion of the grow out period. However, these antibodies do not protect the broilers
throughout the entire grow-out period. Therefore, it may be necessary to vaccinate the broilers
either in the hatchery or in the field to prevent certain diseases. The timing of vaccinations
should be based upon the level of expected maternal antibody, the disease in question and
current field challenges.
The success of a broiler vaccination program is contingent upon properly administering the
vaccines. Specific recommendations for vaccine applications should be obtained from vaccine
suppliers, as these supplier recommendations may be different from the following general
guidelines.
1. General vaccine handling procedures
• Ensure that vaccines are stored at the manufacturer’s recommended temperature
(2-8°C/36-46°F).
• Prepare vaccine and stabilizer mixture in clean containers free of any chemicals,
disinfectants, cleaners or organic materials.
• Record vaccine product type, serial number and expiration date on pen charts or some
other permanent flock record.
• Open each vial of vaccine while submerged under the water-stabilizer mixture.
114 COBB
COBB Broiler Management Guide
• Prepare vaccine and stabilizer mixture on a clean surface in clean containers free of any
chemicals, disinfectants, cleaners or organic materials. (Use stabilizer only if called for by
manufacturer of equipment and vaccine for this application method).
• Rinse each vial of vaccine completely.
A. Hatchery vaccination guidelines
• The hatchery has become a very important piece of the health program as many vaccines
are administered either via in-ovo or at day of age and a high number of embryos or chicks
can be easily vaccinated against several diseases. The hatchery is the only place where
in-ovo vaccination can be performed.
• For years, spray vaccinations have been also performed at the hatchery for effective
immunization against Infectious Bronchitis, Newcastle Disease, and Coccidiosis. Make
sure to follow vaccine manufacturer recommendations as to how to achieve the best
immunization possible as recommendation differ among products and manufacturers.
• Broilers that are placed on used litter and/or grown to heavy weights may require
immunization against Marek’s disease at the hatchery. This is done by injecting at least
1500 pfu’s of the HVT vaccine either in-ovo or at day of age.
• HVT-vectored vaccines can also be administered at the hatchery as an aid to prevent
Infectious Laringotracheitis, Newcastle Disease, Infectious Bursal Disease, and Avian
Influenza. It is important to note that HVT-vectored vaccines require the administration of
a full dose so the vector virus and the insert can reach the levels needed for proper
immunization.
B. Field vaccination guidelines
1. Water Vaccination
• Amount of water for vaccination should be calculated based on 90-120 min vaccination
time.
• Vaccinate early in the morning to reduce stress, especially in times of warm weather.
• Avoid using water rich in metallic ions (e.g. iron and copper). Bring in outside water of
better quality if these conditions are known to exist.
• Water pH should be 5.5-6.5. High pH water can taste bitter to the birds and so reduce
water and vaccine intake.
• Ensure rapid uptake of vaccine by depriving the birds of water a maximum of 1 hour before
administration of vaccine begins.
115COBB
COBB Broiler Management Guide
• Use of a vaccine manufacturer’s approved dye or colored stabilizer may help in
determining when water lines are primed and how many birds have consumed vaccine.
• Turn off chlorinator 48 hours before administering the vaccine.
• Clean water filters 48 hours before vaccination commences to remove any detergent
residues. Clean filters using plain water.
• Turn ultra-violet light off, if used, as this may inactivate the vaccine.
• Vaccination can be performed unevenly if done through a medicator.
• Calculate the needed amount of water by using 30% of the previous day’s total consumed
water. If no water meter is available, use the following calculation: Number of birds in
thousands multiplied by their age in days multiplied by two. This equals the amount of
water in liters needed to vaccinate over a 2-hour period.
• Mix 2.5 g (2 teaspoons) of powdered skimmed milk per liter (1.05 quarts) of water.
Alternatively, commercial stabilizers can be used per manufacturer’s recommendations.
• Prepare skimmed milk solution 20 min. before administering the vaccine to ensure the
skimmed milk powder has neutralized any chlorine present in the water.
• Raise drinker lines.
• Pour the prepared vaccine, stabilizer and color solution into the header tank or storage
tank.
• Prime the lines until the stabilizer or dyed water comes through the far ends of the lines.
• Lower drinker lines and allow birds to consume vaccine, making sure to turn water back
on into the header tank just before the tank runs dry.
• Walk through the birds gently to encourage drinking and uniformity of application.
• Note the vaccine consumption time in the records and any adjustments needed for next
application of similar age birds and equipment to reach the ideal time of 90-120 min.
116 COBB
COBB Broiler Management Guide
Open - Bell drinker system:
• Two people are needed to carry out the vaccination procedure. One person is needed to
mix the vaccine solution and the other person is needed to administer the vaccine.
• Clean each drinker, emptying it of water and litter. Do not use a disinfectant to clean the
drinkers.
• Carefully fill each drinker in a predetermined fashion, making sure not to over fill the drinker
or spill the mixed vaccine solution.
• During vaccination, walk the house to encourage birds along the walls to get closer to the
drinkers.
Monitoring water vaccination intake:
• Start to monitor after birds receive vaccine.
• Select 100 birds per house and check how many have dyed tongues, beak or crops.
• Divide the house into four parts and check for staining from 25 birds per house division.
• Calculate number of birds on a percentage basis with staining.
• Vaccination is considered successful when 95% of birds show staining.
If anything happens out of the ordinary during or after vaccination, closely monitor
birds and consult your veterinary advisor.
117
Percentage of birds with Blue staining Hour after administration of vaccine
75% 1 hour
95% 2 hours
COBB
COBB Broiler Management Guide
2. Aerosol/coarse spray vaccination
• Spray vaccination requires careful management. Spray may be lost through evaporation,
settlement and drift before it reaches the birds.
• Vaccination equipment should be serviced as per manufacturer’s recommendations to
ensure correct functioning and dispersion of the correct particle size.
• Spray vaccinating day-old chicks in boxes at the farm requires a specific type of sprayer.
(Consult vaccine manufacturer).
• Check that the vaccination equipment is working properly at least 1 week before
vaccination to allow time for repairs if needed.
• Operators inexperienced with specific house conditions and equipment should practice
using plain water to verify walking pace.
• Use the sprayer for vaccination only. Never put disinfectant or any chemicals such as
insecticides into your sprayer.
118
Vaccinate early morning to reduce stress, especially in times of warm
weather.
COBB
COBB Broiler Management Guide
• Use fresh, cool distilled water.
• Rinse the sprayer with distilled water and dispense a small volume through the unit just
before adding the diluted vaccine.
• A typical coarse spray water volume is 15-30 liters (4-8 gal) per 30,000 birds. (Again refer
to vaccine and equipment manufacturer for specific volumes).
• If using a fine spray the water volume is 1 liter (0.26 gal)/30,000 birds.
• Turn the fans off before spraying commences and dim the lights to reduce stress on the
birds and to allow easy movement through the house for the vaccinator.
• Pen the birds along the outside of the house for coarse water spraying. The distance
between the vaccinator and the side wall must not be more than four meters (13 ft).
• Coarse spray should be about 1 m (3 ft) above bird height.
• Angle the sprayer nozzle down.
• Walk through the birds gently and carefully.
• Leave the fan off for 20 minutes after spraying has finished, provided that the birds are
not being heat stressed and that they are not unattended.
• After vaccination, rinse the sprayer with distilled water and allow it to dry in a clean, dust-
free environment. Take correct care of this valuable equipment.
119COBB
COBB Broiler Management Guide
12. Record Keeping
Accurate record keeping is essential to monitor the performance and profitability of a flock,
and to enable forecasting, programming and cash flow projections to be made. It also serves
to provide an early warning of potential problems. The daily records should be on display for
each house. In some countries the following data must be made available to the relevant
authorities before the birds are slaughtered.
Daily Records include:
• Mortality and culls by house and sex
• Daily feed consumption per bird
• Daily water consumption per bird
• Water to feed ratio
• Water treatments
• Minimum and maximum daily temperatures
• Minimum and maximum daily humidity
• Number of birds taken for processing
• Management changes
• Type of culls
• Leg culls
• Small culls
120 COBB
COBB Broiler Management Guide
Flock Records:
• Feed deliveries (supplier/amount/type/date of consumption)
• Feed sample from each delivery
• Live weight (daily/weekly/daily gain)
• Medication (type/batch/amount/date of administration/date of withdrawal)
• Vaccination (type/batch/amount/date of administration)
• Lighting program
• Litter (type/date of delivery/amount delivered/visual inspection)
• Chick delivery
• number/date/time/count in boxes
• truck temperature and humidity
• internal chick temperature
• Stocking density
• Chick source (hatchery/breed/donor breeder code/chick weight)
• Weights of each load at processing plant
• Downgrades
• Date and time feed withdrawn
• Date and time catching started and finished
• Cleanout (total bacterial counts/visual inspection)
• Post mortem results
• Visitor Book
Annual Records:
• Water (tested at source and at the drinker)
121COBB
COBB Broiler Management Guide
13. Appendices
Metric Conversions:
122
Length:
1 meter (m) 3.281 feet (ft)
1 centimeter (cm) 0.394 inches (“)
Area:
1 sq. meter (m²) 10.76 sq. ft (ft²)
1 sq. centimeter (cm²) 0.155 sq. inch (in²)
Volume:
1 liter (l) 0.22 imperial gallon (IG)
1 liter (l) 0.262 US gallon (gal)
1 cubic meter (m³) 35.31 cubic ft (ft³)
Weight:
1 kilogram (kg) 2.205 pounds (lb)
1 gram (g) 0.035 ounces (oz)
Energy:
1 calorie (cal) 4.184 joules (J)
1 joule (J) 0.735 foot pound
1 joule (J) 0.00095 British thermal unit (BTU)
1 British thermal unit (BTU) 252 calories (cal)
1 British thermal unit (BTU) 0.3 watt per hour (kWh)
Pressure:
1 bar 14.504 pounds per square inch (psi)
1 bar 100,000 Pascals
1 Pascal (Pa) 0.000145 psi
Volume Flow Rate:
1 cubic meter per hour (m³/hour) 0.5886 cubic feet per minute (ft³/min)
1.70m³/h 1 cubic foot per min
Stocking density:
1 square foot per bird (ft²/bird) 10.76 birds per square meter (birds/m²)
1 kilogram per square meter (kg/m²) 0.205 pounds per square foot (lb/ft²)
Temperature:
Celsius to Fahrenheit (°Celsius x 9/5) + 32
Fahrenheit to Celsius (°Fahrenheit - 32) x 5/9
Light:
1 foot-candle (fc) 10.76 lux
1 lux 0.0929 foot-candle
COBB
COBB Broiler Management Guide
Feather Sexing Broiler Chicks
Broiler chicks in the feather sexable, slow feather format, can be feather sexed at day old as
illustrated below.
In the non-feather sexable, fast feather format, both males and females will show the same
pattern of feather development illustrated by the diagram below relating to females.
123
A-Primaries
B-Coverts
At hatching all
feathers short
but coverts
extend only ½
to ¾ length
of primaries
After several
hours feathers
longer but
coverts still ½
to ¾ length
of primaries
1. Spread wing out like a fan.
2. Look at feathers on outer joint - bottom row of feathers are primaries, top row of
feathers are coverts.
3. When the bottom row (primaries) of feathers is longer than the top row (coverts), the
chick is female.
4. When the bottom row (primaries) of feathers is the same length, or shorter than the
top row (coverts), the chick is male.
Coverts and
primaries
extend
same length
Coverts extend
slightly beyond
primaries
Coverts extend
greatly beyond
primaries
FEMALES
Coverts always shorter
than primaries
MALES
Coverts always as long as
or longer than primaries
TOP OF WING
COBB
COBB Broiler Management Guide
124
14. Notes
COBB
COBB Broiler Management Guide
COBB 125
Notes
L-1020-06
August 2017
C O B B - V A N T R E S S . C O M

Cobb broiler management guide eng-2018

  • 1.
    C O BB - V A N T R E S S . C O M
  • 3.
    COBB Broiler ManagementGuide COBB Introduction The Cobb commitment to genetic improvement continues to increase the performance potential in all areas of broiler and broiler breeder production. However, to attain both genetic potential and consistent flock production, it is important that the flock manager has a good management program in place. The worldwide success of Cobb has provided considerable experience over a wide range of climatic conditions, controlled environment and open housing. The Cobb Broiler Management Guide is designed to assist you in developing your management program no matter your housing or environmental conditions. Management must not only meet the basic needs of the birds but must also be finely tuned to benefit fully from the breed’s potential. Some of the guidelines may need to be adapted according to your local experience with assistance from our technical teams. The Cobb Broiler Management Guide is part of our technical information service, which includes Hatchery, Grand Parent, Breeder, Vaccination & Nutrition Guides, Technical Bulletins and a full range of performance charts. Our recommendations are based on current scientific knowledge and practical experience from around the world. You should always be aware of local legislation, which may influence the management practice that you choose to adopt. The Cobb Broiler Management Guide is intended as a reference source and supplement to your own flock management skills so that you can apply your local knowledge and experience to obtain consistent good results from the Cobb family of products. Key points Look for this symbol throughout the guide that highlights Key Points that emphasize important aspects of husbandry and critical procedures.
  • 4.
    COBB Broiler ManagementGuide COBB Contents Page 1. Key Energy Efficient HOUSE DESIGN requirements 1 1.1 Roof Design and Insulation 2-3 1.2 Curtain Installation 4 1.3 Inlet Installation 5-6 1.4 Circulation Fan Installation Options 7-8 1.5 Evaporative Pad Design 9-12 1.6 Fogging Systems 13-14 1.7 Equipment 15-24 2. House Preparation - Pre-Placement 25 2.1 Stocking Density 25-26 2.2 Whole House 26 2.3 Partial House Brooding Setup Options 27 2.4 Brooding Chamber 27-30 2.5 Litter Management 31-33 2.6 Pre-Placement Checklist 33-36 3. Chick Placement 37 3.1 Key Management Requirements 37 3.2 Chick Quality 38-39 3.3 Brooding Management 40 3.4 Internal Chick Temperature 41-42 4. Post Placement of Chicks 43 4.1 Post Placement Checklist 43-47 4.2 Flushing 47 5. Growing Phase 48 5.1 Uniformity 48-50 5.2 Temperature 50-58 5.3 Lighting Programs 59-65 5.4 Lighting Program Benefits 66
  • 5.
    COBB Broiler ManagementGuide COBB Contents Page 6. Ventilation Management 67 6.1 Minimum Ventilation 67-68 6.2 Fans Needed for Minimum Ventilation 69-71 6.3 Negative Pressure - Key Requirement for Minimum Ventilation 72-73 6.4 Simple Negative Pressure Test 74 6.5 Inlet Management and Installation 75-76 6.6 Transitional Ventilation 77-79 6.7 Tunnel Ventilation 80-84 6.8 Evaporative Cooling 85-88 6.9 Natural Ventilation 89-92 7. Water Management 93 7.1 Mineral Content 93 7.2 Microbial Contamination 93 7.3 Water Sanitation and System Cleanout 94-95 7.4 Total Dissolved Solids 96 7.5 Drinking System Cleanout Between Flocks 97 7.6 Water Testing 98 8. Nutrition Management 99-102 9. Catching Procedures 103-108 10. Biosecurity and Farm Sanitation 109 10.1 Biosecurity 109-111 10.2 Farm Sanitation 111-113 11. Bird Health 114 11.1 Vaccination 114-119 12. Record Keeping 120-121 13. Appendices 122-123 14. Notes 124-125
  • 6.
    COBB Broiler ManagementGuide COBB 1. Key Energy Efficient HOUSE DESIGN requirements There are many things to consider when selecting the most suitable type of broiler housing and related equipment. Though economic constraints are generally foremost, factors such as equipment availability, after sales service and life of the products are also critical. Housing should be cost and energy efficient, durable and provide a controllable environment. When planning the construction of a broiler house, one should first select a well-drained site that has plenty of natural air movement. The house should be oriented on an east-west axis to reduce the effect of direct sunlight on the sidewalls during the hottest part of the day. The main objective is to reduce the temperature fluctuation during any 24-hour period. Good temperature control always enhances feed conversion and growth rate. The following are the five key components of any new broiler house: 1. A roof that is well insulated. 2. Heating system with sufficient capacity in accordance with the climate. 3. Ventilation system designed to provide sufficient oxygen, maintain litter moisture conditions, and provide optimal cooling capability for the birds. 4. Lighting system should provide an even distribution of light at floor level. 5. Energy efficient choice of the above components: insulation, fans, heating and lighting. 1
  • 7.
    COBB Broiler ManagementGuide COBB 1.1 Roof Design and Insulation Key to maximizing bird performance is the provision of a consistent house environment. This will help to conserve heating costs, reduce solar energy penetration and prevent condensation. Large fluctuations in house temperature will cause stress on the chick and affect feed consumption. Furthermore, these fluctuations will result in additional energy expenditure to maintain body temperature. The most important insulation requirements are in the roof. A well-insulated roof will reduce solar heat penetrating the house on warm days, thus decreasing the heat load on the birds. In cold weather a well-insulated roof will reduce heat loss and energy consumption needed to maintain the correct environment for the chick during the brooding phase, the most important time in the development of the chick. The roof overhang should be 1.25 m (4 ft). The insulating ability of materials is measured in R or U - values. The higher the R value the greater the insulating properties of the material. When selecting any insulation material, cost per R-value rather than cost per thickness of material is the most important consideration. The roof should be insulated to a minimum R-value of 20-25 (climate dependant). U value - coefficient of heat transmission, is a measure of the rate of non-solar heat loss or gain through a material. U-values gauge how well a material allows heat to pass through. The lower the U-value, the greater a product’s resistance to heat flow and the better its insulating value. The inverse of the U-value is the R-value. The required roof U-value 0.05 - 0.04 (climate dependent). Following are some insulating materials and their respective R- values. 2
  • 8.
    COBB Broiler ManagementGuide COBB Insulating materials and values: 3 Insulation R-Value (US) per 2.5 cm (1”) Insulation Thickness (cm) for R20 (SI R3.5) Expanded Polystyrene (beadboard) 4.0 17 cm Cellulose Blown 3.13 14 cm Fiberglass batt 3.14 16 cm Polystyrene, extruded plain (pink board) 5.0 10 cm Polyurethane foam, un-faced 6.25 8 cm
  • 9.
    COBB Broiler ManagementGuide COBB4 1.2 Curtain Installation • The top of the curtain must overlap a solid surface to prevent leaks; an overlap of at least 15 cm (6”). • A 25 cm (10”) mini curtain installed on the outside of the house at eave height will further prevent leaks over the top of the curtain. • The curtains should fit into an envelope which is a 25 cm (10”) mini curtain that seals the curtain vertically on both ends. • Curtains should be triple hemmed. • Curtains need to be sealed at the base to prevent air leaks at floor level. • All holes and tears in sidewall and/or inlet curtains must be repaired. • Curtains work most efficiently if operating automatically using both temperature and wind speed as criteria for opening and closing. • The optimum dwarf wall height is 0.50 m (1.6 ft). 25 cm curtain envelope 25 cm mini envelope
  • 10.
    COBB Broiler ManagementGuide COBB 1.3 Inlet Installation • Inlets in tunnel housing should be installed close to the ceiling as possible – about 30 cm (12”) below the sidewall eaves. If the ceiling has structural obstructions such as beams, a directional flap can be used on the top of the inlet and a solid “air ramp” needs to be installed to aid the air in passing the obstruction – see image below. • All inlets require wind proofing covers on the outside of the house. • The inlet cover should be at least 30% more than the cross sectional area of the inlet to minimize air restriction. 5 Obstructions deflect air jets The result is cold air at bird level Adjust height/opening of inlet Air ramp over the top of the obstructions to aid the incoming air to the top center of the house
  • 11.
    COBB Broiler ManagementGuide COBB • The leeward side of the house will always create a negative pressure on the outside. The windward side of the house will always create a positive pressure on the outside. Wind proofing will prevent heat being drawn out of the house on the leeward side. • Without wind proofing, the mechanical pressure control system of the house cannot properly adjust the pressure or inlet openings to accomplish the correct air speed across the inlets to prevent condensation on the walls and floor or wind chill at bird level. • Inlet drive motors should be installed in the center of the side wall to reduce inlet opening variation. Cables used to control inlets often stretch causing varying inlet opening and poor air distribution. Solid 8 mm (0.3”) steel rods expand less, making them the best option for long houses. 6 8 mm rod
  • 12.
    COBB Broiler ManagementGuide COBB 1.4 Circulation Fan Installation Options Circulation fans assist in reducing the temperature differential between the ceiling and the floor by pushing heat to floor level. Essential in cold climates for reducing heating costs and keeping litter dry. Placement rules and operation of circulation fans: Circulation fan requirement: Capacity: approximately 10-15% house volume Typical circulation fan capacity: 450 mm (18”) fans with capacity of 70 m³/minute (2500 cfm) Houses wider than 15 m or 50 ft two rows of circulation fans will be required. Note: Larger 600 mm (24”) fans – 140 m³/minute (5000 cfm) should be on speed control. Example 1 - 12m (40 ft) wide house: • 12 m (40 ft) x 152 m (500 ft) x 3 m (9.5 ft) = 5472 m³ (190,000 ft³) • 5472 m³ (190,000 ft³) × 10% = 547 m³/minute (19,000 cfm) stir fan capacity • 547 m³/minute (19,000 cfm) ÷ 70 m³/minute (2,500 cfm) = 7.6 or 8 fans 7 Tilted Slightly Upwards
  • 13.
    COBB Broiler ManagementGuide COBB Layout Example - 12 m (40 ft) wide house Layout Example 2 - 20 m (66 ft) wide house: • 20 m (66 ft) x 183 m (600 ft) x 3 m (9.5 ft) = 10,980 m³ (376,200 ft³) • 10,980 m³ (376,200 ft³) x 10% = 1098 m³ (37,620 cfm) • 1098 m³ (37,620 cfm) ÷ 70 m³/minute (2500 cfm) = 15 or 16 fans Layout Example - 20 m (66 ft) wide house 8 12m(40ft) Brooding Chamber 150 m (500 ft) 20m(66ft) Brooding Chamber 180 m (600 ft) Always smoke test the system and see what you think. These are only 2 examples of numerous configurations.
  • 14.
    COBB Broiler ManagementGuide COBB 1.5 Evaporative Pad Design The pad space surface area must match the fan capacity to ensure correct airflow and evaporation. The evaporative pads most suitable in the modern high speed house are 15 cm (6”) with 45°/15° angle flutes with a 75% cooling efficiency: The following is the optimal evaporative pad house design. The pad area should always be in line with the tunnel inlet opening. Evaporative Pad House Design 9 1.78 m/s or 350 fpm Triple Hemmed Inlet Curtain Automatic Inlet Machine 15 cm Evaporative Cooling Pads
  • 15.
    COBB Broiler ManagementGuide COBB Important design requirements: • A triple hemmed curtain is required. The curtain needs to be sealed - see section 1.2 (page 4) on curtain design. • If using tunnel inlet doors, they need to be well sealed along the perimeter. The roof/ceiling of the cool pad house must be insulated. • The cool pad house should be a minimum of 0.6-1 m (2-3 ft) wide. • The water recovery system must be above ground to ensure easy access for cleaning and maintenance. • Protect standing water in tank from direct sunlight (tank lid) to reduce algae growth. • Modern high speed houses with large evaporative pads should have the pumps installed in the middle of the pad to improve the wetting distribution of the pads. • Avoid placing any structures or shading in front of cooling pads that will cause a pressure increase. The opening should match the pad area. see the picture below. 10 Restrictive opening
  • 16.
    COBB Broiler ManagementGuide COBB 1.5.1 Evaporative Pad Area Requirement Calculation Example: House Airspeed of 3.0 m/s (600 fpm) and Air Exchange of less than 1 min 15 cm (6”) Evaporative Pad Air speed requirement: • 1.78 m/s (350 fpm) Note: Always use fan capacity at pressure of minimum 25 Pa or 0.10” WC when calculating pad area requirement. Fans Capacities Used in the examples are rated @ 0.1” of water column or 25 Pa • 900 mm or 36”, working capacity of 340 m³/min or 12,000 cfm • 1,270 mm or 50”, working capacity of 680 m³/min (11.3 m³/s) or 24,000 cfm Step 1: Determine basic house dimensions • House dimensions: 150 m long, 15 m wide and 2.88 m average height • House dimensions: 500 ft long, 50 ft wide and 9.25 ft average height • Cross section: 15 m wide x 2.88 m average height = 43.2 m² • Cross section: 50 ft wide × 9.25 ft average height = 462.5 ft² Step 2: Fan capacity required to achieve an airspeed of 3.0 m/s (600 fpm) @ 25 Pa or 0.10” WC • Required fan capacity: Cross section × Airspeed 43.2 m² x 3.0 m/s = 129.6 m³/s or 7,776 m³/min • 462.5 ft² × 600 fpm = 277,500 cfm • Number of 1.27 m (50”) fans required: • 7,776 m³/min ÷ 680 m³/min = 11.4 or 12 fans or • 277,500 cfm ÷ 24,000 cfm = 11.6 or 12 fans 11
  • 17.
    COBB Broiler ManagementGuide COBB Step 3: What is the total pad area required: • Total tunnel fan capacity ÷ 1.78 m/s (350 fpm) • (12 × 11.3 m³/s) ÷ 1.78 m/s = 136 m³/s ÷ 1.78 m/s = 76 m² pad area • (12 × 24,000 cfm) ÷ 350 fpm = 288,000 cfm ÷ 350 fpm = 823 ft² pad area • 76 m² ÷ 1.5 m (standard pad height) = 51 m of pad or 25.5 m per side • 823 ft² ÷ 5 ft (standard pad height) = 165 ft of pad or 82 ft per side 12
  • 18.
    COBB Broiler ManagementGuide COBB 1.6 Fogging Systems Examples of important design and installation requirements: • In houses less than 14 m (45 ft) wide there should be two rows of nozzles throughout the house with each line being ⅓ the distance from each side wall. • Low pressure fogging systems operate at 7.6 l/hour (2 gal/hour). • The nozzles are installed pointing straight down at 3.1 m (10 ft) centers on each line and staggered from side-to-side throughout the house. • The fogging lines should be installed in a loop throughout the house. • An automatic drain valve should be installed on each line to drain the water to the outside of the house when the pump is off. Drain valves prevent dripping when the system is not in operation. • In tunnel ventilated houses, a line should be teed off the two main lines in front of the tunnel inlet; 1.2 m (4 ft) from the inlet opening with 7.6 l/hour (2 gal/hour) nozzles on 1.5 m (5 ft) centers. • There should be a 2 cm (¾”) water supply line from the pump to the main fogging line. The pump should be controlled by both temperature and humidity. • Foggers should start running at 28°C (82°F). • Low pressure fogging systems operate at 7-14 bar (100-200 psi) producing a droplet size greater than 30 microns. • High pressure fogging systems operate at 28-41 bar (400-600 psi) producing a droplet size of 10-15 microns. Moisture should never be directly added to the inlet opening when the air velocity is more than 3.0 m/s (600 ft/min) - the inlet area nozzles should be positioned where the air velocity is under 3.0 m/s (600 ft/min) to prevent floor and bird wetting. If the mist from one nozzle combines with that of the next nozzle, there may be too many nozzles or too narrow spacing between nozzles. This situation will cause high humidity and increase bird stress at the fan end of the house. 13
  • 19.
    COBB Broiler ManagementGuide COBB House: 12 m Wide (40 ft) 14 Recommended installation specifications: • Pump - mainline: 2 cm (¾”) pipe. • Inside Loop - 1.25 cm (½”) pipe. • Loop configuration is needed to avoid dripping during operation. Drain valves prevent dripping while system is off. House: 15 m Wide (50 ft) Automatic Drain Valve Automatic Drain Valve Solenoid valve: >30°C
  • 20.
    COBB Broiler ManagementGuide COBB 1.7 Equipment 1.7.1 Drinker Systems Providing clean, cool water with adequate flow rate is fundamental to good poultry production. Without adequate water intake, feed consumption will decline and bird performance will be compromised. Both closed and open watering systems are commonly used. Bell or Cup Drinkers (Open Systems) While there is a cost advantage of installing an open drinker system, problems associated with litter quality, condemnations and water hygiene are more prevalent. Water purity with open systems is difficult to maintain as birds will introduce contaminants into the reservoirs resulting in the need for daily cleaning. This is not only labor intensive but also wastes water. Installation recommendations: • Bell drinkers should provide at least 0.6 cm (0.24”) per bird of drinking space. • All bell drinkers should have a ballast to reduce spillage. Management recommendations: • Bell and cup drinkers should be suspended to ensure that the level of the lip of the drinker is equal to the height of the birds’ back when standing normally. • Height should be adjusted as the birds grow in order to minimize contamination. • Water should be 0.5 cm (0.20”) from the lip of the drinker at day old and gradually decreased to a depth of 1.25 cm (0.50”) after seven days of age, about the depth of a thumbnail. 15
  • 21.
    COBB Broiler ManagementGuide COBB Nipple Systems (Closed systems) There are two types of nipple drinkers commonly used: • High flow nipple drinkers operate at 80-90 ml/min (2.7 to 3 fl. oz/min). They provide a bead of water at the end of the nipple and have a cup to catch any excess water that may leak from the nipple. Generally 12 birds per nipple with high flow rate systems are recommended. • Low flow rate nipple drinkers operate at a flow rate of 50-60 ml/min (1.7 to 2 fl. oz/min). They typically do not have cups, and pressure is adjusted to maintain water flow to meet the broiler’s requirements. Generally 10 birds per nipple with low flow rate systems are recommended. Installation recommendations: • Nipple systems need to be pressurized either by installing a header tank or pump system. • Header tank pressure should be minimum 2 bar or 30 psi. • Pump supplier – 2.8 bar or 40 psi supplied to the control room. Pump systems will need an inline pressure reduction valve to ensure constant pressure of 2 bar is supplied to the nipple system. • Birds should not have to travel more than 3 m (10 ft) to find water. Nipples should be placed at a maximum of 35 cm (14”) centers. 16
  • 22.
    COBB Broiler ManagementGuide COBB Management recommendations: • Nipple drinkers must be adjusted to suit chick height and water pressure. • For systems with stand pipes, pressure adjustments should be made in 5 cm (2”) increments - as per manufacturer’s recommendations. Systems with drip trays should be managed that birds never drink from the drip trays. If water is present in drip trays the pressure is too high in the system. • For optimal broiler performance, it is recommended to use a closed drinker system. Water contamination in a closed nipple drinker system is not as likely as with open drinker systems. Wasting water is also less of a problem. In addition, closed systems offer the advantage of not requiring the daily cleaning necessary with open drinking systems. However, it is essential to regularly monitor and test flow rates as more than a visual assessment is required to determine whether all nipples are operational. When floors have a slope, a slope regulator should be installed every 10 cm (4”) of fall to ensure even water flow down the length of the house. • Higher water pressure does not mean higher consumption. • Too low water pressure can reduce consumption by as much as 20%. • If the pressure is too low the bird needs more time to obtain its required volume, but birds will always spend the same amount of time drinking whether the volume is high or low (under 1 minute). How to use the Cobb Water Flow Meter • Place under an active drinker line, where birds are drinking. • The gauze chimney should be placed touching the nipple, preferably at an angle, so that the water flows freely. • Take the sample with a stopwatch for 30 seconds and record volume. 17 As a general rule birds should always have to slightly reach up and never stoop down to reach the trigger pin - feet must be flat on the floor at all times. Reduced water intake = Reduced feed intake = Reduced weight gain
  • 23.
    COBB Broiler ManagementGuide COBB • The 30 seconds volume required in relation to age is: 1.7.2 Water Meters Monitoring water consumption through the use of water meters is an excellent means of gauging feed consumption, as the two are highly correlated. Water meters should be sized the same as the incoming water supply line to ensure adequate flow rate. Water consumption should be evaluated at the same time each day to best determine general performance trends and bird well-being. Note: install a water meter bypass, to be utilized during flushing – water used during regular flushing procedures should not be included in the daily water intake reading. 18 1. Water consumption per bird should be recorded every 24 hours. 2. Any substantial change in water usage should be investigated as this may indicate a water leak, health challenge or feed issue. A drop in water consumption is often the first indicator of a flock problem. Age Flow per 30 seconds 0-7 days 20 ml 8-14 days 25 ml 15-21 days 30 ml 22-28 days 35 ml 29-35+ days 45 ml 25 mm (1”) medicator valves 25 mm (1”) pressure regulator 25 mm (1”) water meter
  • 24.
    COBB Broiler ManagementGuide COBB 19 1.7.3 Water Storage Tanks Adequate water storage should be provided on the farm in the event that the main system fails. A farm supply of water equal to the maximum 48 hour demand is ideal. The storage capacity is based on the number of birds plus the volume required for the evaporative cooling system. When designing or upgrading a farm, understanding water supply and layout is critical. Separate water supplies for both the birds and cooling systems should be installed for each house. The following must be taken into account: • Peak drinking demand requirements. • Evaporative cooling system demand. The following is an example of a 4 house farm water supply layout: • Pump pressure at source: 3.5 – 4 bar or 50 – 60 psi • A = 75 mm (3”) and 300 l/min • B = 50 mm (2”) and 150 l/min • C = 40 mm (1.5”) and 75 l/min • Control room: 2.8 bar or 40 psi - Minimum • Drinkers: 2 bar or 30 psi
  • 25.
    COBB Broiler ManagementGuide COBB Storage tanks should be housed in a separate insulated building, or alternatively shaded and insulated. If the source of water is a well or holding tank, the supply pump capacity should match the birds’ maximum water consumption and also the maximum needs of the fogging and/or evaporative cooling systems. The following is a table indicating estimated flow rates for different pipe sizes: Evaporative cooling pad water requirements will depend on outside temperature and relative humidity. The following table is an example of how evaporation increases with a drop in relative humidity at 35°C or 95°F: 20 Storage and Pump Station Drinker Supply Evap. Cooling Supply Main Line or Well Flow rate (l/min) Pipe Size (mm and ”) 20 l/min 20 mm or 0.75” 38 l/min 25 mm or 1” 76 l/min 40 mm or 1.5” 150 l/min 50 mm or 2” 230 l/min 65 mm or 2.5” 300 l/min 75 mm or 3” 15 cm (6”) Evaporative Pad Water Requirement @ 35°C (95°F) Per 100,000 cfm (2832 m³/min) Humidity 50% 40% 30% 20% 10 l/min 12 l/min 14 l/min 17 l/min
  • 26.
    COBB Broiler ManagementGuide COBB The following table is an example of the maximum cooling pad water requirement of a modern tunnel ventilated broiler house operating at an airspeed of 3 m/s (600 fpm). 21 15 cm (6”) Evaporative Pad Water Requirement Pads evaporate 10 l/min per 100,000 cfm (2.6 gallon) at 35°C (95°F) House Width Air Speed Tunnel Fan Capacity No Fans (790 m³/min or 28,000 cfm) Pad Requirement 12 m (40 ft) 3 m/s (600 fpm) 6456 m³/min (228,000 cfm) 8 45 l/min 15 m (50 ft) 3 m/s (600 fpm) 8093 m³/min (285,800 cfm) 10 53 l/min 18 m (60 ft) 3 m/s (600 fpm) 9684 m³/min (342,000 cfm) 12 64 l/min 20 m (66 ft) 3 m/s (600 fpm) 10653 m³/min (376,200 cfm) 13 72 l/min
  • 27.
    COBB Broiler ManagementGuide COBB 1.7.4 Feeding Systems Regardless of which type of feeding system is used, feeding space is absolutely critical. If feeder space is insufficient, growth rates will be reduced and uniformity severely compromised. Feed distribution and the proximity of the feeder to the birds are key to achieving target feed consumption rates. All feeder systems should be calibrated to allow for sufficient feed volume with minimal waste. Automatic Feeder Pans: • 50-70 birds per 33 cm (12”) diameter pan is recommended. Pan feeders are generally recommended as they allow for unrestricted bird movement throughout the house, have a lower incidence of feed spillage and improved feed conversion. Feeder pans should be primed on each entry to the house to keep the system full. If birds are “tipping” the pans to reach the feed, then the pans are set too high. Chain Feeders: • Either suspended (winched) or on legs. Winching systems allow easier adjustment. • Minimum feed space of 2.5 - 4 cm per bird. • The lip of the track should always be adjusted to be level with the birds back. • Chain feeding systems can become a barrier in the house if the height is not adjusted accordingly. • Feed depth is controlled by feed slides in the hoppers and should be closely monitored to prevent feed wastage. 22 House Width Number of Feed Lines Up to 12.8 m (42 ft) 2 lines 13 m (43 ft) to 15 m (50 ft) 3 lines 16 m (51 ft) to 20 m (65 ft) 4 lines 21 m (70 ft) to 25 m (85 ft) 5 lines Require overflow (flood) setting for chick start
  • 28.
    COBB Broiler ManagementGuide COBB • Maintenance of the feed track should be carried out between flocks – corner maintenance and chain tension are very important to prevent breakdowns. • When switching to pellets, feed depth should be reduced to 1 cm above the chain. • Chain speed in important to insure uniformity - 18 m/minute (60 fpm) is recommended. • If more than one circuit is required, install the extra track running in reverse direction. • Less fines are common in chain feeding systems because birds are encouraged to clean the track before the next feed rotation. Feed Storage Bins: • Feed storage bins should have a holding capacity equal to 5 days of feed consumption. • To reduce the risk of mold and bacterial growth, it is essential that bins are watertight. • It is recommended that two feed bins be installed for each house. This allows for a rapid change in feed if it becomes necessary to medicate or meet feed withdrawal requirements. • Bulk feed bins should be cleaned between flocks. 1.7.5 Heating Systems The key to maximizing bird performance is providing a consistent housing environment - a consistent ambient and floor temperature for young birds. The heating capacity requirement depends on ambient temperature, roof insulation and the degree of house sealing. Recommendation: 23 Forced Air Heating System Requirement kW/m³ Tropical Climates 0.05 kW/m³ Temperate Climates 0.075 kW/m³ Cold Climates 0.10 kW/m³
  • 29.
    COBB Broiler ManagementGuide COBB The following heating systems are available: • Forced air heaters: These heaters need to be placed where the air movement is slow enough to allow optimum heating of the air, normally in the middle of the house. These heaters should be placed at a height of 1.4-1.5 m from the floor - a height which will not cause drafts on the chicks. Forced air heaters should never be placed near the air inlet because it is impossible for them to heat air that is moving too fast. Heaters placed at the inlets will lead to an increase in heating energy usage and cost. • Radiant / Spot brooders: Either traditional pancake brooders or radiant brooder systems are used to heat the litter within the house. These systems allow the chicks to find their comfort zone. Water and feed should be in close proximity. • Under Floor Heating: This system operates with hot water circulating through pipes in a concrete floor. The heat exchange within the floor warms the litter and the brooding area. Recommendation: Radiant brooders can be used in conjunction with space heaters. Radiant brooders are used as a primary heat source during brooding while space heaters provide supplemental heat in cold weather. As the flock matures, birds develop the ability to regulate their internal body temperature. At approximately 14 days of age, forced air heaters can become the primary heat source. Generally, radiant type heaters should be used as the primary heat source in poorly insulated houses, while forced air heating as the primary source should only be used in well insulated solid wall houses. 24 Too low heating capacity can cause uneven temperature and cold/warm spots resulting in migration, affecting uniformity and performance, and increase fuel consumption.
  • 30.
    COBB Broiler ManagementGuide COBB 25 2. House Preparation - Pre-Placement 2.1 Stocking Density Correct stocking density is essential to the success of a broiler production system by ensuring adequate room for optimal performance. In addition to the performance and profit considerations, correct stocking density also has important welfare implications. To accurately assess stocking density, factors such as climate, housing types, ventilation systems, processing weight and welfare regulations must be taken into account. Incorrect stocking density can lead to leg problems, scratching, bruising and mortality. Furthermore, litter integrity will be compromised. Thinning a portion of the flock is one approach to maintaining optimum bird density. In some countries, a higher number of birds are placed in a house and reared to two different weight targets. At the lower weight target, 20-50% of the birds are removed to satisfy sales in this market segment. The remaining birds then have more space and are reared to a heavier weight. Many different stocking densities are employed around the world. In warmer climates a stocking density of 30 kg/m² is closer to ideal. General recommendations are: House Type Ventilation Type Equipment MAXIMUM Stocking Density Open Sided Natural Stir Fans 30 kg/m² (6.2 lb/ft²) Open Sided Positive Pressure Side wall fans @ 60° 35 kg/m² (7.2 lb/ft²) Solid Wall Cross Ventilation European Set-up 35 - 42 kg/m² (7.2 - 8.6 lb/ft²) Solid Wall Tunnel Ventilation Foggers 39 kg/m² (8.0 lb/ft²) Solid Wall Tunnel Ventilation Evaporative Cooling 42 kg/m² (8.6 lb/ft²)
  • 31.
    COBB Broiler ManagementGuide COBB Housing Configuration: There are several approaches to setting up a house for brooding. Housing design, environmental conditions and resource availability will determine the housing set up. 2.2 Whole House Whole house brooding is generally limited to solid sidewall housing or houses located in mild climates. The most important aspect to whole house brooding is to produce an environment without temperature fluctuations. 26 Closed housing - whole house brooding Curtain housing - partial house brooding
  • 32.
    COBB Broiler ManagementGuide COBB 2.3 Partial House Brooding Setup Options Partial house brooding is commonly practiced in an attempt to reduce heating costs. By reducing the amount of space dedicated to brooding, one can conserve the amount of heat required and reduce energy costs. In addition, correct temperatures are more easily maintained in a small area. The aim of partial house brooding should be to use as large a brooding space as heating capacity and house insulation will allow in order to maintain desired house temperature depending on local weather conditions. Increasing the brooding area depends on heating capacity, house insulation and outside weather conditions. The goal is to increase the brooding area as soon as possible, as long as the desired house temperature is being achieved. Prior to opening, the unused brooding area needs to be heated and ventilated to the desired bird requirement at least 24 hours before releasing birds into the new area. 2.4 Brooding Chamber In poorly insulated buildings, one can reduce temperature fluctuations by building a mini tent inside the house. The mini tent is comprised of a false ceiling that runs from eave to eave. This false ceiling will greatly reduce heat loss and make temperature control easier. A second internal curtain one meter from the outside curtain needs to be installed. The internal curtain will completely seal from the floor to the false ceiling at the eaves. This curtain must open from the top and never from the bottom. The slightest air movement at floor level will cause chilling on the chicks. This second curtain can be used for early ventilation. 27
  • 33.
    COBB Broiler ManagementGuide COBB Below are some examples of partial house brooding: 1. Conventional House: • When we work with a positive pressure system, preferably the brooding area is placed in the central part of the house, like the figure below: 2. Tunnel House – no side wall inlets: • If the house is a negative pressure system with no inlets, the best option is to place this reception area near to the air entrance, to guarantee that the incoming fresh air will enter inside the brooding area during the ventilation cycle. • The incoming air to the brooding area needs to enter preferably over the tops of the curtains, because this will avoid the generation of wind speed at chick level. • In both scenarios, on the extremities of the brooding area are placed two sections (1 and 2). These sections have the function to minimize the loss of heat produced by the heater(s) placed in the brooding area. • The space between the curtains that form the limit of the chamber, need to be at 1 – 3 m wide. • The double curtain in sections 1 and 2 has the function of a double insulation barrier for the heat produced on the brooding area. • To help pre-heat the incoming air from the tunnel inlet, an additional heater can be placed in section 1. 28 Mixed Air Incoming Air Outgoing Air Brooding Area 1 2
  • 34.
    Brooding Area Brooding Area COBBBroiler Management Guide COBB 2. Tunnel House: Several partition curtain designs for house division are employed worldwide. Floor to ceiling curtains are the most commonly used to divide a house. A solid 20 cm (8”) barrier should be placed on the floor in front of the curtain ensuring that no drafts disturb the chicks. • The advantages of center house brooding is being able to split birds evenly between the front and back halves of the house from placement. A migration fence(s) is always placed as a divider in the middle of the brood area. The center house configuration makes it easier turning the birds out to the full house as they don’t have as far to travel moving from the center to both ends. The migration fences/dividers ensure equal distribution of chicks over the length of the house. • The red X’s indicate those inlets which are not being used. The inlets in the brood chamber are utilized to achieve the correct air exchange in the brood chamber during minimum ventilation. • The choice of extraction fan position will depend on house design – side wall extraction or end wall extraction: Side wall extraction: • Many house have incorporated minimum ventilation fans on both ends of the building so we are pulling air in both directions away from the brood/chick chamber and do not bring in cool air from the area behind the curtains. See the diagram below. End walls extraction: 29
  • 35.
    COBB Broiler ManagementGuide COBB The goal is to increase the brooding area as soon as possible, as long as the desired house temperature is being achieved. The placement density will depend on the brooding area being utilized. Initial stocking should not exceed more than 50 - 60 birds/m² during the winter and 40 - 50 birds/m² during the summer. Ensure adequate drinking space, especially during summer placements - do not exceed 20 - 25 birds per nipple. Generally the house should be totally open after 14 to 16 days old - varying according to the final density capacity and house structure conditions. 30 Brood Chamber Stocking Density Age (days) Density (birds/m²) 0 to 3 55 to 60 4 to 6 40 to 45 7 to 9 30 to 35 10 to 12 20 to 25 13 to 15 10 to 15? Prior to expansion, the unused brooding area needs to be heated and ventilated to the desired bird target temperature at least 24 hours before releasing birds into the new area.
  • 36.
    COBB Broiler ManagementGuide COBB 2.5 Litter Management Seldom given sufficient emphasis, litter management is another crucial aspect of environmental management. Correct litter management is fundamental to bird health, performance and final carcass quality which subsequently impacts the profit of both growers and integrators. The litter is the primary residue of the broiler house. Re-use of litter is practiced in a number of countries with a degree of success. Health and economic aspects beyond the environmental legislation must be taken into account before deciding to re-use the litter. The following are some key points to consider when re-using the litter: • All wet caked litter to be removed during down time. • In the case of a disease challenge, it is never recommended to re-use the litter. • The availability and cost to replace old litter. When re-using litter, maintaining good litter quality is essential to achieving optimal performance. The litter should be replaced as necessary, preferable after 4 cycles and at least annually. 2.5.1 Important Functions of Litter Important functions of litter include the ability: • To absorb moisture. • To dilute excreta, thus minimizing bird to manure contact. • To provide an insulation layer between the chicks and the cold floor temperatures. Though several alternatives may be available for litter material, certain criteria should apply. Litter must be absorbent, lightweight, inexpensive and non-toxic. 31 Litter choice criteria should always include post production suitability as a compost, fertilizer or fuel. Down time between flocks should be at least 14 days to maintain good litter quality.
  • 37.
    COBB Broiler ManagementGuide COBB 2.5.2 Litter Alternatives 2.5.3 Litter Evaluation A practical way to evaluate litter moisture is to pick up a handful and gently squeeze it. The litter should slightly adhere to the hand and break down when dropped to the floor. If moisture is in excess it will stay compacted even when dropped. If litter is too dry it will not adhere to your hand when squeezed. Excessive litter moisture (>35%) may cause welfare and/or health challenges. An increased incidence of breast blisters, skin burns, condemnations and downgrades may result. Litter with high moisture content may also contribute to elevated ammonia levels. If litter becomes wet beneath drinkers, water pressure and drinker height should be evaluated. After the cause has been identified and addressed, fresh litter or dry litter must be applied to the problem areas. This will encourage birds to utilize this area of the house. 32 Material Properties Pine Sawdust (kiln dried) Excellent absorptive qualities. Hardwood Shavings May contain tannins which cause toxicity concerns and splinters that may cause crop damage. Sawdust Often high in moisture, prone to mold growth and the presence of aspergillosis. Chopped straw Wheat straw is preferred to barley straw for absorptive qualities. Coarse chopped straw has a tendency to cake in the first few weeks. Paper Difficult to manage when wet; may have a slight tendency to cake and glossy paper does not work well. Rice Hulls An inexpensive option in some areas, rice hulls are a good litter alternative. Peanut Hulls Tend to cake and crust but are manageable.
  • 38.
    COBB Broiler ManagementGuide COBB 2.5.4 Minimum Litter Depth Requirements Note: The above are recommendations for housing with concrete floors. For housing with earth floors, a minimum depth of 10 cm (4”) is advised, in order to provide insulation from the ground and to provide adequate moisture holding capacity. Plastic slats offer an alternative flooring system where cost and availability of good quality litter materials is a concern. Inherent to the use of slats is the difficulty in controlling moisture, due to poor air movements, below the slats, which could result in fly control issues. 2.6 Pre-Placement Checklist The key to successful broiler rearing starts with having a systematic and efficient management program in place. This program must start well before the chicks arrive on-site. Pre-placement house preparation as part of a management program provides a basis for an efficient and profitable flock of broilers. The following checks need to be made: I. Equipment Check: After confirming that the equipment capabilities meet the number of chicks to be placed, install the necessary brooding equipment and check that all equipment is functional. Ensure that all water, feed, heat and ventilation systems are properly adjusted. II. Heater Checks: Verify that all heaters are installed at the recommended height and are operating at maximum output. Heaters should be checked and serviced BEFORE pre-heating commences. 33 Litter Type Minimum Depth OR Volume Dry Sawdust 2.5 cm (1”) Chopped Straw 1 kg/m² (0.2 lb/ft²) Straw Pellets 800 g - 1 kg/m² (0.15 - 0.2 lb/ft²) Rice Hulls 5 cm (2”) Sunflower Husks 5 cm (2”)
  • 39.
    COBB Broiler ManagementGuide COBB34 III. Thermostats or Probe Check: • Placed at bird height and in the center of the brooding area. • Minimum/maximum thermometers should be placed adjacent to thermostat. • Temperature ranges should be recorded daily and not deviate by more than 2°C (4°F) over a 24 hour period. • These should be calibrated at least annually, or sooner if doubt exists about accuracy. IV. Floor temperature Check: • Houses should be preheated so that both the floor and ambient temperatures and humidity are stabilized 24 hours before placement. • To achieve the above targets, pre-heating needs to commence at least 48 hours before chick placement. • Concrete temperature should be 28 - 30°C. • Pre-heating time is dependent on climate conditions, house insulation and heating capacity and will vary from farm to farm. • The chick is highly dependent upon the manager to provide the correct litter temperature. If the litter and air temperatures are too cold, internal body temperature will decrease, leading to increased huddling, reduced feed and water intake, stunted growth and susceptibility to disease. • At placement, litter temperatures should be 30 - 32°C (86 - 90°F) (30-50% RH) with forced air heating. If radiant heaters / brooder stoves are used, floor temperatures should be 40.5°C (105°F) under the heat source. Litter temperature should be recorded before each placement. This will help to evaluate the effectiveness of pre-heating. Chicks do not have the ability to regulate body temperature for the first 5 days and thermoregulation is not fully developed until 14 days of age.
  • 40.
    COBB Broiler ManagementGuide COBB V. Minimum Ventilation Check: • Minimum ventilation should be activated as soon as the preheating begins, in order to remove waste gases and any excess moisture. • Seal air leaks to eliminate drafts on chicks. VI. Drinker Check: • 14-16 drinkers/1,000 chicks (includes supplemental) should be provided within the brooding area of which 8-10 can be bell type drinkers. • All drinkers should be flushed to remove any residual sanitizer. • Adjust pressure to produce a droplet of water visible on each nipple, without dripping. • Check for water leaks and air locks. • Ensure that nipple drinkers are at the chicks’ eye level. • Water must be clean and fresh. • Supplemental drinkers should be placed in such a way that the chicks will make the association between supplemental drinkers and the primary source. VII. Feeder Check: • Remove all water remaining from cleanout prior to filling. • Where full house brooding is practiced, 75 g of feed per chick should be placed on the papers. The feed and paper need to last for at least 96 hours post placement. • Where partial house brooding is practiced, supplementary feed should be provided for the first 7-10 days in the form of turbo feeders / trays and papers. • Turbo feeders should be provided at a rate of at least one per 75 chicks. • Trays should be provided at a rate of one per 50 chicks. • Additionally, 50 g of feed per chick should be placed on the papers. 35
  • 41.
    COBB Broiler ManagementGuide COBB • Supplemental feeders should be placed between the main feed and drinker lines and adjacent to the brooders. • It is of utmost importance that the supplementary feeding system does not run empty as this will place great stress on the chick and reduce yolk sac absorption. • The base of the supplementary feeders should never be exposed - keep full at all times! • Supplemental feeders should be refreshed three times daily until all the chicks are able to gain access to the main feeding system. • Feed should be provided as a good quality crumble. • Do not place feed or water directly under the heat source as this may reduce feed and water intake. • The automatic system should be placed on the floor to make access easier for the chicks. Where possible, flood the automatic feeding systems with feed. • When using paper, the feed area should be a minimum of 50% of the brooding area. The paper should be placed near the automatic drinking system so that the chicks have easy access to both feed and water. • It is ideal (if the environment, temperature and air quality is correct) to have a row of paper either side of each drinker line. 36
  • 42.
    COBB Broiler ManagementGuide COBB 3. Chick Placement 3.1 Key Management Requirements • Place chicks from similar age and flock source in a single house (a maximum of 5 weeks’ difference is recommended if you need to mix donor flocks). • Placement per farm should ensure an “all in-all out” regime. • Delays in placement can contribute to the dehydration of chicks, resulting in higher chick mortality and reduced growth rate. • Transportation must provide ideal conditions for the chicks and the delivery time should be as short as possible. (Refer to the Cobb Hatchery and Optimum Broiler Development Guides). • Reduce the light intensity during chick placement to reduce stress. • Chicks must be carefully placed and evenly distributed near feed and water throughout the brooding area. When using supplemental feed on paper, place chicks on the paper. • Weigh 5% of the boxes to determine day old chick weight. • Lights should be brought to full intensity (minimum 25 lux) within the brooding area once all chicks have been placed. • Following a 1-2 hour acclimation period, check all systems and make adjustments if necessary. • Monitor the distribution of the chicks closely during the first few days. This can be used as an indicator for any problems in feeder, drinker, ventilation or heating systems. 37
  • 43.
    COBB Broiler ManagementGuide COBB38 3.2 Chick Quality Hatcheries can have a tremendous impact on the success of broiler rearing. The hatch process from egg to farm can be stressful. Efforts to minimize stress are fundamental in maintaining good chick quality. Characteristics of a good quality chick: • Well-dried, long-fluffed down. • Bright, round, active eyes. • Look active and alert. • Have completely healed navels. • Legs should be bright and waxy to the touch. • Free of red hocks. • Chicks should be free from deformities (i.e. crooked legs, twisted necks and cross beaks).
  • 44.
    COBB Broiler ManagementGuide COBB 39 Navels Legs Hocks A B C Characteristic A Excellent B Acceptable C Cull 1. Reflex Chick can flip over within 3 seconds Chick flips back over between 4-10 seconds Over 10 seconds or fails to flip over 2. Navel Clean and well healed Closed but slight abrasiveness Not closed/string/button attached or discolored 3. Legs Clean, waxy legs Some dryness/pale Dehydrated with vein protruding 4. Hocks Clean, no blemishes Slight blushing Red color/heavy blushing 5. Defects Clean, no blemishes Slight blushing Missing eye/blind, legs with cuts/abrasions, spraddled legs, cross beaks, poor feathering, clubbed down
  • 45.
    COBB Broiler ManagementGuide COBB 3.3 Brooding Management The importance of the brooding period cannot be over emphasized. The first 14 days of a chick’s life sets the precedent for good performance. Extra effort during the brooding phase will be rewarded in the final flock performance. Check chicks 2 hours after placement. Ensure they are comfortable. See the Proper Brooding Illustration: Proper Brooding 40 Just Right Constantly cheeping chicks evenly spread Too Cold Noisy chicks huddled under brooder Key Chicks Brooder Too Drafty Noisy chicks huddled together away from draught Too Hot Drowsy chicks spread around perimeter Influence of Bright Light draft or noise
  • 46.
    COBB Broiler ManagementGuide COBB 3.4 Internal Chick Temperature 1. Chick internal temperature can be measured using a small rectal probe thermometer. 2. Hatched chick internal temperature should be 40 – 40.6ºC (104 - 105ºF). 3. Chick internal temperature above 41ºC (106ºF) in first 4 days will lead to panting. 4. Chick internal temperature below 40ºC (104ºF) indicates that the chick is too cold. 5. Chick internal temperature increases over the first five days to 41 - 42ºC (106 - 108ºF). 6. A comfortable chick will breathe through its nostrils and lose 1-2 g of moisture in the first 24 hours. 7. The yolk also contains 1-2 g of moisture so the chick will lose weight but not become dehydrated. 8. If chicks start panting they can lose 5-10 g of moisture in the first 24 hours and then dehydration will occur. 9. Higher relative humidity will reduce moisture loss but also impair heat loss, so correct temperature is vital. 10. Chicks from smaller eggs (younger breeder flocks) require higher brooding temperatures because they produce less heat. 11. The yolk contains ⅔ fat and ⅓ protein - fat for energy and protein for growth. 12. If early feed consumption doesn’t take place the chick will use both fat and protein in the yolk for energy, resulting in inadequate protein levels for growth. 41
  • 47.
    COBB Broiler ManagementGuide COBB • Effect of feed intake on internal chick temperature - the chick at Spot 1 - 34.1°C (93.38°F) has eaten and the chick at Spot 2 - 32°C (89.6°F) has not. 42 Spot 1 34.6°C / 94.3°F Spot 2 32.0°C / 89.6°F
  • 48.
    COBB Broiler ManagementGuide COBB 4. Post Placement of Chicks 4.1 Post Placement Checklist Ensure that both feeders and drinkers are in adequate supply, relative to the stocking density, and in close proximity to each other. It’s important that these areas have the correct ambient, floor and litter temperature, protecting the chicks’ “thermal comfort zone.” I. Mini Drinker Check (Supplemental): • Should be provided at a rate of 6-8/1,000 chicks. • Should never be allowed to run dry. • Must be cleaned and refilled as necessary. • Maintain maximum water levels until chicks are large enough to create spillage. • Should be removed approximately 48 hours after placement. • Should be placed slightly higher than the litter to maintain water quality yet not so high that access is impeded. II. Bell Drinker Check: • Height should be maintained such that the lip is at the level of the birds’ back. • Frequent assessment and adjustment is essential. • Must be cleaned daily to prevent buildup of contaminants. If necessary, in hot climates, flush the water system at least two or three times daily to maintain a good water temperature. • All bell drinkers should be ballasted to reduce spillage. 43 Water should be 0.5 cm (0.20”) from the lip of the drinker at day of age and reduced gradually after seven days to a depth of 1.25 cm (0.5”) or thumbnail depth.
  • 49.
    COBB Broiler ManagementGuide COBB III. Nipple Drinker Check: • Height should be at chicks’ eye level for the first 2-3 hours of age and then maintained slightly above chicks’ head. • Pressure should be such that there is a droplet of water suspended from the nipple but no leakage. • The birds’ feet should always be flat on the litter and a bird should never have to stand on its toes to drink. • As a general guide, a nipple flow rate of 40 ml/minute is recommended in the first week. However, always refer to the manufacturer’s instructions. • Flush the lines as necessary, for good hygiene and water temperature control. IV. Feeder Check: • Feed should be provided in crumb form and placed on trays or papers. • Feeders should be placed in a fashion that maximizes accessibility. • For brooding, feeders should be placed on the ground, down in the litter, and set on overflow (flooding of pans) where possible. • Feeders need to be raised incrementally throughout the growing period so that the lip of the trough or pan is level with the birds back at all times. • The feed level within the feeders should be set so that feed is readily available while spillage is minimized. 44 Never allow the feeders to run empty at any time.
  • 50.
    COBB Broiler ManagementGuide COBB V. Crop Fill Evaluation: The main objective of management during the first hours after placement on the farm is to achieve as much intake of both feed and water in as many chicks as possible. Failure to achieve this objective will lead to irreversible compromised flock performance and will express itself as poor growth, poor feed conversion and poor flock uniformity. • An excellent indicator of floor temperature is the temperature of the chick’s feet. • If the chick’s feet are cold, the internal body temperature of the chick is also reduced. • Cold chicks will be seen huddling with reduced activity and resulting in reduced feed and water intake and therefore reduced growth rate. • By placing the chicks feet against your neck or cheek one can readily learn how warm or cold the chick is. • If they are comfortably warm, the chicks should be evenly and actively moving around the brooding area. • If the crops of the chicks are checked eight hours after placement a minimum of 85% of examined chicks should have both feed and water present. • A minimum of 95% of the bird’s crops should be filled upon examination the morning after placement. 45 • Evaluate crop fill and indicate results on form as below: • Sample 100 chicks per brood area. • Check: temperature of feet against neck or cheek. • If the feet are cold, re-evaluate pre-heating temperature. Crop fill No. of chicks Full - Pliable Feed & Water Full - Hard Only feed Full - Soft Only water Empty Evaluation
  • 51.
    COBB Broiler ManagementGuide COBB VI. Seven-day Bodyweight and Feed Conversion Check: • Mortality percentage is a good indicator of chick quality, hatching process, house set up and early brooding management. • Maximum seven day mortality should not exceed 1% cumulative. • Measuring seven-day weights will give an indication of how successful the brooding management has been. • Failure to achieve good seven-day weights will mean an inferior result at the end of the growing cycle. • For every extra gram gained by day 7 we should target an increase of 6 - 7 g at 35 days. • The objective is to achieve 4.6 times the day old weight at seven days of age-minimum. • Minimum water consumption of 1 ml/bird (3.4 oz/100 chicks) per hour for the first twenty four hours after placement. 46 Chicks should not be encouraged to drink from the drip trays after the first day of placement - water in the drip trays is easily contaminated from the environment and wasted onto the litter.
  • 52.
    COBB Broiler ManagementGuide COBB Water consumption should equal approximately 1.6-2 times that of feed by mass, but will vary depending on environmental temperature, feed quality and bird health. • Water consumption increases by 6% for every increase in 1 degree in temperature between 20-32°C. • Water consumption increases by 5% for every increase in 1 degree in temperature between 32-38°C. • Feed consumption decreases by 1.23% for every increase in 1 degree in temperature above 20°C. Relation between ambient temperature and water feed ratio Singleton (2004) 4.2 Flushing All modern poultry watering systems need to be flushed, best practiced on a daily basis to remove bio film, but as a minimum three times per week. High pressure flushing requires having adequate volume and pressure. One to two bars (14-28 psi) of water pressure will create the velocity and turbulence in the pipe work to remove bio film. Flush 2 seconds per meter (3.3 feet) of drinker line in flush mode. Note: 2 seconds of flushing per meter of drinker line in flush mode. In warm/hot climates it might be necessary to flush more than once a day to cool the water temperature. There are automatic flushing systems that make the flushing job easier, saving the grower time and ensuring the water flushing happens. 47 Temperature °C / °F Ratio water and feed 4°C / 39°F 1.7:1 20°C / 68°F 2:1 26°C / 79°F 2.5:1 37°C / 99°F 5:1
  • 53.
    COBB Broiler ManagementGuide 5. Growing Phase Broiler producers must place added emphasis on supplying a feed that will produce a product to meet their customers’ specifications. Growth management programs optimizing flock uniformity, feed conversion, average daily gain and livability are most likely to produce a broiler that meets these specifications and maximizes profitability. These programs may include modification of lighting and/or feeding regimes. 5.1 Uniformity Uniformity is a measure of the variability of bird size in a flock. This can be measured by various means, such as: 1. Visual and subjective evaluation 2. By weight +/- 10% 3. By coefficient of variation 4. Post slaughter – carcass yield evaluations How to calculate flock uniformity: • Divide the house into three sections. • Take a random sample of approximately 100 birds from each section or 1% of the total population. • Weigh and record the individual weights. • It is important to weigh all birds within the catch pen, excluding culls. • Count the number of birds 10% either side of the average body weight of the 100 bird sample. • The number as a percentage of the sample represents the flock uniformity percentage. 48 COBB
  • 54.
    COBB Broiler ManagementGuide Coefficient of Variation (CV) The coefficient of variation (CV) is commonly used to describe variability within a population. A low CV indicates a uniform flock. A high CV indicates an uneven flock. Variation can be expressed either in terms of: • average bird weight • standard deviation of body weight • coefficient of variation in body weight The coefficient of variation is a comparative measure of variation that allows the change in variation during the growth of the flock to be monitored. The standard deviation is a measure of how widely values are dispersed around the average value (the mean). In a normal flock, approximately 95% of the individual birds will fall in a band +/- two standard deviations either side of the average body weight. 49 CV Uniformity Evaluation 8 80% Uniform 10 70% Average 12 60% Poor Uniformity An acceptable broiler as-hatched flock uniformity has a CV of 8-10 (day old chick average uniformity CV 7.88). COBB
  • 55.
    COBB Broiler ManagementGuide CV% = (Standard deviation (g) ÷ average body weight (g)) x 100 The following table gives an approximation of flock uniformity (% within +/- 10%) into CV%. 5.2 Temperature • Floor temperatures are critical for the first two weeks as the chicks tend to lose significant heat through their feet. Cold Chicks vs Hot Chicks 50 % Uniformity CV (%) 95.4 5 90.4 6 84.7 7 78.8 8 73.3 9 68.3 10 63.7 11 58.2 12 55.8 13 52.0 14 49.5 15 46.8 16 min ~24.1°C min ~75.4°F 35.0°C, 95.0°F 35.0°C, 95.0°F 22.0°C, 71.6°F 22.0°C, 71.6°F min ~36.9°C min ~98.4°F COBB
  • 56.
    COBB Broiler ManagementGuide • Water spillage and wastage should be kept to a minimum especially in winter time because of lower air exchange during these months. • Place drinker lines at a height that the birds have to stretch slightly to reach. Note: Ideal water temperature is between 10-14°C (50-57°F), however birds can tolerate a wide range of water temperature; even so water temperature should never be allowed to be less than 5°C (41°F) or greater than 25°C (77°F). If this occurs the drinking system must be flushed at least 3 times per day. 51 Spot 1 31.6°C / 88.9°F Spot 2 35.7°C / 96.2°F Water temperature at placement (31.6°C / 88.9°F). At placement a bead of water should be visible on the end of the nipple to encourage water consumption - this is achieved by setting the pressure low in the drinking system. After the first hours and once you are sure that water consumption has been adequately achieved in the flock, increase the pressure setting in the drinking system to prevent spillage and wet litter. COBB
  • 57.
    COBB Broiler ManagementGuide 52 Pre-heat house for 48 hours before chicks arrive, with brooding temperatures stabilized for 24 hours before placement to heat the litter and house temperature to 32°C (89.6°F) (blow type heaters) and 40.5°C (104.9°F) (for radiant heaters - under the brooder) providing a minimum concrete temperature of 28°C (82.4°F). Example of good concrete temperature from adequate pre-heating and uniform distribution of heat by the minimum ventilation system Spot 29.2°C / 84.6°F RH(%) 45.2 Air 33.6 COBB
  • 58.
    COBB Broiler ManagementGuide • As concrete temperature increases feed intake increases. The maximum concrete temperature should be 32°C (90°F). With any further increases in temperature, feed intake decreases, and at 35°C (95°F) stops altogether. • Often concrete/litter temperature is measured quickly at chick placement in a few random areas, which is not representative of the true uniformity of concrete/litter temperatures. The best way to measure is to take a reading (both concrete/litter) every six meters in length of the poultry house and in three rows across the width of the house. 53 Feed intake in relation to concrete temperature FeedIntake Concrete Temperature 82.4°F 28.0°C 86.0°F 30.0°C 89.6°F 32.0°C 93.2°F 34.0°C 95.0°F 35.0°C 96.8°F 36.0°C C E N T E R R I G H T L E F T Measure every 6 m (19.69 ft) and in three rows across the house COBB
  • 59.
    COBB Broiler ManagementGuide • These readings can then be entered in excel to produce a contour graph. 54 Poor uniformity of concrete temperature Excellent uniformity of concrete temperature Left Center Concrete Temperature °C (°F) Concrete Temperature °C (°F) Right Left Center Right 2 4 6 8 10 12 14 16 18 20 22 24 26 Bays 66.2 - 69.8°F 19 - 21°C 69.8 - 73.4°F 21 - 23°C 73.4 - 77.0°F 23 - 25°C 77.0 - 80.6°F 25 - 27°C 80.6 - 82.4°F 27 - 28°C 66.2 - 71.6°F 19 - 22°C 71.6 - 77.0°F 22 - 25°C 77.0 - 82.4°F 25 - 28°C 82.4 - 87.8°F 28 - 31°C 87.8 - 91.4°F 31 - 33°C 2 4 6 8 10 12 14 16 18 20 22 24 26 27 Bays • Concrete temperature has a big impact on early performance especially mortality, weight gain and flock uniformity. COBB
  • 60.
    COBB Broiler ManagementGuide 55 2150 4.74 2140 4.72 2130 4.70 2120 4.67 2110 4.65 2100 4.63 2090 4.61 2080 4.59 2070 4.56 Finalweight(g/lb) Less than 28°C (82.4°F) Greater than 28°C (82.4°F) Concrete Temperature °C (°F) Final weight increases to 2,142 g (4.72 lb) from 2,098 g (4.62 lb) when concrete temperature at placement is GREATER THAN 28°C (82.4°F). Final Weight v Concrete Temperature 1.40 1.20 1.00 0.80 0.60 0.40 0.20 0.00 7daymortality% Less than 28°C (82.4°F) Greater than 28°C (82.4°F) Concrete Temperature °C (°F) 7 Day Mortality % v Concrete Temperature 190 0.42 185 0.41 180 0.40 175 0.39 170 0.37 165 0.36 160 0.35 7dayweight(g/lb) Less than 28°C (82.4°F) Greater than 28°C (82.4°F) Concrete Temperature °C (°F) 7 Day Weight % v Concrete Temperature 7 day mortality increases to 1.31% from 0.96% when concrete temperature at placement is LESS THAN 28°C (82.4°F). 7 day weight increases from 171 g (0.38 lb) to 186 g (0.41 lb) when concrete temperature at placement is GREATER THAN 28°C (82.4°F). COBB
  • 61.
    COBB Broiler ManagementGuide • The minimum temperature for the first 14 days should not fall more than 1°C (1.8°F) below the set point. • Ensure heaters have been serviced. • Calibrate sensors before placement. • Ensure you have adequate heating capacity. • Radiant heating - ensure the correct number of chicks per heater. • Install back up thermometers to confirm environment. • Place sensors at bird height. 56 185 0.41 180 0.40 175 0.39 170 0.37 165 0.36 160 0.35 155 0.34 150 0.33 7dayweight(g/lb) <0.05 0.05> Heating Capacity kW/m3 7 Day Weight v Heating Capacity kW/m3 2,500 5.51 2,450 5.40 2,400 5.29 2,350 5.18 2,300 5.07 2,250 4.96 2,200 4.85 2,150 4.74 Finalweight(g/lb) <0.05 0.05> Heating Capacity kW/m3 Final Weight v Heating Capacity kW/m3 1.60 1.40 1.20 1.00 0.80 0.60 0.40 0.20 0.00 7daymortality% <0.05 0.05> Heating Capacity kW/m3 7 Day Mortality % v Heating Capacity kW/m3 Forced air heating - where winter outside minimum temperatures are above 0°C a minimum heating capacity of 0.075 kW/m³ of house volume is required. If outside temperature fall below 0°C, a minimum heating capacity of 0.10 kW/hour per cubic meter of house volume is required. COBB
  • 62.
    COBB Broiler ManagementGuide Activity Check: Every time you enter a poultry house you should always observe the following activities: • Birds eating • Birds playing • Birds drinking • Birds “talking” • Birds resting • Birds should never be huddling Temperature guide 57 Age days Relative humidity % Temperature °C (°F) (for chicks from 30 week old parent flocks or younger) Temperature °C (°F) (for chicks from 30 week old parent flocks or older) 0 30-50 34 (93.2) 33 (91.4) 7 40-60 31 (87.8) 30 (86.0) 14 40-60 27 (80.6) 27 (80.6) Chicks from pre-peak breeder flocks are smaller and have a higher need for external heat to maintain their optimal body temperature compared to larger chicks. Smaller chicks have increased surface to body weight ratio and therefore body heat loss is greater than larger chicks. Stocking Density and Role in Temperature Management Any time stocking densities increase above 28 kg/m² heat trapped below the birds can build up very quickly. If this excess heat is not removed the birds will become too hot and resort to increased panting. Increased bird temperatures will result in higher levels of panting, reduce feed intake and subsequent decreases in daily gains. Higher levels of panting means energy required for growth is being used for heat dissipation resulting in increased feed conversions. Stocking densities in excess of 42 kg/m² should be avoided because bird heat removal by the ventilation system becomes very difficult. COBB
  • 63.
    COBB Broiler ManagementGuide Stocking densities above 28 kg/m² require the stockman to constantly monitor bird behavior, feed intake and internal bird temperature. Adjustments in air exchange rates, air velocity and house set points need to be made to ensure the bird comfort. These adjustments are going to depend on whether the house has tunnel ventilation capabilities, and does not take into account the “wind chill factor”. For example 3.5 kg bird at a density of 38 kg/² would require a set point guideline temperature of 17-18°C regardless of age. The following table is a temperature guideline based on stocking densities: 58 Temperature Guide based on Stocking Density Density kg/m² Target Temp. Range (°C) Target Temp. Range (°F) 28 22-24 72-75 30 21-23 70-73 32 20-22 68-72 34 19-21 66-70 36 18-20 64-68 38 17-19 63-66 40 16-18 61-64 42 15-17 59-63 42+ 14-16 57-61 COBB
  • 64.
    COBB Broiler ManagementGuide 5.3 Lighting Programs Lighting programs are a key factor for good broiler performance and flock welfare. Lighting programs are typically designed with changes occurring at predetermined ages and tend to vary according to the final target market weight of the broilers. Lighting programs designed to prevent excessive growth between 7 and 21 days have been shown to reduce mortality due to ascites, sudden death, leg problems, pendulous crop and spiking mortality. Research indicates that lighting programs which include 6 hours of continuous darkness will improve the development of the immune system. One standard lighting program will not be successful for all parts of the world. Therefore, the lighting program recommendations listed in this guide should be customized based on the environmental conditions, house type and overall stockman objectives. Lighting programs inappropriately employed may impair average daily gain (ADG) and compromise flock performance. Careful observations of flock performance, nutrient density and intake are also important in designing lighting programs. If accurate ADG information can be acquired, a program based on average weight gains is preferred. 59COBB
  • 65.
    COBB Broiler ManagementGuide The intensity and distribution of light alters broiler activity. Correct stimulation of activity during the first 5-7 days of age is necessary for optimal feed consumption, digestive and immune system development. Reducing the energy required for activity during the growing period will improve feed efficiency. Uniform distribution of light throughout the house is essential to the success of any lighting program: • Light intensity - 25 lux (2.5 foot-candles) in the darkest part of the house, as measured at chick height, should be the minimum used during brooding to encourage early feed intake and early weight gains. • Light intensity should not vary more than 20% from brightest to darkest place at floor level. • After 7 days of age, or at 130 - 180 g body weight, light intensities should be reduced gradually to 5-10 lux (0.5-1 fc). See lighting programs section for more details. Note: Lowering light intensity below 5 lux during the growing phase to improve feed conversion ratio (FCR), risks the reduction of daily feed consumption and a decrease in the average daily gain. 60 Local government legislation may affect the lighting program that can be used. All operations must comply fully with local animal welfare regulations. COBB
  • 66.
    COBB Broiler ManagementGuide 61 60 watt equivalent LED bulb Compact fluorescent spotlight 60 watt equivalent Old style compact fluorescent bulb Soft output 60 watt incandescent bulb Clear 40 watt incandescent bulb LED lamp equivalent to 60 watt halogen bulb Dimmable corn LED bulb 60 watt compact fluorescent Fluorescent tube Examples of light sources that can be used in the broiler house. COBB
  • 67.
    COBB Broiler ManagementGuide 5.3.1 Key Points to Consider When Using a Lighting Program • Test any lighting program before making it firm policy. • Provide 24 hours light on the first day of placement to ensure adequate feed and water intake. • Turn the lights off on the second night to establish when that off time will be. Once set, this time must never change for the life of the birds. • Once the switch off time has been established for the flock, any adjustment should be by adjusting the on time only. Birds soon get used to when the off time is approaching and will “crop-up” and drink before the lights go off. • Use a single block of darkness in each 24-hour period. • Start increasing the dark period when the birds reach 130-180 g. • If partial house brooding is practiced, delay dimming until the full house is utilized. • Allow the birds to feed ad libitum to ensure they go into the dark period full of feed and water and can eat and drink immediately when the lights turn back on. This helps prevent dehydration and reduces stress. • As much as is possible, the darkness should be provided at night to ensure the dark periods are truly dark and that adequate inspection of the flock is possible during the day. • The birds should be weighed at least weekly and on days that the program is scheduled to be adjusted. The lighting program should be adjusted according to the average weight of the birds. Past experience of a particular farm’s performance should also be considered. • The length of the dark period should be increased in steps and not in gradual hourly increases (see programs). 62 COBB
  • 68.
    COBB Broiler ManagementGuide • Reducing the dark period before catching reduces “flightiness.” • If progressive depopulation is practiced it is good policy to reintroduce 6 hours darkness the first night after depopulation. • Reduce the darkness in times of warm weather if the birds are being stressed during the day and feed intake has been reduced. • In winter time coincide the off time with dusk so the birds are awake during the coldest part of the night. • In the summer time the on time should coincide with sunrise to encourage feed intake before the peak heat of the day. • Make sure that there are no drafts or wet litter at the end of the house where demand pans are installed. This could result in empty feeding systems leading to panic and scratching when lights switch on. • Do not turn the feed and water off during the dark period. • Best to begin increasing/decreasing light prior to on/off periods over a one hour period using a dawn to dusk dimming system. • Broiler producers with clear curtain housing have limited alternatives. They need to design their lighting programs to coincide with natural daylight. • 48 hours prior to catch, increase light intensity to 10/20 lux to acclimate the birds to catching - only if daylight catching is practiced! 63COBB
  • 69.
    COBB Broiler ManagementGuide 5.3.2 Four Lighting Programs 1. Standard Lighting program - Option 1 • Slaughter weight: <2.5 kg (5.5 lb) 2. Standard Lighting program - Option 2 • Slaughter weight: <2.5 kg (5.5 lb) 64 Age days Hours dark Hours change 0 0 0 1 1 1 130-180 g 6 5 Five days before kill 5 1 Four days before kill 4 1 Three days before kill 3 1 Two days before kill 2 1 One day before kill 1 1 Age days Hours dark Hours change 0 0 0 1 1 1 130-180 g 6 5 21 5 1 28 4 1 35 3 1 Two days before kill 2 1 One day before kill 1 1 COBB
  • 70.
    COBB Broiler ManagementGuide 3. Standard Lighting program - Option 3 • Slaughter weight: 2.5 kg - 3.0 kg (5.5 - 6.6 lb) 4. Standard Lighting program - Option 4 • Slaughter weight: >3.0 kg (6.6 lb) 65 Age days Hours dark Hours change 0 0 0 1 1 1 130-180 g 8 7 21 7 1 28 6 1 35 5 1 42 4 1 49 3 1 Three days before kill 3 1 Two days before kill 2 1 One day before kill 1 1 Age days Hours dark Hours change 0 0 0 1 1 1 130-180 g 10 9 22 9 1 28 8 1 35 7 1 42 6 1 49 5 1 Five days before kill 5 0 Four days before kill 4 1 Three days before kill 3 1 Two days before kill 2 1 One day before kill 1 1 COBB
  • 71.
    COBB Broiler ManagementGuide 5.4 Lighting Program Benefits • A period of darkness is a natural requirement for all animals. • Energy is conserved during resting, leading to an improvement in feed conversion. • Mortality is reduced, and skeletal defects are reduced. • The light/dark period increases melatonin production, which is important in immune system development. • Bird uniformity is improved. • Growth rate can be equal to or better than that of birds reared on continuous light when compensatory gain is attained. • Birds with the adequate dark/rest period have a calmer behavior and fewer tendencies to present crowds, scratches and lesions. 66 COBB
  • 72.
    COBB Broiler ManagementGuide 6. Ventilation Management 6.1 Minimum Ventilation Definition: Minimum ventilation systems are designed to manage oxygen levels and moisture using fans on a cycle timer. The system is independent of temperature - operating any time the house temperature is at or below set temperature. The minimum air exchange required must ensure adequate supply of oxygen while removing the waste products of growth and combustion from the environment. 67 Key functions: 1. Provide oxygen to meet the bird’s metabolic demand 2. Moisture and humidity control 3. Maintenance of good litter conditions Air exchange with minimal air movement at chick level <0.30 m/s The maximum level of CO² allowed at any time in the chicken house is 3,000 ppm. If the house environment exceeds 3,000 ppm of CO² or less than 19.6% O² then the ventilation rate must be increased. Air quality guidelines Oxygen % > 19.6% Carbon Dioxide (CO ² ) < 0.3% / 3000 ppm Carbon Monoxide < 10 ppm Ammonia < 10 ppm Inspirable Dust < 3.4 mg/m³ (.0001 oz/35.3 ft³) Relative Humidity < 70% COBB
  • 73.
    COBB Broiler ManagementGuide 5 Minute timer cycle: The timer fans should provide an air exchange capability of approximately 12.5% or 8 min exchange rate based on house volume, or a capacity of 1 – 2 cfm per 1 ft² of floor area or 0.3 - 0.61 m³/min/m² floor area. Note: always match fans as close to requirement as possible. The minimum start run time needs to be approximately 60 seconds to ensure adequate mixing of the cold incoming air with the warm internal air. • A 5-minute cycle is preferred and should not exceed 10 min. • Any time the air quality begins to deteriorate, the ON time must be increased - cycle time always remains constant. • Humidity should be maintained below 60 – 65% where possible. • Increases in ON times should be made in small increments – 10 to 15 seconds and monitored for 24 hours. • Correct operation of the side wall inlets is vital in achieving good air volume and distribution. • The inlets should react to the fans and work on pressure, NOT on percentage of opening or temperature. • The inlet capacity should match the fan capacity at the fans working pressure based on the width of the house – see Table: 1 on page 74. 68 Minimum Ventilation Timer Settings - Seconds Day ON OFF 1 60 (20%) 240 3 60 240 5 75 225 8 90 210 11 105 195 14 120 180 18 135 165 22 150 150 25 165 135 30 180 (60%) 120 COBB
  • 74.
    COBB Broiler ManagementGuide 6.2 Fans Needed for Minimum Ventilation The minimum ventilation system should be able to operate for the full life of the flock, during winter conditions. The following are 2 methods on how to calculate the number of fans required: Method A. Cobb Minimum Ventilation Fan Requirement Calculation : • These fans should be fixed volume and not variable speed. • The capacity of fans on the timer should be able to give a total air exchange range from 8 (12.5%) to 5 min (20%). • Note: the 5 min (20%) capacity will only be needed for producers in cold climates growing a large broiler. • The number of fans required for an air exchange every 8 min. is as follows: Note: All examples that follow are in metric and imperial: House Volume: • House Volume: length x width x average height = House Volume (m³/ ft³). • Note: Average Height = height of side wall + ½ height from eave to peak of the roof. Fans Capacities used in the examples are rated @ 0.1” inches of water column or 25 pa • 900 mm or 36”, working capacity of 340 m³/min or 12,000 cfm. • 1,270 mm or 50”, working capacity of 680 m³/min or 24,000 cfm. 69COBB
  • 75.
    COBB Broiler ManagementGuide Sample Dimensions: • House dimensions: 150 m long, 15 m wide and 2.88 m average height • House dimensions: 500 ft long, 50 ft wide and 9.25 ft average height Calculation Example: • House volume = 150 m x 15 m x 2.88 m = 6,480 m³ • Fan capacity for a 900 mm fan = 340m³/ min • Air exchange range 8 - 5 min • 6,480 m³ ÷ 8/5 = 810/1,296 m³/min • 810 m³/min ÷ 340 m³/min = 2.38 or 2 fans (900 mm fans) • 1,296 m³/min ÷ 340 m³/min = 3.8 or 4 fans (900 mm fans) • House volume = 500 ft x 50 ft x 9.25 ft = 231,250 ft³ • Fan capacity for a 36” fan = 12,000 cfm • Air exchange range 8 - 5 min • 231,250 ft³ ÷ 8/5 = 28,906/46,250 cfm • 28,906 cfm ÷ 12,000 cfm = 2.4 or 2 fans (36” fans) • 46,250 cfm ÷ 12,000 cfm = 3.9 or 4 fans (36” fans) 70 0.75 m / 2.5 ft 2.5 m / 8 ft Average height = 2.5 m + (0.5 x 0.75 m) = 2.88 m Average height = 8 ft + (0.5 x 2.5 ft) = 9.25 ft 150 m / 500 ft 15 m / 50 ft COBB
  • 76.
    COBB Broiler ManagementGuide Method B. Typical US Tunnel House Minimum Ventilation Fan Requirement Calculation Minimum ventilation fan capacity to be installed 1 – 2 cfm per 1 ft² of floor area or 0.3 - 0.61 m³/min/m² floor area. Note: the 2 cfm/ft² capacity will only be needed for producers in cold climates growing a large broiler. Calculation Example: • House area: 150 m (500 ft) × 15 m (50 ft) = 2,250 m² (25,000 ft²) • Air exchange range: 0.3 m³/min/m² o 2,250 m² × 0.3 m³/min/m² = 675 m³/min o 675 ÷ 340 m³/min = 1.98 or 2 fans • Air exchange range: 1 to 2 cfm/ft² o 25,000 ft² × 1 to 2 cfm/ft² = 25,000 cfm to 50,000 cfm o 25,000 cfm ÷ 12,000 cfm = 2.1 or 2 fans Note: Minimum ventilation calculations are only guidelines. Daily adjustments should be made based on air quality and humidity. The range and capacity of fans to be used for cycle ventilation will increase over time until all installed minimum ventilation fans are used. 71COBB
  • 77.
    COBB Broiler ManagementGuide 6.3 Negative Pressure - Key Requirement for Minimum Ventilation The most efficient way to accomplish air distribution for minimum ventilation is by using a negative pressure ventilation system. This system should direct the incoming air into the peak of the house. The pressure drop across the inlets should be adjusted to ensure that the incoming air reaches the peak of the house where the heat has accumulated. The pressure drop selected will depend on the width of the house or how far the air has to travel once it enters the house. Correct air pressure is achieved by matching the inlet area and the fan capacity. Air inlets should be pressure controlled to maintain a constant air speed throughout the ventilation stages. These inlets should close and seal completely when the fans are off. When open, the air should only enter over the top of the inlet and not from the sides or through the bottom of the inlet. Inlets that leak air through the sides and bottom will direct cold air to the floor, resulting in chilled birds and condensation. In open truss houses, the angle of the inlet opening must be such that the air is not directed onto a purling. Obstructions such as a purling or electrical conduit should be avoided because they interrupt the air flow, forcing the air to the floor. 72 Spot 1 11.78°C / 53.2°F Spot 2 17.22°C / 63.0°F Spot 3 23.00°C / 73.4°F Spot 4 24.28°C / 75.7°F COBB
  • 78.
    COBB Broiler ManagementGuide The following table can be used as a reference guide for different widths of poultry houses in determining the required inlet air speed and pressure difference required to ensure the air reaches the center of the house. Table: 1 Always use a smoke test to ensure that the incoming air reaches the center of the house. Note: In houses with side wall inlets only on one side and fans on the opposite wall, the air speeds and pressures need to be increased accordingly to ensure air distribution over the entire cross section of the house. 73 House width (m) Pascal’s/” H ² O Air speed m/s (fpm) Distance air travels (m/ft) 10 20 (0.08) 5.7 m/s (1122 fpm) 5.0 m/16 ft 12 25 (0.10) 6.5 m/s (1280 fpm) 6.0 m/20 ft 15 31 (0.12) 7.2 m/s (1417 fpm) 7.5 m/25 ft 18 37 (0.15) 7.8 m/s (1535 fpm) 9.0 m/30 ft 21 43 (0.17) 8.4 m/s (1654 fpm) 10.5 m/35 ft 24 49 (0.20) 9.0 m/s (1772 fpm) 12.0 m/40 ft Guideline: For every 61 cm (2 ft) the incoming air needs to travel, a pressure drop of 0.01” WC or 2.5 Pa is required. COBB
  • 79.
    COBB Broiler ManagementGuide 6.4 Simple Negative Pressure Test To effectively generate a negative pressure system, a controlled environment must be created. The house needs to be as air tight as possible. Typically, leaks are located along the roof ridge, close to the fans, around doors and along stem walls. Test the effectiveness of how well the house is sealed by closing all the inlets, then open a door slightly ajar or crack open an inlet. Turn on the equivalent of 1cfm per 1 ft² or 0.30 m³/min (18 m³/hr) per 1 m² of floor area should record a pressure in excess of 37.5 Pa (0.15” WC) across the opening. If the pressure is < 25 Pa or 0.10” WC, it’s an indication the house is poorly sealed. On any new housing, the test results should be in excess of 50 Pa or 0.20” WC. The following is an example of pressure readings in a new house in full tunnel operation during a test. 74 Front Wall Tunnel Inlet ¼ House ½ House Fan End 15 Pa 0.06” WC 20 Pa 0.08” WC 32 Pa 0.13” WC 37.5 Pa 0.15” WC 42 Pa 0.17” WC Turn on the equivalent of 1 cfm per 1 ft² or 0.30 m³/min (18 m³/hr) per 1 m² of floor area should record a pressure in excess of 37.5 Pa (0.15” WC) across the opening. If the pressure is < 25 Pa or 0.10” WC, it’s an indication the house is poorly sealed. COBB
  • 80.
    COBB Broiler ManagementGuide 6.5 Inlet Management and Installation The inlets need to open enough to achieve the required static pressure and airflow. A minimum opening of 2.5 cm - 5 cm (1 - 2”) is required to ensure cold air reaches the center – depending on the inlet design. 75 Oxygen at bird level, floors dry and heating costs low Ideal air flow for negative ventilation RH-50%, 16°C (60.8°F) RH-75%, 10°C (50°F) RH-100%, 4°C (39.2°F) Hottest air in the house RH-25%, 27°C (80.6°F) COBB
  • 81.
    COBB Broiler ManagementGuide 76 Poor litter, cold birds, more stress, more mortality, higher energy costs, higher feed conversion RH-75%, 10°C (50°F)RH-100%, 4°C (39.2°F) Hot air pocket COBB
  • 82.
    COBB Broiler ManagementGuide 6.6 Transitional Ventilation • Transition ventilation is a temperature control stage. • These fans operate on a thermostat. • A vital stage of ventilation to ensure daily feed intake with young birds, especially in hot climates. Fan capacity requirement for full transition: The transitional ventilation system typically utilises 40% - 50% of the total tunnel ventilation capacity. • These fans use side wall inlets evenly distributed on each side wall the full length of the house. The inlets are most efficient when controlled by negative pressure. • This system gives excellent temperature control and reduced risk of chilling of the chicks and is a valuable part of any ventilation system. • The final stage of transition or full transition, the tunnel inlet will open. How many inlets for full transition: • Depends on - how much air can we pull through a single inlet? • Depends on - how many fans do you want to operate through the inlets? • In Cold climates without a tunnel ventilation system all ventilation will be through the side wall inlets. These houses have a maximum air exchange capacity in the region of 1.5 minutes. 77 Key function: to increase house air exchange and manage temperature without creating high air speeds across the birds. Maximum airspeeds range from 25% of full tunnel ventilation: 0.5 – 0.8 m/s (100 – 150 fpm) COBB
  • 83.
    COBB Broiler ManagementGuide Transition Ventilation Rates – Methods A and B: Method A: these fans have an operating capacity to ensure an air exchange rate of 2 - 3 min Method B: Fan requirement based on house floor area: 4 – 5 cfm/ft² or 1.2 – 1.5 m³/min/m² Fan capacities used in the examples are rated @ 0.1” inches of water column or 25 Pa • 900 mm or 36”, working capacity of 340 m³/min or 12,000 cfm • 1,270 mm or 50”, working capacity of 680 m³/min or 24,000 cfm Sample Dimensions: • House dimensions: 150 m long, 15 m wide and 2.88 m average height • House dimensions: 500 ft long, 50 ft wide and 9.25 ft average height Calculation Example: Method A: • House Volume 6,480 m³ ÷ 3 min to 2 min = 2,160 to 3,240 m³/min • Fans needed: 2,160 to 3,240 m³/min ÷ 680 m³/min = 3 to 5 tunnel fans • House volume 231,250 ft³ ÷ 3 min to 2 min = 77,083 to 115,625 cfm • Fans needed: 77,083 to 115,625 cfm ÷ 24,000 cfm = 3 to 5 tunnel fans 78 • The more fans you can operate through side wall inlet ventilation the longer you can delay running tunnel ventilation – 50% of tunnel capacity. • To transition to tunnel the outside temperature needs to be warm – above 25°C. • Houses in cold climates with summer temperatures rarely above 30°C, operate all temperature ventilation through side inlets. COBB
  • 84.
    COBB Broiler ManagementGuide 79 Method B: • Floor area × 1.2 – 1.5 m³/min per m² (4 – 5 cfm per ft²) • 2,250 m² × 1.2 to 1.5 m³/min = 2,700 to 3,375 m³/min = 4 or 5 fans needed • 25,000 ft² × 4 to 5 cfm/ft² = 100,000 – 125,000 cfm = 4 or 5 fans needed Inlet Requirement Calculation Example: • House width: 15 m (50 ft) • Pressure requirement based on table 1 page 74: 31 Pa or 0.12” WC • Air velocity requirement based on table 1 page 74: 7.2 m/s or 1417 fpm How many inlets are needed? Example: • Inlet capacity: 24.2 m³/min or 855 cfm @ 20 Pa • Fan capacity for transition: 4 × or 680 m³/min (24,000 cfm) = 2,720 m³/min or 96,000 cfm • Number of inlets: Total Transition Fan Capacity ÷ Inlet Capacity 2,720 m³/min (96,000 cfm) ÷ 24.22 m³/min (855 cfm) = 112 inlets Or 56 inlets per side Note: If inlet capacity is unknown use the following assumptions: Standard Inlet capacity: 750 cfm per ft² of inlet opening or 229 m³/min per m² of inlet opening at 25 Pa (0.10” WC). COBB
  • 85.
    COBB Broiler ManagementGuide 6.7 Tunnel Ventilation Air Exchange: < 1min. Air velocity or air exchange will depend on bird size and stocking density. The tunnel ventilation fans are placed at one end of the house with air intake at the opposite end. The airflow creates a wind-chill effect, which reduces the effective temperature over a wide range depending on air speed by 1-8°C (1-15°F). Bird effective temperatures should be maintained below 30°C (86°F). Fans capacities used in the examples are rated @ 0.1” of water column or 25 Pa • 900 mm or 36”, working capacity of 340 m³/min or 12,000 cfm • 1,270 mm or 50”, working capacity of 680 m³/min or 24,000 cfm Tunnel Ventilation Rates – Methods A and B: Method A: Step 1: Determine basic house dimensions • House dimensions: 150 m long, 15 m wide and 2.88 m average height • House dimensions: 500 ft long, 50 ft wide and 9.25 ft average height • Cross section: 15 m wide x 2.88 m average height = 43.2 m² • Cross section: 50 ft wide × 9.25 ft average height = 462.5 ft² 80 Airspeeds requirements are in the following ranges: 3.0 – 4.0 m/s (600 – 800 fpm) Tunnel ventilation is the final stage of cooling and used in hot weather for the removal of bird metabolic heat. COBB
  • 86.
    COBB Broiler ManagementGuide Step 2: Fan capacity required to achieve an airspeed of 3.0 m/s (600 fpm) @ 25 Pa (0.10” WC) • Required fan capacity: Cross section × Airspeed • 43.2 m² x 3.0 m/s = 129.6 m³/s or 7,776 m³/min • 462.5 ft² × 600 fpm = 277,500 cfm • Number of 1.27 m (50”) fans required: • 7,776 m³/min ÷ 680 m³/min = 11.4 or 12 fans • 277,500 cfm ÷ 24,000 cfm = 11.6 or 12 fans Step 3: Is the air exchange < 1 min? • Air Exchange: House Volume ÷ Total Fan Capacity • House Volume 6,480 m³ ÷ (12 x 680 m³/min) = 6,480 m³ ÷ 8,160 m³/min = 0.79 min or 48 seconds • House volume 231,250 ft³ ÷ (12 × 24,000 cfm) = 231,250 cfm ÷ 288,000 cfm = 0.80 min or 48 seconds Step 4: Is the air speed > 3.0 m/s? • Air Speed: Total Fan Capacity (m³/min) ÷ Cross Section Area (m²) (12 x 680 m³/min) ÷ 43.2 m² = 188.9 m/min or 3.15 m/s • Air Speed: Total Fan Capacity (ft³/min) ÷ Cross Section Area ft²) (12 x 24,000 ft³/min) ÷ 462.5 ft² = 623 fpm Method B – Fan Requirement based on floor area: The following are some general tunnel fan requirements for an insulated and sealed tunnel house. This air exchange capacity as a rule should ensure an absolute maximum temperature pickup or differential (ΔT) of 2.8°C or 5°F, on the hottest day with large birds: • 9 - 11 cfm/ft² • 2.75 - 3.5 m³/min • 165 - 210 m³h/m² 81COBB
  • 87.
    COBB Broiler ManagementGuide The following are some general guidelines in understanding negative pressure measurements in full tunnel mode. • The pressure readings will increase from the front to the extraction end of the house. • The pressure reading at the extraction end is a sum of the following pressure drops: o Pad pressure o Tunnel inlet curtain or door pressure drop o Transition or “squeeze” pressure and o Pipe pressure 82 Step 1: Determine house floor area: • House area: 150 m (500 ft) long x 15 m (50 ft) wide = 2,250 m² or 25,000 ft² Step 2: Fan capacity required: • Required fan capacity: Floor area x 3.04 m³/min per m² (10 cfm/ft²) • 2,250 m² (25,000 ft²) x 3.04 m³/min (10 cfm/ft²) = 6,840 m³/min (250,000 cfm) • or 10 fans There should be no more than 10 Pa or 0.05” WC increase in pressure from the ¼ house to extraction end. COBB
  • 88.
    COBB Broiler ManagementGuide The following are examples of different operating airspeeds and the expected operating pressures: 83 Tunnel Ventilation Operating Pressures Air Velocity Static Pressure Air Velocity Static Pressure 2.0 m/s 22 – 27 Pa 400 fpm 0.09 – 0.11” WC 2.5 m/s 25 – 30 Pa 500 fpm 0.10 – 0.12” WC 3.0 m/s 32 – 37 Pa 600 fpm 0.13 – 0.15” WC 3.5 m/s 40 – 45 Pa 700 fpm 0.16 – 0.18” WC 4.0 m/s 45 – 50 Pa 800 fpm 0.18 – 0.20” WC Estimated Fan Operating Pressure: • Pad pressure + tunnel door + transition + pipe • = 0.05” + 0.01” + 0.04” + 0.04” • = 0.14” Estimated Fan Operating Pressure: • Pad pressure + tunnel door + transition + pipe • = 12.5 Pa + 2.5 Pa+ 10 Pa + 10 Pa • = 35 Pa COBB
  • 89.
    COBB Broiler ManagementGuide Note: • The fans most suitable for a tunnel ventilation system are high capacity cone fans with minimum diameters ranging from 1.2 m (48”) to 1.42 m (56”) • All ratings must be at a minimum pressure: 0.10” or 25 Pa • Energy efficiency 23 cfm per Watt or 0.0109 m³/s per Watt • Air flow ratio: > 0.75 indicator of how well the fan holds up under high static pressures (0.05” – 0.2” WC / 12.5 – 50 Pa) • Fans must be purchased on efficiency – not price 84 LOW PRESSURE and AIR SPEED LOW PRESSURE and AIR SPEED UNEVEN AIR DISTRIBUTION HIGH AIR SPEED Still Air Still Air StillAir DEAD SPOTS CORRECT PRESSURE CORRECT PRESSURE EVEN AIR DISTRIBUTION The following two diagrams illustrate the importance of maintaining the correct airspeed and negative pressure drop at the tunnel inlet curtain or door. Very low inlet airspeeds and pressure drops will result in increased “dead spots” areas. COBB
  • 90.
    COBB Broiler ManagementGuide 85 6.8 Evaporative Cooling • The primary role of the evaporative cooling system is to maintain house temperature below 28°C. • Enough pad area needs to be installed so fan performance is not severely reduced. For every 1°C cooling, the % RH of the air will increase approximately 4.5%. (1°F = 2.5% RH increase) 6.8.1 Evaporative Pad Management • All fans should be on before operating cooling pads! • Pads should not be used at temperatures below 28 – 29°C. • House humidity not to exceed 85 – 90%. • Do not use fogging in conjunction with pads if RH is above 75%. • Generally pads to be used from 9am – 6pm due to natural daily humidity cycles – Night time operation will increase heat stress. • Avoid using evaporative cooling prior to 25 days of age. COBB
  • 91.
    COBB Broiler ManagementGuide COBB 86 • During high temperatures pads can be used with chicks in the 1st 2 weeks: • Wetting of the pads must be limited through the use of an interval timer. • Pads are used only to temper the incoming air. • Tunnel inlet curtains or doors need to be opened to approximately 85% of the cool pad area in full tunnel ventilation. • Pad system should be flushed weekly. • Monitor water quality and pH. Maintain hardness levels below 110 ppm and pH in the sump between 7 and 9. Bleed off the system continuously as per manufacturers recommendations. Higher levels of salts will require more frequent bleed-off. • Avoid using pads on a timer cycle to avoid excessive build-up of solids in the pad surface. Note: The use of evaporative cooling should be evaluated for its effectiveness when outside RH is above 75%. Interval timer example: <30 seconds On and 10 minutes Off
  • 92.
    COBB Broiler ManagementGuide 6.8.2 Evaporative Pad Cooling Potential Two Examples – ambient temperature 32°C and ambient RH 30 and 60%: 1. 32°C and 30% RH: Potential reduction in house temperature is 9.4°C o Added humidity: 4.5% × 9.4°C = 42% o New combined humidity: 30% (outside) + 42% = 72% 2. 32°C and 60% RH: Potential reduction in house temperature is 4.7°C o Added humidity: 4.5% × 4.7°C = 21% o New combined humidity: 60% (outside) + 21% = 81% 87 Expected Cooling Produced by 15 cm/6” Pad System %  RH 100 18.3 21.1 23.9 26.7 29.4 32.2 35.0 37.8 40.6 43.3 95 17.9 20.7 23.4 26.2 28.9 31.7 34.4 37.2 39.9 42.7 90 17.5 20.2 22.9 25.7 28.4 31.1 33.8 36.6 39.3 42.0 85 17.1 19.8 22.4 25.2 27.8 30.6 33.2 35.9 38.6 41.3 80 16.7 19.3 21.9 24.6 27.3 29.9 32.6 35.3 37.9 40.6 75 16.2 18.8 21.4 24.1 26.7 29.3 31.9 34.6 37.2 39.8 70 15.7 18.3 20.9 23.5 26.1 28.7 31.3 33.9 36.4 39.1 65 15.3 17.8 20.4 22.9 25.4 28.0 30.6 33.1 35.7 38.3 60 14.8 17.3 19.8 22.3 24.8 27.3 29.8 32.3 34.9 37.4 55 14.3 16.8 19.2 21.7 24.2 26.6 29.1 31.6 31.4 36.6 50 13.8 16.2 18.7 21.1 23.4 25.9 28.3 30.7 33.2 35.6 45 13.3 15.7 18.1 20.4 22.7 25.1 27.5 29.8 32.2 34.6 40 12.8 15.1 17.4 19.7 22.0 24.3 26.6 28.9 31.3 33.6 35 12.3 14.5 16.8 19.0 21.2 23.4 25.7 28.0 30.2 32.5 30 11.7 13.9 16.1 18.3 20.4 22.6 24.8 26.9 29.2 31.3 25 11.2 13.3 15.4 17.5 19.6 21.7 23.8 25.9 28.0 30.1 20 10.6 12.7 14.7 16.7 18.7 20.7 22.8 24.8 26.8 28.8 15 10.0 12.0 13.9 15.9 17.8 19.7 21.7 23.6 25.5 27.4 10 9.4 11.3 13.2 15.1 16.9 18.7 20.5 22.3 24.1 25.9 18 21 24 27 29 32 35 38 41 43 Temperature °C COBB
  • 93.
    COBB Broiler ManagementGuide 6.8.3 Pump Management • Avoid using a cycle timer if water source is high in scale. Continuous drying can result in the rapid formation of scale on the pad surfaces especially in areas with high levels of salts in the ground water. • Only use chemicals recommended by the manufacturer. • NO CHLORINE OR BROMINE. • Refer to manufactures guidelines. 6.8.4 Common Ventilation Causes for Wet Litter and High Humidity • Not enough pad area for fan capacity. • High stocking densities due to bird migration – too many birds in the cool pad area. • Running the pumps with too low air speed – all tunnel fans should be on. • Running pumps when temperature is below 28°C (82ºF). • Running pumps when relative humidity in the house is above 75%. 88 COBB
  • 94.
    COBB Broiler ManagementGuide 6.9 Natural Ventilation Natural ventilation is common in temperate regions where the climatic conditions are similar to the desired production requirements. It is not recommended to employ this system in regions with climatic extremes. Successful natural ventilation is dependent on house location. Houses should be built in an east to west orientation to avoid solar heating of the sidewalls during the hottest part of the day. Prevailing winds should be used advantageously. A reflective roof surface with a minimum insulation R-value of 10-20 (see insulation values, pages 2-3) and a 1.5 m roof overhang needs to be considered. 6.9.1 Management Techniques in Hot Conditions 1. Walk the birds gently and regularly to encourage air circulation around the birds and stimulate water consumption. 2. Remove feed from the birds by lifting the feeding system six hours before the hottest part of the day. This reduces the birds’ heat output due to feed metabolism. Feed can be returned early evening. 6.9.2 Key Points When Installing Cooling Fans in a Naturally Ventilated House • Minimum size: not less than 900 mm (36”) direct drive fans, with an operating capacity of 5.75 m³/sec or 345 m³/min (10,500 cfm) at 50 Pa. • A 900 mm (36”) fan will only draw air from 1 m (3.3 ft) and move air 12 m (40 ft). Maximum dispersion that a 900 mm fan will distribute air is 2.2 m (7.2 ft). • Fans should be suspended perpendicular and 1 m (3.3 ft) above the floor. 89COBB
  • 95.
    COBB Broiler ManagementGuide 90 GROUP 1 28 days 35 days 42 days Fan Line Group 1 25°C 22°C 20°C Fan Line Group 2 27°C 24°C 22°C Fogger Line Group 1 30°C 27°C 27°C Fogger Line Group 2 32°C 29°C 29°C 6.9.3 Example - Stirring Fan and Fogger Operation Guideline • Avoid using stirring fans in the first 14 days! • Fans divided into two groups - see diagram below. • Group 1 On 2°C above set point • Group 2 On 4°C above set point • Foggers On 6°C above set point GROUP 2 FOGGERS COBB
  • 96.
    COBB Broiler ManagementGuide 6.9.4 Curtain Management Techniques In open sided houses, the curtain management is fundamental to maintaining a healthy flock status throughout the whole production period. Good ventilation management techniques will ensure minimal temperature fluctuations. 1. In different sections of the house you could have temperature variations. 2. Ventilation at all ages is needed to remove excess heat, humidity and/or CO². CO² is important in the first week when the house is well sealed. The level of CO² should never exceed 3,000 ppm. See air quality guidelines. 3. Good curtain management is vital to avoid respiratory conditions and ascites in cold climatic conditions. 4. Minimize 24 hour temperature fluctuations, especially at night. Better temperature control will improve feed conversion and enhance growth rate. 91 MIXED AIR COBB
  • 97.
    COBB Broiler ManagementGuide 92 Heat as Insulator Positive Negative 1.5 m 2.40 m 6.9.5 Curtain Ventilation Techniques 1. Take the wind direction into account in the morning, opening the curtain on the leeward side first. 2. To improve air exchange and increase the air speed entering the house, the curtain on the windward side should be open 25% of the opening on the leeward side. 3. To lower the house air exchange and slow the air entering the house, the windward side should be open four times the leeward side. 4. To achieve maximum air speed across the birds, the curtain should be open the same on both sides and as low as possible. 5. Until 14 days of age, the curtains should be opened to provide air exchange in the house but no air speed at chick or floor level. Air speed across the chicks in the first fourteen days of age leads to chilling, decreased feed and water consumption and increased energy consumption for heat production. COBB
  • 98.
    COBB Broiler ManagementGuide 93 7. Water Management Water is an essential nutrient that impacts virtually all physiological functions. Water comprises 68-76% of the body composition of a bird depending on age. Factors including temperature, relative humidity, diet composition and rate of body weight gain influence water intake. Good water quality is vital to efficient broiler production. Measurements of water quality include pH, mineral levels and the degree of microbial contamination. It is essential that water consumption increases over time. If water consumption decreases at any point, bird health, environment and/or managerial techniques should be re-assessed. 7.1 Mineral Content Although broilers are tolerant of some minerals in excess, (calcium and sodium, for example), they are very sensitive to the presence of others. Iron and manganese tend to give water a bitter taste that may decrease consumption. In addition, these minerals support the growth of bacteria. If iron is a concern, filtration systems and chlorination are effective controls. It is advisable to filter the water supply using a filter with a mesh of 40-50 microns. The filter needs to be checked and cleaned at least weekly. Calcium and magnesium in the water are measured by hardness. These minerals in combination can form scale or deposits that will compromise the effectiveness of a drinker system. This is especially true of closed systems. Water softeners can be incorporated into a system to mitigate calcium and magnesium effects. However, sodium levels should be assessed before a salt-based product is used. Broiler performance can be impeded by as little as 10 ppm nitrates. Unfortunately, there are currently no cost effective options for removal. Water should be tested for nitrates because elevated levels may indicate sewage or fertilizer contamination. 7.2 Microbial Contamination Chronic poor performance may indicate contaminated water and requires prompt testing. When testing water, evaluating the total coliform bacterial count is important, as high levels can cause disease. Assessing the total bacteria through a plate count will reflect the effectiveness of the water sanitation program. Microbial contamination can be introduced from the source of water forward. If an effective water sanitation program is not in place, proliferation of bacteria will readily occur. The water should be tested always when you see noticeable change in color, odor or taste, flooding has occurred near the well, person or animal becomes sick from waterborne disease, maintenance on water supply system, persistently poor performance or loss of pressure in water system. COBB
  • 99.
    COBB Broiler ManagementGuide 7.3 Water Sanitation and System Cleanout A regular water sanitation and water line cleaning program can provide protection against microbial contamination and the build-up of slimy bio-films in water lines. While bio-films may not be a source of problem to birds, once established in water lines, bio-films provide a place for more detrimental bacteria and viruses to hide from disinfectants and also act as a food source for harmful bacteria. Products which contain hydrogen peroxide have proven to be outstanding for the removal of bio-films in water lines. Biofilms have influence on natural contaminants, - iron, sulfur, etc, - vitamins, electrolytes, organic acids, kool-aid, jello, sugar water, vaccines and stabilizers, antibiotics and probiotics can all contribute to the growth of bio-film and special attention to internal drinker line cleanliness should be initiated after the use of any of these products. 7.3.1 Oxidation-Reduction Potential (ORP) Another important factor is the ORP value of the water. ORP stands for oxidation-reduction potential and it simply refers to the property of sanitizers such as chlorine to be a strong oxidizer. A strong oxidizer literally burns up viruses, bacteria and other organic material present, leaving water microbiologically safe. An ORP value in the range of 650 mV (Milli volts) or greater indicates good quality water. The lower the value, such as 250 mV, indicates a heavy organic load that will most likely overwhelm the ability of chlorine to properly disinfect the water. The ORP meter can be a useful tool for identifying and maintaining adequate chlorine supplies without overusing chlorine. Warning: Swimming pool chlorine test kits do not distinguish between free and bound chlorine. A heavy organic load would result in a greater percentage of bound chlorine resulting in a poor sanitizer even though a test kit might indicate chlorine levels of 4-6 ppm. Chlorine is most effective when used in water with a pH of 6.0 to 7.0. This pH level results in a greater percentage of active hypochlorous ions that are a strong sanitizer. Inorganic acids such as sodium bisulfate reduce water pH without tainting the water. Free chlorine residual levels are not considered useful as sanitizers unless there is at least 85% hypochlorus acid present. Most common source of chlorine includes: • Sodium hypochlorite (NaOCl, household bleach) increases water pH so it is a poor option as a water sanitizer. • Trichlor (trichoro-s triazinetrione) which is 90% available chlorine and is in the form of tablets which slowly release chlorine over a period of time; these actually reduce water pH so it is a good option as a water sanitizer. • Chlorine gas is 100% available chlorine and is the purest form of chlorine, but it can be dangerous and is restricted in its use. 94 COBB
  • 100.
    COBB Broiler ManagementGuide 7.3.2 pH • pH is the measure of how many hydrogen ions are in solution and is measured on a scale of 1.0 to 14.0 with 7.0 being neutral. • pH below 7.0 indicates an acid while numbers above 7.0 indicate an alkaline. • pH above 8.0 can impact taste by causing bitterness, thus reducing water consumption. • High water pH can be reduced by using inorganic acids. Organic acids can also negatively affect water consumption and so are discouraged. • pH impacts water quality and the effectiveness of disinfectants such as chlorine. • At a pH above 8.0, the chlorine is present mainly as chloric ions, which have very little sanitizing quality. Impact of pH on the Ratio of Hypochlorus (HOCL) to Chloric Ion (OCL) The ideal drinking water pH for a disinfection water program is between 5 to 6.5 95 pH % Hypochlorus Acid - HOCI % Hypochlorite Ion - OCI 8.5 10 90 8.0 21 79 7.5 48 52 7.0 72 28 6.5 90 10 6.0 96 4 5.0 100 0 COBB
  • 101.
    COBB Broiler ManagementGuide 96 7.4 Total Dissolved Solids Measurement of total dissolved solids (TDS), or salinity, indicates levels of inorganic ions dissolved in water. Calcium, magnesium and sodium salts are the primary components that contribute to TDS. High levels of TDS are the most commonly found contaminants responsible for causing harmful effects in poultry production. The following table provides guidelines suggested by the National Research Council (1974) for the suitability for poultry water with different concentrations of total dissolved solids (TDS), which are the total concentration of all dissolved elements in the water. Suitability of Water with Different Concentrations of Total Dissolved Solids (TDS) Source: Nutrients and Toxic Substances in Water for Livestock and Poultry, National Academy of Sciences, Washington, DC. National Research Council (1974). TDS - ppm Comments Less than 1,000 1,000 to 2,999 Water suitable for any class of poultry. Water suitable for any class of poultry. It may cause watery droppings (especially at higher levels) but with no affect on health or performance. 3,000 to 4,999 Water not suitable for any class of poultry. Can cause watery droppings, increased mortality, and decreased growth. 5,000 to 6,999 Water not suitable for any class of poultry. Will almost always cause some type of problem, especially at the upper limits, where decreased growth and production or increased mortality probably will occur. 7,000 to 10,000 Water unfit for poultry but may be suitable for other livestock. More than 10,000 Water should not be used for any livestock or poultry. COBB
  • 102.
    COBB Broiler ManagementGuide 7.5 Drinking System Cleanout Between Flocks • Drain drinking system and header tanks. • Determine the capacity of the drinking system. • Prepare the cleaning solution to the manufacturer’s recommendation. • Where possible, remove header tank and scrub it clean. • Introduce the solution into the water system, usually in the header tank. • Make sure protective clothing and eyewear are worn when using chemicals. • Turn on the tap at the end of the drinking line and let the water run through until the sanitizing solution appears, then close the end tap. • Raise each drinker line. • Allow the solution to circulate through the drinking system. • If circulation is not possible, let the sanitizing solution stand for at least 12 hours. • After draining the system, flush the system thoroughly to remove bio-film and sanitizing chemical. 97COBB
  • 103.
    COBB Broiler ManagementGuide 7.6 Water Testing Water testing should be performed on a periodic basis but at least yearly. Samples should be collected at both the well house and at the end of a drinker line using a sterile container and analyzed at an accredited lab. When taking the water sample, it is important not to contaminate the water sample. Water Quality Standards for Poultry Source: Muirhead, Sarah, Good, clean water is critical component of poultry production, Feedstuffs, 1995. Water Sampling Technique: 1. Sterilize the end of the tap or nipple by using an open flame for 10 seconds. Never use a chemical for this process as it may affect the sample. 2. In the absence of an open flame, run the water for a few minutes before taking the sample. 98 Contaminant, mineral or ion Level Considered Average Maximum Acceptable Level Bacteria Total bacteria 0 CFU/ml 100 CFU/ml Coliform bacteria 0 CFU/ml 50 CFU/ml Acidity and hardness pH 6.8 - 7.5 6.0 - 8.0 Total hardness 60 - 180 ppm 110 ppm Naturally occurring elements Calcium (Ca) 60 mg/L Chloride (Cl) 14 mg/L 250 mg/L Copper (Cu) 0.002 mg/L 0.6 mg/L Iron (Fe) 0.2 mg/L 0.3 mg/L Lead (Pb) 0 0.02 mg/L Magnesium (Mg) 14 mg/L 125 mg/L Nitrate 10 mg/L 25 mg/L Sulfate 125 mg/L 250 mg/L Zinc 1.5 mg/L Sodium (Na) 32 mg/L 50 mg/L Note: The water supplied to the birds should be fit for human consumption. A swab sample should be taken to measure how effectiveness of the line sanitation program. COBB
  • 104.
    COBB Broiler ManagementGuide 8. Nutrition Management Broiler diets are formulated to provide the energy and nutrients essential for health and efficient broiler production. The basic nutritional components required by the birds are water, amino acids, energy, vitamins and minerals. These components must act in concert to assure correct skeletal growth and muscle deposition. Ingredient quality, feed form and hygiene directly affect the contribution of these basic nutrients. If raw ingredients or milling processes are compromised or there is an imbalance in the nutrient profile of the feed, performance can be decreased. Because broilers are grown to a wide range of end weights, body compositions and production strategies, it is impractical to present a single set of nutritional requirements. Therefore any expression of nutrient requirements should only be viewed as a set of guidelines from which to work. These guidelines must be adjusted as necessary to address specific scenarios from one producer to another. Selection of the optimum diets should take into consideration these key factors: • Raw material availability and cost. • Separate sex growing. • Live weights required by the market. • The value of meat and carcass yield. • Fat levels required by specific market needs such as oven-ready, cooked and further- processed products. • Skin color. • Meat texture and flavor. • Feed mill capabilities. Feed form varies greatly as diets may be prepared as a mash, crumble, pelleted or extruded product. Blending the manufactured feed with whole grains prior to feeding is also common in some areas of the world. Further processing of feed is often preferable as there are both nutritional and managerial benefits. Pelleted or extruded diets generally have a greater ease of handling when compared to mash feeds. Nutritionally, further-processed feeds show a noted improvement in flock efficiency and growth rates when compared with mash feeds. 99COBB
  • 105.
    COBB Broiler ManagementGuide Crude Protein: The broiler requirement for crude protein actually describes the requirements for amino acids, the building blocks of protein. Proteins are found as structural components in tissues ranging from feathers to muscle. Energy: Energy is not a nutrient but a means to describe the metabolism of energy yielding nutrients. Energy is necessary for maintaining the bird’s basic metabolic functions and body weight growth. Traditionally, the metabolizable energy system has been used to describe the energy content of poultry diets. Metabolizable energy (ME) describes the gross amount of energy of a feed consumed minus the gross amount of energy excreted. Micronutrients: Vitamins are routinely supplemented in most poultry feeds and can be classified into either water-soluble or fat-soluble. Water-soluble vitamins include the B-complex vitamins. Vitamins classified as fat-soluble include A, D, E and K. The fat-soluble vitamins can be stored in the liver and other parts of the body. Minerals are inorganic nutrients and are classified as major or trace elements. The major minerals include calcium, phosphorus, potassium, sodium, chlorine, sulphur and magnesium. Trace minerals include iron, iodine, copper, manganese, zinc and selenium. 100 COBB
  • 106.
    COBB Broiler ManagementGuide Feed Testing: A systematic approach to feed sampling on the farm is a “best practice” policy. A good feed sampling technique is important if the results of the analysis are to reflect the real nutrient content of the feed. A sample must be representative of the feed from which it was taken. This cannot be achieved by “grabbing” a sample of feed from the trough or pan. In order to collect a representative feed sample it is necessary to take sub-samples and combine them into a composite sample. It is recommended that five sub-samples from each delivery of feed be taken. Sampling from the feed lines is not recommended as sifting of ingredients or fines will skew results. Samples should be stored in a refrigerator until the flock is processed. Each sample should be recorded with the date, feed type and delivery ticket number. If problems arise during production and feed is suspected, samples should be analyzed. Lab reports should be compared with nutrient specifications for the respective diets. Phase Feeding: Nutrient requirements generally decline with broiler age. From a classical standpoint, starter, grower and finisher diets are incorporated into the growing program of broilers. However, bird nutrient needs do not change abruptly on specific days, but rather they change continuously over time. Most companies feed multiple feeds in an attempt to match bird nutrient requirements. The greater the number of feeds a bird receives, the closer the producer can feed his birds to the requirement. The number of feeds is limited by economic and logistical factors, including feed mill capacity, transportation costs and farm resources. Dietary nutrient concentrations are based on the objectives of the producer. There are three main objectives of feeding broilers and most producers use a combination of these. Diet Type 1: Nutrient-rich to optimize live weight gain and feed conversion. This approach may promote additional carcass lipid content. In addition, diet cost will be high. Diet Type 2: Lowered energy content but optimal crude protein and amino acid content. This approach will result in less lipid gain but maximize lean mass production. Live weight and feed conversion will be negatively affected but cost per lean mass will be optimal. Diet Type 3: Low nutrient concentration. This approach will result in lower live weight growth and higher feed conversion but cost per live weight may be optimum. Feed Withdrawal: During this period, special attention should be directed towards medication withdrawal dates to ensure there is no residue retained in the carcass at processing. Carefully kept records are essential. 101COBB
  • 107.
    COBB Broiler ManagementGuide Supplemental Whole Wheat Feeding: The feeding of supplemental whole wheat to broiler chickens is being practiced in many countries around the world. Benefits observed include a reduction in feed cost and therefore cost per kg (lb) of live weight, improvements in gizzard development resulting in improved digestive efficiency and the ability to manipulate the nutrient intake on a daily basis if necessary. Possible disadvantages are reduced growth rate, reductions in lean gain and poorer uniformity if adjustments to the compound feed are not made. Supplemental wheat may be added either at the feed mill or at the farm. While adding whole wheat at the farm is preferable due to the increased flexibility it offers, this requires an on- farm feed proportioning system as well as additional bulk bins. At the feed mill, whole wheat may be added in the mixer or during the loading of the feed truck. Adding the whole wheat at the feed mill also allows for the potential of some processing, if available, such as roller milling. Typically beginning around day 7, or when birds weigh 160 g, supplemental whole wheat is added at a level of 1%-5%. This can be increased up to approximately 30% using gradual increases of 1%-5%. The maximum percent used will depend on the compound feed quality and nutrient density, wheat quality, desired performance and the performance of the individual flock. It is important to take into account the dilution effect of adding supplemental whole wheat to the diet. Any medications will need to be adjusted as needed to ensure they are fed at the correct levels. Regular monitoring of bird live weight is important to determine the effect whole wheat addition has on a particular flock. The supplemental whole wheat should be removed 48 hours before slaughter to avoid contamination of the carcass during evisceration. 102 COBB
  • 108.
    COBB Broiler ManagementGuide 9. Catching Procedures Logistics The goal of the planning and coordination of the catching process is to insure low DOA (dead on arrival), minimal shrink, and high animal welfare standards. If done properly this is a very complex process that will require the coordination of farm starting times, multiple catching crews and processing plant schedules. The benefits of good planning in terms of improved mortality shrink and plant yield are very real and make it worth the effort. The catching process requires good communication and planning that must include the following key areas: • Plant processing schedule - To insure that birds are available to slaughter with minimal holding time. • Transportation and driving distance from farm to plant - Coordinate the transportation assets to maximize their utilization. • Catching crew schedule - Ensure that crews are scheduled to catch the birds. • Farm set up - Time frames to shut off and raise feeders and water. Feed and Water Withdrawal The feed withdrawal and water withdrawal process is critical in optimizing feed conversion, plant yield, and preventing holding shrink and plant contamination. The purpose of feed withdrawal is to empty the digestive tract, preventing ingested feed and fecal material from contaminating the carcasses during the evisceration process. Always allow access to water as long as possible prior to catching. Only raise the water after the catchers get to the house and start setting up. On multiple house farms only withdraw water just prior to commencing catching. Optimum recommended time off feed is a window of 8 hours to 12 hours. Less than 8 hours will result in excess feed and fecal residues in the digestive tract. This is a waste of the undigested feed as there will be no conversion to meat. The excess feed residue will cause yield and processing problems in the plant. Fecal residues cause contamination of plant equipment. Feed withdrawal in excess of 12 hours causes the intestines to lose their tensile strength, making them easy to tear and rupture. The intestinal contents will become viscous due to the start of intestinal cell necrosis. This condition will cause major equipment contamination in the plant and continue to get worse with time. 103COBB
  • 109.
    COBB Broiler ManagementGuide In a properly planned program the feeders should be raised in the broiler house so the first load from the house will be unloaded and started kill as close to the 8 hour mark as possible with the last load from the house being killed as close to being inside the 12 hour mark as possible. Also in the planning process it should be considered that product held at the plant even in a good holding shed or holding area will continue to lose weight at a rate of .25% or more of body weight per hour from natural shrink. Part of the logistical planning should include minimizing this holding time. It is important to refer to local legislation for feed withdrawal restrictions. Preparation Regardless of method of catch or type of containers used there are some common general operating procedures that should be followed. • Birds should be carefully placed in clean crates or modules to a density that complies with manufacturer’s recommendations. These densities should be reduced in summer months. • Minimize light intensity reduce bird activity. Light in the house should be only enough to see to do the job. If dimming is not feasible, the use of blue or green lights will calm birds and reduce activity. • When possible schedule catching at night to reduce bird activity. 104 The drinking system must remain down until the start of catch. COBB
  • 110.
    COBB Broiler ManagementGuide • When catching during the day it is recommended to utilize curtains and other methods to keep the houses as dark as possible. In cases where light cannot be restricted migration fences and gates must be used to restrict bird crowding. Coops can be used with great effect by building pens from the coops to restrict bird movement. Calm birds facilitate better ventilation, reduce bird stress and diminish the risk of piling. • The use of a catching tunnel should be used during day time catching where possible. • Reduce as much as possible pre catch activity. Make sure all feeders and water are rolled up. Make sure any unnecessary equipment or items that might interfere are out of the house. 105COBB
  • 111.
    COBB Broiler ManagementGuide • Make sure the proper number of head per coop or module compartment is communicated to the catching crew. This number is determined by container type, bird size and seasonal conditions. • If there is time between loads, turn up the lights, replace the water and gently walk through the birds. Preparation for catching Welfare considerations should be of utmost importance during catching. Special care should be given to minimize bruising and downgrades. The stockman should be present during the catching operation to ensure that the correct procedures are followed. Possible causes of downgrades in the processing plant 106 Causes Scratching Bruising Broken limbs Blisters- hock/breast Too high stocking density ● ● ● ● Feeding system break down ● Incorrect lighting program ● High light intensity ● Aggressive movement by stockman ● ● ● Poor feathering ● ● Aggressive catching ● ● ● Poor litter ● Incorrect nutrition ● ● ● Plucking machines ● Ventilation ● ● Drinker management ● COBB
  • 112.
    COBB Broiler ManagementGuide Monitoring bruising color can give an indication of when it happened and how to cure the problem. Machine Catching As with all technology, machine catching equipment is being improved every year. Machine catching is a viable option to manual catching in areas where labor is not available or other factors make manual catching not an attractive option. With machine catching it is important to implement a good preventative maintenance program. Maintenance and repair cost need to be considered when implementing a machine catching program. 107 Color of bruise Age of bruise Red 2 minutes Dark red and purple 12 hours Light green and purple 36 hours Yellow green and orange 48 hours Yellow orange 72 hours Slight yellow 96 hours Black and blue 120 hours COBB
  • 113.
    COBB Broiler ManagementGuide Manual Catching The two most common methods of manual catching are by the feet or by the back. With both machine and manual catching, crew training is essential to ensure correct bird handling with minimal damage. The vast majority of companies catch by the feet. The following handling limits need to be enforced: • Grip only the shank to limit drum bruising. • Handling limits - depends on bird size and crate/module design: • No more than 3 large birds per hand - >2.6 kg (5.75 lb). • Smaller birds – up to 6 birds per hand. • Limit handling birds more than once – do not pass birds between catchers. • Back catching is limited to 2 birds – common practice when coops are used. This limits wing damage. 108 COBB
  • 114.
    COBB Broiler ManagementGuide 10. Biosecurity and Farm Sanitation 10.1 Biosecurity Bio-security is the term used to describe an overall strategy or succession of measures employed to exclude infectious diseases from a production site. Maintaining an effective biosecurity program, employing good hygiene practices and following a comprehensive vaccination program are all essential to disease prevention. A comprehensive biosecurity program involves a sequence of planning, implementing and control. Remember, it is impossible to sterilize a house or the premises. The key is to reduce pathogens and prevent their reintroduction. Outlined below are various key points to a successful biosecurity program: • Limit non-essential visitors to the farm. Keep a record of all visitors and their previous farm visits. • Farm supervisors should visit the youngest flocks at the beginning of the day and working by age to the oldest flock for the last visit in that day. • Avoid contact with noncompany poultry, particularly backyard poultry. • If equipment must come from another farm, it should be thoroughly cleaned and disinfected before it comes onto the farm. • Provide wheel dips or wheel spraying facilities at the farm entrance and allow only necessary vehicles on site. • Farms should be fenced. • Keep doors and gates locked at all times. • Absolutely no other poultry should be kept on the same farm as your poultry unit. Farm animals other than poultry should be fenced separately and have a different entrance from the poultry farm enterprise. • No pet animals should be allowed in or around the poultry housing. • All farms should have a vermin control plan which includes frequent monitoring of rodent activity. Adequate supplies of rodent bait must be maintained. • All houses should be vermin proof. • The area around the poultry house should be free from vegetation, debris and unused equipment that could harbor vermin. • Clean up feed spills as quickly as possible and fix any leaking feed bins or feed pipes. • Farms should have toilet and hand washing facilities separate from the poultry house. 109COBB
  • 115.
    COBB Broiler ManagementGuide • Ideally poultry farms should be built away from other poultry farms and away from rivers and ponds to limit any exposure to wild birds. • If equipment does need to be brought onto the farm then it should be subjected to disinfection by Ultra-Violet light in a sanitizing box that has been constructed with suitable protective sides and bottom. • Best practice is to have feed delivered to a central bin from outside the farm perimeter fence and then using dedicated farm vehicles for moving the feed from the central bin to each house feed bin. • Provide hand-sanitizing facilities at the entrance to each house. • Provide well-maintained footbaths at the entrance to each poultry house. • Footbaths placed outside must have a lid to prevent dilution of disinfectant by rain and prevent contamination from the environment. • Clean footwear before using footbath to remove organic material, which could inactivate the disinfectant. • The choice of disinfectant for the footbath needs to be one that has a broad spectrum of activity and be fast acting because of limited contact time. • Incorporate a boot-change or boot cover system at each entry to the poultry house. • Single-age broiler farms are highly recommended to reduce the cycling of pathogens and/or vaccine agents within the farm. • Birds should be placed from similar age parent flocks of the same vaccination status. • Depletion of birds should be complete before arrival of new chicks. • Catching crews should be provided with protective clothing. Equipment such as coops/ crates and forklifts should be washed and disinfected before entry to the farm, especially if partial depopulation is practiced. • Absolute minimum downtime of three days must be observed from last disinfection on the farm to first placement of birds on a farm. Farms reusing litter require a minimum of 14 days downtime. 110 A dedicated changing facility for protective clothing and footwear should be sited at the farm entrance. Note: Ideally a “shower on and shower off” policy is regarded as best practice. A timed five minute hot shower using the necessary sanitizing agents is recommended. COBB
  • 116.
    COBB Broiler ManagementGuide 10.2 Farm Sanitation The single most important factor in keeping poultry healthy is maintaining good hygiene. Healthy parents and hygienic hatchery conditions contribute greatly to disease-free chicks. Good hygiene standards will reduce disease challenge. Farm sanitation does not just mean the choice of the right disinfectant. The key to farm sanitation is effective cleaning. Disinfectants will be inactivated by organic material. The following points are the basic steps for effective farm sanitation. However, these steps are not applicable when litter is re-used. Key points of a successful farm sanitation program: • At the end of each flock remove all the birds from the farm. • Apply an insecticide. This is best carried out immediately after depopulation and before the litter and building cool. Heavy insect infestations may require an additional insecticide application after the disinfection process is complete. • Maintain the rodent control program after depopulation. • Remove all unused feed from the feed system, including all bins and augers. • Carefully consider the health status of the depleted flock before moving the feed to another flock. • Clean out all the litter from each house and remove it in covered vehicles. • Clean all the dust and dirt from the building, paying special attention to less obvious places such as air inlets, fan boxes and the tops of walls and beams. • Dry clean any equipment that cannot be washed directly and cover it completely to protect it from the washing process. 111COBB Drinking systems should be drained and flushed with an approved disinfectant before flock placement. Ensure that the system is again flushed with clean water before placement to remove any residue • If litter is re-used between flocks, all damp or caked litter should be removed and heat turned on in time to release any built up ammonia and to encourage drying of litter prior to placement of next batch of chicks. • Test water annually for mineral levels and microbial quality.
  • 117.
    COBB Broiler ManagementGuide • Open up any drainage holes and water runoff pathways and wash down all interior surfaces of the house and fixed equipment with a general detergent through a pressure washer. If using a foam or gel, allow the recommended soak time to allow the product adequate time to work. The process should be carried out in a predetermined fashion, washing from the top to the bottom of the house (ceiling to the floor). If the fans are in the roof they should be washed before the ceiling. • In curtain sided houses, special attention should be given to cleaning both the inside and outside of the curtain. • The house should be washed from one end to the other (paying special attention to fans and air inlets) and washed to the end with the best drainage. There should be no standing water around the poultry house and each farm should have adequate drainage that meets local legal requirements. • House control rooms should be carefully cleaned as water may damage electricity control systems. Power air blowers, vacuums and wiping with a damp cloth (where possible and with safety in mind), may be helpful in such areas. • If a water storage or header tank is present, where possible open it and scrub it clean with a detergent. • Drain the drinking system and header tank completely before adding cleaning solution. • Removed equipment should be cleaned first with a detergent (or, if needed, a scale remover) and then thoroughly disinfected. • Any equipment or materials such as a fiber chick guard or feeder lids that cannot be cleaned should not be reused for the next crop and should be safely destroyed. 112 It is best, if possible, to circulate the sanitizing solution in your drinking system. If not, leave it to stand in the drinking system for a minimum of 12 hours before completely flushing the system with clean water. COBB
  • 118.
    COBB Broiler ManagementGuide • External areas such as gutters, fan boxes, roofs, pathways and concrete areas should be cleaned and maintained. Remove any washed out litter or organic matter from the farm compound. Unused and unneeded equipment should be removed from the farm. • Carry out any equipment or facility repairs at this point and re-plug/fill any drainage holes opened up prior to washing. • Outside concrete areas and ends of the house should be washed completely. • Drying down after washing is advantageous. Heat and/or fans can be used to aid in the speed of this process. • Staff areas, canteens, changing areas and offices should also be thoroughly cleaned. All footwear and clothing should be given a complete washing and disinfection at this point. • Apply an effective broad-spectrum disinfectant through a pressure washer with a fan jet nozzle. Thoroughly soak all the interior surfaces and equipment working from top to bottom. Fan boxes, inlets, support beams and posts require special attention. • After disinfection, biosecurity controls at house entrances must be reinstated. • Adequate downtime between flocks will increase the effectiveness of the hygiene program. • When choosing which disinfection product to use check what environment temperature the product is effective in working in. To monitor the effectiveness of the sanitation program, a visual inspection and microbial culture are suggested. The effectiveness of the sanitation program can be measured using quantitative laboratory tests. Sterilization of the facilities is not realistic but microbiological monitoring can confirm that non-desired organisms such as salmonella have been eliminated. A documented audit including microbiological monitoring and attention to the performance of subsequent flocks can help to determine the effectiveness and value of the sanitation program. Swabbing to monitor cleaning and disinfection: The residual bacterial counts or total viable count (TVC), is used to monitor the effectiveness of the cleaning out process. No salmonella should be isolated after cleaning out procedure is completed. A minimum of ten swabs per house should be taken. 113 The maximum total viable count in colony forming units per cm² of floor area should not exceed 1,000 (TVC) and maximum 100 (TVC) for all other surfaces. COBB
  • 119.
    COBB Broiler ManagementGuide 11. Bird Health Prevention is by far the most economical and best method of disease control. Disease prevention is best achieved by the implementation of an effective biosecurity program in conjunction with appropriate immunization. However, diseases can overcome these precautions and when they do, it is important to prevent the spread to other flocks/farms. Caretakers and service personnel should be trained to recognize problems that may be attributed to disease. These include water and feed consumption patterns, litter conditions, excessive mortality, bird activity and behavior. Prompt action to address the problem is essential. 11.1 Vaccination Parent stock breeders are vaccinated for a number of diseases to effectively pass on maternal antibodies to broiler chicks. These antibodies serve to protect the chicks during the early portion of the grow out period. However, these antibodies do not protect the broilers throughout the entire grow-out period. Therefore, it may be necessary to vaccinate the broilers either in the hatchery or in the field to prevent certain diseases. The timing of vaccinations should be based upon the level of expected maternal antibody, the disease in question and current field challenges. The success of a broiler vaccination program is contingent upon properly administering the vaccines. Specific recommendations for vaccine applications should be obtained from vaccine suppliers, as these supplier recommendations may be different from the following general guidelines. 1. General vaccine handling procedures • Ensure that vaccines are stored at the manufacturer’s recommended temperature (2-8°C/36-46°F). • Prepare vaccine and stabilizer mixture in clean containers free of any chemicals, disinfectants, cleaners or organic materials. • Record vaccine product type, serial number and expiration date on pen charts or some other permanent flock record. • Open each vial of vaccine while submerged under the water-stabilizer mixture. 114 COBB
  • 120.
    COBB Broiler ManagementGuide • Prepare vaccine and stabilizer mixture on a clean surface in clean containers free of any chemicals, disinfectants, cleaners or organic materials. (Use stabilizer only if called for by manufacturer of equipment and vaccine for this application method). • Rinse each vial of vaccine completely. A. Hatchery vaccination guidelines • The hatchery has become a very important piece of the health program as many vaccines are administered either via in-ovo or at day of age and a high number of embryos or chicks can be easily vaccinated against several diseases. The hatchery is the only place where in-ovo vaccination can be performed. • For years, spray vaccinations have been also performed at the hatchery for effective immunization against Infectious Bronchitis, Newcastle Disease, and Coccidiosis. Make sure to follow vaccine manufacturer recommendations as to how to achieve the best immunization possible as recommendation differ among products and manufacturers. • Broilers that are placed on used litter and/or grown to heavy weights may require immunization against Marek’s disease at the hatchery. This is done by injecting at least 1500 pfu’s of the HVT vaccine either in-ovo or at day of age. • HVT-vectored vaccines can also be administered at the hatchery as an aid to prevent Infectious Laringotracheitis, Newcastle Disease, Infectious Bursal Disease, and Avian Influenza. It is important to note that HVT-vectored vaccines require the administration of a full dose so the vector virus and the insert can reach the levels needed for proper immunization. B. Field vaccination guidelines 1. Water Vaccination • Amount of water for vaccination should be calculated based on 90-120 min vaccination time. • Vaccinate early in the morning to reduce stress, especially in times of warm weather. • Avoid using water rich in metallic ions (e.g. iron and copper). Bring in outside water of better quality if these conditions are known to exist. • Water pH should be 5.5-6.5. High pH water can taste bitter to the birds and so reduce water and vaccine intake. • Ensure rapid uptake of vaccine by depriving the birds of water a maximum of 1 hour before administration of vaccine begins. 115COBB
  • 121.
    COBB Broiler ManagementGuide • Use of a vaccine manufacturer’s approved dye or colored stabilizer may help in determining when water lines are primed and how many birds have consumed vaccine. • Turn off chlorinator 48 hours before administering the vaccine. • Clean water filters 48 hours before vaccination commences to remove any detergent residues. Clean filters using plain water. • Turn ultra-violet light off, if used, as this may inactivate the vaccine. • Vaccination can be performed unevenly if done through a medicator. • Calculate the needed amount of water by using 30% of the previous day’s total consumed water. If no water meter is available, use the following calculation: Number of birds in thousands multiplied by their age in days multiplied by two. This equals the amount of water in liters needed to vaccinate over a 2-hour period. • Mix 2.5 g (2 teaspoons) of powdered skimmed milk per liter (1.05 quarts) of water. Alternatively, commercial stabilizers can be used per manufacturer’s recommendations. • Prepare skimmed milk solution 20 min. before administering the vaccine to ensure the skimmed milk powder has neutralized any chlorine present in the water. • Raise drinker lines. • Pour the prepared vaccine, stabilizer and color solution into the header tank or storage tank. • Prime the lines until the stabilizer or dyed water comes through the far ends of the lines. • Lower drinker lines and allow birds to consume vaccine, making sure to turn water back on into the header tank just before the tank runs dry. • Walk through the birds gently to encourage drinking and uniformity of application. • Note the vaccine consumption time in the records and any adjustments needed for next application of similar age birds and equipment to reach the ideal time of 90-120 min. 116 COBB
  • 122.
    COBB Broiler ManagementGuide Open - Bell drinker system: • Two people are needed to carry out the vaccination procedure. One person is needed to mix the vaccine solution and the other person is needed to administer the vaccine. • Clean each drinker, emptying it of water and litter. Do not use a disinfectant to clean the drinkers. • Carefully fill each drinker in a predetermined fashion, making sure not to over fill the drinker or spill the mixed vaccine solution. • During vaccination, walk the house to encourage birds along the walls to get closer to the drinkers. Monitoring water vaccination intake: • Start to monitor after birds receive vaccine. • Select 100 birds per house and check how many have dyed tongues, beak or crops. • Divide the house into four parts and check for staining from 25 birds per house division. • Calculate number of birds on a percentage basis with staining. • Vaccination is considered successful when 95% of birds show staining. If anything happens out of the ordinary during or after vaccination, closely monitor birds and consult your veterinary advisor. 117 Percentage of birds with Blue staining Hour after administration of vaccine 75% 1 hour 95% 2 hours COBB
  • 123.
    COBB Broiler ManagementGuide 2. Aerosol/coarse spray vaccination • Spray vaccination requires careful management. Spray may be lost through evaporation, settlement and drift before it reaches the birds. • Vaccination equipment should be serviced as per manufacturer’s recommendations to ensure correct functioning and dispersion of the correct particle size. • Spray vaccinating day-old chicks in boxes at the farm requires a specific type of sprayer. (Consult vaccine manufacturer). • Check that the vaccination equipment is working properly at least 1 week before vaccination to allow time for repairs if needed. • Operators inexperienced with specific house conditions and equipment should practice using plain water to verify walking pace. • Use the sprayer for vaccination only. Never put disinfectant or any chemicals such as insecticides into your sprayer. 118 Vaccinate early morning to reduce stress, especially in times of warm weather. COBB
  • 124.
    COBB Broiler ManagementGuide • Use fresh, cool distilled water. • Rinse the sprayer with distilled water and dispense a small volume through the unit just before adding the diluted vaccine. • A typical coarse spray water volume is 15-30 liters (4-8 gal) per 30,000 birds. (Again refer to vaccine and equipment manufacturer for specific volumes). • If using a fine spray the water volume is 1 liter (0.26 gal)/30,000 birds. • Turn the fans off before spraying commences and dim the lights to reduce stress on the birds and to allow easy movement through the house for the vaccinator. • Pen the birds along the outside of the house for coarse water spraying. The distance between the vaccinator and the side wall must not be more than four meters (13 ft). • Coarse spray should be about 1 m (3 ft) above bird height. • Angle the sprayer nozzle down. • Walk through the birds gently and carefully. • Leave the fan off for 20 minutes after spraying has finished, provided that the birds are not being heat stressed and that they are not unattended. • After vaccination, rinse the sprayer with distilled water and allow it to dry in a clean, dust- free environment. Take correct care of this valuable equipment. 119COBB
  • 125.
    COBB Broiler ManagementGuide 12. Record Keeping Accurate record keeping is essential to monitor the performance and profitability of a flock, and to enable forecasting, programming and cash flow projections to be made. It also serves to provide an early warning of potential problems. The daily records should be on display for each house. In some countries the following data must be made available to the relevant authorities before the birds are slaughtered. Daily Records include: • Mortality and culls by house and sex • Daily feed consumption per bird • Daily water consumption per bird • Water to feed ratio • Water treatments • Minimum and maximum daily temperatures • Minimum and maximum daily humidity • Number of birds taken for processing • Management changes • Type of culls • Leg culls • Small culls 120 COBB
  • 126.
    COBB Broiler ManagementGuide Flock Records: • Feed deliveries (supplier/amount/type/date of consumption) • Feed sample from each delivery • Live weight (daily/weekly/daily gain) • Medication (type/batch/amount/date of administration/date of withdrawal) • Vaccination (type/batch/amount/date of administration) • Lighting program • Litter (type/date of delivery/amount delivered/visual inspection) • Chick delivery • number/date/time/count in boxes • truck temperature and humidity • internal chick temperature • Stocking density • Chick source (hatchery/breed/donor breeder code/chick weight) • Weights of each load at processing plant • Downgrades • Date and time feed withdrawn • Date and time catching started and finished • Cleanout (total bacterial counts/visual inspection) • Post mortem results • Visitor Book Annual Records: • Water (tested at source and at the drinker) 121COBB
  • 127.
    COBB Broiler ManagementGuide 13. Appendices Metric Conversions: 122 Length: 1 meter (m) 3.281 feet (ft) 1 centimeter (cm) 0.394 inches (“) Area: 1 sq. meter (m²) 10.76 sq. ft (ft²) 1 sq. centimeter (cm²) 0.155 sq. inch (in²) Volume: 1 liter (l) 0.22 imperial gallon (IG) 1 liter (l) 0.262 US gallon (gal) 1 cubic meter (m³) 35.31 cubic ft (ft³) Weight: 1 kilogram (kg) 2.205 pounds (lb) 1 gram (g) 0.035 ounces (oz) Energy: 1 calorie (cal) 4.184 joules (J) 1 joule (J) 0.735 foot pound 1 joule (J) 0.00095 British thermal unit (BTU) 1 British thermal unit (BTU) 252 calories (cal) 1 British thermal unit (BTU) 0.3 watt per hour (kWh) Pressure: 1 bar 14.504 pounds per square inch (psi) 1 bar 100,000 Pascals 1 Pascal (Pa) 0.000145 psi Volume Flow Rate: 1 cubic meter per hour (m³/hour) 0.5886 cubic feet per minute (ft³/min) 1.70m³/h 1 cubic foot per min Stocking density: 1 square foot per bird (ft²/bird) 10.76 birds per square meter (birds/m²) 1 kilogram per square meter (kg/m²) 0.205 pounds per square foot (lb/ft²) Temperature: Celsius to Fahrenheit (°Celsius x 9/5) + 32 Fahrenheit to Celsius (°Fahrenheit - 32) x 5/9 Light: 1 foot-candle (fc) 10.76 lux 1 lux 0.0929 foot-candle COBB
  • 128.
    COBB Broiler ManagementGuide Feather Sexing Broiler Chicks Broiler chicks in the feather sexable, slow feather format, can be feather sexed at day old as illustrated below. In the non-feather sexable, fast feather format, both males and females will show the same pattern of feather development illustrated by the diagram below relating to females. 123 A-Primaries B-Coverts At hatching all feathers short but coverts extend only ½ to ¾ length of primaries After several hours feathers longer but coverts still ½ to ¾ length of primaries 1. Spread wing out like a fan. 2. Look at feathers on outer joint - bottom row of feathers are primaries, top row of feathers are coverts. 3. When the bottom row (primaries) of feathers is longer than the top row (coverts), the chick is female. 4. When the bottom row (primaries) of feathers is the same length, or shorter than the top row (coverts), the chick is male. Coverts and primaries extend same length Coverts extend slightly beyond primaries Coverts extend greatly beyond primaries FEMALES Coverts always shorter than primaries MALES Coverts always as long as or longer than primaries TOP OF WING COBB
  • 129.
    COBB Broiler ManagementGuide 124 14. Notes COBB
  • 130.
    COBB Broiler ManagementGuide COBB 125 Notes
  • 132.
    L-1020-06 August 2017 C OB B - V A N T R E S S . C O M