Downloaded 219 times
![Click here to get the most up-to-date version of this SOP
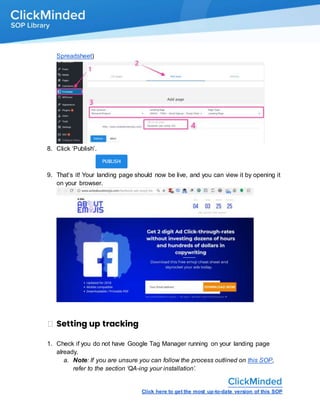
1. [Serial Number] - [Funnel Stage] - [Landing page goal] -
[Some words to summarize what this page is about]
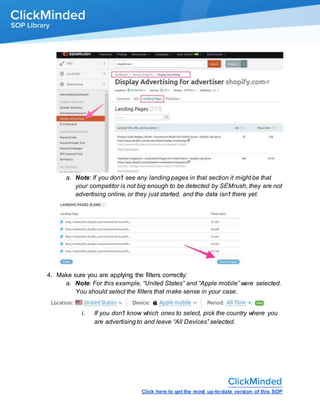
b. Version: The version of the landing page this document refers to. If you
want to document a landing page change, make a copy of the current
document and increase the version number.
c. Publish Date: The date when this landing page will be published while it’s
in a draft. Once the landing page is published this date should reflect the
actual publish date in case they don’t match.
d. Responsible: Who is responsible for making sure this landing page is
delivered.
e. Task URL: If you use a project management tool like Asana, link to the
task here.
f. Status:
i. Planning Stage: While the Landing Page Creation Spreadsheet is
being worked on and not all aspects are clearly defined.
ii. Design Stage: Usually follows the “Planning Stage”, at this stage
the page is clearly defined, and the Web Designer is working on it.
iii. Ready to Publish: Traditionally follows the “Design Stage”, there
might be some reasons why it wasn’t published yet (e.g.: the
planned release date is in the future).
iv. Published: The landing page is live.
v. Unpublished: The landing page is completed and was published at
some point in the past, but it is not live at the moment.
g. URL: The URL where this landing page will be/is available.
h. Title: The title for the landing page. This is seen by your users, and it will
be the title that will be indexed by Search Engines.
i. Note: The spreadsheet will alert you if your meta-description is too
long. If that is the case, you might want to shorten it below 160
characters.
i. Meta description: The meta description for this page. This will be visible
in the search engines results page.](https://image.slidesharecdn.com/sop-210830104741/85/Clickminded-SOP-Library-6-320.jpg)


This document provides a standard operating procedure (SOP) for creating a lead generation landing page, including prerequisites like Google Analytics and Facebook Pixel accounts, and outlines steps for competitor analysis using Semrush. It details the elements needed for the landing page, including messaging, user targeting, and design considerations using Instapage. The ultimate goal is to create a high-converting landing page that effectively generates leads across various devices.


![Crafting an SEO Strategy That WORKS [Case Study]](https://cdn.slidesharecdn.com/ss_thumbnails/seostrategyin2019-190703160558-thumbnail.jpg?width=640&height=640&fit=bounds)