SlideShare a Scribd company logo
1 of 8
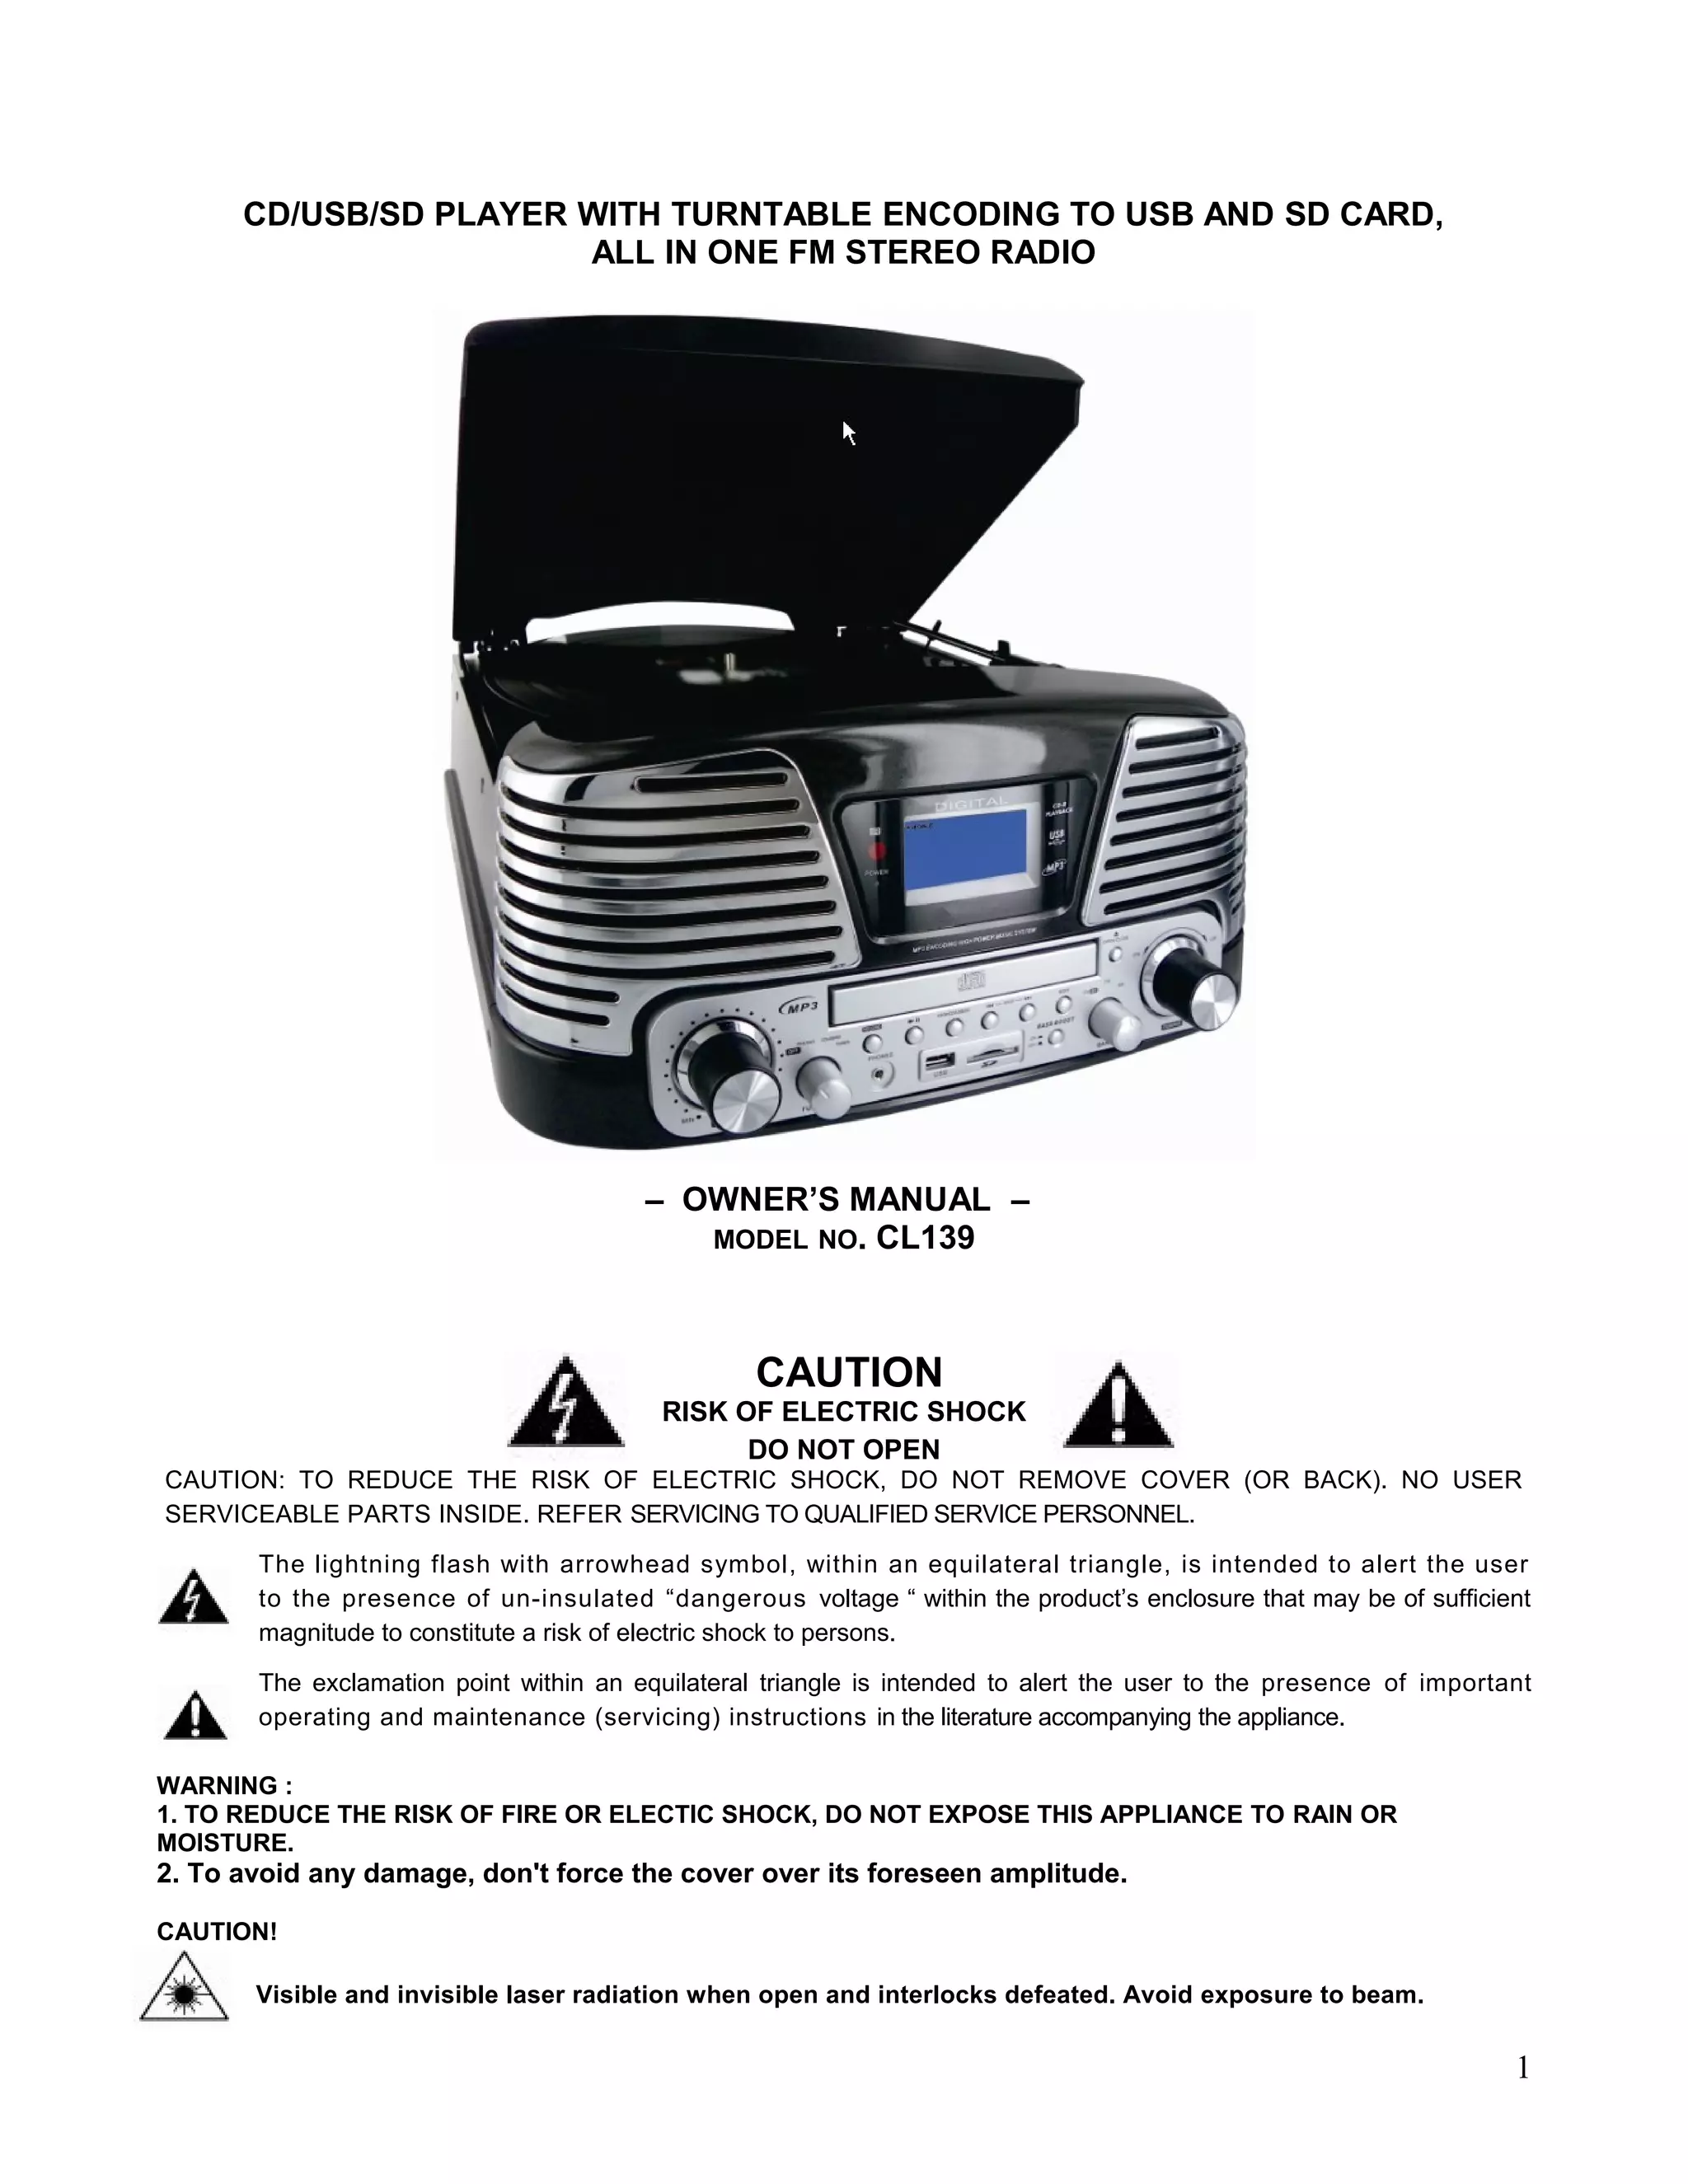
CD/USB/SD PLAYER WITH TURNTABLE ENCODING TO USB AND SD CARD,
                       ALL IN ONE FM STEREO RADIO


                                        – OWNER’S MANUAL –
                                           MODEL NO. CL139


                                                  CAUTION
                                          RISK OF ELECTRIC SHOCK
                                                DO NOT OPEN
CAUTION: TO REDUCE THE RISK OF ELECTRIC SHOCK, DO NOT REMOVE COVER (OR BACK). NO USER
SERVICEABLE PARTS INSIDE. REFER SERVICING TO QUALIFIED SERVICE PERSONNEL.

       The lightning flash with arrowhead symbol, within an equilateral triangle, is intended to alert the user
       to the presence of un-insulated “dangerous voltage “ within the product’s enclosure that may be of sufficient
       magnitude to constitute a risk of electric shock to persons.

       The exclamation point within an equilateral triangle is intended to alert the user to the presence of important
       operating and maintenance (servicing) instructions in the literature accompanying the appliance.

WARNING :
1. TO REDUCE THE RISK OF FIRE OR ELECTIC SHOCK, DO NOT EXPOSE THIS APPLIANCE TO RAIN OR
MOISTURE.
2. To avoid any damage, don't force the cover over its foreseen amplitude.

CAUTION!

       Visible and invisible laser radiation when open and interlocks defeated. Avoid exposure to beam.


                                                                                                                    1
Safety precautions

To reduce the risk of personal injury or property damage when using electrical appliances, basic
safety precautions should always be followed, including the following:

• If the supply cord is damaged, contact after sales support.
• Before turning on the appliance, ensure the electrical voltage and circuit frequency correspond
to those indication on the appliance.
• This appliance is not intended for use by persons (including children) with reduced physical,
sensory or mental capabilities, or lack of experience and knowledge, unless they have been given
supervision or instruction concerning use of the appliance by a person responsible for their safety.
• Young children should be supervised to ensure they do not play with the appliance.
• Do not operate the appliance outdoors.
• The power plug must be removed from the power socket before cleaning, servicing,
maintenance or moving the appliance.
• When the appliance is not is use, switch it off and unplug it.
• The appliance should be placed on a flat surface for operation.
• To reduce the risk of electrocution, never operate this product with wet hands, submerge it in
water or spill liquids into the product parts that contain electrical connections.
• Do not insert any objects into the appliance.
• Do not kink or damage the power cord.
• Improper installation may result in the risk of fire, electric shock and/or injury to persons.
• The manufacturer is not responsible for any eventual damages caused by improper or faulty use.
• Do not attempt to repair, disassemble or modify the appliance.
• Do not move the appliance while the unit is on.
• This appliance is intended for domestic use only.
• This appliance is not intended to be operated by means of an external timer or separate remote-
control system.
• CAUTION: To prevent damage, do not clean the appliance with alkaline or abrasive cleaning
agents. Only use a soft cloth and mild detergent.


                                                                                                   2
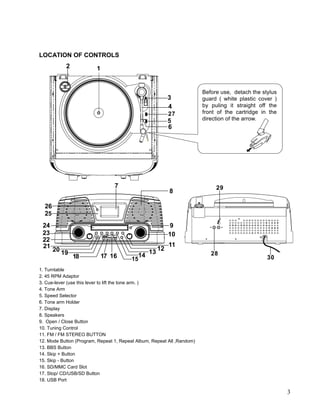
LOCATION OF CONTROLS


1. Turntable
2. 45 RPM Adaptor
3. Cue-lever (use this lever to lift the tone arm. )
4. Tone Arm
5. Speed Selector
6. Tone arm Holder
7. Display
8. Speakers
9. Open / Close Button
10. Tuning Control
11. FM / FM STEREO BUTTON
12. Mode Button (Program, Repeat 1, Repeat Album, Repeat All ,Random)
13. BBS Button
14. Skip + Button
15. Skip - Button
16. SD/MMC Card Slot
17. Stop/ CD/USB/SD Button
18. USB Port

                                                                        3
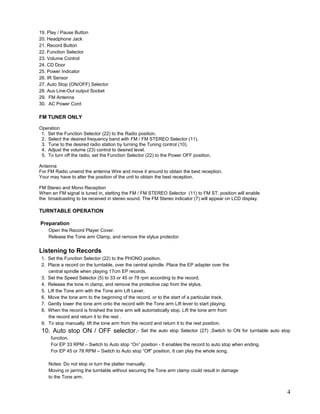
19. Play / Pause Button
20. Headphone Jack
21. Record Button
22. Function Selector
23. Volume Control
24. CD Door
25. Power Indicator
26. IR Sensor
27. Auto Stop (ON/OFF) Selector
28. Aux Line-Out output Socket
29. FM Antenna
30. AC Power Cord

FM TUNER ONLY

Operation
 1. Set the Function Selector (22) to the Radio position.
 2. Select the desired frequency band with FM / FM STEREO Selector (11).
 3. Tune to the desired radio station by turning the Tuning control (10).
 4. Adjust the volume (23) control to desired level.
 5. To turn off the radio, set the Function Selector (22) to the Power OFF position.

Antenna
For FM Radio unwind the antenna Wire and move it around to obtain the best reception.
Your may have to alter the position of the unit to obtain the best reception.

FM Stereo and Mono Reception
When an FM signal is tuned in, stetting the FM / FM STEREO Selector (11) to FM ST. position will enable
the broadcasting to be received in stereo sound. The FM Stereo indicator (7) will appear on LCD display.

TURNTABLE OPERATION

Preparation
    Open the Record Player Cover.
    Release the Tone arm Clamp, and remove the stylus protector.


Listening to Records
 1. Set the Function Selector (22) to the PHONO position.
 2. Place a record on the turntable, over the central spindle. Place the EP adapter over the
    central spindle when playing 17cm EP records.
 3. Set the Speed Selector (5) to 33 or 45 or 78 rpm according to the record.
 4. Release the tone m clamp, and remove the protective cap from the stylus.
 5. Lift the Tone arm with the Tone arm Lift Lever.
 6. Move the tone arm to the beginning of the record, or to the start of a particular track.
 7. Gently lower the tone arm onto the record with the Tone arm Lift lever to start playing.
 8. When the record is finished the tone arm will automatically stop. Lift the tone arm from
    the record and return it to the rest .
 9. To stop manually, lift the tone arm from the record and return it to the rest position.
 10. Auto stop ON / OFF selector.-               Set the auto stop Selector (27) ,Switch to ON for turntable auto stop
     function.
     For EP 33 RPM – Switch to Auto stop “On” position - It enables the record to auto stop when ending.
     For EP 45 or 78 RPM – Switch to Auto stop “Off” position, It can play the whole song.

    Notes: Do not stop or turn the platter manually.
    Moving or jarring the turntable without securing the Tone arm clamp could result in damage
    to the Tone arm.


                                                                                                                    4
Replace the protective cap on the stylus when not in use.


 Aux Line Output
  Line out output (For Aux Amplifier connection)

 HEADPHONE
     This unit will accept stereo headphones (not included) with a 3.5mm plug and an impedance
      of 8 ohms or greater. The speaker are automatically disconnected when headphones are
     connected to the PHONES JACK (20).
COMPACT DISC/MP3 OPERATION
    LOADING AND UNLOADING COMPACT DISCS
    Select CD/MP3 with the Function selector (22) on the unit to choose the CD/MP3 mode.
     Open the disc compartment by pressing the CD Open Button (9).
     When the disc compartment has opened, remove a disc from its case and place it
     carefully in the compartment with the label side facing up. Locate smaller, discs, in
     the centre depression of the compartment.
     Close the disc compartment.
     When the compartment is fully closed, the disc will start turning automatically. The total
     number of tracks of the CD will appear on the LCD display.

 LISTENING TO COMPACT DISC AND MP3 DISC (CD)
  Select CD with the Function selector (22) on the unit to choose the CD mode.
  A) In the CD mode
       This unit can read CD, CD-R, CD-RW.
  B ) In the MP3 mode
      This unit can also read as below :
   1. It can be reading as ‘8 cm’ and ‘multi Section’ of MP3 DISC.

 Listening to CD
   1. Select CD with the Function selector (22) on the unit to choose the CD mode.
    2. Press the PLAY/PAUSE button on the unit once to start playing the CD From the
        first track, and “play” indicator will appear on the display.
    3. Press the PLAY /PAUSE button again to playing the CD “pause” indicator will appear on the display(the
        track number is flash).
    4. To stop playback, press the “Stop/CD/USB/SD” button.

 TRACK SKIP
      Selecting a different track during CD Play
   1. Press the SKIP / SEARCH (REW. or F.F.) button on the unit (14,15),
       The required track number appears on the display.
   2. Press the PLAY / PAUSE button on the unit. Starting again with the track that is currently
      selected.

 SKIP/SEARCH MODE FOR MP3 DISC
  1.   Press FOLDER UP /DOWN by REMOTE (9,10), the Album no. will change.
  2.   Press SKIP +/SKIP - (REW. or F.F.) buttons (14,15 )the Track no. will change.
  3. When the desired track is being selected, press the "PLAY" button to start playback.

 REPEAT PLAY IN CD
   1. When playing the CD, if you desire to repeat the same track only, press the MODE (12)
      button on the unit .
   2. To repeat the whole disc, press the MODE twice and the "REP ALL" display will light up.
   3. To cancel repeat play, press the STOP button or press the MODE button repeatedly
      until the repeat indicator disappears.
  Note : If in "REPEAT ALL" mode, the normal & program playing will also effect in this function.


                                                                                                               5
RANDOM PLAY in CD
 1. When playing the CD or MP3 disc,press the MODE button four times, the “RADDOM” indicator will light up.
 2. Press the SKIP +/- button , The tracks will be played randomly.
 3. To cancel random play, press the STOP button twice until the random indicator disappears.

PROGRAMMED DISC PLAY (CD)
    It is not possible to enter programs during disc play. Press the Stop button (17) first, then follow
    the instructions below.
 1. Press the PROGRAM button(MODE)Button(12) on the unit . The following information will be displayed on
    the CD Display.
 2. Press the Forward and Reverse Skip Track buttons (14,15) on the unit to select the track to be stored in
    location i.e. track 03).
 3. Press the PROGRAM (mode) button. The first program selection is now stored in the program memory.

Listening to Programmed Tracks
Press the Play Pause button. Disc play will start at the beginning of the first programmed track .
To Clear The Program Memory
    If the disc is playing, press the Stop button to stop the disc.

SOURCE SELECTING - STOP / CD / USB / SD (17) button
 Press this button continuously 3 seconds, It will be switched to CD, or
 USB or SD mode
USB- CARD OPERATION
1.Insert the USB or SD card.
2.Press FUNCTION button on the unit to select the CARD-USB mode,the unit will automatically
  read the total folders and the number of the total tracks.
  NOTE: only Mp3 file format is supported.

           *Not all brand of USB flash disc is supported.

PlayingThe EntireCARD
1.Insert USB/SD CARD mode, the song will be autoplay. Playback starts with the first track,the
   display shows the current track number.
2.To interrupt playback,press PLAY/PAUSE button.The time elapsed indicator will flash.
3.To resume playback,press the PLAY/PAUSE again.
4.To stop playback,press the STOP button.

ENCODING AND STORING FROM A NORMAL CD
     You can encode you favorite CD songs into mp3 format and store them into your memory
     device through the USB port or SD/MMC card slot. .
1. Set the Function Selector (22) on the unit to choose the CD mode
2. Press the SKIP +/- button(14,15) to select the track ,then press the PLAY/PAUSE button (19)to be encoded.
3. Press the RECORD button(21) to start sync encoding and the display will show “USB or CARD” flashing ,
4. Press the SKIP +/- button(14,15) to select recording into USB or Card drive, press the RECORD button to
   confirm.
5. Press the Record button(21) or STOP/CD/USB/SD button(16) to stop encoding.
6. Remarks: Recording CD must be synchronized and press the STOP/CD/USB/SD button to confirm.

WARNING : Some originals CD’s may not be recorded as they are protected against copying.

ENCODING AND STORING FROM PHONO.
 You can encode you favorite EP songs into mp3 format and store them into your memory
 device through the USB port or SD/MMC card slot. .
1.   Set the Function Selector (22) to the PHONO position
2.   Select the track no. to be encoded.
3.   Press the Record button to start sync encoding and the display will show “USB or CARD” flashing.
4.   Press the SKIP +/- button(14,15) to select recording into USB or Card drive.
5.   Press the Record button(21) or STOP/CD/USB/SD button(16) to stop encoding


                                                                                                               6
COPYING FROM MP3 DISC
   You can copy the files from an mp3 disc and store then into your memory device through the USB port or
   SD/MMC card slot.
1. Insert the mp3 disc.
2. Press the SKIP +/- button(14,15) to select the track ,then press the PLAY/PAUSE button (19) that you want to
      copy.
 3. Press the encoding button to start copying the files and the display will show “REC” “USB/CARD” flash.
 4. Press the SKIP +/- button(14,15) to select into USB or Card drive.
 5. Press the Record button(21) or STOP/CD/USB/SD button(17) to stop encoding.

COPY FROM USB TO SD OR FROM SD TO USB

1. You can copy the files from MP3 or USB drive and store them into your memory device through the
    USB port or SD/MMC card slot.
2. Insert the MP3 player or USB drive into USB slot and SD CARD into SD card slot. Switch the function
   button to USB. Then press button “STOP / USB / SD” for more than 3 second to change USB/CARD
   mode, and press the RECORD button, the LCD will display “COPY USB > SD”. The display will be
   counted from 1 to 100% during recording. Do not interrupt during copy recording process until
   completed. Otherwise, recording function cannot be performed.
3. Insert the SD card and the MP3 player or USB drive into USB slot. Switch the function button to
   CD/MP3/USB/SD, then press button “STOP / USB / SD” for more than 3 second to change
   USB/CARD mode, and press the RECORD button, the LCD display “COPY SD > USB”. The display
   will be counted from 1 to 100%. Do not interrupt during copy recording process until completed.
   Otherwise, recording function cannot be performed.

BASS BOOST
 Press the BBS button once (13 )to ON position to enjoy a more powerful Bass sound.

   REMOTE CONTROL UNIT
    PREPARATION BEFORE USE

     1.Remove the battery cover from the back of the remote control unit.
     2.Insert a CR2025 (3V) size battery (included). Insert the battery with the + and -
       terminals matching the indication inside the battery compartment.
     3.Replace the cover.


     1.    PLAY/PAUSE BUTTON
     2.    RECORD BUTTON
     3.    STOP/CD/USB/SD BUTTON
     4.    SKIP- BUTTON
     5.    SKIP+ BUTTON
     6.    OPEN BUTTON
     7.    PROG BUTTON
     8.    MODE BUTTON (Repeat 1,Repeat Album, Repeat All ,Random)
     9.    FOLDER UP
     10.   FOLDER DOWN
     11.   Remote Sensor

     BATTERY REPLACEMENT
     When the remote control operation becomes unstable or
     the distance from which remote control is possible
     becomes shorter, replace the battery with a new one.

     USING THE REMOTE CONTROL UNIT
     • To use the remote control unit, point it at the remote sensor (26) and press the button gently.
        Remote control range is approximatley 5m (approx. 16FT). Since the remote control range is less when the
     unit is used at an angle, use directly in front
        of the remote sensor.
     • Do not expose the remote sensor to strong light (direct sunlight or artificial lighting) and
        make sure that there are no obstacles between the remote sensor and the remote

                                                                                                                  7
control unit.

 The Stylus Replacement
      Loosen the red part of the stylus by screw driver
      and take out as per diagram A and B


    Replace the new stylus as per C and D diagram


      THE ABOVE DIAGRAM IS ONLY SHOWING HOW TO REPLACE A NEW NEEDLE/STYLUS.
      (EXTRA STYLUS/NEEDLE IS NOT INCLUDED).


SPECIFICATIONS
 Power Supply
 AC 230V ~ 50Hz
 Power consumption : 25W
 Radio Frequency Coverage
 FM: 87.5 - 108 MHz


                                                                              8

More Related Content

What's hot

Plantronics Voyager Pro user guide
Plantronics Voyager Pro user guidePlantronics Voyager Pro user guide
Plantronics Voyager Pro user guidebest4systems
 
2012 Toyota Avalon Audio System Baltimore, Maryland
2012 Toyota Avalon Audio System Baltimore, Maryland2012 Toyota Avalon Audio System Baltimore, Maryland
2012 Toyota Avalon Audio System Baltimore, MarylandJerry's Toyota
 
Datavideo HDR-70 Rackmountabe HD-SDI 1080p Hard Disk Recorder
Datavideo HDR-70 Rackmountabe HD-SDI 1080p Hard Disk RecorderDatavideo HDR-70 Rackmountabe HD-SDI 1080p Hard Disk Recorder
Datavideo HDR-70 Rackmountabe HD-SDI 1080p Hard Disk RecorderAV ProfShop
 
Airdopes 441 Best Wireless earphone
Airdopes 441 Best Wireless earphoneAirdopes 441 Best Wireless earphone
Airdopes 441 Best Wireless earphoneAmit Kumawat
 
Impulse getting-started-guide 0
Impulse getting-started-guide 0Impulse getting-started-guide 0
Impulse getting-started-guide 0agnaldovalentim
 
Datavideo HDR-60 Desktop HD-SDI 1080p Hard Disk Recorder
Datavideo HDR-60 Desktop HD-SDI 1080p Hard Disk RecorderDatavideo HDR-60 Desktop HD-SDI 1080p Hard Disk Recorder
Datavideo HDR-60 Desktop HD-SDI 1080p Hard Disk RecorderAV ProfShop
 
xgimi h1 dlp projector user manual in english
xgimi h1 dlp projector user manual in englishxgimi h1 dlp projector user manual in english
xgimi h1 dlp projector user manual in englishXueLeah
 
L32 w831 service_manual
L32 w831 service_manualL32 w831 service_manual
L32 w831 service_manualdiegomonte
 
2012 Toyota Sienna Rear Entertainment System
2012 Toyota Sienna Rear Entertainment System2012 Toyota Sienna Rear Entertainment System
2012 Toyota Sienna Rear Entertainment SystemJerry's Toyota
 
2012 Toyota Sienna Audio System
2012 Toyota Sienna Audio System2012 Toyota Sienna Audio System
2012 Toyota Sienna Audio SystemJerry's Toyota
 
2012 Toyota Sequoia Audio & Video Systems
2012 Toyota Sequoia Audio & Video Systems2012 Toyota Sequoia Audio & Video Systems
2012 Toyota Sequoia Audio & Video SystemsJerry's Toyota
 
2012 Toyota Highlander Audio/Video Information
2012 Toyota Highlander Audio/Video Information2012 Toyota Highlander Audio/Video Information
2012 Toyota Highlander Audio/Video InformationJerry's Toyota
 

What's hot (16)

Plantronics Voyager Pro user guide
Plantronics Voyager Pro user guidePlantronics Voyager Pro user guide
Plantronics Voyager Pro user guide
 
2012 Toyota Avalon Audio System Baltimore, Maryland
2012 Toyota Avalon Audio System Baltimore, Maryland2012 Toyota Avalon Audio System Baltimore, Maryland
2012 Toyota Avalon Audio System Baltimore, Maryland
 
Datavideo HDR-70 Rackmountabe HD-SDI 1080p Hard Disk Recorder
Datavideo HDR-70 Rackmountabe HD-SDI 1080p Hard Disk RecorderDatavideo HDR-70 Rackmountabe HD-SDI 1080p Hard Disk Recorder
Datavideo HDR-70 Rackmountabe HD-SDI 1080p Hard Disk Recorder
 
Airdopes 441 Best Wireless earphone
Airdopes 441 Best Wireless earphoneAirdopes 441 Best Wireless earphone
Airdopes 441 Best Wireless earphone
 
How to use a Function generator
How to use a Function generatorHow to use a Function generator
How to use a Function generator
 
iPod Shuffle 3rd Gen - User Guide
iPod Shuffle 3rd Gen - User GuideiPod Shuffle 3rd Gen - User Guide
iPod Shuffle 3rd Gen - User Guide
 
Voyagerpro ug en
Voyagerpro ug enVoyagerpro ug en
Voyagerpro ug en
 
Impulse getting-started-guide 0
Impulse getting-started-guide 0Impulse getting-started-guide 0
Impulse getting-started-guide 0
 
Datavideo HDR-60 Desktop HD-SDI 1080p Hard Disk Recorder
Datavideo HDR-60 Desktop HD-SDI 1080p Hard Disk RecorderDatavideo HDR-60 Desktop HD-SDI 1080p Hard Disk Recorder
Datavideo HDR-60 Desktop HD-SDI 1080p Hard Disk Recorder
 
Comcast on demand_remote_manual
Comcast on demand_remote_manualComcast on demand_remote_manual
Comcast on demand_remote_manual
 
xgimi h1 dlp projector user manual in english
xgimi h1 dlp projector user manual in englishxgimi h1 dlp projector user manual in english
xgimi h1 dlp projector user manual in english
 
L32 w831 service_manual
L32 w831 service_manualL32 w831 service_manual
L32 w831 service_manual
 
2012 Toyota Sienna Rear Entertainment System
2012 Toyota Sienna Rear Entertainment System2012 Toyota Sienna Rear Entertainment System
2012 Toyota Sienna Rear Entertainment System
 
2012 Toyota Sienna Audio System
2012 Toyota Sienna Audio System2012 Toyota Sienna Audio System
2012 Toyota Sienna Audio System
 
2012 Toyota Sequoia Audio & Video Systems
2012 Toyota Sequoia Audio & Video Systems2012 Toyota Sequoia Audio & Video Systems
2012 Toyota Sequoia Audio & Video Systems
 
2012 Toyota Highlander Audio/Video Information
2012 Toyota Highlander Audio/Video Information2012 Toyota Highlander Audio/Video Information
2012 Toyota Highlander Audio/Video Information
 

Similar to CL139

Gf lac m1600-3600_eng_0412
Gf lac m1600-3600_eng_0412Gf lac m1600-3600_eng_0412
Gf lac m1600-3600_eng_0412alexxq
 
gitarpazar.com Ampeg SVT2 PRO 300W Lambalı Bas Gitar Kafa Amfisi kullanim kl...
gitarpazar.com Ampeg SVT2 PRO 300W Lambalı Bas Gitar Kafa Amfisi  kullanim kl...gitarpazar.com Ampeg SVT2 PRO 300W Lambalı Bas Gitar Kafa Amfisi  kullanim kl...
gitarpazar.com Ampeg SVT2 PRO 300W Lambalı Bas Gitar Kafa Amfisi kullanim kl...GitarPazar
 
TC Electronic polytune
TC Electronic polytuneTC Electronic polytune
TC Electronic polytuneGitarPazar
 
gitarpazar.com TC Electronic PolyTune 2 Tuner Pedalı Kullanim Klavuzu Manual
gitarpazar.com TC Electronic PolyTune 2 Tuner Pedalı Kullanim Klavuzu Manualgitarpazar.com TC Electronic PolyTune 2 Tuner Pedalı Kullanim Klavuzu Manual
gitarpazar.com TC Electronic PolyTune 2 Tuner Pedalı Kullanim Klavuzu ManualGitarPazar
 
GP-100_Online Manual_EN_Firmware V1.3_200714.pdf
GP-100_Online Manual_EN_Firmware V1.3_200714.pdfGP-100_Online Manual_EN_Firmware V1.3_200714.pdf
GP-100_Online Manual_EN_Firmware V1.3_200714.pdfJose Cervantes
 
2011 Buick Regal Toledo Get to know
2011 Buick Regal Toledo Get to know2011 Buick Regal Toledo Get to know
2011 Buick Regal Toledo Get to knowBallas Buick GMC
 
TC Electronic Spark Mini Booster Kullanım Klavuzu
TC Electronic Spark Mini Booster Kullanım KlavuzuTC Electronic Spark Mini Booster Kullanım Klavuzu
TC Electronic Spark Mini Booster Kullanım KlavuzuGitarPazar
 

Similar to CL139 (20)

SEG101
SEG101SEG101
SEG101
 
SEG102
SEG102SEG102
SEG102
 
CL140
CL140CL140
CL140
 
Av r500 uk
Av r500 ukAv r500 uk
Av r500 uk
 
CL138
CL138CL138
CL138
 
Gf lac m1600-3600_eng_0412
Gf lac m1600-3600_eng_0412Gf lac m1600-3600_eng_0412
Gf lac m1600-3600_eng_0412
 
Cdp100 e
Cdp100 eCdp100 e
Cdp100 e
 
Stanton C313
Stanton C313Stanton C313
Stanton C313
 
gitarpazar.com Ampeg SVT2 PRO 300W Lambalı Bas Gitar Kafa Amfisi kullanim kl...
gitarpazar.com Ampeg SVT2 PRO 300W Lambalı Bas Gitar Kafa Amfisi  kullanim kl...gitarpazar.com Ampeg SVT2 PRO 300W Lambalı Bas Gitar Kafa Amfisi  kullanim kl...
gitarpazar.com Ampeg SVT2 PRO 300W Lambalı Bas Gitar Kafa Amfisi kullanim kl...
 
CL118
CL118CL118
CL118
 
Cl118
Cl118Cl118
Cl118
 
imove-575sp.pdf
imove-575sp.pdfimove-575sp.pdf
imove-575sp.pdf
 
TC Electronic polytune
TC Electronic polytuneTC Electronic polytune
TC Electronic polytune
 
gitarpazar.com TC Electronic PolyTune 2 Tuner Pedalı Kullanim Klavuzu Manual
gitarpazar.com TC Electronic PolyTune 2 Tuner Pedalı Kullanim Klavuzu Manualgitarpazar.com TC Electronic PolyTune 2 Tuner Pedalı Kullanim Klavuzu Manual
gitarpazar.com TC Electronic PolyTune 2 Tuner Pedalı Kullanim Klavuzu Manual
 
GP-100_Online Manual_EN_Firmware V1.3_200714.pdf
GP-100_Online Manual_EN_Firmware V1.3_200714.pdfGP-100_Online Manual_EN_Firmware V1.3_200714.pdf
GP-100_Online Manual_EN_Firmware V1.3_200714.pdf
 
2011 Buick Regal Toledo Get to know
2011 Buick Regal Toledo Get to know2011 Buick Regal Toledo Get to know
2011 Buick Regal Toledo Get to know
 
Boss PS5
Boss PS5Boss PS5
Boss PS5
 
ccradio_sw.pdf
ccradio_sw.pdfccradio_sw.pdf
ccradio_sw.pdf
 
TC Electronic Spark Mini Booster Kullanım Klavuzu
TC Electronic Spark Mini Booster Kullanım KlavuzuTC Electronic Spark Mini Booster Kullanım Klavuzu
TC Electronic Spark Mini Booster Kullanım Klavuzu
 
MNN Studio Equipment Manual
MNN Studio Equipment ManualMNN Studio Equipment Manual
MNN Studio Equipment Manual
 

CL139

  • 1. CD/USB/SD PLAYER WITH TURNTABLE ENCODING TO USB AND SD CARD, ALL IN ONE FM STEREO RADIO – OWNER’S MANUAL – MODEL NO. CL139 CAUTION RISK OF ELECTRIC SHOCK DO NOT OPEN CAUTION: TO REDUCE THE RISK OF ELECTRIC SHOCK, DO NOT REMOVE COVER (OR BACK). NO USER SERVICEABLE PARTS INSIDE. REFER SERVICING TO QUALIFIED SERVICE PERSONNEL. The lightning flash with arrowhead symbol, within an equilateral triangle, is intended to alert the user to the presence of un-insulated “dangerous voltage “ within the product’s enclosure that may be of sufficient magnitude to constitute a risk of electric shock to persons. The exclamation point within an equilateral triangle is intended to alert the user to the presence of important operating and maintenance (servicing) instructions in the literature accompanying the appliance. WARNING : 1. TO REDUCE THE RISK OF FIRE OR ELECTIC SHOCK, DO NOT EXPOSE THIS APPLIANCE TO RAIN OR MOISTURE. 2. To avoid any damage, don't force the cover over its foreseen amplitude. CAUTION! Visible and invisible laser radiation when open and interlocks defeated. Avoid exposure to beam. 1
  • 2. Safety precautions To reduce the risk of personal injury or property damage when using electrical appliances, basic safety precautions should always be followed, including the following: • If the supply cord is damaged, contact after sales support. • Before turning on the appliance, ensure the electrical voltage and circuit frequency correspond to those indication on the appliance. • This appliance is not intended for use by persons (including children) with reduced physical, sensory or mental capabilities, or lack of experience and knowledge, unless they have been given supervision or instruction concerning use of the appliance by a person responsible for their safety. • Young children should be supervised to ensure they do not play with the appliance. • Do not operate the appliance outdoors. • The power plug must be removed from the power socket before cleaning, servicing, maintenance or moving the appliance. • When the appliance is not is use, switch it off and unplug it. • The appliance should be placed on a flat surface for operation. • To reduce the risk of electrocution, never operate this product with wet hands, submerge it in water or spill liquids into the product parts that contain electrical connections. • Do not insert any objects into the appliance. • Do not kink or damage the power cord. • Improper installation may result in the risk of fire, electric shock and/or injury to persons. • The manufacturer is not responsible for any eventual damages caused by improper or faulty use. • Do not attempt to repair, disassemble or modify the appliance. • Do not move the appliance while the unit is on. • This appliance is intended for domestic use only. • This appliance is not intended to be operated by means of an external timer or separate remote- control system. • CAUTION: To prevent damage, do not clean the appliance with alkaline or abrasive cleaning agents. Only use a soft cloth and mild detergent. 2
  • 3. LOCATION OF CONTROLS 1. Turntable 2. 45 RPM Adaptor 3. Cue-lever (use this lever to lift the tone arm. ) 4. Tone Arm 5. Speed Selector 6. Tone arm Holder 7. Display 8. Speakers 9. Open / Close Button 10. Tuning Control 11. FM / FM STEREO BUTTON 12. Mode Button (Program, Repeat 1, Repeat Album, Repeat All ,Random) 13. BBS Button 14. Skip + Button 15. Skip - Button 16. SD/MMC Card Slot 17. Stop/ CD/USB/SD Button 18. USB Port 3
  • 4. 19. Play / Pause Button 20. Headphone Jack 21. Record Button 22. Function Selector 23. Volume Control 24. CD Door 25. Power Indicator 26. IR Sensor 27. Auto Stop (ON/OFF) Selector 28. Aux Line-Out output Socket 29. FM Antenna 30. AC Power Cord FM TUNER ONLY Operation 1. Set the Function Selector (22) to the Radio position. 2. Select the desired frequency band with FM / FM STEREO Selector (11). 3. Tune to the desired radio station by turning the Tuning control (10). 4. Adjust the volume (23) control to desired level. 5. To turn off the radio, set the Function Selector (22) to the Power OFF position. Antenna For FM Radio unwind the antenna Wire and move it around to obtain the best reception. Your may have to alter the position of the unit to obtain the best reception. FM Stereo and Mono Reception When an FM signal is tuned in, stetting the FM / FM STEREO Selector (11) to FM ST. position will enable the broadcasting to be received in stereo sound. The FM Stereo indicator (7) will appear on LCD display. TURNTABLE OPERATION Preparation Open the Record Player Cover. Release the Tone arm Clamp, and remove the stylus protector. Listening to Records 1. Set the Function Selector (22) to the PHONO position. 2. Place a record on the turntable, over the central spindle. Place the EP adapter over the central spindle when playing 17cm EP records. 3. Set the Speed Selector (5) to 33 or 45 or 78 rpm according to the record. 4. Release the tone m clamp, and remove the protective cap from the stylus. 5. Lift the Tone arm with the Tone arm Lift Lever. 6. Move the tone arm to the beginning of the record, or to the start of a particular track. 7. Gently lower the tone arm onto the record with the Tone arm Lift lever to start playing. 8. When the record is finished the tone arm will automatically stop. Lift the tone arm from the record and return it to the rest . 9. To stop manually, lift the tone arm from the record and return it to the rest position. 10. Auto stop ON / OFF selector.- Set the auto stop Selector (27) ,Switch to ON for turntable auto stop function. For EP 33 RPM – Switch to Auto stop “On” position - It enables the record to auto stop when ending. For EP 45 or 78 RPM – Switch to Auto stop “Off” position, It can play the whole song. Notes: Do not stop or turn the platter manually. Moving or jarring the turntable without securing the Tone arm clamp could result in damage to the Tone arm. 4
  • 5. Replace the protective cap on the stylus when not in use. Aux Line Output Line out output (For Aux Amplifier connection) HEADPHONE This unit will accept stereo headphones (not included) with a 3.5mm plug and an impedance of 8 ohms or greater. The speaker are automatically disconnected when headphones are connected to the PHONES JACK (20). COMPACT DISC/MP3 OPERATION LOADING AND UNLOADING COMPACT DISCS Select CD/MP3 with the Function selector (22) on the unit to choose the CD/MP3 mode. Open the disc compartment by pressing the CD Open Button (9). When the disc compartment has opened, remove a disc from its case and place it carefully in the compartment with the label side facing up. Locate smaller, discs, in the centre depression of the compartment. Close the disc compartment. When the compartment is fully closed, the disc will start turning automatically. The total number of tracks of the CD will appear on the LCD display. LISTENING TO COMPACT DISC AND MP3 DISC (CD) Select CD with the Function selector (22) on the unit to choose the CD mode. A) In the CD mode This unit can read CD, CD-R, CD-RW. B ) In the MP3 mode This unit can also read as below : 1. It can be reading as ‘8 cm’ and ‘multi Section’ of MP3 DISC. Listening to CD 1. Select CD with the Function selector (22) on the unit to choose the CD mode. 2. Press the PLAY/PAUSE button on the unit once to start playing the CD From the first track, and “play” indicator will appear on the display. 3. Press the PLAY /PAUSE button again to playing the CD “pause” indicator will appear on the display(the track number is flash). 4. To stop playback, press the “Stop/CD/USB/SD” button. TRACK SKIP Selecting a different track during CD Play 1. Press the SKIP / SEARCH (REW. or F.F.) button on the unit (14,15), The required track number appears on the display. 2. Press the PLAY / PAUSE button on the unit. Starting again with the track that is currently selected. SKIP/SEARCH MODE FOR MP3 DISC 1. Press FOLDER UP /DOWN by REMOTE (9,10), the Album no. will change. 2. Press SKIP +/SKIP - (REW. or F.F.) buttons (14,15 )the Track no. will change. 3. When the desired track is being selected, press the "PLAY" button to start playback. REPEAT PLAY IN CD 1. When playing the CD, if you desire to repeat the same track only, press the MODE (12) button on the unit . 2. To repeat the whole disc, press the MODE twice and the "REP ALL" display will light up. 3. To cancel repeat play, press the STOP button or press the MODE button repeatedly until the repeat indicator disappears. Note : If in "REPEAT ALL" mode, the normal & program playing will also effect in this function. 5
  • 6. RANDOM PLAY in CD 1. When playing the CD or MP3 disc,press the MODE button four times, the “RADDOM” indicator will light up. 2. Press the SKIP +/- button , The tracks will be played randomly. 3. To cancel random play, press the STOP button twice until the random indicator disappears. PROGRAMMED DISC PLAY (CD) It is not possible to enter programs during disc play. Press the Stop button (17) first, then follow the instructions below. 1. Press the PROGRAM button(MODE)Button(12) on the unit . The following information will be displayed on the CD Display. 2. Press the Forward and Reverse Skip Track buttons (14,15) on the unit to select the track to be stored in location i.e. track 03). 3. Press the PROGRAM (mode) button. The first program selection is now stored in the program memory. Listening to Programmed Tracks Press the Play Pause button. Disc play will start at the beginning of the first programmed track . To Clear The Program Memory If the disc is playing, press the Stop button to stop the disc. SOURCE SELECTING - STOP / CD / USB / SD (17) button Press this button continuously 3 seconds, It will be switched to CD, or USB or SD mode USB- CARD OPERATION 1.Insert the USB or SD card. 2.Press FUNCTION button on the unit to select the CARD-USB mode,the unit will automatically read the total folders and the number of the total tracks. NOTE: only Mp3 file format is supported. *Not all brand of USB flash disc is supported. PlayingThe EntireCARD 1.Insert USB/SD CARD mode, the song will be autoplay. Playback starts with the first track,the display shows the current track number. 2.To interrupt playback,press PLAY/PAUSE button.The time elapsed indicator will flash. 3.To resume playback,press the PLAY/PAUSE again. 4.To stop playback,press the STOP button. ENCODING AND STORING FROM A NORMAL CD You can encode you favorite CD songs into mp3 format and store them into your memory device through the USB port or SD/MMC card slot. . 1. Set the Function Selector (22) on the unit to choose the CD mode 2. Press the SKIP +/- button(14,15) to select the track ,then press the PLAY/PAUSE button (19)to be encoded. 3. Press the RECORD button(21) to start sync encoding and the display will show “USB or CARD” flashing , 4. Press the SKIP +/- button(14,15) to select recording into USB or Card drive, press the RECORD button to confirm. 5. Press the Record button(21) or STOP/CD/USB/SD button(16) to stop encoding. 6. Remarks: Recording CD must be synchronized and press the STOP/CD/USB/SD button to confirm. WARNING : Some originals CD’s may not be recorded as they are protected against copying. ENCODING AND STORING FROM PHONO. You can encode you favorite EP songs into mp3 format and store them into your memory device through the USB port or SD/MMC card slot. . 1. Set the Function Selector (22) to the PHONO position 2. Select the track no. to be encoded. 3. Press the Record button to start sync encoding and the display will show “USB or CARD” flashing. 4. Press the SKIP +/- button(14,15) to select recording into USB or Card drive. 5. Press the Record button(21) or STOP/CD/USB/SD button(16) to stop encoding 6
  • 7. COPYING FROM MP3 DISC You can copy the files from an mp3 disc and store then into your memory device through the USB port or SD/MMC card slot. 1. Insert the mp3 disc. 2. Press the SKIP +/- button(14,15) to select the track ,then press the PLAY/PAUSE button (19) that you want to copy. 3. Press the encoding button to start copying the files and the display will show “REC” “USB/CARD” flash. 4. Press the SKIP +/- button(14,15) to select into USB or Card drive. 5. Press the Record button(21) or STOP/CD/USB/SD button(17) to stop encoding. COPY FROM USB TO SD OR FROM SD TO USB 1. You can copy the files from MP3 or USB drive and store them into your memory device through the USB port or SD/MMC card slot. 2. Insert the MP3 player or USB drive into USB slot and SD CARD into SD card slot. Switch the function button to USB. Then press button “STOP / USB / SD” for more than 3 second to change USB/CARD mode, and press the RECORD button, the LCD will display “COPY USB > SD”. The display will be counted from 1 to 100% during recording. Do not interrupt during copy recording process until completed. Otherwise, recording function cannot be performed. 3. Insert the SD card and the MP3 player or USB drive into USB slot. Switch the function button to CD/MP3/USB/SD, then press button “STOP / USB / SD” for more than 3 second to change USB/CARD mode, and press the RECORD button, the LCD display “COPY SD > USB”. The display will be counted from 1 to 100%. Do not interrupt during copy recording process until completed. Otherwise, recording function cannot be performed. BASS BOOST Press the BBS button once (13 )to ON position to enjoy a more powerful Bass sound. REMOTE CONTROL UNIT PREPARATION BEFORE USE 1.Remove the battery cover from the back of the remote control unit. 2.Insert a CR2025 (3V) size battery (included). Insert the battery with the + and - terminals matching the indication inside the battery compartment. 3.Replace the cover. 1. PLAY/PAUSE BUTTON 2. RECORD BUTTON 3. STOP/CD/USB/SD BUTTON 4. SKIP- BUTTON 5. SKIP+ BUTTON 6. OPEN BUTTON 7. PROG BUTTON 8. MODE BUTTON (Repeat 1,Repeat Album, Repeat All ,Random) 9. FOLDER UP 10. FOLDER DOWN 11. Remote Sensor BATTERY REPLACEMENT When the remote control operation becomes unstable or the distance from which remote control is possible becomes shorter, replace the battery with a new one. USING THE REMOTE CONTROL UNIT • To use the remote control unit, point it at the remote sensor (26) and press the button gently. Remote control range is approximatley 5m (approx. 16FT). Since the remote control range is less when the unit is used at an angle, use directly in front of the remote sensor. • Do not expose the remote sensor to strong light (direct sunlight or artificial lighting) and make sure that there are no obstacles between the remote sensor and the remote 7
  • 8. control unit. The Stylus Replacement Loosen the red part of the stylus by screw driver and take out as per diagram A and B Replace the new stylus as per C and D diagram THE ABOVE DIAGRAM IS ONLY SHOWING HOW TO REPLACE A NEW NEEDLE/STYLUS. (EXTRA STYLUS/NEEDLE IS NOT INCLUDED). SPECIFICATIONS Power Supply AC 230V ~ 50Hz Power consumption : 25W Radio Frequency Coverage FM: 87.5 - 108 MHz 8