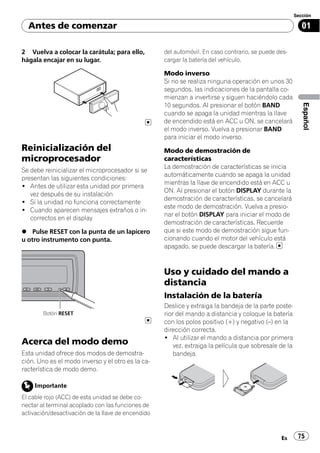
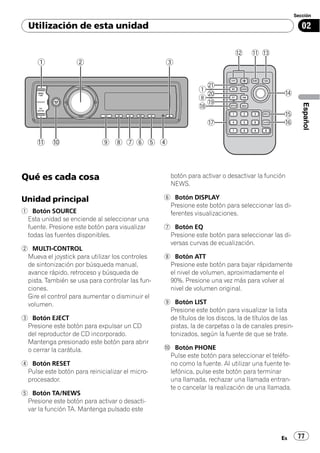
English
    Operation Manual
    Manual de instrucciones


                                     Español
CD RDS Receiver
Reproductor de CD con receptor RDS


DEH-P85BT
2   En
Contents


                                                                                                English
Thank you for buying this Pioneer product.
Please read through these operating instructions so you will know how to operate
your model properly. After you have finished reading the instructions, keep this man-
ual in a safe place for future reference.


   Before You Start                                – Introduction of advanced
   About this unit 6                                  operations 20
   Operating environment 7                         – Selecting a repeat play range 20
   Visit our website 7                             – Playing tracks in random order 20
   In case of trouble 7                            – Scanning folders and tracks 20
   Protecting your unit from theft 7               – Pausing disc playback 21
       – Removing the front panel 8                – Using compression and BMX 21
       – Attaching the front panel 8               – Searching every 10 tracks in the current
   Resetting the microprocessor 8                     disc or folder 21
   About the demo mode 8                           – Using disc title functions 21
   Use and care of the remote control 9            – Displaying text information on disc 22
       – Installing the battery 9                  – Selecting tracks from the track title
       – Using the remote control 9                   list 23
                                                   – Selecting tracks from the file name
   Operating this unit                                list 23
   What’s What 10                               Playing songs on iPod 24
      – Head unit 10                               – Basic Operations 24
      – Remote control 10                          – Browsing for a song 24
   Basic Operations 11                             – Displaying text information on
      – Power ON/OFF 11                               iPod 25
      – Selecting a source 11                      – Introduction of advanced
      – Adjusting the volume 12                       operations 25
   Tuner 12                                        – Repeating play 25
      – Basic Operations 12                        – Playing songs in a random order
      – Storing and recalling broadcast               (shuffle) 25
          frequencies 13                           – Playing all songs in a random order
      – Introduction of advanced                      (shuffle all) 26
          operations 14                            – Pausing a song 26
      – Storing the strongest broadcast            – Changing audiobook speed 26
          frequencies 14                        Bluetooth Audio 27
      – Tuning in strong signals 14                – Basic Operations 27
      – Selecting alternative frequencies 14       – Setting up for Bluetooth audio
      – Receiving traffic announcements 15            player 27
      – Using PTY functions 16                     – Introduction of advanced
      – Using radio text 16                           operations 28
      – PTY list 17                                – Connecting a Bluetooth audio
   Built-in CD Player 18                              player 28
      – Basic Operations 18                        – Disconnecting a Bluetooth audio
      – Selecting a track directly 19                 player 29


                                                                                        En      3
Contents


        – Connecting the most recently             Audio Adjustments 44
          connected Bluetooth audio player 29          – Introduction of audio adjustments 44
        – Playing songs on Bluetooth audio             – Using balance adjustment 44
          player 29                                    – Using the equalizer 44
        – Stopping playback 29                         – Adjusting loudness 46
        – Pausing a song 29                            – Using subwoofer output 46
        – Connecting to a Bluetooth audio player       – Boosting the bass 46
          automatically 29                             – Using the high pass filter 47
        – Displaying BD (Bluetooth Device)             – Adjusting source levels 47
          address 30                                   – Using automatic sound levelizer 47
     Bluetooth Telephone 30                        Initial Settings 48
        – Basic Operations 30                          – Adjusting initial settings 48
        – About the telephone source 31                – Selecting the display language 48
        – Setting up for hands-free phoning 31         – Setting the date 48
        – Making a phone call 32                       – Setting the clock 48
        – Taking a phone call 32                       – Turning the off clock display on or
        – Introduction of advanced                        off 49
          operations 33                                – Setting the FM tuning step 49
        – Connecting a cellular phone 34               – Switching Auto PI Seek 49
        – Disconnecting a cellular phone 35            – Switching the warning tone 49
        – Registering connected cellular               – Switching the face auto open 49
          phone 35                                     – Switching the auxiliary setting 50
        – Deleting a registered phone 36               – Switching the dimmer setting 50
        – Connecting to a registered cellular          – Adjusting the brightness 50
          phone 36                                     – Setting the rear output and subwoofer
        – Using the Phone Book 37                         controller 50
        – Using the Call History 40                    – Switching the sound muting/
        – Assigning preset numbers 41                     attenuation 50
        – Making a call by entering phone              – Switching the feature demo 51
          number 41                                    – Switching the reverse mode 51
        – Clearing memory 42                           – Switching the Ever Scroll 51
        – Setting the automatic rejecting 42           – Activating the BT Audio source 51
        – Setting the automatic answering 42           – Entering PIN code for Bluetooth
        – Changing the ring tone 43                       wireless connection 52
        – Echo canceling and noise                     – Editing device name 52
          reduction 43                                 – Displaying system version for
        – Displaying BD (Bluetooth Device)                repair 52
          address 43                                   – Resetting the Bluetooth wireless
        – Selecting the incoming call screen 43           technology module 53

4   En
Contents


                                                                                           English
Other Functions 53                             Understanding error messages 64
   – Using the AUX source 53                   Handling guideline of discs and player 65
   – Using different entertainment             Dual Discs 65
     displays 54                               Compressed audio files 65
   – Using the PGM button 54                      – Example of a hierarchy 66
                                                  – Compressed audio compatibility 66
Available accessories                          About handling the iPod 67
USB adapter 55                                    – About iPod settings 67
   – Basic Operations 55                       Specifications 68
   – Selecting an audio file directly in the
      current folder 55
   – Introduction of advanced
      operations 55
   – Displaying text information of an audio
      file 56
   – Selecting files from the file name
      list 56
Multi-CD Player 57
   – Basic Operations 57
   – Selecting a track directly 57
   – Introduction of advanced
      operations 57
   – Using ITS playlists 58
   – Using disc title functions 59
   – Using CD TEXT functions 60
DVD Player 60
   – Basic Operations 60
   – Selecting a disc 61
   – Selecting a folder 61
   – Introduction of advanced
      operations 61
TV tuner 62
   – Basic Operations 62
   – Storing and recalling broadcast
      stations 63
   – Storing the strongest broadcast
      stations sequentially 63

Additional Information
Troubleshooting 64

                                                                                     En    5
Section

01          Before You Start

                                                                ! The Pioneer CarStereo-Pass is for use only in
                                                                  Germany.
                                                                ! Keep this manual handy as a reference for op-
                                                                  erating procedures and precautions.
                                                                ! Always keep the volume low enough so that
           If you want to dispose this product, do not mix        you can hear sounds from outside the vehicle.
           it with general household waste. There is a se-      ! Protect this unit from moisture.
           parate collection system for used electronic         ! If the battery is disconnected or discharged,
           products in accordance with legislation that re-       the preset memory will be erased and must be
           quires proper treatment, recovery and recy-            reprogrammed.
           cling.
                                                                About WMA
          Private households in the 25 member states of
          the EU, in Switzerland and Norway may return
          their used electronic products free of charge
          to designated collection facilities or to a retai-
          ler (if you purchase a similar new one).
          For countries not mentioned above, please
                                                                The Windows Media™ logo printed on the box
          contact your local authorities for the correct
                                                                indicates that this unit can play back WMA
          method of disposal.
                                                                data.
          By doing so you will ensure that your disposed
                                                                WMA is short for Windows Media Audio and
          product undergoes the necessary treatment,
                                                                refers to an audio compression technology
          recovery and recycling and thus prevent po-
                                                                that is developed by Microsoft Corporation.
          tential negative effects on the environment
                                                                WMA data can be encoded by using Windows
          and human health.
                                                                Media Player version 7 or later.
                                                                Windows Media and the Windows logo are tra-
                                                                demarks or registered trademarks of Microsoft
          About this unit                                       Corporation in the United States and/or other
          The tuner frequencies on this unit are allo-          countries.
          cated for use in Western Europe, Asia, the            ! This unit may not operate correctly depend-
          Middle East, Africa and Oceania. Use in other            ing on the application used to encode
          areas may result in poor reception. The RDS              WMA files.
          (radio data system) function operates only in
          areas with FM stations broadcasting RDS sig-          About MP3
          nals.                                                 Supply of this product only conveys a license
                                                                for private, non-commercial use and does not
                                                                convey a license nor imply any right to use
                 CAUTION                                        this product in any commercial (i.e. revenue-
          ! Do not allow this unit to come into contact         generating) real time broadcasting (terrestrial,
            with liquids. Electrical shock could result.        satellite, cable and/or any other media), broad-
            Also, this unit damage, smoke, and overheat         casting/streaming via internet, intranets and/
            could result from contact with liquids.             or other networks or in other electronic con-
          ! “CLASS 1 LASER PRODUCT”                             tent distribution systems, such as pay-audio or
            This product contains a laser diode of higher       audio-on-demand applications. An indepen-
            class than 1. To ensure continued safety, do        dent license for such use is required. For de-
            not remove any covers or attempt to gain ac-        tails, please visit
            cess to the inside of the product. Refer all ser-   http://www.mp3licensing.com.
            vicing to qualified personnel.


   6        En
Section

  Before You Start                                                                                     01


                                                                                                        English
About AAC                                          ! This unit does not support software ver-
AAC is short for Advanced Audio Coding and           sions prior to iPod update 2004-10-20. For
refers to an audio compression technology            supported versions, consult your nearest
standard used with MPEG 2 and MPEG 4.                Pioneer dealer.
Several applications can be used to encode         ! Operations may vary depending on the soft-
AAC files, but file formats and extensions dif-      ware version of iPod.
fer depending on the application which is
used to encode.
This unit plays back AAC files encoded by          Operating environment
iTunes® version 6.0.5 and earlier.
                                                   This unit should be used within the tempera-
iTunes is a trademark of Apple Computer, Inc.,
                                                   ture ranges shown below.
registered in the U.S. and other countries.
                                                   Operating temperature range: -10 °C to +60 °C
About Bluetooth                                    (14 °F to 140 °F)
                                                   EN300328 ETC test temperature: -20 °C and
                                                   +55 °C (-4 °F and 131 °F)


                                                   Visit our website
                                                   Visit us at the following site:

Bluetooth is a short-range wireless radio con-
nectivity technology that is developed as a
cable replacement for mobile phones, hand-
held PCs and other devices. Bluetooth oper-
ates in 2.4 GHz frequency range and transmits      ! Register your product. We will keep the de-
voice and data at speeds up to 1 megabit per         tails of your purchase on file to help you
second. Bluetooth was launched by a special          refer to this information in the event of an
interest group (SIG) that comprises of Ericsson      insurance claim such as loss or theft.
Inc., Intel Corp., Nokia Corp., Toshiba and IBM    ! We offer the latest information about
in 1998, and it is currently developed by nearly     Pioneer Corporation on our website.
2 000 companies worldwide.
! The Bluetooth word mark and logos are
    owned by the Bluetooth SIG, Inc. and any
    use of such marks by Pioneer Corporation
                                                   In case of trouble
    is under license. Other trademarks and         Should this product fail to operate properly,
    trade names are those of their respective      contact your dealer or nearest authorized
    owners.                                        Pioneer Service Station.

iPod® compatibility
This unit can control and listen to songs on an
iPod.
                                                   Protecting your unit from
! iPod is a trademark of Apple Computer,           theft
   Inc., registered in the U.S. and other coun-    The front panel can be detached to deter theft.
   tries.                                          ! If the front panel is not detached from the
! This unit supports only an iPod with Dock           head unit within five seconds of turning off
   Connector.                                         the ignition, a warning tone will sound and
                                                      the front panel will open.


                                                                                              En       7
Section

01          Before You Start

          ! You can turn off the warning tone. See            Attaching the front panel
            Switching the warning tone on page 49.
          ! You can turn off the face auto open. See          1   Make sure the inner cover is closed.
            Switching the face auto open on page 49.          2 Replace the front panel by clipping it
                                                              into place.
                 Important
          ! Handle gently when removing or attaching
            the front panel.
          ! Avoid subjecting the front panel to excessive
            shocks.
          ! Keep the front panel out of direct sunlight and
            high temperatures.
          ! A few seconds after turning the ignition
            switch to on or off, the front panel automati-
            cally moves. When this happens, your fingers
            may become jammed in the panel, so keep           Resetting the microprocessor
            your hands away from it.                          The microprocessor must be reset under the
                                                              following conditions:
          Removing the front panel                            ! Prior to using this unit for the first time
                                                                  after installation
          1 Press and hold OPEN to open the front             ! If the unit fails to operate properly
          panel.                                              ! When strange or incorrect messages ap-
                                                                  pear on the display
                                                              % Press RESET with a pen tip or other
                                                              pointed instrument.


          2 Slide and remove the front panel to-
          ward you.
          Take care not to grip it too tightly or to drop
          the front panel and protect it from contact
          with water or other fluids to prevent perma-
          nent damage.
                                                                     RESET button


                                                              About the demo mode
                                                              This unit features two demonstration modes.
                                                              One is the reverse mode, the other is the fea-
                                                              ture demo mode.
          3 Put the front panel into provided pro-
          tective case for safe keeping.


   8        En
Section

  Before You Start                                                                                            01


                                                                                                               English
     Important
                                                           WARNING
The red lead (ACC) of this unit should be con-        Keep the battery out of the reach of children.
nected to a terminal coupled with ignition switch     Should the battery be swallowed, immediately
on/off operations. If this is not done, the vehicle   consult a doctor.
battery may be drained.

Reverse mode                                               CAUTION
If you do not perform an operation within             ! Use only one CR2025 (3 V) lithium battery.
about 30 seconds, screen indications start to         ! Remove the battery if the remote control is not
reverse, and then continue reversing every 10           used for a month or longer.
seconds. Pressing BAND when power to this             ! Danger of explosion if battery is incorrectly re-
unit is turned off while the ignition switch is         placed. Replace only with the same or equiva-
set to ACC or ON cancels the reverse mode.              lent type.
Press BAND again to start the reverse mode.           ! Do not handle the battery with metallic tools.
                                                      ! Do not store the battery with metallic materi-
Feature demo mode                                       als.
The feature demo automatically starts when            ! In the event of battery leakage, wipe the re-
power to this unit is turned off while the igni-        mote control completely clean and install a
tion switch is set to ACC or ON. Pressing               new battery.
DISPLAY during feature demo operation can-            ! When disposing of used batteries, please
cels the feature demo mode. Press DISPLAY               comply with governmental regulations or en-
again to start the feature demo mode. Remem-            vironmental public institutions’ rules that
ber that if the feature demo continues operat-          apply in your country/area.
ing when the car engine is turned off, it may
drain battery power.
                                                      Using the remote control
                                                      Point the remote control in the direction of the
Use and care of the remote                            front panel to operate.
                                                      ! The remote control may not function prop-
control                                                  erly in direct sunlight.
Installing the battery
Slide the tray out on the back of the remote               Important
control and insert the battery with the plus (+)      ! Do not store the remote control in high tem-
and minus (–) poles pointing in the proper di-          peratures or direct sunlight.
rection.                                              ! Do not let the remote control fall onto the
! When using for the first time, pull out the           floor, where it may become jammed under the
   film protruding from the tray.                       brake or accelerator pedal.


                                                                                                   En         9
Section

02          Operating this unit


          What’s What                                      7 EQ button
                                                            Press to select various equalizer curves.

          Head unit                                        8 ATT button
                                                            Press to quickly lower the volume level, by
          1 SOURCE button                                   about 90%. Press once more to return to the
           This unit is turned on by selecting a source.    original volume level.
           Press to cycle through all the available
           sources.                                        9 LIST button
                                                            Press to display the disc title list, track title
          2 MULTI-CONTROL                                   list, folder list, file list or preset channel list
           Move to perform manual seek tuning, fast         depending on the source.
           forward, reverse and track search controls.
           Also used for controlling functions.            a PHONE button
           Turn to increase or decrease the volume.         Press to select the phone as the source.
                                                            While operating a phone source, press to
          3 EJECT button                                    end a call, reject an incoming call or cancel
           Press to eject a CD from your built-in CD        making a call.
           player.
           Press and hold to open or close the front       b BAND button
           panel.                                           Press to select among three FM bands and
                                                            MW/LW bands and to cancel the control
          4 RESET button                                    mode of functions.
           Press to reset the microprocessor.

          5 TA/NEWS button                                 Remote control
           Press to turn TA function on or off. Press
                                                           Operation is the same as when using the but-
           and hold to turn NEWS function on or off.
                                                           tons on the head unit.
          6 DISPLAY button
                                                           c VOLUME buttons
           Press to select different displays.
                                                            Press to increase or decrease the volume.


  10        En
Section

  Operating this unit                                                                                        02


                                                                                                              English
d FUNCTION button                                      Basic Operations
 Press to select functions.
                                                       Power ON/OFF
e Joystick
 Move to perform manual seek tuning, fast              Turning the unit on
 forward, reverse and track search controls.           % Press SOURCE to turn the unit on.
 Also used for controlling functions.
 Functions are the same as                             Turning the unit off
 MULTI-CONTROL except for volume con-
 trol.                                                 % Press SOURCE and hold until the unit
 Press to display the disc title list, track title     turns off.
 list, folder list, file list or preset channel list
 depending on the source.                              Selecting a source
f DIRECT button                                        You can select a source you want to listen to.
 Press to directly select the desired track.           To switch to the built-in CD player, load a disc
 While operating the phone source, press to            in the unit (refer to page 18).
 directly enter a phone number.
                                                       % Press SOURCE to select a source.
g CLEAR button                                         Press SOURCE repeatedly to switch between
 Press to cancel the input number when 0 to            the following sources:
 9 are used.                                           Tuner—Television—DVD player/Multi-
                                                       DVD player—Built-in CD player—Multi-
h 0 to 9 buttons                                       CD player—iPod—USB—External unit 1—
 Press to directly select the desired track,           External unit 2—AUX1—AUX2—BT Audio
 preset tuning or disc. Buttons 1 to 6 can op-         —BT Telephone
 erate the preset tuning for the tuner or disc
 number search for the multi-CD player.                    Notes
i OFF HOOK button                                      ! In the following cases, the sound source will
 Press to start talking on the phone while op-           not change:
 erating a phone source.                                 — When there is no unit corresponding to the
                                                             selected source connected to this unit.
j ON HOOK button                                         — When there is no disc or magazine in the
 While operating the phone source, press to                  player.
 end a call or reject an incoming call.                  — When the AUX (auxiliary input) is set to off
                                                             (refer to page 50).
k PGM button
                                                         — When the BT Audio source is set to off
 Press to operate the preprogrammed func-
                                                             (refer to Activating the BT Audio source on
 tions for each source. (Refer to Using the
                                                             page 51).
 PGM button on page 54.)
                                                       ! AUX1 is set to on by default. Turn off the AUX1
l AUDIO button                                           when not in use (refer to Switching the auxili-
 Press to select various sound quality con-              ary setting on page 50).
 trols.


                                                                                                   En       11
Section

02          Operating this unit

          ! External unit refers to a Pioneer product (such    Tuner
            as one available in the future) that, although
            incompatible as a source, enables control of       Basic Operations
            basic functions by this unit. Two external units   This unit’s AF (alternative frequencies search)
            can be controlled by this unit. When two exter-    function can be turned on and off. AF should
            nal units are connected, the allocation of         be off for normal tuning operation (refer to
            them to external unit 1 or external unit 2 is      page 14).
            automatically set by this unit.
          ! When this unit’s blue/white lead is connected      RDS
            to the vehicle’s auto-antenna relay control        RDS (radio data system) contains inaudible in-
            terminal, the vehicle’s antenna extends when       formations that helps searching of the radio
            this unit’s source is turned on. To retract the    stations.
            antenna, turn the source off.                      ! RDS service may not be provided by all sta-
                                                                  tions.
                                                               ! RDS functions such as AF and TA are only
          Adjusting the volume                                    active when your radio is tuned to an RDS
          % Use MULTI-CONTROL to adjust the                       station.
          sound level.


                                                               1 Band indicator
                                                               2 Stereo (5) indicator
                                                                 Shows when the selected frequency is being
                                                                 broadcast in stereo.
                                                               3 LOC indicator
                                                                 Shows when local seek tuning is on.
                                                               4 Preset number indicator
                                                               5 TP ( ) indicator
                                                                 Shows when a TP station is tuned in.
                                                               6 News ( ) indicator
                                                                 Shows when the set news program is re-
                                                                 ceived.
                                                               7 Program service name
                                                               8 PTY label indicator
                                                               9 TEXT indicator
                                                                 Shows when the radio text is received.


  12        En
Section

    Operating this unit                                                                                    02


                                                                                                            English
Non-RDS or MW/LW                                     Storing and recalling broadcast
                                                     frequencies
                                                     You can easily store up to six broadcast fre-
                                                     quencies for later recall.
                                                     ! Up to 18 FM stations, six for each of the
                                                        three FM bands, and six MW/LW stations
                                                        can be stored in memory.

                                                     1 When you find a frequency that you
                                                     want to store in memory press LIST.
1 Band indicator
2 Stereo (5) indicator                               2 Use MULTI-CONTROL to store the se-
  Shows when the selected frequency is being         lected frequency in memory.
  broadcast in stereo.                               Turn to change the preset number; press and
3 LOC indicator                                      hold to store.
  Shows when local seek tuning is on.                The preset number you have selected will
4 Preset number indicator                            flash and then remain lit. The selected radio
5 Frequency indicator                                station frequency has been stored in memory.

1   Press SOURCE to select the tuner.                3 Use MULTI-CONTROL to select the de-
                                                     sired station.
2 Press BAND to select a band.                       Turn to change the station; press to select.
Press BAND until the desired band is dis-            # You can also change the station by pushing
played, FM-1, FM-2, FM-3 for FM or MW/LW.            MULTI-CONTROL up or down.
                                                     # If you do not operate the list within about 30
3 To perform manual tuning, push                     seconds, the display is automatically returned to
MULTI-CONTROL left or right.                         the ordinary display.
4 To perform seek tuning, push and hold
MULTI-CONTROL left or right for about one            Using the remote control
second and release.                                  % When you find a frequency that you
The tuner will scan the frequencies until a          want to store in memory, press one of pre-
broadcast strong enough for good reception is        set tuning buttons 1 to 6 and hold until the
found.                                               preset number stops flashing.
# You can cancel seek tuning by pushing              The number you have pressed will flash in the
MULTI-CONTROL left or right.                         preset number indicator and then remain lit.
# If you push and hold MULTI-CONTROL left or         The selected radio station frequency has been
right you can skip stations. Seek tuning starts as   stored in memory.
soon as you release MULTI-CONTROL.                   The next time you press the same preset tun-
                                                     ing button the radio station frequency is re-
     Note                                            called from memory.
Listening MW radio while connecting iPod to this     # You can also recall radio station frequencies
unit may generate noise. In this case, disconnect    assigned to preset tuning numbers by pushing
iPod from this unit and noise is disappeared.        MULTI-CONTROL up or down during the fre-
                                                     quency display.


                                                                                                  En      13
Section

02          Operating this unit

          Introduction of advanced                            1 Use MULTI-CONTROL to select BSM in
          operations                                          the function menu.

          1 Press MULTI-CONTROL to display the                2 Press MULTI-CONTROL to turn BSM on.
          main menu.                                          Six strongest broadcast frequencies will be
          FUNCTION, AUDIO and ENTERTAINMENT                   stored in the order of their signal strength.
          appear on the display.                              # To cancel the storage process, press
                                                              MULTI-CONTROL again.
          2 Use MULTI-CONTROL to select
          FUNCTION.                                           3 Use MULTI-CONTROL to select the de-
          Turn to change the menu option; press to se-        sired station.
          lect.                                               Turn to change the station; press to select.
          The function name appears on the display.           # You can also change the station by pushing
                                                              MULTI-CONTROL up or down.
          3 Turn MULTI-CONTROL to select the
          function.
          Turn MULTI-CONTROL to switch between the            Tuning in strong signals
          functions in the following order:                   Local seek tuning lets you tune in only those
          BSM (best stations memory)—Regional (re-            radio stations with sufficiently strong signals
          gional)—Local (local seek tuning)—                  for good reception.
          PTY search (program type selection)—
          Traffic Announce (traffic announcement              1 Use MULTI-CONTROL to select Local in
          standby)—Alternative FREQ (alternative fre-         the function menu.
          quencies search)—News interrupt (news
                                                              2 Press MULTI-CONTROL to turn local
          program interruption)
                                                              seek tuning on.
          # You can also select the function by pressing
                                                              # To turn local seek tuning off, press
          FUNCTION on the remote control.
                                                              MULTI-CONTROL again.
          # If MW/LW band is selected, you can only se-
          lect BSM or Local.                                  3 Push MULTI-CONTROL left or right to
          # To return to the frequency display, press         set the sensitivity.
          BAND.                                               There are four levels of sensitivity for FM and
          # If you do not operate functions within about      two levels for MW/LW:
          30 seconds, the display is automatically returned   FM: Level 1—Level 2—Level 3—Level 4
          to the ordinary display.                            MW/LW: Level 1—Level 2
                                                              The Level 4 setting allows reception of only
                                                              the strongest stations, while lower settings let
          Storing the strongest broadcast                     you receive progressively weaker stations.
          frequencies
          BSM (best stations memory) lets you automa-
          tically store the six strongest broadcast fre-      Selecting alternative frequencies
          quencies under 1 to 6 on the remote control         When the tuner can’t get good reception, the
          and once stored there you can tune in to those      unit automatically search for a different sta-
          frequencies with the touch of a button.             tion in a same network.
          ! Storing broadcast frequencies with BSM
                                                              1 Use MULTI-CONTROL to select
              may replace broadcast frequencies you
                                                              Alternative FREQ in the function menu.
              have saved using 1 to 6 on the remote con-
              trol.                                           2   Press MULTI-CONTROL to turn AF on.
                                                              # To turn AF off, press MULTI-CONTROL again.


  14        En
Section

  Operating this unit                                                                                       02


                                                                                                             English
    Notes                                                Notes
! Only RDS stations are tuned in during seek         ! Regional programming and regional networks
  tuning or BSM when AF is on.                         are organized differently depending on the
! When you recall a preset station, the tuner          country (i.e., they may change according to
  may update the preset station with a new fre-        the hour, state or broadcast area).
  quency from the station’s AF list. No preset       ! The preset number may disappear from the
  number appears on the display if the RDS             display if the tuner tunes in a regional station
  data for the station received differs from that      which differs from the originally set station.
  of the originally stored station.                  ! The regional function can be turned on or off
! Sound may be temporarily interrupted by an-          independently for each FM band.
  other program during an AF frequency
  search.
! AF can be turned on or off independently for       Receiving traffic announcements
  each FM band.                                      TA (traffic announcement standby) lets you re-
                                                     ceive traffic announcements automatically, no
Using PI Seek                                        matter what source you are listening to. TA
                                                     can be activated for both a TP station (a sta-
If the tuner can’t find a suitable station, or re-   tion that broadcasts traffic information) or an
ception status becomes bad, the unit will auto-      enhanced other network’s TP station (a station
matically search for a different station with a      carrying information which cross-references
same programming. During the search,                 TP stations).
PI seek is displayed and the output is muted.
                                                     1 Tune in a TP or enhanced other net-
Using Auto PI Seek for preset stations               work’s TP station.
                                                     The TP ( ) indicator will light.
When preset stations cannot be recalled, as
when travelling long distances, the unit can         2 Press TA/NEWS to turn traffic an-
be set to perform PI Seek during preset recall.      nouncement standby on.
! The default setting for Auto PI Seek is off.       # To turn traffic announcements standby off,
   See Switching Auto PI Seek on page 49.            press TA/NEWS again.

                                                     3 Use MULTI-CONTROL to adjust the TA
Limiting stations to regional                        volume when a traffic announcement be-
programming                                          gins.
When AF is used, the regional function limits        The newly set volume is stored in memory and
the selection of stations broadcasting regional      recalled for subsequent traffic announce-
programs.                                            ments.
1 Use MULTI-CONTROL to select Regional               4 Press TA/NEWS while a traffic an-
in the function menu.                                nouncement is being received to cancel the
                                                     announcement.
2 Press MULTI-CONTROL to turn the re-                The tuner returns to the original source but re-
gional function on.
                                                     mains in the standby mode until TA/NEWS is
# To turn the regional function off, press
                                                     pressed again.
MULTI-CONTROL again.


                                                                                                  En       15
Section

02          Operating this unit


              Notes                                          Using news program interruption
                                                             When a news program is broadcast from a
          ! You can also turn the TA function on or off in
                                                             PTY code news station, the unit can switch
            the menu that appears by using
                                                             from any station to the news broadcast sta-
            MULTI-CONTROL.
                                                             tion. When the news program ends, reception
          ! The system switches back to the original
                                                             of the previous program resumes.
            source following traffic announcement recep-
            tion.                                            % Press TA/NEWS and hold to turn on
          ! Only TP and enhanced other network’s TP sta-     news program interruption.
            tions are tuned in during seek tuning or BSM     Press TA/NEWS until NEWS ON appears in
            when TA is on.                                   the display.
                                                             # To turn off news program interruption, press
                                                             TA/NEWS and hold until NEWS OFF appears in
          Using PTY functions                                the display.
          You can tune in a station by using PTY (pro-       # A news program can be canceled by pressing
          gram type) information.                            TA/NEWS.

          Searching for an RDS station by PTY                    Note
          information                                        You can also turn on or off news program in the
          You can search for general types of broadcast-     menu that appears by using MULTI-CONTROL.
          ing programs, such as those listed on the next
          page.                                              Receiving PTY alarm broadcasts
          1 Use MULTI-CONTROL to select                      When the emergency PTY code broadcasts,
          PTY search in the function menu.                   the unit receives it automatically (ALARM ap-
                                                             pears). When the broadcasting ends, the sys-
          2 Push MULTI-CONTROL left or right to              tem returns to the previous source.
          select a program type.                             ! An emergency announcement can be can-
          News&Inf—Popular—Classics—Others                      celed by pressing TA/NEWS.
          3 Press MULTI-CONTROL to begin the
          search.                                            Using radio text
          The unit searches for a station broadcasting
          that program type. When a station is found its     This tuner can display radio text data trans-
          program service name is displayed.                 mitted by RDS stations, such as station infor-
          PTY (program type ID code) information is          mation, the name of the currently broadcast
          listed on the next page.                           song and the name of the artist.
          # To cancel the search, press MULTI-CONTROL
                                                             ! The tuner automatically memorizes the
          again.
                                                                three latest radio text broadcasts received,
          # The program of some stations may differ from
                                                                replacing text from the least recent recep-
          that indicated by the transmitted PTY.
                                                                tion with new text when it is received.
          # If no station is broadcasting the type of pro-
          gram you searched for, Not found is displayed      Displaying radio text
          for about two seconds and then the tuner returns   You can display the currently received radio
          to the original station.                           text and the three most recent radio texts.


  16        En
Section

  Operating this unit                                                                                      02


                                                                                                            English
1 Press DISPLAY and hold to display radio             PTY list
text.
Radio text for the currently broadcasting sta-        General    Specific   Type of program
tion is displayed.                                    News&Inf   News       News
# You can cancel radio text display by pressing
                                                                 Affairs    Current affairs
DISPLAY or BAND.
# When no radio text is received, No text ap-                    Info       General information and
pears in the display.                                                       advice
                                                                 Sport      Sports
2 Push MULTI-CONTROL left or right to
recall the three most recent radio texts.                        Weather    Weather reports/meteoro-
Pushing MULTI-CONTROL left or right                                         logical information
switches between the current and the three                       Finance    Stock market reports,
radio text data displays.                                                   commerce, trading, etc.
# If there is no radio text data in memory the dis-   Popular    Pop Mus    Popular music
play will not change.
                                                                 Rock Mus   Contemporary modern
3 Push MULTI-CONTROL up or down to                                          music
scroll.                                                          Easy Mus   Easy listening music
Push MULTI-CONTROL up to go to the begin-
                                                                 Oth Mus    Non-categorized music
ning. Push MULTI-CONTROL down to scroll
the radio text data.                                             Jazz       Jazz
                                                                 Country    Country music
Storing and recalling radio text                                 Nat Mus    National music
You can store data from up to six radio text
                                                                 Oldies     Oldies, golden oldies
transmissions for buttons 1 to 6 on the remote
control.                                                         Folk mus   Folk music
                                                      Classics   L. Class   Light classical music
1 Display the radio text you want to
store in memory.                                                 Classic    Classical music
Refer to Displaying radio text on the previous
page.
2 Press and hold any buttons 1 to 6 on
the remote control to store the selected
radio text.
The memory number will display and the se-
lected radio text will be stored in memory.
The next time you press the same button on
the remote control in the radio text display the
stored text is recalled from memory.


                                                                                                    En    17
Section

02         Operating this unit


          Others   Educate    Educational programs        Built-in CD Player
                   Drama      Radio plays and serials     Basic Operations
                   Culture    National or regional cul-   The built-in CD player can play back audio CD
                              ture
                                                          (CD-DA) and compressed audio (WMA/MP3/
                   Science    Nature, science and tech-   AAC/WAV) recorded on CD-ROM. (Refer to
                              nology                      page 65 for files that can be played back.)
                   Varied     Light entertainment         Read the precautions with discs and player on
                                                          page 65.
                   Children   Children’s
                   Social     Social affairs
                   Religion   Religious affairs or ser-
                              vices
                   Phone In   Phone in
                   Touring    Travel programs; not for
                              traffic announcements
                   Leisure    Hobbies and recreational
                              activities
                                                          1 WMA/MP3/AAC/WAV indicator
                   Document   Documentaries                 Shows the type of audio file currently playing
                                                            when the compressed audio is playing.
                                                          2 Folder number indicator
                                                            Shows the folder number currently playing
                                                            when the compressed audio is playing.
                                                          3 Track number indicator
                                                          4 Play time indicator
                                                          5 Bit rate/sampling frequency indicator
                                                            Shows the bit rate or sampling frequency of
                                                            the current track (file) when the compressed
                                                            audio is playing.
                                                             ! When playing back VBR (variable bit
                                                               rate)-recorded WMA files, the average
                                                               bit rate value is displayed.
                                                             ! When playing back VBR (variable bit
                                                               rate)-recorded MP3 files, VBR is dis-
                                                               played instead of bit rate value.
                                                          1 Press OPEN to open the front panel.
                                                          Disc loading slot appears.


  18       En
Section

  Operating this unit                                                                                          02


                                                                                                                English
                  Disc loading slot                    ! When playing CD-EXTRA or MIXED-MODE
                                                         CDs, compressed audio and CD-DA can be
                                                         switched by pressing BAND.
                                                       ! If you have switched between compressed
                                                         audio and CD-DA, playback starts at the first
                                                         track on the disc.
                                                       ! When playing back VBR (variable bit rate) re-
                                                         corded files, elapsed play time may not be dis-
                                                         played correctly.
                                                       ! When playing compressed audio, there is no
2 Insert a CD (CD-ROM) into the disc load-               sound on fast forward or reverse.
ing slot.                                              ! When a CD TEXT disc is inserted, the disc and
Front panel is closed automatically, and play-           track titles automatically begin to scroll in the
back will start.                                         display. When Ever Scroll is set to ON at the
# Be sure to turn up the label side of a disc.
                                                         initial setting, the disc and track titles scroll
# After a CD (CD-ROM) has been inserted, press
                                                         continuously. About Ever Scroll, refer to
SOURCE to select the built-in CD player.
                                                         Switching the Ever Scroll on page 51.
# You can eject a CD (CD-ROM) by pressing
                                                       ! Playback is carried out in order of file number.
EJECT.
                                                         Folders are skipped if they contain no files. (If
3 Push MULTI-CONTROL up or down to                       folder 01 (ROOT) contains no files, playback
select a folder when playing a compressed                commences with folder 02.)
audio.                                                 ! If you cannot insert a disc completely or if
# You cannot select a folder that does not have          after you insert a disc the disc does not play,
a compressed audio file recorded in it.                  check that the label side of the disc is up.
# To return to folder 01 (ROOT), press and hold          Press EJECT to eject the disc, and check the
BAND. However, if folder 01 (ROOT) contains no           disc for damage before inserting it again.
files, playback commences with folder 02.              ! When the disc loading or ejecting function
                                                         does not operate properly, you can eject the
4 To perform fast forward or reverse,                    disc by pressing and holding EJECT while
push and hold MULTI-CONTROL left or                      opening the front panel.
right.                                                 ! Depending on the character sets in the disc,
# If you select Rough search, pushing and hold-          Russian texts may be garbled. About the al-
ing MULTI-CONTROL left or right enables you to           lowed character sets for Russian texts, refer to
search every 10 tracks in the current disc (folder).     Compressed audio files on page 65.
(Refer to Searching every 10 tracks in the current
disc or folder on page 21.)
                                                       Selecting a track directly
5 To skip back or forward to another
                                                       When using the remote control, you can select
track, push MULTI-CONTROL left or right.
                                                       a track directly by entering the desired track
                                                       number.
     Notes
                                                       ! When audio files are being played back,
! There is sometimes a delay between starting              you can select track in the current folder.
  up disc playback and the sound being issued.
  When being read, Format read is displayed.           1 Press DIRECT.
! If an error message such as ERROR-11 is dis-         Track number input display appears.
  played, refer to Understanding error messages
  on page 64.


                                                                                                     En       19
Section

02          Operating this unit

          2 Press 0 to 9 buttons to enter the desired               Selecting a repeat play range
          track number.                                             Repeat play plays the same track/folder within
          # You can cancel the input number by pressing
                                                                    the selected repeat play range.
          CLEAR.
                                                                    Also, the repeat range determines the range of
          3 Press DIRECT.                                           random play and scan play.
          The track of entered number will play.                    1 Use MULTI-CONTROL to select
          # After entering the number input mode, if you
                                                                    Play mode in the function menu.
          do not perform an operation within about eight
          seconds, the mode is automatically canceled.              2 Press MULTI-CONTROL to select the re-
                                                                    peat range.
                                                                       ! Disc repeat – Repeat all tracks
          Introduction of advanced                                     ! Track repeat – Repeat just the current
          operations                                                       track
          1 Press MULTI-CONTROL to display the                         ! Folder repeat – Repeat the current folder
          main menu.                                                # If you select another folder during repeat play,
          FUNCTION, AUDIO and ENTERTAINMENT                         the repeat play range changes to disc repeat.
          appear on the display.                                    # When playing CD, performing track search or
                                                                    fast forward/reverse cancels the repeat play auto-
          2 Use MULTI-CONTROL to select                             matically.
          FUNCTION.                                                 # When playing compressed audio, performing
          Turn to change the menu option; press to se-              track search or fast forward/reverse during
          lect.                                                     Track repeat (track repeat) changes the repeat
          The function name appears on the display.                 play range to folder repeat.
                                                                    # When Folder repeat (folder repeat) is se-
          3 Turn MULTI-CONTROL to select the                        lected, it is not possible to play back a subfolder
          function.                                                 of that folder.
          Turn MULTI-CONTROL to switch between the
          functions in the following order:
          Play mode (repeat play)—Random mode                       Playing tracks in random order
          (random play)—Scan mode (scan play)—                      Random play plays tracks in a random order
          Pause (pause)—Compression (compression                    within the selected repeat range.
          and BMX)—Search mode (search method)—                     Refer to Selecting a repeat play range on this
          TitleInput "A" (disc title input)                         page.
          # You can also select the function by pressing
          FUNCTION on the remote control.                           1 Use MULTI-CONTROL to select
          # When playing a CD TEXT disc, you cannot                 Random mode in the function menu.
          switch to disc title input display. The disc title will
          have already been recorded on a CD TEXT disc.             2 Press MULTI-CONTROL to turn random
          # When playing compressed audio disc, you                 play on.
          cannot switch to disc title input display.                Tracks will play in a random order.
          # To return to the ordinary display, press BAND.          # To turn random play off, press
          # If you do not operate functions except for              MULTI-CONTROL again.
          TitleInput "A" within about 30 seconds, the dis-
          play is automatically returned to the ordinary dis-       Scanning folders and tracks
          play.
                                                                    Scan play searches the song within the se-
                                                                    lected repeat range.


  20        En
Section

  Operating this unit                                                                                     02


                                                                                                           English
Refer to Selecting a repeat play range on the      tracks. Selecting Rough search enables you
previous page.                                     to search every 10 tracks.
1 Use MULTI-CONTROL to select                      1 Use MULTI-CONTROL to select
Scan mode in the function menu.                    Search mode in the function menu.
2 Press MULTI-CONTROL to turn scan play            2 Press MULTI-CONTROL to select
on.                                                Rough search.
The first 10 seconds of each track is played.        ! FF/REV – Fast forward and reverse
                                                     ! Rough search – Searching every 10 tracks
3 When you find the desired track press            # To select FF/REV, press MULTI-CONTROL
MULTI-CONTROL to turn scan play off.               again.
# If the display has automatically returned to
the playback display, select Scan mode again by    3 Press BAND to return to the playback
using MULTI-CONTROL.                               display.
# After scanning of a disc (folder) is finished,
normal playback of the tracks will begin again.    4 Push and hold MULTI-CONTROL left or
                                                   right to search every 10 tracks on a disc
                                                   (folder).
Pausing disc playback                              # If the rest of track number is less than 10,
                                                   pushing and holding MULTI-CONTROL recalls
1 Use MULTI-CONTROL to select Pause in
                                                   the first (last) one.
the function menu.
2 Press MULTI-CONTROL to turn pause
on.
                                                   Using disc title functions
Playback of the current track pauses.              You can input CD titles and display the title.
# To turn pause off, press MULTI-CONTROL           The next time you insert a CD for which you
again.                                             have entered a title, the title of that CD will be
                                                   displayed.

Using compression and BMX                          Entering disc titles
Using the COMP (compression) and BMX
                                                   Use the disc title input feature to store up to
functions let you adjust the sound playback
                                                   48 CD titles in the unit. Each title can be up to
quality of this unit.
                                                   10 characters long.
1 Use MULTI-CONTROL to select                      1 Play the CD that you want to enter a
Compression in the function menu.
                                                   title for.
2 Press MULTI-CONTROL to select your fa-           2 Use MULTI-CONTROL to select
vorite setting.                                    TitleInput "A" in the function menu.
COMP/BMX OFF—COMP 1—COMP 2—
COMP/BMX OFF—BMX 1—BMX 2                           3 Press DISPLAY to select the desired
                                                   character type.
                                                   Press DISPLAY repeatedly to switch between
Searching every 10 tracks in the                   the following character types:
current disc or folder                             Alphabet (upper case), numbers and symbols
You can switch the search method between           —Alphabet (lower case)—European letters,
fast forward/reverse and searching every 10        such as those with accents (e.g. á, à, ä, ç)—
                                                   Numbers and symbols


                                                                                                 En      21
Section

02          Operating this unit

          4 Push MULTI-CONTROL up or down to                 and : track title— : track title and play
          select a letter of the alphabet.                   time— : comment and play time
                                                             For WAV discs
          5 Push MULTI-CONTROL left or right to              Play time— : folder name and : file name
          move the cursor to the previous or next
          character position.                                     Notes
          6 Move the cursor to the last position by          ! You can scroll to the left of the title by pressing
          pushing MULTI-CONTROL right after enter-             and holding DISPLAY.
          ing the title.                                     ! Audio CD that contains certain information
          When you push MULTI-CONTROL right one                such as text and/or number is CD TEXT.
          more time, the entered title is stored in mem-     ! If specific information has not been recorded
          ory.                                                 on a disc, title or name is not displayed.
                                                             ! Depending on the version of iTunes® used to
          7 Press BAND to return to the playback
                                                               write MP3 files onto a disc, comment informa-
          display.
                                                               tion may not be correctly displayed.
                                                             ! Depending on the version of Windows Media
              Notes
                                                               Player used to encode WMA files, album
          ! Titles remain in memory, even after the disc       names and other text information may not be
            has been removed from the unit, and are re-        correctly displayed.
            called when the disc is reinserted.              ! The sampling frequency shown in the display
          ! After data for 48 discs has been stored in         may be abbreviated.
            memory, data for a new disc will overwrite the   ! When Ever Scroll is set to ON at the initial set-
            oldest one.                                        ting, text information scrolls continuously in
          ! If you connect a multi-CD player, you can          the display. Refer to Switching the Ever Scroll
            input disc titles for up to 100 discs.             on page 51.
          ! When a multi-CD player that does not support
            disc title functions is connected, you cannot
            enter disc titles in this unit.


          Displaying text information on
          disc
          % Press DISPLAY to select the desired text
          information.
          For title entered CD
          Play time— : disc title and play time
          For CD TEXT discs
          Play time— : disc artist name and : track
          title— : disc artist name and : disc title
          — : disc title and : track title— : track
          artist name and : track title— : track title
          and play time
          For WMA/MP3/AAC discs
          Play time— : folder name and : file name
          — : artist name and : track title— : ar-
          tist name and : album title— : album title


  22        En
Section

  Operating this unit                                                                                          02


                                                                                                                English
Selecting tracks from the track                          # If you do not operate the list within about 30
title list                                               seconds, the display is automatically returned to
                                                         the ordinary display.
Track title list lets you see the list of track titles
on a CD TEXT disc and select one of them to
play back.

1 Press LIST to switch to the track title list
mode.

2 Use MULTI-CONTROL to select the de-
sired track title.
Turn to change the track title; press to play.
# You can also change the track title by pushing
MULTI-CONTROL up or down.
# If you do not operate the list within about 30
seconds, the display is automatically returned to
the ordinary display.


Selecting tracks from the file
name list
File name list lets you see the list of file names
(or folder names) and select one of them to
playback.

1 Press LIST to switch to the file name list
mode.
Names of files and folders appear in the dis-
play.

2 Use MULTI-CONTROL to select the de-
sired file name (or folder name).
Turn to change the name of file or folder;
press to play; push right to see a list of the
files (or folders) in the selected folder.
# You can also change the name of file or folder
by pushing MULTI-CONTROL up or down.
# To return to the previous list (the folder one
level higher), push MULTI-CONTROL left.
# If the folder/file number is more than 100, last
2-digit of the folder/file number is displayed.
# Number of the folders/files in the currently se-
lected folder will be indicated on the right side of
the display.
# If you select a folder and it contains no folders
or no files, NO FILES is displayed.


                                                                                                      En      23
Section

02          Operating this unit


          Playing songs on iPod                              ! If an error message such as ERROR-11 is dis-
                                                               played, refer to Understanding error messages
          Basic Operations                                     on page 64.
          You can use this unit to control an iPod by        ! Connect directly the dock connector of this
          using a cable (e.g., CD-I200), which is sold se-     unit to the iPod so that this unit works prop-
          parately.                                            erly.
                                                             ! When the ignition switch is set to ACC or ON,
                                                               the iPod’s battery is charged while the iPod is
                                                               connected to this unit.
                                                             ! While the iPod is connected to this unit, the
                                                               iPod itself cannot be turned on or off.
                                                             ! The iPod connected to this unit is turned off
                                                               about two minutes after the ignition switch is
                                                               set to OFF.


          1 Song number indicator                            Browsing for a song
          2 Play time indicator                              The operation of this unit to control an iPod is
          3 Song time (progress bar)                         designed to be as close to the operation of the
          1 Connect the iPod to this unit.                   iPod as possible for easy operation and song
          Playback will automatically start.                 search.
          While the iPod is connected to this unit,          ! If playlist has been selected, first, this unit
          PIONEER (or (check mark)) is displayed on             shows playlist of your iPod’s name. This
          the iPod.                                             playlist plays all songs in your iPod.
          # Before connecting the dock connector of this
                                                             ! If the characters recorded on the iPod are
          unit to the iPod, disconnect the headphones from
                                                                not compatible with this unit, those charac-
          the iPod.
                                                                ters will not be displayed.
          # After the iPod has been connected to this        1 Press LIST to switch to the top menu of
          unit, press SOURCE to select the iPod.             the list search.
          # When removing the iPod from this unit, this
          unit is turned off.                                2 Use MULTI-CONTROL to select a cate-
                                                             gory.
          2 When playing Audiobook or Podcast                Turn to change the category; press to select.
          (with chapter) on iPod, pushing                    Playlists (playlists)—Artists (artists)—
          MULTI-CONTROL up or down to select a               Albums (albums)—Songs (songs)—Podcasts
          chapter.                                           (podcasts)—Genres (genres)—Audiobooks
          3 To perform fast forward or reverse,              (audiobooks)
          push and hold MULTI-CONTROL left or                List from the selected category is displayed.
                                                             # You can start playback throughout the se-
          right.
                                                             lected category by pressing and holding
          4 To skip back or forward to another               MULTI-CONTROL, or pushing MULTI-CONTROL
          song, push MULTI-CONTROL left or right.            right and holding.
                                                             # You can also change the category by pushing
              Notes                                          MULTI-CONTROL up or down.
                                                             # You can also select the category by pushing
          ! Read the precautions with iPod on page 67.
                                                             MULTI-CONTROL right.


  24        En
Section

  Operating this unit                                                                                       02


                                                                                                             English
# To return to the previous list, push                2 Use MULTI-CONTROL to select
MULTI-CONTROL left.                                   FUNCTION.
# To go to the top menu of the list search, push      Turn to change the menu option; press to se-
and hold MULTI-CONTROL left.                          lect.
# Podcasts and Audiobooks are displayed               The function name appears on the display.
when the connected iPod is compatible with the
categories.                                           3 Turn MULTI-CONTROL to select the
# If you do not operate the list within about 30      function.
seconds, the list search is cancelled automati-       Turn MULTI-CONTROL to switch between the
cally.                                                functions in the following order:
                                                      Play mode (repeat play)—Shuffle mode
3 Repeat step 2 to find a song you want               (shuffle)—Shuffle all (shuffle all)—Pause
to listen to.                                         (pause)—Audiobooks (audiobook speed)
                                                      # You can also select the function by pressing
                                                      FUNCTION on the remote control.
Displaying text information on                        # To return to the playback display, press BAND.
iPod                                                  # If you do not operate functions within about
% Press DISPLAY to select the desired text            30 seconds, the display is automatically returned
information.                                          to the ordinary display.
Play time— : artist name and : song title
— : artist name and : album name— :
                                                      Repeating play
album name and : song title— : song title
and play time                                         For playback of the songs on the iPod, there
# If the characters recorded on the iPod are not      are two repeat play ranges: Repeat One (re-
compatible with this unit, those characters will      peat one song) and Repeat All (repeat all
not be displayed.                                     songs in the list).
                                                      ! While Play mode is set to Repeat One,
     Notes
                                                         you cannot select the other songs.

! You can scroll to the left the text information     1 Use MULTI-CONTROL to select
  by pressing and holding DISPLAY.                    Play mode in the function menu.
! When Ever Scroll is set to ON at the initial set-
  ting, text information scrolls continuously in      2 Press MULTI-CONTROL to select the re-
  the display. Refer to Switching the Ever Scroll     peat range.
  on page 51.                                           ! Repeat One – Repeat just the current song
                                                        ! Repeat All – Repeat all songs in the se-
                                                          lected list
Introduction of advanced
operations                                            Playing songs in a random
1 Press MULTI-CONTROL to display the                  order (shuffle)
main menu.
                                                      For playback of the songs on the iPod, there
FUNCTION, AUDIO and ENTERTAINMENT
                                                      are two random play methods: Shuffle Songs
appear on the display.
                                                      (play back songs in a random order) and
                                                      Shuffle Albums (play back albums in a ran-
                                                      dom order).


                                                                                                  En       25
Section

02          Operating this unit

          1 Use MULTI-CONTROL to select                       2 Press MULTI-CONTROL to select your fa-
          Shuffle mode in the function menu.                  vorite setting.
                                                              Press MULTI-CONTROL repeatedly until the
          2 Press MULTI-CONTROL to select your fa-            desired setting appears in the display.
          vorite setting.                                       ! Faster – Playback faster than normal speed
            ! Shuffle Songs – Play back songs in a ran-         ! Normal – Playback in normal speed
              dom order within the selected list                ! Slower – Playback slower than normal
            ! Shuffle Albums – Select an album ran-               speed
              domly, and then play back all the songs in it
              in order
            ! Shuffle OFF – Cancel the random play


          Playing all songs in a random
          order (shuffle all)
          This method plays all songs on the iPod ran-
          domly.

          % Press and hold MULTI-CONTROL to turn
          shuffle all on during the playback display.
          Shuffle All is displayed briefly and all songs
          on the iPod will play randomly.

               Note
          You can also turn shuffle all on in the menu that
          appears by using MULTI-CONTROL.


          Pausing a song
          1 Use MULTI-CONTROL to select Pause in
          the function menu.

          2 Press MULTI-CONTROL to turn pause
          on.
          Playback of the current song pauses.
          # To turn pause off, press MULTI-CONTROL
          again.


          Changing audiobook speed
          The audiobook playback speed can be chan-
          ged.

          1 Use MULTI-CONTROL to select
          Audiobooks in the function menu.


  26        En
Section

  Operating this unit                                                                                         02


                                                                                                               English
Bluetooth Audio                                       Even though your audio player does not con-
                                                      tain a Bluetooth module, you can still control
Basic Operations                                      it from this unit via Bluetooth wireless technol-
You can use this unit to control a separately         ogy using a Bluetooth adapter (sold sepa-
sold portable audio player featuring Bluetooth        rately).
wireless technology (Bluetooth audio player).

     Important
! This unit can control a Bluetooth audio player
  via A2DP or AVRCP profile. Bluetooth audio
  players (or Bluetooth adapters) compatible
  with those profiles can be connected to this
  unit.                                               1 Device name
  — A2DP profile (Advanced Audio Distribution           Shows the device name of the connected
      Profile): Only playing back songs on your         Bluetooth audio player (or Bluetooth adapter).
      audio player is possible.
  — AVRCP profile (Audio/Video Remote Con-            1 Press SOURCE to select Bluetooth audio
      trol Profile): Playing back, pausing, select-   player.
      ing songs, etc., are possible.                  # If you cannot display BT Audio, first activate
! Since there are a number of Bluetooth audio         the BT audio source in the initial setting. For de-
  players available on the market, operations         tailes, refer to Activating the BT Audio source on
  with your Bluetooth audio player using this         page 51.
  unit vary in great range. Please refer to the in-   # For this unit to control your Bluetooth audio
  struction manual that came with your Blue-          player it needs to establish a Bluetooth wireless
  tooth audio player as well as this manual           connection. (Refer to Connecting a Bluetooth
  while operating your player on this unit.           audio player on the next page.)
! Information about songs (e.g. the elapsed
                                                      2 To perform fast forward or reverse,
  playing time, song title, song index, etc.) can-
                                                      push and hold MULTI-CONTROL left or
  not be displayed on this unit.
                                                      right.
! While you are listening to songs on your Blue-
  tooth audio player, please refrain from operat-     3 To skip back or forward to another
  ing on your cellular phone as much as               track, push MULTI-CONTROL left or right.
  possible. If you try operating on your cellular
  phone, the signal from your cellular phone
  may cause a noise on the song playback.             Setting up for Bluetooth audio
! When you are talking on the cellular phone          player
  connected to this unit via Bluetooth wireless       Setting up of this unit is required before using
  technology, the song playback from your Blue-       Bluetooth audio player.
  tooth audio player connected to this unit is
  muted.                                              1 Activation
! Even if while you are listening to song on your     Refer to Activating the BT Audio source on
  Bluetooth audio player you switch to another        page 51 for instructions on how to turn the
  source, the playback of song continues to           BT Audio on.
  elapse.                                             # BT Audio is set to on by default.


                                                                                                     En      27
Section

02          Operating this unit

          2 Connection                                          # If a Bluetooth audio player has not been con-
          To connect your Bluetooth audio player to this        nected to this unit yet, Connection open,
          unit, refer to Connecting the most recently con-      Connect audio, Auto connect and Device info.
          nected Bluetooth audio player on the next page        appear in the function menu and other functions
          and Connecting a Bluetooth audio player on            are not available.
          this page.                                            # To return to the playback display, press BAND.
          # Once connected via Bluetooth wireless tech-         # If you do not operate functions except for
          nology, “Play”, “Stop” and “Pause” on Bluetooth       Connection open, Disconnect audio and
          audio player can be operated in the BT Audio          Connect audio within about 30 seconds, the dis-
          source.                                               play is automatically returned to the ordinary dis-
          # Before you can use audio players you may            play.
          need to enter the PIN code into this unit. If your
          player requires a PIN code to establish a connec-          Note
          tion, look for the code on the player or in its ac-
                                                                Depending on Bluetooth audio players connected
          companying documentation. Enter the PIN code
                                                                to this unit, function operations may not be cor-
          referring to Entering PIN code for Bluetooth wire-
                                                                rectly operated.
          less connection on page 52.

                                                                Connecting a Bluetooth audio
          Introduction of advanced
                                                                player
          operations
                                                                Putting the unit in Connection open mode al-
          1 Press MULTI-CONTROL to display the                  lows you to establish a Bluetooth wireless con-
          main menu.                                            nection from your Bluetooth audio player. You
          FUNCTION, AUDIO and ENTERTAINMENT                     may need to refer to the operation manual that
          appear on the display.                                came with your Bluetooth audio player if you
                                                                are unsure how to initiate a connection from
          2 Use MULTI-CONTROL to select
                                                                your audio player.
          FUNCTION.
          Turn to change the menu option; press to se-          1 Use MULTI-CONTROL to select
          lect.                                                 Connection open in the function menu.
          The function name appears on the display.
                                                                2 Press MULTI-CONTROL to open the con-
          3 Turn MULTI-CONTROL to select the                    nection.
          function.                                             Always waiting is displayed. This unit is now
          Turn MULTI-CONTROL to switch between the              on standby for connection from Bluetooth
          functions in the following order:                     audio player.
          Connection open (connection open)—                    If your Bluetooth audio player is set ready for
          Disconnect audio (disconnect audio)—                  Bluetooth wireless connection, connection to
          Connect audio (connect audio)—Play (play)             this unit will be automatically established.
          —Stop (stop)—Pause (pause)—
          Auto connect (auto connect)—Device info.
          (device information)
          # If a Bluetooth audio player is connected via
          A2DP profile, only Disconnect audio,
          Auto connect and Device info. appear in the
          function menu.


  28        En
Section

  Operating this unit                                                                                     02


                                                                                                           English
     Note                                              Stopping playback
Before you can use audio players you may need          1 Use MULTI-CONTROL to select Stop in
to enter the PIN code into this unit. If your player   the function menu.
requires a PIN code to establish a connection,
                                                       2 Press MULTI-CONTROL to stop the play-
look for the code on the player or in its accompa-
                                                       back.
nying documentation. Enter the PIN code refer-
                                                       Playback of the current song stops.
ring to Entering PIN code for Bluetooth wireless
connection on page 52.
                                                       Pausing a song
Disconnecting a Bluetooth                              1 Use MULTI-CONTROL to select Pause in
audio player                                           the function menu.
1 Use MULTI-CONTROL to select                          2 Press MULTI-CONTROL to turn pause
Disconnect audio in the function menu.                 on.
                                                       Playback of the current song pauses.
2 Press MULTI-CONTROL to disconnect                    # To turn pause off, press MULTI-CONTROL
the Bluetooth audio player.                            again.
Disconnected is displayed. The Bluetooth
audio player is now diconnected from this
unit.                                                  Connecting to a Bluetooth
                                                       audio player automatically
Connecting the most recently                           This unit automatically connects to the Blue-
connected Bluetooth audio player                       tooth audio player that was most recently con-
                                                       nected to this unit. Note that if you want to
This unit searches for a Bluetooth audio player        use other devices, automatic connection can-
in the detectable area. Furthermore, this unit         not be performed.
automatically connects the most recently con-          ! This feature is not available if automatic
nected Bluetooth audio player.                            connection from this unit has been estab-
1 Use MULTI-CONTROL to select                             lished to your cellular phone.
Connect audio in the function menu.                    ! While you are operating in the function
                                                          menu of TEL source or BT Audio source,
2 Press MULTI-CONTROL to connect the                      automatic connection to your Bluetooth
Bluetooth audio player.                                   audio player is not initiated.
While connecting, Connecting is displayed.
After the connection is completed, Connected           1 Use MULTI-CONTROL to select
is displayed.                                          Auto connect in the function menu.

                                                       2 Press MULTI-CONTROL to turn auto-
Playing songs on Bluetooth                             matic connection on.
                                                       # To turn automatic connection off, press
audio player
                                                       MULTI-CONTROL again.
1 Use MULTI-CONTROL to select Play in
the function menu.

2 Press MULTI-CONTROL to start play-
back.


                                                                                                   En    29
Section

02          Operating this unit

          Displaying BD (Bluetooth                           Bluetooth Telephone
          Device) address
                                                             Basic Operations
          1 Use MULTI-CONTROL to select                      If your cellular phone features Bluetooth wire-
          Device info. in the function menu.                 less technology, you can connect to this unit
          The device name (e.g., Pioneer BT unit) of this    for hands-free, wireless calls, even while driving.
          unit appears in the display.
          # You can edit the device name. Refer to Editing
                                                                  Important
          device name on page 52.
                                                             ! Since this unit is on standby to connect with
          2 Push MULTI-CONTROL left to switch to               your cellular phones via Bluetooth wireless
          the BD address.                                      technology, using this unit without running
          12-digit hexadecimal string is displayed.            the engine can result in battery drainage.
          # Pushing MULTI-CONTROL right returns to the       ! Advanced operations that require your atten-
          device name.                                         tion such as dialing numbers on the monitor,
                                                               using phone book, etc., are prohibited while
                                                               you are driving. When you need to use these
                                                               advanced operations, stop your vehicle in a
                                                               safe place and operate.
                                                             ! When phone is selected as a source, no audio
                                                               adjustments, except balance adjustment, are
                                                               possible. The front/rear speaker balance is set
                                                               to F 15 by default for the phone source.

                                                             These are the basic operations to use hands-
                                                             free phoning via Bluetooth wireless technol-
                                                             ogy. More advanced hands-free phoning op-
                                                             erations are explained starting on Introduction
                                                             of advanced operations on page 33.


                                                             1 Device name
                                                               Shows the device name of the cellular phone.
                                                             2 Signal level indicator
                                                               Shows the signal strength of cellular phone.
                                                                ! Signal level indicator may differ from
                                                                  the actual signal level.
                                                                ! If the signal level is not available, this in-
                                                                  dicator is not displayed.
                                                             3 User number indicator


  30        En
Section

  Operating this unit                                                                                        02


                                                                                                              English
  Shows the registration number of the cellular          — A2DP (Advanced Audio Distribution Pro-
  phone.                                                     file)
4 Battery strength indicator                             — AVRCP (Audio/Video Remote Control Pro-
  Shows the battery strength of cellular phone.              file)
   ! Battery strength indicator may differ             ! Battery strength indicator and signal level in-
     from the actual battery strength.                   dicator are shown in the display whenever
   ! If the battery strength is not available,           your cellular phone is connected to this unit
     nothing is displayed in the battery                 via Bluetooth wireless technology.
     strength indicator area.
5 Missed call notice indication
  Shows when an incoming call has been re-             About the telephone source
  ceived and not answered.                             Standby mode
6 Automatic answering/Automatic rejecting in-          Once connected via Bluetooth wireless tech-
  dicator                                              nology, this unit will remain on telephone
  Shows AUTO when the automatic answering              source standby in the background all the
  function is on (for more details, refer to Setting   while the connection is sustained. This means
  the automatic answering on page 42).                 you can freely use the other functions of this
  Shows REFUSE when the automatic rejecting            unit, but still be ready to receive a call.
  function is on (for more details, refer to Setting
  the automatic rejecting on page 42).                 % Press SOURCE to select the telephone.
7 Clock display                                        Press SOURCE until you see TEL displayed.
  Shows the time (if connected with a phone).          # You can also select the TEL by pressing
8 Calendar display                                     PHONE.
  Shows the day, month and year (if connected
  with a phone).
                                                       Setting up for hands-free phoning
     Notes                                             Before you can use the hands-free phoning
                                                       function you will need to set up the unit for
! Even when you select other sources, 2 to 6
                                                       use with your cellular phone. This entails es-
  indicators are displayed.
                                                       tablishing a Bluetooth wireless connection be-
! This unit’s phone call reception is on standby
                                                       tween this unit and your phone, registering
  when ignition switch is set to ACC or ON.
                                                       your phone with this unit, and adjusting the
! The line-of-sight distance between this unit
                                                       volume level.
  and your cellular phone must be 10 meters or
  less for sending and receiving voice and data        1 Connection
  via Bluetooth wireless technology. However,          For detailed instructions on connecting your
  the transmission distance may become short-          phone to this unit via Bluetooth wireless tech-
  er than the estimated distance, depending on         nology, refer to Connecting a cellular phone on
  the environment in use.                              page 34.
! In order to use Bluetooth wireless technology,       # Your phone should now be temporarily con-
  devices must be able to interpret certain pro-       nected; however, to make best use of the technol-
  files. This unit is compatible with the following    ogy, we recommend you register the phone to
  profiles.                                            this unit.
  — GAP (Generic Access Profile)
  — SDP (Service Discovery Protocol)
  — OPP (Object Push Profile)
  — HFP (Hands Free Profile)


                                                                                                    En      31
Section

02          Operating this unit

          2 Registration                                       # Preset number 10 is assigned to 0.
          To register your temporarily connected phone,        # If the number is already in the Phone Book
          refer to Registering connected cellular phone        then the name is also displayed.
          on page 35.                                          # No data is displayed for preset numbers that
                                                               have not been assigned.
          3 Volume adjustment
          Adjust the earpiece volume on your cellular          2   Press MULTI-CONTROL to make a call.
          phone for comfort. When adjusted, the volume
          level is memorized in this unit as the default       Voice recognition
          setting.
                                                               If your cellular phone features voice recogni-
          # Caller’s voice volume and ring volume may
                                                               tion technology, you can make a call by voice
          vary depending on the type of cellular phones.
                                                               commands.
          # If the difference between the ring volume and
                                                               ! Operation varies depending on the type of
          caller’s voice volume is big, overall volume level
                                                                   your cellular phone. Refer to the instruction
          may become unstable.
                                                                   manual that came with your cellular phone
          # Before disconnecting cellular phone from this
                                                                   for detailed instructions.
          unit, make sure to adjust the volume to proper
                                                               ! This function can be operated only when
          level. If the volume has been muted (zero level)
                                                                   the connection is established with HFP
          on your cellular phone, the volume level of your
                                                                   (Hands Free Profile).
          cellular phone remains muted even after the cel-
          lular phone is disconnected from this unit.          1 Press BAND and hold until Voice dial
                                                               appears in the display.
                                                               When Voice dial ON is displayed, voice recog-
          Making a phone call
                                                               nition function is now ready.
          Dial a number                                        # If your cellular phone does not feature voice
          The most basic way to make a call is to simply       recognition function, No voice dial appears in
          dial the number.                                     the display and opearation is not available.
          Refer to Making a call by entering phone num-
                                                               2   Pronounce the name of your contact.
          ber on page 41 for detailed instructions.

          Calling a number in the Phone Book                   Taking a phone call
          or the Call History                                  Answering an incoming call
          Refer to Calling a number in the Phone Book          Even when a source other than TEL is selected
          on page 38 and Calling a number from the Call        or when this unit is turned off, you can still an-
          History on page 41 for detailed instructions.        swer incoming calls. If you set this unit to
                                                               automatically answering incoming calls, refer
          Preset number                                        to Setting the automatic answering on page 42.
          Numbers that you dial frequently can be as-
                                                               1 When a call comes in, press
          signed to presets for quick recall.
                                                               MULTI-CONTROL.
          Refer to Assigning preset numbers on page 41
                                                               # You can also take a phone call by pressing
          for how to assign a number to a preset.
                                                               OFF HOOK on the remote control.
          1 Push MULTI-CONTROL up or down to                   # If the private mode is selected on the cellular
          select a preset number.                              phone, hands-free phoning may not be per-
          # You can also press one of 0 to 9 on the remote     formed.
          control to select a preset number.


  32        En
Section

  Operating this unit                                                                                     02


                                                                                                           English
2 To end the call, press PHONE.                     2 Press PHONE to end all calls.
The estimated call time appears in the display      Pressing PHONE ends all calls including a call
(this may differ slightly from the actual call      waiting on line.
time).                                              # You can also end all calls by pressing
# You can also end the call by pressing             ON HOOK on the remote control.
ON HOOK on the remote control.                      # Except for switching between the calls on line,
# You may hear a noise when you disconnect          you cannot end each call waiting individually.
the phone.                                          Pressing PHONE ends all calls.


Rejecting an incoming call                          Rejecting a call waiting
You can reject an incoming call. To reject all      If you would rather not interrupt your current
incoming calls automatically, refer to Setting      call to answer a call waiting, you can reject it
the automatic rejecting on page 42.                 and have the number added to the missed call
                                                    history list.
% When a call comes in, press PHONE.
The call is rejected.                               % Press PHONE to reject a call waiting.
# You can also reject a call by pressing            # You can also reject a call waiting by pressing
ON HOOK on the remote control.                      ON HOOK on the remote control.
# The rejected call is recorded in missed call
history list. About the missed call history list,
refer to Using the Call History on page 40.         Introduction of advanced
                                                    operations
Answering a call waiting                            1 Press MULTI-CONTROL to display the
If while you are talking on the phone another       main menu.
call comes in, the number (or name if it is in      FUNCTION, AUDIO, ENTERTAINMENT and
your phone book) of the new caller appears in       RECEIVING MOVIE appear on the display.
the display to signal that you have a call wait-
                                                    2 Use MULTI-CONTROL to select
ing. You can put the first caller on hold while
                                                    FUNCTION.
you answer the call waiting, or you can choose
                                                    Turn to change the menu option; press to se-
to reject the call, in which case the number is
                                                    lect.
logged as a missed call.
                                                    The function name appears on the display.
! Depending on the cellular phone, this func-
    tion cannot be used.                            3 Turn MULTI-CONTROL to change func-
! This unit can only handle three calls simul-      tions.
    taneously. Therefore, depending on the cel-     Turn MULTI-CONTROL to switch between the
    lular phone used with this unit, this           functions.
    function may not be performed correctly.        Function names that appear in the display are
                                                    different depending on your cellular phone’s
1 Press MULTI-CONTROL to answer a call
                                                    connection and registration status.
waiting.
                                                    If not connected yet
# You can also answer a call waiting by pressing
OFF HOOK on the remote control.
# Pressing MULTI-CONTROL switches between
callers on hold.


                                                                                                En       33
Section

02          Operating this unit

          Search&Connect (search and connect)—                  Bluetooth wireless technology. There are sev-
          Connection open (connection open)—                    eral ways you can do this.
          Connect phone (connect phone)—                        ! A phone may be connected via Bluetooth
          Delete phone (delete phone)—PH.B.Transfer                wireless technology but not yet registered
          (phone book transfer)—Refuse calls (auto-                with this unit. In this case it is said to be
          matic reject setting)—Auto answer (auto-                 temporarily connected, and the available
          matic answer setting)—Ring tone (ring tone               features are limited. To take full advantage
          select)—Auto connect (automatic connection               of all the features available, we recommend
          setting)—Echo cancel (echo cancel)—                      you register your phone with this unit.
          Device info. (device information)                        Refer to Registering connected cellular
          If connected but not registered yet                      phone on the next page for more on this.
          Disconnect phone (disconnect phone)—
          Set phone (registering phone)—                        Searching for available cellular phones
          Delete phone (delete phone)—PH.B.Transfer
                                                                You can have this unit search for any available
          (phone book transfer)—Number dial (call by
                                                                phones in the area that have Bluetooth wire-
          entering number)—Refuse calls (automatic
                                                                less technology, then select which you want to
          reject setting)—Auto answer (automatic an-
                                                                connect to from a list displayed on-screen.
          swer setting)—Ring tone (ring tone select)—
          Auto connect (automatic connection setting)           1 Use MULTI-CONTROL to select
          —Echo cancel (echo cancel)—Device info.               Search&Connect in the function menu.
          (device information)
          If already connected and registered                   2 Press MULTI-CONTROL to search for
          Disconnect phone (disconnect phone)—                  available cellular phones.
          Delete phone (delete phone)—PH.B.Transfer             While searching, Searching is displayed.
          (phone book transfer)—PH.B.Name view                  When available cellular phones featuring
          (phone book name view)—Clear memory                   Bluetooth wireless technology are found, de-
          (clear memory)—Number dial (call by enter-            vice names or Not found (if names cannot be
          ing number)—Refuse calls (automatic reject            obtained) are displayed.
          setting)—Auto answer (automatic answer                # If this unit fails to find any available cellular
          setting)—Ring tone (ring tone select)—                phones, Not found is displayed.
          Auto connect (automatic connection setting)
          —Echo cancel (echo cancel)—Device info.               3 Push MULTI-CONTROL up or down to
          (device information)                                  select a device name you want to connect.
          # To return to the playback display, press BAND.
                                                                4 Press MULTI-CONTROL to connect the
          # If you do not operate functions except for
                                                                selected cellular phone.
          Search&Connect, Connection open,
                                                                While connecting, Connecting is displayed.
          Connect phone, PH.B.Transfer,
                                                                To complete the connection, please check the
          Disconnect phone, Number dial and
                                                                device name (e.g., Pioneer BT unit) and enter
          Clear memory within about 30 seconds, the dis-
                                                                the link code on your cellular phone. If the
          play is automatically returned to the ordinary dis-
                                                                connection is established, Connected is dis-
          play.
                                                                played.
                                                                # If the connection failed, ERROR is displayed.
          Connecting a cellular phone                           Check the cellular phone, then try again.
          To use a phone wirelessly with this unit, it is
          necessary first to establish a connection using


  34        En
Section

  Operating this unit                                                                                         02


                                                                                                               English
# The link code is set to 0000 as default. You       2 Press MULTI-CONTROL to disconnect a
can change this code in the initial setting. Refer   cellular phone from this unit.
to Entering PIN code for Bluetooth wireless con-     After the disconnection is completed,
nection on page 52.                                  Disconnected is displayed.

Using a cellular phone to initiate a                 Registering connected cellular
connection
                                                     phone
Putting the unit in Connection open mode al-
                                                     You can register a phone that is temporarily
lows you to establish a Bluetooth wireless con-
                                                     connected to this unit in order to take full ad-
nection from your phone. You may need to
                                                     vantage of the features available with Blue-
refer to the operation manual that came with
                                                     tooth wireless technology. A total of three
your phone if you are unsure how to initiate a
                                                     phones can be registered.
connection from your phone.
                                                     1 Use MULTI-CONTROL to select
1 Use MULTI-CONTROL to select
                                                     Set phone in the function menu.
Connection open in the function menu.
                                                     2 Push MULTI-CONTROL up or down to
2 Press MULTI-CONTROL to open the con-
                                                     select a registration assignment.
nection.
                                                     P1 (user phone 1)—P2 (user phone 2)—P3
Always waiting is displayed and the unit is
                                                     (user phone 3)
now on standby for connection from cellular
                                                     # As you select each assignment, you can see
phone.
                                                     whether or not a phone is already registered
3 Use cellular phone to connect to this              there. If the assignment is empty, No data is dis-
unit.                                                played. If the assignment is already taken, the de-
# Operation varies depending on the type of          vice name appears. To replace an assignment
your cellular phone. Refer to the instruction man-   with a new phone, first delete the current assign-
ual that came with your cellular phone for de-       ment. For more detailed instructions, see Deleting
tailed instructions.                                 a registered phone on the next page.
# You may need to enter the link code on your        # If you need to know the BD (Bluetooth Device)
cellular phone to complete the connection.           address of the phone, push MULTI-CONTROL left
# The link code is set to 0000 as default. You       here.
can change this code in the initial setting. Refer
                                                     3 Press MULTI-CONTROL to register the
to Entering PIN code for Bluetooth wireless con-
                                                     currently connected phone.
nection on page 52.
                                                     When the registration is completed,
                                                     Reg. Completed is displayed.
Disconnecting a cellular phone                       # If the registration failed, Reg. ERROR is dis-
When you are done using your phone with this         played. In this case, return to step 1 and try
unit, you can close the Bluetooth wireless con-      again.
nection.
                                                          Note
1 Use MULTI-CONTROL to select                        Depending on the type of cellular phone, registra-
Disconnect phone in the function menu.               tion is available only from a cellular phone. (Refer
Device name of the connected phone appears           to Using a cellular phone to initiate a connection
in the display.                                      on this page.)


                                                                                                    En       35
Section

02          Operating this unit

          Deleting a registered phone                        Connecting to a registered phone
          If you no longer need to use a registered          manually
          phone with this unit, you can delete it from the   1 Use MULTI-CONTROL to select
          registration assignment for another phone.         Connect phone in the function menu.
          ! If a registered phone is deleted from this
              unit, the Phone Book and other settings of     2 Push MULTI-CONTROL up or down to
              that phone are cleared simultaneously.         select a registration assignment.
                                                             P1 (user phone 1)—P2 (user phone 2)—P3
          1 Use MULTI-CONTROL to select                      (user phone 3)
          Delete phone in the function menu.                 # If the assignment is empty, No data is dis-
                                                             played and the operation is not possible.
          2 Push MULTI-CONTROL up or down to                 # If you need to know the BD (Bluetooth Device)
          select a registration assignment.                  address of the phone, push MULTI-CONTROL left
          P1 (user phone 1)—P2 (user phone 2)—P3             here.
          (user phone 3)
          # If the assignment is empty, No data is dis-      3 Press MULTI-CONTROL to connect the
          played and the operation is not possible.          selected cellular phone.
          # If you need to know the BD (Bluetooth Device)    While connecting, Connecting is displayed.
          address of the phone, push MULTI-CONTROL left      After the connection is completed, Connected
          here.                                              is displayed.
                                                             # If Auto connect is on, the most recently con-
          3 Push MULTI-CONTROL right to select               nected registered cellular phone is connected
          Delete YES.                                        automatically. For more details, refer to Connect-
          Delete YES is displayed. Deleting phone is         ing to a registered phone automatically on this
          now on standby.                                    page.
          # If you do not want to delete a registered        # If the connection failed, ERROR is displayed.
          phone, push MULTI-CONTROL left. The display        Check the cellular phone, then try again.
          reverts.

          4 Press MULTI-CONTROL to delete the                Connecting to a registered phone
          phone.                                             automatically
          After the phone is deleted, Deleted is dis-        When automatic connection is active, this unit
          played.                                            will automatically establish a connection with
                                                             a registered cellular phone. When the most re-
                                                             cently connected registered cellular phone
          Connecting to a registered
                                                             comes into range, automatic connection is
          cellular phone                                     performed.
          Once your phone is registered with this unit it    ! This feature may not work with all phones.
          is a simple matter to establish a Bluetooth            If your registered phone fails to connect
          wireless connection, either manually by select-        with automatic connection, use the manual
          ing a registration assignment, or automatically        connection method explained in Connect-
          when a registered phone is within range.               ing to a registered phone manually on this
                                                                 page.


  36        En
Section

  Operating this unit                                                                                  02


                                                                                                        English
! This feature is not possible if you are play-     ! Depending on the cellular phone con-
  ing back songs on your Bluetooth audio              nected via Bluetooth wireless technology,
  player via Bluetooth wireless technology. In        this unit cannot display the Phone Book
  such case, stop the playback and switch to          correctly. (Some characters may be
  another source for your cellular phone to           garbled.)
  connect to this unit through this function.       ! If the phone book in the cellular phone con-
! While you are operating in the function             tains image data, phone book may not be
  menu of TEL source or BT Audio source,              correctly transferred.
  this unit does not initiate an automatic con-
  nection to your registered phone.                 1 Use MULTI-CONTROL to select
! This feature cannot be set for each different     PH.B.Transfer in the function menu.
  user phone.
                                                    2 Press MULTI-CONTROL to enter in the
1 Use MULTI-CONTROL to select                       phone book transfer standby mode.
Auto connect in the function menu.                  Transfer appears in the display.
                                                    # With TEL source selected, you can also dis-
2 Press MULTI-CONTROL to turn auto-                 play the phone book transfer standby mode by
matic connection on.                                pressing and holding PHONE.
If your cellular phone is set ready for Bluetooth
wireless connection, the connection to this         3 Use cellular phone to perform phone
unit will be automatically established.             book transfer.
# To turn automatic connection off, press           Perform phone book transfer using the cellu-
MULTI-CONTROL again.                                lar phone. For detailed instruction on this,
                                                    refer to the instruction manual that came with
                                                    your cellular phone.
Using the Phone Book                                # The display indicates how many entries have
The Phone Book can store up to 650 names            been transferred and the total number to be
and numbers. Use the Phone Book to browse           stored in this unit.
for numbers on the unit’s display and select
                                                    4 Data transferred is displayed and
numbers to call. Names and phone numbers
                                                    phone book transfer is completed.
stored in a registered user phone’s address
book can be transferred to the Phone Book, al-
lowing you to fill the Phone Book quickly and       Changing the Phone Book display order
easily with your contacts.                          Phone book entry can be displayed from first
                                                    name or last name.
Transferring entries to the Phone Book              ! With some cellular phones, this feature
                                                      may not be possible.
To populate the Phone Book you can transfer
the numbers in a registered user phone’s ad-        1 Use MULTI-CONTROL to select
dress book.                                         PH.B.Name view in the function menu.
The Phone Book can hold a total of 650 en-          Invert names YES appears in the display.
tries; 400 from User 1, 200 from User 2, and 50
from User 3.                                        2 Press MULTI-CONTROL to change the
! With some cellular phones, it may not be          name view order.
    possible to transfer whole phone book at a      Inverted is displayed and the name view
    time. In this case, transfer phone book en-     order is changed.
    tries one by one from your phone by using
    your cellular phone.


                                                                                               En     37
Section

02          Operating this unit

          Pressing MULTI-CONTROL repeatedly                     # If several phone numbers are entered to an
          changes the name view order between first             entry, select one by turning MULTI-CONTROL.
          name and last name.                                   # If you want to go back and select another
                                                                entry, push MULTI-CONTROL left.
          Calling a number in the Phone Book                    6   Press MULTI-CONTROL to make a call.
                 Important
                                                                7   To end the call, press PHONE.
          To perform this operation, be sure to park your ve-
          hicle and apply the parking brake.
                                                                Assign genres to phone numbers
          After finding the number in the Phone Book                 Important
          you want to call, you can select the entry and
          make the call.                                        To perform this operation, be sure to park your ve-
                                                                hicle and apply the parking brake.
          1 Press LIST to display the Phone Book.
          Press LIST repeatedly to switch between the           If there are a lot of entries in the Phone Book it
          following lists:                                      can be useful to assign them to specific gen-
          Phone book—Missed call—Dialled call—Re-               res (categories) for easier searching. There are
          ceived call                                           four preset genres that you can assign entries
          # About the Missed call/Dialled call/Received         to: Home, Mobile, Office and Other.
          call, refer to Using the Call History on page 40.
                                                                1 Display the genre and phone number
          2 Push MULTI-CONTROL left or right to                 list of your desired Phone Book entry.
          select the first letter of the name you are           See step 1 to 5 on Calling a number in the
          looking for.                                          Phone Book on this page for how to do this.
          # You can also select the first letter of the name
                                                                2 Press and hold MULTI-CONTROL to dis-
          you are looking for by turning MULTI-CONTROL.
                                                                play the genre input screen.
          3 Press MULTI-CONTROL to display en-                  Edit genre is displayed.
          tries.                                                3 Push MULTI-CONTROL up or down to
          The display shows a Phone Book entry starting         select a genre.
          with that letter (e.g. Names starting with “B”        Each time MULTI-CONTROL is pushed up or
          when “B” is selected).                                down, the genres are switched in the following
          4 Push MULTI-CONTROL up or down to                    order:
          select a Phone Book entry you want to call.           Home (home)—Mobile (mobile)—Office (of-
          # You can also select a Phone Book entry you          fice)—Other (other)
          want to call by turning MULTI-CONTROL.
                                                                4 Press MULTI-CONTROL to assign the
          5 Push MULTI-CONTROL right to display                 genre to the phone number.
          the genre and phone number list of the se-            The selected genre is assigned to the phone
          lected entry.                                         number, and the display reverts to the genre
          # You can also display the genre and phone            and phone number list.
          number list of the selected entry by pressing
          MULTI-CONTROL.
          # You can scroll the name and phone number
          by pressing and holding DISPLAY.


  38        En
Section

  Operating this unit                                                                                         02


                                                                                                               English
Editing the name of a Phone Book entry                6 Push MULTI-CONTROL left or right to
                                                      move the cursor to the previous or next
     Important                                        character position.
To perform this operation, be sure to park your ve-   When the letter you want is displayed, push
hicle and apply the parking brake.                    MULTI-CONTROL right to move the cursor to
                                                      the next position and then select the next let-
You can edit the names of Phone Book entries.         ter. Push MULTI-CONTROL left to move back-
Each name can be up to 40 characters long.            wards in the display.
1 Display the genre and phone number                  7 Press MULTI-CONTROL to store the new
list of your desired Phone Book entry.                name.
See step 1 to 5 on Calling a number in the
Phone Book on the previous page for how to
do this.                                              Editing phone numbers

2 Press and hold MULTI-CONTROL to dis-                     Important
play the genre input screen.                          To perform this operation, be sure to park your ve-
Edit genre is displayed.                              hicle and apply the parking brake.

3 Turn MULTI-CONTROL to switch to the                 You can edit the phone numbers of Phone
name input screen.                                    Book entries.
Turning MULTI-CONTROL switches input
screens in the following order:                       1 Display the genre and phone number
Edit genre (genre input screen)—Edit name             list of your desired Phone Book entry.
(name input screen)—Edit number (number               See step 1 to 5 on Calling a number in the
input screen)—Clear memory (clear memory              Phone Book on the previous page for how to
screen)                                               do this.

4 Press DISPLAY to select the desired                 2 Press and hold MULTI-CONTROL to dis-
character type.                                       play the genre input screen.
Each press of DISPLAY switches the character          Edit genre is displayed.
types in the following order:                         3 Turn MULTI-CONTROL to switch to the
Alphabet (upper case)—Alphabet (lower case)           number input screen.
—Numbers and symbols—European charac-                 Turning MULTI-CONTROL switches input
ters, Russian characters or Greek characters          screens in the following order:
# Pressing and holding DISPLAY enables you to         Edit genre (genre input screen)—Edit name
switch character set among ISO8859-1 (European        (name input screen)—Edit number (number
characters), ISO8859-5 (Russian characters) and       input screen)—Clear memory (clear memory
ISO8859-7 (Greek characters) alternately.             screen)
# European characters, Russian characters and
Greek characters can’t be mixed.                      4 Push MULTI-CONTROL left or right to
                                                      move the cursor to the number you want
5 Push MULTI-CONTROL up or down to                    to change.
select a letter.
# To delete a character and leave a space, select     5 Push MULTI-CONTROL up or down to
“_” (underbar).                                       change numbers.
                                                      Repeat these steps until you have finished
                                                      changing.


                                                                                                    En       39
Section

02          Operating this unit

          6 Press MULTI-CONTROL to store the new                Using the Call History
          number.
                                                                     Important

          Clearing a Phone Book entry                           To perform this operation, be sure to park your ve-
                                                                hicle and apply the parking brake.
                 Important
                                                                The 12 most recent calls made (dialled), re-
          To perform this operation, be sure to park your ve-
                                                                ceived and missed, are stored in the Call His-
          hicle and apply the parking brake.
                                                                tory. You can browse the Call History and call
          You can delete Phone Book entries in the              numbers from it.
          Phone Book one by one.
          To clear all of your entries in the Phone Book,       Displaying the Call History
          refer to Clearing memory on page 42.                  The Call History is divided into three groups:
          1 Display the genre and phone number                  Missed calls, Dialled calls, and Received calls.
          list of your desired Phone Book entry.                You can see the time and date of the call, as
          See step 1 to 5 on Calling a number in the            well as the number (and name if the number
          Phone Book on page 38 for how to do this.             is in the Phone Book).

          2 Press and hold MULTI-CONTROL to dis-                1 Press LIST to display the list.
          play the genre input screen.                          Press LIST repeatedly to switch between the
          Edit genre is displayed.                              following lists:
                                                                Phone book—Missed call—Dialled call—Re-
          3 Turn MULTI-CONTROL to switch to the                 ceived call
          clear memory screen.                                  # About the Phone Book list, refer to Using the
          Turning MULTI-CONTROL switches input                  Phone Book on page 37.
          screens in the following order:                       # If no phone numbers have been stored in the
          Edit genre (genre input screen)—Edit name             selected list, No data is displayed.
          (name input screen)—Edit number (number               # If no name is in the Phone Book, phone num-
          input screen)—Clear memory (clear memory              ber is displayed instead of name.
          screen)
                                                                2 Turn MULTI-CONTROL to select a phone
          4 Push MULTI-CONTROL right to show a                  number.
          confirmation display.                                 Turning MULTI-CONTROL to change the
          Clear memory YES is displayed.                        phone numbers stored in the list.
          # If you do not want to clear memory that you         # If the number is already in the Phone Book
          have selected, push MULTI-CONTROL left. The           the name is displayed.
          display reverts.                                      # You can also change the phone number by
                                                                pushing MULTI-CONTROL up or down.
          5 Press MULTI-CONTROL to delete the
          Phone Book entry.                                     3 Push MULTI-CONTROL right to display
          Cleared is displayed.                                 the detailed list.
          The Phone Book entry is deleted. The display          Name and phone number are displayed in the
          returns to Phone Book entry list.                     detailed list.
                                                                # If the number is already in the Phone Book
                                                                then the name is also displayed.
                                                                # Turning MULTI-CONTROL switches to the pre-
                                                                vious or next phone number diplayed in the de-
                                                                tailed list.


  40        En
Section

  Operating this unit                                                                                      02


                                                                                                            English
# You can scroll the name and phone number         Assigning preset numbers
by pressing and holding DISPLAY.
# If you do not operate anything within about 30        Important
seconds, the list display is canceled automati-    To perform this operation, be sure to park your ve-
cally.                                             hicle and apply the parking brake.

                                                   Numbers that you dial frequently can be as-
Calling a number from the Call History
                                                   signed to presets for quick recall.
1 Display the list and select a phone num-
ber.                                               1 Select a desired phone number from
Display the phone number you want to make a        the Phone Book or the Call History.
call.                                              To select a desired phone number from the
Refer to Displaying the Call History on the pre-   Phone Book or the Call History, see the in-
vious page.                                        structions explained in previous pages.

2 Press MULTI-CONTROL to make a call.              2 Press one of 0 to 9 on the remote con-
While calling, the phone number is displayed.      trol and hold until the beep sounds.
# If the number is already in the Phone Book       The selected phone number has been stored
then the name is also displayed.                   in memory. The next time you press the same
                                                   preset button, the phone number is recalled
3 To end the call, press PHONE.                    from memory.
The estimated call time appears in the display
(this may differ slightly from the actual call
time).                                             Making a call by entering
                                                   phone number
Calling an international number                         Important
from the Call History
                                                   To perform this operation, be sure to park your ve-
When calling an international number stored
                                                   hicle and apply the parking brake.
in the Call History, proceed the country code
with a +.                                          1 Use MULTI-CONTROL to select
                                                   Number dial in the function menu.
1 Display the phone number you want to
                                                   # You can also press DIRECT on the remote con-
make an international call.
                                                   trol to enter in this menu from the standby dis-
Refer to Calling an international number from
                                                   play.
the Call History on this page.
                                                   2 Push MULTI-CONTROL up or down to
2 Press and hold MULTI-CONTROL to add
                                                   select a number.
+.
                                                   # You can also input numbers by pressing 0 to 9
# To delete +, press and hold MULTI-CONTROL
                                                   on the remote control.
again.
                                                   3 Push MULTI-CONTROL left or right to
3 Press MULTI-CONTROL to make a call.
                                                   move the cursor to the previous or next po-
While calling, Dialling is flashing.
                                                   sition.
4 To end the call, press PHONE.                    # Up to 24 digits can be entered.
The estimated call time appears in the display
                                                   4 When you completed entering the
(this may differ slightly from the actual call
                                                   number, press MULTI-CONTROL.
time).


                                                                                                 En       41
Section

02            Operating this unit

          5 Press MULTI-CONTROL again to make a                 ! This feature cannot be set for each different
          call.                                                   user phone.
          6    To end the call, press PHONE.                    1 Use MULTI-CONTROL to select
                                                                Refuse calls in the function menu.

          Clearing memory                                       2 Press MULTI-CONTROL to turn auto-
          You can clear memory of each item; Phone              matic call rejection on.
          Book, dialled/received/missed call history list       # To turn automatic call rejection off, press
          and preset phone number.                              MULTI-CONTROL again.

          1 Use MULTI-CONTROL to select                              Note
          Clear memory in the function menu.
                                                                If both the automatic reject and automatic an-
          2 Push MULTI-CONTROL up or down to                    swer functions are set to on, the automatic reject
          select an item.                                       is prioritized and all incoming calls are automati-
          Each time MULTI-CONTROL is pushed up or               cally rejected.
          down, the items are switched in the following
          order:
          Phone book (phone book)—Missed calls
                                                                Setting the automatic answering
          (missed call history)—Dialled calls (dialled          If this function is on, this unit automatically
          call history)—Received calls (received call his-      answers all incoming calls.
          tory)—Dial preset (preset phone numbers)—             ! This feature cannot be set for each different
          All clear (delete all memory)                             user phone.
          # If you want to clear all the Phone Book,
                                                                1 Use MULTI-CONTROL to select
          dialled/received/missed call history list and pre-
                                                                Auto answer in the function menu.
          set phone number, select All clear.
                                                                2 Press MULTI-CONTROL to turn auto-
          3 Push MULTI-CONTROL right to deter-
                                                                matic answering on.
          mine the item that you want to delete
                                                                # To turn automatic answering function off,
          from this unit.
                                                                press MULTI-CONTROL again.
          Clear memory YES is displayed. Clearing
          memory is now on standby.                                  Note
          # If you do not want to clear memory that you
          have selected, push MULTI-CONTROL left. The           If both the automatic reject and automatic an-
          display reverts.                                      swer functions are set to on, the automatic reject
                                                                is prioritized and all incoming calls are automati-
          4 Press MULTI-CONTROL to clear the                    cally rejected.
          memory.
          Cleared is displayed and data on the selected
          item is cleared from this unit’s memory.


          Setting the automatic rejecting
          If this function is on, this unit automatically re-
          jects all incoming calls.
          ! Even if you rejected an incoming call, the
              call record is memorized in missed call his-
              tory list.


  42          En
Section

  Operating this unit                                                                                     02


                                                                                                           English
Changing the ring tone                              Displaying BD address of this unit
The unit offers a choice of ring tones for in-      1 Use MULTI-CONTROL to select
coming calls, as well as an Off setting.            Device info. in the function menu.
! The ring tone you select for this unit has no     The device name (e.g., Pioneer BT unit) of this
   effect on the ring tone used by your phone.      unit appears in the display.
   If you do not want your phone and this unit
   to ring at the same time, we recommend           2 Push MULTI-CONTROL left to switch to
   you turn the ring tone of one or the other       the BD address.
   off.                                             12-digit hexadecimal string is displayed.
                                                    # Pushing MULTI-CONTROL right returns to the
1 Use MULTI-CONTROL to select                       device name.
Ring tone in the function menu.

2 Push MULTI-CONTROL left or right to               Selecting the incoming call screen
select a ring tone.                                 It is possible to select an incoming call screen.
Each time MULTI-CONTROL is pushed left or           Since the screen selection is available for
right, the ring tone is selected in the following   each user, it is possible to select different
order:                                              screens between the users.
OFF (ring tone off)—BEEP1 (ring tone 1)—
BEEP2 (ring tone 2)—BEEP3 (ring tone 3)             1 Press MULTI-CONTROL to display the
                                                    main menu.
                                                    FUNCTION, AUDIO, ENTERTAINMENT and
Echo canceling and noise reduction                  RECEIVING MOVIE appear on the display.
When you are operating hands-free phoning
in the vehicle, you may hear undesired echo.        2 Use MULTI-CONTROL to select
This function reduces the echo and noise and        RECEIVING MOVIE.
keeps a certain sound quality.                      Turn to change the menu option; press to se-
! This feature cannot be set for each different     lect.
    user phone.
                                                    3 Use MULTI-CONTROL to select the
1 Use MULTI-CONTROL to select                       screen.
Echo cancel in the function menu.                   Turn to change the menu option; press to se-
                                                    lect.
2 Press MULTI-CONTROL to turn echo can-             Screen 1—Sceen 2—Screen 3—Screen 4
celing on.
# To turn echo canceling off, press
MULTI-CONTROL again.


Displaying BD (Bluetooth
Device) address
Each device featuring Bluetooth wireless tech-
nology is allocated a unique 48-bit device ad-
dress. Each device address consists of a 12-
digit of hexadecimal string.
You can display the BD address of your cellu-
lar phone and this unit.


                                                                                                En       43
Section

02          Operating this unit


          Audio Adjustments                                  Using balance adjustment
                                                             You can change the fader/balance setting so
          Introduction of audio adjustments
                                                             that it can provide you an ideal listening envir-
                                                             onment in all occupied seats.

                                                             1   Use MULTI-CONTROL to select Fader.
                                                             # If the balance setting has been previously ad-
                                                             justed, Balance will be displayed.

                         1                                   2 Push MULTI-CONTROL up or down to
                                                             adjust front/rear speaker balance.
          1 Audio display
                                                             Each time MULTI-CONTROL is pushed up or
            Shows the audio adjustment status.
                                                             down, the front/rear speaker balance moves
          1 Press MULTI-CONTROL to display the               towards the front or rear.
          main menu.                                         F 15 to R 15 is displayed as the front/rear
          FUNCTION, AUDIO and ENTERTAINMENT                  speaker balance moves from front to rear.
          appear on the display.                             # F/R 0 is the proper setting when only two
                                                             speakers are used.
          2 Use MULTI-CONTROL to select AUDIO.               # When the rear output setting is Rear SP :S/W,
          Turn to change the menu option; press to se-       you cannot adjust front/rear speaker balance.
          lect.                                              Refer to Setting the rear output and subwoofer
          The audio function name appears on the dis-        controller on page 50.
          play.
                                                             3 Push MULTI-CONTROL left or right to
          3 Turn MULTI-CONTROL to select the                 adjust left/right speaker balance.
          audio function.                                    Each time MULTI-CONTROL is pushed left or
          Turn MULTI-CONTROL to switch between the           right, the left/right speaker balance moves to-
          audio functions in the following order:            wards the left or right.
          Fader (balance adjustment)—Powerful (gra-          L 15 to R 15 is displayed as the left/right
          phic equalizer adjustment)—50Hz (7-band            speaker balance moves from left to right.
          graphic equalizer adjustment)—LOUD (loud-
          ness)—Sub W.1 (subwoofer on/off setting)—
          Sub W.2 (subwoofer setting)—Bass (bass             Using the equalizer
          boost)—HPF (high pass filter)—SLA (source          The equalizer lets you adjust the equalization
          level adjustment)—ASL (automatic sound le-         to match car interior acoustic characteristics
          velizer)                                           as desired.
          # You can also select the audio function by
          pressing AUDIO on the remote control.              Recalling equalizer curves
          # You can select the Sub W.2 only when sub-
                                                             There are seven stored equalizer curves which
          woofer output is turned on in Sub W.1.
                                                             you can easily recall at any time. Here is a list
          # When selecting the FM tuner as the source,
                                                             of the equalizer curves:
          you cannot switch to SLA.
          # To return to the display of each source, press    Display            Equalizer curve
          BAND.
                                                              Powerful           Powerful
          # If you do not operate functions except for
          50Hz within about 30 seconds, the display is        Natural            Natural
          automatically returned to the ordinary display.     Vocal              Vocal


  44        En
Section

  Operating this unit                                                                                    02


                                                                                                          English
 Custom 1             Custom 1
                                                   +6 to –4 (or –6) is displayed as the equalizer
                                                   curve is increased or decreased.
 Custom 2             Custom 2                     # The actual range of the adjustments are differ-
 Flat                 Flat                         ent depending on which equalizer curve is se-
 SuperBass (S.Bass)   Super bass
                                                   lected.
                                                   # The equalizer curve with all frequencies set to
! Custom 1 and Custom 2 are adjusted               0 cannot be adjusted.
  equalizer curves that you create. Adjust-
  ments can be made with a 7-band graphic          Adjusting 7-band graphic equalizer
  equalizer.                                       For Custom 1 and Custom 2 equalizer curves,
! When Flat is selected no supplement or           you can adjust the level of each band.
  correction is made to the sound. This is         ! A separate Custom 1 curve can be created
  useful to check the effect of the equalizer         for each source. (The built-in CD player and
  curves by switching alternatively between           the multi-CD player are set to the same
  Flat and a set equalizer curve.                     equalizer adjustment setting automati-
% Press EQ to select the equalizer.                   cally.) If you make adjustments when a
Press EQ repeatedly to switch between the fol-        curve other than Custom 2 is selected, the
lowing equalizers:                                    equalizer curve settings will be memorized
Powerful—Natural—Vocal—Custom 1—                      in Custom 1.
Custom 2—Flat—SuperBass (S.Bass)                   ! A Custom 2 curve can be created common
                                                      to all sources. If you make adjustments
                                                      when the Custom 2 curve is selected, the
Adjusting equalizer curves                            Custom 2 curve will be updated.
The factory supplied equalizer curves, with the
exception of Flat, can be adjusted to a fine de-   1 Recall the equalizer curve you want to
gree (nuance control).                             adjust.
                                                   See Recalling equalizer curves on the previous
1 Use MULTI-CONTROL to select the gra-             page.
phic equalizer adjustment.
Powerful appears in the display.                   2 Use MULTI-CONTROL to select 7-band
If the equalizer curve has been previously se-     graphic equalizer adjustment.
lected, the curve of that previously selected      Frequency and the level (e.g., 50Hz +4) ap-
will be displayed instead of Powerful.             pears in the display.

2 Push MULTI-CONTROL left or right to              3 Push MULTI-CONTROL left or right to
select an equalizer curve.                         select the equalizer band to adjust.
Each time MULTI-CONTROL is pushed left or          Each time MULTI-CONTROL is pushed left or
right, equalizer curves are selected in the fol-   right, equalizer bands are selected in the fol-
lowing order:                                      lowing order:
Powerful—Natural—Vocal—Custom 1—                   50Hz—125Hz—315Hz—800Hz—2kHz—
Custom 2—Flat—SuperBass (S.Bass)                   5kHz—12.5kHz

3 Push MULTI-CONTROL up or down to                 4 Push MULTI-CONTROL up or down to
adjust the equalizer curve.                        adjust the level of the equalizer band.
Each time MULTI-CONTROL is pushed up or            Each time MULTI-CONTROL is pushed up or
down, the equalizer curve increases or de-         down, the level of the equalization band in-
creases respectively.                              creases or decreases.


                                                                                               En       45
Section

02            Operating this unit

          +6 to –6 is displayed as the level is increased    Adjusting subwoofer settings
          or decreased.                                      When the subwoofer output is on, you can ad-
          # You can then select another band and adjust      just the cut-off frequency and the output level
          the level.                                         of the subwoofer.
          5 Press BAND to cancel the 7-band gra-             1   Use MULTI-CONTROL to select Sub W.2.
          phic equalizer adjustment.                         # When the subwoofer output is on, you can se-
                                                             lect Sub W.2.
          Adjusting loudness                                 2 Push MULTI-CONTROL left or right to
          Loudness compensates for deficiencies in the       select cut-off frequency.
          low- and high-sound ranges at low volume.          Each time MULTI-CONTROL is pushed left or
                                                             right, cut-off frequencies are selected in the
          1    Use MULTI-CONTROL to select LOUD.             following order:
          2 Press MULTI-CONTROL to turn loudness             50Hz—63Hz—80Hz—100Hz—125Hz
          on.                                                Only frequencies lower than those in the se-
          Loudness level (e.g., Mid) appears in the dis-     lected range are outputted from the subwoo-
          play.                                              fer.
          # To turn loudness off, press MULTI-CONTROL        3 Push MULTI-CONTROL up or down to
          again.                                             adjust the output level of the subwoofer.
          3 Push MULTI-CONTROL left or right to              Each time MULTI-CONTROL is pushed up or
          select a desired level.                            down, subwoofer level increases or decreases.
          Each time MULTI-CONTROL is pushed left or          +6 to –24 is displayed as the level is increased
          right, level is selected in the following order:   or decreased.
          Low (low)—Mid (mid)—High (high)
                                                             Boosting the bass
          Using subwoofer output                             Bass boost function boosts the bass level of
          This unit is equipped with a subwoofer output      sound lower than 100 Hz. The more the bass
          which can be turned on or off.                     level is increased, the more the bass sound is
                                                             emphasized and the entire sound becomes
          1    Use MULTI-CONTROL to select Sub W.1.          powerful. When using this function with the
                                                             subwoofer, the sound under the cut-off fre-
          2 Press MULTI-CONTROL to turn subwoo-              quency is boosted.
          fer output on.
          Normal appears in the display. Subwoofer out-      1   Use MULTI-CONTROL to select Bass.
          put is now on.
          # To turn subwoofer output off, press
                                                             2 Push MULTI-CONTROL up or down to
          MULTI-CONTROL again.
                                                             select a desired level.
                                                             0 to +6 is displayed as the level is increased or
          3 Push MULTI-CONTROL left or right to              decreased.
          select the phase of subwoofer output.
          Push MULTI-CONTROL left to select reverse
          phase and Reverse appears in the display.
          Push MULTI-CONTROL right to select normal
          phase and Normal appears in the display.


  46          En
Section

    Operating this unit                                                                                  02


                                                                                                          English
Using the high pass filter                          3 Push MULTI-CONTROL up or down to
When you do not want low sounds from the            adjust the source volume.
subwoofer output frequency range to play            Each time MULTI-CONTROL is pushed up or
from the front or rear speakers, turn on the        down, source volume increases or decreases.
HPF (high pass filter). Only frequencies higher     SLA +4 to SLA –4 is displayed as the source
than those in the selected range are outputted      volume is increased or decreased.
from the front or rear speakers.
                                                        Notes
1   Use MULTI-CONTROL to select HPF.                ! The MW/LW tuner volume level can also be
2 Press MULTI-CONTROL to turn high                    adjusted with source level adjustments.
pass filter on.                                     ! The built-in CD player and the multi-CD player
80Hz appears in the display. High pass filter is      are set to the same source level adjustment
now on.                                               volume automatically.
# If the high pass filter has been previously ad-   ! External unit 1 and external unit 2 are set to
justed, the frequency of that previously selected     the same source level adjustment volume
will be displayed instead of 80Hz.                    automatically.
# To turn high pass filter off, press
MULTI-CONTROL again.                                Using automatic sound levelizer
3 Push MULTI-CONTROL left or right to               During driving, noise in the car changes ac-
select cut-off frequency.                           cording to the driving speed and road condi-
Each time MULTI-CONTROL is pushed left or           tions. The automatic sound levelizer (ASL)
right, cut-off frequencies are selected in the      monitors such varying noise and automati-
following order:                                    cally increases the volume level, if this noise
50Hz—63Hz—80Hz—100Hz—125Hz                          becomes greater. The sensitivity (variation of
Only frequencies higher than those in the se-       volume level to noise level) of ASL can be set
lected range are outputted from the front or        to one of five levels.
rear speakers.
                                                    1   Use MULTI-CONTROL to select ASL.

Adjusting source levels                             2 Press MULTI-CONTROL to turn ASL on.
                                                    Mid appears in the display.
SLA (source level adjustment) lets you adjust       # To turn ASL off, press MULTI-CONTROL
the volume level of each source to prevent ra-      again.
dical changes in volume when switching be-
tween sources.                                      3 Push MULTI-CONTROL left or right to
! Settings are based on the FM tuner volume         select the desired ASL level.
   level, which remains unchanged.                  Each time MULTI-CONTROL is pushed left or
                                                    right, ASL level is selected in the following
1 Compare the FM tuner volume level                 order:
with the level of the source you wish to ad-        Low (low)—Mid-L (mid-low)—Mid (mid)—
just.                                               Mid-H (mid-high)—High (high)
2   Use MULTI-CONTROL to select SLA.


                                                                                                En      47
Section

02          Operating this unit


          Initial Settings                                  # You can also select the function by pressing
                                                            FUNCTION on the remote control.
          Adjusting initial settings                        # To cancel initial settings, press BAND.
          Using the initial settings, you can customize     # You cannot select BT AUDIO when the Blue-
          various system settings to achieve optimal per-   tooth audio player has been connected.
          formance from this unit.
                                                            Selecting the display language
                                                            For your convenience, this unit equips multi-
                                                            ple language display. You can select the lan-
                                                            guage best suited to your first language.

                                                            1 Use MULTI-CONTROL to select
                           1
                                                            Language select.
          1 Function display
            Shows the function status.                      2 Press MULTI-CONTROL to select the lan-
                                                            guage.
          1 Press SOURCE and hold until the unit            Each press of MULTI-CONTROL selects lan-
          turns off.                                        guages in the following order:
                                                            English—Français—Italiano—Español—
          2 Press MULTI-CONTROL and hold until              Deutsch—Nederlands—РУССКИЙ
          Language select appears in the display.
          # You can also perform this operation by press-
          ing and holding FUNCTION on the remote con-       Setting the date
          trol.                                             The calender display adjusted in this mode ap-
                                                            pears when the telephone source is selected
          3 Turn MULTI-CONTROL to select one of
                                                            or sources and the feature demo are off.
          the initial settings.
          Turn MULTI-CONTROL to switch between the          1 Use MULTI-CONTROL to select
          functions in the following order:                 Calendar.
          Language select (language selection)—
          Calendar (calendar)—Clock (clock)—                2 Push MULTI-CONTROL left or right to
          Off clock (off clock)—FM step (FM tuning          select the segment of the calendar display
          step)—Auto PI (auto PI seek)—Warning tone         you wish to set.
          (warning tone)—Face auto open (face auto          Pushing MULTI-CONTROL left or right will se-
          open)—AUX1 (auxiliary input 1)—AUX2 (aux-         lect one segment of the calendar display:
          iliary input 2)—Dimmer (dimmer)—                  Day—Month—Year
          Brightness (brightness)—S/W control (rear         As you select segments of the calendar dis-
          output and subwoofer controller)—Mute             play the segment selected will blink.
          (sound muting/attenuation)—Demonstration
          (feature demo)—Reverse mode (reverse              3 Push MULTI-CONTROL up or down to
          mode)—Ever-scroll (ever scroll)—BT AUDIO          set the date.
          (Bluetooth audio)—Pin code input (pin code
          input)—Edit device name (device name edit)        Setting the clock
          —BT Version Info. (Bluetooth version infor-
                                                            Use these instructions to set the clock.
          mation)—BT reset (Bluetooth reset)
          Use the following instructions to operate each    1   Use MULTI-CONTROL to select Clock.
          particular setting.


  48        En
Section

    Operating this unit                                                                                 02


                                                                                                         English
2 Push MULTI-CONTROL left or right to              2 Press MULTI-CONTROL to select the FM
select the segment of the clock display you        tuning step.
wish to set.                                       Pressing MULTI-CONTROL repeatedly will
Pushing MULTI-CONTROL left or right will se-       switch the FM tuning step between 50 kHz
lect one segment of the clock display:             and 100 kHz while AF or TA is on. The selected
Hour—Minute                                        FM tuning step will appear in the display.
As you select segments of the clock display
the segment selected will blink.                       Note

3 Push MULTI-CONTROL up or down to                 The tuning step remains at 50 kHz during manual
put a clock right.                                 tuning.


     Note                                          Switching Auto PI Seek
You can match the clock to a time signal by        The unit can automatically search for a differ-
pressing MULTI-CONTROL.                            ent station with the same programming, even
! If the minute is 00 to 29, the minutes are       during preset recall.
   rounded down. (e.g., 10:18 becomes 10:00.)
! If the minute is 30 to 59, the minutes are       1   Use MULTI-CONTROL to select Auto PI.
   rounded up. (e.g., 10:36 becomes 11:00.)
                                                   2 Press MULTI-CONTROL to turn Auto PI
                                                   seek on.
Turning the off clock display on                   # To turn Auto PI seek off, press
or off                                             MULTI-CONTROL again.
If the off clock display is turned on, when the
sources and the feature demo are off, the          Switching the warning tone
clock display appears on the display.
                                                   If the front panel is not detached from the
1 Use MULTI-CONTROL to select                      head unit within four seconds of turning off
Off clock.                                         the ignition, a warning tone will sound. You
                                                   can turn off the warning tone.
2 Press MULTI-CONTROL to turn the off
clock display on.                                  1 Use MULTI-CONTROL to select
# To turn the off clock display off, press         Warning tone.
MULTI-CONTROL again.
                                                   2 Press MULTI-CONTROL to turn warning
                                                   tone on.
Setting the FM tuning step                         # To turn warning tone off, press
                                                   MULTI-CONTROL again.
Normally the FM tuning step employed by
seek tuning is 50 kHz. When AF or TA is on,
the tuning step automatically changes to 100       Switching the face auto open
kHz. It may be preferable to set the tuning step
                                                   To protect against theft, this unit features de-
to 50 kHz when AF is on.
                                                   tachable front panel. To detach the front panel
1   Use MULTI-CONTROL to select FM step.           easily, the front panel opens automatically.
                                                   This function is on as a default.

                                                   1 Use MULTI-CONTROL to select
                                                   Face auto open.


                                                                                              En       49
Section

02            Operating this unit

          2 Press MULTI-CONTROL to turn the face              Setting the rear output and
          auto open on.                                       subwoofer controller
          # To turn the face auto open off, press
                                                              This unit’s rear output (rear speaker leads out-
          MULTI-CONTROL again.
                                                              put and RCA rear output) can be used for full-
                                                              range speaker (Rear SP :F.Range) or subwoo-
          Switching the auxiliary setting                     fer (Rear SP :S/W) connection. If you switch
          Auxiliary equipments connected to this unit         the rear output setting to Rear SP :S/W, you
          can be activated individually. Set each AUX         can connect a rear speaker lead directly to a
          source to ON when using. About connecting           subwoofer without using an auxiliary amp.
          or using auxiliary equipments, refer to Using       Initially, the unit is set for rear full-range speak-
          the AUX source on page 53.                          er connection (Rear SP :F.Range).

          1 Use MULTI-CONTROL to select AUX1/                 1 Use MULTI-CONTROL to select
          AUX2.                                               S/W control.

          2 Press MULTI-CONTROL to turn AUX1/                 2 Press MULTI-CONTROL to switch the
          AUX2 on.                                            rear output setting.
          # To turn AUX off, press MULTI-CONTROL              Pressing MULTI-CONTROL will switch be-
          again.                                              tween Rear SP :F.Range (full-range speaker)
                                                              and Rear SP :S/W (subwoofer) and that status
                                                              will be displayed.
          Switching the dimmer setting                        # When no subwoofer is connected to the rear
          To prevent the display from being too bright at     output, select Rear SP :F.Range.
          night, the display is automatically dimmed          # When a subwoofer is connected to the rear
          when the car’s headlights are turned on. You        output, set for subwoofer Rear SP :S/W.
          can turn the dimmer on or off.
                                                                   Notes
          1    Use MULTI-CONTROL to select Dimmer.
                                                              ! Even if you change this setting, there is no
          2 Press MULTI-CONTROL to turn dimmer                  output unless you turn the subwoofer output
          on.                                                   on (refer to Using subwoofer output on page
          # To turn dimmer off, press MULTI-CONTROL             46).
          again.                                              ! If you change this setting, subwoofer output
                                                                in the audio menu return to the factory set-
                                                                tings.
          Adjusting the brightness                            ! Both rear speaker leads outputs and RCA rear
          You can adjust the display brightness. Initially      output are switched simultaneously in this
          this mode is set to 12.                               setting.

          1 Use MULTI-CONTROL to select
          Brightness.                                         Switching the sound muting/
                                                              attenuation
          2 Push MULTI-CONTROL left or right to
                                                              Sound from this system is muted or attenu-
          adjust the brightness level.
                                                              ated automatically when the signal from the
          0 to 15 is displayed as the level is increased or
                                                              equipment with mute function is received.
          decreased.
          # When dimmer is functioning, the brightness
          level can be adjusted 0 to 10.

  50          En
Section

    Operating this unit                                                                                    02


                                                                                                            English
! The sound is muted or attenuated, MUTE            2 Press MULTI-CONTROL to turn the re-
  or ATT are displayed and no audio adjust-         verse mode on.
  ment is possible.                                 # To turn the reverse mode off, press
! Sound from this system returns to normal          MULTI-CONTROL again.
  when the muting or attenuation is can-
  celed.                                                 Note

1   Use MULTI-CONTROL to select Mute.               You can also turn on or off reverse mode by press-
                                                    ing BAND while this unit is turned off. For more
2 Press MULTI-CONTROL to switch the tel-            details, see Reverse mode on page 9.
ephone muting/attenuation.
Pressing MULTI-CONTROL will switch be-
tween TEL ATT (attenuation) and TEL mute            Switching the Ever Scroll
(muting) and that status will be displayed.         When Ever Scroll is set to ON, text information
                                                    recorded on CD or iPod scrolls continuously in
                                                    the display. Set to OFF if you prefer the infor-
Switching the feature demo                          mation to scroll just once.
The feature demo automatically starts when
power to this unit is turned off while the igni-    1 Use MULTI-CONTROL to select
tion switch is set to ACC or ON.                    Ever-scroll.

1 Use MULTI-CONTROL to select                       2 Press MULTI-CONTROL to turn the Ever
Demonstration.                                      Scroll on.
                                                    # To turn the Ever Scroll off, press
2 Press MULTI-CONTROL to turn the fea-              MULTI-CONTROL again.
ture demo on.
# To turn the feature demo off, press
MULTI-CONTROL again.                                Activating the BT Audio source
                                                    You need to activate the BT Audio source in
     Notes                                          order to use a Bluetooth audio player.
                                                    This setting is set to on by default. If you do
! Remember that if the feature demo continues
                                                    not use BT Audio, you can turn it off.
  operating when the car engine is turned off, it
  may drain battery power.                          1 Use MULTI-CONTROL to select
! You can also turn on or off feature demo by       BT AUDIO.
  pressing DISPLAY while this unit is turned off.
  For more details, see Feature demo mode on        2 Press MULTI-CONTROL to turn the
  page 9.                                           BT Audio source on.
                                                    # To turn the BT Audio source off, press
                                                    MULTI-CONTROL again.
Switching the reverse mode                          # If you turn the BT AUDIO in the initial settings
If you do not perform an operation within           off, the history of the most recently connected
about 30 seconds, screen indications start to       Bluetooth audio stored in this unit is cleared.
reverse, and then continue reversing every 10
seconds.

1 Use MULTI-CONTROL to select
Reverse mode.


                                                                                                 En       51
Section

02          Operating this unit

          Entering PIN code for Bluetooth                     2 Press DISPLAY to select the desired
          wireless connection                                 character type.
                                                              Press DISPLAY repeatedly to switch between
          To connect your cellular phone to this unit via
                                                              the following character types:
          Bluetooth wireless technology, you need to
                                                              Alphabet (upper case)—Alphabet (lower case)
          enter PIN code on your phone to verify the
                                                              —Numbers and symbols
          connection. The default code is 0000, but you
          can change this in this function.                   3 Push MULTI-CONTROL up or down to
          ! With some Bluetooth audio players, you            select a letter of the alphabet.
             may be required to enter to this unit in ad-
             vance PIN code of your Bluetooth audio           4 Push MULTI-CONTROL left or right to
             player, in order to set this unit ready for a    move the cursor to the previous or next
             connection from your Bluetooth audio             character position.
             player.
                                                              5 After inputting device name, press
          1 Use MULTI-CONTROL to select                       MULTI-CONTROL to store in this unit.
          Pin code input.                                     # Pushing MULTI-CONTROL right in the confir-
                                                              mation display returns you to the device name
          2 Push MULTI-CONTROL up or down to                  input display, and you can change the device
          select a number.                                    name.
          # You can also press 0 to 9 on the remote con-      # If an invalid character has been entered, sub-
          trol to select a number.                            sequent characters are not displayed.
                                                              # If an invalid character has been entered in the
          3 Push MULTI-CONTROL left or right to
                                                              beginning, device name cannot be stored in
          move the cursor to the previous or next po-
                                                              memory.
          sition.

          4 After inputting PIN code (up to 16 di-            Displaying system version for
          gits), press MULTI-CONTROL to store in this
          unit.
                                                              repair
          # Pushing MULTI-CONTROL right in the confir-        Should this unit fails to operate properly and
          mation display returns you to the PIN code input    you consult with dealer for repair, you may be
          display, and you can change the PIN code.           asked to indicate the system versions of this
          # If an invalid character has been entered, sub-    unit and of Bluetooth module. You can display
          sequent characters are not displayed.               the versions and confirm them.
          # If an invalid character has been entered in the
                                                              1 Use MULTI-CONTROL to select
          beginning, PIN code cannot be stored in mem-
                                                              BT Version Info.
          ory.
                                                              The system (microprocessor) version of this
                                                              unit is displayed.
          Editing device name
                                                              2 Push MULTI-CONTROL left to switch to
          You can edit the device name.                       the version of the Bluetooth module of this
          The device name is set to Pioneer BT unit as        unit.
          default.                                            # Pushing MULTI-CONTROL right returns to the
                                                              system version of this unit.
          1 Use MULTI-CONTROL to select
          Edit device name.


  52        En
Section

    Operating this unit                                                                                 02


                                                                                                         English
Resetting the Bluetooth                            Other Functions
wireless technology module
                                                   Using the AUX source
Bluetooth telephone and Bluetooth Audio
                                                   This unit can control up to two auxiliary equip-
data can be deleted. To protect personal infor-
                                                   ments such as VCR or portable devices (sold
mation, we recommend deleting this data be-
                                                   separately). When connected, auxiliary equip-
fore transferring the unit to other persons. The
                                                   ments are automatically read in as AUX
following settings will be deleted.
                                                   sources and assigned to AUX1 or AUX2. The
! phone book entries on the Bluetooth tele-
                                                   relationship between AUX1 and AUX2
    phone
                                                   sources is explained below.
! preset numbers on the Bluetooth tele-
    phone
! registration assignment of Bluetooth tele-       About AUX1 and AUX2
    phone                                          You have two methods to connect auxiliary
! call history of Bluetooth telephone              equipments to this unit.
! history of the most recently connected
    Bluetooth audio                                AUX1 source:
1   Use MULTI-CONTROL to select BT reset.          When connecting auxiliary equipment using a
                                                   stereo mini plug cable
2 Push MULTI-CONTROL right to show a
confirmation display.                              % Insert the stereo mini plug into the
Clear memory YES is displayed. Clearing            input jack on this unit.
memory is now on standby.                          For more details, refer to the installation man-
# If you do not want to reset phone memory,        ual.
push MULTI-CONTROL left. The display reverts.      The allocation of this auxiliary equipment is
                                                   automatically set to AUX1.
3 Press MULTI-CONTROL to clear the
memory.
                                                   AUX2 source:
Cleared is displayed and the settings are
deleted.                                           When connecting auxiliary equipment using an
                                                   IP-BUS-RCA Interconnector (sold separately)

                                                   % Use an IP-BUS-RCA Interconnector such
                                                   as the CD-RB20/CD-RB10 (sold separetely)
                                                   to connect this unit to auxiliary equipment
                                                   featuring RCA output.
                                                   For more details, refer to the IP-BUS-RCA Inter-
                                                   connector owner’s manual.
                                                   The allocation of this auxiliary equipment is
                                                   automatically set to AUX2.
                                                   # You can only make this type of connection if
                                                   the auxiliary equipment has RCA outputs.


                                                                                               En      53
Section

02          Operating this unit

          Selecting AUX as the source                         VISUALIZER-2 (visualizer 2)—VISUALIZER-3
                                                              (visualizer 3)—SPECTRUM ANALYZER-1
          % Press SOURCE to select AUX as the
                                                              (spectrum analyzer 1)—
          source.
                                                              SPECTRUM ANALYZER-2 (spectrum analyzer
          # If the auxiliary setting is not turned on, AUX
                                                              2)—MOVIE (movie)—ENT CLOCK (entertain-
          cannot be selected. For more details, see Switch-
                                                              ment clock)
          ing the auxiliary setting on page 50.
                                                              # To return to the playback display, press BAND.

          Setting the AUX title
          The title displayed for each AUX1 or AUX2           Using the PGM button
          source can be changed.                              You can operate the preprogrammed functions
                                                              for each source by using PGM on the remote
          1 After you have selected AUX as the                control.
          source, use MULTI-CONTROL and select
          FUNCTION to display TitleInput "A".                 % Press PGM to turn pause on when se-
                                                              lecting the following sources:
          2 Enter a title in the same way as the                !  CD – Built-in CD player
          built-in CD player.                                   !  iPod – iPod
          For details concerning operation, refer to En-        !  Multi CD – Multi-CD player
          tering disc titles on page 21.                        !  USB – USB portable audio player/USB
                                                                   memory
                                                                ! BT Audio – Bluetooth audio player
          Using different entertainment
                                                                ! DVD – DVD player/multi-DVD player
          displays                                            # To turn pause off, press PGM again.
          You can enjoy entertainment displays while lis-
          tening to each sound source.                        % Press PGM and hold to turn BSM on
                                                              when selecting tuner as the source.
          1 Press MULTI-CONTROL to display the                Press PGM and hold until the BSM turns on.
          main menu.                                          # To cancel the storage process, press PGM
          FUNCTION, AUDIO and ENTERTAINMENT                   again.
          appear on the display.
                                                              % Press PGM and hold to turn BSSM on
          2 Use MULTI-CONTROL to select                       when selecting television as the source.
          ENTERTAINMENT.                                      Press PGM and hold until the BSSM turns on.
          Turn to change the menu option; press to se-        # To cancel the storage process, press PGM
          lect.                                               again.

          3 Use MULTI-CONTROL to change the dis-
          play.
          Turn to change the menu option; press to se-
          lect.
          BGV-1 (background visual 1)—BGV-2 (back-
          ground visual 2)—BGP-1 (background picture
          1)—BGP-2 (background picture 2)—BGP-3
          (background picture 3)—BGP-4 (background
          picture 4)—SIMPLE-1 (simple display 1)—
          SIMPLE-2 (simple display 2)—LEVEL METER
          (level meter)—VISUALIZER-1 (visualizer 1)—


  54        En
Section

    Available accessories                                                                               03


                                                                                                         English
USB adapter                                       Selecting an audio file directly
                                                  in the current folder
Basic Operations
                                                  The operation is basically the same as that of
You can use this unit to control a USB adapter,
                                                  the built-in CD player.
which is sold separately.
                                                  For details concerning operation, refer to Se-
For details concerning operation, refer to the
                                                  lecting a track directly on page 19.
USB adapter’s operation manual. This section
provides information on USB portable audio
player/USB memory operations with this unit       Introduction of advanced
which differs from that described in the USB      operations
adapter’s operation manual.
! Optimum performance of this unit may not        1 Press MULTI-CONTROL to display the
   be obtained depending on the connected         main menu.
   USB portable audio player/USB memory.          FUNCTION, AUDIO and ENTERTAINMENT
                                                  appear on the display.

                                                  2 Use MULTI-CONTROL to select
                                                  FUNCTION.
                                                  Turn to change the menu option; press to se-
                                                  lect.
                                                  The function name appears on the display.

                                                  3 Turn MULTI-CONTROL to select the
                                                  function.
1 WMA/MP3/AAC indicator                           Turn MULTI-CONTROL to switch between the
  Shows the type of file currently playing.       functions in the following order:
2 Folder number indicator                         Play mode (repeat play)—Random mode
3 Track number indicator                          (random play)—Scan mode (scan play)—
4 Play time indicator                             Pause (pause)
5 Bit rate indicator                              # You can also select the function by pressing
                                                  FUNCTION on the remote control.
1   Press SOURCE to select USB.                   # To return to the playback display, press BAND.
                                                  # If you do not operate functions within about
2 Push MULTI-CONTROL up or down to                30 seconds, the display is automatically returned
select a folder.                                  to the ordinary display.
# You cannot select a folder that does not have
a compressed audio file recorded in it.
# To return to folder 01 (ROOT), press and hold   Function and operation
BAND. However, if folder 01 (ROOT) contains no    Play mode, Random mode, Scan mode and
files, playback commences with folder 02.         Pause operations are basically the same as
                                                  that of the built-in CD player.
3 To perform fast forward or reverse,
push and hold MULTI-CONTROL left or
right.

4 To skip back or forward to another
compressed audio file, push
MULTI-CONTROL left or right.


                                                                                              En       55
Section

03          Available accessories


           Function name    Operation
                                                                    Refer to Displaying text information on disc on
                                                                    page 22.
                            Refer to Selecting a repeat play        ! If the characters recorded on the audio file
                            range on page 20.
                            But the repeat play ranges you can         are not compatible with this unit, those
                            select are different from that of the      characters will not be displayed.
                            built-in CD player. The repeat play
                            ranges of the USB portable audio
           Play mode        player/USB memory are as below:         Selecting files from the file
                            ! Track repeat – Repeat just the
                                current file
                                                                    name list
                            ! Folder repeat – Repeat the            The operation is the same as that of the built-
                                current folder                      in CD player.
                            ! All repeat – Repeat all files         Refer to Selecting tracks from the file name list
                            Refer to Playing tracks in random       on page 23.
           Random mode
                            order on page 20.
                            Refer to Scanning folders and
           Scan mode
                            tracks on page 20.
                            Refer to Pausing disc playback on
           Pause
                            page 21.


              Notes
          ! If you select another folder during repeat play,
            the repeat play range changes to All repeat.
          ! If you perform track search or fast forward/re-
            verse during Track repeat, the repeat play
            range changes to Folder repeat.
          ! When Folder repeat is selected, it is not pos-
            sible to play back a subfolder of that folder.
          ! Scan play searches the file within the selected
            repeat range.
            While you are using Track repeat or
            Folder repeat, the beginning of each file in
            the folder is played for about 10 seconds.
            When you are using All repeat, the beginning
            of the each file in the USB portable audio
            player/USB memory is played for about 10
            seconds.
          ! After scanning is finished, normal playback of
            the files will begin again.


          Displaying text information of
          an audio file
          The operation is the same as that of the built-
          in CD player.


  56        En
Section

  Available accessories                                                                                       03


                                                                                                               English
Multi-CD Player                                            Notes

Basic Operations                                       ! When the multi-CD player performs the pre-
                                                         paratory operations, Ready is displayed.
You can use this unit to control a multi-CD
                                                       ! If an error message such as ERROR-11 is dis-
player, which is sold separately.
                                                         played, refer to the multi-CD player owner’s
! Only those functions described in this man-
                                                         manual.
   ual are supported by 50-disc multi-CD
                                                       ! If there are no discs in the multi-CD player ma-
   players.
                                                         gazine, No Disc is displayed.
! This unit is not designed to operate disc title
   list functions with a 50-disc multi-CD player.
   About the disc title list functions, please         Selecting a track directly
   refer to Selecting discs from the disc title list
                                                       The operation is basically the same as that of
   on page 60.
                                                       the built-in CD player.
                                                       For details concerning operation, refer to Se-
                                                       lecting a track directly on page 19.


                                                       Introduction of advanced
                                                       operations
                                                       You can use Compression (compression and
                                                       DBE) only with a multi-CD player that supports
                                                       them.
1 Disc number indicator
2 Track number indicator                               1 Press MULTI-CONTROL to display the
3 Play time indicator                                  main menu.
                                                       FUNCTION, AUDIO and ENTERTAINMENT
1 Press SOURCE to select the multi-CD                  appear on the display.
player.
                                                       2 Use MULTI-CONTROL to select
2 Push MULTI-CONTROL up or down to                     FUNCTION.
select a disc you want to listen to.                   Turn to change the menu option; press to se-
# You can also select a disc by using 1 to 6 but-      lect.
tons on the remote control.                            The function name appears on the display.
  ! For discs 1 to 6, press the corresponding
      button number.                                   3 Turn MULTI-CONTROL to select the
  ! For discs 7 to 12, press and hold the corre-       function.
      sponding numbers, such as 1 for disc 7,          Turn MULTI-CONTROL to switch between the
      until the disc number appears in the dis-        functions in the following order:
      play.                                            Play mode (repeat play)—Random mode
                                                       (random play)—Scan mode (scan play)—
3 To perform fast forward or reverse,                  Pause (pause)—Compression (compression
push and hold MULTI-CONTROL left or                    and DBE)—ITS play mode (ITS play)—
right.                                                 ITS memo (ITS programming)—
                                                       TitleInput "A" (disc title input)
4 To skip back or forward to another
                                                       # You can also select the function by pressing
track, push MULTI-CONTROL left or right.
                                                       FUNCTION on the remote control.
                                                       # To return to the playback display, press BAND.


                                                                                                    En       57
Section

03          Available accessories

          # If you do not operate functions except for                   Notes
          ITS memo and TitleInput "A" within about 30
          seconds, the display is automatically returned to         ! If you select other discs during repeat play,
          the ordinary display.                                       the repeat play range changes to
                                                                      M-CD repeat.
                                                                    ! If you perform track search or fast forward/re-
          Function and operation                                      verse during Track repeat, the repeat play
          Play mode, Random mode, Scan mode,                          range changes to Disc repeat.
          Pause, Compression and TitleInput "A" op-                 ! After track or disc scanning is finished, nor-
          erations are basically the same as that of the              mal playback of the tracks will begin again.
          built-in CD player.                                       ! When playing a CD TEXT disc on a CD TEXT
                                                                      compatible multi-CD player, you cannot
           Function name    Operation
                                                                      switch to TitleInput "A". The disc title has al-
                            Refer to Selecting a repeat play          ready been recorded on a CD TEXT disc.
                            range on page 20.
                            But the repeat play ranges you can
                            select are different from that of the   Using ITS playlists
                            built-in CD player. The repeat play
                            ranges of the multi-CD player are       ITS (instant track selection) lets you make a
           Play mode        as below:                               playlist of favorite tracks from those in the
                            ! M-CD repeat – Repeat all              multi-CD player magazine. After you have
                                discs in the multi-CD player
                                                                    added your favorite tracks to the playlist you
                            ! Track repeat – Repeat just the
                                current track
                                                                    can turn on ITS play and play just those selec-
                            ! Disc repeat – Repeat the cur-         tions.
                                rent disc
                            Refer to Playing tracks in random       Creating a playlist with ITS programming
           Random mode
                            order on page 20.                       You can use ITS to enter and play back up to
                            Refer to Scanning folders and           99 tracks per disc from up to 100 discs (with
           Scan mode
                            tracks on page 20.                      the disc titles). (With multi-CD players sold be-
                            Refer to Pausing disc playback on       fore the CDX-P1250 and CDX-P650, up to 24
           Pause                                                    tracks can be stored in the playlist.)
                            page 21.
                            Refer to Using compression and          1 Play a CD that you want to program.
                            BMX on page 21.
                                                                    Push MULTI-CONTROL up or down to select
                            Multi-CD player has DBE (dynamic
                            bass emphasis) function instead         the CD.
           Compression      of BMX.
                            The settings can be switched as         2 Use MULTI-CONTROL to select
                            below:                                  ITS memo in the function menu.
                            COMP OFF—COMP 1—COMP 2
                            —COMP OFF—DBE 1—DBE 2                   3 Select the desired track by pushing
                                                                    MULTI-CONTROL left or right.
                            Refer to Using ITS playlists on this
           ITS play mode
                            page.                                   4 Push MULTI-CONTROL up to store the
                            Refer to Using ITS playlists on this    currently playing track in the playlist.
           ITS memo
                            page.                                   Memory complete is displayed and the cur-
                            Refer to Entering disc titles on the    rently playing selection is added to your play-
           TitleInput "A"                                           list.
                            next page.

                                                                    5 Press BAND to return to the playback
                                                                    display.


  58        En
Section

  Available accessories                                                                                     03


                                                                                                             English
     Note                                            4 Push MULTI-CONTROL down to erase
                                                     the track from your ITS playlist.
After data for 100 discs has been stored in mem-     The currently playing selection is erased from
ory, data for a new disc will overwrite the oldest   your ITS playlist and playback of the next track
one.                                                 from your ITS playlist begins.
                                                     # If there are no tracks from your playlist in the
Playback from your ITS playlist                      current range, ITS empty is displayed and nor-
ITS play lets you listen to the tracks that you      mal play resumes.
have entered into your ITS playlist. When you        5 Press BAND to return to the playback
turn on ITS play, tracks from your ITS playlist      display.
in the multi-CD player will begin to play.
1 Select the repeat range.                           Erasing a CD from your ITS playlist
Refer to Playing tracks in random order on           You can delete all tracks of a CD from your ITS
page 20.                                             playlist if ITS play is off.
2 Use MULTI-CONTROL to select                        1 Play the CD that you want to delete.
ITS play mode in the function menu.                  Push MULTI-CONTROL up or down to select
3 Press MULTI-CONTROL to turn ITS play               the CD.
on.                                                  2 Use MULTI-CONTROL to select
Playback begins of those tracks from your            ITS memo in the function menu.
playlist within the previously selected
M-CD repeat or Disc repeat ranges.                   3 Push MULTI-CONTROL down to erase
# If no tracks in the current range are pro-         all tracks on the currently playing CD from
grammed for ITS play, then ITS empty is dis-         your ITS playlist.
played.                                              All tracks on the currently playing CD are
# To turn ITS play off, press MULTI-CONTROL          erased from your playlist and
again.                                               Memory deleted is displayed.
                                                     4 Press BAND to return to the playback
Erasing a track from your ITS playlist               display.
You can delete a track from your ITS playlist if
ITS play is on.
If ITS play is already on, skip to step 2. If ITS    Using disc title functions
play is not already on, use MULTI-CONTROL.           You can input CD titles and display the titles.
                                                     Then you can easily search for and play a de-
1 Play the CD with the track you want to             sired disc.
delete from your ITS playlist, and turn ITS
play on.
Refer to Playback from your ITS playlist on this     Entering disc titles
page.                                                Use the disc title input feature to store up to
                                                     100 CD titles (with ITS playlist) into the multi-
2 Use MULTI-CONTROL to select                        CD player. Each title can be up to 10 charac-
ITS memo in the function menu.                       ters long.
3 Select the desired track by pushing                For details concerning operation, refer to En-
MULTI-CONTROL left or right.                         tering disc titles on page 21.


                                                                                                   En      59
Section

03          Available accessories

          ! Titles remain in memory, even after the              DVD Player
            disc has been removed from the magazine,
            and are recalled when the disc is rein-              Basic Operations
            serted.                                              You can use this unit to control a DVD player or
          ! After data for 100 discs has been stored in          multi-DVD player, which is sold separately.
            memory, data for a new disc will overwrite           For details concerning operation, refer to the
            the oldest one.                                      DVD player’s or multi-DVD player’s operation
                                                                 manual. This section provides information on
          Displaying disc titles                                 DVD operations with this unit which differs
          You can display the text information of any            from that described in the DVD player’s or
          disc that has had a disc title entered.                multi-DVD player’s operation manual.
          The operation is the same as that of the built-
          in CD player.
          Refer to Displaying text information on disc on
          page 22.

          Selecting discs from the disc title list
          Disc title list lets you see the list of disc titles
          that have been entered into the multi-CD
          player and select one of them to play back.
                                                                 1 DVD-V/VCD/CD/MP3/WMA indicator
          1 Press LIST to switch to the disc title list            Shows the type of disc currently playing.
          mode during the playback display.                      2 Disc number indicator
                                                                   Shows the disc number currently playing
          2 Use MULTI-CONTROL to select the de-
          sired disc title.                                        when using a multi-DVD player.
          Turn to change the disc title; press to play.          3 Title/Folder number indicator
          # You can also change the disc title by pushing          Shows the title (when playing DVD video) or
          MULTI-CONTROL up or down.                                folder (when playing compressed audio) of
          # When playing CD TEXT disc, push                        the selection currently playing.
          MULTI-CONTROL right to see a list of the tracks        4 Chapter/track number indicator
          in the selected disc. Push MULTI-CONTROL left            Shows the chapter (when playing DVD video)
          to return to the disc list.                              or track (when playing video CD, CD or com-
          # If no title has been entered for a disc,               pressed audio) currently playing.
          No D.Title will be displayed.                          5 Play time indicator
          # No Disc is displayed next to the disc number
          when there is no disc in the magazine.
                                                                 1 Press SOURCE to select the DVD player/
                                                                 multi-DVD player.

          Using CD TEXT functions                                2 To perform fast forward or reverse,
                                                                 push and hold MULTI-CONTROL left or
          You can use these functions only with a CD
                                                                 right.
          TEXT compatible multi-CD player.
          The operation is the same as that of the built-        3 To skip back or forward to another
          in CD player.                                          chapter/track, push MULTI-CONTROL left or
          Refer to Displaying text information on disc on        right.
          page 22.


  60        En
Section

  Available accessories                                                                                     03


                                                                                                             English
Selecting a disc                                # You can also select the function by pressing
                                                FUNCTION on the remote control.
! You can operate this function only when a
                                                # To return to the playback display, press BAND.
  multi-DVD player is connected to this unit.

% Press any of 1 to 6 on the remote con-        Function and operation
trol to select the desired disc.                Play mode, Random mode, Scan mode,
                                                Pause and TitleInput "A" operations are basi-
Selecting a folder                              cally the same as that of the built-in CD player.
                                                Also, ITS play mode and ITS memo opera-
! You can operate this function only when a
                                                tions are basically the same as that the multi-
  DVD player which is corresponding to com-
                                                CD player.
  pressed audio playback is connected to
  this unit.                                     Function name    Operation

% Push MULTI-CONTROL up or down to                                Refer to Selecting a repeat play
                                                                  range on page 20.
select a folder.
                                                                  But the repeat play range that you
                                                                  can select is vary depending on
                                                                  the type of disc or system. The re-
Introduction of advanced                                          peat play ranges of the DVD
operations                                                        player/multi-DVD player are as
                                                                  below:
1 Press MULTI-CONTROL to display the                              During PBC playback of Video
main menu.                                                        CDs, this function cannot be oper-
                                                 Play mode        ated.
FUNCTION, AUDIO and ENTERTAINMENT
                                                                  ! Disc repeat – Repeat the cur-
appear on the display.                                                rent disc
                                                                  ! Folder repeat – Repeat the
2 Use MULTI-CONTROL to select                                         current folder
FUNCTION.                                                         ! Title repeat – Repeat just the
Turn to change the menu option; press to se-                          current title
lect.                                                             ! Chapter repeat – Repeat just
The function name appears on the display.                             the current chapter
                                                                  ! Track repeat – Repeat just the
3 Turn MULTI-CONTROL to select the                                    current track
function.                                                         Refer to Playing tracks in random
                                                 Random mode
Turn MULTI-CONTROL to switch between the                          order on page 20.
functions in the following order:                                 Refer to Scanning folders and
During DVD video or Video CD playback            Scan mode
                                                                  tracks on page 20.
Play mode (repeat play)—Pause (pause)
                                                                  Refer to Pausing disc playback on
During CD playback                               Pause
                                                                  page 21.
Play mode (repeat play)—Random mode
                                                                  Refer to Using ITS playlists on
(random play)—Scan mode (scan play)—             ITS play mode
                                                                  page 58.
Pause (pause)—ITS play mode (ITS play)—
ITS memo (ITS input)—TitleInput "A" (disc                         Refer to Using ITS playlists on
                                                 ITS memo
                                                                  page 58.
title input)
During compressed audio playback                                  Refer to Entering disc titles on
                                                 TitleInput "A"
                                                                  page 21.
Play mode (repeat play)—Random mode
(random play)—Scan mode (scan play)—
Pause (pause)


                                                                                                     En    61
Section

03          Available accessories


              Notes                                            TV tuner
          ! If you select other discs during repeat play,      Basic Operations
            the repeat play range changes to Disc repeat.
                                                               You can use this unit to control a TV tuner,
          ! During video CD or CD playback, if you per-
                                                               which is sold separately.
            form track search or fast forward/reverse dur-
                                                               For details concerning operation, refer to the
            ing Track repeat, the repeat play range
                                                               TV tuner’s operation manual. This section pro-
            changes to Disc repeat.
                                                               vides information on TV operations with this
          ! During compressed audio playback, if you se-
                                                               unit which differs from that described in the
            lect another folder during repeat play, the re-
                                                               TV tuner’s operation manual.
            peat play range changes to Disc repeat.
          ! During compressed audio playback, if you per-
            form track search or fast forward/reverse dur-
            ing Track repeat, the repeat play range
            changes to Folder repeat.
          ! Multi-DVD player that has ITS functions and
            disc title functions can also be connected to
            this unit. In this case, ITS play mode,
            ITS memo and disc title input can be con-
            trolled.
          ! The ITS function of a DVD player differs           1 Band indicator
            slightly from ITS playback with a multi-CD         2 Preset number indicator
            player. With multi-DVD player, ITS playback ap-    3 Channel indicator
            plies only to the CD playing. For details, refer
                                                               1   Press SOURCE to select the TV.
            to Using ITS playlists on page 58.
                                                               2 Press BAND to select a band.
                                                               Press BAND until the desired band is dis-
                                                               played, TV-1 or TV-2.

                                                               3 To perform manual tuning, push
                                                               MULTI-CONTROL left or right.

                                                               4 To perform seek tuning, push and hold
                                                               MULTI-CONTROL left or right for about one
                                                               second and release.
                                                               The tuner will scan the channels until a broad-
                                                               cast strong enough for good reception is
                                                               found.
                                                               # You can cancel seek tuning by pushing
                                                               MULTI-CONTROL left or right.
                                                               # If you push and hold MULTI-CONTROL left or
                                                               right, you can skip broadcasting channels. Seek
                                                               tuning starts as soon as you release
                                                               MULTI-CONTROL.


  62        En
Section

  Available accessories                                                                                   03


                                                                                                           English
Storing and recalling broadcast                     Storing the strongest broadcast
stations                                            stations sequentially
You can easily store up to 12 broadcast sta-        1 Press MULTI-CONTROL to display the
tions for later recall.                             main menu.
! Up to 24 stations, 12 for each of two TV          FUNCTION, AUDIO and ENTERTAINMENT
   bands, can be stored in memory.                  appear on the display.
1 When you find a station that you want             2 Use MULTI-CONTROL and select
to store in memory press LIST.                      FUNCTION to display BSSM.
                                                    Turn to change the menu option; press to se-
2 Use MULTI-CONTROL to store the se-
                                                    lect.
lected station in memory.
                                                    # You can also select the function by pressing
Turn to change the preset number; press and
                                                    FUNCTION on the remote control.
hold to store.
The preset number you have selected will            3 Press MULTI-CONTROL to turn BSSM
flash and then remain lit. The selected station     on.
has been stored in memory.                          Searching is displayed. While Searching is
                                                    displayed, the 12 strongest broadcast stations
3 Use MULTI-CONTROL to select the de-
                                                    will be stored in order from the lowest channel
sired station.
                                                    up. When finished, the preset channel list ap-
Turn to change the station; press to select.
                                                    pears.
# You can also change the station by pushing
                                                    # To cancel the storage process, press
MULTI-CONTROL up or down.
                                                    MULTI-CONTROL again.
# If you do not operate the list within about 30
seconds, the display is automatically returned to   4 Use MULTI-CONTROL to select the de-
the ordinary display.                               sired station.
                                                    Turn to change the station; press to select.
Using the remote control                            # You can also change the station by pushing
You can also store and recall stations assigned     MULTI-CONTROL up or down.
to preset tuning numbers P.CH 1 to P.CH 6 by        # To return to the channel display, press BAND.
using the remote control.                           # If you do not operate the list within about 30
                                                    seconds, the display is automatically returned to
% When you find a station that you want             the ordinary display.
to store in memory, press one of preset
tuning buttons 1 to 6 and hold until the                Note
preset number stops flashing.
                                                    Storing broadcast stations with BSSM may re-
The number you have pressed will flash in the
                                                    place broadcast stations you have saved using
preset number indicator and then remain lit.
                                                    P.CH 1 to P.CH12.
The selected station has been stored in mem-
ory.
The next time you press the same preset tun-
ing button the station is recalled from mem-
ory.
# You can also recall stations assigned to preset
tuning numbers by pushing MULTI-CONTROL up
or down during the channel display.


                                                                                                 En      63
Appendix

           Additional Information


       Troubleshooting                                         iPod
                                                               Message     Cause              Action
       Symptom        Cause              Action                ERROR-11    Communication      Disconnect the
       iPod doesn’t   Cables are incor- Disconnect the                     failure            cable from iPod.
       operate cor-   rectly connected. cable from iPod.                                      Once iPod main
       rectly.                          Once iPod main                                        menu is displayed,
                                        menu is displayed,                                    connect the cable
                                        connect the cable                                     again.
                                        again.                                                Reset the iPod.
                                        Reset the iPod.        ERROR-21    Old version of     Update the iPod
                                                                           iPod               version.
                                                               ERROR-30    iPod failure       Reset the iPod.
                                                               ERROR-A0    iPod is not        Check if the con-
                                                                           charged but op-    nection cable for
       Understanding error                                                 erates correctly   iPod shorted out
       messages                                                                               (e.g., not caught in
                                                                                              metal objects).
       When you contact your dealer or your nearest                                           After checking,
       Pioneer Service Center, be sure to record the                                          switch the ignition
                                                                                              key or disconnect
       error message.                                                                         the iPod and con-
                                                                                              nect again.
       Built-in CD Player
                                                               No Songs    No songs           Transfer the songs
       Message        Cause              Action                                               to iPod.
       ERROR-11, 12, Dirty disc          Clean disc.           STOP        No songs in the    Select a list that
       17, 30                                                              current list       contains the
                                                                                              songs.
       ERROR-11, 12, Scratched disc      Replace disc.
       17, 30
       ERROR-10, 11, Electrical or me-   Switch the ignition   Bluetooth audio/telephone
       12, 15, 17, 30, chanical          key, or switch to a   Message     Cause              Action
       A0                                different source,
                                         then back to the      ERROR-10    Built-in Blue-     Turn the ignition
                                         CD player.                        tooth unit en-     OFF and ON.
                                                                           countered an
       ERROR-15       The inserted disc Replace disc.
                                                                           error
                      does not contain
                      any data                                 ERROR-80    Built-in FLASH     Turn the ignition
                                                                           ROM encoun-        OFF and ON.
       ERROR-22, 23   The CD format    Replace disc.
                                                                           tered an error
                      cannot be played
                      back
       No Audio       The inserted disc Replace disc.
                      does not contain
                      any files that can
                      be played back
       PROTECT        All the files on  Replace disc.
                      the inserted disc
                      are secured by
                      DRM
       TRK SKIPPED    The inserted disc Replace disc.
                      contains WMA
                      files that are pro-
                      tected by DRM


  64       En
Appendix

  Additional Information


                                                                                                    English
Handling guideline of discs                       ! Road shocks may interrupt disc playback.
                                                  ! Read the precautions with discs before
and player                                          using them.
! Use only discs featuring either of following
  two logos.
                                                  Dual Discs
                                                  ! Dual Discs are two-sided discs that have a
                                                    recordable CD for audio on one side and a
                                                    recordable DVD for video on the other.
                                                  ! Since the CD side of Dual Discs is not phy-
! Use only conventional, fully circular discs.      sically compatible with the general CD
  Do not use shaped discs.                          standard, it may not be possible to play the
                                                    CD side with this unit.
                                                  ! Frequent loading and ejecting of a Dual
                                                    Disc may result in scratches on the disc.
                                                    Serious scratches can lead to playback pro-
! Use 12-cm or 8-cm CD. Do not use an               blems on this unit. In some cases, a Dual
  adapter when playing 8-cm CDs.                    Disc may become stuck in the disc loading
! Do not insert anything other than a CD into       slot and will not eject. To prevent this, we
  the CD loading slot.                              recommend you refrain from using Dual
! Do not use cracked, chipped, warped, or           Disc with this unit.
  otherwise damaged discs as they may da-         ! Please refer to the information from the
  mage the player.                                  disc manufacturer for more detailed infor-
! Unfinalized CD-R/CD-RW disc playback is           mation about Dual Discs.
  not possible.
! Do not touch the recorded surface of the
  discs.                                          Compressed audio files
! Store discs in their cases when not in use.
! Avoid leaving discs in excessively hot envir-   ! Depending on the version of Windows
  onments including under direct sunlight.          Media Player used to encode WMA files,
! Do not attach labels, write on or apply che-      album names and other text information
  micals to the surface of the discs.               may not be correctly displayed.
! To clean a CD, wipe the disc with a soft        ! Depending on the software (or the version
  cloth outward from the center.                    of the software) used to encode the audio
! Condensation may temporarily impair the           files, this unit may not operate properly.
  player’s performance. Leave it to adjust to     ! There may be a slight delay when starting
  the warmer temperature for about one              playback of WMA/AAC files encoded with
  hour. Also, wipe any dump discs with a soft       image data.
  cloth.                                          ! ISO 9660 Level 1 and 2 compliant. Romeo
! Playback of discs may not be possible be-         and Joliet file systems are both compatible
  cause of disc characteristics, disc format,       with this player.
  recorded application, playback environ-         ! Multi-session playback is possible.
  ment, storage conditions and so on.             ! Compressed audio files are not compatible
! Text information may not be correctly dis-        with packet write data transfer.
  played depending on the recorded environ-
  ment.


                                                                                           En      65
Appendix

           Additional Information

       ! Only 64 characters from the beginning can        ! Folder hierarchy is allowed up to eight tiers.
         be displayed as a file name (including the         However, practical hierarchy of folder is
         extension such as .wma, .mp3, .m4a or              less than two tiers.
         .wav) or a folder name.                          ! Up to 99 folders on a disc can be played
       ! Folder selection sequence or other opera-          back.
         tion may be altered depending on the en-
         coding or writing software.
       ! Regardless of the length of blank section        Compressed audio compatibility
         between the songs of original recording,         WMA
         compressed audio discs will play with a          ! Compatible format: WMA encoded by
         short pause between songs.                         Windows Media Player Ver. 7, 7.1, 8, 9 or 10
       ! File extensions such as .wma, .mp3, .m4a         ! Bit rate: 48 kbps to 320 kbps (CBR), 48 kbps
         or .wav must be used properly.                     to 384 kbps (VBR)
       ! Russian texts to be displayed on this unit       ! Sampling frequency: 32 kHz to 48 kHz
         should be encoded with the following char-       ! Windows Media Audio 9 Professional, Loss-
         acter sets:                                        less, Voice: No
         — Unicodes (UTF-8, UTF-16)
         — Character sets other than Unicode that         MP3
             are used in Windows environment and          ! Bit rate: 8 kbps to 320 kbps
             are set to Russian in the multi-language     ! Sampling frequency: 16 kHz to 48 kHz (32,
             setting                                        44.1, 48 kHz for emphasis)
       ! Only 32 characters from the beginning can        ! Compatible ID3 tag version: 1.0, 1.1, 2.2,
         be displayed as a file name (including the         2.3, 2.4 (ID3 tag Version 2.x is given priority
         extension such as .wma, .mp3, .m4a or              than Version 1.x.)
         .wav) or a folder name when using Russian        ! M3u playlist: No
         texts.                                           ! MP3i (MP3 interactive), mp3 PRO: No

                                                          AAC
       Example of a hierarchy                             ! Compatible format: AAC encoded by
             : Folder                                       iTunes® version 6.0.5 and earlier
           : Compressed audio file                        ! Sampling frequency: 11.025 kHz to 48 kHz
                                                          ! Transmission rate: 16 kbps to 320 kbps
                                                          ! Apple Lossless: No

                                          1
                                                          WAV
                                                          ! Compatible format: Linear PCM (LPCM),
                                          2
                                                            MS ADPCM
                                                          ! Quantization bits: 8 and 16 (LPCM), 4 (MS
                                                    3       ADPCM)
                                                    4     ! Sampling frequency: 16 kHz to 48 kHz
                                          5
                                                            (LPCM), 22.05 kHz to 44.1 kHz (MS AD-
                                          6
                                                            PCM)

                  Level 1   Level 2   Level 3   Level 4

       ! This unit assigns folder numbers. The user
         cannot assign folder numbers.


  66       En
Appendix

  Additional Information


                                                                English
About handling the iPod
     CAUTION
! Pioneer accepts no responsibility for data lost
  on the iPod even if that data is lost while
  using this unit.
! Do not leave the iPod in direct sunlight for ex-
  tended amounts of time. Extended exposure
  to direct sunlight can result in iPod malfunc-
  tion due to the resulting high temperature.
! Do not leave the iPod in any location with a
  high temperature.
! Firmly secure the iPod when driving. Do not
  let the iPod fall onto the floor, where it may be-
  come jammed under the brake or accelerator
  pedal.

For details, refer to the iPod’s manuals.


About iPod settings
! You cannot operate the iPod Equalizer on
  the Pioneer products. We recommend that
  you set the iPod Equalizer to off, before con-
  necting the iPod to this unit.
! You cannot set Repeat to off on the iPod
  when using this unit. Even if you set Repeat
  to off on the iPod, Repeat is changed to All
  automatically when connecting the iPod to
  this unit.


                                                       En     67
Appendix

           Additional Information


       Specifications                                                                        Signal format:
                                                                                                 Sampling frequency ..... 44.1 kHz
       General                                                                                   Number of quantization bits
       Power source ............................. 14.4 V DC (10.8 V to 15.1 V                        ........................................... 16; linear
                                                               allowable)                    Frequency characteristics ... 5 Hz to 20 000 Hz (±1 dB)
       Grounding system ................... Negative type                                    Signal-to-noise ratio ............... 94 dB (1 kHz) (IEC-A net-
       Max. current consumption                                                                                                                  work)
         ..................................................... 10.0 A                        Dynamic range ......................... 92 dB (1 kHz)
       Dimensions (W × H × D):                                                               Number of channels .............. 2 (stereo)
             DIN                                                                             MP3 decoding format ........... MPEG-1 & 2 Audio Layer 3
                       Chassis ..................... 178 × 50 × 165 mm                       WMA decoding format ......... Ver. 7, 7.1, 8, 9, 10 (2ch
                       Nose ........................... 188 × 58 × 16 mm                                                                         audio)
             D                                                                                                                                   (Windows Media Player)
                       Chassis ..................... 178 × 50 × 165 mm                       AAC decoding format ............ MPEG-4 AAC (iTunes® en-
                       Nose ........................... 170 × 45 × 16 mm                                                                         coded only)
       Weight .......................................... 1.68 kg                             WAV signal format .................. Linear PCM & MS ADPCM

       Audio                                                                                 FM tuner
       Maximum power output ....... 50 W × 4                                                 Frequency range ...................... 87.5 MHz to 108.0 MHz
                                                                50 W × 2/4 W + 70 W × 1/2    Usable sensitivity ..................... 8 dBf (0.7 µV/75 W, mono,
                                                                W (for subwoofer)                                                             S/N: 30 dB)
       Continuous power output ... 22 W × 4 (50 Hz to 15 000                                 Signal-to-noise ratio ............... 75 dB (IEC-A network)
                                                                Hz, 5% THD, 4 W load, both   Distortion ..................................... 0.3 % (at 65 dBf, 1 kHz,
                                                                channels driven)                                                              stereo)
       Load impedance ...................... 4 W to 8 W × 4                                                                                   0.1 % (at 65 dBf, 1 kHz,
                                                                4 W to 8 W × 2 + 2 W × 1                                                      mono)
       Preout max output level/output impedance                                              Frequency response ............... 30 Hz to 15 000 Hz (±3 dB)
          ..................................................... 4 V/100W                     Stereo separation .................... 45 dB (at 65 dBf, 1 kHz)
       Equalizer (7-Band Graphic Equalizer):
              Frequency .......................... 50/125/315/800/2k/5k/12.5k                MW tuner
                                                                Hz                           Frequency range ...................... 531 kHz to 1 602 kHz (9 kHz)
              Gain ...................................... ±12 dB                             Usable sensitivity ..................... 18 µV (S/N: 20 dB)
       Loudness contour:                                                                     Signal-to-noise ratio ............... 65 dB (IEC-A network)
              Low ....................................... +3.5 dB (100 Hz), +3 dB (10
                                                                kHz)                         LW tuner
              Mid ....................................... +10 dB (100 Hz), +6.5 dB           Frequency range ...................... 153 kHz to 281 kHz
                                                                (10 kHz)                     Usable sensitivity ..................... 30 µV (S/N: 20 dB)
              High ..................................... +11 dB (100 Hz), +11 dB             Signal-to-noise ratio ............... 65 dB (IEC-A network)
                                                                (10 kHz)
                                                                (volume: –30 dB)             Bluetooth
       HPF:                                                                                  Version .......................................... Bluetooth 1.2 certified
              Frequency .......................... 50/63/80/100/125 Hz                       Output power ............................ +4 dBm Max.
              Slope .................................... –12 dB/oct                                                                             (Power class 2)
       Subwoofer (mono):
              Frequency .......................... 50/63/80/100/125 Hz                               Note
              Slope .................................... –18 dB/oct
              Gain ...................................... +6 dB to –24 dB                    Specifications and the design are subject to pos-
              Phase .................................. Normal/Reverse                        sible modifications without notice due to im-
       Bass boost:                                                                           provements.
              Gain ...................................... +12 dB to 0 dB

       CD player
       System .......................................... Compact disc audio system
       Usable discs .............................. Compact disc


  68       En
Contenido


Gracias por haber comprado este producto Pioneer.
Lea con detenimiento estas instrucciones sobre el funcionamiento del aparato,
para que pueda darle el mejor uso posible. Una vez que las haya leído, conserve
este manual en un lugar seguro para consultarlo en el futuro.


                                                                                                  Español
   Antes de comenzar                              – Introducción a las funciones
   Acerca de esta unidad 72                          avanzadas 88
   Ambiente de funcionamiento 73                  – Selección de una gama de repetición
   Visite nuestro sitio Web 74                       de reproducción 88
   En caso de problemas 74                        – Reproducción de las pistas en orden
   Protección del producto contra robo 74            aleatorio 89
       – Extracción de la carátula 74             – Exploración de carpetas y pistas 89
       – Colocación de la carátula 74             – Pausa de la reproducción de un
   Reinicialización del microprocesador 75           disco 89
   Acerca del modo demo 75                        – Uso de la compresión y BMX 89
   Uso y cuidado del mando a distancia 75         – Búsqueda cada 10 pistas en el disco o
       – Instalación de la batería 75                carpeta actuales 90
       – Uso del mando a distancia 76             – Uso de las funciones de títulos de
                                                     discos 90
   Utilización de esta unidad                     – Visualización de información de texto
   Qué es cada cosa 77                               en el disco 91
      – Unidad principal 77                       – Selección de pistas de la lista de títulos
      – Mando a distancia 78                         de las pistas 91
   Funciones básicas 79                           – Selección de pistas de la lista de
      – Encendido y apagado 79                       nombres de ficheros 91
      – Selección de una fuente 79             Para reproducir canciones en el iPod 92
      – Ajuste del volumen 79                     – Funciones básicas 92
   Sintonizador 80                                – Para buscar una canción 93
      – Funciones básicas 80                      – Visualización de información de texto
      – Almacenamiento y recuperación de             en el iPod 93
         frecuencias 81                           – Introducción a las funciones
      – Introducción a las funciones                 avanzadas 94
         avanzadas 81                             – Repetición de reproducción 94
      – Almacenamiento de las frecuencias de      – Reproducción de las canciones en un
         radio más fuertes 82                        orden aleatorio (shuffle) 94
      – Sintonización de señales fuertes 82       – Reproducción de todas las canciones
      – Selección de frecuencias                     en un orden aleatorio (shuffle all) 94
         alternativas 82                          – Para poner en pausa una canción 94
      – Recepción de anuncios de tráfico 83       – Cambio de la velocidad del
      – Uso de las funciones PTY 84                  audiolibro 95
      – Uso del radio texto 84                 Bluetooth Audio 95
      – Lista PTY 85                              – Funciones básicas 95
   Reproductor de CD incorporado 86               – Ajuste del reproductor de audio
      – Funciones básicas 86                         Bluetooth 96
      – Selección directa de una pista 88         – Introducción a las funciones
                                                     avanzadas 96

                                                                                         Es      69
Contenido


          – Conexión de un reproductor de audio        – Borrado de la memoria 112
            Bluetooth 97                               – Ajuste del rechazo automático 112
          – Desconexión de un reproductor de           – Ajuste de la respuesta
            audio Bluetooth 97                           automática 112
          – Conexión del reproductor de audio          – Cambio del tono de llamada 113
            Bluetooth conectado más                    – Cancelación del eco y reducción de
            recientemente 97                             ruido 113
          – Reproducción de canciones en el            – Visualización de la dirección BD
            reproductor de audio Bluetooth 98            (Bluetooth Device) 113
          – Para detener la reproducción 98            – Selección de la pantalla de llamadas
          – Para poner en pausa una canción 98           entrantes 113
          – Conexión automática a un reproductor    Ajustes de audio 114
            de audio Bluetooth 98                      – Introducción a los ajustes de
          – Visualización de la dirección BD             audio 114
            (Bluetooth Device) 98                      – Uso del ajuste del balance 115
      Teléfono Bluetooth 99                            – Uso del ecualizador 115
          – Funciones básicas 99                       – Ajuste de la sonoridad 116
          – Información sobre la fuente                – Uso de la salida de subgraves 117
            telefónica 100                             – Intensificación de los graves 117
          – Configuración de la función manos          – Uso del filtro de paso alto 118
            libres 100                                 – Ajuste de los niveles de la fuente 118
          – Realización de una llamada                 – Uso del nivelador automático de
            telefónica 101                               sonido 118
          – Aceptación de una llamada               Ajustes iniciales 119
            telefónica 101                             – Configuración de los ajustes
          – Introducción a las funciones                 iniciales 119
            avanzadas 102                              – Selección del idioma de
          – Conexión de un teléfono móvil 103            visualización 120
          – Desconexión de un teléfono móvil 104       – Ajuste de la fecha 120
          – Registro del teléfono móvil                – Ajuste del reloj 120
            conectado 104                              – Activación y desactivación de la
          – Eliminación de un teléfono                   visualización del reloj de apagado 121
            registrado 105                             – Ajuste del paso de sintonía de FM 121
          – Conexión a un teléfono móvil               – Cambio de la búsqueda PI
            registrado 105                               automática 121
          – Uso del Directorio de teléfonos 106        – Cambio del tono de advertencia 121
          – Uso del Historial de llamadas 110          – Cambio de la apertura automática de la
          – Asignación de números                        cara 121
            prefijados 111                             – Cambio del ajuste de un equipo
          – Realización de una llamada ingresando        auxiliar 122
            el número de teléfono 111

70   Es
Contenido


                                                                                             Español
   – Cambio del ajuste del atenuador de           – Introducción a las funciones
      luz 122                                       avanzadas 130
   – Ajuste del brillo 122                        – Uso de listas de reproducción ITS 132
   – Ajuste de la salida posterior y del          – Uso de las funciones de títulos de
      controlador de subgraves 122                  discos 133
   – Cambio del silenciamiento/atenuación         – Uso de las funciones CD TEXT 134
      del sonido 123                           Reproductor de DVD 134
   – Cambio de la demostración de                 – Funciones básicas 134
      características 123                         – Selección de un disco 135
   – Cambio del modo inverso 123                  – Selección de una carpeta 135
   – Cambio del desplazamiento                    – Introducción a las funciones
      continuo 123                                  avanzadas 135
   – Activación de la fuente BT Audio 124      Sintonizador de TV 137
   – Ingreso del código PIN para la               – Funciones básicas 137
      conexión inalámbrica Bluetooth 124          – Almacenamiento y recuperación de
   – Edición del nombre del                         emisoras 137
      dispositivo 124                             – Almacenamiento consecutivo de las
   – Visualización de la versión del sistema        emisoras con las señales más
      para tareas de reparación 125                 fuertes 138
   – Reajuste del módulo de tecnología
                                               Información adicional
      inalámbrica Bluetooth 125
                                               Solución de problemas 139
Otras funciones 126
   – Uso de la fuente AUX 126                  Para comprender los mensajes de error 139
   – Uso de diferentes visualizaciones de      Pautas para el manejo de discos y del
      entretenimiento 126                        reproductor 140
                                               Discos dobles 140
   – Uso del botón PGM 127
                                               Archivos de audio comprimidos 140
Accesorios disponibles                            – Ejemplo de una jerarquía 141
Adaptador USB 128                                 – Compatibilidad con audio
  – Funciones básicas 128                            comprimido 141
  – Selección directa de un fichero de         Acerca del manejo del iPod 142
     audio en la carpeta actual 128               – Acerca de los ajustes del iPod 142
  – Introducción a las funciones               Especificaciones 143
     avanzadas 128
  – Visualización de información de texto
     de un fichero de audio 129
  – Selección de ficheros de la lista de
     nombres de ficheros 129
Reproductor de CD múltiple 130
  – Funciones básicas 130
  – Selección directa de una pista 130


                                                                                    Es      71
Sección

01         Antes de comenzar

                                                              descarga eléctrica. Además, el contacto con
                                                              líquidos puede causar daños en la unidad,
                                                              humo y recalentamiento.
                                                          !   “PRODUCTO LÁSER DE CLASE 1”
                                                              Este producto contiene un diodo de láser de
          Si desea deshacerse de este producto, no lo         clase superior a 1. Para garantizar la seguri-
          mezcle con los residuos generales de su             dad continua, no extraiga ninguna tapa ni in-
          hogar. De conformidad con la legislación vi-        tente acceder a la parte interna del producto.
          gente, existe un sistema de recogida distinto       Solicite a personal calificado que realice el
          para los productos electrónicos que requieren       servicio técnico.
          un procedimiento adecuado de tratamiento,       !   El CarStereo-Pass Pioneer es para usarse sólo
          recuperación y reciclado.                           en Alemania.
                                                          !   Conserve este manual a mano para que
       Las viviendas privadas en los 25 estados               pueda consultar los procedimientos de opera-
       miembros de la UE, en Suiza y Noruega pue-             ción y las precauciones cuando sea necesa-
       den devolver gratuitamente sus productos               rio.
       electrónicos usados en las instalaciones de re-    !   Mantenga siempre el volumen lo suficiente-
       colección previstas o bien en las instalaciones        mente bajo como para que pueda escuchar
       de minoristas (si adquieren un producto simi-          los sonidos que provienen del exterior del ve-
       lar nuevo).                                            hículo.
       En el caso de los países que no se han men-        !   Proteja esta unidad de la humedad.
       cionado en el párrafo anterior, póngase en         !   Si se desconecta o se descarga la batería, la
       contacto con sus autoridades locales a fin de          memoria preajustada se borrará y deberá ser
       conocer el método de eliminación correcto.             reprogramada.
       Al actuar siguiendo estas instrucciones, se
       asegurará de que el producto de desecho se         Acerca de WMA
       somete a los procesos de tratamiento, recupe-
       ración y reciclaje necesarios, con lo que se
       previenen los efectos negativos potenciales
       para el entorno y la salud humana.


                                                          El logo de Windows Media™ impreso en la
       Acerca de esta unidad                              caja indica que esta unidad puede reproducir
       Las frecuencias del sintonizador de esta uni-      datos WMA.
       dad están asignadas para su uso en Europa          WMA es la abreviatura de Windows Media
       Occidental, Asia, Medio Oriente, África y          Audio, y se refiere a la tecnología de compre-
       Oceanía. El uso en otras áreas puede causar        sión de audio desarrollada por Microsoft
       una recepción deficiente. La función RDS (sis-     Corporation. Los datos WMA se pueden cifrar
       tema de datos de radio) opera sólo en áreas        con la versión 7 o posterior del Windows
       con emisoras de FM que trasmiten señales de        Media Player.
       RDS.                                               Windows Media y el logo de Windows son
                                                          marcas comerciales o registradas de
                                                          Microsoft Corporation en los EE.UU. y/o en
                PRECAUCIÓN                                otros países.
       ! No permita que esta unidad entre en contacto
         con líquidos, ya que ello puede producir una


  72       Es
Sección

  Antes de comenzar                                                                                       01

! Esta unidad puede no funcionar correcta-         rrollada para sustituir los cables de los teléfo-
  mente, dependiendo de la aplicación utili-       nos móviles, ordenadores de bolsillo y otros
  zada para codificar ficheros WMA.                dispositivos. Bluetooth opera a una frecuencia
                                                   de 2,4 GHz y permite transmitir voz y datos a
Acerca de MP3                                      velocidades de hasta 1 megabit por segundo.
La venta de este producto sólo otorga una li-      Bluetooth fue lanzado por parte de un Grupo
cencia para su uso privado, no comercial. No       de Interés Especial (SIG) integrado por Erics-


                                                                                                          Español
otorga ninguna licencia ni concede ningún          son Inc., Intel Corp., Nokia Corp., Toshiba e
derecho a utilizar este producto en transmisio-    IBM en 1998 y en la actualidad está siendo de-
nes comerciales (es decir, lucrativas) en tiem-    sarrollado por alrededor de 2 000 compañías a
po real (terrestres, vía satélite, por cable y/o   nivel mundial.
por cualquier otro medio), transmisiones/          ! La marca literal y los logotipos Bluetooth
streaming por Internet, intranets y/u otras           son propiedad de Bluetooth SIG, Inc., y
redes o en otros sistemas de distribución de          cualquier uso de dichas marcas por
contenido electrónico, como por ejemplo, apli-        Pioneer Corporation se hace bajo licencia.
caciones de pago por escucha (pay-audio) o            Otras marcas y nombres comerciales son
audio bajo demanda (audio-on-demand). Se              propiedad de sus respectivos propietarios.
necesita una licencia independiente para su
uso comercial. Para obtener más información,       Compatibilidad con iPod®
visite                                             Esta unidad permite el control y la escucha de
http://www.mp3licensing.com.                       canciones en un iPod.
                                                   ! iPod es una marca comercial de Apple
Acerca de AAC                                         Computer, Inc., registrada en los EE.UU. y
AAC es la abreviatura de Advanced Audio Co-           otros países.
ding y alude a una norma de tecnología de          ! Esta unidad soporta sólo un iPod con co-
compresión de audio usada con MPEG 2 y                nector del Dock.
MPEG 4.                                            ! Esta unidad no es compatible con versio-
Es posible usar varias aplicaciones para codifi-      nes de software anteriores a la actualiza-
car ficheros AAC, pero los formatos y extensio-       ción de iPod 2004-10-20. Para obtener
nes de los ficheros varían según la aplicación        información sobre versiones compatibles,
utilizada para la codificación.                       consulte al concesionario Pioneer más pró-
Esta unidad reproduce ficheros AAC codifica-          ximo a su domicilio.
dos con iTunes® versión 6.0.5 y anteriores.        ! Las funciones pueden variar según la ver-
iTunes es una marca comercial de Apple                sión de software del iPod.
Computer, Inc., registrada en los EE.UU. y
otros países.

Acerca de Bluetooth                                Ambiente de funcionamiento
                                                   Esta unidad se debe usar dentro de las gamas
                                                   de temperaturas que se indican a continua-
                                                   ción.
                                                   Gama de temperatura de funcionamiento: -10
                                                   °C a +60 °C (14 °F a 140 °F)
                                                   Temperatura de prueba EN300328 ETC: -20 °C
                                                   a +55 °C (-4 °F a 131 °F)
Bluetooth es una tecnología inalámbrica de
conectividad por radio de corto alcance, desa-


                                                                                               Es       73
Sección

01        Antes de comenzar


       Visite nuestro sitio Web                            ! Evite someter la carátula a impactos excesi-
                                                             vos.
       Visítenos en el siguiente sitio:                    ! Mantenga la carátula fuera del alcance de la
                                                             luz solar directa y no la exponga a altas tem-
                                                             peraturas.
                                                           ! Unos segundos después de conectar o desco-
                                                             nectar la llave de encendido del automóvil, la
                                                             carátula se mueve automáticamente. Cuando
       ! Registre su producto. Conservaremos los             esto sucede, corre el riesgo de pillarse los
         datos de su compra archivados para que              dedos. Para evitarlo, mantenga las manos ale-
         pueda consultar esta información en caso            jadas de la carátula.
         de que deba efectuar un reclamo a la com-
         pañía de seguros por pérdida o robo.
       ! En nuestro sitio Web ofrecemos la informa-        Extracción de la carátula
         ción más reciente acerca de Pioneer
                                                           1 Mantenga presionado OPEN para abrir
         Corporation.
                                                           la carátula.


       En caso de problemas
       En caso de que este producto no funcione co-
       rrectamente, comuníquese con su concesio-
       nario o el Servicio técnico oficial Pioneer más
       próximo a su domicilio.
                                                           2 Deslice la carátula hacia usted y retíre-
                                                           la.
                                                           No sujete la carátula con fuerza ni permita
       Protección del producto                             que caiga. Evite que entre en contacto con
       contra robo                                         agua u otros líquidos para que no sufra daños
                                                           permanentes.
       Se puede extraer la carátula como medida
       antirrobo.
       ! Si no se extrae la carátula de la unidad
          principal dentro de los cinco segundos des-
          pués de desconectar la llave de encendido
          del automóvil, se emitirá un tono de adver-
          tencia y se abrirá la carátula.
       ! Se puede desactivar el tono de advertencia.
          Consulte Cambio del tono de advertencia en       3 Coloque la carátula en la carcasa pro-
          la página 121.                                   tectora provista para guardarla de manera
       ! Se puede desactivar la apertura automática        segura.
          de la cara. Consulte Cambio de la apertura
          automática de la cara en la página 121.
                                                           Colocación de la carátula
               Importante                                  1 Asegúrese de que la cubierta interna
                                                           esté cerrada.
       ! Proceda con cuidado al retirar o colocar la ca-
         rátula.


  74      Es
Sección

  Antes de comenzar                                                                                        01

2 Vuelva a colocar la carátula; para ello,          del automóvil. En caso contrario, se puede des-
hágala encajar en su lugar.                         cargar la batería del vehículo.

                                                    Modo inverso
                                                    Si no se realiza ninguna operación en unos 30
                                                    segundos, las indicaciones de la pantalla co-
                                                    mienzan a invertirse y siguen haciéndolo cada


                                                                                                           Español
                                                    10 segundos. Al presionar el botón BAND
                                                    cuando se apaga la unidad mientras la llave
                                                    de encendido está en ACC u ON, se cancelará
                                                    el modo inverso. Vuelva a presionar BAND
                                                    para iniciar el modo inverso.
Reinicialización del                                Modo de demostración de
microprocesador                                     características
                                                    La demostración de características se inicia
Se debe reinicializar el microprocesador si se
                                                    automáticamente cuando se apaga la unidad
presentan las siguientes condiciones:
                                                    mientras la llave de encendido está en ACC u
! Antes de utilizar esta unidad por primera
                                                    ON. Al presionar el botón DISPLAY durante la
   vez después de su instalación
                                                    demostración de características, se cancelará
! Si la unidad no funciona correctamente
                                                    este modo de demostración. Vuelva a presio-
! Cuando aparecen mensajes extraños o in-
                                                    nar el botón DISPLAY para iniciar el modo de
   correctos en el display
                                                    demostración de características. Recuerde
% Pulse RESET con la punta de un lapicero           que si este modo de demostración sigue fun-
u otro instrumento con punta.                       cionando cuando el motor del vehículo está
                                                    apagado, se puede descargar la batería.


                                                    Uso y cuidado del mando a
                                                    distancia
                                                    Instalación de la batería
                                                    Deslice y extraiga la bandeja de la parte poste-
        Botón RESET                                 rior del mando a distancia y coloque la batería
                                                    con los polos positivo (+) y negativo (–) en la
                                                    dirección correcta.
                                                    ! Al utilizar el mando a distancia por primera
Acerca del modo demo                                    vez, extraiga la película que sobresale de la
Esta unidad ofrece dos modos de demostra-               bandeja.
ción. Uno es el modo inverso y el otro es la ca-
racterística de modo demo.

    Importante
El cable rojo (ACC) de esta unidad se debe co-
nectar al terminal acoplado con las funciones de
activación/desactivación de la llave de encendido


                                                                                                Es       75
Sección

01        Antes de comenzar


               ADVERTENCIA
       Mantenga la batería fuera del alcance de los
       niños. En caso de ingestión accidental, consulte
       a un médico de inmediato.


               PRECAUCIÓN
       ! Utilice una sola batería de litio CR2025 (3 V).
       ! Extraiga la batería si no piensa utilizar el
         mando a distancia durante un mes o más
         tiempo.
       ! Peligro de explosión si la batería se reemplaza
         incorrectamente. Reemplácela sólo con una
         del mismo tipo, o equivalente.
       ! No manipule la batería con herramientas me-
         tálicas.
       ! No guarde la batería con materiales metáli-
         cos.
       ! En el caso de que se produzca una fuga del
         fluido de la batería, limpie completamente el
         mando a distancia e instale una batería
         nueva.
       ! Para deshacerse de las baterías usadas, cum-
         pla con los reglamentos gubernamentales o
         las normas de las instituciones públicas am-
         bientales pertinentes, aplicables en su país/
         zona.


       Uso del mando a distancia
       Apunte el mando a distancia hacia la carátula
       para hacer funcionar la unidad.
       ! Es posible que el mando a distancia no
          funcione correctamente si lo expone a la
          luz solar directa.

               Importante
       ! No guarde el mando a distancia en lugares ex-
         puestos a altas temperaturas o a la luz solar
         directa.
       ! No deje caer el mando a distancia al suelo, ya
         que puede quedar atascado debajo del freno
         o del acelerador.


  76      Es
Sección

  Utilización de esta unidad                                                                          02


                                                                                                      Español
Qué es cada cosa                                   botón para activar o desactivar la función
                                                   NEWS.

Unidad principal                                 6 Botón DISPLAY
                                                  Presione este botón para seleccionar las di-
1 Botón SOURCE                                    ferentes visualizaciones.
 Esta unidad se enciende al seleccionar una
 fuente. Presione este botón para visualizar     7 Botón EQ
 todas las fuentes disponibles.                   Presione este botón para seleccionar las di-
                                                  versas curvas de ecualización.
2 MULTI-CONTROL
 Mueva el joystick para utilizar los controles   8 Botón ATT
 de sintonización por búsqueda manual,            Presione este botón para bajar rápidamente
 avance rápido, retroceso y búsqueda de           el nivel de volumen, aproximadamente el
 pista. También se usa para controlar las fun-    90%. Presione una vez más para volver al
 ciones.                                          nivel de volumen original.
 Gire el control para aumentar o disminuir el
 volumen.                                        9 Botón LIST
                                                  Presione este botón para visualizar la lista
3 Botón EJECT                                     de títulos de los discos, la de títulos de las
 Presione este botón para expulsar un CD          pistas, la de carpetas o la de canales presin-
 del reproductor de CD incorporado.               tonizados, según la fuente de que se trate.
 Mantenga presionado este botón para abrir
 o cerrar la carátula.                           a Botón PHONE
                                                  Pulse este botón para seleccionar el teléfo-
4 Botón RESET                                     no como la fuente. Al utilizar una fuente te-
 Pulse este botón para reinicializar el micro-    lefónica, pulse este botón para terminar
 procesador.                                      una llamada, rechazar una llamada entran-
                                                  te o cancelar la realización de una llamada.
5 Botón TA/NEWS
 Presione este botón para activar o desacti-
 var la función TA. Mantenga pulsado este


                                                                                           Es       77
Sección

02        Utilización de esta unidad

       b Botón BAND                                        nizador o para realizar la búsqueda por
        Pulse este botón para seleccionar entre tres       número de disco en el reproductor de CD
        bandas FM y las bandas MW/LW, y para               múltiple.
        cancelar el modo de control de funciones.
                                                         i Botón OFF HOOK
                                                          Pulse para comenzar a hablar en el teléfono
       Mando a distancia                                  mientras utiliza una fuente telefónica.
       Las funciones se utilizan de la misma manera
                                                         j Botón ON HOOK
       que al usar los botones de la unidad principal.
                                                          Mientras utiliza la fuente telefónica, pulse
       c Botones VOLUME                                   este botón para terminar una llamada o re-
        Presione este botón para aumentar o dismi-        chazar una llamada entrante.
        nuir el volumen.
                                                         k Botón PGM
       d Botón FUNCTION                                   Presione este botón para utilizar las funcio-
        Presione este botón para seleccionar las          nes preprogramadas de cada fuente. (Con-
        funciones.                                        sulte Uso del botón PGM en la página 127.)

       e Joystick                                        l Botón AUDIO
        Mueva el joystick para utilizar los controles     Presione este botón para seleccionar los di-
        de sintonización por búsqueda manual,             versos controles de calidad del sonido.
        avance rápido, retroceso y búsqueda de
        pista. También se usa para controlar las fun-
        ciones.
        Las funciones son idénticas a las de
        MULTI-CONTROL con la excepción del con-
        trol de volumen.
        Presione este botón para visualizar la lista
        de títulos de los discos, la de títulos de las
        pistas, la de carpetas o la de canales presin-
        tonizados, según la fuente de que se trate.

       f Botón DIRECT
        Presione este botón para seleccionar direc-
        tamente la pista deseada.
        Mientras utiliza la fuente telefónica, presio-
        ne este botón para ingresar directamente
        un número de teléfono.

       g Botón CLEAR
        Presiónelo para cancelar el número ingresa-
        do cuando se utilizan los botones 0 a 9.

       h Botones 0 a 9
        Presiónelos para seleccionar directamente
        la pista, el ajuste de presintonías o el disco
        deseado. Los botones 1 a 6 se pueden utili-
        zar para el ajuste de presintonías del sinto-


  78      Es
Sección

  Utilización de esta unidad                                                                           02


Funciones básicas                                   Cambio del ajuste de un equipo auxiliar en la
                                                    página 122).
Encendido y apagado                               ! Por unidad externa se entiende un producto
Encendido de la unidad                              Pioneer (como el que pueda estar disponible
                                                    en el futuro) que, si bien es incompatible
% Presione SOURCE para encender la uni-             como fuente, permite que este sistema con-
dad.                                                trole funciones básicas. Dos unidades exter-


                                                                                                       Español
                                                    nas se pueden controlar con este sistema.
Apagado de la unidad                                Cuando se conectan dos unidades externas,
                                                    la asignación a la unidad externa 1 o la uni-
% Mantenga presionado SOURCE hasta
                                                    dad externa 2 la fija automáticamente este sis-
que se apague la unidad.
                                                    tema.
                                                  ! Si el cable azul/blanco de esta unidad está co-
Selección de una fuente                             nectado al terminal de control del relé de la
Puede seleccionar una fuente que desee escu-        antena automática del vehículo, la antena se
char. Para cambiar al reproductor de CD incor-      extiende cuando se enciende el equipo. Para
porado, cargue un disco en la unidad                retraer la antena, apague la fuente.
(consulte la página 86).

% Presione SOURCE para seleccionar una
                                                  Ajuste del volumen
fuente.                                           % Utilice MULTI-CONTROL para ajustar el
Presione SOURCE repetidamente para cam-           nivel de sonido.
biar entre las siguientes fuentes:
Sintonizador—Televisor—Reproductor de
DVD/Reproductor de DVD múltiple—Re-
productor de CD incorporado—Reproduc-
tor de CD múltiple—iPod—USB—Unidad
externa 1—Unidad externa 2—AUX1—
AUX2—Audio BT—Teléfono BT

    Notas
! En los siguientes casos, la fuente sonora no
  cambiará:
  — Cuando no hay ninguna unidad correspon-
     diente a la fuente seleccionada conectada
     a esta unidad.
  — Cuando no hay disco o cargador en el re-
     productor.
  — Cuando AUX (entrada auxiliar) está desac-
     tivada (consulte la página 122).
  — Cuando la fuente BT Audio está desactiva-
     da (consulte Activación de la fuente
     BT Audio en la página 124).
! AUX1 está activada de forma predeterminada.
  Desactive AUX1 cuando no la utilice (consulte


                                                                                              Es      79
Sección

02        Utilización de esta unidad


       Sintonizador                                     No RDS o MW/LW

       Funciones básicas
       Se puede activar y desactivar la función AF
       (búsqueda de frecuencias alternativas) de esta
       unidad. Se debe desactivar la función AF para
       la sintonización normal (consulte la página
       82).
       RDS
       RDS (sistema de datos de radio) contiene in-
       formaciones inaudibles que ayudan a buscar       1 Indicador de banda
       emisoras de radio.                               2 Indicador de estéreo (5)
       ! Es posible que no todas las emisoras sumi-       Aparece cuando la frecuencia seleccionada
          nistren el servicio RDS.                        se está transmitiendo en estéreo.
       ! Las funciones RDS como AF y TA sólo se         3 Indicador LOC
          activan cuando la radio está sintonizada en     Aparece cuando la sintonización por búsque-
          una emisora RDS.                                da local está activada.
                                                        4 Indicador del número de presintonía
                                                        5 Indicador de frecuencia

                                                        1 Presione SOURCE para seleccionar el
                                                        sintonizador.
                                                        2 Presione BAND para seleccionar una
                                                        banda.
                                                        Presione BAND hasta que visualice la banda
                                                        deseada: FM-1, FM-2, FM-3 para FM o
                                                        MW/LW.
       1 Indicador de banda
       2 Indicador de estéreo (5)                       3 Para utilizar la sintonización manual,
         Aparece cuando la frecuencia seleccionada      pulse MULTI-CONTROL izquierda o dere-
         se está transmitiendo en estéreo.              cha.
       3 Indicador LOC
         Aparece cuando la sintonización por búsque-    4 Para utilizar la sintonización por bús-
         da local está activada.                        queda, mantenga presionado
       4 Indicador del número de presintonía            MULTI-CONTROL izquierda o derecha du-
       5 Indicador TP ( )                               rante aproximadamente un segundo y
         Aparece cuando una emisora TP está sintoni-    luego suelte el control.
         zada.                                          El sintonizador explorará las frecuencias hasta
       6 Indicador de noticias ( )                      que encuentre una emisora con señales de su-
         Aparece cuando se recibe el programa de no-    ficiente intensidad como para asegurar una
         ticias definido.                               buena recepción.
       7 Nombre del servicio de programa                # Se puede cancelar la sintonización por bús-
       8 Indicador de etiqueta PTY                      queda presionando MULTI-CONTROL izquierda o
       9 Indicador TEXT                                 derecha.
         Aparece cuando se recibe el radio texto.       # Si mantiene presionado MULTI-CONTROL iz-
                                                        quierda o derecha, podrá saltar las emisoras. La
                                                        sintonización por búsqueda comienza inmediata-
                                                        mente después de que suelte MULTI-CONTROL.


  80      Es
Sección

  Utilización de esta unidad                                                                             02


    Nota                                             Uso del mando a distancia
Si se escucha la radio MW teniendo el iPod co-       % Cuando encuentre la frecuencia que
nectado a esta unidad, puede generarse ruido.        desea almacenar en la memoria, presione
En tal caso, desconecte el iPod de la unidad para    uno de los botones de ajuste de presinto-
que desaparezca el ruido.                            nías 1 a 6 y manténgalo presionado hasta
                                                     que el número de presintonía deje de des-
                                                     tellar.


                                                                                                         Español
Almacenamiento y                                     El número seleccionado destellará en el indi-
recuperación de frecuencias                          cador del número de presintonía y quedará ilu-
                                                     minado. La frecuencia de la emisora de radio
Se pueden almacenar con facilidad hasta seis
                                                     seleccionada se ha almacenado en la memo-
frecuencias de emisoras para recuperarlas
                                                     ria.
posteriormente.
                                                     La próxima vez que presione el mismo botón
! Se pueden almacenar en la memoria hasta
                                                     de ajuste de presintonías, la memoria recupe-
   18 emisoras FM, seis por cada una de las
                                                     rará la frecuencia de la emisora.
   tres bandas FM, y seis emisoras MW/LW.
                                                     # También se pueden recuperar las frecuencias
1 Cuando encuentre la frecuencia que                 de las emisoras de radio asignadas a los núme-
desea almacenar en la memoria presione               ros de ajuste de presintonías presionando
LIST.                                                MULTI-CONTROL hacia arriba o abajo durante la
                                                     visualización de frecuencias.
2 Utilice MULTI-CONTROL para almacenar
la frecuencia seleccionada en la memoria.
Haga girar el control para cambiar el número         Introducción a las funciones
de presintonía, mantenga pulsado para alma-          avanzadas
cenarlo.
El número de presintonía que ha seleccionado         1 Presione MULTI-CONTROL para visuali-
parpadeará y permanecerá encendido. La fre-          zar el menú principal.
cuencia de la emisora de radio seleccionada          FUNCTION, AUDIO y ENTERTAINMENT apa-
se ha almacenado en la memoria.                      recen en el display.

3 Utilice MULTI-CONTROL para seleccio-               2 Utilice MULTI-CONTROL para seleccio-
nar la emisora deseada.                              nar FUNCTION.
Haga girar el control para cambiar la emisora        Haga girar el control para cambiar la opción
y pulse para seleccionarla.                          de menú y presiónelo para seleccionarla.
# También puede cambiar la emisora pulsando          Aparece el nombre de la función en el display.
MULTI-CONTROL arriba o abajo.                        3 Haga girar MULTI-CONTROL para selec-
# Si no se utiliza la lista en unos 30 segundos,     cionar la función.
el display volverá automáticamente a la visualiza-   Haga girar MULTI-CONTROL para cambiar
ción normal.                                         entre las funciones en el siguiente orden:
                                                     BSM (memoria de las mejores emisoras)—
                                                     Regional (regional)—Local (sintonización por
                                                     búsqueda local)—PTY search (selección de
                                                     tipo de programa)—Traffic Announce (espera
                                                     por anuncio de tráfico)—Alternative FREQ
                                                     (búsqueda de frecuencias alternativas)—
                                                     News interrupt (interrupción por programa
                                                     de noticias)


                                                                                               Es      81
Sección

02        Utilización de esta unidad

       # También se puede seleccionar la función pre-       1 Utilice MULTI-CONTROL para seleccio-
       sionando FUNCTION en el mando a distancia.           nar Local en el menú de funciones.
       # Si se elige la banda MW/LW, sólo se puede se-
       leccionar BSM o Local.                               2 Presione MULTI-CONTROL para activar
       # Para volver a la visualización de la frecuencia,   la sintonización por búsqueda local.
       presione BAND.                                       # Vuelva a presionar MULTI-CONTROL para de-
       # Si no se utilizan las funciones en unos 30 se-     sactivar la sintonización por búsqueda local.
       gundos, el display volverá automáticamente a la      3 Presione MULTI-CONTROL izquierda o
       visualización normal.                                derecha para ajustar la sensibilidad.
                                                            Hay cuatro niveles de sensibilidad para FM y
                                                            dos niveles para MW/LW:
       Almacenamiento de las
                                                            FM: Level 1—Level 2—Level 3—Level 4
       frecuencias de radio más fuertes                     MW/LW: Level 1—Level 2
       La función BSM (memoria de las mejores emi-          El ajuste Level 4 sólo permite recibir las emi-
       soras) le permite almacenar automáticamente          soras con las señales más fuertes, mientras
       seis frecuencias de las emisoras más fuertes         que los ajustes más bajos permiten recibir de
       en los botones 1 a 6 en el mando a distancia.        manera progresiva las emisoras con las seña-
       Una vez almacenadas, podrá sintonizar esas           les más débiles.
       frecuencias presionando un solo botón.
       ! Al almacenar frecuencias con la función
          BSM, se pueden reemplazar las frecuen-            Selección de frecuencias
          cias que se almacenaron con los botones 1         alternativas
          a 6 en el mando a distancia.                      Si el sintonizador no puede obtener una
       1 Utilice MULTI-CONTROL para seleccio-               buena recepción, la unidad busca automática-
       nar BSM en el menú de funciones.                     mente otra emisora de la misma red.

       2 Presione MULTI-CONTROL para activar                1 Utilice MULTI-CONTROL para seleccio-
       la función BSM.                                      nar Alternative FREQ en el menú de funcio-
       Las seis frecuencias de las emisoras más fuer-       nes.
       tes se almacenarán en orden según la intensi-        2 Presione MULTI-CONTROL para activar
       dad de las señales.                                  AF.
       # Para cancelar el proceso de almacenamiento,        # Para desactivar la función AF, vuelva a presio-
       vuelva a pulsar MULTI-CONTROL.                       nar MULTI-CONTROL.
       3 Utilice MULTI-CONTROL para seleccio-
       nar la emisora deseada.                                  Notas
       Haga girar el control para cambiar la emisora        ! Sólo se sintonizan las emisoras RDS durante
       y pulse para seleccionarla.                            la sintonización por búsqueda o BSM cuando
       # También puede cambiar la emisora pulsando            la función AF está activada.
       MULTI-CONTROL arriba o abajo.                        ! Cuando se recupera una emisora presintoni-
                                                              zada, el sintonizador puede actualizarla con
                                                              una nueva frecuencia de la lista AF de emiso-
       Sintonización de señales fuertes                       ras. En el display no aparece ningún número
       La sintonización por búsqueda local le permite         de presintonía si los datos RDS de la emisora
       sintonizar sólo las emisoras de radio con seña-        recibida son distintos de los de la emisora al-
       les lo suficientemente fuertes como para ase-          macenada originalmente.
       gurar una buena recepción.


  82      Es
Sección

  Utilización de esta unidad                                                                               02

! Otro programa puede interrumpir temporal-         ! El número de presintonía puede desaparecer
  mente el sonido durante la búsqueda de una          del display si se sintoniza una emisora regio-
  frecuencia AF.                                      nal que es diferente de la emisora almacena-
! La función AF se puede activar y desactivar in-     da originalmente.
  dependientemente para cada banda FM.              ! La función regional se puede activar o desacti-
                                                      var en forma independiente por cada banda
Uso de la búsqueda PI                                 FM.


                                                                                                           Español
Si el sintonizador no puede encontrar una
emisora adecuada o el estado de la recepción        Recepción de anuncios de tráfico
empeora, la unidad buscará automáticamente          TA (espera por anuncio de tráfico) permite re-
otra emisora con la misma programación. Du-         cibir anuncios de tráfico automáticamente, al
rante la búsqueda aparece PI seek y la salida       margen de la fuente que se escuche. La fun-
se silencia.                                        ción TA se puede activar tanto para una emi-
                                                    sora TP (una emisora que transmite
Uso de la búsqueda PI automática                    información de tráfico) como para una emiso-
para emisoras presintonizadas                       ra TP de otra red realzada (una emisora que
Cuando no se pueden llamar las emisoras pre-        brinda información que remite a emisoras TP).
sintonizadas, como por ejemplo, al realizar via-    1 Sintonice una emisora TP o la emisora
jes largos, se puede ajustar la unidad para         TP de otra red realzada.
realizar la búsqueda PI durante la llamada de       Se iluminará el indicador TP ( ).
las emisoras presintonizadas.
! El ajuste predefinido de la función de bús-       2 Presione TA/NEWS para activar la espe-
   queda PI automática es desactivado. Con-         ra por anuncio de tráfico.
   sulte Cambio de la búsqueda PI automática        # Para desactivar la espera por anuncio de tráfi-
   en la página 121.                                co, vuelva a presionar TA/NEWS.

                                                    3 Utilice MULTI-CONTROL para ajustar el
Limitación de las emisoras para                     volumen de TA cuando comienza un anun-
programación regional                               cio de tráfico.
Cuando se usa la función AF, la función regio-      El volumen recién ajustado se almacena en la
nal limita la selección de las emisoras que         memoria y se recupera para los siguientes
transmiten programas regionales.                    anuncios de tráfico.

1 Utilice MULTI-CONTROL para seleccio-              4 Presione TA/NEWS mientras se está re-
nar Regional en el menú de funciones.               cibiendo el anuncio de tráfico para cance-
                                                    larlo.
2 Presione MULTI-CONTROL para activar               El sintonizador vuelve a la fuente original pero
la función regional.                                sigue en el modo de espera hasta que se vuel-
# Para desactivar la función regional, vuelva a     va a presionar TA/NEWS.
presionar MULTI-CONTROL.
                                                        Notas
    Notas
                                                    ! También se puede activar o desactivar la fun-
! La programación regional y las redes regiona-       ción TA en el menú que aparece usando
  les se organizan de distinta manera según el        MULTI-CONTROL.
  país (es decir, pueden cambiar de acuerdo         ! El sistema cambia de nuevo a la fuente origi-
  con la hora, el estado o la provincia de que se     nal después de la recepción del anuncio de
  trate, o el área de transmisión).                   tráfico.


                                                                                                Es       83
Sección

02        Utilización de esta unidad

       ! Sólo se sintonizan las emisoras TP y las emi-     unidad puede cambiar de cualquier emisora a
         soras TP de otra red realzada durante la sinto-   la emisora que transmite las noticias. Cuando
         nización por búsqueda o BSM cuando la             finaliza el programa de noticias, se reanuda la
         función TA está activada.                         recepción del programa anterior.
                                                           % Presione TA/NEWS y mantenga presio-
       Uso de las funciones PTY                            nado para activar la interrupción por pro-
       Se puede sintonizar una emisora usando la in-       grama de noticias.
       formación PTY (tipo de programa).                   Presione TA/NEWS hasta que NEWS ON apa-
                                                           rezca en el display.
                                                           # Para desactivar la interrupción por programa
       Búsqueda de una emisora RDS por                     de noticias, presione TA/NEWS y mantenga pre-
       información PTY                                     sionado hasta que NEWS OFF aparezca en el dis-
       Se pueden buscar tipos generales de progra-         play.
       mas, tales como los que se indican en la pági-      # Se puede cancelar un programa de noticias
       na siguiente.                                       presionando TA/NEWS.

       1 Utilice MULTI-CONTROL para seleccio-                  Nota
       nar PTY search en el menú de funciones.
                                                           También se puede activar o desactivar un progra-
       2 Presione MULTI-CONTROL izquierda o                ma de noticias en el menú que aparece, usando
       derecha para seleccionar un tipo de progra-         MULTI-CONTROL.
       ma.
       News&Inf—Popular—Classics—Others
                                                           Recepción de transmisiones de
       3 Presione MULTI-CONTROL para comen-                alarma PTY
       zar la búsqueda.                                    Cuando se emite el código PTY de emergen-
       La unidad busca una emisora que transmita           cia, la unidad lo recibe automáticamente (apa-
       ese tipo de programa. Cuando encuentra la           rece ALARM). Una vez finalizada la
       emisora, se visualiza el nombre del servicio de     transmisión, el sistema vuelve a la fuente ante-
       programa.                                           rior.
       En la página siguiente se indica la informa-        ! Se puede cancelar un anuncio de emer-
       ción PTY (código de identificación de tipo de           gencia, presionando TA/NEWS.
       programa).
       # Para cancelar la búsqueda, vuelva a presionar
       MULTI-CONTROL.                                      Uso del radio texto
       # El programa de algunas emisoras puede ser         Este sintonizador puede mostrar los datos de
       distinto del programa indicado por el PTY trans-    radio texto transmitidos por emisoras RDS,
       mitido.                                             como por ejemplo, información de la emisora,
       # Si ninguna emisora está transmitiendo el tipo     el nombre de la canción que se está transmi-
       de programa buscado, se visualiza Not found         tiendo y el nombre del artista.
       durante unos dos segundos, y el sintonizador        ! El sintonizador memoriza automáticamen-
       vuelve a la emisora original.                           te las tres últimas transmisiones con radio
                                                               texto recibidas, reemplazando el texto de la
       Uso de la interrupción por programa                     recepción menos reciente con el nuevo
       de noticias                                             texto recibido.
       Cuando se transmite un programa de noticias
       de una emisora de noticias con código PTY, la


  84      Es
Sección

  Utilización de esta unidad                                                                                   02

Visualización de radio texto                        radio texto, el texto almacenado se recuperará
Se puede visualizar el radio texto que se acaba     de la memoria.
de recibir y los tres radio textos más recientes.
1 Presione DISPLAY y mantenga presio-               Lista PTY
nado para visualizar el radio texto.
Se visualiza el radio texto de la emisora que        Generales   Específico   Tipo de programa


                                                                                                               Español
está transmitiendo actualmente.                      News&Inf    News         Noticias
# Se puede cancelar la visualización de radio                    Affairs      Temas de actualidad
texto presionando DISPLAY o BAND.
# Cuando no se recibe radio texto, se visualiza                  Info         Información general y
                                                                              consejos
No text en el display.
                                                                 Sport        Programas deportivos
2 Presione MULTI-CONTROL izquierda o
                                                                 Weather      Informes del tiempo/infor-
derecha para recuperar los tres radio textos
                                                                              mación meteorológica
más recientes.
Al presionar MULTI-CONTROL izquierda o de-                       Finance      Informes del mercado de
                                                                              valores, comercio, tran-
recha se cambia entre la visualización de
                                                                              sacciones, etc.
radio texto actual y la visualización de los tres
radio textos más recientes.                          Popular     Pop Mus      Música popular
# Si no hay datos de radio texto en la memoria,                  Rock Mus     Música moderna contem-
la visualización no cambiará.                                                 poránea

3 Presione MULTI-CONTROL arriba o                                Easy Mus     Música “fácil de escu-
                                                                              char”
abajo para desplazarse por los datos.
Presione MULTI-CONTROL arriba para ir al                         Oth Mus      Música alternativa
principio. Presione MULTI-CONTROL abajo                          Jazz         Jazz
para desplazar los datos de radio texto.
                                                                 Country      Música country
                                                                 Nat Mus      Música nacional
Almacenamiento y recuperación de
radio texto                                                      Oldies       Música antigua y de la
                                                                              “Edad de Oro”
Se pueden almacenar los datos de hasta seis
transmisiones de radio texto con los botones 1                   Folk mus     Música folklórica
a 6 en el mando a distancia.                         Classics    L. Class     Música clásica ligera
1 Visualice el radio texto que desea alma-                       Classic      Música clásica
cenar en la memoria.
Consulte Visualización de radio texto en esta
página.
2 Mantenga presionados cualquiera de
los botones 1 a 6 en el mando a distancia
para almacenar el radio texto seleccionado.
Se visualizará el número de la memoria y el
radio texto seleccionado se almacenará en la
memoria.
La próxima vez que presione el mismo botón
en el mando a distancia en la visualización de


                                                                                                       Es    85
Sección

02         Utilización de esta unidad


          Others   Educate    Programas educativos         Reproductor de CD
                   Drama      Comedias y series radiofó-   incorporado
                              nicas
                                                           Funciones básicas
                   Culture    Cultura nacional o regio-
                              nal                          El reproductor de CD incorporado puede re-
                                                           producir CD audio (CD-DA) y audio comprimi-
                   Science    Naturaleza, ciencia y tec-
                              nología                      do (WMA/MP3/AAC/WAV) grabado en CD-
                                                           ROM. (Consulte la página 140 para los fiche-
                   Varied     Entretenimiento ligero       ros que se pueden reproducir.)
                   Children   Programas para niños         Lea las precauciones relativas a los discos y al
                   Social     Temas sociales
                                                           reproductor en la página 140.

                   Religion   Programas o servicios de
                              asuntos religiosos
                   Phone In   Entrada por teléfono
                   Touring    Programas de viaje; no
                              para anuncios de tráfico
                   Leisure    Pasatiempos favoritos y
                              actividades recreativas
                   Document   Programas documentales
                                                           1 Indicador WMA/MP3/AAC/WAV
                                                             Muestra el tipo de fichero de audio que se
                                                             está reproduciendo actualmente cuando el
                                                             audio comprimido se está reproduciendo.
                                                           2 Indicador del número de carpeta
                                                             Muestra el número de fichero que se está re-
                                                             produciendo actualmente cuando el audio
                                                             comprimido se está reproduciendo.
                                                           3 Indicador de número de pista
                                                           4 Indicador de tiempo de reproducción
                                                           5 Indicador de frecuencia de muestreo/veloci-
                                                             dad de grabación
                                                             Muestra la frecuencia de muestreo o veloci-
                                                             dad de grabación de la pista (fichero) actual
                                                             cuando el audio comprimido se está reprodu-
                                                             ciendo.
                                                              ! Al reproducir ficheros WMA grabados
                                                                como VBR (velocidad de grabación va-
                                                                riable), se visualizará el valor promedio
                                                                de la velocidad de grabación.
                                                              ! Al reproducir ficheros MP3 grabados
                                                                con VBR (velocidad de grabación varia-
                                                                ble), se visualizará VBR en lugar del
                                                                valor de velocidad de grabación.
                                                           1 Presione OPEN para abrir la carátula.
                                                           Aparece la ranura de carga de discos.


  86       Es
Sección

  Utilización de esta unidad                                                                               02

             Ranura de carga de discos                   Notas
                                                     ! A veces se produce una demora entre el co-
                                                       mienzo de la reproducción de un disco y la
                                                       emisión del sonido. Durante la lectura inicial,
                                                       se visualiza Format read.
                                                     ! Si aparece un mensaje de error como
                                                       ERROR-11, consulte Para comprender los men-


                                                                                                           Español
                                                       sajes de error en la página 139.
                                                     ! Al reproducir CD-EXTRA o CD DE MODO
2 Introduzca un CD (CD-ROM) por la ranu-               MIXTO, se puede cambiar entre audio compri-
ra de carga de discos.                                 mido y CD-DA presionando BAND.
La carátula se cierra automáticamente y co-          ! Si se cambia entre audio comprimido y CD-
mienza la reproducción.                                DA, la reproducción comienza en la primera
# Asegúrese de que el lado de la etiqueta              pista del disco.
del disco esté hacia arriba.                         ! Al reproducir ficheros grabados con VBR (ve-
# Después de colocar un CD (CD-ROM), presio-           locidad de grabación variable), puede que no
ne SOURCE para seleccionar el reproductor de           se muestre correctamente el tiempo de repro-
CD incorporado.                                        ducción transcurrido.
# Se puede expulsar un CD (CD-ROM) presio-           ! Al reproducir audio comprimido, no hay soni-
nando EJECT.                                           do en el avance rápido o en el retroceso.
                                                     ! Cuando se coloca un disco CD TEXT, los títu-
3 Presione MULTI-CONTROL arriba o
                                                       los del disco y de las pistas comienzan a des-
abajo para seleccionar una carpeta cuando
                                                       plazarse automáticamente por el display. Si se
se está reproduciendo un audio comprimi-
                                                       activa la función de desplazamiento continuo
do.
                                                       en el ajuste inicial, estos títulos se desplazan
# No se puede seleccionar una carpeta que no
                                                       continuamente. Para obtener información
tenga un fichero de audio comprimido grabado
                                                       sobre el desplazamiento continuo, consulte
en ella.
                                                       Cambio del desplazamiento continuo en la pá-
# Para volver a la carpeta 01 (RAÍZ), mantenga
                                                       gina 123.
presionado BAND. Sin embargo, si la carpeta 01
                                                     ! Los discos se reproducen por orden del núme-
(RAÍZ) no contiene ficheros, la reproducción co-
                                                       ro de fichero. Se saltan las carpetas que no
menzará en la carpeta 02.
                                                       tienen ficheros. (Si la carpeta 01 (RAÍZ) no
4 Para realizar el avance rápido o retroce-            contiene ficheros, la reproducción comienza
so, mantenga pulsado MULTI-CONTROL iz-                 en la carpeta 02.)
quierda o derecha.                                   ! Si no se puede introducir un disco por com-
# Si selecciona Rough search, al mantener pre-         pleto o si después de hacerlo, el disco no se
sionado MULTI-CONTROL izquierda o derecha              reproduce, compruebe que el lado de la eti-
podrá buscar una pista cada 10 pistas en la car-       queta del disco esté hacia arriba. Presione
peta actual (fichero). (Consulte Búsqueda cada 10      EJECT para expulsar el disco y verifique si pre-
pistas en el disco o carpeta actuales en la página     senta daños antes de volver a introducirlo.
90.)                                                 ! Cuando la función de carga o expulsión de
                                                       disco no funciona adecuadamente, puede ex-
5 Para saltar y retroceder o avanzar hasta             pulsar el disco manteniendo presionado
otra pista, presione MULTI-CONTROL iz-                 EJECT mientras abre la carátula.
quierda o derecha.


                                                                                                  Es      87
Sección

02        Utilización de esta unidad

       ! Dependiendo de los conjuntos de caracteres        3 Haga girar MULTI-CONTROL para selec-
         presentes en el disco, los textos en ruso pue-    cionar la función.
         den aparecer no reconocibles. Para ver infor-     Haga girar MULTI-CONTROL para cambiar
         mación sobre los conjuntos de caracteres          entre las funciones en el siguiente orden:
         permitidos para textos en ruso, consulte Archi-   Play mode (repetición de reproducción)—
         vos de audio comprimidos en la página 140.        Random mode (reproducción aleatoria)—
                                                           Scan mode (reproducción con exploración)—
                                                           Pause (pausa)—Compression (compresión y
       Selección directa de una pista                      BMX)— Search mode (método de búsqueda)
       Al utilizar el mando a distancia, se puede se-      —TitleInput "A" (ingreso de títulos de discos)
       leccionar directamente una pista ingresando         # También se puede seleccionar la función pre-
       el número de la pista deseada.                      sionando FUNCTION en el mando a distancia.
       ! Cuando se reproducen ficheros de audio,           # Cuando reproduzca un disco CD TEXT, no se
           puede seleccionar pistas en la carpeta ac-      puede cambiar a la visualización de ingreso de tí-
           tual.                                           tulos de discos. El título del disco estará ya graba-
                                                           do en un disco CD TEXT.
       1 Presione DIRECT.
                                                           # Cuando reproduzca un disco de audio compri-
       Se visualiza en el display el área para ingresar
                                                           mido, no se puede cambiar a la visualización de
       el número de pista.
                                                           ingreso de títulos de discos.
       2 Presione los botones 0 a 9 para ingresar          # Para volver a la visualización normal, presione
       el numero de pista deseada.                         BAND.
       # Se puede cancelar el número ingresado pre-        # Si no se utilizan las funciones exceptuando
       sionando CLEAR.                                     TitleInput "A" en unos 30 segundos, el display
                                                           volverá automáticamente a la visualización nor-
       3 Presione DIRECT.                                  mal.
       Se reproducirá la pista seleccionada.
       # Después de acceder al modo de ingreso de
       números, si no realiza una operación en unos        Selección de una gama de
       ocho segundos, el modo se cancelará automáti-       repetición de reproducción
       camente.                                            Con la repetición de reproducción se reprodu-
                                                           ce la misma pista/carpeta dentro de la gama
       Introducción a las funciones                        de repetición de reproducción seleccionada.
                                                           Además, la gama de repetición determina la
       avanzadas                                           gama de reproducción aleatoria y de repro-
       1 Presione MULTI-CONTROL para visuali-              ducción con exploración.
       zar el menú principal.
       FUNCTION, AUDIO y ENTERTAINMENT apa-                1 Utilice MULTI-CONTROL para seleccio-
       recen en el display.                                nar Play mode en el menú de funciones.

       2 Utilice MULTI-CONTROL para seleccio-              2 Pulse MULTI-CONTROL para seleccionar
       nar FUNCTION.                                       la gama de repetición.
                                                              ! Disc repeat – Repite todas las pistas
       Haga girar el control para cambiar la opción
                                                              ! Track repeat – Sólo repite la pista actual
       de menú y presiónelo para seleccionarla.
                                                              ! Folder repeat – Repite la carpeta actual
       Aparece el nombre de la función en el display.
                                                           # Si selecciona otra carpeta durante la repeti-
                                                           ción de reproducción, la gama de repetición cam-
                                                           bia a repetición de disco.


  88      Es
Sección

  Utilización de esta unidad                                                                             02

# Al reproducir un CD, realizar una búsqueda        3 Cuando encuentre la pista deseada,
de pista o el avance rápido/retroceso, se cancela   presione MULTI-CONTROL para desactivar
automáticamente la repetición de reproducción.      la reproducción con exploración.
# Al reproducir audio comprimido, si se realiza     # Si el display vuelve automáticamente a la vi-
una búsqueda de pista o el avance rápido/retro-     sualización de reproducción, seleccione
ceso durante Track repeat (repetición de pista),    Scan mode de nuevo usando MULTI-CONTROL.
se cambia la gama de repetición de reproducción     # Una vez finalizada la exploración de un disco


                                                                                                         Español
a repetición de carpeta.                            (carpeta), volverá a comenzar la reproducción
# Cuando se selecciona Folder repeat (repeti-       normal de las pistas.
ción de carpeta), no se puede reproducir una
subcarpeta de esa carpeta.
                                                    Pausa de la reproducción de un
                                                    disco
Reproducción de las pistas en
                                                    1 Utilice MULTI-CONTROL para seleccio-
orden aleatorio                                     nar Pause en el menú de funciones.
Con la reproducción aleatoria se reproducen
las pistas en un orden aleatorio dentro de la       2 Presione MULTI-CONTROL para activar
gama de repetición seleccionada.                    la pausa.
Consulte Selección de una gama de repetición        Se detiene temporalmente la reproducción de
de reproducción en la página anterior.              la pista actual.
                                                    # Para desactivar la pausa, vuelva a presionar
1 Utilice MULTI-CONTROL para seleccio-              MULTI-CONTROL.
nar Random mode en el menú de funcio-
nes.
                                                    Uso de la compresión y BMX
2 Presione MULTI-CONTROL para activar
                                                    El uso de las funciones COMP (compresión) y
la reproducción aleatoria.
                                                    BMX le permiten ajustar la calidad de repro-
Las pistas se reproducirán en un orden aleato-
                                                    ducción de sonido de este reproductor.
rio.
# Vuelva a presionar MULTI-CONTROL para de-         1 Utilice MULTI-CONTROL para seleccio-
sactivar la reproducción aleatoria.                 nar Compression en el menú de funciones.
                                                    2 Presione MULTI-CONTROL para seleccio-
Exploración de carpetas y pistas                    nar su ajuste favorito.
La reproducción con exploración busca la            COMP/BMX OFF—COMP 1—COMP 2—
canción dentro de la gama de repetición se-         COMP/BMX OFF—BMX 1—BMX 2
leccionada.
Consulte Selección de una gama de repetición
de reproducción en la página anterior.
1 Utilice MULTI-CONTROL para seleccio-
nar Scan mode en el menú de funciones.
2 Presione MULTI-CONTROL para activar
la reproducción con exploración.
Se reproducirán los primeros 10 segundos de
cada pista.


                                                                                               Es      89
Sección

02        Utilización de esta unidad

       Búsqueda cada 10 pistas en el                       3 Presione DISPLAY para seleccionar el
       disco o carpeta actuales                            tipo de carácter deseado.
                                                           Presione DISPLAY repetidamente para cam-
       Se puede cambiar el método de búsqueda
                                                           biar entre los siguientes tipos de caracteres:
       entre las opciones de avance rápido/retroceso
                                                           Alfabeto (mayúsculas), números y símbolos—
       y búsqueda cada 10 pistas. Seleccionar
                                                           Alfabeto (minúsculas)—letras de idiomas eu-
       Rough search le permite realizar la búsqueda
                                                           ropeos, tales como aquéllas con acentos (p.
       cada 10 pistas.
                                                           ej., á, à, ä, ç)—Números y símbolos
       1 Utilice MULTI-CONTROL para seleccio-
                                                           4 Presione MULTI-CONTROL arriba o
       nar Search mode en el menú de funciones.
                                                           abajo para seleccionar una letra del alfabe-
       2 Presione MULTI-CONTROL para seleccio-             to.
       nar Rough search.
                                                           5 Presione MULTI-CONTROL izquierda o
         ! FF/REV – Avance rápido y retroceso
                                                           derecha para mover el cursor a la anterior
         ! Rough search – Búsqueda cada 10 pistas
                                                           o siguiente posición de carácter.
       # Para seleccionar FF/REV, vuelva a presionar
       MULTI-CONTROL.                                      6 Mueva el cursor a la última posición
                                                           pulsando MULTI-CONTROL derecha des-
       3 Presione BAND para volver a la visuali-
                                                           pués de ingresar el título.
       zación de reproducción.
                                                           Al pulsar MULTI-CONTROL derecha una vez
       4 Mantenga presionado MULTI-CONTROL                 más, el título ingresado se almacena en la me-
       izquierda o derecha para buscar una pista           moria.
       cada 10 pistas en un disco (carpeta).
                                                           7 Presione BAND para volver a la visuali-
       # Si el número de pistas restantes es inferior a
                                                           zación de reproducción.
       10, mantenga presionado MULTI-CONTROL para
       recuperar la primera (última) pista.
                                                               Notas
                                                           ! Los títulos se conservan en la memoria, aun
       Uso de las funciones de títulos                       después de extraer el disco de la unidad, y se
       de discos                                             recuperan cuando se vuelve a colocar el disco
       Es posible ingresar títulos de CD y visualizar el     correspondiente.
       título. La próxima vez que se coloque un CD         ! Una vez que los datos para 48 discos han sido
       cuyo título se haya ingresado, se visualizará el      almacenados en la memoria, los datos para
       título de ese CD.                                     un nuevo disco se sobreponen a los datos
                                                             más antiguos.
                                                           ! Si conecta un reproductor de CD múltiple,
       Ingreso de títulos de discos
                                                             podrá ingresar los títulos de hasta 100 discos.
       Utilice la función de ingreso de títulos de dis-    ! Cuando se conecta un reproductor de CD
       cos para almacenar hasta 48 títulos de CD en          múltiple que no es compatible con las funcio-
       la unidad. Cada título puede tener una longi-         nes de título de disco, no es posible ingresar
       tud de hasta 10 caracteres.                           los títulos en esta unidad.
       1 Reproduzca el CD cuyo título desea in-
       gresar.

       2 Utilice MULTI-CONTROL para seleccio-
       nar TitleInput "A" en el menú de funciones.


  90      Es
Sección

  Utilización de esta unidad                                                                                02

Visualización de información                        ! La frecuencia de muestreo que se visualiza en
de texto en el disco                                  el display puede estar abreviada.
                                                    ! Si se activa la función de desplazamiento con-
% Presione DISPLAY para seleccionar el                tinuo en el ajuste inicial, la información de
texto de información deseado.                         texto se desplazará de manera ininterrumpida
Para CD con título ingresado                          por el display. Consulte Cambio del desplaza-
Tiempo de reproducción— : título del disco y          miento continuo en la página 123.


                                                                                                            Español
tiempo de reproducción
Para discos CD TEXT
Tiempo de reproducción— : nombre de ar-             Selección de pistas de la lista
tista del disco y : título de la pista— :           de títulos de las pistas
nombre de artista del disco y : título del          Esta función le permite ver la lista de los títu-
disco— : título del disco y : título de la          los de las pistas en un disco CD TEXT y selec-
pista— : nombre de artista de la pista : tí-        cionar uno de ellos para su reproducción.
tulo de la pista— : título de la pista y tiempo
de reproducción                                     1 Pulse LIST para cambiar al modo de
Para discos WMA/MP3/AAC                             lista de títulos de las pistas.
Tiempo de reproducción— : nombre de car-
peta y : nombre de fichero— : nombre de             2 Utilice MULTI-CONTROL para seleccio-
artista y : título de la pista— : nombre de         nar el título de la pista deseada.
artista y : título del álbum— : título del          Haga girar el control para cambiar el título de
álbum y : título de la pista— : título de la        la pista y pulse para seleccionarlo.
pista y tiempo de reproducción— : comenta-          # También puede cambiar el título de la pista
rio y tiempo de reproducción                        pulsando MULTI-CONTROL arriba o abajo.
Para discos WAV                                     # Si no se utiliza la lista en unos 30 segundos,
Tiempo de reproducción— : nombre de car-            el display volverá automáticamente a la visualiza-
peta y : nombre del fichero                         ción normal.


    Notas                                           Selección de pistas de la lista
! Puede desplazarse hacia la izquierda del título   de nombres de ficheros
  manteniendo presionado DISPLAY.                   Esta función le permite ver la lista de los nom-
! Un CD de audio que contiene determinada in-       bres de los ficheros (o de las carpetas) y selec-
  formación como texto y/o números es un CD         cionar uno de ellos para su reproducción.
  TEXT.
! Si determinada información no se grabó en         1 Presione LIST para cambiar al modo de
  un disco, no se visualizará el título o el nom-   lista de nombres de ficheros.
  bre.                                              Los nombres de los ficheros y las carpetas
! Según sea la versión de iTunes® utilizada para    aparecen en el display.
  grabar ficheros MP3 en un disco, es posible
  que no se visualice correctamente la informa-     2 Utilice MULTI-CONTROL para seleccio-
  ción de comentarios.                              nar el nombre del fichero deseado (o de la
! Según la versión del Windows Media Player         carpeta deseada).
  utilizada para codificar los ficheros WMA, es     Haga girar el control para cambiar el nombre
  posible que no se visualicen correctamente        del fichero o de la carpeta; presione para re-
  los nombres de álbumes y demás información        producirlo; presione el control a la derecha
  de texto.                                         para ver una lista de los ficheros (o de las car-
                                                    petas) en la carpeta seleccionada.

                                                                                                 Es       91
Sección

02        Utilización de esta unidad

       # También puede cambiar el nombre del fichero         Para reproducir canciones
       o de la carpeta, presionando MULTI-CONTROL
       arriba o abajo.                                       en el iPod
       # Para volver a la lista anterior (la carpeta de un   Funciones básicas
       nivel superior), pulse MULTI-CONTROL hacia la
                                                             Se puede usar esta unidad para controlar un
       izquierda.
                                                             iPod mediante un cable (p. ej., CD-I200), que se
       # Si el número de carpeta o fichero es superior
                                                             vende por separado.
       a 100, se visualizarán los últimos 2 dígitos de
       dicho número.
       # El número de las carpetas o ficheros presen-
       tes en la carpeta seleccionada actualmente apa-
       recerá en el lado derecho del display.
       # Si selecciona una carpeta que no contenga
       carpetas o ficheros, aparece NO FILES.
       # Si no se utiliza la lista en unos 30 segundos,
       el display volverá automáticamente a la visualiza-
       ción normal.
                                                             1 Indicador del número de canción
                                                             2 Indicador de tiempo de reproducción
                                                             3 Tiempo de canción (barra de progreso)

                                                             1 Conecte el iPod a esta unidad.
                                                             La reproducción comenzará automáticamen-
                                                             te.
                                                             Mientras el iPod está conectado a esta unidad,
                                                             aparece en él PIONEER (o (marca de verifi-
                                                             cación)).
                                                             # Antes de conectar el conector del Dock de
                                                             esta unidad al iPod, desconecte los auriculares
                                                             del iPod.
                                                             # Una vez haya conectado el iPod a esta unidad,
                                                             presione SOURCE para seleccionar el iPod.
                                                             # Al extraer el iPod de esta unidad, ésta se
                                                             apaga.

                                                             2 Cuando reproduzca audiolibros o pod-
                                                             cast (con capítulos) en el iPod, si presiona
                                                             MULTI-CONTROL arriba o abajo selecciona-
                                                             rá un capítulo.

                                                             3 Para realizar el avance rápido o retroce-
                                                             so, mantenga pulsado MULTI-CONTROL iz-
                                                             quierda o derecha.

                                                             4 Para saltar y retroceder o avanzar hasta
                                                             otra canción, pulse MULTI-CONTROL iz-
                                                             quierda o derecha.


  92      Es
Sección

  Utilización de esta unidad                                                                               02


    Notas                                            # Puede comenzar la reproducción por la cate-
                                                     goría seleccionada manteniendo presionado
! Lea las precauciones relativas al iPod en la pá-   MULTI-CONTROL o manteniendo presionado
  gina 142.                                          MULTI-CONTROL a la derecha.
! Si aparece un mensaje de error como                # También puede cambiar de categoría pulsan-
  ERROR-11, consulte Para comprender los men-        do MULTI-CONTROL arriba o abajo.
  sajes de error en la página 139.                   # También puede seleccionar la categoría pul-
! Conecte directamente el conector del Dock de


                                                                                                           Español
                                                     sando MULTI-CONTROL derecha.
  esta unidad al iPod para que esta unidad fun-      # Para volver a la lista anterior, pulse
  cione adecuadamente.                               MULTI-CONTROL izquierda.
! Cuando la llave de encendido está fijada en        # Para ir al menú superior de la búsqueda de lis-
  ACC u ON, la batería del iPod se carga mien-       tas, mantenga pulsado MULTI-CONTROL izquier-
  tras esté conectado a esta unidad.                 da.
! Cuando el iPod está conectado a esta unidad,       # Podcasts y Audiobooks aparecen cuando el
  no se puede encender ni apagar.                    iPod conectado es compatible con las categorías.
! El iPod conectado a esta unidad se apaga           # Si no se utiliza la lista en unos 30 segundos,
  aproximadamente dos minutos después de             la búsqueda de listas se cancelará automática-
  que la llave de encendido se fije en OFF.          mente.

                                                     3 Repita el paso 2 para encontrar una
Para buscar una canción                              canción que desee escuchar.
El manejo de esta unidad para controlar el
iPod está diseñado para imitar del modo más
fidedigno posible el manejo del iPod, para faci-     Visualización de información
litar su uso y la búsqueda de canciones.             de texto en el iPod
! Si se ha seleccionado una lista de repro-          % Presione DISPLAY para seleccionar el
    ducción, esta unidad muestra primero la          texto de información deseado.
    lista de reproducción del nombre del iPod.       Tiempo de reproducción— : nombre de ar-
    Esta lista de reproducción reproduce todas       tista y : título de la canción— : nombre de
    las canciones del iPod.                          artista y : nombre del álbum— : nombre
! Si los caracteres grabados en el iPod no           del álbum y : título de la canción— : título
    son compatibles con esta unidad, no apa-         de la canción y tiempo de reproducción
    recerán en el display.                           # Si los caracteres grabados en el iPod no son
1 Para ir al menú superior de la búsqueda            compatibles con esta unidad, no aparecerán en
de listas, presione LIST.                            el display.

2 Utilice MULTI-CONTROL para seleccio-                   Notas
nar una categoría.                                   ! Puede desplazar la información de texto hacia
Haga girar el control para cambiar la catego-          la izquierda manteniendo pulsado DISPLAY.
ría y presiónelo para seleccionarla.                 ! Si se activa la función de desplazamiento con-
Playlists (listas de reproducción)—Artists (ar-        tinuo en el ajuste inicial, la información de
tistas)—Albums (álbumes)—Songs (cancio-                texto se desplazará de manera ininterrumpida
nes)—Podcasts (podcasts)—Genres                        por el display. Consulte Cambio del desplaza-
(géneros)—Audiobooks (audiolibros)                     miento continuo en la página 123.
Se visualiza la lista de la categoría selecciona-
da.


                                                                                                 Es      93
Sección

02        Utilización de esta unidad

       Introducción a las funciones                        Reproducción de las canciones
       avanzadas                                           en un orden aleatorio (shuffle)
       1 Presione MULTI-CONTROL para visuali-              Para la reproducción de las canciones en el
       zar el menú principal.                              iPod existen dos métodos de reproducción
       FUNCTION, AUDIO y ENTERTAINMENT apa-                aleatoria: Shuffle Songs (reproducir cancio-
       recen en el display.                                nes en un orden aleatorio) y Shuffle Albums
                                                           (reproducir álbumes en un orden aleatorio).
       2 Utilice MULTI-CONTROL para seleccio-
       nar FUNCTION.                                       1 Utilice MULTI-CONTROL para seleccio-
       Haga girar el control para cambiar la opción        nar Shuffle mode en el menú de funciones.
       de menú y presiónelo para seleccionarla.
                                                           2 Presione MULTI-CONTROL para seleccio-
       Aparece el nombre de la función en el display.
                                                           nar su ajuste favorito.
       3 Haga girar MULTI-CONTROL para selec-                ! Shuffle Songs – Reproduce canciones en
       cionar la función.                                      un orden aleatorio dentro de la lista selec-
       Haga girar MULTI-CONTROL para cambiar                   cionada
       entre las funciones en el siguiente orden:            ! Shuffle Albums – Selecciona un álbum de
       Play mode (repetición de reproducción)—                 manera aleatoria y luego reproduce todas
       Shuffle mode (shuffle)—Shuffle all (shuffle             las canciones en el orden en que se en-
       all)—Pause (pausa)—Audiobooks (velocidad                cuentran en el álbum
       del audiolibro)                                       ! Shuffle OFF – Cancela la reproducción
       # También se puede seleccionar la función pre-          aleatoria
       sionando FUNCTION en el mando a distancia.
       # Para volver a la visualización de reproducción,
                                                           Reproducción de todas las
       presione BAND.
       # Si no se utilizan las funciones en unos 30 se-    canciones en un orden
       gundos, el display volverá automáticamente a la     aleatorio (shuffle all)
       visualización normal.                               Este método reproduce todas las canciones
                                                           en el iPod de manera aleatoria.
       Repetición de reproducción                          % Mantenga presionado MULTI-CONTROL
       Hay dos gamas de repetición de reproducción         para activar la función de shuffle all duran-
       de las canciones en el iPod. Repeat One (re-        te el display de reproducción.
       petición de una canción) y Repeat All (repeti-      Se visualiza Shuffle All por un momento y
       ción de todas las canciones de la lista).           todas las canciones en el iPod se reproducirán
       ! Cuando Play mode está fijado en                   de manera aleatoria.
          Repeat One, no es posible seleccionar las
          demás canciones.                                     Nota

       1 Utilice MULTI-CONTROL para seleccio-              También puede activar la función de shuffle all en
       nar Play mode en el menú de funciones.              el menú que aparece mediante el
                                                           MULTI-CONTROL.
       2 Pulse MULTI-CONTROL para seleccionar
       la gama de repetición.
          ! Repeat One – Sólo repite la canción actual
                                                           Para poner en pausa una canción
          ! Repeat All – Repite todas las canciones de     1 Utilice MULTI-CONTROL para seleccio-
            la lista seleccionada                          nar Pause en el menú de funciones.


  94      Es
Sección

  Utilización de esta unidad                                                                             02

2 Presione MULTI-CONTROL para activar            Bluetooth Audio
la pausa.
Se detiene temporalmente la reproducción de      Funciones básicas
la canción actual.                               Puede utilizar esta unidad para controlar un re-
# Para desactivar la pausa, vuelva a presionar   productor portátil de audio, vendido por separa-
MULTI-CONTROL.                                   do, provisto de tecnología inalámbrica
                                                 Bluetooth (reproductor de audio Bluetooth).


                                                                                                         Español
Cambio de la velocidad del                            Importante
audiolibro
                                                 ! Esta unidad permite controlar un reproductor
La velocidad de reproducción del audiolibro se
                                                   de audio Bluetooth a través de un perfil A2DP
puede modificar.
                                                   o AVRCP Los reproductores de audio Blue-
                                                             .
1 Utilice MULTI-CONTROL para seleccio-             tooth (o los adaptadores Bluetooth) compati-
nar Audiobooks en el menú de funciones.            bles con estos perfiles pueden conectarse a
                                                   este perfil.
2 Presione MULTI-CONTROL para seleccio-            — Perfil A2DP (Advanced Audio Distribution
nar su ajuste favorito.                                Profile): Es posible reproducir únicamente
Presione MULTI-CONTROL repetidamente                   canciones en su reproductor de audio.
hasta que el ajuste deseado aparezca en el         — Perfil AVRCP (Audio/Video Remote Control
display.                                               Profile): Es posible reproducir, realizar pau-
  ! Faster – Reproducción con velocidad supe-          sas, seleccionar canciones, etc.
    rior a la normal                             ! Ya que hay varios reproductores de audio
  ! Normal – Reproducción con velocidad nor-       Bluetooth disponibles en el mercado, las fun-
    mal                                            ciones que puede realizar su reproductor de
  ! Slower – Reproducción con velocidad infe-      audio Bluetooth utilizando esta unidad pue-
    rior a la normal                               den ser muy diferentes. Consulte el manual
                                                   de instrucciones de su reproductor de audio
                                                   Bluetooth, así como este manual, mientras
                                                   utilice su reproductor con esta unidad.
                                                 ! No es posible mostrar en esta unidad informa-
                                                   ción sobre las canciones (ej.: tiempo de repro-
                                                   ducción transcurrido, título de la canción,
                                                   índice de canciones, etc.).
                                                 ! Mientras escucha canciones en su reproduc-
                                                   tor de audio Bluetooth, no realice operaciones
                                                   innecesarias en su teléfono móvil. Si intenta
                                                   realizar una operación en su teléfono móvil, la
                                                   señal de su teléfono móvil puede ocasionar
                                                   ruido en la reproducción de canciones.
                                                 ! Cuando habla con el teléfono móvil conectado
                                                   a esta unidad a través de tecnología inalám-
                                                   brica Bluetooth, la reproducción de canciones
                                                   del reproductor de audio Bluetooth conectado
                                                   a esta unidad se silencia.


                                                                                                Es      95
Sección

02        Utilización de esta unidad

       ! Incluso si está escuchando un canción en su          Ajuste del reproductor de
         reproductor de audio Bluetooth y cambia a            audio Bluetooth
         otra fuente, la reproducción de la canción
         continúa.
                                                              Es necesario configurar esta unidad antes de
                                                              utilizar el reproductor de audio Bluetooth.
       Aunque su reproductor de audio no esté pro-
       visto de un módulo Bluetooth, lo puede con-            1 Activación
       trolar desde esta unidad a través de                   Consulte Activación de la fuente BT Audio en
       tecnología inalámbrica Bluetooth por medio             la página 124 para obtener instrucciones
       de un adaptador Bluetooth (se vende por sepa-          sobre cómo activar BT Audio.
                                                              # BT Audio está activado de forma predetermi-
       rado).
                                                              nada.

                                                              2 Conexión
                                                              Para conectar el reproductor de audio Blue-
                                                              tooth a esta unidad, consulte Conexión del re-
                                                              productor de audio Bluetooth conectado más
                                                              recientemente en la página siguiente y Cone-
                                                              xión de un reproductor de audio Bluetooth en la
       1 Nombre del dispositivo                               página siguiente.
         Muestra el nombre del dispositivo del repro-         # Cuando esté conectado a través de tecnología
         ductor de audio Bluetooth (o adaptador Blue-         inalámbrica Bluetooth, las funciones “Reprodu-
         tooth).                                              cir”, “Parar” y “Pausa” del reproductor de audio
                                                              Bluetooth se pueden utilizar en la fuente
       1 Presione SOURCE para seleccionar el re-              BT Audio.
       productor de audio Bluetooth.                          # Antes de que pueda utilizar algunos reproduc-
       # Si no puede visualizar BT Audio, en primer           tores de audio, es necesario que introduzca el có-
       lugar active la fuente de audio BT en el ajuste ini-   digo PIN en esta unidad. Si su reproductor
       cial. Para obtener más información, consulte Ac-       requiere un código PIN para establecer una cone-
       tivación de la fuente BT Audio en la página 124.       xión, localice el código en el reproductor o en su
       # Para que esta unidad pueda controlar su re-          documentación. Consulte Ingreso del código PIN
       productor de audio Bluetooth, debe establecer          para la conexión inalámbrica Bluetooth en la pági-
       una conexión inalámbrica Bluetooth. (Consulte          na 124 para obtener instrucciones sobre cómo in-
       Conexión de un reproductor de audio Bluetooth en       gresar el código PIN.
       la página siguiente.)

       2 Para realizar el avance rápido o retroce-            Introducción a las funciones
       so, mantenga pulsado MULTI-CONTROL iz-                 avanzadas
       quierda o derecha.
                                                              1 Presione MULTI-CONTROL para visuali-
       3 Para saltar y retroceder o avanzar hasta             zar el menú principal.
       otra pista, presione MULTI-CONTROL iz-                 FUNCTION, AUDIO y ENTERTAINMENT apa-
       quierda o derecha.                                     recen en el display.

                                                              2 Utilice MULTI-CONTROL para seleccio-
                                                              nar FUNCTION.
                                                              Haga girar el control para cambiar la opción
                                                              de menú y presiónelo para seleccionarla.
                                                              Aparece el nombre de la función en el display.

  96      Es
Sección

  Utilización de esta unidad                                                                              02

3 Haga girar MULTI-CONTROL para selec-              1 Utilice MULTI-CONTROL para seleccio-
cionar la función.                                  nar Connection open en el menú de funcio-
Haga girar MULTI-CONTROL para cambiar               nes.
entre las funciones en el siguiente orden:
Connection open (conexión abierta)—                 2 Presione MULTI-CONTROL para abrir la
Disconnect audio (desconectar audio)—               conexión.
Connect audio (conectar audio)—Play (Re-            Se visualiza Always waiting. La unidad esta-


                                                                                                          Español
producir)—Stop (Parar)—Pause (pausa)—               rá en espera de conexión desde el reproductor
Auto connect (conexión automática)—                 de audio Bluetooth.
Device info. (información del dispositivo)          Si su reproductor de audio Bluetooth está pre-
# Si el reproductor de audio Bluetooth está co-     parado para la conexión inalámbrica Blue-
nectado a través de un perfil A2DP, en el menú      tooth, se establecerá automáticamente la
de funciones sólo se visualizará                    conexión a esta unidad.
Disconnect audio, Auto connect y Device info.
# Si todavía no se ha conectado un reproductor          Nota
de audio Bluetooth a esta unidad, se mostrará       Antes de que pueda utilizar algunos reproducto-
Connection open, Connect audio,                     res de audio, es necesario que introduzca el códi-
Auto connect y Device info. en el menú de fun-      go PIN en esta unidad. Si su reproductor requiere
ciones y las otras funciones no estarán disponi-    un código PIN para establecer una conexión, lo-
bles.                                               calice el código en el reproductor o en su docu-
# Para volver a la visualización de reproducción,   mentación. Consulte Ingreso del código PIN para
presione BAND.                                      la conexión inalámbrica Bluetooth en la página
# Si no se utilizan las funciones exceptuando       124 para obtener instrucciones sobre cómo ingre-
Connection open, Disconnect audio y                 sar el código PIN.
Connect audio en unos 30 segundos, el display
volverá automáticamente a la visualización nor-
mal.                                                Desconexión de un reproductor
                                                    de audio Bluetooth
    Nota
                                                    1 Utilice MULTI-CONTROL para seleccio-
Dependiendo de los reproductores de audio Blue-     nar Disconnect audio en el menú de funcio-
tooth que estén conectados a esta unidad, es po-    nes.
sible que algunas funciones no se puedan utilizar
correctamente.                                      2 Presione MULTI-CONTROL para desco-
                                                    nectar el reproductor de audio Bluetooth.
                                                    Se visualiza Disconnected. El reproductor de
Conexión de un reproductor de                       audio Bluetooth se desconecta de la unidad.
audio Bluetooth
Si ajusta la unidad en el modo                      Conexión del reproductor de
Connection open, podrá establecer una cone-
                                                    audio Bluetooth conectado más
xión inalámbrica Bluetooth desde su repro-
ductor de audio Bluetooth. Es posible que           recientemente
tenga que consultar el manual de funciona-          Esta unidad busca un reproductor de audio
miento de su reproductor de audio Bluetooth         Bluetooth en el área detectable. Además, esta
si no está seguro de cómo iniciar una cone-         unidad conecta automáticamente el reproduc-
xión desde el reproductor de audio.                 tor de audio Bluetooth conectado más recien-
                                                    temente.


                                                                                                 Es      97
Sección

02        Utilización de esta unidad

       1 Utilice MULTI-CONTROL para seleccio-           que, si desea utilizar otros dispositivos, no se
       nar Connect audio en el menú de funcio-          podrá realizar la conexión automática.
       nes.                                             ! Esta función no está disponible si la cone-
                                                          xión automática de esta unidad se ha esta-
       2 Presione MULTI-CONTROL para co-                  blecido en el teléfono móvil.
       nectar el reproductor de audio Bluetooth.        ! Cuando utiliza la unidad en el menú de
       Mientras se realiza la conexión, se mostrará       funciones de la fuente TEL o la fuente
       Connecting. Una vez completada la conexión,        BT Audio, no se inicia la conexión automá-
       aparece Connected.                                 tica al reproductor de audio Bluetooth.

                                                        1 Utilice MULTI-CONTROL para seleccio-
       Reproducción de canciones en el                  nar Auto connect en el menú de funciones.
       reproductor de audio Bluetooth
                                                        2 Pulse MULTI-CONTROL para activar la
       1 Utilice MULTI-CONTROL para seleccio-
                                                        conexión automática.
       nar Play en el menú de funciones.
                                                        # Para desactivar la conexión automática, vuel-
       2 Pulse MULTI-CONTROL para comenzar              va a pulsar MULTI-CONTROL.
       la reproducción.
                                                        Visualización de la dirección BD
       Para detener la reproducción                     (Bluetooth Device)
       1 Utilice MULTI-CONTROL para seleccio-           1 Utilice MULTI-CONTROL para seleccio-
       nar Stop en el menú de funciones.                nar Device info. en el menú de funciones.
                                                        El nombre del dispositivo (p. ej., Pioneer BT
       2 Presione MULTI-CONTROL para detener            unit) de esta unidad se mostrará en el display.
       la reproducción.                                 # Es posible editar el nombre del dispositivo.
       Se detiene la reproducción de la canción ac-     Consulte Edición del nombre del dispositivo en la
       tual.                                            página 124.

                                                        2 Pulse MULTI-CONTROL izquierda para
       Para poner en pausa una canción                  visualizar la dirección BD.
       1 Utilice MULTI-CONTROL para seleccio-           Aparece la cadena hexadecimal de 12 dígitos.
       nar Pause en el menú de funciones.               # Pulse MULTI-CONTROL derecha para regre-
                                                        sar al nombre del dispositivo.
       2 Presione MULTI-CONTROL para activar
       la pausa.
       Se detiene temporalmente la reproducción de
       la canción actual.
       # Para desactivar la pausa, vuelva a presionar
       MULTI-CONTROL.


       Conexión automática a un
       reproductor de audio Bluetooth
       Esta unidad se conecta automáticamente al
       reproductor de audio Bluetooth conectado
       más recientemente a ella. Tenga en cuenta


  98      Es
Sección

  Utilización de esta unidad                                                                               02


Teléfono Bluetooth                                     Muestra la intensidad de la señal del teléfono
                                                       móvil.
Funciones básicas                                      ! El indicador de nivel de señal puede di-
Si su teléfono móvil posee tecnología inalámbri-         ferir del nivel de señal real.
ca Bluetooth, puede conectarse a esta unidad           ! Si el nivel de señal no está disponible,
para hacer llamadas inalámbricas de manos li-            no aparece este indicador.
bres, incluso al conducir.                          3 Indicador del número de usuario


                                                                                                           Español
                                                      Muestra el número de registro del teléfono
    Importante                                        móvil.
                                                    4 Indicador de potencia de la batería
! Puesto que esta unidad se encuentra en espe-        Muestra la potencia de la batería del teléfono
  ra para conectar con sus teléfonos móviles          móvil.
  mediante la tecnología inalámbrica Bluetooth,        ! El indicador de potencia de la batería
  utilizarla sin encender el motor puede descar-         puede diferir de la potencia real de la
  gar la batería.                                        misma.
! Las operaciones avanzadas que exigen con-            ! Si no hay potencia en la batería, no se
  centración, tales como marcar números en la            visualizará nada en el área del indicador
  pantalla, usar el directorio de teléfonos, etc,        de potencia de la batería.
  están prohibidas mientras conduce. Cuando         5 Indicación de aviso de llamada perdida
  tenga que utilizar estas funciones avanzadas,       Aparece cuando se ha recibido una llamada
  detenga su vehículo en un lugar seguro.             entrante a la que no se ha respondido.
! Cuando el teléfono esté seleccionado como         6 Indicador de respuesta automática/rechazo
  fuente, no será posible hacer ajustes de            automático
  audio, excepto el ajuste del balance. El balan-     Aparece AUTO cuando está activada la fun-
  ce entre los altavoces delanteros/traseros está     ción de respuesta automática (para obtener
  ajustado a F 15 de forma predeterminada             más información, consulte Ajuste de la res-
  para la fuente telefónica.                          puesta automática en la página 112).
A continuación se indican las funciones bási-         Aparece REFUSE cuando está activada la fun-
cas para utilizar manos libres a través de la         ción de respuesta automática (para obtener
tecnología inalámbrica Bluetooth. En Introduc-        más información, consulte Ajuste del rechazo
ción a las funciones avanzadas en la página           automático en la página 112).
102 se explican las funciones más avanzadas         7 Visualización del reloj
y cómo utilizarlas.                                   Muestra la hora (si está conectado a un teléfo-
                                                      no).
                                                    8 Visualización del calendario
                                                      Muestra el día, el mes y el año (si está conec-
                                                      tado a un teléfono).

                                                        Notas
                                                    ! Aunque seleccione otras fuentes, aparecen
                                                      los indicadores 2 a 6.
                                                    ! La recepción de llamadas telefónicas de esta
1 Nombre del dispositivo                              unidad entra en espera cuando la llave de
  Muestra el nombre del dispositivo del teléfono      contacto está en la posición ACC (accesorio)
  móvil.                                              u ON (encendido).
2 Indicador de nivel de señal


                                                                                                 Es      99
Sección

02        Utilización de esta unidad

       ! La distancia de visibilidad entre esta unidad y     Configuración de la función
         su teléfono móvil deber ser de 10 metros o in-      manos libres
         ferior para el envío y recepción de voz y datos
         mediante la tecnología inalámbrica Bluetooth.
                                                             Antes de poder hacer uso de la función
         Sin embargo, la distancia de transmisión
                                                             manos libres, deberá configurar la unidad
         puede llegar a ser más corta que la distancia
                                                             para su utilización con el teléfono móvil. Esto
         estimada, dependiendo del entorno en que se
                                                             conlleva establecer una conexión inalámbrica
         utilice.
                                                             Bluetooth entre esta unidad y su teléfono, re-
       ! Para utilizar la tecnología inalámbrica Blue-
                                                             gistrar su teléfono en esta unidad, y ajustar el
         tooth, los dispositivos deben ser capaces de
                                                             nivel de volumen.
         interpretar ciertos perfiles. Esta unidad es        1 Conexión
         compatible con los siguientes perfiles.             Para ver instrucciones detalladas sobre cómo
         — GAP (Generic Access Profile)                      conectar su teléfono a esta unidad mediante
         — SDP (Service Discovery Protocol)                  la tecnología inalámbrica Bluetooth, consulte
         — OPP (Object Push Profile)                         Conexión de un teléfono móvil en la página
         — HFP (Hands Free Profile)                          103.
         — A2DP (Advanced Audio Distribution Profi-          # Su teléfono estará ahora conectado temporal-
             le)                                             mente. Sin embargo, para hacer un mejor uso de
         — AVRCP (Audio/Video Remote Control Profi-          la tecnología, recomendamos que registre el telé-
             le)                                             fono en esta unidad.
       ! El indicador de potencia de la batería y el indi-
         cador de nivel de señal se muestran en el dis-      2 Registro
         play siempre que el teléfono móvil está             Para registrar el teléfono conectado temporal-
         conectado a esta unidad mediante la tecnolo-        mente, consulte Registro del teléfono móvil co-
         gía inalámbrica Bluetooth.                          nectado en la página 104.

                                                             3 Ajuste del volumen
       Información sobre la fuente                           Ajuste el volumen del audífono de su teléfono
       telefónica                                            móvil hasta que le resulte cómodo. Una vez
                                                             ajustado, el nivel de volumen se memorizará
       Modo de espera                                        en la unidad como el ajuste predefinido.
       Cuando la unidad esté conectada a través de           # El volumen de voz de la persona que llama y
       tecnología inalámbrica Bluetooth, seguirá en          el volumen del timbre pueden variar según el tipo
       espera de fuente telefónica en segundo plano          de teléfono móvil.
       siempre que se mantenga la conexión. Esto             # Si la diferencia entre el volumen del timbre y
       significa que es posible utilizar libremente las      el volumen de la persona que llama es demasia-
       demás funciones de la unidad y seguirá estan-         do grande, el nivel de volumen general puede vol-
       do preparada para recibir una llamada.                verse inestable.
                                                             # Antes de desconectar el teléfono móvil de
       % Presione SOURCE para seleccionar el te-
                                                             esta unidad, no olvide ajustar el volumen a un
       léfono.
                                                             nivel adecuado. Si el volumen ha sido silenciado
       Presione SOURCE hasta que visualice TEL.
                                                             (nivel cero) en su teléfono móvil, permanecerá si-
       # También es posible seleccionar TEL pulsando
                                                             lenciado incluso después de que desconecte el
       PHONE.
                                                             teléfono de esta unidad.


 100      Es
Sección

  Utilización de esta unidad                                                                              02

Realización de una llamada                           de su teléfono móvil para ver más instruc-
telefónica                                           ciones.
                                                   ! Esta función se puede utilizar únicamente
Marcar un número                                     cuando la conexión se establece mediante
La manera más básica de hacer una llamada            un HFP (Hands Free Profile).
es simplemente marcar el número.
Consulte Realización de una llamada ingresan-      1 Presione BAND y mantenga presionado


                                                                                                          Español
do el número de teléfono en la página 111 para     hasta que Voice dial aparezca en el display.
ver instrucciones detalladas.                      Cuando se visualiza Voice dial ON, se activa
                                                   la función de reconocimiento de voz.
                                                   # Si su teléfono móvil no tiene la función de re-
Llamar a un número del Directorio de               conocimiento de voz, en el display aparece
teléfonos o del Historial de llamadas              No voice dial y la operación no está disponible.
Consulte Llamada a un número del Directorio
de teléfonos en la página 107 y Llamada a un       2   Pronuncie el nombre de su contacto.
número desde el Historial de llamadas en la pá-
gina 111 para ver instrucciones detalladas.
                                                   Aceptación de una llamada
                                                   telefónica
Número predefinido
Es posible asignar a la memoria los números        Atender una llamada entrante
que marca frecuentemente, para volver a mar-       Incluso si se selecciona una fuente distinta de
carlos rápidamente.                                TEL o si la unidad está apagada, podrá con-
Consulte Asignación de números prefijados en       testar llamadas entrantes. Si desea hacer que
la página 111 para ver cómo asignar un núme-       esta unidad rechace automáticamente todas
ro a una memoria.                                  las llamadas entrantes, consulte Ajuste de la
                                                   respuesta automática en la página 112.
1 Pulse MULTI-CONTROL arriba o abajo
para seleccionar un número.                        1 Cuando entre una llamada, presione
# También puede presionar uno de los botones       MULTI-CONTROL.
del 0 a 9 del mando a distancia para seleccionar   # También se puede aceptar una llamada telefó-
un número de presintonía.                          nica presionando OFF HOOK en el mando a dis-
# El número de presintonía 10 se asigna al 0.      tancia.
# Si el número ya está ingresado en el Directo-    # Si en el teléfono móvil está seleccionado el
rio de teléfonos, también aparecerá el nombre.     modo privado, puede que la función manos libres
# Al seleccionar números de presintonías que       no esté disponible.
no han sido asignados, aparece No data.
                                                   2 Para finalizar la llamada, pulse PHONE.
2 Pulse MULTI-CONTROL para hacer una               El tiempo estimado de la llamada aparece en
llamada.                                           el display (esto puede diferir ligeramente del
                                                   tiempo de llamada real).
                                                   # También se puede finalizar la llamada presio-
Reconocimiento de voz
                                                   nando ON HOOK en el mando a distancia.
Si su teléfono móvil posee tecnología de reco-     # Puede que escuche un ruido al desconectar el
nocimiento de voz, puede hacer una llamada         teléfono.
mediante comandos de voz.
! El funcionamiento es diferente según el
    tipo de teléfono móvil. Consulte el manual


                                                                                                Es     101
Sección

02        Utilización de esta unidad

       Rechazo de una llamada entrante                     2 Pulse PHONE para finalizar todas las lla-
       Puede rechazar una llamada entrante. Para re-       madas.
       chazar automáticamente todas las llamadas           Pulse PHONE para finalizar todas las llama-
       entrantes, consulte Ajuste del rechazo automá-      das, incluida una llamada en espera.
       tico en la página 112.                              # También se pueden finalizar todas las llama-
                                                           das presionando ON HOOK en el mando a dis-
       % Cuando entre una llamada, presione                tancia.
       PHONE.                                              # Además de alternar entre las llamadas en
       Se rechazará la llamada.                            línea, no puede terminar cada llamada en espera
       # También se puede rechazar una llamada pre-        por separado. Pulse PHONE para finalizar todas
       sionando ON HOOK en el mando a distancia.           las llamadas.
       # La llamada rechazada se registra en la lista de
       historial de llamadas perdidas. Para obtener in-    Rechazo de una llamada en espera
       formación sobre la lista de historial de llamadas
                                                           Si desea no interrumpir su llamada actual
       perdidas, consulte Uso del Historial de llamadas
                                                           para responder una llamada entrante, puede
       en la página 110.
                                                           rechazarla y agregar el número a la lista de
                                                           historial de llamadas perdidas.
       Atender una llamada en espera
       Si, mientras está hablando por teléfono, se         % Pulse PHONE para rechazar una llama-
       produce otra llamada entrante, el número (o         da entrante.
       nombre si figura en el directorio de teléfonos)     # También se puede rechazar una llamada en
       de la persona que llama aparecerá en el dis-        espera presionando ON HOOK en el mando a
       play para indicarle que tiene una llamada en-       distancia.
       trante. Puede poner en espera a la persona de
       la primera llamada mientras usted responde
                                                           Introducción a las funciones
       la llamada entrante; o bien rechazar la llama-
       da, en cuyo caso quedará registrado el núme-        avanzadas
       ro de la llamada perdida.                           1 Presione MULTI-CONTROL para visuali-
       ! Dependiendo del teléfono móvil, esta fun-         zar el menú principal.
           ción no se puede utilizar.                      FUNCTION, AUDIO, ENTERTAINMENT y
       ! Esta unidad sólo puede procesar tres lla-         RECEIVING MOVIE aparecen en el display.
           madas simultáneamente. Por lo tanto, de-
           pendiendo del teléfono móvil que se utilice     2 Utilice MULTI-CONTROL para seleccio-
           con esta unidad, puede que esta función         nar FUNCTION.
           no se ejecute correctamente.                    Haga girar el control para cambiar la opción
                                                           de menú y presiónelo para seleccionarla.
       1 Pulse MULTI-CONTROL para responder                Aparece el nombre de la función en el display.
       una llamada entrante.
       # También se puede responder una llamada en         3 Gire el control MULTI-CONTROL para
       espera presionando OFF HOOK en el mando a           cambiar las funciones.
       distancia.                                          Haga girar MULTI-CONTROL para alternar
       # Si presiona MULTI-CONTROL se cambiará             entre las funciones.
       entre las personas que llaman y están en espera.    Los nombres de las funciones que se muestran
                                                           en el display son diferentes según la conexión y
                                                           el estado de registro del teléfono móvil.
                                                           Si aún no está conectado


 102      Es
Sección

  Utilización de esta unidad                                                                             02

Search&Connect (buscar y conectar)—                 volverá automáticamente a la visualización nor-
Connection open (conexión abierta)—                 mal.
Connect phone (conectar teléfono)—
Delete phone (eliminar teléfono)—
PH.B.Transfer (transferencia del directorio de      Conexión de un teléfono móvil
teléfonos)—Refuse calls (ajuste de rechazo          Para utilizar un teléfono de forma inalámbrica
automático)—Auto answer (ajuste de res-             con esta unidad, en primer lugar es necesario


                                                                                                         Español
puesta automática)—Ring tone (selección de          establecer una conexión con la tecnología ina-
tono de llamada)—Auto connect (ajuste de            lámbrica Bluetooth. Existen varias formas de
conexión automática)—Echo cancel (cancela-          realizar esto.
ción de eco)—Device info. (información del          ! Un teléfono se puede conectar a través de
dispositivo)                                           tecnología inalámbrica Bluetooth sin estar
Si está conectado, pero aún no se ha regis-            registrado con esta unidad. En este caso, el
trado                                                  teléfono estará temporalmente conectado
Disconnect phone (desconectar teléfono)—               pero con las funciones disponibles limi-
Set phone (registrando teléfono)—                      tadas. Para aprovechar completamente
Delete phone (eliminar teléfono)—                      todas las funciones disponibles, se reco-
PH.B.Transfer (transferencia del directorio de         mienda registrar su teléfono en esta uni-
teléfonos)—Number dial (llamar ingresando              dad. Consulte Registro del teléfono móvil
un número)—Refuse calls (ajuste de rechazo             conectado en la página siguiente para obte-
automático)—Auto answer (ajuste de res-                ner más información.
puesta automática)—Ring tone (selección de
tono de llamada)—Auto connect (ajuste de            Búsqueda de los teléfonos móviles
conexión automática)—Echo cancel (cancela-          disponibles
ción de eco)—Device info. (información del
                                                    Puede hacer que esta unidad busque los telé-
dispositivo)
                                                    fonos disponibles en el área que tengan tecno-
Si ya está conectado y registrado
                                                    logía inalámbrica Bluetooth, y luego
Disconnect phone (desconectar teléfono)—
                                                    seleccionar el teléfono al que desea conectar-
Delete phone (eliminar teléfono)—
                                                    se en una lista visualizada en la pantalla.
PH.B.Transfer (transferencia del directorio de
teléfonos)—PH.B.Name view (ver nombre del           1 Utilice MULTI-CONTROL para seleccio-
directorio de teléfonos)—Clear memory (bo-          nar Search&Connect en el menú de funcio-
rrar la memoria)—Number dial (llamar ingre-         nes.
sando un número)—Refuse calls (ajuste de
rechazo automático)—Auto answer (ajuste             2 Pulse MULTI-CONTROL para hacer una
de respuesta automática)—Ring tone (selec-          búsqueda de los teléfonos móviles disponi-
ción de tono de llamada)—Auto connect               bles.
(ajuste de conexión automática)—                    Mientras se realiza la búsqueda, se mostrará
Echo cancel (cancelación de eco)—                   Searching. Cuando se encuentren los teléfo-
Device info. (información del dispositivo)          nos móviles disponibles que tengan tecnolo-
# Para volver a la visualización de reproducción,   gía inalámbrica Bluetooth, se mostrarán los
presione BAND.                                      nombres de los dispositivos o Not found (si
# Si no se utilizan las funciones exceptuando       no se pueden obtener los nombres).
Search&Connect, Connection open,                    # Si la unidad no puede encontrar ningún telé-
Connect phone, PH.B.Transfer,                       fono móvil, se mostrará Not found.
Disconnect phone, Number dial y
Clear memory en unos 30 segundos, el display


                                                                                                Es    103
Sección

02        Utilización de esta unidad

       3 Pulse MULTI-CONTROL arriba o abajo                  # Es posible que tenga que introducir el código
       para seleccionar el nombre del dispositivo            de enlace en su teléfono móvil para completar la
       que desea conectar.                                   conexión.
                                                             # El ajuste predefinido del código de enlace es
       4 Pulse MULTI-CONTROL para conectar el                0000. Puede cambiar este código en el ajuste ini-
       teléfono móvil seleccionado.                          cial. Consulte Ingreso del código PIN para la cone-
       Mientras se realiza la conexión, se mostrará          xión inalámbrica Bluetooth en la página 124.
       Connecting. Para completar la conexión, veri-
       fique el nombre del dispositivo (p. ej., Pioneer
       BT unit) e ingrese el código de enlace en su          Desconexión de un teléfono móvil
       teléfono móvil. Si la conexión se establece, se       Cuando haya terminado de utilizar el teléfono
       visualizará Connected.                                en esta unidad, puede desactivar la conexión
       # Si la conexión no se ha realizado correcta-         Bluetooth.
       mente, aparece ERROR. Compruebe el teléfono
       móvil e inténtelo de nuevo.                           1 Utilice MULTI-CONTROL para seleccio-
       # El ajuste predefinido del código de enlace es       nar Disconnect phone en el menú de fun-
       0000. Puede cambiar este código en el ajuste ini-     ciones.
       cial. Consulte Ingreso del código PIN para la cone-   El nombre del dispositivo del teléfono conec-
       xión inalámbrica Bluetooth en la página 124.          tado se visualiza en el display.

                                                             2 Pulse MULTI-CONTROL para desco-
       Uso de un teléfono móvil para iniciar                 nectar un teléfono móvil de esta unidad.
       una conexión                                          Una vez completada la desconexión, aparece
       Si ajusta la unidad en el modo                        Disconnected.
       Connection open podrá establecer una cone-
       xión inalámbrica Bluetooth desde su teléfono.
       Es posible que tenga que consultar el manual          Registro del teléfono móvil
       de funcionamiento de su teléfono si no está           conectado
       seguro de cómo iniciar una conexión desde el          Puede registrar un teléfono que esté conec-
       teléfono.                                             tado temporalmente a esta unidad con el fin
                                                             de aprovechar al máximo las funciones de la
       1 Utilice MULTI-CONTROL para seleccio-                tecnología inalámbrica Bluetooth. Es posible
       nar Connection open en el menú de funcio-             registrar un total de tres teléfonos.
       nes.
                                                             1 Utilice MULTI-CONTROL para seleccio-
       2 Presione MULTI-CONTROL para abrir la                nar Set phone en el menú de funciones.
       conexión.
       Se visualizará Always waiting y la unidad es-         2 Pulse MULTI-CONTROL arriba o abajo
       tará en espera de conexión desde el teléfono          para seleccionar una asignación de regis-
       móvil.                                                tro.
                                                             P1 (teléfono de usuario 1)—P2 (teléfono de
       3 Uso del teléfono móvil para la conexión             usuario 2)—P3 (teléfono de usuario 3)
       a esta unidad.
       # El funcionamiento es diferente según el tipo
       de teléfono móvil. Consulte el manual de su telé-
       fono móvil para ver más instrucciones.


 104      Es
Sección

  Utilización de esta unidad                                                                               02

# A medida que seleccione cada asignación,           # Si la asignación está vacía, se mostrará
podrá ver si un teléfono ya está registrado o no.    No data y la operación no será posible.
Si la asignación está vacía, se visualizará          # Si necesita saber la dirección BD (Bluetooth
No data. Si ya se ha adoptado la asignación, apa-    Device) del teléfono, pulse MULTI-CONTROL iz-
recerá el nombre del dispositivo. Si desea susti-    quierda aquí.
tuir una asignación con un nuevo teléfono,
primero elimine la asignación actual. Para obte-     3 Pulse MULTI-CONTROL derecha para se-


                                                                                                           Español
ner instrucciones detalladas, consulte Elimina-      leccionar Delete YES.
ción de un teléfono registrado en esta página.       Se visualiza Delete YES. El borrado del teléfo-
# Si necesita saber la dirección BD (Bluetooth       no se pondrá en modo de espera.
Device) del teléfono, pulse MULTI-CONTROL iz-        # Si no desea eliminar un teléfono registrado,
quierda aquí.                                        presione MULTI-CONTROL izquierda. Se cambia-
                                                     rá el display.
3 Presione MULTI-CONTROL para regis-
trar el teléfono móvil actual conectado.             4 Pulse MULTI-CONTROL para eliminar el
Una vez completado el registro, aparece              teléfono.
Reg. Completed.                                      Una vez que se borre el teléfono, se visualizará
# Si el registro no se ha realizado correctamen-     Deleted.
te, aparece Reg. ERROR. En este caso, vuelva al
paso 1 e inténtelo de nuevo.
                                                     Conexión a un teléfono móvil
     Nota
                                                     registrado
                                                     Cuando su teléfono está registrado en esta
Dependiendo del tipo de teléfono móvil, el regis-    unidad es fácil establecer una conexión Blue-
tro puede estar disponible únicamente desde un       tooth, ya sea manualmente seleccionando
teléfono móvil. (Consulte Uso de un teléfono         una asignación de registro o automáticamen-
móvil para iniciar una conexión en la página ante-   te cuando el teléfono registrado se encuentre
rior.)                                               dentro del alcance.

Eliminación de un teléfono                           Conexión manual a un teléfono
registrado                                           registrado
Si ya no necesita utilizar un teléfono registra-     1 Utilice MULTI-CONTROL para seleccio-
do en esta unidad, puede eliminarlo de la asig-      nar Connect phone en el menú de funcio-
nación de registro para utilizar otro teléfono.      nes.
! Si un teléfono registrado se elimina de esta
    unidad, el Directorio de teléfonos y otros       2 Pulse MULTI-CONTROL arriba o abajo
    ajustes de dicho teléfono se borran simul-       para seleccionar una asignación de regis-
    táneamente.                                      tro.
                                                     P1 (teléfono de usuario 1)—P2 (teléfono de
1 Utilice MULTI-CONTROL para seleccio-               usuario 2)—P3 (teléfono de usuario 3)
nar Delete phone en el menú de funciones.            # Si la asignación está vacía, se mostrará
                                                     No data y la operación no será posible.
2 Pulse MULTI-CONTROL arriba o abajo                 # Si necesita saber la dirección BD (Bluetooth
para seleccionar una asignación de regis-            Device) del teléfono, pulse MULTI-CONTROL iz-
tro.                                                 quierda aquí.
P1 (teléfono de usuario 1)—P2 (teléfono de
usuario 2)—P3 (teléfono de usuario 3)


                                                                                                Es      105
Sección

02        Utilización de esta unidad

       3 Pulse MULTI-CONTROL para conectar el             2 Pulse MULTI-CONTROL para activar la
       teléfono móvil seleccionado.                       conexión automática.
       Mientras se realiza la conexión, se mostrará       Si su teléfono móvil está preparado para la co-
       Connecting. Una vez completada la conexión,        nexión inalámbrica Bluetooth, se establecerá
       aparece Connected.                                 automáticamente la conexión a esta unidad.
       # Si Auto connect está activado, el teléfono       # Para desactivar la conexión automática, vuel-
       móvil registrado conectado más recientemente       va a pulsar MULTI-CONTROL.
       se conecta automáticamente. Para obtener más
       información, consulte Conexión automática a un
       teléfono registrado en esta página.                Uso del Directorio de teléfonos
       # Si la conexión no se ha realizado correcta-      El Directorio de teléfonos permite almacenar
       mente, aparece ERROR. Compruebe el teléfono        hasta 650 nombres y números. Utilice el Direc-
       móvil e inténtelo de nuevo.                        torio de teléfonos para buscar números en el
                                                          display de la unidad y seleccionar números
                                                          para llamar. Los nombres y los números de te-
       Conexión automática a un teléfono
                                                          léfono almacenados en una libreta de direc-
       registrado
                                                          ciones de un teléfono de usuario registrado se
       Cuando la conexión automática esté activa, la      pueden transferir al Directorio de teléfonos, lo
       unidad establecerá automáticamente una co-         que permite que se llene de contactos de
       nexión a un teléfono móvil registrado. Cuando      forma rápida y sencilla.
       el teléfono móvil registrado conectado más re-
       cientemente esté dentro de la cobertura, se
       realizará la conexión automática.                  Transferencia de entradas al
       ! Es posible que esta característica no fun-       Directorio de teléfonos
           cione con todos los teléfonos. Si su teléfo-   Para rellenar el Directorio de teléfonos puede
           no registrado no se puede conectar con la      transferir los números almacenados en una li-
           Conexión automática, utilice el método de      breta de direcciones de un teléfono de usuario
           conexión manual que se describe en Cone-       registrado.
           xión manual a un teléfono registrado en la     El Directorio de teléfonos puede almacenar un
           página anterior.                               total de 650 registros; 400 del usuario 1, 200
       ! Es posible que no funcione esta caracterís-      del usuario 2 y 50 del usuario 3.
           tica si está reproduciendo canciones en su     ! En algunos teléfonos móviles, es posible
           reproductor de audio Bluetooth a través de        que no se pueda transferir todo el Directo-
           tecnología inalámbrica Bluetooth. En tal          rio de teléfonos de una vez. En este caso,
           caso, detenga la reproducción o cambie a          transfiera una a una las entradas del Direc-
           otra fuente para que su teléfono móvil            torio de teléfonos desde su teléfono a tra-
           pueda conectarse a esta unidad por medio          vés de su teléfono móvil.
           de esta función.                               ! Según el teléfono móvil conectado a través
       ! Cuando utiliza la unidad en el menú de              de tecnología inalámbrica Bluetooth, esta
           funciones de la fuente TEL o la fuente            unidad podría no visualizar correctamente
           BT Audio, la unidad no realiza una cone-          el Directorio de teléfonos. (Algunos carac-
           xión automática a su teléfono registrado.         teres pueden ser confusos).
       ! Esta función no se puede configurar para         ! Si el Directorio de teléfonos del teléfono
           cada teléfono de usuario distinto.                móvil contiene datos de imagen, puede
                                                             ocurrir que no se transfiera correctamente.
       1 Utilice MULTI-CONTROL para seleccio-
       nar Auto connect en el menú de funciones.


 106      Es
Sección

  Utilización de esta unidad                                                                                02

1 Utilice MULTI-CONTROL para seleccio-               Llamada a un número del Directorio
nar PH.B.Transfer en el menú de funciones.           de teléfonos
2 Presione MULTI-CONTROL para acceder                     Importante
al modo de espera de transferencia del di-           Para realizar esta operación, asegúrese de esta-
rectorio de teléfonos.                               cionar el vehículo y poner el freno de mano.
Transfer aparece en el display.
# Con la fuente TEL seleccionada, también


                                                                                                            Español
                                                     Después de encontrar el número al que desea
podrá visualizar el modo de espera de transferen-    llamar en el Directorio de teléfonos, puede se-
cia del directorio de teléfonos si mantiene pulsa-   leccionar la entrada y efectuar la llamada.
do PHONE.
                                                     1 Pulse LIST para visualizar el Directorio
3 Utilice el teléfono móvil para realizar la         de teléfonos.
transferencia del Directorio de teléfonos.           Pulse LIST repetidamente para cambiar entre
Realice la transferencia del Directorio de telé-     las siguientes listas:
fonos utilizando el teléfono móvil. Para obte-       Directorio de teléfonos—Llamadas perdidas—
ner más información, consulte el manual de           Llamadas marcadas—Llamadas recibidas
instrucciones del teléfono móvil.                    # Para obtener información sobre llamadas per-
# El display indica cuántas entradas se han          didas, marcadas y recibidas, consulte Uso del
transferido y el número total que se almacenará      Historial de llamadas en la página 110.
en esta unidad.
                                                     2 Pulse MULTI-CONTROL izquierda o de-
4 Aparece Data transferred y se completa             recha para seleccionar la primera letra del
la transferencia del Directorio de teléfonos.        nombre que está buscando.
                                                     # También puede seleccionar la primera letra
Cambio del orden de visualización                    del nombre que está buscando girando
del Directorio de teléfonos                          MULTI-CONTROL.
Se pueden visualizar la entradas del Directorio      3 Pulse MULTI-CONTROL para visualizar
de teléfonos desde el primer nombre o desde          las entradas.
el último.                                           El display muestra una entrada del Directorio
! Es posible que esta función no esté dispo-         de teléfonos que empieza por dicha letra
    nible en algunos teléfonos móviles.              (p.ej., nombres que empiezan por “B” cuando
                                                     se selecciona la “B”).
1 Utilice MULTI-CONTROL para seleccio-
nar PH.B.Name view en el menú de funcio-             4 Pulse MULTI-CONTROL arriba o abajo
nes.                                                 para seleccionar la entrada del Directorio
Invert names YES aparece en el display.              de teléfonos a la que desee llamar.
                                                     # También puede seleccionar una entrada del
2 Pulse MULTI-CONTROL para cambiar el
                                                     Directorio de teléfonos a la que desee llamar gi-
orden de visualización de nombres.
                                                     rando MULTI-CONTROL.
Se mostrará Inverted y se cambiará el orden
de visualización de nombres.                         5 Presione MULTI-CONTROL derecha para
Si presiona repetidamente MULTI-CONTROL              ver el género y la lista de números de telé-
se cambiará el orden de visualización entre el       fono de la entrada seleccionada.
nombre y los apellidos.                              # También puede ver el género y la lista de nú-
                                                     meros de teléfono de la entrada seleccionada
                                                     presionando MULTI-CONTROL.


                                                                                                   Es    107
Sección

02         Utilización de esta unidad

       # Puede hacer que el nombre y el número de te-      4 Pulse MULTI-CONTROL para asignar el
       léfono se desplacen, presionando DISPLAY y          género al número de teléfono.
       manteniendo presionado.                             El género seleccionado se asignará al número
       # Si va a introducir varios números de teléfono     de teléfono, y el display cambiará a la lista de
       en una entrada, seleccione un número girando        géneros y números de teléfono.
       MULTI-CONTROL.
       # Pulse MULTI-CONTROL izquierda si desea re-        Edición del nombre de una entrada
       gresar y seleccionar otra entrada.
                                                           del Directorio de teléfonos
       6 Pulse MULTI-CONTROL para hacer una                     Importante
       llamada.
                                                           Para realizar esta operación, asegúrese de esta-
       7    Para finalizar la llamada, pulse PHONE.        cionar el vehículo y poner el freno de mano.

                                                           Puede editar los nombres de las entradas del
       Asignación de géneros a números de                  Directorio de teléfonos. Cada nombre puede
       teléfono                                            tener una longitud de hasta 40 caracteres.
                Importante
                                                           1 Visualice el género y la lista de números
       Para realizar esta operación, asegúrese de esta-    de teléfono de la entrada del Directorio de
       cionar el vehículo y poner el freno de mano.        teléfonos deseada.
                                                           Consulte los pasos 1 al 5 Llamada a un núme-
       Si hay muchas entradas en el Directorio de te-      ro del Directorio de teléfonos en la página ante-
       léfonos, puede resultar útil asignarlos a géne-     rior para el procedimiento.
       ros (categorías) específicos para que la
       búsqueda sea más fácil. Existen cuatro géne-        2 Mantenga pulsado MULTI-CONTROL
       ros preajustados a los que puede asignar en-        para visualizar la pantalla de ingreso de gé-
       tradas: Home, Mobile, Office y Other.               nero.
                                                           Se visualiza Edit genre.
       1 Visualice el género y la lista de números
       de teléfono de la entrada del Directorio de         3 Gire MULTI-CONTROL para cambiar a la
       teléfonos deseada.                                  pantalla de ingreso de nombre.
       Consulte los pasos 1 al 5 Llamada a un núme-        Al girar MULTI-CONTROL se cambiarán las
       ro del Directorio de teléfonos en la página ante-   pantallas de entrada en el siguiente orden:
       rior para el procedimiento.                         Edit genre (pantalla de ingreso de género)—
                                                           Edit name (pantalla de ingreso de nombre)—
       2 Mantenga pulsado MULTI-CONTROL                    Edit number (pantalla de ingreso de número)
       para visualizar la pantalla de ingreso de gé-       —Clear memory (pantalla de borrado de me-
       nero.                                               moria)
       Se visualiza Edit genre.
                                                           4 Presione DISPLAY para seleccionar el
       3 Pulse MULTI-CONTROL arriba o abajo                tipo de carácter deseado.
       para seleccionar un género.                         Al pulsar DISPLAY se cambiarán los tipos de
       Cada vez que se pulsa MULTI-CONTROL arri-           caracteres en el siguiente orden:
       ba o abajo, se selecciona un género en el si-       Alfabeto (mayúsculas)—Alfabeto (minúscu-
       guiente orden:                                      las)—números y símbolos—Caracteres euro-
       Home (inicio)—Mobile (móvil)—Office (ofici-         peos, caracteres rusos o caracteres griegos
       na)—Other (otro)


 108       Es
Sección

  Utilización de esta unidad                                                                              02

# Si mantiene presionado DISPLAY, puede cam-        3 Gire MULTI-CONTROL para cambiar a la
biar el conjunto de caracteres entre ISO8859-1      pantalla de ingreso de número.
(caracteres europeos), ISO8859-5 (caracteres        Al girar MULTI-CONTROL se cambiarán las
rusos) e ISO8859-7 (caracteres griegos) de mane-    pantallas de entrada en el siguiente orden:
ra alternante.                                      Edit genre (pantalla de ingreso de género)—
# Los caracteres europeos, los caracteres rusos     Edit name (pantalla de ingreso de nombre)—
y los caracteres griegos no se pueden combinar.     Edit number (pantalla de ingreso de número)


                                                                                                          Español
                                                    —Clear memory (pantalla de borrado de me-
5 Pulse MULTI-CONTROL arriba o abajo                moria)
para seleccionar una letra.
# Para eliminar un carácter y dejar un espacio,     4 Pulse MULTI-CONTROL izquierda o de-
seleccione “_” (subrayado).                         recha para mover el cursor al número que
                                                    desee cambiar.
6 Presione MULTI-CONTROL izquierda o
derecha para mover el cursor a la anterior          5 Pulse MULTI-CONTROL arriba o abajo
o siguiente posición de carácter.                   para cambiar los números.
Cuando visualice la letra deseada, pulse            Repita estos pasos hasta que termine.
MULTI-CONTROL derecha para mover el cur-
sor a la siguiente posición y seleccione la letra   6 Presione MULTI-CONTROL para guardar
siguiente. Pulse MULTI-CONTROL izquierda            el nuevo número.
para mover el cursor hacia atrás en el display.
                                                    Borrado de una entrada del
7 Pulse MULTI-CONTROL para guardar el
                                                    Directorio de teléfonos
nuevo nombre.
                                                         Importante
Edición de números de teléfono                      Para realizar esta operación, asegúrese de esta-
                                                    cionar el vehículo y poner el freno de mano.
     Importante
Para realizar esta operación, asegúrese de esta-    Puede eliminar entradas del Directorio de telé-
cionar el vehículo y poner el freno de mano.        fonos una a una.
                                                    Para borrar todas las entradas del Directorio
Puede editar los números de teléfono de las         de teléfonos, consulte Borrado de la memoria
entradas del Directorio de teléfonos.               en la página 112.

1 Visualice el género y la lista de números         1 Visualice el género y la lista de números
de teléfono de la entrada del Directorio de         de teléfono de la entrada del Directorio de
teléfonos deseada.                                  teléfonos deseada.
Consulte los pasos 1 al 5 Llamada a un núme-        Consulte los pasos 1 al 5 Llamada a un núme-
ro del Directorio de teléfonos en la página 107     ro del Directorio de teléfonos en la página 107
para el procedimiento.                              para el procedimiento.

2 Mantenga pulsado MULTI-CONTROL                    2 Mantenga pulsado MULTI-CONTROL
para visualizar la pantalla de ingreso de gé-       para visualizar la pantalla de ingreso de gé-
nero.                                               nero.
Se visualiza Edit genre.                            Se visualiza Edit genre.


                                                                                                 Es    109
Sección

02        Utilización de esta unidad

       3 Gire MULTI-CONTROL para cambiar a la             Directorio de teléfonos—Llamadas perdidas—
       pantalla de borrado de memoria.                    Llamadas marcadas—Llamadas recibidas
       Al girar MULTI-CONTROL se cambiarán las            # Para obtener información sobre el Directorio
       pantallas de entrada en el siguiente orden:        de teléfonos, consulte Uso del Directorio de teléfo-
       Edit genre (pantalla de ingreso de género)—        nos en la página 106.
       Edit name (pantalla de ingreso de nombre)—         # Si no se han almacenado números de teléfo-
       Edit number (pantalla de ingreso de número)        no en la lista seleccionada, se visualizará
       —Clear memory (pantalla de borrado de me-          No data.
       moria)                                             # Si no hay ningún nombre en el Directorio de
                                                          teléfonos, aparecerá el número de teléfono en
       4 Pulse MULTI-CONTROL derecha para                 lugar del nombre.
       mostrar una pantalla de confirmación.
       Se visualiza Clear memory YES.                     2 Gire MULTI-CONTROL para seleccionar
       # Si no desea borrar la memoria que ha selec-      un número de teléfono.
       cionado, pulse MULTI-CONTROL izquierda. Se         Gire MULTI-CONTROL para cambiar los nú-
       cambiará el display.                               meros de teléfono almacenados en la lista.
                                                          # Si el número ya está ingresado en el Directo-
       5 Presione MULTI-CONTROL para eliminar             rio de teléfonos, aparecerá el nombre.
       la entrada del Directorio de teléfonos.            # También puede cambiar el número de teléfo-
       Se visualiza Cleared.                              no, pulsando MULTI-CONTROL arriba o abajo.
       La entrada del Directorio de teléfonos se elimi-
       nará. El display cambia a la lista de ingreso      3 Presione MULTI-CONTROL derecha para
       del Directorio de teléfonos.                       visualizar la lista detallada.
                                                          El nombre y número de teléfono se visualizan
                                                          en la lista detallada.
       Uso del Historial de llamadas                      # Si el número ya está ingresado en el Directo-
               Importante                                 rio de teléfonos, también aparecerá el nombre.
                                                          # Al girar MULTI-CONTROL se cambiará al nú-
       Para realizar esta operación, asegúrese de esta-   mero de teléfono anterior o siguiente visualizado
       cionar el vehículo y poner el freno de mano.       en la lista detallada.
                                                          # Puede hacer que el nombre y el número de te-
       Las 12 últimas llamadas realizadas (marca-
                                                          léfono se desplacen, presionando DISPLAY y
       das), recibidas y perdidas se almacenan en el
                                                          manteniendo presionado.
       Historial de llamadas. Puede realizar una bús-
                                                          # Si no realiza ninguna acción en unos 30 se-
       queda en el Historial de llamadas y llamar a
                                                          gundos, la visualización de la lista se cancelará
       los números desde éste.
                                                          automáticamente.

       Visualización del Historial de llamadas
       El Historial de llamadas se divide en tres gru-
       pos: Llamadas perdidas, Llamadas marcadas
       y Llamadas recibidas. Puede ver la fecha y la
       hora de la llamada, así como el número (y el
       nombre si está en el Directorio de teléfonos).

       1 Pulse LIST para visualizar la lista.
       Pulse LIST repetidamente para cambiar entre
       las siguientes listas:


 110      Es
Sección

  Utilización de esta unidad                                                                             02

Llamada a un número desde el                       Asignación de números prefijados
Historial de llamadas
                                                        Importante
1 Visualice la lista y seleccione un número
de teléfono.                                       Para realizar esta operación, asegúrese de esta-
Visualice el número de teléfono al que desea       cionar el vehículo y poner el freno de mano.
llamar.
                                                   Es posible asignar a la memoria los números
Consulte Visualización del Historial de llamadas


                                                                                                         Español
                                                   que marca frecuentemente, para volver a mar-
en la página anterior.                             carlos rápidamente.
2 Pulse MULTI-CONTROL para hacer una
                                                   1 Seleccione un número de teléfono del
llamada.
                                                   Directorio de teléfonos o del historial de
Mientras se llama, se muestra el número de         llamadas.
teléfono.
                                                   Consulte las instrucciones descritas en las pá-
# Si el número ya está ingresado en el Directo-
                                                   ginas anteriores sobre cómo seleccionar un
rio de teléfonos, también aparecerá el nombre.
                                                   número de teléfono del Directorio de teléfonos
3 Para finalizar la llamada, pulse PHONE.          o del historial de llamadas.
El tiempo estimado de la llamada aparece en
                                                   2 Presione uno de los botones de 0 a 9 en
el display (esto puede diferir ligeramente del     el mando a distancia hasta escuchar un
tiempo de llamada real).
                                                   aviso sonoro.
                                                   El número de teléfono seleccionado se ha al-
Llamada a un número internacional                  macenado en la memoria. La próxima vez que
desde el Historial de llamadas                     pulse el mismo botón predefinido, el número
Cuando llame a un número internacional al-         de teléfono se recuperará de la memoria.
macenado en el Historial de llamadas, ante-
ponga al número de país un signo +.
                                                   Realización de una llamada
1 Visualice el número de teléfono para el          ingresando el número de teléfono
que desea hacer la llamada internacional.
                                                        Importante
Consulte Llamada a un número internacional
desde el Historial de llamadas en esta página.     Para realizar esta operación, asegúrese de esta-
                                                   cionar el vehículo y poner el freno de mano.
2 Mantenga presionado MULTI-CONTROL
para agregar +.                                    1 Utilice MULTI-CONTROL para seleccio-
# Para borrar el +, mantenga presionado            nar Number dial en el menú de funciones.
MULTI-CONTROL otra vez.                            # También se puede presionar DIRECT en el
                                                   mando a distancia para acceder a este menú
3 Pulse MULTI-CONTROL para hacer una               desde la pantalla de espera.
llamada.
Mientras llama, parpadeará Dialling.               2 Pulse MULTI-CONTROL arriba o abajo
                                                   para seleccionar un número.
4 Para finalizar la llamada, pulse PHONE.          # También es posible ingresar los números pre-
El tiempo estimado de la llamada aparece en        sionando 0 a 9 en el mando a distancia.
el display (esto puede diferir ligeramente del
tiempo de llamada real).


                                                                                                Es    111
Sección

02         Utilización de esta unidad

       3 Presione MULTI-CONTROL izquierda o                  # Si no desea borrar la memoria que ha selec-
       derecha para mover el cursor a la anterior            cionado, pulse MULTI-CONTROL izquierda. Se
       o siguiente posición.                                 cambiará el display.
       # Se puede ingresar hasta 24 dígitos.
                                                             4 Pulse MULTI-CONTROL para borrar la
       4 Cuando haya terminado de ingresar el                memoria.
       número, presione MULTI-CONTROL.                       Se visualiza Cleared y los datos del elemento
                                                             seleccionado se borran de la memoria de esta
       5 Pulse MULTI-CONTROL nuevamente                      unidad.
       para hacer una llamada.

       6    Para finalizar la llamada, pulse PHONE.          Ajuste del rechazo automático
                                                             Si esta función está activada, la unidad recha-
       Borrado de la memoria                                 zará automáticamente todas las llamadas en-
                                                             trantes.
       Puede borrar la memoria de cada elemento:
                                                             ! Incluso si rechaza una llamada entrante, el
       Directorio de teléfonos, lista de historial de lla-
                                                                registro de llamada se memorizará en la
       madas marcadas/recibidas/perdidas y número
                                                                lista de historial de llamadas perdidas.
       de teléfono prefijado.
                                                             ! Esta función no se puede configurar para
       1 Utilice MULTI-CONTROL para seleccio-                   cada teléfono de usuario distinto.
       nar Clear memory en el menú de funciones.
                                                             1 Utilice MULTI-CONTROL para seleccio-
       2 Pulse MULTI-CONTROL arriba o abajo                  nar Refuse calls en el menú de funciones.
       para seleccionar un elemento.
                                                             2 Pulse MULTI-CONTROL para activar el
       Cada vez que se pulsa MULTI-CONTROL arri-
                                                             rechazo automático de llamada.
       ba o abajo, los elementos se cambian en el si-
                                                             # Para desactivar el rechazo automático de lla-
       guiente orden:
                                                             mada, vuelva a pulsar MULTI-CONTROL.
       Phone book (directorio de teléfonos)—
       Missed calls (historial de llamadas perdidas)
                                                                 Nota
       —Dialled calls (historial de llamadas marca-
       das)—Received calls (historial de llamadas re-        Si las funciones de rechazo automático y res-
       cibidas)—Dial preset (números de teléfono             puesta automática están activadas, el rechazo
       predefinidos)—All clear (borrar toda la memo-         automático tendrá prioridad, y todas las llamadas
       ria)                                                  entrantes se rechazarán automáticamente.
       # Si desea borrar todo el Directorio de teléfonos,
       la lista del historial de llamadas marcadas/recibi-
       das/perdidas y el número de teléfono predefinido,     Ajuste de la respuesta automática
       seleccione All clear.                                 Si esta función está activada, la unidad con-
                                                             testará automáticamente todas las llamadas
       3 Pulse MULTI-CONTROL derecha para se-                entrantes.
       leccionar el elemento que desea eliminar              ! Esta función no se puede configurar para
       de esta unidad.                                          cada teléfono de usuario distinto.
       Se visualiza Clear memory YES. El borrado de
       memoria se ajustará ahora en modo en espe-            1 Utilice MULTI-CONTROL para seleccio-
       ra.                                                   nar Auto answer en el menú de funciones.


 112       Es
Sección

  Utilización de esta unidad                                                                             02

2 Pulse MULTI-CONTROL para activar la               1 Utilice MULTI-CONTROL para seleccio-
respuesta automática.                               nar Echo cancel en el menú de funciones.
# Para desactivar la respuesta automática, vuel-
va a pulsar MULTI-CONTROL.                          2 Pulse MULTI-CONTROL para activar la
                                                    cancelación de eco.
    Nota                                            # Para desactivar la cancelación de eco, vuelva
                                                    a pulsar MULTI-CONTROL.
Si las funciones de rechazo automático y res-


                                                                                                         Español
puesta automática están activadas, el rechazo
automático tendrá prioridad, y todas las llamadas   Visualización de la dirección BD
entrantes se rechazarán automáticamente.            (Bluetooth Device)
                                                    Cada dispositivo que posee tecnología inalám-
Cambio del tono de llamada                          brica Bluetooth recibe una dirección de dispo-
                                                    sitivo única de 48 bits. Cada dirección del
La unidad ofrece una variedad de tonos de
                                                    dispositivo está formada por una cadena hexa-
timbre para llamadas entrantes, así como un
                                                    decimal de 12 dígitos.
ajuste de desactivado.
                                                    Puede visualizar la dirección BD de su teléfo-
! El tono de llamada que seleccione para
                                                    no móvil y esta unidad.
   esta unidad no tiene efecto en el tono de
   llamada utilizado por su teléfono. Si no
   desea que su teléfono y esta unidad sue-         Visualización de la dirección BD de
   nen al mismo tiempo, se recomienda de-           esta unidad
   sactivar el tono de llamada de uno de los        1 Utilice MULTI-CONTROL para seleccio-
   dispositivos.                                    nar Device info. en el menú de funciones.
                                                    El nombre del dispositivo (p. ej., Pioneer BT
1 Utilice MULTI-CONTROL para seleccio-
                                                    unit) de esta unidad se mostrará en el display.
nar Ring tone en el menú de funciones.
                                                    2 Pulse MULTI-CONTROL izquierda para
2 Pulse MULTI-CONTROL izquierda o de-
                                                    visualizar la dirección BD.
recha para seleccionar un tono de llamada.
                                                    Aparece la cadena hexadecimal de 12 dígitos.
Cada vez que se pulsa MULTI-CONTROL iz-
                                                    # Pulse MULTI-CONTROL derecha para regre-
quierda o derecha, se selecciona un tono de
                                                    sar al nombre del dispositivo.
timbre en el siguiente orden:
OFF (tono de llamada desactivado)—BEEP1
(tono de llamada 1)—BEEP2 (tono de llamada          Selección de la pantalla de
2)—BEEP3 (tono de llamada 3)                        llamadas entrantes
                                                    Es posible seleccionar la pantalla de una lla-
Cancelación del eco y reducción                     mada entrante. Puesto que esta función está
de ruido                                            disponible para cada usuario, cada uno de
                                                    ellos puede seleccionar pantallas distintas.
Cuando usa la función manos libres en el ve-
hículo, puede que escuche un eco no desea-          1 Presione MULTI-CONTROL para visuali-
do. Esta función reduce el ruido y el eco, y        zar el menú principal.
mantiene una cierta calidad de sonido.              FUNCTION, AUDIO, ENTERTAINMENT y
! Esta función no se puede configurar para          RECEIVING MOVIE aparecen en el display.
   cada teléfono de usuario distinto.


                                                                                               Es     113
Sección

02        Utilización de esta unidad

       2 Utilice MULTI-CONTROL para seleccio-         Ajustes de audio
       nar RECEIVING MOVIE.
       Haga girar el control para cambiar la opción   Introducción a los ajustes de audio
       de menú y presiónelo para seleccionarla.

       3 Utilice MULTI-CONTROL para seleccio-
       nar la pantalla.
       Haga girar el control para cambiar la opción
       de menú y presiónelo para seleccionarla.
       Pantalla 1—Pantalla 2—Pantalla 3—Pantalla                     1
       4
                                                      1 Visualización de audio
                                                        Muestra el estado de los ajustes de audio.

                                                      1 Presione MULTI-CONTROL para visuali-
                                                      zar el menú principal.
                                                      FUNCTION, AUDIO y ENTERTAINMENT apa-
                                                      recen en el display.

                                                      2 Utilice MULTI-CONTROL para seleccio-
                                                      nar AUDIO.
                                                      Haga girar el control para cambiar la opción
                                                      de menú y presiónelo para seleccionarla.
                                                      Aparece el nombre de la función de audio en
                                                      el display.

                                                      3 Haga girar MULTI-CONTROL para selec-
                                                      cionar la función de audio.
                                                      Haga girar MULTI-CONTROL para cambiar
                                                      entre las funciones de audio en el siguiente
                                                      orden:
                                                      Fader (ajuste del balance)—Powerful (ajuste
                                                      del ecualizador gráfico)—50Hz (ajuste del
                                                      ecualizador gráfico de 7 bandas)—LOUD (so-
                                                      noridad)—Sub W.1 (ajuste de subgraves acti-
                                                      vado/desactivado)—Sub W.2 (ajuste de
                                                      subgraves)—Bass (intensificación de graves)
                                                      —HPF (filtro de paso alto)—SLA (ajuste del
                                                      nivel de fuente)—ASL (nivelador automático
                                                      de sonido)
                                                      # También se puede seleccionar la función de
                                                      audio presionando AUDIO en el mando a distan-
                                                      cia.
                                                      # Se puede seleccionar Sub W.2 sólo cuando la
                                                      salida de subgraves se activa en Sub W.1.
                                                      # Cuando se seleccione el sintonizador de FM
                                                      como fuente, no se puede cambiar a SLA.


 114      Es
Sección

  Utilización de esta unidad                                                                               02

# Para volver a la visualización de cada fuente,     Uso del ecualizador
presione BAND.
                                                     El ecualizador le permite ajustar la ecualiza-
# Si no se utilizan las funciones exceptuando
                                                     ción de acuerdo con las características acústi-
50Hz en unos 30 segundos, el display volverá
                                                     cas del interior del automóvil.
automáticamente a la visualización normal.

                                                     Recuperación de las curvas de
Uso del ajuste del balance


                                                                                                           Español
                                                     ecualización
Se puede cambiar el ajuste de fader/balance,         Hay siete tipos de curvas de ecualización me-
de manera que proporcione un entorno de              morizadas que se pueden recuperar con facili-
audio ideal en todos los asientos ocupados.          dad en cualquier momento. A continuación se
                                                     ofrece una lista de estas curvas de ecualiza-
1 Utilice MULTI-CONTROL para seleccio-               ción:
nar Fader.
# Si el balance se ajustó con anterioridad, se vi-    Visualización        Curva de ecualización
sualizará Balance.
                                                      Powerful             Potente
2 Presione MULTI-CONTROL arriba o                     Natural              Natural
abajo para ajustar el balance entre los alta-         Vocal                Vocal
voces delanteros/traseros.
Cada vez que se presiona MULTI-CONTROL                Custom 1             Personalizada 1
arriba o abajo, se mueve el balance entre los         Custom 2             Personalizada 2
altavoces delanteros/traseros hacia adelante o        Flat                 Plana
hacia atrás.
Se visualiza F 15 a R 15 mientras el balance          SuperBass (S.Bass)   Supergraves
entre los altavoces delanteros/traseros se
                                                     ! Custom 1 y Custom 2 son curvas de ecua-
mueve desde adelante hacia atrás.
                                                       lización ajustadas creadas por el usuario.
# F/R 0 es el ajuste apropiado cuando se usan
                                                       Se pueden realizar los ajustes con un ecua-
sólo dos altavoces.
                                                       lizador gráfico de 7 bandas.
# Cuando el ajuste de la salida posterior es
                                                     ! Cuando se selecciona Flat no se introduce
Rear SP :S/W, no se puede ajustar el balance
                                                       ningún suplemento ni corrección en el so-
entre los altavoces delanteros/traseros. Consulte
                                                       nido. Esto es útil para verificar el efecto de
Ajuste de la salida posterior y del controlador de
                                                       los ajustes de ecualización al cambiar alter-
subgraves en la página 122.
                                                       nativamente entre Flat y una curva de
3 Presione MULTI-CONTROL izquierda o                   ecualización ajustada.
derecha para ajustar el balance entre los al-
                                                     % Presione EQ para seleccionar el ecuali-
tavoces izquierdos/derechos.
                                                     zador.
Cada vez que se presiona MULTI-CONTROL iz-
                                                     Presione EQ repetidamente para cambiar
quierda o derecha, se mueve el balance entre
                                                     entre las siguientes opciones:
los altavoces izquierdos/derechos hacia la iz-
                                                     Powerful—Natural—Vocal—Custom 1—
quierda o hacia la derecha.
                                                     Custom 2—Flat—SuperBass (S.Bass)
Se visualiza L 15 a R 15 mientras el balance
entre los altavoces izquierdos/derechos se
mueve desde la izquierda hacia la derecha.


                                                                                                   Es   115
Sección

02        Utilización de esta unidad

       Ajuste de las curvas de ecualización              ! Se puede crear una curva Custom 2
       Las curvas de ecualización que vienen predefi-      común a todas las fuentes. Si se realizan
       nidas de fábrica, con la excepción de Flat, se      ajustes cuando la curva Custom 2 está se-
       pueden ajustar a un nivel preciso (control de       leccionada, la curva Custom 2 se actuali-
       matiz).                                             zará.

       1 Utilice MULTI-CONTROL para seleccio-            1 Recupere la curva de ecualización que
       nar el ajuste del ecualizador gráfico.            desea ajustar.
       Powerful aparece en el display.                   Consulte Recuperación de las curvas de ecuali-
       Si se ha seleccionado anteriormente la curva      zación en la página anterior.
       de ecualización, se visualizará la curva selec-
                                                         2 Utilice MULTI-CONTROL para seleccio-
       cionada previamente en lugar de Powerful.
                                                         nar el ajuste del ecualizador gráfico de 7
       2 Presione MULTI-CONTROL izquierda o              bandas.
       derecha para seleccionar una curva de             La frecuencia y el nivel (p. ej., 50Hz +4) apare-
       ecualización.                                     cen en el display.
       Cada vez que se presiona MULTI-CONTROL iz-
                                                         3 Pulse MULTI-CONTROL izquierda o de-
       quierda o derecha, se seleccionan las curvas
                                                         recha para seleccionar la banda de ecuali-
       de ecualización en el siguiente orden:
                                                         zación a ajustar.
       Powerful—Natural—Vocal—Custom 1—
                                                         Cada vez que se pulsa MULTI-CONTROL iz-
       Custom 2—Flat—SuperBass (S.Bass)
                                                         quierda o derecha, se seleccionan las bandas
       3 Presione MULTI-CONTROL arriba o                 de ecualización en el siguiente orden:
       abajo para ajustar la curva de ecualización.      50Hz—125Hz—315Hz—800Hz—2kHz—
       Cada vez que se presiona MULTI-CONTROL            5kHz—12,5kHz
       arriba o abajo, se aumenta o disminuye la
                                                         4 Pulse MULTI-CONTROL arriba o abajo
       curva de ecualización, respectivamente.
                                                         para ajustar el nivel de la banda de ecuali-
       Se visualiza +6 a –4 (o –6) mientras se aumen-
                                                         zación.
       ta o disminuye la curva de ecualización.
                                                         Cada vez que se pulsa MULTI-CONTROL arri-
       # La gama real de ajustes difiere de acuerdo
                                                         ba o abajo, se aumenta o disminuye el nivel
       con la curva de ecualización seleccionada.
                                                         de la banda de ecualización.
       # No se puede ajustar una curva de ecualiza-
                                                         Se visualiza +6 a –6 mientras se aumenta o
       ción con todas las frecuencias definidas en 0.
                                                         disminuye el nivel.
                                                         # Se puede seleccionar otra banda y ajustar su
       Ajuste del ecualizador gráfico de 7               nivel.
       bandas
       Para las curvas de ecualización Custom 1 y        5 Presione BAND para cancelar el ajuste
       Custom 2, se puede ajustar el nivel de cada       del ecualizador gráfico de 7 bandas.
       banda.
       ! Se puede crear una curva Custom 1 sepa-         Ajuste de la sonoridad
          rada por cada fuente. (El lector de CD in-
                                                         La sonoridad compensa las deficiencias en
          corporado y el lector de CD múltiple se
                                                         las gamas de sonido bajas y altas cuando se
          fijan al mismo ajuste de ecualización auto-
                                                         escucha a un volumen bajo.
          máticamente.) Si se realizan ajustes cuan-
          do una curva distinta a Custom 2 está          1 Utilice MULTI-CONTROL para seleccio-
          seleccionada, los ajustes de la curva de       nar LOUD.
          ecualización se memorizarán en Custom 1.

 116      Es
Sección

  Utilización de esta unidad                                                                            02

2 Presione MULTI-CONTROL para activar              1 Utilice MULTI-CONTROL para seleccio-
la sonoridad.                                      nar Sub W.2.
El nivel de sonoridad (p. ej., Mid) aparece en     # Cuando la salida de subgraves está activada,
el display.                                        se puede seleccionar Sub W.2.
# Para desactivar la sonoridad, vuelva a presio-
nar MULTI-CONTROL.                                 2 Presione MULTI-CONTROL izquierda o
                                                   derecha para seleccionar la frecuencia de


                                                                                                        Español
3 Presione MULTI-CONTROL izquierda o               corte.
derecha para seleccionar el nivel deseado.         Cada vez que se presiona MULTI-CONTROL iz-
Cada vez que se presiona MULTI-CONTROL iz-         quierda o derecha, se selecciona una frecuen-
quierda o derecha, se selecciona un nivel en       cia de corte en el siguiente orden:
el siguiente orden:                                50Hz—63Hz—80Hz—100Hz—125Hz
Low (bajo)—Mid (medio)—High (alto)                 Sólo las frecuencias más bajas que aquéllas
                                                   en la gama seleccionada se generan por el al-
                                                   tavoz de subgraves.
Uso de la salida de subgraves
Esta unidad está equipada con una salida de        3 Presione MULTI-CONTROL arriba o
subgraves que se puede activar o desactivar.       abajo para ajustar el nivel de salida del al-
                                                   tavoz de subgraves.
1 Utilice MULTI-CONTROL para seleccio-             Cada vez que se pulsa MULTI-CONTROL arri-
nar Sub W.1.                                       ba o abajo, se aumenta o disminuye el nivel
                                                   de subgraves. Se visualiza +6 a –24 mientras
2 Presione MULTI-CONTROL para activar              se aumenta o disminuye el nivel.
la salida de subgraves.
Normal aparece en el display. Se activa la sali-
da de subgraves.                                   Intensificación de los graves
# Para desactivar la salida de subgraves, vuelva   La función de intensificación de graves inten-
a pulsar MULTI-CONTROL.                            sifica el nivel de sonido grave inferior a 100
                                                   Hz. Mientras más se aumenta el nivel de gra-
3 Pulse MULTI-CONTROL izquierda o de-
                                                   ves, más se enfatiza el sonido grave y el soni-
recha para seleccionar la fase de la salida
                                                   do completo se vuelve más potente. Al usar
de subgraves.
                                                   esta función con el altavoz de subgraves, se
Pulse MULTI-CONTROL izquierda para selec-
                                                   intensifica el sonido bajo la frecuencia de
cionar la fase inversa y Reverse aparece en el
                                                   corte.
display. Pulse MULTI-CONTROL derecha para
seleccionar la fase normal y Normal aparece        1 Utilice MULTI-CONTROL para seleccio-
en el display.                                     nar Bass.

Configuración de los ajustes de                    2 Pulse MULTI-CONTROL hacia arriba o
subgraves                                          abajo para seleccionar el nivel deseado.
                                                   Se visualiza 0 a +6 mientras se aumenta o dis-
Cuando la salida de subgraves está activada,
                                                   minuye el nivel.
se puede ajustar la frecuencia de corte y el
nivel de salida del altavoz de subgraves.


                                                                                              Es     117
Sección

02        Utilización de esta unidad

       Uso del filtro de paso alto                           2 Utilice MULTI-CONTROL para seleccio-
       Cuando no desea que se generen los sonidos            nar SLA.
       bajos de la gama de frecuencias de salida de          3 Pulse MULTI-CONTROL arriba o abajo
       subgraves a través de los altavoces delanteros        para ajustar el volumen de la fuente.
       o traseros, active el filtro de paso alto (HPF).      Cada vez que se presiona MULTI-CONTROL
       Sólo las frecuencias más altas que aquéllas           arriba o abajo, se aumenta o disminuye el vo-
       en la gama seleccionada se generan a través           lumen de la fuente.
       de los altavoces delanteros o traseros.               Se visualiza SLA +4 a SLA –4 mientras se au-
       1 Utilice MULTI-CONTROL para seleccio-                menta o disminuye el volumen de la fuente.
       nar HPF.
                                                                 Notas
       2 Presione MULTI-CONTROL para activar                 ! El nivel del volumen del sintonizador de MW/
       el filtro de paso alto.                                 LW también se puede ajustar con el ajuste del
       80Hz aparece en el display. Se activa el filtro         nivel de fuente.
       de paso alto.                                         ! El reproductor de CD incorporado y el repro-
       # Si el filtro de paso alto se ha ajustado con an-      ductor de CD múltiple se definen automática-
       terioridad, se visualizará la frecuencia previamen-     mente con el mismo ajuste del nivel de
       te seleccionada en lugar de 80Hz.                       fuente.
       # Para desactivar el filtro de paso alto, vuelva a    ! La unidad externa 1 y la unidad externa 2 se
       pulsar MULTI-CONTROL.                                   definen automáticamente con el mismo ajus-
       3 Presione MULTI-CONTROL izquierda o                    te del nivel de fuente.
       derecha para seleccionar la frecuencia de
       corte.                                                Uso del nivelador automático
       Cada vez que se presiona MULTI-CONTROL iz-
       quierda o derecha, se selecciona una frecuen-
                                                             de sonido
       cia de corte en el siguiente orden:                   Al conducir su automóvil, los ruidos en el ve-
       50Hz—63Hz—80Hz—100Hz—125Hz                            hículo cambian de acuerdo con la velocidad
       Sólo las frecuencias más altas que aquéllas           de conducción y las condiciones de la carrete-
       en la gama seleccionada se generan a través           ra. El nivelador automático de sonido (ASL)
       de los altavoces delanteros o traseros.               controla los niveles variables de estos ruidos y
                                                             aumenta el volumen automáticamente, si los
                                                             ruidos alcanzan niveles más altos. La sensibili-
       Ajuste de los niveles de la fuente                    dad (variación del nivel de volumen según el
       La función SLA (ajuste del nivel de fuente) le        nivel de ruido) de la función ASL se puede
       permite ajustar el nivel de volumen de cada           ajustar en uno de los cinco niveles disponi-
       fuente para evitar cambios radicales en el vo-        bles.
       lumen cuando se cambia entre las fuentes.
                                                             1 Utilice MULTI-CONTROL para seleccio-
       ! Los ajustes se basan en el nivel de volumen
                                                             nar ASL.
          del sintonizador de FM, que se mantiene
          inalterado.                                        2 Presione MULTI-CONTROL para activar
                                                             el ASL.
       1 Compare el nivel de volumen del sinto-
                                                             Mid aparece en el display.
       nizador de FM con el de la fuente que
                                                             # Para desactivar la función ASL, vuelva a pre-
       desea ajustar.
                                                             sionar MULTI-CONTROL.


 118      Es
Sección

  Utilización de esta unidad                                                                        02

3 Presione MULTI-CONTROL izquierda o            Ajustes iniciales
derecha para seleccionar el nivel del ASL
deseado.                                        Configuración de los ajustes
Cada vez que se presiona MULTI-CONTROL iz-      iniciales
quierda o derecha, se selecciona un nivel del   Utilizando los ajustes iniciales, puede perso-
ASL en el siguiente orden:                      nalizar varios ajustes del sistema para lograr
Low (bajo)—Mid-L (medio-bajo)—Mid               un funcionamiento óptimo de esta unidad.


                                                                                                    Español
(medio)—Mid-H (medio-alto)—High (alto)


                                                                 1
                                                1 Visualización de función
                                                  Muestra el estado de la función.

                                                1 Mantenga presionado SOURCE hasta
                                                que se apague la unidad.

                                                2 Mantenga presionado MULTI-CONTROL
                                                hasta que Language select aparezca en el
                                                display.
                                                # También puede realizar esta operación mante-
                                                niendo presionado FUNCTION del mando a dis-
                                                tancia.

                                                3 Haga girar MULTI-CONTROL para selec-
                                                cionar uno de los ajustes iniciales.
                                                Haga girar MULTI-CONTROL para cambiar
                                                entre las funciones en el siguiente orden:


                                                                                           Es    119
Sección

02        Utilización de esta unidad

       Language select (selección de idioma)—            Ajuste de la fecha
       Calendar (calendario)—Clock (reloj)—              La visualización de calendario ajustada en
       Off clock (reloj de apagado)—FM step (paso        este modo aparece cuando la fuente del telé-
       de sintonía de FM)—Auto PI (búsqueda PI           fono está seleccionada y las fuentes o la de-
       automática)—Warning tone (tono de adver-          mostración de características están
       tencia)—Face auto open (apertura automáti-        desactivadas.
       ca de la cara)—AUX1 (entrada auxiliar 1)—
       AUX2 (entrada auxiliar 2)—Dimmer (atenua-         1 Utilice MULTI-CONTROL para seleccio-
       dor de luz)—Brightness (brillo)—S/W control       nar Calendar.
       (salida posterior y controlador de subgraves)
       —Mute (silenciamiento/atenuación del soni-        2 Pulse MULTI-CONTROL izquierda o de-
       do)—Demonstration (demostración de carac-         recha para seleccionar el segmento de la vi-
       terísticas)—Reverse mode (modo inverso)—          sualización de calendario que desea
       Ever-scroll (desplazamiento continuo)—            ajustar.
       BT AUDIO (Bluetooth audio)—Pin code input         Al pulsar MULTI-CONTROL izquierda o dere-
       (ingreso de código PIN)—Edit device name          cha se seleccionará un solo segmento de la vi-
       (edición del nombre de dispositivo)—              sualización del calendario:
       BT Version Info. (información de versión de       Día—Mes—Año
       Bluetooth)—BT reset (reajuste de Bluetooth)       Al seleccionar las horas o los minutos de la vi-
       Siga las instrucciones que se indican a conti-    sualización de calendario, los dígitos seleccio-
       nuación para operar cada ajuste en particular.    nados destellarán.
       # También se puede seleccionar la función pre-
                                                         3 Pulse MULTI-CONTROL arriba o abajo
       sionando FUNCTION en el mando a distancia.
                                                         para ajustar la fecha.
       # Para cancelar los ajustes iniciales, presione
       BAND.
       # No se puede seleccionar BT AUDIO cuando         Ajuste del reloj
       se ha conectado el reproductor de audio Blue-
                                                         Siga estas instrucciones para ajustar el reloj.
       tooth.
                                                         1 Utilice MULTI-CONTROL para seleccio-
                                                         nar Clock.
       Selección del idioma de
       visualización                                     2 Pulse MULTI-CONTROL izquierda o de-
       Para una mayor comodidad, esta unidad in-         recha para seleccionar el segmento de la vi-
       cluye un display en varios idiomas. Es posible    sualización del reloj que desea ajustar.
       seleccionar el idioma más adecuado como pri-      Al pulsar MULTI-CONTROL izquierda o dere-
       mera opción de idioma.                            cha se seleccionará un solo segmento de la vi-
                                                         sualización del reloj:
       1 Utilice MULTI-CONTROL para seleccio-            Hora—Minuto
       nar Language select.                              Al seleccionar las horas o los minutos de la vi-
                                                         sualización del reloj, los dígitos seleccionados
       2 Presione MULTI-CONTROL para seleccio-           destellarán.
       nar el idioma.
       Cada vez que se presiona MULTI-CONTROL,           3 Presione MULTI-CONTROL arriba o
       se seleccionan los idiomas en el siguiente        abajo para ajustar el reloj.
       orden:
       English—Français—Italiano—Español—
       Deutsch—Nederlands—РУССКИЙ


 120      Es
Sección

  Utilización de esta unidad                                                                               02


    Nota                                                Nota
Se puede sincronizar el reloj con una señal tem-   El paso de sintonía es de 50 kHz durante la sinto-
poral pulsando MULTI-CONTROL.                      nización manual.
! Si los minutos son 00 a 29, éstos se redon-
   dean hacia abajo. (p. ej., 10:18 se redondea
   en 10:00.)                                      Cambio de la búsqueda PI
! Si los minutos son 30 a 59, éstos se redon-      automática


                                                                                                           Español
   dean hacia arriba. (p. ej., 10:36 se redondea   La unidad puede buscar automáticamente
   en 11:00.)                                      una emisora diferente con el mismo progra-
                                                   ma, aun durante la recuperación de emisoras
                                                   presintonizadas.
Activación y desactivación de la
visualización del reloj de apagado                 1 Utilice MULTI-CONTROL para seleccio-
Si la visualización del reloj de apagado está      nar Auto PI.
activada, cuando las fuentes y la demostra-
                                                   2 Presione MULTI-CONTROL para activar
ción de características estén desactivadas, la
                                                   la función de búsqueda PI automática.
visualización de reloj aparecerá en el display.
                                                   # Para desactivar la función de búsqueda PI
1 Utilice MULTI-CONTROL para seleccio-             automática, vuelva a pulsar MULTI-CONTROL.
nar Off clock.

2 Pulse MULTI-CONTROL para activar la              Cambio del tono de advertencia
visualización del reloj de apagado.                Si no se extrae la carátula de la unidad princi-
# Para desactivar la visualización del reloj de    pal dentro de los cuatro segundos después de
apagado, pulse MULTI-CONTROL nuevamente.           desconectar la llave de encendido del automó-
                                                   vil, se emitirá un tono de advertencia. Se
                                                   puede desactivar el tono de advertencia.
Ajuste del paso de sintonía de FM
Normalmente, el paso de sintonía de FM em-         1 Utilice MULTI-CONTROL para seleccio-
pleado por la sintonización por búsqueda es        nar Warning tone.
de 50 kHz. Si la función AF o TA está activada,
                                                   2 Pulse MULTI-CONTROL para activar el
el paso de sintonía cambia automáticamente
                                                   tono de advertencia.
a 100 kHz. Puede ser conveniente ajustar el
                                                   # Para desactivar el tono de advertencia, vuelva
paso de sintonía a 50 kHz si la función AF está
                                                   a pulsar MULTI-CONTROL.
activada.

1 Utilice MULTI-CONTROL para seleccio-             Cambio de la apertura
nar FM step.
                                                   automática de la cara
2 Presione MULTI-CONTROL para seleccio-            Como medida antirrobo, esta unidad posee
nar el paso de sintonía de FM.                     una carátula extraíble. Para facilitar su extrac-
Al presionar MULTI-CONTROL repetidamente           ción, la carátula se abre automáticamente.
se cambiará el paso de sintonía de FM entre        Esta función está activada de forma predefini-
50 kHz y 100 kHz mientras la función AF o TA       da.
está activada. El paso de sintonía de FM selec-
cionado aparecerá en el display.                   1 Utilice MULTI-CONTROL para seleccio-
                                                   nar Face auto open.


                                                                                                Es      121
Sección

02        Utilización de esta unidad

       2 Presione MULTI-CONTROL para activar                 2 Presione MULTI-CONTROL izquierda o
       la apertura automática de la cara.                    derecha para ajustar el nivel de brillo.
       # Vuelva a presionar MULTI-CONTROL para de-           Se visualiza 0 a 15 mientras se aumenta o dis-
       sactivar la apertura automática de la cara.           minuye el nivel.
                                                             # Cuando el atenuador de luz está activado
                                                             (ON), el nivel de brillo se puede ajustar de 0 a 10.
       Cambio del ajuste de un equipo
       auxiliar
       Los equipos auxiliares conectados a esta uni-
                                                             Ajuste de la salida posterior y
       dad se pueden activar por separado. Al utili-         del controlador de subgraves
       zarla, fije en ON cada fuente AUX. Para               La salida posterior de esta unidad (salida de
       obtener información sobre cómo conectar o             cables de altavoces traseros y salida RCA pos-
       utilizar equipos auxiliares, consulte Uso de la       terior) se puede usar para la conexión de alta-
       fuente AUX en la página 126.                          voces de toda la gama (Rear SP :F.Range) o
                                                             subgraves (Rear SP :S/W). Si se cambia el
       1 Utilice MULTI-CONTROL para seleccio-                ajuste de la salida posterior a Rear SP :S/W,
       nar AUX1/AUX2.                                        se podrá conectar el cable de altavoces trase-
                                                             ros directamente al altavoz de subgraves sin
       2 Presione MULTI-CONTROL para activar
                                                             necesidad de usar un amplificador auxiliar.
       AUX1/AUX2.
                                                             Inicialmente, la unidad está ajustada para una
       # Para desactivar la función AUX, vuelva a pul-
                                                             conexión de altavoces traseros de toda la
       sar MULTI-CONTROL.
                                                             gama (Rear SP :F.Range).

       Cambio del ajuste del                                 1 Utilice MULTI-CONTROL para seleccio-
                                                             nar S/W control.
       atenuador de luz
       Para evitar que el display quede muy brillante        2 Pulse MULTI-CONTROL para cambiar el
       durante la noche, éste se atenúa automática-          ajuste de la salida posterior.
       mente cuando se encienden las luces del               Al pulsar MULTI-CONTROL se cambiará entre
       automóvil. Se puede activar y desactivar el ate-      Rear SP :F.Range (altavoz de toda la gama) y
       nuador de luz.                                        Rear SP :S/W (altavoz de subgraves), y se vi-
                                                             sualizará el estado correspondiente.
       1 Utilice MULTI-CONTROL para seleccio-                # Cuando no se conecta el altavoz de subgraves
       nar Dimmer.                                           a la salida posterior, seleccione Rear SP :F.Range.
                                                             # Cuando se conecta el altavoz de subgraves a
       2 Presione MULTI-CONTROL para activar
                                                             la salida posterior, seleccione Rear SP :S/W para
       el atenuador de luz.
                                                             el altavoz.
       # Para desactivar el atenuador de luz, vuelva a
       presionar MULTI-CONTROL.
                                                                  Notas
                                                             ! Aunque cambie este ajuste, no se producirá
       Ajuste del brillo                                       ningún sonido a menos que active la salida
       Puede ajustar el brillo del display. El ajuste ini-     de subgraves (consulte Uso de la salida de
       cial de este modo es 12.                                subgraves en la página 117).
                                                             ! Si cambia este ajuste, la salida de subgraves
       1 Utilice MULTI-CONTROL para seleccio-                  vuelve a los ajustes de fábrica en el menú de
       nar Brightness.                                         audio.


 122      Es
Sección

  Utilización de esta unidad                                                                             02

! Las salidas de cables de altavoces traseros y        Notas
  la salida RCA posterior se cambian simultá-
  neamente en este ajuste.                         ! Recuerde que si este modo de demostración
                                                     sigue funcionando cuando el motor del ve-
                                                     hículo está apagado, se puede descargar la
Cambio del silenciamiento/                           batería.
atenuación del sonido                              ! También puede activar o desactivar la demos-


                                                                                                         Español
El sonido proveniente de este sistema se silen-      tración de características, presionando
cia o atenúa automáticamente cuando se reci-         DISPLAY mientras la unidad está apagada.
be la señal desde el equipo con función de           Para obtener más detalles, consulte Modo de
silenciamiento.                                      demostración de características en la página
! El sonido se silencia o atenúa, se visualizan      75.
    MUTE o ATT y no se puede ajustar el
    audio.                                         Cambio del modo inverso
! El sonido proveniente de este sistema vuel-
                                                   Si no se realiza ninguna operación en unos 30
    ve a la normalidad cuando se cancela el si-
                                                   segundos, las indicaciones de la pantalla co-
    lenciador o la atenuación.
                                                   mienzan a invertirse y siguen haciéndolo cada
1 Utilice MULTI-CONTROL para seleccio-             10 segundos.
nar Mute.
                                                   1 Utilice MULTI-CONTROL para seleccio-
2 Pulse MULTI-CONTROL para cambiar el              nar Reverse mode.
modo de silenciador/atenuación de teléfo-
                                                   2 Presione MULTI-CONTROL para activar
no.
                                                   el modo inverso.
Al presionar MULTI-CONTROL se cambiará
                                                   # Para desactivar el modo inverso, vuelva a pre-
entre TEL ATT (atenuación) y TEL mute (silen-
                                                   sionar MULTI-CONTROL.
ciamiento), y se visualizará el estado corres-
pondiente.
                                                       Nota
                                                   También puede activar o desactivar el modo inver-
Cambio de la demostración de                       so, presionando BAND mientras la unidad está
características                                    apagada. Para obtener más detalles, consulte
La demostración de características se inicia       Modo inverso en la página 75.
automáticamente cuando se apaga la unidad
mientras la llave de encendido está en ACC u
ON.
                                                   Cambio del desplazamiento
                                                   continuo
1 Utilice MULTI-CONTROL para seleccio-             Si la función de desplazamiento continuo está
nar Demonstration.                                 activada, la información de texto grabada en
                                                   el CD o iPod se desplazará de manera ininte-
2 Presione MULTI-CONTROL para activar
                                                   rrumpida. Desactive la función si desea que la
la demostración de características.
                                                   información se desplace una sola vez.
# Para desactivar la demostración de caracterís-
ticas, vuelva a presionar MULTI-CONTROL.           1 Utilice MULTI-CONTROL para seleccio-
                                                   nar Ever-scroll.


                                                                                               Es      123
Sección

02        Utilización de esta unidad

       2 Presione MULTI-CONTROL para activar                  3 Presione MULTI-CONTROL izquierda o
       la función de desplazamiento continuo.                 derecha para mover el cursor a la anterior
       # Para desactivar la función de desplazamiento         o siguiente posición.
       continuo, vuelva a presionar MULTI-CONTROL.
                                                              4 Después de ingresar el código PIN
                                                              (hasta 16 dígitos), presione
       Activación de la fuente BT Audio                       MULTI-CONTROL para almacenarlo en esta
       Es necesario activar la fuente BT Audio para           unidad.
       utilizar un reproductor de audio Bluetooth.            # Al presionar MULTI-CONTROL derecha en el
       Este ajuste está activado de forma predetermi-         display de confirmación, se volverá al display de
       nada. Si no utiliza BT Audio, puede desactivar-        ingreso de código PIN y se podrá cambiar.
       lo.                                                    # Si se ha especificado un carácter no válido,
                                                              no se muestran los caracteres siguientes.
       1 Utilice MULTI-CONTROL para seleccio-                 # Si se ha especificado un carácter no válido al
       nar BT AUDIO.                                          inicio, el código PIN no se puede almacenar en la
                                                              memoria.
       2 Pulse MULTI-CONTROL para encender la
       fuente BT Audio.
       # Para apagar la fuente BT Audio, vuelva a pul-        Edición del nombre del dispositivo
       sar MULTI-CONTROL.                                     Es posible editar el nombre del dispositivo.
       # Si se desactiva BT AUDIO en los ajustes ini-         El ajuste predefinido del nombre del dispositi-
       ciales, se borra en esta unidad el historial del re-   vo es Pioneer BT unit.
       productor de audio Bluetooth conectado más
       recientemente.                                         1 Utilice MULTI-CONTROL para seleccio-
                                                              nar Edit device name.

       Ingreso del código PIN para la                         2 Presione DISPLAY para seleccionar el
       conexión inalámbrica Bluetooth                         tipo de carácter deseado.
       Para conectar su teléfono móvil a esta unidad          Presione DISPLAY repetidamente para cam-
       a través de tecnología inalámbrica Bluetooth,          biar entre los siguientes tipos de caracteres:
       debe ingresar el código PIN en su teléfono             Alfabeto (mayúsculas)—Alfabeto (minúscu-
       para verificar la conexión. El código predefini-       las)—Números y símbolos
       do es 0000, aunque puede cambiarlo en esta             3 Presione MULTI-CONTROL arriba o
       función.                                               abajo para seleccionar una letra del alfabe-
       ! En algunos reproductores de audio Blue-              to.
           tooth, es posible que tenga que ingresar
           previamente el código PIN de su reproduc-          4 Presione MULTI-CONTROL izquierda o
           tor de audio Bluetooth en esta unidad para         derecha para mover el cursor a la anterior
           que esté lista para una conexión desde su          o siguiente posición de carácter.
           reproductor.
                                                              5 Después de ingresar el nombre del dis-
       1 Utilice MULTI-CONTROL para seleccio-                 positivo, presione MULTI-CONTROL para al-
       nar Pin code input.                                    macenarlo en esta unidad.
                                                              # Al presionar MULTI-CONTROL derecha en el
       2 Pulse MULTI-CONTROL arriba o abajo                   display de confirmación, se volverá al display de
       para seleccionar un número.                            ingreso del nombre del dispositivo y se podrá
       # También puede presionar 0 a 9 en el mando a          cambiar.
       distancia para seleccionar un número.


 124      Es
Sección

  Utilización de esta unidad                                                                              02

# Si se ha especificado un carácter no válido,      1 Utilice MULTI-CONTROL para seleccio-
no se muestran los caracteres siguientes.           nar BT reset.
# Si se ha especificado un carácter no válido al
inicio, el nombre del dispositivo no se puede al-   2 Pulse MULTI-CONTROL derecha para
macenar en la memoria.                              mostrar una pantalla de confirmación.
                                                    Se visualiza Clear memory YES. El borrado de
                                                    memoria se ajustará ahora en modo en espe-
Visualización de la versión del


                                                                                                          Español
                                                    ra.
sistema para tareas de reparación                   # Si no desea reajustar la memoria del teléfono,
Si se produce un fallo de funcionamiento en         presione MULTI-CONTROL izquierda. Se cambia-
la unidad y debe ponerse en contacto con un         rá el display.
concesionario para que realice la reparación,       3 Pulse MULTI-CONTROL para borrar la
es posible que tenga que indicar la versión del     memoria.
sistema de esta unidad y el módulo Bluetooth.       Se muestra Cleared y se eliminan los
Puede visualizar las versiones y confirmarlas.      ajustes.
1 Utilice MULTI-CONTROL para seleccio-
nar BT Version Info.
Se muestra la versión del sistema (micropro-
cesador) de esta unidad.

2 Presione MULTI-CONTROL izquierda
para cambiar a la versión del módulo Blue-
tooth de esta unidad.
# Si se presiona MULTI-CONTROL derecha, re-
gresa a la versión del sistema de esta unidad.


Reajuste del módulo de tecnología
inalámbrica Bluetooth
Es posible eliminar los datos del teléfono Blue-
tooth y del reproductor de audio Bluetooth.
Para proteger la información personal, le reco-
mendamos eliminar estos datos antes de
transferir la unidad a otras personas. Se elimi-
narán los siguientes ajustes.
! Entradas del directorio de teléfonos en el
   teléfono Bluetooth
! Números de presintonía que haya en el te-
   léfono Bluetooth
! Asignación de registro del teléfono Blue-
   tooth
! Historial de llamadas del teléfono Blue-
   tooth
! Historial del reproductor de audio Blue-
   tooth conectado más recientemente


                                                                                               Es      125
Sección

02        Utilización de esta unidad


       Otras funciones                                   Selección de AUX como la fuente
                                                         % Presione SOURCE para seleccionar AUX
       Uso de la fuente AUX
                                                         como la fuente.
       Esta unidad puede controlar hasta dos com-        # Si el ajuste auxiliar no está activado, no es po-
       ponentes auxiliares, como VCR o dispositivos      sible seleccionar AUX. Para obtener más deta-
       portátiles (se venden por separado). Cuando       lles, consulte Cambio del ajuste de un equipo
       están conectados, los componentes auxiliares      auxiliar en la página 122.
       son identificados automáticamente como
       fuentes AUX y se asignan a AUX1 o AUX2. La
       relación entre las fuentes AUX1 Y AUX2 se ex-     Ajuste del título AUX
       plica a continuación.                             Se puede cambiar el título que se visualiza
                                                         para cada fuente AUX1 o AUX2.
       Acerca de AUX1 y AUX2                             1 Después de haber seleccionado AUX
       Existen dos métodos a su disposición para co-     como la fuente, utilice MULTI-CONTROL y
       nectar equipos auxiliares a esta unidad.          seleccione FUNCTION para visualizar
                                                         TitleInput "A".
       Fuente AUX1:
                                                         2 Ingrese un título siguiendo el mismo
       Al conectar un equipo auxiliar utilizando un      procedimiento que con el reproductor de
       cable miniconector estéreo                        CD incorporado.
                                                         Para obtener más información sobre el funcio-
       % Inserte el miniconector estéreo en el co-
                                                         namiento, consulte Ingreso de títulos de discos
       nector de entrada de esta unidad.
                                                         en la página 90.
       Para obtener más información, consulte el
       manual de instalación.
       La asignación de este equipo auxiliar se fija     Uso de diferentes visualizaciones
       automáticamente a AUX1.                           de entretenimiento
                                                         Se puede disfrutar de distintas visualizaciones
       Fuente AUX2:                                      de entretenimiento mientras se escucha cada
       Al conectar equipos auxiliares usando un Inter-   fuente.
       conector IP-BUS-RCA (se vende por separado)
                                                         1 Presione MULTI-CONTROL para visuali-
       % Use un Interconector IP-BUS-RCA como            zar el menú principal.
       el CD-RB20/CD-RB10 (se vende por separa-          FUNCTION, AUDIO y ENTERTAINMENT apa-
       do) para conectar esta unidad a un equipo         recen en el display.
       auxiliar provisto de una salida RCA.
       Para obtener más detalles, consulte el manual     2 Utilice MULTI-CONTROL para seleccio-
       de instrucciones del Interconector IP-BUS-        nar ENTERTAINMENT.
       RCA.                                              Haga girar el control para cambiar la opción
       La asignación de este equipo auxiliar se fija     de menú y presiónelo para seleccionarla.
       automáticamente a AUX2.
                                                         3 Utilice MULTI-CONTROL para cambiar la
       # Sólo puede hacer este tipo de conexión si el
                                                         visualización.
       equipo auxiliar tiene salidas RCA.
                                                         Haga girar el control para cambiar la opción
                                                         de menú y presiónelo para seleccionarla.


 126      Es
Sección

  Utilización de esta unidad                                                                           02

BGV-1 (presentación visual de fondo 1)—             % Mantenga pulsado PGM para activar la
BGV-2 (presentación visual de fondo 2)—             función BSSM al seleccionar el televisor
BGP-1 (imagen de fondo 1)—BGP-2 (imagen             como la fuente.
de fondo 2)—BGP-3 (imagen de fondo 3)—              Mantenga presionado PGM hasta que se acti-
BGP-4 (imagen de fondo 4)—SIMPLE-1 (dis-            ve la función BSSM.
play simple 1)—SIMPLE-2 (display simple 2)—         # Para cancelar el proceso de almacenamiento,
LEVEL METER (medidor de nivel)—                     vuelva a presionar PGM.


                                                                                                       Español
VISUALIZER-1 (visualizador 1)—
VISUALIZER-2 (visualizador 2)—
VISUALIZER-3 (visualizador 3)—
SPECTRUM ANALYZER-1 (analizador de es-
pectro 1)—SPECTRUM ANALYZER-2 (analiza-
dor de espectro 2)—MOVIE (película)—
ENT CLOCK (reloj de entretenimiento)
# Para volver a la visualización de reproducción,
presione BAND.


Uso del botón PGM
Se pueden utilizar las funciones preprograma-
das de cada fuente con PGM en el mando a
distancia.

% Presione PGM para activar la pausa al
seleccionar las siguientes fuentes:
  !  CD – Reproductor de CD incorporado
  !  iPod – iPod
  !  Multi CD – Reproductor de CD múltiple
  !  USB – Reproductor de audio portátil USB/
     memoria USB
  ! BT Audio – Reproductor de audio Blue-
     tooth
  ! DVD – Reproductor de DVD/reproductor de
     DVD múltiple
# Para desactivar la pausa, vuelva a presionar
PGM.

% Mantenga pulsado PGM para activar la
función BSM al seleccionar el sintonizador
como la fuente.
Mantenga presionado PGM hasta que se acti-
ve la función BSM.
# Para cancelar el proceso de almacenamiento,
vuelva a presionar PGM.


                                                                                             Es     127
Sección

03         Accesorios disponibles


       Adaptador USB                                      3 Para realizar el avance rápido o retroce-
                                                          so, mantenga pulsado MULTI-CONTROL iz-
       Funciones básicas                                  quierda o derecha.
       Se puede utilizar esta unidad para controlar un
       adaptador USB, que se vende por separado.          4 Para saltar y retroceder o avanzar hasta
       Para obtener más información, consulte el          otro fichero de audio comprimido, presione
       manual de instrucciones del adaptador USB.         MULTI-CONTROL izquierda o derecha.
       Esta sección proporciona información acerca
       de las funciones del reproductor de audio por-     Selección directa de un fichero
       tátil USB/memoria USB con esta unidad que
                                                          de audio en la carpeta actual
       difieren de las descritas en el manual de ins-
       trucciones del adaptador de USB.                   Es básicamente la misma operación que la
       ! Es posible que la unidad no funcione de          del reproductor de CD incorporado.
           manera óptima según el reproductor de          Para obtener más información sobre el funcio-
           audio portátil USB/memoria USB conec-          namiento, consulte Selección directa de una
           tado.                                          pista en la página 88.


                                                          Introducción a las funciones
                                                          avanzadas
                                                          1 Presione MULTI-CONTROL para visuali-
                                                          zar el menú principal.
                                                          FUNCTION, AUDIO y ENTERTAINMENT apa-
                                                          recen en el display.

                                                          2 Utilice MULTI-CONTROL para seleccio-
       1 Indicador WMA/MP3/AAC                            nar FUNCTION.
         Muestra el tipo de fichero que se está repro-    Haga girar el control para cambiar la opción
         duciendo actualmente.                            de menú y presiónelo para seleccionarla.
       2 Indicador del número de carpeta                  Aparece el nombre de la función en el display.
       3 Indicador de número de pista
       4 Indicador de tiempo de reproducción              3 Haga girar MULTI-CONTROL para selec-
       5 Indicador de la velocidad de grabación           cionar la función.
                                                          Haga girar MULTI-CONTROL para cambiar
       1    Presione SOURCE para seleccionar USB.         entre las funciones en el siguiente orden:
       2 Pulse MULTI-CONTROL arriba o abajo               Play mode (repetición de reproducción)—
       para seleccionar una carpeta.                      Random mode (reproducción aleatoria)—
       # No se puede seleccionar una carpeta que no
                                                          Scan mode (reproducción con exploración)—
       tenga un fichero de audio comprimido grabado
                                                          Pause (pausa)
                                                          # También se puede seleccionar la función pre-
       en ella.
                                                          sionando FUNCTION en el mando a distancia.
       # Para volver a la carpeta 01 (RAÍZ), mantenga
                                                          # Para volver a la visualización de reproducción,
       presionado BAND. Sin embargo, si la carpeta 01
                                                          presione BAND.
       (RAÍZ) no contiene ficheros, la reproducción co-
                                                          # Si no se utilizan las funciones en unos 30 se-
       menzará en la carpeta 02.
                                                          gundos, el display volverá automáticamente a la
                                                          visualización normal.


 128       Es
Sección

  Accesorios disponibles                                                                                        03

Función y operación                                     ! La reproducción con exploración busca el fi-
Las operaciones Play mode, Random mode,                   chero dentro de la gama de repetición selec-
Scan mode y Pause son básicamente las mis-                cionada.
mas que las del reproductor de CD incorpora-              Cuando se utiliza Track repeat o
do.                                                       Folder repeat, el comienzo del cada fichero
                                                          de la carpeta se reproduce durante alrededor
 Nombre de la función   Operación                         de 10 segundos. Cuando se utiliza All repeat,


                                                                                                                Español
                        Consulte Selección de una
                                                          el comienzo de cada fichero del reproductor
                        gama de repetición de repro-      de audio portátil USB/memoria USB se repro-
                        ducción en la página 88.          duce durante alrededor de 10 segundos.
                        Pero las gamas de repeti-       ! Una vez finalizada la exploración, volverá a co-
                        ción para la reproducción
                                                          menzar la reproducción normal de los fiche-
                        que puede seleccionar son
                        diferentes a las de un re-        ros.
                        productor de CD incorpora-
                        do. Las gamas de
 Play mode              repetición para el reproduc-    Visualización de información
                        tor de audio portátil USB/
                        memoria USB son como se
                                                        de texto de un fichero de audio
                        indican a continuación:         Es la misma operación que la del reproductor
                        ! Track repeat – Sólo re-       de CD incorporado.
                            pite el fichero actual      Consulte Visualización de información de texto
                        ! Folder repeat – Repite
                            la carpeta actual
                                                        en el disco en la página 91.
                        ! All repeat – Repite           ! Si los caracteres grabados en el fichero de
                            todos los ficheros             audio no son compatibles con esta unidad,
                                                           no aparecerán en el display.
                        Consulte Reproducción de
 Random mode            las pistas en orden aleatorio
                        en la página 89.
                                                        Selección de ficheros de la lista
                        Consulte Exploración de car-
 Scan mode              petas y pistas en la página
                                                        de nombres de ficheros
                        89.                             Es la misma operación que la del reproductor
                        Consulte Pausa de la repro-     de CD incorporado.
 Pause                  ducción de un disco en la       Consulte Selección de pistas de la lista de nom-
                        página 89.                      bres de ficheros en la página 91.

    Notas
! Si se selecciona otra carpeta durante la repeti-
  ción de reproducción, la gama de repetición
  cambia a All repeat.
! Si se realiza una búsqueda de pistas o el avan-
  ce rápido/retroceso durante la repetición
  Track repeat, la gama de repetición cambia a
  Folder repeat.
! Cuando se selecciona Folder repeat, no se
  puede reproducir una subcarpeta de esa car-
  peta.


                                                                                                     Es      129
Sección

03        Accesorios disponibles


       Reproductor de CD múltiple                           4 Para saltar y retroceder o avanzar hasta
                                                            otra pista, presione MULTI-CONTROL iz-
       Funciones básicas                                    quierda o derecha.
       Se puede usar esta unidad para controlar un re-
       productor de CD múltiple, que se vende por se-           Notas
       parado.                                              ! Mientras el reproductor de CD múltiple realiza
       ! Sólo las funciones descritas en este manual          las funciones preparatorias, se visualiza
          son compatibles con los reproductores de            Ready.
          CD múltiple de 50 discos.                         ! Si aparece un mensaje de error como
       ! Esta unidad no está diseñada para utilizar           ERROR-11, consulte el manual de instruccio-
          las funciones de lista de títulos de los discos     nes del reproductor de CD múltiple.
          con un reproductor de CD múltiple de 50 dis-      ! Si no hay discos en el cargador de CD del re-
          cos. Consulte Selección de discos de la lista       productor de CD múltiple, se visualiza
          de títulos de los discos en la página 133 para      No Disc.
          obtener información sobre las funciones de
          lista de títulos de los discos.
                                                            Selección directa de una pista
                                                            Es básicamente la misma operación que la
                                                            del reproductor de CD incorporado.
                                                            Para obtener más información sobre el funcio-
                                                            namiento, consulte Selección directa de una
                                                            pista en la página 88.


                                                            Introducción a las funciones
       1 Indicador de número de disco                       avanzadas
       2 Indicador de número de pista                       Puede utilizar Compression (compresión y
       3 Indicador de tiempo de reproducción                DBE) sólo con un reproductor de CD múltiple
                                                            compatible con ellas.
       1 Presione SOURCE para seleccionar el re-
       productor de CD múltiple.                            1 Presione MULTI-CONTROL para visuali-
                                                            zar el menú principal.
       2 Presione MULTI-CONTROL arriba o                    FUNCTION, AUDIO y ENTERTAINMENT apa-
       abajo para seleccionar el disco que desea            recen en el display.
       escuchar.
       # También se puede seleccionar un disco, utili-      2 Utilice MULTI-CONTROL para seleccio-
       zando los botones 1 a 6 en el mando a distancia.     nar FUNCTION.
         ! Para los discos 1 a 6, pulse el número del       Haga girar el control para cambiar la opción
            botón correspondiente.                          de menú y presiónelo para seleccionarla.
         ! Para los discos 7 a 12, mantenga pulsados        Aparece el nombre de la función en el display.
            los números correspondientes, como 1
            para el disco 7, hasta que el número del        3 Haga girar MULTI-CONTROL para selec-
            disco aparezca en la pantalla.                  cionar la función.
                                                            Haga girar MULTI-CONTROL para cambiar
       3 Para realizar el avance rápido o retroce-          entre las funciones en el siguiente orden:
       so, mantenga pulsado MULTI-CONTROL iz-
       quierda o derecha.


 130      Es
Sección

  Accesorios disponibles                                                                                         03

Play mode (repetición de reproducción)—                                        Consulte Pausa de la repro-
Random mode (reproducción aleatoria)—                    Pause                 ducción de un disco en la
Scan mode (reproducción con exploración)—                                      página 89.
Pause (pausa)—Compression (compresión y                                        Consulte Uso de la compre-
DBE)—ITS play mode (reproducción ITS)—                                         sión y BMX en la página 89.
ITS memo (programación ITS)—                                                   El reproductor de CD múlti-
TitleInput "A" (ingreso de títulos de discos)                                  ple dispone de función
                                                                               DBE (enfatizador dinámico


                                                                                                                 Español
# También se puede seleccionar la función pre-                                 de graves) en lugar de
sionando FUNCTION en el mando a distancia.               Compression           BMX.
# Para volver a la visualización de reproducción,                              Los ajustes pueden cam-
presione BAND.                                                                 biarse de la siguiente ma-
                                                                               nera:
# Si no se utilizan las funciones exceptuando
                                                                               COMP OFF—COMP 1—
ITS memo y TitleInput "A" en unos 30 segun-                                    COMP 2—COMP OFF—
dos, el display volverá automáticamente a la vi-                               DBE 1—DBE 2
sualización normal.                                                            Consulte Uso de listas de
                                                         ITS play mode         reproducción ITS en la pági-
                                                                               na siguiente.
Función y operación
Las operaciones Play mode, Random mode,                                        Consulte Uso de listas de
                                                         ITS memo              reproducción ITS en la pági-
Scan mode, Pause, Compression y                                                na siguiente.
TitleInput "A" son básicamente las mismas
que las del reproductor de CD incorporado.                                     Consulte Ingreso de títulos
                                                         TitleInput "A"
                                                                               de discos en la página 133.
 Nombre de la función   Operación

                        Consulte Selección de una           Notas
                        gama de repetición de repro-
                        ducción en la página 88.        ! Si se seleccionan otros discos durante la repe-
                        Pero las gamas de repeti-         tición de reproducción, la gama de repetición
                        ción para la reproducción         cambia a M-CD repeat.
                        que puede seleccionar son       ! Si se realiza una búsqueda de pistas o el avan-
                        diferentes a las de un re-
                        productor de CD incorpora-        ce rápido/retroceso durante la repetición
                        do. Las gamas de                  Track repeat, la gama de repetición cambia a
                        repetición para la repro-         Disc repeat.
 Play mode              ducción del reproductor de      ! Una vez finalizada la exploración de pistas o
                        CD múltiple son como se
                        indican a continuación:
                                                          discos, volverá a comenzar la reproducción
                        ! M-CD repeat – Repite            normal de las pistas.
                            todos los discos que se     ! Al reproducir un disco CD TEXT en un repro-
                            encuentran en el repro-       ductor de CD múltiple compatible con CD
                            ductor de CD múltiple         TEXT, no se podrá cambiar a TitleInput "A".
                        ! Track repeat – Sólo re-
                                                          El título del disco ya se ha grabado en un
                            pite la pista actual
                        ! Disc repeat – Repite el
                                                          disco CD TEXT.
                            disco actual

                        Consulte Reproducción de
 Random mode            las pistas en orden aleatorio
                        en la página 89.
                        Consulte Exploración de car-
 Scan mode              petas y pistas en la página
                        89.


                                                                                                       Es     131
Sección

03        Accesorios disponibles

       Uso de listas de reproducción ITS                   Reproducción de la lista de
       La función ITS (selección instantánea de            reproducción ITS
       pista) le permite crear una lista de reproduc-      La reproducción ITS le permite escuchar las
       ción de las pistas favoritas incluidas en el car-   pistas que ha ingresado en su lista de repro-
       gador del reproductor de CD múltiple.               ducción ITS. Cuando activa la reproducción
       Después de añadir sus pistas favoritas a la         ITS, se comenzarán a reproducir las pistas de
       lista de reproducción, puede activar la repro-      la lista de reproducción ITS en el reproductor
       ducción ITS y reproducir sólo las pistas selec-     de CD múltiple.
       cionadas.
                                                           1 Seleccione la gama de repetición.
                                                           Consulte Reproducción de las pistas en orden
       Creación de una lista de reproducción               aleatorio en la página 89.
       con la programación ITS
       Puede utilizar la función ITS para ingresar y re-   2 Utilice MULTI-CONTROL para seleccio-
       producir hasta 99 pistas por disco desde hasta      nar ITS play mode en el menú de funcio-
       100 discos (incluidos los títulos de los discos).   nes.
       (Con reproductores de CD múltiple vendidos
                                                           3 Presione MULTI-CONTROL para activar
       antes del CDX-P1250 y del CDX-P650, es posi-
                                                           la reproducción ITS.
       ble guardar hasta 24 pistas en la lista de repro-
                                                           La reproducción de las pistas de la lista co-
       ducción.)
                                                           mienza en la gama de repetición
       1 Reproduzca el CD que desea progra-                M-CD repeat o Disc repeat seleccionada con
       mar.                                                anterioridad.
       Pulse MULTI-CONTROL arriba o abajo para             # Si no hay pistas programadas en la gama ac-
       seleccionar el CD.                                  tual de reproducción ITS, se visualiza ITS empty.
                                                           # Vuelva a pulsar MULTI-CONTROL para desac-
       2 Utilice MULTI-CONTROL para seleccio-              tivar la reproducción ITS.
       nar ITS memo en el menú de funciones.

       3 Seleccione la pista deseada pulsando              Borrado de una pista de la lista de
       MULTI-CONTROL izquierda o derecha.                  reproducción ITS
                                                           Puede eliminar una pista de la lista de repro-
       4 Pulse MULTI-CONTROL arriba para al-               ducción ITS si la función de reproducción ITS
       macenar la pista que se está reproduciendo          está activada.
       actualmente en la lista de reproducción.            Si la reproducción ITS ya está activada, vaya al
       Se visualiza Memory complete y se agrega la         paso 2. Si la reproducción ITS todavía no está
       pista actual a la lista de reproducción.            activada, utilice MULTI-CONTROL.
       5 Presione BAND para volver a la visuali-           1 Reproduzca el CD que tiene la pista que
       zación de reproducción.                             desea eliminar de la lista de reproducción
                                                           ITS y active la reproducción ITS.
               Nota                                        Consulte Reproducción de la lista de reproduc-
       Una vez que los datos para 100 discos han sido      ción ITS en esta página.
       almacenados en la memoria, los datos para un
                                                           2 Utilice MULTI-CONTROL para seleccio-
       nuevo disco se sobreponen a los datos más anti-
                                                           nar ITS memo en el menú de funciones.
       guos.


 132      Es
Sección

  Accesorios disponibles                                                                                   03

3 Seleccione la pista deseada pulsando              Ingreso de títulos de discos
MULTI-CONTROL izquierda o derecha.                  Utilice la función de ingreso de títulos de dis-
                                                    cos para almacenar hasta 100 títulos de CD
4 Presione MULTI-CONTROL abajo para
                                                    (con la lista de reproducción ITS) en el repro-
eliminar la pista de la lista de reproducción
                                                    ductor de CD múltiple. Cada título puede
ITS.
                                                    tener una longitud de hasta 10 caracteres.
La pista que se está reproduciendo se borra
                                                    Para obtener más información sobre el funcio-


                                                                                                           Español
de la lista de reproducción ITS y comienza la
                                                    namiento, consulte Ingreso de títulos de discos
reproducción de la próxima pista de la lista.
                                                    en la página 90.
# Si no hay pistas de la lista de reproducción en
                                                    ! Los títulos se conservan en la memoria,
la gama actual, se visualiza ITS empty y se rea-
                                                       aun después de que se retiren los discos
nuda la reproducción normal.
                                                       del cargador, y se recuperan cuando se
5 Presione BAND para volver a la visuali-              vuelven a colocar los discos correspondien-
zación de reproducción.                                tes.
                                                    ! Una vez que los datos para 100 discos han
                                                       sido almacenados en la memoria, los datos
Borrado de un CD de la lista de
                                                       para un nuevo disco se sobreponen a los
reproducción ITS
                                                       datos más antiguos.
Puede borrar todas las pistas de un CD de la
lista de reproducción ITS, si la función de re-
                                                    Visualización de los títulos de discos
producción ITS está desactivada.
                                                    Puede visualizar la información de texto en
1 Reproduzca el CD que desea borrar.                cualquier disco al cual se le haya ingresado
Pulse MULTI-CONTROL arriba o abajo para             un título de disco.
seleccionar el CD.                                  Es la misma operación que la del reproductor
                                                    de CD incorporado.
2 Utilice MULTI-CONTROL para seleccio-              Consulte Visualización de información de texto
nar ITS memo en el menú de funciones.               en el disco en la página 91.
3 Presione MULTI-CONTROL abajo para
borrar todas las pistas del CD que se está          Selección de discos de la lista de
reproduciendo de la lista de reproducción           títulos de los discos
ITS.                                                Esta función le permite ver la lista de los títu-
Todas las pistas del CD que se está reprodu-        los de los discos que se han ingresado en el
ciendo se borran de la lista de reproducción y      reproductor de CD múltiple y seleccionar uno
se visualiza Memory deleted.                        de ellos para su reproducción.
4 Presione BAND para volver a la visuali-           1 Presione LIST para cambiar al modo de
zación de reproducción.                             lista de títulos de los discos durante la vi-
                                                    sualización de reproducción.
Uso de las funciones de títulos                     2 Utilice MULTI-CONTROL para seleccio-
de discos                                           nar el título del disco deseado.
Se pueden ingresar títulos de CD y visualizar-      Haga girar el control para cambiar el título del
los. De esta manera, se puede buscar y selec-       disco y presione para reproducirlo.
cionar con facilidad el disco deseado.              # También puede cambiar el título del disco pul-
                                                    sando MULTI-CONTROL arriba o abajo.


                                                                                                 Es     133
Sección

03        Accesorios disponibles

       # Cuando reproduzca un disco CD TEXT, presio-        Reproductor de DVD
       ne MULTI-CONTROL derecha para visualizar una
       lista de las pistas en el disco seleccionado. Pre-   Funciones básicas
       sione MULTI-CONTROL izquierda para volver a la       Se puede utilizar esta unidad para controlar un
       lista del disco.                                     reproductor de DVD o un reproductor de DVD
       # Si no se ha ingresado un título para un disco,     múltiple, que se vende por separado.
       se visualizará No D.Title.                           Para obtener más información sobre el funcio-
       # Se visualiza No Disc al lado del número del        namiento, consulte el manual de funciona-
       disco cuando no hay discos en el cargador.           miento del reproductor DVD o del reproductor
                                                            de DVD múltiple. Esta sección proporciona in-
                                                            formación acerca de las funciones de DVD
       Uso de las funciones CD TEXT                         con esta unidad que difieren de las descritas
       Estas funciones sólo se pueden usar con un re-       en el manual de instrucciones del reproductor
       productor de CD múltiple compatible con CD           de DVD o del reproductor de DVD múltiple.
       TEXT.
       Es la misma operación que la del reproductor
       de CD incorporado.
       Consulte Visualización de información de texto
       en el disco en la página 91.


                                                            1 Indicador DVD-V/VCD/CD/MP3/WMA
                                                              Muestra el tipo de disco que se está reprodu-
                                                              ciendo actualmente.
                                                            2 Indicador de número de disco
                                                              Muestra el número de disco que se está repro-
                                                              duciendo al utilizar el reproductor de DVD
                                                              múltiple.
                                                            3 Indicador de número de Título/Carpeta
                                                              Muestra el título (al reproducir vídeo DVD) o
                                                              la carpeta (al reproducir audio comprimido)
                                                              de la selección que se está reproduciendo ac-
                                                              tualmente.
                                                            4 Indicador de número de capítulo/pista
                                                              Muestra el capítulo (al reproducir un vídeo
                                                              DVD) o la pista (al reproducir un vídeo CD, CD
                                                              o audio comprimido) que se está reproducien-
                                                              do actualmente.
                                                            5 Indicador de tiempo de reproducción

                                                            1 Presione SOURCE para seleccionar el re-
                                                            productor de DVD o el de DVD múltiple.


 134      Es
Sección

  Accesorios disponibles                                                                                 03

2 Para realizar el avance rápido o retroce-       Play mode (repetición de reproducción)—
so, mantenga pulsado MULTI-CONTROL iz-            Pause (pausa)
quierda o derecha.                                Durante la reproducción de un CD
                                                  Play mode (repetición de reproducción)—
3 Para saltar y retroceder o avanzar hasta        Random mode (reproducción aleatoria)—
otro capítulo/pista, presione                     Scan mode (reproducción con exploración)—
MULTI-CONTROL izquierda o derecha.                Pause (pausa)—ITS play mode (reproducción


                                                                                                         Español
                                                  ITS)—ITS memo (ingreso ITS)—
Selección de un disco                             TitleInput "A" (ingreso de títulos de discos)
                                                  Durante la reproducción de audio compri-
! Se puede utilizar esta función sólo si un re-   mido
  productor de DVD múltiple está conectado        Play mode (repetición de reproducción)—
  a esta unidad.                                  Random mode (reproducción aleatoria)—
% Presione cualquiera de los botones 1 a          Scan mode (reproducción con exploración)—
6 para seleccionar el disco deseado.              Pause (pausa)
                                                  # También se puede seleccionar la función pre-
                                                  sionando FUNCTION en el mando a distancia.
Selección de una carpeta                          # Para volver a la visualización de reproducción,
! Puede utilizar esta función sólo cuando         presione BAND.
  hay conectado a esta unidad, un reproduc-
  tor de DVD que corresponde a la reproduc-       Función y operación
  ción de audio comprimido.                       Las operaciones Play mode, Random mode,
                                                  Scan mode, Pause y TitleInput "A" son bási-
% Pulse MULTI-CONTROL arriba o abajo
                                                  camente las mismas que las del reproductor
para seleccionar una carpeta.
                                                  de CD incorporado.
                                                  También, las operaciones ITS play mode y
Introducción a las funciones                      ITS memo son básicamente las mismas que
avanzadas                                         las del reproductor de CD múltiple.

1 Presione MULTI-CONTROL para visuali-
zar el menú principal.
FUNCTION, AUDIO y ENTERTAINMENT apa-
recen en el display.

2 Utilice MULTI-CONTROL para seleccio-
nar FUNCTION.
Haga girar el control para cambiar la opción
de menú y presiónelo para seleccionarla.
Aparece el nombre de la función en el display.

3 Haga girar MULTI-CONTROL para selec-
cionar la función.
Haga girar MULTI-CONTROL para cambiar
entre las funciones en el siguiente orden:
Durante la reproducción de un vídeo DVD
o un vídeo CD


                                                                                              Es      135
Sección

03         Accesorios disponibles


          Nombre de la función   Operación
                                                                  ! Durante la reproducción de un vídeo CD o un
                                                                    CD, si se realiza una búsqueda de pistas o el
                                 Consulte Selección de una          avance rápido/retroceso durante la repetición
                                 gama de repetición de repro-
                                 ducción en la página 88.           Track repeat, la gama de repetición cambia a
                                 Pero la gama de repetición         Disc repeat.
                                 de reproducción que puede        ! Durante la reproducción de audio comprimi-
                                 seleccionar varía según el         do, si se selecciona otra carpeta durante la re-
                                 tipo de disco o sistema. Las
                                 gamas de repetición para
                                                                    petición de reproducción, la gama de
                                 la reproducción del repro-         repetición para la reproducción cambia a
                                 ductor de DVD/reproductor          Disc repeat.
                                 de DVD múltiple son como         ! Durante la reproducción de audio comprimi-
                                 se indican a continuación:
                                                                    do, si se realiza una búsqueda de pistas o el
          Play mode              Durante la reproducción
                                 PBC de un vídeo CD, no se          avance rápido/retroceso durante
                                 puede utilizar esta función.       Track repeat, la gama de repetición de repro-
                                 ! Disc repeat – Repite el          ducción cambia a Folder repeat.
                                      disco actual                ! También se puede conectar a esta unidad un
                                 ! Folder repeat – Repite
                                                                    reproductor de DVD múltiple con funciones
                                      la carpeta actual
                                 ! Title repeat – Sólo re-          ITS y funciones de títulos de discos. En este
                                      pite el título actual         caso, pueden controlarse ITS play mode,
                                 ! Chapter repeat – Sólo            ITS memo y el ingreso de títulos de discos.
                                      repite el capítulo actual   ! La función ITS de un reproductor de DVD es li-
                                 ! Track repeat – Sólo re-          geramente diferente de la reproducción ITS
                                      pite la pista actual
                                                                    con un reproductor de CD múltiple. En el caso
                                 Consulte Reproducción de           del reproductor de DVD múltiple, la reproduc-
          Random mode            las pistas en orden aleatorio      ción ITS sólo se puede utilizar al reproducir
                                 en la página 89.
                                                                    CD. Para obtener más información, consulte
                                 Consulte Exploración de car-       Uso de listas de reproducción ITS en la página
          Scan mode              petas y pistas en la página        132.
                                 89.
                                 Consulte Pausa de la repro-
          Pause                  ducción de un disco en la
                                 página 89.
                                 Consulte Uso de listas de
          ITS play mode          reproducción ITS en la pági-
                                 na 132.
                                 Consulte Uso de listas de
          ITS memo               reproducción ITS en la pági-
                                 na 132.
                                 Consulte Ingreso de títulos
          TitleInput "A"
                                 de discos en la página 90.


                Notas
       ! Si se seleccionan otros discos durante la repe-
         tición de reproducción, la gama de repetición
         cambia a Disc repeat.


 136       Es
Sección

    Accesorios disponibles                                                                                03


Sintonizador de TV                                # Si mantiene presionado MULTI-CONTROL iz-
                                                  quierda o derecha, podrá saltar los canales. La
Funciones básicas                                 sintonización por búsqueda comienza inmediata-
Se puede utilizar esta unidad para controlar un   mente después de que suelte MULTI-CONTROL.
sintonizador de TV, que se vende por separado.
Para obtener más información, consulte el
manual de instrucciones del sintonizador de
                                                  Almacenamiento y


                                                                                                          Español
TV. Esta sección proporciona información          recuperación de emisoras
acerca de las funciones de TV con esta unidad     Se pueden almacenar con facilidad hasta 12
que difieren de las descritas en el manual de     emisoras para recuperarlas posteriormente.
instrucciones del sintonizador de TV.             ! Se pueden almacenar en la memoria hasta
                                                     24 emisoras, 12 por cada una de las dos
                                                     bandas de TV.

                                                  1 Cuando encuentre la emisora que
                                                  desea almacenar en la memoria presione
                                                  LIST.

                                                  2 Utilice el MULTI-CONTROL para almace-
                                                  nar la emisora seleccionada en la memoria.
                                                  Haga girar el control para cambiar el número
1 Indicador de banda                              de presintonía, mantenga pulsado para alma-
2 Indicador del número de presintonía             cenarlo.
3 Indicador de canal                              El número de presintonía que ha seleccionado
                                                  parpadeará y permanecerá encendido. La emi-
1   Presione SOURCE para seleccionar el TV.       sora seleccionada se ha almacenado en la
                                                  memoria.
2 Presione BAND para seleccionar una
banda.                                            3 Utilice MULTI-CONTROL para seleccio-
Pulse BAND hasta que visualice la banda de-       nar la emisora deseada.
seada: TV-1 o TV-2.                               Haga girar el control para cambiar la emisora
                                                  y pulse para seleccionarla.
3 Para utilizar la sintonización manual,
                                                  # También puede cambiar la emisora pulsando
pulse MULTI-CONTROL izquierda o dere-
                                                  MULTI-CONTROL arriba o abajo.
cha.
                                                  # Si no se utiliza la lista en unos 30 segundos,
4 Para utilizar la sintonización por bús-         el display volverá automáticamente a la visualiza-
queda, mantenga presionado                        ción normal.
MULTI-CONTROL izquierda o derecha du-
rante aproximadamente un segundo y                Uso del mando a distancia
luego suelte el control.
                                                  También se pueden almacenar y recuperar las
El sintonizador explorará los canales hasta
                                                  emisoras asignadas a los botones de ajuste de
que encuentre una emisora con señales de su-
                                                  presintonías P.CH 1 a P.CH 6 utilizando el
ficiente intensidad como para asegurar una
                                                  mando a distancia.
buena recepción.
# Se puede cancelar la sintonización por bús-
queda presionando MULTI-CONTROL izquierda o
derecha.


                                                                                               Es      137
Sección

03        Accesorios disponibles

       % Cuando encuentre la emisora que                 4 Utilice MULTI-CONTROL para seleccio-
       desea almacenar en la memoria, presione           nar la emisora deseada.
       uno de los botones de ajuste de presinto-         Haga girar el control para cambiar la emisora
       nías 1 a 6 y manténgalo presionado hasta          y pulse para seleccionarla.
       que el número de presintonía deje de des-         # También puede cambiar la emisora pulsando
       tellar.                                           MULTI-CONTROL arriba o abajo.
       El número seleccionado destellará en el indi-     # Para volver a la visualización del canal, pulse
       cador del número de presintonía y quedará ilu-    BAND.
       minado. La emisora seleccionada se ha             # Si no se utiliza la lista en unos 30 segundos,
       almacenado en la memoria.                         el display volverá automáticamente a la visualiza-
       La próxima vez que presione el mismo botón        ción normal.
       de ajuste de presintonías, la emisora se recu-
       perará de la memoria.                                 Nota
       # También se pueden recuperar las emisoras
                                                         Al almacenar emisoras con la función BSSM, se
       asignadas a los números de ajuste de presinto-
                                                         pueden reemplazar las emisoras que se almace-
       nías presionando MULTI-CONTROL arriba o
                                                         naron con P.CH 1 a P.CH12.
       abajo durante la visualización de canales.


       Almacenamiento consecutivo
       de las emisoras con las señales
       más fuertes
       1 Presione MULTI-CONTROL para visuali-
       zar el menú principal.
       FUNCTION, AUDIO y ENTERTAINMENT apa-
       recen en el display.

       2 Utilice MULTI-CONTROL y seleccione
       FUNCTION para visualizar BSSM.
       Haga girar el control para cambiar la opción
       de menú y presiónelo para seleccionarla.
       # También se puede seleccionar la función pre-
       sionando FUNCTION en el mando a distancia.

       3 Pulse MULTI-CONTROL para activar la
       función BSSM.
       Se visualiza Searching. Mientras se visualiza
       Searching, las 12 emisoras más fuertes se al-
       macenarán en orden ascendente desde el
       canal más bajo. Una vez finalizada la opera-
       ción, aparecerá la lista de canales presintoni-
       zados.
       # Para cancelar el proceso de almacenamiento,
       vuelva a pulsar MULTI-CONTROL.


 138      Es
Apéndice

  Información adicional


Solución de problemas                                                El disco que se  Reemplace el
                                                       TRK SKIPPED   ha colocado con- disco.
                                                                     tiene ficheros
Síntoma         Causa              Acción                            WMA protegidos
El iPod no fun- Los cables están Desconecte el                       con DRM
ciona correcta- conectados inco- cable del iPod. Una
mente.          rrectamente.     vez que aparezca el   iPod
                                 menú principal del


                                                                                                                    Español
                                 iPod, conecte el      Mensaje       Causa              Acción
                                 cable nuevamente.
                                                       ERROR-11      Falla de comuni-   Desconecte el
                                 Reinicie el iPod.
                                                                     cación             cable del iPod. Una
                                                                                        vez que aparezca el
                                                                                        menú principal del
                                                                                        iPod, conecte el
                                                                                        cable nuevamente.
Para comprender los                                                                     Reinicie el iPod.

mensajes de error                                      ERROR-21      Versión de iPod
                                                                     antigua
                                                                                        Actualice la ver-
                                                                                        sión del iPod.
Cuando contacte con su concesionario o con             ERROR-30      Falla del iPod     Reinicie el iPod.
el servicio técnico Pioneer más cercano, ase-          ERROR-A0      El iPod no está    Compruebe si el
gúrese de anotar el mensaje de error.                                cargado pero       cable de conexión
                                                                     funciona correc-   del iPod está corto-
Reproductor de CD incorporado                                        tamente            circuitado (p. ej.,
                                                                                        no queda pillado
Mensaje         Causa              Acción
                                                                                        entre objetos metá-
ERROR-11, 12, Disco sucio          Limpie el disco.                                     licos). Una vez
17, 30                                                                                  comprobado, acti-
                                                                                        ve la llave de en-
ERROR-11, 12, Disco rayado         Reemplace el
                                                                                        cendido o
17, 30                             disco.
                                                                                        desconecte el iPod
ERROR-10, 11, Problema eléctri- Cambie la llave de                                      y conéctelo de
12, 15, 17, 30, co o mecánico   encendido del                                           nuevo.
A0                              automóvil, o cam-
                                                       No Songs      No hay cancio-     Transfiera cancio-
                                bie a una fuente di-
                                                                     nes                nes al iPod.
                                ferente, y después
                                vuelva a activar el    STOP          No hay cancio-      Seleccione una
                                reproductor de CD.                   nes en la lista ac- lista que contenga
                                                                     tual                canciones.
ERROR-15        El disco inser-  Reemplace el
                tado no contiene disco.
                datos                                  Bluetooth audio/teléfono
ERROR-22, 23    No se puede re-    Reemplace el        Mensaje       Causa              Acción
                producir el for-   disco.
                mato del CD                            ERROR-10      La unidad Blue-    Gire la llave de con-
                                                                     tooth incorpora-   tacto a la posición
No Audio        El disco que se   Reemplace el                       da encontró un     OFF (apagado) y
                ha colocado no disco.                                error              ON (encendido).
                contiene ficheros
                que se puedan                          ERROR-80      La unidad FLASH    Gire la llave de con-
                reproducir                                           ROM incorpora-     tacto a la posición
                                                                     da encontró un     OFF (apagado) y
PROTECT         Todos los fiche- Reemplace el                        error              ON (encendido).
                ros del disco    disco.
                están protegidos
                con DRM


                                                                                                        Es        139
Apéndice

           Información adicional


       Pautas para el manejo de                          ! Puede ocurrir que no sea posible reprodu-
                                                           cir algunos discos debido a sus caracterís-
       discos y del reproductor                            ticas, formato, aplicación grabada, entorno
       ! Use únicamente discos que tengan uno de           de reproducción, condiciones de almace-
         los siguientes dos logos.                         namiento u otras causas.
                                                         ! Dependiendo del entorno en que se grabó
                                                           la información de texto, puede que no se vi-
                                                           sualice correctamente.
                                                         ! Las vibraciones en las carreteras pueden
                                                           interrumpir la reproducción de un disco.
                                                         ! Lea las advertencias impresas que vienen
       ! Utilice sólo discos convencionales y com-         con los discos antes de usarlos.
         pletamente circulares. No use discos con
         formas irregulares.
                                                         Discos dobles
                                                         ! Los discos dobles son discos de dos caras
                                                           que incluyen CD grabable de audio en una
       ! Utilice un CD de 12 cm u 8 cm. No utilice         cara y DVD grabable de vídeo en la otra
         un adaptador cuando reproduzca un CD de           cara.
         8 cm.                                           ! Debido a que la cara CD de los discos do-
       ! No coloque ningún otro elemento que no            bles no es físicamente compatible con el
         sea un CD en la ranura de carga de CD.            estándar CD general, es posible que no se
       ! No use discos trizados, con picaduras, de-        pueda reproducir la cara CD en esta uni-
         formados o dañados de otro modo, ya que           dad.
         pueden causar daños al reproductor.             ! La carga y expulsión frecuente de un disco
       ! No es posible reproducir discos CD-R/CD-          doble puede producir rayaduras en el
         RW no finalizados.                                disco. Las rayaduras graves pueden produ-
       ! No toque la superficie grabada de los dis-        cir problemas de reproducción en esta uni-
         cos.                                              dad. En algunos casos, un disco doble
       ! Almacene los discos en sus cajas cuando           pueden atascarse en la ranura de carga del
         no los utilice.                                   disco y no se expulsará. Para evitarlo, reco-
       ! Evite dejar discos en ambientes excesiva-         mendamos que no utilice un disco doble
         mente calientes o expuestos a la luz solar        en esta unidad.
         directa.                                        ! Consulte la información del fabricante del
       ! No fije etiquetas, no escriba ni aplique sus-     disco para obtener más información sobre
         tancias químicas en la superficie de los          los discos dobles.
         discos.
       ! Para limpiar un CD, pásele un paño suave
         desde el centro hacia afuera.                   Archivos de audio
       ! La condensación puede afectar temporal-
         mente el rendimiento del reproductor. Deje      comprimidos
         que se adapte a la temperatura más cálida       ! Según la versión del Windows Media Player
         durante aproximadamente una hora. Ade-            utilizada para codificar los ficheros WMA,
         más, si los discos tienen humedad, séque-         es posible que no se visualicen correcta-
         los con un paño suave.                            mente los nombres de álbumes y demás in-
                                                           formación de texto.


 140       Es
Apéndice

  Información adicional

! Según el software (o la versión del softwa-    Ejemplo de una jerarquía
  re) utilizado para codificar los ficheros de       : Carpeta
  audio, es posible que esta unidad no fun-        : Archivo de audio comprimido
  cione correctamente.
! Es posible que ocurra un pequeño retardo
  al iniciar la reproducción de ficheros
  WMA/AAC codificados con datos de ima-                                            1


                                                                                                            Español
  gen.                                                                             2
! Conforme con ISO 9660 Nivel 1 y 2. Los sis-
  temas de archivo Romeo y Joliet son com-
                                                                                             3
  patibles con este reproductor.
                                                                                             4
! Es posible la reproducción multi-sesión.                                         5
! Los ficheros de audio comprimidos no son                                         6
  compatibles con la transferencia de datos
  en formato Packet Write.
! Se pueden visualizar sólo 64 caracteres                  Nivel 1   Nivel 2   Nivel 3   Nivel 4
  desde el principio como nombre de fichero
                                                 ! Esta unidad asigna los números de carpe-
  (incluida la extensión, como .wma, .mp3,
                                                   tas. El usuario no puede asignarlos.
  .m4a o .wav) o nombre de carpeta.
                                                 ! Se permite una jerarquía de carpetas de
! La secuencia de selección de carpetas u
                                                   hasta ocho niveles. Sin embargo, la jerar-
  otras operaciones pueden cambiar, depen-
                                                   quía práctica de carpetas es de menos de
  diendo del programa de codificación o es-
                                                   dos niveles.
  critura.
                                                 ! Es posible reproducir hasta 99 carpetas en
! Independientemente de la longitud de la
                                                   un disco.
  sección en blanco que haya entre las can-
  ciones de la grabación original, los discos
  de audio comprimidos se reproducirán con       Compatibilidad con audio
  una breve pausa entre canciones.               comprimido
! Las extensiones de fichero como .wma,
  .mp3, .m4a o .wav se deben utilizar adecua-    WMA
  damente.                                       ! Formato compatible: WMA codificado con
! Los textos en ruso que se visualizarán en        Windows Media Player Ver. 7, 7.1, 8, 9 o 10
  esta unidad se deben codificar con los si-     ! Velocidad de grabación: 48 kbps a 320 kbps
  guientes conjuntos de caracteres:                (CBR), 48 kbps a 384 kbps (VBR)
  — Unicodes (UTF-8, UTF-16)                     ! Frecuencia de muestreo: 32 kHz a 48 kHz
  — Conjuntos de caracteres distintos de         ! Windows Media Audio 9 Professional, Loss-
      Unicode que se usan en el entorno            less, Voice: No
      Windows y están configurados a ruso
                                                 MP3
      en la configuración de idiomas múlti-
                                                 ! Velocidad de grabación: 8 kbps a 320 kbps
      ples
                                                 ! Frecuencia de muestreo: 16 kHz a 48 kHz
! Se pueden visualizar sólo 32 caracteres
                                                   (32, 44,1, 48 kHz para énfasis)
  desde el principio como un nombre de fi-
                                                 ! Versiones de etiqueta ID3 compatibles: 1.0,
  chero (incluida la extensión, como .wma,
                                                   1.1, 2.2, 2.3, 2.4 (la etiqueta ID3 Versión 2.x
  .mp3, .m4a o .wav) o un nombre de carpeta
                                                   tiene prioridad sobre la Versión 1.x.)
  cuando utilice textos en ruso.
                                                 ! Lista de reproducción M3u: No
                                                 ! MP3i (MP3 interactivo), mp3 PRO: No


                                                                                                   Es     141
Apéndice

           Información adicional

       AAC                                                   ! Al usar esta unidad no se puede desactivar
       ! Formato compatible: AAC codificados con               la Repetición del iPod. Incluso si la desacti-
         iTunes® versión 6.0.5 y anteriores                    va, la Repetición cambiará automáticamen-
       ! Frecuencia de muestreo: 11,025 kHz a 48               te a Todos cuando conecte el iPod a esta
         kHz                                                   unidad.
       ! Velocidad de transmisión: 16 kbps a 320
         kbps
       ! Apple Lossless: No

       WAV
       ! Formato compatible: Lineal PCM (LPCM),
         MS ADPCM
       ! Bits de cuantificación: 8 y 16 (LPCM), 4
         (MS ADPCM)
       ! Frecuencia de muestreo: 16 kHz a 48 kHz
         (LPCM), 22,05 kHz a 44,1 kHz (MS
         ADPCM)


       Acerca del manejo del iPod
                PRECAUCIÓN
       ! Pioneer no asume responsabilidades por la
         pérdida de datos en el iPod, incluso si la pérdi-
         da ocurre durante el uso de esta unidad.
       ! No deje el reproductor el iPod expuesto a la
         luz solar directa durante un largo periodo de
         tiempo. La exposición prolongada a la luz
         solar puede causar un fallo de funcionamien-
         to del iPod como consecuencia de las altas
         temperaturas generadas.
       ! No deje el iPod en cualquier lugar expuesto a
         una temperatura elevada.
       ! Fije bien el iPod cuando conduzca. No deje
         caer el iPod al piso, ya que puede quedar atas-
         cado debajo del freno o del acelerador.

       Consulte los manuales del iPod para obtener
       mayores detalles.


       Acerca de los ajustes del iPod
       ! No se puede utilizar el Ecualizador del iPod
         en los productos Pioneer. Recomendamos
         que desactive el Ecualizador del iPod antes
         de conectar el iPod a esta unidad.


 142       Es
Apéndice

    Información adicional


Especificaciones                                                                      Discos utilizables .................... Disco compacto
                                                                                      Formato de la señal:
Generales                                                                                    Frecuencia de muestreo
Fuente de alimentación ........ 14,4 V CC (10,8 a 15,1 V per-                                      ........................................... 44,1 kHz
                                                         misible)                            Número de bits de cuantificación
Sistema de conexión a tierra                                                                       ........................................... 16; lineal
   ..................................................... Tipo negativo                Características de la frecuencia
Consumo máximo de corriente                                                              ..................................................... 5 Hz a 20 000 Hz (±1 dB)
                                                                                      Relación de señal a ruido .... 94 dB (1 kHz) (red IEC-A)


                                                                                                                                                                                 Español
   ..................................................... 10,0 A
Dimensiones (An × Al × Pr):                                                           Gama dinámica ........................ 92 dB (1 kHz)
       DIN                                                                            Número de canales ................ 2 (estéreo)
                 Bastidor .................... 178 × 50 × 165 mm                      Formato de decodificación MP3
                 Cara anterior .......... 188 × 58 × 16 mm                               ..................................................... MPEG-1 & 2 Audio Layer 3
       D                                                                              Formato de decodificación WMA
                 Bastidor .................... 178 × 50 × 165 mm                         ..................................................... Ver. 7, 7.1, 8, 9, 10 (audio 2
                 Cara anterior .......... 170 × 45 × 16 mm                                                                                     canales)
Peso ............................................... 1,68 kg                                                                                   (Windows Media Player)
                                                                                      Formato de decodificación AAC
Audio                                                                                    ..................................................... MPEG-4 AAC (sólo codifica-
Potencia de salida máxima                                                                                                                      do con iTunes®)
   ..................................................... 50 W × 4                     Formato de señal WAV ......... PCM lineal & MS ADPCM
                                                         50 W × 2/4 W + 70 W × 1/2
                                                         W (para altavoz de subgra-   Sintonizador de FM
                                                         ves)                         Gama de frecuencias ............ 87,5 MHz a 108,0 MHz
Potencia de salida continua                                                           Sensibilidad utilizable ........... 8 dBf (0,7 µV/75 W, mono,
   ..................................................... 22 W × 4 (50 a 15 000 Hz,                                                    Señal/ruido: 30 dB)
                                                         5% THD, 4 W de carga,        Relación de señal a ruido .... 75 dB (red IEC-A)
                                                         ambos canales activados)     Distorsión .................................... 0,3 % (a 65 dBf, 1 kHz, esté-
Impedancia de carga ............. 4 W a 8 W × 4                                                                                       reo)
                                                         4Wa8W×2+2W×1                                                                 0,1 % (a 65 dBf, 1 kHz,
Nivel de salida máx. del preamplificador (Pre-out)/impe-                                                                              mono)
dancia de salida ....................... 4 V/100W                                     Respuesta de frecuencia ..... 30 Hz a 15 000 Hz (±3 dB)
Ecualizador (Ecualizador gráfico de 7 bandas):                                        Separación estéreo ................. 45 dB (a 65 dBf, 1 kHz)
       Frecuencia ........................ 50/125/315/800/2k/5k/12,5k
                                                         Hz
                                                                                      Sintonizador de MW
                                                                                      Gama de frecuencias ............ 531 kHz a 1 602 kHz (9 kHz)
       Ganancia ........................... ±12 dB
                                                                                      Sensibilidad utilizable ........... 18 µV (Señal/ruido: 20 dB)
Contorno de sonoridad:
                                                                                      Relación de señal a ruido .... 65 dB (red IEC-A)
       Bajo ...................................... +3,5 dB (100 Hz), +3 dB (10
                                                         kHz)                         Sintonizador de LW
       Medio .................................. +10 dB (100 Hz), +6,5 dB              Gama de frecuencias ............ 153 kHz a 281 kHz
                                                         (10 kHz)                     Sensibilidad utilizable ........... 30 µV (Señal/ruido: 20 dB)
       Alto ....................................... +11 dB (100 Hz), +11 dB           Relación de señal a ruido .... 65 dB (red IEC-A)
                                                         (10 kHz)
                                                         (volumen: –30 dB)            Bluetooth
HPF:                                                                                  Versión .......................................... Certificada para Bluetooth
       Frecuencia ........................ 50/63/80/100/125 Hz                                                                           1.2
       Pendiente .......................... –12 dB/oct                                Potencia de salida ................... +4 dBm Máx.
Altavoz de subgraves (mono):                                                                                                             (Clase de potencia 2)
       Frecuencia ........................ 50/63/80/100/125 Hz
       Pendiente .......................... –18 dB/oct
                                                                                              Nota
       Ganancia ........................... +6 dB a –24 dB
       Fase ...................................... Normal/Inversa                     Las especificaciones y el diseño están sujetos a
Intensificación de graves:                                                            posibles modificaciones sin previo aviso.
       Ganancia ........................... +12 dB a 0 dB

Reproductor de CD
Sistema ........................................ Sistema de audio de discos
                                                 compactos


                                                                                                                                                                     Es         143
PIONEER CORPORATION
4-1, MEGURO 1-CHOME, MEGURO-KU
TOKYO 153-8654, JAPAN
PIONEER ELECTRONICS (USA) INC.
P.O. Box 1540, Long Beach, California 90801-1540, U.S.A.
TEL: (800) 421-1404
PIONEER EUROPE NV
Haven 1087, Keetberglaan 1, B-9120 Melsele, Belgium
TEL: (0) 3/570.05.11
PIONEER ELECTRONICS ASIACENTRE PTE. LTD.
253 Alexandra Road, #04-01, Singapore 159936
TEL: 65-6472-7555
PIONEER ELECTRONICS AUSTRALIA PTY. LTD.
178-184 Boundary Road, Braeside, Victoria 3195, Australia
TEL: (03) 9586-6300
PIONEER ELECTRONICS OF CANADA, INC.
300 Allstate Parkway, Markham, Ontario L3R OP2, Canada
TEL: 1-877-283-5901
PIONEER ELECTRONICS DE MEXICO, S.A. de C.V.
Blvd.Manuel Avila Camacho 138 10 piso
Col.Lomas de Chapultepec, Mexico, D.F. 11000
TEL: 55-9178-4270
先鋒股份有限公司                                                    Published by Pioneer Corporation.
總公司 : 台北市中山北路二段44號13樓                                       Copyright © 2006 by Pioneer Corporation.
電話 : (02) 2521-3588                                         All rights reserved.
先鋒電子(香港)有限公司                                                Publicado por Pioneer Corporation.
香港九龍尖沙咀海港城世界商業中心                                            Copyright © 2006 por Pioneer
9樓901-6室                                                    Corporation. Todos los derechos
電話 : (0852) 2848-6488                                       reservados.

                                                            Printed in Thailand
                                                            Impreso en Tailandia
<KMIZX> <06L00000>                                          <CRD4201-A/N> EW

Deh P85 Bt Manual En Es

  • 1.
    English Operation Manual Manual de instrucciones Español CD RDS Receiver Reproductor de CD con receptor RDS DEH-P85BT
  • 2.
    2 En
  • 3.
    Contents English Thank you for buying this Pioneer product. Please read through these operating instructions so you will know how to operate your model properly. After you have finished reading the instructions, keep this man- ual in a safe place for future reference. Before You Start – Introduction of advanced About this unit 6 operations 20 Operating environment 7 – Selecting a repeat play range 20 Visit our website 7 – Playing tracks in random order 20 In case of trouble 7 – Scanning folders and tracks 20 Protecting your unit from theft 7 – Pausing disc playback 21 – Removing the front panel 8 – Using compression and BMX 21 – Attaching the front panel 8 – Searching every 10 tracks in the current Resetting the microprocessor 8 disc or folder 21 About the demo mode 8 – Using disc title functions 21 Use and care of the remote control 9 – Displaying text information on disc 22 – Installing the battery 9 – Selecting tracks from the track title – Using the remote control 9 list 23 – Selecting tracks from the file name Operating this unit list 23 What’s What 10 Playing songs on iPod 24 – Head unit 10 – Basic Operations 24 – Remote control 10 – Browsing for a song 24 Basic Operations 11 – Displaying text information on – Power ON/OFF 11 iPod 25 – Selecting a source 11 – Introduction of advanced – Adjusting the volume 12 operations 25 Tuner 12 – Repeating play 25 – Basic Operations 12 – Playing songs in a random order – Storing and recalling broadcast (shuffle) 25 frequencies 13 – Playing all songs in a random order – Introduction of advanced (shuffle all) 26 operations 14 – Pausing a song 26 – Storing the strongest broadcast – Changing audiobook speed 26 frequencies 14 Bluetooth Audio 27 – Tuning in strong signals 14 – Basic Operations 27 – Selecting alternative frequencies 14 – Setting up for Bluetooth audio – Receiving traffic announcements 15 player 27 – Using PTY functions 16 – Introduction of advanced – Using radio text 16 operations 28 – PTY list 17 – Connecting a Bluetooth audio Built-in CD Player 18 player 28 – Basic Operations 18 – Disconnecting a Bluetooth audio – Selecting a track directly 19 player 29 En 3
  • 4.
    Contents – Connecting the most recently Audio Adjustments 44 connected Bluetooth audio player 29 – Introduction of audio adjustments 44 – Playing songs on Bluetooth audio – Using balance adjustment 44 player 29 – Using the equalizer 44 – Stopping playback 29 – Adjusting loudness 46 – Pausing a song 29 – Using subwoofer output 46 – Connecting to a Bluetooth audio player – Boosting the bass 46 automatically 29 – Using the high pass filter 47 – Displaying BD (Bluetooth Device) – Adjusting source levels 47 address 30 – Using automatic sound levelizer 47 Bluetooth Telephone 30 Initial Settings 48 – Basic Operations 30 – Adjusting initial settings 48 – About the telephone source 31 – Selecting the display language 48 – Setting up for hands-free phoning 31 – Setting the date 48 – Making a phone call 32 – Setting the clock 48 – Taking a phone call 32 – Turning the off clock display on or – Introduction of advanced off 49 operations 33 – Setting the FM tuning step 49 – Connecting a cellular phone 34 – Switching Auto PI Seek 49 – Disconnecting a cellular phone 35 – Switching the warning tone 49 – Registering connected cellular – Switching the face auto open 49 phone 35 – Switching the auxiliary setting 50 – Deleting a registered phone 36 – Switching the dimmer setting 50 – Connecting to a registered cellular – Adjusting the brightness 50 phone 36 – Setting the rear output and subwoofer – Using the Phone Book 37 controller 50 – Using the Call History 40 – Switching the sound muting/ – Assigning preset numbers 41 attenuation 50 – Making a call by entering phone – Switching the feature demo 51 number 41 – Switching the reverse mode 51 – Clearing memory 42 – Switching the Ever Scroll 51 – Setting the automatic rejecting 42 – Activating the BT Audio source 51 – Setting the automatic answering 42 – Entering PIN code for Bluetooth – Changing the ring tone 43 wireless connection 52 – Echo canceling and noise – Editing device name 52 reduction 43 – Displaying system version for – Displaying BD (Bluetooth Device) repair 52 address 43 – Resetting the Bluetooth wireless – Selecting the incoming call screen 43 technology module 53 4 En
  • 5.
    Contents English Other Functions 53 Understanding error messages 64 – Using the AUX source 53 Handling guideline of discs and player 65 – Using different entertainment Dual Discs 65 displays 54 Compressed audio files 65 – Using the PGM button 54 – Example of a hierarchy 66 – Compressed audio compatibility 66 Available accessories About handling the iPod 67 USB adapter 55 – About iPod settings 67 – Basic Operations 55 Specifications 68 – Selecting an audio file directly in the current folder 55 – Introduction of advanced operations 55 – Displaying text information of an audio file 56 – Selecting files from the file name list 56 Multi-CD Player 57 – Basic Operations 57 – Selecting a track directly 57 – Introduction of advanced operations 57 – Using ITS playlists 58 – Using disc title functions 59 – Using CD TEXT functions 60 DVD Player 60 – Basic Operations 60 – Selecting a disc 61 – Selecting a folder 61 – Introduction of advanced operations 61 TV tuner 62 – Basic Operations 62 – Storing and recalling broadcast stations 63 – Storing the strongest broadcast stations sequentially 63 Additional Information Troubleshooting 64 En 5
  • 6.
    Section 01 Before You Start ! The Pioneer CarStereo-Pass is for use only in Germany. ! Keep this manual handy as a reference for op- erating procedures and precautions. ! Always keep the volume low enough so that If you want to dispose this product, do not mix you can hear sounds from outside the vehicle. it with general household waste. There is a se- ! Protect this unit from moisture. parate collection system for used electronic ! If the battery is disconnected or discharged, products in accordance with legislation that re- the preset memory will be erased and must be quires proper treatment, recovery and recy- reprogrammed. cling. About WMA Private households in the 25 member states of the EU, in Switzerland and Norway may return their used electronic products free of charge to designated collection facilities or to a retai- ler (if you purchase a similar new one). For countries not mentioned above, please The Windows Media™ logo printed on the box contact your local authorities for the correct indicates that this unit can play back WMA method of disposal. data. By doing so you will ensure that your disposed WMA is short for Windows Media Audio and product undergoes the necessary treatment, refers to an audio compression technology recovery and recycling and thus prevent po- that is developed by Microsoft Corporation. tential negative effects on the environment WMA data can be encoded by using Windows and human health. Media Player version 7 or later. Windows Media and the Windows logo are tra- demarks or registered trademarks of Microsoft About this unit Corporation in the United States and/or other The tuner frequencies on this unit are allo- countries. cated for use in Western Europe, Asia, the ! This unit may not operate correctly depend- Middle East, Africa and Oceania. Use in other ing on the application used to encode areas may result in poor reception. The RDS WMA files. (radio data system) function operates only in areas with FM stations broadcasting RDS sig- About MP3 nals. Supply of this product only conveys a license for private, non-commercial use and does not convey a license nor imply any right to use CAUTION this product in any commercial (i.e. revenue- ! Do not allow this unit to come into contact generating) real time broadcasting (terrestrial, with liquids. Electrical shock could result. satellite, cable and/or any other media), broad- Also, this unit damage, smoke, and overheat casting/streaming via internet, intranets and/ could result from contact with liquids. or other networks or in other electronic con- ! “CLASS 1 LASER PRODUCT” tent distribution systems, such as pay-audio or This product contains a laser diode of higher audio-on-demand applications. An indepen- class than 1. To ensure continued safety, do dent license for such use is required. For de- not remove any covers or attempt to gain ac- tails, please visit cess to the inside of the product. Refer all ser- http://www.mp3licensing.com. vicing to qualified personnel. 6 En
  • 7.
    Section BeforeYou Start 01 English About AAC ! This unit does not support software ver- AAC is short for Advanced Audio Coding and sions prior to iPod update 2004-10-20. For refers to an audio compression technology supported versions, consult your nearest standard used with MPEG 2 and MPEG 4. Pioneer dealer. Several applications can be used to encode ! Operations may vary depending on the soft- AAC files, but file formats and extensions dif- ware version of iPod. fer depending on the application which is used to encode. This unit plays back AAC files encoded by Operating environment iTunes® version 6.0.5 and earlier. This unit should be used within the tempera- iTunes is a trademark of Apple Computer, Inc., ture ranges shown below. registered in the U.S. and other countries. Operating temperature range: -10 °C to +60 °C About Bluetooth (14 °F to 140 °F) EN300328 ETC test temperature: -20 °C and +55 °C (-4 °F and 131 °F) Visit our website Visit us at the following site: Bluetooth is a short-range wireless radio con- nectivity technology that is developed as a cable replacement for mobile phones, hand- held PCs and other devices. Bluetooth oper- ates in 2.4 GHz frequency range and transmits ! Register your product. We will keep the de- voice and data at speeds up to 1 megabit per tails of your purchase on file to help you second. Bluetooth was launched by a special refer to this information in the event of an interest group (SIG) that comprises of Ericsson insurance claim such as loss or theft. Inc., Intel Corp., Nokia Corp., Toshiba and IBM ! We offer the latest information about in 1998, and it is currently developed by nearly Pioneer Corporation on our website. 2 000 companies worldwide. ! The Bluetooth word mark and logos are owned by the Bluetooth SIG, Inc. and any use of such marks by Pioneer Corporation In case of trouble is under license. Other trademarks and Should this product fail to operate properly, trade names are those of their respective contact your dealer or nearest authorized owners. Pioneer Service Station. iPod® compatibility This unit can control and listen to songs on an iPod. Protecting your unit from ! iPod is a trademark of Apple Computer, theft Inc., registered in the U.S. and other coun- The front panel can be detached to deter theft. tries. ! If the front panel is not detached from the ! This unit supports only an iPod with Dock head unit within five seconds of turning off Connector. the ignition, a warning tone will sound and the front panel will open. En 7
  • 8.
    Section 01 Before You Start ! You can turn off the warning tone. See Attaching the front panel Switching the warning tone on page 49. ! You can turn off the face auto open. See 1 Make sure the inner cover is closed. Switching the face auto open on page 49. 2 Replace the front panel by clipping it into place. Important ! Handle gently when removing or attaching the front panel. ! Avoid subjecting the front panel to excessive shocks. ! Keep the front panel out of direct sunlight and high temperatures. ! A few seconds after turning the ignition switch to on or off, the front panel automati- cally moves. When this happens, your fingers may become jammed in the panel, so keep Resetting the microprocessor your hands away from it. The microprocessor must be reset under the following conditions: Removing the front panel ! Prior to using this unit for the first time after installation 1 Press and hold OPEN to open the front ! If the unit fails to operate properly panel. ! When strange or incorrect messages ap- pear on the display % Press RESET with a pen tip or other pointed instrument. 2 Slide and remove the front panel to- ward you. Take care not to grip it too tightly or to drop the front panel and protect it from contact with water or other fluids to prevent perma- nent damage. RESET button About the demo mode This unit features two demonstration modes. One is the reverse mode, the other is the fea- ture demo mode. 3 Put the front panel into provided pro- tective case for safe keeping. 8 En
  • 9.
    Section BeforeYou Start 01 English Important WARNING The red lead (ACC) of this unit should be con- Keep the battery out of the reach of children. nected to a terminal coupled with ignition switch Should the battery be swallowed, immediately on/off operations. If this is not done, the vehicle consult a doctor. battery may be drained. Reverse mode CAUTION If you do not perform an operation within ! Use only one CR2025 (3 V) lithium battery. about 30 seconds, screen indications start to ! Remove the battery if the remote control is not reverse, and then continue reversing every 10 used for a month or longer. seconds. Pressing BAND when power to this ! Danger of explosion if battery is incorrectly re- unit is turned off while the ignition switch is placed. Replace only with the same or equiva- set to ACC or ON cancels the reverse mode. lent type. Press BAND again to start the reverse mode. ! Do not handle the battery with metallic tools. ! Do not store the battery with metallic materi- Feature demo mode als. The feature demo automatically starts when ! In the event of battery leakage, wipe the re- power to this unit is turned off while the igni- mote control completely clean and install a tion switch is set to ACC or ON. Pressing new battery. DISPLAY during feature demo operation can- ! When disposing of used batteries, please cels the feature demo mode. Press DISPLAY comply with governmental regulations or en- again to start the feature demo mode. Remem- vironmental public institutions’ rules that ber that if the feature demo continues operat- apply in your country/area. ing when the car engine is turned off, it may drain battery power. Using the remote control Point the remote control in the direction of the Use and care of the remote front panel to operate. ! The remote control may not function prop- control erly in direct sunlight. Installing the battery Slide the tray out on the back of the remote Important control and insert the battery with the plus (+) ! Do not store the remote control in high tem- and minus (–) poles pointing in the proper di- peratures or direct sunlight. rection. ! Do not let the remote control fall onto the ! When using for the first time, pull out the floor, where it may become jammed under the film protruding from the tray. brake or accelerator pedal. En 9
  • 10.
    Section 02 Operating this unit What’s What 7 EQ button Press to select various equalizer curves. Head unit 8 ATT button Press to quickly lower the volume level, by 1 SOURCE button about 90%. Press once more to return to the This unit is turned on by selecting a source. original volume level. Press to cycle through all the available sources. 9 LIST button Press to display the disc title list, track title 2 MULTI-CONTROL list, folder list, file list or preset channel list Move to perform manual seek tuning, fast depending on the source. forward, reverse and track search controls. Also used for controlling functions. a PHONE button Turn to increase or decrease the volume. Press to select the phone as the source. While operating a phone source, press to 3 EJECT button end a call, reject an incoming call or cancel Press to eject a CD from your built-in CD making a call. player. Press and hold to open or close the front b BAND button panel. Press to select among three FM bands and MW/LW bands and to cancel the control 4 RESET button mode of functions. Press to reset the microprocessor. 5 TA/NEWS button Remote control Press to turn TA function on or off. Press Operation is the same as when using the but- and hold to turn NEWS function on or off. tons on the head unit. 6 DISPLAY button c VOLUME buttons Press to select different displays. Press to increase or decrease the volume. 10 En
  • 11.
    Section Operatingthis unit 02 English d FUNCTION button Basic Operations Press to select functions. Power ON/OFF e Joystick Move to perform manual seek tuning, fast Turning the unit on forward, reverse and track search controls. % Press SOURCE to turn the unit on. Also used for controlling functions. Functions are the same as Turning the unit off MULTI-CONTROL except for volume con- trol. % Press SOURCE and hold until the unit Press to display the disc title list, track title turns off. list, folder list, file list or preset channel list depending on the source. Selecting a source f DIRECT button You can select a source you want to listen to. Press to directly select the desired track. To switch to the built-in CD player, load a disc While operating the phone source, press to in the unit (refer to page 18). directly enter a phone number. % Press SOURCE to select a source. g CLEAR button Press SOURCE repeatedly to switch between Press to cancel the input number when 0 to the following sources: 9 are used. Tuner—Television—DVD player/Multi- DVD player—Built-in CD player—Multi- h 0 to 9 buttons CD player—iPod—USB—External unit 1— Press to directly select the desired track, External unit 2—AUX1—AUX2—BT Audio preset tuning or disc. Buttons 1 to 6 can op- —BT Telephone erate the preset tuning for the tuner or disc number search for the multi-CD player. Notes i OFF HOOK button ! In the following cases, the sound source will Press to start talking on the phone while op- not change: erating a phone source. — When there is no unit corresponding to the selected source connected to this unit. j ON HOOK button — When there is no disc or magazine in the While operating the phone source, press to player. end a call or reject an incoming call. — When the AUX (auxiliary input) is set to off (refer to page 50). k PGM button — When the BT Audio source is set to off Press to operate the preprogrammed func- (refer to Activating the BT Audio source on tions for each source. (Refer to Using the page 51). PGM button on page 54.) ! AUX1 is set to on by default. Turn off the AUX1 l AUDIO button when not in use (refer to Switching the auxili- Press to select various sound quality con- ary setting on page 50). trols. En 11
  • 12.
    Section 02 Operating this unit ! External unit refers to a Pioneer product (such Tuner as one available in the future) that, although incompatible as a source, enables control of Basic Operations basic functions by this unit. Two external units This unit’s AF (alternative frequencies search) can be controlled by this unit. When two exter- function can be turned on and off. AF should nal units are connected, the allocation of be off for normal tuning operation (refer to them to external unit 1 or external unit 2 is page 14). automatically set by this unit. ! When this unit’s blue/white lead is connected RDS to the vehicle’s auto-antenna relay control RDS (radio data system) contains inaudible in- terminal, the vehicle’s antenna extends when formations that helps searching of the radio this unit’s source is turned on. To retract the stations. antenna, turn the source off. ! RDS service may not be provided by all sta- tions. ! RDS functions such as AF and TA are only Adjusting the volume active when your radio is tuned to an RDS % Use MULTI-CONTROL to adjust the station. sound level. 1 Band indicator 2 Stereo (5) indicator Shows when the selected frequency is being broadcast in stereo. 3 LOC indicator Shows when local seek tuning is on. 4 Preset number indicator 5 TP ( ) indicator Shows when a TP station is tuned in. 6 News ( ) indicator Shows when the set news program is re- ceived. 7 Program service name 8 PTY label indicator 9 TEXT indicator Shows when the radio text is received. 12 En
  • 13.
    Section Operating this unit 02 English Non-RDS or MW/LW Storing and recalling broadcast frequencies You can easily store up to six broadcast fre- quencies for later recall. ! Up to 18 FM stations, six for each of the three FM bands, and six MW/LW stations can be stored in memory. 1 When you find a frequency that you want to store in memory press LIST. 1 Band indicator 2 Stereo (5) indicator 2 Use MULTI-CONTROL to store the se- Shows when the selected frequency is being lected frequency in memory. broadcast in stereo. Turn to change the preset number; press and 3 LOC indicator hold to store. Shows when local seek tuning is on. The preset number you have selected will 4 Preset number indicator flash and then remain lit. The selected radio 5 Frequency indicator station frequency has been stored in memory. 1 Press SOURCE to select the tuner. 3 Use MULTI-CONTROL to select the de- sired station. 2 Press BAND to select a band. Turn to change the station; press to select. Press BAND until the desired band is dis- # You can also change the station by pushing played, FM-1, FM-2, FM-3 for FM or MW/LW. MULTI-CONTROL up or down. # If you do not operate the list within about 30 3 To perform manual tuning, push seconds, the display is automatically returned to MULTI-CONTROL left or right. the ordinary display. 4 To perform seek tuning, push and hold MULTI-CONTROL left or right for about one Using the remote control second and release. % When you find a frequency that you The tuner will scan the frequencies until a want to store in memory, press one of pre- broadcast strong enough for good reception is set tuning buttons 1 to 6 and hold until the found. preset number stops flashing. # You can cancel seek tuning by pushing The number you have pressed will flash in the MULTI-CONTROL left or right. preset number indicator and then remain lit. # If you push and hold MULTI-CONTROL left or The selected radio station frequency has been right you can skip stations. Seek tuning starts as stored in memory. soon as you release MULTI-CONTROL. The next time you press the same preset tun- ing button the radio station frequency is re- Note called from memory. Listening MW radio while connecting iPod to this # You can also recall radio station frequencies unit may generate noise. In this case, disconnect assigned to preset tuning numbers by pushing iPod from this unit and noise is disappeared. MULTI-CONTROL up or down during the fre- quency display. En 13
  • 14.
    Section 02 Operating this unit Introduction of advanced 1 Use MULTI-CONTROL to select BSM in operations the function menu. 1 Press MULTI-CONTROL to display the 2 Press MULTI-CONTROL to turn BSM on. main menu. Six strongest broadcast frequencies will be FUNCTION, AUDIO and ENTERTAINMENT stored in the order of their signal strength. appear on the display. # To cancel the storage process, press MULTI-CONTROL again. 2 Use MULTI-CONTROL to select FUNCTION. 3 Use MULTI-CONTROL to select the de- Turn to change the menu option; press to se- sired station. lect. Turn to change the station; press to select. The function name appears on the display. # You can also change the station by pushing MULTI-CONTROL up or down. 3 Turn MULTI-CONTROL to select the function. Turn MULTI-CONTROL to switch between the Tuning in strong signals functions in the following order: Local seek tuning lets you tune in only those BSM (best stations memory)—Regional (re- radio stations with sufficiently strong signals gional)—Local (local seek tuning)— for good reception. PTY search (program type selection)— Traffic Announce (traffic announcement 1 Use MULTI-CONTROL to select Local in standby)—Alternative FREQ (alternative fre- the function menu. quencies search)—News interrupt (news 2 Press MULTI-CONTROL to turn local program interruption) seek tuning on. # You can also select the function by pressing # To turn local seek tuning off, press FUNCTION on the remote control. MULTI-CONTROL again. # If MW/LW band is selected, you can only se- lect BSM or Local. 3 Push MULTI-CONTROL left or right to # To return to the frequency display, press set the sensitivity. BAND. There are four levels of sensitivity for FM and # If you do not operate functions within about two levels for MW/LW: 30 seconds, the display is automatically returned FM: Level 1—Level 2—Level 3—Level 4 to the ordinary display. MW/LW: Level 1—Level 2 The Level 4 setting allows reception of only the strongest stations, while lower settings let Storing the strongest broadcast you receive progressively weaker stations. frequencies BSM (best stations memory) lets you automa- tically store the six strongest broadcast fre- Selecting alternative frequencies quencies under 1 to 6 on the remote control When the tuner can’t get good reception, the and once stored there you can tune in to those unit automatically search for a different sta- frequencies with the touch of a button. tion in a same network. ! Storing broadcast frequencies with BSM 1 Use MULTI-CONTROL to select may replace broadcast frequencies you Alternative FREQ in the function menu. have saved using 1 to 6 on the remote con- trol. 2 Press MULTI-CONTROL to turn AF on. # To turn AF off, press MULTI-CONTROL again. 14 En
  • 15.
    Section Operatingthis unit 02 English Notes Notes ! Only RDS stations are tuned in during seek ! Regional programming and regional networks tuning or BSM when AF is on. are organized differently depending on the ! When you recall a preset station, the tuner country (i.e., they may change according to may update the preset station with a new fre- the hour, state or broadcast area). quency from the station’s AF list. No preset ! The preset number may disappear from the number appears on the display if the RDS display if the tuner tunes in a regional station data for the station received differs from that which differs from the originally set station. of the originally stored station. ! The regional function can be turned on or off ! Sound may be temporarily interrupted by an- independently for each FM band. other program during an AF frequency search. ! AF can be turned on or off independently for Receiving traffic announcements each FM band. TA (traffic announcement standby) lets you re- ceive traffic announcements automatically, no Using PI Seek matter what source you are listening to. TA can be activated for both a TP station (a sta- If the tuner can’t find a suitable station, or re- tion that broadcasts traffic information) or an ception status becomes bad, the unit will auto- enhanced other network’s TP station (a station matically search for a different station with a carrying information which cross-references same programming. During the search, TP stations). PI seek is displayed and the output is muted. 1 Tune in a TP or enhanced other net- Using Auto PI Seek for preset stations work’s TP station. The TP ( ) indicator will light. When preset stations cannot be recalled, as when travelling long distances, the unit can 2 Press TA/NEWS to turn traffic an- be set to perform PI Seek during preset recall. nouncement standby on. ! The default setting for Auto PI Seek is off. # To turn traffic announcements standby off, See Switching Auto PI Seek on page 49. press TA/NEWS again. 3 Use MULTI-CONTROL to adjust the TA Limiting stations to regional volume when a traffic announcement be- programming gins. When AF is used, the regional function limits The newly set volume is stored in memory and the selection of stations broadcasting regional recalled for subsequent traffic announce- programs. ments. 1 Use MULTI-CONTROL to select Regional 4 Press TA/NEWS while a traffic an- in the function menu. nouncement is being received to cancel the announcement. 2 Press MULTI-CONTROL to turn the re- The tuner returns to the original source but re- gional function on. mains in the standby mode until TA/NEWS is # To turn the regional function off, press pressed again. MULTI-CONTROL again. En 15
  • 16.
    Section 02 Operating this unit Notes Using news program interruption When a news program is broadcast from a ! You can also turn the TA function on or off in PTY code news station, the unit can switch the menu that appears by using from any station to the news broadcast sta- MULTI-CONTROL. tion. When the news program ends, reception ! The system switches back to the original of the previous program resumes. source following traffic announcement recep- tion. % Press TA/NEWS and hold to turn on ! Only TP and enhanced other network’s TP sta- news program interruption. tions are tuned in during seek tuning or BSM Press TA/NEWS until NEWS ON appears in when TA is on. the display. # To turn off news program interruption, press TA/NEWS and hold until NEWS OFF appears in Using PTY functions the display. You can tune in a station by using PTY (pro- # A news program can be canceled by pressing gram type) information. TA/NEWS. Searching for an RDS station by PTY Note information You can also turn on or off news program in the You can search for general types of broadcast- menu that appears by using MULTI-CONTROL. ing programs, such as those listed on the next page. Receiving PTY alarm broadcasts 1 Use MULTI-CONTROL to select When the emergency PTY code broadcasts, PTY search in the function menu. the unit receives it automatically (ALARM ap- pears). When the broadcasting ends, the sys- 2 Push MULTI-CONTROL left or right to tem returns to the previous source. select a program type. ! An emergency announcement can be can- News&Inf—Popular—Classics—Others celed by pressing TA/NEWS. 3 Press MULTI-CONTROL to begin the search. Using radio text The unit searches for a station broadcasting that program type. When a station is found its This tuner can display radio text data trans- program service name is displayed. mitted by RDS stations, such as station infor- PTY (program type ID code) information is mation, the name of the currently broadcast listed on the next page. song and the name of the artist. # To cancel the search, press MULTI-CONTROL ! The tuner automatically memorizes the again. three latest radio text broadcasts received, # The program of some stations may differ from replacing text from the least recent recep- that indicated by the transmitted PTY. tion with new text when it is received. # If no station is broadcasting the type of pro- gram you searched for, Not found is displayed Displaying radio text for about two seconds and then the tuner returns You can display the currently received radio to the original station. text and the three most recent radio texts. 16 En
  • 17.
    Section Operatingthis unit 02 English 1 Press DISPLAY and hold to display radio PTY list text. Radio text for the currently broadcasting sta- General Specific Type of program tion is displayed. News&Inf News News # You can cancel radio text display by pressing Affairs Current affairs DISPLAY or BAND. # When no radio text is received, No text ap- Info General information and pears in the display. advice Sport Sports 2 Push MULTI-CONTROL left or right to recall the three most recent radio texts. Weather Weather reports/meteoro- Pushing MULTI-CONTROL left or right logical information switches between the current and the three Finance Stock market reports, radio text data displays. commerce, trading, etc. # If there is no radio text data in memory the dis- Popular Pop Mus Popular music play will not change. Rock Mus Contemporary modern 3 Push MULTI-CONTROL up or down to music scroll. Easy Mus Easy listening music Push MULTI-CONTROL up to go to the begin- Oth Mus Non-categorized music ning. Push MULTI-CONTROL down to scroll the radio text data. Jazz Jazz Country Country music Storing and recalling radio text Nat Mus National music You can store data from up to six radio text Oldies Oldies, golden oldies transmissions for buttons 1 to 6 on the remote control. Folk mus Folk music Classics L. Class Light classical music 1 Display the radio text you want to store in memory. Classic Classical music Refer to Displaying radio text on the previous page. 2 Press and hold any buttons 1 to 6 on the remote control to store the selected radio text. The memory number will display and the se- lected radio text will be stored in memory. The next time you press the same button on the remote control in the radio text display the stored text is recalled from memory. En 17
  • 18.
    Section 02 Operating this unit Others Educate Educational programs Built-in CD Player Drama Radio plays and serials Basic Operations Culture National or regional cul- The built-in CD player can play back audio CD ture (CD-DA) and compressed audio (WMA/MP3/ Science Nature, science and tech- AAC/WAV) recorded on CD-ROM. (Refer to nology page 65 for files that can be played back.) Varied Light entertainment Read the precautions with discs and player on page 65. Children Children’s Social Social affairs Religion Religious affairs or ser- vices Phone In Phone in Touring Travel programs; not for traffic announcements Leisure Hobbies and recreational activities 1 WMA/MP3/AAC/WAV indicator Document Documentaries Shows the type of audio file currently playing when the compressed audio is playing. 2 Folder number indicator Shows the folder number currently playing when the compressed audio is playing. 3 Track number indicator 4 Play time indicator 5 Bit rate/sampling frequency indicator Shows the bit rate or sampling frequency of the current track (file) when the compressed audio is playing. ! When playing back VBR (variable bit rate)-recorded WMA files, the average bit rate value is displayed. ! When playing back VBR (variable bit rate)-recorded MP3 files, VBR is dis- played instead of bit rate value. 1 Press OPEN to open the front panel. Disc loading slot appears. 18 En
  • 19.
    Section Operatingthis unit 02 English Disc loading slot ! When playing CD-EXTRA or MIXED-MODE CDs, compressed audio and CD-DA can be switched by pressing BAND. ! If you have switched between compressed audio and CD-DA, playback starts at the first track on the disc. ! When playing back VBR (variable bit rate) re- corded files, elapsed play time may not be dis- played correctly. ! When playing compressed audio, there is no 2 Insert a CD (CD-ROM) into the disc load- sound on fast forward or reverse. ing slot. ! When a CD TEXT disc is inserted, the disc and Front panel is closed automatically, and play- track titles automatically begin to scroll in the back will start. display. When Ever Scroll is set to ON at the # Be sure to turn up the label side of a disc. initial setting, the disc and track titles scroll # After a CD (CD-ROM) has been inserted, press continuously. About Ever Scroll, refer to SOURCE to select the built-in CD player. Switching the Ever Scroll on page 51. # You can eject a CD (CD-ROM) by pressing ! Playback is carried out in order of file number. EJECT. Folders are skipped if they contain no files. (If 3 Push MULTI-CONTROL up or down to folder 01 (ROOT) contains no files, playback select a folder when playing a compressed commences with folder 02.) audio. ! If you cannot insert a disc completely or if # You cannot select a folder that does not have after you insert a disc the disc does not play, a compressed audio file recorded in it. check that the label side of the disc is up. # To return to folder 01 (ROOT), press and hold Press EJECT to eject the disc, and check the BAND. However, if folder 01 (ROOT) contains no disc for damage before inserting it again. files, playback commences with folder 02. ! When the disc loading or ejecting function does not operate properly, you can eject the 4 To perform fast forward or reverse, disc by pressing and holding EJECT while push and hold MULTI-CONTROL left or opening the front panel. right. ! Depending on the character sets in the disc, # If you select Rough search, pushing and hold- Russian texts may be garbled. About the al- ing MULTI-CONTROL left or right enables you to lowed character sets for Russian texts, refer to search every 10 tracks in the current disc (folder). Compressed audio files on page 65. (Refer to Searching every 10 tracks in the current disc or folder on page 21.) Selecting a track directly 5 To skip back or forward to another When using the remote control, you can select track, push MULTI-CONTROL left or right. a track directly by entering the desired track number. Notes ! When audio files are being played back, ! There is sometimes a delay between starting you can select track in the current folder. up disc playback and the sound being issued. When being read, Format read is displayed. 1 Press DIRECT. ! If an error message such as ERROR-11 is dis- Track number input display appears. played, refer to Understanding error messages on page 64. En 19
  • 20.
    Section 02 Operating this unit 2 Press 0 to 9 buttons to enter the desired Selecting a repeat play range track number. Repeat play plays the same track/folder within # You can cancel the input number by pressing the selected repeat play range. CLEAR. Also, the repeat range determines the range of 3 Press DIRECT. random play and scan play. The track of entered number will play. 1 Use MULTI-CONTROL to select # After entering the number input mode, if you Play mode in the function menu. do not perform an operation within about eight seconds, the mode is automatically canceled. 2 Press MULTI-CONTROL to select the re- peat range. ! Disc repeat – Repeat all tracks Introduction of advanced ! Track repeat – Repeat just the current operations track 1 Press MULTI-CONTROL to display the ! Folder repeat – Repeat the current folder main menu. # If you select another folder during repeat play, FUNCTION, AUDIO and ENTERTAINMENT the repeat play range changes to disc repeat. appear on the display. # When playing CD, performing track search or fast forward/reverse cancels the repeat play auto- 2 Use MULTI-CONTROL to select matically. FUNCTION. # When playing compressed audio, performing Turn to change the menu option; press to se- track search or fast forward/reverse during lect. Track repeat (track repeat) changes the repeat The function name appears on the display. play range to folder repeat. # When Folder repeat (folder repeat) is se- 3 Turn MULTI-CONTROL to select the lected, it is not possible to play back a subfolder function. of that folder. Turn MULTI-CONTROL to switch between the functions in the following order: Play mode (repeat play)—Random mode Playing tracks in random order (random play)—Scan mode (scan play)— Random play plays tracks in a random order Pause (pause)—Compression (compression within the selected repeat range. and BMX)—Search mode (search method)— Refer to Selecting a repeat play range on this TitleInput "A" (disc title input) page. # You can also select the function by pressing FUNCTION on the remote control. 1 Use MULTI-CONTROL to select # When playing a CD TEXT disc, you cannot Random mode in the function menu. switch to disc title input display. The disc title will have already been recorded on a CD TEXT disc. 2 Press MULTI-CONTROL to turn random # When playing compressed audio disc, you play on. cannot switch to disc title input display. Tracks will play in a random order. # To return to the ordinary display, press BAND. # To turn random play off, press # If you do not operate functions except for MULTI-CONTROL again. TitleInput "A" within about 30 seconds, the dis- play is automatically returned to the ordinary dis- Scanning folders and tracks play. Scan play searches the song within the se- lected repeat range. 20 En
  • 21.
    Section Operatingthis unit 02 English Refer to Selecting a repeat play range on the tracks. Selecting Rough search enables you previous page. to search every 10 tracks. 1 Use MULTI-CONTROL to select 1 Use MULTI-CONTROL to select Scan mode in the function menu. Search mode in the function menu. 2 Press MULTI-CONTROL to turn scan play 2 Press MULTI-CONTROL to select on. Rough search. The first 10 seconds of each track is played. ! FF/REV – Fast forward and reverse ! Rough search – Searching every 10 tracks 3 When you find the desired track press # To select FF/REV, press MULTI-CONTROL MULTI-CONTROL to turn scan play off. again. # If the display has automatically returned to the playback display, select Scan mode again by 3 Press BAND to return to the playback using MULTI-CONTROL. display. # After scanning of a disc (folder) is finished, normal playback of the tracks will begin again. 4 Push and hold MULTI-CONTROL left or right to search every 10 tracks on a disc (folder). Pausing disc playback # If the rest of track number is less than 10, pushing and holding MULTI-CONTROL recalls 1 Use MULTI-CONTROL to select Pause in the first (last) one. the function menu. 2 Press MULTI-CONTROL to turn pause on. Using disc title functions Playback of the current track pauses. You can input CD titles and display the title. # To turn pause off, press MULTI-CONTROL The next time you insert a CD for which you again. have entered a title, the title of that CD will be displayed. Using compression and BMX Entering disc titles Using the COMP (compression) and BMX Use the disc title input feature to store up to functions let you adjust the sound playback 48 CD titles in the unit. Each title can be up to quality of this unit. 10 characters long. 1 Use MULTI-CONTROL to select 1 Play the CD that you want to enter a Compression in the function menu. title for. 2 Press MULTI-CONTROL to select your fa- 2 Use MULTI-CONTROL to select vorite setting. TitleInput "A" in the function menu. COMP/BMX OFF—COMP 1—COMP 2— COMP/BMX OFF—BMX 1—BMX 2 3 Press DISPLAY to select the desired character type. Press DISPLAY repeatedly to switch between Searching every 10 tracks in the the following character types: current disc or folder Alphabet (upper case), numbers and symbols You can switch the search method between —Alphabet (lower case)—European letters, fast forward/reverse and searching every 10 such as those with accents (e.g. á, à, ä, ç)— Numbers and symbols En 21
  • 22.
    Section 02 Operating this unit 4 Push MULTI-CONTROL up or down to and : track title— : track title and play select a letter of the alphabet. time— : comment and play time For WAV discs 5 Push MULTI-CONTROL left or right to Play time— : folder name and : file name move the cursor to the previous or next character position. Notes 6 Move the cursor to the last position by ! You can scroll to the left of the title by pressing pushing MULTI-CONTROL right after enter- and holding DISPLAY. ing the title. ! Audio CD that contains certain information When you push MULTI-CONTROL right one such as text and/or number is CD TEXT. more time, the entered title is stored in mem- ! If specific information has not been recorded ory. on a disc, title or name is not displayed. ! Depending on the version of iTunes® used to 7 Press BAND to return to the playback write MP3 files onto a disc, comment informa- display. tion may not be correctly displayed. ! Depending on the version of Windows Media Notes Player used to encode WMA files, album ! Titles remain in memory, even after the disc names and other text information may not be has been removed from the unit, and are re- correctly displayed. called when the disc is reinserted. ! The sampling frequency shown in the display ! After data for 48 discs has been stored in may be abbreviated. memory, data for a new disc will overwrite the ! When Ever Scroll is set to ON at the initial set- oldest one. ting, text information scrolls continuously in ! If you connect a multi-CD player, you can the display. Refer to Switching the Ever Scroll input disc titles for up to 100 discs. on page 51. ! When a multi-CD player that does not support disc title functions is connected, you cannot enter disc titles in this unit. Displaying text information on disc % Press DISPLAY to select the desired text information. For title entered CD Play time— : disc title and play time For CD TEXT discs Play time— : disc artist name and : track title— : disc artist name and : disc title — : disc title and : track title— : track artist name and : track title— : track title and play time For WMA/MP3/AAC discs Play time— : folder name and : file name — : artist name and : track title— : ar- tist name and : album title— : album title 22 En
  • 23.
    Section Operatingthis unit 02 English Selecting tracks from the track # If you do not operate the list within about 30 title list seconds, the display is automatically returned to the ordinary display. Track title list lets you see the list of track titles on a CD TEXT disc and select one of them to play back. 1 Press LIST to switch to the track title list mode. 2 Use MULTI-CONTROL to select the de- sired track title. Turn to change the track title; press to play. # You can also change the track title by pushing MULTI-CONTROL up or down. # If you do not operate the list within about 30 seconds, the display is automatically returned to the ordinary display. Selecting tracks from the file name list File name list lets you see the list of file names (or folder names) and select one of them to playback. 1 Press LIST to switch to the file name list mode. Names of files and folders appear in the dis- play. 2 Use MULTI-CONTROL to select the de- sired file name (or folder name). Turn to change the name of file or folder; press to play; push right to see a list of the files (or folders) in the selected folder. # You can also change the name of file or folder by pushing MULTI-CONTROL up or down. # To return to the previous list (the folder one level higher), push MULTI-CONTROL left. # If the folder/file number is more than 100, last 2-digit of the folder/file number is displayed. # Number of the folders/files in the currently se- lected folder will be indicated on the right side of the display. # If you select a folder and it contains no folders or no files, NO FILES is displayed. En 23
  • 24.
    Section 02 Operating this unit Playing songs on iPod ! If an error message such as ERROR-11 is dis- played, refer to Understanding error messages Basic Operations on page 64. You can use this unit to control an iPod by ! Connect directly the dock connector of this using a cable (e.g., CD-I200), which is sold se- unit to the iPod so that this unit works prop- parately. erly. ! When the ignition switch is set to ACC or ON, the iPod’s battery is charged while the iPod is connected to this unit. ! While the iPod is connected to this unit, the iPod itself cannot be turned on or off. ! The iPod connected to this unit is turned off about two minutes after the ignition switch is set to OFF. 1 Song number indicator Browsing for a song 2 Play time indicator The operation of this unit to control an iPod is 3 Song time (progress bar) designed to be as close to the operation of the 1 Connect the iPod to this unit. iPod as possible for easy operation and song Playback will automatically start. search. While the iPod is connected to this unit, ! If playlist has been selected, first, this unit PIONEER (or (check mark)) is displayed on shows playlist of your iPod’s name. This the iPod. playlist plays all songs in your iPod. # Before connecting the dock connector of this ! If the characters recorded on the iPod are unit to the iPod, disconnect the headphones from not compatible with this unit, those charac- the iPod. ters will not be displayed. # After the iPod has been connected to this 1 Press LIST to switch to the top menu of unit, press SOURCE to select the iPod. the list search. # When removing the iPod from this unit, this unit is turned off. 2 Use MULTI-CONTROL to select a cate- gory. 2 When playing Audiobook or Podcast Turn to change the category; press to select. (with chapter) on iPod, pushing Playlists (playlists)—Artists (artists)— MULTI-CONTROL up or down to select a Albums (albums)—Songs (songs)—Podcasts chapter. (podcasts)—Genres (genres)—Audiobooks 3 To perform fast forward or reverse, (audiobooks) push and hold MULTI-CONTROL left or List from the selected category is displayed. # You can start playback throughout the se- right. lected category by pressing and holding 4 To skip back or forward to another MULTI-CONTROL, or pushing MULTI-CONTROL song, push MULTI-CONTROL left or right. right and holding. # You can also change the category by pushing Notes MULTI-CONTROL up or down. # You can also select the category by pushing ! Read the precautions with iPod on page 67. MULTI-CONTROL right. 24 En
  • 25.
    Section Operatingthis unit 02 English # To return to the previous list, push 2 Use MULTI-CONTROL to select MULTI-CONTROL left. FUNCTION. # To go to the top menu of the list search, push Turn to change the menu option; press to se- and hold MULTI-CONTROL left. lect. # Podcasts and Audiobooks are displayed The function name appears on the display. when the connected iPod is compatible with the categories. 3 Turn MULTI-CONTROL to select the # If you do not operate the list within about 30 function. seconds, the list search is cancelled automati- Turn MULTI-CONTROL to switch between the cally. functions in the following order: Play mode (repeat play)—Shuffle mode 3 Repeat step 2 to find a song you want (shuffle)—Shuffle all (shuffle all)—Pause to listen to. (pause)—Audiobooks (audiobook speed) # You can also select the function by pressing FUNCTION on the remote control. Displaying text information on # To return to the playback display, press BAND. iPod # If you do not operate functions within about % Press DISPLAY to select the desired text 30 seconds, the display is automatically returned information. to the ordinary display. Play time— : artist name and : song title — : artist name and : album name— : Repeating play album name and : song title— : song title and play time For playback of the songs on the iPod, there # If the characters recorded on the iPod are not are two repeat play ranges: Repeat One (re- compatible with this unit, those characters will peat one song) and Repeat All (repeat all not be displayed. songs in the list). ! While Play mode is set to Repeat One, Notes you cannot select the other songs. ! You can scroll to the left the text information 1 Use MULTI-CONTROL to select by pressing and holding DISPLAY. Play mode in the function menu. ! When Ever Scroll is set to ON at the initial set- ting, text information scrolls continuously in 2 Press MULTI-CONTROL to select the re- the display. Refer to Switching the Ever Scroll peat range. on page 51. ! Repeat One – Repeat just the current song ! Repeat All – Repeat all songs in the se- lected list Introduction of advanced operations Playing songs in a random 1 Press MULTI-CONTROL to display the order (shuffle) main menu. For playback of the songs on the iPod, there FUNCTION, AUDIO and ENTERTAINMENT are two random play methods: Shuffle Songs appear on the display. (play back songs in a random order) and Shuffle Albums (play back albums in a ran- dom order). En 25
  • 26.
    Section 02 Operating this unit 1 Use MULTI-CONTROL to select 2 Press MULTI-CONTROL to select your fa- Shuffle mode in the function menu. vorite setting. Press MULTI-CONTROL repeatedly until the 2 Press MULTI-CONTROL to select your fa- desired setting appears in the display. vorite setting. ! Faster – Playback faster than normal speed ! Shuffle Songs – Play back songs in a ran- ! Normal – Playback in normal speed dom order within the selected list ! Slower – Playback slower than normal ! Shuffle Albums – Select an album ran- speed domly, and then play back all the songs in it in order ! Shuffle OFF – Cancel the random play Playing all songs in a random order (shuffle all) This method plays all songs on the iPod ran- domly. % Press and hold MULTI-CONTROL to turn shuffle all on during the playback display. Shuffle All is displayed briefly and all songs on the iPod will play randomly. Note You can also turn shuffle all on in the menu that appears by using MULTI-CONTROL. Pausing a song 1 Use MULTI-CONTROL to select Pause in the function menu. 2 Press MULTI-CONTROL to turn pause on. Playback of the current song pauses. # To turn pause off, press MULTI-CONTROL again. Changing audiobook speed The audiobook playback speed can be chan- ged. 1 Use MULTI-CONTROL to select Audiobooks in the function menu. 26 En
  • 27.
    Section Operatingthis unit 02 English Bluetooth Audio Even though your audio player does not con- tain a Bluetooth module, you can still control Basic Operations it from this unit via Bluetooth wireless technol- You can use this unit to control a separately ogy using a Bluetooth adapter (sold sepa- sold portable audio player featuring Bluetooth rately). wireless technology (Bluetooth audio player). Important ! This unit can control a Bluetooth audio player via A2DP or AVRCP profile. Bluetooth audio players (or Bluetooth adapters) compatible with those profiles can be connected to this unit. 1 Device name — A2DP profile (Advanced Audio Distribution Shows the device name of the connected Profile): Only playing back songs on your Bluetooth audio player (or Bluetooth adapter). audio player is possible. — AVRCP profile (Audio/Video Remote Con- 1 Press SOURCE to select Bluetooth audio trol Profile): Playing back, pausing, select- player. ing songs, etc., are possible. # If you cannot display BT Audio, first activate ! Since there are a number of Bluetooth audio the BT audio source in the initial setting. For de- players available on the market, operations tailes, refer to Activating the BT Audio source on with your Bluetooth audio player using this page 51. unit vary in great range. Please refer to the in- # For this unit to control your Bluetooth audio struction manual that came with your Blue- player it needs to establish a Bluetooth wireless tooth audio player as well as this manual connection. (Refer to Connecting a Bluetooth while operating your player on this unit. audio player on the next page.) ! Information about songs (e.g. the elapsed 2 To perform fast forward or reverse, playing time, song title, song index, etc.) can- push and hold MULTI-CONTROL left or not be displayed on this unit. right. ! While you are listening to songs on your Blue- tooth audio player, please refrain from operat- 3 To skip back or forward to another ing on your cellular phone as much as track, push MULTI-CONTROL left or right. possible. If you try operating on your cellular phone, the signal from your cellular phone may cause a noise on the song playback. Setting up for Bluetooth audio ! When you are talking on the cellular phone player connected to this unit via Bluetooth wireless Setting up of this unit is required before using technology, the song playback from your Blue- Bluetooth audio player. tooth audio player connected to this unit is muted. 1 Activation ! Even if while you are listening to song on your Refer to Activating the BT Audio source on Bluetooth audio player you switch to another page 51 for instructions on how to turn the source, the playback of song continues to BT Audio on. elapse. # BT Audio is set to on by default. En 27
  • 28.
    Section 02 Operating this unit 2 Connection # If a Bluetooth audio player has not been con- To connect your Bluetooth audio player to this nected to this unit yet, Connection open, unit, refer to Connecting the most recently con- Connect audio, Auto connect and Device info. nected Bluetooth audio player on the next page appear in the function menu and other functions and Connecting a Bluetooth audio player on are not available. this page. # To return to the playback display, press BAND. # Once connected via Bluetooth wireless tech- # If you do not operate functions except for nology, “Play”, “Stop” and “Pause” on Bluetooth Connection open, Disconnect audio and audio player can be operated in the BT Audio Connect audio within about 30 seconds, the dis- source. play is automatically returned to the ordinary dis- # Before you can use audio players you may play. need to enter the PIN code into this unit. If your player requires a PIN code to establish a connec- Note tion, look for the code on the player or in its ac- Depending on Bluetooth audio players connected companying documentation. Enter the PIN code to this unit, function operations may not be cor- referring to Entering PIN code for Bluetooth wire- rectly operated. less connection on page 52. Connecting a Bluetooth audio Introduction of advanced player operations Putting the unit in Connection open mode al- 1 Press MULTI-CONTROL to display the lows you to establish a Bluetooth wireless con- main menu. nection from your Bluetooth audio player. You FUNCTION, AUDIO and ENTERTAINMENT may need to refer to the operation manual that appear on the display. came with your Bluetooth audio player if you are unsure how to initiate a connection from 2 Use MULTI-CONTROL to select your audio player. FUNCTION. Turn to change the menu option; press to se- 1 Use MULTI-CONTROL to select lect. Connection open in the function menu. The function name appears on the display. 2 Press MULTI-CONTROL to open the con- 3 Turn MULTI-CONTROL to select the nection. function. Always waiting is displayed. This unit is now Turn MULTI-CONTROL to switch between the on standby for connection from Bluetooth functions in the following order: audio player. Connection open (connection open)— If your Bluetooth audio player is set ready for Disconnect audio (disconnect audio)— Bluetooth wireless connection, connection to Connect audio (connect audio)—Play (play) this unit will be automatically established. —Stop (stop)—Pause (pause)— Auto connect (auto connect)—Device info. (device information) # If a Bluetooth audio player is connected via A2DP profile, only Disconnect audio, Auto connect and Device info. appear in the function menu. 28 En
  • 29.
    Section Operatingthis unit 02 English Note Stopping playback Before you can use audio players you may need 1 Use MULTI-CONTROL to select Stop in to enter the PIN code into this unit. If your player the function menu. requires a PIN code to establish a connection, 2 Press MULTI-CONTROL to stop the play- look for the code on the player or in its accompa- back. nying documentation. Enter the PIN code refer- Playback of the current song stops. ring to Entering PIN code for Bluetooth wireless connection on page 52. Pausing a song Disconnecting a Bluetooth 1 Use MULTI-CONTROL to select Pause in audio player the function menu. 1 Use MULTI-CONTROL to select 2 Press MULTI-CONTROL to turn pause Disconnect audio in the function menu. on. Playback of the current song pauses. 2 Press MULTI-CONTROL to disconnect # To turn pause off, press MULTI-CONTROL the Bluetooth audio player. again. Disconnected is displayed. The Bluetooth audio player is now diconnected from this unit. Connecting to a Bluetooth audio player automatically Connecting the most recently This unit automatically connects to the Blue- connected Bluetooth audio player tooth audio player that was most recently con- nected to this unit. Note that if you want to This unit searches for a Bluetooth audio player use other devices, automatic connection can- in the detectable area. Furthermore, this unit not be performed. automatically connects the most recently con- ! This feature is not available if automatic nected Bluetooth audio player. connection from this unit has been estab- 1 Use MULTI-CONTROL to select lished to your cellular phone. Connect audio in the function menu. ! While you are operating in the function menu of TEL source or BT Audio source, 2 Press MULTI-CONTROL to connect the automatic connection to your Bluetooth Bluetooth audio player. audio player is not initiated. While connecting, Connecting is displayed. After the connection is completed, Connected 1 Use MULTI-CONTROL to select is displayed. Auto connect in the function menu. 2 Press MULTI-CONTROL to turn auto- Playing songs on Bluetooth matic connection on. # To turn automatic connection off, press audio player MULTI-CONTROL again. 1 Use MULTI-CONTROL to select Play in the function menu. 2 Press MULTI-CONTROL to start play- back. En 29
  • 30.
    Section 02 Operating this unit Displaying BD (Bluetooth Bluetooth Telephone Device) address Basic Operations 1 Use MULTI-CONTROL to select If your cellular phone features Bluetooth wire- Device info. in the function menu. less technology, you can connect to this unit The device name (e.g., Pioneer BT unit) of this for hands-free, wireless calls, even while driving. unit appears in the display. # You can edit the device name. Refer to Editing Important device name on page 52. ! Since this unit is on standby to connect with 2 Push MULTI-CONTROL left to switch to your cellular phones via Bluetooth wireless the BD address. technology, using this unit without running 12-digit hexadecimal string is displayed. the engine can result in battery drainage. # Pushing MULTI-CONTROL right returns to the ! Advanced operations that require your atten- device name. tion such as dialing numbers on the monitor, using phone book, etc., are prohibited while you are driving. When you need to use these advanced operations, stop your vehicle in a safe place and operate. ! When phone is selected as a source, no audio adjustments, except balance adjustment, are possible. The front/rear speaker balance is set to F 15 by default for the phone source. These are the basic operations to use hands- free phoning via Bluetooth wireless technol- ogy. More advanced hands-free phoning op- erations are explained starting on Introduction of advanced operations on page 33. 1 Device name Shows the device name of the cellular phone. 2 Signal level indicator Shows the signal strength of cellular phone. ! Signal level indicator may differ from the actual signal level. ! If the signal level is not available, this in- dicator is not displayed. 3 User number indicator 30 En
  • 31.
    Section Operatingthis unit 02 English Shows the registration number of the cellular — A2DP (Advanced Audio Distribution Pro- phone. file) 4 Battery strength indicator — AVRCP (Audio/Video Remote Control Pro- Shows the battery strength of cellular phone. file) ! Battery strength indicator may differ ! Battery strength indicator and signal level in- from the actual battery strength. dicator are shown in the display whenever ! If the battery strength is not available, your cellular phone is connected to this unit nothing is displayed in the battery via Bluetooth wireless technology. strength indicator area. 5 Missed call notice indication Shows when an incoming call has been re- About the telephone source ceived and not answered. Standby mode 6 Automatic answering/Automatic rejecting in- Once connected via Bluetooth wireless tech- dicator nology, this unit will remain on telephone Shows AUTO when the automatic answering source standby in the background all the function is on (for more details, refer to Setting while the connection is sustained. This means the automatic answering on page 42). you can freely use the other functions of this Shows REFUSE when the automatic rejecting unit, but still be ready to receive a call. function is on (for more details, refer to Setting the automatic rejecting on page 42). % Press SOURCE to select the telephone. 7 Clock display Press SOURCE until you see TEL displayed. Shows the time (if connected with a phone). # You can also select the TEL by pressing 8 Calendar display PHONE. Shows the day, month and year (if connected with a phone). Setting up for hands-free phoning Notes Before you can use the hands-free phoning function you will need to set up the unit for ! Even when you select other sources, 2 to 6 use with your cellular phone. This entails es- indicators are displayed. tablishing a Bluetooth wireless connection be- ! This unit’s phone call reception is on standby tween this unit and your phone, registering when ignition switch is set to ACC or ON. your phone with this unit, and adjusting the ! The line-of-sight distance between this unit volume level. and your cellular phone must be 10 meters or less for sending and receiving voice and data 1 Connection via Bluetooth wireless technology. However, For detailed instructions on connecting your the transmission distance may become short- phone to this unit via Bluetooth wireless tech- er than the estimated distance, depending on nology, refer to Connecting a cellular phone on the environment in use. page 34. ! In order to use Bluetooth wireless technology, # Your phone should now be temporarily con- devices must be able to interpret certain pro- nected; however, to make best use of the technol- files. This unit is compatible with the following ogy, we recommend you register the phone to profiles. this unit. — GAP (Generic Access Profile) — SDP (Service Discovery Protocol) — OPP (Object Push Profile) — HFP (Hands Free Profile) En 31
  • 32.
    Section 02 Operating this unit 2 Registration # Preset number 10 is assigned to 0. To register your temporarily connected phone, # If the number is already in the Phone Book refer to Registering connected cellular phone then the name is also displayed. on page 35. # No data is displayed for preset numbers that have not been assigned. 3 Volume adjustment Adjust the earpiece volume on your cellular 2 Press MULTI-CONTROL to make a call. phone for comfort. When adjusted, the volume level is memorized in this unit as the default Voice recognition setting. If your cellular phone features voice recogni- # Caller’s voice volume and ring volume may tion technology, you can make a call by voice vary depending on the type of cellular phones. commands. # If the difference between the ring volume and ! Operation varies depending on the type of caller’s voice volume is big, overall volume level your cellular phone. Refer to the instruction may become unstable. manual that came with your cellular phone # Before disconnecting cellular phone from this for detailed instructions. unit, make sure to adjust the volume to proper ! This function can be operated only when level. If the volume has been muted (zero level) the connection is established with HFP on your cellular phone, the volume level of your (Hands Free Profile). cellular phone remains muted even after the cel- lular phone is disconnected from this unit. 1 Press BAND and hold until Voice dial appears in the display. When Voice dial ON is displayed, voice recog- Making a phone call nition function is now ready. Dial a number # If your cellular phone does not feature voice The most basic way to make a call is to simply recognition function, No voice dial appears in dial the number. the display and opearation is not available. Refer to Making a call by entering phone num- 2 Pronounce the name of your contact. ber on page 41 for detailed instructions. Calling a number in the Phone Book Taking a phone call or the Call History Answering an incoming call Refer to Calling a number in the Phone Book Even when a source other than TEL is selected on page 38 and Calling a number from the Call or when this unit is turned off, you can still an- History on page 41 for detailed instructions. swer incoming calls. If you set this unit to automatically answering incoming calls, refer Preset number to Setting the automatic answering on page 42. Numbers that you dial frequently can be as- 1 When a call comes in, press signed to presets for quick recall. MULTI-CONTROL. Refer to Assigning preset numbers on page 41 # You can also take a phone call by pressing for how to assign a number to a preset. OFF HOOK on the remote control. 1 Push MULTI-CONTROL up or down to # If the private mode is selected on the cellular select a preset number. phone, hands-free phoning may not be per- # You can also press one of 0 to 9 on the remote formed. control to select a preset number. 32 En
  • 33.
    Section Operatingthis unit 02 English 2 To end the call, press PHONE. 2 Press PHONE to end all calls. The estimated call time appears in the display Pressing PHONE ends all calls including a call (this may differ slightly from the actual call waiting on line. time). # You can also end all calls by pressing # You can also end the call by pressing ON HOOK on the remote control. ON HOOK on the remote control. # Except for switching between the calls on line, # You may hear a noise when you disconnect you cannot end each call waiting individually. the phone. Pressing PHONE ends all calls. Rejecting an incoming call Rejecting a call waiting You can reject an incoming call. To reject all If you would rather not interrupt your current incoming calls automatically, refer to Setting call to answer a call waiting, you can reject it the automatic rejecting on page 42. and have the number added to the missed call history list. % When a call comes in, press PHONE. The call is rejected. % Press PHONE to reject a call waiting. # You can also reject a call by pressing # You can also reject a call waiting by pressing ON HOOK on the remote control. ON HOOK on the remote control. # The rejected call is recorded in missed call history list. About the missed call history list, refer to Using the Call History on page 40. Introduction of advanced operations Answering a call waiting 1 Press MULTI-CONTROL to display the If while you are talking on the phone another main menu. call comes in, the number (or name if it is in FUNCTION, AUDIO, ENTERTAINMENT and your phone book) of the new caller appears in RECEIVING MOVIE appear on the display. the display to signal that you have a call wait- 2 Use MULTI-CONTROL to select ing. You can put the first caller on hold while FUNCTION. you answer the call waiting, or you can choose Turn to change the menu option; press to se- to reject the call, in which case the number is lect. logged as a missed call. The function name appears on the display. ! Depending on the cellular phone, this func- tion cannot be used. 3 Turn MULTI-CONTROL to change func- ! This unit can only handle three calls simul- tions. taneously. Therefore, depending on the cel- Turn MULTI-CONTROL to switch between the lular phone used with this unit, this functions. function may not be performed correctly. Function names that appear in the display are different depending on your cellular phone’s 1 Press MULTI-CONTROL to answer a call connection and registration status. waiting. If not connected yet # You can also answer a call waiting by pressing OFF HOOK on the remote control. # Pressing MULTI-CONTROL switches between callers on hold. En 33
  • 34.
    Section 02 Operating this unit Search&Connect (search and connect)— Bluetooth wireless technology. There are sev- Connection open (connection open)— eral ways you can do this. Connect phone (connect phone)— ! A phone may be connected via Bluetooth Delete phone (delete phone)—PH.B.Transfer wireless technology but not yet registered (phone book transfer)—Refuse calls (auto- with this unit. In this case it is said to be matic reject setting)—Auto answer (auto- temporarily connected, and the available matic answer setting)—Ring tone (ring tone features are limited. To take full advantage select)—Auto connect (automatic connection of all the features available, we recommend setting)—Echo cancel (echo cancel)— you register your phone with this unit. Device info. (device information) Refer to Registering connected cellular If connected but not registered yet phone on the next page for more on this. Disconnect phone (disconnect phone)— Set phone (registering phone)— Searching for available cellular phones Delete phone (delete phone)—PH.B.Transfer You can have this unit search for any available (phone book transfer)—Number dial (call by phones in the area that have Bluetooth wire- entering number)—Refuse calls (automatic less technology, then select which you want to reject setting)—Auto answer (automatic an- connect to from a list displayed on-screen. swer setting)—Ring tone (ring tone select)— Auto connect (automatic connection setting) 1 Use MULTI-CONTROL to select —Echo cancel (echo cancel)—Device info. Search&Connect in the function menu. (device information) If already connected and registered 2 Press MULTI-CONTROL to search for Disconnect phone (disconnect phone)— available cellular phones. Delete phone (delete phone)—PH.B.Transfer While searching, Searching is displayed. (phone book transfer)—PH.B.Name view When available cellular phones featuring (phone book name view)—Clear memory Bluetooth wireless technology are found, de- (clear memory)—Number dial (call by enter- vice names or Not found (if names cannot be ing number)—Refuse calls (automatic reject obtained) are displayed. setting)—Auto answer (automatic answer # If this unit fails to find any available cellular setting)—Ring tone (ring tone select)— phones, Not found is displayed. Auto connect (automatic connection setting) —Echo cancel (echo cancel)—Device info. 3 Push MULTI-CONTROL up or down to (device information) select a device name you want to connect. # To return to the playback display, press BAND. 4 Press MULTI-CONTROL to connect the # If you do not operate functions except for selected cellular phone. Search&Connect, Connection open, While connecting, Connecting is displayed. Connect phone, PH.B.Transfer, To complete the connection, please check the Disconnect phone, Number dial and device name (e.g., Pioneer BT unit) and enter Clear memory within about 30 seconds, the dis- the link code on your cellular phone. If the play is automatically returned to the ordinary dis- connection is established, Connected is dis- play. played. # If the connection failed, ERROR is displayed. Connecting a cellular phone Check the cellular phone, then try again. To use a phone wirelessly with this unit, it is necessary first to establish a connection using 34 En
  • 35.
    Section Operatingthis unit 02 English # The link code is set to 0000 as default. You 2 Press MULTI-CONTROL to disconnect a can change this code in the initial setting. Refer cellular phone from this unit. to Entering PIN code for Bluetooth wireless con- After the disconnection is completed, nection on page 52. Disconnected is displayed. Using a cellular phone to initiate a Registering connected cellular connection phone Putting the unit in Connection open mode al- You can register a phone that is temporarily lows you to establish a Bluetooth wireless con- connected to this unit in order to take full ad- nection from your phone. You may need to vantage of the features available with Blue- refer to the operation manual that came with tooth wireless technology. A total of three your phone if you are unsure how to initiate a phones can be registered. connection from your phone. 1 Use MULTI-CONTROL to select 1 Use MULTI-CONTROL to select Set phone in the function menu. Connection open in the function menu. 2 Push MULTI-CONTROL up or down to 2 Press MULTI-CONTROL to open the con- select a registration assignment. nection. P1 (user phone 1)—P2 (user phone 2)—P3 Always waiting is displayed and the unit is (user phone 3) now on standby for connection from cellular # As you select each assignment, you can see phone. whether or not a phone is already registered 3 Use cellular phone to connect to this there. If the assignment is empty, No data is dis- unit. played. If the assignment is already taken, the de- # Operation varies depending on the type of vice name appears. To replace an assignment your cellular phone. Refer to the instruction man- with a new phone, first delete the current assign- ual that came with your cellular phone for de- ment. For more detailed instructions, see Deleting tailed instructions. a registered phone on the next page. # You may need to enter the link code on your # If you need to know the BD (Bluetooth Device) cellular phone to complete the connection. address of the phone, push MULTI-CONTROL left # The link code is set to 0000 as default. You here. can change this code in the initial setting. Refer 3 Press MULTI-CONTROL to register the to Entering PIN code for Bluetooth wireless con- currently connected phone. nection on page 52. When the registration is completed, Reg. Completed is displayed. Disconnecting a cellular phone # If the registration failed, Reg. ERROR is dis- When you are done using your phone with this played. In this case, return to step 1 and try unit, you can close the Bluetooth wireless con- again. nection. Note 1 Use MULTI-CONTROL to select Depending on the type of cellular phone, registra- Disconnect phone in the function menu. tion is available only from a cellular phone. (Refer Device name of the connected phone appears to Using a cellular phone to initiate a connection in the display. on this page.) En 35
  • 36.
    Section 02 Operating this unit Deleting a registered phone Connecting to a registered phone If you no longer need to use a registered manually phone with this unit, you can delete it from the 1 Use MULTI-CONTROL to select registration assignment for another phone. Connect phone in the function menu. ! If a registered phone is deleted from this unit, the Phone Book and other settings of 2 Push MULTI-CONTROL up or down to that phone are cleared simultaneously. select a registration assignment. P1 (user phone 1)—P2 (user phone 2)—P3 1 Use MULTI-CONTROL to select (user phone 3) Delete phone in the function menu. # If the assignment is empty, No data is dis- played and the operation is not possible. 2 Push MULTI-CONTROL up or down to # If you need to know the BD (Bluetooth Device) select a registration assignment. address of the phone, push MULTI-CONTROL left P1 (user phone 1)—P2 (user phone 2)—P3 here. (user phone 3) # If the assignment is empty, No data is dis- 3 Press MULTI-CONTROL to connect the played and the operation is not possible. selected cellular phone. # If you need to know the BD (Bluetooth Device) While connecting, Connecting is displayed. address of the phone, push MULTI-CONTROL left After the connection is completed, Connected here. is displayed. # If Auto connect is on, the most recently con- 3 Push MULTI-CONTROL right to select nected registered cellular phone is connected Delete YES. automatically. For more details, refer to Connect- Delete YES is displayed. Deleting phone is ing to a registered phone automatically on this now on standby. page. # If you do not want to delete a registered # If the connection failed, ERROR is displayed. phone, push MULTI-CONTROL left. The display Check the cellular phone, then try again. reverts. 4 Press MULTI-CONTROL to delete the Connecting to a registered phone phone. automatically After the phone is deleted, Deleted is dis- When automatic connection is active, this unit played. will automatically establish a connection with a registered cellular phone. When the most re- cently connected registered cellular phone Connecting to a registered comes into range, automatic connection is cellular phone performed. Once your phone is registered with this unit it ! This feature may not work with all phones. is a simple matter to establish a Bluetooth If your registered phone fails to connect wireless connection, either manually by select- with automatic connection, use the manual ing a registration assignment, or automatically connection method explained in Connect- when a registered phone is within range. ing to a registered phone manually on this page. 36 En
  • 37.
    Section Operatingthis unit 02 English ! This feature is not possible if you are play- ! Depending on the cellular phone con- ing back songs on your Bluetooth audio nected via Bluetooth wireless technology, player via Bluetooth wireless technology. In this unit cannot display the Phone Book such case, stop the playback and switch to correctly. (Some characters may be another source for your cellular phone to garbled.) connect to this unit through this function. ! If the phone book in the cellular phone con- ! While you are operating in the function tains image data, phone book may not be menu of TEL source or BT Audio source, correctly transferred. this unit does not initiate an automatic con- nection to your registered phone. 1 Use MULTI-CONTROL to select ! This feature cannot be set for each different PH.B.Transfer in the function menu. user phone. 2 Press MULTI-CONTROL to enter in the 1 Use MULTI-CONTROL to select phone book transfer standby mode. Auto connect in the function menu. Transfer appears in the display. # With TEL source selected, you can also dis- 2 Press MULTI-CONTROL to turn auto- play the phone book transfer standby mode by matic connection on. pressing and holding PHONE. If your cellular phone is set ready for Bluetooth wireless connection, the connection to this 3 Use cellular phone to perform phone unit will be automatically established. book transfer. # To turn automatic connection off, press Perform phone book transfer using the cellu- MULTI-CONTROL again. lar phone. For detailed instruction on this, refer to the instruction manual that came with your cellular phone. Using the Phone Book # The display indicates how many entries have The Phone Book can store up to 650 names been transferred and the total number to be and numbers. Use the Phone Book to browse stored in this unit. for numbers on the unit’s display and select 4 Data transferred is displayed and numbers to call. Names and phone numbers phone book transfer is completed. stored in a registered user phone’s address book can be transferred to the Phone Book, al- lowing you to fill the Phone Book quickly and Changing the Phone Book display order easily with your contacts. Phone book entry can be displayed from first name or last name. Transferring entries to the Phone Book ! With some cellular phones, this feature may not be possible. To populate the Phone Book you can transfer the numbers in a registered user phone’s ad- 1 Use MULTI-CONTROL to select dress book. PH.B.Name view in the function menu. The Phone Book can hold a total of 650 en- Invert names YES appears in the display. tries; 400 from User 1, 200 from User 2, and 50 from User 3. 2 Press MULTI-CONTROL to change the ! With some cellular phones, it may not be name view order. possible to transfer whole phone book at a Inverted is displayed and the name view time. In this case, transfer phone book en- order is changed. tries one by one from your phone by using your cellular phone. En 37
  • 38.
    Section 02 Operating this unit Pressing MULTI-CONTROL repeatedly # If several phone numbers are entered to an changes the name view order between first entry, select one by turning MULTI-CONTROL. name and last name. # If you want to go back and select another entry, push MULTI-CONTROL left. Calling a number in the Phone Book 6 Press MULTI-CONTROL to make a call. Important 7 To end the call, press PHONE. To perform this operation, be sure to park your ve- hicle and apply the parking brake. Assign genres to phone numbers After finding the number in the Phone Book Important you want to call, you can select the entry and make the call. To perform this operation, be sure to park your ve- hicle and apply the parking brake. 1 Press LIST to display the Phone Book. Press LIST repeatedly to switch between the If there are a lot of entries in the Phone Book it following lists: can be useful to assign them to specific gen- Phone book—Missed call—Dialled call—Re- res (categories) for easier searching. There are ceived call four preset genres that you can assign entries # About the Missed call/Dialled call/Received to: Home, Mobile, Office and Other. call, refer to Using the Call History on page 40. 1 Display the genre and phone number 2 Push MULTI-CONTROL left or right to list of your desired Phone Book entry. select the first letter of the name you are See step 1 to 5 on Calling a number in the looking for. Phone Book on this page for how to do this. # You can also select the first letter of the name 2 Press and hold MULTI-CONTROL to dis- you are looking for by turning MULTI-CONTROL. play the genre input screen. 3 Press MULTI-CONTROL to display en- Edit genre is displayed. tries. 3 Push MULTI-CONTROL up or down to The display shows a Phone Book entry starting select a genre. with that letter (e.g. Names starting with “B” Each time MULTI-CONTROL is pushed up or when “B” is selected). down, the genres are switched in the following 4 Push MULTI-CONTROL up or down to order: select a Phone Book entry you want to call. Home (home)—Mobile (mobile)—Office (of- # You can also select a Phone Book entry you fice)—Other (other) want to call by turning MULTI-CONTROL. 4 Press MULTI-CONTROL to assign the 5 Push MULTI-CONTROL right to display genre to the phone number. the genre and phone number list of the se- The selected genre is assigned to the phone lected entry. number, and the display reverts to the genre # You can also display the genre and phone and phone number list. number list of the selected entry by pressing MULTI-CONTROL. # You can scroll the name and phone number by pressing and holding DISPLAY. 38 En
  • 39.
    Section Operatingthis unit 02 English Editing the name of a Phone Book entry 6 Push MULTI-CONTROL left or right to move the cursor to the previous or next Important character position. To perform this operation, be sure to park your ve- When the letter you want is displayed, push hicle and apply the parking brake. MULTI-CONTROL right to move the cursor to the next position and then select the next let- You can edit the names of Phone Book entries. ter. Push MULTI-CONTROL left to move back- Each name can be up to 40 characters long. wards in the display. 1 Display the genre and phone number 7 Press MULTI-CONTROL to store the new list of your desired Phone Book entry. name. See step 1 to 5 on Calling a number in the Phone Book on the previous page for how to do this. Editing phone numbers 2 Press and hold MULTI-CONTROL to dis- Important play the genre input screen. To perform this operation, be sure to park your ve- Edit genre is displayed. hicle and apply the parking brake. 3 Turn MULTI-CONTROL to switch to the You can edit the phone numbers of Phone name input screen. Book entries. Turning MULTI-CONTROL switches input screens in the following order: 1 Display the genre and phone number Edit genre (genre input screen)—Edit name list of your desired Phone Book entry. (name input screen)—Edit number (number See step 1 to 5 on Calling a number in the input screen)—Clear memory (clear memory Phone Book on the previous page for how to screen) do this. 4 Press DISPLAY to select the desired 2 Press and hold MULTI-CONTROL to dis- character type. play the genre input screen. Each press of DISPLAY switches the character Edit genre is displayed. types in the following order: 3 Turn MULTI-CONTROL to switch to the Alphabet (upper case)—Alphabet (lower case) number input screen. —Numbers and symbols—European charac- Turning MULTI-CONTROL switches input ters, Russian characters or Greek characters screens in the following order: # Pressing and holding DISPLAY enables you to Edit genre (genre input screen)—Edit name switch character set among ISO8859-1 (European (name input screen)—Edit number (number characters), ISO8859-5 (Russian characters) and input screen)—Clear memory (clear memory ISO8859-7 (Greek characters) alternately. screen) # European characters, Russian characters and Greek characters can’t be mixed. 4 Push MULTI-CONTROL left or right to move the cursor to the number you want 5 Push MULTI-CONTROL up or down to to change. select a letter. # To delete a character and leave a space, select 5 Push MULTI-CONTROL up or down to “_” (underbar). change numbers. Repeat these steps until you have finished changing. En 39
  • 40.
    Section 02 Operating this unit 6 Press MULTI-CONTROL to store the new Using the Call History number. Important Clearing a Phone Book entry To perform this operation, be sure to park your ve- hicle and apply the parking brake. Important The 12 most recent calls made (dialled), re- To perform this operation, be sure to park your ve- ceived and missed, are stored in the Call His- hicle and apply the parking brake. tory. You can browse the Call History and call You can delete Phone Book entries in the numbers from it. Phone Book one by one. To clear all of your entries in the Phone Book, Displaying the Call History refer to Clearing memory on page 42. The Call History is divided into three groups: 1 Display the genre and phone number Missed calls, Dialled calls, and Received calls. list of your desired Phone Book entry. You can see the time and date of the call, as See step 1 to 5 on Calling a number in the well as the number (and name if the number Phone Book on page 38 for how to do this. is in the Phone Book). 2 Press and hold MULTI-CONTROL to dis- 1 Press LIST to display the list. play the genre input screen. Press LIST repeatedly to switch between the Edit genre is displayed. following lists: Phone book—Missed call—Dialled call—Re- 3 Turn MULTI-CONTROL to switch to the ceived call clear memory screen. # About the Phone Book list, refer to Using the Turning MULTI-CONTROL switches input Phone Book on page 37. screens in the following order: # If no phone numbers have been stored in the Edit genre (genre input screen)—Edit name selected list, No data is displayed. (name input screen)—Edit number (number # If no name is in the Phone Book, phone num- input screen)—Clear memory (clear memory ber is displayed instead of name. screen) 2 Turn MULTI-CONTROL to select a phone 4 Push MULTI-CONTROL right to show a number. confirmation display. Turning MULTI-CONTROL to change the Clear memory YES is displayed. phone numbers stored in the list. # If you do not want to clear memory that you # If the number is already in the Phone Book have selected, push MULTI-CONTROL left. The the name is displayed. display reverts. # You can also change the phone number by pushing MULTI-CONTROL up or down. 5 Press MULTI-CONTROL to delete the Phone Book entry. 3 Push MULTI-CONTROL right to display Cleared is displayed. the detailed list. The Phone Book entry is deleted. The display Name and phone number are displayed in the returns to Phone Book entry list. detailed list. # If the number is already in the Phone Book then the name is also displayed. # Turning MULTI-CONTROL switches to the pre- vious or next phone number diplayed in the de- tailed list. 40 En
  • 41.
    Section Operatingthis unit 02 English # You can scroll the name and phone number Assigning preset numbers by pressing and holding DISPLAY. # If you do not operate anything within about 30 Important seconds, the list display is canceled automati- To perform this operation, be sure to park your ve- cally. hicle and apply the parking brake. Numbers that you dial frequently can be as- Calling a number from the Call History signed to presets for quick recall. 1 Display the list and select a phone num- ber. 1 Select a desired phone number from Display the phone number you want to make a the Phone Book or the Call History. call. To select a desired phone number from the Refer to Displaying the Call History on the pre- Phone Book or the Call History, see the in- vious page. structions explained in previous pages. 2 Press MULTI-CONTROL to make a call. 2 Press one of 0 to 9 on the remote con- While calling, the phone number is displayed. trol and hold until the beep sounds. # If the number is already in the Phone Book The selected phone number has been stored then the name is also displayed. in memory. The next time you press the same preset button, the phone number is recalled 3 To end the call, press PHONE. from memory. The estimated call time appears in the display (this may differ slightly from the actual call time). Making a call by entering phone number Calling an international number Important from the Call History To perform this operation, be sure to park your ve- When calling an international number stored hicle and apply the parking brake. in the Call History, proceed the country code with a +. 1 Use MULTI-CONTROL to select Number dial in the function menu. 1 Display the phone number you want to # You can also press DIRECT on the remote con- make an international call. trol to enter in this menu from the standby dis- Refer to Calling an international number from play. the Call History on this page. 2 Push MULTI-CONTROL up or down to 2 Press and hold MULTI-CONTROL to add select a number. +. # You can also input numbers by pressing 0 to 9 # To delete +, press and hold MULTI-CONTROL on the remote control. again. 3 Push MULTI-CONTROL left or right to 3 Press MULTI-CONTROL to make a call. move the cursor to the previous or next po- While calling, Dialling is flashing. sition. 4 To end the call, press PHONE. # Up to 24 digits can be entered. The estimated call time appears in the display 4 When you completed entering the (this may differ slightly from the actual call number, press MULTI-CONTROL. time). En 41
  • 42.
    Section 02 Operating this unit 5 Press MULTI-CONTROL again to make a ! This feature cannot be set for each different call. user phone. 6 To end the call, press PHONE. 1 Use MULTI-CONTROL to select Refuse calls in the function menu. Clearing memory 2 Press MULTI-CONTROL to turn auto- You can clear memory of each item; Phone matic call rejection on. Book, dialled/received/missed call history list # To turn automatic call rejection off, press and preset phone number. MULTI-CONTROL again. 1 Use MULTI-CONTROL to select Note Clear memory in the function menu. If both the automatic reject and automatic an- 2 Push MULTI-CONTROL up or down to swer functions are set to on, the automatic reject select an item. is prioritized and all incoming calls are automati- Each time MULTI-CONTROL is pushed up or cally rejected. down, the items are switched in the following order: Phone book (phone book)—Missed calls Setting the automatic answering (missed call history)—Dialled calls (dialled If this function is on, this unit automatically call history)—Received calls (received call his- answers all incoming calls. tory)—Dial preset (preset phone numbers)— ! This feature cannot be set for each different All clear (delete all memory) user phone. # If you want to clear all the Phone Book, 1 Use MULTI-CONTROL to select dialled/received/missed call history list and pre- Auto answer in the function menu. set phone number, select All clear. 2 Press MULTI-CONTROL to turn auto- 3 Push MULTI-CONTROL right to deter- matic answering on. mine the item that you want to delete # To turn automatic answering function off, from this unit. press MULTI-CONTROL again. Clear memory YES is displayed. Clearing memory is now on standby. Note # If you do not want to clear memory that you have selected, push MULTI-CONTROL left. The If both the automatic reject and automatic an- display reverts. swer functions are set to on, the automatic reject is prioritized and all incoming calls are automati- 4 Press MULTI-CONTROL to clear the cally rejected. memory. Cleared is displayed and data on the selected item is cleared from this unit’s memory. Setting the automatic rejecting If this function is on, this unit automatically re- jects all incoming calls. ! Even if you rejected an incoming call, the call record is memorized in missed call his- tory list. 42 En
  • 43.
    Section Operatingthis unit 02 English Changing the ring tone Displaying BD address of this unit The unit offers a choice of ring tones for in- 1 Use MULTI-CONTROL to select coming calls, as well as an Off setting. Device info. in the function menu. ! The ring tone you select for this unit has no The device name (e.g., Pioneer BT unit) of this effect on the ring tone used by your phone. unit appears in the display. If you do not want your phone and this unit to ring at the same time, we recommend 2 Push MULTI-CONTROL left to switch to you turn the ring tone of one or the other the BD address. off. 12-digit hexadecimal string is displayed. # Pushing MULTI-CONTROL right returns to the 1 Use MULTI-CONTROL to select device name. Ring tone in the function menu. 2 Push MULTI-CONTROL left or right to Selecting the incoming call screen select a ring tone. It is possible to select an incoming call screen. Each time MULTI-CONTROL is pushed left or Since the screen selection is available for right, the ring tone is selected in the following each user, it is possible to select different order: screens between the users. OFF (ring tone off)—BEEP1 (ring tone 1)— BEEP2 (ring tone 2)—BEEP3 (ring tone 3) 1 Press MULTI-CONTROL to display the main menu. FUNCTION, AUDIO, ENTERTAINMENT and Echo canceling and noise reduction RECEIVING MOVIE appear on the display. When you are operating hands-free phoning in the vehicle, you may hear undesired echo. 2 Use MULTI-CONTROL to select This function reduces the echo and noise and RECEIVING MOVIE. keeps a certain sound quality. Turn to change the menu option; press to se- ! This feature cannot be set for each different lect. user phone. 3 Use MULTI-CONTROL to select the 1 Use MULTI-CONTROL to select screen. Echo cancel in the function menu. Turn to change the menu option; press to se- lect. 2 Press MULTI-CONTROL to turn echo can- Screen 1—Sceen 2—Screen 3—Screen 4 celing on. # To turn echo canceling off, press MULTI-CONTROL again. Displaying BD (Bluetooth Device) address Each device featuring Bluetooth wireless tech- nology is allocated a unique 48-bit device ad- dress. Each device address consists of a 12- digit of hexadecimal string. You can display the BD address of your cellu- lar phone and this unit. En 43
  • 44.
    Section 02 Operating this unit Audio Adjustments Using balance adjustment You can change the fader/balance setting so Introduction of audio adjustments that it can provide you an ideal listening envir- onment in all occupied seats. 1 Use MULTI-CONTROL to select Fader. # If the balance setting has been previously ad- justed, Balance will be displayed. 1 2 Push MULTI-CONTROL up or down to adjust front/rear speaker balance. 1 Audio display Each time MULTI-CONTROL is pushed up or Shows the audio adjustment status. down, the front/rear speaker balance moves 1 Press MULTI-CONTROL to display the towards the front or rear. main menu. F 15 to R 15 is displayed as the front/rear FUNCTION, AUDIO and ENTERTAINMENT speaker balance moves from front to rear. appear on the display. # F/R 0 is the proper setting when only two speakers are used. 2 Use MULTI-CONTROL to select AUDIO. # When the rear output setting is Rear SP :S/W, Turn to change the menu option; press to se- you cannot adjust front/rear speaker balance. lect. Refer to Setting the rear output and subwoofer The audio function name appears on the dis- controller on page 50. play. 3 Push MULTI-CONTROL left or right to 3 Turn MULTI-CONTROL to select the adjust left/right speaker balance. audio function. Each time MULTI-CONTROL is pushed left or Turn MULTI-CONTROL to switch between the right, the left/right speaker balance moves to- audio functions in the following order: wards the left or right. Fader (balance adjustment)—Powerful (gra- L 15 to R 15 is displayed as the left/right phic equalizer adjustment)—50Hz (7-band speaker balance moves from left to right. graphic equalizer adjustment)—LOUD (loud- ness)—Sub W.1 (subwoofer on/off setting)— Sub W.2 (subwoofer setting)—Bass (bass Using the equalizer boost)—HPF (high pass filter)—SLA (source The equalizer lets you adjust the equalization level adjustment)—ASL (automatic sound le- to match car interior acoustic characteristics velizer) as desired. # You can also select the audio function by pressing AUDIO on the remote control. Recalling equalizer curves # You can select the Sub W.2 only when sub- There are seven stored equalizer curves which woofer output is turned on in Sub W.1. you can easily recall at any time. Here is a list # When selecting the FM tuner as the source, of the equalizer curves: you cannot switch to SLA. # To return to the display of each source, press Display Equalizer curve BAND. Powerful Powerful # If you do not operate functions except for 50Hz within about 30 seconds, the display is Natural Natural automatically returned to the ordinary display. Vocal Vocal 44 En
  • 45.
    Section Operatingthis unit 02 English Custom 1 Custom 1 +6 to –4 (or –6) is displayed as the equalizer curve is increased or decreased. Custom 2 Custom 2 # The actual range of the adjustments are differ- Flat Flat ent depending on which equalizer curve is se- SuperBass (S.Bass) Super bass lected. # The equalizer curve with all frequencies set to ! Custom 1 and Custom 2 are adjusted 0 cannot be adjusted. equalizer curves that you create. Adjust- ments can be made with a 7-band graphic Adjusting 7-band graphic equalizer equalizer. For Custom 1 and Custom 2 equalizer curves, ! When Flat is selected no supplement or you can adjust the level of each band. correction is made to the sound. This is ! A separate Custom 1 curve can be created useful to check the effect of the equalizer for each source. (The built-in CD player and curves by switching alternatively between the multi-CD player are set to the same Flat and a set equalizer curve. equalizer adjustment setting automati- % Press EQ to select the equalizer. cally.) If you make adjustments when a Press EQ repeatedly to switch between the fol- curve other than Custom 2 is selected, the lowing equalizers: equalizer curve settings will be memorized Powerful—Natural—Vocal—Custom 1— in Custom 1. Custom 2—Flat—SuperBass (S.Bass) ! A Custom 2 curve can be created common to all sources. If you make adjustments when the Custom 2 curve is selected, the Adjusting equalizer curves Custom 2 curve will be updated. The factory supplied equalizer curves, with the exception of Flat, can be adjusted to a fine de- 1 Recall the equalizer curve you want to gree (nuance control). adjust. See Recalling equalizer curves on the previous 1 Use MULTI-CONTROL to select the gra- page. phic equalizer adjustment. Powerful appears in the display. 2 Use MULTI-CONTROL to select 7-band If the equalizer curve has been previously se- graphic equalizer adjustment. lected, the curve of that previously selected Frequency and the level (e.g., 50Hz +4) ap- will be displayed instead of Powerful. pears in the display. 2 Push MULTI-CONTROL left or right to 3 Push MULTI-CONTROL left or right to select an equalizer curve. select the equalizer band to adjust. Each time MULTI-CONTROL is pushed left or Each time MULTI-CONTROL is pushed left or right, equalizer curves are selected in the fol- right, equalizer bands are selected in the fol- lowing order: lowing order: Powerful—Natural—Vocal—Custom 1— 50Hz—125Hz—315Hz—800Hz—2kHz— Custom 2—Flat—SuperBass (S.Bass) 5kHz—12.5kHz 3 Push MULTI-CONTROL up or down to 4 Push MULTI-CONTROL up or down to adjust the equalizer curve. adjust the level of the equalizer band. Each time MULTI-CONTROL is pushed up or Each time MULTI-CONTROL is pushed up or down, the equalizer curve increases or de- down, the level of the equalization band in- creases respectively. creases or decreases. En 45
  • 46.
    Section 02 Operating this unit +6 to –6 is displayed as the level is increased Adjusting subwoofer settings or decreased. When the subwoofer output is on, you can ad- # You can then select another band and adjust just the cut-off frequency and the output level the level. of the subwoofer. 5 Press BAND to cancel the 7-band gra- 1 Use MULTI-CONTROL to select Sub W.2. phic equalizer adjustment. # When the subwoofer output is on, you can se- lect Sub W.2. Adjusting loudness 2 Push MULTI-CONTROL left or right to Loudness compensates for deficiencies in the select cut-off frequency. low- and high-sound ranges at low volume. Each time MULTI-CONTROL is pushed left or right, cut-off frequencies are selected in the 1 Use MULTI-CONTROL to select LOUD. following order: 2 Press MULTI-CONTROL to turn loudness 50Hz—63Hz—80Hz—100Hz—125Hz on. Only frequencies lower than those in the se- Loudness level (e.g., Mid) appears in the dis- lected range are outputted from the subwoo- play. fer. # To turn loudness off, press MULTI-CONTROL 3 Push MULTI-CONTROL up or down to again. adjust the output level of the subwoofer. 3 Push MULTI-CONTROL left or right to Each time MULTI-CONTROL is pushed up or select a desired level. down, subwoofer level increases or decreases. Each time MULTI-CONTROL is pushed left or +6 to –24 is displayed as the level is increased right, level is selected in the following order: or decreased. Low (low)—Mid (mid)—High (high) Boosting the bass Using subwoofer output Bass boost function boosts the bass level of This unit is equipped with a subwoofer output sound lower than 100 Hz. The more the bass which can be turned on or off. level is increased, the more the bass sound is emphasized and the entire sound becomes 1 Use MULTI-CONTROL to select Sub W.1. powerful. When using this function with the subwoofer, the sound under the cut-off fre- 2 Press MULTI-CONTROL to turn subwoo- quency is boosted. fer output on. Normal appears in the display. Subwoofer out- 1 Use MULTI-CONTROL to select Bass. put is now on. # To turn subwoofer output off, press 2 Push MULTI-CONTROL up or down to MULTI-CONTROL again. select a desired level. 0 to +6 is displayed as the level is increased or 3 Push MULTI-CONTROL left or right to decreased. select the phase of subwoofer output. Push MULTI-CONTROL left to select reverse phase and Reverse appears in the display. Push MULTI-CONTROL right to select normal phase and Normal appears in the display. 46 En
  • 47.
    Section Operating this unit 02 English Using the high pass filter 3 Push MULTI-CONTROL up or down to When you do not want low sounds from the adjust the source volume. subwoofer output frequency range to play Each time MULTI-CONTROL is pushed up or from the front or rear speakers, turn on the down, source volume increases or decreases. HPF (high pass filter). Only frequencies higher SLA +4 to SLA –4 is displayed as the source than those in the selected range are outputted volume is increased or decreased. from the front or rear speakers. Notes 1 Use MULTI-CONTROL to select HPF. ! The MW/LW tuner volume level can also be 2 Press MULTI-CONTROL to turn high adjusted with source level adjustments. pass filter on. ! The built-in CD player and the multi-CD player 80Hz appears in the display. High pass filter is are set to the same source level adjustment now on. volume automatically. # If the high pass filter has been previously ad- ! External unit 1 and external unit 2 are set to justed, the frequency of that previously selected the same source level adjustment volume will be displayed instead of 80Hz. automatically. # To turn high pass filter off, press MULTI-CONTROL again. Using automatic sound levelizer 3 Push MULTI-CONTROL left or right to During driving, noise in the car changes ac- select cut-off frequency. cording to the driving speed and road condi- Each time MULTI-CONTROL is pushed left or tions. The automatic sound levelizer (ASL) right, cut-off frequencies are selected in the monitors such varying noise and automati- following order: cally increases the volume level, if this noise 50Hz—63Hz—80Hz—100Hz—125Hz becomes greater. The sensitivity (variation of Only frequencies higher than those in the se- volume level to noise level) of ASL can be set lected range are outputted from the front or to one of five levels. rear speakers. 1 Use MULTI-CONTROL to select ASL. Adjusting source levels 2 Press MULTI-CONTROL to turn ASL on. Mid appears in the display. SLA (source level adjustment) lets you adjust # To turn ASL off, press MULTI-CONTROL the volume level of each source to prevent ra- again. dical changes in volume when switching be- tween sources. 3 Push MULTI-CONTROL left or right to ! Settings are based on the FM tuner volume select the desired ASL level. level, which remains unchanged. Each time MULTI-CONTROL is pushed left or right, ASL level is selected in the following 1 Compare the FM tuner volume level order: with the level of the source you wish to ad- Low (low)—Mid-L (mid-low)—Mid (mid)— just. Mid-H (mid-high)—High (high) 2 Use MULTI-CONTROL to select SLA. En 47
  • 48.
    Section 02 Operating this unit Initial Settings # You can also select the function by pressing FUNCTION on the remote control. Adjusting initial settings # To cancel initial settings, press BAND. Using the initial settings, you can customize # You cannot select BT AUDIO when the Blue- various system settings to achieve optimal per- tooth audio player has been connected. formance from this unit. Selecting the display language For your convenience, this unit equips multi- ple language display. You can select the lan- guage best suited to your first language. 1 Use MULTI-CONTROL to select 1 Language select. 1 Function display Shows the function status. 2 Press MULTI-CONTROL to select the lan- guage. 1 Press SOURCE and hold until the unit Each press of MULTI-CONTROL selects lan- turns off. guages in the following order: English—Français—Italiano—Español— 2 Press MULTI-CONTROL and hold until Deutsch—Nederlands—РУССКИЙ Language select appears in the display. # You can also perform this operation by press- ing and holding FUNCTION on the remote con- Setting the date trol. The calender display adjusted in this mode ap- pears when the telephone source is selected 3 Turn MULTI-CONTROL to select one of or sources and the feature demo are off. the initial settings. Turn MULTI-CONTROL to switch between the 1 Use MULTI-CONTROL to select functions in the following order: Calendar. Language select (language selection)— Calendar (calendar)—Clock (clock)— 2 Push MULTI-CONTROL left or right to Off clock (off clock)—FM step (FM tuning select the segment of the calendar display step)—Auto PI (auto PI seek)—Warning tone you wish to set. (warning tone)—Face auto open (face auto Pushing MULTI-CONTROL left or right will se- open)—AUX1 (auxiliary input 1)—AUX2 (aux- lect one segment of the calendar display: iliary input 2)—Dimmer (dimmer)— Day—Month—Year Brightness (brightness)—S/W control (rear As you select segments of the calendar dis- output and subwoofer controller)—Mute play the segment selected will blink. (sound muting/attenuation)—Demonstration (feature demo)—Reverse mode (reverse 3 Push MULTI-CONTROL up or down to mode)—Ever-scroll (ever scroll)—BT AUDIO set the date. (Bluetooth audio)—Pin code input (pin code input)—Edit device name (device name edit) Setting the clock —BT Version Info. (Bluetooth version infor- Use these instructions to set the clock. mation)—BT reset (Bluetooth reset) Use the following instructions to operate each 1 Use MULTI-CONTROL to select Clock. particular setting. 48 En
  • 49.
    Section Operating this unit 02 English 2 Push MULTI-CONTROL left or right to 2 Press MULTI-CONTROL to select the FM select the segment of the clock display you tuning step. wish to set. Pressing MULTI-CONTROL repeatedly will Pushing MULTI-CONTROL left or right will se- switch the FM tuning step between 50 kHz lect one segment of the clock display: and 100 kHz while AF or TA is on. The selected Hour—Minute FM tuning step will appear in the display. As you select segments of the clock display the segment selected will blink. Note 3 Push MULTI-CONTROL up or down to The tuning step remains at 50 kHz during manual put a clock right. tuning. Note Switching Auto PI Seek You can match the clock to a time signal by The unit can automatically search for a differ- pressing MULTI-CONTROL. ent station with the same programming, even ! If the minute is 00 to 29, the minutes are during preset recall. rounded down. (e.g., 10:18 becomes 10:00.) ! If the minute is 30 to 59, the minutes are 1 Use MULTI-CONTROL to select Auto PI. rounded up. (e.g., 10:36 becomes 11:00.) 2 Press MULTI-CONTROL to turn Auto PI seek on. Turning the off clock display on # To turn Auto PI seek off, press or off MULTI-CONTROL again. If the off clock display is turned on, when the sources and the feature demo are off, the Switching the warning tone clock display appears on the display. If the front panel is not detached from the 1 Use MULTI-CONTROL to select head unit within four seconds of turning off Off clock. the ignition, a warning tone will sound. You can turn off the warning tone. 2 Press MULTI-CONTROL to turn the off clock display on. 1 Use MULTI-CONTROL to select # To turn the off clock display off, press Warning tone. MULTI-CONTROL again. 2 Press MULTI-CONTROL to turn warning tone on. Setting the FM tuning step # To turn warning tone off, press MULTI-CONTROL again. Normally the FM tuning step employed by seek tuning is 50 kHz. When AF or TA is on, the tuning step automatically changes to 100 Switching the face auto open kHz. It may be preferable to set the tuning step To protect against theft, this unit features de- to 50 kHz when AF is on. tachable front panel. To detach the front panel 1 Use MULTI-CONTROL to select FM step. easily, the front panel opens automatically. This function is on as a default. 1 Use MULTI-CONTROL to select Face auto open. En 49
  • 50.
    Section 02 Operating this unit 2 Press MULTI-CONTROL to turn the face Setting the rear output and auto open on. subwoofer controller # To turn the face auto open off, press This unit’s rear output (rear speaker leads out- MULTI-CONTROL again. put and RCA rear output) can be used for full- range speaker (Rear SP :F.Range) or subwoo- Switching the auxiliary setting fer (Rear SP :S/W) connection. If you switch Auxiliary equipments connected to this unit the rear output setting to Rear SP :S/W, you can be activated individually. Set each AUX can connect a rear speaker lead directly to a source to ON when using. About connecting subwoofer without using an auxiliary amp. or using auxiliary equipments, refer to Using Initially, the unit is set for rear full-range speak- the AUX source on page 53. er connection (Rear SP :F.Range). 1 Use MULTI-CONTROL to select AUX1/ 1 Use MULTI-CONTROL to select AUX2. S/W control. 2 Press MULTI-CONTROL to turn AUX1/ 2 Press MULTI-CONTROL to switch the AUX2 on. rear output setting. # To turn AUX off, press MULTI-CONTROL Pressing MULTI-CONTROL will switch be- again. tween Rear SP :F.Range (full-range speaker) and Rear SP :S/W (subwoofer) and that status will be displayed. Switching the dimmer setting # When no subwoofer is connected to the rear To prevent the display from being too bright at output, select Rear SP :F.Range. night, the display is automatically dimmed # When a subwoofer is connected to the rear when the car’s headlights are turned on. You output, set for subwoofer Rear SP :S/W. can turn the dimmer on or off. Notes 1 Use MULTI-CONTROL to select Dimmer. ! Even if you change this setting, there is no 2 Press MULTI-CONTROL to turn dimmer output unless you turn the subwoofer output on. on (refer to Using subwoofer output on page # To turn dimmer off, press MULTI-CONTROL 46). again. ! If you change this setting, subwoofer output in the audio menu return to the factory set- tings. Adjusting the brightness ! Both rear speaker leads outputs and RCA rear You can adjust the display brightness. Initially output are switched simultaneously in this this mode is set to 12. setting. 1 Use MULTI-CONTROL to select Brightness. Switching the sound muting/ attenuation 2 Push MULTI-CONTROL left or right to Sound from this system is muted or attenu- adjust the brightness level. ated automatically when the signal from the 0 to 15 is displayed as the level is increased or equipment with mute function is received. decreased. # When dimmer is functioning, the brightness level can be adjusted 0 to 10. 50 En
  • 51.
    Section Operating this unit 02 English ! The sound is muted or attenuated, MUTE 2 Press MULTI-CONTROL to turn the re- or ATT are displayed and no audio adjust- verse mode on. ment is possible. # To turn the reverse mode off, press ! Sound from this system returns to normal MULTI-CONTROL again. when the muting or attenuation is can- celed. Note 1 Use MULTI-CONTROL to select Mute. You can also turn on or off reverse mode by press- ing BAND while this unit is turned off. For more 2 Press MULTI-CONTROL to switch the tel- details, see Reverse mode on page 9. ephone muting/attenuation. Pressing MULTI-CONTROL will switch be- tween TEL ATT (attenuation) and TEL mute Switching the Ever Scroll (muting) and that status will be displayed. When Ever Scroll is set to ON, text information recorded on CD or iPod scrolls continuously in the display. Set to OFF if you prefer the infor- Switching the feature demo mation to scroll just once. The feature demo automatically starts when power to this unit is turned off while the igni- 1 Use MULTI-CONTROL to select tion switch is set to ACC or ON. Ever-scroll. 1 Use MULTI-CONTROL to select 2 Press MULTI-CONTROL to turn the Ever Demonstration. Scroll on. # To turn the Ever Scroll off, press 2 Press MULTI-CONTROL to turn the fea- MULTI-CONTROL again. ture demo on. # To turn the feature demo off, press MULTI-CONTROL again. Activating the BT Audio source You need to activate the BT Audio source in Notes order to use a Bluetooth audio player. This setting is set to on by default. If you do ! Remember that if the feature demo continues not use BT Audio, you can turn it off. operating when the car engine is turned off, it may drain battery power. 1 Use MULTI-CONTROL to select ! You can also turn on or off feature demo by BT AUDIO. pressing DISPLAY while this unit is turned off. For more details, see Feature demo mode on 2 Press MULTI-CONTROL to turn the page 9. BT Audio source on. # To turn the BT Audio source off, press MULTI-CONTROL again. Switching the reverse mode # If you turn the BT AUDIO in the initial settings If you do not perform an operation within off, the history of the most recently connected about 30 seconds, screen indications start to Bluetooth audio stored in this unit is cleared. reverse, and then continue reversing every 10 seconds. 1 Use MULTI-CONTROL to select Reverse mode. En 51
  • 52.
    Section 02 Operating this unit Entering PIN code for Bluetooth 2 Press DISPLAY to select the desired wireless connection character type. Press DISPLAY repeatedly to switch between To connect your cellular phone to this unit via the following character types: Bluetooth wireless technology, you need to Alphabet (upper case)—Alphabet (lower case) enter PIN code on your phone to verify the —Numbers and symbols connection. The default code is 0000, but you can change this in this function. 3 Push MULTI-CONTROL up or down to ! With some Bluetooth audio players, you select a letter of the alphabet. may be required to enter to this unit in ad- vance PIN code of your Bluetooth audio 4 Push MULTI-CONTROL left or right to player, in order to set this unit ready for a move the cursor to the previous or next connection from your Bluetooth audio character position. player. 5 After inputting device name, press 1 Use MULTI-CONTROL to select MULTI-CONTROL to store in this unit. Pin code input. # Pushing MULTI-CONTROL right in the confir- mation display returns you to the device name 2 Push MULTI-CONTROL up or down to input display, and you can change the device select a number. name. # You can also press 0 to 9 on the remote con- # If an invalid character has been entered, sub- trol to select a number. sequent characters are not displayed. # If an invalid character has been entered in the 3 Push MULTI-CONTROL left or right to beginning, device name cannot be stored in move the cursor to the previous or next po- memory. sition. 4 After inputting PIN code (up to 16 di- Displaying system version for gits), press MULTI-CONTROL to store in this unit. repair # Pushing MULTI-CONTROL right in the confir- Should this unit fails to operate properly and mation display returns you to the PIN code input you consult with dealer for repair, you may be display, and you can change the PIN code. asked to indicate the system versions of this # If an invalid character has been entered, sub- unit and of Bluetooth module. You can display sequent characters are not displayed. the versions and confirm them. # If an invalid character has been entered in the 1 Use MULTI-CONTROL to select beginning, PIN code cannot be stored in mem- BT Version Info. ory. The system (microprocessor) version of this unit is displayed. Editing device name 2 Push MULTI-CONTROL left to switch to You can edit the device name. the version of the Bluetooth module of this The device name is set to Pioneer BT unit as unit. default. # Pushing MULTI-CONTROL right returns to the system version of this unit. 1 Use MULTI-CONTROL to select Edit device name. 52 En
  • 53.
    Section Operating this unit 02 English Resetting the Bluetooth Other Functions wireless technology module Using the AUX source Bluetooth telephone and Bluetooth Audio This unit can control up to two auxiliary equip- data can be deleted. To protect personal infor- ments such as VCR or portable devices (sold mation, we recommend deleting this data be- separately). When connected, auxiliary equip- fore transferring the unit to other persons. The ments are automatically read in as AUX following settings will be deleted. sources and assigned to AUX1 or AUX2. The ! phone book entries on the Bluetooth tele- relationship between AUX1 and AUX2 phone sources is explained below. ! preset numbers on the Bluetooth tele- phone ! registration assignment of Bluetooth tele- About AUX1 and AUX2 phone You have two methods to connect auxiliary ! call history of Bluetooth telephone equipments to this unit. ! history of the most recently connected Bluetooth audio AUX1 source: 1 Use MULTI-CONTROL to select BT reset. When connecting auxiliary equipment using a stereo mini plug cable 2 Push MULTI-CONTROL right to show a confirmation display. % Insert the stereo mini plug into the Clear memory YES is displayed. Clearing input jack on this unit. memory is now on standby. For more details, refer to the installation man- # If you do not want to reset phone memory, ual. push MULTI-CONTROL left. The display reverts. The allocation of this auxiliary equipment is automatically set to AUX1. 3 Press MULTI-CONTROL to clear the memory. AUX2 source: Cleared is displayed and the settings are deleted. When connecting auxiliary equipment using an IP-BUS-RCA Interconnector (sold separately) % Use an IP-BUS-RCA Interconnector such as the CD-RB20/CD-RB10 (sold separetely) to connect this unit to auxiliary equipment featuring RCA output. For more details, refer to the IP-BUS-RCA Inter- connector owner’s manual. The allocation of this auxiliary equipment is automatically set to AUX2. # You can only make this type of connection if the auxiliary equipment has RCA outputs. En 53
  • 54.
    Section 02 Operating this unit Selecting AUX as the source VISUALIZER-2 (visualizer 2)—VISUALIZER-3 (visualizer 3)—SPECTRUM ANALYZER-1 % Press SOURCE to select AUX as the (spectrum analyzer 1)— source. SPECTRUM ANALYZER-2 (spectrum analyzer # If the auxiliary setting is not turned on, AUX 2)—MOVIE (movie)—ENT CLOCK (entertain- cannot be selected. For more details, see Switch- ment clock) ing the auxiliary setting on page 50. # To return to the playback display, press BAND. Setting the AUX title The title displayed for each AUX1 or AUX2 Using the PGM button source can be changed. You can operate the preprogrammed functions for each source by using PGM on the remote 1 After you have selected AUX as the control. source, use MULTI-CONTROL and select FUNCTION to display TitleInput "A". % Press PGM to turn pause on when se- lecting the following sources: 2 Enter a title in the same way as the ! CD – Built-in CD player built-in CD player. ! iPod – iPod For details concerning operation, refer to En- ! Multi CD – Multi-CD player tering disc titles on page 21. ! USB – USB portable audio player/USB memory ! BT Audio – Bluetooth audio player Using different entertainment ! DVD – DVD player/multi-DVD player displays # To turn pause off, press PGM again. You can enjoy entertainment displays while lis- tening to each sound source. % Press PGM and hold to turn BSM on when selecting tuner as the source. 1 Press MULTI-CONTROL to display the Press PGM and hold until the BSM turns on. main menu. # To cancel the storage process, press PGM FUNCTION, AUDIO and ENTERTAINMENT again. appear on the display. % Press PGM and hold to turn BSSM on 2 Use MULTI-CONTROL to select when selecting television as the source. ENTERTAINMENT. Press PGM and hold until the BSSM turns on. Turn to change the menu option; press to se- # To cancel the storage process, press PGM lect. again. 3 Use MULTI-CONTROL to change the dis- play. Turn to change the menu option; press to se- lect. BGV-1 (background visual 1)—BGV-2 (back- ground visual 2)—BGP-1 (background picture 1)—BGP-2 (background picture 2)—BGP-3 (background picture 3)—BGP-4 (background picture 4)—SIMPLE-1 (simple display 1)— SIMPLE-2 (simple display 2)—LEVEL METER (level meter)—VISUALIZER-1 (visualizer 1)— 54 En
  • 55.
    Section Available accessories 03 English USB adapter Selecting an audio file directly in the current folder Basic Operations The operation is basically the same as that of You can use this unit to control a USB adapter, the built-in CD player. which is sold separately. For details concerning operation, refer to Se- For details concerning operation, refer to the lecting a track directly on page 19. USB adapter’s operation manual. This section provides information on USB portable audio player/USB memory operations with this unit Introduction of advanced which differs from that described in the USB operations adapter’s operation manual. ! Optimum performance of this unit may not 1 Press MULTI-CONTROL to display the be obtained depending on the connected main menu. USB portable audio player/USB memory. FUNCTION, AUDIO and ENTERTAINMENT appear on the display. 2 Use MULTI-CONTROL to select FUNCTION. Turn to change the menu option; press to se- lect. The function name appears on the display. 3 Turn MULTI-CONTROL to select the function. 1 WMA/MP3/AAC indicator Turn MULTI-CONTROL to switch between the Shows the type of file currently playing. functions in the following order: 2 Folder number indicator Play mode (repeat play)—Random mode 3 Track number indicator (random play)—Scan mode (scan play)— 4 Play time indicator Pause (pause) 5 Bit rate indicator # You can also select the function by pressing FUNCTION on the remote control. 1 Press SOURCE to select USB. # To return to the playback display, press BAND. # If you do not operate functions within about 2 Push MULTI-CONTROL up or down to 30 seconds, the display is automatically returned select a folder. to the ordinary display. # You cannot select a folder that does not have a compressed audio file recorded in it. # To return to folder 01 (ROOT), press and hold Function and operation BAND. However, if folder 01 (ROOT) contains no Play mode, Random mode, Scan mode and files, playback commences with folder 02. Pause operations are basically the same as that of the built-in CD player. 3 To perform fast forward or reverse, push and hold MULTI-CONTROL left or right. 4 To skip back or forward to another compressed audio file, push MULTI-CONTROL left or right. En 55
  • 56.
    Section 03 Available accessories Function name Operation Refer to Displaying text information on disc on page 22. Refer to Selecting a repeat play ! If the characters recorded on the audio file range on page 20. But the repeat play ranges you can are not compatible with this unit, those select are different from that of the characters will not be displayed. built-in CD player. The repeat play ranges of the USB portable audio Play mode player/USB memory are as below: Selecting files from the file ! Track repeat – Repeat just the current file name list ! Folder repeat – Repeat the The operation is the same as that of the built- current folder in CD player. ! All repeat – Repeat all files Refer to Selecting tracks from the file name list Refer to Playing tracks in random on page 23. Random mode order on page 20. Refer to Scanning folders and Scan mode tracks on page 20. Refer to Pausing disc playback on Pause page 21. Notes ! If you select another folder during repeat play, the repeat play range changes to All repeat. ! If you perform track search or fast forward/re- verse during Track repeat, the repeat play range changes to Folder repeat. ! When Folder repeat is selected, it is not pos- sible to play back a subfolder of that folder. ! Scan play searches the file within the selected repeat range. While you are using Track repeat or Folder repeat, the beginning of each file in the folder is played for about 10 seconds. When you are using All repeat, the beginning of the each file in the USB portable audio player/USB memory is played for about 10 seconds. ! After scanning is finished, normal playback of the files will begin again. Displaying text information of an audio file The operation is the same as that of the built- in CD player. 56 En
  • 57.
    Section Availableaccessories 03 English Multi-CD Player Notes Basic Operations ! When the multi-CD player performs the pre- paratory operations, Ready is displayed. You can use this unit to control a multi-CD ! If an error message such as ERROR-11 is dis- player, which is sold separately. played, refer to the multi-CD player owner’s ! Only those functions described in this man- manual. ual are supported by 50-disc multi-CD ! If there are no discs in the multi-CD player ma- players. gazine, No Disc is displayed. ! This unit is not designed to operate disc title list functions with a 50-disc multi-CD player. About the disc title list functions, please Selecting a track directly refer to Selecting discs from the disc title list The operation is basically the same as that of on page 60. the built-in CD player. For details concerning operation, refer to Se- lecting a track directly on page 19. Introduction of advanced operations You can use Compression (compression and DBE) only with a multi-CD player that supports them. 1 Disc number indicator 2 Track number indicator 1 Press MULTI-CONTROL to display the 3 Play time indicator main menu. FUNCTION, AUDIO and ENTERTAINMENT 1 Press SOURCE to select the multi-CD appear on the display. player. 2 Use MULTI-CONTROL to select 2 Push MULTI-CONTROL up or down to FUNCTION. select a disc you want to listen to. Turn to change the menu option; press to se- # You can also select a disc by using 1 to 6 but- lect. tons on the remote control. The function name appears on the display. ! For discs 1 to 6, press the corresponding button number. 3 Turn MULTI-CONTROL to select the ! For discs 7 to 12, press and hold the corre- function. sponding numbers, such as 1 for disc 7, Turn MULTI-CONTROL to switch between the until the disc number appears in the dis- functions in the following order: play. Play mode (repeat play)—Random mode (random play)—Scan mode (scan play)— 3 To perform fast forward or reverse, Pause (pause)—Compression (compression push and hold MULTI-CONTROL left or and DBE)—ITS play mode (ITS play)— right. ITS memo (ITS programming)— TitleInput "A" (disc title input) 4 To skip back or forward to another # You can also select the function by pressing track, push MULTI-CONTROL left or right. FUNCTION on the remote control. # To return to the playback display, press BAND. En 57
  • 58.
    Section 03 Available accessories # If you do not operate functions except for Notes ITS memo and TitleInput "A" within about 30 seconds, the display is automatically returned to ! If you select other discs during repeat play, the ordinary display. the repeat play range changes to M-CD repeat. ! If you perform track search or fast forward/re- Function and operation verse during Track repeat, the repeat play Play mode, Random mode, Scan mode, range changes to Disc repeat. Pause, Compression and TitleInput "A" op- ! After track or disc scanning is finished, nor- erations are basically the same as that of the mal playback of the tracks will begin again. built-in CD player. ! When playing a CD TEXT disc on a CD TEXT compatible multi-CD player, you cannot Function name Operation switch to TitleInput "A". The disc title has al- Refer to Selecting a repeat play ready been recorded on a CD TEXT disc. range on page 20. But the repeat play ranges you can select are different from that of the Using ITS playlists built-in CD player. The repeat play ranges of the multi-CD player are ITS (instant track selection) lets you make a Play mode as below: playlist of favorite tracks from those in the ! M-CD repeat – Repeat all multi-CD player magazine. After you have discs in the multi-CD player added your favorite tracks to the playlist you ! Track repeat – Repeat just the current track can turn on ITS play and play just those selec- ! Disc repeat – Repeat the cur- tions. rent disc Refer to Playing tracks in random Creating a playlist with ITS programming Random mode order on page 20. You can use ITS to enter and play back up to Refer to Scanning folders and 99 tracks per disc from up to 100 discs (with Scan mode tracks on page 20. the disc titles). (With multi-CD players sold be- Refer to Pausing disc playback on fore the CDX-P1250 and CDX-P650, up to 24 Pause tracks can be stored in the playlist.) page 21. Refer to Using compression and 1 Play a CD that you want to program. BMX on page 21. Push MULTI-CONTROL up or down to select Multi-CD player has DBE (dynamic bass emphasis) function instead the CD. Compression of BMX. The settings can be switched as 2 Use MULTI-CONTROL to select below: ITS memo in the function menu. COMP OFF—COMP 1—COMP 2 —COMP OFF—DBE 1—DBE 2 3 Select the desired track by pushing MULTI-CONTROL left or right. Refer to Using ITS playlists on this ITS play mode page. 4 Push MULTI-CONTROL up to store the Refer to Using ITS playlists on this currently playing track in the playlist. ITS memo page. Memory complete is displayed and the cur- Refer to Entering disc titles on the rently playing selection is added to your play- TitleInput "A" list. next page. 5 Press BAND to return to the playback display. 58 En
  • 59.
    Section Availableaccessories 03 English Note 4 Push MULTI-CONTROL down to erase the track from your ITS playlist. After data for 100 discs has been stored in mem- The currently playing selection is erased from ory, data for a new disc will overwrite the oldest your ITS playlist and playback of the next track one. from your ITS playlist begins. # If there are no tracks from your playlist in the Playback from your ITS playlist current range, ITS empty is displayed and nor- ITS play lets you listen to the tracks that you mal play resumes. have entered into your ITS playlist. When you 5 Press BAND to return to the playback turn on ITS play, tracks from your ITS playlist display. in the multi-CD player will begin to play. 1 Select the repeat range. Erasing a CD from your ITS playlist Refer to Playing tracks in random order on You can delete all tracks of a CD from your ITS page 20. playlist if ITS play is off. 2 Use MULTI-CONTROL to select 1 Play the CD that you want to delete. ITS play mode in the function menu. Push MULTI-CONTROL up or down to select 3 Press MULTI-CONTROL to turn ITS play the CD. on. 2 Use MULTI-CONTROL to select Playback begins of those tracks from your ITS memo in the function menu. playlist within the previously selected M-CD repeat or Disc repeat ranges. 3 Push MULTI-CONTROL down to erase # If no tracks in the current range are pro- all tracks on the currently playing CD from grammed for ITS play, then ITS empty is dis- your ITS playlist. played. All tracks on the currently playing CD are # To turn ITS play off, press MULTI-CONTROL erased from your playlist and again. Memory deleted is displayed. 4 Press BAND to return to the playback Erasing a track from your ITS playlist display. You can delete a track from your ITS playlist if ITS play is on. If ITS play is already on, skip to step 2. If ITS Using disc title functions play is not already on, use MULTI-CONTROL. You can input CD titles and display the titles. Then you can easily search for and play a de- 1 Play the CD with the track you want to sired disc. delete from your ITS playlist, and turn ITS play on. Refer to Playback from your ITS playlist on this Entering disc titles page. Use the disc title input feature to store up to 100 CD titles (with ITS playlist) into the multi- 2 Use MULTI-CONTROL to select CD player. Each title can be up to 10 charac- ITS memo in the function menu. ters long. 3 Select the desired track by pushing For details concerning operation, refer to En- MULTI-CONTROL left or right. tering disc titles on page 21. En 59
  • 60.
    Section 03 Available accessories ! Titles remain in memory, even after the DVD Player disc has been removed from the magazine, and are recalled when the disc is rein- Basic Operations serted. You can use this unit to control a DVD player or ! After data for 100 discs has been stored in multi-DVD player, which is sold separately. memory, data for a new disc will overwrite For details concerning operation, refer to the the oldest one. DVD player’s or multi-DVD player’s operation manual. This section provides information on Displaying disc titles DVD operations with this unit which differs You can display the text information of any from that described in the DVD player’s or disc that has had a disc title entered. multi-DVD player’s operation manual. The operation is the same as that of the built- in CD player. Refer to Displaying text information on disc on page 22. Selecting discs from the disc title list Disc title list lets you see the list of disc titles that have been entered into the multi-CD player and select one of them to play back. 1 DVD-V/VCD/CD/MP3/WMA indicator 1 Press LIST to switch to the disc title list Shows the type of disc currently playing. mode during the playback display. 2 Disc number indicator Shows the disc number currently playing 2 Use MULTI-CONTROL to select the de- sired disc title. when using a multi-DVD player. Turn to change the disc title; press to play. 3 Title/Folder number indicator # You can also change the disc title by pushing Shows the title (when playing DVD video) or MULTI-CONTROL up or down. folder (when playing compressed audio) of # When playing CD TEXT disc, push the selection currently playing. MULTI-CONTROL right to see a list of the tracks 4 Chapter/track number indicator in the selected disc. Push MULTI-CONTROL left Shows the chapter (when playing DVD video) to return to the disc list. or track (when playing video CD, CD or com- # If no title has been entered for a disc, pressed audio) currently playing. No D.Title will be displayed. 5 Play time indicator # No Disc is displayed next to the disc number when there is no disc in the magazine. 1 Press SOURCE to select the DVD player/ multi-DVD player. Using CD TEXT functions 2 To perform fast forward or reverse, push and hold MULTI-CONTROL left or You can use these functions only with a CD right. TEXT compatible multi-CD player. The operation is the same as that of the built- 3 To skip back or forward to another in CD player. chapter/track, push MULTI-CONTROL left or Refer to Displaying text information on disc on right. page 22. 60 En
  • 61.
    Section Availableaccessories 03 English Selecting a disc # You can also select the function by pressing FUNCTION on the remote control. ! You can operate this function only when a # To return to the playback display, press BAND. multi-DVD player is connected to this unit. % Press any of 1 to 6 on the remote con- Function and operation trol to select the desired disc. Play mode, Random mode, Scan mode, Pause and TitleInput "A" operations are basi- Selecting a folder cally the same as that of the built-in CD player. Also, ITS play mode and ITS memo opera- ! You can operate this function only when a tions are basically the same as that the multi- DVD player which is corresponding to com- CD player. pressed audio playback is connected to this unit. Function name Operation % Push MULTI-CONTROL up or down to Refer to Selecting a repeat play range on page 20. select a folder. But the repeat play range that you can select is vary depending on the type of disc or system. The re- Introduction of advanced peat play ranges of the DVD operations player/multi-DVD player are as below: 1 Press MULTI-CONTROL to display the During PBC playback of Video main menu. CDs, this function cannot be oper- Play mode ated. FUNCTION, AUDIO and ENTERTAINMENT ! Disc repeat – Repeat the cur- appear on the display. rent disc ! Folder repeat – Repeat the 2 Use MULTI-CONTROL to select current folder FUNCTION. ! Title repeat – Repeat just the Turn to change the menu option; press to se- current title lect. ! Chapter repeat – Repeat just The function name appears on the display. the current chapter ! Track repeat – Repeat just the 3 Turn MULTI-CONTROL to select the current track function. Refer to Playing tracks in random Random mode Turn MULTI-CONTROL to switch between the order on page 20. functions in the following order: Refer to Scanning folders and During DVD video or Video CD playback Scan mode tracks on page 20. Play mode (repeat play)—Pause (pause) Refer to Pausing disc playback on During CD playback Pause page 21. Play mode (repeat play)—Random mode Refer to Using ITS playlists on (random play)—Scan mode (scan play)— ITS play mode page 58. Pause (pause)—ITS play mode (ITS play)— ITS memo (ITS input)—TitleInput "A" (disc Refer to Using ITS playlists on ITS memo page 58. title input) During compressed audio playback Refer to Entering disc titles on TitleInput "A" page 21. Play mode (repeat play)—Random mode (random play)—Scan mode (scan play)— Pause (pause) En 61
  • 62.
    Section 03 Available accessories Notes TV tuner ! If you select other discs during repeat play, Basic Operations the repeat play range changes to Disc repeat. You can use this unit to control a TV tuner, ! During video CD or CD playback, if you per- which is sold separately. form track search or fast forward/reverse dur- For details concerning operation, refer to the ing Track repeat, the repeat play range TV tuner’s operation manual. This section pro- changes to Disc repeat. vides information on TV operations with this ! During compressed audio playback, if you se- unit which differs from that described in the lect another folder during repeat play, the re- TV tuner’s operation manual. peat play range changes to Disc repeat. ! During compressed audio playback, if you per- form track search or fast forward/reverse dur- ing Track repeat, the repeat play range changes to Folder repeat. ! Multi-DVD player that has ITS functions and disc title functions can also be connected to this unit. In this case, ITS play mode, ITS memo and disc title input can be con- trolled. ! The ITS function of a DVD player differs 1 Band indicator slightly from ITS playback with a multi-CD 2 Preset number indicator player. With multi-DVD player, ITS playback ap- 3 Channel indicator plies only to the CD playing. For details, refer 1 Press SOURCE to select the TV. to Using ITS playlists on page 58. 2 Press BAND to select a band. Press BAND until the desired band is dis- played, TV-1 or TV-2. 3 To perform manual tuning, push MULTI-CONTROL left or right. 4 To perform seek tuning, push and hold MULTI-CONTROL left or right for about one second and release. The tuner will scan the channels until a broad- cast strong enough for good reception is found. # You can cancel seek tuning by pushing MULTI-CONTROL left or right. # If you push and hold MULTI-CONTROL left or right, you can skip broadcasting channels. Seek tuning starts as soon as you release MULTI-CONTROL. 62 En
  • 63.
    Section Availableaccessories 03 English Storing and recalling broadcast Storing the strongest broadcast stations stations sequentially You can easily store up to 12 broadcast sta- 1 Press MULTI-CONTROL to display the tions for later recall. main menu. ! Up to 24 stations, 12 for each of two TV FUNCTION, AUDIO and ENTERTAINMENT bands, can be stored in memory. appear on the display. 1 When you find a station that you want 2 Use MULTI-CONTROL and select to store in memory press LIST. FUNCTION to display BSSM. Turn to change the menu option; press to se- 2 Use MULTI-CONTROL to store the se- lect. lected station in memory. # You can also select the function by pressing Turn to change the preset number; press and FUNCTION on the remote control. hold to store. The preset number you have selected will 3 Press MULTI-CONTROL to turn BSSM flash and then remain lit. The selected station on. has been stored in memory. Searching is displayed. While Searching is displayed, the 12 strongest broadcast stations 3 Use MULTI-CONTROL to select the de- will be stored in order from the lowest channel sired station. up. When finished, the preset channel list ap- Turn to change the station; press to select. pears. # You can also change the station by pushing # To cancel the storage process, press MULTI-CONTROL up or down. MULTI-CONTROL again. # If you do not operate the list within about 30 seconds, the display is automatically returned to 4 Use MULTI-CONTROL to select the de- the ordinary display. sired station. Turn to change the station; press to select. Using the remote control # You can also change the station by pushing You can also store and recall stations assigned MULTI-CONTROL up or down. to preset tuning numbers P.CH 1 to P.CH 6 by # To return to the channel display, press BAND. using the remote control. # If you do not operate the list within about 30 seconds, the display is automatically returned to % When you find a station that you want the ordinary display. to store in memory, press one of preset tuning buttons 1 to 6 and hold until the Note preset number stops flashing. Storing broadcast stations with BSSM may re- The number you have pressed will flash in the place broadcast stations you have saved using preset number indicator and then remain lit. P.CH 1 to P.CH12. The selected station has been stored in mem- ory. The next time you press the same preset tun- ing button the station is recalled from mem- ory. # You can also recall stations assigned to preset tuning numbers by pushing MULTI-CONTROL up or down during the channel display. En 63
  • 64.
    Appendix Additional Information Troubleshooting iPod Message Cause Action Symptom Cause Action ERROR-11 Communication Disconnect the iPod doesn’t Cables are incor- Disconnect the failure cable from iPod. operate cor- rectly connected. cable from iPod. Once iPod main rectly. Once iPod main menu is displayed, menu is displayed, connect the cable connect the cable again. again. Reset the iPod. Reset the iPod. ERROR-21 Old version of Update the iPod iPod version. ERROR-30 iPod failure Reset the iPod. ERROR-A0 iPod is not Check if the con- charged but op- nection cable for Understanding error erates correctly iPod shorted out messages (e.g., not caught in metal objects). When you contact your dealer or your nearest After checking, Pioneer Service Center, be sure to record the switch the ignition key or disconnect error message. the iPod and con- nect again. Built-in CD Player No Songs No songs Transfer the songs Message Cause Action to iPod. ERROR-11, 12, Dirty disc Clean disc. STOP No songs in the Select a list that 17, 30 current list contains the songs. ERROR-11, 12, Scratched disc Replace disc. 17, 30 ERROR-10, 11, Electrical or me- Switch the ignition Bluetooth audio/telephone 12, 15, 17, 30, chanical key, or switch to a Message Cause Action A0 different source, then back to the ERROR-10 Built-in Blue- Turn the ignition CD player. tooth unit en- OFF and ON. countered an ERROR-15 The inserted disc Replace disc. error does not contain any data ERROR-80 Built-in FLASH Turn the ignition ROM encoun- OFF and ON. ERROR-22, 23 The CD format Replace disc. tered an error cannot be played back No Audio The inserted disc Replace disc. does not contain any files that can be played back PROTECT All the files on Replace disc. the inserted disc are secured by DRM TRK SKIPPED The inserted disc Replace disc. contains WMA files that are pro- tected by DRM 64 En
  • 65.
    Appendix AdditionalInformation English Handling guideline of discs ! Road shocks may interrupt disc playback. ! Read the precautions with discs before and player using them. ! Use only discs featuring either of following two logos. Dual Discs ! Dual Discs are two-sided discs that have a recordable CD for audio on one side and a recordable DVD for video on the other. ! Since the CD side of Dual Discs is not phy- ! Use only conventional, fully circular discs. sically compatible with the general CD Do not use shaped discs. standard, it may not be possible to play the CD side with this unit. ! Frequent loading and ejecting of a Dual Disc may result in scratches on the disc. Serious scratches can lead to playback pro- ! Use 12-cm or 8-cm CD. Do not use an blems on this unit. In some cases, a Dual adapter when playing 8-cm CDs. Disc may become stuck in the disc loading ! Do not insert anything other than a CD into slot and will not eject. To prevent this, we the CD loading slot. recommend you refrain from using Dual ! Do not use cracked, chipped, warped, or Disc with this unit. otherwise damaged discs as they may da- ! Please refer to the information from the mage the player. disc manufacturer for more detailed infor- ! Unfinalized CD-R/CD-RW disc playback is mation about Dual Discs. not possible. ! Do not touch the recorded surface of the discs. Compressed audio files ! Store discs in their cases when not in use. ! Avoid leaving discs in excessively hot envir- ! Depending on the version of Windows onments including under direct sunlight. Media Player used to encode WMA files, ! Do not attach labels, write on or apply che- album names and other text information micals to the surface of the discs. may not be correctly displayed. ! To clean a CD, wipe the disc with a soft ! Depending on the software (or the version cloth outward from the center. of the software) used to encode the audio ! Condensation may temporarily impair the files, this unit may not operate properly. player’s performance. Leave it to adjust to ! There may be a slight delay when starting the warmer temperature for about one playback of WMA/AAC files encoded with hour. Also, wipe any dump discs with a soft image data. cloth. ! ISO 9660 Level 1 and 2 compliant. Romeo ! Playback of discs may not be possible be- and Joliet file systems are both compatible cause of disc characteristics, disc format, with this player. recorded application, playback environ- ! Multi-session playback is possible. ment, storage conditions and so on. ! Compressed audio files are not compatible ! Text information may not be correctly dis- with packet write data transfer. played depending on the recorded environ- ment. En 65
  • 66.
    Appendix Additional Information ! Only 64 characters from the beginning can ! Folder hierarchy is allowed up to eight tiers. be displayed as a file name (including the However, practical hierarchy of folder is extension such as .wma, .mp3, .m4a or less than two tiers. .wav) or a folder name. ! Up to 99 folders on a disc can be played ! Folder selection sequence or other opera- back. tion may be altered depending on the en- coding or writing software. ! Regardless of the length of blank section Compressed audio compatibility between the songs of original recording, WMA compressed audio discs will play with a ! Compatible format: WMA encoded by short pause between songs. Windows Media Player Ver. 7, 7.1, 8, 9 or 10 ! File extensions such as .wma, .mp3, .m4a ! Bit rate: 48 kbps to 320 kbps (CBR), 48 kbps or .wav must be used properly. to 384 kbps (VBR) ! Russian texts to be displayed on this unit ! Sampling frequency: 32 kHz to 48 kHz should be encoded with the following char- ! Windows Media Audio 9 Professional, Loss- acter sets: less, Voice: No — Unicodes (UTF-8, UTF-16) — Character sets other than Unicode that MP3 are used in Windows environment and ! Bit rate: 8 kbps to 320 kbps are set to Russian in the multi-language ! Sampling frequency: 16 kHz to 48 kHz (32, setting 44.1, 48 kHz for emphasis) ! Only 32 characters from the beginning can ! Compatible ID3 tag version: 1.0, 1.1, 2.2, be displayed as a file name (including the 2.3, 2.4 (ID3 tag Version 2.x is given priority extension such as .wma, .mp3, .m4a or than Version 1.x.) .wav) or a folder name when using Russian ! M3u playlist: No texts. ! MP3i (MP3 interactive), mp3 PRO: No AAC Example of a hierarchy ! Compatible format: AAC encoded by : Folder iTunes® version 6.0.5 and earlier : Compressed audio file ! Sampling frequency: 11.025 kHz to 48 kHz ! Transmission rate: 16 kbps to 320 kbps ! Apple Lossless: No 1 WAV ! Compatible format: Linear PCM (LPCM), 2 MS ADPCM ! Quantization bits: 8 and 16 (LPCM), 4 (MS 3 ADPCM) 4 ! Sampling frequency: 16 kHz to 48 kHz 5 (LPCM), 22.05 kHz to 44.1 kHz (MS AD- 6 PCM) Level 1 Level 2 Level 3 Level 4 ! This unit assigns folder numbers. The user cannot assign folder numbers. 66 En
  • 67.
    Appendix AdditionalInformation English About handling the iPod CAUTION ! Pioneer accepts no responsibility for data lost on the iPod even if that data is lost while using this unit. ! Do not leave the iPod in direct sunlight for ex- tended amounts of time. Extended exposure to direct sunlight can result in iPod malfunc- tion due to the resulting high temperature. ! Do not leave the iPod in any location with a high temperature. ! Firmly secure the iPod when driving. Do not let the iPod fall onto the floor, where it may be- come jammed under the brake or accelerator pedal. For details, refer to the iPod’s manuals. About iPod settings ! You cannot operate the iPod Equalizer on the Pioneer products. We recommend that you set the iPod Equalizer to off, before con- necting the iPod to this unit. ! You cannot set Repeat to off on the iPod when using this unit. Even if you set Repeat to off on the iPod, Repeat is changed to All automatically when connecting the iPod to this unit. En 67
  • 68.
    Appendix Additional Information Specifications Signal format: Sampling frequency ..... 44.1 kHz General Number of quantization bits Power source ............................. 14.4 V DC (10.8 V to 15.1 V ........................................... 16; linear allowable) Frequency characteristics ... 5 Hz to 20 000 Hz (±1 dB) Grounding system ................... Negative type Signal-to-noise ratio ............... 94 dB (1 kHz) (IEC-A net- Max. current consumption work) ..................................................... 10.0 A Dynamic range ......................... 92 dB (1 kHz) Dimensions (W × H × D): Number of channels .............. 2 (stereo) DIN MP3 decoding format ........... MPEG-1 & 2 Audio Layer 3 Chassis ..................... 178 × 50 × 165 mm WMA decoding format ......... Ver. 7, 7.1, 8, 9, 10 (2ch Nose ........................... 188 × 58 × 16 mm audio) D (Windows Media Player) Chassis ..................... 178 × 50 × 165 mm AAC decoding format ............ MPEG-4 AAC (iTunes® en- Nose ........................... 170 × 45 × 16 mm coded only) Weight .......................................... 1.68 kg WAV signal format .................. Linear PCM & MS ADPCM Audio FM tuner Maximum power output ....... 50 W × 4 Frequency range ...................... 87.5 MHz to 108.0 MHz 50 W × 2/4 W + 70 W × 1/2 Usable sensitivity ..................... 8 dBf (0.7 µV/75 W, mono, W (for subwoofer) S/N: 30 dB) Continuous power output ... 22 W × 4 (50 Hz to 15 000 Signal-to-noise ratio ............... 75 dB (IEC-A network) Hz, 5% THD, 4 W load, both Distortion ..................................... 0.3 % (at 65 dBf, 1 kHz, channels driven) stereo) Load impedance ...................... 4 W to 8 W × 4 0.1 % (at 65 dBf, 1 kHz, 4 W to 8 W × 2 + 2 W × 1 mono) Preout max output level/output impedance Frequency response ............... 30 Hz to 15 000 Hz (±3 dB) ..................................................... 4 V/100W Stereo separation .................... 45 dB (at 65 dBf, 1 kHz) Equalizer (7-Band Graphic Equalizer): Frequency .......................... 50/125/315/800/2k/5k/12.5k MW tuner Hz Frequency range ...................... 531 kHz to 1 602 kHz (9 kHz) Gain ...................................... ±12 dB Usable sensitivity ..................... 18 µV (S/N: 20 dB) Loudness contour: Signal-to-noise ratio ............... 65 dB (IEC-A network) Low ....................................... +3.5 dB (100 Hz), +3 dB (10 kHz) LW tuner Mid ....................................... +10 dB (100 Hz), +6.5 dB Frequency range ...................... 153 kHz to 281 kHz (10 kHz) Usable sensitivity ..................... 30 µV (S/N: 20 dB) High ..................................... +11 dB (100 Hz), +11 dB Signal-to-noise ratio ............... 65 dB (IEC-A network) (10 kHz) (volume: –30 dB) Bluetooth HPF: Version .......................................... Bluetooth 1.2 certified Frequency .......................... 50/63/80/100/125 Hz Output power ............................ +4 dBm Max. Slope .................................... –12 dB/oct (Power class 2) Subwoofer (mono): Frequency .......................... 50/63/80/100/125 Hz Note Slope .................................... –18 dB/oct Gain ...................................... +6 dB to –24 dB Specifications and the design are subject to pos- Phase .................................. Normal/Reverse sible modifications without notice due to im- Bass boost: provements. Gain ...................................... +12 dB to 0 dB CD player System .......................................... Compact disc audio system Usable discs .............................. Compact disc 68 En
  • 69.
    Contenido Gracias por habercomprado este producto Pioneer. Lea con detenimiento estas instrucciones sobre el funcionamiento del aparato, para que pueda darle el mejor uso posible. Una vez que las haya leído, conserve este manual en un lugar seguro para consultarlo en el futuro. Español Antes de comenzar – Introducción a las funciones Acerca de esta unidad 72 avanzadas 88 Ambiente de funcionamiento 73 – Selección de una gama de repetición Visite nuestro sitio Web 74 de reproducción 88 En caso de problemas 74 – Reproducción de las pistas en orden Protección del producto contra robo 74 aleatorio 89 – Extracción de la carátula 74 – Exploración de carpetas y pistas 89 – Colocación de la carátula 74 – Pausa de la reproducción de un Reinicialización del microprocesador 75 disco 89 Acerca del modo demo 75 – Uso de la compresión y BMX 89 Uso y cuidado del mando a distancia 75 – Búsqueda cada 10 pistas en el disco o – Instalación de la batería 75 carpeta actuales 90 – Uso del mando a distancia 76 – Uso de las funciones de títulos de discos 90 Utilización de esta unidad – Visualización de información de texto Qué es cada cosa 77 en el disco 91 – Unidad principal 77 – Selección de pistas de la lista de títulos – Mando a distancia 78 de las pistas 91 Funciones básicas 79 – Selección de pistas de la lista de – Encendido y apagado 79 nombres de ficheros 91 – Selección de una fuente 79 Para reproducir canciones en el iPod 92 – Ajuste del volumen 79 – Funciones básicas 92 Sintonizador 80 – Para buscar una canción 93 – Funciones básicas 80 – Visualización de información de texto – Almacenamiento y recuperación de en el iPod 93 frecuencias 81 – Introducción a las funciones – Introducción a las funciones avanzadas 94 avanzadas 81 – Repetición de reproducción 94 – Almacenamiento de las frecuencias de – Reproducción de las canciones en un radio más fuertes 82 orden aleatorio (shuffle) 94 – Sintonización de señales fuertes 82 – Reproducción de todas las canciones – Selección de frecuencias en un orden aleatorio (shuffle all) 94 alternativas 82 – Para poner en pausa una canción 94 – Recepción de anuncios de tráfico 83 – Cambio de la velocidad del – Uso de las funciones PTY 84 audiolibro 95 – Uso del radio texto 84 Bluetooth Audio 95 – Lista PTY 85 – Funciones básicas 95 Reproductor de CD incorporado 86 – Ajuste del reproductor de audio – Funciones básicas 86 Bluetooth 96 – Selección directa de una pista 88 – Introducción a las funciones avanzadas 96 Es 69
  • 70.
    Contenido – Conexión de un reproductor de audio – Borrado de la memoria 112 Bluetooth 97 – Ajuste del rechazo automático 112 – Desconexión de un reproductor de – Ajuste de la respuesta audio Bluetooth 97 automática 112 – Conexión del reproductor de audio – Cambio del tono de llamada 113 Bluetooth conectado más – Cancelación del eco y reducción de recientemente 97 ruido 113 – Reproducción de canciones en el – Visualización de la dirección BD reproductor de audio Bluetooth 98 (Bluetooth Device) 113 – Para detener la reproducción 98 – Selección de la pantalla de llamadas – Para poner en pausa una canción 98 entrantes 113 – Conexión automática a un reproductor Ajustes de audio 114 de audio Bluetooth 98 – Introducción a los ajustes de – Visualización de la dirección BD audio 114 (Bluetooth Device) 98 – Uso del ajuste del balance 115 Teléfono Bluetooth 99 – Uso del ecualizador 115 – Funciones básicas 99 – Ajuste de la sonoridad 116 – Información sobre la fuente – Uso de la salida de subgraves 117 telefónica 100 – Intensificación de los graves 117 – Configuración de la función manos – Uso del filtro de paso alto 118 libres 100 – Ajuste de los niveles de la fuente 118 – Realización de una llamada – Uso del nivelador automático de telefónica 101 sonido 118 – Aceptación de una llamada Ajustes iniciales 119 telefónica 101 – Configuración de los ajustes – Introducción a las funciones iniciales 119 avanzadas 102 – Selección del idioma de – Conexión de un teléfono móvil 103 visualización 120 – Desconexión de un teléfono móvil 104 – Ajuste de la fecha 120 – Registro del teléfono móvil – Ajuste del reloj 120 conectado 104 – Activación y desactivación de la – Eliminación de un teléfono visualización del reloj de apagado 121 registrado 105 – Ajuste del paso de sintonía de FM 121 – Conexión a un teléfono móvil – Cambio de la búsqueda PI registrado 105 automática 121 – Uso del Directorio de teléfonos 106 – Cambio del tono de advertencia 121 – Uso del Historial de llamadas 110 – Cambio de la apertura automática de la – Asignación de números cara 121 prefijados 111 – Cambio del ajuste de un equipo – Realización de una llamada ingresando auxiliar 122 el número de teléfono 111 70 Es
  • 71.
    Contenido Español – Cambio del ajuste del atenuador de – Introducción a las funciones luz 122 avanzadas 130 – Ajuste del brillo 122 – Uso de listas de reproducción ITS 132 – Ajuste de la salida posterior y del – Uso de las funciones de títulos de controlador de subgraves 122 discos 133 – Cambio del silenciamiento/atenuación – Uso de las funciones CD TEXT 134 del sonido 123 Reproductor de DVD 134 – Cambio de la demostración de – Funciones básicas 134 características 123 – Selección de un disco 135 – Cambio del modo inverso 123 – Selección de una carpeta 135 – Cambio del desplazamiento – Introducción a las funciones continuo 123 avanzadas 135 – Activación de la fuente BT Audio 124 Sintonizador de TV 137 – Ingreso del código PIN para la – Funciones básicas 137 conexión inalámbrica Bluetooth 124 – Almacenamiento y recuperación de – Edición del nombre del emisoras 137 dispositivo 124 – Almacenamiento consecutivo de las – Visualización de la versión del sistema emisoras con las señales más para tareas de reparación 125 fuertes 138 – Reajuste del módulo de tecnología Información adicional inalámbrica Bluetooth 125 Solución de problemas 139 Otras funciones 126 – Uso de la fuente AUX 126 Para comprender los mensajes de error 139 – Uso de diferentes visualizaciones de Pautas para el manejo de discos y del entretenimiento 126 reproductor 140 Discos dobles 140 – Uso del botón PGM 127 Archivos de audio comprimidos 140 Accesorios disponibles – Ejemplo de una jerarquía 141 Adaptador USB 128 – Compatibilidad con audio – Funciones básicas 128 comprimido 141 – Selección directa de un fichero de Acerca del manejo del iPod 142 audio en la carpeta actual 128 – Acerca de los ajustes del iPod 142 – Introducción a las funciones Especificaciones 143 avanzadas 128 – Visualización de información de texto de un fichero de audio 129 – Selección de ficheros de la lista de nombres de ficheros 129 Reproductor de CD múltiple 130 – Funciones básicas 130 – Selección directa de una pista 130 Es 71
  • 72.
    Sección 01 Antes de comenzar descarga eléctrica. Además, el contacto con líquidos puede causar daños en la unidad, humo y recalentamiento. ! “PRODUCTO LÁSER DE CLASE 1” Este producto contiene un diodo de láser de Si desea deshacerse de este producto, no lo clase superior a 1. Para garantizar la seguri- mezcle con los residuos generales de su dad continua, no extraiga ninguna tapa ni in- hogar. De conformidad con la legislación vi- tente acceder a la parte interna del producto. gente, existe un sistema de recogida distinto Solicite a personal calificado que realice el para los productos electrónicos que requieren servicio técnico. un procedimiento adecuado de tratamiento, ! El CarStereo-Pass Pioneer es para usarse sólo recuperación y reciclado. en Alemania. ! Conserve este manual a mano para que Las viviendas privadas en los 25 estados pueda consultar los procedimientos de opera- miembros de la UE, en Suiza y Noruega pue- ción y las precauciones cuando sea necesa- den devolver gratuitamente sus productos rio. electrónicos usados en las instalaciones de re- ! Mantenga siempre el volumen lo suficiente- colección previstas o bien en las instalaciones mente bajo como para que pueda escuchar de minoristas (si adquieren un producto simi- los sonidos que provienen del exterior del ve- lar nuevo). hículo. En el caso de los países que no se han men- ! Proteja esta unidad de la humedad. cionado en el párrafo anterior, póngase en ! Si se desconecta o se descarga la batería, la contacto con sus autoridades locales a fin de memoria preajustada se borrará y deberá ser conocer el método de eliminación correcto. reprogramada. Al actuar siguiendo estas instrucciones, se asegurará de que el producto de desecho se Acerca de WMA somete a los procesos de tratamiento, recupe- ración y reciclaje necesarios, con lo que se previenen los efectos negativos potenciales para el entorno y la salud humana. El logo de Windows Media™ impreso en la Acerca de esta unidad caja indica que esta unidad puede reproducir Las frecuencias del sintonizador de esta uni- datos WMA. dad están asignadas para su uso en Europa WMA es la abreviatura de Windows Media Occidental, Asia, Medio Oriente, África y Audio, y se refiere a la tecnología de compre- Oceanía. El uso en otras áreas puede causar sión de audio desarrollada por Microsoft una recepción deficiente. La función RDS (sis- Corporation. Los datos WMA se pueden cifrar tema de datos de radio) opera sólo en áreas con la versión 7 o posterior del Windows con emisoras de FM que trasmiten señales de Media Player. RDS. Windows Media y el logo de Windows son marcas comerciales o registradas de Microsoft Corporation en los EE.UU. y/o en PRECAUCIÓN otros países. ! No permita que esta unidad entre en contacto con líquidos, ya que ello puede producir una 72 Es
  • 73.
    Sección Antesde comenzar 01 ! Esta unidad puede no funcionar correcta- rrollada para sustituir los cables de los teléfo- mente, dependiendo de la aplicación utili- nos móviles, ordenadores de bolsillo y otros zada para codificar ficheros WMA. dispositivos. Bluetooth opera a una frecuencia de 2,4 GHz y permite transmitir voz y datos a Acerca de MP3 velocidades de hasta 1 megabit por segundo. La venta de este producto sólo otorga una li- Bluetooth fue lanzado por parte de un Grupo cencia para su uso privado, no comercial. No de Interés Especial (SIG) integrado por Erics- Español otorga ninguna licencia ni concede ningún son Inc., Intel Corp., Nokia Corp., Toshiba e derecho a utilizar este producto en transmisio- IBM en 1998 y en la actualidad está siendo de- nes comerciales (es decir, lucrativas) en tiem- sarrollado por alrededor de 2 000 compañías a po real (terrestres, vía satélite, por cable y/o nivel mundial. por cualquier otro medio), transmisiones/ ! La marca literal y los logotipos Bluetooth streaming por Internet, intranets y/u otras son propiedad de Bluetooth SIG, Inc., y redes o en otros sistemas de distribución de cualquier uso de dichas marcas por contenido electrónico, como por ejemplo, apli- Pioneer Corporation se hace bajo licencia. caciones de pago por escucha (pay-audio) o Otras marcas y nombres comerciales son audio bajo demanda (audio-on-demand). Se propiedad de sus respectivos propietarios. necesita una licencia independiente para su uso comercial. Para obtener más información, Compatibilidad con iPod® visite Esta unidad permite el control y la escucha de http://www.mp3licensing.com. canciones en un iPod. ! iPod es una marca comercial de Apple Acerca de AAC Computer, Inc., registrada en los EE.UU. y AAC es la abreviatura de Advanced Audio Co- otros países. ding y alude a una norma de tecnología de ! Esta unidad soporta sólo un iPod con co- compresión de audio usada con MPEG 2 y nector del Dock. MPEG 4. ! Esta unidad no es compatible con versio- Es posible usar varias aplicaciones para codifi- nes de software anteriores a la actualiza- car ficheros AAC, pero los formatos y extensio- ción de iPod 2004-10-20. Para obtener nes de los ficheros varían según la aplicación información sobre versiones compatibles, utilizada para la codificación. consulte al concesionario Pioneer más pró- Esta unidad reproduce ficheros AAC codifica- ximo a su domicilio. dos con iTunes® versión 6.0.5 y anteriores. ! Las funciones pueden variar según la ver- iTunes es una marca comercial de Apple sión de software del iPod. Computer, Inc., registrada en los EE.UU. y otros países. Acerca de Bluetooth Ambiente de funcionamiento Esta unidad se debe usar dentro de las gamas de temperaturas que se indican a continua- ción. Gama de temperatura de funcionamiento: -10 °C a +60 °C (14 °F a 140 °F) Temperatura de prueba EN300328 ETC: -20 °C a +55 °C (-4 °F a 131 °F) Bluetooth es una tecnología inalámbrica de conectividad por radio de corto alcance, desa- Es 73
  • 74.
    Sección 01 Antes de comenzar Visite nuestro sitio Web ! Evite someter la carátula a impactos excesi- vos. Visítenos en el siguiente sitio: ! Mantenga la carátula fuera del alcance de la luz solar directa y no la exponga a altas tem- peraturas. ! Unos segundos después de conectar o desco- nectar la llave de encendido del automóvil, la carátula se mueve automáticamente. Cuando ! Registre su producto. Conservaremos los esto sucede, corre el riesgo de pillarse los datos de su compra archivados para que dedos. Para evitarlo, mantenga las manos ale- pueda consultar esta información en caso jadas de la carátula. de que deba efectuar un reclamo a la com- pañía de seguros por pérdida o robo. ! En nuestro sitio Web ofrecemos la informa- Extracción de la carátula ción más reciente acerca de Pioneer 1 Mantenga presionado OPEN para abrir Corporation. la carátula. En caso de problemas En caso de que este producto no funcione co- rrectamente, comuníquese con su concesio- nario o el Servicio técnico oficial Pioneer más próximo a su domicilio. 2 Deslice la carátula hacia usted y retíre- la. No sujete la carátula con fuerza ni permita Protección del producto que caiga. Evite que entre en contacto con contra robo agua u otros líquidos para que no sufra daños permanentes. Se puede extraer la carátula como medida antirrobo. ! Si no se extrae la carátula de la unidad principal dentro de los cinco segundos des- pués de desconectar la llave de encendido del automóvil, se emitirá un tono de adver- tencia y se abrirá la carátula. ! Se puede desactivar el tono de advertencia. Consulte Cambio del tono de advertencia en 3 Coloque la carátula en la carcasa pro- la página 121. tectora provista para guardarla de manera ! Se puede desactivar la apertura automática segura. de la cara. Consulte Cambio de la apertura automática de la cara en la página 121. Colocación de la carátula Importante 1 Asegúrese de que la cubierta interna esté cerrada. ! Proceda con cuidado al retirar o colocar la ca- rátula. 74 Es
  • 75.
    Sección Antesde comenzar 01 2 Vuelva a colocar la carátula; para ello, del automóvil. En caso contrario, se puede des- hágala encajar en su lugar. cargar la batería del vehículo. Modo inverso Si no se realiza ninguna operación en unos 30 segundos, las indicaciones de la pantalla co- mienzan a invertirse y siguen haciéndolo cada Español 10 segundos. Al presionar el botón BAND cuando se apaga la unidad mientras la llave de encendido está en ACC u ON, se cancelará el modo inverso. Vuelva a presionar BAND para iniciar el modo inverso. Reinicialización del Modo de demostración de microprocesador características La demostración de características se inicia Se debe reinicializar el microprocesador si se automáticamente cuando se apaga la unidad presentan las siguientes condiciones: mientras la llave de encendido está en ACC u ! Antes de utilizar esta unidad por primera ON. Al presionar el botón DISPLAY durante la vez después de su instalación demostración de características, se cancelará ! Si la unidad no funciona correctamente este modo de demostración. Vuelva a presio- ! Cuando aparecen mensajes extraños o in- nar el botón DISPLAY para iniciar el modo de correctos en el display demostración de características. Recuerde % Pulse RESET con la punta de un lapicero que si este modo de demostración sigue fun- u otro instrumento con punta. cionando cuando el motor del vehículo está apagado, se puede descargar la batería. Uso y cuidado del mando a distancia Instalación de la batería Deslice y extraiga la bandeja de la parte poste- Botón RESET rior del mando a distancia y coloque la batería con los polos positivo (+) y negativo (–) en la dirección correcta. ! Al utilizar el mando a distancia por primera Acerca del modo demo vez, extraiga la película que sobresale de la Esta unidad ofrece dos modos de demostra- bandeja. ción. Uno es el modo inverso y el otro es la ca- racterística de modo demo. Importante El cable rojo (ACC) de esta unidad se debe co- nectar al terminal acoplado con las funciones de activación/desactivación de la llave de encendido Es 75
  • 76.
    Sección 01 Antes de comenzar ADVERTENCIA Mantenga la batería fuera del alcance de los niños. En caso de ingestión accidental, consulte a un médico de inmediato. PRECAUCIÓN ! Utilice una sola batería de litio CR2025 (3 V). ! Extraiga la batería si no piensa utilizar el mando a distancia durante un mes o más tiempo. ! Peligro de explosión si la batería se reemplaza incorrectamente. Reemplácela sólo con una del mismo tipo, o equivalente. ! No manipule la batería con herramientas me- tálicas. ! No guarde la batería con materiales metáli- cos. ! En el caso de que se produzca una fuga del fluido de la batería, limpie completamente el mando a distancia e instale una batería nueva. ! Para deshacerse de las baterías usadas, cum- pla con los reglamentos gubernamentales o las normas de las instituciones públicas am- bientales pertinentes, aplicables en su país/ zona. Uso del mando a distancia Apunte el mando a distancia hacia la carátula para hacer funcionar la unidad. ! Es posible que el mando a distancia no funcione correctamente si lo expone a la luz solar directa. Importante ! No guarde el mando a distancia en lugares ex- puestos a altas temperaturas o a la luz solar directa. ! No deje caer el mando a distancia al suelo, ya que puede quedar atascado debajo del freno o del acelerador. 76 Es
  • 77.
    Sección Utilizaciónde esta unidad 02 Español Qué es cada cosa botón para activar o desactivar la función NEWS. Unidad principal 6 Botón DISPLAY Presione este botón para seleccionar las di- 1 Botón SOURCE ferentes visualizaciones. Esta unidad se enciende al seleccionar una fuente. Presione este botón para visualizar 7 Botón EQ todas las fuentes disponibles. Presione este botón para seleccionar las di- versas curvas de ecualización. 2 MULTI-CONTROL Mueva el joystick para utilizar los controles 8 Botón ATT de sintonización por búsqueda manual, Presione este botón para bajar rápidamente avance rápido, retroceso y búsqueda de el nivel de volumen, aproximadamente el pista. También se usa para controlar las fun- 90%. Presione una vez más para volver al ciones. nivel de volumen original. Gire el control para aumentar o disminuir el volumen. 9 Botón LIST Presione este botón para visualizar la lista 3 Botón EJECT de títulos de los discos, la de títulos de las Presione este botón para expulsar un CD pistas, la de carpetas o la de canales presin- del reproductor de CD incorporado. tonizados, según la fuente de que se trate. Mantenga presionado este botón para abrir o cerrar la carátula. a Botón PHONE Pulse este botón para seleccionar el teléfo- 4 Botón RESET no como la fuente. Al utilizar una fuente te- Pulse este botón para reinicializar el micro- lefónica, pulse este botón para terminar procesador. una llamada, rechazar una llamada entran- te o cancelar la realización de una llamada. 5 Botón TA/NEWS Presione este botón para activar o desacti- var la función TA. Mantenga pulsado este Es 77
  • 78.
    Sección 02 Utilización de esta unidad b Botón BAND nizador o para realizar la búsqueda por Pulse este botón para seleccionar entre tres número de disco en el reproductor de CD bandas FM y las bandas MW/LW, y para múltiple. cancelar el modo de control de funciones. i Botón OFF HOOK Pulse para comenzar a hablar en el teléfono Mando a distancia mientras utiliza una fuente telefónica. Las funciones se utilizan de la misma manera j Botón ON HOOK que al usar los botones de la unidad principal. Mientras utiliza la fuente telefónica, pulse c Botones VOLUME este botón para terminar una llamada o re- Presione este botón para aumentar o dismi- chazar una llamada entrante. nuir el volumen. k Botón PGM d Botón FUNCTION Presione este botón para utilizar las funcio- Presione este botón para seleccionar las nes preprogramadas de cada fuente. (Con- funciones. sulte Uso del botón PGM en la página 127.) e Joystick l Botón AUDIO Mueva el joystick para utilizar los controles Presione este botón para seleccionar los di- de sintonización por búsqueda manual, versos controles de calidad del sonido. avance rápido, retroceso y búsqueda de pista. También se usa para controlar las fun- ciones. Las funciones son idénticas a las de MULTI-CONTROL con la excepción del con- trol de volumen. Presione este botón para visualizar la lista de títulos de los discos, la de títulos de las pistas, la de carpetas o la de canales presin- tonizados, según la fuente de que se trate. f Botón DIRECT Presione este botón para seleccionar direc- tamente la pista deseada. Mientras utiliza la fuente telefónica, presio- ne este botón para ingresar directamente un número de teléfono. g Botón CLEAR Presiónelo para cancelar el número ingresa- do cuando se utilizan los botones 0 a 9. h Botones 0 a 9 Presiónelos para seleccionar directamente la pista, el ajuste de presintonías o el disco deseado. Los botones 1 a 6 se pueden utili- zar para el ajuste de presintonías del sinto- 78 Es
  • 79.
    Sección Utilizaciónde esta unidad 02 Funciones básicas Cambio del ajuste de un equipo auxiliar en la página 122). Encendido y apagado ! Por unidad externa se entiende un producto Encendido de la unidad Pioneer (como el que pueda estar disponible en el futuro) que, si bien es incompatible % Presione SOURCE para encender la uni- como fuente, permite que este sistema con- dad. trole funciones básicas. Dos unidades exter- Español nas se pueden controlar con este sistema. Apagado de la unidad Cuando se conectan dos unidades externas, la asignación a la unidad externa 1 o la uni- % Mantenga presionado SOURCE hasta dad externa 2 la fija automáticamente este sis- que se apague la unidad. tema. ! Si el cable azul/blanco de esta unidad está co- Selección de una fuente nectado al terminal de control del relé de la Puede seleccionar una fuente que desee escu- antena automática del vehículo, la antena se char. Para cambiar al reproductor de CD incor- extiende cuando se enciende el equipo. Para porado, cargue un disco en la unidad retraer la antena, apague la fuente. (consulte la página 86). % Presione SOURCE para seleccionar una Ajuste del volumen fuente. % Utilice MULTI-CONTROL para ajustar el Presione SOURCE repetidamente para cam- nivel de sonido. biar entre las siguientes fuentes: Sintonizador—Televisor—Reproductor de DVD/Reproductor de DVD múltiple—Re- productor de CD incorporado—Reproduc- tor de CD múltiple—iPod—USB—Unidad externa 1—Unidad externa 2—AUX1— AUX2—Audio BT—Teléfono BT Notas ! En los siguientes casos, la fuente sonora no cambiará: — Cuando no hay ninguna unidad correspon- diente a la fuente seleccionada conectada a esta unidad. — Cuando no hay disco o cargador en el re- productor. — Cuando AUX (entrada auxiliar) está desac- tivada (consulte la página 122). — Cuando la fuente BT Audio está desactiva- da (consulte Activación de la fuente BT Audio en la página 124). ! AUX1 está activada de forma predeterminada. Desactive AUX1 cuando no la utilice (consulte Es 79
  • 80.
    Sección 02 Utilización de esta unidad Sintonizador No RDS o MW/LW Funciones básicas Se puede activar y desactivar la función AF (búsqueda de frecuencias alternativas) de esta unidad. Se debe desactivar la función AF para la sintonización normal (consulte la página 82). RDS RDS (sistema de datos de radio) contiene in- formaciones inaudibles que ayudan a buscar 1 Indicador de banda emisoras de radio. 2 Indicador de estéreo (5) ! Es posible que no todas las emisoras sumi- Aparece cuando la frecuencia seleccionada nistren el servicio RDS. se está transmitiendo en estéreo. ! Las funciones RDS como AF y TA sólo se 3 Indicador LOC activan cuando la radio está sintonizada en Aparece cuando la sintonización por búsque- una emisora RDS. da local está activada. 4 Indicador del número de presintonía 5 Indicador de frecuencia 1 Presione SOURCE para seleccionar el sintonizador. 2 Presione BAND para seleccionar una banda. Presione BAND hasta que visualice la banda deseada: FM-1, FM-2, FM-3 para FM o MW/LW. 1 Indicador de banda 2 Indicador de estéreo (5) 3 Para utilizar la sintonización manual, Aparece cuando la frecuencia seleccionada pulse MULTI-CONTROL izquierda o dere- se está transmitiendo en estéreo. cha. 3 Indicador LOC Aparece cuando la sintonización por búsque- 4 Para utilizar la sintonización por bús- da local está activada. queda, mantenga presionado 4 Indicador del número de presintonía MULTI-CONTROL izquierda o derecha du- 5 Indicador TP ( ) rante aproximadamente un segundo y Aparece cuando una emisora TP está sintoni- luego suelte el control. zada. El sintonizador explorará las frecuencias hasta 6 Indicador de noticias ( ) que encuentre una emisora con señales de su- Aparece cuando se recibe el programa de no- ficiente intensidad como para asegurar una ticias definido. buena recepción. 7 Nombre del servicio de programa # Se puede cancelar la sintonización por bús- 8 Indicador de etiqueta PTY queda presionando MULTI-CONTROL izquierda o 9 Indicador TEXT derecha. Aparece cuando se recibe el radio texto. # Si mantiene presionado MULTI-CONTROL iz- quierda o derecha, podrá saltar las emisoras. La sintonización por búsqueda comienza inmediata- mente después de que suelte MULTI-CONTROL. 80 Es
  • 81.
    Sección Utilizaciónde esta unidad 02 Nota Uso del mando a distancia Si se escucha la radio MW teniendo el iPod co- % Cuando encuentre la frecuencia que nectado a esta unidad, puede generarse ruido. desea almacenar en la memoria, presione En tal caso, desconecte el iPod de la unidad para uno de los botones de ajuste de presinto- que desaparezca el ruido. nías 1 a 6 y manténgalo presionado hasta que el número de presintonía deje de des- tellar. Español Almacenamiento y El número seleccionado destellará en el indi- recuperación de frecuencias cador del número de presintonía y quedará ilu- minado. La frecuencia de la emisora de radio Se pueden almacenar con facilidad hasta seis seleccionada se ha almacenado en la memo- frecuencias de emisoras para recuperarlas ria. posteriormente. La próxima vez que presione el mismo botón ! Se pueden almacenar en la memoria hasta de ajuste de presintonías, la memoria recupe- 18 emisoras FM, seis por cada una de las rará la frecuencia de la emisora. tres bandas FM, y seis emisoras MW/LW. # También se pueden recuperar las frecuencias 1 Cuando encuentre la frecuencia que de las emisoras de radio asignadas a los núme- desea almacenar en la memoria presione ros de ajuste de presintonías presionando LIST. MULTI-CONTROL hacia arriba o abajo durante la visualización de frecuencias. 2 Utilice MULTI-CONTROL para almacenar la frecuencia seleccionada en la memoria. Haga girar el control para cambiar el número Introducción a las funciones de presintonía, mantenga pulsado para alma- avanzadas cenarlo. El número de presintonía que ha seleccionado 1 Presione MULTI-CONTROL para visuali- parpadeará y permanecerá encendido. La fre- zar el menú principal. cuencia de la emisora de radio seleccionada FUNCTION, AUDIO y ENTERTAINMENT apa- se ha almacenado en la memoria. recen en el display. 3 Utilice MULTI-CONTROL para seleccio- 2 Utilice MULTI-CONTROL para seleccio- nar la emisora deseada. nar FUNCTION. Haga girar el control para cambiar la emisora Haga girar el control para cambiar la opción y pulse para seleccionarla. de menú y presiónelo para seleccionarla. # También puede cambiar la emisora pulsando Aparece el nombre de la función en el display. MULTI-CONTROL arriba o abajo. 3 Haga girar MULTI-CONTROL para selec- # Si no se utiliza la lista en unos 30 segundos, cionar la función. el display volverá automáticamente a la visualiza- Haga girar MULTI-CONTROL para cambiar ción normal. entre las funciones en el siguiente orden: BSM (memoria de las mejores emisoras)— Regional (regional)—Local (sintonización por búsqueda local)—PTY search (selección de tipo de programa)—Traffic Announce (espera por anuncio de tráfico)—Alternative FREQ (búsqueda de frecuencias alternativas)— News interrupt (interrupción por programa de noticias) Es 81
  • 82.
    Sección 02 Utilización de esta unidad # También se puede seleccionar la función pre- 1 Utilice MULTI-CONTROL para seleccio- sionando FUNCTION en el mando a distancia. nar Local en el menú de funciones. # Si se elige la banda MW/LW, sólo se puede se- leccionar BSM o Local. 2 Presione MULTI-CONTROL para activar # Para volver a la visualización de la frecuencia, la sintonización por búsqueda local. presione BAND. # Vuelva a presionar MULTI-CONTROL para de- # Si no se utilizan las funciones en unos 30 se- sactivar la sintonización por búsqueda local. gundos, el display volverá automáticamente a la 3 Presione MULTI-CONTROL izquierda o visualización normal. derecha para ajustar la sensibilidad. Hay cuatro niveles de sensibilidad para FM y dos niveles para MW/LW: Almacenamiento de las FM: Level 1—Level 2—Level 3—Level 4 frecuencias de radio más fuertes MW/LW: Level 1—Level 2 La función BSM (memoria de las mejores emi- El ajuste Level 4 sólo permite recibir las emi- soras) le permite almacenar automáticamente soras con las señales más fuertes, mientras seis frecuencias de las emisoras más fuertes que los ajustes más bajos permiten recibir de en los botones 1 a 6 en el mando a distancia. manera progresiva las emisoras con las seña- Una vez almacenadas, podrá sintonizar esas les más débiles. frecuencias presionando un solo botón. ! Al almacenar frecuencias con la función BSM, se pueden reemplazar las frecuen- Selección de frecuencias cias que se almacenaron con los botones 1 alternativas a 6 en el mando a distancia. Si el sintonizador no puede obtener una 1 Utilice MULTI-CONTROL para seleccio- buena recepción, la unidad busca automática- nar BSM en el menú de funciones. mente otra emisora de la misma red. 2 Presione MULTI-CONTROL para activar 1 Utilice MULTI-CONTROL para seleccio- la función BSM. nar Alternative FREQ en el menú de funcio- Las seis frecuencias de las emisoras más fuer- nes. tes se almacenarán en orden según la intensi- 2 Presione MULTI-CONTROL para activar dad de las señales. AF. # Para cancelar el proceso de almacenamiento, # Para desactivar la función AF, vuelva a presio- vuelva a pulsar MULTI-CONTROL. nar MULTI-CONTROL. 3 Utilice MULTI-CONTROL para seleccio- nar la emisora deseada. Notas Haga girar el control para cambiar la emisora ! Sólo se sintonizan las emisoras RDS durante y pulse para seleccionarla. la sintonización por búsqueda o BSM cuando # También puede cambiar la emisora pulsando la función AF está activada. MULTI-CONTROL arriba o abajo. ! Cuando se recupera una emisora presintoni- zada, el sintonizador puede actualizarla con una nueva frecuencia de la lista AF de emiso- Sintonización de señales fuertes ras. En el display no aparece ningún número La sintonización por búsqueda local le permite de presintonía si los datos RDS de la emisora sintonizar sólo las emisoras de radio con seña- recibida son distintos de los de la emisora al- les lo suficientemente fuertes como para ase- macenada originalmente. gurar una buena recepción. 82 Es
  • 83.
    Sección Utilizaciónde esta unidad 02 ! Otro programa puede interrumpir temporal- ! El número de presintonía puede desaparecer mente el sonido durante la búsqueda de una del display si se sintoniza una emisora regio- frecuencia AF. nal que es diferente de la emisora almacena- ! La función AF se puede activar y desactivar in- da originalmente. dependientemente para cada banda FM. ! La función regional se puede activar o desacti- var en forma independiente por cada banda Uso de la búsqueda PI FM. Español Si el sintonizador no puede encontrar una emisora adecuada o el estado de la recepción Recepción de anuncios de tráfico empeora, la unidad buscará automáticamente TA (espera por anuncio de tráfico) permite re- otra emisora con la misma programación. Du- cibir anuncios de tráfico automáticamente, al rante la búsqueda aparece PI seek y la salida margen de la fuente que se escuche. La fun- se silencia. ción TA se puede activar tanto para una emi- sora TP (una emisora que transmite Uso de la búsqueda PI automática información de tráfico) como para una emiso- para emisoras presintonizadas ra TP de otra red realzada (una emisora que Cuando no se pueden llamar las emisoras pre- brinda información que remite a emisoras TP). sintonizadas, como por ejemplo, al realizar via- 1 Sintonice una emisora TP o la emisora jes largos, se puede ajustar la unidad para TP de otra red realzada. realizar la búsqueda PI durante la llamada de Se iluminará el indicador TP ( ). las emisoras presintonizadas. ! El ajuste predefinido de la función de bús- 2 Presione TA/NEWS para activar la espe- queda PI automática es desactivado. Con- ra por anuncio de tráfico. sulte Cambio de la búsqueda PI automática # Para desactivar la espera por anuncio de tráfi- en la página 121. co, vuelva a presionar TA/NEWS. 3 Utilice MULTI-CONTROL para ajustar el Limitación de las emisoras para volumen de TA cuando comienza un anun- programación regional cio de tráfico. Cuando se usa la función AF, la función regio- El volumen recién ajustado se almacena en la nal limita la selección de las emisoras que memoria y se recupera para los siguientes transmiten programas regionales. anuncios de tráfico. 1 Utilice MULTI-CONTROL para seleccio- 4 Presione TA/NEWS mientras se está re- nar Regional en el menú de funciones. cibiendo el anuncio de tráfico para cance- larlo. 2 Presione MULTI-CONTROL para activar El sintonizador vuelve a la fuente original pero la función regional. sigue en el modo de espera hasta que se vuel- # Para desactivar la función regional, vuelva a va a presionar TA/NEWS. presionar MULTI-CONTROL. Notas Notas ! También se puede activar o desactivar la fun- ! La programación regional y las redes regiona- ción TA en el menú que aparece usando les se organizan de distinta manera según el MULTI-CONTROL. país (es decir, pueden cambiar de acuerdo ! El sistema cambia de nuevo a la fuente origi- con la hora, el estado o la provincia de que se nal después de la recepción del anuncio de trate, o el área de transmisión). tráfico. Es 83
  • 84.
    Sección 02 Utilización de esta unidad ! Sólo se sintonizan las emisoras TP y las emi- unidad puede cambiar de cualquier emisora a soras TP de otra red realzada durante la sinto- la emisora que transmite las noticias. Cuando nización por búsqueda o BSM cuando la finaliza el programa de noticias, se reanuda la función TA está activada. recepción del programa anterior. % Presione TA/NEWS y mantenga presio- Uso de las funciones PTY nado para activar la interrupción por pro- Se puede sintonizar una emisora usando la in- grama de noticias. formación PTY (tipo de programa). Presione TA/NEWS hasta que NEWS ON apa- rezca en el display. # Para desactivar la interrupción por programa Búsqueda de una emisora RDS por de noticias, presione TA/NEWS y mantenga pre- información PTY sionado hasta que NEWS OFF aparezca en el dis- Se pueden buscar tipos generales de progra- play. mas, tales como los que se indican en la pági- # Se puede cancelar un programa de noticias na siguiente. presionando TA/NEWS. 1 Utilice MULTI-CONTROL para seleccio- Nota nar PTY search en el menú de funciones. También se puede activar o desactivar un progra- 2 Presione MULTI-CONTROL izquierda o ma de noticias en el menú que aparece, usando derecha para seleccionar un tipo de progra- MULTI-CONTROL. ma. News&Inf—Popular—Classics—Others Recepción de transmisiones de 3 Presione MULTI-CONTROL para comen- alarma PTY zar la búsqueda. Cuando se emite el código PTY de emergen- La unidad busca una emisora que transmita cia, la unidad lo recibe automáticamente (apa- ese tipo de programa. Cuando encuentra la rece ALARM). Una vez finalizada la emisora, se visualiza el nombre del servicio de transmisión, el sistema vuelve a la fuente ante- programa. rior. En la página siguiente se indica la informa- ! Se puede cancelar un anuncio de emer- ción PTY (código de identificación de tipo de gencia, presionando TA/NEWS. programa). # Para cancelar la búsqueda, vuelva a presionar MULTI-CONTROL. Uso del radio texto # El programa de algunas emisoras puede ser Este sintonizador puede mostrar los datos de distinto del programa indicado por el PTY trans- radio texto transmitidos por emisoras RDS, mitido. como por ejemplo, información de la emisora, # Si ninguna emisora está transmitiendo el tipo el nombre de la canción que se está transmi- de programa buscado, se visualiza Not found tiendo y el nombre del artista. durante unos dos segundos, y el sintonizador ! El sintonizador memoriza automáticamen- vuelve a la emisora original. te las tres últimas transmisiones con radio texto recibidas, reemplazando el texto de la Uso de la interrupción por programa recepción menos reciente con el nuevo de noticias texto recibido. Cuando se transmite un programa de noticias de una emisora de noticias con código PTY, la 84 Es
  • 85.
    Sección Utilizaciónde esta unidad 02 Visualización de radio texto radio texto, el texto almacenado se recuperará Se puede visualizar el radio texto que se acaba de la memoria. de recibir y los tres radio textos más recientes. 1 Presione DISPLAY y mantenga presio- Lista PTY nado para visualizar el radio texto. Se visualiza el radio texto de la emisora que Generales Específico Tipo de programa Español está transmitiendo actualmente. News&Inf News Noticias # Se puede cancelar la visualización de radio Affairs Temas de actualidad texto presionando DISPLAY o BAND. # Cuando no se recibe radio texto, se visualiza Info Información general y consejos No text en el display. Sport Programas deportivos 2 Presione MULTI-CONTROL izquierda o Weather Informes del tiempo/infor- derecha para recuperar los tres radio textos mación meteorológica más recientes. Al presionar MULTI-CONTROL izquierda o de- Finance Informes del mercado de valores, comercio, tran- recha se cambia entre la visualización de sacciones, etc. radio texto actual y la visualización de los tres radio textos más recientes. Popular Pop Mus Música popular # Si no hay datos de radio texto en la memoria, Rock Mus Música moderna contem- la visualización no cambiará. poránea 3 Presione MULTI-CONTROL arriba o Easy Mus Música “fácil de escu- char” abajo para desplazarse por los datos. Presione MULTI-CONTROL arriba para ir al Oth Mus Música alternativa principio. Presione MULTI-CONTROL abajo Jazz Jazz para desplazar los datos de radio texto. Country Música country Nat Mus Música nacional Almacenamiento y recuperación de radio texto Oldies Música antigua y de la “Edad de Oro” Se pueden almacenar los datos de hasta seis transmisiones de radio texto con los botones 1 Folk mus Música folklórica a 6 en el mando a distancia. Classics L. Class Música clásica ligera 1 Visualice el radio texto que desea alma- Classic Música clásica cenar en la memoria. Consulte Visualización de radio texto en esta página. 2 Mantenga presionados cualquiera de los botones 1 a 6 en el mando a distancia para almacenar el radio texto seleccionado. Se visualizará el número de la memoria y el radio texto seleccionado se almacenará en la memoria. La próxima vez que presione el mismo botón en el mando a distancia en la visualización de Es 85
  • 86.
    Sección 02 Utilización de esta unidad Others Educate Programas educativos Reproductor de CD Drama Comedias y series radiofó- incorporado nicas Funciones básicas Culture Cultura nacional o regio- nal El reproductor de CD incorporado puede re- producir CD audio (CD-DA) y audio comprimi- Science Naturaleza, ciencia y tec- nología do (WMA/MP3/AAC/WAV) grabado en CD- ROM. (Consulte la página 140 para los fiche- Varied Entretenimiento ligero ros que se pueden reproducir.) Children Programas para niños Lea las precauciones relativas a los discos y al Social Temas sociales reproductor en la página 140. Religion Programas o servicios de asuntos religiosos Phone In Entrada por teléfono Touring Programas de viaje; no para anuncios de tráfico Leisure Pasatiempos favoritos y actividades recreativas Document Programas documentales 1 Indicador WMA/MP3/AAC/WAV Muestra el tipo de fichero de audio que se está reproduciendo actualmente cuando el audio comprimido se está reproduciendo. 2 Indicador del número de carpeta Muestra el número de fichero que se está re- produciendo actualmente cuando el audio comprimido se está reproduciendo. 3 Indicador de número de pista 4 Indicador de tiempo de reproducción 5 Indicador de frecuencia de muestreo/veloci- dad de grabación Muestra la frecuencia de muestreo o veloci- dad de grabación de la pista (fichero) actual cuando el audio comprimido se está reprodu- ciendo. ! Al reproducir ficheros WMA grabados como VBR (velocidad de grabación va- riable), se visualizará el valor promedio de la velocidad de grabación. ! Al reproducir ficheros MP3 grabados con VBR (velocidad de grabación varia- ble), se visualizará VBR en lugar del valor de velocidad de grabación. 1 Presione OPEN para abrir la carátula. Aparece la ranura de carga de discos. 86 Es
  • 87.
    Sección Utilizaciónde esta unidad 02 Ranura de carga de discos Notas ! A veces se produce una demora entre el co- mienzo de la reproducción de un disco y la emisión del sonido. Durante la lectura inicial, se visualiza Format read. ! Si aparece un mensaje de error como ERROR-11, consulte Para comprender los men- Español sajes de error en la página 139. ! Al reproducir CD-EXTRA o CD DE MODO 2 Introduzca un CD (CD-ROM) por la ranu- MIXTO, se puede cambiar entre audio compri- ra de carga de discos. mido y CD-DA presionando BAND. La carátula se cierra automáticamente y co- ! Si se cambia entre audio comprimido y CD- mienza la reproducción. DA, la reproducción comienza en la primera # Asegúrese de que el lado de la etiqueta pista del disco. del disco esté hacia arriba. ! Al reproducir ficheros grabados con VBR (ve- # Después de colocar un CD (CD-ROM), presio- locidad de grabación variable), puede que no ne SOURCE para seleccionar el reproductor de se muestre correctamente el tiempo de repro- CD incorporado. ducción transcurrido. # Se puede expulsar un CD (CD-ROM) presio- ! Al reproducir audio comprimido, no hay soni- nando EJECT. do en el avance rápido o en el retroceso. ! Cuando se coloca un disco CD TEXT, los títu- 3 Presione MULTI-CONTROL arriba o los del disco y de las pistas comienzan a des- abajo para seleccionar una carpeta cuando plazarse automáticamente por el display. Si se se está reproduciendo un audio comprimi- activa la función de desplazamiento continuo do. en el ajuste inicial, estos títulos se desplazan # No se puede seleccionar una carpeta que no continuamente. Para obtener información tenga un fichero de audio comprimido grabado sobre el desplazamiento continuo, consulte en ella. Cambio del desplazamiento continuo en la pá- # Para volver a la carpeta 01 (RAÍZ), mantenga gina 123. presionado BAND. Sin embargo, si la carpeta 01 ! Los discos se reproducen por orden del núme- (RAÍZ) no contiene ficheros, la reproducción co- ro de fichero. Se saltan las carpetas que no menzará en la carpeta 02. tienen ficheros. (Si la carpeta 01 (RAÍZ) no 4 Para realizar el avance rápido o retroce- contiene ficheros, la reproducción comienza so, mantenga pulsado MULTI-CONTROL iz- en la carpeta 02.) quierda o derecha. ! Si no se puede introducir un disco por com- # Si selecciona Rough search, al mantener pre- pleto o si después de hacerlo, el disco no se sionado MULTI-CONTROL izquierda o derecha reproduce, compruebe que el lado de la eti- podrá buscar una pista cada 10 pistas en la car- queta del disco esté hacia arriba. Presione peta actual (fichero). (Consulte Búsqueda cada 10 EJECT para expulsar el disco y verifique si pre- pistas en el disco o carpeta actuales en la página senta daños antes de volver a introducirlo. 90.) ! Cuando la función de carga o expulsión de disco no funciona adecuadamente, puede ex- 5 Para saltar y retroceder o avanzar hasta pulsar el disco manteniendo presionado otra pista, presione MULTI-CONTROL iz- EJECT mientras abre la carátula. quierda o derecha. Es 87
  • 88.
    Sección 02 Utilización de esta unidad ! Dependiendo de los conjuntos de caracteres 3 Haga girar MULTI-CONTROL para selec- presentes en el disco, los textos en ruso pue- cionar la función. den aparecer no reconocibles. Para ver infor- Haga girar MULTI-CONTROL para cambiar mación sobre los conjuntos de caracteres entre las funciones en el siguiente orden: permitidos para textos en ruso, consulte Archi- Play mode (repetición de reproducción)— vos de audio comprimidos en la página 140. Random mode (reproducción aleatoria)— Scan mode (reproducción con exploración)— Pause (pausa)—Compression (compresión y Selección directa de una pista BMX)— Search mode (método de búsqueda) Al utilizar el mando a distancia, se puede se- —TitleInput "A" (ingreso de títulos de discos) leccionar directamente una pista ingresando # También se puede seleccionar la función pre- el número de la pista deseada. sionando FUNCTION en el mando a distancia. ! Cuando se reproducen ficheros de audio, # Cuando reproduzca un disco CD TEXT, no se puede seleccionar pistas en la carpeta ac- puede cambiar a la visualización de ingreso de tí- tual. tulos de discos. El título del disco estará ya graba- do en un disco CD TEXT. 1 Presione DIRECT. # Cuando reproduzca un disco de audio compri- Se visualiza en el display el área para ingresar mido, no se puede cambiar a la visualización de el número de pista. ingreso de títulos de discos. 2 Presione los botones 0 a 9 para ingresar # Para volver a la visualización normal, presione el numero de pista deseada. BAND. # Se puede cancelar el número ingresado pre- # Si no se utilizan las funciones exceptuando sionando CLEAR. TitleInput "A" en unos 30 segundos, el display volverá automáticamente a la visualización nor- 3 Presione DIRECT. mal. Se reproducirá la pista seleccionada. # Después de acceder al modo de ingreso de números, si no realiza una operación en unos Selección de una gama de ocho segundos, el modo se cancelará automáti- repetición de reproducción camente. Con la repetición de reproducción se reprodu- ce la misma pista/carpeta dentro de la gama Introducción a las funciones de repetición de reproducción seleccionada. Además, la gama de repetición determina la avanzadas gama de reproducción aleatoria y de repro- 1 Presione MULTI-CONTROL para visuali- ducción con exploración. zar el menú principal. FUNCTION, AUDIO y ENTERTAINMENT apa- 1 Utilice MULTI-CONTROL para seleccio- recen en el display. nar Play mode en el menú de funciones. 2 Utilice MULTI-CONTROL para seleccio- 2 Pulse MULTI-CONTROL para seleccionar nar FUNCTION. la gama de repetición. ! Disc repeat – Repite todas las pistas Haga girar el control para cambiar la opción ! Track repeat – Sólo repite la pista actual de menú y presiónelo para seleccionarla. ! Folder repeat – Repite la carpeta actual Aparece el nombre de la función en el display. # Si selecciona otra carpeta durante la repeti- ción de reproducción, la gama de repetición cam- bia a repetición de disco. 88 Es
  • 89.
    Sección Utilizaciónde esta unidad 02 # Al reproducir un CD, realizar una búsqueda 3 Cuando encuentre la pista deseada, de pista o el avance rápido/retroceso, se cancela presione MULTI-CONTROL para desactivar automáticamente la repetición de reproducción. la reproducción con exploración. # Al reproducir audio comprimido, si se realiza # Si el display vuelve automáticamente a la vi- una búsqueda de pista o el avance rápido/retro- sualización de reproducción, seleccione ceso durante Track repeat (repetición de pista), Scan mode de nuevo usando MULTI-CONTROL. se cambia la gama de repetición de reproducción # Una vez finalizada la exploración de un disco Español a repetición de carpeta. (carpeta), volverá a comenzar la reproducción # Cuando se selecciona Folder repeat (repeti- normal de las pistas. ción de carpeta), no se puede reproducir una subcarpeta de esa carpeta. Pausa de la reproducción de un disco Reproducción de las pistas en 1 Utilice MULTI-CONTROL para seleccio- orden aleatorio nar Pause en el menú de funciones. Con la reproducción aleatoria se reproducen las pistas en un orden aleatorio dentro de la 2 Presione MULTI-CONTROL para activar gama de repetición seleccionada. la pausa. Consulte Selección de una gama de repetición Se detiene temporalmente la reproducción de de reproducción en la página anterior. la pista actual. # Para desactivar la pausa, vuelva a presionar 1 Utilice MULTI-CONTROL para seleccio- MULTI-CONTROL. nar Random mode en el menú de funcio- nes. Uso de la compresión y BMX 2 Presione MULTI-CONTROL para activar El uso de las funciones COMP (compresión) y la reproducción aleatoria. BMX le permiten ajustar la calidad de repro- Las pistas se reproducirán en un orden aleato- ducción de sonido de este reproductor. rio. # Vuelva a presionar MULTI-CONTROL para de- 1 Utilice MULTI-CONTROL para seleccio- sactivar la reproducción aleatoria. nar Compression en el menú de funciones. 2 Presione MULTI-CONTROL para seleccio- Exploración de carpetas y pistas nar su ajuste favorito. La reproducción con exploración busca la COMP/BMX OFF—COMP 1—COMP 2— canción dentro de la gama de repetición se- COMP/BMX OFF—BMX 1—BMX 2 leccionada. Consulte Selección de una gama de repetición de reproducción en la página anterior. 1 Utilice MULTI-CONTROL para seleccio- nar Scan mode en el menú de funciones. 2 Presione MULTI-CONTROL para activar la reproducción con exploración. Se reproducirán los primeros 10 segundos de cada pista. Es 89
  • 90.
    Sección 02 Utilización de esta unidad Búsqueda cada 10 pistas en el 3 Presione DISPLAY para seleccionar el disco o carpeta actuales tipo de carácter deseado. Presione DISPLAY repetidamente para cam- Se puede cambiar el método de búsqueda biar entre los siguientes tipos de caracteres: entre las opciones de avance rápido/retroceso Alfabeto (mayúsculas), números y símbolos— y búsqueda cada 10 pistas. Seleccionar Alfabeto (minúsculas)—letras de idiomas eu- Rough search le permite realizar la búsqueda ropeos, tales como aquéllas con acentos (p. cada 10 pistas. ej., á, à, ä, ç)—Números y símbolos 1 Utilice MULTI-CONTROL para seleccio- 4 Presione MULTI-CONTROL arriba o nar Search mode en el menú de funciones. abajo para seleccionar una letra del alfabe- 2 Presione MULTI-CONTROL para seleccio- to. nar Rough search. 5 Presione MULTI-CONTROL izquierda o ! FF/REV – Avance rápido y retroceso derecha para mover el cursor a la anterior ! Rough search – Búsqueda cada 10 pistas o siguiente posición de carácter. # Para seleccionar FF/REV, vuelva a presionar MULTI-CONTROL. 6 Mueva el cursor a la última posición pulsando MULTI-CONTROL derecha des- 3 Presione BAND para volver a la visuali- pués de ingresar el título. zación de reproducción. Al pulsar MULTI-CONTROL derecha una vez 4 Mantenga presionado MULTI-CONTROL más, el título ingresado se almacena en la me- izquierda o derecha para buscar una pista moria. cada 10 pistas en un disco (carpeta). 7 Presione BAND para volver a la visuali- # Si el número de pistas restantes es inferior a zación de reproducción. 10, mantenga presionado MULTI-CONTROL para recuperar la primera (última) pista. Notas ! Los títulos se conservan en la memoria, aun Uso de las funciones de títulos después de extraer el disco de la unidad, y se de discos recuperan cuando se vuelve a colocar el disco Es posible ingresar títulos de CD y visualizar el correspondiente. título. La próxima vez que se coloque un CD ! Una vez que los datos para 48 discos han sido cuyo título se haya ingresado, se visualizará el almacenados en la memoria, los datos para título de ese CD. un nuevo disco se sobreponen a los datos más antiguos. ! Si conecta un reproductor de CD múltiple, Ingreso de títulos de discos podrá ingresar los títulos de hasta 100 discos. Utilice la función de ingreso de títulos de dis- ! Cuando se conecta un reproductor de CD cos para almacenar hasta 48 títulos de CD en múltiple que no es compatible con las funcio- la unidad. Cada título puede tener una longi- nes de título de disco, no es posible ingresar tud de hasta 10 caracteres. los títulos en esta unidad. 1 Reproduzca el CD cuyo título desea in- gresar. 2 Utilice MULTI-CONTROL para seleccio- nar TitleInput "A" en el menú de funciones. 90 Es
  • 91.
    Sección Utilizaciónde esta unidad 02 Visualización de información ! La frecuencia de muestreo que se visualiza en de texto en el disco el display puede estar abreviada. ! Si se activa la función de desplazamiento con- % Presione DISPLAY para seleccionar el tinuo en el ajuste inicial, la información de texto de información deseado. texto se desplazará de manera ininterrumpida Para CD con título ingresado por el display. Consulte Cambio del desplaza- Tiempo de reproducción— : título del disco y miento continuo en la página 123. Español tiempo de reproducción Para discos CD TEXT Tiempo de reproducción— : nombre de ar- Selección de pistas de la lista tista del disco y : título de la pista— : de títulos de las pistas nombre de artista del disco y : título del Esta función le permite ver la lista de los títu- disco— : título del disco y : título de la los de las pistas en un disco CD TEXT y selec- pista— : nombre de artista de la pista : tí- cionar uno de ellos para su reproducción. tulo de la pista— : título de la pista y tiempo de reproducción 1 Pulse LIST para cambiar al modo de Para discos WMA/MP3/AAC lista de títulos de las pistas. Tiempo de reproducción— : nombre de car- peta y : nombre de fichero— : nombre de 2 Utilice MULTI-CONTROL para seleccio- artista y : título de la pista— : nombre de nar el título de la pista deseada. artista y : título del álbum— : título del Haga girar el control para cambiar el título de álbum y : título de la pista— : título de la la pista y pulse para seleccionarlo. pista y tiempo de reproducción— : comenta- # También puede cambiar el título de la pista rio y tiempo de reproducción pulsando MULTI-CONTROL arriba o abajo. Para discos WAV # Si no se utiliza la lista en unos 30 segundos, Tiempo de reproducción— : nombre de car- el display volverá automáticamente a la visualiza- peta y : nombre del fichero ción normal. Notas Selección de pistas de la lista ! Puede desplazarse hacia la izquierda del título de nombres de ficheros manteniendo presionado DISPLAY. Esta función le permite ver la lista de los nom- ! Un CD de audio que contiene determinada in- bres de los ficheros (o de las carpetas) y selec- formación como texto y/o números es un CD cionar uno de ellos para su reproducción. TEXT. ! Si determinada información no se grabó en 1 Presione LIST para cambiar al modo de un disco, no se visualizará el título o el nom- lista de nombres de ficheros. bre. Los nombres de los ficheros y las carpetas ! Según sea la versión de iTunes® utilizada para aparecen en el display. grabar ficheros MP3 en un disco, es posible que no se visualice correctamente la informa- 2 Utilice MULTI-CONTROL para seleccio- ción de comentarios. nar el nombre del fichero deseado (o de la ! Según la versión del Windows Media Player carpeta deseada). utilizada para codificar los ficheros WMA, es Haga girar el control para cambiar el nombre posible que no se visualicen correctamente del fichero o de la carpeta; presione para re- los nombres de álbumes y demás información producirlo; presione el control a la derecha de texto. para ver una lista de los ficheros (o de las car- petas) en la carpeta seleccionada. Es 91
  • 92.
    Sección 02 Utilización de esta unidad # También puede cambiar el nombre del fichero Para reproducir canciones o de la carpeta, presionando MULTI-CONTROL arriba o abajo. en el iPod # Para volver a la lista anterior (la carpeta de un Funciones básicas nivel superior), pulse MULTI-CONTROL hacia la Se puede usar esta unidad para controlar un izquierda. iPod mediante un cable (p. ej., CD-I200), que se # Si el número de carpeta o fichero es superior vende por separado. a 100, se visualizarán los últimos 2 dígitos de dicho número. # El número de las carpetas o ficheros presen- tes en la carpeta seleccionada actualmente apa- recerá en el lado derecho del display. # Si selecciona una carpeta que no contenga carpetas o ficheros, aparece NO FILES. # Si no se utiliza la lista en unos 30 segundos, el display volverá automáticamente a la visualiza- ción normal. 1 Indicador del número de canción 2 Indicador de tiempo de reproducción 3 Tiempo de canción (barra de progreso) 1 Conecte el iPod a esta unidad. La reproducción comenzará automáticamen- te. Mientras el iPod está conectado a esta unidad, aparece en él PIONEER (o (marca de verifi- cación)). # Antes de conectar el conector del Dock de esta unidad al iPod, desconecte los auriculares del iPod. # Una vez haya conectado el iPod a esta unidad, presione SOURCE para seleccionar el iPod. # Al extraer el iPod de esta unidad, ésta se apaga. 2 Cuando reproduzca audiolibros o pod- cast (con capítulos) en el iPod, si presiona MULTI-CONTROL arriba o abajo selecciona- rá un capítulo. 3 Para realizar el avance rápido o retroce- so, mantenga pulsado MULTI-CONTROL iz- quierda o derecha. 4 Para saltar y retroceder o avanzar hasta otra canción, pulse MULTI-CONTROL iz- quierda o derecha. 92 Es
  • 93.
    Sección Utilizaciónde esta unidad 02 Notas # Puede comenzar la reproducción por la cate- goría seleccionada manteniendo presionado ! Lea las precauciones relativas al iPod en la pá- MULTI-CONTROL o manteniendo presionado gina 142. MULTI-CONTROL a la derecha. ! Si aparece un mensaje de error como # También puede cambiar de categoría pulsan- ERROR-11, consulte Para comprender los men- do MULTI-CONTROL arriba o abajo. sajes de error en la página 139. # También puede seleccionar la categoría pul- ! Conecte directamente el conector del Dock de Español sando MULTI-CONTROL derecha. esta unidad al iPod para que esta unidad fun- # Para volver a la lista anterior, pulse cione adecuadamente. MULTI-CONTROL izquierda. ! Cuando la llave de encendido está fijada en # Para ir al menú superior de la búsqueda de lis- ACC u ON, la batería del iPod se carga mien- tas, mantenga pulsado MULTI-CONTROL izquier- tras esté conectado a esta unidad. da. ! Cuando el iPod está conectado a esta unidad, # Podcasts y Audiobooks aparecen cuando el no se puede encender ni apagar. iPod conectado es compatible con las categorías. ! El iPod conectado a esta unidad se apaga # Si no se utiliza la lista en unos 30 segundos, aproximadamente dos minutos después de la búsqueda de listas se cancelará automática- que la llave de encendido se fije en OFF. mente. 3 Repita el paso 2 para encontrar una Para buscar una canción canción que desee escuchar. El manejo de esta unidad para controlar el iPod está diseñado para imitar del modo más fidedigno posible el manejo del iPod, para faci- Visualización de información litar su uso y la búsqueda de canciones. de texto en el iPod ! Si se ha seleccionado una lista de repro- % Presione DISPLAY para seleccionar el ducción, esta unidad muestra primero la texto de información deseado. lista de reproducción del nombre del iPod. Tiempo de reproducción— : nombre de ar- Esta lista de reproducción reproduce todas tista y : título de la canción— : nombre de las canciones del iPod. artista y : nombre del álbum— : nombre ! Si los caracteres grabados en el iPod no del álbum y : título de la canción— : título son compatibles con esta unidad, no apa- de la canción y tiempo de reproducción recerán en el display. # Si los caracteres grabados en el iPod no son 1 Para ir al menú superior de la búsqueda compatibles con esta unidad, no aparecerán en de listas, presione LIST. el display. 2 Utilice MULTI-CONTROL para seleccio- Notas nar una categoría. ! Puede desplazar la información de texto hacia Haga girar el control para cambiar la catego- la izquierda manteniendo pulsado DISPLAY. ría y presiónelo para seleccionarla. ! Si se activa la función de desplazamiento con- Playlists (listas de reproducción)—Artists (ar- tinuo en el ajuste inicial, la información de tistas)—Albums (álbumes)—Songs (cancio- texto se desplazará de manera ininterrumpida nes)—Podcasts (podcasts)—Genres por el display. Consulte Cambio del desplaza- (géneros)—Audiobooks (audiolibros) miento continuo en la página 123. Se visualiza la lista de la categoría selecciona- da. Es 93
  • 94.
    Sección 02 Utilización de esta unidad Introducción a las funciones Reproducción de las canciones avanzadas en un orden aleatorio (shuffle) 1 Presione MULTI-CONTROL para visuali- Para la reproducción de las canciones en el zar el menú principal. iPod existen dos métodos de reproducción FUNCTION, AUDIO y ENTERTAINMENT apa- aleatoria: Shuffle Songs (reproducir cancio- recen en el display. nes en un orden aleatorio) y Shuffle Albums (reproducir álbumes en un orden aleatorio). 2 Utilice MULTI-CONTROL para seleccio- nar FUNCTION. 1 Utilice MULTI-CONTROL para seleccio- Haga girar el control para cambiar la opción nar Shuffle mode en el menú de funciones. de menú y presiónelo para seleccionarla. 2 Presione MULTI-CONTROL para seleccio- Aparece el nombre de la función en el display. nar su ajuste favorito. 3 Haga girar MULTI-CONTROL para selec- ! Shuffle Songs – Reproduce canciones en cionar la función. un orden aleatorio dentro de la lista selec- Haga girar MULTI-CONTROL para cambiar cionada entre las funciones en el siguiente orden: ! Shuffle Albums – Selecciona un álbum de Play mode (repetición de reproducción)— manera aleatoria y luego reproduce todas Shuffle mode (shuffle)—Shuffle all (shuffle las canciones en el orden en que se en- all)—Pause (pausa)—Audiobooks (velocidad cuentran en el álbum del audiolibro) ! Shuffle OFF – Cancela la reproducción # También se puede seleccionar la función pre- aleatoria sionando FUNCTION en el mando a distancia. # Para volver a la visualización de reproducción, Reproducción de todas las presione BAND. # Si no se utilizan las funciones en unos 30 se- canciones en un orden gundos, el display volverá automáticamente a la aleatorio (shuffle all) visualización normal. Este método reproduce todas las canciones en el iPod de manera aleatoria. Repetición de reproducción % Mantenga presionado MULTI-CONTROL Hay dos gamas de repetición de reproducción para activar la función de shuffle all duran- de las canciones en el iPod. Repeat One (re- te el display de reproducción. petición de una canción) y Repeat All (repeti- Se visualiza Shuffle All por un momento y ción de todas las canciones de la lista). todas las canciones en el iPod se reproducirán ! Cuando Play mode está fijado en de manera aleatoria. Repeat One, no es posible seleccionar las demás canciones. Nota 1 Utilice MULTI-CONTROL para seleccio- También puede activar la función de shuffle all en nar Play mode en el menú de funciones. el menú que aparece mediante el MULTI-CONTROL. 2 Pulse MULTI-CONTROL para seleccionar la gama de repetición. ! Repeat One – Sólo repite la canción actual Para poner en pausa una canción ! Repeat All – Repite todas las canciones de 1 Utilice MULTI-CONTROL para seleccio- la lista seleccionada nar Pause en el menú de funciones. 94 Es
  • 95.
    Sección Utilizaciónde esta unidad 02 2 Presione MULTI-CONTROL para activar Bluetooth Audio la pausa. Se detiene temporalmente la reproducción de Funciones básicas la canción actual. Puede utilizar esta unidad para controlar un re- # Para desactivar la pausa, vuelva a presionar productor portátil de audio, vendido por separa- MULTI-CONTROL. do, provisto de tecnología inalámbrica Bluetooth (reproductor de audio Bluetooth). Español Cambio de la velocidad del Importante audiolibro ! Esta unidad permite controlar un reproductor La velocidad de reproducción del audiolibro se de audio Bluetooth a través de un perfil A2DP puede modificar. o AVRCP Los reproductores de audio Blue- . 1 Utilice MULTI-CONTROL para seleccio- tooth (o los adaptadores Bluetooth) compati- nar Audiobooks en el menú de funciones. bles con estos perfiles pueden conectarse a este perfil. 2 Presione MULTI-CONTROL para seleccio- — Perfil A2DP (Advanced Audio Distribution nar su ajuste favorito. Profile): Es posible reproducir únicamente Presione MULTI-CONTROL repetidamente canciones en su reproductor de audio. hasta que el ajuste deseado aparezca en el — Perfil AVRCP (Audio/Video Remote Control display. Profile): Es posible reproducir, realizar pau- ! Faster – Reproducción con velocidad supe- sas, seleccionar canciones, etc. rior a la normal ! Ya que hay varios reproductores de audio ! Normal – Reproducción con velocidad nor- Bluetooth disponibles en el mercado, las fun- mal ciones que puede realizar su reproductor de ! Slower – Reproducción con velocidad infe- audio Bluetooth utilizando esta unidad pue- rior a la normal den ser muy diferentes. Consulte el manual de instrucciones de su reproductor de audio Bluetooth, así como este manual, mientras utilice su reproductor con esta unidad. ! No es posible mostrar en esta unidad informa- ción sobre las canciones (ej.: tiempo de repro- ducción transcurrido, título de la canción, índice de canciones, etc.). ! Mientras escucha canciones en su reproduc- tor de audio Bluetooth, no realice operaciones innecesarias en su teléfono móvil. Si intenta realizar una operación en su teléfono móvil, la señal de su teléfono móvil puede ocasionar ruido en la reproducción de canciones. ! Cuando habla con el teléfono móvil conectado a esta unidad a través de tecnología inalám- brica Bluetooth, la reproducción de canciones del reproductor de audio Bluetooth conectado a esta unidad se silencia. Es 95
  • 96.
    Sección 02 Utilización de esta unidad ! Incluso si está escuchando un canción en su Ajuste del reproductor de reproductor de audio Bluetooth y cambia a audio Bluetooth otra fuente, la reproducción de la canción continúa. Es necesario configurar esta unidad antes de utilizar el reproductor de audio Bluetooth. Aunque su reproductor de audio no esté pro- visto de un módulo Bluetooth, lo puede con- 1 Activación trolar desde esta unidad a través de Consulte Activación de la fuente BT Audio en tecnología inalámbrica Bluetooth por medio la página 124 para obtener instrucciones de un adaptador Bluetooth (se vende por sepa- sobre cómo activar BT Audio. # BT Audio está activado de forma predetermi- rado). nada. 2 Conexión Para conectar el reproductor de audio Blue- tooth a esta unidad, consulte Conexión del re- productor de audio Bluetooth conectado más recientemente en la página siguiente y Cone- xión de un reproductor de audio Bluetooth en la 1 Nombre del dispositivo página siguiente. Muestra el nombre del dispositivo del repro- # Cuando esté conectado a través de tecnología ductor de audio Bluetooth (o adaptador Blue- inalámbrica Bluetooth, las funciones “Reprodu- tooth). cir”, “Parar” y “Pausa” del reproductor de audio Bluetooth se pueden utilizar en la fuente 1 Presione SOURCE para seleccionar el re- BT Audio. productor de audio Bluetooth. # Antes de que pueda utilizar algunos reproduc- # Si no puede visualizar BT Audio, en primer tores de audio, es necesario que introduzca el có- lugar active la fuente de audio BT en el ajuste ini- digo PIN en esta unidad. Si su reproductor cial. Para obtener más información, consulte Ac- requiere un código PIN para establecer una cone- tivación de la fuente BT Audio en la página 124. xión, localice el código en el reproductor o en su # Para que esta unidad pueda controlar su re- documentación. Consulte Ingreso del código PIN productor de audio Bluetooth, debe establecer para la conexión inalámbrica Bluetooth en la pági- una conexión inalámbrica Bluetooth. (Consulte na 124 para obtener instrucciones sobre cómo in- Conexión de un reproductor de audio Bluetooth en gresar el código PIN. la página siguiente.) 2 Para realizar el avance rápido o retroce- Introducción a las funciones so, mantenga pulsado MULTI-CONTROL iz- avanzadas quierda o derecha. 1 Presione MULTI-CONTROL para visuali- 3 Para saltar y retroceder o avanzar hasta zar el menú principal. otra pista, presione MULTI-CONTROL iz- FUNCTION, AUDIO y ENTERTAINMENT apa- quierda o derecha. recen en el display. 2 Utilice MULTI-CONTROL para seleccio- nar FUNCTION. Haga girar el control para cambiar la opción de menú y presiónelo para seleccionarla. Aparece el nombre de la función en el display. 96 Es
  • 97.
    Sección Utilizaciónde esta unidad 02 3 Haga girar MULTI-CONTROL para selec- 1 Utilice MULTI-CONTROL para seleccio- cionar la función. nar Connection open en el menú de funcio- Haga girar MULTI-CONTROL para cambiar nes. entre las funciones en el siguiente orden: Connection open (conexión abierta)— 2 Presione MULTI-CONTROL para abrir la Disconnect audio (desconectar audio)— conexión. Connect audio (conectar audio)—Play (Re- Se visualiza Always waiting. La unidad esta- Español producir)—Stop (Parar)—Pause (pausa)— rá en espera de conexión desde el reproductor Auto connect (conexión automática)— de audio Bluetooth. Device info. (información del dispositivo) Si su reproductor de audio Bluetooth está pre- # Si el reproductor de audio Bluetooth está co- parado para la conexión inalámbrica Blue- nectado a través de un perfil A2DP, en el menú tooth, se establecerá automáticamente la de funciones sólo se visualizará conexión a esta unidad. Disconnect audio, Auto connect y Device info. # Si todavía no se ha conectado un reproductor Nota de audio Bluetooth a esta unidad, se mostrará Antes de que pueda utilizar algunos reproducto- Connection open, Connect audio, res de audio, es necesario que introduzca el códi- Auto connect y Device info. en el menú de fun- go PIN en esta unidad. Si su reproductor requiere ciones y las otras funciones no estarán disponi- un código PIN para establecer una conexión, lo- bles. calice el código en el reproductor o en su docu- # Para volver a la visualización de reproducción, mentación. Consulte Ingreso del código PIN para presione BAND. la conexión inalámbrica Bluetooth en la página # Si no se utilizan las funciones exceptuando 124 para obtener instrucciones sobre cómo ingre- Connection open, Disconnect audio y sar el código PIN. Connect audio en unos 30 segundos, el display volverá automáticamente a la visualización nor- mal. Desconexión de un reproductor de audio Bluetooth Nota 1 Utilice MULTI-CONTROL para seleccio- Dependiendo de los reproductores de audio Blue- nar Disconnect audio en el menú de funcio- tooth que estén conectados a esta unidad, es po- nes. sible que algunas funciones no se puedan utilizar correctamente. 2 Presione MULTI-CONTROL para desco- nectar el reproductor de audio Bluetooth. Se visualiza Disconnected. El reproductor de Conexión de un reproductor de audio Bluetooth se desconecta de la unidad. audio Bluetooth Si ajusta la unidad en el modo Conexión del reproductor de Connection open, podrá establecer una cone- audio Bluetooth conectado más xión inalámbrica Bluetooth desde su repro- ductor de audio Bluetooth. Es posible que recientemente tenga que consultar el manual de funciona- Esta unidad busca un reproductor de audio miento de su reproductor de audio Bluetooth Bluetooth en el área detectable. Además, esta si no está seguro de cómo iniciar una cone- unidad conecta automáticamente el reproduc- xión desde el reproductor de audio. tor de audio Bluetooth conectado más recien- temente. Es 97
  • 98.
    Sección 02 Utilización de esta unidad 1 Utilice MULTI-CONTROL para seleccio- que, si desea utilizar otros dispositivos, no se nar Connect audio en el menú de funcio- podrá realizar la conexión automática. nes. ! Esta función no está disponible si la cone- xión automática de esta unidad se ha esta- 2 Presione MULTI-CONTROL para co- blecido en el teléfono móvil. nectar el reproductor de audio Bluetooth. ! Cuando utiliza la unidad en el menú de Mientras se realiza la conexión, se mostrará funciones de la fuente TEL o la fuente Connecting. Una vez completada la conexión, BT Audio, no se inicia la conexión automá- aparece Connected. tica al reproductor de audio Bluetooth. 1 Utilice MULTI-CONTROL para seleccio- Reproducción de canciones en el nar Auto connect en el menú de funciones. reproductor de audio Bluetooth 2 Pulse MULTI-CONTROL para activar la 1 Utilice MULTI-CONTROL para seleccio- conexión automática. nar Play en el menú de funciones. # Para desactivar la conexión automática, vuel- 2 Pulse MULTI-CONTROL para comenzar va a pulsar MULTI-CONTROL. la reproducción. Visualización de la dirección BD Para detener la reproducción (Bluetooth Device) 1 Utilice MULTI-CONTROL para seleccio- 1 Utilice MULTI-CONTROL para seleccio- nar Stop en el menú de funciones. nar Device info. en el menú de funciones. El nombre del dispositivo (p. ej., Pioneer BT 2 Presione MULTI-CONTROL para detener unit) de esta unidad se mostrará en el display. la reproducción. # Es posible editar el nombre del dispositivo. Se detiene la reproducción de la canción ac- Consulte Edición del nombre del dispositivo en la tual. página 124. 2 Pulse MULTI-CONTROL izquierda para Para poner en pausa una canción visualizar la dirección BD. 1 Utilice MULTI-CONTROL para seleccio- Aparece la cadena hexadecimal de 12 dígitos. nar Pause en el menú de funciones. # Pulse MULTI-CONTROL derecha para regre- sar al nombre del dispositivo. 2 Presione MULTI-CONTROL para activar la pausa. Se detiene temporalmente la reproducción de la canción actual. # Para desactivar la pausa, vuelva a presionar MULTI-CONTROL. Conexión automática a un reproductor de audio Bluetooth Esta unidad se conecta automáticamente al reproductor de audio Bluetooth conectado más recientemente a ella. Tenga en cuenta 98 Es
  • 99.
    Sección Utilizaciónde esta unidad 02 Teléfono Bluetooth Muestra la intensidad de la señal del teléfono móvil. Funciones básicas ! El indicador de nivel de señal puede di- Si su teléfono móvil posee tecnología inalámbri- ferir del nivel de señal real. ca Bluetooth, puede conectarse a esta unidad ! Si el nivel de señal no está disponible, para hacer llamadas inalámbricas de manos li- no aparece este indicador. bres, incluso al conducir. 3 Indicador del número de usuario Español Muestra el número de registro del teléfono Importante móvil. 4 Indicador de potencia de la batería ! Puesto que esta unidad se encuentra en espe- Muestra la potencia de la batería del teléfono ra para conectar con sus teléfonos móviles móvil. mediante la tecnología inalámbrica Bluetooth, ! El indicador de potencia de la batería utilizarla sin encender el motor puede descar- puede diferir de la potencia real de la gar la batería. misma. ! Las operaciones avanzadas que exigen con- ! Si no hay potencia en la batería, no se centración, tales como marcar números en la visualizará nada en el área del indicador pantalla, usar el directorio de teléfonos, etc, de potencia de la batería. están prohibidas mientras conduce. Cuando 5 Indicación de aviso de llamada perdida tenga que utilizar estas funciones avanzadas, Aparece cuando se ha recibido una llamada detenga su vehículo en un lugar seguro. entrante a la que no se ha respondido. ! Cuando el teléfono esté seleccionado como 6 Indicador de respuesta automática/rechazo fuente, no será posible hacer ajustes de automático audio, excepto el ajuste del balance. El balan- Aparece AUTO cuando está activada la fun- ce entre los altavoces delanteros/traseros está ción de respuesta automática (para obtener ajustado a F 15 de forma predeterminada más información, consulte Ajuste de la res- para la fuente telefónica. puesta automática en la página 112). A continuación se indican las funciones bási- Aparece REFUSE cuando está activada la fun- cas para utilizar manos libres a través de la ción de respuesta automática (para obtener tecnología inalámbrica Bluetooth. En Introduc- más información, consulte Ajuste del rechazo ción a las funciones avanzadas en la página automático en la página 112). 102 se explican las funciones más avanzadas 7 Visualización del reloj y cómo utilizarlas. Muestra la hora (si está conectado a un teléfo- no). 8 Visualización del calendario Muestra el día, el mes y el año (si está conec- tado a un teléfono). Notas ! Aunque seleccione otras fuentes, aparecen los indicadores 2 a 6. ! La recepción de llamadas telefónicas de esta 1 Nombre del dispositivo unidad entra en espera cuando la llave de Muestra el nombre del dispositivo del teléfono contacto está en la posición ACC (accesorio) móvil. u ON (encendido). 2 Indicador de nivel de señal Es 99
  • 100.
    Sección 02 Utilización de esta unidad ! La distancia de visibilidad entre esta unidad y Configuración de la función su teléfono móvil deber ser de 10 metros o in- manos libres ferior para el envío y recepción de voz y datos mediante la tecnología inalámbrica Bluetooth. Antes de poder hacer uso de la función Sin embargo, la distancia de transmisión manos libres, deberá configurar la unidad puede llegar a ser más corta que la distancia para su utilización con el teléfono móvil. Esto estimada, dependiendo del entorno en que se conlleva establecer una conexión inalámbrica utilice. Bluetooth entre esta unidad y su teléfono, re- ! Para utilizar la tecnología inalámbrica Blue- gistrar su teléfono en esta unidad, y ajustar el tooth, los dispositivos deben ser capaces de nivel de volumen. interpretar ciertos perfiles. Esta unidad es 1 Conexión compatible con los siguientes perfiles. Para ver instrucciones detalladas sobre cómo — GAP (Generic Access Profile) conectar su teléfono a esta unidad mediante — SDP (Service Discovery Protocol) la tecnología inalámbrica Bluetooth, consulte — OPP (Object Push Profile) Conexión de un teléfono móvil en la página — HFP (Hands Free Profile) 103. — A2DP (Advanced Audio Distribution Profi- # Su teléfono estará ahora conectado temporal- le) mente. Sin embargo, para hacer un mejor uso de — AVRCP (Audio/Video Remote Control Profi- la tecnología, recomendamos que registre el telé- le) fono en esta unidad. ! El indicador de potencia de la batería y el indi- cador de nivel de señal se muestran en el dis- 2 Registro play siempre que el teléfono móvil está Para registrar el teléfono conectado temporal- conectado a esta unidad mediante la tecnolo- mente, consulte Registro del teléfono móvil co- gía inalámbrica Bluetooth. nectado en la página 104. 3 Ajuste del volumen Información sobre la fuente Ajuste el volumen del audífono de su teléfono telefónica móvil hasta que le resulte cómodo. Una vez ajustado, el nivel de volumen se memorizará Modo de espera en la unidad como el ajuste predefinido. Cuando la unidad esté conectada a través de # El volumen de voz de la persona que llama y tecnología inalámbrica Bluetooth, seguirá en el volumen del timbre pueden variar según el tipo espera de fuente telefónica en segundo plano de teléfono móvil. siempre que se mantenga la conexión. Esto # Si la diferencia entre el volumen del timbre y significa que es posible utilizar libremente las el volumen de la persona que llama es demasia- demás funciones de la unidad y seguirá estan- do grande, el nivel de volumen general puede vol- do preparada para recibir una llamada. verse inestable. # Antes de desconectar el teléfono móvil de % Presione SOURCE para seleccionar el te- esta unidad, no olvide ajustar el volumen a un léfono. nivel adecuado. Si el volumen ha sido silenciado Presione SOURCE hasta que visualice TEL. (nivel cero) en su teléfono móvil, permanecerá si- # También es posible seleccionar TEL pulsando lenciado incluso después de que desconecte el PHONE. teléfono de esta unidad. 100 Es
  • 101.
    Sección Utilizaciónde esta unidad 02 Realización de una llamada de su teléfono móvil para ver más instruc- telefónica ciones. ! Esta función se puede utilizar únicamente Marcar un número cuando la conexión se establece mediante La manera más básica de hacer una llamada un HFP (Hands Free Profile). es simplemente marcar el número. Consulte Realización de una llamada ingresan- 1 Presione BAND y mantenga presionado Español do el número de teléfono en la página 111 para hasta que Voice dial aparezca en el display. ver instrucciones detalladas. Cuando se visualiza Voice dial ON, se activa la función de reconocimiento de voz. # Si su teléfono móvil no tiene la función de re- Llamar a un número del Directorio de conocimiento de voz, en el display aparece teléfonos o del Historial de llamadas No voice dial y la operación no está disponible. Consulte Llamada a un número del Directorio de teléfonos en la página 107 y Llamada a un 2 Pronuncie el nombre de su contacto. número desde el Historial de llamadas en la pá- gina 111 para ver instrucciones detalladas. Aceptación de una llamada telefónica Número predefinido Es posible asignar a la memoria los números Atender una llamada entrante que marca frecuentemente, para volver a mar- Incluso si se selecciona una fuente distinta de carlos rápidamente. TEL o si la unidad está apagada, podrá con- Consulte Asignación de números prefijados en testar llamadas entrantes. Si desea hacer que la página 111 para ver cómo asignar un núme- esta unidad rechace automáticamente todas ro a una memoria. las llamadas entrantes, consulte Ajuste de la respuesta automática en la página 112. 1 Pulse MULTI-CONTROL arriba o abajo para seleccionar un número. 1 Cuando entre una llamada, presione # También puede presionar uno de los botones MULTI-CONTROL. del 0 a 9 del mando a distancia para seleccionar # También se puede aceptar una llamada telefó- un número de presintonía. nica presionando OFF HOOK en el mando a dis- # El número de presintonía 10 se asigna al 0. tancia. # Si el número ya está ingresado en el Directo- # Si en el teléfono móvil está seleccionado el rio de teléfonos, también aparecerá el nombre. modo privado, puede que la función manos libres # Al seleccionar números de presintonías que no esté disponible. no han sido asignados, aparece No data. 2 Para finalizar la llamada, pulse PHONE. 2 Pulse MULTI-CONTROL para hacer una El tiempo estimado de la llamada aparece en llamada. el display (esto puede diferir ligeramente del tiempo de llamada real). # También se puede finalizar la llamada presio- Reconocimiento de voz nando ON HOOK en el mando a distancia. Si su teléfono móvil posee tecnología de reco- # Puede que escuche un ruido al desconectar el nocimiento de voz, puede hacer una llamada teléfono. mediante comandos de voz. ! El funcionamiento es diferente según el tipo de teléfono móvil. Consulte el manual Es 101
  • 102.
    Sección 02 Utilización de esta unidad Rechazo de una llamada entrante 2 Pulse PHONE para finalizar todas las lla- Puede rechazar una llamada entrante. Para re- madas. chazar automáticamente todas las llamadas Pulse PHONE para finalizar todas las llama- entrantes, consulte Ajuste del rechazo automá- das, incluida una llamada en espera. tico en la página 112. # También se pueden finalizar todas las llama- das presionando ON HOOK en el mando a dis- % Cuando entre una llamada, presione tancia. PHONE. # Además de alternar entre las llamadas en Se rechazará la llamada. línea, no puede terminar cada llamada en espera # También se puede rechazar una llamada pre- por separado. Pulse PHONE para finalizar todas sionando ON HOOK en el mando a distancia. las llamadas. # La llamada rechazada se registra en la lista de historial de llamadas perdidas. Para obtener in- Rechazo de una llamada en espera formación sobre la lista de historial de llamadas Si desea no interrumpir su llamada actual perdidas, consulte Uso del Historial de llamadas para responder una llamada entrante, puede en la página 110. rechazarla y agregar el número a la lista de historial de llamadas perdidas. Atender una llamada en espera Si, mientras está hablando por teléfono, se % Pulse PHONE para rechazar una llama- produce otra llamada entrante, el número (o da entrante. nombre si figura en el directorio de teléfonos) # También se puede rechazar una llamada en de la persona que llama aparecerá en el dis- espera presionando ON HOOK en el mando a play para indicarle que tiene una llamada en- distancia. trante. Puede poner en espera a la persona de la primera llamada mientras usted responde Introducción a las funciones la llamada entrante; o bien rechazar la llama- da, en cuyo caso quedará registrado el núme- avanzadas ro de la llamada perdida. 1 Presione MULTI-CONTROL para visuali- ! Dependiendo del teléfono móvil, esta fun- zar el menú principal. ción no se puede utilizar. FUNCTION, AUDIO, ENTERTAINMENT y ! Esta unidad sólo puede procesar tres lla- RECEIVING MOVIE aparecen en el display. madas simultáneamente. Por lo tanto, de- pendiendo del teléfono móvil que se utilice 2 Utilice MULTI-CONTROL para seleccio- con esta unidad, puede que esta función nar FUNCTION. no se ejecute correctamente. Haga girar el control para cambiar la opción de menú y presiónelo para seleccionarla. 1 Pulse MULTI-CONTROL para responder Aparece el nombre de la función en el display. una llamada entrante. # También se puede responder una llamada en 3 Gire el control MULTI-CONTROL para espera presionando OFF HOOK en el mando a cambiar las funciones. distancia. Haga girar MULTI-CONTROL para alternar # Si presiona MULTI-CONTROL se cambiará entre las funciones. entre las personas que llaman y están en espera. Los nombres de las funciones que se muestran en el display son diferentes según la conexión y el estado de registro del teléfono móvil. Si aún no está conectado 102 Es
  • 103.
    Sección Utilizaciónde esta unidad 02 Search&Connect (buscar y conectar)— volverá automáticamente a la visualización nor- Connection open (conexión abierta)— mal. Connect phone (conectar teléfono)— Delete phone (eliminar teléfono)— PH.B.Transfer (transferencia del directorio de Conexión de un teléfono móvil teléfonos)—Refuse calls (ajuste de rechazo Para utilizar un teléfono de forma inalámbrica automático)—Auto answer (ajuste de res- con esta unidad, en primer lugar es necesario Español puesta automática)—Ring tone (selección de establecer una conexión con la tecnología ina- tono de llamada)—Auto connect (ajuste de lámbrica Bluetooth. Existen varias formas de conexión automática)—Echo cancel (cancela- realizar esto. ción de eco)—Device info. (información del ! Un teléfono se puede conectar a través de dispositivo) tecnología inalámbrica Bluetooth sin estar Si está conectado, pero aún no se ha regis- registrado con esta unidad. En este caso, el trado teléfono estará temporalmente conectado Disconnect phone (desconectar teléfono)— pero con las funciones disponibles limi- Set phone (registrando teléfono)— tadas. Para aprovechar completamente Delete phone (eliminar teléfono)— todas las funciones disponibles, se reco- PH.B.Transfer (transferencia del directorio de mienda registrar su teléfono en esta uni- teléfonos)—Number dial (llamar ingresando dad. Consulte Registro del teléfono móvil un número)—Refuse calls (ajuste de rechazo conectado en la página siguiente para obte- automático)—Auto answer (ajuste de res- ner más información. puesta automática)—Ring tone (selección de tono de llamada)—Auto connect (ajuste de Búsqueda de los teléfonos móviles conexión automática)—Echo cancel (cancela- disponibles ción de eco)—Device info. (información del Puede hacer que esta unidad busque los telé- dispositivo) fonos disponibles en el área que tengan tecno- Si ya está conectado y registrado logía inalámbrica Bluetooth, y luego Disconnect phone (desconectar teléfono)— seleccionar el teléfono al que desea conectar- Delete phone (eliminar teléfono)— se en una lista visualizada en la pantalla. PH.B.Transfer (transferencia del directorio de teléfonos)—PH.B.Name view (ver nombre del 1 Utilice MULTI-CONTROL para seleccio- directorio de teléfonos)—Clear memory (bo- nar Search&Connect en el menú de funcio- rrar la memoria)—Number dial (llamar ingre- nes. sando un número)—Refuse calls (ajuste de rechazo automático)—Auto answer (ajuste 2 Pulse MULTI-CONTROL para hacer una de respuesta automática)—Ring tone (selec- búsqueda de los teléfonos móviles disponi- ción de tono de llamada)—Auto connect bles. (ajuste de conexión automática)— Mientras se realiza la búsqueda, se mostrará Echo cancel (cancelación de eco)— Searching. Cuando se encuentren los teléfo- Device info. (información del dispositivo) nos móviles disponibles que tengan tecnolo- # Para volver a la visualización de reproducción, gía inalámbrica Bluetooth, se mostrarán los presione BAND. nombres de los dispositivos o Not found (si # Si no se utilizan las funciones exceptuando no se pueden obtener los nombres). Search&Connect, Connection open, # Si la unidad no puede encontrar ningún telé- Connect phone, PH.B.Transfer, fono móvil, se mostrará Not found. Disconnect phone, Number dial y Clear memory en unos 30 segundos, el display Es 103
  • 104.
    Sección 02 Utilización de esta unidad 3 Pulse MULTI-CONTROL arriba o abajo # Es posible que tenga que introducir el código para seleccionar el nombre del dispositivo de enlace en su teléfono móvil para completar la que desea conectar. conexión. # El ajuste predefinido del código de enlace es 4 Pulse MULTI-CONTROL para conectar el 0000. Puede cambiar este código en el ajuste ini- teléfono móvil seleccionado. cial. Consulte Ingreso del código PIN para la cone- Mientras se realiza la conexión, se mostrará xión inalámbrica Bluetooth en la página 124. Connecting. Para completar la conexión, veri- fique el nombre del dispositivo (p. ej., Pioneer BT unit) e ingrese el código de enlace en su Desconexión de un teléfono móvil teléfono móvil. Si la conexión se establece, se Cuando haya terminado de utilizar el teléfono visualizará Connected. en esta unidad, puede desactivar la conexión # Si la conexión no se ha realizado correcta- Bluetooth. mente, aparece ERROR. Compruebe el teléfono móvil e inténtelo de nuevo. 1 Utilice MULTI-CONTROL para seleccio- # El ajuste predefinido del código de enlace es nar Disconnect phone en el menú de fun- 0000. Puede cambiar este código en el ajuste ini- ciones. cial. Consulte Ingreso del código PIN para la cone- El nombre del dispositivo del teléfono conec- xión inalámbrica Bluetooth en la página 124. tado se visualiza en el display. 2 Pulse MULTI-CONTROL para desco- Uso de un teléfono móvil para iniciar nectar un teléfono móvil de esta unidad. una conexión Una vez completada la desconexión, aparece Si ajusta la unidad en el modo Disconnected. Connection open podrá establecer una cone- xión inalámbrica Bluetooth desde su teléfono. Es posible que tenga que consultar el manual Registro del teléfono móvil de funcionamiento de su teléfono si no está conectado seguro de cómo iniciar una conexión desde el Puede registrar un teléfono que esté conec- teléfono. tado temporalmente a esta unidad con el fin de aprovechar al máximo las funciones de la 1 Utilice MULTI-CONTROL para seleccio- tecnología inalámbrica Bluetooth. Es posible nar Connection open en el menú de funcio- registrar un total de tres teléfonos. nes. 1 Utilice MULTI-CONTROL para seleccio- 2 Presione MULTI-CONTROL para abrir la nar Set phone en el menú de funciones. conexión. Se visualizará Always waiting y la unidad es- 2 Pulse MULTI-CONTROL arriba o abajo tará en espera de conexión desde el teléfono para seleccionar una asignación de regis- móvil. tro. P1 (teléfono de usuario 1)—P2 (teléfono de 3 Uso del teléfono móvil para la conexión usuario 2)—P3 (teléfono de usuario 3) a esta unidad. # El funcionamiento es diferente según el tipo de teléfono móvil. Consulte el manual de su telé- fono móvil para ver más instrucciones. 104 Es
  • 105.
    Sección Utilizaciónde esta unidad 02 # A medida que seleccione cada asignación, # Si la asignación está vacía, se mostrará podrá ver si un teléfono ya está registrado o no. No data y la operación no será posible. Si la asignación está vacía, se visualizará # Si necesita saber la dirección BD (Bluetooth No data. Si ya se ha adoptado la asignación, apa- Device) del teléfono, pulse MULTI-CONTROL iz- recerá el nombre del dispositivo. Si desea susti- quierda aquí. tuir una asignación con un nuevo teléfono, primero elimine la asignación actual. Para obte- 3 Pulse MULTI-CONTROL derecha para se- Español ner instrucciones detalladas, consulte Elimina- leccionar Delete YES. ción de un teléfono registrado en esta página. Se visualiza Delete YES. El borrado del teléfo- # Si necesita saber la dirección BD (Bluetooth no se pondrá en modo de espera. Device) del teléfono, pulse MULTI-CONTROL iz- # Si no desea eliminar un teléfono registrado, quierda aquí. presione MULTI-CONTROL izquierda. Se cambia- rá el display. 3 Presione MULTI-CONTROL para regis- trar el teléfono móvil actual conectado. 4 Pulse MULTI-CONTROL para eliminar el Una vez completado el registro, aparece teléfono. Reg. Completed. Una vez que se borre el teléfono, se visualizará # Si el registro no se ha realizado correctamen- Deleted. te, aparece Reg. ERROR. En este caso, vuelva al paso 1 e inténtelo de nuevo. Conexión a un teléfono móvil Nota registrado Cuando su teléfono está registrado en esta Dependiendo del tipo de teléfono móvil, el regis- unidad es fácil establecer una conexión Blue- tro puede estar disponible únicamente desde un tooth, ya sea manualmente seleccionando teléfono móvil. (Consulte Uso de un teléfono una asignación de registro o automáticamen- móvil para iniciar una conexión en la página ante- te cuando el teléfono registrado se encuentre rior.) dentro del alcance. Eliminación de un teléfono Conexión manual a un teléfono registrado registrado Si ya no necesita utilizar un teléfono registra- 1 Utilice MULTI-CONTROL para seleccio- do en esta unidad, puede eliminarlo de la asig- nar Connect phone en el menú de funcio- nación de registro para utilizar otro teléfono. nes. ! Si un teléfono registrado se elimina de esta unidad, el Directorio de teléfonos y otros 2 Pulse MULTI-CONTROL arriba o abajo ajustes de dicho teléfono se borran simul- para seleccionar una asignación de regis- táneamente. tro. P1 (teléfono de usuario 1)—P2 (teléfono de 1 Utilice MULTI-CONTROL para seleccio- usuario 2)—P3 (teléfono de usuario 3) nar Delete phone en el menú de funciones. # Si la asignación está vacía, se mostrará No data y la operación no será posible. 2 Pulse MULTI-CONTROL arriba o abajo # Si necesita saber la dirección BD (Bluetooth para seleccionar una asignación de regis- Device) del teléfono, pulse MULTI-CONTROL iz- tro. quierda aquí. P1 (teléfono de usuario 1)—P2 (teléfono de usuario 2)—P3 (teléfono de usuario 3) Es 105
  • 106.
    Sección 02 Utilización de esta unidad 3 Pulse MULTI-CONTROL para conectar el 2 Pulse MULTI-CONTROL para activar la teléfono móvil seleccionado. conexión automática. Mientras se realiza la conexión, se mostrará Si su teléfono móvil está preparado para la co- Connecting. Una vez completada la conexión, nexión inalámbrica Bluetooth, se establecerá aparece Connected. automáticamente la conexión a esta unidad. # Si Auto connect está activado, el teléfono # Para desactivar la conexión automática, vuel- móvil registrado conectado más recientemente va a pulsar MULTI-CONTROL. se conecta automáticamente. Para obtener más información, consulte Conexión automática a un teléfono registrado en esta página. Uso del Directorio de teléfonos # Si la conexión no se ha realizado correcta- El Directorio de teléfonos permite almacenar mente, aparece ERROR. Compruebe el teléfono hasta 650 nombres y números. Utilice el Direc- móvil e inténtelo de nuevo. torio de teléfonos para buscar números en el display de la unidad y seleccionar números para llamar. Los nombres y los números de te- Conexión automática a un teléfono léfono almacenados en una libreta de direc- registrado ciones de un teléfono de usuario registrado se Cuando la conexión automática esté activa, la pueden transferir al Directorio de teléfonos, lo unidad establecerá automáticamente una co- que permite que se llene de contactos de nexión a un teléfono móvil registrado. Cuando forma rápida y sencilla. el teléfono móvil registrado conectado más re- cientemente esté dentro de la cobertura, se realizará la conexión automática. Transferencia de entradas al ! Es posible que esta característica no fun- Directorio de teléfonos cione con todos los teléfonos. Si su teléfo- Para rellenar el Directorio de teléfonos puede no registrado no se puede conectar con la transferir los números almacenados en una li- Conexión automática, utilice el método de breta de direcciones de un teléfono de usuario conexión manual que se describe en Cone- registrado. xión manual a un teléfono registrado en la El Directorio de teléfonos puede almacenar un página anterior. total de 650 registros; 400 del usuario 1, 200 ! Es posible que no funcione esta caracterís- del usuario 2 y 50 del usuario 3. tica si está reproduciendo canciones en su ! En algunos teléfonos móviles, es posible reproductor de audio Bluetooth a través de que no se pueda transferir todo el Directo- tecnología inalámbrica Bluetooth. En tal rio de teléfonos de una vez. En este caso, caso, detenga la reproducción o cambie a transfiera una a una las entradas del Direc- otra fuente para que su teléfono móvil torio de teléfonos desde su teléfono a tra- pueda conectarse a esta unidad por medio vés de su teléfono móvil. de esta función. ! Según el teléfono móvil conectado a través ! Cuando utiliza la unidad en el menú de de tecnología inalámbrica Bluetooth, esta funciones de la fuente TEL o la fuente unidad podría no visualizar correctamente BT Audio, la unidad no realiza una cone- el Directorio de teléfonos. (Algunos carac- xión automática a su teléfono registrado. teres pueden ser confusos). ! Esta función no se puede configurar para ! Si el Directorio de teléfonos del teléfono cada teléfono de usuario distinto. móvil contiene datos de imagen, puede ocurrir que no se transfiera correctamente. 1 Utilice MULTI-CONTROL para seleccio- nar Auto connect en el menú de funciones. 106 Es
  • 107.
    Sección Utilizaciónde esta unidad 02 1 Utilice MULTI-CONTROL para seleccio- Llamada a un número del Directorio nar PH.B.Transfer en el menú de funciones. de teléfonos 2 Presione MULTI-CONTROL para acceder Importante al modo de espera de transferencia del di- Para realizar esta operación, asegúrese de esta- rectorio de teléfonos. cionar el vehículo y poner el freno de mano. Transfer aparece en el display. # Con la fuente TEL seleccionada, también Español Después de encontrar el número al que desea podrá visualizar el modo de espera de transferen- llamar en el Directorio de teléfonos, puede se- cia del directorio de teléfonos si mantiene pulsa- leccionar la entrada y efectuar la llamada. do PHONE. 1 Pulse LIST para visualizar el Directorio 3 Utilice el teléfono móvil para realizar la de teléfonos. transferencia del Directorio de teléfonos. Pulse LIST repetidamente para cambiar entre Realice la transferencia del Directorio de telé- las siguientes listas: fonos utilizando el teléfono móvil. Para obte- Directorio de teléfonos—Llamadas perdidas— ner más información, consulte el manual de Llamadas marcadas—Llamadas recibidas instrucciones del teléfono móvil. # Para obtener información sobre llamadas per- # El display indica cuántas entradas se han didas, marcadas y recibidas, consulte Uso del transferido y el número total que se almacenará Historial de llamadas en la página 110. en esta unidad. 2 Pulse MULTI-CONTROL izquierda o de- 4 Aparece Data transferred y se completa recha para seleccionar la primera letra del la transferencia del Directorio de teléfonos. nombre que está buscando. # También puede seleccionar la primera letra Cambio del orden de visualización del nombre que está buscando girando del Directorio de teléfonos MULTI-CONTROL. Se pueden visualizar la entradas del Directorio 3 Pulse MULTI-CONTROL para visualizar de teléfonos desde el primer nombre o desde las entradas. el último. El display muestra una entrada del Directorio ! Es posible que esta función no esté dispo- de teléfonos que empieza por dicha letra nible en algunos teléfonos móviles. (p.ej., nombres que empiezan por “B” cuando se selecciona la “B”). 1 Utilice MULTI-CONTROL para seleccio- nar PH.B.Name view en el menú de funcio- 4 Pulse MULTI-CONTROL arriba o abajo nes. para seleccionar la entrada del Directorio Invert names YES aparece en el display. de teléfonos a la que desee llamar. # También puede seleccionar una entrada del 2 Pulse MULTI-CONTROL para cambiar el Directorio de teléfonos a la que desee llamar gi- orden de visualización de nombres. rando MULTI-CONTROL. Se mostrará Inverted y se cambiará el orden de visualización de nombres. 5 Presione MULTI-CONTROL derecha para Si presiona repetidamente MULTI-CONTROL ver el género y la lista de números de telé- se cambiará el orden de visualización entre el fono de la entrada seleccionada. nombre y los apellidos. # También puede ver el género y la lista de nú- meros de teléfono de la entrada seleccionada presionando MULTI-CONTROL. Es 107
  • 108.
    Sección 02 Utilización de esta unidad # Puede hacer que el nombre y el número de te- 4 Pulse MULTI-CONTROL para asignar el léfono se desplacen, presionando DISPLAY y género al número de teléfono. manteniendo presionado. El género seleccionado se asignará al número # Si va a introducir varios números de teléfono de teléfono, y el display cambiará a la lista de en una entrada, seleccione un número girando géneros y números de teléfono. MULTI-CONTROL. # Pulse MULTI-CONTROL izquierda si desea re- Edición del nombre de una entrada gresar y seleccionar otra entrada. del Directorio de teléfonos 6 Pulse MULTI-CONTROL para hacer una Importante llamada. Para realizar esta operación, asegúrese de esta- 7 Para finalizar la llamada, pulse PHONE. cionar el vehículo y poner el freno de mano. Puede editar los nombres de las entradas del Asignación de géneros a números de Directorio de teléfonos. Cada nombre puede teléfono tener una longitud de hasta 40 caracteres. Importante 1 Visualice el género y la lista de números Para realizar esta operación, asegúrese de esta- de teléfono de la entrada del Directorio de cionar el vehículo y poner el freno de mano. teléfonos deseada. Consulte los pasos 1 al 5 Llamada a un núme- Si hay muchas entradas en el Directorio de te- ro del Directorio de teléfonos en la página ante- léfonos, puede resultar útil asignarlos a géne- rior para el procedimiento. ros (categorías) específicos para que la búsqueda sea más fácil. Existen cuatro géne- 2 Mantenga pulsado MULTI-CONTROL ros preajustados a los que puede asignar en- para visualizar la pantalla de ingreso de gé- tradas: Home, Mobile, Office y Other. nero. Se visualiza Edit genre. 1 Visualice el género y la lista de números de teléfono de la entrada del Directorio de 3 Gire MULTI-CONTROL para cambiar a la teléfonos deseada. pantalla de ingreso de nombre. Consulte los pasos 1 al 5 Llamada a un núme- Al girar MULTI-CONTROL se cambiarán las ro del Directorio de teléfonos en la página ante- pantallas de entrada en el siguiente orden: rior para el procedimiento. Edit genre (pantalla de ingreso de género)— Edit name (pantalla de ingreso de nombre)— 2 Mantenga pulsado MULTI-CONTROL Edit number (pantalla de ingreso de número) para visualizar la pantalla de ingreso de gé- —Clear memory (pantalla de borrado de me- nero. moria) Se visualiza Edit genre. 4 Presione DISPLAY para seleccionar el 3 Pulse MULTI-CONTROL arriba o abajo tipo de carácter deseado. para seleccionar un género. Al pulsar DISPLAY se cambiarán los tipos de Cada vez que se pulsa MULTI-CONTROL arri- caracteres en el siguiente orden: ba o abajo, se selecciona un género en el si- Alfabeto (mayúsculas)—Alfabeto (minúscu- guiente orden: las)—números y símbolos—Caracteres euro- Home (inicio)—Mobile (móvil)—Office (ofici- peos, caracteres rusos o caracteres griegos na)—Other (otro) 108 Es
  • 109.
    Sección Utilizaciónde esta unidad 02 # Si mantiene presionado DISPLAY, puede cam- 3 Gire MULTI-CONTROL para cambiar a la biar el conjunto de caracteres entre ISO8859-1 pantalla de ingreso de número. (caracteres europeos), ISO8859-5 (caracteres Al girar MULTI-CONTROL se cambiarán las rusos) e ISO8859-7 (caracteres griegos) de mane- pantallas de entrada en el siguiente orden: ra alternante. Edit genre (pantalla de ingreso de género)— # Los caracteres europeos, los caracteres rusos Edit name (pantalla de ingreso de nombre)— y los caracteres griegos no se pueden combinar. Edit number (pantalla de ingreso de número) Español —Clear memory (pantalla de borrado de me- 5 Pulse MULTI-CONTROL arriba o abajo moria) para seleccionar una letra. # Para eliminar un carácter y dejar un espacio, 4 Pulse MULTI-CONTROL izquierda o de- seleccione “_” (subrayado). recha para mover el cursor al número que desee cambiar. 6 Presione MULTI-CONTROL izquierda o derecha para mover el cursor a la anterior 5 Pulse MULTI-CONTROL arriba o abajo o siguiente posición de carácter. para cambiar los números. Cuando visualice la letra deseada, pulse Repita estos pasos hasta que termine. MULTI-CONTROL derecha para mover el cur- sor a la siguiente posición y seleccione la letra 6 Presione MULTI-CONTROL para guardar siguiente. Pulse MULTI-CONTROL izquierda el nuevo número. para mover el cursor hacia atrás en el display. Borrado de una entrada del 7 Pulse MULTI-CONTROL para guardar el Directorio de teléfonos nuevo nombre. Importante Edición de números de teléfono Para realizar esta operación, asegúrese de esta- cionar el vehículo y poner el freno de mano. Importante Para realizar esta operación, asegúrese de esta- Puede eliminar entradas del Directorio de telé- cionar el vehículo y poner el freno de mano. fonos una a una. Para borrar todas las entradas del Directorio Puede editar los números de teléfono de las de teléfonos, consulte Borrado de la memoria entradas del Directorio de teléfonos. en la página 112. 1 Visualice el género y la lista de números 1 Visualice el género y la lista de números de teléfono de la entrada del Directorio de de teléfono de la entrada del Directorio de teléfonos deseada. teléfonos deseada. Consulte los pasos 1 al 5 Llamada a un núme- Consulte los pasos 1 al 5 Llamada a un núme- ro del Directorio de teléfonos en la página 107 ro del Directorio de teléfonos en la página 107 para el procedimiento. para el procedimiento. 2 Mantenga pulsado MULTI-CONTROL 2 Mantenga pulsado MULTI-CONTROL para visualizar la pantalla de ingreso de gé- para visualizar la pantalla de ingreso de gé- nero. nero. Se visualiza Edit genre. Se visualiza Edit genre. Es 109
  • 110.
    Sección 02 Utilización de esta unidad 3 Gire MULTI-CONTROL para cambiar a la Directorio de teléfonos—Llamadas perdidas— pantalla de borrado de memoria. Llamadas marcadas—Llamadas recibidas Al girar MULTI-CONTROL se cambiarán las # Para obtener información sobre el Directorio pantallas de entrada en el siguiente orden: de teléfonos, consulte Uso del Directorio de teléfo- Edit genre (pantalla de ingreso de género)— nos en la página 106. Edit name (pantalla de ingreso de nombre)— # Si no se han almacenado números de teléfo- Edit number (pantalla de ingreso de número) no en la lista seleccionada, se visualizará —Clear memory (pantalla de borrado de me- No data. moria) # Si no hay ningún nombre en el Directorio de teléfonos, aparecerá el número de teléfono en 4 Pulse MULTI-CONTROL derecha para lugar del nombre. mostrar una pantalla de confirmación. Se visualiza Clear memory YES. 2 Gire MULTI-CONTROL para seleccionar # Si no desea borrar la memoria que ha selec- un número de teléfono. cionado, pulse MULTI-CONTROL izquierda. Se Gire MULTI-CONTROL para cambiar los nú- cambiará el display. meros de teléfono almacenados en la lista. # Si el número ya está ingresado en el Directo- 5 Presione MULTI-CONTROL para eliminar rio de teléfonos, aparecerá el nombre. la entrada del Directorio de teléfonos. # También puede cambiar el número de teléfo- Se visualiza Cleared. no, pulsando MULTI-CONTROL arriba o abajo. La entrada del Directorio de teléfonos se elimi- nará. El display cambia a la lista de ingreso 3 Presione MULTI-CONTROL derecha para del Directorio de teléfonos. visualizar la lista detallada. El nombre y número de teléfono se visualizan en la lista detallada. Uso del Historial de llamadas # Si el número ya está ingresado en el Directo- Importante rio de teléfonos, también aparecerá el nombre. # Al girar MULTI-CONTROL se cambiará al nú- Para realizar esta operación, asegúrese de esta- mero de teléfono anterior o siguiente visualizado cionar el vehículo y poner el freno de mano. en la lista detallada. # Puede hacer que el nombre y el número de te- Las 12 últimas llamadas realizadas (marca- léfono se desplacen, presionando DISPLAY y das), recibidas y perdidas se almacenan en el manteniendo presionado. Historial de llamadas. Puede realizar una bús- # Si no realiza ninguna acción en unos 30 se- queda en el Historial de llamadas y llamar a gundos, la visualización de la lista se cancelará los números desde éste. automáticamente. Visualización del Historial de llamadas El Historial de llamadas se divide en tres gru- pos: Llamadas perdidas, Llamadas marcadas y Llamadas recibidas. Puede ver la fecha y la hora de la llamada, así como el número (y el nombre si está en el Directorio de teléfonos). 1 Pulse LIST para visualizar la lista. Pulse LIST repetidamente para cambiar entre las siguientes listas: 110 Es
  • 111.
    Sección Utilizaciónde esta unidad 02 Llamada a un número desde el Asignación de números prefijados Historial de llamadas Importante 1 Visualice la lista y seleccione un número de teléfono. Para realizar esta operación, asegúrese de esta- Visualice el número de teléfono al que desea cionar el vehículo y poner el freno de mano. llamar. Es posible asignar a la memoria los números Consulte Visualización del Historial de llamadas Español que marca frecuentemente, para volver a mar- en la página anterior. carlos rápidamente. 2 Pulse MULTI-CONTROL para hacer una 1 Seleccione un número de teléfono del llamada. Directorio de teléfonos o del historial de Mientras se llama, se muestra el número de llamadas. teléfono. Consulte las instrucciones descritas en las pá- # Si el número ya está ingresado en el Directo- ginas anteriores sobre cómo seleccionar un rio de teléfonos, también aparecerá el nombre. número de teléfono del Directorio de teléfonos 3 Para finalizar la llamada, pulse PHONE. o del historial de llamadas. El tiempo estimado de la llamada aparece en 2 Presione uno de los botones de 0 a 9 en el display (esto puede diferir ligeramente del el mando a distancia hasta escuchar un tiempo de llamada real). aviso sonoro. El número de teléfono seleccionado se ha al- Llamada a un número internacional macenado en la memoria. La próxima vez que desde el Historial de llamadas pulse el mismo botón predefinido, el número Cuando llame a un número internacional al- de teléfono se recuperará de la memoria. macenado en el Historial de llamadas, ante- ponga al número de país un signo +. Realización de una llamada 1 Visualice el número de teléfono para el ingresando el número de teléfono que desea hacer la llamada internacional. Importante Consulte Llamada a un número internacional desde el Historial de llamadas en esta página. Para realizar esta operación, asegúrese de esta- cionar el vehículo y poner el freno de mano. 2 Mantenga presionado MULTI-CONTROL para agregar +. 1 Utilice MULTI-CONTROL para seleccio- # Para borrar el +, mantenga presionado nar Number dial en el menú de funciones. MULTI-CONTROL otra vez. # También se puede presionar DIRECT en el mando a distancia para acceder a este menú 3 Pulse MULTI-CONTROL para hacer una desde la pantalla de espera. llamada. Mientras llama, parpadeará Dialling. 2 Pulse MULTI-CONTROL arriba o abajo para seleccionar un número. 4 Para finalizar la llamada, pulse PHONE. # También es posible ingresar los números pre- El tiempo estimado de la llamada aparece en sionando 0 a 9 en el mando a distancia. el display (esto puede diferir ligeramente del tiempo de llamada real). Es 111
  • 112.
    Sección 02 Utilización de esta unidad 3 Presione MULTI-CONTROL izquierda o # Si no desea borrar la memoria que ha selec- derecha para mover el cursor a la anterior cionado, pulse MULTI-CONTROL izquierda. Se o siguiente posición. cambiará el display. # Se puede ingresar hasta 24 dígitos. 4 Pulse MULTI-CONTROL para borrar la 4 Cuando haya terminado de ingresar el memoria. número, presione MULTI-CONTROL. Se visualiza Cleared y los datos del elemento seleccionado se borran de la memoria de esta 5 Pulse MULTI-CONTROL nuevamente unidad. para hacer una llamada. 6 Para finalizar la llamada, pulse PHONE. Ajuste del rechazo automático Si esta función está activada, la unidad recha- Borrado de la memoria zará automáticamente todas las llamadas en- trantes. Puede borrar la memoria de cada elemento: ! Incluso si rechaza una llamada entrante, el Directorio de teléfonos, lista de historial de lla- registro de llamada se memorizará en la madas marcadas/recibidas/perdidas y número lista de historial de llamadas perdidas. de teléfono prefijado. ! Esta función no se puede configurar para 1 Utilice MULTI-CONTROL para seleccio- cada teléfono de usuario distinto. nar Clear memory en el menú de funciones. 1 Utilice MULTI-CONTROL para seleccio- 2 Pulse MULTI-CONTROL arriba o abajo nar Refuse calls en el menú de funciones. para seleccionar un elemento. 2 Pulse MULTI-CONTROL para activar el Cada vez que se pulsa MULTI-CONTROL arri- rechazo automático de llamada. ba o abajo, los elementos se cambian en el si- # Para desactivar el rechazo automático de lla- guiente orden: mada, vuelva a pulsar MULTI-CONTROL. Phone book (directorio de teléfonos)— Missed calls (historial de llamadas perdidas) Nota —Dialled calls (historial de llamadas marca- das)—Received calls (historial de llamadas re- Si las funciones de rechazo automático y res- cibidas)—Dial preset (números de teléfono puesta automática están activadas, el rechazo predefinidos)—All clear (borrar toda la memo- automático tendrá prioridad, y todas las llamadas ria) entrantes se rechazarán automáticamente. # Si desea borrar todo el Directorio de teléfonos, la lista del historial de llamadas marcadas/recibi- das/perdidas y el número de teléfono predefinido, Ajuste de la respuesta automática seleccione All clear. Si esta función está activada, la unidad con- testará automáticamente todas las llamadas 3 Pulse MULTI-CONTROL derecha para se- entrantes. leccionar el elemento que desea eliminar ! Esta función no se puede configurar para de esta unidad. cada teléfono de usuario distinto. Se visualiza Clear memory YES. El borrado de memoria se ajustará ahora en modo en espe- 1 Utilice MULTI-CONTROL para seleccio- ra. nar Auto answer en el menú de funciones. 112 Es
  • 113.
    Sección Utilizaciónde esta unidad 02 2 Pulse MULTI-CONTROL para activar la 1 Utilice MULTI-CONTROL para seleccio- respuesta automática. nar Echo cancel en el menú de funciones. # Para desactivar la respuesta automática, vuel- va a pulsar MULTI-CONTROL. 2 Pulse MULTI-CONTROL para activar la cancelación de eco. Nota # Para desactivar la cancelación de eco, vuelva a pulsar MULTI-CONTROL. Si las funciones de rechazo automático y res- Español puesta automática están activadas, el rechazo automático tendrá prioridad, y todas las llamadas Visualización de la dirección BD entrantes se rechazarán automáticamente. (Bluetooth Device) Cada dispositivo que posee tecnología inalám- Cambio del tono de llamada brica Bluetooth recibe una dirección de dispo- sitivo única de 48 bits. Cada dirección del La unidad ofrece una variedad de tonos de dispositivo está formada por una cadena hexa- timbre para llamadas entrantes, así como un decimal de 12 dígitos. ajuste de desactivado. Puede visualizar la dirección BD de su teléfo- ! El tono de llamada que seleccione para no móvil y esta unidad. esta unidad no tiene efecto en el tono de llamada utilizado por su teléfono. Si no desea que su teléfono y esta unidad sue- Visualización de la dirección BD de nen al mismo tiempo, se recomienda de- esta unidad sactivar el tono de llamada de uno de los 1 Utilice MULTI-CONTROL para seleccio- dispositivos. nar Device info. en el menú de funciones. El nombre del dispositivo (p. ej., Pioneer BT 1 Utilice MULTI-CONTROL para seleccio- unit) de esta unidad se mostrará en el display. nar Ring tone en el menú de funciones. 2 Pulse MULTI-CONTROL izquierda para 2 Pulse MULTI-CONTROL izquierda o de- visualizar la dirección BD. recha para seleccionar un tono de llamada. Aparece la cadena hexadecimal de 12 dígitos. Cada vez que se pulsa MULTI-CONTROL iz- # Pulse MULTI-CONTROL derecha para regre- quierda o derecha, se selecciona un tono de sar al nombre del dispositivo. timbre en el siguiente orden: OFF (tono de llamada desactivado)—BEEP1 (tono de llamada 1)—BEEP2 (tono de llamada Selección de la pantalla de 2)—BEEP3 (tono de llamada 3) llamadas entrantes Es posible seleccionar la pantalla de una lla- Cancelación del eco y reducción mada entrante. Puesto que esta función está de ruido disponible para cada usuario, cada uno de ellos puede seleccionar pantallas distintas. Cuando usa la función manos libres en el ve- hículo, puede que escuche un eco no desea- 1 Presione MULTI-CONTROL para visuali- do. Esta función reduce el ruido y el eco, y zar el menú principal. mantiene una cierta calidad de sonido. FUNCTION, AUDIO, ENTERTAINMENT y ! Esta función no se puede configurar para RECEIVING MOVIE aparecen en el display. cada teléfono de usuario distinto. Es 113
  • 114.
    Sección 02 Utilización de esta unidad 2 Utilice MULTI-CONTROL para seleccio- Ajustes de audio nar RECEIVING MOVIE. Haga girar el control para cambiar la opción Introducción a los ajustes de audio de menú y presiónelo para seleccionarla. 3 Utilice MULTI-CONTROL para seleccio- nar la pantalla. Haga girar el control para cambiar la opción de menú y presiónelo para seleccionarla. Pantalla 1—Pantalla 2—Pantalla 3—Pantalla 1 4 1 Visualización de audio Muestra el estado de los ajustes de audio. 1 Presione MULTI-CONTROL para visuali- zar el menú principal. FUNCTION, AUDIO y ENTERTAINMENT apa- recen en el display. 2 Utilice MULTI-CONTROL para seleccio- nar AUDIO. Haga girar el control para cambiar la opción de menú y presiónelo para seleccionarla. Aparece el nombre de la función de audio en el display. 3 Haga girar MULTI-CONTROL para selec- cionar la función de audio. Haga girar MULTI-CONTROL para cambiar entre las funciones de audio en el siguiente orden: Fader (ajuste del balance)—Powerful (ajuste del ecualizador gráfico)—50Hz (ajuste del ecualizador gráfico de 7 bandas)—LOUD (so- noridad)—Sub W.1 (ajuste de subgraves acti- vado/desactivado)—Sub W.2 (ajuste de subgraves)—Bass (intensificación de graves) —HPF (filtro de paso alto)—SLA (ajuste del nivel de fuente)—ASL (nivelador automático de sonido) # También se puede seleccionar la función de audio presionando AUDIO en el mando a distan- cia. # Se puede seleccionar Sub W.2 sólo cuando la salida de subgraves se activa en Sub W.1. # Cuando se seleccione el sintonizador de FM como fuente, no se puede cambiar a SLA. 114 Es
  • 115.
    Sección Utilizaciónde esta unidad 02 # Para volver a la visualización de cada fuente, Uso del ecualizador presione BAND. El ecualizador le permite ajustar la ecualiza- # Si no se utilizan las funciones exceptuando ción de acuerdo con las características acústi- 50Hz en unos 30 segundos, el display volverá cas del interior del automóvil. automáticamente a la visualización normal. Recuperación de las curvas de Uso del ajuste del balance Español ecualización Se puede cambiar el ajuste de fader/balance, Hay siete tipos de curvas de ecualización me- de manera que proporcione un entorno de morizadas que se pueden recuperar con facili- audio ideal en todos los asientos ocupados. dad en cualquier momento. A continuación se ofrece una lista de estas curvas de ecualiza- 1 Utilice MULTI-CONTROL para seleccio- ción: nar Fader. # Si el balance se ajustó con anterioridad, se vi- Visualización Curva de ecualización sualizará Balance. Powerful Potente 2 Presione MULTI-CONTROL arriba o Natural Natural abajo para ajustar el balance entre los alta- Vocal Vocal voces delanteros/traseros. Cada vez que se presiona MULTI-CONTROL Custom 1 Personalizada 1 arriba o abajo, se mueve el balance entre los Custom 2 Personalizada 2 altavoces delanteros/traseros hacia adelante o Flat Plana hacia atrás. Se visualiza F 15 a R 15 mientras el balance SuperBass (S.Bass) Supergraves entre los altavoces delanteros/traseros se ! Custom 1 y Custom 2 son curvas de ecua- mueve desde adelante hacia atrás. lización ajustadas creadas por el usuario. # F/R 0 es el ajuste apropiado cuando se usan Se pueden realizar los ajustes con un ecua- sólo dos altavoces. lizador gráfico de 7 bandas. # Cuando el ajuste de la salida posterior es ! Cuando se selecciona Flat no se introduce Rear SP :S/W, no se puede ajustar el balance ningún suplemento ni corrección en el so- entre los altavoces delanteros/traseros. Consulte nido. Esto es útil para verificar el efecto de Ajuste de la salida posterior y del controlador de los ajustes de ecualización al cambiar alter- subgraves en la página 122. nativamente entre Flat y una curva de 3 Presione MULTI-CONTROL izquierda o ecualización ajustada. derecha para ajustar el balance entre los al- % Presione EQ para seleccionar el ecuali- tavoces izquierdos/derechos. zador. Cada vez que se presiona MULTI-CONTROL iz- Presione EQ repetidamente para cambiar quierda o derecha, se mueve el balance entre entre las siguientes opciones: los altavoces izquierdos/derechos hacia la iz- Powerful—Natural—Vocal—Custom 1— quierda o hacia la derecha. Custom 2—Flat—SuperBass (S.Bass) Se visualiza L 15 a R 15 mientras el balance entre los altavoces izquierdos/derechos se mueve desde la izquierda hacia la derecha. Es 115
  • 116.
    Sección 02 Utilización de esta unidad Ajuste de las curvas de ecualización ! Se puede crear una curva Custom 2 Las curvas de ecualización que vienen predefi- común a todas las fuentes. Si se realizan nidas de fábrica, con la excepción de Flat, se ajustes cuando la curva Custom 2 está se- pueden ajustar a un nivel preciso (control de leccionada, la curva Custom 2 se actuali- matiz). zará. 1 Utilice MULTI-CONTROL para seleccio- 1 Recupere la curva de ecualización que nar el ajuste del ecualizador gráfico. desea ajustar. Powerful aparece en el display. Consulte Recuperación de las curvas de ecuali- Si se ha seleccionado anteriormente la curva zación en la página anterior. de ecualización, se visualizará la curva selec- 2 Utilice MULTI-CONTROL para seleccio- cionada previamente en lugar de Powerful. nar el ajuste del ecualizador gráfico de 7 2 Presione MULTI-CONTROL izquierda o bandas. derecha para seleccionar una curva de La frecuencia y el nivel (p. ej., 50Hz +4) apare- ecualización. cen en el display. Cada vez que se presiona MULTI-CONTROL iz- 3 Pulse MULTI-CONTROL izquierda o de- quierda o derecha, se seleccionan las curvas recha para seleccionar la banda de ecuali- de ecualización en el siguiente orden: zación a ajustar. Powerful—Natural—Vocal—Custom 1— Cada vez que se pulsa MULTI-CONTROL iz- Custom 2—Flat—SuperBass (S.Bass) quierda o derecha, se seleccionan las bandas 3 Presione MULTI-CONTROL arriba o de ecualización en el siguiente orden: abajo para ajustar la curva de ecualización. 50Hz—125Hz—315Hz—800Hz—2kHz— Cada vez que se presiona MULTI-CONTROL 5kHz—12,5kHz arriba o abajo, se aumenta o disminuye la 4 Pulse MULTI-CONTROL arriba o abajo curva de ecualización, respectivamente. para ajustar el nivel de la banda de ecuali- Se visualiza +6 a –4 (o –6) mientras se aumen- zación. ta o disminuye la curva de ecualización. Cada vez que se pulsa MULTI-CONTROL arri- # La gama real de ajustes difiere de acuerdo ba o abajo, se aumenta o disminuye el nivel con la curva de ecualización seleccionada. de la banda de ecualización. # No se puede ajustar una curva de ecualiza- Se visualiza +6 a –6 mientras se aumenta o ción con todas las frecuencias definidas en 0. disminuye el nivel. # Se puede seleccionar otra banda y ajustar su Ajuste del ecualizador gráfico de 7 nivel. bandas Para las curvas de ecualización Custom 1 y 5 Presione BAND para cancelar el ajuste Custom 2, se puede ajustar el nivel de cada del ecualizador gráfico de 7 bandas. banda. ! Se puede crear una curva Custom 1 sepa- Ajuste de la sonoridad rada por cada fuente. (El lector de CD in- La sonoridad compensa las deficiencias en corporado y el lector de CD múltiple se las gamas de sonido bajas y altas cuando se fijan al mismo ajuste de ecualización auto- escucha a un volumen bajo. máticamente.) Si se realizan ajustes cuan- do una curva distinta a Custom 2 está 1 Utilice MULTI-CONTROL para seleccio- seleccionada, los ajustes de la curva de nar LOUD. ecualización se memorizarán en Custom 1. 116 Es
  • 117.
    Sección Utilizaciónde esta unidad 02 2 Presione MULTI-CONTROL para activar 1 Utilice MULTI-CONTROL para seleccio- la sonoridad. nar Sub W.2. El nivel de sonoridad (p. ej., Mid) aparece en # Cuando la salida de subgraves está activada, el display. se puede seleccionar Sub W.2. # Para desactivar la sonoridad, vuelva a presio- nar MULTI-CONTROL. 2 Presione MULTI-CONTROL izquierda o derecha para seleccionar la frecuencia de Español 3 Presione MULTI-CONTROL izquierda o corte. derecha para seleccionar el nivel deseado. Cada vez que se presiona MULTI-CONTROL iz- Cada vez que se presiona MULTI-CONTROL iz- quierda o derecha, se selecciona una frecuen- quierda o derecha, se selecciona un nivel en cia de corte en el siguiente orden: el siguiente orden: 50Hz—63Hz—80Hz—100Hz—125Hz Low (bajo)—Mid (medio)—High (alto) Sólo las frecuencias más bajas que aquéllas en la gama seleccionada se generan por el al- tavoz de subgraves. Uso de la salida de subgraves Esta unidad está equipada con una salida de 3 Presione MULTI-CONTROL arriba o subgraves que se puede activar o desactivar. abajo para ajustar el nivel de salida del al- tavoz de subgraves. 1 Utilice MULTI-CONTROL para seleccio- Cada vez que se pulsa MULTI-CONTROL arri- nar Sub W.1. ba o abajo, se aumenta o disminuye el nivel de subgraves. Se visualiza +6 a –24 mientras 2 Presione MULTI-CONTROL para activar se aumenta o disminuye el nivel. la salida de subgraves. Normal aparece en el display. Se activa la sali- da de subgraves. Intensificación de los graves # Para desactivar la salida de subgraves, vuelva La función de intensificación de graves inten- a pulsar MULTI-CONTROL. sifica el nivel de sonido grave inferior a 100 Hz. Mientras más se aumenta el nivel de gra- 3 Pulse MULTI-CONTROL izquierda o de- ves, más se enfatiza el sonido grave y el soni- recha para seleccionar la fase de la salida do completo se vuelve más potente. Al usar de subgraves. esta función con el altavoz de subgraves, se Pulse MULTI-CONTROL izquierda para selec- intensifica el sonido bajo la frecuencia de cionar la fase inversa y Reverse aparece en el corte. display. Pulse MULTI-CONTROL derecha para seleccionar la fase normal y Normal aparece 1 Utilice MULTI-CONTROL para seleccio- en el display. nar Bass. Configuración de los ajustes de 2 Pulse MULTI-CONTROL hacia arriba o subgraves abajo para seleccionar el nivel deseado. Se visualiza 0 a +6 mientras se aumenta o dis- Cuando la salida de subgraves está activada, minuye el nivel. se puede ajustar la frecuencia de corte y el nivel de salida del altavoz de subgraves. Es 117
  • 118.
    Sección 02 Utilización de esta unidad Uso del filtro de paso alto 2 Utilice MULTI-CONTROL para seleccio- Cuando no desea que se generen los sonidos nar SLA. bajos de la gama de frecuencias de salida de 3 Pulse MULTI-CONTROL arriba o abajo subgraves a través de los altavoces delanteros para ajustar el volumen de la fuente. o traseros, active el filtro de paso alto (HPF). Cada vez que se presiona MULTI-CONTROL Sólo las frecuencias más altas que aquéllas arriba o abajo, se aumenta o disminuye el vo- en la gama seleccionada se generan a través lumen de la fuente. de los altavoces delanteros o traseros. Se visualiza SLA +4 a SLA –4 mientras se au- 1 Utilice MULTI-CONTROL para seleccio- menta o disminuye el volumen de la fuente. nar HPF. Notas 2 Presione MULTI-CONTROL para activar ! El nivel del volumen del sintonizador de MW/ el filtro de paso alto. LW también se puede ajustar con el ajuste del 80Hz aparece en el display. Se activa el filtro nivel de fuente. de paso alto. ! El reproductor de CD incorporado y el repro- # Si el filtro de paso alto se ha ajustado con an- ductor de CD múltiple se definen automática- terioridad, se visualizará la frecuencia previamen- mente con el mismo ajuste del nivel de te seleccionada en lugar de 80Hz. fuente. # Para desactivar el filtro de paso alto, vuelva a ! La unidad externa 1 y la unidad externa 2 se pulsar MULTI-CONTROL. definen automáticamente con el mismo ajus- 3 Presione MULTI-CONTROL izquierda o te del nivel de fuente. derecha para seleccionar la frecuencia de corte. Uso del nivelador automático Cada vez que se presiona MULTI-CONTROL iz- quierda o derecha, se selecciona una frecuen- de sonido cia de corte en el siguiente orden: Al conducir su automóvil, los ruidos en el ve- 50Hz—63Hz—80Hz—100Hz—125Hz hículo cambian de acuerdo con la velocidad Sólo las frecuencias más altas que aquéllas de conducción y las condiciones de la carrete- en la gama seleccionada se generan a través ra. El nivelador automático de sonido (ASL) de los altavoces delanteros o traseros. controla los niveles variables de estos ruidos y aumenta el volumen automáticamente, si los ruidos alcanzan niveles más altos. La sensibili- Ajuste de los niveles de la fuente dad (variación del nivel de volumen según el La función SLA (ajuste del nivel de fuente) le nivel de ruido) de la función ASL se puede permite ajustar el nivel de volumen de cada ajustar en uno de los cinco niveles disponi- fuente para evitar cambios radicales en el vo- bles. lumen cuando se cambia entre las fuentes. 1 Utilice MULTI-CONTROL para seleccio- ! Los ajustes se basan en el nivel de volumen nar ASL. del sintonizador de FM, que se mantiene inalterado. 2 Presione MULTI-CONTROL para activar el ASL. 1 Compare el nivel de volumen del sinto- Mid aparece en el display. nizador de FM con el de la fuente que # Para desactivar la función ASL, vuelva a pre- desea ajustar. sionar MULTI-CONTROL. 118 Es
  • 119.
    Sección Utilizaciónde esta unidad 02 3 Presione MULTI-CONTROL izquierda o Ajustes iniciales derecha para seleccionar el nivel del ASL deseado. Configuración de los ajustes Cada vez que se presiona MULTI-CONTROL iz- iniciales quierda o derecha, se selecciona un nivel del Utilizando los ajustes iniciales, puede perso- ASL en el siguiente orden: nalizar varios ajustes del sistema para lograr Low (bajo)—Mid-L (medio-bajo)—Mid un funcionamiento óptimo de esta unidad. Español (medio)—Mid-H (medio-alto)—High (alto) 1 1 Visualización de función Muestra el estado de la función. 1 Mantenga presionado SOURCE hasta que se apague la unidad. 2 Mantenga presionado MULTI-CONTROL hasta que Language select aparezca en el display. # También puede realizar esta operación mante- niendo presionado FUNCTION del mando a dis- tancia. 3 Haga girar MULTI-CONTROL para selec- cionar uno de los ajustes iniciales. Haga girar MULTI-CONTROL para cambiar entre las funciones en el siguiente orden: Es 119
  • 120.
    Sección 02 Utilización de esta unidad Language select (selección de idioma)— Ajuste de la fecha Calendar (calendario)—Clock (reloj)— La visualización de calendario ajustada en Off clock (reloj de apagado)—FM step (paso este modo aparece cuando la fuente del telé- de sintonía de FM)—Auto PI (búsqueda PI fono está seleccionada y las fuentes o la de- automática)—Warning tone (tono de adver- mostración de características están tencia)—Face auto open (apertura automáti- desactivadas. ca de la cara)—AUX1 (entrada auxiliar 1)— AUX2 (entrada auxiliar 2)—Dimmer (atenua- 1 Utilice MULTI-CONTROL para seleccio- dor de luz)—Brightness (brillo)—S/W control nar Calendar. (salida posterior y controlador de subgraves) —Mute (silenciamiento/atenuación del soni- 2 Pulse MULTI-CONTROL izquierda o de- do)—Demonstration (demostración de carac- recha para seleccionar el segmento de la vi- terísticas)—Reverse mode (modo inverso)— sualización de calendario que desea Ever-scroll (desplazamiento continuo)— ajustar. BT AUDIO (Bluetooth audio)—Pin code input Al pulsar MULTI-CONTROL izquierda o dere- (ingreso de código PIN)—Edit device name cha se seleccionará un solo segmento de la vi- (edición del nombre de dispositivo)— sualización del calendario: BT Version Info. (información de versión de Día—Mes—Año Bluetooth)—BT reset (reajuste de Bluetooth) Al seleccionar las horas o los minutos de la vi- Siga las instrucciones que se indican a conti- sualización de calendario, los dígitos seleccio- nuación para operar cada ajuste en particular. nados destellarán. # También se puede seleccionar la función pre- 3 Pulse MULTI-CONTROL arriba o abajo sionando FUNCTION en el mando a distancia. para ajustar la fecha. # Para cancelar los ajustes iniciales, presione BAND. # No se puede seleccionar BT AUDIO cuando Ajuste del reloj se ha conectado el reproductor de audio Blue- Siga estas instrucciones para ajustar el reloj. tooth. 1 Utilice MULTI-CONTROL para seleccio- nar Clock. Selección del idioma de visualización 2 Pulse MULTI-CONTROL izquierda o de- Para una mayor comodidad, esta unidad in- recha para seleccionar el segmento de la vi- cluye un display en varios idiomas. Es posible sualización del reloj que desea ajustar. seleccionar el idioma más adecuado como pri- Al pulsar MULTI-CONTROL izquierda o dere- mera opción de idioma. cha se seleccionará un solo segmento de la vi- sualización del reloj: 1 Utilice MULTI-CONTROL para seleccio- Hora—Minuto nar Language select. Al seleccionar las horas o los minutos de la vi- sualización del reloj, los dígitos seleccionados 2 Presione MULTI-CONTROL para seleccio- destellarán. nar el idioma. Cada vez que se presiona MULTI-CONTROL, 3 Presione MULTI-CONTROL arriba o se seleccionan los idiomas en el siguiente abajo para ajustar el reloj. orden: English—Français—Italiano—Español— Deutsch—Nederlands—РУССКИЙ 120 Es
  • 121.
    Sección Utilizaciónde esta unidad 02 Nota Nota Se puede sincronizar el reloj con una señal tem- El paso de sintonía es de 50 kHz durante la sinto- poral pulsando MULTI-CONTROL. nización manual. ! Si los minutos son 00 a 29, éstos se redon- dean hacia abajo. (p. ej., 10:18 se redondea en 10:00.) Cambio de la búsqueda PI ! Si los minutos son 30 a 59, éstos se redon- automática Español dean hacia arriba. (p. ej., 10:36 se redondea La unidad puede buscar automáticamente en 11:00.) una emisora diferente con el mismo progra- ma, aun durante la recuperación de emisoras presintonizadas. Activación y desactivación de la visualización del reloj de apagado 1 Utilice MULTI-CONTROL para seleccio- Si la visualización del reloj de apagado está nar Auto PI. activada, cuando las fuentes y la demostra- 2 Presione MULTI-CONTROL para activar ción de características estén desactivadas, la la función de búsqueda PI automática. visualización de reloj aparecerá en el display. # Para desactivar la función de búsqueda PI 1 Utilice MULTI-CONTROL para seleccio- automática, vuelva a pulsar MULTI-CONTROL. nar Off clock. 2 Pulse MULTI-CONTROL para activar la Cambio del tono de advertencia visualización del reloj de apagado. Si no se extrae la carátula de la unidad princi- # Para desactivar la visualización del reloj de pal dentro de los cuatro segundos después de apagado, pulse MULTI-CONTROL nuevamente. desconectar la llave de encendido del automó- vil, se emitirá un tono de advertencia. Se puede desactivar el tono de advertencia. Ajuste del paso de sintonía de FM Normalmente, el paso de sintonía de FM em- 1 Utilice MULTI-CONTROL para seleccio- pleado por la sintonización por búsqueda es nar Warning tone. de 50 kHz. Si la función AF o TA está activada, 2 Pulse MULTI-CONTROL para activar el el paso de sintonía cambia automáticamente tono de advertencia. a 100 kHz. Puede ser conveniente ajustar el # Para desactivar el tono de advertencia, vuelva paso de sintonía a 50 kHz si la función AF está a pulsar MULTI-CONTROL. activada. 1 Utilice MULTI-CONTROL para seleccio- Cambio de la apertura nar FM step. automática de la cara 2 Presione MULTI-CONTROL para seleccio- Como medida antirrobo, esta unidad posee nar el paso de sintonía de FM. una carátula extraíble. Para facilitar su extrac- Al presionar MULTI-CONTROL repetidamente ción, la carátula se abre automáticamente. se cambiará el paso de sintonía de FM entre Esta función está activada de forma predefini- 50 kHz y 100 kHz mientras la función AF o TA da. está activada. El paso de sintonía de FM selec- cionado aparecerá en el display. 1 Utilice MULTI-CONTROL para seleccio- nar Face auto open. Es 121
  • 122.
    Sección 02 Utilización de esta unidad 2 Presione MULTI-CONTROL para activar 2 Presione MULTI-CONTROL izquierda o la apertura automática de la cara. derecha para ajustar el nivel de brillo. # Vuelva a presionar MULTI-CONTROL para de- Se visualiza 0 a 15 mientras se aumenta o dis- sactivar la apertura automática de la cara. minuye el nivel. # Cuando el atenuador de luz está activado (ON), el nivel de brillo se puede ajustar de 0 a 10. Cambio del ajuste de un equipo auxiliar Los equipos auxiliares conectados a esta uni- Ajuste de la salida posterior y dad se pueden activar por separado. Al utili- del controlador de subgraves zarla, fije en ON cada fuente AUX. Para La salida posterior de esta unidad (salida de obtener información sobre cómo conectar o cables de altavoces traseros y salida RCA pos- utilizar equipos auxiliares, consulte Uso de la terior) se puede usar para la conexión de alta- fuente AUX en la página 126. voces de toda la gama (Rear SP :F.Range) o subgraves (Rear SP :S/W). Si se cambia el 1 Utilice MULTI-CONTROL para seleccio- ajuste de la salida posterior a Rear SP :S/W, nar AUX1/AUX2. se podrá conectar el cable de altavoces trase- ros directamente al altavoz de subgraves sin 2 Presione MULTI-CONTROL para activar necesidad de usar un amplificador auxiliar. AUX1/AUX2. Inicialmente, la unidad está ajustada para una # Para desactivar la función AUX, vuelva a pul- conexión de altavoces traseros de toda la sar MULTI-CONTROL. gama (Rear SP :F.Range). Cambio del ajuste del 1 Utilice MULTI-CONTROL para seleccio- nar S/W control. atenuador de luz Para evitar que el display quede muy brillante 2 Pulse MULTI-CONTROL para cambiar el durante la noche, éste se atenúa automática- ajuste de la salida posterior. mente cuando se encienden las luces del Al pulsar MULTI-CONTROL se cambiará entre automóvil. Se puede activar y desactivar el ate- Rear SP :F.Range (altavoz de toda la gama) y nuador de luz. Rear SP :S/W (altavoz de subgraves), y se vi- sualizará el estado correspondiente. 1 Utilice MULTI-CONTROL para seleccio- # Cuando no se conecta el altavoz de subgraves nar Dimmer. a la salida posterior, seleccione Rear SP :F.Range. # Cuando se conecta el altavoz de subgraves a 2 Presione MULTI-CONTROL para activar la salida posterior, seleccione Rear SP :S/W para el atenuador de luz. el altavoz. # Para desactivar el atenuador de luz, vuelva a presionar MULTI-CONTROL. Notas ! Aunque cambie este ajuste, no se producirá Ajuste del brillo ningún sonido a menos que active la salida Puede ajustar el brillo del display. El ajuste ini- de subgraves (consulte Uso de la salida de cial de este modo es 12. subgraves en la página 117). ! Si cambia este ajuste, la salida de subgraves 1 Utilice MULTI-CONTROL para seleccio- vuelve a los ajustes de fábrica en el menú de nar Brightness. audio. 122 Es
  • 123.
    Sección Utilizaciónde esta unidad 02 ! Las salidas de cables de altavoces traseros y Notas la salida RCA posterior se cambian simultá- neamente en este ajuste. ! Recuerde que si este modo de demostración sigue funcionando cuando el motor del ve- hículo está apagado, se puede descargar la Cambio del silenciamiento/ batería. atenuación del sonido ! También puede activar o desactivar la demos- Español El sonido proveniente de este sistema se silen- tración de características, presionando cia o atenúa automáticamente cuando se reci- DISPLAY mientras la unidad está apagada. be la señal desde el equipo con función de Para obtener más detalles, consulte Modo de silenciamiento. demostración de características en la página ! El sonido se silencia o atenúa, se visualizan 75. MUTE o ATT y no se puede ajustar el audio. Cambio del modo inverso ! El sonido proveniente de este sistema vuel- Si no se realiza ninguna operación en unos 30 ve a la normalidad cuando se cancela el si- segundos, las indicaciones de la pantalla co- lenciador o la atenuación. mienzan a invertirse y siguen haciéndolo cada 1 Utilice MULTI-CONTROL para seleccio- 10 segundos. nar Mute. 1 Utilice MULTI-CONTROL para seleccio- 2 Pulse MULTI-CONTROL para cambiar el nar Reverse mode. modo de silenciador/atenuación de teléfo- 2 Presione MULTI-CONTROL para activar no. el modo inverso. Al presionar MULTI-CONTROL se cambiará # Para desactivar el modo inverso, vuelva a pre- entre TEL ATT (atenuación) y TEL mute (silen- sionar MULTI-CONTROL. ciamiento), y se visualizará el estado corres- pondiente. Nota También puede activar o desactivar el modo inver- Cambio de la demostración de so, presionando BAND mientras la unidad está características apagada. Para obtener más detalles, consulte La demostración de características se inicia Modo inverso en la página 75. automáticamente cuando se apaga la unidad mientras la llave de encendido está en ACC u ON. Cambio del desplazamiento continuo 1 Utilice MULTI-CONTROL para seleccio- Si la función de desplazamiento continuo está nar Demonstration. activada, la información de texto grabada en el CD o iPod se desplazará de manera ininte- 2 Presione MULTI-CONTROL para activar rrumpida. Desactive la función si desea que la la demostración de características. información se desplace una sola vez. # Para desactivar la demostración de caracterís- ticas, vuelva a presionar MULTI-CONTROL. 1 Utilice MULTI-CONTROL para seleccio- nar Ever-scroll. Es 123
  • 124.
    Sección 02 Utilización de esta unidad 2 Presione MULTI-CONTROL para activar 3 Presione MULTI-CONTROL izquierda o la función de desplazamiento continuo. derecha para mover el cursor a la anterior # Para desactivar la función de desplazamiento o siguiente posición. continuo, vuelva a presionar MULTI-CONTROL. 4 Después de ingresar el código PIN (hasta 16 dígitos), presione Activación de la fuente BT Audio MULTI-CONTROL para almacenarlo en esta Es necesario activar la fuente BT Audio para unidad. utilizar un reproductor de audio Bluetooth. # Al presionar MULTI-CONTROL derecha en el Este ajuste está activado de forma predetermi- display de confirmación, se volverá al display de nada. Si no utiliza BT Audio, puede desactivar- ingreso de código PIN y se podrá cambiar. lo. # Si se ha especificado un carácter no válido, no se muestran los caracteres siguientes. 1 Utilice MULTI-CONTROL para seleccio- # Si se ha especificado un carácter no válido al nar BT AUDIO. inicio, el código PIN no se puede almacenar en la memoria. 2 Pulse MULTI-CONTROL para encender la fuente BT Audio. # Para apagar la fuente BT Audio, vuelva a pul- Edición del nombre del dispositivo sar MULTI-CONTROL. Es posible editar el nombre del dispositivo. # Si se desactiva BT AUDIO en los ajustes ini- El ajuste predefinido del nombre del dispositi- ciales, se borra en esta unidad el historial del re- vo es Pioneer BT unit. productor de audio Bluetooth conectado más recientemente. 1 Utilice MULTI-CONTROL para seleccio- nar Edit device name. Ingreso del código PIN para la 2 Presione DISPLAY para seleccionar el conexión inalámbrica Bluetooth tipo de carácter deseado. Para conectar su teléfono móvil a esta unidad Presione DISPLAY repetidamente para cam- a través de tecnología inalámbrica Bluetooth, biar entre los siguientes tipos de caracteres: debe ingresar el código PIN en su teléfono Alfabeto (mayúsculas)—Alfabeto (minúscu- para verificar la conexión. El código predefini- las)—Números y símbolos do es 0000, aunque puede cambiarlo en esta 3 Presione MULTI-CONTROL arriba o función. abajo para seleccionar una letra del alfabe- ! En algunos reproductores de audio Blue- to. tooth, es posible que tenga que ingresar previamente el código PIN de su reproduc- 4 Presione MULTI-CONTROL izquierda o tor de audio Bluetooth en esta unidad para derecha para mover el cursor a la anterior que esté lista para una conexión desde su o siguiente posición de carácter. reproductor. 5 Después de ingresar el nombre del dis- 1 Utilice MULTI-CONTROL para seleccio- positivo, presione MULTI-CONTROL para al- nar Pin code input. macenarlo en esta unidad. # Al presionar MULTI-CONTROL derecha en el 2 Pulse MULTI-CONTROL arriba o abajo display de confirmación, se volverá al display de para seleccionar un número. ingreso del nombre del dispositivo y se podrá # También puede presionar 0 a 9 en el mando a cambiar. distancia para seleccionar un número. 124 Es
  • 125.
    Sección Utilizaciónde esta unidad 02 # Si se ha especificado un carácter no válido, 1 Utilice MULTI-CONTROL para seleccio- no se muestran los caracteres siguientes. nar BT reset. # Si se ha especificado un carácter no válido al inicio, el nombre del dispositivo no se puede al- 2 Pulse MULTI-CONTROL derecha para macenar en la memoria. mostrar una pantalla de confirmación. Se visualiza Clear memory YES. El borrado de memoria se ajustará ahora en modo en espe- Visualización de la versión del Español ra. sistema para tareas de reparación # Si no desea reajustar la memoria del teléfono, Si se produce un fallo de funcionamiento en presione MULTI-CONTROL izquierda. Se cambia- la unidad y debe ponerse en contacto con un rá el display. concesionario para que realice la reparación, 3 Pulse MULTI-CONTROL para borrar la es posible que tenga que indicar la versión del memoria. sistema de esta unidad y el módulo Bluetooth. Se muestra Cleared y se eliminan los Puede visualizar las versiones y confirmarlas. ajustes. 1 Utilice MULTI-CONTROL para seleccio- nar BT Version Info. Se muestra la versión del sistema (micropro- cesador) de esta unidad. 2 Presione MULTI-CONTROL izquierda para cambiar a la versión del módulo Blue- tooth de esta unidad. # Si se presiona MULTI-CONTROL derecha, re- gresa a la versión del sistema de esta unidad. Reajuste del módulo de tecnología inalámbrica Bluetooth Es posible eliminar los datos del teléfono Blue- tooth y del reproductor de audio Bluetooth. Para proteger la información personal, le reco- mendamos eliminar estos datos antes de transferir la unidad a otras personas. Se elimi- narán los siguientes ajustes. ! Entradas del directorio de teléfonos en el teléfono Bluetooth ! Números de presintonía que haya en el te- léfono Bluetooth ! Asignación de registro del teléfono Blue- tooth ! Historial de llamadas del teléfono Blue- tooth ! Historial del reproductor de audio Blue- tooth conectado más recientemente Es 125
  • 126.
    Sección 02 Utilización de esta unidad Otras funciones Selección de AUX como la fuente % Presione SOURCE para seleccionar AUX Uso de la fuente AUX como la fuente. Esta unidad puede controlar hasta dos com- # Si el ajuste auxiliar no está activado, no es po- ponentes auxiliares, como VCR o dispositivos sible seleccionar AUX. Para obtener más deta- portátiles (se venden por separado). Cuando lles, consulte Cambio del ajuste de un equipo están conectados, los componentes auxiliares auxiliar en la página 122. son identificados automáticamente como fuentes AUX y se asignan a AUX1 o AUX2. La relación entre las fuentes AUX1 Y AUX2 se ex- Ajuste del título AUX plica a continuación. Se puede cambiar el título que se visualiza para cada fuente AUX1 o AUX2. Acerca de AUX1 y AUX2 1 Después de haber seleccionado AUX Existen dos métodos a su disposición para co- como la fuente, utilice MULTI-CONTROL y nectar equipos auxiliares a esta unidad. seleccione FUNCTION para visualizar TitleInput "A". Fuente AUX1: 2 Ingrese un título siguiendo el mismo Al conectar un equipo auxiliar utilizando un procedimiento que con el reproductor de cable miniconector estéreo CD incorporado. Para obtener más información sobre el funcio- % Inserte el miniconector estéreo en el co- namiento, consulte Ingreso de títulos de discos nector de entrada de esta unidad. en la página 90. Para obtener más información, consulte el manual de instalación. La asignación de este equipo auxiliar se fija Uso de diferentes visualizaciones automáticamente a AUX1. de entretenimiento Se puede disfrutar de distintas visualizaciones Fuente AUX2: de entretenimiento mientras se escucha cada Al conectar equipos auxiliares usando un Inter- fuente. conector IP-BUS-RCA (se vende por separado) 1 Presione MULTI-CONTROL para visuali- % Use un Interconector IP-BUS-RCA como zar el menú principal. el CD-RB20/CD-RB10 (se vende por separa- FUNCTION, AUDIO y ENTERTAINMENT apa- do) para conectar esta unidad a un equipo recen en el display. auxiliar provisto de una salida RCA. Para obtener más detalles, consulte el manual 2 Utilice MULTI-CONTROL para seleccio- de instrucciones del Interconector IP-BUS- nar ENTERTAINMENT. RCA. Haga girar el control para cambiar la opción La asignación de este equipo auxiliar se fija de menú y presiónelo para seleccionarla. automáticamente a AUX2. 3 Utilice MULTI-CONTROL para cambiar la # Sólo puede hacer este tipo de conexión si el visualización. equipo auxiliar tiene salidas RCA. Haga girar el control para cambiar la opción de menú y presiónelo para seleccionarla. 126 Es
  • 127.
    Sección Utilizaciónde esta unidad 02 BGV-1 (presentación visual de fondo 1)— % Mantenga pulsado PGM para activar la BGV-2 (presentación visual de fondo 2)— función BSSM al seleccionar el televisor BGP-1 (imagen de fondo 1)—BGP-2 (imagen como la fuente. de fondo 2)—BGP-3 (imagen de fondo 3)— Mantenga presionado PGM hasta que se acti- BGP-4 (imagen de fondo 4)—SIMPLE-1 (dis- ve la función BSSM. play simple 1)—SIMPLE-2 (display simple 2)— # Para cancelar el proceso de almacenamiento, LEVEL METER (medidor de nivel)— vuelva a presionar PGM. Español VISUALIZER-1 (visualizador 1)— VISUALIZER-2 (visualizador 2)— VISUALIZER-3 (visualizador 3)— SPECTRUM ANALYZER-1 (analizador de es- pectro 1)—SPECTRUM ANALYZER-2 (analiza- dor de espectro 2)—MOVIE (película)— ENT CLOCK (reloj de entretenimiento) # Para volver a la visualización de reproducción, presione BAND. Uso del botón PGM Se pueden utilizar las funciones preprograma- das de cada fuente con PGM en el mando a distancia. % Presione PGM para activar la pausa al seleccionar las siguientes fuentes: ! CD – Reproductor de CD incorporado ! iPod – iPod ! Multi CD – Reproductor de CD múltiple ! USB – Reproductor de audio portátil USB/ memoria USB ! BT Audio – Reproductor de audio Blue- tooth ! DVD – Reproductor de DVD/reproductor de DVD múltiple # Para desactivar la pausa, vuelva a presionar PGM. % Mantenga pulsado PGM para activar la función BSM al seleccionar el sintonizador como la fuente. Mantenga presionado PGM hasta que se acti- ve la función BSM. # Para cancelar el proceso de almacenamiento, vuelva a presionar PGM. Es 127
  • 128.
    Sección 03 Accesorios disponibles Adaptador USB 3 Para realizar el avance rápido o retroce- so, mantenga pulsado MULTI-CONTROL iz- Funciones básicas quierda o derecha. Se puede utilizar esta unidad para controlar un adaptador USB, que se vende por separado. 4 Para saltar y retroceder o avanzar hasta Para obtener más información, consulte el otro fichero de audio comprimido, presione manual de instrucciones del adaptador USB. MULTI-CONTROL izquierda o derecha. Esta sección proporciona información acerca de las funciones del reproductor de audio por- Selección directa de un fichero tátil USB/memoria USB con esta unidad que de audio en la carpeta actual difieren de las descritas en el manual de ins- trucciones del adaptador de USB. Es básicamente la misma operación que la ! Es posible que la unidad no funcione de del reproductor de CD incorporado. manera óptima según el reproductor de Para obtener más información sobre el funcio- audio portátil USB/memoria USB conec- namiento, consulte Selección directa de una tado. pista en la página 88. Introducción a las funciones avanzadas 1 Presione MULTI-CONTROL para visuali- zar el menú principal. FUNCTION, AUDIO y ENTERTAINMENT apa- recen en el display. 2 Utilice MULTI-CONTROL para seleccio- 1 Indicador WMA/MP3/AAC nar FUNCTION. Muestra el tipo de fichero que se está repro- Haga girar el control para cambiar la opción duciendo actualmente. de menú y presiónelo para seleccionarla. 2 Indicador del número de carpeta Aparece el nombre de la función en el display. 3 Indicador de número de pista 4 Indicador de tiempo de reproducción 3 Haga girar MULTI-CONTROL para selec- 5 Indicador de la velocidad de grabación cionar la función. Haga girar MULTI-CONTROL para cambiar 1 Presione SOURCE para seleccionar USB. entre las funciones en el siguiente orden: 2 Pulse MULTI-CONTROL arriba o abajo Play mode (repetición de reproducción)— para seleccionar una carpeta. Random mode (reproducción aleatoria)— # No se puede seleccionar una carpeta que no Scan mode (reproducción con exploración)— tenga un fichero de audio comprimido grabado Pause (pausa) # También se puede seleccionar la función pre- en ella. sionando FUNCTION en el mando a distancia. # Para volver a la carpeta 01 (RAÍZ), mantenga # Para volver a la visualización de reproducción, presionado BAND. Sin embargo, si la carpeta 01 presione BAND. (RAÍZ) no contiene ficheros, la reproducción co- # Si no se utilizan las funciones en unos 30 se- menzará en la carpeta 02. gundos, el display volverá automáticamente a la visualización normal. 128 Es
  • 129.
    Sección Accesoriosdisponibles 03 Función y operación ! La reproducción con exploración busca el fi- Las operaciones Play mode, Random mode, chero dentro de la gama de repetición selec- Scan mode y Pause son básicamente las mis- cionada. mas que las del reproductor de CD incorpora- Cuando se utiliza Track repeat o do. Folder repeat, el comienzo del cada fichero de la carpeta se reproduce durante alrededor Nombre de la función Operación de 10 segundos. Cuando se utiliza All repeat, Español Consulte Selección de una el comienzo de cada fichero del reproductor gama de repetición de repro- de audio portátil USB/memoria USB se repro- ducción en la página 88. duce durante alrededor de 10 segundos. Pero las gamas de repeti- ! Una vez finalizada la exploración, volverá a co- ción para la reproducción menzar la reproducción normal de los fiche- que puede seleccionar son diferentes a las de un re- ros. productor de CD incorpora- do. Las gamas de Play mode repetición para el reproduc- Visualización de información tor de audio portátil USB/ memoria USB son como se de texto de un fichero de audio indican a continuación: Es la misma operación que la del reproductor ! Track repeat – Sólo re- de CD incorporado. pite el fichero actual Consulte Visualización de información de texto ! Folder repeat – Repite la carpeta actual en el disco en la página 91. ! All repeat – Repite ! Si los caracteres grabados en el fichero de todos los ficheros audio no son compatibles con esta unidad, no aparecerán en el display. Consulte Reproducción de Random mode las pistas en orden aleatorio en la página 89. Selección de ficheros de la lista Consulte Exploración de car- Scan mode petas y pistas en la página de nombres de ficheros 89. Es la misma operación que la del reproductor Consulte Pausa de la repro- de CD incorporado. Pause ducción de un disco en la Consulte Selección de pistas de la lista de nom- página 89. bres de ficheros en la página 91. Notas ! Si se selecciona otra carpeta durante la repeti- ción de reproducción, la gama de repetición cambia a All repeat. ! Si se realiza una búsqueda de pistas o el avan- ce rápido/retroceso durante la repetición Track repeat, la gama de repetición cambia a Folder repeat. ! Cuando se selecciona Folder repeat, no se puede reproducir una subcarpeta de esa car- peta. Es 129
  • 130.
    Sección 03 Accesorios disponibles Reproductor de CD múltiple 4 Para saltar y retroceder o avanzar hasta otra pista, presione MULTI-CONTROL iz- Funciones básicas quierda o derecha. Se puede usar esta unidad para controlar un re- productor de CD múltiple, que se vende por se- Notas parado. ! Mientras el reproductor de CD múltiple realiza ! Sólo las funciones descritas en este manual las funciones preparatorias, se visualiza son compatibles con los reproductores de Ready. CD múltiple de 50 discos. ! Si aparece un mensaje de error como ! Esta unidad no está diseñada para utilizar ERROR-11, consulte el manual de instruccio- las funciones de lista de títulos de los discos nes del reproductor de CD múltiple. con un reproductor de CD múltiple de 50 dis- ! Si no hay discos en el cargador de CD del re- cos. Consulte Selección de discos de la lista productor de CD múltiple, se visualiza de títulos de los discos en la página 133 para No Disc. obtener información sobre las funciones de lista de títulos de los discos. Selección directa de una pista Es básicamente la misma operación que la del reproductor de CD incorporado. Para obtener más información sobre el funcio- namiento, consulte Selección directa de una pista en la página 88. Introducción a las funciones 1 Indicador de número de disco avanzadas 2 Indicador de número de pista Puede utilizar Compression (compresión y 3 Indicador de tiempo de reproducción DBE) sólo con un reproductor de CD múltiple compatible con ellas. 1 Presione SOURCE para seleccionar el re- productor de CD múltiple. 1 Presione MULTI-CONTROL para visuali- zar el menú principal. 2 Presione MULTI-CONTROL arriba o FUNCTION, AUDIO y ENTERTAINMENT apa- abajo para seleccionar el disco que desea recen en el display. escuchar. # También se puede seleccionar un disco, utili- 2 Utilice MULTI-CONTROL para seleccio- zando los botones 1 a 6 en el mando a distancia. nar FUNCTION. ! Para los discos 1 a 6, pulse el número del Haga girar el control para cambiar la opción botón correspondiente. de menú y presiónelo para seleccionarla. ! Para los discos 7 a 12, mantenga pulsados Aparece el nombre de la función en el display. los números correspondientes, como 1 para el disco 7, hasta que el número del 3 Haga girar MULTI-CONTROL para selec- disco aparezca en la pantalla. cionar la función. Haga girar MULTI-CONTROL para cambiar 3 Para realizar el avance rápido o retroce- entre las funciones en el siguiente orden: so, mantenga pulsado MULTI-CONTROL iz- quierda o derecha. 130 Es
  • 131.
    Sección Accesoriosdisponibles 03 Play mode (repetición de reproducción)— Consulte Pausa de la repro- Random mode (reproducción aleatoria)— Pause ducción de un disco en la Scan mode (reproducción con exploración)— página 89. Pause (pausa)—Compression (compresión y Consulte Uso de la compre- DBE)—ITS play mode (reproducción ITS)— sión y BMX en la página 89. ITS memo (programación ITS)— El reproductor de CD múlti- TitleInput "A" (ingreso de títulos de discos) ple dispone de función DBE (enfatizador dinámico Español # También se puede seleccionar la función pre- de graves) en lugar de sionando FUNCTION en el mando a distancia. Compression BMX. # Para volver a la visualización de reproducción, Los ajustes pueden cam- presione BAND. biarse de la siguiente ma- nera: # Si no se utilizan las funciones exceptuando COMP OFF—COMP 1— ITS memo y TitleInput "A" en unos 30 segun- COMP 2—COMP OFF— dos, el display volverá automáticamente a la vi- DBE 1—DBE 2 sualización normal. Consulte Uso de listas de ITS play mode reproducción ITS en la pági- na siguiente. Función y operación Las operaciones Play mode, Random mode, Consulte Uso de listas de ITS memo reproducción ITS en la pági- Scan mode, Pause, Compression y na siguiente. TitleInput "A" son básicamente las mismas que las del reproductor de CD incorporado. Consulte Ingreso de títulos TitleInput "A" de discos en la página 133. Nombre de la función Operación Consulte Selección de una Notas gama de repetición de repro- ducción en la página 88. ! Si se seleccionan otros discos durante la repe- Pero las gamas de repeti- tición de reproducción, la gama de repetición ción para la reproducción cambia a M-CD repeat. que puede seleccionar son ! Si se realiza una búsqueda de pistas o el avan- diferentes a las de un re- productor de CD incorpora- ce rápido/retroceso durante la repetición do. Las gamas de Track repeat, la gama de repetición cambia a repetición para la repro- Disc repeat. Play mode ducción del reproductor de ! Una vez finalizada la exploración de pistas o CD múltiple son como se indican a continuación: discos, volverá a comenzar la reproducción ! M-CD repeat – Repite normal de las pistas. todos los discos que se ! Al reproducir un disco CD TEXT en un repro- encuentran en el repro- ductor de CD múltiple compatible con CD ductor de CD múltiple TEXT, no se podrá cambiar a TitleInput "A". ! Track repeat – Sólo re- El título del disco ya se ha grabado en un pite la pista actual ! Disc repeat – Repite el disco CD TEXT. disco actual Consulte Reproducción de Random mode las pistas en orden aleatorio en la página 89. Consulte Exploración de car- Scan mode petas y pistas en la página 89. Es 131
  • 132.
    Sección 03 Accesorios disponibles Uso de listas de reproducción ITS Reproducción de la lista de La función ITS (selección instantánea de reproducción ITS pista) le permite crear una lista de reproduc- La reproducción ITS le permite escuchar las ción de las pistas favoritas incluidas en el car- pistas que ha ingresado en su lista de repro- gador del reproductor de CD múltiple. ducción ITS. Cuando activa la reproducción Después de añadir sus pistas favoritas a la ITS, se comenzarán a reproducir las pistas de lista de reproducción, puede activar la repro- la lista de reproducción ITS en el reproductor ducción ITS y reproducir sólo las pistas selec- de CD múltiple. cionadas. 1 Seleccione la gama de repetición. Consulte Reproducción de las pistas en orden Creación de una lista de reproducción aleatorio en la página 89. con la programación ITS Puede utilizar la función ITS para ingresar y re- 2 Utilice MULTI-CONTROL para seleccio- producir hasta 99 pistas por disco desde hasta nar ITS play mode en el menú de funcio- 100 discos (incluidos los títulos de los discos). nes. (Con reproductores de CD múltiple vendidos 3 Presione MULTI-CONTROL para activar antes del CDX-P1250 y del CDX-P650, es posi- la reproducción ITS. ble guardar hasta 24 pistas en la lista de repro- La reproducción de las pistas de la lista co- ducción.) mienza en la gama de repetición 1 Reproduzca el CD que desea progra- M-CD repeat o Disc repeat seleccionada con mar. anterioridad. Pulse MULTI-CONTROL arriba o abajo para # Si no hay pistas programadas en la gama ac- seleccionar el CD. tual de reproducción ITS, se visualiza ITS empty. # Vuelva a pulsar MULTI-CONTROL para desac- 2 Utilice MULTI-CONTROL para seleccio- tivar la reproducción ITS. nar ITS memo en el menú de funciones. 3 Seleccione la pista deseada pulsando Borrado de una pista de la lista de MULTI-CONTROL izquierda o derecha. reproducción ITS Puede eliminar una pista de la lista de repro- 4 Pulse MULTI-CONTROL arriba para al- ducción ITS si la función de reproducción ITS macenar la pista que se está reproduciendo está activada. actualmente en la lista de reproducción. Si la reproducción ITS ya está activada, vaya al Se visualiza Memory complete y se agrega la paso 2. Si la reproducción ITS todavía no está pista actual a la lista de reproducción. activada, utilice MULTI-CONTROL. 5 Presione BAND para volver a la visuali- 1 Reproduzca el CD que tiene la pista que zación de reproducción. desea eliminar de la lista de reproducción ITS y active la reproducción ITS. Nota Consulte Reproducción de la lista de reproduc- Una vez que los datos para 100 discos han sido ción ITS en esta página. almacenados en la memoria, los datos para un 2 Utilice MULTI-CONTROL para seleccio- nuevo disco se sobreponen a los datos más anti- nar ITS memo en el menú de funciones. guos. 132 Es
  • 133.
    Sección Accesoriosdisponibles 03 3 Seleccione la pista deseada pulsando Ingreso de títulos de discos MULTI-CONTROL izquierda o derecha. Utilice la función de ingreso de títulos de dis- cos para almacenar hasta 100 títulos de CD 4 Presione MULTI-CONTROL abajo para (con la lista de reproducción ITS) en el repro- eliminar la pista de la lista de reproducción ductor de CD múltiple. Cada título puede ITS. tener una longitud de hasta 10 caracteres. La pista que se está reproduciendo se borra Para obtener más información sobre el funcio- Español de la lista de reproducción ITS y comienza la namiento, consulte Ingreso de títulos de discos reproducción de la próxima pista de la lista. en la página 90. # Si no hay pistas de la lista de reproducción en ! Los títulos se conservan en la memoria, la gama actual, se visualiza ITS empty y se rea- aun después de que se retiren los discos nuda la reproducción normal. del cargador, y se recuperan cuando se 5 Presione BAND para volver a la visuali- vuelven a colocar los discos correspondien- zación de reproducción. tes. ! Una vez que los datos para 100 discos han sido almacenados en la memoria, los datos Borrado de un CD de la lista de para un nuevo disco se sobreponen a los reproducción ITS datos más antiguos. Puede borrar todas las pistas de un CD de la lista de reproducción ITS, si la función de re- Visualización de los títulos de discos producción ITS está desactivada. Puede visualizar la información de texto en 1 Reproduzca el CD que desea borrar. cualquier disco al cual se le haya ingresado Pulse MULTI-CONTROL arriba o abajo para un título de disco. seleccionar el CD. Es la misma operación que la del reproductor de CD incorporado. 2 Utilice MULTI-CONTROL para seleccio- Consulte Visualización de información de texto nar ITS memo en el menú de funciones. en el disco en la página 91. 3 Presione MULTI-CONTROL abajo para borrar todas las pistas del CD que se está Selección de discos de la lista de reproduciendo de la lista de reproducción títulos de los discos ITS. Esta función le permite ver la lista de los títu- Todas las pistas del CD que se está reprodu- los de los discos que se han ingresado en el ciendo se borran de la lista de reproducción y reproductor de CD múltiple y seleccionar uno se visualiza Memory deleted. de ellos para su reproducción. 4 Presione BAND para volver a la visuali- 1 Presione LIST para cambiar al modo de zación de reproducción. lista de títulos de los discos durante la vi- sualización de reproducción. Uso de las funciones de títulos 2 Utilice MULTI-CONTROL para seleccio- de discos nar el título del disco deseado. Se pueden ingresar títulos de CD y visualizar- Haga girar el control para cambiar el título del los. De esta manera, se puede buscar y selec- disco y presione para reproducirlo. cionar con facilidad el disco deseado. # También puede cambiar el título del disco pul- sando MULTI-CONTROL arriba o abajo. Es 133
  • 134.
    Sección 03 Accesorios disponibles # Cuando reproduzca un disco CD TEXT, presio- Reproductor de DVD ne MULTI-CONTROL derecha para visualizar una lista de las pistas en el disco seleccionado. Pre- Funciones básicas sione MULTI-CONTROL izquierda para volver a la Se puede utilizar esta unidad para controlar un lista del disco. reproductor de DVD o un reproductor de DVD # Si no se ha ingresado un título para un disco, múltiple, que se vende por separado. se visualizará No D.Title. Para obtener más información sobre el funcio- # Se visualiza No Disc al lado del número del namiento, consulte el manual de funciona- disco cuando no hay discos en el cargador. miento del reproductor DVD o del reproductor de DVD múltiple. Esta sección proporciona in- formación acerca de las funciones de DVD Uso de las funciones CD TEXT con esta unidad que difieren de las descritas Estas funciones sólo se pueden usar con un re- en el manual de instrucciones del reproductor productor de CD múltiple compatible con CD de DVD o del reproductor de DVD múltiple. TEXT. Es la misma operación que la del reproductor de CD incorporado. Consulte Visualización de información de texto en el disco en la página 91. 1 Indicador DVD-V/VCD/CD/MP3/WMA Muestra el tipo de disco que se está reprodu- ciendo actualmente. 2 Indicador de número de disco Muestra el número de disco que se está repro- duciendo al utilizar el reproductor de DVD múltiple. 3 Indicador de número de Título/Carpeta Muestra el título (al reproducir vídeo DVD) o la carpeta (al reproducir audio comprimido) de la selección que se está reproduciendo ac- tualmente. 4 Indicador de número de capítulo/pista Muestra el capítulo (al reproducir un vídeo DVD) o la pista (al reproducir un vídeo CD, CD o audio comprimido) que se está reproducien- do actualmente. 5 Indicador de tiempo de reproducción 1 Presione SOURCE para seleccionar el re- productor de DVD o el de DVD múltiple. 134 Es
  • 135.
    Sección Accesoriosdisponibles 03 2 Para realizar el avance rápido o retroce- Play mode (repetición de reproducción)— so, mantenga pulsado MULTI-CONTROL iz- Pause (pausa) quierda o derecha. Durante la reproducción de un CD Play mode (repetición de reproducción)— 3 Para saltar y retroceder o avanzar hasta Random mode (reproducción aleatoria)— otro capítulo/pista, presione Scan mode (reproducción con exploración)— MULTI-CONTROL izquierda o derecha. Pause (pausa)—ITS play mode (reproducción Español ITS)—ITS memo (ingreso ITS)— Selección de un disco TitleInput "A" (ingreso de títulos de discos) Durante la reproducción de audio compri- ! Se puede utilizar esta función sólo si un re- mido productor de DVD múltiple está conectado Play mode (repetición de reproducción)— a esta unidad. Random mode (reproducción aleatoria)— % Presione cualquiera de los botones 1 a Scan mode (reproducción con exploración)— 6 para seleccionar el disco deseado. Pause (pausa) # También se puede seleccionar la función pre- sionando FUNCTION en el mando a distancia. Selección de una carpeta # Para volver a la visualización de reproducción, ! Puede utilizar esta función sólo cuando presione BAND. hay conectado a esta unidad, un reproduc- tor de DVD que corresponde a la reproduc- Función y operación ción de audio comprimido. Las operaciones Play mode, Random mode, Scan mode, Pause y TitleInput "A" son bási- % Pulse MULTI-CONTROL arriba o abajo camente las mismas que las del reproductor para seleccionar una carpeta. de CD incorporado. También, las operaciones ITS play mode y Introducción a las funciones ITS memo son básicamente las mismas que avanzadas las del reproductor de CD múltiple. 1 Presione MULTI-CONTROL para visuali- zar el menú principal. FUNCTION, AUDIO y ENTERTAINMENT apa- recen en el display. 2 Utilice MULTI-CONTROL para seleccio- nar FUNCTION. Haga girar el control para cambiar la opción de menú y presiónelo para seleccionarla. Aparece el nombre de la función en el display. 3 Haga girar MULTI-CONTROL para selec- cionar la función. Haga girar MULTI-CONTROL para cambiar entre las funciones en el siguiente orden: Durante la reproducción de un vídeo DVD o un vídeo CD Es 135
  • 136.
    Sección 03 Accesorios disponibles Nombre de la función Operación ! Durante la reproducción de un vídeo CD o un CD, si se realiza una búsqueda de pistas o el Consulte Selección de una avance rápido/retroceso durante la repetición gama de repetición de repro- ducción en la página 88. Track repeat, la gama de repetición cambia a Pero la gama de repetición Disc repeat. de reproducción que puede ! Durante la reproducción de audio comprimi- seleccionar varía según el do, si se selecciona otra carpeta durante la re- tipo de disco o sistema. Las gamas de repetición para petición de reproducción, la gama de la reproducción del repro- repetición para la reproducción cambia a ductor de DVD/reproductor Disc repeat. de DVD múltiple son como ! Durante la reproducción de audio comprimi- se indican a continuación: do, si se realiza una búsqueda de pistas o el Play mode Durante la reproducción PBC de un vídeo CD, no se avance rápido/retroceso durante puede utilizar esta función. Track repeat, la gama de repetición de repro- ! Disc repeat – Repite el ducción cambia a Folder repeat. disco actual ! También se puede conectar a esta unidad un ! Folder repeat – Repite reproductor de DVD múltiple con funciones la carpeta actual ! Title repeat – Sólo re- ITS y funciones de títulos de discos. En este pite el título actual caso, pueden controlarse ITS play mode, ! Chapter repeat – Sólo ITS memo y el ingreso de títulos de discos. repite el capítulo actual ! La función ITS de un reproductor de DVD es li- ! Track repeat – Sólo re- geramente diferente de la reproducción ITS pite la pista actual con un reproductor de CD múltiple. En el caso Consulte Reproducción de del reproductor de DVD múltiple, la reproduc- Random mode las pistas en orden aleatorio ción ITS sólo se puede utilizar al reproducir en la página 89. CD. Para obtener más información, consulte Consulte Exploración de car- Uso de listas de reproducción ITS en la página Scan mode petas y pistas en la página 132. 89. Consulte Pausa de la repro- Pause ducción de un disco en la página 89. Consulte Uso de listas de ITS play mode reproducción ITS en la pági- na 132. Consulte Uso de listas de ITS memo reproducción ITS en la pági- na 132. Consulte Ingreso de títulos TitleInput "A" de discos en la página 90. Notas ! Si se seleccionan otros discos durante la repe- tición de reproducción, la gama de repetición cambia a Disc repeat. 136 Es
  • 137.
    Sección Accesorios disponibles 03 Sintonizador de TV # Si mantiene presionado MULTI-CONTROL iz- quierda o derecha, podrá saltar los canales. La Funciones básicas sintonización por búsqueda comienza inmediata- Se puede utilizar esta unidad para controlar un mente después de que suelte MULTI-CONTROL. sintonizador de TV, que se vende por separado. Para obtener más información, consulte el manual de instrucciones del sintonizador de Almacenamiento y Español TV. Esta sección proporciona información recuperación de emisoras acerca de las funciones de TV con esta unidad Se pueden almacenar con facilidad hasta 12 que difieren de las descritas en el manual de emisoras para recuperarlas posteriormente. instrucciones del sintonizador de TV. ! Se pueden almacenar en la memoria hasta 24 emisoras, 12 por cada una de las dos bandas de TV. 1 Cuando encuentre la emisora que desea almacenar en la memoria presione LIST. 2 Utilice el MULTI-CONTROL para almace- nar la emisora seleccionada en la memoria. Haga girar el control para cambiar el número 1 Indicador de banda de presintonía, mantenga pulsado para alma- 2 Indicador del número de presintonía cenarlo. 3 Indicador de canal El número de presintonía que ha seleccionado parpadeará y permanecerá encendido. La emi- 1 Presione SOURCE para seleccionar el TV. sora seleccionada se ha almacenado en la memoria. 2 Presione BAND para seleccionar una banda. 3 Utilice MULTI-CONTROL para seleccio- Pulse BAND hasta que visualice la banda de- nar la emisora deseada. seada: TV-1 o TV-2. Haga girar el control para cambiar la emisora y pulse para seleccionarla. 3 Para utilizar la sintonización manual, # También puede cambiar la emisora pulsando pulse MULTI-CONTROL izquierda o dere- MULTI-CONTROL arriba o abajo. cha. # Si no se utiliza la lista en unos 30 segundos, 4 Para utilizar la sintonización por bús- el display volverá automáticamente a la visualiza- queda, mantenga presionado ción normal. MULTI-CONTROL izquierda o derecha du- rante aproximadamente un segundo y Uso del mando a distancia luego suelte el control. También se pueden almacenar y recuperar las El sintonizador explorará los canales hasta emisoras asignadas a los botones de ajuste de que encuentre una emisora con señales de su- presintonías P.CH 1 a P.CH 6 utilizando el ficiente intensidad como para asegurar una mando a distancia. buena recepción. # Se puede cancelar la sintonización por bús- queda presionando MULTI-CONTROL izquierda o derecha. Es 137
  • 138.
    Sección 03 Accesorios disponibles % Cuando encuentre la emisora que 4 Utilice MULTI-CONTROL para seleccio- desea almacenar en la memoria, presione nar la emisora deseada. uno de los botones de ajuste de presinto- Haga girar el control para cambiar la emisora nías 1 a 6 y manténgalo presionado hasta y pulse para seleccionarla. que el número de presintonía deje de des- # También puede cambiar la emisora pulsando tellar. MULTI-CONTROL arriba o abajo. El número seleccionado destellará en el indi- # Para volver a la visualización del canal, pulse cador del número de presintonía y quedará ilu- BAND. minado. La emisora seleccionada se ha # Si no se utiliza la lista en unos 30 segundos, almacenado en la memoria. el display volverá automáticamente a la visualiza- La próxima vez que presione el mismo botón ción normal. de ajuste de presintonías, la emisora se recu- perará de la memoria. Nota # También se pueden recuperar las emisoras Al almacenar emisoras con la función BSSM, se asignadas a los números de ajuste de presinto- pueden reemplazar las emisoras que se almace- nías presionando MULTI-CONTROL arriba o naron con P.CH 1 a P.CH12. abajo durante la visualización de canales. Almacenamiento consecutivo de las emisoras con las señales más fuertes 1 Presione MULTI-CONTROL para visuali- zar el menú principal. FUNCTION, AUDIO y ENTERTAINMENT apa- recen en el display. 2 Utilice MULTI-CONTROL y seleccione FUNCTION para visualizar BSSM. Haga girar el control para cambiar la opción de menú y presiónelo para seleccionarla. # También se puede seleccionar la función pre- sionando FUNCTION en el mando a distancia. 3 Pulse MULTI-CONTROL para activar la función BSSM. Se visualiza Searching. Mientras se visualiza Searching, las 12 emisoras más fuertes se al- macenarán en orden ascendente desde el canal más bajo. Una vez finalizada la opera- ción, aparecerá la lista de canales presintoni- zados. # Para cancelar el proceso de almacenamiento, vuelva a pulsar MULTI-CONTROL. 138 Es
  • 139.
    Apéndice Informaciónadicional Solución de problemas El disco que se Reemplace el TRK SKIPPED ha colocado con- disco. tiene ficheros Síntoma Causa Acción WMA protegidos El iPod no fun- Los cables están Desconecte el con DRM ciona correcta- conectados inco- cable del iPod. Una mente. rrectamente. vez que aparezca el iPod menú principal del Español iPod, conecte el Mensaje Causa Acción cable nuevamente. ERROR-11 Falla de comuni- Desconecte el Reinicie el iPod. cación cable del iPod. Una vez que aparezca el menú principal del iPod, conecte el cable nuevamente. Para comprender los Reinicie el iPod. mensajes de error ERROR-21 Versión de iPod antigua Actualice la ver- sión del iPod. Cuando contacte con su concesionario o con ERROR-30 Falla del iPod Reinicie el iPod. el servicio técnico Pioneer más cercano, ase- ERROR-A0 El iPod no está Compruebe si el gúrese de anotar el mensaje de error. cargado pero cable de conexión funciona correc- del iPod está corto- Reproductor de CD incorporado tamente circuitado (p. ej., no queda pillado Mensaje Causa Acción entre objetos metá- ERROR-11, 12, Disco sucio Limpie el disco. licos). Una vez 17, 30 comprobado, acti- ve la llave de en- ERROR-11, 12, Disco rayado Reemplace el cendido o 17, 30 disco. desconecte el iPod ERROR-10, 11, Problema eléctri- Cambie la llave de y conéctelo de 12, 15, 17, 30, co o mecánico encendido del nuevo. A0 automóvil, o cam- No Songs No hay cancio- Transfiera cancio- bie a una fuente di- nes nes al iPod. ferente, y después vuelva a activar el STOP No hay cancio- Seleccione una reproductor de CD. nes en la lista ac- lista que contenga tual canciones. ERROR-15 El disco inser- Reemplace el tado no contiene disco. datos Bluetooth audio/teléfono ERROR-22, 23 No se puede re- Reemplace el Mensaje Causa Acción producir el for- disco. mato del CD ERROR-10 La unidad Blue- Gire la llave de con- tooth incorpora- tacto a la posición No Audio El disco que se Reemplace el da encontró un OFF (apagado) y ha colocado no disco. error ON (encendido). contiene ficheros que se puedan ERROR-80 La unidad FLASH Gire la llave de con- reproducir ROM incorpora- tacto a la posición da encontró un OFF (apagado) y PROTECT Todos los fiche- Reemplace el error ON (encendido). ros del disco disco. están protegidos con DRM Es 139
  • 140.
    Apéndice Información adicional Pautas para el manejo de ! Puede ocurrir que no sea posible reprodu- cir algunos discos debido a sus caracterís- discos y del reproductor ticas, formato, aplicación grabada, entorno ! Use únicamente discos que tengan uno de de reproducción, condiciones de almace- los siguientes dos logos. namiento u otras causas. ! Dependiendo del entorno en que se grabó la información de texto, puede que no se vi- sualice correctamente. ! Las vibraciones en las carreteras pueden interrumpir la reproducción de un disco. ! Lea las advertencias impresas que vienen ! Utilice sólo discos convencionales y com- con los discos antes de usarlos. pletamente circulares. No use discos con formas irregulares. Discos dobles ! Los discos dobles son discos de dos caras que incluyen CD grabable de audio en una ! Utilice un CD de 12 cm u 8 cm. No utilice cara y DVD grabable de vídeo en la otra un adaptador cuando reproduzca un CD de cara. 8 cm. ! Debido a que la cara CD de los discos do- ! No coloque ningún otro elemento que no bles no es físicamente compatible con el sea un CD en la ranura de carga de CD. estándar CD general, es posible que no se ! No use discos trizados, con picaduras, de- pueda reproducir la cara CD en esta uni- formados o dañados de otro modo, ya que dad. pueden causar daños al reproductor. ! La carga y expulsión frecuente de un disco ! No es posible reproducir discos CD-R/CD- doble puede producir rayaduras en el RW no finalizados. disco. Las rayaduras graves pueden produ- ! No toque la superficie grabada de los dis- cir problemas de reproducción en esta uni- cos. dad. En algunos casos, un disco doble ! Almacene los discos en sus cajas cuando pueden atascarse en la ranura de carga del no los utilice. disco y no se expulsará. Para evitarlo, reco- ! Evite dejar discos en ambientes excesiva- mendamos que no utilice un disco doble mente calientes o expuestos a la luz solar en esta unidad. directa. ! Consulte la información del fabricante del ! No fije etiquetas, no escriba ni aplique sus- disco para obtener más información sobre tancias químicas en la superficie de los los discos dobles. discos. ! Para limpiar un CD, pásele un paño suave desde el centro hacia afuera. Archivos de audio ! La condensación puede afectar temporal- mente el rendimiento del reproductor. Deje comprimidos que se adapte a la temperatura más cálida ! Según la versión del Windows Media Player durante aproximadamente una hora. Ade- utilizada para codificar los ficheros WMA, más, si los discos tienen humedad, séque- es posible que no se visualicen correcta- los con un paño suave. mente los nombres de álbumes y demás in- formación de texto. 140 Es
  • 141.
    Apéndice Informaciónadicional ! Según el software (o la versión del softwa- Ejemplo de una jerarquía re) utilizado para codificar los ficheros de : Carpeta audio, es posible que esta unidad no fun- : Archivo de audio comprimido cione correctamente. ! Es posible que ocurra un pequeño retardo al iniciar la reproducción de ficheros WMA/AAC codificados con datos de ima- 1 Español gen. 2 ! Conforme con ISO 9660 Nivel 1 y 2. Los sis- temas de archivo Romeo y Joliet son com- 3 patibles con este reproductor. 4 ! Es posible la reproducción multi-sesión. 5 ! Los ficheros de audio comprimidos no son 6 compatibles con la transferencia de datos en formato Packet Write. ! Se pueden visualizar sólo 64 caracteres Nivel 1 Nivel 2 Nivel 3 Nivel 4 desde el principio como nombre de fichero ! Esta unidad asigna los números de carpe- (incluida la extensión, como .wma, .mp3, tas. El usuario no puede asignarlos. .m4a o .wav) o nombre de carpeta. ! Se permite una jerarquía de carpetas de ! La secuencia de selección de carpetas u hasta ocho niveles. Sin embargo, la jerar- otras operaciones pueden cambiar, depen- quía práctica de carpetas es de menos de diendo del programa de codificación o es- dos niveles. critura. ! Es posible reproducir hasta 99 carpetas en ! Independientemente de la longitud de la un disco. sección en blanco que haya entre las can- ciones de la grabación original, los discos de audio comprimidos se reproducirán con Compatibilidad con audio una breve pausa entre canciones. comprimido ! Las extensiones de fichero como .wma, .mp3, .m4a o .wav se deben utilizar adecua- WMA damente. ! Formato compatible: WMA codificado con ! Los textos en ruso que se visualizarán en Windows Media Player Ver. 7, 7.1, 8, 9 o 10 esta unidad se deben codificar con los si- ! Velocidad de grabación: 48 kbps a 320 kbps guientes conjuntos de caracteres: (CBR), 48 kbps a 384 kbps (VBR) — Unicodes (UTF-8, UTF-16) ! Frecuencia de muestreo: 32 kHz a 48 kHz — Conjuntos de caracteres distintos de ! Windows Media Audio 9 Professional, Loss- Unicode que se usan en el entorno less, Voice: No Windows y están configurados a ruso MP3 en la configuración de idiomas múlti- ! Velocidad de grabación: 8 kbps a 320 kbps ples ! Frecuencia de muestreo: 16 kHz a 48 kHz ! Se pueden visualizar sólo 32 caracteres (32, 44,1, 48 kHz para énfasis) desde el principio como un nombre de fi- ! Versiones de etiqueta ID3 compatibles: 1.0, chero (incluida la extensión, como .wma, 1.1, 2.2, 2.3, 2.4 (la etiqueta ID3 Versión 2.x .mp3, .m4a o .wav) o un nombre de carpeta tiene prioridad sobre la Versión 1.x.) cuando utilice textos en ruso. ! Lista de reproducción M3u: No ! MP3i (MP3 interactivo), mp3 PRO: No Es 141
  • 142.
    Apéndice Información adicional AAC ! Al usar esta unidad no se puede desactivar ! Formato compatible: AAC codificados con la Repetición del iPod. Incluso si la desacti- iTunes® versión 6.0.5 y anteriores va, la Repetición cambiará automáticamen- ! Frecuencia de muestreo: 11,025 kHz a 48 te a Todos cuando conecte el iPod a esta kHz unidad. ! Velocidad de transmisión: 16 kbps a 320 kbps ! Apple Lossless: No WAV ! Formato compatible: Lineal PCM (LPCM), MS ADPCM ! Bits de cuantificación: 8 y 16 (LPCM), 4 (MS ADPCM) ! Frecuencia de muestreo: 16 kHz a 48 kHz (LPCM), 22,05 kHz a 44,1 kHz (MS ADPCM) Acerca del manejo del iPod PRECAUCIÓN ! Pioneer no asume responsabilidades por la pérdida de datos en el iPod, incluso si la pérdi- da ocurre durante el uso de esta unidad. ! No deje el reproductor el iPod expuesto a la luz solar directa durante un largo periodo de tiempo. La exposición prolongada a la luz solar puede causar un fallo de funcionamien- to del iPod como consecuencia de las altas temperaturas generadas. ! No deje el iPod en cualquier lugar expuesto a una temperatura elevada. ! Fije bien el iPod cuando conduzca. No deje caer el iPod al piso, ya que puede quedar atas- cado debajo del freno o del acelerador. Consulte los manuales del iPod para obtener mayores detalles. Acerca de los ajustes del iPod ! No se puede utilizar el Ecualizador del iPod en los productos Pioneer. Recomendamos que desactive el Ecualizador del iPod antes de conectar el iPod a esta unidad. 142 Es
  • 143.
    Apéndice Información adicional Especificaciones Discos utilizables .................... Disco compacto Formato de la señal: Generales Frecuencia de muestreo Fuente de alimentación ........ 14,4 V CC (10,8 a 15,1 V per- ........................................... 44,1 kHz misible) Número de bits de cuantificación Sistema de conexión a tierra ........................................... 16; lineal ..................................................... Tipo negativo Características de la frecuencia Consumo máximo de corriente ..................................................... 5 Hz a 20 000 Hz (±1 dB) Relación de señal a ruido .... 94 dB (1 kHz) (red IEC-A) Español ..................................................... 10,0 A Dimensiones (An × Al × Pr): Gama dinámica ........................ 92 dB (1 kHz) DIN Número de canales ................ 2 (estéreo) Bastidor .................... 178 × 50 × 165 mm Formato de decodificación MP3 Cara anterior .......... 188 × 58 × 16 mm ..................................................... MPEG-1 & 2 Audio Layer 3 D Formato de decodificación WMA Bastidor .................... 178 × 50 × 165 mm ..................................................... Ver. 7, 7.1, 8, 9, 10 (audio 2 Cara anterior .......... 170 × 45 × 16 mm canales) Peso ............................................... 1,68 kg (Windows Media Player) Formato de decodificación AAC Audio ..................................................... MPEG-4 AAC (sólo codifica- Potencia de salida máxima do con iTunes®) ..................................................... 50 W × 4 Formato de señal WAV ......... PCM lineal & MS ADPCM 50 W × 2/4 W + 70 W × 1/2 W (para altavoz de subgra- Sintonizador de FM ves) Gama de frecuencias ............ 87,5 MHz a 108,0 MHz Potencia de salida continua Sensibilidad utilizable ........... 8 dBf (0,7 µV/75 W, mono, ..................................................... 22 W × 4 (50 a 15 000 Hz, Señal/ruido: 30 dB) 5% THD, 4 W de carga, Relación de señal a ruido .... 75 dB (red IEC-A) ambos canales activados) Distorsión .................................... 0,3 % (a 65 dBf, 1 kHz, esté- Impedancia de carga ............. 4 W a 8 W × 4 reo) 4Wa8W×2+2W×1 0,1 % (a 65 dBf, 1 kHz, Nivel de salida máx. del preamplificador (Pre-out)/impe- mono) dancia de salida ....................... 4 V/100W Respuesta de frecuencia ..... 30 Hz a 15 000 Hz (±3 dB) Ecualizador (Ecualizador gráfico de 7 bandas): Separación estéreo ................. 45 dB (a 65 dBf, 1 kHz) Frecuencia ........................ 50/125/315/800/2k/5k/12,5k Hz Sintonizador de MW Gama de frecuencias ............ 531 kHz a 1 602 kHz (9 kHz) Ganancia ........................... ±12 dB Sensibilidad utilizable ........... 18 µV (Señal/ruido: 20 dB) Contorno de sonoridad: Relación de señal a ruido .... 65 dB (red IEC-A) Bajo ...................................... +3,5 dB (100 Hz), +3 dB (10 kHz) Sintonizador de LW Medio .................................. +10 dB (100 Hz), +6,5 dB Gama de frecuencias ............ 153 kHz a 281 kHz (10 kHz) Sensibilidad utilizable ........... 30 µV (Señal/ruido: 20 dB) Alto ....................................... +11 dB (100 Hz), +11 dB Relación de señal a ruido .... 65 dB (red IEC-A) (10 kHz) (volumen: –30 dB) Bluetooth HPF: Versión .......................................... Certificada para Bluetooth Frecuencia ........................ 50/63/80/100/125 Hz 1.2 Pendiente .......................... –12 dB/oct Potencia de salida ................... +4 dBm Máx. Altavoz de subgraves (mono): (Clase de potencia 2) Frecuencia ........................ 50/63/80/100/125 Hz Pendiente .......................... –18 dB/oct Nota Ganancia ........................... +6 dB a –24 dB Fase ...................................... Normal/Inversa Las especificaciones y el diseño están sujetos a Intensificación de graves: posibles modificaciones sin previo aviso. Ganancia ........................... +12 dB a 0 dB Reproductor de CD Sistema ........................................ Sistema de audio de discos compactos Es 143
  • 144.
    PIONEER CORPORATION 4-1, MEGURO1-CHOME, MEGURO-KU TOKYO 153-8654, JAPAN PIONEER ELECTRONICS (USA) INC. P.O. Box 1540, Long Beach, California 90801-1540, U.S.A. TEL: (800) 421-1404 PIONEER EUROPE NV Haven 1087, Keetberglaan 1, B-9120 Melsele, Belgium TEL: (0) 3/570.05.11 PIONEER ELECTRONICS ASIACENTRE PTE. LTD. 253 Alexandra Road, #04-01, Singapore 159936 TEL: 65-6472-7555 PIONEER ELECTRONICS AUSTRALIA PTY. LTD. 178-184 Boundary Road, Braeside, Victoria 3195, Australia TEL: (03) 9586-6300 PIONEER ELECTRONICS OF CANADA, INC. 300 Allstate Parkway, Markham, Ontario L3R OP2, Canada TEL: 1-877-283-5901 PIONEER ELECTRONICS DE MEXICO, S.A. de C.V. Blvd.Manuel Avila Camacho 138 10 piso Col.Lomas de Chapultepec, Mexico, D.F. 11000 TEL: 55-9178-4270 先鋒股份有限公司 Published by Pioneer Corporation. 總公司 : 台北市中山北路二段44號13樓 Copyright © 2006 by Pioneer Corporation. 電話 : (02) 2521-3588 All rights reserved. 先鋒電子(香港)有限公司 Publicado por Pioneer Corporation. 香港九龍尖沙咀海港城世界商業中心 Copyright © 2006 por Pioneer 9樓901-6室 Corporation. Todos los derechos 電話 : (0852) 2848-6488 reservados. Printed in Thailand Impreso en Tailandia <KMIZX> <06L00000> <CRD4201-A/N> EW