This document provides the owner's manual for a turntable player with AM/FM radio and recording capabilities. It includes instructions on powering the device, operating the radio, playing vinyl records, recording vinyl to digital formats, and using USB/SD functions. Safety warnings and notices are also presented.
This document provides an owner's manual for a device that functions as a CD/USB/SD player, FM stereo radio, and turntable. It describes the various components and controls of the device, and provides instructions for operating the CD/USB/SD player, FM radio, and turntable functions. Safety precautions are also listed to ensure proper usage of the electrical appliance.
Tourne Disque Classique, Platine Vinyle encoding USB, CD, Radio
Tourne disque classique USB, Platine vinyl avec encoding: convertez le vinyl en MP3 sur l'USB
This document provides an owner's manual for a retro AM/FM stereo radio with CD, USB, and SD playback as well as turntable recording capabilities. The 3 sentence summary is:
This owner's manual details the functions and operation of a stereo radio, CD/MP3 player, and turntable that can record to USB/SD, including listening to radio, CDs, and records as well as programming tracks, random playback, and encoding or copying between formats. The unit has inputs for USB, SD, auxiliary line-in and headphones with controls for playback, recording, and settings located on both the device and included remote control.
This document provides instructions for safely setting up and operating an AV receiver. It includes:
1. Important safety notes about avoiding electric shock from water or humidity, proper ventilation, using the correct voltage, and keeping small objects and liquids away from the device.
2. An overview of the control buttons and connection ports on the receiver and remote control.
3. Instructions for connecting speakers, audio/video devices, and antennas.
4. Guidance on selecting inputs, adjusting volume and settings, using radio functions, and troubleshooting issues.
This document provides important safety instructions for audio equipment. It lists 17 safety precautions regarding power sources, ventilation, cleaning, damage requiring service, and other operational guidelines. It also provides step-by-step instructions for unpacking, setting up, and operating a turntable, radio, cassette player, CD player, and SD/USB ports on an audio system.
The document is a user manual for the PS 430 four channel speaker station. It provides instructions for unpacking, installing, and operating the device, including descriptions of front panel controls and connectors, side panel connectors, internal controls, cabling guidelines, and technical specifications. The PS 430 allows for four channel communication and includes features such as a gooseneck microphone, loudspeaker, volume controls, talk and call buttons, and a headset connector.
The document is a user manual for the PS 130 single channel speaker station. It describes the features of the device such as front panel controls including volume control, talk and call buttons, sidetone trimmer, and gooseneck microphone. It also covers installation instructions for connecting the device to an intercom system and adjusting settings like speaker attenuation. The manual provides specifications and details on operating the device as part of an intercom communication system.
The document is a user manual for the PS 230 dual channel speaker station. It contains 10 sections that describe: 1) general information about the speaker station and its full duplex communication abilities. 2) unpacking instructions. 3) installation instructions including cabling guidelines. 4) an overview of the front panel controls and connectors. 5) side panel connectors. 6) internal controls. 7) additional cabling guidelines. 8) an explanation of the party line communication concept. 9) guarantee information. 10) technical specifications of the speaker station including power consumption and microphone specifications.
This document provides instructions for the TOPP PRO TPA GIG7.800-15 PACK audio equipment package. The package includes a TPM7.800 powered mixer with a 230W amplifier and 24-bit multi-effects processor, and two TPS 115 NEO passive speaker cabinets. The mixer provides 10 input channels, effects, equalization, and output options. The speaker cabinets are designed for quality and portability. The document reviews the features and controls of the mixer and advises reading the manual to take advantage of the full functionality.
This document is a user manual for the PS 155 wireless interface. It provides instructions on unpacking, installing, and operating the interface. The interface connects a wired partyline intercom system to a wireless intercom system. It splits and combines the audio signals, and includes volume controls and options to switch between receive and transmit modes, including push to talk, call, and voice activation. The manual describes the front panel controls, rear panel connections, operation modes, and technical specifications.
This document is a user manual for the PS 29 dual channel belt pack, providing instructions on installation, connections, controls and specifications. It describes connecting the belt pack to an existing intercom system via XLR connectors for two separate audio channels and power. The front panel includes independent volume and talk controls for each channel along with call buttons and indicators. The rear and side panels provide details on connections and internal adjustments.
This document is a user manual for the PS 630 six channel speaker station. It describes the front panel controls including volume knobs for each channel, talk and call buttons, a master volume knob, and sidetone trimmers. The rear panel connections include line connectors for each channel and a program input connector. Internal controls that can be adjusted include binaural jumper settings and call receive options.
Diario Libre entrevista a José Antonio LlorenteLLYC
Diario Libre de República Dominicana publica la conversación que mantuvo con José Antonio Llorente, Socio Fundador y Presidente de LLORENTE & CUENCA, sobre el papel de las redes sociales en las campañas electorales.
DCI développe des solutions adaptées à vos besoins pour la formation académique de vos médecins, infirmiers ou pharmaciens, en partenariat avec les universités françaises.
Riche du savoir-faire du SSA, DCI propose également des formations opérationnelles de sauvetage au combat ainsi que des formations de spécialité (NRBC, Tropical, Médecine navale, etc.).
The document discusses Islamic fundamentalism and terrorism, mentioning that Osama bin Laden was responsible for 9/11 but fled afterwards. It notes that while Islam is one of the largest religions, not all Muslims are terrorists. It also states that in Iraq, women do not receive respect. Saddam Hussein faced consequences for being a terrorist and killing many people, so he was killed.
Tocadiscos diseño madera. Tocadiscos Retro con entrada USB
218.30€
129.00€
Tocadiscos de diseño, secciones en madera. Tocadiscos de diseño claramente retro, pero aportando los avances de la tecnología actual. Entrada USB, mando a distancia, salidas para altavoces, tres velocidades, etc... Un buen Tocadiscos a un muy buen precio.
This document provides important safety instructions for audio equipment. It lists 17 safety precautions regarding power sources, ventilation, cleaning, damage requiring service, and more. It also includes instructions for unpacking, setting up, and operating a turntable, radio, cassette player, CD player, and accessories like the 45 RPM adapter.
1) The document provides safety instructions for a turntable player with stereo radio and USB/SD encoding functions.
2) It details 22 important safety instructions that users must follow to prevent fire, shock, or damage to the appliance.
3) The document also provides instructions on how to operate the various functions of the turntable player such as listening to the radio, playing music files from USB/SD cards, encoding vinyl records to digital files, and deleting files.
This document provides instructions for operating a stereo radio and USB/SD MP3 player. It includes:
- A diagram labeling the controls and connections of the device.
- Steps for listening to the radio, including tuning stations manually and tips for best reception.
- Directions for playing MP3/WMA songs from USB storage or an SD card, including how to connect media, control playback, switch folders, and use features like repeat, intro, and random modes.
- Requirements for MP3/WMA file formats and details on encoding CD/phonograph recordings directly into MP3 files to save on the connected storage media.
This document provides instructions for operating a turntable player with stereo radio and USB/SD encoding functions. It details the location and function of 30 controls on the device. It provides guidance on listening to the radio, playback of MP3/WMA files from USB/SD storage, and encoding vinyl records directly into MP3 files on external storage. Safety cautions are also provided.
The document provides safety and usage instructions for a digital piano, including precautions for using the AC adapter, connecting headphones and pedals, selecting tones and effects, and basic MIDI connections and settings. Warnings are given to always check the AC adapter for damage, use the specified CASIO adapter, and refer servicing to qualified personnel.
The document provides instructions and information for using the BOSS ME-20 Guitar Multiple Effects unit. It outlines the main features of the unit which include simple operation like a pedal board, overdrive/distortion solo function, memory storage of 30 sounds, and battery power. It also details important notes on power supply, maintenance, and data handling. Sections describe the front and rear panel components and their functions. Troubleshooting tips are provided for low battery, no power, and no sound issues. Support information directs the user to the Boss website.
This user manual provides instructions for installing and operating the PS 19M single channel beltpack intercom. The beltpack connects to an intercom system via XLR connectors and uses party line technology to allow full duplex communication over a single audio line. It has controls on the front and bottom for volume, talk, call, mic gain, and sidetone level. Cabling guidelines emphasize using shielded cable and connecting all cable shields to a central ground point.
The document is a user manual for the PS 19M single channel beltpack. It describes the beltpack's features like front panel controls for volume, talk, and call buttons. It details rear panel connectors for the line and headset and bottom controls for mic gain and sidetone trimming. It also covers cabling guidelines for connecting the beltpack to an intercom system.
This user manual provides instructions for installing and operating the PS 19M single channel beltpack intercom. The beltpack connects to an intercom system via XLR connectors and allows a user to communicate through a headset. It has controls on the front and bottom for adjusting volume, activating talk and call functions, and gain. Cabling guidelines emphasize using shielded cable and connecting all cable shields to a central ground point.
Blaupunkt-acr4230 car radio user manual.pdfssuser4df463
This document provides operating instructions for the ACR4230 car radio. It includes 3 pages of instructions covering radio operation, storing stations, cassette tape operation, and care instructions. The radio can receive FM frequencies from 87.5 to 108 MHz. It allows for storing stations in different memory banks and has features like autoreverse, fast forward/rewind, and traffic message reception. Maintenance tips recommend using only C60/C90 tapes and protecting cassettes from dirt.
This document provides instructions for operating a car CD/MP3 receiver. It contains safety warnings and explains how to use the various functions of the unit. Key points include:
- Warnings about electric shock and laser radiation from the unit.
- Descriptions of the front panel buttons for power, volume, source selection, equalizer and other functions.
- Instructions for installing the unit in a vehicle and making connections to speakers and an antenna.
- Procedures for basic operations like selecting sources, adjusting volume and settings the clock.
- Details on using the equalizer and sound settings to customize audio playback.
ZEB-JUKE_BAR_2510_UM-1.pdf bluetooth speaker best sound bardrumskarthi2416
ZEB Jukebar 2510 is a powerful soundbar designed keeping the best sleek style in mind for which its glossy finish is the evidence. Its superior sound-delivering ...
This document is a user manual for the PS 630 six channel speaker station. It describes the front panel controls including volume knobs for each channel, talk and call buttons, a master volume knob, and sidetone trimmers. The rear panel connections include line connectors for each channel and a program input connector. Internal controls that can be adjusted include binaural jumper settings and call receive options.
This document is a user manual for the PS 630 six channel speaker station. It describes the features of the device such as front panel controls including volume knobs and talk/call buttons for each channel. It also covers installation instructions for connecting the device to an intercom system and adjusting settings like sidetone levels. The manual provides specifications and details to help users understand and operate the PS 630.
1. The document provides operating instructions for a portable CD player, including how to insert and play CDs and MP3 files, use playback options like repeat and shuffle play, and connect to external devices.
2. It also contains warnings, product registration information, technical specifications, and a list of accessories.
3. The CD player allows the user to enjoy audio CDs and MP3 files with options like programming playback order and repeating songs.
The document is a user manual for the PS 130 single channel speaker station. It describes the features of the device such as front panel controls including volume control, talk and call buttons, sidetone trimmer, and gooseneck microphone. It also covers installation instructions for connecting the device to an intercom system and adjusting settings like speaker attenuation. The manual provides specifications and details on operating the device as part of an intercom communication system.
The document is a user manual for the PS 130 single channel speaker station. It describes the features of the device such as front panel controls including volume control, talk and call buttons, sidetone trimmer, and headset connector. It also covers installation instructions for connecting the device to an intercom system and adjusting settings like speaker attenuation. The manual provides specifications and details to help users understand and operate the PS 130 speaker station.
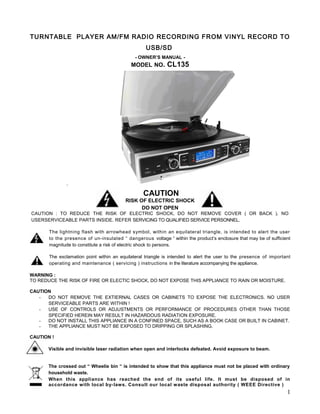
1. TURNTABLE PLAYER AM/FM RADIO RECORDING FROM VINYL RECORD TO
USB/SD
- OWNER’S MANUAL -
MODEL NO. CL135
CAUTION
RISK OF ELECTRIC SHOCK
DO NOT OPEN
CAUTION : TO REDUCE THE RISK OF ELECTRIC SHOCK, DO NOT REMOVE COVER ( OR BACK ). NO
USERSERVICEABLE PARTS INSIDE. REFER SERVICING TO QUALIFIED SERVICE PERSONNEL.
The lightning flash with arrowhead symbol, within an equilateral triangle, is intended to alert the user
to the presence of un-insulated “ dangerous voltage “ within the product’s enclosure that may be of sufficient
magnitude to constitute a risk of electric shock to persons.
The exclamation point within an equilateral triangle is intended to alert the user to the presence of important
operating and maintenance ( servicing ) instructions in the literature accompanying the appliance.
WARNING :
TO REDUCE THE RISK OF FIRE OR ELECTIC SHOCK, DO NOT EXPOSE THIS APPLIANCE TO RAIN OR MOISTURE.
CAUTION
- DO NOT REMOVE THE EXTIERNAL CASES OR CABINETS TO EXPOSE THE ELECTRONICS. NO USER
SERVICEABLE PARTS ARE WITHIN !
- USE OF CONTROLS OR ADJUSTMENTS OR PERFORMANCE OF PROCEDURES OTHER THAN THOSE
SPECIFIED HEREIN MAY RESULT IN HAZARDOUS RADIATION EXPOSURE.
- DO NOT INSTALL THIS APPLIANCE IN A CONFINED SPACE, SUCH AS A BOOK CASE OR BUILT IN CABINET.
- THE APPLIANCE MUST NOT BE EXPOSED TO DRIPPING OR SPLASHING.
CAUTION !
Visible and invisible laser radiation when open and interlocks defeated. Avoid exposure to beam.
The crossed out “ Wheelie bin “ is intended to show that this appliance must not be placed with ordinary
household waste.
When this appliance has reached the end of its useful life. It must be disposed of in
accordance with local by-laws. Consult our local waste disposal authority ( WEEE Directive )
1
3. LOCATION OF CONTROLS
1. Turntable
2. 45 RPM Adapter
3. Cue-lever (use this lever to lift the tone arm)
4. Tone Arm
5. Speed Selector
6. Tone Arm Holder
7. Dust Cover
8. Grill
9. Display
10. Bass Boost Button
11. Function Selector
12. Band Selector
13. Tuning Control
14. Skip + Button
15. Skip – Button
16. Mode Button (Program, Repeat 1, Repeat Album, Repeat All, Intro, Random)
17. IR Sensor
18. Record Button
19. Stop/USB/Card Button
20. Play / Pause Button
21. Volume Control
22. Headphone Jack
23. USB Port
24. SD/MMC Card Slot
25. Power Indicator
26. FM Antenna
27. Auto Stop (ON/OFF) Selector
28. Speaker connection
29. AC Power Cord
3
4. POWER SOURCE
This Unit is designed to only operate on normal 230V~ 50Hz household power. Do not attempt to
operate the System using any other power source. You could cause damage to the unit and void your
warranty.
The remote control unit operates on 1 CR2025 Lithium battery (Included).
AC OPERATION
1. Plug the AC POWER CORD into a 230V AC ~ 50Hz outlet.
2. Turn the System on by sliding the Function Selector (11) to either “TUNER”, “USB/SD” or
“PHONO”. The LCD backlight will turn on.
Mains plug should be regularly checked for any damage. If it is damaged do not operate the unit, seek
advice from a qualified service technician. Do not attempt to operate the unit on any other power
source as this could cause damage to the unit and void your warranty.
Remarks:
If there is a malfunction due to electrostatic discharge (ESD), reset the unit by unplugging the AC
CORD from the outlet, wait 30 seconds and then plug the AC CORD in again to reset to normal
operation.
RADIO OPERATION
1. Slide the FUNCTION Selector (11) to the “TUNER” position.
2. Slide the BAND Selector (12) to either AM, FM or FM ST (FM Stereo Mode).
3. Rotate the TUNING CONTROL (13) until you reach the radio station you wish to listen to. The
radio station frequency shows on the LCD DISPLAY.
4. Adjust the sound level by rotating the VOLUME CONTROL (21).
5. To turn off the radio, Slide the FUNCTION Selector (11) to the “OFF” position. The LCD DISPLAY
will go “off”.
FM stereo RECEPTION
1. With the BAND Selector (12) in the “FM ST” position, the FM Stereo Indicator “ ” will light
up when listening to a strong station that is broadcasting in “Stereo”.
2. Slide the BAND Selector (12) to the FM position if the FM stereo reception is weak. The
reception may improve, but the sound is now monaural (MONO).
TIPS FOR BEST RECEPTION
AM – The AM antenna is located inside the cabinet of the main unit. If AM reception is weak,
change the position of cabinet until the internal antenna picks up the strongest AM signal.
FM – During FM reception, always keep the FM Wire Antenna fully extended. If FM reception is
weak try repositioning the FM Wire Antenna until you find the strongest FM signal
PLAYING PHONO RECORDS
1. Raise the Turntable Dust Cover.
2. Remove the stylus protector and release the Tone Arm Clamp (6).
3. Slide the Function Selector (11) to “PHONO”.
4. Place a record on the turntable, over the center spindle.
5. Set the Speed Selector Switch to 33, 45 or 78 rpm according to
the record you are playing. Place the included 45 RPM adaptor (2)
over the center spindle when playing 45 rpm records.
6. Move the Tone Arm to the beginning of the record or to the beginning of a particular track. Gently
lower the Tone Arm onto the record to start playing. Adjust the Volume if needed. The Turntable
will stop automatically when the record finishes.
4
5. 7. To stop the record before it ends, lift the Tone Arm (4) using the Cue-lever (3) and return it
carefully onto the Tone Arm Clamp (6).
8. Replace the stylus protector on the stylus when not in use.
NOTE:
i. Do not stop or turn the platter manually.
ii. Moving or jarring the turntable without securing the Tone arm clamp could result in
damage to the Tone arm.
AUTO-STOP SWITCH OPERATION
The Auto-Stop area on some records may extend beyond the preset setting. As a result the turntable
could possibly stop before the last track finishes. If you experience this during playback, set the
AUTO-STOP Switch (27) located on the back of the unit to the “OFF” position. The turntable will now
run to the end of the record, but will no longer stop automatically. To stop the turntable you will need to
either set the Function Selector (11) to the OFF position or return the AUTO-STOP Switch (27) to the
“ON” position. After the record stops, lift and return the Tone Arm (4) carefully back onto the Tone Arm
Clamp (6).
IMPORTANT:
Moving or jarring the Turntable without securing the Tone Arm Clamp (6) could result in damage to the
Tone Arm (3).
USING HEADPHONES (NOT INCLUDED)
This System accepts stereo headphones with a 3.5mm plug and an impedance of 8 ohms or greater.
Inserting the plug of your headphones into the Headphone jack (22) will enable you to listen privately.
When using headphones, the speakers will be disconnected automatically.
READ THIS IMPORTANT INFORMATION BEFORE USING YOUR HEADPHONES
1. Avoid extended play at very high volume as it may impair your hearing.
2. If you experience ringing in your ears, reduce the volume or shut off your unit.
3. Keep the volume at a reasonable level even if your headset is an open-air type designed to allow
you to hear outside sounds. Please note that excessively high volume may still block outside
sounds.
NOTE:
We recommend that you reduce the volume control to a lower level before putting on the headphones.
After putting on the headphones, gradually increase the volume to a comfortable listening level.
ENCODING RECORDS(PHONO) TO MP3
You can convert you favorite records into MP3 files and store then on a USB Flash Drive or
SD/MMC Memory Card via the USB port (23) or SD/MMC slot (24) located on the front panel.
1. Insert a USB flash drive into the USB PORT (23) or an SD/MMC Memory Card into the
SD/MMC Slot (24) located on the front panel.
2. Press the RECORD Button (18), “REC” and “USB” will begin to flash in the display, If a USB
Flash Drive is inserted. If an SD/MMC Card is inserted then “REC” and “CARD” will flash in
the display. If both USB and SD/MMC card are inserted, then Icon “SEL” will also appear and
flash in the Display.
3. You can use the SKIP + Button (14) or the SKIP - Button (15) to select what media you want
to record to.
4. Select the track to be encoded and start playing the record.
5. Press the Record button to start sync encoding. The following will be displayed
depending on what media you are using to store the music.
5
6. Encoding to USB Encoding to Card
6. To stop encoding press the STOP/USB/SD Button (19).
Note: To ensure the encoding is successful, remove the USB or Card a few seconds after
pressing the STOP Button.
7. To start recording again, press the RECORD Button (18) again and follow step
#2 above.
PLEASE NOTE : If you want to encode an entire side of a record and have seperate MP3 files for
each track, you must manually press the STOP/USB/SD Button (19) at the end of each track and
then press the RECORD Button (18) again to start recording the next track. If you do not manually
Stop and Start the recording process after each track, you will end up with one large MP3 file that
will have all the songs from the side of the record playing one after the other.
USB / CARD OPERATION
The following tasks can be accomplished by either using the controls on the REMOTE Control or
those which have similar function markings on the unit.
1. Select the USB / CARD function mode by setting the Function selector (11) to “USB/CARD”.
The Display will show “USB NO” when the USB port is empty.
2. Insert either a USB flash drive into the USB PORT (23) or an SD/MMC Memory Card into the
SD/MMC Slot (24). Press and hold the STOP/USB/CARD Button (3) for 2 seconds to switch
between USB and CARD modes if necessary.
3. The total number of tracks on the USB or SD/MMC card will be displayed and playback will
automatically start from the first track depending which mode you have chosen (USB or
CARD).
NOTE: i. MP3 file formats are
supported.
ii. Not all brands of USB flash drives are supported.
4. To interrupt playback, press the button (20). The track being played will flash.
5. To resume playback, press the Button (20) again.
6. To stop playback, briefly press the STOP button (19).
TRACK SKIP
To select a particular track, in Stop mode or during playback, press the or buttons (4,
5){Remote} repeatedly until the desired track number appears on the display. The selected
track will start playback automatically.
FOLDER SKIP
To select a particular folder, in Stop mode or during playback, press the FOLDER UP /DOWN
Button (9,10){Remote}, until the track number (first track number) of the Album appears in the
Display. Playback of the first track of the selected folder will start automatically.
6
7. REPEAT 1/ FOLDER/ ALL PLAYBACK
1. During playback, if you want to repeat the same track, simply press the MODE (8) Button
once ‘ ‘ appears in the Display.
2.
3. The track will be repeated and stop until the STOP Button (3) is pressed.
4. To repeat a Folder, press the MODE button twice. "FOLDER" will light up.
5. The selected Folder will be repeated and stop until the STOP Button is pressed.
6. To repeat all the tracks, press the MODE Button 3 times and the Reapeat All Indicator "
" will light up.
7.
8. All the tracks of the storing device will be repeated until the STOP Button is pressed.
9. To cancel repeat play, press the MODE button repatedly until all the repeat indicator
disappear in the Display.
INTRO PLAY
This function enables the first 10 seconds of each track to be played.
1. During playback press MODE button four times, the Intro Indicator “INTRO” will light up.
2. Press the button once to start playback from the next track.
3. To cancel intro play, press the MODE Button (8) twice.
RANDOM PLAY
1. During palyback press the MODE button five times, the Random Indicator “RADDOM”
will light up.
2. Press the button once. A track is selected at random and playback starts.
3. To cancel random play, press the MODE Button again. The Random Indicator
‘RANDOM’ disappears in the Display.
PROGRAMMED PLAY
Programmed play can only be achieved in Stop mode.
1. In stop mode, briefly press the MODE button (16) on the unit. Program Channel No. ‘P1’
will briefly appear. ‘P’ will then disappear leaving the Program Indicator,‘PROG’ and ‘1’
flash in the Display to prompt for input.
7
8. 2. Press the or buttons (4, 5) to select your desired track to be stored in the
program. For example the first selection is track no.5.
3. Press the MODE button (16) to confirmed when track No.5 flashed in the Display.
The first program selection is now stored in the program memory.
The Program Channel No. ‘P 2’ will appear briefly. ‘P’ will disappear and 2 will revert to 5,
i.e. the first selected program and flash together with ‘PROG’ to prompt for another input.
4. Repeat points 2 and 3 to enter the desired tracks up to max 32 selections.
5. Press the button once to start playback in your programmed sequence.
6. To clear the program memory, while playing press the Stop button 2 times or
select TUNER, PHONO function or turn the Syatem off.
COPYING FILES BETWEEN USB AND CARD
The files stored on your USB flash drive or on the SD/MMC card can be copied to each other.
Please follow the instructions below to copy the files between the USB port and the Card slot.
1. Insert your USB flash drive into the USB PORT (23) and the SD/MMC Memory Card into the
SD/MMC Slot (24).
2. Select the USB / CARD function mode by setting the Function selector (11) to “USB/CARD”.
The total number of tracks on the USB will be displayed and playback will automatically start
from the first track.
3. Press the STOP/USB/SD Button once to stop the playback. Copy of the USB files to the Card
is now ready to proceed any time. If you want to copy the files from the Card to the USB, you
need to enter the Card playback Stop mode first then proceed to Step 4 below for copying.
USB Playback Stop Mode Card Playback Stop Mode
4. To start recording briefly press the RECORD Button once.
Copying USB Files to Card Copying Card Files to USB
5. To stop copying, briefly press the STOP Button once.
DELETING FILES
1. With the USB or Card in the playback stop mode, press or buttons to select the
track to delete, for example track 5 is selected.
2. When the desired track appears in the Display press and hold the RECORD Button(17) to
confirm. ‘DEL’ will flash few times and then disappear. The chosen track, ‘005’, will
8
9. appear and blink in the Display to prompt for confirmation. In case you want to cancel the
delete function just briefly press the STOP Button.
3. To confirm, briefly press the RECORD button once. ‘DEL’ will appear steadily in the
Display for few seconds and then the Display will resume to USB/Card playback stop mode
with the total track number deducted by 1.
Original 38 Files After Deleting Track 5
4. Repeat 1-3 above to delete more tracks as desired.
Bass boost OPERATION
To enhance the low frequency sound, press the BASS BOOST BUTTON (13) once (button in) to
activate. Press the BASS BOOST Button (13) again (button out) to turn the Bass Boost off.
Note: Please refer to the ON/OFF graphic on the Front
Panel for correct operation of the Bass Boost functio
REMOTE CONTROL UNIT
1. PLAY/PAUSE BUTTON
2. RECORD BUTTON
3. STOP/CD/USB/SD BUTTON
4. SKIP- BUTTON
5. SKIP+ BUTTON
6. DISPLAY BUTTON
7. PROG BUTTON
8. MODE BUTTON (Repeat 1,Repeat Album,
Repeat All ,Intro,Random)
9. FOLDER UP BUTTON
10. FOLDER DOWN BUTTON
11. DELETE BUTTON
ACTIVATING THE REMOTE CONTROL
Remove the plastic insulator tag sticking out of the Battery Compartment of the Remote Control by
pulling on it. Once the tag is removed, the Remote Control will be ready for use.
BATTERY CARE
i. If the unit is not to be used for an extended period of time, remove the battery. An old or leaking
battery can cause damage to the Remote Control.
ii. Do not dispose of batteries in fire, batteries may explode or leak.
BATTERY REPLACEMENT
When the battery becomes weak, the operating distance of the Remote
Control is greatly reduced and you will need to replace the Lithium battery.
9
10. 1. Remove the battery compartment from bottom of the Remote Control.
2. Install 1 “CR2025” Lithium battery with the positive side facing up.
3. Replace the battery compartment.
IMPORTANT: Be sure that the battery is installed correctly. Wrong polarity may damage the Remote
Control and void the warranty.
USING THE REMOTE CONTROL CORRECTLY
Note: The Remote Control is only for operating the USB and MMC Card functions.
• Point the Remote Control at the SENSOR (IR) located on the front of the System.
• The functions of the remote buttons are the same as the corresponding controls on the main unit.
• The performance of the infrared SENSOR may be degraded causing unreliable operation if there
is a strong ambient light source in the same room.
• The recommended effective distance for remote operation is about 10-15 feet.
The Stylus Replacement
Loose the red part stylus by screw driver Replace the new stylus as C and D as
and take out as diagram A and B diagram
The above diagram illustrates how to replace a new needle (extra needle not supplied).
SPECIFICATIONS
Power Supply: AC 230V ~ 50Hz
Radio Frequency Coverage:
FM:87.5 - 108 MHz
AM:525 – 1620 KHz
10