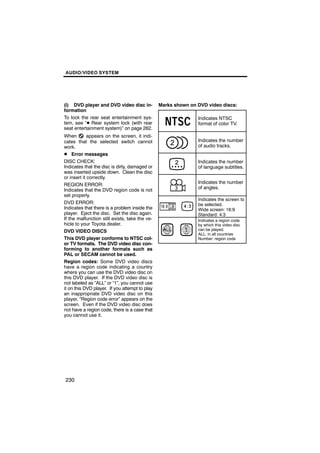
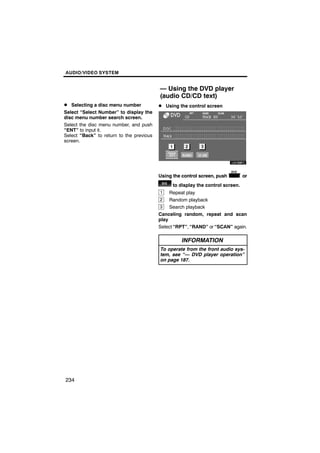
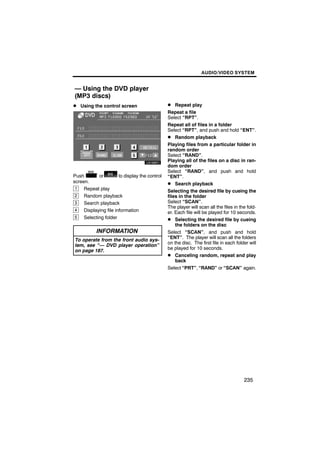
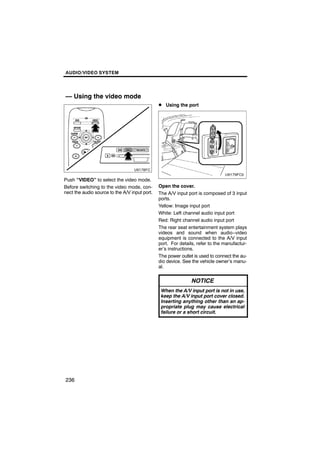
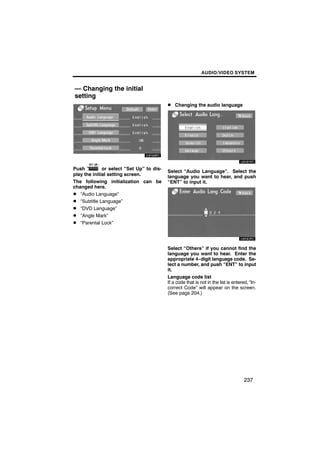
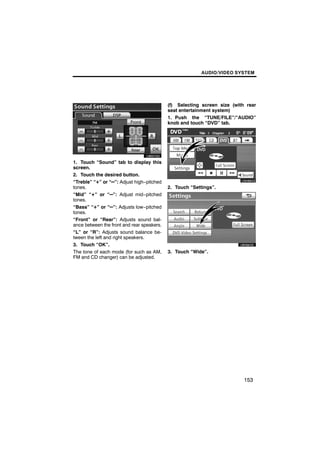
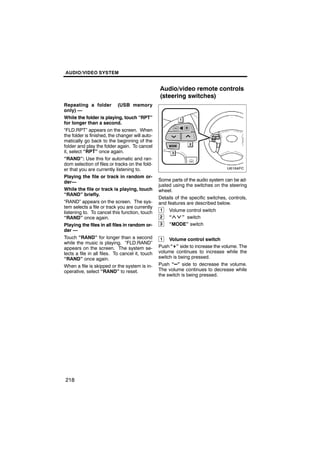
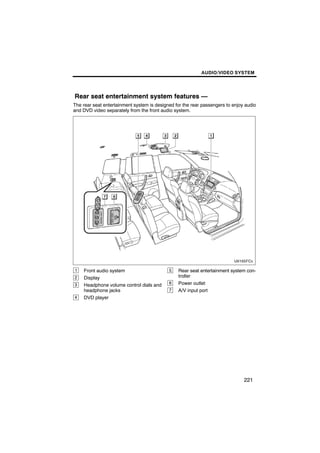
AUDIO/VIDEO SYSTEM


                                                                    SECTION                        6
AUDIO/VIDEO SYSTEM
D Quick reference                                                                                 146
D Using your audio/video system                                                                   147
    Some basics . . . . . . . . . . . . . . . . . . . . . . . . . . . . . . . . . . . . . . . .   147
    Radio operation . . . . . . . . . . . . . . . . . . . . . . . . . . . . . . . . . . . . .     155
    Radio operation (XM Satellite Radio broadcast) . . . . . . . . .                              160
    CD changer operation . . . . . . . . . . . . . . . . . . . . . . . . . . . . . . .            166
    Bluetooth audio operation . . . . . . . . . . . . . . . . . . . . . . . . . . . .             178
    DVD player operation . . . . . . . . . . . . . . . . . . . . . . . . . . . . . . . .          187
    USB memory/iPod operation . . . . . . . . . . . . . . . . . . . . . . . . . .                 211
D Audio/video remote controls (steering switches)                                                 218
D Rear seat entertainment system features                                                         221
    Using the DVD player (DVD video) . . . . . . . . . . . . . . . . . . . .                      226
    Using the DVD player (video CD) . . . . . . . . . . . . . . . . . . . . . .                   232
    Using the DVD player (audio CD/CD text) . . . . . . . . . . . . . .                           234
    Using the DVD player (MP3 discs) . . . . . . . . . . . . . . . . . . . . .                    235
    Using the video mode . . . . . . . . . . . . . . . . . . . . . . . . . . . . . . . .          236
    Changing the initial setting . . . . . . . . . . . . . . . . . . . . . . . . . . .            237
    Replacing the batteries . . . . . . . . . . . . . . . . . . . . . . . . . . . . . .           241
D Audio/video system operating hints                                                              242


                                                                                                    145
AUDIO/VIDEO SYSTEM


Quick reference
Operations such as selecting a preset station and adjusting the sound balance are car-
ried out on the touch screen. To display the audio screen, push the “TUNE/FILE”/“AU-
DIO” knob.


1     Function menu display screen           3   “SEEK/TRACK” button
      To control the radio, CD changer,          Push either side of this button to seek
      DVD player*, Bluetoothr audio play-        up or down for a station, or to access
      er, AUX or USB memory/iPod, touch          a desired track, file or chapter. For
      the touch−screen buttons. For de-          details, see pages 157, 170, 174,
      tails, see page 150.                       185, 190, 193 and 214.
2     Function menu tab                      4   “TUNE/FILE”/“AUDIO” knob
      To control the radio, CD changer,          Push this knob to display the audio
      DVD player*, Bluetoothr audio play-        control screen, and turn this knob to
      er, AUX or USB memory/iPod, touch          move the station band and files up or
      the touch−screen tabs. For details,        down. For details, see pages 149,
      see page 149.                              156, 161, 174 and 214.

*: Vehicles with rear seat entertainment
   system


146
AUDIO/VIDEO SYSTEM

                                                 Using your audio/video
                                                 system —
                                                 — Some basics
5    “LOAD·       / CLOSE” button                This section describes some of the basic
     Push this button to display the             features of your audio system. Some in-
     “Load·Eject” screen or close the dis-       formation may not pertain to your system.
     play. For details, see page 166.            Vehicles with smart key system—
 6   “PWR/VOL” knob                              Your audio system works when the “EN-
     Push this knob to turn the audio sys-       GINE START STOP” switch is turned to
     tem on and off, and turn it to adjust the   ACCESSORY or IGNITION ON mode.
     volume. For details, see page 149.
                                                 Vehicles without smart key system—
 7   “SAT” button
     Push this button to choose a SAT sta-       Your audio system works when the engine
     tion. For details, see pages 149 and        switch is turned to the “ACC” or “ON” posi-
     161.                                        tion.
 8   “DISC·AUX” button
     Push this button to turn the                                  CAUTION
     Bluetoothr audio player, AUX, USB
     memory/iPod, CD changer or DVD               For vehicles sold in U.S.A. and
     player* on. For details, see pages           Canada:
     149, 155, 169, 184 and 189.                  D Part 15 of the FCC Rules
*: Vehicles with rear seat entertainment          FCC Warning:
   system                                         Changes      or    modifications     in
 9   “FM 1·2” button                              construction not expressly approved
     Push this button to choose an FM sta-        by the party responsible for com-
     tion. Each time this button is pushed,       pliance could void the user’s author-
     the mode switches between FM1 and            ity to operate the equipment.
     FM2. For details, see pages 149 and
                                                  CAUTION: Radio Frequency Radi-
     155.
                                                  ation Exposure
10 “AM” button                                    This device is approved for Mobile
     Push this button to choose an AM sta-        Application only and, to comply with
     tion. For details, see pages 149 and         applicable FCC radio frequency ex-
     155.                                         posure regulations, must be used
                                                  with a distance of at least 7.9 in. (20
                                                  cm) between the antenna and the
                                                  body of any person at all time during
                                                  use.


                                                                                      147
AUDIO/VIDEO SYSTEM


                                          (a) Speech command system
D Laser products
  D Do not take this unit apart or at-
    tempt to make any changes
    yourself. This is an intricate unit
    that uses a laser pickup to re-
    trieve information from the sur-
    face of compact discs. The la-
    ser is carefully shielded so that
    its rays remain inside the cabi-
    net. Therefore, never try to dis-
    assemble the player or alter any
    of its parts since you may be ex-
    posed to laser rays and danger-
    ous voltages.
  D This product utilizes a laser.        By pushing the switch above, you can
    Use of controls or adjustments        operate the speech command system.
    or performance of procedures          For the operation of the speech command
    other than those specified here-      system and the list of commands, see
    in may result in hazardous radi-      pages 44 and 47.
    ation exposure.


             NOTICE
To prevent the battery from being dis-
charged, do not leave the audio sys-
tem on longer than necessary when
the engine is not running.


148
AUDIO/VIDEO SYSTEM


(b) Turning the system on and off            (c) Switching between functions


“TUNE/FILE”/“AUDIO”: Push this knob          Push the “DISC·AUX”, “FM 1·2”, “AM”
to display touch−screen buttons for audio/   or “SAT” button to turn on the desired
video system (audio control mode).           mode.


                                                    U6080GS

                                             Push the “TUNE/FILE”/“AUDIO” knob
                                             and touch the “AM”, “FM”, “SAT”,
                                             “CD”, “DVD*”, “BT”, “AUX” or “USB”
“PWR/VOL”: Push this knob to turn the        tab to turn on the desired mode.
audio/video system on and off. Turn this     *: Vehicles with rear seat entertainment
knob to adjust the volume. The system           system
turns on in the last mode used.
You can select the function that enables
automatic return to the previous screen
from the audio screen. See page 260 for
details.


                                                                               149
AUDIO/VIDEO SYSTEM


Push these buttons or tabs if you want to
switch from one mode to another.
If the disc is not set, the CD changer/DVD
player* does not turn on.
You can turn off the CD changer/DVD play-
er* by ejecting all the discs. If the audio
                                                 U6081GS
system was previously off, then the entire
audio system will be turned off when you
eject all the discs. If the other function was
previously playing, it will come on again.
*: Vehicles with rear seat entertainment
    system


                                                 U6080GS


                                                 U6082GS


                                                 U6083GS


150
AUDIO/VIDEO SYSTEM


U6084GS          U6079GS

          The touch−screen buttons for radio, CD
          changer, DVD player*, Bluetoothr
          audio player, AUX and USB memory/
          iPod, operation are displayed on the
          function touch−screen button display
U6086GS   screen when the audio control mode is
          selected.    Touch them lightly and
          directly on the screen.
          *: Vehicles with rear seat entertainment
             system
          Touch the tab to select the desired mode
          when the audio control mode is selected.
          The selected switch is highlighted.


U6085GS             INFORMATION
          D If the system does not respond to a
            touch of a touch−screen button,
            move your finger away from the
            screen and then touch it again.
          D You cannot operate dimmed
            touch−screen buttons.
          D Wipe off fingerprints using a glass
            cleaning cloth. Do not use chemi-
U6078GS     cal cleaners to clean the touch
            screen.


                                            151
AUDIO/VIDEO SYSTEM


(d) DSP control                               (e) Tone and balance
1. Push the “TUNE/FILE”/“AUDIO”               Tone
knob.                                         How good an audio program sounds to you
                                              is largely determined by the mix of the
                                              treble, mid and bass levels. In fact, differ-
                                              ent kinds of music and vocal programs
                                              usually sound better with different mixes of
      U6087GS                                 treble, mid and bass.
                                              Balance
                                              A good balance of the left and right stereo
                                              channels and of the front and rear sound
                                              levels is also important.
                                              Keep in mind that if you are listening to a
2. Touch “Sound” to display the sound         stereo recording or broadcast, changing
adjustment screen.                            the right/left balance will increase the vol-
                                              ume of one group of sounds while de-
                                              creasing the volume of another.


      U6010GI

3. Touch “DSP” tab to display this
screen.
4. Touch “Automatic Sound Levelizer”
and select “On” or “Off”.
Automatic sound levelizer (ASL):
When the audio sound becomes difficult to
hear due to road noise, wind noise or other
noises while driving, select “On”. The sys-
tem adjusts to the optimum volume and
tone quality according to the speed of car.
5. Touch “OK”.


152
AUDIO/VIDEO SYSTEM


                                            (f) Selecting screen size (with rear
                                            seat entertainment system)
                                            1. Push the “TUNE/FILE”/“AUDIO”
                                            knob and touch “DVD” tab.
       U6007GS

1. Touch “Sound” tab to display this
                                                  U6088GS
screen.
2. Touch the desired button.
“Treble” “+” or “–”: Adjust high−pitched
tones.                                      2. Touch “Settings”.
“Mid” “+” or “–”: Adjust mid−pitched
tones.
“Bass” “+” or “–”: Adjusts low−pitched
tones.
“Front” or “Rear”: Adjusts sound bal-
ance between the front and rear speakers.
                                                  U6064GS
“L” or “R”: Adjusts sound balance be-
tween the left and right speakers.
3. Touch “OK”.
The tone of each mode (for such as AM,      3. Touch “Wide”.
FM and CD changer) can be adjusted.


                                                                           153
AUDIO/VIDEO SYSTEM


                                            (g) Your CD changer
                                            When you insert a disc, touch “Load” and
                                            gently push the disc in with the label side
                                            up. This CD changer can store up to four
       U6009GS                              discs. The changer will play from track 1
                                            through to the end of the disc. Then it will
                                            play from track 1 of the next disc.
                                            The changer is intended for use with 4.7 in.
                                            (12 cm) discs only.

4. Touch the desired button.
“Normal”: Displays a 3 : 4 screen, with
            either side in black.
“Wide 1”:   Widens the 3 : 4 screen hori-
            zontally to fill the screen.
“Wide 2”:   Widens the 3 : 4 screen ver-
            tically and horizontally, in
            the same ratio, to fill the
            screen.
When you touch           , the previous
screen returns.
5. Touch “Save”.

                                                            NOTICE
                                             D Do not stack up two discs for inser-
                                               tion, or it will cause damage to the
                                               changer. Insert only one disc into
                                               the slot at a time.
                                             D Never try to disassemble or oil any
                                               part of the changer. Do not insert
                                               anything other than a disc into the
                                               slot.


154
AUDIO/VIDEO SYSTEM


                                             — Radio operation
(h) Your DVD player                          (a) Listening to the radio
(with rear seat entertainment system)
The sound of the rear seat entertainment
system can be enjoyed by pushing the
“DISC·AUX” button or touching the
“DVD” tab on AUDIO screen.
(i) AUX port
The sound of portable audio players
connected to the AUX port can be enjoyed.
Push the “DISC·AUX” button or push the
“TUNE/FILE”/“AUDIO” knob to display
audio screen and touch the “AUX” tab to
switch to AUX mode. When the portable
audio player is not connected to the AUX
port, the tab will tone down. For details,   Push the “AM” or “FM 1·2” button or
refer to the “Owner’s Manual”.               push the “TUNE/FILE”/“AUDIO” knob
(j) USB port                                 to display audio screen and touch the
It is available to connect a USB memory/     “AM” or “FM” tab to choose either an
iPod with the USB port. When the USB         AM or FM station.
memory/iPod is not connected with the        “AM”, “FM1” or “FM2” appears on the
USB port, the tab will tone down. For de-    screen.
tails, see “(a) Connecting a USB memory      If your vehicle is equipped with a satellite
or iPod” on page 211.                        radio broadcast system, when you push
                                             the “SAT” button or touch the “SAT” tab
                                             on AUDIO screen, “SAT1”, “SAT2” or
                                             “SAT3” station appears on the display. For
                                             details about satellite radio broadcast, see
                                             “—Radio operation (XMr Satellite Radio
                                             broadcast)” on page 160.


                                                                                   155
AUDIO/VIDEO SYSTEM


                                                          U6080GS

                                               (b) Presetting a station
                                               1. Tune in the desired station.
Turn the knob clockwise to step up the         2. Touch one of the touch−screen but-
station band or counterclockwise to            tons (1 — 6) you want and hold it until
step down.                                     a beep is heard. This sets the station to
                                               the touch−screen button and the fre-
Your radio automatically changes to stereo     quency appears on the touch−screen
reception when a stereo broadcast is re-       button.
ceived. “ST” appears on the screen. If the
signal becomes weak, the radio reduces         Each radio mode (AM, FM1 or FM2) can
the amount of channel separation to pre-       store up to 6 stations. To change the pre-
vent the weak signal from creating noise.      set station to a different one, follow the
If the signal becomes extremely weak, the      same procedure.
radio switches from stereo to mono recep-      The preset station memory is cancelled
tion. In this case, “ST” disappears from the   when the power source is interrupted by
screen.                                        battery disconnection or a blown fuse.


156
AUDIO/VIDEO SYSTEM


(c) Selecting a station                        (d) Radio Data System
Tune in the desired station using one of the   Your audio system is equipped with Radio
following methods.                             Data Systems (RDS). RDS mode pro-
Preset tuning: Touch the touch−screen          vides you to receive text messages from
button (1 — 6) for the station you want.       radio stations that utilize RDS transmit-
The touch−screen button is highlighted         ters.
and the station frequency appears on the       When RDS is on, the radio can
screen.                                        — only select stations of a particular pro-
Seek tuning: Push the “SEEK/TRACK”             gram type,
button on either side. The radio will begin    — display messages from radio stations,
seeking up or down for a station of the        — search for a stronger signal station.
nearest frequency and will stop on recep-      RDS features are available for use only on
tion. Each time you push the button, the       FM stations which broadcast RDS infor-
stations will be searched automatically        mation.
one after another.
To scan all the frequencies: Touch
“SCAN” on the screen briefly. “SCAN” ap-
pears on the screen. The radio will find the
next station and stay there for a few se-
conds, and then scan again. To select a
station, touch “SCAN” again.
To scan the preset stations: Touch
“SCAN” on the screen for longer than a
second. “P. SCAN” appears on the screen.
The radio will tune in the next preset sta-
tion, stay there for a few seconds, and then
move to the next preset station. To select
a station, touch “SCAN” again.


                                                                                    157
AUDIO/VIDEO SYSTEM


       U6080GS                                  U6089GS

“Type A "”                               “Type Seek”
Each time you touch “A Type ” or “Type   When a program is set, “Type Seek” ap-
"”, the program type changes as in the   pears. Touch the switch and the system
following:                               starts to seek the station in the relevant
D ROCK                                   program type.
D MISC (Miscellaneous)                   If any type program station is not found,
                                         “Nothing” appears on the display.
D INFORM (Information)
D EASY LIS (Easy listening)
D CLS/JAZZ (Classical music and Jazz)
D R & B (Rhythm and Blues)
D RELIGION
D ALART (Emergency message)


158
AUDIO/VIDEO SYSTEM


                                              (e) Traffic announcement


        U6090GSF
                                                      U6091GS

“Message”
If the system receives a radio text from      “Traffic”
RDS station, “MSG” appears on the dis-        A station that regularly broadcasts traffic
play. Touch “Message”, and a text mes-        information is automatically located.
sage is displayed on the screen. This func-
tion is available only when the vehicle is    When you touch “Traffic”, “Traf. Seek”
not moving.                                   appears on the display and the radio will
                                              start seeking any traffic program station.
When you touch “Message Off”, the dis-
play returns.                                 If no traffic program station is found,
                                              “Nothing” appears on the display.
                                              If a traffic program station is found, the
                                              name for traffic program station is dis-
                                              played for a while until a traffic announce-
                                              ment is received.


                                                                                    159
AUDIO/VIDEO SYSTEM

— Radio operation
(XMr Satellite Radio
broadcast)
To listen to a satellite radio broadcast in     The XMr Satellite Radio is solely responsi-
your vehicle, a subscription to the XMr         ble for the quality, availability and content
Satellite Radio service is necessary.           of the satellite radio services provided,
                                                which are subject to the terms and condi-
(a) How to subscribe to an XMr Satel-
                                                tions of the XMr Satellite Radio customer
      lite Radio
                                                service agreement.
An XMr Satellite Radio is a tuner designed
                                                Customers should have their radio ID
exclusively to receive broadcasts provided
                                                ready; the radio ID can be found by tuning
under a separate subscription. Availability
                                                to “channel 000” on the radio. For details,
is limited to the 48 contiguous U.S. states
                                                see “(b) Displaying the radio ID” below.
and some Canadian provinces.
                                                All fees and programming are the respon-
How to subscribe:
                                                sibility of the XMr Satellite Radio and are
You must enter into a separate service          subject to change.
agreement with the XMr Satellite Radio in
                                                Satellite tuner technology notice:
order to receive satellite broadcast pro-
                                                Toyota’s satellite radio tuners are awarded
gramming in the vehicle. Additional activa-
                                                Type Approval Certificates from XMr Sat-
tion and service subscription fees apply
                                                ellite Radio Inc. as proof of compatibility
that are not included in the purchase price
                                                with the services offered by the XMr Satel-
of the vehicle and optional digital satellite
                                                lite Radio.
tuner.
                                                (b) Displaying the radio ID
For complete information on subscription
rates and terms, or to subscribe to the XMr     Each XMr tuner is identified with a unique
Satellite Radio.                                radio ID. You will need the radio ID when
                                                activating XMr service or when reporting
U.S.A.—
                                                a problem.
Visit on the web at www.xmradio.com or
call 1−800−967−2346.                            If you select the “CH 000” using the
                                                “TUNE/FILE”/“AUDIO” knob, the ID
Canada—
                                                code of 8 alphanumeric characters ap-
Visit on the web at www.xmradio.ca or call
                                                pears. If you select another channel, dis-
1−877−438−9677.
                                                play of the ID code is canceled. The chan-
                                                nel(000) alternates the display between
                                                the radio ID and the specific radio ID code.


160
AUDIO/VIDEO SYSTEM


(c) Listening to satellite radio            (d) Channel category


                                                   U6082GS

                                            Touch either “A Type” or “Type "” to go
                                            to the next or previous category.

Push the “SAT” button or push the
“TUNE/FILE”/“AUDIO” knob to display
audio screen and touch the “SAT” tab
to choose a SAT channel.
“SAT1”, “SAT2” or “SAT3” appears on the
screen.


Turn this knob to select the next or pre-
vious channel.
If you turn continuously, you can rapidly
scroll forward or down through the chan-
nels.


                                                                             161
AUDIO/VIDEO SYSTEM


(e) Presetting a channel                       (f) Selecting a channel
1. Tune in the desired channel.                Tune in the desired channel using one of
                                               the following methods.
                                               Preset tuning: Touch the channel selec-
                                               tor button (1 — 6) for the channel you want.
                                               The button (1 — 6) is highlighted and chan-

        U6082GS
                                               nel number appears on the display.
                                               To select channel within the current
                                               category: Push the “ ” or “ ” button of
                                               “SEEK/TRACK”. The radio will step up or
                                               down the channel within the current chan-
                                               nel category. Touch “Type Seek”. The ra-
2. Touch one of the channel selector           dio will step up the channel within the cur-
buttons (1 — 6) and hold it until a beep       rent channel category.
is heard.
This sets the channels to the touch−
screen button and the name and number
of the channel appears on the touch−
screen button.
Each touch−screen button can store three
                                                       U6082GS
SAT channels. To change the preset chan-
nel to a different one, follow the same pro-
cedure.
The preset channel memory is cancelled
when the power source is interrupted by        To scan the currently selected channel
battery disconnection or a blown fuse.         category: Touch “SCAN” briefly. “SCAN”
                                               appears on the display. The radio will find
                                               the next channel in the same channel cate-
                                               gory, stay there for a few seconds, and
                                               then scan again. To select a channel,
                                               touch “SCAN” a second time.
                                               To scan the preset channels: Touch
                                               “SCAN” and hold it until you hear a beep.
                                               “P.SCAN” appears on the display. The ra-
                                               dio will find the next preset channel, stay
                                               there for a few seconds, and then move to
                                               the next preset channel. To select a chan-
                                               nel, touch “SCAN” a second time.


162
AUDIO/VIDEO SYSTEM


(g) Displaying the title and name


       U6092GS

When you touch “Text”, the song/program
title and the artist name/feature are dis-
played.
Up to 16 alphanumeric characters can be
displayed. (Some information will not be
fully displayed.)
When you touch “Text” again, the display
returns.


                                                           163
AUDIO/VIDEO SYSTEM


(h) If the satellite radio tuner malfunctions
When problems occur with the XMr tuner, a message will appear on the display. Refer-
ring to the table below to identify the problem, take the suggested corrective action.
                               The XMr antenna is not connected. Check whether the
                               XMr antenna cable is attached securely.
         ANTENNA               A short circuit occurs in the antenna or the surrounding
                               antenna cable. See a Toyota certified dealer for assis-
                               tance.
                               You have not subscribed to the XMr Satellite Radio.
                               The radio is being updated with the latest encryption
                               code. Contact the XMr Satellite Radio for subscription
                               information. When a contract is canceled, you can
                               choose the “CH000” and all free−to−air channels.
          UNAUTH               The premium channel you selected is not authorized.
                               Wait for about 2 seconds until the radio returns to the
                               previous channel or “CH001”. If it does not change au-
                               tomatically, select another channel. If you want to listen
                               to the premium channel, contact the XMr Satellite Ra-
                               dio.
                               The XMr signal is too weak at the current location. Wait
        NO SIGNAL              until your vehicle reaches a location with a stronger sig-
                               nal.
                               The unit is acquiring audio or program information. Wait
         LOADING
                               until the unit has received the information.
                               The channel you selected is not broadcasting any pro-
          OFF AIR
                               gramming. Select another channel.
                               There is no song/program title or artist name/feature
           −−−−−               associated with the channel at that time. No action
                               needed.
                               The channel you selected is no longer available. Wait
                               for about 2 seconds until the radio returns to the pre-
         CH UNAVL
                               vious channel or “CH001”. If it does not change auto-
                               matically, select another channel.

Contact the XMr Listener         Care Center at 1−800−967−2346 (U.S.A.) or
1−877−438−9677 (Canada).


164
AUDIO/VIDEO SYSTEM


              NOTICE                                INFORMATION
This equipment has been tested and         This XMr tuner supports “Audio
found to comply with the limits for a      Services” (Music and Talk) of only
class B digital device, pursuant to        XMr Satellite Radio and “Text
Part 15 of the FCC Rules. These limits     Information”∗ linked to the respective
are designed to provide reasonable         “Audio Services”.
protection against harmful interfer-       ∗: Text Information includes, Station
ence in a residential installation. This   Name, (Artist) Name, (Song) Title and
equipment generates, uses and can          Category Name.
radiate radio frequency energy and, if
not installed and used in accordance
with the instructions, may cause
harmful interference to radio com-
munications. However, there is no
guarantee that interference will not
occur in a particular installation.
If this equipment does cause harmful
interference to radio or television re-
ception, which can be determined by
turning the equipment off and on, the
user is encouraged to try to correct
the interference by one or more of the
following measures:
—Reorient or relocate the receiving
antenna.
—Increase the separation between
the equipment and receiver.
—Connect the equipment into an out-
let on a circuit different from that to
which the receiver is connected.
—Consult the dealer or an experi-
enced radio/TV technician for help.
Information to user
Alternation or modifications carried
out without appropriate authoriza-
tion may invalidate the user’s right to
operate the equipment.


                                                                            165
AUDIO/VIDEO SYSTEM


— CD changer operation
(a) Inserting discs


                                              3. The amber indicators at either side
                                              of the slot start blinking. When the indi-
Vehicles with smart key system—
                                              cators change to green, insert only one
The “ENGINE START STOP” switch must           disc. After the disc is loaded, the amber
be in ACCESSORY or IGNITION ON                indicators at either side of the slot start
mode.                                         blinking again. When the indicators
Vehicles without smart key system—            change to green, you can insert the
                                              next disc.
The engine switch must be in the “ACC” or
“ON” position.                        4. Push the “LOAD·           / CLOSE” but-
                                      ton to close the display.
Your CD changer can store up to 4 discs.
                                      The changer will automatically start play-
You can set a disc at the lowest empty disc
number.                               ing from the last disc you inserted.
                                      If the label faces down, the disc cannot be
1. Push the “LOAD·      / CLOSE” but-
                                      played. In this case, “Check CD” appears
ton. The “Load·Eject” screen appears.
                                      on the screen.


        U6066GS

2. Touch “Load”. The display opens.


166
AUDIO/VIDEO SYSTEM


                                         (b) Ejecting discs
               CAUTION                   D A single disc alone:
D Do not place anything on the
  opened display, as such items may
  be thrown about and possibly in-
  jure people in the vehicle during
  sudden braking or in an accident.
D To reduce the chance of injury in
  case of an accident or sudden stop
  while driving, keep the display
  closed.
D Take care not to jam your hand
  while the display is moving. Other-
  wise, you could be injured.

                                         1. Push the “LOAD·      / CLOSE” but-
             NOTICE                      ton. The “Load·Eject” screen appears.

D Do not obstruct the display while it
  is moving. It could damage your
  audio/video system.
D Do not insert one disc stacked on
  top of another one or feed them in
  continuously, to prevent discs
                                                 U6019GS
  from getting stuck in the changer.


         INFORMATION
                                         2. Touch the disc number to be
Under extremely cold conditions, the     ejected.
display may react slowly or operation
                                         The display opens and the amber indica-
sound may become louder.
                                         tors at either side of the slot start blinking.
                                         After the disc is ejected, the amber indica-
                                         tors change to green. A disc can be in-
                                         serted.


                                                                                 167
AUDIO/VIDEO SYSTEM


D All the discs:                                  3. Remove the disc.
                                                  The indicators start blinking again and the
                                                  next disc is ejected.
                                                  If a disc is not removed within 15 seconds
                                                  after it is ejected, the operation will be can-
                                                  celed.
                                                  When all the discs are removed, the amber
                                                  indicators change to green. A disc can be
                                                  inserted.


1. Push the “LOAD·      / CLOSE” but-                     U6018GS
ton. The “Load·Eject” screen appears.


                                                  The numbers of the trays where the disc is
        U6020GS                                   not set are dimmed.

                                                                   NOTICE
                                                   If a disc cannot be ejected, do not for-
                                                   cibly take out the disc. Keep pushing
2. Touch “Eject All”.                              the “LOAD·         / CLOSE” button for
The display opens and the amber indica-            approximately 5 seconds and release
tors at either side of the slot start blinking.    it. At this time, the audio disc and the
After the disc is ejected, the blinking indi-      map DVD−ROM will be ejected.
cators stay on.


168
AUDIO/VIDEO SYSTEM


(c) Playing a disc                              (d) Selecting a desired disc


                                                        U6021GS

                                                Touch “Change Discs” on “CD” screen
                                                and touch the desired disc number on
                                                the screen.
Push the “DISC·AUX” button or push              The selected disc number is highlighted.
the “TUNE/FILE”/“AUDIO” knob to dis-
play audio screen and touch the “CD”            The changer will start playing the selected
tab if the discs are already loaded in the      disc from the first track.
changer.
The discs set in the changer are played
continuously, starting with the last disc you
inserted. The disc number of the disc cur-
rently being played, the track number and
the time from the beginning of the program
appear on the screen.
When play of one disc ends, the first track
of the following disc starts. When play of
the final disc ends, play of the first disc
starts again.
The changer will skip any empty disc trays.
Vehicles with rear seat entertainment sys-
tem —
If the DVD player is turned on, push the
“DISC·AUX” button again or touch “CD”
tab to switch to the CD changer.
If the rear seat entertainment system is on,
pushing the “DISC·AUX” button switches
the sound of the front audio system and
that of the rear seat entertainment system.


                                                                                     169
AUDIO/VIDEO SYSTEM


(e) Playing an audio disc


       U6093GS

Push the “TUNE/FILE”/“AUDIO” knob
and touch the “CD” tab, then touch the
“Change Discs”. Choose an audio disc     SELECTING A DESIRED TRACK
number to display this screen.           “SEEK/TRACK” button: Use for direct
                                         access to a desired track.
                                         Push either side of the “SEEK/TRACK”
                                         button and repeat it until the desired track
                                         number appears on the screen. As you re-
                                         lease the button, the changer will start
                                         playing the selected track from the begin-
                                         ning.
                                         “Select” for Track: The desired track can
                                         be selected from a list. This function is
                                         available only when the vehicle is not mov-
                                         ing.
                                         Touch “Select”. The track list is displayed.


170
AUDIO/VIDEO SYSTEM


                                                         U6093GS

Touch the desired track number. The              SEARCHING FOR A DESIRED TRACK
changer will start playing the selected          OR DISC
track from the beginning.                        Searching for a desired track —
                                                 Touch “SCAN” on the screen briefly
    : By touching this touch−screen but-         while the disc is playing.
ton, the list moves up by 5 track groups. If     “SCAN” appears on the screen. The
this button is touched when the top page of      changer will play the next track for 10 sec-
the list is displayed, the last page is dis-     onds, then scan again. To select a track,
played.                                          touch “SCAN” on the screen a second
                                                 time. If the changer reaches the end of the
    : By touching this touch−screen but-         disc, it will continue scanning at track 1.
ton, the list moves down by 5 track groups.      After all the tracks are scanned in one
If this button is touched when the last page     pass, normal play resumes.
of the list is displayed, the top page is dis-   Searching for a desired disc —
played.
                                                 Touch “SCAN” on the screen for longer
", A: If " appears to the right of the item      than a second while the disc is playing.
name, the complete name is too long for
                                                 “D.SCAN” appears on the screen. The
the display.
                                                 program at the beginning of each audio
Touch " to scroll to the end of the name.        disc will be played for 10 seconds. To con-
Touch A to scroll the beginning of the           tinue listening to the program of your
name.                                            choice, touch “SCAN” on the screen a
Fast forward: Push “ ” side of the               second time.
“SEEK/TRACK” button and hold it to fast          After all the audio discs are scanned in one
forward the disc. When you release the           pass, normal play resumes.
button, the changer will resume playing
from that position.
Reverse: Push “ ” side of the “SEEK/
TRACK” button and hold it to reverse the
disc. When you release the button, the
changer will resume playing.


                                                                                      171
AUDIO/VIDEO SYSTEM


                                                “RAND”: Use it for automatic and random
                                                selection.
                                                Playing the tracks on one disc in ran-
                                                dom order —
        U6094GS                                 Touch “RAND” briefly while the disc is
                                                playing. “RAND” appears on the screen.
                                                The system selects a track on the disc be-
                                                ing listened to in random order. To cancel
                                                it, touch “RAND” once again.
                                                Playing the tracks on all the audio discs
OTHER FUNCTIONS                                 in random order —
“RPT”: Use it for automatic repeat of the       Touch “RAND” for longer than a second
track or disc you are currently listening to.   while the disc is playing. “D.RAND” ap-
Repeating a track —                             pears on the screen. The system selects
Touch “RPT” briefly while the track is play-    a track on all the audio discs in the changer
ing. “RPT” appears on the screen. When          in random order. To cancel it, touch
the track is finished, the changer will auto-   “RAND” once again.
matically go back to the beginning of the       If a CD−TEXT disc is inserted, the title of
track and play the track again. To cancel       the disc and track will be displayed. Up to
it, touch “RPT” once again.                     29 letters can be displayed.
Repeating a disc —
Touch “RPT” for longer than a second
while the disc is playing. “D.RPT” appears
on the screen. When the disc is finished,
the changer will automatically go back to
the beginning of the disc and play the disc
again. To cancel it, touch “RPT” once
again.


172
AUDIO/VIDEO SYSTEM


(f)   Playing a MP3/WMA disc             SELECTING A DESIRED FOLDER
                                         “FolderY”: Touch this touch−screen but-
                                         ton to go to the next folder.
                                         “FolderB”: Touch this touch−screen but-
                                         ton to go to the previous folder.
        U6095GS                          “Select” for Folder: The desired folder
                                         can be selected in a list. This function is
                                         available only when the vehicle is not mov-
                                         ing.
                                         Touch “Select”. The folder list is dis-
                                         played.
Push the “TUNE/FILE”/“AUDIO” knob
and touch the “CD” tab, then touch the
“Change Discs”. Choose an MP3/WMA
disc number to display this screen.

                                                 U6026GS

                                         Touch the desired folder number. The
                                         changer will start playing the first file of the
                                         selected folder.

                                              : By touching this touch−screen but-
                                         ton, the list moves up by 5 folder groups.
                                         If this touch−screen button is touched
                                         when the top page of the list is displayed,
                                         the last page is displayed.

                                              : By touching this touch−screen but-
                                         ton, the list moves down by 5 folder
                                         groups. If this touch−screen button is
                                         touched when the last page of the list is
                                         displayed, the top page is displayed.


                                                                                  173
AUDIO/VIDEO SYSTEM


SELECTING A DESIRED FILE                      “TUNE/FILE”/“AUDIO” knob: Use for di-
“SEEK/TRACK” button: Use for direct           rect access to a desired file in the disc.
access to a desired file.                     Turn the “TUNE/FILE”/“AUDIO” knob to
Push either side of the “SEEK/TRACK”          step up or down all the files in the disc you
button and repeat it until the desired file   are currently listening to. The file number
number appears on the display. As you re-     appears on the display. When “RAND” or
lease the button, the changer will start      “FLD.RPT” is on, all the files in the folder
playing the selected file from the begin-     you are currently listening to can be
ning. When “RAND” or “FLD.RPT” is on,         stepped up or down.
the file number within the folder you are
currently listening to appears.
Fast forward: Push “ ” side of the
“SEEK/TRACK” button and hold it to fast
forward the disc. When you release the
button, the changer will resume playing
from that position.
Reverse: Push “ ” side of the “SEEK/
TRACK” button and hold it to reverse the
disc. When you release the button, the
changer will resume playing.


174
AUDIO/VIDEO SYSTEM


        U6095GS                                          U6027GS

“Select” for File: The desired file can be       Touch the desired file number. The chang-
selected in a list. This function is available   er will start playing the selected file from
only when the vehicle is not moving.             the beginning.
Touch “Select”. The file list is displayed.
                                                     : By touching this touch−screen but-
                                                 ton, the list moves up by 5 file groups. If
                                                 this touch−screen button is touched when
                                                 the top page of the list is displayed, the last
                                                 page is displayed.

                                                     : By touching this touch−screen but-
                                                 ton, the list moves down by 5 file groups.
                                                 If this touch−screen button is touched
                                                 when the last page of the list is displayed,
                                                 the top page is displayed.


                                                                                         175
AUDIO/VIDEO SYSTEM


        U6096GS                                         U6097GS

SEARCHING FOR A DESIRED FILE                    SEARCHING FOR A DESIRED FOLDER
Touch “SCAN” on the screen briefly              Touch “SCAN” on the screen for longer
while the disc is playing.                      than a second while the disc is playing.
“SCAN” appears on the screen. The               “FLD.SCAN” appears on the screen. The
changer will play the next file in the folder   program at the beginning of each folder will
for 10 seconds, then scan again. To select      be played for 10 seconds. To continue lis-
a file, touch “SCAN” on the screen a sec-       tening to the program of your choice, touch
ond time. If the changer reaches the end        “SCAN” on the screen a second time.
of the folder, it will continue scanning from   After all the folders are scanned in one
file 1.                                         pass, normal play resumes.
After all the files are scanned in one pass,
normal play resumes.


176
AUDIO/VIDEO SYSTEM


                                                 “RAND”: Use it for automatic and random
                                                 selection of the folder or the disc which you
                                                 are currently listening to.
                                                 Playing the files in one folder in random
        U6098GS                                  order —
                                                 Touch “RAND” briefly while the disc is
                                                 playing. “RAND” appears on the screen.
                                                 The system selects a file in the folder you
                                                 are currently listening to. To cancel it,
                                                 touch “RAND” once again.
OTHER FUNCTIONS                                  Playing the files in all the folders on one
“RPT”: Use it for automatic repeat of the        disc in random order —
file or folder you are currently listening to.   Touch “RAND” for longer than a second
Repeating a file —                               while the disc is playing. “FLD.RAND” ap-
Touch “RPT” briefly while the file is play-      pears on the screen. The system selects
ing. “RPT” appears on the screen. When           a file in all the folders. To cancel it, touch
the file is finished, the changer will auto-     “RAND” once again.
matically go back to the beginning of the        When a file is skipped or the system is in-
file and play the file again. To cancel it,      operative, touch “RAND” to reset.
touch “RPT” once again.
Repeating a folder —
Touch “RPT” for longer than a second
while the folder is playing. “FLD.RPT” ap-
pears on the screen. When the folder is
finished, the changer will automatically go
back to the beginning of the folder and play
the folder again. To cancel it, touch “RPT”
once again.


                                                                                        177
AUDIO/VIDEO SYSTEM


                                              — Bluetoothr audio
                                              operation
(g) If the player malfunctions                The Bluetoothr audio system enables
If “CD Error” appears on the screen, audio    users to enjoy music played on a porta-
signals of the disc cannot be read or the     ble player from the vehicle speaker via
system has trouble. Push the “DIS-            wireless communication.
C·AUX” button once again.
If the changer does not operate, check that
the disc surface is not soiled or damaged.
If the disc is O.K., the temperature of the
changer’s internal mechanism may be
raised because of high external tempera-
ture. Remove the disc from the changer to
cool it.
If the changer still does not operate, have
it checked by your dealer.
If an MP3/WMA disc contains CD−DA             This    audio    system      supports
files, only CD−DA files are played. If an     Bluetoothr, a wireless data system
MP3/WMA disc contains files other than        capable of playing portable audio
CD−DA, only MP3/WMA files are played.         music without cables. If your portable
                                              player does not support Bluetoothr,
                                              the Bluetoothr audio system will not
                                              function.


178
AUDIO/VIDEO SYSTEM


            INFORMATION
Portable players must correspond to
the following specifications in order    Bluetooth is a trademark owned by
to be connected to the Bluetoothr au-    Bluetooth SIG. Inc.
dio system. However, please note
that some functions may be limited                       CAUTION
depending on the type of portable
player.                                  Do not operate the player’s controls
D Bluetoothr Specification               or connect to the Bluetoothr audio
  Ver.1.1 or higher                      system while driving.
  (Recommended: Ver.2.0+EDR or
  higher)
D Profile                                              NOTICE
  D A2DP       (Advanced      Audio      Do not leave your portable player in
    Distribution Profile) Ver.1.0 or     the car. In particular, high tempera-
    higher                               tures inside the vehicle may damage
  D AVRCP (Audio/Video Remote            the portable player.
    Control Profile) Ver.1.0 or higher
    (Recommended: Ver.1.3 or
    higher)                                       INFORMATION
Please go to “http://www.toyota.         D In the following conditions, the
letstalk.com/” to find approved            system may not function.
Bluetoothr phones for this system.
                                           D The portable player is turned off.
                                           D The portable player is not con-
                                              nected.
                                           D The portable player has a low bat-
                                              tery.
                                         D It may take time, the phone connec-
                                           tion is carried out during
                                           Bluetoothr audio play.


                                                                          179
AUDIO/VIDEO SYSTEM


                                               An antenna for the Bluetoothr
                                               connection is built in to the display. The
                                               indication       of    the     Bluetoothr
                                               connection may turn yellow and the
                                               system may not function when you use
                                               the Bluetoothr portable player in the
                                               following conditions.
                                               D Your portable player is hiding behind
                                                   from the display (behind the seat or in
                                                   the glove box or console box).
1     Indicates the condition of the           D Your portable player touches or is cov-
      Bluetoothr connection.                       ered with metal materials.
“Blue” indicates an excellent connection       Leave the Bluetoothr portable player in a
to Bluetoothr.                                 place where the “Blue” indication is dis-
                                               played.
“Yellow” indicates a bad connection to
Bluetoothr, resulting in possible deteriora-   The portable player information is regis-
tion of audio quality.                         tered when the Bluetoothr audio system is
                                               connected. When you release possession
    : No connection to Bluetoothr.             of your vehicle, remove your portable play-
2     Indicates the amount of battery          er. (See “(a) Removing a Bluetoothr au-
      charge left.                             dio” on page 321.)


Empty                           Full


Remaining charge is not displayed while
the Bluetoothr is connecting.
The amount left does not always corre-
spond with the one of your portable player.
This system doesn’t have a charging func-
tion.


180
AUDIO/VIDEO SYSTEM


D For vehicles sold in U.S.A.                D For vehicles sold in Canada

  FCC ID : HYQDNNS025                          IC : 1551A−DNNS025
  Type : DNNS025                               Type : DNNS025
 This device complies with part 15 of the     Operation is subject to the following two
 FCC Rules.                                   conditions; (1) this device may not
 Operation is subject to the following two    cause interference, and (2) this device
 conditions:                                  must accept any interference, including
 (1) This device may not cause harmful        interference that may cause undesired
 interference, and (2) this device must       operation of the device.
 accept any interference received, in-        L’utilisation de ce dispositif est autorisée
 cluding interference that may cause un-      seulement aux deux conditions
 desired operation.                           suivantes : (1) il ne doit pas produire de
                                              brouillage, et (2) l’utilisateur du dispositif
                                              doit être prêt à accepter tout brouillage
                  CAUTION                     radioélectrique reçu, même si ce
                                              brouillage      est       susceptible     de
 FCC WARNING: Changes or modifi-              compromettre le fonctionnement du
 cations not expressly approved by            dispositif.
 the party responsible for compliance
 could void the user’s authority to op-
 erate the equipment.                                            CAUTION
 CAUTION: Radio Frequency Radi-
                                              This equipment complies with IC
 ation Exposure
                                              radiation exposure limits set forth for
 This equipment complies with FCC
                                              uncontrolled environment and meets
 radiation exposure limits set forth for
                                              RSS−102 of the IC radio frequency
 uncontrolled environment and meets
                                              (RF) Exposure rules.
 the FCC radio frequency (RF) Expo-
 sure Guidelines in Supplement C to           This equipment has very low levels of
 OET65. This equipment has very low           RF energy that it deemed to comply
 levels of RF energy that it deemed to        without maximum permissive expo-
 comply without maximum permis-               sure evaluation (MPE). But it is desir-
 sive exposure evaluation (MPE). But          able that it should be installed and
 it is desirable that it should be            operated with at least 20 cm and more
 installed and operated with at least 20      between the radiator and person’s
 cm and more between the radiator             body (excluding extremities: hands,
 and person’s body (excluding ex-             wrists, feet and ankles).
 tremities: hands, wrists, feet and           Co−location : This transmitter must
 ankles).                                     not be co−located or operated in con-
 Co−location : This transmitter must          junction with any other antenna or
 not be co−located or operated in con-        transmitter.
 junction with any other antenna or
 transmitter.


                                                                                      181
AUDIO/VIDEO SYSTEM


                                          (a) Connecting Bluetoothr audio play-
                CAUTION                   er
Cet équipement est conforme aux           To use the Bluetoothr audio system,
limitations sur l’exposition aux          you need to enter your portable player
radiations IC définies pour un            into the system. Once you have
équipement non contrôlé et est            registered it, you can enjoy your music
conforme avec les directives sur          on the vehicle’s audio system. (See
RSS−102 des règles sur l’exposition       “—Setting Bluetoothr audio” on page
aux fréquences radio (RF).         Cet    319.)
équipement présente de très faibles       For the operation procedure for the
niveaux d’énergie RF qui sont             portable player, see the instruction
considérés se conformer sans              manual that comes with it.
évaluation maximum d’exposition           D When the connection method is
autorisée (MPE).        Mais il est          “From Vehicle”.
souhaitable qu’il devrait être installé
et commandé avec au moins 20 cm et           D When the auto connection is on
plus entre le radiateur et le corps de           Vehicles with smart key sys-
la personne (à l’exclusion des                   tem—
extrémités: mains, poignets, pieds et
                                                 When the portable player is
chevilles).
                                                 standby for the connection, it
Colocalisation: Cet émetteur ne doit             will be automatically connected
pas être co−localisé ou mis en                   whenever the “ENGINE START
service en même temps que toute                  STOP” switch is in either AC-
autre antenne ou émetteur.                       CESSORY or IGNITION ON
                                                 mode.
                                                 Vehicles without smart key sys-
                                                 tem—
                                                 When the portable player is
                                                 standby for the connection, it
                                                 will be automatically connected
                                                 whenever the engine switch is in
                                                 either “ACC” or “ON” position.
                                             D When the auto connection is off
                                                 Manually connect the portable
                                                 player in accordance with the
                                                 following procedure.


182
AUDIO/VIDEO SYSTEM


                                           D When the connection method is
                                              “From Portable Player”
                                           Operate the portable player and con-
                                           nect it to the Bluetoothr audio system.
                                           For the operation procedure for the
                                           portable player, see the instruction
                                           manual that comes with it.


Touch “Connect”.


       U6033GS
                                           Touch “Connect”.


When the connection is completed, this

                                                  U6035GS
screen is displayed. Now you can use the
portable player.


       U6034GS                             Connect the portable audio player to the
                                           Bluetoothr audio system.


This screen will appear when the connec-
tion has failed.                                  U6036GS

                                           This screen will appear when the connec-
                                           tion has been successfully established.


                                                                             183
AUDIO/VIDEO SYSTEM


D Reconnecting the portable player            (b) Playing a Bluetoothr audio
Vehicles with smart key system—               D Playing and pausing Bluetoothr au-
If the portable player is disconnected with      dio
poor reception from the Bluetoothr net-
work when the “ENGINE START STOP”
switch is in ACCESSORY or IGNITION
ON mode, the system automatically re-
connects the portable player. In this case,
the connection result is not displayed.
Vehicles without smart key system—
If the portable player is disconnected with
poor reception from the Bluetoothr net-
work when the engine switch is in the
“ACC” or “ON” position, the system auto-      Push the “DISC·AUX” button or push
matically reconnects the portable player.     the “TUNE/FILE”/“AUDIO” knob to
In this case, the connection result is not    display this screen and touch the “BT”
displayed.                                    tab if the Bluetoothr audio player is
If the Bluetoothr is disconnected on pur-     already connected.
pose such as you turned your portable
player off, this does not happen.             Touch      and the music will start playing.
Reconnect it by the following method.         Touch      and the music will pause.
D Select the portable player again.
D Enter the portable player.                  Touch     and the music will start playing
                                              again.
                                              Depending on the portable player that is
                                              connected to the system, the music may
                                              start playing when touching     while it is
                                              paused. On the other hand, the music may
                                              pause when touching       while it is play-
                                              ing.


184
AUDIO/VIDEO SYSTEM


                                           D Selecting a desired track


Some titles may not be displayed depend-
ing on the type of portable player.


                                           “SEEK/TRACK” button: Use for direct
                                           access to a desired track.
                                           Push either side of the “SEEK/TRACK”
                                           button and repeat it until the desired track
                                           number appears on the screen. As you re-
                                           lease the button, the portable player will
                                           start playing the selected track from the
                                           beginning.
                                           Fast forward:
                                           Push and hold the “ ” button of “SEEK/
                                           TRACK” to fast forward the player. When
                                           you release the button, the portable player
                                           will resume playing from that position.
                                           Reverse:
                                           Push and hold the “ ” button of “SEEK/
                                           TRACK” to reverse the player. When you
                                           release the button, the player will resume
                                           playing.

                                                      INFORMATION
                                            Depending on the portable player that
                                            is connected to the system, certain
                                            functions may not be available.


                                                                                 185
AUDIO/VIDEO SYSTEM


D Selecting a desired album             D Other function


“Album Y”: Touch this button to go to   “RPT”: Use this control to automatic re-
the next album.                         play the track you are currently listening to.
“Album B”: Touch this button to go to   Repeating a track—
the previous album.                     While the track is playing, touch “RPT”
                                        briefly.
         INFORMATION                    “RPT” appears on the screen. When the
                                        track is finished, the player will automati-
Depending on the portable player that
                                        cally play it again. To cancel the repeat,
is connected to the system, certain
                                        touch “RPT” once again.
functions may not be available.


186
AUDIO/VIDEO SYSTEM


                                               — DVD player operation
“RAND”: Use this for automatic and ran-        The DVD player can play DVD video, au-
dom selection of tracks on the album that      dio CD, video CD, CD text, dts−CD or
you are currently listening to.                MP3 disc only when a disc is loaded in
Playing the tracks in the album in ran-        the DVD player. A WMA and DVD audio
dom order—                                     disc cannot be played.
While the track is playing, touch              For details of the rear seat entertainment
“RAND” briefly.                                system, see “Rear seat entertainment sys-
                                               tem features” on page 221.
“RAND” appears on the screen. The sys-
tem selects a track in the album you are       For appropriate discs for this player, see
currently listening to. To cancel this func-   “Audio/video system operating hints” on
tion, touch “RAND” once again.                 page 242.
                                               (a) Inserting the disc
           INFORMATION
 Depending on the portable player that
 is connected to the system, certain
 functions may not be available.


                                               A port must be used for 3 in. (8 cm) discs
                                               which are loaded in the same manner as
                                               for 4.7 in. (12 cm) discs.


                                                                                   187
AUDIO/VIDEO SYSTEM


                                               (b) Ejecting a disc


The indicator light turns on while the disc
is loaded.
                                               Push the “    ” button.
If the label faces downward, the disc can-
not be played. In this case, “Check disc”
appears on the screen.
If a disc which is not playable is inserted,
“Check disc” will also appear on the
screen. For appropriate discs for this play-
er, see “Audio/video system operating
hints” on page 242.

                NOTICE
 Never try to disassemble or oil any
 part of the DVD player. Do not insert
 anything other than a disc into the
 slot.


188
AUDIO/VIDEO SYSTEM


(c) Playing a disc                        (d) Operating an audio CD


                                                  U6102GS

                                          PLAYING AN AUDIO CD
                                          CD text only — The disc title and track title
                                          will appear on the screen when pushing
Push the “DISC·AUX” button or push        the “DISC·AUX” button.
the “TUNE/FILE”/“AUDIO” knob to dis-
play audio screen and touch the “DVD”     Push the “TUNE/FILE”/“AUDIO” knob
tab if a disc is already loaded in the    and touch the “DVD” tab to display this
player.                                   screen.
“DVD” appears on the screen. (If the CD
changer is turned on, push the
“DISC·AUX” button again or touch “DVD”
tab to switch to the DVD player.)


                                                                                189
AUDIO/VIDEO SYSTEM


                                                        U6041GS

                                                Touch the desired track number. The play-
                                                er will start playing the selected track from
                                                the beginning.
SELECTING A DESIRED TRACK
“SEEK/TRACK” button: Use for direct                 : By touching this touch−screen but-
access to a desired track.                      ton, the list moves up by 5 track groups. If
Push either side of the “SEEK/TRACK”            this touch−screen button is touched when
button and repeat it until the desired track    the top page of the list is displayed, the last
number appears on the display. As you re-       page is displayed.
lease the button, the player will start play-
ing the selected track from the beginning.          : By touching this touch−screen but-
“Select” for track: The desired track can       ton, the list moves down by 5 track groups.
be selected from a list. This function is       If this touch−screen button is touched
available only when the vehicle is not mov-     when the last page of the list is displayed,
ing.                                            the top page is displayed.
Touch “Select”. The track list is displayed.    Fast forward: Push “ ” side of “SEEK/
                                                TRACK” button and hold it to fast forward
                                                the disc. When you release the button, the
                                                player will resume playing from that posi-
                                                tion.
                                                Reverse: Push “ ” side of the “SEEK/
                                                TRACK” button and hold it to reverse the
                                                disc. When you release the button, the
                                                player will resume playing.


190
AUDIO/VIDEO SYSTEM


        U6103GS                                           U6104GS

SEARCHING FOR A DESIRED TRACK                     OTHER FUNCTIONS
Touch “SCAN” on the screen.                       “RPT”: Use it for automatic repeat of the
“SCAN” will be highlighted on the screen.         track you are currently listening to.
The player will play the next track for 10        Touch “RPT” while the track is playing.
seconds, then scan again. To select a             When the track is finished, the player will
track, touch “SCAN” on the screen a sec-          automatically go back to the beginning of
ond time. If the player reaches the end of        the track and play the track again. To can-
the disc, it will continue scanning at track 1.   cel it, touch “RPT” once again.
After all the tracks are scanned in one           “RAND”: Use it for automatic and random
pass, normal play resumes.                        selection of the disc which you are current-
                                                  ly listening to.
                                                  When “RAND” is touched, the system se-
                                                  lects a track in the disc you are currently
                                                  listening to. To cancel it, touch “RAND”
                                                  once again.
                                                  If a CD−TEXT disc is inserted, the title of
                                                  the disc and track will be displayed. Up to
                                                  29 letters can be displayed.


                                                                                        191
AUDIO/VIDEO SYSTEM


(e) Operating a MP3 DISC


                                                       U6045GS
        U6105GS

                                               Touch the desired folder number. The
PLAYING A MP3 DISC                             player will start playing the first file of the
                                               selected folder.
Push the “TUNE/FILE”/“AUDIO” knob
and touch the “DVD” tab to display this
screen.                                            : By touching this touch−screen but-
SELECTING A DESIRED FOLDER                     ton, the list moves up by 5 folder groups.
                                               If this touch−screen button is touched
“FolderY”: Touch this touch−screen but-        when the top page of the list is displayed,
ton briefly to go to the next folder.          the last page is displayed.
“FolderB”: Touch this touch−screen but-
ton briefly to go to the previous folder. To       : By touching this touch−screen but-
jump up to the first folder, touch and hold
this touch−screen button until the beep        ton, the list moves down by 5 folder
sounds.                                        groups. If this touch−screen button is
                                               touched when the last page of the list is
“Select” for Folder: The desired folder        displayed, the top page is displayed.
can be selected in a list. This function is
available only when the vehicle is not mov-
ing.
Touch “Select”. The folder list is dis-
played.


192
AUDIO/VIDEO SYSTEM


          SELECTING A DESIRED FILE
          “SEEK/TRACK” button: Use for direct
          access to a desired file.
          Push either side of the “SEEK/TRACK”
          button and repeat it until the desired file
          number appears on the display. As you re-
          lease the button, the player will start play-
          ing the selected file from the beginning.
          Fast forward: Push “ ” side of the
          “SEEK/TRACK” button and hold it to fast
          forward the disc. When you release the
          button, the player will resume playing from
          that position.
          Reverse: Push “ ” side of the “SEEK/
          TRACK” button and hold it to reverse the
          disc. When you release the button, the
          player will resume playing.
U6105GS   “Select” for File: The desired file can be
          selected in a list. This function is available
          only when the vehicle is not moving.
          Touch “Select”. The file list is displayed.


                                                 193
AUDIO/VIDEO SYSTEM


        U6046GS                                           U6106GS

Touch the desired file number. The player         SEARCHING FOR A DESIRED FILE
will start playing the selected file from the     Touch “SCAN” on the screen briefly.
beginning.
                                                  “SCAN” appears on the screen. The DVD
                                                  player will play the next file in the folder for
    : By touching this touch−screen but-          10 seconds, then scan again. To select a
ton, the list moves up by 5 file groups. If       file, touch “SCAN” on the screen a second
this touch−screen button is touched when          time. If the player reaches the end of the
the top page of the list is displayed, the last   folder, it will continue scanning from file 1.
page is displayed.                                After all the files are scanned in one pass,
                                                  normal play resumes.
    : By touching this touch−screen but-
ton, the list moves down by 5 file groups.
If this touch−screen button is touched
when the last page of the list is displayed,
the top page is displayed.


194
AUDIO/VIDEO SYSTEM


        U6107GS                                       U6108GS

SEARCHING FOR A DESIRED FOLDER                OTHER FUNCTIONS
Touch and hold “SCAN” on the screen           “RPT”: Use it for automatic repeat of the
until the beep sounds.                        file or folder you are currently listening to.
“FLD.SCAN” appears on the screen. The         Repeating a file —
DVD player will play the file at the begin-   Touch “RPT” briefly while the file is play-
ning of each folder for 10 seconds, then      ing. “RPT” appears on the screen. When
scan again. To select a file, touch “SCAN”    the file is finished, the player will automati-
on the screen a second time.                  cally go back to the beginning of the file
After all the folders are scanned in one      and play the file again. To cancel it, touch
pass, normal play resumes.                    “RPT” once again.
                                              Repeating a folder —
                                              Touch and hold “RPT” until the beep
                                              sounds while the folder is playing.
                                              “FLD.RPT” appears on the screen. When
                                              the folder is finished, the player will auto-
                                              matically go back to the beginning of the
                                              folder and play the folder again. To cancel
                                              it, touch “RPT” once again.


                                                                                      195
AUDIO/VIDEO SYSTEM


“RAND”: Use it for automatic and random         (f) Operating a DVD video disc
selection of the folder which you are cur-      NOTE: The playback condition of some
rently listening to or of all the folders.      DVD video discs may be determined by
Playing the files in one folder in random       a DVD video software producer. This
order —                                         DVD player plays a disc as the software
Touch “RAND” briefly. “RAND” appears            producer intended. So some functions
on the screen. The system selects a file in     may not work properly. Be sure to read
the folder you are currently listening to. To   the instruction manual for the DVD
cancel it, touch “RAND” once again.             video disc separately provided. For the
                                                detailed information about DVD video
Playing the files in all the folders in ran-    discs, see “(i) DVD player and DVD
dom order —                                     video disc information” on page 230.
Touch and hold “RAND” until the beep            Precautions on DVD video disc
sounds. “FLD.RAND” appears on the
screen. The system selects a file in the        When recording with a DVD video or video
folders of all the trays which are set and      CD, audio tracks may not record in some
plays it. To cancel it, touch “RAND” once       cases while the menu is displayed. As au-
again.                                          dio will not play in this case, verify that the
                                                video tracks are playing and then activate
When a file is skipped or the system is in-     playback.
operative, touch “RAND” to reset.
                                                When playback of a disc is completed:
                                                D If an audio CD or MP3 disc is playing,
                                                    the first track or file starts.
                                                D If a DVD video or video CD is playing,
                                                    playback will stop or the menu screen
                                                    will be displayed.
                                                The title/chapter number and playback
                                                time display may not appear while playing
                                                back certain DVD video discs.


196
AUDIO/VIDEO SYSTEM


               CAUTION
Conversational speech on some
DVDs is recorded at a low volume to
emphasize the impact of sound ef-
fects. If you adjust the volume as-
                                                U6077GS
suming that the conversations repre-
sent the maximum volume level that
the DVD will play, you may be startled
by louder sound effects or when you
change to a different audio source.      Vehicles with smart key system—
The louder sounds may have a signif-     This screen appears when the video
icant impact on the human body or        screen is first displayed after “ENGINE
pose a driving hazard. Keep this in      START STOP” switch is in ACCESSO-
mind when you adjust the volume.         RY or IGNITION ON mode.
                                         Vehicles without smart key system—
                                         This screen appears when the video
                                         screen is first displayed after the en-
                                         gine switch is in the “ACC” or “ON”
                                         position.


                                                                          197
AUDIO/VIDEO SYSTEM


       U6084GS                                      U6051GS

PLAYING A DVD DISC                           DVD SETTINGS
Push the “TUNE/FILE”/“AUDIO” knob            If you touch “Settings” on “DVD” screen,
and touch the “DVD” tab to display this      “Settings” screen appears.
screen.
Touch “Settings” on “DVD” screen and
touch “Wide” on “Settings” screen. The
screen mode can be changed.
If you touch “Full Screen” when the ve-
hicle is completely stopped and the park-
ing brake is applied, the video screen re-
turns.


198
AUDIO/VIDEO SYSTEM


DESCRIPTION OF SETTINGS
“DVD Video Settings”: The initial set up
screen appears. (See page 203.)
“Search”: The title search screen ap-
pears. (See page 201.)                            U6084GS
“Return”: Touching this will display the
predetermined scene and start playing
from there.
“Audio”: The audio changing screen ap-
pears. (See page 202.)                     DISPLAYING DVD CONTROLS
“Subtitle”: The subtitle changing screen
appears. (See page 201.)                   If you touch     , while watching video,
“Angle”: The angle selection screen ap-    DVD controls will appear.
pears. (See page 202.)                     If “ ” appears on the screen when you
“Wide”: The screen mode screen ap-         touch a control, the operation relevant to
pears. (See page 153.)                     the control is not permitted.


                                                                               199
AUDIO/VIDEO SYSTEM


DESCRIPTION OF DVD CONTROLS
“Menu” and “Top Menu”: If you touch
any of the above controls, the menu
screen for DVD video appears. (For the
operation, see the manual that come with
the DVD video disc provided separately.)               U6052GS
    : Touching this will display the control
key screen shown on the right.

     : Touching this will pause the video
screen.
       : Touching this will fast reverse dur-
ing playback.
     : Touching this will stop the video               U6053GS
screen.
      : Touching this will resume normal
play during pause.
                                                SELECTING A MENU ITEM
      : Touching this will fast forward dur-
ing playback and forward frame by frame         Enter the menu item using              ,
during pause.                                           ,       and          and touch
                                                “Enter”. The player starts playing vid-
                                                eo for that menu item. (For details, see
                                                the manual that come with the DVD vid-
                                                eo disc provided separately.)
                                                Each time you touch “Move Buttons”,
                                                the controls on the screen move up-
                                                ward and downward.
                                                When you touch the screen, the controls
                                                will disappear. To display them again,
                                                touch the screen.
                                                When you touch           , the previous
                                                screen returns.


200
AUDIO/VIDEO SYSTEM


       U6054GS

SEARCHING BY TITLE                         CHANGING          THE         SUBTITLE
Enter the title number and touch “OK”.     LANGUAGE
The player starts playing video for that   Each time you touch “Change”, the lan-
title number.                              guage is selected from the ones stored
When you push either side of the “SEEK/    in the discs and changed.
TRACK” button, you can select a chapter.   When you touch “Hide”, the subtitle can be
If you enter the wrong numbers, touch      hidden.

       to delete the numbers.              When you touch            , the previous
                                           screen returns.
When you touch           , the previous
screen returns.


                                                                               201
AUDIO/VIDEO SYSTEM


       U6069GSb                                 U6076GS

CHANGING THE AUDIO LANGUAGE              CHANGING THE ANGLE
Each time you touch “Change”, the lan-   The angle can be selected for discs that
guage is selected from the ones stored   are multi−angle compatible when the
in the discs and changed.                angle mark appears on the screen.
When you touch          , the previous   Each time you touch “Change”, the
screen returns.                          angle is selected from the ones stored
                                         in the discs and changed.
                                         When you touch        , and the previous
                                         screen returns.


202
AUDIO/VIDEO SYSTEM


                                                D Audio language
                                                You can change the audio language.
                                                1. Touch “Audio Language”.

        U6058GS                                 2. Touch the language you want to
                                                hear on the “Audio Language” screen.
                                                If you cannot find the language you want to
                                                hear on this screen, touch “Other” and
                                                enter a language code. For the entry of
                                                language code, see the following “ENTER
SETUP MENU                                      AUDIO LANGUAGE CODE”.
There are initial setting touch−screen          To return to the “Setup Menu” screen,
buttons on the “Setup Menu” screen.             touch the         .
After you change the initial setting, touch     D Subtitle language
         . The initial setting screen will be   You can change the subtitle language.
turned off and return to the previous           1. Touch “Subtitle Language”.
screen.
                                                2. Touch a language you want to read
When “Default” is touched, all menus are        on the “Subtitle Language” screen.
initialized.
                                                If you cannot find the language you want to
The initial setting can be changed.             read on this screen, touch “Other” and
                                                enter a language code. For the entry of
                                                language code, see the following “ENTER
                                                AUDIO LANGUAGE CODE”.
                                                To return to the “Setup Menu” screen,
                                                touch the         .
                                                D DVD language
                                                You can change the language on the
                                                DVD video menu.
                                                1. Touch “DVD Language”.
                                                2. Touch the language you want to
                                                read on the “DVD Language” screen.
                                                If you cannot find the language you want to
                                                read on this screen, touch “Other” and
                                                enter a language code. For the entry of
                                                language code, see the following “ENTER
                                                AUDIO LANGUAGE CODE”.
                                                To return to the “Setup Menu” screen,
                                                touch         .


                                                                                     203
AUDIO/VIDEO SYSTEM


D Angle mark                                   ENTER AUDIO LANGUAGE CODE
The multi−angle mark can be turned on
or off on the screen while the disc
which is multi−angle compatible is be-
ing played.
Each time you touch “Angle Mark”, the
angle mark on the screen turns on or off              U6059GS
alternately.
D Parental lock
The level of viewer restrictions can be
changed.
                                               If you touch “Other” on the “Select
1. Touch “Parental Lock”.                      Audio Language” screen, “Select
2. Enter the 4−digit personal code on          Subtitle Language” screen or “DVD
the “Key code” screen.                         Language” screen, you can select the
If you enter the wrong numbers, touch          language you want to hear or read by
                                               entering a language code.
       to delete the numbers.
                                               1. Enter the 4−digit language code.
10 touches of       will initialize the per-   If you enter the wrong numbers, touch
sonal code.                                           to delete the numbers.
To return to the “Setup Menu” screen,          2. Touch “OK”.
touch       .
3. Touch a parental level (1 — 8) on the       Code        Language
“Select Restriction Level”. Touch the          0514        English
       switch to return to the “Setup
                                               1001        Japanese
Menu” screen.
                                               0618        French
                                               0405        German
                                               0920        Italian
                                               0519        Spanish
                                               2608        Chinese
                                               1412        Dutch
                                               1620        Portuguese
                                               1922        Swedish
                                               1821        Russian
                                               1115        Korean
                                               0512        Greek
                                               0101        Afar
                                               0102        Abkhazian


204
AUDIO/VIDEO SYSTEM


0106   Afrikaans      0721   Gujarati
0113   Amharic        0801   Hausa
0118   Arabic         0809   Hindi
0119   Assamese       0818   Croatian
0125   Aymara         0821   Hungarian
0126   Azerbaijani    0825   Armenian
0201   Bashkir        0901   Interlingua
0205   Byelorussian   0905   Interlingue
0207   Bulgarian      0911   Inupiak
0208   Bihari         0914   Indonesian
0209   Bislama        0919   Icelandic
0214   Bengali        0923   Hebrew
0215   Tibetan        1009   Yiddish
0218   Breton         1023   Javanese
0301   Catalan        1101   Georgian
0315   Corsican       1111   Kazakh
0319   Czech          1112   Greenlandic
0325   Welsh          1113   Cambodian
0401   Danish         1114   Kannada
0426   Bhutani        1119   Kashmiri
0515   Esperanto      1121   Kurdish
0520   Estonian       1125   Kirghiz
0521   Basque         1201   Latin
0601   Persian        1214   Lingala
0609   Finnish        1215   Laothian
0610   Fiji           1220   Lithuanian
0615   Faroese        1222   Latvian
0625   Frisian        1307   Malagasy
0701   Irish          1309   Maori
0704   Scots−Gaelic   1311   Macedonian
0712   Galician       1312   Malayalam
0714   Guarani        1314   Mongolian


                                             205
AUDIO/VIDEO SYSTEM


1315     Moldavian        1920   Sesotho
1318     Marathi          1921   Sundanese
1319     Malay            1923   Swahili
1320     Maltese          2001   Tamil
1325     Burmese          2005   Telugu
1401     Nauru            2007   Tajik
1405     Nepali           2008   Thai
1415     Norwegian        2009   Tigrinya
1503     Occitan          2011   Turkmen
1513     (Afan)Oromo      2012   Tagalog
1518     Oriya            2014   Setswana
1601     Panjabi          2015   Tonga
1612     Polish           2018   Turkish
1619     Pashto, Pushto   2019   Tsonga
1721     Quechua          2020   Tatar
1813     Rhaeto−Romance   2023   Twi
1814     Kirundi          2111   Ukrainian
1815     Romanian         2118   Urdu
1823     Kinyarwanda      2126   Uzbek
1901     Sanskrit         2209   Vietnamese
1904     Sindhi           2215   Volapük
1907     Sangho           2315   Wolof
1908     Serbo−Croatian   2408   Xhosa
1909     Sinhalese        2515   Yoruba
1911     Slovak           2621   Zulu
1912     Slovenian
1913     Samoan
1914     Shona
1915     Somali
1917     Albanian
1918     Serbian
1919     Siswati


206
AUDIO/VIDEO SYSTEM


SETUP OPERATION FROM THE REAR                  (g) Operating a video CD
SEAT


        U6060GS                                       U6110GS

                                               PLAYING A VIDEO CD
This screen appears when a rear passen-        Push the “TUNE/FILE”/“AUDIO” knob
ger selects the setup menu.                    and touch the “DVD” tab to display this
If you want to cancel the setup operation      screen.
from the rear seat, touch “Play”. The play-    When you touch “Wide” on “Settings”
er will resume normal play.                    screen, the screen mode can be changed.
Under the same condition, the rear pas-        If you touch “Full Screen” when the ve-
senger can cancel the setup operation          hicle is completely stopped and the park-
from the front seat.                           ing brake is applied, the video screen re-
To lock the operation of the player from the   turns.
rear seat, see “D Rear system lock” on
page 262.


                                                                                   207
AUDIO/VIDEO SYSTEM


                                           DESCRIPTION          OF     VIDEO       CD
                                           SETTINGS
                                           D Controls on top page
                                           “Select Number”: The track or number
       U6062GS                             search screen appears. (See “SEARCH-
                                           ING BY TRACK” on page 210.)
                                           “Prev. Page”: When you touch this while
                                           the disc menu is displayed, the previous
                                           page appears on the screen. If you touch
                                           this while the player is playing video, the
DISPLAYING VIDEO CD SETTINGS               previous track is searched and played.
If you touch “Settings” on “DVD” screen,   “Next Page”: When you touch this while
“Settings” screen appears.                 the disc menu is displayed, the next page
                                           appears on the display. If you touch this
                                           while the player is playing video, the next
                                           track is searched and played.
                                           “Main/Sub”: A multiplex transmission
                                           changing control. The mode changes from
                                           Main/Sub to Main, to Sub and back to
                                           Main/Sub by touching this control.
                                           “Return”: Touching this will display the
                                           predetermined scene and start playing
                                           from there.
                                           “Wide”: The screen mode screen ap-
                                           pears.


208
AUDIO/VIDEO SYSTEM


DISPLAYING VIDEO CD CONTROLS                   DESCRIPTION          OF      VIDEO       CD
If you touch the part where controls are not   CONTROLS
located while you are watching video on
                                                     : Use this to pause the video screen.
the video CD, video CD controls will ap-
pear.                                                : Touch this to fast reverse during
If “ ” appears on the display when you         playback.
touch a control, the operation is not per-
mitted.                                             : Touch this to resume playing during
                                               pause.
                                                     : Touch this to fast forward during the
                                               playback and start playing frame by frame
                                               during pause.


                                                                                     209
AUDIO/VIDEO SYSTEM


                                              (h) If the player malfunctions
                                              If the player or another unit equipped with
                                              the player malfunction, your audio system
                                              will display following messages.
         U6072GSa                             If “Check disc” appears on the display:
                                              It indicates that the disc dirty, damaged, or
                                              it was inserted upside down. Clean the
                                              disc or insert it correctly. If a disc which is
                                              not playable is inserted, “Check disc” will
                                              also appear on the screen.                 For
SEARCHING BY TRACK                            appropriate discs for this player, see
Enter the track numbers and touch             “Audio/video system operating hints” on
“OK”. The player starts playing video         page 242.
for that title number.                        If “Region code error” appears on the
You can select a track number by pushing      display: It indicates that the DVD region
“ ” or “ ” on the “SEEK/TRACK” but-           code is not set properly.
ton.                                          If “DVD error” appears on the display:
If you enter the wrong numbers, touch         It indicates that the inside of the player unit
                                              may be too hot due to the very high ambi-
         to delete the numbers.               ent temperature. Remove the disc from
                                              the player and allow the player to cool
Touch         , and the previous screen re-
                                              down.
turns.
                                              If the malfunction is not rectified: Take
                                              your vehicle to your dealer.
                                              If an MP3 disc contains CD−DA files, only
                                              CD−DA files are played. If an MP3 disc
                                              contains files other than CD−DA, only MP3
                                              files are played.


210
AUDIO/VIDEO SYSTEM


— USB memory/iPod
operation
Connecting a USB memory or iPod en-        (a) Connecting a USB memory or iPod
ables you to enjoy music from the ve-
hicle speakers.

                 CAUTION
 Do not operate the player’s controls
 or connect the USB memory or iPod
 while driving.


               NOTICE
 D Do not leave your portable player in
   the car. In particular, high tempera-   " Vehicles with seat heater
   tures inside the vehicle may dam-
   age the portable player.
 D Do not push down on or apply un-
   necessary pressure to the portable
   player while it is connected as this
   may damage the portable player or
   its terminal.
 D Do not insert foreign objects into
   the port as this may damage the
   portable player or its terminal.


                                           " Vehicles without seat heater

                                           Open the cover and connect a USB
                                           memory or iPod using an iPod cable.
                                           Turn on the power of the USB memory or
                                           iPod if it is not turned on.


                                                                            211
AUDIO/VIDEO SYSTEM


(b) Playing a USB memory or iPod
D Playing and pausing a file or track                    INFORMATION
                                              D When an iPod is connected and the
                                                audio source is changed to iPod
                                                mode, the iPod will resume play
                                                from the same point in which it was

         U6078GS                                last used.
                                              D When the USB memory is con-
                                                nected and the audio source is
                                                changed to USB memory mode,
                                                the USB memory will start playing
                                                the first file in the first folder. If the
                                                same device is removed and rein-
" USB memory
                                                serted (and the contents have not
                                                been changed), the USB memory
                                                will resume play from the same
                                                point in which it was last used.


         U6079GS

" iPod

Touch “USB” tab to display this screen
if the USB memory or iPod is already
connected.
Touch     and the music will start playing.

Touch     and the music will pause.

Touch     and the music will start playing
again.


212
AUDIO/VIDEO SYSTEM


D Selecting a play mode (iPod only)   D Selecting a desired folder (USB
                                         memory only)


       U6079GS                                U6078GS

1. Touch “Menu”.
                                      “FolderY”: Touch this button to go to the
                                      next folder.
                                      “FolderB”: Touch this button to go to the
                                      previous folder.
                                      “Select” for Folder: The desired folder
                                      can be selected in a list. This function is
                                      available only when the vehicle is not mov-
                                      ing.
                                      Touch “Select”. The folder list is dis-
                                      played.
2. Select the desired play mode.


                                      Touch the desired folder number. The play-
                                      er will start playing the first file of the se-
                                      lected folder.

                                          : By touching this touch−screen but-
                                      ton, the list moves up by 5 folder groups.
                                      If this touch−screen button is touched
                                      when the top page of the list is displayed,
                                      the last page is displayed.


                                                                              213
AUDIO/VIDEO SYSTEM


                                            D Selecting a desired file or track
    : By touching this touch−screen but-
ton, the list moves down by 5 folder
groups. If this touch−screen button is
touched when the last page of the list is
displayed, the top page is displayed.


                                            “SEEK/TRACK” button: Use for direct
                                            access to a desired file or track.
                                            Push either side of the “SEEK/TRACK”
                                            button and repeat it until the desired file or
                                            track appears on the screen. As you re-
                                            lease the button, the USB memory or iPod
                                            will start playing the selected file or track
                                            from the beginning.
                                            Fast forward:
                                            Push and hold the “ ” side of the “SEEK/
                                            TRACK” button to fast forward the player.
                                            When you release the button, the player
                                            will resume playing from that position.
                                            Reverse:
                                            Push and hold the “ ” side of the “SEEK/
                                            TRACK” button to reverse the player.
                                            When you release the button, the player
                                            will resume playing.


214
AUDIO/VIDEO SYSTEM


                                                         U6078GS

                                                 " USB memory


“TUNE/FILE”/“AUDIO” knob: Use for di-
rect access to a desired file or track in the
player.
Turn the “TUNE/FILE”/“AUDIO” knob to
step up or down all the files or tracks in the           U6079GS
player you are currently listening to.


                                                 " iPod

                                                 “Select” for File or Track: The desired
                                                 file or track can be selected in a list. This
                                                 function is available only when the vehicle
                                                 is not moving.
                                                 Touch “Select”. The file or track list is dis-
                                                 played.


                                                                                        215
AUDIO/VIDEO SYSTEM


                                                D Searching for a desired file (USB
                                                   memory only)


                                                      U6111GS
Touch the desired file or track number. The
changer will start playing the selected file
or track from the beginning.                    Touch “SCAN” on the screen briefly
                                                while the music is playing.
    : By touching this touch−screen but-        “SCAN” appears on the screen. The play-
ton, the list moves up by 5 file or track       er will play the next file for 10 seconds,
groups. If this touch−screen button is          then scan again. To select a file, touch
touched when the top page of the list is dis-   “SCAN” on the screen a second time. If
played, the last page is displayed.             the player reaches the end of the memory,
                                                it will continue scanning at file1.
    : By touching this touch−screen but-        After all the files are scanned in one pass,
                                                normal play resumes.
ton, the list moves down by 5 file or track
groups. If this touch−screen button is
touched when the last page of the list is
displayed, the top page is displayed.


216
AUDIO/VIDEO SYSTEM


D Searching for a desired folder (USB          D Other functions
   memory only)


      U6112GS                                          U6078GS

                                               " USB memory
Touch “SCAN” on the screen for longer
than a second while the music is play-
ing.
“FLD.SCAN” appears on the screen. The
program at the beginning of each folder will
be played for 10 seconds. To continue lis-
tening to the program of your choice, touch            U6079GS
“SCAN” on the screen a second time.
After all the folders are scanned in one
pass, normal play resumes.

                                               " iPod

                                               “RPT”: Use this control to automatic re-
                                               play the file or track you are currently lis-
                                               tening to.
                                               Repeating a file or track—
                                               While the file or track is playing, touch
                                               “RPT” briefly.
                                               “RPT” appears on the screen. When the
                                               file or track is finished, the player will auto-
                                               matically play it again. To cancel the re-
                                               peat, select “RPT” once again.


                                                                                        217
AUDIO/VIDEO SYSTEM


                                                 Audio/video remote controls
                                                 (steering switches)
Repeating a folder (USB memory
only) —
While the folder is playing, touch “RPT”
for longer than a second.
“FLD.RPT” appears on the screen. When
the folder is finished, the changer will auto-
matically go back to the beginning of the
folder and play the folder again. To cancel
it, select “RPT” once again.
“RAND”: Use this for automatic and ran-
dom selection of files or tracks on the fold-
er that you are currently listening to.
Playing the file or track in random or-
der—                                             Some parts of the audio system can be ad-
                                                 justed using the switches on the steering
While the file or track is playing, touch        wheel.
“RAND” briefly.
                                                 Details of the specific switches, controls,
“RAND” appears on the screen. The sys-           and features are described below.
tem selects a file or track you are currently
listening to. To cancel this function, touch
                                                  1   Volume control switch
“RAND” once again.                                2   “      ” switch
Playing the files in all files in random or-      3   “MODE” switch
der —
Touch “RAND” for longer than a second            1    Volume control switch
while the music is playing. “FLD.RAND”
appears on the screen. The system se-            Push “+” side to increase the volume. The
lects a file in all files. To cancel it, touch   volume continues to increase while the
“RAND” once again.                               switch is being pressed.
When a file is skipped or the system is in-      Push “–” side to decrease the volume.
operative, select “RAND” to reset.               The volume continues to decrease while
                                                 the switch is being pressed.


218
AUDIO/VIDEO SYSTEM


 2     “      ” switch                              Vehicles with rear seat entertainment sys-
Radio                                               tem —
This switch has the following features—             DVD player
To select a preset station:                         While the DVD player is in operation, the
Quickly push and release the “ ” or “ ”             chapter or track can be changed by push-
side of the switch. Do this again to select         ing the “ ” or “ ” switch.
the next preset station.                            Bluetoothr audio player
To seek a station:                                  Use this switch to skip up or down to a dif-
Push and hold the “ ” or “ ” side of the            ferent track or album in either direction.
switch until you hear a beep. Do this again         To select a desired track:
to find the next station. If you push the           Quickly push and release the “ ” or “ ”
switch on either side during the seek               side of the switch until the track you want
mode, seeking will be cancelled.                    to listen to is set. If you want to return to the
To step up or down the frequency, push              beginning of the current track, push the
and hold the switch even after you hear a           “ ” side of the switch once quickly.
beep. When you release from the switch,             To select a desired album:
the radio will begin seeking up or down for         Push and hold “ ” or “ ” switch until
a station. Do this again to find the next sta-      you hear a beep to change to the next or
tion.                                               the previous album. Repeat this operation
XMr Satellite Radio—                                until you reach the album you want to listen
To select a preset channel, push the “ ”            to.
or “ ” side of the switch. Repeat until a           USB memory/iPod
desired channel is found.                           Use this switch to skip up or down to a dif-
CD changer                                          ferent track, file, album or folder in either
Use this switch to skip up or down to a dif-        direction.
ferent track in either direction.                   To select a desired track or file:
To select a desired track or file:                  Quickly push and release the “ ” or “ ”
Quickly push and release the “ ” or “ ”             side of the switch until the track or file you
side of the switch until the track you want         want to listen to is set. If you want to return
to listen to is set. If you want to return to the   to the beginning of the current track or file,
beginning of the current track, push the            push the “ ” side of the switch once,
“ ” side of the switch once, quickly.               quickly.
To select a desired disc:                           To select a desired album or folder:
Push and hold the “ ” or “ ” switch until           Push and hold “ ” or “ ” switch until
you hear a beep to change to the next or            you hear a beep to change to the next or
the previous disc. Repeat this operation            the previous album or folder. Repeat this
until you reach the disc you want to listen         operation until you reach the album or fold-
to.                                                 er you want to listen to.


                                                                                              219
AUDIO/VIDEO SYSTEM


 3   “MODE” switch
Push “MODE” switch to select an audio
mode. Each push changes the mode se-
quentially if the desired mode is ready to
use.
To turn the audio/video system on, push
the “MODE” switch.
To turn the audio/video system off, push
and hold the “MODE” switch until you hear
a beep.


220
AUDIO/VIDEO SYSTEM


Rear seat entertainment system features —
The rear seat entertainment system is designed for the rear passengers to enjoy audio
and DVD video separately from the front audio system.


1   Front audio system                      5   Rear seat entertainment system con-
2   Display                                     troller
3   Headphone volume control dials and      6   Power outlet
    headphone jacks                         7   A/V input port
4   DVD player


                                                                               221
AUDIO/VIDEO SYSTEM


Vehicles with smart key system —
The rear seat entertainment system can
be used when the “ENGINE START
STOP” switch is in ACCESSORY or IGNI-
TION ON mode.
Vehicles without smart key system —
The rear seat entertainment system can
be used when the engine switch is in
“ACC” or “ON” position.
D Opening and closing the display


                                              To close the display, push the display
                                              up until a click is heard.
                                              The illumination of the screen is automati-
                                              cally turned off when the display is closed.
                                              However, the rear seat entertainment sys-
                                              tem is not turned off.


Push the lock release button to open
the display.
Pull the display down to an easily viewable
angle (between 90_ and 125_).


222
AUDIO/VIDEO SYSTEM


D Loading a disc                               D Ejecting a disc


Insert the disc into the slot with the la-     Push    and remove the disc.
bel side up.
The “DISC” indicator light turns on while
the disc is loaded.
The player will play the track or chapter,
and will repeat it after it reaches the end.


                                                                              223
AUDIO/VIDEO SYSTEM


D Headphone jacks                               D Before using the remote controller
                                                   (for new vehicle owners)


1   To use the headphones, connect
    them to the jack.                           An insulating sheet is set to prevent the
2   To adjust the volume                        batteries from being discharged. Remove
                                                the insulating sheet before using the re-
    Right side dial: Turn it toward the front
                                                mote controller.
    of the vehicle to increase the volume.
    Turn it toward the rear of the vehicle      D Headphones
    to decrease the volume.                     With some headphones generally avail-
    Left side dial: Turn it toward the rear     able in the market, it may be difficult to
    of the vehicle to increase the volume.      catch signals properly. Toyota recom-
    Turn it toward the front of the vehicle     mends the use of Toyota genuine wireless
    to decrease the volume.                     headphones.
                                                Please contact your Toyota dealer for fur-
                                                ther details.
                                                D Volume
                                                Adjust the volume when you connect the
                                                headphones to the jack. Loud sounds may
                                                have a significant impact on the human
                                                body.


224
AUDIO/VIDEO SYSTEM


                CAUTION                                  NOTICE
D While driving                           D Cleaning the display
  Do not use headphones.                    Wipe the display with a dry soft
  Doing so may cause an accident,           cloth.
  resulting in death or serious injury.
                                            If the screen is wiped with a rough
D When the rear seat entertainment          cloth, the surface of the screen
  system is not used                        may be scratched.
  Keep the display closed.                D To prevent damage to the remote
  In the event of an accident or sud-       controller
  den braking, the opened display
                                            Keep the remote control away from
  may hit an occupant’s body, result-
                                            direct sunlight, temperature heat
  ing in injury.
                                            and high humidity.
D To prevent accidents and electric
  shock                                     Do not drop or knock the remote
                                            controller against hard objects.
  Do not disassemble or modify the
  remote controller.                        Do not sit on or place heavy ob-
                                            jects on the remote controller.
D When the remote controller is not
  used                                    D DVD player
  Stow the remote controller. Inju-         Never try to disassemble or oil any
  ries may result in the event of an        part of the DVD player. Do not in-
  accident or sudden braking.               sert anything other than a disc into
                                            the slot.
D Conversational speech on some
  DVDs is recorded at a low volume
  to emphasize the impact of sound
  effects. If you adjust the volume
  assuming that the conversations
  represent the maximum volume
  level that the DVD will play, you
  may be startled by louder sound ef-
  fects or when you change to a dif-
  ferent audio source. The louder
  sounds may have a significant im-
  pact on the human body or pose a
  driving hazard. Keep this in mind
  when you adjust the volume.


                                                                           225
AUDIO/VIDEO SYSTEM


— Using the DVD player
(DVD video)
D Remote controller      1    Turning on the DVD mode
                         2    Turning on or off the operation
                              switches on the display
                         3    Selecting a chapter
                         4    Reversing a disc
                         5    Turning on the menu screen
                         6    Turning on the title selection screen
                         7    Searching the title
                         8    Changing the screen angle
                         9    Inputting the selected switch
                         10   Selecting a switch
                         11   Playing/pausing a disc
                         12   Fast forwarding a disc
                         13   Stopping a disc
                         14   Changing the subtitle language
                         15   Changing the audio language


226
AUDIO/VIDEO SYSTEM


D Unit                                D Display (Page 1)


                                      1   Turning off the operation switches on
                                          the display
1   Turning on the DVD mode
                                      2   Displaying to Page 2
2   Skipping to the desired chapter
                                      3   Turning on or off the title selection
                                          screen for the disc
3   Playing/pausing a disc
                                      4   Turning on or off the menu screen for
4   Turning on or off the operation       the disc
    switches on the display
                                      5   Reversing a disc
5   Selecting a switch
                                      6   Stopping a disc
6   Inputting the selected switch
                                      7   Pausing the disc/canceling the pause
                                      8   Fast forwarding a disc


                                                                         227
AUDIO/VIDEO SYSTEM


D Display (Page 2)                               (a) Turning on or off the operation
                                                 switches

                                                 Push         or        to turn on the opera-
                                                 tion switches. Push        or       once
                                                 again or select “Hide Buttons” to turn off
                                                 the operation switches.
                                                 (b) Turning on the title selection
                                                 screen

                                                 Push          or select “Top Menu” to turn
9     Displaying to the initial setting screen   on the title selection screen. For the op-
                                                 eration of the title selection screen, see the
10    Displaying to Page 1
                                                 separate manual for the DVD disc.
11    Search for a title
                                                 (c) Turning on the menu screen
12    Returning to the previous screen
13    Changing the audio language                Push        or select “Menu” to turn on
14    Changing the subtitle language             the menu screen. For the operation of the
                                                 menu screen, see the separate manual for
15    Changing the angle                         the DVD disc.
                                                 (d) Returning to the previous screen
            INFORMATION                          Select “Return” to return to the previous
To operate from the front audio sys-             screen. For the operation of the menu
tem, see “— DVD player operation”                screen, see the separate manual for the
on page 187.                                     DVD disc.


228
AUDIO/VIDEO SYSTEM


(e) Searching for a title                       (g) Changing the audio language


Push            or select “Search” to dis-      Push        or select “Audio” to display
play the screen to search for a title.          the audio language screen.
Select the title number, and push “ENT” to
input it. Select “Back” to return to the pre-   Each time         is pushed or “Audio” is
vious screen.                                   selected, another language stored on the
                                                disc is selected.
(f) Changing the subtitle language              Select “Back” to return to the previous
                                                screen.
                                                (h) Changing the angle


Push        or select “Sub Title” to dis-
play the subtitle language screen.

Each time         is pushed or “Sub Title”      Push        or select “Angle” to display
is selected, another language stored on         the screen to change the angle.
the disc is selected.
Select “Back” to return to the previous         Each time        is pushed or “Angle” is
screen.                                         selected, the angle changes.
                                                Select “Back” to return to the previous
                                                screen.


                                                                                   229
AUDIO/VIDEO SYSTEM


(i) DVD player and DVD video disc in-           Marks shown on DVD video discs:
formation
To lock the rear seat entertainment sys-                       Indicates NTSC
tem, see “D Rear system lock (with rear                        format of color TV.
seat entertainment system)” on page 262.
When         appears on the screen, it indi-
cates that the selected switch cannot                          Indicates the number
work.                                                          of audio tracks.
D Error messages
DISC CHECK:                                                    Indicates the number
Indicates that the disc is dirty, damaged or                   of language subtitles.
was inserted upside down. Clean the disc
or insert it correctly.
REGION ERROR:                                                  Indicates the number
Indicates that the DVD region code is not                      of angles.
set properly.
                                                               Indicates the screen to
DVD ERROR:                                                     be selected.
Indicates that there is a problem inside the                   Wide screen: 16:9
player. Eject the disc. Set the disc again.                    Standard: 4:3
If the malfunction still exists, take the ve-                  Indicates a region code
hicle to your Toyota dealer.                                   by which this video disc
DVD VIDEO DISCS                                                can be played.
                                                               ALL: in all countries
This DVD player conforms to NTSC col-                          Number: region code
or TV formats. The DVD video disc con-
forming to another formats such as
PAL or SECAM cannot be used.
Region codes: Some DVD video discs
have a region code indicating a country
where you can use the DVD video disc on
this DVD player. If the DVD video disc is
not labeled as “ALL” or “1”, you cannot use
it on this DVD player. If you attempt to play
an inappropriate DVD video disc on this
player, “Region code error” appears on the
screen. Even if the DVD video disc does
not have a region code, there is a case that
you cannot use it.


230
AUDIO/VIDEO SYSTEM


DVD VIDEO DISC GLOSSARY                          Region codes: The region codes are pro-
DVD video discs: Digital versatile Disc          vided on DVD players and DVD discs. If
that holds video. DVD video discs have           the DVD video disc does not have the
adopted “MPEG2”, one of the world stan-          same region code as the DVD player, you
dards of digital compression technologies.       cannot play the disc on the DVD player.
The picture data is compressed by 1/40 on        For region codes, see page 230.
average and stored. Variable rate en-            Audio: This DVD player can play liner
coded technology in which the volume of          PCM, Dolby digital and MPEG audio for-
data assigned to the picture is changed de-      mat DVD. Other decoded type cannot be
pending on the picture format has also           played.
been adopted. Audio data is stored using         Title and chapter: Video and audio pro-
PCM and Dolby digital, which enables             grams stored in DVD video disc are divid-
higher quality of sound. Furthermore, mul-       ed in parts by title and chapter.
ti−angle and multi−language features will
also help you enjoy the more advanced            Title: The largest unit of the video and au-
technology of DVD video.                         dio programs stored on DVD video discs.
                                                 Usually, one piece of movie, one album, or
Viewer restrictions: This feature limits         one audio program is assigned as a title.
what can be viewed in conformity with a
level of restrictions of the country. The lev-   Chapter: The unit smaller than that of title.
el of restrictions varies depending on the       A title comprises plural chapters.
DVD video disc. Some DVD video discs             Manufactured under license from
cannot be played at all, or violent scenes       Dolby Laboratories. “Dolby”, “Pro Log-
are skipped or replaced with other scenes.       ic”, and the double−D symbol are trade-
Level 1: DVD video discs for children can        marks of Dolby Laboratories. Confi-
be played.                                       dential unpublished works.
                                                 E1992−1997 Dolby Laboratories. All
Level 2 − 7: DVD video discs for children        rights reserved.
and G−rated movie can be played.
                                                 “DTS” is a trademark of Digital Theater
Level 8: All types of the DVD video discs        Systems, Inc.
can be played.
Multi−angle feature: You can enjoy the
same scene at different angles.
Multi−language feature: You can select a
language of the subtitle and audio.


                                                                                       231
AUDIO/VIDEO SYSTEM


— Using the DVD player
(video CD)
D Remote controller


                                      D Unit
1     Selecting a switch              1   Skipping to the desired chapter
2     Selecting a chapter             2   Playing/pausing a disc
3     Playing/pausing a disc          3   Selecting a switch
4     Reversing a disc                4   Inputting the selected switch
5     Displaying operation switches
6     Inputting the selected switch
7     Fast forwarding a disc
8     Stopping a disc
9     Changing the initial setting


232
AUDIO/VIDEO SYSTEM


D Display (page 1)                         D Display (page 2)


1   Selecting a disc menu number           8    Displaying to page 1
2   Turning off the menu screen            9    Reversing a disc
3   Displaying to page 2                   10   Pausing the disc/canceling the pause
4   Turning on the disc menu               11   Fast forwarding a disc
5   Returning to the previous page
    screen (with the disc menu dis-                  INFORMATION
    played)
                                           To operate from the front audio sys-
6   Proceeding to the next page screen
                                           tem, see “— DVD player operation”
    (with the disc menu displayed)
                                           on page 187.
7   Changing to a multiplex transmission


                                                                              233
AUDIO/VIDEO SYSTEM


                                          — Using the DVD player
                                          (audio CD/CD text)
D Selecting a disc menu number            D Using the control screen
Select “Select Number” to display the
disc menu number search screen.
Select the disc menu number, and push
“ENT” to input it.
Select “Back” to return to the previous
screen.


                                          Using the control screen, push         or
                                                to display the control screen.
                                          1    Repeat play
                                          2    Random playback
                                           3   Search playback
                                          Canceling random, repeat and scan
                                          play
                                          Select “RPT”, “RAND” or “SCAN” again.

                                                    INFORMATION
                                          To operate from the front audio sys-
                                          tem, see “— DVD player operation”
                                          on page 187.


234
AUDIO/VIDEO SYSTEM


— Using the DVD player
(MP3 discs)
D Using the control screen                      D Repeat play
                                                Repeat a file
                                                Select “RPT”.
                                                Repeat all of files in a folder
                                                Select “RPT”, and push and hold “ENT”.
                                                D Random playback
                                                Playing files from a particular folder in
                                                random order
                                                Select “RAND”.
                                                Playing all of the files on a disc in ran-
                                                dom order
                                                Select “RAND”, and push and hold
Push        or         to display the control   “ENT”.
screen.                                         D Search playback
 1   Repeat play                                Selecting the desired file by cueing the
 2   Random playback                            files in the folder
 3   Search playback                            Select “SCAN”.
                                                The player will scan all the files in the fold-
 4   Displaying file information                er. Each file will be played for 10 seconds.
 5   Selecting folder                           D Selecting the desired file by cueing
                                                    the folders on the disc
           INFORMATION                          Select “SCAN”, and push and hold
                                                “ENT”. The player will scan all the folders
 To operate from the front audio sys-
                                                on the disc. The first file in each folder will
 tem, see “— DVD player operation”
                                                be played for 10 seconds.
 on page 187.
                                                D Canceling random, repeat and play
                                                    back
                                                Select “PRT”, “RAND” or “SCAN” again.


                                                                                        235
AUDIO/VIDEO SYSTEM


— Using the video mode
                                               D Using the port


Push “VIDEO” to select the video mode.
Before switching to the video mode, con-       Open the cover.
nect the audio source to the A/V input port.   The A/V input port is composed of 3 input
                                               ports.
                                               Yellow: Image input port
                                               White: Left channel audio input port
                                               Red: Right channel audio input port
                                               The rear seat entertainment system plays
                                               videos and sound when audio−video
                                               equipment is connected to the A/V input
                                               port. For details, refer to the manufactur-
                                               er’s instructions.
                                               The power outlet is used to connect the au-
                                               dio device. See the vehicle owner’s manu-
                                               al.

                                                               NOTICE
                                                When the A/V input port is not in use,
                                                keep the A/V input port cover closed.
                                                Inserting anything other than an ap-
                                                propriate plug may cause electrical
                                                failure or a short circuit.


236
AUDIO/VIDEO SYSTEM


— Changing the initial
setting
                                           D Changing the audio language


Push          or select “Set Up” to dis-
                                           Select “Audio Language”. Select the
play the initial setting screen.           language you want to hear, and push
The following initialization can be        “ENT” to input it.
changed here.
D “Audio Language”
D “Subtitle Language”
D “DVD Language”
D “Angle Mark”
D “Parental Lock”


                                           Select “Others” if you cannot find the
                                           language you want to hear. Enter the
                                           appropriate 4−digit language code. Se-
                                           lect a number, and push “ENT” to input
                                           it.
                                           Language code list
                                           If a code that is not in the list is entered, “In-
                                           correct Code” will appear on the screen.
                                           (See page 204.)


                                                                                      237
AUDIO/VIDEO SYSTEM


D Changing the subtitle language                     D Changing the DVD language


Select “Subtitle Language”. Select the               Select “DVD Language”. Select the lan-
language you want to read, and push                  guage you want to read and push
“ENT” to input it.                                   “ENT” to input it.


Select “Others” if you cannot find the               Select “Others” if you cannot find the
language you want to read. Enter the                 language you want to read. Enter the
appropriate 4−digit language code. Se-               appropriate 4−digit language code. Se-
lect a number, and push “ENT” to input               lect a number, and push “ENT” to input
it.                                                  it.
Language code list                                   Language code list
If a code that is not in the list is entered, “In-   If a code that is not in the list is entered, “In-
correct Code” will appear on the screen.             correct Code” will appear on the screen.
(See page 204.)                                      (See page 204.)


238
AUDIO/VIDEO SYSTEM


D Turning on or off the angle mark           D Setting viewer restriction levels
The angle mark can be turned on for
discs that are multi−angle compatible.
Each time you push “ENT” when “Angle
Mark” is selected, the angle mark turns on
or off alternately.


                                             Setting a password allows the viewer
                                             restriction to be effective.
                                             Select “Parental Lock”. Enter the pass-
                                             word and push “ENT”. The setting can-
                                             not be changed unless the password is
                                             entered.
                                             When you forget the password, initialize
                                             the password. (See page 240.)


                                             Select a restriction level (1−8), and
                                             push “ENT”. The smaller the level num-
                                             ber, the stricter the age limit.


                                                                               239
AUDIO/VIDEO SYSTEM


D Setting the display mode                    D Adjusting the screen


                                              Push        .
                                              Select the brightness, contrast, tone or col-
Pushing            changes the display        or, and make adjustments. Push          or
modes sequentially as follows:                “ENT” to input it.
    Normal → “Wide 1” → Wide 2                Brightness, contrast, tone and color
Returning to the previous screen              adjustment
Select “BACK”, and push “ENT”.                “Brightness” “+”:
                                              Brightens the screen.
D To initialize the password
                                              “Brightness” “−”:
Push A on the remote controller or unit ten   Darkens the screen.
times when the screen to enter the person-
al code is displayed.                         “Contrast” “+”:
                                              Strengthens the contrast of the screen.
                                              “Contrast” “−”:
                                              Weakens the contrast of the screen.
                                              “Tone” “+”: Strengthens the tone of the
                                              screen.
                                              “Tone” “−”: Weakens the tone of the
                                              screen.
                                              “Color” “Red”:
                                              Strengthens the red color of the screen.
                                              “Color” “Green”:
                                              Strengthens the green color of the screen.


240
AUDIO/VIDEO SYSTEM


— Replacing the batteries
Necessary item for replacing “3 AA bat-   If the batteries are discharged, the fol-
teries”.                                  lowing symptoms may occur.
                                          D The rear seat entertainment system
                                              control will not function properly.
                                          D The operational range is reduced.
                                          When using 3 AA batteries
                                          D Batteries can be purchased at your
                                              Toyota dealer, electric appliance shop,
                                              or camera stores.
                                          D Replace only with the same or equiva-
                                              lent type recommended by a Toyota
                                              dealer.
                                          D Dispose of used batteries according to
                                              the local laws.
1. Remove the cover.
                                                            CAUTION
                                           Removed battery and other parts:
                                           D Keep away from children.
                                           D These parts are small and if swal-
                                             lowed by a child they can cause
                                             choking.


                                                          NOTICE
                                           For normal operation after replacing
                                           the battery. Observe the following
2. Remove the depleted batteries and       precautions to prevent accidents:
install new 3 AA batteries.
                                           D Always work with dry hands. Mois-
                                             ture may cause the battery to rust.
                                           D Do not touch or move any other
                                             components inside the remote
                                             controller.
                                           D Do not bend either of the battery
                                             terminals.


                                                                               241
AUDIO/VIDEO SYSTEM


Audio/video system
operating hints
                                                 FM
                 NOTICE                          Fading and drifting stations — Generally,
                                                 the effective range of FM is about 25 miles
 To ensure correct audio/video sys-              (40 km). Once outside this range, you may
 tem operations:                                 notice fading and drifting, which increase
 D Be careful not to spill beverages             with the distance from the radio transmit-
   over the audio/video system.                  ter. They are often accompanied by distor-
                                                 tion.
 D Do not put anything other than a
   compact disc into the slot.                   Multi−path — FM signals are reflective,
                                                 making it possible for two signals to reach
 D Do not put anything other than an             your antenna at the same time. If this hap-
   appropriate disc into the CD                  pens, the signals will cancel each other
   changer or DVD player.                        out, causing a momentary flutter or loss of
 D The use of a cellular phone inside            reception.
   or near the vehicle may cause a               Static and fluttering — These occur when
   noise from the speakers of the au-            signals are blocked by buildings, trees, or
   dio system which you are listening            other large objects. Increasing the bass
   to. However, this does not indicate           level may reduce static and fluttering.
   a malfunction.
                                                 Station swapping — If the FM signal you
                                                 are listening to is interrupted or weakened,
RADIO RECEPTION                                  and there is another strong station nearby
Usually, a problem with radio reception          on the FM band, your radio may tune in the
does not mean there is a problem with your       second station until the original signal can
radio — it is just the normal result of condi-   be picked up again.
tions outside the vehicle.                       AM
For example, nearby buildings and terrain        Fading — AM broadcasts are reflected by
can interfere with FM reception. Power           the upper atmosphere — especially at
lines or telephone wires can interfere with      night. These reflected signals can inter-
AM signals. And of course, radio signals         fere with those received directly from the
have a limited range. The farther you are        radio station, causing the radio station to
from a station, the weaker its signal will be.   sound alternately strong and weak.
In addition, reception conditions change         Station interference — When a reflected
constantly as your vehicle moves.                signal and a signal received directly from
Here are some common reception prob-             a radio station are very nearly the same
lems that probably do not indicate a prob-       frequency, they can interfere with each
lem with your radio:                             other, making it difficult to hear the broad-
                                                 cast.
                                                 Static — AM is easily affected by external
                                                 sources of electrical noise, such as high
                                                 tension power lines, lightening, or electri-
                                                 cal motors. This results in static.


242
AUDIO/VIDEO SYSTEM


XMr                                              USB memory
Cargo loaded on the roof luggage carrier,        USB memories that can be used for MP3
especially metal objects, may adversely          and WMA playback.
affect the reception of XMr Satellite Radio.     D USB communication formats: USB 2.0
Alternation or modifications carried out            FS (12 MBPS)
without appropriate authorization may in-        D File formats: FAT 16/32 (Windowsr)
validate the user’s right to operate the
equipment.                                       D Correspondence class: Mass storage
                                                    class
iPod
About iPod —
D Apple is not responsible for the opera-
    tion of this device or its compliance with
    safety and regulatory standards.
D iPod is a trademark of Apple Inc., regis-
    tered in the U.S. and other countries.
Compatible models —
 Model     Generation Software version
 iPod      5th            Ver. 1.2.0      or
           generation     higher
 iPod      1st            Ver. 1.3.0      or
 nano      generation     higher
           2nd            Ver. 1.1.2      or
           generation     higher
           3rd            Ver. 1.0.0      or
           generation     higher
 iPod      1st            Ver. 1.1.0      or
 touch     generation     higher
 iPod      1st            Ver. 1.0.0      or
 classic   generation     higher
Depending on differences between mod-
els or software versions etc., some models
listed above might be incompatible with
this system.
iPod 4th generation and earlier models are
not compatible with this system.
iPhone, iPod mini, iPod shuffle and iPod
photo are not compatible with this system.


                                                                                243
AUDIO/VIDEO SYSTEM


CARING FOR YOUR CD CHANGER,
DVD PLAYER AND DISCS
D Your CD changer is intended for use
  with 4.7 in. (12 cm) discs only.
D Extremely high temperatures can keep
  your CD changer and DVD player from
  working. On hot days, use the air                 XS18016
  conditioning to cool the vehicle interior
  before you use the changer and player.
D Bumpy roads or other vibrations may
  make your CD changer and DVD play-
  er skip.
D If moisture gets into your CD changer
  and DVD player, you may not play even       CD changer
  though they appear to be working. Re-       D Use only discs marked as shown abo-
  move the disc from the changer and            ve. The following products may not be
  player and wait until it dries.               playable on your changer.
                                                Copy−protected CD
                  CAUTION                       CD−ROM

 CD changer and DVD player use an
 invisible laser beam which could
 cause hazardous radiation exposure
 if directed outside the unit. Be sure to
 operate the changers and players
 correctly.


244
AUDIO/VIDEO SYSTEM


 Audio CDs

                                                6U5B93X


 DVD video                                " Special shaped discs
 discs


 Video CDs


DVD player
D Use only discs marked as shown abo-
                                                6U5B95X
  ve. The following products may not be
  playable on your player.
  SACD
  Copy−protected CD
  CD−ROM                                  " Transparent/translucent discs
  DVD−R
  DVD+R
  DVD−RW
  DVD+RW
  DVD−ROM
  DVD−RAM
  DVD−Audio

                                                6U5B94X


                                          " Low quality discs


                                                                            245
AUDIO/VIDEO SYSTEM


      6U5B96X                                    6U5B97X


" Labeled discs                           " Correct             " Wrong

                                          D Handle discs carefully, especially
              NOTICE                        when you are inserting them. Hold
                                            them on the edge and do not bend the-
D Do not use special shaped, trans-         m. Avoid getting fingerprints on them,
  parent/translucent, low quality or        particularly on the shiny side.
  labeled discs such as those shown       D Dirt, scratches, warping, pin holes, or
  in the illustrations. The use of such     other disc damage could cause the
  discs may damage the player or            player to skip or to repeat a section of
  changer, or it may be impossible to       a track. (To see a pin hole, hold the disc
  eject the disc.                           up to the light.)
D This system is not designed for use     D Remove discs from the players when
  of Dual Disc. Do not use Dual Disc        you are not using them. Store them in
  because it may cause damage to            their plastic cases away from moisture,
  the player or changer.                    heat, and direct sunlight.
D Do not use a disc with protection
  ring. The use of such disc may
  damage the player or changer, or it
  may be impossible to eject the
  disc.
D If a disc cannot be ejected, do not
  forcibly take out the disc. Keep
  pushing the “LOAD·          /CLOSE”
  button for approximately 5 sec-
  onds and release it. At this time,
  the audio disc and the map DVD−
  ROM will be ejected.


246
AUDIO/VIDEO SYSTEM


                                                MP3/WMA FILES
                                                D MP3 (MPEG Audio Layer 3) and WMA
                                                    (Windows Media Audio) are audio
                                                    compression standards.
                                                D   The MP3/WMA player can play MP3

        6U5B98X                                     and WMA files on CD−ROM, CD−R
                                                    and CD−RW discs.
                                                    The unit can play disc recordings com-
                                                    patible with ISO 9660 level 1 and level
                                                    2 and with the Romeo and Joliet file
                                                    system.
                                                D   When naming an MP3 or WMA file, add
                                                    the appropriate file extension (.mp3 or
To clean a disc: Wipe it with a soft, lint−         .wma).
free cloth that has been dampened with
water. Wipe in a straight line from the cen-    D   The MP3/WMA player plays back files
ter to the edge of the disc (not in circles).       with .mp3 or .wma file extensions as
Dry it with another soft, lint−free cloth. Do       MP3 or WMA files. To prevent noise
not use a conventional record cleaner or            and playback errors, use the appropri-
anti−static device.                                 ate file extensions.
                                                D   The player can play only the first ses-
                                                    sion using multi−session compatible
                                                    CDs.
                                                D   MP3 player—MP3 files are compatible
                                                    with the ID3 Tag Ver. 1.0, Ver. 1.1, Ver.
                                                    2.2, and Ver. 2.3 formats. The unit can-
                                                    not display disc title, track title and art-
                                                    ist name in other formats.
                                                D   USB memory—MP3 files are compat-
                                                    ible with the ID3 Tag Ver. 1.0, Ver.1.1,
                                                    Ver 2.2, Ver 2.3 and Ver 2.4 formats.
                                                    The unit cannot display track title and
                                                    artist name in other formats.
                                                D   WMA files can contain a WMA tag that
                                                    is used in the same way as an ID3 tag.
                                                    WMA tags carry information such as
                                                    track title, artist name.
                                                D   The emphasis function is available
                                                    only when playing MP3/WMA files re-
                                                    corded at 32, 44.1 and 48 kHz.


                                                                                         247
AUDIO/VIDEO SYSTEM


Sampling frequency                            D The player is compatible with VBR
MP3 files for MP3 player:                         (Variable Bit Rate).
MPEG 1 LAYER 3—32, 44.1, 48 kHz               D   When playing back files recorded as
MPEG 2 LSF LAYER 3—16, 22.05, 24 kHz              VBR (Variable Bit Rate) files, the play
MP3 files for USB memory:                         time will not be correctly displayed if
MPEG 1 AUDIO LAYER 2, 3—32,44.1, 48               fast−forward or reverse operations are
kHz                                               used.
MPEG 2 AUDIO LAYER 2, 3—16, 22.05,            D   It is not possible to check folders that
24 kHz                                            do not include MP3/WMA files.
MPEG 2.5—8, 11.025, 12 kHz
WMA files for WMA player:                     D   MP3/WMA files in folders up to 8 levels
Ver. 7, 8, 9 CBR—32, 44.1, 48kHz                  deep can be played. However, the
WMA files for USB memory:                         start of playback may be delayed when
Ver. 9—HIGH PROFILE 32, 44.1, 48 kHz              using discs containing numerous lev-
                                                  els of folders. For this reason, we rec-
D The sound quality of MP3/WMA files              ommend creating discs with no more
   generally improves with higher bit rate-       than two levels of folders.
   s. In order to achieve a reasonable lev-
   el of sound quality, discs recorded with   D   It is possible to play up to 192 folders or
   a bit rate of at least 128 kbps are rec-       255 files on one disc.
   ommended.
   Playable bit rates
   MP3 files for MP3 player:
   MPEG1 LAYER3—64 to 320 kbps
   MPEG2 LSF LAYER3—64 to 160 kbps
   MP3 files for USB memory:
   MPEG 1 AUDIO LAYER 2, 3—32 to
   320 kbps
   MPEG 2 AUDIO LAYER 2, 3—32 to
   160 kbps
   MPEG 2.5—32 to 160 kbps
   WMA files for WMA player:
   Ver. 7, 8 CBR—48 to 192 kbps
   Ver. 9 CBR—48 to 320 kbps
   WMA files for USB memory:
   Ver. 9—HIGH PROFILE 32 to 320
   kbps, VBR (Variable Bit Rate)
D The MP3/WMA player does not play
   back MP3/WMA files from discs re-
   corder using packet write data transfer
   (UDF format). Discs should be re-
   corded using “pre−mastering” software
   rather than packet−write software.
D M3u playlists are not compatible with
   the audio player.
D MP3i (MP3 interactive) and MP3PRO
   formats are not compatible with the au-
   dio player.


248
AUDIO/VIDEO SYSTEM


                                              D The play order of the compact disc with
                                                 the structure shown above is as fol-
                                                 lows:
        001.mp3
        002.mp3                               MP3 player (rear seat entertainment sys-
                                              tem)
             Folder 1
       6U5161aX
             003.mp3
             Folder 2
                                              001.mp3         002.mp3 . . .    006.mp3


             004.mp3
                                              MP3/WMA player (front audio system)
             005.mp3
                   Folder 3                   001.mp3         002.wma . . .    006.mp3
                   006.mp3

MP3 player (rear seat entertainment system)   D MP3 player (rear seat entertainment
                                                system)—It is possible to play up to
                                                253 folders on one disc.
                                              D MP3/WMA player (front audio sys-
                                                tem)—It is possible to play up to 192
        001.mp3                                 folders or 255 files on one disc.
        002.wma                               D USB memory player— It is possible to
             Folder 1                           play up to 999 folders or 255 files per
         6U5161aX
             003.mp3
             Folder 2
                                                folder.
                                              D The order changes depending on the
             004.mp3                            PC and MP3/WMA encoding software
             005.wma                            you use.
                   Folder 3
                   006.mp3

MP3/WMA player (front audio system)


                                                                                 249
AUDIO/VIDEO SYSTEM


CD−R and CD−RW discs                         TERMS
D CD−R/CD−RW discs that have not             Packet write—
  been subject to the “finalizing process”   This is a general term that describes the
  (a process that allows discs to be         process of writing data on−demand to
  played on a conventional CD player)        CD−R, etc., in the same way that data is
  cannot be played.                          written to floppy or hard discs.
D It may not be possible to play CD−         ID3 Tag—
  R/CD−RW discs recorded on a music
  CD recorder or a personal computer         This is a method of embedding track−re-
  because of disc characteristics,           lated information in an MP3 file. This em-
  scratches or dirt on the disc, or dirt,    bedded information can include the track
  condensation, etc. on the lens of the      title, the artist’s name, the album title, the
  unit.                                      music genre, the year of production, com-
                                             ments and other data. The contents can
D It may not be possible to play discs re-   be freely edited using software with ID3 tag
  corded on a personal computer de-          editing functions. Although the tags are re-
  pending on the application settings and    stricted to the number of characters, the in-
  the environment. Record with the cor-      formation can be viewed when the track is
  rect format. (For details, contact the     played back.
  appropriate application manufacturers
  of the applications.)                      WMA Tag—
D CD−R/CD−RW discs may be damaged            WMA files can contain a WMA tag that is
  by direct exposure to sunlight, high       used in the same way as an ID3 tag. WMA
  temperatures or other storage condi-       tags carry information such as track title,
  tions. The unit may be unable to play      artist name.
  some damaged discs.                        ISO 9660 format—
D If you insert a CD−RW disc into the        This is the international standard for the
  MP3/WMA player, playback will begin        formatting of CD−ROM folders and files.
  more slowly than with a conventional       For the ISO 9660 format, there are two lev-
  CD or CD−R disc.                           els of regulations.
D Recordings on CD−R/CD−RW cannot            Level 1:
  be played using the DDCD (Double           The file name is in 8.3 format (8 character
  Density CD) system.                        file names, with a 3 character file exten-
                                             sion. File names must be composed of
                                             one−byte capital letters and numbers. The
                                             “_” symbol may also be included.)
                                             Level 2:
                                             The file name can have up to 31 characters
                                             (including the separation mark “.” and file
                                             extension). Each folder must contain few-
                                             er than 8 hierarchies.


250
AUDIO/VIDEO SYSTEM


m3u—
Playlists created using “WINAMP” soft-
ware have a playlist file extension (.m3u).
MP3—
MP3 is an audio compression standard de-
termined by a working group (MPEG) of
the ISO (International Standard Organiza-
tion). MP3 compresses audio data to
about 1/10 the size of that on conventional
discs.
WMA—
WMA (Windows Media Audio) is an audio
compression format developed by Micro-
softr. It compresses files into a size small-
er than that of MP3 files. The decoding for-
mats for WMA files are Ver. 7, 8, and 9.


                                                              251
AUDIO/VIDEO SYSTEM


252

2012 Toyota Highlander Audio/Video Information

  • 1.
    AUDIO/VIDEO SYSTEM SECTION 6 AUDIO/VIDEO SYSTEM D Quick reference 146 D Using your audio/video system 147 Some basics . . . . . . . . . . . . . . . . . . . . . . . . . . . . . . . . . . . . . . . . 147 Radio operation . . . . . . . . . . . . . . . . . . . . . . . . . . . . . . . . . . . . . 155 Radio operation (XM Satellite Radio broadcast) . . . . . . . . . 160 CD changer operation . . . . . . . . . . . . . . . . . . . . . . . . . . . . . . . 166 Bluetooth audio operation . . . . . . . . . . . . . . . . . . . . . . . . . . . . 178 DVD player operation . . . . . . . . . . . . . . . . . . . . . . . . . . . . . . . . 187 USB memory/iPod operation . . . . . . . . . . . . . . . . . . . . . . . . . . 211 D Audio/video remote controls (steering switches) 218 D Rear seat entertainment system features 221 Using the DVD player (DVD video) . . . . . . . . . . . . . . . . . . . . 226 Using the DVD player (video CD) . . . . . . . . . . . . . . . . . . . . . . 232 Using the DVD player (audio CD/CD text) . . . . . . . . . . . . . . 234 Using the DVD player (MP3 discs) . . . . . . . . . . . . . . . . . . . . . 235 Using the video mode . . . . . . . . . . . . . . . . . . . . . . . . . . . . . . . . 236 Changing the initial setting . . . . . . . . . . . . . . . . . . . . . . . . . . . 237 Replacing the batteries . . . . . . . . . . . . . . . . . . . . . . . . . . . . . . 241 D Audio/video system operating hints 242 145
  • 2.
    AUDIO/VIDEO SYSTEM Quick reference Operationssuch as selecting a preset station and adjusting the sound balance are car- ried out on the touch screen. To display the audio screen, push the “TUNE/FILE”/“AU- DIO” knob. 1 Function menu display screen 3 “SEEK/TRACK” button To control the radio, CD changer, Push either side of this button to seek DVD player*, Bluetoothr audio play- up or down for a station, or to access er, AUX or USB memory/iPod, touch a desired track, file or chapter. For the touch−screen buttons. For de- details, see pages 157, 170, 174, tails, see page 150. 185, 190, 193 and 214. 2 Function menu tab 4 “TUNE/FILE”/“AUDIO” knob To control the radio, CD changer, Push this knob to display the audio DVD player*, Bluetoothr audio play- control screen, and turn this knob to er, AUX or USB memory/iPod, touch move the station band and files up or the touch−screen tabs. For details, down. For details, see pages 149, see page 149. 156, 161, 174 and 214. *: Vehicles with rear seat entertainment system 146
  • 3.
    AUDIO/VIDEO SYSTEM Using your audio/video system — — Some basics 5 “LOAD· / CLOSE” button This section describes some of the basic Push this button to display the features of your audio system. Some in- “Load·Eject” screen or close the dis- formation may not pertain to your system. play. For details, see page 166. Vehicles with smart key system— 6 “PWR/VOL” knob Your audio system works when the “EN- Push this knob to turn the audio sys- GINE START STOP” switch is turned to tem on and off, and turn it to adjust the ACCESSORY or IGNITION ON mode. volume. For details, see page 149. Vehicles without smart key system— 7 “SAT” button Push this button to choose a SAT sta- Your audio system works when the engine tion. For details, see pages 149 and switch is turned to the “ACC” or “ON” posi- 161. tion. 8 “DISC·AUX” button Push this button to turn the CAUTION Bluetoothr audio player, AUX, USB memory/iPod, CD changer or DVD For vehicles sold in U.S.A. and player* on. For details, see pages Canada: 149, 155, 169, 184 and 189. D Part 15 of the FCC Rules *: Vehicles with rear seat entertainment FCC Warning: system Changes or modifications in 9 “FM 1·2” button construction not expressly approved Push this button to choose an FM sta- by the party responsible for com- tion. Each time this button is pushed, pliance could void the user’s author- the mode switches between FM1 and ity to operate the equipment. FM2. For details, see pages 149 and CAUTION: Radio Frequency Radi- 155. ation Exposure 10 “AM” button This device is approved for Mobile Push this button to choose an AM sta- Application only and, to comply with tion. For details, see pages 149 and applicable FCC radio frequency ex- 155. posure regulations, must be used with a distance of at least 7.9 in. (20 cm) between the antenna and the body of any person at all time during use. 147
  • 4.
    AUDIO/VIDEO SYSTEM (a) Speech command system D Laser products D Do not take this unit apart or at- tempt to make any changes yourself. This is an intricate unit that uses a laser pickup to re- trieve information from the sur- face of compact discs. The la- ser is carefully shielded so that its rays remain inside the cabi- net. Therefore, never try to dis- assemble the player or alter any of its parts since you may be ex- posed to laser rays and danger- ous voltages. D This product utilizes a laser. By pushing the switch above, you can Use of controls or adjustments operate the speech command system. or performance of procedures For the operation of the speech command other than those specified here- system and the list of commands, see in may result in hazardous radi- pages 44 and 47. ation exposure. NOTICE To prevent the battery from being dis- charged, do not leave the audio sys- tem on longer than necessary when the engine is not running. 148
  • 5.
    AUDIO/VIDEO SYSTEM (b) Turningthe system on and off (c) Switching between functions “TUNE/FILE”/“AUDIO”: Push this knob Push the “DISC·AUX”, “FM 1·2”, “AM” to display touch−screen buttons for audio/ or “SAT” button to turn on the desired video system (audio control mode). mode. U6080GS Push the “TUNE/FILE”/“AUDIO” knob and touch the “AM”, “FM”, “SAT”, “CD”, “DVD*”, “BT”, “AUX” or “USB” “PWR/VOL”: Push this knob to turn the tab to turn on the desired mode. audio/video system on and off. Turn this *: Vehicles with rear seat entertainment knob to adjust the volume. The system system turns on in the last mode used. You can select the function that enables automatic return to the previous screen from the audio screen. See page 260 for details. 149
  • 6.
    AUDIO/VIDEO SYSTEM Push thesebuttons or tabs if you want to switch from one mode to another. If the disc is not set, the CD changer/DVD player* does not turn on. You can turn off the CD changer/DVD play- er* by ejecting all the discs. If the audio U6081GS system was previously off, then the entire audio system will be turned off when you eject all the discs. If the other function was previously playing, it will come on again. *: Vehicles with rear seat entertainment system U6080GS U6082GS U6083GS 150
  • 7.
    AUDIO/VIDEO SYSTEM U6084GS U6079GS The touch−screen buttons for radio, CD changer, DVD player*, Bluetoothr audio player, AUX and USB memory/ iPod, operation are displayed on the function touch−screen button display U6086GS screen when the audio control mode is selected. Touch them lightly and directly on the screen. *: Vehicles with rear seat entertainment system Touch the tab to select the desired mode when the audio control mode is selected. The selected switch is highlighted. U6085GS INFORMATION D If the system does not respond to a touch of a touch−screen button, move your finger away from the screen and then touch it again. D You cannot operate dimmed touch−screen buttons. D Wipe off fingerprints using a glass cleaning cloth. Do not use chemi- U6078GS cal cleaners to clean the touch screen. 151
  • 8.
    AUDIO/VIDEO SYSTEM (d) DSPcontrol (e) Tone and balance 1. Push the “TUNE/FILE”/“AUDIO” Tone knob. How good an audio program sounds to you is largely determined by the mix of the treble, mid and bass levels. In fact, differ- ent kinds of music and vocal programs usually sound better with different mixes of U6087GS treble, mid and bass. Balance A good balance of the left and right stereo channels and of the front and rear sound levels is also important. Keep in mind that if you are listening to a 2. Touch “Sound” to display the sound stereo recording or broadcast, changing adjustment screen. the right/left balance will increase the vol- ume of one group of sounds while de- creasing the volume of another. U6010GI 3. Touch “DSP” tab to display this screen. 4. Touch “Automatic Sound Levelizer” and select “On” or “Off”. Automatic sound levelizer (ASL): When the audio sound becomes difficult to hear due to road noise, wind noise or other noises while driving, select “On”. The sys- tem adjusts to the optimum volume and tone quality according to the speed of car. 5. Touch “OK”. 152
  • 9.
    AUDIO/VIDEO SYSTEM (f) Selecting screen size (with rear seat entertainment system) 1. Push the “TUNE/FILE”/“AUDIO” knob and touch “DVD” tab. U6007GS 1. Touch “Sound” tab to display this U6088GS screen. 2. Touch the desired button. “Treble” “+” or “–”: Adjust high−pitched tones. 2. Touch “Settings”. “Mid” “+” or “–”: Adjust mid−pitched tones. “Bass” “+” or “–”: Adjusts low−pitched tones. “Front” or “Rear”: Adjusts sound bal- ance between the front and rear speakers. U6064GS “L” or “R”: Adjusts sound balance be- tween the left and right speakers. 3. Touch “OK”. The tone of each mode (for such as AM, 3. Touch “Wide”. FM and CD changer) can be adjusted. 153
  • 10.
    AUDIO/VIDEO SYSTEM (g) Your CD changer When you insert a disc, touch “Load” and gently push the disc in with the label side up. This CD changer can store up to four U6009GS discs. The changer will play from track 1 through to the end of the disc. Then it will play from track 1 of the next disc. The changer is intended for use with 4.7 in. (12 cm) discs only. 4. Touch the desired button. “Normal”: Displays a 3 : 4 screen, with either side in black. “Wide 1”: Widens the 3 : 4 screen hori- zontally to fill the screen. “Wide 2”: Widens the 3 : 4 screen ver- tically and horizontally, in the same ratio, to fill the screen. When you touch , the previous screen returns. 5. Touch “Save”. NOTICE D Do not stack up two discs for inser- tion, or it will cause damage to the changer. Insert only one disc into the slot at a time. D Never try to disassemble or oil any part of the changer. Do not insert anything other than a disc into the slot. 154
  • 11.
    AUDIO/VIDEO SYSTEM — Radio operation (h) Your DVD player (a) Listening to the radio (with rear seat entertainment system) The sound of the rear seat entertainment system can be enjoyed by pushing the “DISC·AUX” button or touching the “DVD” tab on AUDIO screen. (i) AUX port The sound of portable audio players connected to the AUX port can be enjoyed. Push the “DISC·AUX” button or push the “TUNE/FILE”/“AUDIO” knob to display audio screen and touch the “AUX” tab to switch to AUX mode. When the portable audio player is not connected to the AUX port, the tab will tone down. For details, Push the “AM” or “FM 1·2” button or refer to the “Owner’s Manual”. push the “TUNE/FILE”/“AUDIO” knob (j) USB port to display audio screen and touch the It is available to connect a USB memory/ “AM” or “FM” tab to choose either an iPod with the USB port. When the USB AM or FM station. memory/iPod is not connected with the “AM”, “FM1” or “FM2” appears on the USB port, the tab will tone down. For de- screen. tails, see “(a) Connecting a USB memory If your vehicle is equipped with a satellite or iPod” on page 211. radio broadcast system, when you push the “SAT” button or touch the “SAT” tab on AUDIO screen, “SAT1”, “SAT2” or “SAT3” station appears on the display. For details about satellite radio broadcast, see “—Radio operation (XMr Satellite Radio broadcast)” on page 160. 155
  • 12.
    AUDIO/VIDEO SYSTEM U6080GS (b) Presetting a station 1. Tune in the desired station. Turn the knob clockwise to step up the 2. Touch one of the touch−screen but- station band or counterclockwise to tons (1 — 6) you want and hold it until step down. a beep is heard. This sets the station to the touch−screen button and the fre- Your radio automatically changes to stereo quency appears on the touch−screen reception when a stereo broadcast is re- button. ceived. “ST” appears on the screen. If the signal becomes weak, the radio reduces Each radio mode (AM, FM1 or FM2) can the amount of channel separation to pre- store up to 6 stations. To change the pre- vent the weak signal from creating noise. set station to a different one, follow the If the signal becomes extremely weak, the same procedure. radio switches from stereo to mono recep- The preset station memory is cancelled tion. In this case, “ST” disappears from the when the power source is interrupted by screen. battery disconnection or a blown fuse. 156
  • 13.
    AUDIO/VIDEO SYSTEM (c) Selectinga station (d) Radio Data System Tune in the desired station using one of the Your audio system is equipped with Radio following methods. Data Systems (RDS). RDS mode pro- Preset tuning: Touch the touch−screen vides you to receive text messages from button (1 — 6) for the station you want. radio stations that utilize RDS transmit- The touch−screen button is highlighted ters. and the station frequency appears on the When RDS is on, the radio can screen. — only select stations of a particular pro- Seek tuning: Push the “SEEK/TRACK” gram type, button on either side. The radio will begin — display messages from radio stations, seeking up or down for a station of the — search for a stronger signal station. nearest frequency and will stop on recep- RDS features are available for use only on tion. Each time you push the button, the FM stations which broadcast RDS infor- stations will be searched automatically mation. one after another. To scan all the frequencies: Touch “SCAN” on the screen briefly. “SCAN” ap- pears on the screen. The radio will find the next station and stay there for a few se- conds, and then scan again. To select a station, touch “SCAN” again. To scan the preset stations: Touch “SCAN” on the screen for longer than a second. “P. SCAN” appears on the screen. The radio will tune in the next preset sta- tion, stay there for a few seconds, and then move to the next preset station. To select a station, touch “SCAN” again. 157
  • 14.
    AUDIO/VIDEO SYSTEM U6080GS U6089GS “Type A "” “Type Seek” Each time you touch “A Type ” or “Type When a program is set, “Type Seek” ap- "”, the program type changes as in the pears. Touch the switch and the system following: starts to seek the station in the relevant D ROCK program type. D MISC (Miscellaneous) If any type program station is not found, “Nothing” appears on the display. D INFORM (Information) D EASY LIS (Easy listening) D CLS/JAZZ (Classical music and Jazz) D R & B (Rhythm and Blues) D RELIGION D ALART (Emergency message) 158
  • 15.
    AUDIO/VIDEO SYSTEM (e) Traffic announcement U6090GSF U6091GS “Message” If the system receives a radio text from “Traffic” RDS station, “MSG” appears on the dis- A station that regularly broadcasts traffic play. Touch “Message”, and a text mes- information is automatically located. sage is displayed on the screen. This func- tion is available only when the vehicle is When you touch “Traffic”, “Traf. Seek” not moving. appears on the display and the radio will start seeking any traffic program station. When you touch “Message Off”, the dis- play returns. If no traffic program station is found, “Nothing” appears on the display. If a traffic program station is found, the name for traffic program station is dis- played for a while until a traffic announce- ment is received. 159
  • 16.
    AUDIO/VIDEO SYSTEM — Radiooperation (XMr Satellite Radio broadcast) To listen to a satellite radio broadcast in The XMr Satellite Radio is solely responsi- your vehicle, a subscription to the XMr ble for the quality, availability and content Satellite Radio service is necessary. of the satellite radio services provided, which are subject to the terms and condi- (a) How to subscribe to an XMr Satel- tions of the XMr Satellite Radio customer lite Radio service agreement. An XMr Satellite Radio is a tuner designed Customers should have their radio ID exclusively to receive broadcasts provided ready; the radio ID can be found by tuning under a separate subscription. Availability to “channel 000” on the radio. For details, is limited to the 48 contiguous U.S. states see “(b) Displaying the radio ID” below. and some Canadian provinces. All fees and programming are the respon- How to subscribe: sibility of the XMr Satellite Radio and are You must enter into a separate service subject to change. agreement with the XMr Satellite Radio in Satellite tuner technology notice: order to receive satellite broadcast pro- Toyota’s satellite radio tuners are awarded gramming in the vehicle. Additional activa- Type Approval Certificates from XMr Sat- tion and service subscription fees apply ellite Radio Inc. as proof of compatibility that are not included in the purchase price with the services offered by the XMr Satel- of the vehicle and optional digital satellite lite Radio. tuner. (b) Displaying the radio ID For complete information on subscription rates and terms, or to subscribe to the XMr Each XMr tuner is identified with a unique Satellite Radio. radio ID. You will need the radio ID when activating XMr service or when reporting U.S.A.— a problem. Visit on the web at www.xmradio.com or call 1−800−967−2346. If you select the “CH 000” using the “TUNE/FILE”/“AUDIO” knob, the ID Canada— code of 8 alphanumeric characters ap- Visit on the web at www.xmradio.ca or call pears. If you select another channel, dis- 1−877−438−9677. play of the ID code is canceled. The chan- nel(000) alternates the display between the radio ID and the specific radio ID code. 160
  • 17.
    AUDIO/VIDEO SYSTEM (c) Listeningto satellite radio (d) Channel category U6082GS Touch either “A Type” or “Type "” to go to the next or previous category. Push the “SAT” button or push the “TUNE/FILE”/“AUDIO” knob to display audio screen and touch the “SAT” tab to choose a SAT channel. “SAT1”, “SAT2” or “SAT3” appears on the screen. Turn this knob to select the next or pre- vious channel. If you turn continuously, you can rapidly scroll forward or down through the chan- nels. 161
  • 18.
    AUDIO/VIDEO SYSTEM (e) Presettinga channel (f) Selecting a channel 1. Tune in the desired channel. Tune in the desired channel using one of the following methods. Preset tuning: Touch the channel selec- tor button (1 — 6) for the channel you want. The button (1 — 6) is highlighted and chan- U6082GS nel number appears on the display. To select channel within the current category: Push the “ ” or “ ” button of “SEEK/TRACK”. The radio will step up or down the channel within the current chan- nel category. Touch “Type Seek”. The ra- 2. Touch one of the channel selector dio will step up the channel within the cur- buttons (1 — 6) and hold it until a beep rent channel category. is heard. This sets the channels to the touch− screen button and the name and number of the channel appears on the touch− screen button. Each touch−screen button can store three U6082GS SAT channels. To change the preset chan- nel to a different one, follow the same pro- cedure. The preset channel memory is cancelled when the power source is interrupted by To scan the currently selected channel battery disconnection or a blown fuse. category: Touch “SCAN” briefly. “SCAN” appears on the display. The radio will find the next channel in the same channel cate- gory, stay there for a few seconds, and then scan again. To select a channel, touch “SCAN” a second time. To scan the preset channels: Touch “SCAN” and hold it until you hear a beep. “P.SCAN” appears on the display. The ra- dio will find the next preset channel, stay there for a few seconds, and then move to the next preset channel. To select a chan- nel, touch “SCAN” a second time. 162
  • 19.
    AUDIO/VIDEO SYSTEM (g) Displayingthe title and name U6092GS When you touch “Text”, the song/program title and the artist name/feature are dis- played. Up to 16 alphanumeric characters can be displayed. (Some information will not be fully displayed.) When you touch “Text” again, the display returns. 163
  • 20.
    AUDIO/VIDEO SYSTEM (h) Ifthe satellite radio tuner malfunctions When problems occur with the XMr tuner, a message will appear on the display. Refer- ring to the table below to identify the problem, take the suggested corrective action. The XMr antenna is not connected. Check whether the XMr antenna cable is attached securely. ANTENNA A short circuit occurs in the antenna or the surrounding antenna cable. See a Toyota certified dealer for assis- tance. You have not subscribed to the XMr Satellite Radio. The radio is being updated with the latest encryption code. Contact the XMr Satellite Radio for subscription information. When a contract is canceled, you can choose the “CH000” and all free−to−air channels. UNAUTH The premium channel you selected is not authorized. Wait for about 2 seconds until the radio returns to the previous channel or “CH001”. If it does not change au- tomatically, select another channel. If you want to listen to the premium channel, contact the XMr Satellite Ra- dio. The XMr signal is too weak at the current location. Wait NO SIGNAL until your vehicle reaches a location with a stronger sig- nal. The unit is acquiring audio or program information. Wait LOADING until the unit has received the information. The channel you selected is not broadcasting any pro- OFF AIR gramming. Select another channel. There is no song/program title or artist name/feature −−−−− associated with the channel at that time. No action needed. The channel you selected is no longer available. Wait for about 2 seconds until the radio returns to the pre- CH UNAVL vious channel or “CH001”. If it does not change auto- matically, select another channel. Contact the XMr Listener Care Center at 1−800−967−2346 (U.S.A.) or 1−877−438−9677 (Canada). 164
  • 21.
    AUDIO/VIDEO SYSTEM NOTICE INFORMATION This equipment has been tested and This XMr tuner supports “Audio found to comply with the limits for a Services” (Music and Talk) of only class B digital device, pursuant to XMr Satellite Radio and “Text Part 15 of the FCC Rules. These limits Information”∗ linked to the respective are designed to provide reasonable “Audio Services”. protection against harmful interfer- ∗: Text Information includes, Station ence in a residential installation. This Name, (Artist) Name, (Song) Title and equipment generates, uses and can Category Name. radiate radio frequency energy and, if not installed and used in accordance with the instructions, may cause harmful interference to radio com- munications. However, there is no guarantee that interference will not occur in a particular installation. If this equipment does cause harmful interference to radio or television re- ception, which can be determined by turning the equipment off and on, the user is encouraged to try to correct the interference by one or more of the following measures: —Reorient or relocate the receiving antenna. —Increase the separation between the equipment and receiver. —Connect the equipment into an out- let on a circuit different from that to which the receiver is connected. —Consult the dealer or an experi- enced radio/TV technician for help. Information to user Alternation or modifications carried out without appropriate authoriza- tion may invalidate the user’s right to operate the equipment. 165
  • 22.
    AUDIO/VIDEO SYSTEM — CDchanger operation (a) Inserting discs 3. The amber indicators at either side of the slot start blinking. When the indi- Vehicles with smart key system— cators change to green, insert only one The “ENGINE START STOP” switch must disc. After the disc is loaded, the amber be in ACCESSORY or IGNITION ON indicators at either side of the slot start mode. blinking again. When the indicators Vehicles without smart key system— change to green, you can insert the next disc. The engine switch must be in the “ACC” or “ON” position. 4. Push the “LOAD· / CLOSE” but- ton to close the display. Your CD changer can store up to 4 discs. The changer will automatically start play- You can set a disc at the lowest empty disc number. ing from the last disc you inserted. If the label faces down, the disc cannot be 1. Push the “LOAD· / CLOSE” but- played. In this case, “Check CD” appears ton. The “Load·Eject” screen appears. on the screen. U6066GS 2. Touch “Load”. The display opens. 166
  • 23.
    AUDIO/VIDEO SYSTEM (b) Ejecting discs CAUTION D A single disc alone: D Do not place anything on the opened display, as such items may be thrown about and possibly in- jure people in the vehicle during sudden braking or in an accident. D To reduce the chance of injury in case of an accident or sudden stop while driving, keep the display closed. D Take care not to jam your hand while the display is moving. Other- wise, you could be injured. 1. Push the “LOAD· / CLOSE” but- NOTICE ton. The “Load·Eject” screen appears. D Do not obstruct the display while it is moving. It could damage your audio/video system. D Do not insert one disc stacked on top of another one or feed them in continuously, to prevent discs U6019GS from getting stuck in the changer. INFORMATION 2. Touch the disc number to be Under extremely cold conditions, the ejected. display may react slowly or operation The display opens and the amber indica- sound may become louder. tors at either side of the slot start blinking. After the disc is ejected, the amber indica- tors change to green. A disc can be in- serted. 167
  • 24.
    AUDIO/VIDEO SYSTEM D Allthe discs: 3. Remove the disc. The indicators start blinking again and the next disc is ejected. If a disc is not removed within 15 seconds after it is ejected, the operation will be can- celed. When all the discs are removed, the amber indicators change to green. A disc can be inserted. 1. Push the “LOAD· / CLOSE” but- U6018GS ton. The “Load·Eject” screen appears. The numbers of the trays where the disc is U6020GS not set are dimmed. NOTICE If a disc cannot be ejected, do not for- cibly take out the disc. Keep pushing 2. Touch “Eject All”. the “LOAD· / CLOSE” button for The display opens and the amber indica- approximately 5 seconds and release tors at either side of the slot start blinking. it. At this time, the audio disc and the After the disc is ejected, the blinking indi- map DVD−ROM will be ejected. cators stay on. 168
  • 25.
    AUDIO/VIDEO SYSTEM (c) Playinga disc (d) Selecting a desired disc U6021GS Touch “Change Discs” on “CD” screen and touch the desired disc number on the screen. Push the “DISC·AUX” button or push The selected disc number is highlighted. the “TUNE/FILE”/“AUDIO” knob to dis- play audio screen and touch the “CD” The changer will start playing the selected tab if the discs are already loaded in the disc from the first track. changer. The discs set in the changer are played continuously, starting with the last disc you inserted. The disc number of the disc cur- rently being played, the track number and the time from the beginning of the program appear on the screen. When play of one disc ends, the first track of the following disc starts. When play of the final disc ends, play of the first disc starts again. The changer will skip any empty disc trays. Vehicles with rear seat entertainment sys- tem — If the DVD player is turned on, push the “DISC·AUX” button again or touch “CD” tab to switch to the CD changer. If the rear seat entertainment system is on, pushing the “DISC·AUX” button switches the sound of the front audio system and that of the rear seat entertainment system. 169
  • 26.
    AUDIO/VIDEO SYSTEM (e) Playingan audio disc U6093GS Push the “TUNE/FILE”/“AUDIO” knob and touch the “CD” tab, then touch the “Change Discs”. Choose an audio disc SELECTING A DESIRED TRACK number to display this screen. “SEEK/TRACK” button: Use for direct access to a desired track. Push either side of the “SEEK/TRACK” button and repeat it until the desired track number appears on the screen. As you re- lease the button, the changer will start playing the selected track from the begin- ning. “Select” for Track: The desired track can be selected from a list. This function is available only when the vehicle is not mov- ing. Touch “Select”. The track list is displayed. 170
  • 27.
    AUDIO/VIDEO SYSTEM U6093GS Touch the desired track number. The SEARCHING FOR A DESIRED TRACK changer will start playing the selected OR DISC track from the beginning. Searching for a desired track — Touch “SCAN” on the screen briefly : By touching this touch−screen but- while the disc is playing. ton, the list moves up by 5 track groups. If “SCAN” appears on the screen. The this button is touched when the top page of changer will play the next track for 10 sec- the list is displayed, the last page is dis- onds, then scan again. To select a track, played. touch “SCAN” on the screen a second time. If the changer reaches the end of the : By touching this touch−screen but- disc, it will continue scanning at track 1. ton, the list moves down by 5 track groups. After all the tracks are scanned in one If this button is touched when the last page pass, normal play resumes. of the list is displayed, the top page is dis- Searching for a desired disc — played. Touch “SCAN” on the screen for longer ", A: If " appears to the right of the item than a second while the disc is playing. name, the complete name is too long for “D.SCAN” appears on the screen. The the display. program at the beginning of each audio Touch " to scroll to the end of the name. disc will be played for 10 seconds. To con- Touch A to scroll the beginning of the tinue listening to the program of your name. choice, touch “SCAN” on the screen a Fast forward: Push “ ” side of the second time. “SEEK/TRACK” button and hold it to fast After all the audio discs are scanned in one forward the disc. When you release the pass, normal play resumes. button, the changer will resume playing from that position. Reverse: Push “ ” side of the “SEEK/ TRACK” button and hold it to reverse the disc. When you release the button, the changer will resume playing. 171
  • 28.
    AUDIO/VIDEO SYSTEM “RAND”: Use it for automatic and random selection. Playing the tracks on one disc in ran- dom order — U6094GS Touch “RAND” briefly while the disc is playing. “RAND” appears on the screen. The system selects a track on the disc be- ing listened to in random order. To cancel it, touch “RAND” once again. Playing the tracks on all the audio discs OTHER FUNCTIONS in random order — “RPT”: Use it for automatic repeat of the Touch “RAND” for longer than a second track or disc you are currently listening to. while the disc is playing. “D.RAND” ap- Repeating a track — pears on the screen. The system selects Touch “RPT” briefly while the track is play- a track on all the audio discs in the changer ing. “RPT” appears on the screen. When in random order. To cancel it, touch the track is finished, the changer will auto- “RAND” once again. matically go back to the beginning of the If a CD−TEXT disc is inserted, the title of track and play the track again. To cancel the disc and track will be displayed. Up to it, touch “RPT” once again. 29 letters can be displayed. Repeating a disc — Touch “RPT” for longer than a second while the disc is playing. “D.RPT” appears on the screen. When the disc is finished, the changer will automatically go back to the beginning of the disc and play the disc again. To cancel it, touch “RPT” once again. 172
  • 29.
    AUDIO/VIDEO SYSTEM (f) Playing a MP3/WMA disc SELECTING A DESIRED FOLDER “FolderY”: Touch this touch−screen but- ton to go to the next folder. “FolderB”: Touch this touch−screen but- ton to go to the previous folder. U6095GS “Select” for Folder: The desired folder can be selected in a list. This function is available only when the vehicle is not mov- ing. Touch “Select”. The folder list is dis- played. Push the “TUNE/FILE”/“AUDIO” knob and touch the “CD” tab, then touch the “Change Discs”. Choose an MP3/WMA disc number to display this screen. U6026GS Touch the desired folder number. The changer will start playing the first file of the selected folder. : By touching this touch−screen but- ton, the list moves up by 5 folder groups. If this touch−screen button is touched when the top page of the list is displayed, the last page is displayed. : By touching this touch−screen but- ton, the list moves down by 5 folder groups. If this touch−screen button is touched when the last page of the list is displayed, the top page is displayed. 173
  • 30.
    AUDIO/VIDEO SYSTEM SELECTING ADESIRED FILE “TUNE/FILE”/“AUDIO” knob: Use for di- “SEEK/TRACK” button: Use for direct rect access to a desired file in the disc. access to a desired file. Turn the “TUNE/FILE”/“AUDIO” knob to Push either side of the “SEEK/TRACK” step up or down all the files in the disc you button and repeat it until the desired file are currently listening to. The file number number appears on the display. As you re- appears on the display. When “RAND” or lease the button, the changer will start “FLD.RPT” is on, all the files in the folder playing the selected file from the begin- you are currently listening to can be ning. When “RAND” or “FLD.RPT” is on, stepped up or down. the file number within the folder you are currently listening to appears. Fast forward: Push “ ” side of the “SEEK/TRACK” button and hold it to fast forward the disc. When you release the button, the changer will resume playing from that position. Reverse: Push “ ” side of the “SEEK/ TRACK” button and hold it to reverse the disc. When you release the button, the changer will resume playing. 174
  • 31.
    AUDIO/VIDEO SYSTEM U6095GS U6027GS “Select” for File: The desired file can be Touch the desired file number. The chang- selected in a list. This function is available er will start playing the selected file from only when the vehicle is not moving. the beginning. Touch “Select”. The file list is displayed. : By touching this touch−screen but- ton, the list moves up by 5 file groups. If this touch−screen button is touched when the top page of the list is displayed, the last page is displayed. : By touching this touch−screen but- ton, the list moves down by 5 file groups. If this touch−screen button is touched when the last page of the list is displayed, the top page is displayed. 175
  • 32.
    AUDIO/VIDEO SYSTEM U6096GS U6097GS SEARCHING FOR A DESIRED FILE SEARCHING FOR A DESIRED FOLDER Touch “SCAN” on the screen briefly Touch “SCAN” on the screen for longer while the disc is playing. than a second while the disc is playing. “SCAN” appears on the screen. The “FLD.SCAN” appears on the screen. The changer will play the next file in the folder program at the beginning of each folder will for 10 seconds, then scan again. To select be played for 10 seconds. To continue lis- a file, touch “SCAN” on the screen a sec- tening to the program of your choice, touch ond time. If the changer reaches the end “SCAN” on the screen a second time. of the folder, it will continue scanning from After all the folders are scanned in one file 1. pass, normal play resumes. After all the files are scanned in one pass, normal play resumes. 176
  • 33.
    AUDIO/VIDEO SYSTEM “RAND”: Use it for automatic and random selection of the folder or the disc which you are currently listening to. Playing the files in one folder in random U6098GS order — Touch “RAND” briefly while the disc is playing. “RAND” appears on the screen. The system selects a file in the folder you are currently listening to. To cancel it, touch “RAND” once again. OTHER FUNCTIONS Playing the files in all the folders on one “RPT”: Use it for automatic repeat of the disc in random order — file or folder you are currently listening to. Touch “RAND” for longer than a second Repeating a file — while the disc is playing. “FLD.RAND” ap- Touch “RPT” briefly while the file is play- pears on the screen. The system selects ing. “RPT” appears on the screen. When a file in all the folders. To cancel it, touch the file is finished, the changer will auto- “RAND” once again. matically go back to the beginning of the When a file is skipped or the system is in- file and play the file again. To cancel it, operative, touch “RAND” to reset. touch “RPT” once again. Repeating a folder — Touch “RPT” for longer than a second while the folder is playing. “FLD.RPT” ap- pears on the screen. When the folder is finished, the changer will automatically go back to the beginning of the folder and play the folder again. To cancel it, touch “RPT” once again. 177
  • 34.
    AUDIO/VIDEO SYSTEM — Bluetoothr audio operation (g) If the player malfunctions The Bluetoothr audio system enables If “CD Error” appears on the screen, audio users to enjoy music played on a porta- signals of the disc cannot be read or the ble player from the vehicle speaker via system has trouble. Push the “DIS- wireless communication. C·AUX” button once again. If the changer does not operate, check that the disc surface is not soiled or damaged. If the disc is O.K., the temperature of the changer’s internal mechanism may be raised because of high external tempera- ture. Remove the disc from the changer to cool it. If the changer still does not operate, have it checked by your dealer. If an MP3/WMA disc contains CD−DA This audio system supports files, only CD−DA files are played. If an Bluetoothr, a wireless data system MP3/WMA disc contains files other than capable of playing portable audio CD−DA, only MP3/WMA files are played. music without cables. If your portable player does not support Bluetoothr, the Bluetoothr audio system will not function. 178
  • 35.
    AUDIO/VIDEO SYSTEM INFORMATION Portable players must correspond to the following specifications in order Bluetooth is a trademark owned by to be connected to the Bluetoothr au- Bluetooth SIG. Inc. dio system. However, please note that some functions may be limited CAUTION depending on the type of portable player. Do not operate the player’s controls D Bluetoothr Specification or connect to the Bluetoothr audio Ver.1.1 or higher system while driving. (Recommended: Ver.2.0+EDR or higher) D Profile NOTICE D A2DP (Advanced Audio Do not leave your portable player in Distribution Profile) Ver.1.0 or the car. In particular, high tempera- higher tures inside the vehicle may damage D AVRCP (Audio/Video Remote the portable player. Control Profile) Ver.1.0 or higher (Recommended: Ver.1.3 or higher) INFORMATION Please go to “http://www.toyota. D In the following conditions, the letstalk.com/” to find approved system may not function. Bluetoothr phones for this system. D The portable player is turned off. D The portable player is not con- nected. D The portable player has a low bat- tery. D It may take time, the phone connec- tion is carried out during Bluetoothr audio play. 179
  • 36.
    AUDIO/VIDEO SYSTEM An antenna for the Bluetoothr connection is built in to the display. The indication of the Bluetoothr connection may turn yellow and the system may not function when you use the Bluetoothr portable player in the following conditions. D Your portable player is hiding behind from the display (behind the seat or in the glove box or console box). 1 Indicates the condition of the D Your portable player touches or is cov- Bluetoothr connection. ered with metal materials. “Blue” indicates an excellent connection Leave the Bluetoothr portable player in a to Bluetoothr. place where the “Blue” indication is dis- played. “Yellow” indicates a bad connection to Bluetoothr, resulting in possible deteriora- The portable player information is regis- tion of audio quality. tered when the Bluetoothr audio system is connected. When you release possession : No connection to Bluetoothr. of your vehicle, remove your portable play- 2 Indicates the amount of battery er. (See “(a) Removing a Bluetoothr au- charge left. dio” on page 321.) Empty Full Remaining charge is not displayed while the Bluetoothr is connecting. The amount left does not always corre- spond with the one of your portable player. This system doesn’t have a charging func- tion. 180
  • 37.
    AUDIO/VIDEO SYSTEM D Forvehicles sold in U.S.A. D For vehicles sold in Canada FCC ID : HYQDNNS025 IC : 1551A−DNNS025 Type : DNNS025 Type : DNNS025 This device complies with part 15 of the Operation is subject to the following two FCC Rules. conditions; (1) this device may not Operation is subject to the following two cause interference, and (2) this device conditions: must accept any interference, including (1) This device may not cause harmful interference that may cause undesired interference, and (2) this device must operation of the device. accept any interference received, in- L’utilisation de ce dispositif est autorisée cluding interference that may cause un- seulement aux deux conditions desired operation. suivantes : (1) il ne doit pas produire de brouillage, et (2) l’utilisateur du dispositif doit être prêt à accepter tout brouillage CAUTION radioélectrique reçu, même si ce brouillage est susceptible de FCC WARNING: Changes or modifi- compromettre le fonctionnement du cations not expressly approved by dispositif. the party responsible for compliance could void the user’s authority to op- erate the equipment. CAUTION CAUTION: Radio Frequency Radi- This equipment complies with IC ation Exposure radiation exposure limits set forth for This equipment complies with FCC uncontrolled environment and meets radiation exposure limits set forth for RSS−102 of the IC radio frequency uncontrolled environment and meets (RF) Exposure rules. the FCC radio frequency (RF) Expo- sure Guidelines in Supplement C to This equipment has very low levels of OET65. This equipment has very low RF energy that it deemed to comply levels of RF energy that it deemed to without maximum permissive expo- comply without maximum permis- sure evaluation (MPE). But it is desir- sive exposure evaluation (MPE). But able that it should be installed and it is desirable that it should be operated with at least 20 cm and more installed and operated with at least 20 between the radiator and person’s cm and more between the radiator body (excluding extremities: hands, and person’s body (excluding ex- wrists, feet and ankles). tremities: hands, wrists, feet and Co−location : This transmitter must ankles). not be co−located or operated in con- Co−location : This transmitter must junction with any other antenna or not be co−located or operated in con- transmitter. junction with any other antenna or transmitter. 181
  • 38.
    AUDIO/VIDEO SYSTEM (a) Connecting Bluetoothr audio play- CAUTION er Cet équipement est conforme aux To use the Bluetoothr audio system, limitations sur l’exposition aux you need to enter your portable player radiations IC définies pour un into the system. Once you have équipement non contrôlé et est registered it, you can enjoy your music conforme avec les directives sur on the vehicle’s audio system. (See RSS−102 des règles sur l’exposition “—Setting Bluetoothr audio” on page aux fréquences radio (RF). Cet 319.) équipement présente de très faibles For the operation procedure for the niveaux d’énergie RF qui sont portable player, see the instruction considérés se conformer sans manual that comes with it. évaluation maximum d’exposition D When the connection method is autorisée (MPE). Mais il est “From Vehicle”. souhaitable qu’il devrait être installé et commandé avec au moins 20 cm et D When the auto connection is on plus entre le radiateur et le corps de Vehicles with smart key sys- la personne (à l’exclusion des tem— extrémités: mains, poignets, pieds et When the portable player is chevilles). standby for the connection, it Colocalisation: Cet émetteur ne doit will be automatically connected pas être co−localisé ou mis en whenever the “ENGINE START service en même temps que toute STOP” switch is in either AC- autre antenne ou émetteur. CESSORY or IGNITION ON mode. Vehicles without smart key sys- tem— When the portable player is standby for the connection, it will be automatically connected whenever the engine switch is in either “ACC” or “ON” position. D When the auto connection is off Manually connect the portable player in accordance with the following procedure. 182
  • 39.
    AUDIO/VIDEO SYSTEM D When the connection method is “From Portable Player” Operate the portable player and con- nect it to the Bluetoothr audio system. For the operation procedure for the portable player, see the instruction manual that comes with it. Touch “Connect”. U6033GS Touch “Connect”. When the connection is completed, this U6035GS screen is displayed. Now you can use the portable player. U6034GS Connect the portable audio player to the Bluetoothr audio system. This screen will appear when the connec- tion has failed. U6036GS This screen will appear when the connec- tion has been successfully established. 183
  • 40.
    AUDIO/VIDEO SYSTEM D Reconnectingthe portable player (b) Playing a Bluetoothr audio Vehicles with smart key system— D Playing and pausing Bluetoothr au- If the portable player is disconnected with dio poor reception from the Bluetoothr net- work when the “ENGINE START STOP” switch is in ACCESSORY or IGNITION ON mode, the system automatically re- connects the portable player. In this case, the connection result is not displayed. Vehicles without smart key system— If the portable player is disconnected with poor reception from the Bluetoothr net- work when the engine switch is in the “ACC” or “ON” position, the system auto- Push the “DISC·AUX” button or push matically reconnects the portable player. the “TUNE/FILE”/“AUDIO” knob to In this case, the connection result is not display this screen and touch the “BT” displayed. tab if the Bluetoothr audio player is If the Bluetoothr is disconnected on pur- already connected. pose such as you turned your portable player off, this does not happen. Touch and the music will start playing. Reconnect it by the following method. Touch and the music will pause. D Select the portable player again. D Enter the portable player. Touch and the music will start playing again. Depending on the portable player that is connected to the system, the music may start playing when touching while it is paused. On the other hand, the music may pause when touching while it is play- ing. 184
  • 41.
    AUDIO/VIDEO SYSTEM D Selecting a desired track Some titles may not be displayed depend- ing on the type of portable player. “SEEK/TRACK” button: Use for direct access to a desired track. Push either side of the “SEEK/TRACK” button and repeat it until the desired track number appears on the screen. As you re- lease the button, the portable player will start playing the selected track from the beginning. Fast forward: Push and hold the “ ” button of “SEEK/ TRACK” to fast forward the player. When you release the button, the portable player will resume playing from that position. Reverse: Push and hold the “ ” button of “SEEK/ TRACK” to reverse the player. When you release the button, the player will resume playing. INFORMATION Depending on the portable player that is connected to the system, certain functions may not be available. 185
  • 42.
    AUDIO/VIDEO SYSTEM D Selectinga desired album D Other function “Album Y”: Touch this button to go to “RPT”: Use this control to automatic re- the next album. play the track you are currently listening to. “Album B”: Touch this button to go to Repeating a track— the previous album. While the track is playing, touch “RPT” briefly. INFORMATION “RPT” appears on the screen. When the track is finished, the player will automati- Depending on the portable player that cally play it again. To cancel the repeat, is connected to the system, certain touch “RPT” once again. functions may not be available. 186
  • 43.
    AUDIO/VIDEO SYSTEM — DVD player operation “RAND”: Use this for automatic and ran- The DVD player can play DVD video, au- dom selection of tracks on the album that dio CD, video CD, CD text, dts−CD or you are currently listening to. MP3 disc only when a disc is loaded in Playing the tracks in the album in ran- the DVD player. A WMA and DVD audio dom order— disc cannot be played. While the track is playing, touch For details of the rear seat entertainment “RAND” briefly. system, see “Rear seat entertainment sys- tem features” on page 221. “RAND” appears on the screen. The sys- tem selects a track in the album you are For appropriate discs for this player, see currently listening to. To cancel this func- “Audio/video system operating hints” on tion, touch “RAND” once again. page 242. (a) Inserting the disc INFORMATION Depending on the portable player that is connected to the system, certain functions may not be available. A port must be used for 3 in. (8 cm) discs which are loaded in the same manner as for 4.7 in. (12 cm) discs. 187
  • 44.
    AUDIO/VIDEO SYSTEM (b) Ejecting a disc The indicator light turns on while the disc is loaded. Push the “ ” button. If the label faces downward, the disc can- not be played. In this case, “Check disc” appears on the screen. If a disc which is not playable is inserted, “Check disc” will also appear on the screen. For appropriate discs for this play- er, see “Audio/video system operating hints” on page 242. NOTICE Never try to disassemble or oil any part of the DVD player. Do not insert anything other than a disc into the slot. 188
  • 45.
    AUDIO/VIDEO SYSTEM (c) Playinga disc (d) Operating an audio CD U6102GS PLAYING AN AUDIO CD CD text only — The disc title and track title will appear on the screen when pushing Push the “DISC·AUX” button or push the “DISC·AUX” button. the “TUNE/FILE”/“AUDIO” knob to dis- play audio screen and touch the “DVD” Push the “TUNE/FILE”/“AUDIO” knob tab if a disc is already loaded in the and touch the “DVD” tab to display this player. screen. “DVD” appears on the screen. (If the CD changer is turned on, push the “DISC·AUX” button again or touch “DVD” tab to switch to the DVD player.) 189
  • 46.
    AUDIO/VIDEO SYSTEM U6041GS Touch the desired track number. The play- er will start playing the selected track from the beginning. SELECTING A DESIRED TRACK “SEEK/TRACK” button: Use for direct : By touching this touch−screen but- access to a desired track. ton, the list moves up by 5 track groups. If Push either side of the “SEEK/TRACK” this touch−screen button is touched when button and repeat it until the desired track the top page of the list is displayed, the last number appears on the display. As you re- page is displayed. lease the button, the player will start play- ing the selected track from the beginning. : By touching this touch−screen but- “Select” for track: The desired track can ton, the list moves down by 5 track groups. be selected from a list. This function is If this touch−screen button is touched available only when the vehicle is not mov- when the last page of the list is displayed, ing. the top page is displayed. Touch “Select”. The track list is displayed. Fast forward: Push “ ” side of “SEEK/ TRACK” button and hold it to fast forward the disc. When you release the button, the player will resume playing from that posi- tion. Reverse: Push “ ” side of the “SEEK/ TRACK” button and hold it to reverse the disc. When you release the button, the player will resume playing. 190
  • 47.
    AUDIO/VIDEO SYSTEM U6103GS U6104GS SEARCHING FOR A DESIRED TRACK OTHER FUNCTIONS Touch “SCAN” on the screen. “RPT”: Use it for automatic repeat of the “SCAN” will be highlighted on the screen. track you are currently listening to. The player will play the next track for 10 Touch “RPT” while the track is playing. seconds, then scan again. To select a When the track is finished, the player will track, touch “SCAN” on the screen a sec- automatically go back to the beginning of ond time. If the player reaches the end of the track and play the track again. To can- the disc, it will continue scanning at track 1. cel it, touch “RPT” once again. After all the tracks are scanned in one “RAND”: Use it for automatic and random pass, normal play resumes. selection of the disc which you are current- ly listening to. When “RAND” is touched, the system se- lects a track in the disc you are currently listening to. To cancel it, touch “RAND” once again. If a CD−TEXT disc is inserted, the title of the disc and track will be displayed. Up to 29 letters can be displayed. 191
  • 48.
    AUDIO/VIDEO SYSTEM (e) Operatinga MP3 DISC U6045GS U6105GS Touch the desired folder number. The PLAYING A MP3 DISC player will start playing the first file of the selected folder. Push the “TUNE/FILE”/“AUDIO” knob and touch the “DVD” tab to display this screen. : By touching this touch−screen but- SELECTING A DESIRED FOLDER ton, the list moves up by 5 folder groups. If this touch−screen button is touched “FolderY”: Touch this touch−screen but- when the top page of the list is displayed, ton briefly to go to the next folder. the last page is displayed. “FolderB”: Touch this touch−screen but- ton briefly to go to the previous folder. To : By touching this touch−screen but- jump up to the first folder, touch and hold this touch−screen button until the beep ton, the list moves down by 5 folder sounds. groups. If this touch−screen button is touched when the last page of the list is “Select” for Folder: The desired folder displayed, the top page is displayed. can be selected in a list. This function is available only when the vehicle is not mov- ing. Touch “Select”. The folder list is dis- played. 192
  • 49.
    AUDIO/VIDEO SYSTEM SELECTING A DESIRED FILE “SEEK/TRACK” button: Use for direct access to a desired file. Push either side of the “SEEK/TRACK” button and repeat it until the desired file number appears on the display. As you re- lease the button, the player will start play- ing the selected file from the beginning. Fast forward: Push “ ” side of the “SEEK/TRACK” button and hold it to fast forward the disc. When you release the button, the player will resume playing from that position. Reverse: Push “ ” side of the “SEEK/ TRACK” button and hold it to reverse the disc. When you release the button, the player will resume playing. U6105GS “Select” for File: The desired file can be selected in a list. This function is available only when the vehicle is not moving. Touch “Select”. The file list is displayed. 193
  • 50.
    AUDIO/VIDEO SYSTEM U6046GS U6106GS Touch the desired file number. The player SEARCHING FOR A DESIRED FILE will start playing the selected file from the Touch “SCAN” on the screen briefly. beginning. “SCAN” appears on the screen. The DVD player will play the next file in the folder for : By touching this touch−screen but- 10 seconds, then scan again. To select a ton, the list moves up by 5 file groups. If file, touch “SCAN” on the screen a second this touch−screen button is touched when time. If the player reaches the end of the the top page of the list is displayed, the last folder, it will continue scanning from file 1. page is displayed. After all the files are scanned in one pass, normal play resumes. : By touching this touch−screen but- ton, the list moves down by 5 file groups. If this touch−screen button is touched when the last page of the list is displayed, the top page is displayed. 194
  • 51.
    AUDIO/VIDEO SYSTEM U6107GS U6108GS SEARCHING FOR A DESIRED FOLDER OTHER FUNCTIONS Touch and hold “SCAN” on the screen “RPT”: Use it for automatic repeat of the until the beep sounds. file or folder you are currently listening to. “FLD.SCAN” appears on the screen. The Repeating a file — DVD player will play the file at the begin- Touch “RPT” briefly while the file is play- ning of each folder for 10 seconds, then ing. “RPT” appears on the screen. When scan again. To select a file, touch “SCAN” the file is finished, the player will automati- on the screen a second time. cally go back to the beginning of the file After all the folders are scanned in one and play the file again. To cancel it, touch pass, normal play resumes. “RPT” once again. Repeating a folder — Touch and hold “RPT” until the beep sounds while the folder is playing. “FLD.RPT” appears on the screen. When the folder is finished, the player will auto- matically go back to the beginning of the folder and play the folder again. To cancel it, touch “RPT” once again. 195
  • 52.
    AUDIO/VIDEO SYSTEM “RAND”: Useit for automatic and random (f) Operating a DVD video disc selection of the folder which you are cur- NOTE: The playback condition of some rently listening to or of all the folders. DVD video discs may be determined by Playing the files in one folder in random a DVD video software producer. This order — DVD player plays a disc as the software Touch “RAND” briefly. “RAND” appears producer intended. So some functions on the screen. The system selects a file in may not work properly. Be sure to read the folder you are currently listening to. To the instruction manual for the DVD cancel it, touch “RAND” once again. video disc separately provided. For the detailed information about DVD video Playing the files in all the folders in ran- discs, see “(i) DVD player and DVD dom order — video disc information” on page 230. Touch and hold “RAND” until the beep Precautions on DVD video disc sounds. “FLD.RAND” appears on the screen. The system selects a file in the When recording with a DVD video or video folders of all the trays which are set and CD, audio tracks may not record in some plays it. To cancel it, touch “RAND” once cases while the menu is displayed. As au- again. dio will not play in this case, verify that the video tracks are playing and then activate When a file is skipped or the system is in- playback. operative, touch “RAND” to reset. When playback of a disc is completed: D If an audio CD or MP3 disc is playing, the first track or file starts. D If a DVD video or video CD is playing, playback will stop or the menu screen will be displayed. The title/chapter number and playback time display may not appear while playing back certain DVD video discs. 196
  • 53.
    AUDIO/VIDEO SYSTEM CAUTION Conversational speech on some DVDs is recorded at a low volume to emphasize the impact of sound ef- fects. If you adjust the volume as- U6077GS suming that the conversations repre- sent the maximum volume level that the DVD will play, you may be startled by louder sound effects or when you change to a different audio source. Vehicles with smart key system— The louder sounds may have a signif- This screen appears when the video icant impact on the human body or screen is first displayed after “ENGINE pose a driving hazard. Keep this in START STOP” switch is in ACCESSO- mind when you adjust the volume. RY or IGNITION ON mode. Vehicles without smart key system— This screen appears when the video screen is first displayed after the en- gine switch is in the “ACC” or “ON” position. 197
  • 54.
    AUDIO/VIDEO SYSTEM U6084GS U6051GS PLAYING A DVD DISC DVD SETTINGS Push the “TUNE/FILE”/“AUDIO” knob If you touch “Settings” on “DVD” screen, and touch the “DVD” tab to display this “Settings” screen appears. screen. Touch “Settings” on “DVD” screen and touch “Wide” on “Settings” screen. The screen mode can be changed. If you touch “Full Screen” when the ve- hicle is completely stopped and the park- ing brake is applied, the video screen re- turns. 198
  • 55.
    AUDIO/VIDEO SYSTEM DESCRIPTION OFSETTINGS “DVD Video Settings”: The initial set up screen appears. (See page 203.) “Search”: The title search screen ap- pears. (See page 201.) U6084GS “Return”: Touching this will display the predetermined scene and start playing from there. “Audio”: The audio changing screen ap- pears. (See page 202.) DISPLAYING DVD CONTROLS “Subtitle”: The subtitle changing screen appears. (See page 201.) If you touch , while watching video, “Angle”: The angle selection screen ap- DVD controls will appear. pears. (See page 202.) If “ ” appears on the screen when you “Wide”: The screen mode screen ap- touch a control, the operation relevant to pears. (See page 153.) the control is not permitted. 199
  • 56.
    AUDIO/VIDEO SYSTEM DESCRIPTION OFDVD CONTROLS “Menu” and “Top Menu”: If you touch any of the above controls, the menu screen for DVD video appears. (For the operation, see the manual that come with the DVD video disc provided separately.) U6052GS : Touching this will display the control key screen shown on the right. : Touching this will pause the video screen. : Touching this will fast reverse dur- ing playback. : Touching this will stop the video U6053GS screen. : Touching this will resume normal play during pause. SELECTING A MENU ITEM : Touching this will fast forward dur- ing playback and forward frame by frame Enter the menu item using , during pause. , and and touch “Enter”. The player starts playing vid- eo for that menu item. (For details, see the manual that come with the DVD vid- eo disc provided separately.) Each time you touch “Move Buttons”, the controls on the screen move up- ward and downward. When you touch the screen, the controls will disappear. To display them again, touch the screen. When you touch , the previous screen returns. 200
  • 57.
    AUDIO/VIDEO SYSTEM U6054GS SEARCHING BY TITLE CHANGING THE SUBTITLE Enter the title number and touch “OK”. LANGUAGE The player starts playing video for that Each time you touch “Change”, the lan- title number. guage is selected from the ones stored When you push either side of the “SEEK/ in the discs and changed. TRACK” button, you can select a chapter. When you touch “Hide”, the subtitle can be If you enter the wrong numbers, touch hidden. to delete the numbers. When you touch , the previous screen returns. When you touch , the previous screen returns. 201
  • 58.
    AUDIO/VIDEO SYSTEM U6069GSb U6076GS CHANGING THE AUDIO LANGUAGE CHANGING THE ANGLE Each time you touch “Change”, the lan- The angle can be selected for discs that guage is selected from the ones stored are multi−angle compatible when the in the discs and changed. angle mark appears on the screen. When you touch , the previous Each time you touch “Change”, the screen returns. angle is selected from the ones stored in the discs and changed. When you touch , and the previous screen returns. 202
  • 59.
    AUDIO/VIDEO SYSTEM D Audio language You can change the audio language. 1. Touch “Audio Language”. U6058GS 2. Touch the language you want to hear on the “Audio Language” screen. If you cannot find the language you want to hear on this screen, touch “Other” and enter a language code. For the entry of language code, see the following “ENTER SETUP MENU AUDIO LANGUAGE CODE”. There are initial setting touch−screen To return to the “Setup Menu” screen, buttons on the “Setup Menu” screen. touch the . After you change the initial setting, touch D Subtitle language . The initial setting screen will be You can change the subtitle language. turned off and return to the previous 1. Touch “Subtitle Language”. screen. 2. Touch a language you want to read When “Default” is touched, all menus are on the “Subtitle Language” screen. initialized. If you cannot find the language you want to The initial setting can be changed. read on this screen, touch “Other” and enter a language code. For the entry of language code, see the following “ENTER AUDIO LANGUAGE CODE”. To return to the “Setup Menu” screen, touch the . D DVD language You can change the language on the DVD video menu. 1. Touch “DVD Language”. 2. Touch the language you want to read on the “DVD Language” screen. If you cannot find the language you want to read on this screen, touch “Other” and enter a language code. For the entry of language code, see the following “ENTER AUDIO LANGUAGE CODE”. To return to the “Setup Menu” screen, touch . 203
  • 60.
    AUDIO/VIDEO SYSTEM D Anglemark ENTER AUDIO LANGUAGE CODE The multi−angle mark can be turned on or off on the screen while the disc which is multi−angle compatible is be- ing played. Each time you touch “Angle Mark”, the angle mark on the screen turns on or off U6059GS alternately. D Parental lock The level of viewer restrictions can be changed. If you touch “Other” on the “Select 1. Touch “Parental Lock”. Audio Language” screen, “Select 2. Enter the 4−digit personal code on Subtitle Language” screen or “DVD the “Key code” screen. Language” screen, you can select the If you enter the wrong numbers, touch language you want to hear or read by entering a language code. to delete the numbers. 1. Enter the 4−digit language code. 10 touches of will initialize the per- If you enter the wrong numbers, touch sonal code. to delete the numbers. To return to the “Setup Menu” screen, 2. Touch “OK”. touch . 3. Touch a parental level (1 — 8) on the Code Language “Select Restriction Level”. Touch the 0514 English switch to return to the “Setup 1001 Japanese Menu” screen. 0618 French 0405 German 0920 Italian 0519 Spanish 2608 Chinese 1412 Dutch 1620 Portuguese 1922 Swedish 1821 Russian 1115 Korean 0512 Greek 0101 Afar 0102 Abkhazian 204
  • 61.
    AUDIO/VIDEO SYSTEM 0106 Afrikaans 0721 Gujarati 0113 Amharic 0801 Hausa 0118 Arabic 0809 Hindi 0119 Assamese 0818 Croatian 0125 Aymara 0821 Hungarian 0126 Azerbaijani 0825 Armenian 0201 Bashkir 0901 Interlingua 0205 Byelorussian 0905 Interlingue 0207 Bulgarian 0911 Inupiak 0208 Bihari 0914 Indonesian 0209 Bislama 0919 Icelandic 0214 Bengali 0923 Hebrew 0215 Tibetan 1009 Yiddish 0218 Breton 1023 Javanese 0301 Catalan 1101 Georgian 0315 Corsican 1111 Kazakh 0319 Czech 1112 Greenlandic 0325 Welsh 1113 Cambodian 0401 Danish 1114 Kannada 0426 Bhutani 1119 Kashmiri 0515 Esperanto 1121 Kurdish 0520 Estonian 1125 Kirghiz 0521 Basque 1201 Latin 0601 Persian 1214 Lingala 0609 Finnish 1215 Laothian 0610 Fiji 1220 Lithuanian 0615 Faroese 1222 Latvian 0625 Frisian 1307 Malagasy 0701 Irish 1309 Maori 0704 Scots−Gaelic 1311 Macedonian 0712 Galician 1312 Malayalam 0714 Guarani 1314 Mongolian 205
  • 62.
    AUDIO/VIDEO SYSTEM 1315 Moldavian 1920 Sesotho 1318 Marathi 1921 Sundanese 1319 Malay 1923 Swahili 1320 Maltese 2001 Tamil 1325 Burmese 2005 Telugu 1401 Nauru 2007 Tajik 1405 Nepali 2008 Thai 1415 Norwegian 2009 Tigrinya 1503 Occitan 2011 Turkmen 1513 (Afan)Oromo 2012 Tagalog 1518 Oriya 2014 Setswana 1601 Panjabi 2015 Tonga 1612 Polish 2018 Turkish 1619 Pashto, Pushto 2019 Tsonga 1721 Quechua 2020 Tatar 1813 Rhaeto−Romance 2023 Twi 1814 Kirundi 2111 Ukrainian 1815 Romanian 2118 Urdu 1823 Kinyarwanda 2126 Uzbek 1901 Sanskrit 2209 Vietnamese 1904 Sindhi 2215 Volapük 1907 Sangho 2315 Wolof 1908 Serbo−Croatian 2408 Xhosa 1909 Sinhalese 2515 Yoruba 1911 Slovak 2621 Zulu 1912 Slovenian 1913 Samoan 1914 Shona 1915 Somali 1917 Albanian 1918 Serbian 1919 Siswati 206
  • 63.
    AUDIO/VIDEO SYSTEM SETUP OPERATIONFROM THE REAR (g) Operating a video CD SEAT U6060GS U6110GS PLAYING A VIDEO CD This screen appears when a rear passen- Push the “TUNE/FILE”/“AUDIO” knob ger selects the setup menu. and touch the “DVD” tab to display this If you want to cancel the setup operation screen. from the rear seat, touch “Play”. The play- When you touch “Wide” on “Settings” er will resume normal play. screen, the screen mode can be changed. Under the same condition, the rear pas- If you touch “Full Screen” when the ve- senger can cancel the setup operation hicle is completely stopped and the park- from the front seat. ing brake is applied, the video screen re- To lock the operation of the player from the turns. rear seat, see “D Rear system lock” on page 262. 207
  • 64.
    AUDIO/VIDEO SYSTEM DESCRIPTION OF VIDEO CD SETTINGS D Controls on top page “Select Number”: The track or number U6062GS search screen appears. (See “SEARCH- ING BY TRACK” on page 210.) “Prev. Page”: When you touch this while the disc menu is displayed, the previous page appears on the screen. If you touch this while the player is playing video, the DISPLAYING VIDEO CD SETTINGS previous track is searched and played. If you touch “Settings” on “DVD” screen, “Next Page”: When you touch this while “Settings” screen appears. the disc menu is displayed, the next page appears on the display. If you touch this while the player is playing video, the next track is searched and played. “Main/Sub”: A multiplex transmission changing control. The mode changes from Main/Sub to Main, to Sub and back to Main/Sub by touching this control. “Return”: Touching this will display the predetermined scene and start playing from there. “Wide”: The screen mode screen ap- pears. 208
  • 65.
    AUDIO/VIDEO SYSTEM DISPLAYING VIDEOCD CONTROLS DESCRIPTION OF VIDEO CD If you touch the part where controls are not CONTROLS located while you are watching video on : Use this to pause the video screen. the video CD, video CD controls will ap- pear. : Touch this to fast reverse during If “ ” appears on the display when you playback. touch a control, the operation is not per- mitted. : Touch this to resume playing during pause. : Touch this to fast forward during the playback and start playing frame by frame during pause. 209
  • 66.
    AUDIO/VIDEO SYSTEM (h) If the player malfunctions If the player or another unit equipped with the player malfunction, your audio system will display following messages. U6072GSa If “Check disc” appears on the display: It indicates that the disc dirty, damaged, or it was inserted upside down. Clean the disc or insert it correctly. If a disc which is not playable is inserted, “Check disc” will also appear on the screen. For SEARCHING BY TRACK appropriate discs for this player, see Enter the track numbers and touch “Audio/video system operating hints” on “OK”. The player starts playing video page 242. for that title number. If “Region code error” appears on the You can select a track number by pushing display: It indicates that the DVD region “ ” or “ ” on the “SEEK/TRACK” but- code is not set properly. ton. If “DVD error” appears on the display: If you enter the wrong numbers, touch It indicates that the inside of the player unit may be too hot due to the very high ambi- to delete the numbers. ent temperature. Remove the disc from the player and allow the player to cool Touch , and the previous screen re- down. turns. If the malfunction is not rectified: Take your vehicle to your dealer. If an MP3 disc contains CD−DA files, only CD−DA files are played. If an MP3 disc contains files other than CD−DA, only MP3 files are played. 210
  • 67.
    AUDIO/VIDEO SYSTEM — USBmemory/iPod operation Connecting a USB memory or iPod en- (a) Connecting a USB memory or iPod ables you to enjoy music from the ve- hicle speakers. CAUTION Do not operate the player’s controls or connect the USB memory or iPod while driving. NOTICE D Do not leave your portable player in the car. In particular, high tempera- " Vehicles with seat heater tures inside the vehicle may dam- age the portable player. D Do not push down on or apply un- necessary pressure to the portable player while it is connected as this may damage the portable player or its terminal. D Do not insert foreign objects into the port as this may damage the portable player or its terminal. " Vehicles without seat heater Open the cover and connect a USB memory or iPod using an iPod cable. Turn on the power of the USB memory or iPod if it is not turned on. 211
  • 68.
    AUDIO/VIDEO SYSTEM (b) Playinga USB memory or iPod D Playing and pausing a file or track INFORMATION D When an iPod is connected and the audio source is changed to iPod mode, the iPod will resume play from the same point in which it was U6078GS last used. D When the USB memory is con- nected and the audio source is changed to USB memory mode, the USB memory will start playing the first file in the first folder. If the same device is removed and rein- " USB memory serted (and the contents have not been changed), the USB memory will resume play from the same point in which it was last used. U6079GS " iPod Touch “USB” tab to display this screen if the USB memory or iPod is already connected. Touch and the music will start playing. Touch and the music will pause. Touch and the music will start playing again. 212
  • 69.
    AUDIO/VIDEO SYSTEM D Selectinga play mode (iPod only) D Selecting a desired folder (USB memory only) U6079GS U6078GS 1. Touch “Menu”. “FolderY”: Touch this button to go to the next folder. “FolderB”: Touch this button to go to the previous folder. “Select” for Folder: The desired folder can be selected in a list. This function is available only when the vehicle is not mov- ing. Touch “Select”. The folder list is dis- played. 2. Select the desired play mode. Touch the desired folder number. The play- er will start playing the first file of the se- lected folder. : By touching this touch−screen but- ton, the list moves up by 5 folder groups. If this touch−screen button is touched when the top page of the list is displayed, the last page is displayed. 213
  • 70.
    AUDIO/VIDEO SYSTEM D Selecting a desired file or track : By touching this touch−screen but- ton, the list moves down by 5 folder groups. If this touch−screen button is touched when the last page of the list is displayed, the top page is displayed. “SEEK/TRACK” button: Use for direct access to a desired file or track. Push either side of the “SEEK/TRACK” button and repeat it until the desired file or track appears on the screen. As you re- lease the button, the USB memory or iPod will start playing the selected file or track from the beginning. Fast forward: Push and hold the “ ” side of the “SEEK/ TRACK” button to fast forward the player. When you release the button, the player will resume playing from that position. Reverse: Push and hold the “ ” side of the “SEEK/ TRACK” button to reverse the player. When you release the button, the player will resume playing. 214
  • 71.
    AUDIO/VIDEO SYSTEM U6078GS " USB memory “TUNE/FILE”/“AUDIO” knob: Use for di- rect access to a desired file or track in the player. Turn the “TUNE/FILE”/“AUDIO” knob to step up or down all the files or tracks in the U6079GS player you are currently listening to. " iPod “Select” for File or Track: The desired file or track can be selected in a list. This function is available only when the vehicle is not moving. Touch “Select”. The file or track list is dis- played. 215
  • 72.
    AUDIO/VIDEO SYSTEM D Searching for a desired file (USB memory only) U6111GS Touch the desired file or track number. The changer will start playing the selected file or track from the beginning. Touch “SCAN” on the screen briefly while the music is playing. : By touching this touch−screen but- “SCAN” appears on the screen. The play- ton, the list moves up by 5 file or track er will play the next file for 10 seconds, groups. If this touch−screen button is then scan again. To select a file, touch touched when the top page of the list is dis- “SCAN” on the screen a second time. If played, the last page is displayed. the player reaches the end of the memory, it will continue scanning at file1. : By touching this touch−screen but- After all the files are scanned in one pass, normal play resumes. ton, the list moves down by 5 file or track groups. If this touch−screen button is touched when the last page of the list is displayed, the top page is displayed. 216
  • 73.
    AUDIO/VIDEO SYSTEM D Searchingfor a desired folder (USB D Other functions memory only) U6112GS U6078GS " USB memory Touch “SCAN” on the screen for longer than a second while the music is play- ing. “FLD.SCAN” appears on the screen. The program at the beginning of each folder will be played for 10 seconds. To continue lis- tening to the program of your choice, touch U6079GS “SCAN” on the screen a second time. After all the folders are scanned in one pass, normal play resumes. " iPod “RPT”: Use this control to automatic re- play the file or track you are currently lis- tening to. Repeating a file or track— While the file or track is playing, touch “RPT” briefly. “RPT” appears on the screen. When the file or track is finished, the player will auto- matically play it again. To cancel the re- peat, select “RPT” once again. 217
  • 74.
    AUDIO/VIDEO SYSTEM Audio/video remote controls (steering switches) Repeating a folder (USB memory only) — While the folder is playing, touch “RPT” for longer than a second. “FLD.RPT” appears on the screen. When the folder is finished, the changer will auto- matically go back to the beginning of the folder and play the folder again. To cancel it, select “RPT” once again. “RAND”: Use this for automatic and ran- dom selection of files or tracks on the fold- er that you are currently listening to. Playing the file or track in random or- der— Some parts of the audio system can be ad- justed using the switches on the steering While the file or track is playing, touch wheel. “RAND” briefly. Details of the specific switches, controls, “RAND” appears on the screen. The sys- and features are described below. tem selects a file or track you are currently listening to. To cancel this function, touch 1 Volume control switch “RAND” once again. 2 “ ” switch Playing the files in all files in random or- 3 “MODE” switch der — Touch “RAND” for longer than a second 1 Volume control switch while the music is playing. “FLD.RAND” appears on the screen. The system se- Push “+” side to increase the volume. The lects a file in all files. To cancel it, touch volume continues to increase while the “RAND” once again. switch is being pressed. When a file is skipped or the system is in- Push “–” side to decrease the volume. operative, select “RAND” to reset. The volume continues to decrease while the switch is being pressed. 218
  • 75.
    AUDIO/VIDEO SYSTEM 2 “ ” switch Vehicles with rear seat entertainment sys- Radio tem — This switch has the following features— DVD player To select a preset station: While the DVD player is in operation, the Quickly push and release the “ ” or “ ” chapter or track can be changed by push- side of the switch. Do this again to select ing the “ ” or “ ” switch. the next preset station. Bluetoothr audio player To seek a station: Use this switch to skip up or down to a dif- Push and hold the “ ” or “ ” side of the ferent track or album in either direction. switch until you hear a beep. Do this again To select a desired track: to find the next station. If you push the Quickly push and release the “ ” or “ ” switch on either side during the seek side of the switch until the track you want mode, seeking will be cancelled. to listen to is set. If you want to return to the To step up or down the frequency, push beginning of the current track, push the and hold the switch even after you hear a “ ” side of the switch once quickly. beep. When you release from the switch, To select a desired album: the radio will begin seeking up or down for Push and hold “ ” or “ ” switch until a station. Do this again to find the next sta- you hear a beep to change to the next or tion. the previous album. Repeat this operation XMr Satellite Radio— until you reach the album you want to listen To select a preset channel, push the “ ” to. or “ ” side of the switch. Repeat until a USB memory/iPod desired channel is found. Use this switch to skip up or down to a dif- CD changer ferent track, file, album or folder in either Use this switch to skip up or down to a dif- direction. ferent track in either direction. To select a desired track or file: To select a desired track or file: Quickly push and release the “ ” or “ ” Quickly push and release the “ ” or “ ” side of the switch until the track or file you side of the switch until the track you want want to listen to is set. If you want to return to listen to is set. If you want to return to the to the beginning of the current track or file, beginning of the current track, push the push the “ ” side of the switch once, “ ” side of the switch once, quickly. quickly. To select a desired disc: To select a desired album or folder: Push and hold the “ ” or “ ” switch until Push and hold “ ” or “ ” switch until you hear a beep to change to the next or you hear a beep to change to the next or the previous disc. Repeat this operation the previous album or folder. Repeat this until you reach the disc you want to listen operation until you reach the album or fold- to. er you want to listen to. 219
  • 76.
    AUDIO/VIDEO SYSTEM 3 “MODE” switch Push “MODE” switch to select an audio mode. Each push changes the mode se- quentially if the desired mode is ready to use. To turn the audio/video system on, push the “MODE” switch. To turn the audio/video system off, push and hold the “MODE” switch until you hear a beep. 220
  • 77.
    AUDIO/VIDEO SYSTEM Rear seatentertainment system features — The rear seat entertainment system is designed for the rear passengers to enjoy audio and DVD video separately from the front audio system. 1 Front audio system 5 Rear seat entertainment system con- 2 Display troller 3 Headphone volume control dials and 6 Power outlet headphone jacks 7 A/V input port 4 DVD player 221
  • 78.
    AUDIO/VIDEO SYSTEM Vehicles withsmart key system — The rear seat entertainment system can be used when the “ENGINE START STOP” switch is in ACCESSORY or IGNI- TION ON mode. Vehicles without smart key system — The rear seat entertainment system can be used when the engine switch is in “ACC” or “ON” position. D Opening and closing the display To close the display, push the display up until a click is heard. The illumination of the screen is automati- cally turned off when the display is closed. However, the rear seat entertainment sys- tem is not turned off. Push the lock release button to open the display. Pull the display down to an easily viewable angle (between 90_ and 125_). 222
  • 79.
    AUDIO/VIDEO SYSTEM D Loadinga disc D Ejecting a disc Insert the disc into the slot with the la- Push and remove the disc. bel side up. The “DISC” indicator light turns on while the disc is loaded. The player will play the track or chapter, and will repeat it after it reaches the end. 223
  • 80.
    AUDIO/VIDEO SYSTEM D Headphonejacks D Before using the remote controller (for new vehicle owners) 1 To use the headphones, connect them to the jack. An insulating sheet is set to prevent the 2 To adjust the volume batteries from being discharged. Remove the insulating sheet before using the re- Right side dial: Turn it toward the front mote controller. of the vehicle to increase the volume. Turn it toward the rear of the vehicle D Headphones to decrease the volume. With some headphones generally avail- Left side dial: Turn it toward the rear able in the market, it may be difficult to of the vehicle to increase the volume. catch signals properly. Toyota recom- Turn it toward the front of the vehicle mends the use of Toyota genuine wireless to decrease the volume. headphones. Please contact your Toyota dealer for fur- ther details. D Volume Adjust the volume when you connect the headphones to the jack. Loud sounds may have a significant impact on the human body. 224
  • 81.
    AUDIO/VIDEO SYSTEM CAUTION NOTICE D While driving D Cleaning the display Do not use headphones. Wipe the display with a dry soft Doing so may cause an accident, cloth. resulting in death or serious injury. If the screen is wiped with a rough D When the rear seat entertainment cloth, the surface of the screen system is not used may be scratched. Keep the display closed. D To prevent damage to the remote In the event of an accident or sud- controller den braking, the opened display Keep the remote control away from may hit an occupant’s body, result- direct sunlight, temperature heat ing in injury. and high humidity. D To prevent accidents and electric shock Do not drop or knock the remote controller against hard objects. Do not disassemble or modify the remote controller. Do not sit on or place heavy ob- jects on the remote controller. D When the remote controller is not used D DVD player Stow the remote controller. Inju- Never try to disassemble or oil any ries may result in the event of an part of the DVD player. Do not in- accident or sudden braking. sert anything other than a disc into the slot. D Conversational speech on some DVDs is recorded at a low volume to emphasize the impact of sound effects. If you adjust the volume assuming that the conversations represent the maximum volume level that the DVD will play, you may be startled by louder sound ef- fects or when you change to a dif- ferent audio source. The louder sounds may have a significant im- pact on the human body or pose a driving hazard. Keep this in mind when you adjust the volume. 225
  • 82.
    AUDIO/VIDEO SYSTEM — Usingthe DVD player (DVD video) D Remote controller 1 Turning on the DVD mode 2 Turning on or off the operation switches on the display 3 Selecting a chapter 4 Reversing a disc 5 Turning on the menu screen 6 Turning on the title selection screen 7 Searching the title 8 Changing the screen angle 9 Inputting the selected switch 10 Selecting a switch 11 Playing/pausing a disc 12 Fast forwarding a disc 13 Stopping a disc 14 Changing the subtitle language 15 Changing the audio language 226
  • 83.
    AUDIO/VIDEO SYSTEM D Unit D Display (Page 1) 1 Turning off the operation switches on the display 1 Turning on the DVD mode 2 Displaying to Page 2 2 Skipping to the desired chapter 3 Turning on or off the title selection screen for the disc 3 Playing/pausing a disc 4 Turning on or off the menu screen for 4 Turning on or off the operation the disc switches on the display 5 Reversing a disc 5 Selecting a switch 6 Stopping a disc 6 Inputting the selected switch 7 Pausing the disc/canceling the pause 8 Fast forwarding a disc 227
  • 84.
    AUDIO/VIDEO SYSTEM D Display(Page 2) (a) Turning on or off the operation switches Push or to turn on the opera- tion switches. Push or once again or select “Hide Buttons” to turn off the operation switches. (b) Turning on the title selection screen Push or select “Top Menu” to turn 9 Displaying to the initial setting screen on the title selection screen. For the op- eration of the title selection screen, see the 10 Displaying to Page 1 separate manual for the DVD disc. 11 Search for a title (c) Turning on the menu screen 12 Returning to the previous screen 13 Changing the audio language Push or select “Menu” to turn on 14 Changing the subtitle language the menu screen. For the operation of the menu screen, see the separate manual for 15 Changing the angle the DVD disc. (d) Returning to the previous screen INFORMATION Select “Return” to return to the previous To operate from the front audio sys- screen. For the operation of the menu tem, see “— DVD player operation” screen, see the separate manual for the on page 187. DVD disc. 228
  • 85.
    AUDIO/VIDEO SYSTEM (e) Searchingfor a title (g) Changing the audio language Push or select “Search” to dis- Push or select “Audio” to display play the screen to search for a title. the audio language screen. Select the title number, and push “ENT” to input it. Select “Back” to return to the pre- Each time is pushed or “Audio” is vious screen. selected, another language stored on the disc is selected. (f) Changing the subtitle language Select “Back” to return to the previous screen. (h) Changing the angle Push or select “Sub Title” to dis- play the subtitle language screen. Each time is pushed or “Sub Title” Push or select “Angle” to display is selected, another language stored on the screen to change the angle. the disc is selected. Select “Back” to return to the previous Each time is pushed or “Angle” is screen. selected, the angle changes. Select “Back” to return to the previous screen. 229
  • 86.
    AUDIO/VIDEO SYSTEM (i) DVDplayer and DVD video disc in- Marks shown on DVD video discs: formation To lock the rear seat entertainment sys- Indicates NTSC tem, see “D Rear system lock (with rear format of color TV. seat entertainment system)” on page 262. When appears on the screen, it indi- cates that the selected switch cannot Indicates the number work. of audio tracks. D Error messages DISC CHECK: Indicates the number Indicates that the disc is dirty, damaged or of language subtitles. was inserted upside down. Clean the disc or insert it correctly. REGION ERROR: Indicates the number Indicates that the DVD region code is not of angles. set properly. Indicates the screen to DVD ERROR: be selected. Indicates that there is a problem inside the Wide screen: 16:9 player. Eject the disc. Set the disc again. Standard: 4:3 If the malfunction still exists, take the ve- Indicates a region code hicle to your Toyota dealer. by which this video disc DVD VIDEO DISCS can be played. ALL: in all countries This DVD player conforms to NTSC col- Number: region code or TV formats. The DVD video disc con- forming to another formats such as PAL or SECAM cannot be used. Region codes: Some DVD video discs have a region code indicating a country where you can use the DVD video disc on this DVD player. If the DVD video disc is not labeled as “ALL” or “1”, you cannot use it on this DVD player. If you attempt to play an inappropriate DVD video disc on this player, “Region code error” appears on the screen. Even if the DVD video disc does not have a region code, there is a case that you cannot use it. 230
  • 87.
    AUDIO/VIDEO SYSTEM DVD VIDEODISC GLOSSARY Region codes: The region codes are pro- DVD video discs: Digital versatile Disc vided on DVD players and DVD discs. If that holds video. DVD video discs have the DVD video disc does not have the adopted “MPEG2”, one of the world stan- same region code as the DVD player, you dards of digital compression technologies. cannot play the disc on the DVD player. The picture data is compressed by 1/40 on For region codes, see page 230. average and stored. Variable rate en- Audio: This DVD player can play liner coded technology in which the volume of PCM, Dolby digital and MPEG audio for- data assigned to the picture is changed de- mat DVD. Other decoded type cannot be pending on the picture format has also played. been adopted. Audio data is stored using Title and chapter: Video and audio pro- PCM and Dolby digital, which enables grams stored in DVD video disc are divid- higher quality of sound. Furthermore, mul- ed in parts by title and chapter. ti−angle and multi−language features will also help you enjoy the more advanced Title: The largest unit of the video and au- technology of DVD video. dio programs stored on DVD video discs. Usually, one piece of movie, one album, or Viewer restrictions: This feature limits one audio program is assigned as a title. what can be viewed in conformity with a level of restrictions of the country. The lev- Chapter: The unit smaller than that of title. el of restrictions varies depending on the A title comprises plural chapters. DVD video disc. Some DVD video discs Manufactured under license from cannot be played at all, or violent scenes Dolby Laboratories. “Dolby”, “Pro Log- are skipped or replaced with other scenes. ic”, and the double−D symbol are trade- Level 1: DVD video discs for children can marks of Dolby Laboratories. Confi- be played. dential unpublished works. E1992−1997 Dolby Laboratories. All Level 2 − 7: DVD video discs for children rights reserved. and G−rated movie can be played. “DTS” is a trademark of Digital Theater Level 8: All types of the DVD video discs Systems, Inc. can be played. Multi−angle feature: You can enjoy the same scene at different angles. Multi−language feature: You can select a language of the subtitle and audio. 231
  • 88.
    AUDIO/VIDEO SYSTEM — Usingthe DVD player (video CD) D Remote controller D Unit 1 Selecting a switch 1 Skipping to the desired chapter 2 Selecting a chapter 2 Playing/pausing a disc 3 Playing/pausing a disc 3 Selecting a switch 4 Reversing a disc 4 Inputting the selected switch 5 Displaying operation switches 6 Inputting the selected switch 7 Fast forwarding a disc 8 Stopping a disc 9 Changing the initial setting 232
  • 89.
    AUDIO/VIDEO SYSTEM D Display(page 1) D Display (page 2) 1 Selecting a disc menu number 8 Displaying to page 1 2 Turning off the menu screen 9 Reversing a disc 3 Displaying to page 2 10 Pausing the disc/canceling the pause 4 Turning on the disc menu 11 Fast forwarding a disc 5 Returning to the previous page screen (with the disc menu dis- INFORMATION played) To operate from the front audio sys- 6 Proceeding to the next page screen tem, see “— DVD player operation” (with the disc menu displayed) on page 187. 7 Changing to a multiplex transmission 233
  • 90.
    AUDIO/VIDEO SYSTEM — Using the DVD player (audio CD/CD text) D Selecting a disc menu number D Using the control screen Select “Select Number” to display the disc menu number search screen. Select the disc menu number, and push “ENT” to input it. Select “Back” to return to the previous screen. Using the control screen, push or to display the control screen. 1 Repeat play 2 Random playback 3 Search playback Canceling random, repeat and scan play Select “RPT”, “RAND” or “SCAN” again. INFORMATION To operate from the front audio sys- tem, see “— DVD player operation” on page 187. 234
  • 91.
    AUDIO/VIDEO SYSTEM — Usingthe DVD player (MP3 discs) D Using the control screen D Repeat play Repeat a file Select “RPT”. Repeat all of files in a folder Select “RPT”, and push and hold “ENT”. D Random playback Playing files from a particular folder in random order Select “RAND”. Playing all of the files on a disc in ran- dom order Select “RAND”, and push and hold Push or to display the control “ENT”. screen. D Search playback 1 Repeat play Selecting the desired file by cueing the 2 Random playback files in the folder 3 Search playback Select “SCAN”. The player will scan all the files in the fold- 4 Displaying file information er. Each file will be played for 10 seconds. 5 Selecting folder D Selecting the desired file by cueing the folders on the disc INFORMATION Select “SCAN”, and push and hold “ENT”. The player will scan all the folders To operate from the front audio sys- on the disc. The first file in each folder will tem, see “— DVD player operation” be played for 10 seconds. on page 187. D Canceling random, repeat and play back Select “PRT”, “RAND” or “SCAN” again. 235
  • 92.
    AUDIO/VIDEO SYSTEM — Usingthe video mode D Using the port Push “VIDEO” to select the video mode. Before switching to the video mode, con- Open the cover. nect the audio source to the A/V input port. The A/V input port is composed of 3 input ports. Yellow: Image input port White: Left channel audio input port Red: Right channel audio input port The rear seat entertainment system plays videos and sound when audio−video equipment is connected to the A/V input port. For details, refer to the manufactur- er’s instructions. The power outlet is used to connect the au- dio device. See the vehicle owner’s manu- al. NOTICE When the A/V input port is not in use, keep the A/V input port cover closed. Inserting anything other than an ap- propriate plug may cause electrical failure or a short circuit. 236
  • 93.
    AUDIO/VIDEO SYSTEM — Changingthe initial setting D Changing the audio language Push or select “Set Up” to dis- Select “Audio Language”. Select the play the initial setting screen. language you want to hear, and push The following initialization can be “ENT” to input it. changed here. D “Audio Language” D “Subtitle Language” D “DVD Language” D “Angle Mark” D “Parental Lock” Select “Others” if you cannot find the language you want to hear. Enter the appropriate 4−digit language code. Se- lect a number, and push “ENT” to input it. Language code list If a code that is not in the list is entered, “In- correct Code” will appear on the screen. (See page 204.) 237
  • 94.
    AUDIO/VIDEO SYSTEM D Changingthe subtitle language D Changing the DVD language Select “Subtitle Language”. Select the Select “DVD Language”. Select the lan- language you want to read, and push guage you want to read and push “ENT” to input it. “ENT” to input it. Select “Others” if you cannot find the Select “Others” if you cannot find the language you want to read. Enter the language you want to read. Enter the appropriate 4−digit language code. Se- appropriate 4−digit language code. Se- lect a number, and push “ENT” to input lect a number, and push “ENT” to input it. it. Language code list Language code list If a code that is not in the list is entered, “In- If a code that is not in the list is entered, “In- correct Code” will appear on the screen. correct Code” will appear on the screen. (See page 204.) (See page 204.) 238
  • 95.
    AUDIO/VIDEO SYSTEM D Turningon or off the angle mark D Setting viewer restriction levels The angle mark can be turned on for discs that are multi−angle compatible. Each time you push “ENT” when “Angle Mark” is selected, the angle mark turns on or off alternately. Setting a password allows the viewer restriction to be effective. Select “Parental Lock”. Enter the pass- word and push “ENT”. The setting can- not be changed unless the password is entered. When you forget the password, initialize the password. (See page 240.) Select a restriction level (1−8), and push “ENT”. The smaller the level num- ber, the stricter the age limit. 239
  • 96.
    AUDIO/VIDEO SYSTEM D Settingthe display mode D Adjusting the screen Push . Select the brightness, contrast, tone or col- Pushing changes the display or, and make adjustments. Push or modes sequentially as follows: “ENT” to input it. Normal → “Wide 1” → Wide 2 Brightness, contrast, tone and color Returning to the previous screen adjustment Select “BACK”, and push “ENT”. “Brightness” “+”: Brightens the screen. D To initialize the password “Brightness” “−”: Push A on the remote controller or unit ten Darkens the screen. times when the screen to enter the person- al code is displayed. “Contrast” “+”: Strengthens the contrast of the screen. “Contrast” “−”: Weakens the contrast of the screen. “Tone” “+”: Strengthens the tone of the screen. “Tone” “−”: Weakens the tone of the screen. “Color” “Red”: Strengthens the red color of the screen. “Color” “Green”: Strengthens the green color of the screen. 240
  • 97.
    AUDIO/VIDEO SYSTEM — Replacingthe batteries Necessary item for replacing “3 AA bat- If the batteries are discharged, the fol- teries”. lowing symptoms may occur. D The rear seat entertainment system control will not function properly. D The operational range is reduced. When using 3 AA batteries D Batteries can be purchased at your Toyota dealer, electric appliance shop, or camera stores. D Replace only with the same or equiva- lent type recommended by a Toyota dealer. D Dispose of used batteries according to the local laws. 1. Remove the cover. CAUTION Removed battery and other parts: D Keep away from children. D These parts are small and if swal- lowed by a child they can cause choking. NOTICE For normal operation after replacing the battery. Observe the following 2. Remove the depleted batteries and precautions to prevent accidents: install new 3 AA batteries. D Always work with dry hands. Mois- ture may cause the battery to rust. D Do not touch or move any other components inside the remote controller. D Do not bend either of the battery terminals. 241
  • 98.
    AUDIO/VIDEO SYSTEM Audio/video system operatinghints FM NOTICE Fading and drifting stations — Generally, the effective range of FM is about 25 miles To ensure correct audio/video sys- (40 km). Once outside this range, you may tem operations: notice fading and drifting, which increase D Be careful not to spill beverages with the distance from the radio transmit- over the audio/video system. ter. They are often accompanied by distor- tion. D Do not put anything other than a compact disc into the slot. Multi−path — FM signals are reflective, making it possible for two signals to reach D Do not put anything other than an your antenna at the same time. If this hap- appropriate disc into the CD pens, the signals will cancel each other changer or DVD player. out, causing a momentary flutter or loss of D The use of a cellular phone inside reception. or near the vehicle may cause a Static and fluttering — These occur when noise from the speakers of the au- signals are blocked by buildings, trees, or dio system which you are listening other large objects. Increasing the bass to. However, this does not indicate level may reduce static and fluttering. a malfunction. Station swapping — If the FM signal you are listening to is interrupted or weakened, RADIO RECEPTION and there is another strong station nearby Usually, a problem with radio reception on the FM band, your radio may tune in the does not mean there is a problem with your second station until the original signal can radio — it is just the normal result of condi- be picked up again. tions outside the vehicle. AM For example, nearby buildings and terrain Fading — AM broadcasts are reflected by can interfere with FM reception. Power the upper atmosphere — especially at lines or telephone wires can interfere with night. These reflected signals can inter- AM signals. And of course, radio signals fere with those received directly from the have a limited range. The farther you are radio station, causing the radio station to from a station, the weaker its signal will be. sound alternately strong and weak. In addition, reception conditions change Station interference — When a reflected constantly as your vehicle moves. signal and a signal received directly from Here are some common reception prob- a radio station are very nearly the same lems that probably do not indicate a prob- frequency, they can interfere with each lem with your radio: other, making it difficult to hear the broad- cast. Static — AM is easily affected by external sources of electrical noise, such as high tension power lines, lightening, or electri- cal motors. This results in static. 242
  • 99.
    AUDIO/VIDEO SYSTEM XMr USB memory Cargo loaded on the roof luggage carrier, USB memories that can be used for MP3 especially metal objects, may adversely and WMA playback. affect the reception of XMr Satellite Radio. D USB communication formats: USB 2.0 Alternation or modifications carried out FS (12 MBPS) without appropriate authorization may in- D File formats: FAT 16/32 (Windowsr) validate the user’s right to operate the equipment. D Correspondence class: Mass storage class iPod About iPod — D Apple is not responsible for the opera- tion of this device or its compliance with safety and regulatory standards. D iPod is a trademark of Apple Inc., regis- tered in the U.S. and other countries. Compatible models — Model Generation Software version iPod 5th Ver. 1.2.0 or generation higher iPod 1st Ver. 1.3.0 or nano generation higher 2nd Ver. 1.1.2 or generation higher 3rd Ver. 1.0.0 or generation higher iPod 1st Ver. 1.1.0 or touch generation higher iPod 1st Ver. 1.0.0 or classic generation higher Depending on differences between mod- els or software versions etc., some models listed above might be incompatible with this system. iPod 4th generation and earlier models are not compatible with this system. iPhone, iPod mini, iPod shuffle and iPod photo are not compatible with this system. 243
  • 100.
    AUDIO/VIDEO SYSTEM CARING FORYOUR CD CHANGER, DVD PLAYER AND DISCS D Your CD changer is intended for use with 4.7 in. (12 cm) discs only. D Extremely high temperatures can keep your CD changer and DVD player from working. On hot days, use the air XS18016 conditioning to cool the vehicle interior before you use the changer and player. D Bumpy roads or other vibrations may make your CD changer and DVD play- er skip. D If moisture gets into your CD changer and DVD player, you may not play even CD changer though they appear to be working. Re- D Use only discs marked as shown abo- move the disc from the changer and ve. The following products may not be player and wait until it dries. playable on your changer. Copy−protected CD CAUTION CD−ROM CD changer and DVD player use an invisible laser beam which could cause hazardous radiation exposure if directed outside the unit. Be sure to operate the changers and players correctly. 244
  • 101.
    AUDIO/VIDEO SYSTEM AudioCDs 6U5B93X DVD video " Special shaped discs discs Video CDs DVD player D Use only discs marked as shown abo- 6U5B95X ve. The following products may not be playable on your player. SACD Copy−protected CD CD−ROM " Transparent/translucent discs DVD−R DVD+R DVD−RW DVD+RW DVD−ROM DVD−RAM DVD−Audio 6U5B94X " Low quality discs 245
  • 102.
    AUDIO/VIDEO SYSTEM 6U5B96X 6U5B97X " Labeled discs " Correct " Wrong D Handle discs carefully, especially NOTICE when you are inserting them. Hold them on the edge and do not bend the- D Do not use special shaped, trans- m. Avoid getting fingerprints on them, parent/translucent, low quality or particularly on the shiny side. labeled discs such as those shown D Dirt, scratches, warping, pin holes, or in the illustrations. The use of such other disc damage could cause the discs may damage the player or player to skip or to repeat a section of changer, or it may be impossible to a track. (To see a pin hole, hold the disc eject the disc. up to the light.) D This system is not designed for use D Remove discs from the players when of Dual Disc. Do not use Dual Disc you are not using them. Store them in because it may cause damage to their plastic cases away from moisture, the player or changer. heat, and direct sunlight. D Do not use a disc with protection ring. The use of such disc may damage the player or changer, or it may be impossible to eject the disc. D If a disc cannot be ejected, do not forcibly take out the disc. Keep pushing the “LOAD· /CLOSE” button for approximately 5 sec- onds and release it. At this time, the audio disc and the map DVD− ROM will be ejected. 246
  • 103.
    AUDIO/VIDEO SYSTEM MP3/WMA FILES D MP3 (MPEG Audio Layer 3) and WMA (Windows Media Audio) are audio compression standards. D The MP3/WMA player can play MP3 6U5B98X and WMA files on CD−ROM, CD−R and CD−RW discs. The unit can play disc recordings com- patible with ISO 9660 level 1 and level 2 and with the Romeo and Joliet file system. D When naming an MP3 or WMA file, add the appropriate file extension (.mp3 or To clean a disc: Wipe it with a soft, lint− .wma). free cloth that has been dampened with water. Wipe in a straight line from the cen- D The MP3/WMA player plays back files ter to the edge of the disc (not in circles). with .mp3 or .wma file extensions as Dry it with another soft, lint−free cloth. Do MP3 or WMA files. To prevent noise not use a conventional record cleaner or and playback errors, use the appropri- anti−static device. ate file extensions. D The player can play only the first ses- sion using multi−session compatible CDs. D MP3 player—MP3 files are compatible with the ID3 Tag Ver. 1.0, Ver. 1.1, Ver. 2.2, and Ver. 2.3 formats. The unit can- not display disc title, track title and art- ist name in other formats. D USB memory—MP3 files are compat- ible with the ID3 Tag Ver. 1.0, Ver.1.1, Ver 2.2, Ver 2.3 and Ver 2.4 formats. The unit cannot display track title and artist name in other formats. D WMA files can contain a WMA tag that is used in the same way as an ID3 tag. WMA tags carry information such as track title, artist name. D The emphasis function is available only when playing MP3/WMA files re- corded at 32, 44.1 and 48 kHz. 247
  • 104.
    AUDIO/VIDEO SYSTEM Sampling frequency D The player is compatible with VBR MP3 files for MP3 player: (Variable Bit Rate). MPEG 1 LAYER 3—32, 44.1, 48 kHz D When playing back files recorded as MPEG 2 LSF LAYER 3—16, 22.05, 24 kHz VBR (Variable Bit Rate) files, the play MP3 files for USB memory: time will not be correctly displayed if MPEG 1 AUDIO LAYER 2, 3—32,44.1, 48 fast−forward or reverse operations are kHz used. MPEG 2 AUDIO LAYER 2, 3—16, 22.05, D It is not possible to check folders that 24 kHz do not include MP3/WMA files. MPEG 2.5—8, 11.025, 12 kHz WMA files for WMA player: D MP3/WMA files in folders up to 8 levels Ver. 7, 8, 9 CBR—32, 44.1, 48kHz deep can be played. However, the WMA files for USB memory: start of playback may be delayed when Ver. 9—HIGH PROFILE 32, 44.1, 48 kHz using discs containing numerous lev- els of folders. For this reason, we rec- D The sound quality of MP3/WMA files ommend creating discs with no more generally improves with higher bit rate- than two levels of folders. s. In order to achieve a reasonable lev- el of sound quality, discs recorded with D It is possible to play up to 192 folders or a bit rate of at least 128 kbps are rec- 255 files on one disc. ommended. Playable bit rates MP3 files for MP3 player: MPEG1 LAYER3—64 to 320 kbps MPEG2 LSF LAYER3—64 to 160 kbps MP3 files for USB memory: MPEG 1 AUDIO LAYER 2, 3—32 to 320 kbps MPEG 2 AUDIO LAYER 2, 3—32 to 160 kbps MPEG 2.5—32 to 160 kbps WMA files for WMA player: Ver. 7, 8 CBR—48 to 192 kbps Ver. 9 CBR—48 to 320 kbps WMA files for USB memory: Ver. 9—HIGH PROFILE 32 to 320 kbps, VBR (Variable Bit Rate) D The MP3/WMA player does not play back MP3/WMA files from discs re- corder using packet write data transfer (UDF format). Discs should be re- corded using “pre−mastering” software rather than packet−write software. D M3u playlists are not compatible with the audio player. D MP3i (MP3 interactive) and MP3PRO formats are not compatible with the au- dio player. 248
  • 105.
    AUDIO/VIDEO SYSTEM D The play order of the compact disc with the structure shown above is as fol- lows: 001.mp3 002.mp3 MP3 player (rear seat entertainment sys- tem) Folder 1 6U5161aX 003.mp3 Folder 2 001.mp3 002.mp3 . . . 006.mp3 004.mp3 MP3/WMA player (front audio system) 005.mp3 Folder 3 001.mp3 002.wma . . . 006.mp3 006.mp3 MP3 player (rear seat entertainment system) D MP3 player (rear seat entertainment system)—It is possible to play up to 253 folders on one disc. D MP3/WMA player (front audio sys- tem)—It is possible to play up to 192 001.mp3 folders or 255 files on one disc. 002.wma D USB memory player— It is possible to Folder 1 play up to 999 folders or 255 files per 6U5161aX 003.mp3 Folder 2 folder. D The order changes depending on the 004.mp3 PC and MP3/WMA encoding software 005.wma you use. Folder 3 006.mp3 MP3/WMA player (front audio system) 249
  • 106.
    AUDIO/VIDEO SYSTEM CD−R andCD−RW discs TERMS D CD−R/CD−RW discs that have not Packet write— been subject to the “finalizing process” This is a general term that describes the (a process that allows discs to be process of writing data on−demand to played on a conventional CD player) CD−R, etc., in the same way that data is cannot be played. written to floppy or hard discs. D It may not be possible to play CD− ID3 Tag— R/CD−RW discs recorded on a music CD recorder or a personal computer This is a method of embedding track−re- because of disc characteristics, lated information in an MP3 file. This em- scratches or dirt on the disc, or dirt, bedded information can include the track condensation, etc. on the lens of the title, the artist’s name, the album title, the unit. music genre, the year of production, com- ments and other data. The contents can D It may not be possible to play discs re- be freely edited using software with ID3 tag corded on a personal computer de- editing functions. Although the tags are re- pending on the application settings and stricted to the number of characters, the in- the environment. Record with the cor- formation can be viewed when the track is rect format. (For details, contact the played back. appropriate application manufacturers of the applications.) WMA Tag— D CD−R/CD−RW discs may be damaged WMA files can contain a WMA tag that is by direct exposure to sunlight, high used in the same way as an ID3 tag. WMA temperatures or other storage condi- tags carry information such as track title, tions. The unit may be unable to play artist name. some damaged discs. ISO 9660 format— D If you insert a CD−RW disc into the This is the international standard for the MP3/WMA player, playback will begin formatting of CD−ROM folders and files. more slowly than with a conventional For the ISO 9660 format, there are two lev- CD or CD−R disc. els of regulations. D Recordings on CD−R/CD−RW cannot Level 1: be played using the DDCD (Double The file name is in 8.3 format (8 character Density CD) system. file names, with a 3 character file exten- sion. File names must be composed of one−byte capital letters and numbers. The “_” symbol may also be included.) Level 2: The file name can have up to 31 characters (including the separation mark “.” and file extension). Each folder must contain few- er than 8 hierarchies. 250
  • 107.
    AUDIO/VIDEO SYSTEM m3u— Playlists createdusing “WINAMP” soft- ware have a playlist file extension (.m3u). MP3— MP3 is an audio compression standard de- termined by a working group (MPEG) of the ISO (International Standard Organiza- tion). MP3 compresses audio data to about 1/10 the size of that on conventional discs. WMA— WMA (Windows Media Audio) is an audio compression format developed by Micro- softr. It compresses files into a size small- er than that of MP3 files. The decoding for- mats for WMA files are Ver. 7, 8, and 9. 251
  • 108.