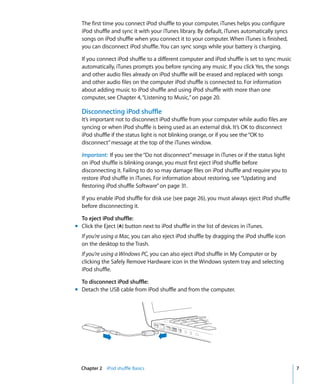
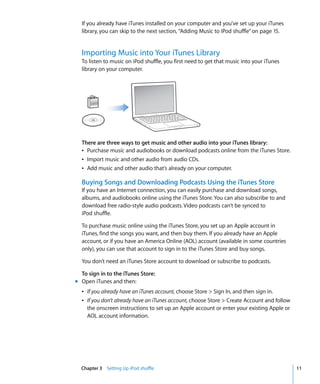
iTunes is used to sync music, audiobooks, and podcasts from your computer to iPod shuffle. You can import content into iTunes from your CD collection, purchase content from the iTunes Store, or add existing files on your computer. Within iTunes you can organize content into playlists and sync it to iPod shuffle. When iPod shuffle is connected to your computer, iTunes automatically syncs the selected content.
This document discusses configuring per-VRF tunnel selection on Cisco IOS-XR. The goal is to direct different VRF traffic (CN and IN) over specific tunnels by modifying the BGP next-hop. A route-policy is used to change the BGP next-hop for certain VRFs and neighbors. Static routes are then configured to map the new next-hops to the appropriate tunnels. After applying the policy and static routes, show commands confirm the different VRF traffic is now using the intended tunnels. The document provides notes on applying the policy and potential backup mechanisms.
The document provides an overview of InfiniBand, including its key components and advantages over traditional network protocols. It describes InfiniBand as a high-performance switched fabric interconnect that uses Remote Direct Memory Access to transfer data between nodes with low latency and CPU overhead. The primary elements of an InfiniBand network are outlined as Host Channel Adapters, switches, subnet managers, and optional gateways and routers.
» Read more at http://www.tail-f.com/education/what-is-netconf/
» Watch the Tail-f Why NETCONF video at
http://www.youtube.com/watch?v=H-BvpHd49-o&list=PLGSa_0wjZ-GgoReC1SNmgSHi2k4KUGPgo&index=1
NETCONF is a protocol defined by the IETF to "install, manipulate, and delete the configuration of network devices". NETCONF operations are realized on top of a Remote Procedure Call (RPC) layer using an XML encoding and provides a basic set of operations to edit and query configuration on a network device.
ifupdown2 is a network interface manager that improves on the default Debian ifupdown. It uses a Python implementation instead of C for easier maintenance. Ifupdown2 understands interface dependencies and configures them in the proper order. It allows incremental changes to interfaces and querying of the running configuration. Recent updates include support for VLAN-aware bridges, VXLAN, VRF, and a new policy infrastructure.
Met de LG PC09SQ 2,5kW Standaard Plus AIRCONDITIONER is her ideale product voor een aangename temperatuur in de ruimte. Energiezuinig en ook nog eens hyper modern doordat het van alle gemakken voorzien is.
Meer informatie is te vinden op onze website:
https://licher.nl
Apuntes para una futura formación sobre "Varnish Cache", ideado para aumentar el rendimiento de las aplicaciones web, también conocido como caché de proxy HTTP inversa.
¿Quieres aprender más? Consúltanos -> info@irontec.com
Operationalizing EVPN in the Data Center: Part 2Cumulus Networks
In the second of our two-part series on EVPN, Cumulus Networks Chief Scientist Dinesh Dutt dives into more technical details of network routing, EVPN use cases, and best practices for operationalizing EVPN in the data center.
To view the recording of this webinar, visit http://go.cumulusnetworks.com/l/32472/2017-09-23/95t7xh
The document discusses IPv4 and IPv6 addressing. It notes that IPv4 provides 4.3 billion addresses while IPv6 provides 3.4 undecillion addresses. It then outlines some limitations of IPv4 including limited addresses and lack of built-in security. Improvements in IPv6 are discussed such as built-in security, more efficient routing, and vastly increased address space. Examples of IPv4 and IPv6 addresses are provided. The document also discusses IPv6 addressing formats, types of IPv6 addresses including unicast, anycast and multicast, and IPv6 transition technologies.
1) The document provides an overview of IPv6 including why it was developed, its key features and improvements over IPv4 such as a vastly larger address space, more efficient routing and security features built into the protocol.
2) It describes IPv6 addressing in detail including the different address types (unicast, multicast, anycast), address formats, interface identifiers and address autoconfiguration.
3) The header format, extension headers for optional information, and new fields for quality of service and flow identification are explained in comparison to IPv4.
4) Protocols for neighbor discovery, multicast listener discovery, and address resolution that replace functions in IPv4 are outlined.
The document summarizes the architecture of Juniper Networks routers. It discusses the separation of the control plane and forwarding plane. The control plane builds the routing tables while the forwarding plane is responsible for packet forwarding using specialized ASICs. It also describes the TX Matrix platform with up to 4 T640 routing nodes, each with 16 packet forwarding engines. The nodes are interconnected using a CLOS fabric switch.
Zenith Networks is a network integration services company headquartered in Philadelphia, PA that has been in business for 25 years. It is a partner of Juniper Networks and provides routing, switching, security and other network services to customers. The document includes details on Zenith Networks and Juniper Networks, as well as examples of Juniper router commands and outputs.
The document discusses Akamai's content delivery network and traffic engineering with Akamai. It provides an overview of Akamai's global intelligent platform and typical daily traffic volumes. It also covers how Akamai mapping works and why peering with Akamai benefits both Akamai and internet service providers. The document analyzes two scenarios involving traffic tuning during a cable break and issues with incomplete route announcements. It concludes with recommendations for internet service providers to maintain complete route announcements and work with Akamai on traffic engineering solutions.
The document provides information about the Cisco Nexus 7009 switch, including:
- It is a modular network switch with up to 9 slots that can support 336 10GbE or 1GbE ports.
- It uses up to 5 Crossbar Fabric Modules and 2 power supplies.
- The Nexus 7009 specifications section provides additional details about its hardware capabilities and supported interface speeds.
The MX960 is an Ethernet-optimized edge router that provides switching and routing capabilities of up to 1.32 terabits per second. It enables services like VPNs, broadband, and data center interconnection. The MX960 provides redundancy through redundant power supplies, fan trays, routing engines, and switch control boards. It can stack up to three routers in a single rack for high port density.
Comparison of SRv6 Extensions uSID, SRv6+, C-SRHKentaro Ebisawa
Comparing concept, SID and header format of compressed Segment Routing IPv6 proposals such as uSID, SRv6+, C-SRH. Slide presented at SRv6 Consortium @Tokyo on 23rd Aug 2019.
Kernel advantages for Istio realized with CiliumCynthia Thomas
Istio brings a myriad of options to provide routing rules, encryption, and monitoring for microservices, typically in container environments. Cilium provides accelerated network security using a modern kernel technology called BPF. Put the two together and what do you get? A distributed security solution enabling microservices traffic management, security, and monitoring while enforcing policy as close to the microservices as possible.
Cynthia Thomas and Romain Lenglet discuss the architectural and performance benefits of using Cilium with Istio and provide a demo of this BPF-based, Linux kernel technology. Cilium provides an API-aware security solution that can make a decision on every single microservice flow, with the ability to enforce protocols such as HTTP, Kafka, and gRPC. By addressing security policy at the API layer, you can enforce policy efficiently with kernel capabilities while reducing the attack surface in a microservices deployment.
BGP Traffic Engineering with SDN Controller, by Shaowen Ma.
A presentation given at APRICOT 2016’s Software Defined Networking session on 24 February 2016.
iPod shuffle allows you to listen to music, audiobooks, and podcasts on the go. To set up iPod shuffle, you first import music and other audio files into your iTunes library on your computer from CDs, downloads, or files already on your computer. You can then organize the files into playlists. Finally, you connect iPod shuffle to your computer and sync the files from your iTunes library onto iPod shuffle so you can listen to them anywhere.
The document provides instructions for setting up and using the iPod shuffle. It describes the four steps to playing music which are installing software, importing music to the computer, connecting the iPod shuffle to transfer songs, and playing music. It also explains how to use iTunes to organize music, transfer songs automatically or manually to the iPod shuffle, and set preferences for how iTunes selects songs.
iPod nano is a portable media player that allows users to listen to music, view photos, and more. To use it, the user imports music and other files from their computer to iTunes and then loads them onto the iPod nano. The iPod nano has controls to play music and other media, as well as menus to access settings and features like listening to podcasts or FM radio. The document provides instructions on music features, photo features, extra features and accessories, tips and troubleshooting, safety information, and learning more about the iPod nano.
The document provides an overview of the features and functionality of the iPod nano. It includes chapters on music, video, photo, and extra features. The summary covers:
1) The iPod nano allows users to sync music, videos, photos and other files from their computer to enjoy on the go. It can also listen to podcasts, audiobooks, and radio.
2) Controls include a click wheel and center button to navigate menus and select items. Users can browse music by album art in Cover Flow and search for songs.
3) The document provides instructions for common tasks like playing music, viewing photos, updating software, and using accessories with the iPod nano.
1) The document provides solutions to common problems with iPods, such as not turning on, music not playing, and the appearance of a folder icon with an exclamation point.
2) It recommends first checking that the hold switch is off, the battery is charged, headphones are plugged in correctly, and volume is turned up to troubleshoot music or power issues.
3) For the folder icon error, it suggests charging the battery fully and updating or restoring the iPod software if needed, or resetting the iPod as a last resort.
The document provides a user guide for the iPod touch operating system iOS 6.1. It contains 32 chapters that cover the basic and advanced features of the iPod touch, including how to set up the device, use built-in apps like Music, Videos, Camera, Photos, and more. It also covers topics like Siri, iCloud, Bluetooth, WiFi and provides troubleshooting tips.
The document provides an overview of the basics of using an iPod Touch, including its keys, accessories, terminology, and navigation features. It describes the power/sleep button, volume keys, and home button. It also lists the included charging adapter, USB cable, and ear buds. Important terms are defined like app, dock, sync, pinching, landscape view, and sliding.
iTunes is a free media player application that allows users to organize and play digital music and video files. The document provides instructions on how to download iTunes, highlights key information about its functionality, and outlines steps for using basic iTunes features like importing music from CDs and accessing imported files in the iTunes library. It concludes with a bibliography of sources used.
More details: http://www.leawo.org/tutorial/transfer-music-to-ipad.html
With an iPad at hand, people are able to enjoy music, watch movies and so on. Listening to music with an iPad is not as convenient as with an iPhone or iPod, but when users want to enjoy their favorite music with iPad, they can also get excellent visual experience. When people want to listen to music on iPad, they have to transfer music to iPad at first. Besides purchasing music in the iTunes Store, people have several other methods to move music to their device. The following post will introduce them in detail.
This document provides a summary of the iPhone User Guide for the iPhone OS 3.1 software. It covers getting started with the iPhone, including activation, installing the SIM card, and registering with iTunes. It also provides overviews of the iPhone's basic features and applications such as Phone, Mail, Safari, iPod, Messages, Calendar, Photos, Camera, YouTube, Stocks, Maps, Weather, and more. The document includes instructions for settings and troubleshooting.
This document provides an overview and user guide for the iPod touch 5th generation. It includes information on the device's accessories, buttons, screen, setting up accounts and syncing with iTunes. It also provides chapters on the various apps and features available, including Siri, Messages, Mail, Safari, Music, Camera, Weather, Maps and more. It concludes with appendices on international keyboards, safety information, and support resources.
The document discusses new features that could be added to the iPod, including wireless sharing of songs between iPods and integration of an FM radio. It notes that having these capabilities would allow users to discover new music from others and avoid having to purchase songs they hear on the radio. The document also briefly reviews other media players that have these features, such as the Zune, and provides instructions for how the sharing and radio functions might work if added to the iPod.
The document provides instructions on how to recover data from an iPod Touch device. It recommends backing up data to iTunes to prevent permanent loss. If data is lost and not backed up, recovery is still possible using specialized recovery software. The software scans the iPod to locate lost files and allows previewing and complete restoration if purchased. Proper recovery requires downloading, installing, and scanning the iPod with the software.
The document provides instructions for recovering data from an iPod Touch. It recommends backing up data to iTunes to prevent permanent loss. If data is lost and not backed up, recovery is still possible using specialized recovery software. The software scans the iPod to locate lost files and allows previewing and recovering them. Proper recovery requires downloading, installing, and using the software to scan and restore lost iPod Touch files and data.
iTunes is a digital media player application introduced by Apple in 2001 that allows users to purchase and download music, videos, and more from the iTunes Store and sync content to iPods and other Apple devices. iTunes allows users to organize their digital media libraries into playlists and edit metadata, as well as burn songs to CDs or DVDs. Key people involved in the development of iTunes include Steve Jobs, Steve Wozniak, and Tim Cook.
Jabra elite 2 user manual en english_rev_aKarthikeyanSb3
This document is a user manual for the Jabra Elite 2 wireless earbuds. It provides instructions on pairing the earbuds with a mobile device, how to wear and charge the earbuds and charging case, what the LED indicator lights mean, how to use the earbud controls to manage music, calls and voice assistants, and troubleshooting tips. It also encourages users to download the Jabra Sound+ app to personalize their music experience and register the included two-year warranty.
This document provides tutorials for using GarageBand to create music, podcasts, and other projects. It includes instructions on recording instruments and software instruments, editing recordings, arranging tracks, mixing audio, adding effects, and sharing finished projects. The tutorials assume no prior experience and guide the user through the GarageBand interface and core functionality.
This document provides a user guide for Pages '09. It begins with an overview of Pages templates and tools for viewing and editing documents. It then covers topics like creating, opening, and saving documents, inserting page breaks and sections, adding citations and footnotes, tracking changes, formatting text, working with tables and charts, and printing or exporting finished documents. The guide concludes with instructions for designing custom templates.
This document provides information about AppleCare service and support products. It summarizes the different support options available for software, hardware, and integrated systems. Complimentary support is available for 90 days after purchase for basic troubleshooting. Paid support options include annual software support contracts, hardware service and support plans for Macs and servers, and integrated plans for video production systems. The document lists contact information for AppleCare support in different countries.
1. The document outlines the terms and conditions for AppleCare Protection Plans for various Apple products including iPods, displays, and Apple TV. It covers defects during the coverage period and provides access to support.
2. Repair coverage is provided for defects in materials and workmanship. Apple will repair or replace defective products with new, refurbished or serviceable parts. Various service options like carry-in, onsite, or mail-in repair are provided depending on the product and location.
3. Limitations to coverage include damage from accident, neglect, modifications, issues caused by non-Apple devices, consumables like batteries, software/data loss, and cosmetic damage. The terms describe how to
This document provides an overview of security configuration for Mac OS X version 10.5 Leopard. It discusses the OS X security architecture including its layered defenses, mandatory access controls, and use of public key infrastructure. It also outlines new security features in Leopard such as sandboxing processes, smart card unlock of FileVault, and improved VPN compatibility.
The document provides 5 marketing secrets for marketing like Apple: 1) Focus on how people feel using your products rather than the products themselves. 2) Make something distinctive about your products, like Apple's white headphones, to make them status symbols. 3) Help customers market for you by providing things like stickers and t-shirts with your logo. 4) Create a tight, memorable marketing message that customers can easily repeat. 5) Surprise and delight customers with packaging and unboxing experiences.
Aperture 2 is Apple's photo editing and management software that provides powerful tools for photographers. It allows users to import, organize, edit, and output photos in one integrated workflow. New features in Aperture 2 include significantly faster performance, a streamlined interface, next-generation RAW processing, and powerful new adjustment tools. It also offers enhanced integration with other Apple products and services.
The Evolution of the Leonardo DiCaprio Haircut: A Journey Through Style and C...greendigital
Leonardo DiCaprio, a name synonymous with Hollywood stardom and acting excellence. has captivated audiences for decades with his talent and charisma. But, the Leonardo DiCaprio haircut is one aspect of his public persona that has garnered attention. From his early days as a teenage heartthrob to his current status as a seasoned actor and environmental activist. DiCaprio's hairstyles have evolved. reflecting both his personal growth and the changing trends in fashion. This article delves into the many phases of the Leonardo DiCaprio haircut. exploring its significance and impact on pop culture.
_7 OTT App Builders to Support the Development of Your Video Applications_.pdfMega P
Due to their ability to produce engaging content more quickly, over-the-top (OTT) app builders have made the process of creating video applications more accessible. The invitation to explore these platforms emphasizes how over-the-top (OTT) applications hold the potential to transform digital entertainment.
Everything You Need to Know About IPTV Ireland.pdfXtreame HDTV
The way we consume television has evolved dramatically over the past decade. Internet Protocol Television (IPTV) has emerged as a popular alternative to traditional cable and satellite TV, offering a wide range of channels and on-demand content via the internet. In Ireland, IPTV is rapidly gaining traction, with Xtreame HDTV being one of the prominent providers in the market. This comprehensive guide will delve into everything you need to know about IPTV Ireland, focusing on Xtreame HDTV, its features, benefits, and how it is revolutionizing TV viewing for Irish audiences.
Barbie Movie Review - The Astras.pdffffftheastras43
Barbie Movie Review has gotten brilliant surveys for its fun and creative story. Coordinated by Greta Gerwig, it stars Margot Robbie as Barbie and Ryan Gosling as Insight. Critics adore its perky humor, dynamic visuals, and intelligent take on the notorious doll's world. It's lauded for being engaging for both kids and grown-ups. The Astras profoundly prescribes observing the Barbie Review for a delightful and colorful cinematic involvement.https://theastras.com/hca-member-gradebooks/hca-gradebook-barbie/
Unveiling Paul Haggis Shaping Cinema Through Diversity. .pdfkenid14983
Paul Haggis is undoubtedly a visionary filmmaker whose work has not only shaped cinema but has also pushed boundaries when it comes to diversity and representation within the industry. From his thought-provoking scripts to his engaging directorial style, Haggis has become a prominent figure in the world of film.
Meet Dinah Mattingly – Larry Bird’s Partner in Life and Loveget joys
Get an intimate look at Dinah Mattingly’s life alongside NBA icon Larry Bird. From their humble beginnings to their life today, discover the love and partnership that have defined their relationship.
The Unbelievable Tale of Dwayne Johnson Kidnapping: A Riveting Sagagreendigital
Introduction
The notion of Dwayne Johnson kidnapping seems straight out of a Hollywood thriller. Dwayne "The Rock" Johnson, known for his larger-than-life persona, immense popularity. and action-packed filmography, is the last person anyone would envision being a victim of kidnapping. Yet, the bizarre and riveting tale of such an incident, filled with twists and turns. has captured the imagination of many. In this article, we delve into the intricate details of this astonishing event. exploring every aspect, from the dramatic rescue operation to the aftermath and the lessons learned.
Follow us on: Pinterest
The Origins of the Dwayne Johnson Kidnapping Saga
Dwayne Johnson: A Brief Background
Before discussing the specifics of the kidnapping. it is crucial to understand who Dwayne Johnson is and why his kidnapping would be so significant. Born May 2, 1972, Dwayne Douglas Johnson is an American actor, producer, businessman. and former professional wrestler. Known by his ring name, "The Rock," he gained fame in the World Wrestling Federation (WWF, now WWE) before transitioning to a successful career in Hollywood.
Johnson's filmography includes blockbuster hits such as "The Fast and the Furious" series, "Jumanji," "Moana," and "San Andreas." His charismatic personality, impressive physique. and action-star status have made him a beloved figure worldwide. Thus, the news of his kidnapping would send shockwaves across the globe.
Setting the Scene: The Day of the Kidnapping
The incident of Dwayne Johnson's kidnapping began on an ordinary day. Johnson was filming his latest high-octane action film set to break box office records. The location was a remote yet scenic area. chosen for its rugged terrain and breathtaking vistas. perfect for the film's climactic scenes.
But, beneath the veneer of normalcy, a sinister plot was unfolding. Unbeknownst to Johnson and his team, a group of criminals had planned his abduction. hoping to leverage his celebrity status for a hefty ransom. The stage was set for an event that would soon dominate worldwide headlines and social media feeds.
The Abduction: Unfolding the Dwayne Johnson Kidnapping
The Moment of Capture
On the day of the kidnapping, everything seemed to be proceeding as usual on set. Johnson and his co-stars and crew were engrossed in shooting a particularly demanding scene. As the day wore on, the production team took a short break. providing the kidnappers with the perfect opportunity to strike.
The abduction was executed with military precision. A group of masked men, armed and organized, infiltrated the set. They created chaos, taking advantage of the confusion to isolate Johnson. Johnson was outnumbered and caught off guard despite his formidable strength and fighting skills. The kidnappers overpowered him, bundled him into a waiting vehicle. and sped away, leaving everyone on set in a state of shock and disbelief.
The Immediate Aftermath
The immediate aftermath of the Dwayne Johnson kidnappin
Matt Rife Cancels Shows Due to Health Concerns, Reschedules Tour Dates.pdfAzura Everhart
Matt Rife's comedy tour took an unexpected turn. He had to cancel his Bloomington show due to a last-minute medical emergency. Fans in Chicago will also have to wait a bit longer for their laughs, as his shows there are postponed. Rife apologized and assured fans he'd be back on stage soon.
https://www.theurbancrews.com/celeb/matt-rife-cancels-bloomington-show/
Modern Radio Frequency Access Control Systems: The Key to Efficiency and SafetyAITIX LLC
Today's fast-paced environment worries companies of all sizes about efficiency and security. Businesses are constantly looking for new and better solutions to solve their problems, whether it's data security or facility access. RFID for access control technologies have revolutionized this.
Christian Louboutin: Innovating with Red Solesget joys
Christian Louboutin is celebrated for his innovative approach to footwear design, marked by his trademark red soles. This in-depth look at his life and career explores the origins of his creativity, the milestones in his journey, and the impact of his work on the fashion industry. Learn how Louboutin's bold vision and dedication to excellence have made his brand synonymous with luxury and style.
2. 2 Contents
Chapter 1 3 About iPod shuffle
Chapter 2 4 iPod shuffle Basics
4 iPod shuffle at a Glance
5 Using the iPod shuffle Controls
6 Connecting and Disconnecting iPod shuffle
8 Charging the Battery
Chapter 3 10 Setting Up iPod shuffle
10 About iTunes
11 Importing Music into Your iTunes Library
14 Organizing Your Music
15 Adding Music to iPod shuffle
Chapter 4 20 Listening to Music
20 Playing Music
22 Using the VoiceOver Feature
Chapter 5 26 Storing Files on iPod shuffle
26 Using iPod shuffle as an External Disk
Chapter 6 28 Tips and Troubleshooting
31 Updating and Restoring iPod shuffle Software
Chapter 7 32 Safety and Handling
32 Important Safety Information
34 Important Handling Information
Chapter 8 35 Learning More, Service, and Support
Index 38
2
3. 1 About iPod shuffle
1
Congratulations on purchasing iPod shuffle. Read this
chapter to learn about the features of iPod shuffle, how
to use its controls, and more.
± WARNING: To avoid injury, read all operating instructions in this guide and
the safety information in “Safety and Handling” on page 32 before using
iPod shuffle.
To use iPod shuffle, you put songs and other audio files on your computer and then
sync them with iPod shuffle.
Use iPod shuffle to:
 Sync songs and playlists for listening on the go
 Listen to podcasts, downloadable radio-style shows, delivered over the Internet
 Listen to audiobooks purchased from the iTunes Store or audible.com
 Store or back up files and other data, using iPod shuffle as an external disk
What’s New in iPod shuffle
 Apple Earphones with Remote to control iPod shuffle easily while you’re on the go
 Support for multiple playlists and audiobooks
 New VoiceOver feature that announces the song and artist names, a menu of your
playlists, audiobooks, and podcasts, and battery status and other messages
 Improved flexibility with syncing music and other content in iTunes
3
4. 2 iPod shuffle Basics
2
Read this chapter to learn about the features of
iPod shuffle, how to use its controls, and more.
Your iPod shuffle package includes iPod shuffle, the Apple Earphones with Remote, and
a USB 2.0 cable to connect iPod shuffle to your computer.
iPod shuffle at a Glance
Earphone port
Status light
Three-way switch
Volume up
Center button
Clip (in back)
Volume down
4
5. To use the Apple Earphones with Remote:
m Plug the earphones into the earphone port on iPod shuffle. Then place the earbuds
in your ears as shown. Use the buttons on the remote to control playback.
Remote The earphone
cord is adjustable.
WARNING: Read all safety instructions about avoiding hearing damage on page 33
before use.
You can purchase other accessories, such as the Apple In-Ear Earphones with Remote
and Mic, and the Apple Earphones with Remote and Mic, at
www.apple.com/ipodstore. The microphone capability isn’t supported on iPod shuffle.
Using the iPod shuffle Controls
The simple three-way switch (OFF, play in order ⁄, or shuffle ¡) on iPod shuffle and
the buttons on the earphone remote make it easy to play songs, audiobooks, and
audio podcasts on iPod shuffle, as described below.
To Do this on iPod shuffle
Turn iPod shuffle on or off Slide the three-way switch (green shading on switch indicates
iPod shuffle is on).
Set the play order Slide the three-way switch to play in order (⁄) or shuffle (¡).
Reset iPod shuffle Disconnect iPod shuffle from the computer. Turn iPod shuffle off,
(if iPod shuffle isn’t responding or wait 10 seconds, and then turn it back on again.
the status light is solid red)
Find the iPod shuffle serial Look under the clip on iPod shuffle. Or, in iTunes (with
number iPod shuffle connected to your computer), select iPod shuffle
under Devices in iTunes and click the Summary tab.
Chapter 2 iPod shuffle Basics 5
6. To Do this with the earphone remote
Play or pause Click the Center button.
Change the volume Click the Volume Up (∂ ) or Volume Down (D) button.
Go to the next track Double-click the Center button.
Fast-forward Double-click and hold the Center button.
Go to the previous track Triple-click the Center button within 6 seconds of the track
starting. Triple-clicking after 6 seconds restarts the current track.
Rewind Triple-click and hold the Center button.
Hear song titles, artist names, To hear the current song title and artist name, click and hold the
and playlist names Center button. To listen to your playlist names, keep holding, and
release when you hear a tone; then click to select the playlist you
want. For more information, see “Using the VoiceOver Feature” on
page 22.
Connecting and Disconnecting iPod shuffle
Connect iPod shuffle to your computer to sync songs and other audio files, and to
charge the battery. Disconnect iPod shuffle when you’re done.
Important: Use only the USB 2.0 cable that came with iPod shuffle to connect it to your
computer.
Connecting iPod shuffle
To connect iPod shuffle to your computer:
m Plug one end of the included USB cable into the earphone port of iPod shuffle, and the
other end into a USB 2.0 port on your computer.
Note: Charging or syncing iPod shuffle is faster if you connect it to a high-power USB
2.0 port. On most keyboards, the USB port doesn’t provide enough power to charge at
optimal speed.
A longer USB cable is available separately at www.apple.com/ipodstore.
6 Chapter 2 iPod shuffle Basics
7. The first time you connect iPod shuffle to your computer, iTunes helps you configure
iPod shuffle and sync it with your iTunes library. By default, iTunes automatically syncs
songs on iPod shuffle when you connect it to your computer. When iTunes is finished,
you can disconnect iPod shuffle. You can sync songs while your battery is charging.
If you connect iPod shuffle to a different computer and iPod shuffle is set to sync music
automatically, iTunes prompts you before syncing any music. If you click Yes, the songs
and other audio files already on iPod shuffle will be erased and replaced with songs
and other audio files on the computer iPod shuffle is connected to. For information
about adding music to iPod shuffle and using iPod shuffle with more than one
computer, see Chapter 4, “Listening to Music,” on page 20.
Disconnecting iPod shuffle
It’s important not to disconnect iPod shuffle from your computer while audio files are
syncing or when iPod shuffle is being used as an external disk. It’s OK to disconnect
iPod shuffle if the status light is not blinking orange, or if you see the “OK to
disconnect” message at the top of the iTunes window.
Important: If you see the “Do not disconnect” message in iTunes or if the status light
on iPod shuffle is blinking orange, you must first eject iPod shuffle before
disconnecting it. Failing to do so may damage files on iPod shuffle and require you to
restore iPod shuffle in iTunes. For information about restoring, see “Updating and
Restoring iPod shuffle Software” on page 31.
If you enable iPod shuffle for disk use (see page 26), you must always eject iPod shuffle
before disconnecting it.
To eject iPod shuffle:
m Click the Eject (C) button next to iPod shuffle in the list of devices in iTunes.
If you’re using a Mac, you can also eject iPod shuffle by dragging the iPod shuffle icon
on the desktop to the Trash.
If you’re using a Windows PC, you can also eject iPod shuffle in My Computer or by
clicking the Safely Remove Hardware icon in the Windows system tray and selecting
iPod shuffle.
To disconnect iPod shuffle:
m Detach the USB cable from iPod shuffle and from the computer.
Chapter 2 iPod shuffle Basics 7
8. Charging the Battery
iPod shuffle has an internal battery that is rechargeable and not user-replaceable. For
best results, the first time you use iPod shuffle, let it charge for about three hours to
fully charge it. The battery is 80-percent charged in about two hours and fully charged
in about three hours. If iPod shuffle isn’t used for a while, the battery might need to be
recharged.
You can sync music while the battery is charging. You can disconnect and use
iPod shuffle before it’s fully charged.
In iTunes, the battery icon next to your iPod shuffle name shows the battery status. The
icon displays a lightning bolt when the battery is charging and a plug when the battery
is fully charged.
You can charge the iPod shuffle battery in two ways:
 Connect iPod shuffle to your computer.
 Use the Apple USB Power Adapter, available separately.
To charge the battery using your computer:
m Connect iPod shuffle to a high-power USB 2.0 port on your computer using the
included USB cable. The computer must be turned on and not in sleep mode.
When the battery is charging, the status light on iPod shuffle is solid orange. When the
battery is fully charged, the status light turns green.
If iPod shuffle is being used as an external disk or is syncing with iTunes, the status light
blinks orange to let you know that you must eject iPod shuffle before disconnecting it.
In this case, your battery may be either still charging or fully charged. You can check
the status by viewing the battery icon next to your iPod shuffle name in the list of
devices in iTunes.
If you don’t see the status light, iPod shuffle might not be connected to a high-power
USB 2.0 port. Try another USB 2.0 port on your computer.
If you want to charge the battery when you’re away from your computer, you can
connect iPod shuffle to an Apple USB Power Adapter. To purchase iPod shuffle
accessories, go to www.apple.com/ipodstore.
To charge the battery using the Apple USB Power Adapter:
1 Connect the AC plug adapter to the power adapter (they might already be connected).
2 Plug the USB connector of the USB cable into the power adapter.
3 Connect the other end of the USB cable to iPod shuffle.
8 Chapter 2 iPod shuffle Basics
9. 4 Plug the power adapter into a working power outlet.
Apple USB Power Adapter
(your adapter may look different)
iPod shuffle USB cable
WARNING: Make sure the power adapter is fully assembled before plugging it into a
power outlet. Read all safety instructions about using the Apple USB Power Adapter
on page 33 before use.
Rechargeable batteries have a limited number of charge cycles. Battery life
and number of charge cycles vary by use and settings. For information, go to
www.apple.com/batteries.
Checking the Battery Status
You can check the battery status of iPod shuffle when it’s connected to your computer
or disconnected. The status light tells you approximately how much charge is in the
battery.
Status light when connected
Solid green Fully charged
Solid orange Charging
Do not disconnect (iTunes is syncing, or iPod shuffle is enabled for
Blinking orange disk use); may be still charging or may be fully charged
If iPod shuffle is on and not connected to a computer, check the battery status without
interrupting playback by quickly turning iPod shuffle off and then on again. You can
also use VoiceOver to hear battery status information.
Status light when disconnected VoiceOver
Solid green Good charge “Battery full”
“Battery 75%”
“Battery 50%”
Solid orange Low charge “Battery 25%”
Solid red Very low charge “Battery low”
Chapter 2 iPod shuffle Basics 9
10. 3 Setting Up iPod shuffle
3
To set up iPod shuffle, you use iTunes on your computer
to import, buy, and organize your music, audio podcasts,
and audiobooks. Then you connect iPod shuffle to your
computer and sync it to your iTunes library.
Read on to learn more about the steps in this process, including:
 Getting music from your CD collection, hard disk, or the iTunes Store (part of iTunes
and available in some countries only) into the iTunes application on your computer
 Organizing your music and other audio into playlists
 Syncing songs, audiobooks, and podcasts (free downloadable radio-style shows) in
your iTunes library with iPod shuffle
 Listening to music or other audio on the go
About iTunes
iTunes is the software application you use to sync music, audiobooks, and audio
podcasts with iPod shuffle. To download iTunes version 8.1 or later (required for
iPod shuffle), go to www.apple.com/ipod/start. After you install iTunes, it opens
automatically when you connect iPod shuffle to your computer.
This chapter explains how to use iTunes to download songs and other audio to your
computer, create personal compilations of your favorite songs (called playlists), sync
iPod shuffle, and adjust iPod shuffle settings.
iTunes also has a feature called Genius, which creates instant playlists of songs from
your iTunes library that go great together. You can create Genius playlists in iTunes and
sync them to iPod shuffle. To learn how to set up Genius in iTunes, see “Using Genius in
iTunes” on page 14.
iTunes has many other features. You can burn your own CDs that play in standard CD
players (if your computer has a recordable CD drive); listen to streaming Internet radio;
watch videos and TV shows; rate songs according to preference; and much more. For
information about using these features, open iTunes and choose Help > iTunes Help.
10
11. If you already have iTunes installed on your computer and you’ve set up your iTunes
library, you can skip to the next section, “Adding Music to iPod shuffle” on page 15.
Importing Music into Your iTunes Library
To listen to music on iPod shuffle, you first need to get that music into your iTunes
library on your computer.
There are three ways to get music and other audio into your iTunes library:
 Purchase music and audiobooks or download podcasts online from the iTunes Store.
 Import music and other audio from audio CDs.
 Add music and other audio that’s already on your computer.
Buying Songs and Downloading Podcasts Using the iTunes Store
If you have an Internet connection, you can easily purchase and download songs,
albums, and audiobooks online using the iTunes Store. You can also subscribe to and
download free radio-style audio podcasts. Video podcasts can’t be synced to
iPod shuffle.
To purchase music online using the iTunes Store, you set up an Apple account in
iTunes, find the songs you want, and then buy them. If you already have an Apple
account, or if you have an America Online (AOL) account (available in some countries
only), you can use that account to sign in to the iTunes Store and buy songs.
You don’t need an iTunes Store account to download or subscribe to podcasts.
To sign in to the iTunes Store:
m Open iTunes and then:
 If you already have an iTunes account, choose Store > Sign In, and then sign in.
 If you don’t already have an iTunes account, choose Store > Create Account and follow
the onscreen instructions to set up an Apple account or enter your existing Apple or
AOL account information.
Chapter 3 Setting Up iPod shuffle 11
12. You can browse or search the iTunes Store to find the album, song, or artist you’re
looking for. Open iTunes and click iTunes Store in the list on the left.
 To browse the iTunes Store, choose a category (for example, Music) on the left side of
the iTunes Store home page. You can choose a genre, look at new releases, click one
of the featured songs, look at Top Songs and more, or click Browse under Quick Links
in the main iTunes Store window.
 To browse for podcasts, click the Podcasts link on the left side of the iTunes Store
home page.
 To search the iTunes Store, type the name of an album, song, artist, or composer in the
search field. Press Return or choose an item from the list that appears.
 To narrow your search results, choose an item from the pop-up menu in the upper left
(the default is All Results). For example, to narrow your search to songs and albums,
choose Music from the pop-up menu.
 To search for a combination of items, click Power Search in the Search Results page.
 To return to the home page of the iTunes Store, click the Home button in the status line
at the top of the page.
To buy a song, album, or audiobook:
1 Select iTunes Store, and then find the item you want to buy.
You can double-click a song or other item to listen to a portion of it and make sure it’s
what you want. (If your network connection is slower than 128 kbps, choose iTunes
Preferences, and in the Store pane, select “Load complete preview before playing.”)
2 Click Buy Song, Buy Album, or Buy Book.
The item is downloaded to your computer and charged to the credit card listed in your
Apple or AOL account.
To download or subscribe to a podcast:
1 Select iTunes Store.
2 Click the Podcasts link on the left side of the home page in the iTunes Store.
3 Browse for the podcast you want to download.
 To download a single podcast episode, click the Get Episode button next to the
episode.
 To subscribe to a podcast, click the Subscribe button next to the podcast graphic.
iTunes downloads the most recent episode. As new episodes become available,
they’re automatically downloaded to iTunes when you connect to the Internet.
Adding Songs Already on Your Computer to Your iTunes Library
If you have songs on your computer encoded in file formats that iTunes supports, you
can easily add the songs to iTunes.
12 Chapter 3 Setting Up iPod shuffle
13. To add songs on your computer to your iTunes library:
m Drag the folder or disk containing the audio files to your iTunes library (or choose File >
Add to Library and select the folder or disk). If iTunes supports the song file format, the
songs are automatically added to your iTunes library.
You can also drag individual song files to iTunes.
Note: Using iTunes for Windows, you can convert nonprotected WMA files to AAC or
MP3 format. This can be useful if you have a library of music encoded in WMA format.
For more information, open iTunes and choose Help > iTunes Help.
Importing Music from Your Audio CDs into iTunes
Follow these instructions to get music from your CDs into iTunes.
To import music from an audio CD into iTunes:
1 Insert a CD into your computer and open iTunes.
If you have an Internet connection, iTunes gets the names of the songs on the CD from
the Internet (if available) and lists them in the window.
If you don’t have an Internet connection, you can import your CDs, and later, when you’re
connected to the Internet, select the songs in iTunes and then choose Advanced > Get
CD Track Names. iTunes will bring in the track names for the imported CDs.
If the CD track names aren’t available online, you can enter the names of the songs
manually. See the following section, “Entering Names of Songs and Other Details.”
With song information entered, you can browse for songs in iTunes by title, artist,
album, and more.
2 Click to remove the checkmark next to any song you don’t want to import.
3 Click the Import button. The display area at the top of the iTunes page shows how long
it will take to import each song.
By default, iTunes plays songs as they’re imported. If you’re importing a lot of songs,
you might want to stop the songs from playing to improve performance.
4 To eject the CD, click the Eject (C) button.
You can’t eject a CD until the import is done.
5 Repeat these steps for any other CDs with songs you want to import.
Entering Names of Songs and Other Details
You can manually enter song titles and other information, including comments, for
songs and other items in your iTunes library.
To enter CD song names and other information manually:
1 Select the first song on the CD and choose File > Get Info.
2 Click Info.
Chapter 3 Setting Up iPod shuffle 13
14. 3 Enter the song information.
4 Click Next to enter information for the next track.
5 Click OK when you finish.
Organizing Your Music
Using iTunes, you can organize songs and other items into lists, called playlists, in any
way you want. For example, you can create playlists with songs to listen to while
exercising, or playlists with songs for a particular mood.
You can also create Smart Playlists that update automatically based on rules you define.
When you add songs to iTunes that match the rules, they get added automatically to
the Smart Playlist. You can also pick a song and use the Genius feature to create a
playlist for you (see the next section for more information). You can’t create a playlist on
iPod shuffle when it’s disconnected from iTunes.
You can create as many playlists as you like, using any of the songs in your iTunes
library. Changes you make to any of your playlists in iTunes, such as adding or
removing songs, won’t change the contents of your iTunes library.
When you listen to playlists on iPod shuffle, all playlists created in iTunes behave the
same way. You can choose them by name on your iPod shuffle.
To create a playlist in iTunes:
1 Click the Add (∂) button or choose File > New Playlist.
2 Type a name for the playlist.
3 Click Music in the Library list, and then drag a song or other item to the playlist.
To select multiple songs, hold down the Shift key or the Command (x) key on a Mac,
or the Shift key or the Control key on a Windows PC, as you click each song.
To create a Smart Playlist:
m Choose File > New Smart Playlist and define the rules for your playlist.
Smart playlists created in iTunes can be synced to iPod shuffle like any other iTunes
playlist.
Using Genius in iTunes
Genius automatically creates playlists containing songs in your library that go great
together. To play Genius playlists on iPod shuffle, you first need to set up Genius in
iTunes. Genius is a free service, but you need an iTunes Store account (if you don’t have
one, you can set one up when you turn on Genius).
To set up Genius:
1 In iTunes, choose Store > Turn on Genius.
14 Chapter 3 Setting Up iPod shuffle
15. 2 Follow the onscreen instructions.
3 Connect and sync iPod shuffle.
You can now use Genius to create a Genius playlist that you can sync to iPod shuffle.
To create a Genius playlist in iTunes:
1 Click Music in the Library list or select a playlist.
2 Select a song.
3 Click the Genius button at the bottom of the iTunes window.
4 To change the maximum number of songs included in the playlist, choose a number
from the pop-up menu.
5 To save the playlist, click Save Playlist. You can change a saved playlist by adding or
removing items. You can also click Refresh to create a new playlist based on the same
original song.
Genius playlists created in iTunes can be synced to iPod shuffle like any other iTunes
playlist.
Adding Music to iPod shuffle
After your music is imported and organized in iTunes, you can easily add it to
iPod shuffle.
To set how music is added from iTunes on your computer to iPod shuffle, you connect
iPod shuffle to your computer, and then use iTunes preferences to choose iPod shuffle
settings.
You can set iTunes to add music to iPod shuffle in three ways:
 Sync songs and playlists: When you connect iPod shuffle, it’s automatically updated to
match the songs and other items in your iTunes library. You can sync all songs and
playlists or selected playlists. Any other songs on iPod shuffle are deleted. See the
following section for more information.
Chapter 3 Setting Up iPod shuffle 15
16. Â Manually add music to iPod shuffle: When you connect iPod shuffle, you can drag
songs and playlists individually to iPod shuffle, and delete songs and playlists
individually from iPod shuffle. Using this option, you can add songs from more than
one computer without erasing songs from iPod shuffle. When you manage music
yourself, you must always eject iPod shuffle from iTunes before you can disconnect it.
See “Managing iPod shuffle Manually” on page 17.
 Autofill iPod shuffle: When you choose to manually manage content on iPod shuffle,
you can have iTunes automatically fill iPod shuffle with a selection of songs and other
content that you specify. See “Autofilling iPod shuffle” on page 18.
Syncing Music Automatically
By default, iPod shuffle is set to sync all songs and playlists when you connect it to your
computer. This is the simplest way to add music to iPod shuffle. You just connect
iPod shuffle to your computer, let it add songs, audiobooks, and audio podcasts
automatically, and then disconnect it and go. If you added any songs to iTunes since
the last time you connected iPod shuffle, they’re synced with iPod shuffle. If you
deleted songs from iTunes, they’re removed from iPod shuffle.
To sync music with iPod shuffle:
m Simply connect iPod shuffle to your computer. If iPod shuffle is set to sync
automatically, the update begins.
Important: The first time you connect iPod shuffle to a computer, a message asks if you
want to sync songs automatically. If you accept, all songs, audiobooks, and podcasts
are erased from iPod shuffle and replaced with songs and other items from that
computer. If you don’t accept, you can still add songs to iPod shuffle manually without
erasing any of the songs already on iPod shuffle.
While music is being synced from your computer to iPod shuffle, the iTunes status
window shows progress, and you see a sync icon next to iPod shuffle in the list of
devices. When the update is done, a message in iTunes says “iPod update is complete.”
If, during iPod shuffle setup, you didn’t choose to automatically sync music to
iPod shuffle, you can do it later. You can sync all songs and playlists, or just selected
playlists.
To set up iTunes to automatically sync music with iPod shuffle:
1 Connect iPod shuffle to your computer.
2 In iTunes, select iPod shuffle in the list of devices, and then click the Music tab.
3 Select “Sync music.”
4 Choose “All songs and playlists,” or choose “Selected playlists” and then select the
playlists you want to sync.
16 Chapter 3 Setting Up iPod shuffle
17. You can sync audiobooks when you sync music. Audiobooks appear in the list of
selected playlists. You can choose to sync all or none of the audiobooks in your iTunes
library.
5 Click Apply.
The update begins automatically.
If “Sync only checked songs” is selected in the Summary pane, iTunes syncs only items
that are checked in your Music and other libraries.
Syncing Podcasts Automatically
The settings for adding podcasts to iPod shuffle are unrelated to the settings for
adding songs. Podcast settings don’t affect song settings, and vice versa. You can set
iTunes to automatically sync all podcasts or selected podcasts, or you can add podcasts
to iPod shuffle manually. You can’t sync video podcasts to iPod shuffle.
To set iTunes to update the podcasts on iPod shuffle automatically:
1 Connect iPod shuffle to your computer.
2 In iTunes, select iPod shuffle in the list of devices, and then click the Podcasts tab.
3 Select “Sync ... episodes of” and choose the number of episodes you want from the
pop-up menu.
4 Select “All podcasts,” or “Selected podcasts.” If you click “Selected podcasts,” also select
the podcasts that you want to sync.
5 Click Apply.
When you set iTunes to sync podcasts automatically, iPod shuffle is updated each time
you connect it to your computer.
Managing iPod shuffle Manually
Setting iTunes to let you manage iPod shuffle manually gives you the most flexibility
for managing music and other content on iPod shuffle. You can add and remove
individual songs, playlists, podcasts, and audiobooks. You can add music and other
audio content from multiple computers to iPod shuffle without erasing items already
on iPod shuffle.
To set iTunes to let you manage audio content on iPod shuffle manually:
1 In iTunes, select iPod shuffle in the list of devices, and then click the Summary tab.
2 In the Options section, select “Manually manage music.”
3 Click Apply.
When you manage iPod shuffle manually, you must always eject iPod shuffle from
iTunes before you disconnect it.
To add a song or other item to iPod shuffle:
1 Click Music or another Library item in iTunes.
Chapter 3 Setting Up iPod shuffle 17
18. 2 Drag a song or other item to iPod shuffle.
You can also drag entire playlists to sync them with iPod shuffle. You can select
multiple items and drag them all at once to iPod shuffle.
To remove a song or other item from iPod shuffle:
1 In iTunes, select iPod shuffle in the list of devices.
2 Select Music, Audiobooks, or Podcasts under iPod shuffle.
3 Select a song or other item and press the Delete or Backspace key on your keyboard.
To use iTunes to create a new playlist on iPod shuffle:
1 In iTunes, select iPod shuffle in the list of devices, and then click the Add (∂) button or
choose File > New Playlist.
2 Type a name for the playlist.
3 Click an item, such as Music, in the Library list, and then drag songs or other items to
the playlist.
To add songs to or remove songs from a playlist on iPod shuffle:
m Drag a song to a playlist on iPod shuffle to add the song. Select a song in a playlist and
press the Delete key on your keyboard to delete the song.
Keep these points in mind if you manually manage your content on iPod shuffle:
 If you make changes to any of your playlists, remember to drag the changed playlist
to iPod shuffle when it’s connected to iTunes.
 If you remove a song or other item from iPod shuffle, it isn’t deleted from your iTunes
library.
 If you set iTunes to manage music manually, you can reset it later to sync
automatically. For information, see page 16.
Autofilling iPod shuffle
If you manually manage music, you can have iTunes automatically sync a selection of
your songs onto iPod shuffle when you click the Autofill button. You can choose your
entire library or a specific playlist to gets songs from, and set other Autofill options.
Using Autofill gives you more control over the content that gets added to iPod shuffle
than automatically syncing, and lets you quickly “top off” your iPod shuffle when you
manually manage the contents.
To autofill music onto iPod shuffle:
1 Connect iPod shuffle to your computer.
2 Select Music under iPod shuffle in the list of devices.
3 Choose the playlist you want to autofill from using the “Autofill from” pop-up menu.
To autofill music from your entire library, choose Music.
18 Chapter 3 Setting Up iPod shuffle
19. 4 Click the Settings button to select from the following options:
Replace all items when Autofilling: iTunes replaces the songs on iPod shuffle with the
new songs you’ve chosen. If this option isn’t selected, songs you’ve already synced with
iPod shuffle remain and iTunes selects more songs to fill the available space.
Choose items randomly: iTunes shuffles the order of songs as it syncs them with
iPod shuffle. If this option isn’t selected, iTunes downloads songs in the order they
appear in your library or selected playlist.
Choose higher rated items more often: iTunes autofills iPod shuffle, giving preference to
songs that you’ve rated with a higher number of stars.
5 To reserve space for disk use, adjust the slider to set how much space to reserve for
iTunes content and how much for data.
For more information about using iPod shuffle as a hard disk, see “Using iPod shuffle as
an External Disk” on page 26.
6 Click OK in the Autofill Settings dialog, and then click Autofill in the iTunes window.
While music is being synced from iTunes to iPod shuffle, the iTunes status window
shows the progress. When the autofill is done, a message in iTunes says “iPod update is
complete.”
Fitting More Songs onto iPod shuffle
If you’ve imported songs into iTunes at higher bit-rate formats, such as iTunes Plus,
Apple Lossless, or WAV, you can set iTunes to automatically convert songs to 128 kbps
AAC files as they’re synced with iPod shuffle. This doesn’t affect the quality or size of
the songs in iTunes.
Note: Songs in formats not supported by iPod shuffle must be converted if you want to
sync them with iPod shuffle. For more information about formats supported by
iPod shuffle, see “If you can’t sync a song or other item onto iPod shuffle” on page 29.
To convert higher bit-rate songs to AAC files:
1 Connect iPod shuffle to your computer.
2 In iTunes, select iPod shuffle in the list of devices.
3 Click the Summary tab.
4 Select “Convert higher bit rate songs to 128 kbps AAC.”
5 Click Apply.
Chapter 3 Setting Up iPod shuffle 19
20. 4 Listening to Music
4
After you set up iPod shuffle, you can listen to songs,
audiobooks, and podcasts. Read this chapter to learn
about listening to iPod shuffle on the go.
When you disconnect iPod shuffle from your computer, you can clip on iPod shuffle
and listen to music, audiobooks, and podcasts, while controlling playback with the
earphone remote. VoiceOver lets you hear the name of the song you’re playing, choose
from a spoken menu of playlists, or get battery status.
Playing Music
After you sync iPod shuffle with music and other audio content, you can listen to it.
To listen to songs and other items on iPod shuffle:
1 Plug the earphones into iPod shuffle and place the earbuds in your ears.
2 Slide the three-way switch on iPod shuffle from OFF to play in order (⁄) or
shuffle (¡).
Playback begins. If iPod shuffle is on when you plug in earphones, playback doesn’t
start automatically. Click the Center button on the remote or slide the three-way
switch off and on again to start playback.
To preserve battery life when you aren’t using iPod shuffle, slide the three-way
switch to OFF.
When you plug in earphones, wait until the green status light turns off before
clicking buttons on the remote. Refer to the table that follows for information about
controlling playback with the earphone remote.
WARNING: Read all safety instructions about avoiding hearing damage on page 33
before use.
20
21. The status light on iPod shuffle blinks in response when you click the buttons on the
earphone remote.
To Do this Status light response
Play Click the Center button once. Blinks green once
Pause Click the Center button once. Blinks green for
30 seconds
Change the volume Click the Volume Up (∂ ) or Volume Blinks green for each
Down (D) button to increase or decrease volume increment
the volume. You hear a tone when you Blinks orange three
change the volume while iPod shuffle is times when the upper or lower
paused. volume limit is reached
Go to the next track (or Double-click the Center button. Blinks green once
audiobook chapter)
Go to the previous track Triple-click the Center button within 6 Blinks green once
(or audiobook chapter) seconds of the track starting. To restart
the current track, triple-click after 6
seconds.
Fast-forward Double-click and hold the Center button. Blinks green once
Rewind Triple-click and hold the Center button. Blinks green once
Hear song title and artist Click and hold the Center button. Blinks green once
names
Hear playlist menu Click the Center button until you hear a Blinks green once
tone, and then release to hear the
playlist menu. When you hear the name
of the playlist you want, click to select it.
You can click ∂ or D to move quickly
through the playlist menu.
Exit the playlist menu Click and hold the Center button. Blinks green once
Setting iPod shuffle to Play Songs in Order or Shuffle Songs
You can set iPod shuffle to shuffle songs or play them in the order in which they’re
organized in iTunes. You hear a tone when you slide the three-way switch.
To set iPod shuffle to play songs in order:
m Slide the three-way switch to play in order (⁄).
After the last song plays, iPod shuffle starts playing the first song again.
Important: When you listen to audiobooks or podcasts, slide the three-way switch to
play in order so chapters or episodes play in the recorded order.
To set iPod shuffle to shuffle:
m Slide the three-way switch to shuffle (¡).
To reshuffle songs, slide the three-way switch from shuffle (¡) to play in order (⁄)
and back to shuffle again.
Chapter 4 Listening to Music 21
22. Using the VoiceOver Feature
iPod shuffle can provide more control over your playback options by speaking your
song titles and artist names, and announcing a menu of playlists for you to choose
from. VoiceOver also tells you battery status and other messages. VoiceOver is available
in selected languages.
To hear these announcements, install the VoiceOver Kit and enable the VoiceOver
feature in iTunes. You can enable VoiceOver when you first set up iPod shuffle, or you
can do it later.
You set VoiceOver options on the Summary tab in iTunes. The following sections
describe how to turn on and customize this feature.
To enable VoiceOver when you set up iPod shuffle:
1 Connect iPod shuffle to your computer.
2 Follow the onscreen instructions in iTunes. Enable VoiceOver is selected by default.
3 Click Continue, and then follow the onscreen instructions to download and install the
VoiceOver Kit.
4 In the Summary tab, under Voice Feedback, choose the language you want from the
Language pop-up menu.
This sets the language for your spoken system messages and playlist names, as well as
many of the song titles and artist names.
Note: To pick a different language for specific songs, select them in iTunes, choose
File > Get Info, choose a VoiceOver language from the pop-up menu on the Options
tab, and then click OK.
5 Click Apply.
When setup is complete, VoiceOver is enabled on iPod shuffle.
To enable VoiceOver at a later time:
1 Connect iPod shuffle to your computer.
2 In iTunes, select iPod shuffle in the list of devices, and click the Summary tab.
3 Under Voice Feedback, select Enable VoiceOver.
4 Click Apply.
5 Follow the onscreen instructions to download and install the VoiceOver Kit.
6 Choose the language you want from the pop-up menu under Voice Feedback.
7 Click Apply.
When syncing is finished, VoiceOver is enabled.
22 Chapter 4 Listening to Music
23. To disable VoiceOver:
1 In iTunes, select iPod shuffle in the list of devices, and click the Summary tab.
2 Under Voice Feedback, click to deselect Enable VoiceOver.
3 Click Apply.
When syncing is finished, VoiceOver is disabled. You’ll still hear some system
announcements in English on iPod shuffle, such as battery status, error messages, and a
generic numbered playlist menu. You won’t hear song titles and artist names.
Hearing Song Announcements
The VoiceOver feature can speak the current song title and artist name while you’re
listening to iPod shuffle. If you don’t want to hear song titles and artist names, you can
disable VoiceOver in iTunes (see “Using the VoiceOver Feature” on page 22).
To hear the current song announcement:
m Click and hold the Center button on the remote.
You hear the current song title and artist name. If you’re listening to an audiobook, you
hear the book title.
You can use VoiceOver to navigate to another song when you’re listening to song
announcements.
To navigate using song announcements:
 If iPod shuffle is playing, click and hold the Center button to hear the current song
announcement; double-click to hear the next announcement while the next song
plays; triple-click to hear the previous announcement while the previous song plays.
 If iPod shuffle is paused, click and hold the Center button to hear the current song
announcement; double-click to hear the next announcement; triple-click to hear the
previous announcement. Press the Center button to play the announced song.
Using the Playlist Menu
When VoiceOver is enabled, you can choose from a spoken menu to listen to any
playlist you’ve synced from iTunes to iPod shuffle. If audiobooks and audio podcasts are
synced to iPod shuffle, their titles are also read as part of the playlist menu. If VoiceOver
is disabled in iTunes, you hear an abbreviated menu of playlists in numbered order, but
not by name (for example, “Playlist 1, Playlist 2,” and so on).
Chapter 4 Listening to Music 23
24. The playlist menu announces items in this order:
 The current playlist (if applicable)
 “All Songs” (default playlist of all the songs on iPod shuffle)
 Any remaining playlists in order
 “Podcasts” (if you choose this, you go to the first podcast in your list; you can
navigate from there to other podcasts)
 Audiobooks (each audiobook title is a separate playlist announcement)
To choose an item from the playlist menu:
1 Click and hold the Center button on the remote.
2 Continue holding after you hear the current song announcement, until you hear a tone.
3 Release the Center button at the tone. You hear the names of your playlists.
When you’re listening to the playlist menu, you can click the Volume Up (∂) or Volume
Down (D) button to move forward or backward in the playlist menu.
4 When you hear the name of the playlist you want, click the Center button to select it.
You hear a tone, and then the first item in your playlist plays.
To restart a playlist, follow these steps to select the playlist you want.
To exit from the playlist menu:
m Click and hold the Center button on the remote.
Setting Songs to Play at the Same Volume Level
The loudness of songs and other audio may vary depending on how the audio was
recorded or encoded. You can set iTunes to automatically adjust the volume of songs
so they play at the same relative volume level, and you can set iPod shuffle to use
those same iTunes volume settings.
To set iTunes to play songs at the same volume level:
1 In iTunes, choose iTunes > Preferences if you’re using a Mac, or choose Edit >
Preferences if you’re using a Windows PC.
2 Click Playback and select Sound Check.
To set iPod shuffle to use the iTunes volume settings:
1 Connect iPod shuffle to your computer.
2 In iTunes, select iPod shuffle in the list of devices.
3 Click the Summary tab.
4 Select Enable Sound Check.
5 Click Apply.
If you haven’t turned on Sound Check in iTunes, setting it on iPod shuffle has no effect.
24 Chapter 4 Listening to Music
25. Setting a Volume Limit
You can set a limit for the volume on iPod shuffle. You can also set a password in iTunes
to prevent anyone else from changing this setting.
If you’ve set a volume limit on iPod shuffle, the status light blinks orange three times if
you try to increase the volume beyond the limit.
To set a volume limit for iPod shuffle:
1 Set iPod shuffle to the desired maximum volume.
2 Connect iPod shuffle to your computer.
3 In iTunes, select iPod shuffle in the list of devices, and then click the Summary tab.
4 Select “Limit maximum volume.”
5 Drag the slider to the desired maximum volume.
The initial slider setting shows the volume iPod shuffle was set to when you selected
the “Limit maximum volume” checkbox.
6 To require a password to change this setting, click the lock and then enter and verify a
password.
If you set a password, you must enter it before you can change or remove the volume
limit.
Note: The volume level may vary if you use different earphones or headphones.
To remove the volume limit:
1 Connect iPod shuffle to your computer.
2 In iTunes, select iPod shuffle in the list of devices.
3 Click the Summary tab.
4 Deselect “Limit maximum volume.”
Enter the password, if required.
If you forget the password, you can restore iPod shuffle. See “Updating and Restoring
iPod shuffle Software” on page 31.
Chapter 4 Listening to Music 25
26. 5 Storing Files on iPod shuffle
5
Use iPod shuffle to carry your data as well as your music.
Read this chapter to find out how to use iPod shuffle as an external disk.
Using iPod shuffle as an External Disk
You can use iPod shuffle as an external disk to store data files.
To sync iPod shuffle with music and other audio that you want to listen to, you must
use iTunes. You can’t play audio files that you’ve copied to iPod shuffle using the
Macintosh Finder or Windows Explorer.
To enable iPod shuffle as an external disk:
1 Connect iPod shuffle to your computer.
2 In iTunes, select iPod shuffle in the list of devices.
3 Click the Summary tab.
4 In the Options section, select “Enable disk use.”
You may need to scroll down to see the disk settings.
5 Click Apply.
When you set iTunes to autofill iPod shuffle, you can reserve space for disk use. See
“Autofilling iPod shuffle” on page 18.
When you use iPod shuffle as an external disk, the iPod shuffle disk icon appears on the
desktop on a Mac, or as the next available drive letter in Windows Explorer on a
Windows PC.
When iPod shuffle is enabled as a hard disk and you connect it to your computer, the
status light blinks orange continuously. Be sure to eject iPod shuffle in iTunes before
you disconnect it from your computer.
26
27. Transferring Files Between Computers
When you enable disk use on iPod shuffle, you can transfer files from one computer to
another. iPod shuffle is formatted as a FAT-32 volume, which is supported by both Macs
and PCs. This allows you to use iPod shuffle to transfer files between computers with
different operating systems.
To transfer files between computers:
1 After enabling disk use on iPod shuffle, connect it to the computer you want to get the
files from.
Important: If iPod shuffle is set to sync automatically, when you connect iPod shuffle to
a different computer or user account, a message asks if you want to erase iPod shuffle
and sync with the new iTunes library. Click Cancel if you don’t want to erase what’s on
iPod shuffle.
2 Using the computer’s file system (the Finder on a Mac, Windows Explorer on a PC), drag
the files to your iPod shuffle.
3 Disconnect iPod shuffle, and then connect it to the other computer.
Again, click Cancel if you don’t want to erase what’s on iPod shuffle.
4 Drag the files from iPod shuffle to a location on the other computer.
Preventing iTunes from Opening Automatically
You can keep iTunes from opening automatically when you connect iPod shuffle to
your computer.
To prevent iTunes from opening automatically:
1 Connect iPod shuffle to your computer.
2 In iTunes, select iPod shuffle in the list of devices.
3 Click the Summary tab.
4 In the Options section, deselect “Open iTunes when this iPod is connected.”
5 Click Apply.
Chapter 5 Storing Files on iPod shuffle 27
28. 6 Tips and Troubleshooting
6
Most problems with iPod shuffle can be solved quickly by
following the advice in this chapter.
The 5 Rs: Reset, Retry, Restart, Reinstall, Restore
Remember these five basic suggestions if you have a problem with iPod shuffle. Try
these steps one at a time until the problem is resolved. If one of the following doesn’t
help, read on for solutions to specific problems.
 Reset iPod shuffle by turning it off, waiting 10 seconds, and then turning it back on
again.
 Retry with a different USB 2.0 port if you cannot see iPod shuffle in iTunes.
 Restart your computer, and make sure you have the latest software updates
installed.
 Reinstall iTunes software from the latest version on the web.
 Restore iPod shuffle. See “Updating and Restoring iPod shuffle Software” on
page 31.
If the status light glows red persistently or you hear the error message “Please use
iTunes to restore”
Connect iPod shuffle to your computer and restore it in iTunes. See “Updating and
Restoring iPod shuffle Software” on page 31.
If iPod shuffle won’t turn on or respond
 Connect iPod shuffle to a high-power USB 2.0 port on your computer. Your
iPod shuffle battery may need to be recharged.
 Turn iPod shuffle off, wait 10 seconds, and then turn it on again.
 You may need to restore iPod shuffle software. See “Updating and Restoring
iPod shuffle Software” on page 31.
28
29. If iPod shuffle isn’t playing music
 iPod shuffle might not have any music on it. If you hear the message “Please use
iTunes to sync music,” connect iPod shuffle to your computer to sync music to it.
 Slide the three-way switch off and then on again.
 Make sure the earphone or headphone connector is pushed in all the way.
 Make sure the volume is adjusted properly. A volume limit might be set. See “Setting
a Volume Limit” on page 25.
 iPod shuffle might be paused. Try clicking the Center button on the earphone
remote.
If you connect iPod shuffle to your computer and nothing happens
 Connect iPod shuffle to a high-power USB 2.0 port on your computer. Your
iPod shuffle battery may need to be recharged.
 Make sure you’ve installed the latest iTunes software from
www.apple.com/ipod/start.
 Try connecting the USB cable to a different USB 2.0 port on your computer. Make
sure the USB cable is firmly connected toiPod shuffle and to the computer. Make sure
the USB connector is oriented correctly. It can be inserted only one way.
 iPod shuffle might need to be reset. Turn iPod shuffle off, wait 10 seconds, and then
turn it back on again.
 If iPod shuffle doesn’t appear in iTunes or the Finder, the battery may be completely
discharged. Let iPod shuffle charge for several minutes to see if it comes back to life.
 Make sure you have the required computer and software. See “If you want to double-
check the system requirements” on page 30.
 Try restarting your computer.
 You might need to restore iPod software. See “Updating and Restoring iPod shuffle
Software” on page 31.
 iPod shuffle may need to be repaired. You can arrange for service on the iPod shuffle
Service & Support website at www.apple.com/support/ipodshuffle/service.
If you can’t sync a song or other item onto iPod shuffle
The song might have been encoded in a format that iPod shuffle doesn’t support. The
following audio file formats are supported by iPod shuffle. These include formats for
audiobooks and podcasts:
 AAC (M4A, M4B, M4P) (up to 320 kbps)
 Apple Lossless (a high-quality compressed format)
 MP3 (up to 320 kbps)
 MP3 Variable Bit Rate (VBR)
 WAV
 AA (audible.com spoken word, formats 2, 3, and 4)
 AIFF
Chapter 6 Tips and Troubleshooting 29
30. A song encoded using Apple Lossless format has near full CD-quality sound, but takes
up only about half as much space as a song encoded using AIFF or WAV format. The
same song encoded in AAC or MP3 format takes up even less space. When you import
music from a CD using iTunes, it’s converted to AAC format by default.
You can have iPod shuffle automatically convert files encoded at higher bit rates to 128
kbps AAC files as they’re synced with iPod shuffle. See “Fitting More Songs onto
iPod shuffle” on page 19.
Using iTunes for Windows, you can convert unprotected WMA files to AAC or MP3
format. This can be useful if you have a collection of music encoded in WMA format.
iPod shuffle doesn’t support WMA, MPEG Layer 1, MPEG Layer 2 audio files, or
audible.com format 1.
If you have a song in iTunes that isn’t supported by iPod shuffle, you can convert it to a
format iPod shuffle supports. For more information, see iTunes Help.
If your podcasts or audiobooks don’t play correctly
 Make sure the three-way switch on iPod shuffle is set to play in order (⁄). If a
playlist includes mixed tracks (songs, podcasts, and audiobooks, for example),
audiobooks and podcasts won’t play if iPod shuffle is set to shuffle (¡).
 If the chapters of an audiobook were added to iPod shuffle out of order, connect
iPod shuffle to your computer and rearrange the tracks using iTunes.
If you want to double-check the system requirements
To use iPod shuffle, you must have:
 One of the following computer configurations:
 A Macintosh with a USB 2.0 port
 A Windows PC with a USB 2.0 port or a USB 2.0 card installed
 One of the following operating systems: Mac OS X v10.4.11 or later, Windows Vista, or
Windows XP Home or Professional with Service Pack 3 or later
 Internet access (a broadband connection is recommended)
 iTunes 8.1 or later (iTunes can be downloaded from www.apple.com/ipod/start)
If your Windows PC doesn’t have a high-power USB 2.0 port, you can purchase and install
a USB 2.0 card.
High-power USB 2.0 port
30 Chapter 6 Tips and Troubleshooting
31. If you want to use iPod shuffle with a Mac and a Windows PC
If your iPod shuffle is set to manually manage music, you can add content to it from
more than one iTunes library, regardless of the operating system on the computer. If
your iPod shuffle is set to sync automatically, when you connect iPod shuffle to a
different computer or user account, a message asks if you want to erase iPod shuffle
and sync with the new iTunes library. Click Cancel if you want to keep the contents of
iPod shuffle as is.
You can use iPod shuffle as an external disk with both Macintosh computers and PCs,
allowing you to transfer files from one operating system to the other. See Chapter 5,
“Storing Files on iPod shuffle,” on page 26.
Updating and Restoring iPod shuffle Software
You can use iTunes to update or restore the iPod shuffle software. It’s recommended
that you update iPod shuffle to use the latest software. You can also restore the
software, which returns iPod shuffle to its original state.
 If you choose to update, the software is updated but your settings, songs, and other
data aren’t affected.
 If you choose to restore, all data is erased from iPod shuffle, including songs and any
other data. All iPod shuffle settings are restored to their original state.
To update or restore iPod shuffle:
1 Make sure you have an Internet connection and have installed the latest version of
iTunes from www.apple.com/ipod/start.
2 Connect iPod shuffle to your computer.
3 In iTunes, select iPod shuffle in the list of devices, and click the Summary tab.
The Version section tells you whether iPod shuffle is up to date or needs a newer
version of the software.
4 Do one of the following:
 To install the latest version of the software, click Update.
 To restore iPod shuffle to its original settings, click Restore. This erases all data from
iPod shuffle. Follow the onscreen instructions to complete the restore process.
Chapter 6 Tips and Troubleshooting 31
32. 7 Safety and Handling
7
This chapter contains important safety and handling
information for iPod shuffle.
± Read all safety information below and operating instructions before using
iPod shuffle to avoid injury.
Keep this user guide for your iPod shuffle handy for future reference.
Important Safety Information
WARNING: Failure to follow these safety instructions could result in fire, electric shock,
or other injury or damage.
Handling iPod shuffle Do not drop, dissemble, open, crush, bend, deform, puncture,
shred, microwave, incinerate, paint, or insert foreign objects into iPod shuffle.
Avoiding water and wet locations Do not use iPod shuffle in rain, or near washbasins
or other wet locations. Take care not to spill any food or liquid on iPod shuffle. In case
iPod shuffle gets wet, unplug all cables, turn off iPod shuffle (slide the three-way switch
to OFF) before cleaning, and allow it to dry thoroughly before turning it on again. Do
not attempt to dry iPod shuffle with an external heat source, such as a microwave oven
or hair dryer.
Repairing iPod shuffle Never attempt to repair or modify iPod shuffle yourself.
iPod shuffle doesn’t contain any user-serviceable parts. If iPod shuffle has been
submerged in water, punctured, or subjected to a severe fall, do not use it until you
take it to an Apple Authorized Service Provider. For service information, choose iPod
Help from the Help menu in iTunes or go to www.apple.com/support/ipod/service. The
rechargeable battery in iPod shuffle should be replaced only by an Apple Authorized
Service Provider. For more information about batteries, go to www.apple.com/batteries.
32
33. Using the Apple USB Power Adapter (available separately) If you use the Apple USB
Power Adapter (sold separately at www.apple.com/ipodstore) to charge iPod shuffle,
make sure that the power adapter is fully assembled before you plug it into a power
outlet. Then insert the Apple USB Power Adapter firmly into the power outlet. Do not
connect or disconnect the Apple USB Power Adapter with wet hands. Do not use any
power adapter other than the Apple USB Power Adapter to charge your iPod shuffle.
The Apple USB Power Adapter may become warm during normal use. Always allow
adequate ventilation around the Apple USB Power Adapter and use care when
handling.
Unplug the Apple USB Power Adapter if any of the following conditions exist:
 The power cord or plug has become frayed or damaged.
 The adapter is exposed to rain, liquids, or excessive moisture.
 The adapter case has become damaged.
 You suspect the adapter needs service or repair.
 You want to clean the adapter.
Avoiding hearing damage Permanent hearing loss may occur if earbuds or
headphones are used at high volume. Set the volume to a safe level. You can adapt
over time to a higher volume of sound that may sound normal but can be damaging to
your hearing. If you experience ringing in your ears or muffled speech, stop listening
and have your hearing checked. The louder the volume, the less time is required before
your hearing could be affected. Hearing experts suggest that to protect your hearing:
 Limit the amount of time you use earbuds or headphones at high volume.
 Avoid turning up the volume to block out noisy surroundings.
 Turn the volume down if you can’t hear people speaking near you.
For information about how to set a volume limit on iPod shuffle, see “Setting a Volume
Limit” on page 25.
Driving safely Use of iPod shuffle alone, or with earphones (even if used in only one
ear) while operating a vehicle is not recommended and is illegal in some areas. Be
careful and attentive while driving. Stop using iPod shuffle if you find it disruptive or
distracting while operating any type of vehicle, or performing any other activity that
requires your full attention.
Chapter 7 Safety and Handling 33
34. Important Handling Information
NOTICE: Failure to follow these handling instructions could result in damage to
iPod shuffle or other property.
Carrying iPod shuffle iPod shuffle contains sensitive components. Do not bend, drop,
or crush iPod shuffle.
Using connectors and ports Never force a connector into a port. Check for
obstructions on the port. If the connector and port don’t join with reasonable ease,
they probably don’t match. Make sure that the connector matches the port and that
you have positioned the connector correctly in relation to the port.
Keeping iPod shuffle within acceptable temperatures Operate iPod shuffle in a place
where the temperature is always between 32º and 95º F (0º and 35º C). iPod shuffle
play time might temporarily shorten in low-temperature conditions.
Store iPod shuffle in a place where the temperature is always between -4º and 113º F
(-20º and 45º C). Don’t leave iPod shuffle in your car, because temperatures in parked
cars can exceed this range.
When you’re using iPod shuffle or charging the battery, it’s normal for iPod shuffle to
get warm. The exterior of iPod shuffle functions as a cooling surface that transfers heat
from inside the unit to the cooler air outside.
Keeping the outside of iPod shuffle clean To clean iPod shuffle, unplug all cables, turn
it off (slide the three-way switch to OFF), and use a soft, slightly damp, lint-free cloth.
Avoid getting moisture in openings. Don’t use window cleaners, household cleaners,
aerosol sprays, solvents, alcohol, ammonia, or abrasives to clean iPod shuffle.
Disposing of iPod shuffle properly For information about the proper disposal of
iPod shuffle, including other important regulatory compliance information, see
“Regulatory Compliance Information” on page 36.
34 Chapter 7 Safety and Handling
35. 8 Learning More, Service,
and Support 8
You can find more information about using iPod shuffle
in onscreen help and on the web.
The following table describes where to get iPod-related software and service
information.
To learn about Do this
Service and support, Go to: www.apple.com/support/ipodshuffle
discussions, tutorials, and
Apple software downloads
Using iTunes Open iTunes and choose Help > iTunes Help.
For an online iTunes tutorial (available in some areas only), go to:
www.apple.com/itunes/tutorials
The latest information about Go to: www.apple.com/ipodshuffle
iPod shuffle
Registering iPod shuffle To register iPod shuffle, install iTunes on your computer and
connect iPod shuffle.
Finding the iPod shuffle serial Look under the clip on iPod shuffle. Or, in iTunes (with iPod shuffle
number connected to your computer), select iPod shuffle in the list of
devices, and click the Summary tab.
Obtaining warranty service First follow the advice in this booklet, the onscreen help, and
online resources, and then go to:
www.apple.com/support/ipodshuffle/service
35
36. Regulatory Compliance Information
FCC Compliance Statement If necessary, consult an Apple-authorized service
This device complies with part 15 of the FCC rules. provider or Apple. See the service and support
Operation is subject to the following two conditions: information that came with your Apple product. Or,
(1) This device may not cause harmful interference, consult an experienced radio/television technician
and (2) this device must accept any interference for additional suggestions.
received, including interference that may cause Important: Changes or modifications to this product
undesired operation. See instructions if interference not authorized by Apple Inc. could void the EMC
to radio or television reception is suspected. compliance and negate your authority to operate
Radio and Television Interference the product.
This computer equipment generates, uses, and can This product was tested for EMC compliance under
radiate radio-frequency energy. If it is not installed conditions that included the use of Apple peripheral
and used properly—that is, in strict accordance with devices and Apple shielded cables and connectors
Apple’s instructions—it may cause interference with between system components.
radio and television reception.
It is important that you use Apple peripheral devices
This equipment has been tested and found to and shielded cables and connectors between system
comply with the limits for a Class B digital device in components to reduce the possibility of causing
accordance with the specifications in Part 15 of FCC interference to radios, television sets, and other
rules. These specifications are designed to provide electronic devices. You can obtain Apple peripheral
reasonable protection against such interference in a devices and the proper shielded cables and
residential installation. However, there is no connectors through an Apple Authorized Reseller.
guarantee that interference will not occur in a For non-Apple peripheral devices, contact the
particular installation. manufacturer or dealer for assistance.
You can determine whether your computer system is Responsible party (contact for FCC matters only):
causing interference by turning it off. If the Apple Inc. Corporate Compliance
interference stops, it was probably caused by the 1 Infinite Loop, MS 26-A
computer or one of the peripheral devices. Cupertino, CA 95014-2084
If your computer system does cause interference to Industry Canada Statement
radio or television reception, try to correct the This Class B device meets all requirements of the
interference by using one or more of the following Canadian interference-causing equipment
measures: regulations.
 Turn the television or radio antenna until the
interference stops. Cet appareil numérique de la classe B respecte
 Move the computer to one side or the other of the toutes les exigences du Règlement sur le matériel
television or radio. brouilleur du Canada.
 Move the computer farther away from the VCCI Class B Statement
television or radio.
 Plug the computer into an outlet that is on a
different circuit from the television or radio. (That
is, make certain the computer and the television or
radio are on circuits controlled by different circuit
breakers or fuses.)
Korea Class B Statement
36
38. Index
Index
A problems connecting iPod shuffle 29
AAC, converting songs to 19 requirements 30
albums, purchasing 12 connecting iPod shuffle
announcements about 6
playlist menu order 24 charging the battery 8
song title and artist name 23 controls
song titles and artist names 23 status light response 21
Apple Earphones with Remote 5 using 5
Apple USB Power Adapter 33 converting songs to AAC files 19
artist names, announcing 23 converting unprotected WMA files 30
audiobooks
hearing name 23 D
listening to 21 data files, storing on iPod shuffle 26
purchasing 12 deleting songs 18
syncing 17 disconnecting iPod shuffle
audio file formats 29 about 6
autofilling iPod shuffle 18 during music update 7
eject first 7
B instructions 7
battery disk, using iPod shuffle as 26
charge status 8 downloading podcasts 12
charging 8, 28
checking status in iTunes 8 E
rechargeable 9 earphone remote 5, 21, 23, 24
replacement information 32 Eject button in iTunes 7
status 9 ejecting iPod shuffle before disconnecting 7
status lights when connected 9 enabling VoiceOver feature 22
status lights when disconnected 9 entering song information manually 13
bit-rate formats 19 exiting the playlist menu 24
browsing iTunes Store 12 external disk, using iPod shuffle as 26
C F
CDs, importing into iTunes 13 fast-forwarding 6
charging the battery features of iPod shuffle 3
about 8, 28 fitting more songs onto iPod shuffle 19
using the Apple USB Power Adapter 8 formats, audio file 29
using your computer 8
choosing playlists 23 G
compressing songs 19 Genius
computer button in iTunes 15
charging the battery 8 creating a playlist in iTunes 15
connecting iPod shuffle 6 getting help 35
38
39. H play in order 5, 21
headphones. See earphones playlist menu
hearing damage, avoiding 33 choosing an item 24
help, getting 35 exiting 24
higher bit rate songs 19 order of announcements 24
high-power USB port 6, 8, 28, 29, 30 playlists
choosing from spoken menu 23
I Genius 15
hearing spoken menu of 23
importing CDs into iTunes 13
restarting 24
iTunes
See also playlist menu
ejecting iPod shuffle 7
podcasts
getting help 35
browsing for 12
importing CDs 13
downloading 12
iTunes Store 12
hearing name 23
setting not to open automatically 27
listening to 21
version required 30
syncing 17
iTunes Library, adding songs 13
ports
iTunes Store
earphone 4, 5
browsing 12
high-power USB 6, 8, 28, 29, 30
downloading podcasts 12
troubleshooting iPod shuffle connection 29
purchasing audiobooks 12
USB 2.0 28, 29, 30
purchasing songs and albums 12
power adapter, USB 8
searching 12
Power Search in iTunes Store 12
signing in 11
power switch 4
preventing iTunes from opening automatically 27
L previous track 6
library, adding songs 13
problems. See troubleshooting
listening to an audiobook 21
purchasing songs, albums, audiobooks 12
M R
Mac OS X version 30
random play 5
manually managing music 17
rechargeable batteries 9
maximum volume limit, setting 25
registering iPod shuffle 35
music
relative volume, playing songs at 24
iPod shuffle not playing 29
remote, earphone. See earphone remote
purchasing 12
removing songs 18
tutorial 35
requirements
See also songs; syncing music
computer 30
iTunes version 30
N operating system 30
names resetting iPod shuffle 5, 28
spoken song titles 23 reshuffling songs 21
navigating by song title 23 restart current track 6, 21
next track 6 restarting a playlist 24
restoring iPod software 31
O rewinding 6
operating system requirements 30
overview of iPod shuffle features 3 S
Safely Remove Hardware icon 7
P safety considerations 32
pausing a song 6 searching iTunes Store 12
playing serial number, locating 5, 35
previous song 6 service and support 35
songs 6 setting play order of songs 5
songs in order 5
Index 39
40. settings tutorial 35
autofill 19 syncing podcasts 17
manually manage music 17 syncing songs manually 17
playing songs at relative volume 24 system requirements 30
shuffle songs 21
speech options 22 T
volume limit 25 three-way switch 4
shuffling songs 5, 21 tracks. See songs
skipping to next track 6 troubleshooting
sleep mode and charging the battery 8 connecting iPod shuffle to computer 29
software, updating and restoring 31 connecting to USB port 29
songs cross-platform use 31
autofilling 18 iPod shuffle not playing music 29
deleting 18 iPod shuffle not responding 28
entering information manually 13 resetting iPod shuffle 5, 28
fast-forwarding 6 safety considerations 32
hearing title of currently playing song 23 updating and restoring software 31
playing and pausing 6 turning iPod shuffle on or off 5
playing at relative volume 24 tutorial 35
playing in order 5
playing next or previous 6 U
purchasing 12 unresponsive iPod shuffle 28
removing 18 unsupported audio file formats 30
reshuffling 21 updating and restoring software 31
rewinding 6 USB 2.0 port 28, 29
shuffling 5, 21 USB Power Adapter 8
skipping to the next 6
syncing manually 17 V
song titles VoiceOver
announcing 23 battery status 9
navigating by 23 disabling 23
Sound Check, enabling 24 enabling 22
speech options 22 song announcements 23
status light using 22
battery 8, 9 volume
location 4 changing 6
response to controls 21 enabling Sound Check 24
storing, data files on iPod shuffle 26 setting limit 25
subscribing to podcasts 12
supported audio file formats 29 W
supported operating systems 30 warranty service 35
switch, three-way 4 Windows
syncing audiobooks 17 supported versions 30
syncing music troubleshooting 31
disconnecting iPod shuffle 7 WMA files, converting 30
overview 15
40 Index