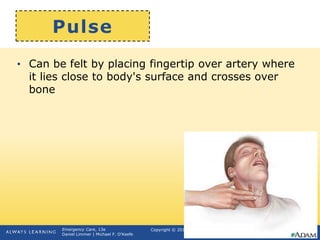
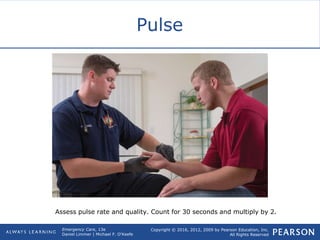
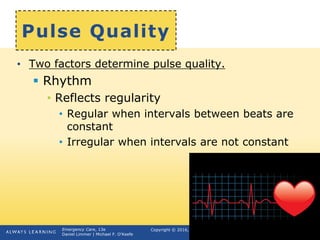
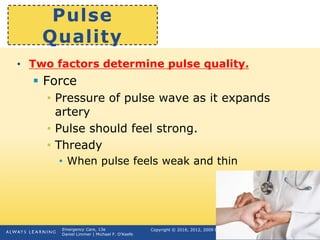
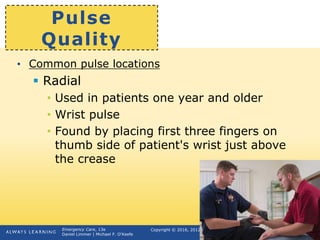
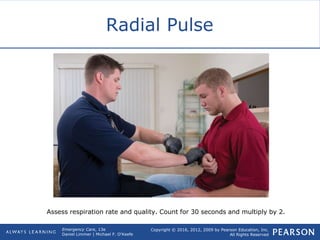
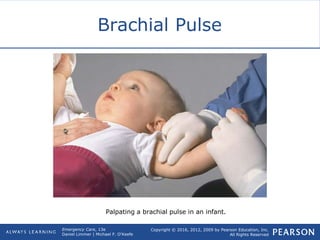
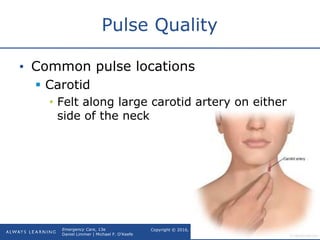
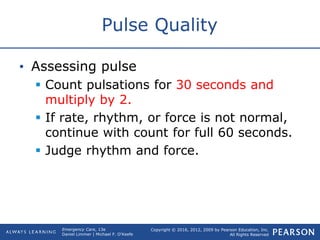
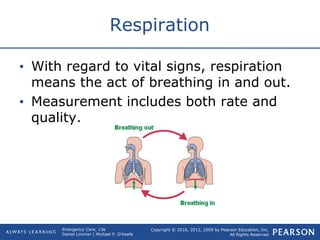
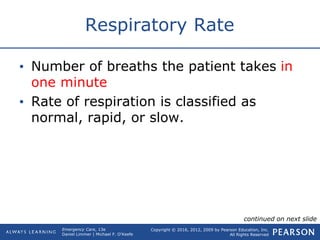
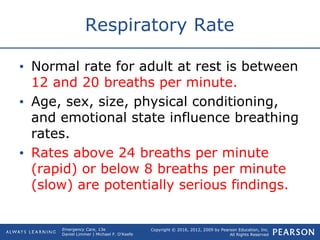
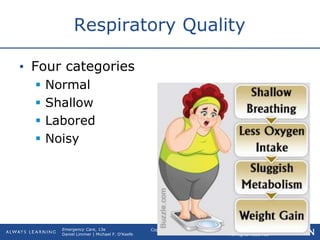
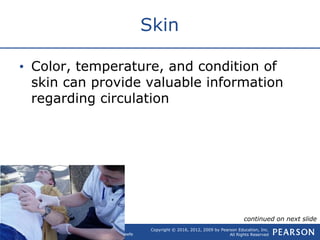
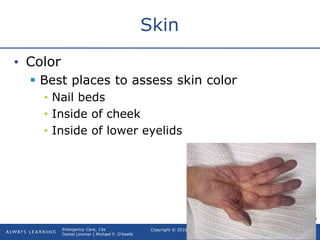
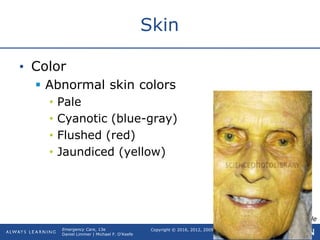
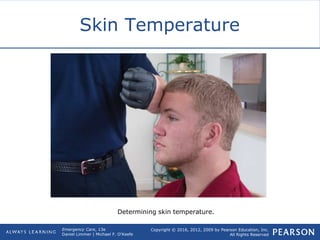
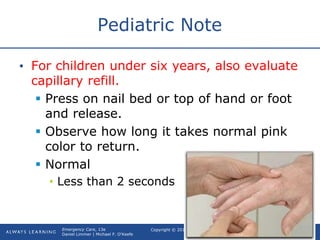
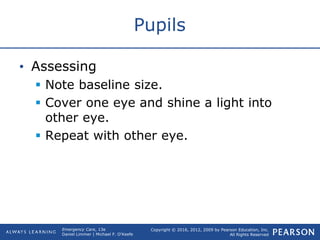
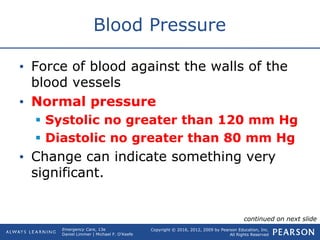
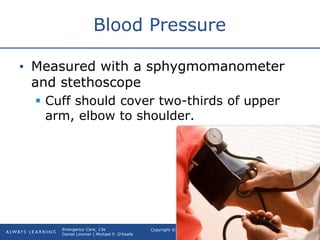
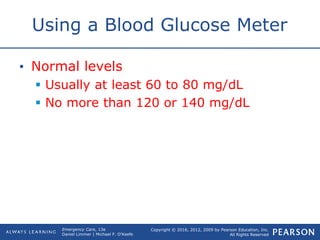
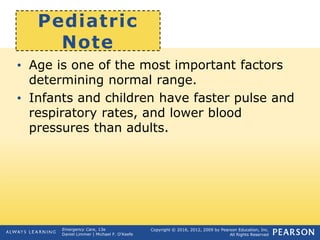
Emergency Care
CHAPTER
Copyright © 2016, 2012, 2009 by Pearson Education, Inc.
All Rights Reserved
Emergency Care, 13e
Daniel Limmer | Michael F. O'Keefe
THIRTEENTH EDITION
Vital Signs and
Monitoring Devices
13
Copyright © 2016, 2012, 2009 by Pearson Education, Inc.
All Rights Reserved
Emergency Care, 13e
Daniel Limmer | Michael F. O'Keefe
Topics
• Gathering the Vital Signs
• Vital Signs
Copyright © 2016, 2012, 2009 by Pearson Education, Inc.
All Rights Reserved
Emergency Care, 13e
Daniel Limmer | Michael F. O'Keefe
Gathering the Vital Signs
Copyright © 2016, 2012, 2009 by Pearson Education, Inc.
All Rights Reserved
Emergency Care, 13e
Daniel Limmer | Michael F. O'Keefe
Gathering the Vital
Signs
• Importance of vital signs
 Outward signs of what is going on inside
the body
 Identify important conditions or trends in
patient conditions
 Gathered on virtually every EMS patient
• Patient severity and treatment priorities may
prevent acquisition.
Copyright © 2016, 2012, 2009 by Pearson Education, Inc.
All Rights Reserved
Emergency Care, 13e
Daniel Limmer | Michael F. O'Keefe
Vital Signs
Copyright © 2016, 2012, 2009 by Pearson Education, Inc.
All Rights Reserved
Emergency Care, 13e
Daniel Limmer | Michael F. O'Keefe
What Are Vital
Signs?
• Pulse
• Respiration
• Skin color, temperature, and condition
(plus capillary refill in infants and children)
• Pupils
• Blood pressure
continued on next slide
Copyright © 2016, 2012, 2009 by Pearson Education, Inc.
All Rights Reserved
Emergency Care, 13e
Daniel Limmer | Michael F. O'Keefe
What Are Vital
Signs?
• Baseline vital signs
 First vital signs obtained
• Repeat vital signs
 Gain further information by establishing
trends
Copyright © 2016, 2012, 2009 by Pearson Education, Inc.
All Rights Reserved
Emergency Care, 13e
Daniel Limmer | Michael F. O'Keefe
Pulse
• Palpable pressure of heart beating, causing blood
to move through arteries in waves
continued on next slide
Copyright © 2016, 2012, 2009 by Pearson Education, Inc.
All Rights Reserved
Emergency Care, 13e
Daniel Limmer | Michael F. O'Keefe
Pulse
• Can be felt by placing fingertip over artery where
it lies close to body's surface and crosses over
bone
Copyright © 2016, 2012, 2009 by Pearson Education, Inc.
All Rights Reserved
Emergency Care, 13e
Daniel Limmer | Michael F. O'Keefe
Pulse
Assess pulse rate and quality. Count for 30 seconds and multiply by 2.
Copyright © 2016, 2012, 2009 by Pearson Education, Inc.
All Rights Reserved
Emergency Care, 13e
Daniel Limmer | Michael F. O'Keefe
Pulse Rate
• Number of beats per minute
• Normal rate for adult at rest is between 60
and 100 beats per minute.
continued on next slide
Copyright © 2016, 2012, 2009 by Pearson Education, Inc.
All Rights Reserved
Emergency Care, 13e
Daniel Limmer | Michael F. O'Keefe
Pulse Rate
• Tachycardia
 Rate above 100 beats per minute is
rapid.
• Bradycardia
 Rate below 60 beats per minute is
considered slow.
continued on next slide
Copyright © 2016, 2012, 2009 by Pearson Education, Inc.
All Rights Reserved
Emergency Care, 13e
Daniel Limmer | Michael F. O'Keefe
Pulse Rate
• Above 120 beats or below 50 beats per minute is
considered a serious finding.
• During an emergency, it is not unusual for pulse
rate to temporarily be between 100 and 140
beats.
Copyright © 2016, 2012, 2009 by Pearson Education, Inc.
All Rights Reserved
Emergency Care, 13e
Daniel Limmer | Michael F. O'Keefe
Think About It
• What normal situations might account
for a heart rate outside the normal
range?
Copyright © 2016, 2012, 2009 by Pearson Education, Inc.
All Rights Reserved
Emergency Care, 13e
Daniel Limmer | Michael F. O'Keefe
Pulse Quality
• Two factors determine pulse quality.
 Rhythm
• Reflects regularity
• Regular when intervals between beats are
constant
• Irregular when intervals are not constant
continued on next slide
Copyright © 2016, 2012, 2009 by Pearson Education, Inc.
All Rights Reserved
Emergency Care, 13e
Daniel Limmer | Michael F. O'Keefe
Pulse
Quality
• Two factors determine pulse quality.
 Force
• Pressure of pulse wave as it expands
artery
• Pulse should feel strong.
• Thready
• When pulse feels weak and thin
continued on next slide
Copyright © 2016, 2012, 2009 by Pearson Education, Inc.
All Rights Reserved
Emergency Care, 13e
Daniel Limmer | Michael F. O'Keefe
Pulse
Quality
• Common pulse locations
 Radial
• Used in patients one year and older
• Wrist pulse
• Found by placing first three fingers on
thumb side of patient's wrist just above
the crease
Copyright © 2016, 2012, 2009 by Pearson Education, Inc.
All Rights Reserved
Emergency Care, 13e
Daniel Limmer | Michael F. O'Keefe
Radial Pulse
Assess respiration rate and quality. Count for 30 seconds and multiply by 2.
Copyright © 2016, 2012, 2009 by Pearson Education, Inc.
All Rights Reserved
Emergency Care, 13e
Daniel Limmer | Michael F. O'Keefe
Pulse
Quality
• Common pulse locations
 Brachial
• Used in patients one year old or younger
• Upper arm pulse
Copyright © 2016, 2012, 2009 by Pearson Education, Inc.
All Rights Reserved
Emergency Care, 13e
Daniel Limmer | Michael F. O'Keefe
Brachial Pulse
Palpating a brachial pulse in an infant.
Copyright © 2016, 2012, 2009 by Pearson Education, Inc.
All Rights Reserved
Emergency Care, 13e
Daniel Limmer | Michael F. O'Keefe
Pulse Quality
• Common pulse locations
 Carotid
• Felt along large carotid artery on either
side of the neck
continued on next slide
Copyright © 2016, 2012, 2009 by Pearson Education, Inc.
All Rights Reserved
Emergency Care, 13e
Daniel Limmer | Michael F. O'Keefe
Pulse Quality
• Assessing pulse
 Count pulsations for 30 seconds and
multiply by 2.
 If rate, rhythm, or force is not normal,
continue with count for full 60 seconds.
 Judge rhythm and force.
Copyright © 2016, 2012, 2009 by Pearson Education, Inc.
All Rights Reserved
Emergency Care, 13e
Daniel Limmer | Michael F. O'Keefe
Respiration
• With regard to vital signs, respiration
means the act of breathing in and out.
• Measurement includes both rate and
quality.
Copyright © 2016, 2012, 2009 by Pearson Education, Inc.
All Rights Reserved
Emergency Care, 13e
Daniel Limmer | Michael F. O'Keefe
Respiratory Rate
• Number of breaths the patient takes in
one minute
• Rate of respiration is classified as
normal, rapid, or slow.
continued on next slide
Copyright © 2016, 2012, 2009 by Pearson Education, Inc.
All Rights Reserved
Emergency Care, 13e
Daniel Limmer | Michael F. O'Keefe
Respiratory Rate
• Normal rate for adult at rest is between
12 and 20 breaths per minute.
• Age, sex, size, physical conditioning,
and emotional state influence breathing
rates.
• Rates above 24 breaths per minute
(rapid) or below 8 breaths per minute
(slow) are potentially serious findings.
Copyright © 2016, 2012, 2009 by Pearson Education, Inc.
All Rights Reserved
Emergency Care, 13e
Daniel Limmer | Michael F. O'Keefe
Respiratory Quality
• Four categories
 Normal
 Shallow
 Labored
 Noisy
Copyright © 2016, 2012, 2009 by Pearson Education, Inc.
All Rights Reserved
Emergency Care, 13e
Daniel Limmer | Michael F. O'Keefe
Respiratory Rhythm
• Count respirations after assessing pulse
rate.
• Count number of breaths taken over 30
seconds and multiply by 2.
• Note rate, quality, and rhythm of
respiration.
Copyright © 2016, 2012, 2009 by Pearson Education, Inc.
All Rights Reserved
Emergency Care, 13e
Daniel Limmer | Michael F. O'Keefe
Skin
• Color, temperature, and condition of
skin can provide valuable information
regarding circulation
continued on next slide
Copyright © 2016, 2012, 2009 by Pearson Education, Inc.
All Rights Reserved
Emergency Care, 13e
Daniel Limmer | Michael F. O'Keefe
Skin
• Color
 Best places to assess skin color
• Nail beds
• Inside of cheek
• Inside of lower eyelids
continued on next slide
Copyright © 2016, 2012, 2009 by Pearson Education, Inc.
All Rights Reserved
Emergency Care, 13e
Daniel Limmer | Michael F. O'Keefe
Skin
• Color
 Abnormal skin colors
• Pale
• Cyanotic (blue-gray)
• Flushed (red)
• Jaundiced (yellow)
continued on next slide
Copyright © 2016, 2012, 2009 by Pearson Education, Inc.
All Rights Reserved
Emergency Care, 13e
Daniel Limmer | Michael F. O'Keefe
Skin
• Temperature
 Feel patient's skin with back of hand.
 Note if skin feels normal (warm), hot,
cool, or cold.
Copyright © 2016, 2012, 2009 by Pearson Education, Inc.
All Rights Reserved
Emergency Care, 13e
Daniel Limmer | Michael F. O'Keefe
Skin Temperature
Determining skin temperature.
Copyright © 2016, 2012, 2009 by Pearson Education, Inc.
All Rights Reserved
Emergency Care, 13e
Daniel Limmer | Michael F. O'Keefe
Pediatric Note
• For children under six years, also evaluate
capillary refill.
 Press on nail bed or top of hand or foot
and release.
 Observe how long it takes normal pink
color to return.
 Normal
• Less than 2 seconds
Copyright © 2016, 2012, 2009 by Pearson Education, Inc.
All Rights Reserved
Emergency Care, 13e
Daniel Limmer | Michael F. O'Keefe
Pupils
• Black center of eye
• Dim environment
 Pupil will dilate.
• Bright environment
 Pupil will constrict.
continued on next slide
Copyright © 2016, 2012, 2009 by Pearson Education, Inc.
All Rights Reserved
Emergency Care, 13e
Daniel Limmer | Michael F. O'Keefe
Pupils
• Assessing
 Note baseline size.
 Cover one eye and shine a light into
other eye.
 Repeat with other eye.
Copyright © 2016, 2012, 2009 by Pearson Education, Inc.
All Rights Reserved
Emergency Care, 13e
Daniel Limmer | Michael F. O'Keefe
Pupils
• Assessing
 Look for:
• Size
• Equality
• Reactivity
Copyright © 2016, 2012, 2009 by Pearson Education, Inc.
All Rights Reserved
Emergency Care, 13e
Daniel Limmer | Michael F. O'Keefe
Assessing Pupils
(A) Constricted, (B) dilated, and (C) unequal pupils.
Copyright © 2016, 2012, 2009 by Pearson Education, Inc.
All Rights Reserved
Emergency Care, 13e
Daniel Limmer | Michael F. O'Keefe
Assessing Pupils
Unequal pupils can be a sign of the influence of a topical drug (one placed directly on
the eye, such as an eye drop) or of head or eye injury.
© Edward T. Dickinson, MD
Copyright © 2016, 2012, 2009 by Pearson Education, Inc.
All Rights Reserved
Emergency Care, 13e
Daniel Limmer | Michael F. O'Keefe
Blood Pressure
• Force of blood against the walls of the
blood vessels
• Normal pressure
 Systolic no greater than 120 mm Hg
 Diastolic no greater than 80 mm Hg
• Change can indicate something very
significant.
continued on next slide
Copyright © 2016, 2012, 2009 by Pearson Education, Inc.
All Rights Reserved
Emergency Care, 13e
Daniel Limmer | Michael F. O'Keefe
Blood Pressure
• Measured with a sphygmomanometer
and stethoscope
 Cuff should cover two-thirds of upper
arm, elbow to shoulder.
Copyright © 2016, 2012, 2009 by Pearson Education, Inc.
All Rights Reserved
Emergency Care, 13e
Daniel Limmer | Michael F. O'Keefe
Measuring Blood Pressure
Positioning blood pressure cuff.
Copyright © 2016, 2012, 2009 by Pearson Education, Inc.
All Rights Reserved
Emergency Care, 13e
Daniel Limmer | Michael F. O'Keefe
Blood Pressure
• Measured with a sphygmomanometer
and stethoscope
 Wrap cuff around patient's upper arm.
 Lower edge of cuff placed about one
inch above crease of elbow
 Center of bladder placed over brachial
artery
Copyright © 2016, 2012, 2009 by Pearson Education, Inc.
All Rights Reserved
Emergency Care, 13e
Daniel Limmer | Michael F. O'Keefe
Determining Blood Pressure by
Auscultation
• Prepare patient.
• Position cuff and stethoscope.
 Palpate brachial artery at crease of
elbow.
 Position stethoscope.
 Position diaphragm of stethoscope
directly over brachial pulse or medial
anterior elbow.
Copyright © 2016, 2012, 2009 by Pearson Education, Inc.
All Rights Reserved
Emergency Care, 13e
Daniel Limmer | Michael F. O'Keefe
Determining Blood Pressure by
Auscultation
When measuring blood pressure by auscultation, locate the brachial artery by
palpation before placing the stethoscope.
Copyright © 2016, 2012, 2009 by Pearson Education, Inc.
All Rights Reserved
Emergency Care, 13e
Daniel Limmer | Michael F. O'Keefe
Determining Blood Pressure by
Auscultation
• Inflate cuff.
 Listen and inflate until gauge reads 30
mm higher than the point the pulse
sound disappeared.
• Obtain systolic pressure.
 Slowly release air from cuff.
 When you hear the first of these
sounds, note the reading on gauge.
continued on next slide
Copyright © 2016, 2012, 2009 by Pearson Education, Inc.
All Rights Reserved
Emergency Care, 13e
Daniel Limmer | Michael F. O'Keefe
Determining Blood Pressure by
Auscultation
• Obtain diastolic pressure.
 Continue to deflate cuff.
 When sounds turn to dull, muffled
thuds, the reading on the gauge is
diastolic pressure.
• Record measurements.
continued on next slide
Copyright © 2016, 2012, 2009 by Pearson Education, Inc.
All Rights Reserved
Emergency Care, 13e
Daniel Limmer | Michael F. O'Keefe
Determining Blood Pressure by
Palpation
• Position cuff and find radial pulse.
• Inflate cuff.
• Obtain and record systolic pressure.
 Slowly deflate cuff.
 Note reading when radial pulse returns
(systolic pressure).
Copyright © 2016, 2012, 2009 by Pearson Education, Inc.
All Rights Reserved
Emergency Care, 13e
Daniel Limmer | Michael F. O'Keefe
Pediatric
Note
• Difficult to obtain on infants and children
younger than three years
• More useful information about the condition
of an infant or very young child comes
from observing for conditions such as sick
appearance, respiratory distress, or
unconsciousness
Copyright © 2016, 2012, 2009 by Pearson Education, Inc.
All Rights Reserved
Emergency Care, 13e
Daniel Limmer | Michael F. O'Keefe
Determining Blood Pressure by
Blood Pressure Monitor
• Position the cuff.
• Inflate the cuff.
• Obtain and record the systolic pressure.
 Slowly deflate the cuff.
Copyright © 2016, 2012, 2009 by Pearson Education, Inc.
All Rights Reserved
Emergency Care, 13e
Daniel Limmer | Michael F. O'Keefe
Temperature
• Narrow range of temperature allows
chemical reactions and other activities
to take place inside the body.
• Core temperature reflects level of heat
inside trunk.
continued on next slide
Copyright © 2016, 2012, 2009 by Pearson Education, Inc.
All Rights Reserved
Emergency Care, 13e
Daniel Limmer | Michael F. O'Keefe
Temperature
• Normal temperature depends on:
 Time of day
 Activity level
 Age
 Where measured
Copyright © 2016, 2012, 2009 by Pearson Education, Inc.
All Rights Reserved
Emergency Care, 13e
Daniel Limmer | Michael F. O'Keefe
Temperature
An electronic thermometer is safer, more hygienic, and quicker to produce a reading
than a glass thermometer.
Copyright © 2016, 2012, 2009 by Pearson Education, Inc.
All Rights Reserved
Emergency Care, 13e
Daniel Limmer | Michael F. O'Keefe
Oxygen Saturation
• Measurement of proportion of oxygen
attached to hemoglobin
• Measured with pulse oximeter
Copyright © 2016, 2012, 2009 by Pearson Education, Inc.
All Rights Reserved
Emergency Care, 13e
Daniel Limmer | Michael F. O'Keefe
When to Use a Pulse Oximeter
• Protocol depends on institution.
• Generally includes all patients
complaining of respiratory problems or
otherwise at risk for hypoxia
Copyright © 2016, 2012, 2009 by Pearson Education, Inc.
All Rights Reserved
Emergency Care, 13e
Daniel Limmer | Michael F. O'Keefe
Oxygen Saturation
A pulse oximeter with sensor applied to the patient's finger.
Copyright © 2016, 2012, 2009 by Pearson Education, Inc.
All Rights Reserved
Emergency Care, 13e
Daniel Limmer | Michael F. O'Keefe
Interpreting Pulse
Oximeter Readings
• Normal
 96 to 100 percent
• Mild hypoxia
 91 to 95 percent
• Significant or moderate hypoxia
 86 to 90 percent
• Severe hypoxia
 85 percent or less
continued on next slide
Copyright © 2016, 2012, 2009 by Pearson Education, Inc.
All Rights Reserved
Emergency Care, 13e
Daniel Limmer | Michael F. O'Keefe
Interpreting Pulse Oximeter
Readings
• Accuracy of reading can be affected by:
 Shock, hypothermia
 Carbon monoxide
 Certain other uncommon types of
poisoning
 Excessive movement
 Nail polish
 Anemia
Copyright © 2016, 2012, 2009 by Pearson Education, Inc.
All Rights Reserved
Emergency Care, 13e
Daniel Limmer | Michael F. O'Keefe
Blood Glucose Meters
• Measures quantity of glucose in the
bloodstream
• Can help identify some diabetic
emergencies
Copyright © 2016, 2012, 2009 by Pearson Education, Inc.
All Rights Reserved
Emergency Care, 13e
Daniel Limmer | Michael F. O'Keefe
Blood Glucose Monitor
Many EMS systems allow EMTs to use blood glucose meters that are carried on the
ambulance.
Copyright © 2016, 2012, 2009 by Pearson Education, Inc.
All Rights Reserved
Emergency Care, 13e
Daniel Limmer | Michael F. O'Keefe
Using a Blood Glucose Meter
• Permission from medical direction or by
local protocol is required to perform
blood glucose monitoring using a blood
glucose meter
• Monitors must be calibrated and stored
according to manufacturer's
recommendations
continued on next slide
Copyright © 2016, 2012, 2009 by Pearson Education, Inc.
All Rights Reserved
Emergency Care, 13e
Daniel Limmer | Michael F. O'Keefe
Using a Blood Glucose Meter
1. Prepare device, test strip, and lancet
2. Cleanse patient's finger with alcohol
3. Perform finger stick with lancet
4. Apply blood to test strip
5. Use glucose meter to analyze sample
and provide reading
continued on next slide
Copyright © 2016, 2012, 2009 by Pearson Education, Inc.
All Rights Reserved
Emergency Care, 13e
Daniel Limmer | Michael F. O'Keefe
Using a Blood Glucose Meter
• Normal levels
 Usually at least 60 to 80 mg/dL
 No more than 120 or 140 mg/dL
Copyright © 2016, 2012, 2009 by Pearson Education, Inc.
All Rights Reserved
Emergency Care, 13e
Daniel Limmer | Michael F. O'Keefe
Pediatric
Note
• Age is one of the most important factors
determining normal range.
• Infants and children have faster pulse and
respiratory rates, and lower blood
pressures than adults.
Copyright © 2016, 2012, 2009 by Pearson Education, Inc.
All Rights Reserved
Emergency Care, 13e
Daniel Limmer | Michael F. O'Keefe
Health and Physical Assessment:
Vital Signs Video
Click on the screenshot to view a video on the subject of assessing vital signs.
Back to Directory
Copyright © 2016, 2012, 2009 by Pearson Education, Inc.
All Rights Reserved
Emergency Care, 13e
Daniel Limmer | Michael F. O'Keefe
Patient Assessment Skills:
Blood Pressure Video
Click on the screenshot to view a video on the topic of assessing blood pressure.
Back to Directory
Copyright © 2016, 2012, 2009 by Pearson Education, Inc.
All Rights Reserved
Emergency Care, 13e
Daniel Limmer | Michael F. O'Keefe
Vocabulary
• Auscultation
• Constrict
• Dilate
• Oxygen Saturation
• Palpation
• Reactivity
Copyright © 2016, 2012, 2009 by Pearson Education, Inc.
All Rights Reserved
Emergency Care, 13e
Daniel Limmer | Michael F. O'Keefe
Chapter Review
Copyright © 2016, 2012, 2009 by Pearson Education, Inc.
All Rights Reserved
Emergency Care, 13e
Daniel Limmer | Michael F. O'Keefe
Chapter Review
• You can gain a great deal of
information about a patient's condition
by taking a complete set of baseline
vital signs, including pulse,
respirations, skin, pupils, and blood
pressure.
continued on next slide
Copyright © 2016, 2012, 2009 by Pearson Education, Inc.
All Rights Reserved
Emergency Care, 13e
Daniel Limmer | Michael F. O'Keefe
Chapter Review
• The EMT must become familiar with
normal ranges for pulse, respirations,
and blood pressure in adults and
children.
• Trends in patient's condition will
become apparent only when vital signs
are repeated, an important step in
continuing assessment.
continued on next slide
Copyright © 2016, 2012, 2009 by Pearson Education, Inc.
All Rights Reserved
Emergency Care, 13e
Daniel Limmer | Michael F. O'Keefe
Chapter Review
• How often you repeat vital signs will
depend on patient's condition: at least
every 15 minutes for stable patients
and at least every 5 minutes for
unstable patients.
Copyright © 2016, 2012, 2009 by Pearson Education, Inc.
All Rights Reserved
Emergency Care, 13e
Daniel Limmer | Michael F. O'Keefe
Remember
• Consider if there is time to obtain vital
signs or if you must wait to obtain them
en route to the hospital.
• Consider when to apply a pulse
oximeter. Should you apply it to a
patient with difficulty breathing?
Without difficulty breathing?
continued on next slide
Copyright © 2016, 2012, 2009 by Pearson Education, Inc.
All Rights Reserved
Emergency Care, 13e
Daniel Limmer | Michael F. O'Keefe
Remember
• Consider whether abnormal vital signs
are a result of an illness or injury or the
result of some other factor.
Copyright © 2016, 2012, 2009 by Pearson Education, Inc.
All Rights Reserved
Emergency Care, 13e
Daniel Limmer | Michael F. O'Keefe
Questions to Consider
• Name the vital signs.
• Explain why vital signs should be taken
more than once.
• How much time should the EMT spend
looking for a pulse when the radial
pulse is absent or extremely weak?
continued on next slide
Copyright © 2016, 2012, 2009 by Pearson Education, Inc.
All Rights Reserved
Emergency Care, 13e
Daniel Limmer | Michael F. O'Keefe
Questions to Consider
• How should you react when the blood
pressure monitor gives a reading that is
extremely different from previous
readings?
• How can you get an accurate pulse
oximeter reading on a patient with
thick artificial nails?
Copyright © 2016, 2012, 2009 by Pearson Education, Inc.
All Rights Reserved
Emergency Care, 13e
Daniel Limmer | Michael F. O'Keefe
Critical Thinking
• Sometimes a patient's heart will have
an electrical problem and beat more
than 200 times a minute. Why is the
pulse so weak in such a patient?

Ch13 vital signs

  • 1.
    Emergency Care CHAPTER Copyright ©2016, 2012, 2009 by Pearson Education, Inc. All Rights Reserved Emergency Care, 13e Daniel Limmer | Michael F. O'Keefe THIRTEENTH EDITION Vital Signs and Monitoring Devices 13
  • 2.
    Copyright © 2016,2012, 2009 by Pearson Education, Inc. All Rights Reserved Emergency Care, 13e Daniel Limmer | Michael F. O'Keefe Topics • Gathering the Vital Signs • Vital Signs
  • 3.
    Copyright © 2016,2012, 2009 by Pearson Education, Inc. All Rights Reserved Emergency Care, 13e Daniel Limmer | Michael F. O'Keefe Gathering the Vital Signs
  • 4.
    Copyright © 2016,2012, 2009 by Pearson Education, Inc. All Rights Reserved Emergency Care, 13e Daniel Limmer | Michael F. O'Keefe Gathering the Vital Signs • Importance of vital signs  Outward signs of what is going on inside the body  Identify important conditions or trends in patient conditions  Gathered on virtually every EMS patient • Patient severity and treatment priorities may prevent acquisition.
  • 5.
    Copyright © 2016,2012, 2009 by Pearson Education, Inc. All Rights Reserved Emergency Care, 13e Daniel Limmer | Michael F. O'Keefe Vital Signs
  • 6.
    Copyright © 2016,2012, 2009 by Pearson Education, Inc. All Rights Reserved Emergency Care, 13e Daniel Limmer | Michael F. O'Keefe What Are Vital Signs? • Pulse • Respiration • Skin color, temperature, and condition (plus capillary refill in infants and children) • Pupils • Blood pressure continued on next slide
  • 7.
    Copyright © 2016,2012, 2009 by Pearson Education, Inc. All Rights Reserved Emergency Care, 13e Daniel Limmer | Michael F. O'Keefe What Are Vital Signs? • Baseline vital signs  First vital signs obtained • Repeat vital signs  Gain further information by establishing trends
  • 8.
    Copyright © 2016,2012, 2009 by Pearson Education, Inc. All Rights Reserved Emergency Care, 13e Daniel Limmer | Michael F. O'Keefe Pulse • Palpable pressure of heart beating, causing blood to move through arteries in waves continued on next slide
  • 9.
    Copyright © 2016,2012, 2009 by Pearson Education, Inc. All Rights Reserved Emergency Care, 13e Daniel Limmer | Michael F. O'Keefe Pulse • Can be felt by placing fingertip over artery where it lies close to body's surface and crosses over bone
  • 10.
    Copyright © 2016,2012, 2009 by Pearson Education, Inc. All Rights Reserved Emergency Care, 13e Daniel Limmer | Michael F. O'Keefe Pulse Assess pulse rate and quality. Count for 30 seconds and multiply by 2.
  • 11.
    Copyright © 2016,2012, 2009 by Pearson Education, Inc. All Rights Reserved Emergency Care, 13e Daniel Limmer | Michael F. O'Keefe Pulse Rate • Number of beats per minute • Normal rate for adult at rest is between 60 and 100 beats per minute. continued on next slide
  • 12.
    Copyright © 2016,2012, 2009 by Pearson Education, Inc. All Rights Reserved Emergency Care, 13e Daniel Limmer | Michael F. O'Keefe Pulse Rate • Tachycardia  Rate above 100 beats per minute is rapid. • Bradycardia  Rate below 60 beats per minute is considered slow. continued on next slide
  • 13.
    Copyright © 2016,2012, 2009 by Pearson Education, Inc. All Rights Reserved Emergency Care, 13e Daniel Limmer | Michael F. O'Keefe Pulse Rate • Above 120 beats or below 50 beats per minute is considered a serious finding. • During an emergency, it is not unusual for pulse rate to temporarily be between 100 and 140 beats.
  • 14.
    Copyright © 2016,2012, 2009 by Pearson Education, Inc. All Rights Reserved Emergency Care, 13e Daniel Limmer | Michael F. O'Keefe Think About It • What normal situations might account for a heart rate outside the normal range?
  • 15.
    Copyright © 2016,2012, 2009 by Pearson Education, Inc. All Rights Reserved Emergency Care, 13e Daniel Limmer | Michael F. O'Keefe Pulse Quality • Two factors determine pulse quality.  Rhythm • Reflects regularity • Regular when intervals between beats are constant • Irregular when intervals are not constant continued on next slide
  • 16.
    Copyright © 2016,2012, 2009 by Pearson Education, Inc. All Rights Reserved Emergency Care, 13e Daniel Limmer | Michael F. O'Keefe Pulse Quality • Two factors determine pulse quality.  Force • Pressure of pulse wave as it expands artery • Pulse should feel strong. • Thready • When pulse feels weak and thin continued on next slide
  • 17.
    Copyright © 2016,2012, 2009 by Pearson Education, Inc. All Rights Reserved Emergency Care, 13e Daniel Limmer | Michael F. O'Keefe Pulse Quality • Common pulse locations  Radial • Used in patients one year and older • Wrist pulse • Found by placing first three fingers on thumb side of patient's wrist just above the crease
  • 18.
    Copyright © 2016,2012, 2009 by Pearson Education, Inc. All Rights Reserved Emergency Care, 13e Daniel Limmer | Michael F. O'Keefe Radial Pulse Assess respiration rate and quality. Count for 30 seconds and multiply by 2.
  • 19.
    Copyright © 2016,2012, 2009 by Pearson Education, Inc. All Rights Reserved Emergency Care, 13e Daniel Limmer | Michael F. O'Keefe Pulse Quality • Common pulse locations  Brachial • Used in patients one year old or younger • Upper arm pulse
  • 20.
    Copyright © 2016,2012, 2009 by Pearson Education, Inc. All Rights Reserved Emergency Care, 13e Daniel Limmer | Michael F. O'Keefe Brachial Pulse Palpating a brachial pulse in an infant.
  • 21.
    Copyright © 2016,2012, 2009 by Pearson Education, Inc. All Rights Reserved Emergency Care, 13e Daniel Limmer | Michael F. O'Keefe Pulse Quality • Common pulse locations  Carotid • Felt along large carotid artery on either side of the neck continued on next slide
  • 22.
    Copyright © 2016,2012, 2009 by Pearson Education, Inc. All Rights Reserved Emergency Care, 13e Daniel Limmer | Michael F. O'Keefe Pulse Quality • Assessing pulse  Count pulsations for 30 seconds and multiply by 2.  If rate, rhythm, or force is not normal, continue with count for full 60 seconds.  Judge rhythm and force.
  • 23.
    Copyright © 2016,2012, 2009 by Pearson Education, Inc. All Rights Reserved Emergency Care, 13e Daniel Limmer | Michael F. O'Keefe Respiration • With regard to vital signs, respiration means the act of breathing in and out. • Measurement includes both rate and quality.
  • 24.
    Copyright © 2016,2012, 2009 by Pearson Education, Inc. All Rights Reserved Emergency Care, 13e Daniel Limmer | Michael F. O'Keefe Respiratory Rate • Number of breaths the patient takes in one minute • Rate of respiration is classified as normal, rapid, or slow. continued on next slide
  • 25.
    Copyright © 2016,2012, 2009 by Pearson Education, Inc. All Rights Reserved Emergency Care, 13e Daniel Limmer | Michael F. O'Keefe Respiratory Rate • Normal rate for adult at rest is between 12 and 20 breaths per minute. • Age, sex, size, physical conditioning, and emotional state influence breathing rates. • Rates above 24 breaths per minute (rapid) or below 8 breaths per minute (slow) are potentially serious findings.
  • 26.
    Copyright © 2016,2012, 2009 by Pearson Education, Inc. All Rights Reserved Emergency Care, 13e Daniel Limmer | Michael F. O'Keefe Respiratory Quality • Four categories  Normal  Shallow  Labored  Noisy
  • 27.
    Copyright © 2016,2012, 2009 by Pearson Education, Inc. All Rights Reserved Emergency Care, 13e Daniel Limmer | Michael F. O'Keefe Respiratory Rhythm • Count respirations after assessing pulse rate. • Count number of breaths taken over 30 seconds and multiply by 2. • Note rate, quality, and rhythm of respiration.
  • 28.
    Copyright © 2016,2012, 2009 by Pearson Education, Inc. All Rights Reserved Emergency Care, 13e Daniel Limmer | Michael F. O'Keefe Skin • Color, temperature, and condition of skin can provide valuable information regarding circulation continued on next slide
  • 29.
    Copyright © 2016,2012, 2009 by Pearson Education, Inc. All Rights Reserved Emergency Care, 13e Daniel Limmer | Michael F. O'Keefe Skin • Color  Best places to assess skin color • Nail beds • Inside of cheek • Inside of lower eyelids continued on next slide
  • 30.
    Copyright © 2016,2012, 2009 by Pearson Education, Inc. All Rights Reserved Emergency Care, 13e Daniel Limmer | Michael F. O'Keefe Skin • Color  Abnormal skin colors • Pale • Cyanotic (blue-gray) • Flushed (red) • Jaundiced (yellow) continued on next slide
  • 31.
    Copyright © 2016,2012, 2009 by Pearson Education, Inc. All Rights Reserved Emergency Care, 13e Daniel Limmer | Michael F. O'Keefe Skin • Temperature  Feel patient's skin with back of hand.  Note if skin feels normal (warm), hot, cool, or cold.
  • 32.
    Copyright © 2016,2012, 2009 by Pearson Education, Inc. All Rights Reserved Emergency Care, 13e Daniel Limmer | Michael F. O'Keefe Skin Temperature Determining skin temperature.
  • 33.
    Copyright © 2016,2012, 2009 by Pearson Education, Inc. All Rights Reserved Emergency Care, 13e Daniel Limmer | Michael F. O'Keefe Pediatric Note • For children under six years, also evaluate capillary refill.  Press on nail bed or top of hand or foot and release.  Observe how long it takes normal pink color to return.  Normal • Less than 2 seconds
  • 34.
    Copyright © 2016,2012, 2009 by Pearson Education, Inc. All Rights Reserved Emergency Care, 13e Daniel Limmer | Michael F. O'Keefe Pupils • Black center of eye • Dim environment  Pupil will dilate. • Bright environment  Pupil will constrict. continued on next slide
  • 35.
    Copyright © 2016,2012, 2009 by Pearson Education, Inc. All Rights Reserved Emergency Care, 13e Daniel Limmer | Michael F. O'Keefe Pupils • Assessing  Note baseline size.  Cover one eye and shine a light into other eye.  Repeat with other eye.
  • 36.
    Copyright © 2016,2012, 2009 by Pearson Education, Inc. All Rights Reserved Emergency Care, 13e Daniel Limmer | Michael F. O'Keefe Pupils • Assessing  Look for: • Size • Equality • Reactivity
  • 37.
    Copyright © 2016,2012, 2009 by Pearson Education, Inc. All Rights Reserved Emergency Care, 13e Daniel Limmer | Michael F. O'Keefe Assessing Pupils (A) Constricted, (B) dilated, and (C) unequal pupils.
  • 38.
    Copyright © 2016,2012, 2009 by Pearson Education, Inc. All Rights Reserved Emergency Care, 13e Daniel Limmer | Michael F. O'Keefe Assessing Pupils Unequal pupils can be a sign of the influence of a topical drug (one placed directly on the eye, such as an eye drop) or of head or eye injury. © Edward T. Dickinson, MD
  • 39.
    Copyright © 2016,2012, 2009 by Pearson Education, Inc. All Rights Reserved Emergency Care, 13e Daniel Limmer | Michael F. O'Keefe Blood Pressure • Force of blood against the walls of the blood vessels • Normal pressure  Systolic no greater than 120 mm Hg  Diastolic no greater than 80 mm Hg • Change can indicate something very significant. continued on next slide
  • 40.
    Copyright © 2016,2012, 2009 by Pearson Education, Inc. All Rights Reserved Emergency Care, 13e Daniel Limmer | Michael F. O'Keefe Blood Pressure • Measured with a sphygmomanometer and stethoscope  Cuff should cover two-thirds of upper arm, elbow to shoulder.
  • 41.
    Copyright © 2016,2012, 2009 by Pearson Education, Inc. All Rights Reserved Emergency Care, 13e Daniel Limmer | Michael F. O'Keefe Measuring Blood Pressure Positioning blood pressure cuff.
  • 42.
    Copyright © 2016,2012, 2009 by Pearson Education, Inc. All Rights Reserved Emergency Care, 13e Daniel Limmer | Michael F. O'Keefe Blood Pressure • Measured with a sphygmomanometer and stethoscope  Wrap cuff around patient's upper arm.  Lower edge of cuff placed about one inch above crease of elbow  Center of bladder placed over brachial artery
  • 43.
    Copyright © 2016,2012, 2009 by Pearson Education, Inc. All Rights Reserved Emergency Care, 13e Daniel Limmer | Michael F. O'Keefe Determining Blood Pressure by Auscultation • Prepare patient. • Position cuff and stethoscope.  Palpate brachial artery at crease of elbow.  Position stethoscope.  Position diaphragm of stethoscope directly over brachial pulse or medial anterior elbow.
  • 44.
    Copyright © 2016,2012, 2009 by Pearson Education, Inc. All Rights Reserved Emergency Care, 13e Daniel Limmer | Michael F. O'Keefe Determining Blood Pressure by Auscultation When measuring blood pressure by auscultation, locate the brachial artery by palpation before placing the stethoscope.
  • 45.
    Copyright © 2016,2012, 2009 by Pearson Education, Inc. All Rights Reserved Emergency Care, 13e Daniel Limmer | Michael F. O'Keefe Determining Blood Pressure by Auscultation • Inflate cuff.  Listen and inflate until gauge reads 30 mm higher than the point the pulse sound disappeared. • Obtain systolic pressure.  Slowly release air from cuff.  When you hear the first of these sounds, note the reading on gauge. continued on next slide
  • 46.
    Copyright © 2016,2012, 2009 by Pearson Education, Inc. All Rights Reserved Emergency Care, 13e Daniel Limmer | Michael F. O'Keefe Determining Blood Pressure by Auscultation • Obtain diastolic pressure.  Continue to deflate cuff.  When sounds turn to dull, muffled thuds, the reading on the gauge is diastolic pressure. • Record measurements. continued on next slide
  • 47.
    Copyright © 2016,2012, 2009 by Pearson Education, Inc. All Rights Reserved Emergency Care, 13e Daniel Limmer | Michael F. O'Keefe Determining Blood Pressure by Palpation • Position cuff and find radial pulse. • Inflate cuff. • Obtain and record systolic pressure.  Slowly deflate cuff.  Note reading when radial pulse returns (systolic pressure).
  • 48.
    Copyright © 2016,2012, 2009 by Pearson Education, Inc. All Rights Reserved Emergency Care, 13e Daniel Limmer | Michael F. O'Keefe Pediatric Note • Difficult to obtain on infants and children younger than three years • More useful information about the condition of an infant or very young child comes from observing for conditions such as sick appearance, respiratory distress, or unconsciousness
  • 49.
    Copyright © 2016,2012, 2009 by Pearson Education, Inc. All Rights Reserved Emergency Care, 13e Daniel Limmer | Michael F. O'Keefe Determining Blood Pressure by Blood Pressure Monitor • Position the cuff. • Inflate the cuff. • Obtain and record the systolic pressure.  Slowly deflate the cuff.
  • 50.
    Copyright © 2016,2012, 2009 by Pearson Education, Inc. All Rights Reserved Emergency Care, 13e Daniel Limmer | Michael F. O'Keefe Temperature • Narrow range of temperature allows chemical reactions and other activities to take place inside the body. • Core temperature reflects level of heat inside trunk. continued on next slide
  • 51.
    Copyright © 2016,2012, 2009 by Pearson Education, Inc. All Rights Reserved Emergency Care, 13e Daniel Limmer | Michael F. O'Keefe Temperature • Normal temperature depends on:  Time of day  Activity level  Age  Where measured
  • 52.
    Copyright © 2016,2012, 2009 by Pearson Education, Inc. All Rights Reserved Emergency Care, 13e Daniel Limmer | Michael F. O'Keefe Temperature An electronic thermometer is safer, more hygienic, and quicker to produce a reading than a glass thermometer.
  • 53.
    Copyright © 2016,2012, 2009 by Pearson Education, Inc. All Rights Reserved Emergency Care, 13e Daniel Limmer | Michael F. O'Keefe Oxygen Saturation • Measurement of proportion of oxygen attached to hemoglobin • Measured with pulse oximeter
  • 54.
    Copyright © 2016,2012, 2009 by Pearson Education, Inc. All Rights Reserved Emergency Care, 13e Daniel Limmer | Michael F. O'Keefe When to Use a Pulse Oximeter • Protocol depends on institution. • Generally includes all patients complaining of respiratory problems or otherwise at risk for hypoxia
  • 55.
    Copyright © 2016,2012, 2009 by Pearson Education, Inc. All Rights Reserved Emergency Care, 13e Daniel Limmer | Michael F. O'Keefe Oxygen Saturation A pulse oximeter with sensor applied to the patient's finger.
  • 56.
    Copyright © 2016,2012, 2009 by Pearson Education, Inc. All Rights Reserved Emergency Care, 13e Daniel Limmer | Michael F. O'Keefe Interpreting Pulse Oximeter Readings • Normal  96 to 100 percent • Mild hypoxia  91 to 95 percent • Significant or moderate hypoxia  86 to 90 percent • Severe hypoxia  85 percent or less continued on next slide
  • 57.
    Copyright © 2016,2012, 2009 by Pearson Education, Inc. All Rights Reserved Emergency Care, 13e Daniel Limmer | Michael F. O'Keefe Interpreting Pulse Oximeter Readings • Accuracy of reading can be affected by:  Shock, hypothermia  Carbon monoxide  Certain other uncommon types of poisoning  Excessive movement  Nail polish  Anemia
  • 58.
    Copyright © 2016,2012, 2009 by Pearson Education, Inc. All Rights Reserved Emergency Care, 13e Daniel Limmer | Michael F. O'Keefe Blood Glucose Meters • Measures quantity of glucose in the bloodstream • Can help identify some diabetic emergencies
  • 59.
    Copyright © 2016,2012, 2009 by Pearson Education, Inc. All Rights Reserved Emergency Care, 13e Daniel Limmer | Michael F. O'Keefe Blood Glucose Monitor Many EMS systems allow EMTs to use blood glucose meters that are carried on the ambulance.
  • 60.
    Copyright © 2016,2012, 2009 by Pearson Education, Inc. All Rights Reserved Emergency Care, 13e Daniel Limmer | Michael F. O'Keefe Using a Blood Glucose Meter • Permission from medical direction or by local protocol is required to perform blood glucose monitoring using a blood glucose meter • Monitors must be calibrated and stored according to manufacturer's recommendations continued on next slide
  • 61.
    Copyright © 2016,2012, 2009 by Pearson Education, Inc. All Rights Reserved Emergency Care, 13e Daniel Limmer | Michael F. O'Keefe Using a Blood Glucose Meter 1. Prepare device, test strip, and lancet 2. Cleanse patient's finger with alcohol 3. Perform finger stick with lancet 4. Apply blood to test strip 5. Use glucose meter to analyze sample and provide reading continued on next slide
  • 62.
    Copyright © 2016,2012, 2009 by Pearson Education, Inc. All Rights Reserved Emergency Care, 13e Daniel Limmer | Michael F. O'Keefe Using a Blood Glucose Meter • Normal levels  Usually at least 60 to 80 mg/dL  No more than 120 or 140 mg/dL
  • 63.
    Copyright © 2016,2012, 2009 by Pearson Education, Inc. All Rights Reserved Emergency Care, 13e Daniel Limmer | Michael F. O'Keefe Pediatric Note • Age is one of the most important factors determining normal range. • Infants and children have faster pulse and respiratory rates, and lower blood pressures than adults.
  • 64.
    Copyright © 2016,2012, 2009 by Pearson Education, Inc. All Rights Reserved Emergency Care, 13e Daniel Limmer | Michael F. O'Keefe Health and Physical Assessment: Vital Signs Video Click on the screenshot to view a video on the subject of assessing vital signs. Back to Directory
  • 65.
    Copyright © 2016,2012, 2009 by Pearson Education, Inc. All Rights Reserved Emergency Care, 13e Daniel Limmer | Michael F. O'Keefe Patient Assessment Skills: Blood Pressure Video Click on the screenshot to view a video on the topic of assessing blood pressure. Back to Directory
  • 66.
    Copyright © 2016,2012, 2009 by Pearson Education, Inc. All Rights Reserved Emergency Care, 13e Daniel Limmer | Michael F. O'Keefe Vocabulary • Auscultation • Constrict • Dilate • Oxygen Saturation • Palpation • Reactivity
  • 67.
    Copyright © 2016,2012, 2009 by Pearson Education, Inc. All Rights Reserved Emergency Care, 13e Daniel Limmer | Michael F. O'Keefe Chapter Review
  • 68.
    Copyright © 2016,2012, 2009 by Pearson Education, Inc. All Rights Reserved Emergency Care, 13e Daniel Limmer | Michael F. O'Keefe Chapter Review • You can gain a great deal of information about a patient's condition by taking a complete set of baseline vital signs, including pulse, respirations, skin, pupils, and blood pressure. continued on next slide
  • 69.
    Copyright © 2016,2012, 2009 by Pearson Education, Inc. All Rights Reserved Emergency Care, 13e Daniel Limmer | Michael F. O'Keefe Chapter Review • The EMT must become familiar with normal ranges for pulse, respirations, and blood pressure in adults and children. • Trends in patient's condition will become apparent only when vital signs are repeated, an important step in continuing assessment. continued on next slide
  • 70.
    Copyright © 2016,2012, 2009 by Pearson Education, Inc. All Rights Reserved Emergency Care, 13e Daniel Limmer | Michael F. O'Keefe Chapter Review • How often you repeat vital signs will depend on patient's condition: at least every 15 minutes for stable patients and at least every 5 minutes for unstable patients.
  • 71.
    Copyright © 2016,2012, 2009 by Pearson Education, Inc. All Rights Reserved Emergency Care, 13e Daniel Limmer | Michael F. O'Keefe Remember • Consider if there is time to obtain vital signs or if you must wait to obtain them en route to the hospital. • Consider when to apply a pulse oximeter. Should you apply it to a patient with difficulty breathing? Without difficulty breathing? continued on next slide
  • 72.
    Copyright © 2016,2012, 2009 by Pearson Education, Inc. All Rights Reserved Emergency Care, 13e Daniel Limmer | Michael F. O'Keefe Remember • Consider whether abnormal vital signs are a result of an illness or injury or the result of some other factor.
  • 73.
    Copyright © 2016,2012, 2009 by Pearson Education, Inc. All Rights Reserved Emergency Care, 13e Daniel Limmer | Michael F. O'Keefe Questions to Consider • Name the vital signs. • Explain why vital signs should be taken more than once. • How much time should the EMT spend looking for a pulse when the radial pulse is absent or extremely weak? continued on next slide
  • 74.
    Copyright © 2016,2012, 2009 by Pearson Education, Inc. All Rights Reserved Emergency Care, 13e Daniel Limmer | Michael F. O'Keefe Questions to Consider • How should you react when the blood pressure monitor gives a reading that is extremely different from previous readings? • How can you get an accurate pulse oximeter reading on a patient with thick artificial nails?
  • 75.
    Copyright © 2016,2012, 2009 by Pearson Education, Inc. All Rights Reserved Emergency Care, 13e Daniel Limmer | Michael F. O'Keefe Critical Thinking • Sometimes a patient's heart will have an electrical problem and beat more than 200 times a minute. Why is the pulse so weak in such a patient?

Editor's Notes

  • #3 Planning Your Time: Plan 50 minutes for this chapter. Gathering the Vital Signs (10 minutes) Vital Signs (40 minutes) Note: The total teaching time recommended is only a guideline. Core Concepts: How to obtain vital signs, including pulse, respirations, blood pressure, skin, temperature, and pupils How to document vital signs on a prehospital care report How to use various monitoring devices
  • #4 Teaching Time: 10 minutes Teaching Tips: Describe the consequences of not obtaining vital signs. Use real-world examples. Describe specific treatment scenarios that prevent assessment of vital signs. Emphasize that these scenarios are the exception and that they come with consequences.
  • #5 Covers Objective: 13.3 Points to Emphasize: Whenever possible, EMTs should obtain vital signs on every patient. Occasionally, emergency treatment will prevent obtaining a full set of vital signs. Discussion Topics: Discuss why it is important to obtain vital signs on every patient. Describe a specific treatment that might prevent you from obtaining a full set of vital signs. Knowledge Application: Discuss the importance of vital signs. Ask students to brainstorm why these signs are important. List the responses. Present a variety of verbal scenarios. Ask the class whether the treatments detailed in the scenarios would interfere with the assessment of vital signs. Discuss why and what the consequences might be. Critical Thinking: You are assessing a 72-year-old man who had a "fainting spell." He is refusing care, and he tells you that he does not want you to take his vital signs. What do you do? Why might vitals be particularly important for this patient?
  • #6 Teaching Time: 40 minutes Teaching Tips: Teach the technique of measuring vital signs in this lesson, but continue practicing it throughout the class. Instead of verbalizing vitals in scenarios and practice, require students actually to obtain them. Relate vital signs to previous discussions of anatomy and physiology. Add meaning to these technical skills. Practice, practice, practice! Repetition of obtaining normal vital signs will improve students' ability to obtain abnormal vital signs.
  • #7 Covers Objective: 13.2 Point to Emphasize: Evaluation of pulse, respiration, skin, pupils, and blood pressure provides a valuable baseline assessment tool. Class Activity: Throughout this chapter, have students take the vital signs of the student seated next to them.
  • #8 Covers Objective: 13.2
  • #9 Covers Objective: 13.6a Point to Emphasize: Evaluate both rate and quality when assessing the pulse. Discussion Topic: Explain how a pulse is created.
  • #10 Covers Objective: 13.6a
  • #11 Covers Objective: 13.6a
  • #12 Covers Objective: 13.6a
  • #13 Covers Objective: 13.6a
  • #14 Covers Objective: 13.6a
  • #15 Covers Objective: 13.8 Talking Points: For fast heart rates consider the level of exercise or anxiety. Either of those situations could increase heart rate in a benign fashion. For slow rates also consider level of activity and level of physical fitness. Athletes often normally have a slow heart rate.
  • #16 Covers Objective: 13.6a
  • #17 Covers Objective: 13.6a
  • #18 Covers Objective: 13.6a, 13.9
  • #19 Covers Objective: 13.6a
  • #20 Covers Objective: 13.9
  • #21 Covers Objective: 13.9
  • #22 Covers Objective: 13.6a Talking Points: Be careful when palpating a carotid pulse. Excessive pressure on the carotid artery can result in slowing of the heart, especially in older patients. If you have difficulty finding the carotid pulse on one side, try the other side, but do not assess the carotid pulses on both sides at the same time.
  • #23 Covers Objective: 13.6a Knowledge Application: Create a county fair. Set up multiple "booths" for students to visit. At each booth, the student will be asked to obtain a different vital sign. Practice and log variations such as brachial pulses and palpated blood pressures.
  • #24 Covers Objective: 13.6b Point to Emphasize: Evaluate rate, quality, and rhythm when assessing respirations.
  • #25 Covers Objective: 13.6b
  • #26 Covers Objective: 13.6b
  • #27 Covers Objective: 13.6b
  • #28 Covers Objective: 13.6b Discussion Topic: Describe the technique of evaluating respirations. Knowledge Application: If equipment permits, assign each student twenty vital signs as homework. In this exercise, each student must obtain and log the vital signs of twenty different people.
  • #29 Covers Objective: 13.6c Point to Emphasize: Assessing the skin can provide information regarding the cardiovascular system. Discussion Topic: Discuss how assessment of the skin relates to the patient's cardiovascular system.
  • #30 Covers Objective: 13.6c Talking Points: These sites are typically consistent even in patients with dark skin tones.
  • #31 Covers Objective: 13.6c
  • #32 Covers Objective: 13.6c
  • #33 Covers Objective: 13.6c
  • #34 Covers Objective: 13.6c Talking Points: Delayed capillary refill can indicate poor circulation. Remember that cold temperatures can cause delayed capillary refill times as well.
  • #35 Covers Objective: 13.6d
  • #36 Covers Objective: 13.6d Talking Points: The pupil should constrict when a light is shining into it and enlarge when you remove the light. Pupils that are dilated, constricted to pinpoint size, unequal in size or reactivity, or nonreactive may indicate a variety of conditions; the influence of a topical drug (one placed directly on the eye, such as an eye drop) or of head or eye injury.
  • #37 Covers Objective: 13.6d
  • #38 Covers Objective: 13.6d Discussion Topic: Describe the potential medical conditions that relate to abnormal pupil findings.
  • #39 Covers Objective: 13.6d Discussion Topic: Describe the potential medical conditions that relate to abnormal pupil findings.
  • #40 Covers Objective: 13.6e Point to Emphasize: Blood pressure is more valuable when measured in a trend. Single blood pressure measurements typically do not tell the complete story. Discussion Topic: Define blood pressure.
  • #41 Covers Objective: 13.6e
  • #42 Covers Objective: 13.6e
  • #43 Covers Objective: 13.6e
  • #44 Covers Objective: 13.6e
  • #45 Covers Objective: 13.6e
  • #46 Covers Objective: 13.6e
  • #47 Covers Objective: 13.6e
  • #48 Covers Objective: 13.6e Talking Points: Inflate the cuff until you can no longer feel the radial pulse and continue to inflate the cuff 30 mmHg beyond this point.
  • #49 Covers Objective: 13.9
  • #50 Covers Objective: 13.6e Talking Points: Inflate the cuff until you can no longer feel the radial pulse and continue to inflate the cuff 30 mmHg beyond this point.
  • #51 Covers Objective: 13.6c
  • #52 Covers Objective: 13.6c Class Activity: Take a field trip. Visit a local nursing home or day care center to obtain vital signs on different types of patients. Knowledge Application: Use programmed patients to include vital signs in assessment scenarios. Include situations in which treatments might take priority.
  • #53 Covers Objective: 13.6c Class Activity: Take a field trip. Visit a local nursing home or day care center to obtain vital signs on different types of patients. Knowledge Application: Use programmed patients to include vital signs in assessment scenarios. Include situations in which treatments might take priority.
  • #54 Covers Objective: 13.6f
  • #55 Covers Objective: 13.6f
  • #56 Covers Objective: 13.6f
  • #57 Covers Objective: 13.6f Talking Points: A reading above 96 percent does not mean you should withhold oxygen from a patient with signs and symptoms that indicate the need for oxygen.
  • #58 Covers Objective: 13.6f
  • #59 Covers Objective: 13.6g
  • #60 Covers Objective: 13.6g
  • #61 Covers Objective: 13.6g
  • #62 Covers Objective: 13.6g
  • #63 Covers Objective: 13.6g Talking Points: Chapter 19, "Diabetic Emergencies and Altered Mental Status," discusses how to interpret this information and apply it to the care of a patient.
  • #64 Covers Objective: 13.9
  • #65 Covers Objective: 13.3 Video Clip Health and Physical Assessment: Vital Signs Are medical records public documents? Discuss why an EMT should document a patient's weight. What vital signs should be provided to a physician? List some activities that may affect a temperature reading taken with a glass thermometer. When an EMT takes a blood pressure, what is he measuring? What should an EMT do if he obtains an unusual blood pressure reading? What sounds should the EMT listen for when assessing a patient's blood pressure?
  • #66 Covers Objective: 13.6e Video Clip Blood Pressure Assessment Describe the ways you can obtain a blood pressure. Where should an EMT apply a blood pressure cuff? Under what situations would you palpate a blood pressure? How do you record blood pressure recordings from palpation?
  • #74 Talking Points: Vital signs include pulse, respirations, blood pressure, skin quality, mental status, pulse oximetry, and pupils. Obtaining more than one set of vital signs allows you to identify trends of either improvement or deterioration. The American Heart Association notes that you should look for a pulse for no more than 10 seconds. If it is difficult to feel, it may not be there.
  • #75 Talking Points: Blood pressure monitors are sometimes inaccurate. You should trust the trend and obtain a manual pressure to confirm. If possible, remove the nails. If this is impossible, consider an alternate site for the pulse oximetry probe; perhaps an earlobe or a toe. Always follow manufacturer's recommendations for your monitor.
  • #76 Talking Points: Fast heart rates can prevent filling of the heart. With this drop in preload, cardiac output also suffers. If little blood is being ejected from the heart, pressure will not be normal and pulse will be weak.