The document provides guidance on photographing artwork to share with others in an art course. It discusses common problems with photographing artwork and offers solutions, such as ensuring even and consistent lighting without shadows, adjusting the white balance if colors appear off, and making sure the entire artwork is in focus within the frame. Proper photographing techniques are described to accurately represent the artwork.
A short workshop presentation by Beata Staszyńska-Hansen and me on taking pictures for our partners in the Social Heritage STEM from European heritage Erasmus+ project. In the presentation, we combined insights about the brain with insights from film theory. The bottom line of the presentation is that if we do not provide our viewers with appropriate clues they will start fantasizing or being bored.
#Citizen2014 Photo Workshop (Photo Basics and Concept Photography)Kieran Hamilton
Slides for the #Citizen2014 Photo basics workshop, focusing on composition, light, patterns and lines, avoiding blur and using focus and a brief overview of concept photography.
What opportunities does a city block have for creating street portraits? This presentation contains the images and information covered in a two-hour photography workshop by Street Photography University in Dallas, Texas
Photography for Joomla!, presented at JUGT 9 December 2014DouglasPickett
Hints and tips on how to take photographs, prepare them for and use them on your Joomla! website. Don't restrict yourself to using just stock images, create your own and help your website stand out from the crowd.
2137ad - Characters that live in Merindol and are at the center of main storiesluforfor
Kurgan is a russian expatriate that is secretly in love with Sonia Contado. Henry is a british soldier that took refuge in Merindol Colony in 2137ad. He is the lover of Sonia Contado.
2137ad Merindol Colony Interiors where refugee try to build a seemengly norm...luforfor
This are the interiors of the Merindol Colony in 2137ad after the Climate Change Collapse and the Apocalipse Wars. Merindol is a small Colony in the Italian Alps where there are around 4000 humans. The Colony values mainly around meritocracy and selection by effort.
Explore the multifaceted world of Muntadher Saleh, an Iraqi polymath renowned for his expertise in visual art, writing, design, and pharmacy. This SlideShare delves into his innovative contributions across various disciplines, showcasing his unique ability to blend traditional themes with modern aesthetics. Learn about his impactful artworks, thought-provoking literary pieces, and his vision as a Neo-Pop artist dedicated to raising awareness about Iraq's cultural heritage. Discover why Muntadher Saleh is celebrated as "The Last Polymath" and how his multidisciplinary talents continue to inspire and influence.
Hadj Ounis's most notable work is his sculpture titled "Metamorphosis." This piece showcases Ounis's mastery of form and texture, as he seamlessly combines metal and wood to create a dynamic and visually striking composition. The juxtaposition of the two materials creates a sense of tension and harmony, inviting viewers to contemplate the relationship between nature and industry.
1. Photographing
Artwork
You
will
need
to
photograph
your
artwork
in
order
to
share
it
with
other
individual
who
are
participating
in
this
course.
Taking
good
photographs
of
your
artwork
is
important
so
other
people
can
understand
what
you
have
made.
This
guide
is
intended
to
help
you
identify
and
fix
some
of
the
most
common
problems
with
photographing
your
artwork.
It
is
not
difficult
to
take
good
pictures
of
your
artwork
if
you
are
careful
and
attentive
to
what
you
are
doing.
Most
common
problems
are
the
same
for
photographing
both
two
and
three-‐dimensional
work.
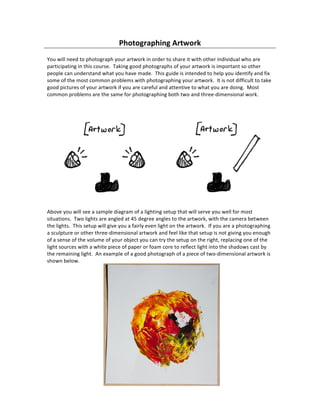
Above
you
will
see
a
sample
diagram
of
a
lighting
setup
that
will
serve
you
well
for
most
situations.
Two
lights
are
angled
at
45
degree
angles
to
the
artwork,
with
the
camera
between
the
lights.
This
setup
will
give
you
a
fairly
even
light
on
the
artwork.
If
you
are
a
photographing
a
sculpture
or
other
three-‐dimensional
artwork
and
feel
like
that
setup
is
not
giving
you
enough
of
a
sense
of
the
volume
of
your
object
you
can
try
the
setup
on
the
right,
replacing
one
of
the
light
sources
with
a
white
piece
of
paper
or
foam
core
to
reflect
light
into
the
shadows
cast
by
the
remaining
light.
An
example
of
a
good
photograph
of
a
piece
of
two-‐dimensional
artwork
is
shown
below.
2.
Troubleshooting
photographs
of
art
Is
the
artwork
evenly
lit?
If
not,
adjust
the
position
of
your
light
or
artwork
so
that
shadows
aren’t
cast
on
it.
Avoid
using
your
flash,
as
this
often
causes
glare.
Good
sources
of
light
include
photographing
outside
on
a
cloudy
day,
in
a
fully
shaded
area
on
a
sunny
day,
or
indoors
with
lamps
that
are
not
too
close
and
are
not
at
a
harsh
angle
to
the
artwork.
Does
your
artwork
appear
the
right
color?
If
not,
you
will
need
to
adjust
white
balance.
Check
your
camera
manual
for
how
to
do
that.
You
will
need
to
adjust
your
white
balance
if
your
artwork
appears
too
yellow,
blue,
or
green.
If
only
one
part
of
your
artwork
appears
to
be
the
wrong
color,
check
to
make
sure
that
you
aren’t
getting
stray
light
from
another
light
source.
You
can
see
an
example
of
mixed
light
sources
in
the
leftmost
image
in
the
section
about
even
lighting
above.
Different
sources
of
light
(light
bulbs,
daylight,
fluorescent
lights)
are
different
colors,
and
mixing
them
may
cause
color
problems.
You
need
to
evenly
light
your
artwork
with
one
kind
of
light.
3.
Is
your
artwork
too
dark
or
too
light?
You
will
want
the
photograph
to
be
in
an
appropriate
range
to
see
detail.
Most
cameras
have
a
control
called
exposure
compensation
to
correct
for
problems
with
exposure.
Check
your
camera
manual
for
how
to
use
this
function
if
you
have
problems
with
the
image
being
too
dark
or
light.
Can
you
see
the
whole
artwork?
Is
the
camera
square
to
the
artwork?
If
you
are
photographing
a
two
dimensional
artwork,
be
sure
that
you
are
including
the
whole
artwork
in
the
frame.
Choose
a
background
that
is
not
distracting
(another
piece
of
paper,
a
piece
of
cardboard,
non-‐patterned
carpet,
or
something
like
that).
Avoid
patterned
or
distracting
backgrounds.
If
you
have
an
artwork
that
is
made
of
black
wire
or
something
like
that,
you
will
want
to
photograph
it
in
front
of
something
light
that
is
not
distracting.
Do
not
photograph
your
two
dimensional
artwork
from
the
side
or
from
another
oblique
angle.
You
need
to
accurately
represent
what
is
in
front
of
you
so
others
can
see
it
clearly.
4.
Is
the
artwork
in
focus?
Try
zooming
in
to
a
small
section
of
your
image
on
your
camera
or
computer
and
make
sure
it
is
in
focus.
Artwork
can
appear
blurry
either
from
the
camera
not
focusing
properly
or
from
movement
during
the
picture
taking
process.
Generally,
blur
from
movement
will
look
smeared
(like
the
image
on
the
right
above).
Blur
from
the
lens
focusing
incorrectly
will
just
look
blurry
(like
the
image
on
the
left
above).
If
you
have
blur
from
movement,
use
a
tripod,
stabilize
the
camera
against
a
steady
surface,
or
use
a
brighter
source
of
light
to
reduce
blur.