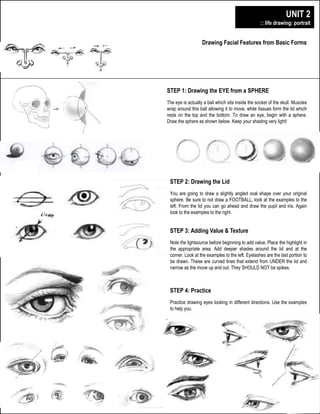
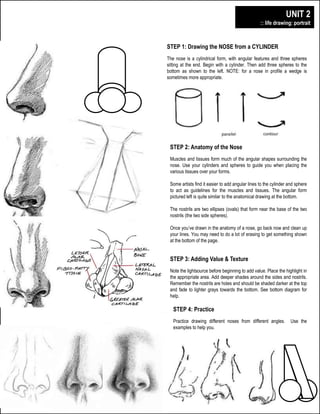
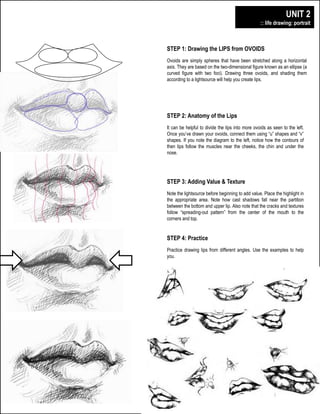
digital illustration + design 
project 2: portraiture 
plainfield central – mr. lawler art + design 
1
digital illustration + design 
Drawing Facial Features from Basic Forms 
plainfield central – mr. lawler art + design 
UNIT 2 
:: life drawing: portrait 
STEP 1: Drawing the EYE from a SPHERE 
The eye is actually a ball which sits inside the socket of the skull. Muscles 
wrap around this ball allowing it to move, while tissues form the lid which 
rests on the top and the bottom. To draw an eye, begin with a sphere. 
Draw the sphere as shown below. Keep your shading very light! 
STEP 2: Drawing the Lid 
You are going to draw a slightly angled oval shape over your original 
sphere. Be sure to not draw a FOOTBALL, look at the examples to the 
left. From the lid you can go ahead and draw the pupil and iris. Again 
look to the examples to the right. 
STEP 3: Adding Value & Texture 
Note the lightsource before beginning to add value. Place the highlight in 
the appropriate area. Add deeper shades around the lid and at the 
corner. Look at the examples to the left. Eyelashes are the last portion to 
be drawn. These are curved lines that extend from UNDER the lid and 
narrow as the move up and out. They SHOULD NOT be spikes. 
STEP 4: Practice 
Practice drawing eyes looking in different directions. Use the examples 
to help you.
digital illustration + design 
plainfield central – mr. lawler art + design 
UNIT 2 
:: life drawing: portrait 
STEP 1: Drawing the NOSE from a CYLINDER 
The nose is a cylindrical form, with angular features and three spheres 
sitting at the end. Begin with a cylinder. Then add three spheres to the 
bottom as shown to the left. NOTE: for a nose in profile a wedge is 
sometimes more appropriate. 
STEP 2: Anatomy of the Nose 
Muscles and tissues form much of the angular shapes surrounding the 
nose. Use your cylinders and spheres to guide you when placing the 
various tissues over your forms. 
Some artists find it easier to add angular lines to the cylinder and sphere 
to act as guidelines for the muscles and tissues. The angular form 
pictured left is quite similar to the anatomical drawing at the bottom. 
The nostrils are two ellipses (ovals) that form near the base of the two 
nostrils (the two side spheres). 
Once you’ve drawn in the anatomy of a nose, go back now and clean up 
your lines. You may need to do a lot of erasing to get something shown 
at the bottom of the page. 
STEP 3: Adding Value & Texture 
Note the lightsource before beginning to add value. Place the highlight in 
the appropriate area. Add deeper shades around the sides and nostrils. 
Remember the nostrils are holes and should be shaded darker at the top 
and fade to lighter grays towards the bottom. See bottom diagram for 
help. 
STEP 4: Practice 
Practice drawing different noses from different angles. Use the 
examples to help you. 
z
digital illustration + design 
plainfield central – mr. lawler art + design 
UNIT 2 
:: life drawing: portrait 
STEP 1: Drawing the LIPS from OVOIDS 
Ovoids are simply spheres that have been stretched along a horizontal 
axis. They are based on the two-dimensional figure known as an ellipse (a 
curved figure with two foci). Drawing three ovoids, and shading them 
according to a lightsource will help you create lips. 
STEP 2: Anatomy of the Lips 
It can be helpful to divide the lips into more ovoids as seen to the left. 
Once you’ve drawn your ovoids, connect them using “u” shapes and “v” 
shapes. If you note the diagram to the left, notice how the contours of 
then lips follow the muscles near the cheeks, the chin and under the 
nose. 
STEP 3: Adding Value & Texture 
Note the lightsource before beginning to add value. Place the highlight in 
the appropriate area. Note how cast shadows fall near the partition 
between the bottom and upper lip. Also note that the cracks and textures 
follow “spreading-out pattern” from the center of the mouth to the 
corners and top. 
STEP 4: Practice 
Practice drawing lips from different angles. Use the examples to help 
you.
digital illustration + design 
plainfield central – mr. lawler art + design 
UNIT 2 
:: life drawing: portrait 
STEP 1: Drawing EARS from LINES & SHAPES 
Unlike the other facial features ears are less easily broken down into 
basic forms. Rather a series of curved lines helps in creating a basis. 
Started with a “lowercase g” –like curve, and from that build spiraling lines 
outward. Note the overlapping lines. It can be easier to start from a more 
geometric shape as seen below. 
STEP 2: Placement & Size of Ears 
The ear is made up of a series of folds and curves. Use the anatomy to 
help ensure that your drawings are accurate. Also remember that ears 
are proportionate to the placement of the eyes, the nose and the mouth. 
STEP 3: Adding Value & Texture 
Note the lightsource before beginning to add value. Place the highlight in 
the appropriate area. The ear is shaded by a series of cast shadows. 
These are created by the different folds. Note the diagram below to help 
you build value. 
STEP 4: Practice 
Practice drawing ears from different angles. Use the examples to help 
you.
digital illustration + design 
Pen Tablet Basics 
A pen tablet is a computer input device 
that allows one to draw images and 
graphics using a pen in the same way we 
draw with a pen on a paper and is used by 
computer artists to create stunning digital 
artworks directly on the computer. This 
tutorial will teach you how to setup a 
newly purchased pen tablet using 
Windows Vista and then configure it to run 
well on Photoshop. 
1. Before getting using the tablet on 
programs, you are going to need to 
setup some setting to use the tablet's 
pen more conveniently. A new folder is 
usually created in your Programs Menu 
that contains tablet preferences 
programs installed in the previous step. 
For Wacom Tablet users, open up the 
program which brings up the Tablet's 
Properties and the pen tablet's settings 
window should appear. 
2. Configuration settings will differ from 
one tablet to another, however, the 
most important feature that you need 
to play around with is the Tip Feel or 
what is occasionally called the 
Firmness. You will need to configure 
this property to determine how hard 
you have to press to make a thick line 
when you draw. The higher the firm the 
feel the more harder you have to press 
to make your lines thicker, the lower 
the firmness (more softness) the easier 
it is for you to get a thicker line when 
you draw. 
plainfield central – mr. lawler art + design
digital illustration + design 
Adjusting Settings in PSD 
Even if you do configure the global settings 
of your pen tablet, Photoshop will have to 
be configured personally to actually make 
use it. To do so, open up Adobe Photoshop 
and then create a New Document of any 
size by going through File>New. Go 
through Window>Brushes to open up the 
Brushes Panel and click on Shape 
Dynamics. You will then have to change the 
Control under Size Jitter to Pen Pressure 
and that should do it! 
1. If you now try to draw using any of the 
brushes you will notice that the line 
gets thicker the harder you press the 
pen against the tablet. The screenshot 
below explains how the lines thicken 
when more pressure is applied using an 
Air Brush of 20px diameter. 
2. Here is an example of how is this 
technique differs from normal brush 
settings using the same 20px Air Brush. 
3. These were the essentials for getting 
your tablet working with Photoshop. 
Always remember that mastering the 
pen table will require plenty of practice 
and like any other skill, so do keep on 
drawing regularly to shape up your 
talent! 
plainfield central – mr. lawler art + design
digital illustration + design 
Trace an Image in PSD 
Tracing Using Pen Tablet (Method 1) 
1. Place the image on top of the tablet. 
2. Create a new file on which to create your tracing. 
3. Select the Pen tool from the Tools palette, and then select the 
Freeform Pen tool from the fly-out menu options. Ensure the 
Paths option is selected in the Options Bar as opposed to the 
Shape Layers option. 
4. Use your pen to trace the lines of your chosen image. Notice the 
new Path appear in the Paths palette. To open the Paths palette, 
go to Window, and ensure the Paths option is checked. 
5. When you have finished tracing the image. Select the image path 
by clicking on it in the Paths palette. Click the *Load Path as a 
Selections* to create marching ants around the image path. 
6. Create a New Layer and then, stroke the path. Edit>Stroke. 
Tracing Using Pen Tablet (Method 2) 
1. Open a PHOTO in PHOTOSHOP 
2. change BACKGROUND LAYER to LAYER 0 by unlocking the image 
3. lower the OPACITY to 50% 
4. make a NEW BLANK LAYER 
5. using the PAINTBRUSH TOOL to trace over the image while using 
the PEN TABLET 
Tracing Using PhotoShop 
1. Open a PHOTO in PHOTOSHOP 
2. Turn image GRAYSCALE (IMAGE  MODE  GRAYSCALE) 
3. DUPLICATE LAYER 
4. CTR+I (IMAGE  ADJUST  INVERT) 
5. Change LAYER BLENDING MODE to COLOR DODGE 
6. FILTER  BLUR  GAUSSIAN BLUR 
plainfield central – mr. lawler art + design

DID Unit 2: Exercises

  • 1.
    digital illustration +design project 2: portraiture plainfield central – mr. lawler art + design 1
  • 2.
    digital illustration +design Drawing Facial Features from Basic Forms plainfield central – mr. lawler art + design UNIT 2 :: life drawing: portrait STEP 1: Drawing the EYE from a SPHERE The eye is actually a ball which sits inside the socket of the skull. Muscles wrap around this ball allowing it to move, while tissues form the lid which rests on the top and the bottom. To draw an eye, begin with a sphere. Draw the sphere as shown below. Keep your shading very light! STEP 2: Drawing the Lid You are going to draw a slightly angled oval shape over your original sphere. Be sure to not draw a FOOTBALL, look at the examples to the left. From the lid you can go ahead and draw the pupil and iris. Again look to the examples to the right. STEP 3: Adding Value & Texture Note the lightsource before beginning to add value. Place the highlight in the appropriate area. Add deeper shades around the lid and at the corner. Look at the examples to the left. Eyelashes are the last portion to be drawn. These are curved lines that extend from UNDER the lid and narrow as the move up and out. They SHOULD NOT be spikes. STEP 4: Practice Practice drawing eyes looking in different directions. Use the examples to help you.
  • 3.
    digital illustration +design plainfield central – mr. lawler art + design UNIT 2 :: life drawing: portrait STEP 1: Drawing the NOSE from a CYLINDER The nose is a cylindrical form, with angular features and three spheres sitting at the end. Begin with a cylinder. Then add three spheres to the bottom as shown to the left. NOTE: for a nose in profile a wedge is sometimes more appropriate. STEP 2: Anatomy of the Nose Muscles and tissues form much of the angular shapes surrounding the nose. Use your cylinders and spheres to guide you when placing the various tissues over your forms. Some artists find it easier to add angular lines to the cylinder and sphere to act as guidelines for the muscles and tissues. The angular form pictured left is quite similar to the anatomical drawing at the bottom. The nostrils are two ellipses (ovals) that form near the base of the two nostrils (the two side spheres). Once you’ve drawn in the anatomy of a nose, go back now and clean up your lines. You may need to do a lot of erasing to get something shown at the bottom of the page. STEP 3: Adding Value & Texture Note the lightsource before beginning to add value. Place the highlight in the appropriate area. Add deeper shades around the sides and nostrils. Remember the nostrils are holes and should be shaded darker at the top and fade to lighter grays towards the bottom. See bottom diagram for help. STEP 4: Practice Practice drawing different noses from different angles. Use the examples to help you. z
  • 4.
    digital illustration +design plainfield central – mr. lawler art + design UNIT 2 :: life drawing: portrait STEP 1: Drawing the LIPS from OVOIDS Ovoids are simply spheres that have been stretched along a horizontal axis. They are based on the two-dimensional figure known as an ellipse (a curved figure with two foci). Drawing three ovoids, and shading them according to a lightsource will help you create lips. STEP 2: Anatomy of the Lips It can be helpful to divide the lips into more ovoids as seen to the left. Once you’ve drawn your ovoids, connect them using “u” shapes and “v” shapes. If you note the diagram to the left, notice how the contours of then lips follow the muscles near the cheeks, the chin and under the nose. STEP 3: Adding Value & Texture Note the lightsource before beginning to add value. Place the highlight in the appropriate area. Note how cast shadows fall near the partition between the bottom and upper lip. Also note that the cracks and textures follow “spreading-out pattern” from the center of the mouth to the corners and top. STEP 4: Practice Practice drawing lips from different angles. Use the examples to help you.
  • 5.
    digital illustration +design plainfield central – mr. lawler art + design UNIT 2 :: life drawing: portrait STEP 1: Drawing EARS from LINES & SHAPES Unlike the other facial features ears are less easily broken down into basic forms. Rather a series of curved lines helps in creating a basis. Started with a “lowercase g” –like curve, and from that build spiraling lines outward. Note the overlapping lines. It can be easier to start from a more geometric shape as seen below. STEP 2: Placement & Size of Ears The ear is made up of a series of folds and curves. Use the anatomy to help ensure that your drawings are accurate. Also remember that ears are proportionate to the placement of the eyes, the nose and the mouth. STEP 3: Adding Value & Texture Note the lightsource before beginning to add value. Place the highlight in the appropriate area. The ear is shaded by a series of cast shadows. These are created by the different folds. Note the diagram below to help you build value. STEP 4: Practice Practice drawing ears from different angles. Use the examples to help you.
  • 6.
    digital illustration +design Pen Tablet Basics A pen tablet is a computer input device that allows one to draw images and graphics using a pen in the same way we draw with a pen on a paper and is used by computer artists to create stunning digital artworks directly on the computer. This tutorial will teach you how to setup a newly purchased pen tablet using Windows Vista and then configure it to run well on Photoshop. 1. Before getting using the tablet on programs, you are going to need to setup some setting to use the tablet's pen more conveniently. A new folder is usually created in your Programs Menu that contains tablet preferences programs installed in the previous step. For Wacom Tablet users, open up the program which brings up the Tablet's Properties and the pen tablet's settings window should appear. 2. Configuration settings will differ from one tablet to another, however, the most important feature that you need to play around with is the Tip Feel or what is occasionally called the Firmness. You will need to configure this property to determine how hard you have to press to make a thick line when you draw. The higher the firm the feel the more harder you have to press to make your lines thicker, the lower the firmness (more softness) the easier it is for you to get a thicker line when you draw. plainfield central – mr. lawler art + design
  • 7.
    digital illustration +design Adjusting Settings in PSD Even if you do configure the global settings of your pen tablet, Photoshop will have to be configured personally to actually make use it. To do so, open up Adobe Photoshop and then create a New Document of any size by going through File>New. Go through Window>Brushes to open up the Brushes Panel and click on Shape Dynamics. You will then have to change the Control under Size Jitter to Pen Pressure and that should do it! 1. If you now try to draw using any of the brushes you will notice that the line gets thicker the harder you press the pen against the tablet. The screenshot below explains how the lines thicken when more pressure is applied using an Air Brush of 20px diameter. 2. Here is an example of how is this technique differs from normal brush settings using the same 20px Air Brush. 3. These were the essentials for getting your tablet working with Photoshop. Always remember that mastering the pen table will require plenty of practice and like any other skill, so do keep on drawing regularly to shape up your talent! plainfield central – mr. lawler art + design
  • 8.
    digital illustration +design Trace an Image in PSD Tracing Using Pen Tablet (Method 1) 1. Place the image on top of the tablet. 2. Create a new file on which to create your tracing. 3. Select the Pen tool from the Tools palette, and then select the Freeform Pen tool from the fly-out menu options. Ensure the Paths option is selected in the Options Bar as opposed to the Shape Layers option. 4. Use your pen to trace the lines of your chosen image. Notice the new Path appear in the Paths palette. To open the Paths palette, go to Window, and ensure the Paths option is checked. 5. When you have finished tracing the image. Select the image path by clicking on it in the Paths palette. Click the *Load Path as a Selections* to create marching ants around the image path. 6. Create a New Layer and then, stroke the path. Edit>Stroke. Tracing Using Pen Tablet (Method 2) 1. Open a PHOTO in PHOTOSHOP 2. change BACKGROUND LAYER to LAYER 0 by unlocking the image 3. lower the OPACITY to 50% 4. make a NEW BLANK LAYER 5. using the PAINTBRUSH TOOL to trace over the image while using the PEN TABLET Tracing Using PhotoShop 1. Open a PHOTO in PHOTOSHOP 2. Turn image GRAYSCALE (IMAGE  MODE  GRAYSCALE) 3. DUPLICATE LAYER 4. CTR+I (IMAGE  ADJUST  INVERT) 5. Change LAYER BLENDING MODE to COLOR DODGE 6. FILTER  BLUR  GAUSSIAN BLUR plainfield central – mr. lawler art + design