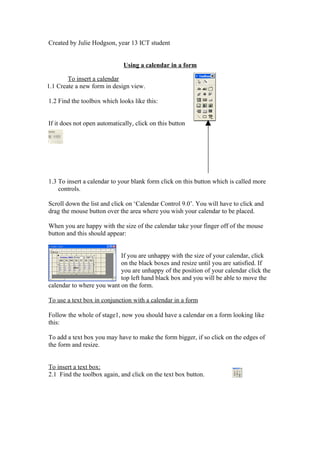
Created by Julie Hodgson, year 13 ICT student


                              Using a calendar in a form

        To insert a calendar
1.1 Create a new form in design view.

1.2 Find the toolbox which looks like this:


If it does not open automatically, click on this button


1.3 To insert a calendar to your blank form click on this button which is called more
    controls.

Scroll down the list and click on ‘Calendar Control 9.0’. You will have to click and
drag the mouse button over the area where you wish your calendar to be placed.

When you are happy with the size of the calendar take your finger off of the mouse
button and this should appear:


                           If you are unhappy with the size of your calendar, click
                           on the black boxes and resize until you are satisfied. If
                           you are unhappy of the position of your calendar click the
                           top left hand black box and you will be able to move the
calendar to where you want on the form.

To use a text box in conjunction with a calendar in a form

Follow the whole of stage1, now you should have a calendar on a form looking like
this:

To add a text box you may have to make the form bigger, if so click on the edges of
the form and resize.


To insert a text box:
2.1 Find the toolbox again, and click on the text box button.
You will have to click and drag the mouse pointer over the form itself until you are
happy with its size. When you have taken your finger off of the mouse this will
appear:


To update the box with the date from the calendar

3.1 Right click anywhere on the calendar. This will bring up a list, on which you need
    to click on properties.


You should always rename objects within a form through the properties menu.
To rename this calendar, the ‘name’ box should be highlighted in the ‘all’ tab, if not
click on it.

Replace the name ‘ActiveXCtl0’ with ‘calendar’

3.2 Then right click the text box and go down to properties, and do the same. This
    time the name in the text box should read ‘text1’ rename the box ‘textbox’, note
    that there are no spaces in the ‘textbox’ name.

Quick hints

         •    When making multiple text boxes or calendars, you should name them
              all differently. I suggest you number them. E.g. text box 1, calendar 2.

         •    You can rename the objects within a form anything that you want to, but
              to perform macros and other difficult processes it is easier to keep the
              names simple as then they are easier to remember.

3.3 Right click the calendar again and go to the ‘build event…’ option. You will be
    presented with a screen that looks like this:

This is where you will need to type in a code that will update the text box with a date
every time you click on a date on the calendar.
This means that the database will perform the task when you click on the calendar

3.4 The code

The code itself is: Me!textbox=calendar

What this code does is tells your database that you want the text box value to equal
the calendar value.

Breaking down the code

The code is made up from your calendar name and text box name.

‘Me!’ Tells your database that when you click on the calendar it is supposed to
       perform a task.

‘Text box’ would be the name of your text box

‘=‘ This tells the database that you want the two objects to have equal values

‘Calendar’ would be the name of your calendar


You need to type the code in here:


Type the code in without the use of capital letters, then after you have typed in the
code press enter. If the ‘me’ turns into a ‘Me’, then you have typed in the code
correctly.

Now when you have the form in form view click on alternate buttons on the calendar
to see if the text box is updated each time.


                                                                                        The calendars
                                                                                        box should turn
                                                                                        grey and the text
                                                                                        box should
                                                                                        update itself

Calendar

  • 1.
    Created by JulieHodgson, year 13 ICT student Using a calendar in a form To insert a calendar 1.1 Create a new form in design view. 1.2 Find the toolbox which looks like this: If it does not open automatically, click on this button 1.3 To insert a calendar to your blank form click on this button which is called more controls. Scroll down the list and click on ‘Calendar Control 9.0’. You will have to click and drag the mouse button over the area where you wish your calendar to be placed. When you are happy with the size of the calendar take your finger off of the mouse button and this should appear: If you are unhappy with the size of your calendar, click on the black boxes and resize until you are satisfied. If you are unhappy of the position of your calendar click the top left hand black box and you will be able to move the calendar to where you want on the form. To use a text box in conjunction with a calendar in a form Follow the whole of stage1, now you should have a calendar on a form looking like this: To add a text box you may have to make the form bigger, if so click on the edges of the form and resize. To insert a text box: 2.1 Find the toolbox again, and click on the text box button.
  • 2.
    You will haveto click and drag the mouse pointer over the form itself until you are happy with its size. When you have taken your finger off of the mouse this will appear: To update the box with the date from the calendar 3.1 Right click anywhere on the calendar. This will bring up a list, on which you need to click on properties. You should always rename objects within a form through the properties menu. To rename this calendar, the ‘name’ box should be highlighted in the ‘all’ tab, if not click on it. Replace the name ‘ActiveXCtl0’ with ‘calendar’ 3.2 Then right click the text box and go down to properties, and do the same. This time the name in the text box should read ‘text1’ rename the box ‘textbox’, note that there are no spaces in the ‘textbox’ name. Quick hints • When making multiple text boxes or calendars, you should name them all differently. I suggest you number them. E.g. text box 1, calendar 2. • You can rename the objects within a form anything that you want to, but to perform macros and other difficult processes it is easier to keep the names simple as then they are easier to remember. 3.3 Right click the calendar again and go to the ‘build event…’ option. You will be presented with a screen that looks like this: This is where you will need to type in a code that will update the text box with a date every time you click on a date on the calendar.
  • 3.
    This means thatthe database will perform the task when you click on the calendar 3.4 The code The code itself is: Me!textbox=calendar What this code does is tells your database that you want the text box value to equal the calendar value. Breaking down the code The code is made up from your calendar name and text box name. ‘Me!’ Tells your database that when you click on the calendar it is supposed to perform a task. ‘Text box’ would be the name of your text box ‘=‘ This tells the database that you want the two objects to have equal values ‘Calendar’ would be the name of your calendar You need to type the code in here: Type the code in without the use of capital letters, then after you have typed in the code press enter. If the ‘me’ turns into a ‘Me’, then you have typed in the code correctly. Now when you have the form in form view click on alternate buttons on the calendar to see if the text box is updated each time. The calendars box should turn grey and the text box should update itself