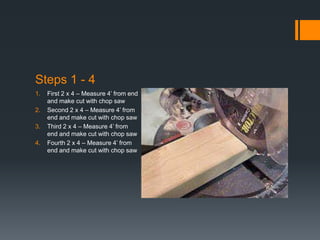
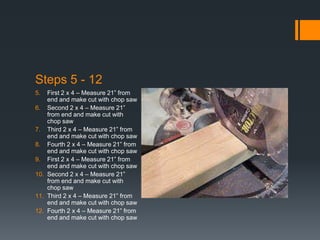
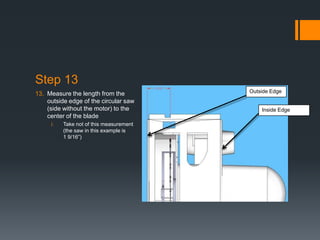
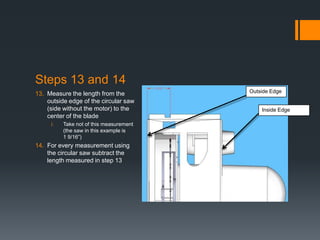
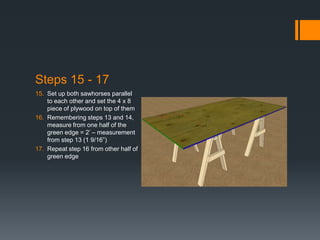
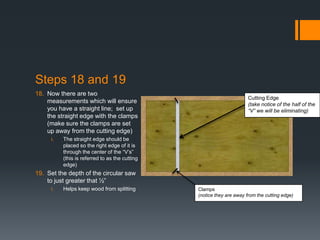
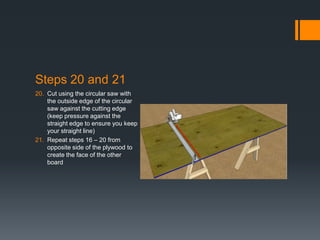
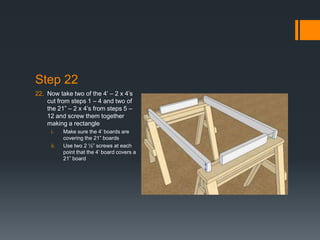
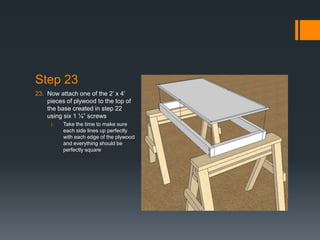
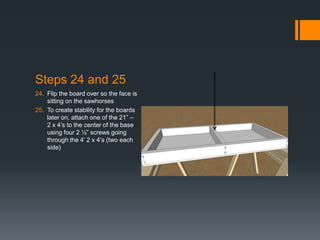
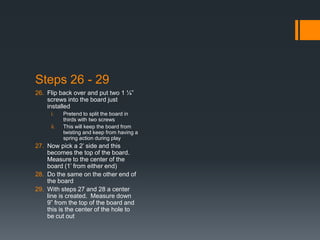
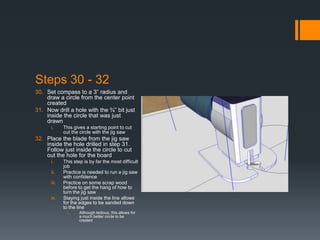
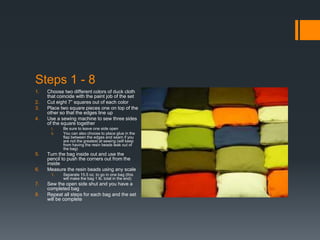
SlideShare a Scribd company logo
Building a Cornhole Set
By: Christian Kline
Steps 1 - 4
1.   First 2 x 4 – Measure 4’ from end
     and make cut with chop saw
2.   Second 2 x 4 – Measure 4’ from
     end and make cut with chop saw
3.   Third 2 x 4 – Measure 4’ from
     end and make cut with chop saw
4.   Fourth 2 x 4 – Measure 4’ from
     end and make cut with chop saw
Steps 5 - 12
5.  First 2 x 4 – Measure 21” from
    end and make cut with chop saw
6. Second 2 x 4 – Measure 21”
    from end and make cut with
    chop saw
7. Third 2 x 4 – Measure 21” from
    end and make cut with chop saw
8. Fourth 2 x 4 – Measure 21” from
    end and make cut with chop saw
9. First 2 x 4 – Measure 21” from
    end and make cut with chop saw
10. Second 2 x 4 – Measure 21”
    from end and make cut with
    chop saw
11. Third 2 x 4 – Measure 21” from
    end and make cut with chop saw
12. Fourth 2 x 4 – Measure 21” from
    end and make cut with chop saw
Step 13
13. Measure the length from the          Outside Edge
    outside edge of the circular saw
    (side without the motor) to the          Inside Edge
    center of the blade
     i.   Take not of this measurement
          (the saw in this example is
          1 9/16”)
Steps 13 and 14
13. Measure the length from the          Outside Edge
    outside edge of the circular saw
    (side without the motor) to the          Inside Edge
    center of the blade
     i.   Take not of this measurement
          (the saw in this example is
          1 9/16”)
14. For every measurement using
    the circular saw subtract the
    length measured in step 13
Steps 15 - 17
15. Set up both sawhorses parallel
    to each other and set the 4 x 8
    piece of plywood on top of them
16. Remembering steps 13 and 14,
    measure from one half of the
    green edge = 2’ – measurement
    from step 13 (1 9/16”)
17. Repeat step 16 from other half of
    green edge
Steps 18 and 19
18. Now there are two
                                                                       Cutting Edge
    measurements which will ensure                                     (take notice of the half of the
    you have a straight line; set up                                   “V” we will be eliminating)
    the straight edge with the clamps
    (make sure the clamps are set
    up away from the cutting edge)
     i.   The straight edge should be
          placed so the right edge of it is
          through the center of the “V’s”
          (this is referred to as the cutting
          edge)
19. Set the depth of the circular saw
    to just greater that ½”
     i.   Helps keep wood from splitting        Clamps
                                                (notice they are away from the cutting edge)
Steps 20 and 21
20. Cut using the circular saw with
    the outside edge of the circular
    saw against the cutting edge
    (keep pressure against the
    straight edge to ensure you keep
    your straight line)
21. Repeat steps 16 – 20 from
    opposite side of the plywood to
    create the face of the other
    board
Step 22
22. Now take two of the 4’ – 2 x 4’s
    cut from steps 1 – 4 and two of
    the 21” – 2 x 4’s from steps 5 –
    12 and screw them together
    making a rectangle
     i.    Make sure the 4’ boards are
           covering the 21” boards
     ii.   Use two 2 ½” screws at each
           point that the 4’ board covers a
           21” board
Step 23
23. Now attach one of the 2’ x 4’
    pieces of plywood to the top of
    the base created in step 22
    using six 1 ¼” screws
     i.   Take the time to make sure
          each side lines up perfectly
          with each edge of the plywood
          and everything should be
          perfectly square
Steps 24 and 25
24. Flip the board over so the face is
    sitting on the sawhorses
25. To create stability for the boards
    later on, attach one of the 21” –
    2 x 4’s to the center of the base
    using four 2 ½” screws going
    through the 4’ 2 x 4’s (two each
    side)
Steps 26 - 29
26. Flip back over and put two 1 ¼”
    screws into the board just
    installed
     i.    Pretend to split the board in
           thirds with two screws
     ii.   This will keep the board from
           twisting and keep from having a
           spring action during play
27. Now pick a 2’ side and this
    becomes the top of the board.
    Measure to the center of the
    board (1’ from either end)
28. Do the same on the other end of
    the board
29. With steps 27 and 28 a center
    line is created. Measure down
    9” from the top of the board and
    this is the center of the hole to
    be cut out
Steps 30 - 32
30. Set compass to a 3” radius and
    draw a circle from the center point
    created
31. Now drill a hole with the ¾” bit just
    inside the circle that was just
    drawn
      i.     This gives a starting point to cut
             out the circle with the jig saw
32. Place the blade from the jig saw
    inside the hole drilled in step 31.
    Follow just inside the circle to cut
    out the hole for the board
      i.     This step is by far the most difficult
             job
      ii.    Practice is needed to run a jig saw
             with confidence
      iii.   Practice on some scrap wood
             before to get the hang of how to
             turn the jig saw
      iv.    Staying just inside the line allows
             for the edges to be sanded down
             to the line
               i.    Although tedious, this allows for
                     a much better circle to be
                     created
Step 33
33. Inspect hole to make sure it
    meets the correct dimensions
    listed in previous slides and
    shown on this slide
Steps 34 - 37
34. Cut a 20 ½” x 12” board out of the
    4’ x 4’ piece of plywood using the
    circular saw
      i.    This is the stand to be used later
      ii.   Needs to be straight so take the
            same measurement tricks as in
            steps 14 - 20
35. Drill 2” hole in board from step 34,
    1” away from edge and in the
    center
      i.    Used as a handle
36. Use the board cut from step 34 to
    size the gap of the stand holder
      i.    Put it perpendicular to the face of
            the set and slide the board from
            step 34 next to the 2 x 4 and then
            take another 21” 2 x 4 and trap the
            board from step 34 between the
            two 21” 2 x 4’s
37. Attach 21” board with four 2 ½”
    screws
      i.    The board from step 34 becomes
            the stand and gives the steady
            incline to the playing surface
Steps 38 and 39
38. Again take the plywood and cut
    two 1” x 4” pieces from it. Use
    the jig saw to make it easier
     i.     These pieces don’t have to be
            perfect
39. Attach to the inside of the bottom
    of the board again using the
    piece from step 34 as a guide to
    set a gap
     i.     This will become the holder to
            store the stand when the set is
            not in use
     ii.    Attach each piece using two 1
            ½” screws
     iii.   Set 1” from bottom of the board
Steps 40 - 45
40. Sand the face of the board completely
    with sander and 120 grit sand paper
41. Rub hand over sanded area and the
    wood should feel completely smooth
      i.   No bumps or valleys in the finish
42. Paint or stain the wood
      i.   Each paint and stain is different so
           read directions on the can to figure
           out correct application techniques
43. Apply high-gloss/clear polyurethane
    varnish
      i.   Again each brand has a different
           application technique so read the
           directions to determine the correct
           way
44. Hand sand the last coat of
    polyurethane with 400 grit sand paper
      i.   This gives the final finish a glass
           smooth feel and will allow the bags to
           slide effectively
45. Repeat steps 22 – 44 to complete
    second board in the set
Making Cornhole Bags
By: Christian Kline
Steps 1 - 8
1.   Choose two different colors of duck cloth
     that coincide with the paint job of the set
2.   Cut eight 7” squares out of each color
3.   Place two square pieces one on top of the
     other so that the edges line up
4.   Use a sewing machine to sew three sides
     of the square together
      i.    Be sure to leave one side open
      ii.   You can also choose to place glue in the
            flap between the edges and seam if you
            are not the greatest at sewing (will keep
            from having the resin beads leak out of
            the bag)
5.   Turn the bag inside out and use the
     pencil to push the corners out from the
     inside
6.   Measure the resin beads using any scale
      1.    Separate 15.5 oz. to go in one bag (this
            will make the bag 1 lb. total in the end)
7.   Sew the open side shut and you have a
     completed bag
8.   Repeat all steps for each bag and the set
     will be complete
For Help
•   For additional help with this
    process go to:
     •    http://www.cornholehowto.com/
          sew-up-some-bags/how-to-
          sew/


•   They have very detailed
    instructions and excellent
    pictures to go along with the
    instructions

More Related Content

What's hot

Presentation1 study notes
Presentation1 study notesPresentation1 study notes
Presentation1 study notes
Mamello Bolofo
 
Cutting and sewing quality scenario of ready made garments
Cutting and sewing quality scenario of ready made garmentsCutting and sewing quality scenario of ready made garments
Cutting and sewing quality scenario of ready made garments
Hindustan University
 
U 6 finishing technology
U 6 finishing technologyU 6 finishing technology
U 6 finishing technology
kibrom G
 
Tools for garment construction
Tools for garment constructionTools for garment construction
Tools for garment construction
dhivyadsp
 
Garments manufacturing
Garments manufacturingGarments manufacturing
Garments manufacturing
Farhan ullah baig
 
CUTTING DEPARTMENT OF APPAREL INDUSTRY.
CUTTING DEPARTMENT OF APPAREL INDUSTRY.CUTTING DEPARTMENT OF APPAREL INDUSTRY.
CUTTING DEPARTMENT OF APPAREL INDUSTRY.
DKHUSHI
 
Marker making
Marker makingMarker making
Marker making
Engr. Md sazzad Hossan
 
Configuration of spreading systems used in apparel industry textile learner
Configuration of spreading systems used in apparel industry   textile learnerConfiguration of spreading systems used in apparel industry   textile learner
Configuration of spreading systems used in apparel industry textile learner
ifty111013003
 
T shirts
T shirtsT shirts
T shirts
Rimsha Maria
 
15020441094, garment manufacturing
15020441094, garment manufacturing15020441094, garment manufacturing
15020441094, garment manufacturing
Gaurav Baishya
 
Cutting department
Cutting departmentCutting department
Cutting department
Manuja Madhushan
 
Fabric Spreading
Fabric SpreadingFabric Spreading
Fabric Spreading
Faisal Ahmed Bappi
 
U 4 cutting technology
U 4 cutting  technology U 4 cutting  technology
U 4 cutting technology
kibrom G
 
Fabric spreading
Fabric spreadingFabric spreading
Fabric spreading
Engr. Md sazzad Hossan
 

What's hot (17)

Presentation1 study notes
Presentation1 study notesPresentation1 study notes
Presentation1 study notes
 
Cutting and sewing quality scenario of ready made garments
Cutting and sewing quality scenario of ready made garmentsCutting and sewing quality scenario of ready made garments
Cutting and sewing quality scenario of ready made garments
 
U 6 finishing technology
U 6 finishing technologyU 6 finishing technology
U 6 finishing technology
 
Tools for garment construction
Tools for garment constructionTools for garment construction
Tools for garment construction
 
Garments manufacturing
Garments manufacturingGarments manufacturing
Garments manufacturing
 
CUTTING DEPARTMENT OF APPAREL INDUSTRY.
CUTTING DEPARTMENT OF APPAREL INDUSTRY.CUTTING DEPARTMENT OF APPAREL INDUSTRY.
CUTTING DEPARTMENT OF APPAREL INDUSTRY.
 
Measuring and marking
Measuring and markingMeasuring and marking
Measuring and marking
 
Garments manufacturing process
Garments manufacturing processGarments manufacturing process
Garments manufacturing process
 
Mp iii lab
Mp iii labMp iii lab
Mp iii lab
 
Marker making
Marker makingMarker making
Marker making
 
Configuration of spreading systems used in apparel industry textile learner
Configuration of spreading systems used in apparel industry   textile learnerConfiguration of spreading systems used in apparel industry   textile learner
Configuration of spreading systems used in apparel industry textile learner
 
T shirts
T shirtsT shirts
T shirts
 
15020441094, garment manufacturing
15020441094, garment manufacturing15020441094, garment manufacturing
15020441094, garment manufacturing
 
Cutting department
Cutting departmentCutting department
Cutting department
 
Fabric Spreading
Fabric SpreadingFabric Spreading
Fabric Spreading
 
U 4 cutting technology
U 4 cutting  technology U 4 cutting  technology
U 4 cutting technology
 
Fabric spreading
Fabric spreadingFabric spreading
Fabric spreading
 

Viewers also liked

Robert Sutter Portfolio
Robert Sutter PortfolioRobert Sutter Portfolio
Robert Sutter PortfolioRobert Sutter
 
Shubhendu cv
Shubhendu cvShubhendu cv
Shubhendu cvshubh7482
 
Active Lifestyle Event Experience Survey - Event Participants are seeking a U...
Active Lifestyle Event Experience Survey - Event Participants are seeking a U...Active Lifestyle Event Experience Survey - Event Participants are seeking a U...
Active Lifestyle Event Experience Survey - Event Participants are seeking a U...
Bryan Ferguson
 
Intake 35 cloud architect track
Intake 35 cloud architect trackIntake 35 cloud architect track
Intake 35 cloud architect track
Mohamed Gamil
 
Enhancing The Reliability of Physician Performance Measures
Enhancing The Reliability of Physician Performance MeasuresEnhancing The Reliability of Physician Performance Measures
Enhancing The Reliability of Physician Performance Measures
Robert Sutter
 
Athlete IQ Wearable Device Survey
Athlete IQ Wearable Device SurveyAthlete IQ Wearable Device Survey
Athlete IQ Wearable Device Survey
Bryan Ferguson
 
Physician performance improvement part one
Physician performance improvement part onePhysician performance improvement part one
Physician performance improvement part oneRobert Sutter
 
Improving Patient Flow
Improving Patient FlowImproving Patient Flow
Improving Patient FlowRobert Sutter
 
Growth Hacking - 10 Key Checklist
Growth Hacking - 10 Key Checklist Growth Hacking - 10 Key Checklist
Growth Hacking - 10 Key Checklist
Bryan Ferguson
 
Analysis Of Proportions
Analysis Of ProportionsAnalysis Of Proportions
Analysis Of ProportionsRobert Sutter
 
Hypothesis Testing Fundamentals
Hypothesis Testing FundamentalsHypothesis Testing Fundamentals
Hypothesis Testing FundamentalsRobert Sutter
 
Ulotka informacyjna czarny na białym
Ulotka informacyjna czarny na białymUlotka informacyjna czarny na białym
Ulotka informacyjna czarny na białym
Przemysław Szczepaniak
 

Viewers also liked (14)

Robert Sutter Portfolio
Robert Sutter PortfolioRobert Sutter Portfolio
Robert Sutter Portfolio
 
Shubhendu cv
Shubhendu cvShubhendu cv
Shubhendu cv
 
Active Lifestyle Event Experience Survey - Event Participants are seeking a U...
Active Lifestyle Event Experience Survey - Event Participants are seeking a U...Active Lifestyle Event Experience Survey - Event Participants are seeking a U...
Active Lifestyle Event Experience Survey - Event Participants are seeking a U...
 
Intake 35 cloud architect track
Intake 35 cloud architect trackIntake 35 cloud architect track
Intake 35 cloud architect track
 
Enhancing The Reliability of Physician Performance Measures
Enhancing The Reliability of Physician Performance MeasuresEnhancing The Reliability of Physician Performance Measures
Enhancing The Reliability of Physician Performance Measures
 
Athlete IQ Wearable Device Survey
Athlete IQ Wearable Device SurveyAthlete IQ Wearable Device Survey
Athlete IQ Wearable Device Survey
 
Physician performance improvement part one
Physician performance improvement part onePhysician performance improvement part one
Physician performance improvement part one
 
Logistic regression
Logistic regressionLogistic regression
Logistic regression
 
Improving Patient Flow
Improving Patient FlowImproving Patient Flow
Improving Patient Flow
 
Growth Hacking - 10 Key Checklist
Growth Hacking - 10 Key Checklist Growth Hacking - 10 Key Checklist
Growth Hacking - 10 Key Checklist
 
Analysis Of Proportions
Analysis Of ProportionsAnalysis Of Proportions
Analysis Of Proportions
 
Hypothesis Testing Fundamentals
Hypothesis Testing FundamentalsHypothesis Testing Fundamentals
Hypothesis Testing Fundamentals
 
Ulotka informacyjna czarny na białym
Ulotka informacyjna czarny na białymUlotka informacyjna czarny na białym
Ulotka informacyjna czarny na białym
 
Kuiz sukan
Kuiz sukanKuiz sukan
Kuiz sukan
 

Similar to Building a cornhole set

4. How to build shed roof rafters
4. How to build shed roof rafters4. How to build shed roof rafters
4. How to build shed roof rafters
icreatablesseo
 
Quilted Chair Caddy
Quilted Chair CaddyQuilted Chair Caddy
Quilted Chair Caddy
mlwilburn
 
Mitra Stats Project Final
Mitra Stats Project FinalMitra Stats Project Final
Mitra Stats Project Finalshonabunch1
 
Week 2 Tool Box Making FOR GRADE 12 AND 11
Week 2 Tool Box Making FOR GRADE 12 AND 11Week 2 Tool Box Making FOR GRADE 12 AND 11
Week 2 Tool Box Making FOR GRADE 12 AND 11
LeoNinoDulce
 
Make a wooden toolbox
Make a wooden toolboxMake a wooden toolbox
Make a wooden toolbox
HAYS NYC
 
Wood reel - bamboo journal 6 - italian bamboo rodmakers association
Wood reel - bamboo journal 6 - italian bamboo rodmakers associationWood reel - bamboo journal 6 - italian bamboo rodmakers association
Wood reel - bamboo journal 6 - italian bamboo rodmakers association
Anibal Ruben Reyes
 
Construção de Violões
Construção de ViolõesConstrução de Violões
Construção de Violões
Gabriel Vandresen
 
How To Make a Corner Bookmark
How To Make a Corner BookmarkHow To Make a Corner Bookmark
How To Make a Corner Bookmarkkootoyoo
 
Make a Castanets - Movil
Make a Castanets - MovilMake a Castanets - Movil
Make a Castanets - MovilRamón Vidal
 
2. How to build a shed floor?
2. How to build a shed floor?2. How to build a shed floor?
2. How to build a shed floor?
icreatablesseo
 
9. How to install asphalt roofing on a shed
9. How to install asphalt roofing on a shed9. How to install asphalt roofing on a shed
9. How to install asphalt roofing on a shed
icreatablesseo
 
Wooden Bench With Storage.
Wooden Bench With Storage.Wooden Bench With Storage.
Wooden Bench With Storage.
WonderfullDaily
 
Make a quick box using box joints
Make a quick box using box jointsMake a quick box using box joints
Make a quick box using box joints
jessica30251
 
Creative DIY tutorial: Make a desk-top hanging file from a fruit box
Creative DIY tutorial: Make a desk-top hanging file from a fruit boxCreative DIY tutorial: Make a desk-top hanging file from a fruit box
Creative DIY tutorial: Make a desk-top hanging file from a fruit box
Hands On Workshop - HOW
 
How to make a cornhole board set
How to make a cornhole board setHow to make a cornhole board set
How to make a cornhole board setKrystle Cook
 
8. How to install trim on the storage shed
8. How to install trim on the storage shed8. How to install trim on the storage shed
8. How to install trim on the storage shed
icreatablesseo
 
bag pattern_pleated
bag pattern_pleatedbag pattern_pleated
bag pattern_pleatedteafunky
 
Roller_Coaster_Manual.pdf
Roller_Coaster_Manual.pdfRoller_Coaster_Manual.pdf
Roller_Coaster_Manual.pdf
KeishaBennaugh
 

Similar to Building a cornhole set (20)

Measuring device
Measuring deviceMeasuring device
Measuring device
 
4. How to build shed roof rafters
4. How to build shed roof rafters4. How to build shed roof rafters
4. How to build shed roof rafters
 
Quilted Chair Caddy
Quilted Chair CaddyQuilted Chair Caddy
Quilted Chair Caddy
 
Mitra Stats Project Final
Mitra Stats Project FinalMitra Stats Project Final
Mitra Stats Project Final
 
Week 2 Tool Box Making FOR GRADE 12 AND 11
Week 2 Tool Box Making FOR GRADE 12 AND 11Week 2 Tool Box Making FOR GRADE 12 AND 11
Week 2 Tool Box Making FOR GRADE 12 AND 11
 
Cestinha patch
Cestinha patchCestinha patch
Cestinha patch
 
Make a wooden toolbox
Make a wooden toolboxMake a wooden toolbox
Make a wooden toolbox
 
Wood reel - bamboo journal 6 - italian bamboo rodmakers association
Wood reel - bamboo journal 6 - italian bamboo rodmakers associationWood reel - bamboo journal 6 - italian bamboo rodmakers association
Wood reel - bamboo journal 6 - italian bamboo rodmakers association
 
Construção de Violões
Construção de ViolõesConstrução de Violões
Construção de Violões
 
How To Make a Corner Bookmark
How To Make a Corner BookmarkHow To Make a Corner Bookmark
How To Make a Corner Bookmark
 
Make a Castanets - Movil
Make a Castanets - MovilMake a Castanets - Movil
Make a Castanets - Movil
 
2. How to build a shed floor?
2. How to build a shed floor?2. How to build a shed floor?
2. How to build a shed floor?
 
9. How to install asphalt roofing on a shed
9. How to install asphalt roofing on a shed9. How to install asphalt roofing on a shed
9. How to install asphalt roofing on a shed
 
Wooden Bench With Storage.
Wooden Bench With Storage.Wooden Bench With Storage.
Wooden Bench With Storage.
 
Make a quick box using box joints
Make a quick box using box jointsMake a quick box using box joints
Make a quick box using box joints
 
Creative DIY tutorial: Make a desk-top hanging file from a fruit box
Creative DIY tutorial: Make a desk-top hanging file from a fruit boxCreative DIY tutorial: Make a desk-top hanging file from a fruit box
Creative DIY tutorial: Make a desk-top hanging file from a fruit box
 
How to make a cornhole board set
How to make a cornhole board setHow to make a cornhole board set
How to make a cornhole board set
 
8. How to install trim on the storage shed
8. How to install trim on the storage shed8. How to install trim on the storage shed
8. How to install trim on the storage shed
 
bag pattern_pleated
bag pattern_pleatedbag pattern_pleated
bag pattern_pleated
 
Roller_Coaster_Manual.pdf
Roller_Coaster_Manual.pdfRoller_Coaster_Manual.pdf
Roller_Coaster_Manual.pdf
 

Recently uploaded

2024.06.01 Introducing a competency framework for languag learning materials ...
2024.06.01 Introducing a competency framework for languag learning materials ...2024.06.01 Introducing a competency framework for languag learning materials ...
2024.06.01 Introducing a competency framework for languag learning materials ...
Sandy Millin
 
The approach at University of Liverpool.pptx
The approach at University of Liverpool.pptxThe approach at University of Liverpool.pptx
The approach at University of Liverpool.pptx
Jisc
 
Introduction to AI for Nonprofits with Tapp Network
Introduction to AI for Nonprofits with Tapp NetworkIntroduction to AI for Nonprofits with Tapp Network
Introduction to AI for Nonprofits with Tapp Network
TechSoup
 
Welcome to TechSoup New Member Orientation and Q&A (May 2024).pdf
Welcome to TechSoup   New Member Orientation and Q&A (May 2024).pdfWelcome to TechSoup   New Member Orientation and Q&A (May 2024).pdf
Welcome to TechSoup New Member Orientation and Q&A (May 2024).pdf
TechSoup
 
Mule 4.6 & Java 17 Upgrade | MuleSoft Mysore Meetup #46
Mule 4.6 & Java 17 Upgrade | MuleSoft Mysore Meetup #46Mule 4.6 & Java 17 Upgrade | MuleSoft Mysore Meetup #46
Mule 4.6 & Java 17 Upgrade | MuleSoft Mysore Meetup #46
MysoreMuleSoftMeetup
 
A Strategic Approach: GenAI in Education
A Strategic Approach: GenAI in EducationA Strategic Approach: GenAI in Education
A Strategic Approach: GenAI in Education
Peter Windle
 
Overview on Edible Vaccine: Pros & Cons with Mechanism
Overview on Edible Vaccine: Pros & Cons with MechanismOverview on Edible Vaccine: Pros & Cons with Mechanism
Overview on Edible Vaccine: Pros & Cons with Mechanism
DeeptiGupta154
 
Thesis Statement for students diagnonsed withADHD.ppt
Thesis Statement for students diagnonsed withADHD.pptThesis Statement for students diagnonsed withADHD.ppt
Thesis Statement for students diagnonsed withADHD.ppt
EverAndrsGuerraGuerr
 
Palestine last event orientationfvgnh .pptx
Palestine last event orientationfvgnh .pptxPalestine last event orientationfvgnh .pptx
Palestine last event orientationfvgnh .pptx
RaedMohamed3
 
1.4 modern child centered education - mahatma gandhi-2.pptx
1.4 modern child centered education - mahatma gandhi-2.pptx1.4 modern child centered education - mahatma gandhi-2.pptx
1.4 modern child centered education - mahatma gandhi-2.pptx
JosvitaDsouza2
 
How libraries can support authors with open access requirements for UKRI fund...
How libraries can support authors with open access requirements for UKRI fund...How libraries can support authors with open access requirements for UKRI fund...
How libraries can support authors with open access requirements for UKRI fund...
Jisc
 
Honest Reviews of Tim Han LMA Course Program.pptx
Honest Reviews of Tim Han LMA Course Program.pptxHonest Reviews of Tim Han LMA Course Program.pptx
Honest Reviews of Tim Han LMA Course Program.pptx
timhan337
 
Unit 2- Research Aptitude (UGC NET Paper I).pdf
Unit 2- Research Aptitude (UGC NET Paper I).pdfUnit 2- Research Aptitude (UGC NET Paper I).pdf
Unit 2- Research Aptitude (UGC NET Paper I).pdf
Thiyagu K
 
Biological Screening of Herbal Drugs in detailed.
Biological Screening of Herbal Drugs in detailed.Biological Screening of Herbal Drugs in detailed.
Biological Screening of Herbal Drugs in detailed.
Ashokrao Mane college of Pharmacy Peth-Vadgaon
 
The Accursed House by Émile Gaboriau.pptx
The Accursed House by Émile Gaboriau.pptxThe Accursed House by Émile Gaboriau.pptx
The Accursed House by Émile Gaboriau.pptx
DhatriParmar
 
Polish students' mobility in the Czech Republic
Polish students' mobility in the Czech RepublicPolish students' mobility in the Czech Republic
Polish students' mobility in the Czech Republic
Anna Sz.
 
The French Revolution Class 9 Study Material pdf free download
The French Revolution Class 9 Study Material pdf free downloadThe French Revolution Class 9 Study Material pdf free download
The French Revolution Class 9 Study Material pdf free download
Vivekanand Anglo Vedic Academy
 
Operation Blue Star - Saka Neela Tara
Operation Blue Star   -  Saka Neela TaraOperation Blue Star   -  Saka Neela Tara
Operation Blue Star - Saka Neela Tara
Balvir Singh
 
TESDA TM1 REVIEWER FOR NATIONAL ASSESSMENT WRITTEN AND ORAL QUESTIONS WITH A...
TESDA TM1 REVIEWER  FOR NATIONAL ASSESSMENT WRITTEN AND ORAL QUESTIONS WITH A...TESDA TM1 REVIEWER  FOR NATIONAL ASSESSMENT WRITTEN AND ORAL QUESTIONS WITH A...
TESDA TM1 REVIEWER FOR NATIONAL ASSESSMENT WRITTEN AND ORAL QUESTIONS WITH A...
EugeneSaldivar
 
Supporting (UKRI) OA monographs at Salford.pptx
Supporting (UKRI) OA monographs at Salford.pptxSupporting (UKRI) OA monographs at Salford.pptx
Supporting (UKRI) OA monographs at Salford.pptx
Jisc
 

Recently uploaded (20)

2024.06.01 Introducing a competency framework for languag learning materials ...
2024.06.01 Introducing a competency framework for languag learning materials ...2024.06.01 Introducing a competency framework for languag learning materials ...
2024.06.01 Introducing a competency framework for languag learning materials ...
 
The approach at University of Liverpool.pptx
The approach at University of Liverpool.pptxThe approach at University of Liverpool.pptx
The approach at University of Liverpool.pptx
 
Introduction to AI for Nonprofits with Tapp Network
Introduction to AI for Nonprofits with Tapp NetworkIntroduction to AI for Nonprofits with Tapp Network
Introduction to AI for Nonprofits with Tapp Network
 
Welcome to TechSoup New Member Orientation and Q&A (May 2024).pdf
Welcome to TechSoup   New Member Orientation and Q&A (May 2024).pdfWelcome to TechSoup   New Member Orientation and Q&A (May 2024).pdf
Welcome to TechSoup New Member Orientation and Q&A (May 2024).pdf
 
Mule 4.6 & Java 17 Upgrade | MuleSoft Mysore Meetup #46
Mule 4.6 & Java 17 Upgrade | MuleSoft Mysore Meetup #46Mule 4.6 & Java 17 Upgrade | MuleSoft Mysore Meetup #46
Mule 4.6 & Java 17 Upgrade | MuleSoft Mysore Meetup #46
 
A Strategic Approach: GenAI in Education
A Strategic Approach: GenAI in EducationA Strategic Approach: GenAI in Education
A Strategic Approach: GenAI in Education
 
Overview on Edible Vaccine: Pros & Cons with Mechanism
Overview on Edible Vaccine: Pros & Cons with MechanismOverview on Edible Vaccine: Pros & Cons with Mechanism
Overview on Edible Vaccine: Pros & Cons with Mechanism
 
Thesis Statement for students diagnonsed withADHD.ppt
Thesis Statement for students diagnonsed withADHD.pptThesis Statement for students diagnonsed withADHD.ppt
Thesis Statement for students diagnonsed withADHD.ppt
 
Palestine last event orientationfvgnh .pptx
Palestine last event orientationfvgnh .pptxPalestine last event orientationfvgnh .pptx
Palestine last event orientationfvgnh .pptx
 
1.4 modern child centered education - mahatma gandhi-2.pptx
1.4 modern child centered education - mahatma gandhi-2.pptx1.4 modern child centered education - mahatma gandhi-2.pptx
1.4 modern child centered education - mahatma gandhi-2.pptx
 
How libraries can support authors with open access requirements for UKRI fund...
How libraries can support authors with open access requirements for UKRI fund...How libraries can support authors with open access requirements for UKRI fund...
How libraries can support authors with open access requirements for UKRI fund...
 
Honest Reviews of Tim Han LMA Course Program.pptx
Honest Reviews of Tim Han LMA Course Program.pptxHonest Reviews of Tim Han LMA Course Program.pptx
Honest Reviews of Tim Han LMA Course Program.pptx
 
Unit 2- Research Aptitude (UGC NET Paper I).pdf
Unit 2- Research Aptitude (UGC NET Paper I).pdfUnit 2- Research Aptitude (UGC NET Paper I).pdf
Unit 2- Research Aptitude (UGC NET Paper I).pdf
 
Biological Screening of Herbal Drugs in detailed.
Biological Screening of Herbal Drugs in detailed.Biological Screening of Herbal Drugs in detailed.
Biological Screening of Herbal Drugs in detailed.
 
The Accursed House by Émile Gaboriau.pptx
The Accursed House by Émile Gaboriau.pptxThe Accursed House by Émile Gaboriau.pptx
The Accursed House by Émile Gaboriau.pptx
 
Polish students' mobility in the Czech Republic
Polish students' mobility in the Czech RepublicPolish students' mobility in the Czech Republic
Polish students' mobility in the Czech Republic
 
The French Revolution Class 9 Study Material pdf free download
The French Revolution Class 9 Study Material pdf free downloadThe French Revolution Class 9 Study Material pdf free download
The French Revolution Class 9 Study Material pdf free download
 
Operation Blue Star - Saka Neela Tara
Operation Blue Star   -  Saka Neela TaraOperation Blue Star   -  Saka Neela Tara
Operation Blue Star - Saka Neela Tara
 
TESDA TM1 REVIEWER FOR NATIONAL ASSESSMENT WRITTEN AND ORAL QUESTIONS WITH A...
TESDA TM1 REVIEWER  FOR NATIONAL ASSESSMENT WRITTEN AND ORAL QUESTIONS WITH A...TESDA TM1 REVIEWER  FOR NATIONAL ASSESSMENT WRITTEN AND ORAL QUESTIONS WITH A...
TESDA TM1 REVIEWER FOR NATIONAL ASSESSMENT WRITTEN AND ORAL QUESTIONS WITH A...
 
Supporting (UKRI) OA monographs at Salford.pptx
Supporting (UKRI) OA monographs at Salford.pptxSupporting (UKRI) OA monographs at Salford.pptx
Supporting (UKRI) OA monographs at Salford.pptx
 

Building a cornhole set

  • 1. Building a Cornhole Set By: Christian Kline
  • 2. Steps 1 - 4 1. First 2 x 4 – Measure 4’ from end and make cut with chop saw 2. Second 2 x 4 – Measure 4’ from end and make cut with chop saw 3. Third 2 x 4 – Measure 4’ from end and make cut with chop saw 4. Fourth 2 x 4 – Measure 4’ from end and make cut with chop saw
  • 3. Steps 5 - 12 5. First 2 x 4 – Measure 21” from end and make cut with chop saw 6. Second 2 x 4 – Measure 21” from end and make cut with chop saw 7. Third 2 x 4 – Measure 21” from end and make cut with chop saw 8. Fourth 2 x 4 – Measure 21” from end and make cut with chop saw 9. First 2 x 4 – Measure 21” from end and make cut with chop saw 10. Second 2 x 4 – Measure 21” from end and make cut with chop saw 11. Third 2 x 4 – Measure 21” from end and make cut with chop saw 12. Fourth 2 x 4 – Measure 21” from end and make cut with chop saw
  • 4. Step 13 13. Measure the length from the Outside Edge outside edge of the circular saw (side without the motor) to the Inside Edge center of the blade i. Take not of this measurement (the saw in this example is 1 9/16”)
  • 5. Steps 13 and 14 13. Measure the length from the Outside Edge outside edge of the circular saw (side without the motor) to the Inside Edge center of the blade i. Take not of this measurement (the saw in this example is 1 9/16”) 14. For every measurement using the circular saw subtract the length measured in step 13
  • 6. Steps 15 - 17 15. Set up both sawhorses parallel to each other and set the 4 x 8 piece of plywood on top of them 16. Remembering steps 13 and 14, measure from one half of the green edge = 2’ – measurement from step 13 (1 9/16”) 17. Repeat step 16 from other half of green edge
  • 7. Steps 18 and 19 18. Now there are two Cutting Edge measurements which will ensure (take notice of the half of the you have a straight line; set up “V” we will be eliminating) the straight edge with the clamps (make sure the clamps are set up away from the cutting edge) i. The straight edge should be placed so the right edge of it is through the center of the “V’s” (this is referred to as the cutting edge) 19. Set the depth of the circular saw to just greater that ½” i. Helps keep wood from splitting Clamps (notice they are away from the cutting edge)
  • 8. Steps 20 and 21 20. Cut using the circular saw with the outside edge of the circular saw against the cutting edge (keep pressure against the straight edge to ensure you keep your straight line) 21. Repeat steps 16 – 20 from opposite side of the plywood to create the face of the other board
  • 9. Step 22 22. Now take two of the 4’ – 2 x 4’s cut from steps 1 – 4 and two of the 21” – 2 x 4’s from steps 5 – 12 and screw them together making a rectangle i. Make sure the 4’ boards are covering the 21” boards ii. Use two 2 ½” screws at each point that the 4’ board covers a 21” board
  • 10. Step 23 23. Now attach one of the 2’ x 4’ pieces of plywood to the top of the base created in step 22 using six 1 ¼” screws i. Take the time to make sure each side lines up perfectly with each edge of the plywood and everything should be perfectly square
  • 11. Steps 24 and 25 24. Flip the board over so the face is sitting on the sawhorses 25. To create stability for the boards later on, attach one of the 21” – 2 x 4’s to the center of the base using four 2 ½” screws going through the 4’ 2 x 4’s (two each side)
  • 12. Steps 26 - 29 26. Flip back over and put two 1 ¼” screws into the board just installed i. Pretend to split the board in thirds with two screws ii. This will keep the board from twisting and keep from having a spring action during play 27. Now pick a 2’ side and this becomes the top of the board. Measure to the center of the board (1’ from either end) 28. Do the same on the other end of the board 29. With steps 27 and 28 a center line is created. Measure down 9” from the top of the board and this is the center of the hole to be cut out
  • 13. Steps 30 - 32 30. Set compass to a 3” radius and draw a circle from the center point created 31. Now drill a hole with the ¾” bit just inside the circle that was just drawn i. This gives a starting point to cut out the circle with the jig saw 32. Place the blade from the jig saw inside the hole drilled in step 31. Follow just inside the circle to cut out the hole for the board i. This step is by far the most difficult job ii. Practice is needed to run a jig saw with confidence iii. Practice on some scrap wood before to get the hang of how to turn the jig saw iv. Staying just inside the line allows for the edges to be sanded down to the line i. Although tedious, this allows for a much better circle to be created
  • 14. Step 33 33. Inspect hole to make sure it meets the correct dimensions listed in previous slides and shown on this slide
  • 15. Steps 34 - 37 34. Cut a 20 ½” x 12” board out of the 4’ x 4’ piece of plywood using the circular saw i. This is the stand to be used later ii. Needs to be straight so take the same measurement tricks as in steps 14 - 20 35. Drill 2” hole in board from step 34, 1” away from edge and in the center i. Used as a handle 36. Use the board cut from step 34 to size the gap of the stand holder i. Put it perpendicular to the face of the set and slide the board from step 34 next to the 2 x 4 and then take another 21” 2 x 4 and trap the board from step 34 between the two 21” 2 x 4’s 37. Attach 21” board with four 2 ½” screws i. The board from step 34 becomes the stand and gives the steady incline to the playing surface
  • 16. Steps 38 and 39 38. Again take the plywood and cut two 1” x 4” pieces from it. Use the jig saw to make it easier i. These pieces don’t have to be perfect 39. Attach to the inside of the bottom of the board again using the piece from step 34 as a guide to set a gap i. This will become the holder to store the stand when the set is not in use ii. Attach each piece using two 1 ½” screws iii. Set 1” from bottom of the board
  • 17. Steps 40 - 45 40. Sand the face of the board completely with sander and 120 grit sand paper 41. Rub hand over sanded area and the wood should feel completely smooth i. No bumps or valleys in the finish 42. Paint or stain the wood i. Each paint and stain is different so read directions on the can to figure out correct application techniques 43. Apply high-gloss/clear polyurethane varnish i. Again each brand has a different application technique so read the directions to determine the correct way 44. Hand sand the last coat of polyurethane with 400 grit sand paper i. This gives the final finish a glass smooth feel and will allow the bags to slide effectively 45. Repeat steps 22 – 44 to complete second board in the set
  • 18. Making Cornhole Bags By: Christian Kline
  • 19. Steps 1 - 8 1. Choose two different colors of duck cloth that coincide with the paint job of the set 2. Cut eight 7” squares out of each color 3. Place two square pieces one on top of the other so that the edges line up 4. Use a sewing machine to sew three sides of the square together i. Be sure to leave one side open ii. You can also choose to place glue in the flap between the edges and seam if you are not the greatest at sewing (will keep from having the resin beads leak out of the bag) 5. Turn the bag inside out and use the pencil to push the corners out from the inside 6. Measure the resin beads using any scale 1. Separate 15.5 oz. to go in one bag (this will make the bag 1 lb. total in the end) 7. Sew the open side shut and you have a completed bag 8. Repeat all steps for each bag and the set will be complete
  • 20. For Help • For additional help with this process go to: • http://www.cornholehowto.com/ sew-up-some-bags/how-to- sew/ • They have very detailed instructions and excellent pictures to go along with the instructions