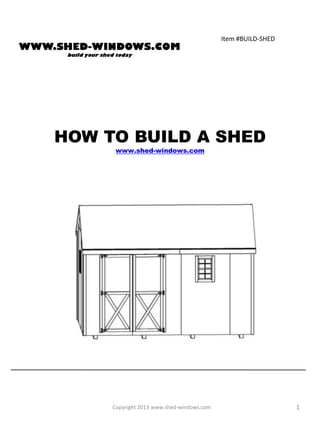
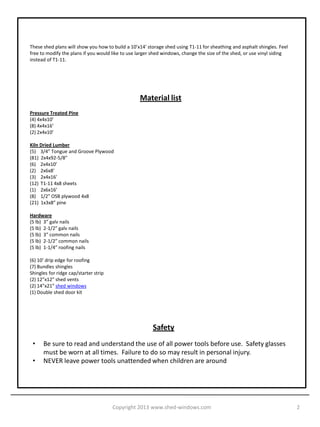
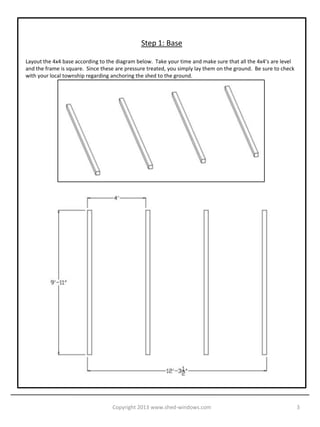
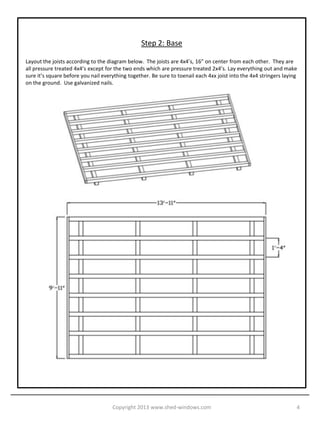
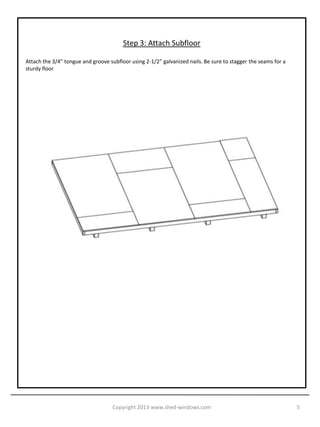
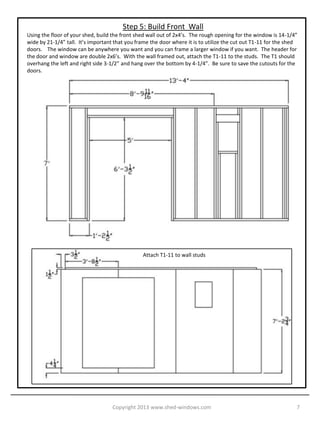
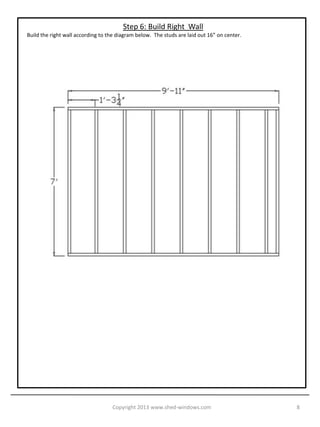
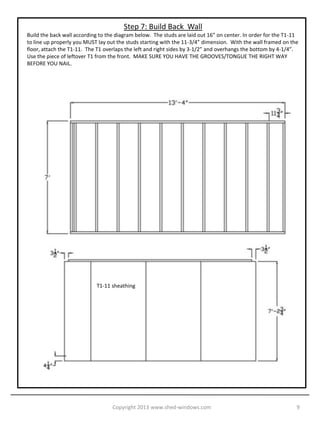
Item #BUILD-SHED
WWW.SHED-WINDOWS.COM
      build your shed today


    HOW TO BUILD A SHED
                     www.shed-windows.com


                    Copyright 2013 www.shed-windows.com                      1
These shed plans will show you how to build a 10’x14’ storage shed using T1-11 for sheathing and asphalt shingles. Feel
free to modify the plans if you would like to use larger shed windows, change the size of the shed, or use vinyl siding
instead of T1-11.


                                                  Material list
Pressure Treated Pine
(4) 4x4x10’
(8) 4x4x16’
(2) 2x4x10’

Kiln Dried Lumber
(5) 3/4” Tongue and Groove Plywood
(84) 2x4x92-5/8”
(6) 2x4x10’
(2) 2x6x8’
(3) 2x4x16’
(12) T1-11 4x8 sheets
(1) 2x6x16’
(8) 1/2” OSB plywood 4x8
(21) 1x3x8” pine

Hardware
(5 lb) 3” galv nails
(5 lb) 2-1/2” galv nails
(5 lb) 3” common nails
(5 lb) 2-1/2” common nails
(5 lb) 1-1/4” roofing nails

(6) 10’ drip edge for roofing
(7) Bundles shingles
Shingles for ridge cap/starter strip
(2) 12”x12” shed vents
(2) 14”x21” shed windows
(1) Double shed door kit


                                                        Safety
 •    Be sure to read and understand the use of all power tools before use. Safety glasses
      must be worn at all times. Failure to do so may result in personal injury.
 •    NEVER leave power tools unattended when children are around


                                       Copyright 2013 www.shed-windows.com                                                2
Step 1: Base

Layout the 4x4 base according to the diagram below. Take your time and make sure that all the 4x4’s are level
and the frame is square. Since these are pressure treated, you simply lay them on the ground. Be sure to check
with your local township regarding anchoring the shed to the ground.


                                   Copyright 2013 www.shed-windows.com                                           3
Step 2: Base

Layout the joists according to the diagram below. The joists are 4x4’s, 16” on center from each other. They are
all pressure treated 4x4’s except for the two ends which are pressure treated 2x4’s. Lay everything out and make
sure it’s square before you nail everything together. Be sure to toenail each 4xx joist into the 4x4 stringers laying
on the ground. Use galvanized nails.


                                     Copyright 2013 www.shed-windows.com                                            4
Step 3: Attach Subfloor

Attach the 3/4” tongue and groove subfloor using 2-1/2” galvanized nails. Be sure to stagger the seams for a
sturdy floor


                                    Copyright 2013 www.shed-windows.com                                        5
Step 4: Build Left Wall

Using the floor of your shed, build the left shed wall out of 2x4’s. The rough opening for the window is 14-1/4”
wide by 21-1/4” tall. The header of the window is a double 2x6


                                                       Dbl 2x6


                                    Copyright 2013 www.shed-windows.com                                            6
Step 5: Build Front Wall
Using the floor of your shed, build the front shed wall out of 2x4’s. The rough opening for the window is 14-1/4”
wide by 21-1/4” tall. It’s important that you frame the door where it is to utilize the cut out T1-11 for the shed
doors. The window can be anywhere you want and you can frame a larger window if you want. The header for
the door and window are double 2x6’s. With the wall framed out, attach the T1-11 to the studs. The T1 should
overhang the left and right side 3-1/2” and hang over the bottom by 4-1/4”. Be sure to save the cutouts for the
doors.


                                                Attach T1-11 to wall studs


                                    Copyright 2013 www.shed-windows.com                                          7
Step 6: Build Right Wall
Build the right wall according to the diagram below. The studs are laid out 16” on center.


                                   Copyright 2013 www.shed-windows.com                       8
Step 7: Build Back Wall
Build the back wall according to the diagram below. The studs are laid out 16” on center. In order for the T1-11
to line up properly you MUST lay out the studs starting with the 11-3/4” dimension. With the wall framed on the
floor, attach the T1-11. The T1 overlaps the left and right sides by 3-1/2” and overhangs the bottom by 4-1/4”.
Use the piece of leftover T1 from the front. MAKE SURE YOU HAVE THE GROOVES/TONGUE THE RIGHT WAY
BEFORE YOU NAIL.


                            T1-11 sheathing


                                   Copyright 2013 www.shed-windows.com                                         9
Step 8: Assemble Wall
Assemble the walls and nail together


                                  Copyright 2013 www.shed-windows.com   10
Step 9: Rafters
Begin by putting the 2x6 ridge board up on top of the 2x4 support posts. The easiest way is to have two people
with ladders at each end. Pre drill a hole to toe-screw a screw in each end just to support the 2x6 beam until the
rafters are installed. Install the rafters next. They are 16” on center. Refer to the diagram below for the
measurements. Toe-nail the rafters where they meet the walls.


                                                                                 Rafter Detail


                                    Copyright 2013 www.shed-windows.com                                         11
Step 10: T1-11
Install the last of the T1-11 on the sides. Start on one side with a full sheet on the bottom and work your way
across the bottom row. With the 24” cutoff from the one side, start on the other side MAKING SURE YOU HAVE
THE TONGUE/GROOVE THR RIGHT WAY on the cutoff piece. Install the remaining top T1-11 pieces.


                                   Copyright 2013 www.shed-windows.com                                        12
Step 10b: Collar ties
Install the three collar ties according to the diagram below.


                          Collar ties


                                        Copyright 2013 www.shed-windows.com   13
Step 11: Fascia and Gables
Install the 2x4 gable ends. They are 1/2” HIGHER than the roof rafters. This is to accommodate for the ½” roof
sheathing. Install the Fascia next using scrap T1-11.


                                   Copyright 2013 www.shed-windows.com                                           14
Step 12: Roof Sheathing
Install the ½” OSB roof sheathing using 2-1/2” nails.


                                    Copyright 2013 www.shed-windows.com   15
Step 13: Roofing
Install the roof felt, drip edge and shingles on the roof.


                                     Copyright 2013 www.shed-windows.com   16
Step 14: Install Windows and Doors

Install the shed windows with small screws or roofing nails. Trim the perimeter with 1x3 painted pine.

Install the doors. For complete instructions on how to install shed doors visit www.shed-doors.com

Trim the corners of the shed with 1x3 painted pine.


                                   Copyright 2013 www.shed-windows.com                                   17
Step 15: Accessories

You can use the leftover pieces of 2x4 and plywood to make shelves. The shelves are great for tools, paint
cane, or anything you need stored off the ground

You can also install other popular shed accessories such as flower boxes, shutters and skylights.

Visit www.shed-windows for a complete line of shed accessories


                                    Copyright 2013 www.shed-windows.com                                      18

How to-build-a-shed

  • 1.
    Item #BUILD-SHED WWW.SHED-WINDOWS.COM build your shed today HOW TO BUILD A SHED www.shed-windows.com Copyright 2013 www.shed-windows.com 1
  • 2.
    These shed planswill show you how to build a 10’x14’ storage shed using T1-11 for sheathing and asphalt shingles. Feel free to modify the plans if you would like to use larger shed windows, change the size of the shed, or use vinyl siding instead of T1-11. Material list Pressure Treated Pine (4) 4x4x10’ (8) 4x4x16’ (2) 2x4x10’ Kiln Dried Lumber (5) 3/4” Tongue and Groove Plywood (84) 2x4x92-5/8” (6) 2x4x10’ (2) 2x6x8’ (3) 2x4x16’ (12) T1-11 4x8 sheets (1) 2x6x16’ (8) 1/2” OSB plywood 4x8 (21) 1x3x8” pine Hardware (5 lb) 3” galv nails (5 lb) 2-1/2” galv nails (5 lb) 3” common nails (5 lb) 2-1/2” common nails (5 lb) 1-1/4” roofing nails (6) 10’ drip edge for roofing (7) Bundles shingles Shingles for ridge cap/starter strip (2) 12”x12” shed vents (2) 14”x21” shed windows (1) Double shed door kit Safety • Be sure to read and understand the use of all power tools before use. Safety glasses must be worn at all times. Failure to do so may result in personal injury. • NEVER leave power tools unattended when children are around Copyright 2013 www.shed-windows.com 2
  • 3.
    Step 1: Base Layoutthe 4x4 base according to the diagram below. Take your time and make sure that all the 4x4’s are level and the frame is square. Since these are pressure treated, you simply lay them on the ground. Be sure to check with your local township regarding anchoring the shed to the ground. Copyright 2013 www.shed-windows.com 3
  • 4.
    Step 2: Base Layoutthe joists according to the diagram below. The joists are 4x4’s, 16” on center from each other. They are all pressure treated 4x4’s except for the two ends which are pressure treated 2x4’s. Lay everything out and make sure it’s square before you nail everything together. Be sure to toenail each 4xx joist into the 4x4 stringers laying on the ground. Use galvanized nails. Copyright 2013 www.shed-windows.com 4
  • 5.
    Step 3: AttachSubfloor Attach the 3/4” tongue and groove subfloor using 2-1/2” galvanized nails. Be sure to stagger the seams for a sturdy floor Copyright 2013 www.shed-windows.com 5
  • 6.
    Step 4: BuildLeft Wall Using the floor of your shed, build the left shed wall out of 2x4’s. The rough opening for the window is 14-1/4” wide by 21-1/4” tall. The header of the window is a double 2x6 Dbl 2x6 Copyright 2013 www.shed-windows.com 6
  • 7.
    Step 5: BuildFront Wall Using the floor of your shed, build the front shed wall out of 2x4’s. The rough opening for the window is 14-1/4” wide by 21-1/4” tall. It’s important that you frame the door where it is to utilize the cut out T1-11 for the shed doors. The window can be anywhere you want and you can frame a larger window if you want. The header for the door and window are double 2x6’s. With the wall framed out, attach the T1-11 to the studs. The T1 should overhang the left and right side 3-1/2” and hang over the bottom by 4-1/4”. Be sure to save the cutouts for the doors. Attach T1-11 to wall studs Copyright 2013 www.shed-windows.com 7
  • 8.
    Step 6: BuildRight Wall Build the right wall according to the diagram below. The studs are laid out 16” on center. Copyright 2013 www.shed-windows.com 8
  • 9.
    Step 7: BuildBack Wall Build the back wall according to the diagram below. The studs are laid out 16” on center. In order for the T1-11 to line up properly you MUST lay out the studs starting with the 11-3/4” dimension. With the wall framed on the floor, attach the T1-11. The T1 overlaps the left and right sides by 3-1/2” and overhangs the bottom by 4-1/4”. Use the piece of leftover T1 from the front. MAKE SURE YOU HAVE THE GROOVES/TONGUE THE RIGHT WAY BEFORE YOU NAIL. T1-11 sheathing Copyright 2013 www.shed-windows.com 9
  • 10.
    Step 8: AssembleWall Assemble the walls and nail together Copyright 2013 www.shed-windows.com 10
  • 11.
    Step 9: Rafters Beginby putting the 2x6 ridge board up on top of the 2x4 support posts. The easiest way is to have two people with ladders at each end. Pre drill a hole to toe-screw a screw in each end just to support the 2x6 beam until the rafters are installed. Install the rafters next. They are 16” on center. Refer to the diagram below for the measurements. Toe-nail the rafters where they meet the walls. Rafter Detail Copyright 2013 www.shed-windows.com 11
  • 12.
    Step 10: T1-11 Installthe last of the T1-11 on the sides. Start on one side with a full sheet on the bottom and work your way across the bottom row. With the 24” cutoff from the one side, start on the other side MAKING SURE YOU HAVE THE TONGUE/GROOVE THR RIGHT WAY on the cutoff piece. Install the remaining top T1-11 pieces. Copyright 2013 www.shed-windows.com 12
  • 13.
    Step 10b: Collarties Install the three collar ties according to the diagram below. Collar ties Copyright 2013 www.shed-windows.com 13
  • 14.
    Step 11: Fasciaand Gables Install the 2x4 gable ends. They are 1/2” HIGHER than the roof rafters. This is to accommodate for the ½” roof sheathing. Install the Fascia next using scrap T1-11. Copyright 2013 www.shed-windows.com 14
  • 15.
    Step 12: RoofSheathing Install the ½” OSB roof sheathing using 2-1/2” nails. Copyright 2013 www.shed-windows.com 15
  • 16.
    Step 13: Roofing Installthe roof felt, drip edge and shingles on the roof. Copyright 2013 www.shed-windows.com 16
  • 17.
    Step 14: InstallWindows and Doors Install the shed windows with small screws or roofing nails. Trim the perimeter with 1x3 painted pine. Install the doors. For complete instructions on how to install shed doors visit www.shed-doors.com Trim the corners of the shed with 1x3 painted pine. Copyright 2013 www.shed-windows.com 17
  • 18.
    Step 15: Accessories Youcan use the leftover pieces of 2x4 and plywood to make shelves. The shelves are great for tools, paint cane, or anything you need stored off the ground You can also install other popular shed accessories such as flower boxes, shutters and skylights. Visit www.shed-windows for a complete line of shed accessories Copyright 2013 www.shed-windows.com 18