Download to read offline


![19
Each ListImage object exposes a Picture property, which lets you extract the image and assign it to
another control, typically a PictureBox or Image
control:
Set Picture1.Picture = ImageList1.ListImages("Cut").Picture
In general, you can use the Picture property of a ListImage object whenever you would use
the Picture property of a PictureBox or an Image control, as
in the following example:
' Save an image to a disk file.
SavePicture ImageList1.ListImages("Cut").Picture, "C:cut.bmp"
' Display an image on the current form, zooming it by a factor ' of 4 along the X-axis, and 8
along the Y-axis. With ImageList1
PaintPicture .ListImages("Cut").Picture, 0, 0, _
ScaleX(.ImageWidth, vbPixels) * 4, ScaleY(.ImageHeight, vbPixels) * 8
End With
Using the PaintPicture method, you can display any ListImage object on a form or in a PictureBox
control, or you can print it to the Printer object. ListImage objects also expose an ExtractIcon
method, which creates an icon out of the image and returns it to the caller. You can therefore use
this method whenever an icon is expected, as in this code:
Form1.MouseIcon = ImageList1.ListImages("Pointer").ExtractIcon
Unlike standard collections, keys in the ListImages collection are dealt with
in a case-sensitive way. In other words, "Pointer" and "pointer" are assumed to be different items.
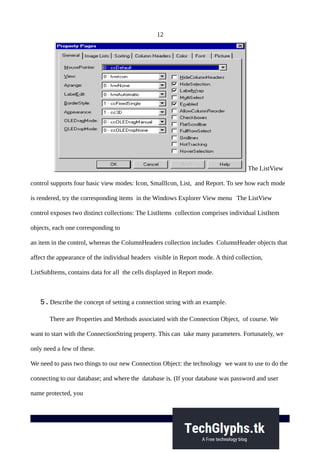
8.Describe the runtime properties of ListView Control.
Adding ListItem Objects Add([Index], [Key], [Text], [Icon], [SmallIcon]) As
ListItem](https://image.slidesharecdn.com/jry3yxvrnunaiwafbgv5-signature-49da57b7632fe8827de6fe73a27d27aaaa482c59fecd0e3a490d7b866d0b6758-poli-160609135458/85/Bt0082-visual-basic2-19-320.jpg)

![21
multiple items by clicking on them while pressing the Ctrl or the Shift key. You can modify the
selection state of a ListItem object via code by assigning the appropriate value to t he Selected
property. With such ListView controls, you must also assign the SelectedItem property to make a
ListItem the current item:
' Make the first ListItem object the current one.
Set ListView1.SelectedItem = ListView1.ListItems(1)
' Select it.
ListView1.ListItems(1).Selected = True
Adding ColumnHeaders Objects
Often you don't know at design time what columns should be displayed in a ListView control. For
example, you might be showing the result of a user-defined query, in which case you don't know the
number and the names of
the fields involved. In such circumstances, you must create ColumnHeader objects at run time with
the Add method of the ColumnHeaders collection, which has this syntax:
Add([Index], [Key], [Text], [Width], [Alignment], [Icon]) _
As ColumnHeader
Index is the position in the collection, Key is an optional key, Text is the string displayed in the
header, and Width is the column's width in twips.
Alignment is one of the following constants: 0-lvwColumnLeft, 1-lvwColumnRight, or 2-
lvwColumnCenter. Icon is an index or a key in the ListImage control referenced by the
ColumnHeaderIcons property. With the
exception of the Tag property, these are the only properties that can be assigned when a
ColumnHeader object is created, so you can usually discard the return value of the Add method:](https://image.slidesharecdn.com/jry3yxvrnunaiwafbgv5-signature-49da57b7632fe8827de6fe73a27d27aaaa482c59fecd0e3a490d7b866d0b6758-poli-160609135458/85/Bt0082-visual-basic2-21-320.jpg)
![22
' Clear any existing column header.
ListView1.ColumnHeaders.Clear
' The alignment for the first column header must be lvwColumnLeft.
istView1.ColumnHeaders.Add , , "Last Name", 2000, lvwColumnLeft
ListView1.ColumnHeaders.Add , , "First Name", 2000, lvwColumnLeft
ListView1.ColumnHeaders.Add , , "Salary", 1500, lvwColumnRight
Adding ListSubItems
Each ListItem object supports a ListSubItems collection, which lets you
create values displayed in the same row as the main ListItem object when the control is in Report
mode. This collection replaces the SubItems array that was present in previous versions of the
control. (The array is still
supported for backward compatibility.) You can create new ListSubItem objects us ing the Add
method of the ListSubItems collection:
Add([Index], [Key], [Text], [ReportIcon], [ToolTipText]) _
As ListSubItem
Index is the position in the collection of the new item, Key is its optional key,
Text is the string that will be displayed in the grid cell, ReportIcon is the index or the key of an
icon in the ImageList control referenced by the SmallIcons property, and ToolTipText is the text of
a ToolTip that appears when the user keeps the mouse hovering over this item. You can also assign
individual Bold and ForeColor attributes to each ListSubItem:
' This ListItem goes under ColumnHeader(1).
With ListView1.ListItems.Add(, , "Ross", 1)
.Bold = True](https://image.slidesharecdn.com/jry3yxvrnunaiwafbgv5-signature-49da57b7632fe8827de6fe73a27d27aaaa482c59fecd0e3a490d7b866d0b6758-poli-160609135458/85/Bt0082-visual-basic2-22-320.jpg)


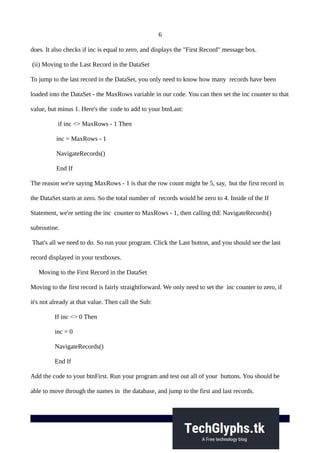
This document describes concepts related to working with data in Visual Basic .NET, including: 1. Setting a connection string involves specifying the data provider technology and data source location in the ConnectionString property of a Connection object, separated by a semicolon. An example connects to an Access database on the C drive. 2. Record navigation in a DataSet can be done by incrementing or decrementing a counter variable and calling a NavigateRecords subroutine. Buttons can move to the first, last, previous, and next records. 3. Arrays can be fixed-size or dynamic. Fixed arrays have a set size declared while dynamic arrays can be resized at runtime using ReDim. Multidimensional arrays