SlideShare a Scribd company logo
1 of 94
UNIT V
ADO .NET AND ASP .NET
The .NET Framework includes its own data access technology i.e. ADO.NET. ADO.NET is
the latest implementation of Microsoft’s Universal Data Access strategy. ADO.NET consists
of managed classes that allows .NET applications to connect to data sources such as Microsoft
SQL Server, Microsoft Access, Oracle, XML, etc., execute commands and manage
disconnected data..t
Microsoft ADO.NET is the latest improvement after ADO. Firstly, ADO.NET was introduced
in the 10th
version of the .NET framework, which helps in providing an extensive array of
various features to handle data in different modes, such as connected mode and disconnected
mode. In connected mode, we are dealing with live data and in disconnected mode, data is
provided from the data store.
ADO.NET was primarily developed to address two ways to work with data that we are getting
from data sources. The two ways are as follows :
1. The first is to do with the user’s need to access data once and to iterate through a collection
of data in a single instance i.e caching the data in runtime memory.
2. The second way to work with data is in connected way which is we do not cache data. And
we always go to database to retrieve it
Architecture of ADO.NET :
ADO.NET uses a multilayered architecture that revolves around a few key concepts as –
 asConnection
 Command
 DataSet objects
The ADO.NET architecture is a little bit different from the ADO, which can be shown from the
following figure of the architecture of ADO.NET.
Architecture of ADO.NET
One of the key differences between ADO and ADO.NET is how they deal with the challenge
of different data sources. In ADO.NET, programmers always use a generic set of objects, no
matter what the underlying data source is. For example, if we want to retrieve a record from
an Oracle Database, we use the same connection class that we use to tackle the same task with
SQL Server. This is not the case with ADO.NET, which uses a data provider model and the
DataSet.
Features of ADO.NET :
The following are the features of ADO.NET –
 Interoperability-
We know that XML documents are text-based formats. So, one can edit and edit XML
documents using standard text-editing tools. ADO.NET uses XML in all data exchanges
and for internal representation of data.
 Maintainability –
ADO.NET is built around the idea of separation of data logic and user interface. It means
that we can create our application in independent layers.
 Programmability (Typed Programming) –
It is a programming style in which user words are used to construct statements or evaluate
expressions. For example: If we want to select the “Marks” column from “Kawal” from the
“Student” table, the following is the way to do so:
DataSet.Student("Kawal").Marks;
 Performance –
It uses disconnected data architecture which is easy to scale as it reduces the load on the
database. Everything is handled on the client-side, so it improves performance.
 Scalability –
It means meeting the needs of the growing number of clients, which degrading
performance. As it uses disconnected data access, applications do not retain database lock
connections for a longer time. Thus, it accommodates scalability by encouraging
programmers to conserve limited resources and allow users to access data simultaneously.
Insert, Update, Delete: ASP.NET Database Connection
Accessing Data from a database is an important aspect of any programming language. It is
necessary for any programming language to have the ability to work with databases.
ASP.Net has the ability to work with different types of databases. It can work with the most
common databases such as Oracle and Microsoft SQL Server.
It also has the ability to work with new forms of databases such as MongoDB and MySQL.
Fundamentals of Database connectivity
ASP.Net has the ability to work with a majority of databases. The most common being Oracle
and Microsoft SQL Server. But with every database, the logic behind working with all of them is
mostly the same.
In our examples, we will look at working with the Microsoft SQL Server as our database. For
learning purposes, one can download and use the Microsoft SQL Server Express Edition. This is
a free database software provided by Microsoft.
While working with databases, the following concepts which are common across all databases.
1. Connection – To work with the data in a database, the first obvious step is the
connection. The connection to a database normally consists of the below-mentioned
parameters.
1. Database name or Data Source – The first important parameter is the database
name. Each connection can only work with one database at a time.
2. Credentials – The next important aspect is the ‘username’ and ‘password’. This
is used to establish a connection to the database.
3. Optional parameters – You can specify optional parameters on how .net should
handle the connection to the database. For example, one can specify a parameter
for how long the connection should stay active.
2. Selecting data from the database – Once the connection is established, data is fetched
from the database. ASP.Net has the ability to execute ‘sql’ select command against the
database. The ‘sql’ statement can be used to fetch data from a specific table in the
database.
3. Inserting data into the database – ASP.Net is used to insert records into the database.
Values for each row that needs to be inserted in the database are specified in ASP.Net.
4. Updating data into the database – ASP.Net can also be used to update existing records
into the database. New values can be specified in ASP.Net for each row that needs to be
updated into the database.
5. Deleting data from a database – ASP.Net can also be used to delete records from the
database. The code is written to delete a particular row from the database.
Ok, now that we have seen the theory part of each operation. Now, let’s see how to perform
database operations in ASP.Net.
ASP.NET Database Connections
Let’s now look at the code, which needs to be kept in place to create a connection to a database.
In our example, we will connect to a database which has the name of Demodb. The credentials
used to connect to the database are given below
 Username – sa
 Password – demo123
Let’s work with our current web application created in the earlier sections.
 Start adding database operations to it.
 Our example look’s at establishing a simple connection. This connection is made to the
Demodb database. This is done when the page is first launched.
 When the connection is established, a message will be sent to the user. The message will
indicate that the connection has been established.
Let’s follow the below-mentioned steps to achieve this.
Step 1) Let’s first ensure that you have your web application (DemoApplication) opened in
Visual Studio. Double click the ‘demo.aspx.cs’ file to enter the code for the database connection.
Step 2) Add the below code which will be used to establish a connection to the database.
namespace DemoApplication
{
public partial class Demo System.Web.UI.Page
{
protected void Page_Load(object sender, EventArgs e)
{
string connetionString;
SqlConnection cnn;
connetionString = @"Data Source=WIN-50GP30FGO75;Initial
Catalog=Demodb ;User ID=sa;Password=demol23";
cnn = new SqlConnection(connetionString);
cnn.Open();
Response.Write("Connection MAde");
conn.Close();
}
}
}
Code Explanation:-
1. The first step is to create variables. It will be used to create the connection string and the
connection to the SQL Server database.
2. The next step is to actually create the connection string. The connection string consists of
the following parts
 Data Source – This is the name of the server on which the database resides. In our case, it
resides on a machine called WIN- 50GP30FGO75.
 The Initial Catalog is used to specify the name of the database
 The UserID and Password are the credentials required to connect to the database.
3. Next, we assign the connecting string to the variable ‘cnn’.
 The variable cnn is of type SqlConnection. This is used to establish a connection to the
database.
 SqlConnection is a class in ASP.Net, which is used to create a connection to a database.
 To use this class, you have to first create an object of this class. Hence, here we create a
variable called ‘cnn’ which is of the type SqlConnection.
4. Next, we use the open method of the cnn variable to open a connection to the database.
We display a message to the user that the connection is established. This is done via the
‘response.write’ method. We then close the connection to the database.
When the above code is set, and the project is executed using Visual Studio. You will get the
below output. Once the form is displayed, click the Connect button.
Output:-
The output message displayed in the browser will show that the connection to the database is
made.
ASP.NET Read Database using SqlDataReader
To show data accessed using Asp.Net, let us assume the following artifacts in our database.
1. A table called demotb. This table will be used to store the ID and names of various
Tutorials.
2. The table will have two columns, one called “TutorialID” and the other called
“TutorialName.”
3. For the moment, the table will have two rows as shown below.
TutorialID TutorialName
1 C#
2 ASP.Net
Let’s change the code so that we can query for this data and display the information on the web
page itself. Note that the code entered is in continuation to that written for the data connection
module.
Step 1) Let’s split the code into two parts,
 The first part will be to construct our “select” statement. It will be used to read the data
from the database.
 We will then execute the “select” statement against the database. This will fetch all the
table rows accordingly.
Code Explanation:-
1. The first step is to create the following variables
 SQLCommand – The ‘SQLCommand’ is a class defined within C#. This class is used to
perform operations of reading and writing into the database. Hence, the first step is to
make sure that we create a variable type of this class. This variable will then be used in
subsequent steps of reading data from our database.
 The DataReader object is used to get all the data specified by the SQL query. We can
then read all the table rows one by one using the data reader.
 We then define two string variables. One is “SQL” to hold our SQL command string. The
next is the “Output” which will contain all the table values.
2. The next step is to actually define the SQL statement. This will be used against our
database. In our case, it is “Select TutorialID, TutorialName from demotb”. This will
fetch all the rows from the table demotb.
3. Next, we create the command object which is used to execute the SQL statement against
the database. In the SQL command, you have to pass the connection object and the SQL
string.
4. Next, we will execute the data reader command, which will fetch all the rows from the
demotb table.
5. Now that we have all the rows of the table with us, we need a mechanism to access the
row one by one.
 For this, we will use the ‘while’ statement.
 The ‘while’ statement will be used to access the rows from the data reader one at a time.
 We then use the ‘GetValue’ method to get the value of TutorialID and TutorialName.
Step 2) In the final step, we will just display the output to the user. Then we will close all the
objects related to the database operation.
namespace DemoApplication
{
public partial class Demo System.Web.UI.Page
{
protected void Page_Load(object sender, EventArgs e)
{
SqlCommand command;
SqlDataReader dataReader;
String sql, Output ="";
sql = "Select TutorialID,TutorialName from demotb";
command = new SqlCommand(sql, cnn);
dataReader = sqlquery.ExecuteReader();
while (dataReader.Read())
{
Output = Output + dataReader.GetValue(0) + "-" + dataReader.GetValue(1)
+ "</br>";
}
Response.Write(Output);
dataReader.Close();
command.dispose();
conn.Close();
}
}
}
Code Explanation:-
1. We will continue our code by displaying the value of the Output variable. This is done
using the Response.Write method.
2. We finally close all the objects related to our database operation. Remember this is
always a good practice.
When the above code is set, and the project is run using Visual Studio, you will get the below
output.
Output:-
From the output, you can clearly see that the program was able to get the values from the
database. The data is then displayed in the browser to the user.
Insert Database Record using InsertCommand
Just like Accessing data, ASP.Net has the ability to insert records into the database as well. Let’s
take the same table structure used for inserting records.
TutorialID TutorialName
1 C#
2 ASP.Net
Let’s change the code in our form, so that we can insert the following row into the table
TutorialID TutorialName
3 VB.Net
Step 1) As the first step let’s add the following code to our program. The below code snippet
will be used to insert an existing record in our database.
namespace DemoApplication
{
public partial class Demo System.Web.UI.Page
{
protected void Page_Load(object sender, EventArgs e)
{
SqlCommand command;
SqlDataAdapter adapter = new SqlDataAdapter();
String sql="";
sql = "Insert into demotb(TutorialID,TutorialName) value(3, '" + "VB.Net
+"')";
command = new SqlCommand(sql,cnn);
adapter.InsertCommand = new SqlCommand(sql,cnn);
adapter.InsertCommand.ExecuteNonQuery();
command.Dispose():
cnn.Close();
}
}
}
Code Explanation:-
1. The first step is to create the following variables
1. SQLCommand – This data type is used to define objects. These objects perform SQL
operations against a database. This object will hold the SQL command which will run
against our SQL Server database.
2. The DataAdapter object is used to perform insert, delete and update SQL commands
3. We then define a string variable, which is “SQL” to hold our SQL command string.
2. The next step is actually to define the SQL statement, which will be used against our
database. In our case, we are issuing an insert statement. This will insert the record of
TutorialID=3 and TutorialName=VB.Net
3. Next, we create the command object which is used to execute the SQL statement against
the database. In the SQL command, you have to pass the connection object and the SQL
string
4. In our data adapter command,
 Associate the insert SQL command to the adapter.
 Then issue the ‘ExecuteNonQuery’ method. This is used to execute the Insert statement
against our database.
 The ‘ExecuteNonQuery’ method is used in C# to issue any DML statements (insert,
delete and update operation) against the database.
 To issue any table statements in ASP.Net, one need’s to use the ‘ExecuteNonQuery’
method.
5. We finally close all the objects related to our database operation. Remember this is
always a good practice.
Step 2) As a second step, let’s add the same code as in the Accessing data section. This is to
display the recent table data in the browser. For that, we will add the below code to the
demo.aspx.cs file.
namespace DemoApplication
{
public partial class Demo System.Web.UI.Page
{
protected void Page_Load(object sender, EventArgs e)
{
SqlCommand sqlquery;
SqlDataReader dataReader;
String Output ="";
sql = "Select TutorialID,TutorialName from demotb";
sqlquery = new SqlCommand(sql, cnn);
dataReader = command.ExecuteReader();
while (dataReader.Read())
{
Output = Output + dataReader.GetValue(0) + "-" + dataReader.GetValue(1)
+ "</br>";
}
Response.Write(Output);
dataReader.Close();
command.dispose();
conn.Close();
}
}
}
When the above code is set, and the project is executed in Visual Studio, you will get the below
output.
Output:-
In the browser window, you will see that the rows was successfully inserted in the database.
Update Database Record using UpdateCommand
ASP.Net has the ability to update existing records from a database. Let’s take the same table
structure which was used above for the example to insert records.
TutorialID TutorialName
1 C#
2 ASP.Net
3 VB.Net
Let’s change the code in our form, so that we can update the following row. The old row value is
TutorialID as “3” and Tutorial Name as “VB.Net”. Which we will update it to “VB.Net
complete” while the row value for Tutorial ID will remain same.
Old row
TutorialID TutorialName
3 VB.Net
New row
TutorialID TutorialName
3 VB.Net complete
Step 1) As the first step let’s add the following code to our program. The below code snippet
will be used to update an existing record in our database.
namespace DemoApplication
{
public partial class Demo System.Web.UI.Page
{
protected void Page_Load(object sender, EventArgs e)
{
SqlCommand command;
SqlDataAdapter adapter = new SqlDataAdapter();
String sql="";
sql = "Update demotb set TutorialName='"VB.Net Complete"+"' where
TutorialID=3";
command = new SqlCommand(sql,cnn);
adapter.InsertCommand = new SqlCommand(sql,cnn);
adapter.InsertCommand.ExecuteNonQuery;
command.Dispose():
cnn.Close();
}
}
}
Code Explanation:-
1. The first step is to create the following variables
1. SQLCommand – his data type is used to define objects to perform SQL operations
against a database. This object will hold the SQL command which will run against our
SQL Server database.
2. The dataadapter object is used to perform insert, delete and update SQL commands
3. We then define a string variable, which is SQL to hold our SQL command string.
2. The next step is actually to define the SQL statement which will be used against our
database. In our case, we are issuing an ‘update’ statement. This will update the Tutorial
name to “VB.Net Complete”. The TutorialID will remain unchanged, and the value will
be 3.
3. Next, we will create the command object. This is used to execute the SQL statement
against the database. In the SQL command, you have passed the connection object and
the SQL string
4. In our data adapter command, we now associate the insert SQL command to our adapter.
We then issue the ExecuteNonQuery method. This is used to execute the Update
statement against our database.
5. We finally close all the objects related to our database operation. Remember this is
always a good practice.
Step 2) As a second step, let’s add the same code as in the Accessing data section. This is to
display the recent table data in the browser. For that, we will add the below code
namespace DemoApplication
{
public partial class Demo System.Web.UI.Page
{
protected void Page_Load(object sender, EventArgs e)
{
SqlCommand sqlquery;
SqlDataReader dataReader;
String Output ="";
sql = "Select TutorialID,TutorialName from demotb";
sqlquery = new SqlCommand(sql, cnn);
dataReader = command.ExecuteReader();
while (dataReader.Read())
{
Output = Output + dataReader.GetValue(0) + "-" + dataReader.GetValue(1)
+ "</br>";
}
Response.Write(Output);
dataReader.Close();
command.dispose();
conn.Close();
}
}
}
When the above code is set, and the project is executed using Visual Studio, you will get the
below output.
Output:-
In the browser window, you will see that the rows were successfully updated in the database.
Delete Database Record using DeleteCommand
ASP.Net can delete existing records from a database. Let’s take the same table structure which
was used above for the example to delete records.
TutorialID TutorialName
1 C#
2 ASP.Net
3 VB.Net complete
Let’s change the code in our form so that we can delete the following row
TutorialID TutorialName
3 VB.Net complete
So let’s add the following code to our program. The below code snippet will be used to delete an
existing record in our database.
Step 1) As the first step let’s add the following code to our program. The below code snippet
will be used to delete an existing record in our database.
namespace DemoApplication
{
public partial class Demo System.Web.UI.Page
{
protected void Page_Load(object sender, EventArgs e)
{
SqlCommand command;
SqlDataAdapter adapter = new SqlDataAdapter();
String sql="";
sql = "Delete demotb where TutorialID=3";
command = new SqlCommand(sql,cnn);
adapter.DeleteCommand = new SqlCommand(sql,cnn);
adapter.DeleteCommand.ExecuteNonQuery;
command.Dispose():
cnn.Close();
}
}
}
Code Explanation:-
1. The Key difference in this code is that we are now issuing the delete SQL statement. The
delete statement is used to delete the row in the demotb table in which the TutorialID has
a value of 3.
2. In our data adapter command, we now associate the insert SQL command to our adapter.
We also issue the ‘ExecuteNonQuery’ method which is used to execute the delete
statement against our database.
Step 2) As a second step, let’s add the same code as in the Accessing data section. This is to
display the recent table data in the browser. For that, we will add the below code.
namespace DemoApplication
{
public partial class Demo System.Web.UI.Page
{
protected void Page_Load(object sender, EventArgs e)
{
SqlCommand sqlquery;
SqlDataReader dataReader;
String Output ="";
sql = "Select TutorialID,TutorialName from demotb";
sqlquery = new SqlCommand(sql, cnn);
dataReader = command.ExecuteReader();
while(dataReader.Read())
{
Output = Output + dataReader.GetValue(0) + "-" + dataReader.GetValue(1)
+ "</br>";
}
Response.Write(Output);
dataReader.Close();
command.dispose();
conn.Close();
}
}
}
When the above code is set, and the project is executed using Visual Studio, you will get the
below output.
Output:-
Connecting Asp.net Controls to Data
We have seen how we can use ASP.Net commands such as SQLCommand and SQLReader to
fetch data from a database. We also saw how we can read each row of the table display it on the
web page.
There are methods available to link controls directly to different fields in the table. At the
moment, only the below controls can be bound to an ASP.Net application
1. CheckboxList
2. RadioButtonList
3. DropDownlist
4. Listbox
So let’s see an example of how we can use control binding in ASP.Net. Here we will take a
listbox example. Let’s say we have the following data in our database.
TutorialID TutorialName
1 C#
2 ASP.Net
3 VB.Net complete
Let’s use the Listbox control and see how it can automatically pick up the data from our Demotb
table.
Let’s follow the below-mentioned steps to achieve this.
Step 1) Construct the basic web form. From the toolbox in Visual Studio, drag and drop 2
components- labels and Listboxes. Then carry out the following substeps;
1. Put the text value of the first label as TutorialID
2. Put the text value of the second label as TutorialName
Below is how the form would look like once the above-mentioned steps are performed.
Step 2) The next step is to start connecting each listbox to the database table.
1. First, click on the Listbox for Tutorial ID. This will bring up another dialog box to the
side of the control.
2. From the dialog box, we need to click on the option of Choose Data source.
Step 3) You will then be presented with a dialog box. This can be used to create a new data
source. The data source will represent a connection to the database. Choose the option of ‘New
data source’.
Step 4) The below screen will be prompted after choosing the new data source in the last step.
Here we need to mention the type of data source we want to create.
1. Choose the database option to work with an SQL Server database.
2. Now we need to give a name to our data source. Here we are giving it a name of
DemoDataSource.
3. Finally, we click the ‘OK’ button to proceed to the next screen.
Step 5) Now we need to create a connection to our database. In the next screen, click on the New
Connection button
Step 6) Next you need to add the credentials to connect to the database.
1. Choose the server name on which the SQL Server resides
2. Enter the user id and password to connect to the database
3. Choose the database as ‘demotb’
4. Click the ‘OK’ button.
Step 7) On the next screen, you will be able to see the Demotb table. Just click on the Next
button to accept the default setting.
Step 8) You will now be able to test the connection on the next screen.
1. Click on the Test Query button to just see if you are able to get the values from the table
2. Click the Finish button to complete the wizard.
Step 9) Now on the final screen, you can click the ‘OK’ button. This will now bind the
TutorialID listbox to the TutorialID field name in the ‘demotb’ table.
Step 10) Now it’s time to bind the Tutorial Name listbox to the Tutorial Name field.
1. First, click on the Tutorial Name Listbox.
2. Next, Choose from Data Source in the dialog box which appears at the side of the
Listbox.
Step 11) You will already see the DemoDataSource when choosing the Data Source in the next
screen.
1. Choose the DemoData Source
2. Click on the OK button.
If all the above steps are executed as shown, you will get the below-mentioned output.
Output:-
From the output, you can see that the listboxes display the Tutorial ID and Tutorial Names
respectively
Summary
 ASP.Net can work with databases such as Oracle and Microsoft SQL Server.
 ASP.Net has all the commands which are required to work with databases. This involves
establishing a connection to the database. You can perform operations such as select,
update, insert and delete.
 The data reader object in ASP.Net is used to hold all the data returned by the database.
The While loop in ASP.net can be used to read the data rows one at a time.
 The data adapter object is used to perform SQL operations such as insert, delete, and
update.
 ASP.Net can bind controls to the various fields in a table. They are bound by defining a
data source in ASP.Net. The data source is used to pull the data from the database and
populate them in the controls.
ADO.NET SqlDataReader Class
This class is used to read data from SQL Server database. It reads data in forward-only stream of
rows from a SQL Server database. it is sealed class so that cannot be inherited. It inherits
DbDataReader class and implements IDisposable interface.
SqlDataReader Signature
1. public class SqlDataReader : System.Data.Common.DbDataReader, IDisposable
SqlDataReader Properties
Property Description
Connection It is used to get the SqlConnection associated with the
SqlDataReader.
Depth It is used to get a value that indicates the depth of nesting for
the current row.
FieldCount It is used to get the number of columns in the current row.
HasRows It is used to get a value that indicates whether the
SqlDataReader contains one or more rows.
IsClosed It is used to retrieve a boolean value that indicates whether the
specified SqlDataReader instance has been closed.
Item[String] It is used to get the value of the specified column in its native
format given the column name.
Item[Int32] It is used to get the value of the specified column in its native
format given the column ordinal.
RecordsAffected It is used to get the number of rows changed, inserted or
deleted by execution of the Transact-SQL statement.
VisibleFieldCount It is used to get the number of fields in the SqlDataReader that
are not hidden.
Methods
Method Description
Close() It is used to closes the SqlDataReader object.
GetBoolean(Int32) It is used to get the value of the specified column as a
Boolean.
GetByte(Int32) It is used to get the value of the specified column as a byte.
GetChar(Int32) It is used to get the value of the specified column as a single
character.
GetDateTime(Int32) It is used to get the value of the specified column as a
DateTime object.
GetDecimal(Int32) It is used to get the value of the specified column as a
Decimal object.
GetDouble(Int32) It is used to get the value of the specified column as a
double-precision floating point number.
GetFloat(Int32) It is used to get the value of the specified column as a single-
precision floating point number.
GetName(Int32) It is used to get the name of the specified column.
GetSchemaTable() It is used to get a DataTable that describes the column
metadata of the SqlDataReader.
GetValue(Int32) It is used to get the value of the specified column in its native
format.
GetValues(Object[]) It is used to populate an array of objects with the column
values of the current row.
NextResult() It is used to get the next result, when reading the results of
SQL statements.
Read() It is used to read record from the SQL Server database.
To create a SqlDataReader instance, we must call the ExecuteReader method of the
SqlCommand object.
Example
In the following program, we are using SqlDataReader to get data from the SQL Server. A C#
code is given below.
// Program.cs
1. using System;
2. using System.Data.SqlClient;
3. namespace AdoNetConsoleApplication
4. {
5. class Program
6. {
7. static void Main(string[] args)
8. {
9. new Program().GetData();
10. }
11. public void GetData()
12. {
13. SqlConnection con = null;
14. try
15. {
16. // Creating Connection
17. con = new SqlConnection("data source=.; database=student; integrated security=SSPI"
);
18. // writing sql query
19. SqlCommand cm = new SqlCommand("select * from student", con);
20. // Opening Connection
21. con.Open();
22. // Executing the SQL query
23. SqlDataReader sdr = cm.ExecuteReader();
24. while (sdr.Read())
25. {
26. Console.WriteLine(sdr["name"]+" "+ sdr["email"]);
27. }
28. }
29. catch (Exception e)
30. {
31. Console.WriteLine("OOPs, something went wrong." + e);
32. }
33. // Closing the connection
34. finally
35. {
36. con.Close();
37. }
38. }
39. }
40. }
Output:
Execute this program by combination of Ctrl+F5 and it will produce the following output.
ADO.NET DataSet
It is a collection of data tables that contain the data. It is used to fetch data without interacting
with a Data Source that's why, it also known as disconnected data access method. It is an in-
memory data store that can hold more than one table at the same time. We can use DataRelation
object to relate these tables. The DataSet can also be used to read and write data as XML
document.
ADO.NET provides a DataSet class that can be used to create DataSet object. It contains
constructors and methods to perform data related operations.
DataSet Class Signature
1. public class DataSet : System.ComponentModel.MarshalByValueComponent, System.Compone
ntModel.IListSource,
2. System.ComponentModel.ISupportInitializeNotification, System.Runtime.Serialization.ISerializ
able,
3. System.Xml.Serialization.IXmlSerializable
DataSet Constructors
Constructor Description
DataSet() It is used to initialize a new instance of the
DataSet class.
DataSet(String) It is used to initialize a new instance of a
DataSet class with the given name.
DataSet(SerializationInfo,
StreamingContext)
It is used to initialize a new instance of a
DataSet class that has the given serialization
information and context.
DataSet(SerializationInfo,
StreamingContext, Boolean)
It is used to initialize a new instance of the
DataSet class.
DataSet Properties
Properties Description
CaseSensitive It is used to check whether DataTable objects are case-
sensitive or not.
DataSetName It is used to get or set name of the current DataSet.
DefaultViewManager It is used to get a custom view of the data contained in the
DataSet to allow filtering and searching.
HasErrors It is used to check whether there are errors in any of the
DataTable objects within this DataSet.
IsInitialized It is used to check whether the DataSet is initialized or not.
Locale It is used to get or set the locale information used to
compare strings within the table.
Namespace It is used to get or set the namespace of the DataSet.
Site It is used to get or set an ISite for the DataSet.
Tables It is used to get the collection of tables contained in the
DataSet.
DataSet Methods
The following table contains some commonly used methods of DataSet.
Method Description
BeginInit() It is used to begin the initialization of a
DataSet that is used on a form.
Clear() It is used to clear the DataSet of any data by
removing all rows in all tables.
Clone() It is used to copy the structure of the DataSet.
Copy() It is used to copy both the structure and data
for this DataSet.
CreateDataReader(DataTable[]) It returns a DataTableReader with one result
set per DataTable.
CreateDataReader() It returns a DataTableReader with one result
set per DataTable.
EndInit() It ends the initialization of a DataSet that is
used on a form.
GetXml() It returns the XML representation of the data
stored in the DataSet.
GetXmlSchema() It returns the XML Schema for the XML
representation of the data stored in the
DataSet.
Load(IDataReader, LoadOption,
DataTable[])
It is used to fill a DataSet with values from a
data source using the supplied IDataReader.
Merge(DataSet) It is used to merge a specified DataSet and its
schema into the current DataSet.
Merge(DataTable) It is used to merge a specified DataTable and
its schema into the current DataSet.
ReadXml(XmlReader, It is used to read XML schema and data into
XmlReadMode) the DataSet using the specified XmlReader
and XmlReadMode.
Reset() It is used to clear all tables and removes all
relations, foreign constraints, and tables from
the DataSet.
WriteXml(XmlWriter,
XmlWriteMode)
It is used to write the current data and
optionally the schema for the DataSet using
the specified XmlWriter and XmlWriteMode.
Example:
Here, in this example, we are implementing DataSet and displaying data into a gridview. Create
a web form and drag a gridview from the toolbox to the form. We can find it inside the data
category.
// DataSetDemo.aspx
1. <%@ Page Language="C#" AutoEventWireup="true" CodeBehind="DataSetDemo.aspx.cs"
2. Inherits="DataSetExample.DataSetDemo" %>
3. <!DOCTYPE html>
4. <html xmlns="http://www.w3.org/1999/xhtml">
5. <head runat="server">
6. <title></title>
7. </head>
8. <body>
9. <form id="form1" runat="server">
10. <div>
11. </div>
12. <asp:GridView ID="GridView1" runat="server" CellPadding="4" ForeColor="#333333"
GridLines="None">
13. <AlternatingRowStyle BackColor="White" />
14. <EditRowStyle BackColor="#2461BF" />
15. <FooterStyle BackColor="#507CD1" Font-Bold="True" ForeColor="White" />
16. <HeaderStyle BackColor="#507CD1" Font-Bold="True" ForeColor="White" />
17. <PagerStyle BackColor="#2461BF" ForeColor="White" HorizontalAlign="Center" />
18. <RowStyle BackColor="#EFF3FB" />
19. <SelectedRowStyle BackColor="#D1DDF1" Font-
Bold="True" ForeColor="#333333" />
20. <SortedAscendingCellStyle BackColor="#F5F7FB" />
21. <SortedAscendingHeaderStyle BackColor="#6D95E1" />
22. <SortedDescendingCellStyle BackColor="#E9EBEF" />
23. <SortedDescendingHeaderStyle BackColor="#4870BE" />
24. </asp:GridView>
25. </form>
26. </body>
27. </html>
CodeBehind
// DataSetDemo.aspx.cs
1. using System;
2. using System.Data.SqlClient;
3. using System.Data;
4. namespace DataSetExample
5. {
6. public partial class DataSetDemo : System.Web.UI.Page
7. {
8. protected void Page_Load(object sender, EventArgs e)
9. {
10. using (SqlConnection con = new SqlConnection("data source=.; database=student; integr
ated security=SSPI"))
11. {
12. SqlDataAdapter sde = new SqlDataAdapter("Select * from student", con);
13. DataSet ds = new DataSet();
14. sde.Fill(ds);
15. GridView1.DataSource = ds;
16. GridView1.DataBind();
17. }
18. }
19. }
20. }
Output:
Execute this code by the combination of Ctrl+F5. It will produce the following output.
ASP.NET - Introduction
ASP.NET is a web development platform, which provides a programming model, a
comprehensive software infrastructure and various services required to build up robust web
applications for PC, as well as mobile devices.
ASP.NET works on top of the HTTP protocol, and uses the HTTP commands and policies to set
a browser-to-server bilateral communication and cooperation.
ASP.NET is a part of Microsoft .Net platform. ASP.NET applications are compiled codes,
written using the extensible and reusable components or objects present in .Net framework.
These codes can use the entire hierarchy of classes in .Net framework.
The ASP.NET application codes can be written in any of the following languages:
 C#
 Visual Basic.Net
 Jscript
 J#
ASP.NET is used to produce interactive, data-driven web applications over the internet. It
consists of a large number of controls such as text boxes, buttons, and labels for assembling,
configuring, and manipulating code to create HTML pages.
ASP.NET Web Forms Model
ASP.NET web forms extend the event-driven model of interaction to the web applications. The
browser submits a web form to the web server and the server returns a full markup page or
HTML page in response.
All client side user activities are forwarded to the server for stateful processing. The server
processes the output of the client actions and triggers the reactions.
Now, HTTP is a stateless protocol. ASP.NET framework helps in storing the information
regarding the state of the application, which consists of:
 Page state
 Session state
The page state is the state of the client, i.e., the content of various input fields in the web form.
The session state is the collective information obtained from various pages the user visited and
worked with, i.e., the overall session state. To clear the concept, let us take an example of a
shopping cart.
User adds items to a shopping cart. Items are selected from a page, say the items page, and the
total collected items and price are shown on a different page, say the cart page. Only HTTP
cannot keep track of all the information coming from various pages. ASP.NET session state and
server side infrastructure keeps track of the information collected globally over a session.
The ASP.NET runtime carries the page state to and from the server across page requests while
generating ASP.NET runtime codes, and incorporates the state of the server side components in
hidden fields.
This way, the server becomes aware of the overall application state and operates in a two-tiered
connected way.
The ASP.NET Component Model
The ASP.NET component model provides various building blocks of ASP.NET pages. Basically
it is an object model, which describes:
 Server side counterparts of almost all HTML elements or tags, such as <form> and
<input>.
 Server controls, which help in developing complex user-interface. For example, the
Calendar control or the Gridview control.
ASP.NET is a technology, which works on the .Net framework that contains all web-related
functionalities. The .Net framework is made of an object-oriented hierarchy. An ASP.NET web
application is made of pages. When a user requests an ASP.NET page, the IIS delegates the
processing of the page to the ASP.NET runtime system.
The ASP.NET runtime transforms the .aspx page into an instance of a class, which inherits from
the base class page of the .Net framework. Therefore, each ASP.NET page is an object and all its
components i.e., the server-side controls are also objects.
Components of .Net Framework 3.5
Before going to the next session on Visual Studio.Net, let us go through at the various
components of the .Net framework 3.5. The following table describes the components of the .Net
framework 3.5 and the job they perform:
Components and their Description
(1) Common Language Runtime or CLR
It performs memory management, exception handling, debugging, security checking,
thread execution, code execution, code safety, verification, and compilation. The code
that is directly managed by the CLR is called the managed code. When the managed
code is compiled, the compiler converts the source code into a CPU independent
intermediate language (IL) code. A Just In Time(JIT) compiler compiles the IL code into
native code, which is CPU specific.
(2) .Net Framework Class Library
It contains a huge library of reusable types. classes, interfaces, structures, and
enumerated values, which are collectively called types.
(3) Common Language Specification
It contains the specifications for the .Net supported languages and implementation of
language integration.
(4) Common Type System
It provides guidelines for declaring, using, and managing types at runtime, and cross-
language communication.
(5) Metadata and Assemblies
Metadata is the binary information describing the program, which is either stored in a
portable executable file (PE) or in the memory. Assembly is a logical unit consisting of
the assembly manifest, type metadata, IL code, and a set of resources like image files.
(6) Windows Forms
Windows Forms contain the graphical representation of any window displayed in the
application.
(7) ASP.NET and ASP.NET AJAX
ASP.NET is the web development model and AJAX is an extension of ASP.NET for
developing and implementing AJAX functionality. ASP.NET AJAX contains the
components that allow the developer to update data on a website without a complete
reload of the page.
(8) ADO.NET
It is the technology used for working with data and databases. It provides access to data
sources like SQL server, OLE DB, XML etc. The ADO.NET allows connection to data
sources for retrieving, manipulating, and updating data.
(9) Windows Workflow Foundation (WF)
It helps in building workflow-based applications in Windows. It contains activities,
workflow runtime, workflow designer, and a rules engine.
(10) Windows Presentation Foundation
It provides a separation between the user interface and the business logic. It helps in
developing visually stunning interfaces using documents, media, two and three
dimensional graphics, animations, and more.
(11) Windows Communication Foundation (WCF)
It is the technology used for building and executing connected systems.
(12) Windows CardSpace
It provides safety for accessing resources and sharing personal information on the
internet.
(13) LINQ
It imparts data querying capabilities to .Net languages using a syntax which is similar to
the tradition query language SQL.
ASP.NET Web Forms is a part of the ASP.NET web application framework and is included
with Visual Studio. It is one of the four programming models you can use to create ASP.NET
web applications, the others are ASP.NET MVC, ASP.NET Web Pages, and ASP.NET Single
Page Applications.
Web Forms are pages that your users request using their browser. These pages can be written
using a combination of HTML, client-script, server controls, and server code. When users
request a page, it is compiled and executed on the server by the framework, and then the
framework generates the HTML markup that the browser can render. An ASP.NET Web Forms
page presents information to the user in any browser or client device.
Using Visual Studio, you can create ASP.NET Web Forms. The Visual Studio Integrated
Development Environment (IDE) lets you drag and drop server controls to lay out your Web
Forms page. You can then easily set properties, methods, and events for controls on the page or
for the page itself. These properties, methods, and events are used to define the web page's
behavior, look and feel, and so on. To write server code to handle the logic for the page, you can
use a .NET language like Visual Basic or C#.
Note
ASP.NET and Visual Studio documentation spans several versions. Topics that highlight
features from previous versions may be useful for your current tasks and scenarios using the
latest versions.
ASP.NET Web Forms are:
 Based on Microsoft ASP.NET technology, in which code that runs on the server
dynamically generates Web page output to the browser or client device.
 Compatible with any browser or mobile device. An ASP.NET Web page automatically
renders the correct browser-compliant HTML for features such as styles, layout, and so on.
 Compatible with any language supported by the .NET common language runtime, such as
Microsoft Visual Basic and Microsoft Visual C#.
 Built on the Microsoft .NET Framework. This provides all the benefits of the framework,
including a managed environment, type safety, and inheritance.
 Flexible because you can add user-created and third party controls to them.
ASP.NET Web Forms offer:
 Separation of HTML and other UI code from application logic.
 A rich suite of server controls for common tasks, including data access.
 Powerful data binding, with great tool support.
 Support for client-side scripting that executes in the browser.
 Support for a variety of other capabilities, including routing, security, performance,
internationalization, testing, debugging, error handling and state management.
ASP.NET Web Forms Helps You Overcome Challenges
Web application programming presents challenges that do not typically arise when programming
traditional client-based applications. Among the challenges are:
 Implementing a rich Web user interface - It can be difficult and tedious to design and
implement a user interface using basic HTML facilities, especially if the page has a
complex layout, a large amount of dynamic content, and full-featured user-interactive
objects.
 Separation of client and server - In a Web application, the client (browser) and server are
different programs often running on different computers (and even on different operating
systems). Consequently, the two halves of the application share very little information;
they can communicate, but typically exchange only small chunks of simple information.
 Stateless execution - When a Web server receives a request for a page, it finds the page,
processes it, sends it to the browser, and then discards all page information. If the user
requests the same page again, the server repeats the entire sequence, reprocessing the page
from scratch. Put another way, a server has no memory of pages that it has processed—
page are stateless. Therefore, if an application needs to maintain information about a page,
its stateless nature can become a problem.
 Unknown client capabilities - In many cases, Web applications are accessible to many
users using different browsers. Browsers have different capabilities, making it difficult to
create an application that will run equally well on all of them.
 Complications with data access - Reading from and writing to a data source in traditional
Web applications can be complicated and resource-intensive.
 Complications with scalability - In many cases Web applications designed with existing
methods fail to meet scalability goals due to the lack of compatibility between the various
components of the application. This is often a common failure point for applications under
a heavy growth cycle.
Meeting these challenges for Web applications can require substantial time and effort. ASP.NET
Web Forms and the ASP.NET framework address these challenges in the following ways:
 Intuitive, consistent object model - The ASP.NET page framework presents an object
model that enables you to think of your forms as a unit, not as separate client and server
pieces. In this model, you can program the page in a more intuitive way than in traditional
Web applications, including the ability to set properties for page elements and respond to
events. In addition, ASP.NET server controls are an abstraction from the physical contents
of an HTML page and from the direct interaction between browser and server. In general,
you can use server controls the way you might work with controls in a client application
and not have to think about how to create the HTML to present and process the controls
and their contents.
 Event-driven programming model - ASP.NET Web Forms bring to Web applications the
familiar model of writing event handlers for events that occur on either the client or server.
The ASP.NET page framework abstracts this model in such a way that the underlying
mechanism of capturing an event on the client, transmitting it to the server, and calling the
appropriate method is all automatic and invisible to you. The result is a clear, easily written
code structure that supports event-driven development.
 Intuitive state management - The ASP.NET page framework automatically handles the
task of maintaining the state of your page and its controls, and it provides you with explicit
ways to maintain the state of application-specific information. This is accomplished
without heavy use of server resources and can be implemented with or without sending
cookies to the browser.
 Browser-independent applications - The ASP.NET page framework enables you to
create all application logic on the server, eliminating the need to explicitly code for
differences in browsers. However, it still enables you to take advantage of browser-specific
features by writing client-side code to provide improved performance and a richer client
experience.
 .NET Framework common language runtime support - The ASP.NET page framework
is built on the .NET Framework, so the entire framework is available to any ASP.NET
application. Your applications can be written in any language that is compatible that is
with the runtime. In addition, data access is simplified using the data access infrastructure
provided by the .NET Framework, including ADO.NET.
 .NET Framework scalable server performance - The ASP.NET page framework enables
you to scale your Web application from one computer with a single processor to a multi-
computer Web farm cleanly and without complicated changes to the application's logic.
Features of ASP.NET Web Forms
 Server Controls- ASP.NET Web server controls are objects on ASP.NET Web pages that
run when the page is requested and that render markup to the browser. Many Web server
controls are similar to familiar HTML elements, such as buttons and text boxes. Other
controls encompass complex behavior, such as a calendar controls, and controls that you
can use to connect to data sources and display data.
 Master Pages- ASP.NET master pages allow you to create a consistent layout for the
pages in your application. A single master page defines the look and feel and standard
behavior that you want for all of the pages (or a group of pages) in your application. You
can then create individual content pages that contain the content you want to display.
When users request the content pages, they merge with the master page to produce output
that combines the layout of the master page with the content from the content page.
 Working with Data- ASP.NET provides many options for storing, retrieving, and
displaying data. In an ASP.NET Web Forms application, you use data-bound controls to
automate the presentation or input of data in web page UI elements such as tables and text
boxes and drop-down lists.
 Membership- ASP.NET Identity stores your users' credentials in a database created by the
application. When your users log in, the application validates their credentials by reading
the database. Your project's Account folder contains the files that implement the various
parts of membership: registering, logging in, changing a password, and authorizing access.
Additionally, ASP.NET Web Forms supports OAuth and OpenID. These authentication
enhancements allow users to log into your site using existing credentials, from such
accounts as Facebook, Twitter, Windows Live, and Google. By default, the template
creates a membership database using a default database name on an instance of SQL
Server Express LocalDB, the development database server that comes with Visual Studio
Express 2013 for Web.
 Client Script and Client Frameworks- You can enhance the server-based features of
ASP.NET by including client-script functionality in ASP.NET Web Form pages. You can
use client script to provide a richer, more responsive user interface to users. You can also
use client script to make asynchronous calls to the Web server while a page is running in
the browser.
 Routing- URL routing allows you to configure an application to accept request URLs that
do not map to physical files. A request URL is simply the URL a user enters into their
browser to find a page on your web site. You use routing to define URLs that are
semantically meaningful to users and that can help with search-engine optimization (SEO).
 State Management- ASP.NET Web Forms includes several options that help you preserve
data on both a per-page basis and an application-wide basis.
 Security- An important part of developing a more secure application is to understand the
threats to it. Microsoft has developed a way to categorize threats: Spoofing, Tampering,
Repudiation, Information disclosure, Denial of service, Elevation of privilege (STRIDE).
In ASP.NET Web Forms, you can add extensibility points and configuration options that
enable you to customize various security behaviors in ASP.NET Web Forms.
 Performance- Performance can be a key factor in a successful Web site or project.
ASP.NET Web Forms allows you to modify performance related to page and server
control processing, state management, data access, application configuration and loading,
and efficient coding practices.
 Internationalization- ASP.NET Web Forms enables you to create web pages that can
obtain content and other data based on the preferred language setting for the browser or
based on the user's explicit choice of language. Content and other data is referred to as
resources and such data can be stored in resource files or other sources. In an ASP.NET
Web Forms page, you configure controls to get their property values from resources. At
run time, the resource expressions are replaced by resources from the appropriate localized
resource file.
 Debugging and Error Handling- ASP.NET includes features to help you diagnose
problems that might arise in your Web Forms application. Debugging and error handling
are well supported within ASP.NET Web Forms so that your applications compile and run
effectively.
 Deployment and Hosting- Visual Studio, ASP.NET, Azure, and IIS provide tools that
help you with the process of deploying and hosting your Web Forms application.
Deciding When to Create a Web Forms Application
You must consider carefully whether to implement a Web application by using either the
ASP.NET Web Forms model or another model, such as the ASP.NET MVC framework. The
MVC framework does not replace the Web Forms model; you can use either framework for Web
applications. Before you decide to use the Web Forms model or the MVC framework for a
specific Web site, weigh the advantages of each approach.
Advantages of a Web Forms-Based Web Application
The Web Forms-based framework offers the following advantages:
 It supports an event model that preserves state over HTTP, which benefits line-of-business
Web application development. The Web Forms-based application provides dozens of
events that are supported in hundreds of server controls.
 It uses a Page Controller pattern that adds functionality to individual pages. For more
information, see Page Controller.
 It uses view state or server-based forms, which can make managing state information
easier.
 It works well for small teams of Web developers and designers who want to take
advantage of the large number of components available for rapid application development.
 In general, it is less complex for application development, because the components
(the Page class, controls, and so on) are tightly integrated and usually require less code
than the MVC model.
Advantages of an MVC-Based Web Application
The ASP.NET MVC framework offers the following advantages:
 It makes it easier to manage complexity by dividing an application into the model, the
view, and the controller.
 It does not use view state or server-based forms. This makes the MVC framework ideal for
developers who want full control over the behavior of an application.
 It uses a Front Controller pattern that processes Web application requests through a single
controller. This enables you to design an application that supports a rich routing
infrastructure. For more information, see Front Controller.
 It provides better support for test-driven development (TDD).
 It works well for Web applications that are supported by large teams of developers and
Web designers who need a high degree of control over the application behavior.
ASP.NET - Data Binding
Every ASP.NET web form control inherits the DataBind method from its parent Control class,
which gives it an inherent capability to bind data to at least one of its properties. This is known
as simple data binding or inline data binding.
Simple data binding involves attaching any collection (item collection) which implements the
IEnumerable interface, or the DataSet and DataTable classes to the DataSource property of the
control.
On the other hand, some controls can bind records, lists, or columns of data into their structure
through a DataSource control. These controls derive from the BaseDataBoundControl class. This
is called declarative data binding.
The data source controls help the data-bound controls implement functionalities such as, sorting,
paging, and editing data collections.
The BaseDataBoundControl is an abstract class, which is inherited by two more abstract classes:
 DataBoundControl
 HierarchicalDataBoundControl
The abstract class DataBoundControl is again inherited by two more abstract classes:
 ListControl
 CompositeDataBoundControl
The controls capable of simple data binding are derived from the ListControl abstract class and
these controls are:
 BulletedList
 CheckBoxList
 DropDownList
 ListBox
 RadioButtonList
The controls capable of declarative data binding (a more complex data binding) are derived from
the abstract class CompositeDataBoundControl. These controls are:
 DetailsView
 FormView
 GridView
 RecordList
Simple Data Binding
Simple data binding involves the read-only selection lists. These controls can bind to an array list
or fields from a database. Selection lists takes two values from the database or the data source;
one value is displayed by the list and the other is considered as the value corresponding to the
display.
Let us take up a small example to understand the concept. Create a web site with a bulleted list
and a SqlDataSource control on it. Configure the data source control to retrieve two values from
your database (we use the same DotNetReferences table as in the previous chapter).
Choosing a data source for the bulleted list control involves:
 Selecting the data source control
 Selecting a field to display, which is called the data field
 Selecting a field for the value
When the application is executed, check that the entire title column is bound to the bulleted list
and displayed.
Declarative Data Binding
We have already used declarative data binding in the previous tutorial using GridView control.
The other composite data bound controls capable of displaying and manipulating data in a
tabular manner are the DetailsView, FormView, and RecordList control.
In the next tutorial, we will look into the technology for handling database, i.e, ADO.NET.
However, the data binding involves the following objects:
 A dataset that stores the data retrieved from the database.
 The data provider, which retrieves data from the database by using a command over a
connection.
 The data adapter that issues the select statement stored in the command object; it is also
capable of update the data in a database by issuing Insert, Delete, and Update statements.
Relation between the data binding objects:
Example
Let us take the following steps:
Step (1) : Create a new website. Add a class named booklist by right clicking on the solution
name in the Solution Explorer and choosing the item 'Class' from the 'Add Item' dialog box.
Name it as booklist.cs.
usingSystem;
usingSystem.Data;
usingSystem.Configuration;
usingSystem.Linq;
usingSystem.Web;
usingSystem.Web.Security;
usingSystem.Web.UI;
usingSystem.Web.UI.HtmlControls;
usingSystem.Web.UI.WebControls;
usingSystem.Web.UI.WebControls.WebParts;
usingSystem.Xml.Linq;
namespace databinding
{
publicclass booklist
{
protectedString bookname;
protectedString authorname;
public booklist(String bname,String aname)
{
this.bookname = bname;
this.authorname = aname;
}
publicStringBook
{
get
{
returnthis.bookname;
}
set
{
this.bookname =value;
}
}
publicStringAuthor
{
get
{
returnthis.authorname;
}
set
{
this.authorname =value;
}
}
}
}
Step (2) : Add four list controls on the page a list box control, a radio button list, a check box
list, and a drop down list and four labels along with these list controls. The page should look like
this in design view:
The source file should look as the following:
<formid="form1"runat="server">
<div>
<tablestyle="width:559px">
<tr>
<tdstyle="width:228px; height:157px;">
<asp:ListBoxID="ListBox1"runat="server"AutoPostBack="True"
OnSelectedIndexChanged="ListBox1_SelectedIndexChanged">
</asp:ListBox>
</td>
<tdstyle="height:157px">
<asp:DropDownListID="DropDownList1"runat="server"
AutoPostBack="True"OnSelectedIndexChanged="DropDownList1_SelectedIndexChanged">
</asp:DropDownList>
</td>
</tr>
<tr>
<tdstyle="width:228px; height:40px;">
<asp:LabelID="lbllistbox"runat="server"></asp:Label>
</td>
<tdstyle="height:40px">
<asp:LabelID="lbldrpdown"runat="server">
</asp:Label>
</td>
</tr>
<tr>
<tdstyle="width:228px; height:21px">
</td>
<tdstyle="height:21px">
</td>
</tr>
<tr>
<tdstyle="width:228px; height:21px">
<asp:RadioButtonListID="RadioButtonList1"runat="server"
AutoPostBack="True"OnSelectedIndexChanged="RadioButtonList1_SelectedIndexChanged">
</asp:RadioButtonList>
</td>
<tdstyle="height:21px">
<asp:CheckBoxListID="CheckBoxList1"runat="server"
AutoPostBack="True"OnSelectedIndexChanged="CheckBoxList1_SelectedIndexChanged">
</asp:CheckBoxList>
</td>
</tr>
<tr>
<tdstyle="width:228px; height:21px">
<asp:LabelID="lblrdlist"runat="server">
</asp:Label>
</td>
<tdstyle="height:21px">
<asp:LabelID="lblchklist"runat="server">
</asp:Label>
</td>
</tr>
</table>
</div>
</form>
Step (3) : Finally, write the following code behind routines of the application:
publicpartialclass_Default:System.Web.UI.Page
{
protectedvoidPage_Load(object sender,EventArgs e)
{
IList bklist = createbooklist();
if(!this.IsPostBack)
{
this.ListBox1.DataSource= bklist;
this.ListBox1.DataTextField="Book";
this.ListBox1.DataValueField="Author";
this.DropDownList1.DataSource= bklist;
this.DropDownList1.DataTextField="Book";
this.DropDownList1.DataValueField="Author";
this.RadioButtonList1.DataSource= bklist;
this.RadioButtonList1.DataTextField="Book";
this.RadioButtonList1.DataValueField="Author";
this.CheckBoxList1.DataSource= bklist;
this.CheckBoxList1.DataTextField="Book";
this.CheckBoxList1.DataValueField="Author";
this.DataBind();
}
}
protectedIList createbooklist()
{
ArrayList allbooks =newArrayList();
booklist bl;
bl =new booklist("UNIX CONCEPTS","SUMITABHA DAS");
allbooks.Add(bl);
bl =new booklist("PROGRAMMING IN C","RICHI KERNIGHAN");
allbooks.Add(bl);
bl =new booklist("DATA STRUCTURE","TANENBAUM");
allbooks.Add(bl);
bl =new booklist("NETWORKING CONCEPTS","FOROUZAN");
allbooks.Add(bl);
bl =new booklist("PROGRAMMING IN C++","B. STROUSTROUP");
allbooks.Add(bl);
bl =new booklist("ADVANCED JAVA","SUMITABHA DAS");
allbooks.Add(bl);
return allbooks;
}
protectedvoidListBox1_SelectedIndexChanged(object sender,EventArgs e)
{
this.lbllistbox.Text=this.ListBox1.SelectedValue;
}
protectedvoidDropDownList1_SelectedIndexChanged(object sender,EventArgs e)
{
this.lbldrpdown.Text=this.DropDownList1.SelectedValue;
}
protectedvoidRadioButtonList1_SelectedIndexChanged(object sender,EventArgs e)
{
this.lblrdlist.Text=this.RadioButtonList1.SelectedValue;
}
protectedvoidCheckBoxList1_SelectedIndexChanged(object sender,EventArgs e)
{
this.lblchklist.Text=this.CheckBoxList1.SelectedValue;
}
}
Observe the following:
 The booklist class has two properties: bookname and authorname.
 The createbooklist method is a user defined method that creates an array of booklist
objects named allbooks.
 The Page_Load event handler ensures that a list of books is created. The list is of IList
type, which implements the IEnumerable interface and capable of being bound to the list
controls. The page load event handler binds the IList object 'bklist' with the list controls.
The bookname property is to be displayed and the authorname property is considered as
the value.
 When the page is run, if the user selects a book, its name is selected and displayed by the
list controls whereas the corresponding labels display the author name, which is the
corresponding value for the selected index of the list control.
What is ASP.NET?
Active Server Pages Network Enabled Technologies is more commonly known as ASP.NET. It
is a platform for developing server-side, open-source web applications that assist developers in
creating data-driven and interactive applications and websites. It is a peculiar combination of
JavaScript, HTML, and CSS, all mashed together.
ASP.NET uses technology built on a compiler, in contrast to languages such as Java and Python.
The compiler will collect all of the different instances of code and compile them all
simultaneously. As a result of this significant feature, the ASP.NET Core framework can
perform better and faster than competing frameworks.
Top Features of ASP.NET
Now, let’s look at some of the fundamental capabilities of ASP.NET, which are utilized by
renowned names such as SpaceX, Alibaba Travels, MasterCard, Slack, Queue-it, etc.
1. Supporting Cross-platform
On operating systems such as Linux, Mac OS, and Windows, the ASP.NET applications can be
installed with ease. .NET gives developers the flexibility to work with any operating system that
they prefer to go ahead with.
2. Environments for Comprehensive Development
ASP.NET allows the developers to create smooth and interactive applications using an Integrated
Development Environment such as Visual Studio. Developers have access to a rich and dynamic
environment within IDEs, which allows them to code programs from scratch by dragging and
dropping components.
3. Independent Nature of the programming Language
.NET is considered to be a language-independent framework. It simply means that developers
can create apps in various languages as they wish. They can also use those languages to construct
dynamic applications.
4. Secure and high performance
Performance is one of the most important aspects of application development. The ASP.NET
Core and Kestrel Web Server have transformed the.NET framework into one of the market’s
fastest, most responsive, and lightest frameworks. The new Kestrel Web Server supports
asynchronous programming approaches, which speed up the framework.
At the same time, Kestrel Web Server gives a unique identifier for all ASP.NET framework
applications, as.NET verifies the legitimacy of apps before allowing them to execute.
5. Frameworks for both MVC and Web API Development
Before the release of ASP.NET Core, most developers relied on Model-View-Controller (MVC)
frameworks to create web applications. At the same time, it was done utilizing HTML and Web
API to create RESTful API via XML and JASON. By merging MVC and Web API, the creation
of ASP.NET Core has simplified development. MVC now always delivers JASON data rather
than HTML.
Razor pages are a new element in ASP.NET Core. Its main usage is that it helps to simplify web
UI development. It is a page-based coding module that enhances the MVC framework to allow
for the reduction of the page’s controller and model capabilities.
6. Supporting HTML5 Form Types
With this programming language, users can enter the values using a variety of input components
that can be found in HTML forms. These input elements include text boxes, radio buttons, and
checkboxes. Users must click the submit button once they have finished filling in the values for
the individual fields before the data can be sent. ASP.NET supports all these HTML5 form types.
Conclusion:
.NET is an open-source web application framework used for scripting on the server side. Talking
about its history, 2002 saw the release of a stable version. It enjoys a robust community on Stack
Overflow and has Microsoft’s backing as an organization.
Now, as you are well aware of the benefits of .NET, you could be interested in developing an
application using the language. If you are, do not hesitate to contact the experts at Qodeify here.
ASP.NET - Custom Controls
ASP.NET allows the users to create controls. These user defined controls are categorized into:
 User controls
 Custom controls
User Controls
User controls behaves like miniature ASP.NET pages or web forms, which could be used by
many other pages. These are derived from the System.Web.UI.UserControl class. These controls
have the following characteristics:
 They have an .ascx extension.
 They may not contain any <html>, <body>, or <form> tags.
 They have a Control directive instead of a Page directive.
To understand the concept, let us create a simple user control, which will work as footer for the
web pages. To create and use the user control, take the following steps:
 Create a new web application.
 Right click on the project folder on the Solution Explorer and choose Add New Item.
 Select Web User Control from the Add New Item dialog box and name it footer.ascx.
Initially, the footer.ascx contains only a Control directive.
 <%@ControlLanguage="C#"AutoEventWireup="true"CodeBehind="footer.ascx.cs"
Inherits="customcontroldemo.footer" %>
 Add the following code to the file:
 <table>
 <tr>
 <tdalign="center"> Copyright ©2010 TutorialPoints Ltd.</td>
 </tr>

 <tr>
 <tdalign="center"> Location: Hyderabad, A.P </td>
 </tr>
</table>
To add the user control to your web page, you must add the Register directive and an instance of
the user control to the page. The following code shows the content file:
<%@PageLanguage="C#"AutoEventWireup="true"CodeBehind="Default.aspx.cs"Inherits="cus
tomcontroldemo._Default" %>
<%@RegisterSrc="~/footer.ascx"TagName="footer"TagPrefix="Tfooter" %>
<!DOCTYPE html PUBLIC "-//W3C//DTD XHTML 1.0
Transitional//EN""http://www.w3.org/TR/xhtml1/DTD/xhtml1-transitional.dtd">
<htmlxmlns="http://www.w3.org/1999/xhtml">
<headrunat="server">
<title>
Untitled Page
</title>
</head>
<body>
<formid="form1"runat="server">
<div>
<asp:LabelID="Label1"runat="server"Text="Welcome to ASP.Net Tutorials "></asp:Label>
<br/><br/>
<asp:ButtonID="Button1"runat="server"onclick="Button1_Click"Text="Copyright Info"/>
</div>
<Tfooter:footerID="footer1"runat="server"/>
</form>
</body>
</html>
When executed, the page shows the footer and this control could be used in all the pages of your
website.
Observe the following:
(1) The Register directive specifies a tag name as well as tag prefix for the control.
<%@RegisterSrc="~/footer.ascx"TagName="footer"TagPrefix="Tfooter" %>
(2) The following tag name and prefix should be used while adding the user control on the page:
<Tfooter:footerID="footer1"runat="server"/>
Custom Controls
Custom controls are deployed as individual assemblies. They are compiled into a Dynamic Link
Library (DLL) and used as any other ASP.NET server control. They could be created in either of
the following way:
 By deriving a custom control from an existing control
 By composing a new custom control combing two or more existing controls.
 By deriving from the base control class.
To understand the concept, let us create a custom control, which will simply render a text
message on the browser. To create this control, take the following steps:
Create a new website. Right click the solution (not the project) at the top of the tree in the
Solution Explorer.
In the New Project dialog box, select ASP.NET Server Control from the project templates.
The above step adds a new project and creates a complete custom control to the solution, called
ServerControl1. In this example, let us name the project CustomControls. To use this control,
this must be added as a reference to the web site before registering it on a page. To add a
reference to the existing project, right click on the project (not the solution), and click Add
Reference.
Select the CustomControls project from the Projects tab of the Add Reference dialog box. The
Solution Explorer should show the reference.
To use the control on a page, add the Register directive just below the @Page directive:
<%@RegisterAssembly="CustomControls"Namespace="CustomControls"TagPrefix="ccs" %>
Further, you can use the control, similar to any other controls.
<formid="form1"runat="server">
<div>
<ccs:ServerControl1runat="server"Text="I am a Custom Server Control"/>
</div>
</form>
When executed, the Text property of the control is rendered on the browser as shown:
Working with Custom Controls
In the previous example, the value for the Text property of the custom control was set. ASP.NET
added this property by default, when the control was created. The following code behind file of
the control reveals this.
usingSystem;
usingSystem.Collections.Generic;
usingSystem.ComponentModel;
usingSystem.Linq;
usingSystem.Text;
usingSystem.Web;
usingSystem.Web.UI;
usingSystem.Web.UI.WebControls;
namespaceCustomControls
{
[DefaultProperty("Text")]
[ToolboxData("<{0}:ServerControl1 runat=server></{0}:ServerControl1 >")]
publicclassServerControl1:WebControl
{
[Bindable(true)]
[Category("Appearance")]
[DefaultValue("")]
[Localizable(true)]
publicstringText
{
get
{
String s =(String)ViewState["Text"];
return((s ==null)?"["+this.ID +"]": s);
}
set
{
ViewState["Text"]=value;
}
}
protectedoverridevoidRenderContents(HtmlTextWriter output)
{
output.Write(Text);
}
}
}
The above code is automatically generated for a custom control. Events and methods could be
added to the custom control class.
Example
Let us expand the previous custom control named SeverControl1. Let us give it a method named
checkpalindrome, which gives it a power to check for palindromes.
Palindromes are words/literals that spell the same when reversed. For example, Malayalam,
madam, saras, etc.
Extend the code for the custom control, which should look as:
usingSystem;
usingSystem.Collections.Generic;
usingSystem.ComponentModel;
usingSystem.Linq;
usingSystem.Text;
usingSystem.Web;
usingSystem.Web.UI;
usingSystem.Web.UI.WebControls;
namespaceCustomControls
{
[DefaultProperty("Text")]
[ToolboxData("<{0}:ServerControl1 runat=server></{0}:ServerControl1 >")]
publicclassServerControl1:WebControl
{
[Bindable(true)]
[Category("Appearance")]
[DefaultValue("")]
[Localizable(true)]
publicstringText
{
get
{
String s =(String)ViewState["Text"];
return((s ==null)?"["+this.ID +"]": s);
}
set
{
ViewState["Text"]=value;
}
}
protectedoverridevoidRenderContents(HtmlTextWriter output)
{
if(this.checkpanlindrome())
{
output.Write("This is a palindrome: <br />");
output.Write("<FONT size=5 color=Blue>");
output.Write("<B>");
output.Write(Text);
output.Write("</B>");
output.Write("</FONT>");
}
else
{
output.Write("This is not a palindrome: <br />");
output.Write("<FONT size=5 color=red>");
output.Write("<B>");
output.Write(Text);
output.Write("</B>");
output.Write("</FONT>");
}
}
protectedbool checkpanlindrome()
{
if(this.Text!=null)
{
String str =this.Text;
String strtoupper =Text.ToUpper();
char[] rev = strtoupper.ToCharArray();
Array.Reverse(rev);
String strrev =newString(rev);
if(strtoupper == strrev)
{
returntrue;
}
else
{
returnfalse;
}
}
else
{
returnfalse;
}
}
}
}
When you change the code for the control, you must build the solution by clicking Build -->
Build Solution, so that the changes are reflected in your project. Add a text box and a button
control to the page, so that the user can provide a text, it is checked for palindrome, when the
button is clicked.
<formid="form1"runat="server">
<div>
Enter a word:
<br/>
<asp:TextBoxID="TextBox1"runat="server"style="width:198px"></asp:TextBox>
<br/><br/>
<asp:ButtonID="Button1"runat="server onclick="Button1_Click" Text="CheckPalindrome"
style="width:132px" />
<br/><br/>
<ccs:ServerControl1ID="ServerControl11"runat="server"Text=""/>
</div>
</form>
The Click event handler for the button simply copies the text from the text box to the text
property of the custom control.
protectedvoidButton1_Click(object sender,EventArgs e)
{
this.ServerControl11.Text=this.TextBox1.Text;
}
When executed, the control successfully checks palindromes.
Observe the following:
(1) When you add a reference to the custom control, it is added to the toolbox and you can
directly use it from the toolbox similar to any other control.
(2) The RenderContents method of the custom control class is overridden here, as you can add
your own methods and events.
(3) The RenderContents method takes a parameter of HtmlTextWriter type, which is responsible
for rendering on the browser.
ASP.NET Master Pages Overview
ASP.NET master pages allow you to create a consistent layout for the pages in your application.
A single master page defines the look and feel and standard behavior that you want for all of the
pages (or a group of pages) in your application. You can then create individual content pages that
contain the content you want to display. When users request the content pages, they merge with
the master page to produce output that combines the layout of the master page with the content
from the content page.
How Master Pages Work
Master pages actually consist of two pieces, the master page itself and one or more content
pages.
Note
You can also nest master pages. For details, see Nested ASP.NET Master Pages.
Master Pages
A master page is an ASP.NET file with the extension .master (for example, MySite.master) with
a predefined layout that can include static text, HTML elements, and server controls. The master
page is identified by a special @ Master directive that replaces the @ Page directive that is used
for ordinary .aspx pages. The directive looks like the following.
VBCopy
<%@ Master Language="VB" %>
The @ Master directive can contain most of the same directives that a @ Control directive can
contain. For example, the following master-page directive includes the name of a code-behind
file, and assigns a class name to the master page.
VBCopy
<%@ Master Language="VB" CodeFile="MasterPage.master.vb"Inherits="MasterPage" %>
In addition to the @ Master directive, the master page also contains all of the top-level HTML
elements for a page, such as html, head, and form. For example, on a master page you might use
an HTML table for the layout, an img element for your company logo, static text for the
copyright notice, and server controls to create standard navigation for your site. You can use any
HTML and any ASP.NET elements as part of your master page.
Replaceable Content Placeholders
In addition to static text and controls that will appear on all pages, the master page also includes
one or more ContentPlaceHolder controls. These placeholder controls define regions where
replaceable content will appear. In turn, the replaceable content is defined in content pages. After
you have defined the ContentPlaceHolder controls, a master page might look like the following.
VBCopy
<% @ Master Language="VB" %>
<!DOCTYPE html PUBLIC"-//W3C//DTD XHTML
1.1//EN""http://www.w3.org/TR/xhtml11/DTD/xhtml11.dtd">
<html xmlns="http://www.w3.org/1999/xhtml">
<head runat="server">
<title>Master page title</title>
</head>
<body>
<form id="form1" runat="server">
<table>
<tr>
<td><asp:contentplaceholder id="Main" runat="server" /></td>
<td><asp:contentplaceholder id="Footer" runat="server" /></td>
</tr>
</table>
</form>
</body>
</html>
Content Pages
You define the content for the master page's placeholder controls by creating individual content
pages, which are ASP.NET pages (.aspx files and, optionally, code-behind files) that are bound
to a specific master page. The binding is established in the content page's @ Page directive by
including a MasterPageFile attribute that points to the master page to be used. For example, a
content page might have the following @ Page directive, which binds it to the Master1.master
page.
VBCopy
<%@ Page Language="VB" MasterPageFile="~/MasterPages/Master1.master" Title="Content
Page" %>
In the content page, you create the content by adding Content controls and mapping them
to ContentPlaceHolder controls on the master page. For example, the master page might have
content placeholders called Main and Footer. In the content page, you can create
two Content controls, one that is mapped to the ContentPlaceHolder control Main and the other
mapped to the ContentPlaceHolder control Footer, as shown in the following figure.
Replacing placeholder content
After creating Content controls, you add text and controls to them. In a content page, anything
that is not inside the Content controls (except script blocks for server code) results in an error.
You can perform any tasks in a content page that you do in an ASP.NET page. For example, you
can generate content for a Content control using server controls and database queries or other
dynamic mechanisms.
A content page might look like the following.
VBCopy
<% @ Page Language="VB" MasterPageFile="~/Master.master" Title="Content Page 1" %>
<asp:Content ID="Content1" ContentPlaceHolderID="Main" Runat="Server">
Main content.
</asp:Content>
<asp:Content ID="Content2" ContentPlaceHolderID="Footer" Runat="Server">
Footer content.
</asp:content>
[C#]
Copy
<% @ Page Language="C#" MasterPageFile="~/Master.master" Title="Content Page 1" %>
<asp:Content ID="Content1" ContentPlaceHolderID="Main" Runat="Server">
Main content.
</asp:Content>
<asp:Content ID="Content2" ContentPlaceHolderID="Footer" Runat="Server">
Footer content.
</asp:content>
The @ Page directive binds the content page to a specific master page, and it defines a title for
the page that will be merged into the master page. Note that the content page contains no other
markup outside of the Content controls. (The master page must contain a head element with the
attribute runat="server" so that the title setting can be merged at run time.)
You can create multiple master pages to define different layouts for different parts of your site,
and a different set of content pages for each master page.
Advantages of Master Pages
Master pages provide functionality that developers have traditionally created by copying existing
code, text, and control elements repeatedly; using framesets; using include files for common
elements; using ASP.NET user controls; and so on. Advantages of master pages include the
following:
 They allow you to centralize the common functionality of your pages so that you can make
updates in just one place.
 They make it easy to create one set of controls and code and apply the results to a set of
pages. For example, you can use controls on the master page to create a menu that applies
to all pages.
 They give you fine-grained control over the layout of the final page by allowing you to
control how the placeholder controls are rendered.
 They provide an object model that allows you to customize the master page from
individual content pages.
Run-time Behavior of Master Pages
At run time, master pages are handled in the following sequence:
1. Users request a page by typing the URL of the content page.
2. When the page is fetched, the @ Page directive is read. If the directive references a master
page, the master page is read as well. If this is the first time the pages have been requested,
both pages are compiled.
3. The master page with the updated content is merged into the control tree of the content
page.
4. The content of individual Content controls is merged into the
corresponding ContentPlaceHolder control in the master page.
5. The resulting merged page is rendered to the browser.
The process is illustrated in the following diagram.
Master pages at run time
From the user's perspective, the combined master and content pages are a single, discrete page.
The URL of the page is that of the content page.
From a programming perspective, the two pages act as separate containers for their respective
controls. The content page acts as a container for the master page. However, you can reference
public master-page members from code in the content page, as described in the next section.
Note that the master page becomes a part of the content page. In effect, the master page acts in
much the same way a user control acts — as a child of the content page and as a container within
that page. In this case, however, the master page is the container for all of the server controls that
are rendered to the browser. The control tree for a merged master and content page looks
something like this:
Copy
Page
Master Page
(Master page markup and controls)
ContentPlaceHolder
Content page markup and server controls
(Master page markup and controls)
ContentPlaceHolder
Content page markup and server controls
(Master page markup and controls)
This diagram is simplified; if the content page does not have corresponding Content controls, the
master page might also have markup and controls in the ContentPlaceHolder controls.
In general, this structure has no effect on how you construct your pages or program them.
However, in some cases, if you set a page-wide property on the master page, it can affect the
behavior of the content page, because the master page is the closest parent for the controls on the
page. For example, if you set the EnableViewState property on the content page to true but set
the same property to false in the master page, view state will effectively be disabled because the
setting on the master page will take priority.
Master Page and Content Page Paths
When a content page is requested, its content is merged with the master page, and the page runs
in the context of the content page. For example, if you get the CurrentExecutionFilePath property
of the HttpRequest object, whether in content page code or in master page code, the path
represents the location of the content page.
The master page and content page do not have to be in the same folder. As long as
the MasterPageFile attribute in the content page's @ Page directive resolves to a .master page,
ASP.NET can merge the content and master pages into a single rendered page.
Referencing External Resources
Both the content page and master page can contain controls and elements that reference external
resources. For example, both might contain image controls that reference image files, or they
might contain anchors that reference other pages.
The context for the merged content and master pages is that of the content page. This can affect
how you specify URLs for resources, such as image files and target pages, in anchors.
Server Controls
In server controls on master pages, ASP.NET dynamically modifies the URLs of properties that
reference external resources. For example, you might put an Image control on a master page and
set its ImageUrl property to be relative to the master page. At run time, ASP.NET will modify
the URL so that it resolves correctly in the context of the content page.
ASP.NET can modify URLs in the following cases:
 The URL is a property of an ASP.NET server control.
 The property is marked internally in the control as being a URL. (The property is marked
with the attribute UrlPropertyAttribute.) In practical terms, ASP.NET server control
properties that are commonly used to reference external resources are marked in this way.
Other Elements
ASP.NET cannot modify URLs on elements that are not server controls. For example, if you use
an img element on a master page and set its src attribute to a URL, ASP.NET will not modify the
URL. In that case, the URL will be resolved in the context of the content page and create the
URL accordingly.
In general, when working with elements on master pages, it is recommended that you use a
server control, even for elements that do not require server code. For example, instead of using
an img element, use an Image server control. That way, ASP.NET can resolve URLs correctly
and you can avoid maintenance issues that might arise if you move the master or content page.
For more information about specifying paths for ASP.NET server controls, see ASP.NET Web
Site Paths.
Master Pages and Themes
You cannot directly apply an ASP.NET theme to a master page. If you add a theme attribute to
the @ Master directive, the page will raise an error when it runs.
However, themes are applied to master pages under these circumstances:
 If a theme is defined in the content page. Master pages are resolved in the context of
content pages, so the content page's theme is applied to the master page as well.
 If the site as a whole is configured to use a theme by including a theme definition in
the pages Element (ASP.NET Settings Schema) element.
For more information, see ASP.NET Themes and Skins Overview.
Scoping Master Pages
You can attach content pages to a master page at three levels:
 At the page level You can use a page directive in each content page to bind it to a master
page, as in the following code example.
VBCopy
<%@ Page Language="VB" MasterPageFile="MySite.Master" %>
 At the application level By making a setting in the pages element of the application's
configuration file (Web.config), you can specify that all ASP.NET pages (.aspx files) in
the application automatically bind to a master page. The element might look like the
following.
Copy
<pages masterPageFile="MySite.Master" />
If you use this strategy, all ASP.NET pages in the application that have Content controls
are merged with the specified master page. (If an ASP.NET page does not
contain Content controls, the master page is not applied.)
 At the folder level This strategy is like binding at the application level, except that you
make the setting in a Web.config file in one folder only. The master-page bindings then
apply to the ASP.NET pages in that folder.
ASP.NET Site Navigation
ASP.NET site navigation is a set of classes that enable you to provide a consistent way for users
to navigate your site. As your site grows, and as you move pages around in the site, it quickly
becomes difficult to manage all of the links. ASP.NET site navigation enables you to store links
to all of your pages in a central location, and render those links in lists or navigation menus on
each page by including a SiteMapDataSource control to read site information and navigation
Web server control such as the TreeView, or Menu controls to display site information.
ASP.NET site navigation consists primarily of site map providers, which communicate with the
site map data source, and the classes that expose the functionality of the site map providers. For
example, the default ASP.NET site map provider obtains site map data from an XML file named
Web.sitemap, and communicates that data to the SiteMapPath Web server control directly.
Introduction
All of the web applications developed usually have more than one page and they are usually
interconnected via some mechanism. In ASP.Net 1.x, navigation was made possible by using
hyperlinks with the help of include file or user controls. They are pretty handy but not so much
when the pages are moved around or their names change.
So in order to overcome this drawback, ASP.Net 2.0 introduces the new Site Navigation System.
Site navigation uses the layered architecture. Controls such as Menu and TreeView provide the
navigation UIs. Classes such as SiteMap and SiteMapNode provide the API that the controls rely
on and also constitute an API you can use yourself if you wish. Site navigation is provider-based,
and the one site map provider that comes with ASP.NET 2.0 -> XmlSiteMapProvider -> reads
site maps from XML data files. By default, those files are named Web.sitemap. In the providers'
lab, students write a custom site map provider that reads site maps from a SQL Server database.
Lets us discuss each on of them one at a time.
Site Map in ASP.Net 2.0
Site Maps help us define the layout of all the pages in the application and their inherent relation
with each other. For this, one could either use the SiteMap Class or
the SiteMapDataSource control.
SiteMapDataSource controls use site map providers to read site maps. They then provide the site
map data to the controls they're bound to. Binding a TreeView to a SiteMapDataSource
transforms each node in the site map into a TreeView node; binding a Menu to
a SiteMapDataSource transforms each node in the site map into a menu item. The only site map
provider that comes with ASP.NET 2.0 is XmlSiteMapProvider. It enables site maps to be read
from XML files that conform to a predefined schema.
Take up the following steps to create a site map ->
1. Start Visual Studio 2005 IDE.
2. Create a new ASP.Net website using C# as language on file system.
3. Right Click on solution and add a new item. From the Add item Wizard, add a new site
map. Let the name be Web.sitemap (default name)
4. Add the following code to it:-
<?xml version="1.0" encoding="utf-8" ?>
<siteMap xmlns="http://schemas.microsoft.com/AspNet/SiteMap-File-1.0">
<siteMapNode title="Home" description="Login Page" url="Home.aspx">
<siteMapNode title="Admin" description="Administration
Functionalities" url="Admin/AdminHome.aspx">
<siteMapNode title="Create User" description="Create User" url="Admin/CreateUser.aspx"/>
<siteMapNode title="Manage Roles" description="Create/Delete
Roles" url="Admin/CreateRoles.aspx"/>
<siteMapNode title="Assign Roles" description="Re-Assign
Roles" url="Admin/ManageRoles.aspx"/>
</siteMapNode>
<siteMapNode roles="" title="Search" description="Search
Employee" url="Personal/Search.aspx"/>
</siteMapNode>
</siteMap>
Only one <sitemap> element can be there in the site map file and there can be
multiple <siteMapNode > element within the root node i.e. <sitemap>
Within the <siteMapNode> element, we have following attributes->
 Title -> This is actual description which appears as a hyperlink.
 Description -> Tool Tip which comes up when we hover over that particular siteMapNode.
 url -> this is the file located within the solution. It can be located within the root folder or
within a sub-folder created within the solution.
 Role -> the roles to which the links should be accessible.
"Security trimming" refers to SiteMapDataSource's ability to hide nodes from users who lack
proper authorization. Authorization is role-based and is enacted by including roles attributes in
<siteMapNode> elements. Of course, you can use ASP.NET 2.0 Role Management service to
define roles and map users to roles. Security trimming is disabled by default in
XmlSiteMapProvider. You can enable it by including these statements in Web.config.
<configuration>
<system.web>
<siteMap>
<providers>
<remove name="AspNetXmlSiteMapProvider" />
<add name="AspNetXmlSiteMapProvider"
type="System.Web.XmlSiteMapProvider, System.Web, ..."
securityTrimmingEnabled="true"
siteMapFile="web.sitemap" />
</providers>
</siteMap>
</system.web>
</configuration>
Tree View Server control
This is a new server control that has been added to ASP.Net 2.0. It can be used to display the
hierarchy of the links contained within the site map file. Once, the Web.sitemap is created, drag
and drop a SiteMapDataSource control on the form. It automatically binds it self to web.sitemap
file. Then, drop a treeView control on the form and set the DataSource id to
unit 3.docx
unit 3.docx
unit 3.docx
unit 3.docx
unit 3.docx
unit 3.docx
unit 3.docx
unit 3.docx
unit 3.docx
unit 3.docx
unit 3.docx
unit 3.docx
unit 3.docx
unit 3.docx
unit 3.docx

More Related Content

Similar to unit 3.docx

PATTERNS07 - Data Representation in C#
PATTERNS07 - Data Representation in C#PATTERNS07 - Data Representation in C#
PATTERNS07 - Data Representation in C#Michael Heron
 
Programming Without Coding Technology (PWCT) Features - Programming Paradigm
Programming Without Coding Technology (PWCT) Features - Programming ParadigmProgramming Without Coding Technology (PWCT) Features - Programming Paradigm
Programming Without Coding Technology (PWCT) Features - Programming ParadigmMahmoud Samir Fayed
 
Simple ado program by visual studio
Simple ado program by visual studioSimple ado program by visual studio
Simple ado program by visual studioAravindharamanan S
 
Simple ado program by visual studio
Simple ado program by visual studioSimple ado program by visual studio
Simple ado program by visual studioAravindharamanan S
 
Introduction to ado
Introduction to adoIntroduction to ado
Introduction to adoHarman Bajwa
 
MVC Application using EntityFramework Code-First approach Part4
MVC Application using EntityFramework Code-First approach Part4MVC Application using EntityFramework Code-First approach Part4
MVC Application using EntityFramework Code-First approach Part4Akhil Mittal
 
Why use .net by naveen kumar veligeti
Why use .net by naveen kumar veligetiWhy use .net by naveen kumar veligeti
Why use .net by naveen kumar veligetiNaveen Kumar Veligeti
 
Chapter 3: ado.net
Chapter 3: ado.netChapter 3: ado.net
Chapter 3: ado.netNgeam Soly
 
Oracle to vb 6.0 connectivity
Oracle to vb 6.0 connectivityOracle to vb 6.0 connectivity
Oracle to vb 6.0 connectivityrohit vishwakarma
 
Ado.Net Architecture
Ado.Net ArchitectureAdo.Net Architecture
Ado.Net ArchitectureUmar Farooq
 
ADO .NET by Sonu Vishwakarma
ADO .NET by Sonu VishwakarmaADO .NET by Sonu Vishwakarma
ADO .NET by Sonu VishwakarmaSonu Vishwakarma
 
Overview of CSharp MVC3 and EF4
Overview of CSharp MVC3 and EF4Overview of CSharp MVC3 and EF4
Overview of CSharp MVC3 and EF4Rich Helton
 

Similar to unit 3.docx (20)

PATTERNS07 - Data Representation in C#
PATTERNS07 - Data Representation in C#PATTERNS07 - Data Representation in C#
PATTERNS07 - Data Representation in C#
 
Ado.Net
Ado.NetAdo.Net
Ado.Net
 
Ado.net
Ado.netAdo.net
Ado.net
 
Programming Without Coding Technology (PWCT) Features - Programming Paradigm
Programming Without Coding Technology (PWCT) Features - Programming ParadigmProgramming Without Coding Technology (PWCT) Features - Programming Paradigm
Programming Without Coding Technology (PWCT) Features - Programming Paradigm
 
Simple ado program by visual studio
Simple ado program by visual studioSimple ado program by visual studio
Simple ado program by visual studio
 
Simple ado program by visual studio
Simple ado program by visual studioSimple ado program by visual studio
Simple ado program by visual studio
 
Ado.Net Tutorial
Ado.Net TutorialAdo.Net Tutorial
Ado.Net Tutorial
 
Unit4
Unit4Unit4
Unit4
 
Introduction to ado
Introduction to adoIntroduction to ado
Introduction to ado
 
MVC Application using EntityFramework Code-First approach Part4
MVC Application using EntityFramework Code-First approach Part4MVC Application using EntityFramework Code-First approach Part4
MVC Application using EntityFramework Code-First approach Part4
 
Ef code first
Ef code firstEf code first
Ef code first
 
Why use .net by naveen kumar veligeti
Why use .net by naveen kumar veligetiWhy use .net by naveen kumar veligeti
Why use .net by naveen kumar veligeti
 
Jdbc
JdbcJdbc
Jdbc
 
Chapter 3: ado.net
Chapter 3: ado.netChapter 3: ado.net
Chapter 3: ado.net
 
Ado
AdoAdo
Ado
 
Oracle to vb 6.0 connectivity
Oracle to vb 6.0 connectivityOracle to vb 6.0 connectivity
Oracle to vb 6.0 connectivity
 
Ado.Net Architecture
Ado.Net ArchitectureAdo.Net Architecture
Ado.Net Architecture
 
ASP.NET 09 - ADO.NET
ASP.NET 09 - ADO.NETASP.NET 09 - ADO.NET
ASP.NET 09 - ADO.NET
 
ADO .NET by Sonu Vishwakarma
ADO .NET by Sonu VishwakarmaADO .NET by Sonu Vishwakarma
ADO .NET by Sonu Vishwakarma
 
Overview of CSharp MVC3 and EF4
Overview of CSharp MVC3 and EF4Overview of CSharp MVC3 and EF4
Overview of CSharp MVC3 and EF4
 

Recently uploaded

Tamil Call Girls Bhayandar WhatsApp +91-9930687706, Best Service
Tamil Call Girls Bhayandar WhatsApp +91-9930687706, Best ServiceTamil Call Girls Bhayandar WhatsApp +91-9930687706, Best Service
Tamil Call Girls Bhayandar WhatsApp +91-9930687706, Best Servicemeghakumariji156
 
COST-EFFETIVE and Energy Efficient BUILDINGS ptx
COST-EFFETIVE  and Energy Efficient BUILDINGS ptxCOST-EFFETIVE  and Energy Efficient BUILDINGS ptx
COST-EFFETIVE and Energy Efficient BUILDINGS ptxJIT KUMAR GUPTA
 
Thermal Engineering-R & A / C - unit - V
Thermal Engineering-R & A / C - unit - VThermal Engineering-R & A / C - unit - V
Thermal Engineering-R & A / C - unit - VDineshKumar4165
 
Linux Systems Programming: Inter Process Communication (IPC) using Pipes
Linux Systems Programming: Inter Process Communication (IPC) using PipesLinux Systems Programming: Inter Process Communication (IPC) using Pipes
Linux Systems Programming: Inter Process Communication (IPC) using PipesRashidFaridChishti
 
Double Revolving field theory-how the rotor develops torque
Double Revolving field theory-how the rotor develops torqueDouble Revolving field theory-how the rotor develops torque
Double Revolving field theory-how the rotor develops torqueBhangaleSonal
 
HOA1&2 - Module 3 - PREHISTORCI ARCHITECTURE OF KERALA.pptx
HOA1&2 - Module 3 - PREHISTORCI ARCHITECTURE OF KERALA.pptxHOA1&2 - Module 3 - PREHISTORCI ARCHITECTURE OF KERALA.pptx
HOA1&2 - Module 3 - PREHISTORCI ARCHITECTURE OF KERALA.pptxSCMS School of Architecture
 
UNIT 4 PTRP final Convergence in probability.pptx
UNIT 4 PTRP final Convergence in probability.pptxUNIT 4 PTRP final Convergence in probability.pptx
UNIT 4 PTRP final Convergence in probability.pptxkalpana413121
 
Introduction to Serverless with AWS Lambda
Introduction to Serverless with AWS LambdaIntroduction to Serverless with AWS Lambda
Introduction to Serverless with AWS LambdaOmar Fathy
 
Unit 4_Part 1 CSE2001 Exception Handling and Function Template and Class Temp...
Unit 4_Part 1 CSE2001 Exception Handling and Function Template and Class Temp...Unit 4_Part 1 CSE2001 Exception Handling and Function Template and Class Temp...
Unit 4_Part 1 CSE2001 Exception Handling and Function Template and Class Temp...drmkjayanthikannan
 
Hospital management system project report.pdf
Hospital management system project report.pdfHospital management system project report.pdf
Hospital management system project report.pdfKamal Acharya
 
Ground Improvement Technique: Earth Reinforcement
Ground Improvement Technique: Earth ReinforcementGround Improvement Technique: Earth Reinforcement
Ground Improvement Technique: Earth ReinforcementDr. Deepak Mudgal
 
Thermal Engineering Unit - I & II . ppt
Thermal Engineering  Unit - I & II . pptThermal Engineering  Unit - I & II . ppt
Thermal Engineering Unit - I & II . pptDineshKumar4165
 
Max. shear stress theory-Maximum Shear Stress Theory ​ Maximum Distortional ...
Max. shear stress theory-Maximum Shear Stress Theory ​  Maximum Distortional ...Max. shear stress theory-Maximum Shear Stress Theory ​  Maximum Distortional ...
Max. shear stress theory-Maximum Shear Stress Theory ​ Maximum Distortional ...ronahami
 
Jaipur ❤CALL GIRL 0000000000❤CALL GIRLS IN Jaipur ESCORT SERVICE❤CALL GIRL IN...
Jaipur ❤CALL GIRL 0000000000❤CALL GIRLS IN Jaipur ESCORT SERVICE❤CALL GIRL IN...Jaipur ❤CALL GIRL 0000000000❤CALL GIRLS IN Jaipur ESCORT SERVICE❤CALL GIRL IN...
Jaipur ❤CALL GIRL 0000000000❤CALL GIRLS IN Jaipur ESCORT SERVICE❤CALL GIRL IN...jabtakhaidam7
 
DC MACHINE-Motoring and generation, Armature circuit equation
DC MACHINE-Motoring and generation, Armature circuit equationDC MACHINE-Motoring and generation, Armature circuit equation
DC MACHINE-Motoring and generation, Armature circuit equationBhangaleSonal
 
Thermal Engineering -unit - III & IV.ppt
Thermal Engineering -unit - III & IV.pptThermal Engineering -unit - III & IV.ppt
Thermal Engineering -unit - III & IV.pptDineshKumar4165
 

Recently uploaded (20)

Tamil Call Girls Bhayandar WhatsApp +91-9930687706, Best Service
Tamil Call Girls Bhayandar WhatsApp +91-9930687706, Best ServiceTamil Call Girls Bhayandar WhatsApp +91-9930687706, Best Service
Tamil Call Girls Bhayandar WhatsApp +91-9930687706, Best Service
 
Call Girls in South Ex (delhi) call me [🔝9953056974🔝] escort service 24X7
Call Girls in South Ex (delhi) call me [🔝9953056974🔝] escort service 24X7Call Girls in South Ex (delhi) call me [🔝9953056974🔝] escort service 24X7
Call Girls in South Ex (delhi) call me [🔝9953056974🔝] escort service 24X7
 
COST-EFFETIVE and Energy Efficient BUILDINGS ptx
COST-EFFETIVE  and Energy Efficient BUILDINGS ptxCOST-EFFETIVE  and Energy Efficient BUILDINGS ptx
COST-EFFETIVE and Energy Efficient BUILDINGS ptx
 
Thermal Engineering-R & A / C - unit - V
Thermal Engineering-R & A / C - unit - VThermal Engineering-R & A / C - unit - V
Thermal Engineering-R & A / C - unit - V
 
Linux Systems Programming: Inter Process Communication (IPC) using Pipes
Linux Systems Programming: Inter Process Communication (IPC) using PipesLinux Systems Programming: Inter Process Communication (IPC) using Pipes
Linux Systems Programming: Inter Process Communication (IPC) using Pipes
 
Double Revolving field theory-how the rotor develops torque
Double Revolving field theory-how the rotor develops torqueDouble Revolving field theory-how the rotor develops torque
Double Revolving field theory-how the rotor develops torque
 
HOA1&2 - Module 3 - PREHISTORCI ARCHITECTURE OF KERALA.pptx
HOA1&2 - Module 3 - PREHISTORCI ARCHITECTURE OF KERALA.pptxHOA1&2 - Module 3 - PREHISTORCI ARCHITECTURE OF KERALA.pptx
HOA1&2 - Module 3 - PREHISTORCI ARCHITECTURE OF KERALA.pptx
 
UNIT 4 PTRP final Convergence in probability.pptx
UNIT 4 PTRP final Convergence in probability.pptxUNIT 4 PTRP final Convergence in probability.pptx
UNIT 4 PTRP final Convergence in probability.pptx
 
Introduction to Serverless with AWS Lambda
Introduction to Serverless with AWS LambdaIntroduction to Serverless with AWS Lambda
Introduction to Serverless with AWS Lambda
 
FEA Based Level 3 Assessment of Deformed Tanks with Fluid Induced Loads
FEA Based Level 3 Assessment of Deformed Tanks with Fluid Induced LoadsFEA Based Level 3 Assessment of Deformed Tanks with Fluid Induced Loads
FEA Based Level 3 Assessment of Deformed Tanks with Fluid Induced Loads
 
Unit 4_Part 1 CSE2001 Exception Handling and Function Template and Class Temp...
Unit 4_Part 1 CSE2001 Exception Handling and Function Template and Class Temp...Unit 4_Part 1 CSE2001 Exception Handling and Function Template and Class Temp...
Unit 4_Part 1 CSE2001 Exception Handling and Function Template and Class Temp...
 
Hospital management system project report.pdf
Hospital management system project report.pdfHospital management system project report.pdf
Hospital management system project report.pdf
 
Ground Improvement Technique: Earth Reinforcement
Ground Improvement Technique: Earth ReinforcementGround Improvement Technique: Earth Reinforcement
Ground Improvement Technique: Earth Reinforcement
 
Thermal Engineering Unit - I & II . ppt
Thermal Engineering  Unit - I & II . pptThermal Engineering  Unit - I & II . ppt
Thermal Engineering Unit - I & II . ppt
 
Max. shear stress theory-Maximum Shear Stress Theory ​ Maximum Distortional ...
Max. shear stress theory-Maximum Shear Stress Theory ​  Maximum Distortional ...Max. shear stress theory-Maximum Shear Stress Theory ​  Maximum Distortional ...
Max. shear stress theory-Maximum Shear Stress Theory ​ Maximum Distortional ...
 
Jaipur ❤CALL GIRL 0000000000❤CALL GIRLS IN Jaipur ESCORT SERVICE❤CALL GIRL IN...
Jaipur ❤CALL GIRL 0000000000❤CALL GIRLS IN Jaipur ESCORT SERVICE❤CALL GIRL IN...Jaipur ❤CALL GIRL 0000000000❤CALL GIRLS IN Jaipur ESCORT SERVICE❤CALL GIRL IN...
Jaipur ❤CALL GIRL 0000000000❤CALL GIRLS IN Jaipur ESCORT SERVICE❤CALL GIRL IN...
 
DC MACHINE-Motoring and generation, Armature circuit equation
DC MACHINE-Motoring and generation, Armature circuit equationDC MACHINE-Motoring and generation, Armature circuit equation
DC MACHINE-Motoring and generation, Armature circuit equation
 
Cara Menggugurkan Sperma Yang Masuk Rahim Biyar Tidak Hamil
Cara Menggugurkan Sperma Yang Masuk Rahim Biyar Tidak HamilCara Menggugurkan Sperma Yang Masuk Rahim Biyar Tidak Hamil
Cara Menggugurkan Sperma Yang Masuk Rahim Biyar Tidak Hamil
 
Thermal Engineering -unit - III & IV.ppt
Thermal Engineering -unit - III & IV.pptThermal Engineering -unit - III & IV.ppt
Thermal Engineering -unit - III & IV.ppt
 
Signal Processing and Linear System Analysis
Signal Processing and Linear System AnalysisSignal Processing and Linear System Analysis
Signal Processing and Linear System Analysis
 

unit 3.docx

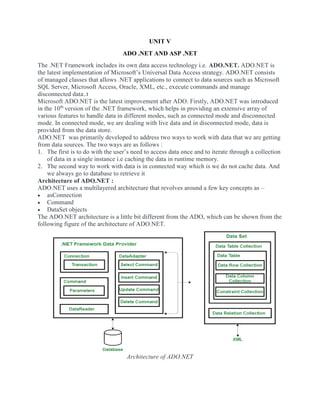
  • 1. UNIT V ADO .NET AND ASP .NET The .NET Framework includes its own data access technology i.e. ADO.NET. ADO.NET is the latest implementation of Microsoft’s Universal Data Access strategy. ADO.NET consists of managed classes that allows .NET applications to connect to data sources such as Microsoft SQL Server, Microsoft Access, Oracle, XML, etc., execute commands and manage disconnected data..t Microsoft ADO.NET is the latest improvement after ADO. Firstly, ADO.NET was introduced in the 10th version of the .NET framework, which helps in providing an extensive array of various features to handle data in different modes, such as connected mode and disconnected mode. In connected mode, we are dealing with live data and in disconnected mode, data is provided from the data store. ADO.NET was primarily developed to address two ways to work with data that we are getting from data sources. The two ways are as follows : 1. The first is to do with the user’s need to access data once and to iterate through a collection of data in a single instance i.e caching the data in runtime memory. 2. The second way to work with data is in connected way which is we do not cache data. And we always go to database to retrieve it Architecture of ADO.NET : ADO.NET uses a multilayered architecture that revolves around a few key concepts as –  asConnection  Command  DataSet objects The ADO.NET architecture is a little bit different from the ADO, which can be shown from the following figure of the architecture of ADO.NET. Architecture of ADO.NET
  • 2. One of the key differences between ADO and ADO.NET is how they deal with the challenge of different data sources. In ADO.NET, programmers always use a generic set of objects, no matter what the underlying data source is. For example, if we want to retrieve a record from an Oracle Database, we use the same connection class that we use to tackle the same task with SQL Server. This is not the case with ADO.NET, which uses a data provider model and the DataSet. Features of ADO.NET : The following are the features of ADO.NET –  Interoperability- We know that XML documents are text-based formats. So, one can edit and edit XML documents using standard text-editing tools. ADO.NET uses XML in all data exchanges and for internal representation of data.  Maintainability – ADO.NET is built around the idea of separation of data logic and user interface. It means that we can create our application in independent layers.  Programmability (Typed Programming) – It is a programming style in which user words are used to construct statements or evaluate expressions. For example: If we want to select the “Marks” column from “Kawal” from the “Student” table, the following is the way to do so: DataSet.Student("Kawal").Marks;  Performance – It uses disconnected data architecture which is easy to scale as it reduces the load on the database. Everything is handled on the client-side, so it improves performance.  Scalability – It means meeting the needs of the growing number of clients, which degrading performance. As it uses disconnected data access, applications do not retain database lock connections for a longer time. Thus, it accommodates scalability by encouraging programmers to conserve limited resources and allow users to access data simultaneously. Insert, Update, Delete: ASP.NET Database Connection Accessing Data from a database is an important aspect of any programming language. It is necessary for any programming language to have the ability to work with databases. ASP.Net has the ability to work with different types of databases. It can work with the most common databases such as Oracle and Microsoft SQL Server. It also has the ability to work with new forms of databases such as MongoDB and MySQL. Fundamentals of Database connectivity ASP.Net has the ability to work with a majority of databases. The most common being Oracle and Microsoft SQL Server. But with every database, the logic behind working with all of them is mostly the same.
  • 3. In our examples, we will look at working with the Microsoft SQL Server as our database. For learning purposes, one can download and use the Microsoft SQL Server Express Edition. This is a free database software provided by Microsoft. While working with databases, the following concepts which are common across all databases. 1. Connection – To work with the data in a database, the first obvious step is the connection. The connection to a database normally consists of the below-mentioned parameters. 1. Database name or Data Source – The first important parameter is the database name. Each connection can only work with one database at a time. 2. Credentials – The next important aspect is the ‘username’ and ‘password’. This is used to establish a connection to the database. 3. Optional parameters – You can specify optional parameters on how .net should handle the connection to the database. For example, one can specify a parameter for how long the connection should stay active. 2. Selecting data from the database – Once the connection is established, data is fetched from the database. ASP.Net has the ability to execute ‘sql’ select command against the database. The ‘sql’ statement can be used to fetch data from a specific table in the database. 3. Inserting data into the database – ASP.Net is used to insert records into the database. Values for each row that needs to be inserted in the database are specified in ASP.Net. 4. Updating data into the database – ASP.Net can also be used to update existing records into the database. New values can be specified in ASP.Net for each row that needs to be updated into the database. 5. Deleting data from a database – ASP.Net can also be used to delete records from the database. The code is written to delete a particular row from the database. Ok, now that we have seen the theory part of each operation. Now, let’s see how to perform database operations in ASP.Net.
  • 4. ASP.NET Database Connections Let’s now look at the code, which needs to be kept in place to create a connection to a database. In our example, we will connect to a database which has the name of Demodb. The credentials used to connect to the database are given below  Username – sa  Password – demo123 Let’s work with our current web application created in the earlier sections.  Start adding database operations to it.  Our example look’s at establishing a simple connection. This connection is made to the Demodb database. This is done when the page is first launched.  When the connection is established, a message will be sent to the user. The message will indicate that the connection has been established.
  • 5. Let’s follow the below-mentioned steps to achieve this. Step 1) Let’s first ensure that you have your web application (DemoApplication) opened in Visual Studio. Double click the ‘demo.aspx.cs’ file to enter the code for the database connection. Step 2) Add the below code which will be used to establish a connection to the database.
  • 6. namespace DemoApplication { public partial class Demo System.Web.UI.Page { protected void Page_Load(object sender, EventArgs e) { string connetionString; SqlConnection cnn; connetionString = @"Data Source=WIN-50GP30FGO75;Initial Catalog=Demodb ;User ID=sa;Password=demol23"; cnn = new SqlConnection(connetionString); cnn.Open(); Response.Write("Connection MAde"); conn.Close(); } } } Code Explanation:- 1. The first step is to create variables. It will be used to create the connection string and the connection to the SQL Server database.
  • 7. 2. The next step is to actually create the connection string. The connection string consists of the following parts  Data Source – This is the name of the server on which the database resides. In our case, it resides on a machine called WIN- 50GP30FGO75.  The Initial Catalog is used to specify the name of the database  The UserID and Password are the credentials required to connect to the database. 3. Next, we assign the connecting string to the variable ‘cnn’.  The variable cnn is of type SqlConnection. This is used to establish a connection to the database.  SqlConnection is a class in ASP.Net, which is used to create a connection to a database.  To use this class, you have to first create an object of this class. Hence, here we create a variable called ‘cnn’ which is of the type SqlConnection. 4. Next, we use the open method of the cnn variable to open a connection to the database. We display a message to the user that the connection is established. This is done via the ‘response.write’ method. We then close the connection to the database. When the above code is set, and the project is executed using Visual Studio. You will get the below output. Once the form is displayed, click the Connect button. Output:- The output message displayed in the browser will show that the connection to the database is made.
  • 8. ASP.NET Read Database using SqlDataReader To show data accessed using Asp.Net, let us assume the following artifacts in our database. 1. A table called demotb. This table will be used to store the ID and names of various Tutorials. 2. The table will have two columns, one called “TutorialID” and the other called “TutorialName.” 3. For the moment, the table will have two rows as shown below. TutorialID TutorialName 1 C# 2 ASP.Net Let’s change the code so that we can query for this data and display the information on the web page itself. Note that the code entered is in continuation to that written for the data connection module. Step 1) Let’s split the code into two parts,  The first part will be to construct our “select” statement. It will be used to read the data from the database.  We will then execute the “select” statement against the database. This will fetch all the table rows accordingly.
  • 9. Code Explanation:- 1. The first step is to create the following variables  SQLCommand – The ‘SQLCommand’ is a class defined within C#. This class is used to perform operations of reading and writing into the database. Hence, the first step is to make sure that we create a variable type of this class. This variable will then be used in subsequent steps of reading data from our database.  The DataReader object is used to get all the data specified by the SQL query. We can then read all the table rows one by one using the data reader.  We then define two string variables. One is “SQL” to hold our SQL command string. The next is the “Output” which will contain all the table values. 2. The next step is to actually define the SQL statement. This will be used against our database. In our case, it is “Select TutorialID, TutorialName from demotb”. This will fetch all the rows from the table demotb. 3. Next, we create the command object which is used to execute the SQL statement against the database. In the SQL command, you have to pass the connection object and the SQL string. 4. Next, we will execute the data reader command, which will fetch all the rows from the demotb table. 5. Now that we have all the rows of the table with us, we need a mechanism to access the row one by one.  For this, we will use the ‘while’ statement.  The ‘while’ statement will be used to access the rows from the data reader one at a time.  We then use the ‘GetValue’ method to get the value of TutorialID and TutorialName. Step 2) In the final step, we will just display the output to the user. Then we will close all the objects related to the database operation.
  • 10. namespace DemoApplication { public partial class Demo System.Web.UI.Page { protected void Page_Load(object sender, EventArgs e) { SqlCommand command; SqlDataReader dataReader; String sql, Output =""; sql = "Select TutorialID,TutorialName from demotb"; command = new SqlCommand(sql, cnn); dataReader = sqlquery.ExecuteReader(); while (dataReader.Read()) { Output = Output + dataReader.GetValue(0) + "-" + dataReader.GetValue(1) + "</br>"; } Response.Write(Output); dataReader.Close(); command.dispose(); conn.Close(); } } } Code Explanation:- 1. We will continue our code by displaying the value of the Output variable. This is done using the Response.Write method. 2. We finally close all the objects related to our database operation. Remember this is always a good practice. When the above code is set, and the project is run using Visual Studio, you will get the below output. Output:-
  • 11. From the output, you can clearly see that the program was able to get the values from the database. The data is then displayed in the browser to the user. Insert Database Record using InsertCommand Just like Accessing data, ASP.Net has the ability to insert records into the database as well. Let’s take the same table structure used for inserting records. TutorialID TutorialName 1 C# 2 ASP.Net Let’s change the code in our form, so that we can insert the following row into the table TutorialID TutorialName 3 VB.Net Step 1) As the first step let’s add the following code to our program. The below code snippet will be used to insert an existing record in our database.
  • 12. namespace DemoApplication { public partial class Demo System.Web.UI.Page { protected void Page_Load(object sender, EventArgs e) { SqlCommand command; SqlDataAdapter adapter = new SqlDataAdapter(); String sql=""; sql = "Insert into demotb(TutorialID,TutorialName) value(3, '" + "VB.Net +"')"; command = new SqlCommand(sql,cnn); adapter.InsertCommand = new SqlCommand(sql,cnn); adapter.InsertCommand.ExecuteNonQuery(); command.Dispose(): cnn.Close(); } } } Code Explanation:- 1. The first step is to create the following variables
  • 13. 1. SQLCommand – This data type is used to define objects. These objects perform SQL operations against a database. This object will hold the SQL command which will run against our SQL Server database. 2. The DataAdapter object is used to perform insert, delete and update SQL commands 3. We then define a string variable, which is “SQL” to hold our SQL command string. 2. The next step is actually to define the SQL statement, which will be used against our database. In our case, we are issuing an insert statement. This will insert the record of TutorialID=3 and TutorialName=VB.Net 3. Next, we create the command object which is used to execute the SQL statement against the database. In the SQL command, you have to pass the connection object and the SQL string 4. In our data adapter command,  Associate the insert SQL command to the adapter.  Then issue the ‘ExecuteNonQuery’ method. This is used to execute the Insert statement against our database.  The ‘ExecuteNonQuery’ method is used in C# to issue any DML statements (insert, delete and update operation) against the database.  To issue any table statements in ASP.Net, one need’s to use the ‘ExecuteNonQuery’ method. 5. We finally close all the objects related to our database operation. Remember this is always a good practice. Step 2) As a second step, let’s add the same code as in the Accessing data section. This is to display the recent table data in the browser. For that, we will add the below code to the demo.aspx.cs file.
  • 14. namespace DemoApplication { public partial class Demo System.Web.UI.Page { protected void Page_Load(object sender, EventArgs e) { SqlCommand sqlquery; SqlDataReader dataReader; String Output =""; sql = "Select TutorialID,TutorialName from demotb"; sqlquery = new SqlCommand(sql, cnn); dataReader = command.ExecuteReader(); while (dataReader.Read()) { Output = Output + dataReader.GetValue(0) + "-" + dataReader.GetValue(1) + "</br>"; } Response.Write(Output); dataReader.Close(); command.dispose(); conn.Close(); }
  • 15. } } When the above code is set, and the project is executed in Visual Studio, you will get the below output. Output:- In the browser window, you will see that the rows was successfully inserted in the database. Update Database Record using UpdateCommand ASP.Net has the ability to update existing records from a database. Let’s take the same table structure which was used above for the example to insert records. TutorialID TutorialName 1 C# 2 ASP.Net 3 VB.Net Let’s change the code in our form, so that we can update the following row. The old row value is TutorialID as “3” and Tutorial Name as “VB.Net”. Which we will update it to “VB.Net complete” while the row value for Tutorial ID will remain same. Old row TutorialID TutorialName 3 VB.Net
  • 16. New row TutorialID TutorialName 3 VB.Net complete Step 1) As the first step let’s add the following code to our program. The below code snippet will be used to update an existing record in our database. namespace DemoApplication { public partial class Demo System.Web.UI.Page { protected void Page_Load(object sender, EventArgs e) { SqlCommand command; SqlDataAdapter adapter = new SqlDataAdapter(); String sql=""; sql = "Update demotb set TutorialName='"VB.Net Complete"+"' where TutorialID=3"; command = new SqlCommand(sql,cnn); adapter.InsertCommand = new SqlCommand(sql,cnn); adapter.InsertCommand.ExecuteNonQuery;
  • 17. command.Dispose(): cnn.Close(); } } } Code Explanation:- 1. The first step is to create the following variables 1. SQLCommand – his data type is used to define objects to perform SQL operations against a database. This object will hold the SQL command which will run against our SQL Server database. 2. The dataadapter object is used to perform insert, delete and update SQL commands 3. We then define a string variable, which is SQL to hold our SQL command string. 2. The next step is actually to define the SQL statement which will be used against our database. In our case, we are issuing an ‘update’ statement. This will update the Tutorial name to “VB.Net Complete”. The TutorialID will remain unchanged, and the value will be 3. 3. Next, we will create the command object. This is used to execute the SQL statement against the database. In the SQL command, you have passed the connection object and the SQL string 4. In our data adapter command, we now associate the insert SQL command to our adapter. We then issue the ExecuteNonQuery method. This is used to execute the Update statement against our database. 5. We finally close all the objects related to our database operation. Remember this is always a good practice. Step 2) As a second step, let’s add the same code as in the Accessing data section. This is to display the recent table data in the browser. For that, we will add the below code
  • 18. namespace DemoApplication { public partial class Demo System.Web.UI.Page { protected void Page_Load(object sender, EventArgs e) { SqlCommand sqlquery; SqlDataReader dataReader; String Output =""; sql = "Select TutorialID,TutorialName from demotb"; sqlquery = new SqlCommand(sql, cnn); dataReader = command.ExecuteReader(); while (dataReader.Read()) { Output = Output + dataReader.GetValue(0) + "-" + dataReader.GetValue(1) + "</br>"; } Response.Write(Output); dataReader.Close(); command.dispose(); conn.Close();
  • 19. } } } When the above code is set, and the project is executed using Visual Studio, you will get the below output. Output:- In the browser window, you will see that the rows were successfully updated in the database. Delete Database Record using DeleteCommand ASP.Net can delete existing records from a database. Let’s take the same table structure which was used above for the example to delete records. TutorialID TutorialName 1 C# 2 ASP.Net 3 VB.Net complete Let’s change the code in our form so that we can delete the following row TutorialID TutorialName
  • 20. TutorialID TutorialName 3 VB.Net complete So let’s add the following code to our program. The below code snippet will be used to delete an existing record in our database. Step 1) As the first step let’s add the following code to our program. The below code snippet will be used to delete an existing record in our database. namespace DemoApplication { public partial class Demo System.Web.UI.Page { protected void Page_Load(object sender, EventArgs e) { SqlCommand command; SqlDataAdapter adapter = new SqlDataAdapter(); String sql=""; sql = "Delete demotb where TutorialID=3"; command = new SqlCommand(sql,cnn); adapter.DeleteCommand = new SqlCommand(sql,cnn); adapter.DeleteCommand.ExecuteNonQuery;
  • 21. command.Dispose(): cnn.Close(); } } } Code Explanation:- 1. The Key difference in this code is that we are now issuing the delete SQL statement. The delete statement is used to delete the row in the demotb table in which the TutorialID has a value of 3. 2. In our data adapter command, we now associate the insert SQL command to our adapter. We also issue the ‘ExecuteNonQuery’ method which is used to execute the delete statement against our database. Step 2) As a second step, let’s add the same code as in the Accessing data section. This is to display the recent table data in the browser. For that, we will add the below code. namespace DemoApplication { public partial class Demo System.Web.UI.Page { protected void Page_Load(object sender, EventArgs e) {
  • 22. SqlCommand sqlquery; SqlDataReader dataReader; String Output =""; sql = "Select TutorialID,TutorialName from demotb"; sqlquery = new SqlCommand(sql, cnn); dataReader = command.ExecuteReader(); while(dataReader.Read()) { Output = Output + dataReader.GetValue(0) + "-" + dataReader.GetValue(1) + "</br>"; } Response.Write(Output); dataReader.Close(); command.dispose(); conn.Close(); } } } When the above code is set, and the project is executed using Visual Studio, you will get the below output. Output:-
  • 23. Connecting Asp.net Controls to Data We have seen how we can use ASP.Net commands such as SQLCommand and SQLReader to fetch data from a database. We also saw how we can read each row of the table display it on the web page. There are methods available to link controls directly to different fields in the table. At the moment, only the below controls can be bound to an ASP.Net application 1. CheckboxList 2. RadioButtonList 3. DropDownlist 4. Listbox So let’s see an example of how we can use control binding in ASP.Net. Here we will take a listbox example. Let’s say we have the following data in our database. TutorialID TutorialName 1 C# 2 ASP.Net 3 VB.Net complete Let’s use the Listbox control and see how it can automatically pick up the data from our Demotb table. Let’s follow the below-mentioned steps to achieve this. Step 1) Construct the basic web form. From the toolbox in Visual Studio, drag and drop 2 components- labels and Listboxes. Then carry out the following substeps; 1. Put the text value of the first label as TutorialID 2. Put the text value of the second label as TutorialName Below is how the form would look like once the above-mentioned steps are performed.
  • 24. Step 2) The next step is to start connecting each listbox to the database table. 1. First, click on the Listbox for Tutorial ID. This will bring up another dialog box to the side of the control. 2. From the dialog box, we need to click on the option of Choose Data source. Step 3) You will then be presented with a dialog box. This can be used to create a new data source. The data source will represent a connection to the database. Choose the option of ‘New data source’.
  • 25. Step 4) The below screen will be prompted after choosing the new data source in the last step. Here we need to mention the type of data source we want to create. 1. Choose the database option to work with an SQL Server database. 2. Now we need to give a name to our data source. Here we are giving it a name of DemoDataSource. 3. Finally, we click the ‘OK’ button to proceed to the next screen.
  • 26. Step 5) Now we need to create a connection to our database. In the next screen, click on the New Connection button
  • 27. Step 6) Next you need to add the credentials to connect to the database. 1. Choose the server name on which the SQL Server resides 2. Enter the user id and password to connect to the database 3. Choose the database as ‘demotb’ 4. Click the ‘OK’ button.
  • 28. Step 7) On the next screen, you will be able to see the Demotb table. Just click on the Next button to accept the default setting.
  • 29. Step 8) You will now be able to test the connection on the next screen. 1. Click on the Test Query button to just see if you are able to get the values from the table 2. Click the Finish button to complete the wizard.
  • 30. Step 9) Now on the final screen, you can click the ‘OK’ button. This will now bind the TutorialID listbox to the TutorialID field name in the ‘demotb’ table.
  • 31. Step 10) Now it’s time to bind the Tutorial Name listbox to the Tutorial Name field. 1. First, click on the Tutorial Name Listbox. 2. Next, Choose from Data Source in the dialog box which appears at the side of the Listbox.
  • 32. Step 11) You will already see the DemoDataSource when choosing the Data Source in the next screen. 1. Choose the DemoData Source 2. Click on the OK button.
  • 33. If all the above steps are executed as shown, you will get the below-mentioned output. Output:-
  • 34. From the output, you can see that the listboxes display the Tutorial ID and Tutorial Names respectively Summary  ASP.Net can work with databases such as Oracle and Microsoft SQL Server.  ASP.Net has all the commands which are required to work with databases. This involves establishing a connection to the database. You can perform operations such as select, update, insert and delete.  The data reader object in ASP.Net is used to hold all the data returned by the database. The While loop in ASP.net can be used to read the data rows one at a time.  The data adapter object is used to perform SQL operations such as insert, delete, and update.  ASP.Net can bind controls to the various fields in a table. They are bound by defining a data source in ASP.Net. The data source is used to pull the data from the database and populate them in the controls. ADO.NET SqlDataReader Class This class is used to read data from SQL Server database. It reads data in forward-only stream of rows from a SQL Server database. it is sealed class so that cannot be inherited. It inherits DbDataReader class and implements IDisposable interface. SqlDataReader Signature 1. public class SqlDataReader : System.Data.Common.DbDataReader, IDisposable SqlDataReader Properties Property Description Connection It is used to get the SqlConnection associated with the SqlDataReader. Depth It is used to get a value that indicates the depth of nesting for the current row. FieldCount It is used to get the number of columns in the current row. HasRows It is used to get a value that indicates whether the SqlDataReader contains one or more rows. IsClosed It is used to retrieve a boolean value that indicates whether the
  • 35. specified SqlDataReader instance has been closed. Item[String] It is used to get the value of the specified column in its native format given the column name. Item[Int32] It is used to get the value of the specified column in its native format given the column ordinal. RecordsAffected It is used to get the number of rows changed, inserted or deleted by execution of the Transact-SQL statement. VisibleFieldCount It is used to get the number of fields in the SqlDataReader that are not hidden. Methods Method Description Close() It is used to closes the SqlDataReader object. GetBoolean(Int32) It is used to get the value of the specified column as a Boolean. GetByte(Int32) It is used to get the value of the specified column as a byte. GetChar(Int32) It is used to get the value of the specified column as a single character. GetDateTime(Int32) It is used to get the value of the specified column as a DateTime object. GetDecimal(Int32) It is used to get the value of the specified column as a Decimal object. GetDouble(Int32) It is used to get the value of the specified column as a double-precision floating point number.
  • 36. GetFloat(Int32) It is used to get the value of the specified column as a single- precision floating point number. GetName(Int32) It is used to get the name of the specified column. GetSchemaTable() It is used to get a DataTable that describes the column metadata of the SqlDataReader. GetValue(Int32) It is used to get the value of the specified column in its native format. GetValues(Object[]) It is used to populate an array of objects with the column values of the current row. NextResult() It is used to get the next result, when reading the results of SQL statements. Read() It is used to read record from the SQL Server database. To create a SqlDataReader instance, we must call the ExecuteReader method of the SqlCommand object. Example In the following program, we are using SqlDataReader to get data from the SQL Server. A C# code is given below. // Program.cs 1. using System; 2. using System.Data.SqlClient; 3. namespace AdoNetConsoleApplication 4. { 5. class Program 6. { 7. static void Main(string[] args)
  • 37. 8. { 9. new Program().GetData(); 10. } 11. public void GetData() 12. { 13. SqlConnection con = null; 14. try 15. { 16. // Creating Connection 17. con = new SqlConnection("data source=.; database=student; integrated security=SSPI" ); 18. // writing sql query 19. SqlCommand cm = new SqlCommand("select * from student", con); 20. // Opening Connection 21. con.Open(); 22. // Executing the SQL query 23. SqlDataReader sdr = cm.ExecuteReader(); 24. while (sdr.Read()) 25. { 26. Console.WriteLine(sdr["name"]+" "+ sdr["email"]); 27. } 28. } 29. catch (Exception e) 30. { 31. Console.WriteLine("OOPs, something went wrong." + e); 32. } 33. // Closing the connection 34. finally 35. { 36. con.Close(); 37. } 38. } 39. } 40. }
  • 38. Output: Execute this program by combination of Ctrl+F5 and it will produce the following output. ADO.NET DataSet It is a collection of data tables that contain the data. It is used to fetch data without interacting with a Data Source that's why, it also known as disconnected data access method. It is an in- memory data store that can hold more than one table at the same time. We can use DataRelation object to relate these tables. The DataSet can also be used to read and write data as XML document. ADO.NET provides a DataSet class that can be used to create DataSet object. It contains constructors and methods to perform data related operations. DataSet Class Signature 1. public class DataSet : System.ComponentModel.MarshalByValueComponent, System.Compone ntModel.IListSource, 2. System.ComponentModel.ISupportInitializeNotification, System.Runtime.Serialization.ISerializ able, 3. System.Xml.Serialization.IXmlSerializable DataSet Constructors Constructor Description DataSet() It is used to initialize a new instance of the DataSet class. DataSet(String) It is used to initialize a new instance of a DataSet class with the given name. DataSet(SerializationInfo, StreamingContext) It is used to initialize a new instance of a DataSet class that has the given serialization
  • 39. information and context. DataSet(SerializationInfo, StreamingContext, Boolean) It is used to initialize a new instance of the DataSet class. DataSet Properties Properties Description CaseSensitive It is used to check whether DataTable objects are case- sensitive or not. DataSetName It is used to get or set name of the current DataSet. DefaultViewManager It is used to get a custom view of the data contained in the DataSet to allow filtering and searching. HasErrors It is used to check whether there are errors in any of the DataTable objects within this DataSet. IsInitialized It is used to check whether the DataSet is initialized or not. Locale It is used to get or set the locale information used to compare strings within the table. Namespace It is used to get or set the namespace of the DataSet. Site It is used to get or set an ISite for the DataSet. Tables It is used to get the collection of tables contained in the DataSet. DataSet Methods The following table contains some commonly used methods of DataSet. Method Description
  • 40. BeginInit() It is used to begin the initialization of a DataSet that is used on a form. Clear() It is used to clear the DataSet of any data by removing all rows in all tables. Clone() It is used to copy the structure of the DataSet. Copy() It is used to copy both the structure and data for this DataSet. CreateDataReader(DataTable[]) It returns a DataTableReader with one result set per DataTable. CreateDataReader() It returns a DataTableReader with one result set per DataTable. EndInit() It ends the initialization of a DataSet that is used on a form. GetXml() It returns the XML representation of the data stored in the DataSet. GetXmlSchema() It returns the XML Schema for the XML representation of the data stored in the DataSet. Load(IDataReader, LoadOption, DataTable[]) It is used to fill a DataSet with values from a data source using the supplied IDataReader. Merge(DataSet) It is used to merge a specified DataSet and its schema into the current DataSet. Merge(DataTable) It is used to merge a specified DataTable and its schema into the current DataSet. ReadXml(XmlReader, It is used to read XML schema and data into
  • 41. XmlReadMode) the DataSet using the specified XmlReader and XmlReadMode. Reset() It is used to clear all tables and removes all relations, foreign constraints, and tables from the DataSet. WriteXml(XmlWriter, XmlWriteMode) It is used to write the current data and optionally the schema for the DataSet using the specified XmlWriter and XmlWriteMode. Example: Here, in this example, we are implementing DataSet and displaying data into a gridview. Create a web form and drag a gridview from the toolbox to the form. We can find it inside the data category. // DataSetDemo.aspx
  • 42. 1. <%@ Page Language="C#" AutoEventWireup="true" CodeBehind="DataSetDemo.aspx.cs" 2. Inherits="DataSetExample.DataSetDemo" %> 3. <!DOCTYPE html> 4. <html xmlns="http://www.w3.org/1999/xhtml"> 5. <head runat="server"> 6. <title></title> 7. </head> 8. <body> 9. <form id="form1" runat="server"> 10. <div> 11. </div> 12. <asp:GridView ID="GridView1" runat="server" CellPadding="4" ForeColor="#333333" GridLines="None"> 13. <AlternatingRowStyle BackColor="White" /> 14. <EditRowStyle BackColor="#2461BF" /> 15. <FooterStyle BackColor="#507CD1" Font-Bold="True" ForeColor="White" /> 16. <HeaderStyle BackColor="#507CD1" Font-Bold="True" ForeColor="White" /> 17. <PagerStyle BackColor="#2461BF" ForeColor="White" HorizontalAlign="Center" /> 18. <RowStyle BackColor="#EFF3FB" /> 19. <SelectedRowStyle BackColor="#D1DDF1" Font- Bold="True" ForeColor="#333333" /> 20. <SortedAscendingCellStyle BackColor="#F5F7FB" /> 21. <SortedAscendingHeaderStyle BackColor="#6D95E1" /> 22. <SortedDescendingCellStyle BackColor="#E9EBEF" /> 23. <SortedDescendingHeaderStyle BackColor="#4870BE" /> 24. </asp:GridView> 25. </form> 26. </body> 27. </html> CodeBehind // DataSetDemo.aspx.cs 1. using System; 2. using System.Data.SqlClient;
  • 43. 3. using System.Data; 4. namespace DataSetExample 5. { 6. public partial class DataSetDemo : System.Web.UI.Page 7. { 8. protected void Page_Load(object sender, EventArgs e) 9. { 10. using (SqlConnection con = new SqlConnection("data source=.; database=student; integr ated security=SSPI")) 11. { 12. SqlDataAdapter sde = new SqlDataAdapter("Select * from student", con); 13. DataSet ds = new DataSet(); 14. sde.Fill(ds); 15. GridView1.DataSource = ds; 16. GridView1.DataBind(); 17. } 18. } 19. } 20. } Output: Execute this code by the combination of Ctrl+F5. It will produce the following output. ASP.NET - Introduction ASP.NET is a web development platform, which provides a programming model, a comprehensive software infrastructure and various services required to build up robust web applications for PC, as well as mobile devices. ASP.NET works on top of the HTTP protocol, and uses the HTTP commands and policies to set a browser-to-server bilateral communication and cooperation. ASP.NET is a part of Microsoft .Net platform. ASP.NET applications are compiled codes, written using the extensible and reusable components or objects present in .Net framework. These codes can use the entire hierarchy of classes in .Net framework. The ASP.NET application codes can be written in any of the following languages:  C#
  • 44.  Visual Basic.Net  Jscript  J# ASP.NET is used to produce interactive, data-driven web applications over the internet. It consists of a large number of controls such as text boxes, buttons, and labels for assembling, configuring, and manipulating code to create HTML pages. ASP.NET Web Forms Model ASP.NET web forms extend the event-driven model of interaction to the web applications. The browser submits a web form to the web server and the server returns a full markup page or HTML page in response. All client side user activities are forwarded to the server for stateful processing. The server processes the output of the client actions and triggers the reactions. Now, HTTP is a stateless protocol. ASP.NET framework helps in storing the information regarding the state of the application, which consists of:  Page state  Session state The page state is the state of the client, i.e., the content of various input fields in the web form. The session state is the collective information obtained from various pages the user visited and worked with, i.e., the overall session state. To clear the concept, let us take an example of a shopping cart. User adds items to a shopping cart. Items are selected from a page, say the items page, and the total collected items and price are shown on a different page, say the cart page. Only HTTP cannot keep track of all the information coming from various pages. ASP.NET session state and server side infrastructure keeps track of the information collected globally over a session. The ASP.NET runtime carries the page state to and from the server across page requests while generating ASP.NET runtime codes, and incorporates the state of the server side components in hidden fields. This way, the server becomes aware of the overall application state and operates in a two-tiered connected way. The ASP.NET Component Model The ASP.NET component model provides various building blocks of ASP.NET pages. Basically it is an object model, which describes:
  • 45.  Server side counterparts of almost all HTML elements or tags, such as <form> and <input>.  Server controls, which help in developing complex user-interface. For example, the Calendar control or the Gridview control. ASP.NET is a technology, which works on the .Net framework that contains all web-related functionalities. The .Net framework is made of an object-oriented hierarchy. An ASP.NET web application is made of pages. When a user requests an ASP.NET page, the IIS delegates the processing of the page to the ASP.NET runtime system. The ASP.NET runtime transforms the .aspx page into an instance of a class, which inherits from the base class page of the .Net framework. Therefore, each ASP.NET page is an object and all its components i.e., the server-side controls are also objects. Components of .Net Framework 3.5 Before going to the next session on Visual Studio.Net, let us go through at the various components of the .Net framework 3.5. The following table describes the components of the .Net framework 3.5 and the job they perform: Components and their Description (1) Common Language Runtime or CLR It performs memory management, exception handling, debugging, security checking, thread execution, code execution, code safety, verification, and compilation. The code that is directly managed by the CLR is called the managed code. When the managed code is compiled, the compiler converts the source code into a CPU independent intermediate language (IL) code. A Just In Time(JIT) compiler compiles the IL code into native code, which is CPU specific. (2) .Net Framework Class Library It contains a huge library of reusable types. classes, interfaces, structures, and enumerated values, which are collectively called types. (3) Common Language Specification It contains the specifications for the .Net supported languages and implementation of language integration. (4) Common Type System It provides guidelines for declaring, using, and managing types at runtime, and cross- language communication. (5) Metadata and Assemblies Metadata is the binary information describing the program, which is either stored in a portable executable file (PE) or in the memory. Assembly is a logical unit consisting of
  • 46. the assembly manifest, type metadata, IL code, and a set of resources like image files. (6) Windows Forms Windows Forms contain the graphical representation of any window displayed in the application. (7) ASP.NET and ASP.NET AJAX ASP.NET is the web development model and AJAX is an extension of ASP.NET for developing and implementing AJAX functionality. ASP.NET AJAX contains the components that allow the developer to update data on a website without a complete reload of the page. (8) ADO.NET It is the technology used for working with data and databases. It provides access to data sources like SQL server, OLE DB, XML etc. The ADO.NET allows connection to data sources for retrieving, manipulating, and updating data. (9) Windows Workflow Foundation (WF) It helps in building workflow-based applications in Windows. It contains activities, workflow runtime, workflow designer, and a rules engine. (10) Windows Presentation Foundation It provides a separation between the user interface and the business logic. It helps in developing visually stunning interfaces using documents, media, two and three dimensional graphics, animations, and more. (11) Windows Communication Foundation (WCF) It is the technology used for building and executing connected systems. (12) Windows CardSpace It provides safety for accessing resources and sharing personal information on the internet. (13) LINQ It imparts data querying capabilities to .Net languages using a syntax which is similar to the tradition query language SQL. ASP.NET Web Forms is a part of the ASP.NET web application framework and is included with Visual Studio. It is one of the four programming models you can use to create ASP.NET web applications, the others are ASP.NET MVC, ASP.NET Web Pages, and ASP.NET Single Page Applications. Web Forms are pages that your users request using their browser. These pages can be written using a combination of HTML, client-script, server controls, and server code. When users request a page, it is compiled and executed on the server by the framework, and then the framework generates the HTML markup that the browser can render. An ASP.NET Web Forms page presents information to the user in any browser or client device.
  • 47. Using Visual Studio, you can create ASP.NET Web Forms. The Visual Studio Integrated Development Environment (IDE) lets you drag and drop server controls to lay out your Web Forms page. You can then easily set properties, methods, and events for controls on the page or for the page itself. These properties, methods, and events are used to define the web page's behavior, look and feel, and so on. To write server code to handle the logic for the page, you can use a .NET language like Visual Basic or C#. Note ASP.NET and Visual Studio documentation spans several versions. Topics that highlight features from previous versions may be useful for your current tasks and scenarios using the latest versions. ASP.NET Web Forms are:  Based on Microsoft ASP.NET technology, in which code that runs on the server dynamically generates Web page output to the browser or client device.  Compatible with any browser or mobile device. An ASP.NET Web page automatically renders the correct browser-compliant HTML for features such as styles, layout, and so on.  Compatible with any language supported by the .NET common language runtime, such as Microsoft Visual Basic and Microsoft Visual C#.  Built on the Microsoft .NET Framework. This provides all the benefits of the framework, including a managed environment, type safety, and inheritance.  Flexible because you can add user-created and third party controls to them. ASP.NET Web Forms offer:  Separation of HTML and other UI code from application logic.  A rich suite of server controls for common tasks, including data access.  Powerful data binding, with great tool support.  Support for client-side scripting that executes in the browser.  Support for a variety of other capabilities, including routing, security, performance, internationalization, testing, debugging, error handling and state management. ASP.NET Web Forms Helps You Overcome Challenges Web application programming presents challenges that do not typically arise when programming traditional client-based applications. Among the challenges are:  Implementing a rich Web user interface - It can be difficult and tedious to design and implement a user interface using basic HTML facilities, especially if the page has a complex layout, a large amount of dynamic content, and full-featured user-interactive objects.  Separation of client and server - In a Web application, the client (browser) and server are different programs often running on different computers (and even on different operating
  • 48. systems). Consequently, the two halves of the application share very little information; they can communicate, but typically exchange only small chunks of simple information.  Stateless execution - When a Web server receives a request for a page, it finds the page, processes it, sends it to the browser, and then discards all page information. If the user requests the same page again, the server repeats the entire sequence, reprocessing the page from scratch. Put another way, a server has no memory of pages that it has processed— page are stateless. Therefore, if an application needs to maintain information about a page, its stateless nature can become a problem.  Unknown client capabilities - In many cases, Web applications are accessible to many users using different browsers. Browsers have different capabilities, making it difficult to create an application that will run equally well on all of them.  Complications with data access - Reading from and writing to a data source in traditional Web applications can be complicated and resource-intensive.  Complications with scalability - In many cases Web applications designed with existing methods fail to meet scalability goals due to the lack of compatibility between the various components of the application. This is often a common failure point for applications under a heavy growth cycle. Meeting these challenges for Web applications can require substantial time and effort. ASP.NET Web Forms and the ASP.NET framework address these challenges in the following ways:  Intuitive, consistent object model - The ASP.NET page framework presents an object model that enables you to think of your forms as a unit, not as separate client and server pieces. In this model, you can program the page in a more intuitive way than in traditional Web applications, including the ability to set properties for page elements and respond to events. In addition, ASP.NET server controls are an abstraction from the physical contents of an HTML page and from the direct interaction between browser and server. In general, you can use server controls the way you might work with controls in a client application and not have to think about how to create the HTML to present and process the controls and their contents.  Event-driven programming model - ASP.NET Web Forms bring to Web applications the familiar model of writing event handlers for events that occur on either the client or server. The ASP.NET page framework abstracts this model in such a way that the underlying mechanism of capturing an event on the client, transmitting it to the server, and calling the appropriate method is all automatic and invisible to you. The result is a clear, easily written code structure that supports event-driven development.  Intuitive state management - The ASP.NET page framework automatically handles the task of maintaining the state of your page and its controls, and it provides you with explicit ways to maintain the state of application-specific information. This is accomplished without heavy use of server resources and can be implemented with or without sending cookies to the browser.  Browser-independent applications - The ASP.NET page framework enables you to create all application logic on the server, eliminating the need to explicitly code for differences in browsers. However, it still enables you to take advantage of browser-specific features by writing client-side code to provide improved performance and a richer client experience.
  • 49.  .NET Framework common language runtime support - The ASP.NET page framework is built on the .NET Framework, so the entire framework is available to any ASP.NET application. Your applications can be written in any language that is compatible that is with the runtime. In addition, data access is simplified using the data access infrastructure provided by the .NET Framework, including ADO.NET.  .NET Framework scalable server performance - The ASP.NET page framework enables you to scale your Web application from one computer with a single processor to a multi- computer Web farm cleanly and without complicated changes to the application's logic. Features of ASP.NET Web Forms  Server Controls- ASP.NET Web server controls are objects on ASP.NET Web pages that run when the page is requested and that render markup to the browser. Many Web server controls are similar to familiar HTML elements, such as buttons and text boxes. Other controls encompass complex behavior, such as a calendar controls, and controls that you can use to connect to data sources and display data.  Master Pages- ASP.NET master pages allow you to create a consistent layout for the pages in your application. A single master page defines the look and feel and standard behavior that you want for all of the pages (or a group of pages) in your application. You can then create individual content pages that contain the content you want to display. When users request the content pages, they merge with the master page to produce output that combines the layout of the master page with the content from the content page.  Working with Data- ASP.NET provides many options for storing, retrieving, and displaying data. In an ASP.NET Web Forms application, you use data-bound controls to automate the presentation or input of data in web page UI elements such as tables and text boxes and drop-down lists.  Membership- ASP.NET Identity stores your users' credentials in a database created by the application. When your users log in, the application validates their credentials by reading the database. Your project's Account folder contains the files that implement the various parts of membership: registering, logging in, changing a password, and authorizing access. Additionally, ASP.NET Web Forms supports OAuth and OpenID. These authentication enhancements allow users to log into your site using existing credentials, from such accounts as Facebook, Twitter, Windows Live, and Google. By default, the template creates a membership database using a default database name on an instance of SQL Server Express LocalDB, the development database server that comes with Visual Studio Express 2013 for Web.  Client Script and Client Frameworks- You can enhance the server-based features of ASP.NET by including client-script functionality in ASP.NET Web Form pages. You can use client script to provide a richer, more responsive user interface to users. You can also use client script to make asynchronous calls to the Web server while a page is running in the browser.  Routing- URL routing allows you to configure an application to accept request URLs that do not map to physical files. A request URL is simply the URL a user enters into their browser to find a page on your web site. You use routing to define URLs that are semantically meaningful to users and that can help with search-engine optimization (SEO).
  • 50.  State Management- ASP.NET Web Forms includes several options that help you preserve data on both a per-page basis and an application-wide basis.  Security- An important part of developing a more secure application is to understand the threats to it. Microsoft has developed a way to categorize threats: Spoofing, Tampering, Repudiation, Information disclosure, Denial of service, Elevation of privilege (STRIDE). In ASP.NET Web Forms, you can add extensibility points and configuration options that enable you to customize various security behaviors in ASP.NET Web Forms.  Performance- Performance can be a key factor in a successful Web site or project. ASP.NET Web Forms allows you to modify performance related to page and server control processing, state management, data access, application configuration and loading, and efficient coding practices.  Internationalization- ASP.NET Web Forms enables you to create web pages that can obtain content and other data based on the preferred language setting for the browser or based on the user's explicit choice of language. Content and other data is referred to as resources and such data can be stored in resource files or other sources. In an ASP.NET Web Forms page, you configure controls to get their property values from resources. At run time, the resource expressions are replaced by resources from the appropriate localized resource file.  Debugging and Error Handling- ASP.NET includes features to help you diagnose problems that might arise in your Web Forms application. Debugging and error handling are well supported within ASP.NET Web Forms so that your applications compile and run effectively.  Deployment and Hosting- Visual Studio, ASP.NET, Azure, and IIS provide tools that help you with the process of deploying and hosting your Web Forms application. Deciding When to Create a Web Forms Application You must consider carefully whether to implement a Web application by using either the ASP.NET Web Forms model or another model, such as the ASP.NET MVC framework. The MVC framework does not replace the Web Forms model; you can use either framework for Web applications. Before you decide to use the Web Forms model or the MVC framework for a specific Web site, weigh the advantages of each approach. Advantages of a Web Forms-Based Web Application The Web Forms-based framework offers the following advantages:  It supports an event model that preserves state over HTTP, which benefits line-of-business Web application development. The Web Forms-based application provides dozens of events that are supported in hundreds of server controls.  It uses a Page Controller pattern that adds functionality to individual pages. For more information, see Page Controller.  It uses view state or server-based forms, which can make managing state information easier.
  • 51.  It works well for small teams of Web developers and designers who want to take advantage of the large number of components available for rapid application development.  In general, it is less complex for application development, because the components (the Page class, controls, and so on) are tightly integrated and usually require less code than the MVC model. Advantages of an MVC-Based Web Application The ASP.NET MVC framework offers the following advantages:  It makes it easier to manage complexity by dividing an application into the model, the view, and the controller.  It does not use view state or server-based forms. This makes the MVC framework ideal for developers who want full control over the behavior of an application.  It uses a Front Controller pattern that processes Web application requests through a single controller. This enables you to design an application that supports a rich routing infrastructure. For more information, see Front Controller.  It provides better support for test-driven development (TDD).  It works well for Web applications that are supported by large teams of developers and Web designers who need a high degree of control over the application behavior. ASP.NET - Data Binding Every ASP.NET web form control inherits the DataBind method from its parent Control class, which gives it an inherent capability to bind data to at least one of its properties. This is known as simple data binding or inline data binding. Simple data binding involves attaching any collection (item collection) which implements the IEnumerable interface, or the DataSet and DataTable classes to the DataSource property of the control. On the other hand, some controls can bind records, lists, or columns of data into their structure through a DataSource control. These controls derive from the BaseDataBoundControl class. This is called declarative data binding. The data source controls help the data-bound controls implement functionalities such as, sorting, paging, and editing data collections. The BaseDataBoundControl is an abstract class, which is inherited by two more abstract classes:  DataBoundControl  HierarchicalDataBoundControl The abstract class DataBoundControl is again inherited by two more abstract classes:
  • 52.  ListControl  CompositeDataBoundControl The controls capable of simple data binding are derived from the ListControl abstract class and these controls are:  BulletedList  CheckBoxList  DropDownList  ListBox  RadioButtonList The controls capable of declarative data binding (a more complex data binding) are derived from the abstract class CompositeDataBoundControl. These controls are:  DetailsView  FormView  GridView  RecordList Simple Data Binding Simple data binding involves the read-only selection lists. These controls can bind to an array list or fields from a database. Selection lists takes two values from the database or the data source; one value is displayed by the list and the other is considered as the value corresponding to the display. Let us take up a small example to understand the concept. Create a web site with a bulleted list and a SqlDataSource control on it. Configure the data source control to retrieve two values from your database (we use the same DotNetReferences table as in the previous chapter). Choosing a data source for the bulleted list control involves:  Selecting the data source control  Selecting a field to display, which is called the data field  Selecting a field for the value
  • 53. When the application is executed, check that the entire title column is bound to the bulleted list and displayed. Declarative Data Binding We have already used declarative data binding in the previous tutorial using GridView control. The other composite data bound controls capable of displaying and manipulating data in a tabular manner are the DetailsView, FormView, and RecordList control. In the next tutorial, we will look into the technology for handling database, i.e, ADO.NET. However, the data binding involves the following objects:  A dataset that stores the data retrieved from the database.  The data provider, which retrieves data from the database by using a command over a connection.
  • 54.  The data adapter that issues the select statement stored in the command object; it is also capable of update the data in a database by issuing Insert, Delete, and Update statements. Relation between the data binding objects: Example Let us take the following steps: Step (1) : Create a new website. Add a class named booklist by right clicking on the solution name in the Solution Explorer and choosing the item 'Class' from the 'Add Item' dialog box. Name it as booklist.cs. usingSystem; usingSystem.Data; usingSystem.Configuration; usingSystem.Linq; usingSystem.Web; usingSystem.Web.Security; usingSystem.Web.UI; usingSystem.Web.UI.HtmlControls; usingSystem.Web.UI.WebControls; usingSystem.Web.UI.WebControls.WebParts; usingSystem.Xml.Linq; namespace databinding { publicclass booklist {
  • 55. protectedString bookname; protectedString authorname; public booklist(String bname,String aname) { this.bookname = bname; this.authorname = aname; } publicStringBook { get { returnthis.bookname; } set { this.bookname =value; } } publicStringAuthor { get { returnthis.authorname; } set { this.authorname =value; } } } } Step (2) : Add four list controls on the page a list box control, a radio button list, a check box list, and a drop down list and four labels along with these list controls. The page should look like this in design view:
  • 56. The source file should look as the following: <formid="form1"runat="server"> <div> <tablestyle="width:559px"> <tr> <tdstyle="width:228px; height:157px;"> <asp:ListBoxID="ListBox1"runat="server"AutoPostBack="True" OnSelectedIndexChanged="ListBox1_SelectedIndexChanged"> </asp:ListBox> </td> <tdstyle="height:157px"> <asp:DropDownListID="DropDownList1"runat="server" AutoPostBack="True"OnSelectedIndexChanged="DropDownList1_SelectedIndexChanged"> </asp:DropDownList> </td> </tr> <tr> <tdstyle="width:228px; height:40px;"> <asp:LabelID="lbllistbox"runat="server"></asp:Label> </td> <tdstyle="height:40px"> <asp:LabelID="lbldrpdown"runat="server"> </asp:Label> </td>
  • 57. </tr> <tr> <tdstyle="width:228px; height:21px"> </td> <tdstyle="height:21px"> </td> </tr> <tr> <tdstyle="width:228px; height:21px"> <asp:RadioButtonListID="RadioButtonList1"runat="server" AutoPostBack="True"OnSelectedIndexChanged="RadioButtonList1_SelectedIndexChanged"> </asp:RadioButtonList> </td> <tdstyle="height:21px"> <asp:CheckBoxListID="CheckBoxList1"runat="server" AutoPostBack="True"OnSelectedIndexChanged="CheckBoxList1_SelectedIndexChanged"> </asp:CheckBoxList> </td> </tr> <tr> <tdstyle="width:228px; height:21px"> <asp:LabelID="lblrdlist"runat="server"> </asp:Label> </td> <tdstyle="height:21px"> <asp:LabelID="lblchklist"runat="server"> </asp:Label> </td> </tr> </table> </div> </form> Step (3) : Finally, write the following code behind routines of the application: publicpartialclass_Default:System.Web.UI.Page { protectedvoidPage_Load(object sender,EventArgs e) {
  • 58. IList bklist = createbooklist(); if(!this.IsPostBack) { this.ListBox1.DataSource= bklist; this.ListBox1.DataTextField="Book"; this.ListBox1.DataValueField="Author"; this.DropDownList1.DataSource= bklist; this.DropDownList1.DataTextField="Book"; this.DropDownList1.DataValueField="Author"; this.RadioButtonList1.DataSource= bklist; this.RadioButtonList1.DataTextField="Book"; this.RadioButtonList1.DataValueField="Author"; this.CheckBoxList1.DataSource= bklist; this.CheckBoxList1.DataTextField="Book"; this.CheckBoxList1.DataValueField="Author"; this.DataBind(); } } protectedIList createbooklist() { ArrayList allbooks =newArrayList(); booklist bl; bl =new booklist("UNIX CONCEPTS","SUMITABHA DAS"); allbooks.Add(bl); bl =new booklist("PROGRAMMING IN C","RICHI KERNIGHAN"); allbooks.Add(bl); bl =new booklist("DATA STRUCTURE","TANENBAUM"); allbooks.Add(bl); bl =new booklist("NETWORKING CONCEPTS","FOROUZAN"); allbooks.Add(bl); bl =new booklist("PROGRAMMING IN C++","B. STROUSTROUP"); allbooks.Add(bl); bl =new booklist("ADVANCED JAVA","SUMITABHA DAS"); allbooks.Add(bl);
  • 59. return allbooks; } protectedvoidListBox1_SelectedIndexChanged(object sender,EventArgs e) { this.lbllistbox.Text=this.ListBox1.SelectedValue; } protectedvoidDropDownList1_SelectedIndexChanged(object sender,EventArgs e) { this.lbldrpdown.Text=this.DropDownList1.SelectedValue; } protectedvoidRadioButtonList1_SelectedIndexChanged(object sender,EventArgs e) { this.lblrdlist.Text=this.RadioButtonList1.SelectedValue; } protectedvoidCheckBoxList1_SelectedIndexChanged(object sender,EventArgs e) { this.lblchklist.Text=this.CheckBoxList1.SelectedValue; } } Observe the following:  The booklist class has two properties: bookname and authorname.  The createbooklist method is a user defined method that creates an array of booklist objects named allbooks.  The Page_Load event handler ensures that a list of books is created. The list is of IList type, which implements the IEnumerable interface and capable of being bound to the list controls. The page load event handler binds the IList object 'bklist' with the list controls. The bookname property is to be displayed and the authorname property is considered as the value.  When the page is run, if the user selects a book, its name is selected and displayed by the list controls whereas the corresponding labels display the author name, which is the corresponding value for the selected index of the list control. What is ASP.NET? Active Server Pages Network Enabled Technologies is more commonly known as ASP.NET. It is a platform for developing server-side, open-source web applications that assist developers in creating data-driven and interactive applications and websites. It is a peculiar combination of JavaScript, HTML, and CSS, all mashed together. ASP.NET uses technology built on a compiler, in contrast to languages such as Java and Python. The compiler will collect all of the different instances of code and compile them all
  • 60. simultaneously. As a result of this significant feature, the ASP.NET Core framework can perform better and faster than competing frameworks. Top Features of ASP.NET Now, let’s look at some of the fundamental capabilities of ASP.NET, which are utilized by renowned names such as SpaceX, Alibaba Travels, MasterCard, Slack, Queue-it, etc. 1. Supporting Cross-platform On operating systems such as Linux, Mac OS, and Windows, the ASP.NET applications can be installed with ease. .NET gives developers the flexibility to work with any operating system that they prefer to go ahead with. 2. Environments for Comprehensive Development ASP.NET allows the developers to create smooth and interactive applications using an Integrated Development Environment such as Visual Studio. Developers have access to a rich and dynamic environment within IDEs, which allows them to code programs from scratch by dragging and dropping components. 3. Independent Nature of the programming Language .NET is considered to be a language-independent framework. It simply means that developers can create apps in various languages as they wish. They can also use those languages to construct dynamic applications. 4. Secure and high performance Performance is one of the most important aspects of application development. The ASP.NET Core and Kestrel Web Server have transformed the.NET framework into one of the market’s fastest, most responsive, and lightest frameworks. The new Kestrel Web Server supports asynchronous programming approaches, which speed up the framework. At the same time, Kestrel Web Server gives a unique identifier for all ASP.NET framework applications, as.NET verifies the legitimacy of apps before allowing them to execute. 5. Frameworks for both MVC and Web API Development Before the release of ASP.NET Core, most developers relied on Model-View-Controller (MVC) frameworks to create web applications. At the same time, it was done utilizing HTML and Web API to create RESTful API via XML and JASON. By merging MVC and Web API, the creation of ASP.NET Core has simplified development. MVC now always delivers JASON data rather than HTML. Razor pages are a new element in ASP.NET Core. Its main usage is that it helps to simplify web UI development. It is a page-based coding module that enhances the MVC framework to allow for the reduction of the page’s controller and model capabilities. 6. Supporting HTML5 Form Types With this programming language, users can enter the values using a variety of input components that can be found in HTML forms. These input elements include text boxes, radio buttons, and checkboxes. Users must click the submit button once they have finished filling in the values for the individual fields before the data can be sent. ASP.NET supports all these HTML5 form types. Conclusion: .NET is an open-source web application framework used for scripting on the server side. Talking about its history, 2002 saw the release of a stable version. It enjoys a robust community on Stack Overflow and has Microsoft’s backing as an organization. Now, as you are well aware of the benefits of .NET, you could be interested in developing an application using the language. If you are, do not hesitate to contact the experts at Qodeify here. ASP.NET - Custom Controls
  • 61. ASP.NET allows the users to create controls. These user defined controls are categorized into:  User controls  Custom controls User Controls User controls behaves like miniature ASP.NET pages or web forms, which could be used by many other pages. These are derived from the System.Web.UI.UserControl class. These controls have the following characteristics:  They have an .ascx extension.  They may not contain any <html>, <body>, or <form> tags.  They have a Control directive instead of a Page directive. To understand the concept, let us create a simple user control, which will work as footer for the web pages. To create and use the user control, take the following steps:  Create a new web application.  Right click on the project folder on the Solution Explorer and choose Add New Item.  Select Web User Control from the Add New Item dialog box and name it footer.ascx. Initially, the footer.ascx contains only a Control directive.  <%@ControlLanguage="C#"AutoEventWireup="true"CodeBehind="footer.ascx.cs" Inherits="customcontroldemo.footer" %>  Add the following code to the file:  <table>  <tr>  <tdalign="center"> Copyright ©2010 TutorialPoints Ltd.</td>  </tr>   <tr>  <tdalign="center"> Location: Hyderabad, A.P </td>
  • 62.  </tr> </table> To add the user control to your web page, you must add the Register directive and an instance of the user control to the page. The following code shows the content file: <%@PageLanguage="C#"AutoEventWireup="true"CodeBehind="Default.aspx.cs"Inherits="cus tomcontroldemo._Default" %> <%@RegisterSrc="~/footer.ascx"TagName="footer"TagPrefix="Tfooter" %> <!DOCTYPE html PUBLIC "-//W3C//DTD XHTML 1.0 Transitional//EN""http://www.w3.org/TR/xhtml1/DTD/xhtml1-transitional.dtd"> <htmlxmlns="http://www.w3.org/1999/xhtml"> <headrunat="server"> <title> Untitled Page </title> </head> <body> <formid="form1"runat="server"> <div> <asp:LabelID="Label1"runat="server"Text="Welcome to ASP.Net Tutorials "></asp:Label> <br/><br/> <asp:ButtonID="Button1"runat="server"onclick="Button1_Click"Text="Copyright Info"/> </div> <Tfooter:footerID="footer1"runat="server"/> </form> </body> </html> When executed, the page shows the footer and this control could be used in all the pages of your website.
  • 63. Observe the following: (1) The Register directive specifies a tag name as well as tag prefix for the control. <%@RegisterSrc="~/footer.ascx"TagName="footer"TagPrefix="Tfooter" %> (2) The following tag name and prefix should be used while adding the user control on the page: <Tfooter:footerID="footer1"runat="server"/> Custom Controls Custom controls are deployed as individual assemblies. They are compiled into a Dynamic Link Library (DLL) and used as any other ASP.NET server control. They could be created in either of the following way:  By deriving a custom control from an existing control  By composing a new custom control combing two or more existing controls.  By deriving from the base control class. To understand the concept, let us create a custom control, which will simply render a text message on the browser. To create this control, take the following steps: Create a new website. Right click the solution (not the project) at the top of the tree in the Solution Explorer.
  • 64. In the New Project dialog box, select ASP.NET Server Control from the project templates. The above step adds a new project and creates a complete custom control to the solution, called ServerControl1. In this example, let us name the project CustomControls. To use this control, this must be added as a reference to the web site before registering it on a page. To add a reference to the existing project, right click on the project (not the solution), and click Add Reference. Select the CustomControls project from the Projects tab of the Add Reference dialog box. The Solution Explorer should show the reference. To use the control on a page, add the Register directive just below the @Page directive:
  • 65. <%@RegisterAssembly="CustomControls"Namespace="CustomControls"TagPrefix="ccs" %> Further, you can use the control, similar to any other controls. <formid="form1"runat="server"> <div> <ccs:ServerControl1runat="server"Text="I am a Custom Server Control"/> </div> </form> When executed, the Text property of the control is rendered on the browser as shown: Working with Custom Controls In the previous example, the value for the Text property of the custom control was set. ASP.NET added this property by default, when the control was created. The following code behind file of the control reveals this. usingSystem; usingSystem.Collections.Generic; usingSystem.ComponentModel; usingSystem.Linq; usingSystem.Text; usingSystem.Web; usingSystem.Web.UI; usingSystem.Web.UI.WebControls; namespaceCustomControls { [DefaultProperty("Text")] [ToolboxData("<{0}:ServerControl1 runat=server></{0}:ServerControl1 >")] publicclassServerControl1:WebControl { [Bindable(true)] [Category("Appearance")] [DefaultValue("")] [Localizable(true)]
  • 66. publicstringText { get { String s =(String)ViewState["Text"]; return((s ==null)?"["+this.ID +"]": s); } set { ViewState["Text"]=value; } } protectedoverridevoidRenderContents(HtmlTextWriter output) { output.Write(Text); } } } The above code is automatically generated for a custom control. Events and methods could be added to the custom control class. Example Let us expand the previous custom control named SeverControl1. Let us give it a method named checkpalindrome, which gives it a power to check for palindromes. Palindromes are words/literals that spell the same when reversed. For example, Malayalam, madam, saras, etc. Extend the code for the custom control, which should look as: usingSystem; usingSystem.Collections.Generic; usingSystem.ComponentModel; usingSystem.Linq; usingSystem.Text; usingSystem.Web; usingSystem.Web.UI; usingSystem.Web.UI.WebControls; namespaceCustomControls
  • 67. { [DefaultProperty("Text")] [ToolboxData("<{0}:ServerControl1 runat=server></{0}:ServerControl1 >")] publicclassServerControl1:WebControl { [Bindable(true)] [Category("Appearance")] [DefaultValue("")] [Localizable(true)] publicstringText { get { String s =(String)ViewState["Text"]; return((s ==null)?"["+this.ID +"]": s); } set { ViewState["Text"]=value; } } protectedoverridevoidRenderContents(HtmlTextWriter output) { if(this.checkpanlindrome()) { output.Write("This is a palindrome: <br />"); output.Write("<FONT size=5 color=Blue>"); output.Write("<B>"); output.Write(Text); output.Write("</B>"); output.Write("</FONT>"); } else { output.Write("This is not a palindrome: <br />"); output.Write("<FONT size=5 color=red>"); output.Write("<B>"); output.Write(Text); output.Write("</B>"); output.Write("</FONT>"); } }
  • 68. protectedbool checkpanlindrome() { if(this.Text!=null) { String str =this.Text; String strtoupper =Text.ToUpper(); char[] rev = strtoupper.ToCharArray(); Array.Reverse(rev); String strrev =newString(rev); if(strtoupper == strrev) { returntrue; } else { returnfalse; } } else { returnfalse; } } } } When you change the code for the control, you must build the solution by clicking Build --> Build Solution, so that the changes are reflected in your project. Add a text box and a button control to the page, so that the user can provide a text, it is checked for palindrome, when the button is clicked. <formid="form1"runat="server"> <div> Enter a word: <br/> <asp:TextBoxID="TextBox1"runat="server"style="width:198px"></asp:TextBox> <br/><br/> <asp:ButtonID="Button1"runat="server onclick="Button1_Click" Text="CheckPalindrome" style="width:132px" /> <br/><br/>
  • 69. <ccs:ServerControl1ID="ServerControl11"runat="server"Text=""/> </div> </form> The Click event handler for the button simply copies the text from the text box to the text property of the custom control. protectedvoidButton1_Click(object sender,EventArgs e) { this.ServerControl11.Text=this.TextBox1.Text; } When executed, the control successfully checks palindromes. Observe the following: (1) When you add a reference to the custom control, it is added to the toolbox and you can directly use it from the toolbox similar to any other control. (2) The RenderContents method of the custom control class is overridden here, as you can add your own methods and events. (3) The RenderContents method takes a parameter of HtmlTextWriter type, which is responsible for rendering on the browser. ASP.NET Master Pages Overview
  • 70. ASP.NET master pages allow you to create a consistent layout for the pages in your application. A single master page defines the look and feel and standard behavior that you want for all of the pages (or a group of pages) in your application. You can then create individual content pages that contain the content you want to display. When users request the content pages, they merge with the master page to produce output that combines the layout of the master page with the content from the content page. How Master Pages Work Master pages actually consist of two pieces, the master page itself and one or more content pages. Note You can also nest master pages. For details, see Nested ASP.NET Master Pages. Master Pages A master page is an ASP.NET file with the extension .master (for example, MySite.master) with a predefined layout that can include static text, HTML elements, and server controls. The master page is identified by a special @ Master directive that replaces the @ Page directive that is used for ordinary .aspx pages. The directive looks like the following. VBCopy <%@ Master Language="VB" %> The @ Master directive can contain most of the same directives that a @ Control directive can contain. For example, the following master-page directive includes the name of a code-behind file, and assigns a class name to the master page. VBCopy <%@ Master Language="VB" CodeFile="MasterPage.master.vb"Inherits="MasterPage" %> In addition to the @ Master directive, the master page also contains all of the top-level HTML elements for a page, such as html, head, and form. For example, on a master page you might use an HTML table for the layout, an img element for your company logo, static text for the copyright notice, and server controls to create standard navigation for your site. You can use any HTML and any ASP.NET elements as part of your master page.
  • 71. Replaceable Content Placeholders In addition to static text and controls that will appear on all pages, the master page also includes one or more ContentPlaceHolder controls. These placeholder controls define regions where replaceable content will appear. In turn, the replaceable content is defined in content pages. After you have defined the ContentPlaceHolder controls, a master page might look like the following. VBCopy <% @ Master Language="VB" %> <!DOCTYPE html PUBLIC"-//W3C//DTD XHTML 1.1//EN""http://www.w3.org/TR/xhtml11/DTD/xhtml11.dtd"> <html xmlns="http://www.w3.org/1999/xhtml"> <head runat="server"> <title>Master page title</title> </head> <body> <form id="form1" runat="server"> <table> <tr> <td><asp:contentplaceholder id="Main" runat="server" /></td> <td><asp:contentplaceholder id="Footer" runat="server" /></td> </tr> </table> </form> </body> </html> Content Pages You define the content for the master page's placeholder controls by creating individual content pages, which are ASP.NET pages (.aspx files and, optionally, code-behind files) that are bound to a specific master page. The binding is established in the content page's @ Page directive by including a MasterPageFile attribute that points to the master page to be used. For example, a content page might have the following @ Page directive, which binds it to the Master1.master page. VBCopy <%@ Page Language="VB" MasterPageFile="~/MasterPages/Master1.master" Title="Content Page" %>
  • 72. In the content page, you create the content by adding Content controls and mapping them to ContentPlaceHolder controls on the master page. For example, the master page might have content placeholders called Main and Footer. In the content page, you can create two Content controls, one that is mapped to the ContentPlaceHolder control Main and the other mapped to the ContentPlaceHolder control Footer, as shown in the following figure. Replacing placeholder content After creating Content controls, you add text and controls to them. In a content page, anything that is not inside the Content controls (except script blocks for server code) results in an error. You can perform any tasks in a content page that you do in an ASP.NET page. For example, you can generate content for a Content control using server controls and database queries or other dynamic mechanisms. A content page might look like the following. VBCopy <% @ Page Language="VB" MasterPageFile="~/Master.master" Title="Content Page 1" %> <asp:Content ID="Content1" ContentPlaceHolderID="Main" Runat="Server"> Main content. </asp:Content> <asp:Content ID="Content2" ContentPlaceHolderID="Footer" Runat="Server"> Footer content. </asp:content> [C#]
  • 73. Copy <% @ Page Language="C#" MasterPageFile="~/Master.master" Title="Content Page 1" %> <asp:Content ID="Content1" ContentPlaceHolderID="Main" Runat="Server"> Main content. </asp:Content> <asp:Content ID="Content2" ContentPlaceHolderID="Footer" Runat="Server"> Footer content. </asp:content> The @ Page directive binds the content page to a specific master page, and it defines a title for the page that will be merged into the master page. Note that the content page contains no other markup outside of the Content controls. (The master page must contain a head element with the attribute runat="server" so that the title setting can be merged at run time.) You can create multiple master pages to define different layouts for different parts of your site, and a different set of content pages for each master page. Advantages of Master Pages Master pages provide functionality that developers have traditionally created by copying existing code, text, and control elements repeatedly; using framesets; using include files for common elements; using ASP.NET user controls; and so on. Advantages of master pages include the following:  They allow you to centralize the common functionality of your pages so that you can make updates in just one place.  They make it easy to create one set of controls and code and apply the results to a set of pages. For example, you can use controls on the master page to create a menu that applies to all pages.  They give you fine-grained control over the layout of the final page by allowing you to control how the placeholder controls are rendered.  They provide an object model that allows you to customize the master page from individual content pages. Run-time Behavior of Master Pages At run time, master pages are handled in the following sequence: 1. Users request a page by typing the URL of the content page. 2. When the page is fetched, the @ Page directive is read. If the directive references a master page, the master page is read as well. If this is the first time the pages have been requested, both pages are compiled.
  • 74. 3. The master page with the updated content is merged into the control tree of the content page. 4. The content of individual Content controls is merged into the corresponding ContentPlaceHolder control in the master page. 5. The resulting merged page is rendered to the browser. The process is illustrated in the following diagram. Master pages at run time From the user's perspective, the combined master and content pages are a single, discrete page. The URL of the page is that of the content page. From a programming perspective, the two pages act as separate containers for their respective controls. The content page acts as a container for the master page. However, you can reference public master-page members from code in the content page, as described in the next section. Note that the master page becomes a part of the content page. In effect, the master page acts in much the same way a user control acts — as a child of the content page and as a container within that page. In this case, however, the master page is the container for all of the server controls that are rendered to the browser. The control tree for a merged master and content page looks something like this: Copy Page Master Page (Master page markup and controls) ContentPlaceHolder
  • 75. Content page markup and server controls (Master page markup and controls) ContentPlaceHolder Content page markup and server controls (Master page markup and controls) This diagram is simplified; if the content page does not have corresponding Content controls, the master page might also have markup and controls in the ContentPlaceHolder controls. In general, this structure has no effect on how you construct your pages or program them. However, in some cases, if you set a page-wide property on the master page, it can affect the behavior of the content page, because the master page is the closest parent for the controls on the page. For example, if you set the EnableViewState property on the content page to true but set the same property to false in the master page, view state will effectively be disabled because the setting on the master page will take priority. Master Page and Content Page Paths When a content page is requested, its content is merged with the master page, and the page runs in the context of the content page. For example, if you get the CurrentExecutionFilePath property of the HttpRequest object, whether in content page code or in master page code, the path represents the location of the content page. The master page and content page do not have to be in the same folder. As long as the MasterPageFile attribute in the content page's @ Page directive resolves to a .master page, ASP.NET can merge the content and master pages into a single rendered page. Referencing External Resources Both the content page and master page can contain controls and elements that reference external resources. For example, both might contain image controls that reference image files, or they might contain anchors that reference other pages. The context for the merged content and master pages is that of the content page. This can affect how you specify URLs for resources, such as image files and target pages, in anchors. Server Controls In server controls on master pages, ASP.NET dynamically modifies the URLs of properties that reference external resources. For example, you might put an Image control on a master page and set its ImageUrl property to be relative to the master page. At run time, ASP.NET will modify the URL so that it resolves correctly in the context of the content page. ASP.NET can modify URLs in the following cases:
  • 76.  The URL is a property of an ASP.NET server control.  The property is marked internally in the control as being a URL. (The property is marked with the attribute UrlPropertyAttribute.) In practical terms, ASP.NET server control properties that are commonly used to reference external resources are marked in this way. Other Elements ASP.NET cannot modify URLs on elements that are not server controls. For example, if you use an img element on a master page and set its src attribute to a URL, ASP.NET will not modify the URL. In that case, the URL will be resolved in the context of the content page and create the URL accordingly. In general, when working with elements on master pages, it is recommended that you use a server control, even for elements that do not require server code. For example, instead of using an img element, use an Image server control. That way, ASP.NET can resolve URLs correctly and you can avoid maintenance issues that might arise if you move the master or content page. For more information about specifying paths for ASP.NET server controls, see ASP.NET Web Site Paths. Master Pages and Themes You cannot directly apply an ASP.NET theme to a master page. If you add a theme attribute to the @ Master directive, the page will raise an error when it runs. However, themes are applied to master pages under these circumstances:  If a theme is defined in the content page. Master pages are resolved in the context of content pages, so the content page's theme is applied to the master page as well.  If the site as a whole is configured to use a theme by including a theme definition in the pages Element (ASP.NET Settings Schema) element. For more information, see ASP.NET Themes and Skins Overview. Scoping Master Pages You can attach content pages to a master page at three levels:  At the page level You can use a page directive in each content page to bind it to a master page, as in the following code example. VBCopy <%@ Page Language="VB" MasterPageFile="MySite.Master" %>
  • 77.  At the application level By making a setting in the pages element of the application's configuration file (Web.config), you can specify that all ASP.NET pages (.aspx files) in the application automatically bind to a master page. The element might look like the following. Copy <pages masterPageFile="MySite.Master" /> If you use this strategy, all ASP.NET pages in the application that have Content controls are merged with the specified master page. (If an ASP.NET page does not contain Content controls, the master page is not applied.)  At the folder level This strategy is like binding at the application level, except that you make the setting in a Web.config file in one folder only. The master-page bindings then apply to the ASP.NET pages in that folder. ASP.NET Site Navigation ASP.NET site navigation is a set of classes that enable you to provide a consistent way for users to navigate your site. As your site grows, and as you move pages around in the site, it quickly becomes difficult to manage all of the links. ASP.NET site navigation enables you to store links to all of your pages in a central location, and render those links in lists or navigation menus on each page by including a SiteMapDataSource control to read site information and navigation Web server control such as the TreeView, or Menu controls to display site information. ASP.NET site navigation consists primarily of site map providers, which communicate with the site map data source, and the classes that expose the functionality of the site map providers. For example, the default ASP.NET site map provider obtains site map data from an XML file named Web.sitemap, and communicates that data to the SiteMapPath Web server control directly. Introduction All of the web applications developed usually have more than one page and they are usually interconnected via some mechanism. In ASP.Net 1.x, navigation was made possible by using hyperlinks with the help of include file or user controls. They are pretty handy but not so much when the pages are moved around or their names change. So in order to overcome this drawback, ASP.Net 2.0 introduces the new Site Navigation System. Site navigation uses the layered architecture. Controls such as Menu and TreeView provide the navigation UIs. Classes such as SiteMap and SiteMapNode provide the API that the controls rely on and also constitute an API you can use yourself if you wish. Site navigation is provider-based, and the one site map provider that comes with ASP.NET 2.0 -> XmlSiteMapProvider -> reads site maps from XML data files. By default, those files are named Web.sitemap. In the providers' lab, students write a custom site map provider that reads site maps from a SQL Server database.
  • 78. Lets us discuss each on of them one at a time. Site Map in ASP.Net 2.0 Site Maps help us define the layout of all the pages in the application and their inherent relation with each other. For this, one could either use the SiteMap Class or the SiteMapDataSource control. SiteMapDataSource controls use site map providers to read site maps. They then provide the site map data to the controls they're bound to. Binding a TreeView to a SiteMapDataSource transforms each node in the site map into a TreeView node; binding a Menu to a SiteMapDataSource transforms each node in the site map into a menu item. The only site map provider that comes with ASP.NET 2.0 is XmlSiteMapProvider. It enables site maps to be read from XML files that conform to a predefined schema. Take up the following steps to create a site map -> 1. Start Visual Studio 2005 IDE. 2. Create a new ASP.Net website using C# as language on file system. 3. Right Click on solution and add a new item. From the Add item Wizard, add a new site map. Let the name be Web.sitemap (default name) 4. Add the following code to it:- <?xml version="1.0" encoding="utf-8" ?> <siteMap xmlns="http://schemas.microsoft.com/AspNet/SiteMap-File-1.0"> <siteMapNode title="Home" description="Login Page" url="Home.aspx"> <siteMapNode title="Admin" description="Administration Functionalities" url="Admin/AdminHome.aspx">
  • 79. <siteMapNode title="Create User" description="Create User" url="Admin/CreateUser.aspx"/> <siteMapNode title="Manage Roles" description="Create/Delete Roles" url="Admin/CreateRoles.aspx"/> <siteMapNode title="Assign Roles" description="Re-Assign Roles" url="Admin/ManageRoles.aspx"/> </siteMapNode> <siteMapNode roles="" title="Search" description="Search Employee" url="Personal/Search.aspx"/> </siteMapNode> </siteMap> Only one <sitemap> element can be there in the site map file and there can be multiple <siteMapNode > element within the root node i.e. <sitemap> Within the <siteMapNode> element, we have following attributes->  Title -> This is actual description which appears as a hyperlink.  Description -> Tool Tip which comes up when we hover over that particular siteMapNode.  url -> this is the file located within the solution. It can be located within the root folder or within a sub-folder created within the solution.  Role -> the roles to which the links should be accessible. "Security trimming" refers to SiteMapDataSource's ability to hide nodes from users who lack proper authorization. Authorization is role-based and is enacted by including roles attributes in <siteMapNode> elements. Of course, you can use ASP.NET 2.0 Role Management service to define roles and map users to roles. Security trimming is disabled by default in XmlSiteMapProvider. You can enable it by including these statements in Web.config. <configuration> <system.web> <siteMap> <providers> <remove name="AspNetXmlSiteMapProvider" /> <add name="AspNetXmlSiteMapProvider" type="System.Web.XmlSiteMapProvider, System.Web, ..." securityTrimmingEnabled="true" siteMapFile="web.sitemap" /> </providers> </siteMap> </system.web> </configuration> Tree View Server control This is a new server control that has been added to ASP.Net 2.0. It can be used to display the hierarchy of the links contained within the site map file. Once, the Web.sitemap is created, drag and drop a SiteMapDataSource control on the form. It automatically binds it self to web.sitemap file. Then, drop a treeView control on the form and set the DataSource id to