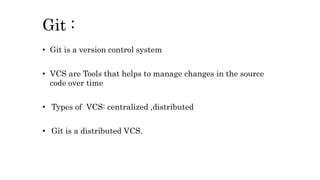
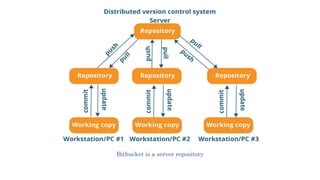
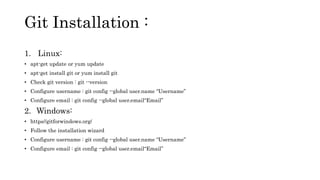
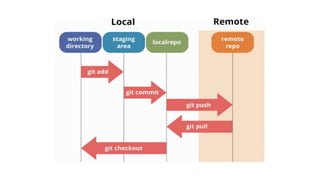
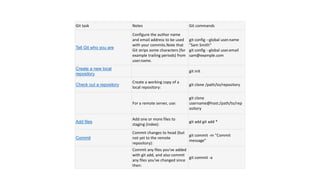
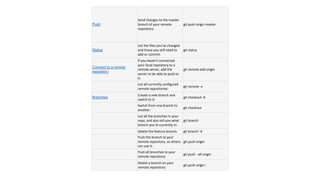
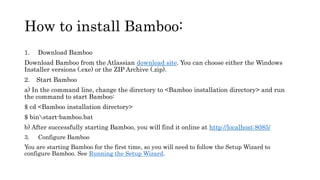
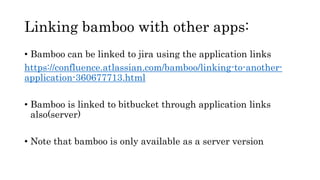
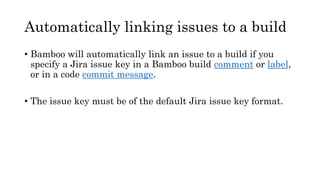
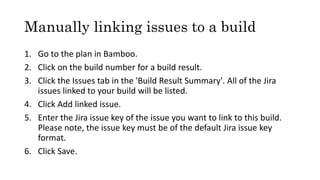
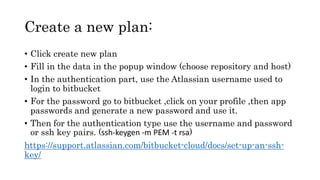
Jira , Bitbucket and
Bamboo
By Elie Hanna
Git :
• Git is a version control system
• VCS are Tools that helps to manage changes in the source
code over time
• Types of VCS: centralized ,distributed
• Git is a distributed VCS.
Bitbucket is a server repository
1. Linux:
• apt-get update or yum update
• apt-get install git or yum install git
• Check git version : git --version
• Configure username : git config --global user.name “Username”
• Configure email : git config --global user.email“Email”
2. Windows:
• https//gitforwindows.org/
• Follow the installation wizard
• Configure username : git config --global user.name “Username”
• Configure email : git config --global user.email“Email”
Git Installation :
Git task Notes Git commands
Tell Git who you are
Configure the author name
and email address to be used
with your commits.Note that
Git strips some characters (for
example trailing periods) from
user.name.
git config --global user.name
"Sam Smith"
git config --global user.email
sam@example.com
Create a new local
repository
git init
Check out a repository
Create a working copy of a
local repository:
git clone /path/to/repository
For a remote server, use:
git clone
username@host:/path/to/rep
ository
Add files
Add one or more files to
staging (index):
git add git add *
Commit
Commit changes to head (but
not yet to the remote
repository):
git commit -m "Commit
message"
Commit any files you've added
with git add, and also commit
any files you've changed since
then:
git commit -a
Push
Send changes to the master
branch of your remote
repository:
git push origin master
Status
List the files you've changed
and those you still need to
add or commit:
git status
Connect to a remote
repository
If you haven't connected
your local repository to a
remote server, add the
server to be able to push to
it:
git remote add origin
List all currently configured
remote repositories:
git remote -v
Branches
Create a new branch and
switch to it:
git checkout -b
Switch from one branch to
another:
git checkout
List all the branches in your
repo, and also tell you what
branch you're currently in:
git branch
Delete the feature branch: git branch -d
Push the branch to your
remote repository, so others
can use it:
git push origin
Push all branches to your
remote repository:
git push --all origin
Delete a branch on your
remote repository:
git push origin :
Update from the remote
repository
Fetch and merge changes on the
remote server to your working
directory:
git pull
To merge a different branch into
your active branch:
git merge
View all the merge conflicts:View
the conflicts against the base
file:Preview changes, before
merging:
git diff
git diff --base
git diff
After you have manually resolved
any conflicts, you mark the changed
file:
git add
Tags
You can use tagging to mark a
significant changeset, such as a
release:
git tag 1.0.0
CommitId is the leading characters
of the changeset ID, up to 10, but
must be unique. Get the ID using:
git log
Push all tags to remote repository: git push --tags origin
o local changes
If you mess up, you can replace the
changes in your working tree with the
last content in head:Changes already
added to the index, as well as new
files, will be kept.
git checkout --
Instead, to drop all your local changes
and commits, fetch the latest history
from the server and point your local
master branch at it, do this:
git fetch origin
git reset --hard origin/master
Search
Search the working directory for
foo():
git grep "foo()"
Bitbucket And Jira:
• Login to bitbucket using an Atlassian account (cloud)
• Add VCS Account through Jira application links(optional).
• Once linked you can go back to bitbucket and create a new
repository.
• Jira issue can be linked by including issue key in the commit
message.
• Select your workspace
• Enter project name (a good practice is to
have a bitbucket project for each jira
project)
• Enter repository name
• Select access levels
• Create the repositry
To clone a repository , got to source
And press on clone
Copy the git command and paste I in a command line.
If you are prompted to login enter your credentials.
Menu Overview:
• Source: containing all the files and source codes
• Commits: a list of all commits with details
• Branches: a list of all branches with the ability to create
a new branch through the bitbucket UI.
• Pull requests: a list of pull requests to merge branches to the master branch
• Pipelines and deployments: used by the dev team to setup continuous
Integration And deployment (Bamboo is used for this purpose on server).
• Jira issues : a list of linked Jira issues.
• Downloads : to download the repository
• Repository settings
Main repository settings
Jira and bitbucket:
• Once linked with bitbucket, and new development section will appear on the Jira ticket.
• A new branch corresponding to the issue can be created
• All the details concerning this issue will be displayed in
the development section (pull requests,builds…)
• Also , on the workflow transitions , triggers can be added
to transition issue automatically based on a bitbucket event
such as : pull request created,pull request denied ,commit created…
• Bamboo is a tool from Atlassian suite.
• It is used for continuous integration, deployment, and delivery.
• Bamboo is java based.
• Platform independent (is compatible with different programing
languages)
How to install Bamboo:
• As Bamboo is java based , it runs with JDK (not JRE).
• make sure that JDK is installed and the JAVA_HOME variable is
set correctly.
• Download JDK: https://www.oracle.com/java/technologies/javase-
downloads.html
• Set JAVA_HOME: https://confluence.atlassian.com/doc/setting-
the-java_home-variable-in-windows-8895.html
How to install Bamboo:
1. Download Bamboo
Download Bamboo from the Atlassian download site. You can choose either the Windows
Installer versions (.exe) or the ZIP Archive (.zip).
2. Start Bamboo
a) In the command line, change the directory to <Bamboo installation directory> and run
the command to start Bamboo:
$ cd <Bamboo installation directory>
$ binstart-bamboo.bat
b) After successfully starting Bamboo, you will find it online at http://localhost:8085/
3. Configure Bamboo
You are starting Bamboo for the first time, so you will need to follow the Setup Wizard to
configure Bamboo. See Running the Setup Wizard.
Linking bamboo with other apps:
• Bamboo can be linked to jira using the application links
https://confluence.atlassian.com/bamboo/linking-to-another-
application-360677713.html
• Bamboo is linked to bitbucket through application links
also(server)
• Note that bamboo is only available as a server version
Automatically linking issues to a build
• Bamboo will automatically link an issue to a build if you
specify a Jira issue key in a Bamboo build comment or label,
or in a code commit message.
• The issue key must be of the default Jira issue key format.
Manually linking issues to a build
1. Go to the plan in Bamboo.
2. Click on the build number for a build result.
3. Click the Issues tab in the 'Build Result Summary'. All of the Jira
issues linked to your build will be listed.
4. Click Add linked issue.
5. Enter the Jira issue key of the issue you want to link to this build.
Please note, the issue key must be of the default Jira issue key
format.
6. Click Save.
Getting started with Bamboo
https://www.youtube.com/playlist?list=PLaD4FvsFdarQp-
qHSr3EqWz1WLFa-HUeD
Using Bamboo:
• Go to Localhost:8085
• Put in the license
• Two installation options are vailable:
1. Express (integrated db)
2. And custom (custom database postgres,sql…)
Create a new plan:
• Click create new plan
• Fill in the data in the popup window (choose repository and host)
• In the authentication part, use the Atlassian username used to
login to bitbucket
• For the password go to bitbucket ,click on your profile ,then app
passwords and generate a new password and use it.
• Then for the authentication type use the username and password
or ssh key pairs. (ssh-keygen -m PEM -t rsa)
https://support.atlassian.com/bitbucket-cloud/docs/set-up-an-ssh-
key/
Configure jobs:
Create Tasks:
Create Tasks:
• Task can be chosen from a set of built-in bundles, such as
maven builder for java projects…
• Or custom scripts can be added to run as a task.
• Also, repository tasks such as creating a new branch can be
done too.
Plan actions:
• Disable plan
• Add or modify plan label (can include a jira issue key)
• Delete plan
• Run (run the plan with all jobs and tasks)
Plan configuration page:

Bitbucket git-bamboo-jira

  • 1.
    Jira , Bitbucketand Bamboo By Elie Hanna
  • 2.
    Git : • Gitis a version control system • VCS are Tools that helps to manage changes in the source code over time • Types of VCS: centralized ,distributed • Git is a distributed VCS.
  • 3.
    Bitbucket is aserver repository
  • 4.
    1. Linux: • apt-getupdate or yum update • apt-get install git or yum install git • Check git version : git --version • Configure username : git config --global user.name “Username” • Configure email : git config --global user.email“Email” 2. Windows: • https//gitforwindows.org/ • Follow the installation wizard • Configure username : git config --global user.name “Username” • Configure email : git config --global user.email“Email” Git Installation :
  • 6.
    Git task NotesGit commands Tell Git who you are Configure the author name and email address to be used with your commits.Note that Git strips some characters (for example trailing periods) from user.name. git config --global user.name "Sam Smith" git config --global user.email sam@example.com Create a new local repository git init Check out a repository Create a working copy of a local repository: git clone /path/to/repository For a remote server, use: git clone username@host:/path/to/rep ository Add files Add one or more files to staging (index): git add git add * Commit Commit changes to head (but not yet to the remote repository): git commit -m "Commit message" Commit any files you've added with git add, and also commit any files you've changed since then: git commit -a
  • 7.
    Push Send changes tothe master branch of your remote repository: git push origin master Status List the files you've changed and those you still need to add or commit: git status Connect to a remote repository If you haven't connected your local repository to a remote server, add the server to be able to push to it: git remote add origin List all currently configured remote repositories: git remote -v Branches Create a new branch and switch to it: git checkout -b Switch from one branch to another: git checkout List all the branches in your repo, and also tell you what branch you're currently in: git branch Delete the feature branch: git branch -d Push the branch to your remote repository, so others can use it: git push origin Push all branches to your remote repository: git push --all origin Delete a branch on your remote repository: git push origin :
  • 8.
    Update from theremote repository Fetch and merge changes on the remote server to your working directory: git pull To merge a different branch into your active branch: git merge View all the merge conflicts:View the conflicts against the base file:Preview changes, before merging: git diff git diff --base git diff After you have manually resolved any conflicts, you mark the changed file: git add Tags You can use tagging to mark a significant changeset, such as a release: git tag 1.0.0 CommitId is the leading characters of the changeset ID, up to 10, but must be unique. Get the ID using: git log Push all tags to remote repository: git push --tags origin
  • 9.
    o local changes Ifyou mess up, you can replace the changes in your working tree with the last content in head:Changes already added to the index, as well as new files, will be kept. git checkout -- Instead, to drop all your local changes and commits, fetch the latest history from the server and point your local master branch at it, do this: git fetch origin git reset --hard origin/master Search Search the working directory for foo(): git grep "foo()"
  • 11.
    Bitbucket And Jira: •Login to bitbucket using an Atlassian account (cloud) • Add VCS Account through Jira application links(optional). • Once linked you can go back to bitbucket and create a new repository. • Jira issue can be linked by including issue key in the commit message.
  • 13.
    • Select yourworkspace • Enter project name (a good practice is to have a bitbucket project for each jira project) • Enter repository name • Select access levels • Create the repositry
  • 14.
    To clone arepository , got to source And press on clone Copy the git command and paste I in a command line. If you are prompted to login enter your credentials.
  • 15.
    Menu Overview: • Source:containing all the files and source codes • Commits: a list of all commits with details • Branches: a list of all branches with the ability to create a new branch through the bitbucket UI. • Pull requests: a list of pull requests to merge branches to the master branch • Pipelines and deployments: used by the dev team to setup continuous Integration And deployment (Bamboo is used for this purpose on server). • Jira issues : a list of linked Jira issues. • Downloads : to download the repository • Repository settings
  • 16.
  • 17.
    Jira and bitbucket: •Once linked with bitbucket, and new development section will appear on the Jira ticket. • A new branch corresponding to the issue can be created • All the details concerning this issue will be displayed in the development section (pull requests,builds…) • Also , on the workflow transitions , triggers can be added to transition issue automatically based on a bitbucket event such as : pull request created,pull request denied ,commit created…
  • 19.
    • Bamboo isa tool from Atlassian suite. • It is used for continuous integration, deployment, and delivery. • Bamboo is java based. • Platform independent (is compatible with different programing languages)
  • 21.
    How to installBamboo: • As Bamboo is java based , it runs with JDK (not JRE). • make sure that JDK is installed and the JAVA_HOME variable is set correctly. • Download JDK: https://www.oracle.com/java/technologies/javase- downloads.html • Set JAVA_HOME: https://confluence.atlassian.com/doc/setting- the-java_home-variable-in-windows-8895.html
  • 22.
    How to installBamboo: 1. Download Bamboo Download Bamboo from the Atlassian download site. You can choose either the Windows Installer versions (.exe) or the ZIP Archive (.zip). 2. Start Bamboo a) In the command line, change the directory to <Bamboo installation directory> and run the command to start Bamboo: $ cd <Bamboo installation directory> $ binstart-bamboo.bat b) After successfully starting Bamboo, you will find it online at http://localhost:8085/ 3. Configure Bamboo You are starting Bamboo for the first time, so you will need to follow the Setup Wizard to configure Bamboo. See Running the Setup Wizard.
  • 23.
    Linking bamboo withother apps: • Bamboo can be linked to jira using the application links https://confluence.atlassian.com/bamboo/linking-to-another- application-360677713.html • Bamboo is linked to bitbucket through application links also(server) • Note that bamboo is only available as a server version
  • 24.
    Automatically linking issuesto a build • Bamboo will automatically link an issue to a build if you specify a Jira issue key in a Bamboo build comment or label, or in a code commit message. • The issue key must be of the default Jira issue key format.
  • 25.
    Manually linking issuesto a build 1. Go to the plan in Bamboo. 2. Click on the build number for a build result. 3. Click the Issues tab in the 'Build Result Summary'. All of the Jira issues linked to your build will be listed. 4. Click Add linked issue. 5. Enter the Jira issue key of the issue you want to link to this build. Please note, the issue key must be of the default Jira issue key format. 6. Click Save.
  • 30.
    Getting started withBamboo https://www.youtube.com/playlist?list=PLaD4FvsFdarQp- qHSr3EqWz1WLFa-HUeD
  • 31.
    Using Bamboo: • Goto Localhost:8085 • Put in the license • Two installation options are vailable: 1. Express (integrated db) 2. And custom (custom database postgres,sql…)
  • 33.
    Create a newplan: • Click create new plan • Fill in the data in the popup window (choose repository and host) • In the authentication part, use the Atlassian username used to login to bitbucket • For the password go to bitbucket ,click on your profile ,then app passwords and generate a new password and use it. • Then for the authentication type use the username and password or ssh key pairs. (ssh-keygen -m PEM -t rsa) https://support.atlassian.com/bitbucket-cloud/docs/set-up-an-ssh- key/
  • 36.
  • 37.
  • 38.
    Create Tasks: • Taskcan be chosen from a set of built-in bundles, such as maven builder for java projects… • Or custom scripts can be added to run as a task. • Also, repository tasks such as creating a new branch can be done too.
  • 39.
    Plan actions: • Disableplan • Add or modify plan label (can include a jira issue key) • Delete plan • Run (run the plan with all jobs and tasks)
  • 40.