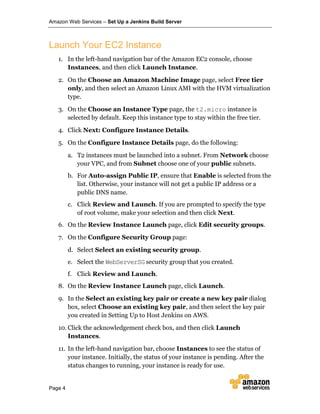
1) The document provides steps to set up a Jenkins build server on Amazon EC2, including launching an EC2 instance, installing Jenkins, and configuring it to use EC2 instances as build slaves.
2) The steps include creating a security group to allow HTTP and SSH access, downloading and installing Jenkins on the EC2 instance, and configuring Jenkins with the Amazon EC2 plugin to enable use of EC2 instances for builds.
3) Additional resources are provided to learn more about Jenkins on AWS, including a whitepaper and links to documentation on DevOps, security groups, and key pairs.

![Amazon Web Services – Set Up a Jenkins Build Server
Page 8
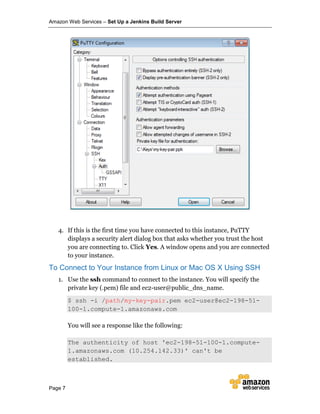
RSA key fingerprint is
1f:51:ae:28:bf:89:e9:d8:1f:25:5d:37:2d:7d:b8:ca:9f:f5
:f1:6f.
Are you sure you want to continue connecting
(yes/no)?
2. Enter yes.
You will see a response like the following:
Warning: Permanently added 'ec2-198-51-100-1.compute-
1.amazonaws.com' (RSA) to the list of known hosts.
Download and Install Jenkins
To download and install Jenkins:
1. To ensure that your software packages are up to date on your instance,
use the following command to perform a quick software update:
[ec2-user ~]$ sudo yum update –y
2. Add the Jenkins repo using the following command:
[ec2-user ~]$ sudo wget -O
/etc/yum.repos.d/jenkins.repo http://pkg.jenkins-
ci.org/redhat/jenkins.repo
3. Import a key file from Jenkins-CI to enable installation from the
package:
[ec2-user ~]$ sudo rpm --import
https://pkg.jenkins.io/redhat/jenkins.io.key
4. Install Jenkins:
[ec2-user ~]$ sudo yum install jenkins -y
5. Start Jenkins as a service:
[ec2-user ~]$ sudo service jenkins start](https://image.slidesharecdn.com/aws-projectjenkins-build-server-190213102510/85/Aws-project-jenkins-build-server-11-320.jpg)
![Amazon Web Services – Set Up a Jenkins Build Server
Page 9
Configure Jenkins
Jenkins is now installed and running on your EC2 instance. To configure
Jenkins:
1. Connect to http://<your_server_public_DNS>:8080 from your favorite
browser. You will be able to access Jenkins through its management
interface:
2. As prompted, enter the password found in
/var/lib/jenkins/secrets/initialAdminPassword. Use the following
command to display this password:
[ec2-user ~]$ sudo cat
/var/lib/jenkins/secrets/initialAdminPassword
3. The Jenkins installation script directs you to the Customize Jenkins page.
Click Install suggested plugins.
4. Once the installation is complete, enter Administrator Credentials, click
Save Credentials, and then click Start Using Jenkins.](https://image.slidesharecdn.com/aws-projectjenkins-build-server-190213102510/85/Aws-project-jenkins-build-server-12-320.jpg)