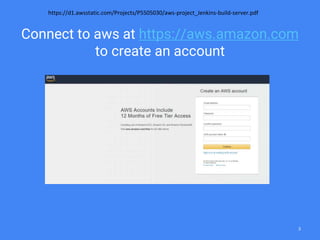
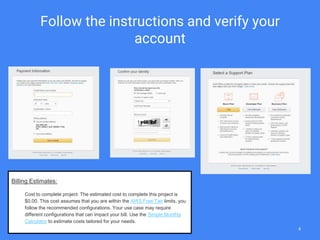
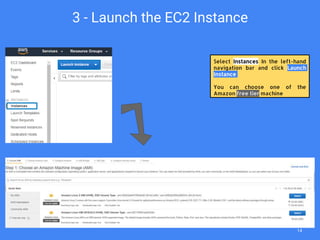
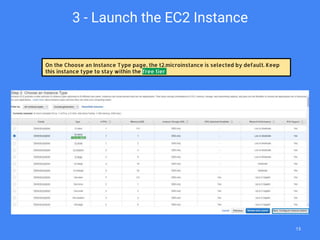
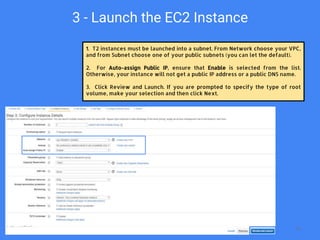
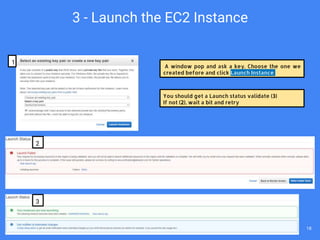
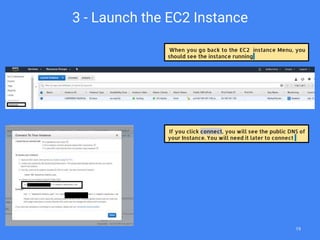
This document provides a step-by-step guide for Salesforce developers to set up a continuous delivery system using SFDX on an AWS EC2 instance with Jenkins. It covers creating an AWS account, setting up security groups, launching the EC2 instance, installing Jenkins, and configuring it to support code testing and delivery. The guide emphasizes the importance of following the AWS free tier limits to avoid costs while setting up the environment.


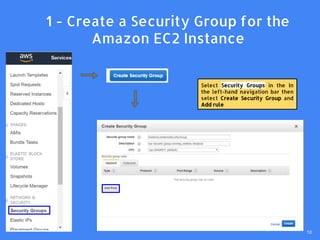

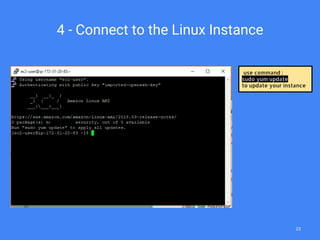
![5 - Install Jenkins
1. Update Java to 1.8 and remove the 1.7 version :
[ec2-user ~]$sudo yum install java-1.8.0
sudo yum remove java-1.7.0-openjdk
1. Add Jenkins repository in the instance :
[ec2-user ~]$ sudo wget -O /etc/yum.repos.d/jenkins.repo
http://pkg.jenkins-ci.org/redhat/jenkins.repo
1. Import a key file from Jenkins-CI to enable installation from the package :
[ec2-user ~]$ sudo rpm --import
https://pkg.jenkins.io/redhat/jenkins.io.key
1. Install Jenkins :
[ec2-user ~]$ sudo yum install jenkins -y
1. Start Jenkins :
[ec2-user ~]$ sudo service jenkins start
24](https://image.slidesharecdn.com/vq34ogn5rzg5ncwc59js-signature-68a529350233724dbb64e40cfae1616128737f1317be415012a7eaf9e6f26c70-poli-190720143811/85/sfdx-continuous-Integration-with-Jenkins-on-aws-Part-I-24-320.jpg)
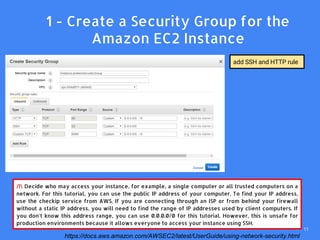
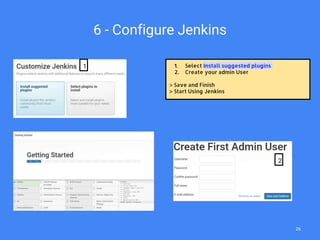
![Connect to Jenkins
To know your admin password, add this command in puTTY
[ec2-user ~]$ sudo cat /var/lib/jenkins/secrets/initialAdminPassword
In a web brother go to : http://<your_server_public_DNS>:8080
25](https://image.slidesharecdn.com/vq34ogn5rzg5ncwc59js-signature-68a529350233724dbb64e40cfae1616128737f1317be415012a7eaf9e6f26c70-poli-190720143811/85/sfdx-continuous-Integration-with-Jenkins-on-aws-Part-I-25-320.jpg)


![[WordPress on AWS] AMIMOTO Hands-On Seminar](https://cdn.slidesharecdn.com/ss_thumbnails/amimotohands-onen-150115015642-conversion-gate01-thumbnail.jpg?width=640&height=640&fit=bounds)


