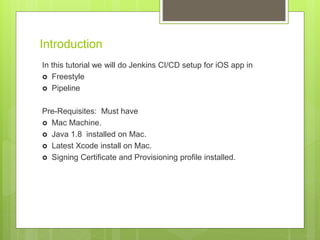
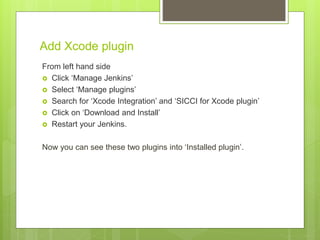
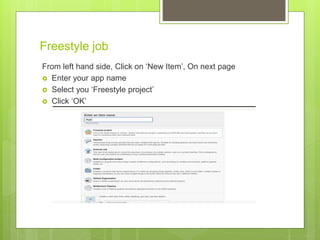
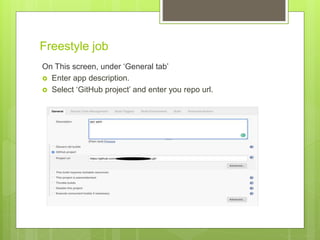
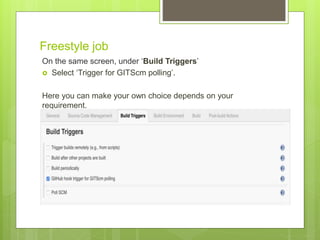
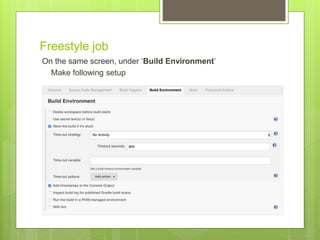
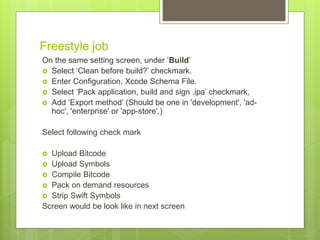
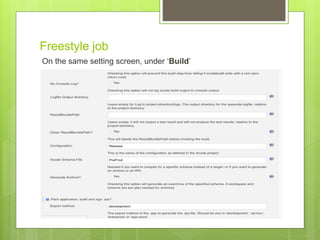
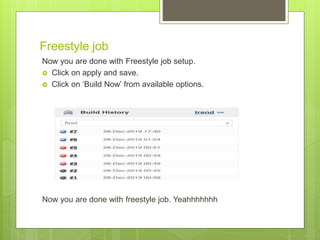
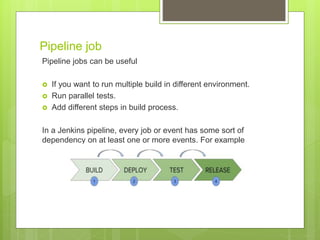
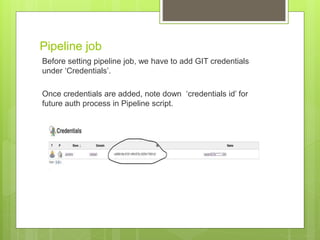
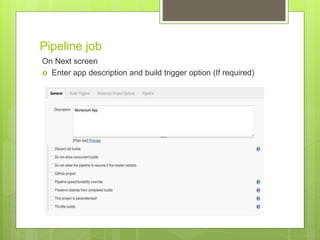
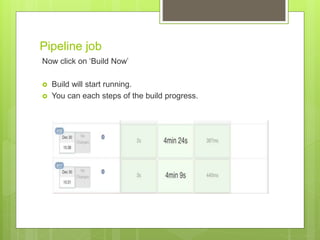
Jenkins Setup
freestyle and pipeline for
iOS apps
By: Gagan Vishal Mishra
Introduction
In this tutorial we will do Jenkins CI/CD setup for iOS app in
 Freestyle
 Pipeline
Pre-Requisites: Must have
 Mac Machine.
 Java 1.8 installed on Mac.
 Latest Xcode install on Mac.
 Signing Certificate and Provisioning profile installed.
Installation
Jenkins native installer has been deprecated. Now Jenkins can
be install using the Homebrew package.
 Install Homebrew package https://brew.sh/ in you dont have
already.
One completed run following command on Terminal
 brew install jenkins-lts
Installations details link can be found on
https://jenkins.io/download/lts/macos/
Installation
When the installer finishes, open localhost:8080 in your
browser, you will get below screen
Copy and paste initialAdminPassword from given path and click
continue.
Installation
From Customize Jenkins screen, select ‘Install Suggested
plugins
Next screen will start download and installing of plugins.
Installation
This will take several minutes, If any installation is getting fail,
then click ‘Retry’ button
Next screen would be account setup screen.
Installation
Now create your admin account — here entering admin for
both Username and Password works fine.
Next screen would be Instance Configuration screen.
Installation
On this screen click ‘Not Now’
After this screen, one more screen will appear, click ‘Start using
Jenkins’. Now you are done with installation process. Next we
will configure Jenkins for Xcode plugin.
Add Xcode plugin
From left hand side
 Click ‘Manage Jenkins’
 Select ‘Manage plugins’
 Search for ‘Xcode Integration’ and ‘SICCI for Xcode plugin’
 Click on ‘Download and Install’
 Restart your Jenkins.
Now you can see these two plugins into ‘Installed plugin’.
Freestyle job
From left hand side, Click on ‘New Item’, On next page
 Enter your app name
 Select you ‘Freestyle project’
 Click ‘OK’
Freestyle job
On This screen, under ‘General tab’
 Enter app description.
 Select ‘GitHub project’ and enter you repo url.
Freestyle job
On the same screen, under ‘Source Code Management’
 Enter Repository URL.
 Select your Git credential under ‘Credentials’. You can add
you credentials by selecting ‘add’.
 Specify your branch.
Freestyle job
On the same screen, under ‘Build Triggers’
 Select ‘Trigger for GITScm polling’.
Here you can make your own choice depends on your
requirement.
Freestyle job
On the same screen, under ‘Build Environment’
Make following setup
Freestyle job
On the same screen, under ‘Build’, Click on ‘Add Build step’ and
select ‘Xcode’ from dropdown.
 Enter ‘Development team id’ which can be found from
Keychain.
 Click ‘Settings’
Freestyle job
On the same setting screen, under ‘Build’
 Select ‘Clean before build?’ checkmark.
 Enter Configuration, Xcode Schema File.
 Select ‘Pack application, build and sign .ipa’ checkmark,
 Add ‘Export method’ (Should be one in 'development', 'ad-
hoc', 'enterprise' or 'app-store'.)
Select following check mark
 Upload Bitcode
 Upload Symbols
 Compile Bitcode
 Pack on demand resources
 Strip Swift Symbols
Screen would be look like in next screen
Freestyle job
On the same setting screen, under ‘Build’
Freestyle job
On the same setting screen, under ‘Code signing & OS X
keychain options’ select automatic
Freestyle job
On the same screen, under ‘Advanced Xcode build options’
 Add your workspace filepath (if you have workspace)
 Add your build output directory. It will contain generated IPA
file.
Freestyle job
Now you are done with Freestyle job setup.
 Click on apply and save.
 Click on ‘Build Now’ from available options.
Now you are done with freestyle job. Yeahhhhhhh
Pipeline job
Pipeline jobs can be useful
 If you want to run multiple build in different environment.
 Run parallel tests.
 Add different steps in build process.
In a Jenkins pipeline, every job or event has some sort of
dependency on at least one or more events. For example
Pipeline job
Before setting pipeline job, we have to add GIT credentials
under ‘Credentials’.
Once credentials are added, note down ‘credentials id’ for
future auth process in Pipeline script.
Pipeline job
From left hand side on Jenkins, click ‘new item’
 Enter app name
 Select ‘Pipeline’
Pipeline job
On Next screen
 Enter app description and build trigger option (If required)
Pipeline job
On the same screen, under ‘Pipeline’
 Under definition, select ‘pipeline script’
 Copy Script in an preferred editor and edit branches,
credentialsId, bundleID, developmentTeamID,
xcodeWorkspaceFile, App store credentials etc and click
save.
Pipeline job
Now click on ‘Build Now’
 Build will start running.
 You can each steps of the build progress.
DONE, Now you are able to add CI/CD to your iOS projects.
Connect me on github/gagan5278

Jenkins CI/CD setup for iOS in Mac OSX

  • 1.
    Jenkins Setup freestyle andpipeline for iOS apps By: Gagan Vishal Mishra
  • 2.
    Introduction In this tutorialwe will do Jenkins CI/CD setup for iOS app in  Freestyle  Pipeline Pre-Requisites: Must have  Mac Machine.  Java 1.8 installed on Mac.  Latest Xcode install on Mac.  Signing Certificate and Provisioning profile installed.
  • 3.
    Installation Jenkins native installerhas been deprecated. Now Jenkins can be install using the Homebrew package.  Install Homebrew package https://brew.sh/ in you dont have already. One completed run following command on Terminal  brew install jenkins-lts Installations details link can be found on https://jenkins.io/download/lts/macos/
  • 4.
    Installation When the installerfinishes, open localhost:8080 in your browser, you will get below screen Copy and paste initialAdminPassword from given path and click continue.
  • 5.
    Installation From Customize Jenkinsscreen, select ‘Install Suggested plugins Next screen will start download and installing of plugins.
  • 6.
    Installation This will takeseveral minutes, If any installation is getting fail, then click ‘Retry’ button Next screen would be account setup screen.
  • 7.
    Installation Now create youradmin account — here entering admin for both Username and Password works fine. Next screen would be Instance Configuration screen.
  • 8.
    Installation On this screenclick ‘Not Now’ After this screen, one more screen will appear, click ‘Start using Jenkins’. Now you are done with installation process. Next we will configure Jenkins for Xcode plugin.
  • 9.
    Add Xcode plugin Fromleft hand side  Click ‘Manage Jenkins’  Select ‘Manage plugins’  Search for ‘Xcode Integration’ and ‘SICCI for Xcode plugin’  Click on ‘Download and Install’  Restart your Jenkins. Now you can see these two plugins into ‘Installed plugin’.
  • 10.
    Freestyle job From lefthand side, Click on ‘New Item’, On next page  Enter your app name  Select you ‘Freestyle project’  Click ‘OK’
  • 11.
    Freestyle job On Thisscreen, under ‘General tab’  Enter app description.  Select ‘GitHub project’ and enter you repo url.
  • 12.
    Freestyle job On thesame screen, under ‘Source Code Management’  Enter Repository URL.  Select your Git credential under ‘Credentials’. You can add you credentials by selecting ‘add’.  Specify your branch.
  • 13.
    Freestyle job On thesame screen, under ‘Build Triggers’  Select ‘Trigger for GITScm polling’. Here you can make your own choice depends on your requirement.
  • 14.
    Freestyle job On thesame screen, under ‘Build Environment’ Make following setup
  • 15.
    Freestyle job On thesame screen, under ‘Build’, Click on ‘Add Build step’ and select ‘Xcode’ from dropdown.  Enter ‘Development team id’ which can be found from Keychain.  Click ‘Settings’
  • 16.
    Freestyle job On thesame setting screen, under ‘Build’  Select ‘Clean before build?’ checkmark.  Enter Configuration, Xcode Schema File.  Select ‘Pack application, build and sign .ipa’ checkmark,  Add ‘Export method’ (Should be one in 'development', 'ad- hoc', 'enterprise' or 'app-store'.) Select following check mark  Upload Bitcode  Upload Symbols  Compile Bitcode  Pack on demand resources  Strip Swift Symbols Screen would be look like in next screen
  • 17.
    Freestyle job On thesame setting screen, under ‘Build’
  • 18.
    Freestyle job On thesame setting screen, under ‘Code signing & OS X keychain options’ select automatic
  • 19.
    Freestyle job On thesame screen, under ‘Advanced Xcode build options’  Add your workspace filepath (if you have workspace)  Add your build output directory. It will contain generated IPA file.
  • 20.
    Freestyle job Now youare done with Freestyle job setup.  Click on apply and save.  Click on ‘Build Now’ from available options. Now you are done with freestyle job. Yeahhhhhhh
  • 21.
    Pipeline job Pipeline jobscan be useful  If you want to run multiple build in different environment.  Run parallel tests.  Add different steps in build process. In a Jenkins pipeline, every job or event has some sort of dependency on at least one or more events. For example
  • 22.
    Pipeline job Before settingpipeline job, we have to add GIT credentials under ‘Credentials’. Once credentials are added, note down ‘credentials id’ for future auth process in Pipeline script.
  • 23.
    Pipeline job From lefthand side on Jenkins, click ‘new item’  Enter app name  Select ‘Pipeline’
  • 24.
    Pipeline job On Nextscreen  Enter app description and build trigger option (If required)
  • 25.
    Pipeline job On thesame screen, under ‘Pipeline’  Under definition, select ‘pipeline script’  Copy Script in an preferred editor and edit branches, credentialsId, bundleID, developmentTeamID, xcodeWorkspaceFile, App store credentials etc and click save.
  • 26.
    Pipeline job Now clickon ‘Build Now’  Build will start running.  You can each steps of the build progress.
  • 27.
    DONE, Now youare able to add CI/CD to your iOS projects. Connect me on github/gagan5278

Editor's Notes

  • #26 Script available at https://gist.github.com/Gagan5278/f849ca27e7c647ee27b89c3e8cc86904
  • #27 Script available at https://gist.github.com/Gagan5278/f849ca27e7c647ee27b89c3e8cc86904
  • #28 Script available at https://gist.github.com/Gagan5278/f849ca27e7c647ee27b89c3e8cc86904