Downloaded 143 times


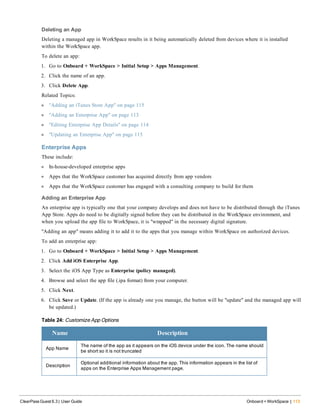
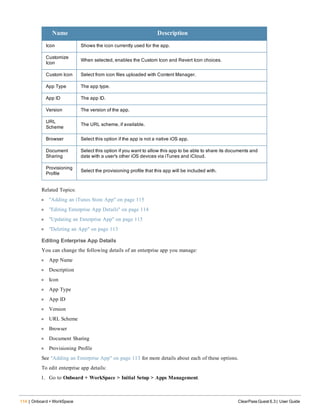
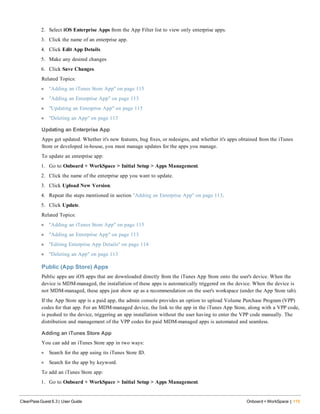
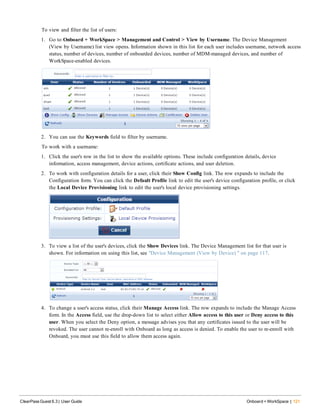
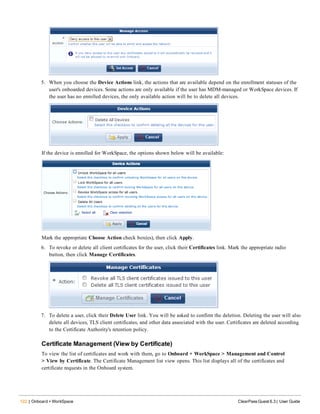
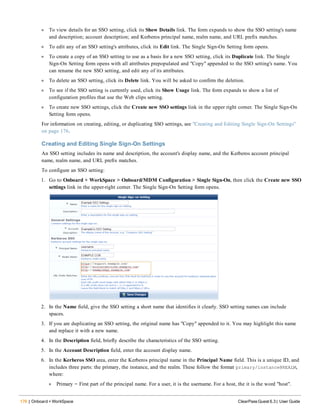
![ClearPass Guest 6.3 | User Guide About this Guide | 19
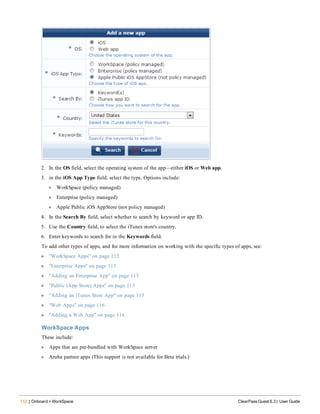
Chapter 1
About this Guide
ClearPass Guest provides a simple and personalized user interface through which operational staff can quickly and
securely manager visitor network access.
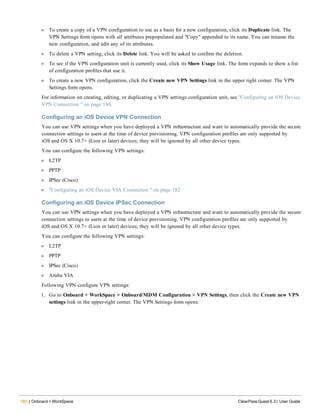
Audience
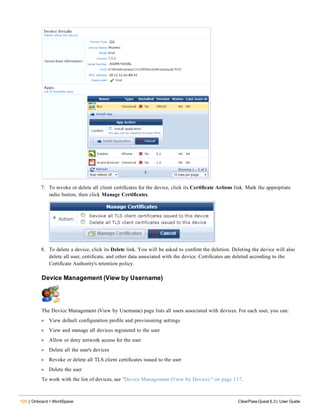
This User Guide is intended for system administrators and people who are installing and configuring ClearPass Guest
as their visitor management solution. It describes the installation and configuration process.
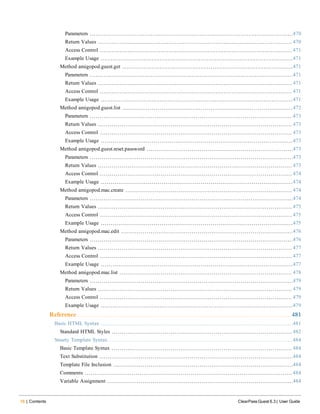
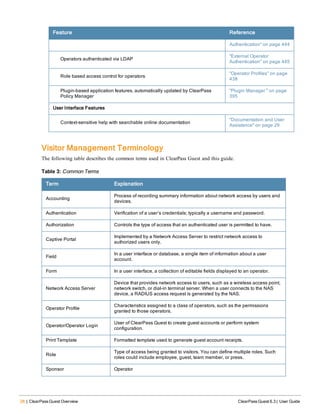
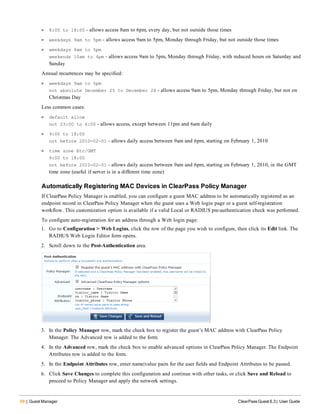
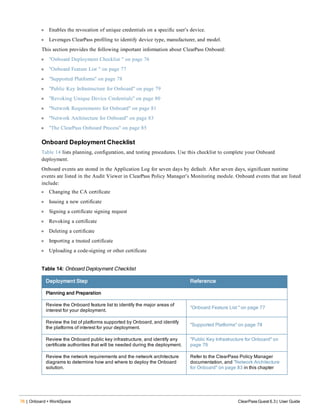
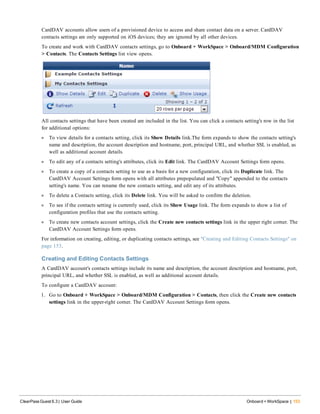
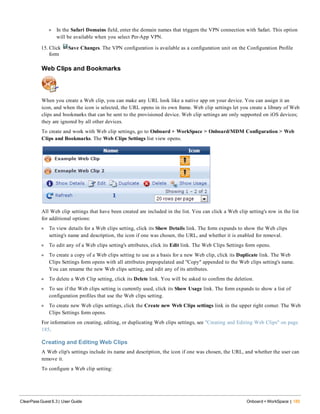
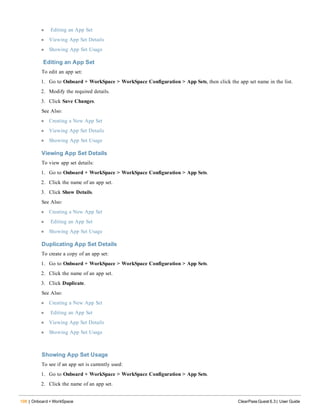
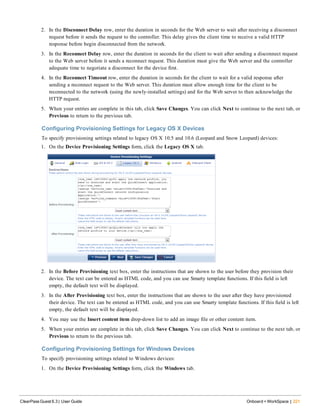
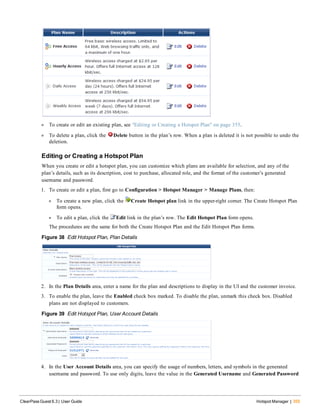
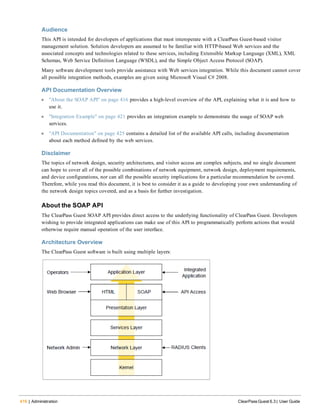
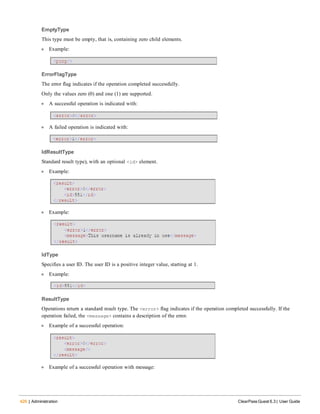
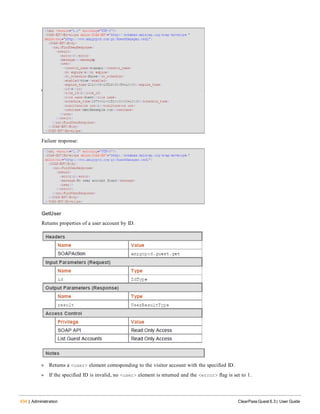
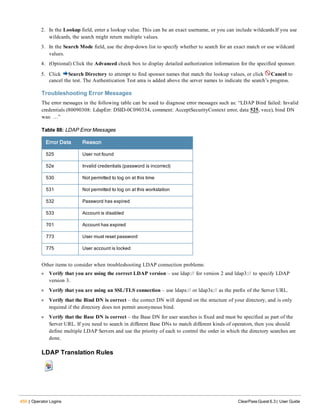
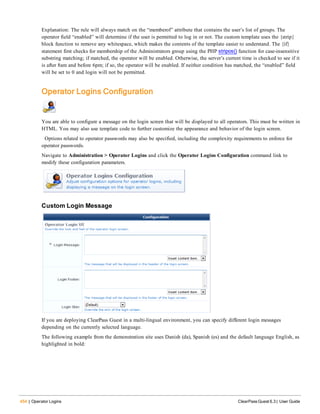
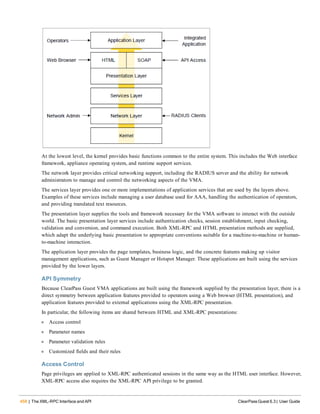
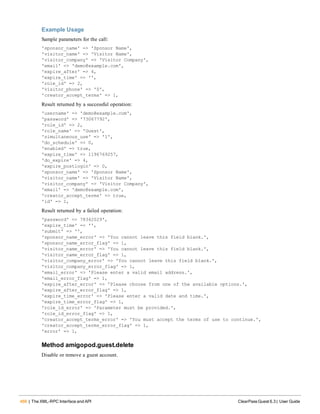
Conventions
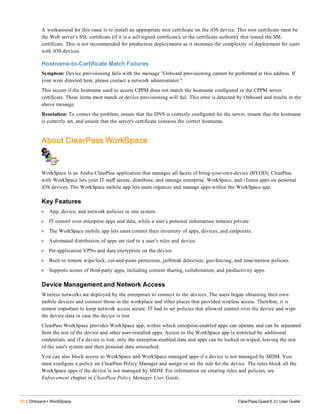
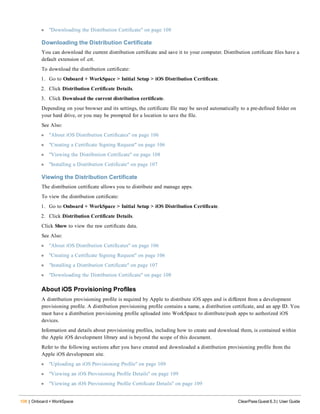
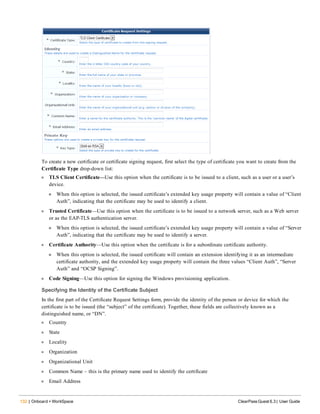
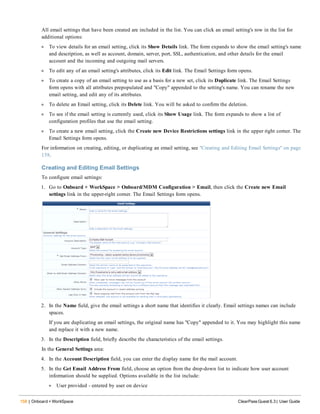
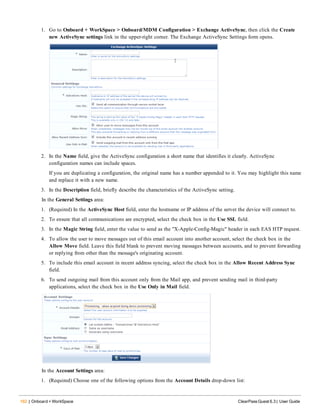
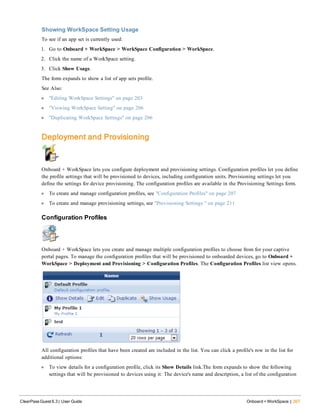
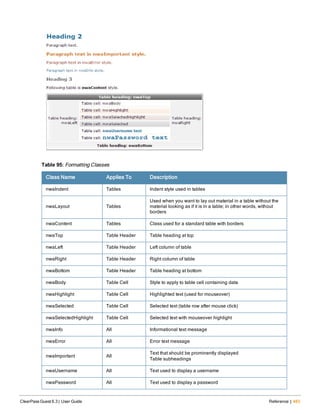
The following conventions are used throughout this guide to emphasize important concepts:
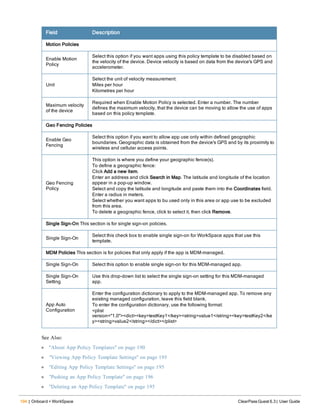
Type Style Description
Italics This style is used to emphasize important terms and to mark the titles of books.
System items
This fixed-width font depicts the following:
l Sample screen output
l System prompts
l Filenames, software devices, and specific commands when mentioned in the text
Commands In the command examples, this bold font depicts text that you must type exactly as shown.
<Arguments>
In the command examples, italicized text within angle brackets represents items that you
should replace with information appropriate to your specific situation. For example:
# send <text message>
In this example, you would type “send” at the system prompt exactly as shown, followed by
the text of the message you wish to send. Do not type the angle brackets.
[Optional] Command examples enclosed in brackets are optional. Do not type the brackets.
{Item A |
Item B}
In the command examples, items within curled braces and separated by a vertical bar
represent the available choices. Enter only one choice. Do not type the braces or bars.
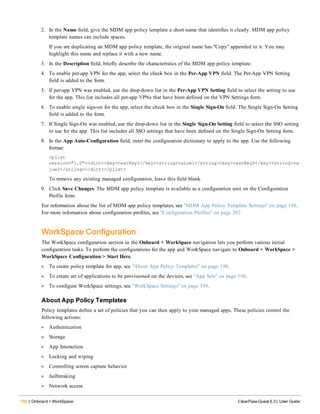
Table 1: Typographical Conventions
The following informational icons are used throughout this guide:
Indicates helpful suggestions, pertinent information, and important things to remember.
Indicates a risk of damage to your hardware or loss of data.
Indicates a risk of personal injury or death.](https://image.slidesharecdn.com/arubacpguestdg6-140605093813-phpapp01/85/Aruba-ClearPass-Guest-6-3-User-Guide-19-320.jpg)
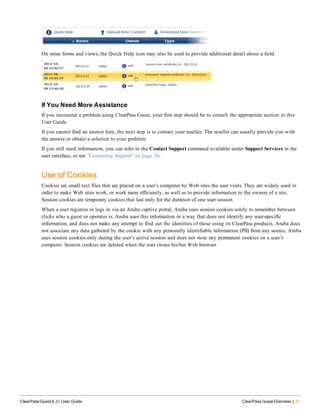
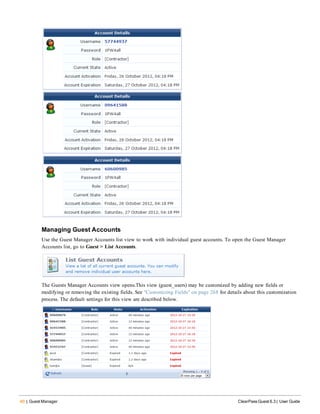
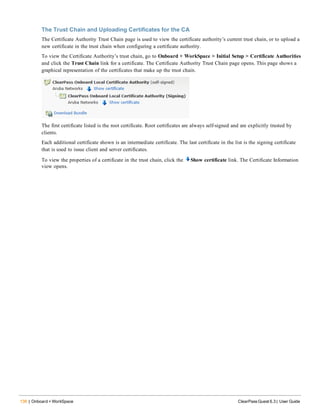
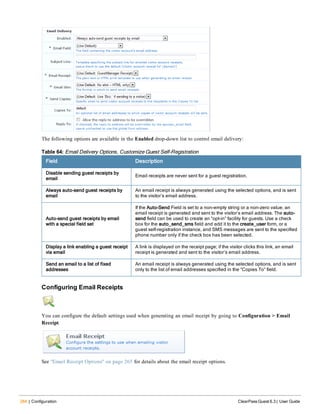
![24 | ClearPass Guest Overview ClearPass Guest 6.3 | User Guide
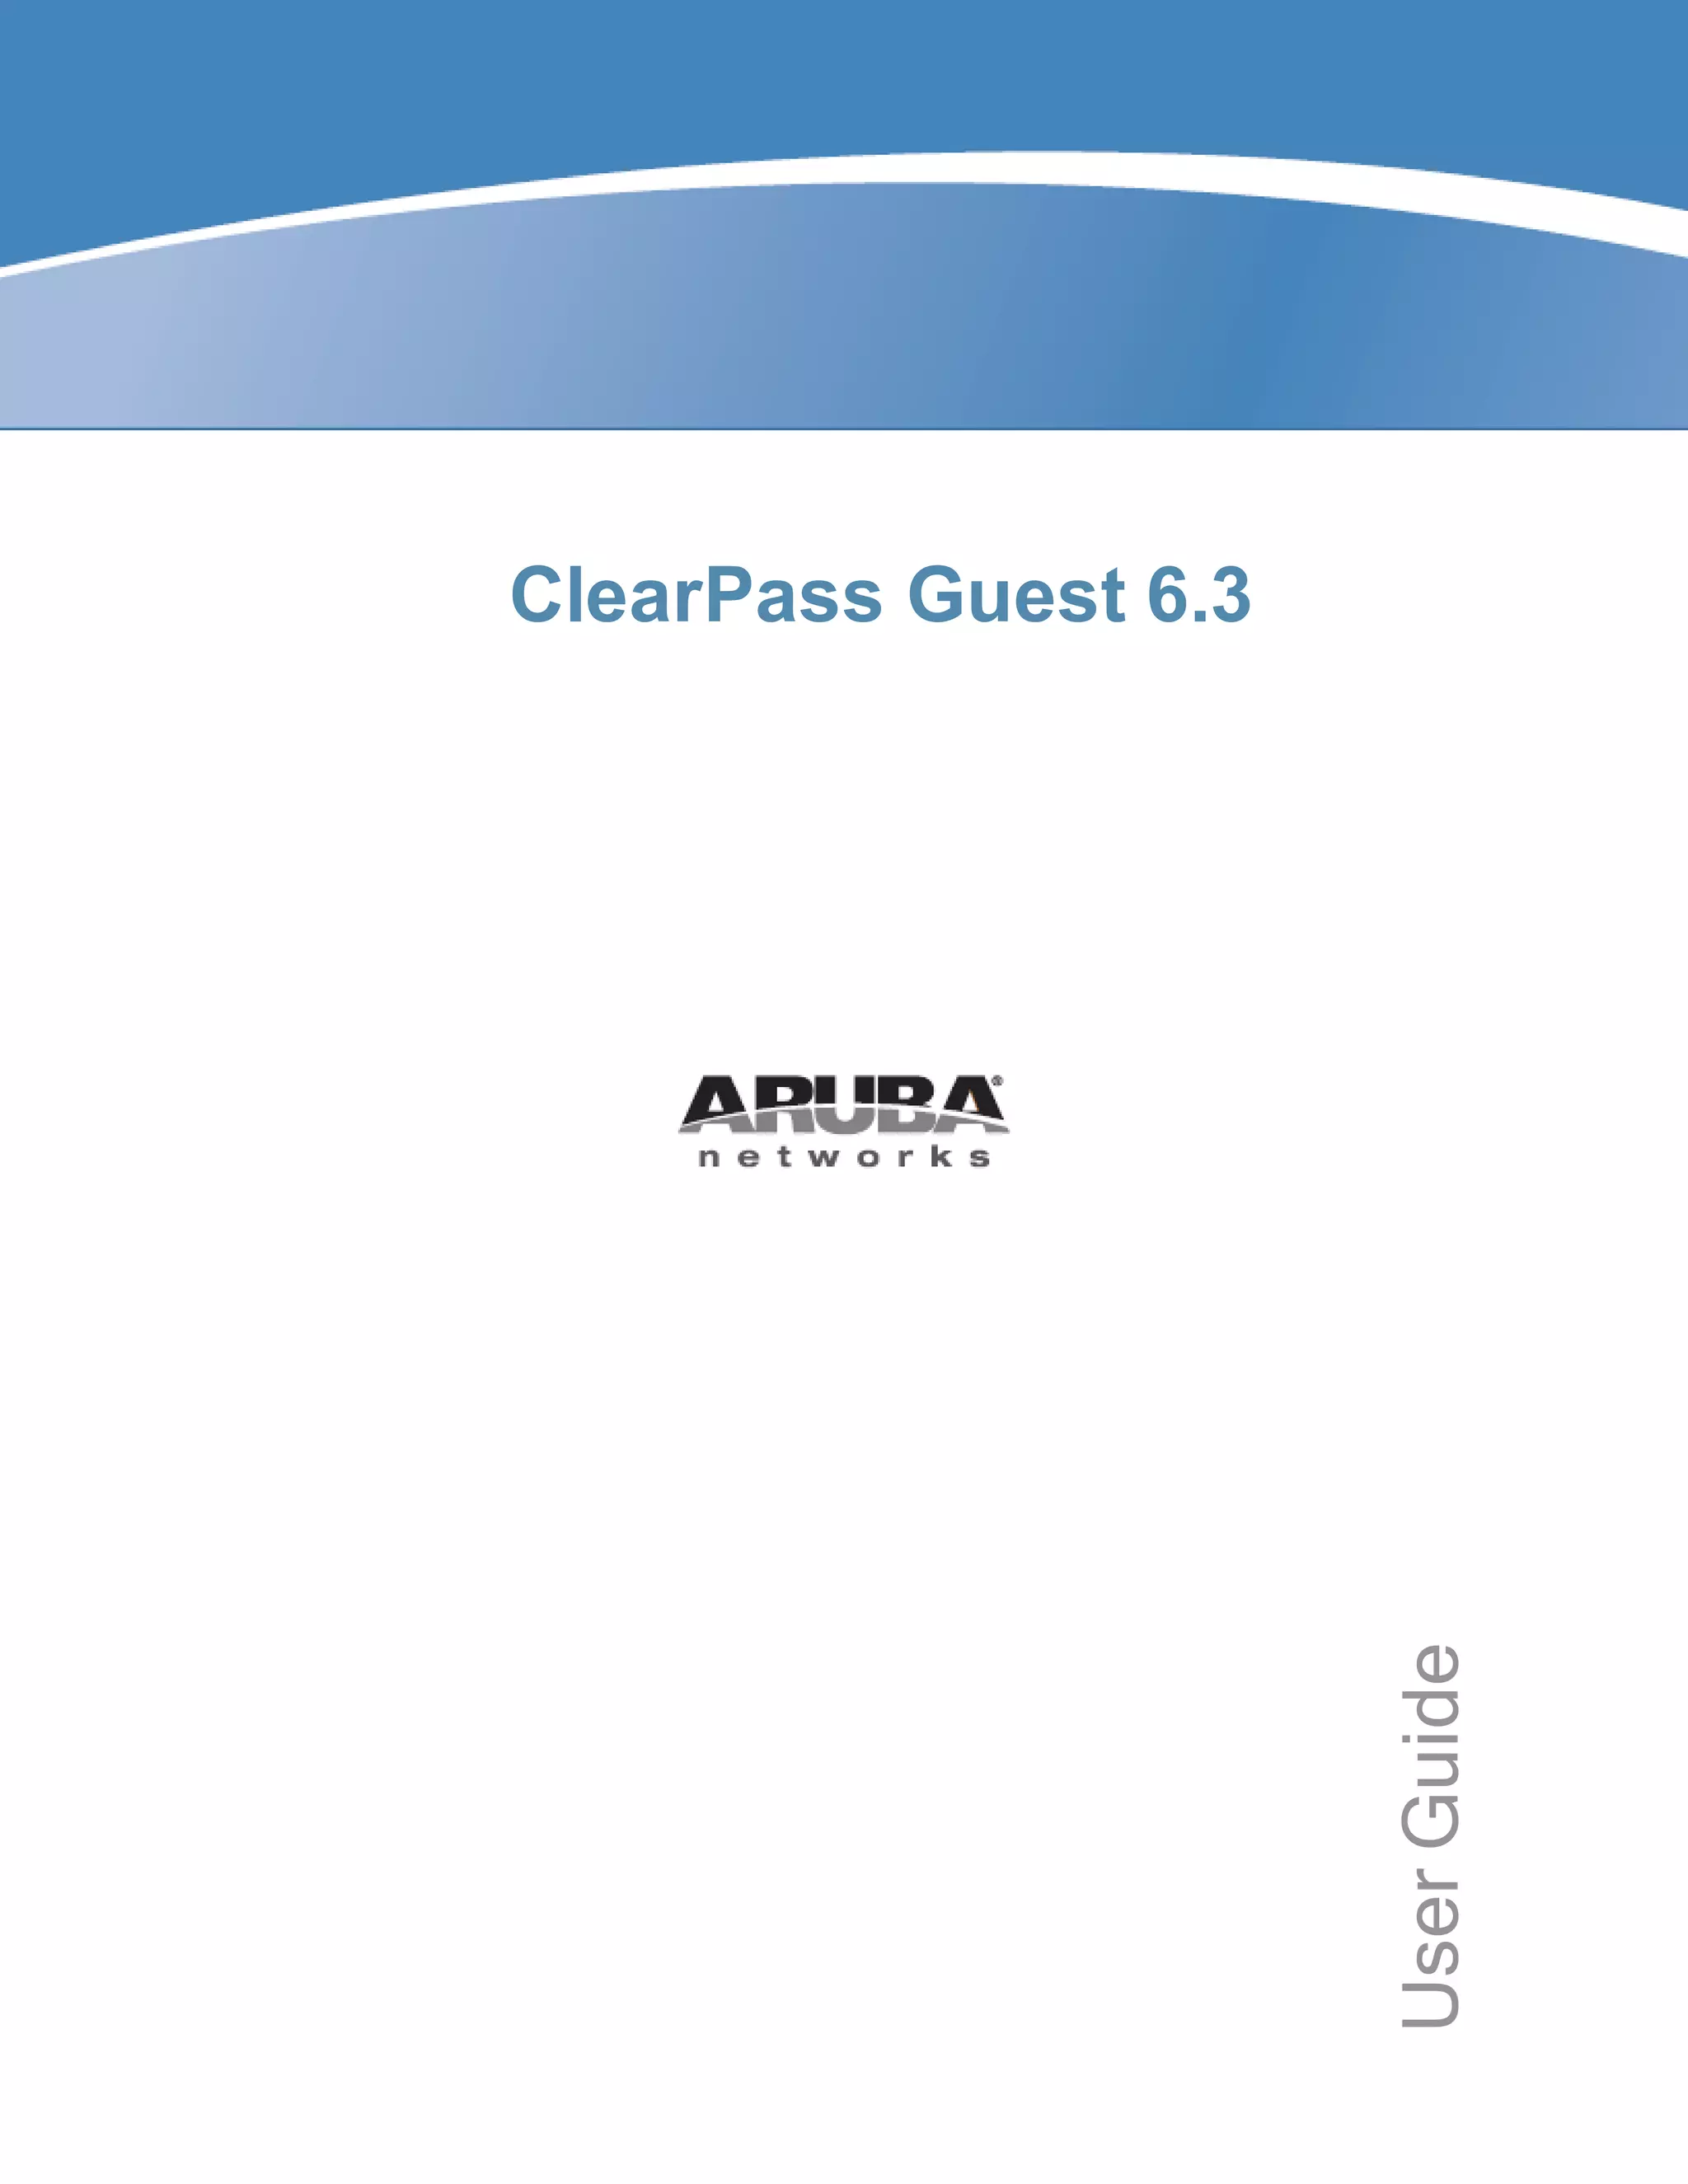
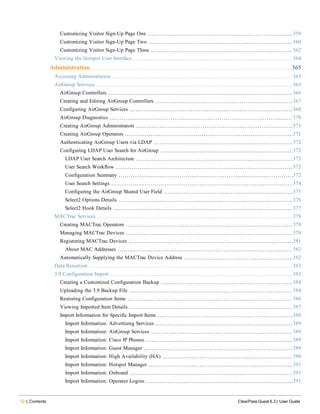
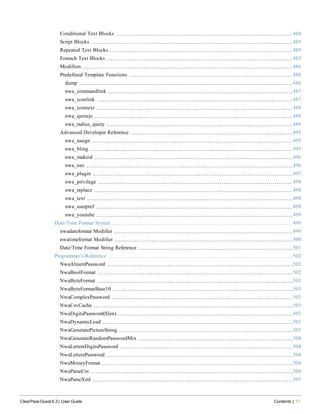
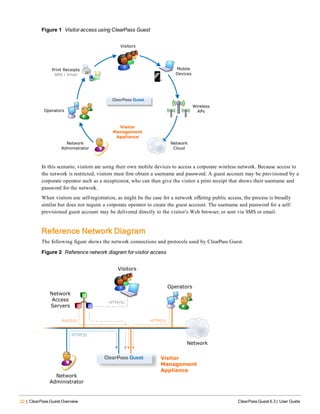
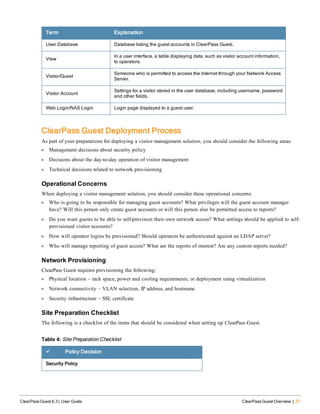
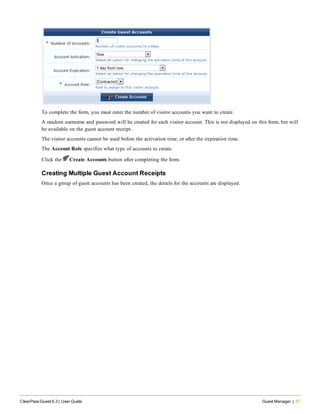
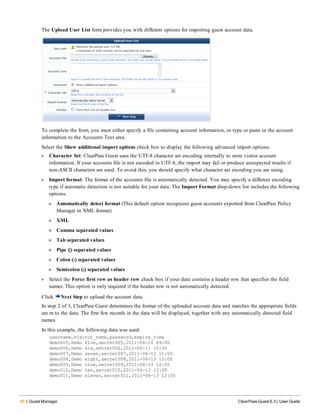
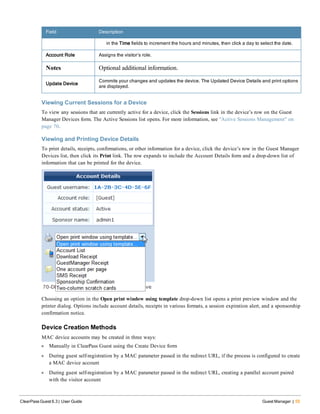
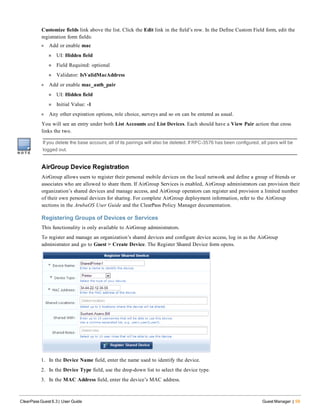
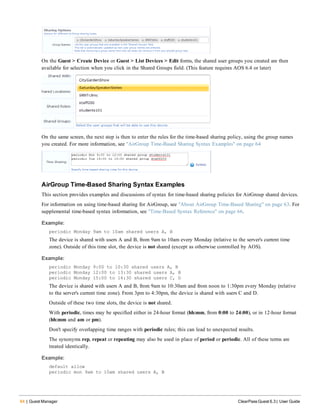
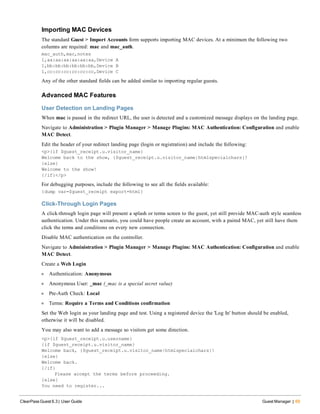
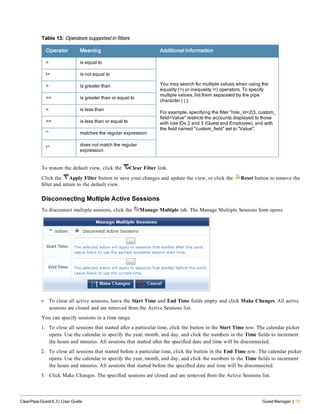
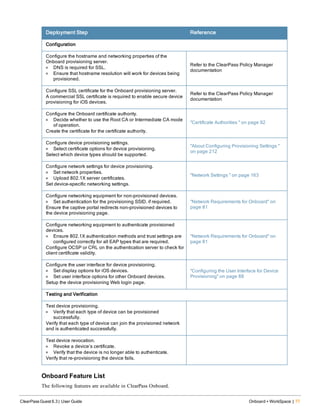
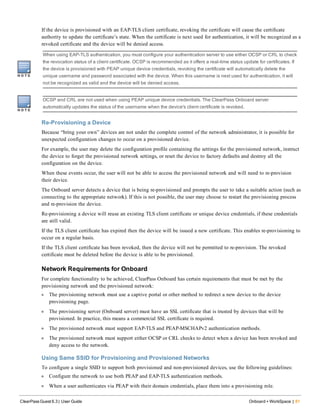
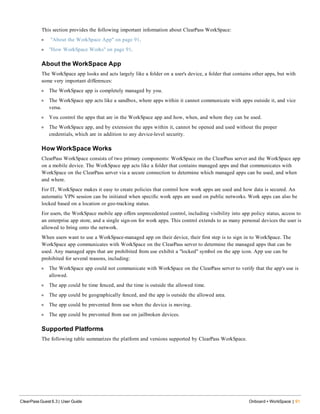
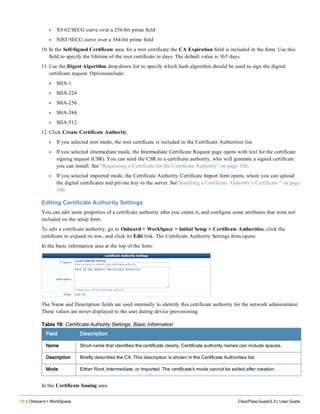
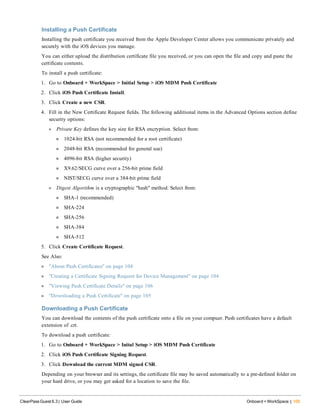
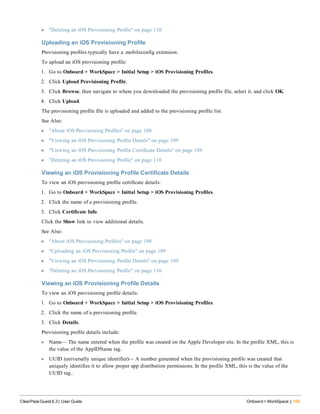
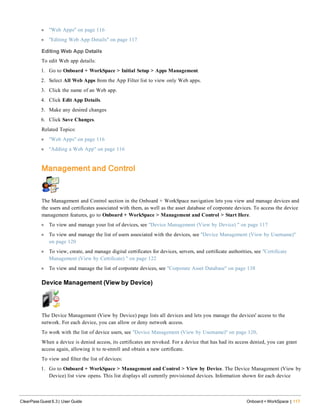
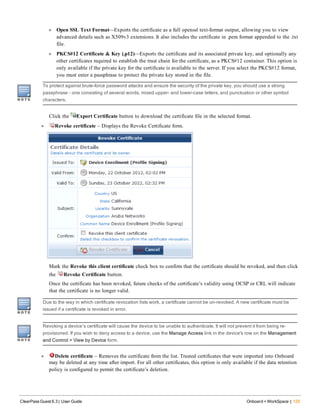
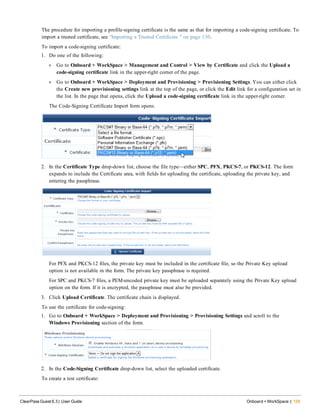
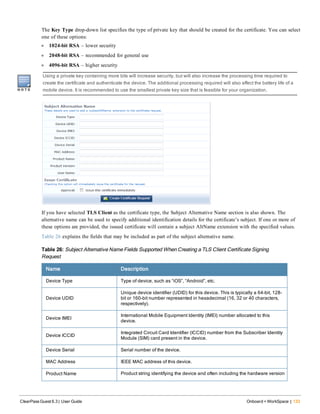
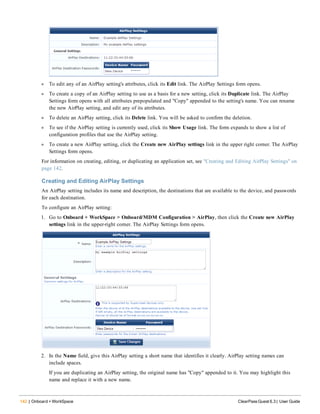
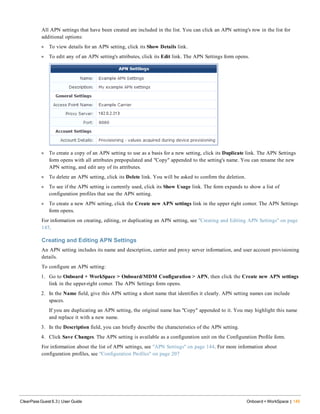
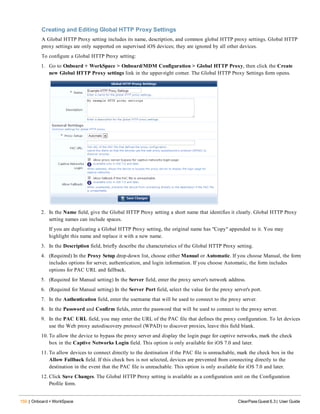
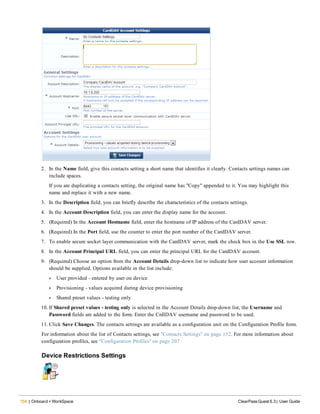
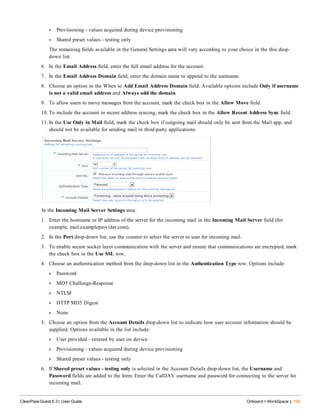
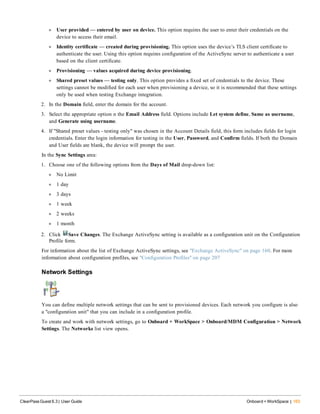
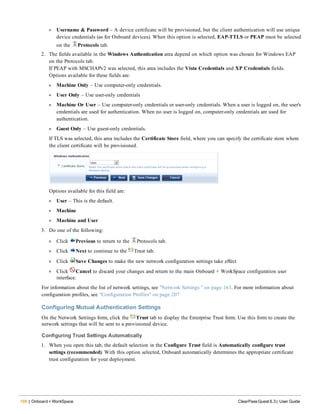
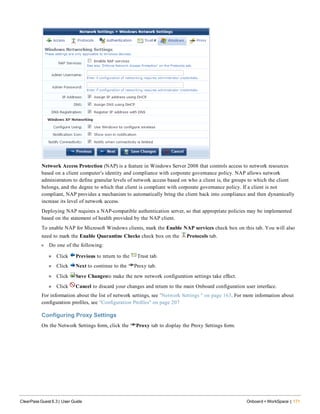
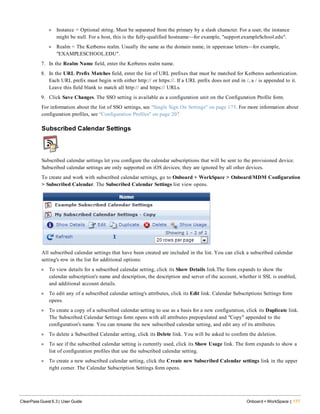
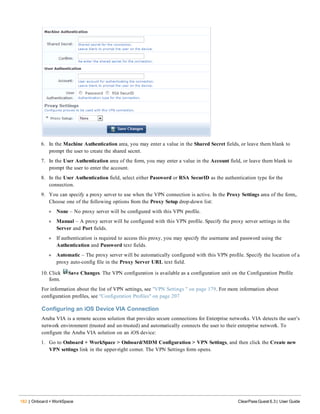
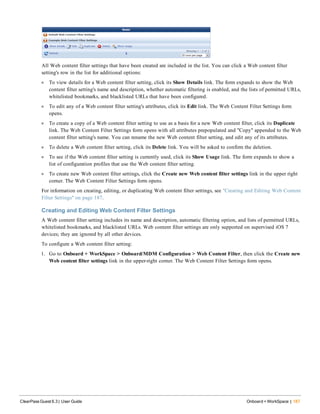
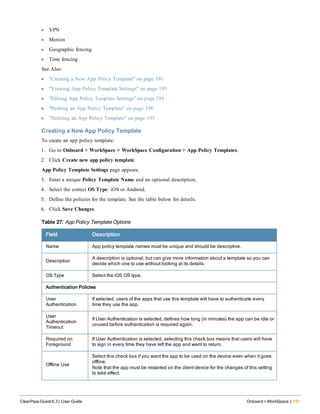
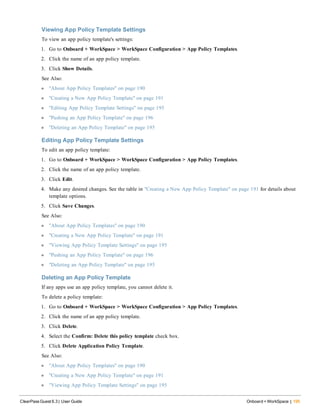
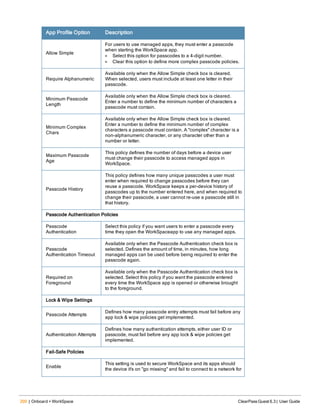
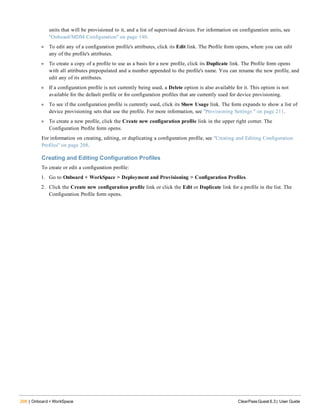
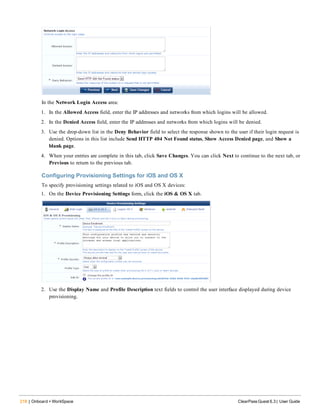
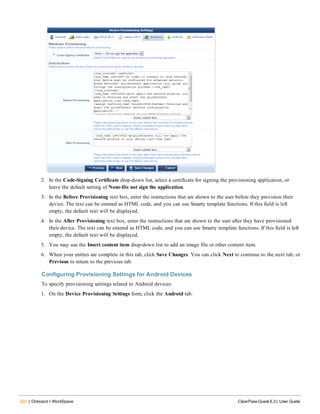
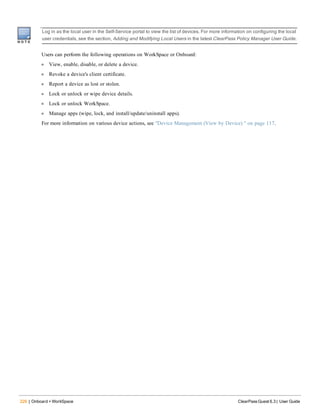
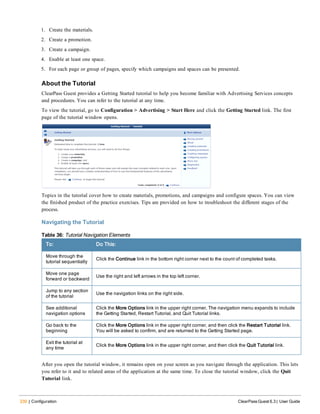
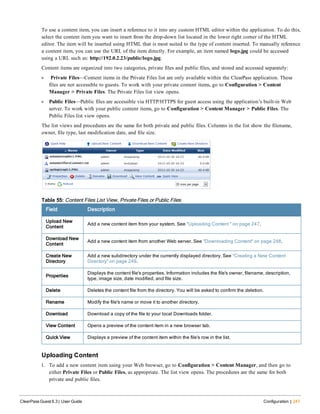
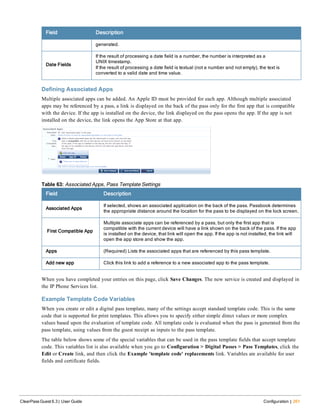
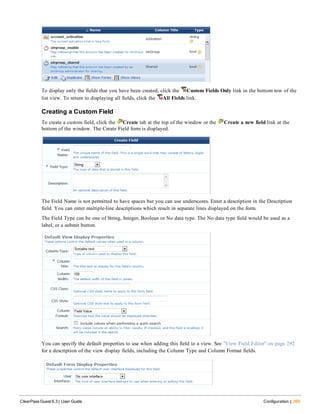
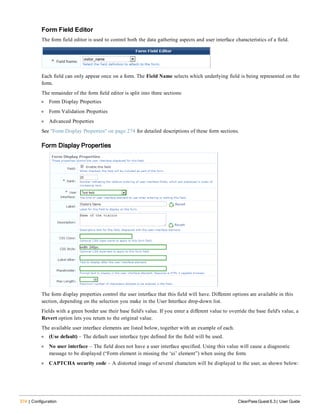
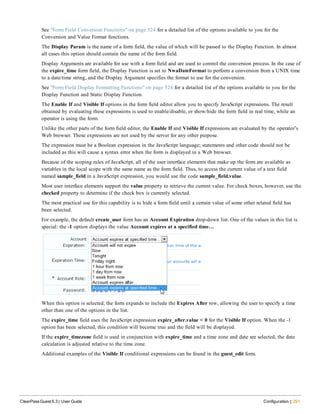
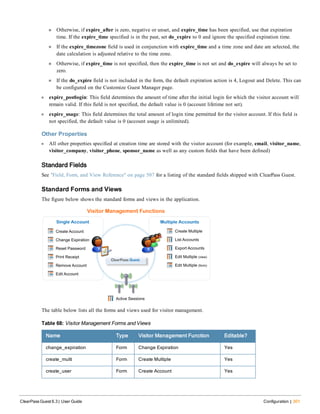
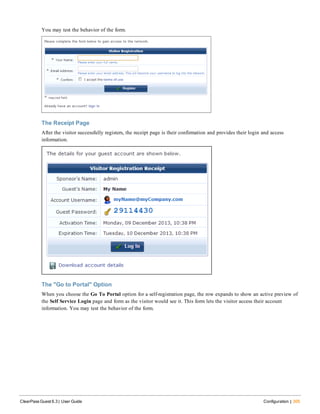
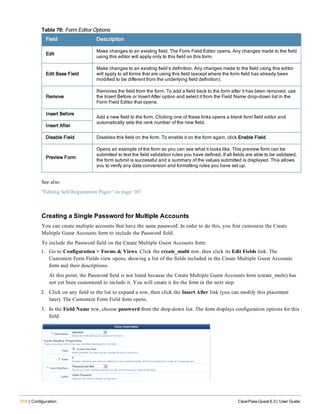
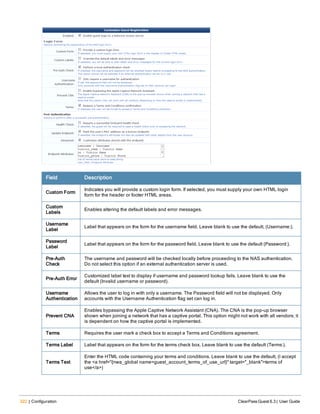
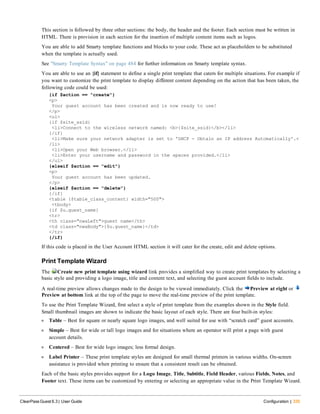
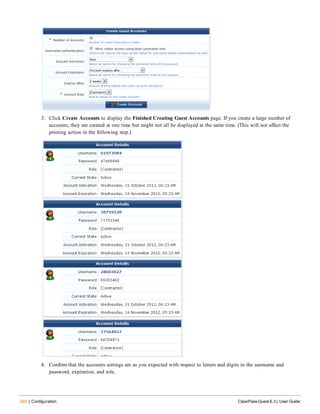
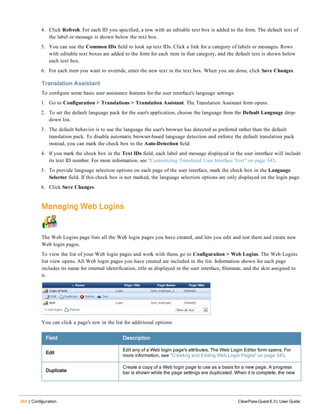
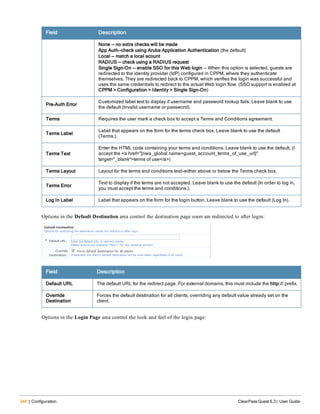
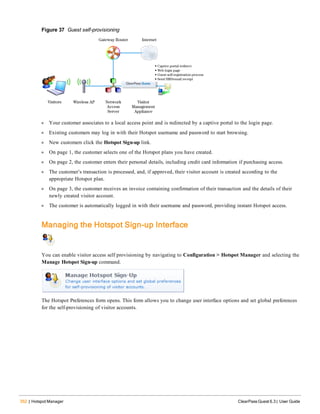
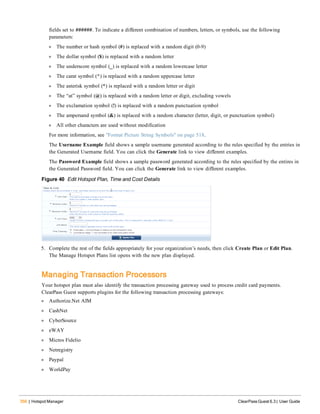
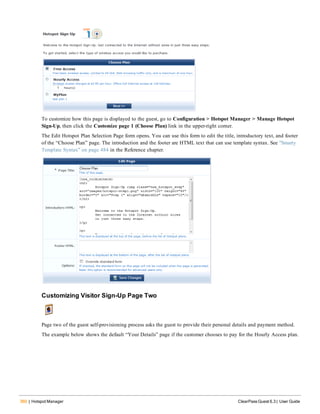
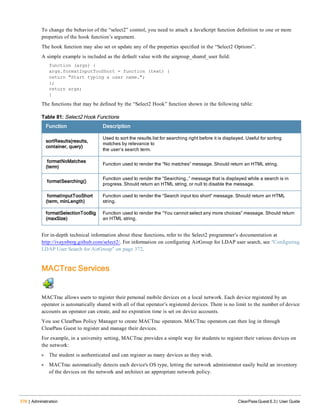
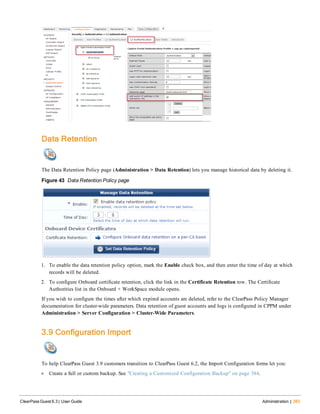
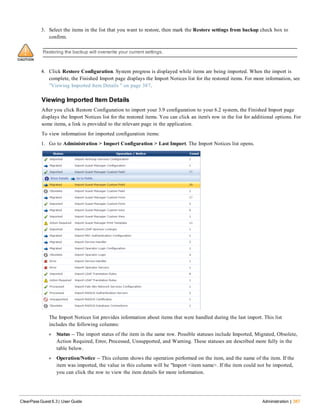
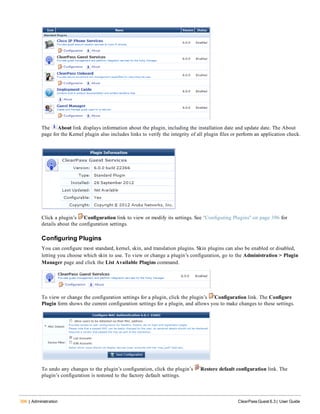
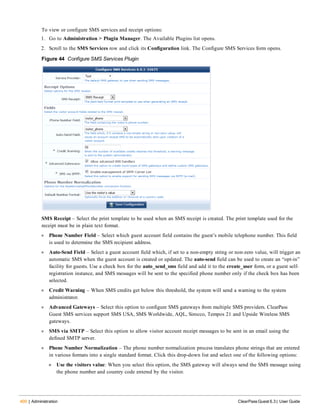
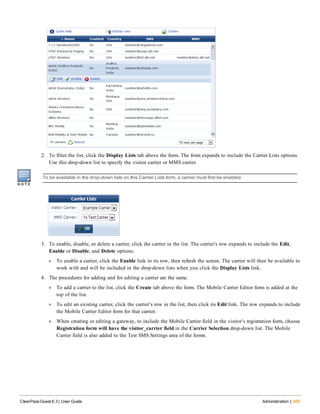
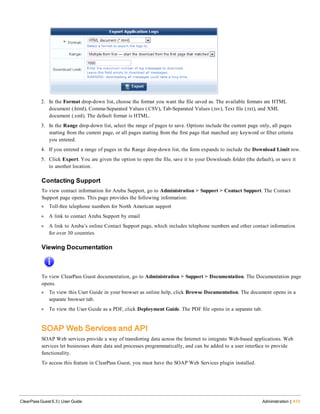
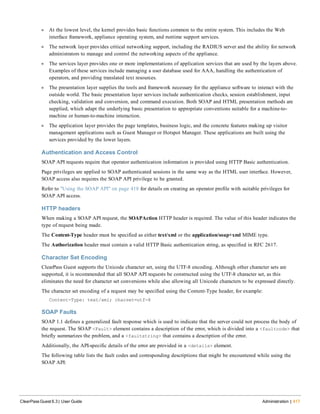
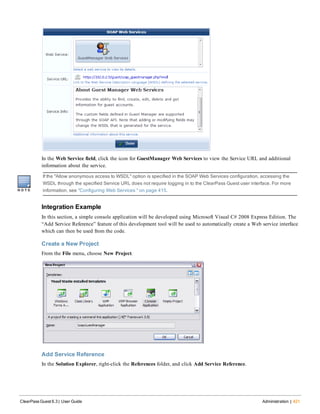
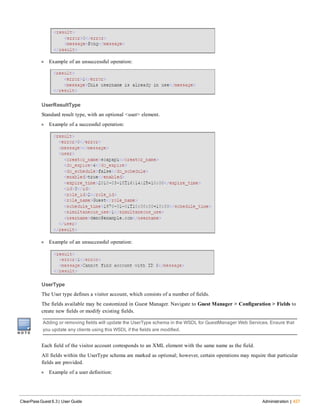
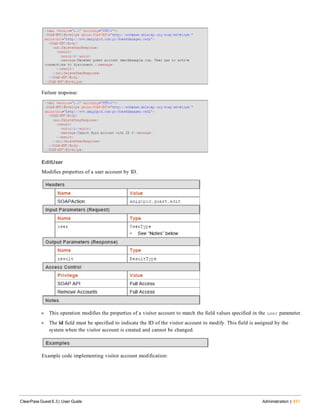
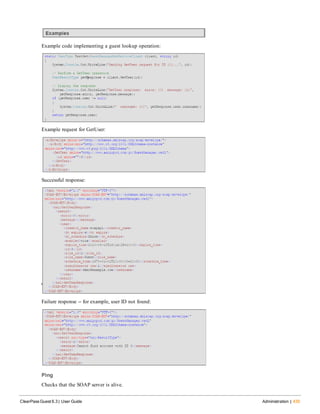
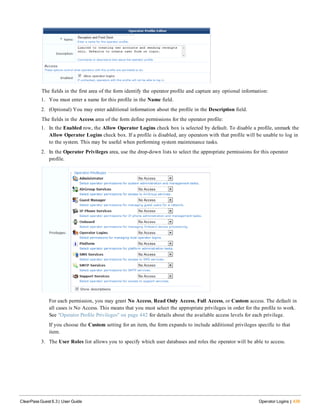
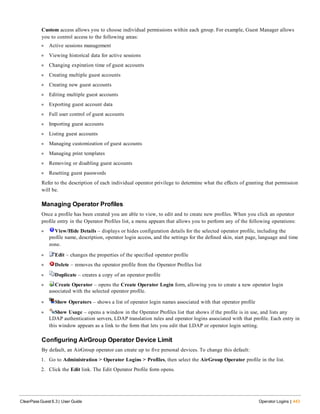
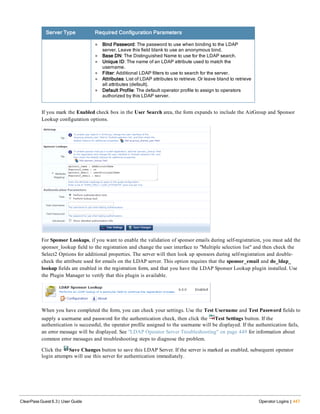
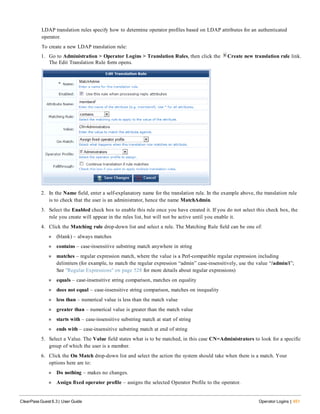
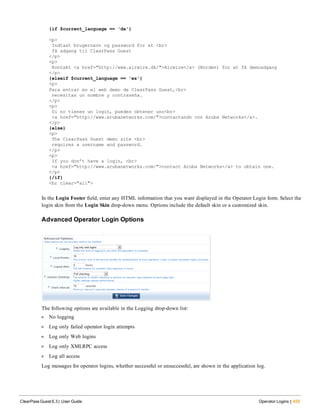
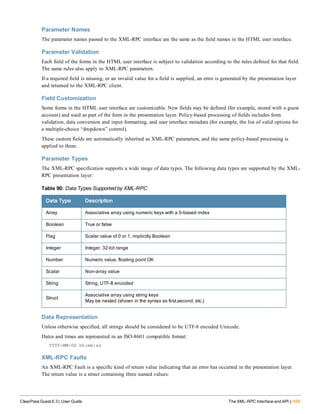
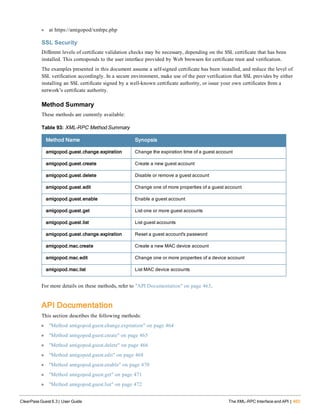
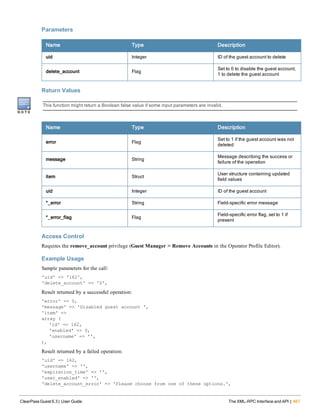
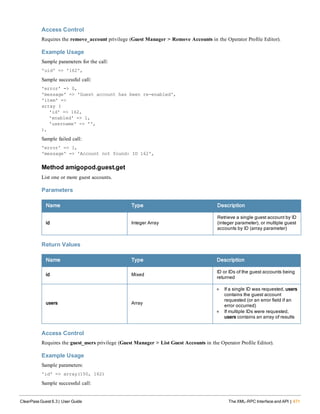
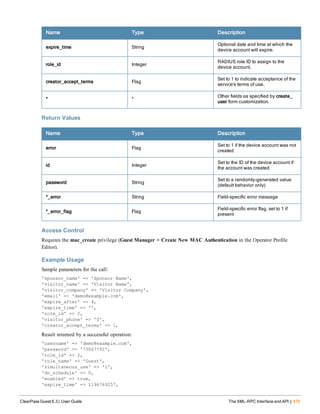
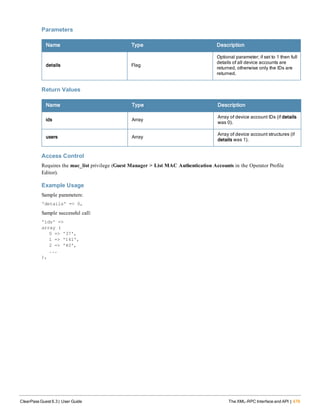
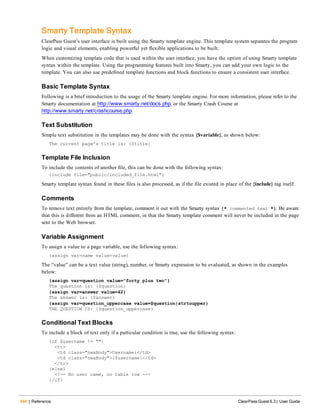
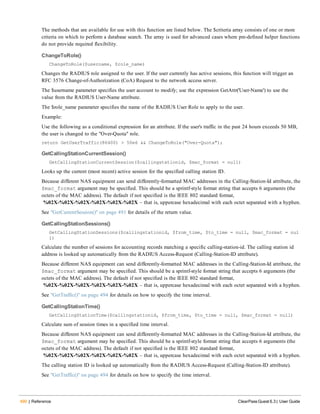
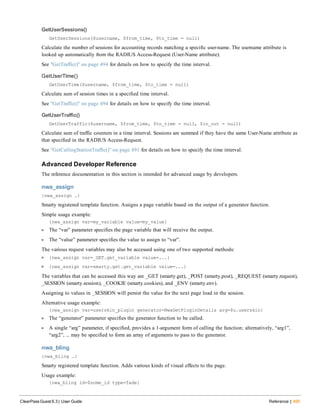
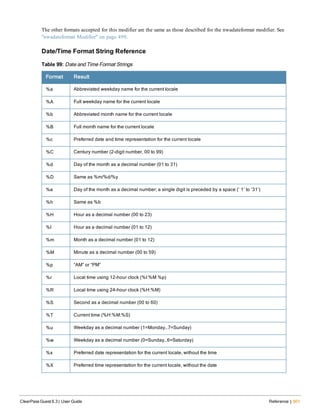
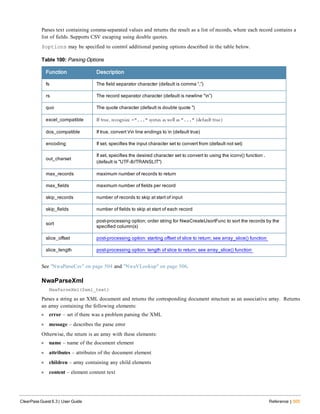
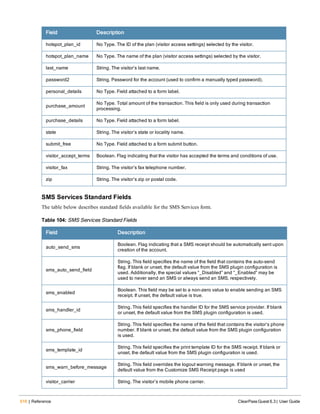
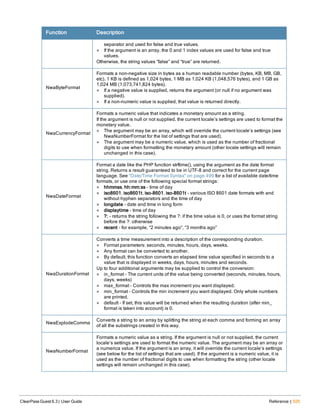
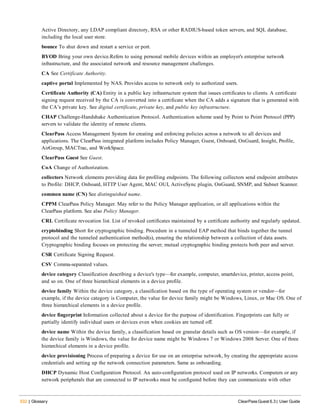
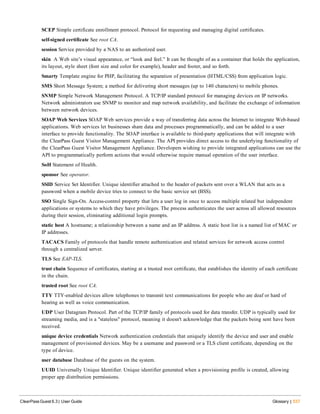
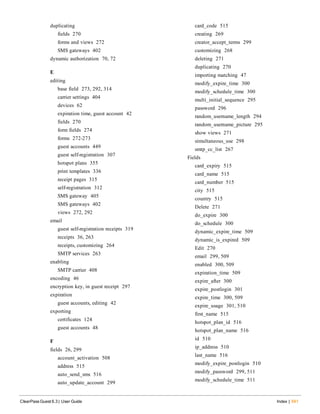
Figure 4 Sequence diagram for network access using AAA
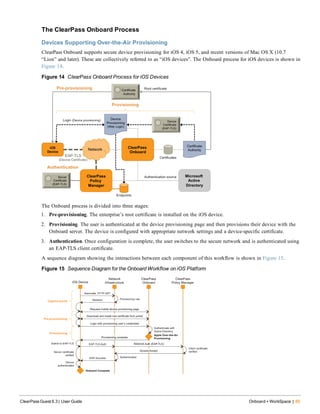
In the standard AAA framework, network access is provided to a user according to the following process:
l The user connects to the network by associating with a local access point [1].
l A landing page is displayed to the user [2] which allows them to log in to the NAS [3], [4] using the login name
and password of their guest account.
l The NAS authenticates the user with the RADIUS protocol [5].
l ClearPass Policy Manager determines whether the user is authorized, and, if so, returns vendor-specific attributes [6]
that are used to configure the NAS based on the user’s role and other policies [7].
l If the user’s access is granted, the NAS permits the guest access to the network based on the settings provided by
the ClearPass Policy Manager server.
l The NAS reports details about the user’s session to the ClearPass Policy Manager server using RADIUS accounting
messages [8].
l After the user’s session times out [9], the NAS will return the user to an unauthorized state and finalize the details
of the user’s session with an accounting update [10].
Key Features
Refer to the table below for a list of key features and a cross-reference to the relevant section of this User Guide.](https://image.slidesharecdn.com/arubacpguestdg6-140605093813-phpapp01/85/Aruba-ClearPass-Guest-6-3-User-Guide-24-320.jpg)

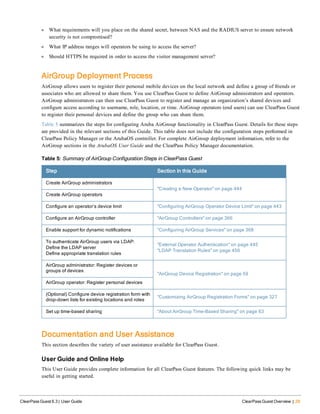

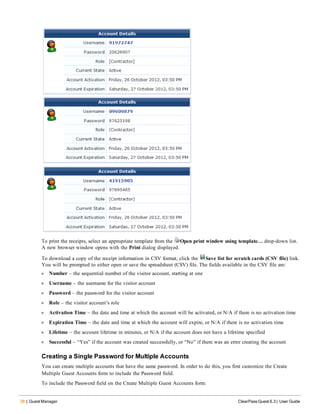
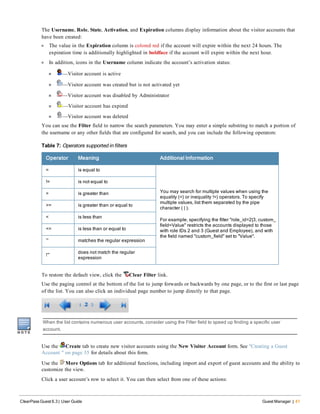

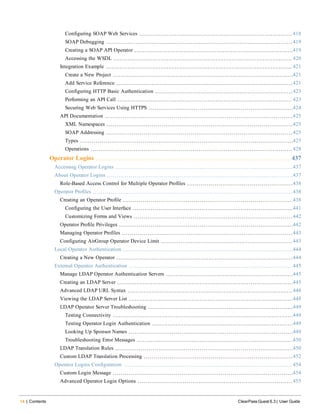
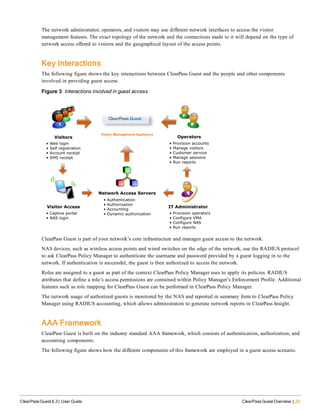
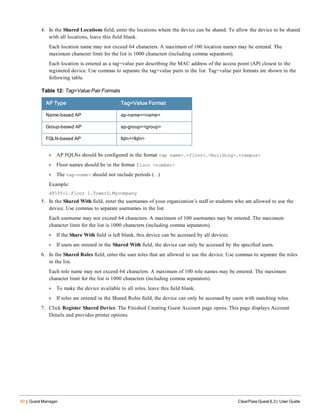
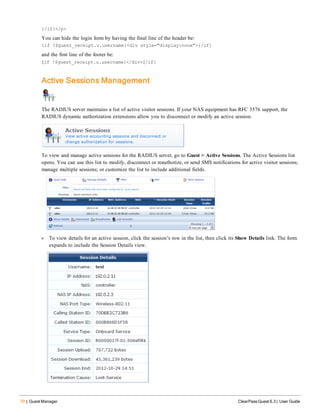
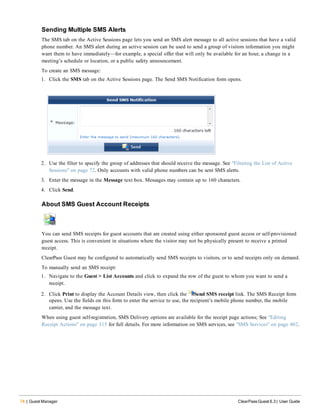
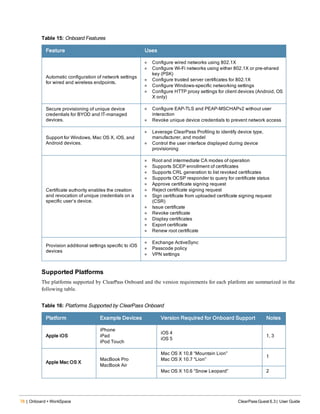
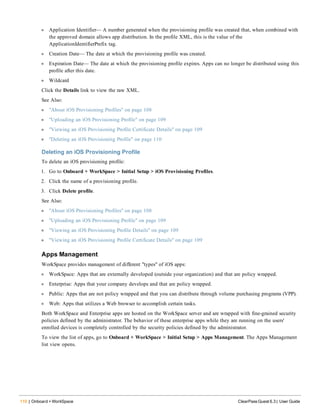
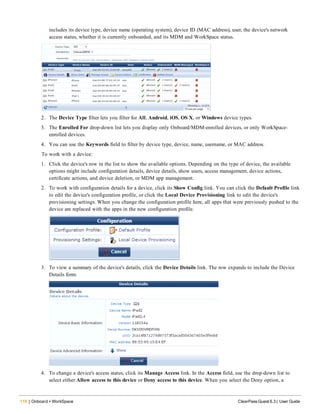
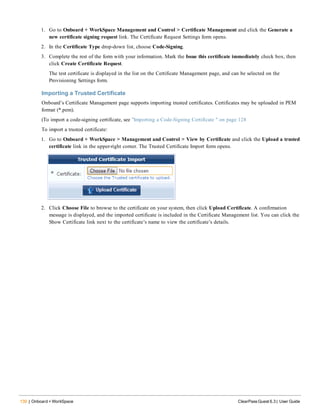
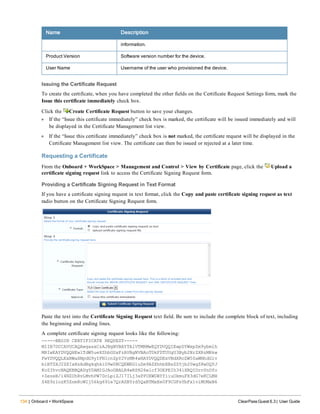
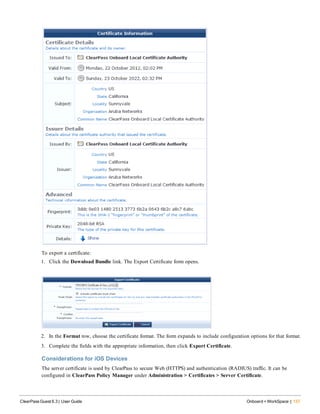
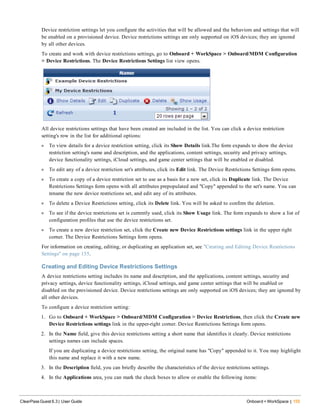
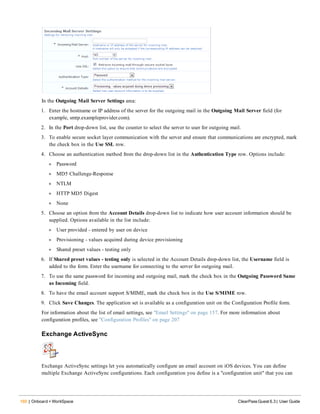
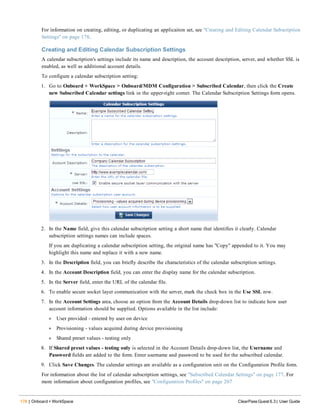
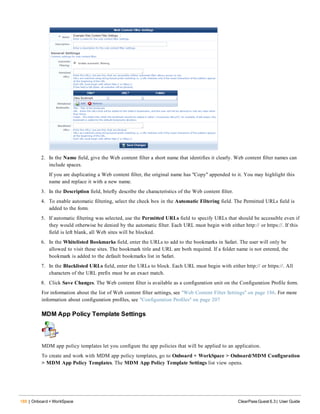
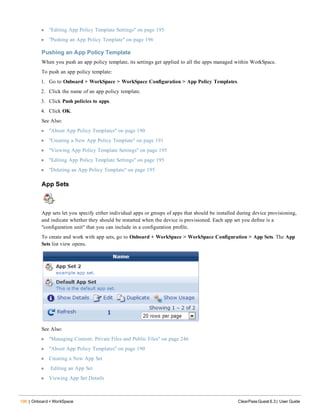
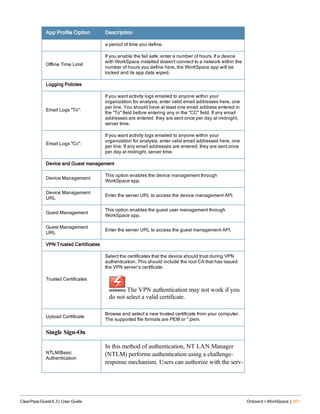
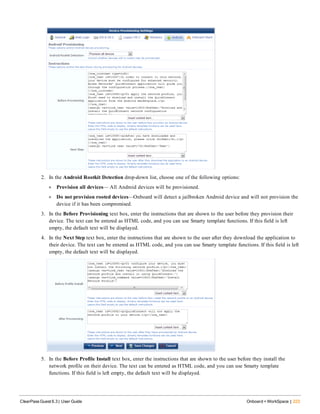
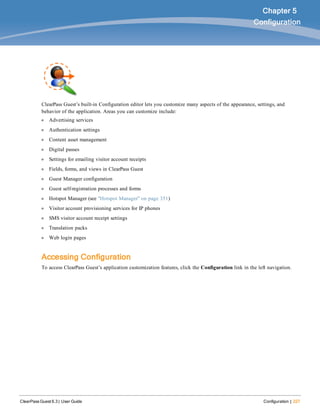
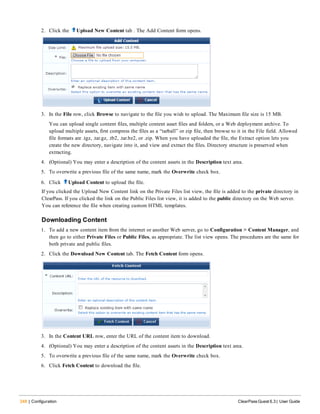
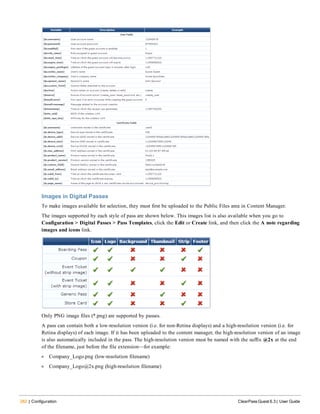
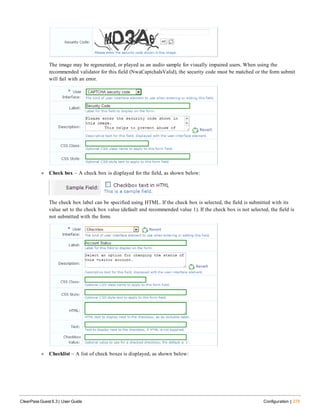
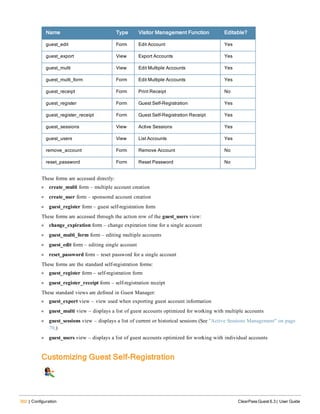
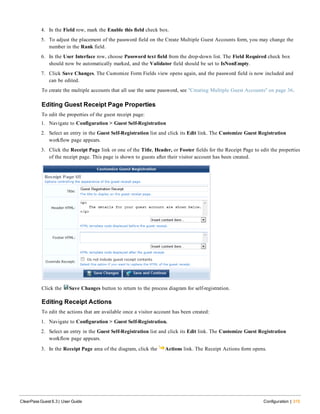
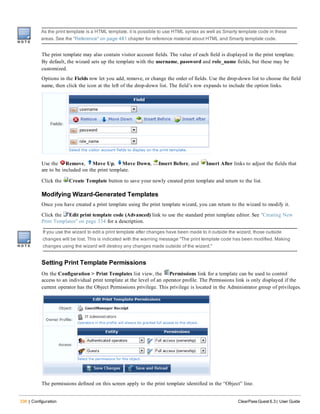
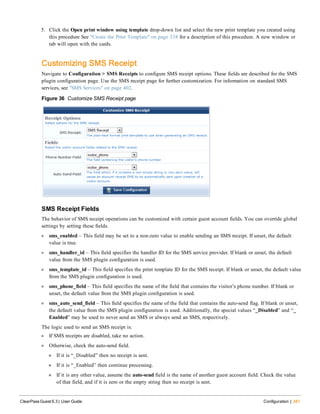
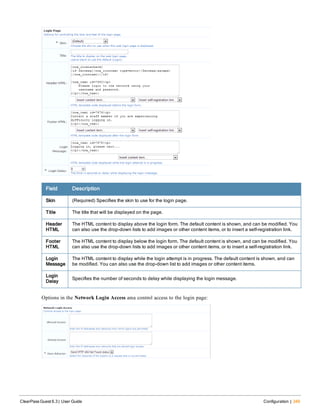
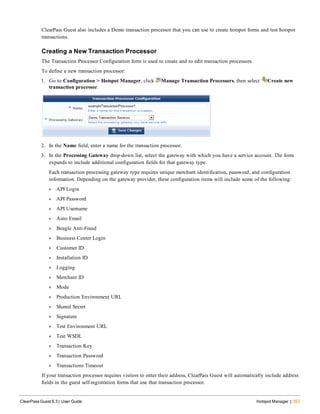
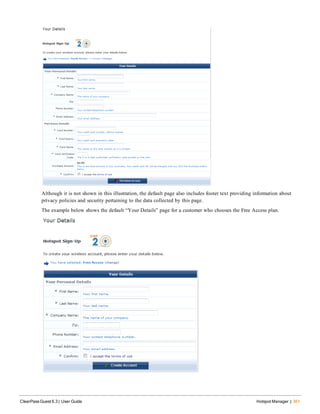
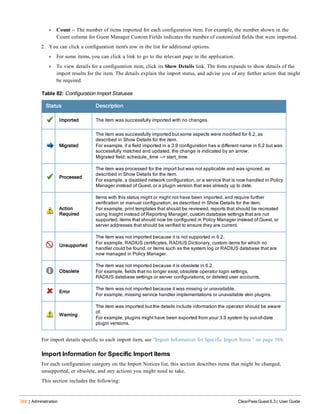
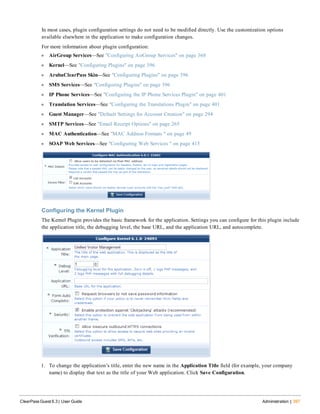
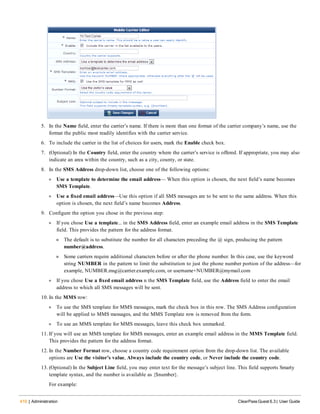
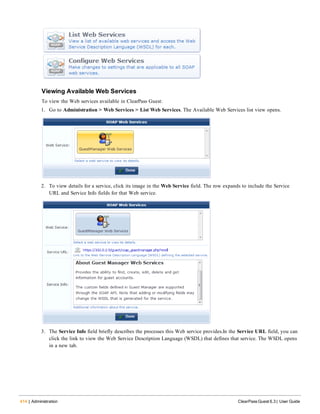
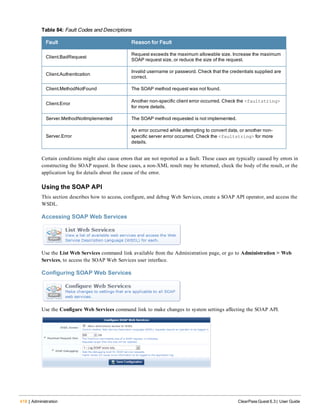
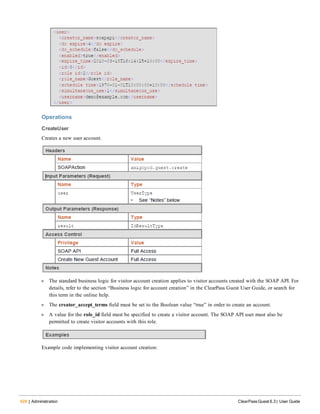
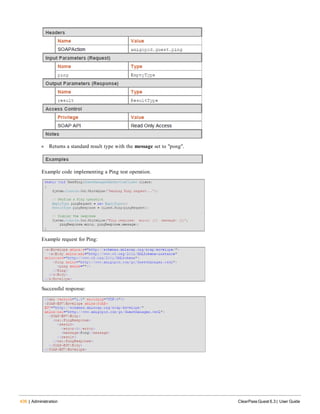
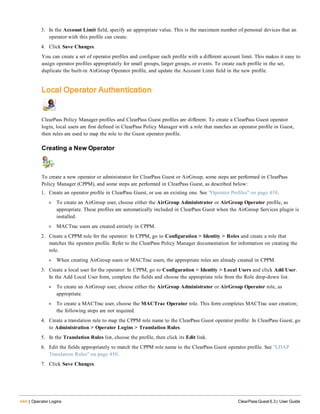
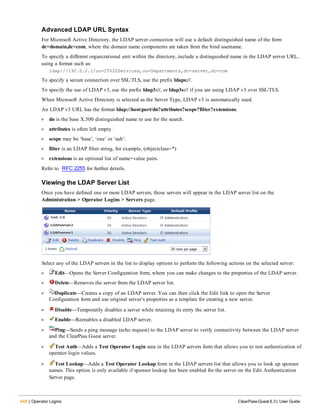
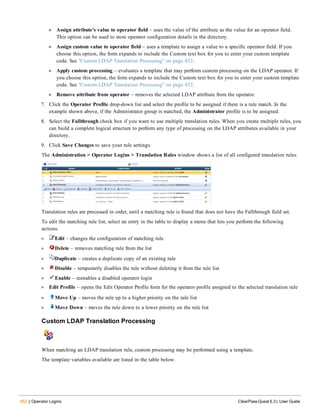
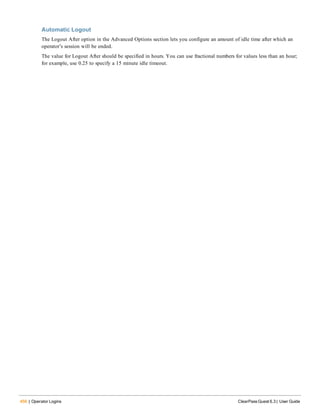
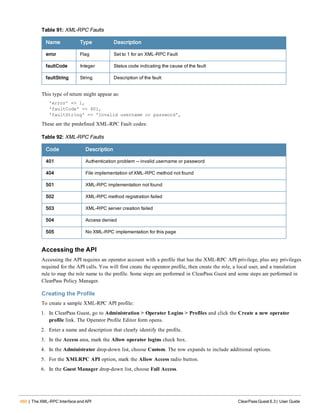
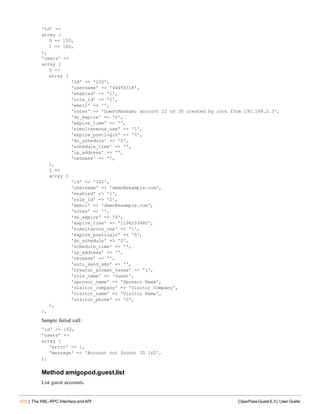
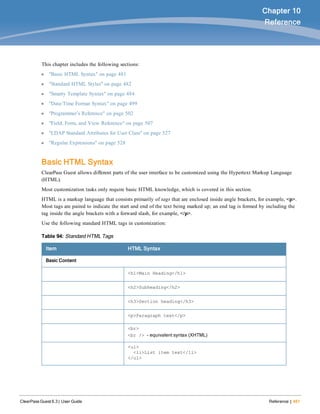
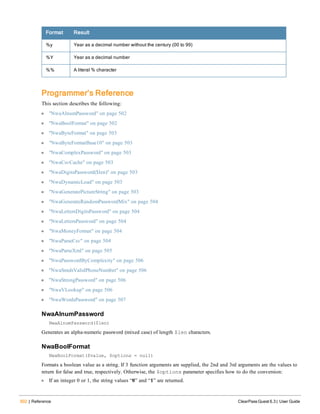
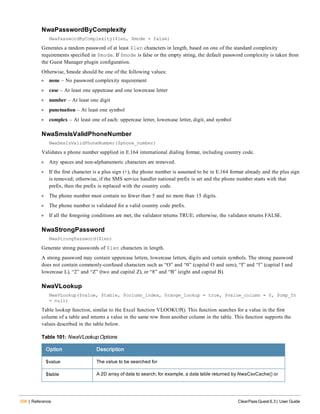
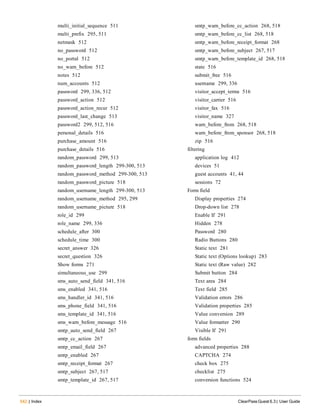
![l Username – Username for the guest account
l Role – Role for the guest account
l Activation – Date and time at which the guest account will be activated, or “N/A” if there is no activation time
l Expiration – Date and time at which the guest account will expire, or “N/A” if there is no expiration time
l Lifetime – The guest account’s lifetime in minutes after login, or 0 if the account lifetime is not set
l Expire Action – Number specifying the action to take when the guest account expires (0 through 4)
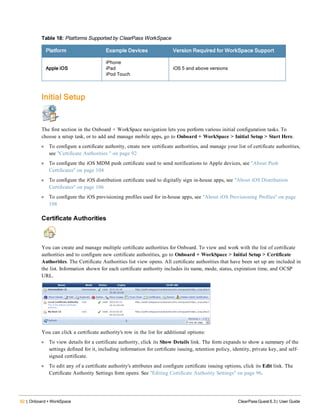
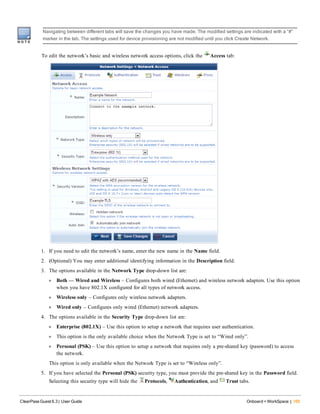
About XML Exports
The default XML format consists of a <GuestUsers> element containing a <GuestUser> element for each exported
guest account. The numeric ID of the guest account is provided as the “id” attribute of the <GuestUser> element. This
format is compatible with the ClearPass Policy Manager XML format for guest users.
The values for both standard and custom fields for guest accounts are exported as the contents of an XML tag, where
the tag has the same name as the guest account field.
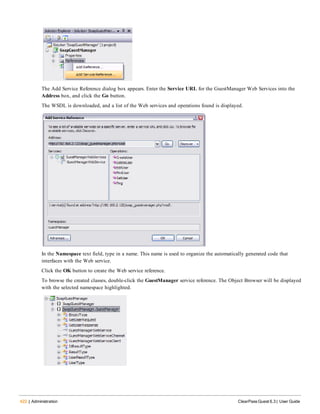
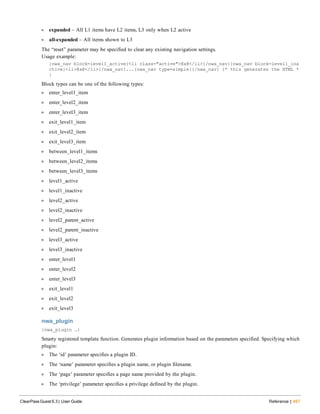
An example XML export is given below:
<?xml version="1.0" encoding="UTF-8" standalone="true"?>
<MyContents xmlns="http://www.example.com/myapiDefs/1.0">
<MyHeader version="6.0" exportTime="Sun, 16 Dec 2012 16:36:03 PST"/>
<GuestUsers>
<GuestUser guestType="USER" enabled="true" sponsorName="55480025"
expiryTime="2012-12-04 13:39:25" startTime="1969-12-31 16:00:00"
password="08654361" name="55480025">
<GuestUserTags tagValue="Hotspot Services self-provisioned guest account
Source IP: 10.11.10.254 MAC: unknown Plan: Free Access x 1 Transaction
Amount: $0.00 Invoice Number: P-15 Transaction ID: " tagName="notes"/>
<GuestUserTags tagValue="2" tagName="[Role ID]"/>
<GuestUserTags tagValue="1" tagName="do_expire"/>
<GuestUserTags tagValue="1" tagName="simultaneous_use"/>
<GuestUserTags tagValue="ff" tagName="Company Name"/>
<GuestUserTags tagValue="2012-12-04 12:39:14" tagName="Create Time"/>
<GuestUserTags tagValue="fff@df" tagName="Email"/>
<GuestUserTags tagValue="ff" tagName="first_name"/>
<GuestUserTags tagValue="plan0" tagName="hotspot_plan_id"/>
<GuestUserTags tagValue="Free Access" tagName="hotspot_plan_name"/>
<GuestUserTags tagValue="ff" tagName="last_name"/>
<GuestUserTags tagValue="ff ff" tagName="Visitor Name"/>
<GuestUserTags tagValue="ff" tagName="zip"/>
</GuestUser>
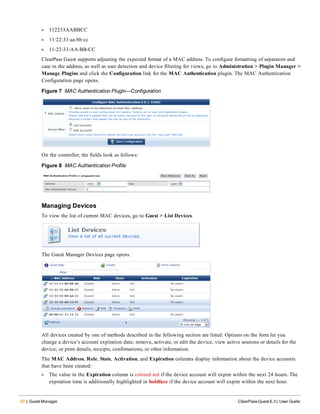
MAC Authentication in ClearPass Guest
ClearPass Guest supports a number of options for MAC Authentication and the ability to authenticate devices.
The advanced features described in this section generally require a WLAN capable of MAC authentication with
captive portal fallback. Please refer to the Aruba WLAN documentation for setting up the controller appropriately.
To verify that you have the most recent MAC Authentication Plugin installed and enabled before you configure these
advanced features, go to Administration > Plugin Manager > List Available Plugins. For information on plugin
management, see "Plugin Manager " on page 395.
MAC Address Formats
Different vendors format the client MAC address in different ways—for example:
ClearPass Guest 6.3 | User Guide Guest Manager | 49](https://image.slidesharecdn.com/arubacpguestdg6-140605093813-phpapp01/85/Aruba-ClearPass-Guest-6-3-User-Guide-49-320.jpg)
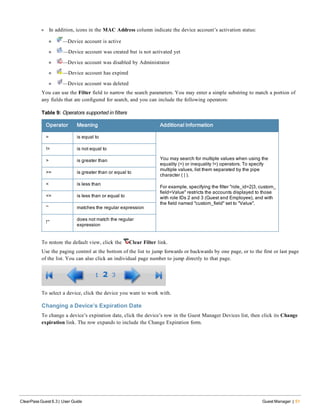

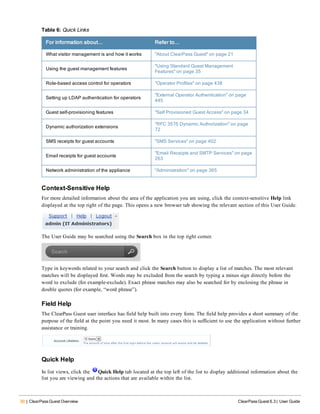
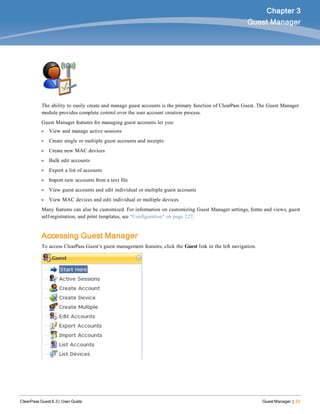
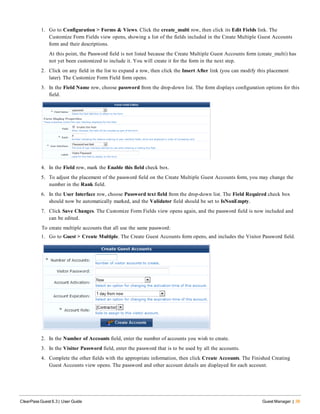
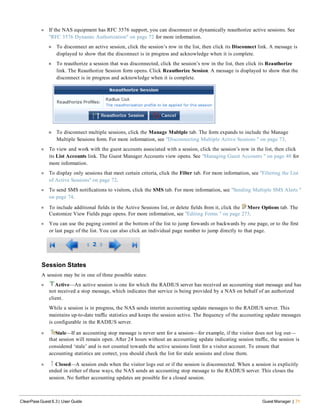
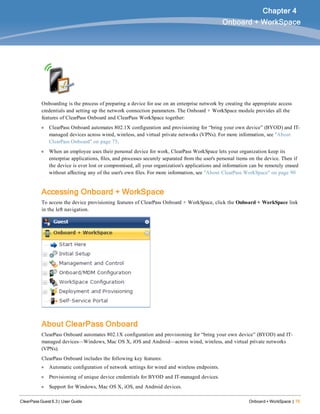
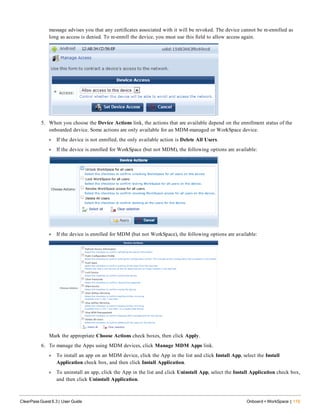
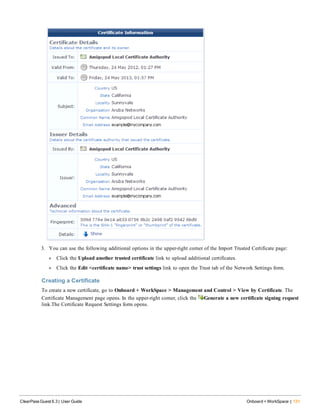
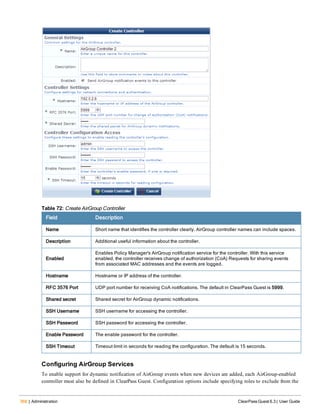
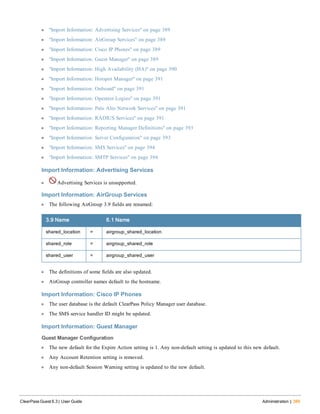
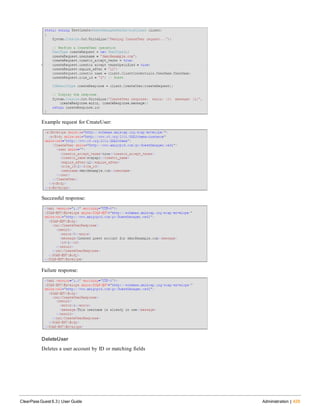
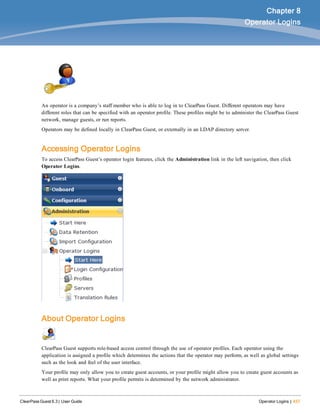
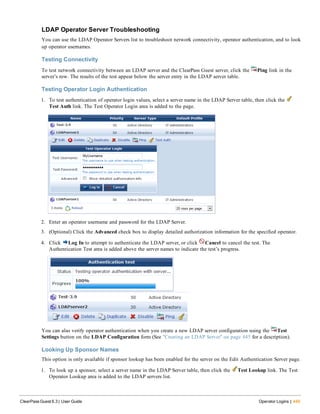
![64. For more information on using time-based sharing with AirGroup, see "About AirGroup Time-Based Sharing" on
page 63.
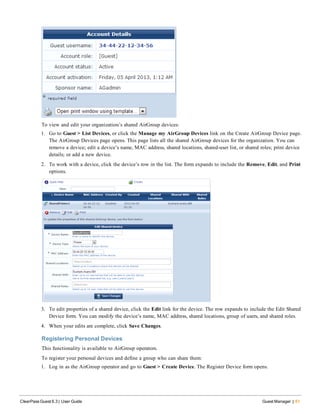
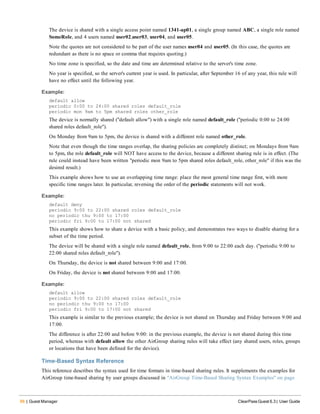
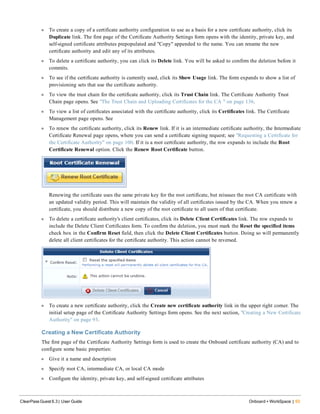
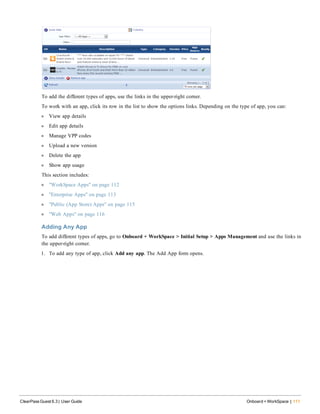
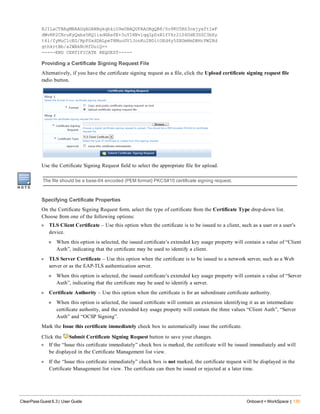
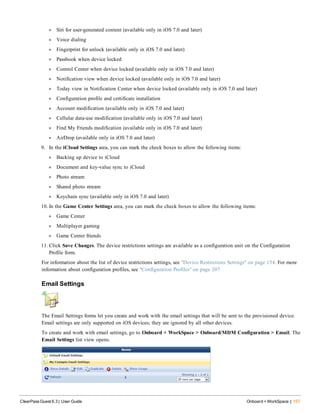
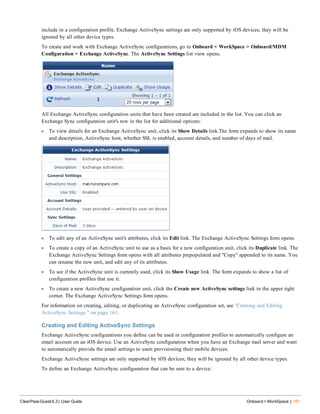
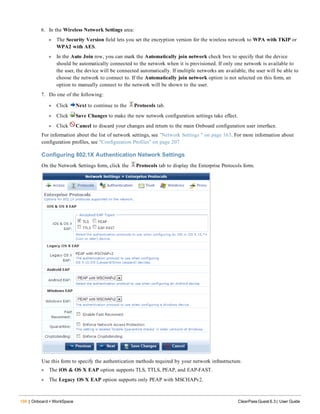
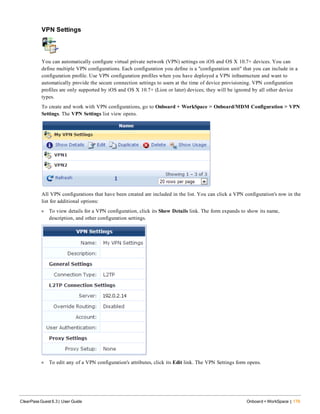
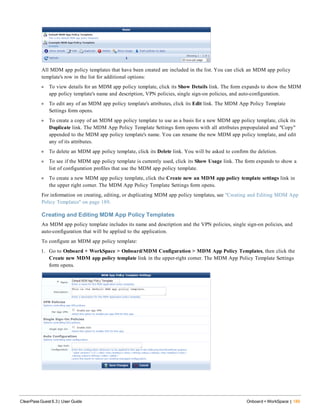
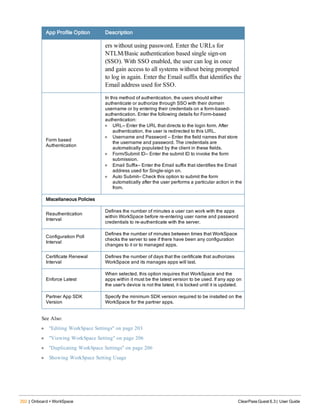
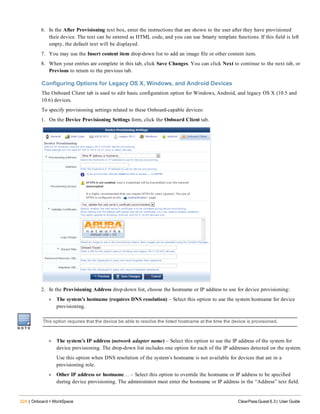
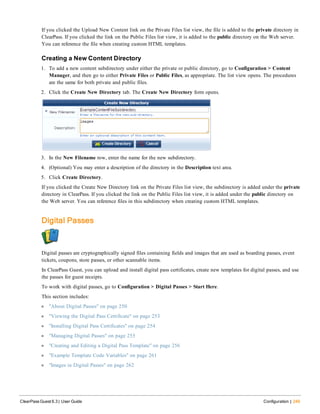
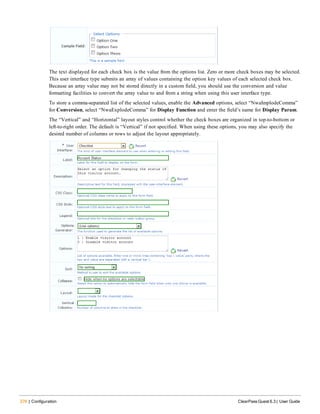
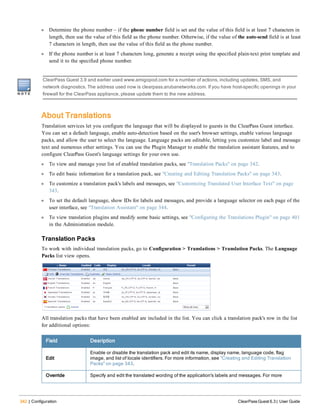
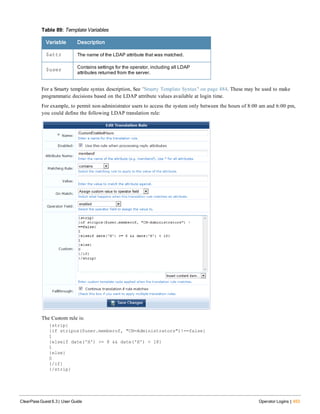
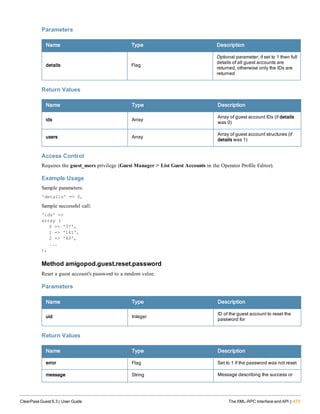
The syntax for AirGroup time-based sharing policies supports all the default time-based ACL rules specified in
TimeRangeACL. This ACL is a sequence of rules, one per line, according to the following syntax:
l default allow|deny
Specifies the default behavior for unmatched times; this is 'allow' only if no 'periodic' or 'absolute' rules are
specified, otherwise it is 'deny'. Use 'default allow' if the remaining rules exclude times, otherwise use 'default deny'
if the remaining rules are to include times. This rule may only be used once.
l [time] zone default|server|...
Specifies the time zone to use for matching times and specifying the time of day. If unset, the current time zone
setting is used (note that this may vary due to operator and/or profile settings). If the value "default" or "server" is
specified, the system's time zone is used. Otherwise, the named time zone is used. This rule may only be used once,
and must be before any rules specifying a time interval.
l [not] period(ic) [day-list] hh:mm to [day] hh:mm
Specifies a periodic or daily interval. Recognized days include Sunday, Monday, Tuesday, Wednesday, Thursday,
Friday, Saturday and 3-letter abbreviations; the tokens "weekends" and "weekdays" may also be used. Without a
day-list, all days of the week are matched. Time may be specified in 12 or 24 hour format, with the special time
24:00 indicating the end of the day.
Example: periodic monday 8:00 to friday 17:00 matches between 8am and 5pm, Monday through Friday.
Example: periodic weekdays 8:00 to 17:00 specifies the same thing as the example in the previous line.
Example: periodic wed 11am to 11pm matches between 11:00 and 23:00 on a Wednesday.
Example: periodic weekend 0:00 to 24:00 matches any time on a Saturday or Sunday.
Example: periodic saturday sunday 0:00 to 24:00 specifies the same thing as the example in the previous
line.
The 'not' keyword may be specified to invert the allow/deny decision.
Example: default allow; not period 23:00 to 6:00 (on 2 separate lines) allows access, except between
11pm and 6am.
Example: period 6:00 to 23:00 is equivalent to the example in the previous line.
l not before [date-and-time]
Specifies an absolute time before which access will always be rejected.
Example: not before 2010-07-01 09:00 matches after 9am on 1 July 2010.
l not after [date-and-time]
Specifies an absolute time after which access will always be rejected.
Example: not after 2011-01-01 00:00 matches before midnight on New Year's Day 2011.
l [not] abs(olute) [start-date-and-time] to [end-date-and-time]
Specifies a start and end interval. The date and time is a format recognized by strtotime(). Times between the start
and end point are matched. The 'not' keyword may be specified to invert the allow/deny decision.
Example: absolute December 25 to December 26 matches all day on Christmas Day each year. (This does not
match on December 26 as midnight on this date is the endpoint of the interval.)
A blank time ACL means "all times are allowed".
The following examples give common usage:
ClearPass Guest 6.3 | User Guide Guest Manager | 67](https://image.slidesharecdn.com/arubacpguestdg6-140605093813-phpapp01/85/Aruba-ClearPass-Guest-6-3-User-Guide-67-320.jpg)
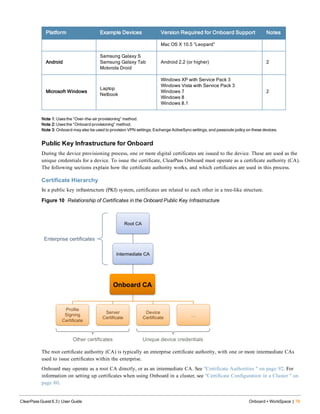


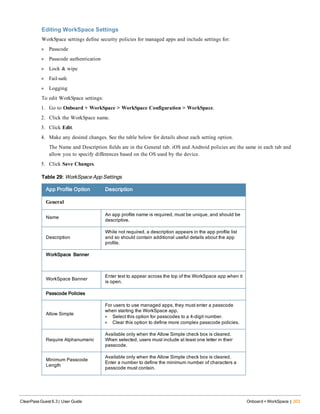

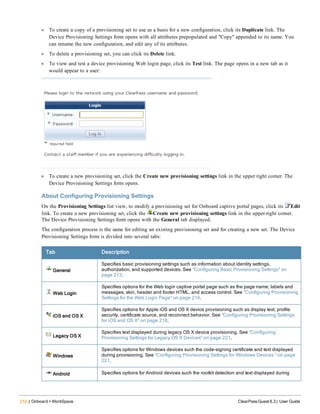

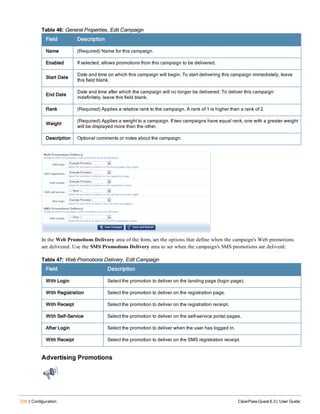
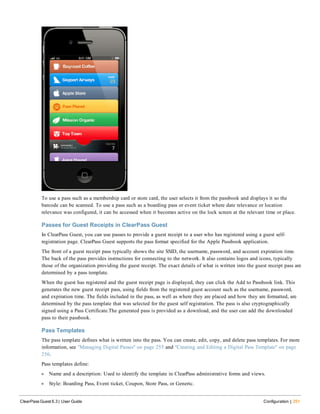
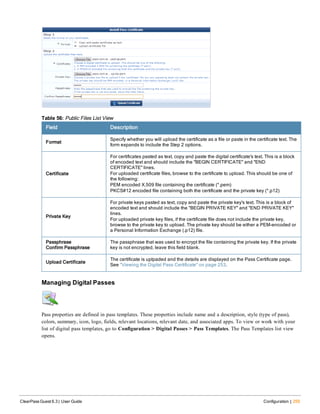
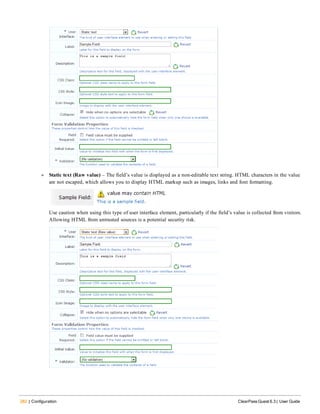
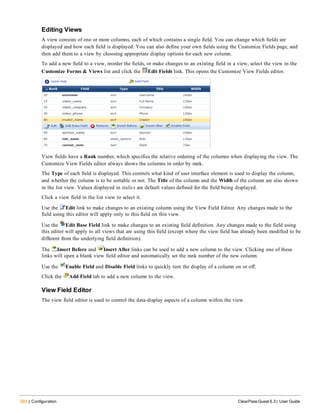
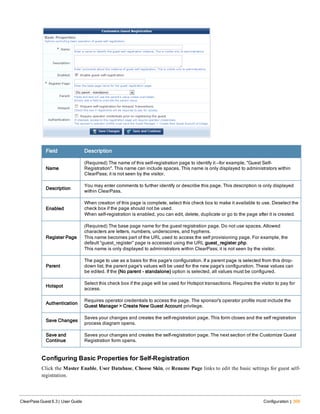
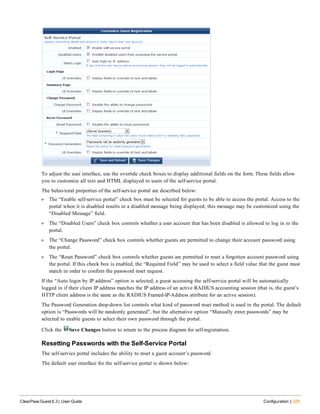
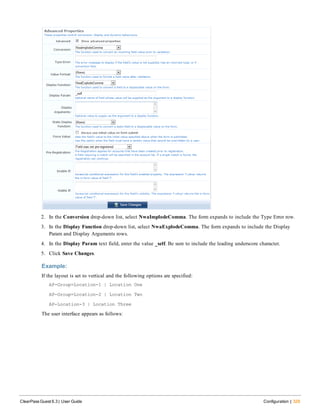
![236 | Configuration ClearPass Guest 6.3 | User Guide
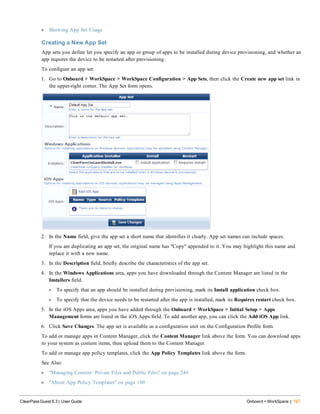
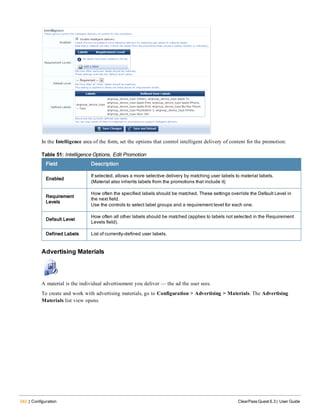
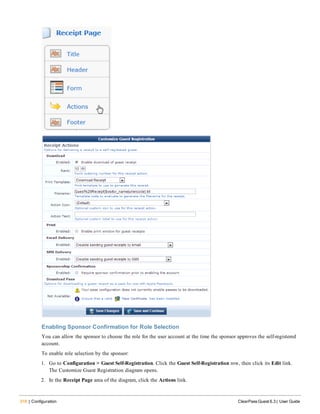
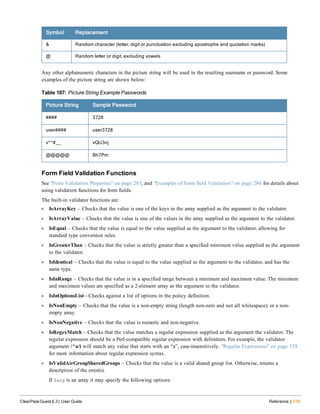
Field Description
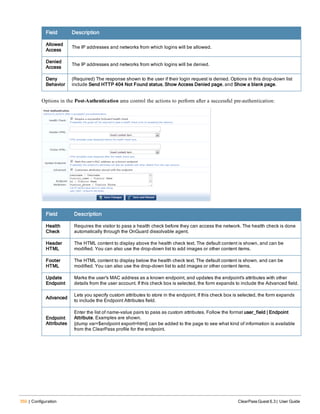
l Large Screens — show on large screens only (laptops, desktops)
Minimum Width Minimum width in pixels for this space.
Maximum Width Maximum width in pixels for this space.
Width Minimum and/or maximum width in pixels for this space.
Minimum Height Minimum height in pixels for this space.
Maximum
Height
Maximum height in pixels for this space.
Height Minimum and/or maximum height in pixels for this space.
Maximum Rows Maximum number of rows.
Maximum
Columns
Maximum number of columns.
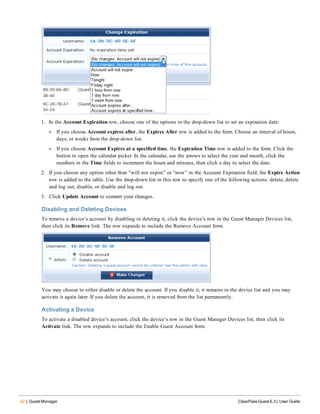
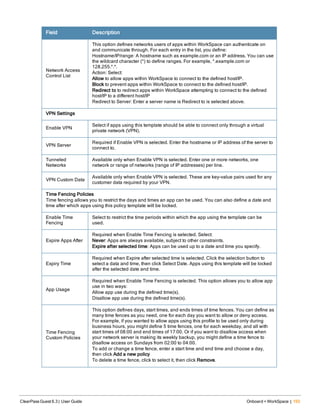
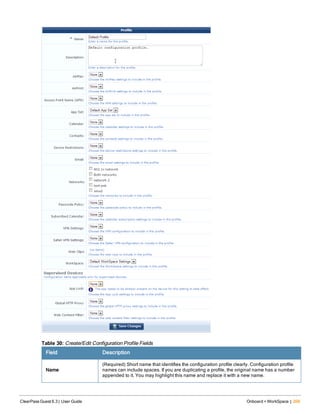
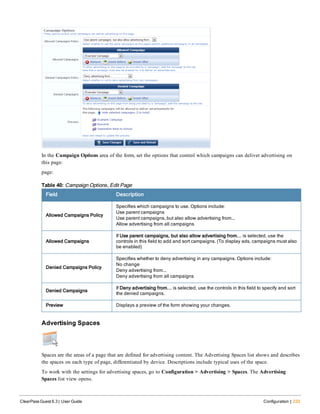
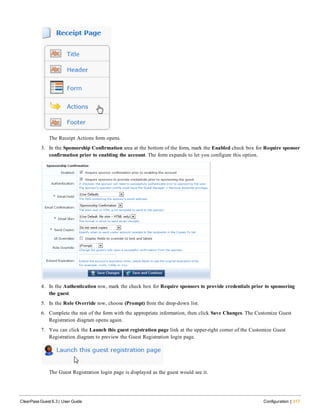
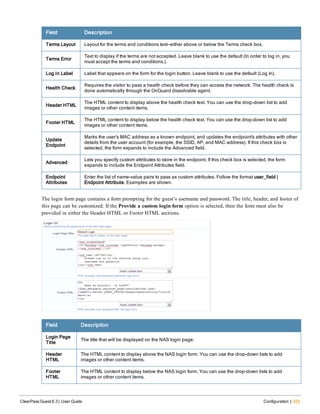
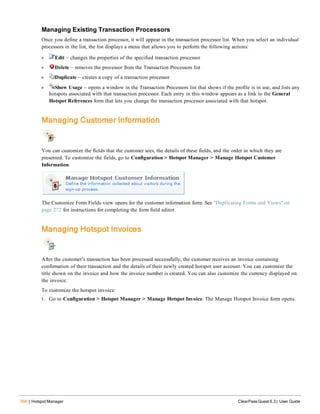
In the Promotional Material Constraints area of the form, set the options that control what can and cannot be shown
in the advertising space:
Field Description
Allowed Material
Select each type of promotional material that should be allowed in this space. Types included are:
l Flash advertisement [Web]
l HTML code (advanced) [Web]
l Image advertisement [Web]
l Text advertisement [Web]
l YouTube video advertisement [Web]
l Text advertisement [SMS]
Table 44: Promotional Material Constraints, Edit Space
Advertising Campaigns
An advertising campaign is the strategy by which you organize the presentation of your ads. It defines which
promotions and materials to deliver, and when they should be delivered.](https://image.slidesharecdn.com/arubacpguestdg6-140605093813-phpapp01/85/Aruba-ClearPass-Guest-6-3-User-Guide-236-320.jpg)
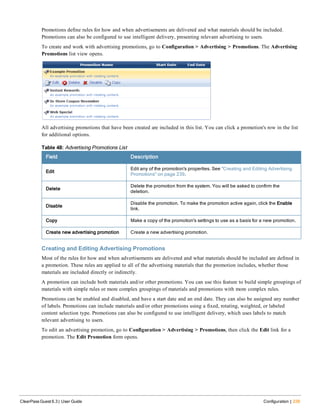

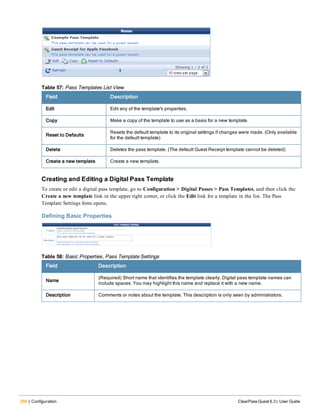


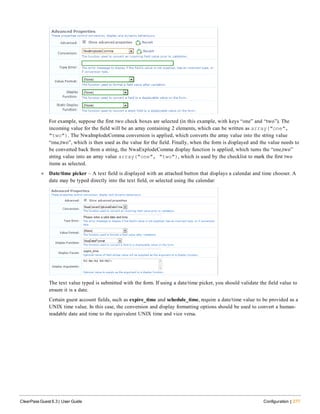

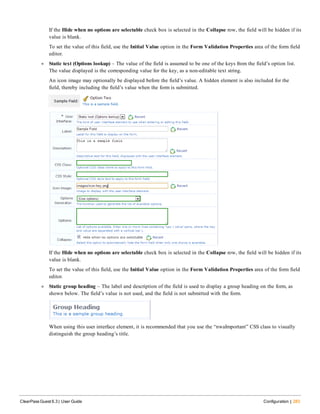
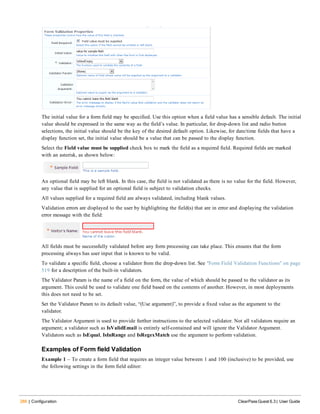

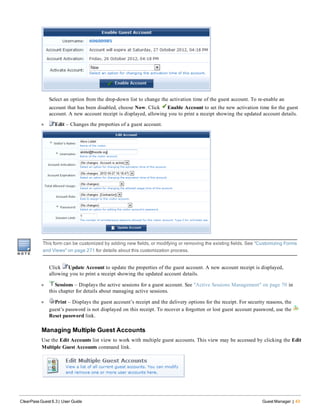
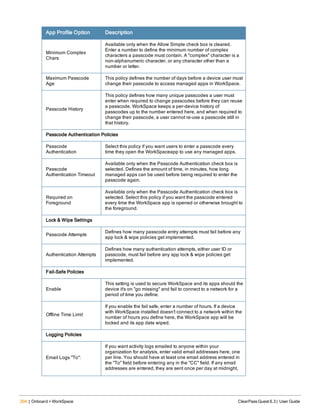
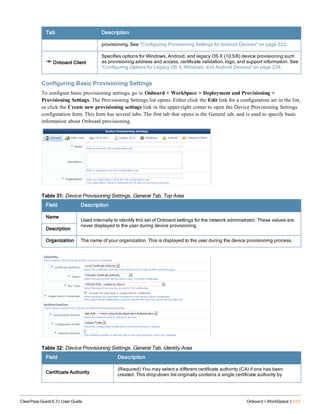
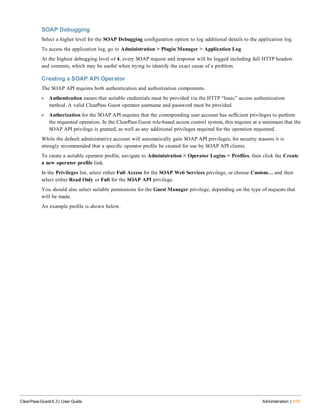
![Field Description
different examples.
Username Format
This field is displayed if the Username Type is set to “Format picture”. It sets the format of
the username to be created. See "Format Picture String Symbols" on page 518 for a list of
the special characters that may be used in the format string. This may be overridden by
using the random_username_picture field.
Initial Sequence
This field contains the next available sequence number for each username prefix that has
been used. Automatic sequence numbering is used when the value of the multi_initial_
sequence field is set to -1. The username prefix is taken from the multi_prefix field when
usernames are automatically generated using the “nwa_sequence” method. You can edit
the values stored here to change the next sequence numbers that will be used. This is an
automatically managed field; in most situations there is no need to edit it.
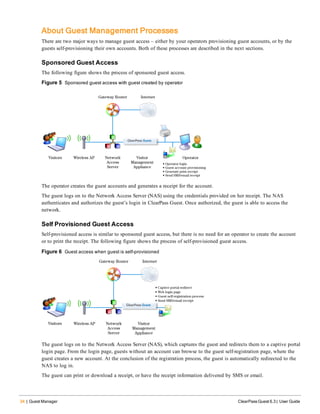
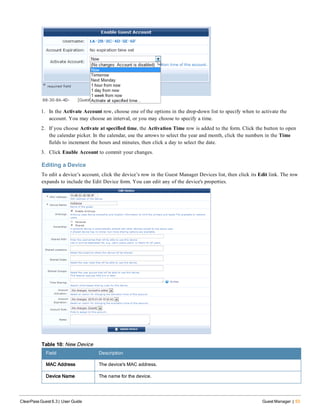
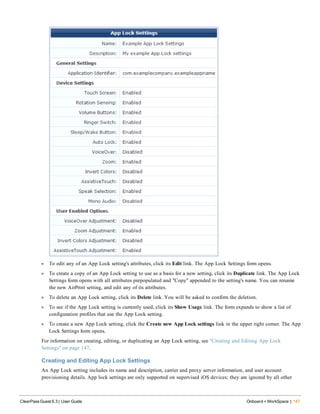
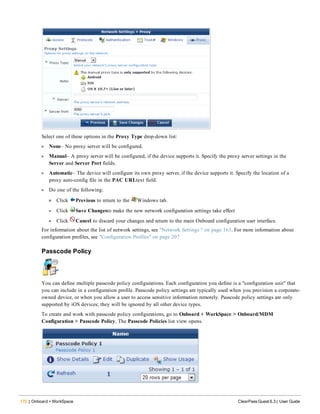
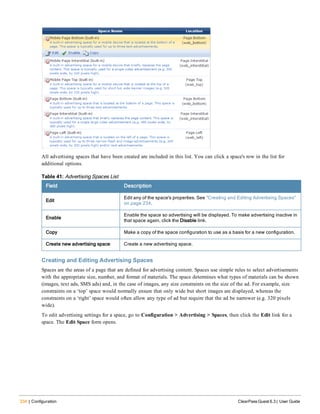
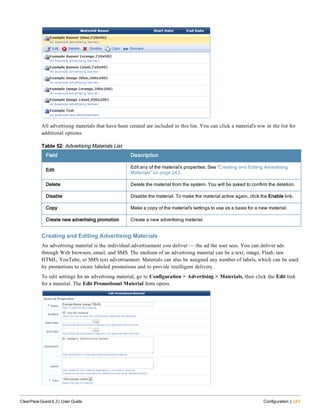
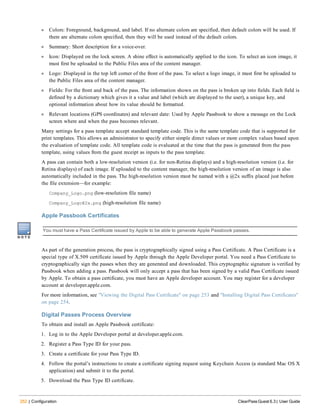
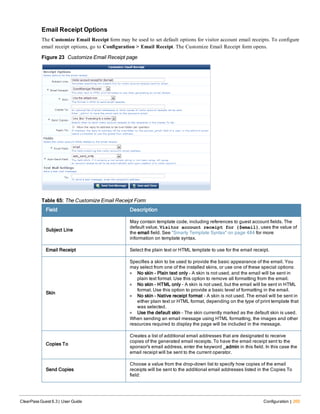
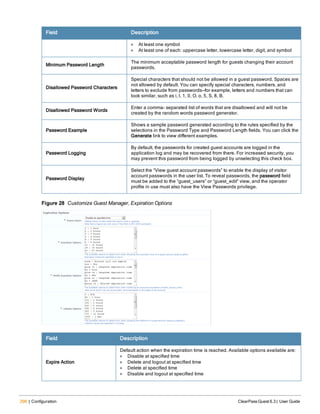
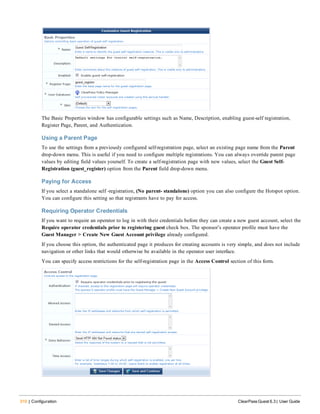
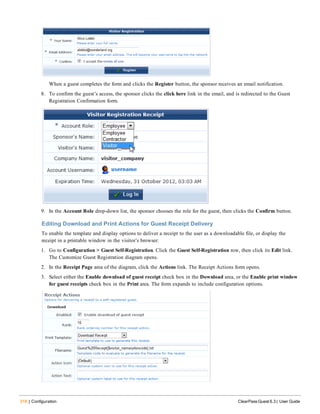
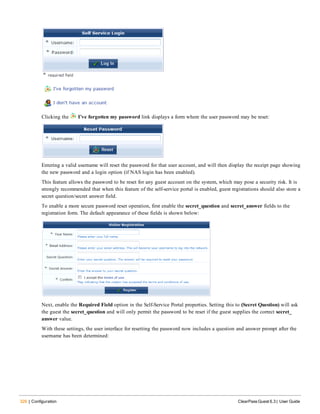
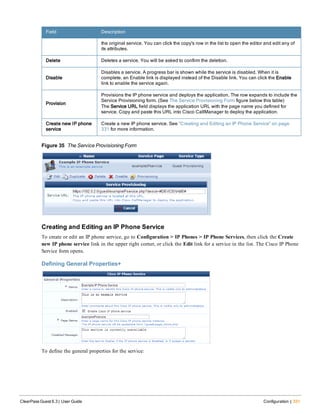
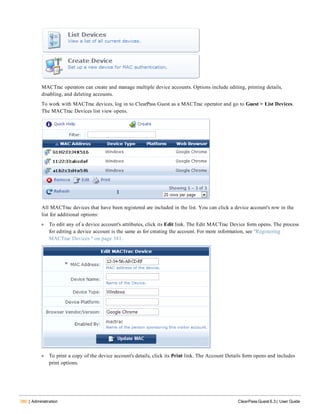
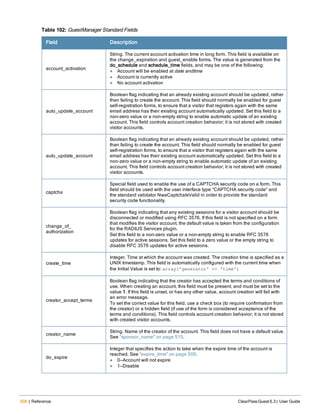
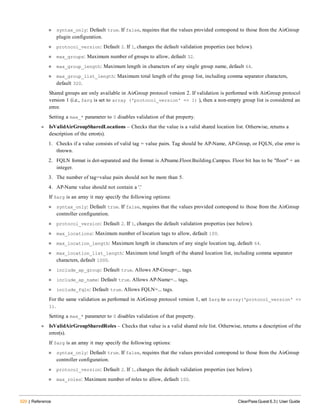
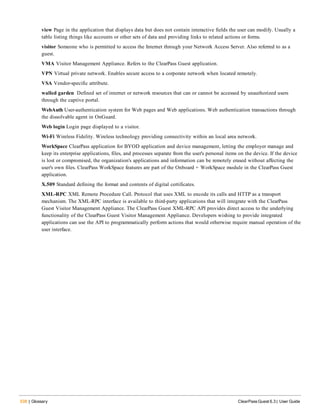
Figure 27 Customize Guest Manager, Password Options
Field Description
Random Password Type
The default method used to generate random account passwords (when
creating groups of accounts). This may be overridden by using the random_
password_method field.
Random Password Length
The default length of random account passwords (when creating groups of
accounts). This may be overridden by using the random_password_length
field.
Password Format
This field is displayed if the Password Type field is set to “Format picture”. It
sets the format of the password to be created. See "Format Picture String
Symbols" on page 518 for a list of the special characters that may be used in
the format string. This may be overridden by using the random_password_
picture field.
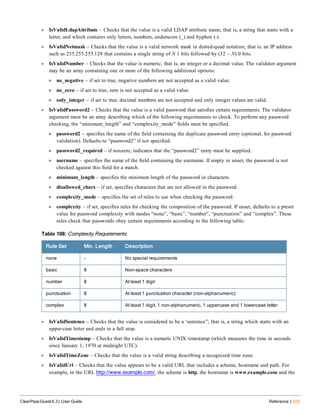
Password Complexity
The policy to enforce when guests change their account passwords using the
guest self-service user interface. Different levels of password complexity can
require guests to select passwords that contain different combinations of
uppercase letters, lowercase letters, digits and symbols (!#$%&()
*+,-./:;<=>?@[]^_{|}~,). The available options for this setting are:
l No password complexity requirement
l At least one uppercase and one lowercase letter
l At least one digit
l At least one letter and one digit
l At least one of each: uppercase letter, lowercase letter, digit
ClearPass Guest 6.3 | User Guide Configuration | 295](https://image.slidesharecdn.com/arubacpguestdg6-140605093813-phpapp01/85/Aruba-ClearPass-Guest-6-3-User-Guide-295-320.jpg)
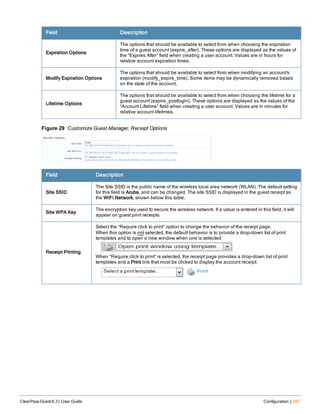
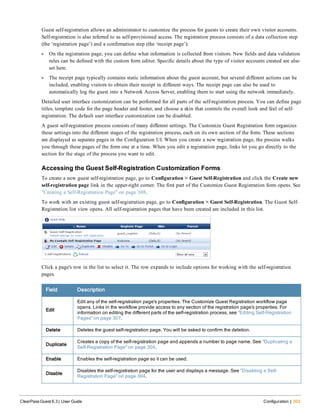
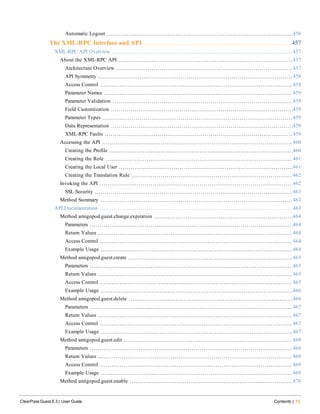
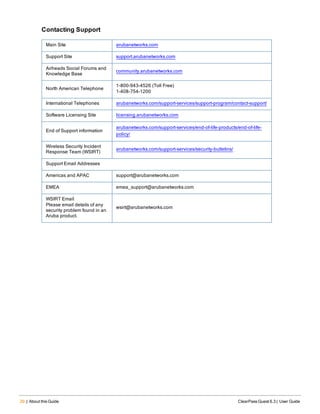
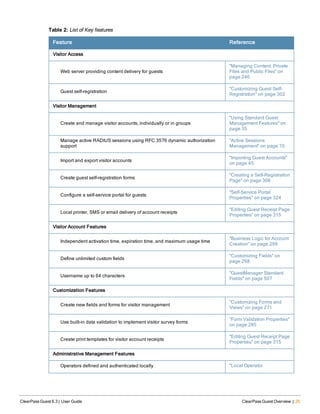
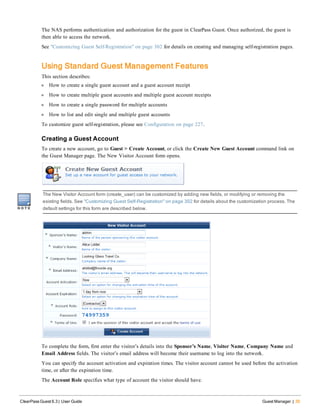
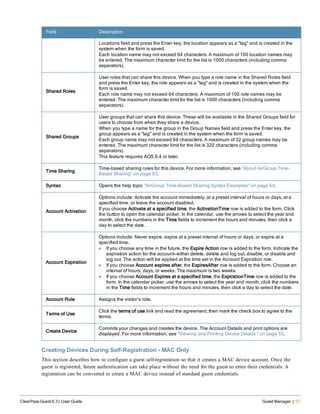
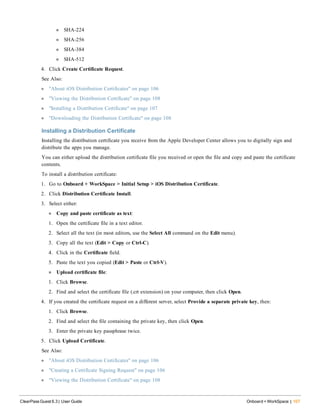
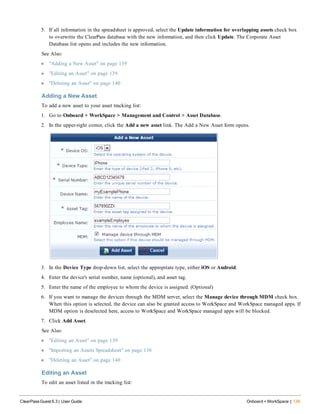
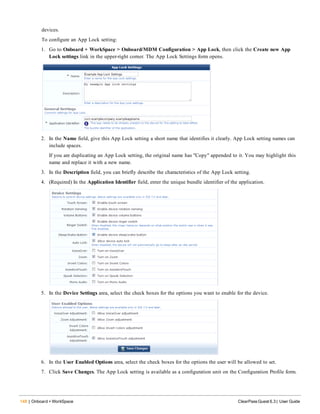
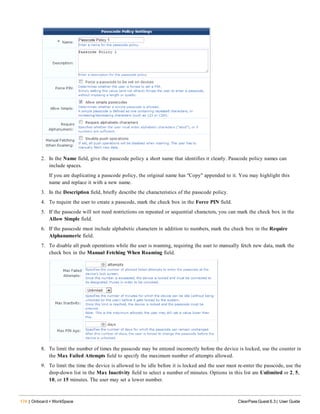
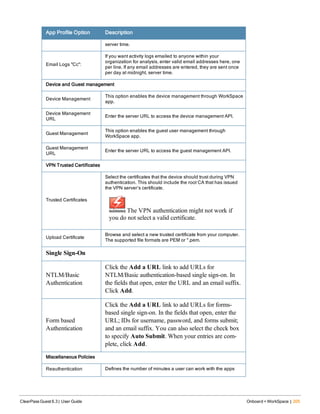
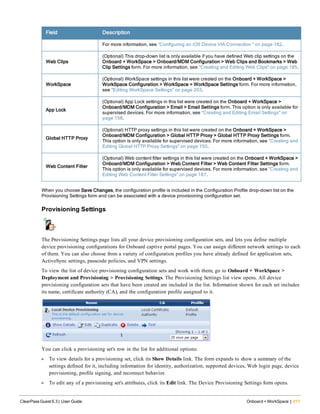
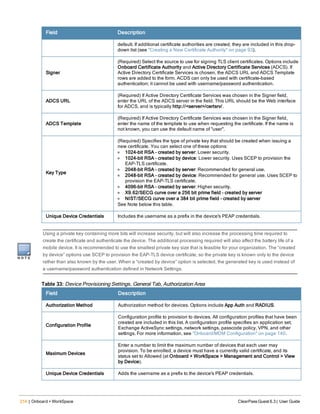
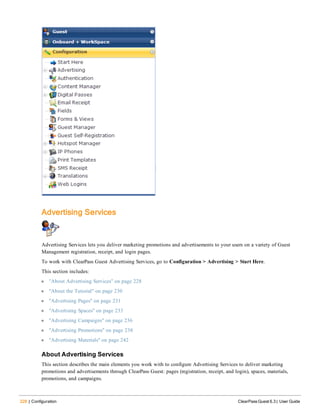
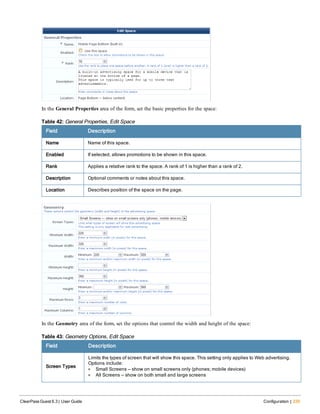
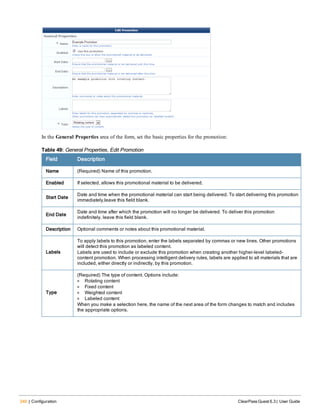
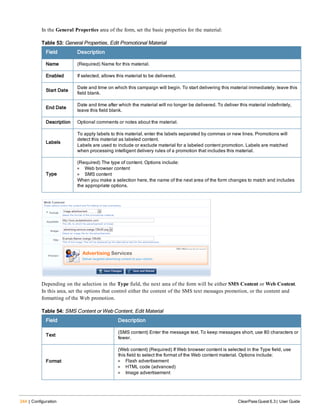
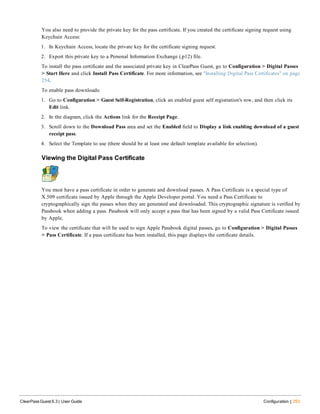
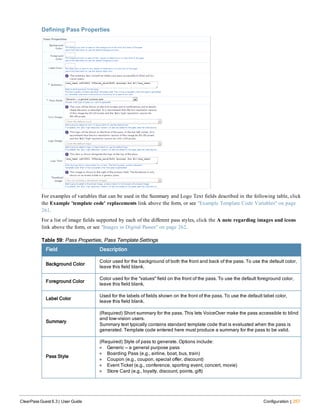
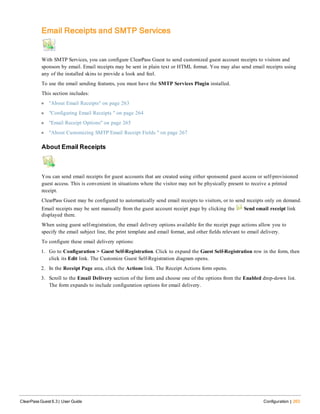
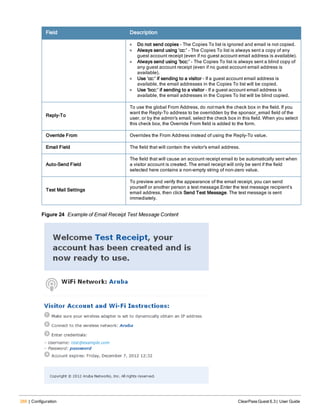
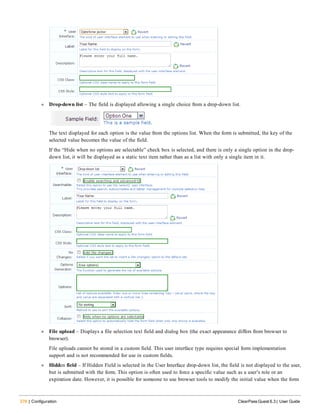
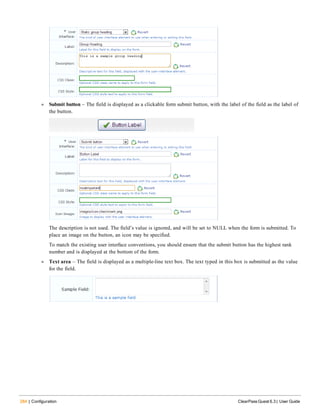
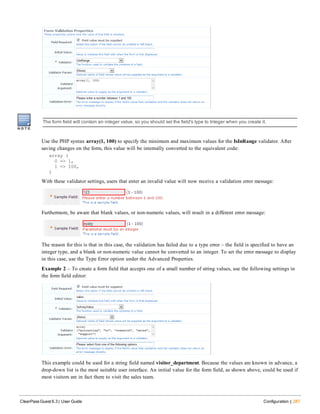
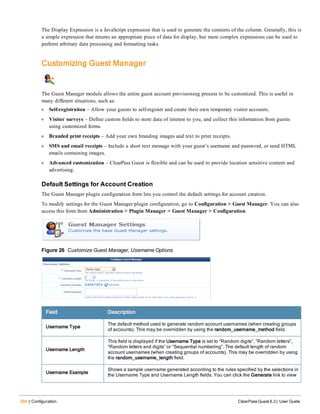
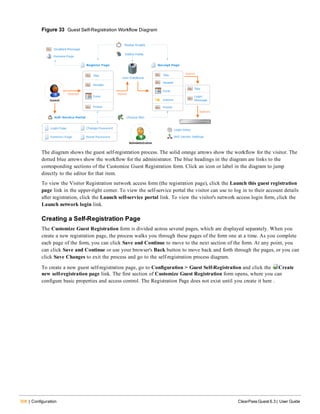
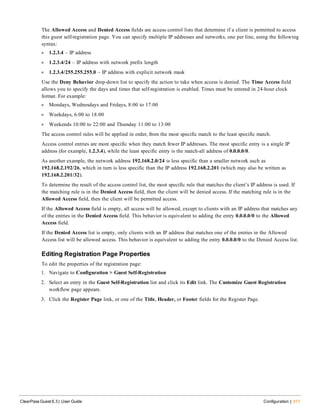
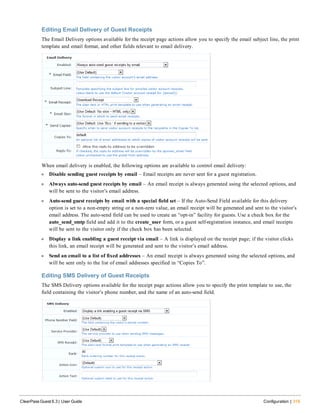
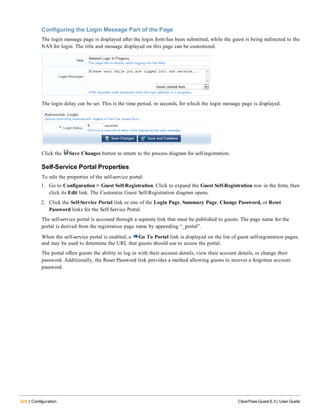
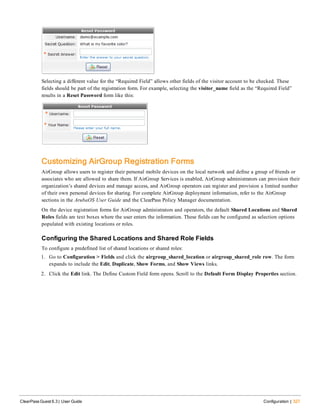
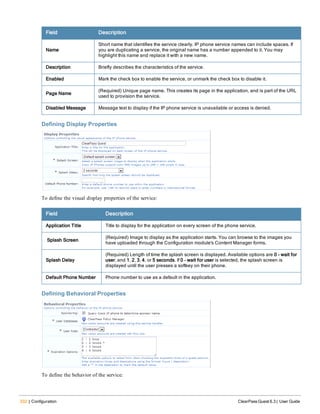
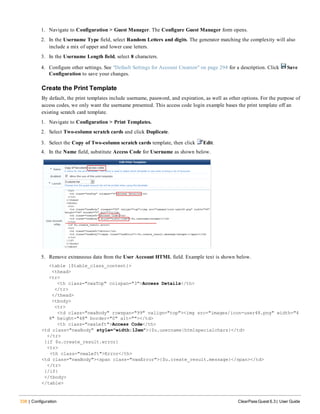
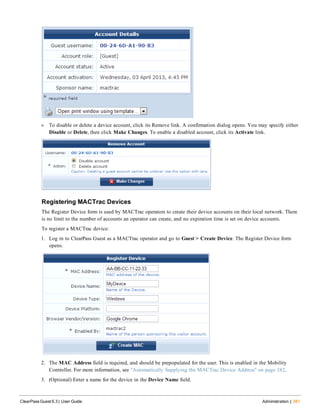
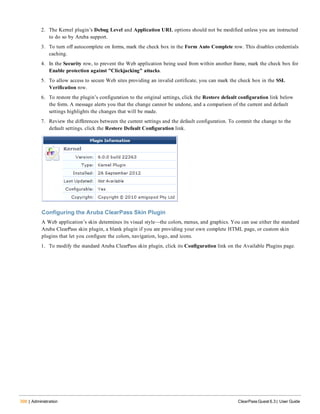
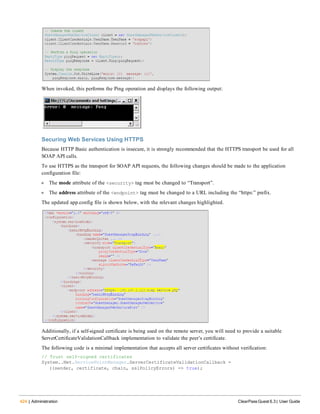
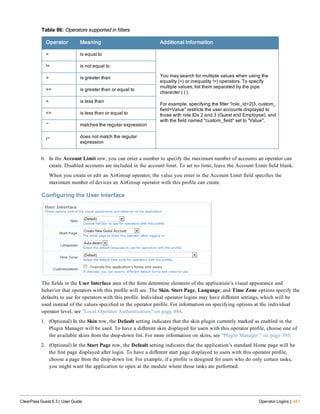
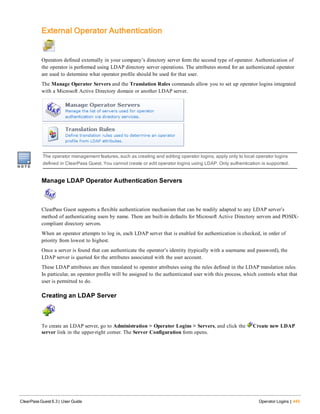
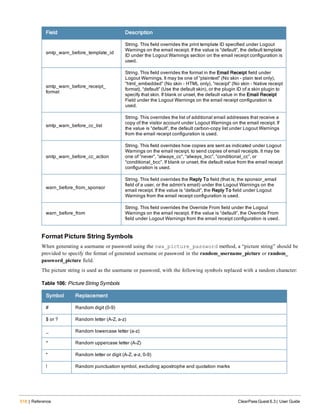
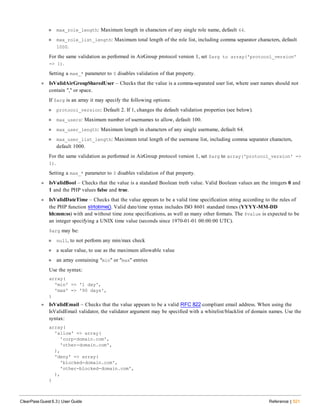
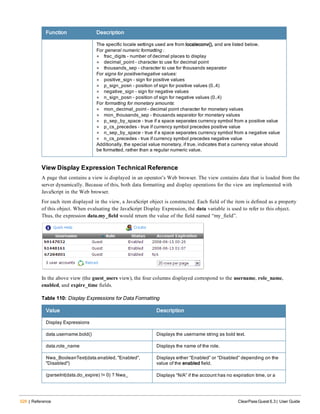
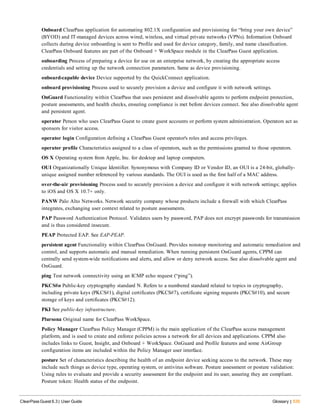
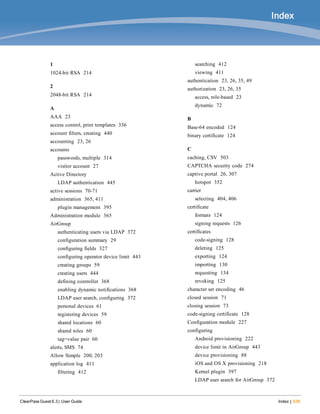
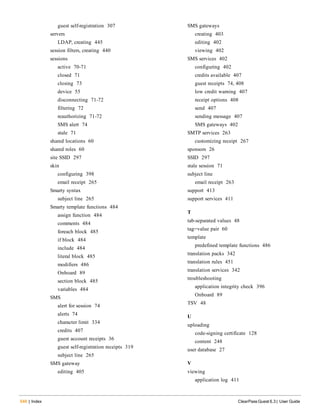
![Figure 32 Sequence Diagram for Guest Self-Registration
In this diagram, the stages in the self-registration process are identified by the numbers in brackets, as follows:
The captive portal redirects unauthorized users [1] to the registration page [2]. After submitting the registration form
[3], the guest account is created and the receipt page is displayed [4] with the details of the guest account. If NAS
login is enabled (the default), submitting the form on this page will display a login message [5] and automatically
redirect the guest to the NAS login [6]. After authentication and authorization the guest’s security profile is applied by
the NAS [7], enabling the guest to access the network [8].
Editing Self-Registration Pages
When you edit a registration page, links let you go directly to the section of the Customize Guest Registration form
that corresponds to the stage of the process you want to edit.
To edit a self-registration page, go to Configuration > Guest Self-Registration, select the page in the list, and click its
Edit link. The Customize Guest Registration workflow diagram opens.
ClearPass Guest 6.3 | User Guide Configuration | 307](https://image.slidesharecdn.com/arubacpguestdg6-140605093813-phpapp01/85/Aruba-ClearPass-Guest-6-3-User-Guide-307-320.jpg)


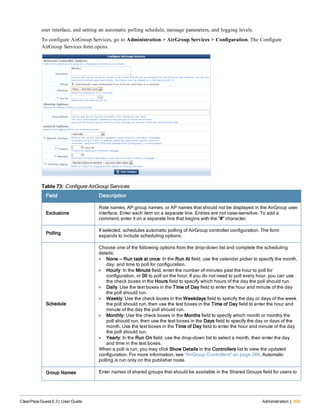
![370 | Administration ClearPass Guest 6.3 | User Guide
Field Description
choose from when they share a device. If additional user groups are also entered by users
when they share a device, the list in the configuration is automatically updated to capture
these fields. Removing a group name from this list does not remove it from other shared group
lists.
When you type a name for the group in the Group Names field, press the Enter key, and click
Save, the group is created in the system and appears as a "tag". For more information, see
"About AirGroup Time-Based Sharing" on page 63.
Each group name may not exceed 64 characters. A maximum of 32 group names may be
entered. The maximum character limit for the list is 320 characters (including comma
separators).
Network Interface
Interface AirGroup will use to send outbound notification messages. To enable using a virtual
IP address, select the appropriate interface. Options include:
l Automatic — Automatically chooses the appropriate source IP address; either the
management port or the data port, depending on the controller's IP address.
l Management port [MGMT] — Always uses the management port as the source address.
l Data/External port [DATA] — Always uses the data port as the source address.
Timeout Number of seconds after which an attempt to send an AirGroup message will time out.
Attempts Maximum number of times the system should attempt to send an AirGroup message.
AirGroup Logging
Choose one of the following options:
l Disabled—Do not log AirGroup related events
l Standard (Recommended)—Log basic information
l Extended—Log additional information
l Debug—Log debug information
l Trace—Log all debug information
See also:
l "AirGroup Diagnostics" on page 370
l "AirGroup Services " on page 365
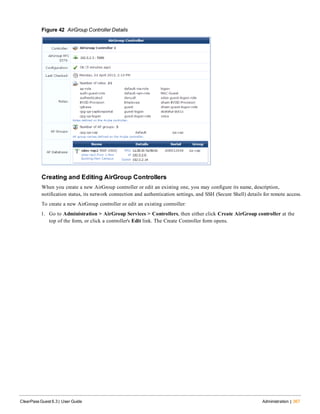
AirGroup Diagnostics
The AirGroup Diagnostics form lets you perform several diagnostic actions. To access this form, go to Administration
> AirGroup Services > Configuration, and then click the AirGroup Diagnostics link in the upper-right corner. The
AirGroup Diagnostics form opens.
When you choose the diagnostic you want to run, the form expands to include fields for identifying information.
When you enter the information and click Submit, the results of the query are displayed below the form. To run
another diagnostic, click the Reset Form link before selecting the diagnostic.](https://image.slidesharecdn.com/arubacpguestdg6-140605093813-phpapp01/85/Aruba-ClearPass-Guest-6-3-User-Guide-370-320.jpg)
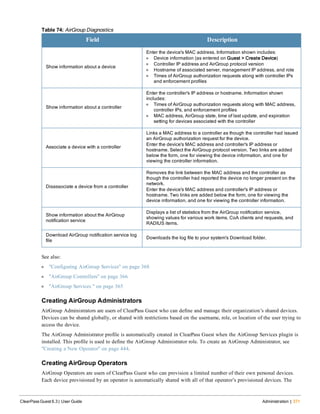

![392 | Administration ClearPass Guest 6.3 | User Guide
RADIUS Certificates
l RADIUS certificates are unsupported.
RADIUS Database Accounting Records
l RADIUS database accounting records are unsupported.
RADIUS Database Connections
l The RADIUS database connection for the local RADIUS server is obsolete.
l For any custom user databases, an authentication source must be created in CPPM.
RADIUS Database User Accounts
l User accounts are migrated and keep the status (disabled, pending, active, expired) they had in 3.9. Any field names
that differ in 6.2 are updated.
l User accounts with the Deleted status are obsolete.
RADIUS Dictionary
l The RADIUS dictionary is unsupported.
RADIUS NAS List
l Each RADIUS network access server (NAS) is imported as a CPPM network access device (NAD) client.
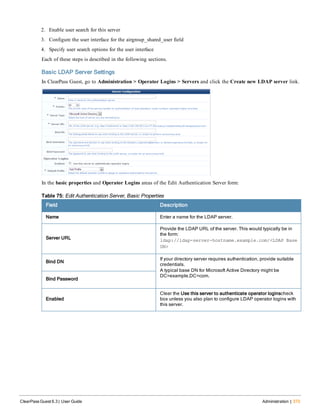
RADIUS Server Configuration
l Non-default RADIUS Server Number settings are obsolete.
l Non-default RADIUS Server Port settings are obsolete.
l Default RADIUS Server Options are not applicable; they are processed and ignored.
l For any non-default RADIUS Server Options, an authentication source must be created in CPPM.
l Non-default Case Insensitive Username settings are obsolete.
l Non-default Include Active Sessions settings are obsolete.
l Non-default EAP Server settings are obsolete.
l Non-default AAA Debug settings are obsolete.
l Non-default Extra RADIUS Attributes settings are obsolete.
l Non-default Interim Accounting settings are obsolete.
l RADIUS Server Configuration is imported (and flagged as imported or action required)
RADIUS User Roles
l For any role that does not have the default attributes ( Reply-Message := <?= $role['name'], the role must be
manually configured in CPPM.
l For any role that had MAC caching enabled, the role must be manually configured in CPPM.](https://image.slidesharecdn.com/arubacpguestdg6-140605093813-phpapp01/85/Aruba-ClearPass-Guest-6-3-User-Guide-392-320.jpg)


![The condition tested in the {if} … {/if} block should be a valid PHP expression. The {else} tag does not require a
closing tag.
Script Blocks
The brace characters { and } are specially handled by the Smarty template engine. Using text that contains these
characters, such as CSS and JavaScript blocks, requires a Smarty block {literal} … {/literal}:
<script type="text/javascript" language="JavaScript">
{literal}
<!--
function my_function() {
// some Javascript code here
}
// -->
{/literal}
</script>
Failing to include the {literal} tag will result in a Smarty syntax error when using your template. Single instances of a
{ or } character can be replaced with the Smarty syntax {ldelim} and {rdelim} respectively.
Repeated Text Blocks
To repeat a block of text for each item in a collection, use the {section} … {/section} tag:
{section loop=$collection name=i}
<tr>
<td class="nwaBody">
{$collection[i].name}
</td>
</tr>
{sectionelse}
<!-- included if $collection is empty -->
{/section}
The content after a {sectionelse} tag is included only if the {section} block would otherwise be empty.
Foreach Text Blocks
An easier to use alternative to the {section} … {/section} tag is to use the {foreach} … {/foreach} block:
{foreach key=key_var item=item_var from=$collection}
{$key_var} = {$item_var}
{foreachelse}
<!—included if $collection is empty -->
{/foreach}
The advantage of this syntax is that each item in the collection is immediately available as the named item variable, in
this example {$item_var}. This construct is also useful when iterating through associative arrays indexed by key, as
the key is immediately available with each item.
A name= attribute may be supplied with the opening {foreach} tag. When a name is supplied, the following
additional Smarty variables are available for use inside the {foreach} … {/foreach} block:
l {$smarty.foreach.name.first} – true if the item being processed is the first item in the collection
l {$smarty.foreach.name.last} – true if the item being processed is the last item in the collection
l {$smarty.foreach.name.index} – counter for the current item, starting at 0 for the first item
l {$smarty.foreach.name.iteration} – counter for the current item, starting at 1 for the first item
l {$smarty.foreach.name.total} – value indicating the total number of items in the collection
The content after a {foreachelse} tag is included only if the {foreach} block would otherwise be empty.
ClearPass Guest 6.3 | User Guide Reference | 485](https://image.slidesharecdn.com/arubacpguestdg6-140605093813-phpapp01/85/Aruba-ClearPass-Guest-6-3-User-Guide-485-320.jpg)

![492 | Reference ClearPass Guest 6.3 | User Guide
'nasporttype' => '',
'calledstationid' => '',
'callingstationid' => '',
'acctstarttime' => '1249258943',
'connectinfo_start' => '',
'acctstoptime' => NULL,
'connectinfo_stop' => NULL,
'acctsessiontime' => 0,
'acctinputoctets' => 0,
'acctoutputoctets' => 0,
'acctterminatecause' => NULL,
'servicetype' => '',
'framedipaddress' => '192.168.2.3',
'framedprotocol' => '',
'acctauthentic' => '',
'nastype' => 'cisco_3576',
'nas_name' => 'centos',
'total_traffic' => 0,
'state' => 'stale',
'traffic_input' => 0,
'traffic_output' => 0,
'traffic_usage' => 0,
'session_time' => 29641260,
)
GetIpAddressCurrentSession()
GetIpAddressCurrentSession($ip_addr = null)
Looks up the current (most recent) active session for the specified client IP address. If ip_addr is not specified, it
defaults to the current value of $smarty.server.REMOTE_ADDR, which may not be the same value as the IP address of
the session if there is a NAT.
See "GetCurrentSession()" on page 491 for details of the return value.
GetIpAddressSessions()
GetIpAddressSessions($ip_addr, $from_time = null, $to_time = null)
Calculate the number of sessions for accounting records matching a specific IP address. The IP address attribute is
looked up automatically from the RADIUS Access-Request (Framed-IP-Address attribute).
See "GetTraffic()" on page 494 for details on how to specify the time interval.
See "GetIpAddressTraffic()" on page 492 for additional details on the $ip_addr argument.
GetIpAddressTime()
GetIpAddressTime($ip_addr, $from_time = null, $to_time = null)
Calculate sum of session times in a specified time interval. The IP address is looked up automatically from the
RADIUS Access-Request (Framed-IP-Address attribute).
See "GetTraffic()" on page 494 for details on how to specify the time interval.
See "GetIpAddressTraffic()" on page 492 for additional details on the $ip_addr argument.
GetIpAddressTraffic()
GetIpAddressTraffic($ip_addr, $from_time = null, $to_time = null, $in_out = null)
Calculate sum of traffic counters in a time interval. The IP address used is determined based on the context. If
processing a RADIUS Access-Request, the IP address is determined using the Framed-IP-Address attribute. If processing
a HTTP request, the current client IP address is assumed
(from $_SERVER['REMOTE_ADDR']).](https://image.slidesharecdn.com/arubacpguestdg6-140605093813-phpapp01/85/Aruba-ClearPass-Guest-6-3-User-Guide-492-320.jpg)
![496 | Reference ClearPass Guest 6.3 | User Guide
The “id” parameter is the ID of the HTML element to which you will add ‘bling’ effects The “type” parameter is the
kind of bling desired:
l “fade”: element smoothly fades in and out
l “blink”: element blinks slowly
nwa_makeid
{nwa_makeid …}
Smarty registered template function. Creates a unique identifier and assigns it to a named page variable. Identifiers are
unique for a given page instantiation.
Usage example:
{nwa_makeid var=some_id}
The “var” parameter specifies the page variable that will be assigned.
Alternative usage:
{nwa_makeid var=some_id file=filename}
The “file” parameter specifies a file which contains a unique ID. This allows issued IDs to be unique across different
page loads. To return the value rather than assign it to a variable, use the syntax:
{nwa_makeid [file=filename] output=1}
Otherwise, this template function does not generate any output.
nwa_nav
{nwa_nav} … {/nwa_nav}
Smarty registered block function. Defines a block area for navigation, a control, or generates navigation control HTML
of a particular type.
Blocks are individual components of the navigation area, which basically consist of HTML. Blocks for actual
navigation items have substitution tags in the form @tagname@.
The recognized tags are described in the table below.
Tag Description
@a@ <a href="navigation_href">navigation name</a>
@name@ navigation item name (HTML safe)
@jsname@ navigation item name (JavaScript quoted)
@href@ navigation item hyperlink
@jshref@ navigation item hyperlink (JavaScript quoted)
@icon@ navigation item icon, if specified
Table 97: Navigation Tags
When used with the “block” parameter, the {nwa_nav} control does not generate any HTML. When used with the
“type” parameter, the {nwa_nav} control uses the previously defined blocks to generate the HTML navigation area.
The following types are recognized:
l simple – Only the current L1 item has L2 items, L3 only when L2 active
l all-l1 – All current L1 items are shown to L3, otherwise L1 only](https://image.slidesharecdn.com/arubacpguestdg6-140605093813-phpapp01/85/Aruba-ClearPass-Guest-6-3-User-Guide-496-320.jpg)


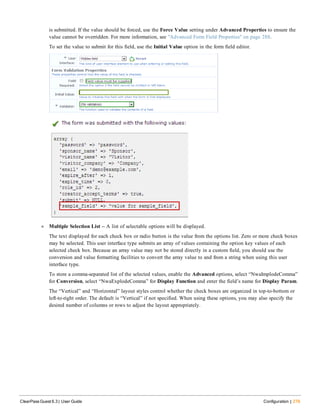
![510 | Reference ClearPass Guest 6.3 | User Guide
Field Description
specified as a UNIX timestamp.
Setting an expire_time value also requires a non-zero value to be set for the do_
expire field; otherwise, the account expiration time will not be used. Set this field to
0 to disable this account expiration timer.
If the expire_timezone field is used in conjunction with expire_time and a time
zone and date are selected, the date calculation is adjusted relative to the time
zone.
expire_timezone
String. Provides a drop-down list of time zones to use in conjunction with expire_
time and start_time. When expire_timezone is selected and a date is chosen, the
date is adjusted to be relative to the time zone.
By default, expire_timezone uses the NwaGenerateTimeZoneList options
generator. To use a smaller subset of time zones, change the Options Generator
to (Use options) and provide your "value | name" pairs. Please reference the
default list for valid time zone values.
expire_usage
Integer. The total time period in seconds for which the account may be used.
Usage is calculated across all accounting sessions with the same username. Set
this field to 0 to disable this account expiration timer.
http_user_agent
String. Identifies the Web browser that you are using. This tracks user’s browsers
when they are registering. This is stored with the user’s account.
id String. Internal user ID used to identify the guest account to the system.
ip_address
String. The IP address to assign to stations authenticating with this account. This
field may be up to 20 characters in length. The value of this field is not currently
used by the system. However, a RADIUS user role may be configured to assign IP
addresses using this field by adding the Framed-IP-Address attribute, and setting
the value for the attribute to: <?= $user["ip_address"]
modify_expire_postlogin
String Value indicating how to modify the expire_postlogin field.
This field is only of use when editing a visitor account. It may be set to one of the
following values:
l “expire_postlogin” to set the post-login expiration time to the value in the
expire_postlogin field;
l “plus X” or “minus X”, where X is a time measurement, to extend or reduce the
post-login expiration timer by X (minutes, but may have a “ywdhms” suffix to
indicate years, weeks, days, hours, minutes, seconds respectively);
l A number, to set the post-login expiration time to the value specified;
l Any other value to leave expire_postlogin unmodified.
This field controls account modifications; it is not stored with the visitor account.
modify_expire_time
String. Value indicating how to modify the expire_time field.
This field may be provided when creating or editing a visitor account. It may be set
to one of the following values:
l “none” to disable the account expiration timer (do_expire and expire_time will
both be set to 0);
l “now” to disable the account immediately;
l “expire_time” to use the expiration time specified in the expire_time field;
l “expire_after” to set the expiration time to the current time, plus the number of
hours in the expire_after field;
l “plus X” or “minus X”, where X is a time measurement, to extend or reduce the
expiration time by X (hours, but may have a “ywdhms” suffix to indicate years,
weeks, days, hours, minutes, seconds respectively);
l A time measurement “X”, to set the expiration time to the current time plus X;
l Any other value to leave expire_time unmodified.](https://image.slidesharecdn.com/arubacpguestdg6-140605093813-phpapp01/85/Aruba-ClearPass-Guest-6-3-User-Guide-510-320.jpg)
![512 | Reference ClearPass Guest 6.3 | User Guide
Field Description
the random_username_method field is set to “nwa_sequence”.
netmask
String. Network address mask to use for stations using the account. This field may
be up to 20 characters in length. The value of this field is not currently used by the
system. However, a RADIUS user role may be configured to assign network
masks using this field by adding the Framed-IP-Netmask attribute, and setting the
value for the attribute to: <?= $user["netmask"]
no_password
Boolean. If set, prevents a user from changing their own password using the guest
self-service portal. Set this field to a non-zero value or a non-empty string to
disable guest-initiated password changes. The default is to allow guest-initiated
password changes, unless this field is set.
no_portal
Boolean. If set, prevents a user from logging into the guest service portal. Set this
field to a non-zero value or a non-empty string to disable guest access to the self-
service portal. The default is to allow guest access to the self-service portal, unless
this field is set.
no_warn_before
Boolean. User does not receive a logout expiration warning. The admin or user
can opt out of this option by setting the field to 1.
notes
String. Comments or notes stored with the account. This field may be up to 255
characters in length.
num_accounts
Integer. The number of accounts to create when using the create_multi form. This
field controls account creation behavior; it is not stored with created visitor
accounts.
password String. Password for the account. This field may be up to 64 characters in length.
password2
String. Password for the account. If this field is set, its value must match the value
of the password field for the account to be created or updated. This can be used to
verify that a password has been typed correctly. This field controls account
creation and modification behavior; it is not stored with created or modified visitor
accounts.
password_action
String. Controls the password changing behavior for a guest account. This field
may be set to one of the following values:
l empty string – Default behavior; that is, guests are not required to change their
password
l deny – Prevents the guest from changing their password
l first – Requires the guest to change their password on their first login
l next – Requires the guest to change their password on their next login
l recur – Require the guest to change their password on a regular schedule (as
specified by the password_action_recur field)
l recur_next – Require the guest to change their password on their next (or first)
login, and then on a regular schedule (as specified by the password_action_
recur field)
If the guest is required to change their password, this will take place during a
network login, before the guest is redirected to the NAS for login. Guest password
changes are only supported for Web login pages and guest self-registration pages
that have the “Perform a local authentication check” option enabled.
The default behavior is to leave guest passwords under the control of the guest.
With the default behavior, guests are not prevented from changing their password,
but are also not required to change it on any particular schedule.
password_action_recur
String. Specifies a date or relative time, after which a guest will be required to
change their password. Using this field also requires the password_action field to](https://image.slidesharecdn.com/arubacpguestdg6-140605093813-phpapp01/85/Aruba-ClearPass-Guest-6-3-User-Guide-512-320.jpg)

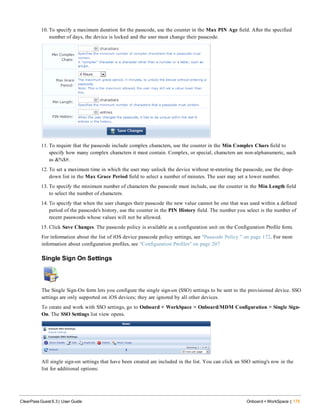
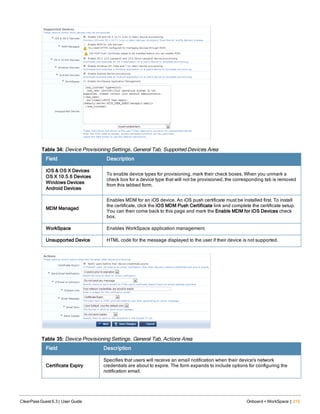
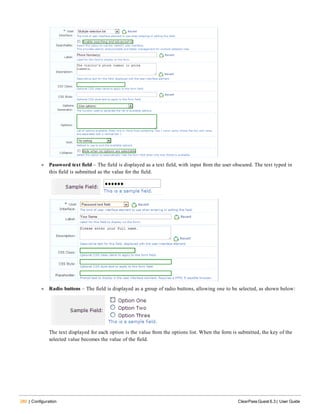
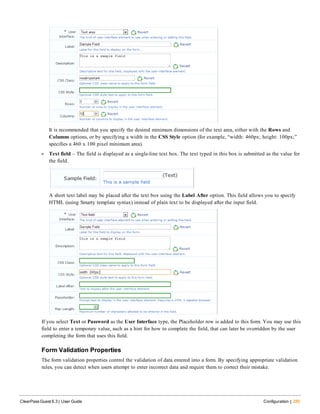
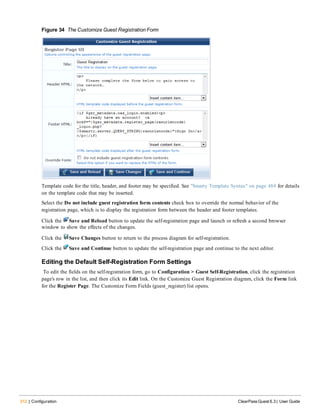
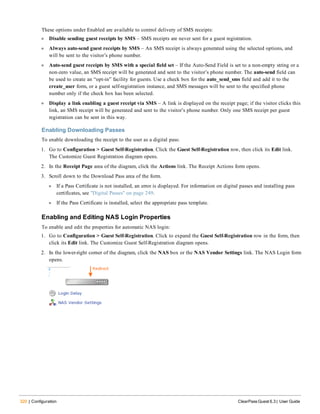
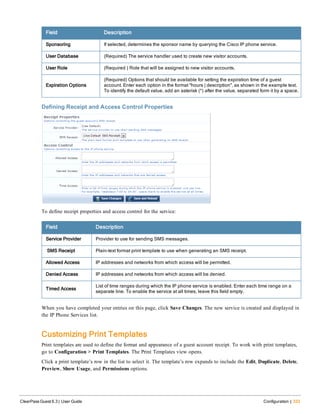
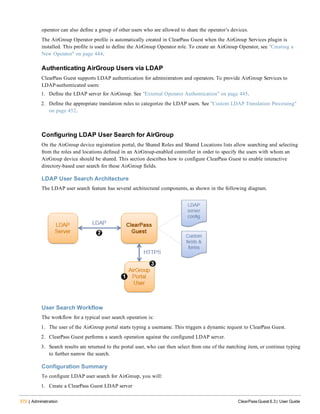
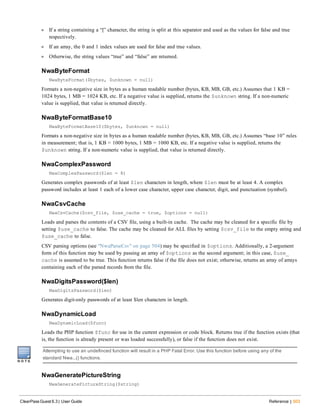
![Value Description
DateFormat(data.expire_time, "%Y-%m-%d
%H:%M") : "N/A"
date and time string if an expiration time has been set.
JavaScript functions
Nwa_BooleanText(
value, if_true, if_false[, if_undefined])
Returns the value of if_true or if_false depending on
whether the value evaluates to a Boolean true or false,
respectively. If the value has an undefined type (in other
words. has not been set), and the if_undefined parameter
was provided, returns if_undefined.
Nwa_DateFormat(value, format)
Converts a numerical value (UNIX time) to a string using
the date and time format string format. The format string
uses similar syntax to the NwaDateFormat() function. See
"Date/Time Format String Reference" on page 501 for a full
list of the supported format strings.
Nwa_FloatFormat(value, decimals)
Converts a numerical value to a string, with the number of
decimal places specified in decimals.
Nwa_MinutesToNatural(value)
Converts a numeric value measuring a time in minutes to
a natural time representation (such as “2 minutes”, “3
hours”, “11 days”).
Nwa_NumberFormat(value[, if_undefined])
Nwa_NumberFormat(
value, decimals)Nwa_NumberFormat(
value, decimals, dec_point, thousands_sep[, if_
undefined])
Converts a numerical value to a string. If the value has an
undefined type (in other words, has not been set), and the
if_undefined parameter was provided, returns if_undefined.
Otherwise, the number is converted to a string using the
number of decimal places specified in decimals (default 0),
the decimal point character in dec_point (default “.”), and
the thousands separator character in thousands_sep
(default “,”).
Nwa_TrimText(value, length)
Trims excessively long strings to a maximum of length
characters, appending an ellipsis (“…”) if the string was
trimmed.
Nwa_ValueText(value[, if_undefined])
If the value has an undefined type (in other words, has not
been set), and the if_undefined parameter was provided,
returns if_undefined, or a HTML non-breaking space
(“ ”) otherwise. Otherwise, the value is converted to a
string for display.
LDAP Standard Attributes for User Class
The following list provides some of the attributes for the LDAP User class. For a complete list you should consult
http://msdn2.microsoft.com/en-us/library/ms683980(VS.85).aspx#windows_2000_server_attributes.
l userPrincipalName: The userPrincipalName is a single-valued and indexed property that is a string that specifies
the user principal name (UPN) of the user. The UPN is an Internet-style login name for the user based on the
Internet standard RFC 822. The sAMAccountName property is a single-valued property that is the logon name The
objectSid property is a single-valued property that specifies the security identifier (SID) of the user.
l accountExpires: The accountExpires property specifies when the account will expire.
l badPasswordTime: The badPasswordTime property specifies when the last time the user tried to log onto the
account using an incorrect password.
ClearPass Guest 6.3 | User Guide Reference | 527](https://image.slidesharecdn.com/arubacpguestdg6-140605093813-phpapp01/85/Aruba-ClearPass-Guest-6-3-User-Guide-527-320.jpg)
![528 | Reference ClearPass Guest 6.3 | User Guide
l badPwdCount: The badPwdCount property specifies the number of times the user tried to log on to the account
using an incorrect password.
l codePage: The codePage property specifies the code page for the user's language of choice. This value is not used
by Windows 2000.
l countryCode: The countryCode property specifies the country code for the user's language of choice. This value is
not used by Windows 2000.
l lastLogoff: The lastLogoff property specifies when the last logoff occurred.
l lastLogon: The lastLogon property specifies when the last logon occurred.
l logonCount: The logonCount property counts the number of successful times the user tried to log on to this
account.
l mail: The mail property is a single-valued property that contains the SMTP address for the user (such as
demo@example.com).
l memberOf: The memberOf property is a multi-valued property that contains groups of which the user is a direct
member.
l primaryGroupID: The primaryGroupID property is a single-valued property containing the relative identifier (RID)
for the primary group of the user.
l sAMAccountType: The sAMAccountType property specifies an integer that represents the account type.
l unicodePwd: The unicodePwd property is the password for the user.
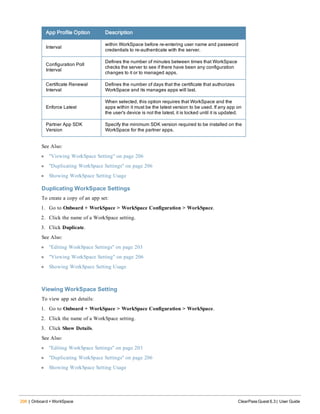
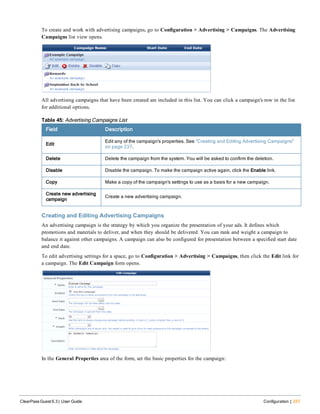
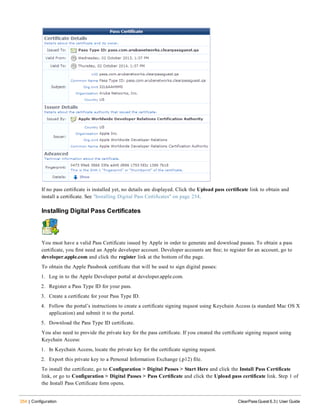
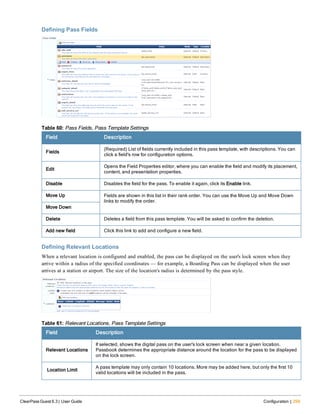
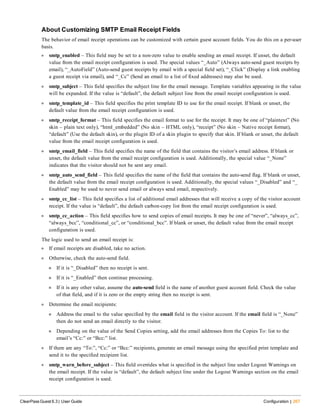
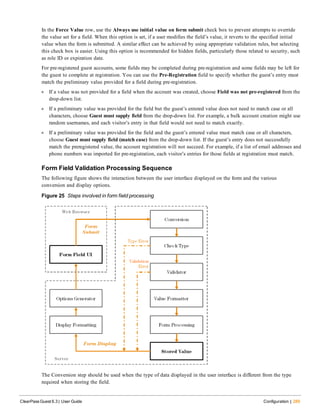
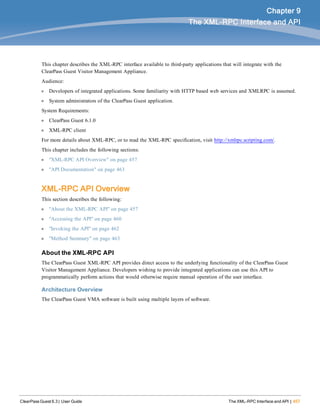
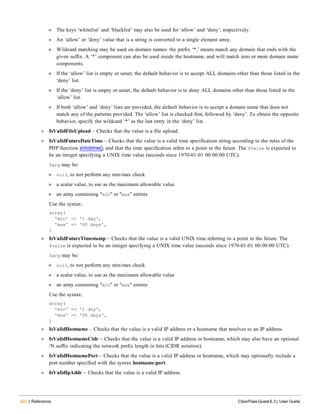
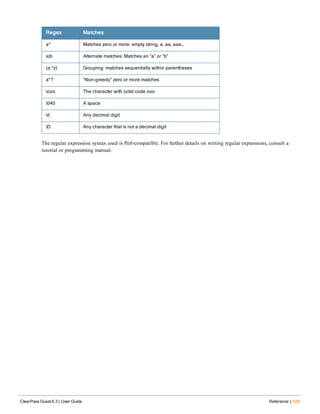
Regular Expressions
The characters shown in Table 111 can be used to perform pattern matching tasks using regular expressions.
Regex Matches
a Any string containing the letter “a”
^a Any string starting with “a”
^a$ Only the string “a”
a$ Any string ending with “a”
. Any single character
. A literal “.”
[abc] Any of the characters a, b, or c
[a-z0-9A-Z] Any alphanumeric character
[^a-z] Any character not in the set a through z
a? Matches zero or one “a”
a+ Matches one or more: a, aa, aaa, …
Table 111: Regular Expressions for Pattern Matching](https://image.slidesharecdn.com/arubacpguestdg6-140605093813-phpapp01/85/Aruba-ClearPass-Guest-6-3-User-Guide-528-320.jpg)


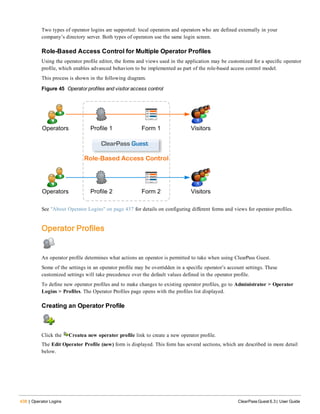
This document provides an overview and user guide for ClearPass Guest 6.3. It includes sections on guest management processes, device management, onboarding and workspace features, digital passes, email receipts, customizing forms and interfaces, hotspot management, administration settings, and more. The document outlines the key capabilities and features of ClearPass Guest and provides instructions and examples for common configuration and customization tasks.