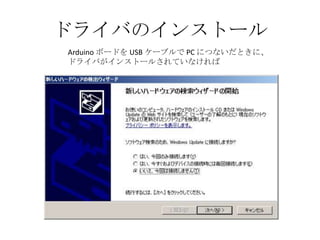
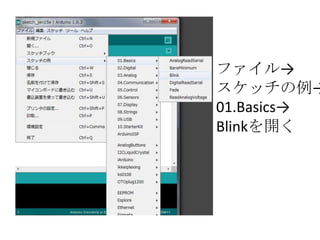
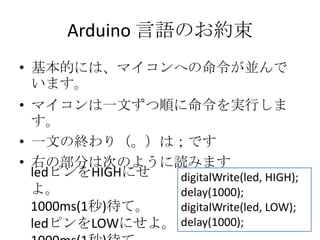
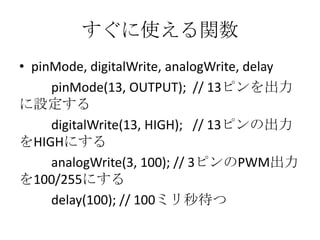
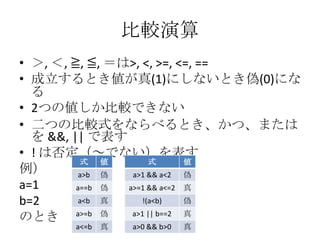
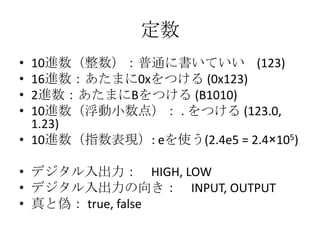
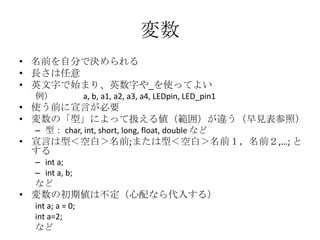
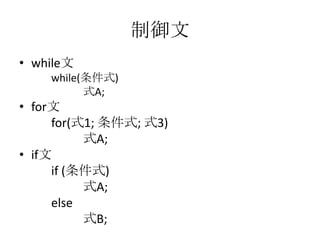
Blinkスケッチ
/*
Blink
Turns on anLED on for one second, then off for one second, repeatedly.
This example code is in the public domain.
*/
// Pin 13 has an LED connected on most Arduino boards.
// give it a name:
int led = 13;
// the setup routine runs once when you press reset:
void setup() {
// initialize the digital pin as an output.
pinMode(led, OUTPUT);
}
// the loop routine runs over and over again forever:
void loop() {
digitalWrite(led, HIGH); // turn the LED on (HIGH is the voltage level)
delay(1000);
// wait for a second
digitalWrite(led, LOW); // turn the LED off by making the voltage LOW
delay(1000);
// wait for a second
}
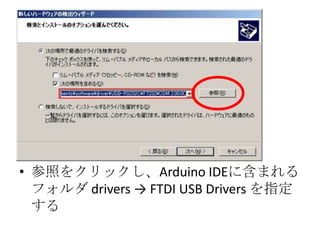
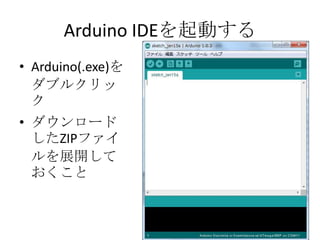
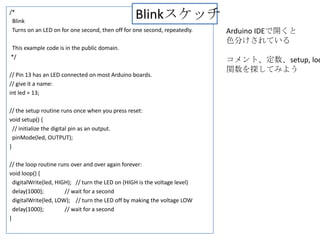
Arduino IDEで開くと
色分けされている
コメント、定数、setup, loo
関数を探してみよう
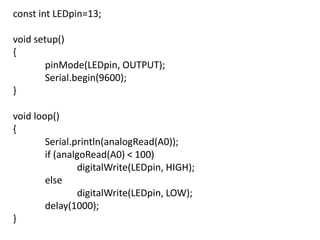
明るくなると点滅が速くなる
const int LEDpin=13;
voidsetup()
{
pinMode(LEDpin, OUTPUT);
}
void loop()
{
int a = analogRead(A0);
digitalWrite(LEDpin, HIGH);
delay(a);
digitalWrite(LEDpin, LOW);
delay(a);
}
アナログ入力の値(0~1023)
の長さ[ms]の間隔で点滅
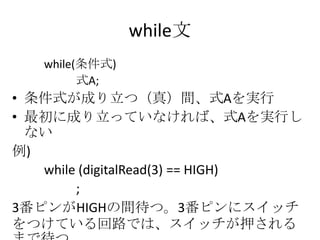
50.
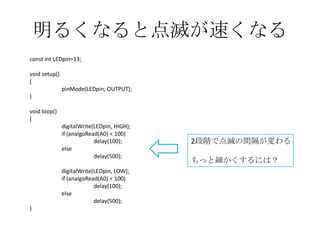
明るくなると点滅が速くなる
const int LEDpin=13;
voidsetup()
{
pinMode(LEDpin, OUTPUT);
}
void loop()
{
int a = analogRead(A0);
digitalWrite(LEDpin, HIGH);
delay(a);
digitalWrite(LEDpin, LOW);
delay(a);
}
アナログ入力の値を元に計算や
比較をすれば色々出来る
もっと速く点滅
int a = analogRead(A0) / 2;
2乗に比例
int a = analogRead(A0);
a = a*a / 1000;
速くなりすぎないように制限する
if (a<100)
a = 100;
暗くなると速くなるようにする
a = 1023 – a;

![配列変数
• 数列(a1, a2, a3, …)のようなもの
• 大きさを宣言してから使う
int a[10];
• 型はなんでもいい
• 添え字は0から始まるので大きさが10なら、添え字
は0から9になる
• 宣言した大きさを超えて使おうとするとうまく動作
しない
• 添え字に[]をつけて使う
a[0] = a[1];
a[i+1] = a[i] + 1;](https://image.slidesharecdn.com/arduino-131221024253-phpapp02/85/Arduino-24-320.jpg)
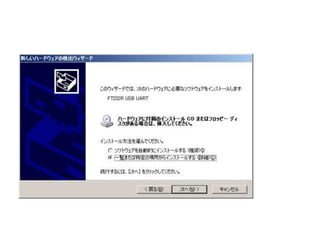
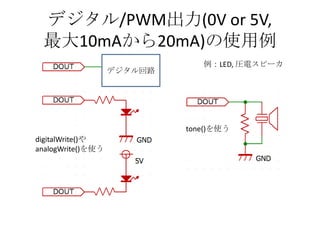
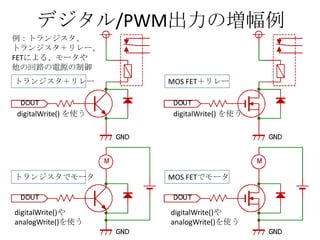
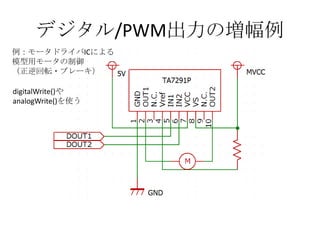
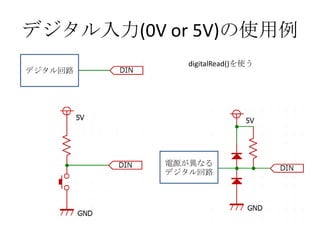
![ピンの機能とつながる回路の例
• デジタル入力 (0[V]/5[V])
– スイッチ,デジタル回路
• デジタル出力 (0[V]/5[V])
– LED,トランジスタやドライバを介してリレー,DCモータ,ソレ
ノイドなど
– デジタル回路
• アナログ入力 (0~5[V]を0~1023で表す)
– 抵抗分圧を使ってポテンショメータ(ボリューム),感圧セン
サなど
– 0から5[V]の範囲で電圧を出力するセンサの回路
• マトリクスLED
– 8×8のマトリクスLED
•
PWM 出力 (高速にON/OFF, ON/OFFの比:0から255
明るさやモータの速度を制御できる)
– LED,トランジスタやドライバを介してモータなど
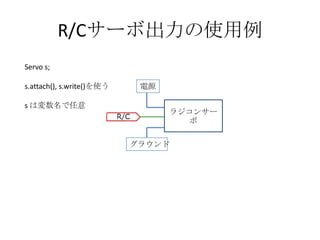
• R/Cサーボ
– ラジコン用のサーボモータ](https://image.slidesharecdn.com/arduino-131221024253-phpapp02/85/Arduino-30-320.jpg)
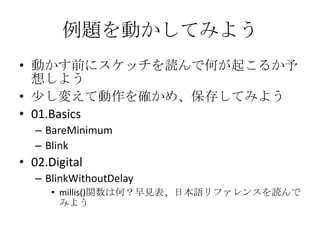
![アナログ入力(0[V]から5[V])の使用
例 ポテンショメータ(ボリューム)
例:温度センサIC,
アナログ回路
(電圧出力の
センサなど)
analogRead()を使う](https://image.slidesharecdn.com/arduino-131221024253-phpapp02/85/Arduino-36-320.jpg)
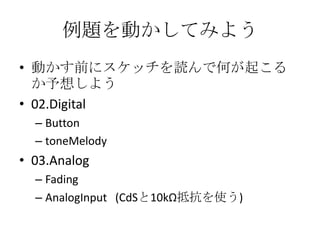
![アナログ入力(0[V]から5[V])の使用
例
~抵抗値が変化するセンサ~
analogRead()を使う
例:CdS, 照度センサ, サーミスタ](https://image.slidesharecdn.com/arduino-131221024253-phpapp02/85/Arduino-37-320.jpg)
![アナログ入力(0[V]から5[V])の使用
例 ポテンショメータ(ボリューム)
例:温度センサIC,
アナログ回路
(電圧出力の
センサなど)
analogRead()を使う](https://image.slidesharecdn.com/arduino-131221024253-phpapp02/85/Arduino-43-320.jpg)

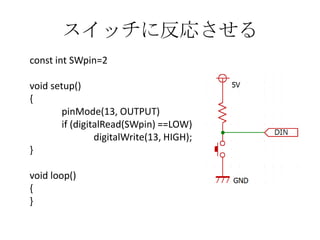
![明るくなると点滅が速くなる
const int LEDpin=13;
void setup()
{
pinMode(LEDpin, OUTPUT);
}
void loop()
{
int a = analogRead(A0);
digitalWrite(LEDpin, HIGH);
delay(a);
digitalWrite(LEDpin, LOW);
delay(a);
}
アナログ入力の値(0~1023)
の長さ[ms]の間隔で点滅](https://image.slidesharecdn.com/arduino-131221024253-phpapp02/85/Arduino-49-320.jpg)
![平均値をとる
const int LEDpin=13;
int oA0[3] ;
void setup()
{
pinMode(LEDpin, OUTPUT);
}
void loop()
{
int a = analogRead(A0);
int avg;
avg = (oA0[0] + oA0[1] + oA0[2] + A0)/4;
if (avg>100)
digitalWrite(LEDpin, HIGH);
}
digitalWrite(LEDpin, LOW);
oA0[0] = oA0[1];
oA0[1] = oA0[2];
oA0[2] = a;
delay(1000);
}
4回の平均を求める例
過去の値を配列にいれてお
く
ノイズの除去、細かい変化
の無視をしたいときに使う
順に覚えている前の値をず
らしていく
平均を求めたり、記憶をず
らすのにforループを使うこ
とも多い](https://image.slidesharecdn.com/arduino-131221024253-phpapp02/85/Arduino-52-320.jpg)
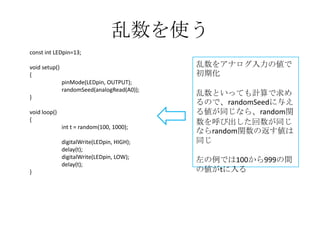
![関数
millis関数:リセットからの経過時間[ms]
数学関数: abs, sin, cos, tan, log などが使える
角度の単位はラジアン、logの底はe
乱数: random, randomSeed
最初に一回randomSeedで初期化
あとはrandomを使う
ほかにも関数がある。制約や注意事項も含めリファレンスマニュアル参照のこと。](https://image.slidesharecdn.com/arduino-131221024253-phpapp02/85/Arduino-53-320.jpg)
![tone関数
• ブザーをならせる
tone(2, 1000);
// 2ピンに1000Hzを出す
noTone(2);
// やめる
tone(2, 1000, 100); // 2ピンに1000Hzを100ms出す
toneMelody のpitches.hを使う(コピーする)と
tone(2, NOTE_C4, 100);
// (4オクターブ目のド)といった記号を使える
• toneMelody では、配列に音の高さと長さを覚えている
• forループで順に処理
• また4→250ms, 8→125ms となるように1000をその音の音符の分で割っている
(4分音符なら4,8分音符なら8)
int noteDurations[] = { 4, 8, 8, 4,4,4,4,4 };
int noteDuration = 1000/noteDurations[thisNote];](https://image.slidesharecdn.com/arduino-131221024253-phpapp02/85/Arduino-55-320.jpg)


![[ZigBee 嵌入式系統] ZigBee 應用實作 - 使用 TI Z-Stack Firmware](https://cdn.slidesharecdn.com/ss_thumbnails/zigbeeappimplementation-150613072040-lva1-app6891-thumbnail.jpg?width=640&height=640&fit=bounds)


![ARコンテンツ作成勉強会:UnityとVuforiaではじめるAR [主要部分]](https://cdn.slidesharecdn.com/ss_thumbnails/arfukuoka-160220011017-thumbnail.jpg?width=640&height=640&fit=bounds)


