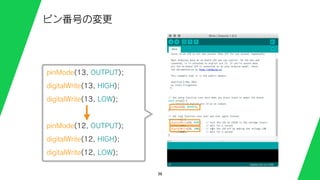
// the setupfunction runs once when you press reset or power the board
void setup() {
// initialize digital pin 13 as an output.
pinMode(12, OUTPUT);
}
// the loop function runs over and over again forever
void loop() {
digitalWrite(12, HIGH); // turn the LED on (HIGH is the voltage level)
delay(1000); // wait for a second
digitalWrite(12, LOW); // turn the LED off by making the voltage LOW
delay(1000); // wait for a second
}
38
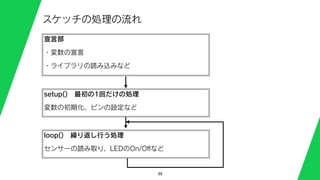
Blinkのコード
// the setupfunction runs once when you press reset or power the board
void setup() {
// initialize digital pin 13 as an output.
pinMode(12, OUTPUT);
}
// the loop function runs over and over again forever
void loop() {
digitalWrite(12, HIGH); // turn the LED on (HIGH is the voltage level)
delay(1000); // wait for a second
digitalWrite(12, LOW); // turn the LED off by making the voltage LOW
delay(1000); // wait for a second
}
40
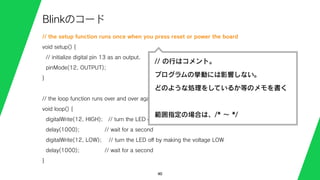
Blinkのコード
// の行はコメント。
プログラムの挙動には影響しない。
どのような処理をしているか等のメモを書く
範囲指定の場合は、/* ∼ */
41.
// the setupfunction runs once when you press reset or power the board
void setup() {
// initialize digital pin 13 as an output.
pinMode(12, OUTPUT);
}
// the loop function runs over and over again forever
void loop() {
digitalWrite(12, HIGH); // turn the LED on (HIGH is the voltage level)
delay(1000); // wait for a second
digitalWrite(12, LOW); // turn the LED off by making the voltage LOW
delay(1000); // wait for a second
}
41
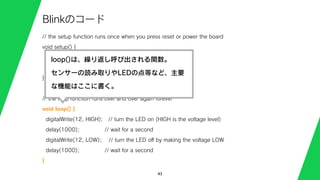
Blinkのコード
{ } で囲まれた範囲が、setup()
という名前で呼び出される。
Arduinoの起動時に1回呼ばれ
るので、初期化処理を行う。
42.
// the setupfunction runs once when you press reset or power the board
void setup() {
// initialize digital pin 13 as an output.
pinMode(12, OUTPUT);
}
// the loop function runs over and over again forever
void loop() {
digitalWrite(12, HIGH); // turn the LED on (HIGH is the voltage level)
delay(1000); // wait for a second
digitalWrite(12, LOW); // turn the LED off by making the voltage LOW
delay(1000); // wait for a second
}
42
Blinkのコード
pinModeは、ピンの使い方を指定する関数。
12番ピンをOUTPUT(出力)として使う。
43.
// the setupfunction runs once when you press reset or power the board
void setup() {
// initialize digital pin 13 as an output.
pinMode(12, OUTPUT);
}
// the loop function runs over and over again forever
void loop() {
digitalWrite(12, HIGH); // turn the LED on (HIGH is the voltage level)
delay(1000); // wait for a second
digitalWrite(12, LOW); // turn the LED off by making the voltage LOW
delay(1000); // wait for a second
}
43
Blinkのコード
loop()は、繰り返し呼び出される関数。
センサーの読み取りやLEDの点等など、主要
な機能はここに書く。
44.
// the setupfunction runs once when you press reset or power the board
void setup() {
// initialize digital pin 13 as an output.
pinMode(12, OUTPUT);
}
// the loop function runs over and over again forever
void loop() {
digitalWrite(12, HIGH); // turn the LED on (HIGH is the voltage level)
delay(1000); // wait for a second
digitalWrite(12, LOW); // turn the LED off by making the voltage LOW
delay(1000); // wait for a second
}
44
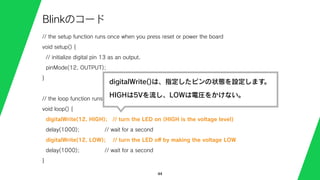
Blinkのコード
digitalWrite()は、指定したピンの状態を設定します。
HIGHは5Vを流し、LOWは電圧をかけない。
45.
// the setupfunction runs once when you press reset or power the board
void setup() {
// initialize digital pin 13 as an output.
pinMode(12, OUTPUT);
}
// the loop function runs over and over again forever
void loop() {
digitalWrite(12, HIGH); // turn the LED on (HIGH is the voltage level)
delay(1000); // wait for a second
digitalWrite(12, LOW); // turn the LED off by making the voltage LOW
delay(1000); // wait for a second
}
45
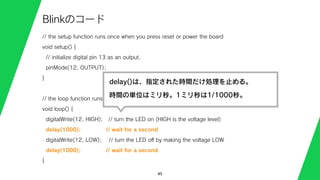
Blinkのコード
delay()は、指定された時間だけ処理を止める。
時間の単位はミリ秒。1ミリ秒は1/1000秒。
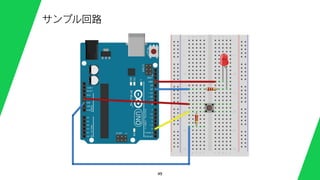
52
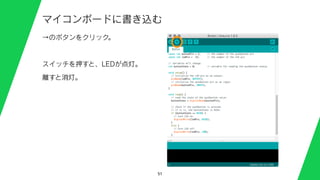
スケッチの説明
const int buttonPin= 2;
const int ledPin = 12;
// variables will change:
int buttonState = 0; // variable for reading the pushbutton status
void setup() {
// initialize the LED pin as an output:
pinMode(ledPin, OUTPUT);
// initialize the pushbutton pin as an input:
pinMode(buttonPin, INPUT);
}
buttonPinを2番ピン
ledPinを12番ピンと設定する
53.
53
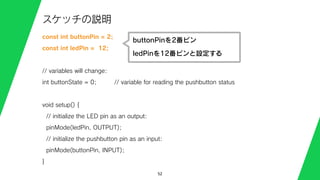
スケッチの説明
const int buttonPin= 2;
const int ledPin = 12;
// variables will change:
int buttonState = 0;
void setup() {
// initialize the LED pin as an output:
pinMode(ledPin, OUTPUT);
// initialize the pushbutton pin as an input:
pinMode(buttonPin, INPUT);
}
buttonPinの状態を記憶する。
HIGH = 1, LOW = 0
54.
54
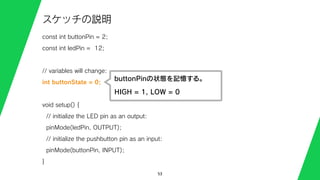
スケッチの説明
const int buttonPin= 2;
const int ledPin = 12;
// variables will change:
int buttonState = 0;
void setup() {
// initialize the LED pin as an output:
pinMode(ledPin, OUTPUT);
// initialize the pushbutton pin as an input:
pinMode(buttonPin, INPUT);
}
ledPinを出力モードに
buttonPinを入力モードに設定
55.
55
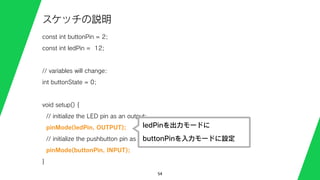
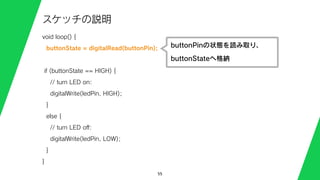
スケッチの説明
void loop() {
buttonState= digitalRead(buttonPin);
if (buttonState == HIGH) {
// turn LED on:
digitalWrite(ledPin, HIGH);
}
else {
// turn LED off:
digitalWrite(ledPin, LOW);
}
}
buttonPinの状態を読み取り、
buttonStateへ格納
56.
56
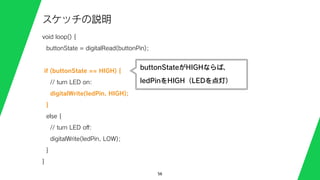
スケッチの説明
void loop() {
buttonState= digitalRead(buttonPin);
if (buttonState == HIGH) {
// turn LED on:
digitalWrite(ledPin, HIGH);
}
else {
// turn LED off:
digitalWrite(ledPin, LOW);
}
}
buttonStateがHIGHならば、
ledPinをHIGH(LEDを点灯)
57.
57
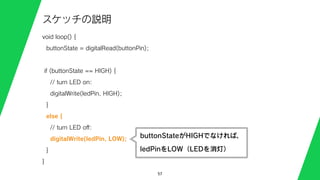
スケッチの説明
void loop() {
buttonState= digitalRead(buttonPin);
if (buttonState == HIGH) {
// turn LED on:
digitalWrite(ledPin, HIGH);
}
else {
// turn LED off:
digitalWrite(ledPin, LOW);
}
}
buttonStateがHIGHでなければ、
ledPinをLOW(LEDを消灯)


![29
Mac(ドライバのインストール)
1. Arduino UNOをUSBケーブルでMacに繋ぐ
(何も表示されなければそのまま次のページへ)
2. ダイアログ表示 [新しいネットワークインターフェースが接続されました]
3. [ネットワーク環境設定] ボタンを押して、設定ウィンドウを開き、[適用]](https://image.slidesharecdn.com/15042403-150720124140-lva1-app6892/85/SFC-WS-3-29-320.jpg)
![30
Mac(シリアルポートとボードの選択)
1. http://arduino.cc/en/Main/Software からMacOSX用のファイルをDL
2. DLしたファイルを解凍して、Arduino.appをApplicationsに移動
3. Arduino.appを起動(Javaが入っていない場合は、インストールする)
4. メニュー[ツール][シリアルポート]から
/dev/tty.usbmodem123/, /dev/cu.usbmodem123/ を選択
USBのポートと機器によって決まる文字列。
5. メニュー[ツール][ボード]から [Arduino Uno] を選択](https://image.slidesharecdn.com/15042403-150720124140-lva1-app6892/85/SFC-WS-3-30-320.jpg)
![31
Windows 7
1. http://arduino.cc/en/Main/Software からWindows用のファイルをDL。展開する。
2. Arduino UNOをUSBケーブルでMacに繋ぐ
3. [コントロールパネル][システム][デバイスマネージャー]
4. Arduino UNOまたは不明なデバイス、として見つかるのでプロパティを開き [ド
ライバーの更新]をクリック
5. [一覧または特定の場所からインストールする] を選び、ダウンロードしたフォル
ダの中の [drivers] を選択する
6. ArduinoUNO.infがインストールされる。
7. ポート(COMとLPT)にArduinoUNO R3が表示されている事とポート番号を確
認する。](https://image.slidesharecdn.com/15042403-150720124140-lva1-app6892/85/SFC-WS-3-31-320.jpg)
![32
Windows 8
http://mag.switch-science.com/2013/02/05/use_uno_on_win8/
1. ダウンロードしたファイルを[Program Files]などに移動
2. Arduino IDE を起動
3. メニュー[ツール][シリアルポート]からさっき確認したCOM番号を選択。
4. メニュー[ツール][ボード]から [Arduino Uno] を選択](https://image.slidesharecdn.com/15042403-150720124140-lva1-app6892/85/SFC-WS-3-32-320.jpg)

![35
サンプルスケッチ
Arduino IDE のメニュー
[ファイル]-
[スケッチの例]-
[01.Basics]-
[Blink] を開く。](https://image.slidesharecdn.com/15042403-150720124140-lva1-app6892/85/SFC-WS-3-35-320.jpg)


![50
サンプルスケッチ
Arduino IDE のメニュー
[ファイル]-
[スケッチの例]-
[02.Digital]-
[Button] を開く。
const int ledPin = 13;
const int ledPin = 12;](https://image.slidesharecdn.com/15042403-150720124140-lva1-app6892/85/SFC-WS-3-50-320.jpg)