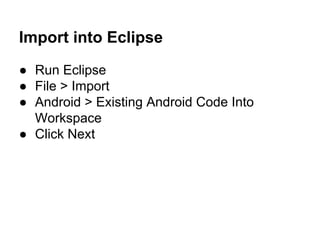
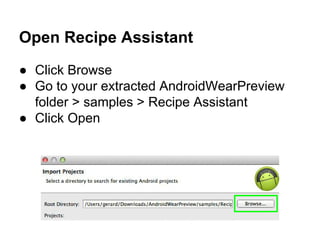
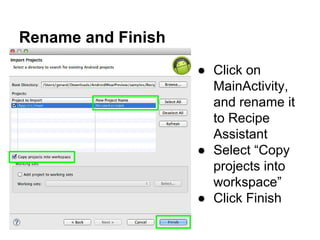
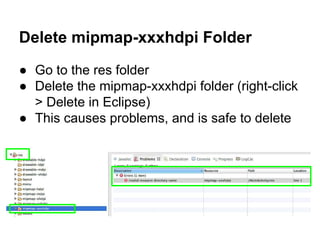
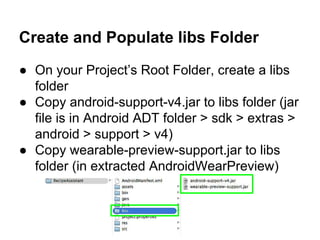
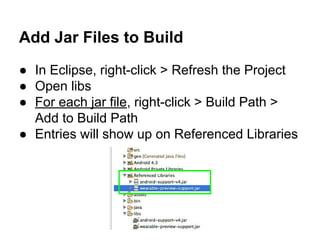
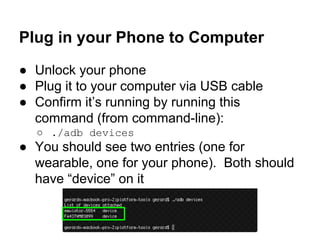
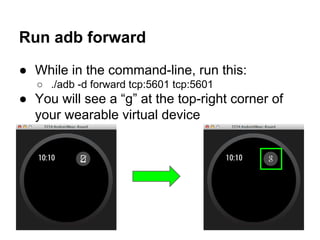
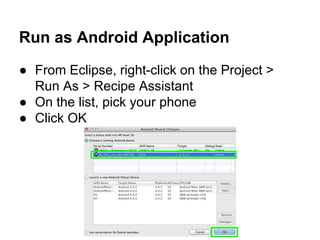
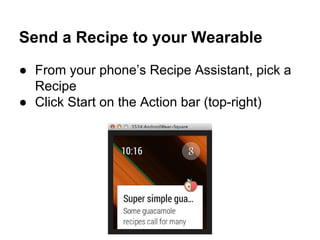
Android Wear Code Lab
Setup and Run Sample App
05-29-2014
+GerardCordero
OptimizedPrime.com
@GerardCordero
Requirements
You need to complete the pre-lab preparation:
http://www.slideshare.
net/optimizedprime/android-wear-code-lab-
preparation
Setup Android Wear
Virtual Device
15 minutes
Android Virtual Device Manager
● Run Eclipse
● Window > Android Virtual Device
Manager
New Virtual Device
● Click New
Setup the Wearable Virtual Device
Square Device Round Device
Start your Virtual Device
● Select your wearable device
● Click Start
Launch Options
● Click Launch
Booting Up
Installing the Android
Wear Preview App
Installed on your Android 4.3+ Phone
10 minutes
Opt-In to test Android Wear Preview
app
On the email you got back during the pre-
requisites, click “Opt-in to become a tester”
Become a Tester
Click on Become a Tester
Initiate Download
Click “Download it from the Play Store”
Pick a Phone to Install Preview App
The phone you choose will be what you will use
in the code lab. Click Install
Done
Click OK
Setup Sample App
Recipe Assistant
15 minutes
Import into Eclipse
● Run Eclipse
● File > Import
● Android > Existing Android Code Into
Workspace
● Click Next
Open Recipe Assistant
● Click Browse
● Go to your extracted AndroidWearPreview
folder > samples > Recipe Assistant
● Click Open
Rename and Finish
● Click on
MainActivity,
and rename it
to Recipe
Assistant
● Select “Copy
projects into
workspace”
● Click Finish
Delete mipmap-xxxhdpi Folder
● Go to the res folder
● Delete the mipmap-xxxhdpi folder (right-click
> Delete in Eclipse)
● This causes problems, and is safe to delete
Create and Populate libs Folder
● On your Project’s Root Folder, create a libs
folder
● Copy android-support-v4.jar to libs folder (jar
file is in Android ADT folder > sdk > extras >
android > support > v4)
● Copy wearable-preview-support.jar to libs
folder (in extracted AndroidWearPreview)
Add Jar Files to Build
● In Eclipse, right-click > Refresh the Project
● Open libs
● For each jar file, right-click > Build Path >
Add to Build Path
● Entries will show up on Referenced Libraries
Move Contents of java to src folder
● Open Finder or Windows Explorer
● Go to your Recipe Assistant project folder
● Move the contents of the “java” folder into
the “src” folder
● This project is originally an Android Studio
project, but Eclipse goes to the src folder for
classes. This step fixes the Class not found
error
● In Eclipse, right-click the Project > Refresh
Download the Finished Code
● For your convenience, here’s the code:
https://github.
com/GerardCordero/AndroidWear/tree/master/
RecipeAssistant
Setup your Phone
Enable phone to talk to Android Wear
emulated device
15 minutes
Boot up your Android Wear virtual
device
If you haven’t done so, boot it up now
Turn on USB Debugging on Phone
● On your phone, go to Settings > Developer
Options
● Make sure Developer Options is turned on
● Make sure USB Debugging is turned on
● Note: Developer Options location may vary
by phone
Getting your ADB’s Path
● Note: this is for the next two steps
● Go to Android SDK Manager
● Get SDK Path’s value, that is your base
folder
● In Finder/Windows Explorer, go to that path
● then go platform-tools
Plug in your Phone to Computer
● Unlock your phone
● Plug it to your computer via USB cable
● Confirm it’s running by running this
command (from command-line):
○ ./adb devices
● You should see two entries (one for
wearable, one for your phone). Both should
have “device” on it
Run adb forward
● While in the command-line, run this:
○ ./adb -d forward tcp:5601 tcp:5601
● You will see a “g” at the top-right corner of
your wearable virtual device
Confirm on your Android Wear
Preview App
● On your Phone, open the Android Wear
Preview app
● It should say “Connected”
Run Recipe Assistant
10 Minutes
Run as Android Application
● From Eclipse, right-click on the Project >
Run As > Recipe Assistant
● On the list, pick your phone
● Click OK
Send a Recipe to your Wearable
● From your phone’s Recipe Assistant, pick a
Recipe
● Click Start on the Action bar (top-right)

Android Wear Code Lab

  • 1.
    Android Wear CodeLab Setup and Run Sample App 05-29-2014
  • 2.
  • 3.
    Requirements You need tocomplete the pre-lab preparation: http://www.slideshare. net/optimizedprime/android-wear-code-lab- preparation
  • 4.
    Setup Android Wear VirtualDevice 15 minutes
  • 5.
    Android Virtual DeviceManager ● Run Eclipse ● Window > Android Virtual Device Manager
  • 6.
  • 7.
    Setup the WearableVirtual Device Square Device Round Device
  • 8.
    Start your VirtualDevice ● Select your wearable device ● Click Start
  • 9.
  • 10.
  • 11.
    Installing the Android WearPreview App Installed on your Android 4.3+ Phone 10 minutes
  • 12.
    Opt-In to testAndroid Wear Preview app On the email you got back during the pre- requisites, click “Opt-in to become a tester”
  • 13.
    Become a Tester Clickon Become a Tester
  • 14.
    Initiate Download Click “Downloadit from the Play Store”
  • 15.
    Pick a Phoneto Install Preview App The phone you choose will be what you will use in the code lab. Click Install
  • 16.
  • 17.
    Setup Sample App RecipeAssistant 15 minutes
  • 18.
    Import into Eclipse ●Run Eclipse ● File > Import ● Android > Existing Android Code Into Workspace ● Click Next
  • 19.
    Open Recipe Assistant ●Click Browse ● Go to your extracted AndroidWearPreview folder > samples > Recipe Assistant ● Click Open
  • 20.
    Rename and Finish ●Click on MainActivity, and rename it to Recipe Assistant ● Select “Copy projects into workspace” ● Click Finish
  • 21.
    Delete mipmap-xxxhdpi Folder ●Go to the res folder ● Delete the mipmap-xxxhdpi folder (right-click > Delete in Eclipse) ● This causes problems, and is safe to delete
  • 22.
    Create and Populatelibs Folder ● On your Project’s Root Folder, create a libs folder ● Copy android-support-v4.jar to libs folder (jar file is in Android ADT folder > sdk > extras > android > support > v4) ● Copy wearable-preview-support.jar to libs folder (in extracted AndroidWearPreview)
  • 23.
    Add Jar Filesto Build ● In Eclipse, right-click > Refresh the Project ● Open libs ● For each jar file, right-click > Build Path > Add to Build Path ● Entries will show up on Referenced Libraries
  • 24.
    Move Contents ofjava to src folder ● Open Finder or Windows Explorer ● Go to your Recipe Assistant project folder ● Move the contents of the “java” folder into the “src” folder ● This project is originally an Android Studio project, but Eclipse goes to the src folder for classes. This step fixes the Class not found error ● In Eclipse, right-click the Project > Refresh
  • 25.
    Download the FinishedCode ● For your convenience, here’s the code: https://github. com/GerardCordero/AndroidWear/tree/master/ RecipeAssistant
  • 26.
    Setup your Phone Enablephone to talk to Android Wear emulated device 15 minutes
  • 27.
    Boot up yourAndroid Wear virtual device If you haven’t done so, boot it up now
  • 28.
    Turn on USBDebugging on Phone ● On your phone, go to Settings > Developer Options ● Make sure Developer Options is turned on ● Make sure USB Debugging is turned on ● Note: Developer Options location may vary by phone
  • 29.
    Getting your ADB’sPath ● Note: this is for the next two steps ● Go to Android SDK Manager ● Get SDK Path’s value, that is your base folder ● In Finder/Windows Explorer, go to that path ● then go platform-tools
  • 30.
    Plug in yourPhone to Computer ● Unlock your phone ● Plug it to your computer via USB cable ● Confirm it’s running by running this command (from command-line): ○ ./adb devices ● You should see two entries (one for wearable, one for your phone). Both should have “device” on it
  • 31.
    Run adb forward ●While in the command-line, run this: ○ ./adb -d forward tcp:5601 tcp:5601 ● You will see a “g” at the top-right corner of your wearable virtual device
  • 32.
    Confirm on yourAndroid Wear Preview App ● On your Phone, open the Android Wear Preview app ● It should say “Connected”
  • 33.
  • 34.
    Run as AndroidApplication ● From Eclipse, right-click on the Project > Run As > Recipe Assistant ● On the list, pick your phone ● Click OK
  • 35.
    Send a Recipeto your Wearable ● From your phone’s Recipe Assistant, pick a Recipe ● Click Start on the Action bar (top-right)