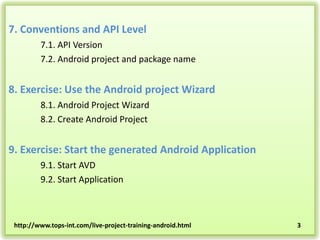
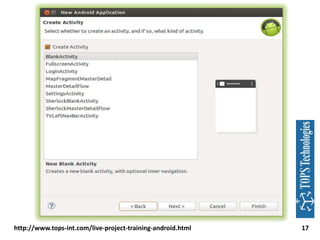
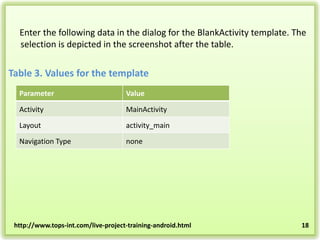
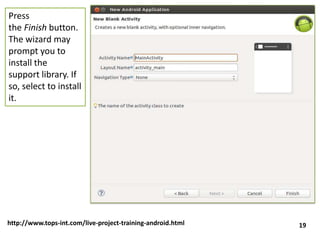
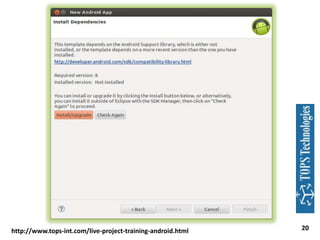
2

http://www.tops-int.com/live-project-training-android.html

1
5. Android Device emulator and Android Virtual Devices
5.1. Android Device emulator and Android Virtual Devices
5.2. Google vs. Android AVD
5.3. Android devices emulator Shortcuts

6. Exercise: Create and Start Android Virtual Devices
6.1. Target
6.2. Create AVD
6.3. Start Your AVD
http://www.tops-int.com/live-project-training-android.html

2
7. Conventions and API Level
7.1. API Version
7.2. Android project and package name

8. Exercise: Use the Android project Wizard
8.1. Android Project Wizard
8.2. Create Android Project

9. Exercise: Start the generated Android Application
9.1. Start AVD
9.2. Start Application

http://www.tops-int.com/live-project-training-android.html

3
10. Android Developer Tools
10.1. DDMS – Dalvik Debug Monitor Service
10.2. Emulator Control
10.3. File explorer

http://www.tops-int.com/live-project-training-android.html

4
5.1. Android emulator and Android Virtual Device
• The Android SDK contains an Android device emulator. This emulator can
be used to run an Android virtual device (AVD). AVDs allow you to test
your Android applications on different Android versions and
configurations without access to the real hardware.
• During the creation of your AVD you define the configuration for the
virtual device. This includes, for example, the resolution, the Android API
version and the density.

• You can define multiple AVDs with different configurations and start
them in parallel. This allows you to test different device configurations.
http://www.tops-int.com/live-project-training-android.html

5
5.2. Google vs. Android AVD
• During the creation of an AVD you decide if you want to create an
Android device or a Google device.

• An AVD created for Android contains the programs from the Android
Open Source Project. An AVD created for the Google API's contains
additional Google specific code.
• AVDs created with the Google API allow you to test applications which
use Google Play services, e.g., the new Google maps API or the new
location services.

http://www.tops-int.com/live-project-training-android.html

6
5.3. Android device emulator shortcuts
The following table lists useful shortcuts for working with an AVD.

Table 1. Android device emulator shortcuts
Shortcut

Description

Alt+Enter

Maximizes the emulator.

Ctrl+F11

Changes the orientation of the emulator from landscape to
portrait and vice versa.

F8

Turns the network on and off.

http://www.tops-int.com/live-project-training-android.html

7
6.Create and start Android Virtual Device
6.1. Target
In this exercise you create and start an AVD. Even if you have a real
Android device available, you should get familiar with the creation and
usage of AVDs. Virtual devices give you the possibility to test your
application for selected Android versions and a specific configuration.

6.2. Create AVD
Define a new Android Virtual Device (AVD) by opening the AVD
Manager via Window → Android Virtual Device Manager and by pressing
the New button.

http://www.tops-int.com/live-project-training-android.html

8
http://www.tops-int.com/live-project-training-android.html

9
Enter values similar to the
following screenshot :
Afterwards press the OK button.
This will create the AVD
configuration and display
it under the list of available
virtual devices.

http://www.tops-int.com/live-project-training-android.html

10
6.3. Start your AVD
Select your new entry and press the Start button. Select Launch in the
following dialog.

http://www.tops-int.com/live-project-training-android.html

11
7. Conventions and API level
7.1. API version
The tutorials of this document have been developed and tested with
Android 4.3, API Level 18. Please use this version for all tutorials in this
tutorial. Higher versions of the API level should also work. A lower
version of the Android API might also work, but if you face issues, try the
recommended version.

7.2. Android project and package name
The base package for the projects is always the same as the project
name, e.g., if you are asked to create a project
called com.vogella.android, then the corresponding package name
is com.vogella.android.
http://www.tops-int.com/live-project-training-android.html

12
8. Exercise: Use the Android project wizard
8.1. Android project wizard
The Android Developer Tools provide wizards for creating Android
applications. In this exercise you use one of the wizards to create an
Android application.

8.2. Create Android project
To create a new Android project
select File → New → Other... → Android → Android Project from the
menu.

http://www.tops-int.com/live-project-training-android.html

13
Press e Next button
and ensure that
you have enabled
the
checkboxes Create
a launcher icon and
Create activity.
On the wizard
page for the
launcher
icon, create an
application icon of
your choosing.
The following
screenshot shows
an example for a
possible result.

http://www.tops-int.com/live-project-training-android.html

15
Press the Next button and select the BlankActivity template. Press the Next button to
proceed.
http://www.tops-int.com/live-project-training-android.html

17
Enter the following data in the dialog for the BlankActivity template. The
selection is depicted in the screenshot after the table.

Table 3. Values for the template
Parameter

Value

Activity

MainActivity

Layout

activity_main

Navigation Type

none

http://www.tops-int.com/live-project-training-android.html

18
Press
the Finish button.
The wizard may
prompt you to
install the
support library. If
so, select to install
it.

http://www.tops-int.com/live-project-training-android.html

19
http://www.tops-int.com/live-project-training-android.html

20
9. Exercise: Start the generated Android application

9.1. Start AVD
If you have not yet done so, create and
start an Android virtual device (AVD)
fitting for your selected API version.

(Once you AVD is ready, unlock your emulator.)

21
To build, install and run your application
the Android application on the Android
emulator, select your project, right click
on it, and select Run-As → Android
Application.

22
You may be prompted if the Android Developer Tools should monitor
messages. Select Yes in this case and press theOK button.

This starts your application on the AVD. The started application is a
simple Hello, world. application.

http://www.tops-int.com/live-project-training-android.html

23
10. Android Developer Tools
10.1. DDMS - Dalvik Debug Monitor Service
• Eclipse provides a perspective for interacting with your Android (virtual)
device and your Android application program. Select Window → Open
Perspective → Other... → DDMS to open this perspective. It groups
several Eclipse views which can also be used independently.
• On the left side it shows you the connected Android devices and the
running processes on the device. The right side is a stack of views with
different purposes. You can select processes and trigger actions from the
toolbar, e.g., start a trace or stop the process.
The following description highlights a few views in this perspective.
Others are described once they are needed.

24
10.2. Emulator Control
The Emulator Control view allows you to simulate phone calls and SMS on
the AVD.
• It also allows
the application
to set the current
geo position.
10.3. File explorer
The file explorer allows you to browse the file system on your Android
virtual device.

http://www.tops-int.com/live-project-training-android.html

27
http://www.tops-int.com/live-project-training-android.html

17
http://www.tops-int.com/live-project-training-android.html

29

How to create android applications

  • 1.
  • 2.
    5. Android Deviceemulator and Android Virtual Devices 5.1. Android Device emulator and Android Virtual Devices 5.2. Google vs. Android AVD 5.3. Android devices emulator Shortcuts 6. Exercise: Create and Start Android Virtual Devices 6.1. Target 6.2. Create AVD 6.3. Start Your AVD http://www.tops-int.com/live-project-training-android.html 2
  • 3.
    7. Conventions andAPI Level 7.1. API Version 7.2. Android project and package name 8. Exercise: Use the Android project Wizard 8.1. Android Project Wizard 8.2. Create Android Project 9. Exercise: Start the generated Android Application 9.1. Start AVD 9.2. Start Application http://www.tops-int.com/live-project-training-android.html 3
  • 4.
    10. Android DeveloperTools 10.1. DDMS – Dalvik Debug Monitor Service 10.2. Emulator Control 10.3. File explorer http://www.tops-int.com/live-project-training-android.html 4
  • 5.
    5.1. Android emulatorand Android Virtual Device • The Android SDK contains an Android device emulator. This emulator can be used to run an Android virtual device (AVD). AVDs allow you to test your Android applications on different Android versions and configurations without access to the real hardware. • During the creation of your AVD you define the configuration for the virtual device. This includes, for example, the resolution, the Android API version and the density. • You can define multiple AVDs with different configurations and start them in parallel. This allows you to test different device configurations. http://www.tops-int.com/live-project-training-android.html 5
  • 6.
    5.2. Google vs.Android AVD • During the creation of an AVD you decide if you want to create an Android device or a Google device. • An AVD created for Android contains the programs from the Android Open Source Project. An AVD created for the Google API's contains additional Google specific code. • AVDs created with the Google API allow you to test applications which use Google Play services, e.g., the new Google maps API or the new location services. http://www.tops-int.com/live-project-training-android.html 6
  • 7.
    5.3. Android deviceemulator shortcuts The following table lists useful shortcuts for working with an AVD. Table 1. Android device emulator shortcuts Shortcut Description Alt+Enter Maximizes the emulator. Ctrl+F11 Changes the orientation of the emulator from landscape to portrait and vice versa. F8 Turns the network on and off. http://www.tops-int.com/live-project-training-android.html 7
  • 8.
    6.Create and startAndroid Virtual Device 6.1. Target In this exercise you create and start an AVD. Even if you have a real Android device available, you should get familiar with the creation and usage of AVDs. Virtual devices give you the possibility to test your application for selected Android versions and a specific configuration. 6.2. Create AVD Define a new Android Virtual Device (AVD) by opening the AVD Manager via Window → Android Virtual Device Manager and by pressing the New button. http://www.tops-int.com/live-project-training-android.html 8
  • 9.
  • 10.
    Enter values similarto the following screenshot : Afterwards press the OK button. This will create the AVD configuration and display it under the list of available virtual devices. http://www.tops-int.com/live-project-training-android.html 10
  • 11.
    6.3. Start yourAVD Select your new entry and press the Start button. Select Launch in the following dialog. http://www.tops-int.com/live-project-training-android.html 11
  • 12.
    7. Conventions andAPI level 7.1. API version The tutorials of this document have been developed and tested with Android 4.3, API Level 18. Please use this version for all tutorials in this tutorial. Higher versions of the API level should also work. A lower version of the Android API might also work, but if you face issues, try the recommended version. 7.2. Android project and package name The base package for the projects is always the same as the project name, e.g., if you are asked to create a project called com.vogella.android, then the corresponding package name is com.vogella.android. http://www.tops-int.com/live-project-training-android.html 12
  • 13.
    8. Exercise: Usethe Android project wizard 8.1. Android project wizard The Android Developer Tools provide wizards for creating Android applications. In this exercise you use one of the wizards to create an Android application. 8.2. Create Android project To create a new Android project select File → New → Other... → Android → Android Project from the menu. http://www.tops-int.com/live-project-training-android.html 13
  • 14.
    Press e Nextbutton and ensure that you have enabled the checkboxes Create a launcher icon and Create activity.
  • 15.
    On the wizard pagefor the launcher icon, create an application icon of your choosing. The following screenshot shows an example for a possible result. http://www.tops-int.com/live-project-training-android.html 15
  • 16.
    Press the Nextbutton and select the BlankActivity template. Press the Next button to proceed.
  • 17.
  • 18.
    Enter the followingdata in the dialog for the BlankActivity template. The selection is depicted in the screenshot after the table. Table 3. Values for the template Parameter Value Activity MainActivity Layout activity_main Navigation Type none http://www.tops-int.com/live-project-training-android.html 18
  • 19.
    Press the Finish button. Thewizard may prompt you to install the support library. If so, select to install it. http://www.tops-int.com/live-project-training-android.html 19
  • 20.
  • 21.
    9. Exercise: Startthe generated Android application 9.1. Start AVD If you have not yet done so, create and start an Android virtual device (AVD) fitting for your selected API version. (Once you AVD is ready, unlock your emulator.) 21
  • 22.
    To build, installand run your application the Android application on the Android emulator, select your project, right click on it, and select Run-As → Android Application. 22
  • 23.
    You may beprompted if the Android Developer Tools should monitor messages. Select Yes in this case and press theOK button. This starts your application on the AVD. The started application is a simple Hello, world. application. http://www.tops-int.com/live-project-training-android.html 23
  • 24.
    10. Android DeveloperTools 10.1. DDMS - Dalvik Debug Monitor Service • Eclipse provides a perspective for interacting with your Android (virtual) device and your Android application program. Select Window → Open Perspective → Other... → DDMS to open this perspective. It groups several Eclipse views which can also be used independently. • On the left side it shows you the connected Android devices and the running processes on the device. The right side is a stack of views with different purposes. You can select processes and trigger actions from the toolbar, e.g., start a trace or stop the process. The following description highlights a few views in this perspective. Others are described once they are needed. 24
  • 26.
    10.2. Emulator Control TheEmulator Control view allows you to simulate phone calls and SMS on the AVD. • It also allows the application to set the current geo position.
  • 27.
    10.3. File explorer Thefile explorer allows you to browse the file system on your Android virtual device. http://www.tops-int.com/live-project-training-android.html 27
  • 28.
  • 29.