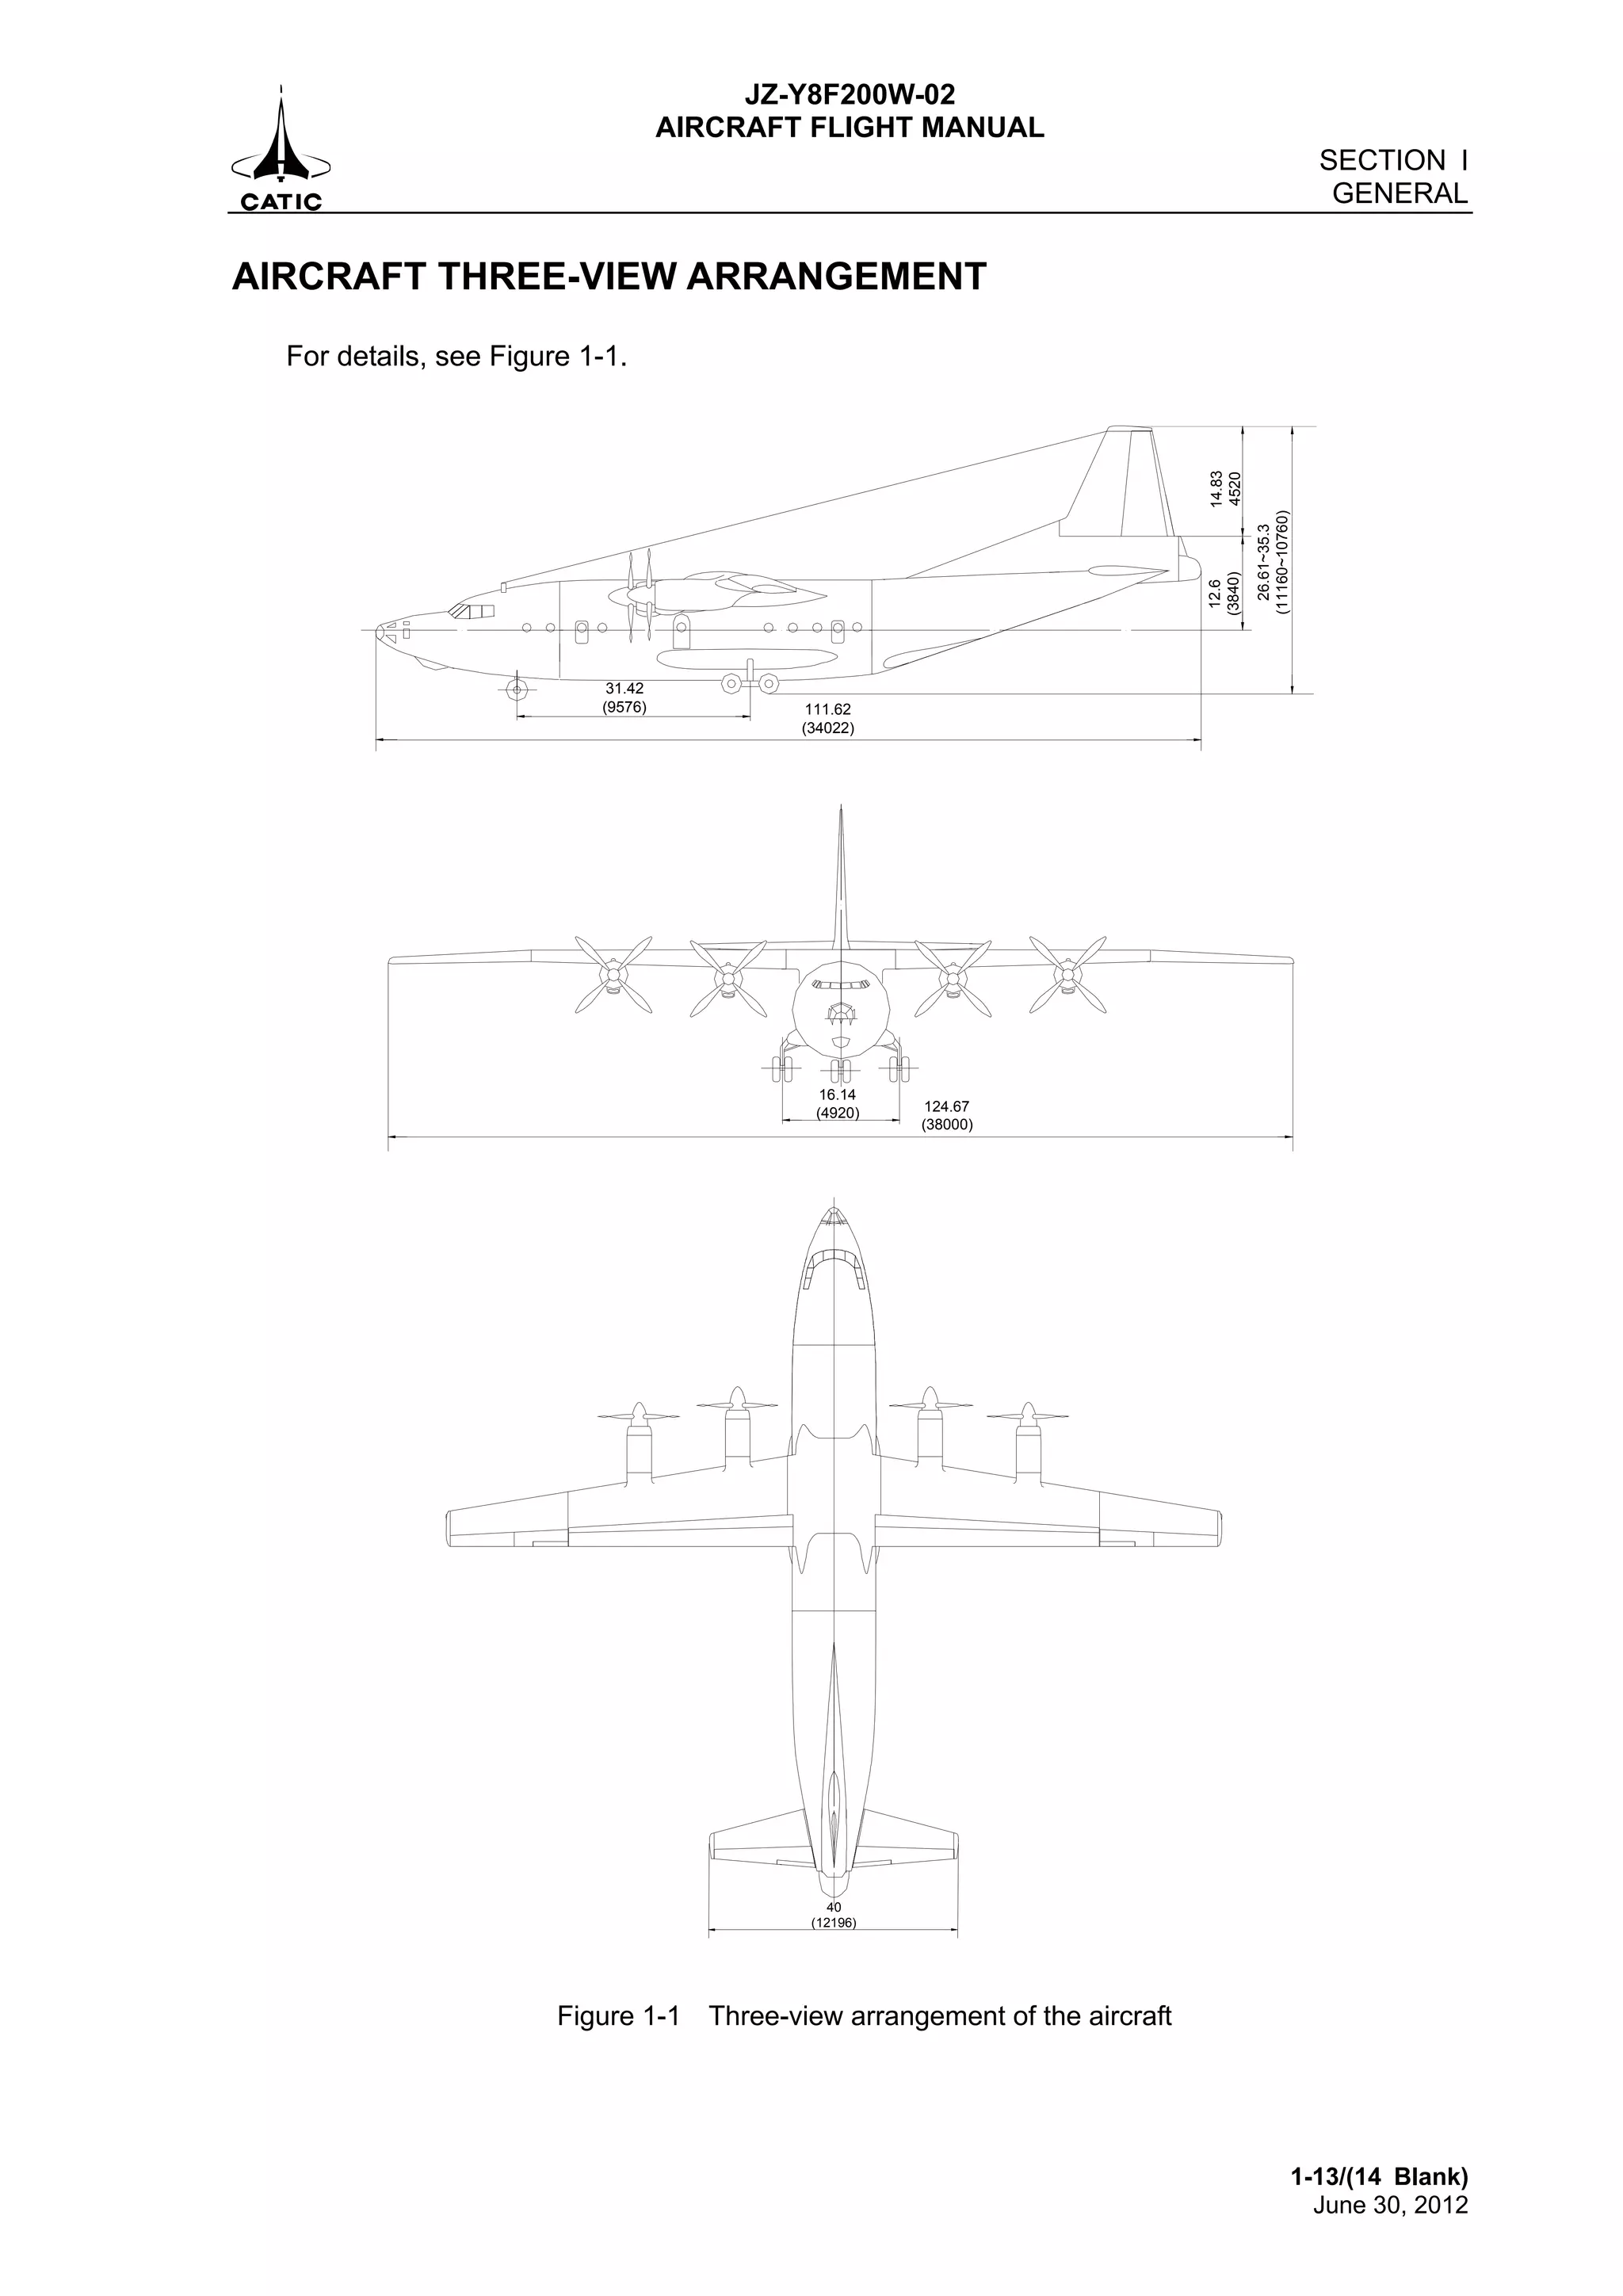
JZ-Y8F200W-02
Y8F200W AIRCRAFT
AIRCRAFT FLIGHT MANUAL
China National Aero-Technology Import & Export Corporation
June 30, 2012
JZ-Y8F200W-02
AIRCRAFT FLIGHT MANUAL
ROR
1/(2 Blank)
June 30, 2012
RECORD OF REVISIONS
REV.
NO.
REV.
DATE
INSERTION
REV.
NO.
REV.
DATE
INSERTION
DATE BY DATE BY
JZ-Y8F200W-02
AIRCRAFT FLIGHT MANUAL
ROR
2
June 30, 2012
THIS PAGE INTENTIONALLY LEFT BLANK
JZ-Y8F200W-02
AIRCRAFT FLIGHT MANUAL
ROTR
1/(2 Blank)
June 30, 2012
RECORD OF TEMPORARY REVISIONS
TEMPORARY REV. INSERTION DELETION
REV. NO.
PAGE
NO.
DATE
ISSUED
DATE BY DATE REV. NO. BY
JZ-Y8F200W-02
AIRCRAFT FLIGHT MANUAL
ROTR
2
June 30, 2012
THIS PAGE INTENTIONALLY LEFT BLANK
JZ-Y8F200W-02
AIRCRAFT FLIGHT MANUAL
TOSB
1/(2 Blank)
June 30, 2012
TABLE OF SERVICE BULLETINS
BULLETIN NO. AMEND. MARKS DATE DESCRIPTION
JZ-Y8F200W-02
AIRCRAFT FLIGHT MANUAL
TOSB
2
June 30, 2012
THIS PAGE INTENTIONALLY LEFT BLANK
JZ-Y8F200W-02
AIRCRAFT FLIGHT MANUAL
LEP
1
Jun. 30, 2012
LIST OF EFFECTIVE PAGES
TOTAL NUMBER OF PAGES IS 748, CONSISTING OF THE FOLLOWING
SUBJECT PAGE DATE SUBJECT PAGE DATE
Title Page T-1 Jun. 30, 2012
Record of Revisions ROR-1 Jun. 30, 2012
ROR-2(Blank) Jun. 30, 2012
Record of ROR-1 Jun. 30, 2012
Temporary Revisions ROR-2(Blank) Jun. 30, 2012
Table of Service TOSB-1 Jun. 30, 2012
Bulletins TOSB-2(Blank) Jun. 30, 2012
List of Effective LEP 1 Jun. 30, 2012
Pages LEP 2(Blank) Jun. 30, 2012
Contents 1 Jun. 30, 2012
2 Jun. 30, 2012
Section 1 1 Jun. 30, 2012
2 Jun. 30, 2012
3 Jun. 30, 2012
4 Jun. 30, 2012
5 Jun. 30, 2012
6 Jun. 30, 2012
7 Jun. 30, 2012
8 Jun. 30, 2012
9 Jun. 30, 2012
10 Jun. 30, 2012
11 Jun. 30, 2012
12 Jun. 30, 2012
13 Jun. 30, 2012
14(Blank) Jun. 30, 2012
Section 2 1 Jun. 30, 2012
2 Jun. 30, 2012
3 Jun. 30, 2012
4 Jun. 30, 2012
5 Jun. 30, 2012
6 Jun. 30, 2012
7 Jun. 30, 2012
8 Jun. 30, 2012
9 Jun. 30, 2012
10 Jun. 30, 2012
11 Jun. 30, 2012
12 Jun. 30, 2012
13 Jun. 30, 2012
14 Jun. 30, 2012
15 Jun. 30, 2012
16 Jun. 30, 2012
17 Jun. 30, 2012
18 Jun. 30, 2012
Section 3 1 Jun. 30, 2012
2 Jun. 30, 2012
3 Jun. 30, 2012
4 Jun. 30, 2012
5 Jun. 30, 2012
6 Jun. 30, 2012
7 Jun. 30, 2012
8 Jun. 30, 2012
9 Jun. 30, 2012
10 Jun. 30, 2012
11 Jun. 30, 2012
12 Jun. 30, 2012
13 Jun. 30, 2012
14 Jun. 30, 2012
15 Jun. 30, 2012
16 Jun. 30, 2012
17 Jun. 30, 2012
18 Jun. 30, 2012
19 Jun. 30, 2012
20 Jun. 30, 2012
21 Jun. 30, 2012
22 Jun. 30, 2012
F Foldout page, printed on single face D Deleted page
R Revised page A Added page
JZ-Y8F200W-02
AIRCRAFT FLIGHT MANUAL
LEP
2
June 30, 2012
SUBJECT PAGE DATE SUBJECT PAGE DATE
23 Jun. 30, 2012
24 Jun. 30, 2012
25 Jun. 30, 2012
26 Jun. 30, 2012
27 Jun. 30, 2012
28 Jun. 30, 2012
29 Jun. 30, 2012
30 Jun. 30, 2012
31 Jun. 30, 2012
32 Jun. 30, 2012
Section 4 1 Jun. 30, 2012
2 Jun. 30, 2012
3 Jun. 30, 2012
4 Jun. 30, 2012
5 Jun. 30, 2012
6 Jun. 30, 2012
7 Jun. 30, 2012
8 Jun. 30, 2012
9 Jun. 30, 2012
10 Jun. 30, 2012
11 Jun. 30, 2012
12 Jun. 30, 2012
13 Jun. 30, 2012
14 Jun. 30, 2012
15 Jun. 30, 2012
16 Jun. 30, 2012
17 Jun. 30, 2012
18 Jun. 30, 2012
19 Jun. 30, 2012
20 Jun. 30, 2012
21 Jun. 30, 2012
22 Jun. 30, 2012
23 Jun. 30, 2012
24 Jun. 30, 2012
25 Jun. 30, 2012
26 Jun. 30, 2012
27 Jun. 30, 2012
28 Jun. 30, 2012
29 Jun. 30, 2012
30 Jun. 30, 2012
31 Jun. 30, 2012
32 Jun. 30, 2012
33 Jun. 30, 2012
34 Jun. 30, 2012
35 Jun. 30, 2012
36 Jun. 30, 2012
37 Jun. 30, 2012
38 Jun. 30, 2012
39 Jun. 30, 2012
40 Jun. 30, 2012
41 Jun. 30, 2012
42 Jun. 30, 2012
43 Jun. 30, 2012
44 Jun. 30, 2012
45 Jun. 30, 2012
46 Jun. 30, 2012
47 Jun. 30, 2012
48 Jun. 30, 2012
49 Jun. 30, 2012
50 Jun. 30, 2012
51 Jun. 30, 2012
52 Jun. 30, 2012
53 Jun. 30, 2012
54 Jun. 30, 2012
55 Jun. 30, 2012
56 Jun. 30, 2012
57 Jun. 30, 2012
58 Jun. 30, 2012
59 Jun. 30, 2012
60 Jun. 30, 2012
61 Jun. 30, 2012
62 Jun. 30, 2012
63 Jun. 30, 2012
64 Jun. 30, 2012
65 Jun. 30, 2012
66 Jun. 30, 2012
F Foldout page, printed on single face D Deleted page
R Revised page A Added page
JZ-Y8F200W-02
AIRCRAFT FLIGHT MANUAL
LEP
3
Jun. 30, 2012
SUBJECT PAGE DATE SUBJECT PAGE DATE
67 Jun. 30, 2012
68 Jun. 30, 2012
69 Jun. 30, 2012
70 Jun. 30, 2012
71 Jun. 30, 2012
72 Jun. 30, 2012
73 Jun. 30, 2012
74 Jun. 30, 2012
75 Jun. 30, 2012
76 Jun. 30, 2012
77 Jun. 30, 2012
78 Jun. 30, 2012
79 Jun. 30, 2012
80 Jun. 30, 2012
81 Jun. 30, 2012
82 Jun. 30, 2012
83 Jun. 30, 2012
84 Jun. 30, 2012
85 Jun. 30, 2012
86 Jun. 30, 2012
87 Jun. 30, 2012
88 Jun. 30, 2012
89 Jun. 30, 2012
90 Jun. 30, 2012
91 Jun. 30, 2012
92 Jun. 30, 2012
93 Jun. 30, 2012
94 Jun. 30, 2012
95 Jun. 30, 2012
96 Jun. 30, 2012
97 Jun. 30, 2012
98 Jun. 30, 2012
99 Jun. 30, 2012
100 Jun. 30, 2012
101 Jun. 30, 2012
102 Jun. 30, 2012
103 Jun. 30, 2012
104 Jun. 30, 2012
105 Jun. 30, 2012
106 Jun. 30, 2012
107 Jun. 30, 2012
108 Jun. 30, 2012
109 Jun. 30, 2012
110 Jun. 30, 2012
111 Jun. 30, 2012
112 Jun. 30, 2012
113 Jun. 30, 2012
114 Jun. 30, 2012
115 Jun. 30, 2012
116 Jun. 30, 2012
117 Jun. 30, 2012
118 Jun. 30, 2012
119 Jun. 30, 2012
120 Jun. 30, 2012
121 Jun. 30, 2012
122 Jun. 30, 2012
123 Jun. 30, 2012
124 Jun. 30, 2012
125 Jun. 30, 2012
126 Jun. 30, 2012
127 Jun. 30, 2012
128 Jun. 30, 2012
129 Jun. 30, 2012
130 Jun. 30, 2012
131 Jun. 30, 2012
132 Jun. 30, 2012
133 Jun. 30, 2012
134 Jun. 30, 2012
135 Jun. 30, 2012
136 Jun. 30, 2012
137 Jun. 30, 2012
138 Jun. 30, 2012
139 Jun. 30, 2012
140 Jun. 30, 2012
141 Jun. 30, 2012
142 Jun. 30, 2012
143 Jun. 30, 2012
144 Jun. 30, 2012
145 Jun. 30, 2012
F Foldout page, printed on single face D Deleted page
R Revised page A Added page
JZ-Y8F200W-02
AIRCRAFT FLIGHT MANUAL
LEP
4
June 30, 2012
SUBJECT PAGE DATE SUBJECT PAGE DATE
146 Jun. 30, 2012
147 Jun. 30, 2012
148 Jun. 30, 2012
149 Jun. 30, 2012
150 Jun. 30, 2012
151 Jun. 30, 2012
152 Jun. 30, 2012
153 Jun. 30, 2012
154 Jun. 30, 2012
155 Jun. 30, 2012
156 Jun. 30, 2012
157 Jun. 30, 2012
158 Jun. 30, 2012
159 Jun. 30, 2012
160 Jun. 30, 2012
161 Jun. 30, 2012
162 Jun. 30, 2012
Section 5 1 Jun. 30, 2012
2 Jun. 30, 2012
3 Jun. 30, 2012
4 Jun. 30, 2012
5 Jun. 30, 2012
6 Jun. 30, 2012
7 Jun. 30, 2012
8 Jun. 30, 2012
9 Jun. 30, 2012
10 Jun. 30, 2012
11 Jun. 30, 2012
12 Jun. 30, 2012
13 Jun. 30, 2012
14 Jun. 30, 2012
15 Jun. 30, 2012
16 Jun. 30, 2012
17 Jun. 30, 2012
18 Jun. 30, 2012
19 Jun. 30, 2012
20 Jun. 30, 2012
21 Jun. 30, 2012
22 Jun. 30, 2012
23 Jun. 30, 2012
24 Jun. 30, 2012
25 Jun. 30, 2012
26 Jun. 30, 2012
27 Jun. 30, 2012
28 Jun. 30, 2012
29 Jun. 30, 2012
30 Jun. 30, 2012
31 Jun. 30, 2012
32 Jun. 30, 2012
33 Jun. 30, 2012
34 Jun. 30, 2012
35 Jun. 30, 2012
36 Jun. 30, 2012
37 Jun. 30, 2012
38 Jun. 30, 2012
39 Jun. 30, 2012
40 Jun. 30, 2012
Section 6 1 Jun. 30, 2012
2 Jun. 30, 2012
3 Jun. 30, 2012
4 Jun. 30, 2012
5 Jun. 30, 2012
6 Jun. 30, 2012
7 Jun. 30, 2012
8 Jun. 30, 2012
9 Jun. 30, 2012
10 Jun. 30, 2012
11 Jun. 30, 2012
12 Jun. 30, 2012
13 Jun. 30, 2012
14 Jun. 30, 2012
15 Jun. 30, 2012
16 Jun. 30, 2012
17 Jun. 30, 2012
18 Jun. 30, 2012
19 Jun. 30, 2012
F Foldout page, printed on single face D Deleted page
R Revised page A Added page
JZ-Y8F200W-02
AIRCRAFT FLIGHT MANUAL
LEP
5
Jun. 30, 2012
SUBJECT PAGE DATE SUBJECT PAGE DATE
20 Jun. 30, 2012
21 Jun. 30, 2012
22 Jun. 30, 2012
23 Jun. 30, 2012
24 Jun. 30, 2012
25 Jun. 30, 2012
26 Jun. 30, 2012
27 Jun. 30, 2012
28 Jun. 30, 2012
29 Jun. 30, 2012
30 Jun. 30, 2012
31 Jun. 30, 2012
32 Jun. 30, 2012
33 Jun. 30, 2012
34 Jun. 30, 2012
35 Jun. 30, 2012
36 Jun. 30, 2012
37 Jun. 30, 2012
38 Jun. 30, 2012
39 Jun. 30, 2012
40 Jun. 30, 2012
41 Jun. 30, 2012
42 Jun. 30, 2012
43 Jun. 30, 2012
44 Jun. 30, 2012
45 Jun. 30, 2012
46 Jun. 30, 2012
47 Jun. 30, 2012
48 Jun. 30, 2012
49 Jun. 30, 2012
50 Jun. 30, 2012
51 Jun. 30, 2012
52 Jun. 30, 2012
53 Jun. 30, 2012
54 Jun. 30, 2012
55 Jun. 30, 2012
56 Jun. 30, 2012
57 Jun. 30, 2012
58 Jun. 30, 2012
59 Jun. 30, 2012
60 Jun. 30, 2012
61 Jun. 30, 2012
62 Jun. 30, 2012
63 Jun. 30, 2012
64 Jun. 30, 2012
65 Jun. 30, 2012
66 Jun. 30, 2012
67 Jun. 30, 2012
68 Jun. 30, 2012
69 Jun. 30, 2012
70 Jun. 30, 2012
71 Jun. 30, 2012
72 Jun. 30, 2012
73 Jun. 30, 2012
74 Jun. 30, 2012
75 Jun. 30, 2012
76 Jun. 30, 2012
77 Jun. 30, 2012
78 Jun. 30, 2012
79 Jun. 30, 2012
80 Jun. 30, 2012
81 Jun. 30, 2012
82 Jun. 30, 2012
83 Jun. 30, 2012
84 Jun. 30, 2012
85 Jun. 30, 2012
86 Jun. 30, 2012
87 Jun. 30, 2012
88 Jun. 30, 2012
89 Jun. 30, 2012
90 Jun. 30, 2012
91 Jun. 30, 2012
92 Jun. 30, 2012
93 Jun. 30, 2012
94 Jun. 30, 2012
95 Jun. 30, 2012
96 Jun. 30, 2012
97 Jun. 30, 2012
98 Jun. 30, 2012
F Foldout page, printed on single face D Deleted page
R Revised page A Added page
JZ-Y8F200W-02
AIRCRAFT FLIGHT MANUAL
LEP
6
June 30, 2012
SUBJECT PAGE DATE SUBJECT PAGE DATE
99 Jun. 30, 2012
100 Jun. 30, 2012
101 Jun. 30, 2012
102 Jun. 30, 2012
103 Jun. 30, 2012
104 Jun. 30, 2012
105 Jun. 30, 2012
106 Jun. 30, 2012
107 Jun. 30, 2012
108 Jun. 30, 2012
109 Jun. 30, 2012
110 Jun. 30, 2012
111 Jun. 30, 2012
112 Jun. 30, 2012
113 Jun. 30, 2012
114 Jun. 30, 2012
115 Jun. 30, 2012
116 Jun. 30, 2012
117 Jun. 30, 2012
118 Jun. 30, 2012
119 Jun. 30, 2012
120 Jun. 30, 2012
121 Jun. 30, 2012
122 Jun. 30, 2012
123 Jun. 30, 2012
124 Jun. 30, 2012
125 Jun. 30, 2012
126 Jun. 30, 2012
127 Jun. 30, 2012
128 Jun. 30, 2012
129 Jun. 30, 2012
130 Jun. 30, 2012
131 Jun. 30, 2012
132 Jun. 30, 2012
133 Jun. 30, 2012
134 Jun. 30, 2012
135 Jun. 30, 2012
136 Jun. 30, 2012
137 Jun. 30, 2012
138 Jun. 30, 2012
139 Jun. 30, 2012
140 Jun. 30, 2012
141 Jun. 30, 2012
142 Jun. 30, 2012
143 Jun. 30, 2012
144 Jun. 30, 2012
145 Jun. 30, 2012
146 Jun. 30, 2012
147 Jun. 30, 2012
148 Jun. 30, 2012
149 Jun. 30, 2012
150 Jun. 30, 2012
151 Jun. 30, 2012
152 Jun. 30, 2012
153 Jun. 30, 2012
154 Jun. 30, 2012
155 Jun. 30, 2012
156 Jun. 30, 2012
157 Jun. 30, 2012
158 Jun. 30, 2012
159 Jun. 30, 2012
160 Jun. 30, 2012
161 Jun. 30, 2012
162 Jun. 30, 2012
163 Jun. 30, 2012
164 Jun. 30, 2012
165 Jun. 30, 2012
166 Jun. 30, 2012
167 Jun. 30, 2012
168 Jun. 30, 2012
169 Jun. 30, 2012
170 Jun. 30, 2012
171 Jun. 30, 2012
172 Jun. 30, 2012
173 Jun. 30, 2012
174 Jun. 30, 2012
175 Jun. 30, 2012
176 Jun. 30, 2012
F Foldout page, printed on single face D Deleted page
R Revised page A Added page
JZ-Y8F200W-02
AIRCRAFT FLIGHT MANUAL
LEP
7
Jun. 30, 2012
SUBJECT PAGE DATE SUBJECT PAGE DATE
177 Jun. 30, 2012
178 Jun. 30, 2012
179 Jun. 30, 2012
180 Jun. 30, 2012
181 Jun. 30, 2012
182 Jun. 30, 2012
183 Jun. 30, 2012
184 Jun. 30, 2012
185 Jun. 30, 2012
186 Jun. 30, 2012
187 Jun. 30, 2012
188 Jun. 30, 2012
189 Jun. 30, 2012
190 Jun. 30, 2012
191 Jun. 30, 2012
192 Jun. 30, 2012
193 Jun. 30, 2012
194 Jun. 30, 2012
195 Jun. 30, 2012
196 Jun. 30, 2012
197 Jun. 30, 2012
198 Jun. 30, 2012
199 Jun. 30, 2012
200 Jun. 30, 2012
201 Jun. 30, 2012
202 Jun. 30, 2012
203 Jun. 30, 2012
204 Jun. 30, 2012
205 Jun. 30, 2012
206 Jun. 30, 2012
207 Jun. 30, 2012
208 Jun. 30, 2012
209 Jun. 30, 2012
210 Jun. 30, 2012
211 Jun. 30, 2012
212 Jun. 30, 2012
213 Jun. 30, 2012
214 Jun. 30, 2012
215 Jun. 30, 2012
216 Jun. 30, 2012
217 Jun. 30, 2012
218 Jun. 30, 2012
219 Jun. 30, 2012
220 Jun. 30, 2012
221 Jun. 30, 2012
222 Jun. 30, 2012
223 Jun. 30, 2012
224 Jun. 30, 2012
225 Jun. 30, 2012
226 Jun. 30, 2012
227 Jun. 30, 2012
228 Jun. 30, 2012
229 Jun. 30, 2012
230 Jun. 30, 2012
231 Jun. 30, 2012
232 Jun. 30, 2012
233 Jun. 30, 2012
234 Jun. 30, 2012
235 Jun. 30, 2012
236 Jun. 30, 2012
237 Jun. 30, 2012
238 Jun. 30, 2012
239 Jun. 30, 2012
240 Jun. 30, 2012
241 Jun. 30, 2012
242 Jun. 30, 2012
243 Jun. 30, 2012
244 Jun. 30, 2012
245 Jun. 30, 2012
246 Jun. 30, 2012
247 Jun. 30, 2012
248 Jun. 30, 2012
249 Jun. 30, 2012
250 Jun. 30, 2012
251 Jun. 30, 2012
252 Jun. 30, 2012
253 Jun. 30, 2012
254 Jun. 30, 2012
F Foldout page, printed on single face D Deleted page
R Revised page A Added page
JZ-Y8F200W-02
AIRCRAFT FLIGHT MANUAL
LEP
8
June 30, 2012
SUBJECT PAGE DATE SUBJECT PAGE DATE
255 Jun. 30, 2012
256 Jun. 30, 2012
257 Jun. 30, 2012
258 Jun. 30, 2012
259 Jun. 30, 2012
260 Jun. 30, 2012
261 Jun. 30, 2012
262 Jun. 30, 2012
263 Jun. 30, 2012
264 Jun. 30, 2012
265 Jun. 30, 2012
266 Jun. 30, 2012
267 Jun. 30, 2012
268 Jun. 30, 2012
269 Jun. 30, 2012
270 Jun. 30, 2012
271 Jun. 30, 2012
272 Jun. 30, 2012
273 Jun. 30, 2012
274 Jun. 30, 2012
275 Jun. 30, 2012
276 Jun. 30, 2012
277 Jun. 30, 2012
278 Jun. 30, 2012
279 Jun. 30, 2012
280 Jun. 30, 2012
281 Jun. 30, 2012
282 Jun. 30, 2012
283 Jun. 30, 2012
284 Jun. 30, 2012
285 Jun. 30, 2012
286 Jun. 30, 2012
287 Jun. 30, 2012
288 Jun. 30, 2012
289 Jun. 30, 2012
290 Jun. 30, 2012
291 Jun. 30, 2012
292 Jun. 30, 2012
293 Jun. 30, 2012
294 Jun. 30, 2012
295 Jun. 30, 2012
296 Jun. 30, 2012
297 Jun. 30, 2012
298 Jun. 30, 2012
299 Jun. 30, 2012
300 Jun. 30, 2012
301 Jun. 30, 2012
302 Jun. 30, 2012
303 Jun. 30, 2012
304 Jun. 30, 2012
305 Jun. 30, 2012
306 Jun. 30, 2012
307 Jun. 30, 2012
308 Jun. 30, 2012
309 Jun. 30, 2012
300 Jun. 30, 2012
311 Jun. 30, 2012
312 Jun. 30, 2012
313 Jun. 30, 2012
314 Jun. 30, 2012
315 Jun. 30, 2012
316 Jun. 30, 2012
317 Jun. 30, 2012
318 Jun. 30, 2012
319 Jun. 30, 2012
320 Jun. 30, 2012
321 Jun. 30, 2012
322 Jun. 30, 2012
323 Jun. 30, 2012
324 Jun. 30, 2012
325 Jun. 30, 2012
326 Jun. 30, 2012
327 Jun. 30, 2012
328 Jun. 30, 2012
329 Jun. 30, 2012
330 Jun. 30, 2012
331 Jun. 30, 2012
332 Jun. 30, 2012
333 Jun. 30, 2012
F Foldout page, printed on single face D Deleted page
R Revised page A Added page
JZ-Y8F200W-02
AIRCRAFT FLIGHT MANUAL
LEP
9
Jun. 30, 2012
SUBJECT PAGE DATE SUBJECT PAGE DATE
334 Jun. 30, 2012
335 Jun. 30, 2012
336 Jun. 30, 2012
337 Jun. 30, 2012
338 Jun. 30, 2012
339 Jun. 30, 2012
340 Jun. 30, 2012
341 Jun. 30, 2012
342 Jun. 30, 2012
343 Jun. 30, 2012
344 Jun. 30, 2012
345 Jun. 30, 2012
346 Jun. 30, 2012
347 Jun. 30, 2012
348 Jun. 30, 2012
349 Jun. 30, 2012
350 Jun. 30, 2012
351 Jun. 30, 2012
352 Jun. 30, 2012
353 Jun. 30, 2012
354 Jun. 30, 2012
355 Jun. 30, 2012
356 Jun. 30, 2012
357 Jun. 30, 2012
358 Jun. 30, 2012
359 Jun. 30, 2012
360 Jun. 30, 2012
361 Jun. 30, 2012
362 Jun. 30, 2012
363 Jun. 30, 2012
364 Jun. 30, 2012
365 Jun. 30, 2012
366 Jun. 30, 2012
367 Jun. 30, 2012
368 Jun. 30, 2012
369 Jun. 30, 2012
370 Jun. 30, 2012
371 Jun. 30, 2012
372 Jun. 30, 2012
373 Jun. 30, 2012
374 Jun. 30, 2012
375 Jun. 30, 2012
376 Jun. 30, 2012
377 Jun. 30, 2012
378 Jun. 30, 2012
379 Jun. 30, 2012
380 Jun. 30, 2012
381 Jun. 30, 2012
382 Jun. 30, 2012
383 Jun. 30, 2012
384 Jun. 30, 2012
385 Jun. 30, 2012
386 Jun. 30, 2012
387 Jun. 30, 2012
388 Jun. 30, 2012
389 Jun. 30, 2012
390 Jun. 30, 2012
391 Jun. 30, 2012
392 Jun. 30, 2012
Appendix A
A1 Jun. 30, 2012
A2 Jun. 30, 2012
A3 Jun. 30, 2012
A4 Jun. 30, 2012
A5 Jun. 30, 2012
A6 Jun. 30, 2012
A7 Jun. 30, 2012
A8 Jun. 30, 2012
A9 Jun. 30, 2012
A10 Jun. 30, 2012
A11 Jun. 30, 2012
A12 (Blank) Jun. 30, 2012
A13 Jun. 30, 2012
A14 (Blank) Jun. 30, 2012
A15 Jun. 30, 2012
A16 (Blank) Jun. 30, 2012
A17 Jun. 30, 2012
A18 Jun. 30, 2012
F Foldout page, printed on single face D Deleted page
R Revised page A Added page
JZ-Y8F200W-02
AIRCRAFT FLIGHT MANUAL
LEP
10
June 30, 2012
SUBJECT PAGE DATE SUBJECT PAGE DATE
A19 Jun. 30, 2012
A20 Jun. 30, 2012
A21 Jun. 30, 2012
A22 Jun. 30, 2012
A23 Jun. 30, 2012
A24 Jun. 30, 2012
A25 Jun. 30, 2012
A26 Jun. 30, 2012
A27 Jun. 30, 2012
A28 Jun. 30, 2012
A29 Jun. 30, 2012
A30 Jun. 30, 2012
A31 Jun. 30, 2012
A32 (Blank) Jun. 30, 2012
A33 Jun. 30, 2012
A34 Jun. 30, 2012
A35 Jun. 30, 2012
A36 Jun. 30, 2012
A37 Jun. 30, 2012
A38 Jun. 30, 2012
Appendix B
B1 Jun. 30, 2012
B2 Jun. 30, 2012
B3 Jun. 30, 2012
B4 Jun. 30, 2012
B5 Jun. 30, 2012
B6 Jun. 30, 2012
Appendix C
C1 Jun. 30, 2012
C2 (Blank) Jun. 30, 2012
C3 Jun. 30, 2012
C4 (Blank) Jun. 30, 2012
Appendix D
D1 Jun. 30, 2012
D2 (Blank) Jun. 30, 2012
GLOSSARY
1 Jun. 30, 2012
2 Jun. 30, 2012
3 Jun. 30, 2012
4 Jun. 30, 2012
5 Jun. 30, 2012
6 Jun. 30, 2012
7 Jun. 30, 2012
8 Jun. 30, 2012
9 Jun. 30, 2012
10 Jun. 30, 2012
11 Jun. 30, 2012
12 Jun. 30, 2012
13 Jun. 30, 2012
14 Jun. 30, 2012
15 Jun. 30, 2012
16 Jun. 30, 2012
F Foldout page, printed on single face D Deleted page
R Revised page A Added page
JZ-Y8F200W-02
AIRCRAFT FLIGHT MANUAL
TOC
1
June 30, 2012
Table of Contents
SUBJECT PAGE
GENERAL.......................................................................................................................................1 
Introduction.............................................................................................................................1 
Aircraft technical data .............................................................................................................5 
Aircraft three-view arrangement ...........................................................................................13
OPERATIONAL LIMITATION ..........................................................................................................1 
General of flight limitation .......................................................................................................1 
Flight limitation........................................................................................................................1 
Speed limitations ....................................................................................................................2 
Weight and C.G. limitations.....................................................................................................7 
G-load limitation....................................................................................................................15 
Limitations of power plant.....................................................................................................16 
Operational limitation for air conditioning system .................................................................18
EMERGENCY PROCEDURES ......................................................................................................1 
Engine failures........................................................................................................................1 
High angle of attack flight .....................................................................................................16 
Flying with door open and descending in emergency...........................................................21 
Landing with the malfunctioned landing gear system ...........................................................22 
Handling of tyre blown-up and brakes failure........................................................................25 
Handling of heading system and the barometer failed in flight .............................................26 
Landing with flaps up............................................................................................................27 
Outside forced landing..........................................................................................................29
JZ-Y8F200W-02
AIRCRAFT FLIGHT MANUAL
TOC
2
June 30, 2012
SUBJECT PAGE
NORMAL PROCEDURES..............................................................................................................1 
Preparations for flight ............................................................................................................1 
Flight ....................................................................................................................................25
PERFORMANCE ...........................................................................................................................1 
General ..................................................................................................................................1 
Aircraft flight performance calculation and conversion curve .................................................1 
Main performance of four engines..........................................................................................7 
Main performance of three engines......................................................................................15 
Takeoff and landing performance in non-standard condition ................................................17 
Climb and descent at different weight and altitude...............................................................30 
AIRCRAFT SYSTEM EQUIPMENT................................................................................................1
Power plant ............................................................................................................................1
Fuel System .........................................................................................................................21
Oil system ............................................................................................................................34
Hydraulic system..................................................................................................................38
Fire-extinguish and neutral gas system................................................................................56
Air-conditioning system ........................................................................................................61
Anti-icing heating system .....................................................................................................71
General ................................................................................................................................71
Oxygen system ....................................................................................................................79
Flight control system..............................................................................................................84
Communication System .....................................................................................................247
Radar system.....................................................................................................................282
Instrument system..............................................................................................................320
Starting power and onboard power equipment...................................................................369
JZ-Y8F200W-02
AIRCRAFT FLIGHT MANUAL
TOC
3/(4 Blank)
June 30, 2012
SUBJECT PAGE
Signal, Illuminating apparatus.............................................................................................380
Sighting, airdlift, airdrop and parachuting equipment..........................................................385
Electric signal gun deviceXQ-1A ........................................................................................392
APPENDIX A ............................................................................................................................... A1
APPENDIX B COMMON KNOWLEDGE INTRODUCTION ...................................................... B1
APPENDIX C FEATURES OF VARIOUS CLOUDS AND THEIR CORRESPONDING
FLIGHT CONDITIONS........................................................................................C1
APPENDIX D AIRCRAFT ICE ACCRETION INTENSITY GRADE............................................D1
JZ-Y8F200W-02
AIRCRAFT FLIGHT MANUAL
TOC
4
June 30, 2012
THIS PAGE INTENTIONALLY LEFT BLANK
JZ-Y8F200W-02
AIRCRAFT FLIGHT MANUAL
SECTION I
GENERAL
1-1
June 30, 2012
GENERAL
INTRODUCTION
Y8F200W is the multifunctional medium transport aircraft of mid range. It mainly serves the
army as air transportation of cargo, arming equipment, armed soldiers, the wounded,
parachuting soldiers and release of small and large-sized cargo and equipment. For the
customization purpose, some adaptation, replacement and adjustment are conducted to the
aircraft like replacement of partial avionics equipment and high-failure rate equipment,
instrument panel distribution adjustment, cargo transportation system interchangeability and
loading effective improvement, floor modification modification in cargo compartment, airframe
surface repaint, addition of engine fuel auto shutoff function and ground auto-cleaning function,
addition of interface between cockpit and air-conditioner ground vehicle, and adaptation of
aircraft structure, ECS, oxygen system, living facilities, power distribution system and
illumination system, etc.
The crew members include pilot (Captain), copilot, navigator, communicator and mechanic.
The aircraft is of metal semimonocoque construction with cantilever high-wing, single
vertical tail and turnup at the fuselage aft. The fuselage section from frames 0~59 are of airtight
cabin, of which, frames 0~8 are the cockpit and frames 9~43 are airtight cargo compartment.
For loading convenience, the floor of cargo cabin has slope at its rear section. The fuselage aft
turnup angle is 18o
43’, and two cargo cabin doors which are openable in the air are located at
the large opening of frames 43~59, and frames 65~68 at the fuselage aft is the non-airtight
equipment cabin.
The tapered wing is of non-geometrical twist along wing span direction and is separated as
center wing, outboard-inboard and outboard wing by two separation surfaces. Four WJ-6
engines are suspended at spar I of outboard-inboard wing, and the double-seam extension flaps
are suspended behind spar II. The two differencial ailerons cooperating with interference board
are suspended behind the spar II of outboard wing.
JZ-Y8F200W-02
AIRCRAFT FLIGHT MANUAL
SECTION I
GENERAL
1-2
June 30, 2012
The tricycle landing gears are of retractable/extensible type, and the four-wheel bogie main
landing gear at both sides of the fuselage is retractable inward to the belly. The doble-wheel
nose landing gear which is retractable backward is at frame 9. The aircraft has 10 wheels, all of
which are equipped with low-pressure tyres, enabling the aircraft to takeoff and land on strip,
grassland, gravel and sand runway. The nose wheel is equipped with nose wheel steering
turning mechanism linked with the rudder control mechanism, and the main wheel is equipped
with hydraulic brake device.
The hydraulic system is composed of two independent sub-systems at left and right side
and standby hand pump and electrical pump system. The two sub-systems at both sides which
are independent to each other are equipped with hydraulic reservoir, hydraulic pump and
hydraulic accessories and two sub-systems can work independently for power plant operation or
cooperatively as standby control mechanism. The two sub-systems are controlled by the
communication valve. Pressurization of hydraulic tank is realized through the pressurized air
from engine compressor, so that normal oil supply is guaranteed regardless of the flight status
and altitude. Total volume of hydraulic system is 28.595gal (130L), with its operating pressure
being 1705~2203psi (11.76~15.19 MPa) (120~155 kgf/cm2
). The hand pump and electrical
pump system aims to control operation of each part on ground and serves as standby system in
the air in emergency.
Flight control system of the aircraft consists of primary control system and auxiliary control
system. The primary control system is of rigid pull rod control, and is equipped with the hydraulic
control surface of KJ-6C autopilot, the control surface receives the control signal from autopilot.
The aircraft can be controlled individually or cooperatively by pilot (Captain) and copilot through
the primary control system.
The airborne oxygen system and two sets of high-altitude facility can gurantee normal living
and working conditions for the crew members. The high-altitude facility fulfills airtight cockpit
pressurization, heating and cooling requirement of the aircraft, while the air is supplied from
stage X compressor of the engine. The low-altitude ventilation system on the aircraft serves to
ventilate the cabin during low-altitude flight. Pressure difference inside and outside the cabin is
not more than 6.67psi (0.046 MPa) (0.469 kgf/cm2
). The air-conditioner interface system inside
the cockpit can connect with the air-conditioner vehicle on ground in short time to supply the
conditioned air to the aircraft. The oxygen is supplied in form of gas and the max. storage is
21.996gal (100 L).
JZ-Y8F200W-02
AIRCRAFT FLIGHT MANUAL
SECTION I
GENERAL
1-3
June 30, 2012
The aircraft is equipped with anti-icing device. Deicing of engine inlet duct at its leading
edge, engine compressor inlet guide vanes assembly is realized through the hot air, while that of
propeller blade, propeller cap and windshield glass is of electrical-driven.
The WJ-6 turbine propeller engine, with its power of 3126kW (4250 equivalent horsepower)
per set is installed on the wing through engine case and engine nacelle support frame. The
engine is started by direct current and designed with auto/manual fuel shut-off, overheat
protection and ground cleaning functions, and is controlled by the steel cable. The engine
propeller is known as J17-G13 four-blade metal propeller and is equipped with auto feathering
pitch control device.
There are 26 rubber fuel tanks inside the left and right wings, and the outboard wing is
equipped with the integrated fuel tank. The fuselage tank is inside the anti-stress fuel tank cabin
under floor of fuselage frames 33~41. Fuel consumption of the fuel system is contolled
automatically or manually as per certain sequence, and the fuel can be added by means of
auto-pressure refuelling or manually from the filler.
The fireproof equipment and effective fire extinguisher can detect and put out the fire timely.
The neutral gas to fuel tank from the neutral-gas system forms the anti-explosive media above
the fuel surface, enhancing safety of the fuel system. Moreover, during emergency landing
process, the neutral gas inside the fuel tank can increase the fuel pressure on its surface, thus
improving the reliability of the fuel supply system.
Aircraft is equipped with 28VDC, single- phase 400Hz 115VAC and three-phase 400Hz
36VAC. Direct current power supply includes QF12-1 starter generator (8 sets) supplying
28VDC with rated output power of 12kW for each, QF-24 starter generator (1 set) supplying
28VDC with rated output power of 18kW and 20GNC28B battery (4 sets) supplying 24VDC.
Alternatiing current (AC) power supply includes JF-12 AC generator (4 sets) and three-phase
alternating current includes 2 sets of SL-1000E three-phase inverter. In addition, the aircraft is
also equipped with a DIAJ-0603 static inverter, its input voltage is 28VDC and output voltage is
110VAC/60Hz with rated output power of 3 kVA.
JZ-Y8F200W-02
AIRCRAFT FLIGHT MANUAL
SECTION I
GENERAL
1-4
June 30, 2012
The airborne navigation system mainly includes HG-593Y8 laser strapdown inertial/satellite
combination navigation system, 2101 I/O GPS navigation system, HZX-1M altitude heading
reference system(AHRS), XAS-3M air data system and WL-11 ADF, JD-3A TACAN, KRA405B
radio altimeter, VOR-432 VOR/ILS, KDM 706A DME distance measuring equipment and MK VIII
enhanced ground proximity warning system. The navigation system integrated by these devices
is cross-linked with KJ-6C autopilot to control the flight automatically.
The communication system consists of TKR-200A2 HF radio, the TKR123E-III VHF radio,
and JT-Y8F200W intercom with AIRMAN 750 headset. In addition, the aircraft is equipped with
JYL-6AT meteorological radar, TCAS-94 airtraffic alarming and anti-collision system, and
JZ/YD-126E IFF transponder.
The airborne instrument mainly includes BK-43 airspeed indicator, BG-1A barometric
altimeter, BC-10 elevation speedometer, BUC-26D capacitance-type fuel gauge, FJ-30D6 flight
data recorder and XFJ-12B cockpit audio frequency recorder, etc.
The aircraft can be equipped with airdrop side guide rail, cargo transportation guide rail,
stop lock, rollway, mooring ring, seat and stretcher etc. to fulfill multi-purpose requirement. Air
transportation equipment on the aircraft mainly include electric winch, beam crane, cargo
transportation side guide rail, stop lock, cargo transportation rollway, mooring ring, capative
cable, tie-down net and stop force component pad, etc. Airborne extraction equipment mainly
consists of airdrop side guide rail, airdrop rollway, extraction parachute releasing device,
extraction sighting equipment, electrical parachute rope recovery mechanism, airdrop and
airborne signal device and airdrop electrical control device, etc. The aircraft can also be
equipped with 86 seats for armed soldier or airborne parachute soldiers; it can also be equipped
with 72 sets of rescue stretchers for rescuing the seriously injured personnel during the air
transportation process.
JZ-Y8F200W-02
AIRCRAFT FLIGHT MANUAL
SECTION I
GENERAL
1-5
June 30, 2012
AIRCRAFT TECHNICAL DATA
Principal geometrical data
General data
(a) Overall length 111.62ft (34.022m)
(b) Overall height
LG free 36.61 ft (11.160m)
LG compressed 35.20 ft (10.730m)
(c) Min. suspension height of belly to ground upon landing gear compression
2.04 ft (0.622m)
(d) Suspension height of cargo cabin floor at frame 43 4.47 ft (1.361m)
(e) AOA of parking aircraft 5o
15’
(f) Max. width of fuselage (with laning gear bay) 14.88 ft (4.536m)
(g) Max. height of fuselage 14.44 ft (4.40m)
(h) Column diameter of fuselage (frames 17-33) 13.45 ft (4.10m)
(i) Interior dimensions of fuselage cargo cabin
Volume 4859.30ft3
(137.60m3
)
Length 48.23 ft (14.7m)
Width (along floor surface)
Frames 9~13 9.84 ft ~11.48 ft (3.000m~3.500m)
Frames 13~25 and frame 30~43 11.48 ft (3.500m)
Frames 25~30 9.84 ft (3.000m)
(j) Height of cargo cabin
Frames 9~14 7.38 ft ~8.2 ft (2.25m~2.50m)
Frames 14~25 8.2 ft (2.50m)
Frames 25~30 7.87 ft (2.40m)
Frames 30~31 7.87 ft ~8.53 ft (2.4m~2.6m)
Frames 31~43 8.53 ft (2.60m)
JZ-Y8F200W-02
AIRCRAFT FLIGHT MANUAL
SECTION I
GENERAL
1-6
June 30, 2012
(k) Boarding gate dimension
Height × width 4.77 ft × 2.62 ft (1.455m × 0.8m)
Wings
(a) Wing span (along chord plane) 124.67 ft (38m)
(b) Area (including area covered by fuselage) 1311.689 ft2
(121.86m2
)
(c) Mean aerodynamic chord 11.322 ft (3.451m)
(d) Aspect ratio 11.85
(e) Wing sweep angle at 25% chord 6o
50’34’’
(f) Wing dihedral angle
Center wing 0o
Outboard-inboard wing (relative to center wing) 1o
Outboard wing (relative to inboard wing) -3o
(g) Wing incidence 4o
(h) Length of single aileron 18.98 ft (5.784m)
(i) Aileron area 84.389 ft2
(7.840m2
)
(j) Maximum deflection angle of aileron
Upwards (25±1)o
Downwards (15+2
-1 )o
(k) Aileron trim tab area 9.042 ft2
(0.84m2
)
(l) Max. deflection angle
Upwards (6±1)o
Downwards (6±1)o
(m) Max. turning angle when the aileron turns to Max. limit position 135o
(n) Flap area 289.657 ft2
(26.910m2
)
(o) Length of single flap 35.958 ft (10.960m)
JZ-Y8F200W-02
AIRCRAFT FLIGHT MANUAL
SECTION I
GENERAL
1-7
June 30, 2012
(p) Flap deflection angle
Takeoff 15o
~(25±1)o
Landing (35±1)o
(q) Flap Double-slot zap type
(r) Length of spoiler (at half wing) 3.609 ft (1.100m)
(s) Height of spoiler at full extension (aileron upwards to 25o
) is 5.51 in±0.20in (140±5mm)
(spoiler tends to protrude when aileron deflects to 3o
)
Tail
(a) Area of horizontal tail 291.164 ft2
(27.050m2
)
(b) Stabilizer area of horizontal tail 214.729 ft2
(19.949m2
)
(c) Span of horizontal tail 40.013 ft (12.196m)
(d) Mean aerodynamic chord of horizontal tail 7.851 ft (2.393m)
(e) Dihedral angle of horizontal tail 0o
(f) Incidence angle of horizontal tail (relative to wing chord) -4o
(g) Elevator area 76.434 ft2
(7.101m2
)
(h) Max. deflection angle of rudder
Upwards 28o
±1o
Downwards 15o
±1o
(i) Elevator trim tab area 8.374 ft2
(0.778m2
)
(j) Max. deflection angle of rudder trim tab (upon steel cable control) at up and down
position 12o
±1o
(k) Area of vertical fin (from upper fuselage, excluding dorsal fin) 21.503m2
(l) Stabilizer area of vertical fin 161.093ft2
(14.966m2
)
(m) Vertical tail span 19.13 (5.83m)
(n) Mean aerodynamic chord of vertical tail 13.28 (4.048m)
(o) Rudder area 70.364ft2
(6.537m2
)
(p) Max. deflection angle of rudder Leftward and rightward 25o
±1o
(q) Rudder trim tab area 4.123ft2
(0.383m2
)
(r) Rudder spring force servo tab area 4.726 ft2
(0.439m2
)
JZ-Y8F200W-02
AIRCRAFT FLIGHT MANUAL
SECTION I
GENERAL
1-8
June 30, 2012
(s) Max. deflection angle of rudder trim tab Leftward and rightward 18.5o
±1o
(t) Max. deflection angle of rudder spring force servo tab
Leftward and rightward 13.5o
±1o
Landing gear
(a) Wheel track along the main wheel contour 17.756 ft (5.412m)
Along the main wheel buffer strut 16.142 ft (4.920m)
Wheel base 31.42 ft (9.576m)
(b) Min. turning radius on ground 45.11 ft (13.75m)
(c) Max. turning angle of nose wheel
Manual control angle Leftward and rightward 35o
Rudder control angle Leftward and rightward 8o
±2o
(d) Favorable taxiing speed of the aircraft when turning with nose wheel handle
2.70kn~3.24kn (5~6km/h)
(e) Main wheel dimension 41.339 in×11.811 in (1050mm×300mm)
(f) Nose wheel dimension 35.433 in×11.811 in (900mm×300mm)
(g) Air pressure of tyre
Within the range of normal takeoff:
Main wheel (85.57+7.25
0 )psi ((0.59+0.05
0 ) MPa)
Nose wheel (71.07+2.90
-1.45 )psi ((0.49+0.02
-0.01 )MPa)
At max. takeoff weight (61t)
Main wheel (100.08+7.25
0 )psi ((0.69+0.05
0 )MPa)
Nose wheel 73.97psi (0.51MPa)
(h) Braking clearance 0.059in~0.138in (1.5mm~3.5mm)
(i) Exposive buffer strut (upon parking and compression)
Within the range of normal takeoff:
Nose buffer strut 3.937in~9.449in (100~240mm)
Main buffer strut 1.693in~4.528in (43~115mm)
At max. takeoff weight (61t)
Nose buffer strut 1.693in~4.528in (70~200mm)
JZ-Y8F200W-02
AIRCRAFT FLIGHT MANUAL
SECTION I
GENERAL
1-9
June 30, 2012
(j) Parking compression of aircraft tyre
Parking compression of aircraft tyre for main landing gear wheel
2.953in~3.543in (75~90mm)
Parking compression of aircraft tyre for nose landing gear wheel
1.378in~1.987in (35~50mm)
Power plant and trubo power starter generator
WJ-6 Engine data
(a) Dimension
Length
122 in±0.079 in (3099mm±2mm)
(with bullet 140 in±0.197 in (3558mm±5mm))
Width 35.118in±0.039 in (892mm±1mm)
Height 46 in±0.0118 in (1174mm±1mm)
(b) Net weight (with accessories) 1200kg+2%
(c) Engine rotating speed
Operating speed (12300+90
)r/min(95.5%~96.2%)
Idle on ground (10400+200
-50 )r/min(80.5%~82.5%)
Cold running speed (30s) 17%~22%
(d) Engine acceleration
From idling on ground to takeoff Not exceed 20s
From idling in the air to takeoff Not exceed 10s
(e) Engine deceleration 8s~10s
(f) Relative incidence angle between engine and wing -4o
(g) Shut off speed of air compressor air-bleed valve
5th
stage (11340+130
) r/min (88%~89%)
8th
stage (9340+200
) r/min (72.5%~74%)
(h) Pressure ratio of air compressor (Maximum continuous power condition H= 26247ft
(8000m), V= 574.15ft/s (175m/s) 9.2
(i) Airflow ((Maximum continuous power condition H=0, V=0) 20.5kg/s
JZ-Y8F200W-02
AIRCRAFT FLIGHT MANUAL
SECTION I
GENERAL
1-10
June 30, 2012
(j) Engine data in different operating conditions is shown in Table 1-1.
Table 1-1 Engine data in different operating conditions (H=0, V=0, PH=101.3kPa, tH=15o
C)
Service condition
Throttle
angle
Equivalent
power rate (kW)
Axis power rate
(kW)
Fuel
consumption
(kg/h)
Takeoff 98o
~105o
3126 2868 1030
Max. continuous power
condition
84±2o
2567 2331 927
0.85 Max. continuous
power condition
72±2o
2184 1971 842
0.7 Max. continuous
power condition
60±2o
1846 1589 757
0.6 Max. continuous
power condition
52±2o
1525 1341 701
0.4 Max. continuous
power condition
35±2o
961 805 578
0.2 Max. continuous
power condition
20±2o
Idling on ground 0o
Propeller data
(a) Model J17-G13
(b) Number of blade 4
(c) Diameter of blade 14.76ft (4.5m)
(d) Rotating direction (Along the flight direction) Anti-clockwise
(e) Blade incidence(R=5.25ft (1.6m) at the section)
Min. blade angle (starting angle) 0o
Mid-range limiting angle 12o
Feathering angle 83o
30’
Ground hydraulic feathering angle 40o
~46o
(f) Blade angle variation 0o
~83o
30’
(g) Propeller operating speed 1075r/min
JZ-Y8F200W-02
AIRCRAFT FLIGHT MANUAL
SECTION I
GENERAL
1-11
June 30, 2012
(h) Full feathering position time
Engine operative Not exceed 10s
Engine shutdown Not exceed 20s
(i) Unfeather time
In the air Not exceed 10s
On ground Not exceed 25s
(j) Rotating inertia 2.382kg•m•s2
(k) Net weight (without hub fairing component and current collector) 408kg+2%
(l) Area of propeller airflow passing the wing 53%
(m) Clearance between propeller and the fuselage 2.17ft (0.66m)
(n) Suspension height of blade tip to ground
Inboard engine 6.34ft (1.932m)
Outboard engine 6.51ft (1.985m)
(o) Propeller pulling arm on horizontal surface
Inboard engine 15.59ft (4.715m)
Outboard engine 31.28ft (9.533m)
Caution
Upon feathering ground test, oil temperature is required to be above 25o
C.
JZ-Y8F200W-02
AIRCRAFT FLIGHT MANUAL
SECTION I
GENERAL
1-12
June 30, 2012
Turbo starter generator
(a) Power rate (at the terminal of QF-24 power generator) 56kW~60kW
(b) Output axis power rate 70kW~73.5kW
(c) Net weight 170kg
(Not exceed 190+5
kg for trubo starter generator with turbo protection device).
(d) Operational altitude 0ft~13780ft (0m~4200m)
(e) Contour dimension
Length (to the end of short exhaust pipe) 62.20in±0.31in (1580mm±8mm)
Height Not exceed 26.38in (670mm)
Width 22.64in (575mm)
(f) Total operating hour of turbo starter generator should not exceed 172h (total engine start
hour is 72h, total hour of power supply to airborne network is 100h, and total start
frequency per engine is 2000 times).
JZ-Y8F200W-02
AIRCRAFT FLIGHT MANUAL
SECTION I
GENERAL
1-13/(14 Blank)
June 30, 2012
AIRCRAFT THREE-VIEW ARRANGEMENT
For details, see Figure 1-1.
14.83
4520
12.6
(3840)
111.62
(34022)
31.42
(9576)
26.61~35.3
(11160~10760)
124.67
(38000)
16.14
(4920)
40
(12196)
Figure 1-1 Three-view arrangement of the aircraft
JZ-Y8F200W-02
AIRCRAFT FLIGHT MANUAL
SECTION I
GENERAL
1-14
June 30, 2012
THIS PAGE INTENTIONALLY LEFT BLANK
JZ-Y8F200W-02
AIRCRAFT FLIGHT MANUAL
SECTION II
OPERATIONAL LIMITATION
2-1
June 30, 2012
OPERATIONAL LIMITATION
GENERAL OF FLIGHT LIMITATION
Minimum crewmembers:
Minimum crewmembers: five persons, i.e., pilot (captain), co-pilot, navigator, communicator
and flight engineer.
Service range:
(a) Day and night flight
(b) Instrument landing
(c) Icing condition of mid-level or below
FLIGHT LIMITATION
(a) Maximum banks are not more than 30o
, and under complicated weather conditions not
more than 15o
during banking and turning.
(b) Maximum angle of attack of wing is 12o
30’ during take-off and landing.
(c) The allowable 90o
crosswind speed during normal take-off and landing is not more than
39.37ft/s (12m/s), and the experienced pilot is allowed to take off and land 90o
crosswind
within the speed of 49.21 ft/s (15m/s).
(d) Go-around altitude of the aircraft is usually not less than 164ft (50m). Under special
circumstances go-around at any altitude is allowed, as long as the four engines are all in
operation and their throttle levers are all over 16o
.
(e) The door is not allowed to open upon aircraft takoff; in case that the door can not be
closed due to its control system failure, normal landing is permitted with AOA of the wing
≯9o
(fuselage AOA≯5o
)
(f) Pressure difference inside and outside of pressurized cabin is not more than 6.67psi
(0.046MPa).
JZ-Y8F200W-02
AIRCRAFT FLIGHT MANUAL
SECTION II
OPERATIONAL LIMITATION
2-2
June 30, 2012
SPEED LIMITATIONS
(a) Speed limitation (Vmax) for level-flight with different air-borne weight and altitude is in
Table 2-1.
Table 2-1a Speed limitation for level flight
Air-borne weight (t) Altitude (ft) IAS (kn)
<55
<18045 Vmax≯281
>18045 M≯0.6
≥55
<23950 Vmax≯248
>23950 M≯0.6
Table 2-1b Level speed limitation
Air-borne weight (t) Altitude (m) Equivalent speed (km/h)
<55
<5500 Vmax≯520
>5500 M≯0.6
≥55
<7300 Vjx≯460
>7300 M≯0.6
(b) Speed limitation (Vjx) for gliding with different airborne weight and altitude and
short-period flight is in Table 2-2.
Table 2-2a Gliding speed limitation
Airborne weight (t) Altitude (ft) IAS (km/h)
<55 <17388 Vjx≯329
>17388 M≯0.7
≥55
<21325 Vjx≯302
>21325 M≯0.7
Table 2-2b Gliding speed limitation
Airborne weight (t) Altitude (m) IAS (km/h)
<55
<5300 Vjx≯610
>5300 M≯0.7
≥55
<6500 Vjx≯560
>6500 M≯0.7
JZ-Y8F200W-02
AIRCRAFT FLIGHT MANUAL
SECTION II
OPERATIONAL LIMITATION
2-3
June 30, 2012
(c) Speed limitation polar curve as per Table 2-1 and Table 2-2 is shown in Figure 2-1.
H(ft)
V
b
(kn)
Longperiodflight
Shortperiodflightandgliding
V
max
V
jx
M=0.6
M=0.7H=23950ft
H=18045ft
H=21325ft
H=17388ft
227 238 248 252 270 281 292 302 313 324 335 346 356 367
26247
22966
19685
16404
13123
9843
6562
3281
0
Figure 2-1a Speed limitation polar curve
420 440 460 480 500 520 540 560 580 600 620 640 660 680
0
1000
2000
3000
4000
5000
6000
7000
8000
H(m)
Vb(km/h)
Longperiodfight
Shortperiodflightandgliding
Vmax Vjx
M=0.6 M=0.7H=7300
H=5500
H=6500
H=5300
Figure 2-1b Speed limitation polar curve
JZ-Y8F200W-02
AIRCRAFT FLIGHT MANUAL
SECTION II
OPERATIONAL LIMITATION
2-4
June 30, 2012
(d) Speed and Mach number limit for emergency landing is the same with that in Table. Load
limit and descending rate for emergency landing recovery should not exceed 1.5g and
131ft/s (40m/s) respectively.
(e) IAS should be no more than 189 kn (350km/h) when the cargo cabin is at open position.
(f) IAS of airdrop and airborne is 173kn~189kn (320km/h~350km/h) and 157kn~189kn
(290km/h~320km/h) respectively.
(g) Upon landing gear retraction/extension, readout of flight speed Vmeter should not exceed
189 kn (350km/h).
(h) Flap extension IAS:
(i) When flap is down by 25o
, IAS should not exceed 184kn (340km/h), and when it is down
by 35o
, the readout should be no more than 162kn (300km/h).
(j) When the aircraft is taxiing on ground at the speed of 2.7kn~32.4kn (5km/h~60km/h), or
81kn (150km/h) under special condition, operation of nose wheel steering handle is
allowed. However, gentle operation is required for the latter situation.
(k) In vertical blast region, lower flight speed timely in case of G-load caused by the gust.
1) In case of the strongest blast (equivalent wind speed: 65.6ft/s (20m/s)), lower the
flight speed as Vzj (See Table 2-3).
Table 2-3a Lowering speed under gust
Altitude (ft) 0 6562 13123 19685
Vzj (kn) 180 182 186 192
Table 2-3b Lowering speed under gust
Altitude (m) 0 2000 4000 6000
Vzj (km/h) 333 337 344 355
2) Under equivalent wind speed of 49.2 ft/s (15m/s), flight speed should not exceed
that of max. level flight (Vmax). See Table 2-1.
3) Under equivalent wind speed of 26.2 ft/s (8m/s), flight speed should not exceed that
of dive limit (Vjx). See Table 2-2.
Note
In case of gust, flight speed should be within the tolerance of Max. gust speed
as per designation.
JZ-Y8F200W-02
AIRCRAFT FLIGHT MANUAL
SECTION II
OPERATIONAL LIMITATION
2-5
June 30, 2012
(l) Max. maneuver speed of level flight with different airborne weight, altitude, flap & landing
gear up is in Table 2-4.
Table 2-4a Maneuver speed (IAS)
Altitude(m)
Airborne weight (t)
<19685 ≥19685
≤54 151 162
>54 173 184
Table 2-4b Maneuver speed (IAS)
Altitude(m)
Airborne weight (t)
<6000 ≥6000
≤54 280 300
>54 320 340
(m) Upon landing light down, flight speed should not eceed 162 kn (300km/h).
(n) Min. allowable speed and falling spiral speed is in Table 2-5.
Table 2-5b Min. allowable speed and falling spiral speed
Altitude
(ft)
Landing
gear
status
Flap
angle
Airborne
weight
(t)
Min.
allowable
speed (kn)
Falling
spiral
speed (kn)
Remark
15748~18045
UP 0o
48.7 140 121 1. Throttle
angle 20o
2. IAS speed
DOWN 25o
48.4 115 103
DOWN 35o
48.2 109 97
Table 2-5b Min. allowable speed and falling spiral speed
Altitude
(m)
Landing
gear
status
Flap
angle
Airborne
weight
(t)
Min.
allowable
speed
(km/h)
Falling
spiral speed
(km/h)
Remark
4800~5500
UP 0o
48.7 260 225 1. Throttle
angle 20o
2. IAS speed
DOWN 25o
48.4 213 190
DOWN 35o
48.2 202 179
(o) Figure 2-2 shows the flight envelope when all engines are operated with the airborne
weight of 49t.
JZ-Y8F200W-02
AIRCRAFT FLIGHT MANUAL
SECTION II
OPERATIONAL LIMITATION
2-6
June 30, 2012
H(ft)
3281
24606
16404
8202
108 216 324 432 V(kn)
Vmin
Vks
Vmax(Max.continuouspowercondition)
Vmax(Max.)
Max.speedpressurelimitfor
levelflightq=12740Pa
Max.glidingspeed
pressureq=17640Pa
0.7Max.continuous
powercondition
Figure 2-2a Flight envelope of four operated engines
H(m)
10000
7500
5000
2500
200 400 600 800 V(km/h)
Vmin
Vks
Vmax(Max.continuouspowercondition)
Vmax(Max.)
Max.speedpressurelimitfor
levelflightq=12740Pa
Max.glidingspeed
pressureq=17640Pa
0.7Max.continuous
powercondition
Figure 2-2b Flight envelope of four operated engines
JZ-Y8F200W-02
AIRCRAFT FLIGHT MANUAL
SECTION II
OPERATIONAL LIMITATION
2-7
June 30, 2012
WEIGHT AND C.G. LIMITATIONS
Basic data
Maximum take-off weight 61t
Normal takeoff weight 56t
Normal landing weight 52t
Theriotical empty weight 35.20t
(See MRB for empty weight per aircraft)
(Specific weight of fuel 0.775kg/L) Max. fuel quantity of wing tank 15.020t
Max. fuel quantity of fuselage tank (Specific weight of fuel 0.775kg/L) 2.200t
Dead fuel 395kg
Fixed weight 778kg
Theoretical C.G of empty aircraft 25.01%CA
(See MRB for C.G per empty aircraft)
Normal range of C.G 22%CA~28%CA
Optimum range of C.G 25%CA~28%CA
Weight and C.G. limitations
Weight limitations
Maximum take-off weight 61t
Maximum taxiing weight 61.5t
Maximum landing weight 58t
Allowable C.G
With aircraft weight equal to or less than 56000kg 16%CA~32%CA
With aircraft weight greater than 56000kg 18%CA~32%CA
JZ-Y8F200W-02
AIRCRAFT FLIGHT MANUAL
SECTION II
OPERATIONAL LIMITATION
2-8
June 30, 2012
Fuel quantity limitation for typical airdrop and air transportatoin
Upon airdrop of cargo for 12 sets of 1m loading platforms, total fuel quantity of the aircraft
should be not less than 4000kg (with dead fuel of 395kg).
Upon airdrop of cargo for 6m loading platform (weight: 7400kg) and 4m loading platform
(weight: 5800kg), total fuel quantity of the aircraft should be not less than 4000kg (with dead fuel
of 395kg).
Total fuel quantity should be not less than 2600kg (with dead fuel of 395kg) when the aircraft
is fulfilled with the wounded.
Fuel consumption influence towards C.G
Variation of C.G as per fuel consumption in different conditions is shown from Figure 2-3 to
Figure 2-11.
60000 55000 50000 45000 40000 35000
10
15
20
25
30
35
RelativeC.Goftheaircraft(%CA
)
C.G backward limit
C.G forward limit
Weight of the aircraft (kg)
Note
Aircraft takeoff weight is 53459kg, and fuel quantity is 17220kg.
Figure 2-3 Variation of C.G as per fuel consumption in empty ferry flight
JZ-Y8F200W-02
AIRCRAFT FLIGHT MANUAL
SECTION II
OPERATIONAL LIMITATION
2-9
June 30, 2012
RelativeC.Goftheaircraft(%CA
) C.G backward limit
C.G forward limit
Weight of the aircraft (kg)
60000 55000 50000 45000 40000 35000
10
15
20
25
30
35
Note
a) Aircraft takeoff weight is 61000kg, fuel quantity is 14210kg, and bulk cargo
weight is 10000kg.
Figure 2-4 Typical variation of C.G. for typical transportation of containerized cargo
RelativeC.Goftheaircraft(%CA
)
C.G backward limit
C.G forward limit
Weight of the aircraft (kg)
60000 55000 50000 45000 40000 35000
10
15
20
25
30
35
Note
Aircraft takeoff weight is 61000kg, fuel quantity is 15211kg, and 3 pieces of
pallet (96’’×125), total weight is 9000kg.
Figure 2-5 Variation of C.G as per fuel consumption for typical transportation of containerized
cargo
JZ-Y8F200W-02
AIRCRAFT FLIGHT MANUAL
SECTION II
OPERATIONAL LIMITATION
2-10
June 30, 2012
RelativeC.Goftheaircraft(%CA
)
C.G backward limit
C.G forward limit
Weight of the aircraft (kg)
60000 55000 50000 45000 40000
10
15
20
25
30
35
Note
Aircraft takeoff weight is 61000kg, fuel weight is 14178kg, and total weight of
86 armed soldiers is 10320kg.
Figure 2-6 Variation of C.G as per fuel consumption for armed soldier transportation
RelativeC.Goftheaircraft(%CA)
C.G backward limit
C.G forward limit
Weight of the aircraft (kg)
60000 55000 50000 45000 40000
10
15
20
25
30
35
Note
Aircraft takeoff weight is 60961kg, fuel weight is 17220kg, and total weight of
60 paratroopers is 9000kg.
Figure 2-7 Variation of C.G as per fuel consumption for airborne paratrooper transportation
JZ-Y8F200W-02
AIRCRAFT FLIGHT MANUAL
SECTION II
OPERATIONAL LIMITATION
2-11
June 30, 2012
RelativeC.Goftheaircraft(%CA) C.G backward limit
C.G forward limit
Weight of the aircraft (kg)
60000 55000 50000 45000 40000
10
15
20
25
30
35
Note
a) Aircraft takeoff weight is 60903kg, fuel quantity is 17220kg, 3 medical care
personnel, 72 seriously wounded persons and 17 walking injuries and
total weight is 6675kg.
b) Residual fuel in the tank should be not less than 2600kg during flight.
Figure 2-8 Variation of C.G as per fuel consumption for the wounded transportation
JZ-Y8F200W-02
AIRCRAFT FLIGHT MANUAL
SECTION II
OPERATIONAL LIMITATION
2-12
June 30, 2012
60000 55000 50000 45000 40000 35000
15
20
25
30
C
B
C
A
B
A’
’
’
RelativeC.Goftheaircraft(%CA
)
Weight of the aircraft (kg)
C.G forward limit
C.G backward limit
Note
a) Curve AA indicates variation of C.G as per fuel consumption with the
weight of empty aircraft + fixed weight + basic configurated application
item + configurated application item of airdrop loading platform + 12 sets
of 1m loading platform(loading status) + full fuel of fuselage tank and wing
tank (variation is 20.7 %CA~28.2 %CA).
b) Curve BB indicates variation of C.G as per fuel consumption with the
weight of empty aircraft + fixed weight + basic configurated application
item + configurated application item of airdrop loading platform + 12 sets
of 1m loading platform(unloading status) + full fuel of fuselage tank and
wing tank (variation is 21.0 %CA~29.3%CA).
c) Curve CC indicates variation of C.G as per fuel consumption with the
weight of empty aircraft + fixed weight + basic configurated application
item + configurated application item of airdrop loading platform + 12 sets
of 1m loading platform(loading platform I-VI in unloading status and VII-XII
in loading status) + full fuel of fuselage tank and wing tank. Upon airdrop,
residual fuel in the tank should not be less than 4000kg.
Figure 2-9 Variation of C.G as per fuel consumption for 12 sets of 1m loading platform in
airdrop status
JZ-Y8F200W-02
AIRCRAFT FLIGHT MANUAL
SECTION II
OPERATIONAL LIMITATION
2-13
June 30, 2012
60000 55000 50000 45000 40000 35000
15
20
25
30
c
C B
A
B
A
RelativeC.Goftheaircraft(%CA
)
Weight of the aircraft (kg)
C.G forward limit
C.G backward limit
’
’
’
Note
a) Curve AA’ indicates variation of C.G as per fuel consumption with total
weight of 61000kg (i.e. empty aircraft + fixed weight + basic configurated
application item + configurated application item of airdrop loading platform
+ 4500kg loading platform + 4500kg loading platform + 14742kg of fuel) in
takeoff status (variation is 29.3 %CA~ 31.0%CA).
b) Curve BB’ indicates variation of C.G as per fuel consumption with total
weight of 61000kg (i.e. empty aircraft + fixed weight + basic configurated
application item + configurated application item of airdrop loading platform
+ 4500kg loading platform (No.1) +4500kg loading platform (No.2) +
14742kg of fuel in takeoff status (variation is 21.0 %CA~24.7 %CA) when
both loading platforms (No.1 and No.2) are in unloading condition.
c) Curve CC’ indicates variation of C.G as per fuel consumption with total
weight of 61000kg (i.e. empty aircraft + fixed weight + basic configurated
application item + configurated application item of airdrop loading platform
+ 4500kg loading platform(No.1) + 4500kg loading platform(No.2) +
14742kg of fuel) in takeoff status (variation is 29.3 %CA~ 31.0%CA) when
loading platform(No.1) is unloaded and loading platform (No.2) is in
loading condition (variation is 16.9 %CA~21.1%CA).
Figure 2-10 Variation of C.G as per fuel consumption for 2 sets of 4m loading platform in
airdrop status
JZ-Y8F200W-02
AIRCRAFT FLIGHT MANUAL
SECTION II
OPERATIONAL LIMITATION
2-14
June 30, 2012
60000 55000 50000 45000 40000 35000
15
20
25
30
c
C
B
A
B
A
Weight of the aircraft (kg)
C.G forward limit
C.G backward limit
RelativeC.Goftheaircraft(%CA
)
’
’
’
Note
a) Curve AA indicates variation of C.G as per fuel consumption with total
weight of 61000kg (i.e. empty aircraft + fixed weight + basic configurated
application item + configurated application item of airdrop loading platform
+ 7400kg loading platform +5800kg loading platform + 10542kg of fuel) in
takeoff status (variation is 29.5 %CA~ 30.2 %CA).
b) Curve BB indicates variation of C.G as per fuel consumption with total
weight of 61000kg (i.e. empty aircraft + fixed weight + basic configurated
application item + configurated application item of airdrop loading platform
+ 7400kg loading platform(No.1) + 5800kg loading platform(No.2) +
10542kg of fuel) in takeoff status (variation is 21.0 %CA~23.2 %CA) when
both loading platforms(No.1 and No.2) are in unloading condition.
c) Curve CC indicates variation of C.G as per fuel consumption with total
weight of 61000kg (i.e. empty aircraft + fixed weight + basic configurated
application item + configurated application item of airdrop loading platform
+ 7400kg loading platform(No.1) +5800kg loading platform(No.2) +
10542kg of fuel) in takeoff status when loading platform(No.1)is unloaded
and loading platform(No.2)is in loading condition. Upon airdrop, residual
fuel in the tank should not be less than 4000kg.
Figure 2-11 Variation of C.G as per fuel consumption for 2 sets of 4m loading platform in
airdrop status
JZ-Y8F200W-02
AIRCRAFT FLIGHT MANUAL
SECTION II
OPERATIONAL LIMITATION
2-15
June 30, 2012
G-LOAD LIMITATION
(a) Upon takeoff, G-load at C.G should not exceed 2g.
(b) Upon landing, G-load at C.G should not exceed 2.5g.
(c) See Table 2-6 for static-strength-based G-load limitation in flight.
Table 2-6 Flight G-load
Aircraft
weight (t)
Min. fuel
quantity of wing
(t)
Max. limit load
(g)
Min. limit load (g)
V≤VjX V≤Vmax Vmax<V<VjX
38 2 2.96 -1 0
53 7 2.5 -1 0
61 10 2.17 0 0
61 5 2.0 0 0
(d) Load limitation
Cargo load should not exceed the following limits marked on the plate:
Concentrated cargo 16t
Bulk cargo 20t
JZ-Y8F200W-02
AIRCRAFT FLIGHT MANUAL
SECTION II
OPERATIONAL LIMITATION
2-16
June 30, 2012
LIMITATIONS OF POWER PLANT
(a) Engine continuous operation duration
Take-off power condition 15min
Ground idling power condition 30min
(b) Percent of engine operating time in its total life:
Takeoff power condition 2.5%
Maximum continuous power condition 32%
See Table 2-7 for the maximum allowable turbine outlet gas temperature.
Table 2-7 Maximum allowable turbine outlet gas temperature
Engine service condition
Engine operating
status
Allowable turbine exhaust
temperature (o
C)
On ground Takeoff
to≤15o
C, 510
to>15o
C, 560
Inflight
Below 26247ft
(8000m)
Takeoff 510
Max. continuous
power
475
Cruising power 450
Above 26247ft
(8000m)
Takeoff 540
Max. continuous
power
495
Cruising power 470
Note
The turbine outlet gas temperature in the Table is specified per standard
atmosphere condition. When the difference between ambient temperature
and the standard air temperature is ±1o
C, the gas temperature varies ±1o
C
accordingly.
JZ-Y8F200W-02
AIRCRAFT FLIGHT MANUAL
SECTION II
OPERATIONAL LIMITATION
2-17
June 30, 2012
(c) Engine operational limitations
1) The maximum allowable turbine outlet gas temperature is 750oC upon engine start.
2) The maximum allowable speed for engine acceleration is 13260rpm.
The maximum engine vibration overload factor K:
Not exceed 2.5g for ex-factory period
Not exceed 3.5g during operation.
3) See Table 2-8 for allowable bleed rate of compressor under all conditions.
Table 2-8a Allowable bleed rate of compressor
Frequent bleed
rate (various
power setting)
Numbers of
operating
engines
Four engines Three engines Two engines
Altitude 32808ft 26247ft 16404ft
Engine bleed
rate
≯0.345kg/s ≯0.46kg/s ≯0.55kg/s
Periodic bleed
rate
Maximum
continuous
power
H=0, V=0, tH=15o
C≯0.15kg/s
H=26246ft, V=574 ft/s, tH=-30o
C≯0.1kg/s
Ejection cooling
bleed rate
On ground
0.4kg/s for small throttle setting
0.6kg/s for 0.2 Max. continuous power setting
Total bleed rate
Maximum
continuous
power
H=0 V=0 tH=15o
C
Bleed rate does not
exceed 0.495kg/s.
H=26247ft
Bleed rate does not
exceed 0.46kg/s
V=574 ft/s
tH=-30o
C
Note
a) Engine deicing system turning on is allowed only when the aircraft is likely
to ice during take-off.
b) Engine deicing system can be used under all working conditions on the
ground.
c) Periodic bleed rate means the bleed rate besides frequent bleed rate,
such as wing deicing, etc.
JZ-Y8F200W-02
AIRCRAFT FLIGHT MANUAL
SECTION II
OPERATIONAL LIMITATION
2-18
June 30, 2012
Table 2-8b Allowable bleed rate of compressor
Frequent bleed
rate (various
power setting)
Numbers of
operating
engines
Four engines Three engines Two engines
Altitude 10000m 8000m 5000m
Engine bleed
rate
≯0.345kg/s ≯0.46kg/s ≯0.55kg/s
Periodic bleed
rate
Maximum
continuous
power
H=0, V=0, tH=15o
C≯0.15kg/s
H=8000m, V=175m/s, tH=-30o
C≯0.1kg/s
Ejection cooling
bleed rate
On ground
0.4kg/s for small throttle setting
0.6kg/s for 0.2 Max. continuous power setting
Total bleed rate
Maximum
continuous
power
H=0 V=0 tH=15o
C
Bleed rate does not
exceed 0.495kg/s.
H=8000m
Bleed rate does not
exceed 0.46kg/s
V=175m/s
tH=-30o
C
Note
a) Engine deicing system turning on is allowed only when the aircraft is likely
to ice during take-off.
b) Engine deicing system can be used under all working conditions on the
ground.
c) Periodic bleed rate means the bleed rate besides frequent bleed rate,
such as wing deicing, etc.
OPERATIONAL LIMITATION FOR AIR CONDITIONING SYSTEM
(a) Air conditioning power on is not allowed when the aircraft is on ground or during take-off
period.
(b) Only one set of air conditioning system is allowed for leading edge deicing of the wing.
JZ-Y8F200W-02
AIRCRAFT FLIGHT MANUAL
SECTION III
EMERGENCY PROCEDURES
3-1
June 30, 2012
EMERGENCY PROCEDURES
Various special events may occur during flight for different causes, such as mechanical
failure, sudden weather change, operation mistakes and so on. Once any of such special cases
occurs, it is necessary for the crewmember to judge accurately and rapidly so as to take action
resolutely and effectively.
ENGINE FAILURES
If the engine or propeller fails in flight when automatic-feathering device is out of operation,
there would be a quite large negative thrust that would make the aircraft controlling difficult.
Therefore, if propeller of the shutdown engine does not feather automatically, the manual
feathering shall be adopted in time. If the manual feathering fails, then the hydraulic emergency
feathering should be used. The measures above can ensure feathering in common condition. In
flight, only when all feathering systems fail simultaneously and the propeller rotates
automatically, and flight speed is less than 227 kn~238 kn (420~440km/h), propeller stop can be
released after windmilling speed is stablized.
Symptoms of engine failure in flight
(a) Aircraft banks and yaws to the side of faulty engine.
(b) The red signal light for engine failure is on.
(c) The pressure on torque indicator decreases.
(d) The upstream fuel pressure of fuel nozzle and fuel instantaneous consumption drops
sharply or pressure oscillating amplitude exceeds 42.64 psi (0.294MPa) (3kgf/cm2
).
(e) Turbine exhaust temperature increases or decreases.
(f) Engine rotating speed increases or decreases and exceeds specified limitation, or
rotating speed oscillates beyond ±2%.
(g) Oil pressure decreases to 56.85 psi (0.392MPa) (4kgf/cm2
) below.
(h) The stop released signal light is on.
(i) The reading of engine vibration indicator exceeds specified limitation. Warning light is on.
(j) Oil in tank leaks out seriously.
Once discovering the symptoms above, the aircrew should make decision correctly and
adopt proper measures timely.
JZ-Y8F200W-02
AIRCRAFT FLIGHT MANUAL
SECTION III
EMERGENCY PROCEDURES
3-2
June 30, 2012
Engine failures during takeoff
Once any engine shuts down during take-off running, the aircrew should work out solution
as per current speed of the aircraft. If the speed is below decision speed, abort takeoff; or else
takeoff should be continued.
Operation procedures for aborting take-off
(a) Keep the direction with the rudder, ailerons, nose wheels and brakes to prevent the
aircraft from yawing abruptly and pull the four throttles back to 0o
at the same time (pull
the throttles at normal engine side back a bit quicker than that at the faulty engine side
for correcting the aircraft yaw by throttle difference).
(b) Push forward the control column for nose wheel extension to maintain the direction.
(c) Release the stop for propellers of two symmetrical operating engines.
(d) Lower flaps fully and slow down the aircraft by the brakes in time. If the runway is not
long enough and the aircraft tends to fly out of the runway, decrease the speed with
emergency brake.
(e) When the running direction is no longer deviated and the aircraft speed is below 32.4 kn
(60km/h), pull out the nose wheel steering handle, release propeller stop of the engine
which is symmetrical to the shutdown engine.
(f) If the running direction cannot be maintained after aborting take-off, the captain should
pull out the nose wheel steering handle at the speed of less than or equal to 150km/h, to
maintain the direction.
Operation procedures for continuing take-off
(a) The takeoff can be continued when aircraft running speed exceeds decision speed and
that the malfunctioned engine feathering is already completed. At this moment, apply the
rudder and push the helm towards the normal engine to maintain the direction, and the
unstick speed should be 5.4kn~8.1kn (10km/h~15km/h) higher than normal in case of
any deviation.
(b) If engine failure occurs after aircraft unsticking, apply the rudder and push the helm
towards the normal engine side rapidly and timely to maintain aircraft attitude.
JZ-Y8F200W-02
AIRCRAFT FLIGHT MANUAL
SECTION III
EMERGENCY PROCEDURES
3-3
June 30, 2012
(c) Judge propeller feathering status of the faulty engine as per the load of control
mechanism and judgment of the flight engineer or pilot. If automatic feathering system
fails, press the manual-feathering button rapidly for feathering.
(d) Gear up with a speed of 135kn~140kn (250~260km/h) and an altitude not less than
16.4ft (5m), and climb with increasing speed, the climb gradient should not be less than
0.5%.
(e) Retract the flaps step by step and reduce the load on the control column and rudder with
trim tab when the altitude is not less than 328ft (100m) and aircraft speed is 162kn~167
(300~310km/h).
(f) Pull the throttle of operating engine back to maximum continuous power condition (84o
).
(g) Pull the throttle of shutdown engine back to 0o
, set the shutdown switch to SHUTDOWN
and put anti-fire switch at OFF position.
(h) Climb to traffic pattern altitude, establish normal pattern and then make visual landing.
Engine failures in flight
(a) Operation procedures with the automatic feathering system being out of operation in
flight
1) Maintain the aircraft attitude by applying the rudder and pushing the helm towards
normal engine side to prevent the aircraft from banking and yawing.
2) Advance the throttles of operating engines to above 84o
and maintain the specified
flight attitude.
3) Judge the malfunctioned engine.
4) Following the captain’s command, the mechanic conducts feathering to the faulty
engine (by pushing down manual feathering button or through emergency hydraulic
feathering device).
5) Balance the aircraft with trim tabs to reduce the load on control column and rudder.
6) Retard the throttle of faulty engine back to 0o
and retard the throttle of symmetrical
engine to 40o
~60o
.
7) Set the engine shutdown switch to SHUTDOWN position and put anti-fire switch at
OFF position.
8) Manually extinguish fire of the faulty engine as per the actual situation.
JZ-Y8F200W-02
AIRCRAFT FLIGHT MANUAL
SECTION III
EMERGENCY PROCEDURES
3-4
June 30, 2012
(b) After any one of the four engines is inoperative in flight, the torque on the aircraft can
easily be maintained by feathering the faulty engine in time and applying rudder and
helm, the load on the rudder and stick can be eliminated completely by using trim tabs,so
flight with three engines is not complicated.
After one engine is feathered, the aircraft still possesses better stability and controllability
and has enough excess thrust to climb, and climb to flight altitude of 26575ft (8100m)
with take off weight of 51t.
(c) Cautions
1) After engine fails, when automatically feathering with negative thrust, the throttle
must be above 40o
.
2) If the automatic feathering system fails and the indicated air speed is more than 189
kn (350km/h), the aircraft may buffet. In this case, the speed should be slowed down
to below 189 kn (350km/h) first, and then conduct manual feathering.
Operation features of landing with three engines operative
(a) Set the trim tab to neutral position during final gliding.
(b) When aircraft flies over the inner locator, set the throttle of the normal engine
symmetrical to the faulty engine to the small throttle position as per the load and
atmospheric temperature, and keep the gliding speed and correct the flight path of
approach with the throttles of the symmetrical normal engines.
(c) During floating, set the throttles of the two normal engines which are in symmetrical
operation gently to 0o
. Meanwhile, be sure to keep the direction, and prevent the aircraft
from floating with side sliding.
(d) After the aircraft touches down and keeps a stable running direction, release the stop of
the propellers of the two symmetrical normal engines, and then pull the throttle of the
normal engine symmetrical to the faulty engine back to 0o
. At the latter stage of running
when the aircraft speed is 32.4kn (60km/h), pull out the nose wheel steering handle to
release the stop of the normal engine propeller symmetrical to the faulty one.
(e) At the early stage of run, keep the direction with rudder and prevent the aircraft from
yawing and banking with brakes and aileron if necessary. At the latter stage of run, keep
the direction with the nose wheel steering handle.
(f) The altitude for go around with three operative engines should not be below 164ft (50m),
its operation procedure for missed approach is the same as that with four operative
engines.
JZ-Y8F200W-02
AIRCRAFT FLIGHT MANUAL
SECTION III
EMERGENCY PROCEDURES
3-5
June 30, 2012
Air start of the engine
(a) Only when the engines are completely normal (engine shutdown due to control error or
other reasons and performance of special air start training), and that the pilot and the
flight engineer have been specially trained for air starting, the air start may be allowed
(start of the malfunctioned engine is not allowed in any case).
(b) Engine air start envelop: The altitude between 6562ft~26247ft (2000~8000m); the
indicated air speed within 162 kn~178 kn (300~330km/h).
(c) Press of the START button on the panel is strictly forbidden when starting the engine in
flight. The pilot and the flight engineer must coordinate for engine start.
(d) Pre-start-up check
1) Set the throttle at 0o
2) Turn on the anti-fire switch (green signal light ON).
3) Check: the AIR-GROUND start changeover switch should be at AIR position.
4) Be sure the propeller stop switch should be at STOP position.
5) Put the engine shutdown switch at ON position.
(e) Air start procedure
1) Remove the lead seal on protection cover of the air start switch 1-2s before
propeller reversing, and put the switch at air start position (the sound of booster coil
can be heard from the intercom).
2) Press the manual feathering button for propeller reversing until the engine speed
reaches 15%~20%. In case that the engine speed grows slowly, press the button
continuously until the speed indicates 22%~25%. At this moment, release the button
and check that the fuel pressure in front of the nozzle should be 99.5psi~142psi
(0.686MPa~0.98MPa) (7kgf/cm2
~10kgf/cm2
) and the fuel in combustion chamber
for ignition (turbine exhaust temperature rise).
JZ-Y8F200W-02
AIRCRAFT FLIGHT MANUAL
SECTION III
EMERGENCY PROCEDURES
3-6
June 30, 2012
3) When turbine exhaust temperature reaches 300o
C, turn off the air start switch and
the engine will reach operating speed automatically. During propeller reversing
process, in case that the fuel in combustion chamber does not ignite and the fuel
temperature has no readout at the engine speed of 15%~20%, it is necessary to
press the feathering button immediately and and turn off the engine shutdown and
air start switches.
4) After the engine is at the normal rotating speed (95.5~96.2%), advance the throttle
gently to 20o
. Check the operating condition of engine as per the indicator readout,
and then advance the throttles to flight requirement position.
5) During the air start, a yawing moment will occur toward the starting engine side for
the propeller reversing moment, and the aircraft would yaw discontinuously toward
the contrary side with engine speed increase. In this case, apply the helm and the
rudder to overcome the yawing.
(f) Cautions for air start
1) During engine start, if the air start change-over switch is not turned off timely, the
start may be failed and propeller will autorotate, generating heavy negative thrust.
2) If the air start change-over switch is misconnected to the operating engine after air
start is completed, then:
a) The operating engine will fether automatically (operating status must be above
0.7 Max. continuous power).
b) Autofeathering is not allowed when engine throttle angle is below 40o
since the
engine will be in wind-milling status or its operating status will not be stable.
3) One engine is not allowed to start for more than three times for a single training, or
else the ignitor might be damaged.
4) Restart interval is 2-3min
5) Ignitor ground check is required after engine air start.
6) Feathering pump can not work normally when oil temperature is below 20o
C thus air
start is not allowed.
7) When flying in icing condition, air start is not allowed until the engine inlet is deiced.
JZ-Y8F200W-02
AIRCRAFT FLIGHT MANUAL
SECTION III
EMERGENCY PROCEDURES
3-7
June 30, 2012
(g) Two engines fail at the same side
1) When two engines fail in a condition above 0.7 maximum continuous power
(throttles at 62o
), the propeller will automatically feather within 2~3s. If engines fail
when throttles are below 40o
±2o
, the propeller will not feather automatically, thus
manual feathering button must be used.
2) In the flight with two engines failed on the same side (the failed engines have been
feathered), the aircraft posses enough thrust to ensure the aircraft to keep a level
flight and climb (the aircraft can ascend to an altitude of 15584ft (4750m) with
takeoff weight of 47t) and has controllability and stability for turning left or right and
approaching and landing on an airport nearby.
3) Operation procedures for two engines on the same side failed in flight
a) Keep the aircraft attitude by banking the stick and applying the rudder to prevent
the aircraft from banking and yawing.
b) Set the throttle of normal engine to takeoff power condition, and keep the
indicated aircraft speed not below 167kn~173kn (310~320km/h). After the
aircraft attitude is stabilized, set the throttle to maximum continuous power
condition.
c) Balance the aircraft with trim tab to eliminate part of the load on the control stick
and rudder.
d) If the engine cannot feather automatically, manual feathering button should be
used immediately.
e) The landing gear, flaps and door should be retracted and closed immediately if
they are in the extended and open positions.
f) Pull the throttle of the faulty engine back to 0o.
g) Set the shutdown switch to SHUTDOWN position and turn off the anti-fire
switch.
h) Extinguish fire by force at the faulty engine and the lower section of the fairing
with the second group of fire bottles according to the actual situation.
i) When flying with two engines on the same side for a long time, pay attention to
the balance of the fuel quantity between left and right tanks.
JZ-Y8F200W-02
AIRCRAFT FLIGHT MANUAL
SECTION III
EMERGENCY PROCEDURES
3-8
June 30, 2012
4) When flying horizontally at the altitude of 26247ft~32808ft (8000~10000m) with two
engines shutdown, the indicated air speed must be kept at 173kn~178kn
(320~330km/h) and descends gradually to the altitude of 11483ft~13123ft
(3500~4000m), and keeps a level flight at the same altitude with IAS of 173kn
(320km/h) to the nearby airport for landing.
5) If a quick descent is required, pull the throttle back to 16o
~20o
position, and keep an
indicated airspeed of 243kn (450km/h) for descending.
(h) Visual landing with two engines failed on the same side
1) When performing a traffic pattern flight with two engines failed on the same side,
keep the indicated speed of 173kn~178kn (320~330km/h) with their propellers
feathered and landing gears retracted. Reduce the load on the control stick and
rudder with trim tab. When two engines on the same side fail, it is suggested to turn
toward the normal engines and get into approach, or turn toward the failed engine
and get into approach with a turning bank angle not more than 5o
. The procedures
for airline establishment are the same as the normal one except for landing gear
down after the final turn. When getting into approach with crosswind of 16.4
ft/s~26.3 ft/s (5~8m/s), the failed engines side must be against the crosswind
direction.
2) If the third and the fourth engines on the right side fail, extend landing gear urgently
with left hydraulic system.
3) Perform the final turn with a turning bank angle not more than 15o and the indicated
air speed of 162 kn~167 kn (300~310km/h). Keep gliding at a fine descent rate after
turning, fly over the outer locator at the altitude 262 ft~328 ft (80~100m) higher than
normal. Before flaring out, be sure to set the trim tab near the neutral position, so
that the load on the control stick and rudder will increase.
4) When the indicated air speed is 157kn~162kn (290~300km/h) over the outer locator,
lower the flap to 25o. After flying over the outer locator, if a successful approach can
be assured by visual method, lower the flap to 35o, and then turn on the hydraulic
communication valve.
5) Keep a speed of 135 kn~151 kn (250~280km/h) before flaring out as per different
weight of aircraft, wind direction and speed. After flaring-out, pull the throttle back to
20o gently. Pull the inboard throttle back to 0o after the aircraft touches down. Lower
the nose wheel and release the stop of inboard propellers when the direction gets
stable. Pull the outboard throttle back to 0o, and keep the running direction with the
rudder and the brakes.
JZ-Y8F200W-02
AIRCRAFT FLIGHT MANUAL
SECTION III
EMERGENCY PROCEDURES
3-9
June 30, 2012
6) When the running speed is lowered to 32 kn (60km/h), pull out the nose wheel
steering handle, and then release the stop of outboard propellers. In this case, the
distance of landing run will increase to 4265 ft~4921 ft (1300~1500m) as per
different aircraft weight.
7) Cautions
a) If the third and fourth engines on the right side fail, the nose wheel control and
emergency brake is driven by left hydraulic system. If the first and the second
engines on the left side fail, the normal brake is propelled by right hydraulic
system. Therefore, when two engines on the same side fail, the hydraulic
communication valve must be turned on.
b) When flying with two engines on the same side, especially during landing, it’s
better to reduce the throttles of the outboard engines and increase that of the
inboard engines so as to reduce the load on the stick and rudder to maintain the
desired flight condition.
(i) Go around with two engines failed on the same side
1) When two engines on the same side fail and the propellers have feathered, go
around could be performed under special condition with the air temperature of 30o
C
below, but the altitude must not be below 328 ft (100m), and flap should not be more
than 25o
.
2) If a go around is determined, the throttles of the operating engines should be
advanced to the take-off power condition (100o+4
o
-2
o ) rapidly, retract the landing gear
and keep the indicated speed not below 151kn (280km/h).
3) When performing the go around with two engines failed on the same side, the most
complicated action is that, when the throttles of the normal engines are advanced to
takeoff power condition, large yawing moment and banking moment are produced
on the aircraft against the failed engines. In order to overcome these two moments,
the rudder should be deflected to the maximum angle, the ailerons to the position of
2/3 of the whole travel. In this case, the load on the rudder will increase to about
784N (80kgf) and that on the stick to about 294N (30kgf). When the rudder is set to
the maximum angle, the aircraft will buffet. After retracting the landing gears, the
aircraft speed increases rapidly, the deflecting angle of the rudder decreases, and
the buffeting will disappear accordingly.
JZ-Y8F200W-02
AIRCRAFT FLIGHT MANUAL
SECTION III
EMERGENCY PROCEDURES
3-10
June 30, 2012
4) In order to reduce the rudder deflection and the load on it, bank the aircraft 7o
~8o
toward the operating engine before the throttles advancement. When the indicated
air speed is 162 kn (300km/h), retract the flaps in steps, and retard the throttles
back to maximum continuous power condition.
(j) Flight procedures with one outboard engine propeller in windmill condition
1) When the engine fails in flight and the entire propeller feathering systems fail, the
propeller will be in a windmill condition. In this case, there will be a large yawing
moment that makes the aircraft yaw and bank to the windmilling engine sharply, and
decreases the aircraft speed by 10.8kn~13.5 kn (20~25km/h).
2) To keep the aircraft attitude and prevent the aircraft from yawing and banking,
operate as follows:
a) Press the helm, apply the rudder and keep the aircraft flying along straight line.
b) Increase the operating engine throttle and keep the indicated air speed not
below 162 kn (300km/h).
c) Set the throttles of symmetrical operating engines to maximum continuous
power condition or takeoff power condition, and pull the throttle of the operating
engine symmetrical to the faulty one back to 40o
~60o
at the same time.
d) Reduce the load on the stick and rudder with trim tab.
e) Retard throttle of the faulty engine back to 0o
.
f) Set the engine shutdown switch to SHUTDOWN position and turn off the
anti-fire switch.
3) When the propeller of an outboard engine is in windmill condition, the load on the
rudder will be about 882N (90kgf) and 343N (35kgf) on the stick. With the windmill
speed stabilized to match the flight speed, the load on the rudder and stick will
reduce by 50%. At this time, the load on the stick could be balanced wholly with trim
tab, but the load on the rudder could not be completely balanced yet.
JZ-Y8F200W-02
AIRCRAFT FLIGHT MANUAL
SECTION III
EMERGENCY PROCEDURES
3-11
June 30, 2012
4) When the propeller of an outboard engine is in windmill condition, the aircraft can fly
with three engines operating at the indicated speed of 178 kn (330km/h) and the
altitude above 16404 ft (5000m). When the true airspeed is below 227kn (420km/h),
the rotating speed of the propeller reaches to or approaches the balanced speed
(95~96%), while the negative thrust of the propeller in windmill condition is not large.
In fact, the drag of the propeller will not be affected by airspeed increase. If the
aircraft flies at the altitude of 28528 ft (9000m), it must be descended gradually to an
altitude of 19685ft~22966ft (6000~7000m) at the indicated speed of 184 kn~189 kn
(340~350km/h).
5) When the aircraft enters the airport area and prepares to land, it must descend at
the indicated speed of 162kn~173kn (300~320km/h). When it reaches to the altitude
of about 16404 ft (5000m), the propeller should be free from the equilibrium speed,
the indicated speed falls and the negative thrust of windmilling propeller be
maximized. In this case, release the stop of the engine propeller from windmill
condition to reduce the negative thrust, and provide favorable conditions for keeping
the flight condition and controlling the landing.
6) At the moment of releasing the propeller stop (3~5s), the negative thrust increases
in a short period, which brings an additional yawing and banking moment which
causes the aircraft to yaw and bank. With the propeller windmill speed falling, the
negative thrust is smaller than that with the propeller at a stop position, at this time,
the aircraft speed increases slightly.
To reduce the aircraft’s yawing and banking, bank the aircraft 7o
~8o
to the contrary
direction of the windmilling propeller before releasing the stop of the propeller.
When an outboard engine propeller is in windmill condition (the stop released),
retract the landing gears and the flaps, and keep the level flight condition at the
indicated speed of 173 kn~178 kn (320~330km/h) under the altitude of 13123 ft
(4000m).
7) Be aware that after the stop of the faulty engine propeller is released, the rotating
speed begins to fall. Set the stop releasing switch to STOP position in 1~1.5s.
JZ-Y8F200W-02
AIRCRAFT FLIGHT MANUAL
SECTION III
EMERGENCY PROCEDURES
3-12
June 30, 2012
(k) Landing procedures with an outboard engine propeller in windmill condition (stop
released)
1) The aircraft weights 49~51t, the air route altitude is 1640ft (500m), the indicated
speed is kept at 173 kn (320km/h) with the landing gears up and at 157 kn~162 kn
(290~300km/h) with the landing gears down. At this time, the throttles of the inboard
operating engines are 72o
~84o
, and the throttle of the outboard operating engine is
about 40o
~60o
.
2) Keep the indicated speed of 162kn~167 kn (300~310km/h) and a turning slope not
more than 15o
during the final turn. After that, extend the landing gears, keep gliding
at a lower rate, and fly over the outer locator at an altitude 262 ft~328 ft (80~100m)
higher than that in a normal condition. During gliding and before flaring out, be sure
to set the ailerons and trim tab of rudder to or near their neutral position.
3) When flying over the outer locator, keep the indicated speed of 157kn~162kn
(290~300km/h), lower the flaps to 25o
, and adjust the indicated gliding speed to
140kn~151kn (260~280km/h). After flying over the outer locator, if a successful
approach can be assured, lower the flaps to 35o
. If there is a crosswind, correct it
according to the crosswind correcting method.
4) Keep an indicated speed of 135kn~151kn (250~280km/h) before flaring out as per
the weight of the aircraft, wind direction and speed. At this time, the throttle of the
operating engine symmetrical to the faulty one is not less than 16o
. After the aircraft
touches down, pull the throttle of the operating engine symmetrical to the faulty one
back to 0o
gently. During this period, take special care to prevent the aircraft from
yawing.
5) After the aircraft touches down, pull the throttles of the symmetrical operating
engines back to 0o
and release the stop. Keep the running direction with the rudder
and brakes, and modify the aircraft yawing with the nose wheel steering handle if
necessary. At the rear half of taxiing, when the aircraft speed is about 32.4kn
(60km/h), pull out the nose wheel steering handle, and release the stop of the
normal engine symmetrical to the faulty one.
6) Cautions:
a) Because the windmill of one engine propeller brings a large negative thrust, the
aircraft balancing requires a larger control surface deflection. So the
aerodynamic performance of the aircraft deteriorates.
JZ-Y8F200W-02
AIRCRAFT FLIGHT MANUAL
SECTION III
EMERGENCY PROCEDURES
3-13
June 30, 2012
b) If an inboard engine fails and its propeller enters into windmill condition, the
yawing and banking moment is much smaller than that from the windmill of an
outboard engine. Therefore, it is easier to control an inboard engine windmilling
in each stage of flight.
(l) Landing procedures with an outboard engine propeller in windmill condition (blade angle
12o
)
1) If the propeller stop could not be released due to stop release system failure and
windmill takes place with blade angle of 12o
, the aircraft should fly to the nearest
airport for landing.
The altitude should be kept below 13123ft (4000m) and the indicated speed at 157
kn~162 kn (290~300km/h), the throttles of the two inboard engines should be
retarded to 72o
~80o
and the throttle of the outboard operating engine retarded to
40o
~60o
.
2) When an outboard engine fails, the indicated speed is 189kn (350km/h) and the
rudder deflection angle is more than 16o
, the aircraft will buffet. To overcome the
buffeting, bank the aircraft by 7o
~8o
toward the two normal engines to reduce the
rudder deflection angle and the load on the rudder. For example, bank 3o
, and the
load on the rudder can be reduced by 147N~196N (15kgf~20kgf), bank 7o
~8o
, by
294N~392N (30 kgf~40kgf). Retarding the throttle of the normal engine symmetrical
to the faulty one at the same time, the rudder deflection can also be reduced,but not
less than 30o
~40o
.
3) Keep level flight to perform the final turn. Descend after the final turn.
4) The operation procedure for the final leg is generally the same as the landing
control procedure with the propeller stop released, except for a larger control
surface deflection and load on the rudder and aileron.
5) When landing with the windmilling propeller, the aircrew should cooperate closely
and try their best to avoid a go around regardless of the propeller status. Therefore,
the specified altitude and air speed must be kept before the final turn.
6) Cautions
a) The power of the normal engine symmetrical to the windmilling one could not be
too large. If the throttle is over 40o
, the rudder deflection would be more than 16o
,
which would bring division of the airflow on the control surface, and the aircraft
would buffet violently.
JZ-Y8F200W-02
AIRCRAFT FLIGHT MANUAL
SECTION III
EMERGENCY PROCEDURES
3-14
June 30, 2012
b) To prevent the high-pressure fuel pump from being damaged, the windmilling of
the engine is not allowed to exceed 10 minutes during flight training.
(m) Go around with an outboard engine propeller in a windmill condition
1) Perform the go around if extremely necessary and the following conditions are all
ready.
a) Visual flight at an altitude not below 492ft (150m).
b) The flap angle is not larger than 25o
.
c) The landing weight of the aircraft is not more than 53t.
d) The air temperature is not higher than 25o
C.
2) Operating procedures for go around:
a) Advance the throttles of all normal engines to the takeoff power condition, and
retract the landing gears and keep the flaps at 15o
.
b) Apply the rudder and bend the stick timely to prevent the aircraft from banking
and yawing, bank the aircraft 4o
~5o
toward the two normal engines.
c) Climb at the indicated airspeed of 157 kn~162 kn (290~300km/h) with a climbing
rate of 6.56ft/s~9.84ft/s (2~3m/s).
d) Retract the flaps step by step.
e) The co-pilot helps the pilot to keep and balance the attitude.
f) Climb to the air route altitude and enter landing again.
(n) Operation procedures when the aircraft glides to the altitude below 492 ft (150m) with an
outboard engine failed
1) Landing before flaring-out:
a) In the gliding before landing, if an outboard engine fails, the landing gears are
extended, the flaps at 35o
and the propeller at the stop position (blade angle is
12o
), the aircraft could continue landing along the gliding line. In this case, it is
easier to stabilize and steer the aircraft. The deflection of the rudder and the
aileron won’t exceed 2/3 of the whole travelling range.
b) Apply the rudder and bend the stick in time to prevent the aircraft from banking
and yawing and keep the aircraft attitude.
c) Advance the inboard engine throttles, keep flying along the normal gliding line at
the specified speed and retard the throttle of the normal engine symmetrical to
the faulty one back to 30o
~40o
.
JZ-Y8F200W-02
AIRCRAFT FLIGHT MANUAL
SECTION III
EMERGENCY PROCEDURES
3-15
June 30, 2012
d) Feather the failed engine with the manual-feathering button.
e) Don’t use or use less the rudder and the aileron trim tabs to balance the aircraft.
f) After feathering, the operating procedures are the same as those for landing
with three engines in operation.
g) If the feathering system fails, the stop of the propeller should not be released.
Keep the indicated speed of 140kn~151kn (260~280km/h), and land in the
same method with that the propeller is in windmill condition.
2) Landing with an outboard engine failed during flaring-out
a) Apply the rudder and bend the stick in time to prevent the aircraft from banking,
yawing and deviating from the runway.
b) Retard all engines throttles back to 0o
and release the propellers stop of the
inboard engines after the aircraft touches down. During running, lower the nose
wheel down to the ground and keep direction with the rudder. If necessary,
correct the direction with the brake or pull out the nose wheel steering handle
when the speed is below 81kn (150km/h).
c) During the latter running with a speed below 32.4kn (60km/h), pull out the nose
wheel steering handle and release the stop of the outboard propellers.
3) Cautions
a) When the engine fails, the propeller is in windmill condition at the stop position
(blade angle is 12o
), the landing gears are extended, the flaps are at 35o
, and
the flight altitude is over 492 ft (150m), the go around could be performed
carefully.
b) If an outboard engine fails and doesn’t feather, and the flaps are lowered at 35o
,
it is not necessary to retract the flaps. Keep the previous flight condition for
gliding and landing.
c) If the engine fails before lowering the flaps, after flying over the outer locator, if a
successful approach can be assured, lower the flap to the required position.
d) Be careful to keep the aircraft direction during landing and running.
JZ-Y8F200W-02
AIRCRAFT FLIGHT MANUAL
SECTION III
EMERGENCY PROCEDURES
3-16
June 30, 2012
HIGH ANGLE OF ATTACK FLIGHT
The aircraft possesses better stability and controllability within the whole operating scope in
terms of Mach number and C.G before the stalling angle of attack, regardless of the operating
status of the landing gears and flaps. The aircraft can recover from stalling in any flying state by
pushing the stick over its neutral position once the stalling phenomenon occurs in flight. It is
prohibited to fly at high angle of attack.
Since the aircraft mainly flies at high altitude near its service ceiling, the conditions that
cause the aircraft stalling depend on the flight state, altitude and airspeed. The stall margin of
angle of attack at high altitude is much less than that of flight at middle altitude. High angle of
attack may occur in flight due to pilot’s misoperation during a sharp recovery of descending or
when flying in a strong turbulent airflow and strong bomb explosive wave. To prevent the aircraft
from stalling in flight, which is hazardous to flight safety, the pilots are required to understand the
symptoms of the aircraft entering high angle of attack up and the operating technique for
recovery, which is of great importance for the flight safety.
Judgment on entering high angle of attack stall state
The symptoms of aircraft stalling at minimum airspeed
(a) When the airspeed of aircraft with its landing gears and flaps retracted decreases to 10.8
kn~13.5 kn (20~25km/h) before stalling, the vortex area on the wing surface enlarges
rapidly, at this time the pilots feel the aircraft buffeting obviously, the left wing sinks and
then the nose sinks.
(b) When the aircraft with its landing gears and flaps lowered (flap setting 25o
for taking-off
and 35o
for landing) nears its stalling state, there is no obvious warning symptom. Only a
not obvious buffet appears at the moment when the aircraft stall occurs. It is difficult for
the aircraft to get into the stalling state at later stage of the level flight after flaring-out (the
throttles of the inboard engines are retarded to 0o
position and those of the outboard
engines to 16o
~20o
position, flaps at 35o
position).
JZ-Y8F200W-02
AIRCRAFT FLIGHT MANUAL
SECTION III
EMERGENCY PROCEDURES
3-17
June 30, 2012
The symptoms of the aircraft stalling in operating airspeed range
Stall of the aircraft not only occur in stalling airspeed state but also in the whole operating
airspeed range. Stalling may be caused by pulling back the stick too hard or flying in airflow
where strong vertical disturbance and bump exist. It depends on the flight conditions and state of
the flight.
Stalling symptoms of the aircraft varies with different Mach numbers. The stalling of the wing
(the left wing stalls first) and the sinking of nose are both slower when flying with a Mach number
less than 0.45~0.5. When Mach number is 0.55~0.66, the stalling of wing and sinking of the
nose develop drastically and aircraft buffet is also serious before the aircraft stalling (2o
~3o
less
than stalling angle).
The general symptom is not obvious for the aircraft at large angle of attack. To ensure the
safety of the aircraft and prevent the aircraft from entering stalling angle, an indicator of critical
angle of attack is furnished on the aircraft which warns the pilot with its light and sound signal
that the aircraft comes near the stalling state. Table 3-1 shows the angle of attack at which the
warning will be given by the critical angle of attack indicator for different flap settings and Mach
numbers.
Table 3-1a Angle of attack at which the warning will be given by the critical angle of attack
indicator
Flap setting Flight status
Takeoff and
landing
M number
Altitude (ft)
0.2 0.3 0.5 0.6 0.65
0 17o
15.4o
11.1o
10.4o
10.5o
3281 15.4o
11.1o
10.4o
10o
3281 above 10.4o
10o
Table 3-1b Angle of attack at which the warning will be given by the critical angle of attack
indicator
Flap setting Flight status
Takeoff and
landing
M number
Altitude (m)
0.2 0.3 0.5 0.6 0.65
0 17o
15.4o
11.1o
10.4o
10.5o
1000 15.4o
11.1o
10.4o
10o
1000 above 10.4o
10o
JZ-Y8F200W-02
AIRCRAFT FLIGHT MANUAL
SECTION III
EMERGENCY PROCEDURES
3-18
June 30, 2012
Stalling symptom for different flight status
(a) The stalling airspeed of the aircraft with a failed engine (has been feathered) is 5.4 kn
~8.1kn (10~15km/h) higher than that with four engines operative. If without sideslip, the
main symptom is that the aircraft banks to the failed engine side and the deflecting angle
of rudder needed may reaches 20o
and the aileron deflection is about half of its full travel,
the force on the pedal is about 490N~588N(50kgf~60kgf).
(b) For flying in turbulent airflow, the angle of attack and load factor will change greatly by
the effect of up or down airflow. Therefore it is harmful to fly at either high or low airspeed.
In vertical gust, the aircraft should fly with the following most favorable airspeed. See
Table 3-2.
Table 3-2a Favorable airspeed in vertical turbulent airflow (IAS, kn)
Alttitude(ft)
Airborne weight (t)
9843 below 9843~26247
44 211 221
54 227 240
60 238 246
Table 3-2b Favorable airspeed in vertical turbulent airflow (IAS, km/h)
Alttitude (m)
Airborne weight (t)
3000 below 3000~8000
44 390 410
54 420 445
60 440 455
Operating procedure for recovering from stalling
(a) When the aircraft is entering stall, the pilots should resolutely and rapidly push the control
column to reduce the angle of attack and then apply the rudder and bend the stick to
eliminate the aircraft banking and sideslip. After leveling off, the stick should be pulled
back to near its neutral position, then level off the aircraft gently as the airspeed
increases. Before airspeed reaches the given value, if reducing the angle of glide in a
hurry by roughly pulling back the control column, the aircraft will stall again.
(b) The pilot must push the stick rapidly through its neutral position to the position of 1/4 or
1/3 of its full travel to recover the aircraft from stalling when flying with minor airspeed at
various altitudes. Meanwhile, be sure not fly with banking.
JZ-Y8F200W-02
AIRCRAFT FLIGHT MANUAL
SECTION III
EMERGENCY PROCEDURES
3-19
June 30, 2012
(c) For recovering the aircraft from descending when the aircraft stalls at minor airspeed,
push the stick forward first to reduce the angle of attack. As airspeed increases to
151kn~162kn (280~300km/h) (landing gears and flaps retracted) or 119kn~130kn
(220~240km/h) (landing gears down, flaps 35o
), gently pull back the stick to recover from
descending, but be sure not to let the aircraft stall again.
(d) The pilot should push the stick forward to its neutral position to restore the normal angle
of attack of the aircraft when the critical angle of attack indicator warns with sound and
light.
(e) When recovering the aircraft from stalling, the pilots should check the aircraft state with
aircraft horizon and rate-of-turn indicator and judge the attitude of the aircraft by referring
to the sky-ground line of horizon.
Cautions for high angle of attack flight
(a) It is prohibited to roughly move the stick to alter the aircraft pitching attitude in flight.
Especially it is prohibited to pull the stick back roughly as it may result in a large load
factor.
(b) When the aircraft is stalling and buffeting, it is dangerous to correct aircraft banking by
roughly pressing stick and applying rudder before pushing stick forward, for it will
promote the stalling on wings.
(c) When flying in disturbing airflow, normally the allowable vertical speed of wind is not
higher than 32.8ft/s (10m/s), and the maximum shall not exceed 72.2ft/s (22m/s).
(d) When the aircraft stalls in any flight condition, it can be recovered and leveled off with an
altitude loss of 328ft~492ft (100~150m), if the pilots deal with it correctly.
(e) To prevent the aircraft from entering stalling state at high angle of attack, the indicated
airspeed should not be less than 151kn (280km/h) for altitude below 19685ft (6000m)
and 162kn (300km/h) above 19685ft (6000m).
JZ-Y8F200W-02
AIRCRAFT FLIGHT MANUAL
SECTION III
EMERGENCY PROCEDURES
3-20
June 30, 2012
Entering spin
After the aircraft enters the stalling state, it can be recovered stably by pushing the stick
through its neutral position. It is very unlikely for the aircraft to get into spin state. Therefore, the
pilots must distinguish the aircraft stalling from steady spin state to avoid a harmful consequence
caused by misjudgment.
(a) Operating procedure for recovering from spin
1) Set ailerons to its neutral position first, at the same time push the stick forward.
Apply rudder against the spin direction after aircraft rotated for a half circle. In this
way the spin delay can be recovered within half a circle.
2) Neutralize the ailerons from the spin direction, then apply the rudder about 13o
against the spin. After rotating half a circle, push the stick to neutral position, the
spin will be recovered for no more than another half a circle.
3) Apply the rudder against spin first. After rotating half a circle, push the stick over or
to neutral position, leave the aileron at the spin position or return it to neutral, the
spin will be recovered within another circle.
4) Only apply rudder against spin can also recover the spin within a circle.
5) Apply rudder against spin, at the same time, push the stick over neutral position, the
spin will be recovered within a circle.
(b) The aircraft will fail to recover from spin under the following conditions:
1) Ailerons at neutral, stick at forward position, elevators downward and rudder
deflects to the spin direction.
2) Ailerons deflect from spin direction to its opposite direction.
JZ-Y8F200W-02
AIRCRAFT FLIGHT MANUAL
SECTION III
EMERGENCY PROCEDURES
3-21
June 30, 2012
FLYING WITH DOOR OPEN AND DESCENDING IN EMERGENCY
Flying with bottom emergency door of cockpit open or cargo door
open
(a) Flying with the bottom emergency door of cockpit open does not change the attitude of
the aircraft significantly, but there will be a strong noise inside the cockpit.
(b) When flying with cargo door open at an indicated airspeed of 151kn~200kn
(280~350km/h), the flying state will not be greatly affected, but when the airspeed is
more than 200kn (370km/h), the aircraft will buffet slightly. The buffet becomes stronger
with airspeed increase.
Emergency descending
When airtight cabin leaks and oxygen system fails in flight, descend the aircraft to an
altitude of 13123ft (4000m) immediately. When engine catches fire, descend to the minimum
altitude. When the aircraft fuel left is not enough for a successful landing and the aircraft
approaches the airfield, emergency descending can be employed.
The operation procedures are as follows:
(a) Check propeller for stop position (red signal light is off).
(b) Retard outboard throttles to 20o
first, then inboard throttles to 0o
, after that outboard
throttles to 0o
to gently operate the aircraft to emergency descending state.
(c) During emergency descending, Mach number is not allowed to be higher than 0.7 at
altitude above 19685ft (6000m); and the indicated airspeed is not allowed to be higher
than 329kn (610km/h) with a rate-of-descent of 82ft/s~131ft/s(25m/s~40m/s) at altitude
below 19685ft (6000m). (During training flight: not greater than 35m/s).
(d) When the elevator trim tabs are operated during descending, a certain amount of
backward force should be applied on the control stick. Control the trim tabs gently.
(e) Recover emergency descending altitude to 13123ft (4000m) and the minimum altitude
should not be less than 6562ft (2000m). Advance outboard throttles to 20o
first, then
inboard throttles to 20o
. The movement to recover emergency descending should be
gentle and the overload should not be more than 1.2.
JZ-Y8F200W-02
AIRCRAFT FLIGHT MANUAL
SECTION III
EMERGENCY PROCEDURES
3-22
June 30, 2012
LANDING WITH THE MALFUNCTIONED LANDING GEAR SYSTEM
If the landing gear extending system fails, the aircrew must adopt all emergency methods to
extend the landing gears, i.e. extending the landing gears repeatly with the main system,
emergency system, and hand pump system. If the above systems all fail, adopt the mechanical
device to extend the gears.
Having confirmed that the landing gears cannot be extended or its extending lock cannot
work, the aircrew should report the situation of aircraft landing gears extension in emergency,
the measures taken and the landing methods to the ground commander. The landing cannot be
performed without permission from the ground commander.
Before landing, the communicator turns on the emergency power source and cuts off all the
DC and AC generators at the altitude of 164ft~230ft (50~70m) by following the instructions.
Then the communicator leaves for the cargo cabin.
Landing with the landing gear signal failure or the malfunctioned
lowering lock
The signal system failure: If the gear lowering signal light is normal, but not on when the
gears are lowered or it is not off when the gears are up again, pressurize the landing gear
actuators with the left system for landing.
The lowering locks failure: Visually inspect that the lowering lock does not work and the
signal lights are off (but the bulbs are normal). At this moment, do not lower or retract the landing
gears again, and land according to the following procedures:
(a) Check the two landing gear handles of the left hydraulic system for the neutral position.
Turn off the power switch for emergency opening/closing of the landing gear door.
(b) Open the safety cover of the switch for emergency lowering the landing gear on the right
console.
(c) Pull out the safety pin.
(d) Push the control handle forwards to lower the landing gear until the aircraft comes to a
complete standstill after landing.
JZ-Y8F200W-02
AIRCRAFT FLIGHT MANUAL
SECTION III
EMERGENCY PROCEDURES
3-23
June 30, 2012
(e) If the landing gear doors are not closed and the signal light is off, pull the control handle
backwards to close the doors. Set the control handle at the neutral position 5~10s after
the doors have been closed. The communicator turns off the safety switch, and then
push the control handle forwards to lower the landing gear.
(f) Push the control handle forwards to the position for lowering the landing gear to
pressurize the landing gear actuators. Even though the landing gears are not
locked well, the landing gears cannot be retracted after landing.
Landing when the landing gears cannot or be fully extended
Land with the fuselage when the landing gears cannot be fully lowered, but it must be
performed on the earth runway especially for forced landing or outside field.
(a) Once determining to land with the fuselage, the captain issues the instructions to the
aircrew to be to be going to cargo cabin, and prepare for the forced landing. Pilot and
copilot fasten the safety belt.
(b) Open the doors of frame 9.
(c) After the final turn, open the cargo cabin door and entry door.
(d) The navigator, the communicator and the flight engineer should get ready for forced
landing in the cargo cabin after completing their work as per stipulation.
(e) At the touching down moment, the captain should retard the four engines throttles back
to 0o
, set the shutdown switch to SHUTDOWN position and turn off the anti-fire switch.
(f) Switch off the aircraft power source before leaving the aircraft after landing.
Landing with the main landing gear when the nose landing gear
cannot be lowered
(a) The landing must be performed on earth runway especially for forced landing.
(b) If possible, before landing, transfer the center of gravity of the aircraft backward to
32%CA.
(c) Navigator should leave navigation cabin for the cargo cabin.
(d) When landing with the main wheels, the depression angle between the aircraft nose and
ground is not permitted. Touch down according to normal procedures. After touching
down, try to keep the two-point run for a long time. Do not use the brakes after touching
down and it is better to make the front section of aircraft touch down gently.
JZ-Y8F200W-02
AIRCRAFT FLIGHT MANUAL
SECTION III
EMERGENCY PROCEDURES
3-24
June 30, 2012
(e) The operating of engine is the same as that in normal landing. During steady running
with the two main wheels, release the stop of the inboard propellers first, and then the
outboard ones. After that, set the engine shutdown switch to SHUTDOWN position and
turn off the anti-fire switch.
Landing when the nose landing gear cannot be retracted and the
main landing gears cannot be lowered
(a) When the main landing gears cannot be lowered and the nose landing gear cannot be
retracted, landing must be done on earth runway especially for forced landing.
(b) It is absolutely forbidden to touch down with a small angle of attack or with the nose
wheel first.
(c) Open the door of frame 9, cargo cabin door and entry door.
(d) The navigator, the communicator and the mechanic should go to cargo cabin to get
ready for forced landing after completing their works.
(e) The control of engine propeller is the same as that of landing with fuselage.
Warning
The nose landing gear might be broken with such landing
Landing with the nose wheel and left main wheel down and the
right main wheel not up
(a) The procedures and the data of the final gliding are normally performed but on the earth
runway.
(b) Bank aircraft to the left by 5o
~8o
before flaring out, apply the left rudder.
(c) Continue bending the stick leftward after touching down (increasing the banking of
pressing the helm with the falling of the aircraft speed).
(d) When the aircraft speed falls to make the aircraft bank rightward, the wing touches down
naturally, and then the aircraft stops if it swerves over 100o
after touching down.
(e) The other control procedures and the cautions are the same as the foregoing conditions.
However, the right outboard wing, propeller of the right outboard engine and the right
landing gear well might be all damaged.
JZ-Y8F200W-02
AIRCRAFT FLIGHT MANUAL
SECTION III
EMERGENCY PROCEDURES
3-25
June 30, 2012
HANDLING OF TYRE BLOWN-UP AND BRAKES FAILURE
Handling of tyre blown-up
Phenomena
(a) The aircraft swerves to the blown up tyre and banks slightly.
(b) The blown-up sound maybe heard.
(c) The aircraft would buffet due to the unbalance of the loading of the tyres.
Handling
(a) Abort the takeoff at the fore stage of running and its handling procedures are as follows:
1) Pull the throttles back to 0o
, release the stop of the inboard engines propellers firstly,
the outboard ones secondly, and then lower the flaps completely to reduce the
aircraft speed.
2) Keep the direction, press the helm properly to the intact wheel side to reduce the
load on the blown-up tyre and the banking of the aircraft.
3) Don’t reduce the speed with the brake too early. During braking, reduce the braking
degree of the wheel with blown-up tyre properly.
(b) Continue taking off if the aircraft speed approaches the takeoff speed at the rear stage of
running, its handling procedures are as follows:
1) Keep the direction, press the helm properly to the intact wheel side to lift the aircraft
off steadily timely.
2) Report to the aircraft dispatcher, and if it is a local flight, the route landing can be
performed. If it is a mission flight, retract the landing gears and continue flying
according to the original plan.
3) During landing, touch down softly, and avoid banking to the wheel with blown-up
tyre side.
4) Keep the direction with the rudder timely after touching down,bend the stick properly
to the intact wheel side to reduce the load on the blown-up tyre, and reduce the
speed carefully with the brake after the speed decrease.
Handling of the aircraft when the brake fails
Phenomena
(a) The brake system is inoperative during the running speed reduction of the aircraft.
(b) The hydraulic accumulator of the left hydraulic system has no pressure.
JZ-Y8F200W-02
AIRCRAFT FLIGHT MANUAL
SECTION III
EMERGENCY PROCEDURES
3-26
June 30, 2012
Handling
(a) Stop taxiing during the normal takeoff when the brakes fail.
(b) When the brake system fails during landing run, reduce the aircraft speed with the
emergency brake. At this moment, “automatic brake released” is inoperative, so do not
pull the emergency brake violently and be sure to balance leftward and rightward.
(c) When the left hydraulic system has no pressure, turn on the hydraulic communication
valve to provide the normal brake pressure by the right system.
(d) If the normal brake and the emergency brake both fail, correct the aircraft direction and
avoid the barrier with the hand control operation or the throttle. Shut down the two
outboard engines, and then the inboard ones at a proper time, to stop the aircraft taxiing
quickly.
HANDLING OF HEADING SYSTEM AND THE BAROMETER FAILED
IN FLIGHT
The heading system failure in flight
(a) The navigator judges the failures of the heading system in all working conditions with the
aid of the instruments and reports the failures to the aircrew. The pilot decides whether to
go on flying or land at the nearest airport according to the present flying condition.
(b) The autopilot must be cut off.
(c) The navigator takes full use of the airborne equipment to navigate.
(d) The communicator contacts with the landing airport and applies to turn on the ground
radar and director station.
(e) The pilot maintains all specified parameters according to the heading reported by the
navigator and indicated by the compass LC-5D.
The static and the pitot pressure system failure
Failure judgement of the static and the pitot pressure system
(a) If the pitot system fails, the indication of the airspeed indicator and the Machmeter are
not correct, and the indication of the altimeter and the vertical velocity indicator (VVI) is
the current flight condition.
(b) If the static system fails, when the aircraft is descending or climbing, the indication of the
above instruments of pitot-static systems is not accurate.
JZ-Y8F200W-02
AIRCRAFT FLIGHT MANUAL
SECTION III
EMERGENCY PROCEDURES
3-27
June 30, 2012
The causes and phenomena of the static and the pitot pressure system failure
(a) When the pitot port and the static tube freeze and the airspeed indicator points to zero. If
failure appears during aircraft descending, the indication of airspeed indicator will exceed
TAS; If failure is appearing during aircraft climbing, indication of airspeed indicator will be
less than TAS, the altimeter and theVVI do not indicate the altitude change, the indication
is not changed (indication of the altimeter is the altitude when failing).
(b) The static tube is not sealed: During level flight, altitude and speed keep constant. At this
time, it is not easy to find out the failure of the static system. If the sealing of static tube is
damaged in flight, the pressure in pressurized cabin could affect the pressure of static
tube, and make the indication of airspeed indicator and the altimeter reduce.
Handling of the static and the pitot pressure system failure
(a) Judge which system is in failure. If the indication of the barometer on the copilot
instrument panel is surely right, the left dynamic, static pressure valves should be turned
over to the pneumatic system of the copilot instrument panel.
(b) If the barometer system of the copilot instrument panel also breaks down, the static
pressure system of the barometer on the pilot instrument panel may be switched over to
the emergency static pressure inlet located in the nose landing gear well.
LANDING WITH FLAPS UP
Features
Compared with flap-down landing, flap-up landing has more pitch control. The aircraft can
easily get into the landing angle of attack. For example, when the landing weight is 52t and the
gliding speed is 167kn (310km/h), the touch-down speed of the aircraft is 151kn (280 km/h), the
landing angle of attack is 12o
and pitch angle is 8o
. But the allowable maximum angle of attack is
12o
30′ and pitch angle is 8o
30′ for aircraft belly contacting with the ground (oleo struts fully
compressed). Therefore, safety margin for contacting with the ground is only 30′ and the run
distance will be sharply increased. Therefore it is not allowed to make a flap-up landing unless in
special case.
Generally, the flap-up landing speed is 10.8kn~16.2kn (20~30km/h) greater than that with
flap-down (35o
), and the float or run distance will be increased by about 50%.
JZ-Y8F200W-02
AIRCRAFT FLIGHT MANUAL
SECTION III
EMERGENCY PROCEDURES
3-28
June 30, 2012
Landing procedures
(a) When landing with flaps-up and the gliding speed is kept at 151kn~173kn
(280km/h~320km/h), the angle of attack is about 7o
~8o
larger than that with the
flaps-down (35o
). After passing the outer locator, keep gliding at the specified speed in
Table 3-3 according to the landing weight of the aircraft.
Table 3-3a Gliding speed
Airborne weight (t) Gliding speed Vb(kn)
45 below 151
50 159
52 163
58 320
Table 3-3b Gliding speed
Airborne weight (t) Gliding speed Vb(km/h)
45 below 280
50 295
52 301
58 320
(b) The altitude for exiting from the final turn should be 131 ft~98 ft (30~40m) lower than
normal, and the gliding point should be moved backward by 328 ft~492 ft (100~150m).
To keep the specified gliding speed, the throttles should be generally smaller than that in
normal condition. After passing the outer locator, adjust the outboard throttles timely
according to the air temperature. Keep the gliding speed with the inboard throttles.
The altitude of flare-out should generally be 23ft~16ft (7~5m) lower than normal, begin
flaring out at the indicated speed of 151kn~146 kn (280~270km/h). The method of pulling
the throttle is the same as that when landing with flaps-down. Retard the inboard throttles
back to 0o
to reduce the flaring-out distance. Compared to that with flaps-down, during
flaring out, the deceleration of airspeed is lower, the distance is longer, the falling is
slower, the control is lighter, and entering landing angle of attack is easier.
(c) After touching down, the angle of attack of the aircraft tends to increase, and the nose
wheel should not be lowered. To prevent the aircraft belly from touching ground, push the
control stick gently and lower the nose wheel, then retard the outboard throttles back to
0o
. Release the stop of propellers separately in taxiing. Only when the speed is not
higher than 113 kn (210km/h), the brake may be used.
JZ-Y8F200W-02
AIRCRAFT FLIGHT MANUAL
SECTION III
EMERGENCY PROCEDURES
3-29
June 30, 2012
Cautions
(a) During landing with flap-up, the indicated gliding speed must not be lower than 151 kn
(280km/h).
(b) Try to prevent the aircraft rushing out of the runway since the distance of float and run is
long.
(c) The control after flaring out must not be rough to prevent the tail fuselage from touching
the ground for the very large angle of attack.
OUTSIDE FORCED LANDING
In case that an emergency event occurs and it is beyond the control of the crew, transmit
emergency signal and perform the outside forced landing with landing gears retracted. During
the forced landing try every means to ensure the safety of onboard personnel and survive the
aircraft additionally.
On the land
Aircrew work assignment
(a) Captain: take full command of the crewmembers and operate aircraft for forced landing.
(b) Co-pilot: assist the captain to control the aircraft.
(c) Navigator: decide forced landing location, then report longitude and latitude and flight
condition to the communicator with intercom.
(d) Communicator: report to the ground about aircraft forced landing location rapidly and
accurately, and reports the instructions of aircraft dispatcher to crewmembers in time.
(e) Mechanic: responsible to open the aircraft emergency doors and windows. If there is fuel
in auxiliary tank, use it up or transferred it to group fuel tank.
JZ-Y8F200W-02
AIRCRAFT FLIGHT MANUAL
SECTION III
EMERGENCY PROCEDURES
3-30
June 30, 2012
Preparations before forced landing
(a) Crewmember should open the entry door and the door of frame 9 and keep them locked.
Open the emergency windows on both sides of the cargo compartment and fix two
escape ropes on air exhauster mount at both sides of cargo cabin. If possible, throw
some on-board cargo out from the aircraft to reduce the aircraft’s landing speed and
firmly tie up those cannot be thrown out with steel cable according to the requirements.
(b) Having decided to perform the forced landing, the members that do not directly involve in
the forced landing operation should go to the cargo cabin, look after personnel onboard
and get some emergency materials for use after the forced landing. The personnel
should fasten their safety belts.
(c) Observe and choose a favorable place for forced landing.
(d) Communicator should report to the ground about forced landing location, time, causes
and send signals for help if necessary.
(e) Make sure the fire extinguishing cock is at the required position and turn on the neutral
gas switch to charge air for the tank in case of fire after force landing.
(f) Having completed their works, the navigator and communicator should go to the cargo
cabin and prepare for force landing at a dependable site, sitting on the floor with their
back against the fuselage, their heads lowered and both hands at the back of their head
and the legs bended slightly.
Force landing implementation
(a) Shut off the pressure control /shutoff valve and pressurization cock at the altitude of 328ft
(100m).
(b) After the aircraft is aligned to forced landing location, lower flap to 15o
, the communicator
should switch the onboard circuit to emergency power supply and the navigator should
leave navigation cabin to cargo cabin at the altitude above 30m.
(c) With landing gear retracted, maintain the same gliding and leveling speed as normal, and
float distance increases remarkably.
(d) Visually choose gliding entry point according to the edge of forced landing area, lower
flap to 35o
and maintain the specified normal gliding speed.
(e) At the moment of the aircraft touching down, the captain should retard the throttle to 0o
,
set the engine shutdown switch to SHUTDOWN position and turn off the anti-fire switch.
(f) After the aircraft touches down, turn off the aircraft power supply to cut off all electric
circuits of the aircraft.
JZ-Y8F200W-02
AIRCRAFT FLIGHT MANUAL
SECTION III
EMERGENCY PROCEDURES
3-31
June 30, 2012
Work after forced landing
(a) When the aircraft stops, the crewmember should quickly arrange the personnel to get far
away from the aircraft through the cargo cabin door, entry door or emergency exits with
the help of escape rope.
(b) The communicator send out SOS signal, report information of the forced landing site,
personnel, aircraft damage and necessities with stndby radio set.
Forced landing on water
(a) When the aircraft flies over the sea 27 n mile (50km) away from the seashore, airborne
lifejacket and raft should be equipped in all cases.
When the aircraft flies over the sea 54 n mile (100km) away from the seashore, the
following survival equipment must be equipped:
1) Lifejacket and raft;
2) Portable off-site radio set
3) Enough medicine and food
4) Seawater desalting agent
5) Luminescence agent
6) Compass
7) Torch
8) Antishark powder
9) Escape rope
10) Antifouling cloth
Each crewmeber should be familiar with location of all survival equipment, and their
positions are clearly marked. They must also understand their operation method. Each
member should be trained so as to operate the equipment skillfully when necessary.
(b) Generally, the aircraft can float for long time after forced landing on water. The
differences between forced landing on water and on ground are as follows:
1) Before the forced landing, all aircrew members should untie the safety belt and
collar button, and check personal & collective survival equipment for reliability.
2) Open emergency window and close other doors and windows to extend floating
time. After a successful force landing, open the emergency exits above the water
line at both sides of the fuselage for evacuation.
JZ-Y8F200W-02
AIRCRAFT FLIGHT MANUAL
SECTION III
EMERGENCY PROCEDURES
3-32
June 30, 2012
3) The captin should conduct the forced landing near the seashore and island and
send out SOS signal with radio channel and international mishap communication
frequency for first-aid deployment.
4) Generally, the forced landing on water should follow the up wind direction. In case
there is wave and the current wind speed is within 26.3ft/s~32.8ft/s (8m/s~10m/s)
(the sea is covered by the wave), forced landing can be conducted following the
wave direction. In case of heavy storm without tidal wave, forced landing should
follow the up wind direction on the rising-up wave.
5) No flap and landing gear down is allowed for forced landing.
6) Feather the propeller at the altitude not lower than 328ft (100m) before the forced
landing.
7) IAS should be reduced at 151kn~148kn (280km/h~275km/h) before level off, and
start level off at the altitude of 26.3ft~32.8ft (8m~10m).
8) Touching the water surface at minimum speed, but be careful not to fall in stall.
9) Keep the aircraft at normal landing status at the moment of touching the water
surface.
10) When the aircraft is floated on water, all crewmembers should evacuate from the
emergency exits with personal and collective life-saving equipment. Personal
lifejacket should be supplied with air at the dorsal fin, and then the collective raft.
Generally, personnel should not leave the aircraft unless its sinkage.
11) In case of forced landing at night, turn on the landing light at the altitude of
328ft~492ft (100m~150m) and concentrate on level off for touching the water
surface. The aircraft is not allowed to touch the water surface with sliding angle or in
stalling status. 
JZ-Y8F200W-02
AIRCRAFT FLIGHT MANUAL
SECTION IV
NORMAL PROCEDURES
4-1
June 30, 2012
NORMAL PROCEDURES
PREPARATIONS FOR FLIGHT
Preparations for flight are necessary step to ensure the successful completion of a flight
mission. Therefore it is necessary to conduct the preparation for each flight.
Preflight preparations
Meteorological analysis
The aircraft features large sphere of activities, high flight altitude, long flight range and
duration, so it is very important to know, analyze and master the meteorological conditions for
accomplishing the flight missions safely and successfully.
When analyzing the meteorological conditions, special attention must be paid to the
following:
(a) The positions of atmospheric front and flight route, the height of cloud base and top in
frontal zone.
(b) The position and strength of the jet flow area, and the height of the axis of the jet flow
area, the horizontal and vertical distributions of wind direction and speed in various
altitude layers.
(c) The horizontal and vertical temperature distributions above troposphere, especially in the
jet flow area.
(d) The baric topography (cyclonic and trough) and its position at high altitude.
(e) The position of the cumulus congested, cumulonimbus clouds and the flight route.
(f) The icing area and its height that may be met in flight route.
(g) The active thunderstorm area, the airflow disturbance condition and the cloud
characteristic.
(h) The weather condition in the landing area and alternative landing area.
JZ-Y8F200W-02
AIRCRAFT FLIGHT MANUAL
SECTION IV
NORMAL PROCEDURES
4-2
June 30, 2012
Determination of the most favorable flight condition
Determination of the most favorable flight condition depends upon the flying distance,
weight and high-altitude wind.
(a) Determination of the most favorable flying altitude
Usually, the altitude of 22966ft~26247ft (7000~8000m) should be chosen for flight in
order to obtain higher cruising speed and improve the aircraft controllability and stability.
For altitude selection when the flying distance is within 810n mile (1500km), see the
Table 4-1.
Table 4-1a Favorable flying altitude
Flight range (n mile) 324 432 540 810
The most favorable altitude (ft) 19686 22966 26247 29528
Table 4-1b Favorable flying altitude
Flight range (km) 600 800 1000 1500
The most favorable altitude (m) 6000 7000 8000 9000
The most favorable flying altitude is 26247 ft~29528 ft (8000~9000m) when the flying
distance is above 810n mile (1500km).
(b) Determination of climb segment
If the flying distance is more than 810n mile (1500km) and takeoff weight is close to the
maximum, the aircraft may climb to an applicable height by adopting the step climb
method after takeoff in summer, and then climb to the most favorable height after certain
amount of fuel is consumed. In general, straight climb method is adopted.
(c) If the wind direction and speed at various height layers are known, the most favorable
flying altitude shall be determined according to the ground speed at each height (the
ground speed = the true airspeed ± correction) calculated based on the Table 4-2. The
wind speed correction increases with the height. If headwind increment exceeds 13.5kn
(25km/h) with each increased height of 3281ft (1000m), the flight shall be conducted at
the low altitude layer.
JZ-Y8F200W-02
AIRCRAFT FLIGHT MANUAL
SECTION IV
NORMAL PROCEDURES
4-3
June 30, 2012
Required fuel calculation
The required fuel for performing mission equals the total of the following fuel.
The required amount of fuel = flight fuel consumption + reserved fuel + required fuel for
ground engine warming, running up, and taxiing + dead fuel
(a) For the fuel consumption when the aircraft takes off and climbs to the planned flight
height with the takeoff weight of 61t, and performs enroute level flight and then descends
to the height of 1640ft (500m), refer to the associated data in Chapter 5.
Table 4-2a W-V numerical Table (Aircraft true speed is 270 kn~378 kn)
Wind speed
(km/h)
Wind
angle(km/h)
20 40 60 80 100 120 140 160 180 200
Down wind: Ground speed=TAS+Correction
0o
360o
10.8 21.6 32.4 43.2 54.0 64.8 75.6 86.4 97.2 108.0
10o
350o
10.8 21.1 31.9 42.7 52.9 63.7 74.0 84.8 95.0 105.8
20o
340o
10.3 20.0 30.2 40.5 50.2 59.9 70.2 79.9 89.6 99.4
30o
330o
9.2 18.4 28.1 36.7 45.9 54.5 63.2 71.8 80.5 89.1
40o
320o
8.1 16.2 24.3 31.9 39.4 47.0 54.0 61.6 68.6 74.5
50o
310o
7.0 13.5 20.0 25.9 31.9 37.3 43.7 48.6 54.0 58.9
60o
300o
5.4 10.3 15.1 19.4 23.8 27.5 31.3 34.6 37.8 40.5
70o
290o
3.8 7.0 9.7 12.4 14.6 16.7 18.4 19.4 20.5 21.1
80o
280o
1.6 3.2 3.8 4.9 4.9 4.9 4.9 3.8 2.2 1.1
Upwind:Ground speed=TAS-Correction
90o
270o
0.0 0.5 1.6 2.7 4.3 6.5 8.6 11.3 14.6 17.8
100o
260o
2.2 4.3 7.0 10.3 14.0 17.3 21.6 25.9 31.3 36.2
110o
250o
3.8 8.1 12.4 17.3 22.7 28.1 33.5 39.4 45.9 52.9
120o
240o
5.4 11.3 17.3 23.8 30.2 37.3 44.3 51.8 59.4 62.1
130o
230o
7.0 14.6 21.6 29.7 37.3 44.3 54.0 62.6 71.3 79.9
140o
220o
8.1 16.7 25.4 34.0 43.2 52.4 61.6 70.7 80.5 90.2
150o
210o
9.2 18.9 30.8 38.3 48.1 57.8 67.5 77.8 88.0 97.7
160o
200o
10.3 20.5 30.8 41.0 51.3 61.6 71.8 82.1 92.9 103.7
170o
190o
10.8 21.1 31.9 42.7 53.5 63.7 74.5 85.3 96.1 106.9
180o
180o
10.8 21.6 32.4 43.2 54.0 64.8 75.6 86.4 97.2 108.0
JZ-Y8F200W-02
AIRCRAFT FLIGHT MANUAL
SECTION IV
NORMAL PROCEDURES
4-4
June 30, 2012
Table 4-2b W-V numerical Table (Aircraft true speed is 500~700km/h)
Wind speed
(km/h)
Wind
angle(km/h)
20 40 60 80 100 120 140 160 180 200
Down wind: Ground speed=TAS+Correction
0o
360o
20 40 60 80 100 120 140 160 180 200
10o
350o
20 39 59 79 98 118 137 157 176 196
20o
340o
19 37 56 75 93 111 130 148 166 184
30o
330o
17 34 52 68 85 101 117 133 149 165
40o
320o
15 30 45 59 73 87 100 114 127 138
50o
310o
13 25 37 48 59 69 81 90 100 109
60o
300o
10 19 28 36 44 51 58 64 70 75
70o
290o
7 13 18 23 27 31 34 36 38 39
80o
280o
3 6 7 9 9 9 9 7 4 2
Upwind:Ground speed=TAS-Correction
90o
270o
0 1 3 5 8 12 16 21 27 33
100o
260o
4 8 13 19 26 32 40 48 58 67
110o
250o
7 15 23 32 42 52 62 73 85 98
120o
240o
10 21 32 44 56 69 82 96 110 115
130o
230o
13 27 40 55 69 82 100 116 132 148
140o
220o
15 31 47 63 80 97 114 131 149 167
150o
210o
17 35 57 71 89 107 125 144 163 181
160o
200o
19 38 57 76 95 114 133 152 172 192
170o
190o
20 39 59 79 99 118 138 158 178 198
180o
180o
20 40 60 80 100 120 140 160 180 200
(b) The ground fuel consumption for pre-takeoff and post-landing are calculated according to
the consumption rate of 28kg per minute. The fuel consumption for 16min is 450kg on
the ground.
(c) The fuel consumption for establishing landing pattern and landing is 280kg for 8min, or
420kg for 12min.
(d) Usually, the enroute reserve fuel is 1.6t, and the average fuel consumption per hour is
2.3t. The reserve fuel should be increased accordingly if performing special mission or
alternate airfields are few in the flight area.
(e) The dead fuel of whole aircraft is 395kg.
Oil consumption of WJ-6 engine is 0.264gal (1.2L) per hour.
JZ-Y8F200W-02
AIRCRAFT FLIGHT MANUAL
SECTION IV
NORMAL PROCEDURES
4-5
June 30, 2012
Preflight check
Before running the engine, the pilot should know aircraft conditions from flight engineer, such as
fuel quantity, center of gravity, oxygen quantity, and the important maintenance and
trouble-shooting that have been done, and carefully check the aircraft together with the flight
engineer following the checking route (Figure 4-1).
Figure 4-1 Checking route before running the engine
Aircraft exterior check
(a) Left side of the nose and the nose
1) Whether there are dents, cracks, or deformation on the skin.
2) All kinds of antennae, airspeed tube, critical angle of attack indicator, icing
annunciator should be in good condition and clean. Take down the blanking covers.
Check sphere surface of icing annunciator for cleaness and clean it with polishing
fined sand paper, then clean the surface with one cloth with rectified alcohol and
polish with chamois leather.
3) The cockpit glass should be clean and in good condition.
4) The radome should be fixed firmly.
5) The landing light on the bottom emergency door of cockpit should be in good
condition.
JZ-Y8F200W-02
AIRCRAFT FLIGHT MANUAL
SECTION IV
NORMAL PROCEDURES
4-6
June 30, 2012
(b) The nose landing gear
1) The steering mechanism for the nose wheel turning should be in good condition with
no leakage.
2) The nose buffering mechanism should be clean and has no leakage. The exposed
length of the buffering strut should be 3.94in~9.45in (100~240mm).
3) The tyre should have no damage, its cord fabric should not be crossgrained, its
pressure should be normal and its compression range should be 1.38in~1.97in
(35~50mm). The hook of retracting mechanism should be flexible and clean.
4) Open the nose landing gear well door, check the hydraulic pipe and its accessories
for leakage.
5) The retraction, extension position lock and the limit switch should be clean and in
good condition, and the lubrication oil and retraction lock should be at OPEN
position.
6) There should not be foreign object in the nose landing gear well, and the steel cable
for lowering the nose wheel mechanically should be fixed.
7) Close the door, check whether the lower section of the fuselage has leakage, and all
antennae, operating windows should be in good condition.
(c) Front-right side of the fuselage
1) Inertia navigation/GNSS antennae and pitot should be in good condition, and pitot
conver should be taken down.
2) The blanking cover of ventilating port should be taken down.
3) The fuselage skins and each window should be in good condition.
4) Emergency exit should be closed. Each vent-plug should be taken down.
5) Neutral gas and fire bottle autorelease indication diaphragm should be in good
condition.
6) Refueling switch control panel, the operating windows of ground connectors should
be closed well, and the landing light should be in good condition.
(d) Right wing and engines
1) The leading edge of the wings should not have damage and leakage (in winter
check and remove ice and frost).
2) Each cowling of engine should be closed well, and have no damage.
JZ-Y8F200W-02
AIRCRAFT FLIGHT MANUAL
SECTION IV
NORMAL PROCEDURES
4-7
June 30, 2012
3) Lower cowling of engine should not have leakage of fuel, oil and hydraulic oil. Each
residual oil tube should not have leakage.
4) No damage on the anti-icing equipment of blade, and its angle should be zero
degree.
5) The propeller cowling should not have dents, and the lock buckle should be locked
well.
6) The blanking covers of engine intake and each vent-plug should be taken down.
7) The wing tip, navigation light discharging brush and radio antenna should be in
good condition.
8) The lower section of the wing should not have leakage, the operating cover should
be closed well.
9) The aileron and flap should be in good condition, and there should not be damage
on their exterior. The trim tab should be at neutral position.
10) The blanking cover of engine tailpipe nozzle should be taken down, and there
should not be foreign object in tailpipe nozzle.
(e) Right landing gear
1) The fixation of hydraulic pipe and cylinder on main wheel shock strut should be in
good condition, clean and have no leakage. The exposed length of the shock strut
should be 1.69in~4.53in (43~115mm).
2) The tyre should have no damage, its cord fabric should not be crossgrained, its
pressure should be normal and its compression range should be 2.95in~3.54in
(75~90mm).
3) The fixation of the nuts for fixing the wheels, the sensors for automatic releasing
braking, each accessory and pipe should be in good condition and have no leakage.
4) The hook of retracting mechanism should be flexible and clean.
5) Check the retraction, extension position lock and the limit switch should be clean
and in good condition, check whether there is lubrication oil and that the springs
should be in good condition and the retraction lock is at OPEN position.
6) Accessories and pipes in the landing gear well should not have leakage, every
control stick should not have deformation, and there should not be foreign objects in
the landing gear well.
JZ-Y8F200W-02
AIRCRAFT FLIGHT MANUAL
SECTION IV
NORMAL PROCEDURES
4-8
June 30, 2012
(f) Rear right side of the fuselage
1) Battery compartment should be covered and the vent-plug should be taken down.
2) The power plug cover not used and the charging oxygen cover plate of rear auxiliary
fuel tank should be covered well.
3) Check that the right side fuselage skin and window should be in good condition.
4) All atennae should be intact.
5) The signal flare should be installed as required (normal sequence of color from
backward should be white, red, green and yellow)
(g) Tail section of the fuselage
1) The horizontal stabilizer and the vertical stabilizer should be in good condition, the
leading-edge heating component should have no damage or discolor (check and
remove the ice and frost in winter).
2) All antennae should be in good condition.
3) The control surface and discharge brush should be in good condition, down elevator
should be at the limit position and the trim tab should be at neutral position.
4) The tail light should be in good condition and the fairing cover should be fixed
reliably.
5) The tail-supporting bar should be taken down, the lower section of fuselage should
have no leakage and the flash light and the radar antenna should be in good
condition.
(h) Besides the inspection of the left side of the fuselage, left landing gear, left wing and left
engine is as same as that of the right side, the following items should be executed:
1) There should be no foreign object in WDZ-1 vent-pipe, and the turbine blades
should be perfect.
2) The WDZ-1 cowling should be closed well, the vent-plugs should be taken down,
and it should not have leakage outside.
3) The grounding jumper at entry door should be retracted, oxygen-filler cover should
be covered all right, and the cool air inlet-plug of cargo cabin should be taken down.
JZ-Y8F200W-02
AIRCRAFT FLIGHT MANUAL
SECTION IV
NORMAL PROCEDURES
4-9
June 30, 2012
Aircraft interior inspection
(a) Cargo cabin
1) The mechanical handle of cool/heat throttle for cargo cabin heating should be at the
required position, and the fire extinguishing should be fixed well.
2) The crane should be locked, each switch of airdrop and oxygen consumption
instrument panel and oxygen valve should be at OFF position, and check if the
oxygen pressure is as required.
3) The cargo and the equipments along with the aircraft should be placed and tied well
according to the regulations, and their center of gravity should be adjusted.
4) The hydraulic accessories of cargo door should not have leakage. Check if there
are foreign objects that affect the opening/closing of the door.
5) All emergency exits should be closed and locked well, and the back-up equipment
should be all ready.
6) Check that the lavatory should be clean and available.
7) Check the electro-heating water tank, electric oven and living equipment cupboard
for reliable fixation.
(b) Cockpit
1) The venting handle should be at CLOSE position when flying at high altitude.
2) The fire bottles, emergency necessities, movable oxygen bottles, water tank and
oven should be fixed and closed well.
3) Check through the feathering oil-residual cup if the feathering switch has fuel
leakage.
4) The dynamic /static pressure changeover switch should be at LEFT position, and
the standby static pressure switch should be at OFF position.
5) Check the seats. The seats, pedals and safe belts should be adjusted to proper
positions.
JZ-Y8F200W-02
AIRCRAFT FLIGHT MANUAL
SECTION IV
NORMAL PROCEDURES
4-10
June 30, 2012
6) Pilot console
a) The oxygen regulator should be in good condition, and the oxygen mask should
be connected.
b) The emergency control handle for cockpit door should be at neutral position and
be locked.
c) The fluorescent light, navigation light and other illuminating switches should be
all at OFF positions.
d) The wires and earphone of radio communication control box should be all
complete and in good condition.
e) The engine air-starting switch should be at OFF position and be locked well.
f) The side movable glass window should be flexible and sealed.
g) The control surface lock handle should be at LOCK position
h) Elevator tab hand wheel should be at NEUTRAL position.
7) Pilot instrument panel
a) The switches on the pilot instrument panel should be at OFF position.
b) The barometric altimeter should be corrected.
c) The parking brake should be lifted.
d) The emergency brake handle and the nose wheel steering handle should be
pushed to OFF positions.
8) Central instrument panel
a) The general fire-extinguish switch should be at neutral position.
b) The clock should be checked and punched in.
c) The automatic brake-releasing switch should be connected.
d) The fire extinguishing button should be covered and locked, and all switches
should be at OFF positions.
e) The switches on autopilot console should be all at OFF positions.
f) The switches of landing light should be at neutral positions.
g) The control handles of landing gears and the flaps should be at neutral
positions.
h) The switches on engine starting control panel should be at their specified
positions.
JZ-Y8F200W-02
AIRCRAFT FLIGHT MANUAL
SECTION IV
NORMAL PROCEDURES
4-11
June 30, 2012
i) The control switches of fuel system, oil system should be at specified positions.
9) Switchboard of pilot overhead console
a) The emergency hydraulic stop handle, each feathering power switch and button
should be at OFF positions.
b) The propeller stop-releasing switches should be at releasing positions.
c) Other switches should be at normal positions.
10) Copilot instrument panel
a) The switches on copilot instrument panel should be at the specified positions.
b) The altimeter should be calibrated.
c) Heating switch for cargo cabin should be at neutral position.
d) The heating switches of clock, tail, propeller and fairing, windshield glass,
dynamic/static pressure tube and cockpit should be at OFF positions.
e) The emergency pressure-releasing switch should be at OFF position.
f) The icing-signal switches of the wings and intake should be at OFF positions.
11) Copilot console
a) The heating switches of guiding device should be at OFF positions.
b) The shut-down switch should be at ENGINE SHUTDOWN position, covered and
lead-sealed.
c) Air traffic alarm switch and anti-collision switch should be at ON position.
d) The retraction/extension switches of landing gears, the retraction/extension
switches of the flaps, elevator tab hand wheel, emergency extension handle of
landing gears and emergency control handle of cabin door should be at the
neutral positions and locked well.
e) The emergency switch for cabin door sealing should be at SEALING
RELEASED position.
f) The AIR SUPPLY FROM ENGINE switch, pressurization switch of forward cabin,
the switch for wings heating should be all at OFF positions.
12) Pilot overhead console
a) The heating switches of tail, propeller and fairing, windshield glass,
dynamic/static pressure tube and cockpit should be at OFF positions.
b) Each lighting switch should be at OFF position.
JZ-Y8F200W-02
AIRCRAFT FLIGHT MANUAL
SECTION IV
NORMAL PROCEDURES
4-12
June 30, 2012
Engine start, warmup and runup
Preparations before engine start
(a) The flight engineer pressurizes the accumulator of the left hydraulic system.
(b) The captain instructs “Everyone is at his position, and prepares to start the engine”.
(c) The captain instructs “Power on”, the ground electrician or the copilot gestures to the
power cart to generate electric power. After powering on, be sure the voltage should be
24.5~28.5V, and turn on the intercom at the same time.
(d) Check all switches and handles from left to right and top to bottom for specified positions.
1) Open the control surface lock.
2) Set the throttles at 0o
.
3) Lift the parking brake.
4) The propeller-stopping switch should be at RELEASE position, and the red signal
light is on.
5) Put the fire-extinguishing switch at CHECK position, and each yellow squib signal
light should be on.
6) Turn on the anti-fire switch, and the four green lights come on.
7) Set the shutdown switch to ON position.
8) Turn off the ejection radiator switch, and the oil radiator switch should be at
AUTOMATIC position.
9) The quantity of oil, hydraulic oil should be normal.
10) Open the WDZ-1 and engine-starting box.
Set the AIR-GROUND start changeover switch at GROUND position, set the
CRANKING-START changeover switch at START position, set the engine starting
select switch at the position for starting engine, the green READY light is on.
Open the fuel pumps of No.1~No.4 groups fuel tanks, and the pressure should be
12.81psi~17.11psi (88.3kPa~118kPa).
(e) Turn on the VHF radio and ask for starting.
JZ-Y8F200W-02
AIRCRAFT FLIGHT MANUAL
SECTION IV
NORMAL PROCEDURES
4-13
June 30, 2012
The instructions for engine start
(a) The permission of starting from the ground given and “Mechanic is ready” reported by
the mechanic, the captain instructs “The voltage is normal, the systems have pressure,
the parking brake are all right, leave from the propeller, and start engine 1” (the sequence
started with the ground power is engines 1, 2, 3, 4, and that started with WDZ-1 is
engines 1, 4, 3, 2).
(b) After depressing the start button, the engine rotating speed reaches 42~46% in 60
seconds, the voltmeter indicates from the maximum to 0V, the communicator reports
“The starter is cut off” and the captain responses “Roger”.
(c) After starting the four engines, the mechanic reports “Engines starting are completion”.
(d) The captain instructs “The communicator turns on the onboard power”. After the
communicator replies “The onboard power is turned on”, the captain instructs “Cut off the
ground power” (The ground can be informed to turn off the power by ground electrician or
copilot through a gesture).
(e) The captain instructs “Turn on the power used for onboard equipment”, and then turn on
the laser inertia combined navigation system horizon, the attitude heading system
HZX-1M, GPS, meteorological radar, identification friend or foe (IFF), the radio compass
(ADF), the intercom, the radio altimeter, the critical angle of attack indicator, TCAS, the
UHF radio set, and VOR/instrument landing system in turn. Check that the automatic
brake-releasing mechanism operating switch for ON position.
(f) The captain instructs “Pull out the ground power plug, remove the wheel chocks, and
prepare to taxi” when the ground technician is at position.
Engine start procedure
(a) Depress the start button for 1.5~2 seconds and punch stopwatch. And then the start
system operates in order automatically, the signal light for starting procedure operation
should be on and the signal light for preparation should be off.
(b) The start voltmeter should indicate, the onboard network voltage should not be below
16V.
(c) The engine rotating speed begins to rise in 3.5 seconds.
(d) The oil has pressure in about 10 seconds (It can be judged from the moment when the
engine failure signal light goes out), and the time should not be longer than 30 seconds.
(e) The voltage should increase to 39~48V in about 15 seconds.
JZ-Y8F200W-02
AIRCRAFT FLIGHT MANUAL
SECTION IV
NORMAL PROCEDURES
4-14
June 30, 2012
(f) The fuel regulator stopping switch is cut-off in 20 seconds and begins to supply fuel. The
indicated upstream pressure of the nozzle should be 113.85psi~170.71psi
(0.785~1.177MPa), and the indicated start voltage should be 50V.
(g) Ignite in 25 seconds, the indications of turbine outlet temperature begins, and carry out
fuel cutoff automatically according to the coordination of the temperature and the rotating
speed.
(h) When the engine speed reaches 42~46% or time up to 70 seconds, the starter is shut
down, the starting procedure operating signal light should be off and the signal light for
ready should be on, and the start voltage drops to zero (If the starter has not shut down
yet when the engine speed reaches 46%, the emergency shutdown button should be
depressed. If the starter still can not be shut down, set the shutdown switch to
SHUTDOWN position to stop the start).
(i) Control strictly the engine exhaust gas temperature whose maximum should not be
higher than 750o
C. When cutting off the fuel, neither hang up nor decrease the rotating
speed. When the speed reaches 55% and increases slowly, advance the throttle to 30o
and back to 0o
gently till the engine enters the idle speed.
(j) When the rotating speed reaches 55~60%, the temperature should decrease
automatically and the rotating speed increases rapidly. At this time, the momentary fuel
consumption is 450kg/h.
(k) The time of the engine entering idle speed (80.5~82.5%) should not exceed 120 seconds,
under the idling condition, the oil pressure should not be below 56.85psi (392kPa).
(l) During engine start with WDZ-1, pay special attention to the temperature and the rotating
speed of WDZ-1 before 25 seconds, and the starting condition of the engine after 25
seconds. At the same time, observe the working condition of WDZ-1.
Stop starting immediately under the following conditions:
(a) The starting power source is below 16V.
(b) It is not ignited in 25 seconds (the temperature does not increase).
(c) There is no oil pressure in 30 seconds.
(d) The rotating speed hangs up or the turbine exhaust gas temperature exceeds 750o
C.
(e) The starter is shut down too early (Generally, the shutdown is done when the rotating
speed is below 35%, if shutting down after the speed is 36% and the temperature could
be controlled, a successful starting can be achieved).
JZ-Y8F200W-02
AIRCRAFT FLIGHT MANUAL
SECTION IV
NORMAL PROCEDURES
4-15
June 30, 2012
(f) The start power is not balanced, the difference of current exceeds 500±100A, the
communicator instructs “Shut down”, and the signal light of start failure should be on.
(g) When starting the engine with WDZ-1, the temperature of WDZ-1 is higher than 750o
C
(the peak value is higher than 820o
C) or the speed is below 83%, stop starting the engine
WJ-6 first (and then shut down the WDZ-1).
(h) The engine is surging or on fire.
(i) It does not enter idling in 120 seconds.
(j) Receive the instruction “Stop” from the ground.
Caution
When stop starting, check the upstream pressure of nozzle and the turbine
outlet temperature for decrease. If the temperature increases or does not stop
spurting fuel entirely, pull the emergency hydraulic feathering handle instantly.
It is forbidden to begin the second start before finding the cause of the start
failure.
Engine cold run
(a) The shutdown switch is at SHUTDOWN position.
(b) Turn on the master start power switch.
(c) START-COLD RUN select switch is at COLD RUN position.
(d) Turn on the start select switch of the cold running engine.
(e) The throttle is at 0o
position.
(f) After issuing the instruction COLD RUN, push the START button, the button cut off
automatically in 30 seconds (cold running speed is 17~22%). If it is necessary to cut off
the engine earlier, push the emergency cutoff button.
Cautions for start
(a) It is forbidden to start or crank the engine which is difficult to crank up.
(b) It is forbidden to turn on the AIR start switch when starting the engines on ground.
(c) It is forbidden to turn off the start select switch or turn to the other engine position before
the engine enters the idling status.
(d) Before the engine entering the idling, it is forbidden to connect the starter generator to
the aircraft network for power supply, to prevent the safety driving shaft coupling of
generator from breaking off.
JZ-Y8F200W-02
AIRCRAFT FLIGHT MANUAL
SECTION IV
NORMAL PROCEDURES
4-16
June 30, 2012
(e) When stop starting, before the propeller stops rotating entirely, it is forbidden to set the
shutdown switch at operation position so as to prevent the fuel from igniting again. Turn
off the shutdown power switch and turn off the aircraft master power.
(f) During engine start, the allowed oil quantity from oil tank into the engine is not more than
3.739gal (17L).
(g) If the power supply is cut off accidentally during the start, turn on the emergency power
supply (or use the master power onboard immediately), and set the shutdown switch to
SHUTDOWN position. Emergency hydraulic feathering should be carried out if the
temperature continues rising.
(h) Each engine can start continuously for 5 times, the interval should not be shorter than 3
minutes, and each operating time of the starter should not be longer than 60 seconds. If
each operating time of the starter is longer than 68±2 seconds, the engine can only start
for 4 times. And then open the engine cowling to cool the starter/generator. The engine
cannot start again until the case temperature is cooled down below 50o
C (generally the
time is 30 minutes).
(i) If the signal light of start system failure is on at the moment of starter power cutting,
change the GROUND-AIR select switch over for one time. After the red signal light is off,
turn the switch back to GROUND position, and start the next engine.
(j) When pressing the start button, if the start system fails within 9 seconds, the red signal
light is on, and the engine shuts down automatically.
(k) After starting one engine, if pressing the start button, the READY signal light is on, the
procedure mechanism does not changeover, then knock the start box at frames 23~25 to
cut off the magnetized start changeover relay.
(l) If the wind speed from tail section of the fuselage exceeds 6~8m/s, the start will be
difficult. In this case, turn the nose of the aircraft to start at the upwind direction.
JZ-Y8F200W-02
AIRCRAFT FLIGHT MANUAL
SECTION IV
NORMAL PROCEDURES
4-17
June 30, 2012
Engine warmup, runup and shutdown
(a) Engine warmup
1) Warm up the engine under the idling condition till the oil intake temperature being
not below 20o
C.
2) The propellers are at STOP RELEASING position, advance the two outboard
engines throttles to 50o
, when the speed rises to rotating speed and stabilizes for
5~8 seconds, retard the throttles back to 0o
. Change pitch like this for two times to
heat the oil in the propeller pitch-control oil tank.
When the air temperature is above 5o
C, the pitch is only allowed to be changed
once.
3) The oil in the propeller pitch-control oil tank of the inboard engine should also be
heated. If the engines operate at idling speed for 1min and the oil intake pressure is
below 56.85psi (392kPa) (4kgf/cm2
), the engines should be shut down.
(b) Engine runup (See Figure 4-2 for engine running-up curve).
1) Partial feathering check
Advance the throttles to 50o
±2o
Set the propeller stop-releasing switch to “STOP” position (the signal light for stop
releasing is off).
Press the partial feathering button, the rotating speed of the engines should
decrease by 1.5%~2.5% (200r/min~300r/min). At the same time, the operating light
of feathering pump is on. After releasing the button, the rotating speed should
recover.
JZ-Y8F200W-02
AIRCRAFT FLIGHT MANUAL
SECTION IV
NORMAL PROCEDURES
4-18
June 30, 2012
95.5~96.2%
1.5~2.5%1.5~2.5%
80.5~82.5%
98~105°
(84±2°)
(60±2°)
(50±2°)
(0°)
Note:SOTPposition
Procedure
Engine
speed
Engine
speed
Throttle
angle
Takeoff
(n%)
Operating
status
Engine
coolingOilheating
Engine
warm-up
Momentary speed increase not more than 103%
Engine
start
Partial
feathering
Torque
auto
feathering
check
Check
engine
acceleration
Propeller
mid pitch
stop check
Engine
shutdown
Max.continuous
powercondition
Max.continuous
powercondition
Max.continuous
powercondition
Negative pull auto
feathering check
STOPrelease
Throttleangle
CheckMax.
continuous
powertakeoff
status
Figure 4-2 Engine running-up curve
JZ-Y8F200W-02
AIRCRAFT FLIGHT MANUAL
SECTION IV
NORMAL PROCEDURES
4-19
June 30, 2012
Caution
If pressing the partial feathering button for more than 1 second, the engine
rotating speed will decrease to below 93%. Therefore, the engines would
boom, the gas temperature would rise beyond the allowable value, and the
engines would be destroyed. If the speed is below 93%, release the button
quickly, pull the unfeathering, and recover the rotating speed rapidly or shut
down the engine instantly.
2) Check the operation of the torque feathering system.
Advance the throttles to 62o
±2o
.
Set the propeller to STOP RELEASING position.
Check the torque automatic feathering, the READY signal light is on, and turn on
the check switch of the torque automatic feathering.
Retard the throttles back to 0o
. When the torque pressure decrease to 142.28psi±
7.11psi (981kPa±49kPa), the operating signal light of automatic feathering sensor
and the signal light of feathering pump operation are on and the automatic
feathering operation are normal.
Turn off the check switch, press the feathering button for a short time, the operating
signal light of feathering pump is off (because the feathering automatic timer begin
working to cut the power supply of feathering pump after 12 seconds, the
unfeathering must be pulled in order to short the operating time of feathering pump).
3) Check the operation of the negative thrust automatic feathering sensor
Pull the throttles to 0o
Set the propeller to STOP position.
Turn on the check switch of the negative thrust automatic feathering sensor, the
operating signal light of automatic feathering sensor is on (i.e. failure signal light),
this indicates that the operation of negative thrust automatic feathering system is
normal.
Turn off the check switch.
4) Check the operation of the engines under the maximum continuous power condition
and take-off power condition.
Set the propeller to STOP position.
JZ-Y8F200W-02
AIRCRAFT FLIGHT MANUAL
SECTION IV
NORMAL PROCEDURES
4-20
June 30, 2012
Advance the throttles gently to 84o
±2o
and hold it for 10s~15s seconds, then check
the operation parameters of the engines.
Advance the throttles gently to take-off power condition (104o
) and hold it for 10~15
seconds, and then check the operation parameters of the engines.
Retard the throttles slowly back to 30o
~35o
(sometimes greater in winter as long as
the speed of engines do not drop).
5) Check the propeller hydraulic stop
Advance the throttles to 30o
~35o
.
Set the propeller to STOP position.
Pull the throttles gently, when the speed decreases from 95.5%~96.2% to 93%,
release the stop, the engine speed should return to the balanced speed, and the
difference between current speed and at stop position should not be more than ±
1.5%
0.5% . When the speed returns to working speed, pull the throttles back to 0o
.
If the speed does not decrease when holding the throttles under the condition that
the air temperature is not above -40o
C, throttles should be increased to 60o
and the
second inspection should be conducted.
It is forbidden to decrease the speed to below 93% when the propellers are at stop
position to prevent the gas temperature from rising and the engines from surging
and be damaged.
6) Engine acceleration check
Set the propeller to STOP position.
Increase the throttles gently to above 16o
, and the speed reaches 95.5%~96.2%.
Increase the throttles gently to take-off position 104o
within 3~4 seconds (in this
case, the rapid increment of speed should not be more than 103%, i.e. 13260r/min,
and the engines fuel bypass automatically), judge the acceleration time on the
principle that the upstream pressure of the nozzles reaches to and keeps the
maximum, and the engines accelerating time should not be longer than 20 seconds.
Release the STOP.
Work under the takeoff power condition for 10~15 seconds. Release the stop of the
propellers, and then hold the throttles to 0o
in 1.5~2 seconds, in this case, the
engines should turn to idling condition slowly.
JZ-Y8F200W-02
AIRCRAFT FLIGHT MANUAL
SECTION IV
NORMAL PROCEDURES
4-21
June 30, 2012
In order to prevent the aircraft from yawing, the throttle of the other symmetrical
engine should be at 30o
~40o
when testing the maximum continuous and the takeoff
power conditions.
(c) Cooling off and shutdown of the engines
1) Retard the throttles to 0o
before engines shutdown, make the engines operate for
2~3 minutes to cool off gradually.
2) Check the fuel supply system and the flaps retracting/ extending. When the throttles
are at 20o
, check the cabin pressurization, the anti-icing, the autopilot, vibration
gauge and other special instruments.
3) Judge the safety driving shaft coupling of starter/generator for intact by means of
checking if each generator has voltage.
4) Shut off the power supply of the equipment, inform the communicator to get ready
for engines shutdown, turn off the generator switches, and make sure that the
aircraft power supply should not be below 24V. Shut down the engine with the
permission.
5) Set the engine shutdown switch to SHUTDOWN position, cut off the fuel pump, and
observe the nozzle pressure and the outlet temperature of the turbine till the
propellers stop rotating completely. If it does not stop supplying fuel entirely, and the
outlet temperature of the turbine rises, conduct emergency hydraulic feathering.
6) The inertial time that the propellers rotating speed from 8% to 0 should not be less
than 60 seconds.
7) After the propellers completely stop, set the engine shutdown switch to “ON”
position, cut off the fire-extinguishing switch, vertical gyro switch and the master
power. Lock up the control surface lock, acquire the running up information of each
trade.
Before the propellers stop entirely, the followings are forbidden so as to prevent the
fuel from spraying into the engines again:
Set the engine shutdown switch to ON position and turn off the shutdown power
switch.
Cut off the onboard power supply.
JZ-Y8F200W-02
AIRCRAFT FLIGHT MANUAL
SECTION IV
NORMAL PROCEDURES
4-22
June 30, 2012
Note
a) Under emergency condition, it is allowed to shut down the engine
under any operating condition without precooling off. After shutting
down, the propellers must be rotated to check the engine rotors for
flexibility. When the rotation of engine rotors is difficult, do not
perform the rotation forcely, do cool off the engines until the rotors
can rotate smoothly, and make the next start.
b) If the training flight with three engines is necessary, check the feathering
for normality during engine runup.
Start and function of the WDZ-1 turbine starter generator
(a) Preparations pre-startup
The start power supply of WDZ-1 is 28V DC. It can be started with airborne battery and
the generator started or the ground power supply. When starting with the power cart and
the onboard battery, pull out the 70V plug to make the power cart generator and the
onboard battery available at the same time.
1) Turn on the power supply and the related circuit breaker.
2) Set the fire-extinguishing switch at CHECK position.
3) Open the air intake shutters (the green light is on when opened fully).
4) Turn on the master power switch of start.
5) Turn on the anti-fire switch, the red light is off and the green one is on. Set the
START-CRANKING select switch to START position.
6) Open the groups 1~4 fuel pumps.
(b) Startup
1) Depress the start button for 1.5~2 seconds and time it with a stopwatch, then
release it. At this time, the yellow start light is on, visually inspect the speed and
temperature, pay attention to the starting condition.
2) The signal light of oil pressure is on after 15~17 seconds, indicating that the
pressure is normal 49.75psi (343kPa).
3) In a short time approaching 17th second, it is normal that the speed halts, but the
speed should rise to idling speed after that.
JZ-Y8F200W-02
AIRCRAFT FLIGHT MANUAL
SECTION IV
NORMAL PROCEDURES
4-23
June 30, 2012
When the speed reaches 93%, the green signal light of start being ready should be
on, and the starter is cut off automatically at 25th second as per the start
procedures.
4) The yellow start light is off at 30±2 seconds.
When the speed and temperature are stable, it indicates that the start of WDZ-1 is
ready. At this time, connect it to the aircraft power supply and then start the engines
and supply the aircraft power after 2 minutes of running.
(c) Shut down the engine emergently under the following conditions:
1) The speed does not rise after pressing the start button for 5 seconds.
2) No temperature indication after 10 seconds.
3) No oil pressure within 15~17 seconds, the yellow signal light is not on.
4) The temperature is higher than 900o
C or is 900o
C more than 3 seconds during start.
5) The speed exceeds 102%.
6) There is boom or noise before entering the idling speed.
7) It does not enter operating speed within 30±2 seconds.
8) The speed decreases to below 83% with a peak load, or the temperature rises
rapidly to 820o
C for more than 6 seconds (in this case, unload it first and then shut
down).
9) There is leakage of fuel and oil which would cause a fire and other accidents.
(d) Start WJ-6 engines with WDZ-1
1) When starting the WDZ-1 with the ground power supply, the master power switch is
set to ONBOARD position after start. Turn the START POWER to START WDZ-1
position.
2) “Disconnected the ground power supply” is instructed.
3) Start the WJ-6 engines according to the engines start procedures and requirements.
4) When starting the engine, the captain pays attention to the outlet gas temperature of
the engine turbine, the mechanic and the copilot observe the temperature and
rotating speed of the WDZ-1 (in about 20 seconds is critical, special attention must
be paid).
5) If finding the WDZ-1 in an abnormal condition during start, stop starting the engines
first, and then shut down the WDZ-1.
JZ-Y8F200W-02
AIRCRAFT FLIGHT MANUAL
SECTION IV
NORMAL PROCEDURES
4-24
June 30, 2012
6) Start the WDZ-1 should follow the following specifications.
When starting each engine, the idling time of the WDZ-1 should not be less than 15
seconds.
The fifth and the sixth start should be made till the WDZ-1 idles for 2 minutes (after
QF-24 cools down).
If continuous start is required, it should be made till the WDZ-1 idle for 3 minutes
after the sixth start, the total start frequency per engine should not be more than 12.
Do not start again until the engine shuts down and WDZ-1 cools down completely.
(e) Shutdown
1) After all the engines are started or stopped supplying power to the aircraft, the
WDZ-1 idles for 2 minutes. And then press the shutdown button, turn off the anti-fire
switch, set the select switch at COLD RUN position.
2) Cut off the fuel transfer pump switch.
3) The inertial time is not less than 20 seconds.
4) If the temperature is higher than 200o
C, cold run should be done. If taking off
instantly, cold run is not necessary.
5) Close the air intake throttles and turn off the master power supply.
(f) Cold run
If the start fails, the temperature after shutdown is higher than 200o
C or the aircraft has
parked for a longer time, cold run should be done before starting.
1) Turn on the power and the power switches, the voltage is 24.5~28.5V.
2) Open the shutters, and the green light is on.
3) Turn on the start power switch.
4) The anti-fire switch is turned off (the red light is on).
5) Set the START-COLD RUN switch to COLD RUN position.
6) Press the start button for 1.5 seconds and punch stopwatch. At this time, the yellow
start light is on and the speed increases.
7) The cranking speed is not below 21%, and cranking stops automatically in 10
seconds. If necessary, press the shutdown button to stop the cranking.
8) The yellow start light is off in 30±2 seconds. And close the air intake, and cut off the
master start power supply after the light is off.
JZ-Y8F200W-02
AIRCRAFT FLIGHT MANUAL
SECTION IV
NORMAL PROCEDURES
4-25
June 30, 2012
9) After the shutters are fully closed, turn off the onboard power supply and the power
switches.
(g) The cautions for WDZ-1 operation
1) When starting and cranking the WDZ-1, the second battery on the aircraft must be
connected, otherwise the WDZ-1 cannot start and crank.
2) When the WDZ-1 catches fire or the fire-extinguish system fails, the WDZ-1 will shut
down instantly automatically.
3) It is allowed to start and crank the WDZ-1 again only after its rotors stop completely.
4) When the air temperature is below -10o
C, in order to prevent the temperature
exceeding the allowable value, warming-up start (i.e. stop starting after half start) is
allowed for 1~3 times. The warming-up start can be controlled within the rotating
speed range (23~24%) as per the temperature.
5) When operating under the high temperature in summer, to prevent the outlet
temperature of the turbine being too high, the WDZ-1 can be started with its cowling
open to decrease the outlet temperature of the turbine by 30o
C~50o
C.
6) When starting the WDZ-1 with the start cart, the voltage and the capacity of the
battery should be observed, the output wire should not be too thin so as to prevent
the cutoff of the power supply or scant voltage during start.
7) Before flying to the plateau airfield, regulate the speed of the WDZ-1 to 94~95%
generally in advance to avoid the shutdown caused by the overrun.
8) It is absolutely forbidden to false start the engine WJ-6 with the WDZ-1.
FLIGHT
Taxiing
Pre-taxiing inspection
(a) Fasten the safety belt. Check the navigation equipment, instrument landing system, the
flight instrument switches and the engine temperature and pressure of the engines for
normal condition.
(b) Move the control surfaces, control stick, helm and paddle and check the control system
for normality and flexibility (the pilot and copilot control should be checked
independently). After that, put the control stick, the helm and the rudder at NEUTRAL
position.
(c) All trim tabs are at neutral position.
JZ-Y8F200W-02
AIRCRAFT FLIGHT MANUAL
SECTION IV
NORMAL PROCEDURES
4-26
June 30, 2012
(d) Close the cabin doors, and the signal lights are off.
(e) The crewmembers report that they are ready, the captain requires taxiing to the aircraft
dispatcher.
(f) After receiving the permission from the aircraft dispatcher, pull out the nose wheel
steering handle (the yellow signal light is on), taxi out according to the signals.
Taxiing
(a) Issue “Taxiing” order to the crewmembers. Release the stop of the propellers (the four
red signal lights are on).
(b) The copilot holds the helm and helps the captain apply the neutral rudder.
(c) Having observed that there are no obstacles in taxiing area and taxiing route, release the
shutdown brake, advance the inboard throttles to 20o
~40o
. After the aircraft moves,
retard the throttles back to 0o
or above 16o
, check operating conditions of the brake for
normality, and then keep taxiing in a straight line or make turn with the nose wheel
steering handle.
(d) Generally, during the straight taxiing, set the throttles at 0o
and the speed is kept at
20~30km/h. especially warn the outside to prevent the aircraft from collision with the
vehicles or other obstacles.
(e) To maintain a proper taxiing direction, the main points are as follows:
1) Find the yawing of direction timely. Pilot should look at the location of 80~100
meters straight ahead. Judge the yaw of direction according to the center line of the
taxiway and with reference to the outline of the taxiway.
2) Operate the nose wheel steering handle gently. When the aircraft is off or in across
the center line of the taxiway, turn the nose wheel steering handle to the opposite
direction timely and steer the nose wheel as required to maintain the direction. In
addition, the aircraft inertia should be handled. Do not operate the nose wheel
steering handle rashly, especially wildly.
(f) On wide taxiing runway without obstacles, check the emergency brake and the operation
of the nose wheel steering mechanism for normality.
Prior to the check of the emergency braking, reduce the speed first, then pull out the
emergency brake handle gently with the left hand. Judge whether the operation of the
brakes is normal according to the the taxiing speed reduction and the brake-pressure
gauge indication.
JZ-Y8F200W-02
AIRCRAFT FLIGHT MANUAL
SECTION IV
NORMAL PROCEDURES
4-27
June 30, 2012
Push in the nose wheel steering handle (the yellow light is off). Turn on the rudder
steering switch (the two green lights come on). Tread the rudder pedals left (or right) to
check if the aircraft direction yaws to the left (or right) accordingly. After the check, turn
off the rudder steering switch and pull out the nose wheel steering handle. Continue with
the taxiing.
(g) Before turning, make sure there are no obstacles in the turning direction. Decrease the
taxiing speed with brake and judge the turning time.
The braking efficiency of this aircraft is fairly good. It should be applied as per the
requirement. The braking pressure depends on the pilot (left or right) who applied more
force.
During the turning, the operation rate of the nose wheel steering handle is proportional to
the speed. Turn it faster at higher speed, and slower at lower speed.
When the aircraft is turned to the direction where the remainder angle to the
pre-determined direction is 30o
, turn the nose wheel steering handle to the opposite
direction gently to make the aircraft recover from the turn.
Precautions for taxiing
(a) The minimum allowable speed with the operative nose wheel steering mechanism is
2.7kn (5km/h). It is forbidden to turn the nose wheel steering handle before the aircraft
moves.
(b) During taxiing, it is forbidden to set the throttles between 0o
~16o
.
(c) Increase the manual and rudder control force properly for nose wheel turning to smooth
the process. When turning in narrow zone and at the beginning of turning, the inboard
pulsating brake can be used and the outboard engine throttles can be advanced to help
the aircraft turn. The minimum turning radius must not be smaller than 49.2ft (15m). It is
forbidden to turn with wheels at one side for braking, and it is forbidden to use the
outboard brakes during turning.
(d) During taxiing, when the inboard throttles exceed 40o
, use the outboard throttles at the
same time to keep the required speed. It is forbidden to set the nose wheel at the
maximum deflection angle when parking the aircraft.
(e) It is forbidden to use the emergency brake or pull the emergency brake fiercely when the
normal brake is applied so as to avoid severe damage to the tyre.
(f) During the whole taxiing, the aircrew should cooperate with each other closely. When
turning right, the copilot and the navigator should pay attention to the obstacles outside
frequently and warn the captain timely.
JZ-Y8F200W-02
AIRCRAFT FLIGHT MANUAL
SECTION IV
NORMAL PROCEDURES
4-28
June 30, 2012
Traffic pattern flight
Refer to Figure 4-3 for traffic pattern.
24s
H=1312ft
S=5.4n mile
FWY270°
flightt=15s
DXF270°
DXF240°
DXF286°
H1312ft V178kn~189kn
t=30sγ15°Level off turn
V173kn
Flap15°
V162kn~167kn
γ15°~20°
Turn
H200γ15°V350
Turning radius 11811ft
15s
DXF238°
V162kn~189kn
γ15°Turn
Ready for landing
gear down, put the
switch of rudder
control on, and
check the propeller
stop switchat STOP
position, then report
radio side-position.
Pattern width check
FMYEngine service
condition check, FMY
calibration
V140kn Descending
v9.8ft/s~16.4ft/s h328ft
v162kn Flap up, throttle
retard 84°
V135kn H23ft~32.8ft Landing gear up
V103kn~130kn Takeoff
Propeller stop, advancethe
throttle engine1,4-4-
84°engine 2,3-60°Shift to
bigtourque, release the
braketo take off
V157kn~162kn Flap 35°
Vy8.2ft/s Glide
T35s H919 Ready for
landing and send
out request
Passing the navigation
station H591~616
V140kn~151kn
Advance inboard throttle
and retard outboard throttle
H197ft~230ftn v135kn~151kn
Gliding point fixation
V9.8ft/s~11.5ft/s
H26.2ft~32.8ft Level off V135kn~140kn
Touching the ground V103kn~124kn
Figure 4-3a Traffic pattern
JZ-Y8F200W-02
AIRCRAFT FLIGHT MANUAL
SECTION IV
NORMAL PROCEDURES
4-29
June 30, 2012
V330~350
γ15°Turn
FWY270°
H400level
flightt=15s
DXF238°
DXF270°
DXF240°
DXF286°
H400 V330~350
t=30sγ15°Level off turn
V320
Flap15°
V300~310
γ15°~20°
Turn
S=10km
24s
H200γ15°V350
Turning radius 3600m
V260 Descending
Vy3~5m/s H100 V300
Flap up, throttle
retard 84°
V250H7~10 Landing gear up
V190~240 Takeoff
H8~10 Level off V250~260
Touching the ground
V190~230
Advance inboard throttle
and retard outboard throttle
H60~70 V250~280
Gliding point fixation
Vy3~3.5m/s
Passing the navigation
station H180~200
V260~280
T35s H280 Ready for
landing and send
out request
V290~300 Flap 35°
Vy2.5m/s Glide
15s
Pattern width check
Engine service condition
check, FMY calibration
Ready for landing gear
down, put the switch of
rudder control on, and
check the propeller stop
switch at STOP position,
then report radio side-
position.
Propeller stop, advance
the throttle engine1~4-84°
engine 2~3 60°Shift to big
tourque, release the brake
to take off
Figure 4-3b Traffic pattern
JZ-Y8F200W-02
AIRCRAFT FLIGHT MANUAL
SECTION IV
NORMAL PROCEDURES
4-30
June 30, 2012
Preparations before takeoff
(a) Enter the runway:
1) Issue the order to lower flaps to 25o
.
2) Observe and make sure that there is no aircraft landing on the final leg. Request for
taxiing into the runway.
3) When entering the runway, align the aircraft with the center line of the runway and
push the nose wheel steering handle to its limit. Turn on the nose wheel rudder
steering switch (the yellow light goes out, and the two green lights come on). Taxi
ahead for 16.4ft~23ft (5~7m) and check the nose wheel rudder-steering mechanism
to see if it is on. Then reduce the speed and neutralize the rudder. Align with the
nose wheel straight and park in the preset position.
(b) Check before takeoff:
1) Check the instruments and the AHS system for correct indication.
2) The flaps are at 25o
and the trim tabs are in neutral positions (the signal lights are
on).
3) The nose wheel rudder steering switch turns on (the two green lights come on).
4) The copilot requests for takeoff. When it is approved by the aircraft dispatcher, the
captain issues the order for “STOP” (the four red lights go out).
Take-off
(a) Apply braking and first advance the outboard throttles to 40o
, the inboard throttles to 40o
,
then advance the outboard throttles to 84o
, the inboard throttles to 60o
. Now there are
indications on the torque meters.
(b) After the mechanic reporting “The propellers are in coarse pitch,” release the brakes
smoothly and simultaneously. The aircraft starts to run. During the taxiing, advance the
inboard throttles to 84o
. Then advance the throttles of the four engines to 104o
.
(c) This aircraft is a high-wing, narrow-wheel track and wide body aircraft. Its side area is
large and the reaction torque of the propellers is great. All these factors will cause some
difficulties to maintain the heading for a crosswind take-off. So judging the heading
variation from the center line of the runway when running the aircraft. In the three-point
running, maintain the heading with the nose wheel rudder steering mechanism. After the
speed is increased to 92kn~113kn (170~210km/h) and the nose wheel lifts off, maintain
the heading with rudder.
JZ-Y8F200W-02
AIRCRAFT FLIGHT MANUAL
SECTION IV
NORMAL PROCEDURES
4-31
June 30, 2012
(d) Generally, the lift-off speed is within the range of 103kn~130kn (190~240km/h),
depending on the aircraft take-off weight, atmospheric temperature and field elevation.
When the aircraft lifts off the ground, hold the stick gently and push the trim tabs forward
to accelerate at a small climb angle. At this moment, concentrate on the judgment of the
terrain clearance altitude to prevent the aircraft from touch-down again.
(e) When the speed is up to 135kn (250km/h) and the altitude is not less than 23ft~33ft
(7~10m), the captain issues the order for gear-up (the landing gears are not retracted for
traffic pattern flight). When the speed is up to 140kn (260km/h), start to climb. At this
moment, the climb rate is normally not greater than 16.4ft/s (5m/s) to allow the altitude
suit with speed during flap retraction. When the altitude is higher than 82ft (25m), divert
the attention to the instrument to maintain a proper climbing.
Take-off leg and crosswind turn
(a) If there is crosswind, the drift should be corrected. Maintain the climbout heading by the
ADF and the azimuth finder, and also with reference to the targets ahead.
(b) When the altitude is not less than 328ft (100m) and the speed is 162kn (300km/h), issue
the order to retract flaps (When retracting flaps, the aircraft will sink, so hold the stick
back timely). When the flaps are up, retard the throttles to 84o
by issuing an order or by
the copilot. Keep the speed of 189kn (350km/h) and continue to climb.
(c) Put into crosswind turn at altitude of 656ft (200m), bank of 15 o
and speed of 189kn
(350km/h).
Crosswind leg and downwind turn
(a) After the crosswind turn, keep the azimuth finder at 270o
and correct drift. When the
aircraft is up to the altitude of 984ft (300m), retard the throttles to 62o
. At the altitude of
1247ft (380m) or 66ft (20m) ahead of the specified altitude for the traffic pattern flight in
this field, retard the throttles to 38o
~ 42o
and level off. Keep the speed of 178kn~189kn
(330~350km/h) and trim the aircraft with trim tabs.
(b) Fly levelly for 15s on the crosswind leg. At ADF bearing of 250o
(245o
for short distance),
conduct downwind turn with bank of 15o
, speed of 178kn~189kn (330~350km/h). After
the turn, correct the drift according to the wind direction.
Downwind leg and base turn
(a) Keep the azimuth finder at 180o
and correct the drift. Pay attention to the engine
operation status.
(b) Check the pattern width by the angle included between the radio bearing line of the outer
locator and that of inner locator or with landmarks. The width should be 5.4 n mile (10km).
If not, correct it by increasing or decreasing the heading.
JZ-Y8F200W-02
AIRCRAFT FLIGHT MANUAL
SECTION IV
NORMAL PROCEDURES
4-32
June 30, 2012
Refer to Table 4-3 for pattern width check with the relative radio bearing of the inner and
the outer locators.
Table 4-3a Data of traffic pattern
Distance between inner and
outer locators
(n mile)
Width of traffic
pattern
(n mile)
Indicated
included
angle
(o
)
Width of
wide pattern
(n mile)
Indicated
included
angle
(o
)
2.16-0.54 5.4 16.5 6.264 14.5
2.70-0.54 5.4 22 6.264 19
3.24-0.54 5.4 26.5 6.264 23
Table 4-3b Data of traffic pattern
Distance between inner and
outer locators
(km)
Width of traffic
pattern
(km)
Indicated
included
angle
(o
)
Width of
wide pattern
(km)
Indicated
included
angle
(o
)
4-1 10 16.5 11.6 14.5
5-1 10 22 11.6 19
6-1 10 26.5 11.6 23
(c) At relative ADF bearing 270o
and at the side of the outer locator, “lower the landing gears
and get ready for landing”. At the same time, report to the aircraft dispatcher “at the side
of the outer locator beacon”. After the mechanic reported “Gears are lowered and rudder
steering is on”, the captain should check that the landing gears are down, the green
annunciator of gear door close is on, the ready light of rudder steering is on, the red light
of “propeller stop releasing” is off and the brake pressure indicator indicates 0.
(d) When the landing gears are down, the speed will be reduced by 5.4kn~10.8kn
(15~20km/h) and the center of gravity of the aircraft will move forward by 0.1%CA. Trim
the aircraft slightly by the trim tabs.
(e) Levelly fly for 30 seconds when flying by the outer locator. At ADF bearing 240o
(230o
for
short distance), make the base turn with bank of 15o
at speed of 178kn (330km/h).
JZ-Y8F200W-02
AIRCRAFT FLIGHT MANUAL
SECTION IV
NORMAL PROCEDURES
4-33
June 30, 2012
Base leg and final turn
(a) After the base turn, keep the azimuth finder at 90o
and correct the drift. At speed of 173kn
(320km/h), issue the order for flaps down 15o
. Take care to press the stick forward to
prevent the aircraft from nose up. At this time, the position of miniature aircraft should be
fixed (The miniature aircraft coincides with the ground level when aircraft levelly flies and
keeps at 2.5o
below ground level after flap down). Maintain the altitude and speed with
reference to the indication of the vertical speed indicator.
(b) At relative ADF bearing 298o
(294o
for short distance), maintain the speed of
162kn~167kn (300~310km/h) and bank of 15o
~20o
(maximum not more than 25o
), get in
the final turn. During the process of turning, judge the opportunity of the turn according to
the indication of the ADF bearing and the azimuth finder and correct it timely by
increasing or decreasing the bank. If the runway is visible, the main task during the
former 45o
of the turn is to maintain flight data. During the latter 45o
of the turn, the main
task is to observe the runway. A proper lead should be selected to withdraw from the turn
and align with the runway.
Approach glide and visual landing
(a) After the final turn and before the aircraft starts to glide, lower the flaps to 35o
at speed of
157kn~162kn (290~300km/h). At this time, the lift coefficient will increase a lot due to
flap-down. Especially at the instant of lowering the flaps, as the flight speed has not been
obviously reduced and in order to keep the lift constant, it is required to press the stick
forward timely to reduce the angle of attack so that the altitude of the aircraft will not be
increased. In the process of lowering the flaps, press the stick forward gently and fix the
position of miniature aircraft with the trim tabs. The miniature aircraft should be kept at 5o
below the ground level with flap down to 35o
, which makes the aircraft descend at the
speed of 8.2ft/s (2.5m/s).
(b) When the flaps are lowered to 35o
, maintain the gliding speed at 135kn~151kn
(250~280km/h) according to the different weight of the aircraft. The gliding speed should
not be less than 135kn (250km/h) in any case.
See Table 4-4 for the gliding speed of the aircraft with different weights.
Table 4-4a Gliding speed of the aircraft
Landing weight (t) Gliding speed (kn)
Below 45 135
50 143
52 145
58 151
JZ-Y8F200W-02
AIRCRAFT FLIGHT MANUAL
SECTION IV
NORMAL PROCEDURES
4-34
June 30, 2012
Table 4-4b Gliding speed of the aircraft
Landing weight (t) Gliding speed (km/h)
Below 45 250
50 264
52 269
58 280
(c) During gliding, adjust throttles to maintain the required gliding speed and trim the aircraft
with the trim tabs so as to keep a stable glide condition.
(d) The altitude is 656ft (200m) (or the altitude specified by the airport) when the aircraft is
flying over the outer locator. It is proper to select the approach aiming point 394ft~492ft
(120~150m) away from the runway threshold.
(e) The altitude is 197ft (60m) (or the altitude specified by the airport) when the aircraft is
flying over the inner locator. Maintain the approach aiming point and the initial flare
speed. When the aircraft is flying over the inner locator, advance the inboard throttles by
5o
~10o
and retard the outboard throttles according to the atmospheric temperature but
not less than 16o
. Adjust the required speed prior to flare with the inboard throttles.
Refer to Table 4-5 for the gliding speed and the initial flare speed after passing the inner
locator.
Table 4-5a Gliding speed and the initial flare speed
Landing weight (t) 38 43 48 53 56 58
Gliding speed (kn) 124 130 135 140 143 146
Flare speed (kn) 116 121 127 132 135 138
Table 4-5b Gliding speed and the initial flare speed
Landing weight (t) 38 43 48 53 56 58
Gliding speed
(km/h)
230 240 250 260 265 270
Flare speed (km/h) 215 225 235 245 250 255
Refer to Table 4-6 for the throttle positions at different atmospheric temperatures
JZ-Y8F200W-02
AIRCRAFT FLIGHT MANUAL
SECTION IV
NORMAL PROCEDURES
4-35
June 30, 2012
Table 4-6 Throttle angle
Ambient
temperature
(o
C)
Below
-50
-30 to
-50
-11 to
-30
0 to -10
0 to
15
20 to
25
30 35 40
Throttle
position
(o
)
28~32 24~28 18~22 16~18 16 18~20 21~22 23 24
(f) During the course of reducing the throttles, take care to apply right rudder to maintain
direction. When the inboard throttles are reduced to 20o
and the altitude is 26.3ft~32.8ft
(8~10m) at the moment, start to flare out. At the altitude of 2.5ft~3.3ft (0.75~1m), get into
float.
(g) When the aircraft touches down, retard the inboard and the outboard throttles to 0o
respectively and lower the nose wheel gently. Issue the order to release the propeller
stop, the inboard ones first, then the outbaord ones. At this moment, use rudder steering
to maintain heading and reduce the speed by properly applying brakes. When the
running speed is less than 32.4kn (60km/h) and the running direction is stabilized, turn
off the rudder steering switch and pull out the nose wheel steering handle to maintain the
direction.
Taxiing into apron and parking
(a) When the aircraft is out of the runway, it usually taxis to the apron with the outbaord
engines shutdown, if it is difficult to taxi into apron, tow the aircraft to its parking position
with a tractor.
(b) Taxiing into the apron is the most complex part of the taxi. It usually requires to make
continuous turns. So the speed should not be too fast. Pay attention to the observation of
the outside and the flight crew should cooperate closely and remind each other.
JZ-Y8F200W-02
AIRCRAFT FLIGHT MANUAL
SECTION IV
NORMAL PROCEDURES
4-36
June 30, 2012
Before entering the apron, check the pressure accumulator for positive pressure
1593psi~2132ps (10.98MPa~14.70MPa) and the brakes for normal operation. Pay
attention to the direction given by the ground crew. Correctly judge the opportunity for the
last turn to taxi into the parking position. During the turning process, adjust the turning
radius according to the entering opportunity of the turn, and try to align the aircraft with
the parking center line when it comes out of the turn. When the aircraft gets out of the
turn, determine whether the parking direction of the aircraft is straight according to the
parking center line. If the aircraft is not aligned with the parking center line, correct it with
the hand steering of the nose wheel. First, correct the aircraft to the parking center line,
then align it with the right direction. Park the aircraft in the required position under the
assistance of the navigator.
(c) After the parking, accomplish the following steps:
1) Pull up the parking brakes.
2) Turn off the power supply for the onboard equipment.
3) Issue the order of “Get ready” and “Shut down”.
(d) After shut-down, check:
1) Put the rudder lock at down limit position and rudder and aileron lock at neutral
position.
2) Put the flap control switch at UP position, flap at zero, and check each trim tab
should be at zero position.
3) The operating switches should return to their original positions after the propellers
stop rotation.
4) When the aircraft power is turned off, the captain give a verbal command “Flight
crew get out of the seats”.
Cautions for traffic pattern flight
(a) Take-off is prohibited in the following cases:
1) The propellers are in STOP RELEASING positions, one or more red lights are on.
2) Turn on engine pressure regulator/shut off valve or cockpit heating is in process.
3) Turn on the oil ejector radiating valve
4) The fuel booster pump is cut off under any condition.
JZ-Y8F200W-02
AIRCRAFT FLIGHT MANUAL
SECTION IV
NORMAL PROCEDURES
4-37
June 30, 2012
(b) When the atmospheric temperature is over 20o
C, the time for advancing throttles should
not be less than 4 seconds. If too fast, it could cause automatic shutdown of the engines.
(c) During take-off run, it is required to stop takeoff if the heading of the aircraft is 6o
to 7o
off
the runway direction. If the take-off direction is yawed, it is prohibited to be corrected by
changing the throttles.
(d) If the rudder steering ON light is not off after the aircraft lifts off, the landing gear can be
retracted only after the rudder steering switch has been turned off. If this case happens
during landing, the rudder steering switch can be turned on only after the aircraft has
landed on the ground and the nose wheel has been extended.
(e) Banking is appearing when flaps extending or retractiing, the operation of the flaps
should be stopped and adjust the flaps to a position in which the aircraft does not bank.
Then landing is allowed.
(f) This aircraft has a fairly good float performance and its float distance is longer. So be
careful not to overshoot and flare out too early. During landing, adjust the gliding speed
with the engine throttles timely to prevent overshoot.
(g) During gliding prior to landing, it is not allowed to retard the throttles over the locking pins
(less than 16o
).
(h) During landing, the pilot should flare out the aircraft to an adequate touch-down angle of
attack. Pay attention to the aircraft attitude of touch-down to avoid three-point or
single-point touch-down.
(i) When the throttles are retarded to a position passing the locking pins and the propeller
stop is released during landing run, the engine failure light will probably be on for a short
time. This is allowed, and not a malfunction.
(j) Touch-down with brakes is absolutely prohibited.
Go-around
Normally, the altitude for the aircraft to go around should not be less than 164ft (50m). If
anything that could damage the flight safety happens during landing process, the aircraft can go
around at any altitude, but the throttles of the four engines should not be less than 16o before
go-around.
(a) Go-around procedures
1) Issue the order of “Go around” to the crew members.
JZ-Y8F200W-02
AIRCRAFT FLIGHT MANUAL
SECTION IV
NORMAL PROCEDURES
4-38
June 30, 2012
2) Advance the throttles gently to takeoff condition 104o
. At the same time, press the
stick forward to increase the speed as the pitching moment of the aircraft is
increased (reduce the load of the stick with elevator tab) and maintain a good flight
condition.
3) Issue the order of “Gear up”.
4) When the speed is up to 151kn~162kn (280~300km/h) and the altitude is not less
than 328ft (100m), issue the order “retract flaps” (raise them step by step). Then
retard the throttles of the four engines to the maximum continuous power condition
84o
and carry out normal climbing. Get into landing again.
(b) Cautions for go-around
1) Go-around is prohibited when the throttles of the four engines are retarded to 0o
.
2) When go-around is made at low altitude and slow speed, the landing gears should
be raised timely and keep flight level for a period of time to increase the speed. A
good flight condition should be strictly maintained.
3) For go-around practice, the landing gear may not be retracted.
Take-off and landing under different conditions
Take-off and landing of narrow traffic pattern
See Figure 4-4 for establishment drawing of narrow traffic pattern.
After take-off, climb up to 492ft~656ft (150~200m), then make a 180o
continuous climbing
turn with the bank of 18o
~20o
and speed of 189kn (350km/h). When the altitude is up to 820ft
(250m), retard the engine throttles to 38o
~42o
gradually. Level off at the altitude of 984ft (300m)
and keep the speed of 178kn (330km/h). Make a level turn and correct the 2~3 times of drift
when the aircraft turns to the opposite of the landing direction. After passing by the outer locator
and when TB is 30s and the relative ADF bearing is 229o
, get into the base turn. 15 seconds
before the base turn, lower the flaps to 15o
and maintain speed of 167kn~173kn (310~320km/h).
Make a level turn with bank of 20o
. When the residual angle is 90o
, get into gliding at the descent
rate of 6.6ft/s (2m/s). Visually inspect the opportunity of entering and correct it timely by
increasing or decreasing the bank. Recover from the final turn at 1.35n mile (2.5km) ahead of
the outer locator and height of 820ft (250m). Align with the runway and lower the flaps to 35o
.
Align with the gliding aiming point, adjust a proper gliding speed and get into visual landing. All
the other procedures are the same as those for the normal traffic pattern.
JZ-Y8F200W-02
AIRCRAFT FLIGHT MANUAL
SECTION IV
NORMAL PROCEDURES
4-39
June 30, 2012
H33ft ~38ft Level off for landing
S=2.808n mile
FWY180°
H300
V178kn
γ18 ~ 20°
V178~189
γ20
°
V167~173
H591ft~656ft,
V140kn~151kn
Request
for landing
H220 flap down at 35°
Patternwidth check
Note down TB time,
landing gear down, turn
on rudder control for
landing, flap down before
the base leg.
DXF229°10s
Enter the turn
Remaining
angle90°,
keepsliding
speedat6.6ft/s.
V162kn H358ft Flap up
H197ft Advanceinboard
enginethrottle and
retardoutboard
enginethrottle
H492ft~656ft enter
theturnV189kn climb
up16.4~19.7ft/s
Figure 4-4a Narrow traffic pattern
.
JZ-Y8F200W-02
AIRCRAFT FLIGHT MANUAL
SECTION IV
NORMAL PROCEDURES
4-40
June 30, 2012
检查航线宽度
H220放襟翼35°
γ18°~20°
V330~350
S=5.2km
γ20°
V310~320
DXF270°
记下TB时间放起
落架打开舵操纵
准备着陆三转弯
前放襟翼15°
H60 Advance
inboard engine
throttle and retard
outboard engine
throttle
H180~200
V260~280
Request
for landing
H220 flap
down at 35°
Pattern
width check
Note down TB time,
landing gear down, turn
on rudder control for
landing, flap down before
the base leg.
DXF229°10s
Enter the turn
Remaining
angle90°,
keepsliding
speedat2m/s.
H8~10 Level
off for landing
V300 H100
Flap up
H150~200enter the
turnV350climb up
Vy5~6m/s
FWY180°
H300
V330
Figure 4-4b Narrow traffic pattern
JZ-Y8F200W-02
AIRCRAFT FLIGHT MANUAL
SECTION IV
NORMAL PROCEDURES
4-41
June 30, 2012
Touch-and-go
Touch-and-go of the aircraft is more difficult than its normal static take-off. It requires close
and strict cooperation of the flight crew. Therefore, only when the normal take-off procedures
have been mastered, can the day or night touch-and-go be conducted.
(a) Operational requirements of touch-and-go:
1) Touch-and-go can be made only under the conditions that the landing condition of
the aircraft is stable and the visual judgment is proper, the engines are operating
normally and none of the four engine throttles is less than 16o
.
2) After touch-down, the captain should issue the order of “Flap up and advance
throttle” in time. The mechanic will raise the flaps to 25o
when receiving the order.
He reports “Flap 25o
” when it is done. The copilot, according to the captain’s
command and the aircraft condition, will gently and concurrently advance the
throttles of the four engines to 104o
(or 84o
). During the process of advancing
throttles, it should be avoided that the throttles are advanced too fast at the
beginning and obvious stop occurs in the process.
3) During aircraft running on ground, captain should keep the takeoff direction, hold the
nose wheel for two-point taxiing attitude. When advancing the throttle, hold the stick
forward timely to prevent the aircraft leave the ground in advance. The speed for
ground leaving should be 5.4kn (10km/h) beyond the normal range. Upon leaving
the ground, watch the ground and increase the speed with small climb angle, so as
not to retouch the ground.
4) Normally, 84o
throttles are used for touch-and-go. If the visual estimated
touch-down point is too far away or the run distance will be too long caused by other
factors, and the aircraft condition is not stable before lift-off, the throttles should be
advanced decisively to 104o
to avoid forgetting to retract the flaps or retracting them
by mistake.
5) When a ferry flight practice requires touch-and-go, communicate with the ground
tower through VHF radio and report to the aircraft dispatcher. Touch-and-go can be
made only when it is approved.
For touch-and-go, the time from touch-down to lift-off is about 10~12 seconds, the
run distance is about 1804ft~2296ft (550~700m).
JZ-Y8F200W-02
AIRCRAFT FLIGHT MANUAL
SECTION IV
NORMAL PROCEDURES
4-42
June 30, 2012
(b) Touch-and-go should not be conducted in the following conditions:
1) Weather conditions: higher than moderate precipitation and ambient temperature of
35o
C, the crosswind is close to the criteria specified for the captain.
2) The field elevation is above 6562ft (2000m).
3) The landing weight is greater than 52 ton.
4) The distance from the touch-down point to the runway threshold is less than 2297ft
(700m) and the length of the runway is shorter than 6562ft (2000m).
Unidirectional traffic pattern
Unidirectional traffic pattern see Figure4-5
(a) Procedures for unidirectional traffic pattern:
1) Calibrate the azimuth finder at 180o
at the time of take-off.
2) Take off according to the procedures for tailwind take-off. All the other actions are
the same as normal.
3) Fly over the locator at the altitude of about 656ft (200m). Note down the time and
turn left (right). Recover from the turn when the azimuth finder indicates 235o
(125o
).
Level off at the altitude of 1312ft (400m) and keep the speed at 178kn (330km/h).
The navigator reports “40 seconds” before getting into the final turn. The captain
issues the order of getting ready for landing and turns on the rudder steering switch
(READY green light on). 15 seconds prior to the final turn, lower the flaps to 15o
. Get
into the final turn with bank of 15o
and speed of 167kn (310km/h). Check the
opportunity for getting into turn according to the variations of the relative ADF
bearing and the azimuth finder and correct it in time. Recover from the final turn at
altitude of 1312ft (400m), 4.32n mile (8km) to the runway threshold, glide down at
the 6.56ft/s (2m/s) rate-of-descent and then get into the visual landing.
(b) Cautions:
1) For unidirectional take-off and landing, the time is shorter, and there are more
continuous actions. So the flight crew should cooperate closely to get rid of
mistakes.
2) Conditions for conduction: the tailwind is not greater than 16.4ft/s (5m/s), the gross
weight is not more than 50 ton and ambient temperature is not higher than 30o
C.
3) Actions after flaring out should not be wild, and should prevent the nose-up angle
from being too great and the tail portion of fuselage from touching with the ground.
JZ-Y8F200W-02
AIRCRAFT FLIGHT MANUAL
SECTION IV
NORMAL PROCEDURES
4-43
June 30, 2012
180°
150°
120°
90°
60°
30°
221°
248°
265°
286°
309°
332°
FWYDXF
Begin
level-off
landing
Vy3.1m/s
H200
Flap down:
35° s 4.32 n
mileH 1312ft
Turn
on
rudder control
for landing
40s
in
advance
FW
Y235°
Flap
down
at
15° 20s
before
landing
80s
Report
30sH886ft
Vy6.89ft/s
H1312ft
t45sH197ft
55°
V167kn~173knγ15°
R1.62n mile t140s
Figure 4-5a Unidirectional traffic pattern
JZ-Y8F200W-02
AIRCRAFT FLIGHT MANUAL
SECTION IV
NORMAL PROCEDURES
4-44
June 30, 2012
180°
150°
120°
90°
60°
30°
221°
248°
265°
286°
309°
332°
FTWDXF
Begin
level-off
landing
t45sH60
Vy3.1m/s
H200
Flap down:
35° S8km
H400
Vy2.1m/s
V310~320
γ15°
R3km
t40s
Turn
on
rudder control
for landing
40s
in
advance
FW
Y235°
H400
Flap
down
at
15° 20s
before
landing
80s
Report
30sH270
Figure 4-5b Unidirectional traffic pattern
JZ-Y8F200W-02
AIRCRAFT FLIGHT MANUAL
SECTION IV
NORMAL PROCEDURES
4-45
June 30, 2012
Crosswind take-off and landing
The crosswind for the aircraft take-off and landing is limited to 49.2ft/s (15m/s) at 90o.
Because this aircraft has narrow wheel tread, large fuselage side area and high-mounted wings,
it will produce sideslip due to crosswind effect. Thus the side-force bank moment and yawing
moment will be produced. This will damage the roll balance of the aircraft with the inclined
airflow. The propellers will produce side force that makes the aircraft yaw to the downwind
direction. The yawing moment depends on the direction and speed of the wind.
When taking off with right crosswind, the left rolling moment produced due to the wind effect
is overcome partially by the right bank reaction moment produced by the propellers. Therefore,
the take-off performance with right crosswind is better than that with left crosswind. The stick
and rudder deflection margin are also greater. So the wind speed limit for right crosswind
take-off is 49.2ft/s (15m/s) at 90o
.
When taking off with left crosswind, due to the right rolling moment caused by the left
crosswind plus the right reaction rolling moment produced by the propellers, the pressure on the
right wheel will be significantly increased. Therefore, the left crosswind take-off performance is
worse, the stick and rudder deflection margin are smaller. The limitation performance is worse
than that of right crosswind. It is limited to 32.8ft/s (10m/s) at 90o
.
Left crosswind landing is more controllable than right crosswind landing, but the limitation
performance is lower. It is limited to 36.1ft/s (11m/s) at 90o
. Because the left crosswind needs to
be corrected in the final approach and the propeller slipstream twist is reduced due to the throttle
reduction, the right deflecting moment is decreased. This needs more right rudder so that the
glide heading can be maintained. So the application of right rudder is greater, and it is easy to
get to full rudder.
JZ-Y8F200W-02
AIRCRAFT FLIGHT MANUAL
SECTION IV
NORMAL PROCEDURES
4-46
June 30, 2012
It is more difficult to control for the right crosswind landing than for the left crosswind landing,
but the limitation performance is higher. It is limited to 59.1ft/s (18m/s) at 90o
. The reason is that
the right crosswind glide is corrected by deflecting the control wheel to the right and applying left
rudder. When the throttles are reduced, the right deflecting moment caused by the propeller
slipstream is decreased. In order to keep heading, it is necessary to reduce the left rudder
slightly. Particularly, when the throttles are reduced to 0o
, the left rudder should be changed to
right rudder in order to keep heading. In the transition, if the pilot does not operate timely, the
nose of the aircraft will yaw to the left. The aircraft will be on the left of the centerline of the
runway. This case is not good for landing. That is why the right crosswind landing is more difficult
to control.
(a) Crosswind take-off:
1) Use rudder steering to keep the aircraft heading during the first half of take-off run
with crosswind. Apply brakes if necessary and deflect the control wheel to the
upwind direction to prevent the aircraft from bank. The efficiency of the control
surfaces is increasing with the speed. The aileron deflection should be reduced
properly.
2) In order to use the stabilization function of the nose wheel to prevent the aircraft
from yawing, the nose wheel lift-off speed for takeoff is 8.1kn~10.8kn (15~20km/h)
greater than normal. If the run direction is not stable, do not be anxious to lift off the
nose wheel. The height of nose wheel lift-off should be lower than normal. If the
crosswind is very heavy, a three-point lift-off can be made.
3) The nose-up angle of the aircraft at lift-off should be smaller than normal. To ensure
more control surface efficiency after the aircraft lifts off, the lift-off speed is required
to be greater than the specified speed. When the aircraft leaves the ground, the
lateral friction force of the wheel no longer exists. Due to the action of the side force,
the aircraft moves laterally towards the opposite of the crosswind. The pilot should
bank the aircraft for 3~5o
towards the crosswind timely, using the third component of
the aircraft weight (G3) to overcome the side force. At the same time, some
opposite rudder should be applied in order to keep heading. When getting into climb,
the sideslip should be eliminated gradually and heading correction will be used.
JZ-Y8F200W-02
AIRCRAFT FLIGHT MANUAL
SECTION IV
NORMAL PROCEDURES
4-47
June 30, 2012
(b) Crosswind landing:
1) In the final approach and before the inner locator, heading correction is utilized.
Keeping the glide direction is based on that the aircraft is moving along the
extension line of the runway. During landing, in order to keep the longitudinal axis of
the aircraft in the direction of the runway, change to sideslip correction when
passing the inner locator. Bank the aircraft for 3~5o
towards the upwind and apply
opposite rudder accordingly. The sideslip angle will be increased with the decrease
of the flight speed in the case that the direction and speed of the wind remain
constant. This requires the pilot to adjust the stick and rudder deflection
continuously so that the heading and flight path and be kept in parallel with the
center line of the runway.
2) The gliding speed of crosswind landing is 5.4kn~8.1kn (10~15km/h) greater than
normal. The flare-out altitude is a little bit lower than normal. Do not lift the nose
wheel too high at touch-down. In the process of float, apply stick and rudder in time
to keep the stable sideslip condition of the aircraft and make the aircraft move along
the center line of the runway without any intersection angle. At the instant of
touch-down, quickly level off at the same time when pulling the stick back (for heavy
crosswind, 2~3o
bank is allowed) to make the two main wheels touch the ground
simultaneously.
3) After touch-down, the sideslip angle is still increasing as the speed is decreasing.
Deflect the stick against the crosswind to prevent the wing on the side of the
crosswind from being lifted up. Lower the nosewheel as early as possible and keep
the run direction with nosewheel rudder steering. When the direction is stable,
release the propeller stop separately.
(c) Cautions for crosswind take-off and landing:
1) For crosswind take-off, lower speed lift-off and retouch-down should be avoided.
2) For crosswind landing, do not flare out too high and the actions should be gentle.
3) For crosswind landing, touch-down with intersection angle is not allowed.
Particularly for right crosswind landing, the nose of the aircraft yaws to the left. This
will make the aircraft run out of the runway more easily.
JZ-Y8F200W-02
AIRCRAFT FLIGHT MANUAL
SECTION IV
NORMAL PROCEDURES
4-48
June 30, 2012
4) After crosswind landing, if the direction yaws rapidly that it can not be stopped by
applying rudder and aircraft trends to run out of the runway, in this case, the
nosewheel steering handle should be pulled out when the speed is not greater than
81kn (150km/h) to keep heading by the hand steering of the nosewheel. But the
steering should be gentle and the inertia should be mastered.
Take-off and landing with heavy headwind
(a) Take-off
The relative airspeed will increase quickly because the wind speed is greater. For heavy
headwind, the nosewheel can be lifted off a bit lower than normal. The lift-off speed is
2.7kn~5.4kn (5~10km/h) greater than normal. Be sure not to lift off at lower speed and
suddenly jump.
(b) Landing
Due to the headwind effect, the angle of glide will be increased and the aiming point will
be shifted backward. This will probably cause undershoot. To correct the visual
estimation, the rate-of-descent will be lower than normal or the altitude of recovering
from the final turn and passing over the locator will be increased accordingly. The flaps
can be lowered to 25o
. The inboard throttles should be advanced more than normal. The
aiming point is selected 164ft (50m) to the threshold of the runway. Flare out should not
be too high and the actions should be gentle. The angle of attack should not be great and
float with four throttles power-on.
Take-off and landing under load, forward and aft CG limits conditions
(a) Take-off and landing under loading condition
1) Taxiing
When taxiing out, first advance the throttles to 25o
~30o
in order to move the aircraft.
When the aircraft starts to move, reduce the outboard throttles to 0o
. At this moment,
keep the taxiing speed at 5.4kn~8.1kn (10~15km/h).
JZ-Y8F200W-02
AIRCRAFT FLIGHT MANUAL
SECTION IV
NORMAL PROCEDURES
4-49
June 30, 2012
2) Under conditions of standard atmosphere, sea level and on concrete runway, the
distance of take-off run is increased by 131ft~180ft (40~55m) for 1 ton increase of
the flight weight when the aircraft with load takes off. In order to reduce the stick
force, select the trim tab position prior to take-off according to the center of gravity. If
C.G. is 24%~26%CA, the trim control wheel should be pulled back for one and a half
measures. If C.G. is 18%CA, pull it back for two measures. For 32%CA C.G., push it
forward for two measures. For take-off weight 61 tons and C.G. 24%~26%CA, the
control of the aircraft is not difficult except that the take-off speed is increased slowly,
the lift-off speed is greater, the speed is also increased slowly after lift-off, and the
climb rate is lower. On the contrary, the aircraft is quite stable in take-off run, and
this is favourable for take-off.
Refer to the Table 4-7 for take-off data with different take-off weights at standard
atmosphere and sea level.
Table 4-7a Takeoff performance data
Weight (t) Lift-off speed (kn) Run distance (ft)
Take-off
distance (ft)
42 97 1542 2500
45 102 1890 2736
49 107 2365 3192
52 111 2762 3645
54 114 3061 3980
56 121 3100 4337
61 129 4167 5256
Note
a) If the take-off weight is less than 48 tons, the maximum continuous power
condition can be used for take-off in practice flight. But the lift-off speed
should be increased by 5.4kn~6.5kn. The run distance will be increased
by 558ft~656ft.
b) The runway friction coefficient f=0.035, safety altitude H=49.2ft, angle of
attack of aircraft lift-off α=8o
, nose-up angle=4o
.
JZ-Y8F200W-02
AIRCRAFT FLIGHT MANUAL
SECTION IV
NORMAL PROCEDURES
4-50
June 30, 2012
Table 4-7b Takeoff performance data
Weight (t) Lift-off speed (km/h) Run distance (m)
Take-off
distance (m)
42 180 470 762
45 188 576 834
49 198 721 973
52 206 842 1111
54 211 933 1213
56 225 945 1322
61 238 1270 1602
Note
a) If the take-off weight is less than 48 tons, the maximum continuous power
condition can be used for take-off in practice flight. But the lift-off speed
should be increased by 10~12km/h. The run distance will be increased by
170~200m.
b) The runway friction coefficient f=0.035, safety altitude H=15m, angle of
attack of aircraft lift-off α=8o
, nose-up angle=4o
.
3) When landing with 58 tons weight, maintain 151kn (280km/h) gliding speed. Adjust
the speed to 140kn (260km/h) prior to flare out and float over with four throttles
power-on. In this case, the float distance is approximately 1312ft (400m) (when the
landing nose-up angle is formed after flare-out, the inboard throttles are also
reduced to 0o
). The touch-down speed is 124kn (230km/h).
Refer to Table 4-8 for the landing data with different weights.
Table 4-8a Landing performance data
Weight
(t)
Gliding Speed
(kn)
Touch-down
speed (kn)
Run distance
(ft)
Run distance
(ft)
40 135 103 2116 3504
46 137 111 2569 4183
50 143 118 2986 4429
52 145 120 3169 4659
58 151 124 3504 5466
JZ-Y8F200W-02
AIRCRAFT FLIGHT MANUAL
SECTION IV
NORMAL PROCEDURES
4-51
June 30, 2012
Note
a) Data in this Table are calculated under standard conditions. They will vary
with ambient temperature.
b) The landing entry altitude H=49.2ft, terrain clearance of the aircraft in float
segment h=26.3ft, the runway friction coefficient f=0.15, angle of glide
θ=3o
and normal load factor ny =0.15.
c) Apply brakes as soon as the nosewheel is lowered after touch-down. The
automatic brake releasing device will function. At this time, the run
distance can be shortened by 328ft~492ft.
Table 4-8b Landing performance data
Weight
(t)
Gliding Speed
(km/h)
Touch-down
speed (km/h)
Run distance
(m)
Run distance
(m)
40 250 191 645 1068
46 253 205 783 1275
50 264 218 910 1350
52 269 223 966 1420
58 280 230 1068 1666
Note
a) Data in this Table are calculated under standard conditions. They will vary
with ambient temperature.
b) The landing entry altitude H=15m, terrain clearance of the aircraft in float
segment h=8m, the runway friction coefficient f=0.15, angle of glide θ=3o
and normal load factor ny =0.15.
c) Apply brakes as soon as the nosewheel is lowered after touch-down. The
automatic brake releasing device will function. At this time, the run
distance can be shortened by 100 to 150m.
JZ-Y8F200W-02
AIRCRAFT FLIGHT MANUAL
SECTION IV
NORMAL PROCEDURES
4-52
June 30, 2012
(b) Take-off and landing with forward C.G. limit
The forward C.G. limit allowed for take-off and landing is 16%CA
1) In take-off with fore C.G. limit, it is difficult for the aircraft to get the nose-up angle
(when the trim tabs are neutralized, the elevator is required to be 15o
~20o
up and
the stick force will reach 441N (45kgf)). As a result, the take-off run distance will be
increased and the lift-off speed will be a little bit greater. To control the aircraft easily,
the elevator tab wheel should be pulled back for two measures before take-off. After
lift-off, take care to hold the stick back to prevent the aircraft from sinking.
2) In landing with forward C.G. limit, the gliding speed will be a little greater than
normal. When passing the inner locator, the elevator tab should be turned back
more to make the aircraft get into normal float so that it can enter normal flare-out
and landing. All the other operational procedures are the same as normal.
(c) Take-off and landing with aft C.G. limit
In take-off and landing with aft C.G. limit, it is easy for the aircraft to get into a large angle
of attack. At this time, it is difficult to maintain the normal angle of attack for take-off and
landing because of low elevator efficiency and speed. So, it is important to avoid high
angle of attack and low speed in take-off and landing with aft C.G. limit.
1) When taxiing under aft C.G. limit condition, especially on the uneven ground,
longitudinal sway of the aircraft will occur. As the efficiency of nose wheel
handle-steering is reduced, take care to apply brakes gently and not advance or
retard the throttles wildly during taxiing.
2) In take-off with aft C.G. limit, it is easy to increase the nose-up angle of the aircraft.
The elevator tab should be pushed forward for one and a half to two measures
before take-off. After lift-off, the aircraft nose-up angle will probably increase. So
press the stick forward in time to keep the flight condition.
3) In the final approach at aft C.G. limit, push forward the elevator tab for one and a
half to two measures and judge whether it is proper by the force used to press the
stick forward. The gliding and flare-out speeds and the selection of the aiming point
are the same as that of normal. The flare-out height should be lower than normal by
26.2ft~19.7ft (8m~6m). Pull backward the stick especially gently, because in landing
with aft C.G. limit, it is easy for the aircraft to get into landing angle, and also easy to
flare out too high, to make ballooning and to touch down at high angle of attack.
JZ-Y8F200W-02
AIRCRAFT FLIGHT MANUAL
SECTION IV
NORMAL PROCEDURES
4-53
June 30, 2012
At the instant of touch-down, the force to push the stick forward can be up to
343N~392N (35kgf~40kgf) to stop nose-up. After touch-down, the aircraft angle of
attack will probably increase and it will be difficult to lower the nosewheel. When the
run direction is stable, push the stick forward gently to lower the nosewheel.
4) In special case, land without flaps down in 36%CA C.G. condition. During gliding, the
elevator tab can be pushed forward for two measures to reduce the stick force.
(d) Cautions for take-off and landing under load, forward and aft C.G. limit conditions:
1) Normally, the landing weight is limited to 58 tons, 60 tons is allowed for special case,
but the landing gear unit should be checked after landing.
2) In landing with forward C.G. limit and take-off and landing with aft C.G. limit, the pilot
is required to take care when controlling the aircraft with the throttles and trim tabs.
Misoperation will endanger the flight safety.
3) When the atmospheric temperature is below 30o
C, the take-off weight can be 61
tons. In summer, when the temperature is over 30o
C, the take-off weight should not
be more than 58 tons.
Sweltering weather and plateau airfield flight
Sweltering weather flight
(a) Performance varying features of the aircraft in sweltering weather:
1) As the ambient temperature is high, the air density is low and the engine power is
significantly decreased. The run distance of take-off and landing will be longer than
that in normal condition.
2) The climb performance of the aircraft is degraded. Both the climb rate and practical
ceiling are decreased.
3) As the engine power is decreased, it is necessary to advance the throttles more
during landing to keep the engine power constant.
4) As the operating temperature of the accessories is higher, their efficiency is
decreased. So the ground start is more difficult.
(b) Aircraft control features in sweltering weather:
1) Affected by the temperature, the payload should be reduced accordingly. Refer to
Table 4-9 for the run distance of take-off and landing in different temperature and
weight conditions.
JZ-Y8F200W-02
AIRCRAFT FLIGHT MANUAL
SECTION IV
NORMAL PROCEDURES
4-54
June 30, 2012
2) In order to lower the oil-inlet temperature in taxiing, the ejection radiation can be
used or advance the throttles to 20o
. To keep the normal taxiing speed and avoid
excessive braking, the inboard and the outboard throttles should be used
alternatively.
3) Make good use of the runway length in take-off. Do not advance the throttles wildly
and too fast. Normally, it needs, at least, 3~4s. Brakes can be released and run can
be done only after the indications of the engine instruments are stable.
4) As the ambient temperature is high in take-off, the pilot should strictly maintain the
specified lift-off speed in order to prevent lift-off at lower speed and high angle of
attack as well as retouch-down. After lift-off, only when the speed is up to 135kn
(250km/h) can the landing gears be raised.
Table 4-9a Takeoff and landing performance of the aircraft under sweltering weather condition
Weight (t)
lift-off/touchdown
speed (kn)
Run distance (ft)
Atmospheric
temperature (o
C)
48 50 52 54 56 58 61
105 109 109 113 111 118 116 118 121 119 124 127 129
Takeoff
Landing
Takeoff
Landing
Takeoff
Landing
Takeoff
Landing
Takeoff
Landing
Takeoff
Landing
Takeoff
15 2244 2372 2507 2454 2762 2986 2940 3058 3100 3117 3517 3248 4167
25 2474 2503 2769 2585 3058 3117 3268 3189 3461 3248 3911 3379 4610
35 2474 2579 2907 2661 3330 3192 3678 3264 4009 3323 4593 3455 5499
Note
The cement road has no lateral turn at air pressure of 14.7psi (101.325kPa)
and zero wind speed.
JZ-Y8F200W-02
AIRCRAFT FLIGHT MANUAL
SECTION IV
NORMAL PROCEDURES
4-55
June 30, 2012
Table 4-9b Takeoff and landing performance of the aircraft under sweltering weather condition
Weight (t)
lift-off/touchdown
speed (km/h)
Run distance (m)
Atmospheric
temperature (o
C)
48 50 52 54 56 58 61
195 202 201 210 206 218 215 219 225 220 230 235 238
Takeoff
Landing
Takeoff
Landing
Takeoff
Landing
Takeoff
Landing
Takeoff
Landing
Takeoff
Landing
Takeoff
15 684 723 764 748 842 910 896 932 945 950 1072 990 1270
25 754 763 844 788 932 950 996 972 1055 990 1192 1030 1405
35 754 786 886 811 1015 973 1121 995 1222 1013 1400 1053 1676
Note
The cement road has no lateral turn at air pressure of 14.7psi (101.325kPa)
and zero wind speed.
5) When aircraft climbs with the engine maximum continuous power condition,
specified climb indicated air speed should be strictly maintained. It is not allowed to
climb with low speed. If the speed is low, it will make the climb performance bad. If
disturbing airflow is met, the critical angle of attack is easy to be got by the aircraft,
which will unfavourable to safety.
6) When landing in sweltering weather, the throttle angle without thrust is increased.
Plateau flight
(a) Features of plateau flight:
In addition to the features of the flight at high altitude, the plateau flight also has the
aircraft performance varying features in sweltering weather.
1) Most of the plateau airfields are built in mountain valleys. The clearway condition in
these airfields is poor. So it is difficult to take off and land. Restricted by the terrain,
the aircraft, after take-off, can only climb in the direction of the valley. It is not
favourable for getting outbound. The landing pattern cannot be established in the
normal way.
JZ-Y8F200W-02
AIRCRAFT FLIGHT MANUAL
SECTION IV
NORMAL PROCEDURES
4-56
June 30, 2012
2) There are many mountains in the plateau, and it is difficult to find a place for forced
landing. Although the flying altitude is close to the practical ceiling, the absolute
altitude above the ground is low. So it is difficult to handle in special cases.
3) Flying over the plateau, the average pattern elevation is higher than 13123ft (4000m)
above sea level. These areas are sparsely populated and equipped with less
navaids than that in the inner land. The radio-wave propagation is adversely
affected by the terrain. The effective range is greatly reduced (the effective range
can only be up to 54n mile~81n mile (100~150km)) and the indication error is
greater. The communication range of UHF radio is shortened. When the aircraft is
flying in cumulonimbus clouds or gliding into a sandstorm, the static interference is
greater, which affects the communication. As there are many mountains in the
plateau area, it is difficult to distinguish the displays of thunderstorms and mountain
peaks as they are similar to each other.
4) Plateau flight has the combined features of high-altitude flight, medium-altitude
navigation and flight in mountain areas. The residential areas and high ways are
mostly located in the low areas of the valleys. They are normally covered by the
high mountains and low clouds. So it is difficult to find them and define their
positions accurately. But when the weather is fine, the peaks of the big mountains,
the mountain passes and obvious lakes can be found far away. The approximate
positions can be determined easily. These can be used as natural “Navaids”. Also,
the mountain peaks are satisfactory reflectors of the radar. The EGPWS onboard is
convenient for plateau flight.
5) The weather in the plateau is complex and changeable. And there are few weather
stations there. So it is difficult to predict the local weather accurately.
(b) Take-off features in the plateau:
1) Major factors affecting the take-off and run distance:
Air density: The higher the altitude, the lower the air density. In addition, affected by
the ground radiating heat of the plateau airfield, the temperature in the airfield will
be higher and the air density will be lower. So the take-off and run distance will be
increased.
Take-off weight: For the same increase of take-off weight, the increase of run
distance in a plateau airfield is greater than that in a normal plain airfield. For
example, the field elevation is 9843ft (3000m) and the temperature is 20o
C, the run
distance will be increased by 328ft~394ft (100~120m) for 1 ton increase of weight.
JZ-Y8F200W-02
AIRCRAFT FLIGHT MANUAL
SECTION IV
NORMAL PROCEDURES
4-57
June 30, 2012
Tailwind effect: In most of the plateau airfields, only unidirectional take-off and
landing can be conducted. So it is possible to make tailwind take-off and landing.
And for the same wind speed, the tailwind effect in the plateau airfield is greater
than that in the normal plain airfield. For instance, 5m/s tailwind in normal plain
airfield under standard conditions will make the run distance increased by 656ft
(200m). But for a 9843ft (3000m) plateau airfield at 20o
C, 16.4ft/s (5m/s) tailwind will
make the run distance increased by 902ft (275m). So when taking off with tailwind in
a plateau airfield, the tailwind effect should be taken into account.
Runway gradient: Restricted by the terrain, most of the plateau airfields have
greater gradient. On up-gradient take off, the gravity component opposite to the
direction of the aircraft motion acts as a drag. So the aircraft acceleration is reduced
and the take-off run distance is prolonged. If the longitudinal gradient of a normal
plain airfield under standard conditions is 1% (corresponds to 0.57o
), the run
distance is increased by 164ft (50m). But if the field elevation is 9843ft (3000m) and
the temperature is 20o
C, the same 1% longitudinal gradient makes the take-off run
distance increased by 459ft (140m).
2) Runway surface: Most of the plateau airfields are made up of cement; some of them
of gravel and salt layers. The surface is very rough. So the friction coefficient is
increased and the take-off run distance is also increased. See Charpter 5 for lift-off
speed, takeoff run distance and takeoff distance with different elevations and takeoff
weights.
3) Take-off control features:
Make good use of the runway length. Advance the outboard throttles to 104o
, the
inboard throttles to 84o
.When the torque meter and the fuel flow indicator indicate
stably, the brakes can be released to take off.
The time and distance required for each segments of take-off in a plateau airfield
are generally 1.5~2 times of that in a normal plain airfield. Taking off from a plateau
airfield, the nosewheel should not be lifted off too early and the angle of attack
should not be too high. The rudder deflection should be smaller and the action
should be gently. The frontal drag should be minimized.
It requires 30 seconds from the start of running to lift-off the nosewheel. At this
moment, put the control stick in its neutral position. When keep the heading with
rudder, do not operate wildly to avoid affecting the increase of the aircraft speed.
JZ-Y8F200W-02
AIRCRAFT FLIGHT MANUAL
SECTION IV
NORMAL PROCEDURES
4-58
June 30, 2012
It is 20 seconds from lifting off the nosewheel to the lift-off speed. Pull the stick back
gently, then the speed is up to 103kn~124kn (190~230 km/h), lift off the nosewheel
gradually and continue to increase speed. Hold the stick back to lift off the aircraft
smoothly. During this period, if the stick is hold back too early and too much, the run
angle of attack will be increased due to large elevator deflection. The total drag of
the aircraft will be increased so that the run distance will be prolonged. Also, if the
run angle of attack is too high, it is easy to make the aircraft lift off at low speed. As a
result, speed increase after lift-off would be difficult. The aircraft may even retouch
down which will endanger the flight safety.
Taking off with tailwind, the nosewheel should be lift off a bit later, the lift-off angle of
attack should be lower and the lift-off speed should be properly increased. Standard
altitude of the airport is 11483ft (3500m). Refer to the Table 4-10 for the aircraft run
distance of take-off and landing with tailwind and different weights.
Table 4-10a Takeoff and landing performance in plateau
Tailwind
Speed
(ft/s)
Take-off Landing
Weight
(t)
Lift-off IAS
(kn)
Distance
(ft)
Weight
(t)
Down IAS (kn)
Running
distance (ft)
0 49 116 6037 49 120 4265
0 50 117 6332 50 121 4396
3.3 49 116 6299 50 121 4528
3.3 50 117 6430 52 124 4823
6.6 49 116 6496 50 121 4659
6.6 50 117 6693 52 124 4954
9.8 49 116 6726 50 121 4790
9.8 50 117 7054 52 124 5085
13.1 49 116 6988 50 121 4921
13.1 50 117 7283 52 124 5217
16.4 49 116 7218 50 121 5052
16.4 50 117 7480 52 124 5348
JZ-Y8F200W-02
AIRCRAFT FLIGHT MANUAL
SECTION IV
NORMAL PROCEDURES
4-59
June 30, 2012
Table 4-10b Takeoff and landing performance in plateau
Tailwind
Speed
(m/s)
Take-off Landing
Weight
(t)
Lift-off IAS
(km/h)
Distance
(m)
Weight
(t)
Down IAS
(km/h)
Running
distance
(m)
0 49 215 1840 49 223 1300
0 50 217 1930 50 225 1340
1 49 215 1920 50 225 1380
1 50 217 1960 52 230 1470
2 49 215 1980 50 225 1420
2 50 217 2040 52 230 1510
3 49 215 2050 50 225 1460
3 50 217 2150 52 230 1550
4 49 215 2130 50 225 1500
4 50 217 2220 52 230 1590
5 49 215 2200 50 225 1540
5 50 217 2280 52 230 1630
When climbing after take-off, if the aircraft can not take-off in the direction of better
clearway condition due to overspeed of the tailwind, it should get to an altitude as
soon as possible to fly over or around the mountain peaks. In this case, climb up at
a lower speed, with 15o
flaps and take-off power (not more than 15min) and at
178kn (330km/h) indicated air speed, and get rid of the mountain peaks by visually
changing the heading. After flying over or around the mountains, raise the flaps up
and retard the throttles to maximum continuous power condition, then shift to normal
climb.
(c) Traffic pattern establishment and visual landing features
1) Traffic pattern establishment:
Based on the airfield terrain condition, the traffic pattern is generally established by
the following two methods:
One is to land directly with a long final leg along the mountain gully if the pilot is
familiar with the airfield conditions.
The other method is to keep the pecified safe altitude to approach, then change a
certain heading to fly (or by means of angular correction) for a computation time.
Then return to the airfield and align with the runway visually.
JZ-Y8F200W-02
AIRCRAFT FLIGHT MANUAL
SECTION IV
NORMAL PROCEDURES
4-60
June 30, 2012
2) Visual landing:
As the true air speed is increased, the distance of each landing segment is
prolonged and the actions to control the aircraft have some special features.
The weather in the plateau is fine and the visibility is excellent. At 9843ft (3000m)
absolute height, the runway can be in sight 16.2n mile (30km) away. In visual
judgement of distance, it is easy to mistake the far for the near and to descend too
early so that the altitude of each landing segment after glide could be too low. For
this aircraft landing in plateau airfield, the approach altitude should not be too high
and the glide angle should not be too large. As a result, the pilot should make good
use of the obvious landmarks and locators to control strictly the altitude at each
point.
As the air speed is greater and the float distance is longer, the aiming point should
be selected 328ft (100m) further than that in a normal plain airfield. But the plateau
airfields are mostly built on the river banks. Thresholds are close to the river ravine.
Be careful not to undershoot and land out of the runway.
During landing, set the outboard throttle positions according to the temperature, in
addition, adjust the throttles according to the air pressure (for every 1.16psi (8.0kPa)
decrease of air pressure, advance the throttles by 1.5o
~2.0o
).
During landing, the flare-out altitude is a little bit lower than that in normal. Do not
flare out too high and balloon. Because the air drag in the plateau airfield is smaller,
the run direction stability after touch-down is poorer than that in a normal plain
airfield. So the propeller stop can be released only when the run direction is stable.
When the propellers stop is released, the deceleration is not obvious since the
negative thrust of the propellers is smaller. Therefore, the run distance will be
increased.
3) Tailwind landing:
Gliding with tailwind, the glide angle is decreased and the ground speed in float is
greater. This could cause overshoot. So the altitude when recovering from the final
turn should be lower than that in normal, the throttle positions should be smaller
than normal and the aiming point should be about 328ft (100m) backwards than
normal. Align with the aiming point in time and increase the rate-of-descent to
maintain the glide curve. The running distance is increased due to greater true air
speed after touchdown.
JZ-Y8F200W-02
AIRCRAFT FLIGHT MANUAL
SECTION IV
NORMAL PROCEDURES
4-61
June 30, 2012
(d) Cautions for take-off and landing
1) Use the oxygen masks prior to take-off and approach landing in a plateau airfield.
Close the air supply valve before passing the outer locator. After landing, release
the airtightness of the cockpit first, and then the copilot opens the small window on
the right side to equalize the pressure. After that, open the door of the escort cabin.
2) Take-off with ice and frost in a plateau airfield is totally inhibited.
3) Operate the altimeters correctly during take-off and landing. One of the two
barometric altimeters can be used to set up field elevation pressure, the other one
can be used to set up the sea-level pressure. Check and calibrate them frequently
with the radio altimeter to prevent mistakes.
Zero altitude calibration method: When the field elevation pressure is less than
129.52psi (89.3KPa) (670mmHg), rotate the adjusting knob according to the “Zero
Altitude" message provided by the aircraft dispatcher and (the inner triangle arrow
indicates in the thousand meter unit and the outer one indicates in meter unit) set up
the pressure altitude of the airport with altitude arrows. In this way, the relative
altitude is avaliable for take-off and landing.
4) The safe altitude should be strictly maintained during approach when flying in
clouds. Do not glide too early. When penetrating the clouds, keep the specified data
strictly to prevent the aircraft from hitting the mountains during gliding and
penetrating.
5) When starting engines in a plateau airfield, pay attention to the following points:
Restart time after shut-down: It is not easy to restart the engines in 45 minutes after
shut-down as they are still hot. It is easier to restart in two hours and difficult in more
than two hours.
When starting the engines in different elevations, it is allowed if the engines can get
to idle speed within 3~4 minutes.
It is difficult to start with tailwind. Therefore, watch out for the wind direction in
parking.
If the first start fails, only after the cranking can the engine be restarted. If necessary,
adjust No. 16 or No.17 screw by the ground crew. If two of engines have been
started successfully, but the other two are difficult to start, start them with the ram
pressure during taxiing.
JZ-Y8F200W-02
AIRCRAFT FLIGHT MANUAL
SECTION IV
NORMAL PROCEDURES
4-62
June 30, 2012
Take-off and landing on earth and snow-covered runways
This aircraft has the performance data of take-off and landing on an earth runway whose
standard strength is greater than 113.71psi~127.92psi (0.784MPa~0.882MPa) (8kgf/cm2
~
9kgf/cm2
) (the depth of the wheel tracks is not more than 2.76 in~3.15 in (7~8cm) when the
taxiing speed is 2.7kn~8.1kn (5~15km/h)), on a 7.87in (20cm) unpacked snow (the density of the
packed snow layer is greater than 16.214lb/ft3 (0.5g/cm3
)) runway and a 3.94 in~5.91 in
(10~15cm) packed snow (the density of the packed snow layer is greater than 19.5 lb/ft3
(0.6g/cm3
)) runway.
When taking off in an earth runway at 14.7psi (0.1013MPa) (760mmHg) standard air
pressure and 15o
C temperature, the take-off run distance is 4265ft (1300m) with 54t weight and
C.G of 25%CA.
With 61t weight, the aircraft can take off from a 7.87in (20cm) unpacked snow runway. In
winter (packed snow layer), the depth of snow layer is bigger than 3.94in~5.91in (10~15cm) the
take-off run distance is not greater than that on a concrete runway during summer. But, if the
strength of the packed snow layer is low and the snow layer is 3.94in~5.91in (10~15cm) deep,
the take-off run distance should be increased.
Taxiing
(a) Taxiing no matter on an earth runway (the standard strength is greater than 113.71psi
(0.784MPa) (8kgf/cm2
)) or a snow-covered runway has no much difference with taxiing
on a concrete runway except that the inboard throttles are increased. To move the
aircraft from its static state, all the four throttles should be advanced to 30o
~40o
. The four
throttles are required to be at 18o
~20o
in order to maintain 10.8kn (20km/h) taxiing speed.
(b) When taxiing on the segment of an earth runway whose strength is lower, or on a runway
that is covered by more than 5.91in (15cm) snow layer or by a more than 5.91in (15cm)
packed snow layer, the taxiing speed should be kept at no less than 10.8kn~16.2kn
(20~30km/h). Parking and small radius (less than 98ft (30m)) turning are not allowed.
(c) When taxiing on an earth runway that is watered or covered with snow and partial ice, the
efficiencies of nose wheel steering and braking will be greatly reduced. In order to
improve the braking efficiency, the automatic brake release switch should be turned off.
The outboard throttles can be used to assist turning if required.
JZ-Y8F200W-02
AIRCRAFT FLIGHT MANUAL
SECTION IV
NORMAL PROCEDURES
4-63
June 30, 2012
Take-off on earth runway
(a) In order to rotate the nose wheel easily, the best C.G. position for earth runway take-off is
24%CA~30%CA based on the take-off weight of the aircraft (54~61 tons). For an aircraft
with 50~54t take-off weight, the forward C.G. should not be greater than 20%CA. To
reduce the stick force, pull the elevator tab back for one and a half to two measures
before take-off according to the weight (50~61 tons).
(b) Taking off from a smooth and hard earth runway has no difference with that from a
concrete runway except for minor buffet.
(c) Taking off from an unsmooth and non-uniformly strengthened earth runway, particularly
at forward C.G., the nose wheel should be rotated at the speed of 65kn~70kn
(120~130km/h) so as to reduce the nose wheel load as well as aircraft buffet and
longitudinal swing.
When taking off from an earth runway that is non-uniform in strength, even in some
places, the strength is 113.71psi~56.85psi (0.784~0.392MPa) (8~4kgf/cm2
), the aircraft
will swing longitudinally. It is difficult for the pilot to keep the run nose-up angle after the
nose wheel has been rotated. The aircraft heading is maintained by rudder only, and no
braking is allowed.
When taking off from an unsmooth runway, it is possible to lift off too early at a lower
speed. In this case, the pilot should control the aircraft timely to avoid retouch-down.
Especially in the case with crosswind, it is dangerous to retouch down.
(d) The piloting technique is quite complicated for the take-off when the aircraft weight is 54
tons at 20%CA C.G. and with 33~39ft/s (10~12m/s) crosswind at 90o
(particularly the left
crosswind). In order to reduce the nose wheel load and prevent the aircraft from
longitudinal swing, the pilot should pull the stick fully back (at this moment, the stick force
is 392N~441N (40kgf~45kgf) when the speed is 65kn~70kn (120~130km/h). At the same
time, operate the control wheel to eliminate the aircraft banking. In this case, the aircraft
is required to lift off in an approximate three-point attitude at a lower speed.
(e) Before lift-off, if the engine fails at the speed less than the decision speed, the nose
wheel should be lowered immediately and abort the take-off. If the speed is greater than
the decision speed, continue with the take-off. So during take-off run, the navigator is
required to report the speed variation in time so as to accomplish the take-off smoothly.
JZ-Y8F200W-02
AIRCRAFT FLIGHT MANUAL
SECTION IV
NORMAL PROCEDURES
4-64
June 30, 2012
Landing on earth runway
(a) It is not complex for the aircraft to land on an earth runway whose standard strength is
113.71psi (0.784MPa) (8kgf/cm2
). The control actions for visual landing are the same as
normal.
(b) When landing on an earth runway with poor strength or insufficient strength in some
places, the stick should be pulled to the back position during landing run in order to
reduce aircraft bumping. Release the propeller stop when the nose wheel has been
lowered for 4~5 seconds.
(c) To protect the runway surface, the brakes are normally not applied to reduce speed. To
prevent the aircraft from stopping and the wheels from sinking in, the throttles should be
advanced before the end of run to keep the speed at 10.8kn~13.5kn (20~25km/h) so that
the aircraft can not stop when making turn at a place of lower strength.
Take off on snow-covered runway
(a) When taking off from a runway that is covered by snows of less than 19.5 lb/ft3
(0.6g/cm3
)
density and less than 3.94in~5.91in (10~15cm) depth, it is the same as normal take-off
except for minor buffet and slight increase of run distance. When taking off from a runway
where the depth of snow cover is less than 7.87in (20cm), it is no difference with normal
takeoff except for minor longitudinal swing and small increase of run distance.
(b) Before take off, the center of gravity should be positioned in the range of 24%CA~30%CA.
After take-off, the landing gears can be raised only when the flaps have been up so as to
blow off the snow on the assemblies of the landing gears.
(c) Take-off from a runway covered with more than 5.91in (15cm) depth of snow or of
insufficient strength and covered with packed snow is normally not allowed except for
special cases (the wheels will break the snow layer). Because of the friction coefficient
increase, slow increase of run speed, aircraft heading yaw, serious longitudinal swing
and decrease of rudder steering efficiency, it is very complex to take off. If it is required to
take off from such a runway, it is better to select the aircraft C.G. in the middle or aft
position (24%CA~30%CA). In order to reduce the wheel load and eliminate the
longitudinal swing, the rotation speed should be 65kn~70kn (120~130km/h).
(d) Taking off from a runway of insufficient strength and covered with more than
3.94in~5.91in (10~15cm) packed snow, the run istance will be much longer than the
take-off from a concrete runway. If the take-off weight is 54 tons, at 14.7psi (101.33kPa)
(760mmHg) standard atmosphere pressure and -5o
C temperature, the run distance is
3609ft (1100m).
JZ-Y8F200W-02
AIRCRAFT FLIGHT MANUAL
SECTION IV
NORMAL PROCEDURES
4-65
June 30, 2012
Landing on snow-covered runway
(a) Landing on a snow-covered runway, it is more difficult and complicated to make the
visual landing judgment and decide the flare-out opportunity than that on a concrete
runway. To improve the accuracy of visual landing and opportunity of flare-out judging,
landmarks should be made 328ft~492ft (100~150m) away from the threshold of the
runway.
(b) When landing on a runway covered with more than 5.91in (15cm) packed snow and of
sufficient strength, the propeller stop should be released 4~5s after the nose wheel has
been lowered in order to reduce the aircraft buffeting and heading yaw (the run speed in
the latter part is 65kn~76kn (120~140km/h)). Keep the running direction with the rudder
steering.
Cautions for takeoff and landing on earth or snow-covered runway
(a) Air fleet flight is allowed on the run way whose standard strength of the earth is more
than 113.71psi~128.07psi (0.784MPa~0.882MPa) (8kgf/cm2
~9kgf/cm2
). In case of air
fleet flight on the earth run way in winter, snow clearance is required in advance.
(b) When flying on an earth runway of 71.07 psi~85.28 psi (0.49~0.588MPa) (5~6kgf/cm2
)
strength or covered with deep snow (more than 5.91in (15cm) deep), the maximum
take-off weight is 48~50 tons. To improve the flight on a runway of insufficient strength,
the pressure of the tyres can be reduced to 4 atmospheres. This pressure can ensure the
aircraft takeoff with 61t weight on an earth runway of 85.28psi~99.64psi
(0.588~0.688MPa) (6~7kgf/cm2
) strength. But for security, the depth of the wheel tracks
should be measured by running test before taking off.
(c) Flight with landing gear unretracted can be performed on a wet, more than 3.94 in~5.91in
(10~15cm) deep packed snow-covered and insufficiently strengthened runway (the
wheels will break the snow layer) if necessary.
Takeoff and landing on partial steel plate and steel plate runway
The aircraft is allowed to take off and land on partial steel plate runway whose depth of
wheel track in the middle of the earth part is no more than 3.15in (8cm) (no FOD obstructing A/C
structure and landing gear up) , or on the steel plate runway. However, under such
circumstances, operation of the aircraft must be conducted by pilots familiar with short & narrow
runway takeoff and landing skills. Pay special attention to the taxi direction at the speed of
16.4~23.0ft/s (5~7m/s) with side wind of 90o
.
JZ-Y8F200W-02
AIRCRAFT FLIGHT MANUAL
SECTION IV
NORMAL PROCEDURES
4-66
June 30, 2012
Measure the start point distance of T-shaped steel plate accurately before takeoff, and the
distance should be arranged as per different landing weight of the aircraft with the earth strength
of 56.86psi~80.93psi (0.392MPa~0.588MPa) (4kgf/cm2
~6kgf/cm2
).
Start point distance of the T-shaped steel plate as per different landing weight of the aircraft
is shown in Table 4-11.
Table 4-11a Start point distance of the T-shaped steel plate
Windspeed (ft/s)
Weigh (t)
Upwind 32.8 Downwind 16.4 No wind
52 1476 1969 2297
50 1312 1673 2133
46 1083 1509 1903
Table 4-11b Start point distance of the T-shaped steel plate
Windspeed (m/s)
Weigh (t)
Upwind 10 Downwind 5 No wind
52 450 600 700
50 400 510 650
46 330 460 580
When earth strength is about 56.85psi (0.392kPa) (4kgf/cm2), C.G. margin is 26%CA~
28%CA, running distance for takeoff and landing with different airborne weight under
international standard atmosphere is shown in Table 4-12.
Table 4-12a Takeoff and landing performance on steel plate runway
Weight
(t)
Lift-off speed and running distance Grounding speed and running distance
Partial steel plate
runway
Steel plate runway
Partial steel plate
runway
Steel plate runway
Lift-off
speed
(kn)
running
distance
(ft)
Lift-off
speed (kn
running
distance
(ft)
Groundin
g speed
(kn)
running
distance
(ft)
Groundin
g speed
(kn)
running
distance
(ft)
54 113 3117 113 2707 119 3379 119 3281
52 111 2723 111 2444 117 3150 117 3051
50 108 2067 107 2001 112 2887 112 2756
46 113 3117 113 2707 119 3379 119 3281
JZ-Y8F200W-02
AIRCRAFT FLIGHT MANUAL
SECTION IV
NORMAL PROCEDURES
4-67
June 30, 2012
Note
The lift-off running distance on partial steel plate runway increases with
advancement of C.G. When C.G is 20%CA, the distance increase is
70m~100m. Running distance for landing on partial steel plate runway and
takeoff and landing on steel plate runway has no relationship with takeoff C.G.
position.
Table 4-12b Takeoff and landing performance on steel plate runway
Weight
(t)
Lift-off speed and running distance Grounding speed and running distance
Partial steel plate
runway
Steel plate runway
Partial steel plate
runway
Steel plate runway
Lift-off
speed
(km/h)
running
distance
(m)
Lift-off
speed
(km/h)
running
distance
(m)
Groundin
g speed
(km/h)
running
distance
(m)
Groundin
g speed
(km/h)
running
distance
(m)
54 215 1100 214 910
52 210 950 210 825 221 1030 221 1000
50 206 830 206 745 217 960 217 930
46 200 630 198 610 208 880 208 840
Note
The lift-off running distance on partial steel plate runway increases with
advancement of C.G. When C.G is 20%CA, the distance increase is
70m~100m. Running distance for landing on partial steel plate runway and
takeoff and landing on steel plate runway has no relationship with takeoff C.G.
position.
Takeoff and landing on partial steel plate runway
(a) Takeoff
The pilot must conduct the running along the mid-line of the run way during takeoff.
During this process, the metal plate will sound and the aircraft will buffet acutely, and
such buffet will be more acute when the aircraft leaves the steel plate for the earth
runway. Its acceleration tends to decrease when the earth strength is below 71.07psi
(0.49MPa) (5kgf/cm2
), resulting in pitching sway and deviation of the direction (especially
when the earth strength is uneven). Thus, correction with rudder is required so as to
keep running direction.
JZ-Y8F200W-02
AIRCRAFT FLIGHT MANUAL
SECTION IV
NORMAL PROCEDURES
4-68
June 30, 2012
The nose wheel can not be lifted up until the aircraft leaves partial steel plate runway.
After the nose wheel leaves the ground, maintain running elevation angle of the aircraft.
When the airbone weight is 54t, 50t and 46t, lift-off speed of the aircraft is 116kn
(215km/h), 113kn (210km/h) and 108kn (220km/h) respectively.
(b) Landing
The aircraft should ground accurately near the T-shaped steel plate with the same speed
as that on the cement runway. After grounding, the aircraft should maintain its running
direction along the midline of the runway. In case its speed saw acute decrease and
tends to stop, it is necessary to advance the throttle before deceleration with the brake.
In case of a low VFR, delay the normal stop release so that the aircraft will enter the steel
plate runway.
Takeoff and landing on steel plate runway
(a) Takeoff
In case the aircraft takes off on the steel plate, the pilot must control the aircraft running
direction along the steel plate timely so that the aircraft will not deviate from the runway.
The nose wheel should lift up as per different airborne weight and C.G position at the
speed of 86kn~97kn (160km/h~180km/h). When the airbone weight is 54t, 50t and 46t,
lift-off speed of the aircraft is 116kn (215km/h), 113kn (210km/h) and 108kn (200km/h)
respectively.
(b) Landing
The aircraft should ground accurately near the T-shaped steel plate with the same speed
as that on the cement runway. Keep running direction of the aircraft on the steel plate
runway. In case of sidewind, watch the running direction to prevent the aircraft from
deviated from the runway.
(c) Cautions of takeoff and landing on partial steel plate and steel plate runway
1) Get the data of earth strength at different parts of partial steel plate and steel plate
runway before flight. When the aircraft takes off or lands on them, the width of the
taxi way should not be less than 29.5ft (9m), with its connecting radius of inner
flange not less than 32.8ft (10m).
JZ-Y8F200W-02
AIRCRAFT FLIGHT MANUAL
SECTION IV
NORMAL PROCEDURES
4-69
June 30, 2012
2) When the aircraft deviates from partial steel plate or steel plate runway due to
misoperation or other reasons, the pilot should hold the flight direction to stop the
deflection. In case that the earth strength at both sides of the runway is above
56.85psi (0.392MPa) (4kgf/cm2
) with no obstructive, keep new takeoff direction to
continue the flight, but do not adjust the flight direction towards the steel plate
runway. In case that the earth strength is below 56.85psi (0.392MPa) (4kgf/cm2
),
abort the takeoff.
3) Brake is only permitted on the steel plate surface in case of taxiing on the partial
steel plate runway. Under such circumstances, avoid coarse brake operation so as
not to damage the runway surface and the tyre.
Ferry flight
The ferry flight is an effective measure to conduct air maneuver and accomplish all kinds of
tasks. The pilot must familiarly master ferry flight abilities in various conditions to ensure the
aircraft flies to the destination rapidly, accurately and safely.
Climbing
After the gears and flaps have been retracted during take-off, set the engines to maximum
continuous power conditions, trim the aircraft with tabs and maintain the specified speed for
climbing up.
At the altitude of 3281ft (1000m), the captain gives the command of “Cabin pressurized”.
The copilot makes the cabin pressurization and report to the captain after the check.
Generally, the optimum speed should be selected for climbing according to the take-off
weight.
Climbing performance of the aircraft with different weights is shown in Chapter 5.
Under standard conditions, the service ceiling of the aircraft with different take-off weights is
shown in Table 4-13.
JZ-Y8F200W-02
AIRCRAFT FLIGHT MANUAL
SECTION IV
NORMAL PROCEDURES
4-70
June 30, 2012
Table 4-13a Service ceiling of the aircraft
Takeoff weight (t) 49 51 54 56 61
Service ceiling (ft) 34104 32972 31250 29774 27312
Table 4-13b Service ceiling of the aircraft
Takeoff weight (t) 49 51 54 56 61
Service ceiling (m) 10395 10050 9525 9075 8325
Normally, the flight should be performed at 1640ft (500m) below the service ceiling.
Enroute flight
(a) When the aircraft climbs to the specified altitude, levels off. When the preset cruising
speed is achieved, the throttles are reduced from maximum continuous power condition
to the operating condition that is normally not higher than 0.85 maximum continuous
power condition (72o
).
During level flight, the speed will gradually increase with constant throttles as the flight
weight decreases due to fuel consumption.
(b) Perform the air navigation. Make full use of the onboard navigation equipment as per
features of the aircraft to master the aircraft position at any time. If the change of flight
data is desired, care should be taken to ensure three accuracies, i.e. listening, watching
and aligning accuracies and prevent mistakes and omissions.
(c) On route, the weather condition should be observed, judged and understood, especially
during night or bad weather flight. The navigator should be reminded of observing
hazardous weather on route with radar.
(d) Be clear about the traffic situation enroute. Turn on the UHF radio to communicate in
advance when flying over the halfway airfield area. The autopilot maybe used during
long-range flight.
JZ-Y8F200W-02
AIRCRAFT FLIGHT MANUAL
SECTION IV
NORMAL PROCEDURES
4-71
June 30, 2012
(e) Range and duration:
1) The range and duration depend on fuel reserve quantity, the aircraft weight, flight
altitude and speed. Below the service ceiling, range and duration increase with the
increase of flight altitude.
2) At the indicated airspeed of 162kn (300km/h), the maximum duration is obtained at
various altitudes. However, this speed is not applicable in actual flight because it is
an economical speed normally, not the optimum speed. The optimum level flight
speed and corresponding fuel consumption per kilometer and fuel consumption per
hour at different altitude are shown in Chapter 5.
The consumed fuel, traveled distance and required time before descending to the
altitude of 1640ft (500m) are listed in Table 4-14.
Table 4-14a Consumed fuel, traveled distance and required time before descending to the
altitude of 1640ft
Descended altitude (m) Fuel Consumption (kg) Distance (km) Time (min)
3281 30 5 1
6562 100 11 3
9843 150 22 6
13123 200 32 8
16404 250 43 10
19685 300 54 11
22966 350 59 13
26247 400 70 15
29528 450 81 16
32808 500 86 18
Note
Descend gradually from the cruising altitude to the traffic pattern altitude at the rate
of 23ft/s~39ft/s and at the normal indicated gliding speed of 243kn with no less than
16o
throttles. Then reduce the speed to 189kn and enter the landing pattern.
JZ-Y8F200W-02
AIRCRAFT FLIGHT MANUAL
SECTION IV
NORMAL PROCEDURES
4-72
June 30, 2012
Table 4-14b Consumed fuel, traveled distance and required time before descending to the
altitude of 500m
Descended altitude (m) Fuel Consumption (kg) Distance (km) Time (min)
1000 30 10 1
2000 100 20 3
3000 150 40 6
4000 200 60 8
5000 250 80 10
6000 300 100 11
7000 350 110 13
8000 400 130 15
9000 450 150 16
10000 500 160 18
Note
Descend gradually from the cruising altitude to the traffic pattern altitude at
the rate of 7~12m/s and at the normal indicated gliding speed of 450km/h with
no less than 16o
throttles. Then reduce the speed to 350km/h and enter the
landing pattern.
Descending
Determine the approach altitude according to the terrain elevation of the airfield area, the
operating rules and regulations of the airfield, the weather condition and the instruction of the
aircraft dispatcher. Judge the descent opportunity exactly as per flight altitude and the enroute
terrain.
During descending, the outboard throttles are normally retarded to 20o
first, then the inboard
throttles to 20o
, and the stick should be pressed forward to maintain the rate of descent at
23ft/s~39.4ft/s (7~12m/s). Trim the aircraft with tabs. The initial descending rate is big. Usually, it
is maintained at 32.8ft/s (10m/s) above 13123ft (4000m) and 23 ft/s~26.3 ft/s (7~8m/s) below
13123ft (4000m). The favorable indicated gliding airspeed is 243kn (450km/h) and not higher
than 270kn (500km/h) in general.
Caution
It is forbidden to retard the throttles lower than 16o
during descent.
JZ-Y8F200W-02
AIRCRAFT FLIGHT MANUAL
SECTION IV
NORMAL PROCEDURES
4-73
June 30, 2012
Main tasks before entering pattern
(a) Turn on the radio altimeter in order to correct the barometric altimeter and for reference
during landing.
(b) Turn on marker beacon receiver and VOR/ILS system.
(c) Select the favorable bearing to enter the airfield or locator, and make the homing timely.
(d) Accurately correct the altimeter after receiving the landing conditions reported by the
aircraft dispatcher. The crewmembers should make clear the procedures for entering the
traffic pattern and study the particulars of the landing field and matters of attention.
(e) Correct the azimuth finder 3~5 minutes before reaching the airfield as per landing
heading, maintain the safe altitude, and report the procedures for entering traffic pattern
to the aircraft dispatcher after finding the airfield.
Pattern establishing and VFR landing
(a) Procedures for penetration and approach:
1) Pattern establishment: Turn base 30 seconds after flying over the outer locator.
2) Narrow pattern: Turn base 15 seconds after passing by the outer locator.
3) Long final landing: See Figure4-6.
4) Penetration for the wide pattern: See Figure4-7.
5) Straight penetration: See Figure 4-8.
The procedures above should be performed according to the operating rules and
regulations of each airfield.
(b) When descending to the altitude of 3281ft (1000m) or the altitude of the traffic pattern,
release the cockpit pressurization and reduce the speed to 189kn (350km/h). Lower the
landing gears and turn on the rudder steering switch to get ready for landing when
passing by the outer locator (or over the outer locator).
Table 4-15 shows the data for width control of traffic pattern for approaching at different
airspeeds.
JZ-Y8F200W-02
AIRCRAFT FLIGHT MANUAL
SECTION IV
NORMAL PROCEDURES
4-74
June 30, 2012
V( ) 260kn
Flap down Flap down35° 35°
Vy16.4ft/s
t5min40s
Vy29.53ft/s
Landing gear down
TAS
H1312ft
V162kn
H656ft
H197ft
2.2 4.3
H2953ftH3281ft
V189knV173kn
8
H2461ft
11 16 19 40 43
H<13123ft
Distance(mile)
Figure 4-6a Long final leg landing
H60
H200 H400
H750
H1000 H900
H<4000
4 8 15 20 30 35 75 80
V300 V320 V350 V( ) 480 (km)
Flap down Flap down35° 35°
Vy5m/s
t5min40s
Vy9m/s
Landing gear down
TAS
Distance
Figure 4-6b Long final leg landing
JZ-Y8F200W-02
AIRCRAFT FLIGHT MANUAL
SECTION IV
NORMAL PROCEDURES
4-75
June 30, 2012
调整飞机校对FWY
检查航线宽度
15s
.
24s
Adjust the
aircraft and
calibrate FWY
Course width check
DXF270°Note down report
position, landing gear
down, turn on rudder
control for landing
T15sDXF240°
v189knγ15°
downwindturn
FWY270°
H1312ft
Leveloff
γ 15° crosswind turn
Fly over the navigation
station H656ft v146kn
DXF286°
γ15°
finalturn
FMY90°
V173kn
15°Flapdown
S=6.264n mile
DXF238°
H656ft V189kn t70s
FWY0°V189kn Climbing
rate no more than 16.4ft/s
H328ft V162kn Flap up
H26.2ft~32.8ft
V135kn~140kn level
Fly over the inner locator
H197ft~230ft Advance inboard
engine throttle and retard
outboard engine throttleAdjust
V140kn~146kn
V146kn~151kn t70sVy10.8ft/s
report 30s Check altitude and
request for landing
H1312ft V157kn~162kn
Flap down 35°
V167kn~173n
FWY180°
H400V330~350
Fly over side way of hte
navigation station 60s DXF
240° V178kn~189knγ15°
base turn
Figure 4-7a Wide traffic pattern establishment
JZ-Y8F200W-02
AIRCRAFT FLIGHT MANUAL
SECTION IV
NORMAL PROCEDURES
4-76
June 30, 2012
调整飞机校对FWY
检查航线宽度
过远台侧方60s
DXF240°V330~350
γ15°第三转弯
15s
S=11.6km
24s
过近台H60~70
加内侧收外侧
调整V260~270
Adjust the
aircraft and
calibrate FWY
Course width check
DXF270°Note down report
position, landing gear
down, turn on rudder
control for landing
Fly over side way of the
navigation station 60s
DXF240°V330~350 γ15°
base turn
FWY180°
H400V330~350
T15sDXF240°
v350γ15°
downwindturn
FWY270°
H400
Leveloff
H200 V350 t70s
γ 15° crosswind turn
Climbing
rate no more than
FWY0°V350
5m/s
H100V300 Flap up
H8~10V250~260 level
Fly over the inner locator
H60~70 Advance inboard
engine throttle and retard
outboard engine throttle
V260~270
H60~70
加内侧收外侧
Fly over the navigation
station H200V270
V270~280
t70sVy3.3 report 30s
Check altitude and request
for landing
Flap down35°
H400V290~300
DXF286°
V310~320
γ15°
finalturn
FMY90°
V320
15°Flapdown
Adjust
Figure 4-7b Wide traffic pattern establishment
JZ-Y8F200W-02
AIRCRAFT FLIGHT MANUAL
SECTION IV
NORMAL PROCEDURES
4-77
June 30, 2012
35°
Flap
up H197ft
Flyover
theinner
locator
Fly over the
inner locator
Check altitude
andrequest
for landing
Flap down
FWY220: Note down the
report position after flying
over thenavigation station
and keep FWY220
Calibrate FWY, check
course track against
the heading
背航检查航迹
Landing gear down and
turn on rudder control
for landing 1min
before final turn
Before turn 20sV173kn
Flap down 15°
H328ft V162kn
t60sH1640ft
V167kn~178kn
final turn
H656ft
Vy16.4ft/s
FW
Y0°V189kn
V146kn~151kn
Vy9.84ft/s
H1640ft V162kn
H500 1640ft
V178kn~189kn Fly
towards the navigation
station
H656ftV189kn
t70sγ
15°
Crosswind
turn
Figure 4-8a Straight pattern establishment (Altitude 1640ft, time 10min)
JZ-Y8F200W-02
AIRCRAFT FLIGHT MANUAL
SECTION IV
NORMAL PROCEDURES
4-78
June 30, 2012
H200V350
t70s
15°
Vy5m
/s
FW
Y0°V350
H100V300
H500V330~350
V270~280
Vy3m/s
H500V300
35°
Crosswind
turn
Flap
up
H60
Flyover
theinner
locator
Flytowardsthe
navigationstation
Fly over the
inner locator
H200
Check altitude
and
request
for landing
Flap down
FWY220: Note down the
report position after flying
over thenavigation station
and keep FWY220
Calibrate FWY, check
course track against
the heading
背航检查航迹
Landing gear down and
turn on rudder control
for landing 1min
before final turn
Before turn 20sV320
Flap down 15°
t90sH500
V310~330
final turn
Figure 4-8b Straight pattern establishment (Altitude 1640ft, time 10min)
JZ-Y8F200W-02
AIRCRAFT FLIGHT MANUAL
SECTION IV
NORMAL PROCEDURES
4-79
June 30, 2012
Table 4-15a Width of traffic pattern
Slope 15o
20o
TAS(kn)
Enterinto
crosswindleg(s)
Enterinto
crosswindleg
parallelingtothe
runway(s)
Radius(km)
T180o
Patternwidth(n
mile)
Enterintocrosswind
leg(s)
Enterinto
crosswindleg
parallelingtothe
runway(s)
Radius(nmile)
T180o
Patternwidth(n
mile)
189 66 29 1.9 1min53s 5.4 76 49 1.43 1min25s 5.4
216 48 6 2.5 2min12s 5.4 58 28 1.86 1min37s 5.4
243 32 3.2 2min30s 6.5 45 10 2.37 1min50s 5.4
270 20 3.9 2min45s 7.9 33 2.92 2mins 5.8
297 8 4.8 3min03s 9.6 23 3.51 2min13s 7.0
Table 4-15b Width of traffic pattern
Slope 15o
20o
TAS(kn)
Enterintocrosswind
leg(s)
Enterintocrosswind
legparallelingtothe
runway(s)
Radius(km)
T180o
Patternwidth(n
mile)
Enterintocrosswind
leg(s)
Enterintocrosswind
legparallelingtothe
runway(s)
Radius(nmile)
T180o
Patternwidth(n
mile)
350 66 29 3.6 1min53s 10 76 49 2.65 1min25s 10
400 48 6 4.7 2min12s 10 58 28 3.45 1min37s 10
450 32 5.98 2min30s 12 45 10 4.39 1min50s 10
500 20 7.3 2min45s 14.6 33 5.4 2mins 10.8
550 8 8.9 3min03s 17.8 23 6.5 2min13s 13
(c) VFR Landing: VFR landing and taxiing in fields vary due to different facilities and
operating rules and regulations of each airfield. The pilots should take corresponding
measures based on the features of each airfield. This is the basic condition to complete a
satisfactory VFR landing in fields.
(d) After touch-down, control the taxiing speed correctly, ask for the taxiing route and parking
position. If the parking position is not clear on an earth runway or in a strange airfield, the
outer engines may not be shut off, and shut them off along with the inboard engines after
parking. The power switch of anti-icing system should be turned off after landing in bad
weather.
JZ-Y8F200W-02
AIRCRAFT FLIGHT MANUAL
SECTION IV
NORMAL PROCEDURES
4-80
June 30, 2012
Cautions for ferry flight
(a) Before flight, decisions on carrying the equipment such as cargo ramp, mat net and
mooring should be made according to mission requirements; and the positions and
prescriptions involved in the forbidden zones and control zones should be understood.
(b) Give special care to the checkout and application of oxygen in flight.
(c) For ferry flight under bad weather conditions, the safe altitude should be strictly
maintained for approach and the pilot should be familiar with the terrain, mountain and
their heights in the airfield area when the clearway condition of the take off or landing
airfield is poor and the flight visibility is limited.
(d) Before landing at night in a field, ask for the positions of the searchlight cars and their
distances to the runway edges in order to get clear the details during VFR landing and
prevent running into the searchlight cars during flare-out due to deflection or not knowing
how things stand.
Night flight
Lighting equipment and its operation for night flight
(a) Generally, the night flying lighting equipment of all airfields is set up according to the
stipulations of regulations, but each airfield has its own particulars. For example, neon
lamps are built up 3281ft (1000m) away from an end of the runway in some airfields.
They can be found from a great distance if they are on. There is only a row of runway
lights in some airfields, and do not consider the grassland side as the runway by mistake
when landing on these airfields. If there is any doubt, ask and make it clear on the final
leg. There are two or three searchlight cars in some airfields and they are set near the
runway edges. Do request carefully in order to know how things stand during VFR
landing, especially in airfields for light aircraft.
(b) Cockpit lighting adjustment
There are many signal lights in this aircraft. Their luminosity can all be adjusted except
for the four red lights of propeller stop. The luminosity of fluorescent lights is not strong. It
should be adjusted so as to fit in with the natural light outside. There is no exposure in
the cockpit and no reflective light on the windshield.
JZ-Y8F200W-02
AIRCRAFT FLIGHT MANUAL
SECTION IV
NORMAL PROCEDURES
4-81
June 30, 2012
Fluorescent lights on the aft ceiling panel are not used in general because it is very easy
to cause the reflection of light on windshield. When refraction and reflection of light arise
on windshield due to the improper adjustment of lighting, the pilot must prevent reflection
of light and refraction with the light-shield assembly. If the fluorescent light cover for the
flight engineer falls down during takeoff, shade the fluorescent light with hand, and turn
on the strong lighting of the landing lights to adjust the influence of the exposure
shinning.
(c) Usage of lights
Landing lights of the aircraft are mounted on both sides of the fuselage and on the
forward emergency door respectively. Since light beam irradiates forward and its range is
relatively narrow, it is not easy to find taxiway exits during taxiing.
The navigator’s portable light mainly functions to assist the pilot during taxiing. It should
irradiate forward and towards the taxiing turn direction timely for observation, especially
when looking for the taxiing center line during turning and parking.
The aircraft is equipped with flashing lights. During night flight, turn them on after starting
the engines and turn them off after shut-down.
There are totally 24 formation lights on the aircraft. They are mounted on the top and the
bottom of the fuselage and wings to mark the positions or specific signals used in
formation flight. Since their power consumption is very large, they are not frequently
used.
There are lights with white shades in cockpit, escort cabin, cargo compartment and the
tail section. They are used for illuminating and icing check on the tail at night.
Night traffic pattern flight
(a) Taxiing:
1) Turn on navigation lights, flashing lights, fluorescent lights and the illumination lights
of rudder tab after starting the engines.
2) The taxi speed at night should usually be 2.7 kn~ 5.4 kn (5~10km/h) lower than that
at daytime. During taxiing, the landing lights should be set in WEAK position. The
strong illumination may be used if necessary. The navigator’s portable light should
be used in time for illumination if passing crossroads and making turns.
3) If strong lights illuminate towards the aircraft during taxiing, the pilot should look at
the taxiway nearer and, at the same time, ask the navigator to illuminate straight
ahead with the portable light. If necessary, turn on the strong lighting for taxiing to
avoid running out of the taxiway or into obstacles.
JZ-Y8F200W-02
AIRCRAFT FLIGHT MANUAL
SECTION IV
NORMAL PROCEDURES
4-82
June 30, 2012
4) Watch the ground signals with special care when entering the parking area at night.
After shut-down, turn off the flashing lights and navigation lights, and turn on the
lights with white shades and engine illumination lights. Then turn off the fluorescent
lights and other signal lights.
(b) Take-off:
1) Enter the runway and taxi to the center line. Align with the nose wheel straight with
reference to the runway center line, directional lights and compass. There should
not be any intersection angle between the aircraft and the runway center line.
2) Before takeoff, observe carefully the runway center line and the directional lights,
and look at further position. The throttles should be advanced gently. Rough and
wild actions are not allowed. Maintain the direction mainly with reference to the
runway center line and the lights on both sides of the runway, and keep the aircraft
running along the center line by referring to the directional lights. If any deviation,
maintain the direction timely and accurately with rudder. It is necessary to guard
against the excessive deflection of rudder, especially the right deflection of rudder
should not be large. Otherwise, it might result in deviation from the runway.
3) The nose wheel should be rotated a little later at night than at daytime so as to
maintain the direction. The lift-off speed should be 2.7 kn~5.4 kn (5~10km/h) higher
than that at daytime. Lift-off with low speed should be prevented. After lift-off, climb
and accelerate at a small climb angle. Do not press the stick forward blindly to
prevent re-touchdown.
(c) The differences of control actions on traffic pattern at night with that at daytime are as
follows:
1) During take-off, the landing lights change from weak to strong. If landing lights are
not on during take-off, there should not be any intersection angle during parking.
The lift-off speed should be 2.7 kn~ 5.4 kn (5~10km/h) higher than normal.
2) Turn off the landing lights at the height of 82ft (25m) and retract them at the height of
164ft~230ft (50~70m) during take-off (the speed will be affected by 4.3kn~5.4kn
(8~10km/h) due to the retraction and extension of the landing lights).
3) When the aircraft glides to the altitude of 984ft (300m) on the final leg, lower the
landing lights (the time required to lower the landing lights is 10~15 seconds, flash
the landing lights for 2~3 times 30 seconds before the outer locator).
4) Turn on the landing lights when the aircraft glides to the altitude of 328ft~492ft
(100~150m) on the final leg.
JZ-Y8F200W-02
AIRCRAFT FLIGHT MANUAL
SECTION IV
NORMAL PROCEDURES
4-83
June 30, 2012
(d) VFR landing:
1) It is difficult to estimate visually for landing at night. The altitude error cannot be
found easily. Maintain the specified glide data strictly and check the glide path by
referring to the altitudes when passing the outer and inner locators. After passing by
the outer locator, correctly select the aiming point mainly according to the landing
“T” light and entrance lights. Generally, the aiming point should be selected
984ft~1148ft (300~500m) to the landing “T” lights (164 ft~328 ft (50~100m) away
from the runway threshold). After turning on the landing lights, take care to keep the
aiming point and do not make it move backward to prevent the approach altitude
from being too low.
2) It is relatively difficult to flare out at night. Since the light changes rapidly from start
of flare-out to that the aircraft has really recovered from float, it is difficult to judge
the ground surface accurately. In order to make a good flare-out, the pilot’s line of
sight should be diverted timely during flare-out, and look further to prevent flare out
from being too high and touch down from being too heavy.
(e) Landing under different illumination conditions:
1) Landing with ground searchlights only:
If rain, snow or fog at night, the ground searchlights should be used for landing to
avoid the light screen which is generated by the landing lights, affecting the pilot’s
sight, or when the landing lights are failed. The aiming point is selected still with
reference to the landing “T” lights and the runway threshold. Do not be affected by
the intensity of ground searchlights or the size of the illuminated area. When landing
with ground searchlights, it is easy to move the aiming point forward during glide,
resulting in a too high approach. Because it is whole pitch black behind the
illuminated area, the pilot dare not gaze at the normal aiming point. If the light area
margin is too backward, the aiming point moves backward easily. This will result in a
too low approach and undershoot. Therefore, when landing with ground
searchlights, the flight data should be kept strictly and the judgement should be
made precisely so as to improve the accuracy of VFR landing. After entering the
light area, the control is the same as normal and there are no more difficulties.
JZ-Y8F200W-02
AIRCRAFT FLIGHT MANUAL
SECTION IV
NORMAL PROCEDURES
4-84
June 30, 2012
2) Landing with onboard landing lights only:
When landing with onboard landing lights only, the glide condition is the same as
normal on the first half of the final leg. When the landing lights are turned on, the
pilot will often be attracted by the light involuntarily. So it is easy to make the aiming
point move backward. At this time, special care should be taken to check the aircraft
horizon and the rate-of-descent to strictly maintain data and keep a correct gliding
angle. The pilot’s sight should not be attracted by the lighting of landing lights. Since
there is no illumination of searchlights on the ground, it is not easy to accurately
select the aiming point. Therefore, an approximate position should be first selected
by referring to the entrance lights and landing “T” lights. After passing the inner
locator, accurate correction and correct data adjustment should be made as the
function of the onboard landing lights is increasing and the ground surface near the
aiming point is clearer. From the altitude of 98ft (30m), the pilot’s sight should be
concentrated on the judgement of ground clearance altitude. At the same time,
control the flare speed by means of throttles.
As the illuminance of the onboard landing lights is weak, it is relatively difficult to
observe the ground surface. During flare-out, the beam of the landing lights should
gradually move forward and the pilot’s sight should move forward correspondingly
with the decrease of the gliding angle and recovering from flare-out. Otherwise, it
will be dark for the pilot to feel the front. In this case, because the pilot feels nervous
about a too low flare-out, on the contrary, a too high flare-out and even ballooning
could be created. In flare-out, the pilot should be concentrated on the judgement of
the relative position of the aircraft and the ground by observing the entrance lights,
runway lights and landing “T” lights to recover from flare-out accurately. After
entering float, observe the clearest ground surface illuminated by the landing lights
to judge whether the aircraft has depression angle, which make the aircraft float with
a positive pitch angle. Accurately judge aircraft sinking. But sinking is not as obvious
as that in the case of using searchlights. So, the stick should be pulled backward
gently to make the aircraft sink steadily and touch down lightly at the lateral of the
landing “T” light. After touch-down, maintain the direction timely, retard first the
inboard throttles to 0o
, then the outboard throttles to 0o
. At this time, issue the order
to release the propeller stop with steady direction caused by nose wheel
touch-down. When the speed is decreased, the rudder steering is turned off first,
then the nose wheel control handle is pulled out. Change the illumination of landing
lights to weak lighting and gently apply brakes to reduce the speed and taxi out the
runway.
JZ-Y8F200W-02
AIRCRAFT FLIGHT MANUAL
SECTION IV
NORMAL PROCEDURES
4-85
June 30, 2012
Cautions for night flight
(a) For night take-off, it is prohibited to lift off with low speed and press the stick forward
blindly to increase the speed, resulting in touch-down again.
(b) In night landing, flaring out outside the lighting area is forbidden and touchdown with
intersection angle and nose-down angle should also be avoided.
(c) When the flaps are down, roughly and wildly pressing the stick forward for gliding is not
allowed to prevent the tail from stalling.
Flight in complicated weather conditions
Preparation
(a) Pay attention to the following points when getting the weather information:
1) The entire and systematic weather situation, the position of frontal surface, the
distribution of clouds, and the heights of cloud base and top.
2) The actual weather condition of the take-off, landing and alternate airfields,
including cloud form, cloud height, the possibility of rainfall and hazardous weather,
visibility, etc., and their variation tendency.
3) The position and intensity of cumulus congestus clouds and thunderstorm, their
development and moving direction.
4) Position and strength of turbulent flow and riptide location.
5) The possible icing area and its intensity, the height of 0o
C isothermal line.
(b) Define the penetrating procedures, responsibility of each crewmember and cautions as
per terrain features and obstacle distributions of the landing airfield.
(c) Draw up the handling plan when encountering thunderstorm, icing or bumpy air.
(d) The following aircraft equipment and systems should be checked with special care:
1) Standby horizon, magnetic compass, radio compass, weather radar, radio altimeter.
2) Anti-icing and heating systems.
3) The bounding jumpers and dischargers of the aircraft.
JZ-Y8F200W-02
AIRCRAFT FLIGHT MANUAL
SECTION IV
NORMAL PROCEDURES
4-86
June 30, 2012
Flight in clouds, rain and under icing condition
Flight in clouds and rain
Before entering the clouds, judge the cloud form and weather condition, turn on the
anti-icing equipment and make the aircraft conditions proper in advance.
Flying in clouds, the aircraft state is maintained on the basis of the horizon indication, and
the other instruments should be cyclically checked. The control actions should be in time, gentle
and accurate. If the indication of any instrument appears questionable or any instrument fails,
correct judgment should be made and proper measures should be taken by referring to the
indication of other instruments.
In over-the-top flight, especially over the cumuli form clouds, the flight altitude should be
generally 1640 ft (500m) higher than the cloud top.
When climbing and descending through clouds, the flight conditions should be maintained,
and pay attention to the surrounding terrain and safe altitude. Do not descend ahead of time.
Flight under icing condition
This aircraft is equipped with perfect anti-icing equipment. Thus the flight can be ensured
under moderate and heavy icing conditions. General flight altitude of the aircraft is
19685ft~29247ft (6000m~8000m), and icing is possible when penentrating the clouds, or in
rainy or foggy weather.
(a) Effect of icing on flight:
Icing on the wings and tail can change the surface shapes of wings to make the aircraft’s
aerodynamic performance poor. Lift decreases and drag increases. This will cause the
decrease of flight speed and the loss of altitude, and the difficulty for control. The
negative critical angle of attack of the horizontal tail decreases as airflow separates in
advance after icing. If the control action is rough and wild, it is likely to result in tail stall.
Icing on the airspeed head can make ASI indication inaccurate, even inoperative. Icing
on inlet guide will affect the operation of engines, even cause engine shut-down in
severe case. Icing on the propellers can result in thrust reduction and engine vibration.
Icing on the radio antennas will affect communication, and can even break the antennas
in severe condition, resulting in the interruption of communication.
JZ-Y8F200W-02
AIRCRAFT FLIGHT MANUAL
SECTION IV
NORMAL PROCEDURES
4-87
June 30, 2012
(b) Icing judgment in flight:
1) The windshield and the leading edges of the wings are the parts to get iced over
most easily. Take care to observe. Observe the icing condition on windshield glass
with torch at night, and conduct periodical check to engine fairing cover for icing
condition with engine lighting device.
2) Icing detectors are mounted on the aircraft and engines. Icing can be determined by
their indications.
If no anti-icing measures are taken in advance under icing condition, it will be
possible that ASI indication goes down or indicates “0”. The phenomena of speed
decrease and altitude reduction can also assist to judge.
(c) Cautions:
1) Try to avoid flying in freezing area if possible. Otherwise, the flight time in freezing
area should be as short as possible and pay attention to the judgement of
performance and level.
2) Under the icing condition, the level flight speed should not be lower than 216 kn
(400km/h), the turning bank should be less than 15o
, gentle control is required, and
do avoid being rough and wild.
3) When it is raining or foggy at the temperature below 5o
C, check the heatings of inlet
guide, windshield and airspeed head should be turned on before take-off.
4) The propeller heating can only be turned on 90s before take-off, and be turned off
within 90s after landing.
5) Under complicated weather condition, it is necessary to turn on the A/C icing switch
and air intake icing signal switch on RH instrument panel before the aircraft lifts off.
(d) Handling of icing on the tail
Ice on the tail must be cleared off before gliding and landing.
If it is not sure whether ice on the tail is cleared off completely, the maximum flap deflection
angle should not exceed 20o
~25o
(15o
in level flight, and lowered to 20o
~25o
before gliding on
the final leg).
Maintain the gliding speed of 146kn~151kn (280~270km/h) and be careful to avoid rough
and wild control actions.
JZ-Y8F200W-02
AIRCRAFT FLIGHT MANUAL
SECTION IV
NORMAL PROCEDURES
4-88
June 30, 2012
(e) When the heatings of wings, inlet guide and cargo compartment are turned on, the flight
kilometric fuel consumption will be increased by 8%.
(f) If ice, frost and snow still exist on the horizontal stabilizer and wing surfaces when the
anti-icing system of wings is on, take-off is inhibited.
Procedures for landing through cloud in bad weather
Landing through cloud with instruments and using locator:
(a) Pattern establishment
1) See Figure 4-9 for wide pattern.
60°
3.078nmile
γ15°
V167kn~194kn
V173kn178kn
H656ft984ft
FWY240°
T70Flapdownat15°
20sbeforelanding
Figure4-9a Reverse straight-in landing after getting out of cloud
JZ-Y8F200W-02
AIRCRAFT FLIGHT MANUAL
SECTION IV
NORMAL PROCEDURES
4-89
June 30, 2012
γ15°
V310~360
t70s
V320~330
H200~300
FW
Y240°
5.7km
Flapdownat15
o
20sbeforelanding
Figure4-9b Reverse straight-in landing after getting out of cloud
For the corresponding degrees of the azimuth finder (FWY) with relative bearing of
the radio station (DXF) for final turn, see Table 4-16.
JZ-Y8F200W-02
AIRCRAFT FLIGHT MANUAL
SECTION IV
NORMAL PROCEDURES
4-90
June 30, 2012
Table 4-16 Degrees of the azimuth finder (FWY) with relative bearing of the radio station (DXF)
in final turn
Name Left wide pattern Right wide pattern
FWY 90o
60o
30o
0o
270o
300o
330o
0o
DXF 287o
309o
333o
0o
73o
51o
27o
0o
Note
DXF of downwind and base turns for right wind pattern is 120o
.
2) Straight pattern
For straight pattern establishing, altitude 1640 ft (500m), time 10min, see Figure 4-8
for carrying out ways.
For the corresponding degrees of the azimuth finder (FWY) with relative bearing of
the radio station (DXF) for left straight final turn, see Table 4-17.
Table 4-17 Degrees of the azimuth finder (FWY) with relative bearing of the radio station (DXF)
in left straight final turn
FWY 180o
150o
120o
90o
60o
30o
DXF 215o
239o
262o
285o
308o
332o
For the corresponding degrees of the azimuth finder (FWY) with relative bearing of
the radio station (DXF) for right straight final turn, see Table 4-18.
Table 4-18 degrees of the azimuth finder (FWY) with relative bearing of the radio station (DXF) in
right straight final turn
FWY 180o
210o
240o
270o
300o
330o
DXF 145o
121o
98o
75o
52o
28o
JZ-Y8F200W-02
AIRCRAFT FLIGHT MANUAL
SECTION IV
NORMAL PROCEDURES
4-91
June 30, 2012
(b) Final turn
The main factors affecting the final turn are pattern establishment, crosswind, turning
opportunity, turning bank, speed and the accuracy of instrument calibration.
In order to enter the final turn correctly, emphasis should be put on the correction of wind
effect in addition to the correction of instrument errors, correct control of the turning
opportunity and strict keeping of flight data. For example, if there is tailwind on the base
leg of a wide pattern, the entry should be earlier; for headwind, it should be later. During
turning, the judgment and correction are made mainly according to the corresponding
relationship of the azimuth finder with the relative bearing of the radio station. The
maximum bank should not exceed 25o
if it is used for correction during turning.
(c) Correction for landing through cloud on the final leg
1) Points for corrections on the final leg:
From piratical experience, the pithy formula can be summarized as:
Rather early than late, first big and then small. If there is deviation, pointer should be
moved. Consider in slightly advance to take the initiative and give considerations to
both direction and altitude.
The control of the aircraft is heavy due to its large inertia, therefore control actions
must be gentle. The aircraft attitude should be as stable as possible. For correction,
rudder should be used more than stick, and bank should be avoided. In recovery,
pay attention to the lead.
2) Maintaining and correction of the glide path:
After recovering from the final turn, flaps should be lowered timely, the specified rate
of descent should be strictly kept and the height of passing the outer and inner
locators should be controlled. If the aircraft reaches the altitude of passing the
locator but it has not passed the locator yet, throttles should be advanced to level off.
Resume gliding after passing the locator. When the altitude of passing the locator is
too high, should calculate in head the new rate of descent according to the actual
altitude. At this time, care should be taken to control the aircraft gently. When
descending to the altitude of 164 ft (50m) but the runway is still not in sight, should
resolutely make a go-around.
JZ-Y8F200W-02
AIRCRAFT FLIGHT MANUAL
SECTION IV
NORMAL PROCEDURES
4-92
June 30, 2012
3) Crew cooperation during landing through cloud:
Close cooperation of crewmembers is another important factor for making a landing
through cloud successfully. The captain should be concentrated on the control of the
aircraft and coordinate the overall task of the crew. The copilot is responsible for
radio-communication and observation of outside and should remind and assist the
captain timely to maintain a good flight. When getting out of the cloud, pay attention
to looking for the runway. The navigator masters accurately the time, corrects the
wind effect, tunes the radio compass, corrects the azimuth finder, reminds the
captain to correct the direction and to maintain the specified rate of descent, and
looks for the runway when coming out from the cloud. The communicator is
responsible for the command and meteorological information and good
communications. The flight engineer takes care of engine operation, correctly
completes the mechanical controls commanded by the captain, and pays attention
to and provides the aircraft conditions. When the runway is in sight, the captain
aligns the aircraft with runway and the aiming point by visual judgement, adjusts the
gliding speed and performs VFR landing.
(d) Take-off and landing in rain or snow
1) Take-off in rain or snow:
Perform a take-off check, turn on the windshield wiper to clear off the water vapor
and ice frost on the inner surface.
During take-off, the height of nosewheel rotation may be a little lower, the lift-off
speed is about 2.7kn~ 5.4kn (5~10km/h) higher. After lift-off, make the aircraft
accelerate with a low angle of climb. The action must be gentle. The height of
retracting the gears is 6.6 ft~9.8ft (2~3m) higher than normal. Change over to climb
when the speed is increased to 146kn (270km/h).
At the height of 328ft (100m) and the speed of 162kn (300km/h), turn off the
windshield wiper. Other control procedures are the same as normal.
2) Landing in rain or snow:
Make full use of the ground navaid.
After the final turn has been completed, turn on the windshield wiper and electric fan
before the outer locator, and wipe the water vapor and ice frost on the windshield
with dry rags.
JZ-Y8F200W-02
AIRCRAFT FLIGHT MANUAL
SECTION IV
NORMAL PROCEDURES
4-93
June 30, 2012
When the aircraft is about to fly out of the cloud and the landmarks or lightings are
dimly in sight but the runway can still not be found, do not be anxious to lock for the
runway, keep the aircraft attitude and make the corrections as per indication of the
instruments. When the runway is clearly in sight, align the aircraft with it, correctly
adjust for the specified gliding speed and select the aiming point (it is selected about
164ft (50m) away from the runway threshold). Try to keep the aircraft as stable as
possible. Hard actions should be avoided.
When the aircraft enters the runway or covers the runway threshold, retard the
inboard throttles to 0o
or land with power-on. The visibility is relatively poor in rain or
snow, so it is more difficult to judge the ground surface during landing. Therefore, it
is necessary for the pilot to control the aircraft gently and make it land safely using
his fine control habit cultivated in normal times.
At night, the lighting in rain or snow can create a light screen. During landing, the
landing lights onboard should be turned on as late as possible or land with these
lights off.
After coming out from the clouds, enter the landing pattern by way of “Reverse
straight-in”.
When it is impossible to approach in the penetrating direction because the wind
speed is too high, the speed should be maintained at 173kn~178kn (320~330km/h)
with altitude of 656ft (200m) or 984ft (300m) after getting out of cloud layer. After
passing over the landing “T”, turn right for 60o
with a bank of 15o
. Keep the azimuth
finder at 240o
. Extend the flaps to 15o
20 seconds earlier than the calculated TB 70s
and turn left to enter the final turn. Then radio compass indication in the reverse
direction of landing may be referred for correction during landing. After recovering
from the turn, align with the runway, extend the flaps to 35o
and make VFR landing.
Flight in turbulent zone and thunderstorm active zone
Turbulent effect on flight
If ∆ny represents turbulent strength, generally, 0.05≤Δny<0.2 is light turbulent; 0.2≤Δny<0.5
is moderate turbulent; 0.5≤Δny<1 is strong turbulent. Turbulent effects on flight are as follows:
(a) Turbulent effect on aircraft structure:
The aircraft has a certain loading strength. The effect of normal turbulent on aircraft
structure is not too obvious. But the permitted loading strength is less for transport
aircraft, especially in heavy-weight flight. Affected by strong turbulent for a long time,
some parts such as wings may be permanently distorted, or even be damaged partly due
to excessive load variation.
JZ-Y8F200W-02
AIRCRAFT FLIGHT MANUAL
SECTION IV
NORMAL PROCEDURES
4-94
June 30, 2012
(b) Turbulent effect on instrument indication:
All of the instruments on the aircraft have certain delay characteristics. In turbulent air,
the instruments will create indication errors as they are suffering from irregular vibration.
Especially, aerodynamic instruments, such as vertical speed indicator, altimeter and
airspeed indicator, can exhibit larger errors, and can not reflect the instant conditions of
the aircraft timely and accurately. In night flight, turbulent can cause jumping of
instrument indication.
(c) Turbulent effect on aircraft control:
Aircraft turbulence can often make the flight altitude, speed and flight conditions vary
irregularly. This will bring great difficulty for the pilot to control. If the aircraft encounters
very strong up current, it is possible to make the aircraft close to its critical angle of attack.
If the aircraft encounters strong down current at low altitude, it is possible to cause the
aircraft to drop down to a dangerous altitude.
Flight under turbulent condition
(a) When flying into strong turbulent area, leave the turbulent zone by changing heading or
altitude. If running into the strong turbulence near the service ceiling, the flight altitude
should be lowered by 3281ft~8202ft (1000~2500m). Mach number should not be higher
than 0.6 during descent. If flying into strong turbulent zone of turbulence band, get out by
reducing altitude of 1640ft~3281ft (500~1000m) or getting off the course by 27n
mile~37.8n mile (50~70km).
(b) The flight altitude should be adequate. Maintain the indicated airspeed of 216kn~243kn
(400~450km/h) at the altitude of 9843ft~19685ft (3000~6000m), and 238kn (440km/h)
from 19685ft (6000m) to the ceiling. It is forbidden to decrease or increase the speed
beyond the specified range.
(c) During flight under light turbulent condition, the autopilot may be used to reduce the
pilot’s fatigue and enhance the accuracy of holding aircraft conditions. It is forbidden to
use the autopilot when the turbulence is more severe than the moderate.
(d) The maintaining of aircraft attitude should mainly rely on the aircraft horizon with
reference to the other instruments. Control actions should not be rough and wild,
otherwise turbulence will be more severe. When making turn or correcting heading under
turbulent condition, the maximum bank should not be greater than 15o
. If the speed is too
low, the altitude may be reduced properly. When the aircraft enters high angle of attack
accidentally and minor buffet occurs, push the stick forward and increase the speed, but
should recover from bank first if during a turn.
JZ-Y8F200W-02
AIRCRAFT FLIGHT MANUAL
SECTION IV
NORMAL PROCEDURES
4-95
June 30, 2012
Flight in thunderstorm active area:
(a) Before take-off, must understand the weather situation and its future development trend,
make the handling plan if running into thunderstorm. The back-up fuel quantity should be
calculated accurately.
(b) In flight, try to maintain over-the-top visual flight if possible, it is strictly forbidden to enter
cumulonimbus clouds and cumulus congestus clouds. The navigator should often
observe thunderstorm distribution situation with radar, and report it to the crew timely. If
cumulonimbus cloud is found, while taking measures onboard, report to the ground in
order to make the ground crew understand aircraft movement.
(c) Handling procedures when running into cumulus congestus clouds and cumulonimbus
clouds:
1) If cumulonimbus clouds are dispersed and isolated, a visual circuitous flight should
be taken. The distance from the boundary of cumulonimbus clouds should not be
less than 2.7n mile (5km) and that from the source of cumulonimbus clouds should
not be less than 5.4 n mile (10km). If flight through the gap between two
thunderstorm zones, the space observed from the radar should not be less than
10.8 n mile (20km).
2) When there is no way for circuitous flight and the aircraft can not climb above the
cloud, reduce the altitude and fly beneath the clouds if the cumulonimbus cloud
base is higher and the terrain along the course is also smooth. But the flight altitude
should be neither too low nor close to the cloud base, normally fly at the height
which is one third of the height from the ground to the cloud base. When
approaching the edge of thunderstorm, the radio equipment should be turned off to
prevent the aircraft from being struck by lighting.
3) In case of radar failure, only the visual circuitous flight is allowed. If no way to
bypass the thunderstorm-acting zone, decision should be made to return or fly to an
alternate airfield.
JZ-Y8F200W-02
AIRCRAFT FLIGHT MANUAL
SECTION IV
NORMAL PROCEDURES
4-96
June 30, 2012
Formation flight
Operating in trail
Basic formation (See Figure 4-10)
Generally, one fleet is formed by three aircraft, with the distance between each aircraft and
fleet being 3281ft (1000m) and 4921ft (1500m) respectively, while the altitude between each
aircraft is 66ft~98ft (20~30m).
3281 ft
66ft~98 ft
4921 ft
Figure 4-10a Formation of operating in trail
1000m
20~30m
1500m
Figure 4-10b Formation of operating in trail
JZ-Y8F200W-02
AIRCRAFT FLIGHT MANUAL
SECTION IV
NORMAL PROCEDURES
4-97
June 30, 2012
Engine start and taxiing
(a) Engine start
1) All aircrew members should be onboard 5~15min before engine start.
2) The leader commands the engine start as per required time of takeoff, engine start,
warmup and taxi to the takeoff line.
3) Engine run is generally conducted as per the leader command, required time or the
signal from ground crew.
(b) Taxiing
1) After the report of “engine run completed” from the last wing is received by the
leader, each aircraft will taxi consequently to the takeoff line with the permission of
the ground dispatcher.
2) During the taxiing process, the distance between each aircraft should not be less
than 164ft (50m). In case that the taxiing is performed on the earth runway, increase
the taxiing distance properly, watch the wind direction and avoid the dust as much
as possible.
3) Each aircraft should taxi into the runway as per their takeoff sequence and form a
snake-like queue with the leader at the downwind side, and the distance between
each wing should be not less than 131ft (40m). See Figure 4-11.
Figure 4-11 Parking diagram
JZ-Y8F200W-02
AIRCRAFT FLIGHT MANUAL
SECTION IV
NORMAL PROCEDURES
4-98
June 30, 2012
Takeoff and rendezvous
(a) Takeoff and climbing
1) The leader shall ask for takeoff when the report of “ready” from the last wing is
received.
2) By the time that the leader (prior aircraft) starts taxiing, the next aircraft shall put the
throttle angle at 30o
~40o
and taxi to the position where the former aircraft stands.
The takeoff interval is 1min.
3) After takeoff, the leader should follow the specified data strictly and climb up along
the takeoff direction with reference of obvious target ahead. In case of side wind,
correct the drift and inform the wing of the corrected value.
4) In the process of climbing up, each wing should observe flight status of leader or the
previous aircraft, and strictly follow the specified data of climbing.
5) Coordination of crew members after takeoff: The leader should watch the overall
situation and strictly follow the stipulated data and position required, while the
copilot is responsible for observing the aircraft status and pilot’s operation, adjusting
the throttle angle as per the pilot’s command and flight purpose, and remind the pilot
of any deviation or assisting in correction of such deviation. The navigator should
master an accurate time as required, report the corrected heading and climbing
data, and the mechanic must watch the instrument readout and engine operating
status in an all-round way.
6) Takeoff and climbing in trail: The position and time of takeoff should be stipulated in
advance and the data should be followed strictly.
(b) 180o
turning and rendezvous (see Figure 4-12).
1) The leader sends out verbal command or signal of “turning” as per required time
and makes a 180o
turn leftward (rightward) with stipulated angle.
Figure 4-12 180o
turnning rendezvous for operating in trail
JZ-Y8F200W-02
AIRCRAFT FLIGHT MANUAL
SECTION IV
NORMAL PROCEDURES
4-99
June 30, 2012
2) On receiving the verbal command of “turning” or seeing the signal, each wing
should remember the turning time and turn as per stipulated interval and the
projection angle of the leader (previous aircraft) on the windshield glass.
3) During the turning process, the leader must follow strictly the stipulated turning data.
During the first half (90o
) of turning, the wing should mainly follow the stipulated data
with the projection angle as an assisted reference, while during the second half of
turning mainly refer to the projection angle with the stipulated data as an assisted
reference. In case of any overrun or drop-off, adjust the turning angle and speed
properly for correction. Each aircraft should maintain their position in the turning
process so as to follow up the fleet after turning.
4) After the turning, the leader keeps level off at the speed of 189kn (350km/h) and
height of 3609ft (1100m) and leads the wing to the preset height until the last wing
has joint the fleet.
See Table 4-19 for climbing data of each aircraft at a separation of 3281ft (1000m)
and the fleet distance of 4921ft (1500m).
Table 4-19a Climbing data of the aircraft
Item
Data
Aircraft
IAS (kn)
Climbing
rate(ft/s)
Altitude at
crosswind leg
(ft)
Time of
crosswind lge
Distance of
crosswind leg
(n mile)
Leader 189 11.48 3281 4min36s 12.96
Aircraft No.2 189 12.14 2953 4min11s
Aircraft No.3 189 13.12 2625 3min46s
Aircraft No.4 189 14.11 2297 3min23s 8.91
Aircraft No.5 189 15.42 1969 2min58s
Aircraft No.6 189 16.40 1640 2min33s
Aircraft No.7 189 17.39 1312 2min10s 5.13
Aircraft No.8 189 18.70 984 1min45s
Aircraft No.9 189 19.69 656 1min20s
JZ-Y8F200W-02
AIRCRAFT FLIGHT MANUAL
SECTION IV
NORMAL PROCEDURES
4-100
June 30, 2012
Table 4-19b Climbing data of the aircraft
Item
Data
Aircraft
IAS (km/h)
Climbing
rate(m/s)
Altitude at
crosswind leg
(m)
Time of
crosswind lge
Distance of
crosswind leg
(km)
Leader 350 3.5 1000 4min36s 24
Aircraft No.2 350 3.7 900 4min11s
Aircraft No.3 350 4 800 3min46s
Aircraft No.4 350 4.3 700 3min23s 16.5
Aircraft No.5 350 4.7 600 2min58s
Aircraft No.6 350 5 500 2min33s
Aircraft No.7 350 5.3 400 2min10s 9.5
Aircraft No.8 350 5.7 300 1min45s
Aircraft No.9 350 6 200 1min20s
(c) Projection angle of 180o
turning rendezvous
1) Figure 4-13 and Table 4-20 are projection angle of 180o
turning rendezvous of the
leader and the previous aircraft at a distance of 4921ft (1500m).
L3°
L18°
R9°
R1°
FW
Y225°
FWY270°
FW
Y315°
FWY0°
Figure 4-13 Projection angle of 180o
turning rendezvous of leader and the previous aircraft at a
distance of 4921ft (1500m)
JZ-Y8F200W-02
AIRCRAFT FLIGHT MANUAL
SECTION IV
NORMAL PROCEDURES
4-101
June 30, 2012
Table 4-20 Projection angle of leader and its previous aircraft (Distance: 4921ft (1500m))
Azimuth angle 0o
315o
270o
225o
Visual angle Left 18o
Right 1o
Right 9o
Left 8o
2) Figure 4-14 and Table 4-21 are projection angle of 180o
turning rendezvous of the
wing and the leader (previous aircraft) at a distance of 3281ft (1000m).
L9°
L15°
R15°
R3°
FW
Y225°
FWY270°
FW
Y315°
FWY0°
Figure 4-14 Projection angle of 180o
turning rendezvous of the wing and the leader (previous
aircraft) at a distance of 3281ft (1000m)
Table 4-21 Porjection angle of each wing and the leader (previous aircraft)(Distance: 3281ft
(1000m))
Azimuth finder 0o
315o
270o
225o
Visual angle Left 15o
Right 8o
Right 15o
Left 9o
JZ-Y8F200W-02
AIRCRAFT FLIGHT MANUAL
SECTION IV
NORMAL PROCEDURES
4-102
June 30, 2012
Trail in straight line
Variance of distance and the altitude difference of trail flight is mainly judged and corrected
timely through projection position, size and clearness of the leader (previous aircraft) on the
windshield glass.
(a) Direction maintenance
1) Trail flight of single aircraft should keep a straight line and its judgement is as per
the leader (previous aircraft) heading. Both the leader and the wing should correct
the drift together and keep the flight at the same track.
2) Keep a straight line, and the leader must follow strictly the flight data. The track is
preferred to be corrected once for all and frequent track correction is not suggested.
During the straight-line followup, the wing should keep level-off, refer to the previous
aircraft lines and align with certain position of the leader (previous aircraft) for
direction maintenance.
3) Upon drift correction, keep the aircraft at level position and correct with sideslip
method. The rudder should be operated more than that of the rod.
4) During the single aircraft trail, aircraft No.2 should strictly keep the direction which is
favorable for the fleet.
(b) Distance maintenance
1) Judgement
Draw two vertical lines which are parallel to each other as per the calculated result,
and envelope the previous aircraft between these two lines during flight. If projection
of the previous aircraft spills over the lines, the aircraft turns out to overrun, if
smaller, the aircraft drops off.
Formula:
L=
Where: L referes to projection length of the previous aircraft between two parallel
lines on the windshield.
The navigator observes the measuring distance on the fluorescent screen from the
JYL-6AT weather radar and reports it to the pilot with intercom.
Judge as per flight speed, altitude and adjunct feature of the previous aircraft on its
fuselage.
Length of wing span×Distance of pilot’s eye from the windshield glass
Trail distance
JZ-Y8F200W-02
AIRCRAFT FLIGHT MANUAL
SECTION IV
NORMAL PROCEDURES
4-103
June 30, 2012
Drop-off and overrun can also be indicated by the corrected IAS and stipulated
speed difference, and as per adjunct clearness of the previous aircraft on its
fuselage. However, such method is not objective enough that during the flight, if the
altitude remains, in case that the previous aircraft tends to climb up, the distance is
far, or else near.
2) Distance correction
Keep the throttle at required position and adjust the speed by means of inboard
throttle control. In case of distance difference during the correction, pay attention to
aircraft inertia and the lead to avoid an excessive speed difference.
Range of speed difference correction with inboard throttle control:
1st
fleet ±10.8kn (±20km/h)
2nd
fleet ±21.6kn (±40km/h)
3rd
fleet ±32.4kn (±60km/h)
Correction with turning cutoff radius: turn early for far distance, and vice versa. The
time for turning correction is calculated as per the distance difference with the
previous aircraft and the ground speed. Correct T/2.
(c) Keep altitude difference
1) During the trail flight, the latter aircraft should be 66ft~98ft (20~30m) higher than the
former one, and it cannot enter the wake region of the previous aircraft at a proper
altitude difference, by when, there is no clearance between stabilizer and rear edge
of the previous aircraft, and the clearance will appear at the difference higher than
stipulated altitude. In case that the altitude difference is below stipulation, full nozzle
will show up. The judgement can also be performed as per the altimeter indication.
2) Timely push or hold the stick back when adjusting the distance with throttle control,
in case of any altitude difference change. Upon altitude difference correction, adjust
the speed timely to keep the distance as well.
3) As for climbing up and sliding in trail, the latter aircraft should also be 66ft~98ft
(20~30m) higher than the former aircraft, and the track of each aircraft should
parallel to each other rather than the same as that of the leader. It is very difficult for
the single aircraft to keep the climbing and sliding distance in trail since drop-off is
frequent for climbing, and overrun is likely to occur for sliding. Especially before
sliding at high altitude, the pilot should enlarge the distance properly, and adjust as
per stipulated range after the sliding status is stabilized, so as to prevent the speed
from overrun.
JZ-Y8F200W-02
AIRCRAFT FLIGHT MANUAL
SECTION IV
NORMAL PROCEDURES
4-104
June 30, 2012
Turn in trail
(a) Time of entering the turn
1) Timing turn
The latter aircraft times at the moment when the previous aircraft begins to turn, and
then turns as per stipulated turning interval.
Turning interval=trail distance÷flight speed
2) Turn as per visual angle
After the previous aircraft entered the turning, the following aircraft turns as per its
visual angle which is half turning angle of the previous aircraft during its track
interval.
(b) For example, suppose IAS=216kn (400km/h), turning slope=15o
, tracking distance =
3281ft (1000m), then tracking interval is 8.3s, and turning angle is 11o
. Therefore, visual
angle of the following aircraft to the previous aircraft is 5.5o
.
During the turning process, both the following aircraft and the previous aircraft should
stabilize their positions. In case there is rightward displacement for the projection of the
previous aircraft on the windshield glass, correct it timely by means of slope adjustment.
In case of turning left, the previous aircraft tends to move leftward and slope increase is
required. When the previous aircraft moves rightward, slope decrease is required. Do not
increase or decrease the slope excessively.
(c) When recovering from the turn, the following aircraft should level off properly as per
recovery of the previous aircraft and the combining lines of previous several aircraft and
current heading, so as to corrct the heading and distance timely.
Break to land
(a) Before the break, the leader should lead the whole fleet enter the airport accurately along
the landing course as per remarkable ground target, navigation aids and the position of
fleet and runway at the height of 3281ft (1000m) and speed of 216kn (400km/h). It should
turn 180o
leftward (rightward) for entering the course and land with the slope of 25o
,
speed of 227kn (420km/h) and descent rate of 16.4ft/s (5m/s). Aircraft No.2 begins timing
at the moment when the leader enters the turning and flight one “TB” forward for break
landing with the same data as that of the leader. Each aircraft following aircraft No.2
should turn as per the same method. Drift double correction is required at the downwind
leg.
JZ-Y8F200W-02
AIRCRAFT FLIGHT MANUAL
SECTION IV
NORMAL PROCEDURES
4-105
June 30, 2012
(b) Decrease the speed at sideway of the threshold to extend the landing gear at the course
altitude of 984ft (300m). Extend the flap at 15o
15s before the base leg, and enter the
turning 30s after flying over the outer locator side at the slope of 14o
, speed of 173kn
(320km/h) and visual angle of 62o
.During the second half (90o
) of turning, descend with
the speed of 6.6ft/s~9.8ft/s (2~3m/s) and recovered turning altitude of 656ft (200m).
(c) The landing interval is 1min20s. See Figure 4-15 for break to land.
t30s
V 227kn
ttiming
Figure 4-15a Single aircraft trail and break to land
t30s
V 420
320
ttiming
Figure 4-15b Single aircraft trail and break to land
JZ-Y8F200W-02
AIRCRAFT FLIGHT MANUAL
SECTION IV
NORMAL PROCEDURES
4-106
June 30, 2012
Night trail of single aircraft
(a) Long-time focus of a single point will probably cause illusion if deviation is not found and
corrected timely;
(b) Separation between each aircraft should not be less than 328ft (100m) during night
taxiing, and put the landing light at ON position when taxiing forward to approach the
previous aircraft;
(c) Takeoff interval is 1min, and the trail distance between each aircraft is 4921ft (1500m).
See Table 4-22 for takeoff, climbing and turning data of the aircraft.
(d) During the takeoff rendezvous, the leader (previous aircraft) should turn on the flash light
until the following aircraft follows up. Each aircraft should enter the turning rendezvous
as stipulated time. When entering the fleet, each aircraft should strictly follow the
stipulated speed to prevent the overrun due to excessive speed difference.
Table 4-22a Takeoff, climbing and turning data of the aircraft
Item
Data
Aircraft
IAS
(kn)
Climbing
rate
(ft/s)
Altitudeat the
beginning of
180o
turn (ft)
Time at
the
beginning
of 180o
turn
Climbing
rate for
turning
(ft/s)
Altitude
upon
completion
of the 180 o
turn (ft)
Leader 189 13.1 1640 2min06s 13.1 3281
Aircraft No.2 189 16.4 984 1min43s 16.4 3346
Aircraft No.3 16.7 6 656 1min20s 23.0 3412
Table 4-22b Takeoff, climbing and turning data of the aircraft
Item
Data
Aircraft
IAS
(km/h)
Climbin
g rate
(m/s)
Altitudeat the
beginning of
180o
turn (m)
Time at
the
beginning
of 180o
turn
Climbing
rate for
turning
(m/s)
Altitude
upon
completion
of the 180 o
turn (m)
Leader 350 4 500 2min06s 4 1000
Aircraft No.2 350 5 300 1min43s 5 1020
Aircraft No.3 350 6 200 1min20s 7 1040
JZ-Y8F200W-02
AIRCRAFT FLIGHT MANUAL
SECTION IV
NORMAL PROCEDURES
4-107
June 30, 2012
Each aircraft should enter the 180o
turning rendezvous as per stipulated time and follow
the required speed when joining the fleet to avoid exceesive overspeed.
The projection angle for 180o
turning rendezvous is the same as that of the daytime.
(e) Trail of straight line
1) Maintain the direction. align the white-colored tail light of the previous aircraft to
keep the red (leftward) and the green (rightward) navigation light symmetrical to
each other, and refer to the heading simultaneously.
2) Keep the distance. Keep the stipulated speed as required and judge the distance as
per formation light and navigation light of the previous aircraft. Action of the previous
aircraft and its distance is hard to be judged correctly in blurred projection line. The
aircraft is likely to over run in the moonlight night, and drop off in dark night.
3) Maintain the altitude difference. The altitude difference should not be excessive to
avoid the confusion between the ground light and the previous aircraft. The altitude
difference is lower if formation light can not be seen clearly,and higher if only seen
the formation light.
4) Tail turn. For the turning moment, timing and turn as per the visual angle and airdrop
color-changing signal light of the leader (previous aircraft), and the flare bomb of the
leader (previous aircraft) or the fixing point above the flashing ground target. During
the turning process, observe the whole wing span of the previous aircraft rather than
the mere white tail light.
(f) Break to land
Each aircraft should turn on their flashing light during the break landing process. For
observation convenience, the following aircraft might be lower than the previous one in
its altitude. Each crew member should follow up their separated duty clearly and special
personnel are required for position observation of the previous aircraft. The visual angle
to the previous aircraft after the base turn is 90o
.
See Table 4-23 for the break landing data.
JZ-Y8F200W-02
AIRCRAFT FLIGHT MANUAL
SECTION IV
NORMAL PROCEDURES
4-108
June 30, 2012
Table 4-23a Data of break landing
Aircraft No. 1 2 3
Tdelay 0 1min2s 1min2s
Vg(ft/s) 16.4 10.8 8.2
Table 4-23b Data of break landing
Aircraft No. 1 2 3
Tdelay 0 1min2s 1min2s
Vg(m/s) 5 3.3 2.5
(g) Cautions for night trail
1) Report timely if the previous aircraft is lost. Under such circumstances, raise the
altitude properly and turn on the flashing light and the light of escort cabin, and
apply the previous aircraft for turning on these lights, then recover the formation or
return to land (single aircraft) as per current situation. In case of rejoining the
formation, avoid excessive speed difference to prevent collision between two
aircraft.
2) Generally, the position and distance of the ground projection in the fleet tends to be
excessive. When flying over the light area, formation light of the previous aircraft will
be darken.
3) The fluorescent light in the cockpit should not be excessively bright during the night
trail, so as not to cause negative effect for observation of the previous aircraft.
4) When flying over the light area (cities), altitude difference of the following aircraft
should not be excessive, and the pilot should focus his eyesight properly to avoid
focusing on a single point (for example the tail light) in case of any illusion. If illusion
occurs, report to other crew members and appeal the other pilot who is not in
eyesight illusion for aircraft control. Aircraft should be controlled strictly as per the
instrument indication, and other crew mebers should remind timely. In case that the
eyesight illusion can not disappear for a long time, appeal the leader for escaping
the formation and return to land.
Single aircraft trail limitations
(a) The throttle angle of straight-line trail is ranged between 25o
~70o
, and the throttle angle
is allowed to be positioned at 0o
in no case.
(b) Speed difference for 180o
turning rendezvous is (+27
-16 )kn ((+50
-30 ) km/h.)
(c) See Table 4-24 for Max. allowable error for each aircraft.
JZ-Y8F200W-02
AIRCRAFT FLIGHT MANUAL
SECTION IV
NORMAL PROCEDURES
4-109
June 30, 2012
Table 4-24a Max. allowable error of each aircraft
Aircraft No.
Takeoff
time
(s)
Climbing
speed
(kn)
Maneuver
speed
(kn)
Trail
distance
(ft)
Turning
slope
(o
)
Landing
time
(s)
Difference
of altitude
(ft)
Leader ±1 ±2.7 ±2.7 0 ±32.8
Aircraft No.2 ±1 ±2.7 ±10.8 656 ±2 ±15 ±49.2
Aircraft No.3 ±1 ±2.7 ±13.5 820 ±2 ±15 ±65.6
Aircraft No.4 ±1 ±2.7 ±16.2 984 ±2 ±15 ±32.8
Aircraft No.5 ±1 ±2.7 ±18.9 984 ±2 ±15 ±49.2
Aircraft No.6 ±1 ±2.7 ±21.6 984 ±2 ±15 ±65.6
Aircraft No.7 ±1 ±5 ±24.3 984 ±2 ±15 ±32.8
Aircraft No.8 ±1 ±2.7 ±27.0 984 ±2 ±15 ±49.2
Aircraft No.9 ±1 ±2.7 ±29.7 984 ±2 ±15 ±65.6
Table 4-24b Max. allowable error of each aircraft
Aircraft No.
Takeoff
time
(s)
Climbing
speed
(km/h)
Maneuver
speed
(km/h)
Trail
distance
(m)
Turning
slope
(o
)
Landing
time
(s)
Difference
of altitude
(m)
Leader ±1 ±5 ±5 0 ±10
Aircraft No.2 ±1 ±5 ±20 200 ±2 ±15 ±15
Aircraft No.3 ±1 ±5 ±25 250 ±2 ±15 ±20
Aircraft No.4 ±1 ±5 ±30 300 ±2 ±15 ±10
Aircraft No.5 ±1 ±5 ±35 300 ±2 ±15 ±15
Aircraft No.6 ±1 ±5 ±40 300 ±2 ±15 ±20
Aircraft No.7 ±1 ±5 ±45 300 ±2 ±15 ±10
Aircraft No.8 ±1 ±5 ±50 300 ±2 ±15 ±15
Aircraft No.9 ±1 ±5 ±55 300 ±2 ±15 ±20
JZ-Y8F200W-02
AIRCRAFT FLIGHT MANUAL
SECTION IV
NORMAL PROCEDURES
4-110
June 30, 2012
Special case treatment in formation flight
Overrun of wing
Overrun of wing generally occurs at the moment of turning rendezvous and entering into the
clouds. Under such circumstances, report to the leader immediately about this case and the
current altitude. Meanwhile, observe carefully to get the interval as per the anti-direction of the
turning. Listen to the leader command. Once the leader (previous aircraft) is found, rejoin the
fleet.
Leader loss
Report immediately in case of the leader loss. Each crew member should observe and
search carefully and selectly, meanwhile deviate the aircraft towards the heading where no
aircraft exists. Once the leader is detected, rejoin the fleet. If the leader can not be searched,
report to the ground dispatcher and return to land. Blind maneuvering flight is strictly prohibited
in case of leader loss, which will severely threaten the flight safety.
Engine failure
(a) If engine failure occurs to the leader, inform the wing first and appoint one deputy leader,
and then lower the altitude to enlarge the altitude difference with the wing. Escape the
fleet and return to land along the shortcut selected as per the favorable direction.
(b) If engine failure occurs to the wing, report to leader first and appeal for escaping the fleet,
and then lower the altitude, get the interval and return to land along the shortcut.
Treatment of entering wake flow of the leader (previous aircraft)
(a) Under such circumstances, the aircraft tends to swing and the altitude will descend, the
rudder will be heavier and performance lowered, with deviation correction delay. The left
wing will even go downward for worse.
(b) After entering the wake flow, control the aircraft timely with force to eliminate the slope.
Increase the speed by means of throttle advancement and hold the stick back gently to
paddle the rudder outward with proper speed so as to lead the aircraft fly out of wake
flow of the leader (previous aircraft).
(c) If the aircraft enters the wake flow during its landing of gliding by the final leg, in case
there is severe dive and decline of wing, advance the throttle to go around at once if the
correction is difficult, and avoid a reluctant landing which will cause negative effect.
JZ-Y8F200W-02
AIRCRAFT FLIGHT MANUAL
SECTION IV
NORMAL PROCEDURES
4-111
June 30, 2012
Treatment of entering the clouds
(a) Principle
The leader should detect the clouds timely and be responsible for the solution, then
inform other aircraft in advance and handle it calmly, while each wing should listen to the
leader command carefully and implement in no hesitate, and remind the problems being
detected.
(b) Steps
1) Forced entering into clouds in 180o
turning rendezvous (formation turning)
Under such circumstances, once the leader (previous aircraft) is lost, the aircraft
should enlarge the distance with each other by means of changing the banking and
altitude difference to ensure the flight safety of the whole fleet.
The leader (previous aircraft) should report the altitude for entering into the cloud
and the level flight, so that the following aircraft can adjust the difference.
During the 180o
turning rendezvous, before the forced entrance into the cloud, the
leader (previous aircraft) can lower its altitude below the clouds if permitted by the
terrain. However, it should report the level flight altitude timely so that the following
aircraft can adjust the difference.
The first fleet makes the turn by means of changing the slope, and the leader of the
second fleet times by the moment when the last wing of the first fleet finishes the
turn, and then flies forward a “TB” time, making the turn as per the method by which
the first fleet makes the separation. The third fleet makes the turn and separation as
per the same steps of the second fleet. In case that the leader of the first fleet
reports entering into clouds and separation as per the preset method, takeoff on
ground shall all be terminated.
Table 4-25 and Figure 4-16 are stipulated data followed by each aircraft during the
forced entrance of clouds in 180o
turning rendezvous.
2) Small pieces of clouds penentration: After the verbal command of “penentrate the
clouds as per stipulated data” is received from the leader, each aircraft should
penetrate following the stipulated data and must keep the flight status as required.
After the penetration, pay attention to adjust the position in the fleet.
JZ-Y8F200W-02
AIRCRAFT FLIGHT MANUAL
SECTION IV
NORMAL PROCEDURES
4-112
June 30, 2012
Table 4-25a Stipulated data followed by each aircraft during the forced entrance of clouds in
180o
turning rendezvous
Item
Data
Aircraft
IAS
(kn)
Radius
R
(ft)
Slope γ
(o
)
Time of
180o
turning
rendezvous
Result of formation separation
Interval
(ft)
Distance
(ft)
Altitude
difference(ft)
Leader 189 9186 20 1min 27s ~6562 0
Aircraft No.2 189 12467 15 2min 00s ~6562 ~14764 656
Aircraft No.3 189 15748 12 2min 30s ~6562 ~14764 13132
Table 4-25b Stipulated data followed by each aircraft during the forced entrance of clouds in
180o
turning rendezvous
Item
Data
Aircraft
IAS
(km/h)
Radius
R
(m)
Slope γ
(o
)
Time of
180o
turning
rendezvous
Result of formation separation
Interval
(m)
Distance
(m)
Altitude
difference(m)
Leader 350 2800 20 1min 27s ~2000 0
Aircraft No.2 350 3800 15 2min 00s ~2000 ~4500 200
Aircraft No.3 350 4800 12 2min 30s ~2000 ~4500 400
R9186 ft
R12467 ft
R15748 ft
14764 ft
6562 ft
14764 ft
6562 ft
Figure 4-16a Separation after the 180o
turning rendezvous
JZ-Y8F200W-02
AIRCRAFT FLIGHT MANUAL
SECTION IV
NORMAL PROCEDURES
4-113
June 30, 2012
R2800
R3800
R4800
4500m
4500m
2000m
2000m
Figure 4-16b Separation after the 180o
turning rendezvous
3) Massive clouds penetration: After the verbal command of “change the speed for
separation” is received, each wing should control the flight speed as required for
enlarging the trail distance. After the fleet penetration, the leader should inform each
wing of rejoining the formation, and they should increase the speed accordingly to
take their separated position.
4) When the low clouds increases and the cloud layer becomes thicker which is
difficult for a continuous formation flight, the leader should send the verbal
command of “altitude and speed change for separation”. On reciving such
command, each wing should control their speed and change altitude as stipulated in
Table 4-26 to enlarge the distance, increase altitude difference and stop the flight
mission. At the same time, the ground dispatcher should guide each aircraft to lower
their altitude as per the preset penetration solution and site. Each aircraft should
return to land separately.
Table 4-26a Altitude changed with speed alternation
Aircraft No. 1 2 3 4 5 6 7 8 9
Speed difference (kn) +16.2 +10.8 +5.4 - -5.4 -10.8 -16.2 -21.6 -27
Altitude difference (ft) - +984 - +984 - +984 - +984 -
Table 4-26b Altitude changed with speed alternation
Aircraft No. 1 2 3 4 5 6 7 8 9
Speed difference (km/h) +30 +20 +10 - -10 -20 -30 -40 -50
Altitude difference (m) - +300 - +300 - +300 - +300 -
JZ-Y8F200W-02
AIRCRAFT FLIGHT MANUAL
SECTION IV
NORMAL PROCEDURES
4-114
June 30, 2012
5) For the separated No.3 and No.4 fleet, the leader should command for flying at
oringal speed (△V=5.4kn (10km/h), and the separation is 3281ft (1000m) for every
6min) after a period of flight time as per the current weather condition. On receiving
such command, each wing should fly as per their original speed.
6) During the treatment of entering into the clouds, both the leader and the wing should
turn on the flashing light, and the wing (following aircraft) navigator should observe
the separation with the previous aircraft with radar during the process of fleet
separation and rejoining. Meanwhile, other crew members of the leader (previous
aircraft) should strengthen the air-to-air observation for prevention of collision.
Climbing and descent during cloud penetration
When the fleet is climbing or descending during the cloud penetration, the aircraft should
keep the safety interval with each other, and the length of that time depends on cloud thickness
and flight skills of the pilot.
Calculation of safety interval
t safe=K
Where, K represents the safety factor, and its range depends on flight skills of the pilot. For
a pilot of medium level, K=2.
△V——Error of speed maintenance, 5.4kn~10.8kn (10km/h~20km/h) in general
H——Cloud thickness;
U——Climbing/desending rate
V——TAS during penentrating climb/descent
For example, a pilot of medium level keeps the speed error of 5.4kn (10km/h), TAS of 194kn
(360km/h) and climbing rate of 8m/s during the penetrating climb. The cloud thickness is 4921ft
(1500m). Thus, safety interval during the penetrating climb is obtained through:
Tsafe=2×
8×100
2.8×1500
=10.5
As a result, the interval is 10.5s.
H•△V
V•U
JZ-Y8F200W-02
AIRCRAFT FLIGHT MANUAL
SECTION IV
NORMAL PROCEDURES
4-115
June 30, 2012
Fleet penentrating climb and rendezvous above the clouds
(a) Each aircraft of the fleet perform the penetrating climb along the same direction and
rendezvous above the clouds
1) After the leader takes off, each wing should take off at every other safety interval.
After the takeoff, each wing climbs in straight line along the takeoff direction with IAS
of 189kn (350km/h) and climbing rate of 19.7ft/s~26.3ft/s (6~8m/s). During the
penentrating climb, the following aircraft should get altitude difference of the
previous aircraft as per the takeoff interval and climbing rate. Meanwhile, the leader
reports his current altitude for every ascension of 3281ft (1000m). Each wing should
check and adjust his current altitude as per the reported data.
2) During the penentrating climb, each aircraft should turn on the flashing light until
completion of such penentration.
3) Each aircraft should follow strictly the stipulated data as required and pay attention
to correct the indication error.
4) Having penentrated through the clouds, the leader performs level flight at the
altitude of 984ft~1640ft (300~500m) above the cloud top with IAS of 350km/h, and
inform the wing of relavent data like the altitude when getting out of clouds and level
flight, etc. When the last wing reports the completion of penentration, the leader
turns with the slope of 15o
, IAS of 189kn (350km/h) and climbing rate of 13.1ft/s
(4m/s) and send out verbal command of turning rendezvous, by when, each wing
begins to time.
See Table 4-27 for turning delay of each aircraft.
Table 4-27 Turning delay of each aircraft
Sequence 1 2 3
Tdelay 0 1min1s 2min7s
5) The wing should inform the leader of his penentration completion, and levels off at
an altitude of 66ft~98ft (20~30m) higher than the leader’s level flight (previous
aircraft), and pay attention to search for the leader. After the leader’s turn, the wing
makes 180o
turning rendezvous leftward (rightward) as per the same data as the
leader after half takeoff interval and period of follow-up. During this process, each
wing should follow strictly the stipulated data, check the turning timing as per the
visual angle and adjust timely the position by means of slope and speed correction.
See Table 4-28 for projection of the 180o
turning rendezvous above clouds.
JZ-Y8F200W-02
AIRCRAFT FLIGHT MANUAL
SECTION IV
NORMAL PROCEDURES
4-116
June 30, 2012
Table 4-28a Projection of 180o
turning rendezvous
Azimuth finder 0o
31 o
270o
225o
Projection angle (VTAS238kn) Left 17o
Right 2o
Right 19o
Right 12o
Projection angle (VTAS238kn) Left 18o
Right 4o
Right 21o
Right 17o
Table 4-28b Projection of 180o
turning rendezvous
Azimuth finder 0o
31 o
270o
225o
Projection angle (VTAS440km/h) Left 17o
Right 2o
Right 19o
Right 12o
Projection angle (VTAS440km/h) Left 18o
Right 4o
Right 21o
Right 17o
6) After the leader (previous aircraft) is confirmed, the wing should rejoin the fleet as
per formation requirement when permitted. See Figure 4-17 for details.
7) After the formation is completed, the leader commands to ascend to the preset
altitude.
Figure 4-17 Penentrating climb and rendezvous above clouds along the same direction (single
aircraft)
(b) Penentrating climb along the course and follow up the fleet with straight line flight
1) If the terrain stops the aircraft from climbing up in line as per the takeoff direction, fly
over the outer locator/sideway as per the stipulated method in Figure 4-18.
JZ-Y8F200W-02
AIRCRAFT FLIGHT MANUAL
SECTION IV
NORMAL PROCEDURES
4-117
June 30, 2012
tlmin30s
tlmin20s
H656ft
15°
189kn
19.7ft/s
Figure 4-18a Flight method in case of terrain stop
tlmin30s
tlmin20s
H200
15°
350
6m/s
Figure 4-18b Flight method in case of terrain stop
2) Each wing should fly along the leader course with IAS of 189kn (350km/h) and
climbing rate of 19.7ft/s~26.2ft/s (6~8m/s).
3) Having penentrated the clouds, the leader performs level flight at an altitude of
984ft~1640ft (300~500m) above the cloud top (above the safety altitude) with IAS of
189kn (350km/h) and report the level flight altitiude.
4) Each wing keeps the same altitude as that of the leader after the penentration.
Meanwhile, aircraft No.2 and No.3 follows up the leader along the straight line with
IAS of 216kn (400km/h) and 243kn (450km/h) respectively, search its position and
measure the distance with the navigation radar. The speed difference is 27kn
(50km/h) and follow-up distance for every 3min is 8268ft (2520m).
JZ-Y8F200W-02
AIRCRAFT FLIGHT MANUAL
SECTION IV
NORMAL PROCEDURES
4-118
June 30, 2012
See Table 4-29 for follow-up time at different distance (△V=27kn (50km/h)).
Table 4-29a Follow-up time
Follow-up
distance (n mile)
8.10 7.56 7.02 6.48 5.94 5.40
Time requried 18min 16min50s 15min40s 14min40s 13min10s 12min
Table 4-29b Follow-up time
Follow-up
distance (km)
15 14 13 12 11 10
Time requried 18min 16min50s 15min40s 14min40s 13min10s 12min
Break above clouds and penentrating descent
(a) The fleet breaks above the clouds and perform penentrating descent separately. Before
the break, proper maneuvering flight is required so that the fleet will be able to land along
the landing direction or enter the navigaton zone for penentrating descent against the
landing direction. See Figure 4-19.
40°
Figure 4-19 Break above clouds and penentrating descent
(b) After flying over the navigation station, the leader turns leftward (rightward) into one
correction angle and continues the level flight (correction angle and the time of flight after
flying over the navigation station depends on the cloud thickness, flight speed and the
descending rate) as per estimated time, then commands break. Meanwhile, it turns
leftward (rightward) for penentrating land as per the stipulated slope. See Table 4-30.
tLeader=
Descen
Levelnnav.statioField
V
V
×
rateDescent
H-H
JZ-Y8F200W-02
AIRCRAFT FLIGHT MANUAL
SECTION IV
NORMAL PROCEDURES
4-119
June 30, 2012
(c) On receving the break command from the leader, each wing should continue level flight
against the landing direction and turn for penentrating landing after half landing safety
interval and follow-up time. Having recovered from the turn, the wing should extend the
landing gear and flap as per stipulated time, follow the stipulated data, align with the
outer locator and glide for visual landing.
twing=tleader+
2
T+T timeup-followtimelanding
(d) Cautions:
1) Integrate the data. Each wing should keep flying against the landing direction after
the leader’s escape.
2) Take the occasion of final turn accurately with the slop of 15o
.
3) Each wing should extend the landing gear and flap as per the leader’s stipulated
time after the final turn.
Table 4-30a Time from level flight to break (leader)
H(ft)
Vy(ft/s)
6562 9843 13123 16404
19.7 4min 24s 6min 50s 9min 24s 11min 48s
26.2 3min 18s 5min 8s 7min 8min 48s
Table 4-30b Time from level flight to break (leader)
H(m)
Vy(m/s)
2000 3000 4000 5000
6 4min 24s 6min 50s 9min 24s 11min 48s
8 3min 18s 5min 8s 7min 8min 48s
JZ-Y8F200W-02
AIRCRAFT FLIGHT MANUAL
SECTION IV
NORMAL PROCEDURES
4-120
June 30, 2012
Airdrop and airborne flight
Airdrop and airborne calculation and several methods of sighting
Operating principle
The aircraft adopts KM-001A sighting equipment in its airdrop and airborne system. It is
designed as the optical sighting system of collimation style, and its operating procedure is as
follows: The navigator obtains the sighting angle and latitudinal angle of deviation as per the
datum for airdrop flight in advance, and then preset these values to sighting system through their
hand wheels. The sighting of direction is performed by adjusting the handwheel of latitudinal
angle of deviation as per the indication of the ground speed drift gauge or the landmark track
within the visual field. Adjust the optical net by turning the handwheel of observation angle to
follow the target, and press the airdrop button when the angle of observation equals to that of
sighting to unlock the platform for airdrop. See Figure 4-20.
Horizon airdrop value is calculated through:
0
verageA
Decline μcos
H
εcosZ+a
=φtan
H
AverageεsinZ+D
=μtan 0
ψ-aiming angle ψinclined-inclined aiming angle
μ-lateral deflection angle μo-inclined angle of aiming plane
α-drift angle a-longitudinal range before parachute develop
A-longitudinal range of airdropping object H-aircraft altitude
Z-deviation length εaverage-average wind direction angle
D-lateral deviation length before parachute develop uaverage ̄-average wind speed
W-aircraft ground speed V-aircraft air speed
d-side range of airdropping object u-wind speed at the altitude of aircraft
Figure 4-20 Airdrop sighting
JZ-Y8F200W-02
AIRCRAFT FLIGHT MANUAL
SECTION IV
NORMAL PROCEDURES
4-121
June 30, 2012
Airdrop/paradrop data calculation
(a) Airdrop with parachute, calculation of track data in windy condition
Drop time after openning of parachute T’=
tDescenV
hH-
Where, H——Altitude of airdrop
h——Altitude of drop before parachute deploy
VDescent——Descent speed after the opening of parachute
Range: A=AO+E×cosFJAverage
Where, AO——Range of windless condition before opening of parachute
Latitudinal length of deviation: d=E×sinFJDescent
For example, in case that the object is with parachute, suppose t=3s, H=800m,
V=240km/h, KCHJ=0o
, KXaverage=238o
, Uaverage=6m/s, ΔC=-2o
, VDescent =5m/s, AO=150m,
h=40m. Then A and d can be obtained through:
T’=
5
40-800
=152s
E=152×6=912m
FJaverage=238o
-(-2o
) ±180o
-0o
=60o
A=150+912×cos60o
=606m
d=912×sin60o
=790m
Thus, A=606m, d=790m (corrected leftward)
(b) Distance sighting by means of angle measurement
Sighting angle tgφ=
H
Sfront
Where, Sfront——Distance between the target and the signal sending point along the
track, which is known as aimoff.
Sighting of direction---approach and application
(a) Sighting of direction with the scale line at front windshield glass
Figure 4-21 is mark line at front windshield glass of the aircraft. Therein, the vertical
markline AB right in front of the pilot is drawn with one plumb line hanging right in front of
the pilot seat as reference, which will be projected to the windshield glass along the A/C
longitudinal axis. Thus, the ground objects observed through this line by the pilot as per
the preset flight attitude are all on the course line.
JZ-Y8F200W-02
AIRCRAFT FLIGHT MANUAL
SECTION IV
NORMAL PROCEDURES
4-122
June 30, 2012
C
B
D
A
18.504in
55°
0
6.639 in
Verticalmarkline
Figure 4-21a Projection line of pilot front windshield glass
C
B
D
A
470mm
55°
0
170mm
Verticalmarkline
Figure 4-21b Projection line of pilot front windshield glass
JZ-Y8F200W-02
AIRCRAFT FLIGHT MANUAL
SECTION IV
NORMAL PROCEDURES
4-123
June 30, 2012
Zero point on the vertical markline is the projection of tangent on the windshield glass
between the visual line and the nose at the moment when the pilot is observing the target
ahead. When the pilot is observing the ground, all the objects observed through this line
are on the same line paralleling to latitudinal axis of the aircraft. The projection scale of
the horizontal markline functioned to correct the latitudinal length of deviation in general
is started from zero point of the vertical markline, with separation of each scale being
1cm.
The distance (L) between the pilot eye and the shielding point on windshield glass is
pre-calculatable, and the shielding angle βshield is also measurable at mean time.
Shied
βCos•L
01.0
is a constant, and the ground distance represented per projection scale on
the windshield glass is easy to be obtained by multiplying it with the airdrop altitude.
Accordingly, the corrected projection scale can be obtained as per the preset latitudinal
length of deviation.
Upon sighting of direction, obtain the projection scale required by correction of preset
latitudinal length of deviation on the windshield glass first. When the target is detected,
the pilot judges its deviation angle at the preset sighting point and controls the aircraft
until the target moves above the preset projection scale, then observes the track of the
target projection on the windshield glass to see if it is able to pass through the calculated
projection scale. If not, correct it by means of heading and sliding methods until a
successful through. As a result, the latitudinal length of deviation is corrected.
(b) Sighting of direction with auxiliary landmarks
1) Upon ground preparation, work out the latitudinal distance between each obvious
landmark and the target with the large scale map or aviation shooting pitcture as per
the entering direction, and mark the distance on the plan.
2) When performing the airdrop, sight with the aid of one favorable landmark as per
the calculated latitudinal length of deviation. Suppose the latitudinal distance
between the landmark and the target is 750m leftward, correct the latitudinal length
of deviation leftward by 750m. When the target is detected, the latitudinal length of
deviation can be obtained by aligning the aircraft right with the landmark.
JZ-Y8F200W-02
AIRCRAFT FLIGHT MANUAL
SECTION IV
NORMAL PROCEDURES
4-124
June 30, 2012
(c) Sighting of direction with scale line on the windshield glass
1) Draw the longtitudinal line and the shielding line on the windshield glass as per the
projection data.
2) Draw the distance of projection on the windshield glass obtained as per the airdrop
altitude on the shielding line to both sides of the longtitudinal markline in the form of
scale line, with the separation of 100m between each.
3) During the airdrop sighting, align the corrected scale line of latitudinal length of
deviation with the airdrop target.
See Table 4-31 for Projection data of pilot front windshield glass.
Table 4-31a Projection data of pilot front windshield glass
m′(in) D (ft)
Content H (ft)
328 656 984 1312 1640 1969 2297 2625 2953 3281
Longitudin
almarkline
(leftward)
1969 0.79 1.57 2.36 3.11 3.86 4.61 5.35 6.10 6.85 7.60
2625 0.59 1.18 1.77 2.36 2.95 3.58 4.17 4.76 5.35 5.98
3281 0.47 0.94 1.42 1.89 2.36 2.87 3.35 3.82 4.33 4.84
3937 0.39 0.79 1.18 1.61 2.01 2.44 2.83 3.27 3.70 4.13
Longitudina
lmarkline
(rightward)
1969 0.79 1.61 2.44 3.31 4.21 5.16 6.10 7.05 8.07 9.13
2625 0.59 1.22 1.85 2.48 3.11 3.78 4.45 5.16 5.91 6.65
3281 0.47 0.94 1.42 1.93 2.44 2.95 3.50 4.06 4.61 5.16
3937 0.39 0.79 1.22 1.61 2.05 2.44 2.87 3.31 3.78 4.21
Note
a) Data calculation: β=83o
, L=800mm, α=35o
~45o
.
b) d refers to latitudinal length of deviation ft(m), m’ refers to distance of
projection on the windshield glass (in), H refers to the flight altitude (m), β
refers to the shielding angle, L refers to distance between the pilot eye
and the shielding point, and αis the slope angle of the windshield glass.
c) Projection of the copilot windshield glass: Convert the data at the left side
and right side of the longitudinal markline in Table 4-31. See Figure 2.
JZ-Y8F200W-02
AIRCRAFT FLIGHT MANUAL
SECTION IV
NORMAL PROCEDURES
4-125
June 30, 2012
Table 4-31b Projection data of pilot front windshield glass
m′(mm) D (m)
Content H (m)
100 200 300 400 500 600 700 800 900 1000
Longitudin
almarkline
(leftward)
600 20 40 60 79 98 117 136 155 174 193
800 15 30 45 60 75 91 106 121 136 152
1000 12 24 36 48 60 73 85 97 110 123
1200 10 20 30 41 51 62 72 83 94 105
Longitudina
lmarkline
(rightward)
600 20 41 62 84 107 131 155 179 205 232
800 15 31 47 63 79 96 113 131 150 169
1000 12 24 36 49 62 75 89 103 117 131
1200 10 20 31 41 52 62 73 84 96 107
Note
a) Data calculation: β=83o
, L=800mm, α=35o
~45o
.
b) d refers to latitudinal length of deviation (m), m’ refers to distance of
projection on the windshield glass (mm), H refers to the flight altitude (m),
β refers to the shielding angle, L refers to distance between the pilot eye
and the shielding point, and αis the slope angle of the windshield
glass.
c) Projection of the copilot windshield glass: Convert the data at the left side
and right side of the longitudinal markline in Table 4-31. See Figure 2.
(d) Sighting of direction by means of double angle offset
Align the track with the target, and setup the corrected angle of heading and slope as per
the obtained latitudinal distance of deviation to make anti-directional movement. Such
correction is conducted at a distance longer than double turning radius below the release
point.
See Figure 4-22. If correct the direction by 800m rightward, turn 30o
rightward first and
then 30o
leftward with the slope of 15o
, by keeping the preset track, the aircraft can fly to
the preset release point.
JZ-Y8F200W-02
AIRCRAFT FLIGHT MANUAL
SECTION IV
NORMAL PROCEDURES
4-126
June 30, 2012
V=173 kn
H=6562 ft
γ=15°
2652ft
Preset track
Figure 4-22a sghting of direction as per double angle offset method
V=320
H=2000
γ=15°
800
Preset track
Figure 4-22b sghting of direction as per double angle offset method
Refer to Table 4-32 for correction distance of double angle offset.
JZ-Y8F200W-02
AIRCRAFT FLIGHT MANUAL
SECTION IV
NORMAL PROCEDURES
4-127
June 30, 2012
Table 4-32a Correction distance of double angle offset.
θ
d(t)
γ
15o
20o
25o
30o
35o
40o
45o
15o
656 1181 1837 2624 3592 4593 5774
20o
492 853 1345 1935 2611 3379 4232
Note
a) θ refers to variation angle, d refers to latitudinal length of deviation, and γ
refers to the slope angle.
b) Calculation data: V=173kn, γ =15o
R=9843ft;V=173kn, γ =20o
R=7218ft.
Table 4-32b Correction distance of double angle offset.
θ
γ
15o
20o
25o
30o
35o
40o
45o
15o
200 360 560 800 1095 1400 1760
20o
150 260 410 590 796 1030 1290
Note
a) θ refers to variation angle, d refers to latitudinal length of deviation, and γ
refers to the slope angle.
b) Calculation data: V=320km/h, γ =15o
, R=3000m;V=320km/h, γ =20o
,
R=2200m.
JZ-Y8F200W-02
AIRCRAFT FLIGHT MANUAL
SECTION IV
NORMAL PROCEDURES
4-128
June 30, 2012
Steps:
1) Align the aircraft with target detected or the heading of airdrop. Visually obtain the
latitudinal length of deviation between the aircraft and the target to obtain the
distance to be corrected.
2) Get the converted variation angle as per the latitudinal distance of variation to be
corrected.
3) Make the correction as per the calculated variation angle in reversal direction.
(e) Correct the latitudinal distance of deviation through heading change
Calculate mentally the latitudinal distance of deviation which is correctable by the each
fixed angle within a certain period of time as per the current ground speed. Suppose
d=300m, heading angle changes by 20o
, then the correctable latitudinal length of
deviation per second is 30m (i.e. 2 o
for heading and 3m for correction of latitudinal length
of deviation ). If the latitudinal length of deviation is corrected another 300m leftwards,
change the heading by 10o
, and recover after level flight of 20s, then the aircraft has
been corrected to preset track.
Steps:
1) Calculate mentally the heading and time of flight as per the latitudinal distance of
deviation.
2) Align the aircraft with the preset heading and recover after the calculated time.
3) See Table 4-33 for information of deviation distance correction.
Table 4-33a Distance of deviation to be corrected
Deviation Time
distance (ft)
Corrected heading
5s 10s 15s 20s 25s 30s
5o
128 256 381 509 633 761
10o
259 377 761 1010 1266 1519
15o
381 761 1129 1509 1886 2260
JZ-Y8F200W-02
AIRCRAFT FLIGHT MANUAL
SECTION IV
NORMAL PROCEDURES
4-129
June 30, 2012
Table 4-33b Distance of deviation to be corrected
Deviation Time
distance (ft)
Corrected heading
5s 10s 15s 20s 25s 30s
5o
39 78 116 155 193 232
10o
78 115 232 308 386 463
15o
116 232 344 460 575 689
(f) The navigator sight the direction with the KM-001A airdrop (airborne) sighting system.
1) White light sighting
During the daytime, it is required to replace the KM-001A airdrop (airborne) sighting
system with the pectroscope of white light, and adjust it properly. Upon replacement,
install the pectroscope at correct position and tighten the screw.
Maintain stable flight when the aircraft entered the airdrop course. Adjust the
bracket hand wheel to make the level at middle position. Power on the white light to
preset the sighting angle and latitudinal angle of deviation. Unlock the handle of
hand wheel for observation angle and preset the angle of observation and the
sighting angle at 80º~90ºand 60o
~70o
espectively. The navigator presets the drift
angle and latitudinal angle of deviation for the sighting system as per current air
data, and controls for direction sighting by means of target or landscape observation
through the cross line. The direction sighting is completed when the target or
landscape moves longitudinally along the cross line.
Upon sighting of distance, rotate the observation hand wheel to make the divition
center target the goal as required. When the airdrop indicating light comes on, align
the center point of the cross line with the target and observe the status of indicating
light and the feedback of the observation hand wheel. When the indicating light
comes off and there is feedback from the observation hand wheel, perform the
airdrop immediately. When the indicating light comes on, continue to rotate the
observation hand wheel for sighting, and rotate the hand wheel quickly in a few
seconds to extinguish the indicating light and make the hand wheel stop at the
feedback position. For this moment, the target should be above the cross line.
Perform the airdrop as soon as the target overlaps the center point of the cross line.
JZ-Y8F200W-02
AIRCRAFT FLIGHT MANUAL
SECTION IV
NORMAL PROCEDURES
4-130
June 30, 2012
The sighting system is also available for mechanical sighting ring. With the
connecting line of the centers of two rings as the alignment line, the target is sighted
through the center of the two rings. Other steps are the same as that described
above.
2) Low light sighting
When the sighting system is applied at night in low visibility, replace proper
pectroscope as required. Install the low light telescope on the sight tool, tighten the
screw and lock the clamp.
Maintain stable flight when the aircraft entered the airdrop course. Adjust the
bracket hand wheel to make the level at middle position. Power on the white light to
preset the sighting angle and latitudinal angle of deviation. Other steps are the
same as that of white light sighting.
Remove the low light sight tool upon completion of the operation.
Airdrop and airborne signal
(a) Signal of ready: the yellow light comes on and the horn produces short blast.
(b) Signal of implementation: The green light comes on and the horn keeps ringing.
(c) Cease of airdrop and airborne: the red light comes on and the horn stops ringing.
(d) Auxiliary signal: Ready, white flag up; start airdrop (airborne), green flag up; stop, red flag
up.
Ground preparation of airdrop and airbone for single aircraft
Preflight preparation
(a) Get a clear understanding of the requirement of flight task and steps of implementation
and propose the flight plan.
(b) Reasearch of airdrop (airborne) field is conducted in details with the aid of large scale
map and aviation photo, etc. On-site study to geological condition of airdrop (airborne)
field, area, terrain, surrounding village, river, mountain and sighting landmarks is also
permitted if feasible.
(c) Selection of entrance site: decide the direction of entrance, standby entrance direction
and method for pattern establishment as per the terrain, standard altitude and wind at the
airdrop (airborne) site.
(d) Get a clear understanding of and memorize the T plate signal and communication rules
of the field.
JZ-Y8F200W-02
AIRCRAFT FLIGHT MANUAL
SECTION IV
NORMAL PROCEDURES
4-131
June 30, 2012
(e) Perform necessary trail assembly, trail airborne and power-on check. Settle the
crewmember and position the personnel as required. Familiarize the cooperative control
with each other and the pilot and navigator draw the scale line of the windshield glass.
(f) Work out loading plan or grouping the airborne as per the task requirement, loading
quantity, weight, volume or number of airborne force to obtain the takeoff weight. Make
clear the entrance frequency and altitude, speed and min. allowable speed of each
entrance. Obtain the takeoff and landing C.G and C.G variation after the release of each
group of cargo.
(g) Get relative data for airdrop calculation.
(h) Workout the safety precautions. Study the special cases that might occur during the
implementation of flight mission. Airdrop is not allowed in the following cases:
1) Ground instruction missed or prohibited by ground instructin;
2) Target and signal not seen clearly;
3) Exccesive error after the ready warning, or entrance angle beyond 20o
.
4) Personnel, vehicle or animal near the bulleye threatening the safety.
5) The navigator loses boresight point or incertitude for the airdrop (airborne) moment.
6) Roller troubleshooting undone, cargo not ready or weather condition not as
required.
7) Obvious error between air and ground calculation result.
Preflight preparation
(a) Get a thorough understanding on weather condition of the track and the airdrop area, as
well as average direction and speed of wind at the altitude of airdrop (airborne) and on
ground and their variation. Workout the direction for entering the airdrop to obtain the
navigation data.
(b) Check the loading status. Check the loading/ airborne force group for any variation,
loading for correctness and reliable fixation, the cargo locking at the side rail as required,
the platform shackle be well locked, and no foreign object between platform and the
raceway. Check the limit switch for correct connection, the static line be well fixed on the
ripcord, and the cord retraction mechanism for retract position.
(c) Further cooperate with the electric personnel and airdrop personnel (airborne force
leader or personnel for parachute discharging) to make clear the operation and signal
rules.
(d) Before taxiing, check the light and horn signal for normal condition.
JZ-Y8F200W-02
AIRCRAFT FLIGHT MANUAL
SECTION IV
NORMAL PROCEDURES
4-132
June 30, 2012
Airdrop and airborne of single aircraft
(a) Enter the track as per the preset plan after takeoff. Communicate with the airdrop
(airborne) site on estimated time of arrival and working status 10min~15min before
approach. Consult the wind information, correct the airdrop (airborne) result and report
the dispatcher of relavent data.
(b) Search for the airdrop (airborne) field as per estimated time of arrival, track and features
of the field, and descend to preset altitude after the entrance point and target are
detected. Follow the airdrop (airborne) track. See Figure 4-23 for operation procedures
on the airdrop (airborne) track.
(c) Request the dispatcher for return upon completion of the airdrop (airborne).
1.Open the cargo door and
release the cord.
2.Flap down at 15
o
.
3.Sight in general.
4. Correct the heading as per the
verbal command of navigator
after shielding.
11.Keep the heading.
12.Get the airdrop (airborne)
information, correct the
result and report to the
ground.
13.Get ready for the next
airdrop (airborne) and the
electric personnel reports
after the preparation is
done.
14.In case of a further
entrance, perform the
base leg 1min/1min20s
after flying over the
sideway, and then confirm
about the airdrop result.
5.Verbal command of “Ready”
15s before the airdrop (airborne),
the yellow light comes on and
the horn make shortblast
twice.
6. Follow relavent data and keep
flight status.
7. The navigator commands“airdrop
(airborne)”, the green light comes
on and the horn blasts.
8. The navigator presses thebutton
to stop the airdrop (airborne), the
red light comes on and the horn
stops blasting.
9. Retract the flap and cord and
close the door.
10.Perform the crosswind turn 25s
after flying over the target.
V=189 kn
R=1.620 n mile
γ=17°~18°
S=1.620nmile
t=8min
Figure 4-23a Operation procedures on airdrop (airborne) track
JZ-Y8F200W-02
AIRCRAFT FLIGHT MANUAL
SECTION IV
NORMAL PROCEDURES
4-133
June 30, 2012
1.Open the cargo door and
release the cord.
2.Flap down at 15
o
.
3.Sight in general.
4. Correct the heading as per the
verbal command of navigator
after shielding.
11.Keep the heading.
12.Get the airdrop (airborne)
information, correct the
result and report to the
ground.
13.Get ready for the next
airdrop (airborne) and the
electric personnel reports
after the preparation is
done.
14.In case of a further
entrance, perform the
base leg 1min/1min20s
after flying over the
sideway, and then confirm
about the airdrop result.
5.Verbal command of “Ready”
15s before the airdrop (airborne),
the yellow light comes on and
the horn make shortblast
twice.
6. Follow relavent data and keep
flight status.
7. The navigator commands“airdrop
(airborne)”, the green light comes
on and the horn blasts.
8. The navigator presses thebutton
to stop the airdrop (airborne), the
red light comes on and the horn
stops blasting.
9. Retract the flap and cord and
close the door.
10.Perform the crosswind turn 25s
after flying over the target.
Figure 4-23b Operation procedures on airdrop (airborne) track
JZ-Y8F200W-02
AIRCRAFT FLIGHT MANUAL
SECTION IV
NORMAL PROCEDURES
4-134
June 30, 2012
Gravity drop delivery
The small cargo on the 1m platform is delivered by means of gravity drop with the roller. The
max. quantity of cargo airdrop is 12 sets, with either single or running drop to be available.
During the gravity airdrop, the cargo is thrusted down by the horizontal component (G2) of its
weight through the bevel between the roller and the ground. See Figure 4-24.
Roller bevel
Ground
G
G1
G2
Figure 4-24 Schematic diagram of gravity drop
Preparation before gravity drop
(a) Check quantity, weight of cargo and the platform lock postion for correctness.
(b) Fix the sight and check the cockpit equipment, turn on airdrop circuit breaker of navigator,
communicator and the electric personnel.
(c) Put the light/heavy selector for normal cargo drop on the airdrop (airborne) console of the
navigator at LIGHT position to light up the platform lockup indicating light. Meanwhile,
correspond the positions of lock selector on the console with the lock number on the
platform (single drop to platform closest to the door, and arbitrary running drop at
required position).
JZ-Y8F200W-02
AIRCRAFT FLIGHT MANUAL
SECTION IV
NORMAL PROCEDURES
4-135
June 30, 2012
Operation
(a) Obtain data of latitudinal length of deviation (d), range (A), shilding distance (S) and time
(t) and sighting angle (ψ) (including verbal command of “READY” 15s before the airdrop)
as per the wind information integrated on the basis of airdrop altitude. Adjust and fix the
sight.
(b) Enter the final leg, and the navigator sends out verbal command of “open the door”,
“release the cord”, put the door switch at ON position and check each indicating light for
correct position (green light for door open comes on).
(c) Enter at an altitude 164ft (50m) below that of the airdrop. The navigator sends out verbal
command of “Ready” 15s before the airdrop and press the “Ready” button to light up the
yellow “Ready” light, by when, the horn continues blasting. The pilot advances the
throttle by about 30o
gently and coordinately to level up the aircraft. Keep the climbing
rate of 16.4ft/s (5m/s) to make the altitude of platform separation equal to that of the
airdrop. During the gravity airdrop, the pilot should follow strictly the data of speed,
climbing rate and altitude as they are direct influence to hit probability.
Upon airdrop, the navigator press the “CARGO DROP” button, the green light comes on,
the horn produces successive blast and the platform unlocks as per the control mode.
Meanwhile, the lock light in front of the platform to be released should be come off
individually.
(d) When the platform is unlocked, it will move backward, causing slight pitching moment of
the aircraft. In this case, push the throttle forward gently and timely to maintain the
climbing rate.
Press STOP or RELEASE button upon completion of the airdrop, the red light comes on
and the horn stops blasting. Retract the cord manually and close the door.
Note
The slope of bevel is 4o
20’ for floor behind frame 34, thus no necessary to
push the throttle for gravity airdrop from the platform.
Separation time of cargo on the platform during gravity airdrop
See Table 4-34 for separation time of cargo on the platform during gravity airdrop with IAS of
189kn (350km/h). Table 4-35 is distance between the lock and the cargo door.
JZ-Y8F200W-02
AIRCRAFT FLIGHT MANUAL
SECTION IV
NORMAL PROCEDURES
4-136
June 30, 2012
Lock No.
G(t)
1 2 3 4 5 6 7 8 9 10 11 12
45 2.9 3.2 3.6 3.9 4.3 4.6 5 5.2 5.6 5.9 6.3 6.5
51 2.7 3.0 3.3 3.6 4.0 4.4 4.6 5.0 5.3 5.6 5.9 6.2
54 2.5 2.9 3.2 3.5 3.9 4.2 4.6 4.9 5.2 5.4 5.8 6.1
58 2.3 2.7 3.0 3.4 3.7 4.1 4.4 4.6 5.0 5.2 5.5 5.7
Note
c) G: flight weight of airdrop(t);
d) T: separation time (s);
e) Calculation formula:
T= a
s2
①
a=g×sinα-f×g×cosθ ②
s—— Distance between the lock and the cargo door
f—— Friction factor of roller
a—— Acceleration
θ—— Angle between floor bevel and the ground. θ (behind frame 34)=level
pitching angle+4o
20’; θ (before frame 34)= level pitching angle+3o
.
g—— Gravity acceleration
T—— Separation time of cargo
JZ-Y8F200W-02
AIRCRAFT FLIGHT MANUAL
SECTION IV
NORMAL PROCEDURES
4-137
June 30, 2012
Table 4-35a Distance between the lock and cargo door
Lock No. 1 2 3 4 5 6 7 8 9 10 11 12
S(ft) 15.98 19.26 22.54 25.82 30.97 34.25 37.53 40.81 44.09 47.38 50.66
Table 4-35b Distance between the lock and cargo door
Lock No. 1 2 3 4 5 6 7 8 9 10 11 12
S(m) 4.87 5.87 6.87 7.87 9.44 10.44 11.44 12.44 13.44 14.44 15.44 16.44
No flap down upon gravity airdrop.
With flap down, the pitching angle of aircraft is reduced by 3o
~5o
which further decreased
the value of G2, prolonging the separation time of cargo.
Failure reasons for gravity airdrop
(a) Airdrop circuit failure
(b) Cargo release button not fully pressed;
(c) Door not fully opened;
(d) ”Heavy/light” selector at wrong position
(e) Airdrop switch “EMER HORIZON” not at RELEASE position
(f) Circuit breaker not cut in.
Emergency airdrop
Emergency airdrop is available in case of normal airdrop failure or special circumstances. In
such case, cut in the “EMER HORIZON” switch at the position of navigator or pilot. The “EMER
ARDP” light comes on after the door is opened, and the cargo on each platform is thrusted down
one by one.
Extraction airdrop
The roller is available for heavy cargo airdrop. The extraction parachute pack is hung up at
two parachute releasing devices between frames 47~49 on the ceiling of cargo cabin. The
navigator press the button to release the cargo and the bomb shackle is released, with platform
shackle being unlocked. Meanwhile, the extraction parachute pack is thrown out, and the
parachute is extended to separate the platform from the aircraft.
JZ-Y8F200W-02
AIRCRAFT FLIGHT MANUAL
SECTION IV
NORMAL PROCEDURES
4-138
June 30, 2012
Preparation before extraction airdrop
(a) Turn on corresponding circuit breaker.
(b) Upon normal release of cargo, put the LIGHT/HEAVY selector at HEAVY position, and
indicating light of relavent platform comes on, lock indicating light comes on. Put the
release sequence selector and unlock selector at their required positions as per the
airdrop plan.
1) Single airdrop of cargo at 6m or 4m platform (I): Put the release sequence selector
at I position, and unlock selector at No.4 position
2) Single airdrop of cargo at 4m platform (II): Put the release sequence selector at II
position, and unlock selector at No.8 position;
3) Single airdrop of cargo at 4m platform (III): Put the release sequence selector at II
position, and unlock selector at No.12 position (Single airdrop of cargo for platform
III must be performed by hanging its traction parachute to the traction parachute
support of platform II at the right side when the cargo of platform II is dropped out).
4) Single airdrop of cargo at 6m platform (II) : Put the release sequence selector at II
position, and unlock selector at No.12 position;
5) Running drop of cargo for two 6m platforms: Put the release sequence selector at
RUNNING DROP position and unlock selector at No.12 position.
6) Running drop of cargo at 4m platform (I, II): Put the release sequence selector at
RUNNING DROP position and unlock selector at No.8 position. If there are only two
4m platforms, put the selector of platform I at No.1~No.4 position as required, and
that of platform II at any position of lock No.5~No.12 as required, unlock selector at
No.12 position, and release sequence selector at RUNNING DROP position.
(c) For prevention of special cases and in favor of cargo separation from the aircraft, on
receiving the verbal command of “Release” from the navigator, the pilot should advance
the throttle to above 72o
gently and coordinately, and retract it to original position after
cargo separation.
(d) Movement of platform I near the cargo door will cause slight pitching moment to the
aircraft, and slight buffeting will occur, then the aircraft will slide stably and slowly. At this
moment, the pilot should pull the throttle and balance the aircraft with rudder tab.
(e) Movement of platform II will generate bigger pitching moment which is more obvious with
the cargo loading of more than 3.5t, while such moment will not be so big after cargo
separation of platform II.
JZ-Y8F200W-02
AIRCRAFT FLIGHT MANUAL
SECTION IV
NORMAL PROCEDURES
4-139
June 30, 2012
(f) Select proper traction parachute as per the cargo weight for extraction airdrop, and the
parachute area should not be excessively large. Meanwhile, the cord should not be too
long so that it will not bump the tail.
Time for separation of cargo from the platform depends on the extractive force, weight of
platform and flying weight, i.e. traction parachute area, resistance factor, track, flight
speed and platform movement friction. Time of cargo separation at each platform for
single airdrop is: 4m platform: 2.7s (I), 3.0s (II), 3.4s (III), and 6m platform: 3.1s (I) and
3.4s (II). In case of running drop, the length of time should be more than 3.4s (II).
Special extraction airdrop operation
(a) When the traction parachute is released, and the platform stays at original position:
1) Cut off the parachute cord;
2) Cut off the circuit breaker for normal/emergency airdrop, and put the change-over
switch at NEUTRAL position.
3) Fix the platform I on the mooring ring with two cables.
4) Close the cargo door. Obtain and adjust aircraft C.G.
(b) Reason for extraction airdrop failure:
1) Airdrop sequence selector at wrong position;
2) Extraction parachute shackle failure;
3) Platform lock selector at wrong position. The circuit is cut in only with this selector
positioned at No.4, No.8 or No.12.
4) Airdrop sequence interlock limit switch not cut in, others are the same as that of
gravity airdrop.
Cautions:
(a) When operating on the platform inside the cargo compartment, no pulling of the cutter
fuse cord on the platform is allowed.
(b) Upon opening of cargo door, personnel approaching to the platform or standing between
the platform and the cargo door is not allowed.
(c) It is not allowed to cut off the traction parachute cord and close the cargo door until the
platform is tied down well with the cable.
(d) Personnel without protection of the safety belt are not allowed to work at the cargo door.
JZ-Y8F200W-02
AIRCRAFT FLIGHT MANUAL
SECTION IV
NORMAL PROCEDURES
4-140
June 30, 2012
Aircraft C.G adjustment and aircraft control in special circumestances
(a) When the platform is stagnated at the cargo door in flight, no severe movement of control
surface (especially the rudder and the aileron) is allowed.
(b) When the platform stagnates at the cargo door at an altitude of more than 13123ft
(4000m), fly and descend with IAS of ≮173kn (320km/h). When the aircraft is desended
at the altitude of 13132ft~19685ft (3000~4000m), keep level flight with the speed of
173kn~189kn (320~350km/h) and conduct the following operations:
1) Fix the stagnated platform with four cables and cut off the traction parachute cord.
2) Move the detachable items on the platform and adjust the position of crew members
to keep the landing C.G within the allowable range of 16CA~32%CA.
(c) In case that the cargo on platform II can not be dropped after the cargo on platform I has
been released, all the crew members should go to the rear part of cargo compartment to
maintain the aircraft C.G within the range of 18%CA~20%CA.
(d) When the aircraft flys with the cargo door opened and C.G of 36%CA, follow limit C.G
stipulation. See Table 4-36 for airdrop data of the aircraft.
Table 4-36a Backward C.G airdrop data
Platform Flight attitude
Form
of
airdrop
Cargo size
Freight
parachute
Extraction parachute
Weight
(kg)
Altitude
(ft)
Area
(ft2
)
Qty.
Area
(ft2
)
Weight of
parachute
assembly
(kg)
Length of
parachute
cord
(ft)
1m
Level flight at
platform before
frame No.43
Gravity 500~1000 3.94 3229
At platform
behind frame
No.43 with
speed of
16.4ft/s
(Climbing)
Gravity 500~1000 3.94 3229
4m
I Level flight Towing 2000~2500 3229 300 53.8 12 82
II Level flight Towing 2000~2500 3229 300 53.8 12 98.4
6m
I Level flight Towing 4000~4500 3229 300 96.9 16 82
II Level flight Towing 4000~4500 3229 300 96.9 16 98.4
JZ-Y8F200W-02
AIRCRAFT FLIGHT MANUAL
SECTION IV
NORMAL PROCEDURES
4-141
June 30, 2012
Table 4-36b Backward C.G airdrop data
Platform
Flight
attitude
Form of
airdrop
Cargo size
Freight
parachute
Extraction parachute
Weight
(kg)
Altitud
e
(m)
Area
(m2
)
Qty.
Area
(m2
)
Weight of
parachute
assembly
(kg)
Length of
parachut
e cord
(m)
1m
Level flight at
platform
before frame
No.43
Gravity 500~1000 1.2 300 1
At platform
behind frame
No.43 with
speed of
5m/s
(Climbing)
Gravity 500~1000 1.2 300 1
4m
I Level flight Towing 2000~2500 2.3 300 5 5 12 25
II Level flight Towing 2000~2500 2.0 300 5 5 12 30
6m
I Level flight Towing 4000~4500 2.3 300 5 9 16 25
II Level flight Towing 4000~4500 2.0 300 5 9 16 30
Note
Single or successive drop is applicable to both gravity airdrop and towing
airdrop.
Airdrop or airborne with autopilot control
Autopilot airdrop or airborne is also available for the pilot or navigator.
(a) When the aircraft is balanced at the airdrop altitude, cut in the autopilot and the navigator
might control at the altitude ≮19685ft (6000m).
(b) Maintaince of flight status with autopilot is more reliable than manual control regardless
of single or running drop. However, attention should always be paid to operating status of
the autopilot, and be ready for an immediate off in case of any failure.
(c) The aircraft’s turning respondance to the autopilot tends to be somewhat hysteretic. In
case of indetectable banking on the instrument after the turning, press the button for
banking recovery to level off the aircraft.
JZ-Y8F200W-02
AIRCRAFT FLIGHT MANUAL
SECTION IV
NORMAL PROCEDURES
4-142
June 30, 2012
(d) For single airdrop of heavy cargo, especially whose weight is beyond 4t, even if the
altitude correction switch is powered on, the aircraft will slide at the descending rate of
6.6ft/s~9.8ft/s (2m/s~3m/s) after the cargo at platform I is separated. Therefore, the
autopilot should be cut out upon separation of cargo at platform I.
Caution
The nose tends to be sunk obviously when the autopilot is cut off. In this case,
hold the stick back timely and balance the aircraft with trim tab, then cut in the
autopilot again. The aircraft will climb with a rate of 9.8ft/s~16.4ft/s (3~5m/s)
after the separation of platform II from the aircraft. In case of running drop by
platform I and platform II, the autopilot can keep the aircraft in level flight.
Plateau airdrop
Features
(a) High altitude
The standard altitude of the drop zone in plateau is higher, and the terrain is more
complicated with accumulative of mountains. Generally, true altitude for airdrop is
3281ft~6562ft (1000~2000m) and sea level elevation is above 16404 ft (5000m).
The range tends to be increased with higher altitude, smaller air density, higher speed of
declining and high TAS of the aircraft.
In case of high altitude airdrop, the speed of aircraft approaches that of the min. level
maneuvering speed. As a result, stability and controlability tends to be degraded.
The altitude is higher and temperature lower in plateau, and the temperature inside cargo
compartment is especially low after the door is opened in winter, requiring the electric
personnel and airdrop personnel to work with oxygen mask, which is very inconvenient.
(b) Poor obstruction condition
Flat ground is rarely distributed in the mountainous western plateau, and the area is
relatively small. Therefore, the pattern establishment, entering direction and altitude of
airdrop are somewhat limited. Generally, the aircraft has to level up as soon as the
airdrop is completed so as to control the timming and radius of turning. Moreover, the
turbulent flow in flight and moderate/strong turbulence along the airway make it more
difficult for the pilot to follow the stipulated data when controlling the aircraft.
JZ-Y8F200W-02
AIRCRAFT FLIGHT MANUAL
SECTION IV
NORMAL PROCEDURES
4-143
June 30, 2012
(c) Drop zone difficult to be detected
With larger areas of land, fewer and smaller man-made landmarks and less accuracy of
map, the field for airdrop generally has to be searched as per latitude and longitude.
(d) Poor conditions of communication and navigation
Sometimes there are only small-sized short wave radio stations on site, limiting the
contact distance. As a result, timely ground guidance is somewhat difficult. The
navigation station is rarely distributed and with lower power, and due to terrain influence,
its receiving distance is comparatively nearer and the indication tends to be unstable.
(e) Poor guaranteed condition of weather
Information of current weather condition in airdrop region and the airway is generally
beyond control in plateau mountainous area where the meteorological environment is
complicated, and there are fewer meteorological stations which are far away from the
drop zone. Lacking the detailed information of wind, the airdrop tends to be less
accurate.
Preparation and operation
Besides general preparation and operation steps, pay attention to the following items:
(a) Collect information, collate and modify the information on the map. Study the terrain and
altitude of mountain within the airdrop region with maps of different scales. Select the
airway with the aid of obvious landmarks and terrain features and keep off the projecting
mountains.
(b) Altitude of airway should be 1969ft~3281ft (600~1000m) above the peak around, and the
point for level flight and sliding should be calculated strictly. After takeoff, it is necessary
to level up to stipulated altitude, and fly to the mountain area with benign function of
engine. The altitude of airway should rather be higher than lower, and under complicated
weather condition, climb up above the clouds where the visibility is better so that
turbulence, icing or possible engine failure are able to be handled.
(c) Work out the airdrop altitude and method for establishing the traffic pattern of entering or
going out of the drop zone as per standard altitude and obstruction condition. The true
altitude for airdrop should not be lower than 600m, In case that the differences between
terrain, standard altitude is obvious, set the altitude of airdrop and work out the method
for establishing the traffic pattern as per current situation. Raise the airdrop altitude in
poor airflow condition.
JZ-Y8F200W-02
AIRCRAFT FLIGHT MANUAL
SECTION IV
NORMAL PROCEDURES
4-144
June 30, 2012
(d) Standarized weather condition for airdrop: Total cloud cover within the airdrop region
should not exceed 5/10, and that below the altitude of airdrop not exceed 3/10, and the
visibility should be more than 5.4 n mile (10km).
(e) Obtain the max. takeoff weight as per standard altitude of airport, temperature, direction
and speed of wind and length of runway. Obtain min. fuel load of the aircraft and min. fuel
load for returning as per local weather condition and quantity of standby airport for
landing. Enough standby fuel should be reserved, and pay attention to min. fuel load for
returning in flight.
(f) Airdrop cargo packing and equipping of parachute: Given parachute quality and relatively
small load in opening status, the loading can not be too heavy. For avoidance of damage
for cargo without parachute upon touch-down, the four-layer hempen sack is preferred
and the cargo should be packed tight interior and loose exterior, with the weight of each
pack being 40kg.
(g) In case troubleshooting of the oxygen system can not be done, use the emergency
oxygen bottle timely and return to land immediately.
(h) High altitude airdrop makes latitudinal control of the aircraft more difficult, especially
under disturbance and turbulence. Thus, IAS should not below 173 kn (320km/h), and
turning bank not more than 15o
.
(i) The crew members should cooperate closely with each other to avoid idle run for the
sake of misoperation. Strictly follow the data in flight and strengthen the visual
observation for prevention of colliding with the mountain.
Formation airdrop (airborne)
Preparation
Except for the airdrop (airborne) preparation of single aircraft, the following details should
also be cared:
(a) Make clear the flight data of leader and wing for formation airdrop (airborne) and the
method for following these data in the air during the flight preparation.
(b) Decide the airdrop (airborne) entrance direction and method of course establishment as
per the field area, funnel condition and information of foe, etc.
JZ-Y8F200W-02
AIRCRAFT FLIGHT MANUAL
SECTION IV
NORMAL PROCEDURES
4-145
June 30, 2012
(c) Coordination of the leader and wing:
1) Confirm communication signal and work out shield command solution of the fleet
airdrop (airborne);
2) Confirm stipulations on airdrop (airborne) steps of the leader and the wing;
3) Work out solutions for airdrop (airborne) special treatment
Upon formation airdrop (airborne), both the leader and the wing should follow the stipulations
below:
(a) The leader should follow strictly the stipulated data and correct gently and accurately to
create favorable conditions for the wings to maintain their positions in formation flight.
(b) In case of any special circumstances, the leader should deal with the cases calmly,
decisively and correctly and commands timely.
(c) Each wing should maintain their positions in the fleet as per stipulated data and try their
best to drop items or airborne force at the same site as that of the leader.
(d) The wing should calculate the airdrop (airborne) data for conduct single airdrop (airborne)
timely and remind the leader of any severe mistake.
Main operation procedures of airdrop (airborne) for single aircraft in trail flight
(a) The leader should inform each wing of the calculated airdrop (airborne) data when
approaching the airdrop (airborne) track starting point. The leader commands “open the
door” 6~8min before the airdrop (airborne) and each wing begins timing. The door
opening begins with the last wing in a reverse order, with the interval of 5s. Each wing
navigator commands “No.6 opens the door” as per the stipulated interval, and reports
when the door is opened.
(b) After entering the airdrop track, the leader gives verbal command of lowering speed
4~5min before the airdrop (airborne), and each aircraft decreases the speed in a reverse
sequence from the last wing.
(c) Pilot and navigator of the leader search for the airdrop (airborne) field as per the terrain,
homming station and smoke screen tank, and correct the heading accurately as per the
latitudinal length of deviation. Inform the wing of such correction if more than 10o
.
(d) The leader gives verbal command of “preparation” 30s before the airdrop (airborne) and
follows the stipulated data as required. On receiving such command, each wing begins
timming at the moment of the leader (previous aircraft)’s first drop-out. The navigator
sends out airdrop (airborne) signal and command as per methods of timming and
parachute push.
JZ-Y8F200W-02
AIRCRAFT FLIGHT MANUAL
SECTION IV
NORMAL PROCEDURES
4-146
June 30, 2012
(e) When the leader completed the airdrop (airborne) within 1.5min, it sends out the verbal
command of “close the door”. When such command is received by the wing, the
navigator commands “No.6 close the door”.
(f) After each wing closes the door, the leader commands “increase the speed” and each
wing increases their speed separately as per the reverse sequence from back to front.
After the wing adjusted their positions in fleet, return to land.
Cautions for formation airdrop (airborne)
(a) On receiving the verbal command of airdrop (airborne) preparation, each wing should
keep his position in the fleet and is not allowed to correct the interval.
(b) The fleet should observe current weather condition along the course.
(c) The verbal command of leader must be clear and accurate in formation airdrop (airborne)
process, and both the leader and the wing should turn on the two ultra-short wave radios
simultaneously, and the wing should listen more than call.
Airdrop (airborne) at night
Features
(a) The terrain and landform of airdrop region tends to be less visible in dark light, making it
more difficult for drop zone searching.
(b) In the drop zone where there are illuminations of oil lamp, firewood or signal flare, etc.,
the observation range from the center of airdrop is further in distance than at daytime,
however, there are fewer landmarks.
(c) Airdrop effect checkout is more difficult at night, in case of a further entrance, the data
can not be corrected as per the previous deviation in general.
Preparation
Besides the preparation which is the same as that of the single aircraft during daytime, pay
special attention to the following points:
(a) Make clear the drop zone features, landmark position of surrounding lights and natural
reflective lights.
(b) Select an obvious and reliable entering point for airdrop. Landmark of auxiliary light is
required before or after entering the starting point if feasible.
(c) During the airdrop, label the white rubberized fabric on shielding line of the windshield
glass in dark night and the black rubberized fabric in moon night. Meanwhile, the sighting
position should also be labeled after obtaining the airdrop data for favor of sighting.
JZ-Y8F200W-02
AIRCRAFT FLIGHT MANUAL
SECTION IV
NORMAL PROCEDURES
4-147
June 30, 2012
(d) In case of accumulative of auxiliary lights along the airway, correct the direction with the
aid of its latitudinal distance of deviation, or drop as per the timming method.
(e) Lighting signal should be equipped within the cargo to be dropped. Meanwhile, flash the
landing light or navigation light to indicate completion of such drop for convenience of
ground search and reminding the ground personnel for shielding, thus guarantee their
safety.
Operation
(a) Check before takeoff
1) Get information about any variation of volume, weight, packing of the cargo and
performance of parachute.
2) The navigator should cooperate with the electric personnel and airdrop personnel
(paratrooper) to make clear the airdrop signal and group release, inform relative
personnel of cautions and operation in special circumstances.
3) Get information about weather condition of the airdrop region and the airway, along
with direction and speed of wind for airdrop and average wind so as to obtain the
airdrop data.
4) Mark the scale on windshield glass and label the rubberized fabric.
(b) Operation steps of entering the airdrop route is the same at that of the daytime.
Cautions for airdrop at night
(a) Familiarize and make clear the air-to-ground signal of communication, and guide the
aircraft for entering the drop zone correctly with required flashing lights. Preferable
timming of sending out the signal flare is after the entrance of final approach turn.
(b) Precise distance of the lighting point is not easy to be obtained at night, pay special
attention to avoid misjudge of the landmarks. Prevent the misrecognization of reflection
of cockpit light on the windshield glass as the sighting point.
(c) As the ambient temperature is low in winter, there might by water vapor and frost on the
windshield glass that negatively effect the direction distance sighting. Thus, it is
necessary to turn on the electric fan or pressure control/shutoff valve and wipe out the
water vapor or frost with dry cloth.
(d) Correction of airdrop data during a further airdrop is not allowed until the previous airdrop
effect is confirmed, so as to avoid more obvious error. Other safety measures adopted
are the same as that for daytime.
JZ-Y8F200W-02
AIRCRAFT FLIGHT MANUAL
SECTION IV
NORMAL PROCEDURES
4-148
June 30, 2012
Airdrop and airborne on the sea
Targets of airdrop on the sea are of fixed (i.e. island and the neaped and parking ship) and
movable (i.e. floating ship and personnel, etc). With fewer landmarks and available navigation
aids, the target is very difficult to be positioned. Lacking of wind information will make the airdrop
more difficult than that on land. See Table 4-37 for information of wind force, wave scale and
phenomenon of sea level.
Features
(a) The main targets for airdrop on the sea are island and ship, and the wind information has
to be obtained through real-time test and judgement by the crew members in air.
(b) Ships or personnel will frequently be stuck during airdrop (airborne) on the sea. Lacking
of auxiliary landmarks makes the sight of direction and distance more difficult. As a result,
they can not be detected and occupy the preset position timely.
(c) It is difficult to select proper airdrop (airborne) field in island where the terrain is rather
complicated. Some mountainous islands are up and down, while others are large but
with higher standard altitude along the lontitudinal area, which are not fitted for airdrop
and airborne.
(d) Rescue target search is more difficult. Most airdrop or airbone targeted the trapped ship
are performed in bad weather conditions of windy, low-clouds and poor visibility. Under
such circumstances, the aircraft is forced to enter at low altitude, bringing more
difficulties for target search.
JZ-Y8F200W-02
AIRCRAFT FLIGHT MANUAL
SECTION IV
NORMAL PROCEDURES
4-149
June 30, 2012
Table 4-37a Wind force, wave scale and phenomenon of sea level
Wind
force
Wave
scale
Wind speed
Name
of wave
scale
Average
height
of wave
(ft)
Phenomenon
ft/s kn
0 0 <3.3
Calm
sea
As smooth as the mirror, and the wave forms an
up-and-down surface of large area which is smooth.
However, there is no accumulative pointed wave.
1 1
3.3~
6.6
1.6~3.
8
Smooth
sea
0.328
Tiny wave (ripple) polishes as the scale under
sunshine.
2 1
6.6~
13.1
3.8~8.
1
Smooth
sea
0.656
Tiny wave (ripple) like the folded smooth paper.
Whenever there is surge, the wave accumulates on
the large scaled fluctuant surface.
3 2
13.1
~19.
7
8.1~1
1.9
Wavelet 1.969
Slight wave with sea-like color, and the wave is
recognizable only through careful observation.
4 3
19.7
~26.
2
11.9~
15.7
Slight
sea
3.28
The wave is not big but obvious with breakage at the
peak. Few waves are locally visible like the
white-colored flowers far away.
5 4
26.2
~36
15.7~
21.6
Moderat
e sea
6.562
The waves are shapable and the white-colored spray
is seen everywhere like blocks of clouds.
6 5
36~
45.9
21.6~
27
Rough
sea
9.843
Rough wave with high peak, and the spray deploys
along the bevel of wave at leeward slope of the peak.
The spray on the peak top is sliced by the wind in
filiform.
7 6
45.9
~55.
8
27~32
.9
Very
rough
sea
13.123
The sliced spray on the axis-like peak forms the
strip-shaped wave of white color along the wave
bevel.
8 6
55.8
~68.
9
32.9~
41
Very
rough
sea
18.045
Obvious long wave which is huge, covering the peak,
and the white-colored strip of spray can be seen.
9 7
68.9
~82
41~48
.6
Monster
wave
22.966
The spray strip covers the whole bevel of wave, with
some spray being at the trough.
10 8
82~
95.1
48.6~
56.2
Very
high
sea
29.526
Dense spray covers fully on the bevel of wave except
for somewhere at the wave base.
11 9
95.1
~10
8.3
56.2~
64.3
Mountai
nous
sea
37.730
Dense spray of white color lays on the sea, making
the sea to be white in color.
12 9
108.
3~1
21.4
64.3~
71.8
Mountai
nous
sea
45.931
The surface of sea is white in color, and the water
drop and billow are sprayed everywhere in the air,
which sharply decreased the visability.
JZ-Y8F200W-02
AIRCRAFT FLIGHT MANUAL
SECTION IV
NORMAL PROCEDURES
4-150
June 30, 2012
Table 4-37b Wind force, wave scale and phenomenon of sea level
Wind
force
Wave
scale
Wind
speed Name
of wave
scale
Averag
e
height
of wave
(m)
Phenomenon
m/s km/h
0 0 <1
Calm
sea
As smooth as the mirror, and the wave forms an
up-and-down surface of large area which is
smooth. However, there is no accumulative
pointed wave.
1 1 1~2 3~7
Smooth
sea
0.1
Tiny wave (ripple) polishes as the scale under
sunshine.
2 1 2~4 7~15
Smooth
sea
0.2
Tiny wave (ripple) like the folded smooth paper.
Whenever there is surge, the wave accumulates
on the large scaled fluctuant surface.
3 2 4~6
15~2
2
Wavelet 0.6
Slight wave with sea-like color, and the wave is
recognizable only through careful observation.
4 3 6~8
22~2
9
Slight
sea
1
The wave is not big but obvious with breakage at
the peak. Few waves are locally visible like the
white-colored flowers far away.
5 4
8~1
1
29~4
0
Moderat
e sea
2
The waves are shapable and the white-colored
spray is seen everywhere like blocks of clouds.
6 5
11~
14
40~5
0
Rough
sea
3
Rough wave with high peak, and the spray
deploys along the bevel of wave at leeward slope
of the peak. The spray on the peak top is sliced
by the wind in filiform.
7 6
14~
17
50~6
1
Very
rough
sea
4
The sliced spray on the axis-like peak forms the
strip-shaped wave of white color along the wave
bevel.
8 6
17~
21
61~7
6
Very
rough
sea
5.5
Obvious long wave which is huge, covering the
peak, and the white-colored strip of spray can be
seen.
9 7
21~
25
76~9
0
Monster
wave
7
The spray strip covers the whole bevel of wave,
with some spray being at the trough.
10 8
25~
29
90~1
04
Very
high
sea
9
Dense spray covers fully on the bevel of wave
except for somewhere at the wave base.
11 9
29~
33
104~
119
Mountai
nous
sea
11.5
Dense spray of white color lays on the sea,
making the sea to be white in color.
12 9
33~
37
119~
133
Mountai
nous
sea
14
The surface of sea is white in color, and the
water drop and billow are sprayed everywhere in
the air, which sharply decreased the visability.
JZ-Y8F200W-02
AIRCRAFT FLIGHT MANUAL
SECTION IV
NORMAL PROCEDURES
4-151
June 30, 2012
(e) Traffic pattern establishment is difficult. It is hard for the aircraft to follow the preset
course upon completion of the final leg when the visibility of the sea is low on its surface,
or when the drift is not properly corrected when the aircraft enters against the sun with
the target being invisible along the down-wind leg direction.
Preparation
(a) Get detail information of mission property and target position. Study the sea motion,
features of island distribution, rules and features of ship movement and signal setup
within target region. Make clear the division of work among the crew members on the
basis of finalized route and the listed method of target search within the region.
(b) Get mission guarantee information, weather forcast and variation and communication
rules of the target region.
(c) Make clear the method and cautions for rescue equipment airdrop prior to sea rescue.
The cargo packing should be waterproof and with colored mark, so that it will not break
after touch-down and be floated, which is convenient for observation and salvage.
(d) Upon duration calculation, time of search and stay at the target region should be fully
considered and enough fuel should be reserved. Work out solutions for special cases.
Operation
(a) Enter the target region as per the preset air route and search the target correctly at
proper altitude. Four methods are adopted in target search, i.e. single air route search,
square search, grid search and sector search. Generally, the first method is adopted as
per the target position and possible range of float, and attention should be paid to take
full advantage of the airborne radar.
Proper altitude of research is generally 2625ft~3281ft (800~1000m). The field of view will
be narrowed at low altitude, while at an overhigh altitude the target tends to be
indetectable. For an object judgement, lower the altitude when the target is detected and
fly from the sideway.
(b) Upon selection of direction for entrance, area and shape of the target region should be
considered and try to avoid entering from the direction of sun. Genreally, the aircraft
enters with reference of the island and fixed object on ground and with the aid of
navigation station (broadcasting station) and positioning radar near the target region. In
case of movable target, enter along the direction paralleling or vertical to the moving
target.
JZ-Y8F200W-02
AIRCRAFT FLIGHT MANUAL
SECTION IV
NORMAL PROCEDURES
4-152
June 30, 2012
(c) Obtain the data of average wind. Generally, the wind of short sea is stronger than that of
the land area but weaker than that of the open sea. The wind of open sea is featured with
stable direction and less variation. Therefore, the data of average wind obtained through
radar is relatively accurate.
At the low altitude, average wind data can be obtained through the judgement of wind
force scale as per the wave. However, the speed of wind is slightly weaker than that in
clouds on average, i.e. 1.3 times as that of the sea wind.
(d) Airdrop or airborne of small target like ship is generally entered at low altitude against the
wind. For less effect of wind and high rate of hit, cargo with parachute is generally
dropped at the altitude of 984ft~1312ft (300~400m), and without parachute 656ft (200m).
(e) Method: Conduct the initial drop in trail, and then obtain the corrected data for further
airdrop as per the deviation. Upon direction and distance sight of the movable target, the
lead should be taken into consideration. Correct moving error during traffic pattern
establishment process for avoidance of losing the target.
(f) Select the sighting point. For convenience of salvage, when targeting the ship for airdrop,
the sighting point should slightly exceed the target. For cargo without parachute, deviate
one safety distance rather than align directly with the ship for sighting. This is for
avoidance of accidental injury.
Low-altitude airdrop (below 1312ft (400m))
Features
(a) Wind test information is susceptible to the terrain. The wind of drop zone and on the air
route are obviously different, thus sighting data calculation can not be counted on the en-
routewind data tested too early.
(b) Target search being difficult. The flight field of view is narrowed at low altitude and the
overall terrain is hard to be observed, and the target search is susceptible to the tarrain.
Moreover, the lowered altitude added more difficulties for recognition of the drop zone.
(c) Shorter period of time to judge direction and distance of correction. Severe turbulence at
low attitude makes it hard to follow current flight data, thus shortened the period of time
to judge direction and distance of correction.
(d) Higher hit rate and more concentrated dispersion pattern. The drop time tends to be
shortened and the airdrop is less susceptible to the wind at low altitude, improving the
accuracy of direction and distance sighting with the aid of landmarks. When sighting with
the dropping angle, the deviation tends to be smaller with the same error.
JZ-Y8F200W-02
AIRCRAFT FLIGHT MANUAL
SECTION IV
NORMAL PROCEDURES
4-153
June 30, 2012
(e) The concussion of touch-down is reduced for cargo without parachute since it has
already dropped on ground before the descending speed reaches its limit.
Preparation
(a) Entering point should have obvious landmarks or navigation equipment for detection in
time and accurate passing-through. The distance between the entering point and the
drop zone is generally 13.5n mile~21.6n mile (25~40km) and the terrain should be as flat
as possible for convenience of search, and the entering direction should be less effected
by the sunlight.
(b) Work out the method of drop zone research, the terrain nearby, landmark feature and the
relations of their positions. Chimney, mountain top and huge constructions which are
detectable are ideal landmarks. But attention must be paid to keep the safety altitude so
as not to collide with the obstructions.
(c) Work out favorable altitude for the airdrop as per mission requirement, terrain and
sighting method adopted. Generally, the altitude of airdrop for cargo without parachute is
492ft~984ft (150~300m) so that the airdrop will be more effective and the concussion of
touch-down will be weakened.
(d) Work out solutions for special cases and troubleshooting of the aircraft. Such solution
must be suitable when the drop zone can not be searched out and under complicated
weather conditions.
Operation
(a) Get the wind information. This is done in real-time through the drop zone. When testing
the wind in air, smoke, trees and crops on the ground should be observed together with
reference of the radar for judgement of direction and speed of wind.
(b) Method for searching the drop zone. After flying over the starting point of air route, follow
strictly the flight data as stipulated. Check direction and distance as per the obvious
landmarks at both sides of the air route for avoidance of any readily diversion or search
failure due to excessive deviation. Search in advance as per preset time and position of
landmark. Report the dispatcher or raise the altitude in case of any search obstacles.
(c) Sighting. Timming with the aid of landmarks or area above the target. Try to stabilize the
flight status in case of any turbulence to prevent the mislead signal of “drop” triggered by
sighting point jump due to aircraft turbulence.
JZ-Y8F200W-02
AIRCRAFT FLIGHT MANUAL
SECTION IV
NORMAL PROCEDURES
4-154
June 30, 2012
Airdrop with the aid of navigation station
It is available in complicated weather conditions and when the ground target is indetectable.
Low power rate of movable navigation station, lacking of average wind information, high altitude,
indication error difference of the aircraft all decrease the hit rate and enlarged the area of airdrop
to some extent. For flight safety, training airdrop is only available for cargo with parachute in
general.
Preparation
(a) Study the air route and work out the method for entering the airdrop route. Generally, for
reducing the drop error, the aircraft will enter the drop zone as per upwind direction.
Therefore, the route of navigation airdrop varies as per the wind direction. After entered
the area above the movable navigation station of the drop zone, establish the route as
per the current wind direction.
(b) Get clear understanding about the operating features of navigation station and radio
compass (ADF), position, frequency, calling signal and performance of the navigation
station near the drop zone, indication error of ADF on the aircraft, pointer degree and
timming for testing and calibration when flying over the navigation station, as well as the
treatment of ADF disturbance.
(c) Study the weather condition. Get information of weather focast, types of cloud, direction
and speed of wind on ground, threathening of hazard weather and work out feasible
solutions. The navigation airdrop is generally conducted amid or above the stable cloud
layer rather than in the cumuliform cloud.
Operation
(a) Sighting of direction. When entered the airdrop route, fly home actively. During the
navigation flight, perform the correction timely as per indication of ADF and azimuth
finder according to that of final leg correction during instrument landing.
(b) Sighting of distance. If the airdrop is above the navigation station, the movable
navigation station is required to be located right below the place from where the airdrop
signal is sent out. The “drop” signal is sent out when the aircraft is flying over the
navigation station.
Timming airdrop above the navigation station. Timming at the moment when the aircraft
flies over the navigation station. Follow the preset track and drop at the point of sending
signal, so that the error of direction can be somewhat corrected.
JZ-Y8F200W-02
AIRCRAFT FLIGHT MANUAL
SECTION IV
NORMAL PROCEDURES
4-155
June 30, 2012
(c) Judgement for the instance of flying over the navigation station. This is the key for
seizing the timming of drop. Judge with the aid of indication, and listen carefully.
Sometimes the pointer tends to swing in flight when there is radio disturbance or signal
from the navigation station. For avoidance of misleading, postion of the aircraft can not
be judged being above the navigation station until the pointer made a reversal turn at
60o
~90o
leftward and rightward.
Airdrop with the lack of landmark, wind information and guidance
Features
(a) Without landmarks, range and center of the airdrop will not be settled and detected easily,
and sight of direction and distance is performed only with the aid of landmarks.Under
such circumstance, misjudgement will lead in big error or even drop mistake.
(b) Airdrop without wind information. In this case, the crew members have to get the wind in
the air for data calculation. Therefore, the calculation error will be boardened which will
be affective to the airdrop precision.
(c) Airdrop without guidance. When the aircraft enters the final leg of the airdrop route, the
error of direction and distance is not likely to be timely guided by the ground dispatcher.
Preparation and operation
(a) Prepare seriously. Correct the largescale map carefully as per the shooting picture. Since
its accuracy is somewhat affective to track maintaining, target search and airdrop
precision, thus detailed research and correct calibration is required.
(b) The air route should be convenient for track following with obvious and reliable starting
point. The proper distance should be 16.2n mile~21.6n mile (30~40km). Reasearch the
landmarks at both sides of air route and center of the drop zone in detail, and select 2 to
3 directions and distances as auxiliary point of check and sighting. Make calculation;
mark the data of distance and time.
(c) Familiarize with features and positions of the terrain and landscape around the drop zone
center of the airdrop route. Work out entering direction, distance and method of sighting.
(d) Seasonal influence to terrain and landscape. Judge the variation and development of
wind as per history information and data obtained through real-time test at the nearby
meteorological station.
(e) Work out the indication error of radar and its influence for division of labor among the
crew mebers when entered the airdrop route.
JZ-Y8F200W-02
AIRCRAFT FLIGHT MANUAL
SECTION IV
NORMAL PROCEDURES
4-156
June 30, 2012
(f) Requirement of drop zone research
1) Follow strictly the flight data along the preset route as per the ground preparation.
Take advantage of each navigation equipment for track following and fly over the
starting point of the air route timely and accurately.
2) When entered the starting point, calculate sectionally with the aid of landmarks and
control pointwise, adjust the speed timely with margin, follow strictly the track and
data so as to arrive as per estimated time.
3) The crew members should cooperate closely with each other as per the division of
labor. Correct the drift and follow the track according to features and positions of
drop zone terrain and landscape, and search the target from close to the distant,
from the sideway to the middle part and from line to point.
(g) Obtaining the average wind
1) Source of wind information. Obtain the wind data with the aid of rada. Calculate the
resultant wind above two flying levels (done by the last wing during formation flight)
at the altitude of 656ft~984ft (200~300m) as per the indicated drift and ground
speed, and judge with the reference of ground smoke and by means of smoke
screen tank release.
2) Obtain the airdrop data based on an integrated analysis of wind information.
Generally, the value of wind in clouds is bigger than that of the true value. The
correction is 75% in small scale of wind and 100% in large scale of wind. Airdrop
right towards the center is available with wind speed of not more than 6.56ft/s (2m/s)
and drift of ±1o
.
3) Direction and distance correction as per the selected landmarks. Settle the auxiliary
point of sighting with timming method and sighting angle as the aid as per the
current situation.
Cautions
(a) Make a tight plan and organize intensively, strictly follow the stipulation in various
weather conditions.
(b) Sthrengthen the on-site command and test the scale of wind timely. Timely command for
ceasing the airdrop in case of over deviation that is threatening to safety of the aircraft.
(c) The crew members should cooperate closely with each other and make a clear division
of labor, remind each other as required, supervise timely and follow the stipulations for
avoidance of target misrecognization.
JZ-Y8F200W-02
AIRCRAFT FLIGHT MANUAL
SECTION IV
NORMAL PROCEDURES
4-157
June 30, 2012
(d) During formation flight airdrop, the deputy leader and wing should correct timely any
mis-calculated data of the leader which is obvious.
(e) Airdrop at night is featured of no wind information and ground guidance.
Rescue
(a) The cargo compartment can be equipped with 72 sets of stretchers arranged in three
rows (parallel to longtitudinal axis of the aircraft) and six lines (vertical to longtitudinal
axis of the aircraft) and four levels, one line of seats to the left of cargo compartment
available for 3 medical care personnel and 17 walking injuries, as a result, total number
of person carried is 92. Each stretcher and seat is equipped with oxygen device and their
working condition is required for serious check after the mounting of stretcher support.
Meanwhile, be sure that the masks are well covered.
(b) Get each first-aid equipment and sanitary equipment at their positions before flight. The
equipment include first-aid medicine, standby oxygen and sewage drainer, etc. The
medical equipment should be fixed reliably and with anti-shock protection.
(c) The pilot should control the aircraft gently and avoid excessive climbing and descending
rate.
(d) Check oxygen supply condition of each wounded personnel in flight and increase the
supply quantity if necessary. Emergency oxygen supply is available to the severe
wounded and personnel with breathing difficulty. Control the oxygen consumption as per
the duration period of time and pay attention to application of compartment heating.
JZ-Y8F200W-02
AIRCRAFT FLIGHT MANUAL
SECTION IV
NORMAL PROCEDURES
4-158
June 30, 2012
Low-altitude flight
Low-altitude flight refers to the flight at an altitude 328ft~3281ft (100~1000m) above the
ground or the water. In this case, the aircraft is able to take full advantage of terrain, ground
object and cloud for shielding, which is strategically significant so that the aircraft will not likely to
be detected by the foe. Such flight is available for rescue airdrop, forest fire extinguishment and
other missions at peace time. Thus mastered flight skill is needed to fulfill the requirement during
war and peace times.
Features
(a) Severe threathening of obstruction and turbulence, and sometimes the flight altitude
requires frequent alternation as per the terrain feature.
(b) Aircraft and engine troubleshooting is hard to be done.
(c) Lower TAS, more consumption of engine fuel, shortened effective distance, smaller
range and worse performance of radio and radar equipment.
(d) The landmarks are broadened at low altitude so they are easily to be scaled up manually
and prolonged visually. With higher speed of relative motion between the aircraft and the
ground, the landmark is detected late and in case of terrain fluctuation, the full
appearance of landscape and their relations of position are hard to be distinguished,
bringing difficulties to landmark detection and recognition.
(e) Lower speed and pendulum direction of wind. As affected by the terrain, the wind varies
obviously. Generally, the weather at low altitude changes alternatively and the visibility is
worse.
Preparation
(a) The air route should be shielding-effectively, reliable and convenient for maneuvering
flight. It should approach the linear landmarks with less cuves and turning points, and
especially, the starting point of airdrop route should approach the landmarks of dot shape
which are obvious and reliable. Meanwhile, take full advantage of the radio navigation
station.
(b) Study the air route with large-scale map of the latest version. Make clear and memorize
the main check point and features of turning point. These points should be searched and
recognized by finding out the max. standard altitude within the range of 25km to the left
and right side of the air route, and then work out min. altitude of flight at each section.
(c) Work out solutions for special cases and make clear the division of labor.
JZ-Y8F200W-02
AIRCRAFT FLIGHT MANUAL
SECTION IV
NORMAL PROCEDURES
4-159
June 30, 2012
Operation
(a) Follow strictly the data of true flight altitude that checked by radio altimeter. Level up the
aircraft with elevator tab. The descending altitude can not be excessive and strengthen
external observation during the descent process.
Keep the IAS not lower than 216kn (400km/h) at low altitude to reserve maneuvering
space for special cases or climbing. Adjust the throttle angle accordingly when
alternating the flight altitude.
Follow strictly the heading. Correct any variation of drift or deviation of track accurately
and timely, and follow strictly the corrected heading.
Upon turning, fly over the turning point accurately and control strictly the timming of turn.
(b) Follow the navigation of ADF and landmarks and refer to the radio and radar if
necessary.
The landmark should be observed from close to the distant and from the sideways to
forward direction, and seize its outstanding features and symptom.
(c) Thepilot should pay attention to the overall situation and divide attention reasonably.
Frequent external observation is required, keep the flight data as per the indication and
avoid long-time work in the cockpit.
(d) Make clear the division of labor among each crew member
The aircraft commander should pay attention to the overall situation and strengthen the
judgement and troubleshooting in special cases.
For mitigation of fatigue in flight, pilot and copilot can control the aircraft alternatively with
clear handover, so as to prevent the aircraft from control-free status. The pilot controlling
the aircraft should be concentrated on maintaining the flight status, and the copilot
should focus more on external observation, and check flight data and operating status of
the aircraft and the engine as required, assisting the pilot’s operation.
Besides flight data calculation, the navigator should pay more attention to external
observation so as to get the current position of the aircraft and remind the pilot to follow
the flight data.
JZ-Y8F200W-02
AIRCRAFT FLIGHT MANUAL
SECTION IV
NORMAL PROCEDURES
4-160
June 30, 2012
Flight in summer and winter
Winter flight
Features
(a) The engine power rate tends to be increased with lower temperature and thicker air, and
the takeoff and running distance of aircraft are shortened, while the Max. speed of level
flight and ceiling limit are increased.
(b) Strengthen the check of anti-icing and deicing system, and operate the anti-icing and
deicing equipment correctly as required.
(c) Temperature difference inside and outside the cockpit will cause water vapor and froast
at inner wall of the windshield glass which might negatively effect the visual field of pilot.
Therefore, they must be wiped out with dry cloth and electric fan before taxiing and
during aircraft taking off and running. Clean the water vapor and froast by means of
windshield glass heating if necessary.
(d) When the ground is covered with heavy snow, the landscape varies that the rivers, lakes
and towns become illegible with exception of railway and highway. The runway
approaches the snow-covered ground in color, thus search and identify of airport tend to
be more difficult.
(e) The reflection of light on the snow will cause negative effect to the vision, especially at
low altitude. Therefore, excessive external observation is not suggested. When landing
on the snow-covered runway, the landmarks are broadened at low altitude so they are
easily to be scaled up manually and prolonged visually.
(f) The wheel might be slided and out of control when the aircraft is taxiing on the snow or
ice-covered ground. Perform the taxiing as per relavent requirement.
JZ-Y8F200W-02
AIRCRAFT FLIGHT MANUAL
SECTION IV
NORMAL PROCEDURES
4-161
June 30, 2012
Features of operation and maintenance
(a) Takeoff with froast is strictly prohibited. Clear the ice and froast away before takeoff and
check each air vent for ice blockage. Check the sealing system of cockpit for icing after
engine run.
(b) Check each pipe, duct, tube, conduit and their fittings for oil seepage and icing. Insolate
the buffer strut of landing gears for warmup in low temperature to prevent air leakage.
(c) It is necessary to drain off the water in fuel system as per localized condition before each
flight and after refilling of fuel to prevent icing.
(d) Heat the engine before the engine run when the temperature is below -25o
C. Warmup
after the engine run. Engine heating is allowed by advancing the throttle to 50o
only when
the oil temperature reaches 20o
C above. Generally, the equipment should be preheated
for a period of 2min before their service.
(e) If the aircraft is parked for a long time (for exemle through the night) at a temperature
below -15o
C, the battery should be removed for prevention of cold damage.
Summer flight
Features
(a) The engine power rate tends to be decreased with higher temperature and thiner air in
summer. When the IAS is settled, TAS is higher than that in winter. The distance of
takeoff and running is longer, Max. level flight speed and ceiling limit of the aircraft are
both reduced, and engine troubleshooting are hard to be done.
(b) In summer, the weather changes alternatively, the convection cloud grows quickly, and
the thunderstorms are frequent, with local parts being hard to be forcasted accurately.
Therefore, attention must be paid to weather alternation in flight to avoid entering into the
thunderstorm regions.
(c) Ambient temperature is lower at high altitude which might also leads to icing, so enough
attention must be paid.
(d) Avoid the application of brake in taxiing to prevent overheat damage.
(e) Make reasonable use of the airborne electrical equipment and shut off when they are
nolonger used, so as to prevent overheat damage.
(f) Relavent personnel should have a good rest in hot summer.
(g) It is necessary to check the tyre for normal pressure, and the discharger and bounding
jumper for reliable connection. Generally, the fuel should not be over loaded in summer
flight.
JZ-Y8F200W-02
AIRCRAFT FLIGHT MANUAL
SECTION IV
NORMAL PROCEDURES
4-162
June 30, 2012
Features of operation and maintenance
(a) The aircraft is likely to be rusted at its metal parts with more rain and high humidity. For
the sake of insolation, the tyres and plastics are likely to be aged and cracked and the
windshield glass discolored and deformed. Therefore, ventilate the aircraft after the rain
and cover the cloth daily.
(b) Drain off the water before each flight and after refilling of fuel for prevention of air
obstruction due to overheat of the system.
(c) To avoid harm of the thunder storm, put the wheel chock and the tail support at required
position, cover the cloth and position the bounding jumper as required after each flight.
(d) The engine start is more difficult at high temperature. The time for engine start should be
controlled strictly to prevent overheat and excessive of operation period on ground. After
engine run, it is allowed to turn on the oil ejection cooler, but remember to turn it off
before takeoff.
(e) Generally, the cockpit temperature ragulator is positioned at 16o
C. Power on the vent
switch before pressurization, and turn on the turbine cooler after pressurization. After the
turbine cooler is turned on, the air temperature inside the tube can be lowered by about
30o
C~50o
C.
JZ-Y8F200W-02
AIRCRAFT FLIGHT MANUAL
SECTION V
PERFORMANCE
5-1
June 30, 2012
PERFORMANCE
GENERAL
In comparison with the prototype aircraft, it has no difference in aerodynamic characteristic
when the doors are in closing condition, and the characteristic of the power plant slightly
decreases since the air conditioning system increases the amount of air introduced: the
capibility to achieve climb and level fight slightly weakens; yet the capibility to take off is about
the same as that of prototype.
AIRCRAFT FLIGHT PERFORMANCE CALCULATION AND
CONVERSION CURVE
Aerodynamic correction value
Aerodynamic correction value is shown in Figure 5-1 and Figure 5-2.
Temperature difference curve
Temperature difference curve is shown in Figure 5-3.
Correction of wind speed and direction
Correction of wind speed and direction is shown in Figure 5-4.
Airport elevation and atmosphere conversion
Airport elevation and atmosphere conversion is shown in Figure 5-5.
Temperature gauge correction
Temperature gauge correction is shown in Figure 5-6.
JZ-Y8F200W-02
AIRCRAFT FLIGHT MANUAL
SECTION V
PERFORMANCE
5-2
June 30, 2012
Vb(km/h)
Vz(km/h)
550
500
400
300
300 400 500
Figure 5-1a Aerodynamic correction curve of indicated airspeed
H(m)
-250
-50
-100
-150
-200
300 400 500 Vb(km/h)
Figure 5-1b Aerodynamic correction curve of indicated airspeed
JZ-Y8F200W-02
AIRCRAFT FLIGHT MANUAL
SECTION V
PERFORMANCE
5-3
June 30, 2012
H(ft)
-820
-164
-328
-492
-656
162 216 270 Vb(km/h)
Figure 5-2a Aerodynamic correction curve of altitude
0
1000
2000
3000
4000
5000
6000
7000
8000
9000
10000
H(m)
-50 -40 -30 -20 -10 0 10 20 30 40 t(℃)
-5 5
-15
15
-25
25
-35
35
-45
45
-55
-65
-75
-85
Figure 5-2b Aerodynamic correction curve of altitude
JZ-Y8F200W-02
AIRCRAFT FLIGHT MANUAL
SECTION V
PERFORMANCE
5-4
June 30, 2012
-85
-75
-65
-55
-45
-35
-25
-15
-5
5
15
25
35
45
difference value(
o
C)
32808
29528
26247
22966
19685
16404
13123
9843
6562
3281
0
H(ft)
-50 -40 -30 -20 -10 0 10 20 30 40
Figure 5-3a The difference between standard atmosphere temperature and non-standard
temperature
m/s m/s
50
50
50
40
40
40
30 30
30
20 20
20
10 10
10
0
10°
20°
30°
40°
50°
60°
70°
80°
90°
100°
110°
120°
130°
140°
150°
160°
170°
180°
m
/s
Forecasted
w
indspeed
m
/s
Forecasted
windspeed
m/sWind speed crosswind component
Wind speed headwind component Wind speed tailwind component
Figure 5-4a Wind speed and heading correction curve during takeoff and landing
JZ-Y8F200W-02
AIRCRAFT FLIGHT MANUAL
SECTION V
PERFORMANCE
5-5
June 30, 2012
(ft/s) (ft/s)
164
164
5098
131
13198 989866 66
6633 33
330
10°
20°
30°
40°
50°
60°
70°
80°
90°
100°
110°
120°
130°
140°
150°
160°
170°
180°
(ft/s)
Forecasted
w
indspeed
(ft/s)
Forecasted
windspeed
(ft/s)Wind speed crosswind component
Wind speed headwind component Wind speed tailwind component
39
Figure 5-4b Wind speed and heading correction curve during takeoff and landing
Altitude(ftm)
Pressure(psi)
8.70 10.15 11.60 13.05 14.50
9843
0
1640
3281
4921
6562
8202
11483
13123
14764
Figure 5-5a Airport elevation and atmospheric pressure conversion curve
JZ-Y8F200W-02
AIRCRAFT FLIGHT MANUAL
SECTION V
PERFORMANCE
5-6
June 30, 2012
(m)
(mmHg)
4000
3000
2000
1000
0
500 600 700 800
Airport
elevation
Atmospheric
pressure
Figure 5-5b Airport elevation and atmospheric pressure conversion curve
Indicated
temperatureo
C
Atmospheric
temperature o
C
Figure 5-6 Indicated value of temperature gauge corrected to atmospheric static temperature
curve
JZ-Y8F200W-02
AIRCRAFT FLIGHT MANUAL
SECTION V
PERFORMANCE
5-7
June 30, 2012
MAIN PERFORMANCE OF FOUR ENGINES
Takeoff and landing performance
Data of takeoff and landing performance
During takeoff and landing, flap deviation angle are 25o
and 35o
respectively. Takeoff and landing
performance of difference weight on concrete runway at sea level in ISA is shown in Figure 5-1
and Figure 5-7.
Figure 5-1a Takeoff and landing performance
Takeoff weight (t) 45 49 52 56 61
Liftoff speed(km/h) 102 107 111 119 129
Takeoff taxiing distance(m) 1890 2635 2762 3100 4167
Rolling distance (m) 2736 3192 3645 4337 5256
Landing weight (t) 40 46 50 52 58
Touchdown speed (km/h) 103 111 116 119 130
Landing roll distance (m) 2116 2569 2956 3117 3445
Total landing distance (m) 3563 4183 4429 4659 5466
Note
f) Runway friction factor during takeoff is set as 0.035, liftoff AOA is 8o
.
g) Safe takeoff altitude is taken as 49.2ft.
h) Brake friction factor is taken as 0.2.
i) Landing gliding altitude is taken as 49.2ft. Gliding angle is 3o
. flare section
g-load increaseΔny is 0.15, flare starting altitude h is 32.8ft.
Figure 5-1b Takeoff and landing performance
Takeoff weight (t) 45 49 52 56 61
Liftoff speed(km/h) 188 198 206 220 238
Takeoff taxiing distance(m) 576 721 842 945 1270
Rolling distance (m) 834 973 1111 1322 1602
Landing weight (t) 40 46 50 52 58
Touchdown speed (km/h) 191 205 215 220 240
Landing roll distance (m) 645 783 901 950 1050
Total landing distance (m) 1086 1275 1350 1420 1666
JZ-Y8F200W-02
AIRCRAFT FLIGHT MANUAL
SECTION V
PERFORMANCE
5-8
June 30, 2012
Note
a) Runway friction factor during takeoff is set as 0.035, liftoff AOA is 8o
.
b) Safe takeoff altitude is taken as 15m.
c) Brake friction factor is taken as 0.2.
d) Landing gliding altitude is taken as 15m. Gliding angle is 3o
. flare section
g-load increaseΔny is 0.15, flare starting altitude h is 10m.
Takeoff and landing curve
During normal operation of four engines and at standard atmosphere condition, takeoff and
landing curve is shown in Figure 5-7.
Climbing performance
During normal operation of four engines, the main climbing performance data is shown in
Figure 5-2. For detailed data, please see Table 5-9. The climbing performance curve is shown in
Figure 5-8.
10m。V(km/h) L(m)
250 3500
2500200
1500150
100 500
40 45 50 55 60 G(t)
Vjd
Vld
Lzl
Lqfh
Lqf
Lzjh
Figure 5-7a Takeoff and landing performance curve
JZ-Y8F200W-02
AIRCRAFT FLIGHT MANUAL
SECTION V
PERFORMANCE
5-9
June 30, 2012
H(km)
10
8
6
4
2
0 2 4 6 8 10 12 Vy(m/s)
Vks(km/h)
L(km)
75 150 225 300 375
100 200 300 400 500
Gqf=51t
54t
61t
56t 61t
51t
Vy
Vks54t
61t
Figure 5-7b Takeoff and landing performance curve
H(ft)
32808
26247
19685
13123
6562
0 6.56 13.12 19.69 26.25 32.81 39.37 Vy(tt/s)
Vks(kn)
L(n mile)
40 81 121 162 202
54 108 162 216 270
Gqf=51t
54t
61t
56t 61t
51t
Vy
Vks54t
61t
Figure 5-8a Climbing curve of four engines at rated status
JZ-Y8F200W-02
AIRCRAFT FLIGHT MANUAL
SECTION V
PERFORMANCE
5-10
June 30, 2012
H(km)
10
8
6
4
2
0 2 4 6 8 10 12 Vy(m/s)
Vks(km/h)
L(km)
75 150 225 300 375
100 200 300 400 500
Gqf=51t
54t
61t
56t 61t
51t
Vy
Vks54t
61t
Figure 5-8b Climbing curve of four engines at rated status
Table 5-2a Main climbing performance data of four engines
Takeoff weight(t)
Parameter
49 51 54 56 61
Service ceiling(ft) 34104 32972 31250 29774 27313
Climb time(min) 39.5 36.47 43.47 46.55 49.9
Climb distance(n mile) 163 151 181 196 211
Table 5-2b Main climbing performance data of four engines
Takeoff weight(t)
Parameter
49 51 54 56 61
Service ceiling(m) 10395 10050 9525 9075 8325
Climb time(min) 39.5 36.47 43.47 46.55 49.9
Climb distance(km) 301 279 336 363 390
Note
Climb at the rated regime of four engines.
JZ-Y8F200W-02
AIRCRAFT FLIGHT MANUAL
SECTION V
PERFORMANCE
5-11
June 30, 2012
Level flight performance
When four engines work at the maximum regime and rated regime and flight weight is 49t,
the maximum level flight speed at different altitude is shown in Table 5-3.
Table 5-3a Max. level flight speed(G=49t)
Flight altitude(ft)
Engine regime
0 6562 13123 19685 26247 32808
Max. regime 302 319 335 342 344 340
Rated regime 281 301 316 332 328 313
Table 5-3b Max. level flight speed(G=49t)
Flight altitude(m)
Engine regime
0 2000 4000 6000 8000 10000
Max. regime 560 590 621 633 637 630
Rated regime 520 557 586 615 608 580
Range and duration
Duration performance data
Cruising altitude is 8000m, reserve fuel is 1.6t, the range and duration of aircraft is shown in
Table 5-4.
Table 5-4a Duration performance
Takeoff weight (t) Loading capacity(t) Fuel quantity (t) Range (n mile) Duration(h)
49 0 12.867 1596 6.07
51 0 14.867 1896 7.55
53.353 0 17.22 2214 8.39
58.353 5 17.22 2113 8.02
61 8 16.867 2008 7.48
61 10 14.867 1699 6.36
61 15 9.867 950 3.6
61 20 4.867 240 0.85
JZ-Y8F200W-02
AIRCRAFT FLIGHT MANUAL
SECTION V
PERFORMANCE
5-12
June 30, 2012
Table 5-4b Duration performance
Takeoff weight (t) Loading capacity(t) Fuel quantity (t) Range (km) Duration(h)
49 0 12.867 2955 6.07
51 0 14.867 3512 7.55
53.353 0 17.22 4100 8.39
58.353 5 17.22 3913 8.02
61 8 16.867 3719 7.48
61 10 14.867 3146 6.36
61 15 9.867 1759 3.6
61 20 4.867 444 0.85
Relative kilometer fuel consumption curve
The relationship between relative kilometer fuel consumption Ce and flight Mach number is
shown in Figure 5-9.
Ce
kg(km·t)
0.12
0.11
0.10
0.09
0.08
0.07
0.06
0.30 0.35 0.40 0.45 0.50 0.55 0.60 M
60
68
77
88
100
116
134
Ghs=155
Figure 5-9 Curve for relation between relative kilometer fule consumption Ce and conversion
weight and Mach number
JZ-Y8F200W-02
AIRCRAFT FLIGHT MANUAL
SECTION V
PERFORMANCE
5-13
June 30, 2012
Conversion formula Ghs= flightG•
PH
Po
Relative kilometer fuel consumption formula: Ce=
flightG
q
In the formula: Po-standard atmosphere pressure at sea level, PH- Atmosphere pressure at
actual flight altitude, q- Fuel consumption per kilometer.
Stalling speed during level flight
Under standard atmosphere condition, stalling speed during level flight with a flap angle 0o
is shown in Figure 5-5, stalling speed during level flight with a flap angle 25o is shown in Figure
5-6, and stalling speed during level flight with a flap angle 35o is shown in Figure 5-7.
Table 5-5a Stalling speed during level flight at flap 0o
(Indicated speed, unit: kn)
Flight weight(t)
Altitude(ft)
45 47 49 51 53 55 57 59 61
0 113 116 118 120 123 125 127 130 132
3281 113 116 118 120 123 125 128 131 133
6562 113 116 118 121 124 127 130 133 136
9843 114 117 120 123 126 129 132 135 138
13123 116 119 122 125 129 132 134 138 141
19685 120 124 127 131 134 138 141 144 147
22966 123 127 130 134 138 141 145 148 151
26247 126 130 134 138 141 145 148 152 156
Table 5-5b Stalling speed during level flight at flap 0o
(Indicated speed, unit: km/h)
Flight weight(t)
Altitude(m)
45 47 49 51 53 55 57 59 61
0 209 214 218 223 227 231 236 240 244
1000 209 214 218 223 227 231 237 242 247
2000 209 214 219 224 230 235 240 246 251
3000 211 216 222 228 233 239 245 250 256
4000 214 220 226 232 238 244 249 255 261
6000 223 229 236 242 248 255 261 267 273
7000 228 235 241 248 255 261 268 274 280
8000 234 241 248 255 261 268 275 282 288
JZ-Y8F200W-02
AIRCRAFT FLIGHT MANUAL
SECTION V
PERFORMANCE
5-14
June 30, 2012
Table 5-6a Stalling speed during level flight at flap 25o
(Indicated speed, unit: kn)
Flight weight(t)
Altitude(m)
45 47 49 51 53 55 57 59 61
0 98 100 188 102 106 108 110 112 113
3281 98 100 188 102 106 108 110 112 113
6562 98 100 188 102 106 108 110 112 113
9843 98 100 188 102 106 108 110 112 114
13123 98 100 188 102 106 109 111 113 115
Table 5-6b Stalling speed during level flight at flap 25o
(Indicated speed, unit: km/h)
Flight weight(t)
Altitude(m)
45 47 49 51 53 55 57 59 61
0 181 185 188 192 196 200 203 207 210
1000 181 185 188 192 196 200 203 207 210
2000 181 185 188 192 196 200 203 207 210
3000 181 185 188 192 196 200 203 207 211
4000 181 185 188 192 197 201 205 209 213
Table 5-7a Stalling speed during level flight at flap 35o
(Indicated speed, unit: km/h)
Flight weight(t)
Altitude(m)
45 47 49 51 53 55 57 59 61
0 90 92 95 96 98 100 102 103 105
3281 90 92 95 96 98 100 102 103 105
6562 90 92 95 96 98 100 102 103 105
9843 90 92 95 96 98 100 102 103 105
13123 90 92 95 96 98 100 102 103 106
Table 5-7b Stalling speed during level flight at flap 35o
(Indicated speed, unit: km/h)
Flight weight(t)
Altitude(m)
45 47 49 51 53 55 57 59 61
0 167 171 175 178 181 185 188 191 195
1000 167 171 175 178 181 185 188 191 195
2000 167 171 175 178 181 185 188 191 195
3000 167 171 175 178 181 185 188 191 195
4000 167 171 175 178 181 185 188 192 196
JZ-Y8F200W-02
AIRCRAFT FLIGHT MANUAL
SECTION V
PERFORMANCE
5-15
June 30, 2012
MAIN PERFORMANCE OF THREE ENGINES
Takeoff performance of three engines
Three-engine takeoff theoretical calculation and trial flight result is shown in Table 5-8.
Table 5-8a Three engine takeoff performance
Takeoff weight(t)
Parameter
49 51 54 56 58 61
Nose liftoff speed (kn) 110 110 115 118 121 126
Liftoff speed(kn) 114 117 121 124 127 131
Safety speed(kn) 119 122 127 128 130 133
Decision speed (kn) 85 90 97 103 107 114
Balanced field length (ft) 4288 4701 5856 6014 6644 7746
Table 5-8b Three engine takeoff performance
Takeoff weight(t)
Parameter
49 51 54 56 58 61
Nose liftoff speed (km/h) 204 204 219 224 233
Liftoff speed(km/h) 212 217 214 230 235 242
Safety speed(km/h) 221 226 236 237 241 247
Decision speed (km/h) 158 167 180 190 198 211
Balanced field length (m) 1307 1433 1785 1833 2025 2361
Note
The value of 54t is test flight value, the rest are calculation value.
JZ-Y8F200W-02
AIRCRAFT FLIGHT MANUAL
SECTION V
PERFORMANCE
5-16
June 30, 2012
Three-engine climbing performance
If one engine stops, aircraft still has enough residual thrust if three engine work at rated
regime. Aircraft can climb to 7800m on the condition that takeoff weight is 51t. The climbing
performance of three engine is shown Table 5-9.
Table 5-9a Climbing performance of three engine
Altitude
(ft)
Takeoff weight 51t Takeoff weight 61t
Fastclimbing
speed
(kn)
Climbrate
(ft/s)
Climbtime
(min)
Climbdistance
(nmile)
Climbfuel
consumption
(kg)
Fastclimbrate
(kn)
Climbrate
(ft/s)
Climbtime
(min)
Climbdistance
(nmile)
Climbfuel
consumption
(kg)
0 170 20.8 0 0 0 186 14.4 0 0 0
6562 188 17.6 5.6 16.7 244 202 10.9 8.38 26.8 365
13123 205 14.8 12.22 37.4 514 225 7.2 19.83 67.1 831
19685 228 8.9 20.97 68.6 834 247 1.6 42.42 168.4 1751
22591 251 1.6 40.9 148.4 1443
Table 5-9b Climbing performance of three engine
Altitude
(m)
Takeoff weight 51t Takeoff weight 61t
Fastclimbing
speed
(km/h)
Climbrate
(m/s)
Climbtime
(min)
Climbdistance
(km)
Climbfuel
consumption
(kg)
Fastclimbrate
(km/h)
Climbrate
(m/s)
Climbtime
(min)
Climbdistance
(km)
Climbfuel
consumption
(kg)
0 314 6.33 0 0 0 344 4.38 0 0 0
2000 349 5.35 5.6 30.9 244 375 3.32 8.38 49.7 365
4000 379 4.52 12.22 69.3 514 416 2.2 19.83 124.3 831
6000 422 2.7 20.97 127.1 834 458 0.5 42.42 311.8 1751
7800 464 0.5 40.9 274.8 1443
JZ-Y8F200W-02
AIRCRAFT FLIGHT MANUAL
SECTION V
PERFORMANCE
5-17
June 30, 2012
Three-engine level flight performance
When one engine stops and three engine work at rated regime, the character of level flight
speed at different flight weight and different flight altitude is shown in Table 5-10.
Table 5-10a Max. level speed of three engine (Unit: kn)
Flight weight (kg)
Flight altitude(ft)
49000 51000 54000 56000 61000
0 254 470 468 464 461
6562 266 490 488 482 480
13123 280 515 510 504 492
19685 288 530 522 402
22591 278
Table 5-10b Max. level speed of three engine (Unit: km/h)
Flight weight (kg)
Flight altitude(m)
49000 51000 54000 56000 61000
0 471 470 468 464 461
2000 492 490 488 482 480
4000 518 515 510 504 492
6000 534 530 522 402
8000 514
TAKEOFF AND LANDING PERFORMANCE IN NON-STANDARD
CONDITION
The main factors affecting takeoff and taxiing distance includes takeoff landing weight,
atmosphere temperature, airport elevation, wind direction and wind speed, runway smoothness,
and runway gradient, etc. these factors should be taken into consideration when calculating
takeoff and landing roll distance.
Calculation method of takeoff run distance
Under different takeoff condition, the distance from starting taxiing to lifting off from ground is
shown in Figure 5-10. The curve is composed of four charts, from the left to left, representing the
scale of air temperature, airport elevation, takeoff weight, runway gradient corresponding that
affect the takeoff roll distance. Vertical coordinates is takeoff roll distance. The following sample
shows method how to use Figure 5-10 to check takeoff run distance.
JZ-Y8F200W-02
AIRCRAFT FLIGHT MANUAL
SECTION V
PERFORMANCE
5-18
June 30, 2012
(Example) The known condition: air temperature is 27oC, airport elevation is 1640ft(500m),
takeoff weight is 58t, airport gradient -1%, head wind 16.4ft/s(5m/s), question:the takeoff run
distance.
See the route indicated by the dotted line in Figure 5-10, from the point where air
temperature is 27o
C (Pinot A in the figure), draw a perpendicular which crosses the curve of
airport elevation 1640ft (500m) at Point B. From Point B, draw a horizontal rightward which
crosses the reference line representing aircraft weight at Point C, view the top right from the
oblique line passing through Point C, this oblique line crosses perpendicular representing weight
of 58t at Point D, draw rightward a horizontal which crosses the reference line representing
gradient at Point E, view the right lower side from the oblique line passing through Point E, this
line crossed a perpendicular with gradient of -1% at Point F. draw a level from Point F to the right
side which crosses the reference line representing wind direction and wind speed at Point R.
draw an oblique line to the left lower side and cross the perpendicular representing head wind
5m/s at Point S, finally, draw a horizontal to the right from point and crosses vertical coordinates
at Point K, the data at this point 3871ft(1180m) is the takeoff roll distance that this example
seeks.
The calculation method for landing run distance
The landing run distance is the distance that aircraft passes through from touchdown to
taxiing fully stop.
JZ-Y8F200W-02
AIRCRAFT FLIGHT MANUAL
SECTION V
PERFORMANCE
5-19
June 30, 2012
13123
11483
9843
8202
6562
4921
3281
1010
0
L(ft)
8202
6562
4921
K
3281
1640
2010110203050
A
t℃58G(t)20265.652.539.426.213.10-13.1-26.2
%ft/s
B
C
DE
F
S
R
t Standard +40
o
t Standard +30
o
t Standard +20
o
t Standard +10
o
t Standard
Reference line
Reference line
Reference line
UpslopeDownslope
Gradient
HeadwindTailwind
Rolling
14764
Airportelevation
(m
)
Figure 5-10a Takeoff run distance (concrete runway, δj=25o
) in different condition
JZ-Y8F200W-02
AIRCRAFT FLIGHT MANUAL
SECTION V
PERFORMANCE
5-20
June 30, 2012
4000
3500
3000
2500
2000
1500
1000
500
0
L(m)
2500
2000
1500
K
1000
500
2010110203050
A
t℃58G(t)202201612840-4-8
%m/s
B
C
DE
F
S
R
t Standard +40
o
t Standard +30
o
t Standard +20
o
t Standard +10
o
t Standard
Reference line
Reference line
Reference line
UpslopeDownslope
Gradient
HeadwindTailwind
Rolling
4500
Airportelevation
(m
)
Figure 5-10b Takeoff run distance (concrete runway,  j=25o
) in different condition
JZ-Y8F200W-02
AIRCRAFT FLIGHT MANUAL
SECTION V
PERFORMANCE
5-21
June 30, 2012
Figure 5-11 shows how different factors affect landing run distance. Pilot can use this
diagram as per the current practical condition. From the left to the right are the scale for airport
elevation and air temperature affecting landing run distance, scales for landing weight, runway
gradient and wind direction and speed. There are reference line on each scale diagram, vertical
coordinates is the landing run distance.
Below is an example illustrating the method for reference of Figure 5-11.
(Example) The known condition: airport elevation 1640ft(500m), air temperature 25o
C,
runway gradient +1%(up slope), head wind 5m/s, landing weight 58t, question: landing roll
distance.
(Answer) See route indicated by dotted line in Figure 5-11.
Find Point A representing air temperature, draw upward a perpendicular and crosses the
curve representing airport elevation 1640ft(500m) at Point B. From the Point B, draw rightward a
horizontal line and crosses weight reference line at Point C. a slant line through Point C goes up
and to the right side and cross the perpendicular representing weight 58t at Point D. From Point
D, draw a horizontal line and crossed gradient reference line at Point E. A slant line through
Point E goes to the lower right side and crosses the perpendicular representing gradient +1% at
Point F. in the same way, get Point S representing head wind 5m/s, at last, from Point S, draw
rightward a horizontal line and crosses vertical coordinates at Point K, whose value 3543ft
(1080m) is the takeoff run distance we seek.
Note:
In emergency case, to effectively shorten the landing run distance, can retard
throttle level and release the limit in the rear section of postflare float. But
correction should be made in time to avoid deflection caused by uneven
negative thrust on two side which results from unsynchronized throttle
releasing or the non-coordination caused by throttle delay
JZ-Y8F200W-02
AIRCRAFT FLIGHT MANUAL
SECTION V
PERFORMANCE
5-22
June 30, 2012
Takeoff decision speed and takeoff limit weight
(a) The method to determine the takeoff decision speed and takeoff limit speed
(b) Figure 5-12 is used for airport with good clearway. For these airport with poor clearway,
first compute limit weight respectively as per Figure 5-12 and Figure 5-13, then select the
smaller one as takeoff limit weight.
(Example) Airport runway length: 6234ft(1900m), clear zone length: 1969ft(600m),
airport elevation: 2165ft(660m), runway gradient: -1%, headwind: 16.4ft/s(5m/s), air
temperature:22o
C, airport has good clearway, find takeoff limit weight and decision speed
(V1).
(Answer) Use Figure 5-12, which is composed of four figures, (A), (B), (C) and (D).
1) First, determine refusal useable distance and takeoff useable distance.
Refusal useable distance is equal to runway length plus clearway length, then
deduct 328ft(100m). In this case, it is7874ft(2400m), (Point B in Figure 5-12(B)).
Takeoff useable run distance is equal to runway length minus 328ft(100m), in this
case, it is 5906ft(1800m) (Point A in Figure 5-12(A).
2) Convert the given air temperature into standard air temperature which can be used
by this curve. The standard air temperature at elevation of 2165ft(660m) is 11o
C,
therefore, when air temperature is 22o
C, it can be written in form of standard air
temperature:
22o
C=11o
C+11o
C=tStandard+11o
In the formula, t standard is the standard temperature at this elevation.
(c) View Figure 5-12(A). From Point A, draw a horizontal line to the right side and crosses
gradient reference line at Point C, from Point C, draw a slant line to upper right side and
crosses the perpendicular representing gradient -1% at Point D. by the same method,
find Point F representing head wind 5m/s, from F, draw horizontal line rightward.
JZ-Y8F200W-02
AIRCRAFT FLIGHT MANUAL
SECTION V
PERFORMANCE
5-23
June 30, 2012
13123
9813
6562
3281
0
6562
4921
K
3281
1640
65.2103050At℃
G(t)
202200032.832.8
ft/s
BC
DE
F
S
6040-10-20
L(ft)
%
t Standard +30
o
t Standard +20
o
t Standard +10
o
t Standard
Reference line
Reference line
Reference line
UpslopeDownslope
Gradient
HeadwindTailwind
Rolling
Airportelevation(ft)
Figure 5-11a Landing run distance at different condition (concrete runway,δj=35o
)
JZ-Y8F200W-02
AIRCRAFT FLIGHT MANUAL
SECTION V
PERFORMANCE
5-24
June 30, 2012
4000
3000
2000
1000
0
2000
1500
K
1000
500
2010103050At℃
G(t)
2022000-10
m/s
BC
DE
F
S
6040-10-20
L(m)
%
t Standard +30
o
t Standard +20
o
t Standard +10
o
t Standard
Reference line
Reference line
Reference line
UpslopeDownslope
Gradient
HeadwindTailwind
Rolling
Airportelevation(m)
Figure 5-11b Landing run distance at different condition (concrete runway,δj=35o
)
JZ-Y8F200W-02
AIRCRAFT FLIGHT MANUAL
SECTION V
PERFORMANCE
5-25
June 30, 2012
m/s
(A)
(B)
(C)
(D)
%
t Standard
+30
o
t Standard
+20
o
t Standard
+10
o
t Standard
Gradient
%Gradient
Upslope Down
slope
Head
wind
Tail
wind
UpslopeDown
slope
HeadTail
Airport elevation (ft)
Referenceline
Reference line
Referenceline
Reference line
Referenceline
Takeoffuseabledistance(m)
Refusal useable distance (ft)
13123
131239843
9843
6562
65623281
13123984365623281
3281
2 1 0 -1 -2 66 33 0 -33
20-2-266330-33
windwind
VI(Kn)
97
108
119
130
Figure 5-12a At different condition, the relationship between refusal useable distance, takeoff
useable run distance and takeoff limit weight, takeoff decision speed (δj=25o
, dry concrete surface)
JZ-Y8F200W-02
AIRCRAFT FLIGHT MANUAL
SECTION V
PERFORMANCE
5-26
June 30, 2012
m/s
(A)
(B)
(C)
(D)
%
t Standard
+30
o
t Standard
+20
o
t Standard
+10
o
t Standard
Gradient
%Gradient
Upslope Down
slope
Head
wind
Tail
wind
UpslopeDown
slope
Head
wind
Tail
wind
Airport elevation (m)
Referenceline
Reference line
Referenceline
Reference line
Referenceline
Takeoffuseabledistance(m)
Refusal useable distance (m)
Figure 5-12b At different condition, the relationship between refusal useable distance, takeoff
useable run distance and takeoff limit weight, takeoff decision speed (δj=25o
, dry concrete surface)
JZ-Y8F200W-02
AIRCRAFT FLIGHT MANUAL
SECTION V
PERFORMANCE
5-27
June 30, 2012
(A) (B)
(C) (D)
m/s%
t Standard
+30
o
t Standard
+20
o
t Standard
+10
o
t Standard
Gradient
Upslope Down
slope
Head
wind
Tail
wind
UpslopeDown
slope
HeadTail
Airport elevation (ft)
Referenceline
Reference line
Reference line
Takeoffuseabledistance(ft)
Refusal useable distance (ft)
13123
9843
6562
3281
2 1 0 -1 -2 66 33 0 -33
20-2-266330-33
windwind
13123984365623281
97
108
119
VI(Kn)
Referenceline
Figure 5-13a At different condition, the relationship between refusal useable distance, takeoff
useable run distance and takeoff limit weight, takeoff decision speed (δj=25o
, dry concrete surface)
JZ-Y8F200W-02
AIRCRAFT FLIGHT MANUAL
SECTION V
PERFORMANCE
5-28
June 30, 2012
基准线
(A) (B)
(C) (D)
m/s%
t Standard
+30
o
t Standard
+20
o
t Standard
+10
o
t Standard
Gradient
Upslope Down
slope
Head
wind
Tail
wind
UpslopeDown
slope
Head
wind
Tail
wind
Airport elevation (m)
Referenceline
Reference line
Reference line
Takeoffuseabledistance(m)
Refusal useable distance (m)
Figure 5-13b At different condition, the relationship between refusal useable distance, takeoff
useable run distance and takeoff limit weight, takeoff decision speed (δj=25o
, dry concrete surface)
JZ-Y8F200W-02
AIRCRAFT FLIGHT MANUAL
SECTION V
PERFORMANCE
5-29
June 30, 2012
(d) See Figure 5-12 (B). as per the above-mentioned method, the available distance for
takeoff abortion is 7874ft(2400m), the runway slope is -1% and the speed of upwind is
16.4ft/s(5m/s). Draw an vertical line upward from point B and intersect it with the level
from F at point H when passing the characteristic point of slope and up wind. The value
of R and ratio of decesive speed (V1) and liftoff speed of the nose wheel (VR) can be
obtained as per the position of point H. i.e. H=2900, V1/VR=0.94.
(e) See Figure 5-12 (D). The longtitudinal coordinate is R, and the latitudinal coordinate is
standard altitude of the airport. If R=2900, then point K can be found out. Draw a level
leftward from point K and intersect it with the vertical line whose standard altitude is
2165ft (660m) at point M. Seeing towards bottom left from the oblique line of point M, this
line intersects the reference line at point N. Draw a level leftward from point N and
intersect it with an oblique line (t) whose standard temperature is +11o
at point O. Then
draw a vertical line passing point O and intersect it with the latitudinal coordinate in
Figure 5-12 (C) at point P. The weight (59t) corresponded is the limited value of weight.
Draw one vertical line downward from point P and intersect it with the oblique line
V1/VR=0.94 at point S, then draw a level rightward from point S and intersect it with the
longitudinal coordinate at point T. The speed value of 118kn(218km/h) corresponded with
T is the decesive speed.
Caution
a) During the initial phase of climbing, the tangent of climb angle should be
more than 0.03, and speed should not be lower than the safety speed of
takeoff, regardless of the obstruction condition of the airport, so that the
aircraft is able to fly over the obstacles successfully and the flight safety
can be guaranteed.
b) When taking off at the airport with higher standard altitude, with higher
ambient temperature, the power rate of engine will see obvious decline.
Given the possibility of engine (1 set) shutdown during takeoff which may
further decrease its power rate, and that the residual pull and climbing
angle will be smaller, the aircraft is likely to fly for a rather long distance at
a too low altitude after liftoff, the safety speed can not be reached for long.
In this case, reduce the Max. takeoff weight properly.
JZ-Y8F200W-02
AIRCRAFT FLIGHT MANUAL
SECTION V
PERFORMANCE
5-30
June 30, 2012
CLIMB AND DESCENT AT DIFFERENT WEIGHT AND ALTITUDE
Climb performance
The climb performance data of four engines at rated regime is shown in Table 5-11.
JZ-Y8F200W-02
AIRCRAFT FLIGHT MANUAL
SECTION V
PERFORMANCE
5-31
June 30, 2012
Table 5-11a Climb performance at different weigth and altitude
Weight
(t)
Altitude
(ft)
Indicated
climb
speed(kn)
Climb
true
speed
(kn)
Climb
rate
(ft/s)
Climb
time
(min)
Climb
distance
(n mile)
Climb fuel
consumption
(kg)
49
0 175 175 35.40 0 0.00 0
6562 166 184 33.50 3.05 10.21 174
13123 165 202 29.95 6.50 19.98 365
19685 165 225 22.67 10.74 35.10 555
26247 164 251 13.35 17.25 61.0 816
34104 154 272 1.64 39.50 162.5 1517
51
0 178 179 32.91 0 0.0 0
6562 170 188 31.14 3.27 9.7 186
13123 169 207 27.66 7.0 22.1 382
19685 168 229 20.64 11.62 38.9 600
26247 167 256 11.48 19.04 68.6 898
32972 161 279 1.64 36.47 150.5 1598
54
0 182 182 29.86 0 0.0 0
6562 174 192 27.92 3.63 11.3 207
13123 173 212 24.48 7.82 25.4 427
19685 174 237 17.78 13.12 45.4 677
26247 172 262 8.86 22.38 83.7 1050
31250 168 284 1.64 43.47 191.7 1751
56
0 184 184 28.22 0 0.0 0
6562 177 195 25.92 3.89 12.4 222
13123 177 217 22.51 8.43 28.1 460
19685 177 241 16.01 14.27 50.2 736
26247 174 267 7.25 25.24 96.1 1179
29773 173 286 1.64 46.55 195.5 1900
58
0 180 180 26.25 0 0.0 0
6562 181 200 24.05 4.18 13.0 239
13123 180 220 20.67 9.10 30.2 497
19685 179 245 14.34 15.56 55.6 801
26247 178 272 5.97 28.52 111.2 1326
28871 187 305 1.64 48.72 206.3 2029
61
0 186 186 23.95 0 0.0 0
6562 185 204 21.39 4.67 15.1 266
13123 185 226 18.04 10.25 35.1 559
19685 185 251 12.01 17.83 65.3 918
26247 182 278 3.94 43.3 146.9 1667
27313 197 312 1.64 49.9 205.2 2153
JZ-Y8F200W-02
AIRCRAFT FLIGHT MANUAL
SECTION V
PERFORMANCE
5-32
June 30, 2012
Table 5-11b Climb performance at different weigth and altitude
Weight
(t)
Altitude
(m)
Indicated
climb
speed(km/h)
Climb
true
speed
(km/h)
Climb
rate
(m/s)
Climb
time
(min)
Climb
distance
(km)
Climb fuel
consumption
(kg)
49
0 324 325 10.79 0 0 0
2000 308 340 10.21 3.05 18.9 174
4000 305 374 9.13 6.5 37 365
6000 306 417 6.91 10.74 65 555
8000 304 465 4.07 17.25 113 816
10395 285 504 0.5 39.5 301 1517
51
0 330 331 10.03 0 0 0
2000 315 348 9.49 3.27 18 186
4000 313 383 8.43 7 41 382
6000 312 425 6.29 11.62 72 600
8000 310 474 3.5 19.04 127 898
10050 298 517 0.5 36.47 278.7 1598
54
0 337 337 9.1 0 0 0
2000 322 356 8.51 3.63 21 207
4000 321 393 7.46 7.82 47 427
6000 322 438 5.42 13.12 84 677
8000 318 486 2.7 22.38 155 1050
9525 311 526 0.5 43.47 355 1751
56
0 340 340 8.6 0 0 0
2000 328 362 7.9 3.89 23 222
4000 328 402 6.86 8.43 52 460
6000 327 446 4.88 14.27 93 736
8000 323 494 2.21 25.24 178 1179
9075 320 530 0.5 46.55 362 1900
58
0 334 334 8 0 0 0
2000 335 370 7.33 4.18 24 239
4000 334 408 6.3 9.1 56 497
6000 332 453 4.37 15.56 103 801
8000 330 504 1.82 28.52 206 1326
8800 347 565 0.5 48.72 382 2029
61
0 344 344 7.3 0 0 0
2000 343 378 6.52 4.67 28 266
4000 342 418 5.5 10.25 65 559
6000 342 465 3.66 17.83 121 918
8000 337 515 1.2 43.3 272 1667
8325 365 577 0.5 49.9 380 2153
JZ-Y8F200W-02
AIRCRAFT FLIGHT MANUAL
SECTION V
PERFORMANCE
5-33
June 30, 2012
In standard condition, aircraft service ceiling at different weight is shown in Table 5-12.
Table 5-12a Service ceiling at different weight
Takeoff weight(t) 49 51 54 56 58 61
Service ceiling(ft) 34104 32972 31250 29774 28871 27313
Table 5-12b Service ceiling at different weight
Takeoff weight(t) 49 51 54 56 58 61
Service ceiling(m) 10395 10050 9525 9075 8800 8325
Descent performance
Steady descent
When aircraft with a takeoff weight 49t, descend to 1640ft (500m) from different altitude at
small throttle level state (throttle position 16o
), its descent performance is shown in Table 5-13.
This method is not used unless the fuel quantity is limited.
Table 5-13a Steady descent performance
Altitude(ft)
Descent
indicated
speed
(kn)
Descent
true
speed
(kn)
Descent
rate
(ft/s)
Descent
angle
(o
)
Descent
time
(min)
Descent fuel
consumption
(kg)
26247 197 300 32.55 3.62 19.19 428
22966 193 278 28.61 3.50 17.22 377
19685 190 259 25.16 3.30 15.10 321
16404 186 241 22.05 3.11 12.62 259
13123 185 226 18.77 2.82 9.71 191
9843 183 212 16.40 2.63 7.30 136
6562 181 200 13.62 2.31 5.10 76
3281 180 190 12.34 2.21 1.63 20
1640 173 177 11.48 2.20 0.00 0.00
JZ-Y8F200W-02
AIRCRAFT FLIGHT MANUAL
SECTION V
PERFORMANCE
5-34
June 30, 2012
Table 5-13b Steady descent performance
Altitude(m)
Descent
indicated
speed
(km/h)
Descent
true speed
(km/h)
Descent
rate
(m/s)
Descent
angle
(o
)
Descent
time
(min)
Descent fuel
consumption
(kg)
8000 364 556 9.92 3.62 19.19 428
7000 357 514 8.72 3.5 17.22 377
6000 352 479 7.67 3.3 15.1 321
5000 345 446 6.72 3.11 12.62 259
4000 342 418 5.72 2.82 9.71 191
3000 339 393 5 2.63 7.3 136
2000 336 371 4.15 2.31 5.1 76
1000 334 351 3.76 2.21 1.63 20
500 320 328 3.5 2.2 0 0
Fast descent
For fast descent, set engine throttle at 62o. Within a certain period, a relative long descent
distance can be acquired. The character of fast descent to 1640ft (500m) from different altitude
is shown in Table 5-14.
Constant-airspeed descent
Maintain the favorable descent indicated speed at 243kn (450km/h), and put throttle level at
the position of 20o
(not lower than 16o
), the character that descend to 500m from different
altitude is shown in Table 5-15. This method is used for common descent.
Optimum level speed and fuel consumption at different weight hand altitude
By flying at indicated speed of 178kn (300km/h), the maximum endurance can be acquired
at every altitude, but it is not most optimum speed, generally, it is economic speed.
Optimum speed is larger than economic speed, at this speed, generally, the maximum
range can be acquired. The optimum level speed (maximum range speed) at different flight
height and weight and corresponding fuel consumption per kilometer, fuel consumption per hour
are shown in Table 5-16.
JZ-Y8F200W-02
AIRCRAFT FLIGHT MANUAL
SECTION V
PERFORMANCE
5-35
June 30, 2012
Table 5-14a Fast descent performance
Parameter
altitude
(m)
Descent
indicate
speed
(km/h)
Descent
true
speed
(km/h)
Descent
rate
(m/s)
Descent
angle
(o
)
Descent
distance
(km)
Descent
time
(min)
Descent fuel
consumption
(kg)
26247 225 343 52.00 5.13 61.0 16.76 443
22966 203 293 46.49 5.03 55.1 15.65 399
19685 195 266 38.25 4.86 49.1 14.33 350
16404 191 246 33.04 4.55 42.1 12.79 299
13123 184 225 27.53 4.14 35.1 10.99 245
9843 178 206 22.87 3.75 27.0 8.81 188
6562 166 183 16.67 3.09 17.3 6.01 121
3281 158 165 12.96 2.66 5.9 2.16 40
1640 157 161 12.37 2.61 0.0 0.00 0.00
Table 5-14b Fast descent performance
Parameter
altitude
(m)
Descent
indicate
speed
(km/h)
Descent
true
speed
(km/h)
Descent
rate
(m/s)
Descent
angle
(o
)
Descent
distance
(km)
Descent
time
(min)
Descent fuel
consumption
(kg)
8000 416 635 15.85 5.13 113 16.76 443
7000 376 543 14.17 5.03 102 15.65 399
6000 362 493 11.66 4.86 91 14.33 350
5000 353 456 10.07 4.55 78 12.79 299
4000 341 417 8.39 4.14 65 10.99 245
3000 329 382 6.97 3.75 50 8.81 188
2000 307 338 5.08 3.09 32 6.01 121
1000 292 306 3.95 2.66 11 2.16 40
500 291 298 3.77 2.61 0.00 0.00 0.00
JZ-Y8F200W-02
AIRCRAFT FLIGHT MANUAL
SECTION V
PERFORMANCE
5-36
June 30, 2012
Table 5-15a Constant-airspeed descent (Vb=243kn)
Parameter
altitude(m)
Descent
rate
(m/s)
Descent
angle
(o
)
Descent
horizontal
distance
(km)
Descent
time
(min)
Descent fuel
consumption
(kg)
26247 30.05 2.75 77.4 15.5 356.6
22966 29.07 2.82 66.1 13.6 322.6
19685 27.72 2.85 55.2 11.8 285
16404 27.66 3.0 44.4 9.8 241
13123 26.44 3.02 34.1 7.8 195
9843 25.33 3.05 24.1 5.73 145
6562 24.41 3.09 14.1 3.57 90.3
3281 23.46 3.13 5.4 1.33 32.1
Table 5-15b Constant-airspeed descent (Vb=450km/h)
Parameter
altitude(m)
Descent
rate
(m/s)
Descent
angle
(o
)
Descent
horizontal
distance
(km)
Descent
time
(min)
Descent fuel
consumption
(kg)
8000 9.16 2.75 143.3 15.5 356.6
7000 8.86 2.82 122.5 13.6 322.6
6000 8.45 2.85 102.2 11.8 285
5000 8.43 3 82.2 9.8 241
4000 8.06 3.02 63.1 7.8 195
3000 7.72 3.05 44.6 5.73 145
2000 7.44 3.09 26.2 3.57 90.3
1000 7.15 3.13 10 1.33 32.1
JZ-Y8F200W-02
AIRCRAFT FLIGHT MANUAL
SECTION V
PERFORMANCE
5-37
June 30, 2012
Table 5-16a Optimum speed and fuel consumption at different weight and altitude
Average
level flight
weight (t)
Altitude
(m)
Indicated
speed
(km/h)
True speed
(km/h)
Fuel
consumption
per kilometer
(kg/km)
Fuel
consumption
per hour
(kg/h)
45
6562 196 216 9.37 2025
9843 194 226 8.78 1981
13123 193 236 8.22 1941
16404 193 249 7.67 1907
19685 196 267 7.06 1883
22966 189 272 6.59 1795
26247 188 287 6.28 1792
47
6562 200 221 9.56 2116
9843 210 244 8.95 2173
13123 199 243 8.41 2042
16404 206 265 7.82 2071
19685 197 269 7.19 1935
22966 191 275 6.78 1867
26247 202 309 6.37 1971
49
6562 221 244 9.50 2319
9843 213 247 8.91 2198
13123 209 255 8.39 2143
16404 207 267 7.82 2088
19685 200 273 7.22 1974
22966 196 282 6.83 1930
26247 203 310 6.41 1982
51
6562 221 244 9.57 2329
9843 214 249 8.95 2230
13123 212 259 8.48 2197
16404 209 269 7.91 2130
19685 203 277 7.35 2036
22966 201 290 6.96 2018
26247 202 309 6.48 2002
54
6562 217 239 9.83 2357
9843 213 248 9.32 2308
13123 217 260 8.85 2344
16404 211 272 8.26 2244
JZ-Y8F200W-02
AIRCRAFT FLIGHT MANUAL
SECTION V
PERFORMANCE
5-38
June 30, 2012
Table 5-16a (Continued)
Average level
flight weight (t)
Altitude
(m)
Indicated
speed
(km/h)
True speed
(km/h)
Fuel
consumption
per kilometer
(kg/km)
Fuel
consumption
per hour
(kg/h)
54
19685 206 280 7.70 2159
22966 214 308 7.20 2225
26247 197 300 6.82 2045
55
6562 219 242 9.70 2351
9843 215 250 9.17 2292
13123 217 266 8.69 2308
16404 212 274 8.13 2227
19685 207 282 7.59 2141
22966 215 309 7.13 2204
26247 199 303 6.70 2029
57
6562 219 242 9.80 2373
9843 217 252 9.28 2338
13123 219 267 8.80 2350
16404 213 275 8.28 2276
19685 230 313 7.72 2417
22966 218 313 7.19 2249
26247 195 299 6.85 2048
59
6562 221 244 9.93 2420
9843 219 254 9.43 2398
13123 220 269 8.91 2400
16404 232 300 8.37 2510
19685 230 313 7.80 2440
22966 213 307 7.30 2238
26247 195 298 7.06 2098
JZ-Y8F200W-02
AIRCRAFT FLIGHT MANUAL
SECTION V
PERFORMANCE
5-39
June 30, 2012
Table 5-16b Optimum speed and fuel consumption at different weight and altitude
Average
level flight
weight (t)
Altitude
(m)
Indicated
speed
(km/h)
True speed
(km/h)
Fuel
consumption
per kilometer
(kg/km)
Fuel
consumption
per hour
(kg/h)
45
2000 363 400 5.06 2025
3000 360 418 4.74 1981
4000 357 437 4.44 1941
5000 357 461 4.14 1907
6000 363 495 3.81 1883
7000 350 504 3.56 1795
8000 348 531 3.39 1792
47
2000 371 410 5.16 2116
3000 389 452 4.83 2173
4000 368 450 4.54 2042
5000 381 491 4.22 2071
6000 365 498 3.88 1935
7000 354 510 3.66 1867
8000 374 572 3.44 1971
49
2000 410 452 5.13 2319
3000 394 457 4.81 2198
4000 387 473 4.53 2143
5000 384 495 4.22 2088
6000 371 506 3.9 1974
7000 363 523 3.69 1930
8000 376 574 3.46 1982
51
2000 409 451 5.17 2329
3000 397 461 4.83 2230
4000 393 480 4.58 2197
5000 387 499 4.27 2130
6000 376 513 3.97 2036
7000 373 537 3.76 2018
8000 375 573 3.5 2002
54
2000 401 443 5.31 2357
3000 395 459 5.03 2308
4000 402 481 4.78 2344
5000 390 503 4.46 2244
JZ-Y8F200W-02
AIRCRAFT FLIGHT MANUAL
SECTION V
PERFORMANCE
5-40
June 30, 2012
Table 5-16b (Continued)
Average
level flight
weight (t)
Altitude
(m)
Indicated
speed
(km/h)
True
speed
(km/h)
Fuel
consumption
per kilometer
(kg/km)
Fuel
consumption
per hour
(kg/h)
54
6000 381 519 4.16 2159
7000 396 571 3.89 2225
8000 364 556 3.68 2045
55
2000 406 448 5.24 2351
3000 399 463 4.95 2292
4000 402 492 4.69 2308
5000 393 507 4.39 2227
6000 383 522 4.1 2141
7000 398 573 3.85 2204
8000 368 561 3.62 2029
57
2000 406 448 5.29 2373
3000 401 466 5.01 2338
4000 405 495 4.75 2350
5000 395 510 4.47 2276
6000 426 580 4.17 2417
7000 403 580 3.88 2249
8000 362 553 3.7 2048
59
2000 409 451 5.36 2420
3000 406 471 5.09 2398
4000 408 499 4.81 2400
5000 430 555 4.52 2510
6000 426 580 4.21 2440
7000 394 568 3.94 2238
8000 361 551 3.81 2098
JZ-Y8F200W-02
AIRCRAFT FLIGHT MANUAL
SECTION VI
AIRCRAFT SYSTEM EQUIPMENT
6-1
June 30, 2012
AIRCRAFT SYSTEM EQUIPMENT
POWER PLANT
General
WJ-6 consists of closed differential planetary decelerator (with torque measuring mechanism),
air inlet casing, 10th
stage axial flow type compressor, combined combustion chamber, third stage
axial-flow reaction turbine and fixed-area nozzle, etc.
Under the standard atmosphere on the ground, air flows into compressor by engine air inlet
and be compressed gradually to outlet of compressor with the pressure of P2=106.7psi (0.736MPa)
and temperature of 482o
F (250o
C). Compressed air enters into combustion chamber and mixes
with high-pressure fuel ejected by fuel injector, and is burnt continually, becoming combustion gas.
The temperature of combustion chamber center is about 2200K. Combustion gas burnt mixes with
other flow of compressed air in combustion chamber with the temperature of T*
3=1436o
F (780o
C)
before it entering into turbine. High-temperature and high-pressure gas expands in turbine to drive
the turbine to operate. Power of turbine is transmitted into compressor and propeller. The pressure
and temperature of expanded gas in turbine reduce. But its speed increases. After entering into tail
pipe, its pressure reduces to 14.7psi (101.3kPa) (one atmospheric pressure), but the speed
increases to 447kn (230m/s). The combustion gas from nozzle outlet is ejected at the speed of
349.92kn (180m/s), producing thrust of about 848.7 lb(3776N) (H=0, V=0). The operating process
of engine is shown in Figure 6-1.
0-Inlet of air inlet
1-Inlet of compressor
2-Outlet of compressor
3-Outlet of combustion chamber
4-Outlet of turbine
5-Outlet of exhaust section
0 1 2 3 4 5
C
C
P
P
T
T
m/s K
Figure 6-1 Schematic diagram of engine operating
JZ-Y8F200W-02
AIRCRAFT FLIGHT MANUAL
SECTION VI
AIRCRAFT SYSTEM EQUIPMENT
6-2
June 30, 2012
Propeller, decelerator, compressor and turbine of engine WJ-6 are connected with the same
shaft, which is called high altitude turboprop engine with single shaft. Besides owning the
advantages of simple structure, small size and light weight of turbojet engine, the propeller engine
also has the advantages of high efficiency of propeller, great economics, and large thrust with
middle-low speeds. But it also has disadvantages, that is, rotary inertia of propeller and rotor is
large to hardly start the engine, speeding up characteristic is a little bit weak, and the negative
thrust by propeller is larger more several times than that of reciprocating engine, when shutting
down the engine, the propeller failing to feather with windmill state.
Power produced by turbine is more than 9856.6hp (7350kW) (about more than 104
horsepower) when engine operates in take-off status. The consumed power by compressor and its
accessories are more than 6900hp (5145kW) (about more than seven thousand horsepower), and
the power to propeller is 2868.4kW (3900 horsepower). The thrust produced by jet flow is 848.7 lb
(3776N) Thus, the equivalent power in taking off Nequivalent power=2868.4+0.91х385х 0.735=3126kW
(Nequivalent power=3900+0.91 х385 =4250 horsepower) (0.91 is the horsepower coefficient changed
from thrust).
Regulation of engine WJ-6
Regulating law
Rotating speed, equivalent power, and turbine-inlet temperature of engine WJ-6 are chose as
regulated parameters. The variations of these parameters reflect the constant speed regulating,
constant equivalent power regulating and constant turbine-inlet temperature regulating.
Constant rotating speed regulation is implemented in the following way: The engine rotating
speed regulator's centrifugal mechanism senses the engine rotating speed, and automatically
controls the propeller to change the blade angle, that is, changes the propeller-required power to
adapt to the engine output power, ensuring constant engine rotating speed.
Constant equivalent power regulating is operated in the height range from ground to 3.1 mile
(5km) altitude, which is called power restricted area or constant equivalent power area.
Turbine-inlet temperature (T*
3) reduces gradually from the maximum allowable value in this area to
ensure the equivalent power do not change approximately.
JZ-Y8F200W-02
AIRCRAFT FLIGHT MANUAL
SECTION VI
AIRCRAFT SYSTEM EQUIPMENT
6-3
June 30, 2012
Constant turbine-inlet temperature regulating is operated in the altitude of 3.1~6.8mile
(5~11km). Turbine-inlet temperature always is at its allowable maximum value (different maximum
values in different operating state).
Correction mechanism on fuel governor senses static pressure PH, total temperature tH
*
, and
total inlet pressure of compressor P*
1 of the outside air temperature, to control the axial movement
amount of throttle valve automatically to change pump delivery for the engine operating, regulating
the constant equivalent power and constant turbine-inlet temperature.
Equivalent power Nequivalent power, According to the regulating law, turbine-inlet temperature T*
3,
and pump delivery GGsupply of engine WJ-6 vary with the flight altitude H and flight speed. The
variation is shown in Figure 6-2.
V1
V1
V1
V2
V2
H2H1
V2
V
NNequivalent power
GGsupply
3T*
Figure 6-2 Curve for variation of Nequivalent power, T*
3, GGsupply with H, V
JZ-Y8F200W-02
AIRCRAFT FLIGHT MANUAL
SECTION VI
AIRCRAFT SYSTEM EQUIPMENT
6-4
June 30, 2012
When the air inlet temperature of engine increases above 77o
F (25o
C), booster ratio of
compressor and air mass density will decrease with the increasing temperature. Thus, the airflow
of the engine will reduce as well. If keeping the pump delivery same, T*
3 will increase. In order to
avoid the overheat of turbine and its parts, reduce oil supply necessarily at the temperature t*
H
above 77o
F (25o
C) to keep T*
3 unchangeable generally. At that time, temperature sensing probe of
temperature correction mechanism senses the total temperature of airflow in air inlet to regulate
the oil supply. When the air temperature is above 77o
F (25o
C), oil supply may reduce 13.9 lb/h
(6.29kg/h) by increasing every 1.8o
F (1o
C).
Main adjusting screw of fuel governor and its function
(a) 1A screw: Change oil supply in proportion according to all characteristic curves of oil supply,
only in temperature restriction zone. Rotating one circle changes 10%~11% of oil supply.
Rotate clockwise to increase oil quantity; counter clockwise, reduce oil quantity. It is
allowed to rotate it clockwise or counter clockwise one circle from the initial manufactory
position. After adjusting 1A screw, oil supply in power restriction zone is affected, thus,
adjusting 36# screw with the amount of 5~6 times that of 1A screw in the opposite direction
to 1A screw.
(b) 36# screw: Regulate the oil supply in power restriction zone (including the ground). Rotate
clockwise to increase oil quantity; counter clockwise, reduce oil quantity. Rotating every
one circle changes the 1.5% oil supply of all the characteristic curves. It is allowed to rotate
it clockwise or counter clockwise 5 circles from the initial manufactory position.
(c) 46# screw: Change oil supply in taking off state. Rotating every one circle changes the oil
supply 88 lb/h(40kg/h) for taking off. Rotate clockwise to decrease oil quantity; counter
clockwise, increase oil quantity. It is allowed to rotate it clockwise one circle or counter
clockwise 1/2 circle (6 grids) from the initial manufactory position.
(d) 16# screw: Change the initial oil supply when taking off. Rotate one grid (1/2) circle to
change oil supply 22lb/h (10kg/h), Rotate clockwise to decrease oil quantity; counter
clockwise, increase oil quantity. It is allowed to rotate it clockwise or counter clockwise 1/3
circle (4 grids) from the initial manufactory position.
(e) 14# screw: Regulate the allowable maximum rotating speed. Rotate every one circle to
change the rotating speed of 300r/min (about 2.3%). Rotate clockwise to decrease oil
quantity; counter clockwise, increase oil quantity.
JZ-Y8F200W-02
AIRCRAFT FLIGHT MANUAL
SECTION VI
AIRCRAFT SYSTEM EQUIPMENT
6-5
June 30, 2012
(f) 15# screw: Regulate the idling rotating speed of engine. Change rotating speed of teeth for
75r/min (0.6%). Rotate clockwise to increase oil quantity; counter clockwise, decrease oil
quantity.
(g) 17# screw: Change the time of the engine entering into idling stare, that is, change oil
supply in starting and accelerating process. Rotate every grid (1/12 circle), changing the oil
supply of 6.61~8.82Ib/h (3~4kg/h) in the range of 4500~9500r/min. Rotate clockwise to
increase oil quantity; counter clockwise, decrease oil quantity. It is allowed to rotate it
clockwise 6 grids and counter clockwise 12 grids (1 circle) from the initial manufactory
position.
(h) 20# screw: Change the closing rotating speed of bleed-off valve of 8th
grade. Rotate every
circle changing 600r/min (4.5%). Rotate clockwise to increase oil quantity; counter
clockwise, decrease oil quantity. It is allowed to rotate it clockwise or counter clockwise one
circle from the initial manufactory position.
(i) 21# screw: Change the closing rotating speed of bleed-off valve of 5th
grade. Rotate every
circle changing 600r/min (4.5%). Rotate clockwise to increase oil quantity; counter
clockwise, decrease oil quantity. It is allowed to rotate it clockwise or counter clockwise1
circle from the initial manufactory position.
Operation of propeller and speed regulator
Function
Propeller and speed regulator operate together to keep the constant rotating speed of engine
automatically by changing blade angle (BA) of propeller. And they can also complete the following
missions: propeller feathering, unfeathering, mid pitch stop and releasing mid pitch stop, etc.
The balance between output power of engine and the needed power of propeller is damaged
when the ambient atmospheric condition, state of flight and operating state of engine change. The
rotating speed of engine will increase or decrease. Meanwhile with the change of rotating speed,
centrifugal regulator on speed regulator may send out signals. Enlarge or reduce blade angle (BA)
to make the needed power of propeller and output power of engine equal. Thus, keep the constant
rotating speed of engine (12300r/min) unchanged. At that time, new power balance state occurs.
JZ-Y8F200W-02
AIRCRAFT FLIGHT MANUAL
SECTION VI
AIRCRAFT SYSTEM EQUIPMENT
6-6
June 30, 2012
Function and operation of all constant pitch of propeller
When the operating state and flight state of engine are uncoordinated and trouble happens in
engine or its accessories, propeller blade is at the negative angle of attack position to produce
negative thrust or overrun. Only in aircraft is in landing run and emergency descent, the negative
thrust produced by propeller can operate to brake well. In other conditions, excess negative thrust
can bring great difficulty to operate the engine. Overrun can cause the damage to engine and
moving parts of propeller. Thus, mid pitch stop, mechanical pitch control, hydraulic pitch control,
centrifugal pitch control and other safety devices are installed in propeller hub.
Automatic torque feathering, negative thrust auto-feathering, manual feathering, emergency
hydraulic feathering and manual unfeathering systems are set to keep the aircraft safety and the
smallest resistance for propeller in flight direction.
Function of constant pitch safety device
Hydraulic pitch control: The propeller reverse pitch is fixed automatically, that is, set the blade
angle (BA) of propeller at the angle of operation without reducing to prevent the propeller from
overrun.
Mechanical pitch control: Mechanical pitch control and hydraulic pitch control can operate
together when the blade angle is at the range of 0o
~45o
. Meanwhile, the reliability of pitch control
is increased. When the hydraulic pitch control is inoperative, the mechanical pitch control can
ensure the pitch control of propeller.
Centrifugal pitch control: When the rotating speed of propeller exceeds (1105+15
) r/min,
centrifugal pitch control mechanism can control the pitch automatically to avoid the propeller
rotating speed increasing, no matter how much the oil pressure in all oil pipes of propeller is.
Function of mid pitch stop
Mid pitch stop mechanism can ensure that when blade angle reduces to fine pitch stop12o
, the
propeller blade can be restricted to that place. Thus, avoid large negative thrust and overrun in
rapid deceleration of the engine or trouble occurring in engine. It can also ensure the propeller to
be returned with necessary blade angle quickly when opening the throttle in the second flight.
Release the mid pitch stop when the plane is in landing run. Reduce the blade angle from 12o
to 0o
position, producing large negative thrust. Thus, landing run distance is shortened largely.
JZ-Y8F200W-02
AIRCRAFT FLIGHT MANUAL
SECTION VI
AIRCRAFT SYSTEM EQUIPMENT
6-7
June 30, 2012
Function of feathering and unfeathering mechanism
(a) Automatic torque feathering: When the throttle-control lever is above 56o
with the torque
pressure decreasing to 142psi (980kPa), feather the propeller automatically by signals sent
by automatic torque feathering sensor.
(b) Negative thrust auto-feathering: When the throttle-control lever is above 40o
with the
negative thrust produced by propeller shaft exceeding 2645.5lb (11768N), feather the
propeller automatically by negative thrust feathering sensor.
(c) Manual feathering: The engine can feather manually if necessary. Press Manual feathering
button, the propeller turns to feathering position.
(d) Emergency hydraulic feathering: If feathering is needed in emergency with the electric
system of automatic or manual feathering inoperative, pull downward and rotate 90o
the
emergency hydraulic feathering switch to force the propeller to be at feathering position.
This method is done by speed governor self supplying oil to feather, and the time for
supplying oil is short. Therefore, feathering cannot be done completely. But the blade angle
is not less than 40o
generally.
(e) Part feathering: Part feathering can be operated to check the operation of the part
feathering system in engine operating state and shutdown state.
(f) Unfeathering: Place the propeller electric switch to Stop releasing button position, to make
the lade angle back to 0o
position on ground. When starting the feathered engine in air,
manual unfeathering should be made to reduce the needed blade angle. At that time, the
propeller drives the engine to rotate in frontal airflow.
The method for unfeathering is as follows: pull up the unfeathering button and keep it at its
original position (pulling time is not more than 2.5s), and the blade returns to its starting
angle from feathering position.
JZ-Y8F200W-02
AIRCRAFT FLIGHT MANUAL
SECTION VI
AIRCRAFT SYSTEM EQUIPMENT
6-8
June 30, 2012
Propeller thrust
(a) The propeller thrust varied with the flight speed V, flight altitude H and air temperature t.
The thrust depends on the flight speed, rotating speed of propeller, flight altitude and blade
angle. The opening of blade angle depends on the throttle, and the rotating speed is a
constant. Thus, the thrust can be calculated, as long as the V, H and Npropeller of throttle is
known. The procedure of producing the thrust is shown in Figure 6-3.
The total thrust of one engine in different altitude, speed, throttle and air temperature is
shown in Figure 6-4 and 6-5.
Figure 6-3 Propeller thrust
(b) Propeller Operation in negative thrust
The power consumption of turbine propeller engine is large and the blade angle can
change to very small angle. Thus, negative thrust can reach above 11023 lb(49000N) in
small blade angle windmill state with the tH=-60o
C. Besides, when the throttle is opened
small, negative thrust may be produced.
JZ-Y8F200W-02
AIRCRAFT FLIGHT MANUAL
SECTION VI
AIRCRAFT SYSTEM EQUIPMENT
6-9
June 30, 2012
Figure 6-4 Total thrust of one engine in H=0mile (0km)
Figure 6-5 Total thrust of one engine in H=4.97mile (8km)
JZ-Y8F200W-02
AIRCRAFT FLIGHT MANUAL
SECTION VI
AIRCRAFT SYSTEM EQUIPMENT
6-10
June 30, 2012
(1) Windmill state of propeller
When the angle of attack of blade element α<-8, the large negative thrust may be
produced. Meanwhile, the rotating of propeller does not need to be powered by
engine, and can supply power to engine in frontal airflow. In windmill state, the
negative thrust can reach to its maximum, which exceeds the maximum positive thrust
of power plant. Also in this state, the power that propeller supplied to engine is the
windmill power (Nwindmill).
The windmill power of propeller depends on the power coefficient β, air density ρ and
the rotating speed of propeller n. And β depends on corresponding feed pitch λ and
blade angle φ. Thus, when the altitude keeps unchangeable with the n is a constant
(1075r/min), the propeller windmill power is relevant to flight speed V and blade
angle φ. The relation curve of windmill power Nwindmill and V, φ.
N (0.735km)
5000
4000
3000
2000
1000
0
0 10 20 30 40
Windmill power
without oil supply
300
350
400
450
500
V=550km
/h
φ (o
)
Figure 6-6 The relation curve of windmill power Nwindmill and V,φ (H=0, t=59o
F(15o
C), n=1075r/min)
JZ-Y8F200W-02
AIRCRAFT FLIGHT MANUAL
SECTION VI
AIRCRAFT SYSTEM EQUIPMENT
6-11
June 30, 2012
(2) The thrust varied with the speed in small throttle both in air and on ground:
The throttle without producing negative and positive thrust is called zero thrust throttle.
Small throttle in air is zero thrust throttle. But, thrust is affected greatly by air
temperature. Thus, small throttle in air changes with the air temperature. When
throttle is at 16o
, the thrust changes with the air temperature and flight speed.
Variation of thrust when throttle is at 16o
is shown in Figure 6-7.
P (9.81N)
0
1000
2500
2000
60
60
30
300200 Vb (km/h)
t=15°C
Figure 6-7 Variation of thrust with throttle at 16o
Release the inboard propeller stop and then the outboard. And each engine can
JZ-Y8F200W-02
AIRCRAFT FLIGHT MANUAL
SECTION VI
AIRCRAFT SYSTEM EQUIPMENT
6-12
June 30, 2012
produce 3307~3527lb (14700~15680N) negative thrust. Negative thrust decreases
with the running speed reducing. When the V=70~81kn (130~150km/h), the blade
angle changes to be positive, and the thrust changes to not big positive value. The
variation of thrust in landing and running process are shown in Figure 6-8.
P (9.81N)
0
1000
2000
500
120 200
4
3
5
1
280 Vb(km/h)
2
1-2, The variation of thrust when the throttle lever is at 16o
2-3, The throttle lever is at 0o
4-5, Propeller releasing the mid pitch stop
Figure 6-8 The variation of thrust in landing and running process
JZ-Y8F200W-02
AIRCRAFT FLIGHT MANUAL
SECTION VI
AIRCRAFT SYSTEM EQUIPMENT
6-13
June 30, 2012
(3) The following measures should be taken when the engine is out of oil supply and
cannot be feathered:
a) The negative thrust is at its maximum when Vactual=227~238kn (420~440km/h),
and it is larger in low altitude than in high altitude. Method should be made to
reach this speed in high altitude. The detailed step is: reduce the indicated
airspeed to allowable speed 162kn(300km/h) in 5000m and keep that speed to
slide.
b) Observe the rotating speed carefully when the speed reduced inVactual>227~238kn
(420~440km/h). When rotating speed cannot be kept and it reduces (about Vactual
227~238kn (420~440km/h)), release the stop at once.
Note
1) Do not release the stop too early, otherwise, the blade angle will be less than
12o
in the process of propeller changing into small moment by speed
governor. At that time, as the negative coefficient (-CP) increasing rapidly,
the negative thrust can exceed -22031 lb (-98000N).
2) Do not appear wave-off when the propeller is at windmill state and enters
into landing. The negative thrust can increase gradually in increasing speed.
Other point is that, when the throttle is at 0o
position with  =0o
in increasing
speed, negative thrust is larger than that of in oil supply cutoff. When the V
increases to 194kn (360km/h), P=-12337 lb (-54880N) [p=-6609 lb (-29400N)
without oil supply], engine must be shut down, because of the engine cannot
be feathered.
(c) Negative thrust produced by engine air start
When unfeathering in engine air start, large negative angle of attack on propeller blade is
produced. Thus, produce great negative thrust. Negative thrust becomes larger when the
speed increases in high altitude. Moreover, the instant started negative thrust reached to its
maximum value.
The starting method has a great effect on the negative thrust. With unfeathering fast, the
blade can enter into fine pitch stop quickly. Because the blade keeps at this angle for a
longer time, the negative thrust increases. Thus, in engine air start, unfeather in time
(n=15%~20%) and supply feathering to avoid the rotating speed increasing fast, largely
reducing the negative thrust.
The variation of negative thrust in engine air start is shown in Figure 6-9.
JZ-Y8F200W-02
AIRCRAFT FLIGHT MANUAL
SECTION VI
AIRCRAFT SYSTEM EQUIPMENT
6-14
June 30, 2012
n(r/min)
11000
9000
7000
5000
3000
1000
80
60
40
20
0 10 20 25
4400
3400
2400
1400
P(9.81N)
t(s)
Figure 6-9 The variation curve of negative thrust in engine air start
JZ-Y8F200W-02
AIRCRAFT FLIGHT MANUAL
SECTION VI
AIRCRAFT SYSTEM EQUIPMENT
6-15
June 30, 2012
Precautions in power plant operation
Release the stop of propeller in taxing
When the engine is started by turboprop airplane, the propeller can be at the minimum blade
angle (starting angle) position. At that time, propeller torque is small to facilitate engine starting.
Even operate 0o
throttle, the four engines may produce 1764~2204 lb(7840 ~9800N) thrust. Thus,
pay attention to lifting parking brake.
The rotating speed is 10400r/min at 0o
throttle. Rotating speed increases gradually to its
operation speed when the throttle is enlarged from 0o
to 16o
~22o
step by step. In that process,
blade angle keeps the same, rotating speed increases, and thrust keeps constant generally
(increasing slightly, strictly speaking), which is the so called Zero Throttle. Increasing the throttle to
16o
~22o
, the blade angle is enlarged by propeller governor. Meanwhile, the rotating speed is
constant and thrust is increased largely.
If the fuel regulations of left and right engine are inconsistent, rotating speed of left and right is
usually different in Zero Throttle. However, the thrusts on left and right differ indistinctly and have a
small effect on the taxiing. When the throttle is above 16o
~22o
, the enlarged propeller moments on
left and right are inconsistent. And the thrusts on both sides differ greatly. Thus, there is deviation
and shaking head in taxing.
In taxing, the propeller should be at Stop releasing button position. In order to acquire a certain
taxing speed in large head wind, upslope, and load, the throttle should be above 30o
, and the
blade angle is larger than limiting angle (12o
). Once stop sliding and throttle is at 0o
, blade should
stop at the 12o
limiting position if unreleasing the stop. At that time, the thrust cannot be reduced
quickly and great rotating moment may occur as well. In that situation, in order to keep the throttle
at 0o
and corresponding rotating speed, fuel control unit tends to supply more fuel to increase the
combustion gas temperature, produce sonic boom, and even burn out turbine impeller (in fact,
there is surge when the rotating speed reducing to 93%).
JZ-Y8F200W-02
AIRCRAFT FLIGHT MANUAL
SECTION VI
AIRCRAFT SYSTEM EQUIPMENT
6-16
June 30, 2012
Propeller must be stopped in taking off
Keep the throttle to 100o
to take-off run, at this time, the blade angle is 24o
~26o
. The blade
angle may increase with the increasing take-off run speed. Thus, as long as the engine operates
normally, whether the propeller is stopped or not will have no effect on engine operation
characteristics. But, when one or several engines shut down with the feathering position full of
troubles, and the speed at that time is less than 227~238kn (420~440km/h), propeller can supply a
certain power to drive the compressor in windmill state. But the power is limited to maintain the
operation speed, and the propeller changes to its minimum moment (releasing the stop, 0o
;
unreleased, 12o
). The rotating speed does not be reduced in the shutdown moment. If the
propeller is at its original Releasing stop position, negative angle of attack is great as well as the
negative thrust at that time.
The excess negative thrust can produce large yawing torque. If feeding rudder a little late, the
aircraft may deviate from the runway. Thus, when taking off, the propeller must be stopped. It is
forbidden to take off when the propeller switch is at Release Stop position.
The propeller switch should be at Stop position even engine is in normal
operation
When the flight speed is less than 227~238kn (420~440km/h), engine shuts down, and the
propeller is in windmilling, whether the propeller is stopped or not affect the negative thrust largely,
because the speed is low and the propeller windmill power is limited to maintain the operation
speed. Propeller changes to its maximum moment at once by propeller governor. If the propeller is
at Release Stop position before the engine shutdown, the blade angle reduces to 0o
at once. At the
time when the rotating speed does not be reduced in shutdown moment, propeller negative thrust
at Release Stop position is much larger than that at Stop position. Propeller switch should be at
Stop position to avoid excess negative thrust in shutdown moment in flight.
If the engine is shut down with the speed at the range of 227~238kn (420~440km/h), Release
the stop in time after the windmilling speed is stable. Because of releasing the stop, the rotating
speed reduces further and the negative thrust reduce as well. But at initial the moment of releasing
the stop (3s~4s), negative thrust increases slightly. Therefore, pay attention to the balance of the
aircraft.
JZ-Y8F200W-02
AIRCRAFT FLIGHT MANUAL
SECTION VI
AIRCRAFT SYSTEM EQUIPMENT
6-17
June 30, 2012
Throttle in air cannot be less than allowable degree
According to turboprop engine characteristics, close the throttle to 0o
(over locking pin) only in
rear section of landing float. In other situations, it is forbidden to close the throttle over locking pin.
Otherwise, great negative thrust is produced [about 3307~4409lb (14.7~19.6kN)] to affect the
flight security seriously.
The degree of small throttle depends on temperature, pressure and regulating situation of
engine. No matter the temperature is lower or higher than 15o
C, the small throttle increases in air.
The variation is shown in Table 6-1.
Table 6-1
Air
temperature
o
F (o
C)
-55
(-67)
-55~-30
(-67~-22)
-31.01~-24.56
(-23.8~-12.2)
-10~0
(14~32)
0~15
(32~59)
20~25
(68~77)
30
(86)
35
(95)
40
(104)
Small
throttle
degree in air
(°)
36~32 32~28 26~22 22~20 20 22~24 25~26 27 28
When the pressure is lower than sea level standard air pressure 101.3kPa (760mmHg), small
air throttle increases. When the pressure reduces every 1.16psi (7.997kPa), small air throttle
increases 1.5o
~2o
.
In the same throttle, if fuel governor supplies much less fuel, small air throttle will increase;
otherwise, small air throttle may decrease.
All in all, pilot should make clear the airfield level temperature, and pressure, determine the
degree of small air throttle and adjust the throttle locking pin position before landing. Do not
consider the small air throttle degree is a constant data.
JZ-Y8F200W-02
AIRCRAFT FLIGHT MANUAL
SECTION VI
AIRCRAFT SYSTEM EQUIPMENT
6-18
June 30, 2012
Steps should be pay attention to when closing the throttle to pass locking pin
and releasing propeller stop
One of the characters of power plant of this type, large negative thrust can be acquired when in
closing the throttle over locking pin and releasing propeller stop to shorten the landing and landing
run distance. Effects are different in different operating time and different orders. The two
operation methods of power plant right now are as follows:
Method 1: In initial part of floating, after aircraft nose shielding the threshold, close the internal
throttle to pass locking pin; close the outboard throttle to pass locking pin when touching ground;
after lowering down the nosewheel, release the propeller stop from internal side to outboard side.
Method 2: Close the throttle to locking pin in floating, and pass the locking pin after touching
the ground; release the propeller stop after lowering down the nosewheel.
The advantage of method 1 are as follows: Propeller can produce negative thrust earlier to
reduce the landing and landing run distance effectively and with the negative thrust section
function, aircraft reduces its speed slowly to facilitate the operation. There are also disadvantages
of method 1. When the delayer of internal small throttle of engine operates inharmoniously, and
different oil supplies in left and right engines, the negative thrusts of left and right differ from each
other to produce yawing torque, which brings great difficulty in keeping flight altitude in floating,
especially in the following condition: releasing the propeller stop of left and right sides at different
time, or one side being released or two sides being released, etc. Close the throttle to pass locking
pin, with large yawing torque and great negative thrust, and the aircraft may lower down quickly by
reducing the speed. At that time, the speed is small with low efficiency of control surface, and the
deviation cannot be controlled easily by feeding rudder. The lateral side of aircraft touches the
ground, and the landing gear may be damaged by much lateral load. When the aircraft lowers
down abruptly without holding the stick back immediately, the nosewheel may touch the ground at
first. If the above situation occurs, close the throttle at once, and control the direction with rudder.
The advantage of method 2 is that slow reducing speed, steady attitude and easy control.
Even in small throttle delayer is inharmoniously or restrictor with trouble and other situations, the
aircraft can easily be corrected after touching the ground. But, negative thrust is produced late and
floating distance and landing run distance are long, thus, it is not suitable to airport with short
runway.
In emergency, in order to shorten the distance of floating and landing run without away from
runway, close the throttle to pass locking pin after grounding state is form in the rear section of
floating. Meanwhile, release the stop. Hold the stick back in time to prevent the aircraft from
lowering down abruptly with nosewheel contacting the ground.
JZ-Y8F200W-02
AIRCRAFT FLIGHT MANUAL
SECTION VI
AIRCRAFT SYSTEM EQUIPMENT
6-19
June 30, 2012
Cut off the engine after ground contact on situations
Cut off the engine after ground contact, which is different from releasing the stop after ground
contact. In that process, landing run distance cannot be shortened, but be prolonged. The
negative thrust after ground contact changes as Figure 6-10.
P (9.81N) 5 10 15 20 25 t (s)
500
1000
1500
2000
1
2
3
Curve 1, at 0o
throttle, the negative thrust without releasing the stop;
Curve 2, at 0o
throttle, the negative thrust with releasing the stop
Curve 3, Negative pull after engine shutdown
Figure 6-10 Variation curve of negative thrust with different time after ground contact
In landing run, mean negative thrust is small after cutting off the engine (less than 0o
throttle,
and releasing the mean negative thrust stopped), thus, the sliding distance is longer.
If restrictor has trouble not to release the stop after ground contact, cut off the engine. Large
negative thrust shortens the landing run distance effectively.
JZ-Y8F200W-02
AIRCRAFT FLIGHT MANUAL
SECTION VI
AIRCRAFT SYSTEM EQUIPMENT
6-20
June 30, 2012
Prevent and correct the deflection when two engines in one side shutdown and
land.
If the shutdown engine is feathered in flight, the resistance of this engine is not big about
441~441lb (1960 ~2450N). At this moment, the thrust of operating engine produces yawing torque
to force the shutdown engine to deviate to one side. The situation is different when closing the
throttle to pass locking pin in landing especially after releasing the stop. Large negative thrust is
produced by shutdown engine 3307~5511.5 lb (14700~24500N) to form yawing torque, forcing the
aircraft to deviate to the side of operating engine. If wrong method is done by pilot, the aircraft may
deviate abruptly and even be away from the runway. Closing the throttle and release the stop
earlier with less short interval, the negative thrust and its yawing torque are large. Thus, in landing
with two engines on one side shutdown, the following points should be paid attention to:
(a) Sliding before landing, close the outboard throttle to small air throttle position, and try to
use internal throttle to keep specified sliding speed.
(b) Place the trim tab of rudder to central position to reduce the force of pushing on rudder of
shutdown engine, when closing the throttle to pass the locking pin and releasing the stop.
(c) After flareout, close the internal throttle softly to small air throttle position. Close the internal
throttle to 0o
position and release stop only after lowering down the nosewheel on ground
contact with constant direction. Thus, negative thrust produced by operating engine and
yawing torque are small in floating to keep the aircraft balance. After lowering down the
nosewheel, close the internal throttle to pass the locking pin and release the stop, and the
aircraft can deviate to one side of operating engine. Keep the correct direction by rudder
control mechanism and use brake if necessary.
(d) When rolling speed reduces to about 32.4kn (60km/h), draw out control handle of
nosewheel, close outboard throttle to pass to pass the locking pin and release the stop,
with correct direction. Because the speed is low, and nosewheel load increases, increasing
the direction efficiency; thrust variation and its yawing torque are small after releasing the
stop, which facilitates to keep the direction.
The reasons for two engines shutdown landing on one side are as follows: on one hand,
the negative thrust is small because of the shutdown engine feathering; on the other hand,
on the other hand, the closing outboard throttle to pass to pass the locking pin and
releasing the stop are late, and the negative thrust is produced late. Thus, mean negative
thrust in landing is small, and the landing run distance is short, which should be paid
attention to when landing in short runway. The landing run distance of two engines
shutdown landing on one side is 4265~4921ft (1300~1500m).
JZ-Y8F200W-02
AIRCRAFT FLIGHT MANUAL
SECTION VI
AIRCRAFT SYSTEM EQUIPMENT
6-21
June 30, 2012
FUEL SYSTEM
General
The fuel system consists of the fuel supply system, vent system, and refueling and fuel
drainage system. There are totally seven fuel tank groups 0, I, II, III, IV, V, and VI on aircraft wings,
and there is a flexible fuel tank in the fuselage.
The fuel supply system supports automatically-and manually-controlled fuel consumption
modes. The fuel consumption sequence is as follows: I, fuselage fuel tank, I, II, III, IV, V, VI, 0, VI.
When the flight altitude is below 13123.36 ft (4000 m) and the residual fuel in the fuel supply tank
is more than half of its capacity, the gravity fuel supply capability is available. Fuel tank group 0
and fuselage fuel tank do not directly supply fuel to engines; instead, fuel in fuel tank group 0 and
fuselage fuel tank is delivered to fuel tank groups VI and I, which in turn supply fuel to engines.
The tank vent system is an open vent system. Each group of fuel tanks communicates with the
air to balance the pressure inside and outside fuel tanks. In this way, vacuity will not be produced
inside the fuel tank, ensuring that the fuel tank can supply fuel properly. This can also prevent fuel
tanks and fuel compartment from being damaged due to excessively large difference between
pressure inside and outside the fuel tank. Fuel tank group 0 has an independent vent system,
whereas vent systems of fuel tank groups I~VI and the fuselage fuel tank are communicate with
each other.
The refueling system supports pressure refueling and gravity refueling. The pressure refueling
system can be further divided into automatic and manual pressure refueling systems. The
pressure refueling sequence is as follows: fuel tank groups VI, V, IV, III, II, I, and 0. Manual
pressure refueling of the fuselage fuel tank is performed independently. The fuel drainage system
supports pressure draining and gravity draining.
JZ-Y8F200W-02
AIRCRAFT FLIGHT MANUAL
SECTION VI
AIRCRAFT SYSTEM EQUIPMENT
6-22
June 30, 2012
The fuel designation of the fuel system is listed in Table 6-2.
Table 6-2
Country Designation
Technical
Specification
Freezing Point
China
RP-3 GB 6537 -52.6°F(-47o
C)
RP-2 SY1006 -58°F(-50o
C)
RP-1 GB438 -76°F(-60o
C)
U.S.A
JP-1 MIL-F-5616 -76°F(-60o
C)
JP-4 MIL-J-5624D -67°F(-55o
C)
JP-5 MIL-E-7142 -50.8°F(-46o
C)
Britain
JP-1B DERD-2482 -40°F(-40o
C)
JP-4B DERD-2486 -40°F(-40o
C)
JP-5B DERD-2488 -40°F(-40o
C)
Russia
T-1 ГОСТ10227-86 -76°F(-60o
C)
TC-1 ГОСТ10227-86 -76°F(-60o
C)
T-2 ГОСТ10227-86 -76°F(-60o
C)
PT ГОСТ10227-86 -67°F(-55o
C)
Others ATF-650 AT-150 JETA-1
Note
1) Fuel with the freezing point at -40o
F (-40o
C) can be used only when
the local temperature is not lower than 14o
F (-10o
C)
2) International principle for fuel substitute: The substitute can be used
if main physical and chemical specifications (distillation range,
viscosity, and freezing point) are similar.
JZ-Y8F200W-02
AIRCRAFT FLIGHT MANUAL
SECTION VI
AIRCRAFT SYSTEM EQUIPMENT
6-23
June 30, 2012
The number, capacity, and refueling quantity of each fuel tank are
listed in Table 6-3.
Table 6-3
Fuel
Tank
Group
Fuel
Tank No.
Fuel Tank Capacity
Manual Refueling
Quantity
Pressure Refueling
Quantity
Unusable Fuel
gal(L) lb(kg) gal(L) lb(kg) gal(L) lb(kg) gal(L) lb(kg)
Group 0
Structura
l fuel
tank
2×337.20
(2×1533)
2×2109.69
(2×1188)
2×316.53
2×1439
2×2458.15
2×1115
2×282.65
(2×1285)
2×2195.80
(2×996)
0 0
Group I
(left
group)
1# and
2#
460.16
(2092)
3573.69
(1621)
441.24
(2006)
3428.18
(1555)
397.69
(1808)
3088.67
(1401)
5.65
-25.7
44.09
-20
Group I
(right
group)
1# and
2#
494.47
(2248)
3840.45
(1742)
481.06
(2187)
3736.83
(1695)
432.01
(1964)
3355.43
(1522)
9.41
-42.8
72.75
-33
Group II 3#
2×216
(2×982)
2×1677.72
(2×761)
2×209.02
(2×953)
2×1629.21
(2×739)
2×191.81
(2×872)
2×1490.32
(2×676)
2×1.43
(2×6.5)
2×11.02
(2×5)
Group III
6# and
7#
2×280.23
(2×1274)
2×2178.16
(2×988)
2×271.87
(2×1236)
2×2112.03
(2×958)
2×243.94
(2×1109)
2×1973.13
(2×859)
2×1.54
(2×7)
2×11.02
(2×5)
Group IV
8#, 9#,
and 10#
2×332.14
(2×1510)
2×2579.41
(2×1170)
2×323.42
(2×1484)
2×2535.31
(2×1150)
2×296.29
(2×1347)
2×2031.62
(2×1044)
2×21.23
(2×96.5)
2×165.35
(2×75)
Group V
11#, 12#,
and 13#
2×206.10
(2×937)
2×1600.55
(2×726)
2×204.12
(2×928)
2×1585.12
(2×719)
2×179.05
(2×814)
2×1319.12
(2×631)
2×2.46
(2×11.2)
2×19.84
(2×9)
Group VI
4# and
5#
2×351.94
(2×1600)
2×2733.73
(2×1240)
2×341.82
(2×1554)
2×2654.36
(2×1204)
2×311.03
(2×1414)
2×2416.26
(2×1096)
2×20.81
(2×94.6)
2×160.94
(2×73)
Fuselage
group
16#
692.88
(3150)
5381.48
(2441)
671.98
-3055
5220.54
-2368
624.47
(2839)
4850.16
(2200)
2.2
-10
17.09
-7.75
Total fuel
quantity
5094.76
-23162
39572.93
-17950
4935.07
-22436
38333.93
-17388
4463.69
(20293)
33679.98
(15727)
112.18
(510)
870.82
-395
Note
1) In Table 2, the pressure refueling quantity is obtained when aircraft is with an
angle of attack of 2.5o
.
2) Data in Table 2 is obtained when the fuel specific weight (ρ) is 7.77 lb/gal
(0.775 kg/L).
JZ-Y8F200W-02
AIRCRAFT FLIGHT MANUAL
SECTION VI
AIRCRAFT SYSTEM EQUIPMENT
6-24
June 30, 2012
The fuel pump operating data is listed Table 6-4
Table 6-4 Fuel pump operating data
Item psi (MPa)
Allowable seepage of
excessive fuel pipe
Primary fuel pump
(CB-55)
Maximum: 1564.56 (10.78)
When the safety valve is opened:
1849.03+71.12
0 (12.74+0.49
0 )
When the safety valve is completely
opened: 2257.73 (15.68)
Not more than one drop per
min
Auxiliary fuel pump
(XB-36H)
35.56+7.11
0 (0.245+0.049
0 )
Not more than 1.83×10⁻⁵
gal/min (5cm3
/h)
Fuel pump (LB-22)
When the fuel supply quantity is
0:Low-pressure state: not higher than
9.67 (0.067), Rated state: not higher
than 18.49 (0.127), High-pressure
state: not higher than 25.60 (0.177)
When the fuel supply quantity is 14.66
gal/min (4000 L/h): Low-pressure state:
not higher than 5.69 (0.039), Rated
state: not higher than 12.09 (0.083)
In the high-pressure state, when the
fuel supply quantity is 7.33 gal/min
(2000 L/h), the operating pressure is at
least 17.79 (0.123).
When the operating fluid
temperature is higher than
-40o
F (-40o
C): not more than
1.83×10⁻⁶
gal/min (0.5cm3
/h).
When the operating fluid
temperature is lower than
-40o
F (-40o
C): not more than
two drops per minute.
Under normal temperature or
non-operating state: leakage
not allowed.
Fuel pump (LB-21)
When the fuel supply quantity is 14.66
gal/min (4000 L/h), the operating
pressure is at least 14.66 gal/min (4000
L/h).
When the operating fluid
temperature is below -31o
F
(-35o
C): not more than two
drops per minute.
When the operating fluid
temperature is above -31o
F
(-35o
C): not more than
1.83×10⁻⁶
gal/min (0.5cm3
/h).
Non-operating state: leakage
not allowed.
JZ-Y8F200W-02
AIRCRAFT FLIGHT MANUAL
SECTION VI
AIRCRAFT SYSTEM EQUIPMENT
6-25
June 30, 2012
Aircraft refueling and fuel drainage
Refueling
(a) Before refueling, check that
(1) The refueling truck has a laboratory sheet and fuel is qualified.
(2) The deposit drained out of the refueling truck has no water, ice crystal, and
mechanical impurity.
(3) The lead sealing on the refueling truck is intact.
(4) The doper net filter is clean.
(5) Fire extinguishing devices are placed near aircraft.
(6) Pipelines are unblocked and clean (Take down blockages at air vents of fuel tanks.)
(b) Connect grounding wires for the refueling truck, doper, and aircraft.
(c) Perform parking brake and place wheel chocks.
(d) Determine the refueling quantity required by a flight task, and specify the fuel tanks that
need to be filled up and those that need partial refueling.
(e) Manual refueling is implemented as follows: Use the doper to fill fuel into each fuel tank on
the upper side of the aircraft wing through the refueling filler on each fuel tank. The
refueling sequence is opposite to the fuel consumption sequence. To save time, refueling
can also be implemented in the following sequence: left VI, V: right VI, V, IV, III; left IV, III, II,
I; right II, I, 0; left group 0; or in the opposite sequence, starting from right. If two refueling
trucks are used, left and right wing fuel tanks can be refueled simultaneously. The
maximum refueling quantity of fuel that can be filled through the refueling filler on the fuel
tank on the upper side of the aircraft wing can reach 97% of the total fuel tank capacity.
Fill fuel into the fuselage fuel tank through the manual refueling filler at the tail of the right
landing gear nacelle.
Note
During manual refueling through the refueling filler on the fuel tank on the upper
side of the aircraft, note that the fuel expansion space should be left between
the fuel level and the refueling edge, preventing fuel from flowing out of the
outer surface of the fuel tank.
JZ-Y8F200W-02
AIRCRAFT FLIGHT MANUAL
SECTION VI
AIRCRAFT SYSTEM EQUIPMENT
6-26
June 30, 2012
(f) Automatic pressure refueling is implemented by the refueling controller, which implements
refueling in the sequence of groups VI, V, IV, III, II, I, and 0. After one group of fuel tanks is
filled up, refueling of another group of fuel tank starts. Fuel flows into pipelines on the
aircraft through the pressure refueling union from the fuel pump in the refueling truck, and
then into the fuel tank through the refueling valve and float valve. When the refueling
pressure is higher than 2.13 psi (0.15 kg•f/cm2
), the green light on the refueling power
distribution box (PDB) illuminates, indicating that the refueling pressure is normal. When
the refueling pressure is higher than 49.78 psi (3.5 kg•f/cm2
), the red light on the refueling
PDB illuminates, indicating refueling overpressure. In this case, refueling should be
stopped immediately. During refueling, when the pressure of fuel tank group 0 is higher
than 1.71 psi (0.12 kg•f/cm2
), the corresponding red light on the refueling PDB illuminates.
In this case, refueling should be stopped immediately.
(g) If the automatic control system is operating abnormally, aircraft refueling can be
implemented by means of manual pressure refueling. During manual refueling, turn off the
automatic refueling valve first. Then, use the manual refueling valve to control the opening
and closing of the refueling valve. All refueling valves can be turned on simultaneously, or
the refueling valve for a fuel tank group can be turned on independently. Refueling must be
performed in the specified sequence. During refueling to fuel tank group VI, turn electrical
fuel valve RDK-1A first. Then, turn on the pressure refueling valve and fuel supply pump of
fuel tank group V. After the fuel tank is filled up, turn off the fuel supply pump of fuel tank
group V first, and then turn off the electrical fuel valve.
Manual pressure refueling to the fuselage fuel tank is implemented by the refueling PDB on
the fuselage fuel tank independently. During refueling, turn on refuel valves on two
fuselage fuel tank groups manually (the blue light is off). After fuel tanks are filled up, both
the blue and yellow signal lights illuminate. If there is no need to fill up fuel tanks, stop
refueling when the required fuel quantity is reached. Turn off the refueling valves (the blue
light illuminates). After refueling, drain out fuel in the refueling pipeline of the fuselage fuel
tank through the fuel drainage valve on the refueling pipeline.
(h) Refueling precautions
(1) The refueling sequence is opposite to the fuel consumption sequence. Refueling must
be performed in the specified sequence. Fuel quantities in left and right wing fuel
tanks should be balanced.
(2) During pressure refueling, if the red signal light on the pressure refueling PDB
illuminates or fuel cannot be filled in, refueling should be stopped.
(3) After refueling, turn off the power switch on the pressure refueling PDB.
JZ-Y8F200W-02
AIRCRAFT FLIGHT MANUAL
SECTION VI
AIRCRAFT SYSTEM EQUIPMENT
6-27
June 30, 2012
Fuel drainage
Before fuel drainage, connect the grounding jumper and take down the vent blockage. Partial
or complete pressure or gravity fuel drainage can be implemented through the drainage valve on
the coarse filter on any engine. (During partial or complete pressure fuel drainage, turn on the fuel
supply pump corresponding to the fuel tank whose fuel needs to be drained out in the fuel
consumption sequence.) Fuel in the fuselage fuel tank is delivered to fuel tank group I first, and
then the fuel is drained out from fuel tank group I.
Gravity fuel drainage indicates fuel drainage in the case that the fuel supply pump does not
operate. In gravity fuel drainage, only fuel in the wing fuel tanks can be drained out.
In-flight operation of the fuel system
Automatic fuel consumption and manual fuel consumption control of the
fuselage fuel tank
Automatic fuel consumption of wing fuel tanks
(a) Turn on the safety switch of the fuel system.
(b) Set the AUTOMATIC-MANUAL changeover switch to the AUTOMATIC position, and turn
on valves of the automatic fuel consumption controller, fuel quantity indicator, and on-duty
fuel pump for group VI. If the automatic fuel consumption mechanism is operating properly,
the green lights for the operating fuel pumps and the blue lights indicating the fuel
consumption sequence should illuminate and can switch automatically according to the
specified fuel consumption sequence.
(c) The fuel consumption controller performs automatic fuel consumption switchover
according to Figure 6-11.
Low
pressure
Yellow
light
Switch over to the high-
pressure operating state,
and connect group V
Connect group VI manually;
rated operating state
Fuel
consumption
Manually
turn on
Fuselage
group
Note: Rated
High
pressure
Switch over to the high-
pressure operating state,
and connect group IV
257.94 ± 35.27 lb
346.17 ± 35.27 lb
445.33 ± 35.27 lb
421.81 ± 35.27 lb
Switch over to the
high-pressure operating
state, and connect group III
Switch over to the
high-pressure operating
state, and connect group II
± 35.27 lb
Right 504.86
Left 478.40
Green
light
Connect group 0,
and lock group V
Disconnect Group 0
Red
light
1102.31 lb
Connect the
fuselage fuel tank
Group VI
Group I
Group II
Group III
Group IV
Group V
Group 0
Disconnect group I
Disconnect group II
Disconnect
group II
Disconnect
group IV
Manually
turn off
1258.84 ± 35.27 lb
1161.83 ± 35.27 lb
3417.16 ± 70.55 lb
1419.78 ± 35.27 lb
1779.13 ± 35.27 lb
1679.92 ± 35.27 lb
1258.84 ± 35.27 lb
1119.95 ± 70.55 lb
Figure 6-11 Schematic diagram of automatic fuel consumption switchover
JZ-Y8F200W-02
AIRCRAFT FLIGHT MANUAL
SECTION VI
AIRCRAFT SYSTEM EQUIPMENT
6-28
June 30, 2012
(d) The automatic fuel consumption sequence is as follows:
Power on the fuel pump for group I (the green light is on) and turn on the fuel consumption
sequence light for group I (blue light is on). At this time, the fuel pump for group I is in rated
operating state and starts supplying fuel to engines. When the residual fuel in left fuel tank
group I is about 478.40 lb±35.27 lb (217 kg±16 kg) or the residual fuel in right fuel tank
group I is about 504.86 lb±35.27 lb (229 kg±16 kg), the sensor's lower annunciator starts
operating and gives out a signal to power on the fuel pump for group II (the green light is on)
and turn on the fuel consumption sequence light for group II (the blue light is on). The fuel
pump for group II is in rated operating state. At the same time, the fuel supply pump for
group I switches over to the high-pressure operating state. The fuel output pressure in
high-pressure operating state is higher than that in rated operating state. Therefore, fuel
tank group I continues consuming fuel. Fuel tank group II starts consuming fuel only after
fuel in fuel tank group I is almost exhausted.
When the residual fuel in fuel tank group II is about 1419.78 lb±35.27 lb (644 kg±16 kg),
the sensor gives out an upper signal to disconnect the fuel supply pump of group I. When
the residual fuel is about 257.94 lb±35.27 lb (117 kg±16 kg), the sensor gives out a lower
signal to power on the fuel pump for group III (the green light is on) and turn on the fuel
consumption sequence light for group III (the blue light is on). The fuel pump for group III is
in rated operating state. At the same time, disconnect the fuel supply pump for group I
again. The fuel supply pump for group II switches over to the high-pressure state. Fuel tank
group III starts consuming fuel only after fuel in fuel tank group II is almost exhausted.
When the residual fuel in fuel tank group III is about 1779.13 lb±35.27 lb (807 kg±16 kg),
the sensor gives out an upper signal to disconnect the fuel pump for group II. When the
residual fuel is about 346.13 lb±35.27 lb (157 kg±16 kg), the sensor gives out a lower
signal to power on the fuel pump for group IV (the green light is on) and turn on the fuel
consumption sequence light for group IV (the blue light is on). The fuel pump for group IV is
in rated operating state. At the same time, disconnect the fuel supply pump for group II
again. The fuel supply pump for group III switches over to the high-pressure state. Fuel
tank group IV starts consuming fuel only after fuel in fuel tank group III is almost exhausted.
JZ-Y8F200W-02
AIRCRAFT FLIGHT MANUAL
SECTION VI
AIRCRAFT SYSTEM EQUIPMENT
6-29
June 30, 2012
When the residual fuel in fuel tank group IV is about 1679.92 lb±35.27 lb (762 kg±16 kg),
the sensor gives out an upper signal to disconnect the fuel pump for group III. When the
residual fuel is about 445.33 lb±35.27 lb (202 kg±16 kg), the sensor gives out a lower
signal to power on the fuel pump for group V (the green light is on) and turn on the fuel
consumption sequence for group V (the blue light is on). The fuel pump for group V is in
rated operating state. At the same time, disconnect the fuel supply pump for group III again.
The fuel supply pump for group IV switches over to the high-pressure state. Fuel tank
group V starts consuming fuel only after fuel in fuel tank group IV is almost exhausted.
When the residual fuel in fuel tank group V is about 1258.84 lb±35.27 lb (571 kg±16 kg),
the sensor gives out an upper signal to disconnect the fuel pump for group IV. When the
residual fuel is about 421.81 lb±35.27 lb (191 kg±16 kg), the sensor gives out a lower
signal to make the fuel pump for group VI switch over from the low-pressure operating
state to rated operating state (the green light is on). At the same time, disconnect the fuel
supply pump for group IV again. The fuel supply pump for group V switches over to the
high-pressure state. Fuel tank group VI starts consuming fuel only after fuel in fuel tank
group V is almost exhausted.
When the residual fuel in fuel tank group VI is about 2279.58 lb±35.27 lb (1034 kg±16 kg),
the sensor gives out the first upper signal to disconnect the fuel pump for group V. At the
same time, power on the fuel pump for group 0 (the green light is on) and turn on the fuel
consumption sequence light for group 0 (the blue light is on). Fuel in fuel tank group 0 is
pressurized and then flows into fuel tank group VI through the check valve and restricting
nipple. The fuel is supplied to engines from fuel tank group VI. When the residual fuel in
fuel tank group 0 is about 1161.83 lb±35.27 lb (527 kg±16 kg), the sensor gives out a lower
signal to disconnect the fuel pump for group 0. After fuel in fuel tank group 0 is exhausted,
fuel tank group VI starts consuming fuel. When the residual fuel is about 1708.58 lb±35.27
lb (775 kg±16 kg), the sensor gives out the second upper signal to disconnect the fuel
supply pump of group 0. At the same time, turn on the 45min warning light (the yellow light
is on). When the residual fuel in fuel tank group VI is about 559.97 lb±35.27 lb (254 kg±16
kg), the sensor gives out a lower signal to turn on the 15min warning light (the red light is
on). At the same time, disconnect the fuel supply pump of group 0 again.
JZ-Y8F200W-02
AIRCRAFT FLIGHT MANUAL
SECTION VI
AIRCRAFT SYSTEM EQUIPMENT
6-30
June 30, 2012
Manual fuel consumption control
The manual fuel consumption control procedure is as follows:
(a) Set the AUTOMATIC-MANUAL changeover switch to the MANUAL position.
(b) Turn on the valve of the fuel pump for a fuel consumption tank group according to the fuel
consumption sequence. At this time, the fuel pump operating green signal light and
operating sequence blue signal light illuminate.
(c) When fuel in this group is almost exhausted (judged based on the fuel quantity indicator
reading), turn on the valve of the fuel supply pump for the next group. (The sequence blue
signal light for the next group and fuel pump operating green signal light illuminate)
(d) After the fuel of the previous group is exhausted, the green signal light is off. At this time,
turn off the fuel pump valve.
Note
When the total residual fuel in fuel tank groups VI in both the left and right wings
is 3417.16 lb±70.55 lb (1550 kg±32 kg) (that is, the residual fuel in fuel tank
group VI in one wing is 1708.58 lb±35.27 lb (775 kg±16 kg)), the yellow warning
light illuminates, indicating that flight can proceed for about 45min. When the
total residual fuel in fuel tank groups VI in both the left and right wings is 1119.95
lb±70.55 lb (508 kg±32 kg) (that is, the residual fuel in fuel tank group VI in one
wing is 559.97 lb±35.27 lb (254 kg±16 kg)), the red warning light illuminates,
indicating that flight can proceed for about 15min.
Fuel consumption of the fuselage fuel tank
When the residual fuel in fuel tank group I reaches the lower signal position of the sensor, the
fuel pump switches to operate in high-pressure state. When the fuel pump for group II switches to
operate in rated state or when the residual fuel in fuel tank group I is about 1102.31 lb (500 kg),
fuel in the fuselage fuel tank can be used. At this time, fuel in fuel tank group I continues to be
consumed and the refueling valve for fuel tank group I is turned on (the blue light is on). If the
fuselage fuel tank is filled up, its fuel pump should be turned on.
JZ-Y8F200W-02
AIRCRAFT FLIGHT MANUAL
SECTION VI
AIRCRAFT SYSTEM EQUIPMENT
6-31
June 30, 2012
Note
1) To deliver fuel to only one fuel tank in left or right fuel tank group I, turn on the
refueling valve for this group only.
2) When fuel tank groups I in left and right wings are almost filled up, turn off the
fuel pump for the fuselage fuel tank and refueling valves for fuel tank groups
I in left and right wings. When fuel in group I is almost exhausted, turn on the
fuel pump for the fuselage fuel tank and refueling valves for group I again.
Repeat this process several times until fuel in the fuselage fuel tank is
exhausted completely. At this time, turn off the fuel supply pump for the
fuselage fuel tank and refueling valves of group I. Then, perform fuel supply
according to the specified fuel consumption sequence.
Caution
When a specific fuel supply pump for left and right fuel tank groups I is faulty,
the refueling valve for this fuel tank group must be turned off. Fuel in the
fuselage fuel tank is delivered to the fuel tank group that operates properly. At
this time, the communication valve must be turned on so that the fuel tank group
that operates properly can supply fuel to the four engines.
Fuel quantity balance
(a) Turn on the communication valve. The orange light illuminates.
(b) Set the BALANCE switch on the side with more fuel. The fuel pump on this side is used for
fuel consumption of all engines. At this time, the fuel pump on the side with fewer fuel stops
operating.
(c) When the fuel quantity is balanced, set the BALANCE switch to the neutral position. Then,
turn off the communication valve.
Caution
The fuel quantities in fuel tanks on left and right wings must be balanced before
fuel in fuel tank group V is exhausted.
JZ-Y8F200W-02
AIRCRAFT FLIGHT MANUAL
SECTION VI
AIRCRAFT SYSTEM EQUIPMENT
6-32
June 30, 2012
Fuel consumption precautions
(a) The difference between fuel quantities in fuel tanks of the left and right wings should fall
within the range of 1102.31 lb~1322.77 lb (500 kg~600 kg).
(b) Under any circumstances during flight, the on-duty fuel pump valve for group VI must be
set to the ON position (on duty). When the fuel quantity in fuel tank group VI is low and
aircraft is climbing, the inner (front fuel pump) green light is off. When the aircraft is gliding,
the outer (rear fuel pump) green light is off. These are normal cases.
Fuselage fuel tank operation
(a) Turn on the refueling valve for fuel tank group I. The blue signal light on the overhead
console illuminates.
(b) Turn on the fuel pump of the fuselage fuel tank to deliver fuel to fuel tank group I.
Note
When fuel tank group I is almost filled up, turn off the fuel delivery pump of the
fuselage fuel tank.
(c) After fuel in the fuselage fuel tank is exhausted, turn off the fuel pump of the fuselage fuel
tank and the refueling valve for fuel tank group I.
Note
When the fuselage fuel tank is in use, if the fuel pump for fuel tank group I at
one side is faulty, turn off the refueling valve for this side, and then turn on the
communication valve for fuel supply.
In-flight troubleshooting
(a) The green signal light indicating that the fuel pump in a group at one side is operating is off.
(1) Turn on the communication valve.
(2) Check whether the bulb is in good condition. If the bulb is in good condition and the
fuel quantity remains unchanged, it indicates that the fuel pump is faulty. To prevent
excessively large banking torque from being produced on wings at both sides, stop
using fuel in this fuel tank group (except group I). After manual fuel consumption of the
next group starts, turn off the communication valve.
JZ-Y8F200W-02
AIRCRAFT FLIGHT MANUAL
SECTION VI
AIRCRAFT SYSTEM EQUIPMENT
6-33
June 30, 2012
Note
The residual fuel in the faulty fuel tank group can be used for emergency
backup.
(b) All fuel pumps in the fuel supply system are faulty and only the gravity fuel supply is
available.
(1) Level off the aircraft immediately (climbing is prohibited). A slight gliding angle is
allowed if the heading altitude is permitted. In addition, land the aircraft at the airfield
in vicinity.
(2) Control the aircraft and advance or retard the throttle smoothly. The throttle angle
cannot exceed 74o
. Observe the operating condition of the fuel supply system.
(c) When the fuel quantity indicated by the fuel quantity indicator decreases quickly, check the
fuel quantity in fuel tank subgroup immediately, and check whether fuel leakage occurs
visually. If yes, take the following measures:
(1) Turn on the communication valve.
(2) Switch over to manual fuel consumption, and turn on the switch of the fuel pump for
the leaking fuel tank group.
(3) Set the balance switch to the side where fuel is leaking. When fuel in the fuel tank is
almost exhausted, set the balance switch to the other side to balance the fuel quantity.
(4) After the fuel quantity is balanced, set the balance switch to the neutral position.
Switch over to the automatic fuel consumption. Then, turn off the communication
valve. In addition, land the aircraft at the airfield in vicinity.
(d) The signal light indicating that the fine filter is blocked illuminates.
During flight, if the pressure difference before and after fuel drainage through the drainage
valve on the fine filter reaches 5.69+1.07
-0.71 psi (39.2+7.35
-4.9 kPa (0.4+0.075
-0.05 kgf/cm2
)), the red signal
light indicating that the fine filter is blocked illuminates. At this time, take the following
measures:
(1) Advance the throttle to an angle greater than 62o
so that automatic feathering can be
implemented when fuel supply is interrupted.
(2) After landing, clean and check the fine filter and RT-11 fuel regulator.
Note
If the auxiliary fuel pump pressure decreases below 35.56 psi (0.245 MPa (2.5
kgf/cm2
)) during flight, clean the coarse filter and replace the paper filter
element of the fine filter after flight.
JZ-Y8F200W-02
AIRCRAFT FLIGHT MANUAL
SECTION VI
AIRCRAFT SYSTEM EQUIPMENT
6-34
June 30, 2012
(e) The filter is iced.
In winter or in high-altitude flight, if there is water in the fuel tank, the fine filter will be iced.
If the low-pressure fuel pressure and nozzle pressure are detected to swing, it indicates
that the filter is iced. At this time, take the following measures:
(1) Advance the throttle to an angle greater than 62o
immediately so that automatic
feathering can be implemented when the fuel supply is interrupted.
(2) Take all emergency measures in case of engine shutdown quickly.
(3) Land the aircraft at the airfield in vicinity immediately.
OIL SYSTEM
General
The same set of oil system but operated respectively is installed on each engine to ensure the
engine can work in all states of flight and any altitude. This system is used to lubricate and cool off
the surfaces of inner parts of the engine, and the operation medium serving as part accessories,
such as, propeller governor, fuel governor, torque measuring mechanism, and negative thrust
auto- feathering sensor, etc. Meanwhile, the oil system can ensure the supplying oil pressure and
oil quantity.
Oil temperature automatic control system is mounted in oil system to control the opening of oil
radiator flap automatically according to the oil temperature, and to ensure the oil temperature to be
at the range of 158~176o
F (70~80o
C). Control the opening of oil radiator flap manually if the
auto-control is broken, ensuring the oil temperature to be at normal range. When the outside air
temperature is high, oil ejection system is mounted to improve the oil radiation characteristics
when operating engine on the ground. Hot air from 10th stage compressor is released forward by
injector, which speeds up the speed of airflow, causing low pressure. Thus, airflow from oil radiator
increases, which improve the oil radiation characteristics.
Oil circulation in oil system is a closed cycle, that is, hot oil from engine deaerator is radiated
through oil radiator and then enters into main oil pump of the engine. Oil flows along the closed
circuit again and again, and then flows into oil tank. The consummated oil is supplied by auxiliary
oil tank defueling oil from oil tank.
The total oil quality of oil system of each engine is 27.7gal (105L), among which the oil in oil
tank is 15.3+0.53
-0.26 gla(58+2
-1 L), and others in exterior and inner pipes, propeller hub oil cavity and
radiator.
JZ-Y8F200W-02
AIRCRAFT FLIGHT MANUAL
SECTION VI
AIRCRAFT SYSTEM EQUIPMENT
6-35
June 30, 2012
Marks of various mixed oil and its mixed proportion (see Table 6-5)
Table 6-5
Country
name
Mark Technical norms
Mixed
proportion
China
HH-20 and 8A GB440-77 and GB439-90 25% and 75%
20# compound hydrocarbon
aviation lubricating oil and 8#
compound hydrocarbon aviation
lubricating oil
(GJB1219-91) and
(8B, GB439-90)
25% and 75%
America
1100 MIL-L-6082B 25%
1010 MIL-O-6081B10 75%
England
B-0 DERD-2472B 25%
OM-11 DERD-2940 75%
Application data
Oil pressure
Idling state 56.6psi (0.392MPa)
Operating states on the ground 71~78.3psi (0.49~0.54MPa)
Operating states in flight 56.6~78.3psi (0.392~0.539MPa)
Oil temperature
(a) Oil temperature of engine inlet
Allowable minimum oil temperature 104o
F (40o
C)
Optimum oil temperature 158~176o
F (70~80o
C)
Allowable the highest oil temperature (constant operation time not more than 15min) 90o
C
Oil temperature when the engine changes from idling state to the indication of throttle is
25o
(constant operation time not more than 15min) not more than 212o
F (100o
C)
(b) Oil temperature at engine outlet (return oil temperature)
Allowable maximum oil temperature 239o
F (115o
C)
(c) When in rated power setting with the temperature of engine inlet oil temperature 176+9o
F
(80+5o
C), the oil quantity is not more than 33gal (125L/min).
(d) When in rated power setting with the temperature of engine inlet oil temperature
176+9o
F(80+5o
C), the oil radiation quantity is not more than 3.545× 10³
KJ/min (850Kcal 850
thousand calorie/s)
(e) The oil consumption is not more than 0.21 gal (0.8L/h).
JZ-Y8F200W-02
AIRCRAFT FLIGHT MANUAL
SECTION VI
AIRCRAFT SYSTEM EQUIPMENT
6-36
June 30, 2012
Operation of oil system
Requirement of oil quantity when the engine operates
(a) Minimum remaining oil 7.66±0.26gal( 29±1L)
(b) optimum oil quantity 12.4~15.1gal(47~57L)
(c) Maximum remaining oil 15+0.5
-0.25gal(58+2
-1 L)
Note
1) When the warning red light of minimum oil quantity illuminates 7.66±0.26gal
(29±1L), pay close attention to the oil pressure. When the pressure is lower
than 56.6psi (0.392MPa) with oil quantity less than 7.4gal (28L), feather it at
once.
2) The oil pressure can be lower than 56.6psi (0.392Mpa) in short time (6~8s)
when the aircraft is in turbulence flight or the load factor approaches zero.
Requirements of refilling the oil tank in daily maintenance
Caution
Oil with different composition cannot be mixed.
(a) Check the laboratory sheet of fuel truck before refilling oil and the oil meets the
specification and the cleanness of refueling pipe and doper.
(b) Remove standing water and dirt before opening the filling cover when refilling oil; place well
the cover and apply lock wire after refilling.
(c) Before starting the engine, check the oil quantity in oil tank. If the oil quantity is less than
11.4gal (43L), refill more oil to 11.4~12.2gal (43~46L) (engine in shutdown state). After
starting engine, the oil in engine is allowed to be less than 4.5gal (17L) (3.2gal (12L) in
engine, 1.3gal (5L) in propeller).
JZ-Y8F200W-02
AIRCRAFT FLIGHT MANUAL
SECTION VI
AIRCRAFT SYSTEM EQUIPMENT
6-37
June 30, 2012
Troubleshooting when there are normal problems in oil system
(a) Oil temperature is too high when in flight
Check the shutter of oil radiator is at CLOSE position. If it is at CLOSE position, change it
to Manual operating, and open the shuttle widest to keep the oil temperature at 158~176o
F
(70~80o
C).
Reduce the power of damaged engine and increase the flying speed if the shuttle fails to
be operated.
If the above methods are inefficiency, feather it with the temperature exceeding specified
value (194o
F (90o
C) in less than15min)
(b) Oil pressure gauge oscillation
Check for the normal oil temperature. Adjustment should be made if the inlet oil
temperature is too high or too low.
Check whether the oil quantity reduces, and inspect the leakage of external part of engine
visually. Feather it if there is oil leakage, before the leakage quantity reaching 7.4gal (28L).
If there is no trouble in engine oil temperature, oil quantity, and other parameters, the
problems may be in air lock or circuit. The aircraft can continue to fly. But special
observation should be made.
(c) Pay special attention to oil pressure when the red warning light of minimum remaining oil
7.66±0.26gal (29±1L) illuminates. Feather it immediately when the pressure is lower than
56.6psi (0.392MPa) and the oil quantity is less than 7.4gal (28L).
Note
The oil pressure can be lower than 56.6psi (0.392MPa) in short time (6~8s)
when the aircraft is in turbulence flight or the load factor approaches zero.
(d) In high altitude, there is white smoke in cabin, which is caused by oil entering into
pressurization system because of poor sealing mechanism of engine case. The following
steps must be taken:
Flying with oxygen-mask;
Turn off pressure control/shutoff valve by turn in normal interval to judge the engine with
trouble;
(e) After judgment, supply pressurizing air source with other three engines. Continue to fly
without oxygen-mask, and pay attention to oil quantity of engine in trouble.
JZ-Y8F200W-02
AIRCRAFT FLIGHT MANUAL
SECTION VI
AIRCRAFT SYSTEM EQUIPMENT
6-38
June 30, 2012
HYDRAULIC SYSTEM
General
The aircraft hydraulic system consists of left, right independent hydraulic system and
hand-electric pump.
The left and right systems each have hydraulic reservoir, pump and control distribution
accessory and power mechanism. The left and right systems can control the power mechanism
individually. After operation, the hydraulic fluid flows into its own reservoir respectively. While, the
two systems can also be used as standby emergency to control each other, which are connected
with each other through a communication valve. When control handle is at neutral position, the
accessory will not bear load. When the pressure of right hydraulic pump is pressurized to
2132.06psi ±106.60psi (14.7MPa±0.735MPa), the oil supply in hydraulic pump is reduced after
pressure regulation by pressure-regulating valve in hydraulic pump. And the system is at
unloading state. However, when the pressure of left hydraulic pump is pressurized to
2203.12psi±71.07psi (15.19MPa±0.49MPa), hydraulic fluid from oil pump returns oil through
pressure unloading valve to make the system be at unloading state.
The left and right system tanks use a common pressurizing system. Compressed air comes
from engine compressor after reducing pressure to pressurize the tank to ensure normal hydraulic
fluid supply to pumps under various flight.
Hand-electric pump system can be used to control all parts to operate on the ground, and used
as alternate system in emergency in the air as well. And this system can control all accessories
except for autopilot control actuator.
The functions of the left system are as follows: control of normal brake of wheels, engine
emergency feathering and shutdown, opening/closing of nose emergency cabin doors,
retraction/extension of flaps, emergency retracting landing gears, opening /closing of landing gear
doors and emergency opening/closing of cargo doors.
The functions of the right system are as follows: retraction/extension of landing gears,
opening/closing of landing gear doors, opening/closing of cargo door, retraction/ extension of flaps,
wheel emergency brake and automatic brake when retracting landing gear, control of windshield
wiper, supplying of pressure to control actuator of autopilot, control of nose wheel steering and
emergency opening/closing of nose emergency cabin doors.
The functions of the hand-electric pump are as follows: opening/closing landing gear doors,
extending nose and main landing gears, extending flaps, opening/closing cargo doors, filling left
and right system tanks, pressurizing pressure accumulator of right system, and pressurizing brake
accumulator and left system accumulator, and balance oil quantity.
JZ-Y8F200W-02
AIRCRAFT FLIGHT MANUAL
SECTION VI
AIRCRAFT SYSTEM EQUIPMENT
6-39
June 30, 2012
When turn on communication valve if necessary, right system can supply oil to left system to
operate all pressure consumed accessories, while, left system can only supply oil to right system
to operate the following performance: nosewheel steering, control of windshield wiper, emergency
brake and emergency opening/closing of nose emergency cabin doors.
Operation data of hydraulic system
Hydraulic fluid mark (see Table 6-6)
Table 6-6
China Soviet England America France Canada
(GJB 1177-1991)
15# aviation fluid
(GJB 1177-1991)
АМГ-10 DTD-585 MIL-H-5606A F-H5-1 3GP-26A
Volume
Total capacity of hydraulic system 28.60gal(130L)
Tank capacity (8.360
-0.44)gal(380
-2L)
Tank refilling quantity
There is pressure in accumulator and the wheels are in braking state
(4.40~4.84gal) (20~22L)
Minimum refilling quantity 3.30gal (15L)
Hydraulic system operating pressure
Right system 2132.06±106.60psi (14.7±0.735MPa)
Left system 2203.12±71.07psi (15.19±0.49MPa)
With the safety valve of right system open 2359.48±56.85psi (16.268±0.392MPa)
With safety valve in relief valve of left system open 2416.33+142.14
0 psi (16.66+0.98
0 ) MPa
Pressurizing pressure of hydraulic reservoir
Normal 14.21±1.42psi (0.098±0.0098MPa)
Maximum 25.58psi (0.1764MPa)
Time for extending landing gear by right system
Retracting landing gear not more than 17s
Extending landing gear not more than 14s
JZ-Y8F200W-02
AIRCRAFT FLIGHT MANUAL
SECTION VI
AIRCRAFT SYSTEM EQUIPMENT
6-40
June 30, 2012
Normal retraction/extension of landing gear
Normally, the retraction/extension of landing gear is pressurized by right system through
connecting L/G operating handle in the following order: opening landing gear door,
retraction/extension of landing gear, and closing landing gear door.
Normal retraction of landing gear
(a) Place the L/G operating handle on central instrument panel at the retraction of landing gear
position, at that time:
(1) LG red signal light retraction circuit turns on on right instrument panel illuminates;
(2) Green light signal at landing gear door close turns out, and red light at door opening
on central instrument panel turns on;
(3) Green signal light at extension position of LG turns out, and the LG is retracted in
14s~17s. After being locked, red light at extension turns on;
(4) Door opening red light turns out, and door closing green signal light turns on.
(b) After retracting/extending the LG and door exactly, place the switch at neutral position and
apply lock wire.
Note
If retracting LG at parking state mistakenly, LG not retracted green signal light
on right instrument panel turns on, which indicates that LG cannot be retracted.
Normal extension of landing gear
(a) Place the L/G operating handle at the extension position, at that time:
(1) Door closing green signal light turns off and door opening red light turns on;
(2) Red signal light at LG extension position turns out, and the LG is extended in 12s~14s.
After being locked, green signal light at LG extension position turns on;
(3) Door opening red light turns out, and door closing green signal light turns on.
(b) After retracting/extending the LG and door exactly, place the switch at neutral position and
apply lock wire.
JZ-Y8F200W-02
AIRCRAFT FLIGHT MANUAL
SECTION VI
AIRCRAFT SYSTEM EQUIPMENT
6-41
June 30, 2012
Note
1) If the position of LG operating handle in central instrument panel and right
console is not the same, refer to the switch position on central instrument
panel.
2) When retracting/extending LG, after the retracting/ extending the LG and
closing door well, place the switch at neutral position 3s~5s after the system
pressure reaching 2132.06psi (14.7MPa) and apply lock wire.
3) When the LG is not extended well (warning device is mounted at the LG
signal section), the warning horn brays with LG not extended well signal
lights turning on as long as one engine throttle is less than 31o
~34o
. If that is
not at landing time, press the release warning button on central instrument
panel to cut off the signal circuit, and the horn stops braying with the signal
light turning out.
4) When the normal control handle on central instrument panel fails, the
stand-by switch on right console can be used to retract/extend the LG.
Troubleshooting when LG cannot be extended
Check the circuit whether it fails
(a) Check the warning device for good condition and whether the safety switch is turned on.
(b) Operate the LG cock for several times to avoid the poor contact of the cock.
(c) Place the LG operating handle on central instrument panel at the neutral position, and
operate it with retraction/extension switch on right console.
(d) If the LG operating handle is at extension position with no change in pressure gauge of
right hydraulic system and signal at the LG extension position, YS-7A hydraulic selector
may be at on state all time. At that moment, if open the switch cut off cabin door
auto-closing on right console, the LG extends automatically, which shows that the circuit is
in trouble. Therefore:
Open the cut off cabin door auto-closing switch (the circuit is cut off really), at that time, the
cabin door opens and the LG extends;
After the LG is locked in extension, close the cut off cabin door auto-closing switch (the
circuit is connected really). At that time, cabin door closes;
After extending the cabin door well, place the LG switch at neutral position and apply lock
wire.
JZ-Y8F200W-02
AIRCRAFT FLIGHT MANUAL
SECTION VI
AIRCRAFT SYSTEM EQUIPMENT
6-42
June 30, 2012
Note
When the LG is extended, the above method can be used if there is trouble in
YS-7A, and the retraction/ extension switch must be at extension position.
Emergency landing gear extension by left system with power
When the right system fails, the left system can be used by copilot to extend the LG in
emergency.
(a) Open the protective lid of emergency extension LG control switch on right console, and
open the lock pin from left (lock pin links a LG door). At that time, the door closing signal
light turns off. After 8s~10s, the door opens with red light turns on.
(b) Push the control handle to the front position. At this moment, the red light of LG extension
turn off. 23s~25 s later, the LG is extended well with the green light turning on.
(c) After the LG is extended well, place the control handle at the neutral position, and push
right the lock pin to its original position.
(d) Pull backward the control handle. After 8s~10s, the door is closed with green signal light
turning on. And then place the control handle at the neutral position.
(e) After check of the LG well extended and the door closed, cover the protective lid, and the
aircraft can land normally.
Note
If the signal operates normally in LG and cabin door system, the handle is not
necessary to be pushed forward to pressurize the system on the ground. If
there is trouble in signal operation, the handle should be pushed forward to
pressurize the system on the ground. Therefore:
1) Cut off the circuit breaker emergency opening cabin door, and open the
lock pin from left side;
2) Push the handle forward until the flight is over.
JZ-Y8F200W-02
AIRCRAFT FLIGHT MANUAL
SECTION VI
AIRCRAFT SYSTEM EQUIPMENT
6-43
June 30, 2012
Emergency landing gear extension right system without power
If the power supply system fails in flight with the right system operating normally, the LG
needed to be extended with emergency landing gear extension by right system.
(a) Lift the seat between frame 22~23 on right side of fuselage, open the button protective
cover of solenoid valve YDF-12A and YDF-11 (left side) on sidewall.
(b) Press the left button (extension LG) of solenoid valve YDF-12A to the bottom for 1min. At
that time, LG door is opened and the LG is extended. Lock the LG and then release the
button.
(c) After check of the LG is locked through check access (the signal light not illuminates
without power on board), press the button of solenoid valve YDF-12A with one hand, and
press the YDF-11 button with the other hand till the cabin door is closed (not less than 30s);
after that, release the YDF-12A button, and then the YDF-11 button.
Note
If the performance is in reverse, the door can be opened again.
(d) After the LG is extended and door is closed well, the aircraft can land normally.
Note
Place the LG switch at the extension position before operation to prevent the
circuit from being connected automatically again in manual operation.
Emergency landing gear extension by hand- electrical pump
When there is trouble in left and right systems, the hand- electrical pump system can be used
to close/open the cabin door and extend LG. In emergency landing gear extension by hand-
electrical pump, the oil from right oil tank can be used to extend the LG and the oil from left system
can be used to close the door generally.
(a) Place the three-position distribution cock at from left hydraulic tank position, and set the
seven-position distribution cock at opening the door position.
(b) Pressurize by hand pump or electrical pump until the door is opened fully with signal lights
turning on.
(c) Place the three-position distribution cock at from right hydraulic tank position, and set the
seven-position distribution cock at extension main wheel position and pressurize with hand
pump or electrical pump. When the pressure reaches 639.62psi± 710.69psi
(4.41MPa~4.9MPa), the main LG is unlocked. While, the pressure reduces to
71.07psi±142.14psi (0.49 MPa~0.98MPa), the main LG extends and is locked. After that,
signal lights turns on.
JZ-Y8F200W-02
AIRCRAFT FLIGHT MANUAL
SECTION VI
AIRCRAFT SYSTEM EQUIPMENT
6-44
June 30, 2012
(d) Place the seven-position distribution cock at nosewheel extension position, and pressurize
with hand pump or electrical pump. When the pressure reaches 639.62psi±710.69psi
(4.41MPa~4.9MPa), the nose LG is unlocked. While, the pressure reduces to
71.07psi±142.14psi (0.49MPa~0.98 MPa), the nose LG extends and is locked. After that,
signal lights turns on.
(e) Place the three-position distribution cock at from left hydraulic tank position, and set the
seven-position distribution cock at opening the door position. Pressurize with hand pump
or electrical pump. After closing the door, the green signal lights turns on.
(f) Judge the LG extension and door closing, and place the three-position distribution cock
and seven-position distribution cock at the neutral position.
Note
In emergency landing gear extension by hand- electrical pump, another seven-
position distribution cock should be at neutral position.
LG extension by cable on board
When the above methods are useless, LG can be extended with cable without closing the door.
And the door may be damaged when landing.
(a) Lift the main LG up lock manually [with force about 110.16lb~220.31lb (490N ~980N)].
(b) Lift the LG cable by manual winch on upright pillar of frame 30 [the force on manual winch
handle not more than110.16lb (490N)], and then extend the main LG and lock it.
(c) Open the access door on frame 12 floor and lift the nose LG up lock with the force of
110.16lb~220.31lb (490N~ 980N). And then extend and lock the nose LG.
Note
1) It is forbidden to extend the nose LG if the main LG is not extended well.
2) Check that the nose and main LG are extended well and are locked. After
that, the aircraft can land.
JZ-Y8F200W-02
AIRCRAFT FLIGHT MANUAL
SECTION VI
AIRCRAFT SYSTEM EQUIPMENT
6-45
June 30, 2012
If there is trouble in nose LG extension because of nosewheel rotating, the nose
wheel turning handle can be used to make the nose wheel return to neutral
position to extend the nose LG.
(a) When the nose LG cannot be extended in the air, make a visual observation to check that
whether the nose LG cannot be extended because of nose wheel turning or not: first judge
the nose turning direction and try to operate control handle of nose wheel turning in reverse
direction to its turning direction to keep the nose wheel be at the neutral position. And then
the nose wheel can be extended. Moreover, nose LG can be extended in the normal
procedure.
(b) If the nose LG cannot be extended for nose wheel turning, stop extending the nose LG
immediately and then make a check after landing.
Flap operation
(a) Flap retraction/extension is operated by left and right hydraulic system at the same time.
When one of the systems fails, the other one can ensure the normal flap
retraction/extension. While, there is problem in the two systems, hand- electrical pump can
be used to retract/extend the flap. When the pressure accumulator of right system is
pressurized to 2132.06psi (14.7MPa), the flap can be extended at 25o
.
One flap control switch is mounted on central instrument panel and right console
respectively. When the normal retraction/extension switch on central instrument panel fails,
the standby control switch on right console can be used to retract/extend.
Hydraulic system can ensure that the flap can be set at any middle position in flap
retraction/extension. And the flap can be locked by hydraulic pressure and mechanism.
The flap retraction/ extension angle can be indicated by indicator at flap position on central
instrument panel. The time for retraction/extension to 35o
±1o
is 15s~ 20s in system normal
operation; signal system can operate to retract/extend the flap; the flap can be extended
45o
with hand-electrical pump.
(b) When the LG is at extension position without the flap extension angle at 25o
±1o
, and the
throttles of four engines are more than 55o
~60o
, the warning horn brays with flap not
extended well red signal light turning on to inform the pilot of check the flap angle in take off.
If it is at normal condition, press the release warning button. And the horn stops braying
with the signal light turning out; when the throttle is less than the angle above, the signal
light turns off.
Note
When the LG is at extension position, this warning circuit do not operate.
JZ-Y8F200W-02
AIRCRAFT FLIGHT MANUAL
SECTION VI
AIRCRAFT SYSTEM EQUIPMENT
6-46
June 30, 2012
(c) Procedure of flap extension by hand - electrical pump system
(1) Place the three-position distribution valve at from left hydraulic reservoir position;
(2) Place the upper seven-position distribution valve at flap extension position;
(3) Shake the hand pump or operate the electrical pump till the flap is extended to the
needed position;
(4) Place the three-position and seven position distribution valve at the neutral position.
(d) When there is trouble in flap position indicator with system operating normally (judge the
shake of pressure gauge), the timing method can be used to determine the flap angle. The
data is shown in Figure 6-7.
Table 6-7
Retraction (extension) flap angle 0o
~15o
0o
~25o
15o
~35o
35o
~25o
Time (s) 7 12 10 5
Nosewheel steering control
This system is used when pilot operates the aircraft to steer on the ground. There are two
nosewheel steering state: taxiing control state and takeoff and landing control state. In taxiing state,
operate the handle mechanism by hand to make the nosewheel steer, and the nosewheel
rotates(35o0
o
-2
o) to left and right according to the neutral position; and in takeoff and landing state,
use control surface to make the nosewheel steer. At this time, the nosewheel may rotate 8o
~2o
to
left and right according to neutral position.
(a) The control handle in front right of pilot must be pulled out when operating the nosewheel
with hand. At that time, yellow signal light on nosewheel steering control box beside the
handle turns on, which indicates that the handle operation is connected, and the control
handle can be rotated to operate the nosewheel steering with hand (when rotating the
handle in reverse direction, nosewheel steers in the opposite direction).
When operating with rudder, push the nosewheel control handle to the bottom, and the
yellow light on nosewheel steering control box turns off. After that, connect the control
switch of control surface on control box, and the ready and on green signal light turns on,
which indicates that the rudder control is connected. Then, step on the footrest of rudder to
make the nosewheel steer (when stepping on the footrest of rudder in the reverse direction,
the nosewheel steers in the reverse direction).
JZ-Y8F200W-02
AIRCRAFT FLIGHT MANUAL
SECTION VI
AIRCRAFT SYSTEM EQUIPMENT
6-47
June 30, 2012
(b) When there is no pressure in right hydraulic system, first open the communication valve of
hydraulic system before operating nosewheel and then pressurize with left hydraulic
system. Therefore:
(1) After extending the LG and flap, pump the oil by hand pump in right hydraulic reservoir
or electrical pump to left hydraulic reservoir (1.10gal~1.32gal) (5 L~6L) before landing,
and then open the communication valve.
(2) Pay attention to the oil quantity in right hydraulic reservoir in taxiing, which should be
not more than 6.16gal (28L). If the oil exceeds that value, pump the oil with hand or
electrical pump to left hydraulic reservoir. The oil quantity in left hydraulic reservoir
should not be less than 2.64gal (12L). If the oil is less than that value, close the
communication valve and stop operating nosewheel steering.
Note
1) When connecting the rudder control, push the nosewheel control handle to
the bottom; otherwise, the rudder control cannot be connected.
2) When operating with hand, pull out the control handle and the rudder control
cut off automatically.
3) After the aircraft is away from the land, if the on signal light of rudder control
still illuminates, close the rudder control switch before retracting the LG, and
then the LG can be retracted at last. After that, connect the rudder control
switch, if the on signal light illuminates, the rudder control switch should be
closed, and it can be reconnected at the moment the aircraft is away from
the ground.
JZ-Y8F200W-02
AIRCRAFT FLIGHT MANUAL
SECTION VI
AIRCRAFT SYSTEM EQUIPMENT
6-48
June 30, 2012
Braking device control
In order to ensure the aircraft do not move with interference force in main LG wheel braking
and parking and to prevent the other mechanisms from being damaged by wheel inertial rotation in
LG retraction, four braking systems: normal braking system, emergency braking system, parking
braking system and auto braking in LG retraction by right system, are installed on the aircraft. In
order to improve the braking efficiency in normal braking system and avoid the tire over wearing
and tire skidding, anti-skid braking device of auto release braking is used in normal braking
system.
(a) The braking device is pressurized by left hydraulic system in normal operation. When
braking, two foot step on the footrest to brake. Check the normal braking system operation
by braking pressure gauge and aoto release braking signal light. The two yellow indication
light should illuminate [the braking extent is reflected by the value in braking pressure
gauge. The value is 142.14psi~1421.37psi (0.98MPa~ 9.8MPa)].
(b) In order to shorten the aircraft landing and taxiing distance, brake the aircraft thoroughly till
the aircraft stops running (auto release braking switch is mounted on the left upper angle of
central instrument panel; connect the switch before the aircraft touches the ground).
(c) When there is trouble in left hydraulic system, the emergency braking, which is pressurized
by right system, can be operated. In emergency braking system, pull out the pair of
emergency braking handles on pilot instrument panel (left handle controls left LG wheel
braking, and right handle controls the right LG wheel braking). The braking extent depends
on the extent that the emergency braking handle pulling. When the emergency braking
handle is pulled to the end, the braking pressure is (1421.370
-142.14)psi [(9.80
-0.98)MPa]. The
operation condition of emergency braking system can be judged by the sense of pilot and
can be informed by the indication of braking pressure gauge on central instrument panel.
When releasing the braking, loosen the pair of emergency braking handle.
In emergency braking, auto release braking do not operate.
(d) When operating the parking braking, step on the pilot footset to the bottom, and then lift the
parking braking handle and at last loosen the footset. When releasing, step on the pilot
footset with force, and the parking braking handle bound automatically. Then, loosen the
footset.
(e) When there is no pressure in pressure accumulator of left hydraulic system, pump the oil of
(1.10gal~1.32gal) (5 L~6L) from the left hydraulic reservoir with hand pump or electrical
pump to right hydraulic reservoir after LG and flap extension, and then open the hydraulic
communication valve. Normal braking can be operated in landing.
JZ-Y8F200W-02
AIRCRAFT FLIGHT MANUAL
SECTION VI
AIRCRAFT SYSTEM EQUIPMENT
6-49
June 30, 2012
Before aircraft landing, check the oil quantity in left reservoir not more than 6.16gal (28L). If
there is more oil, pump the excess oil from left reservoir to right reservoir with hand or
electrical pump; if the oil is less than 2.64gal (12L), close the communication valve to
reduce the speed by emergency braking.
(f) Precautions
(1) It is forbidden to land with braking;
(2) In auto release braking trouble (signal light keeps on), loose the braking at once, close
the aoto release braking switch and then adopt the method of mean point braking.
(3) It is forbidden to use the normal braking and emergency braking at the same time.
Otherwise, the braking may not operate.
(4) In take-off training, cool the wheel with water and compressed air to avoid the wheel
braking overheat.
(5) When pilot and copilot operate the braking in serial connection, the braking pressure
depends on the travel of footset respectively. If the travel of copilot is larger than that
of pilot, the braking pressure depends on the control of copilot. On the contrary, when
the travel of copilot is smaller than that of pilot, the braking pressure depends on the
control of pilot.
Control of bottom emergency door of forward cabin
The aircrew shall carry out bailout from bottom emergency door in emergency and the
aircrew/groundcrew is in and out from bottom emergency door under engine shutdown failure on
the ground. The bottom emergency door control includes normal control and emergency control.
In normal control, control the handle on left console with pressure supplied by left hydraulic system.
In emergency control, control the handle on copilot console with pressure supplied by right
hydraulic system. When the left hydraulic system fails, the bottom emergency door of cockpit may
be opened by emergency control using right hydraulic system. When the door is closed
incompletely, DOOR OPEN red indicating light on left instrument panel should be on.
(a) Open bottom emergency door of forward cabin with left/right hydraulic system
(1) Release the sealing of cockpit.
(2) Press head part of control handle and pull it forward to ON position, then the signal
light of door is lit, the floor door in forward cabin is opened and locked firstly and the
door of cockpit is opened successively.
(3) If it is necessary to keep the forward cabin door open in flight, the control handle shall
be always at "ON" position.
JZ-Y8F200W-02
AIRCRAFT FLIGHT MANUAL
SECTION VI
AIRCRAFT SYSTEM EQUIPMENT
6-50
June 30, 2012
(b) Close bottom emergency door of forward cabin with left/right hydraulic system
(1) Press head part of control handle and pull it backward to OFF position. 3~4 s later, the
door is closed and the signal light of door extinguishes.
(2) Press head part of control handle and pull it to neutral position.
(3) Close the floor door in forward cabin manually.
(c) Where there is no pressure from left or right hydraulic system, the door may be closed by
hand-electric pump system. Put the handle of pilot or copilot console to the door closing
position, three-position distribution switch to the position of the pressure from left or from
right hydraulic reservior, seven-position distribution switch to relevant left or right hydraulic
system position before wobbling hand pump or starting electric pump for pressurization.
Cautions
1) Make sure personnel are away from the door when the door is opened or
closed on the ground.
2) The opening/closing of the door must be done separately to avoid the hurt of
personnel and overlarge pressure on components.
3) If adopting hand pump to open the door in flight, only keep wobbling hand
pump incessantly to ensure the door is completely opened.
Cargo door control
Operation principle drawing of hydraulic system of cargo door is shown in Figure 6-12.
In normal operation, the cargo cabin door is pressurized by right system, while in emergency
operation, it is pressurized by left system. When left and right systems fail, the cargo cabin door
can be operated by hand –electrical pump. Control switch on cargo cabin door is mounted on the
navigator airdrop airborne console. Besides, electrical control switch is mounted on the floor
console of cargo door between frame 42~43 on the left of fuselage.
There are three position to start loading ramp of cargo door: airdrop, airborne, and ground.
When perform the airdrop (airborne) missions, install the airdrop (airborne) pull rod on the pull rod
seat of triangular longeron between frame 48~49, and connect the pull rod with loading ramp.
When in airdrop condition, put the loading ramp under the horizontal Line with the included angle
of 4°20′ between the loading ramp line and the horizontal line; while in airborne condition, the
loading ramp aligns with the horizontal line. The installation hole of airdrop (airborne) pull rod
depends on condition.
The switch position of cargo door is indicated by the signal lights on navigator airdrop airborne
console, pilot console and jettison console. And the circuit breaker is mounted on navigator
console.
JZ-Y8F200W-02
AIRCRAFT FLIGHT MANUAL
SECTION VI
AIRCRAFT SYSTEM EQUIPMENT
6-51
June 30, 2012
PressureoillineofleftsystemPressureoillineofhand-electricalpump
Pressureoillineofrightsystem
Tankforleftsystem
Tankforrightsystem
unlock
lock
unlock
lock
unlock
lock
OffOffOnOn
OffOnOffOn
21
20
4
3219
4
19
4
1
4
16
1616
16
16
16
19
4
7
1314
12
19
4
6
44
8
9
9
23
22
15
5
1
4
18
17
1110
1. Electromagnet valve 13. Flow throttle valve
2. Manual valve 14. Delay valve
3. Seven -position distribution valve 15. Up lock
4. Check valve 16. Changeover valve
5. Hydraulic lock 17. Safety valve
6. Hydraulic lock 18. Check flow throttle valve
7. Distribution valve 19. Electromagnet valve
8. Relief Valve 20. Flow throttle valve
9. Flow regulation valve 21. Pressure gauge
10. Actuator 22. Electromagnet valve
11. Actuator 23. Flow throttle valve
12. Actuator
Figure 6-12 Operation principle drawing of hydraulic system of cargo door
JZ-Y8F200W-02
AIRCRAFT FLIGHT MANUAL
SECTION VI
AIRCRAFT SYSTEM EQUIPMENT
6-52
June 30, 2012
Note
After closing the cargo door in flight each time, the loading ramp locked green
indicating light should illuminate and loading ramp unlocked red indicating light
should turn off. Furthermore, visually check the mechanical indicator pin of
loading ramp lock mechanism, which should stretch out, and check the down
locks of rear cargo door should be locked.
Open the door with right hydraulic system in the air
(a) Remove the lock wire of control switch of cargo door;
(b) Place the control switch at the opening cargo door position. At that time, loading ramp
locked green light turns off, loading ramp unlocked red light turns on, and the cargo door
moving red light illuminates. When the loading ramp is at airdrop and airborne position,
loading ramp door opening green light turns on. After opening the rear cargo door, rear
door opening light turns on and cargo door moving red light turns off. Moreover, the time for
opening the cargo door is not more than 30s.
(c) After the signal light turning on, place the switch on the neutral position and apply lock wire.
Close the door with right hydraulic system in the air
(a) Place the control switch at the closing cargo door position. At that time, cargo door opening
green light turns off and the cargo door moving red light turns on. After the loading ramp is
closed and locked well, loading ramp locked green light turns on and loading ramp
unlocked red light turns off. When closing the cargo door, rear cargo door opening green
light turns off. After the door is closed fully, cargo door moving red light turns off. And the
time for closing the cargo door should not be more than 30s.
(b) 3s~5s after the signal light turning on, place the switch on the neutral position and apply
lock wire.
Open the door with right hydraulic system on the ground
Place the electrical control switch of cargo door, which is on cargo door ground console
between frame 42~43 on left side of fuselage, at the opening cargo door position. At that time, the
cargo cabin locked green light turns off, loading ramp unlocked red light turns on, and cargo door
moving red light on ground console illuminates. After opening the rear cargo door, the loading
ramp is on the ground. Perform a visual check, the red light should not be turned off. And the time
for opening the cargo door should not be more than 40s.
JZ-Y8F200W-02
AIRCRAFT FLIGHT MANUAL
SECTION VI
AIRCRAFT SYSTEM EQUIPMENT
6-53
June 30, 2012
Close the door with right hydraulic system on the ground
(a) Place the electrical control switch of cargo door, which is on cargo door ground console
between frame 42~43 on left side of fuselage, at the closing cargo door position. At that
time, the cargo cabin moving red light on ground console turns on all the time. After closing
the loading ramp and locking it, loading ramp locked green light turns on and loading ramp
unlocked red light turns off with the mechanical indicator pin of loading ramp lock
mechanism stretching out. After closing the cargo door, the cargo door moving red light
turns off. And the time for closing the cargo door should not be more than 40s when the
loading ramp is on the ground.
(b) 3s~5s after opening/closing the door, release the switch and apply lock wire.
Open/close the cargo door with left hydraulic system in the air
(a) Remove the lock wire of control switch of cargo door;
(b) Place the emergency control switch at the opening the cargo door position, and set loading
ramp at airdrop and airborne position. After opening the rear cargo door, emergency
airdrop red light turns on. And the time for opening the cargo door should be not more than
30s.
(c) Place the emergency control switch at the closing cargo door position. At that moment,
emergency airdrop red light turns off. And the time for closing the cargo door should be not
more than 30s.
(d) 3s~5s after opening/closing the door, release the switch and apply lock wire.
Note
There is one emergency jettison linkage switch each on navigator and pilot.
After opening that switch, the cargo door is opened firstly by left system. Then
perform airdrop. At that time, the circuit of other emergency cabin door is cut off
automatically.
Control cargo door with hand- electrical pump on the ground
When there is no pressure in left and right hydraulic system, the cargo door is controlled by
hand- electrical pump system on the ground. If the auto safety switch of cargo door is connected,
judge the opening/closing state of cargo door by signal light or by visual check. Ground console of
cargo door is mounted between frame 42~43 on the left side of fuselage. Before opening/closing
the cargo door, place the three–position distribution valve, which is at frame 7 of fuselage on hand
-electrical pump accessory panel, at from left hydraulic reservoir position. And set the
seven–position distribution valve at left system pressurizing position. Shake the hand pump or
operate the electrical pump.
JZ-Y8F200W-02
AIRCRAFT FLIGHT MANUAL
SECTION VI
AIRCRAFT SYSTEM EQUIPMENT
6-54
June 30, 2012
(a) Operation with manual valve of ground console should be in order without reverse.
(b) The order of opening the cargo door:
Open the rear door→lift (close) loading ramp→unlock the loading ramp lock→unlock the
loading ramp.
(c) The order of closing the cargo door:
Unlock the loading ramp lock→close the loading ramp→lock the loading ramp lock→close
the rear door.
(d) After opening/closing the cargo door, stop shaking the hand pump or closing electrical
pump and place the switch at the neutral position.
The balance of hydraulic oil quantity
If there is no balance of oil quantity between left and right hydraulic reservoir, balance the oil
quantity if there is no oil leakage.
(a) Place the three–position distribution valve at the position of tank with more oil;
(b) Place the seven–position distribution valve at the refilling oil position of tank with less oil,
and shake the hand pump of operate the electrical pump;
(c) When the oil quantity in two tanks balance, stop shaking the hand pump or closing the
electrical pump and then place the switch at neutral position.
Windshield wiper control
Windshield wiper control is pressurized by right system. Remove the water, ice and snow, frost
and moisture of pilot windshield glass by hydraulic pressure operating the windshield wiper to
swing to left and right. Thus, the pilot can have a good visual.
Data
(a) Swing times 0~3.67Hz (0~220 times/min)
(b) Operating oil pressure 1696.94+142.14
0 psi (11.7+0.49
0 MPa)
(c) When the windshield wiper operates, the allowable flight speed
not more than 161.99~172.79k.n (300~320km/h)
(d) Swing angle 46o
±4o
(e) Compression force of windshield wiper
Measurement at middle position 11.02~13.22lb (49~58.8N)
Measurement in two limit position not less than7.04lb (31.3N)
JZ-Y8F200W-02
AIRCRAFT FLIGHT MANUAL
SECTION VI
AIRCRAFT SYSTEM EQUIPMENT
6-55
June 30, 2012
Operation principle
Windshield wiper is used when the rain and snow affect the visual of pilot in taxiing, takeoff and
landing. Throttling switch of controlling windshield wiper, which is mounted on each left and right
console, is to open/close the windshield wiper respectively and can adjust the speed of windshield
wiper swing. The windshield wiper in taxiing should not be opened too large, basing on that the
pilot can see the things clearly. However, windshield wiper should be opened to its maximum
position in takeoff and landing.
It is forbidden to operate the windshield wiper when there is no rain, snow and fluid.
Operation of electrical pump and precautions
Operation of electrical pump
Electrical pump can replace the hand pump. And the two pumps can operate at the same time.
The opening/closing of electrical pump method is as follows:
(a) Connect the hydraulic pump switch on communicator circuit breaker board.
(b) Place the three-position and seven- position distribution valve at the needed position.
Press upward the electrical pump switch, it operates with white indicating light turning on.
Observe the pressure gauge. When the system pressure reaches (426.41+142.14
-71.07 ) psi [(2.94
+0.98
-0.49 MPa)], release the electrical pump switch. When the pressure rises to (1696.94+142.14
-28.43 )
psi [(11.7+0.49
-0.196 MPa)], the electrical pump stops operation automatically with indicating light
turning off. When the pressure reduces to (1696.94+142.14
-28.43 ) psi [(11.76+0.49
-0.196) MPa], electrical
pump connects by itself with indicating light turning on. When the pressure decreases
below (426.41+142.14
-71.07 ) psi [(2.94+0.98
-0.49 ) MPa], electrical pump stops operation by itself with
indicating light turning off.
(c) After operation, cut off the above switch. And place the seven-position and three-position
distribution valve at neutral and refilling oil to tank position respectively.
Precautions
(a) Regulate the time for connecting the electrical pump strictly. When the pressure is 27V with
pressurizing pressure of 1696.94 psi (11.7MPa), the allowable time is 4min30s.Then
reconnect the pump when the electrical pump engine cools off below 140o
F (60o
C).
(b) Pay attention to the oil change in two tanks when operating the electrical pump.
JZ-Y8F200W-02
AIRCRAFT FLIGHT MANUAL
SECTION VI
AIRCRAFT SYSTEM EQUIPMENT
6-56
June 30, 2012
Engine emergency feathering shutdown control
Emergency feathering shutdown system is to operate the hydraulic pressure to perform
emergency feathering shutdown by engine when there is trouble in engine auto feathering system
and electrical control system.
Emergency feathering shutdown system is controlled by four emergency feathering switch,
which is mounted on the fight front of pilot. Each switch controls one engine. After pulling down the
emergency feathering control switch, the hydraulic fluid is forced to flow to emergency shutdown
valve of fuel regulator and to feathering isolating valve of speed governor to shutdown the engine
and feather.
(a) When the emergency feathering shutdown is needed to be operated, rotate the emergency
feathering switch handle for 30o
counter clockwise, which is needed to be opened. Pull it out
downward. And then rotate it in counter clockwise and lock it. At that time, the propeller is
feathering and the engine is shutdown.
(b) Close the emergency feathering switch in counter feathering, that is, rotate the switch
handle clockwise for 30o
, and then push the handle to the bottom, and at last rotate it
clockwise until it is locked.
FIRE-EXTINGUISH AND NEUTRAL GAS SYSTEM
General
Fire extinguishing system includes aircraft fire extinguishing and fire extinguishing in the
engine inner cavity. The system is used to put out fire in the easiest fire-catching places, such as in
the engine nacelle, fuel tank cabins of wings, drop tank cabins of rear airframe, turbine
starter/generator cabin, and the engine inner cavity. In addition, there are portable fire
extinguishing bottles with extinguishing agent of CO2 in the cabin to extinguish fire. Also external
fire can be put out in parking apron.
Aircraft fire extinguishing system includes 5 MHP-8F fire extinguishing bottles with
extinguishing liquid of 1211 (CF2CIBr). The five fire extinguishing bottles are divided into three
groups to put out fire in each area in the aircraft. Each fire extinguishing area is equipped with
pipes and jet pipes which transfer fire extinguishing agents to ensure enough fire extinguishing
liquid sprays fire area to put it out. If necessary, two ZQP-8 neutral gas bottles in neutral gas
system help put out fire. There are eight spherical fire extinguishing bottles (2 for each engine)
with the agent of 1211 liquid in the engine fire extinguishing equipment. Aircraft fire extinguishing
system and fire extinguishing system in the engine have their own independent fire warning signal
system.
JZ-Y8F200W-02
AIRCRAFT FLIGHT MANUAL
SECTION VI
AIRCRAFT SYSTEM EQUIPMENT
6-57
June 30, 2012
Neutral gas system is used to fill neutral gas - gseity CO2 to the space on the surface of fuel
tank when aircraft flies in enemy place to operate mission. That can form anti-explosion medium in
fuel tank to prevent the fuel tank from exploding and being on fire to raise the security of unit fuel
system. Fill neutral gas to fuel tank to increase the pressure on consumed fuel surface and raise
the reliability of filling fuel when aircraft slides downward in emergency. Meanwhile, after the
aircraft catching fire, CO2 in neutral gas system can enter into Fire-extinguish system to assist
extinguishing the fire.
Operations and precautions of fire-extinguish system
When the aircraft or engine catches fire in flying, the fire can be dealt with manually or with
automatic fire-extinguish system. Before using fire-extinguish system, observe visually that the
aircraft or engine is really on fire or the signal system fails to warn the damage. Operate it
immediately and use the fire-extinguish system correctly on real condition.
Operations of fire-extinguish system
(a) Extinguish the fire automatically: When a certain area is on fire, the red warning light in
corresponding area on central instrument panel illuminates, and the solenoid valve to that
area is opened to make the pipes is clear. Meanwhile, fire bottle squib of group 1 blows out
automatically, red indication light turns off and fire extinguishant flows into the area on fire.
Adjust the extinguishing fire select button to the central position (the time should not be too
short, otherwise, the excess pressure of fire extinguishant in fire pipes may reopen the
solenoid valve) and place the button to AUTO position at once. Red fire warning light
turning off means the fire is extinguished; if the red light still illuminates, the fire is not put
off. Then, press fire bottle squib of group 2 (without fire bottle of group 2 and 3 blowout) to
continue to extinguish the fire. Check the fire extinguishing with above methods after 15s. If
the fire is still on, operate fire bottle of group 3. After opening all fire bottle MHP-8F, if the
fire is still on, press the neutral gas fire button by using CO2 in ZQP-8.
(b) Extinguish the fire manually: Judge the certain area is really on fire visually or by other
methods. If the red fire warning light turns off, press the red fire button in that area (caution:
do not press wrongly). When the red fire warning light illuminates, the solenoid valve
operates. At that time, the operating process is the same as that of in extinguishing the fire
automatically. If fire bottle of group 1 inoperates (yellow light turning off), press the button of
fire bottle of group 2. The operations of fire bottle of group 3 and neutral gas bottle are the
same as the above. After distinguishing the fire, put the select switch at the CHECK
position (operating fire bottle of group 1 manually).
JZ-Y8F200W-02
AIRCRAFT FLIGHT MANUAL
SECTION VI
AIRCRAFT SYSTEM EQUIPMENT
6-58
June 30, 2012
Precautions in operation:
(a) Place the select switch to AUTO position. Checking the extinguishing system with power
on and pressing the red fire warning light are forbidden; otherwise, the fire bottle can be
released automatically.
(b) Place the select switch to CHECK position. Press fire button of engine inner cavity, which
does not operate. And the fire bottle of group 1 does not operate when force the aircraft to
land by belly.
(c) Turn on FIRE CHECK switch when checking with power on in ground. At that time, press
fire extinguishing button, and fire bottle does not operate.
Caution
Turn off the switch after checking; otherwise, once there is fire, solenoid valve
cannot be opened to extinguish fire.
(d) Use the same mark of indication light of fire bottle squib when replacing it. Otherwise, if
bulb with smaller resistance is replaced, the fire bottle may blow out automatically.
(e) Wash fire extinguishant on the devices to prevent rusting after releasing the air bottle.
(f) The engine only can be operated in the following missions if the fire bottle in inner cavity is
released accidently.
The following missions can be operated in 120h when cleaning the fire extinguishant 1211:
(1) Release the total oil in oil system;
(2) Replace the isolation valve adapter and thin aluminum piece at transportation
connector of fire extinguishant on accessory case.
(3) Disassemble the isolation valve. Clean the valve, spring, and case cavity with wash oil,
and coat with oil and then mount them. Refill new oil;
(4) Start engine and push and pull the throttle in the range of 0o
~84o
for 5~7min, and then
shut down the engine;
(5) Release the total oil in oil tank.
(6) Refilling oil completely (filling oil again after blowout) to check thoroughly in engine
test.
JZ-Y8F200W-02
AIRCRAFT FLIGHT MANUAL
SECTION VI
AIRCRAFT SYSTEM EQUIPMENT
6-59
June 30, 2012
Treatment when the aircraft is on fire
When the aircraft is on fire, great security damage may occur. If the damage cannot be dealt
with rightly, the fire may cause aircraft destruction and death to people. Therefore, at that time, the
flight crew should deal with the fire rapidly with composure and accuracy. And meanwhile, lower
the altitude of the aircraft to choose the vantage ground to make preparations of forced landing (if
the time is permitted, land on airfield in vicinity). If the fire cannot be extinguished, force the aircraft
to land with belly, with the select switch at AUTO position. When the belly touches ground, the
terminal switch of forced landing is pressed open by land. At that time, all the fire bottles and
neutral gas are released, and the fire extinguishant flows through all the areas. If automatic fire
distinguishing is inoperative, connect the total fire extinguishing system manually.
If the fire is extinguished, land on airfield in vicinity to check out the reason.
If all areas are on fire, emergency methods are as follows:
(a) Engine is on fire
(1) Feather the engine on fire at first (otherwise, the negative drawing force is produced
when failing to feather or distinguishing the fire in inner cavity with throttle is below
40o
), close engine fire cock, shut-off cock and pressure control/shutoff valve, and then
distinguish the fire in fire distinguishing procedure.
Note
When the exterior is on fire, the fire extinguishant of group 1 has been used to
distinguishing the fire.
(2) When the exterior is on fire, press fire button in inner cavity after feathering.
(3) When a certain engine inner cavity is on fire (red fire warning light in inner cavity
illuminates), press the fire button with the yellow light turning on. At that time, both two
detonating caps of engine and fire bottle of group 1 in fire system of exterior engine
operate. If the fire bottle of group 1 inoperates (yellow light turning on), fire bottles of
group 2 and 3 should be operated manually.
(b) Oil tank in wing is on fire:
(1) Distinguish the fire in the normal procedure. Press fire bottle of group 1 and 2 or all
groups (group 1, 2, and 3), if the fire burns severely.
(2) Connect emergency power supply when distinguishing the fire. Meanwhile, only oil
pump in VI group is supplied power by battery with low pressure in operating.
(3) Turn on NORMAL switch of neutral gas bottle to supply CO2 to oil tanks on fire to
prevent them from being on fire again, after distinguishing the fire.
(c) Turbine generating device WDZ-1 is on fire:
JZ-Y8F200W-02
AIRCRAFT FLIGHT MANUAL
SECTION VI
AIRCRAFT SYSTEM EQUIPMENT
6-60
June 30, 2012
WDZ-1 can stop operating automatically when distinguishing the fire on normal procedure.
When distinguishing the fire, close the fire cock and then close the circuit breaker
connecting with WDZ-1.
(d) The cabin is on fire
Find out the reason. If the fire is cause by power source system, cut off the power source at
once with portable fire bottle.
If the cargos are on fire, distinguish the fire with aircraft cover and others.
If the fire is heavy and the reason is not clear, the following steps should be made:
(1) Lower the flight altitude immediately and stop pressurizing the cabin if necessary;
(2) Turn on emergency power supply;
(3) Distinguish the fire with portable fire bottle;
(4) After distinguishing the fire, close all circuit breakers, then connect the power source
to find out the equipment that is on fire (smoke appearing when connecting the
equipment shows that that equipment is on fire);
(5) After finding out the reason, cut off the power source of that equipment, close the
circuit breaker and then pull off locking wire.
Caution
When distinguishing the fire with portable fire bottle, the crews may lack of
oxygen. Thus, the relevant crews should wear oxygen mask.
The operation of neutral gas
Deposit should be removed before operating the neutral gas system. And heat the neutral gas
bottle according to the outside air temperature (see Table 6-8) to prevent the restricted orifice and
pipe are blocked under low temperature. Then operate the bottle with following methods:
Table 6-8
Outside air
temperature o
F
(o
C)
-58 (-50) -40 (-40) -22 (-30) -4 (-20) 14 (-10) 32 (0)
Heating time (h) 2.5 2 1.5 1 0.5
No
heating
JZ-Y8F200W-02
AIRCRAFT FLIGHT MANUAL
SECTION VI
AIRCRAFT SYSTEM EQUIPMENT
6-61
June 30, 2012
(a) Connect the neutral gas bottle and heat it after starting the engine.
(b) Slide to flight line and then open the solenoid valve, which is used to fill in the neutral gas in
zero group oil tank. At that time, the green indication light of zero group on central
instrument panel illuminates. If there is no oil in zero group, and oil in I~VI group oil tanks is
used, place the air charge valve to Level flight position with its green light illuminates. If the
oil in group 1 oil tank is used up, close its switch.
(c) Turn on release switch on neutral gas bottle.
(d) Place the Level flight - Glide switch in group I to Glide position 15min before entering into
theater. And connect air-charging valve oil tank in zero group.
(e) After sliding completely for 7~8min, turn the switch of group I to Level flight position, and
close the air-charging valve of oil tank in zero group.
(f) Open the air-charging valve to release the excess pressure in the bottle when in glide
landing in return flight. Close all the neutral gas switches before shutdown.
Note
If the two check switches of neutral gas are at check position, when using the
neutral gas, one of the bottles does not operate.
AIR-CONDITIONING SYSTEM
General
The air-conditioning system adopts two sets of step-up air-cycle systems with high-pressure
water separator at the left and right. Each system consists of the primary heat exchanger,
secondary heat exchanger, turbine compressor, water separator, water jet, and condenser. The
right system ensures the airflow in the cockpit in preference and also ensures the airflow in the
cargo cabin, while the left system is mainly used to pressurize the air conditioner in the cargo
cabin. The two systems are interconnected, and can be used together or separately.
The cabin pressure control system consists of one cabin pressure regulator (CTQ-18), 3
exhaust valves (CTQ-19A) driven by the pressure regulator, and 3 safety valves (CTQ-15) for
emergency use. The cabin pressure control system makes the airtight pressure change according
to a specific adjusting rule, keeping specific pressure and sufficient and flesh air in the airtight
cockpit/cabin.
The temperature regulating device of air-conditioning system helps keep the temperature in
the airtight cockpit/cabin at a certain level.
JZ-Y8F200W-02
AIRCRAFT FLIGHT MANUAL
SECTION VI
AIRCRAFT SYSTEM EQUIPMENT
6-62
June 30, 2012
Operating data of the air-conditioning system
(a) Pressure data of the front emergency door sealing system
(1) The charge pressure of the sealing rubber hose is 38.44 psi~45.54 psi (2.7~3.2
kgf/cm2
).
(2) The charge pressure of the air bottle is 99.5 psi (686 kPa (7 kgf/cm2
))
(b) Pressure system of the airtight cabin the pressure system curve is shown in Figure
6-13.
(1) When the flight altitude is below 6561.68 ft (2000 m), and the airtight cabin is
ventilated at a low altitude, the excessive pressure in the airtight cabin should not
exceed 0.995 psi (6.86 kPa (0.07 kgf/cm2
)).
(2) Normally, absolute pressure inside airtight cockpit should be 11.52±0.28 psia
(79.4±1.96kPa (596±15mmHg)) at an altitude of 6561.68~23293.96ft (2000~ 7100m);
(3) In standby status at an altitude of 6561.68~14107.61ft (2000~ 4300m), such pressure
should be 11.52±0.28 psia (79.4±1.96kPa (596±15mmHg));
(4) Under normal and standby conditions, ensure that the excessive pressure of the
airtight cabin is as follows:
Under normal conditions (>23293.96 ft (7100 m)): 5.69 psi±0.28 psi (39.2 kPa±1.96
kPa (294 mmHg±15 mmHg))
Under standby conditions (>14107.61 ft (4300 m)): 2.84 psi±0.28 psi (19.6 kPa±1.96
kPa (147 mmHg±15 mmHg))
JZ-Y8F200W-02
AIRCRAFT FLIGHT MANUAL
SECTION VI
AIRCRAFT SYSTEM EQUIPMENT
6-63
June 30, 2012
Pressure inside the cockpit at the climbing/
descending ratio of32.81ft/s, and variation
per unit time of 24Pa/s
P- Pressure inside the cockpit
maintained by the regulator
H- Flying altitude
Normal
Standby
Standard
atmospheric
pressure
Figure 6-13 Curve indicating that the pressure inside the pressurized cabin changes with the flight
altitude
(c) Change rate of the airtight cabin pressure
(1) The maximum decompressing average rate should not exceed 0.1 psi/s (667 Pa/s (5
mmHg/s)).
(2) The maximum pressurizing average rate should not exceed 0.01 psi/s (84 Pa/s (0.625
mmHg/s)).
(3) The maximum excessive pressure in the airtight cabin should not exceed 6.67 psi (46
kPa (0.469 kgf/cm2
)).
(4) The maximum negative pressure in the airtight cabin should not exceed 0.39 psi (2.67
kPa (0.02 kgf/cm2
)).
(5) Environment control system
a) Under normal conditions, the maximum stable temperature inside the pipe should
not exceed 194o
F (90o
C).
b) Under normal conditions, the minimum stable temperature inside the pipe should
not exceed 32o
F(0o
C);
c) Under normal conditions, when two air-conditioning systems are operating, the
airtight cabin temperature should be automatically kept in the range selected by
the environment control box after manual regulation.
JZ-Y8F200W-02
AIRCRAFT FLIGHT MANUAL
SECTION VI
AIRCRAFT SYSTEM EQUIPMENT
6-64
June 30, 2012
Operation of airtight cabin pressurization
After aircraft exits from the takeoff state (the engine throttle is retarded from 104o
to 84o
), the
air-conditioning system can be used. Generally, low-altitude ventilation is used to when the flight
altitude is below 6561.68 ft (2000 m), while cabin air-conditioning pressurization is used when the
flight altitude is above 6561.68 ft (2000 m).
Preparations before takeoff
(a) Set the three-way switch handle of the cabin pressure regulator (CTQ-18) to the ON
position.
(b) Turn the EXCESSIVE PRESSURE selection knob of the pressure regulator (CTQ-18) to
5.69 psi (39.2 kPa (0.4 kgf/cm2
)), the AIRTIGHTNESS START selection knob to 11.52 psi
(79.4 kPa 596 mmHg)), and the PRESSURE CHANGE RATE selection knob to 24 Pa/s
(0.18 mmHg/s).
(c) Turn off the CROSS VALVE (crossover valve) switch on the right console (the yellow light
extinguishes), L (left) and R (right) AUXILIARY VALVE (auxiliary ventilation valve) switches,
L (left) and R (right) CUTOFF VALVE (cutoff valve) switches (the yellow light illuminates),
and L (left) and R (right) DIVERTER VALVE (bypass valve) switches. Set the FLOW CON
VALVE (flow control valve) switch to the NORMAL (normal) position (the green light
illuminates).
(d) The AIR SUPPLY FROM ENGING (engine air supply) switches on the four engines on the
right console, L (left) and R (right) WING HEATING (wing heating) switches, ENG
AIR-INLET GUIDES HEATING (heating of the engine inlet guide) switch, and OIL
EJECTION RADIATION (oil radiation) switch on the central instrument panel should be
turned off.
(e) Set the TEMP CTL (temperature control) switch on the copilot instrument panel to the
neutral position.
Auxiliary ventilation operation
When the flight altitude is below 6561.68 ft (2000 m) and the air-conditioning system does not
operate, set L (left) and R (right) AUXILIARY VALVE (auxiliary ventilation valve) switches to the
ON position to conduct cabin ventilation.
JZ-Y8F200W-02
AIRCRAFT FLIGHT MANUAL
SECTION VI
AIRCRAFT SYSTEM EQUIPMENT
6-65
June 30, 2012
Pressurization procedure of airtight cabin
(a) Push the AIR CHARGING SWITCH FOR SEALING STRIP switch of the sealing rubber
hose on the front emergency cabin door of the right console forward to the AIR
CHARGING position. At this time, the pointer of PRESSURE OF SEALING STRIP on the
air charging pressure gauge of the sealing rubber hose on the right console should indicate
a value in the range of 38.44 psi~45.54 psi (265 ~314 kPa) (2.7~3.2 kgf/cm2
), and L (left)
and R (right) AUXILIARY VALVE switches should be at the OFF positions.
(b) Set the selection knob on temperature control box CXT-19 to the position of a required
temperature value.
(c) Set the TEMP CTL (temperature control) switch on the copilot instrument panel to the
AUTO position.
(d) Turn on L (left) and R (right) CUTOFF VALVE (shutoff valve) switches on the right console
(the yellow light extinguishes) and L (left) and R (right) DIVERTER VALVE switches. The
CROSS VALVE switch should be at the OFF position.
(e) Turn on AIR SUPPLY FROM ENGING switches of the four engines on the right console in
turn. It should take about 40s to turn all the switches on.
(f) Generally, the FLOW CON VALVE switch on the right console should be set to the
NORMAL position. The green light should illuminate. The cockpit airflow can be adjusted
through FLOW CON VALVE (flow control valve) switch when necessary.
Note
1) During airtight cabin pressurization, retard the engine throttle or reduce the
bleed air quantity properly if the turbine outlet temperature of a specific
engine is found overtemperature.
2) When only the left air-conditioning system is used, set the FLOW CON
VALVE (flow control valve) switch to the SMALL position to obtain the
maximum airflow of the cockpit.
Oxygen breathing
When CABIN ALT (cabin altitude) of the cockpit altitude/differential pressure gauge on the
copilot instrument panel indicates that the cabin altitude has reached 11482.94 ft (3500 m), the
BREATHING OXYGEN SIGNAL signal light starts blinking, and the cockpit warning bell and cargo
cabin air horn start ringing. Then, press the OFF position on the right console. The aircrew and
passengers can breathe oxygen.
JZ-Y8F200W-02
AIRCRAFT FLIGHT MANUAL
SECTION VI
AIRCRAFT SYSTEM EQUIPMENT
6-66
June 30, 2012
Procedure for releasing airtight cabin pressurization
(a) Turn off the AIR SUPPLY FROM ENGING switch on right console (at least for 40s), L (left)
and R (right) CUTOFF VALVE switches (the yellow light extinguishes), and L (left) and R
(right) DIVERTER VALVE switches.
(b) Pull backward the AIR CHARGING SWITCH FOR SEALING STRIP handle of the front
emergency door sealing system on the right console to release sealing of the front
emergency door. The pointer of PRESSURE OF SEALING STRIP on the air charging
pressure gauge of the sealing rubber hose on the right console should indicate 0.
Door opening in the air
(a) Operating procedure when the airtight cabin is pressurized and the air-conditioning system
is operating properly:
(1) Release airtight cabin pressurization (the procedure is the same as that described in
(a))
(2) Observe CABIN ALT on the cockpit altitude/differential pressure gauge on the copilot
instrument panel. When the cockpit pressure stops decreasing, turn on the CABIN
PRES REL switch on the copilot instrument panel to ensure sufficient and balanced
pressures inside and outside the airtight cabin.
(3) Open the door.
(4) Close the door after the task has been finished. Then, turn off the CABIN PRES REL
(cabin emergency pressure release) switch on the copilot instrument panel.
(b) Operating procedure when the flight altitude is below 6561.68 ft (2000 m) and the airtight
cabin is not pressurized:
(1) The procedure is the same as that described in item a of Release airtight cabin
pressurization
(2) Turn on the CABIN PRES REL (cabin emergency pressure release) switch on the
copilot instrument panel to ensure the sufficient and balanced pressures inside and
outside the airtight cabin.
(3) Open the door.
(4) Close the door after the task has been finished. Then, turn off the CABIN PRES REL
(cabin emergency pressure release) switch on the copilot instrument panel.
JZ-Y8F200W-02
AIRCRAFT FLIGHT MANUAL
SECTION VI
AIRCRAFT SYSTEM EQUIPMENT
6-67
June 30, 2012
Operating precautions
(a) After releasing airtight cabin pressurization, release sealing of the front emergency cabin
door to prevent the sealing rubber hose from being damaged when the cabin door is
opened or closed.
(b) Operation of the air-conditioning system is prohibited when aircraft is on the ground and
during takeoff.
(c) When aircraft is flying through the radioactive contamination area, stop using cabin
pressurization air- conditioning and auxiliary ventilation systems. The aircrew and
passengers must wear oxygen masks to breathe pure oxygen (Set the oxygen regulator
switch to the position of 100%).
(d) When the aircraft is flying over the enemy-occupied area, turn the EXCESSIVE
PRESSURE knob on cabin pressure regulator CTQ-18 to 2.84 psi (19.6 kPa (0.2 kgf/cm2
))
(indicating the standby state).
(e) If an engine shuts down in flight, set the AIR SUPPLY FROM ENGING switch of the
shutdown engine on the overhead console to the OFF position.
(f) Under normal conditions, it is not allowed to supply the bleed air from one engine for the
operation of one set of air-conditioning system.
(g) Before landing, when the flight altitude reduces to 3280.84 ft (1000 m), release cabin
pressurization.
(h) When the air-conditioning system is turned on, it is not allowed to turn on L (left) and R
(right) AUXILIARY VALVE (auxiliary ventilation) switches.
(i) When the WING HEATING switch on the right console is turned on, only one
air-conditioning system is permitted to operate. Meanwhile, turn on the CROSS VALVE
switch (crossover valve) and the L (left) and R (right) CUTOFF VALVE switches (shutoff
valve), and set the DIVERTER VALVE switch (bypass valve) of the other air-conditioning
system, which is not operating, to the OFF position.
(j) When the airtight cabin is pressurized, set all control switches of the cargo cabin door to
the neutral position.
(k) When the sea level elevation of the takeoff airfield is above 6560 ft (2000 m), turn on the
CABIN PRES REL switch (cabin emergency pressure release) before takeoff, and turn off
the switch before pressurization through the air-conditioning system.
JZ-Y8F200W-02
AIRCRAFT FLIGHT MANUAL
SECTION VI
AIRCRAFT SYSTEM EQUIPMENT
6-68
June 30, 2012
(l) When the sea level elevation of the landing airfield is above 6560 ft (2000 m), during
landing, release airtight cabin pressurization and then turn on the CABIN PRES REL switch
(cabin emergency pressure release) to ensure the sufficient and balanced pressures inside
and outside the airtight cabin. Meanwhile, observe the cockpit altitude/differential pressure
gauge on the copilot instrument panel to ensure that the cabin pressure difference is near 0
in landing. Turn off this switch after landing.
In-flight troubleshooting
(a) If the BL AIR OVERPRESS IND (engine bleed air overpressure) indicating light (yellow) on
the copilot instrument panel illuminates, it indicates that the bleed air pressure has
exceeded 63.82 psi (440 kPa). At this time, set the AIR SUPPLY FROM ENGINE) (engine
air supply) switch on the right console to the OFF position.
(b) Airtight cabin not pressurized or pressure being low after pressurization
(1) Check whether the cabin door and windows are well closed, whether the sealing
rubber hose pressure is normal, whether L (left) and R (right) AUXILIARY VALVE
(auxiliary ventilation) switches are at the OFF position, and whether the CABIN PRES
REL (cabin emergency pressure release) switch on the copilot instrument panel is at
the OFF position.
(2) Check whether switch of cabin pressure regulator CTQ-18 is at the ON position.
When the BREATHING OXYGEN SIGNAL (oxygen breathing signal) signal light does
not blink and the air horn does not ring, check whether the vent connector on
cockpit/cabin altitude differential gauge BGC-2 on the copilot instrument panel is
blocked.
(3) Check whether control switches of the cargo cabin door on the navigator's airdrop and
parachuting console, pilot instrument panel, and ground console at frame 43 are at
the neutral position. If no, set them to the neutral position.
(c) If the airtight cabin pressure exceeds 6.67 psi (46 kPa) and continues increasing, it
indicates that cockpit/ cabin pressure regulator CTQ-18, exhaust valve CTQ-19A, and
safety valve CTQ-15 are faulty. At this time, perform the following operations:
(1) Change the EXCESSIVE PRESSURE switch of the airtight cabin from the normal
state to the standby state. If the pressure remains unchanged, set the AIR SUPPLY
FROM ENGINE (engine air supply) switch on the right console, L (left) and R (right)
CUTOFF VALVE) (shutoff valve) switches, and DIVERTER VALVE (diverter valve)
switch to the OFF position. Meanwhile, turn on the CABIN PRES REL (cabin
emergency pressure release) switch on the copilot instrument panel to release
pressure and sealing of the airtight cabin. At this time, the aircrew and passengers
should breathe oxygen. In addition, the pilot should reduce the flight altitude.
JZ-Y8F200W-02
AIRCRAFT FLIGHT MANUAL
SECTION VI
AIRCRAFT SYSTEM EQUIPMENT
6-69
June 30, 2012
(2) When the communication valve on cabin pressure regulator CTQ-18 is blocked, the
cabin pressure regulator will not operate. The phenomena are as follows: The
pressure difference is small when pressurization starts, and then the pressure
difference increases up to 5.95 psi~6.67 psi (41 kPa~46 kPa (0.42 kgf/cm2
~0.469
kgf/cm2
)) after a period of time. At this time, the absolute pressure of the airtight cabin
is higher than the normal value, and will be over 14.69 psi (101.3 kPa) when the flight
altitude is below 14763.78 ft (4500 m). In this case, release airtight cabin
pressurization and reduce the flight altitude.
(d) If there are damage symptoms on the airtight cabin glass and skins, set the pressure
regulator switch to the standby state. If the damage symptoms persist severely, release
airtight cabin pressurization and reduce the flight altitude.
(e) After the airtight cabin pressure is lost (both in the air and on the ground), when the cargo
cabin door or the cockpit door is opened, first turn on the CABIN PRES REL switch (cabin
emergency pressure release) on the copilot instrument panel to ensure the efficient and
balanced pressures inside and outside the airtight cabin.
(f) White smoking in the airtight cabin during flight is caused by failure of the sealing device of
the engine compressor box. This makes oil enter into the pressurization system. At this
time, wear the oxygen mask; turn off the AIR SUPPLY FROM ENGING (engine air supply)
switch on the right console in turn and with an interval to locate the faulty engine. After the
engine is located, turn off the faulty AIR SUPPLY FROM ENGING (engine air supply)
switch. Turn on the CROSS VALVE switch (crossover valve) on the right console if the
second set of air-conditioning system is used.
(g) Failure in one air-conditioning system or one bleed air system
(1) When one air-conditioning system fails, but two bleed air systems are operating
properly, and the engine on the wing where the normal air-conditioning system is
located supplies air to the normal air-conditioning system, the operating procedure is
as follows:
a) Turn on the two AIR SUPPLY FROM ENGING (engine air supply) switches at the
same side with the normal air conditioner on the right console, and the CUTOFF
VALVE switch (shutoff valve) and DIVERTER VALVE switches (diverter valve) at
the same side with the normal air conditioner.
b) Turn off the DIVERTER VALVE switch (diverter valve) at the same side with the
faulty air conditioner on the right console.
JZ-Y8F200W-02
AIRCRAFT FLIGHT MANUAL
SECTION VI
AIRCRAFT SYSTEM EQUIPMENT
6-70
June 30, 2012
(2) When one bleed air system fails, but two air-conditioning systems are operating
properly, and the engine bleed air system on the wing where the normal bleed air
system is located supplies air to the two air-conditioning systems, the procedure is as
follows:
a) Turn on the two AIR SUPPLY FROM ENGING (engine air supply) switches at the
same side with the normally operating wing on the right console, the CUTOFF
VALVE switch (shutoff valve), CROSS VALVE switch (crossover valve) (the yellow
indicating light illuminates), and DIVERTER VALVE switches (diverter valve) of the
air-conditioning systems at both sides.
b) Turn off the CUTOFF VALVE switch (shutoff valve) (the yellow indicating light
illuminates) at the side where bleed air failure occurs on the right console.
Note
The bleed air from one engine on one wing is only used in emergency to supply
air to two sets of systems.
(3) When the bleed air system at one side fails, but the air-conditioning system at the
opposite side is operating properly, and the normal bleed air system supplies air to the
air-conditioning system at the same side (that is, same-side air supply), the procedure
is as follows:
a) Turn on the two AIR SUPPLY FROM ENGING (engine air supply) switches at the
side of the normal bleed air system on the right console, and the CUTOFF VALVE
switch (shutoff valve), and DIVERTER VALVE switch (diverter valve) at the side of
normal air-conditioning system.
b) Turn off the CUTOFF VALVE switch (shutoff valve) at the side of the faulty
air-conditioning system (the yellow indicating light illuminates).
(4) When one bleed air system at one side fails, but the air-conditioning system at the
same side is operating properly, and the normal bleed air system supplies air to the
normal air-conditioning system at the opposite side (that is, opposite-side air supply),
the procedure is as follows:
a) Turn on the two AIR SUPPLY FROM ENGING (engine air supply) switches at the
side of normal bleed air system on the right console, the CROSS VALVE switch
(crossover valve) (the yellow indicating light illuminates), DIVERTER VALVE
switch (diverter valve) at the side of the normal air-conditioning system, and
CUTOFF VALVE switch (shutoff valve) at other the side.
JZ-Y8F200W-02
AIRCRAFT FLIGHT MANUAL
SECTION VI
AIRCRAFT SYSTEM EQUIPMENT
6-71
June 30, 2012
b) Turn off the CUTOFF VALVE switch (shutoff valve) (the yellow indicating light
illuminates) at the side where bleed air failure occurs and DIVERTER VALVE
switch (diverter valve) at the side where the air-conditioning system fails.
(h) When there is much moisture or ice on the cockpit glass, heat the cockpit/cabin and push
upwards the handle of the heating switch (Y8C-7613-70) to the limit position (ensure the
maximum airflow of the cockpit cabin when necessary).
(i) When the airtight cabin pressure is lost, but this does not affect pressurization, do not
power off the air-conditioning system to prevent the windshield glass from being frozen
with droplets.
(j) When the air supply temperature indicated by CABIN (cockpit) or CAR (cargo cabin) on the
air supply thermometer of the copilot instrument panel exceeds 194o
F (90o
C), set the
TEMP CTL (temperature control) switch of CABIN (cockpit) or CAR (cargo cabin) on the
copilot instrument panel to the direction of COOL to manually reduce the air supply
temperature of this cabin. If the temperature of this cabin cannot be cooled down, turn off
the L (left) or R (right) DIVERTER VALVE switch (diverter valve) (the L (left) diverter valve
is for the cargo cabin, while the R (right) diverter valve is for the cockpit).
ANTI-ICING HEATING SYSTEM
GENERAL
The hot air heating and electric heating and anti-icing device is installed on aircraft to prevent
import parts, such as wing leading edge, tail leading edge, engine inlet duct leading edge, engine
inlet guide vane, propeller, and windshield glass, from being iced. It is used to implement anti-icing
when aircraft is flying through the severe icing area at different altitudes and speeds, ensuring
flight safety.
The hot air heating system is used to heat parts such as the engine inlet duct leading edge,
inlet guide vane, and wing leading edge. The hot air is supplied by the 10th
stage compressor of
the engine. The electric heating system is used to heat parts such as the windshield glass,
propellers and their cowlings, and tail leading edge for anti-icing.
JZ-Y8F200W-02
AIRCRAFT FLIGHT MANUAL
SECTION VI
AIRCRAFT SYSTEM EQUIPMENT
6-72
June 30, 2012
Heating of the engine inlet duct leading edge and inlet guide vane
Ground inspection
(a) Before startup, turn on the INLET ICING SGL (inlet duct icing signal) switch on the copilot
instrument panel. The red ENG AIR INTAKE ICING (inlet duct icing) signal light on the
copilot instrument panel illuminates, and the ICING XHD-3A-10 main warning light is
blinking and then extinguishes.
(b) After start-up, turn on the ENG AIR-INLET GUIDES HEATING (engine inlet guide heating)
switch on the right console. The green ENG AIR INTAKE HEATING (inlet duct heating)
signal light on the copilot instrument panel illuminates, indicating normal operation. After
inspection, turn off the switch.
Heating in the following cases:
(a) Perform test run under the icing condition.
(b) When the in-flight temperature is below 41o
F (5o
C) (below 50o
F (10o
C) at night), if there is
fog or before the aircraft enters the cloud, rain, or snow shower area), heating is required.
(c) During flight, the red ENG AIR INTAKE ICING (inlet duct icing) signal light on the copilot
instrument panel illuminates and the ICING XHD-3A-10 main warning light is blinking, turn
on the ENG AIR-INLET GUIDES HEATING (engine inlet guide heating) switch on the right
console immediately. At this time, the inlet duct leading edge anti-icing switch and guide
vane anti-icing switch are turned on simultaneously.
Note
After inlet duct leading edge and guide vane heating is enabled, the turbine
outlet temperature increases to a temperature in the range of 50o
F~68o
F (10o
C~
20o
C), and fuel consumption rate at 3280.84 ft (km) is increases by 3%.
Operating precautions
(a) When aircraft is flying through the icing area, advance the throttle to an angle greater than
62o
so that automatic feathering can be implemented in case of shutdown.
(b) In the case that the heating system is found faulty and the inlet duct is identified iced, leave
the icing area immediately, make feathering preparations, and land at an airfield in vicinity.
(c) When the inlet duct is iced, turn off the heating switch. After the aircraft leaves the icing
area, enable inlet duct leading edge and guide vane heating for one inner engine. Then,
enable inlet duct leading edge and guide vane heating for other engines every 2 to 3
minutes. If engines shut down after heating is enabled, do not turn on the heating switch of
engines for which heating has not been enabled yet. It is allowed to perform air start for the
shutdown engines as required.
JZ-Y8F200W-02
AIRCRAFT FLIGHT MANUAL
SECTION VI
AIRCRAFT SYSTEM EQUIPMENT
6-73
June 30, 2012
Wing heating and deicing
Ground inspection (with an throttle angle greater than 20o
)
(a) Turn off L (left) and R (right) CUTOFF VALVE switch (shutoff valve) on the right console.
Then, turn on the AIR SUPPLY FROM ENGINE (engine air supply) switches of the four
engines on the right console.
(b) Turn on the R (right) WING HEATING (wing heating) switch on the right console. After
20s~40s, the two green signal lights on the right wing illuminate. At the same time, hot air
flows out from the wing tip, indicating that the heating and anti-icing system is operating
properly. Turn off the R (right) WING HEATING (wing heating) switch. Check the left wing
heating and anti-icing system using the same method.
(c) After inspection, turn off the AIR SUPPLY FROM ENGINE (engine air supply) switch on the
right console and WING HEATING (wing heating) switch.
In-flight operations
If icing occurs on aircraft (icing found visually) or the A/C ICING (aircraft icing) red signal light
on the copilot instrument panel illuminates and the red XHD-3A-10 main warning light is blinking
(note: Once XHD-3A-10 main warning light is blinking, it is not controlled by 5-input icing signals.
At this time, press XHD-3A-10 main warning light. XHD-3A-10 main warning light extinguishes.
Within a delay of 5min±10s, it does not respond to any signals. After the delay is over, the original
functions can be used again), perform wing heating and deicing according to the following
procedure:
(a) Turn on the WING HEATING (wing heating) switch on the right console. The four WING
HEATING (wing heating) green signal lights on the copilot instrument panel illuminate.
(b) Turn on the AIR SUPPLY FROM ENGINE (engine air supply) switches of the four engines
on the right console in turn.
(c) After deicing, turn off the above-mentioned switches.
In-operation precautions
(a) Enabling wing heating and deicing is prohibited during takeoff.
(b) Wing heating can be enabled in the moderate and severe icing area where the air
temperature is 14o
F (-10o
C). If one or two engines are faulty, turn off the L (left) and R (right)
DIVERTER VALVE switches (diverter valve) for the air-conditioning system. Meanwhile,
turn on the CROSS VALVE switch (crossover valve) on the right console, and L (left) and R
(right) CUTOFF VALVE switches (shutoff valve). After the aircrew and passengers wear the
oxygen masks, perform wing heating and deicing.
(c) Before aircraft descends to enter the clouds and the air temperature is below 32o
F (0o
C),
engage the wing heating and anti-icing system.
JZ-Y8F200W-02
AIRCRAFT FLIGHT MANUAL
SECTION VI
AIRCRAFT SYSTEM EQUIPMENT
6-74
June 30, 2012
(d) In case of landing under the icing condition, power off the wing heating and anti-icing
system after the aircraft touches the ground.
(e) In case of takeoff under the icing condition, after the aircraft leaves the ground and the
engine changes from the takeoff state to the rated state, power on the wing heating and
anti-icing system. At this time, only one set of air-conditioning system can operate.
(f) After heating for the wing, inlet duct leading edge, and inlet guide vane is enabled, the flight
speed decreases to a value in the range of 13.67 ft/s~18.23 ft/s (15 km/h~20 km/h). The
throttle can be advanced when necessary.
(g) After the wing anti-icing system is checked on the ground to be normal, turn off the WING
HEATING (wing heating) switch on the right console and AIR SUPPLY FROM ENGINE
(engine air supply) switch to prevent machine components from being damaged due to
overtemperature (the inspection duration should be as short as possible).
Windshield-plexiglass heating (115V, 400H AC)
Heat the windshield-plexiglass to remove the ice, frost and water vapor formed on the glass in
flight and to ensure the normal visibility for pilot under bad flight conditions.
The windshield-plexiglass adopts electric heating whose heating methods include constant
heating and circulatory heating.
Power distribution of heating power:
(a) Bus bar I supplies power to the 1st
glass heating; generator F1 supplies power to the 2nd
and 3rd
glasses; and the bus bar II supplies power to the 4th
and 5th
glasses.
(b) Low heating uses 190V AC and high heating uses 230V AC.
(c) All windshield-plexiglasses can adopt constant heating and the 4th
and 5th
glasses can also
adopt circulatory heating. The circulatory cycle is 25s±2s.
Note
The S/N sequences (from left to right in cockpit) of electric heating glasses are
the 1st
, 2nd
, 3rd
and 4th
, with the 5th
in the navigation compartment.
JZ-Y8F200W-02
AIRCRAFT FLIGHT MANUAL
SECTION VI
AIRCRAFT SYSTEM EQUIPMENT
6-75
June 30, 2012
Operation of windshield-plexiglass electric heating:
(a) As for the windshield heating switch (on the instrument panel) for the pilot, its upward
direction represents HI (high) heating, downward direction represents LO (low) heating and
middle position represents no operating.
(b) There are two windshield heating switches for the copilot; W/SHIELD HEAT (changing
between high and low glass heating) switch controls HI (high) or LO (low); W/S HEAT
(glass heating) switch controls the two-position switch (high circulation or low circulation)
for CONT (constant) (upward) or CIR (circulatory) (downward) heating, according to the
position of HI (high) and LO (low) switches. Install both the two switches on the copilot
overhead console.
(c) As for the 5th
windshield heating switch in navigation compartment, its upward direction
represents HI (high) heating and downward direction represents LO (low) heating. It is
controlled by positions of the W/S HEAT switch (CONT/CIR) on the overhead console .
(d) As for windshield-plexiglass heating, two temperature control boxes WKH-2C keep the
glass temperature at 35o
C±1o
C automatically. Such as when the atmospheric temperature
is above 35o
C, it cannot be turned on.
Caution
When heating, operate at the LO (low) position for 8min~10min first, and then
put it at the HI (high) heating position. If necessary, put it directly at the HI (high)
heating position.
(e) When the atmospheric temperature is below 5o
C before takeoff, turn on the cockpit glass
electric heating. It is best to turn on the electric heating in whole flight on IFR flight.
(f) The glass can be effectively heated 5min~6min after turning on the electric heating. Thus it
is best to turn it on (such as before cloud penetrating, when descending or foggy) before
entering icing region in flight.
(g) Cabin glass heating on ground: it can only be turned on when removing the icing or water
vapor on glasses during electric heating system check and aircraft parking or taxiing as
well as before aircraft takeoff.
JZ-Y8F200W-02
AIRCRAFT FLIGHT MANUAL
SECTION VI
AIRCRAFT SYSTEM EQUIPMENT
6-76
June 30, 2012
Heating of propeller and its dome (115V, 400Hz AC)
AC supplies power to the propeller and its dome for heating and deicing, so as to ensure the
engine can operate normally when the aircraft enters the icing region.
Power distribution of heating power:
(a) The AC generator JF-12 supplies power to the power source of heating components. When
four generators JF-12 all operate normally, F1 supplies power to 1 and 4 engine propeller
and dome heating components, and F2 supplies power to 2 and 3 engine propeller and
nose dome heating components.
(b) Due to high current for each propeller, one AC generator cannot supply to heat two
propellers simultaneously, thus heating is circulatory. F1 and F2 heat 1 and 3 engine
heating components respectively first, then they turn to 2 and 4 engine heating
components automatically 25s±2s later. One circulatory cycle is 50s±4s, which avoids ice
formation of the propeller and its dome.
(c) When the AC generator (namely F1) fails, F4 supplies power to 1 and 4 heating
components, when F2 fails, F3 supplies power to 2 and 3 heating components.
(d) If inboard AC generator fails, then the outboard rather than inboard AC generator can heat.
If outboard AC generator fails, both inboard and outboard cannot heat.
(e) When one of F2 or F3 operates, the four engines can be heated. When one of F1 or F4
operates, then only 1 and 4 engines rather than 2 and 3 engines can be heated.
Operation of propeller heating:
Before the aircraft enters the icing region, put the TALL HEAT (propeller and its dome heating)
switch on overhead console at ON (turning on) (upward) position, and check the electric current of
AC generator F1 and F2 being about 60A (with blade temperature of 100o
C). The indicating light
(engines I and II as well as III and IV turn on simultaneously) for normal heating of propeller and its
dome on the right instrument panel turns on alternatively.
If the heating resistance of a blade breaks, the circuit current will descend to less than 50A.
Caution
Due to bad ground ventilation and high ground temperature, continuous heating
on ground shall not be more than 1min30s to avoid burning out the propeller
blade and cap.
JZ-Y8F200W-02
AIRCRAFT FLIGHT MANUAL
SECTION VI
AIRCRAFT SYSTEM EQUIPMENT
6-77
June 30, 2012
Air-speed tube heating system
Function of air-speed tube heating system
If the atmospheric temperature is below 5o
C in flight when ice is probably formed, the aircraft
shall turn on the total and static pressure heating before entering cloud and rain regions.
Operation of air-speed tube heating system
As for the LEFT and RIGHT heating switches (HEATING FOR PILOT-STATIC TUBE) on the
overhead console in cockpit, when putting it at the TEST position, the 5 blue indicating lights (both
LEFT SP VENTS and RIGHT SP VENTS) under static pressure HEATING CHECK on the pilot
right instrument panel turn on; when putting it at the HEAT position, the blue indicating light under
static pressure heating check turns off, two pilot heating (PITOT HEAT ON LEFT OFF FLASH and
PITOT HEAT ON LIGHE OFF FLASH) yellow light on the pilot left and right instrument panel keeps
on and start to heat the air-speed tube heating system.
Caution
The ground check heating shall not be more than 3min.
Tail heating (28.5V DC)
Before the aircraft enters icing region, heat the tail for anti-icing and to ensure the normal flight
of the aircraft.
Ail heating is supplied by 28.5V DC power in forms of constant heating and circulatory heating.
After powering on the tail heating switch on overhead console, the tail heating signal indicating
light (blue) turns on and two heating methods operate simultaneously.
Power distribution of heating power:
(a) Divide the heating components of constant heating area and circulatory heating area into
five groups and four groups respectively;
(b) After turning on the tail heating switch, automatic circulation heating system starts to
operate: first power on the constant heating components, meanwhile carry out the
automatic circulation heating to four groups of circulatory heating components in turn under
the control of DS-19 circulatory heating timing mechanism. Heat each group for 38.5s±2s
with a circulatory cycle of 154s±3s. Circulatory heating sequence: outer section of left and
right horizontal tails→middle section of left and right horizontal tails→inner section of left
and right horizontal tails and vertical tail lower section→vertical tail upper and middle
sections. Automatic circulation heating starts and continues from the position where the
timing mechanism DS-19 turns off last time.
JZ-Y8F200W-02
AIRCRAFT FLIGHT MANUAL
SECTION VI
AIRCRAFT SYSTEM EQUIPMENT
6-78
June 30, 2012
Note
he inner skin in the section of the nine heating components is equipped with
automatic heating switch. When the temperature is above 50o
C± 10o
C, it turns
off automatically; when the temperature is below 40o
C± 10o
C, it turns on
automatically.
Operation of tail heating:
(a) When flying in icing condition, power on the tail heating. The blue TAIL HEATING light on
right instrument panel turns on, which represents normal heating;
(b) Power off the heating switch before leaving the icing region or landing (at the time of
landing in icing condition).
Ground check
(a) Check the ground with ground power or at the time of engine test run;
(b) Check the heating of constant heating components and observe the power indicator next to
the tail anti-icing distribution box. It indicates 65A~75A with single automatic switch turned
on to ZKP-80; 18A~20A with single turned on to ZKP-20; and 275A~320A with five
automatic switches turned on simultaneously;
(c) Check the heating of circulatory heating components and the current indication shall be:
550A~610A for outer section of left and right horizontal tails; 560A~620A for vertical tail
upper and middle sections; 600A~670A for horizontal tail inner section and vertical tail
lower section; and 710A~790A for middle section of left and right horizontal tails;
(d) Check the 28.5V DC power supply with ground power or engine test run, (putting the TAIL
HEATING switch MJK2-2A (1191) on overhead console at OFF position), press the
self-check button on XKH-11 tail heating signal control box, then the indicating light (blue)
for normal self-check on control box and the blue TAIL HEATING light (2522) on right
instrument panel turn on. When turning on the TAIL HEATING switch MJK2-2A (1191) on
overhead console, the blue TAIL HEATING light (2522) on right instrument panel turns on.
Turn off any one of those constant heating switches (6665, 6666, 6667, 6668, 6669), the
blue TAIL HEATING light (2522) on right instrument panel blinks, which represents failure
warning for tail heating.
Note
Time of turning on the TAIL HEATING switch (1191) shall not be longer than 5s.
JZ-Y8F200W-02
AIRCRAFT FLIGHT MANUAL
SECTION VI
AIRCRAFT SYSTEM EQUIPMENT
6-79
June 30, 2012
OXYGEN SYSTEM
General
The oxygen system is installed on Y8F200W aircraft to be exported to Venezuela to satisfy the
following needs:
Ensure safety of aircrew and passengers in the case of high-altitude flight, pressure loss
in the airtight cabin, or harmful gas pollution in the cabin.
Satisfy physiological needs of aircrew and passengers during long-term flight
The oxygen system on Y8F200W aircraft provides gaseous oxygen, with separate oxygen
supplies for the cockpit and cargo cabin. Totally five 4.40 gal (20L) glass- fabric-reinforced plastic
(GFRP) oxygen bottles are installed on the whole aircraft, and they can contain 22.0 gal (100L)
oxygen with the pressure of 2133.51 psi (14.71 MPa). The oxygen supply capacity for passengers
is 13.20 gal (60L), while that for aircrew is 8.80 gal (40L), ensuring 3h oxygen consumption for
aircrew and 15min oxygen consumption for 96 passengers. Each aircrew member is provided with
a set of demand regulator YTQ-21/1 for oxygen supply, while passengers are provided with 5 sets
of continuous oxygen supply regulator YTQ-11.
In addition, four 0.37 gal (1.7L) moveable oxygen bottles are installed on aircraft to provide
oxygen in case of emergencies or for personnel moving on aircraft.
Device Description
Oxygen supply layout
(a) Five 4.40 gal (20L) oxygen bottles are installed on the dorsal fin in the rear section of
fuselage to supply oxygen for 5 aircrew members and 96 passengers.
(b) Four 0.37 gal (1.7L) moveable oxygen bottles with the oxygen pressure of 426.41 psi (2.94
MPa) are installed on the left and right pieces of floor in frames 11 to 12, two on each side.
These moveable oxygen bottles can supply oxygen for 8min in case of emergencies or for
personnel moving on aircraft. If oxygen is still required after 8min, oxygen can be charged
using the oxygen charging hose on the cargo cabin instrument panel.
Oxygen pressure regulator
(a) There are five YTQ-21/1 oxygen pressure regulators, which are used by flight crew
together with oxygen masks YM6512A. When the regulator switch handle is set at the ON
position and the air inlet switch is set at the PURE OXYGEN position, pure oxygen is
supplied. When the air inlet switch is set at the MIXED OXYGEN position, the mixed
oxygen is supplied. When the regulator is faulty or aircrew and passengers feel suffocated,
turn on the emergency oxygen supply valve.
JZ-Y8F200W-02
AIRCRAFT FLIGHT MANUAL
SECTION VI
AIRCRAFT SYSTEM EQUIPMENT
6-80
June 30, 2012
(b) There are five YTQ-11 oxygen pressure regulators which can connect with 96 oxygen
masks for passengers in the cargo cabin. YTQ-11 oxygen pressure regulator can
automatically regulate the oxygen pressure and supply oxygen continuously with the flight
altitude variation. When automatic oxygen supply fails or the oxygen supply pressure is
insufficient, turn on the emergency oxygen supply valve to manually regulate the oxygen
supply pressure according to the mapping table on the oxygen instrument panel in the
cargo cabin.
(c) There are four YTQ-5 oxygen pressure regulators which are installed on moveable oxygen
bottles respectively. The operating method is the same as that of YTQ-11 oxygen pressure
regulator.
Oxygen using altitude annunciator XG-1A
When the cabin altitude exceeds 11482.94 ft (3500 m), both the cockpit warning bell and the
cargo cabin air horn start ringing, and the cabin altitude oxygen warning lights (one for each
aircrew member, one at the left and right of the rear web in frame 9 respectively, and one on the
cargo cabin instrument panel) start blinking, prompting personnel on aircraft to use oxygen
equipment. To make the bell and horn stop ringing, press the RELEASE buttons on the cockpit
central instrument panel and cargo cabin oxygen instrument panel. The oxygen annunciator is
blinking all the time. The cargo cabin air horn is ringing only after the engine pressure
control/shutoff valve is turned on.
Pre-flight check on the oxygen equipment
(a) Turn on OXYGEN SOURCE COCK (oxygen supply valve) YK-3A at the left of frame 9 in
the cockpit and OXYGEN SOURCE COCK (oxygen supply valve) YK-6 on the small
instrument panel of the cargo cabin at the left of frame 31. Check that readings of
YTQ-21/1 and OXYGEN SOURCE PRESSURE (oxygen supply pressure) on the cargo
cabin instrument panel fall within the range of 1847.78 psi~2133.51 psi (12.74 MPa~14.71
MPa). The readings cannot be lower than 1421.37 psi (9.8 MPa); otherwise, flight mission
requirements cannot be met.
(b) Turn on the valve of the moveable oxygen bottle. Then, check that the oxygen pressure
falls within the range of 355.34 psi~426.41 psi (2.45 MPa~2.94 MPa).
(c) Check whether oxygen supply conditions of oxygen pressure regulators YTQ-21/1 and
YTQ-11 are normal.
JZ-Y8F200W-02
AIRCRAFT FLIGHT MANUAL
SECTION VI
AIRCRAFT SYSTEM EQUIPMENT
6-81
June 30, 2012
Operation of the oxygen system in air
When the cabin altitude reaches over 11482.94 ft (3500 m) or pressure reduces quickly
because the airtight cabin pressurization system is inoperative, the cabin altitude oxygen warning
light starts blinking, and the warning bell and horn start ringing. In this case, aircrew and
passengers should use the oxygen equipment immediately. The pilot should fly the aircraft down
to the safe altitude emergently when necessary.
Using oxygen by aircrew
(a) The mechanic turns on OXYGEN SOURCE COCK (oxygen supply valve) YK-3A in the
cockpit before flight, and check the oxygen pressure of oxygen pressure regulator
YTQ-21/1 for each aircrew member. When the oxygen warning bell starts ringing and the
oxygen warning light starts blinking, turn on the oxygen valve on YTQ-21/1, and connect
and wear the oxygen mask to start breathing oxygen.
(b) Check the reading of the pressure gauge on the regulator. The air mechanic checks
oxygen consumption according to the pressure gauge. If oxygen is insufficient or other
accidents occur (for example, aircraft flying through the poisonous area), set the air inlet
switch on YTQ-21/1 at the PURE OXYGEN position or turn on the emergency oxygen
supply valve to breathe pure oxygen.
Using oxygen by passengers
(a) The mechanic turns on the two OXYGEN SOURCE COCK (oxygen supply valves) YK-6 on
the small instrument panel in the cargo cabin at the left of frame 31 before flight. When the
oxygen horn starts ringing and warning light starts blinking, take out the oxygen mask and
power on flow indicator YSL-3/1 to start breathing oxygen. All oxygen masks for
paratroopers are placed in parachute holders on paratrooper seats at both sides of the
cargo cabin.
(b) Check the pressure of the oxygen supply pressure gauge on the cargo cabin instrument
panel at the left of frame 30 periodically. If the pressure is lower than 426.41 psi (2.94 MPa)
or the system is faulty, inform the captain immediately to fly the aircraft down to a safe
altitude below 11482.94 ft (3500 m).
(c) Using moveable oxygen bottles
(1) When it is required to use a moveable oxygen bottle, put the moveable oxygen bottle
on back, connect the mask hose to the union, turn on the oxygen valve, and wear the
oxygen mask. Oxygen pressure regulator YTQ-5 can automatically regulate the
oxygen supply quantity according to the flight altitude.
(2) If oxygen is required in special cases or the oxygen quantity is found insufficient, turn
on the emergency oxygen supply valve on the regulator.
JZ-Y8F200W-02
AIRCRAFT FLIGHT MANUAL
SECTION VI
AIRCRAFT SYSTEM EQUIPMENT
6-82
June 30, 2012
(3) Pay attention to the pressure inside the bottle in real time. When the pressure inside
the bottle is lower than 85.28 psi (0.588 MPa), if oxygen is still required, charge
oxygen using the oxygen charging hose on the cargo cabin instrument panel. During
oxygen charging, connect the oxygen charging hose. Then, turn on OXYGEN
CHARGING COCK (oxygen charging valve) YK-4B on the cargo cabin instrument
panel. When the oxygen charging pressure reaches 426.41 psi (2.94 MPa), stop
charging oxygen and turn off the oxygen charging valve.
Oxygen duration calculation
t=
In the preceding formula: P=Pressure inside the bottle (MPa)
2.942=Remaining pressure inside the bottle (MPa)
V=Oxygen bottle capacity (L/bottle)
i=Number of oxygen bottles (number)
g=Oxygen quantity supplied to each person (L/min·person)
n=Total number of persons requiring oxygen (number)
5.88=Pressure conversion coefficient (MPa)
t=Oxygen supply duration during flight (h)
Oxygen charging precautions
(a) Before oxygen charging, check whether the oxygen has the breathing oxygen certificate.
During oxygen charging, connect aircraft to the bonding jumper and ground oxygen supply,
and turn on the oxygen charging valve. After oxygen charging, fill the oxygen charging date
and pressure in the aircraft logbook.
(b) Refueling, defueling, and power-on are prohibited during oxygen charging.
(c) Charge oxygen with special tools. It is prohibited to contact the oxygen system using tools
and rag with oil stains.
(d) Hands and clothes of the personnel for charging oxygen must keep clean without oil stains.
(e) The oxygen charging pressure depends on the ambient temperature and should not
exceed the pressure specified in Table 6-9.
(P-2.942) v•i
5.88g•n
JZ-Y8F200W-02
AIRCRAFT FLIGHT MANUAL
SECTION VI
AIRCRAFT SYSTEM EQUIPMENT
6-83
June 30, 2012
Table 6-9 Mapping between temperature and pressure
Temperature
Pressure of the
High-pressure Oxygen Bottle
Pressure of the Moveable
Oxygen Bottle
122o
F(50o
C) 2375.72psi(16.38MPa) 477.18psi(3.29 MPa)
113o
F(45o
C) 2346.71psi(16.18MPa) 469.92psi(3.24MPa)
104o
F(40o
C) 2304.65psi(15.89MPa) 462.67psi(3.19MPa)
95o
F(35o
C) 2275.65psi(15.69MPa) 455.42psi(3.14MPa)
86o
F(30o
C) 2233.59psi(15.40MPa) 448.17psi(3.09MPa)
77o
F(25o
C) 2204.58psi(15.20MPa) 440.92psi(3.04MPa)
68o
F(20o
C) 2162.52psi(14.91MPa) 433.66psi(2.99MPa)
59o
F(15o
C) 2133.51psi(14.71MPa) 426.41psi(2.94MPa)
50o
F(10o
C) 2104.50psi(14.51MPa) 419.16psi(2.89MPa)
41o
F(5o
C) 2062.44psi(14.22MPa) 411.91psi(2.84MPa)
32o
F(0o
C) 2033.43psi(14.02MPa) 406.11psi(2.80MPa)
23o
F(-5o
C) 1991.37psi(13.73MPa) 398.85psi(2.75MPa)
14o
F(-10o
C) 1962.36psi(13.53MPa) 391.60psi(2.70MPa)
5o
F(-15o
C) 1934.81psi(13.34MPa) 384.35psi(2.65MPa)
-4o
F(-20o
C) 1905.80psi(13.14MPa) 377.10psi(2.60MPa)
-13o
F(-25o
C) 1863.74psi(12.85MPa) 369.85psi(2.55MPa)
-22o
F(-30o
C) 1820.23psi(12.55MPa) 362.60psi(2.50 MPa)
-31o
F(-35o
C) 1792.67psi(12.36MPa) 355.34psi(2.45 MPa)
-40o
F(-40o
C) 1763.66psi(12.16MPa) 348.09psi(2.40 MPa)
-49o
F(-45o
C) 1721.60psi(11.87MPa) 340.84psi(2.35 MPa)
-58o
F(-50o
C) 1678.09psi(11.57MPa) 335.04psi(2.31 MPa)
JZ-Y8F200W-02
AIRCRAFT FLIGHT MANUAL
SECTION VI
AIRCRAFT SYSTEM EQUIPMENT
6-84
June 30, 2012
FLIGHT CONTROL SYSTEM
Control system
General
The aircraft control system consists of the primary control system and secondary control
system.
The aircraft primary control system consists of the rudder, elevator, and aileron control systems.
Deflect the rudder, elevator, and aileron can make the aircraft yaw, pitch, and roll. KJ-6CII
autopilot's hydraulic control actuator is installed in the primary control system to receive the control
signal transmitted from the autopilot.
The aircraft secondary control system consists of trim tab control systems for the rudder,
elevator, and aileron, rudder spring tab control system, aileron balancing tab control system, flap
control system, and parking brake system.
To increase the lift force during takeoff and landing and shorten the takeoff and landing run
distance, the flap control system is installed on the aircraft.
To prevent the control mechanism from abrading because wind blows the moveable control
surface when aircraft is parked on the ground, the parking brake mechanism is installed on
aircraft.
Control System Functions
Elevator control system
The elevator control system applies push-pull rod control. The left and right control sticks serve
as the elevator control mechanism. When the control stick leans 1o
backward, the elevator is at the
neutral position; when the control stick leans 12o
forward, the elevator deflects 15o
±1o
downwards;
when the control stick leans 21o
backwards, the elevator deflects 28o
±1o
upwards.
JZ-Y8F200W-02
AIRCRAFT FLIGHT MANUAL
SECTION VI
AIRCRAFT SYSTEM EQUIPMENT
6-85
June 30, 2012
The lower rocker arms of the left and right control sticks are connected to the rocker arm group
under the floor in the cockpit in front of frame 9 through the lever and rocker arm. After
convergence, the lever is placed vertically upwards in front of frame 9 and then connected with the
lever on the lever guide seat at frame 13 through the horizontal lever. Then, the control linkage
extends backwards along the left of the fuselage center line through the guide pulley base and is
connected with the lever on the airtight joint at frame 59. The lever is then connected with the
double-lug rocker arm on the control actuator bracket at frame 62. The front of the elevator control
rocker arm on the control actuator bracket is connected with the rocker arm at frame 59 through
the lever and is connected with the control actuator through the bolt. The control actuator feedback
sensor is installed on the control actuator bracket and is connected with the double-lug rocker arm
through the small lever. A lock nest for parking brake is installed on the other end of the double-lug
rocker arm. The left and right rocker arms on the rocker pipe are connected respectively using the
lever and rotating shaft flanges on the two elevators at the rear frame 65.
The elevator control system is located on the combined bracket under the floor in the cockpit at
the rear of frame 5 and it is equipped with the adjustable stop pin. When the elevator deflects
15o
±1o
downwards, the rocker arm should touch the stop pin. The stop pin is used to limit the
forward tilt degree of the control stick to prevent the control stick from striking the instrument or
instrument panel. The middle primary rocker arm in the rocker arm pipe in front of frame 65 and
left rocker arm are respectively stopped by the upper and lower two stop pins installed on the
structure so that the elevator's limiting deflection angle can be limited.
Rudder control system
The rudder control system applies push-pull rod control. Two pairs of pedals on the pilot and
copilot foot consoles serve as the rudder control mechanism. When the right pedal is pushed
forward, the rudder deflects rightwards; when the left pedal is pushed forward, the rudder deflects
leftwards.
JZ-Y8F200W-02
AIRCRAFT FLIGHT MANUAL
SECTION VI
AIRCRAFT SYSTEM EQUIPMENT
6-86
June 30, 2012
The rudder control linkage is led from the tri-arm rocker on the left and right foot consoles. The
rudder control linkage is converged with the left and right linkages through the lever and rocker
arm and then installed on the rocker arm group under the floor in the reinforced cabin in front of
frame 9. Then, the linkage extends to the tri-arm rocker on the control actuator bracket in front of
frame 62 along the line parallel with the elevator control system. Another arm of this rocker arm is
connected with the tri-arm rocker on the upper side of frame 62 using a vertical lever and is
connected with the rocker arm on the lower part of the rudder rotating shaft using a horizontal lever.
The rocker arm shaft is connected with the rudder pipe shaft through a universal joint. The rudder
pipe shaft is supported in the bearing fixed on rib 4 of the rudder. A double-arm rocker is fixed on
the upper end of the pipe shaft. One of its arms is connected with the bracket on the rudder using
the spring lever, and the other arm is connected with the lug of the spring tab using the lever.
When pushing the left and right pedals, the double-arm rocker fixed on the pipe shaft will be driven
to rotate, and the rudder will be driven by the spring lever to deflect around its own suspending
axis. The rudder pipe shaft axis is coaxial with the rudder rotating axis. The rudder control actuator
and elevator control actuator are together installed on the control actuator bracket in front of frame
62. The control actuator is connected with the third arm of the tri-arm rocker. The control actuator
feedback sensor is also installed on the bracket and connected with the tri-arm rocker. A rudder
deflection angle limiter is installed on the fuselage tail section platform.
The control rocker arm of the rudder plate valve in the nose wheel turn mechanism is
connected with the double-arm rocker under frame 9 using the adjustable lever. The other arm of
the double-arm rocker is connected to the rocker arm group under the floor in the cockpit in front of
frame 9 using the spring lever. When aircraft is taxiing on the ground with a high speed, push the
pedal to deflect the rudder. The rocker arm drives the rudder plate valve to operate using the
spring lever. At this time, the spring of the spring lever does not deform, and the spring lever length
remains unchanged. When the rudder plate valve is stuck, control the rudder so that the spring
lever length is changed. Then, the rudder control system can operate properly.
Aileron control system
The aileron control system applies combined control. Noiseless chains are located inside the
left and right control wheels. Cable flexible control is applied between the noiseless chains and the
sector rocker arm on the floor in the cockpit, while push-pull rod control is applied on other parts.
The control wheels on the left and right control sticks serve as the aileron control mechanism.
When the control wheel deflects 125o
±3o
leftwards, the left aileron deflects 25o
±1o
upwards, while
the right aileron deflects 15o+2
o
-1
o downwards; when the control wheel deflects 125o
±3o
, the ailerons
deflect to the opposite directions.
JZ-Y8F200W-02
AIRCRAFT FLIGHT MANUAL
SECTION VI
AIRCRAFT SYSTEM EQUIPMENT
6-87
June 30, 2012
Two cables are led from the lower arm of each control stick. They are connected to the sector
rocker arm installed on the floor in the cockpit after passing through the pulley. By using the lever
and rocker arm, the left and right control linkages are converged on the rocker arm group under
the floor in front of frame 9. Then, the linkages are extended to the rocker arm in front of spar I on
the center wing along the line parallel with the elevator and rudder control systems. The lever is
connected with the lower rocker arm on the aileron vertical axis at the rear of spar II through the
passage between spars I and II on the center wing. A lock nest for parking brake is installed on the
lower rocker arm. The included angle between upper and lower rocker arms on the vertical axis is
90°. Levers are extended from the left and right sides of the upper rocker arm and are then led to
the left and right ailerons along the rocker arm and guide pulley base at the rear of spar II on the
wing. To improve the lateral controllability when aircraft is at the high angle of attack and enhance
the aileron effect, four spoilers are installed between rib 13~15 on the wing. The spoiler control is
linked with aileron control.
Secondary control system
Trim tabs of the rudder, elevator, and aileron have control systems independent of the rudder,
elevator, and aileron. These systems are used to balance or eliminate forces acted on the pedal,
control stick, and control wheel when aircraft is in diverse flight attitudes. The rudder spring tab
and aileron tab are balancing tabs. The aileron tab can automatically deflect to the direction
opposite to the aileron deflection direction when aileron deflects so that the control force on the
control wheel can be alleviated. The rudder spring tab starts deflecting after the force on the pedal
exceeds 147 N so that the control force on the pedal can be alleviated.
Flap control
Flap control applies hydraulic control. Flap extension and retraction are implemented by
reciprocating motion of the two flap retraction/extension mechanisms at rib 5 and rib 11. The flap
retraction/extension mechanisms are driven by the hydraulic motor on spar II of the center wing.
The hydraulic motor driving device is connected with the flap retraction/extension mechanisms
through driving rods. The driving rods are connected with the universal joint and are laid along
spar II on the wing.
The flap retraction/extension angle is indicated on the flap location indicator on the central
instrument panel. The location indicator sensor is installed together with the flap location
mechanism on the cargo cabin ceiling at the rear of spar II on the center wing. The angle indicated
by the location indicator should match the actual flap deflection angle. An error is allowable. When
the flap is extended by 25o
or 35o
, the allowable error is ±1o
; when the flap is extended by 45o
, the
allowable error is ±2.6o
.
JZ-Y8F200W-02
AIRCRAFT FLIGHT MANUAL
SECTION VI
AIRCRAFT SYSTEM EQUIPMENT
6-88
June 30, 2012
The flap location control switch is installed on the central instrument panel. When the pilot set
the switch to the retraction or extension position, the flap will deflect to the retraction or extension
limit position. When the flap reaches its limit position, the location mechanism automatically cuts
off the flap control circuit. At this time, oil supply to the hydraulic motor is stopped, and the flap
stops at the retraction or extension limit position. If the flap is extended to any middle positions, set
the control switch to the NEUTRAL position. The circuit of the electromagnetic valve is cut off. At
this time, hydraulic transmission is braked. The flap can stop at any middle positions reliably.
During takeoff, extend the flap by 25o
. When the flap angle does not fall within the range of
23o
~27o
, the warning bell in the cockpit should ring. During landing, extend the flap by 35o
. The
structure design allows a maximum flap extension angle of 45o
. At this time, use the hand pump or
electrical pump to extend flaps. The throw difference of left and right flaps during extension cannot
exceed 2o
. Extending flaps by 35o
±1o
on the ground will take 15s~20s.
Parking brake system control
The parking brake system is a control system used to lock the elevator, rudder, and aileron by
cables using the handle when aircraft is parking on the ground.
The parking brake system is used to lock the elevator, rudder, and aileron when aircraft is
parking on the ground, preventing the control surface and control system driving mechanism from
being damaged due to control surface swing under the wind condition. At the same time when the
parking brake system locks all control surfaces, it interlocks with the engine throttle lever. At this
time, the travel of the engine throttle lever is limited at the small throttle position to prevent dangers
when the pilot controls aircraft to take off without unlocking the control surface lock, and to reduce
the pilot's control force when aircraft is taxiing under the gale condition. When the control surface
is locked and the throttle lever is set at the small throttle position, the ground taxiing need can be
met.
During parking brake on the ground, the rudder and aileron are locked at the neutral position.
At this time, the pedal and control wheel should be at the neutral position. The elevator is locked at
the lower limit position to prevent aircraft from nosing up under the gale condition. At this time, the
control stick should be at the front limit position. When the control surface is locked, the brake
mechanism handle leans forward at the locking position.
JZ-Y8F200W-02
AIRCRAFT FLIGHT MANUAL
SECTION VI
AIRCRAFT SYSTEM EQUIPMENT
6-89
June 30, 2012
KJ-6CII Electrohydraulic Autopilot System
General
KJ-6CII autopilot is an automatic control system that controls the aircraft flight attitude. By
using the autopilot, the pilot can control aircraft to:
Keep the level flight attitude.
Rise or glide with a specified pitch angle.
Turn along the specified course or with a specified bank angle.
Fly along the specified track.
In addition, the autopilot helps the pilot stabilize the flight altitude and control the flight quality
with high precision in a long term.
The autopilot can implement the following tasks:
(a) Control the flight course or track according to control signals given out by navigation
devices such as the attitude-heading reference system (AHRS) and the navigation
computer.
(b) Maintain the aircraft stability along the three axes. Maintain the flight altitude and preset
heading, course, and track. Implement coordinated turning, climbing, gliding, and turn with
a banking angle less than 30o
.
(c) Level off the aircraft from any flight attitudes with a banking angle less than ±30o
and pitch
angle less than ±14o
.
(d) The autopilot can be powered on when aircraft is at any heading and at any flight attitudes
with a banking angle less than ±30o
and pitch angle less than ±14o
. The original flight
attitude remains unchanged after the power-on.
(e) When the autopilot is powered on with the LEVEL-OFF button, aircraft can automatically fly
in a rectilinear flight attitude. After the LEVEL-OFF FROM TILT button is pressed, aircraft
can be leveled off from the banking attitude with the pitch attitude unchanged.
(f) When the autopilot is faulty, the pilot can control aircraft forcibly or press the EMERGENCY
SHUTOFF button to power off the autopilot, ensuring the flight safety.
JZ-Y8F200W-02
AIRCRAFT FLIGHT MANUAL
SECTION VI
AIRCRAFT SYSTEM EQUIPMENT
6-90
June 30, 2012
Simplified Technical Performance
(a) Power supply:
DC 28V±2.7V
AC Three-phase 36×(1+5%)V,400Hz±5%
(b) Consumption power:
DC ≯150W
AC Three-phase 36V,≯500VA
(c) 15# aviation hydraulic:Pressure:
5.88~20.60MPa (60~210kg/cm2
) Maximum hydraulic consumption:16.5L/min
(d) Preparation duration: ≯18s
(e) Heading holding precision: ±1o
relative to the heading reference)
(f) Banking angle holding precision: ±0.5o
(g) Pitch angle holding precision: ±0.5o
(h) Altitude holding precision: ±65.62ft (±20m)
(i) The autopilot can be powered on when aircraft is flying with a banking angle of ±27.5o
±2.5o
and a pitch angle of ±14o
±2o
(j) Turning banking angle:
Less than ±30o
when the pilot's control handle is used.
Less than ±20o
when the navigator's control knob is used.
(k) Pitch angle control range: 14o
±2o
(Only the pilot can control.)
(l) Maximum control speed when the pilot's control handle is used:
Banking control: 3o
±0.5o
/s
Pitch control: 1.2o
±0.4o
/s
(m) Level-off speed:
Speed of level-off from banking:
4o
±1.0o
/s
Speed of level-off from pitching:
1.2o
±0.3o
/s
The output force of the control actuator is not greater than 342+33.05
-66.09 lbf [(1520+147
-294 )N].
JZ-Y8F200W-02
AIRCRAFT FLIGHT MANUAL
SECTION VI
AIRCRAFT SYSTEM EQUIPMENT
6-91
June 30, 2012
(n) Forced control force (See Table 6-10).
Table 6-10 Forced control force
Component Forced Control Force (N) Forced Control Force (lbf)
Control wheel 157~294 35.30~66.09
Control stick 245~441 50.08~99.14
Pedal 392~588 88.13~132.19
Operation Precautions
The autopilot can be powered on only when:
The flight altitude is higher than 3280.84ft (1000 m).
The flight indicated air speed is larger than 172.79kn (320 km/h).
The turbulent flow condition is medium or below.
(a) Used by the pilot
(1) Balance the aircraft using the adjustment tab.
(2) Turn on the electromagnetic valve switch on the circuit breaker board. Check that the
operating pressure of the right hydraulic system is greater than 2132.06psi
(14.7MPa).
(3) Check that the HORIZON switch on console CZT-6B is at the ON position. See Figure
6-14.
(4) Set the POWER-OFF switch on console CZT-6B at the POWER position. The READY
yellow light should be on within 18s.
JZ-Y8F200W-02
AIRCRAFT FLIGHT MANUAL
SECTION VI
AIRCRAFT SYSTEM EQUIPMENT
6-92
June 30, 2012
Figure 6-14 Console CZT-6B of the autopilot
(5) Press the CONNECT button on the autopilot. The CONNECT green light should be on.
At this time, the control stick, control wheel, and pedal should have brake force.
(6) Press the ALTIMETER button on console CZT-6B. The green light should be on. At
this time, the system accesses the altitude- holding status. The aircraft fly within
±65.62ft (±20m) of the instantaneous altitude at the moment of altitude-holding
access.
(7) After the autopilot is powered on, the pilot can release the control stick. Under the
control of the autopilot, aircraft can fly in the level attitude stably. When the flight
attitude needs to be changed, the pilot can use the control handle to control aircraft.
When the pilot pushes the handle forward, pulls it backward, and moves it leftward or
rightward, the aircraft also noses down, noses up, and banks leftward or rightward.
The speed that the flight attitude changes depends on the handle control amplitude.
The maximum banking angle that the pilot controls aircraft by using the control handle
cannot exceed 30o
.
JZ-Y8F200W-02
AIRCRAFT FLIGHT MANUAL
SECTION VI
AIRCRAFT SYSTEM EQUIPMENT
6-93
June 30, 2012
(8) When aircraft is at the banking and pitching attitude, the LEVEL-OFF button can be
pressed. At this time, the aircraft automatically levels off.
Note
After this button is pressed, if the pilot needs to control aircraft by using the
control, press the CONNECT button again; otherwise, handle control does not
take effect.
(b) Used by the navigator:
(1) Set the PILOT-NAVIGATOR changeover switch on console CZT-6B at the
NAVIGATOR position. The light should be on. The navigator can use CN-1B navigator
turning knob to control the aircraft to turn. If the knob is turned to the L position, the
aircraft turns leftward; if the knob is turned to the R position, the aircraft turns
rightward. When the banking angle is required, stop control. The aircraft performs
turning with the banking angle. To exit turning, turn the knob back to the CENTER
position. After the knob returns to the CENTER position, the heading signal is
automatically received. To avoid the adverse roll when the heading signal is received,
turn the knob back to the CENTER position slowly. It is better to stop 2s before it
approaches the neutral card slot.
(2) The navigator can control only the flight heading. The flight altitude is still controlled by
the pilot.
(c) When engines are shut down in air, autopilot power-on is prohibited. After the autopilot is
powered on, manual control over the adjustment tab is prohibited in the three channels.
During the long-term flight, the autopilot should be powered off periodically and then
powered on after aircraft is balanced by using the adjustment tab. This can prevent great
elevator jitter occurs when the autopilot is powered off due to changes on the aircraft's
center of gravity, speed, and altitude.
(d) When the aircraft speed change exceeds the range of 27.00~32.40kn (50 km/h~60 km/h),
power off the autopilot, rebalance the aircraft, and then power on the autopilot again.
(e) When GPS, INS, or AP status (see Figure 6-15) is selected as the automatic navigation
signal and the flight mode is heading stabilization or track stabilization, it is prohibited to
change the AHRS operating status. If the AHRS operating status needs to be changed,
power off the autopilot. (The changeover circuit is laid onboard. Therefore, when KJ-6CII
autopilot is in AP state and the AHRS performs fast erection, the heading signal will
automatically returns to zero. At this time, the autopilot cannot be powered off.)
JZ-Y8F200W-02
AIRCRAFT FLIGHT MANUAL
SECTION VI
AIRCRAFT SYSTEM EQUIPMENT
6-94
June 30, 2012
Figure 6-15 Automatic navigation signal selection
In-air Autopilot Adjustment
(a) To ensure the flight attitude when the autopilot is used, the pilot can adjust the centering
potentiometer on the console as required.
(b) During flight, if the adverse roll after level-off is great and the control speed and level-off
speed do not meet technical requirements, power off the autopilot. Adjust the number of
potentiometer grids of CONTROL SPEED, LEVEL-OFF SPEED and 141 AMPLITUDE on
the flight control box.
(c) During in-air adjustment, adjustment of the RUDDER DEFLECTION potentiometer is
prohibited.
Crosslinking Between the Autopilot and Navigation Devices
General
KJ-6CII autopilot is interconnected with HZX-1M AHRS, HG-593Y8 laser strapdown
inertial/satellite integrated navigation system, and 2101 I/O global positioning system (hereinafter
referred to as GPS) respectively.
When the autopilot is interconnected with HZX-1M, it is called the AP status, in which
automatic heading keeping flight can be implemented.
When the autopilot is interconnected with HG-593Y8, it is called the INS status, in which
automatic preset track keeping flight can be implemented.
When the autopilot is interconnected with the GPS, it is called the GPS status, in which
automatic preset track keeping flight can be implemented.
The crosslinking schematic diagram is shown in Figure 6-16.
JZ-Y8F200W-02
AIRCRAFT FLIGHT MANUAL
SECTION VI
AIRCRAFT SYSTEM EQUIPMENT
6-95
June 30, 2012
Enabling the AP Status
To use the AP status initially, there is no need to press the AP button (installed on the
navigator's instrument panel). See Figure 6-16. Instead, the AP status is enabled when the
autopilot is powered on. If the AP status light is on, it indicates that the AP status is enabled. When
the READY yellow light on the autopilot console is on, the AP status light is also on. At this time,
however, the heading stabilization signal and heading integration signal have not been transmitted
to the autopilot. They are transmitted to the heading channel of the autopilot only when the
CONNECT green light on the console is on.
To change the status from INS or GPS to AP, press the AP button. After the AP button is
released, the AP status light is on.
KJ-6CII
autopilot
system
Automatic navigation signal select
Green Green Green
GPS AP INS
HZX-1M
AHRS
ELH-2
Heading
linkage box
HG-593Y8
Laser strapdown inertial/satellite
integrated navigation system
Free Flight 2101 I/0 GPS I/O GPS
Navigation system relay box
Figure 6-16 Schematic diagram of crosslinking between the autopilot and automatic navigation
systems
Enabling the INS Status
To enable the INS status, press the INS button that is installed on the navigator's instrument
panel. See Figure 6-15. Then, the INS status light is on and the AP status light is off. If the INS
status light does not turn on, find the cause. If it is due to a navigator component failure, the INS
status cannot be used.
JZ-Y8F200W-02
AIRCRAFT FLIGHT MANUAL
SECTION VI
AIRCRAFT SYSTEM EQUIPMENT
6-96
June 30, 2012
Enabling the GPS Status
To enable the GPS status, press the GPS button that is installed on the navigator's instrument
panel. See Figure 2. Then, the GPS status light is on and the light for the previous status selected
is off. If the GPS status light does not turn on, find the cause. If it is due to a GPS component
failure, the GPS status cannot be used.
After the GPS status is selected, to change the flight plan on the GPS, disconnect 2101 I/O
GPS from the autopilot temporarily. After the operation is complete, reconnect 2101 I/O GPS to the
autopilot.
Operation Precautions
(a) When both the left and right systems of HZX-1M onboard are faulty, autopilot operation is
prohibited.
(b) In INS status, if the aircraft attitude changes abruptly because HG-593Y8 does not operate
properly, power off the autopilot or perform manual forcible control immediately to level off
the aircraft.
Navigation System
Strapdown Inertial/Satellite Integrated Navigation System HG-593Y8
General
The strapdown inertial/satellite integrated navigation system is a subsystem of the aircraft, with
one set for a single unit and the model of HG-593Y8.
The strapdown inertial/satellite integrated navigation system utilizes the pure inertial
combination of GPS/GLONASS (GNSS) to realize binary positioning, provides other onboard
equipment with high-accuracy position, true/magnetic heading, attitude, speed, angular rate, wind
speed, wind direction and other navigation parameters in the integrated navigation mode and
crosslinks with automatic flight control system to realize automatic navigation. Besides, the system
embodies functions such as self-check, position correcting, position memorizing, nonvolatile
storing and setting up, etc. It also has external excitation interfaces. Here are the details:
(c) By adopting the laser strapdown inertial navigation system and being inserted with GNSS
satellite navigation receiver, it forms the inertial /satellite integrated navigation system.
(d) The inertia navigation part adopts laser gyroscope and flexible accelerometer, which
constitutes the strapdown inertia navigation system which is capable of establishing inertia
navigation standard by way of mathematical analysis.
(e) By navigation digital computation in combination of inertia navigation information and
GNSS positioning information, it can provide combination navigation information with high
precision.
JZ-Y8F200W-02
AIRCRAFT FLIGHT MANUAL
SECTION VI
AIRCRAFT SYSTEM EQUIPMENT
6-97
June 30, 2012
(f) There are three navigation statuses, namely, inertia/GNSS, pure inertia and GNSS, among
which the GNSS navigation is only employed automatically by the system when there is
failure for inertia navigation system under combination navigation condition.
(g) The system can realize normal compass alignment, fast compass alignment and heading
storage alignment.
(h) Parameter binding, operating status selection and comprehensive display of navigation
information can all be realized through status selector and controlling display.
(i) Crosslinking between data bus and weather radar, flight data recording system and ground
proximity warning system, it can provide such as position, speed, angular speed,
acceleration, true/magnetic heading, attitude, wind speed, wind direction, navigation
direction and other real time information about the aircraft accurately. It is one of major
information sources for the aircraft.
(j) It has functions such as position correction, identification memorizing, self-test and
non-volatile memory, etc. It also has external simulated excitation interfaces.
(k) With the function of manual and automatic heading altering, the system can realize
automatic navigation and navigation with selective course by crosslinking of flight control
system.
(l) The system can be corrected manually for position.
(m) The system can memorize and provide position information of 4 indifferent points.
(n) The system can realize manual or automatic binding of flight plan data, to be more specific,
28 waypoints.
(o) The system has the function of self-calibration.
(p) It has the function of self-test, which can provide error warning and warning signals for the
operating equipment.
(q) The system embodies the function of non-volatile memory.
(r) The turn prediction light suggests aircraft in turning or arrival of a certain waypoint.
(s) The system can receive relative information about air data computer through the HB
6096-1986 data bus and then calculates air pressure, altitude, wind speed and wind
direction of outlet inertia in altitude channel of damping inertia navigation.
(t) In test status, the system can output fixed parameter of data such as longitude, latitude,
true heading, pitch angle, roll angle, ground speed and deflection angle. It can also output
analog fixed parameter such as control signal and off-course distance.
(u) In the process of alignment and navigation, the system can display GNSS
position and GNSS time.
JZ-Y8F200W-02
AIRCRAFT FLIGHT MANUAL
SECTION VI
AIRCRAFT SYSTEM EQUIPMENT
6-98
June 30, 2012
System composition
System composition of laser inertia navigation system refers t Table 6-11.
Table 6-11 Composition of laser inertial navigation system
S/N Nomenclature Type No.
No. of a
single set
Installation position Remarks
1
Inertia navigation
component
6193Y8 1 Under pilot console
2
Inertia navigation
component
support
6293A1 1 Under pilot console
3 Status selector 6463Y8 1
Navigator instrument
panel
4 Control display 6363Y8 1
Navigator instrument
panel
5
GNSS aviation
antenna
YW11-53 1
Frames 9~10 at the
top of aircraft
6 Antenna feeder 1 1 m
7 Associated plug 1 set
Principal technical data
Electrical requirements
(a) Aligning time: See Table 6-12
Table 6-12 Aligning time
Alignment
manner
Regular compass
alignment
Quick
alignment
Aligning time 8 2.5
JZ-Y8F200W-02
AIRCRAFT FLIGHT MANUAL
SECTION VI
AIRCRAFT SYSTEM EQUIPMENT
6-99
June 30, 2012
(b) Pure inertial navigation accuracy: See Table 6-13
Table 6-13 Pure inertial navigation accuracy
Item Alignment
manner
Normal compass
alignment
Positioning
accuracy
Within 1 h of
navigation
CEP 0.8 nmile/h
Within 4 h of
navigation
95%
CEP
2.0 nmile/h
Speed accuracy
Within 2 h of
navigation
RMS 0.8 m/s
After 2 h of
navigation
RMS 2.0 m/s
Attitude accuracy - RMS ≤0.1o
True heading
accuracy
Within 1 h of
navigation
RMS ≤0.1o
Within 2 h of
navigation
RMS ≤0.15o
(c) Integrated navigation exactness: see Table 6-14
6-14 Integrated navigation exactness
Combination
navigation
Inertia/GNSS
Position ≤50 m(RMS)
Speed ≤0.5 m/s(RMS)
True heading
Same with pure
inertia
Attitude
Same with pure
inertia
JZ-Y8F200W-02
AIRCRAFT FLIGHT MANUAL
SECTION VI
AIRCRAFT SYSTEM EQUIPMENT
6-100
June 30, 2012
Power supply for system
Purposes of power and consumption requirements of the inertial navigation system 593Y8 are
shown in Table 6-15.
Table 6-15 Power and consumption of an inertial navigation system set
Power type Purpose
Consumption
Start-up (below 5s) Normal operation
28V DC
Major power of the inertial
navigation system.
≤250 W ≤150 W
Battery 24V DC
Continuous power (when the
28 V DC suddenly fails, the 24
V battery can sustain operation
of the system for 30 s.
≤150 W
Single-phase 36V/400Hz Crosslinking with the pilot. ≤25 VA
Operation
Ventilation
When the inertial navigation system 593Y8 operates, ventilation or cooling is not required.
Display and control units
The status selector and control display of the system are the medium for the information
exchange between the system and pilots and are the principal object realizing man-aircraft
dialogue for the system. Pilot's operation on the status selector can realize the whole control from
alignment to navigation. And the maintenance staff can also realize setting-up periodically for the
system through status selector. Operation on the control display can realize the following: various
navigation information display, heading-alternation or navigation modes choosing, searching or
sending waypoint data, position correction and position memorizing etc. Both are installed on
navigator auxiliary instrument panel. There are display, band switch, buttons and indicating lights
on status selector and control display for the purpose of displaying and operation. Besides,
interface for quick and rapid transmission of flying plan is also available.
JZ-Y8F200W-02
AIRCRAFT FLIGHT MANUAL
SECTION VI
AIRCRAFT SYSTEM EQUIPMENT
6-101
June 30, 2012
(a) Status selector
Status selector controls the basic operating status for the system, starts the system and
chooses operating status for the system before flying. Appearance of status selector panel
is shown in Figure 6-17. To realize choices of each operating status of the system, the
status selector adopts two band switches, one being the start-up and the other status
choosing. The locking function of the two switches can avoid wrong operation in the space.
Internal lighting is available for the status selector.
OFF
ON
TEST
8TY FA ALI
NAV
Figure 6-17 Status selector panel
(1) Start-up switch
a) OFF: disconnecting power for the system.
b) ON: connecting power for the system and the system starts to operate on power
connecting.
(2) Status choosing switch
a) TEST: the system output fixed value for crosslinking test in form of analog and
statistics.
b) Ready (BIY): waiting for choosing operating status;
c) Fast alignment (FA): the system proceeds storing heading alignment.
d) Alignment (ALI): the system proceeds gyroscope compass alignment.
e) Navigation (NAV): the basic operating status of the system, available to display
and output various navigation parameters. Now the switch is locked to avoid
accidental handling with the tap position during flight.
In dealing with the knob I of status selector, properly lift the knob outwardly, and
then turn to another tap position. While in coping with knob II, lift the knob
outwardly when turning to or shifting from navigation position. Then turning could
be continued.
JZ-Y8F200W-02
AIRCRAFT FLIGHT MANUAL
SECTION VI
AIRCRAFT SYSTEM EQUIPMENT
6-102
June 30, 2012
(b) Control display unit (CDU)
Main functions of CDU are as following: input and display for the system, reading
navigation parameters, overflying point correction and indifferent point memorizing etc.
CDU panel of the system is shown in Figure 6-18.
CHL
MOD
DISP
STA
MNEM
RET
FAUL
FLY
PLAN
LIAD
MENU 1 2N
4W
7+
5
8S 9-
6E
3 CLE
0
ENTER
Figure 6-18 Control display unit panel
(1) Display
The control display unit can display navigation parameter, operating status, flying plan
etc. And the utmost display line limit is 6.
Line 1~5 displays information such as navigation parameter and flying plan, allowing 3
lines of characters of 5 lines of letters or numbers. The last line is the status bar, which
displays the executing time with the unit of 10 s, status number, error code, status hint,
total time of start-up with the unit of minute and permissible navigation hint under
statuses of BIY, FA, and ALA. Under navigation status, navigation status hint, error
code, head-altering mode, stage of flight and head-altering hint are displayed.
JZ-Y8F200W-02
AIRCRAFT FLIGHT MANUAL
SECTION VI
AIRCRAFT SYSTEM EQUIPMENT
6-103
June 30, 2012
(2) Keys
a) Head-altering (CHL): choosing manual head-altering, turning passing through the
check point and tangent turning.
b) Status (STA): combination of inertia/GNSS and choosing pure inertial navigation
status. The default status is combination. One press would change to pure inertial
and the two alternate.
c) Correction (COR): correction of overflying point.
d) Memory (MNEM): manually memorizing indifferent targets.
e) Display (DISP): reading parameters of the system.
f) Return (RET): finishing or stopping a certain operation and return to normal
display status of the system.
g) Brightness (BRT): displaying brightness adjustment. There are altogether 4 tap
positions. The default mode is the brightest. Each press will be an inferior
lightness choosing. And the 4 positions go in a circular way.
h) ↑ and ↓: page up/down for page-continuing information.
i) MENU: forwarding the main menu.
j) Clear (CLR): clearing wrong input before pressing ENT
k) Enter (ENT): input the binding data to the mainframe of the system and enter the
operation.
l) N, S, E and W: representing north latitude, south latitude, east longitude and west
longitude.
m) + and - represent positive sign and negative sign respectively.
n) Number keys: binding parameters for the system.
(3) Error indicating light
When there is an error, the signaling light would be on.
(4) Load interface of flight plan
For loading of flight plan
Note
Continuous and rapid calibration of inertial and memory and other function keys
may result to a blinking screen, which is not an error. But calibration like that is
not suggested.
JZ-Y8F200W-02
AIRCRAFT FLIGHT MANUAL
SECTION VI
AIRCRAFT SYSTEM EQUIPMENT
6-104
June 30, 2012
Operation flow of the system
(a) System flow
The first step for the system after power-on is alignment. Meanwhile, the system monitors
and tests the whole process of alignment, and decides if there is anything going wrong in
that process. If the alignment finishes normally, permissible navigation hint would be given,
suggesting that the system could enter navigation status. If the alignment is abnormal, then
continue to align according to the degree of error or turn off for trouble-shooting (see
details in maintenance).
In navigation status, the system would process real-time calculation of various navigation
parameters according to the attained statistics, display the statistics through control display
and provide required data information or signals for other onboard equipment. At the same
time, corresponding navigation would be realized according to aviator's operation on the
control display. The system embodies relatively operation flow instructions, which can help
to realize normal usage of the inertial navigation system.
(b) Navigation status of inertial navigation system 593Y8
The system has three operating statuses, namely, pure inertial navigation, inertial/GNSS
combination navigation and GNSS satellite navigation. On condition that the inertial
navigation system is in normal operation, the three navigation modes can be switched
through the status key of CDU. The default mode is inertial/GNSS combination mode.
If there is anything wrong with the inertial assembly of the system, then it would
automatically turn to satellite navigation according to the type of error.
The default status is inertial/GNSS combination navigation, and manual choices of
navigation status could be achieved through pressing keys.
(1) Inertial/GNSS combination navigation mode
This mode gives full play to the advantages of the inertial system, GPS and
GLONASS satellite. If valid GNSS information is captured, then the system would
automatically enter inertial/GNSS combination navigation after alignment. If GNSS
information is invalid, then the system would enter pure inertial navigation. If GNSS
information is valid, but there is something wrong with the inertial navigation units,
then the system would enter satellite navigation. If the satellite signals are invalid and
there is error in inertial navigation unit, then the system should be turned off manually.
When the aircraft is moving or the satellite signals are not quite catching, then the
combined indicating words would shift.
JZ-Y8F200W-02
AIRCRAFT FLIGHT MANUAL
SECTION VI
AIRCRAFT SYSTEM EQUIPMENT
6-105
June 30, 2012
(2) Pure inertial navigation mode
If pure inertial navigation or I/GNSS is chosen but GNSS is invalid, the system would
enter pure inertial navigation mode. When the system automatically enters pure
inertial navigation for invalid GNSS information, but GNSS information becomes valid,
then the system would turn back to the original combination mode. If there is
something wrong with inertial navigation units, the system should be turned off
manually.
(3) Satellite navigation mode
Satellite navigation belongs to non-manual control mode.
If there is something wrong with the inertial navigation system, error code would
appear on the control display unit, error signaling light would be on, the power of the
inertial navigation unit would be interrupted, and the control display unit would enter
satellite navigation mode. Whether normal navigation could be realized depends on
the present satellite data. If GNSS data is valid, GNSS would be displayed, and the
error indicating light is turned off. However, if the GNSS information is invalid, the
system should be turned off manually.
In satellite navigation mode, the control display unit presents satellite location, ground
speed, track angle and deflection distance etc. (displayed in two pages) When there is
something wrong with the inertial navigation system, it would give warning signals to
other equipments. Information as pitch angle, roll angle, true heading, wind speed,
wind direction and deflection angle are all invalid.
Figure 6-19 Display 1 of satellite navigation
Figure 6-20 Display 2 of satellite navigation
TTG xxx'xx'' DIS xxxx.x
YAW xxxx DXTLRxxxx
Next WPT
GNSS 00 manual 03→04
N xx°xx.xx′ E xxx°xx.x′
TK xxxx GS xxxx
TAE xxxx ALT xxxxx
GNSS 00 manual 03→04
JZ-Y8F200W-02
AIRCRAFT FLIGHT MANUAL
SECTION VI
AIRCRAFT SYSTEM EQUIPMENT
6-106
June 30, 2012
When there is failure for communication between the control display and the inertia
navigation component, 429 communication error would be displayed on the control
display in full screen, reminding the operator to consider disconnecting operation of
inertia navigation signals (it is decided by the operator whether to disconnect or not),
and then it would turn to satellite navigation. At this moment, the inertia navigation
component is still at power-on.
Check before operation
(c) Check the No.2 battery at the right bulge of the aircraft which should be installed
appropriately, make sure the onboard 28 V DC and three-phase 115 V AC power supply for
the system is normal, and check battery capacity which should be enough and can sustain
normal operation for the equipment.
(d) The knob (1) of status selector should be at OFF position, and knob (2) should be at STY
(Standby) position.
Operation
(e) Start-up and check
(1) Turn on the INS switch on the navigator right console.
(2) Turn on the INS BAT switch on the navigator instrument panel.
(3) Rotate the knob 2 to STY position, rotate the knob 1 to ON position, and the inertia
navigation system is power on ,
(4) After the initialization of control display unit (the panel drawing in shown in Figure
6-18), and the performing 429 checking, display 111111, 222222, ……999999, 000000
sequently every 1 second, when the display is all 0,. The self-check is completed,
when the display is NORMAL SELF-CHECK, as is shown in Figure 6-18, and then
starting to indicate binding initial position, as is shown in Figure 6-21.
(5) When self-test is finished, if it is normal, BIT OK would be displayed (refer to Figure
6-22). Otherwise, BIT ERROR would be displayed. 5 s after normal self-test, tip of
primitive position binding would be presented (refer to Figure 6-23). At this moment,
the tip display would not disappear until binding of primitive position is finished.
Figure 6-21 Display of normal system self-check
593Y8 LASER SINS
BIT
OK
JZ-Y8F200W-02
AIRCRAFT FLIGHT MANUAL
SECTION VI
AIRCRAFT SYSTEM EQUIPMENT
6-107
June 30, 2012
Figure 6-22 Binding display of primitive location
Figure 6-23 Display of primitive position binding
(f) Binding primitive location
(1) Indicate binding
When the system alignment starts, the coordinate of parking point must be sent to the
system (the binding initial position).when the opening inspection is over it will indicate
the binding of the initial position; and the initial position can also be bound after
opening for 2minutes.
a) When the self-check is over, it displays indicating binding interface
b) Binding latitude: Press [2N] or [8S] switch, and press the number key in order, if
failing in display, the right data can be adopted directly and the wrong data will be
squeezed out from right to left, or press the CLR key, and then send the correct
data; if the display is correct, press ENT key, the cursor moves to the longitude
line.
c) Binding longitude: Press [4W] or [6E] switch, and press the number key in order, if
failing in display, the correct data can be adopted directly and the wrong data will
be squeezed out from right to left, or press the CLR key, and then send the correct
data; if the display is correct, press ENT key.
initial position:
LAT: N34d12.9
LON:
002 90 00 I/G 1
initial position:
LAT: N34d12.9
LON:
002 90 00 I/G 1
xxx xx xx I/W xx
JZ-Y8F200W-02
AIRCRAFT FLIGHT MANUAL
SECTION VI
AIRCRAFT SYSTEM EQUIPMENT
6-108
June 30, 2012
d) When entering the binding display, wait for 2s, the indicating drawing of the
selecting operation regime is shown in Figure 6-24. And if failures founded at this
time, the menu binding initial position introduced in (2) can be used to rebind.
Figure 6-24 Operation regime indicating
(2) Menu binding
The system can call out the main menu at any operation regime by pressing the
MENU key, the main menu is displayed in two pages, press [↑], [↓] to turn the page, as
is shown in Figure 6-25, Figure 6-26, and the default page is main menu drawing 1.
Press the number keys in front of the corresponding menu name to enter the
corresponding subsidiary menu. Press the [2N] key under the main menu to call out
the display of binding initial position, as is shown in Figure 606. Pressing the number
keys in front of the options can select binding or checking. Press the [2] key to select
binding, the display of binding is the same as what is shown in Figure 607, the binding
data and methods are the same as (1).
Figure 6-25 Main menu display 1
1. WPT 2. IP
3. PARA 4.DIS/ DIR
5.HDG 6.ALT
026 40 00 I/G 6
mode select
001 60 00 I/G 2
001 60 00 I/G 2
JZ-Y8F200W-02
AIRCRAFT FLIGHT MANUAL
SECTION VI
AIRCRAFT SYSTEM EQUIPMENT
6-109
June 30, 2012
Figure 6-26 Main menu display 2
Figure 6-27 Menu binding initial position display
Figure 6-28 Binding initial position over display
Input IP:
LAT: N 34°01.3′
LON: E108°41.4’
002 60 00 I/G 2
IP:
1.Input
2.Exam
002 60 00 I/G 2
7. DST CAL
8. BRT
9.Auto UPLOAD
0. MT BS
mounting tray error 84-1
026 40 00
JZ-Y8F200W-02
AIRCRAFT FLIGHT MANUAL
SECTION VI
AIRCRAFT SYSTEM EQUIPMENT
6-110
June 30, 2012
The Figure 607 displays the interface after rebinding N34o
01.3′, E108o
41.4′. Press
RET to quit the menu.
(g) Alignment and display of system
After binding the initial position, indicate mode select, as is shown in Figure 603, therefore,
the corresponding alignment method should be selected. The inertia navigation system
contains gyroscope compass alignment (including normal compass alignment and fast
compass alignment), fast alignment (stored heading alignment) and so on.
Normal compass alignment is basic method of alignment, in normal temperature, the time
for alignment is 8 min. Fast compass alignment takes 2min less than that of the normal
alignment, and accuracy of system navigation reduces. Fast alignment (stored heading
alignment), the preparation time is 2.5 min, and the accuracy of the system navigation
reduces.
Alignment is performed for preparations of building navigation base, during the alignment;
the inertia navigation mainframe cannot be moved. And when aligning on the aircraft, the
aircraft cannot be moved, swing of the aircraft and people moving on the aircraft should be
reduced.
In fast alignment and alignment condition, the display of the status bar are as follows: the
first three digits are the executing time (unit: 10s); the following two digits are status digits;
the following two digits are fault code and combined status prompt character; the following
two digits are the total power-on time (unit: min); the last two digits are course alignment
prompt character.
(1) Compass alignment
Normal compass alignment is the basic alignment method, the accuracy of the system
is relatively high, in normal temperature, the alignment time should not exceed 8 min;
operation and display the compass alignment are as follows;
a) Set the regime selector knob 1 to ON position;
b) Set the regime selector knob 2 to STY position;
c) Binding the initial position. 2 sec after the binding of initial position, the control
display indicates 3 min as is shown in Figure 603, selecting the operation regime;
d) Set the regime knob 2 to ALI position, the control display aligns display , as is
shown in Figure 608, the upper most two lines are the initial latitude and longitude
of the binding just now, it displays ready way point! indicating that the control
display is reading the waypoint value on the inertia to standby in case of the pure
satellite navigation, the display lasts about 10sec and disappears; during the
period, the control display and the inertia navigation units will cause mass
communication, please do not perform other operations.
JZ-Y8F200W-02
AIRCRAFT FLIGHT MANUAL
SECTION VI
AIRCRAFT SYSTEM EQUIPMENT
6-111
June 30, 2012
e) Observing that the regime numbers of the control display status bar are:
90,60,40,30, and the right side of the status bar will display indicating characters
COURSE ALIGNMENT, keep aligning. The display is shown in Figure 609. The
navigation will be transferred to fast compass alignment.
f) Keep aligning , when the status is 00, indicating characters RDY flash, as is shown
in Figure 610, rotate the regime selector knob 2 to NAV position, and the control
display starts to display navigation indication, and the normal compass alignment
is finished by this time.
g) Turn off. Set the selector knob (1) at OFF position and knob (2) at STY position.
Check all display of control display which should disappear within 10 s.
Figure 6-29 Alignment display 1
Figure 6-30 Alignment display 2
Figure 6-31 Alignment display 3
N 34º01.3′E 108º41.4′
Move prohibition
000 00 00 I/G 8
readiness′′′
N xxo
xx.x‘ E xxxo
xx.x‘
Move prohibition
001 30 00 I/G 6
readiness RDY(ready)
N xx°xx.x′ E xxx°
xx.x′
Move prohibition
020 40 00 I/G 6
JZ-Y8F200W-02
AIRCRAFT FLIGHT MANUAL
SECTION VI
AIRCRAFT SYSTEM EQUIPMENT
6-112
June 30, 2012
(2) Fast alignment (stored heading alignment)
Stored heading alignment, the alignment time is about 2.5min, the accuracy of the
navigation is lower than that of the former two kinds of alignment. The premise of the
stored heading alignment is: the former alignment should be a normal compass
alignment, turn off the system immediately when transferred to navigation, and the
position of the aircraft does not change during the transfer. The stored heading
alignment:
a) The first three steps are the same as compass alignment;
b) Rotate the regime selector knob 2 to FA position;
c) Observing that the regime numbers are 90, 60, 40, the indicating characters RDY
will display and flash.
d) After the flashing of the indicating characters RDY, Rotate the regime selector
knob 2 to NAVIGATION position, the system enters into navigation status, and the
control display displays navigation indication, the system enters into navigation
status.
(3) Description of alignment.
a) Before transferring to navigation, bind the latitude and longitude of the first
waypoint. After the transfer, the knob should be kept on NAV position; otherwise
the system must be shut off and realigned.
b) When the fast compass alignment is finished, the indicating characters RDY will
display, indicating that the operator must transfer to navigation.
(h) Binding of flight plan
After self-test of the system, bind flight plan automatically according to needs. If automatic
binding fails, apply manual binding of waypoints to attain flight plan.
Manual binding of waypoints could be proceeded at any time after self-test of the system.
But before switching navigation, bind longitude and latitude of 01 waypoint.
The system can bind coordinates of waypoints from 01 to 18 manually or automatically and
store them into the memory of the system. Automatic binding is proceeded with flight plan
box through 232 jack of control display panel. Except that the 10 waypoint should be bound
at alignment, other waypoints could be input during ground alignment or after takeoff.
Note
19~28 are special waypoint numbers during course choosing of the flight, among
which even numbers are waypoints to be bound, and odd numbers are waypoints
formed according to corresponding distance and azimuth in relative to even number
waypoints. If input are odd number waypoints, and there are corresponding input of
JZ-Y8F200W-02
AIRCRAFT FLIGHT MANUAL
SECTION VI
AIRCRAFT SYSTEM EQUIPMENT
6-113
June 30, 2012
distance and azimuth of even number waypoints, then the input waypoint may be
changed as the automatically formed waypoint. When 19~28 waypoints do not
conduct choosing course function, their usage are the same as other waypoints.
Procedure for manual binding of waypoint longitude and latitude
c) Put the selector knob (1) at ON position and knob (2) at STY, FA, ALI or NAV
position.
d) Project the main menu through [MENU]. Refer to Figure 6-25.
e) Project the submenu through [1]. Refer to Figure 6-32.
f) Press [1] and choose binding. Refer to Figure 6-33. Bind serial number of
waypoints: the cursor would be at serial number position of waypoints, and then
press corresponding number key. If error is displayed, cross out the wrong number
from right to left by pressing right data directly, or press [CLR] and then input the
right number. If display is correct, press [ENT] and the cursor would move to the
altitude line.
g) Altitude binding: press [2N] or [8S], and then press number keys respectively. If
the display is wrong, directly cross out the wrong number from right to left by
pressing right data, or press [CLR] and then input the right number. If display is
correct, press [ENT] and the cursor would move to the altitude line.
Figure 6-32 Waypoint display 1
Figure 6-33 Waypoint display 2
WPT:
1. Input
2. Exam
018 40 00 I/G 04
Input WPT,S/N:05
05 lat: N34°01.3′
lon: E109°13.4′
06 lat: N35°01.3′
lon: E109°13.4′
JZ-Y8F200W-02
AIRCRAFT FLIGHT MANUAL
SECTION VI
AIRCRAFT SYSTEM EQUIPMENT
6-114
June 30, 2012
h) Binding longitude: Press [4W] or [6E] switch, and press the number key in order, if
failing in display, the correct data can be adopted directly and the wrong data will
be squeezed out from right to left, or press the CLR key, and then send the correct
data; if the display is correct, press ENT key.
i) After binding, the cursor would move to altitude of the next waypoint automatically
for further binding of longitude and latitude of next waypoint. One sheet allows
binding of two waypoints. After binding of longitude of the second waypoint at the
present screen, the cursor would return to serial number position of waypoint.
j) Repeat the above procedures to bind other waypoints. Or choose the waypoint
number to be bound through keys of [↓] and [↑].
k) After binding of waypoint, press [RET] to quit the main menu.
Caution
After the inertia navigation system is up in the sky, waypoints from 1 to 28 could be
used repeatedly.
(i) Methods of checking parameters of waypoints are as follows:
(1) Press [1] key to call out the subsidiary menu when in display of Figure 6-25. As is
showed in Figure 6-32;
(2) Press 2 to check, as is shown in Figure 6-34, the cursor is behind the numbers, press
the corresponding number keys of waypoint numbers that need to be checked. Press
the [ENT] key again, the cursor disappears, displaying the waypoints need to be
checked and the longitude and latitude data of the next waypoint, as is shown in
Figure 6-35. We can also press [↑] key and [↓] key to check the neighboring waypoint.
Press [RET] key to quit the menu.
Figure 6-34 Checking waypoint display 1
Examining WPT,S/N:
JZ-Y8F200W-02
AIRCRAFT FLIGHT MANUAL
SECTION VI
AIRCRAFT SYSTEM EQUIPMENT
6-115
June 30, 2012
Figure 6-35 Checking waypoint display 2
(j) Checking parameters (MISC)
The system can record related and necessary parameters in the alignment and navigation
process, and they are stored in the form of MISC code.
The subsidiary menu is used for checking stray parameter and memorial indifferent point of
longitude and latitude.
(1) Press [3] key to call out under the main menu, as is shown in Figure 6-36;
(2) After pressing the [1] key, the display is shown in 6-37, the cursor is behind in MISC;
(3) Binding the MISC code, press the [ENT] key, and the display is shown accordingly.
We can also press [↑] key and [↓] key to check the neighboring parameter. If we need
to check MISC40, press [4],[0],[ENT] key.
(4) Press the [RET] key to quit the menu.
Figure 6-36 MISC parameter subsidiary menu display 1
Figure 6-37 MISC parameter subsidiary menu display 2
Exam MISC:
MISC:
1.Examine
Examining WPT,S/N: 05
07 Lat: N34°01.3′
Lon: E109°13.4′
08 Lat: N35°01.3′
Lon: E109°13.4′
JZ-Y8F200W-02
AIRCRAFT FLIGHT MANUAL
SECTION VI
AIRCRAFT SYSTEM EQUIPMENT
6-116
June 30, 2012
Table 6-16 Misc code table
Programme Code Form Content Remarks
Record
alignment
10
000 000
000 010
000 100
001 000
010 000
100 000
100 000
Normal compass alignment
Move during the alignment
Stored heading alignment
Select navigation regime in early time
(compass compass)
Realignment ( from navigation to alignment
Not binding immediate position
(degradated navigation)
Realignment ( From navigation to
alignment)
Not binding immediate position
(degradated navigation)
Record
alignment time
11 ××××.×min
Time spent on alignment when transferred
to navigation
Record
navigation
12
000 000
000 001
000 010
000 100
001 000
010 000
100 000
Normal navigation
Flying position correction
Auxiliary correction
Air correction
Accumulated circular probability error
correction
Attitude
Integrated navigation
Record time of
navigation
13 ××××.×min
Count when the alignment and navigation
start, until leaving the navigation.
JZ-Y8F200W-02
AIRCRAFT FLIGHT MANUAL
SECTION VI
AIRCRAFT SYSTEM EQUIPMENT
6-117
June 30, 2012
Table 6-16 (continue) Misc code table
Programme Code Form Content Remarks
Mission radial
error ratio
19
E X.X
E 9.9
E FA
RER<9.9nmile/h(18.33km/h); when
RER<9.9nmile/h(18.33km/h);
a) Use runway heading alignment,
stored heading alignment or
navigation degradation
b) Use air alignment
c) The immediate groundspeed is over
50nmile/h(92.60km/h);
d) In heading attitude condition
Accumulated
circular
probability(CEP)
20
21
××. ×
SQUAWK
××.×
××.×
When RER<5nmile/h(9.26km/h) last
time in Misc 19,correct the accumulated
circular probability error correction, the
first character is N( times of sampling )
N<8, and the last three characters are
CEP value( précised to 0.1n mile/h);
When RER>3n mile/h in Misc 19,
When misc 19 is RER FA, display the
CEP value last time.
Every time when calculating the latest
CEP value, when RER>9.9n mile/h in
Misc 19 or Misc IS RER NA, the CEP
value cannot be calculated.
When display
SQUAWK, judge
whether the
value of RER is
valid or not, if it
is valid, correct it
manually, and
display the
corrected value.
Terminal (base)
22
23
24
25
××°××.×′
×××°××.×′
××°××.×′
×××°××.×′
The latitude of the terminal base
The longitude of the terminal base
Pure inertia latitude calculated by the
system
Pure inertia longitude calculated by the
system.
The moment
when the system
is shut off, value
calculated by the
system (not
including
position
correction), is
the pure inertial
value.
JZ-Y8F200W-02
AIRCRAFT FLIGHT MANUAL
SECTION VI
AIRCRAFT SYSTEM EQUIPMENT
6-118
June 30, 2012
Table 6-16 (continue) Misc code table
Programme Code Form Content Remark
The latest 8 radial
error ratio
26~33 RER×.X
The last 8 radial error ratio, the earliest is
stored in Misc 26, and the latest
stored in Misc33.
a) RER<3nmile/h(5.56km/h) in Misc19,
then store in Misc26~33, help
calculation of CEP value;
b) When RER>9.9nmile/h(18.33km/h) or
is FA in Misc19, do not store in Misc
26~33, and do not participate in the
calculation of CEP value;
c) When RER>5nmile(9.26km/h) and
less than 9.9nmile/h(18.33km/h) in
Misc19, deal with it according to the
validity, if it is valid, it can be stored,
and if it is invalid, it cannot be stored.
Record the
inertial navigation
on/off times
34 ×××××
Accumulated ON/OFF times since the
last maintenance .
Record the total
operation time of
the system
35 ××××.×h
Total operation time since the last
maintenance.
Record the
position of
indifferent point
40~47
××.××.×
×××.××.×
××.××.×
×××.××.×
××.××.×
×××.××.×
××.××.×
×××.××.×
The latitude and longitude of the first
memory point
The latitude and longitude of the second
memory point
The latitude and longitude of the second
memory point
The latitude and longitude of the second
memory point
The latitude and longitude of the third
memory point
The latitude and longitude of the third
memory point
The latitude and longitude of the fourth
memory point
The latitude and longitude of the fourth
memory point
The memory
point can be
used in cycle
Record the
system failure
code
48 ××
No failure, the failure code is 00.
When there is failure , record the first
failure code,
When the
failure is
corrected,
the failure
code is zero.
JZ-Y8F200W-02
AIRCRAFT FLIGHT MANUAL
SECTION VI
AIRCRAFT SYSTEM EQUIPMENT
6-119
June 30, 2012
(k) Binding distance and direction (DIS/DIR)
We can only bind, check corresponding distance and direction of waypoints of even
numbers from 20 to 28 to select parameters needed in course binding. The binding
methods are as follows:
(1) Press [4] key to call out the subsidiary in display showed in Figure 6-22, as is shown in
Figure 6-38.
(2) Press [1] key to select binding, as is shown in Figure 6-39. The cursor is in front of the
waypoint.
(3) Press number keys to bind numbers of waypoint, and then press [ENT] key, the cursor
moves behind the distance, such as No.24 waypoint.
(4) Press number keys, and then press [ENT] key to bind distance. The resolution ratio of
the distance is 0.06mile (0.1km). For example, when binding 37.59mile (60.5km),
press [6], [0], [5] key, the display of the control display is 60.5, press [COMFIRM] key,
and the cursor moves under the data of direction.
(5) Press number keys, and then press [ENT] key to bind direction. The resolution ratio of
direction is 0.1o
. For example, when binding 23o
, press [2], [3], [0] key, the control
display displays 23.0o
, press [ENT] key, the cursor returns to the front of waypoint .If
we need to bind others, we can start from (3).
(6) Press [RETURN] to quit the menu.
(l) Checking distance and direction
(1) Press the [2] key to select in the display of Figure 6-38, the display is shown in Figure
6-39, the cursor is in front of waypoint;
(2) Binding waypoint numbers: Press number keys, and then press [ENT] key. If we want
to check corresponding distance and direction of No.26 waypoints, press [2], [6] ,and
then press [ENT] key, the distance and direction of the No.26 waypoint will be
displayed. We can also press [↑], [↓] to view the distance and direction of neighboring
and opposite waypoints.
JZ-Y8F200W-02
AIRCRAFT FLIGHT MANUAL
SECTION VI
AIRCRAFT SYSTEM EQUIPMENT
6-120
June 30, 2012
(3) Press [RET] key to quit the menu.
Figure 6-38 Distance and direction menu display
Figure 6-39 Binding distance and direction display
Figure 6-40 Checking distance and direction display
EXAM
Ref WPT NO. 24
DIS: xxx.x km
DIR: xxx.x°
INPUT
Ref WPT NO. 24
DIST: 60.5Km
Bearing:23.0º
018 40 00 I/G 04
DIS/DIR:
1. Input
2. Exam
018 40 00 I/G 04
JZ-Y8F200W-02
AIRCRAFT FLIGHT MANUAL
SECTION VI
AIRCRAFT SYSTEM EQUIPMENT
6-121
June 30, 2012
(m) Binding heading angle (HDG)
(1) Press[5] key to call out the subsidiary menu when in the display shown in Figure 6-25,
as is shown in 6-41;
(2) Press [1] key to select binding, as is shown in Figure 6-42, and the cursor is behind
the heading angle.
(3) Binding the true heading, press the corresponding numbers, sent in from high to low,
and press [ENT] key to confirm.(maximum is 360o
, and the resolution ratio is 0.1o
).
(4) Press the [RET] key to quit the menu.
Note
Binding of the heading angle is only suited for fast alignment ,during the aligning
process, when the binding of initial position is finished, bind the present heading
angle of the aircraft into the system, and then continue the alignment.
Figure 6-41 Binding and checking heading angle display
Figure 6-42 Binding heading angle display 2
Input:
THG: 45.1º
018 40 00 I/G 04
THG:
1.Input
2. Exam
018 40 00 I/G04
JZ-Y8F200W-02
AIRCRAFT FLIGHT MANUAL
SECTION VI
AIRCRAFT SYSTEM EQUIPMENT
6-122
June 30, 2012
(n) Check the heading angle
Press [2] to check in the display of Figure 6-41, and the display is similar to that of Figure
6-26, the only difference is that the Input is changed into Exam. And it displays binding
heading angle.
(o) Binding and checking the altitude (ALT)
The subsidiary menu is used for binding and checking the altitude of certain waypoint,
press [6E] to call out in the display of Figure 6-25 in main menu, as is shown in Figure 6-43.
Press [1], used for binding altitude display as is shown in Figure 6-44, first use the cursor to
indicate the binding waypoint number, then indicate binding altitude automatically after
binding, 3 waypoint altitudes displayed in one screen, the checking display is similar to that
of Figure 6-44, the only difference is that the Input is changed into Exam, press [↑] key or[↓]
key to check neighbor waypoints.
Figure 6-43 Binding and checking the altitude display 1
Figure 6-44 Binding and checking the altitude display 2
Input 5 WPT ALT:
5:
6:
7:
018 40 00 I/G 04
ALT:
1. Input
2.Exam
018 40 00 I/G 04
JZ-Y8F200W-02
AIRCRAFT FLIGHT MANUAL
SECTION VI
AIRCRAFT SYSTEM EQUIPMENT
6-123
June 30, 2012
(p) Distance calculation (DIS CAL)
Under navigation status, this submenu is used for measuring great circle distance, azimuth
and time to go of any two waypoints at will or of the distance from present location to a
certain waypoint. The procedures are as follows:
(1) Press [7] at Figure 6-23 of the screen to forward Figure 6-45 and the cursor flashes at
the sequence number of to waypoint.
(2) Press the number key to bind from/to waypoint sequence numbers and then press
[ENT]. Now the great circle distance between two waypoints, time to go, desired track
angle are displayed. Press [RET] to exit. For example, press [0], [2], [0] and [5] from
02 to 05, then press [ENT], and the display would be like Figure 6-46.
(3) For distance calculation from the present location to a certain waypoint, send 00 to the
from point would do.
Note
The latitude and longitude of the waypoints which need to be calculated should
be bound in advance; After the calculation during the navigation, navigation
method changes into tangent line method .Please correct immediately if the
navigation method does not match with the required one.
Figure 6-45 Distance calculation display 1
Figure 6-46 Distance calculation display 2
DIS CAL: 02→05
TAE 84.7° DIS 786.5
TTG 47.4
018 40 00 combine 04
DIS CAL:02→05
TAE DIS
TTG
018 40 00 combine 04
JZ-Y8F200W-02
AIRCRAFT FLIGHT MANUAL
SECTION VI
AIRCRAFT SYSTEM EQUIPMENT
6-124
June 30, 2012
(q) Light checking (BRT)
Press [8] key to select light checking as is displayed in Figure 6-23 can light the failure
lights, check that whether it can be lightened normally: and the display is lightened from the
left to right stepwise, check that whether there is scotomas, and output warning signals to
the exterior users. Press the [RET] to quit after the light checking.
(r) Rapid transmission and reading of flight plan
Pre-input the waypoint parameter of present flight plan into the flight plan box, and insert
the flight plan box into the 232 interface on the control display. When the system finishes
self-test and transmission of primitive position, rapid transmission of flight plan is available
to enter the system. Here are the methods:
(1) Connect the flight plan box well, press [MENU], and then project the second sheet of
the main menu through the [↓]. Refer to Figure 6-23.
(2) Press [9] to execute flight plan transmission.
(3) During the transmission, tip as transmit from control display unit … would present.
After the transmission, tips as transmission is correct or transmission is error would
present.
(4) If there is error during the flight plan transmission, repeat (3). Manual longitude and
latitude binding of waypoint is applicable for correction of wrong data.
(5) Flight plan reading is the same as waypoint reading.
(6) Press [RET] to quit the main menu.
(s) Binding and checking installation error angle (MT BS)
(1) Press the [0] key to call out the subsidiary menu when the display in Figure 6-23
shows, as is shown in Figure 6-47
(2) Press the [1] to select binding, shown in Figure 6-48, and the cursor is behind the tilt;
(3) Binding the error angle: Press corresponding symbol keys and number keys, sent
then from high to low, and then press [ENT] to confirm.
(4) Operate the same as above to sent rolling ,direction;
(5) Press the [RET] to quit the menu.
Note
In the aligning process, after binding the initial position, sent the present
installation error angle of the aircraft to the system, and then continue the
alignment.
JZ-Y8F200W-02
AIRCRAFT FLIGHT MANUAL
SECTION VI
AIRCRAFT SYSTEM EQUIPMENT
6-125
June 30, 2012
Figure 6-47 Binding installation error angle display 1
Figure 6-48 Binding installation error angle display 2
(6) Press [2] to check in the display shown in Figure 6-47, the display is similar to that in
Figure 6-48, the only difference is Input is changed into Exam. and it displays the
binding installation error angle.
(t) Primitive track establishment
Primitive track refers to the wide round pattern of the aircraft from the present position at
start directly to the chosen waypoint. Before flight, the chosen primitive track refers to the
wide round pattern of the aircraft from the primitive position to the chosen waypoint.
Choose primitive tract according to the following:
(1) After start-up of the system, bind longitude and latitude of the initial point at first.
(2) Before switching navigation of the system, bind longitude and latitude of 01 waypoint
beforehand.
(3) After navigation switching, the program would establish the primitive track of 00→01
automatically. Then the system would calculate navigation parameters according to
primitive track.
After taking off and completion of regulated take-off movement for the aircraft, namely,
flight from the present position to the first waypoint, pilot should alter heading for the
present position, namely, 00→01. At this moment, the primitive track refers to the wide
round pattern from the present position to the first waypoint. Refer to Figure 6-49.
Input MT BS
PIT:
ROL:
HDG:
018 40 00 I/G 04
018 70 00 combine 04
MT BS:
1. Input
2.EXAM
018 70 00 I/G 0 4
JZ-Y8F200W-02
AIRCRAFT FLIGHT MANUAL
SECTION VI
AIRCRAFT SYSTEM EQUIPMENT
6-126
June 30, 2012
00
00
01
02
N
Present position
Primitive position
Status bar
I/G 00 Auto 00 01 I/G 00 MAN 00 01
Figure 6-49 Primitive track establishment
(u) Operation and display of navigation
Navigation is the status employed during pattern flight of the system. The system can
display and provide needed navigation parameter for relative airborne electronic
equipment.
In navigation status, the control display can present the following navigation data: present
position, heading/drift, track/ground speed, deflection angle/off-course distance, preset
track, time to go/range to go, coordinate of target waypoint, pitch/roll and GNSS
position/time. When the air data computer is effective, it can also display wind speed, wind
direction and inertia pressure altitude.
Under navigation status, the pilot can alter zone according to flight plan automatically or
manually, alter zone from present position, change coordinate of waypoint, correct position
manually, memorize and read indifferent targets or measure remote distance directly.
(1) Navigation status selection
In navigation status, the default navigation status of the system is inertia/satellite
combination navigation and the default navigation manner is I/G. Primitive zone of
00→01 waypoint would be established automatically.
Under normal condition of inertia assembly, pressing [STA] can realize shifting
between I/G and inertial. Once there is failure for inertia assembly, satellite navigation
status would be chosen.
JZ-Y8F200W-02
AIRCRAFT FLIGHT MANUAL
SECTION VI
AIRCRAFT SYSTEM EQUIPMENT
6-127
June 30, 2012
(2) Navigation parameter display
In the process of navigation, the control display displays navigation parameters in 4
sheets (after navigation switching, the default is shown in Figure 6-50) which could
realize pageup and pagedown through keys of [↑] and [↓] (refer to Figure
6-51~6-53).The default display of navigation parameter is shown in Figure 1.
Parameter catalog could be projected through [DISP] (refer to Figure 6-54 and 6-55),
and then press code on parameter screen to display the needed parameter. Main
navigation parameters are shown in Figure 6-56 and 6-57.
In navigation status, displays of the status bar are combination status tip, error code,
alter zone manner, zone and alter zone tip respectively.
Figure 6-50 Display 1 of navigation parameter
Figure 6-51 Display 2 of navigation parameter
N xx°xx.xx' E xxx°xx.x'
HDG xxx.x° DH xxx.x°
Tk xxx.x° TAE xxx.x°
I/G 00 M 02 → 03
TTG xxx′xx″ DTG xxxx.x
YAW±xxx.x° DXT L(R)xxx.x
GS XXXX DS±XX.X°
I/G 00 AUTO 02 → 03
JZ-Y8F200W-02
AIRCRAFT FLIGHT MANUAL
SECTION VI
AIRCRAFT SYSTEM EQUIPMENT
6-128
June 30, 2012
Figure 6-52 Display 3 of navigation parameter
Figure 6-53 Display 4 of navigation parameter
Figure 6-54 Display 1 of display catalog
Figure 6-55 Display 2 of display catalog
3. WS,WD,ALT, NEXT, WPT
4. PIT, ROL, GNSS TIME, POS
1.TTG/DIS,YAW/DXT ,GS/DA,
2. POS,THG,DH,TK,TAE
PIT±xx.x ROL±xxx.x
GNSS TIME
N xx°xx.x' E xxx°xx.x'
I/G 00 M 02 → 03
N xx°xx.xx' E xxx°xx.x'
HDG xxx.x° DH xxx.x°
Tk xxx.x° TAE xxx.x°
I/G 00 M 02 → 03
JZ-Y8F200W-02
AIRCRAFT FLIGHT MANUAL
SECTION VI
AIRCRAFT SYSTEM EQUIPMENT
6-129
June 30, 2012
N34o
13.1’
E108o
54.7’
00
True north
True north
Heading
Track
angle
Drift
Ground speed
Present position
Figure 6-56 Schematic diagram 1 of navigation parameter
02
03
True north
True north
Track
angle
Preset course angle
Off-course
distance
Off-course
angle
Range
to
go
Figure 6-57 Schematic diagram 2 of navigation parameter
Note
In the above figures, drift refers to drift angle, preset flight refers to preset flight
angle and prescribed flight refers to prescribed heading. In navigation, words in
front of the status bar are navigation status indication, and the following two
numbers are error code, navigation manner indication and course indication
(from No.→to No.), and finally are warning tip words. Under specific
circumstances, flashing of indication words in the status bar suggests specific
intonation.
JZ-Y8F200W-02
AIRCRAFT FLIGHT MANUAL
SECTION VI
AIRCRAFT SYSTEM EQUIPMENT
6-130
June 30, 2012
Measurement range for navigation parameter of inertia navigation system and display
format of control display refer to Table 6-9g.
Table 6-17 Measurement range for navigation parameter of inertia navigation system and display
format of control display
Display Measuring range Display format
Present latitude ±90o
N(S)××o
××.×'
Present longitude ±180o
E(W)×××o
××.×'
True heading 0o
~360o
×××.×o
Pitch angle ±90o
±××.×o
Roll angle ±180o
±×××.×o
Ground speed 0o
~4427(kn) ××××.×
Drift 0o
~±180o
±×××.×o
Preset course
angle
0o
~360o
×××.×o
Track angle 0o
~360 o
×××.×o
Off-course angle 0o
~±180o
±×××.×o
Off-course
distance
±159 (mile) ±×××.×
Time to go 0~420 (min) ×××'××"
Range to go 0~5091 (mile) ××××.×
Waypoint latitude ±90o
N(S)××o
××.×'
Waypoint longitude ±180o
E(W)×××o
××.×'
JZ-Y8F200W-02
AIRCRAFT FLIGHT MANUAL
SECTION VI
AIRCRAFT SYSTEM EQUIPMENT
6-131
June 30, 2012
(1) Automatic program navigation according to flight plan (navigation manner with
advance tangent turn navigation manner)
At navigation, press [CHL] to project the altering zone selective menu (refer to Figure
6-580. Press [2] to choose tangent zone altering manner. As a result, tangent would
be displayed in status bar, and the system operates under tangent zone altering
manner.
Figure 6-58 Manner selection for altering zone
In this manner, the aircraft fly according to the input flight plan. If the time to go when
the aircraft arrive the waypoint, for example, 02, is less than 2 m, indicating words as
ALT would be displayed at the end of the control display status bar. When the time to
go is less than the advance tangent turn time, which is decided by present speed of
the aircraft and the about-to turn angle, automatic zone altering would be executed,
and ALT disappears or holds, which is decided by time to go to next zone. The new
zone 02→03 would be displayed in the status bar, and the system calculates
navigation parameter according to the new zone. Refer to Figure 6-59.
True north
True north
Time to go 2min
Warning appears
Warning disappear
Fly along the arc line
Alter zone
automatically here
Status bar Combination 00 Remote distance 01 02 warning Combination 00 Remote distance 02 03
01
50 o
54.7’
89o
54.7’
02 03
Figure 6-59 Automatic programe navigation according to flight plan—tangent line
Change course:
1.OVERFLY (O)
2.TANGENTALITY(T)
3. MANUAL(M)
I/G 00 M 01 → 02
JZ-Y8F200W-02
AIRCRAFT FLIGHT MANUAL
SECTION VI
AIRCRAFT SYSTEM EQUIPMENT
6-132
June 30, 2012
Note
When the aircraft fly at fast speed with large turn angle, presenting time of
indicating words ALT is relatively short and is about 5 s, which is normal.
(2) Automatic turning passing through the check point according to flight plan
In display as Figure 6-58 at navigation, press [1] to choose zone altering manner of
automatic turning passing through the check point. Overfly would be displayed in the
status bar, and the system operates under zone altering manner of turning passing
through the check point. It is the default navigation manner of the system after
switching navigation. If the time to go is less than 2 m, indicating words as ALT would
be displayed at the end of the control display status bar. When the time to go is less
than the advance tangent turn time, which is decided by present speed of the aircraft
and the about-to turn angle, ALT flickers. When the aircraft fly over the target point and
the preset track angle is less than 1 degree, the inertia navigation would execute
present position zone altering The zone indication is 00→03, and indication words
ALT disappears. (Refer to Figure 6-60).
Time to go 2min
warning appears
True north
True north
Warning disappears
Fly along the course Prompt zone altering, zone display 00 03
Status bar
Combination 00 Automatic 01 02 warning Combination 00 Automatic 02 03
Figure 6-60 Automatic programe navigation according to flight plan—turning passing through the
check point
JZ-Y8F200W-02
AIRCRAFT FLIGHT MANUAL
SECTION VI
AIRCRAFT SYSTEM EQUIPMENT
6-133
June 30, 2012
(3) Manual zone altering according to flight plan
In display as Figure 6-58 at navigation, press [3] to choose manual zone altering
manner. M would be displayed in status bar, and the cursor flickers below the TO
waypoint serial number, waiting to input from/to zone. If zone needs no change, press
[ENT], then the cursor disappears and the system operates under manual zone
altering.
Under manual zone altering manner, if the time to go of the aircraft to next waypoint
like 02 is less than 2 m, ALT would be displayed at the end of the control display status
bar. If it is less than 1 m, ALT flickers, suggesting manual zone altering.Procedures of
manual zone altering
a) If the cursor appears below TO serial number, press corresponding number keys
to enter new zone. If display of the new zone serial number is incorrect, input
new zone again and cross out the wrong information, then press [ENT]. If display
is correct, press [ENT] directly and the cursor disappears. Then the system would
calculate navigation parameters according to primitive zone.
b) If zone needs no change, press [ENT], and the cursor disappears.
Note
00→00 would not be accepted.
If warning indicating word flickers but manual zone altering does not follow, the
word would continue to flicker. At this moment, the system would calculate
according to 01→02 zone until manual zone altering is valid.
If manual zone altering is not executed two minutes after the aircraft fly away from
the TO waypoint, warning indicating word disappears and the system continues to
calculate according to 01→02 zone until manual zone altering is effective.(Refer to
Figure 6-61).
JZ-Y8F200W-02
AIRCRAFT FLIGHT MANUAL
SECTION VI
AIRCRAFT SYSTEM EQUIPMENT
6-134
June 30, 2012
True north
Time to go 2min
Time to go 1min
True north
"Warning" disappears
Without zone
altering
With zone
altering
"Warning" flickers
"Warning" appears
Combination 00 Manual 01 02 warning
Status bar
Combination 00 Manual 02 03
Figure 6-61 Manual zone altering according to flight plan
(4) Zone altering of present position
Pattern between the present position to any waypoint could be established. Its
operation is similar to manual zone altering according to flight plan, only with from
point as 00. For example, for flight of 01→02 pattern, it is possible to fly from present
position 00 to 04 by steering clear of waypoints 02 and 03.
(5) Zone altering of choosing pattern
19~28 are special waypoint numbers during course choosing of the flight, among
which even numbers are waypoints to be bound, and odd numbers are waypoints
formed according to corresponding distance and azimuth in relative to even number
waypoints. Here are procedures for zone altering of changing pattern
JZ-Y8F200W-02
AIRCRAFT FLIGHT MANUAL
SECTION VI
AIRCRAFT SYSTEM EQUIPMENT
6-135
June 30, 2012
a) Bind longitude and latitude of waypoint. If it has been done before, skip it.
b) Bind distance and azimuth relative to the waypoints which are restricted in 20, 22,
24, 26 and 28. The corresponding formed waypoints are 19, 21, 23, 25 and 27. If
binding has been done before, it is unnecessary to do it again.
c) Alter zone manually and bind the waypoint serial number for the selected pattern
such as 21→22. Method is the same as manual zone altering according to flight
plan.
(6) Referring to automatically formed waypoint
After binding position and relative range azimuth for even waypoints from 19~28 and
establishing a zone from the former waypoint to the present waypoint, the system
would create automatically the position of the former waypoint. Refer to it as method
of referring to waypoint position.
(7) Change of flight plan
Pilot can change flight plan by manually changing coordinate of waypoint or by using
a certain past waypoint to store the future waypoint parameter. That is to say,
waypoints can be used in a cycle way.
(8) Position correction
During flight, if the system s in inertia navigation status, compare the present position
of the control display with correct position attained by other method. If it needs
correction, correct the position manually. Here are the procedures:
d) When the aircraft fly over the known coordinate point, press [MOD] and the
correction display would appear as shown in Figure 6-62. At the same time, the
displayed present longitude and latitude are frozen.
e) Compare the attained longitude and latitude of landmark with those of the frozen
display. If it does not need correction, press [MOD] to recover normal display. It
needs correction, input longitude or latitude or both according to the attained
landmark.
f) Check correctness of the input data and then press [MOD] to finish manual
correction. The system then displays the corrected new present position. Position
change during the operation is compensated automatically.
JZ-Y8F200W-02
AIRCRAFT FLIGHT MANUAL
SECTION VI
AIRCRAFT SYSTEM EQUIPMENT
6-136
June 30, 2012
Note
After correction, the system enters combination navigation status and outputs
data in combination form. Manual correction is also available at combination
status, but the system outputs data in combination so quickly so that correction
is not distinguishable on control display.
Press "correction" now
Present position N38o
12.1’
E117o
44.6’
N38o
12.6’
E117o
45.1’
Correction point
Correction
Latitude: N38o
12.6’
Longitude:_
Combination 00 Manual 07 08
Figure 6-62 Correction display
(9) Memorizing and referring to indifferent target
During flight, when there is position needs to be memorized, use [MNEM] to input the
position to the non-volatile memory of the computer for future reference.
Press [MNEM] and be memorizing is displayed on the control display in full screen for
1 second, and then the control display returns back to normal display. The system can
memorize 4 indifferent targets for one flight. For targets above 4, the system would
memorize in a cycle way by starting from the first one.Refer to memorized targets in
the same method as referring to parameter (MISC code) in parameter (MISC).
Parameter 40 and 41 are latitude and longitude of the first target to be memorized, 42
and 43 are the second, 44 and 45 are the third and 46 and 47 are the fourth.
JZ-Y8F200W-02
AIRCRAFT FLIGHT MANUAL
SECTION VI
AIRCRAFT SYSTEM EQUIPMENT
6-137
June 30, 2012
CAUTION
(a) In preparation of flying, make sure that the available battery electricity energy is enough.
Connect the battery switch before flying.
(b) During running or takeoff, the onboard inertial navigation system should be in navigation
operation status.
(c) If there is something wrong in the inertial navigation system during flying, error signaling
light on the control display unit should be on, and error code should be displayed in the
status bar, indicating error type. 00 suggests no error, and error code in other form rather
than 00 is displayed when there is something wrong. Specific error type is shown in MISC
code. Turn off the system upon knowing the error code. Now try to control the aircraft to
stably fly for 5 min if permitted.
(d) In turning off the system, first turn off the status selector, and then turn off onboard and
ground power supply.
(e) Turn off the battery once the innertia navigation system is off.
(f) Except for special check for the inertial navigation system, autopilot connecting is not
allowed when the system is power-on on the ground.
Free Flight 2101 I/O GPS Free Flight 2101 I/O GPS navigator
General
Free Flight 2101 I/O GPS navigator is a long-range navigation system, which:
Receives signals from the space navigation satellites and computes the aircraft location
information.
Receives signals such as the true air speed from the air data system onboard and
heading reference from the attitude heading reference system (AHRS) and outputs
information such as aircraft azimuth, track angle, wind speed, ground speed, drift, time to
go, and off-course distance to implement navigation so that aircraft can fly along the
preset course.
Outputs control signals to KJ-6CII autopilot to implement the autopilot function during in-air
flight.
Main Technical Specifications
Location update rate: 5 times/sec
Operating power supply: 28VDC/2A
26VAC,400Hz/2A
Positioning accuracy: 15 m (root-meansquare error)
JZ-Y8F200W-02
AIRCRAFT FLIGHT MANUAL
SECTION VI
AIRCRAFT SYSTEM EQUIPMENT
6-138
June 30, 2012
Composition and Installation Position
Composition and installation position are listed in Table 6-18.
Table 6-18 Composition and installation position
Component Quantity Installation Position
Receiving/display unit 1 On the navigator's instrument panel
GPS antenna 1
Between stringer 54~55 at the right of
frame 10~11
Operation
The receiving/display unit panel is shown in Figure 6-63.
Power switch
Selection knob
Data slot
LED display
Signal light
Free Flight ·OFF
·ON
·ENT
MENU
2101 I/O PLUS
MSG APR HLD PTK WPT
NAV WPT NRST D
FPL CALC AUX MSG
Figure 6-63 Free Flight 2101 I/O GPS navigation system operating panel
(a) Operating panel description
(1) Operating buttons
Operating buttons include mode buttons and functional buttons.
There are 6 mode buttons, namely, NAV, WPT, NRST, FPL, CALC, and AUX. They are
described as follows:
NAV: This button is used to view the navigation and location information along the
selected course.
WPT: This button is used to view information such as azimuth, distance, runway,
name, frequency, and location.
JZ-Y8F200W-02
AIRCRAFT FLIGHT MANUAL
SECTION VI
AIRCRAFT SYSTEM EQUIPMENT
6-139
June 30, 2012
FPL: This button is used to view the current flight plan and stored flight plan. It can
also be used to make and edit a flight plan.
CALC: This button is used to compute air data.
AUX: This button is used to view system information such as date, time, and GPS
receiver state. It can also be used to view the routine list, set the parallel track
deviation, and select a database searching area.
NRST: This button is used to view the following information: 20 nearest airports, VOR
(VHF Omnidirectional Radio Range) station, office of the charged affairs, NDB (non-
directional beacon), intersection point, and user waypoint.
There are 3 functional buttons, namely, D, MSG, and ENT. They are described as
follows:
D : This button is used to change the course. Use of this button can make the aircraft
fly to any waypoints stored in the database, and start a flight plan.
MSG: This button is used view system information and the current CDI (course
deviation indicator) graduation.
ENT: This button is used for data input. After this button is pressed, a blinking cursor
occurs in an editable data section. The selection knob is used to control information
display and edit.
(2) Selection knob
The selection knob consists of an outer (large) knob and an inner (small) knob. The
outer knob is used to view information in the bottom line or move the cursor, while the
inner knob is used to view information in the top line or select data items during data
input.
(3) Data slot
The data slot is used to house the navigation data card. Insert the navigation data
card into the navigator with its golden contact surface upwards. If it is inserted
correctly, the card can slide into the slot smoothly; otherwise, remove the card and
readjust the direction. The data card can be removed and inserted only when the GPS
is powered off. If the card has not been inserted when the power is engaged,
Database missed will be displayed. If this card has expired, Database expired will be
displayed.
JZ-Y8F200W-02
AIRCRAFT FLIGHT MANUAL
SECTION VI
AIRCRAFT SYSTEM EQUIPMENT
6-140
June 30, 2012
Note
When the power is engaged, removing the data card will cancel the current
flight plan. This situation persists until the data card is reinserted. Then, the
navigator will be restarted.
(4) Power switch
To power off the system, set the switch at the OFF position; to power on the system,
set the switch at the ON position. After the system is powered on, all internal signal
lights on the navigator, WPT turning prompt lights on the pilot's and copilot's
instrument panels, and all button lights turn on. After the self-test is complete,
pressing any key to start navigation. At this time, signal and button lights turn off.
(5) LED display
The navigator has an LED display on which two lines of information can be displayed.
The information displayed in these two lines varies with the selected mode. The LED
display supports the automatic dimming function. The display brightness can be
automatically adjusted according to the ambient lighting.
(6) Internal signal lights
MSG: When a piece of information needs to be checked by the pilot, the MSG signal
light starts blinking. If multiple pieces of information need to be checked and the pilot
cannot finish reading all of them, the signal light blinks continuously until all
information is checked. After all information is viewed, the MSG signal light stops
blinking.
WPT: The WPT signal light prompts the pilot that aircraft has reached the waypoint.
When aircraft is approaching the current waypoint, the WPT signal light turns on in
advance according to the preset time. The lead time can be set using the AUX button
in Configure mode. The factory setting is 10 seconds by default.
PTK: The PTK annunciator indicates that the track that is parallel with the current
track has been selected. To view the selected deviation, press the MSG button.
HLD: The HLD annunciator is used to warn the pilot that the current flight plan
suspends at the current waypoint.
APR: The APR annunciator starts blinking from 2 sea miles inbound flight to the final
approach fix (FAF), prompting the pilot that all approach requirements have been met.
JZ-Y8F200W-02
AIRCRAFT FLIGHT MANUAL
SECTION VI
AIRCRAFT SYSTEM EQUIPMENT
6-141
June 30, 2012
(b) Detailed Operating Button Description
(1) WPT button
a) Waypoint name input
Press the WPT button several times until the USER mode is entered. Turn the
outer knob until the ADD WAYPOINT page is displayed. Then, press the ENT
button. Turn the inner knob to select the first character of the waypoint name.
(Turn the inner knob clockwise. The character cyclically occurs in sequence of A,
B, C…X, Y, Z, 0, 1, 2…9.) Turn the outer knob to move the cursor. Then, turn the
inner knob to enter the second character. Repeat this process to enter the whole
waypoint name by using the inner and outer knobs.
Assume that the waypoint name is BC. The procedure for entering the waypoint
name BC is as follows:
Press the WPT button to enter the USER mode. Turn the outer knob until the ADD
WAYPOINT page is displayed. Then, press the ENT button. Perform the steps
described in Figure 6-64.
NEW USER WAYPOINT
NAME:A
NEW USER WAYPOINT
NAME: B
NEW USER WAYPOINT
NAME:B-
BC SAVE USING
THIS POSITION?(ENT )
Turn the inner knob clockwise
until the first character is B
Turn the outer knob
clockwise to move the cursor
Turn the inner knob until the displayed
character at the cursor position is C
Figure 6-64 Procedure for entering the waypoint name BC
JZ-Y8F200W-02
AIRCRAFT FLIGHT MANUAL
SECTION VI
AIRCRAFT SYSTEM EQUIPMENT
6-142
June 30, 2012
At this time, to use the current location coordinates as the waypoint coordinates,
press the ENT button. To enter the waypoint coordinates manually, perform the
operation described in 4.2.1.2.2.
b) Entering the waypoint coordinates
Method 1 (using the current location coordinates as the waypoint coordinates)
Enter the waypoint name, for example, BC.
Press the ENT button for confirmation. Then, the current aircraft location
coordinates are saved to the waypoint BC.
Method 2 (entering the waypoint coordinates manually)
Enter the waypoint name (BC in this case).
Turn the outer knob until the information as shown in Figure 6-65 is displayed.
Figure 6-65 Interface display
Press the ENT button for confirmation.
Turn the inner knob to adjust the digit displayed and select N (north latitude), S
(south latitude), E (east longitude), and W (west longitude). Then, turn the outer
knob to move the cursor. Use both the inner and outer knobs to enter the waypoint
latitude and longitude (latitude first and then longitude) coordinates and the
latitude and longitude identifiers.
Press the ENT button for confirmation.
c) Changing the waypoint name
Press the WPT button several times until the USER mode is entered.
Turn the inner knob to select the waypoint name to be changed (in this case, the
original waypoint name is BC).
Turn the outer knob. The information as shown in Figure 6-66 is displayed.
Figure 6-66 Interface display
Press the ENT button.
Use the inner and outer knobs to change the waypoint name.
Press the ENT button for confirmation.
TO BC
EDIT BC (ENT)
BC SAVE USING
LAT/LON? (ENT)
JZ-Y8F200W-02
AIRCRAFT FLIGHT MANUAL
SECTION VI
AIRCRAFT SYSTEM EQUIPMENT
6-143
June 30, 2012
d) Changing the waypoint coordinates
Press the WPT button several times until the USER mode is entered.
Turn the outer knob until the EDIT xxx? (ENT) information is displayed.
Press the ENT button. The information as shown in Figure 6-67 is displayed.
Figure 6-67 Interface display
Use the inner and outer knobs to change the waypoint coordinates.
Press the ENT button for confirmation.
e) Deleting the waypoint
Press the WPT button until the USER mode is entered. Turn the inner knob to
select the waypoint to be deleted. Then, turn the outer knob until the ERASE page
is displayed. Press the ENT button and then the WPT button to delete the
waypoint. (Press any other buttons to cancel deletion.)
(2) FPL button
a) Four modes of the FPL button
The FPL button has four modes: current plan, current flight plan stage, stored flight
plan, and stored flight plan stage. Pressing this button for the first time to enter the
current plan mode; pressing this button for the second time to enter the current
flight plan stage mode; pressing this button for the third time to enter the stored
flight plan mode; pressing this button for the fourth time to enter the stored flight
plan stage mode. If you continue pressing this button, the system switches over
between the stored flight plan mode and the stored flight plan stage mode. To
return to the current plan mode, press and hold the FPL button for about 1s. Using
the FPL button can activate, view, edit, or cancel a stored flight plan. Each mode
has the following data pages:
Press the FPL button for the first time. The current plan or NO ACTIVE FLIGHT
PLAN page is displayed. If the current plan exists, the takeoff and terminal
waypoints, and waypoint identifier for the current stage are displayed, as
shown in Figure 6-68. The stage is presented by NOW, NEXT, and LAST. To
change the stage, turn either the inner or the outer knob. To make the aircraft
fly in the stage displayed, press D twice.
BC EDIT USING
LL33o
0.81N 107o
12.3E
JZ-Y8F200W-02
AIRCRAFT FLIGHT MANUAL
SECTION VI
AIRCRAFT SYSTEM EQUIPMENT
6-144
June 30, 2012
Figure 6-68 Interface display
Press the FPL button for the second time. The current flight plan stage page (if
the flight plan exists) is displayed. A pair of waypoints of a stage, and the
azimuth, distance, and ETE (estimated time en route) of this stage are
displayed, as shown in Figure 6-69. The stage is presented by NOW, NEXT 1,
and LAST 1. To change the stage, turn either the inner or outer knob.
Figure 6-69 Interface display
Press the FPL for the third time. The stored flight plan or NO STORED FLIGHT
PLANS page is displayed. If the stored flight plan exists, the takeoff and
terminal waypoints and the waypoint identifier of the first stage of the stored
flight plan are displayed, as shown in Figure 6-70. The stage is presented by
LEG1, LEG2 …, etc. To view other stored flight plans, turn the inner knob. To
change the stage, turn the outer knob. To activate the flight plan, press D for
the required stage to select direct or addition. Then, press D again.
Figure 6-70 Interface display
Press the FPL button for the fourth time. The stored flight plan stage page is
displayed. A pair of waypoints of a stage, and the azimuth, distance, and ETE
of this stage are displayed, as shown in Figure 6-71.
Figure 6-71 Interface display
LEG2: PDZV PSPA
082o
513N
M ETE 0:26
LAXA—→PHXA ACTIVE
NOW:PDZV T
0 PSPA
NEXT 2:PDZV
T
0 PSPA
082o
51.3N
M ETE 0:26
LRXA —→PHXA 325N
M
LEG1: LRXA
T
0 PDZV
JZ-Y8F200W-02
AIRCRAFT FLIGHT MANUAL
SECTION VI
AIRCRAFT SYSTEM EQUIPMENT
6-145
June 30, 2012
To activate this flight plan, press D for the required stage to select direct or
addition. Then, press D again. Press the FPL several times at any time to
return the current stage of the current flight plan. When the navigator is
displaying the current stage or stored stage page, the FPL button is blinking.
b) Making a flight plan
Press the FPL button several times until the STORED FLIGHT PLANS page is
displayed.
Turn either the inner or outer knob rightward or leftward until the ADD NEW
FLIGHT PLAN page is displayed, as shown in Figure 6-72.
Figure 6-72 Interface display
The blinking ++ mark between start and end indicates the waypoint insertion point.
When a flight plan has two or more waypoints, turning the outer selection knob can
move this insertion point. Press the WPT button several times to select the
required waypoint type. To select the waypoint name, press the ENT button and
turn the selection knob. Press the FPL button to add the selected waypoint to the
flight plan. To edit other waypoints of the flight plan, repeat the preceding steps. To
exit editing the flight plan, when ++ is displays, press the FPL button.
c) Editing a flight plan
Adding a waypoint
Press the FPL button to enter the FLIGHT PLAN mode.
Turn the inner knob to invoke the flight plan to be edited.
Turn the outer knob to select the edit mode. The interface is as shown in Figure
6-73.
Figure 6-73
Press the ENT button. The information as shown in Figure 6-74 is displayed.
Figure 6-74
ADD NEW FLIGHT PLAN
start ++ end
01U—→04U EDIT
LEG1:01U TO 02U
EDIT FLIGHT PLAN
START: ++01U - 02U
JZ-Y8F200W-02
AIRCRAFT FLIGHT MANUAL
SECTION VI
AIRCRAFT SYSTEM EQUIPMENT
6-146
June 30, 2012
To add waypoint 05 between waypoints 01 and 02, turn the outer knob so that ++
moves between waypoints 01 and 02.
Turn the inner knob to enter 05. The interface is as shown in Figure 6-75.
Figure 6-75 Interface display
Press the ENT button. To continue adding waypoints, repeat the preceding steps.
Press the FPL button to end editing the flight plan.
Deleting a waypoint
Press the FPL button to enter the flight plan mode.
Turn the inner knob to invoke the flight plan to be edited. The interface is as shown
in Figure 6-76.
Figure 6-76 Interface display
Turn the outer knob to select the editing mode. The interface is as shown in Figure
6-77.
Figure 6-77 Interface display
Press the ENT button.
To delete waypoint 03 from the flight plan 01U 04U
Turn the inner knob until DELETE is displayed in the lower line, as shown in Figure
6-78.
Figure 6-78 Interface display
Turn the outer knob until DELETE replaces 03U, as shown in Figure 6-79.
01U—→04U 250N
M
LEG: 01U TO 02U
EDIT FLIGHT PLAN
01U 05U 02U
01U—→04U EDIT
LEG1: 01U TO 02
EDIT FLIGHT PLAN
01U-DELETE-02U
JZ-Y8F200W-02
AIRCRAFT FLIGHT MANUAL
SECTION VI
AIRCRAFT SYSTEM EQUIPMENT
6-147
June 30, 2012
Figure 6-79 Interface display
Press the ENT button to delete the waypoint, as shown in Figure 6-80.
Figure 6-80 Interface display
Press the FPL button to end editing the flight plan.
Replacing a waypoint
Press the FPL button to enter the flight plan mode.
Turn the inner knob to invoke the flight plan to be edited. The interface as shown in
Figure 6-81 is displayed.
Figure 6-81 Interface display
Turn the outer knob to select the editing mode. The interface as shown in Figure
6-82 is displayed.
Figure 6-82 Interface display
To replace 03 with 05, turn the inner knob until REPLACE is displayed in the lower
line, as shown in Figure 6-83.
Figure 6-83 Interface display
Turn the outer knob until 03U is replaced by REPLACE, as shown in Figure 6-84.
Figure 6-84 Interface display
01U—→04U 250N
M
LEG1: 01U TO 02U
EDIT FLIGHT PLAN
02U-DELETE-04U
EDIT FLIGHT PLAN
02U++04U-END
01U—→04U EDIT
LEG1: 01U TO 02U
EDIT FLIGHT PLAN
01U-REPLACE-02U
EDIT FLIGHT PLAN
02U-REPLACE-04U
JZ-Y8F200W-02
AIRCRAFT FLIGHT MANUAL
SECTION VI
AIRCRAFT SYSTEM EQUIPMENT
6-148
June 30, 2012
Turn both the inner and outer knobs to enter 05. The interface is as shown in
Figure 6-85.
Figure 6-85 Interface display
Press the ENT button. The interface is as shown in Figure 6-86.
Figure 6-86 Interface display
Press the FPL button to end editing the flight plan.
d) Viewing the stage of the flight plan
The azimuth and distance of any stage can be viewed in the stored or current flight
plan. Stages for the stored flight plan are named LEG1, LEG2, …; stages for the
current flight plan are named LAST2, LAST1, NOW, NEXT1, NEXT2, …. The
viewing method is as follows:
Current flight plan stage
Press the FPL button twice (the FPL button in blinking). Turn either the inner or
outer selection knob to move between two stages.
Stored flight plan stage
Press the FPL buttons twice except that there is a current FPL (flight plan stage).
Press the FPL buttons three times to enter the STORED FLIGHT PLANS page.
Turn the inner knob to select a stored flight plan. Press the FPL button (the FPL
button is blinking). Turn either the inner or outer selection knob to move between
the two stages.
e) Activating a flight plan
The pilot can activate any stages or waypoints in a flight plan. During flight plan
activation, there are two choices for the pilot: added to the displayed stage;
directly fly to any waypoint in the stage.
EDIT FLIGHT PLAN
05U++04U-END
EDIT FLIGHT PLAN
02U-05U-04U
JZ-Y8F200W-02
AIRCRAFT FLIGHT MANUAL
SECTION VI
AIRCRAFT SYSTEM EQUIPMENT
6-149
June 30, 2012
Added to a flight plan stage
Select a stored flight plan.
Turn the outer selection knob clockwise to select the required stage.
Press D
Press D again to add to the stage and activate the program.
Directly flying to the waypoint in the flight plan stage
Select a stored flight plan.
Turn the outer selection knob to select the stage that has the required waypoint.
Press D
Turn the outer selection knob to select the required waypoint. Turn the outer knob
leftward to select the first waypoint in the stage, while turn the outer knob
rightward to select the second waypoint in the stage.
Press D again to directly fly to the waypoint and activate the program.
f) Reversing a flight plan
Press the FPL button to enter the stored flight plan.
Turn the inner knob to invoke the flight plan to be edited.
Turn the outer knob to select the editing mode. The interface is as shown in Figure
6-87.
Figure 6-87 Interface display
Press the ENT button for confirmation. At this time, the interface is as shown in
Figure 6-88.
Figure 6-88 Interface display
g) Canceling a current flight plan
Press the FPL button. Turn the inner knob to select a currently-executed flight plan
(marked with ACTIVE). Turn the outer knob until the interface as shown in Figure
6-89 is displayed.
01U—→04U REVERSE
LEG1:01U TO 02U
01U 04U 250N
M
LEG1:02U TO 01U
JZ-Y8F200W-02
AIRCRAFT FLIGHT MANUAL
SECTION VI
AIRCRAFT SYSTEM EQUIPMENT
6-150
June 30, 2012
Figure 6-89 Interface display
Press the ENT button for confirmation.
h) Clearing a flight plan
The pilot can clear any stored flight plans by pressing the ENT and FPL buttons.
To change the determination when pressing the second button, do as follows:
Select a stored flight plan.
Turn the outer selection knob leftward until the blinking ERASE is displayed.
Press the ENT button.
Press the FPL button for confirmation and to clear the flight plan; or press the NAV
button to suspend the clear program.
i) Executing a flight plan
Before takeoff, a flight plan must be executed.
Press the FPL button. Turn the inner knob to invoke the selected flight plan. Turn
the outer knob until the interface as shown in Figure 6-90 is displayed.
Figure 6-90 Interface display
Press D to select stage 1. Press D again to end executing the flight plan. At
this time, the interface is as shown in Figure 6-91.
Figure 6-91 Interface display
(3) NAV button
Press the NAV button to enter the navigation mode. The main navigation page is
displayed, as shown in Figure 6-92.
Figure 6-92 Interface display
01U—→04U CANCEL
NOW: 01U TO 02U
01U 04U 380KM
LEG1: 01U TO 02U
01U —→ 04U ACTIVE
NOW:01U TO 02U
TO 02U120o
143N
M 0:13
[·1
1 ·1
1 ·0·1
1 ·1
1 ·] T
N 124o
650N
M
JZ-Y8F200W-02
AIRCRAFT FLIGHT MANUAL
SECTION VI
AIRCRAFT SYSTEM EQUIPMENT
6-151
June 30, 2012
The top line on the main navigation page shows the name of the waypoint to fly,
azimuth angle from the current location to the waypoint to fly, distance between the
current location and the waypoint to fly, and the time to go from the current location to
the waypoint to fly, while the bottom line shows main navigation information such as
the off-course distance, track angle, and ground speed.
In Figure 30, the top line shows that the name of the waypoint to fly is 02, the azimuth
angle is 120°, the range to go is 143 nm, and the time to go is 13min; the bottom line
shows that the track angle is 124o
and the ground speed is 650 nm/h. In addition, the
bottom line also shows a course deviation indicator (CDI), which clearly indicates the
degree and direction that the aircraft deviates from the preset course. In the CDI, 0 is
at the center. There are two short vertical lines, two dots, and one square bracket on
each side of 0. They further divide parts at the left and right of 0 into five equally
divided sections, forming the CDI dial. The long vertical line indicates the course rod
that can be moved left and right. It is used to show the degree and direction that
aircraft deviates from the preset course.
The full off-course distance set in the receiver is 2.5 nm, which means that each
section of the five equally divided sections at the left and right represents 0.5 nm
(2.5/5) off-course distance. When aircraft deviates from the preset course (left or right)
for more than 2.5 nm, the square bracket (left or right) in the CDI will be replaced by
an arrow ( or ), and the off-course distance is displayed at the same time,
5 nm for example, indicating that aircraft has deviated rightward from the preset
course for 5 nm, exceeding the CDI indicating range. At this time, the pilot should
control the aircraft to fly leftward to return to the preset course.
Note
When the course is 5.0 nm, terminal is 1.0 nm, and landing approach is 0.3 nm,
2101 I/O GPS navigator automatically controls the CDI scales.
JZ-Y8F200W-02
AIRCRAFT FLIGHT MANUAL
SECTION VI
AIRCRAFT SYSTEM EQUIPMENT
6-152
June 30, 2012
(4) CALC button
a) Calculation of time, distance, and ground speed
Press the CALC button to enter the FLT PLAN/FUEL mode. Turn the inner knob
until the time, distance, and ground speed information page is displayed.
b) Air data calculation
Press the CALC button to enter the AIR DATA mode. Turn the inner knob until the
WINDS page and ALTITUDE page are displayed respectively.
(5) AUX button
The AUX (auxiliary) button is used to manage and monitor information from the
navigator. The AUX button provides five modes: check table, system status, sensor
status, configuration, and user installation.
a) Check table mode
The check table mode allows the user to create up to 10 routine check tables.
Each check table can hold a maximum of 26 entries.
b) System status mode
The system status mode allows the operator to rapidly obtain the system status
information. This mode provides the following status pages:
Date and time display
Information about the current location/latitude and longitude
Voltage and internal temperature display
Database expiration information
Software version information
System code display
JZ-Y8F200W-02
AIRCRAFT FLIGHT MANUAL
SECTION VI
AIRCRAFT SYSTEM EQUIPMENT
6-153
June 30, 2012
Data and time display
Press the AUX button several times until the *SYSTEM STATUS page is displayed.
The current time information is displayed for a moment, as shown in Figure 6-93.
Figure 6-93 Interface display
For description of the information displayed in Figure 6-93, see the original
document (+8 indicates the difference between the local time and the Greenwich
time.)
Current location/altitude display
Press the AUX button several times until the *SYSTEM STATUS* page is
displayed.
Turn the inner knob. The current location is displayed, as shown in Figure 6-94.
Figure 6-94 Interface display
Turn the outer knob. The altitude information is displayed, as shown in Figure
6-95.
Figure 6-95 Interface display
If GPS=3D, the GPS implements 3D navigation; if GPS=2D, the GPS implements
2D navigation and manual altitude input is required.
PRESENT POSITION
LL33o
0.81N 107o
12.3E
WEDNESDAY 15-MAY-96
10:18:55Z +8 18:18
ALTITUDE :10253ft
SOURCE: GPS=3D
JZ-Y8F200W-02
AIRCRAFT FLIGHT MANUAL
SECTION VI
AIRCRAFT SYSTEM EQUIPMENT
6-154
June 30, 2012
Voltage and internal temperature display
Press the AUX button until the *SYSTEM STATUS* page is displayed. Turn the
inner knob. The voltage and temperature page is displayed, as shown in Figure
6-96. The indicated input voltage is 14.2 V and the indicated navigator's internal
temperature is 33o
C.
Figure 6-96 Interface display
Database expiration display
The DATABASE EXPIRATION page displays the expiration date of the navigation
data card. Press the AUX button until the *SYSTEM STATUS* page is displayed.
Turn the inner knob. The DATABASE EXPIRATION page is displayed. For
example, DATABASE EXPIRATION 25-MAR-2008 indicates that the database will
expire on March 25, 2008.
Software version display
Press the AUX button several times until the *SYSTEM STATUS* is displayed.
Turn the inner knob. The software version page is displayed, as shown in Figure
6-97.
Figure 6-97 Interface display
System code display
Press the AUX button several times until the *SYSTEM STATUS* page is
displayed. Turn the inner knob to enter the SYSTEM CODE page, on which the
version of the GPS navigator software is displayed. The version number is the
same as the last four digits of the piece No. on the navigator ID panel.
INPUT VOLTAGE: 14.2V
INTERNAL TEMP: 33o
C
REVISION: NAV2.6 20
GPS 5 2-0812
JZ-Y8F200W-02
AIRCRAFT FLIGHT MANUAL
SECTION VI
AIRCRAFT SYSTEM EQUIPMENT
6-155
June 30, 2012
c) Sensor status mode
The sensor status mode provides the following pages:
GPS status
Estimated accuracy
GPS satellite status
GPS sensor re-setting
GPS satellite availability
Sensor status page
Press the AUX page several times until the *SENSOR STATUS* page is displayed.
The information in Figure 6-98 is displayed automatically for a moment.
Figure 6-98 Interface display
In the preceding information, GPS: 3D indicates that the GPS implements 3D
space positioning calculation; RAIM indicates that the RAIM (receiver autonomous
integrity monitoring) function is available; MODE: TERM indicates that the RAIM
mode is TERM; PDOP: 2.6 indicates the geometric divergence of precision.
GPS:3D RAIM
MODE:TERM PDOP: 2.6
JZ-Y8F200W-02
AIRCRAFT FLIGHT MANUAL
SECTION VI
AIRCRAFT SYSTEM EQUIPMENT
6-156
June 30, 2012
Estimated accuracy page
Press the AUX button several times until the *SENSOR STATUS* is displayed.
Turn the outer knob counter-clockwise until the estimated accuracy page is
displayed.
The navigator calculates an estimated location error under the worst condition
based on the signal accuracy and GPS satellite's geometric condition. The
estimated error is displayed on the estimated accuracy page.
Figure 6-99 Interface display
Traced GPS satellite display
Press the AUX button several times until the *SENSOR STATUS* is displayed.
Turn the outer knob clockwise until the traced GPS satellite page is displayed.
Information displayed on the traced GPS satellite page shown in Figure 6-100
shows that the GPS receiver is tracing 9 satellites currently, which are satellites
No. 1, 9, 12, 15, 21, 23, 25, 28, and 31. Free Flight 2101 landing approach GPS
navigator traces all satellites in the line of sight.
The blinking number on the traced GPS satellite page indicates that the traced
satellite is not used in location resolving due to its weak signal strength.
Figure 6-100 Interface display
ESTIMAED ACCURACY:
GPS:0,02N
M
GPS TRACK 9: 31 28
1 9 12 15 21 23 25
JZ-Y8F200W-02
AIRCRAFT FLIGHT MANUAL
SECTION VI
AIRCRAFT SYSTEM EQUIPMENT
6-157
June 30, 2012
GPS satellite status display
Press the AUX button several times until the *SENSOR STATUS* is displayed.
Turn the outer knob clockwise.
Information on the GPS satellite status page shown in Figure 6-101 indicates that
the signal from satellite 03 is being received (SV indicates satellite), and the
signal-to-noise ratio is 10.0. The current azimuth angle and elevation angle of
satellite 03 are 248o
and 29o
respectively. If the negative elevation angle occurs on
this page, it indicates that the satellite is below the horizon and its location
coordinates cannot be obtained. In this case, select information about other
satellites. Turn the outer knob to view status of all satellites no matter whether they
are being traced currently or not.
Figure 6-101 Interface display
GPS sensor re-setting
The sensor re-setting function allows the GPS receiver to execute the power-on
and satellite acquisition program, like that the navigator is powered off and then
on.
Press the AUX button several times until the *SENSOR STATUS* is displayed.
Turn the outer knob clockwise. The GPS sensor re-setting page is displayed, as
shown in Figure 6-102.
Press the ENT button.
Press the AUX button to confirm re-setting.
Figure 6-102 Interface display
GPS SV: 03 SIG 10.0
ELV 029o
AZM 248o
RESET GPS SENSOR?
(ENT)
JZ-Y8F200W-02
AIRCRAFT FLIGHT MANUAL
SECTION VI
AIRCRAFT SYSTEM EQUIPMENT
6-158
June 30, 2012
GPS satellite availability
The availability function is used for overlay prediction of the current point on any
day and at any time.
Press the AUX button several times until the *SENSOR STATUS* is displayed.
Turn the inner knob clockwise. Observe information displayed in Figure 6-103.
Information on the satellite availability page shown in Figure 6-103 indicates that
GPS 3D positioning information can be obtained within 24 hours from the satellite
positioned on September 19, 1996.
Figure 6-103 Interface display
Pre-flight Preparations
System power-on
Insert the data card correctly into the data card slot in the receiving/display unit of Free Flight
2101 I/O GPS. Turn on the GPS 28 VDC circuit breaker on the navigator's right console, and GPS
I and GPS III 26 VAC circuit breakers on the navigator's side cover plate. At the same time,
engage power supplies of XAS-3M, HZX-1M, and KJ-6CII systems that are interconnected with
2101 I/O GPS and ensure that these interconnected systems are operating properly.
Turn the power knob on the GPS receiving/display unit panel on the navigator's instrument
panel to the ON position. After the GPS receiving/display unit is warmed up, the self-test result is
normal. (If the self-test result is normal, READY FOR NAVIGATION will be displayed on the
interface.)
GPS AVAIL: 19-SEP-96
3-D: 24 HR COVERAGE
JZ-Y8F200W-02
AIRCRAFT FLIGHT MANUAL
SECTION VI
AIRCRAFT SYSTEM EQUIPMENT
6-159
June 30, 2012
System Settings
(a) Setting the display brightness
Enter the INSTALL mode page. Turn the inner knob to enter the SET DISPLAY INTENSITY
LEVEL page. Press the ENT button, and then turn the inner knob to set the button backlight
brightness properly. Turn the outer knob to set the screen brightness properly. Press the
ENT button again to complete the brightness setting.
(b) Setting the unit
Enter the INSTALL mode page. Turn the inner knob to enter the unit setting page. Then,
turn the outer knob to enter the distance unit selection page. Press the ENT button. After
that, turn the inner knob to select the distance unit as sea mile (NAUTICAL MILES). Press
the ENT button again to complete selection.
Set the altitude, speed, temperature, and time units respectively according to the preceding
methods.
(c) Setting the CDI sensibility
(1) Setting the internal CDI sensibility
The internal CDI has five full deviation values: ±5 nm, ±2.5 nm, ±1.0 nm, ±0.3 nm, and
±0.1 nm. The full deviation ex-factory setting is ±2.5 nm.
Press the AUX button on the GPS receiving/display unit panel to enter the
CONFIGURE page. Turn the inner knob to enter the CDI sensibility setting page, as
shown in Figure 6-104.
Figure 6-104 Interface display
CDI SENSITIVITY
TURN OUTER KNOB
JZ-Y8F200W-02
AIRCRAFT FLIGHT MANUAL
SECTION VI
AIRCRAFT SYSTEM EQUIPMENT
6-160
June 30, 2012
Turn the outer knob until the information as shown in Figure 6-105 is displayed.
Figure 6-105 Interface display
Press the ENT button. Then, turn the inner knob to set the required CDI sensibility.
See Figure 6-106.
Figure 6-106 Interface display
Press the ENT button to confirm that the new full deviation value is 1.0 sea mile.
(2) Setting the external CDI sensibility
The GPS can drive the external CDI (PFD upper course deviation). The unit of the
external CDI can only be sea mile. There are three settings: ±5 sea miles (full
deviation value), ±1 sea miles, and ±0.3 sea miles. If the autopilot is used for tracing, it
is suggested to set ±1 sea miles as the full deviation value as follows:
Press the AUX button on the GPS receiving/display unit panel to enter the
CONFIGURE page. Turn the inner knob to set the CDI sensibility. The information as
shown in Figure 6-107 is displayed.
Figure 6-107 Interface display
INTERNAL CDI ADJUST:
FULL SCALL=2.5K
M
INTERNAL CDI ADJUST:
FULL SCALL=1.0N
M
CDI SENSITIVITY
TURN OUTER KNOB
JZ-Y8F200W-02
AIRCRAFT FLIGHT MANUAL
SECTION VI
AIRCRAFT SYSTEM EQUIPMENT
6-161
June 30, 2012
Turn the outer knob until the information shown in Figure 6-108 is displayed.
Figure 6-108 Interface display
Press the ENT button. Then, turn the inner knob to set the required CDI sensitivity.
See Figure 6-109.
Figure 6-109 Interface display
Press the ENT button to confirm that the new full deviation value is 1.0 nm.
(3) The magnetic variation can be set to AUTO (automatic calculation) or any value
between west 180o
and east 180o
. AUTO is the ex-factory setting. The procedure for
setting the magnetic variation is as follows:
Press the AUX button to enter the *SYSTEM STATUS* page.
Turn the inner knob to enter the MAGNETIC VARIATION page, as shown in Figure
6-110.
Figure 6-110 Interface display
EXTERNAL CDI ADJUST:
FULL SCALL=5N
M
EXTERNAL CDI ADJUST:
FULL SCALL=1.0N
M
MAGENETIC VARIATION
AUTO 15o
east
JZ-Y8F200W-02
AIRCRAFT FLIGHT MANUAL
SECTION VI
AIRCRAFT SYSTEM EQUIPMENT
6-162
June 30, 2012
Information on this page shows that the automatically set magnetic variation is 15. If it
does not match the local magnetic variation, set it manually, east 13o
for example.
Then, perform the following operations:
Press the ENT button to activate the cursor.
Turn the outer knob counter-clockwise until east 13o
is displayed. (Turning the outer
knob counter-clockwise can increase the magnetic variation to east, while turning the
outer knob clockwise can increase the magnetic variation to west.)
Press the ENT button to confirm the new setting.
Configuring the input/output (I/O) interface
Configuring the serial port
Press the AUX button several times until the INSTALL page is displayed. Turn the inner knob
until the information shown in Figure 6-111 is displayed.
Figure 6-111 Interface display
Configuring the I/O interface
Turn the inner knob until the AUX I/O SETUP page is displayed. Turn the outer knob to invoke
the following I/O information respectively. Press the ENT button. Then, turn the inner knob to
select information of the corresponding signal format. After the selected information is displayed,
press the ENT button again to confirm and save the setting. The specific I/O interface format
configured is as follows:
SERIAL I/O SETUP
TURN OUTER KNOB
JZ-Y8F200W-02
AIRCRAFT FLIGHT MANUAL
SECTION VI
AIRCRAFT SYSTEM EQUIPMENT
6-163
June 30, 2012
TAS INPUT----Digital-from DADS Via ARINC 429 Lo Port 3
BARO ALTITUDE INPUT---Digital- from DADS Via ARINC 429 Lo Port 3
PRESSURE ALTITUDE INPUT--- Digital-from DADS Via ARINC 429 Lo Port 3
HEADING INPUT---Digital-from AHRS via ARINC 429 Hi Port 2
OLEO INPUT---Ground-Current state is on Ground
DADS---ARINC429 Low Speed
AUTOPOLIT ROLL STEER--- Normal
DIGITAL OUTPUT#1or #2--- ARINC 429 High Speed
Operation in the air
The operation in the air is as follows: Select a finished flight plan on the ground. Press D to
activate the plan. View the required navigation information on the main navigation page. Then,
control the aircraft to fly along the selected path
(a) Executing the flight plan
Press the FPL button. Turn the inner knob to invoke the selected flight plan. Then, turn the
outer knob until the information shown in Figure 6-112 is displayed.
Figure 6-112 Interface display
Press D to complete selection. Press D again to end executing the flight plan.
(b) Viewing the course navigation information
Press the NAV button to enter the main navigation page in navigation mode. Once a
waypoint or a flight plan has been activated to guide the flight, press D. Various
navigation information for the aircraft to fly along the selected path will be displayed on the
main navigation page.
01U 04U 380KM
LEG1: 01U TO 02U
JZ-Y8F200W-02
AIRCRAFT FLIGHT MANUAL
SECTION VI
AIRCRAFT SYSTEM EQUIPMENT
6-164
June 30, 2012
HZX-1M attitude-heading reference system
General
HZX-1M attitude-heading reference system (AHRS) is a system integrated with the
gyromagnetic compass and horizon gyro platform. It can senses and displays the flight heading
and attitude. It provides the following functions:
(a) Indicate the aircraft's magnetic heading, gyro heading, and turning angle.
(b) The navigation indicator displays the true heading after the manual magnetic variation
correction.
(c) Cooperate with the horizon indicator to display the aircraft's banking angle and pitch angle.
(d) Cooperate with the automatic direction finder (ADF), TACAN, and VOR-432 to convert and
display the radio azimuth, TACAN azimuth, landing heading deviation, and gliding
deviation and its alarm.
(e) Output the heading angle, pitch angle, and banking angle information to the weather radar
and flight data recording system. Transmit the yawing angle signal for heading stabilization
to the autopilot.
(f) Cooperate with 2101 I/O GPS navigation system and HG-593Y8 laser strapdown
inertial/satellite integrated navigation system to indicate the true heading, drift angle, and
off-course distance.
JZ-Y8F200W-02
AIRCRAFT FLIGHT MANUAL
SECTION VI
AIRCRAFT SYSTEM EQUIPMENT
6-165
June 30, 2012
System Composition and Component Installation Position
The system composition and component installation position are listed in Table 6-19.
Table 6-19 System composition and component installation position
No. Component Model Quantity Installation Position
1
Magnetic heading
sensor
GHC-5 2
One at the left wing tip and one at the
right wing tip
2
Integrated heading
indicator
ZHZ-4A 2
One on the left instrument panel and
one on the right instrument panel
3
All-attitude combined
gyro
TQZ-1D 2
Under the floor at the left between
frame 12~13
4
Heading location
indicator
ZEH-1R(B) 2
One on the left instrument panel and
one on the right instrument panel
5
Heading location
indicator
ZEH-1S(B) 1 On the navigator's instrument panel
6 Navigation indicator ZHL-2J(B) 1 On the navigator's instrument panel
7 Integrated amplifier FZ-3B 2
Under the floor at the left between
frame 12~13
8 Control box EK-3 1 On the navigator's instrument panel
9 Relay box EJ-7P 1
Under the floor at the left between
frame 11~12
10 Horizon indicator ZDP-1 3
One on the left instrument panel, one
on the right instrument panel, and
one on the navigator's instrument
panel
11
Power supply
transformer
ZBY-300A 1
Under the floor at the left between
frame 12~13
JZ-Y8F200W-02
AIRCRAFT FLIGHT MANUAL
SECTION VI
AIRCRAFT SYSTEM EQUIPMENT
6-166
June 30, 2012
Component Function Description
GHC-5 Fluxgate magnetic heading sensor
Fluxgate magnetic heading sensor GHC-5 senses the horizontal component of the earth
magnetic field and transmits the magnetic heading signal to the heading gyro so that the heading
gyro can output the gyro magnetic heading signal.
Integrated heading indicator ZHZ-4A
Integrated heading indicator ZHZ-4A is used to indicate the magnetic heading, turning angle,
and relative azimuth angle of the radio set. In this system, it is used to connect the fluxgate
magnetic heading sensor and the heading gyro. In addition, it can be used to eliminate the
compass deviation and instrument error in the system. Appearance of integrated heading indicator
ZHZ-4A is shown in Figure 113.
Figure 6-113 Integrated heading indicator ZHZ-4A
JZ-Y8F200W-02
AIRCRAFT FLIGHT MANUAL
SECTION VI
AIRCRAFT SYSTEM EQUIPMENT
6-167
June 30, 2012
Heading location indicators ZEH-1R(B) and ZEH-1S(B)
The heading location indicator is used to display the following information:
Heading angle (Ψ): indicates the included angle between scale line N on the dial and the
heading reference line.
Radio set magnetic azimuth angle (λ): indicates the included angle between scale line N
on the dial and the radio set pointer.
Radio set relative azimuth angle (λH): indicates the included angle between the radio set
pointer and the heading reference line.
Drift angle (α): indicates the included angle between the drift pointer and the heading
reference line.
The course pole displays deviation (ε) of aircraft relative to the specified course. When
HZX-1M AHRS is interconnected with 777B or GPS, the off-course distance can be read;
when HZX-1M AHRS is interconnected with ZHJ-2020 combined receiver, the heading
deviation can be read. Readings of both the off-course distance and the heading deviation
are indicated by the drum type dial facing the course pole.
The gliding deviation reading is indicated by the gliding pointer facing the gliding reference line
(This pointer is unavailable on ZEH-1S(B) indicator.)
The heading location indicator can preselect the heading angle. Turn the handle in the lower
right corner of the indicator so that the specified pointer turns by an angle (ΨP) relative to scale line
N on the dial.
When ZEH-1S(B) heading location indicator rotates on the heading dial, it also transmits a
three-phase heading signal to the heading linkage box's selsyn receiver through the selsyn
transmitter stator. This signal is converted to the heading deviation signal and heading deviation
integration control signal through the heading linkage box's low-power follow-up system and
return-to-zero circuit. Then, these signals are transmitted to the autopilot to stabilize the aircraft
heading and eliminate heading deviation.
The pointer indication is shown in Figure 6-114. ZEH-1R(B) and ZEH-1S(B) indicators are
installed respectively on the left and right instrument panels and navigator's instrument panel.
These indicators provide similar functions.
JZ-Y8F200W-02
AIRCRAFT FLIGHT MANUAL
SECTION VI
AIRCRAFT SYSTEM EQUIPMENT
6-168
June 30, 2012
21
33
3024
V
A
N
24
W
30
1521
S
33
N
E
15
12
12
G
S
3
6
3
6
Figure 6-114 Heading location indicator ZEH-1R(B)
Navigation indicator ZHL-2J(B)
ZHL-2J(B) navigation indicator is the navigator's primary indicator which can display the true
heading, magnetic heading, magnetic variation angle, and relative azimuth angle and magnetic
azimuth angle of two radio sets. In addition, it can transmit AC and DC true heading signals to the
related navigation devices onboard.
24
21
30
33
1
S
15
N
3
E126
2
W
Figure 6-115 Navigation indicator ZHL-2J(B)
JZ-Y8F200W-02
AIRCRAFT FLIGHT MANUAL
SECTION VI
AIRCRAFT SYSTEM EQUIPMENT
6-169
June 30, 2012
Control box EK-3
Figure 6-116 Control box EK-3
(a) MAGNETIC-HALF changeover switch
MAGNETIC: Corrected by the fluxgate magnetic heading sensor, the gyro outputs a
heading signal indicating the gyro magnetic heading.
HALF: Not corrected by the fluxgate magnetic heading sensor, the gyro outs a heading
signal indicating the great circle heading, that is, half compass heading.
(b) Setting knob: heading transmitter for manually correcting the gyro according to the preset
azimuth.
(c) LEFT-NORMAL-RIGHT changeover switch
NORMAL: The left and right gyros operate properly and transmit heading signals to the
corresponding indicators respectively.
LEFT: The right gyro is powered off. All indicators receive heading signals from the left gyro
only.
RIGHT: The left gyro is powered off. All indicators receive heading signals from the right
gyro only.
(d) RADIO-INERTIAL NAVIGATION changeover switch (not used)
(e) NORTH-SOUTH changeover switch
This switch is used to change the correction azimuth of the gyro apparent error when
aircraft is flying in the northern (or southern) hemisphere.
(f) SLAVING button
This button is used to rapidly correct the gyro magnetic heading.
JZ-Y8F200W-02
AIRCRAFT FLIGHT MANUAL
SECTION VI
AIRCRAFT SYSTEM EQUIPMENT
6-170
June 30, 2012
(g) Latitude potentiometer
This potentiometer is used to perform gyro latitude correction to eliminate the apparent
error when aircraft is flying at different latitudes.
(h) Correction potentiometers (one at the left and one at the right)
These potentiometers are used to compensate the imbalanced gyro drift error generated
during manufacturing. Turning the correction potentiometers during flight is prohibited.
TQZ-1D All-attitude combined gyro TQZ-1D
All-attitude combined gyro TQZ-1D can serve as the central gyroscope for aircraft. It can
output the banking angle, pitch angle, and half compass heading, and stabilize and output the
magnetic heading.
Integrated amplifier FZ-3B
The two integrated amplifiers FZ-3B are used to amplify, convert, and correct various signals.
EJ-7P Relay box EJ-7P
Relay box EJ-7P is used for electric connection of the whole set of HZX-1M AHRS
components and system operating status switchover.
ZBY-300A Power supply transformer ZBY-300A
Power supply transformer ZBY-300A is an autotransformer which can convert the onboard
power supply of 115 V and 400 Hz to the power supply of single-phase 36 V and 26 V and 400 Hz,
supplying power to HZX-1M AHRS and other devices.
Horizon indicator ZDP-1
Totally three horizon indicators ZDP-1 are installed respectively on the pilot's, copilot's and
navigator's instrument panels. They cooperate with the two all-attitude combine gyros to display
the aircraft's banking angle and pitch angle.
Main Technical Data
Operating conditions
Temperature range: -67o
F~+140o
F (-55o
C~+60o
C)
Altitude range: -1640 ft~36089 ft (-500~11000m)
JZ-Y8F200W-02
AIRCRAFT FLIGHT MANUAL
SECTION VI
AIRCRAFT SYSTEM EQUIPMENT
6-171
June 30, 2012
Power supply and consumption power
DC: 27V±10%,≤70W
AC: single-phase:115±5.75V 400±2.5% Hz≤250VA
Three-phase: 36±1.8V 400±2.5% Hz≤180VA
Operating preparation duration: Not longer than 2min
Precision
(a) Heading error: Not greater than ±1.5º after being corrected by the correction mechanism.
(b) Attitude error: Not greater than ±1º at the zero position; not greater than ±1.5º if the attitude
angle is smaller than 30º; not greater than ±2.5º if the attitude angle is greater than 30º.
Half compass drift error: Not greater than 2º/h
(c) Radio set (or VOR) relative azimuth angle error:
Not greater than ±1.5º at the zero position when there are two radio sets.
Not greater than ±1º at the zero position when there are one radio set.
Drift angle error: Not greater than ±0.5º
Magnetic heading swing: Not greater than ±0.5º
Magnetic correction coordination speed
Normal coordination speed: (forward and backward)
Fast coordination speed: Not lower than 8o
/s (forward and backward)
One radio set (or VOR): Not lower than 40º/s
System weight: Not heavier than 100.3 lb (45.5 kg)
JZ-Y8F200W-02
AIRCRAFT FLIGHT MANUAL
SECTION VI
AIRCRAFT SYSTEM EQUIPMENT
6-172
June 30, 2012
Operation Description
System principles
Operating principles of HZX-1M ARHS are described from the heading and attitude
perspectives respectively:
For both the heading and attitude parts, there are two basically independent systems at the left
and right which are interconnected with each other in emergency status switchover.
All-attitude combined gyro TQZ-1D serves as the primary component of HZX-1M AHRS.
TQZ-1D consists of the vertical gyro and heading gyro. The vertical gyro represents the earth
vertical, senses the aircraft's pitch angle and banking angle, converts these angles into electric
signals, and transmits the signals to horizon indicator ZDP-1 and other devices.
In the half compass operating state, the heading gyro serves as an independent heading
sensor and corrects the earth's rotation error by the potentiometer on control box EK-3 based on
the geographical latitude. The heading gyro is equipped with banking and pitch brackets.
Therefore, the bracket error resulted from aircraft banking and pitching is eliminated. In addition, it
transmits the gyro azimuth long range to each indicator through the synchronous follow-up system
to indicate the aircraft heading change.
When the operating status switch on control box EK-3 is set to the MAGNETIC position, the
gyro heading is corrected by fluxgate magnetic heading sensor GHC-5 to indicate the aircraft
magnetic heading.
Heading location indicators on the pilot's and copilot's instrument panels are both ZEH-1R(B),
while that on the navigator's instrument panel is ZEH-1S(B).
JZ-Y8F200W-02
AIRCRAFT FLIGHT MANUAL
SECTION VI
AIRCRAFT SYSTEM EQUIPMENT
6-173
June 30, 2012
Signal crosslinking with devices onboard
When HZX-1M AHRS is operating in normal magnetic correction state, use the NAV SEL
(navigation source selection) switch on the left instrument panel to interconnect HZX-1M AHRS
with HG-593Y8 laser strapdown inertial/satellite integrated navigation system or VOR-432. When
the switch is set to the INS position, both ZEH-1S(B) and left and right ZEH-1R(B) indicate the
magnetic heading of HZX-1M AHRS and the true heading, drift angle, and off-course distance
signals from the inertial system, whose values are the same as the true heading, drift angle, and
off-course distance displayed on the inertial system screen. When the NAV SEL (navigation
source selection) switch is set to the VOR1 or VOR2 position, left and right ZEH-1R(B) indicators
indicate the magnetic heading of HZX-1M AHRS and the corresponding azimuth deviation, gliding
deviation, and its alarm flag from VOR1 or VOR2. If the course pole deviates rightward, the
deviation is positive; if the course pole deviates leftward, the deviation is negative. The gliding
deviation is the reading of the gliding pointer (this pointer is unavailable on ZEH-1S(B)) facing the
central scale line. If the gliding pointer deviates upwards, the deviation is positive; if the gliding
pointer deviates downwards, the deviation is negative. The NAV alarm flags on the two ZEH-1R(B)
indicators display heading deviation alarms, while the GS alarm flags display gliding deviation
alarms.
When the ADF1/TACAN/VOR1 switches on the pilot's, copilot's and navigator's instrument
panels are all set to the VOR1 position, the left and right heading location indicators ZEH-1R(B) and
navigation indicator ZHL-2J(B) should display the azimuth angle from VOR1; when the
ADF2/VOR2 switches on the pilot's, copilot's and navigator's instrument panels are all set to the
VOR2 position, the left and right integrated heading indicators ZHZ-4A and navigation indicator
ZHL-2J(B) should display the azimuth angle from VOR2.
JZ-Y8F200W-02
AIRCRAFT FLIGHT MANUAL
SECTION VI
AIRCRAFT SYSTEM EQUIPMENT
6-174
June 30, 2012
When the ADF1/TACAN/VOR1 switches on the pilot's, copilot's and navigator's instrument
panels are all set to the ADF1 position, the left and right heading location indicators ZEH-1R(B) and
navigation indicator ZHL-2J(B) should display the azimuth angle from ADF1; when the ADF2/VOR2
switches on the pilot's, copilot's and navigator's instrument panels are all set to the ADF2 position,
the left and right integrated heading indicators ZHZ-4A and navigation indicator ZHL-2J(B) should
display the azimuth angle from ADF2.
When the ADF1/TACAN/VOR1 switches on the pilot's, copilot's and navigator's instrument
panels are all set to the TACAN position, the left and right heading location indicators ZEH-1R(B)
and navigation indicator ZHL-2J(B) should display the azimuth angle from the TACAN station.
Heading location indicators on the pilot's and copilot's instrument panels are both ZEH-1R(B),
while that on the navigator's instrument panel is ZEH-1S(B).
In-flight operations
Before takeoff, perform the following operations:
Set the GYRO SEL (horizon gyro selection) switch on the left instrument panel to the N
(normal) position.
Set the MAGNETIC-HALF switch on control box EK-3 to the MAGNETIC position.
Set the LEFT-NORMAL-RIGHT switch to the NORMAL position.
Set the SOUTH-NORTH switch to the NORTH position.
Set the latitude dial to the local latitude.
Set the magnetic variation pointer on ZHJ-2J(B) indicator to the zero position.
Set the TIME DELAY switch on the navigator's instrument panel to the ON position.
After power is supplied to aircraft properly, turn on the power switch of HZX-1M on the
navigator's instrument panel. The power effectiveness light is on. After 15s, the red indicating
lights for the three ZDP-1 indicators should turn on and then off after 50s. ZDP-1 indicator
indicates the aircraft parking attitude. Press the SLAVING button. The magnetic heading after
indicator coordination points to the aircraft parking azimuth. After the AHRS starts operating
properly, set the TIME DELAY switch on the navigator's instrument panel to the OFF position.
JZ-Y8F200W-02
AIRCRAFT FLIGHT MANUAL
SECTION VI
AIRCRAFT SYSTEM EQUIPMENT
6-175
June 30, 2012
After the system is powered on for 5min and starts operating properly, the aircraft can taxi out
of the parking apron.
During flight, the navigator can select the required flight status by using the MAGNETIC-HALF
switch on control box EK-3. When the switch is set to the HALF position, the flight precision will
decrease with the flight duration increasing and gyro drift error accumulating. At this time, set the
switch to the MAGNETIC position periodically (for example, once per hour) for correction.
Correction can be performed only when aircraft is in the rectilinear flight attitude and is flying with a
constant speed. The correction method is to set the MAGNETIC-HALF position to the MAGNETIC
position and then press the SLAVING button. During half compass flight status, revise the latitude
when the latitude changes per 2º.
Check that the LEFT-NORMAL-RIGHT switch on control box EK-3 is operating properly. All
heading indicators should operate properly. Then, check that horizon LEFT-NORMAL- RIGHT
switch on the left instrument panel is operating properly. All attitude indicators should operate
properly.
When the local magnetic variation is set according to the outer scale circle using the magnetic
variation handle of ZHJ-2J(B) indicator, ZHJ-2J(B) indicator can display the true heading and output
the true heading signal.
The pilot can choose to display the ADF1, ADF2, TACAN, or VOR azimuth as required by
using the ADF1/TACAN/VOR1 switches and ADF2/VOR2 switches on the pilot's, copilot's and
navigator's instrument panels. The pilot can choose to display the AHRS (flight attitude) and INS
(inertial) navigation parameter indication or VOR1 and VOR2 course deviation or course gliding
indication when landing as required by using the NAV SEL (navigation source) switch on the pilot's
instrument panel. When the switch is set to the INS position, the three heading location indicators
display the true heading, drift angle, and off-course distance information about HG-593Y8 laser
strapdown inertial/satellite integrated navigation system. During landing approach, set the switch
to the VOR1 or VOR2 position. The landing azimuth deviation and gliding deviation can be
indicated by the deviation pole and gliding pointer on the left and right heading location indicators
facing the deviation and gliding marks. In this way, the location of aircraft relative to the runway
can be determined.
JZ-Y8F200W-02
AIRCRAFT FLIGHT MANUAL
SECTION VI
AIRCRAFT SYSTEM EQUIPMENT
6-176
June 30, 2012
Operation Precautions
(a) Within 1min that the gyro is powered on and 30min after it is powered off, moving the gyro
is prohibited.
(b) Before starting the inverter, check that the AHRS power switch is at the OFF position and
the TIME DELAY switch is at the ON position. Supply 27 V power to aircraft and then start
the single-phase and three-phase inverters. After the voltage indication becomes normal,
wait 10s and turn on the AHRS power switch. To power off the AHRS, turn off the AHRS
power switch and then the master power switch onboard.
(c) After the aircraft is landed and when it parks on the ground, turn off the AHRS power switch
and then the power switch onboard. After the AHRS power switch is turned off, any great
attitude mechanical taxiing is prohibited.
KRA 405B radio altimeter
Functions
A set of KRA 405B radio altimeter is installed on the Y8F200W aircraft to be exported to
Venezuela. It provides reliable and accurate altitude information for the pilot during takeoff,
approach, landing, and ground proximity flight in other cases. In addition, the system is capable of
providing alarms when aircraft approaches the preset altitude.
System Composition and Component Installation Position
The altimeter consists of one transceiver, two altitude indicators, one receiving antenna, one
transmitting antenna, and connecting cables. Their models and installation positions are listed in
Table 6-20.
Table 6-20 Component models and installation positions
Component Model Quantity Installation Position
Transceiver KRA 405B 1 At the right between frame 63~64
Navigator's altitude
indicator
KNI 415 1 On the navigator's instrument panel
Pilot's indicator KNI 415 1 On the pilot's instrument panel
Transmitting antenna KA 54A 1
Between rib 4~5 of stringer 4~5 on the
lower surface of the right horizontal tail
Receiving antenna KA 54A 1
Between rib 4~5 of stringer 4~5 on the
lower surface of the left horizontal tail
Warning light
Lamp shade ZSD-10
(red)
Bulb FJ28-0.1
1 On the copilot's instrument panel
JZ-Y8F200W-02
AIRCRAFT FLIGHT MANUAL
SECTION VI
AIRCRAFT SYSTEM EQUIPMENT
6-177
June 30, 2012
Main Technical Specifications
Operating frequency: 4300±15MHz
Operating power supply: 28 VDC (maximum current of 2A)
Altitude output precision: ±5% (0~500ft); ±7% (500~2500ft)
Altitude measuring range: 0~2500ft
Operating altitude: 0~55000ft
Operations
Altitude indicator description
Appearance of the radio altitude indicator is shown in Figure 6-117.
TEST
DH
DH warning light
1
2
3
4
510
15
20
RADAR ALT
×100 FEET
Fault flag Indicator pointer
Warning vernier
"TEST" self-test button
Warning altitude knob
Figure 6-117 KNI-415 altitude indicator
JZ-Y8F200W-02
AIRCRAFT FLIGHT MANUAL
SECTION VI
AIRCRAFT SYSTEM EQUIPMENT
6-178
June 30, 2012
(a) The altitude indicator indicates a radio altitude within the range of 0 ft~2000 ft. When the
flight altitude is higher than 2000 ft, the indicator pointer rotates clockwise and hides behind
the baffle.
(b) The warning altitude knob is used to adjust the preset warning altitude. Turning the warning
knob will drive the warning vernier on the dial. The reading pointed by the warning vernier
indicates the preset warning altitude.
(c) Whether the DH warning light is on or off depends on whether the altitude indicator pointer
is lower than or higher than the warning vernier. When the warning light is on, it can be
turned off by pressing the DH warning light. When aircraft is flying at an altitude lower than
the preset warning altitude, press the DH warning light again to turn on the warning light
again. If the warning altitude is set to a value higher than 50 ft, pressing the TEST self-test
button to turn on the warning light is also allowable.
(d) When the radio altimeter is operating properly in tracing state, the fault flag is invisible. The
fault flag appears only when the radio altimeter is operating in other states, for example,
the traced object is missing, power is cut off, fault is generated, or self-test is performed.
(e) The ALT ALERT warning light on the copilot's instrument panel is on when the warning light
on the pilot's altitude indicator turns on, and it is off when the warning light on the pilot's
altitude indicator turns off. The on or off status of the ALT ALERT warning light is
asynchronous with that of the warning light on the navigator's altitude indicator.
Altitude indicator display and operations
(a) Turn warning altitude knobs on altitude indicators on the pilot's and navigator's instrument
panel to make the warning altitude vernier point to 0 ft. Observe the altitude indicator. The
indicator pointer points to (0±5) ft. The fault flag is invisible.
Note
1) There should be no other object in the ground area whose diameter is 140 ft
corresponding to the radio altimeter antenna on the lower surface of the left
horizontal tail.
2) 0 ft indicates the flight altitude when landing gears are in the parking
compression state.
JZ-Y8F200W-02
AIRCRAFT FLIGHT MANUAL
SECTION VI
AIRCRAFT SYSTEM EQUIPMENT
6-179
June 30, 2012
(b) Turn the R-ALT BRT ADJ knob on the pilot's instrument panel. Observe the brightness
change of the altitude indicator on the pilot's instrument panel. Turning the knob clockwise
will brighten the indicator.
(c) Turn the R-ALT BRT ADJ knob on the navigator's instrument panel. Observe the brightness
change of the altitude indicator on the navigator's instrument panel. Turning the knob
clockwise will brighten the indicator.
Note
During the first power-on check, if readings of the two altitude indicators are not
0, use a small round stick to push the calibration switch (SW 1) on the
transceiver front panel for 10s so that the altitude indicator pointer points to
scale 0.
(d) Ground self-test
Perform self-test according to the following procedure:
(1) Turn the warning altitude knob so that the warning altitude vernier points to 25 ft.
(2) Press and hold the TEST self-test button on the altitude indicator.
(3) When the altitude indicator indicates (50±5) ft, the fault flag appears. The DH warning
light and ALT ALERT warning light on the copilot's instrument panel are off.
(4) Turn the warning altitude knob DH. When the warning altitude vernier reading is
greater than (50±5) ft, the DH warning light turns on.
(5) Release the TEST self-test button. The fault flag disappears and the pointer points to
(0±5) ft.
In-flight operations
(a) Turn on the RALT circuit breaker on the navigator's right console.
(b) Turn the warning altitude knob on the altitude indicator before flight to select the required
warning altitude.
(c) When the reading pointed by the warning altitude vernier on the altitude indicator is higher
than the radio altimeter indication, the DH warning light turns on; otherwise, the DH
warning light is off.
JZ-Y8F200W-02
AIRCRAFT FLIGHT MANUAL
SECTION VI
AIRCRAFT SYSTEM EQUIPMENT
6-180
June 30, 2012
Note
1) When the radio altimeter indication is higher than 2000 ft, the altitude pointer
of the altitude indicator hides behind the baffle.
2) When the radio altimeter indication is higher than 2500 ft, the fault flag
appears on the altitude indicator.
(d) Press the TEST self-test button on the altitude indicator at any altitudes to perform self-test
so that the altimeter can operate properly. The procedure is as follows:
(1) Press and hold the TEST self-test button on the altitude indicator.
(2) The altitude indicator pointer points to (50±5) ft. The fault flag appears.
(3) The DH warning light and ALT ALERT warning light on the copilot's instrument panel
are off.
(4) If the preset warning altitude is higher than 50 ft, the DH warning light is on.
(5) Release the TEST self-test button. The fault flag disappears and the altitude indicate
restores to the normal value.
Precautions
(a) The radio altimeter indicates the aircraft altitude relative to the ground. It can provide
accurate altitudes relative to various ground conditions. In certain unusual environments,
however, the altimeter precision will be affected. When aircraft is flying through jungles, the
indicator may not indicate the altitude relative to the treetop; when aircraft is flying through
firn, the indicator may not indicate the altitude relative to the firn.
(b) During flight with a great pitch angle and a roll angle, the altimeter precision will be
affected.
(c) Before takeoff and approach, perform self-test to check the altimeter. In this way, faults can
be detected in advance and the corresponding preventive measures can be taken.
JZ-Y8F200W-02
AIRCRAFT FLIGHT MANUAL
SECTION VI
AIRCRAFT SYSTEM EQUIPMENT
6-181
June 30, 2012
Air Data System (XAS-3M)
Function
XAS-3M consists of XSC-3N air data computer, static temperature sensor GWR-24 and
altitude indicator ZG-4B. It functions to provide air parameter and its relative information for other
systems of the aircraft. Here is specific information of its functions:
(d) Providing air pressure and altitude information for pilot, copilot and navigator.
Providing absolute air pressure altitude, relative air pressure altitude and vertical
speed signal for ground proximity warning system and providing absolute air pressure
altitude, Mach number, static air pressure, total air pressure, true airspeed, vertical
speed and air speed indication signals, etc.
(e) Providing absolute air pressure altitude signal and true airspeed signal for traffic collision
and avoidance system.
(f) Providing total air pressure DC analog signal for automatic fuel cutoff and overtemperature
protection devices.
(g) Providing absolute air pressure altitude signal and true airspeed signal for Free Flight 2101
I/0 GPS navigation system.
(h) Providing air pressure altitude signal for JZ/YD-126E airborne transponder.
JZ-Y8F200W-02
AIRCRAFT FLIGHT MANUAL
SECTION VI
AIRCRAFT SYSTEM EQUIPMENT
6-182
June 30, 2012
Composition and installation position of system kit
Composition
The composition and installation position of air data system refer to Table 6-21.
Table 6-21 Composition and installation position of air data system
S/N Nomenclature Type No. Qty. Installation position Remarks
1 Air data computer XSC-3N 2 Equipment rack on left of Frame 9
2
Temperature
sensor
GWR-24 2
Left and right aircraft skin of
Frame 7~8
3 Altitude indicator ZG-4B 3
Left and right instrument panel
and navigator instrument panel,
one for each
System configuration
There are 2 air data computers for system configuration of the aircraft. Under normal condition,
the air data computer 1 is for ground proximity warning system, flight data recording system,
TCAS-2000 traffic collision and avoidance system responder 1, automatic fuel cutoff and
overtemperature protective devices and navigator and pilot altitude indicator ZG-4B. In contrast,
air data computer 2 is for TCAS-2000 traffic collision and avoidance system responder 2, Free
Flight 2101 I/0 GPS navigation system, JZ/YD-126E airborne transponder and altitude indicator
ZG-4B of copilot instrument panel. There is an air data computer changeover switch respectively
on instrument panels of navigator, pilot and copilot. If there should be failure for one of the air data
computer, switch to the other through the changeover switch for normal operation. Crosslinking
block diagram refers to Figure 6-118.
JZ-Y8F200W-02
AIRCRAFT FLIGHT MANUAL
SECTION VI
AIRCRAFT SYSTEM EQUIPMENT
6-183
June 30, 2012
Airdatacomputer1
Airdatacomputer2
Total air
temperature
Total air
temperatureTemperature
sensor
Temperature
sensor
Air
parameter
Air
parameter
Relay box
Navigatorinstrument
panelaltitudeindicator
Leftinstrument
panelindicator
Inquisitor
Laserinertianavigationsystem
Groundproximitywarningsystem
Tcassystem
Automaticfuelshut-offsystem
Rightinstrumentpanel
altitudeindicator
Freeflightnavigation
system
Totalpressure
Totalpressure
Staticpressure
Flightdatarecordingsystem
Staticpressure
Figure 6-118 Functional block diagram of air data system
Air data computer (XSC-3N)
(a) General
Air data computer (short for ADC), the core of whole air data system, receives pitot
pressure and static pressure of pitot-static system and air temperature information from
temperature sensor. Then, ADC deals that information to acquire all kinds of air parameters,
and then sends the parameters to altimeter indicator, traffic alert and collision avoidance
system TCAS-94 and flight data record system.
JZ-Y8F200W-02
AIRCRAFT FLIGHT MANUAL
SECTION VI
AIRCRAFT SYSTEM EQUIPMENT
6-184
June 30, 2012
(b) Operation Principle
ADC XSC-3N is a microcomputer system made of chip Adu C812BS. ADC, core of air data
system, senses pitot pressure and static pressure of pitot-static system of aircraft and
calculates parameters of absolute pressure altitude Hp in flight, true air speed TAS, etc., by
air parametric equation. Sense static aircraft temperature by static temperature sensor SAT.
And then calculate out total air temperature TAT by static temperature.
Procedure of ADC performs continuous monitoring for each factor in aircraft operating. If
judging the trouble in air data computer itself, failure indicator light on front panel will give
out trouble indication signal.
When BIT signal is effective with aircraft on the ground, air data computer may cut off
normal operating procedures currently and performs BIT procedure, that is, ADC performs
function check in each part. If all conditions are normal, the computer may send out a
group of specified data; otherwise, output data are all 0.
(c) Main Technical Data
(1) Inlet of air data computer
a) Static temperature
The air data computer receives static air pressure from static-pressure hole.
Measurement range: 0.35~15.95psi (0.71 inHg~32.48 inHg)
Operation range: 1.09~15.80psi (2.21 inHg~32.16 inHg)
b) Total pressure
The air data computer receives total pressure from aircraft air-speed tube.
Measurement range: 0.35~37.71psi (0.71 inHg~76.77 inHg)
Operation range: 1.52~23.26psi (3.1 inHg~47.35 inHg)
JZ-Y8F200W-02
AIRCRAFT FLIGHT MANUAL
SECTION VI
AIRCRAFT SYSTEM EQUIPMENT
6-185
June 30, 2012
c) Static air temperature(SAT) of air data computer
The air data computer receives static temperature resistance signals from aircraft
temperature sensor.
Measurement range: -108.4o
F (-78o
C) (34.32Ω) ~197.6o
F (92o
C) (68.00Ω)
Operation range:-76o
F (-60o
C) (34.32Ω) ~176o
F (80o
C) (68.00Ω)
d) Build-in Test (BIT) initial
It receives BIT discrete magnitude input of its own front panel or the instrument
panel of the aircraft.
(2) Output format of air data computer
Four ARINC429 low-speed British data buses;
One RS422 data bus (spare);
Parallel altitude code, which is also called 11 channel Gray code data bus(spare);
Discrete magnitude output;
(3) Output of air data computer and its characteristics
Accorded with air data Standard ARINC429.
a) Absolute air pressure altitude(Hp)
Output range: -1000 ft~50000 ft(-304.8m~15240m)
Output parameter accuracy refers to Table 6-22.
JZ-Y8F200W-02
AIRCRAFT FLIGHT MANUAL
SECTION VI
AIRCRAFT SYSTEM EQUIPMENT
6-186
June 30, 2012
Table 6-22 Correction card for altitude
Altitude
ft (or m)
Tolerance
±ft (or ±m)
Altitude
ft (or m)
Tolerance
±ft (or ±m)
0 25 (8) 14000 (4267) 40 (12)
1000 (305) 25 (8) 17000 (5182) 45 (14)
2000 (610) 25 (8) 20000 (6096) 50 (15)
3000 (914) 25 (8) 30000 (9144) 75 (23)
4000 (1219) 25 (8) 40000 (12192) 100 (30)
5000 (1524) 25 (8) 50000 (15240) 125 (38)
8000 (2438) 30 (9)
11000 (3353) 35 (11)
b) (TAS)True airspeed (TAS)
Output parameter range: 50 kn~598 kn (92.6~1107.5km/h);
When true airspeed is less than 50kn (92.6km/h), the output set should be 0.
Output parameter accuracy refers to Table 6-23.
Table 6-23 TAS accuracy sheet
TAS kn(km/h) Tolerance (or±kn)
50 kn~70 kn(92.6~129.64km/h) ±12 kn(±22.22km/h)
70 kn~150 kn(129.64~277.8km/h)
±12 kn~±4 kn(±22.22~±7.41km/h)(linear
transition)
150 kn~598 kn(277.8~1107.5km/h) ±4 kn(±7.41km/h)
JZ-Y8F200W-02
AIRCRAFT FLIGHT MANUAL
SECTION VI
AIRCRAFT SYSTEM EQUIPMENT
6-187
June 30, 2012
c) Static air temperature (SAT)
Output range: -76~176o
F (-60o
C~80o
C)
Output accuracy: +34.7o
F~+29.3(±1.5o
C)
d) Elevating speed (HPR)
Output parameter range: -20000 ft/min~20000 ft/min (-101.6~101.6m/s)
Output parameter accuracy is shown in Table 6-24.
Table 6-24 Correction card for elevating speed
Elevating speed
ft/min (or m/min)
Tolerance
ft/min(or ±m/min)
Elevating speed
ft/min (or m/min)
Tolerance
ft/min (or ±m/min)
20000 (6096) 1000 (305) -50 (-15) 45 (14)
6000 (1829) 300 (91) -100 (-30) 45 (14)
4000 (1219) 200 (61) -200 (-61) 45 (14)
2000 (610) 100 (30) -500 (-152) 45 (14)
1000 (305) 50 (15) -1000 (-305) 50 (15)
500 (152) 45 (14) -2000 (-610) 100 (30)
200 (61) 45 (14) -4000 (-1219) 200 (61)
100 (30) 45 (14) -6000 (-1829) 300 (91)
50 (15) 45 (14) -20000 (-6096) 1000 (305)
0 45 (14)
JZ-Y8F200W-02
AIRCRAFT FLIGHT MANUAL
SECTION VI
AIRCRAFT SYSTEM EQUIPMENT
6-188
June 30, 2012
e) Total air temperature (TAT)
Output range: -76~210.2o
F (-60o
C~99o
C)
Output accuracy: 34.7~+29.3o
F (±1.5o
C)
f) Indicated airspeed(Vi)
Output parameter range: 30 kn~450 kn(55.56~833.4km/h)
When indicated speed is below 30kn (55.56km/h), the output set should be 0.
The output parameter accuracy refers to Table 6-25.
Table 6-25 Correction card for indicated airspeed
Indicated air speed
(IAS)
kn (or km/h)
Tolerance
±kn (or ±km/h)
Indicated air speed
(IAS))
kn (or km/h)
Tolerance
±kn (or ±km/h)
30 (55.5) 5.0 (9.3) 80 (148) 3.5 (6.5)
40 (74) 5.0 (9.3) 100 (185) 2.0 (3.7)
50 (93) 5.0 (9.3) 450 (833) 2.0 (3.7)
g) Mach number (M)
Output parameter range: 0.00~1.00
Output parameter accuracy refers to Table 6-26.
JZ-Y8F200W-02
AIRCRAFT FLIGHT MANUAL
SECTION VI
AIRCRAFT SYSTEM EQUIPMENT
6-189
June 30, 2012
Table 6-26 Mach (M) exactness sheet
Absolute air pressure altitude range Mach number Tolerance
0 ft~10000 fat (0~3048m) 0.100 ±0.012
0 ft~10000 fat (0~3048m) 0.200 ±0.012
0 ft~10000 fat (0~3048m) 0.300 ±0.010
0 ft~20000 fat (0~6096m) 0.400 ±0.010
0 ft~20000 fat (0~6096m) 0.500 ±0.010
0 ft~30000 fat (0~9144m) 0.600 ±0.0095
10000 ft~40000 fat (3048~12192m) 0.700 ±0.0090
30000 ft~50000 fat (9144~15240m) 0.800 ±0.0085
30000 ft~50000 fat (9144~15240m) 0.900 ±0.0075
(4) Main Technical Data of Air Data Computer
Power supply 28V DC
Power consumption Not more than 15 W
Operating temperature range -67~158o
F -55o
C~70o
C
Outline size (length×width×height) 6.38in×4.41in×3.78in (162 mm×112 mm×96 mm)
Weight of air data computer 4.41 lb (2kg)
JZ-Y8F200W-02
AIRCRAFT FLIGHT MANUAL
SECTION VI
AIRCRAFT SYSTEM EQUIPMENT
6-190
June 30, 2012
(5) Operation Principle
Front panel of air data computer is shown in Figure 6-119. In the Figure:
Static pressure
(Ps)
XS1
N
D
Pitot pressure
(Pt)
Air data computer
Operation Trouble Built-in test
Figure 6-119 Front panel of air data computer
a) Ps nipple connects with aircraft static pipeline to make static pressure enter into
static sensor.
b) Pt nipple connects with aircraft pitot pipeline to make pitot pressure enter into pitot
sensor.
c) Operating indicating light (green), called ADC power supply indicating light,
extinguishes when there is no power or power supply is abnormal; otherwise, that
light is on.
d) Failure indicator light (red) is to indicate that there is trouble in product. When
there is failure in ADC, this indicating light is on; otherwise, it is at off state.
e) Built-in test button: to control built-in circuit.
f) Connection socket: connecting with aircraft cable.
JZ-Y8F200W-02
AIRCRAFT FLIGHT MANUAL
SECTION VI
AIRCRAFT SYSTEM EQUIPMENT
6-191
June 30, 2012
Temperature sensor GWR-24
(a) Function
Temperature sensor (GWR-24) is to sense ambient air temperature around aircraft and
then sends measured air temperature signal to air data computer XSC-3N. Sensitive
element of GWR-24 is platinum resistance, whose resistance value changes in linearity.
The value is 50Ω at 32o
F(0o
C).
(b) Main Technical Index
Operating temperature range -76o
F ~176o
F (-60o
C~+80o
C)
Accuracy ±(32.54±32.0054)o
F (±(0.3±0.003T)o
C)
Operating current Not more than 5mA
Outline size (mm) 1.73in×0.98in×2.36in (44mm×25mm×60mm)
Weight Not more than 0.22lb (0.1 kg)
Altitude indicator (ZG-4B)
Function
Altitude indicator (ZG-4B) receives absolute altitude signal according with ARINC429 form
from aircraft air data computer and preset pressure value at inHg unit by pressure binding knob to
provide absolute and relative pressure altitude signals for navigator, pilot and copilot.
JZ-Y8F200W-02
AIRCRAFT FLIGHT MANUAL
SECTION VI
AIRCRAFT SYSTEM EQUIPMENT
6-192
June 30, 2012
Main Technical Index
Operating power and consumption 28V DC, not more than 15 W.
Interior lighting power and consumption 28V DC, not more than 5 W.
Interior lighting White lighting
Air pressure amending display range -1000 ft~50000 fat (-304.8~15240m)
Accuracy 20 ft (6.10m)
Aerodrome pressure binding signal display range 0.98psi~15.22psi (22.00 inHg~30.99 inHg)
Air pressure binding accuracy ±4.9×10⁻³
psi(±0.01 inHg)
Outline size 3.17in×3.17in×5.71in (80.64mm×80.64mm×145mm)
Weight not above 4.41 lb
(c) Air pressure amending altitude indication
Air pressure amending altitude indication of the altitude indicator displays air pressure
altitude in combination of dial, pointer and nixie tube. One circle of the pointer relative to
the dial represents 1,000 FT, and the minimum scale of the dial is 10 FT. The nixie tube at
the center line of the dial displays accurate air pressure altitude.
Read directly from the middle line nixie tube for correct reading. The solid pointer can read
flight tendency within 1,000 FT.
If - appears at the 10,000 digit of the nixie tube, it suggests that the air pressure altitude is
negative altitude below 0 m, i.e., below the sea level. Here is the reading method: the solid
pointer reading minus 1000 FT in relative to the dial. For example, if the pointer points to
830, then air pressure altitude reading should be: 830-1,000=-170(FT). In contrast, read
the reading on nixie tube directly.
When there is error for air pressure altitude indication, the red light would be on at the
warning window, reminding of warning for the operator and suggesting invalid present
altitude indication.
JZ-Y8F200W-02
AIRCRAFT FLIGHT MANUAL
SECTION VI
AIRCRAFT SYSTEM EQUIPMENT
6-193
June 30, 2012
(d) Aerodrome pressure binding
Knobs marked with aerodrome pressure at the lower left of the altitude indicator panel are
used for setting airport altitude in pressure unit of in Hgor hPa. When flymen conducts
take-off, landing or ferrying flight operations, reporting through the tower can realize zero
altitude of the pointer relative to the airport.
Turn the aerodrome pressure knob in a clockwise wire, inHg or hpa is increased, and
reading of the solid pointer increases accordingly, and vice versa.
Unit are displayed by special digital lights.
(e) Self-test
When the ZG-B altitude indicator enters self-test, normal operation programs are
interrupted, the warning suggests invalid indication, and all internal assembly units start
self-test during self-test status. If self-test passes, for the ZG-4B altitude indicator, the air
pressure altitude pointer would point to 700 ft in the shortest path, warning light is on, all
displays of the nixie tube are 8, and the reading maintains for 5 s and then return to normal
operation status. If self-test fails, the warning would still be on. Error display would not be
removed only when failure disappears or is removed.This manner supports ZG-4B altitude
indicator original place checking, i.e., BIT.
(f) Failure diagnoses and troubleshooting
(6) Airfield failure diagnoses
Under normal operation, airfield failure diagnoses could be realized according to the
pointer, nixie tube and error signaling light on the front panel of the altitude indicator.
When error signaling light is on, it suggests failure of the altitude indicator. However,
when the error signaling light is off, if suggests that the altitude indicator is free from
failure.
(7) Workshop failure diagnoses
Once there is failure, use special test equipment at the workshop to locate the failure
for further isolation. Generally, failure isolation is conducted by replacing plug-in plate.
JZ-Y8F200W-02
AIRCRAFT FLIGHT MANUAL
SECTION VI
AIRCRAFT SYSTEM EQUIPMENT
6-194
June 30, 2012
WL-11 Automatic direction finder
Functions
Two sets of WL-11 automatic direction finders (ADFs) are installed on the Y8F200W aircraft to
be exported to Venezuela. They can indicate the angle between the aircraft longitudinal axis and
the ground radio set (navigation station or broadcast station) azimuth continuously and
automatically so that navigation can be implemented based on the ground radio set.
System Composition and Component Installation Position
The two sets of WL-11 ADFs consist of two receivers, two sets of ZT-9 combined antennae,
two control boxes, one signal damper, and connecting cables. Their models and installation
positions are listed in Table 6-27.
Table 6-27 Component models and installation positions
Component Model Installation Position
First set of the compass
combined antenna
ZT-9
On longeron 0 between frame 36~37
on the top of the fuselage
Second set of the compass
combined antenna
ZT-9
On longeron 0 between frame 38~39
on the top of the fuselage
First set of the compass
control box
WL-11-2F1
On the upper part of the navigator's
instrument panel
Second set of the compass
control box
WL-11-2F1
On the upper part of the navigator's
instrument panel
First set of the compass
receiver
WL-11-1A1
On the ceiling at the right of frame
37~38
Second set of the compass
receiver
WL-11-1A1
On the ceiling at the right of frame
39~40
Signal damper WL-11-8
On the ceiling at the right of frame
32~34
JZ-Y8F200W-02
AIRCRAFT FLIGHT MANUAL
SECTION VI
AIRCRAFT SYSTEM EQUIPMENT
6-195
June 30, 2012
Main Technical Data
Operating frequency range
The operating frequency range is 150~1750 kHz. The frequency interval is 0.5 kHz. There are
totally 7 frequency bands. The control box provides 8 online store functions.
Band I:150 kHz~189.5 kHz;
Band II:190 kHz~279.5 kHz;
Band III:280 kHz~399.5 kHz;
Band IV:400 kHz~599.5 kHz;
Band V:600 kHz~899.5 kHz;
Band VI:900 kHz~1399.5 kHz;
Band VII:1400 kHz~1750 kHz;
Effective range
When the ADF is cooperating with the navigation station whose transmitting power is 500 W
and frequency accuracy is not lower than ±200 Hz, the effective range is as follows:
(a) 180km Flight altitude of 1000 m: 180 km
(b) 250km Flight altitude of 5000 m: 250 km
(c) 300km Flight altitude of 10000 m: 300 km
JZ-Y8F200W-02
AIRCRAFT FLIGHT MANUAL
SECTION VI
AIRCRAFT SYSTEM EQUIPMENT
6-196
June 30, 2012
Azimuth error
(a) Error at azimuth 0o
: not higher than ±0.5o
(b) Error at azimuth 180o
: not higher than ±1o
(c) Error at other azimuths: not higher than ±3o
Power consumption
DC power supply: 27V/1.2A
AC power supply: 115V/0.6A (400Hz)
Operations
Control panel description
MANUAL
3
PRESET
2
V
8 9
ANT
OFF ADF
1
10 11 12
TUNER
2
1
1888.8
FAR
NEAR
3
BRT
4
8
1413
7
6
54
L
6
TEST
MEM
5 7
Figure 6-120 Appearance of WL-11-2F1 control panel
JZ-Y8F200W-02
AIRCRAFT FLIGHT MANUAL
SECTION VI
AIRCRAFT SYSTEM EQUIPMENT
6-197
June 30, 2012
Positions of various switches and control knobs on the control panel are shown in Figure 6-120.
Their functions are as follows:
(1) FAR: outer marker (OM) indicator
(2) NEAR: inner marker (IM) indicator
(3) Frequency display window
(4) BRT: frequency display brightness adjustment knob
(5) MANUAL/PRESET: manual control/preset switch
(6) MEM: memory button
(7) TEST: self-test button
(8) Function knob:
ANT-receiving;
ADF-compass;
OFF-OFF position
(9) V: volume adjustment knob
(10) Hundreds-digit and thousands-digit frequency control knob
(11) Tens-digit frequency control knob
(12) Units-digit and 0.5 frequency control knob
(13) Preset channel switch
(14) L: Panel illumination adjustment knob
(a) OFF: When the compass operating mode switch on the control panel is set to the OFF
position, both the DC and AC power supplies are cut off, and the compass is in shutoff
state. When the switch is set other positions, both the DC and AC power supplies are
engaged.
(b) ADF: When the compass operating mode switch is set to the ADF position, the compass
can be used for azimuth measurement.
(c) ANT: When the compass operating mode switch is set to the ANT position, the audio
modulation signal of the tuned radio set can be clearly heard through the earphone. In this
case, however, the compass cannot be used for azimuth measurement.
JZ-Y8F200W-02
AIRCRAFT FLIGHT MANUAL
SECTION VI
AIRCRAFT SYSTEM EQUIPMENT
6-198
June 30, 2012
(d) V: Volume can be adjusted by using the volume adjustment knob on the control panel.
Turning the knob clockwise can turn up the volume, while turning the knob
counter-clockwise can turn down the volume. The volume can also be adjusted by using
the intercom control box.
(e) L: Brightness of characters on the control panel can be adjusted by using the L knob.
Turning the knob clockwise can increase the character brightness, while turning the knob
counter-clockwise can decrease the character brightness.
(f) BRT: Brightness of characters displayed in the control box frequency window can be
adjusted by using the BRT knob. Turning the knob clockwise can increase the character
display brightness, while turning the knob counter-clockwise can decrease the character
display brightness.
(g) PRESET: When the switch is set to the PRESET position, turn the preset channel knob to
select a preset channel. At this time, the frequency display window should display the
operating frequency of the selected channel. Meanwhile, the corresponding OM indicator
or IM indicator should turn on.
(h) MANUAL: When the switch is set to the MANUAL position, turn the units-digit
manually-controlled tuner knob to select units-digit and 0.5 kHz compass operating
frequency; turn the tens-digit manually-controlled tuner knob to select the tens-digit
compass operating frequency; turn the hundreds-digit and thousands-digit
manually-controlled tuner knob to select the hundreds-digit and thousands-digit compass
operating frequency. In MANUAL operating mode, the OM indicator and IM indicator
should turn off. The manually-controlled tuning frequency range is 150.0 kHz~1750.0 kHz
with a minimum frequency interval of 0.5 kHz.
(i) TEST: Press the TEST button on the control panel and hold it for 2s~3s to make the
compass enter the self-test state. The earphone should output the audio of 1000 Hz. The
azimuth pointer on the indicator should stop temporarily at 90o
and then rotate to 135o
±5o
.
The frequency window on the control box displays PASS for 1s~2s, indicating that the
compass self-test result is normal. After the self-test is complete, the compass returns to
the operating status before the self-test.
JZ-Y8F200W-02
AIRCRAFT FLIGHT MANUAL
SECTION VI
AIRCRAFT SYSTEM EQUIPMENT
6-199
June 30, 2012
Compass azimuth indication description
(a) The relative azimuth of the first set of WL-11 ADF is indicated by the pointer (green thin
pointer) of radio set 1 on navigation indicator ZHL-2J (B) on the navigator's instrument
panel, radio pointer on heading location indicator ZEH-1R(B) on the pilot's instrument
panel, and radio pointer on heading location indicator ZEH-1R(B) on the copilot's
instrument panel. The relative azimuth of the second set of WL-11 ADF is indicated by the
pointer (orange wide pointer) of radio set 2 on navigation indicator ZHL-2J (B) on the
navigator's instrument panel, radio pointer on integrated heading indicator ZHZ-4A on the
pilot's instrument panel, and radio pointer on integrated heading indicator ZHZ-4A on the
copilot's instrument panel.
(b) During control box self-test, if the pointer does not point to 135o
after it stops at 90o
temporarily, the frequency display window on the control panel displays the fault code
EXXXX for about 1s~2s, indicating that the compass self-test result is abnormal.
Storing the preset operating frequency of the control box
(a) Set the compass operating mode switch on the control panel to the ANT or ADF position
and the MANUAL/PRESET changeover switch to the MANUAL position.
(b) Press and hold the MEM button on the control panel until the OM indicator turns on. Then,
release the MEM button. At this time, the FAR indicator is on, whereas the NEAR indicator
is off, indicating that the control box enters the storing status. The operating frequency to
be stored is the OM operating frequency.
(c) Turn the preset channel knob to select preset channel numbers 1~8.
(d) Turn the frequency tuning knob so that the control box operating frequency to be displayed
is the OM operating frequency to be stored.
(e) Press the MEM button to store the OM operating frequency in the memory. At this time, the
FAR indicator is off, whereas the NEAR indicator is on, indicating that the operating
frequency to be stored is the OM operating frequency.
(f) Repeat 4.3.2 through 4.3.5 to select another channel number and store the required preset
operating frequency until all preset channel operating frequencies to be stored are stored.
(g) After all frequencies are stored, set the MANUAL/PRESET changeover switch from the
MANUAL position to the PRESET position so that the control box exits from the storing
status.
JZ-Y8F200W-02
AIRCRAFT FLIGHT MANUAL
SECTION VI
AIRCRAFT SYSTEM EQUIPMENT
6-200
June 30, 2012
Operating instruction in combination with HF radio set
When the HF radio radiated, the azimuth pointer of the radio compass on HZX-1M heading
attitude system indicator would be locked at the azimuth position before the HF radio set radiates.
If continuous radiating time of the HF radio set is above 15 s, the compass would enter invalid
azimuth status automatically, and pointer of the indicator would turn from the azimuth position
before radiating to stay at 90o
azimuth. When the HF radio set stops radiating, the pointer can
follow to correct direction.
In-flight operations
(a) Switch and knob settings
Perform the following operations: Turn on the ADF-1 and ADF-2 28 VDC circuit breakers
on the communicator circuit breaker board. Apply power to 115 VAC power distribution disk.
Set the ADF1/TACAN/VOR1 switches on the left and right instrument panels to the ADF1
position. Set the compass switch on the control panel to the ADF or ANT position. Turn the
ADF1 knob on the intercom control box to choose to tune in audio signals from the first set
of WL-11 ADF. Turning this knob clockwise can turn up the volume, while turning this knob
counter-clockwise can turn down the volume. Turn the ADF2 knob on the intercom control
box to choose to tune in audio signals from the second set of WL-11 ADF. Turning this knob
clockwise can turn up the volume, while turning this knob counter-clockwise can turn down
the volume. Turn the L knob on the compass control box on the upper part of the
navigator's instrument panel to properly adjust the illumination on the control panel. Turn
the BRT knob on the control panel to properly adjust brightness of characters displayed in
the control panel frequency window.
(b) Power-on self-test
After the intercom and attitude-heading reference system (AHRS) are powered on properly,
set the compass operating mode switch on the upper part of the navigator's instrument
panel from the OFF position to the ANT position. The frequency display window should
display 1888.8. Meanwhile, both the FAR and NEAR indicators turn on. After about 1s, the
system starts performing self-test. The earphone outputs audio of 1000 Hz. The frequency
display window displays the accumulated operating duration. The HZX-1M AHRS pointer
for the compass points to 90o
and stops temporarily and then rotates to 135o
. Then,
self-test is complete, and the system enters the normal operating status. The frequency
display window on the control panel displays an operating frequency (last operating
frequency before the last shutoff) falling within the range of 150.0~1750.0 kHz.
JZ-Y8F200W-02
AIRCRAFT FLIGHT MANUAL
SECTION VI
AIRCRAFT SYSTEM EQUIPMENT
6-201
June 30, 2012
(c) Start-up self-test
When the compass operating mode switch on the control panel is set to the ANT or ADF
position, press and hold the TEST button on the control panel for about 2s~3s so that the
compass enters the self-test status. The earphone should output audio of 1000 Hz. The
azimuth pointer on the indicator should point to 90o
N and stops temporarily and then
rotates to 135o
±5o
. The frequency display window on the control panel displays PASS for
about 1s~2s, indicating that the compass self-test result is normal. After the self-test is
complete, the compass returns to the operating status before the self-test.
(d) ADF status
Set the compass operating mode switch to the ADF position. The indicator pointer should
point to the relative azimuth of the navigation station, and the earphone should output the
audio signal from this navigation station.
(e) ANT receiving status
Set the compass operating mode switch to the ANT position, set the frequency, receive the
navigation station signal, and adjust the volume. The earphone should output the audio
signal from this navigation station. The indicator pointer stops at the azimuth of 90o
.
(f) Power-off
After the flight, set the compass operating mode switch to the OFF position, and turn off the
power switches of the 28 V ADF and the 115 V power distribution disk ADF.
Precautions
(a) To achieve clear audio signal receiving effect, it is better to make the compass receiver
operate in ANT mode.
(b) In ADF mode, when no signal is received or the signal is weak, the display azimuth pointer
will stop at the position of 90o
.
(c) Transmission of short-wave radio set will affect ADF indication. At this time, ADF indication
is untrustworthy. Therefore, to ensure that the ADF can operate properly during landing
approach, the ultrashort wave radio set, instead of the short-wave radio set, is used for
external liaison.
(d) ADF is a navigation device basically for receiving the ground wave. Therefore, the azimuth
error will increase when aircraft is flying through the mountain area, through sea, and at
night because the positioning accuracy is affected by the mountain effect, shore effect, and
night effect.
JZ-Y8F200W-02
AIRCRAFT FLIGHT MANUAL
SECTION VI
AIRCRAFT SYSTEM EQUIPMENT
6-202
June 30, 2012
VOR/Instrument landing system
General
The VOR/ILS system is a radio navigation system. Two sets of VOR/ILS are installed on the
entire aircraft. This system provides the instrument landing system (ILS) function and VOR
function. Cooperating with the ground station, it implements aircraft navigation and landing
approach guide.
System Composition
Table 6-27 System composition and component installation position
No. Component Model Quantity Installation Position
1 Receiver VIR-432 2
On the equipment rack at the right of frame
3~4
2 Control box CTL-32G 2 On the navigator's side cover plate
3
VOR/heading
antenna
S65-247-12 2
Stringer 4~7 of rib 9~10 at the left and right
of the vertical fin (with coupler
SSPD-113-10)
4 Gliding antenna S41422-2 1 In the nose radome
5 Beacon antenna MB10-128 2
One between stringer 3~4 at the left of
frame 20~21 and one at the right
6 Distributor SSPD-113-13 1
On the equipment rack at the right of frame
3~4
JZ-Y8F200W-02
AIRCRAFT FLIGHT MANUAL
SECTION VI
AIRCRAFT SYSTEM EQUIPMENT
6-203
June 30, 2012
Main Technical Specifications
(a) Frequency range
Heading: 108.1~111.95MHz
Gliding: 329.15~335.00MHz
VOR: 108.00~117.95MHz
Beacon: 75 MHz
(b) Number of channels
Instrument landing: 40 channels
Microwave landing: 200 channels
VOR channel: 160 channels
(c) Audio output:
LOC/VOR: 1000Hz/100mW/600Ω
MKR: 50mW /600Ω
(d) Power supply:
Receiver: 28VDC/1.4A
Control box: 28VDC/0.25A
(e) Operating temperature:
Receiver: -55o
C~+70o
C;
Control box: -30o
C ~+70o
C;
Gliding antenna: -73o
C ~+121o
C;
VOR/heading antenna: -55o
C ~+71o
C;
Beacon antenna: -55o
C ~+85o
C;
JZ-Y8F200W-02
AIRCRAFT FLIGHT MANUAL
SECTION VI
AIRCRAFT SYSTEM EQUIPMENT
6-204
June 30, 2012
Operations
A
C
T
XFR
MEM
MEM HLD
HLDON
OFF
STO
TEST
NAV
ACT
XFR/MEM
Prompt light
Prompt light
Power and mode
selection knob
Volume
control knob Frequency
storing button
Self-test
button
ACT button
Frequency
selection knob
Figure 6-121 Appearance of VOR/ILS system control panel
JZ-Y8F200W-02
AIRCRAFT FLIGHT MANUAL
SECTION VI
AIRCRAFT SYSTEM EQUIPMENT
6-205
June 30, 2012
Description
A set of VOR/ILS shares a control box with a set of distance measuring equipment (DME). The
control panel is shown in Figure 6-73.
Display window
The display window applies the LED display which can display two lines of information.
Generally, the upper line displays the current frequency, while the lower line displays the preset
frequency.
Power and mode selection knob
OFF/ON'HLD serves as the power and mode selection knob. When the knob is turned to the
ON position, the control box power is turned on; when the knob is turned to the OFF position, the
control box power is turned off; when the knob is turned to the HLD position, the VOR/ILS does not
cooperate with the DME any more. The frequency (upper line in the window) of VOR/ILS can be
changed independently. The DME channel remains unchanged (lower line in the window).
Distance measuring can be continued on the original channel.
Prompt light display
(a) ACT prompt light: When the frequency is changed, the ACT prompt light starts blinking
immediately. If the actually tuned frequency is different from the currently displayed
frequency, the ACT prompt light will blink continuously.
(b) MEM prompt light: When a frequency is displayed in the lower line of the display window,
the MEM prompt light will blink continuously.
(c) HLD prompt light: If the HLD prompt light is blinking, it indicates that the DME is in holding
state. After the HLD mode is enabled, the upper line in the display window displays the
navigation frequency, while the lower line displays the DME holding frequency. (At this time,
the prestored frequency originally displayed in the lower line in the display window is not
displayed but is still effective. It can be converted to the current frequency through the
XFR.)
Volume adjustment
The VOR/ILS volume can be adjusted by turning the V knob. Turning the knob clockwise can
turn up the volume, while turning the knob counter-clockwise can turn down the volume.
JZ-Y8F200W-02
AIRCRAFT FLIGHT MANUAL
SECTION VI
AIRCRAFT SYSTEM EQUIPMENT
6-206
June 30, 2012
Frequency conversion
The XFR/MEM frequency changeover switch is used for frequency conversion. When the
switch is set to the XFR position, the preset frequency switches to display in the current frequency
position (upper line in the display window), and the previous current frequency is converted to a
new preset frequency and is displayed in the lower line in the display window. When the switch is
set to the MEM position, one of the four prestored frequencies is displayed in the lower line of the
display window, and the prestored channel number is displayed in the upper line of the display
window. To display the four prestored frequencies cyclically, hold the switch at the MEM position.
ACT button
Press and hold the ACT button for 2s and then release it to select the direct tuning mode. At
this time, the upper line in the display window displays the current frequency, while the lower line
displays -----. To adjust the current frequency, turn the frequency selection knob. During frequency
tuning, the ACT prompt light on the control panel is blinking. When the ACT prompt light is
constant on, it indicates that the frequency has been tuned. The selected frequency is the current
operating frequency. At this time, press and hold the ACT button for 2s and then release it to return
to the current frequency/preset frequency mode display.
Frequency selection (ACT mode disabled)
The frequency selection knob is used to tune the frequency in the display window. The outer
(large) knob is used to tune frequencies at the tens digit and units digit. Turning the outer knob
clockwise can increase the frequency, while turning the outer knob counter-clockwise can
decrease the frequency. The frequency changes with a step of 1 MHz. The inner (small) knob is
used to the tune frequencies at the tenths digit and hundredths digit. Turning the inner knob
clockwise can increase the frequency, while turning the inner knob counter-clockwise can
decrease the frequency. The frequency changes with a step of 0.05 MHz. The frequency selection
method is as follows:
(a) When the power and mode selection knob is turned to the ON position, the upper line in the
display window on the control panel displays the current operating frequency, while the
lower line displays the preset frequency. Turning the frequency selection knob can tuning
the preset frequency. After the frequency is determined, set the XFR/MEM switch to the
XFR position immediately. At this time, the preset frequency switches to display in the
upper line of the display window, while the previous current frequency switches to display
in the lower line. At this time, the ACT prompt light is constant on, indicating that the
frequency is tuned to the converted frequency.
JZ-Y8F200W-02
AIRCRAFT FLIGHT MANUAL
SECTION VI
AIRCRAFT SYSTEM EQUIPMENT
6-207
June 30, 2012
(b) When the power and mode selection knob is turned to the ON position and the XFR/MEM
switch is set to the MEM position, the upper line in the display window displays the
prestored channel number, while the lower line displays the frequency corresponding to the
prestored channel number. Toggle the MEM switch continuously to display the four
prestored frequencies cyclically. When the required prestored frequency is displayed in the
lower line of the display window, set the XFR/MEM switch to the XFR position immediately.
Then, this prestored frequency is converted to the current operating frequency.
Frequency storing
The STO button is used to store the channel and frequency. The channel and frequency can
be prestored only when the XFR/MEM switch is set to the MEM position. To store the frequency,
set the XFR/MEM switch to the MEM position and toggle the MEM switch continuously until the
required channel number (CH1, CH2, CH3, or CH4) is displayed in the upper line of the display
window. Then, turn the frequency selection knob to select the frequency to be stored. Within 5s
after the required frequency is displayed in the lower line of the display window, press the STO
button twice continuously so that the selected frequency can be stored for the selected channel. A
maximum of four frequencies can be prestored. (After 5s, the control box will return to the current
frequency/preset frequency mode display.)
Brightness adjustment
The ATC/VOR/DME brightness adjustment knob on the navigator's side cover plate is used to
adjust brightness of the VOR/DME control box. Turning the knob clockwise can increase the
brightness, while turning the knob counter-clockwise can decrease the brightness.
JZ-Y8F200W-02
AIRCRAFT FLIGHT MANUAL
SECTION VI
AIRCRAFT SYSTEM EQUIPMENT
6-208
June 30, 2012
Self-test
(a) ILS self-test
Select a heading frequency, 108.10 MHz for example, on the VOR/DME control box on the
navigator's side cover plate. Press and hold the TEST button. If the self-test result is
normal, navigation and gliding flags will appear on heading location indicators on both the
pilot's and copilot's instrument panels and they will disappear after 3s. The course
deviation pole deviates rightward for about one point, while the gliding deviation pointer
deviates downwards for about one point. At the same time, the three beacon indicating
lights (blue, yellow, and white lights) on the pilot's and copilot's instrument panels blink in
turn with a frequency of 30 Hz. The corresponding audio signal can be tuned in through the
earphone. Otherwise, it indicates a self-test failure. At this time, release the TEST button.
(b) VOR self-test
VOR/DME control box on the navigator's side cover plate. Press and hold the TEST button.
Check that NAV flags appear on integrated heading indicators on both the pilot's and
copilot's instrument panels and on the navigation indicator on the navigator's instrument
panel. They will disappear after 2s. The course deviation pole points to the center position,
and the VOR azimuth points to 0o
. At the same time, the three beacon indicating lights
(blue, yellow, and white lights) on the pilot's and copilot's instrument panels blink in turn
with a frequency of 30 Hz. The corresponding audio signal can be tuned in through the
earphone.
Note
During ILS and VOR self-tests, within 2s~3s after the TEST button is pressed,
the upper line of the display window on the control panel displays FLAG, DIAG,
or ----, while the lower line displays a diagnosis code consisting of two digits.
When the upper line displays ---- and the lower line displays 00, it indicates the
device is operating properly. When the upper line displays FLAG and the lower
line displays a diagnosis code, it indicates that the device has no fault but is
operating improperly (for example, low signal level). When the upper line
displays DIAG and the lower line displays a diagnosis code, it indicates that the
device is faulty. The meaning of each diagnosis code is as follows:
JZ-Y8F200W-02
AIRCRAFT FLIGHT MANUAL
SECTION VI
AIRCRAFT SYSTEM EQUIPMENT
6-209
June 30, 2012
00: No failure
02: Receiver RAM failure
03: No data output through the serial port
04: No serial port frequency control word
05: Frequency invalid
06: Processor failure
09: Processor failure
10: Processor failure
11: A/D failure
12: A/D accuracy failure
13:+13 V power failure
14:-13 V power failure
15: VOR sinθ/LOC D/A failure
16: VOR cosθ/GS D/A failure
17: VOR receiver invalid
18: No VOR RF signal
19: VOR reference phase signal weak
20: VOR variable phase signal weak
21, 22, 23, and 24: VOR receiver unavailable
25: LOC receiver invalid
26: LOC signal unavailable
27: LOC deviation fault
28: Receiver invalid
29: GS unavailable
30: GS deviation fault
32: Beacon indication failure
JZ-Y8F200W-02
AIRCRAFT FLIGHT MANUAL
SECTION VI
AIRCRAFT SYSTEM EQUIPMENT
6-210
June 30, 2012
In-flight Operations
Pre-flight preparations
Perform the following operations before flight:
Engage the 28 VDC power supply onboard.
Turn on VOR/ILS1 and VOR/ILS2 circuit breakers on the navigator's right console.
(VOR/ILS1 applies the emergency power supply, while VOR/ILS2 applies the normal
power supply.)
Set the OFF/ON/HLD switch on the VOR/DME1 control box (controlling the first set of
VOR/ILS receiver) on the navigator's side cover plate to the ON position.
If the self-test result is normal, store the operating frequency as required.
Check that the VOR/ILS1 and VOR/ILS2 circuit breakers on the navigator's right console are
turned off, and the OFF/ON/HLD switch on the VOR/DME control box on the navigator's side
cover plate is set to the OFF position.
Using the instrument landing function of the first set of VOR/ILS
After the power supply is engaged properly, turn on VOR/ILS1 and VOR/ILS2 circuit breakers
on the navigator's right console, set the OFF/ON/HLD switch on the VOR/DME1 control box on the
navigator's side cover plate to the ON position, and turn the ATC/VOR/ILS brightness adjustment
knob on the navigator's side cover plate to properly adjust the control box brightness. During
aircraft approach, set the INS/AHS/VOR1/ VOR2 switch on the navigator's instrument panel to the
VOR1 position, set the MKR1 SENS (beacon sensibility switch) on the pilot's top console to the H
(high sensibility) position or L (low sensibility) position, and select 108.10 MHz (here is an example;
the selected frequency should be the same as the airport ground station frequency) as the
instrument landing operating frequency on the VOR/DME1 control box.
The heading location indicators on the pilot's and copilot's instrument panels display the
heading deviation, gliding deviation, and alarm flag. The heading location indicator on the
navigator's instrument panel displays the heading deviation. The beacon indicators on the pilot's
and copilot's instrument panels indicate that the aircraft is flying over which station. The heading
deviation is indicated by the deviation of the course deviation pole relative to the zero position. The
gliding deviation is indicated by the deviation of the gliding pointer relative to the zero position. The
left (or right) deviation of the course deviation pole relative to the zero position indicates that
aircraft should fly leftward (or rightward). The upward (or downward) deviation of the gliding
pointer relative to the zero position indicates that aircraft should fly upward (or downward). Turn
the VOR1 knobs on intercom control boxes at the pilot, copilot, and navigator positions. Clear
heading identification tone signals can be heard through the pilot's, copilot's and navigator's
earphones.
JZ-Y8F200W-02
AIRCRAFT FLIGHT MANUAL
SECTION VI
AIRCRAFT SYSTEM EQUIPMENT
6-211
June 30, 2012
When aircraft is flying over the outer marker (OM), blue beacon lights on the pilot's and
copilot's instrument panels are on, and clear OM beacon signal identification tone can be heard
through the pilot's, copilot's and navigator's earphones. When aircraft is flying over the medium
marker (MM), orange beacon lights on the pilot's and copilot's instrument panels are on, and clear
MM beacon signal identification tone can be heard through the pilot's, copilot's and navigator's
earphones. When aircraft is flying over the inner marker (IM), white beacon lights on the pilot's and
copilot's instrument panels are on, and clear IM beacon signal identification tone can be heard
through the pilot's, copilot's and navigator's earphones.
Note
1) The alarm flags appear on the heading location indicators on the pilot's and
copilot's instrument panels when no heading and gliding signals are
received.
2) OM station: 400 Hz audio modulation. Continuous signals with two dashes
per second are sent.
3) MM station: 1300 Hz audio modulation. Signals with one dot and one dash
(alternate) are sent.
4) IM station: 3000 Hz audio modulation. Continuous signals with six dots per
second are sent.
Using the VOR function of the first set of VOR/ILS
Set the ADF1/TACAN/VOR1 switches on the pilot's, copilot's and navigator's instrument panels
to the VOR1 position. Select 108.0 MHz (here is an example; the selected frequency should be the
same as the airport ground station frequency) as the frequency on the VOR/DME1 control box.
The VOR azimuth is indicated by the integrated heading indicators on the pilot's and copilot's
instrument panels and navigation indicator on the navigator's instrument panel. Turn the VOR1
knobs on intercom control boxes at the pilot, copilot, and navigator positions respectively. Clear
VOR identification tone signals can be heard through the pilot's, copilot's and navigator's
earphones.
Using the instrument landing function of the second set of VOR/ILS
Set the OFF/ON/HLD switch on the VOR/DME2 control box (controlling the second set of
VOR/ILS receiver) on the navigator's side cover plate to the ON position, and turn the
ATC/VOR/ILS brightness adjustment knob to properly adjust the control box brightness. During
aircraft approach, set the INS/AHS/VOR1/VOR2 switch on the navigator's instrument panel to the
VOR2 position, set the MKR1 SENS (beacon sensibility switch) on the pilot's top console to the H
position or L position, and select 108.10 MHz (here is an example; the selected frequency should
be the same as the airport ground station frequency) as the instrument landing operating
frequency on the VOR/DME2 control box.
JZ-Y8F200W-02
AIRCRAFT FLIGHT MANUAL
SECTION VI
AIRCRAFT SYSTEM EQUIPMENT
6-212
June 30, 2012
The heading location indicators on the pilot's and copilot's instrument panels display the
heading deviation, gliding deviation, and alarm flag. The heading location indicator on the
navigator's instrument panel displays the heading deviation. The beacon indicators on the pilot's
and copilot's instrument panels indicate that the aircraft is flying over which station. The heading
deviation is indicated by the deviation of the course deviation pole relative to the zero position. The
gliding deviation is indicated by the deviation of the gliding pointer relative to the zero position. The
left (or right) deviation of the course deviation pole relative to the zero position indicates that
aircraft should fly leftward (or rightward). The upward (or downward) deviation of the gliding
pointer relative to the zero position indicates that aircraft should fly upward (or downward). Turn
the VOR2 knobs on intercom control boxes at the pilot, copilot, and navigator positions. Clear
heading identification tone signals can be heard through the pilot's, copilot's and navigator's
earphones.
When aircraft is flying over the OM, blue beacon lights on the pilot's and copilot's instrument
panels are on, and clear beacon signal identification tone of 400 Hz can be heard through the
pilot's, copilot's and navigator's earphones. When aircraft is flying over the MM, orange beacon
lights on the pilot's and copilot's instrument panels are on, and clear beacon signal identification
tone of 1300 Hz can be heard through the pilot's, copilot's and navigator's earphones. When
aircraft is flying over the IM, white beacon lights on the pilot's and copilot's instrument panels are
on, and clear beacon signal identification tone of 3000 Hz can be heard through the pilot's,
copilot's and navigator's earphones.
Using the VOR function of the second set of VOR/ILS
Set the ADF1/TACAN/VOR1 switches on the pilot's, copilot's and navigator's instrument panels
to the VOR2 position. Select 108.0 MHz (here is an example; the selected frequency should be the
same as the airport ground station frequency) as the frequency on the VOR/DME2 control box.
The VOR azimuth is indicated by the integrated heading indicators on the pilot's and copilot's
instrument panels and navigation indicator on the navigator's instrument panel. Turn the VOR2
knobs on intercom control boxes at the pilot, copilot, and navigator positions respectively. Clear
VOR identification tone signals can be heard through the pilot's, copilot's and navigator's
earphones.
JZ-Y8F200W-02
AIRCRAFT FLIGHT MANUAL
SECTION VI
AIRCRAFT SYSTEM EQUIPMENT
6-213
June 30, 2012
KDM 706A distance measuring equipment
Function
KDM 706A distance measuring equipment (DME) provides the slant range relative to the
selected DME ground station and identification signal of the selected navigation station for aircraft.
System Composition and Installation Position
Table 6-122 Composition of KDM 706A DME and component installation position
No. Component Model Quantity Installation Position Remarks
1 Transceiver KDM 706A 2
On the equipment rack at the
right between frame 3-4
2
Primary
indicator
KDI 574 2
On the navigator's side cover
plate
3
Secondary
indicator
KDI 573 2
On the left and right
instrument panels of the pilot
4 Converter CAD-31 2
On the equipment rack at the
right between frame 3-4
5 Antenna ANT-42 2
Between stringer 0-left 1 of
frame 13-14
Between stringer 1-2 at the
right of frame 15-16
6 Circuit breaker ZKZ-2 2
On the navigator's right
console
JZ-Y8F200W-02
AIRCRAFT FLIGHT MANUAL
SECTION VI
AIRCRAFT SYSTEM EQUIPMENT
6-214
June 30, 2012
Main Technical Specifications
Main technical specifications of KDM 706A
(a) Operating channel
The DME operating channel is 962 MHz~1213 MHz. There are totally 252 channels: 126 X
channels (1X~126X) and 126 Y channels (1Y~126Y).
(b) Frequency stability: ±100 kHz
(c) Transmitting performance
The transmitting pulse power should not be lower than 290 W.
(d) Receiving performance
The receiver sensibility should not be lower than -90dB.
(e) Distance measuring
(1) Distance measuring range and precision
The distance measuring range is 0~389 nm. When the distance measuring range is
0~99.9 nm, the maximum error is ±0.1 nm; when the measuring range is 100~389 nm,
the maximum error is ±1 nm.
(2) Tracing rate: 0-1900 kts
(f) Time to station measurement
The measuring range is 0~99min with the error not greater than 1min.
(g) Identification signal
When the load resistance is 500 Ω, the peak-to-peak voltage is 14.14 V.
JZ-Y8F200W-02
AIRCRAFT FLIGHT MANUAL
SECTION VI
AIRCRAFT SYSTEM EQUIPMENT
6-215
June 30, 2012
Ground Operation
The DME and VOR/ILS share one control box. For details about the control box operations,
see VOR/ILS Flight Manual.
In-air Flight Operation
Pre-flight settings
After engines are started, perform the following operations:
Turn on DME-1, DME-2, VOR/ILS1, and VOR/ILS2 switches on the navigator's right
console.
Set the VOR/DME control box mode switch on the navigator's side cover plate at the ON
position.
Turn the ATC/VOR/ILS electroluminescent panel brightness adjustment knob on the
navigator's side cover plate to set proper brightness for the control panel.
Set the DME switch ON/TEST on the navigator's side cover plate at the ON position.
Turn the DME1 and DME2 knobs on the pilot's, copilot's, navigator's and mechanic's intercom
control boxes to set proper identification tone volume for the DME navigation station. Turning the
knob clockwise can turn up the volume, while turning the knob counter-clockwise can turn down
the volume.
Using the DME function
Set the OFF/ON'HLD switch on the control box at the ON position, and select the VOR
frequency for the control box. At this time, the DME and VOR are used together. Turn the
frequency selection knob to adjust the preset frequency. The outer (large) knob is used to adjust
the frequency at the tens digit and units digit. Turning it clockwise can increase the frequency and
turning it counter-clockwise can decrease the frequency. The frequency changes with a step of 1
MHz. The inner (small) knob is used to adjust the frequency at the tenths digit and hundredths digit.
Turning it clockwise can increase the frequency and turning it counter-clockwise can decrease the
frequency. The frequency changes with a step of 0.05 MHz.
The secondary indicator on the pilot's instrument panel and primary indicator DME Master
Indicator I on the navigator's side cover plate show the range to station, ground speed, time to
station, and channel source (the first set displays 1).
The secondary indicator on the copilot's instrument panel and primary indicator DME Master
Indicator II on the navigator's side cover plate show the range to station, ground speed, time to
station, and channel source (the second set displays 2). The indicator panel is shown in Figure
6-122.
JZ-Y8F200W-02
AIRCRAFT FLIGHT MANUAL
SECTION VI
AIRCRAFT SYSTEM EQUIPMENT
6-216
June 30, 2012
Using the DME Hold function
When the frequency of the combined receiver needs to be changed but the DME still uses the
original channel for distance measurement, set the OFF/ON/HLD switch on the control box at the
HLD position (meaning DME holding). The secondary indicator on the pilot's instrument panel and
primary indicator DME Master Indicator I on the navigator's side cover plate displays 1H, while the
secondary indicator on the copilot's instrument panel and primary indicator DME Master Indicator
II on the navigator's side cover plate displays H2. The HLD prompt light on the VOR/DME control
box on the navigator's side cover plate is on. The top line on the screen displays the VOR
frequency and the lower line displays the DME holding frequency. (At this time, the pre-stored
frequency originally displayed in the lower line is not displayed but is still effective. It can be
converted to the current frequency through the XFR.)
Figure 6-122 Indicator display panel
JZ-Y8F200W-02
AIRCRAFT FLIGHT MANUAL
SECTION VI
AIRCRAFT SYSTEM EQUIPMENT
6-217
June 30, 2012
MK VIII Enhanced Ground Proximity Warning System
General
MK VIII Enhanced Ground Proximity Warning System (EGPWS) is a ground proximity warning
system providing basic GPWS functions plus additional terrain data. The aircraft input parameters
for EGPWS are: longitude & latitude of present position, heading, attitude, radio altitude, pressure
altitude, airspeed, glideslope deviation, landing gear and flap position signals, etc. These
parameters and relevant internal terrain, obstacle, and airport databse are used together to predict
the potential conflict between flight route and terrain or an obstacle, and to provide the pilot with
three styles of caution or warning signal, i.e., sound, light and display. Besides, EGPWS system
gives warning to excessive glideslope deviation, flap or the landing gear not in landing
configuration and provides altitude callouts. The pilot can operate correctly by acquired
information to avoid the possible flying accident and ensure flight safety.
System Description
System composition and installation
EGPWS MKVIII Enhanced Ground Proximity Warning System consists of the following
componts as shown in Table 6-28:
Table 6-28
S/N Nomenclature Type No./P/N
Qty.for single
aircraft
Installation
position
1 Ground proximity warning computer 965-1210-026 1
On equipment
rack of right
frames 3~4
2 Configuration module 700-1710-020 1
3 Installation bracket 405-0383-001 1
4 GPWS P/TEST warning signal light 631406-005 1
Left instrument
panel
5
BELOW G/S P/CANCEL warning
signal light
631406-006 1
6 FLAP OVRD warning signal light 631406-007 1
7 G/S CANCLD warning signal light 631406-003 1
8
GPWS FAIL/TERR FAIL
warning signal light
631406-011 1
9
TERR INHIBIT ON
warning signal light
631406-002 1
10 Terrain indicator 70-4300 1 Right instrument
panel11 GPWS P/TEST warning signal light 631406-005 1
12
BELOW G/S P/CANCEL
warning signal light
631406-006 1
Right instrument
panel
JZ-Y8F200W-02
AIRCRAFT FLIGHT MANUAL
SECTION VI
AIRCRAFT SYSTEM EQUIPMENT
6-218
June 30, 2012
Description of components
(a) Ground proximity warning computer
Ground proximity warning computer (GPWC) is used to receive and process flight
parameter signals from equipment to give an alert when the aircraft is in danger of crash
with terrain or an obstacle; in each flight phases, MHD300 terrain display shows terrain
information provided by ground proximity warning computer. The GPWC front panel has an
EXTERNAL FAULT light, a COMPUTER OK light and a COMPUTER FAIL light; the
illumination of amber EXTERNAL FAULT light shows that a fault external to the GPWC
exists, while the extinguishing of the light shows normal operation of equipment interlinked
with GPWC; the green COMPUTER OK illuminates to show that the GPWC is operating
correctly with no internal faults; and the red COMPUTER FAIL light shows there is an
internal fault in GPWC. The drawing of front panel of GPWC is shown in Figure 6-123.
Figure 6-123 GPWC front panel
JZ-Y8F200W-02
AIRCRAFT FLIGHT MANUAL
SECTION VI
AIRCRAFT SYSTEM EQUIPMENT
6-219
June 30, 2012
(b) MHD300 terrain display
The MHD300 terrain display panel is shown in Figure 6-124, and its operation instruction is
shown as follows:
(1) RNG knob: turn RNG knob on MHD300 terrain display to increase or decrease
measurement range (5 nm, 10 nm, 20 nm, 40 nm).
(2) BRT knob: turn the DIM knob to control the brightness of display.
(3) Other keys are used for configuration of the display on the ground.
(4) Heading display: MHD300 heading display menu consists of: aircraft symbol at
bottom of display range and heading dial at top.
(5) Terrain display is described as below:
Figure 6-124 MHD300 terrain display panel
JZ-Y8F200W-02
AIRCRAFT FLIGHT MANUAL
SECTION VI
AIRCRAFT SYSTEM EQUIPMENT
6-220
June 30, 2012
Make sure the TERR INHIBIT warning signal light on left instrument panel is not
pressed. The colors in MHD300 terrain display have different meanings:
Dark red: warning danger zone;
Dark yellow: danger zone requiring attention;
50% red spots: terrain (or obstacle) 2000 ft (610 m) above aircraft;
50% yellow spots: terrain (or obstacle) 1000~2000 ft (305~610 m) above aircraft;
25% yellow spots: terrain (or obstacle) -500~1000 ft (-152.5~305 m) above
aircraft;
Thick green: no mountain (or obstacle) 500 ft (152.5 m) below aircraft;
50% thick green: presence of mountain (or obstacle) 500~1000 ft (152.5~305 m)
below aircraft;
16% thick green: presence of mountain (or obstacle) 1000~2000 ft (305~610 m)
below aircraft;
Dark: no terrain (or obstacle) requiring attention.
16% dark blue: zone in sea level altitude;
Magenta: zone for which data is difficult to obtain in terrain database.
(c) Warning signal light
GPWS P/TEST and BELOW G/S P/CANCEL warning signal lights are equipped on right
instrument panel, as shown in Figure 6-125. And the functions of them are as follows:
GPWS P/TEST warning signal light: less than 2s press of the light can start the EGPWS
built-in test; the light turns on when the ground proximity warning gives out PULL UP
warning alert in fight;
BELOW G/S P/CANCEL warning signal light: the light turns on when the ground proximity
warning gives out BELOW G/S hint alert in flight; Press the light to cancel glideslope
warning, and the light turns off.
Figure 6-125 Warning signal lights on right instrument panel
JZ-Y8F200W-02
AIRCRAFT FLIGHT MANUAL
SECTION VI
AIRCRAFT SYSTEM EQUIPMENT
6-221
June 30, 2012
Warning signal lights of GPWS P/TEST, BELOW G/S P/CANCEL, GPWS G/S CANCEL,
GPWS FLAP OVRD, TERR INHIBIT ON, and GPWS FAIL TERR FAIL are equipped on left
instrument panel, as shown in Figure 6-126. Their functions are as follows:
GPWS P/TEST warning signal light: less than 2s press of the light can start the EGPWS
built-in test; the light turns on when the ground proximity warning gives out PULL UP
warning alert in fight;
BELOW G/S P/CANCEL warning signal light: the light turns on when the ground proximity
warning gives out BELOW G/S hint alert in flight; Press the light to cancel glideslope
warning, and the light turns off.
GPWS G/S CANCEL warning signal light: the light turns on when the glideslope warning is
cancelled in flight;
GPWS FLAP OVRD warning signal light: when the ground proximity warning gives out
TOO LOW FLAPS hint warning in flight, press the warning signal light to cancel too low
flaps warning, while the light turns on to prompt calcelling the warning of too low flaps in a
manual way;
TERR INHIBIT ON warning signal light: press this light, and the light turns on with no
terrain indication on MHD300 display; this button light is at pressed state when in pattern
flight test;
GPWS FAIL TERR FAIL warning signal light: GPWS FAIL turns on partially when GPWC
has a fault (including external trouble, crosslinking trouble or internal trouble); TERR FAIL
illuminates partially when terrain database of EGPWS has a fault or no information about
the terrain of present position.
Figure 6-126 Warning signal lights on left instrument panel
JZ-Y8F200W-02
AIRCRAFT FLIGHT MANUAL
SECTION VI
AIRCRAFT SYSTEM EQUIPMENT
6-222
June 30, 2012
Crosslinking relation between system and external device
Ground proximity warning system has crosslinking relation with the following devices. The
drawing of system crosslinking is shown in Figure 6-127:
(a) Receive discrete signal of nose gear retraction-extension;
(b) Receive discrete signal of flap state: when the flap position is not less than 35o
, it is in flaps
setting state; otherwise, it is in flaps up state.
(c) Receive the signals of static air temperature, vertical speed, true airspeed, indicated
airspeed, relative and absolute altitude and other signals in HB6096 form of air data
system;
(d) Receive radio altitude signal, and other signals in ARINC429 of radio altimeter;
(e) Receive signals of pitch angle, rolling angle, and magnetic heading, etc in ARINC429 form
of Inertia Navigation System;
(f) Receive signals of the gliding (pitch angle) deviation, heading (orientation) deviation signal
in ARINC429 form of VOR/instrument landing system;
(g) Receive signals of EGPWS built-in test, TERR INHIBIT ON, BELOW G/S P/CANCEL and
GPWS FLAP OVRD discrete magnitude;
(h) Input speech warning signal to intercom;
(i) Output discrete magnitude in warning state to flight data recording system to record;
(j) Provide inhibition signal to TCAS when there is warning signal in ground proximity warning
system.
Flap position
sensor
Landing gear
position
sensor
Air data
computer
Radio
altimeter
GPWS FAIL
TERR FAIL
GPWS
FLAP
OVRD
Airborne
power
supply
TERR
INHIBIT
ON
BIT
built-in
test
Inertia
navigation
Intercom
Flight
data
recording
system
BELOW
G/S
P/CANCEL
VOR/
instrument
landing
system
MKVIII EGPWC
MHD 300
TCAS
Figure 6-127 Ground proximity warning system crosslinking drawing
JZ-Y8F200W-02
AIRCRAFT FLIGHT MANUAL
SECTION VI
AIRCRAFT SYSTEM EQUIPMENT
6-223
June 30, 2012
Main system function
(a) This system owns the following system:
EGPWS enhanced ground proximity warning system will send light and speech warning
signal if the aircraft descends in large rate with the radio altitude less than 2500ft (762m) in
all flight phases; mode 1 includes internal and external interfaces(see Figure 6-128).
When the aircraft enters into its external interface (light grey zone in Figure 6-128), there is
SINKRATE,SINKRATE speech warning in earphone. This speech can be produced again
by EGPWS enhanced ground proximity warning system when the radio altitude reduces
20% each time (based on the radio altitude at the first speech warning). And this warning
signal will stop when the aircraft is out of external interface.
When the aircraft enters into internal interface (dark grey zone in Figure 6-128), GPWS
P/TEST warning signal lights on left and right instrument panel turn on, meanwhile, the
PULL UP speech warning occurs in earphone. When aircraft is out of internal interface, that
warning signal will stop.
Figure 6-128 Warning schematic drawing with large rate of descent
JZ-Y8F200W-02
AIRCRAFT FLIGHT MANUAL
SECTION VI
AIRCRAFT SYSTEM EQUIPMENT
6-224
June 30, 2012
(b) Give out warning to great near earth rate
Mode 2 is used to avoid crash between aircraft and terrain rising abruptly. And make
judgment according to radio altitude and the reducing sharply of radio altitude. This form is
divided into two parts: mode 2A and mode 2B.
(1) Mode 2A
Mode 2A is used in phases of climbing, cruise condition and initial approach (flap is
not at landing configuration without aircraft at center line of glideslope).When near
earth rate is at the range of 2000~10000ft/min (7.6m/s~51m/s) and radio altitude
lower than 1500ft~ 2000ft (457.5m~610m), EGPWS will send out warning signal light
(see Figure 6-129). There is TERRAIN, TERRAIN warning voice in earphone when
the aircraft is in warning zone. Moreover, when it enters into deep warning zone, PULL
UP speech warning may occurs in earphone. The GPWS P/TEST warning signal light
on left and right instrument panel illuminates and it will continue until the aircraft is out
of warning zone.
Figure 6-129 Schematic drawing of mode 2A alert
JZ-Y8F200W-02
AIRCRAFT FLIGHT MANUAL
SECTION VI
AIRCRAFT SYSTEM EQUIPMENT
6-225
June 30, 2012
When the aircraft is out of warning zone with the distance between aircraft and ground
decreasing, TERRAIN hint warning voice will continue until that distance stop
decreasing. After the aircraft climbs 45s, the altitude will increase 300ft (92m) or the
flap is at landing state. At that time, the light warning can be stopped.
When TAD function is normal to all flight speed, the upper radio altitude of mode 2A
warning zone is 1250ft (381m). Decreasing the upper radio altitude of mode 2A
warning zone is to reduce possible harmful warning in flight approach.
(2) 2B Mode 2B
Mode 2B provides a warning zone with low sensitivity to no use warning produced by
maneuver in normal ground proximity landing. When the aircraft enters into blind
approach landing system with flap at landing configuration or FLAP OVRD warning
signal light on left instrument panel pressed, or deviation between glideslope and
bearing beacon less than 2 points. After the aircraft takes off in 60s, mode 2B is at
operating state.
EGPWS can also choose mode 2B to reduce possible harmful warning in approach
when the distance to target airport is less than 5nm(9.2km), with radio altitude less
than 3500ft(1050m) and efficient TAD.
Schematic drawing of model 2B alert is shown in Figure 6-130.
If aircraft passes through warning envelope of mode 2B without landing gear of flap at
landing configuration in approach, TERRAIN,TERRAIN hint warning voice will be
produced. If aircraft continues to go into warning envelop, PULL UP voice will repeat
continuously, and at that time, GPWS P/TEST warning signal light on left and right
instrument panel illuminates until the aircraft is out of the warning envelope. When the
aircraft is at warning zone with landing gear and flap at landing configuration, PULL
UP voice will be inhibited, and there is TERRAIN voice in earphone until the aircraft is
out of warning zone.
JZ-Y8F200W-02
AIRCRAFT FLIGHT MANUAL
SECTION VI
AIRCRAFT SYSTEM EQUIPMENT
6-226
June 30, 2012
Figure 6-130 Schematic drawing of mode 2B alert
JZ-Y8F200W-02
AIRCRAFT FLIGHT MANUAL
SECTION VI
AIRCRAFT SYSTEM EQUIPMENT
6-227
June 30, 2012
(c) Form 3: taking off rear aircraft mush warning
When the aircraft takes off rear aircraft mush or goes around in low altitude (takeoff altitude
less than 170ft(52m)) with the landing gear or flap is at landing configuration, mode 3
provides warning signal. The schematic drawing of mode 3 alert is shown in Figure 131.
When aircraft enters into warning zone (dark grey zone in Figure 131), there is DON'T
SINK, DON'T SINK warning voice in earphone. If aircraft altitude is reduced continually, the
above speech warning signal will only appear twice. Once the altitude is increased, speech
and light warning will both disappear.
Figure 6-131 The schematic drawing of mode 3 alert
JZ-Y8F200W-02
AIRCRAFT FLIGHT MANUAL
SECTION VI
AIRCRAFT SYSTEM EQUIPMENT
6-228
June 30, 2012
(d) Form 4: Alert for unsafe distance from ground
Considering different flight phases, different configuration of landing gear and flap, and
flight speed, etc, mode 4 provides warning when the aircraft has no enough safe distance
from ground, which is divided into three modes: 4A, 4B and 4C.
(1) Mode 4A is efficient in cruise and approach phase without landing gear and flap at
landing configuration.
(2) Mode 4B is efficient in cruise and approach phase with landing gear at landing
configuration and flap not at landing configuration.
(3) Mode 4C is efficient in taking off phase without landing gear and flap at landing
configuration.
Schematic drawing of mode 4A alert is shown in Figure 6-134.
When airspeed is less than 178kn(330km/h) with the terrain clearance less than
500ft(152m), TOO LOW GEAR warning will appear in earphone (light grey zone in
Figure 6-134). While, airspeed is more than 178kn(330km/h) with the terrain
clearance less than 750ft(228m), TOO LOW TERRAIN warning will occur in earphone
(dark grey zone in Figure 6-134) until the aircraft is out of warning zone.
Figure 6-134 The schematic drawing of mode 4A alert
JZ-Y8F200W-02
AIRCRAFT FLIGHT MANUAL
SECTION VI
AIRCRAFT SYSTEM EQUIPMENT
6-229
June 30, 2012
The schematic drawing of mode 4B alert is shown in Figure 6-135. When the terrain
clearance is less than 170ft(52m) with airspeed less than 150kn(278km/h), TOO LOW
FLAPS warning will appear in earphone (light grey zone in Figure 6-135). While, when
the terrain clearance is less than 750ft(228m) with airspeed more than
150kn(278km/h), TOO LOW TERRAIN warning will occur in earphone (dark grey
zone in Figure 6-135) until the aircraft is out of warning zone.
Mode 4C is operated based on Minimum Terrain Clearance calculated by EGPWS.
After the aircraft takes off without landing gear or flap at landing configuration or goes
around with terrain clearance less than 170ft(52m), the mode 4C is efficient.
Figure 6-135 The schematic drawing of mode 4B alert
JZ-Y8F200W-02
AIRCRAFT FLIGHT MANUAL
SECTION VI
AIRCRAFT SYSTEM EQUIPMENT
6-230
June 30, 2012
Figure 6-136 The schematic drawing of mode 4C alert
JZ-Y8F200W-02
AIRCRAFT FLIGHT MANUAL
SECTION VI
AIRCRAFT SYSTEM EQUIPMENT
6-231
June 30, 2012
When aircraft takes off, MTC value is 0ft (0m). MTC value increases to 75% of aircraft
radio altitude with the aircraft ascending (the mean value in initial 15s). This value
cannot be reduced and inhibited to 500ft (152m) terrain altitude; the schematic
drawing of mode 4C alert is shown in Figure 6-136.
There is TOO LOW TERRAIN warning voice in earphone when radio altitude of
aircraft is less than MTC value. When the aircraft is out of the warning zone, the
warning signal will disappear.
(e) Mode 5: much lower than slide slope alert
When in approach flight phase below slide slope, mode 5 will give out alert signal. The
schematic drawing of mode 5 alert is shown in Figure 6-137. And mode 5 divides into two
grades alert.
First grade alert (soft alert): when radio altitude of aircraft is lower than 1000ft(305m) with
downward deviation of slide slope more than 1.3 point, as is shown in Figure 6-137, soft
GLIDESLOPE alert voice appears in earphone. When downward deviation of slide slope
increases by 20%, speeding up alert voice GLIDESLOPE appears gradually.
Second grade alert (hard alert): The second grade alert is shown in dark grey area in
Figure 6-137. When the radio altitude is less than 300ft(91m) with downward deviation of
slide slope is about 2 points or more, great GLIDESLOPE , GLIDESLOPE alert voice will
appear in earphone. And this voice repeats once in every 4s until the aircraft is out of
second grade alert zone.
JZ-Y8F200W-02
AIRCRAFT FLIGHT MANUAL
SECTION VI
AIRCRAFT SYSTEM EQUIPMENT
6-232
June 30, 2012
Figure 6-137 Schematic drawing of mode 5 alert
JZ-Y8F200W-02
AIRCRAFT FLIGHT MANUAL
SECTION VI
AIRCRAFT SYSTEM EQUIPMENT
6-233
June 30, 2012
(f) Mode 6: Report for radio altitude
After extending landing gear in landing, when aircraft reduces to a radio altitude that
needed to report, ground proximity warning computer will produce corresponding speech
signal to give out voice of altitude report from warning horn. The report of radio altitude of
Y8F200W aircraft to Venezuela is 500ft(152m). AFIVE HUNDRED voice will be produced
when the aircraft reduces to 500ft(152m) radio altitude.
(g) Terrain alerting and display (TAD)
Terrain alerting and display has an enhanced function to detect terrain ahead of aircraft or
obstacle with more alert time, which is based on the internal terrain data base of EGPWS.
This function is accomplished on terrain data figure in front of the aircraft, aircraft position,
flight path angle, flight trace and speed.
Alert string and note alert string (see Figure 6-138) are formed in front of the aircraft by
complex front view calculation. That string expands laterally from the position of 1/4nm
width ahead of fuselage to 3o
, forward, downward and then upward.
CAUTION TERRAIN,CAUTION TERRAIN or TERRAIN AHEAD, TERRAIN AHEAD voice
information will occur when a protrusion part enters into note alert strip. And CAUTION
OBSTACLE or OBSTACLE AHEAD, OBSTACLE AHEAD voice information will appear
when an obstacle is in note alert stripe. The alert will be produced 40~60s before touching
the obstacle; as long as the obstacle is in the alert strip zone, this kind of alert will be
provided once in every 7s.
GPWS P/TEST warning signal light illuminates when the terrain/obstacle enters into alert
strip (in 30s before colliding with the aircraft). And TERRAIN, TERRAIN, PULL UP with
PULL UP or TERRAIN AHEAD, PULL UP or OBSTACLE, OBSTACLE, PULL UP or
OBSTACLE AHEAD, PULL UP alert voice will occur as well. The alert voice will repeat
continually as long as the conflict is in alert zone.
JZ-Y8F200W-02
AIRCRAFT FLIGHT MANUAL
SECTION VI
AIRCRAFT SYSTEM EQUIPMENT
6-234
June 30, 2012
Figure 6-138 Schematic diagram of terrain warning and display
System restriction
EGPWS has following restrictions
(a) If terrain data is hard to be obtained in a certain area of area data base, the terrain/obstacle
warning is inefficient. At that time, the indication of terrain in MHD300 is red purple.
(b) Terrain and obstacle information is used as a warning tool in certain conditions, and not as
a signal source to provide accurate and real operation signal to avoid crash;
(c) If GPS with trouble or no high accuracy aircraft position information provided by GPS,
enhanced function is inhibited automatically and the terrain indication is inefficient;
(d) When the aircraft is in 15nm (27.78km) from airport (this airport is not in aircraft data base)
and approach to land, TAD function should be forbidden manually to avoid unnecessary
alert;
JZ-Y8F200W-02
AIRCRAFT FLIGHT MANUAL
SECTION VI
AIRCRAFT SYSTEM EQUIPMENT
6-235
June 30, 2012
(e) TAD function should be forbidden manually in forced landing and landing in non-airport
area;
(f) When TAD function is inhibited with other functions of EGPWS in operation, EGPWS
returns back to the basic GPWS function (mode 1-6). In this occasion, when aircraft
approaches cliffy terrain abruptly, EGPWS will not predict alert in advance, especially in the
following situations:
(1) The aircraft is at landing configuration;
(2) The aircraft slides steadily at normal approach lowering rate;
(g) Terrain clearance and lowering rate compatible with the standard minimum value specified
in EGPWS may bring unnecessary alert;
(h) Terrain/obstacle data base in EGPW includes many catalogued artificial obstacles more
than 100ft(30.5m) in North America, part of Europe and part of Asian. This data base do
not contain anything, so many updated, smaller and unknown obstacles may appear.
Operation instruction
(a) Turn on airborne DC power supply of 28V to make sure the normal power supply;
(b) Turn on EGPWS circuit breaker on circuit breaker box;
(c) Turn on the power supply to the following systems to make them at normal operating state;
(1) XAS-3M air data system;
(2) VIR-432 VOR/instrument landing system
(3) HG-593Y8 laser inertial/satellite integrated navigation system;
(4) RKA405B radio altimeter;
JZ-Y8F200W-02
AIRCRAFT FLIGHT MANUAL
SECTION VI
AIRCRAFT SYSTEM EQUIPMENT
6-236
June 30, 2012
(5) JT-Y8F200W intercom;
(6) FJ-30D6 flight data recording system;
(7) TCAS-94 traffic collision and avoidance system;
(8) Landing gear and flap system.
(d) Level 1 built-in test (with/without pass test)
Level 1 built-in test is used to testify the correctness of EGPWS before flight:
Make sure the normal power supply of the aircraft; make clear that the TERRAIN INHIBIT
ON warning signal lights on left instrument panel is not pressed; Terrain indication should
appear on MHD300.
Press GPWS P/TEST warning signal light on left or right instrument panel for a moment;
Check the correctness of system configuration at first by EGPWS when built-in test is
operated. If there is error, system may produce sound hint and the built-in test stops. If
there is no error, certain sound information is produced. Any determined function
inefficiency may also produce sound hint (such as: sliding inefficiency)
Conclusion is made after built-in test. The description of prediction result to typical built-in
test 1 is shown as follows:
(1) Orange GPWS FAIL TERRAIN FAIL warning signal light on left instrument panel
illuminates;
(2) FLAP OVRD warning signal light on left instrument panel illuminates;
(3) BELOW G/S P/CANCEL warning signal light on left/right instrument panel illuminates;
(4) GLIDESLOPE voice produced in earphone;
(5) BELOW G/S P/CANCEL warning signal light on left/right instrument panel turns off;
(6) G/S CANCELED warning signal light on left instrument panel illuminates;
JZ-Y8F200W-02
AIRCRAFT FLIGHT MANUAL
SECTION VI
AIRCRAFT SYSTEM EQUIPMENT
6-237
June 30, 2012
(7) GPWS P/TEST warning signal light on left/right instrument panel illuminates;
(8) PULL UP voice can be heard;
(9) MHD300 displays built-in test picture;
(10) TERRAIN TERRAIN PULL UP voice produced in earphone;
(11) GPWS P/TEST warning signal light on left/right instrument panel turns off;
(12) GPWS FAIL TERRAIN FAIL warning signal light on left instrument panel turns off;
(13) Built-in picture disappears after scanning several time;
Level 1 built-in test is finished.
(e) After level 1 built-in test, the system can enter into normal operating state.
(f) After operation, first cut off EGPWS circuit breaker on circuit breaker box and then cut off
the power supply of relevant equipment on board, and turn off the airborne power supply at
last.
(g) EGPWS warning
EGPWS warning is divided into Note alert and Warning alert.
Note alert includes (the following situations are considered to be note alert):
(1) PULL UP, TERRAIN,TERRAIN, PULL UP, or OBSTACLE, OBSTACLE PULL UP voice
appears in earphone;
(2) GPWS P/TEST warning signal light on left/right instrument panel illuminates;
Warning alert includes (the following situations are considered to be warning alert):
JZ-Y8F200W-02
AIRCRAFT FLIGHT MANUAL
SECTION VI
AIRCRAFT SYSTEM EQUIPMENT
6-238
June 30, 2012
(1) CAUTION TERRAIN, CAUTION OBSTACLE, TOO LOW TERRAIN, SINKRATE,
DON'T SINK, GLIDESLOPE, TOO LOW FLAPS or TOO LOW GEAR voice appears in
earphone;
(2) GPWS P/TEST warning signal light on left/right instrument panel illuminates or
BELOW G/S P/CANCEL warning signal light on left/right instrument panel illuminates;
(h) Suggested methods to EGPWS warning
(1) Note alert
a) Stop any lowering to climb, analyzing instruments available and information to
decide optimal performance in eliminating warning.
b) Inform the air traffic control department if necessary.
(2) Warning alert
a) Push the throttle-control lever to maximum rated thrust position and use the
maximum available power. If there is pilot that do not drive the aircraft, he should
choose power and make sure it is at taking off/going around power and mode.
b) If autopilot is at operating state, turn it off, and enlarge the pitch angle steadily and
rapidly in control stick direction or limit direction of pitching inhibited indicator to
acquire maximum climbing ability.
c) Continue to climb until the alert is released and assurance of safety flight.
d) Inform the air traffic control department of the above situations.
JZ-Y8F200W-02
AIRCRAFT FLIGHT MANUAL
SECTION VI
AIRCRAFT SYSTEM EQUIPMENT
6-239
June 30, 2012
Note
1) Except in contact flight or pilot can make a turning which is the optimum
method besides climbing basing on all available information and climbing is
the only suggestion.
2) Navigation cannot be set on the basis of terrain warning display.
(3) Glide slope alert
Below glide slope warning set on the slide slope deviation extent and altitude includes
soft and hard alert. The respond to these alerts is to correct flight path to return back
to gliding center line or to go around.
(4) Hint call
Hint call is used to inform an incident or one condition generally (such as MINIMUMS,
MINIMUMS). The respond to these hint calls is operated in standard procedure.
(i) Abnormal procedure
(1) Abnormal procedure is operated when part system is inefficient or in compensation.
The detail procedures are as follows:
(2) Mode 1 Large rate-of-descent
Accuracy can be reduced by FLAP OVRD warning signal light on left instrument panel
manually in mode 1. If the aircraft has a large rate-of-descent in non-landing state,
press FLAP OVRD warning signal light. Warning envelope curve of note alert and
warning alert of mode 1 will increase 300 FPM to allow larger rate-of-descent without
warning. When aircraft lowers down to or below 50 ft (15.24 m) altitude, warning
envelope curve return to normal value automatically.
JZ-Y8F200W-02
AIRCRAFT FLIGHT MANUAL
SECTION VI
AIRCRAFT SYSTEM EQUIPMENT
6-240
June 30, 2012
(3) Mode 3 Lose altitude after taking off
Press FLAP OVRD warning signal light on left instrument panel manually in mode 3 to
increase the tolerance of lose altitude after taking off. After the aircraft taking off needs
to fly in low altitude, press FLAP OVRD warning signal light to avoid mode 3
producing alert. When the aircraft lowers down to or below 50 ft (15.24 m), mode 3
warning inhibition will be cancelled automatically.
(4) Mode 5 Too much lower than glide slope
When the radio altitude is lower than 2000 ft (609 m), glide slope warning produced by
mode 5 can be inhibited by pressing BELOW G/S P/CANCEL warning signal light on
left/right instrument panel manually. When the aircraft lowering down beyond
expected glide slope or flexible method needed to be done in instrument landing at
final approach phase, press BELOW G/S P/CANCEL warning signal light to inhibit
mode 5 to produce warning. When aircraft altitude climbs more than 2000 ft(609 m)or
after landing, mode 5 warning inhabitation is cancelled automatically.
(5) If pressing TERRAIN INHIBIT ON warning signal light on left instrument panel to avoid
the TAD alert and display and can also to avoid the alert and display of obstacle and
spike if possible. This operation is used typically in airports which are not in terrain
data base. The choice of terrain inhabitation may cause terrain inefficiency indication,
except that the aircraft makes circuit connection for this. Terrain inhabitation needs to
be cancelled manually.
Emergency procedure
Operate flap, TAD inhibition and other switches according to specific requirement to
emergency situations (such as forced landing, etc).
JZ-Y8F200W-02
AIRCRAFT FLIGHT MANUAL
SECTION VI
AIRCRAFT SYSTEM EQUIPMENT
6-241
June 30, 2012
TACAN system
General
A set of TACAN is mounted on board, which is used to supply the aircraft with the relative
bearing according to the selected TACAN beacon and determine the slant range from the aircraft
to the beacon. Moreover, the TACAN can output the recognition signal of TACAN beacon and has
the function of air/air distance measuring to measure the mutual distance between aircrafts.
System composition
The composition of TACAN system is shown in Table 6-29.
Table 6-29
Nomenclature Type No Qty Installation position
TACAN receiver JD-3A-SF13 1 Left sidewall of frame 27-28
TACAN control box JD-3A-KZ15 1 Navigator instrument panel
Integrated display
unit
JD-3A-XS6 1 Navigator instrument panel
Antenna JD-2-TX
1 Head of frame 20~21
1 Bottom of frame 36~37
Circuit breaker
ZKC-5 1 115V AC distribution board
DBF-2 1 Communicator circuit breaker board
JZ-Y8F200W-02
AIRCRAFT FLIGHT MANUAL
SECTION VI
AIRCRAFT SYSTEM EQUIPMENT
6-242
June 30, 2012
Main technical index
(a) Operation power
DC: 28V; Power consumption: ≤80W
AC: 115V±6V 400Hz±20Hz; Power consumption: ≤110VA
(b) Frequency range: 962MHz~1213MHz
Signal form:ARINC429 interface signal form and 11.8V three wire synchronous signal
(ARINC407) interface
(c) Input impedance: 50Ω (radio frequency)
(d) Output impedance: 600Ω, 60mW (audio frequency)
(e) Operating channel: 252 (126 for X and 126 for Y)
(f) Transmitting pulse peak power: not less than 500W
(g) Reception sensitivity: not less than -89dBm
(h) Range tracking ratio: 3888kn (1 nm/s)
Operation instruction of TACAN
Brief introduction of control box panel
The drawing of control box panel is shown in Figure 6-139.
Figure 6-139 Drawing of control box panel
JZ-Y8F200W-02
AIRCRAFT FLIGHT MANUAL
SECTION VI
AIRCRAFT SYSTEM EQUIPMENT
6-243
June 30, 2012
(a) Selector switch of operating condition: the switch is used to select the operating condition
for TACAN. There are four operating conditions for TACAN, OFF, REC, R/T, and A/A. When
choosing the OFF condition, the equipment does not operate; Choosing REC condition,
the equipment can only measure the relative bearing according to the related TACAN
beacon; For R/T condition, the equipment can be operated to measure the relative bearing
according to the related TACAN beacon and determine the distance from the aircraft and
the beacon; For A/A condition, the equipment can be used for air/air distance measuring to
measure the mutual distance between aircrafts.
(b) R-RATIO (distance ratio): Large and small distance ratio are effective only in A/A operating
condition. When the large and small selector switch is at the SMALL position, the ratio is
4:1, which shows that if the ratio for each of the two wingman to the leader airplane is lower
than 4:1, the distance can be measured; When the large and small selector switch is at the
BIG position, the ratio is 30:1, which shows that aircrafts in operating range can be
measured. When there are only two aircrafts measuring the distance mutually, set the two
aircrafts ratio at the minimum value; if the number of the aircraft is more than 2 (not more
than 6), and the ratio for the distance that between the leader airplane (or tanker) and the
wingman (receiver aircraft) in longest distance and between the leader airplane (or tanker)
and the wingman (receiver aircraft) in nearest distance, is less than 4:1, set the leader
airplane (or tanker) with the minimum distance ratio. When that distance value is more than
4:1, set the leader airplane with large distance ratio. No matter how the leader airplane is
set, all wingmen (or receiver aircraft) are set at SMALL distance ratio.
(c) XY selector switch: X is used for X channel, and Y is used for Y channel.
(d) CHANNEL (channel display): display the current channel
(e) TEST (self-check button): press the button, and the equipment enters into the starting
self-check state.
(f) TUNE (channel selector switch): it is used for TACAN to choose the channel. The outer
ring button is to choose the units digit of channel. Rotating it clockwise or counter clockwise,
the value in unit digit increases or decreases by the unit of 1. Middle ring button is used to
choose the tens/hundreds digit. Rotate this button in clockwise or counter clockwise, the
value on tens digit increases/ decreases by the unit of 10.
JZ-Y8F200W-02
AIRCRAFT FLIGHT MANUAL
SECTION VI
AIRCRAFT SYSTEM EQUIPMENT
6-244
June 30, 2012
(g) BRT (brightness control) knob: it is used to control the brightness of number of channel
display. Rotate it in clockwise to increase the brightness, and in counter clockwise to
decrease the brightness.
(h) VOL (volume control) knob: it is used to control the volume of recognition voice of TACAN
beacon. Rotate it in clockwise to increase the volume, and in counter clockwise to
decrease the volume.
(i) LIGHTING knob: it is used to control the brightness control of TACAN control box panel.
Rotate it in clockwise to increase the brightness, and in counter clockwise to decrease the
brightness.
Brief introduction of integrated display unit
The drawing of TACAN integrated display unit panel is shown in Figure 6-140.
(a) STATE switch: It is a changeover switch to display the data content alternately. Press the
switch once, the content of display window change in the following two states: display of
azimuth and distance data, display of distance ratio and time to the channel.
(b) BRT knob: It is at the left side of display panel and is used to regulate the brightness of
integrated display screen. Rotate it in clockwise to increase the brightness, and in counter
clockwise to decrease the brightness.
(c) Display window: when the equipment is at normal operation, the upper row displays the
azimuth data (the unit is o
) or the distance ratio (unit is kts). When receiving the ineffective
data, the upper row displays - - - -. The lower row displays the distance data (unit is nm) or
the time to channel (unit is min). When receiving the ineffective data, the lower row
displays - - - - When the TACAN system is in self-check, if the check is normal, the upper
row display the azimuth of 180o
and the distance of 000.0 nm. If the self-check is abnormal,
the trouble code should be displayed on the upper row.
Figure 6-140 Drawing of JD-3A TACAN integrated display unit panel
JZ-Y8F200W-02
AIRCRAFT FLIGHT MANUAL
SECTION VI
AIRCRAFT SYSTEM EQUIPMENT
6-245
June 30, 2012
Operation
(a) Switch and knob setting
Turn on the TACAN power circuit breaker on communicator circuit breaker board and AC
115 V distributing board, and then place the ADF1/TACAN/VOR1channel selector switch
on left and right instrument panel and navigator instrument panel at the TACAN position.
Rotate the LIGHTING knob on TACAN control box on navigator instrument panel to
regulate the brightness of control box to a proper extent. And then rotate the BRT knob to
regulate the brightness of channel display widow on control box board. Rotate the BRT'
knob on integrated display at the same time to regulate the brightness of display window
on integrated display panel properly.
(b) TACAN self-check
TACAN self-check is divided into self-check with power state and starting self-check state.
(1) Self-check with power
Place the operating condition switch on JD-3A TACAN control box board on navigator
instrument panel from the OFF to REC position, which is starting self-check. If the
self-check is normal, the value will be displayed on JD-3A integrated display as:
azimuth 180.0o
(error is ±2o
), distance 0 nm (error is±0.2 nm). If the self-check is
abnormal, the trouble code may be displayed on the JD-3A integrated display. The
codes are as follows:
Transmitter 01;
Receiver 02;
Frequency synthesis 03;
Information unit 05.
JZ-Y8F200W-02
AIRCRAFT FLIGHT MANUAL
SECTION VI
AIRCRAFT SYSTEM EQUIPMENT
6-246
June 30, 2012
(2) Starting self-check
Press the self-check button on JD-3A TACAN control box board to enter into the
starting self-check state. The judgment of TACAN system starting self-check is the
same as that of self-check with power.
Flight service
(a) Receiving state
Place JD-3A control box to the selected beacon channel and set the operating condition
switch at REC position with the coded switch X/Y consistent with the beacon, JD-3A
integrated display, on navigator instrument panel, displays the aircraft TACAN azimuth
according to the beacon. Heading position indicators of pilot, copilot and navigator all
display the TACAN azimuth.
(b) Receive/Send state
Place JD-3A control box to the selected beacon channel and set the operating condition
switch at R/T position with the coded switch X/Y consistent with the beacon, JD-3A
integrated display, on navigator instrument panel, displays the aircraft TACAN azimuth
and digital oblique line distance according to the beacon. Heading position indicators of
pilot, copilot and navigator all display the TACAN azimuth. When the flight attitude is 8 km,
the largest operation distance should not be less than 173 nm.
(c) Beacon recognition signal
Turn on the TACAN switch on intercom control box of pilot, copilot and navigator. Regulate
the volume knob on TACAN control box or on intercom control box to make the recognition
volume proper that can be heard by earphone clearly.
(d) A/A state
Place the operating condition switch of JD-3A control box at A/A position, and the coded
switch at X(Y) position. At that time, if other aircraft is in TACAN operation in A/A and X(Y)
state, with the two aircraft channel discrepancy of 63 channels, the linear distance of the
two aircrafts can be measured (when the distance between the two same airborne TACAN
aircrafts with A/A distance measuring function is in 81 nm without blocking, the two aircrafts
can measure the distance between them mutually).
JZ-Y8F200W-02
AIRCRAFT FLIGHT MANUAL
SECTION VI
AIRCRAFT SYSTEM EQUIPMENT
6-247
June 30, 2012
COMMUNICATION SYSTEM
K/TKR-200A2
General
Two sets of K/TKR-200A2 airborne high frequency (HF) radio sets are installed on the
Y8F200W aircraft. K/TKR-200A2 airborne HF radio set is capable of transmitting and receiving. It
is used for long-range communication and liaison between aircraft and aircraft, and between
aircraft and ground. Single sideband (SSB) speech is mainly used during communication, but
sideband report and modulation speech can also be used. This radio set is mainly used by the
communicator. The pilot can also use this radio set, but the navigator can only tune in this radio set
and the mechanic cannot use it. The first set is used for emergency power supply, while the
second set is used for normal power supply. The two sets of radio set are in active/standby mode.
SYSTEM COMPOSITION AND COMPONENT INSTALLATION POSITION
K/TKR-200A2 radio set system consists of the following components. The component
installation position is listed in Table 6-18.
Table 6-18 Component composition of K/TKR-200A2 radio set system
Nomenclature Qty (pcs) Type No. Installation Position
Transceiver 2 K/TKR-200A2 HF Transceiver-1
One on the equipment rack at
the right of the front web at
frame 9.
On the upper side of the
communicator's console
Antenna tuner 2 K/TKR-200A2 HF Transceiver-2
One on the equipment rack at
the right of the front web at
frame 9.
On the equipment rack of the
door top at frame 9 in the
cockpit.
Control box 2 K/TKR-200A2 HF Transceiver-3
On the communicator's console
panel
Pre/post-selector 2 K/TKR-200A2 HF Transceiver-4
On the equipment rack at the
right of the front web at frame 9
Telegraph key 2 LW3.684.003MX
On the communicator's
operating desk
Copper-cable
antenna
2
Y8C-7102-24 From left and right stringer
49~50 at frame 8~9 to the
vertical finY8-7102-48
JZ-Y8F200W-02
AIRCRAFT FLIGHT MANUAL
SECTION VI
AIRCRAFT SYSTEM EQUIPMENT
6-248
June 30, 2012
MAIN TECHNICAL PERFORMANCE
Power supply 28 VDC±2.8% VDC
Power consumption 28 VDC: ≤900 W
Frequency range 2~29.9999MHz
Channel interval 100Hz;
Operating mode USB,LSB,AME (data)
Operating period 1:1 (counted at transmission 5min), continuously operating for 24h
Transmitting power SSB:200W+1.0dB (PEP)
UCW: 200 W+1.0dB (average)
AME: ≥80 W (carrier wave)
Tuning precision VSWR≤1.5 (typical value)
VSWR≤1.7 (full frequency band)
Tuning duration Stored channel≤50ms
Non-stored channel≤5s
Sensibility When (S+N)/N = 10 dB
SSB, UCW:≤0.5μV
AM (30%):≤2.5μV
JZ-Y8F200W-02
AIRCRAFT FLIGHT MANUAL
SECTION VI
AIRCRAFT SYSTEM EQUIPMENT
6-249
June 30, 2012
PANEL DESCRIPTION
The control panel consists of the display window, key group, power/brightness knob, operating
mode knob, and INJECT interface. The control panel is shown in Figure 6-141.
工种 信息/频率
注入
收 发
关 开 选择 迟入 扫描/调谐
电源 静噪 自检 定呼
定频
自适应
注入
工作模式
Fuction Type of work Information/frequency
lnject
lnject
Power supply
Operation mode
Adaptive
FH
Off On
Rx Tx
Selection Late entry Scan/tune
/Squelch /Self-test Fixed call
Figure 6-141 Control panel
Control panel description
The display window includes the FUNCTION area, TYPE OF WORK area,
INFORMATION/FREQUENCY area, Rx (receiving) and Tx (transmitting) indicating lights, and
power indicating light. The display window is used to display the radio set operating state.
JZ-Y8F200W-02
AIRCRAFT FLIGHT MANUAL
SECTION VI
AIRCRAFT SYSTEM EQUIPMENT
6-250
June 30, 2012
Key group
The key group consists of eight keys which are used to set all parameters for the HF radio set.
Power/brightness knob
This knob has ON/OFF positions which are used to power on or off the HF radio set.
Operating mode knob
This knob has three positions, namely, FIXED FREQUENCY, SELF-ADAPTIVE, and INJECT.
It is used to switch over the operating mode of the HF radio set.
INJECT interface
This interface is used to inject parameters to the HF radio set by the parameter injector or PC.
IN-FLIGHT OPERATION
Check on the first set of the HF radio set
(a) Power-on of the first set of the HF radio set
(1) Supply 28 VDC power to the aircraft, and turn on the HF1, INTERCOM1, and
INTERCOME2 power switches on the communicator circuit breaker board.
(2) Turn the POWER SUPPLY knob on the control box of the first set of the HF radio set
on the communicator's console from the OFF position to the ON position. The HF
radio set is powered on. The HF radio set displays its model first and then performs
power-on self-test. Then, it returns to the state used before the last power-off. Turn the
electroluminescent panel illumination brightness adjustment knob on the
communicator's panel to properly adjust illumination brightness of the
electroluminescent panel on the HF radio set control box. In the fixed frequency
receiving state, when no character on the screen is blinking, press the FIXED CALL
button on the control box. At this time, LIGHT ADJUST is displayed in the display
screen. Then, press ↑ to increase the character display brightness or press ↓ to
decrease the character display brightness. After the character display brightness is
adjusted properly, press the FIXED CALL button again to exit.
(3) HF1.Turn the control knob on the intercom control box to the HF1 position.
JZ-Y8F200W-02
AIRCRAFT FLIGHT MANUAL
SECTION VI
AIRCRAFT SYSTEM EQUIPMENT
6-251
June 30, 2012
(b) Check on operating at the fixed frequency
(1) Turn the OPERATING MODE knob on the control box to the FH position to enter the
fixed frequency channel communication state. The meaning of each part of the display
window is shown in Figure 6-142.
U S B 0 1 2 3 4 5 6
Information/frequency area
RX TX
Sub-function area
Receiving indicating light Transmitting indicating light Transmitting output power indicating light
Type of work area
Figure 6-142 Meaning of each part of the display window
(2) Radio set self-test and power-on self-test: The radio set is in channel communication
state shown in Figure 143. Press the →/SELF-TEST button. The radio set starts
self-test, and the interface is shown in Figure 3. The self-test sequence is as follows:
power-on/power-off unit (KGDY), pre/post-selector (YHXQ), frequency synthesizer
unit (PH), DSP signal processor unit (DSP), receiving channel of the RF amplifier unit
(SPR), audio power amplifier (YPGF), audio interface unit (YPJK), transmitting
channel of the RF amplifier unit (SPT), power amplification unit (GF), filter unit (LBQ),
antenna switch unit (TXKG), and automatic antenna tuner (TT). After the self-test is
complete, the radio set automatically returns to the state before self-test. If the
self-test result is normal, the information/frequency area will display XXX OK. If the
self-test result is abnormal, this area will display XXX ERR. (Here, XXX indicates the
unit code). If the antenna tuner has no power, NO POWER will be displayed. When
the OPERATING MODE knob of the radio set is turned to the FH or ADAPTIVE
position, power on the HF radio set and it starts power-on self-test. The self-test
sequence is the same as the manual self-test. After the self-test is complete, the
OPERATING MODE knob points to the corresponding operating state. In addition, if
the radio set is in INJECT operating mode after power-on, it does not perform
power-on self-test.
Note
During self-test, do not speak to the microphone; otherwise, the self-test result
of the audio interface unit will be inaccurate. If the radio set is in INJECT
operating mode after power-on, it does not perform power-on self-test.
JZ-Y8F200W-02
AIRCRAFT FLIGHT MANUAL
SECTION VI
AIRCRAFT SYSTEM EQUIPMENT
6-252
June 30, 2012
- - - - U S B B I T E . . . .
Rx Tx
Figure 6-143 Interface displayed during self-test
(3) Fixed frequency parameter setting
a) If the radio set is in fixed frequency communication state shown in Figure 6-142,
press the SELECT button. The radio set enters the programming state. The cursor
is blinking at the first digit in the information/frequency area. See Figure 144. (The
italic digit in bold indicates that it is blinking.). Press ↑ to page up the channel, or
press ↓ to page down the channel. Radio set fixed frequencies 0-9 have totally 10
channels.
b) After the channel has been selected, press→/SELF- TEST or ←/SQUELCH to
move the cursor to a digit of the frequency. The cursor is blinking. Press ↑ to page
up the frequency value, or press ↓ to page down the frequency value. The radio
set frequency range is 2.0000 MHz~29.9999 MHz.
c) After the operating frequency has been selected, press →/SELF-TEST or
←/SQUELCH to move the cursor to the type of work area. The cursor is blinking.
See Figure 6-95. (italic characters in bold indicate that these digits are blinking)
Press →/SELF-TEST or ←/ SQUELCH to move the cursor to the type of work
area. The cursor is blinking. Press ↑ to page up the type of work, or press ↓ to
page down the type of work. Types of work of the radio set are as follows: USB
(upper sideband speech), LSB (lower sideband speech), UCW (upper sideband
report), and AME (compatible modulation). (The radio set does not use the
message transmission function.)
d) After programming is complete, press SELECT again. The radio set exits the
programming state and returns to the fixed frequency communication state.
- - - - U S B 0 1 2 3 4 5 6
Rx Tx
Figure 6-144 Blinking digit in the information/frequency area
- - - - U S B 0 1 2 3 4 5 6
Rx Tx
Figure 6-145 Blinking digit in the type of work area
JZ-Y8F200W-02
AIRCRAFT FLIGHT MANUAL
SECTION VI
AIRCRAFT SYSTEM EQUIPMENT
6-253
June 30, 2012
(4) Check on the fixed frequency transceiving function of the radio set: When the radio
set checks the fixed frequency transceiving function, it should select several
frequency points in high, medium, and lower frequency bands in the operating
frequency range respectively for spot check.
a) Transmitting check: Ensure that the radio set is in fixed frequency communication
state. Set the channel, frequency, type of work, and sub-function according to
methods described in 5.1.2 c). Press SCAN/TUNE. The radio set will tune the
frequency corresponding to the current channel. If tuning succeeds, the
information/frequency area will display TT OK, as shown in Figure 6-146. If tuning
fails, this area will display TT ERR, as shown in Figure 6-147. If tuning has no
power, this area will display NO POWER, as shown in Figure 6-148. The radio set
automatically returns to the fixed frequency communication state shown in Figure
6-141 within about 2s after tuning is complete. At this time, RADIO button can be
pressed to speak, and self-listening tone can be heard through the earphone.
- - - - U S B T T O K
Rx Tx
Figure 6-146 Tuning succeeds
- - - - U S B T T E R R
Rx Tx
Figure 6-147 Tuning fails
- - - - U S B N O P O W E R
Rx Tx
Figure 6-148 Tuning has no power
JZ-Y8F200W-02
AIRCRAFT FLIGHT MANUAL
SECTION VI
AIRCRAFT SYSTEM EQUIPMENT
6-254
June 30, 2012
b) Receiving check: Press ↑ to turn up the volume, or press ↓ to turn down the
volume. (Pressing ↑ or ↓ intermittently can slightly change the volume; holding ↑ or
↓ can greatly change the volume.) After the volume is adjusted properly, noise
should be heard through the earphone (squelch function disabled). Press
←/SQUELCH. The interface shown in Figure 6-149 is displayed. Enable the
squelch function. Press ←/ SQUELCH again. The interface shown in Figure 6-150
is displayed. Disable the squelch function and enable the active noise function.
Press ←/SQUELCH for the third time. The radio set returns to the fixed frequency
state shown in Figure 151.
S Q U U S B 0 1 2 3 4 5 6
Rx Tx
Figure 6-149 Pressing ←/SQUELCH for the first time
R O N U S B 0 1 2 3 4 5 6
Rx Tx
Figure 6-150 Pressing ←/SQUELCH for the second time
(c) Self-adaptive operating check
(1) Turn the OPERATING MODE knob to the ADAPTIVE position. The radio set enters
the self-test adaptive scanning state. The meaning of each part of the display window
is shown in Figure 6-151. If the self-adaptive link has been established between the
radio set on the aircraft and the third-party radio set, when the radio set is in self-test
communication state, the meaning of each part of the display window is shown in
Figure 6-152
U S B 0 0 1 S C
Rx Tx
Sub-function
Receiving indicating light Transmitting indicating light Transmitting output power indicating light
Type of work Channel group Scanning channel Scanning state
Figure 6-151 Meaning of each part of the display window
U S B C 0 1 1 0 1
Rx Tx
Sub-function
Receiving indicating light Transmitting indicating light Transmitting output power indicating light
Type of work Communication channel Calling station number
Figure 6-152 Meaning of each part of the display window
JZ-Y8F200W-02
AIRCRAFT FLIGHT MANUAL
SECTION VI
AIRCRAFT SYSTEM EQUIPMENT
6-255
June 30, 2012
(2) Self-adaptive parameter setting
a) Select the scanning channel group: The radio set is in scanning state. Press
SELECT to enter the scanning channel group selection state. At this time, the
cursor is blinking at the first digit in the information/frequency area. Press ↑ to
page up the scanning channel group, or press ↓ to page down the scanning
channel group. After the modification, press SELECT again to exit the scanning
channel group selection state. The radio set returns to the scanning state.
b) Set the calling address: The radio set is in scanning state. Press SCAN/TUNE to
enter the call setting state, as shown in Figure 6-153 (the italic digit in bold
indicates that this digit is blinking). Press ←/ SQUELCH or →/SELF- TEST to
move the cursor to the last digit in the information/frequency area. The cursor is
blinking. Press ↑ to page up the calling address at the digit where the cursor
locates, or press ↓ to page down the calling address. 100~299 are single station
addresses, 300~319 are network call addresses, and 900 is the general call
address. After the calling address has been set, press the RADIO button to call, or
press SCAN/TUNE to make the radio set return to the scanning state.
- - - - U S B C i n d 1 0 1
Rx Tx
Figure 6-153 Call setting interface
(3) Self-adaptive operating mode
a) Self-adaptive scanning: Turn the OPERATING MODE knob to the ADAPTIVE
position. The radio set enters the self-adaptive scanning state. At this time, if other
radio sets perform self-adaptive calling and establish a link with this radio set,
when SCAN/TUNE is pressed again, the radio set will return to the scanning state.
JZ-Y8F200W-02
AIRCRAFT FLIGHT MANUAL
SECTION VI
AIRCRAFT SYSTEM EQUIPMENT
6-256
June 30, 2012
b) LQA calling: The radio set is in scanning state. Press SCAN/TUNE to enter the call
setting state. The radio set display window is shown in Figure 6-154 (the italic
character in bold indicates that this digit is blinking). Press ↑ or ↓ to replace C with
L. Press the RADIO button. The radio set will perform LQA calling according to the
preset parameters. During calling, the radio set display window is shown in Figure
6-155. After LQA calling is over, the radio set automatically returns to the scanning
state.
- - - - U S B C i n d 1 0 1
Rx Tx
Figure 6-154 Radio set display window in the call setting state
- - - - U S B L 0 1 1 0 1
Rx Tx
Figure 6-155 Radio set display window during LQA calling
c) Automatic call: After the radio set on the aircraft has performed LQA calling with
the target radio set, press the RADIO button. The radio set will enter the automatic
calling state. The radio set will automatically select a frequency for call transmitting
based on the channel quality obtained by the LQA.
d) Manual calling: The radio set is in scanning state. Press SCAN/TUNE to enter the
call setting state. Press FIXED CALL to enter the manual calling channel setting
state. The radio set display window is shown in Figure 6-156 (the italic digit in bold
indicates that this digit is blinking). Press ↑ to page up the calling channel, or press
↓ to page down the calling channel. After the channel has been set, press the
RADIO button to perform manual calling, or press SCAN/TUNE again to exit the
manual calling state and make the radio set return to the scanning state.
- - - - U S B C 0 1 1 0 1
Rx Tx
Figure 6-156 Radio set display window in the manual calling channel selection state
JZ-Y8F200W-02
AIRCRAFT FLIGHT MANUAL
SECTION VI
AIRCRAFT SYSTEM EQUIPMENT
6-257
June 30, 2012
e) Link protection calling: The radio set is in scanning state. Press SELECT. Then,
press ←/SQUELCH or →/SELF-TEST to move the cursor to the function area.
The cursor is blinking. Press ↑ or ↓ to make the sub-function area display LP, as
shown in Figure 6-157 (italic characters in bold indicate that these digits are
blinking). Press SELECT again and then LATE ENTRY. The radio set display
window is shown in Figure 6-158. The radio set exchanges time with the called
radio set (If the time difference between the two radio sets is within 3min, there is
no need for them to exchange time.) After the time exchange, automatic calling or
manual calling can be performed in line protection mode.
L P U S B 0 0 1 S C
Rx Tx
Figure 6-157 Radio set display window
L P U S B C 0 1 1 0 1
Rx Tx
Figure 6-158 Radio set display window
Note
Calling can be performed and the communication link can be established only
when both parties are in line protection state and the scanning duration is within
3min. If either radio set is not in line protection state, the communication link
cannot be established. If both radio sets are in line protection state, but the
scanning duration exceeds 3min, one of the radio sets must execute the LATE
ENTRY transmitting time exchange command so that the communication link
can be established. It is recommended that time exchange be performed before
the line protection calling function is used.
JZ-Y8F200W-02
AIRCRAFT FLIGHT MANUAL
SECTION VI
AIRCRAFT SYSTEM EQUIPMENT
6-258
June 30, 2012
f) Self-adaptive late entry: The late entry (insertion) function is available on the radio
set in self-adaptive state. When two or more K/TKR-200A2 airborne radio sets
enter the communication state with the channel having the same frequency, the
third-party radio set that is scanning state can call any radio sets to which links
have been established. After the communication state is entered, the radio set can
communicate with other radio sets that have already been in communication state.
The method is as follows: Set the calling address according to the method
described in 5.1.3 b). Select the channel (the frequency corresponding to the
channel should be the same) that matches the calling address according to the
method described in 5.1.3 b). Then, press PTT to perform manual calling late entry.
Set the calling address according to the method described in 5.1.3 b). Perform
automatic calling late entry according to the method described in 5.1.3 c). (At least
one of the scanning channel frequency of the radio set that is about to perform
automatic calling late entry must be the same as the frequency of the radio set that
has already been in communication state; otherwise, the self-adaptive late entry
function cannot be implemented.)
Note
When selecting the calling address, the radio set that is about to perform
self-adaptive late entry can select the single station address or network call
address only. The general call address cannot be selected in this case.
Check on the second set of the HF radio set
(a) Power-on of the second set of the HF radio set
(1) Supply 28 VDC power to the aircraft, and turn on the HF2, INTERCOM1, and
INTERCOME2 power switches on the communicator circuit breaker board.
(2) Turn the POWER SUPPLY knob on the control box of the second set of the HF radio
set on the communicator's console from the OFF position to the ON position. The HF
radio set is powered on. The HF radio set displays its model first and then performs
power-on self-test. Then, it returns to the state used before the last power-off. Turn the
HF BRI electroluminescent panel illumination brightness adjustment knob on the
communicator's panel to properly adjust illumination brightness of the
electroluminescent panel on the HF radio set control box. In the fixed frequency
receiving state, when no character on the screen is blinking, press the FIXED CALL
button on the control box. Then, press ↑ to increase the character display brightness
or press ↓ to decrease the character display brightness. After the character display
brightness is adjusted properly, press the FIXED CALL button again to exit.
(3) Turn the control knob on the intercom control box to the HF2 position.
JZ-Y8F200W-02
AIRCRAFT FLIGHT MANUAL
SECTION VI
AIRCRAFT SYSTEM EQUIPMENT
6-259
June 30, 2012
(b) The method for check on operating at the fixed frequency is the same as that described in
the above item.
(c) The method for self-adaptive operating check is the same as that described in the above
item.
DESCRIPTION
(a) To perform self-adaptive communication, contact witch the target radio set and make the
communication protocol in advance.
(b) Before using the radio set, tune frequencies to be used. After the operating environment is
changed, frequencies must be tuned again. When TT ERR is displayed for tuning,
transmitting is prohibited. Do not switch channels during radio set tuning and transmitting.
(c) If the radio set is inoperative, power off and then power on the radio set again.
(d) During transmission of the HF radio set, person cannot stand on the dorsal.
(e) If the open circuit or short circuit occurs, the radio set will enter the automatic protection
state. At this time, the radio set display window in shown in Figure 159. The radio set can
exit the protection state only after the SCAN/TUNE button is pressed to retune the radio set,
or the SELECT button is pressed to re-set the frequency, or the radio set is powered off.
T r a n s P r o t e c t
Rx Tx
Figure 6-159 Radio set display window in automatic protection state
(f) The final assembly factory performs (c) and (d), and the flight test factory performs (d) and
(e). The self-adaptive and injection functions can be dispensed if the ground station does
not have the check condition.
(g) Transmitting of the HF radio set will interfere with the ADF. Therefore, HF radio set
transmitting is prohibited during approach.
(h) Bilingual illustration for panel of K/TKR-200A2 radio set control box refers to Figure 6-160.
JZ-Y8F200W-02
AIRCRAFT FLIGHT MANUAL
SECTION VI
AIRCRAFT SYSTEM EQUIPMENT
6-260
June 30, 2012
工种 信息/频率
注入
收 发
关 开 选择 迟入 扫描/调谐
电源 静噪 自检 定呼
定频
自适应
注入
工作模式
Fuction Type of work Information/frequency
lnject
lnject
Power supply
Operation mode
Adaptive
FH
Off On
Rx Tx
Selection Late entry Scan/tune
/Squelch /Self-test Fixed call
Figure 6-160 K/TKR-200A2 radio set control box panel
JZ-Y8F200W-02
AIRCRAFT FLIGHT MANUAL
SECTION VI
AIRCRAFT SYSTEM EQUIPMENT
6-261
June 30, 2012
TKR123E-III VHF radio
GENERAL
Two sets of TKR123E-III VHF radio set are installed on the Y8F200W aircraft to
be exported to Venezuela. They are used for routine plain voice communication and
liaison in the visual range between aircraft and ground, aircraft and aircraft, and
aircraft and ship.
MAIN TECHNICAL PERFORMANCE
BASIC PERFORMANCE
The basic performance of TKR123E-III VHF radio set is as follows
(a) Operating frequency band 30~87.975MHz (FM)
108~155.975MHz (AM/FM)
156~173.975MHz (FM)
225~399.975MHz (AM/FM)
(b) Survival frequency: 40.5MHz,121.5 MHz,156.8 MHz,243MHz
Operating mode AM, FM
Channel interval 25kHz
Power supply voltage 28V DC
Operating temperature -45o
C~+60o
C
Preset number of channels 40
JZ-Y8F200W-02
AIRCRAFT FLIGHT MANUAL
SECTION VI
AIRCRAFT SYSTEM EQUIPMENT
6-262
June 30, 2012
Receiver performance
(a) Sensitivity (S+N)/N≥10 dB
AM: ≤103 dBm 1kHz (30% modulation);
FM: ≤-113 dBm 1kHz (±6.0kHz frequency deviation);
(b) Automatic gain control feature: The automatic gain dynamic range is 120 dB
Main transmitter specifications
(a) Output power ≥10 W(AM);≥15 W(FM)
(b) AM modulation degree 80%~98%
(c) FM frequency deviation ±6 kHz±0.5 kHz
(d) RF impedance 50Ω
(e) The transmitter provides the antenna open-circuit/short-circuit, standing-wave ratio, and
overheating protection functions.
Audio interface
The VHF radio set is interconnected with JT-Y8F200W intercom through the simulated
interface, which is used for audio input and output.
(a) Input (audio transmitted by the microphone) interface (balanced input):
Impedance 150Ω
Level 0.25V
Bandwidth 300~3500Hz
(b) Output (audio received by the earphone) interface (balanced output):
Impedance 600Ω
Level 100mW
Bandwidth 300~3500 Hz
JZ-Y8F200W-02
AIRCRAFT FLIGHT MANUAL
SECTION VI
AIRCRAFT SYSTEM EQUIPMENT
6-263
June 30, 2012
SYSTEM COMPOSITION AND COMPONENT INSTALLATION POSITION
The two sets of VHF radio sets installed on the Y8F200W aircraft to be exported to Venezuela
have the same composition. The specific composition and component installation position are
listed in Table 6-30.
Table 6-30 Composition of the VHF radio set and component installation position
No Component Model Quantity Installation Position
1 Control box TKR123E-III K1 2 On the overhead console
3 Transceiver TKR123E-III TR 2
On the equipment rack at the left of
frame 9
3 Mounting bracket LZ4.284.108 2
On the equipment rack at the left of
frame 9
4 Antenna 8DTX2B-607B 2
First set: Between left stringer 9-10
at frame 8-9
Second set: Between right stringer
9-10 at frame 8-9
5 Circuit breaker ZKC-10 2
On the communicator circuit
breaker board
6 Switch ZK2-2 2 On the overhead console
7
Light control
potentiometer
JWX5-2-1KΩ±5% 1 On the overhead console
JZ-Y8F200W-02
AIRCRAFT FLIGHT MANUAL
SECTION VI
AIRCRAFT SYSTEM EQUIPMENT
6-264
June 30, 2012
CONTROL BOX DESCRIPTION
Control panel layout
The control panel of the VHF radio set is shown in Figure 6-161.
BT1
BT2MODE
SOS MN GD TX CH
TONE
SELFRQ
AM/FM
Indicating light brightness
adjusting knob
Emergency
indicating light
Main receiving
indicating light
Survival
indicating light
Transmitting
indicating light
Channel
/frequency button
Monophony buttonFrequency/channel
/squelch knob
Volume adjusterOperating state/modulation mode
/display area brightness adjusting knob
Figure 6-161 Control panel of the VHF radio set
Functions of each button and knob displayed in Figure 1 are described as follows (according to
the No. marked in Figure 6-161):
(a) BT1: Indicating light brightness adjusting knob
(b) SOS: Emergency indicating light
(c) MN: Main receiving indicating light
(d) GD: Survival indicating light
(e) TX: Transmitting indicating light
JZ-Y8F200W-02
AIRCRAFT FLIGHT MANUAL
SECTION VI
AIRCRAFT SYSTEM EQUIPMENT
6-265
June 30, 2012
(f) CH: Channel/frequency selection button
(g) TONE: Monophony button. After this button is pressed, the monophony signal can be
transmitted. After the frequency is changed, pressing this button can confirm that the radio
set changed status is valid.
(h) FRQ/SEL: Frequency/channel/ squelch knob. This knob consists of a large knob and a
small knob. The large knob on the lower layer is used to adjust the channel number and
frequency, while the small knob on the upper layer is used to cooperate with the large knob
to adjust the channel number and frequency. In addition, pushing in the small knob can set
squelch, while pulling out the small knob can set non-squelch.
(i) Radio set volume adjuster: Turning it clockwise can turn up the volume, while turning it
counter-clockwise can turn down the volume.
(j) MODE/BT2: Operating state/ modulation mode/display area brightness adjusting knob.
This knob consists of a large knob and a small knob. Turning the large knob on the lower
layer can select the operating mode, while turning the small knob on the upper layer can
adjust the nixie tube brightness. In addition, pushing in the small knob can select AM, while
pulling out the small knob can select FM.
Control box operations
(a) After the VHF radio set control box is powered on and PASS is displayed, the VHF radio
set starts operating properly.
(b) Press and hold the CH (channel/frequency) button on the control panel for 2s (until
information in the display area on the control box starts blinking). The radio set enters the
preset state. At this time, the blinking channel number on the radio set control box is the
channel number displayed before the last normal power-off.
(c) Preset channel number: When the channel number is blinking, turn the FRQ/SEL
(frequency/channel/squelch) knob to the channel number that needs to be preset. The
specific adjustment method is as follows:
(1) Turn the large or small knob clockwise. The channel number increases by 1.
(2) Turn the large or small knob counter-clockwise. The channel number decreases by 1.
JZ-Y8F200W-02
AIRCRAFT FLIGHT MANUAL
SECTION VI
AIRCRAFT SYSTEM EQUIPMENT
6-266
June 30, 2012
(d) Press the CH (channel/frequency) button on the control panel after the channel number
has been set. The frequency point corresponding to the preset channel is displayed in the
display area. If the frequency point corresponding to the channel needs to be modified, turn
the FRQ/SEL (frequency/channel/squelch) knob. The specific adjustment method is as
follows:
(1) Turn the large knob clockwise. The frequency increases by 1 MHz when the knob is
turned by one step.
(2) Turn the large knob counter- clockwise. The frequency decreases by 1 MHz when the
knob is turned by one step.
(3) Turn the small knob clockwise. The frequency increases by 25 kHz when the knob is
turned by one step.
(4) Turn the small knob counter- clockwise. The frequency decreases by 25 kHz when the
knob is turned by one step.
(5) After the frequency has been set, press the TONE button for frequency storing
confirmation.
Preset other channels or frequencies in the same way. After preset is complete, press
and hold the TONE button for 2s. The display area stops blinking. The control box
automatically stores the preset channels or frequencies and then exits the preset
mode. Turn the large knob on the lower layer of the MODE/BT2 (operating state/
modulation mode/display area brightness adjustment) knob on control panel 1 or
control panel 2 to select the required operating state. The operating state is changed
when this knob is turned. When the knob is turned continuously, the operating states
are changed in the following sequence cyclically: Main receiving → Survival → Dual
receiving → Emergency → Main receiving. The specific display mode of each
operating state is as follows:
(e) Main receiving state: The MN main receiving indicating light in the operating state
indication area illuminates, and the channel number of operating frequency in main
receiving state is displayed in the display screen.
(f) Survival state: The GD survival indicating light in the operating state indication area
illuminates, and the survival frequency is displayed in the display screen.
(g) Dual receiving state: The MN main receiving indicating light and the GD survival indicating
light in the operating state indication area illuminate simultaneously, and the channel
number or operating frequency in dual receiving state is displayed in the display screen.
JZ-Y8F200W-02
AIRCRAFT FLIGHT MANUAL
SECTION VI
AIRCRAFT SYSTEM EQUIPMENT
6-267
June 30, 2012
(h) Emergency state: the SOS emergency indicating light in the operating state indication area
illuminates, and 243.000 is displayed in the display screen.
Note
1) The SOS (emergency), MN (main receiving), GD (survival), TX (transmitting)
indicating lights are illuminating in green.
2) To adjust brightness of the operating state indicating light, turn the BT1
potentiometer in the upper left corner of the control panel. Turning the knob
clockwise can increase brightness, while turning the knob counter-clockwise
can decrease brightness.
3) To adjust brightness of characters displayed in the display screen, turn the
small knob on the upper layer of the MODE/BT2 knob. Turning the knob
clockwise can increase brightness, while turning the knob counter-clockwise
can decrease brightness.
4) The radio set provides two regular operating modes, that is, amplitude
modulation (AM) and frequency modulation (FM).
IN-FLIGHT OPERATIONS
Operating procedure
(a) Power-on
Turn on VHF-I and VHF-II circuit breakers on the communicator circuit breaker board at the
right of frame 9 and VHF-I and VHF-II power control switches on the overhead console.
Lights in control panels of the two sets of VHF radio set illuminate.
JZ-Y8F200W-02
AIRCRAFT FLIGHT MANUAL
SECTION VI
AIRCRAFT SYSTEM EQUIPMENT
6-268
June 30, 2012
(b) Brightness adjustment
Turn the VHF DIM brightness adjustment potentiometer on the overhead console.
Illumination of the two control panels should change. During power-on, properly adjust the
control box brightness. (Turning the knob clockwise can increase brightness, while turning
the knob counter-clockwise can decrease brightness.)
(c) Squelch adjustment
Pull out or push in the small knob on the upper layer of the FQR/SEL knob on the control
panel. Noise or squelch should be heard through the earphone.
(d) Monophony operation
Press and hold the TONE button so that the radio set is in monophony transmitting state.
The transceiver outputs the monophony, indicating that the radio set communication
function is normal. Release the TONE button to exit the monophony transmitting state.
(e) Volume adjustment
To adjust the radio set receiving volume, turn the volume adjustment potentiometer in the
center of the control panel. Turning the knob clockwise can turn up the volume, while
turning the knob counter-clockwise can turn down the volume.
Operating mode
(a) Communication in the main receiving mode
Turn the large knob on the lower layer of the MODE/BT2 operating mode selection knob on
the control panel. If the MN main receiving indicating light in the operating state indication
area illuminates, it indicates that the operating mode is main receiving, and the channel
number or operating frequency in main receiving state is displayed in the display screen.
Use the channel selection knob to select the channel. After the operating channel number
or operating frequency of the radio set is set according to the methods described in 4.2 c)
and 4.2 d), push into the small knob on the upper layer of the FRQ/SEL knob to set squelch.
Then, turn the selection knob on the intercom to the UV1 or UV2 position. Press the radio
button in the corresponding position and speak. The self-listening tone can be heard
through the earphone.
JZ-Y8F200W-02
AIRCRAFT FLIGHT MANUAL
SECTION VI
AIRCRAFT SYSTEM EQUIPMENT
6-269
June 30, 2012
Table 6-31 Operating frequency range and operating mode of the VHF radio set
Operating Frequency
Survival Frequency and
Modulation Mode
Operating Mode
30 MHz~87.975 MHz 40.5 MHz(FM) FM
108 MHz~155.975 MHz 121.5 MHz(FM) AM,FM
156 MHz~173.975 MHz 156.8 MHz(FM) FM
225 MHz~399.975 MHz 243 MHz(FM) AM,FM
(b) Communication in dual receiving mode
Turn the large knob on the lower layer of the MODE/BT2 operating mode selection knob on
the control box. If the MN main receiving indicating light and GD survival indicating light in
the operating state indication area illuminate simultaneously, it indicates that the operating
mode is dual receiving. The channel number or operating frequency in dual receiving state
is displayed in the display screen. Use the channel selection knob to select the channel.
After the operating channel number or operating frequency of the radio set is set according
to the methods described in 4.2 c) and 4.2 d), push into the small knob on the upper layer
of the FRQ/SEL knob to set squelch. Then, turn the selection knob on the intercom to the
UV1 or UV2 position. Press the radio button in the corresponding position and speak. The
self-listening tone can be heard through the earphone.
(c) Communication in survival mode
Turn the large knob on the lower layer of the MODE/BT2 operating mode selection knob on
the control box. If the GD survival indicating light in the operating state indication area
illuminates, it indicates that the operating mode is survival. The operating frequency (the
survival frequency at each operating band of the radio set is listed in Table 2) in survival
state is displayed in the display screen. Push into the small knob on the upper layer of the
FRQ/SEL knob to set squelch. Then, turn the selection knob on the intercom to the UV1 or
UV2 position. Turn the large knob on the lower layer of the MODE/BT2 operating mode
selection knob on the control box. The self-listening tone can be heard through the
earphone.
JZ-Y8F200W-02
AIRCRAFT FLIGHT MANUAL
SECTION VI
AIRCRAFT SYSTEM EQUIPMENT
6-270
June 30, 2012
(d) Communication in 243 mode
Turn the large knob on the lower layer of the MODE/BT2 operating mode selection knob on
the control box. If the SOS emergency indicating light in the operating state indication area
illuminates and the operating frequency 243.000 is displayed in the display screen, it
indicates the operating mode in emergency.
(e) 1020 monophony operation
Set the operating mode of the control box to main receiving or dual receiving. Press and
hold the TONE button so that the radio set is in monophony transmitting state. The
transceiver outputs the monophony, indicating that the radio set communication function is
normal. Release the TONE button to exit the monophony transmitting state.
Power-off
Turn off the VHF-I and VHF-II power control switches on the overhead console first. Then, turn
off VHF-I and VHF-II circuit breakers on the communicator circuit breaker board at the right of
frame 9.
JT-Y8F200W Intercom
General
JT-Y8F200W intercom is a radio communication system. Only one set of JT-Y8F200W
intercom is installed on the entire aircraft.
JT-Y8F200W intercom provides the following functions:
Allow intercommunication among the flight crew.
Interconnect with the radio set so that the flight crew can control the radio set to implement
the external radio contact.
Tune in audio identification signals from ground navigation stations such as the TACAN,
automatic direction finder (ADF), VOR/ILS/DME, and beacon.
Tune in warning signals from the TCAS and ground-proximity warning system (GPWS).
JZ-Y8F200W-02
AIRCRAFT FLIGHT MANUAL
SECTION VI
AIRCRAFT SYSTEM EQUIPMENT
6-271
June 30, 2012
Support Components Onboard and Installation Position (See Table 6-32)
Table 6-32 Support components onboard and installation position
Component Model
Qua
ntity
Installation Position
Pilot Copilot Navigator
Mechan
ic
Comm
unicat
or
Intercom
control box
JT-Y8F200W-
KZ
5
Overhea
d
console
Overhead
console
Navigator'
s side
cover
plate
Overhe
ad
console
Comm
unicat
or's
control
panel
Intercom
expansion
device
JT-Y8F200W-
NKZ
1 On the equipment rack at the left of frame 9
Intercom
junction box
JT-Y8F200W-
JX
1 On the equipment rack at the left of frame 9
Simplified
control box
JT-Y8F200W-
JYK
3
The simplified control box for the cargo attendant is
located on the side wall at the right of frames 11~12.
The simplified control box for the medical staff is
located on the side wall at the left of frames 30~31.
The simplified control box for the jettison staff is located
on the side wall at the right of frames 42~43.
JZ-Y8F200W-02
AIRCRAFT FLIGHT MANUAL
SECTION VI
AIRCRAFT SYSTEM EQUIPMENT
6-272
June 30, 2012
Main Technical Specifications
Power supply
28VDC±10%
Electric performance
Microphone input: 400mV, 600Ω, feed to microphone 12 DVC
Wire inputs are listed in Table 6-33.
Table 6-33 Wire inputs
CH Definition Input Level
Input
Mode
Pilot Copilot Navigator Mechanic Communicator
Volume
tunable
1
Ultrashort wave
radio set 1
7.75V,
600Ω
Balanced
type
TR TR TR TR TR Y
2
Ultrashort wave
radio set 2
7.75V,
600Ω
Balanced
type
TR TR TR TR TR Y
3
Ultrashort wave
radio set 1
7.75V,
600Ω
Balanced
type
TR TR TR TR TR Y
4
Ultrashort wave
radio set 2
7.75V,
600Ω
Balanced
type
TR TR TR TR TR Y
5 Compass 1
7.75V,
600Ω
Balanced
type
Receiver Receiver Receiver Y
6 Compass 2
7.75V,
600Ω
Balanced
type
Receiver Receiver Receiver Y
7 DME1 100mW,500
Balanced
type
Receiver Receiver Receiver Y
8 DME2 100mW,500
Balanced
type
Receiver Receiver Receiver Y
9 TCAS-94 7.00V,600
Balanced
type
Receiver Receiver Receiver N
10 Beacon 1 50mW,600
Balanced
type
Receiver Receiver Receiver N
11 Beacon 2 50mW,600
Balanced
type
Receiver Receiver Receiver N
12
Ground
proximity
warning
7.75V,600
Balanced
type
Receiver Receiver Receiver N
14 VOR1 100mW,600
Balanced
type
Receiver Receiver Receiver Y
15 VOR2 100mW,600
Balanced
type
Receiver Receiver Receiver Y
16 TACAN 60mW,600
Balanced
type
Receiver Receiver Receiver Y
17
Critical angle of
attack
30V,20k
Imbalanc
ed type
Receiver Receiver Receiver N
JZ-Y8F200W-02
AIRCRAFT FLIGHT MANUAL
SECTION VI
AIRCRAFT SYSTEM EQUIPMENT
6-273
June 30, 2012
(a) Intercom headset output voltage (7.75V+2
-1 )V/600Ω balanced
Calling headset output voltage (5.52±1)V/600Ω
Simplified intercom headset output voltage (7.75V+2
-1 )V/600 Ω balanced
(b) Receiving headset output voltage (7.75V+2
-1 )V/600 Ω balanced
Sound transmission output (250±30) mV/150 Ω (channels 1 and 2)
(775+200
-100 ) mV/600 Ω (channels 3 and 4)
(c) Harmonic distortion: Communication state≤4% (1kHz
Wire state≤4% (1kHz)
Calling state≤4% (1kHz)
Sound transmission state≤2% (1kHz)
(d) Audio response 300Hz~5000Hz fluctuation≤5dB
(e) Signal-to-noise ratio ≥50dB(1kHz)
(f) Channel crosstalk suppression ≥50dB(1kHz)
Headset loading feature: During variation between 600Ω~300 Ω, the output amplitude
variation is smaller than or equal to 3 dB (1 kHz).
Panel Description
Control box panel
Appearance of JT-Y8F200W intercom control box panel is shown in Figure 6-162
Figure 6-162 Appearance of JT-Y8F200W intercom control box panel
JZ-Y8F200W-02
AIRCRAFT FLIGHT MANUAL
SECTION VI
AIRCRAFT SYSTEM EQUIPMENT
6-274
June 30, 2012
The intercom control box panel is a white lighting electroluminescent panel. There are 14
encoding volume potentiometers, one external communication transmission selection knob, and
one MASK/INPH knob on the intercom control box panel. They are used to implement control
functions of the control box.
Knob functions are described as follows:
(a) UV1, UV2, HF1, and HF2 knobs are used to adjust the volume of the corresponding radio
set.
(b) VOR1, VOR2, DME1, DME2, ADF1, ADF2, and TACAN knobs are used to adjust the
volume of the corresponding navigation devices.
(c) The INPH knob is used to adjust the volume of the intercom voice.
(d) The LGT knob is used to adjust illuminance of the electroluminescent panel.
(e) MASK/INPH knob: MASK indicates the mask function. When using the mask microphone,
the pilot turns this knob to the MASK position.
(f) The CALL button is a forced-calling button. After pressing this button, the person who
presses this button hears the caller's voice with the maximum volume passively. This
button is used to implement emergent intercom in special cases. Its volume is not
controlled by the intercom volume adjusting knob.
(g) The UV1, UV2, HF1, and HF2 selection knob is used to select the radio set to be used for
external communication. Turn the pointer to a radio set to select that radio set for
transmission.
(h) The SBY/NORM selection knob is used to select the state of the intercom control box.
When the knob is at the NORM position, the control box is operating properly. When the
control box is faulty, turn the knob to the SBY position so that the backup module starts
operating. The backup module provides the same functions as those provided by the
control box operating properly.
JZ-Y8F200W-02
AIRCRAFT FLIGHT MANUAL
SECTION VI
AIRCRAFT SYSTEM EQUIPMENT
6-275
June 30, 2012
Simplified control box panel
Appearance of JT-Y8F200W intercom simplified control box panel is shown in Figure 6-163.
Figure 6-163 Appearance of the simplified control box panel
There is an NET1/NET2 switch, a volume potentiometer, and a CALL button on the simplified
control box panel. They are used to implement control functions of the control box. Functions of
the switch, knob, and button are described as follows:
(a) NET1/NET2 switch: NET1 indicates the internal network, which implements internal
communication among expansion members (cargo attendants, medical staff, and jettison
staff) through the simplified control box. NET2 indicates the external network, which
implements intercom between expansion members (cargo attendants, medical staff, and
jettison staff) and intercom control box members. Expansion members (cargo attendants,
medical staff, and jettison staff) can switch over the network state by turning this
changeover switch.
JZ-Y8F200W-02
AIRCRAFT FLIGHT MANUAL
SECTION VI
AIRCRAFT SYSTEM EQUIPMENT
6-276
June 30, 2012
(b) Volume potentiometer: Turning this knob can adjusting the intercom voice volume (turning
clockwise to turn up the volume, while turning counter-clockwise to turn down the volume).
(c) The CALL button is a forced-calling button. After pressing this button, the person who
presses this button hears the caller's voice with the maximum volume passively. This
button is used to implement emergent intercom in special cases. Its volume is not
controlled by the intercom volume adjusting knob.
Operation
System power-on
Turn on INTERCOM1 and INTERCOM2 circuit breakers on the communicator circuit breaker
board. At this time, illumination of the electroluminescent panel on the control box panel applies
white light.
Intercom operating mode
(a) Common intercom operating mode
After the power supply is engaged, the control box user presses its own TALK button (The
pilot presses the TALK button on the left control stick; the copilot presses the TALK button
on the right control stick; the mechanic presses the TALK button on the central instrument
panel or steps on the foot push nearby; the navigator steps on the two foot pushes on the
floor where the navigator locates; the communicator presses the TALK button on the
communicator's instrument panel.) After the corresponding button is pressed, the user's
control box is in communication operating mode, and crew members can communicate
with each other. To adjust the volume, turn the INPH volume adjusting knob.
(b) Calling operating mode
When the user of a control box presses the CALL button on the control box panel, all other
crew members should hear the calling sound clearly and undistortedly no matter they are
in what states.
JZ-Y8F200W-02
AIRCRAFT FLIGHT MANUAL
SECTION VI
AIRCRAFT SYSTEM EQUIPMENT
6-277
June 30, 2012
External liaison and monitoring of navigation audio and warning audio
(a) Using ultrashort wave radio set 1
Tune in the voice from ultrashort wave radio set 1. Turn the UV1 volume adjusting knob to
adjust the volume to a proper volume. To use ultrashort wave radio set 1 for external
transmission, turn the external communication selection knob to the UV1 position. Then,
the pilot, copilot, navigator, mechanic, and communicator can press their own RADIO
buttons to perform external liaison using ultrashort wave radio set 1.
(b) Using ultrashort wave radio set 2
The operation method is the same as that described in 5.3 a). In this case, however, turn
the UV2 volume adjusting knob and turn the external communication selection knob to the
UV2 position.
(c) Using short wave radio set 1
Tune in the voice from short wave radio set 1. Turn the HF1 volume adjusting knob to
adjust the volume to a proper volume. To use short wave radio set 1 for external
transmission, turn the external communication selection knob to the HF1 position. Then,
the pilot, copilot, navigator, mechanic, and communicator can press their own RADIO
buttons to perform external liaison using short wave radio set 1.
(d) Using short wave radio set 2
The operation method is the same as that described in 5.3 c). In this case, however, turn
the HF2 volume adjusting knob and turn the external communication selection knob to the
HF2 position.
JZ-Y8F200W-02
AIRCRAFT FLIGHT MANUAL
SECTION VI
AIRCRAFT SYSTEM EQUIPMENT
6-278
June 30, 2012
(e) Tuning in the signal from VOR1
The pilot, copilot, and navigator turn the VOR1 volume adjusting knob respectively to
adjust the volume to a proper volume. When the signal from the ground VOR set is
received, the pilot, copilot, and navigator can tune in VOR1's audio signal through their
headsets.
(f) Tuning in the signal from VOR2
The operation method is the same as that described in 5.3 e). In this case, however, turn
the VOR2 volume adjusting knob.
(g) Tuning in the signal from compass 1
The pilot, copilot, and navigator turn the ADF1 volume adjusting knob on the control box
panel respectively to adjust the volume to a proper volume, and set the operating mode of
the radio compass control box at the ANT position. At this time, the pilot, copilot, and
navigator can tune in the audio signal from the ground compass navigation station through
their headsets.
(h) Tuning in the signal from compass 2
The operation method is the same as that described in 5.3 g). In this case, however, turn
the ADF2 volume adjusting knob.
(i) Tuning in the TACAN signal
The pilot, copilot, and navigator turn the TACAN volume adjusting knob on the control box
panel respectively to adjust the volume to a proper volume. When aircraft receives the
TACAN signal, the pilot, copilot, and navigator can tune in the audio signal from TACAN
through their headsets.
(j) Tuning in the signal from DME1
The pilot, copilot, and navigator turn the DME1 volume adjusting knob on the control box
panel respectively to adjust the volume to a proper volume. When the signal from the
ground DME navigation station is received, the pilot, copilot, and navigator can tune in the
audio signal from DME1 through their headsets.
JZ-Y8F200W-02
AIRCRAFT FLIGHT MANUAL
SECTION VI
AIRCRAFT SYSTEM EQUIPMENT
6-279
June 30, 2012
(k) Tuning in the signal from DME2
The operating method is the same as that described in 5.3 j). In this case, however, turn
the DME2 volume adjusting knob.
(l) Tuning in the warning signal from the TCAS
When RA and TA alarms are generated in the TCAS, the TCAS outputs the audio signal. At
this time, the pilot, copilot, and navigator can tune in the audio warning signal through their
headsets. The signal volume is not controlled by the volume adjusting knob.
(m) Tuning in the ground proximity warning signal
When aircraft reaches the ground proximity warning distance, the pilot, copilot, and
navigator can tune in the warning audio signal through their headsets. The signal volume is
not controlled by the volume adjusting knob.
(n) Tuning in the signal from beacon 1
Set the operating state of VOR/instrument landing system 1 to beacon state. When aircraft
flying over the beacon, the pilot, copilot, and navigator can tune in the beacon audio signal
from the combined receiving device through their headsets. The audio signal output to the
intercom is in fixed output state. The signal volume is not controlled by the volume
adjusting knob on the intercom control box.
(o) Tuning in the signal from beacon 2
The operating method is the same as that described in 5.3 n). In this case, however, set the
operating state of VOR/instrument landing system 2 to beacon state.
(p) Tuning in the warning signal of the critical angle of attack
When the intercom receives the warning signal of the critical angle of attack, the pilot and
copilot can hear the pulse sound through their headsets. The signal volume is not
controlled by the volume adjusting knob.
JZ-Y8F200W-02
AIRCRAFT FLIGHT MANUAL
SECTION VI
AIRCRAFT SYSTEM EQUIPMENT
6-280
June 30, 2012
Other functions
(a) Illuminance adjusting function
The pilot, copilot, mechanic, navigator, and communicator turn the LGT illuminance
adjusting knob on the intercom control box at their positions respectively. Illuminance of the
electroluminescent panel on the control box panel should change.
(b) Oxygen mask microphone
Connect the oxygen mask microphone to the oxygen mask microphone socket. Then, set
the MASK/INPH switch on the control box at the MASK position to start communication.
(c) Power-off
After the intercom power-on check is over, turn off INTERCOM1 and INTERCOM2 circuit
breakers on the communicator circuit breaker board. Indicators on the control box panel turn
off and the electroluminescent panel goes out.
Notes
(1) JT-Y8F200W intercom applies the emergency power supply onboard.
(2) JT-Y8F200W intercom is equipped with AIRMAN 750 headset monophone set.
AIRMAN 750 Headset Monophone Set
Composition and Functions
AIRMAN 750 headset monophone set (hereinafter referred to as headset) is noise-proof and
of low resistance. It is a communication audio terminal for internal communication among crew
members through the intercom or for external communication through the radio set. It provides not
only microphone and receiver functions but also the noise-proof function.
JZ-Y8F200W-02
AIRCRAFT FLIGHT MANUAL
SECTION VI
AIRCRAFT SYSTEM EQUIPMENT
6-281
June 30, 2012
Support Components Onboard and Position
AIRMAN 750 headset monophone set consists of the microphone, receiver, and ear capsule.
There are 8 sets of AIRMAN 750 headsets on the entire aircraft (one on the left and right control
sticks respectively; one on hooks for the mechanic, navigator, and communicator respectively; one
on hooks for the cargo attendant and medical staff; one in the bag for the jettison staff).
Main Technical Specifications
Headset
Type Dynamic
Impedance 150~600Ω
Frequency response 100~3000Hz
Sensitivity 90dB SPL/mW@1KHz
Microphone and amplifier
Type: Noise-proof
Matching impedance 50~600Ω
Frequency response 100~5000Hz
Sensitivity -51dB re: 1V/ubar at 1KHz, 12VDC bias
Operating voltage: 8~16VDC
Operating Method
After the airborne intercom starts operating, wear the headset. To ensure the comfortableness,
optimal communication effect, and optimal noise-excluding-and-reducing performance, adjust the
slide rod according to the head form before wearing the headset so that soft ear pads of the ear
capsule can cover ears. Meanwhile, adjust the connecting rod of the microphone and keep the
microphone about 1 cm away from the mouth; otherwise, the voice will be low and thus the
signal-to-noise ratio will be reduced, affecting the communication effect.
JZ-Y8F200W-02
AIRCRAFT FLIGHT MANUAL
SECTION VI
AIRCRAFT SYSTEM EQUIPMENT
6-282
June 30, 2012
RADAR SYSTEM
JYL-6AT weather radar
General
One set of JYL-6AT weather radar is installed on the Y8F200W to be exported to Venezuela. It
is an integrated X-band display radar with color alphanumeric pictures. It is used to detect the
weather condition, terrain, and ground objects in the front of the aircraft, and display them on the
display for the pilot to make correct judgment and acquire the comprehensive weather and terrain
conditions. In this way, the pilot can select a safe and comfortable flight path, enhancing the flight
safety.
JYL-6AT Radar Composition and Component Installation Position (See Table
6-34)
Table 6-34 Composition and component installation position
Component Installation Position
Antenna (12 in x 18 in) In the radar cabin between frame 2a~4
Transceiver On the equipment rack on the floor at the left of frame 4~5
Display
One on the navigator's side cover plate, and one on the
pilot's central instrument panel
JZ-Y8F200W-02
AIRCRAFT FLIGHT MANUAL
SECTION VI
AIRCRAFT SYSTEM EQUIPMENT
6-283
June 30, 2012
Main Technical Specifications
Operating frequency: 9345±30MHz
Pulse peak power: ≥5KW
Distance range: 10nm,25nm,50nm,100 nm,200nm,250nm
Pulse repetition frequency: 120Hz±10 Hz
Pulse width: Long-range:5.5±0.5μs
Short-range:1±0.5μs
In-air Operations
Display panel description
Operations of JYL-6AT color weather radar are implemented by knobs, buttons (keys), and
switches on the control display panel. The display panel is shown in Figure 6-164.
Figure 6-164 JYL-6AT radar display panel
JZ-Y8F200W-02
AIRCRAFT FLIGHT MANUAL
SECTION VI
AIRCRAFT SYSTEM EQUIPMENT
6-284
June 30, 2012
Functions and operations of knobs, buttons (keys), and switches on the display
panel
(a) ON/OFF (power switch) knob: When the knob is turned to the OFF position, the radar is
powered off. When the knob is turned to the ON position, the radar is powered on.
(b) STBY (preparation operating mode) button: This button is a push ON/OFF button. After this
button is pressed, the radar is in warm-up standby state. The 28 VDC power supply is
engaged, and warm-up of 60s~90s starts.
(c) TEST (self-test mode) button: This button is a push ON/OFF button. It is used to check
whether the radar system is operating properly. In this mode, the radar's simulated target
pulse is processed by means of video lamination. Then, green, yellow, red (red and black
occur alternately at a frequency of 1 Hz), yellow, and green sector concentric color ring
areas. During flight, whether components of the weather radar are operating properly can
be checked at any time.
(d) WX (weather detection mode) button: This button is a push ON/OFF button. After this
button is pressed, the transmitter radiates the microwave energy to detect the rain area
location and strength in the front of the aircraft. The strength is displayed in the sequence
of green, yellow, and red (red and black occur alternately at a frequency of 1 Hz) from weak
to strong.
(e) NORM (normal detection mode) button: The target detected in this mode is the same as
that detected in WX mode. The target display color is also the same in these two modes. In
this mode, however, red displayed is stable and does not blink.
(f) MAP (terrain mapping mode) button: This mode is used to detect terrain features such as
lake, river, shoreline, mountain, and large city in the down front of the aircraft. The terrain
contour is displayed in blue, yellow, and fuchsin for auxiliary navigation. In this case, the
distance mark, distance advisory, azimuth mark, and status advisory characters are all
displayed in green.
(g) GAIN (gain control) knob: GAIN (MAX/MIN) is a five-position knob that is used to control
the receiver gain. When it is turned clockwise to its ultimate position, that is, the MAX
position, the receiver has the highest sensitivity. The receiver sensitivity is reduced by one
step when the knob is turned counter-clockwise by one position. Gain control is available
when the weather radar is operating in WX and MAP operating modes. In these two modes,
the GAIN knob is generally turned to the MAX position.
JZ-Y8F200W-02
AIRCRAFT FLIGHT MANUAL
SECTION VI
AIRCRAFT SYSTEM EQUIPMENT
6-285
June 30, 2012
(h) LIGHT knob: LIGHT is a continuous adjustable potentiometer which is installed in the bottle
middle part of the display panel. It is used to adjust illumination brightness of the display
electroluminescent panel. Turning the knob clockwise can brighten the panel, while turning
the knob counter-clockwise can dim the panel.
(i) TILT (pitch manual control) knob and STAB (antenna stabilization control) button: TILT is a
continuous adjustable potentiometer which allows the antenna to be adjusted continuously
in the range of ±15o
. Pushing the STAB button in can enable antenna stabilization control,
while pushing it out can disable antenna stabilization control.
(j) INT (screen intensity control) knob: INT is a continuous adjustable potentiometer. The
screen intensity can be adjusted according to the cabin illumination condition to achieve
the optimal illumination effect. Turning the knob clockwise can brighten the screen, while
turning it counter-clockwise can dim the screen. This knob is generally turned to the center
position.
(k) HOLD (holding) button: This button is a push ON/OFF button. After this button is pressed,
the target display screen will be frozen. HOLD and the selected status will be displayed as
the status advisory alternately at the rate of 1 Hz. It is used to prompt the pilot that currently
the system is operating in HOLD state, and the display screen has been frozen.
(l) M/S (master/slave display switchover) key: After the display is powered on, the navigator's
display serves as the master display by default. To switch over between the master and
slave displays, press this key. After the radar is powered on, the navigator's display serves
as the master display by default. The display master (M) and slave (S) states are indicated
in the lower right corner of the screen. The master display is capable of complete radar
control, while the slave display can only be used to control the range change and
superpose the navigation information and lists on the slave display screen.
JZ-Y8F200W-02
AIRCRAFT FLIGHT MANUAL
SECTION VI
AIRCRAFT SYSTEM EQUIPMENT
6-286
June 30, 2012
(m) NAV (navigation mode) button: This button is a push ON/OFF button which can be used to
control the current display only. It is available when the radar is in STBY, TEST, WX, NORM,
and MAP state. After it is pressed, the following operating states are switched over in turn:
(1) The navigation function is enabled, and the airway information is superposed on the
current screen.
(2) The display screen is switched over to the navigation list.
(3) The navigation function is disabled, and the previous function screen is restored.
(n) TGT warning button: This button is used to enable or disable the TGT warning function. It is
available only when the radar is in WX operating mode. By default, it is enabled. If the TGT
warning is valid, when the heavy rain target occurs in ±15o
range to the right ahead of the
nose with the distance range of 60 nm~160 nm, yellow characters TGT with the red ground
color start blinking with the frequency of 1 Hz in the upper right part of the display screen. If
there is no heavy rain target, only one yellow character T with the red ground color is
displayed in that part.
(o) STAB (antenna stabilization) key: It is only available when master display control is
enabled. It is used to enable or disable the airspace stabilization function. By default, this
function is enabled.
(p) ▲ (distance range increase) button: This button is used to clear the screen and increase
the range by one stage (except for the range 250 nm). The selected range is displayed in
the upper right corner of the screen.
(q) ▼ (distance range decrease) button: This button is used to clear the screen and decrease
the range by one stage (except for the range 10 nm). The selected range is displayed in
the upper right corner of the screen.
Operations
(a) Turn on the WXR circuit breaker on the 115 VAC 400 Hz power distribution disk at the left
of frame 9 and the WXR circuit breaker on the navigator's right console.
(b) Set the radar power switch on the display panel to the ON position, and connect the radar
to the power supply. The radar automatically enters the STBY status and starts warm-up of
60s~90s. When power is supplied for 5s~10s, five blue distance mark lines are displayed
on the display screen. After a range selection key is pressed, a distance mark is displayed
at the right of the corresponding distance mark line. The status characters STBY are
displayed in the lower left corner of the display screen. Turn the INT knob to properly adjust
the display brightness. The STBY display screen is shown in Figure 6-165.
JZ-Y8F200W-02
AIRCRAFT FLIGHT MANUAL
SECTION VI
AIRCRAFT SYSTEM EQUIPMENT
6-287
June 30, 2012
Figure 6-165
(c) Press the TEST button. The operating status characters change to TEST. Starting from the
left ultimate position, the antenna starts scanning in the range of azimuth ±60o
at the rate of
14 times per second. After warm-up of 60s~90s, the test screen is displayed on the display.
The range selected is 50 nm. The self-test screen is of a proper size. Check that the color
straps on the test screen are arranged in the following sequence from inner to outer: green,
yellow, red (red and black occur alternately at the frequency of 1 Hz), yellow, and green
sector concentric color ring areas. Here, red represents the strongest target reflection. The
TEST display screen is shown in Figure 6-166.
Figure 6-166 TEST display screen
JZ-Y8F200W-02
AIRCRAFT FLIGHT MANUAL
SECTION VI
AIRCRAFT SYSTEM EQUIPMENT
6-288
June 30, 2012
(d) When the TEST screen does not fill the range of azimuth ±60o
, press the HOLD button.
The display screen is frozen. Characters TEST and HOLD are displayed alternately. Press
the HOLD button again to release freezing. The TEST screen will fill the range of azimuth
±60o
.
(e) Turn the TILT knob in the lower right corner of the display panel. Turning the knob
clockwise to its ultimate position will pitch up the antenna for 15o
. Turning the knob
counter-clockwise will pitch down the antenna. The antenna can pitch down to a maximum
of 15o
. When the knob notch points to the 0 position, the antenna is at the level position.
(f) Turn the LIGHT knob on the navigator's display to properly adjust the illumination
brightness of the display panel.
(g) Press the WX button. The transmitter radiates the microwave energy. Select 25 nm as the
range. The rain area targets in the front of the heading will be displayed on the display.
They are displayed in green, yellow, and red in the strength sequence from weak to strong.
The heavy rain area targets are displayed in red and black which are blinking at a
frequency of 1 Hz. The target azimuth and distance can be determined by referring to the
azimuth and distance marks. WX display screen is shown in Figure 6-167.
Note
1) The radar in WX state cannot automatically differentiate echoes of rain area
targets and ground object targets. Therefore, the pilot should perform
analysis and judgment based on terrain features.
2) In WX state, when the range is 10 nm, the transmitting pulse is narrow pulse.
Figure 6-167 WX display screen
JZ-Y8F200W-02
AIRCRAFT FLIGHT MANUAL
SECTION VI
AIRCRAFT SYSTEM EQUIPMENT
6-289
June 30, 2012
(h) It is better to select the receiver gain to better display the targets on the display screen.
When the GAIN knob is turned from the MAX position to the MIN position, the number of
targets and target area on the display screen will be decreased.
(i) If targets such as cloudy rain, buildings, or mountain peaks are in the long range, turn the
TILT knob properly to display the target contour clearly.
(j) When pressing the ▲ key in turn to view distances 10 nm, 25 nm, 50 nm, 100 nm, 200 nm,
and 250 nm, pay attention to the range change and movement of targets on the display
screen. Then, when pressing the ▼ key in turn to view distances 250 nm, 200 nm, 100 nm,
50 nm, 25 nm, and 10 nm, pay attention to the distance range change and movement of
targets on the display screen.
(k) The range selection key is the same as the corresponding farthest distance mark on each
distance arc. Press the HOLD button. Characters WX and HOLD will be displayed
alternately, and the target display screen remains unchanged. Press the HOLD button
again. Only characters WX are displayed, and the holding screen is released.
(l) Select 25 nm as the distance range. Press the TEST button. When the self-test screen is
displayed, press the HOLD button. The self-test screen will be frozen. Characters TEST
and HOLD are displayed alternately.
(m) Press the HOLD button again. The complete self-test screen will be displayed. The red
strap in the center of the screen is displayed in red and black alternately at a frequency of 1
Hz. The straps are displayed in the sequence of green, yellow, red, yellow, and green.
Press the WX button and any distance key, and observe the meteorological targets that
may occur. Turn the TILT knob and INT knob when necessary.
(n) Press the WX button. The TGT function is enabled by default. The yellow character T in a
frame with the red ground color will be displayed in the upper right corner of the screen. If a
target with the red strength occurs in the front of the heading of azimuth of ±15o
and in the
range of 60 nm~160 nm, the character T will be replaced by characters TGT that is blinking.
If there is no proper target, whether the function is available or not cannot be judged.
(o) Turn the GAIN knob from the MAX position to the MIN position in turn. If the gain
decreases, the number and size of targets will decrease accordingly. When the gain is
attenuated, characters WX and GAIN will be displayed alternately.
JZ-Y8F200W-02
AIRCRAFT FLIGHT MANUAL
SECTION VI
AIRCRAFT SYSTEM EQUIPMENT
6-290
June 30, 2012
(p) Press the MAP button to detect terrain features such as lake, river, shoreline, mountain,
and large city in the down front of the aircraft, and display their contours in blue, yellow, and
fuchsin for auxiliary navigation. In this case, the distance mark, distance advisory, azimuth
mark, and status advisory characters are all displayed in green. The MAP display screen is
shown in Figure 6-118.
Figure 6-168 MAP display screen
(q) Press the NAV button. At this time, the radar is operating in navigation state. The
navigation operating state is to superpose the navigation information prestored in the laser
strapdown inertial/satellite integrated navigation system on the WX and MAP screens. The
status characters NAV are displayed above the primary status characters.
(r) FAULT: This radar is configured with the fault monitoring circuit. In the operating state, if the
receiver is detected as faulty, for example, the transmitter stops operating or the power
supply is interrupted instantaneously, fault characters FAULT will be displayed in the lower
left corner of the screen and blink at a frequency of 1 Hz to attract the pilot's attention.
(s) Power-off: When the radar is operating in any state of WX, MAP, or TEST, the power-off
procedure should be as follows: Press the STBY button. Stay in the STBY state for at least
10s, ensuring sufficient time for the antenna to return to the 60o
position at the left. Then,
set the power switch to the OFF position. (In these three states, if the radar is directly
powered off, the antenna will stay at any positions. Consequently, when the radar is
powered on again, synchronous adjustment will be performed during azimuth scanning by
the antenna.) Then, turn off the WXR circuit breakers on the 115 VAC 400 Hz power
distribution disk at the left of frame 9 and on the navigator's right console.
JZ-Y8F200W-02
AIRCRAFT FLIGHT MANUAL
SECTION VI
AIRCRAFT SYSTEM EQUIPMENT
6-291
June 30, 2012
Precautions
(t) When starting the transmitter, ensure that there is no person, fuel, or strong-metal reflector
in the sector of ±60o
to the right ahead of the antenna and with the distance of 5 m.
(u) The weather radar can only operate in preparation or test state when there are strong
reflectors such as the fuel truck and iron gate in front of the aircraft.
(v) When the weather radar is energized on the ground, if the transmitter is operating, the
antenna pitch angle should be higher than 0o. Radar power-on is prohibited during aircraft
refueling or defueling.
(w) When the weather radar cannot automatically differentiate rain object and ground object
echoes, the pilot should perform analysis and judgment based on terrain features.
JZ/YD126E airborne transponder
General
JZ/YD126E airborne transponder is an airborne electronic device belonging to the
western-system identification friend or foe (IFF) system. Only one set of airborne transponder is
installed on aircraft.
JZ/YD126E airborne transponder can operate in three modes: M1 (military aircraft security
identification mode), M2 (military aircraft identity identification mode), and M6 (security operating
mode). It is used to receive and encode interrogation signals, and transmit reply signals
corresponding to air identification interrogation signals transmitted by the ground, shipborne, or
airborne transponder. In this way, the interrogator encodes the reply signals and extracts target
code information. The device equipped with the interrogator transponder is used to perform
identity identification and IFF using the interrogation reply system for the aircraft on which the
transponder is installed.
JZ-Y8F200W-02
AIRCRAFT FLIGHT MANUAL
SECTION VI
AIRCRAFT SYSTEM EQUIPMENT
6-292
June 30, 2012
System Composition and Airborne Component Installation Position
Installation positions of transponder sub-assemblies of JZ/YD126E airborne transponder are
listed in Table 6-35.
Table 6-35 Installation positions of transponder sub-assemblies
No. Unit Sub-unit Quantity Installation Position
1 Mainframe No.2 1
On the equipment rack at the left of
frame 9
2 Control box No.3 1 On the navigator side cover plate
3 Front antenna No.1 1
Between stringers 53-55 at the right
of frames 3~4
4 Rear antenna No.1 1
Between stringers 0-1 at the right of
frames 41~42
5 Power filtering box No.4 1
On the equipment rack at the left of
frame 9
6 Signal crosslinking box 25D 1
On the equipment rack at the left of
frame 9
7 IFF circuit breaker ZKC-5 1 On the navigator's right console
8
Circuit breaker of the
signal crosslinking box
ZKC-2 1 On the navigator's right console
Operation
Control Box Functions
(a) Control Panel Introduction
The control panel is shown in Figure 6-169
JZ-Y8F200W-02
AIRCRAFT FLIGHT MANUAL
SECTION VI
AIRCRAFT SYSTEM EQUIPMENT
6-293
June 30, 2012
Reply
light
Fault
light
Knob for selecting
a confidential mode
Reply mode
switchover
knob
Mode
selection
knob
Main control
knob
Special
identification
button
M1-mode
code display
Operating
mode indication Self-test button
Brightness
adjustment
knob
Antenna
selection
switch
Figure 6-169 Control panel
JZ-Y8F200W-02
AIRCRAFT FLIGHT MANUAL
SECTION VI
AIRCRAFT SYSTEM EQUIPMENT
6-294
June 30, 2012
(b) Functional switch description
Functional switches on JZ/YD126E airborne transponder control box are described as
follows:
(1) Main control knob: The main control knob marked with MASTER has 5 positions, that
is, OFF, STBY, LOW, NOR, and EMER (in clockwise sequence). When it is turned to
the OFF position, the entire transponder is in power-off state. When it is turned to the
STBY position, the entire transponder is powered on and is in transmission waiting
state. When it is turned to the LOW position, the entire transponder is powered on and
is in low-sensibility operating state. This mode is applicable to short distance
operation to reduce interference. When it is turned to the NOR position, the entire
transponder is powered on and is in normal operating state. When it is turned to the
EMER position, the entire transponder is powered on and is about to load emergency
reply identification information to the reply code. To turn the MASTER knob from the
NOR position to the EMER position clockwise, pull the knob out before turning
because the knob applies the position limit design. To turn the MASTER knob from the
EMER position to the NOR position counter-clockwise, turn the knob directly without
pulling it out. To turn the MASTER knob from the STBY position to the OFF position
counter-clockwise during power-off, pull the knob out before turning. To turn the
MASTER knob from the OFF position to the STBY position clockwise during power-on,
turn the knob directly without pulling it out.
(2) Reply light: The reply light is used for reply indication of JZ/YD126E airborne
transponder.
(3) Fault light: The fault light is used for fault indication of JZ/YD126E airborne
transponder.
(4) Knob for selecting a confidential mode: This knob is used to switch between A and B
tap positions in M6 mode of JZ/YD126E airborne transponder and to clear keys. Tap
positions A and B are in clockwise sequence. When the knob is turned
counter-clockwise from A position, the knob will be at 0 position, indicating that keys
are cleared. To turn the knob from A position to 0 position, pull the knob out before
turning because the knob applies the position limit design; otherwise, the knob cannot
be turned.
JZ-Y8F200W-02
AIRCRAFT FLIGHT MANUAL
SECTION VI
AIRCRAFT SYSTEM EQUIPMENT
6-295
June 30, 2012
(5) Reply mode switchover knob: When the knob is set at the M6OVR position, the
transponder can operate in M6 mode only. At this time, M1 and M2 modes of the
transponder are locked and are unavailable. When the knob is set at the OFF position,
all modes are available. To enable the M6 operating mode, set the M6 operating
status to O in addition to turning this knob to the M6OVR position.
(6) Brightness adjustment knob: This knob is used to adjust display brightness of the
control panel.
(7) Antenna selection switch: This switch is a toggle switch. When the switch is set at the
TOP position, only the upper antenna can function. When the switch is set at the LOW
position, only the lower antenna can function. When the switch is set at the DIV
position, both the upper and lower antennae can function.
(8) IDENT button: After the IDENT button is pressed, the airborne transponder will load
special position identification information to the reply code.
(9) TEST button: After the TEST button is pressed, self-test is performed for the current
operating mode.
(10) Operating mode indication: This function is used to indicate the current operating
mode.
(11) M1-mode code display: This function is used to display the current M1-mode code.
(12) Mode selection knob: The mode selection knob is divided into two layers. The
upper-layer knob is used to adjust the cursor position and the lower-layer knob is used
to adjust the state of the content that the cursor points. For example, to make the
transponder operate in M1 mode, turn the lower-layer knob to make the cursor point
at the M1 position of Operating mode indication. Then, turn the upper-layer knob to
set its operating state at the O position (indicating ON). Repeat the operations to set
M2 and M6 operating states at position (indicating OFF). Then, turn the lower-layer
knob to make the cursor point at the M1 position of M1-mode code selection on the
control box. Turn the upper-layer knob to set the code value. Set the M2 operating
mode code on the receiver panel. This code switch consists of four groups of toggle
switches. To set the M2-mode reply code, toggle the toggle switch at the
corresponding number position.
JZ-Y8F200W-02
AIRCRAFT FLIGHT MANUAL
SECTION VI
AIRCRAFT SYSTEM EQUIPMENT
6-296
June 30, 2012
Preparations before Powering on JZ/YD126E Airborne Transponder
Perform power-on check for JZ/YD126E airborne transponder on ground and ensure that it is
in good condition. Before powering on the airborne transponder, turn off the IFF power switch on
the navigator's right console, and set components on the control box at positions specified in Table
6-36. Initial switch positions on the control box are listed in Table 6-36.
Table 6-36 Component positions before system power-on
No. Knob/Button Status Position
1 Main control knob (MASTER) OFF On the control panel
2 Special identification button (IDENT) OUT (pushed out) On the control panel
3
Knob for selecting a confidential mode
(M6CODE)
A or B On the control panel
4 Reply mode switchover knob (M6OVR) OFF On the control panel
5 Antenna selection knob DIV On the control panel
6 M2-mode code
0000 or the code
currently used
On the transceiver
panel
In-flight Operation of JZ/YD126E Airborne Transponder
To operate JZ/YD126E airborne transponder during flight, perform operations on the control
box as follows:
(a) Turn on IFF and L-Band Suppressor power switches on the navigator's right console.
(b) Turn the MASTER main control knob on the control panel of the airborne transponder to
the NOR position.
JZ-Y8F200W-02
AIRCRAFT FLIGHT MANUAL
SECTION VI
AIRCRAFT SYSTEM EQUIPMENT
6-297
June 30, 2012
(c) Select the required operating mode according to the flight task. Check whether the reply
light is on (green). If yes, it indicates that the airborne transponder has received
interrogation signals and transmitted the reply signals.
(d) When the airborne transponder is operating in M1 or M2 mode and the aircraft is in a
special position, the pilot can press the IDENT button according to the order issued by the
ground radar commander. The transponder then will transmit a reply code loaded with the
special identification information to the interrogation carrier within about 20s.
(e) When the airborne transponder is operating in M1, M2, or M6 mode and the aircraft
confronts with dangers, turn the MASTER main control knob to the EMER position. The
airborne will then load emergency information to the identification information in the reply
code.
(f) When there is need to adjust brightness of the control panel, turn the brightness
adjustment knob on the transponder clockwise to brighten the panel, whereas turn the
knob counter-clockwise to darken the panel.
Post-Flight Operations of JZ/YD126E Airborne Transponder
After the flight, turn the MASTER main control knob on the control box to the OFF position,
power off the airborne transponder, and turn off IFF and L-Band Suppressor power switches on
the navigator's right console.
TCAS-94 traffic alert and collision avoidance system (TCAS)
GENERAL
TCAS-94 traffic alert and collision avoidance system (TCAS) is capable of avoiding the coming
danger that possibly occurs to the aircraft in flight. With the S-mode air traffic control (ATC)
transponder installed on the aircraft, it transmits the aircraft's flight code, pressure altitude, and
other flight information to the screen of the ground controller, and exchanges information with the
nearby aircraft. By interrogation replies with the intruder, it can determine the distance, azimuth,
proximity rate, and relative altitude of the intruder. When the collsion is close, it will provide the
proper avoidance strategy for aircrew and prompt them with video or audio signals to avoid aircraft
collision.
JZ-Y8F200W-02
AIRCRAFT FLIGHT MANUAL
SECTION VI
AIRCRAFT SYSTEM EQUIPMENT
6-298
June 30, 2012
System Composition
One set of TCAS-94 is installed on the Y8F200W aircraft to be exported to Venezuela. Its
components and their installation positions are listed in Table 6-37.
Table 6-37 TCAS-94 composition
S/N Component Model Quantity Installation Position Onboard
1 TCAS receiver-transmitter TTR-921 1
On the equipment rack under
the left floor of frames 10~11
2 TCAS indicator TVI-920D 2
On the pilot and copilot
instrument panels
3 TCAS control CTL-93T 1 On the left of the top console
4 ATC transponder control CTL-92E 1
On the navigator side cover
plate
5
ATC transponder antenna
converter
402-167 2
On the equipment rack under
the left floor of frames 10~11
6 TCAS directional antenna TRE-920 2
Between stringers 0~2 on the
right of frames 18~19
Between stringers 53~55 on
the left of frames 13~14
7
ATC transponder
transceiver
TDR-94D 2
On the right floor of frames
17~18
8 ATC transponder antenna LS65-5366-7L 2
Between stringers 54~55 on
the right of frames 15~16
Between stringers 1~2 on the
right of frames 16~17
9 Loudspeaker (8Ω; 8 W) YDP613-13a 1 On the pilot top console
10 Brightness regulator
JWX25-100Ω
±10%-20ZS-3
1
On the navigator side cover
plate
11 Brightness regulator
JWX5-300Ω
±10%-20ZS-3
1 On the top console
TCAS-94 traffic alert and collision avoidance system installed on the Y8F200W aircraft is
shown in Figure 6-170.
JZ-Y8F200W-02
AIRCRAFT FLIGHT MANUAL
SECTION VI
AIRCRAFT SYSTEM EQUIPMENT
6-299
June 30, 2012
lighting
lighting
Figure 6-170 Schematic diagram of TCAS-94
JZ-Y8F200W-02
AIRCRAFT FLIGHT MANUAL
SECTION VI
AIRCRAFT SYSTEM EQUIPMENT
6-300
June 30, 2012
Main technical data
(a) RA (resolution advisory) duration: 35~15s
(b) TA (traffic advisory) duration: 48~20s
(c) Monitoring capability:
Maximum tracing capability: 45 targets
Maximum display capability: 30 targets
(d) Monitoring range: 40 n mile
(e) S-mode transponder transmitter output: Minimum peak power 250W
Maximum peak power 625W
(f) S-mode transponder receiver sensibility: 77±2dBm
(g) S-mode transponder transmitter frequency: 1090±0.1MHz
(h) S-mode transponder receiver frequency: 1030±0.2MHz
(i) TCAS receiver-transmitter transmitting pulse power: 160~400W
(j) TCAS receiver-transmitter sensibility: -85±2dBm
(k) TCAS receiver-transmitter transmitter frequency: 1030±0.01MHz
(l) TCAS receiver-transmitter receiver frequency: 1090±3MHz
JZ-Y8F200W-02
AIRCRAFT FLIGHT MANUAL
SECTION VI
AIRCRAFT SYSTEM EQUIPMENT
6-301
June 30, 2012
Panel Description
Control Box
(a) CTL-93T TCAS control
CTL-93T TCAS control panel is shown in Figure 6-171.
Y
Figure 6-171 CTL-93T TCAS control panel
CTL-93T TCAS control operates the TTR-921 TCAS receiver-transmitter. The control has:
a function knob for setting the TCAS operating mode, an M (mode) button for selecting
full-time or part-time traffic display, an A/B (above/below) button for setting the traffic
display range, an R (range) button for setting the range ring, and a TEST button for turning
on self-test.
JZ-Y8F200W-02
AIRCRAFT FLIGHT MANUAL
SECTION VI
AIRCRAFT SYSTEM EQUIPMENT
6-302
June 30, 2012
(1) Function knob: Turn the CTL-92T function knob to select the TCAS operating mode.
There are four positions for the function knob: OFF, STBY, AUTO, and TA ONLY.
a) OFF position: The OFF position turns off power to the TCAS receiver-transmitter.
TVI-920 D indicator shows TCAS OFF in this mode.
b) STBY position: The STBY position sets the TCAS receiver-transmitter to the
standby mode. The TCAS does not show TA traffic on the display, does not give
RA and does not respond to other aircraft TCAS interrogations. TVI-920D indicator
shows TCAS OFF in this mode.
c) AUTO position: The AUTO position is the normal mode of operation. TCAS shows
traffic on the traffic display and gives traffic alerts (TA) and resolution advisories
(RA), as appropriate, in this mode.
d) TA-ONLY: The TA ONLY position sets the receiver-transmitter to the traffic
advisory only mode. TCAS does not give resolution advisories on the TVI-920D
indicator or show RA traffic on the traffic display in this mode. Also, TA ONLY
shows on the TCAS display to identify this mode.
(2) M button: This button is used to select the display mode. There are two modes
available: part-time-threat-only traffic display and full-time traffic display. Only full-time
traffic display is shown on the aircraft.
(3) A/B button: This button is used to select the monitoring altitude range relative to your
own aircraft. Successive presses of the button cycles through the available modes
(NORMAL, ABOVE, and BELOW).
a) NORMAL mode: the mode shows Other Traffic from 2700 ft above to 2700 ft below
your own aircraft.
b) ABOVE mode: the mode shows Other Traffic from 9900 ft above to 2700 ft below
your own aircraft.
c) BELOW mode: the mode shows Other Traffic from 2700 ft above to 9900 ft below
your own aircraft.
JZ-Y8F200W-02
AIRCRAFT FLIGHT MANUAL
SECTION VI
AIRCRAFT SYSTEM EQUIPMENT
6-303
June 30, 2012
(4) R button: press the R button to set the range of TCAS traffic display. The upper right
part of the indicator shows the set range. The aircraft symbol and traffic display range
ring appear on the indicator. Successive presses of the button cycles through the
available ranges: 3 nm, 5 nm, 10 nm, 20 nm, and 40 nm.
(5) TEST button: Press the TEST button to turn on the self-test function of the TCAS-94
system. The TCAS traffic and RA displays show test pattern traffic symbols, a red and
green resolution advisory, and the TEST annunciator.
(b) CTL-92E ATC transponder control
The CTL-92E ATC transponder control panel is shown in Figure 6-172. Functions of
buttons, knobs, and switches on the control panel are described as follows:
ATC squawk code and
fault indication
Collions
A
C
T 1
2
RMT TX
ATC
OFF
STBY
ON ALT
IDENT
TEST PRE
Comparison
announciator
Encoded altitude
and fault display
Announciator
RMT on,
transponder fails
TX on, transponder
operates
Electric source and mode knob
At the ON position, the
ident code is replied.
At the ALT position, the
ident code and encoded
altitude are replied. Brightness
sensor
Self-test
button
Transponder 1/2
changeover switch
Code selection knob
(Two knobs)
Preselection button
(code preselection)Identification
button
Figure 6-172 CTL-92E ATC transponder control panel
JZ-Y8F200W-02
AIRCRAFT FLIGHT MANUAL
SECTION VI
AIRCRAFT SYSTEM EQUIPMENT
6-304
June 30, 2012
(1) Display: The two-line display on the upper part of CTL-92E control is used to show the
ATC squawk codes, annunciators, encoded altitude, and diagnostic codes.
a) Top line: During normal operation, the top display line of CTL-92E shows the ATC
squawk code that the control sends to the transponder. The 1/2 changeover
switch can realize the switching of two sets of S-mode transponders. A
preselected ATC squawk code shows on this line when the PRE button is pressed
and held while setting the code. In ALT mode, dash "-" will show on this line when
no altitude data is presented. Also, during self-test, if an out-of-tolerance condition
is detected in the transponder, the diagnostic annunciator "diAG" is shown on the
top line, and a diagnostic code appears on the bottom display line while the
display flashes from minimum to maximum brightness.
b) Bottom line: In the normal operating modes (STBY, ON, ALT), the bottom display
line is blank. In the ident mode, it shows the annunciator "id". In the self-test mode,
it shows uncorrected barometric altitude in thousands of feet in 100-foot
increments (i.e., 7.4 is 7400 feet). During normal operation, the transponder can
monitor its own operating status. When failure occurs, the "diAG" annunciator
appears on the bottom display line. At this time, press the TEST button on the
control. The diAG annunciator moves to the top display line and the associated
diagnostic code appears on the bottom display line.
(2) Function knob: Turn the function knob to set the necessary transponder operating
mode. This knob has four positions, namely, OFF, STBY, ON, and ALT.
a) OFF position: This position turns off power to the transponder.
b) STBY position: The STBY position sets the transponder to a standby mode so it
does not reply to interrogations.
c) ON position: In the ON position, the transponder does not include altitude data in
the reply transmission. Select this mode only when the ATC instructs to "stop
altitude squawk".
d) ALT position: ALT is the normal operating mode. In the ALT position, the
transponder includes uncorrected altitude data in the reply transmission.
JZ-Y8F200W-02
AIRCRAFT FLIGHT MANUAL
SECTION VI
AIRCRAFT SYSTEM EQUIPMENT
6-305
June 30, 2012
(3) ATC code-set knob: Turn the ATC code-set knobs to set the ATC squawk code shown
on the top line of the display. The larger knob adjusts the two left side numbers of the
ATC squawk code and the smaller knob adjusts the two right side numbers. For
emergency codes 7600 and 7700, the display flashes the code for approximately 5
seconds before sending the code to the transponder.
(4) IDENT button: Press the IDENT button to make the transponder transmit the ident
code. The display shows the ident annunciator "id" and the transmit annunciator "TX".
The transponder transmits the special ident code, for approximately 20 seconds, to
help ATC locate the position of the aircraft, then changes back to the set operating
mode. Press this button only when ATC requests "squawk ident" or "squawk (code)
and ident".
(5) PRE preset button: Press and hold the PRE button and turn the code-set knobs to
preset an ATC squawk code. Release the PRE button when the necessary code is set.
Then set the active code. When the stored preset code is required to become the
active code, press and release the PRE button.The stored code is in the memory.
(6) TEST button: Press the TEST button to turn on the self-test function of the TCAS-94
system. The test routine takes approximately 10 seconds to complete. After
successful completion of the test, the system returns to the preset operating mode.
(7) 1/2 changeover switch: Use this switch to select the active transponder from two sets
of ATC transponders.
Indicator
TVI-920D integrates functions of the vertical speed indicator (VSI), TCAS traffic indicator, and
resolution-advisory indicator to show all TCAS information on only one display. TVI-920D receives
TCAS data from TTR-921 and vertical speed data from the air data system.
TVI-920D liquid crystal display indicator shows: vertical speed scale and pointer (VSI), TCAS
RA, TCAS traffic indicator, TCAS mode annunciator, and TCAS warning flag.
JZ-Y8F200W-02
AIRCRAFT FLIGHT MANUAL
SECTION VI
AIRCRAFT SYSTEM EQUIPMENT
6-306
June 30, 2012
(a) VSI/RA display
The VSI display uses white vertical speed scales to show the climb and descent speeds, in
feet/minute. In VSI mode, cyan annunciator VERT SPEED are shown above the middle of
the display, while ×1000FPM below the middle of the display. VSI/RA display is shown in
Figure 173.
Vertical speed scales Vertical speed pointer
1 2
4
6
4
21
.5
0
.5
Figure 6-173 TVI-920D vertical speed/TCAS indicator (vertical speed display)
(b) RA indication
TCAS resolution advisories (RA) show as red and green light bands surrounding vertical
speed scales. When RA shows, do fly vertical speeds in the green-band area. RA display is
shown in Figure 6-174.
1 2
4
6
4
21
.5
0
.5
6NM
Red RA band
Green RA band
Figure 6-174 TVI-920D vertical speed/TCAS indicator (typical RA)
JZ-Y8F200W-02
AIRCRAFT FLIGHT MANUAL
SECTION VI
AIRCRAFT SYSTEM EQUIPMENT
6-307
June 30, 2012
(c) Traffic display
The traffic display shows nearby aircraft traffics that reply TCAS interrogation with the
C-mode or S-mode transponder. The traffic display information aids pilots in visually
acquiring the nearby traffic.
Traffic display shows: An aircraft symbol in white in the lower center of the display; A white,
dotted, 2-nm range ring around the aircraft symbol (it shows a 20-nm dotted range ring
when set to the 40-nm range),
(1) Aircraft symbol and range ring
Aircraft symbol: the own aircraft is a white symbol shown in the lower-center of the
display. This aircraft symbol shows the own aircraft with respect to other aircraft
shown on the display.
Range ring: The fixed, 2-nm range ring shows as dots around the aircraft symbol.
These dots display the surrounding azimuth of the aircraft. The vertical speed scale is
the maximum traffic display range ring for a selected display range. TVI-920D
indicator is shown in Figure 6-175.
Note
The intruder aircraft symbol is displayed at the maximum range only when the
intruder is situated directly in the front (0° relative azimuth) of the own aircraft.
When the intruder is directly behind the own aircraft, the maximum range
erodes sinusoidally to about 0.42 of maximum. The relative maximum display
ranges of three types of intruder angles and optional display ranges for various
TVIs are listed in Table 6-38.
Table 6-38 Relative maximum display ranges of three types of intruder angles and optional
display ranges for various TVIs
Selected
Distance
Maximum Display
Distance at 0o
Maximum Display
Distance at 90o
Maximum Display
Distance at 180o
3 3.43 2.24 1.43
5 5.72 3.77 2.39
10 11.44 7.55 4.78
20 22.88 15.11 9.55
40 45.77 30.21 19.10
JZ-Y8F200W-02
AIRCRAFT FLIGHT MANUAL
SECTION VI
AIRCRAFT SYSTEM EQUIPMENT
6-308
June 30, 2012
Aircraft symbol2 nm range ring
Figure 6-175 TVI-920D indicator
(2) Four types of TCAS traffic symbols
The TCAS traffic symbols show for the nearby aircraft traffic that reply TCAS
interrogation in the selected range and altitude mode. Symbols on the traffic display
show azimuth, distance, relative altitude (if available), and vertical speed of the traffic.
Each type of TCAS traffic shows a unique symbol on the traffic display. See Figure
6-176.
JZ-Y8F200W-02
AIRCRAFT FLIGHT MANUAL
SECTION VI
AIRCRAFT SYSTEM EQUIPMENT
6-309
June 30, 2012
1 2
4
6
4
21
.5
0
.5
TCAS TCAS
OFF
+10
-10
+02
-02
TEST
PT traffic
RA traffic
OT traffic
TA traffic
Figure 6-176 TVI-920D display (traffic symbols)
+02
■ RA traffic shows as a solid red square.
●↑
-20 TA traffic shows as a solid light yellow circle.
◆↓
-10 Proximate traffic (PT) shows as a solid white or cyan diamond.
+10
◇ Other traffic OT shows as a hollow white or cyan diamond.
Note
1) Proximate traffic refers to the intruder traffic at the relative altitude of ±1200 ft
and in the range of 6 nm.
2) Other traffic refers to the intruder traffic appearing in the selected traffic
display range and altitude mode and the computer confirms to be no threat.
JZ-Y8F200W-02
AIRCRAFT FLIGHT MANUAL
SECTION VI
AIRCRAFT SYSTEM EQUIPMENT
6-310
June 30, 2012
The relative altitude and vertical speed direction show in the same color as the
associated traffic symbol. The altitude data shows above the traffic symbol for traffic at
an altitude above your aircraft and below the symbol for traffic below your aircraft. The
vertical speed direction arrow shows to the right of the traffic symbol.
Relative altitude data shows as two numbers, preceded by a "+" or "–" sign. The
number on the left shows thousands of feet of altitude and the number on the right
shows hundreds of feet of altitude (i.e., +22 = 2200 ft above the aircraft and –02 = 200
ft below the aircraft).
The vertical-speed direction arrows show for traffic with an actual (not relative) vertical
speed equal to or greater than 500 ft/min. An upward pointing arrow (↑) shows for
climbing traffic, and a downward pointing arrow (↓) shows for descending traffic. No
arrow shows for traffic climbing or descending at an actual vertical speed of less than
500 ft/min.
RA and TA traffic show partial symbols for traffic beyond the selected range of the
traffic display. The partial symbols show at the appropriate bearing along the
maximum range ring. Other traffic and proximate traffic do not show partial symbols.
(3) Annunciator and flag
The TVI-920D LCD display shows annunciators and flags for the various TCAS
operating modes and system failures.
a) ABV (above) annunciator: It shows as the letters "ABV" in white, with a light yellow
background, in the upper-right corner of the display.
b) BLW (below) annunciator: It shows as the letters "BLW" in white, with a light yellow
background, in the upper-right corner of the display.
c) Range annunciator (3 nm, 5 nm, 10 nm, etc.): It shows as the white letters, with a
light yellow background, in the upper-right corner of the display. This annunciator
shows the maximum traffic range on the display.
JZ-Y8F200W-02
AIRCRAFT FLIGHT MANUAL
SECTION VI
AIRCRAFT SYSTEM EQUIPMENT
6-311
June 30, 2012
d) ONLY TA annunciator: It shows in the upper left corner of the display. If the TCAS
does not show any TA traffic on the display, the annunciator shows as white letters
in a white box. If the TCAS detects TA traffic, the annunciator shows as light yellow
letters in a light yellow box. This annunciator is only shown in TA or TA ONLY
mode. When this annunciator shows on the indicator, the TCAS does not give any
RA. See Figure 6-177.
e) No bearing TA/RA annunciator: TA and RA traffic, for which TCAS cannot
calculate a bearing, show on the lower center of the display. The annunciator
shows the type (TA or RA), range, and relative or absolute altitude of the traffic
target. See Figure 6-177.
1 2
4
6
4
21
.5
0
.5
12NM
BLW
ONLY
TA
-25
-20
TA 3.0 -15
+50TA33.5
ONLY TA annunciator Range annunciator ABV/BLW annunciator
TA/RA no bearing annunciator
Figure 6-177 TVI-920D display
JZ-Y8F200W-02
AIRCRAFT FLIGHT MANUAL
SECTION VI
AIRCRAFT SYSTEM EQUIPMENT
6-312
June 30, 2012
f) V/S flag: The vertical-speed flag shows as the black letters "V/S", on a light yellow
background, in the lower-left corner of the display. When this flag shows,
vertical-speed data is missing or invalid. See Figure 6-178.
g) RA flag: The resolution advisory flag shows as the black letters "RA", on a light
yellow background, in the upper-left corner of the display. This flag shows a failure
of the RA function of the VSI. TCAS does not show resolution advisories when this
flag shows. See Figure 6-178.
1 2
4
6
4
21
.5
0
.5
6NM
-01
V/S
RA flag
RA
V/S flag
Figure 6-178 TVI-920D display
h) TCAS flag: The TCAS failure flag shows as the black letters "TCAS", on a light
yellow background, in the upper-left corner of the display. This flag shows when a
TCAS system failure occurs. No traffic shows on the traffic display, and no
resolution advisories are given, when this flag shows. See Figure 6-179.
i) TCAS OFF annunciator: The "TCAS OFF" annunciator shows as white letters in a
white box in the upper-right corner of the display. This annunciator shows when
TCAS is set to the standby mode or turned off. See Figure 6-179.
JZ-Y8F200W-02
AIRCRAFT FLIGHT MANUAL
SECTION VI
AIRCRAFT SYSTEM EQUIPMENT
6-313
June 30, 2012
j) TEST annunciator: The annunciator shows as white letters in a white box in the
lower center of the display. This annunciator shows while the TCAS system
self-test operates. See Figure 6-179.
1 2
4
6
4
21
.5
0
.5
TCAS TCAS
OFF
+10
-10
+02
-02 TEST
TCAS flag TCAS OFF annunciator
Figure 6-179 TVI-920D display
k) Diagnostic display: The TVI-920D can show a diagnostic failure list of
TCAS-related systems that fail or do not provide valid data to the TCAS system. A
10-second (approximate), or longer press of the TCAS self-test button turns on the
diagnostic list display. When all TCAS-related systems operate properly, the part
number of the TCAS computer software shows on the list. TCAS system failures
show below the part number.
Note
The TVI-920D self-test and diagnostic functions operate only when the aircraft
is on ground. See Figure 6-180.
JZ-Y8F200W-02
AIRCRAFT FLIGHT MANUAL
SECTION VI
AIRCRAFT SYSTEM EQUIPMENT
6-314
June 30, 2012
1 2
4
6
4
21
.5
0
.5
826-6401-103
TCAS PROC
XPDR NO 1
UPPER ANT
RA NO 2
TA NO 1
RALT NO2
MAG HDG
ATTITUDE
Figure 6-180 TVI-920D display (failure list example)
In-flight Operation Procedure of TCAS-94
Switch settings
(a) Turn on the power for the air data system, radio altimeter, strapdown heading system, flight
data recording system, intercom, KZH-138 proximity warning system and make sure they
are in normal operation.
(b) Turn on TVI-1, TVI-2, TCAS R/T, ATC-1, ATC-2, and LG CTL circuit breakers on the
communicator circuit breaker board.
Self-test Check
(a) Set to the 1 position the 1/2 changeover switch on the CTL-92E ATC transponder control
on the left of the top console, and set the operating mode to ALT.
JZ-Y8F200W-02
AIRCRAFT FLIGHT MANUAL
SECTION VI
AIRCRAFT SYSTEM EQUIPMENT
6-315
June 30, 2012
(b) Turn to the AUTO position the function knob on the CTL-93T TCAS control on the top
console. Press the TEST button on the CTL-93T TCAS control or on the front panel of
TTR-921 TCAS receiver-transmitter under the left floor of frames 9~10. Check that letters
TEST shows in the middle of the bottom of TVI-920D display on left and right instrument
panels and the intruder symbol shows as:
(1) An RA (solid red square) shows at 2 nm position, (+02) sign shows above the RA
symbol with the relative altitude of 200 ft, no vertical speed arrow shows and the
relative azimuth is +90o
.
(2) A TA (solid yellow circle) shows at 2 nm position, (-02) sign shows below the TA
symbol with the relative altitude of 200 ft, a traffic climing arrow shows and the relative
azimuth is -90o
.
(3) A PT (solid white diamond) shows at 3.625 nm position, (-10) sign shows below the
PT symbol with the relative altitude of 1000 ft, a traffic descending arrow shows and
the relative azimuth is +33.75o
.
(4) An OT (hollow white diamond) shows at 3.625 nm position, (+10) sign is displayed
below the OT symbol with the relative altitude of 1000 ft, a traffic descending arrow
shows and the relative azimuth is -33.75o
.
(c) While checking the self-test result on the TVI-920D display, confirm red lights on the front
panel of the TTR-921 TCAS receiver-transmitter should illuminate for 1s and then go out,
and the TTR PASS green light on the front panel illuminate temporarily.
(d) It takes about 8s to finish the entire self-test procedure. After self-test is performed
successfully, TCAS-94 returns to the preset operating mode. "TCAS System Test OK" can
be heard in the earphone and loudspeaker simultaneously. If the TCAS has trouble, the
associated red light of the failure device on the front panel of the TCAS receiver-transmitter
illuminates. At the same time, letters TCAS or TCAS FAIL shows on the TCAS display, and
"TCAS SYSTEM TEST FAIL" can be heard in the earphone and loudspeaker.
JZ-Y8F200W-02
AIRCRAFT FLIGHT MANUAL
SECTION VI
AIRCRAFT SYSTEM EQUIPMENT
6-316
June 30, 2012
(e) Set to the 2 position the 1/2 changeover switch on the CTL-92E ATC transponder control ,
and set the operating mode to ALT. Then, repeat steps b) thru d).
System operations
(a) Set to the 1 position the 1/2 changeover switch on CTL-92E transponder control, and turn
the function knob to the SBY position.
(b) Set the ident code for the first set of the ATC transponder according to the ATC
requirement.
(c) Set the 1/2 changeover switch on CTL-92E control to the 2 position. Set the ident code for
the second set of the ATC transponder according to the ATC requirement.
(d) Set the 1/2 changeover switch on CTL-92E control to the 1 position.
(e) If the ATC department does not issue special commands, the function knob on the
CTL-92E transponder control should be turned to the ALT position during the whole flight.
Turn the function knob on CTL-93T TCAS contro to the AUTO position, and turn the A/B
knob on CTL-93T control to desired position. It is recommended that the knob be turned to
the ABOVE position during taking off and climbing, to the NORMAL position during cruise,
and to the BELOW position during descending and landing.
(f) Select the traffic display distance range required according to the flight requirement.
(g) When TCAS-94 detects an intruder, the TCAS indicator will show traffic advisory
information and give out the corresponding audio warning sound. When the RA shows, the
pilot should pay attention to the vertical speed display area of the TCAS indicator, control
the aircraft to climb, descend, or keep the current vertical speed according to the displayed
requirement, and make the vertical speed pointer within the green area. The TCAS audio
warning information is listed in Table 6-39. The aircrew should take the measures based on
the warning information to ensure flight safety.
JZ-Y8F200W-02
AIRCRAFT FLIGHT MANUAL
SECTION VI
AIRCRAFT SYSTEM EQUIPMENT
6-317
June 30, 2012
Table 6-39 Reference of the audio annunciations
Advisory Audio Annunciations Proper Pilot Response
Clear CLEAR OF CONFLICT
Resume normal flight, apparent conflict of
airspace has been resolved.
TA TRAFFIC, TRAFFIC
Check TCAS display for traffic bearing and
range. Assess the threat and prepare to
execute anti-collision control command.
System
self-test
TCAS System Test Ok The system self-test succeeds
TCAS System Test Fail The system self-test fails
Preventive RA
MONITOR VERTICAL SPEED
Be alert for the approaching traffic target.
Ensure that that the VSI pointer does not
enter the red scale area on the display.
MAINTAIN VERTICAL SPEED
Keep the current vertical speed and
direction, and ensure that the VSI pointer
does not enter the red area.
MAINTAIN VERTICAL SPEED
A flight path crossing is predicted, but being
monitored by the TCAS. Keep the current
vertical speed and direction, and ensure
that the VSI pointer does not enter the red
area.
CROSSING MAINTIAN
ADJUST VERTICAL SPEED
Indicates a weakening of the RA. Allows
pilot to start returning to an assigned
altitude.
JZ-Y8F200W-02
AIRCRAFT FLIGHT MANUAL
SECTION VI
AIRCRAFT SYSTEM EQUIPMENT
6-318
June 30, 2012
Advisory Audio Annunciations Proper Pilot Response
Corrective RA
CLIMB, CLIMB
Change the vertical speed to 1500 ft/min
climbing, or as indicated on the display.
CLIMB, CROSSING CLIMB
Same as previous, except that it further
indicates flight paths will
cross at some altitude.
DESCEND, DESCEND
Change the vertical speed to 1500 ft/min
descending, or as indicated on the
display.
DESCEND, CROSSING
DESCEND
Same as previous except that it further
indicates that flight paths
will cross at some altitude
ADJUST VERTICAL SPEED
Reduce the climbing vertical speed to the
that shown on the display.
ADJUST VERTICAL SPEED
Reduce the descending vertical speed to
that shown on the display.
INCREASE DESCENT,
INCREASE DESCENT,
Increase the descending speed.
CLIMB, CLIMB NOW,
CLIMB, CLIMB NOW,
Change vertical speed from decent to
climb.
DESCEND, DESCEND NOW,
DESCEND, DESCEND NOW
Change vertical speed from climb to
descent.
JZ-Y8F200W-02
AIRCRAFT FLIGHT MANUAL
SECTION VI
AIRCRAFT SYSTEM EQUIPMENT
6-319
June 30, 2012
Emergency Codes
When aircraft confronts with special cases, the pilot can transmit the following emergency
codes.
7500 shows that aircraft and personnel on aircraft are affected by non-strong interference
(hijacking).
7600 shows that aircraft radio devices are faulty.
7700 shows that airborne devices are faulty.
Relevant documents in civil aviation also provide other special codes.
Precautions
(a) The altitude limit for climbing at 1500 ft/min is 12000 ft in TCAS-94 of the aircraft. When the
aircraft altitude is higher than 12000 ft, the TCAS will not issue the climbing instruction.
Therefore, the pilot should take proper aircraft avoidance actions immediately when seeing
the TA and RA.
(b) If the transponder of the intruder does not operate in C mode or S mode, the TCAS cannot
reconnoiter any intruders.
(c) In-flight self-test of the TCAS is suppressed.
(d) TCAS system and TDR-94D ATC transponder system should be supplied with power
independently. The operation of TCAS requires the altitude information from the TDR-94D
ATC transponder, but the operation of TDR-94D ATC transponder is independent of the
TCAS. Therefore, the TCAS failure will have no impact on normal operation of TDR-94D
ATC transponder.
(e) When the aircraft flight altitude with respect to the ground is lower than 1450 ft, the
"INCREASE DESCENT" RA will be suppressed.
(f) When the aircraft flight altitude with respect to the ground is lower than 1000 ft, the
"DESCEND, DESCEND NOW" warning information will be suppressed.
(g) When the aircraft flight altitude with respect to the ground is lower than 1000 ft, all RA
warning information will be suppressed.
(h) When the intruder flight altitude with respect to the ground is lower than 380 ft, all TA
warning information will be suppressed.
(i) In the case of any signal failure of radio altitude, pressure altitude, and heading of aircraft,
TCAS-94 cannot operate properly.
JZ-Y8F200W-02
AIRCRAFT FLIGHT MANUAL
SECTION VI
AIRCRAFT SYSTEM EQUIPMENT
6-320
June 30, 2012
INSTRUMENT SYSTEM
Flight data recording system FJ-30D6
General
The flight data recording system FJ-30D6 can collect and record important flight data in flight,
providing data for analysis of reasons for flight accidents and monitoring and maintenance of the
aircraft and engine.
Composition and installation position
The composition and installation of the flight data recording system for the Y8F200W aircraft
are shown in the following Table.
Table 6-40
S/N Nomenclature Type No. Qty. Installation position
1
Flight data collector (including
mounting bracket)
FA-30D6(AZ-30D) 1 Under the pilot control stand
2
Flight data recorder (including
positioning beacon under
water)
FB-30D 1 Left side of frame 59
3 Quick-accessed recorder FBQ-30D 1 On ADF control panel
4 Three-axis accelerator GJ-23E 1
On the ceiling between frame
31~32
5
Plug for line checking
processor
XKE18R12ZQ-H 1 Under the pilot control stand
6 Angular displacement sensor CD-1 3
On the right aileron, vertical tail
platform between frame 60~65, and
right horizontal stabilizer
respectively.
7 FLASH data card FR-1A 2
Inserted into quick-accessed
recorder
Precautions
Operation and precautions before takeoff
Before takeoff, turn on onboard 28V DC power supply. The indicating light on the
quick-accessed recorder panel on the ADF control panel should illuminate and then extinguish
after about 5s. The flight data recording system starts to operate normally. If the indicating light still
illuminates, it means that the data card is not properly installed or the recorder fails. Then, turn off
the power supply to re-install the data card or for troubleshooting.
JZ-Y8F200W-02
AIRCRAFT FLIGHT MANUAL
SECTION VI
AIRCRAFT SYSTEM EQUIPMENT
6-321
June 30, 2012
Note
During the installation of the data card, press and turn the knob on the lower
side of the data card door, the door shall automatically open. The data card
FR-1A with marked characters face upwards. Align it with the card groove to
insert it with even force. Close the door after inserting it properly. If the card
needs taking out, press and turn the knob on the lower side of the data card
door to open the door. Move rightwards and leftwards respectively locking pins
in the door, FR-1A will be popped. Then, the card can be taken out.
Quick-accessed recorder panel is shown as follows:
Status
indicating light
Door
open/close knob Emergency
button
Quick access recorder FBQ-30D
Cabin door
Table 6-181
Precautions in flight
(a) During the flight, do not take out the data card from the quick-accessed recorder. (Data
card supports hot plug-in and pull-out. That is to say, the plug-in or pull-out of the data card
with power supplied shall inevitably cause, instead of damage to the device, that data
record is interrupted and that the quick-accessed recorder displays the failure of DATA
CARD NOT PLUG-IN. it is strictly prohibited to plug-in and pull-out the data card in flight so
as to ensure the completeness of the flight data record.
(b) During the flight, if aircrew personnel think that data at some time needs replaying for the
ground, just press the button EVENT on the quick-accessed recorder FBQ-30D to mark the
current time.
JZ-Y8F200W-02
AIRCRAFT FLIGHT MANUAL
SECTION VI
AIRCRAFT SYSTEM EQUIPMENT
6-322
June 30, 2012
Cabin audio recording system XFJ-12B
General
A set of XFJ-12B cabin audio recording system is installed on the Y8F200W aircraft exported
to Venezuela. It is used to collect and record flight crew intercommunication, ground-to-air
communication, and cockpit environmental sound. After being processed by the ground data
processing station, the recorded and stored audio data can reflect the actual communication
among flight crew members and the cockpit environmental sound, facilitating site condition
understanding and accident analysis.
System Composition
Airborne device composition of XFJ-12B cabin audio recording system and installation position
are listed in Table 6-41.
Table 6-41 Airborne device composition of XFJ-12B cabin audio recording system and installation
position
No. Airborne Device Model Quantity Installation Position Onboard
1
Cabin audio
recorder
FB-12 1
At the right at the rear part of the web in frame
59
2 Mounting bracket AZ-12 1
At the right at the rear part of the web in frame
59
3 Audio monitor YK-12B 1 On the communicator's control panel
4 Sound pickup SY-12 4
One on the pilot's instrument panel, one on
the copilot's instrument panel, one on the
navigator's instrument panel, and one on the
communicator's control panel
5 XFJ-12B relay box Self-made 1
On the equipment rack on the floor at the right
of frames 3~4
JZ-Y8F200W-02
AIRCRAFT FLIGHT MANUAL
SECTION VI
AIRCRAFT SYSTEM EQUIPMENT
6-323
June 30, 2012
Operation
Appearance of the audio monitor panel is shown in Figure 6-182.
AUDIO CONTROL UNIT
TEST
STATE
EARPHONE/600
Figure 6-182 Audio monitor panel
Before takeoff, engage the 28 VDC power supply on aircraft. Perform the power-on self-test for
XFJ-12B cabin audio recording system. The STATE indicator on YK-12B audio monitor turns off (it
is on yellow previously), indicating that the system self-test result is normal; otherwise, it indicates
that the system is faulty.
Precautions
(a) It is prohibited from pressing the TEST button on the audio monitor in air.
(b) Before the first flight on a day, check XFJ-12B cabin audio recording system. At this time,
insert ECD-36N earphone into the EARPHONE/600 Ω earphone jack on YK-12B audio
monitor. Then, press and hold the TEST button on the audio monitor for more than 2s to
start self-test. Speak to the sound pickup. After 1min, monitor the sound through the
earphone. The clear and understandable sound can be heard, indicating that the system is
operating properly. During the second flight on that day, monitor the STATE indicator on the
audio monitor. If the indicator is off, it indicates that the system is operating properly.
JZ-Y8F200W-02
AIRCRAFT FLIGHT MANUAL
SECTION VI
AIRCRAFT SYSTEM EQUIPMENT
6-324
June 30, 2012
Magnetic compass LC-5D
General
Magnetic compass LC-5D can be read directly, used to measure and indicate the magnetic
heading of the aircraft. It is mainly applicable to the indication of magnetic heading in emergency.
The Y8F200W aircraft is equipped with 2 magnetic compasses LC-5D shown in the Figure 6-183.
EW
NS
010 10
27 2430
Figure 6-183 Panel of magnetic compass LC-5D
JZ-Y8F200W-02
AIRCRAFT FLIGHT MANUAL
SECTION VI
AIRCRAFT SYSTEM EQUIPMENT
6-325
June 30, 2012
Composition and installation position
The composition and installation position in the aircraft is shown in Table 6-42.
Table 6-42 Installation position of magnetic compass LC-5D
S/N Nomenclature Type No. Qty. Installation position
1
Magnetic
compass
LC-5D 2
One on the upper middle light shade on the
instrument panel (see Y8C-7706F-0), the other
on the front ceiling at frame 1 in navigator's
cockpit (see Y8C-7705F-0).
Main technical data
(a) The basic error (excluding magnetic compensator assembly) should not be greater than
±1o
at 68o
F(20o
C).
(b) When the magnetic compensator assembly (installed in upper magnetic compass) is
adjusted to the middle position, the normal deviation should not be greater than ±2o
in N, S,
E, and W headings. When the magnetic compass incline longitudinally by 10o
, the
deviation variation should not exceed ±4o
in W and E directions.
(c) The maximum magnet effect of the magnetic compensator assembly should not be less
than 45o
in N and E directions.
(d) Environment adaptability
(1) Height above the sea level: 26247ft (8000m)
(2) Environment temperature: -67o
F~158o
F(-55o
C~+70o
C)
(3) Storage temperature of the magnetic compass: -67o
F~140o
F(-55o
C~+60o
C)
(4) Relative humidity: 20%~80%
(5) Vibration: max. overload of 5g
(6) Impact: overload of 30g
(e) operating power supply: llumination power supply 28 ±10% VDC
JZ-Y8F200W-02
AIRCRAFT FLIGHT MANUAL
SECTION VI
AIRCRAFT SYSTEM EQUIPMENT
6-326
June 30, 2012
Operation
Turn on onboard 28V power supply to control illuminance of the emergency magnetic compass.
The illuminace of the emergency magnetic compass LC-5D in navigator's cockpit is controlled by
the magnetic compass switch ZKC-2 on navigator's right console while that in pilots' cockpit is
controlled by the magnetic compass switch MJK-2A on right instrument panel.
Emergency locator transmitter ADT 406AF
General
Emergency locator transmitter ADT 406AF is used for emergency calling for help when aircraft
runs into damage or has an accident, and providing directional objective signals for searching and
rescuing aircraft.
The emergency locator transmitter can transmits digital accident signals automatically or
manually, while satellites capture these signals from emergency locator transmitters to locate and
retransmit these signals to ground reception stations. The mission control centers in turn
retransmit these position data to the nearest rescue coordination centers so that they can start the
search and rescue operations according to these position data upon receiving relative order.
Introduction to control panel and its functions
Introduction to control panel
Figure 6-183
JZ-Y8F200W-02
AIRCRAFT FLIGHT MANUAL
SECTION VI
AIRCRAFT SYSTEM EQUIPMENT
6-327
June 30, 2012
(a) The switch ARMED/ON - ARMED means the preparation state while ON indicates the
manual activation mode.
(b) The button RESET/TEST - press the button, the self-test starts. After operating mistakenly
the beacon transmitter, press the button RESET/TEST to recover to the initial state.
(c) ON - indicating light for the control panel. It illuminates when the beacon transmitter is
activated.
Introduction to beacon transmitter panel
Figure 6-185
(a) The switch ARMED/OFF/ON - ARMED means the preparation state, OFF non-operation
state, and ON the manual activation mode.
(b) EXT.ANT. - connected with external antenna.
(c) BACK UP ANT. - connected with pull rod antenna.
(d) TX - indicating light for the beacon transmitter. It illuminates when the beacon transmitter is
activated.
JZ-Y8F200W-02
AIRCRAFT FLIGHT MANUAL
SECTION VI
AIRCRAFT SYSTEM EQUIPMENT
6-328
June 30, 2012
Check
(a) Turn on ELT power switch on navigator's right console.
(b) Use the light brightness knob ELT DIM on overhead console to adjust the brightness of the
control panel ADT406AF. Clockwise adjust it, the brightness increases while
counterclockwise adjusting it, the brightness decreases. Adjust the brightness of the
control panel ADT406AF to the proper position.
(c) Self-test of the transmitter
There are two cases of self-test operation state for the beacon transmitter: self-test of
control panel and that of beacon transmitter.
Before the self-test, tune the frequency of the any UHF radio set in a nearby aircraft to
121.5 MHz, the emergency locator transmitter shall transmit the 121.5 MHz signal during
the self-test. The sounds can be heard in the UHF radio set.
(1) Self-test of control panel
Put the beacon's ARMED/OFF/ON switch (installed at frame 39~40, stringers 41~42)
at ARMED position and the control panel's ARMED/ON switch at ARMED position.
Press the RESET/TEST button on the control panel (ELT CTRL PANEL, installed at
upper left side of overhead console) until the indicating light on control panel blinks
twice. After delay for 6s, the indicating light on control panel displays the self-test
report: 10s permanent illumination of the indicating light is for correct operation while
10s blinking condition of the indicating light is for failure self-test.
JZ-Y8F200W-02
AIRCRAFT FLIGHT MANUAL
SECTION VI
AIRCRAFT SYSTEM EQUIPMENT
6-329
June 30, 2012
Blinking frequency indicates the failure source detection
125ms ON, 125ms OFF (Frequency 4Hz), ELT check integrated failure (software
problem)
250ms ON, 250ms OFF (Frequency 2Hz), ELT power failure (UHF/VHF)
500ms ON, 500ms OFF (Frequency 1Hz), antenna connection failure or signal
identification missing.
Note
During self-test process, it can be observed that on the beacon, after two short
blinks the indicating light comes on and the buzz sounds can be heard for 6s.
Note
When control panel is not used, set ARMED/ON switch on control panel at
ARMED position.
(2) Self-test of the beacon transmitter
Place the beacon's ARMED/OFF/ON switch at ON position
After two short blinks and delay of 3s, the indicating light comes on and the buzz
sounds can be heard constantly for approximately 6s. 10s permanent illumination of
the indicating light is for correct operation while 10s blinking condition of the indicating
light is for failure self-test.
JZ-Y8F200W-02
AIRCRAFT FLIGHT MANUAL
SECTION VI
AIRCRAFT SYSTEM EQUIPMENT
6-330
June 30, 2012
Blinking frequency indicates the failure source detection:
125ms ON, 125ms OFF (Frequency 4Hz), ELT check integrated failure (software
problem)
250ms ON, 250ms OFF (Frequency 2Hz), ELT power failure (UHF/VHF)
500ms ON, 500ms OFF (Frequency 1Hz), antenna connection failure or signal
identification missing.
After self-test, the beacon transmitter enters the waiting condition for 30s. The
indicating light of the beacon transmitter is on for 1.75s and off for 0.25s. During this
state, put the ARMED/OFF/ON switch to ARMED position.
Note
1) This self-test process shall not be interrupted. If this process is not finished
for any reason, a new self-test is performed.
2) Place the ARMED/ OFF/ON switch on beacon transmitter at the ARMED or
OFF position within 30s after self-test to avoid distress signal transmission.
(d) After the completion of the above check, place the ARMED/ON switch on control panel at
the ARMED position, and ARMED/OFF/ON switch on beacon transmitter at ARMED
position. Turn off ELT power switch on navigator's right console to finish power-on test.
JZ-Y8F200W-02
AIRCRAFT FLIGHT MANUAL
SECTION VI
AIRCRAFT SYSTEM EQUIPMENT
6-331
June 30, 2012
Operation
(a) Turn on ELT power switch on navigator's right console
(b) Adopt automatic mode when it is not in emergency and need not transmit manually
distress signal. Set the switch ARMED/ON on control panel to ARMED position and the
switch ARMED/ OFF/ON on beacon transmitter to ARMED position. Other operations are
not needed. When the emergency locator transmitter is automatically activated with the
sign that indicating light on the beacon transmitter illuminates and buzz sounds can be
heard, there is nothing to do but wait the arrival of the rescue team
(c) When the distress signal needs transmitting in emergency, the emergency locator
transmitter can be activated manually through the control panel and beacon transmitter.
(1) Manual activation through control panel
Set the switch ARMED/ON on the control panel to ON position. When the beacon
transmitter is activated, the indicating light on the control panel illuminates constantly,
the indicating light on the beacon transmitter illuminates and buzz sounds can be
heard.
(2) Manual activation through beacon transmitter
Set the switch ARMED/OFF/ON on the beacon transmitter to ON position. If the
beacon transmitter enters the waiting condition for 30s, the indicating light of the
beacon transmitter is on for 1.75s and off for 0.25s.
When the beacon transmitter is activated, the indicating light on the beacon
transmitter illuminates and buzz sounds can be heard. If the real distress signal is
transmitted, the indicating light on the beacon transmitter is on for 0.5s and off for
0.5s.
Note
After the disoperation, press the button RESET/TEST on control panel in time to
turn off the beacon transmitter so as to avoid transmitting distress signal.
However, do not use the button RESET/TEST on control panel to turn off the
beacon transmitter during the self-test process or when the switch ARMED/ON
on control panel is set to ON position.
JZ-Y8F200W-02
AIRCRAFT FLIGHT MANUAL
SECTION VI
AIRCRAFT SYSTEM EQUIPMENT
6-332
June 30, 2012
(3) When it is necessary to leave the aircraft, remove the beacon transmitter ADT406AF
from the aircraft if necessary. Extend the emergency antenna on the beacon
transmitter, and set the switch ARMED/OFF/ON on the beacon transmitter to ON
position. Then distress signal can be transmitted.
Maintenance
(a) Periodically carry out regular self-test to emergency locator transmitter. The maximum
frequency is once per day. Usually, the check is carried out during such periodical checks
as check A. More self-test will reduce the service lifespan of the battery.
(b) The service and storage temperature for the battery is -20oC+55o
C and -55o
C+85o
C
respectively. Replace it once for five years. The new battery replaced must be of the same
specification as that of the old one and the batteries must be authorized by ELTA or
02N60052 or 02N60053 batteries. Emergency locator transmitter ADT406AF is overhauled
once per five years (in special factory), and replaced or checked by ELTA or its authorized
agents.
(c) During the installation in the aircraft, emergency locator transmitter must not compress and
crash beacon transmitter to avoid sending distress signals resulted from the trigger of
internal acceleration sensor.
Emergency horizon BDP-12A
General
Emergency horizon BDP-12A is supplied with DC power but operates with AC. Its core
component is two-frame gyroscope, used to provide a real and stable vertical reference, and
display vividly the pitch and bank angles of the aircraft relative to ground level for pilots through
indication mechanism of the instrument. The emergency horizon adopts mechanical pendulous
correction system. Even if the power supply for the aircraft is cut off, the inertia movement of the
two-frame gyroscope enables the gyroscope to maintain enough precision at a certain time. In
emergency, it can provide the reliable attitude information of the aircraft relative to ground level for
the pilots.
JZ-Y8F200W-02
AIRCRAFT FLIGHT MANUAL
SECTION VI
AIRCRAFT SYSTEM EQUIPMENT
6-333
June 30, 2012
Installation position
The installation position of the emergency horizon BDP-12A is shown in Table 6-43.
Table 6-43 Installation position of emergency horizon BDP-12A
S/N Nomenclature Type No. Qty. Installation position
1 Emergency horizon BDP-12A 1 Left instrument panel
The panel of the emergency horizon BDP-12A is shown in Figure 6-186.
01
2
3 0
0
01
3
2 0
0
Warning flag
Scale of decline
Scale of pitching
Miniature aircraft
Adjusting knob
Figure 6-186 panel of the emergency horizon BDP-12A
JZ-Y8F200W-02
AIRCRAFT FLIGHT MANUAL
SECTION VI
AIRCRAFT SYSTEM EQUIPMENT
6-334
June 30, 2012
Main technical data
(a) Power supply
Operating voltage: 27VDC±10%
Lighting voltage: 27VDC±10%
(b) Consumed current
Starting state: ≤1.2A
Normal operation: ≤0.3A
(c) Starting time
Normal temperature: ≤3min
High/low temperature ≤10min;
(d) Average correction speed:
2o
~4o
/min at normal temperature while 1.5o
~4.5o
/min at high or low temperature when the
main axis of the gyroscope deviates from the vertical axis by not more than 7o.
(e) Cutoff correction angle range: 10±2o
(f) Caging error: ≤±1o
(g) Indicating range for the attitude angles: Bank angle: ±180o
Pitch angle: ±80o
(h) Indication error: ≤±1.5o
at not more than 30o
≤±2o
at more than 30o
(i) Adjustable range for the small aircraft: ±5o
(j) Time for the inertia movement of the gyroscope motor: >9min
(k) Weight: ≤1.5kg
JZ-Y8F200W-02
AIRCRAFT FLIGHT MANUAL
SECTION VI
AIRCRAFT SYSTEM EQUIPMENT
6-335
June 30, 2012
Operation
Pre-flight
When the emergency horizon is locked, turn on the switch EMERGING HORIZON PWR on the
left instrument panel, BDP-12A starts to operate. 1 min later, release the lock (see note for
information about how to lock and release the lock), the emergency horizon can stably indicate the
parking attitude angles of the aircraft within 3 min. After it enters the operation state, the warning
flag disappears from the window. Adjust EMERGING HORIZON BRT ADJ on the left instrument
panel by clockwise or counterclockwise turning it, the brightness inside the emergency horizon
should turn bright (dark) correspondingly.
Thru-flight
During the flight, usually do not operate the emergency horizon. However, when the aircraft
flies horizontally with a certain angle of attack, it is allowed to turn the pitch knob of the small
aircraft at the lower right corner of the emergency horizon to make the pointer of its angle of attack
point to 0o
. The both wing ends of the small aircraft should overlap with horizon. From then on,
measure the pitch angle of the aircraft from the position.
(a) Determination of the bank angle
When the aircraft has bank angle, the angle when the bank mark on the dial aligns with its
scale line is the bank angle. The graduation range for the dial is divided from the zero line
in the middle: 60o
rightwards and leftwards respectively with the increment of 10o
, as
shown in Figure 6-187 and Figure 6-188.
(b) Determination of pitch angle
When the aircraft has pitch angle, the angle is the scale where the small aircraft points. The
nose-up of the dial drum is azure while its nose-down is brown, as shown in Figure 6-189
and Figure 6-190.
Zero line of pitching
1
1
2
2
3
0
0
0
0
0
Pitching scale
Miniature aircraft
Indication panel of bank
Zero line of bank Bank scale
Banking of 30
o
leftward
Figure 6-187
JZ-Y8F200W-02
AIRCRAFT FLIGHT MANUAL
SECTION VI
AIRCRAFT SYSTEM EQUIPMENT
6-336
June 30, 2012
Zero line of pitching
Pitching scale
Miniature aircraft
Indication panel of bank
Zero line of bank Bank scale
Banking of 30
o
leftward
0
0
0
0
1
1
2
2
3
Figure 6-188
Zero line of pitching Pitching scale
Miniature aircraft
Indication panel of bank
Zero line of bank Bank scale
1
1
2
2
0
0
0
0
03
Pitch-down angle: 10
o
Figure 6-189
Zero line of pitching
Pitching scale
Miniature aircraft
Indication panel of bank
Zero line of bank Bank scale
1
1
2
0
0
0
0
0
3
4
Pitch-up 10
o
Figure 6-190
JZ-Y8F200W-02
AIRCRAFT FLIGHT MANUAL
SECTION VI
AIRCRAFT SYSTEM EQUIPMENT
6-337
June 30, 2012
Post-flight
Turn off the switch EMERGING HORIZON PWR on the left instrument panel, and lock the
emergency horizon to finish the operation.
Note
Procedures to lock and release the lock of the emergency horizon: pull
outwards the knob with hands to the utmost position to lock it. Put the knob
quickly without impact to release it. If the locking state needs maintaining,
clockwise turn the knob with hands to the utmost position, and pull out the knob.
Continue to clockwise turn it until the knob enters the locking groove. When
releasing the lock again, pull out the knob from the locking groove,
counterclockwise turn it to put it down. Adjust the knob until the small aircraft
locates at the zero position on the pitch dial. The knob should be in locking state
during the starting and delivering.
Precautions
(a) Release the lock of the emergency horizon after the emergency horizon is powered for 1
min.
(b) When the emergency horizon operates in normal condition, lock it in not more than 5 min
after the power is cut off. Otherwise, the operating performance of the horizon will reduce.
310 Aircraft Clock
General
The aircraft clock 310 is supplied with power by battery. It consists of HF quartz resonator,
CMOS integrated circuit and micro-power step motor. It is used to display the TIME, F.T. and E.T.
in flight and is a kind of precision timing device mounted on the instrument panel. Its panel is
shown as follows:
JZ-Y8F200W-02
AIRCRAFT FLIGHT MANUAL
SECTION VI
AIRCRAFT SYSTEM EQUIPMENT
6-338
June 30, 2012
Panel of aviation clock 310
Composition and installation position
Table 6-44
S/N Nomenclature Type No. Qty Installation position
1 Aircraft clock 310 4
On the center instrument panel, navigator
instrument panel, communicator instrument
panel, electric mechanic instrument panel.
JZ-Y8F200W-02
AIRCRAFT FLIGHT MANUAL
SECTION VI
AIRCRAFT SYSTEM EQUIPMENT
6-339
June 30, 2012
Main technical data
(a) Lighting power supply
(1) Lighting voltage: 28VDC±10%
(2) Lighting current: 24mA
Timing precision
Average instantaneous error: m≤±1s/d
Operation and check
Check of brightness adjustment
Turn on the CLOCK power switch ZKC-2 on the communicator instrument panel. Clockwise
turn buttons CLK BRT on the navigator instrument panel, center instrument panel, communicator
instrument panel and electric mechanic instrument panel respectively, the correspondent aircraft
clocks turn bright. Counterclockwise turn them, the correspondent aircraft clocks turn dark.
Display and adjustment of time
The TIME dials of aircraft clocks 310 on the navigator instrument panel, center instrument
panel, communicator instrument panel and electric mechanic instrument panel should display
respectively the TIME. When the error between the TIME and local time is large, adjust
respectively the TIME for each aircraft clock 310. Pull out the F.T. handle on the panel of the
aircraft clock 310, the clock stops. Clockwise or counterclockwise turn the F.T. handle, the minute
and hour hands in the TIME dial move correspondingly. When the TIME complies with the local
time, move the F.T. handle to the original position. The clock operates from the adjusted time.
JZ-Y8F200W-02
AIRCRAFT FLIGHT MANUAL
SECTION VI
AIRCRAFT SYSTEM EQUIPMENT
6-340
June 30, 2012
Starting, stopping and return-to-zero of F.T.
Press F.T. handle, the hour and minute hands in the F.T. dial start to move. At the same time,
the color of the signal window of F.T. dial is black. Press the handle once again, the hour and
minute hands in the F.T. dial stop, and the color of the signal window of F.T. dial is half black and
half white. Read the F.T. value according to the positions of hour and minute hands in F.T. dial.
Press the handle for the third time, the hour and minute hands in the F.T. dial return to zero, and
the color of the signal window of F.T. dial is white.
Starting, stopping and return-to-zero of E.T.
Press E.T. handle, the minute and second hands in the large dial start to move. Press the
handle once again, the minute and second hands in the large dial stop, and the color of the signal
window of F.T. dial is half black and half white. Read the E.T. value according to the positions of
minute and second hands in the large dial. Press the handle for the third time, the minute and
second hands in the large dial return to zero.
Note
During the measurement of E.T. and F.T., if the E.T. and F.T. states change
simultaneously or in turn, the display of TIME, F.T., and E.T. does not influence
each other.
Power off
Turn off the CLOCK power switch ZKC-2 on the communicator instrument panel, the
correspondent TIME should display in TIME dials of aircraft clocks 310 on the navigator instrument
panel, center instrument panel, communicator instrument panel, and electric mechanic instrument
panel. Turn off the onboard power supply to finish the check.
JZ-Y8F200W-02
AIRCRAFT FLIGHT MANUAL
SECTION VI
AIRCRAFT SYSTEM EQUIPMENT
6-341
June 30, 2012
Critical AOA signal system XLG-1A
General
When the aircraft is at a critical angle of attack during the takeoff, landing and flight, the critical
AOA signal system sends out warning signal to warn pilots. There are two operating states for the
critical AOA system: takeoff and landing, and flight. The changeover between the above two
operating states is realized by the limit switch mounted in flaps extending from 23o
to the utmost
position.
The critical AOA system is composed of critical AOA sensor GLG-1, AOA sensor GGJ-3 and
signal control box EF-1C, shown in Figure 192.
Ps
Pt GLG-1
U1=f
U3
U3
=f
U2=f
(α M)
α
α Preset
α Instant
GGJ-3
EF-1C
Critical,
( )
( )
U1 or
Setter Preset
Changeoverswitch
Signal of sound
Signal of light
Figure 192 Block diagram of critical AOA system
JZ-Y8F200W-02
AIRCRAFT FLIGHT MANUAL
SECTION VI
AIRCRAFT SYSTEM EQUIPMENT
6-342
June 30, 2012
Brief technical data
(a) Power supply 27±10% VDC
115±5% VAC, 400Hz
(b) Operating range altitude 0~49213ft (0~15000m)
Temperature 140o
F~-76o
F (±60o
C)
(c) Signal connection range
Speed M 0.2~0.65
Connection condition α=10.5o
in takeoff and landing state
(d) The AOA during the danger signal transmission is shown in Table 6-45.
Table 6-45
M value
Altitude (km)
0.2 0.3 0.5 0.6 0.65
Takeoff and
landing state
0 17o
15.4o
11.1o
10.4o
10.5o
10 15.4o
11.1o
10.4o
10o
15 10.4o
10o
JZ-Y8F200W-02
AIRCRAFT FLIGHT MANUAL
SECTION VI
AIRCRAFT SYSTEM EQUIPMENT
6-343
June 30, 2012
Precautions
(a) When the aircraft is at the danger flight angle of attack, the light CRITICAL AOA on the
instrument panel illuminates and the sound signals can be heard in earphones. The pilots
should control the aircraft to change the critical AOA state, the light extinguishes and
sounds disappear.
(b) Ground connection heating time should not be greater than 1.5 min.
M meter BM1-1A
BM1-1A is used to measure the M value in different altitudes, automatically providing the
warning signal when M is more than 0.7 (the signal light illuminates when speed is high). The
range for the M meter is between 0.5 and 1.0 M, as shown in Figure 6-193.
0.7 0.8
0.9
1.00.5
0.6 M数
Figure 6-193 M meter
The comparison between VIAS, VTAS, and M in different altitudes is shown in Table 6-46.
JZ-Y8F200W-02
AIRCRAFT FLIGHT MANUAL
SECTION VI
AIRCRAFT SYSTEM EQUIPMENT
6-344
June 30, 2012
Table 6-46 (Unit: km/h)
VTAS VIAS
M
Altitude ft(m)
54
(100)
108
(200)
162
(300)
216
(400)
270
(500)
324
(600)
378
(700)
432
(800)
486
(900)
6561.7 (2000)
59.4
(110)
188.8
(220)
178.2
(330) 237.0
(439)
295.9
(548)
364.5
(657)
0.55
412.5
(764)
0.64
470.3
(871)
0.73
527.6
(977)
0.81
13123 (4000)
65.9
(122)
131.8
(244)
197.1
(365)
261.9
(485)
326.1
(604)
0.52
389.3
(721)
0.62
452
(837)
0.72
513.5
(951)
0.81
574.0
(1063)
0.9
19685 (6000)
73.4
(136)
146.3
(271)
218.7
(405)
290.0
(537)
0.50
359.6
(666)
0.59
428.2
(793)
0.67
495.2
(917)
0.80
26247 (8000)
82.1
(152)
136.6
(303)
244.1
(452)
322.4
(597)
0.54
398.5
(738)
0.60
471.9
(874)
0.79
542.1
(1004)
0.90
32808 (10000)
92.9
(172)
187.4
(347)
273.2
(506)
359.6
(666)
0.62
442.2
(819)
0.62
521.1
(965)
0.89
39370 (12000)
106.9
(198)
211.7
(392)
312.1
(578)
0.55
407.7
(755)
0.71
407.7
(755)
0.71
583.7
(1081)
1.01
JZ-Y8F200W-02
AIRCRAFT FLIGHT MANUAL
SECTION VI
AIRCRAFT SYSTEM EQUIPMENT
6-345
June 30, 2012
BG-1A Bellows-Type Pressure Altimeter
General
BG-1A bellows-type pressure altimeter, a kind of emergency instrument, receives the static
pressure signal from total and static pressure system to provide the pilot with pressure altitude
information.
Installation position
Installation position of BG-1A bellows-type altimeter is shown in Table 6-47.
Table 6-47 Installation position of BG-1A bellows-type altimeter
S/N Nomenclature Type No. Qty. Installation position
1
bellows-type
altimeter
BG-1A 2
One at left instrument panel and electric
mechanic instrument panel respectively
Main technical data
Ambient adaptability
Operating temperature range: -49o
F~122o
F (-45o
C~+50o
C) ensuring precision;
-67o
F~140o
F (-55o
C~+60o
C) ensuring operating ability.
Storage temperature: -67o
F~158o
F (-55o
C~+70o
C)
JZ-Y8F200W-02
AIRCRAFT FLIGHT MANUAL
SECTION VI
AIRCRAFT SYSTEM EQUIPMENT
6-346
June 30, 2012
Operating power
5VDC Light power: 5VDC
Display mode
Altitude display adopts three pointers and dial mode. Scale character is 1000ft/360o
,which
means that when the long pointer rotating a circle(360o
), the altitude change is 1000ft with the
shorter pointer rotating 36o
and the dial pointer rotating 3.6o
. The minimum dial value of the dial is
20ft and the large dial value is 100ft.
Barcode on the altitude dial has warning function. When the aircraft is in the low altitude state,
the code warns the pilot that that altitude is dangerous, and the pilot should take measures as
soon as possible.
Pressure binding is displayed by index and dial. The binding range is inHg~30.99 inHg. The
large dial value is 0.1 inHg, and the small one is 0.05 inHg.
In normal condition, when the pressure dial displays the datum plane standard atmosphere
pressure 29.92 inHg, the value in altimeter indicates the current aerodrome pressure altitude.
6
ALT
8
1
0ft
9
100 FEET0
2
29.9
30.0
1
2
3
4
56
37
4
5
Figure 1 The drawing of pressure altimeter panel
1. Short pointer 4. Long pointer
2. Dial pointer 5. Bar code
3. Pressure dial 6. Pressure reference regulating knob
JZ-Y8F200W-02
AIRCRAFT FLIGHT MANUAL
SECTION VI
AIRCRAFT SYSTEM EQUIPMENT
6-347
June 30, 2012
Display error in normal temperature
Requirement of display error in normal temperature is shown in Table 6-48.
Table 6-48 Display error in normal temperature
Altitude measuring
point kft
0 1 2 4 8 10
Display error in
normal temperature ft
±50 ±70 ±90 ±110 ±130 ±140
Altitude measuring
point kft
15 20 25 30 40 50
Display error in
normal temperature ft
±200 ±250 ±330 ±350 ±500 ±750
Pressure binding error
Requirement of pressure binding error is shown in Table 6-49.
Table 6-49 Pressure binding
Pressure measuring
point inHg
28.1 28.5 29 29.5 29.92 30.5 30.9 30.99
binding altitude value in
standard atmosphere
pressure ft
-1727 -1340 -863 -392 0 531 893 974
Allowable error in
pressure binding
±50 ±50 ±50 ±50 ±50 ±50 ±50 ±50
Indication range of pressure altitude
0~50000ft
Air tightness
Take out the pressure in pressure altimeter until the value equals to that in pressure altitude
15000 ft. Altitude value change caused by housing leakage should not be more than ±300 ft in
1min.
JZ-Y8F200W-02
AIRCRAFT FLIGHT MANUAL
SECTION VI
AIRCRAFT SYSTEM EQUIPMENT
6-348
June 30, 2012
Pointer jumps in ununiformity (sluggish jump)
Pointer sluggish jump cannot be more than 45.72m (150 ft) in the range of -304.8m~1524m
(-1000 ft~5000 ft); and not more than 121.92m (400ft) in the range of 1524m~914.4m
(5000ft~30000 ft); not more than 182.88m (600 ft) in the range of 9144m (30000 ft)
Position error (inclination affection)
The error for altimeter indication in normal pressure at normal operating position and in any
other attitudes should not exceed ±12.19m (±40 ft).
Operation
Operation method
Rotate the pressure regulation knob to regulate the altimeter to absolute altitude based on
standard atmosphere pressure 0.101MPa (29.91 inHg) or to relative altitude (airport altitude is
zero) based on aerodrome pressure. When the dial indication is 0.101MPa (29.91 inHg) on the
ground, altimeter indicates the current aerodrome pressure altitude. Rotate the pressure
regulation knob to make the indication be zero, the pressure dial indicates the aerodrome pressure
and the altimeter in flight indicates the relative altitude.
The range of pressure binding is 0.095~0.105MPa (28.1~30.99 inHg) When regulate the
aerodrome pressure to the limit state, the knob is forbidden to be rotated; otherwise, the device
can be damaged.
Special instruction
In front of altimeter, aerodrome pressure binding mechanism locks the nut tightly to lock the
unisonous relation between the pressure and altitude. Do not loosen the locked nut in operation,
and do not loosen it meanly and pull out the pressure regulation knob; otherwise, the unisonous
relation between the pressure and altitude will be destroyed. And the indication error will occur.
JZ-Y8F200W-02
AIRCRAFT FLIGHT MANUAL
SECTION VI
AIRCRAFT SYSTEM EQUIPMENT
6-349
June 30, 2012
Hydraulic pressure gauge
General
Hydraulic pressure gauge installed on the aircraft includes brake pressure gauge and hydraulic
system and battery pressure gauge which are all remote induction pressure gauges. The former is
used for measuring brake valve outlet pressure of the brake system, and the hydraulic and the
latter is used for measuring pressure of hydraulic system and battery.
Installation position
There are altogether two sets of brake pressure gauge, including 2 2ZYG-150 indicators and 4
GY150-1 sensors. There are 4 sets of hydraulic system and battery pressure gauges, including 4
ZYG-240 indicators and 4 GY240-1 sensors. Installation position refers to Table 6-49.
Table 6-49 Installation position of hydraulic pressure gauge
Name Qty. Installation position
Right system pressure sensor GY240-1 1
At the right side of frame 28
of main landing gear cabin
Right system battery pressure gauge sensor
GY240-1
1
Below the floor of frames
8~9 of forward cabin
Right system pressure indicator ZYG-240 1 Central instrument panel
Right system battery pressure indicator
ZYG-240
1 Pilot instrument panel
Left system battery pressure gauge sensor
GY240-1
1
Below the floor of frames
8~9 of cockpit
Left system pressure sensor GY240-1 1
Below the floor of frames
8~9 of cockpit
Left system pressure indicator ZYG-240 2 Central instrument panel
Brake pressure sensor GY150-1 2
Brake pressure gauge indicator 2ZYG-150 2 Central instrument panel
JZ-Y8F200W-02
AIRCRAFT FLIGHT MANUAL
SECTION VI
AIRCRAFT SYSTEM EQUIPMENT
6-350
June 30, 2012
Main technical data
(c) Assembly, scale range and operation range refer to Table 6-50.
(d) Power : 36±6%V; Voltage: AC 400±2%Hz. 
(e) Operating current: when the rated voltage is AC 36 V, needed current of the whole set of
ZYG pressure gauge is not larger than 0.15A, and that of 2ZYG type is not larger than 0.3
A.
Table 6-50 Assembly, scale range and operation range
S/N Name
Type Measurement
range
PSI (kgf/cm2
)
Operation range
PSI(kgf/cm2
)
Indicator Sensor
1
Brake
pressure
gauge
2ZYG-150
GY150-1
(with buffer QN5277002)
0~2133.495
(0~150)
426.699~1706.796
(30~120)
2
Hydraulic
system and
battery
pressure
gauge
ZYG-240
GY240-1
(with buffer QN5277002)
0~3413.592
(0~240)
568.932~3129.126
(40~220)
(f) Operating temperature range: The indicator should ensure normal operation within the
temperature range of -85o
F~131o
F (-60±5o
C~+50±5o
C).
(g) Within operating range, indicating error of the pressure gauge should not exceed the
regulated value in Table 6-51.
(h) When operating voltage changes within the range of 36±6%V, added error of the indicator
should not exceed error regulated in Table 6-51. 
JZ-Y8F200W-02
AIRCRAFT FLIGHT MANUAL
SECTION VI
AIRCRAFT SYSTEM EQUIPMENT
6-351
June 30, 2012
Table 6-51 Indicating error of pressure gauge
Indicator Error under the following temperature PSI (kgf/cm2
)
Type
Checking point on the
dial
59o
F~77o
F
(20±5o
C)
113o
F ~131o
F (50±5o
C)
-58o
F ~40o
F (-45±5o
C)
-85o
F ~-67o
F (-60±5o
C)
Whole set
59o
F~77o
F
(20±5o
C)
2ZYG-150
30;50;70;100;200
±32.002
(±2.25)
±64.00485
(±4.5)
±85.3398
(±6)
0;20;130;150
±42.6699
(±3)
±85.3398
(±6)
±128.0097
(±9)
ZYG-240
40;60;80;100;120;140;
160;180;200;220
±51.203
(±3.6)
±102.40776
(±7.2)
±136.54368
(±9.6)
0;20;240
±68.27184
(±4.8)
±136.54368
(±9.6)
±204.81552
(±14.4)
Operation
The remote induction pressure gauge, also referred as two-wire pressure gauge, indicates
pressure of fluid through magnetoelectric (moving-coil) logometer upon the principle of shifting
pressure change to inductance variation through the differential inductance convertor.
JZ-Y8F200W-02
AIRCRAFT FLIGHT MANUAL
SECTION VI
AIRCRAFT SYSTEM EQUIPMENT
6-352
June 30, 2012
BWP-2 Exhaust Gas Thermometer
General
(a) Function
BWP-2 exhaust gas thermometer is used to measure mean exhaust gas temperature of
engine.
(b) Main technical data
(1) Measure range 572o
F ~1652o
F(300o
C~900o
C)
(2) Operation range 572o
F ~1112o
F(300o
C~600o
C)
(3) Ambient temperature -76o
F ~122o
F(-60o
C~50o
C)
(4) Operation altitude 82021ft (25000m)
(5) Indicating error: When indicator ambient air temperature is 68±9o
F (20±5o
C), exhaust
gas thermometer errors should not exceed specified indicating values in table 6-52.
Table 6-52 Allowable errors
Scale range o
F (o
C)
Allowable error o
F (o
C)
Indicator Full set
212~570.2 (100~299)
1113.8~1652 (601~900)
±43.2 (±24) ±68.4 (±38)
644~1040 (340~560) ±18 (±10) ±37.8 (±21)
572~642.2 (300~339)
1041.8~1112 (561~600)
±25.2 (±14) ±46.8 (±26)
JZ-Y8F200W-02
AIRCRAFT FLIGHT MANUAL
SECTION VI
AIRCRAFT SYSTEM EQUIPMENT
6-353
June 30, 2012
Note
1) When ambient temperature is more than 122o
F (+50o
C), temperature
additional error should be considered. Additional error in extending
connecting wire caused by temperature difference of 18o
F (10o
C) within the
range of 212~1112o
F (100~ 600o
C) is 0.18o
F (0.1o
C )and within the range of
1112~ 1652o
F (600~ 900o
C) is 0.36o
F (0.2o
C).
2) When performing actual meter testing, ambient temperature of instrument is
+68o
F (+20o
C) (thermocouple, ambient temperature of compensating wire is
+68o
F (+20o
C) too, external resistance of 5.25Ω should be connected
(instead of 5Ω). The reason of adding 0.25Ω  is that when testing meter,
added value of resistance caused by temperature of extending connecting
wire and thermocouple increasing from +68o
F (20o
C) should be considered
and adding additional 0.15Ω  equals to resistance mean added value when
thermocouple is heated.
(6) External resistance (four thermo-resistances and extending connecting wires,
connecting meter wire total resistance): when ambient temperature is +68o
F (+20o
C),
it is 5±0.1Ω.
(7) Indicator, thermocouple and extending connecting wire with the same type and group
are exchangeable, but when changing extending connecting wire, external resistance
should be 5±0.1Ω at temperature of +68o
F (+20o
C).
(8) Uniformity of indicator pointer travel: Indicator pointer should move uniformly and
have no obvious impulse and jump.
(9) Delay error: Delay errors of indication should not exceed two times of basic errors.
(10) Damp: Damp time of indicator movable system should not exceed 2.5s.
JZ-Y8F200W-02
AIRCRAFT FLIGHT MANUAL
SECTION VI
AIRCRAFT SYSTEM EQUIPMENT
6-354
June 30, 2012
Composition and installation position
Engine exhaust gas thermometer indicator is installed on the center instrument panel. Exhaust
gas thermometer sensor comes together with engine. There are four sensors on one engine,
which are equipped at sandwich of engine tail pipe. Four thermocouples are distributed uniformly
around the nozzle circumference.
Operating principle
Schematic diagram of exhaust gas thermometer is shown in Figure 6-195.
3
5
61
2
4
7
RD
RP
RA RC
RB
RB
Figure 6-195 Schematic diagram of exhaust gas thermometer
1. External resistance 5. Additional resistance
2. Thermistor 6. Adjusting resistance
3. Hairspring resistance 7. Thermocouple
4. Coil resistance
Operating point (thermo-end) welded together of thermocouple inserts into engine nozzle to
sense high temperature; the other point (cold end) connects to terminal board and then delivers to
indicator with wire. During engine operating, temperature in tailpipe nozzle increases, temperature
difference between thermocouple and the free end is produced; potential is produced in the free
end. For convenient measurement and reliable measurement, 16 thermocouples are divided into
four groups to connect in series, which are distributed around engine tailpipe nozzle circumference
uniformly to measure mean temperature. Total potential is measured with an electromagnetic
millivoltmeter. For total potential is proportioned to mean temperature, so the scale of
millivoltmeter that is converted into temperature will become a thermometer and indicate mean
temperature of tailpipe nozzle directly.
JZ-Y8F200W-02
AIRCRAFT FLIGHT MANUAL
SECTION VI
AIRCRAFT SYSTEM EQUIPMENT
6-355
June 30, 2012
Resistances of indicator are influenced by ambient temperature to make current values
through coil vary while instrument receives the same potential, thus affecting accuracy of
indication. Connect in series an additional resistance RD with negative temperature factor in the
metering circuit. If ambient temperature of indicator increases, total resistances in coil increase
and RD decreases to remain total resistances as a constant approximately, thus making the
indication of temperature indicator close to true value.
Connection circuit of engine exhaust gas thermometer is shown in Figure 6-196.
ZWP-2599
WB12
WB11
- +
596
GR-2A Sensor (Engine 1)
ZWP-2599a
WB13
WB14
-+
594
GR-2A Sensor (Engine 2)
ZWP-21564a
WB28
WB29
- +
1561
GR-2A Sensor (Engine 3)
ZWP-21564
WB31
WB30
-+
1560
GR-2A Sensor (Engine 4)
Figure 6-196 Connection circuit of engine exhaust gas thermometer
JZ-Y8F200W-02
AIRCRAFT FLIGHT MANUAL
SECTION VI
AIRCRAFT SYSTEM EQUIPMENT
6-356
June 30, 2012
Engine Vibration G-Load Indicator
Description
Function
Engine vibration G-load indicator is used to measure and indicate vibration G-load values
during engine operation (its unit is g). When vibration G-load value is up to allowable limitation, the
red signal light illuminates and provides danger vibration warning to aircrew.
Main technical data
(a) Resonance operation frequency of amplifier 205±1.5Hz.
(b) In normal condition, as vibration G-load reaches the specified value in the following table,
the red signal light should illuminate.
Table 6-53 Value of vibration G-load
Actual value of engine first running Signal light and mechanic adjusting value
Less than or equal to 1g 3.5g
More than 1g, but less than or equal to 2g 4g
More than 2g,
but less than or equal to 3.5g
5g
G-load measuring errors are as follows:
Within the range of 1~3g ±0.3g
Over 3g ±10%
JZ-Y8F200W-02
AIRCRAFT FLIGHT MANUAL
SECTION VI
AIRCRAFT SYSTEM EQUIPMENT
6-357
June 30, 2012
(c) Indicator sensitivity should be less than 0.1g
(d) AC power supply of vibration amplifier 115+2.5
-6.0 %V
Frequency 400±5%Hz
(e) Current consumption of vibration amplifier is not more than 0.5A
(f) When operation temperature of vibration amplifier is -67~+140o
F(-55~+60o
C)(operation
temperature of sensor is -76~+248o
F (-60~+120o
C)), measuring errors are:
Within the range of 1~3g ±0.6g
Over 3g ±20%
(g) When relative humidity is 95±3% and temperature is 68±9 o
F(20±5o
C), total errors of full
set are as follows:
Within the range of 1~3g ±0.3g
Over 3g ±10%
Composition and installation position
Engine vibration G-load meter consists of vibration indicator, sensor and amplifier.
(a) Sensor is mounted on the platform at the upper of butt surface of engine compressor
casing and gas casing.
(b) Indicator is mounted on engine vibration instrument panel at the upper of center instrument
panel.
(c) Amplifier is mounted on ceiling between frames 11~12.
JZ-Y8F200W-02
AIRCRAFT FLIGHT MANUAL
SECTION VI
AIRCRAFT SYSTEM EQUIPMENT
6-358
June 30, 2012
Description
Operating principle of engine vibration G-load Engine Vibration G-load Indicator is that
vibration sensor produces induced electromotive force proportioned to engine vibration G-load
value. After vibration amplifier amplifying, vibration indicator indicates vibration G-load value.
Turbine starter/generator tachometer BZT-1
General
Turbine starter/generator tachometer BZT-1 can continuously indicate the rotation speed per
minute of WDZ-1's major shaft.
Installation position
There is one set of tachometer BZT-1 onboard. Each set consists of an indicator ZZT-1 and a
sensor GBT-1. The indicator is at the lower left of the central instrument panel, and the sensor is at
the lower right of WDZ-1.
Main technical data
Indicator operating temperature range -76o
F~122o
F(-60o
C~+50o
C)
Sensor operating temperature range -85o
F~365o
F (-60±5o
C~180±5o
C)
Altitude 82021ft (25000m)
Measuring range 10~105%
Operation range 60~100%
Allowable error (when ambient temperature is 59o
F~77o
F(20±5o
C), within operating range
±0.5
Allowable error: When the ambient temperature is +20±5o
C, +50±5o
C, or -60±5o
C, the
tachometer error should be greater than the value specified in Table 1.
JZ-Y8F200W-02
AIRCRAFT FLIGHT MANUAL
SECTION VI
AIRCRAFT SYSTEM EQUIPMENT
6-359
June 30, 2012
Deviation (delay error) Not more than two times of the allowable error
Damping time (indicator acting system) Not longer than 3s
Pointer travel regularity The pointer moves regularly and there is no obvious pulsation
Operation
Tachometer operation principle: converts rotation of the tested shaft to electric signal, passes
the signal to the indicator, and converts the signal to pointer angular displacement through the
magnetic induction assembly.
Indicator scale display method: When WDZ-1's main shaft speed is 35000r/min, the value
indicated is 100%.
Exhaust thermometer BWP-3
General
Exhaust thermometer BWP-3 is used to measure the exhaust temperature of turbine
starter/generator WDZ-1.
Composition and Installation Position
Table 6-54
Element Model Panel Area Access Cover
Indicator ZWP-3 214GL④ 214
Sensor GR-3 141 141ML③H
JZ-Y8F200W-02
AIRCRAFT FLIGHT MANUAL
SECTION VI
AIRCRAFT SYSTEM EQUIPMENT
6-360
June 30, 2012
Description/operation
Main technical data
Measuring range 32o
F~1652o
F (0o
C~900o
C)
Operation range 1112o
F~1472o
F (600o
C~800o
C)
Ambient temperature range -76o
F~122o
F (-60o
C~+50o
C)
Altitude 82021ft (25000m)
External circuit resistant 9±0.06Ω
Instrument error (ambient temperature: 20±5o
C; within the operation range):
Indicator ±21.6o
F(±12o
C)
Whole set ±36o
F(±20o
C)
(a) An exhaust thermometer, as a set of thermoelectricity instrument, consists of the
electromagnetic millivoltmeter and nisiloy-nickel/chrome thermocouple. Aircraft is equipped
with a set of BWP-3 thermometer, which consists of a indicator ZWP-3, a thermocouple
GR-3, and compensation wires.
(b) When the turbine starter/generator is operating, temperature at the nozzle area increases,
and the thermocouple inside the nozzle pipe generates thermal electromotive force, which
is in direct proportion to the cool end temperature difference.
(c) To improve temperature measurement accuracy, compensation wires at the thermocouple
cool end of BWP-3 thermometer is led to the indicator with small temperature variation on
the instrument panel. Inside the indicator, bimetal sheet will automatically make the
indicator pointer point at the ambient medium temperature to eliminate the method error
produced when the temperature at the thermocouple free end varies within -60~+50o
C.
JZ-Y8F200W-02
AIRCRAFT FLIGHT MANUAL
SECTION VI
AIRCRAFT SYSTEM EQUIPMENT
6-361
June 30, 2012
BYG-100 propeller torque indicator
General
BYG-100 propeller torque indicator is used to measure oil pressure proportioned to propeller
torque moment to master propeller power.
Description
Main technical data
(d) Pressure measuring range 0~1422.33PSI(0~100kgf/cm2
)
(e) Operation range 142.233~1137.864PSI (10~80kgf/cm2
)
(f) Power supply: Three phase AC, 36 (1±6%) V, 400 (1±2%) Hz
(g) Operation temperature of indicator: -85o
F~131o
F (-60o
C±5o
C~+50o
C±5o
C)
When rated voltage is AC 36V, needed operation current of full set BYG-100 torque
indicator should be not greater than: Not greater than 0.15A
(h) In following ambient temperature, indicating errors of torque indicator should not exceed
specified values listed in the table.
(i) When operation voltage varies within the range of 36(1±6%)V, additional errors of indicator
should not exceed specified basic errors listed in the table above.
JZ-Y8F200W-02
AIRCRAFT FLIGHT MANUAL
SECTION VI
AIRCRAFT SYSTEM EQUIPMENT
6-362
June 30, 2012
Table 6-55 Value of indicating errors of torque indicator
Check points at
indicating scale
59o
F~77o
F
(20o
C±5o
C)
PSI
(kgf/cm2
)
113 o
F~131o
F (50o
C±5o
C)
-58 o
F~-40o
F (-45o
C±5o
C)
-85 o
F~-67o
F (-60o
C±5o
C)
PSI
(kgf/cm2
)
Full set
59 o
F~77o
F
(20o
C±5o
C)
PSI
(kgf/cm2
)
10; 20; 30; 40; 50; 60;
70; 80
±21.33(±1.5) ±42.66(±3) ±56.88(±4)
0; 90; 100 ±28.44(±2) ±56.88(±4) ±85.33(±6)
Composition and installation position
(j) There are four sets of propeller torque indicators ZYG-100 equipped with aircraft, which
are installed on the center instrument panel.
(k) There are four sets of propeller torque indicator sensors GY100-2 (with buffer QN5277002)
in one aircraft, which are installed on right sides of engines 1, 2, 3 and 4 respectively.
OPERATING
Principle of propeller torque indicator is shown in Figure 6-197.
Figure 6-197 Principle of propeller torque indicator
1. Coil 4. Iron core
2. Rectifier 5. Coil
3. Power supply transformer 6. Movable armature
JZ-Y8F200W-02
AIRCRAFT FLIGHT MANUAL
SECTION VI
AIRCRAFT SYSTEM EQUIPMENT
6-363
June 30, 2012
Propeller torque indicator consists of sensor and indicator. Sensor consists of diaphragm and
converter which changes displacement into inductance variation. Indicator is DC two-wire current
ratio meter and adds a pair of germanium rectifiers, therefore, instrument uses AC power supply,
but actually current in the instrument circuit is pulse current, which can be taken as DC
approximately. Operating principle of instrument is to change relative position of movable armature
and fixing iron core by using diaphragm deformation caused by fluid pressure, namely changes
inductive resistance of two coils at fixing iron cores, thus changing current ratio of two coils at
indicator and making pointer indicate corresponding pressure.
The two-pointer throttle lever position indicator
General
The two-pointer throttle lever position indicator is used to indicate the throttle lever angle of the
FCU. The scale range is from 0o
~105o
.
Description
Main technical data
Indicator scale range 0o
~105o
Remote distance transfer error
Within 60o
~105o
≤±1o
Other scales ≤±1.5o
Temperature operation range -76o
F ~122o
F (-60o
C~50o
C)
Power supply 27±10%V
JZ-Y8F200W-02
AIRCRAFT FLIGHT MANUAL
SECTION VI
AIRCRAFT SYSTEM EQUIPMENT
6-364
June 30, 2012
Composition and Component installation position
Table 6-56 Component composition
Nomenclature Type No. Panel Zone
Throttle lever position
indicator
ZEG-3 213GL④ 213
Throttle lever position
transmitter
GE-1M 414/424/434/444BB①H
414/424/434/444
The two throttle lever position indicators are mounted on the cockpit center instrument panel
and the four transmitters are mounted at the back of the FCUs of engines 1, 2, 3, and 4.
Operation
The throttle lever position indicator is shown in Figure 6-198.
Figure 6-198 Schematic diagram of the throttle lever position indicator
1. Crank arm 3. Carbon brush 5. Coil
2. Potentiometer 4. Magnet rotor
JZ-Y8F200W-02
AIRCRAFT FLIGHT MANUAL
SECTION VI
AIRCRAFT SYSTEM EQUIPMENT
6-365
June 30, 2012
The throttle lever position indicator operates according to the principle of the DC synchronous
transmitting; the sensor consists of three carbon brushes and annular potentiometers, which is
connected to the indicator with three wires. The indicator consists of three coil current ratio
meters and moveable magnet. The position of the moveable magnet is determined by the direction
of the resultant magnetic field decided by the three coils, while the direction of the resultant
magnetic field should be synchronous with the positions of the three carbon brushes of the sensor.
Because there are pins fixed on the magnet axle of the indicator, the rotating angle is indicated on
the scale disc, and the position of the pointer is the angle of the throttle.
The throttle lever position indicator is a two-pointer indicator. No. 1 and No. 2 engines share
one indicator and No. 3 and No. 4 engines use the other indicator. The angular sensor signal
mea
Aircraft flight manual

Aircraft flight manual

  • 1.
    JZ-Y8F200W-02 Y8F200W AIRCRAFT AIRCRAFT FLIGHTMANUAL China National Aero-Technology Import & Export Corporation June 30, 2012
  • 3.
    JZ-Y8F200W-02 AIRCRAFT FLIGHT MANUAL ROR 1/(2Blank) June 30, 2012 RECORD OF REVISIONS REV. NO. REV. DATE INSERTION REV. NO. REV. DATE INSERTION DATE BY DATE BY
  • 4.
    JZ-Y8F200W-02 AIRCRAFT FLIGHT MANUAL ROR 2 June30, 2012 THIS PAGE INTENTIONALLY LEFT BLANK
  • 5.
    JZ-Y8F200W-02 AIRCRAFT FLIGHT MANUAL ROTR 1/(2Blank) June 30, 2012 RECORD OF TEMPORARY REVISIONS TEMPORARY REV. INSERTION DELETION REV. NO. PAGE NO. DATE ISSUED DATE BY DATE REV. NO. BY
  • 6.
    JZ-Y8F200W-02 AIRCRAFT FLIGHT MANUAL ROTR 2 June30, 2012 THIS PAGE INTENTIONALLY LEFT BLANK
  • 7.
    JZ-Y8F200W-02 AIRCRAFT FLIGHT MANUAL TOSB 1/(2Blank) June 30, 2012 TABLE OF SERVICE BULLETINS BULLETIN NO. AMEND. MARKS DATE DESCRIPTION
  • 8.
    JZ-Y8F200W-02 AIRCRAFT FLIGHT MANUAL TOSB 2 June30, 2012 THIS PAGE INTENTIONALLY LEFT BLANK
  • 9.
    JZ-Y8F200W-02 AIRCRAFT FLIGHT MANUAL LEP 1 Jun.30, 2012 LIST OF EFFECTIVE PAGES TOTAL NUMBER OF PAGES IS 748, CONSISTING OF THE FOLLOWING SUBJECT PAGE DATE SUBJECT PAGE DATE Title Page T-1 Jun. 30, 2012 Record of Revisions ROR-1 Jun. 30, 2012 ROR-2(Blank) Jun. 30, 2012 Record of ROR-1 Jun. 30, 2012 Temporary Revisions ROR-2(Blank) Jun. 30, 2012 Table of Service TOSB-1 Jun. 30, 2012 Bulletins TOSB-2(Blank) Jun. 30, 2012 List of Effective LEP 1 Jun. 30, 2012 Pages LEP 2(Blank) Jun. 30, 2012 Contents 1 Jun. 30, 2012 2 Jun. 30, 2012 Section 1 1 Jun. 30, 2012 2 Jun. 30, 2012 3 Jun. 30, 2012 4 Jun. 30, 2012 5 Jun. 30, 2012 6 Jun. 30, 2012 7 Jun. 30, 2012 8 Jun. 30, 2012 9 Jun. 30, 2012 10 Jun. 30, 2012 11 Jun. 30, 2012 12 Jun. 30, 2012 13 Jun. 30, 2012 14(Blank) Jun. 30, 2012 Section 2 1 Jun. 30, 2012 2 Jun. 30, 2012 3 Jun. 30, 2012 4 Jun. 30, 2012 5 Jun. 30, 2012 6 Jun. 30, 2012 7 Jun. 30, 2012 8 Jun. 30, 2012 9 Jun. 30, 2012 10 Jun. 30, 2012 11 Jun. 30, 2012 12 Jun. 30, 2012 13 Jun. 30, 2012 14 Jun. 30, 2012 15 Jun. 30, 2012 16 Jun. 30, 2012 17 Jun. 30, 2012 18 Jun. 30, 2012 Section 3 1 Jun. 30, 2012 2 Jun. 30, 2012 3 Jun. 30, 2012 4 Jun. 30, 2012 5 Jun. 30, 2012 6 Jun. 30, 2012 7 Jun. 30, 2012 8 Jun. 30, 2012 9 Jun. 30, 2012 10 Jun. 30, 2012 11 Jun. 30, 2012 12 Jun. 30, 2012 13 Jun. 30, 2012 14 Jun. 30, 2012 15 Jun. 30, 2012 16 Jun. 30, 2012 17 Jun. 30, 2012 18 Jun. 30, 2012 19 Jun. 30, 2012 20 Jun. 30, 2012 21 Jun. 30, 2012 22 Jun. 30, 2012 F Foldout page, printed on single face D Deleted page R Revised page A Added page
  • 10.
    JZ-Y8F200W-02 AIRCRAFT FLIGHT MANUAL LEP 2 June30, 2012 SUBJECT PAGE DATE SUBJECT PAGE DATE 23 Jun. 30, 2012 24 Jun. 30, 2012 25 Jun. 30, 2012 26 Jun. 30, 2012 27 Jun. 30, 2012 28 Jun. 30, 2012 29 Jun. 30, 2012 30 Jun. 30, 2012 31 Jun. 30, 2012 32 Jun. 30, 2012 Section 4 1 Jun. 30, 2012 2 Jun. 30, 2012 3 Jun. 30, 2012 4 Jun. 30, 2012 5 Jun. 30, 2012 6 Jun. 30, 2012 7 Jun. 30, 2012 8 Jun. 30, 2012 9 Jun. 30, 2012 10 Jun. 30, 2012 11 Jun. 30, 2012 12 Jun. 30, 2012 13 Jun. 30, 2012 14 Jun. 30, 2012 15 Jun. 30, 2012 16 Jun. 30, 2012 17 Jun. 30, 2012 18 Jun. 30, 2012 19 Jun. 30, 2012 20 Jun. 30, 2012 21 Jun. 30, 2012 22 Jun. 30, 2012 23 Jun. 30, 2012 24 Jun. 30, 2012 25 Jun. 30, 2012 26 Jun. 30, 2012 27 Jun. 30, 2012 28 Jun. 30, 2012 29 Jun. 30, 2012 30 Jun. 30, 2012 31 Jun. 30, 2012 32 Jun. 30, 2012 33 Jun. 30, 2012 34 Jun. 30, 2012 35 Jun. 30, 2012 36 Jun. 30, 2012 37 Jun. 30, 2012 38 Jun. 30, 2012 39 Jun. 30, 2012 40 Jun. 30, 2012 41 Jun. 30, 2012 42 Jun. 30, 2012 43 Jun. 30, 2012 44 Jun. 30, 2012 45 Jun. 30, 2012 46 Jun. 30, 2012 47 Jun. 30, 2012 48 Jun. 30, 2012 49 Jun. 30, 2012 50 Jun. 30, 2012 51 Jun. 30, 2012 52 Jun. 30, 2012 53 Jun. 30, 2012 54 Jun. 30, 2012 55 Jun. 30, 2012 56 Jun. 30, 2012 57 Jun. 30, 2012 58 Jun. 30, 2012 59 Jun. 30, 2012 60 Jun. 30, 2012 61 Jun. 30, 2012 62 Jun. 30, 2012 63 Jun. 30, 2012 64 Jun. 30, 2012 65 Jun. 30, 2012 66 Jun. 30, 2012 F Foldout page, printed on single face D Deleted page R Revised page A Added page
  • 11.
    JZ-Y8F200W-02 AIRCRAFT FLIGHT MANUAL LEP 3 Jun.30, 2012 SUBJECT PAGE DATE SUBJECT PAGE DATE 67 Jun. 30, 2012 68 Jun. 30, 2012 69 Jun. 30, 2012 70 Jun. 30, 2012 71 Jun. 30, 2012 72 Jun. 30, 2012 73 Jun. 30, 2012 74 Jun. 30, 2012 75 Jun. 30, 2012 76 Jun. 30, 2012 77 Jun. 30, 2012 78 Jun. 30, 2012 79 Jun. 30, 2012 80 Jun. 30, 2012 81 Jun. 30, 2012 82 Jun. 30, 2012 83 Jun. 30, 2012 84 Jun. 30, 2012 85 Jun. 30, 2012 86 Jun. 30, 2012 87 Jun. 30, 2012 88 Jun. 30, 2012 89 Jun. 30, 2012 90 Jun. 30, 2012 91 Jun. 30, 2012 92 Jun. 30, 2012 93 Jun. 30, 2012 94 Jun. 30, 2012 95 Jun. 30, 2012 96 Jun. 30, 2012 97 Jun. 30, 2012 98 Jun. 30, 2012 99 Jun. 30, 2012 100 Jun. 30, 2012 101 Jun. 30, 2012 102 Jun. 30, 2012 103 Jun. 30, 2012 104 Jun. 30, 2012 105 Jun. 30, 2012 106 Jun. 30, 2012 107 Jun. 30, 2012 108 Jun. 30, 2012 109 Jun. 30, 2012 110 Jun. 30, 2012 111 Jun. 30, 2012 112 Jun. 30, 2012 113 Jun. 30, 2012 114 Jun. 30, 2012 115 Jun. 30, 2012 116 Jun. 30, 2012 117 Jun. 30, 2012 118 Jun. 30, 2012 119 Jun. 30, 2012 120 Jun. 30, 2012 121 Jun. 30, 2012 122 Jun. 30, 2012 123 Jun. 30, 2012 124 Jun. 30, 2012 125 Jun. 30, 2012 126 Jun. 30, 2012 127 Jun. 30, 2012 128 Jun. 30, 2012 129 Jun. 30, 2012 130 Jun. 30, 2012 131 Jun. 30, 2012 132 Jun. 30, 2012 133 Jun. 30, 2012 134 Jun. 30, 2012 135 Jun. 30, 2012 136 Jun. 30, 2012 137 Jun. 30, 2012 138 Jun. 30, 2012 139 Jun. 30, 2012 140 Jun. 30, 2012 141 Jun. 30, 2012 142 Jun. 30, 2012 143 Jun. 30, 2012 144 Jun. 30, 2012 145 Jun. 30, 2012 F Foldout page, printed on single face D Deleted page R Revised page A Added page
  • 12.
    JZ-Y8F200W-02 AIRCRAFT FLIGHT MANUAL LEP 4 June30, 2012 SUBJECT PAGE DATE SUBJECT PAGE DATE 146 Jun. 30, 2012 147 Jun. 30, 2012 148 Jun. 30, 2012 149 Jun. 30, 2012 150 Jun. 30, 2012 151 Jun. 30, 2012 152 Jun. 30, 2012 153 Jun. 30, 2012 154 Jun. 30, 2012 155 Jun. 30, 2012 156 Jun. 30, 2012 157 Jun. 30, 2012 158 Jun. 30, 2012 159 Jun. 30, 2012 160 Jun. 30, 2012 161 Jun. 30, 2012 162 Jun. 30, 2012 Section 5 1 Jun. 30, 2012 2 Jun. 30, 2012 3 Jun. 30, 2012 4 Jun. 30, 2012 5 Jun. 30, 2012 6 Jun. 30, 2012 7 Jun. 30, 2012 8 Jun. 30, 2012 9 Jun. 30, 2012 10 Jun. 30, 2012 11 Jun. 30, 2012 12 Jun. 30, 2012 13 Jun. 30, 2012 14 Jun. 30, 2012 15 Jun. 30, 2012 16 Jun. 30, 2012 17 Jun. 30, 2012 18 Jun. 30, 2012 19 Jun. 30, 2012 20 Jun. 30, 2012 21 Jun. 30, 2012 22 Jun. 30, 2012 23 Jun. 30, 2012 24 Jun. 30, 2012 25 Jun. 30, 2012 26 Jun. 30, 2012 27 Jun. 30, 2012 28 Jun. 30, 2012 29 Jun. 30, 2012 30 Jun. 30, 2012 31 Jun. 30, 2012 32 Jun. 30, 2012 33 Jun. 30, 2012 34 Jun. 30, 2012 35 Jun. 30, 2012 36 Jun. 30, 2012 37 Jun. 30, 2012 38 Jun. 30, 2012 39 Jun. 30, 2012 40 Jun. 30, 2012 Section 6 1 Jun. 30, 2012 2 Jun. 30, 2012 3 Jun. 30, 2012 4 Jun. 30, 2012 5 Jun. 30, 2012 6 Jun. 30, 2012 7 Jun. 30, 2012 8 Jun. 30, 2012 9 Jun. 30, 2012 10 Jun. 30, 2012 11 Jun. 30, 2012 12 Jun. 30, 2012 13 Jun. 30, 2012 14 Jun. 30, 2012 15 Jun. 30, 2012 16 Jun. 30, 2012 17 Jun. 30, 2012 18 Jun. 30, 2012 19 Jun. 30, 2012 F Foldout page, printed on single face D Deleted page R Revised page A Added page
  • 13.
    JZ-Y8F200W-02 AIRCRAFT FLIGHT MANUAL LEP 5 Jun.30, 2012 SUBJECT PAGE DATE SUBJECT PAGE DATE 20 Jun. 30, 2012 21 Jun. 30, 2012 22 Jun. 30, 2012 23 Jun. 30, 2012 24 Jun. 30, 2012 25 Jun. 30, 2012 26 Jun. 30, 2012 27 Jun. 30, 2012 28 Jun. 30, 2012 29 Jun. 30, 2012 30 Jun. 30, 2012 31 Jun. 30, 2012 32 Jun. 30, 2012 33 Jun. 30, 2012 34 Jun. 30, 2012 35 Jun. 30, 2012 36 Jun. 30, 2012 37 Jun. 30, 2012 38 Jun. 30, 2012 39 Jun. 30, 2012 40 Jun. 30, 2012 41 Jun. 30, 2012 42 Jun. 30, 2012 43 Jun. 30, 2012 44 Jun. 30, 2012 45 Jun. 30, 2012 46 Jun. 30, 2012 47 Jun. 30, 2012 48 Jun. 30, 2012 49 Jun. 30, 2012 50 Jun. 30, 2012 51 Jun. 30, 2012 52 Jun. 30, 2012 53 Jun. 30, 2012 54 Jun. 30, 2012 55 Jun. 30, 2012 56 Jun. 30, 2012 57 Jun. 30, 2012 58 Jun. 30, 2012 59 Jun. 30, 2012 60 Jun. 30, 2012 61 Jun. 30, 2012 62 Jun. 30, 2012 63 Jun. 30, 2012 64 Jun. 30, 2012 65 Jun. 30, 2012 66 Jun. 30, 2012 67 Jun. 30, 2012 68 Jun. 30, 2012 69 Jun. 30, 2012 70 Jun. 30, 2012 71 Jun. 30, 2012 72 Jun. 30, 2012 73 Jun. 30, 2012 74 Jun. 30, 2012 75 Jun. 30, 2012 76 Jun. 30, 2012 77 Jun. 30, 2012 78 Jun. 30, 2012 79 Jun. 30, 2012 80 Jun. 30, 2012 81 Jun. 30, 2012 82 Jun. 30, 2012 83 Jun. 30, 2012 84 Jun. 30, 2012 85 Jun. 30, 2012 86 Jun. 30, 2012 87 Jun. 30, 2012 88 Jun. 30, 2012 89 Jun. 30, 2012 90 Jun. 30, 2012 91 Jun. 30, 2012 92 Jun. 30, 2012 93 Jun. 30, 2012 94 Jun. 30, 2012 95 Jun. 30, 2012 96 Jun. 30, 2012 97 Jun. 30, 2012 98 Jun. 30, 2012 F Foldout page, printed on single face D Deleted page R Revised page A Added page
  • 14.
    JZ-Y8F200W-02 AIRCRAFT FLIGHT MANUAL LEP 6 June30, 2012 SUBJECT PAGE DATE SUBJECT PAGE DATE 99 Jun. 30, 2012 100 Jun. 30, 2012 101 Jun. 30, 2012 102 Jun. 30, 2012 103 Jun. 30, 2012 104 Jun. 30, 2012 105 Jun. 30, 2012 106 Jun. 30, 2012 107 Jun. 30, 2012 108 Jun. 30, 2012 109 Jun. 30, 2012 110 Jun. 30, 2012 111 Jun. 30, 2012 112 Jun. 30, 2012 113 Jun. 30, 2012 114 Jun. 30, 2012 115 Jun. 30, 2012 116 Jun. 30, 2012 117 Jun. 30, 2012 118 Jun. 30, 2012 119 Jun. 30, 2012 120 Jun. 30, 2012 121 Jun. 30, 2012 122 Jun. 30, 2012 123 Jun. 30, 2012 124 Jun. 30, 2012 125 Jun. 30, 2012 126 Jun. 30, 2012 127 Jun. 30, 2012 128 Jun. 30, 2012 129 Jun. 30, 2012 130 Jun. 30, 2012 131 Jun. 30, 2012 132 Jun. 30, 2012 133 Jun. 30, 2012 134 Jun. 30, 2012 135 Jun. 30, 2012 136 Jun. 30, 2012 137 Jun. 30, 2012 138 Jun. 30, 2012 139 Jun. 30, 2012 140 Jun. 30, 2012 141 Jun. 30, 2012 142 Jun. 30, 2012 143 Jun. 30, 2012 144 Jun. 30, 2012 145 Jun. 30, 2012 146 Jun. 30, 2012 147 Jun. 30, 2012 148 Jun. 30, 2012 149 Jun. 30, 2012 150 Jun. 30, 2012 151 Jun. 30, 2012 152 Jun. 30, 2012 153 Jun. 30, 2012 154 Jun. 30, 2012 155 Jun. 30, 2012 156 Jun. 30, 2012 157 Jun. 30, 2012 158 Jun. 30, 2012 159 Jun. 30, 2012 160 Jun. 30, 2012 161 Jun. 30, 2012 162 Jun. 30, 2012 163 Jun. 30, 2012 164 Jun. 30, 2012 165 Jun. 30, 2012 166 Jun. 30, 2012 167 Jun. 30, 2012 168 Jun. 30, 2012 169 Jun. 30, 2012 170 Jun. 30, 2012 171 Jun. 30, 2012 172 Jun. 30, 2012 173 Jun. 30, 2012 174 Jun. 30, 2012 175 Jun. 30, 2012 176 Jun. 30, 2012 F Foldout page, printed on single face D Deleted page R Revised page A Added page
  • 15.
    JZ-Y8F200W-02 AIRCRAFT FLIGHT MANUAL LEP 7 Jun.30, 2012 SUBJECT PAGE DATE SUBJECT PAGE DATE 177 Jun. 30, 2012 178 Jun. 30, 2012 179 Jun. 30, 2012 180 Jun. 30, 2012 181 Jun. 30, 2012 182 Jun. 30, 2012 183 Jun. 30, 2012 184 Jun. 30, 2012 185 Jun. 30, 2012 186 Jun. 30, 2012 187 Jun. 30, 2012 188 Jun. 30, 2012 189 Jun. 30, 2012 190 Jun. 30, 2012 191 Jun. 30, 2012 192 Jun. 30, 2012 193 Jun. 30, 2012 194 Jun. 30, 2012 195 Jun. 30, 2012 196 Jun. 30, 2012 197 Jun. 30, 2012 198 Jun. 30, 2012 199 Jun. 30, 2012 200 Jun. 30, 2012 201 Jun. 30, 2012 202 Jun. 30, 2012 203 Jun. 30, 2012 204 Jun. 30, 2012 205 Jun. 30, 2012 206 Jun. 30, 2012 207 Jun. 30, 2012 208 Jun. 30, 2012 209 Jun. 30, 2012 210 Jun. 30, 2012 211 Jun. 30, 2012 212 Jun. 30, 2012 213 Jun. 30, 2012 214 Jun. 30, 2012 215 Jun. 30, 2012 216 Jun. 30, 2012 217 Jun. 30, 2012 218 Jun. 30, 2012 219 Jun. 30, 2012 220 Jun. 30, 2012 221 Jun. 30, 2012 222 Jun. 30, 2012 223 Jun. 30, 2012 224 Jun. 30, 2012 225 Jun. 30, 2012 226 Jun. 30, 2012 227 Jun. 30, 2012 228 Jun. 30, 2012 229 Jun. 30, 2012 230 Jun. 30, 2012 231 Jun. 30, 2012 232 Jun. 30, 2012 233 Jun. 30, 2012 234 Jun. 30, 2012 235 Jun. 30, 2012 236 Jun. 30, 2012 237 Jun. 30, 2012 238 Jun. 30, 2012 239 Jun. 30, 2012 240 Jun. 30, 2012 241 Jun. 30, 2012 242 Jun. 30, 2012 243 Jun. 30, 2012 244 Jun. 30, 2012 245 Jun. 30, 2012 246 Jun. 30, 2012 247 Jun. 30, 2012 248 Jun. 30, 2012 249 Jun. 30, 2012 250 Jun. 30, 2012 251 Jun. 30, 2012 252 Jun. 30, 2012 253 Jun. 30, 2012 254 Jun. 30, 2012 F Foldout page, printed on single face D Deleted page R Revised page A Added page
  • 16.
    JZ-Y8F200W-02 AIRCRAFT FLIGHT MANUAL LEP 8 June30, 2012 SUBJECT PAGE DATE SUBJECT PAGE DATE 255 Jun. 30, 2012 256 Jun. 30, 2012 257 Jun. 30, 2012 258 Jun. 30, 2012 259 Jun. 30, 2012 260 Jun. 30, 2012 261 Jun. 30, 2012 262 Jun. 30, 2012 263 Jun. 30, 2012 264 Jun. 30, 2012 265 Jun. 30, 2012 266 Jun. 30, 2012 267 Jun. 30, 2012 268 Jun. 30, 2012 269 Jun. 30, 2012 270 Jun. 30, 2012 271 Jun. 30, 2012 272 Jun. 30, 2012 273 Jun. 30, 2012 274 Jun. 30, 2012 275 Jun. 30, 2012 276 Jun. 30, 2012 277 Jun. 30, 2012 278 Jun. 30, 2012 279 Jun. 30, 2012 280 Jun. 30, 2012 281 Jun. 30, 2012 282 Jun. 30, 2012 283 Jun. 30, 2012 284 Jun. 30, 2012 285 Jun. 30, 2012 286 Jun. 30, 2012 287 Jun. 30, 2012 288 Jun. 30, 2012 289 Jun. 30, 2012 290 Jun. 30, 2012 291 Jun. 30, 2012 292 Jun. 30, 2012 293 Jun. 30, 2012 294 Jun. 30, 2012 295 Jun. 30, 2012 296 Jun. 30, 2012 297 Jun. 30, 2012 298 Jun. 30, 2012 299 Jun. 30, 2012 300 Jun. 30, 2012 301 Jun. 30, 2012 302 Jun. 30, 2012 303 Jun. 30, 2012 304 Jun. 30, 2012 305 Jun. 30, 2012 306 Jun. 30, 2012 307 Jun. 30, 2012 308 Jun. 30, 2012 309 Jun. 30, 2012 300 Jun. 30, 2012 311 Jun. 30, 2012 312 Jun. 30, 2012 313 Jun. 30, 2012 314 Jun. 30, 2012 315 Jun. 30, 2012 316 Jun. 30, 2012 317 Jun. 30, 2012 318 Jun. 30, 2012 319 Jun. 30, 2012 320 Jun. 30, 2012 321 Jun. 30, 2012 322 Jun. 30, 2012 323 Jun. 30, 2012 324 Jun. 30, 2012 325 Jun. 30, 2012 326 Jun. 30, 2012 327 Jun. 30, 2012 328 Jun. 30, 2012 329 Jun. 30, 2012 330 Jun. 30, 2012 331 Jun. 30, 2012 332 Jun. 30, 2012 333 Jun. 30, 2012 F Foldout page, printed on single face D Deleted page R Revised page A Added page
  • 17.
    JZ-Y8F200W-02 AIRCRAFT FLIGHT MANUAL LEP 9 Jun.30, 2012 SUBJECT PAGE DATE SUBJECT PAGE DATE 334 Jun. 30, 2012 335 Jun. 30, 2012 336 Jun. 30, 2012 337 Jun. 30, 2012 338 Jun. 30, 2012 339 Jun. 30, 2012 340 Jun. 30, 2012 341 Jun. 30, 2012 342 Jun. 30, 2012 343 Jun. 30, 2012 344 Jun. 30, 2012 345 Jun. 30, 2012 346 Jun. 30, 2012 347 Jun. 30, 2012 348 Jun. 30, 2012 349 Jun. 30, 2012 350 Jun. 30, 2012 351 Jun. 30, 2012 352 Jun. 30, 2012 353 Jun. 30, 2012 354 Jun. 30, 2012 355 Jun. 30, 2012 356 Jun. 30, 2012 357 Jun. 30, 2012 358 Jun. 30, 2012 359 Jun. 30, 2012 360 Jun. 30, 2012 361 Jun. 30, 2012 362 Jun. 30, 2012 363 Jun. 30, 2012 364 Jun. 30, 2012 365 Jun. 30, 2012 366 Jun. 30, 2012 367 Jun. 30, 2012 368 Jun. 30, 2012 369 Jun. 30, 2012 370 Jun. 30, 2012 371 Jun. 30, 2012 372 Jun. 30, 2012 373 Jun. 30, 2012 374 Jun. 30, 2012 375 Jun. 30, 2012 376 Jun. 30, 2012 377 Jun. 30, 2012 378 Jun. 30, 2012 379 Jun. 30, 2012 380 Jun. 30, 2012 381 Jun. 30, 2012 382 Jun. 30, 2012 383 Jun. 30, 2012 384 Jun. 30, 2012 385 Jun. 30, 2012 386 Jun. 30, 2012 387 Jun. 30, 2012 388 Jun. 30, 2012 389 Jun. 30, 2012 390 Jun. 30, 2012 391 Jun. 30, 2012 392 Jun. 30, 2012 Appendix A A1 Jun. 30, 2012 A2 Jun. 30, 2012 A3 Jun. 30, 2012 A4 Jun. 30, 2012 A5 Jun. 30, 2012 A6 Jun. 30, 2012 A7 Jun. 30, 2012 A8 Jun. 30, 2012 A9 Jun. 30, 2012 A10 Jun. 30, 2012 A11 Jun. 30, 2012 A12 (Blank) Jun. 30, 2012 A13 Jun. 30, 2012 A14 (Blank) Jun. 30, 2012 A15 Jun. 30, 2012 A16 (Blank) Jun. 30, 2012 A17 Jun. 30, 2012 A18 Jun. 30, 2012 F Foldout page, printed on single face D Deleted page R Revised page A Added page
  • 18.
    JZ-Y8F200W-02 AIRCRAFT FLIGHT MANUAL LEP 10 June30, 2012 SUBJECT PAGE DATE SUBJECT PAGE DATE A19 Jun. 30, 2012 A20 Jun. 30, 2012 A21 Jun. 30, 2012 A22 Jun. 30, 2012 A23 Jun. 30, 2012 A24 Jun. 30, 2012 A25 Jun. 30, 2012 A26 Jun. 30, 2012 A27 Jun. 30, 2012 A28 Jun. 30, 2012 A29 Jun. 30, 2012 A30 Jun. 30, 2012 A31 Jun. 30, 2012 A32 (Blank) Jun. 30, 2012 A33 Jun. 30, 2012 A34 Jun. 30, 2012 A35 Jun. 30, 2012 A36 Jun. 30, 2012 A37 Jun. 30, 2012 A38 Jun. 30, 2012 Appendix B B1 Jun. 30, 2012 B2 Jun. 30, 2012 B3 Jun. 30, 2012 B4 Jun. 30, 2012 B5 Jun. 30, 2012 B6 Jun. 30, 2012 Appendix C C1 Jun. 30, 2012 C2 (Blank) Jun. 30, 2012 C3 Jun. 30, 2012 C4 (Blank) Jun. 30, 2012 Appendix D D1 Jun. 30, 2012 D2 (Blank) Jun. 30, 2012 GLOSSARY 1 Jun. 30, 2012 2 Jun. 30, 2012 3 Jun. 30, 2012 4 Jun. 30, 2012 5 Jun. 30, 2012 6 Jun. 30, 2012 7 Jun. 30, 2012 8 Jun. 30, 2012 9 Jun. 30, 2012 10 Jun. 30, 2012 11 Jun. 30, 2012 12 Jun. 30, 2012 13 Jun. 30, 2012 14 Jun. 30, 2012 15 Jun. 30, 2012 16 Jun. 30, 2012 F Foldout page, printed on single face D Deleted page R Revised page A Added page
  • 19.
    JZ-Y8F200W-02 AIRCRAFT FLIGHT MANUAL TOC 1 June30, 2012 Table of Contents SUBJECT PAGE GENERAL.......................................................................................................................................1  Introduction.............................................................................................................................1  Aircraft technical data .............................................................................................................5  Aircraft three-view arrangement ...........................................................................................13 OPERATIONAL LIMITATION ..........................................................................................................1  General of flight limitation .......................................................................................................1  Flight limitation........................................................................................................................1  Speed limitations ....................................................................................................................2  Weight and C.G. limitations.....................................................................................................7  G-load limitation....................................................................................................................15  Limitations of power plant.....................................................................................................16  Operational limitation for air conditioning system .................................................................18 EMERGENCY PROCEDURES ......................................................................................................1  Engine failures........................................................................................................................1  High angle of attack flight .....................................................................................................16  Flying with door open and descending in emergency...........................................................21  Landing with the malfunctioned landing gear system ...........................................................22  Handling of tyre blown-up and brakes failure........................................................................25  Handling of heading system and the barometer failed in flight .............................................26  Landing with flaps up............................................................................................................27  Outside forced landing..........................................................................................................29
  • 20.
    JZ-Y8F200W-02 AIRCRAFT FLIGHT MANUAL TOC 2 June30, 2012 SUBJECT PAGE NORMAL PROCEDURES..............................................................................................................1  Preparations for flight ............................................................................................................1  Flight ....................................................................................................................................25 PERFORMANCE ...........................................................................................................................1  General ..................................................................................................................................1  Aircraft flight performance calculation and conversion curve .................................................1  Main performance of four engines..........................................................................................7  Main performance of three engines......................................................................................15  Takeoff and landing performance in non-standard condition ................................................17  Climb and descent at different weight and altitude...............................................................30  AIRCRAFT SYSTEM EQUIPMENT................................................................................................1 Power plant ............................................................................................................................1 Fuel System .........................................................................................................................21 Oil system ............................................................................................................................34 Hydraulic system..................................................................................................................38 Fire-extinguish and neutral gas system................................................................................56 Air-conditioning system ........................................................................................................61 Anti-icing heating system .....................................................................................................71 General ................................................................................................................................71 Oxygen system ....................................................................................................................79 Flight control system..............................................................................................................84 Communication System .....................................................................................................247 Radar system.....................................................................................................................282 Instrument system..............................................................................................................320 Starting power and onboard power equipment...................................................................369
  • 21.
    JZ-Y8F200W-02 AIRCRAFT FLIGHT MANUAL TOC 3/(4Blank) June 30, 2012 SUBJECT PAGE Signal, Illuminating apparatus.............................................................................................380 Sighting, airdlift, airdrop and parachuting equipment..........................................................385 Electric signal gun deviceXQ-1A ........................................................................................392 APPENDIX A ............................................................................................................................... A1 APPENDIX B COMMON KNOWLEDGE INTRODUCTION ...................................................... B1 APPENDIX C FEATURES OF VARIOUS CLOUDS AND THEIR CORRESPONDING FLIGHT CONDITIONS........................................................................................C1 APPENDIX D AIRCRAFT ICE ACCRETION INTENSITY GRADE............................................D1
  • 22.
    JZ-Y8F200W-02 AIRCRAFT FLIGHT MANUAL TOC 4 June30, 2012 THIS PAGE INTENTIONALLY LEFT BLANK
  • 23.
    JZ-Y8F200W-02 AIRCRAFT FLIGHT MANUAL SECTIONI GENERAL 1-1 June 30, 2012 GENERAL INTRODUCTION Y8F200W is the multifunctional medium transport aircraft of mid range. It mainly serves the army as air transportation of cargo, arming equipment, armed soldiers, the wounded, parachuting soldiers and release of small and large-sized cargo and equipment. For the customization purpose, some adaptation, replacement and adjustment are conducted to the aircraft like replacement of partial avionics equipment and high-failure rate equipment, instrument panel distribution adjustment, cargo transportation system interchangeability and loading effective improvement, floor modification modification in cargo compartment, airframe surface repaint, addition of engine fuel auto shutoff function and ground auto-cleaning function, addition of interface between cockpit and air-conditioner ground vehicle, and adaptation of aircraft structure, ECS, oxygen system, living facilities, power distribution system and illumination system, etc. The crew members include pilot (Captain), copilot, navigator, communicator and mechanic. The aircraft is of metal semimonocoque construction with cantilever high-wing, single vertical tail and turnup at the fuselage aft. The fuselage section from frames 0~59 are of airtight cabin, of which, frames 0~8 are the cockpit and frames 9~43 are airtight cargo compartment. For loading convenience, the floor of cargo cabin has slope at its rear section. The fuselage aft turnup angle is 18o 43’, and two cargo cabin doors which are openable in the air are located at the large opening of frames 43~59, and frames 65~68 at the fuselage aft is the non-airtight equipment cabin. The tapered wing is of non-geometrical twist along wing span direction and is separated as center wing, outboard-inboard and outboard wing by two separation surfaces. Four WJ-6 engines are suspended at spar I of outboard-inboard wing, and the double-seam extension flaps are suspended behind spar II. The two differencial ailerons cooperating with interference board are suspended behind the spar II of outboard wing.
  • 24.
    JZ-Y8F200W-02 AIRCRAFT FLIGHT MANUAL SECTIONI GENERAL 1-2 June 30, 2012 The tricycle landing gears are of retractable/extensible type, and the four-wheel bogie main landing gear at both sides of the fuselage is retractable inward to the belly. The doble-wheel nose landing gear which is retractable backward is at frame 9. The aircraft has 10 wheels, all of which are equipped with low-pressure tyres, enabling the aircraft to takeoff and land on strip, grassland, gravel and sand runway. The nose wheel is equipped with nose wheel steering turning mechanism linked with the rudder control mechanism, and the main wheel is equipped with hydraulic brake device. The hydraulic system is composed of two independent sub-systems at left and right side and standby hand pump and electrical pump system. The two sub-systems at both sides which are independent to each other are equipped with hydraulic reservoir, hydraulic pump and hydraulic accessories and two sub-systems can work independently for power plant operation or cooperatively as standby control mechanism. The two sub-systems are controlled by the communication valve. Pressurization of hydraulic tank is realized through the pressurized air from engine compressor, so that normal oil supply is guaranteed regardless of the flight status and altitude. Total volume of hydraulic system is 28.595gal (130L), with its operating pressure being 1705~2203psi (11.76~15.19 MPa) (120~155 kgf/cm2 ). The hand pump and electrical pump system aims to control operation of each part on ground and serves as standby system in the air in emergency. Flight control system of the aircraft consists of primary control system and auxiliary control system. The primary control system is of rigid pull rod control, and is equipped with the hydraulic control surface of KJ-6C autopilot, the control surface receives the control signal from autopilot. The aircraft can be controlled individually or cooperatively by pilot (Captain) and copilot through the primary control system. The airborne oxygen system and two sets of high-altitude facility can gurantee normal living and working conditions for the crew members. The high-altitude facility fulfills airtight cockpit pressurization, heating and cooling requirement of the aircraft, while the air is supplied from stage X compressor of the engine. The low-altitude ventilation system on the aircraft serves to ventilate the cabin during low-altitude flight. Pressure difference inside and outside the cabin is not more than 6.67psi (0.046 MPa) (0.469 kgf/cm2 ). The air-conditioner interface system inside the cockpit can connect with the air-conditioner vehicle on ground in short time to supply the conditioned air to the aircraft. The oxygen is supplied in form of gas and the max. storage is 21.996gal (100 L).
  • 25.
    JZ-Y8F200W-02 AIRCRAFT FLIGHT MANUAL SECTIONI GENERAL 1-3 June 30, 2012 The aircraft is equipped with anti-icing device. Deicing of engine inlet duct at its leading edge, engine compressor inlet guide vanes assembly is realized through the hot air, while that of propeller blade, propeller cap and windshield glass is of electrical-driven. The WJ-6 turbine propeller engine, with its power of 3126kW (4250 equivalent horsepower) per set is installed on the wing through engine case and engine nacelle support frame. The engine is started by direct current and designed with auto/manual fuel shut-off, overheat protection and ground cleaning functions, and is controlled by the steel cable. The engine propeller is known as J17-G13 four-blade metal propeller and is equipped with auto feathering pitch control device. There are 26 rubber fuel tanks inside the left and right wings, and the outboard wing is equipped with the integrated fuel tank. The fuselage tank is inside the anti-stress fuel tank cabin under floor of fuselage frames 33~41. Fuel consumption of the fuel system is contolled automatically or manually as per certain sequence, and the fuel can be added by means of auto-pressure refuelling or manually from the filler. The fireproof equipment and effective fire extinguisher can detect and put out the fire timely. The neutral gas to fuel tank from the neutral-gas system forms the anti-explosive media above the fuel surface, enhancing safety of the fuel system. Moreover, during emergency landing process, the neutral gas inside the fuel tank can increase the fuel pressure on its surface, thus improving the reliability of the fuel supply system. Aircraft is equipped with 28VDC, single- phase 400Hz 115VAC and three-phase 400Hz 36VAC. Direct current power supply includes QF12-1 starter generator (8 sets) supplying 28VDC with rated output power of 12kW for each, QF-24 starter generator (1 set) supplying 28VDC with rated output power of 18kW and 20GNC28B battery (4 sets) supplying 24VDC. Alternatiing current (AC) power supply includes JF-12 AC generator (4 sets) and three-phase alternating current includes 2 sets of SL-1000E three-phase inverter. In addition, the aircraft is also equipped with a DIAJ-0603 static inverter, its input voltage is 28VDC and output voltage is 110VAC/60Hz with rated output power of 3 kVA.
  • 26.
    JZ-Y8F200W-02 AIRCRAFT FLIGHT MANUAL SECTIONI GENERAL 1-4 June 30, 2012 The airborne navigation system mainly includes HG-593Y8 laser strapdown inertial/satellite combination navigation system, 2101 I/O GPS navigation system, HZX-1M altitude heading reference system(AHRS), XAS-3M air data system and WL-11 ADF, JD-3A TACAN, KRA405B radio altimeter, VOR-432 VOR/ILS, KDM 706A DME distance measuring equipment and MK VIII enhanced ground proximity warning system. The navigation system integrated by these devices is cross-linked with KJ-6C autopilot to control the flight automatically. The communication system consists of TKR-200A2 HF radio, the TKR123E-III VHF radio, and JT-Y8F200W intercom with AIRMAN 750 headset. In addition, the aircraft is equipped with JYL-6AT meteorological radar, TCAS-94 airtraffic alarming and anti-collision system, and JZ/YD-126E IFF transponder. The airborne instrument mainly includes BK-43 airspeed indicator, BG-1A barometric altimeter, BC-10 elevation speedometer, BUC-26D capacitance-type fuel gauge, FJ-30D6 flight data recorder and XFJ-12B cockpit audio frequency recorder, etc. The aircraft can be equipped with airdrop side guide rail, cargo transportation guide rail, stop lock, rollway, mooring ring, seat and stretcher etc. to fulfill multi-purpose requirement. Air transportation equipment on the aircraft mainly include electric winch, beam crane, cargo transportation side guide rail, stop lock, cargo transportation rollway, mooring ring, capative cable, tie-down net and stop force component pad, etc. Airborne extraction equipment mainly consists of airdrop side guide rail, airdrop rollway, extraction parachute releasing device, extraction sighting equipment, electrical parachute rope recovery mechanism, airdrop and airborne signal device and airdrop electrical control device, etc. The aircraft can also be equipped with 86 seats for armed soldier or airborne parachute soldiers; it can also be equipped with 72 sets of rescue stretchers for rescuing the seriously injured personnel during the air transportation process.
  • 27.
    JZ-Y8F200W-02 AIRCRAFT FLIGHT MANUAL SECTIONI GENERAL 1-5 June 30, 2012 AIRCRAFT TECHNICAL DATA Principal geometrical data General data (a) Overall length 111.62ft (34.022m) (b) Overall height LG free 36.61 ft (11.160m) LG compressed 35.20 ft (10.730m) (c) Min. suspension height of belly to ground upon landing gear compression 2.04 ft (0.622m) (d) Suspension height of cargo cabin floor at frame 43 4.47 ft (1.361m) (e) AOA of parking aircraft 5o 15’ (f) Max. width of fuselage (with laning gear bay) 14.88 ft (4.536m) (g) Max. height of fuselage 14.44 ft (4.40m) (h) Column diameter of fuselage (frames 17-33) 13.45 ft (4.10m) (i) Interior dimensions of fuselage cargo cabin Volume 4859.30ft3 (137.60m3 ) Length 48.23 ft (14.7m) Width (along floor surface) Frames 9~13 9.84 ft ~11.48 ft (3.000m~3.500m) Frames 13~25 and frame 30~43 11.48 ft (3.500m) Frames 25~30 9.84 ft (3.000m) (j) Height of cargo cabin Frames 9~14 7.38 ft ~8.2 ft (2.25m~2.50m) Frames 14~25 8.2 ft (2.50m) Frames 25~30 7.87 ft (2.40m) Frames 30~31 7.87 ft ~8.53 ft (2.4m~2.6m) Frames 31~43 8.53 ft (2.60m)
  • 28.
    JZ-Y8F200W-02 AIRCRAFT FLIGHT MANUAL SECTIONI GENERAL 1-6 June 30, 2012 (k) Boarding gate dimension Height × width 4.77 ft × 2.62 ft (1.455m × 0.8m) Wings (a) Wing span (along chord plane) 124.67 ft (38m) (b) Area (including area covered by fuselage) 1311.689 ft2 (121.86m2 ) (c) Mean aerodynamic chord 11.322 ft (3.451m) (d) Aspect ratio 11.85 (e) Wing sweep angle at 25% chord 6o 50’34’’ (f) Wing dihedral angle Center wing 0o Outboard-inboard wing (relative to center wing) 1o Outboard wing (relative to inboard wing) -3o (g) Wing incidence 4o (h) Length of single aileron 18.98 ft (5.784m) (i) Aileron area 84.389 ft2 (7.840m2 ) (j) Maximum deflection angle of aileron Upwards (25±1)o Downwards (15+2 -1 )o (k) Aileron trim tab area 9.042 ft2 (0.84m2 ) (l) Max. deflection angle Upwards (6±1)o Downwards (6±1)o (m) Max. turning angle when the aileron turns to Max. limit position 135o (n) Flap area 289.657 ft2 (26.910m2 ) (o) Length of single flap 35.958 ft (10.960m)
  • 29.
    JZ-Y8F200W-02 AIRCRAFT FLIGHT MANUAL SECTIONI GENERAL 1-7 June 30, 2012 (p) Flap deflection angle Takeoff 15o ~(25±1)o Landing (35±1)o (q) Flap Double-slot zap type (r) Length of spoiler (at half wing) 3.609 ft (1.100m) (s) Height of spoiler at full extension (aileron upwards to 25o ) is 5.51 in±0.20in (140±5mm) (spoiler tends to protrude when aileron deflects to 3o ) Tail (a) Area of horizontal tail 291.164 ft2 (27.050m2 ) (b) Stabilizer area of horizontal tail 214.729 ft2 (19.949m2 ) (c) Span of horizontal tail 40.013 ft (12.196m) (d) Mean aerodynamic chord of horizontal tail 7.851 ft (2.393m) (e) Dihedral angle of horizontal tail 0o (f) Incidence angle of horizontal tail (relative to wing chord) -4o (g) Elevator area 76.434 ft2 (7.101m2 ) (h) Max. deflection angle of rudder Upwards 28o ±1o Downwards 15o ±1o (i) Elevator trim tab area 8.374 ft2 (0.778m2 ) (j) Max. deflection angle of rudder trim tab (upon steel cable control) at up and down position 12o ±1o (k) Area of vertical fin (from upper fuselage, excluding dorsal fin) 21.503m2 (l) Stabilizer area of vertical fin 161.093ft2 (14.966m2 ) (m) Vertical tail span 19.13 (5.83m) (n) Mean aerodynamic chord of vertical tail 13.28 (4.048m) (o) Rudder area 70.364ft2 (6.537m2 ) (p) Max. deflection angle of rudder Leftward and rightward 25o ±1o (q) Rudder trim tab area 4.123ft2 (0.383m2 ) (r) Rudder spring force servo tab area 4.726 ft2 (0.439m2 )
  • 30.
    JZ-Y8F200W-02 AIRCRAFT FLIGHT MANUAL SECTIONI GENERAL 1-8 June 30, 2012 (s) Max. deflection angle of rudder trim tab Leftward and rightward 18.5o ±1o (t) Max. deflection angle of rudder spring force servo tab Leftward and rightward 13.5o ±1o Landing gear (a) Wheel track along the main wheel contour 17.756 ft (5.412m) Along the main wheel buffer strut 16.142 ft (4.920m) Wheel base 31.42 ft (9.576m) (b) Min. turning radius on ground 45.11 ft (13.75m) (c) Max. turning angle of nose wheel Manual control angle Leftward and rightward 35o Rudder control angle Leftward and rightward 8o ±2o (d) Favorable taxiing speed of the aircraft when turning with nose wheel handle 2.70kn~3.24kn (5~6km/h) (e) Main wheel dimension 41.339 in×11.811 in (1050mm×300mm) (f) Nose wheel dimension 35.433 in×11.811 in (900mm×300mm) (g) Air pressure of tyre Within the range of normal takeoff: Main wheel (85.57+7.25 0 )psi ((0.59+0.05 0 ) MPa) Nose wheel (71.07+2.90 -1.45 )psi ((0.49+0.02 -0.01 )MPa) At max. takeoff weight (61t) Main wheel (100.08+7.25 0 )psi ((0.69+0.05 0 )MPa) Nose wheel 73.97psi (0.51MPa) (h) Braking clearance 0.059in~0.138in (1.5mm~3.5mm) (i) Exposive buffer strut (upon parking and compression) Within the range of normal takeoff: Nose buffer strut 3.937in~9.449in (100~240mm) Main buffer strut 1.693in~4.528in (43~115mm) At max. takeoff weight (61t) Nose buffer strut 1.693in~4.528in (70~200mm)
  • 31.
    JZ-Y8F200W-02 AIRCRAFT FLIGHT MANUAL SECTIONI GENERAL 1-9 June 30, 2012 (j) Parking compression of aircraft tyre Parking compression of aircraft tyre for main landing gear wheel 2.953in~3.543in (75~90mm) Parking compression of aircraft tyre for nose landing gear wheel 1.378in~1.987in (35~50mm) Power plant and trubo power starter generator WJ-6 Engine data (a) Dimension Length 122 in±0.079 in (3099mm±2mm) (with bullet 140 in±0.197 in (3558mm±5mm)) Width 35.118in±0.039 in (892mm±1mm) Height 46 in±0.0118 in (1174mm±1mm) (b) Net weight (with accessories) 1200kg+2% (c) Engine rotating speed Operating speed (12300+90 )r/min(95.5%~96.2%) Idle on ground (10400+200 -50 )r/min(80.5%~82.5%) Cold running speed (30s) 17%~22% (d) Engine acceleration From idling on ground to takeoff Not exceed 20s From idling in the air to takeoff Not exceed 10s (e) Engine deceleration 8s~10s (f) Relative incidence angle between engine and wing -4o (g) Shut off speed of air compressor air-bleed valve 5th stage (11340+130 ) r/min (88%~89%) 8th stage (9340+200 ) r/min (72.5%~74%) (h) Pressure ratio of air compressor (Maximum continuous power condition H= 26247ft (8000m), V= 574.15ft/s (175m/s) 9.2 (i) Airflow ((Maximum continuous power condition H=0, V=0) 20.5kg/s
  • 32.
    JZ-Y8F200W-02 AIRCRAFT FLIGHT MANUAL SECTIONI GENERAL 1-10 June 30, 2012 (j) Engine data in different operating conditions is shown in Table 1-1. Table 1-1 Engine data in different operating conditions (H=0, V=0, PH=101.3kPa, tH=15o C) Service condition Throttle angle Equivalent power rate (kW) Axis power rate (kW) Fuel consumption (kg/h) Takeoff 98o ~105o 3126 2868 1030 Max. continuous power condition 84±2o 2567 2331 927 0.85 Max. continuous power condition 72±2o 2184 1971 842 0.7 Max. continuous power condition 60±2o 1846 1589 757 0.6 Max. continuous power condition 52±2o 1525 1341 701 0.4 Max. continuous power condition 35±2o 961 805 578 0.2 Max. continuous power condition 20±2o Idling on ground 0o Propeller data (a) Model J17-G13 (b) Number of blade 4 (c) Diameter of blade 14.76ft (4.5m) (d) Rotating direction (Along the flight direction) Anti-clockwise (e) Blade incidence(R=5.25ft (1.6m) at the section) Min. blade angle (starting angle) 0o Mid-range limiting angle 12o Feathering angle 83o 30’ Ground hydraulic feathering angle 40o ~46o (f) Blade angle variation 0o ~83o 30’ (g) Propeller operating speed 1075r/min
  • 33.
    JZ-Y8F200W-02 AIRCRAFT FLIGHT MANUAL SECTIONI GENERAL 1-11 June 30, 2012 (h) Full feathering position time Engine operative Not exceed 10s Engine shutdown Not exceed 20s (i) Unfeather time In the air Not exceed 10s On ground Not exceed 25s (j) Rotating inertia 2.382kg•m•s2 (k) Net weight (without hub fairing component and current collector) 408kg+2% (l) Area of propeller airflow passing the wing 53% (m) Clearance between propeller and the fuselage 2.17ft (0.66m) (n) Suspension height of blade tip to ground Inboard engine 6.34ft (1.932m) Outboard engine 6.51ft (1.985m) (o) Propeller pulling arm on horizontal surface Inboard engine 15.59ft (4.715m) Outboard engine 31.28ft (9.533m) Caution Upon feathering ground test, oil temperature is required to be above 25o C.
  • 34.
    JZ-Y8F200W-02 AIRCRAFT FLIGHT MANUAL SECTIONI GENERAL 1-12 June 30, 2012 Turbo starter generator (a) Power rate (at the terminal of QF-24 power generator) 56kW~60kW (b) Output axis power rate 70kW~73.5kW (c) Net weight 170kg (Not exceed 190+5 kg for trubo starter generator with turbo protection device). (d) Operational altitude 0ft~13780ft (0m~4200m) (e) Contour dimension Length (to the end of short exhaust pipe) 62.20in±0.31in (1580mm±8mm) Height Not exceed 26.38in (670mm) Width 22.64in (575mm) (f) Total operating hour of turbo starter generator should not exceed 172h (total engine start hour is 72h, total hour of power supply to airborne network is 100h, and total start frequency per engine is 2000 times).
  • 35.
    JZ-Y8F200W-02 AIRCRAFT FLIGHT MANUAL SECTIONI GENERAL 1-13/(14 Blank) June 30, 2012 AIRCRAFT THREE-VIEW ARRANGEMENT For details, see Figure 1-1. 14.83 4520 12.6 (3840) 111.62 (34022) 31.42 (9576) 26.61~35.3 (11160~10760) 124.67 (38000) 16.14 (4920) 40 (12196) Figure 1-1 Three-view arrangement of the aircraft
  • 36.
    JZ-Y8F200W-02 AIRCRAFT FLIGHT MANUAL SECTIONI GENERAL 1-14 June 30, 2012 THIS PAGE INTENTIONALLY LEFT BLANK
  • 37.
    JZ-Y8F200W-02 AIRCRAFT FLIGHT MANUAL SECTIONII OPERATIONAL LIMITATION 2-1 June 30, 2012 OPERATIONAL LIMITATION GENERAL OF FLIGHT LIMITATION Minimum crewmembers: Minimum crewmembers: five persons, i.e., pilot (captain), co-pilot, navigator, communicator and flight engineer. Service range: (a) Day and night flight (b) Instrument landing (c) Icing condition of mid-level or below FLIGHT LIMITATION (a) Maximum banks are not more than 30o , and under complicated weather conditions not more than 15o during banking and turning. (b) Maximum angle of attack of wing is 12o 30’ during take-off and landing. (c) The allowable 90o crosswind speed during normal take-off and landing is not more than 39.37ft/s (12m/s), and the experienced pilot is allowed to take off and land 90o crosswind within the speed of 49.21 ft/s (15m/s). (d) Go-around altitude of the aircraft is usually not less than 164ft (50m). Under special circumstances go-around at any altitude is allowed, as long as the four engines are all in operation and their throttle levers are all over 16o . (e) The door is not allowed to open upon aircraft takoff; in case that the door can not be closed due to its control system failure, normal landing is permitted with AOA of the wing ≯9o (fuselage AOA≯5o ) (f) Pressure difference inside and outside of pressurized cabin is not more than 6.67psi (0.046MPa).
  • 38.
    JZ-Y8F200W-02 AIRCRAFT FLIGHT MANUAL SECTIONII OPERATIONAL LIMITATION 2-2 June 30, 2012 SPEED LIMITATIONS (a) Speed limitation (Vmax) for level-flight with different air-borne weight and altitude is in Table 2-1. Table 2-1a Speed limitation for level flight Air-borne weight (t) Altitude (ft) IAS (kn) <55 <18045 Vmax≯281 >18045 M≯0.6 ≥55 <23950 Vmax≯248 >23950 M≯0.6 Table 2-1b Level speed limitation Air-borne weight (t) Altitude (m) Equivalent speed (km/h) <55 <5500 Vmax≯520 >5500 M≯0.6 ≥55 <7300 Vjx≯460 >7300 M≯0.6 (b) Speed limitation (Vjx) for gliding with different airborne weight and altitude and short-period flight is in Table 2-2. Table 2-2a Gliding speed limitation Airborne weight (t) Altitude (ft) IAS (km/h) <55 <17388 Vjx≯329 >17388 M≯0.7 ≥55 <21325 Vjx≯302 >21325 M≯0.7 Table 2-2b Gliding speed limitation Airborne weight (t) Altitude (m) IAS (km/h) <55 <5300 Vjx≯610 >5300 M≯0.7 ≥55 <6500 Vjx≯560 >6500 M≯0.7
  • 39.
    JZ-Y8F200W-02 AIRCRAFT FLIGHT MANUAL SECTIONII OPERATIONAL LIMITATION 2-3 June 30, 2012 (c) Speed limitation polar curve as per Table 2-1 and Table 2-2 is shown in Figure 2-1. H(ft) V b (kn) Longperiodflight Shortperiodflightandgliding V max V jx M=0.6 M=0.7H=23950ft H=18045ft H=21325ft H=17388ft 227 238 248 252 270 281 292 302 313 324 335 346 356 367 26247 22966 19685 16404 13123 9843 6562 3281 0 Figure 2-1a Speed limitation polar curve 420 440 460 480 500 520 540 560 580 600 620 640 660 680 0 1000 2000 3000 4000 5000 6000 7000 8000 H(m) Vb(km/h) Longperiodfight Shortperiodflightandgliding Vmax Vjx M=0.6 M=0.7H=7300 H=5500 H=6500 H=5300 Figure 2-1b Speed limitation polar curve
  • 40.
    JZ-Y8F200W-02 AIRCRAFT FLIGHT MANUAL SECTIONII OPERATIONAL LIMITATION 2-4 June 30, 2012 (d) Speed and Mach number limit for emergency landing is the same with that in Table. Load limit and descending rate for emergency landing recovery should not exceed 1.5g and 131ft/s (40m/s) respectively. (e) IAS should be no more than 189 kn (350km/h) when the cargo cabin is at open position. (f) IAS of airdrop and airborne is 173kn~189kn (320km/h~350km/h) and 157kn~189kn (290km/h~320km/h) respectively. (g) Upon landing gear retraction/extension, readout of flight speed Vmeter should not exceed 189 kn (350km/h). (h) Flap extension IAS: (i) When flap is down by 25o , IAS should not exceed 184kn (340km/h), and when it is down by 35o , the readout should be no more than 162kn (300km/h). (j) When the aircraft is taxiing on ground at the speed of 2.7kn~32.4kn (5km/h~60km/h), or 81kn (150km/h) under special condition, operation of nose wheel steering handle is allowed. However, gentle operation is required for the latter situation. (k) In vertical blast region, lower flight speed timely in case of G-load caused by the gust. 1) In case of the strongest blast (equivalent wind speed: 65.6ft/s (20m/s)), lower the flight speed as Vzj (See Table 2-3). Table 2-3a Lowering speed under gust Altitude (ft) 0 6562 13123 19685 Vzj (kn) 180 182 186 192 Table 2-3b Lowering speed under gust Altitude (m) 0 2000 4000 6000 Vzj (km/h) 333 337 344 355 2) Under equivalent wind speed of 49.2 ft/s (15m/s), flight speed should not exceed that of max. level flight (Vmax). See Table 2-1. 3) Under equivalent wind speed of 26.2 ft/s (8m/s), flight speed should not exceed that of dive limit (Vjx). See Table 2-2. Note In case of gust, flight speed should be within the tolerance of Max. gust speed as per designation.
  • 41.
    JZ-Y8F200W-02 AIRCRAFT FLIGHT MANUAL SECTIONII OPERATIONAL LIMITATION 2-5 June 30, 2012 (l) Max. maneuver speed of level flight with different airborne weight, altitude, flap & landing gear up is in Table 2-4. Table 2-4a Maneuver speed (IAS) Altitude(m) Airborne weight (t) <19685 ≥19685 ≤54 151 162 >54 173 184 Table 2-4b Maneuver speed (IAS) Altitude(m) Airborne weight (t) <6000 ≥6000 ≤54 280 300 >54 320 340 (m) Upon landing light down, flight speed should not eceed 162 kn (300km/h). (n) Min. allowable speed and falling spiral speed is in Table 2-5. Table 2-5b Min. allowable speed and falling spiral speed Altitude (ft) Landing gear status Flap angle Airborne weight (t) Min. allowable speed (kn) Falling spiral speed (kn) Remark 15748~18045 UP 0o 48.7 140 121 1. Throttle angle 20o 2. IAS speed DOWN 25o 48.4 115 103 DOWN 35o 48.2 109 97 Table 2-5b Min. allowable speed and falling spiral speed Altitude (m) Landing gear status Flap angle Airborne weight (t) Min. allowable speed (km/h) Falling spiral speed (km/h) Remark 4800~5500 UP 0o 48.7 260 225 1. Throttle angle 20o 2. IAS speed DOWN 25o 48.4 213 190 DOWN 35o 48.2 202 179 (o) Figure 2-2 shows the flight envelope when all engines are operated with the airborne weight of 49t.
  • 42.
    JZ-Y8F200W-02 AIRCRAFT FLIGHT MANUAL SECTIONII OPERATIONAL LIMITATION 2-6 June 30, 2012 H(ft) 3281 24606 16404 8202 108 216 324 432 V(kn) Vmin Vks Vmax(Max.continuouspowercondition) Vmax(Max.) Max.speedpressurelimitfor levelflightq=12740Pa Max.glidingspeed pressureq=17640Pa 0.7Max.continuous powercondition Figure 2-2a Flight envelope of four operated engines H(m) 10000 7500 5000 2500 200 400 600 800 V(km/h) Vmin Vks Vmax(Max.continuouspowercondition) Vmax(Max.) Max.speedpressurelimitfor levelflightq=12740Pa Max.glidingspeed pressureq=17640Pa 0.7Max.continuous powercondition Figure 2-2b Flight envelope of four operated engines
  • 43.
    JZ-Y8F200W-02 AIRCRAFT FLIGHT MANUAL SECTIONII OPERATIONAL LIMITATION 2-7 June 30, 2012 WEIGHT AND C.G. LIMITATIONS Basic data Maximum take-off weight 61t Normal takeoff weight 56t Normal landing weight 52t Theriotical empty weight 35.20t (See MRB for empty weight per aircraft) (Specific weight of fuel 0.775kg/L) Max. fuel quantity of wing tank 15.020t Max. fuel quantity of fuselage tank (Specific weight of fuel 0.775kg/L) 2.200t Dead fuel 395kg Fixed weight 778kg Theoretical C.G of empty aircraft 25.01%CA (See MRB for C.G per empty aircraft) Normal range of C.G 22%CA~28%CA Optimum range of C.G 25%CA~28%CA Weight and C.G. limitations Weight limitations Maximum take-off weight 61t Maximum taxiing weight 61.5t Maximum landing weight 58t Allowable C.G With aircraft weight equal to or less than 56000kg 16%CA~32%CA With aircraft weight greater than 56000kg 18%CA~32%CA
  • 44.
    JZ-Y8F200W-02 AIRCRAFT FLIGHT MANUAL SECTIONII OPERATIONAL LIMITATION 2-8 June 30, 2012 Fuel quantity limitation for typical airdrop and air transportatoin Upon airdrop of cargo for 12 sets of 1m loading platforms, total fuel quantity of the aircraft should be not less than 4000kg (with dead fuel of 395kg). Upon airdrop of cargo for 6m loading platform (weight: 7400kg) and 4m loading platform (weight: 5800kg), total fuel quantity of the aircraft should be not less than 4000kg (with dead fuel of 395kg). Total fuel quantity should be not less than 2600kg (with dead fuel of 395kg) when the aircraft is fulfilled with the wounded. Fuel consumption influence towards C.G Variation of C.G as per fuel consumption in different conditions is shown from Figure 2-3 to Figure 2-11. 60000 55000 50000 45000 40000 35000 10 15 20 25 30 35 RelativeC.Goftheaircraft(%CA ) C.G backward limit C.G forward limit Weight of the aircraft (kg) Note Aircraft takeoff weight is 53459kg, and fuel quantity is 17220kg. Figure 2-3 Variation of C.G as per fuel consumption in empty ferry flight
  • 45.
    JZ-Y8F200W-02 AIRCRAFT FLIGHT MANUAL SECTIONII OPERATIONAL LIMITATION 2-9 June 30, 2012 RelativeC.Goftheaircraft(%CA ) C.G backward limit C.G forward limit Weight of the aircraft (kg) 60000 55000 50000 45000 40000 35000 10 15 20 25 30 35 Note a) Aircraft takeoff weight is 61000kg, fuel quantity is 14210kg, and bulk cargo weight is 10000kg. Figure 2-4 Typical variation of C.G. for typical transportation of containerized cargo RelativeC.Goftheaircraft(%CA ) C.G backward limit C.G forward limit Weight of the aircraft (kg) 60000 55000 50000 45000 40000 35000 10 15 20 25 30 35 Note Aircraft takeoff weight is 61000kg, fuel quantity is 15211kg, and 3 pieces of pallet (96’’×125), total weight is 9000kg. Figure 2-5 Variation of C.G as per fuel consumption for typical transportation of containerized cargo
  • 46.
    JZ-Y8F200W-02 AIRCRAFT FLIGHT MANUAL SECTIONII OPERATIONAL LIMITATION 2-10 June 30, 2012 RelativeC.Goftheaircraft(%CA ) C.G backward limit C.G forward limit Weight of the aircraft (kg) 60000 55000 50000 45000 40000 10 15 20 25 30 35 Note Aircraft takeoff weight is 61000kg, fuel weight is 14178kg, and total weight of 86 armed soldiers is 10320kg. Figure 2-6 Variation of C.G as per fuel consumption for armed soldier transportation RelativeC.Goftheaircraft(%CA) C.G backward limit C.G forward limit Weight of the aircraft (kg) 60000 55000 50000 45000 40000 10 15 20 25 30 35 Note Aircraft takeoff weight is 60961kg, fuel weight is 17220kg, and total weight of 60 paratroopers is 9000kg. Figure 2-7 Variation of C.G as per fuel consumption for airborne paratrooper transportation
  • 47.
    JZ-Y8F200W-02 AIRCRAFT FLIGHT MANUAL SECTIONII OPERATIONAL LIMITATION 2-11 June 30, 2012 RelativeC.Goftheaircraft(%CA) C.G backward limit C.G forward limit Weight of the aircraft (kg) 60000 55000 50000 45000 40000 10 15 20 25 30 35 Note a) Aircraft takeoff weight is 60903kg, fuel quantity is 17220kg, 3 medical care personnel, 72 seriously wounded persons and 17 walking injuries and total weight is 6675kg. b) Residual fuel in the tank should be not less than 2600kg during flight. Figure 2-8 Variation of C.G as per fuel consumption for the wounded transportation
  • 48.
    JZ-Y8F200W-02 AIRCRAFT FLIGHT MANUAL SECTIONII OPERATIONAL LIMITATION 2-12 June 30, 2012 60000 55000 50000 45000 40000 35000 15 20 25 30 C B C A B A’ ’ ’ RelativeC.Goftheaircraft(%CA ) Weight of the aircraft (kg) C.G forward limit C.G backward limit Note a) Curve AA indicates variation of C.G as per fuel consumption with the weight of empty aircraft + fixed weight + basic configurated application item + configurated application item of airdrop loading platform + 12 sets of 1m loading platform(loading status) + full fuel of fuselage tank and wing tank (variation is 20.7 %CA~28.2 %CA). b) Curve BB indicates variation of C.G as per fuel consumption with the weight of empty aircraft + fixed weight + basic configurated application item + configurated application item of airdrop loading platform + 12 sets of 1m loading platform(unloading status) + full fuel of fuselage tank and wing tank (variation is 21.0 %CA~29.3%CA). c) Curve CC indicates variation of C.G as per fuel consumption with the weight of empty aircraft + fixed weight + basic configurated application item + configurated application item of airdrop loading platform + 12 sets of 1m loading platform(loading platform I-VI in unloading status and VII-XII in loading status) + full fuel of fuselage tank and wing tank. Upon airdrop, residual fuel in the tank should not be less than 4000kg. Figure 2-9 Variation of C.G as per fuel consumption for 12 sets of 1m loading platform in airdrop status
  • 49.
    JZ-Y8F200W-02 AIRCRAFT FLIGHT MANUAL SECTIONII OPERATIONAL LIMITATION 2-13 June 30, 2012 60000 55000 50000 45000 40000 35000 15 20 25 30 c C B A B A RelativeC.Goftheaircraft(%CA ) Weight of the aircraft (kg) C.G forward limit C.G backward limit ’ ’ ’ Note a) Curve AA’ indicates variation of C.G as per fuel consumption with total weight of 61000kg (i.e. empty aircraft + fixed weight + basic configurated application item + configurated application item of airdrop loading platform + 4500kg loading platform + 4500kg loading platform + 14742kg of fuel) in takeoff status (variation is 29.3 %CA~ 31.0%CA). b) Curve BB’ indicates variation of C.G as per fuel consumption with total weight of 61000kg (i.e. empty aircraft + fixed weight + basic configurated application item + configurated application item of airdrop loading platform + 4500kg loading platform (No.1) +4500kg loading platform (No.2) + 14742kg of fuel in takeoff status (variation is 21.0 %CA~24.7 %CA) when both loading platforms (No.1 and No.2) are in unloading condition. c) Curve CC’ indicates variation of C.G as per fuel consumption with total weight of 61000kg (i.e. empty aircraft + fixed weight + basic configurated application item + configurated application item of airdrop loading platform + 4500kg loading platform(No.1) + 4500kg loading platform(No.2) + 14742kg of fuel) in takeoff status (variation is 29.3 %CA~ 31.0%CA) when loading platform(No.1) is unloaded and loading platform (No.2) is in loading condition (variation is 16.9 %CA~21.1%CA). Figure 2-10 Variation of C.G as per fuel consumption for 2 sets of 4m loading platform in airdrop status
  • 50.
    JZ-Y8F200W-02 AIRCRAFT FLIGHT MANUAL SECTIONII OPERATIONAL LIMITATION 2-14 June 30, 2012 60000 55000 50000 45000 40000 35000 15 20 25 30 c C B A B A Weight of the aircraft (kg) C.G forward limit C.G backward limit RelativeC.Goftheaircraft(%CA ) ’ ’ ’ Note a) Curve AA indicates variation of C.G as per fuel consumption with total weight of 61000kg (i.e. empty aircraft + fixed weight + basic configurated application item + configurated application item of airdrop loading platform + 7400kg loading platform +5800kg loading platform + 10542kg of fuel) in takeoff status (variation is 29.5 %CA~ 30.2 %CA). b) Curve BB indicates variation of C.G as per fuel consumption with total weight of 61000kg (i.e. empty aircraft + fixed weight + basic configurated application item + configurated application item of airdrop loading platform + 7400kg loading platform(No.1) + 5800kg loading platform(No.2) + 10542kg of fuel) in takeoff status (variation is 21.0 %CA~23.2 %CA) when both loading platforms(No.1 and No.2) are in unloading condition. c) Curve CC indicates variation of C.G as per fuel consumption with total weight of 61000kg (i.e. empty aircraft + fixed weight + basic configurated application item + configurated application item of airdrop loading platform + 7400kg loading platform(No.1) +5800kg loading platform(No.2) + 10542kg of fuel) in takeoff status when loading platform(No.1)is unloaded and loading platform(No.2)is in loading condition. Upon airdrop, residual fuel in the tank should not be less than 4000kg. Figure 2-11 Variation of C.G as per fuel consumption for 2 sets of 4m loading platform in airdrop status
  • 51.
    JZ-Y8F200W-02 AIRCRAFT FLIGHT MANUAL SECTIONII OPERATIONAL LIMITATION 2-15 June 30, 2012 G-LOAD LIMITATION (a) Upon takeoff, G-load at C.G should not exceed 2g. (b) Upon landing, G-load at C.G should not exceed 2.5g. (c) See Table 2-6 for static-strength-based G-load limitation in flight. Table 2-6 Flight G-load Aircraft weight (t) Min. fuel quantity of wing (t) Max. limit load (g) Min. limit load (g) V≤VjX V≤Vmax Vmax<V<VjX 38 2 2.96 -1 0 53 7 2.5 -1 0 61 10 2.17 0 0 61 5 2.0 0 0 (d) Load limitation Cargo load should not exceed the following limits marked on the plate: Concentrated cargo 16t Bulk cargo 20t
  • 52.
    JZ-Y8F200W-02 AIRCRAFT FLIGHT MANUAL SECTIONII OPERATIONAL LIMITATION 2-16 June 30, 2012 LIMITATIONS OF POWER PLANT (a) Engine continuous operation duration Take-off power condition 15min Ground idling power condition 30min (b) Percent of engine operating time in its total life: Takeoff power condition 2.5% Maximum continuous power condition 32% See Table 2-7 for the maximum allowable turbine outlet gas temperature. Table 2-7 Maximum allowable turbine outlet gas temperature Engine service condition Engine operating status Allowable turbine exhaust temperature (o C) On ground Takeoff to≤15o C, 510 to>15o C, 560 Inflight Below 26247ft (8000m) Takeoff 510 Max. continuous power 475 Cruising power 450 Above 26247ft (8000m) Takeoff 540 Max. continuous power 495 Cruising power 470 Note The turbine outlet gas temperature in the Table is specified per standard atmosphere condition. When the difference between ambient temperature and the standard air temperature is ±1o C, the gas temperature varies ±1o C accordingly.
  • 53.
    JZ-Y8F200W-02 AIRCRAFT FLIGHT MANUAL SECTIONII OPERATIONAL LIMITATION 2-17 June 30, 2012 (c) Engine operational limitations 1) The maximum allowable turbine outlet gas temperature is 750oC upon engine start. 2) The maximum allowable speed for engine acceleration is 13260rpm. The maximum engine vibration overload factor K: Not exceed 2.5g for ex-factory period Not exceed 3.5g during operation. 3) See Table 2-8 for allowable bleed rate of compressor under all conditions. Table 2-8a Allowable bleed rate of compressor Frequent bleed rate (various power setting) Numbers of operating engines Four engines Three engines Two engines Altitude 32808ft 26247ft 16404ft Engine bleed rate ≯0.345kg/s ≯0.46kg/s ≯0.55kg/s Periodic bleed rate Maximum continuous power H=0, V=0, tH=15o C≯0.15kg/s H=26246ft, V=574 ft/s, tH=-30o C≯0.1kg/s Ejection cooling bleed rate On ground 0.4kg/s for small throttle setting 0.6kg/s for 0.2 Max. continuous power setting Total bleed rate Maximum continuous power H=0 V=0 tH=15o C Bleed rate does not exceed 0.495kg/s. H=26247ft Bleed rate does not exceed 0.46kg/s V=574 ft/s tH=-30o C Note a) Engine deicing system turning on is allowed only when the aircraft is likely to ice during take-off. b) Engine deicing system can be used under all working conditions on the ground. c) Periodic bleed rate means the bleed rate besides frequent bleed rate, such as wing deicing, etc.
  • 54.
    JZ-Y8F200W-02 AIRCRAFT FLIGHT MANUAL SECTIONII OPERATIONAL LIMITATION 2-18 June 30, 2012 Table 2-8b Allowable bleed rate of compressor Frequent bleed rate (various power setting) Numbers of operating engines Four engines Three engines Two engines Altitude 10000m 8000m 5000m Engine bleed rate ≯0.345kg/s ≯0.46kg/s ≯0.55kg/s Periodic bleed rate Maximum continuous power H=0, V=0, tH=15o C≯0.15kg/s H=8000m, V=175m/s, tH=-30o C≯0.1kg/s Ejection cooling bleed rate On ground 0.4kg/s for small throttle setting 0.6kg/s for 0.2 Max. continuous power setting Total bleed rate Maximum continuous power H=0 V=0 tH=15o C Bleed rate does not exceed 0.495kg/s. H=8000m Bleed rate does not exceed 0.46kg/s V=175m/s tH=-30o C Note a) Engine deicing system turning on is allowed only when the aircraft is likely to ice during take-off. b) Engine deicing system can be used under all working conditions on the ground. c) Periodic bleed rate means the bleed rate besides frequent bleed rate, such as wing deicing, etc. OPERATIONAL LIMITATION FOR AIR CONDITIONING SYSTEM (a) Air conditioning power on is not allowed when the aircraft is on ground or during take-off period. (b) Only one set of air conditioning system is allowed for leading edge deicing of the wing.
  • 55.
    JZ-Y8F200W-02 AIRCRAFT FLIGHT MANUAL SECTIONIII EMERGENCY PROCEDURES 3-1 June 30, 2012 EMERGENCY PROCEDURES Various special events may occur during flight for different causes, such as mechanical failure, sudden weather change, operation mistakes and so on. Once any of such special cases occurs, it is necessary for the crewmember to judge accurately and rapidly so as to take action resolutely and effectively. ENGINE FAILURES If the engine or propeller fails in flight when automatic-feathering device is out of operation, there would be a quite large negative thrust that would make the aircraft controlling difficult. Therefore, if propeller of the shutdown engine does not feather automatically, the manual feathering shall be adopted in time. If the manual feathering fails, then the hydraulic emergency feathering should be used. The measures above can ensure feathering in common condition. In flight, only when all feathering systems fail simultaneously and the propeller rotates automatically, and flight speed is less than 227 kn~238 kn (420~440km/h), propeller stop can be released after windmilling speed is stablized. Symptoms of engine failure in flight (a) Aircraft banks and yaws to the side of faulty engine. (b) The red signal light for engine failure is on. (c) The pressure on torque indicator decreases. (d) The upstream fuel pressure of fuel nozzle and fuel instantaneous consumption drops sharply or pressure oscillating amplitude exceeds 42.64 psi (0.294MPa) (3kgf/cm2 ). (e) Turbine exhaust temperature increases or decreases. (f) Engine rotating speed increases or decreases and exceeds specified limitation, or rotating speed oscillates beyond ±2%. (g) Oil pressure decreases to 56.85 psi (0.392MPa) (4kgf/cm2 ) below. (h) The stop released signal light is on. (i) The reading of engine vibration indicator exceeds specified limitation. Warning light is on. (j) Oil in tank leaks out seriously. Once discovering the symptoms above, the aircrew should make decision correctly and adopt proper measures timely.
  • 56.
    JZ-Y8F200W-02 AIRCRAFT FLIGHT MANUAL SECTIONIII EMERGENCY PROCEDURES 3-2 June 30, 2012 Engine failures during takeoff Once any engine shuts down during take-off running, the aircrew should work out solution as per current speed of the aircraft. If the speed is below decision speed, abort takeoff; or else takeoff should be continued. Operation procedures for aborting take-off (a) Keep the direction with the rudder, ailerons, nose wheels and brakes to prevent the aircraft from yawing abruptly and pull the four throttles back to 0o at the same time (pull the throttles at normal engine side back a bit quicker than that at the faulty engine side for correcting the aircraft yaw by throttle difference). (b) Push forward the control column for nose wheel extension to maintain the direction. (c) Release the stop for propellers of two symmetrical operating engines. (d) Lower flaps fully and slow down the aircraft by the brakes in time. If the runway is not long enough and the aircraft tends to fly out of the runway, decrease the speed with emergency brake. (e) When the running direction is no longer deviated and the aircraft speed is below 32.4 kn (60km/h), pull out the nose wheel steering handle, release propeller stop of the engine which is symmetrical to the shutdown engine. (f) If the running direction cannot be maintained after aborting take-off, the captain should pull out the nose wheel steering handle at the speed of less than or equal to 150km/h, to maintain the direction. Operation procedures for continuing take-off (a) The takeoff can be continued when aircraft running speed exceeds decision speed and that the malfunctioned engine feathering is already completed. At this moment, apply the rudder and push the helm towards the normal engine to maintain the direction, and the unstick speed should be 5.4kn~8.1kn (10km/h~15km/h) higher than normal in case of any deviation. (b) If engine failure occurs after aircraft unsticking, apply the rudder and push the helm towards the normal engine side rapidly and timely to maintain aircraft attitude.
  • 57.
    JZ-Y8F200W-02 AIRCRAFT FLIGHT MANUAL SECTIONIII EMERGENCY PROCEDURES 3-3 June 30, 2012 (c) Judge propeller feathering status of the faulty engine as per the load of control mechanism and judgment of the flight engineer or pilot. If automatic feathering system fails, press the manual-feathering button rapidly for feathering. (d) Gear up with a speed of 135kn~140kn (250~260km/h) and an altitude not less than 16.4ft (5m), and climb with increasing speed, the climb gradient should not be less than 0.5%. (e) Retract the flaps step by step and reduce the load on the control column and rudder with trim tab when the altitude is not less than 328ft (100m) and aircraft speed is 162kn~167 (300~310km/h). (f) Pull the throttle of operating engine back to maximum continuous power condition (84o ). (g) Pull the throttle of shutdown engine back to 0o , set the shutdown switch to SHUTDOWN and put anti-fire switch at OFF position. (h) Climb to traffic pattern altitude, establish normal pattern and then make visual landing. Engine failures in flight (a) Operation procedures with the automatic feathering system being out of operation in flight 1) Maintain the aircraft attitude by applying the rudder and pushing the helm towards normal engine side to prevent the aircraft from banking and yawing. 2) Advance the throttles of operating engines to above 84o and maintain the specified flight attitude. 3) Judge the malfunctioned engine. 4) Following the captain’s command, the mechanic conducts feathering to the faulty engine (by pushing down manual feathering button or through emergency hydraulic feathering device). 5) Balance the aircraft with trim tabs to reduce the load on control column and rudder. 6) Retard the throttle of faulty engine back to 0o and retard the throttle of symmetrical engine to 40o ~60o . 7) Set the engine shutdown switch to SHUTDOWN position and put anti-fire switch at OFF position. 8) Manually extinguish fire of the faulty engine as per the actual situation.
  • 58.
    JZ-Y8F200W-02 AIRCRAFT FLIGHT MANUAL SECTIONIII EMERGENCY PROCEDURES 3-4 June 30, 2012 (b) After any one of the four engines is inoperative in flight, the torque on the aircraft can easily be maintained by feathering the faulty engine in time and applying rudder and helm, the load on the rudder and stick can be eliminated completely by using trim tabs,so flight with three engines is not complicated. After one engine is feathered, the aircraft still possesses better stability and controllability and has enough excess thrust to climb, and climb to flight altitude of 26575ft (8100m) with take off weight of 51t. (c) Cautions 1) After engine fails, when automatically feathering with negative thrust, the throttle must be above 40o . 2) If the automatic feathering system fails and the indicated air speed is more than 189 kn (350km/h), the aircraft may buffet. In this case, the speed should be slowed down to below 189 kn (350km/h) first, and then conduct manual feathering. Operation features of landing with three engines operative (a) Set the trim tab to neutral position during final gliding. (b) When aircraft flies over the inner locator, set the throttle of the normal engine symmetrical to the faulty engine to the small throttle position as per the load and atmospheric temperature, and keep the gliding speed and correct the flight path of approach with the throttles of the symmetrical normal engines. (c) During floating, set the throttles of the two normal engines which are in symmetrical operation gently to 0o . Meanwhile, be sure to keep the direction, and prevent the aircraft from floating with side sliding. (d) After the aircraft touches down and keeps a stable running direction, release the stop of the propellers of the two symmetrical normal engines, and then pull the throttle of the normal engine symmetrical to the faulty engine back to 0o . At the latter stage of running when the aircraft speed is 32.4kn (60km/h), pull out the nose wheel steering handle to release the stop of the normal engine propeller symmetrical to the faulty one. (e) At the early stage of run, keep the direction with rudder and prevent the aircraft from yawing and banking with brakes and aileron if necessary. At the latter stage of run, keep the direction with the nose wheel steering handle. (f) The altitude for go around with three operative engines should not be below 164ft (50m), its operation procedure for missed approach is the same as that with four operative engines.
  • 59.
    JZ-Y8F200W-02 AIRCRAFT FLIGHT MANUAL SECTIONIII EMERGENCY PROCEDURES 3-5 June 30, 2012 Air start of the engine (a) Only when the engines are completely normal (engine shutdown due to control error or other reasons and performance of special air start training), and that the pilot and the flight engineer have been specially trained for air starting, the air start may be allowed (start of the malfunctioned engine is not allowed in any case). (b) Engine air start envelop: The altitude between 6562ft~26247ft (2000~8000m); the indicated air speed within 162 kn~178 kn (300~330km/h). (c) Press of the START button on the panel is strictly forbidden when starting the engine in flight. The pilot and the flight engineer must coordinate for engine start. (d) Pre-start-up check 1) Set the throttle at 0o 2) Turn on the anti-fire switch (green signal light ON). 3) Check: the AIR-GROUND start changeover switch should be at AIR position. 4) Be sure the propeller stop switch should be at STOP position. 5) Put the engine shutdown switch at ON position. (e) Air start procedure 1) Remove the lead seal on protection cover of the air start switch 1-2s before propeller reversing, and put the switch at air start position (the sound of booster coil can be heard from the intercom). 2) Press the manual feathering button for propeller reversing until the engine speed reaches 15%~20%. In case that the engine speed grows slowly, press the button continuously until the speed indicates 22%~25%. At this moment, release the button and check that the fuel pressure in front of the nozzle should be 99.5psi~142psi (0.686MPa~0.98MPa) (7kgf/cm2 ~10kgf/cm2 ) and the fuel in combustion chamber for ignition (turbine exhaust temperature rise).
  • 60.
    JZ-Y8F200W-02 AIRCRAFT FLIGHT MANUAL SECTIONIII EMERGENCY PROCEDURES 3-6 June 30, 2012 3) When turbine exhaust temperature reaches 300o C, turn off the air start switch and the engine will reach operating speed automatically. During propeller reversing process, in case that the fuel in combustion chamber does not ignite and the fuel temperature has no readout at the engine speed of 15%~20%, it is necessary to press the feathering button immediately and and turn off the engine shutdown and air start switches. 4) After the engine is at the normal rotating speed (95.5~96.2%), advance the throttle gently to 20o . Check the operating condition of engine as per the indicator readout, and then advance the throttles to flight requirement position. 5) During the air start, a yawing moment will occur toward the starting engine side for the propeller reversing moment, and the aircraft would yaw discontinuously toward the contrary side with engine speed increase. In this case, apply the helm and the rudder to overcome the yawing. (f) Cautions for air start 1) During engine start, if the air start change-over switch is not turned off timely, the start may be failed and propeller will autorotate, generating heavy negative thrust. 2) If the air start change-over switch is misconnected to the operating engine after air start is completed, then: a) The operating engine will fether automatically (operating status must be above 0.7 Max. continuous power). b) Autofeathering is not allowed when engine throttle angle is below 40o since the engine will be in wind-milling status or its operating status will not be stable. 3) One engine is not allowed to start for more than three times for a single training, or else the ignitor might be damaged. 4) Restart interval is 2-3min 5) Ignitor ground check is required after engine air start. 6) Feathering pump can not work normally when oil temperature is below 20o C thus air start is not allowed. 7) When flying in icing condition, air start is not allowed until the engine inlet is deiced.
  • 61.
    JZ-Y8F200W-02 AIRCRAFT FLIGHT MANUAL SECTIONIII EMERGENCY PROCEDURES 3-7 June 30, 2012 (g) Two engines fail at the same side 1) When two engines fail in a condition above 0.7 maximum continuous power (throttles at 62o ), the propeller will automatically feather within 2~3s. If engines fail when throttles are below 40o ±2o , the propeller will not feather automatically, thus manual feathering button must be used. 2) In the flight with two engines failed on the same side (the failed engines have been feathered), the aircraft posses enough thrust to ensure the aircraft to keep a level flight and climb (the aircraft can ascend to an altitude of 15584ft (4750m) with takeoff weight of 47t) and has controllability and stability for turning left or right and approaching and landing on an airport nearby. 3) Operation procedures for two engines on the same side failed in flight a) Keep the aircraft attitude by banking the stick and applying the rudder to prevent the aircraft from banking and yawing. b) Set the throttle of normal engine to takeoff power condition, and keep the indicated aircraft speed not below 167kn~173kn (310~320km/h). After the aircraft attitude is stabilized, set the throttle to maximum continuous power condition. c) Balance the aircraft with trim tab to eliminate part of the load on the control stick and rudder. d) If the engine cannot feather automatically, manual feathering button should be used immediately. e) The landing gear, flaps and door should be retracted and closed immediately if they are in the extended and open positions. f) Pull the throttle of the faulty engine back to 0o. g) Set the shutdown switch to SHUTDOWN position and turn off the anti-fire switch. h) Extinguish fire by force at the faulty engine and the lower section of the fairing with the second group of fire bottles according to the actual situation. i) When flying with two engines on the same side for a long time, pay attention to the balance of the fuel quantity between left and right tanks.
  • 62.
    JZ-Y8F200W-02 AIRCRAFT FLIGHT MANUAL SECTIONIII EMERGENCY PROCEDURES 3-8 June 30, 2012 4) When flying horizontally at the altitude of 26247ft~32808ft (8000~10000m) with two engines shutdown, the indicated air speed must be kept at 173kn~178kn (320~330km/h) and descends gradually to the altitude of 11483ft~13123ft (3500~4000m), and keeps a level flight at the same altitude with IAS of 173kn (320km/h) to the nearby airport for landing. 5) If a quick descent is required, pull the throttle back to 16o ~20o position, and keep an indicated airspeed of 243kn (450km/h) for descending. (h) Visual landing with two engines failed on the same side 1) When performing a traffic pattern flight with two engines failed on the same side, keep the indicated speed of 173kn~178kn (320~330km/h) with their propellers feathered and landing gears retracted. Reduce the load on the control stick and rudder with trim tab. When two engines on the same side fail, it is suggested to turn toward the normal engines and get into approach, or turn toward the failed engine and get into approach with a turning bank angle not more than 5o . The procedures for airline establishment are the same as the normal one except for landing gear down after the final turn. When getting into approach with crosswind of 16.4 ft/s~26.3 ft/s (5~8m/s), the failed engines side must be against the crosswind direction. 2) If the third and the fourth engines on the right side fail, extend landing gear urgently with left hydraulic system. 3) Perform the final turn with a turning bank angle not more than 15o and the indicated air speed of 162 kn~167 kn (300~310km/h). Keep gliding at a fine descent rate after turning, fly over the outer locator at the altitude 262 ft~328 ft (80~100m) higher than normal. Before flaring out, be sure to set the trim tab near the neutral position, so that the load on the control stick and rudder will increase. 4) When the indicated air speed is 157kn~162kn (290~300km/h) over the outer locator, lower the flap to 25o. After flying over the outer locator, if a successful approach can be assured by visual method, lower the flap to 35o, and then turn on the hydraulic communication valve. 5) Keep a speed of 135 kn~151 kn (250~280km/h) before flaring out as per different weight of aircraft, wind direction and speed. After flaring-out, pull the throttle back to 20o gently. Pull the inboard throttle back to 0o after the aircraft touches down. Lower the nose wheel and release the stop of inboard propellers when the direction gets stable. Pull the outboard throttle back to 0o, and keep the running direction with the rudder and the brakes.
  • 63.
    JZ-Y8F200W-02 AIRCRAFT FLIGHT MANUAL SECTIONIII EMERGENCY PROCEDURES 3-9 June 30, 2012 6) When the running speed is lowered to 32 kn (60km/h), pull out the nose wheel steering handle, and then release the stop of outboard propellers. In this case, the distance of landing run will increase to 4265 ft~4921 ft (1300~1500m) as per different aircraft weight. 7) Cautions a) If the third and fourth engines on the right side fail, the nose wheel control and emergency brake is driven by left hydraulic system. If the first and the second engines on the left side fail, the normal brake is propelled by right hydraulic system. Therefore, when two engines on the same side fail, the hydraulic communication valve must be turned on. b) When flying with two engines on the same side, especially during landing, it’s better to reduce the throttles of the outboard engines and increase that of the inboard engines so as to reduce the load on the stick and rudder to maintain the desired flight condition. (i) Go around with two engines failed on the same side 1) When two engines on the same side fail and the propellers have feathered, go around could be performed under special condition with the air temperature of 30o C below, but the altitude must not be below 328 ft (100m), and flap should not be more than 25o . 2) If a go around is determined, the throttles of the operating engines should be advanced to the take-off power condition (100o+4 o -2 o ) rapidly, retract the landing gear and keep the indicated speed not below 151kn (280km/h). 3) When performing the go around with two engines failed on the same side, the most complicated action is that, when the throttles of the normal engines are advanced to takeoff power condition, large yawing moment and banking moment are produced on the aircraft against the failed engines. In order to overcome these two moments, the rudder should be deflected to the maximum angle, the ailerons to the position of 2/3 of the whole travel. In this case, the load on the rudder will increase to about 784N (80kgf) and that on the stick to about 294N (30kgf). When the rudder is set to the maximum angle, the aircraft will buffet. After retracting the landing gears, the aircraft speed increases rapidly, the deflecting angle of the rudder decreases, and the buffeting will disappear accordingly.
  • 64.
    JZ-Y8F200W-02 AIRCRAFT FLIGHT MANUAL SECTIONIII EMERGENCY PROCEDURES 3-10 June 30, 2012 4) In order to reduce the rudder deflection and the load on it, bank the aircraft 7o ~8o toward the operating engine before the throttles advancement. When the indicated air speed is 162 kn (300km/h), retract the flaps in steps, and retard the throttles back to maximum continuous power condition. (j) Flight procedures with one outboard engine propeller in windmill condition 1) When the engine fails in flight and the entire propeller feathering systems fail, the propeller will be in a windmill condition. In this case, there will be a large yawing moment that makes the aircraft yaw and bank to the windmilling engine sharply, and decreases the aircraft speed by 10.8kn~13.5 kn (20~25km/h). 2) To keep the aircraft attitude and prevent the aircraft from yawing and banking, operate as follows: a) Press the helm, apply the rudder and keep the aircraft flying along straight line. b) Increase the operating engine throttle and keep the indicated air speed not below 162 kn (300km/h). c) Set the throttles of symmetrical operating engines to maximum continuous power condition or takeoff power condition, and pull the throttle of the operating engine symmetrical to the faulty one back to 40o ~60o at the same time. d) Reduce the load on the stick and rudder with trim tab. e) Retard throttle of the faulty engine back to 0o . f) Set the engine shutdown switch to SHUTDOWN position and turn off the anti-fire switch. 3) When the propeller of an outboard engine is in windmill condition, the load on the rudder will be about 882N (90kgf) and 343N (35kgf) on the stick. With the windmill speed stabilized to match the flight speed, the load on the rudder and stick will reduce by 50%. At this time, the load on the stick could be balanced wholly with trim tab, but the load on the rudder could not be completely balanced yet.
  • 65.
    JZ-Y8F200W-02 AIRCRAFT FLIGHT MANUAL SECTIONIII EMERGENCY PROCEDURES 3-11 June 30, 2012 4) When the propeller of an outboard engine is in windmill condition, the aircraft can fly with three engines operating at the indicated speed of 178 kn (330km/h) and the altitude above 16404 ft (5000m). When the true airspeed is below 227kn (420km/h), the rotating speed of the propeller reaches to or approaches the balanced speed (95~96%), while the negative thrust of the propeller in windmill condition is not large. In fact, the drag of the propeller will not be affected by airspeed increase. If the aircraft flies at the altitude of 28528 ft (9000m), it must be descended gradually to an altitude of 19685ft~22966ft (6000~7000m) at the indicated speed of 184 kn~189 kn (340~350km/h). 5) When the aircraft enters the airport area and prepares to land, it must descend at the indicated speed of 162kn~173kn (300~320km/h). When it reaches to the altitude of about 16404 ft (5000m), the propeller should be free from the equilibrium speed, the indicated speed falls and the negative thrust of windmilling propeller be maximized. In this case, release the stop of the engine propeller from windmill condition to reduce the negative thrust, and provide favorable conditions for keeping the flight condition and controlling the landing. 6) At the moment of releasing the propeller stop (3~5s), the negative thrust increases in a short period, which brings an additional yawing and banking moment which causes the aircraft to yaw and bank. With the propeller windmill speed falling, the negative thrust is smaller than that with the propeller at a stop position, at this time, the aircraft speed increases slightly. To reduce the aircraft’s yawing and banking, bank the aircraft 7o ~8o to the contrary direction of the windmilling propeller before releasing the stop of the propeller. When an outboard engine propeller is in windmill condition (the stop released), retract the landing gears and the flaps, and keep the level flight condition at the indicated speed of 173 kn~178 kn (320~330km/h) under the altitude of 13123 ft (4000m). 7) Be aware that after the stop of the faulty engine propeller is released, the rotating speed begins to fall. Set the stop releasing switch to STOP position in 1~1.5s.
  • 66.
    JZ-Y8F200W-02 AIRCRAFT FLIGHT MANUAL SECTIONIII EMERGENCY PROCEDURES 3-12 June 30, 2012 (k) Landing procedures with an outboard engine propeller in windmill condition (stop released) 1) The aircraft weights 49~51t, the air route altitude is 1640ft (500m), the indicated speed is kept at 173 kn (320km/h) with the landing gears up and at 157 kn~162 kn (290~300km/h) with the landing gears down. At this time, the throttles of the inboard operating engines are 72o ~84o , and the throttle of the outboard operating engine is about 40o ~60o . 2) Keep the indicated speed of 162kn~167 kn (300~310km/h) and a turning slope not more than 15o during the final turn. After that, extend the landing gears, keep gliding at a lower rate, and fly over the outer locator at an altitude 262 ft~328 ft (80~100m) higher than that in a normal condition. During gliding and before flaring out, be sure to set the ailerons and trim tab of rudder to or near their neutral position. 3) When flying over the outer locator, keep the indicated speed of 157kn~162kn (290~300km/h), lower the flaps to 25o , and adjust the indicated gliding speed to 140kn~151kn (260~280km/h). After flying over the outer locator, if a successful approach can be assured, lower the flaps to 35o . If there is a crosswind, correct it according to the crosswind correcting method. 4) Keep an indicated speed of 135kn~151kn (250~280km/h) before flaring out as per the weight of the aircraft, wind direction and speed. At this time, the throttle of the operating engine symmetrical to the faulty one is not less than 16o . After the aircraft touches down, pull the throttle of the operating engine symmetrical to the faulty one back to 0o gently. During this period, take special care to prevent the aircraft from yawing. 5) After the aircraft touches down, pull the throttles of the symmetrical operating engines back to 0o and release the stop. Keep the running direction with the rudder and brakes, and modify the aircraft yawing with the nose wheel steering handle if necessary. At the rear half of taxiing, when the aircraft speed is about 32.4kn (60km/h), pull out the nose wheel steering handle, and release the stop of the normal engine symmetrical to the faulty one. 6) Cautions: a) Because the windmill of one engine propeller brings a large negative thrust, the aircraft balancing requires a larger control surface deflection. So the aerodynamic performance of the aircraft deteriorates.
  • 67.
    JZ-Y8F200W-02 AIRCRAFT FLIGHT MANUAL SECTIONIII EMERGENCY PROCEDURES 3-13 June 30, 2012 b) If an inboard engine fails and its propeller enters into windmill condition, the yawing and banking moment is much smaller than that from the windmill of an outboard engine. Therefore, it is easier to control an inboard engine windmilling in each stage of flight. (l) Landing procedures with an outboard engine propeller in windmill condition (blade angle 12o ) 1) If the propeller stop could not be released due to stop release system failure and windmill takes place with blade angle of 12o , the aircraft should fly to the nearest airport for landing. The altitude should be kept below 13123ft (4000m) and the indicated speed at 157 kn~162 kn (290~300km/h), the throttles of the two inboard engines should be retarded to 72o ~80o and the throttle of the outboard operating engine retarded to 40o ~60o . 2) When an outboard engine fails, the indicated speed is 189kn (350km/h) and the rudder deflection angle is more than 16o , the aircraft will buffet. To overcome the buffeting, bank the aircraft by 7o ~8o toward the two normal engines to reduce the rudder deflection angle and the load on the rudder. For example, bank 3o , and the load on the rudder can be reduced by 147N~196N (15kgf~20kgf), bank 7o ~8o , by 294N~392N (30 kgf~40kgf). Retarding the throttle of the normal engine symmetrical to the faulty one at the same time, the rudder deflection can also be reduced,but not less than 30o ~40o . 3) Keep level flight to perform the final turn. Descend after the final turn. 4) The operation procedure for the final leg is generally the same as the landing control procedure with the propeller stop released, except for a larger control surface deflection and load on the rudder and aileron. 5) When landing with the windmilling propeller, the aircrew should cooperate closely and try their best to avoid a go around regardless of the propeller status. Therefore, the specified altitude and air speed must be kept before the final turn. 6) Cautions a) The power of the normal engine symmetrical to the windmilling one could not be too large. If the throttle is over 40o , the rudder deflection would be more than 16o , which would bring division of the airflow on the control surface, and the aircraft would buffet violently.
  • 68.
    JZ-Y8F200W-02 AIRCRAFT FLIGHT MANUAL SECTIONIII EMERGENCY PROCEDURES 3-14 June 30, 2012 b) To prevent the high-pressure fuel pump from being damaged, the windmilling of the engine is not allowed to exceed 10 minutes during flight training. (m) Go around with an outboard engine propeller in a windmill condition 1) Perform the go around if extremely necessary and the following conditions are all ready. a) Visual flight at an altitude not below 492ft (150m). b) The flap angle is not larger than 25o . c) The landing weight of the aircraft is not more than 53t. d) The air temperature is not higher than 25o C. 2) Operating procedures for go around: a) Advance the throttles of all normal engines to the takeoff power condition, and retract the landing gears and keep the flaps at 15o . b) Apply the rudder and bend the stick timely to prevent the aircraft from banking and yawing, bank the aircraft 4o ~5o toward the two normal engines. c) Climb at the indicated airspeed of 157 kn~162 kn (290~300km/h) with a climbing rate of 6.56ft/s~9.84ft/s (2~3m/s). d) Retract the flaps step by step. e) The co-pilot helps the pilot to keep and balance the attitude. f) Climb to the air route altitude and enter landing again. (n) Operation procedures when the aircraft glides to the altitude below 492 ft (150m) with an outboard engine failed 1) Landing before flaring-out: a) In the gliding before landing, if an outboard engine fails, the landing gears are extended, the flaps at 35o and the propeller at the stop position (blade angle is 12o ), the aircraft could continue landing along the gliding line. In this case, it is easier to stabilize and steer the aircraft. The deflection of the rudder and the aileron won’t exceed 2/3 of the whole travelling range. b) Apply the rudder and bend the stick in time to prevent the aircraft from banking and yawing and keep the aircraft attitude. c) Advance the inboard engine throttles, keep flying along the normal gliding line at the specified speed and retard the throttle of the normal engine symmetrical to the faulty one back to 30o ~40o .
  • 69.
    JZ-Y8F200W-02 AIRCRAFT FLIGHT MANUAL SECTIONIII EMERGENCY PROCEDURES 3-15 June 30, 2012 d) Feather the failed engine with the manual-feathering button. e) Don’t use or use less the rudder and the aileron trim tabs to balance the aircraft. f) After feathering, the operating procedures are the same as those for landing with three engines in operation. g) If the feathering system fails, the stop of the propeller should not be released. Keep the indicated speed of 140kn~151kn (260~280km/h), and land in the same method with that the propeller is in windmill condition. 2) Landing with an outboard engine failed during flaring-out a) Apply the rudder and bend the stick in time to prevent the aircraft from banking, yawing and deviating from the runway. b) Retard all engines throttles back to 0o and release the propellers stop of the inboard engines after the aircraft touches down. During running, lower the nose wheel down to the ground and keep direction with the rudder. If necessary, correct the direction with the brake or pull out the nose wheel steering handle when the speed is below 81kn (150km/h). c) During the latter running with a speed below 32.4kn (60km/h), pull out the nose wheel steering handle and release the stop of the outboard propellers. 3) Cautions a) When the engine fails, the propeller is in windmill condition at the stop position (blade angle is 12o ), the landing gears are extended, the flaps are at 35o , and the flight altitude is over 492 ft (150m), the go around could be performed carefully. b) If an outboard engine fails and doesn’t feather, and the flaps are lowered at 35o , it is not necessary to retract the flaps. Keep the previous flight condition for gliding and landing. c) If the engine fails before lowering the flaps, after flying over the outer locator, if a successful approach can be assured, lower the flap to the required position. d) Be careful to keep the aircraft direction during landing and running.
  • 70.
    JZ-Y8F200W-02 AIRCRAFT FLIGHT MANUAL SECTIONIII EMERGENCY PROCEDURES 3-16 June 30, 2012 HIGH ANGLE OF ATTACK FLIGHT The aircraft possesses better stability and controllability within the whole operating scope in terms of Mach number and C.G before the stalling angle of attack, regardless of the operating status of the landing gears and flaps. The aircraft can recover from stalling in any flying state by pushing the stick over its neutral position once the stalling phenomenon occurs in flight. It is prohibited to fly at high angle of attack. Since the aircraft mainly flies at high altitude near its service ceiling, the conditions that cause the aircraft stalling depend on the flight state, altitude and airspeed. The stall margin of angle of attack at high altitude is much less than that of flight at middle altitude. High angle of attack may occur in flight due to pilot’s misoperation during a sharp recovery of descending or when flying in a strong turbulent airflow and strong bomb explosive wave. To prevent the aircraft from stalling in flight, which is hazardous to flight safety, the pilots are required to understand the symptoms of the aircraft entering high angle of attack up and the operating technique for recovery, which is of great importance for the flight safety. Judgment on entering high angle of attack stall state The symptoms of aircraft stalling at minimum airspeed (a) When the airspeed of aircraft with its landing gears and flaps retracted decreases to 10.8 kn~13.5 kn (20~25km/h) before stalling, the vortex area on the wing surface enlarges rapidly, at this time the pilots feel the aircraft buffeting obviously, the left wing sinks and then the nose sinks. (b) When the aircraft with its landing gears and flaps lowered (flap setting 25o for taking-off and 35o for landing) nears its stalling state, there is no obvious warning symptom. Only a not obvious buffet appears at the moment when the aircraft stall occurs. It is difficult for the aircraft to get into the stalling state at later stage of the level flight after flaring-out (the throttles of the inboard engines are retarded to 0o position and those of the outboard engines to 16o ~20o position, flaps at 35o position).
  • 71.
    JZ-Y8F200W-02 AIRCRAFT FLIGHT MANUAL SECTIONIII EMERGENCY PROCEDURES 3-17 June 30, 2012 The symptoms of the aircraft stalling in operating airspeed range Stall of the aircraft not only occur in stalling airspeed state but also in the whole operating airspeed range. Stalling may be caused by pulling back the stick too hard or flying in airflow where strong vertical disturbance and bump exist. It depends on the flight conditions and state of the flight. Stalling symptoms of the aircraft varies with different Mach numbers. The stalling of the wing (the left wing stalls first) and the sinking of nose are both slower when flying with a Mach number less than 0.45~0.5. When Mach number is 0.55~0.66, the stalling of wing and sinking of the nose develop drastically and aircraft buffet is also serious before the aircraft stalling (2o ~3o less than stalling angle). The general symptom is not obvious for the aircraft at large angle of attack. To ensure the safety of the aircraft and prevent the aircraft from entering stalling angle, an indicator of critical angle of attack is furnished on the aircraft which warns the pilot with its light and sound signal that the aircraft comes near the stalling state. Table 3-1 shows the angle of attack at which the warning will be given by the critical angle of attack indicator for different flap settings and Mach numbers. Table 3-1a Angle of attack at which the warning will be given by the critical angle of attack indicator Flap setting Flight status Takeoff and landing M number Altitude (ft) 0.2 0.3 0.5 0.6 0.65 0 17o 15.4o 11.1o 10.4o 10.5o 3281 15.4o 11.1o 10.4o 10o 3281 above 10.4o 10o Table 3-1b Angle of attack at which the warning will be given by the critical angle of attack indicator Flap setting Flight status Takeoff and landing M number Altitude (m) 0.2 0.3 0.5 0.6 0.65 0 17o 15.4o 11.1o 10.4o 10.5o 1000 15.4o 11.1o 10.4o 10o 1000 above 10.4o 10o
  • 72.
    JZ-Y8F200W-02 AIRCRAFT FLIGHT MANUAL SECTIONIII EMERGENCY PROCEDURES 3-18 June 30, 2012 Stalling symptom for different flight status (a) The stalling airspeed of the aircraft with a failed engine (has been feathered) is 5.4 kn ~8.1kn (10~15km/h) higher than that with four engines operative. If without sideslip, the main symptom is that the aircraft banks to the failed engine side and the deflecting angle of rudder needed may reaches 20o and the aileron deflection is about half of its full travel, the force on the pedal is about 490N~588N(50kgf~60kgf). (b) For flying in turbulent airflow, the angle of attack and load factor will change greatly by the effect of up or down airflow. Therefore it is harmful to fly at either high or low airspeed. In vertical gust, the aircraft should fly with the following most favorable airspeed. See Table 3-2. Table 3-2a Favorable airspeed in vertical turbulent airflow (IAS, kn) Alttitude(ft) Airborne weight (t) 9843 below 9843~26247 44 211 221 54 227 240 60 238 246 Table 3-2b Favorable airspeed in vertical turbulent airflow (IAS, km/h) Alttitude (m) Airborne weight (t) 3000 below 3000~8000 44 390 410 54 420 445 60 440 455 Operating procedure for recovering from stalling (a) When the aircraft is entering stall, the pilots should resolutely and rapidly push the control column to reduce the angle of attack and then apply the rudder and bend the stick to eliminate the aircraft banking and sideslip. After leveling off, the stick should be pulled back to near its neutral position, then level off the aircraft gently as the airspeed increases. Before airspeed reaches the given value, if reducing the angle of glide in a hurry by roughly pulling back the control column, the aircraft will stall again. (b) The pilot must push the stick rapidly through its neutral position to the position of 1/4 or 1/3 of its full travel to recover the aircraft from stalling when flying with minor airspeed at various altitudes. Meanwhile, be sure not fly with banking.
  • 73.
    JZ-Y8F200W-02 AIRCRAFT FLIGHT MANUAL SECTIONIII EMERGENCY PROCEDURES 3-19 June 30, 2012 (c) For recovering the aircraft from descending when the aircraft stalls at minor airspeed, push the stick forward first to reduce the angle of attack. As airspeed increases to 151kn~162kn (280~300km/h) (landing gears and flaps retracted) or 119kn~130kn (220~240km/h) (landing gears down, flaps 35o ), gently pull back the stick to recover from descending, but be sure not to let the aircraft stall again. (d) The pilot should push the stick forward to its neutral position to restore the normal angle of attack of the aircraft when the critical angle of attack indicator warns with sound and light. (e) When recovering the aircraft from stalling, the pilots should check the aircraft state with aircraft horizon and rate-of-turn indicator and judge the attitude of the aircraft by referring to the sky-ground line of horizon. Cautions for high angle of attack flight (a) It is prohibited to roughly move the stick to alter the aircraft pitching attitude in flight. Especially it is prohibited to pull the stick back roughly as it may result in a large load factor. (b) When the aircraft is stalling and buffeting, it is dangerous to correct aircraft banking by roughly pressing stick and applying rudder before pushing stick forward, for it will promote the stalling on wings. (c) When flying in disturbing airflow, normally the allowable vertical speed of wind is not higher than 32.8ft/s (10m/s), and the maximum shall not exceed 72.2ft/s (22m/s). (d) When the aircraft stalls in any flight condition, it can be recovered and leveled off with an altitude loss of 328ft~492ft (100~150m), if the pilots deal with it correctly. (e) To prevent the aircraft from entering stalling state at high angle of attack, the indicated airspeed should not be less than 151kn (280km/h) for altitude below 19685ft (6000m) and 162kn (300km/h) above 19685ft (6000m).
  • 74.
    JZ-Y8F200W-02 AIRCRAFT FLIGHT MANUAL SECTIONIII EMERGENCY PROCEDURES 3-20 June 30, 2012 Entering spin After the aircraft enters the stalling state, it can be recovered stably by pushing the stick through its neutral position. It is very unlikely for the aircraft to get into spin state. Therefore, the pilots must distinguish the aircraft stalling from steady spin state to avoid a harmful consequence caused by misjudgment. (a) Operating procedure for recovering from spin 1) Set ailerons to its neutral position first, at the same time push the stick forward. Apply rudder against the spin direction after aircraft rotated for a half circle. In this way the spin delay can be recovered within half a circle. 2) Neutralize the ailerons from the spin direction, then apply the rudder about 13o against the spin. After rotating half a circle, push the stick to neutral position, the spin will be recovered for no more than another half a circle. 3) Apply the rudder against spin first. After rotating half a circle, push the stick over or to neutral position, leave the aileron at the spin position or return it to neutral, the spin will be recovered within another circle. 4) Only apply rudder against spin can also recover the spin within a circle. 5) Apply rudder against spin, at the same time, push the stick over neutral position, the spin will be recovered within a circle. (b) The aircraft will fail to recover from spin under the following conditions: 1) Ailerons at neutral, stick at forward position, elevators downward and rudder deflects to the spin direction. 2) Ailerons deflect from spin direction to its opposite direction.
  • 75.
    JZ-Y8F200W-02 AIRCRAFT FLIGHT MANUAL SECTIONIII EMERGENCY PROCEDURES 3-21 June 30, 2012 FLYING WITH DOOR OPEN AND DESCENDING IN EMERGENCY Flying with bottom emergency door of cockpit open or cargo door open (a) Flying with the bottom emergency door of cockpit open does not change the attitude of the aircraft significantly, but there will be a strong noise inside the cockpit. (b) When flying with cargo door open at an indicated airspeed of 151kn~200kn (280~350km/h), the flying state will not be greatly affected, but when the airspeed is more than 200kn (370km/h), the aircraft will buffet slightly. The buffet becomes stronger with airspeed increase. Emergency descending When airtight cabin leaks and oxygen system fails in flight, descend the aircraft to an altitude of 13123ft (4000m) immediately. When engine catches fire, descend to the minimum altitude. When the aircraft fuel left is not enough for a successful landing and the aircraft approaches the airfield, emergency descending can be employed. The operation procedures are as follows: (a) Check propeller for stop position (red signal light is off). (b) Retard outboard throttles to 20o first, then inboard throttles to 0o , after that outboard throttles to 0o to gently operate the aircraft to emergency descending state. (c) During emergency descending, Mach number is not allowed to be higher than 0.7 at altitude above 19685ft (6000m); and the indicated airspeed is not allowed to be higher than 329kn (610km/h) with a rate-of-descent of 82ft/s~131ft/s(25m/s~40m/s) at altitude below 19685ft (6000m). (During training flight: not greater than 35m/s). (d) When the elevator trim tabs are operated during descending, a certain amount of backward force should be applied on the control stick. Control the trim tabs gently. (e) Recover emergency descending altitude to 13123ft (4000m) and the minimum altitude should not be less than 6562ft (2000m). Advance outboard throttles to 20o first, then inboard throttles to 20o . The movement to recover emergency descending should be gentle and the overload should not be more than 1.2.
  • 76.
    JZ-Y8F200W-02 AIRCRAFT FLIGHT MANUAL SECTIONIII EMERGENCY PROCEDURES 3-22 June 30, 2012 LANDING WITH THE MALFUNCTIONED LANDING GEAR SYSTEM If the landing gear extending system fails, the aircrew must adopt all emergency methods to extend the landing gears, i.e. extending the landing gears repeatly with the main system, emergency system, and hand pump system. If the above systems all fail, adopt the mechanical device to extend the gears. Having confirmed that the landing gears cannot be extended or its extending lock cannot work, the aircrew should report the situation of aircraft landing gears extension in emergency, the measures taken and the landing methods to the ground commander. The landing cannot be performed without permission from the ground commander. Before landing, the communicator turns on the emergency power source and cuts off all the DC and AC generators at the altitude of 164ft~230ft (50~70m) by following the instructions. Then the communicator leaves for the cargo cabin. Landing with the landing gear signal failure or the malfunctioned lowering lock The signal system failure: If the gear lowering signal light is normal, but not on when the gears are lowered or it is not off when the gears are up again, pressurize the landing gear actuators with the left system for landing. The lowering locks failure: Visually inspect that the lowering lock does not work and the signal lights are off (but the bulbs are normal). At this moment, do not lower or retract the landing gears again, and land according to the following procedures: (a) Check the two landing gear handles of the left hydraulic system for the neutral position. Turn off the power switch for emergency opening/closing of the landing gear door. (b) Open the safety cover of the switch for emergency lowering the landing gear on the right console. (c) Pull out the safety pin. (d) Push the control handle forwards to lower the landing gear until the aircraft comes to a complete standstill after landing.
  • 77.
    JZ-Y8F200W-02 AIRCRAFT FLIGHT MANUAL SECTIONIII EMERGENCY PROCEDURES 3-23 June 30, 2012 (e) If the landing gear doors are not closed and the signal light is off, pull the control handle backwards to close the doors. Set the control handle at the neutral position 5~10s after the doors have been closed. The communicator turns off the safety switch, and then push the control handle forwards to lower the landing gear. (f) Push the control handle forwards to the position for lowering the landing gear to pressurize the landing gear actuators. Even though the landing gears are not locked well, the landing gears cannot be retracted after landing. Landing when the landing gears cannot or be fully extended Land with the fuselage when the landing gears cannot be fully lowered, but it must be performed on the earth runway especially for forced landing or outside field. (a) Once determining to land with the fuselage, the captain issues the instructions to the aircrew to be to be going to cargo cabin, and prepare for the forced landing. Pilot and copilot fasten the safety belt. (b) Open the doors of frame 9. (c) After the final turn, open the cargo cabin door and entry door. (d) The navigator, the communicator and the flight engineer should get ready for forced landing in the cargo cabin after completing their work as per stipulation. (e) At the touching down moment, the captain should retard the four engines throttles back to 0o , set the shutdown switch to SHUTDOWN position and turn off the anti-fire switch. (f) Switch off the aircraft power source before leaving the aircraft after landing. Landing with the main landing gear when the nose landing gear cannot be lowered (a) The landing must be performed on earth runway especially for forced landing. (b) If possible, before landing, transfer the center of gravity of the aircraft backward to 32%CA. (c) Navigator should leave navigation cabin for the cargo cabin. (d) When landing with the main wheels, the depression angle between the aircraft nose and ground is not permitted. Touch down according to normal procedures. After touching down, try to keep the two-point run for a long time. Do not use the brakes after touching down and it is better to make the front section of aircraft touch down gently.
  • 78.
    JZ-Y8F200W-02 AIRCRAFT FLIGHT MANUAL SECTIONIII EMERGENCY PROCEDURES 3-24 June 30, 2012 (e) The operating of engine is the same as that in normal landing. During steady running with the two main wheels, release the stop of the inboard propellers first, and then the outboard ones. After that, set the engine shutdown switch to SHUTDOWN position and turn off the anti-fire switch. Landing when the nose landing gear cannot be retracted and the main landing gears cannot be lowered (a) When the main landing gears cannot be lowered and the nose landing gear cannot be retracted, landing must be done on earth runway especially for forced landing. (b) It is absolutely forbidden to touch down with a small angle of attack or with the nose wheel first. (c) Open the door of frame 9, cargo cabin door and entry door. (d) The navigator, the communicator and the mechanic should go to cargo cabin to get ready for forced landing after completing their works. (e) The control of engine propeller is the same as that of landing with fuselage. Warning The nose landing gear might be broken with such landing Landing with the nose wheel and left main wheel down and the right main wheel not up (a) The procedures and the data of the final gliding are normally performed but on the earth runway. (b) Bank aircraft to the left by 5o ~8o before flaring out, apply the left rudder. (c) Continue bending the stick leftward after touching down (increasing the banking of pressing the helm with the falling of the aircraft speed). (d) When the aircraft speed falls to make the aircraft bank rightward, the wing touches down naturally, and then the aircraft stops if it swerves over 100o after touching down. (e) The other control procedures and the cautions are the same as the foregoing conditions. However, the right outboard wing, propeller of the right outboard engine and the right landing gear well might be all damaged.
  • 79.
    JZ-Y8F200W-02 AIRCRAFT FLIGHT MANUAL SECTIONIII EMERGENCY PROCEDURES 3-25 June 30, 2012 HANDLING OF TYRE BLOWN-UP AND BRAKES FAILURE Handling of tyre blown-up Phenomena (a) The aircraft swerves to the blown up tyre and banks slightly. (b) The blown-up sound maybe heard. (c) The aircraft would buffet due to the unbalance of the loading of the tyres. Handling (a) Abort the takeoff at the fore stage of running and its handling procedures are as follows: 1) Pull the throttles back to 0o , release the stop of the inboard engines propellers firstly, the outboard ones secondly, and then lower the flaps completely to reduce the aircraft speed. 2) Keep the direction, press the helm properly to the intact wheel side to reduce the load on the blown-up tyre and the banking of the aircraft. 3) Don’t reduce the speed with the brake too early. During braking, reduce the braking degree of the wheel with blown-up tyre properly. (b) Continue taking off if the aircraft speed approaches the takeoff speed at the rear stage of running, its handling procedures are as follows: 1) Keep the direction, press the helm properly to the intact wheel side to lift the aircraft off steadily timely. 2) Report to the aircraft dispatcher, and if it is a local flight, the route landing can be performed. If it is a mission flight, retract the landing gears and continue flying according to the original plan. 3) During landing, touch down softly, and avoid banking to the wheel with blown-up tyre side. 4) Keep the direction with the rudder timely after touching down,bend the stick properly to the intact wheel side to reduce the load on the blown-up tyre, and reduce the speed carefully with the brake after the speed decrease. Handling of the aircraft when the brake fails Phenomena (a) The brake system is inoperative during the running speed reduction of the aircraft. (b) The hydraulic accumulator of the left hydraulic system has no pressure.
  • 80.
    JZ-Y8F200W-02 AIRCRAFT FLIGHT MANUAL SECTIONIII EMERGENCY PROCEDURES 3-26 June 30, 2012 Handling (a) Stop taxiing during the normal takeoff when the brakes fail. (b) When the brake system fails during landing run, reduce the aircraft speed with the emergency brake. At this moment, “automatic brake released” is inoperative, so do not pull the emergency brake violently and be sure to balance leftward and rightward. (c) When the left hydraulic system has no pressure, turn on the hydraulic communication valve to provide the normal brake pressure by the right system. (d) If the normal brake and the emergency brake both fail, correct the aircraft direction and avoid the barrier with the hand control operation or the throttle. Shut down the two outboard engines, and then the inboard ones at a proper time, to stop the aircraft taxiing quickly. HANDLING OF HEADING SYSTEM AND THE BAROMETER FAILED IN FLIGHT The heading system failure in flight (a) The navigator judges the failures of the heading system in all working conditions with the aid of the instruments and reports the failures to the aircrew. The pilot decides whether to go on flying or land at the nearest airport according to the present flying condition. (b) The autopilot must be cut off. (c) The navigator takes full use of the airborne equipment to navigate. (d) The communicator contacts with the landing airport and applies to turn on the ground radar and director station. (e) The pilot maintains all specified parameters according to the heading reported by the navigator and indicated by the compass LC-5D. The static and the pitot pressure system failure Failure judgement of the static and the pitot pressure system (a) If the pitot system fails, the indication of the airspeed indicator and the Machmeter are not correct, and the indication of the altimeter and the vertical velocity indicator (VVI) is the current flight condition. (b) If the static system fails, when the aircraft is descending or climbing, the indication of the above instruments of pitot-static systems is not accurate.
  • 81.
    JZ-Y8F200W-02 AIRCRAFT FLIGHT MANUAL SECTIONIII EMERGENCY PROCEDURES 3-27 June 30, 2012 The causes and phenomena of the static and the pitot pressure system failure (a) When the pitot port and the static tube freeze and the airspeed indicator points to zero. If failure appears during aircraft descending, the indication of airspeed indicator will exceed TAS; If failure is appearing during aircraft climbing, indication of airspeed indicator will be less than TAS, the altimeter and theVVI do not indicate the altitude change, the indication is not changed (indication of the altimeter is the altitude when failing). (b) The static tube is not sealed: During level flight, altitude and speed keep constant. At this time, it is not easy to find out the failure of the static system. If the sealing of static tube is damaged in flight, the pressure in pressurized cabin could affect the pressure of static tube, and make the indication of airspeed indicator and the altimeter reduce. Handling of the static and the pitot pressure system failure (a) Judge which system is in failure. If the indication of the barometer on the copilot instrument panel is surely right, the left dynamic, static pressure valves should be turned over to the pneumatic system of the copilot instrument panel. (b) If the barometer system of the copilot instrument panel also breaks down, the static pressure system of the barometer on the pilot instrument panel may be switched over to the emergency static pressure inlet located in the nose landing gear well. LANDING WITH FLAPS UP Features Compared with flap-down landing, flap-up landing has more pitch control. The aircraft can easily get into the landing angle of attack. For example, when the landing weight is 52t and the gliding speed is 167kn (310km/h), the touch-down speed of the aircraft is 151kn (280 km/h), the landing angle of attack is 12o and pitch angle is 8o . But the allowable maximum angle of attack is 12o 30′ and pitch angle is 8o 30′ for aircraft belly contacting with the ground (oleo struts fully compressed). Therefore, safety margin for contacting with the ground is only 30′ and the run distance will be sharply increased. Therefore it is not allowed to make a flap-up landing unless in special case. Generally, the flap-up landing speed is 10.8kn~16.2kn (20~30km/h) greater than that with flap-down (35o ), and the float or run distance will be increased by about 50%.
  • 82.
    JZ-Y8F200W-02 AIRCRAFT FLIGHT MANUAL SECTIONIII EMERGENCY PROCEDURES 3-28 June 30, 2012 Landing procedures (a) When landing with flaps-up and the gliding speed is kept at 151kn~173kn (280km/h~320km/h), the angle of attack is about 7o ~8o larger than that with the flaps-down (35o ). After passing the outer locator, keep gliding at the specified speed in Table 3-3 according to the landing weight of the aircraft. Table 3-3a Gliding speed Airborne weight (t) Gliding speed Vb(kn) 45 below 151 50 159 52 163 58 320 Table 3-3b Gliding speed Airborne weight (t) Gliding speed Vb(km/h) 45 below 280 50 295 52 301 58 320 (b) The altitude for exiting from the final turn should be 131 ft~98 ft (30~40m) lower than normal, and the gliding point should be moved backward by 328 ft~492 ft (100~150m). To keep the specified gliding speed, the throttles should be generally smaller than that in normal condition. After passing the outer locator, adjust the outboard throttles timely according to the air temperature. Keep the gliding speed with the inboard throttles. The altitude of flare-out should generally be 23ft~16ft (7~5m) lower than normal, begin flaring out at the indicated speed of 151kn~146 kn (280~270km/h). The method of pulling the throttle is the same as that when landing with flaps-down. Retard the inboard throttles back to 0o to reduce the flaring-out distance. Compared to that with flaps-down, during flaring out, the deceleration of airspeed is lower, the distance is longer, the falling is slower, the control is lighter, and entering landing angle of attack is easier. (c) After touching down, the angle of attack of the aircraft tends to increase, and the nose wheel should not be lowered. To prevent the aircraft belly from touching ground, push the control stick gently and lower the nose wheel, then retard the outboard throttles back to 0o . Release the stop of propellers separately in taxiing. Only when the speed is not higher than 113 kn (210km/h), the brake may be used.
  • 83.
    JZ-Y8F200W-02 AIRCRAFT FLIGHT MANUAL SECTIONIII EMERGENCY PROCEDURES 3-29 June 30, 2012 Cautions (a) During landing with flap-up, the indicated gliding speed must not be lower than 151 kn (280km/h). (b) Try to prevent the aircraft rushing out of the runway since the distance of float and run is long. (c) The control after flaring out must not be rough to prevent the tail fuselage from touching the ground for the very large angle of attack. OUTSIDE FORCED LANDING In case that an emergency event occurs and it is beyond the control of the crew, transmit emergency signal and perform the outside forced landing with landing gears retracted. During the forced landing try every means to ensure the safety of onboard personnel and survive the aircraft additionally. On the land Aircrew work assignment (a) Captain: take full command of the crewmembers and operate aircraft for forced landing. (b) Co-pilot: assist the captain to control the aircraft. (c) Navigator: decide forced landing location, then report longitude and latitude and flight condition to the communicator with intercom. (d) Communicator: report to the ground about aircraft forced landing location rapidly and accurately, and reports the instructions of aircraft dispatcher to crewmembers in time. (e) Mechanic: responsible to open the aircraft emergency doors and windows. If there is fuel in auxiliary tank, use it up or transferred it to group fuel tank.
  • 84.
    JZ-Y8F200W-02 AIRCRAFT FLIGHT MANUAL SECTIONIII EMERGENCY PROCEDURES 3-30 June 30, 2012 Preparations before forced landing (a) Crewmember should open the entry door and the door of frame 9 and keep them locked. Open the emergency windows on both sides of the cargo compartment and fix two escape ropes on air exhauster mount at both sides of cargo cabin. If possible, throw some on-board cargo out from the aircraft to reduce the aircraft’s landing speed and firmly tie up those cannot be thrown out with steel cable according to the requirements. (b) Having decided to perform the forced landing, the members that do not directly involve in the forced landing operation should go to the cargo cabin, look after personnel onboard and get some emergency materials for use after the forced landing. The personnel should fasten their safety belts. (c) Observe and choose a favorable place for forced landing. (d) Communicator should report to the ground about forced landing location, time, causes and send signals for help if necessary. (e) Make sure the fire extinguishing cock is at the required position and turn on the neutral gas switch to charge air for the tank in case of fire after force landing. (f) Having completed their works, the navigator and communicator should go to the cargo cabin and prepare for force landing at a dependable site, sitting on the floor with their back against the fuselage, their heads lowered and both hands at the back of their head and the legs bended slightly. Force landing implementation (a) Shut off the pressure control /shutoff valve and pressurization cock at the altitude of 328ft (100m). (b) After the aircraft is aligned to forced landing location, lower flap to 15o , the communicator should switch the onboard circuit to emergency power supply and the navigator should leave navigation cabin to cargo cabin at the altitude above 30m. (c) With landing gear retracted, maintain the same gliding and leveling speed as normal, and float distance increases remarkably. (d) Visually choose gliding entry point according to the edge of forced landing area, lower flap to 35o and maintain the specified normal gliding speed. (e) At the moment of the aircraft touching down, the captain should retard the throttle to 0o , set the engine shutdown switch to SHUTDOWN position and turn off the anti-fire switch. (f) After the aircraft touches down, turn off the aircraft power supply to cut off all electric circuits of the aircraft.
  • 85.
    JZ-Y8F200W-02 AIRCRAFT FLIGHT MANUAL SECTIONIII EMERGENCY PROCEDURES 3-31 June 30, 2012 Work after forced landing (a) When the aircraft stops, the crewmember should quickly arrange the personnel to get far away from the aircraft through the cargo cabin door, entry door or emergency exits with the help of escape rope. (b) The communicator send out SOS signal, report information of the forced landing site, personnel, aircraft damage and necessities with stndby radio set. Forced landing on water (a) When the aircraft flies over the sea 27 n mile (50km) away from the seashore, airborne lifejacket and raft should be equipped in all cases. When the aircraft flies over the sea 54 n mile (100km) away from the seashore, the following survival equipment must be equipped: 1) Lifejacket and raft; 2) Portable off-site radio set 3) Enough medicine and food 4) Seawater desalting agent 5) Luminescence agent 6) Compass 7) Torch 8) Antishark powder 9) Escape rope 10) Antifouling cloth Each crewmeber should be familiar with location of all survival equipment, and their positions are clearly marked. They must also understand their operation method. Each member should be trained so as to operate the equipment skillfully when necessary. (b) Generally, the aircraft can float for long time after forced landing on water. The differences between forced landing on water and on ground are as follows: 1) Before the forced landing, all aircrew members should untie the safety belt and collar button, and check personal & collective survival equipment for reliability. 2) Open emergency window and close other doors and windows to extend floating time. After a successful force landing, open the emergency exits above the water line at both sides of the fuselage for evacuation.
  • 86.
    JZ-Y8F200W-02 AIRCRAFT FLIGHT MANUAL SECTIONIII EMERGENCY PROCEDURES 3-32 June 30, 2012 3) The captin should conduct the forced landing near the seashore and island and send out SOS signal with radio channel and international mishap communication frequency for first-aid deployment. 4) Generally, the forced landing on water should follow the up wind direction. In case there is wave and the current wind speed is within 26.3ft/s~32.8ft/s (8m/s~10m/s) (the sea is covered by the wave), forced landing can be conducted following the wave direction. In case of heavy storm without tidal wave, forced landing should follow the up wind direction on the rising-up wave. 5) No flap and landing gear down is allowed for forced landing. 6) Feather the propeller at the altitude not lower than 328ft (100m) before the forced landing. 7) IAS should be reduced at 151kn~148kn (280km/h~275km/h) before level off, and start level off at the altitude of 26.3ft~32.8ft (8m~10m). 8) Touching the water surface at minimum speed, but be careful not to fall in stall. 9) Keep the aircraft at normal landing status at the moment of touching the water surface. 10) When the aircraft is floated on water, all crewmembers should evacuate from the emergency exits with personal and collective life-saving equipment. Personal lifejacket should be supplied with air at the dorsal fin, and then the collective raft. Generally, personnel should not leave the aircraft unless its sinkage. 11) In case of forced landing at night, turn on the landing light at the altitude of 328ft~492ft (100m~150m) and concentrate on level off for touching the water surface. The aircraft is not allowed to touch the water surface with sliding angle or in stalling status. 
  • 87.
    JZ-Y8F200W-02 AIRCRAFT FLIGHT MANUAL SECTIONIV NORMAL PROCEDURES 4-1 June 30, 2012 NORMAL PROCEDURES PREPARATIONS FOR FLIGHT Preparations for flight are necessary step to ensure the successful completion of a flight mission. Therefore it is necessary to conduct the preparation for each flight. Preflight preparations Meteorological analysis The aircraft features large sphere of activities, high flight altitude, long flight range and duration, so it is very important to know, analyze and master the meteorological conditions for accomplishing the flight missions safely and successfully. When analyzing the meteorological conditions, special attention must be paid to the following: (a) The positions of atmospheric front and flight route, the height of cloud base and top in frontal zone. (b) The position and strength of the jet flow area, and the height of the axis of the jet flow area, the horizontal and vertical distributions of wind direction and speed in various altitude layers. (c) The horizontal and vertical temperature distributions above troposphere, especially in the jet flow area. (d) The baric topography (cyclonic and trough) and its position at high altitude. (e) The position of the cumulus congested, cumulonimbus clouds and the flight route. (f) The icing area and its height that may be met in flight route. (g) The active thunderstorm area, the airflow disturbance condition and the cloud characteristic. (h) The weather condition in the landing area and alternative landing area.
  • 88.
    JZ-Y8F200W-02 AIRCRAFT FLIGHT MANUAL SECTIONIV NORMAL PROCEDURES 4-2 June 30, 2012 Determination of the most favorable flight condition Determination of the most favorable flight condition depends upon the flying distance, weight and high-altitude wind. (a) Determination of the most favorable flying altitude Usually, the altitude of 22966ft~26247ft (7000~8000m) should be chosen for flight in order to obtain higher cruising speed and improve the aircraft controllability and stability. For altitude selection when the flying distance is within 810n mile (1500km), see the Table 4-1. Table 4-1a Favorable flying altitude Flight range (n mile) 324 432 540 810 The most favorable altitude (ft) 19686 22966 26247 29528 Table 4-1b Favorable flying altitude Flight range (km) 600 800 1000 1500 The most favorable altitude (m) 6000 7000 8000 9000 The most favorable flying altitude is 26247 ft~29528 ft (8000~9000m) when the flying distance is above 810n mile (1500km). (b) Determination of climb segment If the flying distance is more than 810n mile (1500km) and takeoff weight is close to the maximum, the aircraft may climb to an applicable height by adopting the step climb method after takeoff in summer, and then climb to the most favorable height after certain amount of fuel is consumed. In general, straight climb method is adopted. (c) If the wind direction and speed at various height layers are known, the most favorable flying altitude shall be determined according to the ground speed at each height (the ground speed = the true airspeed ± correction) calculated based on the Table 4-2. The wind speed correction increases with the height. If headwind increment exceeds 13.5kn (25km/h) with each increased height of 3281ft (1000m), the flight shall be conducted at the low altitude layer.
  • 89.
    JZ-Y8F200W-02 AIRCRAFT FLIGHT MANUAL SECTIONIV NORMAL PROCEDURES 4-3 June 30, 2012 Required fuel calculation The required fuel for performing mission equals the total of the following fuel. The required amount of fuel = flight fuel consumption + reserved fuel + required fuel for ground engine warming, running up, and taxiing + dead fuel (a) For the fuel consumption when the aircraft takes off and climbs to the planned flight height with the takeoff weight of 61t, and performs enroute level flight and then descends to the height of 1640ft (500m), refer to the associated data in Chapter 5. Table 4-2a W-V numerical Table (Aircraft true speed is 270 kn~378 kn) Wind speed (km/h) Wind angle(km/h) 20 40 60 80 100 120 140 160 180 200 Down wind: Ground speed=TAS+Correction 0o 360o 10.8 21.6 32.4 43.2 54.0 64.8 75.6 86.4 97.2 108.0 10o 350o 10.8 21.1 31.9 42.7 52.9 63.7 74.0 84.8 95.0 105.8 20o 340o 10.3 20.0 30.2 40.5 50.2 59.9 70.2 79.9 89.6 99.4 30o 330o 9.2 18.4 28.1 36.7 45.9 54.5 63.2 71.8 80.5 89.1 40o 320o 8.1 16.2 24.3 31.9 39.4 47.0 54.0 61.6 68.6 74.5 50o 310o 7.0 13.5 20.0 25.9 31.9 37.3 43.7 48.6 54.0 58.9 60o 300o 5.4 10.3 15.1 19.4 23.8 27.5 31.3 34.6 37.8 40.5 70o 290o 3.8 7.0 9.7 12.4 14.6 16.7 18.4 19.4 20.5 21.1 80o 280o 1.6 3.2 3.8 4.9 4.9 4.9 4.9 3.8 2.2 1.1 Upwind:Ground speed=TAS-Correction 90o 270o 0.0 0.5 1.6 2.7 4.3 6.5 8.6 11.3 14.6 17.8 100o 260o 2.2 4.3 7.0 10.3 14.0 17.3 21.6 25.9 31.3 36.2 110o 250o 3.8 8.1 12.4 17.3 22.7 28.1 33.5 39.4 45.9 52.9 120o 240o 5.4 11.3 17.3 23.8 30.2 37.3 44.3 51.8 59.4 62.1 130o 230o 7.0 14.6 21.6 29.7 37.3 44.3 54.0 62.6 71.3 79.9 140o 220o 8.1 16.7 25.4 34.0 43.2 52.4 61.6 70.7 80.5 90.2 150o 210o 9.2 18.9 30.8 38.3 48.1 57.8 67.5 77.8 88.0 97.7 160o 200o 10.3 20.5 30.8 41.0 51.3 61.6 71.8 82.1 92.9 103.7 170o 190o 10.8 21.1 31.9 42.7 53.5 63.7 74.5 85.3 96.1 106.9 180o 180o 10.8 21.6 32.4 43.2 54.0 64.8 75.6 86.4 97.2 108.0
  • 90.
    JZ-Y8F200W-02 AIRCRAFT FLIGHT MANUAL SECTIONIV NORMAL PROCEDURES 4-4 June 30, 2012 Table 4-2b W-V numerical Table (Aircraft true speed is 500~700km/h) Wind speed (km/h) Wind angle(km/h) 20 40 60 80 100 120 140 160 180 200 Down wind: Ground speed=TAS+Correction 0o 360o 20 40 60 80 100 120 140 160 180 200 10o 350o 20 39 59 79 98 118 137 157 176 196 20o 340o 19 37 56 75 93 111 130 148 166 184 30o 330o 17 34 52 68 85 101 117 133 149 165 40o 320o 15 30 45 59 73 87 100 114 127 138 50o 310o 13 25 37 48 59 69 81 90 100 109 60o 300o 10 19 28 36 44 51 58 64 70 75 70o 290o 7 13 18 23 27 31 34 36 38 39 80o 280o 3 6 7 9 9 9 9 7 4 2 Upwind:Ground speed=TAS-Correction 90o 270o 0 1 3 5 8 12 16 21 27 33 100o 260o 4 8 13 19 26 32 40 48 58 67 110o 250o 7 15 23 32 42 52 62 73 85 98 120o 240o 10 21 32 44 56 69 82 96 110 115 130o 230o 13 27 40 55 69 82 100 116 132 148 140o 220o 15 31 47 63 80 97 114 131 149 167 150o 210o 17 35 57 71 89 107 125 144 163 181 160o 200o 19 38 57 76 95 114 133 152 172 192 170o 190o 20 39 59 79 99 118 138 158 178 198 180o 180o 20 40 60 80 100 120 140 160 180 200 (b) The ground fuel consumption for pre-takeoff and post-landing are calculated according to the consumption rate of 28kg per minute. The fuel consumption for 16min is 450kg on the ground. (c) The fuel consumption for establishing landing pattern and landing is 280kg for 8min, or 420kg for 12min. (d) Usually, the enroute reserve fuel is 1.6t, and the average fuel consumption per hour is 2.3t. The reserve fuel should be increased accordingly if performing special mission or alternate airfields are few in the flight area. (e) The dead fuel of whole aircraft is 395kg. Oil consumption of WJ-6 engine is 0.264gal (1.2L) per hour.
  • 91.
    JZ-Y8F200W-02 AIRCRAFT FLIGHT MANUAL SECTIONIV NORMAL PROCEDURES 4-5 June 30, 2012 Preflight check Before running the engine, the pilot should know aircraft conditions from flight engineer, such as fuel quantity, center of gravity, oxygen quantity, and the important maintenance and trouble-shooting that have been done, and carefully check the aircraft together with the flight engineer following the checking route (Figure 4-1). Figure 4-1 Checking route before running the engine Aircraft exterior check (a) Left side of the nose and the nose 1) Whether there are dents, cracks, or deformation on the skin. 2) All kinds of antennae, airspeed tube, critical angle of attack indicator, icing annunciator should be in good condition and clean. Take down the blanking covers. Check sphere surface of icing annunciator for cleaness and clean it with polishing fined sand paper, then clean the surface with one cloth with rectified alcohol and polish with chamois leather. 3) The cockpit glass should be clean and in good condition. 4) The radome should be fixed firmly. 5) The landing light on the bottom emergency door of cockpit should be in good condition.
  • 92.
    JZ-Y8F200W-02 AIRCRAFT FLIGHT MANUAL SECTIONIV NORMAL PROCEDURES 4-6 June 30, 2012 (b) The nose landing gear 1) The steering mechanism for the nose wheel turning should be in good condition with no leakage. 2) The nose buffering mechanism should be clean and has no leakage. The exposed length of the buffering strut should be 3.94in~9.45in (100~240mm). 3) The tyre should have no damage, its cord fabric should not be crossgrained, its pressure should be normal and its compression range should be 1.38in~1.97in (35~50mm). The hook of retracting mechanism should be flexible and clean. 4) Open the nose landing gear well door, check the hydraulic pipe and its accessories for leakage. 5) The retraction, extension position lock and the limit switch should be clean and in good condition, and the lubrication oil and retraction lock should be at OPEN position. 6) There should not be foreign object in the nose landing gear well, and the steel cable for lowering the nose wheel mechanically should be fixed. 7) Close the door, check whether the lower section of the fuselage has leakage, and all antennae, operating windows should be in good condition. (c) Front-right side of the fuselage 1) Inertia navigation/GNSS antennae and pitot should be in good condition, and pitot conver should be taken down. 2) The blanking cover of ventilating port should be taken down. 3) The fuselage skins and each window should be in good condition. 4) Emergency exit should be closed. Each vent-plug should be taken down. 5) Neutral gas and fire bottle autorelease indication diaphragm should be in good condition. 6) Refueling switch control panel, the operating windows of ground connectors should be closed well, and the landing light should be in good condition. (d) Right wing and engines 1) The leading edge of the wings should not have damage and leakage (in winter check and remove ice and frost). 2) Each cowling of engine should be closed well, and have no damage.
  • 93.
    JZ-Y8F200W-02 AIRCRAFT FLIGHT MANUAL SECTIONIV NORMAL PROCEDURES 4-7 June 30, 2012 3) Lower cowling of engine should not have leakage of fuel, oil and hydraulic oil. Each residual oil tube should not have leakage. 4) No damage on the anti-icing equipment of blade, and its angle should be zero degree. 5) The propeller cowling should not have dents, and the lock buckle should be locked well. 6) The blanking covers of engine intake and each vent-plug should be taken down. 7) The wing tip, navigation light discharging brush and radio antenna should be in good condition. 8) The lower section of the wing should not have leakage, the operating cover should be closed well. 9) The aileron and flap should be in good condition, and there should not be damage on their exterior. The trim tab should be at neutral position. 10) The blanking cover of engine tailpipe nozzle should be taken down, and there should not be foreign object in tailpipe nozzle. (e) Right landing gear 1) The fixation of hydraulic pipe and cylinder on main wheel shock strut should be in good condition, clean and have no leakage. The exposed length of the shock strut should be 1.69in~4.53in (43~115mm). 2) The tyre should have no damage, its cord fabric should not be crossgrained, its pressure should be normal and its compression range should be 2.95in~3.54in (75~90mm). 3) The fixation of the nuts for fixing the wheels, the sensors for automatic releasing braking, each accessory and pipe should be in good condition and have no leakage. 4) The hook of retracting mechanism should be flexible and clean. 5) Check the retraction, extension position lock and the limit switch should be clean and in good condition, check whether there is lubrication oil and that the springs should be in good condition and the retraction lock is at OPEN position. 6) Accessories and pipes in the landing gear well should not have leakage, every control stick should not have deformation, and there should not be foreign objects in the landing gear well.
  • 94.
    JZ-Y8F200W-02 AIRCRAFT FLIGHT MANUAL SECTIONIV NORMAL PROCEDURES 4-8 June 30, 2012 (f) Rear right side of the fuselage 1) Battery compartment should be covered and the vent-plug should be taken down. 2) The power plug cover not used and the charging oxygen cover plate of rear auxiliary fuel tank should be covered well. 3) Check that the right side fuselage skin and window should be in good condition. 4) All atennae should be intact. 5) The signal flare should be installed as required (normal sequence of color from backward should be white, red, green and yellow) (g) Tail section of the fuselage 1) The horizontal stabilizer and the vertical stabilizer should be in good condition, the leading-edge heating component should have no damage or discolor (check and remove the ice and frost in winter). 2) All antennae should be in good condition. 3) The control surface and discharge brush should be in good condition, down elevator should be at the limit position and the trim tab should be at neutral position. 4) The tail light should be in good condition and the fairing cover should be fixed reliably. 5) The tail-supporting bar should be taken down, the lower section of fuselage should have no leakage and the flash light and the radar antenna should be in good condition. (h) Besides the inspection of the left side of the fuselage, left landing gear, left wing and left engine is as same as that of the right side, the following items should be executed: 1) There should be no foreign object in WDZ-1 vent-pipe, and the turbine blades should be perfect. 2) The WDZ-1 cowling should be closed well, the vent-plugs should be taken down, and it should not have leakage outside. 3) The grounding jumper at entry door should be retracted, oxygen-filler cover should be covered all right, and the cool air inlet-plug of cargo cabin should be taken down.
  • 95.
    JZ-Y8F200W-02 AIRCRAFT FLIGHT MANUAL SECTIONIV NORMAL PROCEDURES 4-9 June 30, 2012 Aircraft interior inspection (a) Cargo cabin 1) The mechanical handle of cool/heat throttle for cargo cabin heating should be at the required position, and the fire extinguishing should be fixed well. 2) The crane should be locked, each switch of airdrop and oxygen consumption instrument panel and oxygen valve should be at OFF position, and check if the oxygen pressure is as required. 3) The cargo and the equipments along with the aircraft should be placed and tied well according to the regulations, and their center of gravity should be adjusted. 4) The hydraulic accessories of cargo door should not have leakage. Check if there are foreign objects that affect the opening/closing of the door. 5) All emergency exits should be closed and locked well, and the back-up equipment should be all ready. 6) Check that the lavatory should be clean and available. 7) Check the electro-heating water tank, electric oven and living equipment cupboard for reliable fixation. (b) Cockpit 1) The venting handle should be at CLOSE position when flying at high altitude. 2) The fire bottles, emergency necessities, movable oxygen bottles, water tank and oven should be fixed and closed well. 3) Check through the feathering oil-residual cup if the feathering switch has fuel leakage. 4) The dynamic /static pressure changeover switch should be at LEFT position, and the standby static pressure switch should be at OFF position. 5) Check the seats. The seats, pedals and safe belts should be adjusted to proper positions.
  • 96.
    JZ-Y8F200W-02 AIRCRAFT FLIGHT MANUAL SECTIONIV NORMAL PROCEDURES 4-10 June 30, 2012 6) Pilot console a) The oxygen regulator should be in good condition, and the oxygen mask should be connected. b) The emergency control handle for cockpit door should be at neutral position and be locked. c) The fluorescent light, navigation light and other illuminating switches should be all at OFF positions. d) The wires and earphone of radio communication control box should be all complete and in good condition. e) The engine air-starting switch should be at OFF position and be locked well. f) The side movable glass window should be flexible and sealed. g) The control surface lock handle should be at LOCK position h) Elevator tab hand wheel should be at NEUTRAL position. 7) Pilot instrument panel a) The switches on the pilot instrument panel should be at OFF position. b) The barometric altimeter should be corrected. c) The parking brake should be lifted. d) The emergency brake handle and the nose wheel steering handle should be pushed to OFF positions. 8) Central instrument panel a) The general fire-extinguish switch should be at neutral position. b) The clock should be checked and punched in. c) The automatic brake-releasing switch should be connected. d) The fire extinguishing button should be covered and locked, and all switches should be at OFF positions. e) The switches on autopilot console should be all at OFF positions. f) The switches of landing light should be at neutral positions. g) The control handles of landing gears and the flaps should be at neutral positions. h) The switches on engine starting control panel should be at their specified positions.
  • 97.
    JZ-Y8F200W-02 AIRCRAFT FLIGHT MANUAL SECTIONIV NORMAL PROCEDURES 4-11 June 30, 2012 i) The control switches of fuel system, oil system should be at specified positions. 9) Switchboard of pilot overhead console a) The emergency hydraulic stop handle, each feathering power switch and button should be at OFF positions. b) The propeller stop-releasing switches should be at releasing positions. c) Other switches should be at normal positions. 10) Copilot instrument panel a) The switches on copilot instrument panel should be at the specified positions. b) The altimeter should be calibrated. c) Heating switch for cargo cabin should be at neutral position. d) The heating switches of clock, tail, propeller and fairing, windshield glass, dynamic/static pressure tube and cockpit should be at OFF positions. e) The emergency pressure-releasing switch should be at OFF position. f) The icing-signal switches of the wings and intake should be at OFF positions. 11) Copilot console a) The heating switches of guiding device should be at OFF positions. b) The shut-down switch should be at ENGINE SHUTDOWN position, covered and lead-sealed. c) Air traffic alarm switch and anti-collision switch should be at ON position. d) The retraction/extension switches of landing gears, the retraction/extension switches of the flaps, elevator tab hand wheel, emergency extension handle of landing gears and emergency control handle of cabin door should be at the neutral positions and locked well. e) The emergency switch for cabin door sealing should be at SEALING RELEASED position. f) The AIR SUPPLY FROM ENGINE switch, pressurization switch of forward cabin, the switch for wings heating should be all at OFF positions. 12) Pilot overhead console a) The heating switches of tail, propeller and fairing, windshield glass, dynamic/static pressure tube and cockpit should be at OFF positions. b) Each lighting switch should be at OFF position.
  • 98.
    JZ-Y8F200W-02 AIRCRAFT FLIGHT MANUAL SECTIONIV NORMAL PROCEDURES 4-12 June 30, 2012 Engine start, warmup and runup Preparations before engine start (a) The flight engineer pressurizes the accumulator of the left hydraulic system. (b) The captain instructs “Everyone is at his position, and prepares to start the engine”. (c) The captain instructs “Power on”, the ground electrician or the copilot gestures to the power cart to generate electric power. After powering on, be sure the voltage should be 24.5~28.5V, and turn on the intercom at the same time. (d) Check all switches and handles from left to right and top to bottom for specified positions. 1) Open the control surface lock. 2) Set the throttles at 0o . 3) Lift the parking brake. 4) The propeller-stopping switch should be at RELEASE position, and the red signal light is on. 5) Put the fire-extinguishing switch at CHECK position, and each yellow squib signal light should be on. 6) Turn on the anti-fire switch, and the four green lights come on. 7) Set the shutdown switch to ON position. 8) Turn off the ejection radiator switch, and the oil radiator switch should be at AUTOMATIC position. 9) The quantity of oil, hydraulic oil should be normal. 10) Open the WDZ-1 and engine-starting box. Set the AIR-GROUND start changeover switch at GROUND position, set the CRANKING-START changeover switch at START position, set the engine starting select switch at the position for starting engine, the green READY light is on. Open the fuel pumps of No.1~No.4 groups fuel tanks, and the pressure should be 12.81psi~17.11psi (88.3kPa~118kPa). (e) Turn on the VHF radio and ask for starting.
  • 99.
    JZ-Y8F200W-02 AIRCRAFT FLIGHT MANUAL SECTIONIV NORMAL PROCEDURES 4-13 June 30, 2012 The instructions for engine start (a) The permission of starting from the ground given and “Mechanic is ready” reported by the mechanic, the captain instructs “The voltage is normal, the systems have pressure, the parking brake are all right, leave from the propeller, and start engine 1” (the sequence started with the ground power is engines 1, 2, 3, 4, and that started with WDZ-1 is engines 1, 4, 3, 2). (b) After depressing the start button, the engine rotating speed reaches 42~46% in 60 seconds, the voltmeter indicates from the maximum to 0V, the communicator reports “The starter is cut off” and the captain responses “Roger”. (c) After starting the four engines, the mechanic reports “Engines starting are completion”. (d) The captain instructs “The communicator turns on the onboard power”. After the communicator replies “The onboard power is turned on”, the captain instructs “Cut off the ground power” (The ground can be informed to turn off the power by ground electrician or copilot through a gesture). (e) The captain instructs “Turn on the power used for onboard equipment”, and then turn on the laser inertia combined navigation system horizon, the attitude heading system HZX-1M, GPS, meteorological radar, identification friend or foe (IFF), the radio compass (ADF), the intercom, the radio altimeter, the critical angle of attack indicator, TCAS, the UHF radio set, and VOR/instrument landing system in turn. Check that the automatic brake-releasing mechanism operating switch for ON position. (f) The captain instructs “Pull out the ground power plug, remove the wheel chocks, and prepare to taxi” when the ground technician is at position. Engine start procedure (a) Depress the start button for 1.5~2 seconds and punch stopwatch. And then the start system operates in order automatically, the signal light for starting procedure operation should be on and the signal light for preparation should be off. (b) The start voltmeter should indicate, the onboard network voltage should not be below 16V. (c) The engine rotating speed begins to rise in 3.5 seconds. (d) The oil has pressure in about 10 seconds (It can be judged from the moment when the engine failure signal light goes out), and the time should not be longer than 30 seconds. (e) The voltage should increase to 39~48V in about 15 seconds.
  • 100.
    JZ-Y8F200W-02 AIRCRAFT FLIGHT MANUAL SECTIONIV NORMAL PROCEDURES 4-14 June 30, 2012 (f) The fuel regulator stopping switch is cut-off in 20 seconds and begins to supply fuel. The indicated upstream pressure of the nozzle should be 113.85psi~170.71psi (0.785~1.177MPa), and the indicated start voltage should be 50V. (g) Ignite in 25 seconds, the indications of turbine outlet temperature begins, and carry out fuel cutoff automatically according to the coordination of the temperature and the rotating speed. (h) When the engine speed reaches 42~46% or time up to 70 seconds, the starter is shut down, the starting procedure operating signal light should be off and the signal light for ready should be on, and the start voltage drops to zero (If the starter has not shut down yet when the engine speed reaches 46%, the emergency shutdown button should be depressed. If the starter still can not be shut down, set the shutdown switch to SHUTDOWN position to stop the start). (i) Control strictly the engine exhaust gas temperature whose maximum should not be higher than 750o C. When cutting off the fuel, neither hang up nor decrease the rotating speed. When the speed reaches 55% and increases slowly, advance the throttle to 30o and back to 0o gently till the engine enters the idle speed. (j) When the rotating speed reaches 55~60%, the temperature should decrease automatically and the rotating speed increases rapidly. At this time, the momentary fuel consumption is 450kg/h. (k) The time of the engine entering idle speed (80.5~82.5%) should not exceed 120 seconds, under the idling condition, the oil pressure should not be below 56.85psi (392kPa). (l) During engine start with WDZ-1, pay special attention to the temperature and the rotating speed of WDZ-1 before 25 seconds, and the starting condition of the engine after 25 seconds. At the same time, observe the working condition of WDZ-1. Stop starting immediately under the following conditions: (a) The starting power source is below 16V. (b) It is not ignited in 25 seconds (the temperature does not increase). (c) There is no oil pressure in 30 seconds. (d) The rotating speed hangs up or the turbine exhaust gas temperature exceeds 750o C. (e) The starter is shut down too early (Generally, the shutdown is done when the rotating speed is below 35%, if shutting down after the speed is 36% and the temperature could be controlled, a successful starting can be achieved).
  • 101.
    JZ-Y8F200W-02 AIRCRAFT FLIGHT MANUAL SECTIONIV NORMAL PROCEDURES 4-15 June 30, 2012 (f) The start power is not balanced, the difference of current exceeds 500±100A, the communicator instructs “Shut down”, and the signal light of start failure should be on. (g) When starting the engine with WDZ-1, the temperature of WDZ-1 is higher than 750o C (the peak value is higher than 820o C) or the speed is below 83%, stop starting the engine WJ-6 first (and then shut down the WDZ-1). (h) The engine is surging or on fire. (i) It does not enter idling in 120 seconds. (j) Receive the instruction “Stop” from the ground. Caution When stop starting, check the upstream pressure of nozzle and the turbine outlet temperature for decrease. If the temperature increases or does not stop spurting fuel entirely, pull the emergency hydraulic feathering handle instantly. It is forbidden to begin the second start before finding the cause of the start failure. Engine cold run (a) The shutdown switch is at SHUTDOWN position. (b) Turn on the master start power switch. (c) START-COLD RUN select switch is at COLD RUN position. (d) Turn on the start select switch of the cold running engine. (e) The throttle is at 0o position. (f) After issuing the instruction COLD RUN, push the START button, the button cut off automatically in 30 seconds (cold running speed is 17~22%). If it is necessary to cut off the engine earlier, push the emergency cutoff button. Cautions for start (a) It is forbidden to start or crank the engine which is difficult to crank up. (b) It is forbidden to turn on the AIR start switch when starting the engines on ground. (c) It is forbidden to turn off the start select switch or turn to the other engine position before the engine enters the idling status. (d) Before the engine entering the idling, it is forbidden to connect the starter generator to the aircraft network for power supply, to prevent the safety driving shaft coupling of generator from breaking off.
  • 102.
    JZ-Y8F200W-02 AIRCRAFT FLIGHT MANUAL SECTIONIV NORMAL PROCEDURES 4-16 June 30, 2012 (e) When stop starting, before the propeller stops rotating entirely, it is forbidden to set the shutdown switch at operation position so as to prevent the fuel from igniting again. Turn off the shutdown power switch and turn off the aircraft master power. (f) During engine start, the allowed oil quantity from oil tank into the engine is not more than 3.739gal (17L). (g) If the power supply is cut off accidentally during the start, turn on the emergency power supply (or use the master power onboard immediately), and set the shutdown switch to SHUTDOWN position. Emergency hydraulic feathering should be carried out if the temperature continues rising. (h) Each engine can start continuously for 5 times, the interval should not be shorter than 3 minutes, and each operating time of the starter should not be longer than 60 seconds. If each operating time of the starter is longer than 68±2 seconds, the engine can only start for 4 times. And then open the engine cowling to cool the starter/generator. The engine cannot start again until the case temperature is cooled down below 50o C (generally the time is 30 minutes). (i) If the signal light of start system failure is on at the moment of starter power cutting, change the GROUND-AIR select switch over for one time. After the red signal light is off, turn the switch back to GROUND position, and start the next engine. (j) When pressing the start button, if the start system fails within 9 seconds, the red signal light is on, and the engine shuts down automatically. (k) After starting one engine, if pressing the start button, the READY signal light is on, the procedure mechanism does not changeover, then knock the start box at frames 23~25 to cut off the magnetized start changeover relay. (l) If the wind speed from tail section of the fuselage exceeds 6~8m/s, the start will be difficult. In this case, turn the nose of the aircraft to start at the upwind direction.
  • 103.
    JZ-Y8F200W-02 AIRCRAFT FLIGHT MANUAL SECTIONIV NORMAL PROCEDURES 4-17 June 30, 2012 Engine warmup, runup and shutdown (a) Engine warmup 1) Warm up the engine under the idling condition till the oil intake temperature being not below 20o C. 2) The propellers are at STOP RELEASING position, advance the two outboard engines throttles to 50o , when the speed rises to rotating speed and stabilizes for 5~8 seconds, retard the throttles back to 0o . Change pitch like this for two times to heat the oil in the propeller pitch-control oil tank. When the air temperature is above 5o C, the pitch is only allowed to be changed once. 3) The oil in the propeller pitch-control oil tank of the inboard engine should also be heated. If the engines operate at idling speed for 1min and the oil intake pressure is below 56.85psi (392kPa) (4kgf/cm2 ), the engines should be shut down. (b) Engine runup (See Figure 4-2 for engine running-up curve). 1) Partial feathering check Advance the throttles to 50o ±2o Set the propeller stop-releasing switch to “STOP” position (the signal light for stop releasing is off). Press the partial feathering button, the rotating speed of the engines should decrease by 1.5%~2.5% (200r/min~300r/min). At the same time, the operating light of feathering pump is on. After releasing the button, the rotating speed should recover.
  • 104.
    JZ-Y8F200W-02 AIRCRAFT FLIGHT MANUAL SECTIONIV NORMAL PROCEDURES 4-18 June 30, 2012 95.5~96.2% 1.5~2.5%1.5~2.5% 80.5~82.5% 98~105° (84±2°) (60±2°) (50±2°) (0°) Note:SOTPposition Procedure Engine speed Engine speed Throttle angle Takeoff (n%) Operating status Engine coolingOilheating Engine warm-up Momentary speed increase not more than 103% Engine start Partial feathering Torque auto feathering check Check engine acceleration Propeller mid pitch stop check Engine shutdown Max.continuous powercondition Max.continuous powercondition Max.continuous powercondition Negative pull auto feathering check STOPrelease Throttleangle CheckMax. continuous powertakeoff status Figure 4-2 Engine running-up curve
  • 105.
    JZ-Y8F200W-02 AIRCRAFT FLIGHT MANUAL SECTIONIV NORMAL PROCEDURES 4-19 June 30, 2012 Caution If pressing the partial feathering button for more than 1 second, the engine rotating speed will decrease to below 93%. Therefore, the engines would boom, the gas temperature would rise beyond the allowable value, and the engines would be destroyed. If the speed is below 93%, release the button quickly, pull the unfeathering, and recover the rotating speed rapidly or shut down the engine instantly. 2) Check the operation of the torque feathering system. Advance the throttles to 62o ±2o . Set the propeller to STOP RELEASING position. Check the torque automatic feathering, the READY signal light is on, and turn on the check switch of the torque automatic feathering. Retard the throttles back to 0o . When the torque pressure decrease to 142.28psi± 7.11psi (981kPa±49kPa), the operating signal light of automatic feathering sensor and the signal light of feathering pump operation are on and the automatic feathering operation are normal. Turn off the check switch, press the feathering button for a short time, the operating signal light of feathering pump is off (because the feathering automatic timer begin working to cut the power supply of feathering pump after 12 seconds, the unfeathering must be pulled in order to short the operating time of feathering pump). 3) Check the operation of the negative thrust automatic feathering sensor Pull the throttles to 0o Set the propeller to STOP position. Turn on the check switch of the negative thrust automatic feathering sensor, the operating signal light of automatic feathering sensor is on (i.e. failure signal light), this indicates that the operation of negative thrust automatic feathering system is normal. Turn off the check switch. 4) Check the operation of the engines under the maximum continuous power condition and take-off power condition. Set the propeller to STOP position.
  • 106.
    JZ-Y8F200W-02 AIRCRAFT FLIGHT MANUAL SECTIONIV NORMAL PROCEDURES 4-20 June 30, 2012 Advance the throttles gently to 84o ±2o and hold it for 10s~15s seconds, then check the operation parameters of the engines. Advance the throttles gently to take-off power condition (104o ) and hold it for 10~15 seconds, and then check the operation parameters of the engines. Retard the throttles slowly back to 30o ~35o (sometimes greater in winter as long as the speed of engines do not drop). 5) Check the propeller hydraulic stop Advance the throttles to 30o ~35o . Set the propeller to STOP position. Pull the throttles gently, when the speed decreases from 95.5%~96.2% to 93%, release the stop, the engine speed should return to the balanced speed, and the difference between current speed and at stop position should not be more than ± 1.5% 0.5% . When the speed returns to working speed, pull the throttles back to 0o . If the speed does not decrease when holding the throttles under the condition that the air temperature is not above -40o C, throttles should be increased to 60o and the second inspection should be conducted. It is forbidden to decrease the speed to below 93% when the propellers are at stop position to prevent the gas temperature from rising and the engines from surging and be damaged. 6) Engine acceleration check Set the propeller to STOP position. Increase the throttles gently to above 16o , and the speed reaches 95.5%~96.2%. Increase the throttles gently to take-off position 104o within 3~4 seconds (in this case, the rapid increment of speed should not be more than 103%, i.e. 13260r/min, and the engines fuel bypass automatically), judge the acceleration time on the principle that the upstream pressure of the nozzles reaches to and keeps the maximum, and the engines accelerating time should not be longer than 20 seconds. Release the STOP. Work under the takeoff power condition for 10~15 seconds. Release the stop of the propellers, and then hold the throttles to 0o in 1.5~2 seconds, in this case, the engines should turn to idling condition slowly.
  • 107.
    JZ-Y8F200W-02 AIRCRAFT FLIGHT MANUAL SECTIONIV NORMAL PROCEDURES 4-21 June 30, 2012 In order to prevent the aircraft from yawing, the throttle of the other symmetrical engine should be at 30o ~40o when testing the maximum continuous and the takeoff power conditions. (c) Cooling off and shutdown of the engines 1) Retard the throttles to 0o before engines shutdown, make the engines operate for 2~3 minutes to cool off gradually. 2) Check the fuel supply system and the flaps retracting/ extending. When the throttles are at 20o , check the cabin pressurization, the anti-icing, the autopilot, vibration gauge and other special instruments. 3) Judge the safety driving shaft coupling of starter/generator for intact by means of checking if each generator has voltage. 4) Shut off the power supply of the equipment, inform the communicator to get ready for engines shutdown, turn off the generator switches, and make sure that the aircraft power supply should not be below 24V. Shut down the engine with the permission. 5) Set the engine shutdown switch to SHUTDOWN position, cut off the fuel pump, and observe the nozzle pressure and the outlet temperature of the turbine till the propellers stop rotating completely. If it does not stop supplying fuel entirely, and the outlet temperature of the turbine rises, conduct emergency hydraulic feathering. 6) The inertial time that the propellers rotating speed from 8% to 0 should not be less than 60 seconds. 7) After the propellers completely stop, set the engine shutdown switch to “ON” position, cut off the fire-extinguishing switch, vertical gyro switch and the master power. Lock up the control surface lock, acquire the running up information of each trade. Before the propellers stop entirely, the followings are forbidden so as to prevent the fuel from spraying into the engines again: Set the engine shutdown switch to ON position and turn off the shutdown power switch. Cut off the onboard power supply.
  • 108.
    JZ-Y8F200W-02 AIRCRAFT FLIGHT MANUAL SECTIONIV NORMAL PROCEDURES 4-22 June 30, 2012 Note a) Under emergency condition, it is allowed to shut down the engine under any operating condition without precooling off. After shutting down, the propellers must be rotated to check the engine rotors for flexibility. When the rotation of engine rotors is difficult, do not perform the rotation forcely, do cool off the engines until the rotors can rotate smoothly, and make the next start. b) If the training flight with three engines is necessary, check the feathering for normality during engine runup. Start and function of the WDZ-1 turbine starter generator (a) Preparations pre-startup The start power supply of WDZ-1 is 28V DC. It can be started with airborne battery and the generator started or the ground power supply. When starting with the power cart and the onboard battery, pull out the 70V plug to make the power cart generator and the onboard battery available at the same time. 1) Turn on the power supply and the related circuit breaker. 2) Set the fire-extinguishing switch at CHECK position. 3) Open the air intake shutters (the green light is on when opened fully). 4) Turn on the master power switch of start. 5) Turn on the anti-fire switch, the red light is off and the green one is on. Set the START-CRANKING select switch to START position. 6) Open the groups 1~4 fuel pumps. (b) Startup 1) Depress the start button for 1.5~2 seconds and time it with a stopwatch, then release it. At this time, the yellow start light is on, visually inspect the speed and temperature, pay attention to the starting condition. 2) The signal light of oil pressure is on after 15~17 seconds, indicating that the pressure is normal 49.75psi (343kPa). 3) In a short time approaching 17th second, it is normal that the speed halts, but the speed should rise to idling speed after that.
  • 109.
    JZ-Y8F200W-02 AIRCRAFT FLIGHT MANUAL SECTIONIV NORMAL PROCEDURES 4-23 June 30, 2012 When the speed reaches 93%, the green signal light of start being ready should be on, and the starter is cut off automatically at 25th second as per the start procedures. 4) The yellow start light is off at 30±2 seconds. When the speed and temperature are stable, it indicates that the start of WDZ-1 is ready. At this time, connect it to the aircraft power supply and then start the engines and supply the aircraft power after 2 minutes of running. (c) Shut down the engine emergently under the following conditions: 1) The speed does not rise after pressing the start button for 5 seconds. 2) No temperature indication after 10 seconds. 3) No oil pressure within 15~17 seconds, the yellow signal light is not on. 4) The temperature is higher than 900o C or is 900o C more than 3 seconds during start. 5) The speed exceeds 102%. 6) There is boom or noise before entering the idling speed. 7) It does not enter operating speed within 30±2 seconds. 8) The speed decreases to below 83% with a peak load, or the temperature rises rapidly to 820o C for more than 6 seconds (in this case, unload it first and then shut down). 9) There is leakage of fuel and oil which would cause a fire and other accidents. (d) Start WJ-6 engines with WDZ-1 1) When starting the WDZ-1 with the ground power supply, the master power switch is set to ONBOARD position after start. Turn the START POWER to START WDZ-1 position. 2) “Disconnected the ground power supply” is instructed. 3) Start the WJ-6 engines according to the engines start procedures and requirements. 4) When starting the engine, the captain pays attention to the outlet gas temperature of the engine turbine, the mechanic and the copilot observe the temperature and rotating speed of the WDZ-1 (in about 20 seconds is critical, special attention must be paid). 5) If finding the WDZ-1 in an abnormal condition during start, stop starting the engines first, and then shut down the WDZ-1.
  • 110.
    JZ-Y8F200W-02 AIRCRAFT FLIGHT MANUAL SECTIONIV NORMAL PROCEDURES 4-24 June 30, 2012 6) Start the WDZ-1 should follow the following specifications. When starting each engine, the idling time of the WDZ-1 should not be less than 15 seconds. The fifth and the sixth start should be made till the WDZ-1 idles for 2 minutes (after QF-24 cools down). If continuous start is required, it should be made till the WDZ-1 idle for 3 minutes after the sixth start, the total start frequency per engine should not be more than 12. Do not start again until the engine shuts down and WDZ-1 cools down completely. (e) Shutdown 1) After all the engines are started or stopped supplying power to the aircraft, the WDZ-1 idles for 2 minutes. And then press the shutdown button, turn off the anti-fire switch, set the select switch at COLD RUN position. 2) Cut off the fuel transfer pump switch. 3) The inertial time is not less than 20 seconds. 4) If the temperature is higher than 200o C, cold run should be done. If taking off instantly, cold run is not necessary. 5) Close the air intake throttles and turn off the master power supply. (f) Cold run If the start fails, the temperature after shutdown is higher than 200o C or the aircraft has parked for a longer time, cold run should be done before starting. 1) Turn on the power and the power switches, the voltage is 24.5~28.5V. 2) Open the shutters, and the green light is on. 3) Turn on the start power switch. 4) The anti-fire switch is turned off (the red light is on). 5) Set the START-COLD RUN switch to COLD RUN position. 6) Press the start button for 1.5 seconds and punch stopwatch. At this time, the yellow start light is on and the speed increases. 7) The cranking speed is not below 21%, and cranking stops automatically in 10 seconds. If necessary, press the shutdown button to stop the cranking. 8) The yellow start light is off in 30±2 seconds. And close the air intake, and cut off the master start power supply after the light is off.
  • 111.
    JZ-Y8F200W-02 AIRCRAFT FLIGHT MANUAL SECTIONIV NORMAL PROCEDURES 4-25 June 30, 2012 9) After the shutters are fully closed, turn off the onboard power supply and the power switches. (g) The cautions for WDZ-1 operation 1) When starting and cranking the WDZ-1, the second battery on the aircraft must be connected, otherwise the WDZ-1 cannot start and crank. 2) When the WDZ-1 catches fire or the fire-extinguish system fails, the WDZ-1 will shut down instantly automatically. 3) It is allowed to start and crank the WDZ-1 again only after its rotors stop completely. 4) When the air temperature is below -10o C, in order to prevent the temperature exceeding the allowable value, warming-up start (i.e. stop starting after half start) is allowed for 1~3 times. The warming-up start can be controlled within the rotating speed range (23~24%) as per the temperature. 5) When operating under the high temperature in summer, to prevent the outlet temperature of the turbine being too high, the WDZ-1 can be started with its cowling open to decrease the outlet temperature of the turbine by 30o C~50o C. 6) When starting the WDZ-1 with the start cart, the voltage and the capacity of the battery should be observed, the output wire should not be too thin so as to prevent the cutoff of the power supply or scant voltage during start. 7) Before flying to the plateau airfield, regulate the speed of the WDZ-1 to 94~95% generally in advance to avoid the shutdown caused by the overrun. 8) It is absolutely forbidden to false start the engine WJ-6 with the WDZ-1. FLIGHT Taxiing Pre-taxiing inspection (a) Fasten the safety belt. Check the navigation equipment, instrument landing system, the flight instrument switches and the engine temperature and pressure of the engines for normal condition. (b) Move the control surfaces, control stick, helm and paddle and check the control system for normality and flexibility (the pilot and copilot control should be checked independently). After that, put the control stick, the helm and the rudder at NEUTRAL position. (c) All trim tabs are at neutral position.
  • 112.
    JZ-Y8F200W-02 AIRCRAFT FLIGHT MANUAL SECTIONIV NORMAL PROCEDURES 4-26 June 30, 2012 (d) Close the cabin doors, and the signal lights are off. (e) The crewmembers report that they are ready, the captain requires taxiing to the aircraft dispatcher. (f) After receiving the permission from the aircraft dispatcher, pull out the nose wheel steering handle (the yellow signal light is on), taxi out according to the signals. Taxiing (a) Issue “Taxiing” order to the crewmembers. Release the stop of the propellers (the four red signal lights are on). (b) The copilot holds the helm and helps the captain apply the neutral rudder. (c) Having observed that there are no obstacles in taxiing area and taxiing route, release the shutdown brake, advance the inboard throttles to 20o ~40o . After the aircraft moves, retard the throttles back to 0o or above 16o , check operating conditions of the brake for normality, and then keep taxiing in a straight line or make turn with the nose wheel steering handle. (d) Generally, during the straight taxiing, set the throttles at 0o and the speed is kept at 20~30km/h. especially warn the outside to prevent the aircraft from collision with the vehicles or other obstacles. (e) To maintain a proper taxiing direction, the main points are as follows: 1) Find the yawing of direction timely. Pilot should look at the location of 80~100 meters straight ahead. Judge the yaw of direction according to the center line of the taxiway and with reference to the outline of the taxiway. 2) Operate the nose wheel steering handle gently. When the aircraft is off or in across the center line of the taxiway, turn the nose wheel steering handle to the opposite direction timely and steer the nose wheel as required to maintain the direction. In addition, the aircraft inertia should be handled. Do not operate the nose wheel steering handle rashly, especially wildly. (f) On wide taxiing runway without obstacles, check the emergency brake and the operation of the nose wheel steering mechanism for normality. Prior to the check of the emergency braking, reduce the speed first, then pull out the emergency brake handle gently with the left hand. Judge whether the operation of the brakes is normal according to the the taxiing speed reduction and the brake-pressure gauge indication.
  • 113.
    JZ-Y8F200W-02 AIRCRAFT FLIGHT MANUAL SECTIONIV NORMAL PROCEDURES 4-27 June 30, 2012 Push in the nose wheel steering handle (the yellow light is off). Turn on the rudder steering switch (the two green lights come on). Tread the rudder pedals left (or right) to check if the aircraft direction yaws to the left (or right) accordingly. After the check, turn off the rudder steering switch and pull out the nose wheel steering handle. Continue with the taxiing. (g) Before turning, make sure there are no obstacles in the turning direction. Decrease the taxiing speed with brake and judge the turning time. The braking efficiency of this aircraft is fairly good. It should be applied as per the requirement. The braking pressure depends on the pilot (left or right) who applied more force. During the turning, the operation rate of the nose wheel steering handle is proportional to the speed. Turn it faster at higher speed, and slower at lower speed. When the aircraft is turned to the direction where the remainder angle to the pre-determined direction is 30o , turn the nose wheel steering handle to the opposite direction gently to make the aircraft recover from the turn. Precautions for taxiing (a) The minimum allowable speed with the operative nose wheel steering mechanism is 2.7kn (5km/h). It is forbidden to turn the nose wheel steering handle before the aircraft moves. (b) During taxiing, it is forbidden to set the throttles between 0o ~16o . (c) Increase the manual and rudder control force properly for nose wheel turning to smooth the process. When turning in narrow zone and at the beginning of turning, the inboard pulsating brake can be used and the outboard engine throttles can be advanced to help the aircraft turn. The minimum turning radius must not be smaller than 49.2ft (15m). It is forbidden to turn with wheels at one side for braking, and it is forbidden to use the outboard brakes during turning. (d) During taxiing, when the inboard throttles exceed 40o , use the outboard throttles at the same time to keep the required speed. It is forbidden to set the nose wheel at the maximum deflection angle when parking the aircraft. (e) It is forbidden to use the emergency brake or pull the emergency brake fiercely when the normal brake is applied so as to avoid severe damage to the tyre. (f) During the whole taxiing, the aircrew should cooperate with each other closely. When turning right, the copilot and the navigator should pay attention to the obstacles outside frequently and warn the captain timely.
  • 114.
    JZ-Y8F200W-02 AIRCRAFT FLIGHT MANUAL SECTIONIV NORMAL PROCEDURES 4-28 June 30, 2012 Traffic pattern flight Refer to Figure 4-3 for traffic pattern. 24s H=1312ft S=5.4n mile FWY270° flightt=15s DXF270° DXF240° DXF286° H1312ft V178kn~189kn t=30sγ15°Level off turn V173kn Flap15° V162kn~167kn γ15°~20° Turn H200γ15°V350 Turning radius 11811ft 15s DXF238° V162kn~189kn γ15°Turn Ready for landing gear down, put the switch of rudder control on, and check the propeller stop switchat STOP position, then report radio side-position. Pattern width check FMYEngine service condition check, FMY calibration V140kn Descending v9.8ft/s~16.4ft/s h328ft v162kn Flap up, throttle retard 84° V135kn H23ft~32.8ft Landing gear up V103kn~130kn Takeoff Propeller stop, advancethe throttle engine1,4-4- 84°engine 2,3-60°Shift to bigtourque, release the braketo take off V157kn~162kn Flap 35° Vy8.2ft/s Glide T35s H919 Ready for landing and send out request Passing the navigation station H591~616 V140kn~151kn Advance inboard throttle and retard outboard throttle H197ft~230ftn v135kn~151kn Gliding point fixation V9.8ft/s~11.5ft/s H26.2ft~32.8ft Level off V135kn~140kn Touching the ground V103kn~124kn Figure 4-3a Traffic pattern
  • 115.
    JZ-Y8F200W-02 AIRCRAFT FLIGHT MANUAL SECTIONIV NORMAL PROCEDURES 4-29 June 30, 2012 V330~350 γ15°Turn FWY270° H400level flightt=15s DXF238° DXF270° DXF240° DXF286° H400 V330~350 t=30sγ15°Level off turn V320 Flap15° V300~310 γ15°~20° Turn S=10km 24s H200γ15°V350 Turning radius 3600m V260 Descending Vy3~5m/s H100 V300 Flap up, throttle retard 84° V250H7~10 Landing gear up V190~240 Takeoff H8~10 Level off V250~260 Touching the ground V190~230 Advance inboard throttle and retard outboard throttle H60~70 V250~280 Gliding point fixation Vy3~3.5m/s Passing the navigation station H180~200 V260~280 T35s H280 Ready for landing and send out request V290~300 Flap 35° Vy2.5m/s Glide 15s Pattern width check Engine service condition check, FMY calibration Ready for landing gear down, put the switch of rudder control on, and check the propeller stop switch at STOP position, then report radio side- position. Propeller stop, advance the throttle engine1~4-84° engine 2~3 60°Shift to big tourque, release the brake to take off Figure 4-3b Traffic pattern
  • 116.
    JZ-Y8F200W-02 AIRCRAFT FLIGHT MANUAL SECTIONIV NORMAL PROCEDURES 4-30 June 30, 2012 Preparations before takeoff (a) Enter the runway: 1) Issue the order to lower flaps to 25o . 2) Observe and make sure that there is no aircraft landing on the final leg. Request for taxiing into the runway. 3) When entering the runway, align the aircraft with the center line of the runway and push the nose wheel steering handle to its limit. Turn on the nose wheel rudder steering switch (the yellow light goes out, and the two green lights come on). Taxi ahead for 16.4ft~23ft (5~7m) and check the nose wheel rudder-steering mechanism to see if it is on. Then reduce the speed and neutralize the rudder. Align with the nose wheel straight and park in the preset position. (b) Check before takeoff: 1) Check the instruments and the AHS system for correct indication. 2) The flaps are at 25o and the trim tabs are in neutral positions (the signal lights are on). 3) The nose wheel rudder steering switch turns on (the two green lights come on). 4) The copilot requests for takeoff. When it is approved by the aircraft dispatcher, the captain issues the order for “STOP” (the four red lights go out). Take-off (a) Apply braking and first advance the outboard throttles to 40o , the inboard throttles to 40o , then advance the outboard throttles to 84o , the inboard throttles to 60o . Now there are indications on the torque meters. (b) After the mechanic reporting “The propellers are in coarse pitch,” release the brakes smoothly and simultaneously. The aircraft starts to run. During the taxiing, advance the inboard throttles to 84o . Then advance the throttles of the four engines to 104o . (c) This aircraft is a high-wing, narrow-wheel track and wide body aircraft. Its side area is large and the reaction torque of the propellers is great. All these factors will cause some difficulties to maintain the heading for a crosswind take-off. So judging the heading variation from the center line of the runway when running the aircraft. In the three-point running, maintain the heading with the nose wheel rudder steering mechanism. After the speed is increased to 92kn~113kn (170~210km/h) and the nose wheel lifts off, maintain the heading with rudder.
  • 117.
    JZ-Y8F200W-02 AIRCRAFT FLIGHT MANUAL SECTIONIV NORMAL PROCEDURES 4-31 June 30, 2012 (d) Generally, the lift-off speed is within the range of 103kn~130kn (190~240km/h), depending on the aircraft take-off weight, atmospheric temperature and field elevation. When the aircraft lifts off the ground, hold the stick gently and push the trim tabs forward to accelerate at a small climb angle. At this moment, concentrate on the judgment of the terrain clearance altitude to prevent the aircraft from touch-down again. (e) When the speed is up to 135kn (250km/h) and the altitude is not less than 23ft~33ft (7~10m), the captain issues the order for gear-up (the landing gears are not retracted for traffic pattern flight). When the speed is up to 140kn (260km/h), start to climb. At this moment, the climb rate is normally not greater than 16.4ft/s (5m/s) to allow the altitude suit with speed during flap retraction. When the altitude is higher than 82ft (25m), divert the attention to the instrument to maintain a proper climbing. Take-off leg and crosswind turn (a) If there is crosswind, the drift should be corrected. Maintain the climbout heading by the ADF and the azimuth finder, and also with reference to the targets ahead. (b) When the altitude is not less than 328ft (100m) and the speed is 162kn (300km/h), issue the order to retract flaps (When retracting flaps, the aircraft will sink, so hold the stick back timely). When the flaps are up, retard the throttles to 84o by issuing an order or by the copilot. Keep the speed of 189kn (350km/h) and continue to climb. (c) Put into crosswind turn at altitude of 656ft (200m), bank of 15 o and speed of 189kn (350km/h). Crosswind leg and downwind turn (a) After the crosswind turn, keep the azimuth finder at 270o and correct drift. When the aircraft is up to the altitude of 984ft (300m), retard the throttles to 62o . At the altitude of 1247ft (380m) or 66ft (20m) ahead of the specified altitude for the traffic pattern flight in this field, retard the throttles to 38o ~ 42o and level off. Keep the speed of 178kn~189kn (330~350km/h) and trim the aircraft with trim tabs. (b) Fly levelly for 15s on the crosswind leg. At ADF bearing of 250o (245o for short distance), conduct downwind turn with bank of 15o , speed of 178kn~189kn (330~350km/h). After the turn, correct the drift according to the wind direction. Downwind leg and base turn (a) Keep the azimuth finder at 180o and correct the drift. Pay attention to the engine operation status. (b) Check the pattern width by the angle included between the radio bearing line of the outer locator and that of inner locator or with landmarks. The width should be 5.4 n mile (10km). If not, correct it by increasing or decreasing the heading.
  • 118.
    JZ-Y8F200W-02 AIRCRAFT FLIGHT MANUAL SECTIONIV NORMAL PROCEDURES 4-32 June 30, 2012 Refer to Table 4-3 for pattern width check with the relative radio bearing of the inner and the outer locators. Table 4-3a Data of traffic pattern Distance between inner and outer locators (n mile) Width of traffic pattern (n mile) Indicated included angle (o ) Width of wide pattern (n mile) Indicated included angle (o ) 2.16-0.54 5.4 16.5 6.264 14.5 2.70-0.54 5.4 22 6.264 19 3.24-0.54 5.4 26.5 6.264 23 Table 4-3b Data of traffic pattern Distance between inner and outer locators (km) Width of traffic pattern (km) Indicated included angle (o ) Width of wide pattern (km) Indicated included angle (o ) 4-1 10 16.5 11.6 14.5 5-1 10 22 11.6 19 6-1 10 26.5 11.6 23 (c) At relative ADF bearing 270o and at the side of the outer locator, “lower the landing gears and get ready for landing”. At the same time, report to the aircraft dispatcher “at the side of the outer locator beacon”. After the mechanic reported “Gears are lowered and rudder steering is on”, the captain should check that the landing gears are down, the green annunciator of gear door close is on, the ready light of rudder steering is on, the red light of “propeller stop releasing” is off and the brake pressure indicator indicates 0. (d) When the landing gears are down, the speed will be reduced by 5.4kn~10.8kn (15~20km/h) and the center of gravity of the aircraft will move forward by 0.1%CA. Trim the aircraft slightly by the trim tabs. (e) Levelly fly for 30 seconds when flying by the outer locator. At ADF bearing 240o (230o for short distance), make the base turn with bank of 15o at speed of 178kn (330km/h).
  • 119.
    JZ-Y8F200W-02 AIRCRAFT FLIGHT MANUAL SECTIONIV NORMAL PROCEDURES 4-33 June 30, 2012 Base leg and final turn (a) After the base turn, keep the azimuth finder at 90o and correct the drift. At speed of 173kn (320km/h), issue the order for flaps down 15o . Take care to press the stick forward to prevent the aircraft from nose up. At this time, the position of miniature aircraft should be fixed (The miniature aircraft coincides with the ground level when aircraft levelly flies and keeps at 2.5o below ground level after flap down). Maintain the altitude and speed with reference to the indication of the vertical speed indicator. (b) At relative ADF bearing 298o (294o for short distance), maintain the speed of 162kn~167kn (300~310km/h) and bank of 15o ~20o (maximum not more than 25o ), get in the final turn. During the process of turning, judge the opportunity of the turn according to the indication of the ADF bearing and the azimuth finder and correct it timely by increasing or decreasing the bank. If the runway is visible, the main task during the former 45o of the turn is to maintain flight data. During the latter 45o of the turn, the main task is to observe the runway. A proper lead should be selected to withdraw from the turn and align with the runway. Approach glide and visual landing (a) After the final turn and before the aircraft starts to glide, lower the flaps to 35o at speed of 157kn~162kn (290~300km/h). At this time, the lift coefficient will increase a lot due to flap-down. Especially at the instant of lowering the flaps, as the flight speed has not been obviously reduced and in order to keep the lift constant, it is required to press the stick forward timely to reduce the angle of attack so that the altitude of the aircraft will not be increased. In the process of lowering the flaps, press the stick forward gently and fix the position of miniature aircraft with the trim tabs. The miniature aircraft should be kept at 5o below the ground level with flap down to 35o , which makes the aircraft descend at the speed of 8.2ft/s (2.5m/s). (b) When the flaps are lowered to 35o , maintain the gliding speed at 135kn~151kn (250~280km/h) according to the different weight of the aircraft. The gliding speed should not be less than 135kn (250km/h) in any case. See Table 4-4 for the gliding speed of the aircraft with different weights. Table 4-4a Gliding speed of the aircraft Landing weight (t) Gliding speed (kn) Below 45 135 50 143 52 145 58 151
  • 120.
    JZ-Y8F200W-02 AIRCRAFT FLIGHT MANUAL SECTIONIV NORMAL PROCEDURES 4-34 June 30, 2012 Table 4-4b Gliding speed of the aircraft Landing weight (t) Gliding speed (km/h) Below 45 250 50 264 52 269 58 280 (c) During gliding, adjust throttles to maintain the required gliding speed and trim the aircraft with the trim tabs so as to keep a stable glide condition. (d) The altitude is 656ft (200m) (or the altitude specified by the airport) when the aircraft is flying over the outer locator. It is proper to select the approach aiming point 394ft~492ft (120~150m) away from the runway threshold. (e) The altitude is 197ft (60m) (or the altitude specified by the airport) when the aircraft is flying over the inner locator. Maintain the approach aiming point and the initial flare speed. When the aircraft is flying over the inner locator, advance the inboard throttles by 5o ~10o and retard the outboard throttles according to the atmospheric temperature but not less than 16o . Adjust the required speed prior to flare with the inboard throttles. Refer to Table 4-5 for the gliding speed and the initial flare speed after passing the inner locator. Table 4-5a Gliding speed and the initial flare speed Landing weight (t) 38 43 48 53 56 58 Gliding speed (kn) 124 130 135 140 143 146 Flare speed (kn) 116 121 127 132 135 138 Table 4-5b Gliding speed and the initial flare speed Landing weight (t) 38 43 48 53 56 58 Gliding speed (km/h) 230 240 250 260 265 270 Flare speed (km/h) 215 225 235 245 250 255 Refer to Table 4-6 for the throttle positions at different atmospheric temperatures
  • 121.
    JZ-Y8F200W-02 AIRCRAFT FLIGHT MANUAL SECTIONIV NORMAL PROCEDURES 4-35 June 30, 2012 Table 4-6 Throttle angle Ambient temperature (o C) Below -50 -30 to -50 -11 to -30 0 to -10 0 to 15 20 to 25 30 35 40 Throttle position (o ) 28~32 24~28 18~22 16~18 16 18~20 21~22 23 24 (f) During the course of reducing the throttles, take care to apply right rudder to maintain direction. When the inboard throttles are reduced to 20o and the altitude is 26.3ft~32.8ft (8~10m) at the moment, start to flare out. At the altitude of 2.5ft~3.3ft (0.75~1m), get into float. (g) When the aircraft touches down, retard the inboard and the outboard throttles to 0o respectively and lower the nose wheel gently. Issue the order to release the propeller stop, the inboard ones first, then the outbaord ones. At this moment, use rudder steering to maintain heading and reduce the speed by properly applying brakes. When the running speed is less than 32.4kn (60km/h) and the running direction is stabilized, turn off the rudder steering switch and pull out the nose wheel steering handle to maintain the direction. Taxiing into apron and parking (a) When the aircraft is out of the runway, it usually taxis to the apron with the outbaord engines shutdown, if it is difficult to taxi into apron, tow the aircraft to its parking position with a tractor. (b) Taxiing into the apron is the most complex part of the taxi. It usually requires to make continuous turns. So the speed should not be too fast. Pay attention to the observation of the outside and the flight crew should cooperate closely and remind each other.
  • 122.
    JZ-Y8F200W-02 AIRCRAFT FLIGHT MANUAL SECTIONIV NORMAL PROCEDURES 4-36 June 30, 2012 Before entering the apron, check the pressure accumulator for positive pressure 1593psi~2132ps (10.98MPa~14.70MPa) and the brakes for normal operation. Pay attention to the direction given by the ground crew. Correctly judge the opportunity for the last turn to taxi into the parking position. During the turning process, adjust the turning radius according to the entering opportunity of the turn, and try to align the aircraft with the parking center line when it comes out of the turn. When the aircraft gets out of the turn, determine whether the parking direction of the aircraft is straight according to the parking center line. If the aircraft is not aligned with the parking center line, correct it with the hand steering of the nose wheel. First, correct the aircraft to the parking center line, then align it with the right direction. Park the aircraft in the required position under the assistance of the navigator. (c) After the parking, accomplish the following steps: 1) Pull up the parking brakes. 2) Turn off the power supply for the onboard equipment. 3) Issue the order of “Get ready” and “Shut down”. (d) After shut-down, check: 1) Put the rudder lock at down limit position and rudder and aileron lock at neutral position. 2) Put the flap control switch at UP position, flap at zero, and check each trim tab should be at zero position. 3) The operating switches should return to their original positions after the propellers stop rotation. 4) When the aircraft power is turned off, the captain give a verbal command “Flight crew get out of the seats”. Cautions for traffic pattern flight (a) Take-off is prohibited in the following cases: 1) The propellers are in STOP RELEASING positions, one or more red lights are on. 2) Turn on engine pressure regulator/shut off valve or cockpit heating is in process. 3) Turn on the oil ejector radiating valve 4) The fuel booster pump is cut off under any condition.
  • 123.
    JZ-Y8F200W-02 AIRCRAFT FLIGHT MANUAL SECTIONIV NORMAL PROCEDURES 4-37 June 30, 2012 (b) When the atmospheric temperature is over 20o C, the time for advancing throttles should not be less than 4 seconds. If too fast, it could cause automatic shutdown of the engines. (c) During take-off run, it is required to stop takeoff if the heading of the aircraft is 6o to 7o off the runway direction. If the take-off direction is yawed, it is prohibited to be corrected by changing the throttles. (d) If the rudder steering ON light is not off after the aircraft lifts off, the landing gear can be retracted only after the rudder steering switch has been turned off. If this case happens during landing, the rudder steering switch can be turned on only after the aircraft has landed on the ground and the nose wheel has been extended. (e) Banking is appearing when flaps extending or retractiing, the operation of the flaps should be stopped and adjust the flaps to a position in which the aircraft does not bank. Then landing is allowed. (f) This aircraft has a fairly good float performance and its float distance is longer. So be careful not to overshoot and flare out too early. During landing, adjust the gliding speed with the engine throttles timely to prevent overshoot. (g) During gliding prior to landing, it is not allowed to retard the throttles over the locking pins (less than 16o ). (h) During landing, the pilot should flare out the aircraft to an adequate touch-down angle of attack. Pay attention to the aircraft attitude of touch-down to avoid three-point or single-point touch-down. (i) When the throttles are retarded to a position passing the locking pins and the propeller stop is released during landing run, the engine failure light will probably be on for a short time. This is allowed, and not a malfunction. (j) Touch-down with brakes is absolutely prohibited. Go-around Normally, the altitude for the aircraft to go around should not be less than 164ft (50m). If anything that could damage the flight safety happens during landing process, the aircraft can go around at any altitude, but the throttles of the four engines should not be less than 16o before go-around. (a) Go-around procedures 1) Issue the order of “Go around” to the crew members.
  • 124.
    JZ-Y8F200W-02 AIRCRAFT FLIGHT MANUAL SECTIONIV NORMAL PROCEDURES 4-38 June 30, 2012 2) Advance the throttles gently to takeoff condition 104o . At the same time, press the stick forward to increase the speed as the pitching moment of the aircraft is increased (reduce the load of the stick with elevator tab) and maintain a good flight condition. 3) Issue the order of “Gear up”. 4) When the speed is up to 151kn~162kn (280~300km/h) and the altitude is not less than 328ft (100m), issue the order “retract flaps” (raise them step by step). Then retard the throttles of the four engines to the maximum continuous power condition 84o and carry out normal climbing. Get into landing again. (b) Cautions for go-around 1) Go-around is prohibited when the throttles of the four engines are retarded to 0o . 2) When go-around is made at low altitude and slow speed, the landing gears should be raised timely and keep flight level for a period of time to increase the speed. A good flight condition should be strictly maintained. 3) For go-around practice, the landing gear may not be retracted. Take-off and landing under different conditions Take-off and landing of narrow traffic pattern See Figure 4-4 for establishment drawing of narrow traffic pattern. After take-off, climb up to 492ft~656ft (150~200m), then make a 180o continuous climbing turn with the bank of 18o ~20o and speed of 189kn (350km/h). When the altitude is up to 820ft (250m), retard the engine throttles to 38o ~42o gradually. Level off at the altitude of 984ft (300m) and keep the speed of 178kn (330km/h). Make a level turn and correct the 2~3 times of drift when the aircraft turns to the opposite of the landing direction. After passing by the outer locator and when TB is 30s and the relative ADF bearing is 229o , get into the base turn. 15 seconds before the base turn, lower the flaps to 15o and maintain speed of 167kn~173kn (310~320km/h). Make a level turn with bank of 20o . When the residual angle is 90o , get into gliding at the descent rate of 6.6ft/s (2m/s). Visually inspect the opportunity of entering and correct it timely by increasing or decreasing the bank. Recover from the final turn at 1.35n mile (2.5km) ahead of the outer locator and height of 820ft (250m). Align with the runway and lower the flaps to 35o . Align with the gliding aiming point, adjust a proper gliding speed and get into visual landing. All the other procedures are the same as those for the normal traffic pattern.
  • 125.
    JZ-Y8F200W-02 AIRCRAFT FLIGHT MANUAL SECTIONIV NORMAL PROCEDURES 4-39 June 30, 2012 H33ft ~38ft Level off for landing S=2.808n mile FWY180° H300 V178kn γ18 ~ 20° V178~189 γ20 ° V167~173 H591ft~656ft, V140kn~151kn Request for landing H220 flap down at 35° Patternwidth check Note down TB time, landing gear down, turn on rudder control for landing, flap down before the base leg. DXF229°10s Enter the turn Remaining angle90°, keepsliding speedat6.6ft/s. V162kn H358ft Flap up H197ft Advanceinboard enginethrottle and retardoutboard enginethrottle H492ft~656ft enter theturnV189kn climb up16.4~19.7ft/s Figure 4-4a Narrow traffic pattern .
  • 126.
    JZ-Y8F200W-02 AIRCRAFT FLIGHT MANUAL SECTIONIV NORMAL PROCEDURES 4-40 June 30, 2012 检查航线宽度 H220放襟翼35° γ18°~20° V330~350 S=5.2km γ20° V310~320 DXF270° 记下TB时间放起 落架打开舵操纵 准备着陆三转弯 前放襟翼15° H60 Advance inboard engine throttle and retard outboard engine throttle H180~200 V260~280 Request for landing H220 flap down at 35° Pattern width check Note down TB time, landing gear down, turn on rudder control for landing, flap down before the base leg. DXF229°10s Enter the turn Remaining angle90°, keepsliding speedat2m/s. H8~10 Level off for landing V300 H100 Flap up H150~200enter the turnV350climb up Vy5~6m/s FWY180° H300 V330 Figure 4-4b Narrow traffic pattern
  • 127.
    JZ-Y8F200W-02 AIRCRAFT FLIGHT MANUAL SECTIONIV NORMAL PROCEDURES 4-41 June 30, 2012 Touch-and-go Touch-and-go of the aircraft is more difficult than its normal static take-off. It requires close and strict cooperation of the flight crew. Therefore, only when the normal take-off procedures have been mastered, can the day or night touch-and-go be conducted. (a) Operational requirements of touch-and-go: 1) Touch-and-go can be made only under the conditions that the landing condition of the aircraft is stable and the visual judgment is proper, the engines are operating normally and none of the four engine throttles is less than 16o . 2) After touch-down, the captain should issue the order of “Flap up and advance throttle” in time. The mechanic will raise the flaps to 25o when receiving the order. He reports “Flap 25o ” when it is done. The copilot, according to the captain’s command and the aircraft condition, will gently and concurrently advance the throttles of the four engines to 104o (or 84o ). During the process of advancing throttles, it should be avoided that the throttles are advanced too fast at the beginning and obvious stop occurs in the process. 3) During aircraft running on ground, captain should keep the takeoff direction, hold the nose wheel for two-point taxiing attitude. When advancing the throttle, hold the stick forward timely to prevent the aircraft leave the ground in advance. The speed for ground leaving should be 5.4kn (10km/h) beyond the normal range. Upon leaving the ground, watch the ground and increase the speed with small climb angle, so as not to retouch the ground. 4) Normally, 84o throttles are used for touch-and-go. If the visual estimated touch-down point is too far away or the run distance will be too long caused by other factors, and the aircraft condition is not stable before lift-off, the throttles should be advanced decisively to 104o to avoid forgetting to retract the flaps or retracting them by mistake. 5) When a ferry flight practice requires touch-and-go, communicate with the ground tower through VHF radio and report to the aircraft dispatcher. Touch-and-go can be made only when it is approved. For touch-and-go, the time from touch-down to lift-off is about 10~12 seconds, the run distance is about 1804ft~2296ft (550~700m).
  • 128.
    JZ-Y8F200W-02 AIRCRAFT FLIGHT MANUAL SECTIONIV NORMAL PROCEDURES 4-42 June 30, 2012 (b) Touch-and-go should not be conducted in the following conditions: 1) Weather conditions: higher than moderate precipitation and ambient temperature of 35o C, the crosswind is close to the criteria specified for the captain. 2) The field elevation is above 6562ft (2000m). 3) The landing weight is greater than 52 ton. 4) The distance from the touch-down point to the runway threshold is less than 2297ft (700m) and the length of the runway is shorter than 6562ft (2000m). Unidirectional traffic pattern Unidirectional traffic pattern see Figure4-5 (a) Procedures for unidirectional traffic pattern: 1) Calibrate the azimuth finder at 180o at the time of take-off. 2) Take off according to the procedures for tailwind take-off. All the other actions are the same as normal. 3) Fly over the locator at the altitude of about 656ft (200m). Note down the time and turn left (right). Recover from the turn when the azimuth finder indicates 235o (125o ). Level off at the altitude of 1312ft (400m) and keep the speed at 178kn (330km/h). The navigator reports “40 seconds” before getting into the final turn. The captain issues the order of getting ready for landing and turns on the rudder steering switch (READY green light on). 15 seconds prior to the final turn, lower the flaps to 15o . Get into the final turn with bank of 15o and speed of 167kn (310km/h). Check the opportunity for getting into turn according to the variations of the relative ADF bearing and the azimuth finder and correct it in time. Recover from the final turn at altitude of 1312ft (400m), 4.32n mile (8km) to the runway threshold, glide down at the 6.56ft/s (2m/s) rate-of-descent and then get into the visual landing. (b) Cautions: 1) For unidirectional take-off and landing, the time is shorter, and there are more continuous actions. So the flight crew should cooperate closely to get rid of mistakes. 2) Conditions for conduction: the tailwind is not greater than 16.4ft/s (5m/s), the gross weight is not more than 50 ton and ambient temperature is not higher than 30o C. 3) Actions after flaring out should not be wild, and should prevent the nose-up angle from being too great and the tail portion of fuselage from touching with the ground.
  • 129.
    JZ-Y8F200W-02 AIRCRAFT FLIGHT MANUAL SECTIONIV NORMAL PROCEDURES 4-43 June 30, 2012 180° 150° 120° 90° 60° 30° 221° 248° 265° 286° 309° 332° FWYDXF Begin level-off landing Vy3.1m/s H200 Flap down: 35° s 4.32 n mileH 1312ft Turn on rudder control for landing 40s in advance FW Y235° Flap down at 15° 20s before landing 80s Report 30sH886ft Vy6.89ft/s H1312ft t45sH197ft 55° V167kn~173knγ15° R1.62n mile t140s Figure 4-5a Unidirectional traffic pattern
  • 130.
    JZ-Y8F200W-02 AIRCRAFT FLIGHT MANUAL SECTIONIV NORMAL PROCEDURES 4-44 June 30, 2012 180° 150° 120° 90° 60° 30° 221° 248° 265° 286° 309° 332° FTWDXF Begin level-off landing t45sH60 Vy3.1m/s H200 Flap down: 35° S8km H400 Vy2.1m/s V310~320 γ15° R3km t40s Turn on rudder control for landing 40s in advance FW Y235° H400 Flap down at 15° 20s before landing 80s Report 30sH270 Figure 4-5b Unidirectional traffic pattern
  • 131.
    JZ-Y8F200W-02 AIRCRAFT FLIGHT MANUAL SECTIONIV NORMAL PROCEDURES 4-45 June 30, 2012 Crosswind take-off and landing The crosswind for the aircraft take-off and landing is limited to 49.2ft/s (15m/s) at 90o. Because this aircraft has narrow wheel tread, large fuselage side area and high-mounted wings, it will produce sideslip due to crosswind effect. Thus the side-force bank moment and yawing moment will be produced. This will damage the roll balance of the aircraft with the inclined airflow. The propellers will produce side force that makes the aircraft yaw to the downwind direction. The yawing moment depends on the direction and speed of the wind. When taking off with right crosswind, the left rolling moment produced due to the wind effect is overcome partially by the right bank reaction moment produced by the propellers. Therefore, the take-off performance with right crosswind is better than that with left crosswind. The stick and rudder deflection margin are also greater. So the wind speed limit for right crosswind take-off is 49.2ft/s (15m/s) at 90o . When taking off with left crosswind, due to the right rolling moment caused by the left crosswind plus the right reaction rolling moment produced by the propellers, the pressure on the right wheel will be significantly increased. Therefore, the left crosswind take-off performance is worse, the stick and rudder deflection margin are smaller. The limitation performance is worse than that of right crosswind. It is limited to 32.8ft/s (10m/s) at 90o . Left crosswind landing is more controllable than right crosswind landing, but the limitation performance is lower. It is limited to 36.1ft/s (11m/s) at 90o . Because the left crosswind needs to be corrected in the final approach and the propeller slipstream twist is reduced due to the throttle reduction, the right deflecting moment is decreased. This needs more right rudder so that the glide heading can be maintained. So the application of right rudder is greater, and it is easy to get to full rudder.
  • 132.
    JZ-Y8F200W-02 AIRCRAFT FLIGHT MANUAL SECTIONIV NORMAL PROCEDURES 4-46 June 30, 2012 It is more difficult to control for the right crosswind landing than for the left crosswind landing, but the limitation performance is higher. It is limited to 59.1ft/s (18m/s) at 90o . The reason is that the right crosswind glide is corrected by deflecting the control wheel to the right and applying left rudder. When the throttles are reduced, the right deflecting moment caused by the propeller slipstream is decreased. In order to keep heading, it is necessary to reduce the left rudder slightly. Particularly, when the throttles are reduced to 0o , the left rudder should be changed to right rudder in order to keep heading. In the transition, if the pilot does not operate timely, the nose of the aircraft will yaw to the left. The aircraft will be on the left of the centerline of the runway. This case is not good for landing. That is why the right crosswind landing is more difficult to control. (a) Crosswind take-off: 1) Use rudder steering to keep the aircraft heading during the first half of take-off run with crosswind. Apply brakes if necessary and deflect the control wheel to the upwind direction to prevent the aircraft from bank. The efficiency of the control surfaces is increasing with the speed. The aileron deflection should be reduced properly. 2) In order to use the stabilization function of the nose wheel to prevent the aircraft from yawing, the nose wheel lift-off speed for takeoff is 8.1kn~10.8kn (15~20km/h) greater than normal. If the run direction is not stable, do not be anxious to lift off the nose wheel. The height of nose wheel lift-off should be lower than normal. If the crosswind is very heavy, a three-point lift-off can be made. 3) The nose-up angle of the aircraft at lift-off should be smaller than normal. To ensure more control surface efficiency after the aircraft lifts off, the lift-off speed is required to be greater than the specified speed. When the aircraft leaves the ground, the lateral friction force of the wheel no longer exists. Due to the action of the side force, the aircraft moves laterally towards the opposite of the crosswind. The pilot should bank the aircraft for 3~5o towards the crosswind timely, using the third component of the aircraft weight (G3) to overcome the side force. At the same time, some opposite rudder should be applied in order to keep heading. When getting into climb, the sideslip should be eliminated gradually and heading correction will be used.
  • 133.
    JZ-Y8F200W-02 AIRCRAFT FLIGHT MANUAL SECTIONIV NORMAL PROCEDURES 4-47 June 30, 2012 (b) Crosswind landing: 1) In the final approach and before the inner locator, heading correction is utilized. Keeping the glide direction is based on that the aircraft is moving along the extension line of the runway. During landing, in order to keep the longitudinal axis of the aircraft in the direction of the runway, change to sideslip correction when passing the inner locator. Bank the aircraft for 3~5o towards the upwind and apply opposite rudder accordingly. The sideslip angle will be increased with the decrease of the flight speed in the case that the direction and speed of the wind remain constant. This requires the pilot to adjust the stick and rudder deflection continuously so that the heading and flight path and be kept in parallel with the center line of the runway. 2) The gliding speed of crosswind landing is 5.4kn~8.1kn (10~15km/h) greater than normal. The flare-out altitude is a little bit lower than normal. Do not lift the nose wheel too high at touch-down. In the process of float, apply stick and rudder in time to keep the stable sideslip condition of the aircraft and make the aircraft move along the center line of the runway without any intersection angle. At the instant of touch-down, quickly level off at the same time when pulling the stick back (for heavy crosswind, 2~3o bank is allowed) to make the two main wheels touch the ground simultaneously. 3) After touch-down, the sideslip angle is still increasing as the speed is decreasing. Deflect the stick against the crosswind to prevent the wing on the side of the crosswind from being lifted up. Lower the nosewheel as early as possible and keep the run direction with nosewheel rudder steering. When the direction is stable, release the propeller stop separately. (c) Cautions for crosswind take-off and landing: 1) For crosswind take-off, lower speed lift-off and retouch-down should be avoided. 2) For crosswind landing, do not flare out too high and the actions should be gentle. 3) For crosswind landing, touch-down with intersection angle is not allowed. Particularly for right crosswind landing, the nose of the aircraft yaws to the left. This will make the aircraft run out of the runway more easily.
  • 134.
    JZ-Y8F200W-02 AIRCRAFT FLIGHT MANUAL SECTIONIV NORMAL PROCEDURES 4-48 June 30, 2012 4) After crosswind landing, if the direction yaws rapidly that it can not be stopped by applying rudder and aircraft trends to run out of the runway, in this case, the nosewheel steering handle should be pulled out when the speed is not greater than 81kn (150km/h) to keep heading by the hand steering of the nosewheel. But the steering should be gentle and the inertia should be mastered. Take-off and landing with heavy headwind (a) Take-off The relative airspeed will increase quickly because the wind speed is greater. For heavy headwind, the nosewheel can be lifted off a bit lower than normal. The lift-off speed is 2.7kn~5.4kn (5~10km/h) greater than normal. Be sure not to lift off at lower speed and suddenly jump. (b) Landing Due to the headwind effect, the angle of glide will be increased and the aiming point will be shifted backward. This will probably cause undershoot. To correct the visual estimation, the rate-of-descent will be lower than normal or the altitude of recovering from the final turn and passing over the locator will be increased accordingly. The flaps can be lowered to 25o . The inboard throttles should be advanced more than normal. The aiming point is selected 164ft (50m) to the threshold of the runway. Flare out should not be too high and the actions should be gentle. The angle of attack should not be great and float with four throttles power-on. Take-off and landing under load, forward and aft CG limits conditions (a) Take-off and landing under loading condition 1) Taxiing When taxiing out, first advance the throttles to 25o ~30o in order to move the aircraft. When the aircraft starts to move, reduce the outboard throttles to 0o . At this moment, keep the taxiing speed at 5.4kn~8.1kn (10~15km/h).
  • 135.
    JZ-Y8F200W-02 AIRCRAFT FLIGHT MANUAL SECTIONIV NORMAL PROCEDURES 4-49 June 30, 2012 2) Under conditions of standard atmosphere, sea level and on concrete runway, the distance of take-off run is increased by 131ft~180ft (40~55m) for 1 ton increase of the flight weight when the aircraft with load takes off. In order to reduce the stick force, select the trim tab position prior to take-off according to the center of gravity. If C.G. is 24%~26%CA, the trim control wheel should be pulled back for one and a half measures. If C.G. is 18%CA, pull it back for two measures. For 32%CA C.G., push it forward for two measures. For take-off weight 61 tons and C.G. 24%~26%CA, the control of the aircraft is not difficult except that the take-off speed is increased slowly, the lift-off speed is greater, the speed is also increased slowly after lift-off, and the climb rate is lower. On the contrary, the aircraft is quite stable in take-off run, and this is favourable for take-off. Refer to the Table 4-7 for take-off data with different take-off weights at standard atmosphere and sea level. Table 4-7a Takeoff performance data Weight (t) Lift-off speed (kn) Run distance (ft) Take-off distance (ft) 42 97 1542 2500 45 102 1890 2736 49 107 2365 3192 52 111 2762 3645 54 114 3061 3980 56 121 3100 4337 61 129 4167 5256 Note a) If the take-off weight is less than 48 tons, the maximum continuous power condition can be used for take-off in practice flight. But the lift-off speed should be increased by 5.4kn~6.5kn. The run distance will be increased by 558ft~656ft. b) The runway friction coefficient f=0.035, safety altitude H=49.2ft, angle of attack of aircraft lift-off α=8o , nose-up angle=4o .
  • 136.
    JZ-Y8F200W-02 AIRCRAFT FLIGHT MANUAL SECTIONIV NORMAL PROCEDURES 4-50 June 30, 2012 Table 4-7b Takeoff performance data Weight (t) Lift-off speed (km/h) Run distance (m) Take-off distance (m) 42 180 470 762 45 188 576 834 49 198 721 973 52 206 842 1111 54 211 933 1213 56 225 945 1322 61 238 1270 1602 Note a) If the take-off weight is less than 48 tons, the maximum continuous power condition can be used for take-off in practice flight. But the lift-off speed should be increased by 10~12km/h. The run distance will be increased by 170~200m. b) The runway friction coefficient f=0.035, safety altitude H=15m, angle of attack of aircraft lift-off α=8o , nose-up angle=4o . 3) When landing with 58 tons weight, maintain 151kn (280km/h) gliding speed. Adjust the speed to 140kn (260km/h) prior to flare out and float over with four throttles power-on. In this case, the float distance is approximately 1312ft (400m) (when the landing nose-up angle is formed after flare-out, the inboard throttles are also reduced to 0o ). The touch-down speed is 124kn (230km/h). Refer to Table 4-8 for the landing data with different weights. Table 4-8a Landing performance data Weight (t) Gliding Speed (kn) Touch-down speed (kn) Run distance (ft) Run distance (ft) 40 135 103 2116 3504 46 137 111 2569 4183 50 143 118 2986 4429 52 145 120 3169 4659 58 151 124 3504 5466
  • 137.
    JZ-Y8F200W-02 AIRCRAFT FLIGHT MANUAL SECTIONIV NORMAL PROCEDURES 4-51 June 30, 2012 Note a) Data in this Table are calculated under standard conditions. They will vary with ambient temperature. b) The landing entry altitude H=49.2ft, terrain clearance of the aircraft in float segment h=26.3ft, the runway friction coefficient f=0.15, angle of glide θ=3o and normal load factor ny =0.15. c) Apply brakes as soon as the nosewheel is lowered after touch-down. The automatic brake releasing device will function. At this time, the run distance can be shortened by 328ft~492ft. Table 4-8b Landing performance data Weight (t) Gliding Speed (km/h) Touch-down speed (km/h) Run distance (m) Run distance (m) 40 250 191 645 1068 46 253 205 783 1275 50 264 218 910 1350 52 269 223 966 1420 58 280 230 1068 1666 Note a) Data in this Table are calculated under standard conditions. They will vary with ambient temperature. b) The landing entry altitude H=15m, terrain clearance of the aircraft in float segment h=8m, the runway friction coefficient f=0.15, angle of glide θ=3o and normal load factor ny =0.15. c) Apply brakes as soon as the nosewheel is lowered after touch-down. The automatic brake releasing device will function. At this time, the run distance can be shortened by 100 to 150m.
  • 138.
    JZ-Y8F200W-02 AIRCRAFT FLIGHT MANUAL SECTIONIV NORMAL PROCEDURES 4-52 June 30, 2012 (b) Take-off and landing with forward C.G. limit The forward C.G. limit allowed for take-off and landing is 16%CA 1) In take-off with fore C.G. limit, it is difficult for the aircraft to get the nose-up angle (when the trim tabs are neutralized, the elevator is required to be 15o ~20o up and the stick force will reach 441N (45kgf)). As a result, the take-off run distance will be increased and the lift-off speed will be a little bit greater. To control the aircraft easily, the elevator tab wheel should be pulled back for two measures before take-off. After lift-off, take care to hold the stick back to prevent the aircraft from sinking. 2) In landing with forward C.G. limit, the gliding speed will be a little greater than normal. When passing the inner locator, the elevator tab should be turned back more to make the aircraft get into normal float so that it can enter normal flare-out and landing. All the other operational procedures are the same as normal. (c) Take-off and landing with aft C.G. limit In take-off and landing with aft C.G. limit, it is easy for the aircraft to get into a large angle of attack. At this time, it is difficult to maintain the normal angle of attack for take-off and landing because of low elevator efficiency and speed. So, it is important to avoid high angle of attack and low speed in take-off and landing with aft C.G. limit. 1) When taxiing under aft C.G. limit condition, especially on the uneven ground, longitudinal sway of the aircraft will occur. As the efficiency of nose wheel handle-steering is reduced, take care to apply brakes gently and not advance or retard the throttles wildly during taxiing. 2) In take-off with aft C.G. limit, it is easy to increase the nose-up angle of the aircraft. The elevator tab should be pushed forward for one and a half to two measures before take-off. After lift-off, the aircraft nose-up angle will probably increase. So press the stick forward in time to keep the flight condition. 3) In the final approach at aft C.G. limit, push forward the elevator tab for one and a half to two measures and judge whether it is proper by the force used to press the stick forward. The gliding and flare-out speeds and the selection of the aiming point are the same as that of normal. The flare-out height should be lower than normal by 26.2ft~19.7ft (8m~6m). Pull backward the stick especially gently, because in landing with aft C.G. limit, it is easy for the aircraft to get into landing angle, and also easy to flare out too high, to make ballooning and to touch down at high angle of attack.
  • 139.
    JZ-Y8F200W-02 AIRCRAFT FLIGHT MANUAL SECTIONIV NORMAL PROCEDURES 4-53 June 30, 2012 At the instant of touch-down, the force to push the stick forward can be up to 343N~392N (35kgf~40kgf) to stop nose-up. After touch-down, the aircraft angle of attack will probably increase and it will be difficult to lower the nosewheel. When the run direction is stable, push the stick forward gently to lower the nosewheel. 4) In special case, land without flaps down in 36%CA C.G. condition. During gliding, the elevator tab can be pushed forward for two measures to reduce the stick force. (d) Cautions for take-off and landing under load, forward and aft C.G. limit conditions: 1) Normally, the landing weight is limited to 58 tons, 60 tons is allowed for special case, but the landing gear unit should be checked after landing. 2) In landing with forward C.G. limit and take-off and landing with aft C.G. limit, the pilot is required to take care when controlling the aircraft with the throttles and trim tabs. Misoperation will endanger the flight safety. 3) When the atmospheric temperature is below 30o C, the take-off weight can be 61 tons. In summer, when the temperature is over 30o C, the take-off weight should not be more than 58 tons. Sweltering weather and plateau airfield flight Sweltering weather flight (a) Performance varying features of the aircraft in sweltering weather: 1) As the ambient temperature is high, the air density is low and the engine power is significantly decreased. The run distance of take-off and landing will be longer than that in normal condition. 2) The climb performance of the aircraft is degraded. Both the climb rate and practical ceiling are decreased. 3) As the engine power is decreased, it is necessary to advance the throttles more during landing to keep the engine power constant. 4) As the operating temperature of the accessories is higher, their efficiency is decreased. So the ground start is more difficult. (b) Aircraft control features in sweltering weather: 1) Affected by the temperature, the payload should be reduced accordingly. Refer to Table 4-9 for the run distance of take-off and landing in different temperature and weight conditions.
  • 140.
    JZ-Y8F200W-02 AIRCRAFT FLIGHT MANUAL SECTIONIV NORMAL PROCEDURES 4-54 June 30, 2012 2) In order to lower the oil-inlet temperature in taxiing, the ejection radiation can be used or advance the throttles to 20o . To keep the normal taxiing speed and avoid excessive braking, the inboard and the outboard throttles should be used alternatively. 3) Make good use of the runway length in take-off. Do not advance the throttles wildly and too fast. Normally, it needs, at least, 3~4s. Brakes can be released and run can be done only after the indications of the engine instruments are stable. 4) As the ambient temperature is high in take-off, the pilot should strictly maintain the specified lift-off speed in order to prevent lift-off at lower speed and high angle of attack as well as retouch-down. After lift-off, only when the speed is up to 135kn (250km/h) can the landing gears be raised. Table 4-9a Takeoff and landing performance of the aircraft under sweltering weather condition Weight (t) lift-off/touchdown speed (kn) Run distance (ft) Atmospheric temperature (o C) 48 50 52 54 56 58 61 105 109 109 113 111 118 116 118 121 119 124 127 129 Takeoff Landing Takeoff Landing Takeoff Landing Takeoff Landing Takeoff Landing Takeoff Landing Takeoff 15 2244 2372 2507 2454 2762 2986 2940 3058 3100 3117 3517 3248 4167 25 2474 2503 2769 2585 3058 3117 3268 3189 3461 3248 3911 3379 4610 35 2474 2579 2907 2661 3330 3192 3678 3264 4009 3323 4593 3455 5499 Note The cement road has no lateral turn at air pressure of 14.7psi (101.325kPa) and zero wind speed.
  • 141.
    JZ-Y8F200W-02 AIRCRAFT FLIGHT MANUAL SECTIONIV NORMAL PROCEDURES 4-55 June 30, 2012 Table 4-9b Takeoff and landing performance of the aircraft under sweltering weather condition Weight (t) lift-off/touchdown speed (km/h) Run distance (m) Atmospheric temperature (o C) 48 50 52 54 56 58 61 195 202 201 210 206 218 215 219 225 220 230 235 238 Takeoff Landing Takeoff Landing Takeoff Landing Takeoff Landing Takeoff Landing Takeoff Landing Takeoff 15 684 723 764 748 842 910 896 932 945 950 1072 990 1270 25 754 763 844 788 932 950 996 972 1055 990 1192 1030 1405 35 754 786 886 811 1015 973 1121 995 1222 1013 1400 1053 1676 Note The cement road has no lateral turn at air pressure of 14.7psi (101.325kPa) and zero wind speed. 5) When aircraft climbs with the engine maximum continuous power condition, specified climb indicated air speed should be strictly maintained. It is not allowed to climb with low speed. If the speed is low, it will make the climb performance bad. If disturbing airflow is met, the critical angle of attack is easy to be got by the aircraft, which will unfavourable to safety. 6) When landing in sweltering weather, the throttle angle without thrust is increased. Plateau flight (a) Features of plateau flight: In addition to the features of the flight at high altitude, the plateau flight also has the aircraft performance varying features in sweltering weather. 1) Most of the plateau airfields are built in mountain valleys. The clearway condition in these airfields is poor. So it is difficult to take off and land. Restricted by the terrain, the aircraft, after take-off, can only climb in the direction of the valley. It is not favourable for getting outbound. The landing pattern cannot be established in the normal way.
  • 142.
    JZ-Y8F200W-02 AIRCRAFT FLIGHT MANUAL SECTIONIV NORMAL PROCEDURES 4-56 June 30, 2012 2) There are many mountains in the plateau, and it is difficult to find a place for forced landing. Although the flying altitude is close to the practical ceiling, the absolute altitude above the ground is low. So it is difficult to handle in special cases. 3) Flying over the plateau, the average pattern elevation is higher than 13123ft (4000m) above sea level. These areas are sparsely populated and equipped with less navaids than that in the inner land. The radio-wave propagation is adversely affected by the terrain. The effective range is greatly reduced (the effective range can only be up to 54n mile~81n mile (100~150km)) and the indication error is greater. The communication range of UHF radio is shortened. When the aircraft is flying in cumulonimbus clouds or gliding into a sandstorm, the static interference is greater, which affects the communication. As there are many mountains in the plateau area, it is difficult to distinguish the displays of thunderstorms and mountain peaks as they are similar to each other. 4) Plateau flight has the combined features of high-altitude flight, medium-altitude navigation and flight in mountain areas. The residential areas and high ways are mostly located in the low areas of the valleys. They are normally covered by the high mountains and low clouds. So it is difficult to find them and define their positions accurately. But when the weather is fine, the peaks of the big mountains, the mountain passes and obvious lakes can be found far away. The approximate positions can be determined easily. These can be used as natural “Navaids”. Also, the mountain peaks are satisfactory reflectors of the radar. The EGPWS onboard is convenient for plateau flight. 5) The weather in the plateau is complex and changeable. And there are few weather stations there. So it is difficult to predict the local weather accurately. (b) Take-off features in the plateau: 1) Major factors affecting the take-off and run distance: Air density: The higher the altitude, the lower the air density. In addition, affected by the ground radiating heat of the plateau airfield, the temperature in the airfield will be higher and the air density will be lower. So the take-off and run distance will be increased. Take-off weight: For the same increase of take-off weight, the increase of run distance in a plateau airfield is greater than that in a normal plain airfield. For example, the field elevation is 9843ft (3000m) and the temperature is 20o C, the run distance will be increased by 328ft~394ft (100~120m) for 1 ton increase of weight.
  • 143.
    JZ-Y8F200W-02 AIRCRAFT FLIGHT MANUAL SECTIONIV NORMAL PROCEDURES 4-57 June 30, 2012 Tailwind effect: In most of the plateau airfields, only unidirectional take-off and landing can be conducted. So it is possible to make tailwind take-off and landing. And for the same wind speed, the tailwind effect in the plateau airfield is greater than that in the normal plain airfield. For instance, 5m/s tailwind in normal plain airfield under standard conditions will make the run distance increased by 656ft (200m). But for a 9843ft (3000m) plateau airfield at 20o C, 16.4ft/s (5m/s) tailwind will make the run distance increased by 902ft (275m). So when taking off with tailwind in a plateau airfield, the tailwind effect should be taken into account. Runway gradient: Restricted by the terrain, most of the plateau airfields have greater gradient. On up-gradient take off, the gravity component opposite to the direction of the aircraft motion acts as a drag. So the aircraft acceleration is reduced and the take-off run distance is prolonged. If the longitudinal gradient of a normal plain airfield under standard conditions is 1% (corresponds to 0.57o ), the run distance is increased by 164ft (50m). But if the field elevation is 9843ft (3000m) and the temperature is 20o C, the same 1% longitudinal gradient makes the take-off run distance increased by 459ft (140m). 2) Runway surface: Most of the plateau airfields are made up of cement; some of them of gravel and salt layers. The surface is very rough. So the friction coefficient is increased and the take-off run distance is also increased. See Charpter 5 for lift-off speed, takeoff run distance and takeoff distance with different elevations and takeoff weights. 3) Take-off control features: Make good use of the runway length. Advance the outboard throttles to 104o , the inboard throttles to 84o .When the torque meter and the fuel flow indicator indicate stably, the brakes can be released to take off. The time and distance required for each segments of take-off in a plateau airfield are generally 1.5~2 times of that in a normal plain airfield. Taking off from a plateau airfield, the nosewheel should not be lifted off too early and the angle of attack should not be too high. The rudder deflection should be smaller and the action should be gently. The frontal drag should be minimized. It requires 30 seconds from the start of running to lift-off the nosewheel. At this moment, put the control stick in its neutral position. When keep the heading with rudder, do not operate wildly to avoid affecting the increase of the aircraft speed.
  • 144.
    JZ-Y8F200W-02 AIRCRAFT FLIGHT MANUAL SECTIONIV NORMAL PROCEDURES 4-58 June 30, 2012 It is 20 seconds from lifting off the nosewheel to the lift-off speed. Pull the stick back gently, then the speed is up to 103kn~124kn (190~230 km/h), lift off the nosewheel gradually and continue to increase speed. Hold the stick back to lift off the aircraft smoothly. During this period, if the stick is hold back too early and too much, the run angle of attack will be increased due to large elevator deflection. The total drag of the aircraft will be increased so that the run distance will be prolonged. Also, if the run angle of attack is too high, it is easy to make the aircraft lift off at low speed. As a result, speed increase after lift-off would be difficult. The aircraft may even retouch down which will endanger the flight safety. Taking off with tailwind, the nosewheel should be lift off a bit later, the lift-off angle of attack should be lower and the lift-off speed should be properly increased. Standard altitude of the airport is 11483ft (3500m). Refer to the Table 4-10 for the aircraft run distance of take-off and landing with tailwind and different weights. Table 4-10a Takeoff and landing performance in plateau Tailwind Speed (ft/s) Take-off Landing Weight (t) Lift-off IAS (kn) Distance (ft) Weight (t) Down IAS (kn) Running distance (ft) 0 49 116 6037 49 120 4265 0 50 117 6332 50 121 4396 3.3 49 116 6299 50 121 4528 3.3 50 117 6430 52 124 4823 6.6 49 116 6496 50 121 4659 6.6 50 117 6693 52 124 4954 9.8 49 116 6726 50 121 4790 9.8 50 117 7054 52 124 5085 13.1 49 116 6988 50 121 4921 13.1 50 117 7283 52 124 5217 16.4 49 116 7218 50 121 5052 16.4 50 117 7480 52 124 5348
  • 145.
    JZ-Y8F200W-02 AIRCRAFT FLIGHT MANUAL SECTIONIV NORMAL PROCEDURES 4-59 June 30, 2012 Table 4-10b Takeoff and landing performance in plateau Tailwind Speed (m/s) Take-off Landing Weight (t) Lift-off IAS (km/h) Distance (m) Weight (t) Down IAS (km/h) Running distance (m) 0 49 215 1840 49 223 1300 0 50 217 1930 50 225 1340 1 49 215 1920 50 225 1380 1 50 217 1960 52 230 1470 2 49 215 1980 50 225 1420 2 50 217 2040 52 230 1510 3 49 215 2050 50 225 1460 3 50 217 2150 52 230 1550 4 49 215 2130 50 225 1500 4 50 217 2220 52 230 1590 5 49 215 2200 50 225 1540 5 50 217 2280 52 230 1630 When climbing after take-off, if the aircraft can not take-off in the direction of better clearway condition due to overspeed of the tailwind, it should get to an altitude as soon as possible to fly over or around the mountain peaks. In this case, climb up at a lower speed, with 15o flaps and take-off power (not more than 15min) and at 178kn (330km/h) indicated air speed, and get rid of the mountain peaks by visually changing the heading. After flying over or around the mountains, raise the flaps up and retard the throttles to maximum continuous power condition, then shift to normal climb. (c) Traffic pattern establishment and visual landing features 1) Traffic pattern establishment: Based on the airfield terrain condition, the traffic pattern is generally established by the following two methods: One is to land directly with a long final leg along the mountain gully if the pilot is familiar with the airfield conditions. The other method is to keep the pecified safe altitude to approach, then change a certain heading to fly (or by means of angular correction) for a computation time. Then return to the airfield and align with the runway visually.
  • 146.
    JZ-Y8F200W-02 AIRCRAFT FLIGHT MANUAL SECTIONIV NORMAL PROCEDURES 4-60 June 30, 2012 2) Visual landing: As the true air speed is increased, the distance of each landing segment is prolonged and the actions to control the aircraft have some special features. The weather in the plateau is fine and the visibility is excellent. At 9843ft (3000m) absolute height, the runway can be in sight 16.2n mile (30km) away. In visual judgement of distance, it is easy to mistake the far for the near and to descend too early so that the altitude of each landing segment after glide could be too low. For this aircraft landing in plateau airfield, the approach altitude should not be too high and the glide angle should not be too large. As a result, the pilot should make good use of the obvious landmarks and locators to control strictly the altitude at each point. As the air speed is greater and the float distance is longer, the aiming point should be selected 328ft (100m) further than that in a normal plain airfield. But the plateau airfields are mostly built on the river banks. Thresholds are close to the river ravine. Be careful not to undershoot and land out of the runway. During landing, set the outboard throttle positions according to the temperature, in addition, adjust the throttles according to the air pressure (for every 1.16psi (8.0kPa) decrease of air pressure, advance the throttles by 1.5o ~2.0o ). During landing, the flare-out altitude is a little bit lower than that in normal. Do not flare out too high and balloon. Because the air drag in the plateau airfield is smaller, the run direction stability after touch-down is poorer than that in a normal plain airfield. So the propeller stop can be released only when the run direction is stable. When the propellers stop is released, the deceleration is not obvious since the negative thrust of the propellers is smaller. Therefore, the run distance will be increased. 3) Tailwind landing: Gliding with tailwind, the glide angle is decreased and the ground speed in float is greater. This could cause overshoot. So the altitude when recovering from the final turn should be lower than that in normal, the throttle positions should be smaller than normal and the aiming point should be about 328ft (100m) backwards than normal. Align with the aiming point in time and increase the rate-of-descent to maintain the glide curve. The running distance is increased due to greater true air speed after touchdown.
  • 147.
    JZ-Y8F200W-02 AIRCRAFT FLIGHT MANUAL SECTIONIV NORMAL PROCEDURES 4-61 June 30, 2012 (d) Cautions for take-off and landing 1) Use the oxygen masks prior to take-off and approach landing in a plateau airfield. Close the air supply valve before passing the outer locator. After landing, release the airtightness of the cockpit first, and then the copilot opens the small window on the right side to equalize the pressure. After that, open the door of the escort cabin. 2) Take-off with ice and frost in a plateau airfield is totally inhibited. 3) Operate the altimeters correctly during take-off and landing. One of the two barometric altimeters can be used to set up field elevation pressure, the other one can be used to set up the sea-level pressure. Check and calibrate them frequently with the radio altimeter to prevent mistakes. Zero altitude calibration method: When the field elevation pressure is less than 129.52psi (89.3KPa) (670mmHg), rotate the adjusting knob according to the “Zero Altitude" message provided by the aircraft dispatcher and (the inner triangle arrow indicates in the thousand meter unit and the outer one indicates in meter unit) set up the pressure altitude of the airport with altitude arrows. In this way, the relative altitude is avaliable for take-off and landing. 4) The safe altitude should be strictly maintained during approach when flying in clouds. Do not glide too early. When penetrating the clouds, keep the specified data strictly to prevent the aircraft from hitting the mountains during gliding and penetrating. 5) When starting engines in a plateau airfield, pay attention to the following points: Restart time after shut-down: It is not easy to restart the engines in 45 minutes after shut-down as they are still hot. It is easier to restart in two hours and difficult in more than two hours. When starting the engines in different elevations, it is allowed if the engines can get to idle speed within 3~4 minutes. It is difficult to start with tailwind. Therefore, watch out for the wind direction in parking. If the first start fails, only after the cranking can the engine be restarted. If necessary, adjust No. 16 or No.17 screw by the ground crew. If two of engines have been started successfully, but the other two are difficult to start, start them with the ram pressure during taxiing.
  • 148.
    JZ-Y8F200W-02 AIRCRAFT FLIGHT MANUAL SECTIONIV NORMAL PROCEDURES 4-62 June 30, 2012 Take-off and landing on earth and snow-covered runways This aircraft has the performance data of take-off and landing on an earth runway whose standard strength is greater than 113.71psi~127.92psi (0.784MPa~0.882MPa) (8kgf/cm2 ~ 9kgf/cm2 ) (the depth of the wheel tracks is not more than 2.76 in~3.15 in (7~8cm) when the taxiing speed is 2.7kn~8.1kn (5~15km/h)), on a 7.87in (20cm) unpacked snow (the density of the packed snow layer is greater than 16.214lb/ft3 (0.5g/cm3 )) runway and a 3.94 in~5.91 in (10~15cm) packed snow (the density of the packed snow layer is greater than 19.5 lb/ft3 (0.6g/cm3 )) runway. When taking off in an earth runway at 14.7psi (0.1013MPa) (760mmHg) standard air pressure and 15o C temperature, the take-off run distance is 4265ft (1300m) with 54t weight and C.G of 25%CA. With 61t weight, the aircraft can take off from a 7.87in (20cm) unpacked snow runway. In winter (packed snow layer), the depth of snow layer is bigger than 3.94in~5.91in (10~15cm) the take-off run distance is not greater than that on a concrete runway during summer. But, if the strength of the packed snow layer is low and the snow layer is 3.94in~5.91in (10~15cm) deep, the take-off run distance should be increased. Taxiing (a) Taxiing no matter on an earth runway (the standard strength is greater than 113.71psi (0.784MPa) (8kgf/cm2 )) or a snow-covered runway has no much difference with taxiing on a concrete runway except that the inboard throttles are increased. To move the aircraft from its static state, all the four throttles should be advanced to 30o ~40o . The four throttles are required to be at 18o ~20o in order to maintain 10.8kn (20km/h) taxiing speed. (b) When taxiing on the segment of an earth runway whose strength is lower, or on a runway that is covered by more than 5.91in (15cm) snow layer or by a more than 5.91in (15cm) packed snow layer, the taxiing speed should be kept at no less than 10.8kn~16.2kn (20~30km/h). Parking and small radius (less than 98ft (30m)) turning are not allowed. (c) When taxiing on an earth runway that is watered or covered with snow and partial ice, the efficiencies of nose wheel steering and braking will be greatly reduced. In order to improve the braking efficiency, the automatic brake release switch should be turned off. The outboard throttles can be used to assist turning if required.
  • 149.
    JZ-Y8F200W-02 AIRCRAFT FLIGHT MANUAL SECTIONIV NORMAL PROCEDURES 4-63 June 30, 2012 Take-off on earth runway (a) In order to rotate the nose wheel easily, the best C.G. position for earth runway take-off is 24%CA~30%CA based on the take-off weight of the aircraft (54~61 tons). For an aircraft with 50~54t take-off weight, the forward C.G. should not be greater than 20%CA. To reduce the stick force, pull the elevator tab back for one and a half to two measures before take-off according to the weight (50~61 tons). (b) Taking off from a smooth and hard earth runway has no difference with that from a concrete runway except for minor buffet. (c) Taking off from an unsmooth and non-uniformly strengthened earth runway, particularly at forward C.G., the nose wheel should be rotated at the speed of 65kn~70kn (120~130km/h) so as to reduce the nose wheel load as well as aircraft buffet and longitudinal swing. When taking off from an earth runway that is non-uniform in strength, even in some places, the strength is 113.71psi~56.85psi (0.784~0.392MPa) (8~4kgf/cm2 ), the aircraft will swing longitudinally. It is difficult for the pilot to keep the run nose-up angle after the nose wheel has been rotated. The aircraft heading is maintained by rudder only, and no braking is allowed. When taking off from an unsmooth runway, it is possible to lift off too early at a lower speed. In this case, the pilot should control the aircraft timely to avoid retouch-down. Especially in the case with crosswind, it is dangerous to retouch down. (d) The piloting technique is quite complicated for the take-off when the aircraft weight is 54 tons at 20%CA C.G. and with 33~39ft/s (10~12m/s) crosswind at 90o (particularly the left crosswind). In order to reduce the nose wheel load and prevent the aircraft from longitudinal swing, the pilot should pull the stick fully back (at this moment, the stick force is 392N~441N (40kgf~45kgf) when the speed is 65kn~70kn (120~130km/h). At the same time, operate the control wheel to eliminate the aircraft banking. In this case, the aircraft is required to lift off in an approximate three-point attitude at a lower speed. (e) Before lift-off, if the engine fails at the speed less than the decision speed, the nose wheel should be lowered immediately and abort the take-off. If the speed is greater than the decision speed, continue with the take-off. So during take-off run, the navigator is required to report the speed variation in time so as to accomplish the take-off smoothly.
  • 150.
    JZ-Y8F200W-02 AIRCRAFT FLIGHT MANUAL SECTIONIV NORMAL PROCEDURES 4-64 June 30, 2012 Landing on earth runway (a) It is not complex for the aircraft to land on an earth runway whose standard strength is 113.71psi (0.784MPa) (8kgf/cm2 ). The control actions for visual landing are the same as normal. (b) When landing on an earth runway with poor strength or insufficient strength in some places, the stick should be pulled to the back position during landing run in order to reduce aircraft bumping. Release the propeller stop when the nose wheel has been lowered for 4~5 seconds. (c) To protect the runway surface, the brakes are normally not applied to reduce speed. To prevent the aircraft from stopping and the wheels from sinking in, the throttles should be advanced before the end of run to keep the speed at 10.8kn~13.5kn (20~25km/h) so that the aircraft can not stop when making turn at a place of lower strength. Take off on snow-covered runway (a) When taking off from a runway that is covered by snows of less than 19.5 lb/ft3 (0.6g/cm3 ) density and less than 3.94in~5.91in (10~15cm) depth, it is the same as normal take-off except for minor buffet and slight increase of run distance. When taking off from a runway where the depth of snow cover is less than 7.87in (20cm), it is no difference with normal takeoff except for minor longitudinal swing and small increase of run distance. (b) Before take off, the center of gravity should be positioned in the range of 24%CA~30%CA. After take-off, the landing gears can be raised only when the flaps have been up so as to blow off the snow on the assemblies of the landing gears. (c) Take-off from a runway covered with more than 5.91in (15cm) depth of snow or of insufficient strength and covered with packed snow is normally not allowed except for special cases (the wheels will break the snow layer). Because of the friction coefficient increase, slow increase of run speed, aircraft heading yaw, serious longitudinal swing and decrease of rudder steering efficiency, it is very complex to take off. If it is required to take off from such a runway, it is better to select the aircraft C.G. in the middle or aft position (24%CA~30%CA). In order to reduce the wheel load and eliminate the longitudinal swing, the rotation speed should be 65kn~70kn (120~130km/h). (d) Taking off from a runway of insufficient strength and covered with more than 3.94in~5.91in (10~15cm) packed snow, the run istance will be much longer than the take-off from a concrete runway. If the take-off weight is 54 tons, at 14.7psi (101.33kPa) (760mmHg) standard atmosphere pressure and -5o C temperature, the run distance is 3609ft (1100m).
  • 151.
    JZ-Y8F200W-02 AIRCRAFT FLIGHT MANUAL SECTIONIV NORMAL PROCEDURES 4-65 June 30, 2012 Landing on snow-covered runway (a) Landing on a snow-covered runway, it is more difficult and complicated to make the visual landing judgment and decide the flare-out opportunity than that on a concrete runway. To improve the accuracy of visual landing and opportunity of flare-out judging, landmarks should be made 328ft~492ft (100~150m) away from the threshold of the runway. (b) When landing on a runway covered with more than 5.91in (15cm) packed snow and of sufficient strength, the propeller stop should be released 4~5s after the nose wheel has been lowered in order to reduce the aircraft buffeting and heading yaw (the run speed in the latter part is 65kn~76kn (120~140km/h)). Keep the running direction with the rudder steering. Cautions for takeoff and landing on earth or snow-covered runway (a) Air fleet flight is allowed on the run way whose standard strength of the earth is more than 113.71psi~128.07psi (0.784MPa~0.882MPa) (8kgf/cm2 ~9kgf/cm2 ). In case of air fleet flight on the earth run way in winter, snow clearance is required in advance. (b) When flying on an earth runway of 71.07 psi~85.28 psi (0.49~0.588MPa) (5~6kgf/cm2 ) strength or covered with deep snow (more than 5.91in (15cm) deep), the maximum take-off weight is 48~50 tons. To improve the flight on a runway of insufficient strength, the pressure of the tyres can be reduced to 4 atmospheres. This pressure can ensure the aircraft takeoff with 61t weight on an earth runway of 85.28psi~99.64psi (0.588~0.688MPa) (6~7kgf/cm2 ) strength. But for security, the depth of the wheel tracks should be measured by running test before taking off. (c) Flight with landing gear unretracted can be performed on a wet, more than 3.94 in~5.91in (10~15cm) deep packed snow-covered and insufficiently strengthened runway (the wheels will break the snow layer) if necessary. Takeoff and landing on partial steel plate and steel plate runway The aircraft is allowed to take off and land on partial steel plate runway whose depth of wheel track in the middle of the earth part is no more than 3.15in (8cm) (no FOD obstructing A/C structure and landing gear up) , or on the steel plate runway. However, under such circumstances, operation of the aircraft must be conducted by pilots familiar with short & narrow runway takeoff and landing skills. Pay special attention to the taxi direction at the speed of 16.4~23.0ft/s (5~7m/s) with side wind of 90o .
  • 152.
    JZ-Y8F200W-02 AIRCRAFT FLIGHT MANUAL SECTIONIV NORMAL PROCEDURES 4-66 June 30, 2012 Measure the start point distance of T-shaped steel plate accurately before takeoff, and the distance should be arranged as per different landing weight of the aircraft with the earth strength of 56.86psi~80.93psi (0.392MPa~0.588MPa) (4kgf/cm2 ~6kgf/cm2 ). Start point distance of the T-shaped steel plate as per different landing weight of the aircraft is shown in Table 4-11. Table 4-11a Start point distance of the T-shaped steel plate Windspeed (ft/s) Weigh (t) Upwind 32.8 Downwind 16.4 No wind 52 1476 1969 2297 50 1312 1673 2133 46 1083 1509 1903 Table 4-11b Start point distance of the T-shaped steel plate Windspeed (m/s) Weigh (t) Upwind 10 Downwind 5 No wind 52 450 600 700 50 400 510 650 46 330 460 580 When earth strength is about 56.85psi (0.392kPa) (4kgf/cm2), C.G. margin is 26%CA~ 28%CA, running distance for takeoff and landing with different airborne weight under international standard atmosphere is shown in Table 4-12. Table 4-12a Takeoff and landing performance on steel plate runway Weight (t) Lift-off speed and running distance Grounding speed and running distance Partial steel plate runway Steel plate runway Partial steel plate runway Steel plate runway Lift-off speed (kn) running distance (ft) Lift-off speed (kn running distance (ft) Groundin g speed (kn) running distance (ft) Groundin g speed (kn) running distance (ft) 54 113 3117 113 2707 119 3379 119 3281 52 111 2723 111 2444 117 3150 117 3051 50 108 2067 107 2001 112 2887 112 2756 46 113 3117 113 2707 119 3379 119 3281
  • 153.
    JZ-Y8F200W-02 AIRCRAFT FLIGHT MANUAL SECTIONIV NORMAL PROCEDURES 4-67 June 30, 2012 Note The lift-off running distance on partial steel plate runway increases with advancement of C.G. When C.G is 20%CA, the distance increase is 70m~100m. Running distance for landing on partial steel plate runway and takeoff and landing on steel plate runway has no relationship with takeoff C.G. position. Table 4-12b Takeoff and landing performance on steel plate runway Weight (t) Lift-off speed and running distance Grounding speed and running distance Partial steel plate runway Steel plate runway Partial steel plate runway Steel plate runway Lift-off speed (km/h) running distance (m) Lift-off speed (km/h) running distance (m) Groundin g speed (km/h) running distance (m) Groundin g speed (km/h) running distance (m) 54 215 1100 214 910 52 210 950 210 825 221 1030 221 1000 50 206 830 206 745 217 960 217 930 46 200 630 198 610 208 880 208 840 Note The lift-off running distance on partial steel plate runway increases with advancement of C.G. When C.G is 20%CA, the distance increase is 70m~100m. Running distance for landing on partial steel plate runway and takeoff and landing on steel plate runway has no relationship with takeoff C.G. position. Takeoff and landing on partial steel plate runway (a) Takeoff The pilot must conduct the running along the mid-line of the run way during takeoff. During this process, the metal plate will sound and the aircraft will buffet acutely, and such buffet will be more acute when the aircraft leaves the steel plate for the earth runway. Its acceleration tends to decrease when the earth strength is below 71.07psi (0.49MPa) (5kgf/cm2 ), resulting in pitching sway and deviation of the direction (especially when the earth strength is uneven). Thus, correction with rudder is required so as to keep running direction.
  • 154.
    JZ-Y8F200W-02 AIRCRAFT FLIGHT MANUAL SECTIONIV NORMAL PROCEDURES 4-68 June 30, 2012 The nose wheel can not be lifted up until the aircraft leaves partial steel plate runway. After the nose wheel leaves the ground, maintain running elevation angle of the aircraft. When the airbone weight is 54t, 50t and 46t, lift-off speed of the aircraft is 116kn (215km/h), 113kn (210km/h) and 108kn (220km/h) respectively. (b) Landing The aircraft should ground accurately near the T-shaped steel plate with the same speed as that on the cement runway. After grounding, the aircraft should maintain its running direction along the midline of the runway. In case its speed saw acute decrease and tends to stop, it is necessary to advance the throttle before deceleration with the brake. In case of a low VFR, delay the normal stop release so that the aircraft will enter the steel plate runway. Takeoff and landing on steel plate runway (a) Takeoff In case the aircraft takes off on the steel plate, the pilot must control the aircraft running direction along the steel plate timely so that the aircraft will not deviate from the runway. The nose wheel should lift up as per different airborne weight and C.G position at the speed of 86kn~97kn (160km/h~180km/h). When the airbone weight is 54t, 50t and 46t, lift-off speed of the aircraft is 116kn (215km/h), 113kn (210km/h) and 108kn (200km/h) respectively. (b) Landing The aircraft should ground accurately near the T-shaped steel plate with the same speed as that on the cement runway. Keep running direction of the aircraft on the steel plate runway. In case of sidewind, watch the running direction to prevent the aircraft from deviated from the runway. (c) Cautions of takeoff and landing on partial steel plate and steel plate runway 1) Get the data of earth strength at different parts of partial steel plate and steel plate runway before flight. When the aircraft takes off or lands on them, the width of the taxi way should not be less than 29.5ft (9m), with its connecting radius of inner flange not less than 32.8ft (10m).
  • 155.
    JZ-Y8F200W-02 AIRCRAFT FLIGHT MANUAL SECTIONIV NORMAL PROCEDURES 4-69 June 30, 2012 2) When the aircraft deviates from partial steel plate or steel plate runway due to misoperation or other reasons, the pilot should hold the flight direction to stop the deflection. In case that the earth strength at both sides of the runway is above 56.85psi (0.392MPa) (4kgf/cm2 ) with no obstructive, keep new takeoff direction to continue the flight, but do not adjust the flight direction towards the steel plate runway. In case that the earth strength is below 56.85psi (0.392MPa) (4kgf/cm2 ), abort the takeoff. 3) Brake is only permitted on the steel plate surface in case of taxiing on the partial steel plate runway. Under such circumstances, avoid coarse brake operation so as not to damage the runway surface and the tyre. Ferry flight The ferry flight is an effective measure to conduct air maneuver and accomplish all kinds of tasks. The pilot must familiarly master ferry flight abilities in various conditions to ensure the aircraft flies to the destination rapidly, accurately and safely. Climbing After the gears and flaps have been retracted during take-off, set the engines to maximum continuous power conditions, trim the aircraft with tabs and maintain the specified speed for climbing up. At the altitude of 3281ft (1000m), the captain gives the command of “Cabin pressurized”. The copilot makes the cabin pressurization and report to the captain after the check. Generally, the optimum speed should be selected for climbing according to the take-off weight. Climbing performance of the aircraft with different weights is shown in Chapter 5. Under standard conditions, the service ceiling of the aircraft with different take-off weights is shown in Table 4-13.
  • 156.
    JZ-Y8F200W-02 AIRCRAFT FLIGHT MANUAL SECTIONIV NORMAL PROCEDURES 4-70 June 30, 2012 Table 4-13a Service ceiling of the aircraft Takeoff weight (t) 49 51 54 56 61 Service ceiling (ft) 34104 32972 31250 29774 27312 Table 4-13b Service ceiling of the aircraft Takeoff weight (t) 49 51 54 56 61 Service ceiling (m) 10395 10050 9525 9075 8325 Normally, the flight should be performed at 1640ft (500m) below the service ceiling. Enroute flight (a) When the aircraft climbs to the specified altitude, levels off. When the preset cruising speed is achieved, the throttles are reduced from maximum continuous power condition to the operating condition that is normally not higher than 0.85 maximum continuous power condition (72o ). During level flight, the speed will gradually increase with constant throttles as the flight weight decreases due to fuel consumption. (b) Perform the air navigation. Make full use of the onboard navigation equipment as per features of the aircraft to master the aircraft position at any time. If the change of flight data is desired, care should be taken to ensure three accuracies, i.e. listening, watching and aligning accuracies and prevent mistakes and omissions. (c) On route, the weather condition should be observed, judged and understood, especially during night or bad weather flight. The navigator should be reminded of observing hazardous weather on route with radar. (d) Be clear about the traffic situation enroute. Turn on the UHF radio to communicate in advance when flying over the halfway airfield area. The autopilot maybe used during long-range flight.
  • 157.
    JZ-Y8F200W-02 AIRCRAFT FLIGHT MANUAL SECTIONIV NORMAL PROCEDURES 4-71 June 30, 2012 (e) Range and duration: 1) The range and duration depend on fuel reserve quantity, the aircraft weight, flight altitude and speed. Below the service ceiling, range and duration increase with the increase of flight altitude. 2) At the indicated airspeed of 162kn (300km/h), the maximum duration is obtained at various altitudes. However, this speed is not applicable in actual flight because it is an economical speed normally, not the optimum speed. The optimum level flight speed and corresponding fuel consumption per kilometer and fuel consumption per hour at different altitude are shown in Chapter 5. The consumed fuel, traveled distance and required time before descending to the altitude of 1640ft (500m) are listed in Table 4-14. Table 4-14a Consumed fuel, traveled distance and required time before descending to the altitude of 1640ft Descended altitude (m) Fuel Consumption (kg) Distance (km) Time (min) 3281 30 5 1 6562 100 11 3 9843 150 22 6 13123 200 32 8 16404 250 43 10 19685 300 54 11 22966 350 59 13 26247 400 70 15 29528 450 81 16 32808 500 86 18 Note Descend gradually from the cruising altitude to the traffic pattern altitude at the rate of 23ft/s~39ft/s and at the normal indicated gliding speed of 243kn with no less than 16o throttles. Then reduce the speed to 189kn and enter the landing pattern.
  • 158.
    JZ-Y8F200W-02 AIRCRAFT FLIGHT MANUAL SECTIONIV NORMAL PROCEDURES 4-72 June 30, 2012 Table 4-14b Consumed fuel, traveled distance and required time before descending to the altitude of 500m Descended altitude (m) Fuel Consumption (kg) Distance (km) Time (min) 1000 30 10 1 2000 100 20 3 3000 150 40 6 4000 200 60 8 5000 250 80 10 6000 300 100 11 7000 350 110 13 8000 400 130 15 9000 450 150 16 10000 500 160 18 Note Descend gradually from the cruising altitude to the traffic pattern altitude at the rate of 7~12m/s and at the normal indicated gliding speed of 450km/h with no less than 16o throttles. Then reduce the speed to 350km/h and enter the landing pattern. Descending Determine the approach altitude according to the terrain elevation of the airfield area, the operating rules and regulations of the airfield, the weather condition and the instruction of the aircraft dispatcher. Judge the descent opportunity exactly as per flight altitude and the enroute terrain. During descending, the outboard throttles are normally retarded to 20o first, then the inboard throttles to 20o , and the stick should be pressed forward to maintain the rate of descent at 23ft/s~39.4ft/s (7~12m/s). Trim the aircraft with tabs. The initial descending rate is big. Usually, it is maintained at 32.8ft/s (10m/s) above 13123ft (4000m) and 23 ft/s~26.3 ft/s (7~8m/s) below 13123ft (4000m). The favorable indicated gliding airspeed is 243kn (450km/h) and not higher than 270kn (500km/h) in general. Caution It is forbidden to retard the throttles lower than 16o during descent.
  • 159.
    JZ-Y8F200W-02 AIRCRAFT FLIGHT MANUAL SECTIONIV NORMAL PROCEDURES 4-73 June 30, 2012 Main tasks before entering pattern (a) Turn on the radio altimeter in order to correct the barometric altimeter and for reference during landing. (b) Turn on marker beacon receiver and VOR/ILS system. (c) Select the favorable bearing to enter the airfield or locator, and make the homing timely. (d) Accurately correct the altimeter after receiving the landing conditions reported by the aircraft dispatcher. The crewmembers should make clear the procedures for entering the traffic pattern and study the particulars of the landing field and matters of attention. (e) Correct the azimuth finder 3~5 minutes before reaching the airfield as per landing heading, maintain the safe altitude, and report the procedures for entering traffic pattern to the aircraft dispatcher after finding the airfield. Pattern establishing and VFR landing (a) Procedures for penetration and approach: 1) Pattern establishment: Turn base 30 seconds after flying over the outer locator. 2) Narrow pattern: Turn base 15 seconds after passing by the outer locator. 3) Long final landing: See Figure4-6. 4) Penetration for the wide pattern: See Figure4-7. 5) Straight penetration: See Figure 4-8. The procedures above should be performed according to the operating rules and regulations of each airfield. (b) When descending to the altitude of 3281ft (1000m) or the altitude of the traffic pattern, release the cockpit pressurization and reduce the speed to 189kn (350km/h). Lower the landing gears and turn on the rudder steering switch to get ready for landing when passing by the outer locator (or over the outer locator). Table 4-15 shows the data for width control of traffic pattern for approaching at different airspeeds.
  • 160.
    JZ-Y8F200W-02 AIRCRAFT FLIGHT MANUAL SECTIONIV NORMAL PROCEDURES 4-74 June 30, 2012 V( ) 260kn Flap down Flap down35° 35° Vy16.4ft/s t5min40s Vy29.53ft/s Landing gear down TAS H1312ft V162kn H656ft H197ft 2.2 4.3 H2953ftH3281ft V189knV173kn 8 H2461ft 11 16 19 40 43 H<13123ft Distance(mile) Figure 4-6a Long final leg landing H60 H200 H400 H750 H1000 H900 H<4000 4 8 15 20 30 35 75 80 V300 V320 V350 V( ) 480 (km) Flap down Flap down35° 35° Vy5m/s t5min40s Vy9m/s Landing gear down TAS Distance Figure 4-6b Long final leg landing
  • 161.
    JZ-Y8F200W-02 AIRCRAFT FLIGHT MANUAL SECTIONIV NORMAL PROCEDURES 4-75 June 30, 2012 调整飞机校对FWY 检查航线宽度 15s . 24s Adjust the aircraft and calibrate FWY Course width check DXF270°Note down report position, landing gear down, turn on rudder control for landing T15sDXF240° v189knγ15° downwindturn FWY270° H1312ft Leveloff γ 15° crosswind turn Fly over the navigation station H656ft v146kn DXF286° γ15° finalturn FMY90° V173kn 15°Flapdown S=6.264n mile DXF238° H656ft V189kn t70s FWY0°V189kn Climbing rate no more than 16.4ft/s H328ft V162kn Flap up H26.2ft~32.8ft V135kn~140kn level Fly over the inner locator H197ft~230ft Advance inboard engine throttle and retard outboard engine throttleAdjust V140kn~146kn V146kn~151kn t70sVy10.8ft/s report 30s Check altitude and request for landing H1312ft V157kn~162kn Flap down 35° V167kn~173n FWY180° H400V330~350 Fly over side way of hte navigation station 60s DXF 240° V178kn~189knγ15° base turn Figure 4-7a Wide traffic pattern establishment
  • 162.
    JZ-Y8F200W-02 AIRCRAFT FLIGHT MANUAL SECTIONIV NORMAL PROCEDURES 4-76 June 30, 2012 调整飞机校对FWY 检查航线宽度 过远台侧方60s DXF240°V330~350 γ15°第三转弯 15s S=11.6km 24s 过近台H60~70 加内侧收外侧 调整V260~270 Adjust the aircraft and calibrate FWY Course width check DXF270°Note down report position, landing gear down, turn on rudder control for landing Fly over side way of the navigation station 60s DXF240°V330~350 γ15° base turn FWY180° H400V330~350 T15sDXF240° v350γ15° downwindturn FWY270° H400 Leveloff H200 V350 t70s γ 15° crosswind turn Climbing rate no more than FWY0°V350 5m/s H100V300 Flap up H8~10V250~260 level Fly over the inner locator H60~70 Advance inboard engine throttle and retard outboard engine throttle V260~270 H60~70 加内侧收外侧 Fly over the navigation station H200V270 V270~280 t70sVy3.3 report 30s Check altitude and request for landing Flap down35° H400V290~300 DXF286° V310~320 γ15° finalturn FMY90° V320 15°Flapdown Adjust Figure 4-7b Wide traffic pattern establishment
  • 163.
    JZ-Y8F200W-02 AIRCRAFT FLIGHT MANUAL SECTIONIV NORMAL PROCEDURES 4-77 June 30, 2012 35° Flap up H197ft Flyover theinner locator Fly over the inner locator Check altitude andrequest for landing Flap down FWY220: Note down the report position after flying over thenavigation station and keep FWY220 Calibrate FWY, check course track against the heading 背航检查航迹 Landing gear down and turn on rudder control for landing 1min before final turn Before turn 20sV173kn Flap down 15° H328ft V162kn t60sH1640ft V167kn~178kn final turn H656ft Vy16.4ft/s FW Y0°V189kn V146kn~151kn Vy9.84ft/s H1640ft V162kn H500 1640ft V178kn~189kn Fly towards the navigation station H656ftV189kn t70sγ 15° Crosswind turn Figure 4-8a Straight pattern establishment (Altitude 1640ft, time 10min)
  • 164.
    JZ-Y8F200W-02 AIRCRAFT FLIGHT MANUAL SECTIONIV NORMAL PROCEDURES 4-78 June 30, 2012 H200V350 t70s 15° Vy5m /s FW Y0°V350 H100V300 H500V330~350 V270~280 Vy3m/s H500V300 35° Crosswind turn Flap up H60 Flyover theinner locator Flytowardsthe navigationstation Fly over the inner locator H200 Check altitude and request for landing Flap down FWY220: Note down the report position after flying over thenavigation station and keep FWY220 Calibrate FWY, check course track against the heading 背航检查航迹 Landing gear down and turn on rudder control for landing 1min before final turn Before turn 20sV320 Flap down 15° t90sH500 V310~330 final turn Figure 4-8b Straight pattern establishment (Altitude 1640ft, time 10min)
  • 165.
    JZ-Y8F200W-02 AIRCRAFT FLIGHT MANUAL SECTIONIV NORMAL PROCEDURES 4-79 June 30, 2012 Table 4-15a Width of traffic pattern Slope 15o 20o TAS(kn) Enterinto crosswindleg(s) Enterinto crosswindleg parallelingtothe runway(s) Radius(km) T180o Patternwidth(n mile) Enterintocrosswind leg(s) Enterinto crosswindleg parallelingtothe runway(s) Radius(nmile) T180o Patternwidth(n mile) 189 66 29 1.9 1min53s 5.4 76 49 1.43 1min25s 5.4 216 48 6 2.5 2min12s 5.4 58 28 1.86 1min37s 5.4 243 32 3.2 2min30s 6.5 45 10 2.37 1min50s 5.4 270 20 3.9 2min45s 7.9 33 2.92 2mins 5.8 297 8 4.8 3min03s 9.6 23 3.51 2min13s 7.0 Table 4-15b Width of traffic pattern Slope 15o 20o TAS(kn) Enterintocrosswind leg(s) Enterintocrosswind legparallelingtothe runway(s) Radius(km) T180o Patternwidth(n mile) Enterintocrosswind leg(s) Enterintocrosswind legparallelingtothe runway(s) Radius(nmile) T180o Patternwidth(n mile) 350 66 29 3.6 1min53s 10 76 49 2.65 1min25s 10 400 48 6 4.7 2min12s 10 58 28 3.45 1min37s 10 450 32 5.98 2min30s 12 45 10 4.39 1min50s 10 500 20 7.3 2min45s 14.6 33 5.4 2mins 10.8 550 8 8.9 3min03s 17.8 23 6.5 2min13s 13 (c) VFR Landing: VFR landing and taxiing in fields vary due to different facilities and operating rules and regulations of each airfield. The pilots should take corresponding measures based on the features of each airfield. This is the basic condition to complete a satisfactory VFR landing in fields. (d) After touch-down, control the taxiing speed correctly, ask for the taxiing route and parking position. If the parking position is not clear on an earth runway or in a strange airfield, the outer engines may not be shut off, and shut them off along with the inboard engines after parking. The power switch of anti-icing system should be turned off after landing in bad weather.
  • 166.
    JZ-Y8F200W-02 AIRCRAFT FLIGHT MANUAL SECTIONIV NORMAL PROCEDURES 4-80 June 30, 2012 Cautions for ferry flight (a) Before flight, decisions on carrying the equipment such as cargo ramp, mat net and mooring should be made according to mission requirements; and the positions and prescriptions involved in the forbidden zones and control zones should be understood. (b) Give special care to the checkout and application of oxygen in flight. (c) For ferry flight under bad weather conditions, the safe altitude should be strictly maintained for approach and the pilot should be familiar with the terrain, mountain and their heights in the airfield area when the clearway condition of the take off or landing airfield is poor and the flight visibility is limited. (d) Before landing at night in a field, ask for the positions of the searchlight cars and their distances to the runway edges in order to get clear the details during VFR landing and prevent running into the searchlight cars during flare-out due to deflection or not knowing how things stand. Night flight Lighting equipment and its operation for night flight (a) Generally, the night flying lighting equipment of all airfields is set up according to the stipulations of regulations, but each airfield has its own particulars. For example, neon lamps are built up 3281ft (1000m) away from an end of the runway in some airfields. They can be found from a great distance if they are on. There is only a row of runway lights in some airfields, and do not consider the grassland side as the runway by mistake when landing on these airfields. If there is any doubt, ask and make it clear on the final leg. There are two or three searchlight cars in some airfields and they are set near the runway edges. Do request carefully in order to know how things stand during VFR landing, especially in airfields for light aircraft. (b) Cockpit lighting adjustment There are many signal lights in this aircraft. Their luminosity can all be adjusted except for the four red lights of propeller stop. The luminosity of fluorescent lights is not strong. It should be adjusted so as to fit in with the natural light outside. There is no exposure in the cockpit and no reflective light on the windshield.
  • 167.
    JZ-Y8F200W-02 AIRCRAFT FLIGHT MANUAL SECTIONIV NORMAL PROCEDURES 4-81 June 30, 2012 Fluorescent lights on the aft ceiling panel are not used in general because it is very easy to cause the reflection of light on windshield. When refraction and reflection of light arise on windshield due to the improper adjustment of lighting, the pilot must prevent reflection of light and refraction with the light-shield assembly. If the fluorescent light cover for the flight engineer falls down during takeoff, shade the fluorescent light with hand, and turn on the strong lighting of the landing lights to adjust the influence of the exposure shinning. (c) Usage of lights Landing lights of the aircraft are mounted on both sides of the fuselage and on the forward emergency door respectively. Since light beam irradiates forward and its range is relatively narrow, it is not easy to find taxiway exits during taxiing. The navigator’s portable light mainly functions to assist the pilot during taxiing. It should irradiate forward and towards the taxiing turn direction timely for observation, especially when looking for the taxiing center line during turning and parking. The aircraft is equipped with flashing lights. During night flight, turn them on after starting the engines and turn them off after shut-down. There are totally 24 formation lights on the aircraft. They are mounted on the top and the bottom of the fuselage and wings to mark the positions or specific signals used in formation flight. Since their power consumption is very large, they are not frequently used. There are lights with white shades in cockpit, escort cabin, cargo compartment and the tail section. They are used for illuminating and icing check on the tail at night. Night traffic pattern flight (a) Taxiing: 1) Turn on navigation lights, flashing lights, fluorescent lights and the illumination lights of rudder tab after starting the engines. 2) The taxi speed at night should usually be 2.7 kn~ 5.4 kn (5~10km/h) lower than that at daytime. During taxiing, the landing lights should be set in WEAK position. The strong illumination may be used if necessary. The navigator’s portable light should be used in time for illumination if passing crossroads and making turns. 3) If strong lights illuminate towards the aircraft during taxiing, the pilot should look at the taxiway nearer and, at the same time, ask the navigator to illuminate straight ahead with the portable light. If necessary, turn on the strong lighting for taxiing to avoid running out of the taxiway or into obstacles.
  • 168.
    JZ-Y8F200W-02 AIRCRAFT FLIGHT MANUAL SECTIONIV NORMAL PROCEDURES 4-82 June 30, 2012 4) Watch the ground signals with special care when entering the parking area at night. After shut-down, turn off the flashing lights and navigation lights, and turn on the lights with white shades and engine illumination lights. Then turn off the fluorescent lights and other signal lights. (b) Take-off: 1) Enter the runway and taxi to the center line. Align with the nose wheel straight with reference to the runway center line, directional lights and compass. There should not be any intersection angle between the aircraft and the runway center line. 2) Before takeoff, observe carefully the runway center line and the directional lights, and look at further position. The throttles should be advanced gently. Rough and wild actions are not allowed. Maintain the direction mainly with reference to the runway center line and the lights on both sides of the runway, and keep the aircraft running along the center line by referring to the directional lights. If any deviation, maintain the direction timely and accurately with rudder. It is necessary to guard against the excessive deflection of rudder, especially the right deflection of rudder should not be large. Otherwise, it might result in deviation from the runway. 3) The nose wheel should be rotated a little later at night than at daytime so as to maintain the direction. The lift-off speed should be 2.7 kn~5.4 kn (5~10km/h) higher than that at daytime. Lift-off with low speed should be prevented. After lift-off, climb and accelerate at a small climb angle. Do not press the stick forward blindly to prevent re-touchdown. (c) The differences of control actions on traffic pattern at night with that at daytime are as follows: 1) During take-off, the landing lights change from weak to strong. If landing lights are not on during take-off, there should not be any intersection angle during parking. The lift-off speed should be 2.7 kn~ 5.4 kn (5~10km/h) higher than normal. 2) Turn off the landing lights at the height of 82ft (25m) and retract them at the height of 164ft~230ft (50~70m) during take-off (the speed will be affected by 4.3kn~5.4kn (8~10km/h) due to the retraction and extension of the landing lights). 3) When the aircraft glides to the altitude of 984ft (300m) on the final leg, lower the landing lights (the time required to lower the landing lights is 10~15 seconds, flash the landing lights for 2~3 times 30 seconds before the outer locator). 4) Turn on the landing lights when the aircraft glides to the altitude of 328ft~492ft (100~150m) on the final leg.
  • 169.
    JZ-Y8F200W-02 AIRCRAFT FLIGHT MANUAL SECTIONIV NORMAL PROCEDURES 4-83 June 30, 2012 (d) VFR landing: 1) It is difficult to estimate visually for landing at night. The altitude error cannot be found easily. Maintain the specified glide data strictly and check the glide path by referring to the altitudes when passing the outer and inner locators. After passing by the outer locator, correctly select the aiming point mainly according to the landing “T” light and entrance lights. Generally, the aiming point should be selected 984ft~1148ft (300~500m) to the landing “T” lights (164 ft~328 ft (50~100m) away from the runway threshold). After turning on the landing lights, take care to keep the aiming point and do not make it move backward to prevent the approach altitude from being too low. 2) It is relatively difficult to flare out at night. Since the light changes rapidly from start of flare-out to that the aircraft has really recovered from float, it is difficult to judge the ground surface accurately. In order to make a good flare-out, the pilot’s line of sight should be diverted timely during flare-out, and look further to prevent flare out from being too high and touch down from being too heavy. (e) Landing under different illumination conditions: 1) Landing with ground searchlights only: If rain, snow or fog at night, the ground searchlights should be used for landing to avoid the light screen which is generated by the landing lights, affecting the pilot’s sight, or when the landing lights are failed. The aiming point is selected still with reference to the landing “T” lights and the runway threshold. Do not be affected by the intensity of ground searchlights or the size of the illuminated area. When landing with ground searchlights, it is easy to move the aiming point forward during glide, resulting in a too high approach. Because it is whole pitch black behind the illuminated area, the pilot dare not gaze at the normal aiming point. If the light area margin is too backward, the aiming point moves backward easily. This will result in a too low approach and undershoot. Therefore, when landing with ground searchlights, the flight data should be kept strictly and the judgement should be made precisely so as to improve the accuracy of VFR landing. After entering the light area, the control is the same as normal and there are no more difficulties.
  • 170.
    JZ-Y8F200W-02 AIRCRAFT FLIGHT MANUAL SECTIONIV NORMAL PROCEDURES 4-84 June 30, 2012 2) Landing with onboard landing lights only: When landing with onboard landing lights only, the glide condition is the same as normal on the first half of the final leg. When the landing lights are turned on, the pilot will often be attracted by the light involuntarily. So it is easy to make the aiming point move backward. At this time, special care should be taken to check the aircraft horizon and the rate-of-descent to strictly maintain data and keep a correct gliding angle. The pilot’s sight should not be attracted by the lighting of landing lights. Since there is no illumination of searchlights on the ground, it is not easy to accurately select the aiming point. Therefore, an approximate position should be first selected by referring to the entrance lights and landing “T” lights. After passing the inner locator, accurate correction and correct data adjustment should be made as the function of the onboard landing lights is increasing and the ground surface near the aiming point is clearer. From the altitude of 98ft (30m), the pilot’s sight should be concentrated on the judgement of ground clearance altitude. At the same time, control the flare speed by means of throttles. As the illuminance of the onboard landing lights is weak, it is relatively difficult to observe the ground surface. During flare-out, the beam of the landing lights should gradually move forward and the pilot’s sight should move forward correspondingly with the decrease of the gliding angle and recovering from flare-out. Otherwise, it will be dark for the pilot to feel the front. In this case, because the pilot feels nervous about a too low flare-out, on the contrary, a too high flare-out and even ballooning could be created. In flare-out, the pilot should be concentrated on the judgement of the relative position of the aircraft and the ground by observing the entrance lights, runway lights and landing “T” lights to recover from flare-out accurately. After entering float, observe the clearest ground surface illuminated by the landing lights to judge whether the aircraft has depression angle, which make the aircraft float with a positive pitch angle. Accurately judge aircraft sinking. But sinking is not as obvious as that in the case of using searchlights. So, the stick should be pulled backward gently to make the aircraft sink steadily and touch down lightly at the lateral of the landing “T” light. After touch-down, maintain the direction timely, retard first the inboard throttles to 0o , then the outboard throttles to 0o . At this time, issue the order to release the propeller stop with steady direction caused by nose wheel touch-down. When the speed is decreased, the rudder steering is turned off first, then the nose wheel control handle is pulled out. Change the illumination of landing lights to weak lighting and gently apply brakes to reduce the speed and taxi out the runway.
  • 171.
    JZ-Y8F200W-02 AIRCRAFT FLIGHT MANUAL SECTIONIV NORMAL PROCEDURES 4-85 June 30, 2012 Cautions for night flight (a) For night take-off, it is prohibited to lift off with low speed and press the stick forward blindly to increase the speed, resulting in touch-down again. (b) In night landing, flaring out outside the lighting area is forbidden and touchdown with intersection angle and nose-down angle should also be avoided. (c) When the flaps are down, roughly and wildly pressing the stick forward for gliding is not allowed to prevent the tail from stalling. Flight in complicated weather conditions Preparation (a) Pay attention to the following points when getting the weather information: 1) The entire and systematic weather situation, the position of frontal surface, the distribution of clouds, and the heights of cloud base and top. 2) The actual weather condition of the take-off, landing and alternate airfields, including cloud form, cloud height, the possibility of rainfall and hazardous weather, visibility, etc., and their variation tendency. 3) The position and intensity of cumulus congestus clouds and thunderstorm, their development and moving direction. 4) Position and strength of turbulent flow and riptide location. 5) The possible icing area and its intensity, the height of 0o C isothermal line. (b) Define the penetrating procedures, responsibility of each crewmember and cautions as per terrain features and obstacle distributions of the landing airfield. (c) Draw up the handling plan when encountering thunderstorm, icing or bumpy air. (d) The following aircraft equipment and systems should be checked with special care: 1) Standby horizon, magnetic compass, radio compass, weather radar, radio altimeter. 2) Anti-icing and heating systems. 3) The bounding jumpers and dischargers of the aircraft.
  • 172.
    JZ-Y8F200W-02 AIRCRAFT FLIGHT MANUAL SECTIONIV NORMAL PROCEDURES 4-86 June 30, 2012 Flight in clouds, rain and under icing condition Flight in clouds and rain Before entering the clouds, judge the cloud form and weather condition, turn on the anti-icing equipment and make the aircraft conditions proper in advance. Flying in clouds, the aircraft state is maintained on the basis of the horizon indication, and the other instruments should be cyclically checked. The control actions should be in time, gentle and accurate. If the indication of any instrument appears questionable or any instrument fails, correct judgment should be made and proper measures should be taken by referring to the indication of other instruments. In over-the-top flight, especially over the cumuli form clouds, the flight altitude should be generally 1640 ft (500m) higher than the cloud top. When climbing and descending through clouds, the flight conditions should be maintained, and pay attention to the surrounding terrain and safe altitude. Do not descend ahead of time. Flight under icing condition This aircraft is equipped with perfect anti-icing equipment. Thus the flight can be ensured under moderate and heavy icing conditions. General flight altitude of the aircraft is 19685ft~29247ft (6000m~8000m), and icing is possible when penentrating the clouds, or in rainy or foggy weather. (a) Effect of icing on flight: Icing on the wings and tail can change the surface shapes of wings to make the aircraft’s aerodynamic performance poor. Lift decreases and drag increases. This will cause the decrease of flight speed and the loss of altitude, and the difficulty for control. The negative critical angle of attack of the horizontal tail decreases as airflow separates in advance after icing. If the control action is rough and wild, it is likely to result in tail stall. Icing on the airspeed head can make ASI indication inaccurate, even inoperative. Icing on inlet guide will affect the operation of engines, even cause engine shut-down in severe case. Icing on the propellers can result in thrust reduction and engine vibration. Icing on the radio antennas will affect communication, and can even break the antennas in severe condition, resulting in the interruption of communication.
  • 173.
    JZ-Y8F200W-02 AIRCRAFT FLIGHT MANUAL SECTIONIV NORMAL PROCEDURES 4-87 June 30, 2012 (b) Icing judgment in flight: 1) The windshield and the leading edges of the wings are the parts to get iced over most easily. Take care to observe. Observe the icing condition on windshield glass with torch at night, and conduct periodical check to engine fairing cover for icing condition with engine lighting device. 2) Icing detectors are mounted on the aircraft and engines. Icing can be determined by their indications. If no anti-icing measures are taken in advance under icing condition, it will be possible that ASI indication goes down or indicates “0”. The phenomena of speed decrease and altitude reduction can also assist to judge. (c) Cautions: 1) Try to avoid flying in freezing area if possible. Otherwise, the flight time in freezing area should be as short as possible and pay attention to the judgement of performance and level. 2) Under the icing condition, the level flight speed should not be lower than 216 kn (400km/h), the turning bank should be less than 15o , gentle control is required, and do avoid being rough and wild. 3) When it is raining or foggy at the temperature below 5o C, check the heatings of inlet guide, windshield and airspeed head should be turned on before take-off. 4) The propeller heating can only be turned on 90s before take-off, and be turned off within 90s after landing. 5) Under complicated weather condition, it is necessary to turn on the A/C icing switch and air intake icing signal switch on RH instrument panel before the aircraft lifts off. (d) Handling of icing on the tail Ice on the tail must be cleared off before gliding and landing. If it is not sure whether ice on the tail is cleared off completely, the maximum flap deflection angle should not exceed 20o ~25o (15o in level flight, and lowered to 20o ~25o before gliding on the final leg). Maintain the gliding speed of 146kn~151kn (280~270km/h) and be careful to avoid rough and wild control actions.
  • 174.
    JZ-Y8F200W-02 AIRCRAFT FLIGHT MANUAL SECTIONIV NORMAL PROCEDURES 4-88 June 30, 2012 (e) When the heatings of wings, inlet guide and cargo compartment are turned on, the flight kilometric fuel consumption will be increased by 8%. (f) If ice, frost and snow still exist on the horizontal stabilizer and wing surfaces when the anti-icing system of wings is on, take-off is inhibited. Procedures for landing through cloud in bad weather Landing through cloud with instruments and using locator: (a) Pattern establishment 1) See Figure 4-9 for wide pattern. 60° 3.078nmile γ15° V167kn~194kn V173kn178kn H656ft984ft FWY240° T70Flapdownat15° 20sbeforelanding Figure4-9a Reverse straight-in landing after getting out of cloud
  • 175.
    JZ-Y8F200W-02 AIRCRAFT FLIGHT MANUAL SECTIONIV NORMAL PROCEDURES 4-89 June 30, 2012 γ15° V310~360 t70s V320~330 H200~300 FW Y240° 5.7km Flapdownat15 o 20sbeforelanding Figure4-9b Reverse straight-in landing after getting out of cloud For the corresponding degrees of the azimuth finder (FWY) with relative bearing of the radio station (DXF) for final turn, see Table 4-16.
  • 176.
    JZ-Y8F200W-02 AIRCRAFT FLIGHT MANUAL SECTIONIV NORMAL PROCEDURES 4-90 June 30, 2012 Table 4-16 Degrees of the azimuth finder (FWY) with relative bearing of the radio station (DXF) in final turn Name Left wide pattern Right wide pattern FWY 90o 60o 30o 0o 270o 300o 330o 0o DXF 287o 309o 333o 0o 73o 51o 27o 0o Note DXF of downwind and base turns for right wind pattern is 120o . 2) Straight pattern For straight pattern establishing, altitude 1640 ft (500m), time 10min, see Figure 4-8 for carrying out ways. For the corresponding degrees of the azimuth finder (FWY) with relative bearing of the radio station (DXF) for left straight final turn, see Table 4-17. Table 4-17 Degrees of the azimuth finder (FWY) with relative bearing of the radio station (DXF) in left straight final turn FWY 180o 150o 120o 90o 60o 30o DXF 215o 239o 262o 285o 308o 332o For the corresponding degrees of the azimuth finder (FWY) with relative bearing of the radio station (DXF) for right straight final turn, see Table 4-18. Table 4-18 degrees of the azimuth finder (FWY) with relative bearing of the radio station (DXF) in right straight final turn FWY 180o 210o 240o 270o 300o 330o DXF 145o 121o 98o 75o 52o 28o
  • 177.
    JZ-Y8F200W-02 AIRCRAFT FLIGHT MANUAL SECTIONIV NORMAL PROCEDURES 4-91 June 30, 2012 (b) Final turn The main factors affecting the final turn are pattern establishment, crosswind, turning opportunity, turning bank, speed and the accuracy of instrument calibration. In order to enter the final turn correctly, emphasis should be put on the correction of wind effect in addition to the correction of instrument errors, correct control of the turning opportunity and strict keeping of flight data. For example, if there is tailwind on the base leg of a wide pattern, the entry should be earlier; for headwind, it should be later. During turning, the judgment and correction are made mainly according to the corresponding relationship of the azimuth finder with the relative bearing of the radio station. The maximum bank should not exceed 25o if it is used for correction during turning. (c) Correction for landing through cloud on the final leg 1) Points for corrections on the final leg: From piratical experience, the pithy formula can be summarized as: Rather early than late, first big and then small. If there is deviation, pointer should be moved. Consider in slightly advance to take the initiative and give considerations to both direction and altitude. The control of the aircraft is heavy due to its large inertia, therefore control actions must be gentle. The aircraft attitude should be as stable as possible. For correction, rudder should be used more than stick, and bank should be avoided. In recovery, pay attention to the lead. 2) Maintaining and correction of the glide path: After recovering from the final turn, flaps should be lowered timely, the specified rate of descent should be strictly kept and the height of passing the outer and inner locators should be controlled. If the aircraft reaches the altitude of passing the locator but it has not passed the locator yet, throttles should be advanced to level off. Resume gliding after passing the locator. When the altitude of passing the locator is too high, should calculate in head the new rate of descent according to the actual altitude. At this time, care should be taken to control the aircraft gently. When descending to the altitude of 164 ft (50m) but the runway is still not in sight, should resolutely make a go-around.
  • 178.
    JZ-Y8F200W-02 AIRCRAFT FLIGHT MANUAL SECTIONIV NORMAL PROCEDURES 4-92 June 30, 2012 3) Crew cooperation during landing through cloud: Close cooperation of crewmembers is another important factor for making a landing through cloud successfully. The captain should be concentrated on the control of the aircraft and coordinate the overall task of the crew. The copilot is responsible for radio-communication and observation of outside and should remind and assist the captain timely to maintain a good flight. When getting out of the cloud, pay attention to looking for the runway. The navigator masters accurately the time, corrects the wind effect, tunes the radio compass, corrects the azimuth finder, reminds the captain to correct the direction and to maintain the specified rate of descent, and looks for the runway when coming out from the cloud. The communicator is responsible for the command and meteorological information and good communications. The flight engineer takes care of engine operation, correctly completes the mechanical controls commanded by the captain, and pays attention to and provides the aircraft conditions. When the runway is in sight, the captain aligns the aircraft with runway and the aiming point by visual judgement, adjusts the gliding speed and performs VFR landing. (d) Take-off and landing in rain or snow 1) Take-off in rain or snow: Perform a take-off check, turn on the windshield wiper to clear off the water vapor and ice frost on the inner surface. During take-off, the height of nosewheel rotation may be a little lower, the lift-off speed is about 2.7kn~ 5.4kn (5~10km/h) higher. After lift-off, make the aircraft accelerate with a low angle of climb. The action must be gentle. The height of retracting the gears is 6.6 ft~9.8ft (2~3m) higher than normal. Change over to climb when the speed is increased to 146kn (270km/h). At the height of 328ft (100m) and the speed of 162kn (300km/h), turn off the windshield wiper. Other control procedures are the same as normal. 2) Landing in rain or snow: Make full use of the ground navaid. After the final turn has been completed, turn on the windshield wiper and electric fan before the outer locator, and wipe the water vapor and ice frost on the windshield with dry rags.
  • 179.
    JZ-Y8F200W-02 AIRCRAFT FLIGHT MANUAL SECTIONIV NORMAL PROCEDURES 4-93 June 30, 2012 When the aircraft is about to fly out of the cloud and the landmarks or lightings are dimly in sight but the runway can still not be found, do not be anxious to lock for the runway, keep the aircraft attitude and make the corrections as per indication of the instruments. When the runway is clearly in sight, align the aircraft with it, correctly adjust for the specified gliding speed and select the aiming point (it is selected about 164ft (50m) away from the runway threshold). Try to keep the aircraft as stable as possible. Hard actions should be avoided. When the aircraft enters the runway or covers the runway threshold, retard the inboard throttles to 0o or land with power-on. The visibility is relatively poor in rain or snow, so it is more difficult to judge the ground surface during landing. Therefore, it is necessary for the pilot to control the aircraft gently and make it land safely using his fine control habit cultivated in normal times. At night, the lighting in rain or snow can create a light screen. During landing, the landing lights onboard should be turned on as late as possible or land with these lights off. After coming out from the clouds, enter the landing pattern by way of “Reverse straight-in”. When it is impossible to approach in the penetrating direction because the wind speed is too high, the speed should be maintained at 173kn~178kn (320~330km/h) with altitude of 656ft (200m) or 984ft (300m) after getting out of cloud layer. After passing over the landing “T”, turn right for 60o with a bank of 15o . Keep the azimuth finder at 240o . Extend the flaps to 15o 20 seconds earlier than the calculated TB 70s and turn left to enter the final turn. Then radio compass indication in the reverse direction of landing may be referred for correction during landing. After recovering from the turn, align with the runway, extend the flaps to 35o and make VFR landing. Flight in turbulent zone and thunderstorm active zone Turbulent effect on flight If ∆ny represents turbulent strength, generally, 0.05≤Δny<0.2 is light turbulent; 0.2≤Δny<0.5 is moderate turbulent; 0.5≤Δny<1 is strong turbulent. Turbulent effects on flight are as follows: (a) Turbulent effect on aircraft structure: The aircraft has a certain loading strength. The effect of normal turbulent on aircraft structure is not too obvious. But the permitted loading strength is less for transport aircraft, especially in heavy-weight flight. Affected by strong turbulent for a long time, some parts such as wings may be permanently distorted, or even be damaged partly due to excessive load variation.
  • 180.
    JZ-Y8F200W-02 AIRCRAFT FLIGHT MANUAL SECTIONIV NORMAL PROCEDURES 4-94 June 30, 2012 (b) Turbulent effect on instrument indication: All of the instruments on the aircraft have certain delay characteristics. In turbulent air, the instruments will create indication errors as they are suffering from irregular vibration. Especially, aerodynamic instruments, such as vertical speed indicator, altimeter and airspeed indicator, can exhibit larger errors, and can not reflect the instant conditions of the aircraft timely and accurately. In night flight, turbulent can cause jumping of instrument indication. (c) Turbulent effect on aircraft control: Aircraft turbulence can often make the flight altitude, speed and flight conditions vary irregularly. This will bring great difficulty for the pilot to control. If the aircraft encounters very strong up current, it is possible to make the aircraft close to its critical angle of attack. If the aircraft encounters strong down current at low altitude, it is possible to cause the aircraft to drop down to a dangerous altitude. Flight under turbulent condition (a) When flying into strong turbulent area, leave the turbulent zone by changing heading or altitude. If running into the strong turbulence near the service ceiling, the flight altitude should be lowered by 3281ft~8202ft (1000~2500m). Mach number should not be higher than 0.6 during descent. If flying into strong turbulent zone of turbulence band, get out by reducing altitude of 1640ft~3281ft (500~1000m) or getting off the course by 27n mile~37.8n mile (50~70km). (b) The flight altitude should be adequate. Maintain the indicated airspeed of 216kn~243kn (400~450km/h) at the altitude of 9843ft~19685ft (3000~6000m), and 238kn (440km/h) from 19685ft (6000m) to the ceiling. It is forbidden to decrease or increase the speed beyond the specified range. (c) During flight under light turbulent condition, the autopilot may be used to reduce the pilot’s fatigue and enhance the accuracy of holding aircraft conditions. It is forbidden to use the autopilot when the turbulence is more severe than the moderate. (d) The maintaining of aircraft attitude should mainly rely on the aircraft horizon with reference to the other instruments. Control actions should not be rough and wild, otherwise turbulence will be more severe. When making turn or correcting heading under turbulent condition, the maximum bank should not be greater than 15o . If the speed is too low, the altitude may be reduced properly. When the aircraft enters high angle of attack accidentally and minor buffet occurs, push the stick forward and increase the speed, but should recover from bank first if during a turn.
  • 181.
    JZ-Y8F200W-02 AIRCRAFT FLIGHT MANUAL SECTIONIV NORMAL PROCEDURES 4-95 June 30, 2012 Flight in thunderstorm active area: (a) Before take-off, must understand the weather situation and its future development trend, make the handling plan if running into thunderstorm. The back-up fuel quantity should be calculated accurately. (b) In flight, try to maintain over-the-top visual flight if possible, it is strictly forbidden to enter cumulonimbus clouds and cumulus congestus clouds. The navigator should often observe thunderstorm distribution situation with radar, and report it to the crew timely. If cumulonimbus cloud is found, while taking measures onboard, report to the ground in order to make the ground crew understand aircraft movement. (c) Handling procedures when running into cumulus congestus clouds and cumulonimbus clouds: 1) If cumulonimbus clouds are dispersed and isolated, a visual circuitous flight should be taken. The distance from the boundary of cumulonimbus clouds should not be less than 2.7n mile (5km) and that from the source of cumulonimbus clouds should not be less than 5.4 n mile (10km). If flight through the gap between two thunderstorm zones, the space observed from the radar should not be less than 10.8 n mile (20km). 2) When there is no way for circuitous flight and the aircraft can not climb above the cloud, reduce the altitude and fly beneath the clouds if the cumulonimbus cloud base is higher and the terrain along the course is also smooth. But the flight altitude should be neither too low nor close to the cloud base, normally fly at the height which is one third of the height from the ground to the cloud base. When approaching the edge of thunderstorm, the radio equipment should be turned off to prevent the aircraft from being struck by lighting. 3) In case of radar failure, only the visual circuitous flight is allowed. If no way to bypass the thunderstorm-acting zone, decision should be made to return or fly to an alternate airfield.
  • 182.
    JZ-Y8F200W-02 AIRCRAFT FLIGHT MANUAL SECTIONIV NORMAL PROCEDURES 4-96 June 30, 2012 Formation flight Operating in trail Basic formation (See Figure 4-10) Generally, one fleet is formed by three aircraft, with the distance between each aircraft and fleet being 3281ft (1000m) and 4921ft (1500m) respectively, while the altitude between each aircraft is 66ft~98ft (20~30m). 3281 ft 66ft~98 ft 4921 ft Figure 4-10a Formation of operating in trail 1000m 20~30m 1500m Figure 4-10b Formation of operating in trail
  • 183.
    JZ-Y8F200W-02 AIRCRAFT FLIGHT MANUAL SECTIONIV NORMAL PROCEDURES 4-97 June 30, 2012 Engine start and taxiing (a) Engine start 1) All aircrew members should be onboard 5~15min before engine start. 2) The leader commands the engine start as per required time of takeoff, engine start, warmup and taxi to the takeoff line. 3) Engine run is generally conducted as per the leader command, required time or the signal from ground crew. (b) Taxiing 1) After the report of “engine run completed” from the last wing is received by the leader, each aircraft will taxi consequently to the takeoff line with the permission of the ground dispatcher. 2) During the taxiing process, the distance between each aircraft should not be less than 164ft (50m). In case that the taxiing is performed on the earth runway, increase the taxiing distance properly, watch the wind direction and avoid the dust as much as possible. 3) Each aircraft should taxi into the runway as per their takeoff sequence and form a snake-like queue with the leader at the downwind side, and the distance between each wing should be not less than 131ft (40m). See Figure 4-11. Figure 4-11 Parking diagram
  • 184.
    JZ-Y8F200W-02 AIRCRAFT FLIGHT MANUAL SECTIONIV NORMAL PROCEDURES 4-98 June 30, 2012 Takeoff and rendezvous (a) Takeoff and climbing 1) The leader shall ask for takeoff when the report of “ready” from the last wing is received. 2) By the time that the leader (prior aircraft) starts taxiing, the next aircraft shall put the throttle angle at 30o ~40o and taxi to the position where the former aircraft stands. The takeoff interval is 1min. 3) After takeoff, the leader should follow the specified data strictly and climb up along the takeoff direction with reference of obvious target ahead. In case of side wind, correct the drift and inform the wing of the corrected value. 4) In the process of climbing up, each wing should observe flight status of leader or the previous aircraft, and strictly follow the specified data of climbing. 5) Coordination of crew members after takeoff: The leader should watch the overall situation and strictly follow the stipulated data and position required, while the copilot is responsible for observing the aircraft status and pilot’s operation, adjusting the throttle angle as per the pilot’s command and flight purpose, and remind the pilot of any deviation or assisting in correction of such deviation. The navigator should master an accurate time as required, report the corrected heading and climbing data, and the mechanic must watch the instrument readout and engine operating status in an all-round way. 6) Takeoff and climbing in trail: The position and time of takeoff should be stipulated in advance and the data should be followed strictly. (b) 180o turning and rendezvous (see Figure 4-12). 1) The leader sends out verbal command or signal of “turning” as per required time and makes a 180o turn leftward (rightward) with stipulated angle. Figure 4-12 180o turnning rendezvous for operating in trail
  • 185.
    JZ-Y8F200W-02 AIRCRAFT FLIGHT MANUAL SECTIONIV NORMAL PROCEDURES 4-99 June 30, 2012 2) On receiving the verbal command of “turning” or seeing the signal, each wing should remember the turning time and turn as per stipulated interval and the projection angle of the leader (previous aircraft) on the windshield glass. 3) During the turning process, the leader must follow strictly the stipulated turning data. During the first half (90o ) of turning, the wing should mainly follow the stipulated data with the projection angle as an assisted reference, while during the second half of turning mainly refer to the projection angle with the stipulated data as an assisted reference. In case of any overrun or drop-off, adjust the turning angle and speed properly for correction. Each aircraft should maintain their position in the turning process so as to follow up the fleet after turning. 4) After the turning, the leader keeps level off at the speed of 189kn (350km/h) and height of 3609ft (1100m) and leads the wing to the preset height until the last wing has joint the fleet. See Table 4-19 for climbing data of each aircraft at a separation of 3281ft (1000m) and the fleet distance of 4921ft (1500m). Table 4-19a Climbing data of the aircraft Item Data Aircraft IAS (kn) Climbing rate(ft/s) Altitude at crosswind leg (ft) Time of crosswind lge Distance of crosswind leg (n mile) Leader 189 11.48 3281 4min36s 12.96 Aircraft No.2 189 12.14 2953 4min11s Aircraft No.3 189 13.12 2625 3min46s Aircraft No.4 189 14.11 2297 3min23s 8.91 Aircraft No.5 189 15.42 1969 2min58s Aircraft No.6 189 16.40 1640 2min33s Aircraft No.7 189 17.39 1312 2min10s 5.13 Aircraft No.8 189 18.70 984 1min45s Aircraft No.9 189 19.69 656 1min20s
  • 186.
    JZ-Y8F200W-02 AIRCRAFT FLIGHT MANUAL SECTIONIV NORMAL PROCEDURES 4-100 June 30, 2012 Table 4-19b Climbing data of the aircraft Item Data Aircraft IAS (km/h) Climbing rate(m/s) Altitude at crosswind leg (m) Time of crosswind lge Distance of crosswind leg (km) Leader 350 3.5 1000 4min36s 24 Aircraft No.2 350 3.7 900 4min11s Aircraft No.3 350 4 800 3min46s Aircraft No.4 350 4.3 700 3min23s 16.5 Aircraft No.5 350 4.7 600 2min58s Aircraft No.6 350 5 500 2min33s Aircraft No.7 350 5.3 400 2min10s 9.5 Aircraft No.8 350 5.7 300 1min45s Aircraft No.9 350 6 200 1min20s (c) Projection angle of 180o turning rendezvous 1) Figure 4-13 and Table 4-20 are projection angle of 180o turning rendezvous of the leader and the previous aircraft at a distance of 4921ft (1500m). L3° L18° R9° R1° FW Y225° FWY270° FW Y315° FWY0° Figure 4-13 Projection angle of 180o turning rendezvous of leader and the previous aircraft at a distance of 4921ft (1500m)
  • 187.
    JZ-Y8F200W-02 AIRCRAFT FLIGHT MANUAL SECTIONIV NORMAL PROCEDURES 4-101 June 30, 2012 Table 4-20 Projection angle of leader and its previous aircraft (Distance: 4921ft (1500m)) Azimuth angle 0o 315o 270o 225o Visual angle Left 18o Right 1o Right 9o Left 8o 2) Figure 4-14 and Table 4-21 are projection angle of 180o turning rendezvous of the wing and the leader (previous aircraft) at a distance of 3281ft (1000m). L9° L15° R15° R3° FW Y225° FWY270° FW Y315° FWY0° Figure 4-14 Projection angle of 180o turning rendezvous of the wing and the leader (previous aircraft) at a distance of 3281ft (1000m) Table 4-21 Porjection angle of each wing and the leader (previous aircraft)(Distance: 3281ft (1000m)) Azimuth finder 0o 315o 270o 225o Visual angle Left 15o Right 8o Right 15o Left 9o
  • 188.
    JZ-Y8F200W-02 AIRCRAFT FLIGHT MANUAL SECTIONIV NORMAL PROCEDURES 4-102 June 30, 2012 Trail in straight line Variance of distance and the altitude difference of trail flight is mainly judged and corrected timely through projection position, size and clearness of the leader (previous aircraft) on the windshield glass. (a) Direction maintenance 1) Trail flight of single aircraft should keep a straight line and its judgement is as per the leader (previous aircraft) heading. Both the leader and the wing should correct the drift together and keep the flight at the same track. 2) Keep a straight line, and the leader must follow strictly the flight data. The track is preferred to be corrected once for all and frequent track correction is not suggested. During the straight-line followup, the wing should keep level-off, refer to the previous aircraft lines and align with certain position of the leader (previous aircraft) for direction maintenance. 3) Upon drift correction, keep the aircraft at level position and correct with sideslip method. The rudder should be operated more than that of the rod. 4) During the single aircraft trail, aircraft No.2 should strictly keep the direction which is favorable for the fleet. (b) Distance maintenance 1) Judgement Draw two vertical lines which are parallel to each other as per the calculated result, and envelope the previous aircraft between these two lines during flight. If projection of the previous aircraft spills over the lines, the aircraft turns out to overrun, if smaller, the aircraft drops off. Formula: L= Where: L referes to projection length of the previous aircraft between two parallel lines on the windshield. The navigator observes the measuring distance on the fluorescent screen from the JYL-6AT weather radar and reports it to the pilot with intercom. Judge as per flight speed, altitude and adjunct feature of the previous aircraft on its fuselage. Length of wing span×Distance of pilot’s eye from the windshield glass Trail distance
  • 189.
    JZ-Y8F200W-02 AIRCRAFT FLIGHT MANUAL SECTIONIV NORMAL PROCEDURES 4-103 June 30, 2012 Drop-off and overrun can also be indicated by the corrected IAS and stipulated speed difference, and as per adjunct clearness of the previous aircraft on its fuselage. However, such method is not objective enough that during the flight, if the altitude remains, in case that the previous aircraft tends to climb up, the distance is far, or else near. 2) Distance correction Keep the throttle at required position and adjust the speed by means of inboard throttle control. In case of distance difference during the correction, pay attention to aircraft inertia and the lead to avoid an excessive speed difference. Range of speed difference correction with inboard throttle control: 1st fleet ±10.8kn (±20km/h) 2nd fleet ±21.6kn (±40km/h) 3rd fleet ±32.4kn (±60km/h) Correction with turning cutoff radius: turn early for far distance, and vice versa. The time for turning correction is calculated as per the distance difference with the previous aircraft and the ground speed. Correct T/2. (c) Keep altitude difference 1) During the trail flight, the latter aircraft should be 66ft~98ft (20~30m) higher than the former one, and it cannot enter the wake region of the previous aircraft at a proper altitude difference, by when, there is no clearance between stabilizer and rear edge of the previous aircraft, and the clearance will appear at the difference higher than stipulated altitude. In case that the altitude difference is below stipulation, full nozzle will show up. The judgement can also be performed as per the altimeter indication. 2) Timely push or hold the stick back when adjusting the distance with throttle control, in case of any altitude difference change. Upon altitude difference correction, adjust the speed timely to keep the distance as well. 3) As for climbing up and sliding in trail, the latter aircraft should also be 66ft~98ft (20~30m) higher than the former aircraft, and the track of each aircraft should parallel to each other rather than the same as that of the leader. It is very difficult for the single aircraft to keep the climbing and sliding distance in trail since drop-off is frequent for climbing, and overrun is likely to occur for sliding. Especially before sliding at high altitude, the pilot should enlarge the distance properly, and adjust as per stipulated range after the sliding status is stabilized, so as to prevent the speed from overrun.
  • 190.
    JZ-Y8F200W-02 AIRCRAFT FLIGHT MANUAL SECTIONIV NORMAL PROCEDURES 4-104 June 30, 2012 Turn in trail (a) Time of entering the turn 1) Timing turn The latter aircraft times at the moment when the previous aircraft begins to turn, and then turns as per stipulated turning interval. Turning interval=trail distance÷flight speed 2) Turn as per visual angle After the previous aircraft entered the turning, the following aircraft turns as per its visual angle which is half turning angle of the previous aircraft during its track interval. (b) For example, suppose IAS=216kn (400km/h), turning slope=15o , tracking distance = 3281ft (1000m), then tracking interval is 8.3s, and turning angle is 11o . Therefore, visual angle of the following aircraft to the previous aircraft is 5.5o . During the turning process, both the following aircraft and the previous aircraft should stabilize their positions. In case there is rightward displacement for the projection of the previous aircraft on the windshield glass, correct it timely by means of slope adjustment. In case of turning left, the previous aircraft tends to move leftward and slope increase is required. When the previous aircraft moves rightward, slope decrease is required. Do not increase or decrease the slope excessively. (c) When recovering from the turn, the following aircraft should level off properly as per recovery of the previous aircraft and the combining lines of previous several aircraft and current heading, so as to corrct the heading and distance timely. Break to land (a) Before the break, the leader should lead the whole fleet enter the airport accurately along the landing course as per remarkable ground target, navigation aids and the position of fleet and runway at the height of 3281ft (1000m) and speed of 216kn (400km/h). It should turn 180o leftward (rightward) for entering the course and land with the slope of 25o , speed of 227kn (420km/h) and descent rate of 16.4ft/s (5m/s). Aircraft No.2 begins timing at the moment when the leader enters the turning and flight one “TB” forward for break landing with the same data as that of the leader. Each aircraft following aircraft No.2 should turn as per the same method. Drift double correction is required at the downwind leg.
  • 191.
    JZ-Y8F200W-02 AIRCRAFT FLIGHT MANUAL SECTIONIV NORMAL PROCEDURES 4-105 June 30, 2012 (b) Decrease the speed at sideway of the threshold to extend the landing gear at the course altitude of 984ft (300m). Extend the flap at 15o 15s before the base leg, and enter the turning 30s after flying over the outer locator side at the slope of 14o , speed of 173kn (320km/h) and visual angle of 62o .During the second half (90o ) of turning, descend with the speed of 6.6ft/s~9.8ft/s (2~3m/s) and recovered turning altitude of 656ft (200m). (c) The landing interval is 1min20s. See Figure 4-15 for break to land. t30s V 227kn ttiming Figure 4-15a Single aircraft trail and break to land t30s V 420 320 ttiming Figure 4-15b Single aircraft trail and break to land
  • 192.
    JZ-Y8F200W-02 AIRCRAFT FLIGHT MANUAL SECTIONIV NORMAL PROCEDURES 4-106 June 30, 2012 Night trail of single aircraft (a) Long-time focus of a single point will probably cause illusion if deviation is not found and corrected timely; (b) Separation between each aircraft should not be less than 328ft (100m) during night taxiing, and put the landing light at ON position when taxiing forward to approach the previous aircraft; (c) Takeoff interval is 1min, and the trail distance between each aircraft is 4921ft (1500m). See Table 4-22 for takeoff, climbing and turning data of the aircraft. (d) During the takeoff rendezvous, the leader (previous aircraft) should turn on the flash light until the following aircraft follows up. Each aircraft should enter the turning rendezvous as stipulated time. When entering the fleet, each aircraft should strictly follow the stipulated speed to prevent the overrun due to excessive speed difference. Table 4-22a Takeoff, climbing and turning data of the aircraft Item Data Aircraft IAS (kn) Climbing rate (ft/s) Altitudeat the beginning of 180o turn (ft) Time at the beginning of 180o turn Climbing rate for turning (ft/s) Altitude upon completion of the 180 o turn (ft) Leader 189 13.1 1640 2min06s 13.1 3281 Aircraft No.2 189 16.4 984 1min43s 16.4 3346 Aircraft No.3 16.7 6 656 1min20s 23.0 3412 Table 4-22b Takeoff, climbing and turning data of the aircraft Item Data Aircraft IAS (km/h) Climbin g rate (m/s) Altitudeat the beginning of 180o turn (m) Time at the beginning of 180o turn Climbing rate for turning (m/s) Altitude upon completion of the 180 o turn (m) Leader 350 4 500 2min06s 4 1000 Aircraft No.2 350 5 300 1min43s 5 1020 Aircraft No.3 350 6 200 1min20s 7 1040
  • 193.
    JZ-Y8F200W-02 AIRCRAFT FLIGHT MANUAL SECTIONIV NORMAL PROCEDURES 4-107 June 30, 2012 Each aircraft should enter the 180o turning rendezvous as per stipulated time and follow the required speed when joining the fleet to avoid exceesive overspeed. The projection angle for 180o turning rendezvous is the same as that of the daytime. (e) Trail of straight line 1) Maintain the direction. align the white-colored tail light of the previous aircraft to keep the red (leftward) and the green (rightward) navigation light symmetrical to each other, and refer to the heading simultaneously. 2) Keep the distance. Keep the stipulated speed as required and judge the distance as per formation light and navigation light of the previous aircraft. Action of the previous aircraft and its distance is hard to be judged correctly in blurred projection line. The aircraft is likely to over run in the moonlight night, and drop off in dark night. 3) Maintain the altitude difference. The altitude difference should not be excessive to avoid the confusion between the ground light and the previous aircraft. The altitude difference is lower if formation light can not be seen clearly,and higher if only seen the formation light. 4) Tail turn. For the turning moment, timing and turn as per the visual angle and airdrop color-changing signal light of the leader (previous aircraft), and the flare bomb of the leader (previous aircraft) or the fixing point above the flashing ground target. During the turning process, observe the whole wing span of the previous aircraft rather than the mere white tail light. (f) Break to land Each aircraft should turn on their flashing light during the break landing process. For observation convenience, the following aircraft might be lower than the previous one in its altitude. Each crew member should follow up their separated duty clearly and special personnel are required for position observation of the previous aircraft. The visual angle to the previous aircraft after the base turn is 90o . See Table 4-23 for the break landing data.
  • 194.
    JZ-Y8F200W-02 AIRCRAFT FLIGHT MANUAL SECTIONIV NORMAL PROCEDURES 4-108 June 30, 2012 Table 4-23a Data of break landing Aircraft No. 1 2 3 Tdelay 0 1min2s 1min2s Vg(ft/s) 16.4 10.8 8.2 Table 4-23b Data of break landing Aircraft No. 1 2 3 Tdelay 0 1min2s 1min2s Vg(m/s) 5 3.3 2.5 (g) Cautions for night trail 1) Report timely if the previous aircraft is lost. Under such circumstances, raise the altitude properly and turn on the flashing light and the light of escort cabin, and apply the previous aircraft for turning on these lights, then recover the formation or return to land (single aircraft) as per current situation. In case of rejoining the formation, avoid excessive speed difference to prevent collision between two aircraft. 2) Generally, the position and distance of the ground projection in the fleet tends to be excessive. When flying over the light area, formation light of the previous aircraft will be darken. 3) The fluorescent light in the cockpit should not be excessively bright during the night trail, so as not to cause negative effect for observation of the previous aircraft. 4) When flying over the light area (cities), altitude difference of the following aircraft should not be excessive, and the pilot should focus his eyesight properly to avoid focusing on a single point (for example the tail light) in case of any illusion. If illusion occurs, report to other crew members and appeal the other pilot who is not in eyesight illusion for aircraft control. Aircraft should be controlled strictly as per the instrument indication, and other crew mebers should remind timely. In case that the eyesight illusion can not disappear for a long time, appeal the leader for escaping the formation and return to land. Single aircraft trail limitations (a) The throttle angle of straight-line trail is ranged between 25o ~70o , and the throttle angle is allowed to be positioned at 0o in no case. (b) Speed difference for 180o turning rendezvous is (+27 -16 )kn ((+50 -30 ) km/h.) (c) See Table 4-24 for Max. allowable error for each aircraft.
  • 195.
    JZ-Y8F200W-02 AIRCRAFT FLIGHT MANUAL SECTIONIV NORMAL PROCEDURES 4-109 June 30, 2012 Table 4-24a Max. allowable error of each aircraft Aircraft No. Takeoff time (s) Climbing speed (kn) Maneuver speed (kn) Trail distance (ft) Turning slope (o ) Landing time (s) Difference of altitude (ft) Leader ±1 ±2.7 ±2.7 0 ±32.8 Aircraft No.2 ±1 ±2.7 ±10.8 656 ±2 ±15 ±49.2 Aircraft No.3 ±1 ±2.7 ±13.5 820 ±2 ±15 ±65.6 Aircraft No.4 ±1 ±2.7 ±16.2 984 ±2 ±15 ±32.8 Aircraft No.5 ±1 ±2.7 ±18.9 984 ±2 ±15 ±49.2 Aircraft No.6 ±1 ±2.7 ±21.6 984 ±2 ±15 ±65.6 Aircraft No.7 ±1 ±5 ±24.3 984 ±2 ±15 ±32.8 Aircraft No.8 ±1 ±2.7 ±27.0 984 ±2 ±15 ±49.2 Aircraft No.9 ±1 ±2.7 ±29.7 984 ±2 ±15 ±65.6 Table 4-24b Max. allowable error of each aircraft Aircraft No. Takeoff time (s) Climbing speed (km/h) Maneuver speed (km/h) Trail distance (m) Turning slope (o ) Landing time (s) Difference of altitude (m) Leader ±1 ±5 ±5 0 ±10 Aircraft No.2 ±1 ±5 ±20 200 ±2 ±15 ±15 Aircraft No.3 ±1 ±5 ±25 250 ±2 ±15 ±20 Aircraft No.4 ±1 ±5 ±30 300 ±2 ±15 ±10 Aircraft No.5 ±1 ±5 ±35 300 ±2 ±15 ±15 Aircraft No.6 ±1 ±5 ±40 300 ±2 ±15 ±20 Aircraft No.7 ±1 ±5 ±45 300 ±2 ±15 ±10 Aircraft No.8 ±1 ±5 ±50 300 ±2 ±15 ±15 Aircraft No.9 ±1 ±5 ±55 300 ±2 ±15 ±20
  • 196.
    JZ-Y8F200W-02 AIRCRAFT FLIGHT MANUAL SECTIONIV NORMAL PROCEDURES 4-110 June 30, 2012 Special case treatment in formation flight Overrun of wing Overrun of wing generally occurs at the moment of turning rendezvous and entering into the clouds. Under such circumstances, report to the leader immediately about this case and the current altitude. Meanwhile, observe carefully to get the interval as per the anti-direction of the turning. Listen to the leader command. Once the leader (previous aircraft) is found, rejoin the fleet. Leader loss Report immediately in case of the leader loss. Each crew member should observe and search carefully and selectly, meanwhile deviate the aircraft towards the heading where no aircraft exists. Once the leader is detected, rejoin the fleet. If the leader can not be searched, report to the ground dispatcher and return to land. Blind maneuvering flight is strictly prohibited in case of leader loss, which will severely threaten the flight safety. Engine failure (a) If engine failure occurs to the leader, inform the wing first and appoint one deputy leader, and then lower the altitude to enlarge the altitude difference with the wing. Escape the fleet and return to land along the shortcut selected as per the favorable direction. (b) If engine failure occurs to the wing, report to leader first and appeal for escaping the fleet, and then lower the altitude, get the interval and return to land along the shortcut. Treatment of entering wake flow of the leader (previous aircraft) (a) Under such circumstances, the aircraft tends to swing and the altitude will descend, the rudder will be heavier and performance lowered, with deviation correction delay. The left wing will even go downward for worse. (b) After entering the wake flow, control the aircraft timely with force to eliminate the slope. Increase the speed by means of throttle advancement and hold the stick back gently to paddle the rudder outward with proper speed so as to lead the aircraft fly out of wake flow of the leader (previous aircraft). (c) If the aircraft enters the wake flow during its landing of gliding by the final leg, in case there is severe dive and decline of wing, advance the throttle to go around at once if the correction is difficult, and avoid a reluctant landing which will cause negative effect.
  • 197.
    JZ-Y8F200W-02 AIRCRAFT FLIGHT MANUAL SECTIONIV NORMAL PROCEDURES 4-111 June 30, 2012 Treatment of entering the clouds (a) Principle The leader should detect the clouds timely and be responsible for the solution, then inform other aircraft in advance and handle it calmly, while each wing should listen to the leader command carefully and implement in no hesitate, and remind the problems being detected. (b) Steps 1) Forced entering into clouds in 180o turning rendezvous (formation turning) Under such circumstances, once the leader (previous aircraft) is lost, the aircraft should enlarge the distance with each other by means of changing the banking and altitude difference to ensure the flight safety of the whole fleet. The leader (previous aircraft) should report the altitude for entering into the cloud and the level flight, so that the following aircraft can adjust the difference. During the 180o turning rendezvous, before the forced entrance into the cloud, the leader (previous aircraft) can lower its altitude below the clouds if permitted by the terrain. However, it should report the level flight altitude timely so that the following aircraft can adjust the difference. The first fleet makes the turn by means of changing the slope, and the leader of the second fleet times by the moment when the last wing of the first fleet finishes the turn, and then flies forward a “TB” time, making the turn as per the method by which the first fleet makes the separation. The third fleet makes the turn and separation as per the same steps of the second fleet. In case that the leader of the first fleet reports entering into clouds and separation as per the preset method, takeoff on ground shall all be terminated. Table 4-25 and Figure 4-16 are stipulated data followed by each aircraft during the forced entrance of clouds in 180o turning rendezvous. 2) Small pieces of clouds penentration: After the verbal command of “penentrate the clouds as per stipulated data” is received from the leader, each aircraft should penetrate following the stipulated data and must keep the flight status as required. After the penetration, pay attention to adjust the position in the fleet.
  • 198.
    JZ-Y8F200W-02 AIRCRAFT FLIGHT MANUAL SECTIONIV NORMAL PROCEDURES 4-112 June 30, 2012 Table 4-25a Stipulated data followed by each aircraft during the forced entrance of clouds in 180o turning rendezvous Item Data Aircraft IAS (kn) Radius R (ft) Slope γ (o ) Time of 180o turning rendezvous Result of formation separation Interval (ft) Distance (ft) Altitude difference(ft) Leader 189 9186 20 1min 27s ~6562 0 Aircraft No.2 189 12467 15 2min 00s ~6562 ~14764 656 Aircraft No.3 189 15748 12 2min 30s ~6562 ~14764 13132 Table 4-25b Stipulated data followed by each aircraft during the forced entrance of clouds in 180o turning rendezvous Item Data Aircraft IAS (km/h) Radius R (m) Slope γ (o ) Time of 180o turning rendezvous Result of formation separation Interval (m) Distance (m) Altitude difference(m) Leader 350 2800 20 1min 27s ~2000 0 Aircraft No.2 350 3800 15 2min 00s ~2000 ~4500 200 Aircraft No.3 350 4800 12 2min 30s ~2000 ~4500 400 R9186 ft R12467 ft R15748 ft 14764 ft 6562 ft 14764 ft 6562 ft Figure 4-16a Separation after the 180o turning rendezvous
  • 199.
    JZ-Y8F200W-02 AIRCRAFT FLIGHT MANUAL SECTIONIV NORMAL PROCEDURES 4-113 June 30, 2012 R2800 R3800 R4800 4500m 4500m 2000m 2000m Figure 4-16b Separation after the 180o turning rendezvous 3) Massive clouds penetration: After the verbal command of “change the speed for separation” is received, each wing should control the flight speed as required for enlarging the trail distance. After the fleet penetration, the leader should inform each wing of rejoining the formation, and they should increase the speed accordingly to take their separated position. 4) When the low clouds increases and the cloud layer becomes thicker which is difficult for a continuous formation flight, the leader should send the verbal command of “altitude and speed change for separation”. On reciving such command, each wing should control their speed and change altitude as stipulated in Table 4-26 to enlarge the distance, increase altitude difference and stop the flight mission. At the same time, the ground dispatcher should guide each aircraft to lower their altitude as per the preset penetration solution and site. Each aircraft should return to land separately. Table 4-26a Altitude changed with speed alternation Aircraft No. 1 2 3 4 5 6 7 8 9 Speed difference (kn) +16.2 +10.8 +5.4 - -5.4 -10.8 -16.2 -21.6 -27 Altitude difference (ft) - +984 - +984 - +984 - +984 - Table 4-26b Altitude changed with speed alternation Aircraft No. 1 2 3 4 5 6 7 8 9 Speed difference (km/h) +30 +20 +10 - -10 -20 -30 -40 -50 Altitude difference (m) - +300 - +300 - +300 - +300 -
  • 200.
    JZ-Y8F200W-02 AIRCRAFT FLIGHT MANUAL SECTIONIV NORMAL PROCEDURES 4-114 June 30, 2012 5) For the separated No.3 and No.4 fleet, the leader should command for flying at oringal speed (△V=5.4kn (10km/h), and the separation is 3281ft (1000m) for every 6min) after a period of flight time as per the current weather condition. On receiving such command, each wing should fly as per their original speed. 6) During the treatment of entering into the clouds, both the leader and the wing should turn on the flashing light, and the wing (following aircraft) navigator should observe the separation with the previous aircraft with radar during the process of fleet separation and rejoining. Meanwhile, other crew members of the leader (previous aircraft) should strengthen the air-to-air observation for prevention of collision. Climbing and descent during cloud penetration When the fleet is climbing or descending during the cloud penetration, the aircraft should keep the safety interval with each other, and the length of that time depends on cloud thickness and flight skills of the pilot. Calculation of safety interval t safe=K Where, K represents the safety factor, and its range depends on flight skills of the pilot. For a pilot of medium level, K=2. △V——Error of speed maintenance, 5.4kn~10.8kn (10km/h~20km/h) in general H——Cloud thickness; U——Climbing/desending rate V——TAS during penentrating climb/descent For example, a pilot of medium level keeps the speed error of 5.4kn (10km/h), TAS of 194kn (360km/h) and climbing rate of 8m/s during the penetrating climb. The cloud thickness is 4921ft (1500m). Thus, safety interval during the penetrating climb is obtained through: Tsafe=2× 8×100 2.8×1500 =10.5 As a result, the interval is 10.5s. H•△V V•U
  • 201.
    JZ-Y8F200W-02 AIRCRAFT FLIGHT MANUAL SECTIONIV NORMAL PROCEDURES 4-115 June 30, 2012 Fleet penentrating climb and rendezvous above the clouds (a) Each aircraft of the fleet perform the penetrating climb along the same direction and rendezvous above the clouds 1) After the leader takes off, each wing should take off at every other safety interval. After the takeoff, each wing climbs in straight line along the takeoff direction with IAS of 189kn (350km/h) and climbing rate of 19.7ft/s~26.3ft/s (6~8m/s). During the penentrating climb, the following aircraft should get altitude difference of the previous aircraft as per the takeoff interval and climbing rate. Meanwhile, the leader reports his current altitude for every ascension of 3281ft (1000m). Each wing should check and adjust his current altitude as per the reported data. 2) During the penentrating climb, each aircraft should turn on the flashing light until completion of such penentration. 3) Each aircraft should follow strictly the stipulated data as required and pay attention to correct the indication error. 4) Having penentrated through the clouds, the leader performs level flight at the altitude of 984ft~1640ft (300~500m) above the cloud top with IAS of 350km/h, and inform the wing of relavent data like the altitude when getting out of clouds and level flight, etc. When the last wing reports the completion of penentration, the leader turns with the slope of 15o , IAS of 189kn (350km/h) and climbing rate of 13.1ft/s (4m/s) and send out verbal command of turning rendezvous, by when, each wing begins to time. See Table 4-27 for turning delay of each aircraft. Table 4-27 Turning delay of each aircraft Sequence 1 2 3 Tdelay 0 1min1s 2min7s 5) The wing should inform the leader of his penentration completion, and levels off at an altitude of 66ft~98ft (20~30m) higher than the leader’s level flight (previous aircraft), and pay attention to search for the leader. After the leader’s turn, the wing makes 180o turning rendezvous leftward (rightward) as per the same data as the leader after half takeoff interval and period of follow-up. During this process, each wing should follow strictly the stipulated data, check the turning timing as per the visual angle and adjust timely the position by means of slope and speed correction. See Table 4-28 for projection of the 180o turning rendezvous above clouds.
  • 202.
    JZ-Y8F200W-02 AIRCRAFT FLIGHT MANUAL SECTIONIV NORMAL PROCEDURES 4-116 June 30, 2012 Table 4-28a Projection of 180o turning rendezvous Azimuth finder 0o 31 o 270o 225o Projection angle (VTAS238kn) Left 17o Right 2o Right 19o Right 12o Projection angle (VTAS238kn) Left 18o Right 4o Right 21o Right 17o Table 4-28b Projection of 180o turning rendezvous Azimuth finder 0o 31 o 270o 225o Projection angle (VTAS440km/h) Left 17o Right 2o Right 19o Right 12o Projection angle (VTAS440km/h) Left 18o Right 4o Right 21o Right 17o 6) After the leader (previous aircraft) is confirmed, the wing should rejoin the fleet as per formation requirement when permitted. See Figure 4-17 for details. 7) After the formation is completed, the leader commands to ascend to the preset altitude. Figure 4-17 Penentrating climb and rendezvous above clouds along the same direction (single aircraft) (b) Penentrating climb along the course and follow up the fleet with straight line flight 1) If the terrain stops the aircraft from climbing up in line as per the takeoff direction, fly over the outer locator/sideway as per the stipulated method in Figure 4-18.
  • 203.
    JZ-Y8F200W-02 AIRCRAFT FLIGHT MANUAL SECTIONIV NORMAL PROCEDURES 4-117 June 30, 2012 tlmin30s tlmin20s H656ft 15° 189kn 19.7ft/s Figure 4-18a Flight method in case of terrain stop tlmin30s tlmin20s H200 15° 350 6m/s Figure 4-18b Flight method in case of terrain stop 2) Each wing should fly along the leader course with IAS of 189kn (350km/h) and climbing rate of 19.7ft/s~26.2ft/s (6~8m/s). 3) Having penentrated the clouds, the leader performs level flight at an altitude of 984ft~1640ft (300~500m) above the cloud top (above the safety altitude) with IAS of 189kn (350km/h) and report the level flight altitiude. 4) Each wing keeps the same altitude as that of the leader after the penentration. Meanwhile, aircraft No.2 and No.3 follows up the leader along the straight line with IAS of 216kn (400km/h) and 243kn (450km/h) respectively, search its position and measure the distance with the navigation radar. The speed difference is 27kn (50km/h) and follow-up distance for every 3min is 8268ft (2520m).
  • 204.
    JZ-Y8F200W-02 AIRCRAFT FLIGHT MANUAL SECTIONIV NORMAL PROCEDURES 4-118 June 30, 2012 See Table 4-29 for follow-up time at different distance (△V=27kn (50km/h)). Table 4-29a Follow-up time Follow-up distance (n mile) 8.10 7.56 7.02 6.48 5.94 5.40 Time requried 18min 16min50s 15min40s 14min40s 13min10s 12min Table 4-29b Follow-up time Follow-up distance (km) 15 14 13 12 11 10 Time requried 18min 16min50s 15min40s 14min40s 13min10s 12min Break above clouds and penentrating descent (a) The fleet breaks above the clouds and perform penentrating descent separately. Before the break, proper maneuvering flight is required so that the fleet will be able to land along the landing direction or enter the navigaton zone for penentrating descent against the landing direction. See Figure 4-19. 40° Figure 4-19 Break above clouds and penentrating descent (b) After flying over the navigation station, the leader turns leftward (rightward) into one correction angle and continues the level flight (correction angle and the time of flight after flying over the navigation station depends on the cloud thickness, flight speed and the descending rate) as per estimated time, then commands break. Meanwhile, it turns leftward (rightward) for penentrating land as per the stipulated slope. See Table 4-30. tLeader= Descen Levelnnav.statioField V V × rateDescent H-H
  • 205.
    JZ-Y8F200W-02 AIRCRAFT FLIGHT MANUAL SECTIONIV NORMAL PROCEDURES 4-119 June 30, 2012 (c) On receving the break command from the leader, each wing should continue level flight against the landing direction and turn for penentrating landing after half landing safety interval and follow-up time. Having recovered from the turn, the wing should extend the landing gear and flap as per stipulated time, follow the stipulated data, align with the outer locator and glide for visual landing. twing=tleader+ 2 T+T timeup-followtimelanding (d) Cautions: 1) Integrate the data. Each wing should keep flying against the landing direction after the leader’s escape. 2) Take the occasion of final turn accurately with the slop of 15o . 3) Each wing should extend the landing gear and flap as per the leader’s stipulated time after the final turn. Table 4-30a Time from level flight to break (leader) H(ft) Vy(ft/s) 6562 9843 13123 16404 19.7 4min 24s 6min 50s 9min 24s 11min 48s 26.2 3min 18s 5min 8s 7min 8min 48s Table 4-30b Time from level flight to break (leader) H(m) Vy(m/s) 2000 3000 4000 5000 6 4min 24s 6min 50s 9min 24s 11min 48s 8 3min 18s 5min 8s 7min 8min 48s
  • 206.
    JZ-Y8F200W-02 AIRCRAFT FLIGHT MANUAL SECTIONIV NORMAL PROCEDURES 4-120 June 30, 2012 Airdrop and airborne flight Airdrop and airborne calculation and several methods of sighting Operating principle The aircraft adopts KM-001A sighting equipment in its airdrop and airborne system. It is designed as the optical sighting system of collimation style, and its operating procedure is as follows: The navigator obtains the sighting angle and latitudinal angle of deviation as per the datum for airdrop flight in advance, and then preset these values to sighting system through their hand wheels. The sighting of direction is performed by adjusting the handwheel of latitudinal angle of deviation as per the indication of the ground speed drift gauge or the landmark track within the visual field. Adjust the optical net by turning the handwheel of observation angle to follow the target, and press the airdrop button when the angle of observation equals to that of sighting to unlock the platform for airdrop. See Figure 4-20. Horizon airdrop value is calculated through: 0 verageA Decline μcos H εcosZ+a =φtan H AverageεsinZ+D =μtan 0 ψ-aiming angle ψinclined-inclined aiming angle μ-lateral deflection angle μo-inclined angle of aiming plane α-drift angle a-longitudinal range before parachute develop A-longitudinal range of airdropping object H-aircraft altitude Z-deviation length εaverage-average wind direction angle D-lateral deviation length before parachute develop uaverage ̄-average wind speed W-aircraft ground speed V-aircraft air speed d-side range of airdropping object u-wind speed at the altitude of aircraft Figure 4-20 Airdrop sighting
  • 207.
    JZ-Y8F200W-02 AIRCRAFT FLIGHT MANUAL SECTIONIV NORMAL PROCEDURES 4-121 June 30, 2012 Airdrop/paradrop data calculation (a) Airdrop with parachute, calculation of track data in windy condition Drop time after openning of parachute T’= tDescenV hH- Where, H——Altitude of airdrop h——Altitude of drop before parachute deploy VDescent——Descent speed after the opening of parachute Range: A=AO+E×cosFJAverage Where, AO——Range of windless condition before opening of parachute Latitudinal length of deviation: d=E×sinFJDescent For example, in case that the object is with parachute, suppose t=3s, H=800m, V=240km/h, KCHJ=0o , KXaverage=238o , Uaverage=6m/s, ΔC=-2o , VDescent =5m/s, AO=150m, h=40m. Then A and d can be obtained through: T’= 5 40-800 =152s E=152×6=912m FJaverage=238o -(-2o ) ±180o -0o =60o A=150+912×cos60o =606m d=912×sin60o =790m Thus, A=606m, d=790m (corrected leftward) (b) Distance sighting by means of angle measurement Sighting angle tgφ= H Sfront Where, Sfront——Distance between the target and the signal sending point along the track, which is known as aimoff. Sighting of direction---approach and application (a) Sighting of direction with the scale line at front windshield glass Figure 4-21 is mark line at front windshield glass of the aircraft. Therein, the vertical markline AB right in front of the pilot is drawn with one plumb line hanging right in front of the pilot seat as reference, which will be projected to the windshield glass along the A/C longitudinal axis. Thus, the ground objects observed through this line by the pilot as per the preset flight attitude are all on the course line.
  • 208.
    JZ-Y8F200W-02 AIRCRAFT FLIGHT MANUAL SECTIONIV NORMAL PROCEDURES 4-122 June 30, 2012 C B D A 18.504in 55° 0 6.639 in Verticalmarkline Figure 4-21a Projection line of pilot front windshield glass C B D A 470mm 55° 0 170mm Verticalmarkline Figure 4-21b Projection line of pilot front windshield glass
  • 209.
    JZ-Y8F200W-02 AIRCRAFT FLIGHT MANUAL SECTIONIV NORMAL PROCEDURES 4-123 June 30, 2012 Zero point on the vertical markline is the projection of tangent on the windshield glass between the visual line and the nose at the moment when the pilot is observing the target ahead. When the pilot is observing the ground, all the objects observed through this line are on the same line paralleling to latitudinal axis of the aircraft. The projection scale of the horizontal markline functioned to correct the latitudinal length of deviation in general is started from zero point of the vertical markline, with separation of each scale being 1cm. The distance (L) between the pilot eye and the shielding point on windshield glass is pre-calculatable, and the shielding angle βshield is also measurable at mean time. Shied βCos•L 01.0 is a constant, and the ground distance represented per projection scale on the windshield glass is easy to be obtained by multiplying it with the airdrop altitude. Accordingly, the corrected projection scale can be obtained as per the preset latitudinal length of deviation. Upon sighting of direction, obtain the projection scale required by correction of preset latitudinal length of deviation on the windshield glass first. When the target is detected, the pilot judges its deviation angle at the preset sighting point and controls the aircraft until the target moves above the preset projection scale, then observes the track of the target projection on the windshield glass to see if it is able to pass through the calculated projection scale. If not, correct it by means of heading and sliding methods until a successful through. As a result, the latitudinal length of deviation is corrected. (b) Sighting of direction with auxiliary landmarks 1) Upon ground preparation, work out the latitudinal distance between each obvious landmark and the target with the large scale map or aviation shooting pitcture as per the entering direction, and mark the distance on the plan. 2) When performing the airdrop, sight with the aid of one favorable landmark as per the calculated latitudinal length of deviation. Suppose the latitudinal distance between the landmark and the target is 750m leftward, correct the latitudinal length of deviation leftward by 750m. When the target is detected, the latitudinal length of deviation can be obtained by aligning the aircraft right with the landmark.
  • 210.
    JZ-Y8F200W-02 AIRCRAFT FLIGHT MANUAL SECTIONIV NORMAL PROCEDURES 4-124 June 30, 2012 (c) Sighting of direction with scale line on the windshield glass 1) Draw the longtitudinal line and the shielding line on the windshield glass as per the projection data. 2) Draw the distance of projection on the windshield glass obtained as per the airdrop altitude on the shielding line to both sides of the longtitudinal markline in the form of scale line, with the separation of 100m between each. 3) During the airdrop sighting, align the corrected scale line of latitudinal length of deviation with the airdrop target. See Table 4-31 for Projection data of pilot front windshield glass. Table 4-31a Projection data of pilot front windshield glass m′(in) D (ft) Content H (ft) 328 656 984 1312 1640 1969 2297 2625 2953 3281 Longitudin almarkline (leftward) 1969 0.79 1.57 2.36 3.11 3.86 4.61 5.35 6.10 6.85 7.60 2625 0.59 1.18 1.77 2.36 2.95 3.58 4.17 4.76 5.35 5.98 3281 0.47 0.94 1.42 1.89 2.36 2.87 3.35 3.82 4.33 4.84 3937 0.39 0.79 1.18 1.61 2.01 2.44 2.83 3.27 3.70 4.13 Longitudina lmarkline (rightward) 1969 0.79 1.61 2.44 3.31 4.21 5.16 6.10 7.05 8.07 9.13 2625 0.59 1.22 1.85 2.48 3.11 3.78 4.45 5.16 5.91 6.65 3281 0.47 0.94 1.42 1.93 2.44 2.95 3.50 4.06 4.61 5.16 3937 0.39 0.79 1.22 1.61 2.05 2.44 2.87 3.31 3.78 4.21 Note a) Data calculation: β=83o , L=800mm, α=35o ~45o . b) d refers to latitudinal length of deviation ft(m), m’ refers to distance of projection on the windshield glass (in), H refers to the flight altitude (m), β refers to the shielding angle, L refers to distance between the pilot eye and the shielding point, and αis the slope angle of the windshield glass. c) Projection of the copilot windshield glass: Convert the data at the left side and right side of the longitudinal markline in Table 4-31. See Figure 2.
  • 211.
    JZ-Y8F200W-02 AIRCRAFT FLIGHT MANUAL SECTIONIV NORMAL PROCEDURES 4-125 June 30, 2012 Table 4-31b Projection data of pilot front windshield glass m′(mm) D (m) Content H (m) 100 200 300 400 500 600 700 800 900 1000 Longitudin almarkline (leftward) 600 20 40 60 79 98 117 136 155 174 193 800 15 30 45 60 75 91 106 121 136 152 1000 12 24 36 48 60 73 85 97 110 123 1200 10 20 30 41 51 62 72 83 94 105 Longitudina lmarkline (rightward) 600 20 41 62 84 107 131 155 179 205 232 800 15 31 47 63 79 96 113 131 150 169 1000 12 24 36 49 62 75 89 103 117 131 1200 10 20 31 41 52 62 73 84 96 107 Note a) Data calculation: β=83o , L=800mm, α=35o ~45o . b) d refers to latitudinal length of deviation (m), m’ refers to distance of projection on the windshield glass (mm), H refers to the flight altitude (m), β refers to the shielding angle, L refers to distance between the pilot eye and the shielding point, and αis the slope angle of the windshield glass. c) Projection of the copilot windshield glass: Convert the data at the left side and right side of the longitudinal markline in Table 4-31. See Figure 2. (d) Sighting of direction by means of double angle offset Align the track with the target, and setup the corrected angle of heading and slope as per the obtained latitudinal distance of deviation to make anti-directional movement. Such correction is conducted at a distance longer than double turning radius below the release point. See Figure 4-22. If correct the direction by 800m rightward, turn 30o rightward first and then 30o leftward with the slope of 15o , by keeping the preset track, the aircraft can fly to the preset release point.
  • 212.
    JZ-Y8F200W-02 AIRCRAFT FLIGHT MANUAL SECTIONIV NORMAL PROCEDURES 4-126 June 30, 2012 V=173 kn H=6562 ft γ=15° 2652ft Preset track Figure 4-22a sghting of direction as per double angle offset method V=320 H=2000 γ=15° 800 Preset track Figure 4-22b sghting of direction as per double angle offset method Refer to Table 4-32 for correction distance of double angle offset.
  • 213.
    JZ-Y8F200W-02 AIRCRAFT FLIGHT MANUAL SECTIONIV NORMAL PROCEDURES 4-127 June 30, 2012 Table 4-32a Correction distance of double angle offset. θ d(t) γ 15o 20o 25o 30o 35o 40o 45o 15o 656 1181 1837 2624 3592 4593 5774 20o 492 853 1345 1935 2611 3379 4232 Note a) θ refers to variation angle, d refers to latitudinal length of deviation, and γ refers to the slope angle. b) Calculation data: V=173kn, γ =15o R=9843ft;V=173kn, γ =20o R=7218ft. Table 4-32b Correction distance of double angle offset. θ γ 15o 20o 25o 30o 35o 40o 45o 15o 200 360 560 800 1095 1400 1760 20o 150 260 410 590 796 1030 1290 Note a) θ refers to variation angle, d refers to latitudinal length of deviation, and γ refers to the slope angle. b) Calculation data: V=320km/h, γ =15o , R=3000m;V=320km/h, γ =20o , R=2200m.
  • 214.
    JZ-Y8F200W-02 AIRCRAFT FLIGHT MANUAL SECTIONIV NORMAL PROCEDURES 4-128 June 30, 2012 Steps: 1) Align the aircraft with target detected or the heading of airdrop. Visually obtain the latitudinal length of deviation between the aircraft and the target to obtain the distance to be corrected. 2) Get the converted variation angle as per the latitudinal distance of variation to be corrected. 3) Make the correction as per the calculated variation angle in reversal direction. (e) Correct the latitudinal distance of deviation through heading change Calculate mentally the latitudinal distance of deviation which is correctable by the each fixed angle within a certain period of time as per the current ground speed. Suppose d=300m, heading angle changes by 20o , then the correctable latitudinal length of deviation per second is 30m (i.e. 2 o for heading and 3m for correction of latitudinal length of deviation ). If the latitudinal length of deviation is corrected another 300m leftwards, change the heading by 10o , and recover after level flight of 20s, then the aircraft has been corrected to preset track. Steps: 1) Calculate mentally the heading and time of flight as per the latitudinal distance of deviation. 2) Align the aircraft with the preset heading and recover after the calculated time. 3) See Table 4-33 for information of deviation distance correction. Table 4-33a Distance of deviation to be corrected Deviation Time distance (ft) Corrected heading 5s 10s 15s 20s 25s 30s 5o 128 256 381 509 633 761 10o 259 377 761 1010 1266 1519 15o 381 761 1129 1509 1886 2260
  • 215.
    JZ-Y8F200W-02 AIRCRAFT FLIGHT MANUAL SECTIONIV NORMAL PROCEDURES 4-129 June 30, 2012 Table 4-33b Distance of deviation to be corrected Deviation Time distance (ft) Corrected heading 5s 10s 15s 20s 25s 30s 5o 39 78 116 155 193 232 10o 78 115 232 308 386 463 15o 116 232 344 460 575 689 (f) The navigator sight the direction with the KM-001A airdrop (airborne) sighting system. 1) White light sighting During the daytime, it is required to replace the KM-001A airdrop (airborne) sighting system with the pectroscope of white light, and adjust it properly. Upon replacement, install the pectroscope at correct position and tighten the screw. Maintain stable flight when the aircraft entered the airdrop course. Adjust the bracket hand wheel to make the level at middle position. Power on the white light to preset the sighting angle and latitudinal angle of deviation. Unlock the handle of hand wheel for observation angle and preset the angle of observation and the sighting angle at 80º~90ºand 60o ~70o espectively. The navigator presets the drift angle and latitudinal angle of deviation for the sighting system as per current air data, and controls for direction sighting by means of target or landscape observation through the cross line. The direction sighting is completed when the target or landscape moves longitudinally along the cross line. Upon sighting of distance, rotate the observation hand wheel to make the divition center target the goal as required. When the airdrop indicating light comes on, align the center point of the cross line with the target and observe the status of indicating light and the feedback of the observation hand wheel. When the indicating light comes off and there is feedback from the observation hand wheel, perform the airdrop immediately. When the indicating light comes on, continue to rotate the observation hand wheel for sighting, and rotate the hand wheel quickly in a few seconds to extinguish the indicating light and make the hand wheel stop at the feedback position. For this moment, the target should be above the cross line. Perform the airdrop as soon as the target overlaps the center point of the cross line.
  • 216.
    JZ-Y8F200W-02 AIRCRAFT FLIGHT MANUAL SECTIONIV NORMAL PROCEDURES 4-130 June 30, 2012 The sighting system is also available for mechanical sighting ring. With the connecting line of the centers of two rings as the alignment line, the target is sighted through the center of the two rings. Other steps are the same as that described above. 2) Low light sighting When the sighting system is applied at night in low visibility, replace proper pectroscope as required. Install the low light telescope on the sight tool, tighten the screw and lock the clamp. Maintain stable flight when the aircraft entered the airdrop course. Adjust the bracket hand wheel to make the level at middle position. Power on the white light to preset the sighting angle and latitudinal angle of deviation. Other steps are the same as that of white light sighting. Remove the low light sight tool upon completion of the operation. Airdrop and airborne signal (a) Signal of ready: the yellow light comes on and the horn produces short blast. (b) Signal of implementation: The green light comes on and the horn keeps ringing. (c) Cease of airdrop and airborne: the red light comes on and the horn stops ringing. (d) Auxiliary signal: Ready, white flag up; start airdrop (airborne), green flag up; stop, red flag up. Ground preparation of airdrop and airbone for single aircraft Preflight preparation (a) Get a clear understanding of the requirement of flight task and steps of implementation and propose the flight plan. (b) Reasearch of airdrop (airborne) field is conducted in details with the aid of large scale map and aviation photo, etc. On-site study to geological condition of airdrop (airborne) field, area, terrain, surrounding village, river, mountain and sighting landmarks is also permitted if feasible. (c) Selection of entrance site: decide the direction of entrance, standby entrance direction and method for pattern establishment as per the terrain, standard altitude and wind at the airdrop (airborne) site. (d) Get a clear understanding of and memorize the T plate signal and communication rules of the field.
  • 217.
    JZ-Y8F200W-02 AIRCRAFT FLIGHT MANUAL SECTIONIV NORMAL PROCEDURES 4-131 June 30, 2012 (e) Perform necessary trail assembly, trail airborne and power-on check. Settle the crewmember and position the personnel as required. Familiarize the cooperative control with each other and the pilot and navigator draw the scale line of the windshield glass. (f) Work out loading plan or grouping the airborne as per the task requirement, loading quantity, weight, volume or number of airborne force to obtain the takeoff weight. Make clear the entrance frequency and altitude, speed and min. allowable speed of each entrance. Obtain the takeoff and landing C.G and C.G variation after the release of each group of cargo. (g) Get relative data for airdrop calculation. (h) Workout the safety precautions. Study the special cases that might occur during the implementation of flight mission. Airdrop is not allowed in the following cases: 1) Ground instruction missed or prohibited by ground instructin; 2) Target and signal not seen clearly; 3) Exccesive error after the ready warning, or entrance angle beyond 20o . 4) Personnel, vehicle or animal near the bulleye threatening the safety. 5) The navigator loses boresight point or incertitude for the airdrop (airborne) moment. 6) Roller troubleshooting undone, cargo not ready or weather condition not as required. 7) Obvious error between air and ground calculation result. Preflight preparation (a) Get a thorough understanding on weather condition of the track and the airdrop area, as well as average direction and speed of wind at the altitude of airdrop (airborne) and on ground and their variation. Workout the direction for entering the airdrop to obtain the navigation data. (b) Check the loading status. Check the loading/ airborne force group for any variation, loading for correctness and reliable fixation, the cargo locking at the side rail as required, the platform shackle be well locked, and no foreign object between platform and the raceway. Check the limit switch for correct connection, the static line be well fixed on the ripcord, and the cord retraction mechanism for retract position. (c) Further cooperate with the electric personnel and airdrop personnel (airborne force leader or personnel for parachute discharging) to make clear the operation and signal rules. (d) Before taxiing, check the light and horn signal for normal condition.
  • 218.
    JZ-Y8F200W-02 AIRCRAFT FLIGHT MANUAL SECTIONIV NORMAL PROCEDURES 4-132 June 30, 2012 Airdrop and airborne of single aircraft (a) Enter the track as per the preset plan after takeoff. Communicate with the airdrop (airborne) site on estimated time of arrival and working status 10min~15min before approach. Consult the wind information, correct the airdrop (airborne) result and report the dispatcher of relavent data. (b) Search for the airdrop (airborne) field as per estimated time of arrival, track and features of the field, and descend to preset altitude after the entrance point and target are detected. Follow the airdrop (airborne) track. See Figure 4-23 for operation procedures on the airdrop (airborne) track. (c) Request the dispatcher for return upon completion of the airdrop (airborne). 1.Open the cargo door and release the cord. 2.Flap down at 15 o . 3.Sight in general. 4. Correct the heading as per the verbal command of navigator after shielding. 11.Keep the heading. 12.Get the airdrop (airborne) information, correct the result and report to the ground. 13.Get ready for the next airdrop (airborne) and the electric personnel reports after the preparation is done. 14.In case of a further entrance, perform the base leg 1min/1min20s after flying over the sideway, and then confirm about the airdrop result. 5.Verbal command of “Ready” 15s before the airdrop (airborne), the yellow light comes on and the horn make shortblast twice. 6. Follow relavent data and keep flight status. 7. The navigator commands“airdrop (airborne)”, the green light comes on and the horn blasts. 8. The navigator presses thebutton to stop the airdrop (airborne), the red light comes on and the horn stops blasting. 9. Retract the flap and cord and close the door. 10.Perform the crosswind turn 25s after flying over the target. V=189 kn R=1.620 n mile γ=17°~18° S=1.620nmile t=8min Figure 4-23a Operation procedures on airdrop (airborne) track
  • 219.
    JZ-Y8F200W-02 AIRCRAFT FLIGHT MANUAL SECTIONIV NORMAL PROCEDURES 4-133 June 30, 2012 1.Open the cargo door and release the cord. 2.Flap down at 15 o . 3.Sight in general. 4. Correct the heading as per the verbal command of navigator after shielding. 11.Keep the heading. 12.Get the airdrop (airborne) information, correct the result and report to the ground. 13.Get ready for the next airdrop (airborne) and the electric personnel reports after the preparation is done. 14.In case of a further entrance, perform the base leg 1min/1min20s after flying over the sideway, and then confirm about the airdrop result. 5.Verbal command of “Ready” 15s before the airdrop (airborne), the yellow light comes on and the horn make shortblast twice. 6. Follow relavent data and keep flight status. 7. The navigator commands“airdrop (airborne)”, the green light comes on and the horn blasts. 8. The navigator presses thebutton to stop the airdrop (airborne), the red light comes on and the horn stops blasting. 9. Retract the flap and cord and close the door. 10.Perform the crosswind turn 25s after flying over the target. Figure 4-23b Operation procedures on airdrop (airborne) track
  • 220.
    JZ-Y8F200W-02 AIRCRAFT FLIGHT MANUAL SECTIONIV NORMAL PROCEDURES 4-134 June 30, 2012 Gravity drop delivery The small cargo on the 1m platform is delivered by means of gravity drop with the roller. The max. quantity of cargo airdrop is 12 sets, with either single or running drop to be available. During the gravity airdrop, the cargo is thrusted down by the horizontal component (G2) of its weight through the bevel between the roller and the ground. See Figure 4-24. Roller bevel Ground G G1 G2 Figure 4-24 Schematic diagram of gravity drop Preparation before gravity drop (a) Check quantity, weight of cargo and the platform lock postion for correctness. (b) Fix the sight and check the cockpit equipment, turn on airdrop circuit breaker of navigator, communicator and the electric personnel. (c) Put the light/heavy selector for normal cargo drop on the airdrop (airborne) console of the navigator at LIGHT position to light up the platform lockup indicating light. Meanwhile, correspond the positions of lock selector on the console with the lock number on the platform (single drop to platform closest to the door, and arbitrary running drop at required position).
  • 221.
    JZ-Y8F200W-02 AIRCRAFT FLIGHT MANUAL SECTIONIV NORMAL PROCEDURES 4-135 June 30, 2012 Operation (a) Obtain data of latitudinal length of deviation (d), range (A), shilding distance (S) and time (t) and sighting angle (ψ) (including verbal command of “READY” 15s before the airdrop) as per the wind information integrated on the basis of airdrop altitude. Adjust and fix the sight. (b) Enter the final leg, and the navigator sends out verbal command of “open the door”, “release the cord”, put the door switch at ON position and check each indicating light for correct position (green light for door open comes on). (c) Enter at an altitude 164ft (50m) below that of the airdrop. The navigator sends out verbal command of “Ready” 15s before the airdrop and press the “Ready” button to light up the yellow “Ready” light, by when, the horn continues blasting. The pilot advances the throttle by about 30o gently and coordinately to level up the aircraft. Keep the climbing rate of 16.4ft/s (5m/s) to make the altitude of platform separation equal to that of the airdrop. During the gravity airdrop, the pilot should follow strictly the data of speed, climbing rate and altitude as they are direct influence to hit probability. Upon airdrop, the navigator press the “CARGO DROP” button, the green light comes on, the horn produces successive blast and the platform unlocks as per the control mode. Meanwhile, the lock light in front of the platform to be released should be come off individually. (d) When the platform is unlocked, it will move backward, causing slight pitching moment of the aircraft. In this case, push the throttle forward gently and timely to maintain the climbing rate. Press STOP or RELEASE button upon completion of the airdrop, the red light comes on and the horn stops blasting. Retract the cord manually and close the door. Note The slope of bevel is 4o 20’ for floor behind frame 34, thus no necessary to push the throttle for gravity airdrop from the platform. Separation time of cargo on the platform during gravity airdrop See Table 4-34 for separation time of cargo on the platform during gravity airdrop with IAS of 189kn (350km/h). Table 4-35 is distance between the lock and the cargo door.
  • 222.
    JZ-Y8F200W-02 AIRCRAFT FLIGHT MANUAL SECTIONIV NORMAL PROCEDURES 4-136 June 30, 2012 Lock No. G(t) 1 2 3 4 5 6 7 8 9 10 11 12 45 2.9 3.2 3.6 3.9 4.3 4.6 5 5.2 5.6 5.9 6.3 6.5 51 2.7 3.0 3.3 3.6 4.0 4.4 4.6 5.0 5.3 5.6 5.9 6.2 54 2.5 2.9 3.2 3.5 3.9 4.2 4.6 4.9 5.2 5.4 5.8 6.1 58 2.3 2.7 3.0 3.4 3.7 4.1 4.4 4.6 5.0 5.2 5.5 5.7 Note c) G: flight weight of airdrop(t); d) T: separation time (s); e) Calculation formula: T= a s2 ① a=g×sinα-f×g×cosθ ② s—— Distance between the lock and the cargo door f—— Friction factor of roller a—— Acceleration θ—— Angle between floor bevel and the ground. θ (behind frame 34)=level pitching angle+4o 20’; θ (before frame 34)= level pitching angle+3o . g—— Gravity acceleration T—— Separation time of cargo
  • 223.
    JZ-Y8F200W-02 AIRCRAFT FLIGHT MANUAL SECTIONIV NORMAL PROCEDURES 4-137 June 30, 2012 Table 4-35a Distance between the lock and cargo door Lock No. 1 2 3 4 5 6 7 8 9 10 11 12 S(ft) 15.98 19.26 22.54 25.82 30.97 34.25 37.53 40.81 44.09 47.38 50.66 Table 4-35b Distance between the lock and cargo door Lock No. 1 2 3 4 5 6 7 8 9 10 11 12 S(m) 4.87 5.87 6.87 7.87 9.44 10.44 11.44 12.44 13.44 14.44 15.44 16.44 No flap down upon gravity airdrop. With flap down, the pitching angle of aircraft is reduced by 3o ~5o which further decreased the value of G2, prolonging the separation time of cargo. Failure reasons for gravity airdrop (a) Airdrop circuit failure (b) Cargo release button not fully pressed; (c) Door not fully opened; (d) ”Heavy/light” selector at wrong position (e) Airdrop switch “EMER HORIZON” not at RELEASE position (f) Circuit breaker not cut in. Emergency airdrop Emergency airdrop is available in case of normal airdrop failure or special circumstances. In such case, cut in the “EMER HORIZON” switch at the position of navigator or pilot. The “EMER ARDP” light comes on after the door is opened, and the cargo on each platform is thrusted down one by one. Extraction airdrop The roller is available for heavy cargo airdrop. The extraction parachute pack is hung up at two parachute releasing devices between frames 47~49 on the ceiling of cargo cabin. The navigator press the button to release the cargo and the bomb shackle is released, with platform shackle being unlocked. Meanwhile, the extraction parachute pack is thrown out, and the parachute is extended to separate the platform from the aircraft.
  • 224.
    JZ-Y8F200W-02 AIRCRAFT FLIGHT MANUAL SECTIONIV NORMAL PROCEDURES 4-138 June 30, 2012 Preparation before extraction airdrop (a) Turn on corresponding circuit breaker. (b) Upon normal release of cargo, put the LIGHT/HEAVY selector at HEAVY position, and indicating light of relavent platform comes on, lock indicating light comes on. Put the release sequence selector and unlock selector at their required positions as per the airdrop plan. 1) Single airdrop of cargo at 6m or 4m platform (I): Put the release sequence selector at I position, and unlock selector at No.4 position 2) Single airdrop of cargo at 4m platform (II): Put the release sequence selector at II position, and unlock selector at No.8 position; 3) Single airdrop of cargo at 4m platform (III): Put the release sequence selector at II position, and unlock selector at No.12 position (Single airdrop of cargo for platform III must be performed by hanging its traction parachute to the traction parachute support of platform II at the right side when the cargo of platform II is dropped out). 4) Single airdrop of cargo at 6m platform (II) : Put the release sequence selector at II position, and unlock selector at No.12 position; 5) Running drop of cargo for two 6m platforms: Put the release sequence selector at RUNNING DROP position and unlock selector at No.12 position. 6) Running drop of cargo at 4m platform (I, II): Put the release sequence selector at RUNNING DROP position and unlock selector at No.8 position. If there are only two 4m platforms, put the selector of platform I at No.1~No.4 position as required, and that of platform II at any position of lock No.5~No.12 as required, unlock selector at No.12 position, and release sequence selector at RUNNING DROP position. (c) For prevention of special cases and in favor of cargo separation from the aircraft, on receiving the verbal command of “Release” from the navigator, the pilot should advance the throttle to above 72o gently and coordinately, and retract it to original position after cargo separation. (d) Movement of platform I near the cargo door will cause slight pitching moment to the aircraft, and slight buffeting will occur, then the aircraft will slide stably and slowly. At this moment, the pilot should pull the throttle and balance the aircraft with rudder tab. (e) Movement of platform II will generate bigger pitching moment which is more obvious with the cargo loading of more than 3.5t, while such moment will not be so big after cargo separation of platform II.
  • 225.
    JZ-Y8F200W-02 AIRCRAFT FLIGHT MANUAL SECTIONIV NORMAL PROCEDURES 4-139 June 30, 2012 (f) Select proper traction parachute as per the cargo weight for extraction airdrop, and the parachute area should not be excessively large. Meanwhile, the cord should not be too long so that it will not bump the tail. Time for separation of cargo from the platform depends on the extractive force, weight of platform and flying weight, i.e. traction parachute area, resistance factor, track, flight speed and platform movement friction. Time of cargo separation at each platform for single airdrop is: 4m platform: 2.7s (I), 3.0s (II), 3.4s (III), and 6m platform: 3.1s (I) and 3.4s (II). In case of running drop, the length of time should be more than 3.4s (II). Special extraction airdrop operation (a) When the traction parachute is released, and the platform stays at original position: 1) Cut off the parachute cord; 2) Cut off the circuit breaker for normal/emergency airdrop, and put the change-over switch at NEUTRAL position. 3) Fix the platform I on the mooring ring with two cables. 4) Close the cargo door. Obtain and adjust aircraft C.G. (b) Reason for extraction airdrop failure: 1) Airdrop sequence selector at wrong position; 2) Extraction parachute shackle failure; 3) Platform lock selector at wrong position. The circuit is cut in only with this selector positioned at No.4, No.8 or No.12. 4) Airdrop sequence interlock limit switch not cut in, others are the same as that of gravity airdrop. Cautions: (a) When operating on the platform inside the cargo compartment, no pulling of the cutter fuse cord on the platform is allowed. (b) Upon opening of cargo door, personnel approaching to the platform or standing between the platform and the cargo door is not allowed. (c) It is not allowed to cut off the traction parachute cord and close the cargo door until the platform is tied down well with the cable. (d) Personnel without protection of the safety belt are not allowed to work at the cargo door.
  • 226.
    JZ-Y8F200W-02 AIRCRAFT FLIGHT MANUAL SECTIONIV NORMAL PROCEDURES 4-140 June 30, 2012 Aircraft C.G adjustment and aircraft control in special circumestances (a) When the platform is stagnated at the cargo door in flight, no severe movement of control surface (especially the rudder and the aileron) is allowed. (b) When the platform stagnates at the cargo door at an altitude of more than 13123ft (4000m), fly and descend with IAS of ≮173kn (320km/h). When the aircraft is desended at the altitude of 13132ft~19685ft (3000~4000m), keep level flight with the speed of 173kn~189kn (320~350km/h) and conduct the following operations: 1) Fix the stagnated platform with four cables and cut off the traction parachute cord. 2) Move the detachable items on the platform and adjust the position of crew members to keep the landing C.G within the allowable range of 16CA~32%CA. (c) In case that the cargo on platform II can not be dropped after the cargo on platform I has been released, all the crew members should go to the rear part of cargo compartment to maintain the aircraft C.G within the range of 18%CA~20%CA. (d) When the aircraft flys with the cargo door opened and C.G of 36%CA, follow limit C.G stipulation. See Table 4-36 for airdrop data of the aircraft. Table 4-36a Backward C.G airdrop data Platform Flight attitude Form of airdrop Cargo size Freight parachute Extraction parachute Weight (kg) Altitude (ft) Area (ft2 ) Qty. Area (ft2 ) Weight of parachute assembly (kg) Length of parachute cord (ft) 1m Level flight at platform before frame No.43 Gravity 500~1000 3.94 3229 At platform behind frame No.43 with speed of 16.4ft/s (Climbing) Gravity 500~1000 3.94 3229 4m I Level flight Towing 2000~2500 3229 300 53.8 12 82 II Level flight Towing 2000~2500 3229 300 53.8 12 98.4 6m I Level flight Towing 4000~4500 3229 300 96.9 16 82 II Level flight Towing 4000~4500 3229 300 96.9 16 98.4
  • 227.
    JZ-Y8F200W-02 AIRCRAFT FLIGHT MANUAL SECTIONIV NORMAL PROCEDURES 4-141 June 30, 2012 Table 4-36b Backward C.G airdrop data Platform Flight attitude Form of airdrop Cargo size Freight parachute Extraction parachute Weight (kg) Altitud e (m) Area (m2 ) Qty. Area (m2 ) Weight of parachute assembly (kg) Length of parachut e cord (m) 1m Level flight at platform before frame No.43 Gravity 500~1000 1.2 300 1 At platform behind frame No.43 with speed of 5m/s (Climbing) Gravity 500~1000 1.2 300 1 4m I Level flight Towing 2000~2500 2.3 300 5 5 12 25 II Level flight Towing 2000~2500 2.0 300 5 5 12 30 6m I Level flight Towing 4000~4500 2.3 300 5 9 16 25 II Level flight Towing 4000~4500 2.0 300 5 9 16 30 Note Single or successive drop is applicable to both gravity airdrop and towing airdrop. Airdrop or airborne with autopilot control Autopilot airdrop or airborne is also available for the pilot or navigator. (a) When the aircraft is balanced at the airdrop altitude, cut in the autopilot and the navigator might control at the altitude ≮19685ft (6000m). (b) Maintaince of flight status with autopilot is more reliable than manual control regardless of single or running drop. However, attention should always be paid to operating status of the autopilot, and be ready for an immediate off in case of any failure. (c) The aircraft’s turning respondance to the autopilot tends to be somewhat hysteretic. In case of indetectable banking on the instrument after the turning, press the button for banking recovery to level off the aircraft.
  • 228.
    JZ-Y8F200W-02 AIRCRAFT FLIGHT MANUAL SECTIONIV NORMAL PROCEDURES 4-142 June 30, 2012 (d) For single airdrop of heavy cargo, especially whose weight is beyond 4t, even if the altitude correction switch is powered on, the aircraft will slide at the descending rate of 6.6ft/s~9.8ft/s (2m/s~3m/s) after the cargo at platform I is separated. Therefore, the autopilot should be cut out upon separation of cargo at platform I. Caution The nose tends to be sunk obviously when the autopilot is cut off. In this case, hold the stick back timely and balance the aircraft with trim tab, then cut in the autopilot again. The aircraft will climb with a rate of 9.8ft/s~16.4ft/s (3~5m/s) after the separation of platform II from the aircraft. In case of running drop by platform I and platform II, the autopilot can keep the aircraft in level flight. Plateau airdrop Features (a) High altitude The standard altitude of the drop zone in plateau is higher, and the terrain is more complicated with accumulative of mountains. Generally, true altitude for airdrop is 3281ft~6562ft (1000~2000m) and sea level elevation is above 16404 ft (5000m). The range tends to be increased with higher altitude, smaller air density, higher speed of declining and high TAS of the aircraft. In case of high altitude airdrop, the speed of aircraft approaches that of the min. level maneuvering speed. As a result, stability and controlability tends to be degraded. The altitude is higher and temperature lower in plateau, and the temperature inside cargo compartment is especially low after the door is opened in winter, requiring the electric personnel and airdrop personnel to work with oxygen mask, which is very inconvenient. (b) Poor obstruction condition Flat ground is rarely distributed in the mountainous western plateau, and the area is relatively small. Therefore, the pattern establishment, entering direction and altitude of airdrop are somewhat limited. Generally, the aircraft has to level up as soon as the airdrop is completed so as to control the timming and radius of turning. Moreover, the turbulent flow in flight and moderate/strong turbulence along the airway make it more difficult for the pilot to follow the stipulated data when controlling the aircraft.
  • 229.
    JZ-Y8F200W-02 AIRCRAFT FLIGHT MANUAL SECTIONIV NORMAL PROCEDURES 4-143 June 30, 2012 (c) Drop zone difficult to be detected With larger areas of land, fewer and smaller man-made landmarks and less accuracy of map, the field for airdrop generally has to be searched as per latitude and longitude. (d) Poor conditions of communication and navigation Sometimes there are only small-sized short wave radio stations on site, limiting the contact distance. As a result, timely ground guidance is somewhat difficult. The navigation station is rarely distributed and with lower power, and due to terrain influence, its receiving distance is comparatively nearer and the indication tends to be unstable. (e) Poor guaranteed condition of weather Information of current weather condition in airdrop region and the airway is generally beyond control in plateau mountainous area where the meteorological environment is complicated, and there are fewer meteorological stations which are far away from the drop zone. Lacking the detailed information of wind, the airdrop tends to be less accurate. Preparation and operation Besides general preparation and operation steps, pay attention to the following items: (a) Collect information, collate and modify the information on the map. Study the terrain and altitude of mountain within the airdrop region with maps of different scales. Select the airway with the aid of obvious landmarks and terrain features and keep off the projecting mountains. (b) Altitude of airway should be 1969ft~3281ft (600~1000m) above the peak around, and the point for level flight and sliding should be calculated strictly. After takeoff, it is necessary to level up to stipulated altitude, and fly to the mountain area with benign function of engine. The altitude of airway should rather be higher than lower, and under complicated weather condition, climb up above the clouds where the visibility is better so that turbulence, icing or possible engine failure are able to be handled. (c) Work out the airdrop altitude and method for establishing the traffic pattern of entering or going out of the drop zone as per standard altitude and obstruction condition. The true altitude for airdrop should not be lower than 600m, In case that the differences between terrain, standard altitude is obvious, set the altitude of airdrop and work out the method for establishing the traffic pattern as per current situation. Raise the airdrop altitude in poor airflow condition.
  • 230.
    JZ-Y8F200W-02 AIRCRAFT FLIGHT MANUAL SECTIONIV NORMAL PROCEDURES 4-144 June 30, 2012 (d) Standarized weather condition for airdrop: Total cloud cover within the airdrop region should not exceed 5/10, and that below the altitude of airdrop not exceed 3/10, and the visibility should be more than 5.4 n mile (10km). (e) Obtain the max. takeoff weight as per standard altitude of airport, temperature, direction and speed of wind and length of runway. Obtain min. fuel load of the aircraft and min. fuel load for returning as per local weather condition and quantity of standby airport for landing. Enough standby fuel should be reserved, and pay attention to min. fuel load for returning in flight. (f) Airdrop cargo packing and equipping of parachute: Given parachute quality and relatively small load in opening status, the loading can not be too heavy. For avoidance of damage for cargo without parachute upon touch-down, the four-layer hempen sack is preferred and the cargo should be packed tight interior and loose exterior, with the weight of each pack being 40kg. (g) In case troubleshooting of the oxygen system can not be done, use the emergency oxygen bottle timely and return to land immediately. (h) High altitude airdrop makes latitudinal control of the aircraft more difficult, especially under disturbance and turbulence. Thus, IAS should not below 173 kn (320km/h), and turning bank not more than 15o . (i) The crew members should cooperate closely with each other to avoid idle run for the sake of misoperation. Strictly follow the data in flight and strengthen the visual observation for prevention of colliding with the mountain. Formation airdrop (airborne) Preparation Except for the airdrop (airborne) preparation of single aircraft, the following details should also be cared: (a) Make clear the flight data of leader and wing for formation airdrop (airborne) and the method for following these data in the air during the flight preparation. (b) Decide the airdrop (airborne) entrance direction and method of course establishment as per the field area, funnel condition and information of foe, etc.
  • 231.
    JZ-Y8F200W-02 AIRCRAFT FLIGHT MANUAL SECTIONIV NORMAL PROCEDURES 4-145 June 30, 2012 (c) Coordination of the leader and wing: 1) Confirm communication signal and work out shield command solution of the fleet airdrop (airborne); 2) Confirm stipulations on airdrop (airborne) steps of the leader and the wing; 3) Work out solutions for airdrop (airborne) special treatment Upon formation airdrop (airborne), both the leader and the wing should follow the stipulations below: (a) The leader should follow strictly the stipulated data and correct gently and accurately to create favorable conditions for the wings to maintain their positions in formation flight. (b) In case of any special circumstances, the leader should deal with the cases calmly, decisively and correctly and commands timely. (c) Each wing should maintain their positions in the fleet as per stipulated data and try their best to drop items or airborne force at the same site as that of the leader. (d) The wing should calculate the airdrop (airborne) data for conduct single airdrop (airborne) timely and remind the leader of any severe mistake. Main operation procedures of airdrop (airborne) for single aircraft in trail flight (a) The leader should inform each wing of the calculated airdrop (airborne) data when approaching the airdrop (airborne) track starting point. The leader commands “open the door” 6~8min before the airdrop (airborne) and each wing begins timing. The door opening begins with the last wing in a reverse order, with the interval of 5s. Each wing navigator commands “No.6 opens the door” as per the stipulated interval, and reports when the door is opened. (b) After entering the airdrop track, the leader gives verbal command of lowering speed 4~5min before the airdrop (airborne), and each aircraft decreases the speed in a reverse sequence from the last wing. (c) Pilot and navigator of the leader search for the airdrop (airborne) field as per the terrain, homming station and smoke screen tank, and correct the heading accurately as per the latitudinal length of deviation. Inform the wing of such correction if more than 10o . (d) The leader gives verbal command of “preparation” 30s before the airdrop (airborne) and follows the stipulated data as required. On receiving such command, each wing begins timming at the moment of the leader (previous aircraft)’s first drop-out. The navigator sends out airdrop (airborne) signal and command as per methods of timming and parachute push.
  • 232.
    JZ-Y8F200W-02 AIRCRAFT FLIGHT MANUAL SECTIONIV NORMAL PROCEDURES 4-146 June 30, 2012 (e) When the leader completed the airdrop (airborne) within 1.5min, it sends out the verbal command of “close the door”. When such command is received by the wing, the navigator commands “No.6 close the door”. (f) After each wing closes the door, the leader commands “increase the speed” and each wing increases their speed separately as per the reverse sequence from back to front. After the wing adjusted their positions in fleet, return to land. Cautions for formation airdrop (airborne) (a) On receiving the verbal command of airdrop (airborne) preparation, each wing should keep his position in the fleet and is not allowed to correct the interval. (b) The fleet should observe current weather condition along the course. (c) The verbal command of leader must be clear and accurate in formation airdrop (airborne) process, and both the leader and the wing should turn on the two ultra-short wave radios simultaneously, and the wing should listen more than call. Airdrop (airborne) at night Features (a) The terrain and landform of airdrop region tends to be less visible in dark light, making it more difficult for drop zone searching. (b) In the drop zone where there are illuminations of oil lamp, firewood or signal flare, etc., the observation range from the center of airdrop is further in distance than at daytime, however, there are fewer landmarks. (c) Airdrop effect checkout is more difficult at night, in case of a further entrance, the data can not be corrected as per the previous deviation in general. Preparation Besides the preparation which is the same as that of the single aircraft during daytime, pay special attention to the following points: (a) Make clear the drop zone features, landmark position of surrounding lights and natural reflective lights. (b) Select an obvious and reliable entering point for airdrop. Landmark of auxiliary light is required before or after entering the starting point if feasible. (c) During the airdrop, label the white rubberized fabric on shielding line of the windshield glass in dark night and the black rubberized fabric in moon night. Meanwhile, the sighting position should also be labeled after obtaining the airdrop data for favor of sighting.
  • 233.
    JZ-Y8F200W-02 AIRCRAFT FLIGHT MANUAL SECTIONIV NORMAL PROCEDURES 4-147 June 30, 2012 (d) In case of accumulative of auxiliary lights along the airway, correct the direction with the aid of its latitudinal distance of deviation, or drop as per the timming method. (e) Lighting signal should be equipped within the cargo to be dropped. Meanwhile, flash the landing light or navigation light to indicate completion of such drop for convenience of ground search and reminding the ground personnel for shielding, thus guarantee their safety. Operation (a) Check before takeoff 1) Get information about any variation of volume, weight, packing of the cargo and performance of parachute. 2) The navigator should cooperate with the electric personnel and airdrop personnel (paratrooper) to make clear the airdrop signal and group release, inform relative personnel of cautions and operation in special circumstances. 3) Get information about weather condition of the airdrop region and the airway, along with direction and speed of wind for airdrop and average wind so as to obtain the airdrop data. 4) Mark the scale on windshield glass and label the rubberized fabric. (b) Operation steps of entering the airdrop route is the same at that of the daytime. Cautions for airdrop at night (a) Familiarize and make clear the air-to-ground signal of communication, and guide the aircraft for entering the drop zone correctly with required flashing lights. Preferable timming of sending out the signal flare is after the entrance of final approach turn. (b) Precise distance of the lighting point is not easy to be obtained at night, pay special attention to avoid misjudge of the landmarks. Prevent the misrecognization of reflection of cockpit light on the windshield glass as the sighting point. (c) As the ambient temperature is low in winter, there might by water vapor and frost on the windshield glass that negatively effect the direction distance sighting. Thus, it is necessary to turn on the electric fan or pressure control/shutoff valve and wipe out the water vapor or frost with dry cloth. (d) Correction of airdrop data during a further airdrop is not allowed until the previous airdrop effect is confirmed, so as to avoid more obvious error. Other safety measures adopted are the same as that for daytime.
  • 234.
    JZ-Y8F200W-02 AIRCRAFT FLIGHT MANUAL SECTIONIV NORMAL PROCEDURES 4-148 June 30, 2012 Airdrop and airborne on the sea Targets of airdrop on the sea are of fixed (i.e. island and the neaped and parking ship) and movable (i.e. floating ship and personnel, etc). With fewer landmarks and available navigation aids, the target is very difficult to be positioned. Lacking of wind information will make the airdrop more difficult than that on land. See Table 4-37 for information of wind force, wave scale and phenomenon of sea level. Features (a) The main targets for airdrop on the sea are island and ship, and the wind information has to be obtained through real-time test and judgement by the crew members in air. (b) Ships or personnel will frequently be stuck during airdrop (airborne) on the sea. Lacking of auxiliary landmarks makes the sight of direction and distance more difficult. As a result, they can not be detected and occupy the preset position timely. (c) It is difficult to select proper airdrop (airborne) field in island where the terrain is rather complicated. Some mountainous islands are up and down, while others are large but with higher standard altitude along the lontitudinal area, which are not fitted for airdrop and airborne. (d) Rescue target search is more difficult. Most airdrop or airbone targeted the trapped ship are performed in bad weather conditions of windy, low-clouds and poor visibility. Under such circumstances, the aircraft is forced to enter at low altitude, bringing more difficulties for target search.
  • 235.
    JZ-Y8F200W-02 AIRCRAFT FLIGHT MANUAL SECTIONIV NORMAL PROCEDURES 4-149 June 30, 2012 Table 4-37a Wind force, wave scale and phenomenon of sea level Wind force Wave scale Wind speed Name of wave scale Average height of wave (ft) Phenomenon ft/s kn 0 0 <3.3 Calm sea As smooth as the mirror, and the wave forms an up-and-down surface of large area which is smooth. However, there is no accumulative pointed wave. 1 1 3.3~ 6.6 1.6~3. 8 Smooth sea 0.328 Tiny wave (ripple) polishes as the scale under sunshine. 2 1 6.6~ 13.1 3.8~8. 1 Smooth sea 0.656 Tiny wave (ripple) like the folded smooth paper. Whenever there is surge, the wave accumulates on the large scaled fluctuant surface. 3 2 13.1 ~19. 7 8.1~1 1.9 Wavelet 1.969 Slight wave with sea-like color, and the wave is recognizable only through careful observation. 4 3 19.7 ~26. 2 11.9~ 15.7 Slight sea 3.28 The wave is not big but obvious with breakage at the peak. Few waves are locally visible like the white-colored flowers far away. 5 4 26.2 ~36 15.7~ 21.6 Moderat e sea 6.562 The waves are shapable and the white-colored spray is seen everywhere like blocks of clouds. 6 5 36~ 45.9 21.6~ 27 Rough sea 9.843 Rough wave with high peak, and the spray deploys along the bevel of wave at leeward slope of the peak. The spray on the peak top is sliced by the wind in filiform. 7 6 45.9 ~55. 8 27~32 .9 Very rough sea 13.123 The sliced spray on the axis-like peak forms the strip-shaped wave of white color along the wave bevel. 8 6 55.8 ~68. 9 32.9~ 41 Very rough sea 18.045 Obvious long wave which is huge, covering the peak, and the white-colored strip of spray can be seen. 9 7 68.9 ~82 41~48 .6 Monster wave 22.966 The spray strip covers the whole bevel of wave, with some spray being at the trough. 10 8 82~ 95.1 48.6~ 56.2 Very high sea 29.526 Dense spray covers fully on the bevel of wave except for somewhere at the wave base. 11 9 95.1 ~10 8.3 56.2~ 64.3 Mountai nous sea 37.730 Dense spray of white color lays on the sea, making the sea to be white in color. 12 9 108. 3~1 21.4 64.3~ 71.8 Mountai nous sea 45.931 The surface of sea is white in color, and the water drop and billow are sprayed everywhere in the air, which sharply decreased the visability.
  • 236.
    JZ-Y8F200W-02 AIRCRAFT FLIGHT MANUAL SECTIONIV NORMAL PROCEDURES 4-150 June 30, 2012 Table 4-37b Wind force, wave scale and phenomenon of sea level Wind force Wave scale Wind speed Name of wave scale Averag e height of wave (m) Phenomenon m/s km/h 0 0 <1 Calm sea As smooth as the mirror, and the wave forms an up-and-down surface of large area which is smooth. However, there is no accumulative pointed wave. 1 1 1~2 3~7 Smooth sea 0.1 Tiny wave (ripple) polishes as the scale under sunshine. 2 1 2~4 7~15 Smooth sea 0.2 Tiny wave (ripple) like the folded smooth paper. Whenever there is surge, the wave accumulates on the large scaled fluctuant surface. 3 2 4~6 15~2 2 Wavelet 0.6 Slight wave with sea-like color, and the wave is recognizable only through careful observation. 4 3 6~8 22~2 9 Slight sea 1 The wave is not big but obvious with breakage at the peak. Few waves are locally visible like the white-colored flowers far away. 5 4 8~1 1 29~4 0 Moderat e sea 2 The waves are shapable and the white-colored spray is seen everywhere like blocks of clouds. 6 5 11~ 14 40~5 0 Rough sea 3 Rough wave with high peak, and the spray deploys along the bevel of wave at leeward slope of the peak. The spray on the peak top is sliced by the wind in filiform. 7 6 14~ 17 50~6 1 Very rough sea 4 The sliced spray on the axis-like peak forms the strip-shaped wave of white color along the wave bevel. 8 6 17~ 21 61~7 6 Very rough sea 5.5 Obvious long wave which is huge, covering the peak, and the white-colored strip of spray can be seen. 9 7 21~ 25 76~9 0 Monster wave 7 The spray strip covers the whole bevel of wave, with some spray being at the trough. 10 8 25~ 29 90~1 04 Very high sea 9 Dense spray covers fully on the bevel of wave except for somewhere at the wave base. 11 9 29~ 33 104~ 119 Mountai nous sea 11.5 Dense spray of white color lays on the sea, making the sea to be white in color. 12 9 33~ 37 119~ 133 Mountai nous sea 14 The surface of sea is white in color, and the water drop and billow are sprayed everywhere in the air, which sharply decreased the visability.
  • 237.
    JZ-Y8F200W-02 AIRCRAFT FLIGHT MANUAL SECTIONIV NORMAL PROCEDURES 4-151 June 30, 2012 (e) Traffic pattern establishment is difficult. It is hard for the aircraft to follow the preset course upon completion of the final leg when the visibility of the sea is low on its surface, or when the drift is not properly corrected when the aircraft enters against the sun with the target being invisible along the down-wind leg direction. Preparation (a) Get detail information of mission property and target position. Study the sea motion, features of island distribution, rules and features of ship movement and signal setup within target region. Make clear the division of work among the crew members on the basis of finalized route and the listed method of target search within the region. (b) Get mission guarantee information, weather forcast and variation and communication rules of the target region. (c) Make clear the method and cautions for rescue equipment airdrop prior to sea rescue. The cargo packing should be waterproof and with colored mark, so that it will not break after touch-down and be floated, which is convenient for observation and salvage. (d) Upon duration calculation, time of search and stay at the target region should be fully considered and enough fuel should be reserved. Work out solutions for special cases. Operation (a) Enter the target region as per the preset air route and search the target correctly at proper altitude. Four methods are adopted in target search, i.e. single air route search, square search, grid search and sector search. Generally, the first method is adopted as per the target position and possible range of float, and attention should be paid to take full advantage of the airborne radar. Proper altitude of research is generally 2625ft~3281ft (800~1000m). The field of view will be narrowed at low altitude, while at an overhigh altitude the target tends to be indetectable. For an object judgement, lower the altitude when the target is detected and fly from the sideway. (b) Upon selection of direction for entrance, area and shape of the target region should be considered and try to avoid entering from the direction of sun. Genreally, the aircraft enters with reference of the island and fixed object on ground and with the aid of navigation station (broadcasting station) and positioning radar near the target region. In case of movable target, enter along the direction paralleling or vertical to the moving target.
  • 238.
    JZ-Y8F200W-02 AIRCRAFT FLIGHT MANUAL SECTIONIV NORMAL PROCEDURES 4-152 June 30, 2012 (c) Obtain the data of average wind. Generally, the wind of short sea is stronger than that of the land area but weaker than that of the open sea. The wind of open sea is featured with stable direction and less variation. Therefore, the data of average wind obtained through radar is relatively accurate. At the low altitude, average wind data can be obtained through the judgement of wind force scale as per the wave. However, the speed of wind is slightly weaker than that in clouds on average, i.e. 1.3 times as that of the sea wind. (d) Airdrop or airborne of small target like ship is generally entered at low altitude against the wind. For less effect of wind and high rate of hit, cargo with parachute is generally dropped at the altitude of 984ft~1312ft (300~400m), and without parachute 656ft (200m). (e) Method: Conduct the initial drop in trail, and then obtain the corrected data for further airdrop as per the deviation. Upon direction and distance sight of the movable target, the lead should be taken into consideration. Correct moving error during traffic pattern establishment process for avoidance of losing the target. (f) Select the sighting point. For convenience of salvage, when targeting the ship for airdrop, the sighting point should slightly exceed the target. For cargo without parachute, deviate one safety distance rather than align directly with the ship for sighting. This is for avoidance of accidental injury. Low-altitude airdrop (below 1312ft (400m)) Features (a) Wind test information is susceptible to the terrain. The wind of drop zone and on the air route are obviously different, thus sighting data calculation can not be counted on the en- routewind data tested too early. (b) Target search being difficult. The flight field of view is narrowed at low altitude and the overall terrain is hard to be observed, and the target search is susceptible to the tarrain. Moreover, the lowered altitude added more difficulties for recognition of the drop zone. (c) Shorter period of time to judge direction and distance of correction. Severe turbulence at low attitude makes it hard to follow current flight data, thus shortened the period of time to judge direction and distance of correction. (d) Higher hit rate and more concentrated dispersion pattern. The drop time tends to be shortened and the airdrop is less susceptible to the wind at low altitude, improving the accuracy of direction and distance sighting with the aid of landmarks. When sighting with the dropping angle, the deviation tends to be smaller with the same error.
  • 239.
    JZ-Y8F200W-02 AIRCRAFT FLIGHT MANUAL SECTIONIV NORMAL PROCEDURES 4-153 June 30, 2012 (e) The concussion of touch-down is reduced for cargo without parachute since it has already dropped on ground before the descending speed reaches its limit. Preparation (a) Entering point should have obvious landmarks or navigation equipment for detection in time and accurate passing-through. The distance between the entering point and the drop zone is generally 13.5n mile~21.6n mile (25~40km) and the terrain should be as flat as possible for convenience of search, and the entering direction should be less effected by the sunlight. (b) Work out the method of drop zone research, the terrain nearby, landmark feature and the relations of their positions. Chimney, mountain top and huge constructions which are detectable are ideal landmarks. But attention must be paid to keep the safety altitude so as not to collide with the obstructions. (c) Work out favorable altitude for the airdrop as per mission requirement, terrain and sighting method adopted. Generally, the altitude of airdrop for cargo without parachute is 492ft~984ft (150~300m) so that the airdrop will be more effective and the concussion of touch-down will be weakened. (d) Work out solutions for special cases and troubleshooting of the aircraft. Such solution must be suitable when the drop zone can not be searched out and under complicated weather conditions. Operation (a) Get the wind information. This is done in real-time through the drop zone. When testing the wind in air, smoke, trees and crops on the ground should be observed together with reference of the radar for judgement of direction and speed of wind. (b) Method for searching the drop zone. After flying over the starting point of air route, follow strictly the flight data as stipulated. Check direction and distance as per the obvious landmarks at both sides of the air route for avoidance of any readily diversion or search failure due to excessive deviation. Search in advance as per preset time and position of landmark. Report the dispatcher or raise the altitude in case of any search obstacles. (c) Sighting. Timming with the aid of landmarks or area above the target. Try to stabilize the flight status in case of any turbulence to prevent the mislead signal of “drop” triggered by sighting point jump due to aircraft turbulence.
  • 240.
    JZ-Y8F200W-02 AIRCRAFT FLIGHT MANUAL SECTIONIV NORMAL PROCEDURES 4-154 June 30, 2012 Airdrop with the aid of navigation station It is available in complicated weather conditions and when the ground target is indetectable. Low power rate of movable navigation station, lacking of average wind information, high altitude, indication error difference of the aircraft all decrease the hit rate and enlarged the area of airdrop to some extent. For flight safety, training airdrop is only available for cargo with parachute in general. Preparation (a) Study the air route and work out the method for entering the airdrop route. Generally, for reducing the drop error, the aircraft will enter the drop zone as per upwind direction. Therefore, the route of navigation airdrop varies as per the wind direction. After entered the area above the movable navigation station of the drop zone, establish the route as per the current wind direction. (b) Get clear understanding about the operating features of navigation station and radio compass (ADF), position, frequency, calling signal and performance of the navigation station near the drop zone, indication error of ADF on the aircraft, pointer degree and timming for testing and calibration when flying over the navigation station, as well as the treatment of ADF disturbance. (c) Study the weather condition. Get information of weather focast, types of cloud, direction and speed of wind on ground, threathening of hazard weather and work out feasible solutions. The navigation airdrop is generally conducted amid or above the stable cloud layer rather than in the cumuliform cloud. Operation (a) Sighting of direction. When entered the airdrop route, fly home actively. During the navigation flight, perform the correction timely as per indication of ADF and azimuth finder according to that of final leg correction during instrument landing. (b) Sighting of distance. If the airdrop is above the navigation station, the movable navigation station is required to be located right below the place from where the airdrop signal is sent out. The “drop” signal is sent out when the aircraft is flying over the navigation station. Timming airdrop above the navigation station. Timming at the moment when the aircraft flies over the navigation station. Follow the preset track and drop at the point of sending signal, so that the error of direction can be somewhat corrected.
  • 241.
    JZ-Y8F200W-02 AIRCRAFT FLIGHT MANUAL SECTIONIV NORMAL PROCEDURES 4-155 June 30, 2012 (c) Judgement for the instance of flying over the navigation station. This is the key for seizing the timming of drop. Judge with the aid of indication, and listen carefully. Sometimes the pointer tends to swing in flight when there is radio disturbance or signal from the navigation station. For avoidance of misleading, postion of the aircraft can not be judged being above the navigation station until the pointer made a reversal turn at 60o ~90o leftward and rightward. Airdrop with the lack of landmark, wind information and guidance Features (a) Without landmarks, range and center of the airdrop will not be settled and detected easily, and sight of direction and distance is performed only with the aid of landmarks.Under such circumstance, misjudgement will lead in big error or even drop mistake. (b) Airdrop without wind information. In this case, the crew members have to get the wind in the air for data calculation. Therefore, the calculation error will be boardened which will be affective to the airdrop precision. (c) Airdrop without guidance. When the aircraft enters the final leg of the airdrop route, the error of direction and distance is not likely to be timely guided by the ground dispatcher. Preparation and operation (a) Prepare seriously. Correct the largescale map carefully as per the shooting picture. Since its accuracy is somewhat affective to track maintaining, target search and airdrop precision, thus detailed research and correct calibration is required. (b) The air route should be convenient for track following with obvious and reliable starting point. The proper distance should be 16.2n mile~21.6n mile (30~40km). Reasearch the landmarks at both sides of air route and center of the drop zone in detail, and select 2 to 3 directions and distances as auxiliary point of check and sighting. Make calculation; mark the data of distance and time. (c) Familiarize with features and positions of the terrain and landscape around the drop zone center of the airdrop route. Work out entering direction, distance and method of sighting. (d) Seasonal influence to terrain and landscape. Judge the variation and development of wind as per history information and data obtained through real-time test at the nearby meteorological station. (e) Work out the indication error of radar and its influence for division of labor among the crew mebers when entered the airdrop route.
  • 242.
    JZ-Y8F200W-02 AIRCRAFT FLIGHT MANUAL SECTIONIV NORMAL PROCEDURES 4-156 June 30, 2012 (f) Requirement of drop zone research 1) Follow strictly the flight data along the preset route as per the ground preparation. Take advantage of each navigation equipment for track following and fly over the starting point of the air route timely and accurately. 2) When entered the starting point, calculate sectionally with the aid of landmarks and control pointwise, adjust the speed timely with margin, follow strictly the track and data so as to arrive as per estimated time. 3) The crew members should cooperate closely with each other as per the division of labor. Correct the drift and follow the track according to features and positions of drop zone terrain and landscape, and search the target from close to the distant, from the sideway to the middle part and from line to point. (g) Obtaining the average wind 1) Source of wind information. Obtain the wind data with the aid of rada. Calculate the resultant wind above two flying levels (done by the last wing during formation flight) at the altitude of 656ft~984ft (200~300m) as per the indicated drift and ground speed, and judge with the reference of ground smoke and by means of smoke screen tank release. 2) Obtain the airdrop data based on an integrated analysis of wind information. Generally, the value of wind in clouds is bigger than that of the true value. The correction is 75% in small scale of wind and 100% in large scale of wind. Airdrop right towards the center is available with wind speed of not more than 6.56ft/s (2m/s) and drift of ±1o . 3) Direction and distance correction as per the selected landmarks. Settle the auxiliary point of sighting with timming method and sighting angle as the aid as per the current situation. Cautions (a) Make a tight plan and organize intensively, strictly follow the stipulation in various weather conditions. (b) Sthrengthen the on-site command and test the scale of wind timely. Timely command for ceasing the airdrop in case of over deviation that is threatening to safety of the aircraft. (c) The crew members should cooperate closely with each other and make a clear division of labor, remind each other as required, supervise timely and follow the stipulations for avoidance of target misrecognization.
  • 243.
    JZ-Y8F200W-02 AIRCRAFT FLIGHT MANUAL SECTIONIV NORMAL PROCEDURES 4-157 June 30, 2012 (d) During formation flight airdrop, the deputy leader and wing should correct timely any mis-calculated data of the leader which is obvious. (e) Airdrop at night is featured of no wind information and ground guidance. Rescue (a) The cargo compartment can be equipped with 72 sets of stretchers arranged in three rows (parallel to longtitudinal axis of the aircraft) and six lines (vertical to longtitudinal axis of the aircraft) and four levels, one line of seats to the left of cargo compartment available for 3 medical care personnel and 17 walking injuries, as a result, total number of person carried is 92. Each stretcher and seat is equipped with oxygen device and their working condition is required for serious check after the mounting of stretcher support. Meanwhile, be sure that the masks are well covered. (b) Get each first-aid equipment and sanitary equipment at their positions before flight. The equipment include first-aid medicine, standby oxygen and sewage drainer, etc. The medical equipment should be fixed reliably and with anti-shock protection. (c) The pilot should control the aircraft gently and avoid excessive climbing and descending rate. (d) Check oxygen supply condition of each wounded personnel in flight and increase the supply quantity if necessary. Emergency oxygen supply is available to the severe wounded and personnel with breathing difficulty. Control the oxygen consumption as per the duration period of time and pay attention to application of compartment heating.
  • 244.
    JZ-Y8F200W-02 AIRCRAFT FLIGHT MANUAL SECTIONIV NORMAL PROCEDURES 4-158 June 30, 2012 Low-altitude flight Low-altitude flight refers to the flight at an altitude 328ft~3281ft (100~1000m) above the ground or the water. In this case, the aircraft is able to take full advantage of terrain, ground object and cloud for shielding, which is strategically significant so that the aircraft will not likely to be detected by the foe. Such flight is available for rescue airdrop, forest fire extinguishment and other missions at peace time. Thus mastered flight skill is needed to fulfill the requirement during war and peace times. Features (a) Severe threathening of obstruction and turbulence, and sometimes the flight altitude requires frequent alternation as per the terrain feature. (b) Aircraft and engine troubleshooting is hard to be done. (c) Lower TAS, more consumption of engine fuel, shortened effective distance, smaller range and worse performance of radio and radar equipment. (d) The landmarks are broadened at low altitude so they are easily to be scaled up manually and prolonged visually. With higher speed of relative motion between the aircraft and the ground, the landmark is detected late and in case of terrain fluctuation, the full appearance of landscape and their relations of position are hard to be distinguished, bringing difficulties to landmark detection and recognition. (e) Lower speed and pendulum direction of wind. As affected by the terrain, the wind varies obviously. Generally, the weather at low altitude changes alternatively and the visibility is worse. Preparation (a) The air route should be shielding-effectively, reliable and convenient for maneuvering flight. It should approach the linear landmarks with less cuves and turning points, and especially, the starting point of airdrop route should approach the landmarks of dot shape which are obvious and reliable. Meanwhile, take full advantage of the radio navigation station. (b) Study the air route with large-scale map of the latest version. Make clear and memorize the main check point and features of turning point. These points should be searched and recognized by finding out the max. standard altitude within the range of 25km to the left and right side of the air route, and then work out min. altitude of flight at each section. (c) Work out solutions for special cases and make clear the division of labor.
  • 245.
    JZ-Y8F200W-02 AIRCRAFT FLIGHT MANUAL SECTIONIV NORMAL PROCEDURES 4-159 June 30, 2012 Operation (a) Follow strictly the data of true flight altitude that checked by radio altimeter. Level up the aircraft with elevator tab. The descending altitude can not be excessive and strengthen external observation during the descent process. Keep the IAS not lower than 216kn (400km/h) at low altitude to reserve maneuvering space for special cases or climbing. Adjust the throttle angle accordingly when alternating the flight altitude. Follow strictly the heading. Correct any variation of drift or deviation of track accurately and timely, and follow strictly the corrected heading. Upon turning, fly over the turning point accurately and control strictly the timming of turn. (b) Follow the navigation of ADF and landmarks and refer to the radio and radar if necessary. The landmark should be observed from close to the distant and from the sideways to forward direction, and seize its outstanding features and symptom. (c) Thepilot should pay attention to the overall situation and divide attention reasonably. Frequent external observation is required, keep the flight data as per the indication and avoid long-time work in the cockpit. (d) Make clear the division of labor among each crew member The aircraft commander should pay attention to the overall situation and strengthen the judgement and troubleshooting in special cases. For mitigation of fatigue in flight, pilot and copilot can control the aircraft alternatively with clear handover, so as to prevent the aircraft from control-free status. The pilot controlling the aircraft should be concentrated on maintaining the flight status, and the copilot should focus more on external observation, and check flight data and operating status of the aircraft and the engine as required, assisting the pilot’s operation. Besides flight data calculation, the navigator should pay more attention to external observation so as to get the current position of the aircraft and remind the pilot to follow the flight data.
  • 246.
    JZ-Y8F200W-02 AIRCRAFT FLIGHT MANUAL SECTIONIV NORMAL PROCEDURES 4-160 June 30, 2012 Flight in summer and winter Winter flight Features (a) The engine power rate tends to be increased with lower temperature and thicker air, and the takeoff and running distance of aircraft are shortened, while the Max. speed of level flight and ceiling limit are increased. (b) Strengthen the check of anti-icing and deicing system, and operate the anti-icing and deicing equipment correctly as required. (c) Temperature difference inside and outside the cockpit will cause water vapor and froast at inner wall of the windshield glass which might negatively effect the visual field of pilot. Therefore, they must be wiped out with dry cloth and electric fan before taxiing and during aircraft taking off and running. Clean the water vapor and froast by means of windshield glass heating if necessary. (d) When the ground is covered with heavy snow, the landscape varies that the rivers, lakes and towns become illegible with exception of railway and highway. The runway approaches the snow-covered ground in color, thus search and identify of airport tend to be more difficult. (e) The reflection of light on the snow will cause negative effect to the vision, especially at low altitude. Therefore, excessive external observation is not suggested. When landing on the snow-covered runway, the landmarks are broadened at low altitude so they are easily to be scaled up manually and prolonged visually. (f) The wheel might be slided and out of control when the aircraft is taxiing on the snow or ice-covered ground. Perform the taxiing as per relavent requirement.
  • 247.
    JZ-Y8F200W-02 AIRCRAFT FLIGHT MANUAL SECTIONIV NORMAL PROCEDURES 4-161 June 30, 2012 Features of operation and maintenance (a) Takeoff with froast is strictly prohibited. Clear the ice and froast away before takeoff and check each air vent for ice blockage. Check the sealing system of cockpit for icing after engine run. (b) Check each pipe, duct, tube, conduit and their fittings for oil seepage and icing. Insolate the buffer strut of landing gears for warmup in low temperature to prevent air leakage. (c) It is necessary to drain off the water in fuel system as per localized condition before each flight and after refilling of fuel to prevent icing. (d) Heat the engine before the engine run when the temperature is below -25o C. Warmup after the engine run. Engine heating is allowed by advancing the throttle to 50o only when the oil temperature reaches 20o C above. Generally, the equipment should be preheated for a period of 2min before their service. (e) If the aircraft is parked for a long time (for exemle through the night) at a temperature below -15o C, the battery should be removed for prevention of cold damage. Summer flight Features (a) The engine power rate tends to be decreased with higher temperature and thiner air in summer. When the IAS is settled, TAS is higher than that in winter. The distance of takeoff and running is longer, Max. level flight speed and ceiling limit of the aircraft are both reduced, and engine troubleshooting are hard to be done. (b) In summer, the weather changes alternatively, the convection cloud grows quickly, and the thunderstorms are frequent, with local parts being hard to be forcasted accurately. Therefore, attention must be paid to weather alternation in flight to avoid entering into the thunderstorm regions. (c) Ambient temperature is lower at high altitude which might also leads to icing, so enough attention must be paid. (d) Avoid the application of brake in taxiing to prevent overheat damage. (e) Make reasonable use of the airborne electrical equipment and shut off when they are nolonger used, so as to prevent overheat damage. (f) Relavent personnel should have a good rest in hot summer. (g) It is necessary to check the tyre for normal pressure, and the discharger and bounding jumper for reliable connection. Generally, the fuel should not be over loaded in summer flight.
  • 248.
    JZ-Y8F200W-02 AIRCRAFT FLIGHT MANUAL SECTIONIV NORMAL PROCEDURES 4-162 June 30, 2012 Features of operation and maintenance (a) The aircraft is likely to be rusted at its metal parts with more rain and high humidity. For the sake of insolation, the tyres and plastics are likely to be aged and cracked and the windshield glass discolored and deformed. Therefore, ventilate the aircraft after the rain and cover the cloth daily. (b) Drain off the water before each flight and after refilling of fuel for prevention of air obstruction due to overheat of the system. (c) To avoid harm of the thunder storm, put the wheel chock and the tail support at required position, cover the cloth and position the bounding jumper as required after each flight. (d) The engine start is more difficult at high temperature. The time for engine start should be controlled strictly to prevent overheat and excessive of operation period on ground. After engine run, it is allowed to turn on the oil ejection cooler, but remember to turn it off before takeoff. (e) Generally, the cockpit temperature ragulator is positioned at 16o C. Power on the vent switch before pressurization, and turn on the turbine cooler after pressurization. After the turbine cooler is turned on, the air temperature inside the tube can be lowered by about 30o C~50o C.
  • 249.
    JZ-Y8F200W-02 AIRCRAFT FLIGHT MANUAL SECTIONV PERFORMANCE 5-1 June 30, 2012 PERFORMANCE GENERAL In comparison with the prototype aircraft, it has no difference in aerodynamic characteristic when the doors are in closing condition, and the characteristic of the power plant slightly decreases since the air conditioning system increases the amount of air introduced: the capibility to achieve climb and level fight slightly weakens; yet the capibility to take off is about the same as that of prototype. AIRCRAFT FLIGHT PERFORMANCE CALCULATION AND CONVERSION CURVE Aerodynamic correction value Aerodynamic correction value is shown in Figure 5-1 and Figure 5-2. Temperature difference curve Temperature difference curve is shown in Figure 5-3. Correction of wind speed and direction Correction of wind speed and direction is shown in Figure 5-4. Airport elevation and atmosphere conversion Airport elevation and atmosphere conversion is shown in Figure 5-5. Temperature gauge correction Temperature gauge correction is shown in Figure 5-6.
  • 250.
    JZ-Y8F200W-02 AIRCRAFT FLIGHT MANUAL SECTIONV PERFORMANCE 5-2 June 30, 2012 Vb(km/h) Vz(km/h) 550 500 400 300 300 400 500 Figure 5-1a Aerodynamic correction curve of indicated airspeed H(m) -250 -50 -100 -150 -200 300 400 500 Vb(km/h) Figure 5-1b Aerodynamic correction curve of indicated airspeed
  • 251.
    JZ-Y8F200W-02 AIRCRAFT FLIGHT MANUAL SECTIONV PERFORMANCE 5-3 June 30, 2012 H(ft) -820 -164 -328 -492 -656 162 216 270 Vb(km/h) Figure 5-2a Aerodynamic correction curve of altitude 0 1000 2000 3000 4000 5000 6000 7000 8000 9000 10000 H(m) -50 -40 -30 -20 -10 0 10 20 30 40 t(℃) -5 5 -15 15 -25 25 -35 35 -45 45 -55 -65 -75 -85 Figure 5-2b Aerodynamic correction curve of altitude
  • 252.
    JZ-Y8F200W-02 AIRCRAFT FLIGHT MANUAL SECTIONV PERFORMANCE 5-4 June 30, 2012 -85 -75 -65 -55 -45 -35 -25 -15 -5 5 15 25 35 45 difference value( o C) 32808 29528 26247 22966 19685 16404 13123 9843 6562 3281 0 H(ft) -50 -40 -30 -20 -10 0 10 20 30 40 Figure 5-3a The difference between standard atmosphere temperature and non-standard temperature m/s m/s 50 50 50 40 40 40 30 30 30 20 20 20 10 10 10 0 10° 20° 30° 40° 50° 60° 70° 80° 90° 100° 110° 120° 130° 140° 150° 160° 170° 180° m /s Forecasted w indspeed m /s Forecasted windspeed m/sWind speed crosswind component Wind speed headwind component Wind speed tailwind component Figure 5-4a Wind speed and heading correction curve during takeoff and landing
  • 253.
    JZ-Y8F200W-02 AIRCRAFT FLIGHT MANUAL SECTIONV PERFORMANCE 5-5 June 30, 2012 (ft/s) (ft/s) 164 164 5098 131 13198 989866 66 6633 33 330 10° 20° 30° 40° 50° 60° 70° 80° 90° 100° 110° 120° 130° 140° 150° 160° 170° 180° (ft/s) Forecasted w indspeed (ft/s) Forecasted windspeed (ft/s)Wind speed crosswind component Wind speed headwind component Wind speed tailwind component 39 Figure 5-4b Wind speed and heading correction curve during takeoff and landing Altitude(ftm) Pressure(psi) 8.70 10.15 11.60 13.05 14.50 9843 0 1640 3281 4921 6562 8202 11483 13123 14764 Figure 5-5a Airport elevation and atmospheric pressure conversion curve
  • 254.
    JZ-Y8F200W-02 AIRCRAFT FLIGHT MANUAL SECTIONV PERFORMANCE 5-6 June 30, 2012 (m) (mmHg) 4000 3000 2000 1000 0 500 600 700 800 Airport elevation Atmospheric pressure Figure 5-5b Airport elevation and atmospheric pressure conversion curve Indicated temperatureo C Atmospheric temperature o C Figure 5-6 Indicated value of temperature gauge corrected to atmospheric static temperature curve
  • 255.
    JZ-Y8F200W-02 AIRCRAFT FLIGHT MANUAL SECTIONV PERFORMANCE 5-7 June 30, 2012 MAIN PERFORMANCE OF FOUR ENGINES Takeoff and landing performance Data of takeoff and landing performance During takeoff and landing, flap deviation angle are 25o and 35o respectively. Takeoff and landing performance of difference weight on concrete runway at sea level in ISA is shown in Figure 5-1 and Figure 5-7. Figure 5-1a Takeoff and landing performance Takeoff weight (t) 45 49 52 56 61 Liftoff speed(km/h) 102 107 111 119 129 Takeoff taxiing distance(m) 1890 2635 2762 3100 4167 Rolling distance (m) 2736 3192 3645 4337 5256 Landing weight (t) 40 46 50 52 58 Touchdown speed (km/h) 103 111 116 119 130 Landing roll distance (m) 2116 2569 2956 3117 3445 Total landing distance (m) 3563 4183 4429 4659 5466 Note f) Runway friction factor during takeoff is set as 0.035, liftoff AOA is 8o . g) Safe takeoff altitude is taken as 49.2ft. h) Brake friction factor is taken as 0.2. i) Landing gliding altitude is taken as 49.2ft. Gliding angle is 3o . flare section g-load increaseΔny is 0.15, flare starting altitude h is 32.8ft. Figure 5-1b Takeoff and landing performance Takeoff weight (t) 45 49 52 56 61 Liftoff speed(km/h) 188 198 206 220 238 Takeoff taxiing distance(m) 576 721 842 945 1270 Rolling distance (m) 834 973 1111 1322 1602 Landing weight (t) 40 46 50 52 58 Touchdown speed (km/h) 191 205 215 220 240 Landing roll distance (m) 645 783 901 950 1050 Total landing distance (m) 1086 1275 1350 1420 1666
  • 256.
    JZ-Y8F200W-02 AIRCRAFT FLIGHT MANUAL SECTIONV PERFORMANCE 5-8 June 30, 2012 Note a) Runway friction factor during takeoff is set as 0.035, liftoff AOA is 8o . b) Safe takeoff altitude is taken as 15m. c) Brake friction factor is taken as 0.2. d) Landing gliding altitude is taken as 15m. Gliding angle is 3o . flare section g-load increaseΔny is 0.15, flare starting altitude h is 10m. Takeoff and landing curve During normal operation of four engines and at standard atmosphere condition, takeoff and landing curve is shown in Figure 5-7. Climbing performance During normal operation of four engines, the main climbing performance data is shown in Figure 5-2. For detailed data, please see Table 5-9. The climbing performance curve is shown in Figure 5-8. 10m。V(km/h) L(m) 250 3500 2500200 1500150 100 500 40 45 50 55 60 G(t) Vjd Vld Lzl Lqfh Lqf Lzjh Figure 5-7a Takeoff and landing performance curve
  • 257.
    JZ-Y8F200W-02 AIRCRAFT FLIGHT MANUAL SECTIONV PERFORMANCE 5-9 June 30, 2012 H(km) 10 8 6 4 2 0 2 4 6 8 10 12 Vy(m/s) Vks(km/h) L(km) 75 150 225 300 375 100 200 300 400 500 Gqf=51t 54t 61t 56t 61t 51t Vy Vks54t 61t Figure 5-7b Takeoff and landing performance curve H(ft) 32808 26247 19685 13123 6562 0 6.56 13.12 19.69 26.25 32.81 39.37 Vy(tt/s) Vks(kn) L(n mile) 40 81 121 162 202 54 108 162 216 270 Gqf=51t 54t 61t 56t 61t 51t Vy Vks54t 61t Figure 5-8a Climbing curve of four engines at rated status
  • 258.
    JZ-Y8F200W-02 AIRCRAFT FLIGHT MANUAL SECTIONV PERFORMANCE 5-10 June 30, 2012 H(km) 10 8 6 4 2 0 2 4 6 8 10 12 Vy(m/s) Vks(km/h) L(km) 75 150 225 300 375 100 200 300 400 500 Gqf=51t 54t 61t 56t 61t 51t Vy Vks54t 61t Figure 5-8b Climbing curve of four engines at rated status Table 5-2a Main climbing performance data of four engines Takeoff weight(t) Parameter 49 51 54 56 61 Service ceiling(ft) 34104 32972 31250 29774 27313 Climb time(min) 39.5 36.47 43.47 46.55 49.9 Climb distance(n mile) 163 151 181 196 211 Table 5-2b Main climbing performance data of four engines Takeoff weight(t) Parameter 49 51 54 56 61 Service ceiling(m) 10395 10050 9525 9075 8325 Climb time(min) 39.5 36.47 43.47 46.55 49.9 Climb distance(km) 301 279 336 363 390 Note Climb at the rated regime of four engines.
  • 259.
    JZ-Y8F200W-02 AIRCRAFT FLIGHT MANUAL SECTIONV PERFORMANCE 5-11 June 30, 2012 Level flight performance When four engines work at the maximum regime and rated regime and flight weight is 49t, the maximum level flight speed at different altitude is shown in Table 5-3. Table 5-3a Max. level flight speed(G=49t) Flight altitude(ft) Engine regime 0 6562 13123 19685 26247 32808 Max. regime 302 319 335 342 344 340 Rated regime 281 301 316 332 328 313 Table 5-3b Max. level flight speed(G=49t) Flight altitude(m) Engine regime 0 2000 4000 6000 8000 10000 Max. regime 560 590 621 633 637 630 Rated regime 520 557 586 615 608 580 Range and duration Duration performance data Cruising altitude is 8000m, reserve fuel is 1.6t, the range and duration of aircraft is shown in Table 5-4. Table 5-4a Duration performance Takeoff weight (t) Loading capacity(t) Fuel quantity (t) Range (n mile) Duration(h) 49 0 12.867 1596 6.07 51 0 14.867 1896 7.55 53.353 0 17.22 2214 8.39 58.353 5 17.22 2113 8.02 61 8 16.867 2008 7.48 61 10 14.867 1699 6.36 61 15 9.867 950 3.6 61 20 4.867 240 0.85
  • 260.
    JZ-Y8F200W-02 AIRCRAFT FLIGHT MANUAL SECTIONV PERFORMANCE 5-12 June 30, 2012 Table 5-4b Duration performance Takeoff weight (t) Loading capacity(t) Fuel quantity (t) Range (km) Duration(h) 49 0 12.867 2955 6.07 51 0 14.867 3512 7.55 53.353 0 17.22 4100 8.39 58.353 5 17.22 3913 8.02 61 8 16.867 3719 7.48 61 10 14.867 3146 6.36 61 15 9.867 1759 3.6 61 20 4.867 444 0.85 Relative kilometer fuel consumption curve The relationship between relative kilometer fuel consumption Ce and flight Mach number is shown in Figure 5-9. Ce kg(km·t) 0.12 0.11 0.10 0.09 0.08 0.07 0.06 0.30 0.35 0.40 0.45 0.50 0.55 0.60 M 60 68 77 88 100 116 134 Ghs=155 Figure 5-9 Curve for relation between relative kilometer fule consumption Ce and conversion weight and Mach number
  • 261.
    JZ-Y8F200W-02 AIRCRAFT FLIGHT MANUAL SECTIONV PERFORMANCE 5-13 June 30, 2012 Conversion formula Ghs= flightG• PH Po Relative kilometer fuel consumption formula: Ce= flightG q In the formula: Po-standard atmosphere pressure at sea level, PH- Atmosphere pressure at actual flight altitude, q- Fuel consumption per kilometer. Stalling speed during level flight Under standard atmosphere condition, stalling speed during level flight with a flap angle 0o is shown in Figure 5-5, stalling speed during level flight with a flap angle 25o is shown in Figure 5-6, and stalling speed during level flight with a flap angle 35o is shown in Figure 5-7. Table 5-5a Stalling speed during level flight at flap 0o (Indicated speed, unit: kn) Flight weight(t) Altitude(ft) 45 47 49 51 53 55 57 59 61 0 113 116 118 120 123 125 127 130 132 3281 113 116 118 120 123 125 128 131 133 6562 113 116 118 121 124 127 130 133 136 9843 114 117 120 123 126 129 132 135 138 13123 116 119 122 125 129 132 134 138 141 19685 120 124 127 131 134 138 141 144 147 22966 123 127 130 134 138 141 145 148 151 26247 126 130 134 138 141 145 148 152 156 Table 5-5b Stalling speed during level flight at flap 0o (Indicated speed, unit: km/h) Flight weight(t) Altitude(m) 45 47 49 51 53 55 57 59 61 0 209 214 218 223 227 231 236 240 244 1000 209 214 218 223 227 231 237 242 247 2000 209 214 219 224 230 235 240 246 251 3000 211 216 222 228 233 239 245 250 256 4000 214 220 226 232 238 244 249 255 261 6000 223 229 236 242 248 255 261 267 273 7000 228 235 241 248 255 261 268 274 280 8000 234 241 248 255 261 268 275 282 288
  • 262.
    JZ-Y8F200W-02 AIRCRAFT FLIGHT MANUAL SECTIONV PERFORMANCE 5-14 June 30, 2012 Table 5-6a Stalling speed during level flight at flap 25o (Indicated speed, unit: kn) Flight weight(t) Altitude(m) 45 47 49 51 53 55 57 59 61 0 98 100 188 102 106 108 110 112 113 3281 98 100 188 102 106 108 110 112 113 6562 98 100 188 102 106 108 110 112 113 9843 98 100 188 102 106 108 110 112 114 13123 98 100 188 102 106 109 111 113 115 Table 5-6b Stalling speed during level flight at flap 25o (Indicated speed, unit: km/h) Flight weight(t) Altitude(m) 45 47 49 51 53 55 57 59 61 0 181 185 188 192 196 200 203 207 210 1000 181 185 188 192 196 200 203 207 210 2000 181 185 188 192 196 200 203 207 210 3000 181 185 188 192 196 200 203 207 211 4000 181 185 188 192 197 201 205 209 213 Table 5-7a Stalling speed during level flight at flap 35o (Indicated speed, unit: km/h) Flight weight(t) Altitude(m) 45 47 49 51 53 55 57 59 61 0 90 92 95 96 98 100 102 103 105 3281 90 92 95 96 98 100 102 103 105 6562 90 92 95 96 98 100 102 103 105 9843 90 92 95 96 98 100 102 103 105 13123 90 92 95 96 98 100 102 103 106 Table 5-7b Stalling speed during level flight at flap 35o (Indicated speed, unit: km/h) Flight weight(t) Altitude(m) 45 47 49 51 53 55 57 59 61 0 167 171 175 178 181 185 188 191 195 1000 167 171 175 178 181 185 188 191 195 2000 167 171 175 178 181 185 188 191 195 3000 167 171 175 178 181 185 188 191 195 4000 167 171 175 178 181 185 188 192 196
  • 263.
    JZ-Y8F200W-02 AIRCRAFT FLIGHT MANUAL SECTIONV PERFORMANCE 5-15 June 30, 2012 MAIN PERFORMANCE OF THREE ENGINES Takeoff performance of three engines Three-engine takeoff theoretical calculation and trial flight result is shown in Table 5-8. Table 5-8a Three engine takeoff performance Takeoff weight(t) Parameter 49 51 54 56 58 61 Nose liftoff speed (kn) 110 110 115 118 121 126 Liftoff speed(kn) 114 117 121 124 127 131 Safety speed(kn) 119 122 127 128 130 133 Decision speed (kn) 85 90 97 103 107 114 Balanced field length (ft) 4288 4701 5856 6014 6644 7746 Table 5-8b Three engine takeoff performance Takeoff weight(t) Parameter 49 51 54 56 58 61 Nose liftoff speed (km/h) 204 204 219 224 233 Liftoff speed(km/h) 212 217 214 230 235 242 Safety speed(km/h) 221 226 236 237 241 247 Decision speed (km/h) 158 167 180 190 198 211 Balanced field length (m) 1307 1433 1785 1833 2025 2361 Note The value of 54t is test flight value, the rest are calculation value.
  • 264.
    JZ-Y8F200W-02 AIRCRAFT FLIGHT MANUAL SECTIONV PERFORMANCE 5-16 June 30, 2012 Three-engine climbing performance If one engine stops, aircraft still has enough residual thrust if three engine work at rated regime. Aircraft can climb to 7800m on the condition that takeoff weight is 51t. The climbing performance of three engine is shown Table 5-9. Table 5-9a Climbing performance of three engine Altitude (ft) Takeoff weight 51t Takeoff weight 61t Fastclimbing speed (kn) Climbrate (ft/s) Climbtime (min) Climbdistance (nmile) Climbfuel consumption (kg) Fastclimbrate (kn) Climbrate (ft/s) Climbtime (min) Climbdistance (nmile) Climbfuel consumption (kg) 0 170 20.8 0 0 0 186 14.4 0 0 0 6562 188 17.6 5.6 16.7 244 202 10.9 8.38 26.8 365 13123 205 14.8 12.22 37.4 514 225 7.2 19.83 67.1 831 19685 228 8.9 20.97 68.6 834 247 1.6 42.42 168.4 1751 22591 251 1.6 40.9 148.4 1443 Table 5-9b Climbing performance of three engine Altitude (m) Takeoff weight 51t Takeoff weight 61t Fastclimbing speed (km/h) Climbrate (m/s) Climbtime (min) Climbdistance (km) Climbfuel consumption (kg) Fastclimbrate (km/h) Climbrate (m/s) Climbtime (min) Climbdistance (km) Climbfuel consumption (kg) 0 314 6.33 0 0 0 344 4.38 0 0 0 2000 349 5.35 5.6 30.9 244 375 3.32 8.38 49.7 365 4000 379 4.52 12.22 69.3 514 416 2.2 19.83 124.3 831 6000 422 2.7 20.97 127.1 834 458 0.5 42.42 311.8 1751 7800 464 0.5 40.9 274.8 1443
  • 265.
    JZ-Y8F200W-02 AIRCRAFT FLIGHT MANUAL SECTIONV PERFORMANCE 5-17 June 30, 2012 Three-engine level flight performance When one engine stops and three engine work at rated regime, the character of level flight speed at different flight weight and different flight altitude is shown in Table 5-10. Table 5-10a Max. level speed of three engine (Unit: kn) Flight weight (kg) Flight altitude(ft) 49000 51000 54000 56000 61000 0 254 470 468 464 461 6562 266 490 488 482 480 13123 280 515 510 504 492 19685 288 530 522 402 22591 278 Table 5-10b Max. level speed of three engine (Unit: km/h) Flight weight (kg) Flight altitude(m) 49000 51000 54000 56000 61000 0 471 470 468 464 461 2000 492 490 488 482 480 4000 518 515 510 504 492 6000 534 530 522 402 8000 514 TAKEOFF AND LANDING PERFORMANCE IN NON-STANDARD CONDITION The main factors affecting takeoff and taxiing distance includes takeoff landing weight, atmosphere temperature, airport elevation, wind direction and wind speed, runway smoothness, and runway gradient, etc. these factors should be taken into consideration when calculating takeoff and landing roll distance. Calculation method of takeoff run distance Under different takeoff condition, the distance from starting taxiing to lifting off from ground is shown in Figure 5-10. The curve is composed of four charts, from the left to left, representing the scale of air temperature, airport elevation, takeoff weight, runway gradient corresponding that affect the takeoff roll distance. Vertical coordinates is takeoff roll distance. The following sample shows method how to use Figure 5-10 to check takeoff run distance.
  • 266.
    JZ-Y8F200W-02 AIRCRAFT FLIGHT MANUAL SECTIONV PERFORMANCE 5-18 June 30, 2012 (Example) The known condition: air temperature is 27oC, airport elevation is 1640ft(500m), takeoff weight is 58t, airport gradient -1%, head wind 16.4ft/s(5m/s), question:the takeoff run distance. See the route indicated by the dotted line in Figure 5-10, from the point where air temperature is 27o C (Pinot A in the figure), draw a perpendicular which crosses the curve of airport elevation 1640ft (500m) at Point B. From Point B, draw a horizontal rightward which crosses the reference line representing aircraft weight at Point C, view the top right from the oblique line passing through Point C, this oblique line crosses perpendicular representing weight of 58t at Point D, draw rightward a horizontal which crosses the reference line representing gradient at Point E, view the right lower side from the oblique line passing through Point E, this line crossed a perpendicular with gradient of -1% at Point F. draw a level from Point F to the right side which crosses the reference line representing wind direction and wind speed at Point R. draw an oblique line to the left lower side and cross the perpendicular representing head wind 5m/s at Point S, finally, draw a horizontal to the right from point and crosses vertical coordinates at Point K, the data at this point 3871ft(1180m) is the takeoff roll distance that this example seeks. The calculation method for landing run distance The landing run distance is the distance that aircraft passes through from touchdown to taxiing fully stop.
  • 267.
    JZ-Y8F200W-02 AIRCRAFT FLIGHT MANUAL SECTIONV PERFORMANCE 5-19 June 30, 2012 13123 11483 9843 8202 6562 4921 3281 1010 0 L(ft) 8202 6562 4921 K 3281 1640 2010110203050 A t℃58G(t)20265.652.539.426.213.10-13.1-26.2 %ft/s B C DE F S R t Standard +40 o t Standard +30 o t Standard +20 o t Standard +10 o t Standard Reference line Reference line Reference line UpslopeDownslope Gradient HeadwindTailwind Rolling 14764 Airportelevation (m ) Figure 5-10a Takeoff run distance (concrete runway, δj=25o ) in different condition
  • 268.
    JZ-Y8F200W-02 AIRCRAFT FLIGHT MANUAL SECTIONV PERFORMANCE 5-20 June 30, 2012 4000 3500 3000 2500 2000 1500 1000 500 0 L(m) 2500 2000 1500 K 1000 500 2010110203050 A t℃58G(t)202201612840-4-8 %m/s B C DE F S R t Standard +40 o t Standard +30 o t Standard +20 o t Standard +10 o t Standard Reference line Reference line Reference line UpslopeDownslope Gradient HeadwindTailwind Rolling 4500 Airportelevation (m ) Figure 5-10b Takeoff run distance (concrete runway,  j=25o ) in different condition
  • 269.
    JZ-Y8F200W-02 AIRCRAFT FLIGHT MANUAL SECTIONV PERFORMANCE 5-21 June 30, 2012 Figure 5-11 shows how different factors affect landing run distance. Pilot can use this diagram as per the current practical condition. From the left to the right are the scale for airport elevation and air temperature affecting landing run distance, scales for landing weight, runway gradient and wind direction and speed. There are reference line on each scale diagram, vertical coordinates is the landing run distance. Below is an example illustrating the method for reference of Figure 5-11. (Example) The known condition: airport elevation 1640ft(500m), air temperature 25o C, runway gradient +1%(up slope), head wind 5m/s, landing weight 58t, question: landing roll distance. (Answer) See route indicated by dotted line in Figure 5-11. Find Point A representing air temperature, draw upward a perpendicular and crosses the curve representing airport elevation 1640ft(500m) at Point B. From the Point B, draw rightward a horizontal line and crosses weight reference line at Point C. a slant line through Point C goes up and to the right side and cross the perpendicular representing weight 58t at Point D. From Point D, draw a horizontal line and crossed gradient reference line at Point E. A slant line through Point E goes to the lower right side and crosses the perpendicular representing gradient +1% at Point F. in the same way, get Point S representing head wind 5m/s, at last, from Point S, draw rightward a horizontal line and crosses vertical coordinates at Point K, whose value 3543ft (1080m) is the takeoff run distance we seek. Note: In emergency case, to effectively shorten the landing run distance, can retard throttle level and release the limit in the rear section of postflare float. But correction should be made in time to avoid deflection caused by uneven negative thrust on two side which results from unsynchronized throttle releasing or the non-coordination caused by throttle delay
  • 270.
    JZ-Y8F200W-02 AIRCRAFT FLIGHT MANUAL SECTIONV PERFORMANCE 5-22 June 30, 2012 Takeoff decision speed and takeoff limit weight (a) The method to determine the takeoff decision speed and takeoff limit speed (b) Figure 5-12 is used for airport with good clearway. For these airport with poor clearway, first compute limit weight respectively as per Figure 5-12 and Figure 5-13, then select the smaller one as takeoff limit weight. (Example) Airport runway length: 6234ft(1900m), clear zone length: 1969ft(600m), airport elevation: 2165ft(660m), runway gradient: -1%, headwind: 16.4ft/s(5m/s), air temperature:22o C, airport has good clearway, find takeoff limit weight and decision speed (V1). (Answer) Use Figure 5-12, which is composed of four figures, (A), (B), (C) and (D). 1) First, determine refusal useable distance and takeoff useable distance. Refusal useable distance is equal to runway length plus clearway length, then deduct 328ft(100m). In this case, it is7874ft(2400m), (Point B in Figure 5-12(B)). Takeoff useable run distance is equal to runway length minus 328ft(100m), in this case, it is 5906ft(1800m) (Point A in Figure 5-12(A). 2) Convert the given air temperature into standard air temperature which can be used by this curve. The standard air temperature at elevation of 2165ft(660m) is 11o C, therefore, when air temperature is 22o C, it can be written in form of standard air temperature: 22o C=11o C+11o C=tStandard+11o In the formula, t standard is the standard temperature at this elevation. (c) View Figure 5-12(A). From Point A, draw a horizontal line to the right side and crosses gradient reference line at Point C, from Point C, draw a slant line to upper right side and crosses the perpendicular representing gradient -1% at Point D. by the same method, find Point F representing head wind 5m/s, from F, draw horizontal line rightward.
  • 271.
    JZ-Y8F200W-02 AIRCRAFT FLIGHT MANUAL SECTIONV PERFORMANCE 5-23 June 30, 2012 13123 9813 6562 3281 0 6562 4921 K 3281 1640 65.2103050At℃ G(t) 202200032.832.8 ft/s BC DE F S 6040-10-20 L(ft) % t Standard +30 o t Standard +20 o t Standard +10 o t Standard Reference line Reference line Reference line UpslopeDownslope Gradient HeadwindTailwind Rolling Airportelevation(ft) Figure 5-11a Landing run distance at different condition (concrete runway,δj=35o )
  • 272.
    JZ-Y8F200W-02 AIRCRAFT FLIGHT MANUAL SECTIONV PERFORMANCE 5-24 June 30, 2012 4000 3000 2000 1000 0 2000 1500 K 1000 500 2010103050At℃ G(t) 2022000-10 m/s BC DE F S 6040-10-20 L(m) % t Standard +30 o t Standard +20 o t Standard +10 o t Standard Reference line Reference line Reference line UpslopeDownslope Gradient HeadwindTailwind Rolling Airportelevation(m) Figure 5-11b Landing run distance at different condition (concrete runway,δj=35o )
  • 273.
    JZ-Y8F200W-02 AIRCRAFT FLIGHT MANUAL SECTIONV PERFORMANCE 5-25 June 30, 2012 m/s (A) (B) (C) (D) % t Standard +30 o t Standard +20 o t Standard +10 o t Standard Gradient %Gradient Upslope Down slope Head wind Tail wind UpslopeDown slope HeadTail Airport elevation (ft) Referenceline Reference line Referenceline Reference line Referenceline Takeoffuseabledistance(m) Refusal useable distance (ft) 13123 131239843 9843 6562 65623281 13123984365623281 3281 2 1 0 -1 -2 66 33 0 -33 20-2-266330-33 windwind VI(Kn) 97 108 119 130 Figure 5-12a At different condition, the relationship between refusal useable distance, takeoff useable run distance and takeoff limit weight, takeoff decision speed (δj=25o , dry concrete surface)
  • 274.
    JZ-Y8F200W-02 AIRCRAFT FLIGHT MANUAL SECTIONV PERFORMANCE 5-26 June 30, 2012 m/s (A) (B) (C) (D) % t Standard +30 o t Standard +20 o t Standard +10 o t Standard Gradient %Gradient Upslope Down slope Head wind Tail wind UpslopeDown slope Head wind Tail wind Airport elevation (m) Referenceline Reference line Referenceline Reference line Referenceline Takeoffuseabledistance(m) Refusal useable distance (m) Figure 5-12b At different condition, the relationship between refusal useable distance, takeoff useable run distance and takeoff limit weight, takeoff decision speed (δj=25o , dry concrete surface)
  • 275.
    JZ-Y8F200W-02 AIRCRAFT FLIGHT MANUAL SECTIONV PERFORMANCE 5-27 June 30, 2012 (A) (B) (C) (D) m/s% t Standard +30 o t Standard +20 o t Standard +10 o t Standard Gradient Upslope Down slope Head wind Tail wind UpslopeDown slope HeadTail Airport elevation (ft) Referenceline Reference line Reference line Takeoffuseabledistance(ft) Refusal useable distance (ft) 13123 9843 6562 3281 2 1 0 -1 -2 66 33 0 -33 20-2-266330-33 windwind 13123984365623281 97 108 119 VI(Kn) Referenceline Figure 5-13a At different condition, the relationship between refusal useable distance, takeoff useable run distance and takeoff limit weight, takeoff decision speed (δj=25o , dry concrete surface)
  • 276.
    JZ-Y8F200W-02 AIRCRAFT FLIGHT MANUAL SECTIONV PERFORMANCE 5-28 June 30, 2012 基准线 (A) (B) (C) (D) m/s% t Standard +30 o t Standard +20 o t Standard +10 o t Standard Gradient Upslope Down slope Head wind Tail wind UpslopeDown slope Head wind Tail wind Airport elevation (m) Referenceline Reference line Reference line Takeoffuseabledistance(m) Refusal useable distance (m) Figure 5-13b At different condition, the relationship between refusal useable distance, takeoff useable run distance and takeoff limit weight, takeoff decision speed (δj=25o , dry concrete surface)
  • 277.
    JZ-Y8F200W-02 AIRCRAFT FLIGHT MANUAL SECTIONV PERFORMANCE 5-29 June 30, 2012 (d) See Figure 5-12 (B). as per the above-mentioned method, the available distance for takeoff abortion is 7874ft(2400m), the runway slope is -1% and the speed of upwind is 16.4ft/s(5m/s). Draw an vertical line upward from point B and intersect it with the level from F at point H when passing the characteristic point of slope and up wind. The value of R and ratio of decesive speed (V1) and liftoff speed of the nose wheel (VR) can be obtained as per the position of point H. i.e. H=2900, V1/VR=0.94. (e) See Figure 5-12 (D). The longtitudinal coordinate is R, and the latitudinal coordinate is standard altitude of the airport. If R=2900, then point K can be found out. Draw a level leftward from point K and intersect it with the vertical line whose standard altitude is 2165ft (660m) at point M. Seeing towards bottom left from the oblique line of point M, this line intersects the reference line at point N. Draw a level leftward from point N and intersect it with an oblique line (t) whose standard temperature is +11o at point O. Then draw a vertical line passing point O and intersect it with the latitudinal coordinate in Figure 5-12 (C) at point P. The weight (59t) corresponded is the limited value of weight. Draw one vertical line downward from point P and intersect it with the oblique line V1/VR=0.94 at point S, then draw a level rightward from point S and intersect it with the longitudinal coordinate at point T. The speed value of 118kn(218km/h) corresponded with T is the decesive speed. Caution a) During the initial phase of climbing, the tangent of climb angle should be more than 0.03, and speed should not be lower than the safety speed of takeoff, regardless of the obstruction condition of the airport, so that the aircraft is able to fly over the obstacles successfully and the flight safety can be guaranteed. b) When taking off at the airport with higher standard altitude, with higher ambient temperature, the power rate of engine will see obvious decline. Given the possibility of engine (1 set) shutdown during takeoff which may further decrease its power rate, and that the residual pull and climbing angle will be smaller, the aircraft is likely to fly for a rather long distance at a too low altitude after liftoff, the safety speed can not be reached for long. In this case, reduce the Max. takeoff weight properly.
  • 278.
    JZ-Y8F200W-02 AIRCRAFT FLIGHT MANUAL SECTIONV PERFORMANCE 5-30 June 30, 2012 CLIMB AND DESCENT AT DIFFERENT WEIGHT AND ALTITUDE Climb performance The climb performance data of four engines at rated regime is shown in Table 5-11.
  • 279.
    JZ-Y8F200W-02 AIRCRAFT FLIGHT MANUAL SECTIONV PERFORMANCE 5-31 June 30, 2012 Table 5-11a Climb performance at different weigth and altitude Weight (t) Altitude (ft) Indicated climb speed(kn) Climb true speed (kn) Climb rate (ft/s) Climb time (min) Climb distance (n mile) Climb fuel consumption (kg) 49 0 175 175 35.40 0 0.00 0 6562 166 184 33.50 3.05 10.21 174 13123 165 202 29.95 6.50 19.98 365 19685 165 225 22.67 10.74 35.10 555 26247 164 251 13.35 17.25 61.0 816 34104 154 272 1.64 39.50 162.5 1517 51 0 178 179 32.91 0 0.0 0 6562 170 188 31.14 3.27 9.7 186 13123 169 207 27.66 7.0 22.1 382 19685 168 229 20.64 11.62 38.9 600 26247 167 256 11.48 19.04 68.6 898 32972 161 279 1.64 36.47 150.5 1598 54 0 182 182 29.86 0 0.0 0 6562 174 192 27.92 3.63 11.3 207 13123 173 212 24.48 7.82 25.4 427 19685 174 237 17.78 13.12 45.4 677 26247 172 262 8.86 22.38 83.7 1050 31250 168 284 1.64 43.47 191.7 1751 56 0 184 184 28.22 0 0.0 0 6562 177 195 25.92 3.89 12.4 222 13123 177 217 22.51 8.43 28.1 460 19685 177 241 16.01 14.27 50.2 736 26247 174 267 7.25 25.24 96.1 1179 29773 173 286 1.64 46.55 195.5 1900 58 0 180 180 26.25 0 0.0 0 6562 181 200 24.05 4.18 13.0 239 13123 180 220 20.67 9.10 30.2 497 19685 179 245 14.34 15.56 55.6 801 26247 178 272 5.97 28.52 111.2 1326 28871 187 305 1.64 48.72 206.3 2029 61 0 186 186 23.95 0 0.0 0 6562 185 204 21.39 4.67 15.1 266 13123 185 226 18.04 10.25 35.1 559 19685 185 251 12.01 17.83 65.3 918 26247 182 278 3.94 43.3 146.9 1667 27313 197 312 1.64 49.9 205.2 2153
  • 280.
    JZ-Y8F200W-02 AIRCRAFT FLIGHT MANUAL SECTIONV PERFORMANCE 5-32 June 30, 2012 Table 5-11b Climb performance at different weigth and altitude Weight (t) Altitude (m) Indicated climb speed(km/h) Climb true speed (km/h) Climb rate (m/s) Climb time (min) Climb distance (km) Climb fuel consumption (kg) 49 0 324 325 10.79 0 0 0 2000 308 340 10.21 3.05 18.9 174 4000 305 374 9.13 6.5 37 365 6000 306 417 6.91 10.74 65 555 8000 304 465 4.07 17.25 113 816 10395 285 504 0.5 39.5 301 1517 51 0 330 331 10.03 0 0 0 2000 315 348 9.49 3.27 18 186 4000 313 383 8.43 7 41 382 6000 312 425 6.29 11.62 72 600 8000 310 474 3.5 19.04 127 898 10050 298 517 0.5 36.47 278.7 1598 54 0 337 337 9.1 0 0 0 2000 322 356 8.51 3.63 21 207 4000 321 393 7.46 7.82 47 427 6000 322 438 5.42 13.12 84 677 8000 318 486 2.7 22.38 155 1050 9525 311 526 0.5 43.47 355 1751 56 0 340 340 8.6 0 0 0 2000 328 362 7.9 3.89 23 222 4000 328 402 6.86 8.43 52 460 6000 327 446 4.88 14.27 93 736 8000 323 494 2.21 25.24 178 1179 9075 320 530 0.5 46.55 362 1900 58 0 334 334 8 0 0 0 2000 335 370 7.33 4.18 24 239 4000 334 408 6.3 9.1 56 497 6000 332 453 4.37 15.56 103 801 8000 330 504 1.82 28.52 206 1326 8800 347 565 0.5 48.72 382 2029 61 0 344 344 7.3 0 0 0 2000 343 378 6.52 4.67 28 266 4000 342 418 5.5 10.25 65 559 6000 342 465 3.66 17.83 121 918 8000 337 515 1.2 43.3 272 1667 8325 365 577 0.5 49.9 380 2153
  • 281.
    JZ-Y8F200W-02 AIRCRAFT FLIGHT MANUAL SECTIONV PERFORMANCE 5-33 June 30, 2012 In standard condition, aircraft service ceiling at different weight is shown in Table 5-12. Table 5-12a Service ceiling at different weight Takeoff weight(t) 49 51 54 56 58 61 Service ceiling(ft) 34104 32972 31250 29774 28871 27313 Table 5-12b Service ceiling at different weight Takeoff weight(t) 49 51 54 56 58 61 Service ceiling(m) 10395 10050 9525 9075 8800 8325 Descent performance Steady descent When aircraft with a takeoff weight 49t, descend to 1640ft (500m) from different altitude at small throttle level state (throttle position 16o ), its descent performance is shown in Table 5-13. This method is not used unless the fuel quantity is limited. Table 5-13a Steady descent performance Altitude(ft) Descent indicated speed (kn) Descent true speed (kn) Descent rate (ft/s) Descent angle (o ) Descent time (min) Descent fuel consumption (kg) 26247 197 300 32.55 3.62 19.19 428 22966 193 278 28.61 3.50 17.22 377 19685 190 259 25.16 3.30 15.10 321 16404 186 241 22.05 3.11 12.62 259 13123 185 226 18.77 2.82 9.71 191 9843 183 212 16.40 2.63 7.30 136 6562 181 200 13.62 2.31 5.10 76 3281 180 190 12.34 2.21 1.63 20 1640 173 177 11.48 2.20 0.00 0.00
  • 282.
    JZ-Y8F200W-02 AIRCRAFT FLIGHT MANUAL SECTIONV PERFORMANCE 5-34 June 30, 2012 Table 5-13b Steady descent performance Altitude(m) Descent indicated speed (km/h) Descent true speed (km/h) Descent rate (m/s) Descent angle (o ) Descent time (min) Descent fuel consumption (kg) 8000 364 556 9.92 3.62 19.19 428 7000 357 514 8.72 3.5 17.22 377 6000 352 479 7.67 3.3 15.1 321 5000 345 446 6.72 3.11 12.62 259 4000 342 418 5.72 2.82 9.71 191 3000 339 393 5 2.63 7.3 136 2000 336 371 4.15 2.31 5.1 76 1000 334 351 3.76 2.21 1.63 20 500 320 328 3.5 2.2 0 0 Fast descent For fast descent, set engine throttle at 62o. Within a certain period, a relative long descent distance can be acquired. The character of fast descent to 1640ft (500m) from different altitude is shown in Table 5-14. Constant-airspeed descent Maintain the favorable descent indicated speed at 243kn (450km/h), and put throttle level at the position of 20o (not lower than 16o ), the character that descend to 500m from different altitude is shown in Table 5-15. This method is used for common descent. Optimum level speed and fuel consumption at different weight hand altitude By flying at indicated speed of 178kn (300km/h), the maximum endurance can be acquired at every altitude, but it is not most optimum speed, generally, it is economic speed. Optimum speed is larger than economic speed, at this speed, generally, the maximum range can be acquired. The optimum level speed (maximum range speed) at different flight height and weight and corresponding fuel consumption per kilometer, fuel consumption per hour are shown in Table 5-16.
  • 283.
    JZ-Y8F200W-02 AIRCRAFT FLIGHT MANUAL SECTIONV PERFORMANCE 5-35 June 30, 2012 Table 5-14a Fast descent performance Parameter altitude (m) Descent indicate speed (km/h) Descent true speed (km/h) Descent rate (m/s) Descent angle (o ) Descent distance (km) Descent time (min) Descent fuel consumption (kg) 26247 225 343 52.00 5.13 61.0 16.76 443 22966 203 293 46.49 5.03 55.1 15.65 399 19685 195 266 38.25 4.86 49.1 14.33 350 16404 191 246 33.04 4.55 42.1 12.79 299 13123 184 225 27.53 4.14 35.1 10.99 245 9843 178 206 22.87 3.75 27.0 8.81 188 6562 166 183 16.67 3.09 17.3 6.01 121 3281 158 165 12.96 2.66 5.9 2.16 40 1640 157 161 12.37 2.61 0.0 0.00 0.00 Table 5-14b Fast descent performance Parameter altitude (m) Descent indicate speed (km/h) Descent true speed (km/h) Descent rate (m/s) Descent angle (o ) Descent distance (km) Descent time (min) Descent fuel consumption (kg) 8000 416 635 15.85 5.13 113 16.76 443 7000 376 543 14.17 5.03 102 15.65 399 6000 362 493 11.66 4.86 91 14.33 350 5000 353 456 10.07 4.55 78 12.79 299 4000 341 417 8.39 4.14 65 10.99 245 3000 329 382 6.97 3.75 50 8.81 188 2000 307 338 5.08 3.09 32 6.01 121 1000 292 306 3.95 2.66 11 2.16 40 500 291 298 3.77 2.61 0.00 0.00 0.00
  • 284.
    JZ-Y8F200W-02 AIRCRAFT FLIGHT MANUAL SECTIONV PERFORMANCE 5-36 June 30, 2012 Table 5-15a Constant-airspeed descent (Vb=243kn) Parameter altitude(m) Descent rate (m/s) Descent angle (o ) Descent horizontal distance (km) Descent time (min) Descent fuel consumption (kg) 26247 30.05 2.75 77.4 15.5 356.6 22966 29.07 2.82 66.1 13.6 322.6 19685 27.72 2.85 55.2 11.8 285 16404 27.66 3.0 44.4 9.8 241 13123 26.44 3.02 34.1 7.8 195 9843 25.33 3.05 24.1 5.73 145 6562 24.41 3.09 14.1 3.57 90.3 3281 23.46 3.13 5.4 1.33 32.1 Table 5-15b Constant-airspeed descent (Vb=450km/h) Parameter altitude(m) Descent rate (m/s) Descent angle (o ) Descent horizontal distance (km) Descent time (min) Descent fuel consumption (kg) 8000 9.16 2.75 143.3 15.5 356.6 7000 8.86 2.82 122.5 13.6 322.6 6000 8.45 2.85 102.2 11.8 285 5000 8.43 3 82.2 9.8 241 4000 8.06 3.02 63.1 7.8 195 3000 7.72 3.05 44.6 5.73 145 2000 7.44 3.09 26.2 3.57 90.3 1000 7.15 3.13 10 1.33 32.1
  • 285.
    JZ-Y8F200W-02 AIRCRAFT FLIGHT MANUAL SECTIONV PERFORMANCE 5-37 June 30, 2012 Table 5-16a Optimum speed and fuel consumption at different weight and altitude Average level flight weight (t) Altitude (m) Indicated speed (km/h) True speed (km/h) Fuel consumption per kilometer (kg/km) Fuel consumption per hour (kg/h) 45 6562 196 216 9.37 2025 9843 194 226 8.78 1981 13123 193 236 8.22 1941 16404 193 249 7.67 1907 19685 196 267 7.06 1883 22966 189 272 6.59 1795 26247 188 287 6.28 1792 47 6562 200 221 9.56 2116 9843 210 244 8.95 2173 13123 199 243 8.41 2042 16404 206 265 7.82 2071 19685 197 269 7.19 1935 22966 191 275 6.78 1867 26247 202 309 6.37 1971 49 6562 221 244 9.50 2319 9843 213 247 8.91 2198 13123 209 255 8.39 2143 16404 207 267 7.82 2088 19685 200 273 7.22 1974 22966 196 282 6.83 1930 26247 203 310 6.41 1982 51 6562 221 244 9.57 2329 9843 214 249 8.95 2230 13123 212 259 8.48 2197 16404 209 269 7.91 2130 19685 203 277 7.35 2036 22966 201 290 6.96 2018 26247 202 309 6.48 2002 54 6562 217 239 9.83 2357 9843 213 248 9.32 2308 13123 217 260 8.85 2344 16404 211 272 8.26 2244
  • 286.
    JZ-Y8F200W-02 AIRCRAFT FLIGHT MANUAL SECTIONV PERFORMANCE 5-38 June 30, 2012 Table 5-16a (Continued) Average level flight weight (t) Altitude (m) Indicated speed (km/h) True speed (km/h) Fuel consumption per kilometer (kg/km) Fuel consumption per hour (kg/h) 54 19685 206 280 7.70 2159 22966 214 308 7.20 2225 26247 197 300 6.82 2045 55 6562 219 242 9.70 2351 9843 215 250 9.17 2292 13123 217 266 8.69 2308 16404 212 274 8.13 2227 19685 207 282 7.59 2141 22966 215 309 7.13 2204 26247 199 303 6.70 2029 57 6562 219 242 9.80 2373 9843 217 252 9.28 2338 13123 219 267 8.80 2350 16404 213 275 8.28 2276 19685 230 313 7.72 2417 22966 218 313 7.19 2249 26247 195 299 6.85 2048 59 6562 221 244 9.93 2420 9843 219 254 9.43 2398 13123 220 269 8.91 2400 16404 232 300 8.37 2510 19685 230 313 7.80 2440 22966 213 307 7.30 2238 26247 195 298 7.06 2098
  • 287.
    JZ-Y8F200W-02 AIRCRAFT FLIGHT MANUAL SECTIONV PERFORMANCE 5-39 June 30, 2012 Table 5-16b Optimum speed and fuel consumption at different weight and altitude Average level flight weight (t) Altitude (m) Indicated speed (km/h) True speed (km/h) Fuel consumption per kilometer (kg/km) Fuel consumption per hour (kg/h) 45 2000 363 400 5.06 2025 3000 360 418 4.74 1981 4000 357 437 4.44 1941 5000 357 461 4.14 1907 6000 363 495 3.81 1883 7000 350 504 3.56 1795 8000 348 531 3.39 1792 47 2000 371 410 5.16 2116 3000 389 452 4.83 2173 4000 368 450 4.54 2042 5000 381 491 4.22 2071 6000 365 498 3.88 1935 7000 354 510 3.66 1867 8000 374 572 3.44 1971 49 2000 410 452 5.13 2319 3000 394 457 4.81 2198 4000 387 473 4.53 2143 5000 384 495 4.22 2088 6000 371 506 3.9 1974 7000 363 523 3.69 1930 8000 376 574 3.46 1982 51 2000 409 451 5.17 2329 3000 397 461 4.83 2230 4000 393 480 4.58 2197 5000 387 499 4.27 2130 6000 376 513 3.97 2036 7000 373 537 3.76 2018 8000 375 573 3.5 2002 54 2000 401 443 5.31 2357 3000 395 459 5.03 2308 4000 402 481 4.78 2344 5000 390 503 4.46 2244
  • 288.
    JZ-Y8F200W-02 AIRCRAFT FLIGHT MANUAL SECTIONV PERFORMANCE 5-40 June 30, 2012 Table 5-16b (Continued) Average level flight weight (t) Altitude (m) Indicated speed (km/h) True speed (km/h) Fuel consumption per kilometer (kg/km) Fuel consumption per hour (kg/h) 54 6000 381 519 4.16 2159 7000 396 571 3.89 2225 8000 364 556 3.68 2045 55 2000 406 448 5.24 2351 3000 399 463 4.95 2292 4000 402 492 4.69 2308 5000 393 507 4.39 2227 6000 383 522 4.1 2141 7000 398 573 3.85 2204 8000 368 561 3.62 2029 57 2000 406 448 5.29 2373 3000 401 466 5.01 2338 4000 405 495 4.75 2350 5000 395 510 4.47 2276 6000 426 580 4.17 2417 7000 403 580 3.88 2249 8000 362 553 3.7 2048 59 2000 409 451 5.36 2420 3000 406 471 5.09 2398 4000 408 499 4.81 2400 5000 430 555 4.52 2510 6000 426 580 4.21 2440 7000 394 568 3.94 2238 8000 361 551 3.81 2098
  • 289.
    JZ-Y8F200W-02 AIRCRAFT FLIGHT MANUAL SECTIONVI AIRCRAFT SYSTEM EQUIPMENT 6-1 June 30, 2012 AIRCRAFT SYSTEM EQUIPMENT POWER PLANT General WJ-6 consists of closed differential planetary decelerator (with torque measuring mechanism), air inlet casing, 10th stage axial flow type compressor, combined combustion chamber, third stage axial-flow reaction turbine and fixed-area nozzle, etc. Under the standard atmosphere on the ground, air flows into compressor by engine air inlet and be compressed gradually to outlet of compressor with the pressure of P2=106.7psi (0.736MPa) and temperature of 482o F (250o C). Compressed air enters into combustion chamber and mixes with high-pressure fuel ejected by fuel injector, and is burnt continually, becoming combustion gas. The temperature of combustion chamber center is about 2200K. Combustion gas burnt mixes with other flow of compressed air in combustion chamber with the temperature of T* 3=1436o F (780o C) before it entering into turbine. High-temperature and high-pressure gas expands in turbine to drive the turbine to operate. Power of turbine is transmitted into compressor and propeller. The pressure and temperature of expanded gas in turbine reduce. But its speed increases. After entering into tail pipe, its pressure reduces to 14.7psi (101.3kPa) (one atmospheric pressure), but the speed increases to 447kn (230m/s). The combustion gas from nozzle outlet is ejected at the speed of 349.92kn (180m/s), producing thrust of about 848.7 lb(3776N) (H=0, V=0). The operating process of engine is shown in Figure 6-1. 0-Inlet of air inlet 1-Inlet of compressor 2-Outlet of compressor 3-Outlet of combustion chamber 4-Outlet of turbine 5-Outlet of exhaust section 0 1 2 3 4 5 C C P P T T m/s K Figure 6-1 Schematic diagram of engine operating
  • 290.
    JZ-Y8F200W-02 AIRCRAFT FLIGHT MANUAL SECTIONVI AIRCRAFT SYSTEM EQUIPMENT 6-2 June 30, 2012 Propeller, decelerator, compressor and turbine of engine WJ-6 are connected with the same shaft, which is called high altitude turboprop engine with single shaft. Besides owning the advantages of simple structure, small size and light weight of turbojet engine, the propeller engine also has the advantages of high efficiency of propeller, great economics, and large thrust with middle-low speeds. But it also has disadvantages, that is, rotary inertia of propeller and rotor is large to hardly start the engine, speeding up characteristic is a little bit weak, and the negative thrust by propeller is larger more several times than that of reciprocating engine, when shutting down the engine, the propeller failing to feather with windmill state. Power produced by turbine is more than 9856.6hp (7350kW) (about more than 104 horsepower) when engine operates in take-off status. The consumed power by compressor and its accessories are more than 6900hp (5145kW) (about more than seven thousand horsepower), and the power to propeller is 2868.4kW (3900 horsepower). The thrust produced by jet flow is 848.7 lb (3776N) Thus, the equivalent power in taking off Nequivalent power=2868.4+0.91х385х 0.735=3126kW (Nequivalent power=3900+0.91 х385 =4250 horsepower) (0.91 is the horsepower coefficient changed from thrust). Regulation of engine WJ-6 Regulating law Rotating speed, equivalent power, and turbine-inlet temperature of engine WJ-6 are chose as regulated parameters. The variations of these parameters reflect the constant speed regulating, constant equivalent power regulating and constant turbine-inlet temperature regulating. Constant rotating speed regulation is implemented in the following way: The engine rotating speed regulator's centrifugal mechanism senses the engine rotating speed, and automatically controls the propeller to change the blade angle, that is, changes the propeller-required power to adapt to the engine output power, ensuring constant engine rotating speed. Constant equivalent power regulating is operated in the height range from ground to 3.1 mile (5km) altitude, which is called power restricted area or constant equivalent power area. Turbine-inlet temperature (T* 3) reduces gradually from the maximum allowable value in this area to ensure the equivalent power do not change approximately.
  • 291.
    JZ-Y8F200W-02 AIRCRAFT FLIGHT MANUAL SECTIONVI AIRCRAFT SYSTEM EQUIPMENT 6-3 June 30, 2012 Constant turbine-inlet temperature regulating is operated in the altitude of 3.1~6.8mile (5~11km). Turbine-inlet temperature always is at its allowable maximum value (different maximum values in different operating state). Correction mechanism on fuel governor senses static pressure PH, total temperature tH * , and total inlet pressure of compressor P* 1 of the outside air temperature, to control the axial movement amount of throttle valve automatically to change pump delivery for the engine operating, regulating the constant equivalent power and constant turbine-inlet temperature. Equivalent power Nequivalent power, According to the regulating law, turbine-inlet temperature T* 3, and pump delivery GGsupply of engine WJ-6 vary with the flight altitude H and flight speed. The variation is shown in Figure 6-2. V1 V1 V1 V2 V2 H2H1 V2 V NNequivalent power GGsupply 3T* Figure 6-2 Curve for variation of Nequivalent power, T* 3, GGsupply with H, V
  • 292.
    JZ-Y8F200W-02 AIRCRAFT FLIGHT MANUAL SECTIONVI AIRCRAFT SYSTEM EQUIPMENT 6-4 June 30, 2012 When the air inlet temperature of engine increases above 77o F (25o C), booster ratio of compressor and air mass density will decrease with the increasing temperature. Thus, the airflow of the engine will reduce as well. If keeping the pump delivery same, T* 3 will increase. In order to avoid the overheat of turbine and its parts, reduce oil supply necessarily at the temperature t* H above 77o F (25o C) to keep T* 3 unchangeable generally. At that time, temperature sensing probe of temperature correction mechanism senses the total temperature of airflow in air inlet to regulate the oil supply. When the air temperature is above 77o F (25o C), oil supply may reduce 13.9 lb/h (6.29kg/h) by increasing every 1.8o F (1o C). Main adjusting screw of fuel governor and its function (a) 1A screw: Change oil supply in proportion according to all characteristic curves of oil supply, only in temperature restriction zone. Rotating one circle changes 10%~11% of oil supply. Rotate clockwise to increase oil quantity; counter clockwise, reduce oil quantity. It is allowed to rotate it clockwise or counter clockwise one circle from the initial manufactory position. After adjusting 1A screw, oil supply in power restriction zone is affected, thus, adjusting 36# screw with the amount of 5~6 times that of 1A screw in the opposite direction to 1A screw. (b) 36# screw: Regulate the oil supply in power restriction zone (including the ground). Rotate clockwise to increase oil quantity; counter clockwise, reduce oil quantity. Rotating every one circle changes the 1.5% oil supply of all the characteristic curves. It is allowed to rotate it clockwise or counter clockwise 5 circles from the initial manufactory position. (c) 46# screw: Change oil supply in taking off state. Rotating every one circle changes the oil supply 88 lb/h(40kg/h) for taking off. Rotate clockwise to decrease oil quantity; counter clockwise, increase oil quantity. It is allowed to rotate it clockwise one circle or counter clockwise 1/2 circle (6 grids) from the initial manufactory position. (d) 16# screw: Change the initial oil supply when taking off. Rotate one grid (1/2) circle to change oil supply 22lb/h (10kg/h), Rotate clockwise to decrease oil quantity; counter clockwise, increase oil quantity. It is allowed to rotate it clockwise or counter clockwise 1/3 circle (4 grids) from the initial manufactory position. (e) 14# screw: Regulate the allowable maximum rotating speed. Rotate every one circle to change the rotating speed of 300r/min (about 2.3%). Rotate clockwise to decrease oil quantity; counter clockwise, increase oil quantity.
  • 293.
    JZ-Y8F200W-02 AIRCRAFT FLIGHT MANUAL SECTIONVI AIRCRAFT SYSTEM EQUIPMENT 6-5 June 30, 2012 (f) 15# screw: Regulate the idling rotating speed of engine. Change rotating speed of teeth for 75r/min (0.6%). Rotate clockwise to increase oil quantity; counter clockwise, decrease oil quantity. (g) 17# screw: Change the time of the engine entering into idling stare, that is, change oil supply in starting and accelerating process. Rotate every grid (1/12 circle), changing the oil supply of 6.61~8.82Ib/h (3~4kg/h) in the range of 4500~9500r/min. Rotate clockwise to increase oil quantity; counter clockwise, decrease oil quantity. It is allowed to rotate it clockwise 6 grids and counter clockwise 12 grids (1 circle) from the initial manufactory position. (h) 20# screw: Change the closing rotating speed of bleed-off valve of 8th grade. Rotate every circle changing 600r/min (4.5%). Rotate clockwise to increase oil quantity; counter clockwise, decrease oil quantity. It is allowed to rotate it clockwise or counter clockwise one circle from the initial manufactory position. (i) 21# screw: Change the closing rotating speed of bleed-off valve of 5th grade. Rotate every circle changing 600r/min (4.5%). Rotate clockwise to increase oil quantity; counter clockwise, decrease oil quantity. It is allowed to rotate it clockwise or counter clockwise1 circle from the initial manufactory position. Operation of propeller and speed regulator Function Propeller and speed regulator operate together to keep the constant rotating speed of engine automatically by changing blade angle (BA) of propeller. And they can also complete the following missions: propeller feathering, unfeathering, mid pitch stop and releasing mid pitch stop, etc. The balance between output power of engine and the needed power of propeller is damaged when the ambient atmospheric condition, state of flight and operating state of engine change. The rotating speed of engine will increase or decrease. Meanwhile with the change of rotating speed, centrifugal regulator on speed regulator may send out signals. Enlarge or reduce blade angle (BA) to make the needed power of propeller and output power of engine equal. Thus, keep the constant rotating speed of engine (12300r/min) unchanged. At that time, new power balance state occurs.
  • 294.
    JZ-Y8F200W-02 AIRCRAFT FLIGHT MANUAL SECTIONVI AIRCRAFT SYSTEM EQUIPMENT 6-6 June 30, 2012 Function and operation of all constant pitch of propeller When the operating state and flight state of engine are uncoordinated and trouble happens in engine or its accessories, propeller blade is at the negative angle of attack position to produce negative thrust or overrun. Only in aircraft is in landing run and emergency descent, the negative thrust produced by propeller can operate to brake well. In other conditions, excess negative thrust can bring great difficulty to operate the engine. Overrun can cause the damage to engine and moving parts of propeller. Thus, mid pitch stop, mechanical pitch control, hydraulic pitch control, centrifugal pitch control and other safety devices are installed in propeller hub. Automatic torque feathering, negative thrust auto-feathering, manual feathering, emergency hydraulic feathering and manual unfeathering systems are set to keep the aircraft safety and the smallest resistance for propeller in flight direction. Function of constant pitch safety device Hydraulic pitch control: The propeller reverse pitch is fixed automatically, that is, set the blade angle (BA) of propeller at the angle of operation without reducing to prevent the propeller from overrun. Mechanical pitch control: Mechanical pitch control and hydraulic pitch control can operate together when the blade angle is at the range of 0o ~45o . Meanwhile, the reliability of pitch control is increased. When the hydraulic pitch control is inoperative, the mechanical pitch control can ensure the pitch control of propeller. Centrifugal pitch control: When the rotating speed of propeller exceeds (1105+15 ) r/min, centrifugal pitch control mechanism can control the pitch automatically to avoid the propeller rotating speed increasing, no matter how much the oil pressure in all oil pipes of propeller is. Function of mid pitch stop Mid pitch stop mechanism can ensure that when blade angle reduces to fine pitch stop12o , the propeller blade can be restricted to that place. Thus, avoid large negative thrust and overrun in rapid deceleration of the engine or trouble occurring in engine. It can also ensure the propeller to be returned with necessary blade angle quickly when opening the throttle in the second flight. Release the mid pitch stop when the plane is in landing run. Reduce the blade angle from 12o to 0o position, producing large negative thrust. Thus, landing run distance is shortened largely.
  • 295.
    JZ-Y8F200W-02 AIRCRAFT FLIGHT MANUAL SECTIONVI AIRCRAFT SYSTEM EQUIPMENT 6-7 June 30, 2012 Function of feathering and unfeathering mechanism (a) Automatic torque feathering: When the throttle-control lever is above 56o with the torque pressure decreasing to 142psi (980kPa), feather the propeller automatically by signals sent by automatic torque feathering sensor. (b) Negative thrust auto-feathering: When the throttle-control lever is above 40o with the negative thrust produced by propeller shaft exceeding 2645.5lb (11768N), feather the propeller automatically by negative thrust feathering sensor. (c) Manual feathering: The engine can feather manually if necessary. Press Manual feathering button, the propeller turns to feathering position. (d) Emergency hydraulic feathering: If feathering is needed in emergency with the electric system of automatic or manual feathering inoperative, pull downward and rotate 90o the emergency hydraulic feathering switch to force the propeller to be at feathering position. This method is done by speed governor self supplying oil to feather, and the time for supplying oil is short. Therefore, feathering cannot be done completely. But the blade angle is not less than 40o generally. (e) Part feathering: Part feathering can be operated to check the operation of the part feathering system in engine operating state and shutdown state. (f) Unfeathering: Place the propeller electric switch to Stop releasing button position, to make the lade angle back to 0o position on ground. When starting the feathered engine in air, manual unfeathering should be made to reduce the needed blade angle. At that time, the propeller drives the engine to rotate in frontal airflow. The method for unfeathering is as follows: pull up the unfeathering button and keep it at its original position (pulling time is not more than 2.5s), and the blade returns to its starting angle from feathering position.
  • 296.
    JZ-Y8F200W-02 AIRCRAFT FLIGHT MANUAL SECTIONVI AIRCRAFT SYSTEM EQUIPMENT 6-8 June 30, 2012 Propeller thrust (a) The propeller thrust varied with the flight speed V, flight altitude H and air temperature t. The thrust depends on the flight speed, rotating speed of propeller, flight altitude and blade angle. The opening of blade angle depends on the throttle, and the rotating speed is a constant. Thus, the thrust can be calculated, as long as the V, H and Npropeller of throttle is known. The procedure of producing the thrust is shown in Figure 6-3. The total thrust of one engine in different altitude, speed, throttle and air temperature is shown in Figure 6-4 and 6-5. Figure 6-3 Propeller thrust (b) Propeller Operation in negative thrust The power consumption of turbine propeller engine is large and the blade angle can change to very small angle. Thus, negative thrust can reach above 11023 lb(49000N) in small blade angle windmill state with the tH=-60o C. Besides, when the throttle is opened small, negative thrust may be produced.
  • 297.
    JZ-Y8F200W-02 AIRCRAFT FLIGHT MANUAL SECTIONVI AIRCRAFT SYSTEM EQUIPMENT 6-9 June 30, 2012 Figure 6-4 Total thrust of one engine in H=0mile (0km) Figure 6-5 Total thrust of one engine in H=4.97mile (8km)
  • 298.
    JZ-Y8F200W-02 AIRCRAFT FLIGHT MANUAL SECTIONVI AIRCRAFT SYSTEM EQUIPMENT 6-10 June 30, 2012 (1) Windmill state of propeller When the angle of attack of blade element α<-8, the large negative thrust may be produced. Meanwhile, the rotating of propeller does not need to be powered by engine, and can supply power to engine in frontal airflow. In windmill state, the negative thrust can reach to its maximum, which exceeds the maximum positive thrust of power plant. Also in this state, the power that propeller supplied to engine is the windmill power (Nwindmill). The windmill power of propeller depends on the power coefficient β, air density ρ and the rotating speed of propeller n. And β depends on corresponding feed pitch λ and blade angle φ. Thus, when the altitude keeps unchangeable with the n is a constant (1075r/min), the propeller windmill power is relevant to flight speed V and blade angle φ. The relation curve of windmill power Nwindmill and V, φ. N (0.735km) 5000 4000 3000 2000 1000 0 0 10 20 30 40 Windmill power without oil supply 300 350 400 450 500 V=550km /h φ (o ) Figure 6-6 The relation curve of windmill power Nwindmill and V,φ (H=0, t=59o F(15o C), n=1075r/min)
  • 299.
    JZ-Y8F200W-02 AIRCRAFT FLIGHT MANUAL SECTIONVI AIRCRAFT SYSTEM EQUIPMENT 6-11 June 30, 2012 (2) The thrust varied with the speed in small throttle both in air and on ground: The throttle without producing negative and positive thrust is called zero thrust throttle. Small throttle in air is zero thrust throttle. But, thrust is affected greatly by air temperature. Thus, small throttle in air changes with the air temperature. When throttle is at 16o , the thrust changes with the air temperature and flight speed. Variation of thrust when throttle is at 16o is shown in Figure 6-7. P (9.81N) 0 1000 2500 2000 60 60 30 300200 Vb (km/h) t=15°C Figure 6-7 Variation of thrust with throttle at 16o Release the inboard propeller stop and then the outboard. And each engine can
  • 300.
    JZ-Y8F200W-02 AIRCRAFT FLIGHT MANUAL SECTIONVI AIRCRAFT SYSTEM EQUIPMENT 6-12 June 30, 2012 produce 3307~3527lb (14700~15680N) negative thrust. Negative thrust decreases with the running speed reducing. When the V=70~81kn (130~150km/h), the blade angle changes to be positive, and the thrust changes to not big positive value. The variation of thrust in landing and running process are shown in Figure 6-8. P (9.81N) 0 1000 2000 500 120 200 4 3 5 1 280 Vb(km/h) 2 1-2, The variation of thrust when the throttle lever is at 16o 2-3, The throttle lever is at 0o 4-5, Propeller releasing the mid pitch stop Figure 6-8 The variation of thrust in landing and running process
  • 301.
    JZ-Y8F200W-02 AIRCRAFT FLIGHT MANUAL SECTIONVI AIRCRAFT SYSTEM EQUIPMENT 6-13 June 30, 2012 (3) The following measures should be taken when the engine is out of oil supply and cannot be feathered: a) The negative thrust is at its maximum when Vactual=227~238kn (420~440km/h), and it is larger in low altitude than in high altitude. Method should be made to reach this speed in high altitude. The detailed step is: reduce the indicated airspeed to allowable speed 162kn(300km/h) in 5000m and keep that speed to slide. b) Observe the rotating speed carefully when the speed reduced inVactual>227~238kn (420~440km/h). When rotating speed cannot be kept and it reduces (about Vactual 227~238kn (420~440km/h)), release the stop at once. Note 1) Do not release the stop too early, otherwise, the blade angle will be less than 12o in the process of propeller changing into small moment by speed governor. At that time, as the negative coefficient (-CP) increasing rapidly, the negative thrust can exceed -22031 lb (-98000N). 2) Do not appear wave-off when the propeller is at windmill state and enters into landing. The negative thrust can increase gradually in increasing speed. Other point is that, when the throttle is at 0o position with  =0o in increasing speed, negative thrust is larger than that of in oil supply cutoff. When the V increases to 194kn (360km/h), P=-12337 lb (-54880N) [p=-6609 lb (-29400N) without oil supply], engine must be shut down, because of the engine cannot be feathered. (c) Negative thrust produced by engine air start When unfeathering in engine air start, large negative angle of attack on propeller blade is produced. Thus, produce great negative thrust. Negative thrust becomes larger when the speed increases in high altitude. Moreover, the instant started negative thrust reached to its maximum value. The starting method has a great effect on the negative thrust. With unfeathering fast, the blade can enter into fine pitch stop quickly. Because the blade keeps at this angle for a longer time, the negative thrust increases. Thus, in engine air start, unfeather in time (n=15%~20%) and supply feathering to avoid the rotating speed increasing fast, largely reducing the negative thrust. The variation of negative thrust in engine air start is shown in Figure 6-9.
  • 302.
    JZ-Y8F200W-02 AIRCRAFT FLIGHT MANUAL SECTIONVI AIRCRAFT SYSTEM EQUIPMENT 6-14 June 30, 2012 n(r/min) 11000 9000 7000 5000 3000 1000 80 60 40 20 0 10 20 25 4400 3400 2400 1400 P(9.81N) t(s) Figure 6-9 The variation curve of negative thrust in engine air start
  • 303.
    JZ-Y8F200W-02 AIRCRAFT FLIGHT MANUAL SECTIONVI AIRCRAFT SYSTEM EQUIPMENT 6-15 June 30, 2012 Precautions in power plant operation Release the stop of propeller in taxing When the engine is started by turboprop airplane, the propeller can be at the minimum blade angle (starting angle) position. At that time, propeller torque is small to facilitate engine starting. Even operate 0o throttle, the four engines may produce 1764~2204 lb(7840 ~9800N) thrust. Thus, pay attention to lifting parking brake. The rotating speed is 10400r/min at 0o throttle. Rotating speed increases gradually to its operation speed when the throttle is enlarged from 0o to 16o ~22o step by step. In that process, blade angle keeps the same, rotating speed increases, and thrust keeps constant generally (increasing slightly, strictly speaking), which is the so called Zero Throttle. Increasing the throttle to 16o ~22o , the blade angle is enlarged by propeller governor. Meanwhile, the rotating speed is constant and thrust is increased largely. If the fuel regulations of left and right engine are inconsistent, rotating speed of left and right is usually different in Zero Throttle. However, the thrusts on left and right differ indistinctly and have a small effect on the taxiing. When the throttle is above 16o ~22o , the enlarged propeller moments on left and right are inconsistent. And the thrusts on both sides differ greatly. Thus, there is deviation and shaking head in taxing. In taxing, the propeller should be at Stop releasing button position. In order to acquire a certain taxing speed in large head wind, upslope, and load, the throttle should be above 30o , and the blade angle is larger than limiting angle (12o ). Once stop sliding and throttle is at 0o , blade should stop at the 12o limiting position if unreleasing the stop. At that time, the thrust cannot be reduced quickly and great rotating moment may occur as well. In that situation, in order to keep the throttle at 0o and corresponding rotating speed, fuel control unit tends to supply more fuel to increase the combustion gas temperature, produce sonic boom, and even burn out turbine impeller (in fact, there is surge when the rotating speed reducing to 93%).
  • 304.
    JZ-Y8F200W-02 AIRCRAFT FLIGHT MANUAL SECTIONVI AIRCRAFT SYSTEM EQUIPMENT 6-16 June 30, 2012 Propeller must be stopped in taking off Keep the throttle to 100o to take-off run, at this time, the blade angle is 24o ~26o . The blade angle may increase with the increasing take-off run speed. Thus, as long as the engine operates normally, whether the propeller is stopped or not will have no effect on engine operation characteristics. But, when one or several engines shut down with the feathering position full of troubles, and the speed at that time is less than 227~238kn (420~440km/h), propeller can supply a certain power to drive the compressor in windmill state. But the power is limited to maintain the operation speed, and the propeller changes to its minimum moment (releasing the stop, 0o ; unreleased, 12o ). The rotating speed does not be reduced in the shutdown moment. If the propeller is at its original Releasing stop position, negative angle of attack is great as well as the negative thrust at that time. The excess negative thrust can produce large yawing torque. If feeding rudder a little late, the aircraft may deviate from the runway. Thus, when taking off, the propeller must be stopped. It is forbidden to take off when the propeller switch is at Release Stop position. The propeller switch should be at Stop position even engine is in normal operation When the flight speed is less than 227~238kn (420~440km/h), engine shuts down, and the propeller is in windmilling, whether the propeller is stopped or not affect the negative thrust largely, because the speed is low and the propeller windmill power is limited to maintain the operation speed. Propeller changes to its maximum moment at once by propeller governor. If the propeller is at Release Stop position before the engine shutdown, the blade angle reduces to 0o at once. At the time when the rotating speed does not be reduced in shutdown moment, propeller negative thrust at Release Stop position is much larger than that at Stop position. Propeller switch should be at Stop position to avoid excess negative thrust in shutdown moment in flight. If the engine is shut down with the speed at the range of 227~238kn (420~440km/h), Release the stop in time after the windmilling speed is stable. Because of releasing the stop, the rotating speed reduces further and the negative thrust reduce as well. But at initial the moment of releasing the stop (3s~4s), negative thrust increases slightly. Therefore, pay attention to the balance of the aircraft.
  • 305.
    JZ-Y8F200W-02 AIRCRAFT FLIGHT MANUAL SECTIONVI AIRCRAFT SYSTEM EQUIPMENT 6-17 June 30, 2012 Throttle in air cannot be less than allowable degree According to turboprop engine characteristics, close the throttle to 0o (over locking pin) only in rear section of landing float. In other situations, it is forbidden to close the throttle over locking pin. Otherwise, great negative thrust is produced [about 3307~4409lb (14.7~19.6kN)] to affect the flight security seriously. The degree of small throttle depends on temperature, pressure and regulating situation of engine. No matter the temperature is lower or higher than 15o C, the small throttle increases in air. The variation is shown in Table 6-1. Table 6-1 Air temperature o F (o C) -55 (-67) -55~-30 (-67~-22) -31.01~-24.56 (-23.8~-12.2) -10~0 (14~32) 0~15 (32~59) 20~25 (68~77) 30 (86) 35 (95) 40 (104) Small throttle degree in air (°) 36~32 32~28 26~22 22~20 20 22~24 25~26 27 28 When the pressure is lower than sea level standard air pressure 101.3kPa (760mmHg), small air throttle increases. When the pressure reduces every 1.16psi (7.997kPa), small air throttle increases 1.5o ~2o . In the same throttle, if fuel governor supplies much less fuel, small air throttle will increase; otherwise, small air throttle may decrease. All in all, pilot should make clear the airfield level temperature, and pressure, determine the degree of small air throttle and adjust the throttle locking pin position before landing. Do not consider the small air throttle degree is a constant data.
  • 306.
    JZ-Y8F200W-02 AIRCRAFT FLIGHT MANUAL SECTIONVI AIRCRAFT SYSTEM EQUIPMENT 6-18 June 30, 2012 Steps should be pay attention to when closing the throttle to pass locking pin and releasing propeller stop One of the characters of power plant of this type, large negative thrust can be acquired when in closing the throttle over locking pin and releasing propeller stop to shorten the landing and landing run distance. Effects are different in different operating time and different orders. The two operation methods of power plant right now are as follows: Method 1: In initial part of floating, after aircraft nose shielding the threshold, close the internal throttle to pass locking pin; close the outboard throttle to pass locking pin when touching ground; after lowering down the nosewheel, release the propeller stop from internal side to outboard side. Method 2: Close the throttle to locking pin in floating, and pass the locking pin after touching the ground; release the propeller stop after lowering down the nosewheel. The advantage of method 1 are as follows: Propeller can produce negative thrust earlier to reduce the landing and landing run distance effectively and with the negative thrust section function, aircraft reduces its speed slowly to facilitate the operation. There are also disadvantages of method 1. When the delayer of internal small throttle of engine operates inharmoniously, and different oil supplies in left and right engines, the negative thrusts of left and right differ from each other to produce yawing torque, which brings great difficulty in keeping flight altitude in floating, especially in the following condition: releasing the propeller stop of left and right sides at different time, or one side being released or two sides being released, etc. Close the throttle to pass locking pin, with large yawing torque and great negative thrust, and the aircraft may lower down quickly by reducing the speed. At that time, the speed is small with low efficiency of control surface, and the deviation cannot be controlled easily by feeding rudder. The lateral side of aircraft touches the ground, and the landing gear may be damaged by much lateral load. When the aircraft lowers down abruptly without holding the stick back immediately, the nosewheel may touch the ground at first. If the above situation occurs, close the throttle at once, and control the direction with rudder. The advantage of method 2 is that slow reducing speed, steady attitude and easy control. Even in small throttle delayer is inharmoniously or restrictor with trouble and other situations, the aircraft can easily be corrected after touching the ground. But, negative thrust is produced late and floating distance and landing run distance are long, thus, it is not suitable to airport with short runway. In emergency, in order to shorten the distance of floating and landing run without away from runway, close the throttle to pass locking pin after grounding state is form in the rear section of floating. Meanwhile, release the stop. Hold the stick back in time to prevent the aircraft from lowering down abruptly with nosewheel contacting the ground.
  • 307.
    JZ-Y8F200W-02 AIRCRAFT FLIGHT MANUAL SECTIONVI AIRCRAFT SYSTEM EQUIPMENT 6-19 June 30, 2012 Cut off the engine after ground contact on situations Cut off the engine after ground contact, which is different from releasing the stop after ground contact. In that process, landing run distance cannot be shortened, but be prolonged. The negative thrust after ground contact changes as Figure 6-10. P (9.81N) 5 10 15 20 25 t (s) 500 1000 1500 2000 1 2 3 Curve 1, at 0o throttle, the negative thrust without releasing the stop; Curve 2, at 0o throttle, the negative thrust with releasing the stop Curve 3, Negative pull after engine shutdown Figure 6-10 Variation curve of negative thrust with different time after ground contact In landing run, mean negative thrust is small after cutting off the engine (less than 0o throttle, and releasing the mean negative thrust stopped), thus, the sliding distance is longer. If restrictor has trouble not to release the stop after ground contact, cut off the engine. Large negative thrust shortens the landing run distance effectively.
  • 308.
    JZ-Y8F200W-02 AIRCRAFT FLIGHT MANUAL SECTIONVI AIRCRAFT SYSTEM EQUIPMENT 6-20 June 30, 2012 Prevent and correct the deflection when two engines in one side shutdown and land. If the shutdown engine is feathered in flight, the resistance of this engine is not big about 441~441lb (1960 ~2450N). At this moment, the thrust of operating engine produces yawing torque to force the shutdown engine to deviate to one side. The situation is different when closing the throttle to pass locking pin in landing especially after releasing the stop. Large negative thrust is produced by shutdown engine 3307~5511.5 lb (14700~24500N) to form yawing torque, forcing the aircraft to deviate to the side of operating engine. If wrong method is done by pilot, the aircraft may deviate abruptly and even be away from the runway. Closing the throttle and release the stop earlier with less short interval, the negative thrust and its yawing torque are large. Thus, in landing with two engines on one side shutdown, the following points should be paid attention to: (a) Sliding before landing, close the outboard throttle to small air throttle position, and try to use internal throttle to keep specified sliding speed. (b) Place the trim tab of rudder to central position to reduce the force of pushing on rudder of shutdown engine, when closing the throttle to pass the locking pin and releasing the stop. (c) After flareout, close the internal throttle softly to small air throttle position. Close the internal throttle to 0o position and release stop only after lowering down the nosewheel on ground contact with constant direction. Thus, negative thrust produced by operating engine and yawing torque are small in floating to keep the aircraft balance. After lowering down the nosewheel, close the internal throttle to pass the locking pin and release the stop, and the aircraft can deviate to one side of operating engine. Keep the correct direction by rudder control mechanism and use brake if necessary. (d) When rolling speed reduces to about 32.4kn (60km/h), draw out control handle of nosewheel, close outboard throttle to pass to pass the locking pin and release the stop, with correct direction. Because the speed is low, and nosewheel load increases, increasing the direction efficiency; thrust variation and its yawing torque are small after releasing the stop, which facilitates to keep the direction. The reasons for two engines shutdown landing on one side are as follows: on one hand, the negative thrust is small because of the shutdown engine feathering; on the other hand, on the other hand, the closing outboard throttle to pass to pass the locking pin and releasing the stop are late, and the negative thrust is produced late. Thus, mean negative thrust in landing is small, and the landing run distance is short, which should be paid attention to when landing in short runway. The landing run distance of two engines shutdown landing on one side is 4265~4921ft (1300~1500m).
  • 309.
    JZ-Y8F200W-02 AIRCRAFT FLIGHT MANUAL SECTIONVI AIRCRAFT SYSTEM EQUIPMENT 6-21 June 30, 2012 FUEL SYSTEM General The fuel system consists of the fuel supply system, vent system, and refueling and fuel drainage system. There are totally seven fuel tank groups 0, I, II, III, IV, V, and VI on aircraft wings, and there is a flexible fuel tank in the fuselage. The fuel supply system supports automatically-and manually-controlled fuel consumption modes. The fuel consumption sequence is as follows: I, fuselage fuel tank, I, II, III, IV, V, VI, 0, VI. When the flight altitude is below 13123.36 ft (4000 m) and the residual fuel in the fuel supply tank is more than half of its capacity, the gravity fuel supply capability is available. Fuel tank group 0 and fuselage fuel tank do not directly supply fuel to engines; instead, fuel in fuel tank group 0 and fuselage fuel tank is delivered to fuel tank groups VI and I, which in turn supply fuel to engines. The tank vent system is an open vent system. Each group of fuel tanks communicates with the air to balance the pressure inside and outside fuel tanks. In this way, vacuity will not be produced inside the fuel tank, ensuring that the fuel tank can supply fuel properly. This can also prevent fuel tanks and fuel compartment from being damaged due to excessively large difference between pressure inside and outside the fuel tank. Fuel tank group 0 has an independent vent system, whereas vent systems of fuel tank groups I~VI and the fuselage fuel tank are communicate with each other. The refueling system supports pressure refueling and gravity refueling. The pressure refueling system can be further divided into automatic and manual pressure refueling systems. The pressure refueling sequence is as follows: fuel tank groups VI, V, IV, III, II, I, and 0. Manual pressure refueling of the fuselage fuel tank is performed independently. The fuel drainage system supports pressure draining and gravity draining.
  • 310.
    JZ-Y8F200W-02 AIRCRAFT FLIGHT MANUAL SECTIONVI AIRCRAFT SYSTEM EQUIPMENT 6-22 June 30, 2012 The fuel designation of the fuel system is listed in Table 6-2. Table 6-2 Country Designation Technical Specification Freezing Point China RP-3 GB 6537 -52.6°F(-47o C) RP-2 SY1006 -58°F(-50o C) RP-1 GB438 -76°F(-60o C) U.S.A JP-1 MIL-F-5616 -76°F(-60o C) JP-4 MIL-J-5624D -67°F(-55o C) JP-5 MIL-E-7142 -50.8°F(-46o C) Britain JP-1B DERD-2482 -40°F(-40o C) JP-4B DERD-2486 -40°F(-40o C) JP-5B DERD-2488 -40°F(-40o C) Russia T-1 ГОСТ10227-86 -76°F(-60o C) TC-1 ГОСТ10227-86 -76°F(-60o C) T-2 ГОСТ10227-86 -76°F(-60o C) PT ГОСТ10227-86 -67°F(-55o C) Others ATF-650 AT-150 JETA-1 Note 1) Fuel with the freezing point at -40o F (-40o C) can be used only when the local temperature is not lower than 14o F (-10o C) 2) International principle for fuel substitute: The substitute can be used if main physical and chemical specifications (distillation range, viscosity, and freezing point) are similar.
  • 311.
    JZ-Y8F200W-02 AIRCRAFT FLIGHT MANUAL SECTIONVI AIRCRAFT SYSTEM EQUIPMENT 6-23 June 30, 2012 The number, capacity, and refueling quantity of each fuel tank are listed in Table 6-3. Table 6-3 Fuel Tank Group Fuel Tank No. Fuel Tank Capacity Manual Refueling Quantity Pressure Refueling Quantity Unusable Fuel gal(L) lb(kg) gal(L) lb(kg) gal(L) lb(kg) gal(L) lb(kg) Group 0 Structura l fuel tank 2×337.20 (2×1533) 2×2109.69 (2×1188) 2×316.53 2×1439 2×2458.15 2×1115 2×282.65 (2×1285) 2×2195.80 (2×996) 0 0 Group I (left group) 1# and 2# 460.16 (2092) 3573.69 (1621) 441.24 (2006) 3428.18 (1555) 397.69 (1808) 3088.67 (1401) 5.65 -25.7 44.09 -20 Group I (right group) 1# and 2# 494.47 (2248) 3840.45 (1742) 481.06 (2187) 3736.83 (1695) 432.01 (1964) 3355.43 (1522) 9.41 -42.8 72.75 -33 Group II 3# 2×216 (2×982) 2×1677.72 (2×761) 2×209.02 (2×953) 2×1629.21 (2×739) 2×191.81 (2×872) 2×1490.32 (2×676) 2×1.43 (2×6.5) 2×11.02 (2×5) Group III 6# and 7# 2×280.23 (2×1274) 2×2178.16 (2×988) 2×271.87 (2×1236) 2×2112.03 (2×958) 2×243.94 (2×1109) 2×1973.13 (2×859) 2×1.54 (2×7) 2×11.02 (2×5) Group IV 8#, 9#, and 10# 2×332.14 (2×1510) 2×2579.41 (2×1170) 2×323.42 (2×1484) 2×2535.31 (2×1150) 2×296.29 (2×1347) 2×2031.62 (2×1044) 2×21.23 (2×96.5) 2×165.35 (2×75) Group V 11#, 12#, and 13# 2×206.10 (2×937) 2×1600.55 (2×726) 2×204.12 (2×928) 2×1585.12 (2×719) 2×179.05 (2×814) 2×1319.12 (2×631) 2×2.46 (2×11.2) 2×19.84 (2×9) Group VI 4# and 5# 2×351.94 (2×1600) 2×2733.73 (2×1240) 2×341.82 (2×1554) 2×2654.36 (2×1204) 2×311.03 (2×1414) 2×2416.26 (2×1096) 2×20.81 (2×94.6) 2×160.94 (2×73) Fuselage group 16# 692.88 (3150) 5381.48 (2441) 671.98 -3055 5220.54 -2368 624.47 (2839) 4850.16 (2200) 2.2 -10 17.09 -7.75 Total fuel quantity 5094.76 -23162 39572.93 -17950 4935.07 -22436 38333.93 -17388 4463.69 (20293) 33679.98 (15727) 112.18 (510) 870.82 -395 Note 1) In Table 2, the pressure refueling quantity is obtained when aircraft is with an angle of attack of 2.5o . 2) Data in Table 2 is obtained when the fuel specific weight (ρ) is 7.77 lb/gal (0.775 kg/L).
  • 312.
    JZ-Y8F200W-02 AIRCRAFT FLIGHT MANUAL SECTIONVI AIRCRAFT SYSTEM EQUIPMENT 6-24 June 30, 2012 The fuel pump operating data is listed Table 6-4 Table 6-4 Fuel pump operating data Item psi (MPa) Allowable seepage of excessive fuel pipe Primary fuel pump (CB-55) Maximum: 1564.56 (10.78) When the safety valve is opened: 1849.03+71.12 0 (12.74+0.49 0 ) When the safety valve is completely opened: 2257.73 (15.68) Not more than one drop per min Auxiliary fuel pump (XB-36H) 35.56+7.11 0 (0.245+0.049 0 ) Not more than 1.83×10⁻⁵ gal/min (5cm3 /h) Fuel pump (LB-22) When the fuel supply quantity is 0:Low-pressure state: not higher than 9.67 (0.067), Rated state: not higher than 18.49 (0.127), High-pressure state: not higher than 25.60 (0.177) When the fuel supply quantity is 14.66 gal/min (4000 L/h): Low-pressure state: not higher than 5.69 (0.039), Rated state: not higher than 12.09 (0.083) In the high-pressure state, when the fuel supply quantity is 7.33 gal/min (2000 L/h), the operating pressure is at least 17.79 (0.123). When the operating fluid temperature is higher than -40o F (-40o C): not more than 1.83×10⁻⁶ gal/min (0.5cm3 /h). When the operating fluid temperature is lower than -40o F (-40o C): not more than two drops per minute. Under normal temperature or non-operating state: leakage not allowed. Fuel pump (LB-21) When the fuel supply quantity is 14.66 gal/min (4000 L/h), the operating pressure is at least 14.66 gal/min (4000 L/h). When the operating fluid temperature is below -31o F (-35o C): not more than two drops per minute. When the operating fluid temperature is above -31o F (-35o C): not more than 1.83×10⁻⁶ gal/min (0.5cm3 /h). Non-operating state: leakage not allowed.
  • 313.
    JZ-Y8F200W-02 AIRCRAFT FLIGHT MANUAL SECTIONVI AIRCRAFT SYSTEM EQUIPMENT 6-25 June 30, 2012 Aircraft refueling and fuel drainage Refueling (a) Before refueling, check that (1) The refueling truck has a laboratory sheet and fuel is qualified. (2) The deposit drained out of the refueling truck has no water, ice crystal, and mechanical impurity. (3) The lead sealing on the refueling truck is intact. (4) The doper net filter is clean. (5) Fire extinguishing devices are placed near aircraft. (6) Pipelines are unblocked and clean (Take down blockages at air vents of fuel tanks.) (b) Connect grounding wires for the refueling truck, doper, and aircraft. (c) Perform parking brake and place wheel chocks. (d) Determine the refueling quantity required by a flight task, and specify the fuel tanks that need to be filled up and those that need partial refueling. (e) Manual refueling is implemented as follows: Use the doper to fill fuel into each fuel tank on the upper side of the aircraft wing through the refueling filler on each fuel tank. The refueling sequence is opposite to the fuel consumption sequence. To save time, refueling can also be implemented in the following sequence: left VI, V: right VI, V, IV, III; left IV, III, II, I; right II, I, 0; left group 0; or in the opposite sequence, starting from right. If two refueling trucks are used, left and right wing fuel tanks can be refueled simultaneously. The maximum refueling quantity of fuel that can be filled through the refueling filler on the fuel tank on the upper side of the aircraft wing can reach 97% of the total fuel tank capacity. Fill fuel into the fuselage fuel tank through the manual refueling filler at the tail of the right landing gear nacelle. Note During manual refueling through the refueling filler on the fuel tank on the upper side of the aircraft, note that the fuel expansion space should be left between the fuel level and the refueling edge, preventing fuel from flowing out of the outer surface of the fuel tank.
  • 314.
    JZ-Y8F200W-02 AIRCRAFT FLIGHT MANUAL SECTIONVI AIRCRAFT SYSTEM EQUIPMENT 6-26 June 30, 2012 (f) Automatic pressure refueling is implemented by the refueling controller, which implements refueling in the sequence of groups VI, V, IV, III, II, I, and 0. After one group of fuel tanks is filled up, refueling of another group of fuel tank starts. Fuel flows into pipelines on the aircraft through the pressure refueling union from the fuel pump in the refueling truck, and then into the fuel tank through the refueling valve and float valve. When the refueling pressure is higher than 2.13 psi (0.15 kg•f/cm2 ), the green light on the refueling power distribution box (PDB) illuminates, indicating that the refueling pressure is normal. When the refueling pressure is higher than 49.78 psi (3.5 kg•f/cm2 ), the red light on the refueling PDB illuminates, indicating refueling overpressure. In this case, refueling should be stopped immediately. During refueling, when the pressure of fuel tank group 0 is higher than 1.71 psi (0.12 kg•f/cm2 ), the corresponding red light on the refueling PDB illuminates. In this case, refueling should be stopped immediately. (g) If the automatic control system is operating abnormally, aircraft refueling can be implemented by means of manual pressure refueling. During manual refueling, turn off the automatic refueling valve first. Then, use the manual refueling valve to control the opening and closing of the refueling valve. All refueling valves can be turned on simultaneously, or the refueling valve for a fuel tank group can be turned on independently. Refueling must be performed in the specified sequence. During refueling to fuel tank group VI, turn electrical fuel valve RDK-1A first. Then, turn on the pressure refueling valve and fuel supply pump of fuel tank group V. After the fuel tank is filled up, turn off the fuel supply pump of fuel tank group V first, and then turn off the electrical fuel valve. Manual pressure refueling to the fuselage fuel tank is implemented by the refueling PDB on the fuselage fuel tank independently. During refueling, turn on refuel valves on two fuselage fuel tank groups manually (the blue light is off). After fuel tanks are filled up, both the blue and yellow signal lights illuminate. If there is no need to fill up fuel tanks, stop refueling when the required fuel quantity is reached. Turn off the refueling valves (the blue light illuminates). After refueling, drain out fuel in the refueling pipeline of the fuselage fuel tank through the fuel drainage valve on the refueling pipeline. (h) Refueling precautions (1) The refueling sequence is opposite to the fuel consumption sequence. Refueling must be performed in the specified sequence. Fuel quantities in left and right wing fuel tanks should be balanced. (2) During pressure refueling, if the red signal light on the pressure refueling PDB illuminates or fuel cannot be filled in, refueling should be stopped. (3) After refueling, turn off the power switch on the pressure refueling PDB.
  • 315.
    JZ-Y8F200W-02 AIRCRAFT FLIGHT MANUAL SECTIONVI AIRCRAFT SYSTEM EQUIPMENT 6-27 June 30, 2012 Fuel drainage Before fuel drainage, connect the grounding jumper and take down the vent blockage. Partial or complete pressure or gravity fuel drainage can be implemented through the drainage valve on the coarse filter on any engine. (During partial or complete pressure fuel drainage, turn on the fuel supply pump corresponding to the fuel tank whose fuel needs to be drained out in the fuel consumption sequence.) Fuel in the fuselage fuel tank is delivered to fuel tank group I first, and then the fuel is drained out from fuel tank group I. Gravity fuel drainage indicates fuel drainage in the case that the fuel supply pump does not operate. In gravity fuel drainage, only fuel in the wing fuel tanks can be drained out. In-flight operation of the fuel system Automatic fuel consumption and manual fuel consumption control of the fuselage fuel tank Automatic fuel consumption of wing fuel tanks (a) Turn on the safety switch of the fuel system. (b) Set the AUTOMATIC-MANUAL changeover switch to the AUTOMATIC position, and turn on valves of the automatic fuel consumption controller, fuel quantity indicator, and on-duty fuel pump for group VI. If the automatic fuel consumption mechanism is operating properly, the green lights for the operating fuel pumps and the blue lights indicating the fuel consumption sequence should illuminate and can switch automatically according to the specified fuel consumption sequence. (c) The fuel consumption controller performs automatic fuel consumption switchover according to Figure 6-11. Low pressure Yellow light Switch over to the high- pressure operating state, and connect group V Connect group VI manually; rated operating state Fuel consumption Manually turn on Fuselage group Note: Rated High pressure Switch over to the high- pressure operating state, and connect group IV 257.94 ± 35.27 lb 346.17 ± 35.27 lb 445.33 ± 35.27 lb 421.81 ± 35.27 lb Switch over to the high-pressure operating state, and connect group III Switch over to the high-pressure operating state, and connect group II ± 35.27 lb Right 504.86 Left 478.40 Green light Connect group 0, and lock group V Disconnect Group 0 Red light 1102.31 lb Connect the fuselage fuel tank Group VI Group I Group II Group III Group IV Group V Group 0 Disconnect group I Disconnect group II Disconnect group II Disconnect group IV Manually turn off 1258.84 ± 35.27 lb 1161.83 ± 35.27 lb 3417.16 ± 70.55 lb 1419.78 ± 35.27 lb 1779.13 ± 35.27 lb 1679.92 ± 35.27 lb 1258.84 ± 35.27 lb 1119.95 ± 70.55 lb Figure 6-11 Schematic diagram of automatic fuel consumption switchover
  • 316.
    JZ-Y8F200W-02 AIRCRAFT FLIGHT MANUAL SECTIONVI AIRCRAFT SYSTEM EQUIPMENT 6-28 June 30, 2012 (d) The automatic fuel consumption sequence is as follows: Power on the fuel pump for group I (the green light is on) and turn on the fuel consumption sequence light for group I (blue light is on). At this time, the fuel pump for group I is in rated operating state and starts supplying fuel to engines. When the residual fuel in left fuel tank group I is about 478.40 lb±35.27 lb (217 kg±16 kg) or the residual fuel in right fuel tank group I is about 504.86 lb±35.27 lb (229 kg±16 kg), the sensor's lower annunciator starts operating and gives out a signal to power on the fuel pump for group II (the green light is on) and turn on the fuel consumption sequence light for group II (the blue light is on). The fuel pump for group II is in rated operating state. At the same time, the fuel supply pump for group I switches over to the high-pressure operating state. The fuel output pressure in high-pressure operating state is higher than that in rated operating state. Therefore, fuel tank group I continues consuming fuel. Fuel tank group II starts consuming fuel only after fuel in fuel tank group I is almost exhausted. When the residual fuel in fuel tank group II is about 1419.78 lb±35.27 lb (644 kg±16 kg), the sensor gives out an upper signal to disconnect the fuel supply pump of group I. When the residual fuel is about 257.94 lb±35.27 lb (117 kg±16 kg), the sensor gives out a lower signal to power on the fuel pump for group III (the green light is on) and turn on the fuel consumption sequence light for group III (the blue light is on). The fuel pump for group III is in rated operating state. At the same time, disconnect the fuel supply pump for group I again. The fuel supply pump for group II switches over to the high-pressure state. Fuel tank group III starts consuming fuel only after fuel in fuel tank group II is almost exhausted. When the residual fuel in fuel tank group III is about 1779.13 lb±35.27 lb (807 kg±16 kg), the sensor gives out an upper signal to disconnect the fuel pump for group II. When the residual fuel is about 346.13 lb±35.27 lb (157 kg±16 kg), the sensor gives out a lower signal to power on the fuel pump for group IV (the green light is on) and turn on the fuel consumption sequence light for group IV (the blue light is on). The fuel pump for group IV is in rated operating state. At the same time, disconnect the fuel supply pump for group II again. The fuel supply pump for group III switches over to the high-pressure state. Fuel tank group IV starts consuming fuel only after fuel in fuel tank group III is almost exhausted.
  • 317.
    JZ-Y8F200W-02 AIRCRAFT FLIGHT MANUAL SECTIONVI AIRCRAFT SYSTEM EQUIPMENT 6-29 June 30, 2012 When the residual fuel in fuel tank group IV is about 1679.92 lb±35.27 lb (762 kg±16 kg), the sensor gives out an upper signal to disconnect the fuel pump for group III. When the residual fuel is about 445.33 lb±35.27 lb (202 kg±16 kg), the sensor gives out a lower signal to power on the fuel pump for group V (the green light is on) and turn on the fuel consumption sequence for group V (the blue light is on). The fuel pump for group V is in rated operating state. At the same time, disconnect the fuel supply pump for group III again. The fuel supply pump for group IV switches over to the high-pressure state. Fuel tank group V starts consuming fuel only after fuel in fuel tank group IV is almost exhausted. When the residual fuel in fuel tank group V is about 1258.84 lb±35.27 lb (571 kg±16 kg), the sensor gives out an upper signal to disconnect the fuel pump for group IV. When the residual fuel is about 421.81 lb±35.27 lb (191 kg±16 kg), the sensor gives out a lower signal to make the fuel pump for group VI switch over from the low-pressure operating state to rated operating state (the green light is on). At the same time, disconnect the fuel supply pump for group IV again. The fuel supply pump for group V switches over to the high-pressure state. Fuel tank group VI starts consuming fuel only after fuel in fuel tank group V is almost exhausted. When the residual fuel in fuel tank group VI is about 2279.58 lb±35.27 lb (1034 kg±16 kg), the sensor gives out the first upper signal to disconnect the fuel pump for group V. At the same time, power on the fuel pump for group 0 (the green light is on) and turn on the fuel consumption sequence light for group 0 (the blue light is on). Fuel in fuel tank group 0 is pressurized and then flows into fuel tank group VI through the check valve and restricting nipple. The fuel is supplied to engines from fuel tank group VI. When the residual fuel in fuel tank group 0 is about 1161.83 lb±35.27 lb (527 kg±16 kg), the sensor gives out a lower signal to disconnect the fuel pump for group 0. After fuel in fuel tank group 0 is exhausted, fuel tank group VI starts consuming fuel. When the residual fuel is about 1708.58 lb±35.27 lb (775 kg±16 kg), the sensor gives out the second upper signal to disconnect the fuel supply pump of group 0. At the same time, turn on the 45min warning light (the yellow light is on). When the residual fuel in fuel tank group VI is about 559.97 lb±35.27 lb (254 kg±16 kg), the sensor gives out a lower signal to turn on the 15min warning light (the red light is on). At the same time, disconnect the fuel supply pump of group 0 again.
  • 318.
    JZ-Y8F200W-02 AIRCRAFT FLIGHT MANUAL SECTIONVI AIRCRAFT SYSTEM EQUIPMENT 6-30 June 30, 2012 Manual fuel consumption control The manual fuel consumption control procedure is as follows: (a) Set the AUTOMATIC-MANUAL changeover switch to the MANUAL position. (b) Turn on the valve of the fuel pump for a fuel consumption tank group according to the fuel consumption sequence. At this time, the fuel pump operating green signal light and operating sequence blue signal light illuminate. (c) When fuel in this group is almost exhausted (judged based on the fuel quantity indicator reading), turn on the valve of the fuel supply pump for the next group. (The sequence blue signal light for the next group and fuel pump operating green signal light illuminate) (d) After the fuel of the previous group is exhausted, the green signal light is off. At this time, turn off the fuel pump valve. Note When the total residual fuel in fuel tank groups VI in both the left and right wings is 3417.16 lb±70.55 lb (1550 kg±32 kg) (that is, the residual fuel in fuel tank group VI in one wing is 1708.58 lb±35.27 lb (775 kg±16 kg)), the yellow warning light illuminates, indicating that flight can proceed for about 45min. When the total residual fuel in fuel tank groups VI in both the left and right wings is 1119.95 lb±70.55 lb (508 kg±32 kg) (that is, the residual fuel in fuel tank group VI in one wing is 559.97 lb±35.27 lb (254 kg±16 kg)), the red warning light illuminates, indicating that flight can proceed for about 15min. Fuel consumption of the fuselage fuel tank When the residual fuel in fuel tank group I reaches the lower signal position of the sensor, the fuel pump switches to operate in high-pressure state. When the fuel pump for group II switches to operate in rated state or when the residual fuel in fuel tank group I is about 1102.31 lb (500 kg), fuel in the fuselage fuel tank can be used. At this time, fuel in fuel tank group I continues to be consumed and the refueling valve for fuel tank group I is turned on (the blue light is on). If the fuselage fuel tank is filled up, its fuel pump should be turned on.
  • 319.
    JZ-Y8F200W-02 AIRCRAFT FLIGHT MANUAL SECTIONVI AIRCRAFT SYSTEM EQUIPMENT 6-31 June 30, 2012 Note 1) To deliver fuel to only one fuel tank in left or right fuel tank group I, turn on the refueling valve for this group only. 2) When fuel tank groups I in left and right wings are almost filled up, turn off the fuel pump for the fuselage fuel tank and refueling valves for fuel tank groups I in left and right wings. When fuel in group I is almost exhausted, turn on the fuel pump for the fuselage fuel tank and refueling valves for group I again. Repeat this process several times until fuel in the fuselage fuel tank is exhausted completely. At this time, turn off the fuel supply pump for the fuselage fuel tank and refueling valves of group I. Then, perform fuel supply according to the specified fuel consumption sequence. Caution When a specific fuel supply pump for left and right fuel tank groups I is faulty, the refueling valve for this fuel tank group must be turned off. Fuel in the fuselage fuel tank is delivered to the fuel tank group that operates properly. At this time, the communication valve must be turned on so that the fuel tank group that operates properly can supply fuel to the four engines. Fuel quantity balance (a) Turn on the communication valve. The orange light illuminates. (b) Set the BALANCE switch on the side with more fuel. The fuel pump on this side is used for fuel consumption of all engines. At this time, the fuel pump on the side with fewer fuel stops operating. (c) When the fuel quantity is balanced, set the BALANCE switch to the neutral position. Then, turn off the communication valve. Caution The fuel quantities in fuel tanks on left and right wings must be balanced before fuel in fuel tank group V is exhausted.
  • 320.
    JZ-Y8F200W-02 AIRCRAFT FLIGHT MANUAL SECTIONVI AIRCRAFT SYSTEM EQUIPMENT 6-32 June 30, 2012 Fuel consumption precautions (a) The difference between fuel quantities in fuel tanks of the left and right wings should fall within the range of 1102.31 lb~1322.77 lb (500 kg~600 kg). (b) Under any circumstances during flight, the on-duty fuel pump valve for group VI must be set to the ON position (on duty). When the fuel quantity in fuel tank group VI is low and aircraft is climbing, the inner (front fuel pump) green light is off. When the aircraft is gliding, the outer (rear fuel pump) green light is off. These are normal cases. Fuselage fuel tank operation (a) Turn on the refueling valve for fuel tank group I. The blue signal light on the overhead console illuminates. (b) Turn on the fuel pump of the fuselage fuel tank to deliver fuel to fuel tank group I. Note When fuel tank group I is almost filled up, turn off the fuel delivery pump of the fuselage fuel tank. (c) After fuel in the fuselage fuel tank is exhausted, turn off the fuel pump of the fuselage fuel tank and the refueling valve for fuel tank group I. Note When the fuselage fuel tank is in use, if the fuel pump for fuel tank group I at one side is faulty, turn off the refueling valve for this side, and then turn on the communication valve for fuel supply. In-flight troubleshooting (a) The green signal light indicating that the fuel pump in a group at one side is operating is off. (1) Turn on the communication valve. (2) Check whether the bulb is in good condition. If the bulb is in good condition and the fuel quantity remains unchanged, it indicates that the fuel pump is faulty. To prevent excessively large banking torque from being produced on wings at both sides, stop using fuel in this fuel tank group (except group I). After manual fuel consumption of the next group starts, turn off the communication valve.
  • 321.
    JZ-Y8F200W-02 AIRCRAFT FLIGHT MANUAL SECTIONVI AIRCRAFT SYSTEM EQUIPMENT 6-33 June 30, 2012 Note The residual fuel in the faulty fuel tank group can be used for emergency backup. (b) All fuel pumps in the fuel supply system are faulty and only the gravity fuel supply is available. (1) Level off the aircraft immediately (climbing is prohibited). A slight gliding angle is allowed if the heading altitude is permitted. In addition, land the aircraft at the airfield in vicinity. (2) Control the aircraft and advance or retard the throttle smoothly. The throttle angle cannot exceed 74o . Observe the operating condition of the fuel supply system. (c) When the fuel quantity indicated by the fuel quantity indicator decreases quickly, check the fuel quantity in fuel tank subgroup immediately, and check whether fuel leakage occurs visually. If yes, take the following measures: (1) Turn on the communication valve. (2) Switch over to manual fuel consumption, and turn on the switch of the fuel pump for the leaking fuel tank group. (3) Set the balance switch to the side where fuel is leaking. When fuel in the fuel tank is almost exhausted, set the balance switch to the other side to balance the fuel quantity. (4) After the fuel quantity is balanced, set the balance switch to the neutral position. Switch over to the automatic fuel consumption. Then, turn off the communication valve. In addition, land the aircraft at the airfield in vicinity. (d) The signal light indicating that the fine filter is blocked illuminates. During flight, if the pressure difference before and after fuel drainage through the drainage valve on the fine filter reaches 5.69+1.07 -0.71 psi (39.2+7.35 -4.9 kPa (0.4+0.075 -0.05 kgf/cm2 )), the red signal light indicating that the fine filter is blocked illuminates. At this time, take the following measures: (1) Advance the throttle to an angle greater than 62o so that automatic feathering can be implemented when fuel supply is interrupted. (2) After landing, clean and check the fine filter and RT-11 fuel regulator. Note If the auxiliary fuel pump pressure decreases below 35.56 psi (0.245 MPa (2.5 kgf/cm2 )) during flight, clean the coarse filter and replace the paper filter element of the fine filter after flight.
  • 322.
    JZ-Y8F200W-02 AIRCRAFT FLIGHT MANUAL SECTIONVI AIRCRAFT SYSTEM EQUIPMENT 6-34 June 30, 2012 (e) The filter is iced. In winter or in high-altitude flight, if there is water in the fuel tank, the fine filter will be iced. If the low-pressure fuel pressure and nozzle pressure are detected to swing, it indicates that the filter is iced. At this time, take the following measures: (1) Advance the throttle to an angle greater than 62o immediately so that automatic feathering can be implemented when the fuel supply is interrupted. (2) Take all emergency measures in case of engine shutdown quickly. (3) Land the aircraft at the airfield in vicinity immediately. OIL SYSTEM General The same set of oil system but operated respectively is installed on each engine to ensure the engine can work in all states of flight and any altitude. This system is used to lubricate and cool off the surfaces of inner parts of the engine, and the operation medium serving as part accessories, such as, propeller governor, fuel governor, torque measuring mechanism, and negative thrust auto- feathering sensor, etc. Meanwhile, the oil system can ensure the supplying oil pressure and oil quantity. Oil temperature automatic control system is mounted in oil system to control the opening of oil radiator flap automatically according to the oil temperature, and to ensure the oil temperature to be at the range of 158~176o F (70~80o C). Control the opening of oil radiator flap manually if the auto-control is broken, ensuring the oil temperature to be at normal range. When the outside air temperature is high, oil ejection system is mounted to improve the oil radiation characteristics when operating engine on the ground. Hot air from 10th stage compressor is released forward by injector, which speeds up the speed of airflow, causing low pressure. Thus, airflow from oil radiator increases, which improve the oil radiation characteristics. Oil circulation in oil system is a closed cycle, that is, hot oil from engine deaerator is radiated through oil radiator and then enters into main oil pump of the engine. Oil flows along the closed circuit again and again, and then flows into oil tank. The consummated oil is supplied by auxiliary oil tank defueling oil from oil tank. The total oil quality of oil system of each engine is 27.7gal (105L), among which the oil in oil tank is 15.3+0.53 -0.26 gla(58+2 -1 L), and others in exterior and inner pipes, propeller hub oil cavity and radiator.
  • 323.
    JZ-Y8F200W-02 AIRCRAFT FLIGHT MANUAL SECTIONVI AIRCRAFT SYSTEM EQUIPMENT 6-35 June 30, 2012 Marks of various mixed oil and its mixed proportion (see Table 6-5) Table 6-5 Country name Mark Technical norms Mixed proportion China HH-20 and 8A GB440-77 and GB439-90 25% and 75% 20# compound hydrocarbon aviation lubricating oil and 8# compound hydrocarbon aviation lubricating oil (GJB1219-91) and (8B, GB439-90) 25% and 75% America 1100 MIL-L-6082B 25% 1010 MIL-O-6081B10 75% England B-0 DERD-2472B 25% OM-11 DERD-2940 75% Application data Oil pressure Idling state 56.6psi (0.392MPa) Operating states on the ground 71~78.3psi (0.49~0.54MPa) Operating states in flight 56.6~78.3psi (0.392~0.539MPa) Oil temperature (a) Oil temperature of engine inlet Allowable minimum oil temperature 104o F (40o C) Optimum oil temperature 158~176o F (70~80o C) Allowable the highest oil temperature (constant operation time not more than 15min) 90o C Oil temperature when the engine changes from idling state to the indication of throttle is 25o (constant operation time not more than 15min) not more than 212o F (100o C) (b) Oil temperature at engine outlet (return oil temperature) Allowable maximum oil temperature 239o F (115o C) (c) When in rated power setting with the temperature of engine inlet oil temperature 176+9o F (80+5o C), the oil quantity is not more than 33gal (125L/min). (d) When in rated power setting with the temperature of engine inlet oil temperature 176+9o F(80+5o C), the oil radiation quantity is not more than 3.545× 10³ KJ/min (850Kcal 850 thousand calorie/s) (e) The oil consumption is not more than 0.21 gal (0.8L/h).
  • 324.
    JZ-Y8F200W-02 AIRCRAFT FLIGHT MANUAL SECTIONVI AIRCRAFT SYSTEM EQUIPMENT 6-36 June 30, 2012 Operation of oil system Requirement of oil quantity when the engine operates (a) Minimum remaining oil 7.66±0.26gal( 29±1L) (b) optimum oil quantity 12.4~15.1gal(47~57L) (c) Maximum remaining oil 15+0.5 -0.25gal(58+2 -1 L) Note 1) When the warning red light of minimum oil quantity illuminates 7.66±0.26gal (29±1L), pay close attention to the oil pressure. When the pressure is lower than 56.6psi (0.392MPa) with oil quantity less than 7.4gal (28L), feather it at once. 2) The oil pressure can be lower than 56.6psi (0.392Mpa) in short time (6~8s) when the aircraft is in turbulence flight or the load factor approaches zero. Requirements of refilling the oil tank in daily maintenance Caution Oil with different composition cannot be mixed. (a) Check the laboratory sheet of fuel truck before refilling oil and the oil meets the specification and the cleanness of refueling pipe and doper. (b) Remove standing water and dirt before opening the filling cover when refilling oil; place well the cover and apply lock wire after refilling. (c) Before starting the engine, check the oil quantity in oil tank. If the oil quantity is less than 11.4gal (43L), refill more oil to 11.4~12.2gal (43~46L) (engine in shutdown state). After starting engine, the oil in engine is allowed to be less than 4.5gal (17L) (3.2gal (12L) in engine, 1.3gal (5L) in propeller).
  • 325.
    JZ-Y8F200W-02 AIRCRAFT FLIGHT MANUAL SECTIONVI AIRCRAFT SYSTEM EQUIPMENT 6-37 June 30, 2012 Troubleshooting when there are normal problems in oil system (a) Oil temperature is too high when in flight Check the shutter of oil radiator is at CLOSE position. If it is at CLOSE position, change it to Manual operating, and open the shuttle widest to keep the oil temperature at 158~176o F (70~80o C). Reduce the power of damaged engine and increase the flying speed if the shuttle fails to be operated. If the above methods are inefficiency, feather it with the temperature exceeding specified value (194o F (90o C) in less than15min) (b) Oil pressure gauge oscillation Check for the normal oil temperature. Adjustment should be made if the inlet oil temperature is too high or too low. Check whether the oil quantity reduces, and inspect the leakage of external part of engine visually. Feather it if there is oil leakage, before the leakage quantity reaching 7.4gal (28L). If there is no trouble in engine oil temperature, oil quantity, and other parameters, the problems may be in air lock or circuit. The aircraft can continue to fly. But special observation should be made. (c) Pay special attention to oil pressure when the red warning light of minimum remaining oil 7.66±0.26gal (29±1L) illuminates. Feather it immediately when the pressure is lower than 56.6psi (0.392MPa) and the oil quantity is less than 7.4gal (28L). Note The oil pressure can be lower than 56.6psi (0.392MPa) in short time (6~8s) when the aircraft is in turbulence flight or the load factor approaches zero. (d) In high altitude, there is white smoke in cabin, which is caused by oil entering into pressurization system because of poor sealing mechanism of engine case. The following steps must be taken: Flying with oxygen-mask; Turn off pressure control/shutoff valve by turn in normal interval to judge the engine with trouble; (e) After judgment, supply pressurizing air source with other three engines. Continue to fly without oxygen-mask, and pay attention to oil quantity of engine in trouble.
  • 326.
    JZ-Y8F200W-02 AIRCRAFT FLIGHT MANUAL SECTIONVI AIRCRAFT SYSTEM EQUIPMENT 6-38 June 30, 2012 HYDRAULIC SYSTEM General The aircraft hydraulic system consists of left, right independent hydraulic system and hand-electric pump. The left and right systems each have hydraulic reservoir, pump and control distribution accessory and power mechanism. The left and right systems can control the power mechanism individually. After operation, the hydraulic fluid flows into its own reservoir respectively. While, the two systems can also be used as standby emergency to control each other, which are connected with each other through a communication valve. When control handle is at neutral position, the accessory will not bear load. When the pressure of right hydraulic pump is pressurized to 2132.06psi ±106.60psi (14.7MPa±0.735MPa), the oil supply in hydraulic pump is reduced after pressure regulation by pressure-regulating valve in hydraulic pump. And the system is at unloading state. However, when the pressure of left hydraulic pump is pressurized to 2203.12psi±71.07psi (15.19MPa±0.49MPa), hydraulic fluid from oil pump returns oil through pressure unloading valve to make the system be at unloading state. The left and right system tanks use a common pressurizing system. Compressed air comes from engine compressor after reducing pressure to pressurize the tank to ensure normal hydraulic fluid supply to pumps under various flight. Hand-electric pump system can be used to control all parts to operate on the ground, and used as alternate system in emergency in the air as well. And this system can control all accessories except for autopilot control actuator. The functions of the left system are as follows: control of normal brake of wheels, engine emergency feathering and shutdown, opening/closing of nose emergency cabin doors, retraction/extension of flaps, emergency retracting landing gears, opening /closing of landing gear doors and emergency opening/closing of cargo doors. The functions of the right system are as follows: retraction/extension of landing gears, opening/closing of landing gear doors, opening/closing of cargo door, retraction/ extension of flaps, wheel emergency brake and automatic brake when retracting landing gear, control of windshield wiper, supplying of pressure to control actuator of autopilot, control of nose wheel steering and emergency opening/closing of nose emergency cabin doors. The functions of the hand-electric pump are as follows: opening/closing landing gear doors, extending nose and main landing gears, extending flaps, opening/closing cargo doors, filling left and right system tanks, pressurizing pressure accumulator of right system, and pressurizing brake accumulator and left system accumulator, and balance oil quantity.
  • 327.
    JZ-Y8F200W-02 AIRCRAFT FLIGHT MANUAL SECTIONVI AIRCRAFT SYSTEM EQUIPMENT 6-39 June 30, 2012 When turn on communication valve if necessary, right system can supply oil to left system to operate all pressure consumed accessories, while, left system can only supply oil to right system to operate the following performance: nosewheel steering, control of windshield wiper, emergency brake and emergency opening/closing of nose emergency cabin doors. Operation data of hydraulic system Hydraulic fluid mark (see Table 6-6) Table 6-6 China Soviet England America France Canada (GJB 1177-1991) 15# aviation fluid (GJB 1177-1991) АМГ-10 DTD-585 MIL-H-5606A F-H5-1 3GP-26A Volume Total capacity of hydraulic system 28.60gal(130L) Tank capacity (8.360 -0.44)gal(380 -2L) Tank refilling quantity There is pressure in accumulator and the wheels are in braking state (4.40~4.84gal) (20~22L) Minimum refilling quantity 3.30gal (15L) Hydraulic system operating pressure Right system 2132.06±106.60psi (14.7±0.735MPa) Left system 2203.12±71.07psi (15.19±0.49MPa) With the safety valve of right system open 2359.48±56.85psi (16.268±0.392MPa) With safety valve in relief valve of left system open 2416.33+142.14 0 psi (16.66+0.98 0 ) MPa Pressurizing pressure of hydraulic reservoir Normal 14.21±1.42psi (0.098±0.0098MPa) Maximum 25.58psi (0.1764MPa) Time for extending landing gear by right system Retracting landing gear not more than 17s Extending landing gear not more than 14s
  • 328.
    JZ-Y8F200W-02 AIRCRAFT FLIGHT MANUAL SECTIONVI AIRCRAFT SYSTEM EQUIPMENT 6-40 June 30, 2012 Normal retraction/extension of landing gear Normally, the retraction/extension of landing gear is pressurized by right system through connecting L/G operating handle in the following order: opening landing gear door, retraction/extension of landing gear, and closing landing gear door. Normal retraction of landing gear (a) Place the L/G operating handle on central instrument panel at the retraction of landing gear position, at that time: (1) LG red signal light retraction circuit turns on on right instrument panel illuminates; (2) Green light signal at landing gear door close turns out, and red light at door opening on central instrument panel turns on; (3) Green signal light at extension position of LG turns out, and the LG is retracted in 14s~17s. After being locked, red light at extension turns on; (4) Door opening red light turns out, and door closing green signal light turns on. (b) After retracting/extending the LG and door exactly, place the switch at neutral position and apply lock wire. Note If retracting LG at parking state mistakenly, LG not retracted green signal light on right instrument panel turns on, which indicates that LG cannot be retracted. Normal extension of landing gear (a) Place the L/G operating handle at the extension position, at that time: (1) Door closing green signal light turns off and door opening red light turns on; (2) Red signal light at LG extension position turns out, and the LG is extended in 12s~14s. After being locked, green signal light at LG extension position turns on; (3) Door opening red light turns out, and door closing green signal light turns on. (b) After retracting/extending the LG and door exactly, place the switch at neutral position and apply lock wire.
  • 329.
    JZ-Y8F200W-02 AIRCRAFT FLIGHT MANUAL SECTIONVI AIRCRAFT SYSTEM EQUIPMENT 6-41 June 30, 2012 Note 1) If the position of LG operating handle in central instrument panel and right console is not the same, refer to the switch position on central instrument panel. 2) When retracting/extending LG, after the retracting/ extending the LG and closing door well, place the switch at neutral position 3s~5s after the system pressure reaching 2132.06psi (14.7MPa) and apply lock wire. 3) When the LG is not extended well (warning device is mounted at the LG signal section), the warning horn brays with LG not extended well signal lights turning on as long as one engine throttle is less than 31o ~34o . If that is not at landing time, press the release warning button on central instrument panel to cut off the signal circuit, and the horn stops braying with the signal light turning out. 4) When the normal control handle on central instrument panel fails, the stand-by switch on right console can be used to retract/extend the LG. Troubleshooting when LG cannot be extended Check the circuit whether it fails (a) Check the warning device for good condition and whether the safety switch is turned on. (b) Operate the LG cock for several times to avoid the poor contact of the cock. (c) Place the LG operating handle on central instrument panel at the neutral position, and operate it with retraction/extension switch on right console. (d) If the LG operating handle is at extension position with no change in pressure gauge of right hydraulic system and signal at the LG extension position, YS-7A hydraulic selector may be at on state all time. At that moment, if open the switch cut off cabin door auto-closing on right console, the LG extends automatically, which shows that the circuit is in trouble. Therefore: Open the cut off cabin door auto-closing switch (the circuit is cut off really), at that time, the cabin door opens and the LG extends; After the LG is locked in extension, close the cut off cabin door auto-closing switch (the circuit is connected really). At that time, cabin door closes; After extending the cabin door well, place the LG switch at neutral position and apply lock wire.
  • 330.
    JZ-Y8F200W-02 AIRCRAFT FLIGHT MANUAL SECTIONVI AIRCRAFT SYSTEM EQUIPMENT 6-42 June 30, 2012 Note When the LG is extended, the above method can be used if there is trouble in YS-7A, and the retraction/ extension switch must be at extension position. Emergency landing gear extension by left system with power When the right system fails, the left system can be used by copilot to extend the LG in emergency. (a) Open the protective lid of emergency extension LG control switch on right console, and open the lock pin from left (lock pin links a LG door). At that time, the door closing signal light turns off. After 8s~10s, the door opens with red light turns on. (b) Push the control handle to the front position. At this moment, the red light of LG extension turn off. 23s~25 s later, the LG is extended well with the green light turning on. (c) After the LG is extended well, place the control handle at the neutral position, and push right the lock pin to its original position. (d) Pull backward the control handle. After 8s~10s, the door is closed with green signal light turning on. And then place the control handle at the neutral position. (e) After check of the LG well extended and the door closed, cover the protective lid, and the aircraft can land normally. Note If the signal operates normally in LG and cabin door system, the handle is not necessary to be pushed forward to pressurize the system on the ground. If there is trouble in signal operation, the handle should be pushed forward to pressurize the system on the ground. Therefore: 1) Cut off the circuit breaker emergency opening cabin door, and open the lock pin from left side; 2) Push the handle forward until the flight is over.
  • 331.
    JZ-Y8F200W-02 AIRCRAFT FLIGHT MANUAL SECTIONVI AIRCRAFT SYSTEM EQUIPMENT 6-43 June 30, 2012 Emergency landing gear extension right system without power If the power supply system fails in flight with the right system operating normally, the LG needed to be extended with emergency landing gear extension by right system. (a) Lift the seat between frame 22~23 on right side of fuselage, open the button protective cover of solenoid valve YDF-12A and YDF-11 (left side) on sidewall. (b) Press the left button (extension LG) of solenoid valve YDF-12A to the bottom for 1min. At that time, LG door is opened and the LG is extended. Lock the LG and then release the button. (c) After check of the LG is locked through check access (the signal light not illuminates without power on board), press the button of solenoid valve YDF-12A with one hand, and press the YDF-11 button with the other hand till the cabin door is closed (not less than 30s); after that, release the YDF-12A button, and then the YDF-11 button. Note If the performance is in reverse, the door can be opened again. (d) After the LG is extended and door is closed well, the aircraft can land normally. Note Place the LG switch at the extension position before operation to prevent the circuit from being connected automatically again in manual operation. Emergency landing gear extension by hand- electrical pump When there is trouble in left and right systems, the hand- electrical pump system can be used to close/open the cabin door and extend LG. In emergency landing gear extension by hand- electrical pump, the oil from right oil tank can be used to extend the LG and the oil from left system can be used to close the door generally. (a) Place the three-position distribution cock at from left hydraulic tank position, and set the seven-position distribution cock at opening the door position. (b) Pressurize by hand pump or electrical pump until the door is opened fully with signal lights turning on. (c) Place the three-position distribution cock at from right hydraulic tank position, and set the seven-position distribution cock at extension main wheel position and pressurize with hand pump or electrical pump. When the pressure reaches 639.62psi± 710.69psi (4.41MPa~4.9MPa), the main LG is unlocked. While, the pressure reduces to 71.07psi±142.14psi (0.49 MPa~0.98MPa), the main LG extends and is locked. After that, signal lights turns on.
  • 332.
    JZ-Y8F200W-02 AIRCRAFT FLIGHT MANUAL SECTIONVI AIRCRAFT SYSTEM EQUIPMENT 6-44 June 30, 2012 (d) Place the seven-position distribution cock at nosewheel extension position, and pressurize with hand pump or electrical pump. When the pressure reaches 639.62psi±710.69psi (4.41MPa~4.9MPa), the nose LG is unlocked. While, the pressure reduces to 71.07psi±142.14psi (0.49MPa~0.98 MPa), the nose LG extends and is locked. After that, signal lights turns on. (e) Place the three-position distribution cock at from left hydraulic tank position, and set the seven-position distribution cock at opening the door position. Pressurize with hand pump or electrical pump. After closing the door, the green signal lights turns on. (f) Judge the LG extension and door closing, and place the three-position distribution cock and seven-position distribution cock at the neutral position. Note In emergency landing gear extension by hand- electrical pump, another seven- position distribution cock should be at neutral position. LG extension by cable on board When the above methods are useless, LG can be extended with cable without closing the door. And the door may be damaged when landing. (a) Lift the main LG up lock manually [with force about 110.16lb~220.31lb (490N ~980N)]. (b) Lift the LG cable by manual winch on upright pillar of frame 30 [the force on manual winch handle not more than110.16lb (490N)], and then extend the main LG and lock it. (c) Open the access door on frame 12 floor and lift the nose LG up lock with the force of 110.16lb~220.31lb (490N~ 980N). And then extend and lock the nose LG. Note 1) It is forbidden to extend the nose LG if the main LG is not extended well. 2) Check that the nose and main LG are extended well and are locked. After that, the aircraft can land.
  • 333.
    JZ-Y8F200W-02 AIRCRAFT FLIGHT MANUAL SECTIONVI AIRCRAFT SYSTEM EQUIPMENT 6-45 June 30, 2012 If there is trouble in nose LG extension because of nosewheel rotating, the nose wheel turning handle can be used to make the nose wheel return to neutral position to extend the nose LG. (a) When the nose LG cannot be extended in the air, make a visual observation to check that whether the nose LG cannot be extended because of nose wheel turning or not: first judge the nose turning direction and try to operate control handle of nose wheel turning in reverse direction to its turning direction to keep the nose wheel be at the neutral position. And then the nose wheel can be extended. Moreover, nose LG can be extended in the normal procedure. (b) If the nose LG cannot be extended for nose wheel turning, stop extending the nose LG immediately and then make a check after landing. Flap operation (a) Flap retraction/extension is operated by left and right hydraulic system at the same time. When one of the systems fails, the other one can ensure the normal flap retraction/extension. While, there is problem in the two systems, hand- electrical pump can be used to retract/extend the flap. When the pressure accumulator of right system is pressurized to 2132.06psi (14.7MPa), the flap can be extended at 25o . One flap control switch is mounted on central instrument panel and right console respectively. When the normal retraction/extension switch on central instrument panel fails, the standby control switch on right console can be used to retract/extend. Hydraulic system can ensure that the flap can be set at any middle position in flap retraction/extension. And the flap can be locked by hydraulic pressure and mechanism. The flap retraction/ extension angle can be indicated by indicator at flap position on central instrument panel. The time for retraction/extension to 35o ±1o is 15s~ 20s in system normal operation; signal system can operate to retract/extend the flap; the flap can be extended 45o with hand-electrical pump. (b) When the LG is at extension position without the flap extension angle at 25o ±1o , and the throttles of four engines are more than 55o ~60o , the warning horn brays with flap not extended well red signal light turning on to inform the pilot of check the flap angle in take off. If it is at normal condition, press the release warning button. And the horn stops braying with the signal light turning out; when the throttle is less than the angle above, the signal light turns off. Note When the LG is at extension position, this warning circuit do not operate.
  • 334.
    JZ-Y8F200W-02 AIRCRAFT FLIGHT MANUAL SECTIONVI AIRCRAFT SYSTEM EQUIPMENT 6-46 June 30, 2012 (c) Procedure of flap extension by hand - electrical pump system (1) Place the three-position distribution valve at from left hydraulic reservoir position; (2) Place the upper seven-position distribution valve at flap extension position; (3) Shake the hand pump or operate the electrical pump till the flap is extended to the needed position; (4) Place the three-position and seven position distribution valve at the neutral position. (d) When there is trouble in flap position indicator with system operating normally (judge the shake of pressure gauge), the timing method can be used to determine the flap angle. The data is shown in Figure 6-7. Table 6-7 Retraction (extension) flap angle 0o ~15o 0o ~25o 15o ~35o 35o ~25o Time (s) 7 12 10 5 Nosewheel steering control This system is used when pilot operates the aircraft to steer on the ground. There are two nosewheel steering state: taxiing control state and takeoff and landing control state. In taxiing state, operate the handle mechanism by hand to make the nosewheel steer, and the nosewheel rotates(35o0 o -2 o) to left and right according to the neutral position; and in takeoff and landing state, use control surface to make the nosewheel steer. At this time, the nosewheel may rotate 8o ~2o to left and right according to neutral position. (a) The control handle in front right of pilot must be pulled out when operating the nosewheel with hand. At that time, yellow signal light on nosewheel steering control box beside the handle turns on, which indicates that the handle operation is connected, and the control handle can be rotated to operate the nosewheel steering with hand (when rotating the handle in reverse direction, nosewheel steers in the opposite direction). When operating with rudder, push the nosewheel control handle to the bottom, and the yellow light on nosewheel steering control box turns off. After that, connect the control switch of control surface on control box, and the ready and on green signal light turns on, which indicates that the rudder control is connected. Then, step on the footrest of rudder to make the nosewheel steer (when stepping on the footrest of rudder in the reverse direction, the nosewheel steers in the reverse direction).
  • 335.
    JZ-Y8F200W-02 AIRCRAFT FLIGHT MANUAL SECTIONVI AIRCRAFT SYSTEM EQUIPMENT 6-47 June 30, 2012 (b) When there is no pressure in right hydraulic system, first open the communication valve of hydraulic system before operating nosewheel and then pressurize with left hydraulic system. Therefore: (1) After extending the LG and flap, pump the oil by hand pump in right hydraulic reservoir or electrical pump to left hydraulic reservoir (1.10gal~1.32gal) (5 L~6L) before landing, and then open the communication valve. (2) Pay attention to the oil quantity in right hydraulic reservoir in taxiing, which should be not more than 6.16gal (28L). If the oil exceeds that value, pump the oil with hand or electrical pump to left hydraulic reservoir. The oil quantity in left hydraulic reservoir should not be less than 2.64gal (12L). If the oil is less than that value, close the communication valve and stop operating nosewheel steering. Note 1) When connecting the rudder control, push the nosewheel control handle to the bottom; otherwise, the rudder control cannot be connected. 2) When operating with hand, pull out the control handle and the rudder control cut off automatically. 3) After the aircraft is away from the land, if the on signal light of rudder control still illuminates, close the rudder control switch before retracting the LG, and then the LG can be retracted at last. After that, connect the rudder control switch, if the on signal light illuminates, the rudder control switch should be closed, and it can be reconnected at the moment the aircraft is away from the ground.
  • 336.
    JZ-Y8F200W-02 AIRCRAFT FLIGHT MANUAL SECTIONVI AIRCRAFT SYSTEM EQUIPMENT 6-48 June 30, 2012 Braking device control In order to ensure the aircraft do not move with interference force in main LG wheel braking and parking and to prevent the other mechanisms from being damaged by wheel inertial rotation in LG retraction, four braking systems: normal braking system, emergency braking system, parking braking system and auto braking in LG retraction by right system, are installed on the aircraft. In order to improve the braking efficiency in normal braking system and avoid the tire over wearing and tire skidding, anti-skid braking device of auto release braking is used in normal braking system. (a) The braking device is pressurized by left hydraulic system in normal operation. When braking, two foot step on the footrest to brake. Check the normal braking system operation by braking pressure gauge and aoto release braking signal light. The two yellow indication light should illuminate [the braking extent is reflected by the value in braking pressure gauge. The value is 142.14psi~1421.37psi (0.98MPa~ 9.8MPa)]. (b) In order to shorten the aircraft landing and taxiing distance, brake the aircraft thoroughly till the aircraft stops running (auto release braking switch is mounted on the left upper angle of central instrument panel; connect the switch before the aircraft touches the ground). (c) When there is trouble in left hydraulic system, the emergency braking, which is pressurized by right system, can be operated. In emergency braking system, pull out the pair of emergency braking handles on pilot instrument panel (left handle controls left LG wheel braking, and right handle controls the right LG wheel braking). The braking extent depends on the extent that the emergency braking handle pulling. When the emergency braking handle is pulled to the end, the braking pressure is (1421.370 -142.14)psi [(9.80 -0.98)MPa]. The operation condition of emergency braking system can be judged by the sense of pilot and can be informed by the indication of braking pressure gauge on central instrument panel. When releasing the braking, loosen the pair of emergency braking handle. In emergency braking, auto release braking do not operate. (d) When operating the parking braking, step on the pilot footset to the bottom, and then lift the parking braking handle and at last loosen the footset. When releasing, step on the pilot footset with force, and the parking braking handle bound automatically. Then, loosen the footset. (e) When there is no pressure in pressure accumulator of left hydraulic system, pump the oil of (1.10gal~1.32gal) (5 L~6L) from the left hydraulic reservoir with hand pump or electrical pump to right hydraulic reservoir after LG and flap extension, and then open the hydraulic communication valve. Normal braking can be operated in landing.
  • 337.
    JZ-Y8F200W-02 AIRCRAFT FLIGHT MANUAL SECTIONVI AIRCRAFT SYSTEM EQUIPMENT 6-49 June 30, 2012 Before aircraft landing, check the oil quantity in left reservoir not more than 6.16gal (28L). If there is more oil, pump the excess oil from left reservoir to right reservoir with hand or electrical pump; if the oil is less than 2.64gal (12L), close the communication valve to reduce the speed by emergency braking. (f) Precautions (1) It is forbidden to land with braking; (2) In auto release braking trouble (signal light keeps on), loose the braking at once, close the aoto release braking switch and then adopt the method of mean point braking. (3) It is forbidden to use the normal braking and emergency braking at the same time. Otherwise, the braking may not operate. (4) In take-off training, cool the wheel with water and compressed air to avoid the wheel braking overheat. (5) When pilot and copilot operate the braking in serial connection, the braking pressure depends on the travel of footset respectively. If the travel of copilot is larger than that of pilot, the braking pressure depends on the control of copilot. On the contrary, when the travel of copilot is smaller than that of pilot, the braking pressure depends on the control of pilot. Control of bottom emergency door of forward cabin The aircrew shall carry out bailout from bottom emergency door in emergency and the aircrew/groundcrew is in and out from bottom emergency door under engine shutdown failure on the ground. The bottom emergency door control includes normal control and emergency control. In normal control, control the handle on left console with pressure supplied by left hydraulic system. In emergency control, control the handle on copilot console with pressure supplied by right hydraulic system. When the left hydraulic system fails, the bottom emergency door of cockpit may be opened by emergency control using right hydraulic system. When the door is closed incompletely, DOOR OPEN red indicating light on left instrument panel should be on. (a) Open bottom emergency door of forward cabin with left/right hydraulic system (1) Release the sealing of cockpit. (2) Press head part of control handle and pull it forward to ON position, then the signal light of door is lit, the floor door in forward cabin is opened and locked firstly and the door of cockpit is opened successively. (3) If it is necessary to keep the forward cabin door open in flight, the control handle shall be always at "ON" position.
  • 338.
    JZ-Y8F200W-02 AIRCRAFT FLIGHT MANUAL SECTIONVI AIRCRAFT SYSTEM EQUIPMENT 6-50 June 30, 2012 (b) Close bottom emergency door of forward cabin with left/right hydraulic system (1) Press head part of control handle and pull it backward to OFF position. 3~4 s later, the door is closed and the signal light of door extinguishes. (2) Press head part of control handle and pull it to neutral position. (3) Close the floor door in forward cabin manually. (c) Where there is no pressure from left or right hydraulic system, the door may be closed by hand-electric pump system. Put the handle of pilot or copilot console to the door closing position, three-position distribution switch to the position of the pressure from left or from right hydraulic reservior, seven-position distribution switch to relevant left or right hydraulic system position before wobbling hand pump or starting electric pump for pressurization. Cautions 1) Make sure personnel are away from the door when the door is opened or closed on the ground. 2) The opening/closing of the door must be done separately to avoid the hurt of personnel and overlarge pressure on components. 3) If adopting hand pump to open the door in flight, only keep wobbling hand pump incessantly to ensure the door is completely opened. Cargo door control Operation principle drawing of hydraulic system of cargo door is shown in Figure 6-12. In normal operation, the cargo cabin door is pressurized by right system, while in emergency operation, it is pressurized by left system. When left and right systems fail, the cargo cabin door can be operated by hand –electrical pump. Control switch on cargo cabin door is mounted on the navigator airdrop airborne console. Besides, electrical control switch is mounted on the floor console of cargo door between frame 42~43 on the left of fuselage. There are three position to start loading ramp of cargo door: airdrop, airborne, and ground. When perform the airdrop (airborne) missions, install the airdrop (airborne) pull rod on the pull rod seat of triangular longeron between frame 48~49, and connect the pull rod with loading ramp. When in airdrop condition, put the loading ramp under the horizontal Line with the included angle of 4°20′ between the loading ramp line and the horizontal line; while in airborne condition, the loading ramp aligns with the horizontal line. The installation hole of airdrop (airborne) pull rod depends on condition. The switch position of cargo door is indicated by the signal lights on navigator airdrop airborne console, pilot console and jettison console. And the circuit breaker is mounted on navigator console.
  • 339.
    JZ-Y8F200W-02 AIRCRAFT FLIGHT MANUAL SECTIONVI AIRCRAFT SYSTEM EQUIPMENT 6-51 June 30, 2012 PressureoillineofleftsystemPressureoillineofhand-electricalpump Pressureoillineofrightsystem Tankforleftsystem Tankforrightsystem unlock lock unlock lock unlock lock OffOffOnOn OffOnOffOn 21 20 4 3219 4 19 4 1 4 16 1616 16 16 16 19 4 7 1314 12 19 4 6 44 8 9 9 23 22 15 5 1 4 18 17 1110 1. Electromagnet valve 13. Flow throttle valve 2. Manual valve 14. Delay valve 3. Seven -position distribution valve 15. Up lock 4. Check valve 16. Changeover valve 5. Hydraulic lock 17. Safety valve 6. Hydraulic lock 18. Check flow throttle valve 7. Distribution valve 19. Electromagnet valve 8. Relief Valve 20. Flow throttle valve 9. Flow regulation valve 21. Pressure gauge 10. Actuator 22. Electromagnet valve 11. Actuator 23. Flow throttle valve 12. Actuator Figure 6-12 Operation principle drawing of hydraulic system of cargo door
  • 340.
    JZ-Y8F200W-02 AIRCRAFT FLIGHT MANUAL SECTIONVI AIRCRAFT SYSTEM EQUIPMENT 6-52 June 30, 2012 Note After closing the cargo door in flight each time, the loading ramp locked green indicating light should illuminate and loading ramp unlocked red indicating light should turn off. Furthermore, visually check the mechanical indicator pin of loading ramp lock mechanism, which should stretch out, and check the down locks of rear cargo door should be locked. Open the door with right hydraulic system in the air (a) Remove the lock wire of control switch of cargo door; (b) Place the control switch at the opening cargo door position. At that time, loading ramp locked green light turns off, loading ramp unlocked red light turns on, and the cargo door moving red light illuminates. When the loading ramp is at airdrop and airborne position, loading ramp door opening green light turns on. After opening the rear cargo door, rear door opening light turns on and cargo door moving red light turns off. Moreover, the time for opening the cargo door is not more than 30s. (c) After the signal light turning on, place the switch on the neutral position and apply lock wire. Close the door with right hydraulic system in the air (a) Place the control switch at the closing cargo door position. At that time, cargo door opening green light turns off and the cargo door moving red light turns on. After the loading ramp is closed and locked well, loading ramp locked green light turns on and loading ramp unlocked red light turns off. When closing the cargo door, rear cargo door opening green light turns off. After the door is closed fully, cargo door moving red light turns off. And the time for closing the cargo door should not be more than 30s. (b) 3s~5s after the signal light turning on, place the switch on the neutral position and apply lock wire. Open the door with right hydraulic system on the ground Place the electrical control switch of cargo door, which is on cargo door ground console between frame 42~43 on left side of fuselage, at the opening cargo door position. At that time, the cargo cabin locked green light turns off, loading ramp unlocked red light turns on, and cargo door moving red light on ground console illuminates. After opening the rear cargo door, the loading ramp is on the ground. Perform a visual check, the red light should not be turned off. And the time for opening the cargo door should not be more than 40s.
  • 341.
    JZ-Y8F200W-02 AIRCRAFT FLIGHT MANUAL SECTIONVI AIRCRAFT SYSTEM EQUIPMENT 6-53 June 30, 2012 Close the door with right hydraulic system on the ground (a) Place the electrical control switch of cargo door, which is on cargo door ground console between frame 42~43 on left side of fuselage, at the closing cargo door position. At that time, the cargo cabin moving red light on ground console turns on all the time. After closing the loading ramp and locking it, loading ramp locked green light turns on and loading ramp unlocked red light turns off with the mechanical indicator pin of loading ramp lock mechanism stretching out. After closing the cargo door, the cargo door moving red light turns off. And the time for closing the cargo door should not be more than 40s when the loading ramp is on the ground. (b) 3s~5s after opening/closing the door, release the switch and apply lock wire. Open/close the cargo door with left hydraulic system in the air (a) Remove the lock wire of control switch of cargo door; (b) Place the emergency control switch at the opening the cargo door position, and set loading ramp at airdrop and airborne position. After opening the rear cargo door, emergency airdrop red light turns on. And the time for opening the cargo door should be not more than 30s. (c) Place the emergency control switch at the closing cargo door position. At that moment, emergency airdrop red light turns off. And the time for closing the cargo door should be not more than 30s. (d) 3s~5s after opening/closing the door, release the switch and apply lock wire. Note There is one emergency jettison linkage switch each on navigator and pilot. After opening that switch, the cargo door is opened firstly by left system. Then perform airdrop. At that time, the circuit of other emergency cabin door is cut off automatically. Control cargo door with hand- electrical pump on the ground When there is no pressure in left and right hydraulic system, the cargo door is controlled by hand- electrical pump system on the ground. If the auto safety switch of cargo door is connected, judge the opening/closing state of cargo door by signal light or by visual check. Ground console of cargo door is mounted between frame 42~43 on the left side of fuselage. Before opening/closing the cargo door, place the three–position distribution valve, which is at frame 7 of fuselage on hand -electrical pump accessory panel, at from left hydraulic reservoir position. And set the seven–position distribution valve at left system pressurizing position. Shake the hand pump or operate the electrical pump.
  • 342.
    JZ-Y8F200W-02 AIRCRAFT FLIGHT MANUAL SECTIONVI AIRCRAFT SYSTEM EQUIPMENT 6-54 June 30, 2012 (a) Operation with manual valve of ground console should be in order without reverse. (b) The order of opening the cargo door: Open the rear door→lift (close) loading ramp→unlock the loading ramp lock→unlock the loading ramp. (c) The order of closing the cargo door: Unlock the loading ramp lock→close the loading ramp→lock the loading ramp lock→close the rear door. (d) After opening/closing the cargo door, stop shaking the hand pump or closing electrical pump and place the switch at the neutral position. The balance of hydraulic oil quantity If there is no balance of oil quantity between left and right hydraulic reservoir, balance the oil quantity if there is no oil leakage. (a) Place the three–position distribution valve at the position of tank with more oil; (b) Place the seven–position distribution valve at the refilling oil position of tank with less oil, and shake the hand pump of operate the electrical pump; (c) When the oil quantity in two tanks balance, stop shaking the hand pump or closing the electrical pump and then place the switch at neutral position. Windshield wiper control Windshield wiper control is pressurized by right system. Remove the water, ice and snow, frost and moisture of pilot windshield glass by hydraulic pressure operating the windshield wiper to swing to left and right. Thus, the pilot can have a good visual. Data (a) Swing times 0~3.67Hz (0~220 times/min) (b) Operating oil pressure 1696.94+142.14 0 psi (11.7+0.49 0 MPa) (c) When the windshield wiper operates, the allowable flight speed not more than 161.99~172.79k.n (300~320km/h) (d) Swing angle 46o ±4o (e) Compression force of windshield wiper Measurement at middle position 11.02~13.22lb (49~58.8N) Measurement in two limit position not less than7.04lb (31.3N)
  • 343.
    JZ-Y8F200W-02 AIRCRAFT FLIGHT MANUAL SECTIONVI AIRCRAFT SYSTEM EQUIPMENT 6-55 June 30, 2012 Operation principle Windshield wiper is used when the rain and snow affect the visual of pilot in taxiing, takeoff and landing. Throttling switch of controlling windshield wiper, which is mounted on each left and right console, is to open/close the windshield wiper respectively and can adjust the speed of windshield wiper swing. The windshield wiper in taxiing should not be opened too large, basing on that the pilot can see the things clearly. However, windshield wiper should be opened to its maximum position in takeoff and landing. It is forbidden to operate the windshield wiper when there is no rain, snow and fluid. Operation of electrical pump and precautions Operation of electrical pump Electrical pump can replace the hand pump. And the two pumps can operate at the same time. The opening/closing of electrical pump method is as follows: (a) Connect the hydraulic pump switch on communicator circuit breaker board. (b) Place the three-position and seven- position distribution valve at the needed position. Press upward the electrical pump switch, it operates with white indicating light turning on. Observe the pressure gauge. When the system pressure reaches (426.41+142.14 -71.07 ) psi [(2.94 +0.98 -0.49 MPa)], release the electrical pump switch. When the pressure rises to (1696.94+142.14 -28.43 ) psi [(11.7+0.49 -0.196 MPa)], the electrical pump stops operation automatically with indicating light turning off. When the pressure reduces to (1696.94+142.14 -28.43 ) psi [(11.76+0.49 -0.196) MPa], electrical pump connects by itself with indicating light turning on. When the pressure decreases below (426.41+142.14 -71.07 ) psi [(2.94+0.98 -0.49 ) MPa], electrical pump stops operation by itself with indicating light turning off. (c) After operation, cut off the above switch. And place the seven-position and three-position distribution valve at neutral and refilling oil to tank position respectively. Precautions (a) Regulate the time for connecting the electrical pump strictly. When the pressure is 27V with pressurizing pressure of 1696.94 psi (11.7MPa), the allowable time is 4min30s.Then reconnect the pump when the electrical pump engine cools off below 140o F (60o C). (b) Pay attention to the oil change in two tanks when operating the electrical pump.
  • 344.
    JZ-Y8F200W-02 AIRCRAFT FLIGHT MANUAL SECTIONVI AIRCRAFT SYSTEM EQUIPMENT 6-56 June 30, 2012 Engine emergency feathering shutdown control Emergency feathering shutdown system is to operate the hydraulic pressure to perform emergency feathering shutdown by engine when there is trouble in engine auto feathering system and electrical control system. Emergency feathering shutdown system is controlled by four emergency feathering switch, which is mounted on the fight front of pilot. Each switch controls one engine. After pulling down the emergency feathering control switch, the hydraulic fluid is forced to flow to emergency shutdown valve of fuel regulator and to feathering isolating valve of speed governor to shutdown the engine and feather. (a) When the emergency feathering shutdown is needed to be operated, rotate the emergency feathering switch handle for 30o counter clockwise, which is needed to be opened. Pull it out downward. And then rotate it in counter clockwise and lock it. At that time, the propeller is feathering and the engine is shutdown. (b) Close the emergency feathering switch in counter feathering, that is, rotate the switch handle clockwise for 30o , and then push the handle to the bottom, and at last rotate it clockwise until it is locked. FIRE-EXTINGUISH AND NEUTRAL GAS SYSTEM General Fire extinguishing system includes aircraft fire extinguishing and fire extinguishing in the engine inner cavity. The system is used to put out fire in the easiest fire-catching places, such as in the engine nacelle, fuel tank cabins of wings, drop tank cabins of rear airframe, turbine starter/generator cabin, and the engine inner cavity. In addition, there are portable fire extinguishing bottles with extinguishing agent of CO2 in the cabin to extinguish fire. Also external fire can be put out in parking apron. Aircraft fire extinguishing system includes 5 MHP-8F fire extinguishing bottles with extinguishing liquid of 1211 (CF2CIBr). The five fire extinguishing bottles are divided into three groups to put out fire in each area in the aircraft. Each fire extinguishing area is equipped with pipes and jet pipes which transfer fire extinguishing agents to ensure enough fire extinguishing liquid sprays fire area to put it out. If necessary, two ZQP-8 neutral gas bottles in neutral gas system help put out fire. There are eight spherical fire extinguishing bottles (2 for each engine) with the agent of 1211 liquid in the engine fire extinguishing equipment. Aircraft fire extinguishing system and fire extinguishing system in the engine have their own independent fire warning signal system.
  • 345.
    JZ-Y8F200W-02 AIRCRAFT FLIGHT MANUAL SECTIONVI AIRCRAFT SYSTEM EQUIPMENT 6-57 June 30, 2012 Neutral gas system is used to fill neutral gas - gseity CO2 to the space on the surface of fuel tank when aircraft flies in enemy place to operate mission. That can form anti-explosion medium in fuel tank to prevent the fuel tank from exploding and being on fire to raise the security of unit fuel system. Fill neutral gas to fuel tank to increase the pressure on consumed fuel surface and raise the reliability of filling fuel when aircraft slides downward in emergency. Meanwhile, after the aircraft catching fire, CO2 in neutral gas system can enter into Fire-extinguish system to assist extinguishing the fire. Operations and precautions of fire-extinguish system When the aircraft or engine catches fire in flying, the fire can be dealt with manually or with automatic fire-extinguish system. Before using fire-extinguish system, observe visually that the aircraft or engine is really on fire or the signal system fails to warn the damage. Operate it immediately and use the fire-extinguish system correctly on real condition. Operations of fire-extinguish system (a) Extinguish the fire automatically: When a certain area is on fire, the red warning light in corresponding area on central instrument panel illuminates, and the solenoid valve to that area is opened to make the pipes is clear. Meanwhile, fire bottle squib of group 1 blows out automatically, red indication light turns off and fire extinguishant flows into the area on fire. Adjust the extinguishing fire select button to the central position (the time should not be too short, otherwise, the excess pressure of fire extinguishant in fire pipes may reopen the solenoid valve) and place the button to AUTO position at once. Red fire warning light turning off means the fire is extinguished; if the red light still illuminates, the fire is not put off. Then, press fire bottle squib of group 2 (without fire bottle of group 2 and 3 blowout) to continue to extinguish the fire. Check the fire extinguishing with above methods after 15s. If the fire is still on, operate fire bottle of group 3. After opening all fire bottle MHP-8F, if the fire is still on, press the neutral gas fire button by using CO2 in ZQP-8. (b) Extinguish the fire manually: Judge the certain area is really on fire visually or by other methods. If the red fire warning light turns off, press the red fire button in that area (caution: do not press wrongly). When the red fire warning light illuminates, the solenoid valve operates. At that time, the operating process is the same as that of in extinguishing the fire automatically. If fire bottle of group 1 inoperates (yellow light turning off), press the button of fire bottle of group 2. The operations of fire bottle of group 3 and neutral gas bottle are the same as the above. After distinguishing the fire, put the select switch at the CHECK position (operating fire bottle of group 1 manually).
  • 346.
    JZ-Y8F200W-02 AIRCRAFT FLIGHT MANUAL SECTIONVI AIRCRAFT SYSTEM EQUIPMENT 6-58 June 30, 2012 Precautions in operation: (a) Place the select switch to AUTO position. Checking the extinguishing system with power on and pressing the red fire warning light are forbidden; otherwise, the fire bottle can be released automatically. (b) Place the select switch to CHECK position. Press fire button of engine inner cavity, which does not operate. And the fire bottle of group 1 does not operate when force the aircraft to land by belly. (c) Turn on FIRE CHECK switch when checking with power on in ground. At that time, press fire extinguishing button, and fire bottle does not operate. Caution Turn off the switch after checking; otherwise, once there is fire, solenoid valve cannot be opened to extinguish fire. (d) Use the same mark of indication light of fire bottle squib when replacing it. Otherwise, if bulb with smaller resistance is replaced, the fire bottle may blow out automatically. (e) Wash fire extinguishant on the devices to prevent rusting after releasing the air bottle. (f) The engine only can be operated in the following missions if the fire bottle in inner cavity is released accidently. The following missions can be operated in 120h when cleaning the fire extinguishant 1211: (1) Release the total oil in oil system; (2) Replace the isolation valve adapter and thin aluminum piece at transportation connector of fire extinguishant on accessory case. (3) Disassemble the isolation valve. Clean the valve, spring, and case cavity with wash oil, and coat with oil and then mount them. Refill new oil; (4) Start engine and push and pull the throttle in the range of 0o ~84o for 5~7min, and then shut down the engine; (5) Release the total oil in oil tank. (6) Refilling oil completely (filling oil again after blowout) to check thoroughly in engine test.
  • 347.
    JZ-Y8F200W-02 AIRCRAFT FLIGHT MANUAL SECTIONVI AIRCRAFT SYSTEM EQUIPMENT 6-59 June 30, 2012 Treatment when the aircraft is on fire When the aircraft is on fire, great security damage may occur. If the damage cannot be dealt with rightly, the fire may cause aircraft destruction and death to people. Therefore, at that time, the flight crew should deal with the fire rapidly with composure and accuracy. And meanwhile, lower the altitude of the aircraft to choose the vantage ground to make preparations of forced landing (if the time is permitted, land on airfield in vicinity). If the fire cannot be extinguished, force the aircraft to land with belly, with the select switch at AUTO position. When the belly touches ground, the terminal switch of forced landing is pressed open by land. At that time, all the fire bottles and neutral gas are released, and the fire extinguishant flows through all the areas. If automatic fire distinguishing is inoperative, connect the total fire extinguishing system manually. If the fire is extinguished, land on airfield in vicinity to check out the reason. If all areas are on fire, emergency methods are as follows: (a) Engine is on fire (1) Feather the engine on fire at first (otherwise, the negative drawing force is produced when failing to feather or distinguishing the fire in inner cavity with throttle is below 40o ), close engine fire cock, shut-off cock and pressure control/shutoff valve, and then distinguish the fire in fire distinguishing procedure. Note When the exterior is on fire, the fire extinguishant of group 1 has been used to distinguishing the fire. (2) When the exterior is on fire, press fire button in inner cavity after feathering. (3) When a certain engine inner cavity is on fire (red fire warning light in inner cavity illuminates), press the fire button with the yellow light turning on. At that time, both two detonating caps of engine and fire bottle of group 1 in fire system of exterior engine operate. If the fire bottle of group 1 inoperates (yellow light turning on), fire bottles of group 2 and 3 should be operated manually. (b) Oil tank in wing is on fire: (1) Distinguish the fire in the normal procedure. Press fire bottle of group 1 and 2 or all groups (group 1, 2, and 3), if the fire burns severely. (2) Connect emergency power supply when distinguishing the fire. Meanwhile, only oil pump in VI group is supplied power by battery with low pressure in operating. (3) Turn on NORMAL switch of neutral gas bottle to supply CO2 to oil tanks on fire to prevent them from being on fire again, after distinguishing the fire. (c) Turbine generating device WDZ-1 is on fire:
  • 348.
    JZ-Y8F200W-02 AIRCRAFT FLIGHT MANUAL SECTIONVI AIRCRAFT SYSTEM EQUIPMENT 6-60 June 30, 2012 WDZ-1 can stop operating automatically when distinguishing the fire on normal procedure. When distinguishing the fire, close the fire cock and then close the circuit breaker connecting with WDZ-1. (d) The cabin is on fire Find out the reason. If the fire is cause by power source system, cut off the power source at once with portable fire bottle. If the cargos are on fire, distinguish the fire with aircraft cover and others. If the fire is heavy and the reason is not clear, the following steps should be made: (1) Lower the flight altitude immediately and stop pressurizing the cabin if necessary; (2) Turn on emergency power supply; (3) Distinguish the fire with portable fire bottle; (4) After distinguishing the fire, close all circuit breakers, then connect the power source to find out the equipment that is on fire (smoke appearing when connecting the equipment shows that that equipment is on fire); (5) After finding out the reason, cut off the power source of that equipment, close the circuit breaker and then pull off locking wire. Caution When distinguishing the fire with portable fire bottle, the crews may lack of oxygen. Thus, the relevant crews should wear oxygen mask. The operation of neutral gas Deposit should be removed before operating the neutral gas system. And heat the neutral gas bottle according to the outside air temperature (see Table 6-8) to prevent the restricted orifice and pipe are blocked under low temperature. Then operate the bottle with following methods: Table 6-8 Outside air temperature o F (o C) -58 (-50) -40 (-40) -22 (-30) -4 (-20) 14 (-10) 32 (0) Heating time (h) 2.5 2 1.5 1 0.5 No heating
  • 349.
    JZ-Y8F200W-02 AIRCRAFT FLIGHT MANUAL SECTIONVI AIRCRAFT SYSTEM EQUIPMENT 6-61 June 30, 2012 (a) Connect the neutral gas bottle and heat it after starting the engine. (b) Slide to flight line and then open the solenoid valve, which is used to fill in the neutral gas in zero group oil tank. At that time, the green indication light of zero group on central instrument panel illuminates. If there is no oil in zero group, and oil in I~VI group oil tanks is used, place the air charge valve to Level flight position with its green light illuminates. If the oil in group 1 oil tank is used up, close its switch. (c) Turn on release switch on neutral gas bottle. (d) Place the Level flight - Glide switch in group I to Glide position 15min before entering into theater. And connect air-charging valve oil tank in zero group. (e) After sliding completely for 7~8min, turn the switch of group I to Level flight position, and close the air-charging valve of oil tank in zero group. (f) Open the air-charging valve to release the excess pressure in the bottle when in glide landing in return flight. Close all the neutral gas switches before shutdown. Note If the two check switches of neutral gas are at check position, when using the neutral gas, one of the bottles does not operate. AIR-CONDITIONING SYSTEM General The air-conditioning system adopts two sets of step-up air-cycle systems with high-pressure water separator at the left and right. Each system consists of the primary heat exchanger, secondary heat exchanger, turbine compressor, water separator, water jet, and condenser. The right system ensures the airflow in the cockpit in preference and also ensures the airflow in the cargo cabin, while the left system is mainly used to pressurize the air conditioner in the cargo cabin. The two systems are interconnected, and can be used together or separately. The cabin pressure control system consists of one cabin pressure regulator (CTQ-18), 3 exhaust valves (CTQ-19A) driven by the pressure regulator, and 3 safety valves (CTQ-15) for emergency use. The cabin pressure control system makes the airtight pressure change according to a specific adjusting rule, keeping specific pressure and sufficient and flesh air in the airtight cockpit/cabin. The temperature regulating device of air-conditioning system helps keep the temperature in the airtight cockpit/cabin at a certain level.
  • 350.
    JZ-Y8F200W-02 AIRCRAFT FLIGHT MANUAL SECTIONVI AIRCRAFT SYSTEM EQUIPMENT 6-62 June 30, 2012 Operating data of the air-conditioning system (a) Pressure data of the front emergency door sealing system (1) The charge pressure of the sealing rubber hose is 38.44 psi~45.54 psi (2.7~3.2 kgf/cm2 ). (2) The charge pressure of the air bottle is 99.5 psi (686 kPa (7 kgf/cm2 )) (b) Pressure system of the airtight cabin the pressure system curve is shown in Figure 6-13. (1) When the flight altitude is below 6561.68 ft (2000 m), and the airtight cabin is ventilated at a low altitude, the excessive pressure in the airtight cabin should not exceed 0.995 psi (6.86 kPa (0.07 kgf/cm2 )). (2) Normally, absolute pressure inside airtight cockpit should be 11.52±0.28 psia (79.4±1.96kPa (596±15mmHg)) at an altitude of 6561.68~23293.96ft (2000~ 7100m); (3) In standby status at an altitude of 6561.68~14107.61ft (2000~ 4300m), such pressure should be 11.52±0.28 psia (79.4±1.96kPa (596±15mmHg)); (4) Under normal and standby conditions, ensure that the excessive pressure of the airtight cabin is as follows: Under normal conditions (>23293.96 ft (7100 m)): 5.69 psi±0.28 psi (39.2 kPa±1.96 kPa (294 mmHg±15 mmHg)) Under standby conditions (>14107.61 ft (4300 m)): 2.84 psi±0.28 psi (19.6 kPa±1.96 kPa (147 mmHg±15 mmHg))
  • 351.
    JZ-Y8F200W-02 AIRCRAFT FLIGHT MANUAL SECTIONVI AIRCRAFT SYSTEM EQUIPMENT 6-63 June 30, 2012 Pressure inside the cockpit at the climbing/ descending ratio of32.81ft/s, and variation per unit time of 24Pa/s P- Pressure inside the cockpit maintained by the regulator H- Flying altitude Normal Standby Standard atmospheric pressure Figure 6-13 Curve indicating that the pressure inside the pressurized cabin changes with the flight altitude (c) Change rate of the airtight cabin pressure (1) The maximum decompressing average rate should not exceed 0.1 psi/s (667 Pa/s (5 mmHg/s)). (2) The maximum pressurizing average rate should not exceed 0.01 psi/s (84 Pa/s (0.625 mmHg/s)). (3) The maximum excessive pressure in the airtight cabin should not exceed 6.67 psi (46 kPa (0.469 kgf/cm2 )). (4) The maximum negative pressure in the airtight cabin should not exceed 0.39 psi (2.67 kPa (0.02 kgf/cm2 )). (5) Environment control system a) Under normal conditions, the maximum stable temperature inside the pipe should not exceed 194o F (90o C). b) Under normal conditions, the minimum stable temperature inside the pipe should not exceed 32o F(0o C); c) Under normal conditions, when two air-conditioning systems are operating, the airtight cabin temperature should be automatically kept in the range selected by the environment control box after manual regulation.
  • 352.
    JZ-Y8F200W-02 AIRCRAFT FLIGHT MANUAL SECTIONVI AIRCRAFT SYSTEM EQUIPMENT 6-64 June 30, 2012 Operation of airtight cabin pressurization After aircraft exits from the takeoff state (the engine throttle is retarded from 104o to 84o ), the air-conditioning system can be used. Generally, low-altitude ventilation is used to when the flight altitude is below 6561.68 ft (2000 m), while cabin air-conditioning pressurization is used when the flight altitude is above 6561.68 ft (2000 m). Preparations before takeoff (a) Set the three-way switch handle of the cabin pressure regulator (CTQ-18) to the ON position. (b) Turn the EXCESSIVE PRESSURE selection knob of the pressure regulator (CTQ-18) to 5.69 psi (39.2 kPa (0.4 kgf/cm2 )), the AIRTIGHTNESS START selection knob to 11.52 psi (79.4 kPa 596 mmHg)), and the PRESSURE CHANGE RATE selection knob to 24 Pa/s (0.18 mmHg/s). (c) Turn off the CROSS VALVE (crossover valve) switch on the right console (the yellow light extinguishes), L (left) and R (right) AUXILIARY VALVE (auxiliary ventilation valve) switches, L (left) and R (right) CUTOFF VALVE (cutoff valve) switches (the yellow light illuminates), and L (left) and R (right) DIVERTER VALVE (bypass valve) switches. Set the FLOW CON VALVE (flow control valve) switch to the NORMAL (normal) position (the green light illuminates). (d) The AIR SUPPLY FROM ENGING (engine air supply) switches on the four engines on the right console, L (left) and R (right) WING HEATING (wing heating) switches, ENG AIR-INLET GUIDES HEATING (heating of the engine inlet guide) switch, and OIL EJECTION RADIATION (oil radiation) switch on the central instrument panel should be turned off. (e) Set the TEMP CTL (temperature control) switch on the copilot instrument panel to the neutral position. Auxiliary ventilation operation When the flight altitude is below 6561.68 ft (2000 m) and the air-conditioning system does not operate, set L (left) and R (right) AUXILIARY VALVE (auxiliary ventilation valve) switches to the ON position to conduct cabin ventilation.
  • 353.
    JZ-Y8F200W-02 AIRCRAFT FLIGHT MANUAL SECTIONVI AIRCRAFT SYSTEM EQUIPMENT 6-65 June 30, 2012 Pressurization procedure of airtight cabin (a) Push the AIR CHARGING SWITCH FOR SEALING STRIP switch of the sealing rubber hose on the front emergency cabin door of the right console forward to the AIR CHARGING position. At this time, the pointer of PRESSURE OF SEALING STRIP on the air charging pressure gauge of the sealing rubber hose on the right console should indicate a value in the range of 38.44 psi~45.54 psi (265 ~314 kPa) (2.7~3.2 kgf/cm2 ), and L (left) and R (right) AUXILIARY VALVE switches should be at the OFF positions. (b) Set the selection knob on temperature control box CXT-19 to the position of a required temperature value. (c) Set the TEMP CTL (temperature control) switch on the copilot instrument panel to the AUTO position. (d) Turn on L (left) and R (right) CUTOFF VALVE (shutoff valve) switches on the right console (the yellow light extinguishes) and L (left) and R (right) DIVERTER VALVE switches. The CROSS VALVE switch should be at the OFF position. (e) Turn on AIR SUPPLY FROM ENGING switches of the four engines on the right console in turn. It should take about 40s to turn all the switches on. (f) Generally, the FLOW CON VALVE switch on the right console should be set to the NORMAL position. The green light should illuminate. The cockpit airflow can be adjusted through FLOW CON VALVE (flow control valve) switch when necessary. Note 1) During airtight cabin pressurization, retard the engine throttle or reduce the bleed air quantity properly if the turbine outlet temperature of a specific engine is found overtemperature. 2) When only the left air-conditioning system is used, set the FLOW CON VALVE (flow control valve) switch to the SMALL position to obtain the maximum airflow of the cockpit. Oxygen breathing When CABIN ALT (cabin altitude) of the cockpit altitude/differential pressure gauge on the copilot instrument panel indicates that the cabin altitude has reached 11482.94 ft (3500 m), the BREATHING OXYGEN SIGNAL signal light starts blinking, and the cockpit warning bell and cargo cabin air horn start ringing. Then, press the OFF position on the right console. The aircrew and passengers can breathe oxygen.
  • 354.
    JZ-Y8F200W-02 AIRCRAFT FLIGHT MANUAL SECTIONVI AIRCRAFT SYSTEM EQUIPMENT 6-66 June 30, 2012 Procedure for releasing airtight cabin pressurization (a) Turn off the AIR SUPPLY FROM ENGING switch on right console (at least for 40s), L (left) and R (right) CUTOFF VALVE switches (the yellow light extinguishes), and L (left) and R (right) DIVERTER VALVE switches. (b) Pull backward the AIR CHARGING SWITCH FOR SEALING STRIP handle of the front emergency door sealing system on the right console to release sealing of the front emergency door. The pointer of PRESSURE OF SEALING STRIP on the air charging pressure gauge of the sealing rubber hose on the right console should indicate 0. Door opening in the air (a) Operating procedure when the airtight cabin is pressurized and the air-conditioning system is operating properly: (1) Release airtight cabin pressurization (the procedure is the same as that described in (a)) (2) Observe CABIN ALT on the cockpit altitude/differential pressure gauge on the copilot instrument panel. When the cockpit pressure stops decreasing, turn on the CABIN PRES REL switch on the copilot instrument panel to ensure sufficient and balanced pressures inside and outside the airtight cabin. (3) Open the door. (4) Close the door after the task has been finished. Then, turn off the CABIN PRES REL (cabin emergency pressure release) switch on the copilot instrument panel. (b) Operating procedure when the flight altitude is below 6561.68 ft (2000 m) and the airtight cabin is not pressurized: (1) The procedure is the same as that described in item a of Release airtight cabin pressurization (2) Turn on the CABIN PRES REL (cabin emergency pressure release) switch on the copilot instrument panel to ensure the sufficient and balanced pressures inside and outside the airtight cabin. (3) Open the door. (4) Close the door after the task has been finished. Then, turn off the CABIN PRES REL (cabin emergency pressure release) switch on the copilot instrument panel.
  • 355.
    JZ-Y8F200W-02 AIRCRAFT FLIGHT MANUAL SECTIONVI AIRCRAFT SYSTEM EQUIPMENT 6-67 June 30, 2012 Operating precautions (a) After releasing airtight cabin pressurization, release sealing of the front emergency cabin door to prevent the sealing rubber hose from being damaged when the cabin door is opened or closed. (b) Operation of the air-conditioning system is prohibited when aircraft is on the ground and during takeoff. (c) When aircraft is flying through the radioactive contamination area, stop using cabin pressurization air- conditioning and auxiliary ventilation systems. The aircrew and passengers must wear oxygen masks to breathe pure oxygen (Set the oxygen regulator switch to the position of 100%). (d) When the aircraft is flying over the enemy-occupied area, turn the EXCESSIVE PRESSURE knob on cabin pressure regulator CTQ-18 to 2.84 psi (19.6 kPa (0.2 kgf/cm2 )) (indicating the standby state). (e) If an engine shuts down in flight, set the AIR SUPPLY FROM ENGING switch of the shutdown engine on the overhead console to the OFF position. (f) Under normal conditions, it is not allowed to supply the bleed air from one engine for the operation of one set of air-conditioning system. (g) Before landing, when the flight altitude reduces to 3280.84 ft (1000 m), release cabin pressurization. (h) When the air-conditioning system is turned on, it is not allowed to turn on L (left) and R (right) AUXILIARY VALVE (auxiliary ventilation) switches. (i) When the WING HEATING switch on the right console is turned on, only one air-conditioning system is permitted to operate. Meanwhile, turn on the CROSS VALVE switch (crossover valve) and the L (left) and R (right) CUTOFF VALVE switches (shutoff valve), and set the DIVERTER VALVE switch (bypass valve) of the other air-conditioning system, which is not operating, to the OFF position. (j) When the airtight cabin is pressurized, set all control switches of the cargo cabin door to the neutral position. (k) When the sea level elevation of the takeoff airfield is above 6560 ft (2000 m), turn on the CABIN PRES REL switch (cabin emergency pressure release) before takeoff, and turn off the switch before pressurization through the air-conditioning system.
  • 356.
    JZ-Y8F200W-02 AIRCRAFT FLIGHT MANUAL SECTIONVI AIRCRAFT SYSTEM EQUIPMENT 6-68 June 30, 2012 (l) When the sea level elevation of the landing airfield is above 6560 ft (2000 m), during landing, release airtight cabin pressurization and then turn on the CABIN PRES REL switch (cabin emergency pressure release) to ensure the sufficient and balanced pressures inside and outside the airtight cabin. Meanwhile, observe the cockpit altitude/differential pressure gauge on the copilot instrument panel to ensure that the cabin pressure difference is near 0 in landing. Turn off this switch after landing. In-flight troubleshooting (a) If the BL AIR OVERPRESS IND (engine bleed air overpressure) indicating light (yellow) on the copilot instrument panel illuminates, it indicates that the bleed air pressure has exceeded 63.82 psi (440 kPa). At this time, set the AIR SUPPLY FROM ENGINE) (engine air supply) switch on the right console to the OFF position. (b) Airtight cabin not pressurized or pressure being low after pressurization (1) Check whether the cabin door and windows are well closed, whether the sealing rubber hose pressure is normal, whether L (left) and R (right) AUXILIARY VALVE (auxiliary ventilation) switches are at the OFF position, and whether the CABIN PRES REL (cabin emergency pressure release) switch on the copilot instrument panel is at the OFF position. (2) Check whether switch of cabin pressure regulator CTQ-18 is at the ON position. When the BREATHING OXYGEN SIGNAL (oxygen breathing signal) signal light does not blink and the air horn does not ring, check whether the vent connector on cockpit/cabin altitude differential gauge BGC-2 on the copilot instrument panel is blocked. (3) Check whether control switches of the cargo cabin door on the navigator's airdrop and parachuting console, pilot instrument panel, and ground console at frame 43 are at the neutral position. If no, set them to the neutral position. (c) If the airtight cabin pressure exceeds 6.67 psi (46 kPa) and continues increasing, it indicates that cockpit/ cabin pressure regulator CTQ-18, exhaust valve CTQ-19A, and safety valve CTQ-15 are faulty. At this time, perform the following operations: (1) Change the EXCESSIVE PRESSURE switch of the airtight cabin from the normal state to the standby state. If the pressure remains unchanged, set the AIR SUPPLY FROM ENGINE (engine air supply) switch on the right console, L (left) and R (right) CUTOFF VALVE) (shutoff valve) switches, and DIVERTER VALVE (diverter valve) switch to the OFF position. Meanwhile, turn on the CABIN PRES REL (cabin emergency pressure release) switch on the copilot instrument panel to release pressure and sealing of the airtight cabin. At this time, the aircrew and passengers should breathe oxygen. In addition, the pilot should reduce the flight altitude.
  • 357.
    JZ-Y8F200W-02 AIRCRAFT FLIGHT MANUAL SECTIONVI AIRCRAFT SYSTEM EQUIPMENT 6-69 June 30, 2012 (2) When the communication valve on cabin pressure regulator CTQ-18 is blocked, the cabin pressure regulator will not operate. The phenomena are as follows: The pressure difference is small when pressurization starts, and then the pressure difference increases up to 5.95 psi~6.67 psi (41 kPa~46 kPa (0.42 kgf/cm2 ~0.469 kgf/cm2 )) after a period of time. At this time, the absolute pressure of the airtight cabin is higher than the normal value, and will be over 14.69 psi (101.3 kPa) when the flight altitude is below 14763.78 ft (4500 m). In this case, release airtight cabin pressurization and reduce the flight altitude. (d) If there are damage symptoms on the airtight cabin glass and skins, set the pressure regulator switch to the standby state. If the damage symptoms persist severely, release airtight cabin pressurization and reduce the flight altitude. (e) After the airtight cabin pressure is lost (both in the air and on the ground), when the cargo cabin door or the cockpit door is opened, first turn on the CABIN PRES REL switch (cabin emergency pressure release) on the copilot instrument panel to ensure the efficient and balanced pressures inside and outside the airtight cabin. (f) White smoking in the airtight cabin during flight is caused by failure of the sealing device of the engine compressor box. This makes oil enter into the pressurization system. At this time, wear the oxygen mask; turn off the AIR SUPPLY FROM ENGING (engine air supply) switch on the right console in turn and with an interval to locate the faulty engine. After the engine is located, turn off the faulty AIR SUPPLY FROM ENGING (engine air supply) switch. Turn on the CROSS VALVE switch (crossover valve) on the right console if the second set of air-conditioning system is used. (g) Failure in one air-conditioning system or one bleed air system (1) When one air-conditioning system fails, but two bleed air systems are operating properly, and the engine on the wing where the normal air-conditioning system is located supplies air to the normal air-conditioning system, the operating procedure is as follows: a) Turn on the two AIR SUPPLY FROM ENGING (engine air supply) switches at the same side with the normal air conditioner on the right console, and the CUTOFF VALVE switch (shutoff valve) and DIVERTER VALVE switches (diverter valve) at the same side with the normal air conditioner. b) Turn off the DIVERTER VALVE switch (diverter valve) at the same side with the faulty air conditioner on the right console.
  • 358.
    JZ-Y8F200W-02 AIRCRAFT FLIGHT MANUAL SECTIONVI AIRCRAFT SYSTEM EQUIPMENT 6-70 June 30, 2012 (2) When one bleed air system fails, but two air-conditioning systems are operating properly, and the engine bleed air system on the wing where the normal bleed air system is located supplies air to the two air-conditioning systems, the procedure is as follows: a) Turn on the two AIR SUPPLY FROM ENGING (engine air supply) switches at the same side with the normally operating wing on the right console, the CUTOFF VALVE switch (shutoff valve), CROSS VALVE switch (crossover valve) (the yellow indicating light illuminates), and DIVERTER VALVE switches (diverter valve) of the air-conditioning systems at both sides. b) Turn off the CUTOFF VALVE switch (shutoff valve) (the yellow indicating light illuminates) at the side where bleed air failure occurs on the right console. Note The bleed air from one engine on one wing is only used in emergency to supply air to two sets of systems. (3) When the bleed air system at one side fails, but the air-conditioning system at the opposite side is operating properly, and the normal bleed air system supplies air to the air-conditioning system at the same side (that is, same-side air supply), the procedure is as follows: a) Turn on the two AIR SUPPLY FROM ENGING (engine air supply) switches at the side of the normal bleed air system on the right console, and the CUTOFF VALVE switch (shutoff valve), and DIVERTER VALVE switch (diverter valve) at the side of normal air-conditioning system. b) Turn off the CUTOFF VALVE switch (shutoff valve) at the side of the faulty air-conditioning system (the yellow indicating light illuminates). (4) When one bleed air system at one side fails, but the air-conditioning system at the same side is operating properly, and the normal bleed air system supplies air to the normal air-conditioning system at the opposite side (that is, opposite-side air supply), the procedure is as follows: a) Turn on the two AIR SUPPLY FROM ENGING (engine air supply) switches at the side of normal bleed air system on the right console, the CROSS VALVE switch (crossover valve) (the yellow indicating light illuminates), DIVERTER VALVE switch (diverter valve) at the side of the normal air-conditioning system, and CUTOFF VALVE switch (shutoff valve) at other the side.
  • 359.
    JZ-Y8F200W-02 AIRCRAFT FLIGHT MANUAL SECTIONVI AIRCRAFT SYSTEM EQUIPMENT 6-71 June 30, 2012 b) Turn off the CUTOFF VALVE switch (shutoff valve) (the yellow indicating light illuminates) at the side where bleed air failure occurs and DIVERTER VALVE switch (diverter valve) at the side where the air-conditioning system fails. (h) When there is much moisture or ice on the cockpit glass, heat the cockpit/cabin and push upwards the handle of the heating switch (Y8C-7613-70) to the limit position (ensure the maximum airflow of the cockpit cabin when necessary). (i) When the airtight cabin pressure is lost, but this does not affect pressurization, do not power off the air-conditioning system to prevent the windshield glass from being frozen with droplets. (j) When the air supply temperature indicated by CABIN (cockpit) or CAR (cargo cabin) on the air supply thermometer of the copilot instrument panel exceeds 194o F (90o C), set the TEMP CTL (temperature control) switch of CABIN (cockpit) or CAR (cargo cabin) on the copilot instrument panel to the direction of COOL to manually reduce the air supply temperature of this cabin. If the temperature of this cabin cannot be cooled down, turn off the L (left) or R (right) DIVERTER VALVE switch (diverter valve) (the L (left) diverter valve is for the cargo cabin, while the R (right) diverter valve is for the cockpit). ANTI-ICING HEATING SYSTEM GENERAL The hot air heating and electric heating and anti-icing device is installed on aircraft to prevent import parts, such as wing leading edge, tail leading edge, engine inlet duct leading edge, engine inlet guide vane, propeller, and windshield glass, from being iced. It is used to implement anti-icing when aircraft is flying through the severe icing area at different altitudes and speeds, ensuring flight safety. The hot air heating system is used to heat parts such as the engine inlet duct leading edge, inlet guide vane, and wing leading edge. The hot air is supplied by the 10th stage compressor of the engine. The electric heating system is used to heat parts such as the windshield glass, propellers and their cowlings, and tail leading edge for anti-icing.
  • 360.
    JZ-Y8F200W-02 AIRCRAFT FLIGHT MANUAL SECTIONVI AIRCRAFT SYSTEM EQUIPMENT 6-72 June 30, 2012 Heating of the engine inlet duct leading edge and inlet guide vane Ground inspection (a) Before startup, turn on the INLET ICING SGL (inlet duct icing signal) switch on the copilot instrument panel. The red ENG AIR INTAKE ICING (inlet duct icing) signal light on the copilot instrument panel illuminates, and the ICING XHD-3A-10 main warning light is blinking and then extinguishes. (b) After start-up, turn on the ENG AIR-INLET GUIDES HEATING (engine inlet guide heating) switch on the right console. The green ENG AIR INTAKE HEATING (inlet duct heating) signal light on the copilot instrument panel illuminates, indicating normal operation. After inspection, turn off the switch. Heating in the following cases: (a) Perform test run under the icing condition. (b) When the in-flight temperature is below 41o F (5o C) (below 50o F (10o C) at night), if there is fog or before the aircraft enters the cloud, rain, or snow shower area), heating is required. (c) During flight, the red ENG AIR INTAKE ICING (inlet duct icing) signal light on the copilot instrument panel illuminates and the ICING XHD-3A-10 main warning light is blinking, turn on the ENG AIR-INLET GUIDES HEATING (engine inlet guide heating) switch on the right console immediately. At this time, the inlet duct leading edge anti-icing switch and guide vane anti-icing switch are turned on simultaneously. Note After inlet duct leading edge and guide vane heating is enabled, the turbine outlet temperature increases to a temperature in the range of 50o F~68o F (10o C~ 20o C), and fuel consumption rate at 3280.84 ft (km) is increases by 3%. Operating precautions (a) When aircraft is flying through the icing area, advance the throttle to an angle greater than 62o so that automatic feathering can be implemented in case of shutdown. (b) In the case that the heating system is found faulty and the inlet duct is identified iced, leave the icing area immediately, make feathering preparations, and land at an airfield in vicinity. (c) When the inlet duct is iced, turn off the heating switch. After the aircraft leaves the icing area, enable inlet duct leading edge and guide vane heating for one inner engine. Then, enable inlet duct leading edge and guide vane heating for other engines every 2 to 3 minutes. If engines shut down after heating is enabled, do not turn on the heating switch of engines for which heating has not been enabled yet. It is allowed to perform air start for the shutdown engines as required.
  • 361.
    JZ-Y8F200W-02 AIRCRAFT FLIGHT MANUAL SECTIONVI AIRCRAFT SYSTEM EQUIPMENT 6-73 June 30, 2012 Wing heating and deicing Ground inspection (with an throttle angle greater than 20o ) (a) Turn off L (left) and R (right) CUTOFF VALVE switch (shutoff valve) on the right console. Then, turn on the AIR SUPPLY FROM ENGINE (engine air supply) switches of the four engines on the right console. (b) Turn on the R (right) WING HEATING (wing heating) switch on the right console. After 20s~40s, the two green signal lights on the right wing illuminate. At the same time, hot air flows out from the wing tip, indicating that the heating and anti-icing system is operating properly. Turn off the R (right) WING HEATING (wing heating) switch. Check the left wing heating and anti-icing system using the same method. (c) After inspection, turn off the AIR SUPPLY FROM ENGINE (engine air supply) switch on the right console and WING HEATING (wing heating) switch. In-flight operations If icing occurs on aircraft (icing found visually) or the A/C ICING (aircraft icing) red signal light on the copilot instrument panel illuminates and the red XHD-3A-10 main warning light is blinking (note: Once XHD-3A-10 main warning light is blinking, it is not controlled by 5-input icing signals. At this time, press XHD-3A-10 main warning light. XHD-3A-10 main warning light extinguishes. Within a delay of 5min±10s, it does not respond to any signals. After the delay is over, the original functions can be used again), perform wing heating and deicing according to the following procedure: (a) Turn on the WING HEATING (wing heating) switch on the right console. The four WING HEATING (wing heating) green signal lights on the copilot instrument panel illuminate. (b) Turn on the AIR SUPPLY FROM ENGINE (engine air supply) switches of the four engines on the right console in turn. (c) After deicing, turn off the above-mentioned switches. In-operation precautions (a) Enabling wing heating and deicing is prohibited during takeoff. (b) Wing heating can be enabled in the moderate and severe icing area where the air temperature is 14o F (-10o C). If one or two engines are faulty, turn off the L (left) and R (right) DIVERTER VALVE switches (diverter valve) for the air-conditioning system. Meanwhile, turn on the CROSS VALVE switch (crossover valve) on the right console, and L (left) and R (right) CUTOFF VALVE switches (shutoff valve). After the aircrew and passengers wear the oxygen masks, perform wing heating and deicing. (c) Before aircraft descends to enter the clouds and the air temperature is below 32o F (0o C), engage the wing heating and anti-icing system.
  • 362.
    JZ-Y8F200W-02 AIRCRAFT FLIGHT MANUAL SECTIONVI AIRCRAFT SYSTEM EQUIPMENT 6-74 June 30, 2012 (d) In case of landing under the icing condition, power off the wing heating and anti-icing system after the aircraft touches the ground. (e) In case of takeoff under the icing condition, after the aircraft leaves the ground and the engine changes from the takeoff state to the rated state, power on the wing heating and anti-icing system. At this time, only one set of air-conditioning system can operate. (f) After heating for the wing, inlet duct leading edge, and inlet guide vane is enabled, the flight speed decreases to a value in the range of 13.67 ft/s~18.23 ft/s (15 km/h~20 km/h). The throttle can be advanced when necessary. (g) After the wing anti-icing system is checked on the ground to be normal, turn off the WING HEATING (wing heating) switch on the right console and AIR SUPPLY FROM ENGINE (engine air supply) switch to prevent machine components from being damaged due to overtemperature (the inspection duration should be as short as possible). Windshield-plexiglass heating (115V, 400H AC) Heat the windshield-plexiglass to remove the ice, frost and water vapor formed on the glass in flight and to ensure the normal visibility for pilot under bad flight conditions. The windshield-plexiglass adopts electric heating whose heating methods include constant heating and circulatory heating. Power distribution of heating power: (a) Bus bar I supplies power to the 1st glass heating; generator F1 supplies power to the 2nd and 3rd glasses; and the bus bar II supplies power to the 4th and 5th glasses. (b) Low heating uses 190V AC and high heating uses 230V AC. (c) All windshield-plexiglasses can adopt constant heating and the 4th and 5th glasses can also adopt circulatory heating. The circulatory cycle is 25s±2s. Note The S/N sequences (from left to right in cockpit) of electric heating glasses are the 1st , 2nd , 3rd and 4th , with the 5th in the navigation compartment.
  • 363.
    JZ-Y8F200W-02 AIRCRAFT FLIGHT MANUAL SECTIONVI AIRCRAFT SYSTEM EQUIPMENT 6-75 June 30, 2012 Operation of windshield-plexiglass electric heating: (a) As for the windshield heating switch (on the instrument panel) for the pilot, its upward direction represents HI (high) heating, downward direction represents LO (low) heating and middle position represents no operating. (b) There are two windshield heating switches for the copilot; W/SHIELD HEAT (changing between high and low glass heating) switch controls HI (high) or LO (low); W/S HEAT (glass heating) switch controls the two-position switch (high circulation or low circulation) for CONT (constant) (upward) or CIR (circulatory) (downward) heating, according to the position of HI (high) and LO (low) switches. Install both the two switches on the copilot overhead console. (c) As for the 5th windshield heating switch in navigation compartment, its upward direction represents HI (high) heating and downward direction represents LO (low) heating. It is controlled by positions of the W/S HEAT switch (CONT/CIR) on the overhead console . (d) As for windshield-plexiglass heating, two temperature control boxes WKH-2C keep the glass temperature at 35o C±1o C automatically. Such as when the atmospheric temperature is above 35o C, it cannot be turned on. Caution When heating, operate at the LO (low) position for 8min~10min first, and then put it at the HI (high) heating position. If necessary, put it directly at the HI (high) heating position. (e) When the atmospheric temperature is below 5o C before takeoff, turn on the cockpit glass electric heating. It is best to turn on the electric heating in whole flight on IFR flight. (f) The glass can be effectively heated 5min~6min after turning on the electric heating. Thus it is best to turn it on (such as before cloud penetrating, when descending or foggy) before entering icing region in flight. (g) Cabin glass heating on ground: it can only be turned on when removing the icing or water vapor on glasses during electric heating system check and aircraft parking or taxiing as well as before aircraft takeoff.
  • 364.
    JZ-Y8F200W-02 AIRCRAFT FLIGHT MANUAL SECTIONVI AIRCRAFT SYSTEM EQUIPMENT 6-76 June 30, 2012 Heating of propeller and its dome (115V, 400Hz AC) AC supplies power to the propeller and its dome for heating and deicing, so as to ensure the engine can operate normally when the aircraft enters the icing region. Power distribution of heating power: (a) The AC generator JF-12 supplies power to the power source of heating components. When four generators JF-12 all operate normally, F1 supplies power to 1 and 4 engine propeller and dome heating components, and F2 supplies power to 2 and 3 engine propeller and nose dome heating components. (b) Due to high current for each propeller, one AC generator cannot supply to heat two propellers simultaneously, thus heating is circulatory. F1 and F2 heat 1 and 3 engine heating components respectively first, then they turn to 2 and 4 engine heating components automatically 25s±2s later. One circulatory cycle is 50s±4s, which avoids ice formation of the propeller and its dome. (c) When the AC generator (namely F1) fails, F4 supplies power to 1 and 4 heating components, when F2 fails, F3 supplies power to 2 and 3 heating components. (d) If inboard AC generator fails, then the outboard rather than inboard AC generator can heat. If outboard AC generator fails, both inboard and outboard cannot heat. (e) When one of F2 or F3 operates, the four engines can be heated. When one of F1 or F4 operates, then only 1 and 4 engines rather than 2 and 3 engines can be heated. Operation of propeller heating: Before the aircraft enters the icing region, put the TALL HEAT (propeller and its dome heating) switch on overhead console at ON (turning on) (upward) position, and check the electric current of AC generator F1 and F2 being about 60A (with blade temperature of 100o C). The indicating light (engines I and II as well as III and IV turn on simultaneously) for normal heating of propeller and its dome on the right instrument panel turns on alternatively. If the heating resistance of a blade breaks, the circuit current will descend to less than 50A. Caution Due to bad ground ventilation and high ground temperature, continuous heating on ground shall not be more than 1min30s to avoid burning out the propeller blade and cap.
  • 365.
    JZ-Y8F200W-02 AIRCRAFT FLIGHT MANUAL SECTIONVI AIRCRAFT SYSTEM EQUIPMENT 6-77 June 30, 2012 Air-speed tube heating system Function of air-speed tube heating system If the atmospheric temperature is below 5o C in flight when ice is probably formed, the aircraft shall turn on the total and static pressure heating before entering cloud and rain regions. Operation of air-speed tube heating system As for the LEFT and RIGHT heating switches (HEATING FOR PILOT-STATIC TUBE) on the overhead console in cockpit, when putting it at the TEST position, the 5 blue indicating lights (both LEFT SP VENTS and RIGHT SP VENTS) under static pressure HEATING CHECK on the pilot right instrument panel turn on; when putting it at the HEAT position, the blue indicating light under static pressure heating check turns off, two pilot heating (PITOT HEAT ON LEFT OFF FLASH and PITOT HEAT ON LIGHE OFF FLASH) yellow light on the pilot left and right instrument panel keeps on and start to heat the air-speed tube heating system. Caution The ground check heating shall not be more than 3min. Tail heating (28.5V DC) Before the aircraft enters icing region, heat the tail for anti-icing and to ensure the normal flight of the aircraft. Ail heating is supplied by 28.5V DC power in forms of constant heating and circulatory heating. After powering on the tail heating switch on overhead console, the tail heating signal indicating light (blue) turns on and two heating methods operate simultaneously. Power distribution of heating power: (a) Divide the heating components of constant heating area and circulatory heating area into five groups and four groups respectively; (b) After turning on the tail heating switch, automatic circulation heating system starts to operate: first power on the constant heating components, meanwhile carry out the automatic circulation heating to four groups of circulatory heating components in turn under the control of DS-19 circulatory heating timing mechanism. Heat each group for 38.5s±2s with a circulatory cycle of 154s±3s. Circulatory heating sequence: outer section of left and right horizontal tails→middle section of left and right horizontal tails→inner section of left and right horizontal tails and vertical tail lower section→vertical tail upper and middle sections. Automatic circulation heating starts and continues from the position where the timing mechanism DS-19 turns off last time.
  • 366.
    JZ-Y8F200W-02 AIRCRAFT FLIGHT MANUAL SECTIONVI AIRCRAFT SYSTEM EQUIPMENT 6-78 June 30, 2012 Note he inner skin in the section of the nine heating components is equipped with automatic heating switch. When the temperature is above 50o C± 10o C, it turns off automatically; when the temperature is below 40o C± 10o C, it turns on automatically. Operation of tail heating: (a) When flying in icing condition, power on the tail heating. The blue TAIL HEATING light on right instrument panel turns on, which represents normal heating; (b) Power off the heating switch before leaving the icing region or landing (at the time of landing in icing condition). Ground check (a) Check the ground with ground power or at the time of engine test run; (b) Check the heating of constant heating components and observe the power indicator next to the tail anti-icing distribution box. It indicates 65A~75A with single automatic switch turned on to ZKP-80; 18A~20A with single turned on to ZKP-20; and 275A~320A with five automatic switches turned on simultaneously; (c) Check the heating of circulatory heating components and the current indication shall be: 550A~610A for outer section of left and right horizontal tails; 560A~620A for vertical tail upper and middle sections; 600A~670A for horizontal tail inner section and vertical tail lower section; and 710A~790A for middle section of left and right horizontal tails; (d) Check the 28.5V DC power supply with ground power or engine test run, (putting the TAIL HEATING switch MJK2-2A (1191) on overhead console at OFF position), press the self-check button on XKH-11 tail heating signal control box, then the indicating light (blue) for normal self-check on control box and the blue TAIL HEATING light (2522) on right instrument panel turn on. When turning on the TAIL HEATING switch MJK2-2A (1191) on overhead console, the blue TAIL HEATING light (2522) on right instrument panel turns on. Turn off any one of those constant heating switches (6665, 6666, 6667, 6668, 6669), the blue TAIL HEATING light (2522) on right instrument panel blinks, which represents failure warning for tail heating. Note Time of turning on the TAIL HEATING switch (1191) shall not be longer than 5s.
  • 367.
    JZ-Y8F200W-02 AIRCRAFT FLIGHT MANUAL SECTIONVI AIRCRAFT SYSTEM EQUIPMENT 6-79 June 30, 2012 OXYGEN SYSTEM General The oxygen system is installed on Y8F200W aircraft to be exported to Venezuela to satisfy the following needs: Ensure safety of aircrew and passengers in the case of high-altitude flight, pressure loss in the airtight cabin, or harmful gas pollution in the cabin. Satisfy physiological needs of aircrew and passengers during long-term flight The oxygen system on Y8F200W aircraft provides gaseous oxygen, with separate oxygen supplies for the cockpit and cargo cabin. Totally five 4.40 gal (20L) glass- fabric-reinforced plastic (GFRP) oxygen bottles are installed on the whole aircraft, and they can contain 22.0 gal (100L) oxygen with the pressure of 2133.51 psi (14.71 MPa). The oxygen supply capacity for passengers is 13.20 gal (60L), while that for aircrew is 8.80 gal (40L), ensuring 3h oxygen consumption for aircrew and 15min oxygen consumption for 96 passengers. Each aircrew member is provided with a set of demand regulator YTQ-21/1 for oxygen supply, while passengers are provided with 5 sets of continuous oxygen supply regulator YTQ-11. In addition, four 0.37 gal (1.7L) moveable oxygen bottles are installed on aircraft to provide oxygen in case of emergencies or for personnel moving on aircraft. Device Description Oxygen supply layout (a) Five 4.40 gal (20L) oxygen bottles are installed on the dorsal fin in the rear section of fuselage to supply oxygen for 5 aircrew members and 96 passengers. (b) Four 0.37 gal (1.7L) moveable oxygen bottles with the oxygen pressure of 426.41 psi (2.94 MPa) are installed on the left and right pieces of floor in frames 11 to 12, two on each side. These moveable oxygen bottles can supply oxygen for 8min in case of emergencies or for personnel moving on aircraft. If oxygen is still required after 8min, oxygen can be charged using the oxygen charging hose on the cargo cabin instrument panel. Oxygen pressure regulator (a) There are five YTQ-21/1 oxygen pressure regulators, which are used by flight crew together with oxygen masks YM6512A. When the regulator switch handle is set at the ON position and the air inlet switch is set at the PURE OXYGEN position, pure oxygen is supplied. When the air inlet switch is set at the MIXED OXYGEN position, the mixed oxygen is supplied. When the regulator is faulty or aircrew and passengers feel suffocated, turn on the emergency oxygen supply valve.
  • 368.
    JZ-Y8F200W-02 AIRCRAFT FLIGHT MANUAL SECTIONVI AIRCRAFT SYSTEM EQUIPMENT 6-80 June 30, 2012 (b) There are five YTQ-11 oxygen pressure regulators which can connect with 96 oxygen masks for passengers in the cargo cabin. YTQ-11 oxygen pressure regulator can automatically regulate the oxygen pressure and supply oxygen continuously with the flight altitude variation. When automatic oxygen supply fails or the oxygen supply pressure is insufficient, turn on the emergency oxygen supply valve to manually regulate the oxygen supply pressure according to the mapping table on the oxygen instrument panel in the cargo cabin. (c) There are four YTQ-5 oxygen pressure regulators which are installed on moveable oxygen bottles respectively. The operating method is the same as that of YTQ-11 oxygen pressure regulator. Oxygen using altitude annunciator XG-1A When the cabin altitude exceeds 11482.94 ft (3500 m), both the cockpit warning bell and the cargo cabin air horn start ringing, and the cabin altitude oxygen warning lights (one for each aircrew member, one at the left and right of the rear web in frame 9 respectively, and one on the cargo cabin instrument panel) start blinking, prompting personnel on aircraft to use oxygen equipment. To make the bell and horn stop ringing, press the RELEASE buttons on the cockpit central instrument panel and cargo cabin oxygen instrument panel. The oxygen annunciator is blinking all the time. The cargo cabin air horn is ringing only after the engine pressure control/shutoff valve is turned on. Pre-flight check on the oxygen equipment (a) Turn on OXYGEN SOURCE COCK (oxygen supply valve) YK-3A at the left of frame 9 in the cockpit and OXYGEN SOURCE COCK (oxygen supply valve) YK-6 on the small instrument panel of the cargo cabin at the left of frame 31. Check that readings of YTQ-21/1 and OXYGEN SOURCE PRESSURE (oxygen supply pressure) on the cargo cabin instrument panel fall within the range of 1847.78 psi~2133.51 psi (12.74 MPa~14.71 MPa). The readings cannot be lower than 1421.37 psi (9.8 MPa); otherwise, flight mission requirements cannot be met. (b) Turn on the valve of the moveable oxygen bottle. Then, check that the oxygen pressure falls within the range of 355.34 psi~426.41 psi (2.45 MPa~2.94 MPa). (c) Check whether oxygen supply conditions of oxygen pressure regulators YTQ-21/1 and YTQ-11 are normal.
  • 369.
    JZ-Y8F200W-02 AIRCRAFT FLIGHT MANUAL SECTIONVI AIRCRAFT SYSTEM EQUIPMENT 6-81 June 30, 2012 Operation of the oxygen system in air When the cabin altitude reaches over 11482.94 ft (3500 m) or pressure reduces quickly because the airtight cabin pressurization system is inoperative, the cabin altitude oxygen warning light starts blinking, and the warning bell and horn start ringing. In this case, aircrew and passengers should use the oxygen equipment immediately. The pilot should fly the aircraft down to the safe altitude emergently when necessary. Using oxygen by aircrew (a) The mechanic turns on OXYGEN SOURCE COCK (oxygen supply valve) YK-3A in the cockpit before flight, and check the oxygen pressure of oxygen pressure regulator YTQ-21/1 for each aircrew member. When the oxygen warning bell starts ringing and the oxygen warning light starts blinking, turn on the oxygen valve on YTQ-21/1, and connect and wear the oxygen mask to start breathing oxygen. (b) Check the reading of the pressure gauge on the regulator. The air mechanic checks oxygen consumption according to the pressure gauge. If oxygen is insufficient or other accidents occur (for example, aircraft flying through the poisonous area), set the air inlet switch on YTQ-21/1 at the PURE OXYGEN position or turn on the emergency oxygen supply valve to breathe pure oxygen. Using oxygen by passengers (a) The mechanic turns on the two OXYGEN SOURCE COCK (oxygen supply valves) YK-6 on the small instrument panel in the cargo cabin at the left of frame 31 before flight. When the oxygen horn starts ringing and warning light starts blinking, take out the oxygen mask and power on flow indicator YSL-3/1 to start breathing oxygen. All oxygen masks for paratroopers are placed in parachute holders on paratrooper seats at both sides of the cargo cabin. (b) Check the pressure of the oxygen supply pressure gauge on the cargo cabin instrument panel at the left of frame 30 periodically. If the pressure is lower than 426.41 psi (2.94 MPa) or the system is faulty, inform the captain immediately to fly the aircraft down to a safe altitude below 11482.94 ft (3500 m). (c) Using moveable oxygen bottles (1) When it is required to use a moveable oxygen bottle, put the moveable oxygen bottle on back, connect the mask hose to the union, turn on the oxygen valve, and wear the oxygen mask. Oxygen pressure regulator YTQ-5 can automatically regulate the oxygen supply quantity according to the flight altitude. (2) If oxygen is required in special cases or the oxygen quantity is found insufficient, turn on the emergency oxygen supply valve on the regulator.
  • 370.
    JZ-Y8F200W-02 AIRCRAFT FLIGHT MANUAL SECTIONVI AIRCRAFT SYSTEM EQUIPMENT 6-82 June 30, 2012 (3) Pay attention to the pressure inside the bottle in real time. When the pressure inside the bottle is lower than 85.28 psi (0.588 MPa), if oxygen is still required, charge oxygen using the oxygen charging hose on the cargo cabin instrument panel. During oxygen charging, connect the oxygen charging hose. Then, turn on OXYGEN CHARGING COCK (oxygen charging valve) YK-4B on the cargo cabin instrument panel. When the oxygen charging pressure reaches 426.41 psi (2.94 MPa), stop charging oxygen and turn off the oxygen charging valve. Oxygen duration calculation t= In the preceding formula: P=Pressure inside the bottle (MPa) 2.942=Remaining pressure inside the bottle (MPa) V=Oxygen bottle capacity (L/bottle) i=Number of oxygen bottles (number) g=Oxygen quantity supplied to each person (L/min·person) n=Total number of persons requiring oxygen (number) 5.88=Pressure conversion coefficient (MPa) t=Oxygen supply duration during flight (h) Oxygen charging precautions (a) Before oxygen charging, check whether the oxygen has the breathing oxygen certificate. During oxygen charging, connect aircraft to the bonding jumper and ground oxygen supply, and turn on the oxygen charging valve. After oxygen charging, fill the oxygen charging date and pressure in the aircraft logbook. (b) Refueling, defueling, and power-on are prohibited during oxygen charging. (c) Charge oxygen with special tools. It is prohibited to contact the oxygen system using tools and rag with oil stains. (d) Hands and clothes of the personnel for charging oxygen must keep clean without oil stains. (e) The oxygen charging pressure depends on the ambient temperature and should not exceed the pressure specified in Table 6-9. (P-2.942) v•i 5.88g•n
  • 371.
    JZ-Y8F200W-02 AIRCRAFT FLIGHT MANUAL SECTIONVI AIRCRAFT SYSTEM EQUIPMENT 6-83 June 30, 2012 Table 6-9 Mapping between temperature and pressure Temperature Pressure of the High-pressure Oxygen Bottle Pressure of the Moveable Oxygen Bottle 122o F(50o C) 2375.72psi(16.38MPa) 477.18psi(3.29 MPa) 113o F(45o C) 2346.71psi(16.18MPa) 469.92psi(3.24MPa) 104o F(40o C) 2304.65psi(15.89MPa) 462.67psi(3.19MPa) 95o F(35o C) 2275.65psi(15.69MPa) 455.42psi(3.14MPa) 86o F(30o C) 2233.59psi(15.40MPa) 448.17psi(3.09MPa) 77o F(25o C) 2204.58psi(15.20MPa) 440.92psi(3.04MPa) 68o F(20o C) 2162.52psi(14.91MPa) 433.66psi(2.99MPa) 59o F(15o C) 2133.51psi(14.71MPa) 426.41psi(2.94MPa) 50o F(10o C) 2104.50psi(14.51MPa) 419.16psi(2.89MPa) 41o F(5o C) 2062.44psi(14.22MPa) 411.91psi(2.84MPa) 32o F(0o C) 2033.43psi(14.02MPa) 406.11psi(2.80MPa) 23o F(-5o C) 1991.37psi(13.73MPa) 398.85psi(2.75MPa) 14o F(-10o C) 1962.36psi(13.53MPa) 391.60psi(2.70MPa) 5o F(-15o C) 1934.81psi(13.34MPa) 384.35psi(2.65MPa) -4o F(-20o C) 1905.80psi(13.14MPa) 377.10psi(2.60MPa) -13o F(-25o C) 1863.74psi(12.85MPa) 369.85psi(2.55MPa) -22o F(-30o C) 1820.23psi(12.55MPa) 362.60psi(2.50 MPa) -31o F(-35o C) 1792.67psi(12.36MPa) 355.34psi(2.45 MPa) -40o F(-40o C) 1763.66psi(12.16MPa) 348.09psi(2.40 MPa) -49o F(-45o C) 1721.60psi(11.87MPa) 340.84psi(2.35 MPa) -58o F(-50o C) 1678.09psi(11.57MPa) 335.04psi(2.31 MPa)
  • 372.
    JZ-Y8F200W-02 AIRCRAFT FLIGHT MANUAL SECTIONVI AIRCRAFT SYSTEM EQUIPMENT 6-84 June 30, 2012 FLIGHT CONTROL SYSTEM Control system General The aircraft control system consists of the primary control system and secondary control system. The aircraft primary control system consists of the rudder, elevator, and aileron control systems. Deflect the rudder, elevator, and aileron can make the aircraft yaw, pitch, and roll. KJ-6CII autopilot's hydraulic control actuator is installed in the primary control system to receive the control signal transmitted from the autopilot. The aircraft secondary control system consists of trim tab control systems for the rudder, elevator, and aileron, rudder spring tab control system, aileron balancing tab control system, flap control system, and parking brake system. To increase the lift force during takeoff and landing and shorten the takeoff and landing run distance, the flap control system is installed on the aircraft. To prevent the control mechanism from abrading because wind blows the moveable control surface when aircraft is parked on the ground, the parking brake mechanism is installed on aircraft. Control System Functions Elevator control system The elevator control system applies push-pull rod control. The left and right control sticks serve as the elevator control mechanism. When the control stick leans 1o backward, the elevator is at the neutral position; when the control stick leans 12o forward, the elevator deflects 15o ±1o downwards; when the control stick leans 21o backwards, the elevator deflects 28o ±1o upwards.
  • 373.
    JZ-Y8F200W-02 AIRCRAFT FLIGHT MANUAL SECTIONVI AIRCRAFT SYSTEM EQUIPMENT 6-85 June 30, 2012 The lower rocker arms of the left and right control sticks are connected to the rocker arm group under the floor in the cockpit in front of frame 9 through the lever and rocker arm. After convergence, the lever is placed vertically upwards in front of frame 9 and then connected with the lever on the lever guide seat at frame 13 through the horizontal lever. Then, the control linkage extends backwards along the left of the fuselage center line through the guide pulley base and is connected with the lever on the airtight joint at frame 59. The lever is then connected with the double-lug rocker arm on the control actuator bracket at frame 62. The front of the elevator control rocker arm on the control actuator bracket is connected with the rocker arm at frame 59 through the lever and is connected with the control actuator through the bolt. The control actuator feedback sensor is installed on the control actuator bracket and is connected with the double-lug rocker arm through the small lever. A lock nest for parking brake is installed on the other end of the double-lug rocker arm. The left and right rocker arms on the rocker pipe are connected respectively using the lever and rotating shaft flanges on the two elevators at the rear frame 65. The elevator control system is located on the combined bracket under the floor in the cockpit at the rear of frame 5 and it is equipped with the adjustable stop pin. When the elevator deflects 15o ±1o downwards, the rocker arm should touch the stop pin. The stop pin is used to limit the forward tilt degree of the control stick to prevent the control stick from striking the instrument or instrument panel. The middle primary rocker arm in the rocker arm pipe in front of frame 65 and left rocker arm are respectively stopped by the upper and lower two stop pins installed on the structure so that the elevator's limiting deflection angle can be limited. Rudder control system The rudder control system applies push-pull rod control. Two pairs of pedals on the pilot and copilot foot consoles serve as the rudder control mechanism. When the right pedal is pushed forward, the rudder deflects rightwards; when the left pedal is pushed forward, the rudder deflects leftwards.
  • 374.
    JZ-Y8F200W-02 AIRCRAFT FLIGHT MANUAL SECTIONVI AIRCRAFT SYSTEM EQUIPMENT 6-86 June 30, 2012 The rudder control linkage is led from the tri-arm rocker on the left and right foot consoles. The rudder control linkage is converged with the left and right linkages through the lever and rocker arm and then installed on the rocker arm group under the floor in the reinforced cabin in front of frame 9. Then, the linkage extends to the tri-arm rocker on the control actuator bracket in front of frame 62 along the line parallel with the elevator control system. Another arm of this rocker arm is connected with the tri-arm rocker on the upper side of frame 62 using a vertical lever and is connected with the rocker arm on the lower part of the rudder rotating shaft using a horizontal lever. The rocker arm shaft is connected with the rudder pipe shaft through a universal joint. The rudder pipe shaft is supported in the bearing fixed on rib 4 of the rudder. A double-arm rocker is fixed on the upper end of the pipe shaft. One of its arms is connected with the bracket on the rudder using the spring lever, and the other arm is connected with the lug of the spring tab using the lever. When pushing the left and right pedals, the double-arm rocker fixed on the pipe shaft will be driven to rotate, and the rudder will be driven by the spring lever to deflect around its own suspending axis. The rudder pipe shaft axis is coaxial with the rudder rotating axis. The rudder control actuator and elevator control actuator are together installed on the control actuator bracket in front of frame 62. The control actuator is connected with the third arm of the tri-arm rocker. The control actuator feedback sensor is also installed on the bracket and connected with the tri-arm rocker. A rudder deflection angle limiter is installed on the fuselage tail section platform. The control rocker arm of the rudder plate valve in the nose wheel turn mechanism is connected with the double-arm rocker under frame 9 using the adjustable lever. The other arm of the double-arm rocker is connected to the rocker arm group under the floor in the cockpit in front of frame 9 using the spring lever. When aircraft is taxiing on the ground with a high speed, push the pedal to deflect the rudder. The rocker arm drives the rudder plate valve to operate using the spring lever. At this time, the spring of the spring lever does not deform, and the spring lever length remains unchanged. When the rudder plate valve is stuck, control the rudder so that the spring lever length is changed. Then, the rudder control system can operate properly. Aileron control system The aileron control system applies combined control. Noiseless chains are located inside the left and right control wheels. Cable flexible control is applied between the noiseless chains and the sector rocker arm on the floor in the cockpit, while push-pull rod control is applied on other parts. The control wheels on the left and right control sticks serve as the aileron control mechanism. When the control wheel deflects 125o ±3o leftwards, the left aileron deflects 25o ±1o upwards, while the right aileron deflects 15o+2 o -1 o downwards; when the control wheel deflects 125o ±3o , the ailerons deflect to the opposite directions.
  • 375.
    JZ-Y8F200W-02 AIRCRAFT FLIGHT MANUAL SECTIONVI AIRCRAFT SYSTEM EQUIPMENT 6-87 June 30, 2012 Two cables are led from the lower arm of each control stick. They are connected to the sector rocker arm installed on the floor in the cockpit after passing through the pulley. By using the lever and rocker arm, the left and right control linkages are converged on the rocker arm group under the floor in front of frame 9. Then, the linkages are extended to the rocker arm in front of spar I on the center wing along the line parallel with the elevator and rudder control systems. The lever is connected with the lower rocker arm on the aileron vertical axis at the rear of spar II through the passage between spars I and II on the center wing. A lock nest for parking brake is installed on the lower rocker arm. The included angle between upper and lower rocker arms on the vertical axis is 90°. Levers are extended from the left and right sides of the upper rocker arm and are then led to the left and right ailerons along the rocker arm and guide pulley base at the rear of spar II on the wing. To improve the lateral controllability when aircraft is at the high angle of attack and enhance the aileron effect, four spoilers are installed between rib 13~15 on the wing. The spoiler control is linked with aileron control. Secondary control system Trim tabs of the rudder, elevator, and aileron have control systems independent of the rudder, elevator, and aileron. These systems are used to balance or eliminate forces acted on the pedal, control stick, and control wheel when aircraft is in diverse flight attitudes. The rudder spring tab and aileron tab are balancing tabs. The aileron tab can automatically deflect to the direction opposite to the aileron deflection direction when aileron deflects so that the control force on the control wheel can be alleviated. The rudder spring tab starts deflecting after the force on the pedal exceeds 147 N so that the control force on the pedal can be alleviated. Flap control Flap control applies hydraulic control. Flap extension and retraction are implemented by reciprocating motion of the two flap retraction/extension mechanisms at rib 5 and rib 11. The flap retraction/extension mechanisms are driven by the hydraulic motor on spar II of the center wing. The hydraulic motor driving device is connected with the flap retraction/extension mechanisms through driving rods. The driving rods are connected with the universal joint and are laid along spar II on the wing. The flap retraction/extension angle is indicated on the flap location indicator on the central instrument panel. The location indicator sensor is installed together with the flap location mechanism on the cargo cabin ceiling at the rear of spar II on the center wing. The angle indicated by the location indicator should match the actual flap deflection angle. An error is allowable. When the flap is extended by 25o or 35o , the allowable error is ±1o ; when the flap is extended by 45o , the allowable error is ±2.6o .
  • 376.
    JZ-Y8F200W-02 AIRCRAFT FLIGHT MANUAL SECTIONVI AIRCRAFT SYSTEM EQUIPMENT 6-88 June 30, 2012 The flap location control switch is installed on the central instrument panel. When the pilot set the switch to the retraction or extension position, the flap will deflect to the retraction or extension limit position. When the flap reaches its limit position, the location mechanism automatically cuts off the flap control circuit. At this time, oil supply to the hydraulic motor is stopped, and the flap stops at the retraction or extension limit position. If the flap is extended to any middle positions, set the control switch to the NEUTRAL position. The circuit of the electromagnetic valve is cut off. At this time, hydraulic transmission is braked. The flap can stop at any middle positions reliably. During takeoff, extend the flap by 25o . When the flap angle does not fall within the range of 23o ~27o , the warning bell in the cockpit should ring. During landing, extend the flap by 35o . The structure design allows a maximum flap extension angle of 45o . At this time, use the hand pump or electrical pump to extend flaps. The throw difference of left and right flaps during extension cannot exceed 2o . Extending flaps by 35o ±1o on the ground will take 15s~20s. Parking brake system control The parking brake system is a control system used to lock the elevator, rudder, and aileron by cables using the handle when aircraft is parking on the ground. The parking brake system is used to lock the elevator, rudder, and aileron when aircraft is parking on the ground, preventing the control surface and control system driving mechanism from being damaged due to control surface swing under the wind condition. At the same time when the parking brake system locks all control surfaces, it interlocks with the engine throttle lever. At this time, the travel of the engine throttle lever is limited at the small throttle position to prevent dangers when the pilot controls aircraft to take off without unlocking the control surface lock, and to reduce the pilot's control force when aircraft is taxiing under the gale condition. When the control surface is locked and the throttle lever is set at the small throttle position, the ground taxiing need can be met. During parking brake on the ground, the rudder and aileron are locked at the neutral position. At this time, the pedal and control wheel should be at the neutral position. The elevator is locked at the lower limit position to prevent aircraft from nosing up under the gale condition. At this time, the control stick should be at the front limit position. When the control surface is locked, the brake mechanism handle leans forward at the locking position.
  • 377.
    JZ-Y8F200W-02 AIRCRAFT FLIGHT MANUAL SECTIONVI AIRCRAFT SYSTEM EQUIPMENT 6-89 June 30, 2012 KJ-6CII Electrohydraulic Autopilot System General KJ-6CII autopilot is an automatic control system that controls the aircraft flight attitude. By using the autopilot, the pilot can control aircraft to: Keep the level flight attitude. Rise or glide with a specified pitch angle. Turn along the specified course or with a specified bank angle. Fly along the specified track. In addition, the autopilot helps the pilot stabilize the flight altitude and control the flight quality with high precision in a long term. The autopilot can implement the following tasks: (a) Control the flight course or track according to control signals given out by navigation devices such as the attitude-heading reference system (AHRS) and the navigation computer. (b) Maintain the aircraft stability along the three axes. Maintain the flight altitude and preset heading, course, and track. Implement coordinated turning, climbing, gliding, and turn with a banking angle less than 30o . (c) Level off the aircraft from any flight attitudes with a banking angle less than ±30o and pitch angle less than ±14o . (d) The autopilot can be powered on when aircraft is at any heading and at any flight attitudes with a banking angle less than ±30o and pitch angle less than ±14o . The original flight attitude remains unchanged after the power-on. (e) When the autopilot is powered on with the LEVEL-OFF button, aircraft can automatically fly in a rectilinear flight attitude. After the LEVEL-OFF FROM TILT button is pressed, aircraft can be leveled off from the banking attitude with the pitch attitude unchanged. (f) When the autopilot is faulty, the pilot can control aircraft forcibly or press the EMERGENCY SHUTOFF button to power off the autopilot, ensuring the flight safety.
  • 378.
    JZ-Y8F200W-02 AIRCRAFT FLIGHT MANUAL SECTIONVI AIRCRAFT SYSTEM EQUIPMENT 6-90 June 30, 2012 Simplified Technical Performance (a) Power supply: DC 28V±2.7V AC Three-phase 36×(1+5%)V,400Hz±5% (b) Consumption power: DC ≯150W AC Three-phase 36V,≯500VA (c) 15# aviation hydraulic:Pressure: 5.88~20.60MPa (60~210kg/cm2 ) Maximum hydraulic consumption:16.5L/min (d) Preparation duration: ≯18s (e) Heading holding precision: ±1o relative to the heading reference) (f) Banking angle holding precision: ±0.5o (g) Pitch angle holding precision: ±0.5o (h) Altitude holding precision: ±65.62ft (±20m) (i) The autopilot can be powered on when aircraft is flying with a banking angle of ±27.5o ±2.5o and a pitch angle of ±14o ±2o (j) Turning banking angle: Less than ±30o when the pilot's control handle is used. Less than ±20o when the navigator's control knob is used. (k) Pitch angle control range: 14o ±2o (Only the pilot can control.) (l) Maximum control speed when the pilot's control handle is used: Banking control: 3o ±0.5o /s Pitch control: 1.2o ±0.4o /s (m) Level-off speed: Speed of level-off from banking: 4o ±1.0o /s Speed of level-off from pitching: 1.2o ±0.3o /s The output force of the control actuator is not greater than 342+33.05 -66.09 lbf [(1520+147 -294 )N].
  • 379.
    JZ-Y8F200W-02 AIRCRAFT FLIGHT MANUAL SECTIONVI AIRCRAFT SYSTEM EQUIPMENT 6-91 June 30, 2012 (n) Forced control force (See Table 6-10). Table 6-10 Forced control force Component Forced Control Force (N) Forced Control Force (lbf) Control wheel 157~294 35.30~66.09 Control stick 245~441 50.08~99.14 Pedal 392~588 88.13~132.19 Operation Precautions The autopilot can be powered on only when: The flight altitude is higher than 3280.84ft (1000 m). The flight indicated air speed is larger than 172.79kn (320 km/h). The turbulent flow condition is medium or below. (a) Used by the pilot (1) Balance the aircraft using the adjustment tab. (2) Turn on the electromagnetic valve switch on the circuit breaker board. Check that the operating pressure of the right hydraulic system is greater than 2132.06psi (14.7MPa). (3) Check that the HORIZON switch on console CZT-6B is at the ON position. See Figure 6-14. (4) Set the POWER-OFF switch on console CZT-6B at the POWER position. The READY yellow light should be on within 18s.
  • 380.
    JZ-Y8F200W-02 AIRCRAFT FLIGHT MANUAL SECTIONVI AIRCRAFT SYSTEM EQUIPMENT 6-92 June 30, 2012 Figure 6-14 Console CZT-6B of the autopilot (5) Press the CONNECT button on the autopilot. The CONNECT green light should be on. At this time, the control stick, control wheel, and pedal should have brake force. (6) Press the ALTIMETER button on console CZT-6B. The green light should be on. At this time, the system accesses the altitude- holding status. The aircraft fly within ±65.62ft (±20m) of the instantaneous altitude at the moment of altitude-holding access. (7) After the autopilot is powered on, the pilot can release the control stick. Under the control of the autopilot, aircraft can fly in the level attitude stably. When the flight attitude needs to be changed, the pilot can use the control handle to control aircraft. When the pilot pushes the handle forward, pulls it backward, and moves it leftward or rightward, the aircraft also noses down, noses up, and banks leftward or rightward. The speed that the flight attitude changes depends on the handle control amplitude. The maximum banking angle that the pilot controls aircraft by using the control handle cannot exceed 30o .
  • 381.
    JZ-Y8F200W-02 AIRCRAFT FLIGHT MANUAL SECTIONVI AIRCRAFT SYSTEM EQUIPMENT 6-93 June 30, 2012 (8) When aircraft is at the banking and pitching attitude, the LEVEL-OFF button can be pressed. At this time, the aircraft automatically levels off. Note After this button is pressed, if the pilot needs to control aircraft by using the control, press the CONNECT button again; otherwise, handle control does not take effect. (b) Used by the navigator: (1) Set the PILOT-NAVIGATOR changeover switch on console CZT-6B at the NAVIGATOR position. The light should be on. The navigator can use CN-1B navigator turning knob to control the aircraft to turn. If the knob is turned to the L position, the aircraft turns leftward; if the knob is turned to the R position, the aircraft turns rightward. When the banking angle is required, stop control. The aircraft performs turning with the banking angle. To exit turning, turn the knob back to the CENTER position. After the knob returns to the CENTER position, the heading signal is automatically received. To avoid the adverse roll when the heading signal is received, turn the knob back to the CENTER position slowly. It is better to stop 2s before it approaches the neutral card slot. (2) The navigator can control only the flight heading. The flight altitude is still controlled by the pilot. (c) When engines are shut down in air, autopilot power-on is prohibited. After the autopilot is powered on, manual control over the adjustment tab is prohibited in the three channels. During the long-term flight, the autopilot should be powered off periodically and then powered on after aircraft is balanced by using the adjustment tab. This can prevent great elevator jitter occurs when the autopilot is powered off due to changes on the aircraft's center of gravity, speed, and altitude. (d) When the aircraft speed change exceeds the range of 27.00~32.40kn (50 km/h~60 km/h), power off the autopilot, rebalance the aircraft, and then power on the autopilot again. (e) When GPS, INS, or AP status (see Figure 6-15) is selected as the automatic navigation signal and the flight mode is heading stabilization or track stabilization, it is prohibited to change the AHRS operating status. If the AHRS operating status needs to be changed, power off the autopilot. (The changeover circuit is laid onboard. Therefore, when KJ-6CII autopilot is in AP state and the AHRS performs fast erection, the heading signal will automatically returns to zero. At this time, the autopilot cannot be powered off.)
  • 382.
    JZ-Y8F200W-02 AIRCRAFT FLIGHT MANUAL SECTIONVI AIRCRAFT SYSTEM EQUIPMENT 6-94 June 30, 2012 Figure 6-15 Automatic navigation signal selection In-air Autopilot Adjustment (a) To ensure the flight attitude when the autopilot is used, the pilot can adjust the centering potentiometer on the console as required. (b) During flight, if the adverse roll after level-off is great and the control speed and level-off speed do not meet technical requirements, power off the autopilot. Adjust the number of potentiometer grids of CONTROL SPEED, LEVEL-OFF SPEED and 141 AMPLITUDE on the flight control box. (c) During in-air adjustment, adjustment of the RUDDER DEFLECTION potentiometer is prohibited. Crosslinking Between the Autopilot and Navigation Devices General KJ-6CII autopilot is interconnected with HZX-1M AHRS, HG-593Y8 laser strapdown inertial/satellite integrated navigation system, and 2101 I/O global positioning system (hereinafter referred to as GPS) respectively. When the autopilot is interconnected with HZX-1M, it is called the AP status, in which automatic heading keeping flight can be implemented. When the autopilot is interconnected with HG-593Y8, it is called the INS status, in which automatic preset track keeping flight can be implemented. When the autopilot is interconnected with the GPS, it is called the GPS status, in which automatic preset track keeping flight can be implemented. The crosslinking schematic diagram is shown in Figure 6-16.
  • 383.
    JZ-Y8F200W-02 AIRCRAFT FLIGHT MANUAL SECTIONVI AIRCRAFT SYSTEM EQUIPMENT 6-95 June 30, 2012 Enabling the AP Status To use the AP status initially, there is no need to press the AP button (installed on the navigator's instrument panel). See Figure 6-16. Instead, the AP status is enabled when the autopilot is powered on. If the AP status light is on, it indicates that the AP status is enabled. When the READY yellow light on the autopilot console is on, the AP status light is also on. At this time, however, the heading stabilization signal and heading integration signal have not been transmitted to the autopilot. They are transmitted to the heading channel of the autopilot only when the CONNECT green light on the console is on. To change the status from INS or GPS to AP, press the AP button. After the AP button is released, the AP status light is on. KJ-6CII autopilot system Automatic navigation signal select Green Green Green GPS AP INS HZX-1M AHRS ELH-2 Heading linkage box HG-593Y8 Laser strapdown inertial/satellite integrated navigation system Free Flight 2101 I/0 GPS I/O GPS Navigation system relay box Figure 6-16 Schematic diagram of crosslinking between the autopilot and automatic navigation systems Enabling the INS Status To enable the INS status, press the INS button that is installed on the navigator's instrument panel. See Figure 6-15. Then, the INS status light is on and the AP status light is off. If the INS status light does not turn on, find the cause. If it is due to a navigator component failure, the INS status cannot be used.
  • 384.
    JZ-Y8F200W-02 AIRCRAFT FLIGHT MANUAL SECTIONVI AIRCRAFT SYSTEM EQUIPMENT 6-96 June 30, 2012 Enabling the GPS Status To enable the GPS status, press the GPS button that is installed on the navigator's instrument panel. See Figure 2. Then, the GPS status light is on and the light for the previous status selected is off. If the GPS status light does not turn on, find the cause. If it is due to a GPS component failure, the GPS status cannot be used. After the GPS status is selected, to change the flight plan on the GPS, disconnect 2101 I/O GPS from the autopilot temporarily. After the operation is complete, reconnect 2101 I/O GPS to the autopilot. Operation Precautions (a) When both the left and right systems of HZX-1M onboard are faulty, autopilot operation is prohibited. (b) In INS status, if the aircraft attitude changes abruptly because HG-593Y8 does not operate properly, power off the autopilot or perform manual forcible control immediately to level off the aircraft. Navigation System Strapdown Inertial/Satellite Integrated Navigation System HG-593Y8 General The strapdown inertial/satellite integrated navigation system is a subsystem of the aircraft, with one set for a single unit and the model of HG-593Y8. The strapdown inertial/satellite integrated navigation system utilizes the pure inertial combination of GPS/GLONASS (GNSS) to realize binary positioning, provides other onboard equipment with high-accuracy position, true/magnetic heading, attitude, speed, angular rate, wind speed, wind direction and other navigation parameters in the integrated navigation mode and crosslinks with automatic flight control system to realize automatic navigation. Besides, the system embodies functions such as self-check, position correcting, position memorizing, nonvolatile storing and setting up, etc. It also has external excitation interfaces. Here are the details: (c) By adopting the laser strapdown inertial navigation system and being inserted with GNSS satellite navigation receiver, it forms the inertial /satellite integrated navigation system. (d) The inertia navigation part adopts laser gyroscope and flexible accelerometer, which constitutes the strapdown inertia navigation system which is capable of establishing inertia navigation standard by way of mathematical analysis. (e) By navigation digital computation in combination of inertia navigation information and GNSS positioning information, it can provide combination navigation information with high precision.
  • 385.
    JZ-Y8F200W-02 AIRCRAFT FLIGHT MANUAL SECTIONVI AIRCRAFT SYSTEM EQUIPMENT 6-97 June 30, 2012 (f) There are three navigation statuses, namely, inertia/GNSS, pure inertia and GNSS, among which the GNSS navigation is only employed automatically by the system when there is failure for inertia navigation system under combination navigation condition. (g) The system can realize normal compass alignment, fast compass alignment and heading storage alignment. (h) Parameter binding, operating status selection and comprehensive display of navigation information can all be realized through status selector and controlling display. (i) Crosslinking between data bus and weather radar, flight data recording system and ground proximity warning system, it can provide such as position, speed, angular speed, acceleration, true/magnetic heading, attitude, wind speed, wind direction, navigation direction and other real time information about the aircraft accurately. It is one of major information sources for the aircraft. (j) It has functions such as position correction, identification memorizing, self-test and non-volatile memory, etc. It also has external simulated excitation interfaces. (k) With the function of manual and automatic heading altering, the system can realize automatic navigation and navigation with selective course by crosslinking of flight control system. (l) The system can be corrected manually for position. (m) The system can memorize and provide position information of 4 indifferent points. (n) The system can realize manual or automatic binding of flight plan data, to be more specific, 28 waypoints. (o) The system has the function of self-calibration. (p) It has the function of self-test, which can provide error warning and warning signals for the operating equipment. (q) The system embodies the function of non-volatile memory. (r) The turn prediction light suggests aircraft in turning or arrival of a certain waypoint. (s) The system can receive relative information about air data computer through the HB 6096-1986 data bus and then calculates air pressure, altitude, wind speed and wind direction of outlet inertia in altitude channel of damping inertia navigation. (t) In test status, the system can output fixed parameter of data such as longitude, latitude, true heading, pitch angle, roll angle, ground speed and deflection angle. It can also output analog fixed parameter such as control signal and off-course distance. (u) In the process of alignment and navigation, the system can display GNSS position and GNSS time.
  • 386.
    JZ-Y8F200W-02 AIRCRAFT FLIGHT MANUAL SECTIONVI AIRCRAFT SYSTEM EQUIPMENT 6-98 June 30, 2012 System composition System composition of laser inertia navigation system refers t Table 6-11. Table 6-11 Composition of laser inertial navigation system S/N Nomenclature Type No. No. of a single set Installation position Remarks 1 Inertia navigation component 6193Y8 1 Under pilot console 2 Inertia navigation component support 6293A1 1 Under pilot console 3 Status selector 6463Y8 1 Navigator instrument panel 4 Control display 6363Y8 1 Navigator instrument panel 5 GNSS aviation antenna YW11-53 1 Frames 9~10 at the top of aircraft 6 Antenna feeder 1 1 m 7 Associated plug 1 set Principal technical data Electrical requirements (a) Aligning time: See Table 6-12 Table 6-12 Aligning time Alignment manner Regular compass alignment Quick alignment Aligning time 8 2.5
  • 387.
    JZ-Y8F200W-02 AIRCRAFT FLIGHT MANUAL SECTIONVI AIRCRAFT SYSTEM EQUIPMENT 6-99 June 30, 2012 (b) Pure inertial navigation accuracy: See Table 6-13 Table 6-13 Pure inertial navigation accuracy Item Alignment manner Normal compass alignment Positioning accuracy Within 1 h of navigation CEP 0.8 nmile/h Within 4 h of navigation 95% CEP 2.0 nmile/h Speed accuracy Within 2 h of navigation RMS 0.8 m/s After 2 h of navigation RMS 2.0 m/s Attitude accuracy - RMS ≤0.1o True heading accuracy Within 1 h of navigation RMS ≤0.1o Within 2 h of navigation RMS ≤0.15o (c) Integrated navigation exactness: see Table 6-14 6-14 Integrated navigation exactness Combination navigation Inertia/GNSS Position ≤50 m(RMS) Speed ≤0.5 m/s(RMS) True heading Same with pure inertia Attitude Same with pure inertia
  • 388.
    JZ-Y8F200W-02 AIRCRAFT FLIGHT MANUAL SECTIONVI AIRCRAFT SYSTEM EQUIPMENT 6-100 June 30, 2012 Power supply for system Purposes of power and consumption requirements of the inertial navigation system 593Y8 are shown in Table 6-15. Table 6-15 Power and consumption of an inertial navigation system set Power type Purpose Consumption Start-up (below 5s) Normal operation 28V DC Major power of the inertial navigation system. ≤250 W ≤150 W Battery 24V DC Continuous power (when the 28 V DC suddenly fails, the 24 V battery can sustain operation of the system for 30 s. ≤150 W Single-phase 36V/400Hz Crosslinking with the pilot. ≤25 VA Operation Ventilation When the inertial navigation system 593Y8 operates, ventilation or cooling is not required. Display and control units The status selector and control display of the system are the medium for the information exchange between the system and pilots and are the principal object realizing man-aircraft dialogue for the system. Pilot's operation on the status selector can realize the whole control from alignment to navigation. And the maintenance staff can also realize setting-up periodically for the system through status selector. Operation on the control display can realize the following: various navigation information display, heading-alternation or navigation modes choosing, searching or sending waypoint data, position correction and position memorizing etc. Both are installed on navigator auxiliary instrument panel. There are display, band switch, buttons and indicating lights on status selector and control display for the purpose of displaying and operation. Besides, interface for quick and rapid transmission of flying plan is also available.
  • 389.
    JZ-Y8F200W-02 AIRCRAFT FLIGHT MANUAL SECTIONVI AIRCRAFT SYSTEM EQUIPMENT 6-101 June 30, 2012 (a) Status selector Status selector controls the basic operating status for the system, starts the system and chooses operating status for the system before flying. Appearance of status selector panel is shown in Figure 6-17. To realize choices of each operating status of the system, the status selector adopts two band switches, one being the start-up and the other status choosing. The locking function of the two switches can avoid wrong operation in the space. Internal lighting is available for the status selector. OFF ON TEST 8TY FA ALI NAV Figure 6-17 Status selector panel (1) Start-up switch a) OFF: disconnecting power for the system. b) ON: connecting power for the system and the system starts to operate on power connecting. (2) Status choosing switch a) TEST: the system output fixed value for crosslinking test in form of analog and statistics. b) Ready (BIY): waiting for choosing operating status; c) Fast alignment (FA): the system proceeds storing heading alignment. d) Alignment (ALI): the system proceeds gyroscope compass alignment. e) Navigation (NAV): the basic operating status of the system, available to display and output various navigation parameters. Now the switch is locked to avoid accidental handling with the tap position during flight. In dealing with the knob I of status selector, properly lift the knob outwardly, and then turn to another tap position. While in coping with knob II, lift the knob outwardly when turning to or shifting from navigation position. Then turning could be continued.
  • 390.
    JZ-Y8F200W-02 AIRCRAFT FLIGHT MANUAL SECTIONVI AIRCRAFT SYSTEM EQUIPMENT 6-102 June 30, 2012 (b) Control display unit (CDU) Main functions of CDU are as following: input and display for the system, reading navigation parameters, overflying point correction and indifferent point memorizing etc. CDU panel of the system is shown in Figure 6-18. CHL MOD DISP STA MNEM RET FAUL FLY PLAN LIAD MENU 1 2N 4W 7+ 5 8S 9- 6E 3 CLE 0 ENTER Figure 6-18 Control display unit panel (1) Display The control display unit can display navigation parameter, operating status, flying plan etc. And the utmost display line limit is 6. Line 1~5 displays information such as navigation parameter and flying plan, allowing 3 lines of characters of 5 lines of letters or numbers. The last line is the status bar, which displays the executing time with the unit of 10 s, status number, error code, status hint, total time of start-up with the unit of minute and permissible navigation hint under statuses of BIY, FA, and ALA. Under navigation status, navigation status hint, error code, head-altering mode, stage of flight and head-altering hint are displayed.
  • 391.
    JZ-Y8F200W-02 AIRCRAFT FLIGHT MANUAL SECTIONVI AIRCRAFT SYSTEM EQUIPMENT 6-103 June 30, 2012 (2) Keys a) Head-altering (CHL): choosing manual head-altering, turning passing through the check point and tangent turning. b) Status (STA): combination of inertia/GNSS and choosing pure inertial navigation status. The default status is combination. One press would change to pure inertial and the two alternate. c) Correction (COR): correction of overflying point. d) Memory (MNEM): manually memorizing indifferent targets. e) Display (DISP): reading parameters of the system. f) Return (RET): finishing or stopping a certain operation and return to normal display status of the system. g) Brightness (BRT): displaying brightness adjustment. There are altogether 4 tap positions. The default mode is the brightest. Each press will be an inferior lightness choosing. And the 4 positions go in a circular way. h) ↑ and ↓: page up/down for page-continuing information. i) MENU: forwarding the main menu. j) Clear (CLR): clearing wrong input before pressing ENT k) Enter (ENT): input the binding data to the mainframe of the system and enter the operation. l) N, S, E and W: representing north latitude, south latitude, east longitude and west longitude. m) + and - represent positive sign and negative sign respectively. n) Number keys: binding parameters for the system. (3) Error indicating light When there is an error, the signaling light would be on. (4) Load interface of flight plan For loading of flight plan Note Continuous and rapid calibration of inertial and memory and other function keys may result to a blinking screen, which is not an error. But calibration like that is not suggested.
  • 392.
    JZ-Y8F200W-02 AIRCRAFT FLIGHT MANUAL SECTIONVI AIRCRAFT SYSTEM EQUIPMENT 6-104 June 30, 2012 Operation flow of the system (a) System flow The first step for the system after power-on is alignment. Meanwhile, the system monitors and tests the whole process of alignment, and decides if there is anything going wrong in that process. If the alignment finishes normally, permissible navigation hint would be given, suggesting that the system could enter navigation status. If the alignment is abnormal, then continue to align according to the degree of error or turn off for trouble-shooting (see details in maintenance). In navigation status, the system would process real-time calculation of various navigation parameters according to the attained statistics, display the statistics through control display and provide required data information or signals for other onboard equipment. At the same time, corresponding navigation would be realized according to aviator's operation on the control display. The system embodies relatively operation flow instructions, which can help to realize normal usage of the inertial navigation system. (b) Navigation status of inertial navigation system 593Y8 The system has three operating statuses, namely, pure inertial navigation, inertial/GNSS combination navigation and GNSS satellite navigation. On condition that the inertial navigation system is in normal operation, the three navigation modes can be switched through the status key of CDU. The default mode is inertial/GNSS combination mode. If there is anything wrong with the inertial assembly of the system, then it would automatically turn to satellite navigation according to the type of error. The default status is inertial/GNSS combination navigation, and manual choices of navigation status could be achieved through pressing keys. (1) Inertial/GNSS combination navigation mode This mode gives full play to the advantages of the inertial system, GPS and GLONASS satellite. If valid GNSS information is captured, then the system would automatically enter inertial/GNSS combination navigation after alignment. If GNSS information is invalid, then the system would enter pure inertial navigation. If GNSS information is valid, but there is something wrong with the inertial navigation units, then the system would enter satellite navigation. If the satellite signals are invalid and there is error in inertial navigation unit, then the system should be turned off manually. When the aircraft is moving or the satellite signals are not quite catching, then the combined indicating words would shift.
  • 393.
    JZ-Y8F200W-02 AIRCRAFT FLIGHT MANUAL SECTIONVI AIRCRAFT SYSTEM EQUIPMENT 6-105 June 30, 2012 (2) Pure inertial navigation mode If pure inertial navigation or I/GNSS is chosen but GNSS is invalid, the system would enter pure inertial navigation mode. When the system automatically enters pure inertial navigation for invalid GNSS information, but GNSS information becomes valid, then the system would turn back to the original combination mode. If there is something wrong with inertial navigation units, the system should be turned off manually. (3) Satellite navigation mode Satellite navigation belongs to non-manual control mode. If there is something wrong with the inertial navigation system, error code would appear on the control display unit, error signaling light would be on, the power of the inertial navigation unit would be interrupted, and the control display unit would enter satellite navigation mode. Whether normal navigation could be realized depends on the present satellite data. If GNSS data is valid, GNSS would be displayed, and the error indicating light is turned off. However, if the GNSS information is invalid, the system should be turned off manually. In satellite navigation mode, the control display unit presents satellite location, ground speed, track angle and deflection distance etc. (displayed in two pages) When there is something wrong with the inertial navigation system, it would give warning signals to other equipments. Information as pitch angle, roll angle, true heading, wind speed, wind direction and deflection angle are all invalid. Figure 6-19 Display 1 of satellite navigation Figure 6-20 Display 2 of satellite navigation TTG xxx'xx'' DIS xxxx.x YAW xxxx DXTLRxxxx Next WPT GNSS 00 manual 03→04 N xx°xx.xx′ E xxx°xx.x′ TK xxxx GS xxxx TAE xxxx ALT xxxxx GNSS 00 manual 03→04
  • 394.
    JZ-Y8F200W-02 AIRCRAFT FLIGHT MANUAL SECTIONVI AIRCRAFT SYSTEM EQUIPMENT 6-106 June 30, 2012 When there is failure for communication between the control display and the inertia navigation component, 429 communication error would be displayed on the control display in full screen, reminding the operator to consider disconnecting operation of inertia navigation signals (it is decided by the operator whether to disconnect or not), and then it would turn to satellite navigation. At this moment, the inertia navigation component is still at power-on. Check before operation (c) Check the No.2 battery at the right bulge of the aircraft which should be installed appropriately, make sure the onboard 28 V DC and three-phase 115 V AC power supply for the system is normal, and check battery capacity which should be enough and can sustain normal operation for the equipment. (d) The knob (1) of status selector should be at OFF position, and knob (2) should be at STY (Standby) position. Operation (e) Start-up and check (1) Turn on the INS switch on the navigator right console. (2) Turn on the INS BAT switch on the navigator instrument panel. (3) Rotate the knob 2 to STY position, rotate the knob 1 to ON position, and the inertia navigation system is power on , (4) After the initialization of control display unit (the panel drawing in shown in Figure 6-18), and the performing 429 checking, display 111111, 222222, ……999999, 000000 sequently every 1 second, when the display is all 0,. The self-check is completed, when the display is NORMAL SELF-CHECK, as is shown in Figure 6-18, and then starting to indicate binding initial position, as is shown in Figure 6-21. (5) When self-test is finished, if it is normal, BIT OK would be displayed (refer to Figure 6-22). Otherwise, BIT ERROR would be displayed. 5 s after normal self-test, tip of primitive position binding would be presented (refer to Figure 6-23). At this moment, the tip display would not disappear until binding of primitive position is finished. Figure 6-21 Display of normal system self-check 593Y8 LASER SINS BIT OK
  • 395.
    JZ-Y8F200W-02 AIRCRAFT FLIGHT MANUAL SECTIONVI AIRCRAFT SYSTEM EQUIPMENT 6-107 June 30, 2012 Figure 6-22 Binding display of primitive location Figure 6-23 Display of primitive position binding (f) Binding primitive location (1) Indicate binding When the system alignment starts, the coordinate of parking point must be sent to the system (the binding initial position).when the opening inspection is over it will indicate the binding of the initial position; and the initial position can also be bound after opening for 2minutes. a) When the self-check is over, it displays indicating binding interface b) Binding latitude: Press [2N] or [8S] switch, and press the number key in order, if failing in display, the right data can be adopted directly and the wrong data will be squeezed out from right to left, or press the CLR key, and then send the correct data; if the display is correct, press ENT key, the cursor moves to the longitude line. c) Binding longitude: Press [4W] or [6E] switch, and press the number key in order, if failing in display, the correct data can be adopted directly and the wrong data will be squeezed out from right to left, or press the CLR key, and then send the correct data; if the display is correct, press ENT key. initial position: LAT: N34d12.9 LON: 002 90 00 I/G 1 initial position: LAT: N34d12.9 LON: 002 90 00 I/G 1 xxx xx xx I/W xx
  • 396.
    JZ-Y8F200W-02 AIRCRAFT FLIGHT MANUAL SECTIONVI AIRCRAFT SYSTEM EQUIPMENT 6-108 June 30, 2012 d) When entering the binding display, wait for 2s, the indicating drawing of the selecting operation regime is shown in Figure 6-24. And if failures founded at this time, the menu binding initial position introduced in (2) can be used to rebind. Figure 6-24 Operation regime indicating (2) Menu binding The system can call out the main menu at any operation regime by pressing the MENU key, the main menu is displayed in two pages, press [↑], [↓] to turn the page, as is shown in Figure 6-25, Figure 6-26, and the default page is main menu drawing 1. Press the number keys in front of the corresponding menu name to enter the corresponding subsidiary menu. Press the [2N] key under the main menu to call out the display of binding initial position, as is shown in Figure 606. Pressing the number keys in front of the options can select binding or checking. Press the [2] key to select binding, the display of binding is the same as what is shown in Figure 607, the binding data and methods are the same as (1). Figure 6-25 Main menu display 1 1. WPT 2. IP 3. PARA 4.DIS/ DIR 5.HDG 6.ALT 026 40 00 I/G 6 mode select 001 60 00 I/G 2 001 60 00 I/G 2
  • 397.
    JZ-Y8F200W-02 AIRCRAFT FLIGHT MANUAL SECTIONVI AIRCRAFT SYSTEM EQUIPMENT 6-109 June 30, 2012 Figure 6-26 Main menu display 2 Figure 6-27 Menu binding initial position display Figure 6-28 Binding initial position over display Input IP: LAT: N 34°01.3′ LON: E108°41.4’ 002 60 00 I/G 2 IP: 1.Input 2.Exam 002 60 00 I/G 2 7. DST CAL 8. BRT 9.Auto UPLOAD 0. MT BS mounting tray error 84-1 026 40 00
  • 398.
    JZ-Y8F200W-02 AIRCRAFT FLIGHT MANUAL SECTIONVI AIRCRAFT SYSTEM EQUIPMENT 6-110 June 30, 2012 The Figure 607 displays the interface after rebinding N34o 01.3′, E108o 41.4′. Press RET to quit the menu. (g) Alignment and display of system After binding the initial position, indicate mode select, as is shown in Figure 603, therefore, the corresponding alignment method should be selected. The inertia navigation system contains gyroscope compass alignment (including normal compass alignment and fast compass alignment), fast alignment (stored heading alignment) and so on. Normal compass alignment is basic method of alignment, in normal temperature, the time for alignment is 8 min. Fast compass alignment takes 2min less than that of the normal alignment, and accuracy of system navigation reduces. Fast alignment (stored heading alignment), the preparation time is 2.5 min, and the accuracy of the system navigation reduces. Alignment is performed for preparations of building navigation base, during the alignment; the inertia navigation mainframe cannot be moved. And when aligning on the aircraft, the aircraft cannot be moved, swing of the aircraft and people moving on the aircraft should be reduced. In fast alignment and alignment condition, the display of the status bar are as follows: the first three digits are the executing time (unit: 10s); the following two digits are status digits; the following two digits are fault code and combined status prompt character; the following two digits are the total power-on time (unit: min); the last two digits are course alignment prompt character. (1) Compass alignment Normal compass alignment is the basic alignment method, the accuracy of the system is relatively high, in normal temperature, the alignment time should not exceed 8 min; operation and display the compass alignment are as follows; a) Set the regime selector knob 1 to ON position; b) Set the regime selector knob 2 to STY position; c) Binding the initial position. 2 sec after the binding of initial position, the control display indicates 3 min as is shown in Figure 603, selecting the operation regime; d) Set the regime knob 2 to ALI position, the control display aligns display , as is shown in Figure 608, the upper most two lines are the initial latitude and longitude of the binding just now, it displays ready way point! indicating that the control display is reading the waypoint value on the inertia to standby in case of the pure satellite navigation, the display lasts about 10sec and disappears; during the period, the control display and the inertia navigation units will cause mass communication, please do not perform other operations.
  • 399.
    JZ-Y8F200W-02 AIRCRAFT FLIGHT MANUAL SECTIONVI AIRCRAFT SYSTEM EQUIPMENT 6-111 June 30, 2012 e) Observing that the regime numbers of the control display status bar are: 90,60,40,30, and the right side of the status bar will display indicating characters COURSE ALIGNMENT, keep aligning. The display is shown in Figure 609. The navigation will be transferred to fast compass alignment. f) Keep aligning , when the status is 00, indicating characters RDY flash, as is shown in Figure 610, rotate the regime selector knob 2 to NAV position, and the control display starts to display navigation indication, and the normal compass alignment is finished by this time. g) Turn off. Set the selector knob (1) at OFF position and knob (2) at STY position. Check all display of control display which should disappear within 10 s. Figure 6-29 Alignment display 1 Figure 6-30 Alignment display 2 Figure 6-31 Alignment display 3 N 34º01.3′E 108º41.4′ Move prohibition 000 00 00 I/G 8 readiness′′′ N xxo xx.x‘ E xxxo xx.x‘ Move prohibition 001 30 00 I/G 6 readiness RDY(ready) N xx°xx.x′ E xxx° xx.x′ Move prohibition 020 40 00 I/G 6
  • 400.
    JZ-Y8F200W-02 AIRCRAFT FLIGHT MANUAL SECTIONVI AIRCRAFT SYSTEM EQUIPMENT 6-112 June 30, 2012 (2) Fast alignment (stored heading alignment) Stored heading alignment, the alignment time is about 2.5min, the accuracy of the navigation is lower than that of the former two kinds of alignment. The premise of the stored heading alignment is: the former alignment should be a normal compass alignment, turn off the system immediately when transferred to navigation, and the position of the aircraft does not change during the transfer. The stored heading alignment: a) The first three steps are the same as compass alignment; b) Rotate the regime selector knob 2 to FA position; c) Observing that the regime numbers are 90, 60, 40, the indicating characters RDY will display and flash. d) After the flashing of the indicating characters RDY, Rotate the regime selector knob 2 to NAVIGATION position, the system enters into navigation status, and the control display displays navigation indication, the system enters into navigation status. (3) Description of alignment. a) Before transferring to navigation, bind the latitude and longitude of the first waypoint. After the transfer, the knob should be kept on NAV position; otherwise the system must be shut off and realigned. b) When the fast compass alignment is finished, the indicating characters RDY will display, indicating that the operator must transfer to navigation. (h) Binding of flight plan After self-test of the system, bind flight plan automatically according to needs. If automatic binding fails, apply manual binding of waypoints to attain flight plan. Manual binding of waypoints could be proceeded at any time after self-test of the system. But before switching navigation, bind longitude and latitude of 01 waypoint. The system can bind coordinates of waypoints from 01 to 18 manually or automatically and store them into the memory of the system. Automatic binding is proceeded with flight plan box through 232 jack of control display panel. Except that the 10 waypoint should be bound at alignment, other waypoints could be input during ground alignment or after takeoff. Note 19~28 are special waypoint numbers during course choosing of the flight, among which even numbers are waypoints to be bound, and odd numbers are waypoints formed according to corresponding distance and azimuth in relative to even number waypoints. If input are odd number waypoints, and there are corresponding input of
  • 401.
    JZ-Y8F200W-02 AIRCRAFT FLIGHT MANUAL SECTIONVI AIRCRAFT SYSTEM EQUIPMENT 6-113 June 30, 2012 distance and azimuth of even number waypoints, then the input waypoint may be changed as the automatically formed waypoint. When 19~28 waypoints do not conduct choosing course function, their usage are the same as other waypoints. Procedure for manual binding of waypoint longitude and latitude c) Put the selector knob (1) at ON position and knob (2) at STY, FA, ALI or NAV position. d) Project the main menu through [MENU]. Refer to Figure 6-25. e) Project the submenu through [1]. Refer to Figure 6-32. f) Press [1] and choose binding. Refer to Figure 6-33. Bind serial number of waypoints: the cursor would be at serial number position of waypoints, and then press corresponding number key. If error is displayed, cross out the wrong number from right to left by pressing right data directly, or press [CLR] and then input the right number. If display is correct, press [ENT] and the cursor would move to the altitude line. g) Altitude binding: press [2N] or [8S], and then press number keys respectively. If the display is wrong, directly cross out the wrong number from right to left by pressing right data, or press [CLR] and then input the right number. If display is correct, press [ENT] and the cursor would move to the altitude line. Figure 6-32 Waypoint display 1 Figure 6-33 Waypoint display 2 WPT: 1. Input 2. Exam 018 40 00 I/G 04 Input WPT,S/N:05 05 lat: N34°01.3′ lon: E109°13.4′ 06 lat: N35°01.3′ lon: E109°13.4′
  • 402.
    JZ-Y8F200W-02 AIRCRAFT FLIGHT MANUAL SECTIONVI AIRCRAFT SYSTEM EQUIPMENT 6-114 June 30, 2012 h) Binding longitude: Press [4W] or [6E] switch, and press the number key in order, if failing in display, the correct data can be adopted directly and the wrong data will be squeezed out from right to left, or press the CLR key, and then send the correct data; if the display is correct, press ENT key. i) After binding, the cursor would move to altitude of the next waypoint automatically for further binding of longitude and latitude of next waypoint. One sheet allows binding of two waypoints. After binding of longitude of the second waypoint at the present screen, the cursor would return to serial number position of waypoint. j) Repeat the above procedures to bind other waypoints. Or choose the waypoint number to be bound through keys of [↓] and [↑]. k) After binding of waypoint, press [RET] to quit the main menu. Caution After the inertia navigation system is up in the sky, waypoints from 1 to 28 could be used repeatedly. (i) Methods of checking parameters of waypoints are as follows: (1) Press [1] key to call out the subsidiary menu when in display of Figure 6-25. As is showed in Figure 6-32; (2) Press 2 to check, as is shown in Figure 6-34, the cursor is behind the numbers, press the corresponding number keys of waypoint numbers that need to be checked. Press the [ENT] key again, the cursor disappears, displaying the waypoints need to be checked and the longitude and latitude data of the next waypoint, as is shown in Figure 6-35. We can also press [↑] key and [↓] key to check the neighboring waypoint. Press [RET] key to quit the menu. Figure 6-34 Checking waypoint display 1 Examining WPT,S/N:
  • 403.
    JZ-Y8F200W-02 AIRCRAFT FLIGHT MANUAL SECTIONVI AIRCRAFT SYSTEM EQUIPMENT 6-115 June 30, 2012 Figure 6-35 Checking waypoint display 2 (j) Checking parameters (MISC) The system can record related and necessary parameters in the alignment and navigation process, and they are stored in the form of MISC code. The subsidiary menu is used for checking stray parameter and memorial indifferent point of longitude and latitude. (1) Press [3] key to call out under the main menu, as is shown in Figure 6-36; (2) After pressing the [1] key, the display is shown in 6-37, the cursor is behind in MISC; (3) Binding the MISC code, press the [ENT] key, and the display is shown accordingly. We can also press [↑] key and [↓] key to check the neighboring parameter. If we need to check MISC40, press [4],[0],[ENT] key. (4) Press the [RET] key to quit the menu. Figure 6-36 MISC parameter subsidiary menu display 1 Figure 6-37 MISC parameter subsidiary menu display 2 Exam MISC: MISC: 1.Examine Examining WPT,S/N: 05 07 Lat: N34°01.3′ Lon: E109°13.4′ 08 Lat: N35°01.3′ Lon: E109°13.4′
  • 404.
    JZ-Y8F200W-02 AIRCRAFT FLIGHT MANUAL SECTIONVI AIRCRAFT SYSTEM EQUIPMENT 6-116 June 30, 2012 Table 6-16 Misc code table Programme Code Form Content Remarks Record alignment 10 000 000 000 010 000 100 001 000 010 000 100 000 100 000 Normal compass alignment Move during the alignment Stored heading alignment Select navigation regime in early time (compass compass) Realignment ( from navigation to alignment Not binding immediate position (degradated navigation) Realignment ( From navigation to alignment) Not binding immediate position (degradated navigation) Record alignment time 11 ××××.×min Time spent on alignment when transferred to navigation Record navigation 12 000 000 000 001 000 010 000 100 001 000 010 000 100 000 Normal navigation Flying position correction Auxiliary correction Air correction Accumulated circular probability error correction Attitude Integrated navigation Record time of navigation 13 ××××.×min Count when the alignment and navigation start, until leaving the navigation.
  • 405.
    JZ-Y8F200W-02 AIRCRAFT FLIGHT MANUAL SECTIONVI AIRCRAFT SYSTEM EQUIPMENT 6-117 June 30, 2012 Table 6-16 (continue) Misc code table Programme Code Form Content Remarks Mission radial error ratio 19 E X.X E 9.9 E FA RER<9.9nmile/h(18.33km/h); when RER<9.9nmile/h(18.33km/h); a) Use runway heading alignment, stored heading alignment or navigation degradation b) Use air alignment c) The immediate groundspeed is over 50nmile/h(92.60km/h); d) In heading attitude condition Accumulated circular probability(CEP) 20 21 ××. × SQUAWK ××.× ××.× When RER<5nmile/h(9.26km/h) last time in Misc 19,correct the accumulated circular probability error correction, the first character is N( times of sampling ) N<8, and the last three characters are CEP value( précised to 0.1n mile/h); When RER>3n mile/h in Misc 19, When misc 19 is RER FA, display the CEP value last time. Every time when calculating the latest CEP value, when RER>9.9n mile/h in Misc 19 or Misc IS RER NA, the CEP value cannot be calculated. When display SQUAWK, judge whether the value of RER is valid or not, if it is valid, correct it manually, and display the corrected value. Terminal (base) 22 23 24 25 ××°××.×′ ×××°××.×′ ××°××.×′ ×××°××.×′ The latitude of the terminal base The longitude of the terminal base Pure inertia latitude calculated by the system Pure inertia longitude calculated by the system. The moment when the system is shut off, value calculated by the system (not including position correction), is the pure inertial value.
  • 406.
    JZ-Y8F200W-02 AIRCRAFT FLIGHT MANUAL SECTIONVI AIRCRAFT SYSTEM EQUIPMENT 6-118 June 30, 2012 Table 6-16 (continue) Misc code table Programme Code Form Content Remark The latest 8 radial error ratio 26~33 RER×.X The last 8 radial error ratio, the earliest is stored in Misc 26, and the latest stored in Misc33. a) RER<3nmile/h(5.56km/h) in Misc19, then store in Misc26~33, help calculation of CEP value; b) When RER>9.9nmile/h(18.33km/h) or is FA in Misc19, do not store in Misc 26~33, and do not participate in the calculation of CEP value; c) When RER>5nmile(9.26km/h) and less than 9.9nmile/h(18.33km/h) in Misc19, deal with it according to the validity, if it is valid, it can be stored, and if it is invalid, it cannot be stored. Record the inertial navigation on/off times 34 ××××× Accumulated ON/OFF times since the last maintenance . Record the total operation time of the system 35 ××××.×h Total operation time since the last maintenance. Record the position of indifferent point 40~47 ××.××.× ×××.××.× ××.××.× ×××.××.× ××.××.× ×××.××.× ××.××.× ×××.××.× The latitude and longitude of the first memory point The latitude and longitude of the second memory point The latitude and longitude of the second memory point The latitude and longitude of the second memory point The latitude and longitude of the third memory point The latitude and longitude of the third memory point The latitude and longitude of the fourth memory point The latitude and longitude of the fourth memory point The memory point can be used in cycle Record the system failure code 48 ×× No failure, the failure code is 00. When there is failure , record the first failure code, When the failure is corrected, the failure code is zero.
  • 407.
    JZ-Y8F200W-02 AIRCRAFT FLIGHT MANUAL SECTIONVI AIRCRAFT SYSTEM EQUIPMENT 6-119 June 30, 2012 (k) Binding distance and direction (DIS/DIR) We can only bind, check corresponding distance and direction of waypoints of even numbers from 20 to 28 to select parameters needed in course binding. The binding methods are as follows: (1) Press [4] key to call out the subsidiary in display showed in Figure 6-22, as is shown in Figure 6-38. (2) Press [1] key to select binding, as is shown in Figure 6-39. The cursor is in front of the waypoint. (3) Press number keys to bind numbers of waypoint, and then press [ENT] key, the cursor moves behind the distance, such as No.24 waypoint. (4) Press number keys, and then press [ENT] key to bind distance. The resolution ratio of the distance is 0.06mile (0.1km). For example, when binding 37.59mile (60.5km), press [6], [0], [5] key, the display of the control display is 60.5, press [COMFIRM] key, and the cursor moves under the data of direction. (5) Press number keys, and then press [ENT] key to bind direction. The resolution ratio of direction is 0.1o . For example, when binding 23o , press [2], [3], [0] key, the control display displays 23.0o , press [ENT] key, the cursor returns to the front of waypoint .If we need to bind others, we can start from (3). (6) Press [RETURN] to quit the menu. (l) Checking distance and direction (1) Press the [2] key to select in the display of Figure 6-38, the display is shown in Figure 6-39, the cursor is in front of waypoint; (2) Binding waypoint numbers: Press number keys, and then press [ENT] key. If we want to check corresponding distance and direction of No.26 waypoints, press [2], [6] ,and then press [ENT] key, the distance and direction of the No.26 waypoint will be displayed. We can also press [↑], [↓] to view the distance and direction of neighboring and opposite waypoints.
  • 408.
    JZ-Y8F200W-02 AIRCRAFT FLIGHT MANUAL SECTIONVI AIRCRAFT SYSTEM EQUIPMENT 6-120 June 30, 2012 (3) Press [RET] key to quit the menu. Figure 6-38 Distance and direction menu display Figure 6-39 Binding distance and direction display Figure 6-40 Checking distance and direction display EXAM Ref WPT NO. 24 DIS: xxx.x km DIR: xxx.x° INPUT Ref WPT NO. 24 DIST: 60.5Km Bearing:23.0º 018 40 00 I/G 04 DIS/DIR: 1. Input 2. Exam 018 40 00 I/G 04
  • 409.
    JZ-Y8F200W-02 AIRCRAFT FLIGHT MANUAL SECTIONVI AIRCRAFT SYSTEM EQUIPMENT 6-121 June 30, 2012 (m) Binding heading angle (HDG) (1) Press[5] key to call out the subsidiary menu when in the display shown in Figure 6-25, as is shown in 6-41; (2) Press [1] key to select binding, as is shown in Figure 6-42, and the cursor is behind the heading angle. (3) Binding the true heading, press the corresponding numbers, sent in from high to low, and press [ENT] key to confirm.(maximum is 360o , and the resolution ratio is 0.1o ). (4) Press the [RET] key to quit the menu. Note Binding of the heading angle is only suited for fast alignment ,during the aligning process, when the binding of initial position is finished, bind the present heading angle of the aircraft into the system, and then continue the alignment. Figure 6-41 Binding and checking heading angle display Figure 6-42 Binding heading angle display 2 Input: THG: 45.1º 018 40 00 I/G 04 THG: 1.Input 2. Exam 018 40 00 I/G04
  • 410.
    JZ-Y8F200W-02 AIRCRAFT FLIGHT MANUAL SECTIONVI AIRCRAFT SYSTEM EQUIPMENT 6-122 June 30, 2012 (n) Check the heading angle Press [2] to check in the display of Figure 6-41, and the display is similar to that of Figure 6-26, the only difference is that the Input is changed into Exam. And it displays binding heading angle. (o) Binding and checking the altitude (ALT) The subsidiary menu is used for binding and checking the altitude of certain waypoint, press [6E] to call out in the display of Figure 6-25 in main menu, as is shown in Figure 6-43. Press [1], used for binding altitude display as is shown in Figure 6-44, first use the cursor to indicate the binding waypoint number, then indicate binding altitude automatically after binding, 3 waypoint altitudes displayed in one screen, the checking display is similar to that of Figure 6-44, the only difference is that the Input is changed into Exam, press [↑] key or[↓] key to check neighbor waypoints. Figure 6-43 Binding and checking the altitude display 1 Figure 6-44 Binding and checking the altitude display 2 Input 5 WPT ALT: 5: 6: 7: 018 40 00 I/G 04 ALT: 1. Input 2.Exam 018 40 00 I/G 04
  • 411.
    JZ-Y8F200W-02 AIRCRAFT FLIGHT MANUAL SECTIONVI AIRCRAFT SYSTEM EQUIPMENT 6-123 June 30, 2012 (p) Distance calculation (DIS CAL) Under navigation status, this submenu is used for measuring great circle distance, azimuth and time to go of any two waypoints at will or of the distance from present location to a certain waypoint. The procedures are as follows: (1) Press [7] at Figure 6-23 of the screen to forward Figure 6-45 and the cursor flashes at the sequence number of to waypoint. (2) Press the number key to bind from/to waypoint sequence numbers and then press [ENT]. Now the great circle distance between two waypoints, time to go, desired track angle are displayed. Press [RET] to exit. For example, press [0], [2], [0] and [5] from 02 to 05, then press [ENT], and the display would be like Figure 6-46. (3) For distance calculation from the present location to a certain waypoint, send 00 to the from point would do. Note The latitude and longitude of the waypoints which need to be calculated should be bound in advance; After the calculation during the navigation, navigation method changes into tangent line method .Please correct immediately if the navigation method does not match with the required one. Figure 6-45 Distance calculation display 1 Figure 6-46 Distance calculation display 2 DIS CAL: 02→05 TAE 84.7° DIS 786.5 TTG 47.4 018 40 00 combine 04 DIS CAL:02→05 TAE DIS TTG 018 40 00 combine 04
  • 412.
    JZ-Y8F200W-02 AIRCRAFT FLIGHT MANUAL SECTIONVI AIRCRAFT SYSTEM EQUIPMENT 6-124 June 30, 2012 (q) Light checking (BRT) Press [8] key to select light checking as is displayed in Figure 6-23 can light the failure lights, check that whether it can be lightened normally: and the display is lightened from the left to right stepwise, check that whether there is scotomas, and output warning signals to the exterior users. Press the [RET] to quit after the light checking. (r) Rapid transmission and reading of flight plan Pre-input the waypoint parameter of present flight plan into the flight plan box, and insert the flight plan box into the 232 interface on the control display. When the system finishes self-test and transmission of primitive position, rapid transmission of flight plan is available to enter the system. Here are the methods: (1) Connect the flight plan box well, press [MENU], and then project the second sheet of the main menu through the [↓]. Refer to Figure 6-23. (2) Press [9] to execute flight plan transmission. (3) During the transmission, tip as transmit from control display unit … would present. After the transmission, tips as transmission is correct or transmission is error would present. (4) If there is error during the flight plan transmission, repeat (3). Manual longitude and latitude binding of waypoint is applicable for correction of wrong data. (5) Flight plan reading is the same as waypoint reading. (6) Press [RET] to quit the main menu. (s) Binding and checking installation error angle (MT BS) (1) Press the [0] key to call out the subsidiary menu when the display in Figure 6-23 shows, as is shown in Figure 6-47 (2) Press the [1] to select binding, shown in Figure 6-48, and the cursor is behind the tilt; (3) Binding the error angle: Press corresponding symbol keys and number keys, sent then from high to low, and then press [ENT] to confirm. (4) Operate the same as above to sent rolling ,direction; (5) Press the [RET] to quit the menu. Note In the aligning process, after binding the initial position, sent the present installation error angle of the aircraft to the system, and then continue the alignment.
  • 413.
    JZ-Y8F200W-02 AIRCRAFT FLIGHT MANUAL SECTIONVI AIRCRAFT SYSTEM EQUIPMENT 6-125 June 30, 2012 Figure 6-47 Binding installation error angle display 1 Figure 6-48 Binding installation error angle display 2 (6) Press [2] to check in the display shown in Figure 6-47, the display is similar to that in Figure 6-48, the only difference is Input is changed into Exam. and it displays the binding installation error angle. (t) Primitive track establishment Primitive track refers to the wide round pattern of the aircraft from the present position at start directly to the chosen waypoint. Before flight, the chosen primitive track refers to the wide round pattern of the aircraft from the primitive position to the chosen waypoint. Choose primitive tract according to the following: (1) After start-up of the system, bind longitude and latitude of the initial point at first. (2) Before switching navigation of the system, bind longitude and latitude of 01 waypoint beforehand. (3) After navigation switching, the program would establish the primitive track of 00→01 automatically. Then the system would calculate navigation parameters according to primitive track. After taking off and completion of regulated take-off movement for the aircraft, namely, flight from the present position to the first waypoint, pilot should alter heading for the present position, namely, 00→01. At this moment, the primitive track refers to the wide round pattern from the present position to the first waypoint. Refer to Figure 6-49. Input MT BS PIT: ROL: HDG: 018 40 00 I/G 04 018 70 00 combine 04 MT BS: 1. Input 2.EXAM 018 70 00 I/G 0 4
  • 414.
    JZ-Y8F200W-02 AIRCRAFT FLIGHT MANUAL SECTIONVI AIRCRAFT SYSTEM EQUIPMENT 6-126 June 30, 2012 00 00 01 02 N Present position Primitive position Status bar I/G 00 Auto 00 01 I/G 00 MAN 00 01 Figure 6-49 Primitive track establishment (u) Operation and display of navigation Navigation is the status employed during pattern flight of the system. The system can display and provide needed navigation parameter for relative airborne electronic equipment. In navigation status, the control display can present the following navigation data: present position, heading/drift, track/ground speed, deflection angle/off-course distance, preset track, time to go/range to go, coordinate of target waypoint, pitch/roll and GNSS position/time. When the air data computer is effective, it can also display wind speed, wind direction and inertia pressure altitude. Under navigation status, the pilot can alter zone according to flight plan automatically or manually, alter zone from present position, change coordinate of waypoint, correct position manually, memorize and read indifferent targets or measure remote distance directly. (1) Navigation status selection In navigation status, the default navigation status of the system is inertia/satellite combination navigation and the default navigation manner is I/G. Primitive zone of 00→01 waypoint would be established automatically. Under normal condition of inertia assembly, pressing [STA] can realize shifting between I/G and inertial. Once there is failure for inertia assembly, satellite navigation status would be chosen.
  • 415.
    JZ-Y8F200W-02 AIRCRAFT FLIGHT MANUAL SECTIONVI AIRCRAFT SYSTEM EQUIPMENT 6-127 June 30, 2012 (2) Navigation parameter display In the process of navigation, the control display displays navigation parameters in 4 sheets (after navigation switching, the default is shown in Figure 6-50) which could realize pageup and pagedown through keys of [↑] and [↓] (refer to Figure 6-51~6-53).The default display of navigation parameter is shown in Figure 1. Parameter catalog could be projected through [DISP] (refer to Figure 6-54 and 6-55), and then press code on parameter screen to display the needed parameter. Main navigation parameters are shown in Figure 6-56 and 6-57. In navigation status, displays of the status bar are combination status tip, error code, alter zone manner, zone and alter zone tip respectively. Figure 6-50 Display 1 of navigation parameter Figure 6-51 Display 2 of navigation parameter N xx°xx.xx' E xxx°xx.x' HDG xxx.x° DH xxx.x° Tk xxx.x° TAE xxx.x° I/G 00 M 02 → 03 TTG xxx′xx″ DTG xxxx.x YAW±xxx.x° DXT L(R)xxx.x GS XXXX DS±XX.X° I/G 00 AUTO 02 → 03
  • 416.
    JZ-Y8F200W-02 AIRCRAFT FLIGHT MANUAL SECTIONVI AIRCRAFT SYSTEM EQUIPMENT 6-128 June 30, 2012 Figure 6-52 Display 3 of navigation parameter Figure 6-53 Display 4 of navigation parameter Figure 6-54 Display 1 of display catalog Figure 6-55 Display 2 of display catalog 3. WS,WD,ALT, NEXT, WPT 4. PIT, ROL, GNSS TIME, POS 1.TTG/DIS,YAW/DXT ,GS/DA, 2. POS,THG,DH,TK,TAE PIT±xx.x ROL±xxx.x GNSS TIME N xx°xx.x' E xxx°xx.x' I/G 00 M 02 → 03 N xx°xx.xx' E xxx°xx.x' HDG xxx.x° DH xxx.x° Tk xxx.x° TAE xxx.x° I/G 00 M 02 → 03
  • 417.
    JZ-Y8F200W-02 AIRCRAFT FLIGHT MANUAL SECTIONVI AIRCRAFT SYSTEM EQUIPMENT 6-129 June 30, 2012 N34o 13.1’ E108o 54.7’ 00 True north True north Heading Track angle Drift Ground speed Present position Figure 6-56 Schematic diagram 1 of navigation parameter 02 03 True north True north Track angle Preset course angle Off-course distance Off-course angle Range to go Figure 6-57 Schematic diagram 2 of navigation parameter Note In the above figures, drift refers to drift angle, preset flight refers to preset flight angle and prescribed flight refers to prescribed heading. In navigation, words in front of the status bar are navigation status indication, and the following two numbers are error code, navigation manner indication and course indication (from No.→to No.), and finally are warning tip words. Under specific circumstances, flashing of indication words in the status bar suggests specific intonation.
  • 418.
    JZ-Y8F200W-02 AIRCRAFT FLIGHT MANUAL SECTIONVI AIRCRAFT SYSTEM EQUIPMENT 6-130 June 30, 2012 Measurement range for navigation parameter of inertia navigation system and display format of control display refer to Table 6-9g. Table 6-17 Measurement range for navigation parameter of inertia navigation system and display format of control display Display Measuring range Display format Present latitude ±90o N(S)××o ××.×' Present longitude ±180o E(W)×××o ××.×' True heading 0o ~360o ×××.×o Pitch angle ±90o ±××.×o Roll angle ±180o ±×××.×o Ground speed 0o ~4427(kn) ××××.× Drift 0o ~±180o ±×××.×o Preset course angle 0o ~360o ×××.×o Track angle 0o ~360 o ×××.×o Off-course angle 0o ~±180o ±×××.×o Off-course distance ±159 (mile) ±×××.× Time to go 0~420 (min) ×××'××" Range to go 0~5091 (mile) ××××.× Waypoint latitude ±90o N(S)××o ××.×' Waypoint longitude ±180o E(W)×××o ××.×'
  • 419.
    JZ-Y8F200W-02 AIRCRAFT FLIGHT MANUAL SECTIONVI AIRCRAFT SYSTEM EQUIPMENT 6-131 June 30, 2012 (1) Automatic program navigation according to flight plan (navigation manner with advance tangent turn navigation manner) At navigation, press [CHL] to project the altering zone selective menu (refer to Figure 6-580. Press [2] to choose tangent zone altering manner. As a result, tangent would be displayed in status bar, and the system operates under tangent zone altering manner. Figure 6-58 Manner selection for altering zone In this manner, the aircraft fly according to the input flight plan. If the time to go when the aircraft arrive the waypoint, for example, 02, is less than 2 m, indicating words as ALT would be displayed at the end of the control display status bar. When the time to go is less than the advance tangent turn time, which is decided by present speed of the aircraft and the about-to turn angle, automatic zone altering would be executed, and ALT disappears or holds, which is decided by time to go to next zone. The new zone 02→03 would be displayed in the status bar, and the system calculates navigation parameter according to the new zone. Refer to Figure 6-59. True north True north Time to go 2min Warning appears Warning disappear Fly along the arc line Alter zone automatically here Status bar Combination 00 Remote distance 01 02 warning Combination 00 Remote distance 02 03 01 50 o 54.7’ 89o 54.7’ 02 03 Figure 6-59 Automatic programe navigation according to flight plan—tangent line Change course: 1.OVERFLY (O) 2.TANGENTALITY(T) 3. MANUAL(M) I/G 00 M 01 → 02
  • 420.
    JZ-Y8F200W-02 AIRCRAFT FLIGHT MANUAL SECTIONVI AIRCRAFT SYSTEM EQUIPMENT 6-132 June 30, 2012 Note When the aircraft fly at fast speed with large turn angle, presenting time of indicating words ALT is relatively short and is about 5 s, which is normal. (2) Automatic turning passing through the check point according to flight plan In display as Figure 6-58 at navigation, press [1] to choose zone altering manner of automatic turning passing through the check point. Overfly would be displayed in the status bar, and the system operates under zone altering manner of turning passing through the check point. It is the default navigation manner of the system after switching navigation. If the time to go is less than 2 m, indicating words as ALT would be displayed at the end of the control display status bar. When the time to go is less than the advance tangent turn time, which is decided by present speed of the aircraft and the about-to turn angle, ALT flickers. When the aircraft fly over the target point and the preset track angle is less than 1 degree, the inertia navigation would execute present position zone altering The zone indication is 00→03, and indication words ALT disappears. (Refer to Figure 6-60). Time to go 2min warning appears True north True north Warning disappears Fly along the course Prompt zone altering, zone display 00 03 Status bar Combination 00 Automatic 01 02 warning Combination 00 Automatic 02 03 Figure 6-60 Automatic programe navigation according to flight plan—turning passing through the check point
  • 421.
    JZ-Y8F200W-02 AIRCRAFT FLIGHT MANUAL SECTIONVI AIRCRAFT SYSTEM EQUIPMENT 6-133 June 30, 2012 (3) Manual zone altering according to flight plan In display as Figure 6-58 at navigation, press [3] to choose manual zone altering manner. M would be displayed in status bar, and the cursor flickers below the TO waypoint serial number, waiting to input from/to zone. If zone needs no change, press [ENT], then the cursor disappears and the system operates under manual zone altering. Under manual zone altering manner, if the time to go of the aircraft to next waypoint like 02 is less than 2 m, ALT would be displayed at the end of the control display status bar. If it is less than 1 m, ALT flickers, suggesting manual zone altering.Procedures of manual zone altering a) If the cursor appears below TO serial number, press corresponding number keys to enter new zone. If display of the new zone serial number is incorrect, input new zone again and cross out the wrong information, then press [ENT]. If display is correct, press [ENT] directly and the cursor disappears. Then the system would calculate navigation parameters according to primitive zone. b) If zone needs no change, press [ENT], and the cursor disappears. Note 00→00 would not be accepted. If warning indicating word flickers but manual zone altering does not follow, the word would continue to flicker. At this moment, the system would calculate according to 01→02 zone until manual zone altering is valid. If manual zone altering is not executed two minutes after the aircraft fly away from the TO waypoint, warning indicating word disappears and the system continues to calculate according to 01→02 zone until manual zone altering is effective.(Refer to Figure 6-61).
  • 422.
    JZ-Y8F200W-02 AIRCRAFT FLIGHT MANUAL SECTIONVI AIRCRAFT SYSTEM EQUIPMENT 6-134 June 30, 2012 True north Time to go 2min Time to go 1min True north "Warning" disappears "Warning" disappears Without zone altering With zone altering "Warning" flickers "Warning" appears Combination 00 Manual 01 02 warning Status bar Combination 00 Manual 02 03 Figure 6-61 Manual zone altering according to flight plan (4) Zone altering of present position Pattern between the present position to any waypoint could be established. Its operation is similar to manual zone altering according to flight plan, only with from point as 00. For example, for flight of 01→02 pattern, it is possible to fly from present position 00 to 04 by steering clear of waypoints 02 and 03. (5) Zone altering of choosing pattern 19~28 are special waypoint numbers during course choosing of the flight, among which even numbers are waypoints to be bound, and odd numbers are waypoints formed according to corresponding distance and azimuth in relative to even number waypoints. Here are procedures for zone altering of changing pattern
  • 423.
    JZ-Y8F200W-02 AIRCRAFT FLIGHT MANUAL SECTIONVI AIRCRAFT SYSTEM EQUIPMENT 6-135 June 30, 2012 a) Bind longitude and latitude of waypoint. If it has been done before, skip it. b) Bind distance and azimuth relative to the waypoints which are restricted in 20, 22, 24, 26 and 28. The corresponding formed waypoints are 19, 21, 23, 25 and 27. If binding has been done before, it is unnecessary to do it again. c) Alter zone manually and bind the waypoint serial number for the selected pattern such as 21→22. Method is the same as manual zone altering according to flight plan. (6) Referring to automatically formed waypoint After binding position and relative range azimuth for even waypoints from 19~28 and establishing a zone from the former waypoint to the present waypoint, the system would create automatically the position of the former waypoint. Refer to it as method of referring to waypoint position. (7) Change of flight plan Pilot can change flight plan by manually changing coordinate of waypoint or by using a certain past waypoint to store the future waypoint parameter. That is to say, waypoints can be used in a cycle way. (8) Position correction During flight, if the system s in inertia navigation status, compare the present position of the control display with correct position attained by other method. If it needs correction, correct the position manually. Here are the procedures: d) When the aircraft fly over the known coordinate point, press [MOD] and the correction display would appear as shown in Figure 6-62. At the same time, the displayed present longitude and latitude are frozen. e) Compare the attained longitude and latitude of landmark with those of the frozen display. If it does not need correction, press [MOD] to recover normal display. It needs correction, input longitude or latitude or both according to the attained landmark. f) Check correctness of the input data and then press [MOD] to finish manual correction. The system then displays the corrected new present position. Position change during the operation is compensated automatically.
  • 424.
    JZ-Y8F200W-02 AIRCRAFT FLIGHT MANUAL SECTIONVI AIRCRAFT SYSTEM EQUIPMENT 6-136 June 30, 2012 Note After correction, the system enters combination navigation status and outputs data in combination form. Manual correction is also available at combination status, but the system outputs data in combination so quickly so that correction is not distinguishable on control display. Press "correction" now Present position N38o 12.1’ E117o 44.6’ N38o 12.6’ E117o 45.1’ Correction point Correction Latitude: N38o 12.6’ Longitude:_ Combination 00 Manual 07 08 Figure 6-62 Correction display (9) Memorizing and referring to indifferent target During flight, when there is position needs to be memorized, use [MNEM] to input the position to the non-volatile memory of the computer for future reference. Press [MNEM] and be memorizing is displayed on the control display in full screen for 1 second, and then the control display returns back to normal display. The system can memorize 4 indifferent targets for one flight. For targets above 4, the system would memorize in a cycle way by starting from the first one.Refer to memorized targets in the same method as referring to parameter (MISC code) in parameter (MISC). Parameter 40 and 41 are latitude and longitude of the first target to be memorized, 42 and 43 are the second, 44 and 45 are the third and 46 and 47 are the fourth.
  • 425.
    JZ-Y8F200W-02 AIRCRAFT FLIGHT MANUAL SECTIONVI AIRCRAFT SYSTEM EQUIPMENT 6-137 June 30, 2012 CAUTION (a) In preparation of flying, make sure that the available battery electricity energy is enough. Connect the battery switch before flying. (b) During running or takeoff, the onboard inertial navigation system should be in navigation operation status. (c) If there is something wrong in the inertial navigation system during flying, error signaling light on the control display unit should be on, and error code should be displayed in the status bar, indicating error type. 00 suggests no error, and error code in other form rather than 00 is displayed when there is something wrong. Specific error type is shown in MISC code. Turn off the system upon knowing the error code. Now try to control the aircraft to stably fly for 5 min if permitted. (d) In turning off the system, first turn off the status selector, and then turn off onboard and ground power supply. (e) Turn off the battery once the innertia navigation system is off. (f) Except for special check for the inertial navigation system, autopilot connecting is not allowed when the system is power-on on the ground. Free Flight 2101 I/O GPS Free Flight 2101 I/O GPS navigator General Free Flight 2101 I/O GPS navigator is a long-range navigation system, which: Receives signals from the space navigation satellites and computes the aircraft location information. Receives signals such as the true air speed from the air data system onboard and heading reference from the attitude heading reference system (AHRS) and outputs information such as aircraft azimuth, track angle, wind speed, ground speed, drift, time to go, and off-course distance to implement navigation so that aircraft can fly along the preset course. Outputs control signals to KJ-6CII autopilot to implement the autopilot function during in-air flight. Main Technical Specifications Location update rate: 5 times/sec Operating power supply: 28VDC/2A 26VAC,400Hz/2A Positioning accuracy: 15 m (root-meansquare error)
  • 426.
    JZ-Y8F200W-02 AIRCRAFT FLIGHT MANUAL SECTIONVI AIRCRAFT SYSTEM EQUIPMENT 6-138 June 30, 2012 Composition and Installation Position Composition and installation position are listed in Table 6-18. Table 6-18 Composition and installation position Component Quantity Installation Position Receiving/display unit 1 On the navigator's instrument panel GPS antenna 1 Between stringer 54~55 at the right of frame 10~11 Operation The receiving/display unit panel is shown in Figure 6-63. Power switch Selection knob Data slot LED display Signal light Free Flight ·OFF ·ON ·ENT MENU 2101 I/O PLUS MSG APR HLD PTK WPT NAV WPT NRST D FPL CALC AUX MSG Figure 6-63 Free Flight 2101 I/O GPS navigation system operating panel (a) Operating panel description (1) Operating buttons Operating buttons include mode buttons and functional buttons. There are 6 mode buttons, namely, NAV, WPT, NRST, FPL, CALC, and AUX. They are described as follows: NAV: This button is used to view the navigation and location information along the selected course. WPT: This button is used to view information such as azimuth, distance, runway, name, frequency, and location.
  • 427.
    JZ-Y8F200W-02 AIRCRAFT FLIGHT MANUAL SECTIONVI AIRCRAFT SYSTEM EQUIPMENT 6-139 June 30, 2012 FPL: This button is used to view the current flight plan and stored flight plan. It can also be used to make and edit a flight plan. CALC: This button is used to compute air data. AUX: This button is used to view system information such as date, time, and GPS receiver state. It can also be used to view the routine list, set the parallel track deviation, and select a database searching area. NRST: This button is used to view the following information: 20 nearest airports, VOR (VHF Omnidirectional Radio Range) station, office of the charged affairs, NDB (non- directional beacon), intersection point, and user waypoint. There are 3 functional buttons, namely, D, MSG, and ENT. They are described as follows: D : This button is used to change the course. Use of this button can make the aircraft fly to any waypoints stored in the database, and start a flight plan. MSG: This button is used view system information and the current CDI (course deviation indicator) graduation. ENT: This button is used for data input. After this button is pressed, a blinking cursor occurs in an editable data section. The selection knob is used to control information display and edit. (2) Selection knob The selection knob consists of an outer (large) knob and an inner (small) knob. The outer knob is used to view information in the bottom line or move the cursor, while the inner knob is used to view information in the top line or select data items during data input. (3) Data slot The data slot is used to house the navigation data card. Insert the navigation data card into the navigator with its golden contact surface upwards. If it is inserted correctly, the card can slide into the slot smoothly; otherwise, remove the card and readjust the direction. The data card can be removed and inserted only when the GPS is powered off. If the card has not been inserted when the power is engaged, Database missed will be displayed. If this card has expired, Database expired will be displayed.
  • 428.
    JZ-Y8F200W-02 AIRCRAFT FLIGHT MANUAL SECTIONVI AIRCRAFT SYSTEM EQUIPMENT 6-140 June 30, 2012 Note When the power is engaged, removing the data card will cancel the current flight plan. This situation persists until the data card is reinserted. Then, the navigator will be restarted. (4) Power switch To power off the system, set the switch at the OFF position; to power on the system, set the switch at the ON position. After the system is powered on, all internal signal lights on the navigator, WPT turning prompt lights on the pilot's and copilot's instrument panels, and all button lights turn on. After the self-test is complete, pressing any key to start navigation. At this time, signal and button lights turn off. (5) LED display The navigator has an LED display on which two lines of information can be displayed. The information displayed in these two lines varies with the selected mode. The LED display supports the automatic dimming function. The display brightness can be automatically adjusted according to the ambient lighting. (6) Internal signal lights MSG: When a piece of information needs to be checked by the pilot, the MSG signal light starts blinking. If multiple pieces of information need to be checked and the pilot cannot finish reading all of them, the signal light blinks continuously until all information is checked. After all information is viewed, the MSG signal light stops blinking. WPT: The WPT signal light prompts the pilot that aircraft has reached the waypoint. When aircraft is approaching the current waypoint, the WPT signal light turns on in advance according to the preset time. The lead time can be set using the AUX button in Configure mode. The factory setting is 10 seconds by default. PTK: The PTK annunciator indicates that the track that is parallel with the current track has been selected. To view the selected deviation, press the MSG button. HLD: The HLD annunciator is used to warn the pilot that the current flight plan suspends at the current waypoint. APR: The APR annunciator starts blinking from 2 sea miles inbound flight to the final approach fix (FAF), prompting the pilot that all approach requirements have been met.
  • 429.
    JZ-Y8F200W-02 AIRCRAFT FLIGHT MANUAL SECTIONVI AIRCRAFT SYSTEM EQUIPMENT 6-141 June 30, 2012 (b) Detailed Operating Button Description (1) WPT button a) Waypoint name input Press the WPT button several times until the USER mode is entered. Turn the outer knob until the ADD WAYPOINT page is displayed. Then, press the ENT button. Turn the inner knob to select the first character of the waypoint name. (Turn the inner knob clockwise. The character cyclically occurs in sequence of A, B, C…X, Y, Z, 0, 1, 2…9.) Turn the outer knob to move the cursor. Then, turn the inner knob to enter the second character. Repeat this process to enter the whole waypoint name by using the inner and outer knobs. Assume that the waypoint name is BC. The procedure for entering the waypoint name BC is as follows: Press the WPT button to enter the USER mode. Turn the outer knob until the ADD WAYPOINT page is displayed. Then, press the ENT button. Perform the steps described in Figure 6-64. NEW USER WAYPOINT NAME:A NEW USER WAYPOINT NAME: B NEW USER WAYPOINT NAME:B- BC SAVE USING THIS POSITION?(ENT ) Turn the inner knob clockwise until the first character is B Turn the outer knob clockwise to move the cursor Turn the inner knob until the displayed character at the cursor position is C Figure 6-64 Procedure for entering the waypoint name BC
  • 430.
    JZ-Y8F200W-02 AIRCRAFT FLIGHT MANUAL SECTIONVI AIRCRAFT SYSTEM EQUIPMENT 6-142 June 30, 2012 At this time, to use the current location coordinates as the waypoint coordinates, press the ENT button. To enter the waypoint coordinates manually, perform the operation described in 4.2.1.2.2. b) Entering the waypoint coordinates Method 1 (using the current location coordinates as the waypoint coordinates) Enter the waypoint name, for example, BC. Press the ENT button for confirmation. Then, the current aircraft location coordinates are saved to the waypoint BC. Method 2 (entering the waypoint coordinates manually) Enter the waypoint name (BC in this case). Turn the outer knob until the information as shown in Figure 6-65 is displayed. Figure 6-65 Interface display Press the ENT button for confirmation. Turn the inner knob to adjust the digit displayed and select N (north latitude), S (south latitude), E (east longitude), and W (west longitude). Then, turn the outer knob to move the cursor. Use both the inner and outer knobs to enter the waypoint latitude and longitude (latitude first and then longitude) coordinates and the latitude and longitude identifiers. Press the ENT button for confirmation. c) Changing the waypoint name Press the WPT button several times until the USER mode is entered. Turn the inner knob to select the waypoint name to be changed (in this case, the original waypoint name is BC). Turn the outer knob. The information as shown in Figure 6-66 is displayed. Figure 6-66 Interface display Press the ENT button. Use the inner and outer knobs to change the waypoint name. Press the ENT button for confirmation. TO BC EDIT BC (ENT) BC SAVE USING LAT/LON? (ENT)
  • 431.
    JZ-Y8F200W-02 AIRCRAFT FLIGHT MANUAL SECTIONVI AIRCRAFT SYSTEM EQUIPMENT 6-143 June 30, 2012 d) Changing the waypoint coordinates Press the WPT button several times until the USER mode is entered. Turn the outer knob until the EDIT xxx? (ENT) information is displayed. Press the ENT button. The information as shown in Figure 6-67 is displayed. Figure 6-67 Interface display Use the inner and outer knobs to change the waypoint coordinates. Press the ENT button for confirmation. e) Deleting the waypoint Press the WPT button until the USER mode is entered. Turn the inner knob to select the waypoint to be deleted. Then, turn the outer knob until the ERASE page is displayed. Press the ENT button and then the WPT button to delete the waypoint. (Press any other buttons to cancel deletion.) (2) FPL button a) Four modes of the FPL button The FPL button has four modes: current plan, current flight plan stage, stored flight plan, and stored flight plan stage. Pressing this button for the first time to enter the current plan mode; pressing this button for the second time to enter the current flight plan stage mode; pressing this button for the third time to enter the stored flight plan mode; pressing this button for the fourth time to enter the stored flight plan stage mode. If you continue pressing this button, the system switches over between the stored flight plan mode and the stored flight plan stage mode. To return to the current plan mode, press and hold the FPL button for about 1s. Using the FPL button can activate, view, edit, or cancel a stored flight plan. Each mode has the following data pages: Press the FPL button for the first time. The current plan or NO ACTIVE FLIGHT PLAN page is displayed. If the current plan exists, the takeoff and terminal waypoints, and waypoint identifier for the current stage are displayed, as shown in Figure 6-68. The stage is presented by NOW, NEXT, and LAST. To change the stage, turn either the inner or the outer knob. To make the aircraft fly in the stage displayed, press D twice. BC EDIT USING LL33o 0.81N 107o 12.3E
  • 432.
    JZ-Y8F200W-02 AIRCRAFT FLIGHT MANUAL SECTIONVI AIRCRAFT SYSTEM EQUIPMENT 6-144 June 30, 2012 Figure 6-68 Interface display Press the FPL button for the second time. The current flight plan stage page (if the flight plan exists) is displayed. A pair of waypoints of a stage, and the azimuth, distance, and ETE (estimated time en route) of this stage are displayed, as shown in Figure 6-69. The stage is presented by NOW, NEXT 1, and LAST 1. To change the stage, turn either the inner or outer knob. Figure 6-69 Interface display Press the FPL for the third time. The stored flight plan or NO STORED FLIGHT PLANS page is displayed. If the stored flight plan exists, the takeoff and terminal waypoints and the waypoint identifier of the first stage of the stored flight plan are displayed, as shown in Figure 6-70. The stage is presented by LEG1, LEG2 …, etc. To view other stored flight plans, turn the inner knob. To change the stage, turn the outer knob. To activate the flight plan, press D for the required stage to select direct or addition. Then, press D again. Figure 6-70 Interface display Press the FPL button for the fourth time. The stored flight plan stage page is displayed. A pair of waypoints of a stage, and the azimuth, distance, and ETE of this stage are displayed, as shown in Figure 6-71. Figure 6-71 Interface display LEG2: PDZV PSPA 082o 513N M ETE 0:26 LAXA—→PHXA ACTIVE NOW:PDZV T 0 PSPA NEXT 2:PDZV T 0 PSPA 082o 51.3N M ETE 0:26 LRXA —→PHXA 325N M LEG1: LRXA T 0 PDZV
  • 433.
    JZ-Y8F200W-02 AIRCRAFT FLIGHT MANUAL SECTIONVI AIRCRAFT SYSTEM EQUIPMENT 6-145 June 30, 2012 To activate this flight plan, press D for the required stage to select direct or addition. Then, press D again. Press the FPL several times at any time to return the current stage of the current flight plan. When the navigator is displaying the current stage or stored stage page, the FPL button is blinking. b) Making a flight plan Press the FPL button several times until the STORED FLIGHT PLANS page is displayed. Turn either the inner or outer knob rightward or leftward until the ADD NEW FLIGHT PLAN page is displayed, as shown in Figure 6-72. Figure 6-72 Interface display The blinking ++ mark between start and end indicates the waypoint insertion point. When a flight plan has two or more waypoints, turning the outer selection knob can move this insertion point. Press the WPT button several times to select the required waypoint type. To select the waypoint name, press the ENT button and turn the selection knob. Press the FPL button to add the selected waypoint to the flight plan. To edit other waypoints of the flight plan, repeat the preceding steps. To exit editing the flight plan, when ++ is displays, press the FPL button. c) Editing a flight plan Adding a waypoint Press the FPL button to enter the FLIGHT PLAN mode. Turn the inner knob to invoke the flight plan to be edited. Turn the outer knob to select the edit mode. The interface is as shown in Figure 6-73. Figure 6-73 Press the ENT button. The information as shown in Figure 6-74 is displayed. Figure 6-74 ADD NEW FLIGHT PLAN start ++ end 01U—→04U EDIT LEG1:01U TO 02U EDIT FLIGHT PLAN START: ++01U - 02U
  • 434.
    JZ-Y8F200W-02 AIRCRAFT FLIGHT MANUAL SECTIONVI AIRCRAFT SYSTEM EQUIPMENT 6-146 June 30, 2012 To add waypoint 05 between waypoints 01 and 02, turn the outer knob so that ++ moves between waypoints 01 and 02. Turn the inner knob to enter 05. The interface is as shown in Figure 6-75. Figure 6-75 Interface display Press the ENT button. To continue adding waypoints, repeat the preceding steps. Press the FPL button to end editing the flight plan. Deleting a waypoint Press the FPL button to enter the flight plan mode. Turn the inner knob to invoke the flight plan to be edited. The interface is as shown in Figure 6-76. Figure 6-76 Interface display Turn the outer knob to select the editing mode. The interface is as shown in Figure 6-77. Figure 6-77 Interface display Press the ENT button. To delete waypoint 03 from the flight plan 01U 04U Turn the inner knob until DELETE is displayed in the lower line, as shown in Figure 6-78. Figure 6-78 Interface display Turn the outer knob until DELETE replaces 03U, as shown in Figure 6-79. 01U—→04U 250N M LEG: 01U TO 02U EDIT FLIGHT PLAN 01U 05U 02U 01U—→04U EDIT LEG1: 01U TO 02 EDIT FLIGHT PLAN 01U-DELETE-02U
  • 435.
    JZ-Y8F200W-02 AIRCRAFT FLIGHT MANUAL SECTIONVI AIRCRAFT SYSTEM EQUIPMENT 6-147 June 30, 2012 Figure 6-79 Interface display Press the ENT button to delete the waypoint, as shown in Figure 6-80. Figure 6-80 Interface display Press the FPL button to end editing the flight plan. Replacing a waypoint Press the FPL button to enter the flight plan mode. Turn the inner knob to invoke the flight plan to be edited. The interface as shown in Figure 6-81 is displayed. Figure 6-81 Interface display Turn the outer knob to select the editing mode. The interface as shown in Figure 6-82 is displayed. Figure 6-82 Interface display To replace 03 with 05, turn the inner knob until REPLACE is displayed in the lower line, as shown in Figure 6-83. Figure 6-83 Interface display Turn the outer knob until 03U is replaced by REPLACE, as shown in Figure 6-84. Figure 6-84 Interface display 01U—→04U 250N M LEG1: 01U TO 02U EDIT FLIGHT PLAN 02U-DELETE-04U EDIT FLIGHT PLAN 02U++04U-END 01U—→04U EDIT LEG1: 01U TO 02U EDIT FLIGHT PLAN 01U-REPLACE-02U EDIT FLIGHT PLAN 02U-REPLACE-04U
  • 436.
    JZ-Y8F200W-02 AIRCRAFT FLIGHT MANUAL SECTIONVI AIRCRAFT SYSTEM EQUIPMENT 6-148 June 30, 2012 Turn both the inner and outer knobs to enter 05. The interface is as shown in Figure 6-85. Figure 6-85 Interface display Press the ENT button. The interface is as shown in Figure 6-86. Figure 6-86 Interface display Press the FPL button to end editing the flight plan. d) Viewing the stage of the flight plan The azimuth and distance of any stage can be viewed in the stored or current flight plan. Stages for the stored flight plan are named LEG1, LEG2, …; stages for the current flight plan are named LAST2, LAST1, NOW, NEXT1, NEXT2, …. The viewing method is as follows: Current flight plan stage Press the FPL button twice (the FPL button in blinking). Turn either the inner or outer selection knob to move between two stages. Stored flight plan stage Press the FPL buttons twice except that there is a current FPL (flight plan stage). Press the FPL buttons three times to enter the STORED FLIGHT PLANS page. Turn the inner knob to select a stored flight plan. Press the FPL button (the FPL button is blinking). Turn either the inner or outer selection knob to move between the two stages. e) Activating a flight plan The pilot can activate any stages or waypoints in a flight plan. During flight plan activation, there are two choices for the pilot: added to the displayed stage; directly fly to any waypoint in the stage. EDIT FLIGHT PLAN 05U++04U-END EDIT FLIGHT PLAN 02U-05U-04U
  • 437.
    JZ-Y8F200W-02 AIRCRAFT FLIGHT MANUAL SECTIONVI AIRCRAFT SYSTEM EQUIPMENT 6-149 June 30, 2012 Added to a flight plan stage Select a stored flight plan. Turn the outer selection knob clockwise to select the required stage. Press D Press D again to add to the stage and activate the program. Directly flying to the waypoint in the flight plan stage Select a stored flight plan. Turn the outer selection knob to select the stage that has the required waypoint. Press D Turn the outer selection knob to select the required waypoint. Turn the outer knob leftward to select the first waypoint in the stage, while turn the outer knob rightward to select the second waypoint in the stage. Press D again to directly fly to the waypoint and activate the program. f) Reversing a flight plan Press the FPL button to enter the stored flight plan. Turn the inner knob to invoke the flight plan to be edited. Turn the outer knob to select the editing mode. The interface is as shown in Figure 6-87. Figure 6-87 Interface display Press the ENT button for confirmation. At this time, the interface is as shown in Figure 6-88. Figure 6-88 Interface display g) Canceling a current flight plan Press the FPL button. Turn the inner knob to select a currently-executed flight plan (marked with ACTIVE). Turn the outer knob until the interface as shown in Figure 6-89 is displayed. 01U—→04U REVERSE LEG1:01U TO 02U 01U 04U 250N M LEG1:02U TO 01U
  • 438.
    JZ-Y8F200W-02 AIRCRAFT FLIGHT MANUAL SECTIONVI AIRCRAFT SYSTEM EQUIPMENT 6-150 June 30, 2012 Figure 6-89 Interface display Press the ENT button for confirmation. h) Clearing a flight plan The pilot can clear any stored flight plans by pressing the ENT and FPL buttons. To change the determination when pressing the second button, do as follows: Select a stored flight plan. Turn the outer selection knob leftward until the blinking ERASE is displayed. Press the ENT button. Press the FPL button for confirmation and to clear the flight plan; or press the NAV button to suspend the clear program. i) Executing a flight plan Before takeoff, a flight plan must be executed. Press the FPL button. Turn the inner knob to invoke the selected flight plan. Turn the outer knob until the interface as shown in Figure 6-90 is displayed. Figure 6-90 Interface display Press D to select stage 1. Press D again to end executing the flight plan. At this time, the interface is as shown in Figure 6-91. Figure 6-91 Interface display (3) NAV button Press the NAV button to enter the navigation mode. The main navigation page is displayed, as shown in Figure 6-92. Figure 6-92 Interface display 01U—→04U CANCEL NOW: 01U TO 02U 01U 04U 380KM LEG1: 01U TO 02U 01U —→ 04U ACTIVE NOW:01U TO 02U TO 02U120o 143N M 0:13 [·1 1 ·1 1 ·0·1 1 ·1 1 ·] T N 124o 650N M
  • 439.
    JZ-Y8F200W-02 AIRCRAFT FLIGHT MANUAL SECTIONVI AIRCRAFT SYSTEM EQUIPMENT 6-151 June 30, 2012 The top line on the main navigation page shows the name of the waypoint to fly, azimuth angle from the current location to the waypoint to fly, distance between the current location and the waypoint to fly, and the time to go from the current location to the waypoint to fly, while the bottom line shows main navigation information such as the off-course distance, track angle, and ground speed. In Figure 30, the top line shows that the name of the waypoint to fly is 02, the azimuth angle is 120°, the range to go is 143 nm, and the time to go is 13min; the bottom line shows that the track angle is 124o and the ground speed is 650 nm/h. In addition, the bottom line also shows a course deviation indicator (CDI), which clearly indicates the degree and direction that the aircraft deviates from the preset course. In the CDI, 0 is at the center. There are two short vertical lines, two dots, and one square bracket on each side of 0. They further divide parts at the left and right of 0 into five equally divided sections, forming the CDI dial. The long vertical line indicates the course rod that can be moved left and right. It is used to show the degree and direction that aircraft deviates from the preset course. The full off-course distance set in the receiver is 2.5 nm, which means that each section of the five equally divided sections at the left and right represents 0.5 nm (2.5/5) off-course distance. When aircraft deviates from the preset course (left or right) for more than 2.5 nm, the square bracket (left or right) in the CDI will be replaced by an arrow ( or ), and the off-course distance is displayed at the same time, 5 nm for example, indicating that aircraft has deviated rightward from the preset course for 5 nm, exceeding the CDI indicating range. At this time, the pilot should control the aircraft to fly leftward to return to the preset course. Note When the course is 5.0 nm, terminal is 1.0 nm, and landing approach is 0.3 nm, 2101 I/O GPS navigator automatically controls the CDI scales.
  • 440.
    JZ-Y8F200W-02 AIRCRAFT FLIGHT MANUAL SECTIONVI AIRCRAFT SYSTEM EQUIPMENT 6-152 June 30, 2012 (4) CALC button a) Calculation of time, distance, and ground speed Press the CALC button to enter the FLT PLAN/FUEL mode. Turn the inner knob until the time, distance, and ground speed information page is displayed. b) Air data calculation Press the CALC button to enter the AIR DATA mode. Turn the inner knob until the WINDS page and ALTITUDE page are displayed respectively. (5) AUX button The AUX (auxiliary) button is used to manage and monitor information from the navigator. The AUX button provides five modes: check table, system status, sensor status, configuration, and user installation. a) Check table mode The check table mode allows the user to create up to 10 routine check tables. Each check table can hold a maximum of 26 entries. b) System status mode The system status mode allows the operator to rapidly obtain the system status information. This mode provides the following status pages: Date and time display Information about the current location/latitude and longitude Voltage and internal temperature display Database expiration information Software version information System code display
  • 441.
    JZ-Y8F200W-02 AIRCRAFT FLIGHT MANUAL SECTIONVI AIRCRAFT SYSTEM EQUIPMENT 6-153 June 30, 2012 Data and time display Press the AUX button several times until the *SYSTEM STATUS page is displayed. The current time information is displayed for a moment, as shown in Figure 6-93. Figure 6-93 Interface display For description of the information displayed in Figure 6-93, see the original document (+8 indicates the difference between the local time and the Greenwich time.) Current location/altitude display Press the AUX button several times until the *SYSTEM STATUS* page is displayed. Turn the inner knob. The current location is displayed, as shown in Figure 6-94. Figure 6-94 Interface display Turn the outer knob. The altitude information is displayed, as shown in Figure 6-95. Figure 6-95 Interface display If GPS=3D, the GPS implements 3D navigation; if GPS=2D, the GPS implements 2D navigation and manual altitude input is required. PRESENT POSITION LL33o 0.81N 107o 12.3E WEDNESDAY 15-MAY-96 10:18:55Z +8 18:18 ALTITUDE :10253ft SOURCE: GPS=3D
  • 442.
    JZ-Y8F200W-02 AIRCRAFT FLIGHT MANUAL SECTIONVI AIRCRAFT SYSTEM EQUIPMENT 6-154 June 30, 2012 Voltage and internal temperature display Press the AUX button until the *SYSTEM STATUS* page is displayed. Turn the inner knob. The voltage and temperature page is displayed, as shown in Figure 6-96. The indicated input voltage is 14.2 V and the indicated navigator's internal temperature is 33o C. Figure 6-96 Interface display Database expiration display The DATABASE EXPIRATION page displays the expiration date of the navigation data card. Press the AUX button until the *SYSTEM STATUS* page is displayed. Turn the inner knob. The DATABASE EXPIRATION page is displayed. For example, DATABASE EXPIRATION 25-MAR-2008 indicates that the database will expire on March 25, 2008. Software version display Press the AUX button several times until the *SYSTEM STATUS* is displayed. Turn the inner knob. The software version page is displayed, as shown in Figure 6-97. Figure 6-97 Interface display System code display Press the AUX button several times until the *SYSTEM STATUS* page is displayed. Turn the inner knob to enter the SYSTEM CODE page, on which the version of the GPS navigator software is displayed. The version number is the same as the last four digits of the piece No. on the navigator ID panel. INPUT VOLTAGE: 14.2V INTERNAL TEMP: 33o C REVISION: NAV2.6 20 GPS 5 2-0812
  • 443.
    JZ-Y8F200W-02 AIRCRAFT FLIGHT MANUAL SECTIONVI AIRCRAFT SYSTEM EQUIPMENT 6-155 June 30, 2012 c) Sensor status mode The sensor status mode provides the following pages: GPS status Estimated accuracy GPS satellite status GPS sensor re-setting GPS satellite availability Sensor status page Press the AUX page several times until the *SENSOR STATUS* page is displayed. The information in Figure 6-98 is displayed automatically for a moment. Figure 6-98 Interface display In the preceding information, GPS: 3D indicates that the GPS implements 3D space positioning calculation; RAIM indicates that the RAIM (receiver autonomous integrity monitoring) function is available; MODE: TERM indicates that the RAIM mode is TERM; PDOP: 2.6 indicates the geometric divergence of precision. GPS:3D RAIM MODE:TERM PDOP: 2.6
  • 444.
    JZ-Y8F200W-02 AIRCRAFT FLIGHT MANUAL SECTIONVI AIRCRAFT SYSTEM EQUIPMENT 6-156 June 30, 2012 Estimated accuracy page Press the AUX button several times until the *SENSOR STATUS* is displayed. Turn the outer knob counter-clockwise until the estimated accuracy page is displayed. The navigator calculates an estimated location error under the worst condition based on the signal accuracy and GPS satellite's geometric condition. The estimated error is displayed on the estimated accuracy page. Figure 6-99 Interface display Traced GPS satellite display Press the AUX button several times until the *SENSOR STATUS* is displayed. Turn the outer knob clockwise until the traced GPS satellite page is displayed. Information displayed on the traced GPS satellite page shown in Figure 6-100 shows that the GPS receiver is tracing 9 satellites currently, which are satellites No. 1, 9, 12, 15, 21, 23, 25, 28, and 31. Free Flight 2101 landing approach GPS navigator traces all satellites in the line of sight. The blinking number on the traced GPS satellite page indicates that the traced satellite is not used in location resolving due to its weak signal strength. Figure 6-100 Interface display ESTIMAED ACCURACY: GPS:0,02N M GPS TRACK 9: 31 28 1 9 12 15 21 23 25
  • 445.
    JZ-Y8F200W-02 AIRCRAFT FLIGHT MANUAL SECTIONVI AIRCRAFT SYSTEM EQUIPMENT 6-157 June 30, 2012 GPS satellite status display Press the AUX button several times until the *SENSOR STATUS* is displayed. Turn the outer knob clockwise. Information on the GPS satellite status page shown in Figure 6-101 indicates that the signal from satellite 03 is being received (SV indicates satellite), and the signal-to-noise ratio is 10.0. The current azimuth angle and elevation angle of satellite 03 are 248o and 29o respectively. If the negative elevation angle occurs on this page, it indicates that the satellite is below the horizon and its location coordinates cannot be obtained. In this case, select information about other satellites. Turn the outer knob to view status of all satellites no matter whether they are being traced currently or not. Figure 6-101 Interface display GPS sensor re-setting The sensor re-setting function allows the GPS receiver to execute the power-on and satellite acquisition program, like that the navigator is powered off and then on. Press the AUX button several times until the *SENSOR STATUS* is displayed. Turn the outer knob clockwise. The GPS sensor re-setting page is displayed, as shown in Figure 6-102. Press the ENT button. Press the AUX button to confirm re-setting. Figure 6-102 Interface display GPS SV: 03 SIG 10.0 ELV 029o AZM 248o RESET GPS SENSOR? (ENT)
  • 446.
    JZ-Y8F200W-02 AIRCRAFT FLIGHT MANUAL SECTIONVI AIRCRAFT SYSTEM EQUIPMENT 6-158 June 30, 2012 GPS satellite availability The availability function is used for overlay prediction of the current point on any day and at any time. Press the AUX button several times until the *SENSOR STATUS* is displayed. Turn the inner knob clockwise. Observe information displayed in Figure 6-103. Information on the satellite availability page shown in Figure 6-103 indicates that GPS 3D positioning information can be obtained within 24 hours from the satellite positioned on September 19, 1996. Figure 6-103 Interface display Pre-flight Preparations System power-on Insert the data card correctly into the data card slot in the receiving/display unit of Free Flight 2101 I/O GPS. Turn on the GPS 28 VDC circuit breaker on the navigator's right console, and GPS I and GPS III 26 VAC circuit breakers on the navigator's side cover plate. At the same time, engage power supplies of XAS-3M, HZX-1M, and KJ-6CII systems that are interconnected with 2101 I/O GPS and ensure that these interconnected systems are operating properly. Turn the power knob on the GPS receiving/display unit panel on the navigator's instrument panel to the ON position. After the GPS receiving/display unit is warmed up, the self-test result is normal. (If the self-test result is normal, READY FOR NAVIGATION will be displayed on the interface.) GPS AVAIL: 19-SEP-96 3-D: 24 HR COVERAGE
  • 447.
    JZ-Y8F200W-02 AIRCRAFT FLIGHT MANUAL SECTIONVI AIRCRAFT SYSTEM EQUIPMENT 6-159 June 30, 2012 System Settings (a) Setting the display brightness Enter the INSTALL mode page. Turn the inner knob to enter the SET DISPLAY INTENSITY LEVEL page. Press the ENT button, and then turn the inner knob to set the button backlight brightness properly. Turn the outer knob to set the screen brightness properly. Press the ENT button again to complete the brightness setting. (b) Setting the unit Enter the INSTALL mode page. Turn the inner knob to enter the unit setting page. Then, turn the outer knob to enter the distance unit selection page. Press the ENT button. After that, turn the inner knob to select the distance unit as sea mile (NAUTICAL MILES). Press the ENT button again to complete selection. Set the altitude, speed, temperature, and time units respectively according to the preceding methods. (c) Setting the CDI sensibility (1) Setting the internal CDI sensibility The internal CDI has five full deviation values: ±5 nm, ±2.5 nm, ±1.0 nm, ±0.3 nm, and ±0.1 nm. The full deviation ex-factory setting is ±2.5 nm. Press the AUX button on the GPS receiving/display unit panel to enter the CONFIGURE page. Turn the inner knob to enter the CDI sensibility setting page, as shown in Figure 6-104. Figure 6-104 Interface display CDI SENSITIVITY TURN OUTER KNOB
  • 448.
    JZ-Y8F200W-02 AIRCRAFT FLIGHT MANUAL SECTIONVI AIRCRAFT SYSTEM EQUIPMENT 6-160 June 30, 2012 Turn the outer knob until the information as shown in Figure 6-105 is displayed. Figure 6-105 Interface display Press the ENT button. Then, turn the inner knob to set the required CDI sensibility. See Figure 6-106. Figure 6-106 Interface display Press the ENT button to confirm that the new full deviation value is 1.0 sea mile. (2) Setting the external CDI sensibility The GPS can drive the external CDI (PFD upper course deviation). The unit of the external CDI can only be sea mile. There are three settings: ±5 sea miles (full deviation value), ±1 sea miles, and ±0.3 sea miles. If the autopilot is used for tracing, it is suggested to set ±1 sea miles as the full deviation value as follows: Press the AUX button on the GPS receiving/display unit panel to enter the CONFIGURE page. Turn the inner knob to set the CDI sensibility. The information as shown in Figure 6-107 is displayed. Figure 6-107 Interface display INTERNAL CDI ADJUST: FULL SCALL=2.5K M INTERNAL CDI ADJUST: FULL SCALL=1.0N M CDI SENSITIVITY TURN OUTER KNOB
  • 449.
    JZ-Y8F200W-02 AIRCRAFT FLIGHT MANUAL SECTIONVI AIRCRAFT SYSTEM EQUIPMENT 6-161 June 30, 2012 Turn the outer knob until the information shown in Figure 6-108 is displayed. Figure 6-108 Interface display Press the ENT button. Then, turn the inner knob to set the required CDI sensitivity. See Figure 6-109. Figure 6-109 Interface display Press the ENT button to confirm that the new full deviation value is 1.0 nm. (3) The magnetic variation can be set to AUTO (automatic calculation) or any value between west 180o and east 180o . AUTO is the ex-factory setting. The procedure for setting the magnetic variation is as follows: Press the AUX button to enter the *SYSTEM STATUS* page. Turn the inner knob to enter the MAGNETIC VARIATION page, as shown in Figure 6-110. Figure 6-110 Interface display EXTERNAL CDI ADJUST: FULL SCALL=5N M EXTERNAL CDI ADJUST: FULL SCALL=1.0N M MAGENETIC VARIATION AUTO 15o east
  • 450.
    JZ-Y8F200W-02 AIRCRAFT FLIGHT MANUAL SECTIONVI AIRCRAFT SYSTEM EQUIPMENT 6-162 June 30, 2012 Information on this page shows that the automatically set magnetic variation is 15. If it does not match the local magnetic variation, set it manually, east 13o for example. Then, perform the following operations: Press the ENT button to activate the cursor. Turn the outer knob counter-clockwise until east 13o is displayed. (Turning the outer knob counter-clockwise can increase the magnetic variation to east, while turning the outer knob clockwise can increase the magnetic variation to west.) Press the ENT button to confirm the new setting. Configuring the input/output (I/O) interface Configuring the serial port Press the AUX button several times until the INSTALL page is displayed. Turn the inner knob until the information shown in Figure 6-111 is displayed. Figure 6-111 Interface display Configuring the I/O interface Turn the inner knob until the AUX I/O SETUP page is displayed. Turn the outer knob to invoke the following I/O information respectively. Press the ENT button. Then, turn the inner knob to select information of the corresponding signal format. After the selected information is displayed, press the ENT button again to confirm and save the setting. The specific I/O interface format configured is as follows: SERIAL I/O SETUP TURN OUTER KNOB
  • 451.
    JZ-Y8F200W-02 AIRCRAFT FLIGHT MANUAL SECTIONVI AIRCRAFT SYSTEM EQUIPMENT 6-163 June 30, 2012 TAS INPUT----Digital-from DADS Via ARINC 429 Lo Port 3 BARO ALTITUDE INPUT---Digital- from DADS Via ARINC 429 Lo Port 3 PRESSURE ALTITUDE INPUT--- Digital-from DADS Via ARINC 429 Lo Port 3 HEADING INPUT---Digital-from AHRS via ARINC 429 Hi Port 2 OLEO INPUT---Ground-Current state is on Ground DADS---ARINC429 Low Speed AUTOPOLIT ROLL STEER--- Normal DIGITAL OUTPUT#1or #2--- ARINC 429 High Speed Operation in the air The operation in the air is as follows: Select a finished flight plan on the ground. Press D to activate the plan. View the required navigation information on the main navigation page. Then, control the aircraft to fly along the selected path (a) Executing the flight plan Press the FPL button. Turn the inner knob to invoke the selected flight plan. Then, turn the outer knob until the information shown in Figure 6-112 is displayed. Figure 6-112 Interface display Press D to complete selection. Press D again to end executing the flight plan. (b) Viewing the course navigation information Press the NAV button to enter the main navigation page in navigation mode. Once a waypoint or a flight plan has been activated to guide the flight, press D. Various navigation information for the aircraft to fly along the selected path will be displayed on the main navigation page. 01U 04U 380KM LEG1: 01U TO 02U
  • 452.
    JZ-Y8F200W-02 AIRCRAFT FLIGHT MANUAL SECTIONVI AIRCRAFT SYSTEM EQUIPMENT 6-164 June 30, 2012 HZX-1M attitude-heading reference system General HZX-1M attitude-heading reference system (AHRS) is a system integrated with the gyromagnetic compass and horizon gyro platform. It can senses and displays the flight heading and attitude. It provides the following functions: (a) Indicate the aircraft's magnetic heading, gyro heading, and turning angle. (b) The navigation indicator displays the true heading after the manual magnetic variation correction. (c) Cooperate with the horizon indicator to display the aircraft's banking angle and pitch angle. (d) Cooperate with the automatic direction finder (ADF), TACAN, and VOR-432 to convert and display the radio azimuth, TACAN azimuth, landing heading deviation, and gliding deviation and its alarm. (e) Output the heading angle, pitch angle, and banking angle information to the weather radar and flight data recording system. Transmit the yawing angle signal for heading stabilization to the autopilot. (f) Cooperate with 2101 I/O GPS navigation system and HG-593Y8 laser strapdown inertial/satellite integrated navigation system to indicate the true heading, drift angle, and off-course distance.
  • 453.
    JZ-Y8F200W-02 AIRCRAFT FLIGHT MANUAL SECTIONVI AIRCRAFT SYSTEM EQUIPMENT 6-165 June 30, 2012 System Composition and Component Installation Position The system composition and component installation position are listed in Table 6-19. Table 6-19 System composition and component installation position No. Component Model Quantity Installation Position 1 Magnetic heading sensor GHC-5 2 One at the left wing tip and one at the right wing tip 2 Integrated heading indicator ZHZ-4A 2 One on the left instrument panel and one on the right instrument panel 3 All-attitude combined gyro TQZ-1D 2 Under the floor at the left between frame 12~13 4 Heading location indicator ZEH-1R(B) 2 One on the left instrument panel and one on the right instrument panel 5 Heading location indicator ZEH-1S(B) 1 On the navigator's instrument panel 6 Navigation indicator ZHL-2J(B) 1 On the navigator's instrument panel 7 Integrated amplifier FZ-3B 2 Under the floor at the left between frame 12~13 8 Control box EK-3 1 On the navigator's instrument panel 9 Relay box EJ-7P 1 Under the floor at the left between frame 11~12 10 Horizon indicator ZDP-1 3 One on the left instrument panel, one on the right instrument panel, and one on the navigator's instrument panel 11 Power supply transformer ZBY-300A 1 Under the floor at the left between frame 12~13
  • 454.
    JZ-Y8F200W-02 AIRCRAFT FLIGHT MANUAL SECTIONVI AIRCRAFT SYSTEM EQUIPMENT 6-166 June 30, 2012 Component Function Description GHC-5 Fluxgate magnetic heading sensor Fluxgate magnetic heading sensor GHC-5 senses the horizontal component of the earth magnetic field and transmits the magnetic heading signal to the heading gyro so that the heading gyro can output the gyro magnetic heading signal. Integrated heading indicator ZHZ-4A Integrated heading indicator ZHZ-4A is used to indicate the magnetic heading, turning angle, and relative azimuth angle of the radio set. In this system, it is used to connect the fluxgate magnetic heading sensor and the heading gyro. In addition, it can be used to eliminate the compass deviation and instrument error in the system. Appearance of integrated heading indicator ZHZ-4A is shown in Figure 113. Figure 6-113 Integrated heading indicator ZHZ-4A
  • 455.
    JZ-Y8F200W-02 AIRCRAFT FLIGHT MANUAL SECTIONVI AIRCRAFT SYSTEM EQUIPMENT 6-167 June 30, 2012 Heading location indicators ZEH-1R(B) and ZEH-1S(B) The heading location indicator is used to display the following information: Heading angle (Ψ): indicates the included angle between scale line N on the dial and the heading reference line. Radio set magnetic azimuth angle (λ): indicates the included angle between scale line N on the dial and the radio set pointer. Radio set relative azimuth angle (λH): indicates the included angle between the radio set pointer and the heading reference line. Drift angle (α): indicates the included angle between the drift pointer and the heading reference line. The course pole displays deviation (ε) of aircraft relative to the specified course. When HZX-1M AHRS is interconnected with 777B or GPS, the off-course distance can be read; when HZX-1M AHRS is interconnected with ZHJ-2020 combined receiver, the heading deviation can be read. Readings of both the off-course distance and the heading deviation are indicated by the drum type dial facing the course pole. The gliding deviation reading is indicated by the gliding pointer facing the gliding reference line (This pointer is unavailable on ZEH-1S(B) indicator.) The heading location indicator can preselect the heading angle. Turn the handle in the lower right corner of the indicator so that the specified pointer turns by an angle (ΨP) relative to scale line N on the dial. When ZEH-1S(B) heading location indicator rotates on the heading dial, it also transmits a three-phase heading signal to the heading linkage box's selsyn receiver through the selsyn transmitter stator. This signal is converted to the heading deviation signal and heading deviation integration control signal through the heading linkage box's low-power follow-up system and return-to-zero circuit. Then, these signals are transmitted to the autopilot to stabilize the aircraft heading and eliminate heading deviation. The pointer indication is shown in Figure 6-114. ZEH-1R(B) and ZEH-1S(B) indicators are installed respectively on the left and right instrument panels and navigator's instrument panel. These indicators provide similar functions.
  • 456.
    JZ-Y8F200W-02 AIRCRAFT FLIGHT MANUAL SECTIONVI AIRCRAFT SYSTEM EQUIPMENT 6-168 June 30, 2012 21 33 3024 V A N 24 W 30 1521 S 33 N E 15 12 12 G S 3 6 3 6 Figure 6-114 Heading location indicator ZEH-1R(B) Navigation indicator ZHL-2J(B) ZHL-2J(B) navigation indicator is the navigator's primary indicator which can display the true heading, magnetic heading, magnetic variation angle, and relative azimuth angle and magnetic azimuth angle of two radio sets. In addition, it can transmit AC and DC true heading signals to the related navigation devices onboard. 24 21 30 33 1 S 15 N 3 E126 2 W Figure 6-115 Navigation indicator ZHL-2J(B)
  • 457.
    JZ-Y8F200W-02 AIRCRAFT FLIGHT MANUAL SECTIONVI AIRCRAFT SYSTEM EQUIPMENT 6-169 June 30, 2012 Control box EK-3 Figure 6-116 Control box EK-3 (a) MAGNETIC-HALF changeover switch MAGNETIC: Corrected by the fluxgate magnetic heading sensor, the gyro outputs a heading signal indicating the gyro magnetic heading. HALF: Not corrected by the fluxgate magnetic heading sensor, the gyro outs a heading signal indicating the great circle heading, that is, half compass heading. (b) Setting knob: heading transmitter for manually correcting the gyro according to the preset azimuth. (c) LEFT-NORMAL-RIGHT changeover switch NORMAL: The left and right gyros operate properly and transmit heading signals to the corresponding indicators respectively. LEFT: The right gyro is powered off. All indicators receive heading signals from the left gyro only. RIGHT: The left gyro is powered off. All indicators receive heading signals from the right gyro only. (d) RADIO-INERTIAL NAVIGATION changeover switch (not used) (e) NORTH-SOUTH changeover switch This switch is used to change the correction azimuth of the gyro apparent error when aircraft is flying in the northern (or southern) hemisphere. (f) SLAVING button This button is used to rapidly correct the gyro magnetic heading.
  • 458.
    JZ-Y8F200W-02 AIRCRAFT FLIGHT MANUAL SECTIONVI AIRCRAFT SYSTEM EQUIPMENT 6-170 June 30, 2012 (g) Latitude potentiometer This potentiometer is used to perform gyro latitude correction to eliminate the apparent error when aircraft is flying at different latitudes. (h) Correction potentiometers (one at the left and one at the right) These potentiometers are used to compensate the imbalanced gyro drift error generated during manufacturing. Turning the correction potentiometers during flight is prohibited. TQZ-1D All-attitude combined gyro TQZ-1D All-attitude combined gyro TQZ-1D can serve as the central gyroscope for aircraft. It can output the banking angle, pitch angle, and half compass heading, and stabilize and output the magnetic heading. Integrated amplifier FZ-3B The two integrated amplifiers FZ-3B are used to amplify, convert, and correct various signals. EJ-7P Relay box EJ-7P Relay box EJ-7P is used for electric connection of the whole set of HZX-1M AHRS components and system operating status switchover. ZBY-300A Power supply transformer ZBY-300A Power supply transformer ZBY-300A is an autotransformer which can convert the onboard power supply of 115 V and 400 Hz to the power supply of single-phase 36 V and 26 V and 400 Hz, supplying power to HZX-1M AHRS and other devices. Horizon indicator ZDP-1 Totally three horizon indicators ZDP-1 are installed respectively on the pilot's, copilot's and navigator's instrument panels. They cooperate with the two all-attitude combine gyros to display the aircraft's banking angle and pitch angle. Main Technical Data Operating conditions Temperature range: -67o F~+140o F (-55o C~+60o C) Altitude range: -1640 ft~36089 ft (-500~11000m)
  • 459.
    JZ-Y8F200W-02 AIRCRAFT FLIGHT MANUAL SECTIONVI AIRCRAFT SYSTEM EQUIPMENT 6-171 June 30, 2012 Power supply and consumption power DC: 27V±10%,≤70W AC: single-phase:115±5.75V 400±2.5% Hz≤250VA Three-phase: 36±1.8V 400±2.5% Hz≤180VA Operating preparation duration: Not longer than 2min Precision (a) Heading error: Not greater than ±1.5º after being corrected by the correction mechanism. (b) Attitude error: Not greater than ±1º at the zero position; not greater than ±1.5º if the attitude angle is smaller than 30º; not greater than ±2.5º if the attitude angle is greater than 30º. Half compass drift error: Not greater than 2º/h (c) Radio set (or VOR) relative azimuth angle error: Not greater than ±1.5º at the zero position when there are two radio sets. Not greater than ±1º at the zero position when there are one radio set. Drift angle error: Not greater than ±0.5º Magnetic heading swing: Not greater than ±0.5º Magnetic correction coordination speed Normal coordination speed: (forward and backward) Fast coordination speed: Not lower than 8o /s (forward and backward) One radio set (or VOR): Not lower than 40º/s System weight: Not heavier than 100.3 lb (45.5 kg)
  • 460.
    JZ-Y8F200W-02 AIRCRAFT FLIGHT MANUAL SECTIONVI AIRCRAFT SYSTEM EQUIPMENT 6-172 June 30, 2012 Operation Description System principles Operating principles of HZX-1M ARHS are described from the heading and attitude perspectives respectively: For both the heading and attitude parts, there are two basically independent systems at the left and right which are interconnected with each other in emergency status switchover. All-attitude combined gyro TQZ-1D serves as the primary component of HZX-1M AHRS. TQZ-1D consists of the vertical gyro and heading gyro. The vertical gyro represents the earth vertical, senses the aircraft's pitch angle and banking angle, converts these angles into electric signals, and transmits the signals to horizon indicator ZDP-1 and other devices. In the half compass operating state, the heading gyro serves as an independent heading sensor and corrects the earth's rotation error by the potentiometer on control box EK-3 based on the geographical latitude. The heading gyro is equipped with banking and pitch brackets. Therefore, the bracket error resulted from aircraft banking and pitching is eliminated. In addition, it transmits the gyro azimuth long range to each indicator through the synchronous follow-up system to indicate the aircraft heading change. When the operating status switch on control box EK-3 is set to the MAGNETIC position, the gyro heading is corrected by fluxgate magnetic heading sensor GHC-5 to indicate the aircraft magnetic heading. Heading location indicators on the pilot's and copilot's instrument panels are both ZEH-1R(B), while that on the navigator's instrument panel is ZEH-1S(B).
  • 461.
    JZ-Y8F200W-02 AIRCRAFT FLIGHT MANUAL SECTIONVI AIRCRAFT SYSTEM EQUIPMENT 6-173 June 30, 2012 Signal crosslinking with devices onboard When HZX-1M AHRS is operating in normal magnetic correction state, use the NAV SEL (navigation source selection) switch on the left instrument panel to interconnect HZX-1M AHRS with HG-593Y8 laser strapdown inertial/satellite integrated navigation system or VOR-432. When the switch is set to the INS position, both ZEH-1S(B) and left and right ZEH-1R(B) indicate the magnetic heading of HZX-1M AHRS and the true heading, drift angle, and off-course distance signals from the inertial system, whose values are the same as the true heading, drift angle, and off-course distance displayed on the inertial system screen. When the NAV SEL (navigation source selection) switch is set to the VOR1 or VOR2 position, left and right ZEH-1R(B) indicators indicate the magnetic heading of HZX-1M AHRS and the corresponding azimuth deviation, gliding deviation, and its alarm flag from VOR1 or VOR2. If the course pole deviates rightward, the deviation is positive; if the course pole deviates leftward, the deviation is negative. The gliding deviation is the reading of the gliding pointer (this pointer is unavailable on ZEH-1S(B)) facing the central scale line. If the gliding pointer deviates upwards, the deviation is positive; if the gliding pointer deviates downwards, the deviation is negative. The NAV alarm flags on the two ZEH-1R(B) indicators display heading deviation alarms, while the GS alarm flags display gliding deviation alarms. When the ADF1/TACAN/VOR1 switches on the pilot's, copilot's and navigator's instrument panels are all set to the VOR1 position, the left and right heading location indicators ZEH-1R(B) and navigation indicator ZHL-2J(B) should display the azimuth angle from VOR1; when the ADF2/VOR2 switches on the pilot's, copilot's and navigator's instrument panels are all set to the VOR2 position, the left and right integrated heading indicators ZHZ-4A and navigation indicator ZHL-2J(B) should display the azimuth angle from VOR2.
  • 462.
    JZ-Y8F200W-02 AIRCRAFT FLIGHT MANUAL SECTIONVI AIRCRAFT SYSTEM EQUIPMENT 6-174 June 30, 2012 When the ADF1/TACAN/VOR1 switches on the pilot's, copilot's and navigator's instrument panels are all set to the ADF1 position, the left and right heading location indicators ZEH-1R(B) and navigation indicator ZHL-2J(B) should display the azimuth angle from ADF1; when the ADF2/VOR2 switches on the pilot's, copilot's and navigator's instrument panels are all set to the ADF2 position, the left and right integrated heading indicators ZHZ-4A and navigation indicator ZHL-2J(B) should display the azimuth angle from ADF2. When the ADF1/TACAN/VOR1 switches on the pilot's, copilot's and navigator's instrument panels are all set to the TACAN position, the left and right heading location indicators ZEH-1R(B) and navigation indicator ZHL-2J(B) should display the azimuth angle from the TACAN station. Heading location indicators on the pilot's and copilot's instrument panels are both ZEH-1R(B), while that on the navigator's instrument panel is ZEH-1S(B). In-flight operations Before takeoff, perform the following operations: Set the GYRO SEL (horizon gyro selection) switch on the left instrument panel to the N (normal) position. Set the MAGNETIC-HALF switch on control box EK-3 to the MAGNETIC position. Set the LEFT-NORMAL-RIGHT switch to the NORMAL position. Set the SOUTH-NORTH switch to the NORTH position. Set the latitude dial to the local latitude. Set the magnetic variation pointer on ZHJ-2J(B) indicator to the zero position. Set the TIME DELAY switch on the navigator's instrument panel to the ON position. After power is supplied to aircraft properly, turn on the power switch of HZX-1M on the navigator's instrument panel. The power effectiveness light is on. After 15s, the red indicating lights for the three ZDP-1 indicators should turn on and then off after 50s. ZDP-1 indicator indicates the aircraft parking attitude. Press the SLAVING button. The magnetic heading after indicator coordination points to the aircraft parking azimuth. After the AHRS starts operating properly, set the TIME DELAY switch on the navigator's instrument panel to the OFF position.
  • 463.
    JZ-Y8F200W-02 AIRCRAFT FLIGHT MANUAL SECTIONVI AIRCRAFT SYSTEM EQUIPMENT 6-175 June 30, 2012 After the system is powered on for 5min and starts operating properly, the aircraft can taxi out of the parking apron. During flight, the navigator can select the required flight status by using the MAGNETIC-HALF switch on control box EK-3. When the switch is set to the HALF position, the flight precision will decrease with the flight duration increasing and gyro drift error accumulating. At this time, set the switch to the MAGNETIC position periodically (for example, once per hour) for correction. Correction can be performed only when aircraft is in the rectilinear flight attitude and is flying with a constant speed. The correction method is to set the MAGNETIC-HALF position to the MAGNETIC position and then press the SLAVING button. During half compass flight status, revise the latitude when the latitude changes per 2º. Check that the LEFT-NORMAL-RIGHT switch on control box EK-3 is operating properly. All heading indicators should operate properly. Then, check that horizon LEFT-NORMAL- RIGHT switch on the left instrument panel is operating properly. All attitude indicators should operate properly. When the local magnetic variation is set according to the outer scale circle using the magnetic variation handle of ZHJ-2J(B) indicator, ZHJ-2J(B) indicator can display the true heading and output the true heading signal. The pilot can choose to display the ADF1, ADF2, TACAN, or VOR azimuth as required by using the ADF1/TACAN/VOR1 switches and ADF2/VOR2 switches on the pilot's, copilot's and navigator's instrument panels. The pilot can choose to display the AHRS (flight attitude) and INS (inertial) navigation parameter indication or VOR1 and VOR2 course deviation or course gliding indication when landing as required by using the NAV SEL (navigation source) switch on the pilot's instrument panel. When the switch is set to the INS position, the three heading location indicators display the true heading, drift angle, and off-course distance information about HG-593Y8 laser strapdown inertial/satellite integrated navigation system. During landing approach, set the switch to the VOR1 or VOR2 position. The landing azimuth deviation and gliding deviation can be indicated by the deviation pole and gliding pointer on the left and right heading location indicators facing the deviation and gliding marks. In this way, the location of aircraft relative to the runway can be determined.
  • 464.
    JZ-Y8F200W-02 AIRCRAFT FLIGHT MANUAL SECTIONVI AIRCRAFT SYSTEM EQUIPMENT 6-176 June 30, 2012 Operation Precautions (a) Within 1min that the gyro is powered on and 30min after it is powered off, moving the gyro is prohibited. (b) Before starting the inverter, check that the AHRS power switch is at the OFF position and the TIME DELAY switch is at the ON position. Supply 27 V power to aircraft and then start the single-phase and three-phase inverters. After the voltage indication becomes normal, wait 10s and turn on the AHRS power switch. To power off the AHRS, turn off the AHRS power switch and then the master power switch onboard. (c) After the aircraft is landed and when it parks on the ground, turn off the AHRS power switch and then the power switch onboard. After the AHRS power switch is turned off, any great attitude mechanical taxiing is prohibited. KRA 405B radio altimeter Functions A set of KRA 405B radio altimeter is installed on the Y8F200W aircraft to be exported to Venezuela. It provides reliable and accurate altitude information for the pilot during takeoff, approach, landing, and ground proximity flight in other cases. In addition, the system is capable of providing alarms when aircraft approaches the preset altitude. System Composition and Component Installation Position The altimeter consists of one transceiver, two altitude indicators, one receiving antenna, one transmitting antenna, and connecting cables. Their models and installation positions are listed in Table 6-20. Table 6-20 Component models and installation positions Component Model Quantity Installation Position Transceiver KRA 405B 1 At the right between frame 63~64 Navigator's altitude indicator KNI 415 1 On the navigator's instrument panel Pilot's indicator KNI 415 1 On the pilot's instrument panel Transmitting antenna KA 54A 1 Between rib 4~5 of stringer 4~5 on the lower surface of the right horizontal tail Receiving antenna KA 54A 1 Between rib 4~5 of stringer 4~5 on the lower surface of the left horizontal tail Warning light Lamp shade ZSD-10 (red) Bulb FJ28-0.1 1 On the copilot's instrument panel
  • 465.
    JZ-Y8F200W-02 AIRCRAFT FLIGHT MANUAL SECTIONVI AIRCRAFT SYSTEM EQUIPMENT 6-177 June 30, 2012 Main Technical Specifications Operating frequency: 4300±15MHz Operating power supply: 28 VDC (maximum current of 2A) Altitude output precision: ±5% (0~500ft); ±7% (500~2500ft) Altitude measuring range: 0~2500ft Operating altitude: 0~55000ft Operations Altitude indicator description Appearance of the radio altitude indicator is shown in Figure 6-117. TEST DH DH warning light 1 2 3 4 510 15 20 RADAR ALT ×100 FEET Fault flag Indicator pointer Warning vernier "TEST" self-test button Warning altitude knob Figure 6-117 KNI-415 altitude indicator
  • 466.
    JZ-Y8F200W-02 AIRCRAFT FLIGHT MANUAL SECTIONVI AIRCRAFT SYSTEM EQUIPMENT 6-178 June 30, 2012 (a) The altitude indicator indicates a radio altitude within the range of 0 ft~2000 ft. When the flight altitude is higher than 2000 ft, the indicator pointer rotates clockwise and hides behind the baffle. (b) The warning altitude knob is used to adjust the preset warning altitude. Turning the warning knob will drive the warning vernier on the dial. The reading pointed by the warning vernier indicates the preset warning altitude. (c) Whether the DH warning light is on or off depends on whether the altitude indicator pointer is lower than or higher than the warning vernier. When the warning light is on, it can be turned off by pressing the DH warning light. When aircraft is flying at an altitude lower than the preset warning altitude, press the DH warning light again to turn on the warning light again. If the warning altitude is set to a value higher than 50 ft, pressing the TEST self-test button to turn on the warning light is also allowable. (d) When the radio altimeter is operating properly in tracing state, the fault flag is invisible. The fault flag appears only when the radio altimeter is operating in other states, for example, the traced object is missing, power is cut off, fault is generated, or self-test is performed. (e) The ALT ALERT warning light on the copilot's instrument panel is on when the warning light on the pilot's altitude indicator turns on, and it is off when the warning light on the pilot's altitude indicator turns off. The on or off status of the ALT ALERT warning light is asynchronous with that of the warning light on the navigator's altitude indicator. Altitude indicator display and operations (a) Turn warning altitude knobs on altitude indicators on the pilot's and navigator's instrument panel to make the warning altitude vernier point to 0 ft. Observe the altitude indicator. The indicator pointer points to (0±5) ft. The fault flag is invisible. Note 1) There should be no other object in the ground area whose diameter is 140 ft corresponding to the radio altimeter antenna on the lower surface of the left horizontal tail. 2) 0 ft indicates the flight altitude when landing gears are in the parking compression state.
  • 467.
    JZ-Y8F200W-02 AIRCRAFT FLIGHT MANUAL SECTIONVI AIRCRAFT SYSTEM EQUIPMENT 6-179 June 30, 2012 (b) Turn the R-ALT BRT ADJ knob on the pilot's instrument panel. Observe the brightness change of the altitude indicator on the pilot's instrument panel. Turning the knob clockwise will brighten the indicator. (c) Turn the R-ALT BRT ADJ knob on the navigator's instrument panel. Observe the brightness change of the altitude indicator on the navigator's instrument panel. Turning the knob clockwise will brighten the indicator. Note During the first power-on check, if readings of the two altitude indicators are not 0, use a small round stick to push the calibration switch (SW 1) on the transceiver front panel for 10s so that the altitude indicator pointer points to scale 0. (d) Ground self-test Perform self-test according to the following procedure: (1) Turn the warning altitude knob so that the warning altitude vernier points to 25 ft. (2) Press and hold the TEST self-test button on the altitude indicator. (3) When the altitude indicator indicates (50±5) ft, the fault flag appears. The DH warning light and ALT ALERT warning light on the copilot's instrument panel are off. (4) Turn the warning altitude knob DH. When the warning altitude vernier reading is greater than (50±5) ft, the DH warning light turns on. (5) Release the TEST self-test button. The fault flag disappears and the pointer points to (0±5) ft. In-flight operations (a) Turn on the RALT circuit breaker on the navigator's right console. (b) Turn the warning altitude knob on the altitude indicator before flight to select the required warning altitude. (c) When the reading pointed by the warning altitude vernier on the altitude indicator is higher than the radio altimeter indication, the DH warning light turns on; otherwise, the DH warning light is off.
  • 468.
    JZ-Y8F200W-02 AIRCRAFT FLIGHT MANUAL SECTIONVI AIRCRAFT SYSTEM EQUIPMENT 6-180 June 30, 2012 Note 1) When the radio altimeter indication is higher than 2000 ft, the altitude pointer of the altitude indicator hides behind the baffle. 2) When the radio altimeter indication is higher than 2500 ft, the fault flag appears on the altitude indicator. (d) Press the TEST self-test button on the altitude indicator at any altitudes to perform self-test so that the altimeter can operate properly. The procedure is as follows: (1) Press and hold the TEST self-test button on the altitude indicator. (2) The altitude indicator pointer points to (50±5) ft. The fault flag appears. (3) The DH warning light and ALT ALERT warning light on the copilot's instrument panel are off. (4) If the preset warning altitude is higher than 50 ft, the DH warning light is on. (5) Release the TEST self-test button. The fault flag disappears and the altitude indicate restores to the normal value. Precautions (a) The radio altimeter indicates the aircraft altitude relative to the ground. It can provide accurate altitudes relative to various ground conditions. In certain unusual environments, however, the altimeter precision will be affected. When aircraft is flying through jungles, the indicator may not indicate the altitude relative to the treetop; when aircraft is flying through firn, the indicator may not indicate the altitude relative to the firn. (b) During flight with a great pitch angle and a roll angle, the altimeter precision will be affected. (c) Before takeoff and approach, perform self-test to check the altimeter. In this way, faults can be detected in advance and the corresponding preventive measures can be taken.
  • 469.
    JZ-Y8F200W-02 AIRCRAFT FLIGHT MANUAL SECTIONVI AIRCRAFT SYSTEM EQUIPMENT 6-181 June 30, 2012 Air Data System (XAS-3M) Function XAS-3M consists of XSC-3N air data computer, static temperature sensor GWR-24 and altitude indicator ZG-4B. It functions to provide air parameter and its relative information for other systems of the aircraft. Here is specific information of its functions: (d) Providing air pressure and altitude information for pilot, copilot and navigator. Providing absolute air pressure altitude, relative air pressure altitude and vertical speed signal for ground proximity warning system and providing absolute air pressure altitude, Mach number, static air pressure, total air pressure, true airspeed, vertical speed and air speed indication signals, etc. (e) Providing absolute air pressure altitude signal and true airspeed signal for traffic collision and avoidance system. (f) Providing total air pressure DC analog signal for automatic fuel cutoff and overtemperature protection devices. (g) Providing absolute air pressure altitude signal and true airspeed signal for Free Flight 2101 I/0 GPS navigation system. (h) Providing air pressure altitude signal for JZ/YD-126E airborne transponder.
  • 470.
    JZ-Y8F200W-02 AIRCRAFT FLIGHT MANUAL SECTIONVI AIRCRAFT SYSTEM EQUIPMENT 6-182 June 30, 2012 Composition and installation position of system kit Composition The composition and installation position of air data system refer to Table 6-21. Table 6-21 Composition and installation position of air data system S/N Nomenclature Type No. Qty. Installation position Remarks 1 Air data computer XSC-3N 2 Equipment rack on left of Frame 9 2 Temperature sensor GWR-24 2 Left and right aircraft skin of Frame 7~8 3 Altitude indicator ZG-4B 3 Left and right instrument panel and navigator instrument panel, one for each System configuration There are 2 air data computers for system configuration of the aircraft. Under normal condition, the air data computer 1 is for ground proximity warning system, flight data recording system, TCAS-2000 traffic collision and avoidance system responder 1, automatic fuel cutoff and overtemperature protective devices and navigator and pilot altitude indicator ZG-4B. In contrast, air data computer 2 is for TCAS-2000 traffic collision and avoidance system responder 2, Free Flight 2101 I/0 GPS navigation system, JZ/YD-126E airborne transponder and altitude indicator ZG-4B of copilot instrument panel. There is an air data computer changeover switch respectively on instrument panels of navigator, pilot and copilot. If there should be failure for one of the air data computer, switch to the other through the changeover switch for normal operation. Crosslinking block diagram refers to Figure 6-118.
  • 471.
    JZ-Y8F200W-02 AIRCRAFT FLIGHT MANUAL SECTIONVI AIRCRAFT SYSTEM EQUIPMENT 6-183 June 30, 2012 Airdatacomputer1 Airdatacomputer2 Total air temperature Total air temperatureTemperature sensor Temperature sensor Air parameter Air parameter Relay box Navigatorinstrument panelaltitudeindicator Leftinstrument panelindicator Inquisitor Laserinertianavigationsystem Groundproximitywarningsystem Tcassystem Automaticfuelshut-offsystem Rightinstrumentpanel altitudeindicator Freeflightnavigation system Totalpressure Totalpressure Staticpressure Flightdatarecordingsystem Staticpressure Figure 6-118 Functional block diagram of air data system Air data computer (XSC-3N) (a) General Air data computer (short for ADC), the core of whole air data system, receives pitot pressure and static pressure of pitot-static system and air temperature information from temperature sensor. Then, ADC deals that information to acquire all kinds of air parameters, and then sends the parameters to altimeter indicator, traffic alert and collision avoidance system TCAS-94 and flight data record system.
  • 472.
    JZ-Y8F200W-02 AIRCRAFT FLIGHT MANUAL SECTIONVI AIRCRAFT SYSTEM EQUIPMENT 6-184 June 30, 2012 (b) Operation Principle ADC XSC-3N is a microcomputer system made of chip Adu C812BS. ADC, core of air data system, senses pitot pressure and static pressure of pitot-static system of aircraft and calculates parameters of absolute pressure altitude Hp in flight, true air speed TAS, etc., by air parametric equation. Sense static aircraft temperature by static temperature sensor SAT. And then calculate out total air temperature TAT by static temperature. Procedure of ADC performs continuous monitoring for each factor in aircraft operating. If judging the trouble in air data computer itself, failure indicator light on front panel will give out trouble indication signal. When BIT signal is effective with aircraft on the ground, air data computer may cut off normal operating procedures currently and performs BIT procedure, that is, ADC performs function check in each part. If all conditions are normal, the computer may send out a group of specified data; otherwise, output data are all 0. (c) Main Technical Data (1) Inlet of air data computer a) Static temperature The air data computer receives static air pressure from static-pressure hole. Measurement range: 0.35~15.95psi (0.71 inHg~32.48 inHg) Operation range: 1.09~15.80psi (2.21 inHg~32.16 inHg) b) Total pressure The air data computer receives total pressure from aircraft air-speed tube. Measurement range: 0.35~37.71psi (0.71 inHg~76.77 inHg) Operation range: 1.52~23.26psi (3.1 inHg~47.35 inHg)
  • 473.
    JZ-Y8F200W-02 AIRCRAFT FLIGHT MANUAL SECTIONVI AIRCRAFT SYSTEM EQUIPMENT 6-185 June 30, 2012 c) Static air temperature(SAT) of air data computer The air data computer receives static temperature resistance signals from aircraft temperature sensor. Measurement range: -108.4o F (-78o C) (34.32Ω) ~197.6o F (92o C) (68.00Ω) Operation range:-76o F (-60o C) (34.32Ω) ~176o F (80o C) (68.00Ω) d) Build-in Test (BIT) initial It receives BIT discrete magnitude input of its own front panel or the instrument panel of the aircraft. (2) Output format of air data computer Four ARINC429 low-speed British data buses; One RS422 data bus (spare); Parallel altitude code, which is also called 11 channel Gray code data bus(spare); Discrete magnitude output; (3) Output of air data computer and its characteristics Accorded with air data Standard ARINC429. a) Absolute air pressure altitude(Hp) Output range: -1000 ft~50000 ft(-304.8m~15240m) Output parameter accuracy refers to Table 6-22.
  • 474.
    JZ-Y8F200W-02 AIRCRAFT FLIGHT MANUAL SECTIONVI AIRCRAFT SYSTEM EQUIPMENT 6-186 June 30, 2012 Table 6-22 Correction card for altitude Altitude ft (or m) Tolerance ±ft (or ±m) Altitude ft (or m) Tolerance ±ft (or ±m) 0 25 (8) 14000 (4267) 40 (12) 1000 (305) 25 (8) 17000 (5182) 45 (14) 2000 (610) 25 (8) 20000 (6096) 50 (15) 3000 (914) 25 (8) 30000 (9144) 75 (23) 4000 (1219) 25 (8) 40000 (12192) 100 (30) 5000 (1524) 25 (8) 50000 (15240) 125 (38) 8000 (2438) 30 (9) 11000 (3353) 35 (11) b) (TAS)True airspeed (TAS) Output parameter range: 50 kn~598 kn (92.6~1107.5km/h); When true airspeed is less than 50kn (92.6km/h), the output set should be 0. Output parameter accuracy refers to Table 6-23. Table 6-23 TAS accuracy sheet TAS kn(km/h) Tolerance (or±kn) 50 kn~70 kn(92.6~129.64km/h) ±12 kn(±22.22km/h) 70 kn~150 kn(129.64~277.8km/h) ±12 kn~±4 kn(±22.22~±7.41km/h)(linear transition) 150 kn~598 kn(277.8~1107.5km/h) ±4 kn(±7.41km/h)
  • 475.
    JZ-Y8F200W-02 AIRCRAFT FLIGHT MANUAL SECTIONVI AIRCRAFT SYSTEM EQUIPMENT 6-187 June 30, 2012 c) Static air temperature (SAT) Output range: -76~176o F (-60o C~80o C) Output accuracy: +34.7o F~+29.3(±1.5o C) d) Elevating speed (HPR) Output parameter range: -20000 ft/min~20000 ft/min (-101.6~101.6m/s) Output parameter accuracy is shown in Table 6-24. Table 6-24 Correction card for elevating speed Elevating speed ft/min (or m/min) Tolerance ft/min(or ±m/min) Elevating speed ft/min (or m/min) Tolerance ft/min (or ±m/min) 20000 (6096) 1000 (305) -50 (-15) 45 (14) 6000 (1829) 300 (91) -100 (-30) 45 (14) 4000 (1219) 200 (61) -200 (-61) 45 (14) 2000 (610) 100 (30) -500 (-152) 45 (14) 1000 (305) 50 (15) -1000 (-305) 50 (15) 500 (152) 45 (14) -2000 (-610) 100 (30) 200 (61) 45 (14) -4000 (-1219) 200 (61) 100 (30) 45 (14) -6000 (-1829) 300 (91) 50 (15) 45 (14) -20000 (-6096) 1000 (305) 0 45 (14)
  • 476.
    JZ-Y8F200W-02 AIRCRAFT FLIGHT MANUAL SECTIONVI AIRCRAFT SYSTEM EQUIPMENT 6-188 June 30, 2012 e) Total air temperature (TAT) Output range: -76~210.2o F (-60o C~99o C) Output accuracy: 34.7~+29.3o F (±1.5o C) f) Indicated airspeed(Vi) Output parameter range: 30 kn~450 kn(55.56~833.4km/h) When indicated speed is below 30kn (55.56km/h), the output set should be 0. The output parameter accuracy refers to Table 6-25. Table 6-25 Correction card for indicated airspeed Indicated air speed (IAS) kn (or km/h) Tolerance ±kn (or ±km/h) Indicated air speed (IAS)) kn (or km/h) Tolerance ±kn (or ±km/h) 30 (55.5) 5.0 (9.3) 80 (148) 3.5 (6.5) 40 (74) 5.0 (9.3) 100 (185) 2.0 (3.7) 50 (93) 5.0 (9.3) 450 (833) 2.0 (3.7) g) Mach number (M) Output parameter range: 0.00~1.00 Output parameter accuracy refers to Table 6-26.
  • 477.
    JZ-Y8F200W-02 AIRCRAFT FLIGHT MANUAL SECTIONVI AIRCRAFT SYSTEM EQUIPMENT 6-189 June 30, 2012 Table 6-26 Mach (M) exactness sheet Absolute air pressure altitude range Mach number Tolerance 0 ft~10000 fat (0~3048m) 0.100 ±0.012 0 ft~10000 fat (0~3048m) 0.200 ±0.012 0 ft~10000 fat (0~3048m) 0.300 ±0.010 0 ft~20000 fat (0~6096m) 0.400 ±0.010 0 ft~20000 fat (0~6096m) 0.500 ±0.010 0 ft~30000 fat (0~9144m) 0.600 ±0.0095 10000 ft~40000 fat (3048~12192m) 0.700 ±0.0090 30000 ft~50000 fat (9144~15240m) 0.800 ±0.0085 30000 ft~50000 fat (9144~15240m) 0.900 ±0.0075 (4) Main Technical Data of Air Data Computer Power supply 28V DC Power consumption Not more than 15 W Operating temperature range -67~158o F -55o C~70o C Outline size (length×width×height) 6.38in×4.41in×3.78in (162 mm×112 mm×96 mm) Weight of air data computer 4.41 lb (2kg)
  • 478.
    JZ-Y8F200W-02 AIRCRAFT FLIGHT MANUAL SECTIONVI AIRCRAFT SYSTEM EQUIPMENT 6-190 June 30, 2012 (5) Operation Principle Front panel of air data computer is shown in Figure 6-119. In the Figure: Static pressure (Ps) XS1 N D Pitot pressure (Pt) Air data computer Operation Trouble Built-in test Figure 6-119 Front panel of air data computer a) Ps nipple connects with aircraft static pipeline to make static pressure enter into static sensor. b) Pt nipple connects with aircraft pitot pipeline to make pitot pressure enter into pitot sensor. c) Operating indicating light (green), called ADC power supply indicating light, extinguishes when there is no power or power supply is abnormal; otherwise, that light is on. d) Failure indicator light (red) is to indicate that there is trouble in product. When there is failure in ADC, this indicating light is on; otherwise, it is at off state. e) Built-in test button: to control built-in circuit. f) Connection socket: connecting with aircraft cable.
  • 479.
    JZ-Y8F200W-02 AIRCRAFT FLIGHT MANUAL SECTIONVI AIRCRAFT SYSTEM EQUIPMENT 6-191 June 30, 2012 Temperature sensor GWR-24 (a) Function Temperature sensor (GWR-24) is to sense ambient air temperature around aircraft and then sends measured air temperature signal to air data computer XSC-3N. Sensitive element of GWR-24 is platinum resistance, whose resistance value changes in linearity. The value is 50Ω at 32o F(0o C). (b) Main Technical Index Operating temperature range -76o F ~176o F (-60o C~+80o C) Accuracy ±(32.54±32.0054)o F (±(0.3±0.003T)o C) Operating current Not more than 5mA Outline size (mm) 1.73in×0.98in×2.36in (44mm×25mm×60mm) Weight Not more than 0.22lb (0.1 kg) Altitude indicator (ZG-4B) Function Altitude indicator (ZG-4B) receives absolute altitude signal according with ARINC429 form from aircraft air data computer and preset pressure value at inHg unit by pressure binding knob to provide absolute and relative pressure altitude signals for navigator, pilot and copilot.
  • 480.
    JZ-Y8F200W-02 AIRCRAFT FLIGHT MANUAL SECTIONVI AIRCRAFT SYSTEM EQUIPMENT 6-192 June 30, 2012 Main Technical Index Operating power and consumption 28V DC, not more than 15 W. Interior lighting power and consumption 28V DC, not more than 5 W. Interior lighting White lighting Air pressure amending display range -1000 ft~50000 fat (-304.8~15240m) Accuracy 20 ft (6.10m) Aerodrome pressure binding signal display range 0.98psi~15.22psi (22.00 inHg~30.99 inHg) Air pressure binding accuracy ±4.9×10⁻³ psi(±0.01 inHg) Outline size 3.17in×3.17in×5.71in (80.64mm×80.64mm×145mm) Weight not above 4.41 lb (c) Air pressure amending altitude indication Air pressure amending altitude indication of the altitude indicator displays air pressure altitude in combination of dial, pointer and nixie tube. One circle of the pointer relative to the dial represents 1,000 FT, and the minimum scale of the dial is 10 FT. The nixie tube at the center line of the dial displays accurate air pressure altitude. Read directly from the middle line nixie tube for correct reading. The solid pointer can read flight tendency within 1,000 FT. If - appears at the 10,000 digit of the nixie tube, it suggests that the air pressure altitude is negative altitude below 0 m, i.e., below the sea level. Here is the reading method: the solid pointer reading minus 1000 FT in relative to the dial. For example, if the pointer points to 830, then air pressure altitude reading should be: 830-1,000=-170(FT). In contrast, read the reading on nixie tube directly. When there is error for air pressure altitude indication, the red light would be on at the warning window, reminding of warning for the operator and suggesting invalid present altitude indication.
  • 481.
    JZ-Y8F200W-02 AIRCRAFT FLIGHT MANUAL SECTIONVI AIRCRAFT SYSTEM EQUIPMENT 6-193 June 30, 2012 (d) Aerodrome pressure binding Knobs marked with aerodrome pressure at the lower left of the altitude indicator panel are used for setting airport altitude in pressure unit of in Hgor hPa. When flymen conducts take-off, landing or ferrying flight operations, reporting through the tower can realize zero altitude of the pointer relative to the airport. Turn the aerodrome pressure knob in a clockwise wire, inHg or hpa is increased, and reading of the solid pointer increases accordingly, and vice versa. Unit are displayed by special digital lights. (e) Self-test When the ZG-B altitude indicator enters self-test, normal operation programs are interrupted, the warning suggests invalid indication, and all internal assembly units start self-test during self-test status. If self-test passes, for the ZG-4B altitude indicator, the air pressure altitude pointer would point to 700 ft in the shortest path, warning light is on, all displays of the nixie tube are 8, and the reading maintains for 5 s and then return to normal operation status. If self-test fails, the warning would still be on. Error display would not be removed only when failure disappears or is removed.This manner supports ZG-4B altitude indicator original place checking, i.e., BIT. (f) Failure diagnoses and troubleshooting (6) Airfield failure diagnoses Under normal operation, airfield failure diagnoses could be realized according to the pointer, nixie tube and error signaling light on the front panel of the altitude indicator. When error signaling light is on, it suggests failure of the altitude indicator. However, when the error signaling light is off, if suggests that the altitude indicator is free from failure. (7) Workshop failure diagnoses Once there is failure, use special test equipment at the workshop to locate the failure for further isolation. Generally, failure isolation is conducted by replacing plug-in plate.
  • 482.
    JZ-Y8F200W-02 AIRCRAFT FLIGHT MANUAL SECTIONVI AIRCRAFT SYSTEM EQUIPMENT 6-194 June 30, 2012 WL-11 Automatic direction finder Functions Two sets of WL-11 automatic direction finders (ADFs) are installed on the Y8F200W aircraft to be exported to Venezuela. They can indicate the angle between the aircraft longitudinal axis and the ground radio set (navigation station or broadcast station) azimuth continuously and automatically so that navigation can be implemented based on the ground radio set. System Composition and Component Installation Position The two sets of WL-11 ADFs consist of two receivers, two sets of ZT-9 combined antennae, two control boxes, one signal damper, and connecting cables. Their models and installation positions are listed in Table 6-27. Table 6-27 Component models and installation positions Component Model Installation Position First set of the compass combined antenna ZT-9 On longeron 0 between frame 36~37 on the top of the fuselage Second set of the compass combined antenna ZT-9 On longeron 0 between frame 38~39 on the top of the fuselage First set of the compass control box WL-11-2F1 On the upper part of the navigator's instrument panel Second set of the compass control box WL-11-2F1 On the upper part of the navigator's instrument panel First set of the compass receiver WL-11-1A1 On the ceiling at the right of frame 37~38 Second set of the compass receiver WL-11-1A1 On the ceiling at the right of frame 39~40 Signal damper WL-11-8 On the ceiling at the right of frame 32~34
  • 483.
    JZ-Y8F200W-02 AIRCRAFT FLIGHT MANUAL SECTIONVI AIRCRAFT SYSTEM EQUIPMENT 6-195 June 30, 2012 Main Technical Data Operating frequency range The operating frequency range is 150~1750 kHz. The frequency interval is 0.5 kHz. There are totally 7 frequency bands. The control box provides 8 online store functions. Band I:150 kHz~189.5 kHz; Band II:190 kHz~279.5 kHz; Band III:280 kHz~399.5 kHz; Band IV:400 kHz~599.5 kHz; Band V:600 kHz~899.5 kHz; Band VI:900 kHz~1399.5 kHz; Band VII:1400 kHz~1750 kHz; Effective range When the ADF is cooperating with the navigation station whose transmitting power is 500 W and frequency accuracy is not lower than ±200 Hz, the effective range is as follows: (a) 180km Flight altitude of 1000 m: 180 km (b) 250km Flight altitude of 5000 m: 250 km (c) 300km Flight altitude of 10000 m: 300 km
  • 484.
    JZ-Y8F200W-02 AIRCRAFT FLIGHT MANUAL SECTIONVI AIRCRAFT SYSTEM EQUIPMENT 6-196 June 30, 2012 Azimuth error (a) Error at azimuth 0o : not higher than ±0.5o (b) Error at azimuth 180o : not higher than ±1o (c) Error at other azimuths: not higher than ±3o Power consumption DC power supply: 27V/1.2A AC power supply: 115V/0.6A (400Hz) Operations Control panel description MANUAL 3 PRESET 2 V 8 9 ANT OFF ADF 1 10 11 12 TUNER 2 1 1888.8 FAR NEAR 3 BRT 4 8 1413 7 6 54 L 6 TEST MEM 5 7 Figure 6-120 Appearance of WL-11-2F1 control panel
  • 485.
    JZ-Y8F200W-02 AIRCRAFT FLIGHT MANUAL SECTIONVI AIRCRAFT SYSTEM EQUIPMENT 6-197 June 30, 2012 Positions of various switches and control knobs on the control panel are shown in Figure 6-120. Their functions are as follows: (1) FAR: outer marker (OM) indicator (2) NEAR: inner marker (IM) indicator (3) Frequency display window (4) BRT: frequency display brightness adjustment knob (5) MANUAL/PRESET: manual control/preset switch (6) MEM: memory button (7) TEST: self-test button (8) Function knob: ANT-receiving; ADF-compass; OFF-OFF position (9) V: volume adjustment knob (10) Hundreds-digit and thousands-digit frequency control knob (11) Tens-digit frequency control knob (12) Units-digit and 0.5 frequency control knob (13) Preset channel switch (14) L: Panel illumination adjustment knob (a) OFF: When the compass operating mode switch on the control panel is set to the OFF position, both the DC and AC power supplies are cut off, and the compass is in shutoff state. When the switch is set other positions, both the DC and AC power supplies are engaged. (b) ADF: When the compass operating mode switch is set to the ADF position, the compass can be used for azimuth measurement. (c) ANT: When the compass operating mode switch is set to the ANT position, the audio modulation signal of the tuned radio set can be clearly heard through the earphone. In this case, however, the compass cannot be used for azimuth measurement.
  • 486.
    JZ-Y8F200W-02 AIRCRAFT FLIGHT MANUAL SECTIONVI AIRCRAFT SYSTEM EQUIPMENT 6-198 June 30, 2012 (d) V: Volume can be adjusted by using the volume adjustment knob on the control panel. Turning the knob clockwise can turn up the volume, while turning the knob counter-clockwise can turn down the volume. The volume can also be adjusted by using the intercom control box. (e) L: Brightness of characters on the control panel can be adjusted by using the L knob. Turning the knob clockwise can increase the character brightness, while turning the knob counter-clockwise can decrease the character brightness. (f) BRT: Brightness of characters displayed in the control box frequency window can be adjusted by using the BRT knob. Turning the knob clockwise can increase the character display brightness, while turning the knob counter-clockwise can decrease the character display brightness. (g) PRESET: When the switch is set to the PRESET position, turn the preset channel knob to select a preset channel. At this time, the frequency display window should display the operating frequency of the selected channel. Meanwhile, the corresponding OM indicator or IM indicator should turn on. (h) MANUAL: When the switch is set to the MANUAL position, turn the units-digit manually-controlled tuner knob to select units-digit and 0.5 kHz compass operating frequency; turn the tens-digit manually-controlled tuner knob to select the tens-digit compass operating frequency; turn the hundreds-digit and thousands-digit manually-controlled tuner knob to select the hundreds-digit and thousands-digit compass operating frequency. In MANUAL operating mode, the OM indicator and IM indicator should turn off. The manually-controlled tuning frequency range is 150.0 kHz~1750.0 kHz with a minimum frequency interval of 0.5 kHz. (i) TEST: Press the TEST button on the control panel and hold it for 2s~3s to make the compass enter the self-test state. The earphone should output the audio of 1000 Hz. The azimuth pointer on the indicator should stop temporarily at 90o and then rotate to 135o ±5o . The frequency window on the control box displays PASS for 1s~2s, indicating that the compass self-test result is normal. After the self-test is complete, the compass returns to the operating status before the self-test.
  • 487.
    JZ-Y8F200W-02 AIRCRAFT FLIGHT MANUAL SECTIONVI AIRCRAFT SYSTEM EQUIPMENT 6-199 June 30, 2012 Compass azimuth indication description (a) The relative azimuth of the first set of WL-11 ADF is indicated by the pointer (green thin pointer) of radio set 1 on navigation indicator ZHL-2J (B) on the navigator's instrument panel, radio pointer on heading location indicator ZEH-1R(B) on the pilot's instrument panel, and radio pointer on heading location indicator ZEH-1R(B) on the copilot's instrument panel. The relative azimuth of the second set of WL-11 ADF is indicated by the pointer (orange wide pointer) of radio set 2 on navigation indicator ZHL-2J (B) on the navigator's instrument panel, radio pointer on integrated heading indicator ZHZ-4A on the pilot's instrument panel, and radio pointer on integrated heading indicator ZHZ-4A on the copilot's instrument panel. (b) During control box self-test, if the pointer does not point to 135o after it stops at 90o temporarily, the frequency display window on the control panel displays the fault code EXXXX for about 1s~2s, indicating that the compass self-test result is abnormal. Storing the preset operating frequency of the control box (a) Set the compass operating mode switch on the control panel to the ANT or ADF position and the MANUAL/PRESET changeover switch to the MANUAL position. (b) Press and hold the MEM button on the control panel until the OM indicator turns on. Then, release the MEM button. At this time, the FAR indicator is on, whereas the NEAR indicator is off, indicating that the control box enters the storing status. The operating frequency to be stored is the OM operating frequency. (c) Turn the preset channel knob to select preset channel numbers 1~8. (d) Turn the frequency tuning knob so that the control box operating frequency to be displayed is the OM operating frequency to be stored. (e) Press the MEM button to store the OM operating frequency in the memory. At this time, the FAR indicator is off, whereas the NEAR indicator is on, indicating that the operating frequency to be stored is the OM operating frequency. (f) Repeat 4.3.2 through 4.3.5 to select another channel number and store the required preset operating frequency until all preset channel operating frequencies to be stored are stored. (g) After all frequencies are stored, set the MANUAL/PRESET changeover switch from the MANUAL position to the PRESET position so that the control box exits from the storing status.
  • 488.
    JZ-Y8F200W-02 AIRCRAFT FLIGHT MANUAL SECTIONVI AIRCRAFT SYSTEM EQUIPMENT 6-200 June 30, 2012 Operating instruction in combination with HF radio set When the HF radio radiated, the azimuth pointer of the radio compass on HZX-1M heading attitude system indicator would be locked at the azimuth position before the HF radio set radiates. If continuous radiating time of the HF radio set is above 15 s, the compass would enter invalid azimuth status automatically, and pointer of the indicator would turn from the azimuth position before radiating to stay at 90o azimuth. When the HF radio set stops radiating, the pointer can follow to correct direction. In-flight operations (a) Switch and knob settings Perform the following operations: Turn on the ADF-1 and ADF-2 28 VDC circuit breakers on the communicator circuit breaker board. Apply power to 115 VAC power distribution disk. Set the ADF1/TACAN/VOR1 switches on the left and right instrument panels to the ADF1 position. Set the compass switch on the control panel to the ADF or ANT position. Turn the ADF1 knob on the intercom control box to choose to tune in audio signals from the first set of WL-11 ADF. Turning this knob clockwise can turn up the volume, while turning this knob counter-clockwise can turn down the volume. Turn the ADF2 knob on the intercom control box to choose to tune in audio signals from the second set of WL-11 ADF. Turning this knob clockwise can turn up the volume, while turning this knob counter-clockwise can turn down the volume. Turn the L knob on the compass control box on the upper part of the navigator's instrument panel to properly adjust the illumination on the control panel. Turn the BRT knob on the control panel to properly adjust brightness of characters displayed in the control panel frequency window. (b) Power-on self-test After the intercom and attitude-heading reference system (AHRS) are powered on properly, set the compass operating mode switch on the upper part of the navigator's instrument panel from the OFF position to the ANT position. The frequency display window should display 1888.8. Meanwhile, both the FAR and NEAR indicators turn on. After about 1s, the system starts performing self-test. The earphone outputs audio of 1000 Hz. The frequency display window displays the accumulated operating duration. The HZX-1M AHRS pointer for the compass points to 90o and stops temporarily and then rotates to 135o . Then, self-test is complete, and the system enters the normal operating status. The frequency display window on the control panel displays an operating frequency (last operating frequency before the last shutoff) falling within the range of 150.0~1750.0 kHz.
  • 489.
    JZ-Y8F200W-02 AIRCRAFT FLIGHT MANUAL SECTIONVI AIRCRAFT SYSTEM EQUIPMENT 6-201 June 30, 2012 (c) Start-up self-test When the compass operating mode switch on the control panel is set to the ANT or ADF position, press and hold the TEST button on the control panel for about 2s~3s so that the compass enters the self-test status. The earphone should output audio of 1000 Hz. The azimuth pointer on the indicator should point to 90o N and stops temporarily and then rotates to 135o ±5o . The frequency display window on the control panel displays PASS for about 1s~2s, indicating that the compass self-test result is normal. After the self-test is complete, the compass returns to the operating status before the self-test. (d) ADF status Set the compass operating mode switch to the ADF position. The indicator pointer should point to the relative azimuth of the navigation station, and the earphone should output the audio signal from this navigation station. (e) ANT receiving status Set the compass operating mode switch to the ANT position, set the frequency, receive the navigation station signal, and adjust the volume. The earphone should output the audio signal from this navigation station. The indicator pointer stops at the azimuth of 90o . (f) Power-off After the flight, set the compass operating mode switch to the OFF position, and turn off the power switches of the 28 V ADF and the 115 V power distribution disk ADF. Precautions (a) To achieve clear audio signal receiving effect, it is better to make the compass receiver operate in ANT mode. (b) In ADF mode, when no signal is received or the signal is weak, the display azimuth pointer will stop at the position of 90o . (c) Transmission of short-wave radio set will affect ADF indication. At this time, ADF indication is untrustworthy. Therefore, to ensure that the ADF can operate properly during landing approach, the ultrashort wave radio set, instead of the short-wave radio set, is used for external liaison. (d) ADF is a navigation device basically for receiving the ground wave. Therefore, the azimuth error will increase when aircraft is flying through the mountain area, through sea, and at night because the positioning accuracy is affected by the mountain effect, shore effect, and night effect.
  • 490.
    JZ-Y8F200W-02 AIRCRAFT FLIGHT MANUAL SECTIONVI AIRCRAFT SYSTEM EQUIPMENT 6-202 June 30, 2012 VOR/Instrument landing system General The VOR/ILS system is a radio navigation system. Two sets of VOR/ILS are installed on the entire aircraft. This system provides the instrument landing system (ILS) function and VOR function. Cooperating with the ground station, it implements aircraft navigation and landing approach guide. System Composition Table 6-27 System composition and component installation position No. Component Model Quantity Installation Position 1 Receiver VIR-432 2 On the equipment rack at the right of frame 3~4 2 Control box CTL-32G 2 On the navigator's side cover plate 3 VOR/heading antenna S65-247-12 2 Stringer 4~7 of rib 9~10 at the left and right of the vertical fin (with coupler SSPD-113-10) 4 Gliding antenna S41422-2 1 In the nose radome 5 Beacon antenna MB10-128 2 One between stringer 3~4 at the left of frame 20~21 and one at the right 6 Distributor SSPD-113-13 1 On the equipment rack at the right of frame 3~4
  • 491.
    JZ-Y8F200W-02 AIRCRAFT FLIGHT MANUAL SECTIONVI AIRCRAFT SYSTEM EQUIPMENT 6-203 June 30, 2012 Main Technical Specifications (a) Frequency range Heading: 108.1~111.95MHz Gliding: 329.15~335.00MHz VOR: 108.00~117.95MHz Beacon: 75 MHz (b) Number of channels Instrument landing: 40 channels Microwave landing: 200 channels VOR channel: 160 channels (c) Audio output: LOC/VOR: 1000Hz/100mW/600Ω MKR: 50mW /600Ω (d) Power supply: Receiver: 28VDC/1.4A Control box: 28VDC/0.25A (e) Operating temperature: Receiver: -55o C~+70o C; Control box: -30o C ~+70o C; Gliding antenna: -73o C ~+121o C; VOR/heading antenna: -55o C ~+71o C; Beacon antenna: -55o C ~+85o C;
  • 492.
    JZ-Y8F200W-02 AIRCRAFT FLIGHT MANUAL SECTIONVI AIRCRAFT SYSTEM EQUIPMENT 6-204 June 30, 2012 Operations A C T XFR MEM MEM HLD HLDON OFF STO TEST NAV ACT XFR/MEM Prompt light Prompt light Power and mode selection knob Volume control knob Frequency storing button Self-test button ACT button Frequency selection knob Figure 6-121 Appearance of VOR/ILS system control panel
  • 493.
    JZ-Y8F200W-02 AIRCRAFT FLIGHT MANUAL SECTIONVI AIRCRAFT SYSTEM EQUIPMENT 6-205 June 30, 2012 Description A set of VOR/ILS shares a control box with a set of distance measuring equipment (DME). The control panel is shown in Figure 6-73. Display window The display window applies the LED display which can display two lines of information. Generally, the upper line displays the current frequency, while the lower line displays the preset frequency. Power and mode selection knob OFF/ON'HLD serves as the power and mode selection knob. When the knob is turned to the ON position, the control box power is turned on; when the knob is turned to the OFF position, the control box power is turned off; when the knob is turned to the HLD position, the VOR/ILS does not cooperate with the DME any more. The frequency (upper line in the window) of VOR/ILS can be changed independently. The DME channel remains unchanged (lower line in the window). Distance measuring can be continued on the original channel. Prompt light display (a) ACT prompt light: When the frequency is changed, the ACT prompt light starts blinking immediately. If the actually tuned frequency is different from the currently displayed frequency, the ACT prompt light will blink continuously. (b) MEM prompt light: When a frequency is displayed in the lower line of the display window, the MEM prompt light will blink continuously. (c) HLD prompt light: If the HLD prompt light is blinking, it indicates that the DME is in holding state. After the HLD mode is enabled, the upper line in the display window displays the navigation frequency, while the lower line displays the DME holding frequency. (At this time, the prestored frequency originally displayed in the lower line in the display window is not displayed but is still effective. It can be converted to the current frequency through the XFR.) Volume adjustment The VOR/ILS volume can be adjusted by turning the V knob. Turning the knob clockwise can turn up the volume, while turning the knob counter-clockwise can turn down the volume.
  • 494.
    JZ-Y8F200W-02 AIRCRAFT FLIGHT MANUAL SECTIONVI AIRCRAFT SYSTEM EQUIPMENT 6-206 June 30, 2012 Frequency conversion The XFR/MEM frequency changeover switch is used for frequency conversion. When the switch is set to the XFR position, the preset frequency switches to display in the current frequency position (upper line in the display window), and the previous current frequency is converted to a new preset frequency and is displayed in the lower line in the display window. When the switch is set to the MEM position, one of the four prestored frequencies is displayed in the lower line of the display window, and the prestored channel number is displayed in the upper line of the display window. To display the four prestored frequencies cyclically, hold the switch at the MEM position. ACT button Press and hold the ACT button for 2s and then release it to select the direct tuning mode. At this time, the upper line in the display window displays the current frequency, while the lower line displays -----. To adjust the current frequency, turn the frequency selection knob. During frequency tuning, the ACT prompt light on the control panel is blinking. When the ACT prompt light is constant on, it indicates that the frequency has been tuned. The selected frequency is the current operating frequency. At this time, press and hold the ACT button for 2s and then release it to return to the current frequency/preset frequency mode display. Frequency selection (ACT mode disabled) The frequency selection knob is used to tune the frequency in the display window. The outer (large) knob is used to tune frequencies at the tens digit and units digit. Turning the outer knob clockwise can increase the frequency, while turning the outer knob counter-clockwise can decrease the frequency. The frequency changes with a step of 1 MHz. The inner (small) knob is used to the tune frequencies at the tenths digit and hundredths digit. Turning the inner knob clockwise can increase the frequency, while turning the inner knob counter-clockwise can decrease the frequency. The frequency changes with a step of 0.05 MHz. The frequency selection method is as follows: (a) When the power and mode selection knob is turned to the ON position, the upper line in the display window on the control panel displays the current operating frequency, while the lower line displays the preset frequency. Turning the frequency selection knob can tuning the preset frequency. After the frequency is determined, set the XFR/MEM switch to the XFR position immediately. At this time, the preset frequency switches to display in the upper line of the display window, while the previous current frequency switches to display in the lower line. At this time, the ACT prompt light is constant on, indicating that the frequency is tuned to the converted frequency.
  • 495.
    JZ-Y8F200W-02 AIRCRAFT FLIGHT MANUAL SECTIONVI AIRCRAFT SYSTEM EQUIPMENT 6-207 June 30, 2012 (b) When the power and mode selection knob is turned to the ON position and the XFR/MEM switch is set to the MEM position, the upper line in the display window displays the prestored channel number, while the lower line displays the frequency corresponding to the prestored channel number. Toggle the MEM switch continuously to display the four prestored frequencies cyclically. When the required prestored frequency is displayed in the lower line of the display window, set the XFR/MEM switch to the XFR position immediately. Then, this prestored frequency is converted to the current operating frequency. Frequency storing The STO button is used to store the channel and frequency. The channel and frequency can be prestored only when the XFR/MEM switch is set to the MEM position. To store the frequency, set the XFR/MEM switch to the MEM position and toggle the MEM switch continuously until the required channel number (CH1, CH2, CH3, or CH4) is displayed in the upper line of the display window. Then, turn the frequency selection knob to select the frequency to be stored. Within 5s after the required frequency is displayed in the lower line of the display window, press the STO button twice continuously so that the selected frequency can be stored for the selected channel. A maximum of four frequencies can be prestored. (After 5s, the control box will return to the current frequency/preset frequency mode display.) Brightness adjustment The ATC/VOR/DME brightness adjustment knob on the navigator's side cover plate is used to adjust brightness of the VOR/DME control box. Turning the knob clockwise can increase the brightness, while turning the knob counter-clockwise can decrease the brightness.
  • 496.
    JZ-Y8F200W-02 AIRCRAFT FLIGHT MANUAL SECTIONVI AIRCRAFT SYSTEM EQUIPMENT 6-208 June 30, 2012 Self-test (a) ILS self-test Select a heading frequency, 108.10 MHz for example, on the VOR/DME control box on the navigator's side cover plate. Press and hold the TEST button. If the self-test result is normal, navigation and gliding flags will appear on heading location indicators on both the pilot's and copilot's instrument panels and they will disappear after 3s. The course deviation pole deviates rightward for about one point, while the gliding deviation pointer deviates downwards for about one point. At the same time, the three beacon indicating lights (blue, yellow, and white lights) on the pilot's and copilot's instrument panels blink in turn with a frequency of 30 Hz. The corresponding audio signal can be tuned in through the earphone. Otherwise, it indicates a self-test failure. At this time, release the TEST button. (b) VOR self-test VOR/DME control box on the navigator's side cover plate. Press and hold the TEST button. Check that NAV flags appear on integrated heading indicators on both the pilot's and copilot's instrument panels and on the navigation indicator on the navigator's instrument panel. They will disappear after 2s. The course deviation pole points to the center position, and the VOR azimuth points to 0o . At the same time, the three beacon indicating lights (blue, yellow, and white lights) on the pilot's and copilot's instrument panels blink in turn with a frequency of 30 Hz. The corresponding audio signal can be tuned in through the earphone. Note During ILS and VOR self-tests, within 2s~3s after the TEST button is pressed, the upper line of the display window on the control panel displays FLAG, DIAG, or ----, while the lower line displays a diagnosis code consisting of two digits. When the upper line displays ---- and the lower line displays 00, it indicates the device is operating properly. When the upper line displays FLAG and the lower line displays a diagnosis code, it indicates that the device has no fault but is operating improperly (for example, low signal level). When the upper line displays DIAG and the lower line displays a diagnosis code, it indicates that the device is faulty. The meaning of each diagnosis code is as follows:
  • 497.
    JZ-Y8F200W-02 AIRCRAFT FLIGHT MANUAL SECTIONVI AIRCRAFT SYSTEM EQUIPMENT 6-209 June 30, 2012 00: No failure 02: Receiver RAM failure 03: No data output through the serial port 04: No serial port frequency control word 05: Frequency invalid 06: Processor failure 09: Processor failure 10: Processor failure 11: A/D failure 12: A/D accuracy failure 13:+13 V power failure 14:-13 V power failure 15: VOR sinθ/LOC D/A failure 16: VOR cosθ/GS D/A failure 17: VOR receiver invalid 18: No VOR RF signal 19: VOR reference phase signal weak 20: VOR variable phase signal weak 21, 22, 23, and 24: VOR receiver unavailable 25: LOC receiver invalid 26: LOC signal unavailable 27: LOC deviation fault 28: Receiver invalid 29: GS unavailable 30: GS deviation fault 32: Beacon indication failure
  • 498.
    JZ-Y8F200W-02 AIRCRAFT FLIGHT MANUAL SECTIONVI AIRCRAFT SYSTEM EQUIPMENT 6-210 June 30, 2012 In-flight Operations Pre-flight preparations Perform the following operations before flight: Engage the 28 VDC power supply onboard. Turn on VOR/ILS1 and VOR/ILS2 circuit breakers on the navigator's right console. (VOR/ILS1 applies the emergency power supply, while VOR/ILS2 applies the normal power supply.) Set the OFF/ON/HLD switch on the VOR/DME1 control box (controlling the first set of VOR/ILS receiver) on the navigator's side cover plate to the ON position. If the self-test result is normal, store the operating frequency as required. Check that the VOR/ILS1 and VOR/ILS2 circuit breakers on the navigator's right console are turned off, and the OFF/ON/HLD switch on the VOR/DME control box on the navigator's side cover plate is set to the OFF position. Using the instrument landing function of the first set of VOR/ILS After the power supply is engaged properly, turn on VOR/ILS1 and VOR/ILS2 circuit breakers on the navigator's right console, set the OFF/ON/HLD switch on the VOR/DME1 control box on the navigator's side cover plate to the ON position, and turn the ATC/VOR/ILS brightness adjustment knob on the navigator's side cover plate to properly adjust the control box brightness. During aircraft approach, set the INS/AHS/VOR1/ VOR2 switch on the navigator's instrument panel to the VOR1 position, set the MKR1 SENS (beacon sensibility switch) on the pilot's top console to the H (high sensibility) position or L (low sensibility) position, and select 108.10 MHz (here is an example; the selected frequency should be the same as the airport ground station frequency) as the instrument landing operating frequency on the VOR/DME1 control box. The heading location indicators on the pilot's and copilot's instrument panels display the heading deviation, gliding deviation, and alarm flag. The heading location indicator on the navigator's instrument panel displays the heading deviation. The beacon indicators on the pilot's and copilot's instrument panels indicate that the aircraft is flying over which station. The heading deviation is indicated by the deviation of the course deviation pole relative to the zero position. The gliding deviation is indicated by the deviation of the gliding pointer relative to the zero position. The left (or right) deviation of the course deviation pole relative to the zero position indicates that aircraft should fly leftward (or rightward). The upward (or downward) deviation of the gliding pointer relative to the zero position indicates that aircraft should fly upward (or downward). Turn the VOR1 knobs on intercom control boxes at the pilot, copilot, and navigator positions. Clear heading identification tone signals can be heard through the pilot's, copilot's and navigator's earphones.
  • 499.
    JZ-Y8F200W-02 AIRCRAFT FLIGHT MANUAL SECTIONVI AIRCRAFT SYSTEM EQUIPMENT 6-211 June 30, 2012 When aircraft is flying over the outer marker (OM), blue beacon lights on the pilot's and copilot's instrument panels are on, and clear OM beacon signal identification tone can be heard through the pilot's, copilot's and navigator's earphones. When aircraft is flying over the medium marker (MM), orange beacon lights on the pilot's and copilot's instrument panels are on, and clear MM beacon signal identification tone can be heard through the pilot's, copilot's and navigator's earphones. When aircraft is flying over the inner marker (IM), white beacon lights on the pilot's and copilot's instrument panels are on, and clear IM beacon signal identification tone can be heard through the pilot's, copilot's and navigator's earphones. Note 1) The alarm flags appear on the heading location indicators on the pilot's and copilot's instrument panels when no heading and gliding signals are received. 2) OM station: 400 Hz audio modulation. Continuous signals with two dashes per second are sent. 3) MM station: 1300 Hz audio modulation. Signals with one dot and one dash (alternate) are sent. 4) IM station: 3000 Hz audio modulation. Continuous signals with six dots per second are sent. Using the VOR function of the first set of VOR/ILS Set the ADF1/TACAN/VOR1 switches on the pilot's, copilot's and navigator's instrument panels to the VOR1 position. Select 108.0 MHz (here is an example; the selected frequency should be the same as the airport ground station frequency) as the frequency on the VOR/DME1 control box. The VOR azimuth is indicated by the integrated heading indicators on the pilot's and copilot's instrument panels and navigation indicator on the navigator's instrument panel. Turn the VOR1 knobs on intercom control boxes at the pilot, copilot, and navigator positions respectively. Clear VOR identification tone signals can be heard through the pilot's, copilot's and navigator's earphones. Using the instrument landing function of the second set of VOR/ILS Set the OFF/ON/HLD switch on the VOR/DME2 control box (controlling the second set of VOR/ILS receiver) on the navigator's side cover plate to the ON position, and turn the ATC/VOR/ILS brightness adjustment knob to properly adjust the control box brightness. During aircraft approach, set the INS/AHS/VOR1/VOR2 switch on the navigator's instrument panel to the VOR2 position, set the MKR1 SENS (beacon sensibility switch) on the pilot's top console to the H position or L position, and select 108.10 MHz (here is an example; the selected frequency should be the same as the airport ground station frequency) as the instrument landing operating frequency on the VOR/DME2 control box.
  • 500.
    JZ-Y8F200W-02 AIRCRAFT FLIGHT MANUAL SECTIONVI AIRCRAFT SYSTEM EQUIPMENT 6-212 June 30, 2012 The heading location indicators on the pilot's and copilot's instrument panels display the heading deviation, gliding deviation, and alarm flag. The heading location indicator on the navigator's instrument panel displays the heading deviation. The beacon indicators on the pilot's and copilot's instrument panels indicate that the aircraft is flying over which station. The heading deviation is indicated by the deviation of the course deviation pole relative to the zero position. The gliding deviation is indicated by the deviation of the gliding pointer relative to the zero position. The left (or right) deviation of the course deviation pole relative to the zero position indicates that aircraft should fly leftward (or rightward). The upward (or downward) deviation of the gliding pointer relative to the zero position indicates that aircraft should fly upward (or downward). Turn the VOR2 knobs on intercom control boxes at the pilot, copilot, and navigator positions. Clear heading identification tone signals can be heard through the pilot's, copilot's and navigator's earphones. When aircraft is flying over the OM, blue beacon lights on the pilot's and copilot's instrument panels are on, and clear beacon signal identification tone of 400 Hz can be heard through the pilot's, copilot's and navigator's earphones. When aircraft is flying over the MM, orange beacon lights on the pilot's and copilot's instrument panels are on, and clear beacon signal identification tone of 1300 Hz can be heard through the pilot's, copilot's and navigator's earphones. When aircraft is flying over the IM, white beacon lights on the pilot's and copilot's instrument panels are on, and clear beacon signal identification tone of 3000 Hz can be heard through the pilot's, copilot's and navigator's earphones. Using the VOR function of the second set of VOR/ILS Set the ADF1/TACAN/VOR1 switches on the pilot's, copilot's and navigator's instrument panels to the VOR2 position. Select 108.0 MHz (here is an example; the selected frequency should be the same as the airport ground station frequency) as the frequency on the VOR/DME2 control box. The VOR azimuth is indicated by the integrated heading indicators on the pilot's and copilot's instrument panels and navigation indicator on the navigator's instrument panel. Turn the VOR2 knobs on intercom control boxes at the pilot, copilot, and navigator positions respectively. Clear VOR identification tone signals can be heard through the pilot's, copilot's and navigator's earphones.
  • 501.
    JZ-Y8F200W-02 AIRCRAFT FLIGHT MANUAL SECTIONVI AIRCRAFT SYSTEM EQUIPMENT 6-213 June 30, 2012 KDM 706A distance measuring equipment Function KDM 706A distance measuring equipment (DME) provides the slant range relative to the selected DME ground station and identification signal of the selected navigation station for aircraft. System Composition and Installation Position Table 6-122 Composition of KDM 706A DME and component installation position No. Component Model Quantity Installation Position Remarks 1 Transceiver KDM 706A 2 On the equipment rack at the right between frame 3-4 2 Primary indicator KDI 574 2 On the navigator's side cover plate 3 Secondary indicator KDI 573 2 On the left and right instrument panels of the pilot 4 Converter CAD-31 2 On the equipment rack at the right between frame 3-4 5 Antenna ANT-42 2 Between stringer 0-left 1 of frame 13-14 Between stringer 1-2 at the right of frame 15-16 6 Circuit breaker ZKZ-2 2 On the navigator's right console
  • 502.
    JZ-Y8F200W-02 AIRCRAFT FLIGHT MANUAL SECTIONVI AIRCRAFT SYSTEM EQUIPMENT 6-214 June 30, 2012 Main Technical Specifications Main technical specifications of KDM 706A (a) Operating channel The DME operating channel is 962 MHz~1213 MHz. There are totally 252 channels: 126 X channels (1X~126X) and 126 Y channels (1Y~126Y). (b) Frequency stability: ±100 kHz (c) Transmitting performance The transmitting pulse power should not be lower than 290 W. (d) Receiving performance The receiver sensibility should not be lower than -90dB. (e) Distance measuring (1) Distance measuring range and precision The distance measuring range is 0~389 nm. When the distance measuring range is 0~99.9 nm, the maximum error is ±0.1 nm; when the measuring range is 100~389 nm, the maximum error is ±1 nm. (2) Tracing rate: 0-1900 kts (f) Time to station measurement The measuring range is 0~99min with the error not greater than 1min. (g) Identification signal When the load resistance is 500 Ω, the peak-to-peak voltage is 14.14 V.
  • 503.
    JZ-Y8F200W-02 AIRCRAFT FLIGHT MANUAL SECTIONVI AIRCRAFT SYSTEM EQUIPMENT 6-215 June 30, 2012 Ground Operation The DME and VOR/ILS share one control box. For details about the control box operations, see VOR/ILS Flight Manual. In-air Flight Operation Pre-flight settings After engines are started, perform the following operations: Turn on DME-1, DME-2, VOR/ILS1, and VOR/ILS2 switches on the navigator's right console. Set the VOR/DME control box mode switch on the navigator's side cover plate at the ON position. Turn the ATC/VOR/ILS electroluminescent panel brightness adjustment knob on the navigator's side cover plate to set proper brightness for the control panel. Set the DME switch ON/TEST on the navigator's side cover plate at the ON position. Turn the DME1 and DME2 knobs on the pilot's, copilot's, navigator's and mechanic's intercom control boxes to set proper identification tone volume for the DME navigation station. Turning the knob clockwise can turn up the volume, while turning the knob counter-clockwise can turn down the volume. Using the DME function Set the OFF/ON'HLD switch on the control box at the ON position, and select the VOR frequency for the control box. At this time, the DME and VOR are used together. Turn the frequency selection knob to adjust the preset frequency. The outer (large) knob is used to adjust the frequency at the tens digit and units digit. Turning it clockwise can increase the frequency and turning it counter-clockwise can decrease the frequency. The frequency changes with a step of 1 MHz. The inner (small) knob is used to adjust the frequency at the tenths digit and hundredths digit. Turning it clockwise can increase the frequency and turning it counter-clockwise can decrease the frequency. The frequency changes with a step of 0.05 MHz. The secondary indicator on the pilot's instrument panel and primary indicator DME Master Indicator I on the navigator's side cover plate show the range to station, ground speed, time to station, and channel source (the first set displays 1). The secondary indicator on the copilot's instrument panel and primary indicator DME Master Indicator II on the navigator's side cover plate show the range to station, ground speed, time to station, and channel source (the second set displays 2). The indicator panel is shown in Figure 6-122.
  • 504.
    JZ-Y8F200W-02 AIRCRAFT FLIGHT MANUAL SECTIONVI AIRCRAFT SYSTEM EQUIPMENT 6-216 June 30, 2012 Using the DME Hold function When the frequency of the combined receiver needs to be changed but the DME still uses the original channel for distance measurement, set the OFF/ON/HLD switch on the control box at the HLD position (meaning DME holding). The secondary indicator on the pilot's instrument panel and primary indicator DME Master Indicator I on the navigator's side cover plate displays 1H, while the secondary indicator on the copilot's instrument panel and primary indicator DME Master Indicator II on the navigator's side cover plate displays H2. The HLD prompt light on the VOR/DME control box on the navigator's side cover plate is on. The top line on the screen displays the VOR frequency and the lower line displays the DME holding frequency. (At this time, the pre-stored frequency originally displayed in the lower line is not displayed but is still effective. It can be converted to the current frequency through the XFR.) Figure 6-122 Indicator display panel
  • 505.
    JZ-Y8F200W-02 AIRCRAFT FLIGHT MANUAL SECTIONVI AIRCRAFT SYSTEM EQUIPMENT 6-217 June 30, 2012 MK VIII Enhanced Ground Proximity Warning System General MK VIII Enhanced Ground Proximity Warning System (EGPWS) is a ground proximity warning system providing basic GPWS functions plus additional terrain data. The aircraft input parameters for EGPWS are: longitude & latitude of present position, heading, attitude, radio altitude, pressure altitude, airspeed, glideslope deviation, landing gear and flap position signals, etc. These parameters and relevant internal terrain, obstacle, and airport databse are used together to predict the potential conflict between flight route and terrain or an obstacle, and to provide the pilot with three styles of caution or warning signal, i.e., sound, light and display. Besides, EGPWS system gives warning to excessive glideslope deviation, flap or the landing gear not in landing configuration and provides altitude callouts. The pilot can operate correctly by acquired information to avoid the possible flying accident and ensure flight safety. System Description System composition and installation EGPWS MKVIII Enhanced Ground Proximity Warning System consists of the following componts as shown in Table 6-28: Table 6-28 S/N Nomenclature Type No./P/N Qty.for single aircraft Installation position 1 Ground proximity warning computer 965-1210-026 1 On equipment rack of right frames 3~4 2 Configuration module 700-1710-020 1 3 Installation bracket 405-0383-001 1 4 GPWS P/TEST warning signal light 631406-005 1 Left instrument panel 5 BELOW G/S P/CANCEL warning signal light 631406-006 1 6 FLAP OVRD warning signal light 631406-007 1 7 G/S CANCLD warning signal light 631406-003 1 8 GPWS FAIL/TERR FAIL warning signal light 631406-011 1 9 TERR INHIBIT ON warning signal light 631406-002 1 10 Terrain indicator 70-4300 1 Right instrument panel11 GPWS P/TEST warning signal light 631406-005 1 12 BELOW G/S P/CANCEL warning signal light 631406-006 1 Right instrument panel
  • 506.
    JZ-Y8F200W-02 AIRCRAFT FLIGHT MANUAL SECTIONVI AIRCRAFT SYSTEM EQUIPMENT 6-218 June 30, 2012 Description of components (a) Ground proximity warning computer Ground proximity warning computer (GPWC) is used to receive and process flight parameter signals from equipment to give an alert when the aircraft is in danger of crash with terrain or an obstacle; in each flight phases, MHD300 terrain display shows terrain information provided by ground proximity warning computer. The GPWC front panel has an EXTERNAL FAULT light, a COMPUTER OK light and a COMPUTER FAIL light; the illumination of amber EXTERNAL FAULT light shows that a fault external to the GPWC exists, while the extinguishing of the light shows normal operation of equipment interlinked with GPWC; the green COMPUTER OK illuminates to show that the GPWC is operating correctly with no internal faults; and the red COMPUTER FAIL light shows there is an internal fault in GPWC. The drawing of front panel of GPWC is shown in Figure 6-123. Figure 6-123 GPWC front panel
  • 507.
    JZ-Y8F200W-02 AIRCRAFT FLIGHT MANUAL SECTIONVI AIRCRAFT SYSTEM EQUIPMENT 6-219 June 30, 2012 (b) MHD300 terrain display The MHD300 terrain display panel is shown in Figure 6-124, and its operation instruction is shown as follows: (1) RNG knob: turn RNG knob on MHD300 terrain display to increase or decrease measurement range (5 nm, 10 nm, 20 nm, 40 nm). (2) BRT knob: turn the DIM knob to control the brightness of display. (3) Other keys are used for configuration of the display on the ground. (4) Heading display: MHD300 heading display menu consists of: aircraft symbol at bottom of display range and heading dial at top. (5) Terrain display is described as below: Figure 6-124 MHD300 terrain display panel
  • 508.
    JZ-Y8F200W-02 AIRCRAFT FLIGHT MANUAL SECTIONVI AIRCRAFT SYSTEM EQUIPMENT 6-220 June 30, 2012 Make sure the TERR INHIBIT warning signal light on left instrument panel is not pressed. The colors in MHD300 terrain display have different meanings: Dark red: warning danger zone; Dark yellow: danger zone requiring attention; 50% red spots: terrain (or obstacle) 2000 ft (610 m) above aircraft; 50% yellow spots: terrain (or obstacle) 1000~2000 ft (305~610 m) above aircraft; 25% yellow spots: terrain (or obstacle) -500~1000 ft (-152.5~305 m) above aircraft; Thick green: no mountain (or obstacle) 500 ft (152.5 m) below aircraft; 50% thick green: presence of mountain (or obstacle) 500~1000 ft (152.5~305 m) below aircraft; 16% thick green: presence of mountain (or obstacle) 1000~2000 ft (305~610 m) below aircraft; Dark: no terrain (or obstacle) requiring attention. 16% dark blue: zone in sea level altitude; Magenta: zone for which data is difficult to obtain in terrain database. (c) Warning signal light GPWS P/TEST and BELOW G/S P/CANCEL warning signal lights are equipped on right instrument panel, as shown in Figure 6-125. And the functions of them are as follows: GPWS P/TEST warning signal light: less than 2s press of the light can start the EGPWS built-in test; the light turns on when the ground proximity warning gives out PULL UP warning alert in fight; BELOW G/S P/CANCEL warning signal light: the light turns on when the ground proximity warning gives out BELOW G/S hint alert in flight; Press the light to cancel glideslope warning, and the light turns off. Figure 6-125 Warning signal lights on right instrument panel
  • 509.
    JZ-Y8F200W-02 AIRCRAFT FLIGHT MANUAL SECTIONVI AIRCRAFT SYSTEM EQUIPMENT 6-221 June 30, 2012 Warning signal lights of GPWS P/TEST, BELOW G/S P/CANCEL, GPWS G/S CANCEL, GPWS FLAP OVRD, TERR INHIBIT ON, and GPWS FAIL TERR FAIL are equipped on left instrument panel, as shown in Figure 6-126. Their functions are as follows: GPWS P/TEST warning signal light: less than 2s press of the light can start the EGPWS built-in test; the light turns on when the ground proximity warning gives out PULL UP warning alert in fight; BELOW G/S P/CANCEL warning signal light: the light turns on when the ground proximity warning gives out BELOW G/S hint alert in flight; Press the light to cancel glideslope warning, and the light turns off. GPWS G/S CANCEL warning signal light: the light turns on when the glideslope warning is cancelled in flight; GPWS FLAP OVRD warning signal light: when the ground proximity warning gives out TOO LOW FLAPS hint warning in flight, press the warning signal light to cancel too low flaps warning, while the light turns on to prompt calcelling the warning of too low flaps in a manual way; TERR INHIBIT ON warning signal light: press this light, and the light turns on with no terrain indication on MHD300 display; this button light is at pressed state when in pattern flight test; GPWS FAIL TERR FAIL warning signal light: GPWS FAIL turns on partially when GPWC has a fault (including external trouble, crosslinking trouble or internal trouble); TERR FAIL illuminates partially when terrain database of EGPWS has a fault or no information about the terrain of present position. Figure 6-126 Warning signal lights on left instrument panel
  • 510.
    JZ-Y8F200W-02 AIRCRAFT FLIGHT MANUAL SECTIONVI AIRCRAFT SYSTEM EQUIPMENT 6-222 June 30, 2012 Crosslinking relation between system and external device Ground proximity warning system has crosslinking relation with the following devices. The drawing of system crosslinking is shown in Figure 6-127: (a) Receive discrete signal of nose gear retraction-extension; (b) Receive discrete signal of flap state: when the flap position is not less than 35o , it is in flaps setting state; otherwise, it is in flaps up state. (c) Receive the signals of static air temperature, vertical speed, true airspeed, indicated airspeed, relative and absolute altitude and other signals in HB6096 form of air data system; (d) Receive radio altitude signal, and other signals in ARINC429 of radio altimeter; (e) Receive signals of pitch angle, rolling angle, and magnetic heading, etc in ARINC429 form of Inertia Navigation System; (f) Receive signals of the gliding (pitch angle) deviation, heading (orientation) deviation signal in ARINC429 form of VOR/instrument landing system; (g) Receive signals of EGPWS built-in test, TERR INHIBIT ON, BELOW G/S P/CANCEL and GPWS FLAP OVRD discrete magnitude; (h) Input speech warning signal to intercom; (i) Output discrete magnitude in warning state to flight data recording system to record; (j) Provide inhibition signal to TCAS when there is warning signal in ground proximity warning system. Flap position sensor Landing gear position sensor Air data computer Radio altimeter GPWS FAIL TERR FAIL GPWS FLAP OVRD Airborne power supply TERR INHIBIT ON BIT built-in test Inertia navigation Intercom Flight data recording system BELOW G/S P/CANCEL VOR/ instrument landing system MKVIII EGPWC MHD 300 TCAS Figure 6-127 Ground proximity warning system crosslinking drawing
  • 511.
    JZ-Y8F200W-02 AIRCRAFT FLIGHT MANUAL SECTIONVI AIRCRAFT SYSTEM EQUIPMENT 6-223 June 30, 2012 Main system function (a) This system owns the following system: EGPWS enhanced ground proximity warning system will send light and speech warning signal if the aircraft descends in large rate with the radio altitude less than 2500ft (762m) in all flight phases; mode 1 includes internal and external interfaces(see Figure 6-128). When the aircraft enters into its external interface (light grey zone in Figure 6-128), there is SINKRATE,SINKRATE speech warning in earphone. This speech can be produced again by EGPWS enhanced ground proximity warning system when the radio altitude reduces 20% each time (based on the radio altitude at the first speech warning). And this warning signal will stop when the aircraft is out of external interface. When the aircraft enters into internal interface (dark grey zone in Figure 6-128), GPWS P/TEST warning signal lights on left and right instrument panel turn on, meanwhile, the PULL UP speech warning occurs in earphone. When aircraft is out of internal interface, that warning signal will stop. Figure 6-128 Warning schematic drawing with large rate of descent
  • 512.
    JZ-Y8F200W-02 AIRCRAFT FLIGHT MANUAL SECTIONVI AIRCRAFT SYSTEM EQUIPMENT 6-224 June 30, 2012 (b) Give out warning to great near earth rate Mode 2 is used to avoid crash between aircraft and terrain rising abruptly. And make judgment according to radio altitude and the reducing sharply of radio altitude. This form is divided into two parts: mode 2A and mode 2B. (1) Mode 2A Mode 2A is used in phases of climbing, cruise condition and initial approach (flap is not at landing configuration without aircraft at center line of glideslope).When near earth rate is at the range of 2000~10000ft/min (7.6m/s~51m/s) and radio altitude lower than 1500ft~ 2000ft (457.5m~610m), EGPWS will send out warning signal light (see Figure 6-129). There is TERRAIN, TERRAIN warning voice in earphone when the aircraft is in warning zone. Moreover, when it enters into deep warning zone, PULL UP speech warning may occurs in earphone. The GPWS P/TEST warning signal light on left and right instrument panel illuminates and it will continue until the aircraft is out of warning zone. Figure 6-129 Schematic drawing of mode 2A alert
  • 513.
    JZ-Y8F200W-02 AIRCRAFT FLIGHT MANUAL SECTIONVI AIRCRAFT SYSTEM EQUIPMENT 6-225 June 30, 2012 When the aircraft is out of warning zone with the distance between aircraft and ground decreasing, TERRAIN hint warning voice will continue until that distance stop decreasing. After the aircraft climbs 45s, the altitude will increase 300ft (92m) or the flap is at landing state. At that time, the light warning can be stopped. When TAD function is normal to all flight speed, the upper radio altitude of mode 2A warning zone is 1250ft (381m). Decreasing the upper radio altitude of mode 2A warning zone is to reduce possible harmful warning in flight approach. (2) 2B Mode 2B Mode 2B provides a warning zone with low sensitivity to no use warning produced by maneuver in normal ground proximity landing. When the aircraft enters into blind approach landing system with flap at landing configuration or FLAP OVRD warning signal light on left instrument panel pressed, or deviation between glideslope and bearing beacon less than 2 points. After the aircraft takes off in 60s, mode 2B is at operating state. EGPWS can also choose mode 2B to reduce possible harmful warning in approach when the distance to target airport is less than 5nm(9.2km), with radio altitude less than 3500ft(1050m) and efficient TAD. Schematic drawing of model 2B alert is shown in Figure 6-130. If aircraft passes through warning envelope of mode 2B without landing gear of flap at landing configuration in approach, TERRAIN,TERRAIN hint warning voice will be produced. If aircraft continues to go into warning envelop, PULL UP voice will repeat continuously, and at that time, GPWS P/TEST warning signal light on left and right instrument panel illuminates until the aircraft is out of the warning envelope. When the aircraft is at warning zone with landing gear and flap at landing configuration, PULL UP voice will be inhibited, and there is TERRAIN voice in earphone until the aircraft is out of warning zone.
  • 514.
    JZ-Y8F200W-02 AIRCRAFT FLIGHT MANUAL SECTIONVI AIRCRAFT SYSTEM EQUIPMENT 6-226 June 30, 2012 Figure 6-130 Schematic drawing of mode 2B alert
  • 515.
    JZ-Y8F200W-02 AIRCRAFT FLIGHT MANUAL SECTIONVI AIRCRAFT SYSTEM EQUIPMENT 6-227 June 30, 2012 (c) Form 3: taking off rear aircraft mush warning When the aircraft takes off rear aircraft mush or goes around in low altitude (takeoff altitude less than 170ft(52m)) with the landing gear or flap is at landing configuration, mode 3 provides warning signal. The schematic drawing of mode 3 alert is shown in Figure 131. When aircraft enters into warning zone (dark grey zone in Figure 131), there is DON'T SINK, DON'T SINK warning voice in earphone. If aircraft altitude is reduced continually, the above speech warning signal will only appear twice. Once the altitude is increased, speech and light warning will both disappear. Figure 6-131 The schematic drawing of mode 3 alert
  • 516.
    JZ-Y8F200W-02 AIRCRAFT FLIGHT MANUAL SECTIONVI AIRCRAFT SYSTEM EQUIPMENT 6-228 June 30, 2012 (d) Form 4: Alert for unsafe distance from ground Considering different flight phases, different configuration of landing gear and flap, and flight speed, etc, mode 4 provides warning when the aircraft has no enough safe distance from ground, which is divided into three modes: 4A, 4B and 4C. (1) Mode 4A is efficient in cruise and approach phase without landing gear and flap at landing configuration. (2) Mode 4B is efficient in cruise and approach phase with landing gear at landing configuration and flap not at landing configuration. (3) Mode 4C is efficient in taking off phase without landing gear and flap at landing configuration. Schematic drawing of mode 4A alert is shown in Figure 6-134. When airspeed is less than 178kn(330km/h) with the terrain clearance less than 500ft(152m), TOO LOW GEAR warning will appear in earphone (light grey zone in Figure 6-134). While, airspeed is more than 178kn(330km/h) with the terrain clearance less than 750ft(228m), TOO LOW TERRAIN warning will occur in earphone (dark grey zone in Figure 6-134) until the aircraft is out of warning zone. Figure 6-134 The schematic drawing of mode 4A alert
  • 517.
    JZ-Y8F200W-02 AIRCRAFT FLIGHT MANUAL SECTIONVI AIRCRAFT SYSTEM EQUIPMENT 6-229 June 30, 2012 The schematic drawing of mode 4B alert is shown in Figure 6-135. When the terrain clearance is less than 170ft(52m) with airspeed less than 150kn(278km/h), TOO LOW FLAPS warning will appear in earphone (light grey zone in Figure 6-135). While, when the terrain clearance is less than 750ft(228m) with airspeed more than 150kn(278km/h), TOO LOW TERRAIN warning will occur in earphone (dark grey zone in Figure 6-135) until the aircraft is out of warning zone. Mode 4C is operated based on Minimum Terrain Clearance calculated by EGPWS. After the aircraft takes off without landing gear or flap at landing configuration or goes around with terrain clearance less than 170ft(52m), the mode 4C is efficient. Figure 6-135 The schematic drawing of mode 4B alert
  • 518.
    JZ-Y8F200W-02 AIRCRAFT FLIGHT MANUAL SECTIONVI AIRCRAFT SYSTEM EQUIPMENT 6-230 June 30, 2012 Figure 6-136 The schematic drawing of mode 4C alert
  • 519.
    JZ-Y8F200W-02 AIRCRAFT FLIGHT MANUAL SECTIONVI AIRCRAFT SYSTEM EQUIPMENT 6-231 June 30, 2012 When aircraft takes off, MTC value is 0ft (0m). MTC value increases to 75% of aircraft radio altitude with the aircraft ascending (the mean value in initial 15s). This value cannot be reduced and inhibited to 500ft (152m) terrain altitude; the schematic drawing of mode 4C alert is shown in Figure 6-136. There is TOO LOW TERRAIN warning voice in earphone when radio altitude of aircraft is less than MTC value. When the aircraft is out of the warning zone, the warning signal will disappear. (e) Mode 5: much lower than slide slope alert When in approach flight phase below slide slope, mode 5 will give out alert signal. The schematic drawing of mode 5 alert is shown in Figure 6-137. And mode 5 divides into two grades alert. First grade alert (soft alert): when radio altitude of aircraft is lower than 1000ft(305m) with downward deviation of slide slope more than 1.3 point, as is shown in Figure 6-137, soft GLIDESLOPE alert voice appears in earphone. When downward deviation of slide slope increases by 20%, speeding up alert voice GLIDESLOPE appears gradually. Second grade alert (hard alert): The second grade alert is shown in dark grey area in Figure 6-137. When the radio altitude is less than 300ft(91m) with downward deviation of slide slope is about 2 points or more, great GLIDESLOPE , GLIDESLOPE alert voice will appear in earphone. And this voice repeats once in every 4s until the aircraft is out of second grade alert zone.
  • 520.
    JZ-Y8F200W-02 AIRCRAFT FLIGHT MANUAL SECTIONVI AIRCRAFT SYSTEM EQUIPMENT 6-232 June 30, 2012 Figure 6-137 Schematic drawing of mode 5 alert
  • 521.
    JZ-Y8F200W-02 AIRCRAFT FLIGHT MANUAL SECTIONVI AIRCRAFT SYSTEM EQUIPMENT 6-233 June 30, 2012 (f) Mode 6: Report for radio altitude After extending landing gear in landing, when aircraft reduces to a radio altitude that needed to report, ground proximity warning computer will produce corresponding speech signal to give out voice of altitude report from warning horn. The report of radio altitude of Y8F200W aircraft to Venezuela is 500ft(152m). AFIVE HUNDRED voice will be produced when the aircraft reduces to 500ft(152m) radio altitude. (g) Terrain alerting and display (TAD) Terrain alerting and display has an enhanced function to detect terrain ahead of aircraft or obstacle with more alert time, which is based on the internal terrain data base of EGPWS. This function is accomplished on terrain data figure in front of the aircraft, aircraft position, flight path angle, flight trace and speed. Alert string and note alert string (see Figure 6-138) are formed in front of the aircraft by complex front view calculation. That string expands laterally from the position of 1/4nm width ahead of fuselage to 3o , forward, downward and then upward. CAUTION TERRAIN,CAUTION TERRAIN or TERRAIN AHEAD, TERRAIN AHEAD voice information will occur when a protrusion part enters into note alert strip. And CAUTION OBSTACLE or OBSTACLE AHEAD, OBSTACLE AHEAD voice information will appear when an obstacle is in note alert stripe. The alert will be produced 40~60s before touching the obstacle; as long as the obstacle is in the alert strip zone, this kind of alert will be provided once in every 7s. GPWS P/TEST warning signal light illuminates when the terrain/obstacle enters into alert strip (in 30s before colliding with the aircraft). And TERRAIN, TERRAIN, PULL UP with PULL UP or TERRAIN AHEAD, PULL UP or OBSTACLE, OBSTACLE, PULL UP or OBSTACLE AHEAD, PULL UP alert voice will occur as well. The alert voice will repeat continually as long as the conflict is in alert zone.
  • 522.
    JZ-Y8F200W-02 AIRCRAFT FLIGHT MANUAL SECTIONVI AIRCRAFT SYSTEM EQUIPMENT 6-234 June 30, 2012 Figure 6-138 Schematic diagram of terrain warning and display System restriction EGPWS has following restrictions (a) If terrain data is hard to be obtained in a certain area of area data base, the terrain/obstacle warning is inefficient. At that time, the indication of terrain in MHD300 is red purple. (b) Terrain and obstacle information is used as a warning tool in certain conditions, and not as a signal source to provide accurate and real operation signal to avoid crash; (c) If GPS with trouble or no high accuracy aircraft position information provided by GPS, enhanced function is inhibited automatically and the terrain indication is inefficient; (d) When the aircraft is in 15nm (27.78km) from airport (this airport is not in aircraft data base) and approach to land, TAD function should be forbidden manually to avoid unnecessary alert;
  • 523.
    JZ-Y8F200W-02 AIRCRAFT FLIGHT MANUAL SECTIONVI AIRCRAFT SYSTEM EQUIPMENT 6-235 June 30, 2012 (e) TAD function should be forbidden manually in forced landing and landing in non-airport area; (f) When TAD function is inhibited with other functions of EGPWS in operation, EGPWS returns back to the basic GPWS function (mode 1-6). In this occasion, when aircraft approaches cliffy terrain abruptly, EGPWS will not predict alert in advance, especially in the following situations: (1) The aircraft is at landing configuration; (2) The aircraft slides steadily at normal approach lowering rate; (g) Terrain clearance and lowering rate compatible with the standard minimum value specified in EGPWS may bring unnecessary alert; (h) Terrain/obstacle data base in EGPW includes many catalogued artificial obstacles more than 100ft(30.5m) in North America, part of Europe and part of Asian. This data base do not contain anything, so many updated, smaller and unknown obstacles may appear. Operation instruction (a) Turn on airborne DC power supply of 28V to make sure the normal power supply; (b) Turn on EGPWS circuit breaker on circuit breaker box; (c) Turn on the power supply to the following systems to make them at normal operating state; (1) XAS-3M air data system; (2) VIR-432 VOR/instrument landing system (3) HG-593Y8 laser inertial/satellite integrated navigation system; (4) RKA405B radio altimeter;
  • 524.
    JZ-Y8F200W-02 AIRCRAFT FLIGHT MANUAL SECTIONVI AIRCRAFT SYSTEM EQUIPMENT 6-236 June 30, 2012 (5) JT-Y8F200W intercom; (6) FJ-30D6 flight data recording system; (7) TCAS-94 traffic collision and avoidance system; (8) Landing gear and flap system. (d) Level 1 built-in test (with/without pass test) Level 1 built-in test is used to testify the correctness of EGPWS before flight: Make sure the normal power supply of the aircraft; make clear that the TERRAIN INHIBIT ON warning signal lights on left instrument panel is not pressed; Terrain indication should appear on MHD300. Press GPWS P/TEST warning signal light on left or right instrument panel for a moment; Check the correctness of system configuration at first by EGPWS when built-in test is operated. If there is error, system may produce sound hint and the built-in test stops. If there is no error, certain sound information is produced. Any determined function inefficiency may also produce sound hint (such as: sliding inefficiency) Conclusion is made after built-in test. The description of prediction result to typical built-in test 1 is shown as follows: (1) Orange GPWS FAIL TERRAIN FAIL warning signal light on left instrument panel illuminates; (2) FLAP OVRD warning signal light on left instrument panel illuminates; (3) BELOW G/S P/CANCEL warning signal light on left/right instrument panel illuminates; (4) GLIDESLOPE voice produced in earphone; (5) BELOW G/S P/CANCEL warning signal light on left/right instrument panel turns off; (6) G/S CANCELED warning signal light on left instrument panel illuminates;
  • 525.
    JZ-Y8F200W-02 AIRCRAFT FLIGHT MANUAL SECTIONVI AIRCRAFT SYSTEM EQUIPMENT 6-237 June 30, 2012 (7) GPWS P/TEST warning signal light on left/right instrument panel illuminates; (8) PULL UP voice can be heard; (9) MHD300 displays built-in test picture; (10) TERRAIN TERRAIN PULL UP voice produced in earphone; (11) GPWS P/TEST warning signal light on left/right instrument panel turns off; (12) GPWS FAIL TERRAIN FAIL warning signal light on left instrument panel turns off; (13) Built-in picture disappears after scanning several time; Level 1 built-in test is finished. (e) After level 1 built-in test, the system can enter into normal operating state. (f) After operation, first cut off EGPWS circuit breaker on circuit breaker box and then cut off the power supply of relevant equipment on board, and turn off the airborne power supply at last. (g) EGPWS warning EGPWS warning is divided into Note alert and Warning alert. Note alert includes (the following situations are considered to be note alert): (1) PULL UP, TERRAIN,TERRAIN, PULL UP, or OBSTACLE, OBSTACLE PULL UP voice appears in earphone; (2) GPWS P/TEST warning signal light on left/right instrument panel illuminates; Warning alert includes (the following situations are considered to be warning alert):
  • 526.
    JZ-Y8F200W-02 AIRCRAFT FLIGHT MANUAL SECTIONVI AIRCRAFT SYSTEM EQUIPMENT 6-238 June 30, 2012 (1) CAUTION TERRAIN, CAUTION OBSTACLE, TOO LOW TERRAIN, SINKRATE, DON'T SINK, GLIDESLOPE, TOO LOW FLAPS or TOO LOW GEAR voice appears in earphone; (2) GPWS P/TEST warning signal light on left/right instrument panel illuminates or BELOW G/S P/CANCEL warning signal light on left/right instrument panel illuminates; (h) Suggested methods to EGPWS warning (1) Note alert a) Stop any lowering to climb, analyzing instruments available and information to decide optimal performance in eliminating warning. b) Inform the air traffic control department if necessary. (2) Warning alert a) Push the throttle-control lever to maximum rated thrust position and use the maximum available power. If there is pilot that do not drive the aircraft, he should choose power and make sure it is at taking off/going around power and mode. b) If autopilot is at operating state, turn it off, and enlarge the pitch angle steadily and rapidly in control stick direction or limit direction of pitching inhibited indicator to acquire maximum climbing ability. c) Continue to climb until the alert is released and assurance of safety flight. d) Inform the air traffic control department of the above situations.
  • 527.
    JZ-Y8F200W-02 AIRCRAFT FLIGHT MANUAL SECTIONVI AIRCRAFT SYSTEM EQUIPMENT 6-239 June 30, 2012 Note 1) Except in contact flight or pilot can make a turning which is the optimum method besides climbing basing on all available information and climbing is the only suggestion. 2) Navigation cannot be set on the basis of terrain warning display. (3) Glide slope alert Below glide slope warning set on the slide slope deviation extent and altitude includes soft and hard alert. The respond to these alerts is to correct flight path to return back to gliding center line or to go around. (4) Hint call Hint call is used to inform an incident or one condition generally (such as MINIMUMS, MINIMUMS). The respond to these hint calls is operated in standard procedure. (i) Abnormal procedure (1) Abnormal procedure is operated when part system is inefficient or in compensation. The detail procedures are as follows: (2) Mode 1 Large rate-of-descent Accuracy can be reduced by FLAP OVRD warning signal light on left instrument panel manually in mode 1. If the aircraft has a large rate-of-descent in non-landing state, press FLAP OVRD warning signal light. Warning envelope curve of note alert and warning alert of mode 1 will increase 300 FPM to allow larger rate-of-descent without warning. When aircraft lowers down to or below 50 ft (15.24 m) altitude, warning envelope curve return to normal value automatically.
  • 528.
    JZ-Y8F200W-02 AIRCRAFT FLIGHT MANUAL SECTIONVI AIRCRAFT SYSTEM EQUIPMENT 6-240 June 30, 2012 (3) Mode 3 Lose altitude after taking off Press FLAP OVRD warning signal light on left instrument panel manually in mode 3 to increase the tolerance of lose altitude after taking off. After the aircraft taking off needs to fly in low altitude, press FLAP OVRD warning signal light to avoid mode 3 producing alert. When the aircraft lowers down to or below 50 ft (15.24 m), mode 3 warning inhibition will be cancelled automatically. (4) Mode 5 Too much lower than glide slope When the radio altitude is lower than 2000 ft (609 m), glide slope warning produced by mode 5 can be inhibited by pressing BELOW G/S P/CANCEL warning signal light on left/right instrument panel manually. When the aircraft lowering down beyond expected glide slope or flexible method needed to be done in instrument landing at final approach phase, press BELOW G/S P/CANCEL warning signal light to inhibit mode 5 to produce warning. When aircraft altitude climbs more than 2000 ft(609 m)or after landing, mode 5 warning inhabitation is cancelled automatically. (5) If pressing TERRAIN INHIBIT ON warning signal light on left instrument panel to avoid the TAD alert and display and can also to avoid the alert and display of obstacle and spike if possible. This operation is used typically in airports which are not in terrain data base. The choice of terrain inhabitation may cause terrain inefficiency indication, except that the aircraft makes circuit connection for this. Terrain inhabitation needs to be cancelled manually. Emergency procedure Operate flap, TAD inhibition and other switches according to specific requirement to emergency situations (such as forced landing, etc).
  • 529.
    JZ-Y8F200W-02 AIRCRAFT FLIGHT MANUAL SECTIONVI AIRCRAFT SYSTEM EQUIPMENT 6-241 June 30, 2012 TACAN system General A set of TACAN is mounted on board, which is used to supply the aircraft with the relative bearing according to the selected TACAN beacon and determine the slant range from the aircraft to the beacon. Moreover, the TACAN can output the recognition signal of TACAN beacon and has the function of air/air distance measuring to measure the mutual distance between aircrafts. System composition The composition of TACAN system is shown in Table 6-29. Table 6-29 Nomenclature Type No Qty Installation position TACAN receiver JD-3A-SF13 1 Left sidewall of frame 27-28 TACAN control box JD-3A-KZ15 1 Navigator instrument panel Integrated display unit JD-3A-XS6 1 Navigator instrument panel Antenna JD-2-TX 1 Head of frame 20~21 1 Bottom of frame 36~37 Circuit breaker ZKC-5 1 115V AC distribution board DBF-2 1 Communicator circuit breaker board
  • 530.
    JZ-Y8F200W-02 AIRCRAFT FLIGHT MANUAL SECTIONVI AIRCRAFT SYSTEM EQUIPMENT 6-242 June 30, 2012 Main technical index (a) Operation power DC: 28V; Power consumption: ≤80W AC: 115V±6V 400Hz±20Hz; Power consumption: ≤110VA (b) Frequency range: 962MHz~1213MHz Signal form:ARINC429 interface signal form and 11.8V three wire synchronous signal (ARINC407) interface (c) Input impedance: 50Ω (radio frequency) (d) Output impedance: 600Ω, 60mW (audio frequency) (e) Operating channel: 252 (126 for X and 126 for Y) (f) Transmitting pulse peak power: not less than 500W (g) Reception sensitivity: not less than -89dBm (h) Range tracking ratio: 3888kn (1 nm/s) Operation instruction of TACAN Brief introduction of control box panel The drawing of control box panel is shown in Figure 6-139. Figure 6-139 Drawing of control box panel
  • 531.
    JZ-Y8F200W-02 AIRCRAFT FLIGHT MANUAL SECTIONVI AIRCRAFT SYSTEM EQUIPMENT 6-243 June 30, 2012 (a) Selector switch of operating condition: the switch is used to select the operating condition for TACAN. There are four operating conditions for TACAN, OFF, REC, R/T, and A/A. When choosing the OFF condition, the equipment does not operate; Choosing REC condition, the equipment can only measure the relative bearing according to the related TACAN beacon; For R/T condition, the equipment can be operated to measure the relative bearing according to the related TACAN beacon and determine the distance from the aircraft and the beacon; For A/A condition, the equipment can be used for air/air distance measuring to measure the mutual distance between aircrafts. (b) R-RATIO (distance ratio): Large and small distance ratio are effective only in A/A operating condition. When the large and small selector switch is at the SMALL position, the ratio is 4:1, which shows that if the ratio for each of the two wingman to the leader airplane is lower than 4:1, the distance can be measured; When the large and small selector switch is at the BIG position, the ratio is 30:1, which shows that aircrafts in operating range can be measured. When there are only two aircrafts measuring the distance mutually, set the two aircrafts ratio at the minimum value; if the number of the aircraft is more than 2 (not more than 6), and the ratio for the distance that between the leader airplane (or tanker) and the wingman (receiver aircraft) in longest distance and between the leader airplane (or tanker) and the wingman (receiver aircraft) in nearest distance, is less than 4:1, set the leader airplane (or tanker) with the minimum distance ratio. When that distance value is more than 4:1, set the leader airplane with large distance ratio. No matter how the leader airplane is set, all wingmen (or receiver aircraft) are set at SMALL distance ratio. (c) XY selector switch: X is used for X channel, and Y is used for Y channel. (d) CHANNEL (channel display): display the current channel (e) TEST (self-check button): press the button, and the equipment enters into the starting self-check state. (f) TUNE (channel selector switch): it is used for TACAN to choose the channel. The outer ring button is to choose the units digit of channel. Rotating it clockwise or counter clockwise, the value in unit digit increases or decreases by the unit of 1. Middle ring button is used to choose the tens/hundreds digit. Rotate this button in clockwise or counter clockwise, the value on tens digit increases/ decreases by the unit of 10.
  • 532.
    JZ-Y8F200W-02 AIRCRAFT FLIGHT MANUAL SECTIONVI AIRCRAFT SYSTEM EQUIPMENT 6-244 June 30, 2012 (g) BRT (brightness control) knob: it is used to control the brightness of number of channel display. Rotate it in clockwise to increase the brightness, and in counter clockwise to decrease the brightness. (h) VOL (volume control) knob: it is used to control the volume of recognition voice of TACAN beacon. Rotate it in clockwise to increase the volume, and in counter clockwise to decrease the volume. (i) LIGHTING knob: it is used to control the brightness control of TACAN control box panel. Rotate it in clockwise to increase the brightness, and in counter clockwise to decrease the brightness. Brief introduction of integrated display unit The drawing of TACAN integrated display unit panel is shown in Figure 6-140. (a) STATE switch: It is a changeover switch to display the data content alternately. Press the switch once, the content of display window change in the following two states: display of azimuth and distance data, display of distance ratio and time to the channel. (b) BRT knob: It is at the left side of display panel and is used to regulate the brightness of integrated display screen. Rotate it in clockwise to increase the brightness, and in counter clockwise to decrease the brightness. (c) Display window: when the equipment is at normal operation, the upper row displays the azimuth data (the unit is o ) or the distance ratio (unit is kts). When receiving the ineffective data, the upper row displays - - - -. The lower row displays the distance data (unit is nm) or the time to channel (unit is min). When receiving the ineffective data, the lower row displays - - - - When the TACAN system is in self-check, if the check is normal, the upper row display the azimuth of 180o and the distance of 000.0 nm. If the self-check is abnormal, the trouble code should be displayed on the upper row. Figure 6-140 Drawing of JD-3A TACAN integrated display unit panel
  • 533.
    JZ-Y8F200W-02 AIRCRAFT FLIGHT MANUAL SECTIONVI AIRCRAFT SYSTEM EQUIPMENT 6-245 June 30, 2012 Operation (a) Switch and knob setting Turn on the TACAN power circuit breaker on communicator circuit breaker board and AC 115 V distributing board, and then place the ADF1/TACAN/VOR1channel selector switch on left and right instrument panel and navigator instrument panel at the TACAN position. Rotate the LIGHTING knob on TACAN control box on navigator instrument panel to regulate the brightness of control box to a proper extent. And then rotate the BRT knob to regulate the brightness of channel display widow on control box board. Rotate the BRT' knob on integrated display at the same time to regulate the brightness of display window on integrated display panel properly. (b) TACAN self-check TACAN self-check is divided into self-check with power state and starting self-check state. (1) Self-check with power Place the operating condition switch on JD-3A TACAN control box board on navigator instrument panel from the OFF to REC position, which is starting self-check. If the self-check is normal, the value will be displayed on JD-3A integrated display as: azimuth 180.0o (error is ±2o ), distance 0 nm (error is±0.2 nm). If the self-check is abnormal, the trouble code may be displayed on the JD-3A integrated display. The codes are as follows: Transmitter 01; Receiver 02; Frequency synthesis 03; Information unit 05.
  • 534.
    JZ-Y8F200W-02 AIRCRAFT FLIGHT MANUAL SECTIONVI AIRCRAFT SYSTEM EQUIPMENT 6-246 June 30, 2012 (2) Starting self-check Press the self-check button on JD-3A TACAN control box board to enter into the starting self-check state. The judgment of TACAN system starting self-check is the same as that of self-check with power. Flight service (a) Receiving state Place JD-3A control box to the selected beacon channel and set the operating condition switch at REC position with the coded switch X/Y consistent with the beacon, JD-3A integrated display, on navigator instrument panel, displays the aircraft TACAN azimuth according to the beacon. Heading position indicators of pilot, copilot and navigator all display the TACAN azimuth. (b) Receive/Send state Place JD-3A control box to the selected beacon channel and set the operating condition switch at R/T position with the coded switch X/Y consistent with the beacon, JD-3A integrated display, on navigator instrument panel, displays the aircraft TACAN azimuth and digital oblique line distance according to the beacon. Heading position indicators of pilot, copilot and navigator all display the TACAN azimuth. When the flight attitude is 8 km, the largest operation distance should not be less than 173 nm. (c) Beacon recognition signal Turn on the TACAN switch on intercom control box of pilot, copilot and navigator. Regulate the volume knob on TACAN control box or on intercom control box to make the recognition volume proper that can be heard by earphone clearly. (d) A/A state Place the operating condition switch of JD-3A control box at A/A position, and the coded switch at X(Y) position. At that time, if other aircraft is in TACAN operation in A/A and X(Y) state, with the two aircraft channel discrepancy of 63 channels, the linear distance of the two aircrafts can be measured (when the distance between the two same airborne TACAN aircrafts with A/A distance measuring function is in 81 nm without blocking, the two aircrafts can measure the distance between them mutually).
  • 535.
    JZ-Y8F200W-02 AIRCRAFT FLIGHT MANUAL SECTIONVI AIRCRAFT SYSTEM EQUIPMENT 6-247 June 30, 2012 COMMUNICATION SYSTEM K/TKR-200A2 General Two sets of K/TKR-200A2 airborne high frequency (HF) radio sets are installed on the Y8F200W aircraft. K/TKR-200A2 airborne HF radio set is capable of transmitting and receiving. It is used for long-range communication and liaison between aircraft and aircraft, and between aircraft and ground. Single sideband (SSB) speech is mainly used during communication, but sideband report and modulation speech can also be used. This radio set is mainly used by the communicator. The pilot can also use this radio set, but the navigator can only tune in this radio set and the mechanic cannot use it. The first set is used for emergency power supply, while the second set is used for normal power supply. The two sets of radio set are in active/standby mode. SYSTEM COMPOSITION AND COMPONENT INSTALLATION POSITION K/TKR-200A2 radio set system consists of the following components. The component installation position is listed in Table 6-18. Table 6-18 Component composition of K/TKR-200A2 radio set system Nomenclature Qty (pcs) Type No. Installation Position Transceiver 2 K/TKR-200A2 HF Transceiver-1 One on the equipment rack at the right of the front web at frame 9. On the upper side of the communicator's console Antenna tuner 2 K/TKR-200A2 HF Transceiver-2 One on the equipment rack at the right of the front web at frame 9. On the equipment rack of the door top at frame 9 in the cockpit. Control box 2 K/TKR-200A2 HF Transceiver-3 On the communicator's console panel Pre/post-selector 2 K/TKR-200A2 HF Transceiver-4 On the equipment rack at the right of the front web at frame 9 Telegraph key 2 LW3.684.003MX On the communicator's operating desk Copper-cable antenna 2 Y8C-7102-24 From left and right stringer 49~50 at frame 8~9 to the vertical finY8-7102-48
  • 536.
    JZ-Y8F200W-02 AIRCRAFT FLIGHT MANUAL SECTIONVI AIRCRAFT SYSTEM EQUIPMENT 6-248 June 30, 2012 MAIN TECHNICAL PERFORMANCE Power supply 28 VDC±2.8% VDC Power consumption 28 VDC: ≤900 W Frequency range 2~29.9999MHz Channel interval 100Hz; Operating mode USB,LSB,AME (data) Operating period 1:1 (counted at transmission 5min), continuously operating for 24h Transmitting power SSB:200W+1.0dB (PEP) UCW: 200 W+1.0dB (average) AME: ≥80 W (carrier wave) Tuning precision VSWR≤1.5 (typical value) VSWR≤1.7 (full frequency band) Tuning duration Stored channel≤50ms Non-stored channel≤5s Sensibility When (S+N)/N = 10 dB SSB, UCW:≤0.5μV AM (30%):≤2.5μV
  • 537.
    JZ-Y8F200W-02 AIRCRAFT FLIGHT MANUAL SECTIONVI AIRCRAFT SYSTEM EQUIPMENT 6-249 June 30, 2012 PANEL DESCRIPTION The control panel consists of the display window, key group, power/brightness knob, operating mode knob, and INJECT interface. The control panel is shown in Figure 6-141. 工种 信息/频率 注入 收 发 关 开 选择 迟入 扫描/调谐 电源 静噪 自检 定呼 定频 自适应 注入 工作模式 Fuction Type of work Information/frequency lnject lnject Power supply Operation mode Adaptive FH Off On Rx Tx Selection Late entry Scan/tune /Squelch /Self-test Fixed call Figure 6-141 Control panel Control panel description The display window includes the FUNCTION area, TYPE OF WORK area, INFORMATION/FREQUENCY area, Rx (receiving) and Tx (transmitting) indicating lights, and power indicating light. The display window is used to display the radio set operating state.
  • 538.
    JZ-Y8F200W-02 AIRCRAFT FLIGHT MANUAL SECTIONVI AIRCRAFT SYSTEM EQUIPMENT 6-250 June 30, 2012 Key group The key group consists of eight keys which are used to set all parameters for the HF radio set. Power/brightness knob This knob has ON/OFF positions which are used to power on or off the HF radio set. Operating mode knob This knob has three positions, namely, FIXED FREQUENCY, SELF-ADAPTIVE, and INJECT. It is used to switch over the operating mode of the HF radio set. INJECT interface This interface is used to inject parameters to the HF radio set by the parameter injector or PC. IN-FLIGHT OPERATION Check on the first set of the HF radio set (a) Power-on of the first set of the HF radio set (1) Supply 28 VDC power to the aircraft, and turn on the HF1, INTERCOM1, and INTERCOME2 power switches on the communicator circuit breaker board. (2) Turn the POWER SUPPLY knob on the control box of the first set of the HF radio set on the communicator's console from the OFF position to the ON position. The HF radio set is powered on. The HF radio set displays its model first and then performs power-on self-test. Then, it returns to the state used before the last power-off. Turn the electroluminescent panel illumination brightness adjustment knob on the communicator's panel to properly adjust illumination brightness of the electroluminescent panel on the HF radio set control box. In the fixed frequency receiving state, when no character on the screen is blinking, press the FIXED CALL button on the control box. At this time, LIGHT ADJUST is displayed in the display screen. Then, press ↑ to increase the character display brightness or press ↓ to decrease the character display brightness. After the character display brightness is adjusted properly, press the FIXED CALL button again to exit. (3) HF1.Turn the control knob on the intercom control box to the HF1 position.
  • 539.
    JZ-Y8F200W-02 AIRCRAFT FLIGHT MANUAL SECTIONVI AIRCRAFT SYSTEM EQUIPMENT 6-251 June 30, 2012 (b) Check on operating at the fixed frequency (1) Turn the OPERATING MODE knob on the control box to the FH position to enter the fixed frequency channel communication state. The meaning of each part of the display window is shown in Figure 6-142. U S B 0 1 2 3 4 5 6 Information/frequency area RX TX Sub-function area Receiving indicating light Transmitting indicating light Transmitting output power indicating light Type of work area Figure 6-142 Meaning of each part of the display window (2) Radio set self-test and power-on self-test: The radio set is in channel communication state shown in Figure 143. Press the →/SELF-TEST button. The radio set starts self-test, and the interface is shown in Figure 3. The self-test sequence is as follows: power-on/power-off unit (KGDY), pre/post-selector (YHXQ), frequency synthesizer unit (PH), DSP signal processor unit (DSP), receiving channel of the RF amplifier unit (SPR), audio power amplifier (YPGF), audio interface unit (YPJK), transmitting channel of the RF amplifier unit (SPT), power amplification unit (GF), filter unit (LBQ), antenna switch unit (TXKG), and automatic antenna tuner (TT). After the self-test is complete, the radio set automatically returns to the state before self-test. If the self-test result is normal, the information/frequency area will display XXX OK. If the self-test result is abnormal, this area will display XXX ERR. (Here, XXX indicates the unit code). If the antenna tuner has no power, NO POWER will be displayed. When the OPERATING MODE knob of the radio set is turned to the FH or ADAPTIVE position, power on the HF radio set and it starts power-on self-test. The self-test sequence is the same as the manual self-test. After the self-test is complete, the OPERATING MODE knob points to the corresponding operating state. In addition, if the radio set is in INJECT operating mode after power-on, it does not perform power-on self-test. Note During self-test, do not speak to the microphone; otherwise, the self-test result of the audio interface unit will be inaccurate. If the radio set is in INJECT operating mode after power-on, it does not perform power-on self-test.
  • 540.
    JZ-Y8F200W-02 AIRCRAFT FLIGHT MANUAL SECTIONVI AIRCRAFT SYSTEM EQUIPMENT 6-252 June 30, 2012 - - - - U S B B I T E . . . . Rx Tx Figure 6-143 Interface displayed during self-test (3) Fixed frequency parameter setting a) If the radio set is in fixed frequency communication state shown in Figure 6-142, press the SELECT button. The radio set enters the programming state. The cursor is blinking at the first digit in the information/frequency area. See Figure 144. (The italic digit in bold indicates that it is blinking.). Press ↑ to page up the channel, or press ↓ to page down the channel. Radio set fixed frequencies 0-9 have totally 10 channels. b) After the channel has been selected, press→/SELF- TEST or ←/SQUELCH to move the cursor to a digit of the frequency. The cursor is blinking. Press ↑ to page up the frequency value, or press ↓ to page down the frequency value. The radio set frequency range is 2.0000 MHz~29.9999 MHz. c) After the operating frequency has been selected, press →/SELF-TEST or ←/SQUELCH to move the cursor to the type of work area. The cursor is blinking. See Figure 6-95. (italic characters in bold indicate that these digits are blinking) Press →/SELF-TEST or ←/ SQUELCH to move the cursor to the type of work area. The cursor is blinking. Press ↑ to page up the type of work, or press ↓ to page down the type of work. Types of work of the radio set are as follows: USB (upper sideband speech), LSB (lower sideband speech), UCW (upper sideband report), and AME (compatible modulation). (The radio set does not use the message transmission function.) d) After programming is complete, press SELECT again. The radio set exits the programming state and returns to the fixed frequency communication state. - - - - U S B 0 1 2 3 4 5 6 Rx Tx Figure 6-144 Blinking digit in the information/frequency area - - - - U S B 0 1 2 3 4 5 6 Rx Tx Figure 6-145 Blinking digit in the type of work area
  • 541.
    JZ-Y8F200W-02 AIRCRAFT FLIGHT MANUAL SECTIONVI AIRCRAFT SYSTEM EQUIPMENT 6-253 June 30, 2012 (4) Check on the fixed frequency transceiving function of the radio set: When the radio set checks the fixed frequency transceiving function, it should select several frequency points in high, medium, and lower frequency bands in the operating frequency range respectively for spot check. a) Transmitting check: Ensure that the radio set is in fixed frequency communication state. Set the channel, frequency, type of work, and sub-function according to methods described in 5.1.2 c). Press SCAN/TUNE. The radio set will tune the frequency corresponding to the current channel. If tuning succeeds, the information/frequency area will display TT OK, as shown in Figure 6-146. If tuning fails, this area will display TT ERR, as shown in Figure 6-147. If tuning has no power, this area will display NO POWER, as shown in Figure 6-148. The radio set automatically returns to the fixed frequency communication state shown in Figure 6-141 within about 2s after tuning is complete. At this time, RADIO button can be pressed to speak, and self-listening tone can be heard through the earphone. - - - - U S B T T O K Rx Tx Figure 6-146 Tuning succeeds - - - - U S B T T E R R Rx Tx Figure 6-147 Tuning fails - - - - U S B N O P O W E R Rx Tx Figure 6-148 Tuning has no power
  • 542.
    JZ-Y8F200W-02 AIRCRAFT FLIGHT MANUAL SECTIONVI AIRCRAFT SYSTEM EQUIPMENT 6-254 June 30, 2012 b) Receiving check: Press ↑ to turn up the volume, or press ↓ to turn down the volume. (Pressing ↑ or ↓ intermittently can slightly change the volume; holding ↑ or ↓ can greatly change the volume.) After the volume is adjusted properly, noise should be heard through the earphone (squelch function disabled). Press ←/SQUELCH. The interface shown in Figure 6-149 is displayed. Enable the squelch function. Press ←/ SQUELCH again. The interface shown in Figure 6-150 is displayed. Disable the squelch function and enable the active noise function. Press ←/SQUELCH for the third time. The radio set returns to the fixed frequency state shown in Figure 151. S Q U U S B 0 1 2 3 4 5 6 Rx Tx Figure 6-149 Pressing ←/SQUELCH for the first time R O N U S B 0 1 2 3 4 5 6 Rx Tx Figure 6-150 Pressing ←/SQUELCH for the second time (c) Self-adaptive operating check (1) Turn the OPERATING MODE knob to the ADAPTIVE position. The radio set enters the self-test adaptive scanning state. The meaning of each part of the display window is shown in Figure 6-151. If the self-adaptive link has been established between the radio set on the aircraft and the third-party radio set, when the radio set is in self-test communication state, the meaning of each part of the display window is shown in Figure 6-152 U S B 0 0 1 S C Rx Tx Sub-function Receiving indicating light Transmitting indicating light Transmitting output power indicating light Type of work Channel group Scanning channel Scanning state Figure 6-151 Meaning of each part of the display window U S B C 0 1 1 0 1 Rx Tx Sub-function Receiving indicating light Transmitting indicating light Transmitting output power indicating light Type of work Communication channel Calling station number Figure 6-152 Meaning of each part of the display window
  • 543.
    JZ-Y8F200W-02 AIRCRAFT FLIGHT MANUAL SECTIONVI AIRCRAFT SYSTEM EQUIPMENT 6-255 June 30, 2012 (2) Self-adaptive parameter setting a) Select the scanning channel group: The radio set is in scanning state. Press SELECT to enter the scanning channel group selection state. At this time, the cursor is blinking at the first digit in the information/frequency area. Press ↑ to page up the scanning channel group, or press ↓ to page down the scanning channel group. After the modification, press SELECT again to exit the scanning channel group selection state. The radio set returns to the scanning state. b) Set the calling address: The radio set is in scanning state. Press SCAN/TUNE to enter the call setting state, as shown in Figure 6-153 (the italic digit in bold indicates that this digit is blinking). Press ←/ SQUELCH or →/SELF- TEST to move the cursor to the last digit in the information/frequency area. The cursor is blinking. Press ↑ to page up the calling address at the digit where the cursor locates, or press ↓ to page down the calling address. 100~299 are single station addresses, 300~319 are network call addresses, and 900 is the general call address. After the calling address has been set, press the RADIO button to call, or press SCAN/TUNE to make the radio set return to the scanning state. - - - - U S B C i n d 1 0 1 Rx Tx Figure 6-153 Call setting interface (3) Self-adaptive operating mode a) Self-adaptive scanning: Turn the OPERATING MODE knob to the ADAPTIVE position. The radio set enters the self-adaptive scanning state. At this time, if other radio sets perform self-adaptive calling and establish a link with this radio set, when SCAN/TUNE is pressed again, the radio set will return to the scanning state.
  • 544.
    JZ-Y8F200W-02 AIRCRAFT FLIGHT MANUAL SECTIONVI AIRCRAFT SYSTEM EQUIPMENT 6-256 June 30, 2012 b) LQA calling: The radio set is in scanning state. Press SCAN/TUNE to enter the call setting state. The radio set display window is shown in Figure 6-154 (the italic character in bold indicates that this digit is blinking). Press ↑ or ↓ to replace C with L. Press the RADIO button. The radio set will perform LQA calling according to the preset parameters. During calling, the radio set display window is shown in Figure 6-155. After LQA calling is over, the radio set automatically returns to the scanning state. - - - - U S B C i n d 1 0 1 Rx Tx Figure 6-154 Radio set display window in the call setting state - - - - U S B L 0 1 1 0 1 Rx Tx Figure 6-155 Radio set display window during LQA calling c) Automatic call: After the radio set on the aircraft has performed LQA calling with the target radio set, press the RADIO button. The radio set will enter the automatic calling state. The radio set will automatically select a frequency for call transmitting based on the channel quality obtained by the LQA. d) Manual calling: The radio set is in scanning state. Press SCAN/TUNE to enter the call setting state. Press FIXED CALL to enter the manual calling channel setting state. The radio set display window is shown in Figure 6-156 (the italic digit in bold indicates that this digit is blinking). Press ↑ to page up the calling channel, or press ↓ to page down the calling channel. After the channel has been set, press the RADIO button to perform manual calling, or press SCAN/TUNE again to exit the manual calling state and make the radio set return to the scanning state. - - - - U S B C 0 1 1 0 1 Rx Tx Figure 6-156 Radio set display window in the manual calling channel selection state
  • 545.
    JZ-Y8F200W-02 AIRCRAFT FLIGHT MANUAL SECTIONVI AIRCRAFT SYSTEM EQUIPMENT 6-257 June 30, 2012 e) Link protection calling: The radio set is in scanning state. Press SELECT. Then, press ←/SQUELCH or →/SELF-TEST to move the cursor to the function area. The cursor is blinking. Press ↑ or ↓ to make the sub-function area display LP, as shown in Figure 6-157 (italic characters in bold indicate that these digits are blinking). Press SELECT again and then LATE ENTRY. The radio set display window is shown in Figure 6-158. The radio set exchanges time with the called radio set (If the time difference between the two radio sets is within 3min, there is no need for them to exchange time.) After the time exchange, automatic calling or manual calling can be performed in line protection mode. L P U S B 0 0 1 S C Rx Tx Figure 6-157 Radio set display window L P U S B C 0 1 1 0 1 Rx Tx Figure 6-158 Radio set display window Note Calling can be performed and the communication link can be established only when both parties are in line protection state and the scanning duration is within 3min. If either radio set is not in line protection state, the communication link cannot be established. If both radio sets are in line protection state, but the scanning duration exceeds 3min, one of the radio sets must execute the LATE ENTRY transmitting time exchange command so that the communication link can be established. It is recommended that time exchange be performed before the line protection calling function is used.
  • 546.
    JZ-Y8F200W-02 AIRCRAFT FLIGHT MANUAL SECTIONVI AIRCRAFT SYSTEM EQUIPMENT 6-258 June 30, 2012 f) Self-adaptive late entry: The late entry (insertion) function is available on the radio set in self-adaptive state. When two or more K/TKR-200A2 airborne radio sets enter the communication state with the channel having the same frequency, the third-party radio set that is scanning state can call any radio sets to which links have been established. After the communication state is entered, the radio set can communicate with other radio sets that have already been in communication state. The method is as follows: Set the calling address according to the method described in 5.1.3 b). Select the channel (the frequency corresponding to the channel should be the same) that matches the calling address according to the method described in 5.1.3 b). Then, press PTT to perform manual calling late entry. Set the calling address according to the method described in 5.1.3 b). Perform automatic calling late entry according to the method described in 5.1.3 c). (At least one of the scanning channel frequency of the radio set that is about to perform automatic calling late entry must be the same as the frequency of the radio set that has already been in communication state; otherwise, the self-adaptive late entry function cannot be implemented.) Note When selecting the calling address, the radio set that is about to perform self-adaptive late entry can select the single station address or network call address only. The general call address cannot be selected in this case. Check on the second set of the HF radio set (a) Power-on of the second set of the HF radio set (1) Supply 28 VDC power to the aircraft, and turn on the HF2, INTERCOM1, and INTERCOME2 power switches on the communicator circuit breaker board. (2) Turn the POWER SUPPLY knob on the control box of the second set of the HF radio set on the communicator's console from the OFF position to the ON position. The HF radio set is powered on. The HF radio set displays its model first and then performs power-on self-test. Then, it returns to the state used before the last power-off. Turn the HF BRI electroluminescent panel illumination brightness adjustment knob on the communicator's panel to properly adjust illumination brightness of the electroluminescent panel on the HF radio set control box. In the fixed frequency receiving state, when no character on the screen is blinking, press the FIXED CALL button on the control box. Then, press ↑ to increase the character display brightness or press ↓ to decrease the character display brightness. After the character display brightness is adjusted properly, press the FIXED CALL button again to exit. (3) Turn the control knob on the intercom control box to the HF2 position.
  • 547.
    JZ-Y8F200W-02 AIRCRAFT FLIGHT MANUAL SECTIONVI AIRCRAFT SYSTEM EQUIPMENT 6-259 June 30, 2012 (b) The method for check on operating at the fixed frequency is the same as that described in the above item. (c) The method for self-adaptive operating check is the same as that described in the above item. DESCRIPTION (a) To perform self-adaptive communication, contact witch the target radio set and make the communication protocol in advance. (b) Before using the radio set, tune frequencies to be used. After the operating environment is changed, frequencies must be tuned again. When TT ERR is displayed for tuning, transmitting is prohibited. Do not switch channels during radio set tuning and transmitting. (c) If the radio set is inoperative, power off and then power on the radio set again. (d) During transmission of the HF radio set, person cannot stand on the dorsal. (e) If the open circuit or short circuit occurs, the radio set will enter the automatic protection state. At this time, the radio set display window in shown in Figure 159. The radio set can exit the protection state only after the SCAN/TUNE button is pressed to retune the radio set, or the SELECT button is pressed to re-set the frequency, or the radio set is powered off. T r a n s P r o t e c t Rx Tx Figure 6-159 Radio set display window in automatic protection state (f) The final assembly factory performs (c) and (d), and the flight test factory performs (d) and (e). The self-adaptive and injection functions can be dispensed if the ground station does not have the check condition. (g) Transmitting of the HF radio set will interfere with the ADF. Therefore, HF radio set transmitting is prohibited during approach. (h) Bilingual illustration for panel of K/TKR-200A2 radio set control box refers to Figure 6-160.
  • 548.
    JZ-Y8F200W-02 AIRCRAFT FLIGHT MANUAL SECTIONVI AIRCRAFT SYSTEM EQUIPMENT 6-260 June 30, 2012 工种 信息/频率 注入 收 发 关 开 选择 迟入 扫描/调谐 电源 静噪 自检 定呼 定频 自适应 注入 工作模式 Fuction Type of work Information/frequency lnject lnject Power supply Operation mode Adaptive FH Off On Rx Tx Selection Late entry Scan/tune /Squelch /Self-test Fixed call Figure 6-160 K/TKR-200A2 radio set control box panel
  • 549.
    JZ-Y8F200W-02 AIRCRAFT FLIGHT MANUAL SECTIONVI AIRCRAFT SYSTEM EQUIPMENT 6-261 June 30, 2012 TKR123E-III VHF radio GENERAL Two sets of TKR123E-III VHF radio set are installed on the Y8F200W aircraft to be exported to Venezuela. They are used for routine plain voice communication and liaison in the visual range between aircraft and ground, aircraft and aircraft, and aircraft and ship. MAIN TECHNICAL PERFORMANCE BASIC PERFORMANCE The basic performance of TKR123E-III VHF radio set is as follows (a) Operating frequency band 30~87.975MHz (FM) 108~155.975MHz (AM/FM) 156~173.975MHz (FM) 225~399.975MHz (AM/FM) (b) Survival frequency: 40.5MHz,121.5 MHz,156.8 MHz,243MHz Operating mode AM, FM Channel interval 25kHz Power supply voltage 28V DC Operating temperature -45o C~+60o C Preset number of channels 40
  • 550.
    JZ-Y8F200W-02 AIRCRAFT FLIGHT MANUAL SECTIONVI AIRCRAFT SYSTEM EQUIPMENT 6-262 June 30, 2012 Receiver performance (a) Sensitivity (S+N)/N≥10 dB AM: ≤103 dBm 1kHz (30% modulation); FM: ≤-113 dBm 1kHz (±6.0kHz frequency deviation); (b) Automatic gain control feature: The automatic gain dynamic range is 120 dB Main transmitter specifications (a) Output power ≥10 W(AM);≥15 W(FM) (b) AM modulation degree 80%~98% (c) FM frequency deviation ±6 kHz±0.5 kHz (d) RF impedance 50Ω (e) The transmitter provides the antenna open-circuit/short-circuit, standing-wave ratio, and overheating protection functions. Audio interface The VHF radio set is interconnected with JT-Y8F200W intercom through the simulated interface, which is used for audio input and output. (a) Input (audio transmitted by the microphone) interface (balanced input): Impedance 150Ω Level 0.25V Bandwidth 300~3500Hz (b) Output (audio received by the earphone) interface (balanced output): Impedance 600Ω Level 100mW Bandwidth 300~3500 Hz
  • 551.
    JZ-Y8F200W-02 AIRCRAFT FLIGHT MANUAL SECTIONVI AIRCRAFT SYSTEM EQUIPMENT 6-263 June 30, 2012 SYSTEM COMPOSITION AND COMPONENT INSTALLATION POSITION The two sets of VHF radio sets installed on the Y8F200W aircraft to be exported to Venezuela have the same composition. The specific composition and component installation position are listed in Table 6-30. Table 6-30 Composition of the VHF radio set and component installation position No Component Model Quantity Installation Position 1 Control box TKR123E-III K1 2 On the overhead console 3 Transceiver TKR123E-III TR 2 On the equipment rack at the left of frame 9 3 Mounting bracket LZ4.284.108 2 On the equipment rack at the left of frame 9 4 Antenna 8DTX2B-607B 2 First set: Between left stringer 9-10 at frame 8-9 Second set: Between right stringer 9-10 at frame 8-9 5 Circuit breaker ZKC-10 2 On the communicator circuit breaker board 6 Switch ZK2-2 2 On the overhead console 7 Light control potentiometer JWX5-2-1KΩ±5% 1 On the overhead console
  • 552.
    JZ-Y8F200W-02 AIRCRAFT FLIGHT MANUAL SECTIONVI AIRCRAFT SYSTEM EQUIPMENT 6-264 June 30, 2012 CONTROL BOX DESCRIPTION Control panel layout The control panel of the VHF radio set is shown in Figure 6-161. BT1 BT2MODE SOS MN GD TX CH TONE SELFRQ AM/FM Indicating light brightness adjusting knob Emergency indicating light Main receiving indicating light Survival indicating light Transmitting indicating light Channel /frequency button Monophony buttonFrequency/channel /squelch knob Volume adjusterOperating state/modulation mode /display area brightness adjusting knob Figure 6-161 Control panel of the VHF radio set Functions of each button and knob displayed in Figure 1 are described as follows (according to the No. marked in Figure 6-161): (a) BT1: Indicating light brightness adjusting knob (b) SOS: Emergency indicating light (c) MN: Main receiving indicating light (d) GD: Survival indicating light (e) TX: Transmitting indicating light
  • 553.
    JZ-Y8F200W-02 AIRCRAFT FLIGHT MANUAL SECTIONVI AIRCRAFT SYSTEM EQUIPMENT 6-265 June 30, 2012 (f) CH: Channel/frequency selection button (g) TONE: Monophony button. After this button is pressed, the monophony signal can be transmitted. After the frequency is changed, pressing this button can confirm that the radio set changed status is valid. (h) FRQ/SEL: Frequency/channel/ squelch knob. This knob consists of a large knob and a small knob. The large knob on the lower layer is used to adjust the channel number and frequency, while the small knob on the upper layer is used to cooperate with the large knob to adjust the channel number and frequency. In addition, pushing in the small knob can set squelch, while pulling out the small knob can set non-squelch. (i) Radio set volume adjuster: Turning it clockwise can turn up the volume, while turning it counter-clockwise can turn down the volume. (j) MODE/BT2: Operating state/ modulation mode/display area brightness adjusting knob. This knob consists of a large knob and a small knob. Turning the large knob on the lower layer can select the operating mode, while turning the small knob on the upper layer can adjust the nixie tube brightness. In addition, pushing in the small knob can select AM, while pulling out the small knob can select FM. Control box operations (a) After the VHF radio set control box is powered on and PASS is displayed, the VHF radio set starts operating properly. (b) Press and hold the CH (channel/frequency) button on the control panel for 2s (until information in the display area on the control box starts blinking). The radio set enters the preset state. At this time, the blinking channel number on the radio set control box is the channel number displayed before the last normal power-off. (c) Preset channel number: When the channel number is blinking, turn the FRQ/SEL (frequency/channel/squelch) knob to the channel number that needs to be preset. The specific adjustment method is as follows: (1) Turn the large or small knob clockwise. The channel number increases by 1. (2) Turn the large or small knob counter-clockwise. The channel number decreases by 1.
  • 554.
    JZ-Y8F200W-02 AIRCRAFT FLIGHT MANUAL SECTIONVI AIRCRAFT SYSTEM EQUIPMENT 6-266 June 30, 2012 (d) Press the CH (channel/frequency) button on the control panel after the channel number has been set. The frequency point corresponding to the preset channel is displayed in the display area. If the frequency point corresponding to the channel needs to be modified, turn the FRQ/SEL (frequency/channel/squelch) knob. The specific adjustment method is as follows: (1) Turn the large knob clockwise. The frequency increases by 1 MHz when the knob is turned by one step. (2) Turn the large knob counter- clockwise. The frequency decreases by 1 MHz when the knob is turned by one step. (3) Turn the small knob clockwise. The frequency increases by 25 kHz when the knob is turned by one step. (4) Turn the small knob counter- clockwise. The frequency decreases by 25 kHz when the knob is turned by one step. (5) After the frequency has been set, press the TONE button for frequency storing confirmation. Preset other channels or frequencies in the same way. After preset is complete, press and hold the TONE button for 2s. The display area stops blinking. The control box automatically stores the preset channels or frequencies and then exits the preset mode. Turn the large knob on the lower layer of the MODE/BT2 (operating state/ modulation mode/display area brightness adjustment) knob on control panel 1 or control panel 2 to select the required operating state. The operating state is changed when this knob is turned. When the knob is turned continuously, the operating states are changed in the following sequence cyclically: Main receiving → Survival → Dual receiving → Emergency → Main receiving. The specific display mode of each operating state is as follows: (e) Main receiving state: The MN main receiving indicating light in the operating state indication area illuminates, and the channel number of operating frequency in main receiving state is displayed in the display screen. (f) Survival state: The GD survival indicating light in the operating state indication area illuminates, and the survival frequency is displayed in the display screen. (g) Dual receiving state: The MN main receiving indicating light and the GD survival indicating light in the operating state indication area illuminate simultaneously, and the channel number or operating frequency in dual receiving state is displayed in the display screen.
  • 555.
    JZ-Y8F200W-02 AIRCRAFT FLIGHT MANUAL SECTIONVI AIRCRAFT SYSTEM EQUIPMENT 6-267 June 30, 2012 (h) Emergency state: the SOS emergency indicating light in the operating state indication area illuminates, and 243.000 is displayed in the display screen. Note 1) The SOS (emergency), MN (main receiving), GD (survival), TX (transmitting) indicating lights are illuminating in green. 2) To adjust brightness of the operating state indicating light, turn the BT1 potentiometer in the upper left corner of the control panel. Turning the knob clockwise can increase brightness, while turning the knob counter-clockwise can decrease brightness. 3) To adjust brightness of characters displayed in the display screen, turn the small knob on the upper layer of the MODE/BT2 knob. Turning the knob clockwise can increase brightness, while turning the knob counter-clockwise can decrease brightness. 4) The radio set provides two regular operating modes, that is, amplitude modulation (AM) and frequency modulation (FM). IN-FLIGHT OPERATIONS Operating procedure (a) Power-on Turn on VHF-I and VHF-II circuit breakers on the communicator circuit breaker board at the right of frame 9 and VHF-I and VHF-II power control switches on the overhead console. Lights in control panels of the two sets of VHF radio set illuminate.
  • 556.
    JZ-Y8F200W-02 AIRCRAFT FLIGHT MANUAL SECTIONVI AIRCRAFT SYSTEM EQUIPMENT 6-268 June 30, 2012 (b) Brightness adjustment Turn the VHF DIM brightness adjustment potentiometer on the overhead console. Illumination of the two control panels should change. During power-on, properly adjust the control box brightness. (Turning the knob clockwise can increase brightness, while turning the knob counter-clockwise can decrease brightness.) (c) Squelch adjustment Pull out or push in the small knob on the upper layer of the FQR/SEL knob on the control panel. Noise or squelch should be heard through the earphone. (d) Monophony operation Press and hold the TONE button so that the radio set is in monophony transmitting state. The transceiver outputs the monophony, indicating that the radio set communication function is normal. Release the TONE button to exit the monophony transmitting state. (e) Volume adjustment To adjust the radio set receiving volume, turn the volume adjustment potentiometer in the center of the control panel. Turning the knob clockwise can turn up the volume, while turning the knob counter-clockwise can turn down the volume. Operating mode (a) Communication in the main receiving mode Turn the large knob on the lower layer of the MODE/BT2 operating mode selection knob on the control panel. If the MN main receiving indicating light in the operating state indication area illuminates, it indicates that the operating mode is main receiving, and the channel number or operating frequency in main receiving state is displayed in the display screen. Use the channel selection knob to select the channel. After the operating channel number or operating frequency of the radio set is set according to the methods described in 4.2 c) and 4.2 d), push into the small knob on the upper layer of the FRQ/SEL knob to set squelch. Then, turn the selection knob on the intercom to the UV1 or UV2 position. Press the radio button in the corresponding position and speak. The self-listening tone can be heard through the earphone.
  • 557.
    JZ-Y8F200W-02 AIRCRAFT FLIGHT MANUAL SECTIONVI AIRCRAFT SYSTEM EQUIPMENT 6-269 June 30, 2012 Table 6-31 Operating frequency range and operating mode of the VHF radio set Operating Frequency Survival Frequency and Modulation Mode Operating Mode 30 MHz~87.975 MHz 40.5 MHz(FM) FM 108 MHz~155.975 MHz 121.5 MHz(FM) AM,FM 156 MHz~173.975 MHz 156.8 MHz(FM) FM 225 MHz~399.975 MHz 243 MHz(FM) AM,FM (b) Communication in dual receiving mode Turn the large knob on the lower layer of the MODE/BT2 operating mode selection knob on the control box. If the MN main receiving indicating light and GD survival indicating light in the operating state indication area illuminate simultaneously, it indicates that the operating mode is dual receiving. The channel number or operating frequency in dual receiving state is displayed in the display screen. Use the channel selection knob to select the channel. After the operating channel number or operating frequency of the radio set is set according to the methods described in 4.2 c) and 4.2 d), push into the small knob on the upper layer of the FRQ/SEL knob to set squelch. Then, turn the selection knob on the intercom to the UV1 or UV2 position. Press the radio button in the corresponding position and speak. The self-listening tone can be heard through the earphone. (c) Communication in survival mode Turn the large knob on the lower layer of the MODE/BT2 operating mode selection knob on the control box. If the GD survival indicating light in the operating state indication area illuminates, it indicates that the operating mode is survival. The operating frequency (the survival frequency at each operating band of the radio set is listed in Table 2) in survival state is displayed in the display screen. Push into the small knob on the upper layer of the FRQ/SEL knob to set squelch. Then, turn the selection knob on the intercom to the UV1 or UV2 position. Turn the large knob on the lower layer of the MODE/BT2 operating mode selection knob on the control box. The self-listening tone can be heard through the earphone.
  • 558.
    JZ-Y8F200W-02 AIRCRAFT FLIGHT MANUAL SECTIONVI AIRCRAFT SYSTEM EQUIPMENT 6-270 June 30, 2012 (d) Communication in 243 mode Turn the large knob on the lower layer of the MODE/BT2 operating mode selection knob on the control box. If the SOS emergency indicating light in the operating state indication area illuminates and the operating frequency 243.000 is displayed in the display screen, it indicates the operating mode in emergency. (e) 1020 monophony operation Set the operating mode of the control box to main receiving or dual receiving. Press and hold the TONE button so that the radio set is in monophony transmitting state. The transceiver outputs the monophony, indicating that the radio set communication function is normal. Release the TONE button to exit the monophony transmitting state. Power-off Turn off the VHF-I and VHF-II power control switches on the overhead console first. Then, turn off VHF-I and VHF-II circuit breakers on the communicator circuit breaker board at the right of frame 9. JT-Y8F200W Intercom General JT-Y8F200W intercom is a radio communication system. Only one set of JT-Y8F200W intercom is installed on the entire aircraft. JT-Y8F200W intercom provides the following functions: Allow intercommunication among the flight crew. Interconnect with the radio set so that the flight crew can control the radio set to implement the external radio contact. Tune in audio identification signals from ground navigation stations such as the TACAN, automatic direction finder (ADF), VOR/ILS/DME, and beacon. Tune in warning signals from the TCAS and ground-proximity warning system (GPWS).
  • 559.
    JZ-Y8F200W-02 AIRCRAFT FLIGHT MANUAL SECTIONVI AIRCRAFT SYSTEM EQUIPMENT 6-271 June 30, 2012 Support Components Onboard and Installation Position (See Table 6-32) Table 6-32 Support components onboard and installation position Component Model Qua ntity Installation Position Pilot Copilot Navigator Mechan ic Comm unicat or Intercom control box JT-Y8F200W- KZ 5 Overhea d console Overhead console Navigator' s side cover plate Overhe ad console Comm unicat or's control panel Intercom expansion device JT-Y8F200W- NKZ 1 On the equipment rack at the left of frame 9 Intercom junction box JT-Y8F200W- JX 1 On the equipment rack at the left of frame 9 Simplified control box JT-Y8F200W- JYK 3 The simplified control box for the cargo attendant is located on the side wall at the right of frames 11~12. The simplified control box for the medical staff is located on the side wall at the left of frames 30~31. The simplified control box for the jettison staff is located on the side wall at the right of frames 42~43.
  • 560.
    JZ-Y8F200W-02 AIRCRAFT FLIGHT MANUAL SECTIONVI AIRCRAFT SYSTEM EQUIPMENT 6-272 June 30, 2012 Main Technical Specifications Power supply 28VDC±10% Electric performance Microphone input: 400mV, 600Ω, feed to microphone 12 DVC Wire inputs are listed in Table 6-33. Table 6-33 Wire inputs CH Definition Input Level Input Mode Pilot Copilot Navigator Mechanic Communicator Volume tunable 1 Ultrashort wave radio set 1 7.75V, 600Ω Balanced type TR TR TR TR TR Y 2 Ultrashort wave radio set 2 7.75V, 600Ω Balanced type TR TR TR TR TR Y 3 Ultrashort wave radio set 1 7.75V, 600Ω Balanced type TR TR TR TR TR Y 4 Ultrashort wave radio set 2 7.75V, 600Ω Balanced type TR TR TR TR TR Y 5 Compass 1 7.75V, 600Ω Balanced type Receiver Receiver Receiver Y 6 Compass 2 7.75V, 600Ω Balanced type Receiver Receiver Receiver Y 7 DME1 100mW,500 Balanced type Receiver Receiver Receiver Y 8 DME2 100mW,500 Balanced type Receiver Receiver Receiver Y 9 TCAS-94 7.00V,600 Balanced type Receiver Receiver Receiver N 10 Beacon 1 50mW,600 Balanced type Receiver Receiver Receiver N 11 Beacon 2 50mW,600 Balanced type Receiver Receiver Receiver N 12 Ground proximity warning 7.75V,600 Balanced type Receiver Receiver Receiver N 14 VOR1 100mW,600 Balanced type Receiver Receiver Receiver Y 15 VOR2 100mW,600 Balanced type Receiver Receiver Receiver Y 16 TACAN 60mW,600 Balanced type Receiver Receiver Receiver Y 17 Critical angle of attack 30V,20k Imbalanc ed type Receiver Receiver Receiver N
  • 561.
    JZ-Y8F200W-02 AIRCRAFT FLIGHT MANUAL SECTIONVI AIRCRAFT SYSTEM EQUIPMENT 6-273 June 30, 2012 (a) Intercom headset output voltage (7.75V+2 -1 )V/600Ω balanced Calling headset output voltage (5.52±1)V/600Ω Simplified intercom headset output voltage (7.75V+2 -1 )V/600 Ω balanced (b) Receiving headset output voltage (7.75V+2 -1 )V/600 Ω balanced Sound transmission output (250±30) mV/150 Ω (channels 1 and 2) (775+200 -100 ) mV/600 Ω (channels 3 and 4) (c) Harmonic distortion: Communication state≤4% (1kHz Wire state≤4% (1kHz) Calling state≤4% (1kHz) Sound transmission state≤2% (1kHz) (d) Audio response 300Hz~5000Hz fluctuation≤5dB (e) Signal-to-noise ratio ≥50dB(1kHz) (f) Channel crosstalk suppression ≥50dB(1kHz) Headset loading feature: During variation between 600Ω~300 Ω, the output amplitude variation is smaller than or equal to 3 dB (1 kHz). Panel Description Control box panel Appearance of JT-Y8F200W intercom control box panel is shown in Figure 6-162 Figure 6-162 Appearance of JT-Y8F200W intercom control box panel
  • 562.
    JZ-Y8F200W-02 AIRCRAFT FLIGHT MANUAL SECTIONVI AIRCRAFT SYSTEM EQUIPMENT 6-274 June 30, 2012 The intercom control box panel is a white lighting electroluminescent panel. There are 14 encoding volume potentiometers, one external communication transmission selection knob, and one MASK/INPH knob on the intercom control box panel. They are used to implement control functions of the control box. Knob functions are described as follows: (a) UV1, UV2, HF1, and HF2 knobs are used to adjust the volume of the corresponding radio set. (b) VOR1, VOR2, DME1, DME2, ADF1, ADF2, and TACAN knobs are used to adjust the volume of the corresponding navigation devices. (c) The INPH knob is used to adjust the volume of the intercom voice. (d) The LGT knob is used to adjust illuminance of the electroluminescent panel. (e) MASK/INPH knob: MASK indicates the mask function. When using the mask microphone, the pilot turns this knob to the MASK position. (f) The CALL button is a forced-calling button. After pressing this button, the person who presses this button hears the caller's voice with the maximum volume passively. This button is used to implement emergent intercom in special cases. Its volume is not controlled by the intercom volume adjusting knob. (g) The UV1, UV2, HF1, and HF2 selection knob is used to select the radio set to be used for external communication. Turn the pointer to a radio set to select that radio set for transmission. (h) The SBY/NORM selection knob is used to select the state of the intercom control box. When the knob is at the NORM position, the control box is operating properly. When the control box is faulty, turn the knob to the SBY position so that the backup module starts operating. The backup module provides the same functions as those provided by the control box operating properly.
  • 563.
    JZ-Y8F200W-02 AIRCRAFT FLIGHT MANUAL SECTIONVI AIRCRAFT SYSTEM EQUIPMENT 6-275 June 30, 2012 Simplified control box panel Appearance of JT-Y8F200W intercom simplified control box panel is shown in Figure 6-163. Figure 6-163 Appearance of the simplified control box panel There is an NET1/NET2 switch, a volume potentiometer, and a CALL button on the simplified control box panel. They are used to implement control functions of the control box. Functions of the switch, knob, and button are described as follows: (a) NET1/NET2 switch: NET1 indicates the internal network, which implements internal communication among expansion members (cargo attendants, medical staff, and jettison staff) through the simplified control box. NET2 indicates the external network, which implements intercom between expansion members (cargo attendants, medical staff, and jettison staff) and intercom control box members. Expansion members (cargo attendants, medical staff, and jettison staff) can switch over the network state by turning this changeover switch.
  • 564.
    JZ-Y8F200W-02 AIRCRAFT FLIGHT MANUAL SECTIONVI AIRCRAFT SYSTEM EQUIPMENT 6-276 June 30, 2012 (b) Volume potentiometer: Turning this knob can adjusting the intercom voice volume (turning clockwise to turn up the volume, while turning counter-clockwise to turn down the volume). (c) The CALL button is a forced-calling button. After pressing this button, the person who presses this button hears the caller's voice with the maximum volume passively. This button is used to implement emergent intercom in special cases. Its volume is not controlled by the intercom volume adjusting knob. Operation System power-on Turn on INTERCOM1 and INTERCOM2 circuit breakers on the communicator circuit breaker board. At this time, illumination of the electroluminescent panel on the control box panel applies white light. Intercom operating mode (a) Common intercom operating mode After the power supply is engaged, the control box user presses its own TALK button (The pilot presses the TALK button on the left control stick; the copilot presses the TALK button on the right control stick; the mechanic presses the TALK button on the central instrument panel or steps on the foot push nearby; the navigator steps on the two foot pushes on the floor where the navigator locates; the communicator presses the TALK button on the communicator's instrument panel.) After the corresponding button is pressed, the user's control box is in communication operating mode, and crew members can communicate with each other. To adjust the volume, turn the INPH volume adjusting knob. (b) Calling operating mode When the user of a control box presses the CALL button on the control box panel, all other crew members should hear the calling sound clearly and undistortedly no matter they are in what states.
  • 565.
    JZ-Y8F200W-02 AIRCRAFT FLIGHT MANUAL SECTIONVI AIRCRAFT SYSTEM EQUIPMENT 6-277 June 30, 2012 External liaison and monitoring of navigation audio and warning audio (a) Using ultrashort wave radio set 1 Tune in the voice from ultrashort wave radio set 1. Turn the UV1 volume adjusting knob to adjust the volume to a proper volume. To use ultrashort wave radio set 1 for external transmission, turn the external communication selection knob to the UV1 position. Then, the pilot, copilot, navigator, mechanic, and communicator can press their own RADIO buttons to perform external liaison using ultrashort wave radio set 1. (b) Using ultrashort wave radio set 2 The operation method is the same as that described in 5.3 a). In this case, however, turn the UV2 volume adjusting knob and turn the external communication selection knob to the UV2 position. (c) Using short wave radio set 1 Tune in the voice from short wave radio set 1. Turn the HF1 volume adjusting knob to adjust the volume to a proper volume. To use short wave radio set 1 for external transmission, turn the external communication selection knob to the HF1 position. Then, the pilot, copilot, navigator, mechanic, and communicator can press their own RADIO buttons to perform external liaison using short wave radio set 1. (d) Using short wave radio set 2 The operation method is the same as that described in 5.3 c). In this case, however, turn the HF2 volume adjusting knob and turn the external communication selection knob to the HF2 position.
  • 566.
    JZ-Y8F200W-02 AIRCRAFT FLIGHT MANUAL SECTIONVI AIRCRAFT SYSTEM EQUIPMENT 6-278 June 30, 2012 (e) Tuning in the signal from VOR1 The pilot, copilot, and navigator turn the VOR1 volume adjusting knob respectively to adjust the volume to a proper volume. When the signal from the ground VOR set is received, the pilot, copilot, and navigator can tune in VOR1's audio signal through their headsets. (f) Tuning in the signal from VOR2 The operation method is the same as that described in 5.3 e). In this case, however, turn the VOR2 volume adjusting knob. (g) Tuning in the signal from compass 1 The pilot, copilot, and navigator turn the ADF1 volume adjusting knob on the control box panel respectively to adjust the volume to a proper volume, and set the operating mode of the radio compass control box at the ANT position. At this time, the pilot, copilot, and navigator can tune in the audio signal from the ground compass navigation station through their headsets. (h) Tuning in the signal from compass 2 The operation method is the same as that described in 5.3 g). In this case, however, turn the ADF2 volume adjusting knob. (i) Tuning in the TACAN signal The pilot, copilot, and navigator turn the TACAN volume adjusting knob on the control box panel respectively to adjust the volume to a proper volume. When aircraft receives the TACAN signal, the pilot, copilot, and navigator can tune in the audio signal from TACAN through their headsets. (j) Tuning in the signal from DME1 The pilot, copilot, and navigator turn the DME1 volume adjusting knob on the control box panel respectively to adjust the volume to a proper volume. When the signal from the ground DME navigation station is received, the pilot, copilot, and navigator can tune in the audio signal from DME1 through their headsets.
  • 567.
    JZ-Y8F200W-02 AIRCRAFT FLIGHT MANUAL SECTIONVI AIRCRAFT SYSTEM EQUIPMENT 6-279 June 30, 2012 (k) Tuning in the signal from DME2 The operating method is the same as that described in 5.3 j). In this case, however, turn the DME2 volume adjusting knob. (l) Tuning in the warning signal from the TCAS When RA and TA alarms are generated in the TCAS, the TCAS outputs the audio signal. At this time, the pilot, copilot, and navigator can tune in the audio warning signal through their headsets. The signal volume is not controlled by the volume adjusting knob. (m) Tuning in the ground proximity warning signal When aircraft reaches the ground proximity warning distance, the pilot, copilot, and navigator can tune in the warning audio signal through their headsets. The signal volume is not controlled by the volume adjusting knob. (n) Tuning in the signal from beacon 1 Set the operating state of VOR/instrument landing system 1 to beacon state. When aircraft flying over the beacon, the pilot, copilot, and navigator can tune in the beacon audio signal from the combined receiving device through their headsets. The audio signal output to the intercom is in fixed output state. The signal volume is not controlled by the volume adjusting knob on the intercom control box. (o) Tuning in the signal from beacon 2 The operating method is the same as that described in 5.3 n). In this case, however, set the operating state of VOR/instrument landing system 2 to beacon state. (p) Tuning in the warning signal of the critical angle of attack When the intercom receives the warning signal of the critical angle of attack, the pilot and copilot can hear the pulse sound through their headsets. The signal volume is not controlled by the volume adjusting knob.
  • 568.
    JZ-Y8F200W-02 AIRCRAFT FLIGHT MANUAL SECTIONVI AIRCRAFT SYSTEM EQUIPMENT 6-280 June 30, 2012 Other functions (a) Illuminance adjusting function The pilot, copilot, mechanic, navigator, and communicator turn the LGT illuminance adjusting knob on the intercom control box at their positions respectively. Illuminance of the electroluminescent panel on the control box panel should change. (b) Oxygen mask microphone Connect the oxygen mask microphone to the oxygen mask microphone socket. Then, set the MASK/INPH switch on the control box at the MASK position to start communication. (c) Power-off After the intercom power-on check is over, turn off INTERCOM1 and INTERCOM2 circuit breakers on the communicator circuit breaker board. Indicators on the control box panel turn off and the electroluminescent panel goes out. Notes (1) JT-Y8F200W intercom applies the emergency power supply onboard. (2) JT-Y8F200W intercom is equipped with AIRMAN 750 headset monophone set. AIRMAN 750 Headset Monophone Set Composition and Functions AIRMAN 750 headset monophone set (hereinafter referred to as headset) is noise-proof and of low resistance. It is a communication audio terminal for internal communication among crew members through the intercom or for external communication through the radio set. It provides not only microphone and receiver functions but also the noise-proof function.
  • 569.
    JZ-Y8F200W-02 AIRCRAFT FLIGHT MANUAL SECTIONVI AIRCRAFT SYSTEM EQUIPMENT 6-281 June 30, 2012 Support Components Onboard and Position AIRMAN 750 headset monophone set consists of the microphone, receiver, and ear capsule. There are 8 sets of AIRMAN 750 headsets on the entire aircraft (one on the left and right control sticks respectively; one on hooks for the mechanic, navigator, and communicator respectively; one on hooks for the cargo attendant and medical staff; one in the bag for the jettison staff). Main Technical Specifications Headset Type Dynamic Impedance 150~600Ω Frequency response 100~3000Hz Sensitivity 90dB SPL/mW@1KHz Microphone and amplifier Type: Noise-proof Matching impedance 50~600Ω Frequency response 100~5000Hz Sensitivity -51dB re: 1V/ubar at 1KHz, 12VDC bias Operating voltage: 8~16VDC Operating Method After the airborne intercom starts operating, wear the headset. To ensure the comfortableness, optimal communication effect, and optimal noise-excluding-and-reducing performance, adjust the slide rod according to the head form before wearing the headset so that soft ear pads of the ear capsule can cover ears. Meanwhile, adjust the connecting rod of the microphone and keep the microphone about 1 cm away from the mouth; otherwise, the voice will be low and thus the signal-to-noise ratio will be reduced, affecting the communication effect.
  • 570.
    JZ-Y8F200W-02 AIRCRAFT FLIGHT MANUAL SECTIONVI AIRCRAFT SYSTEM EQUIPMENT 6-282 June 30, 2012 RADAR SYSTEM JYL-6AT weather radar General One set of JYL-6AT weather radar is installed on the Y8F200W to be exported to Venezuela. It is an integrated X-band display radar with color alphanumeric pictures. It is used to detect the weather condition, terrain, and ground objects in the front of the aircraft, and display them on the display for the pilot to make correct judgment and acquire the comprehensive weather and terrain conditions. In this way, the pilot can select a safe and comfortable flight path, enhancing the flight safety. JYL-6AT Radar Composition and Component Installation Position (See Table 6-34) Table 6-34 Composition and component installation position Component Installation Position Antenna (12 in x 18 in) In the radar cabin between frame 2a~4 Transceiver On the equipment rack on the floor at the left of frame 4~5 Display One on the navigator's side cover plate, and one on the pilot's central instrument panel
  • 571.
    JZ-Y8F200W-02 AIRCRAFT FLIGHT MANUAL SECTIONVI AIRCRAFT SYSTEM EQUIPMENT 6-283 June 30, 2012 Main Technical Specifications Operating frequency: 9345±30MHz Pulse peak power: ≥5KW Distance range: 10nm,25nm,50nm,100 nm,200nm,250nm Pulse repetition frequency: 120Hz±10 Hz Pulse width: Long-range:5.5±0.5μs Short-range:1±0.5μs In-air Operations Display panel description Operations of JYL-6AT color weather radar are implemented by knobs, buttons (keys), and switches on the control display panel. The display panel is shown in Figure 6-164. Figure 6-164 JYL-6AT radar display panel
  • 572.
    JZ-Y8F200W-02 AIRCRAFT FLIGHT MANUAL SECTIONVI AIRCRAFT SYSTEM EQUIPMENT 6-284 June 30, 2012 Functions and operations of knobs, buttons (keys), and switches on the display panel (a) ON/OFF (power switch) knob: When the knob is turned to the OFF position, the radar is powered off. When the knob is turned to the ON position, the radar is powered on. (b) STBY (preparation operating mode) button: This button is a push ON/OFF button. After this button is pressed, the radar is in warm-up standby state. The 28 VDC power supply is engaged, and warm-up of 60s~90s starts. (c) TEST (self-test mode) button: This button is a push ON/OFF button. It is used to check whether the radar system is operating properly. In this mode, the radar's simulated target pulse is processed by means of video lamination. Then, green, yellow, red (red and black occur alternately at a frequency of 1 Hz), yellow, and green sector concentric color ring areas. During flight, whether components of the weather radar are operating properly can be checked at any time. (d) WX (weather detection mode) button: This button is a push ON/OFF button. After this button is pressed, the transmitter radiates the microwave energy to detect the rain area location and strength in the front of the aircraft. The strength is displayed in the sequence of green, yellow, and red (red and black occur alternately at a frequency of 1 Hz) from weak to strong. (e) NORM (normal detection mode) button: The target detected in this mode is the same as that detected in WX mode. The target display color is also the same in these two modes. In this mode, however, red displayed is stable and does not blink. (f) MAP (terrain mapping mode) button: This mode is used to detect terrain features such as lake, river, shoreline, mountain, and large city in the down front of the aircraft. The terrain contour is displayed in blue, yellow, and fuchsin for auxiliary navigation. In this case, the distance mark, distance advisory, azimuth mark, and status advisory characters are all displayed in green. (g) GAIN (gain control) knob: GAIN (MAX/MIN) is a five-position knob that is used to control the receiver gain. When it is turned clockwise to its ultimate position, that is, the MAX position, the receiver has the highest sensitivity. The receiver sensitivity is reduced by one step when the knob is turned counter-clockwise by one position. Gain control is available when the weather radar is operating in WX and MAP operating modes. In these two modes, the GAIN knob is generally turned to the MAX position.
  • 573.
    JZ-Y8F200W-02 AIRCRAFT FLIGHT MANUAL SECTIONVI AIRCRAFT SYSTEM EQUIPMENT 6-285 June 30, 2012 (h) LIGHT knob: LIGHT is a continuous adjustable potentiometer which is installed in the bottle middle part of the display panel. It is used to adjust illumination brightness of the display electroluminescent panel. Turning the knob clockwise can brighten the panel, while turning the knob counter-clockwise can dim the panel. (i) TILT (pitch manual control) knob and STAB (antenna stabilization control) button: TILT is a continuous adjustable potentiometer which allows the antenna to be adjusted continuously in the range of ±15o . Pushing the STAB button in can enable antenna stabilization control, while pushing it out can disable antenna stabilization control. (j) INT (screen intensity control) knob: INT is a continuous adjustable potentiometer. The screen intensity can be adjusted according to the cabin illumination condition to achieve the optimal illumination effect. Turning the knob clockwise can brighten the screen, while turning it counter-clockwise can dim the screen. This knob is generally turned to the center position. (k) HOLD (holding) button: This button is a push ON/OFF button. After this button is pressed, the target display screen will be frozen. HOLD and the selected status will be displayed as the status advisory alternately at the rate of 1 Hz. It is used to prompt the pilot that currently the system is operating in HOLD state, and the display screen has been frozen. (l) M/S (master/slave display switchover) key: After the display is powered on, the navigator's display serves as the master display by default. To switch over between the master and slave displays, press this key. After the radar is powered on, the navigator's display serves as the master display by default. The display master (M) and slave (S) states are indicated in the lower right corner of the screen. The master display is capable of complete radar control, while the slave display can only be used to control the range change and superpose the navigation information and lists on the slave display screen.
  • 574.
    JZ-Y8F200W-02 AIRCRAFT FLIGHT MANUAL SECTIONVI AIRCRAFT SYSTEM EQUIPMENT 6-286 June 30, 2012 (m) NAV (navigation mode) button: This button is a push ON/OFF button which can be used to control the current display only. It is available when the radar is in STBY, TEST, WX, NORM, and MAP state. After it is pressed, the following operating states are switched over in turn: (1) The navigation function is enabled, and the airway information is superposed on the current screen. (2) The display screen is switched over to the navigation list. (3) The navigation function is disabled, and the previous function screen is restored. (n) TGT warning button: This button is used to enable or disable the TGT warning function. It is available only when the radar is in WX operating mode. By default, it is enabled. If the TGT warning is valid, when the heavy rain target occurs in ±15o range to the right ahead of the nose with the distance range of 60 nm~160 nm, yellow characters TGT with the red ground color start blinking with the frequency of 1 Hz in the upper right part of the display screen. If there is no heavy rain target, only one yellow character T with the red ground color is displayed in that part. (o) STAB (antenna stabilization) key: It is only available when master display control is enabled. It is used to enable or disable the airspace stabilization function. By default, this function is enabled. (p) ▲ (distance range increase) button: This button is used to clear the screen and increase the range by one stage (except for the range 250 nm). The selected range is displayed in the upper right corner of the screen. (q) ▼ (distance range decrease) button: This button is used to clear the screen and decrease the range by one stage (except for the range 10 nm). The selected range is displayed in the upper right corner of the screen. Operations (a) Turn on the WXR circuit breaker on the 115 VAC 400 Hz power distribution disk at the left of frame 9 and the WXR circuit breaker on the navigator's right console. (b) Set the radar power switch on the display panel to the ON position, and connect the radar to the power supply. The radar automatically enters the STBY status and starts warm-up of 60s~90s. When power is supplied for 5s~10s, five blue distance mark lines are displayed on the display screen. After a range selection key is pressed, a distance mark is displayed at the right of the corresponding distance mark line. The status characters STBY are displayed in the lower left corner of the display screen. Turn the INT knob to properly adjust the display brightness. The STBY display screen is shown in Figure 6-165.
  • 575.
    JZ-Y8F200W-02 AIRCRAFT FLIGHT MANUAL SECTIONVI AIRCRAFT SYSTEM EQUIPMENT 6-287 June 30, 2012 Figure 6-165 (c) Press the TEST button. The operating status characters change to TEST. Starting from the left ultimate position, the antenna starts scanning in the range of azimuth ±60o at the rate of 14 times per second. After warm-up of 60s~90s, the test screen is displayed on the display. The range selected is 50 nm. The self-test screen is of a proper size. Check that the color straps on the test screen are arranged in the following sequence from inner to outer: green, yellow, red (red and black occur alternately at the frequency of 1 Hz), yellow, and green sector concentric color ring areas. Here, red represents the strongest target reflection. The TEST display screen is shown in Figure 6-166. Figure 6-166 TEST display screen
  • 576.
    JZ-Y8F200W-02 AIRCRAFT FLIGHT MANUAL SECTIONVI AIRCRAFT SYSTEM EQUIPMENT 6-288 June 30, 2012 (d) When the TEST screen does not fill the range of azimuth ±60o , press the HOLD button. The display screen is frozen. Characters TEST and HOLD are displayed alternately. Press the HOLD button again to release freezing. The TEST screen will fill the range of azimuth ±60o . (e) Turn the TILT knob in the lower right corner of the display panel. Turning the knob clockwise to its ultimate position will pitch up the antenna for 15o . Turning the knob counter-clockwise will pitch down the antenna. The antenna can pitch down to a maximum of 15o . When the knob notch points to the 0 position, the antenna is at the level position. (f) Turn the LIGHT knob on the navigator's display to properly adjust the illumination brightness of the display panel. (g) Press the WX button. The transmitter radiates the microwave energy. Select 25 nm as the range. The rain area targets in the front of the heading will be displayed on the display. They are displayed in green, yellow, and red in the strength sequence from weak to strong. The heavy rain area targets are displayed in red and black which are blinking at a frequency of 1 Hz. The target azimuth and distance can be determined by referring to the azimuth and distance marks. WX display screen is shown in Figure 6-167. Note 1) The radar in WX state cannot automatically differentiate echoes of rain area targets and ground object targets. Therefore, the pilot should perform analysis and judgment based on terrain features. 2) In WX state, when the range is 10 nm, the transmitting pulse is narrow pulse. Figure 6-167 WX display screen
  • 577.
    JZ-Y8F200W-02 AIRCRAFT FLIGHT MANUAL SECTIONVI AIRCRAFT SYSTEM EQUIPMENT 6-289 June 30, 2012 (h) It is better to select the receiver gain to better display the targets on the display screen. When the GAIN knob is turned from the MAX position to the MIN position, the number of targets and target area on the display screen will be decreased. (i) If targets such as cloudy rain, buildings, or mountain peaks are in the long range, turn the TILT knob properly to display the target contour clearly. (j) When pressing the ▲ key in turn to view distances 10 nm, 25 nm, 50 nm, 100 nm, 200 nm, and 250 nm, pay attention to the range change and movement of targets on the display screen. Then, when pressing the ▼ key in turn to view distances 250 nm, 200 nm, 100 nm, 50 nm, 25 nm, and 10 nm, pay attention to the distance range change and movement of targets on the display screen. (k) The range selection key is the same as the corresponding farthest distance mark on each distance arc. Press the HOLD button. Characters WX and HOLD will be displayed alternately, and the target display screen remains unchanged. Press the HOLD button again. Only characters WX are displayed, and the holding screen is released. (l) Select 25 nm as the distance range. Press the TEST button. When the self-test screen is displayed, press the HOLD button. The self-test screen will be frozen. Characters TEST and HOLD are displayed alternately. (m) Press the HOLD button again. The complete self-test screen will be displayed. The red strap in the center of the screen is displayed in red and black alternately at a frequency of 1 Hz. The straps are displayed in the sequence of green, yellow, red, yellow, and green. Press the WX button and any distance key, and observe the meteorological targets that may occur. Turn the TILT knob and INT knob when necessary. (n) Press the WX button. The TGT function is enabled by default. The yellow character T in a frame with the red ground color will be displayed in the upper right corner of the screen. If a target with the red strength occurs in the front of the heading of azimuth of ±15o and in the range of 60 nm~160 nm, the character T will be replaced by characters TGT that is blinking. If there is no proper target, whether the function is available or not cannot be judged. (o) Turn the GAIN knob from the MAX position to the MIN position in turn. If the gain decreases, the number and size of targets will decrease accordingly. When the gain is attenuated, characters WX and GAIN will be displayed alternately.
  • 578.
    JZ-Y8F200W-02 AIRCRAFT FLIGHT MANUAL SECTIONVI AIRCRAFT SYSTEM EQUIPMENT 6-290 June 30, 2012 (p) Press the MAP button to detect terrain features such as lake, river, shoreline, mountain, and large city in the down front of the aircraft, and display their contours in blue, yellow, and fuchsin for auxiliary navigation. In this case, the distance mark, distance advisory, azimuth mark, and status advisory characters are all displayed in green. The MAP display screen is shown in Figure 6-118. Figure 6-168 MAP display screen (q) Press the NAV button. At this time, the radar is operating in navigation state. The navigation operating state is to superpose the navigation information prestored in the laser strapdown inertial/satellite integrated navigation system on the WX and MAP screens. The status characters NAV are displayed above the primary status characters. (r) FAULT: This radar is configured with the fault monitoring circuit. In the operating state, if the receiver is detected as faulty, for example, the transmitter stops operating or the power supply is interrupted instantaneously, fault characters FAULT will be displayed in the lower left corner of the screen and blink at a frequency of 1 Hz to attract the pilot's attention. (s) Power-off: When the radar is operating in any state of WX, MAP, or TEST, the power-off procedure should be as follows: Press the STBY button. Stay in the STBY state for at least 10s, ensuring sufficient time for the antenna to return to the 60o position at the left. Then, set the power switch to the OFF position. (In these three states, if the radar is directly powered off, the antenna will stay at any positions. Consequently, when the radar is powered on again, synchronous adjustment will be performed during azimuth scanning by the antenna.) Then, turn off the WXR circuit breakers on the 115 VAC 400 Hz power distribution disk at the left of frame 9 and on the navigator's right console.
  • 579.
    JZ-Y8F200W-02 AIRCRAFT FLIGHT MANUAL SECTIONVI AIRCRAFT SYSTEM EQUIPMENT 6-291 June 30, 2012 Precautions (t) When starting the transmitter, ensure that there is no person, fuel, or strong-metal reflector in the sector of ±60o to the right ahead of the antenna and with the distance of 5 m. (u) The weather radar can only operate in preparation or test state when there are strong reflectors such as the fuel truck and iron gate in front of the aircraft. (v) When the weather radar is energized on the ground, if the transmitter is operating, the antenna pitch angle should be higher than 0o. Radar power-on is prohibited during aircraft refueling or defueling. (w) When the weather radar cannot automatically differentiate rain object and ground object echoes, the pilot should perform analysis and judgment based on terrain features. JZ/YD126E airborne transponder General JZ/YD126E airborne transponder is an airborne electronic device belonging to the western-system identification friend or foe (IFF) system. Only one set of airborne transponder is installed on aircraft. JZ/YD126E airborne transponder can operate in three modes: M1 (military aircraft security identification mode), M2 (military aircraft identity identification mode), and M6 (security operating mode). It is used to receive and encode interrogation signals, and transmit reply signals corresponding to air identification interrogation signals transmitted by the ground, shipborne, or airborne transponder. In this way, the interrogator encodes the reply signals and extracts target code information. The device equipped with the interrogator transponder is used to perform identity identification and IFF using the interrogation reply system for the aircraft on which the transponder is installed.
  • 580.
    JZ-Y8F200W-02 AIRCRAFT FLIGHT MANUAL SECTIONVI AIRCRAFT SYSTEM EQUIPMENT 6-292 June 30, 2012 System Composition and Airborne Component Installation Position Installation positions of transponder sub-assemblies of JZ/YD126E airborne transponder are listed in Table 6-35. Table 6-35 Installation positions of transponder sub-assemblies No. Unit Sub-unit Quantity Installation Position 1 Mainframe No.2 1 On the equipment rack at the left of frame 9 2 Control box No.3 1 On the navigator side cover plate 3 Front antenna No.1 1 Between stringers 53-55 at the right of frames 3~4 4 Rear antenna No.1 1 Between stringers 0-1 at the right of frames 41~42 5 Power filtering box No.4 1 On the equipment rack at the left of frame 9 6 Signal crosslinking box 25D 1 On the equipment rack at the left of frame 9 7 IFF circuit breaker ZKC-5 1 On the navigator's right console 8 Circuit breaker of the signal crosslinking box ZKC-2 1 On the navigator's right console Operation Control Box Functions (a) Control Panel Introduction The control panel is shown in Figure 6-169
  • 581.
    JZ-Y8F200W-02 AIRCRAFT FLIGHT MANUAL SECTIONVI AIRCRAFT SYSTEM EQUIPMENT 6-293 June 30, 2012 Reply light Fault light Knob for selecting a confidential mode Reply mode switchover knob Mode selection knob Main control knob Special identification button M1-mode code display Operating mode indication Self-test button Brightness adjustment knob Antenna selection switch Figure 6-169 Control panel
  • 582.
    JZ-Y8F200W-02 AIRCRAFT FLIGHT MANUAL SECTIONVI AIRCRAFT SYSTEM EQUIPMENT 6-294 June 30, 2012 (b) Functional switch description Functional switches on JZ/YD126E airborne transponder control box are described as follows: (1) Main control knob: The main control knob marked with MASTER has 5 positions, that is, OFF, STBY, LOW, NOR, and EMER (in clockwise sequence). When it is turned to the OFF position, the entire transponder is in power-off state. When it is turned to the STBY position, the entire transponder is powered on and is in transmission waiting state. When it is turned to the LOW position, the entire transponder is powered on and is in low-sensibility operating state. This mode is applicable to short distance operation to reduce interference. When it is turned to the NOR position, the entire transponder is powered on and is in normal operating state. When it is turned to the EMER position, the entire transponder is powered on and is about to load emergency reply identification information to the reply code. To turn the MASTER knob from the NOR position to the EMER position clockwise, pull the knob out before turning because the knob applies the position limit design. To turn the MASTER knob from the EMER position to the NOR position counter-clockwise, turn the knob directly without pulling it out. To turn the MASTER knob from the STBY position to the OFF position counter-clockwise during power-off, pull the knob out before turning. To turn the MASTER knob from the OFF position to the STBY position clockwise during power-on, turn the knob directly without pulling it out. (2) Reply light: The reply light is used for reply indication of JZ/YD126E airborne transponder. (3) Fault light: The fault light is used for fault indication of JZ/YD126E airborne transponder. (4) Knob for selecting a confidential mode: This knob is used to switch between A and B tap positions in M6 mode of JZ/YD126E airborne transponder and to clear keys. Tap positions A and B are in clockwise sequence. When the knob is turned counter-clockwise from A position, the knob will be at 0 position, indicating that keys are cleared. To turn the knob from A position to 0 position, pull the knob out before turning because the knob applies the position limit design; otherwise, the knob cannot be turned.
  • 583.
    JZ-Y8F200W-02 AIRCRAFT FLIGHT MANUAL SECTIONVI AIRCRAFT SYSTEM EQUIPMENT 6-295 June 30, 2012 (5) Reply mode switchover knob: When the knob is set at the M6OVR position, the transponder can operate in M6 mode only. At this time, M1 and M2 modes of the transponder are locked and are unavailable. When the knob is set at the OFF position, all modes are available. To enable the M6 operating mode, set the M6 operating status to O in addition to turning this knob to the M6OVR position. (6) Brightness adjustment knob: This knob is used to adjust display brightness of the control panel. (7) Antenna selection switch: This switch is a toggle switch. When the switch is set at the TOP position, only the upper antenna can function. When the switch is set at the LOW position, only the lower antenna can function. When the switch is set at the DIV position, both the upper and lower antennae can function. (8) IDENT button: After the IDENT button is pressed, the airborne transponder will load special position identification information to the reply code. (9) TEST button: After the TEST button is pressed, self-test is performed for the current operating mode. (10) Operating mode indication: This function is used to indicate the current operating mode. (11) M1-mode code display: This function is used to display the current M1-mode code. (12) Mode selection knob: The mode selection knob is divided into two layers. The upper-layer knob is used to adjust the cursor position and the lower-layer knob is used to adjust the state of the content that the cursor points. For example, to make the transponder operate in M1 mode, turn the lower-layer knob to make the cursor point at the M1 position of Operating mode indication. Then, turn the upper-layer knob to set its operating state at the O position (indicating ON). Repeat the operations to set M2 and M6 operating states at position (indicating OFF). Then, turn the lower-layer knob to make the cursor point at the M1 position of M1-mode code selection on the control box. Turn the upper-layer knob to set the code value. Set the M2 operating mode code on the receiver panel. This code switch consists of four groups of toggle switches. To set the M2-mode reply code, toggle the toggle switch at the corresponding number position.
  • 584.
    JZ-Y8F200W-02 AIRCRAFT FLIGHT MANUAL SECTIONVI AIRCRAFT SYSTEM EQUIPMENT 6-296 June 30, 2012 Preparations before Powering on JZ/YD126E Airborne Transponder Perform power-on check for JZ/YD126E airborne transponder on ground and ensure that it is in good condition. Before powering on the airborne transponder, turn off the IFF power switch on the navigator's right console, and set components on the control box at positions specified in Table 6-36. Initial switch positions on the control box are listed in Table 6-36. Table 6-36 Component positions before system power-on No. Knob/Button Status Position 1 Main control knob (MASTER) OFF On the control panel 2 Special identification button (IDENT) OUT (pushed out) On the control panel 3 Knob for selecting a confidential mode (M6CODE) A or B On the control panel 4 Reply mode switchover knob (M6OVR) OFF On the control panel 5 Antenna selection knob DIV On the control panel 6 M2-mode code 0000 or the code currently used On the transceiver panel In-flight Operation of JZ/YD126E Airborne Transponder To operate JZ/YD126E airborne transponder during flight, perform operations on the control box as follows: (a) Turn on IFF and L-Band Suppressor power switches on the navigator's right console. (b) Turn the MASTER main control knob on the control panel of the airborne transponder to the NOR position.
  • 585.
    JZ-Y8F200W-02 AIRCRAFT FLIGHT MANUAL SECTIONVI AIRCRAFT SYSTEM EQUIPMENT 6-297 June 30, 2012 (c) Select the required operating mode according to the flight task. Check whether the reply light is on (green). If yes, it indicates that the airborne transponder has received interrogation signals and transmitted the reply signals. (d) When the airborne transponder is operating in M1 or M2 mode and the aircraft is in a special position, the pilot can press the IDENT button according to the order issued by the ground radar commander. The transponder then will transmit a reply code loaded with the special identification information to the interrogation carrier within about 20s. (e) When the airborne transponder is operating in M1, M2, or M6 mode and the aircraft confronts with dangers, turn the MASTER main control knob to the EMER position. The airborne will then load emergency information to the identification information in the reply code. (f) When there is need to adjust brightness of the control panel, turn the brightness adjustment knob on the transponder clockwise to brighten the panel, whereas turn the knob counter-clockwise to darken the panel. Post-Flight Operations of JZ/YD126E Airborne Transponder After the flight, turn the MASTER main control knob on the control box to the OFF position, power off the airborne transponder, and turn off IFF and L-Band Suppressor power switches on the navigator's right console. TCAS-94 traffic alert and collision avoidance system (TCAS) GENERAL TCAS-94 traffic alert and collision avoidance system (TCAS) is capable of avoiding the coming danger that possibly occurs to the aircraft in flight. With the S-mode air traffic control (ATC) transponder installed on the aircraft, it transmits the aircraft's flight code, pressure altitude, and other flight information to the screen of the ground controller, and exchanges information with the nearby aircraft. By interrogation replies with the intruder, it can determine the distance, azimuth, proximity rate, and relative altitude of the intruder. When the collsion is close, it will provide the proper avoidance strategy for aircrew and prompt them with video or audio signals to avoid aircraft collision.
  • 586.
    JZ-Y8F200W-02 AIRCRAFT FLIGHT MANUAL SECTIONVI AIRCRAFT SYSTEM EQUIPMENT 6-298 June 30, 2012 System Composition One set of TCAS-94 is installed on the Y8F200W aircraft to be exported to Venezuela. Its components and their installation positions are listed in Table 6-37. Table 6-37 TCAS-94 composition S/N Component Model Quantity Installation Position Onboard 1 TCAS receiver-transmitter TTR-921 1 On the equipment rack under the left floor of frames 10~11 2 TCAS indicator TVI-920D 2 On the pilot and copilot instrument panels 3 TCAS control CTL-93T 1 On the left of the top console 4 ATC transponder control CTL-92E 1 On the navigator side cover plate 5 ATC transponder antenna converter 402-167 2 On the equipment rack under the left floor of frames 10~11 6 TCAS directional antenna TRE-920 2 Between stringers 0~2 on the right of frames 18~19 Between stringers 53~55 on the left of frames 13~14 7 ATC transponder transceiver TDR-94D 2 On the right floor of frames 17~18 8 ATC transponder antenna LS65-5366-7L 2 Between stringers 54~55 on the right of frames 15~16 Between stringers 1~2 on the right of frames 16~17 9 Loudspeaker (8Ω; 8 W) YDP613-13a 1 On the pilot top console 10 Brightness regulator JWX25-100Ω ±10%-20ZS-3 1 On the navigator side cover plate 11 Brightness regulator JWX5-300Ω ±10%-20ZS-3 1 On the top console TCAS-94 traffic alert and collision avoidance system installed on the Y8F200W aircraft is shown in Figure 6-170.
  • 587.
    JZ-Y8F200W-02 AIRCRAFT FLIGHT MANUAL SECTIONVI AIRCRAFT SYSTEM EQUIPMENT 6-299 June 30, 2012 lighting lighting Figure 6-170 Schematic diagram of TCAS-94
  • 588.
    JZ-Y8F200W-02 AIRCRAFT FLIGHT MANUAL SECTIONVI AIRCRAFT SYSTEM EQUIPMENT 6-300 June 30, 2012 Main technical data (a) RA (resolution advisory) duration: 35~15s (b) TA (traffic advisory) duration: 48~20s (c) Monitoring capability: Maximum tracing capability: 45 targets Maximum display capability: 30 targets (d) Monitoring range: 40 n mile (e) S-mode transponder transmitter output: Minimum peak power 250W Maximum peak power 625W (f) S-mode transponder receiver sensibility: 77±2dBm (g) S-mode transponder transmitter frequency: 1090±0.1MHz (h) S-mode transponder receiver frequency: 1030±0.2MHz (i) TCAS receiver-transmitter transmitting pulse power: 160~400W (j) TCAS receiver-transmitter sensibility: -85±2dBm (k) TCAS receiver-transmitter transmitter frequency: 1030±0.01MHz (l) TCAS receiver-transmitter receiver frequency: 1090±3MHz
  • 589.
    JZ-Y8F200W-02 AIRCRAFT FLIGHT MANUAL SECTIONVI AIRCRAFT SYSTEM EQUIPMENT 6-301 June 30, 2012 Panel Description Control Box (a) CTL-93T TCAS control CTL-93T TCAS control panel is shown in Figure 6-171. Y Figure 6-171 CTL-93T TCAS control panel CTL-93T TCAS control operates the TTR-921 TCAS receiver-transmitter. The control has: a function knob for setting the TCAS operating mode, an M (mode) button for selecting full-time or part-time traffic display, an A/B (above/below) button for setting the traffic display range, an R (range) button for setting the range ring, and a TEST button for turning on self-test.
  • 590.
    JZ-Y8F200W-02 AIRCRAFT FLIGHT MANUAL SECTIONVI AIRCRAFT SYSTEM EQUIPMENT 6-302 June 30, 2012 (1) Function knob: Turn the CTL-92T function knob to select the TCAS operating mode. There are four positions for the function knob: OFF, STBY, AUTO, and TA ONLY. a) OFF position: The OFF position turns off power to the TCAS receiver-transmitter. TVI-920 D indicator shows TCAS OFF in this mode. b) STBY position: The STBY position sets the TCAS receiver-transmitter to the standby mode. The TCAS does not show TA traffic on the display, does not give RA and does not respond to other aircraft TCAS interrogations. TVI-920D indicator shows TCAS OFF in this mode. c) AUTO position: The AUTO position is the normal mode of operation. TCAS shows traffic on the traffic display and gives traffic alerts (TA) and resolution advisories (RA), as appropriate, in this mode. d) TA-ONLY: The TA ONLY position sets the receiver-transmitter to the traffic advisory only mode. TCAS does not give resolution advisories on the TVI-920D indicator or show RA traffic on the traffic display in this mode. Also, TA ONLY shows on the TCAS display to identify this mode. (2) M button: This button is used to select the display mode. There are two modes available: part-time-threat-only traffic display and full-time traffic display. Only full-time traffic display is shown on the aircraft. (3) A/B button: This button is used to select the monitoring altitude range relative to your own aircraft. Successive presses of the button cycles through the available modes (NORMAL, ABOVE, and BELOW). a) NORMAL mode: the mode shows Other Traffic from 2700 ft above to 2700 ft below your own aircraft. b) ABOVE mode: the mode shows Other Traffic from 9900 ft above to 2700 ft below your own aircraft. c) BELOW mode: the mode shows Other Traffic from 2700 ft above to 9900 ft below your own aircraft.
  • 591.
    JZ-Y8F200W-02 AIRCRAFT FLIGHT MANUAL SECTIONVI AIRCRAFT SYSTEM EQUIPMENT 6-303 June 30, 2012 (4) R button: press the R button to set the range of TCAS traffic display. The upper right part of the indicator shows the set range. The aircraft symbol and traffic display range ring appear on the indicator. Successive presses of the button cycles through the available ranges: 3 nm, 5 nm, 10 nm, 20 nm, and 40 nm. (5) TEST button: Press the TEST button to turn on the self-test function of the TCAS-94 system. The TCAS traffic and RA displays show test pattern traffic symbols, a red and green resolution advisory, and the TEST annunciator. (b) CTL-92E ATC transponder control The CTL-92E ATC transponder control panel is shown in Figure 6-172. Functions of buttons, knobs, and switches on the control panel are described as follows: ATC squawk code and fault indication Collions A C T 1 2 RMT TX ATC OFF STBY ON ALT IDENT TEST PRE Comparison announciator Encoded altitude and fault display Announciator RMT on, transponder fails TX on, transponder operates Electric source and mode knob At the ON position, the ident code is replied. At the ALT position, the ident code and encoded altitude are replied. Brightness sensor Self-test button Transponder 1/2 changeover switch Code selection knob (Two knobs) Preselection button (code preselection)Identification button Figure 6-172 CTL-92E ATC transponder control panel
  • 592.
    JZ-Y8F200W-02 AIRCRAFT FLIGHT MANUAL SECTIONVI AIRCRAFT SYSTEM EQUIPMENT 6-304 June 30, 2012 (1) Display: The two-line display on the upper part of CTL-92E control is used to show the ATC squawk codes, annunciators, encoded altitude, and diagnostic codes. a) Top line: During normal operation, the top display line of CTL-92E shows the ATC squawk code that the control sends to the transponder. The 1/2 changeover switch can realize the switching of two sets of S-mode transponders. A preselected ATC squawk code shows on this line when the PRE button is pressed and held while setting the code. In ALT mode, dash "-" will show on this line when no altitude data is presented. Also, during self-test, if an out-of-tolerance condition is detected in the transponder, the diagnostic annunciator "diAG" is shown on the top line, and a diagnostic code appears on the bottom display line while the display flashes from minimum to maximum brightness. b) Bottom line: In the normal operating modes (STBY, ON, ALT), the bottom display line is blank. In the ident mode, it shows the annunciator "id". In the self-test mode, it shows uncorrected barometric altitude in thousands of feet in 100-foot increments (i.e., 7.4 is 7400 feet). During normal operation, the transponder can monitor its own operating status. When failure occurs, the "diAG" annunciator appears on the bottom display line. At this time, press the TEST button on the control. The diAG annunciator moves to the top display line and the associated diagnostic code appears on the bottom display line. (2) Function knob: Turn the function knob to set the necessary transponder operating mode. This knob has four positions, namely, OFF, STBY, ON, and ALT. a) OFF position: This position turns off power to the transponder. b) STBY position: The STBY position sets the transponder to a standby mode so it does not reply to interrogations. c) ON position: In the ON position, the transponder does not include altitude data in the reply transmission. Select this mode only when the ATC instructs to "stop altitude squawk". d) ALT position: ALT is the normal operating mode. In the ALT position, the transponder includes uncorrected altitude data in the reply transmission.
  • 593.
    JZ-Y8F200W-02 AIRCRAFT FLIGHT MANUAL SECTIONVI AIRCRAFT SYSTEM EQUIPMENT 6-305 June 30, 2012 (3) ATC code-set knob: Turn the ATC code-set knobs to set the ATC squawk code shown on the top line of the display. The larger knob adjusts the two left side numbers of the ATC squawk code and the smaller knob adjusts the two right side numbers. For emergency codes 7600 and 7700, the display flashes the code for approximately 5 seconds before sending the code to the transponder. (4) IDENT button: Press the IDENT button to make the transponder transmit the ident code. The display shows the ident annunciator "id" and the transmit annunciator "TX". The transponder transmits the special ident code, for approximately 20 seconds, to help ATC locate the position of the aircraft, then changes back to the set operating mode. Press this button only when ATC requests "squawk ident" or "squawk (code) and ident". (5) PRE preset button: Press and hold the PRE button and turn the code-set knobs to preset an ATC squawk code. Release the PRE button when the necessary code is set. Then set the active code. When the stored preset code is required to become the active code, press and release the PRE button.The stored code is in the memory. (6) TEST button: Press the TEST button to turn on the self-test function of the TCAS-94 system. The test routine takes approximately 10 seconds to complete. After successful completion of the test, the system returns to the preset operating mode. (7) 1/2 changeover switch: Use this switch to select the active transponder from two sets of ATC transponders. Indicator TVI-920D integrates functions of the vertical speed indicator (VSI), TCAS traffic indicator, and resolution-advisory indicator to show all TCAS information on only one display. TVI-920D receives TCAS data from TTR-921 and vertical speed data from the air data system. TVI-920D liquid crystal display indicator shows: vertical speed scale and pointer (VSI), TCAS RA, TCAS traffic indicator, TCAS mode annunciator, and TCAS warning flag.
  • 594.
    JZ-Y8F200W-02 AIRCRAFT FLIGHT MANUAL SECTIONVI AIRCRAFT SYSTEM EQUIPMENT 6-306 June 30, 2012 (a) VSI/RA display The VSI display uses white vertical speed scales to show the climb and descent speeds, in feet/minute. In VSI mode, cyan annunciator VERT SPEED are shown above the middle of the display, while ×1000FPM below the middle of the display. VSI/RA display is shown in Figure 173. Vertical speed scales Vertical speed pointer 1 2 4 6 4 21 .5 0 .5 Figure 6-173 TVI-920D vertical speed/TCAS indicator (vertical speed display) (b) RA indication TCAS resolution advisories (RA) show as red and green light bands surrounding vertical speed scales. When RA shows, do fly vertical speeds in the green-band area. RA display is shown in Figure 6-174. 1 2 4 6 4 21 .5 0 .5 6NM Red RA band Green RA band Figure 6-174 TVI-920D vertical speed/TCAS indicator (typical RA)
  • 595.
    JZ-Y8F200W-02 AIRCRAFT FLIGHT MANUAL SECTIONVI AIRCRAFT SYSTEM EQUIPMENT 6-307 June 30, 2012 (c) Traffic display The traffic display shows nearby aircraft traffics that reply TCAS interrogation with the C-mode or S-mode transponder. The traffic display information aids pilots in visually acquiring the nearby traffic. Traffic display shows: An aircraft symbol in white in the lower center of the display; A white, dotted, 2-nm range ring around the aircraft symbol (it shows a 20-nm dotted range ring when set to the 40-nm range), (1) Aircraft symbol and range ring Aircraft symbol: the own aircraft is a white symbol shown in the lower-center of the display. This aircraft symbol shows the own aircraft with respect to other aircraft shown on the display. Range ring: The fixed, 2-nm range ring shows as dots around the aircraft symbol. These dots display the surrounding azimuth of the aircraft. The vertical speed scale is the maximum traffic display range ring for a selected display range. TVI-920D indicator is shown in Figure 6-175. Note The intruder aircraft symbol is displayed at the maximum range only when the intruder is situated directly in the front (0° relative azimuth) of the own aircraft. When the intruder is directly behind the own aircraft, the maximum range erodes sinusoidally to about 0.42 of maximum. The relative maximum display ranges of three types of intruder angles and optional display ranges for various TVIs are listed in Table 6-38. Table 6-38 Relative maximum display ranges of three types of intruder angles and optional display ranges for various TVIs Selected Distance Maximum Display Distance at 0o Maximum Display Distance at 90o Maximum Display Distance at 180o 3 3.43 2.24 1.43 5 5.72 3.77 2.39 10 11.44 7.55 4.78 20 22.88 15.11 9.55 40 45.77 30.21 19.10
  • 596.
    JZ-Y8F200W-02 AIRCRAFT FLIGHT MANUAL SECTIONVI AIRCRAFT SYSTEM EQUIPMENT 6-308 June 30, 2012 Aircraft symbol2 nm range ring Figure 6-175 TVI-920D indicator (2) Four types of TCAS traffic symbols The TCAS traffic symbols show for the nearby aircraft traffic that reply TCAS interrogation in the selected range and altitude mode. Symbols on the traffic display show azimuth, distance, relative altitude (if available), and vertical speed of the traffic. Each type of TCAS traffic shows a unique symbol on the traffic display. See Figure 6-176.
  • 597.
    JZ-Y8F200W-02 AIRCRAFT FLIGHT MANUAL SECTIONVI AIRCRAFT SYSTEM EQUIPMENT 6-309 June 30, 2012 1 2 4 6 4 21 .5 0 .5 TCAS TCAS OFF +10 -10 +02 -02 TEST PT traffic RA traffic OT traffic TA traffic Figure 6-176 TVI-920D display (traffic symbols) +02 ■ RA traffic shows as a solid red square. ●↑ -20 TA traffic shows as a solid light yellow circle. ◆↓ -10 Proximate traffic (PT) shows as a solid white or cyan diamond. +10 ◇ Other traffic OT shows as a hollow white or cyan diamond. Note 1) Proximate traffic refers to the intruder traffic at the relative altitude of ±1200 ft and in the range of 6 nm. 2) Other traffic refers to the intruder traffic appearing in the selected traffic display range and altitude mode and the computer confirms to be no threat.
  • 598.
    JZ-Y8F200W-02 AIRCRAFT FLIGHT MANUAL SECTIONVI AIRCRAFT SYSTEM EQUIPMENT 6-310 June 30, 2012 The relative altitude and vertical speed direction show in the same color as the associated traffic symbol. The altitude data shows above the traffic symbol for traffic at an altitude above your aircraft and below the symbol for traffic below your aircraft. The vertical speed direction arrow shows to the right of the traffic symbol. Relative altitude data shows as two numbers, preceded by a "+" or "–" sign. The number on the left shows thousands of feet of altitude and the number on the right shows hundreds of feet of altitude (i.e., +22 = 2200 ft above the aircraft and –02 = 200 ft below the aircraft). The vertical-speed direction arrows show for traffic with an actual (not relative) vertical speed equal to or greater than 500 ft/min. An upward pointing arrow (↑) shows for climbing traffic, and a downward pointing arrow (↓) shows for descending traffic. No arrow shows for traffic climbing or descending at an actual vertical speed of less than 500 ft/min. RA and TA traffic show partial symbols for traffic beyond the selected range of the traffic display. The partial symbols show at the appropriate bearing along the maximum range ring. Other traffic and proximate traffic do not show partial symbols. (3) Annunciator and flag The TVI-920D LCD display shows annunciators and flags for the various TCAS operating modes and system failures. a) ABV (above) annunciator: It shows as the letters "ABV" in white, with a light yellow background, in the upper-right corner of the display. b) BLW (below) annunciator: It shows as the letters "BLW" in white, with a light yellow background, in the upper-right corner of the display. c) Range annunciator (3 nm, 5 nm, 10 nm, etc.): It shows as the white letters, with a light yellow background, in the upper-right corner of the display. This annunciator shows the maximum traffic range on the display.
  • 599.
    JZ-Y8F200W-02 AIRCRAFT FLIGHT MANUAL SECTIONVI AIRCRAFT SYSTEM EQUIPMENT 6-311 June 30, 2012 d) ONLY TA annunciator: It shows in the upper left corner of the display. If the TCAS does not show any TA traffic on the display, the annunciator shows as white letters in a white box. If the TCAS detects TA traffic, the annunciator shows as light yellow letters in a light yellow box. This annunciator is only shown in TA or TA ONLY mode. When this annunciator shows on the indicator, the TCAS does not give any RA. See Figure 6-177. e) No bearing TA/RA annunciator: TA and RA traffic, for which TCAS cannot calculate a bearing, show on the lower center of the display. The annunciator shows the type (TA or RA), range, and relative or absolute altitude of the traffic target. See Figure 6-177. 1 2 4 6 4 21 .5 0 .5 12NM BLW ONLY TA -25 -20 TA 3.0 -15 +50TA33.5 ONLY TA annunciator Range annunciator ABV/BLW annunciator TA/RA no bearing annunciator Figure 6-177 TVI-920D display
  • 600.
    JZ-Y8F200W-02 AIRCRAFT FLIGHT MANUAL SECTIONVI AIRCRAFT SYSTEM EQUIPMENT 6-312 June 30, 2012 f) V/S flag: The vertical-speed flag shows as the black letters "V/S", on a light yellow background, in the lower-left corner of the display. When this flag shows, vertical-speed data is missing or invalid. See Figure 6-178. g) RA flag: The resolution advisory flag shows as the black letters "RA", on a light yellow background, in the upper-left corner of the display. This flag shows a failure of the RA function of the VSI. TCAS does not show resolution advisories when this flag shows. See Figure 6-178. 1 2 4 6 4 21 .5 0 .5 6NM -01 V/S RA flag RA V/S flag Figure 6-178 TVI-920D display h) TCAS flag: The TCAS failure flag shows as the black letters "TCAS", on a light yellow background, in the upper-left corner of the display. This flag shows when a TCAS system failure occurs. No traffic shows on the traffic display, and no resolution advisories are given, when this flag shows. See Figure 6-179. i) TCAS OFF annunciator: The "TCAS OFF" annunciator shows as white letters in a white box in the upper-right corner of the display. This annunciator shows when TCAS is set to the standby mode or turned off. See Figure 6-179.
  • 601.
    JZ-Y8F200W-02 AIRCRAFT FLIGHT MANUAL SECTIONVI AIRCRAFT SYSTEM EQUIPMENT 6-313 June 30, 2012 j) TEST annunciator: The annunciator shows as white letters in a white box in the lower center of the display. This annunciator shows while the TCAS system self-test operates. See Figure 6-179. 1 2 4 6 4 21 .5 0 .5 TCAS TCAS OFF +10 -10 +02 -02 TEST TCAS flag TCAS OFF annunciator Figure 6-179 TVI-920D display k) Diagnostic display: The TVI-920D can show a diagnostic failure list of TCAS-related systems that fail or do not provide valid data to the TCAS system. A 10-second (approximate), or longer press of the TCAS self-test button turns on the diagnostic list display. When all TCAS-related systems operate properly, the part number of the TCAS computer software shows on the list. TCAS system failures show below the part number. Note The TVI-920D self-test and diagnostic functions operate only when the aircraft is on ground. See Figure 6-180.
  • 602.
    JZ-Y8F200W-02 AIRCRAFT FLIGHT MANUAL SECTIONVI AIRCRAFT SYSTEM EQUIPMENT 6-314 June 30, 2012 1 2 4 6 4 21 .5 0 .5 826-6401-103 TCAS PROC XPDR NO 1 UPPER ANT RA NO 2 TA NO 1 RALT NO2 MAG HDG ATTITUDE Figure 6-180 TVI-920D display (failure list example) In-flight Operation Procedure of TCAS-94 Switch settings (a) Turn on the power for the air data system, radio altimeter, strapdown heading system, flight data recording system, intercom, KZH-138 proximity warning system and make sure they are in normal operation. (b) Turn on TVI-1, TVI-2, TCAS R/T, ATC-1, ATC-2, and LG CTL circuit breakers on the communicator circuit breaker board. Self-test Check (a) Set to the 1 position the 1/2 changeover switch on the CTL-92E ATC transponder control on the left of the top console, and set the operating mode to ALT.
  • 603.
    JZ-Y8F200W-02 AIRCRAFT FLIGHT MANUAL SECTIONVI AIRCRAFT SYSTEM EQUIPMENT 6-315 June 30, 2012 (b) Turn to the AUTO position the function knob on the CTL-93T TCAS control on the top console. Press the TEST button on the CTL-93T TCAS control or on the front panel of TTR-921 TCAS receiver-transmitter under the left floor of frames 9~10. Check that letters TEST shows in the middle of the bottom of TVI-920D display on left and right instrument panels and the intruder symbol shows as: (1) An RA (solid red square) shows at 2 nm position, (+02) sign shows above the RA symbol with the relative altitude of 200 ft, no vertical speed arrow shows and the relative azimuth is +90o . (2) A TA (solid yellow circle) shows at 2 nm position, (-02) sign shows below the TA symbol with the relative altitude of 200 ft, a traffic climing arrow shows and the relative azimuth is -90o . (3) A PT (solid white diamond) shows at 3.625 nm position, (-10) sign shows below the PT symbol with the relative altitude of 1000 ft, a traffic descending arrow shows and the relative azimuth is +33.75o . (4) An OT (hollow white diamond) shows at 3.625 nm position, (+10) sign is displayed below the OT symbol with the relative altitude of 1000 ft, a traffic descending arrow shows and the relative azimuth is -33.75o . (c) While checking the self-test result on the TVI-920D display, confirm red lights on the front panel of the TTR-921 TCAS receiver-transmitter should illuminate for 1s and then go out, and the TTR PASS green light on the front panel illuminate temporarily. (d) It takes about 8s to finish the entire self-test procedure. After self-test is performed successfully, TCAS-94 returns to the preset operating mode. "TCAS System Test OK" can be heard in the earphone and loudspeaker simultaneously. If the TCAS has trouble, the associated red light of the failure device on the front panel of the TCAS receiver-transmitter illuminates. At the same time, letters TCAS or TCAS FAIL shows on the TCAS display, and "TCAS SYSTEM TEST FAIL" can be heard in the earphone and loudspeaker.
  • 604.
    JZ-Y8F200W-02 AIRCRAFT FLIGHT MANUAL SECTIONVI AIRCRAFT SYSTEM EQUIPMENT 6-316 June 30, 2012 (e) Set to the 2 position the 1/2 changeover switch on the CTL-92E ATC transponder control , and set the operating mode to ALT. Then, repeat steps b) thru d). System operations (a) Set to the 1 position the 1/2 changeover switch on CTL-92E transponder control, and turn the function knob to the SBY position. (b) Set the ident code for the first set of the ATC transponder according to the ATC requirement. (c) Set the 1/2 changeover switch on CTL-92E control to the 2 position. Set the ident code for the second set of the ATC transponder according to the ATC requirement. (d) Set the 1/2 changeover switch on CTL-92E control to the 1 position. (e) If the ATC department does not issue special commands, the function knob on the CTL-92E transponder control should be turned to the ALT position during the whole flight. Turn the function knob on CTL-93T TCAS contro to the AUTO position, and turn the A/B knob on CTL-93T control to desired position. It is recommended that the knob be turned to the ABOVE position during taking off and climbing, to the NORMAL position during cruise, and to the BELOW position during descending and landing. (f) Select the traffic display distance range required according to the flight requirement. (g) When TCAS-94 detects an intruder, the TCAS indicator will show traffic advisory information and give out the corresponding audio warning sound. When the RA shows, the pilot should pay attention to the vertical speed display area of the TCAS indicator, control the aircraft to climb, descend, or keep the current vertical speed according to the displayed requirement, and make the vertical speed pointer within the green area. The TCAS audio warning information is listed in Table 6-39. The aircrew should take the measures based on the warning information to ensure flight safety.
  • 605.
    JZ-Y8F200W-02 AIRCRAFT FLIGHT MANUAL SECTIONVI AIRCRAFT SYSTEM EQUIPMENT 6-317 June 30, 2012 Table 6-39 Reference of the audio annunciations Advisory Audio Annunciations Proper Pilot Response Clear CLEAR OF CONFLICT Resume normal flight, apparent conflict of airspace has been resolved. TA TRAFFIC, TRAFFIC Check TCAS display for traffic bearing and range. Assess the threat and prepare to execute anti-collision control command. System self-test TCAS System Test Ok The system self-test succeeds TCAS System Test Fail The system self-test fails Preventive RA MONITOR VERTICAL SPEED Be alert for the approaching traffic target. Ensure that that the VSI pointer does not enter the red scale area on the display. MAINTAIN VERTICAL SPEED Keep the current vertical speed and direction, and ensure that the VSI pointer does not enter the red area. MAINTAIN VERTICAL SPEED A flight path crossing is predicted, but being monitored by the TCAS. Keep the current vertical speed and direction, and ensure that the VSI pointer does not enter the red area. CROSSING MAINTIAN ADJUST VERTICAL SPEED Indicates a weakening of the RA. Allows pilot to start returning to an assigned altitude.
  • 606.
    JZ-Y8F200W-02 AIRCRAFT FLIGHT MANUAL SECTIONVI AIRCRAFT SYSTEM EQUIPMENT 6-318 June 30, 2012 Advisory Audio Annunciations Proper Pilot Response Corrective RA CLIMB, CLIMB Change the vertical speed to 1500 ft/min climbing, or as indicated on the display. CLIMB, CROSSING CLIMB Same as previous, except that it further indicates flight paths will cross at some altitude. DESCEND, DESCEND Change the vertical speed to 1500 ft/min descending, or as indicated on the display. DESCEND, CROSSING DESCEND Same as previous except that it further indicates that flight paths will cross at some altitude ADJUST VERTICAL SPEED Reduce the climbing vertical speed to the that shown on the display. ADJUST VERTICAL SPEED Reduce the descending vertical speed to that shown on the display. INCREASE DESCENT, INCREASE DESCENT, Increase the descending speed. CLIMB, CLIMB NOW, CLIMB, CLIMB NOW, Change vertical speed from decent to climb. DESCEND, DESCEND NOW, DESCEND, DESCEND NOW Change vertical speed from climb to descent.
  • 607.
    JZ-Y8F200W-02 AIRCRAFT FLIGHT MANUAL SECTIONVI AIRCRAFT SYSTEM EQUIPMENT 6-319 June 30, 2012 Emergency Codes When aircraft confronts with special cases, the pilot can transmit the following emergency codes. 7500 shows that aircraft and personnel on aircraft are affected by non-strong interference (hijacking). 7600 shows that aircraft radio devices are faulty. 7700 shows that airborne devices are faulty. Relevant documents in civil aviation also provide other special codes. Precautions (a) The altitude limit for climbing at 1500 ft/min is 12000 ft in TCAS-94 of the aircraft. When the aircraft altitude is higher than 12000 ft, the TCAS will not issue the climbing instruction. Therefore, the pilot should take proper aircraft avoidance actions immediately when seeing the TA and RA. (b) If the transponder of the intruder does not operate in C mode or S mode, the TCAS cannot reconnoiter any intruders. (c) In-flight self-test of the TCAS is suppressed. (d) TCAS system and TDR-94D ATC transponder system should be supplied with power independently. The operation of TCAS requires the altitude information from the TDR-94D ATC transponder, but the operation of TDR-94D ATC transponder is independent of the TCAS. Therefore, the TCAS failure will have no impact on normal operation of TDR-94D ATC transponder. (e) When the aircraft flight altitude with respect to the ground is lower than 1450 ft, the "INCREASE DESCENT" RA will be suppressed. (f) When the aircraft flight altitude with respect to the ground is lower than 1000 ft, the "DESCEND, DESCEND NOW" warning information will be suppressed. (g) When the aircraft flight altitude with respect to the ground is lower than 1000 ft, all RA warning information will be suppressed. (h) When the intruder flight altitude with respect to the ground is lower than 380 ft, all TA warning information will be suppressed. (i) In the case of any signal failure of radio altitude, pressure altitude, and heading of aircraft, TCAS-94 cannot operate properly.
  • 608.
    JZ-Y8F200W-02 AIRCRAFT FLIGHT MANUAL SECTIONVI AIRCRAFT SYSTEM EQUIPMENT 6-320 June 30, 2012 INSTRUMENT SYSTEM Flight data recording system FJ-30D6 General The flight data recording system FJ-30D6 can collect and record important flight data in flight, providing data for analysis of reasons for flight accidents and monitoring and maintenance of the aircraft and engine. Composition and installation position The composition and installation of the flight data recording system for the Y8F200W aircraft are shown in the following Table. Table 6-40 S/N Nomenclature Type No. Qty. Installation position 1 Flight data collector (including mounting bracket) FA-30D6(AZ-30D) 1 Under the pilot control stand 2 Flight data recorder (including positioning beacon under water) FB-30D 1 Left side of frame 59 3 Quick-accessed recorder FBQ-30D 1 On ADF control panel 4 Three-axis accelerator GJ-23E 1 On the ceiling between frame 31~32 5 Plug for line checking processor XKE18R12ZQ-H 1 Under the pilot control stand 6 Angular displacement sensor CD-1 3 On the right aileron, vertical tail platform between frame 60~65, and right horizontal stabilizer respectively. 7 FLASH data card FR-1A 2 Inserted into quick-accessed recorder Precautions Operation and precautions before takeoff Before takeoff, turn on onboard 28V DC power supply. The indicating light on the quick-accessed recorder panel on the ADF control panel should illuminate and then extinguish after about 5s. The flight data recording system starts to operate normally. If the indicating light still illuminates, it means that the data card is not properly installed or the recorder fails. Then, turn off the power supply to re-install the data card or for troubleshooting.
  • 609.
    JZ-Y8F200W-02 AIRCRAFT FLIGHT MANUAL SECTIONVI AIRCRAFT SYSTEM EQUIPMENT 6-321 June 30, 2012 Note During the installation of the data card, press and turn the knob on the lower side of the data card door, the door shall automatically open. The data card FR-1A with marked characters face upwards. Align it with the card groove to insert it with even force. Close the door after inserting it properly. If the card needs taking out, press and turn the knob on the lower side of the data card door to open the door. Move rightwards and leftwards respectively locking pins in the door, FR-1A will be popped. Then, the card can be taken out. Quick-accessed recorder panel is shown as follows: Status indicating light Door open/close knob Emergency button Quick access recorder FBQ-30D Cabin door Table 6-181 Precautions in flight (a) During the flight, do not take out the data card from the quick-accessed recorder. (Data card supports hot plug-in and pull-out. That is to say, the plug-in or pull-out of the data card with power supplied shall inevitably cause, instead of damage to the device, that data record is interrupted and that the quick-accessed recorder displays the failure of DATA CARD NOT PLUG-IN. it is strictly prohibited to plug-in and pull-out the data card in flight so as to ensure the completeness of the flight data record. (b) During the flight, if aircrew personnel think that data at some time needs replaying for the ground, just press the button EVENT on the quick-accessed recorder FBQ-30D to mark the current time.
  • 610.
    JZ-Y8F200W-02 AIRCRAFT FLIGHT MANUAL SECTIONVI AIRCRAFT SYSTEM EQUIPMENT 6-322 June 30, 2012 Cabin audio recording system XFJ-12B General A set of XFJ-12B cabin audio recording system is installed on the Y8F200W aircraft exported to Venezuela. It is used to collect and record flight crew intercommunication, ground-to-air communication, and cockpit environmental sound. After being processed by the ground data processing station, the recorded and stored audio data can reflect the actual communication among flight crew members and the cockpit environmental sound, facilitating site condition understanding and accident analysis. System Composition Airborne device composition of XFJ-12B cabin audio recording system and installation position are listed in Table 6-41. Table 6-41 Airborne device composition of XFJ-12B cabin audio recording system and installation position No. Airborne Device Model Quantity Installation Position Onboard 1 Cabin audio recorder FB-12 1 At the right at the rear part of the web in frame 59 2 Mounting bracket AZ-12 1 At the right at the rear part of the web in frame 59 3 Audio monitor YK-12B 1 On the communicator's control panel 4 Sound pickup SY-12 4 One on the pilot's instrument panel, one on the copilot's instrument panel, one on the navigator's instrument panel, and one on the communicator's control panel 5 XFJ-12B relay box Self-made 1 On the equipment rack on the floor at the right of frames 3~4
  • 611.
    JZ-Y8F200W-02 AIRCRAFT FLIGHT MANUAL SECTIONVI AIRCRAFT SYSTEM EQUIPMENT 6-323 June 30, 2012 Operation Appearance of the audio monitor panel is shown in Figure 6-182. AUDIO CONTROL UNIT TEST STATE EARPHONE/600 Figure 6-182 Audio monitor panel Before takeoff, engage the 28 VDC power supply on aircraft. Perform the power-on self-test for XFJ-12B cabin audio recording system. The STATE indicator on YK-12B audio monitor turns off (it is on yellow previously), indicating that the system self-test result is normal; otherwise, it indicates that the system is faulty. Precautions (a) It is prohibited from pressing the TEST button on the audio monitor in air. (b) Before the first flight on a day, check XFJ-12B cabin audio recording system. At this time, insert ECD-36N earphone into the EARPHONE/600 Ω earphone jack on YK-12B audio monitor. Then, press and hold the TEST button on the audio monitor for more than 2s to start self-test. Speak to the sound pickup. After 1min, monitor the sound through the earphone. The clear and understandable sound can be heard, indicating that the system is operating properly. During the second flight on that day, monitor the STATE indicator on the audio monitor. If the indicator is off, it indicates that the system is operating properly.
  • 612.
    JZ-Y8F200W-02 AIRCRAFT FLIGHT MANUAL SECTIONVI AIRCRAFT SYSTEM EQUIPMENT 6-324 June 30, 2012 Magnetic compass LC-5D General Magnetic compass LC-5D can be read directly, used to measure and indicate the magnetic heading of the aircraft. It is mainly applicable to the indication of magnetic heading in emergency. The Y8F200W aircraft is equipped with 2 magnetic compasses LC-5D shown in the Figure 6-183. EW NS 010 10 27 2430 Figure 6-183 Panel of magnetic compass LC-5D
  • 613.
    JZ-Y8F200W-02 AIRCRAFT FLIGHT MANUAL SECTIONVI AIRCRAFT SYSTEM EQUIPMENT 6-325 June 30, 2012 Composition and installation position The composition and installation position in the aircraft is shown in Table 6-42. Table 6-42 Installation position of magnetic compass LC-5D S/N Nomenclature Type No. Qty. Installation position 1 Magnetic compass LC-5D 2 One on the upper middle light shade on the instrument panel (see Y8C-7706F-0), the other on the front ceiling at frame 1 in navigator's cockpit (see Y8C-7705F-0). Main technical data (a) The basic error (excluding magnetic compensator assembly) should not be greater than ±1o at 68o F(20o C). (b) When the magnetic compensator assembly (installed in upper magnetic compass) is adjusted to the middle position, the normal deviation should not be greater than ±2o in N, S, E, and W headings. When the magnetic compass incline longitudinally by 10o , the deviation variation should not exceed ±4o in W and E directions. (c) The maximum magnet effect of the magnetic compensator assembly should not be less than 45o in N and E directions. (d) Environment adaptability (1) Height above the sea level: 26247ft (8000m) (2) Environment temperature: -67o F~158o F(-55o C~+70o C) (3) Storage temperature of the magnetic compass: -67o F~140o F(-55o C~+60o C) (4) Relative humidity: 20%~80% (5) Vibration: max. overload of 5g (6) Impact: overload of 30g (e) operating power supply: llumination power supply 28 ±10% VDC
  • 614.
    JZ-Y8F200W-02 AIRCRAFT FLIGHT MANUAL SECTIONVI AIRCRAFT SYSTEM EQUIPMENT 6-326 June 30, 2012 Operation Turn on onboard 28V power supply to control illuminance of the emergency magnetic compass. The illuminace of the emergency magnetic compass LC-5D in navigator's cockpit is controlled by the magnetic compass switch ZKC-2 on navigator's right console while that in pilots' cockpit is controlled by the magnetic compass switch MJK-2A on right instrument panel. Emergency locator transmitter ADT 406AF General Emergency locator transmitter ADT 406AF is used for emergency calling for help when aircraft runs into damage or has an accident, and providing directional objective signals for searching and rescuing aircraft. The emergency locator transmitter can transmits digital accident signals automatically or manually, while satellites capture these signals from emergency locator transmitters to locate and retransmit these signals to ground reception stations. The mission control centers in turn retransmit these position data to the nearest rescue coordination centers so that they can start the search and rescue operations according to these position data upon receiving relative order. Introduction to control panel and its functions Introduction to control panel Figure 6-183
  • 615.
    JZ-Y8F200W-02 AIRCRAFT FLIGHT MANUAL SECTIONVI AIRCRAFT SYSTEM EQUIPMENT 6-327 June 30, 2012 (a) The switch ARMED/ON - ARMED means the preparation state while ON indicates the manual activation mode. (b) The button RESET/TEST - press the button, the self-test starts. After operating mistakenly the beacon transmitter, press the button RESET/TEST to recover to the initial state. (c) ON - indicating light for the control panel. It illuminates when the beacon transmitter is activated. Introduction to beacon transmitter panel Figure 6-185 (a) The switch ARMED/OFF/ON - ARMED means the preparation state, OFF non-operation state, and ON the manual activation mode. (b) EXT.ANT. - connected with external antenna. (c) BACK UP ANT. - connected with pull rod antenna. (d) TX - indicating light for the beacon transmitter. It illuminates when the beacon transmitter is activated.
  • 616.
    JZ-Y8F200W-02 AIRCRAFT FLIGHT MANUAL SECTIONVI AIRCRAFT SYSTEM EQUIPMENT 6-328 June 30, 2012 Check (a) Turn on ELT power switch on navigator's right console. (b) Use the light brightness knob ELT DIM on overhead console to adjust the brightness of the control panel ADT406AF. Clockwise adjust it, the brightness increases while counterclockwise adjusting it, the brightness decreases. Adjust the brightness of the control panel ADT406AF to the proper position. (c) Self-test of the transmitter There are two cases of self-test operation state for the beacon transmitter: self-test of control panel and that of beacon transmitter. Before the self-test, tune the frequency of the any UHF radio set in a nearby aircraft to 121.5 MHz, the emergency locator transmitter shall transmit the 121.5 MHz signal during the self-test. The sounds can be heard in the UHF radio set. (1) Self-test of control panel Put the beacon's ARMED/OFF/ON switch (installed at frame 39~40, stringers 41~42) at ARMED position and the control panel's ARMED/ON switch at ARMED position. Press the RESET/TEST button on the control panel (ELT CTRL PANEL, installed at upper left side of overhead console) until the indicating light on control panel blinks twice. After delay for 6s, the indicating light on control panel displays the self-test report: 10s permanent illumination of the indicating light is for correct operation while 10s blinking condition of the indicating light is for failure self-test.
  • 617.
    JZ-Y8F200W-02 AIRCRAFT FLIGHT MANUAL SECTIONVI AIRCRAFT SYSTEM EQUIPMENT 6-329 June 30, 2012 Blinking frequency indicates the failure source detection 125ms ON, 125ms OFF (Frequency 4Hz), ELT check integrated failure (software problem) 250ms ON, 250ms OFF (Frequency 2Hz), ELT power failure (UHF/VHF) 500ms ON, 500ms OFF (Frequency 1Hz), antenna connection failure or signal identification missing. Note During self-test process, it can be observed that on the beacon, after two short blinks the indicating light comes on and the buzz sounds can be heard for 6s. Note When control panel is not used, set ARMED/ON switch on control panel at ARMED position. (2) Self-test of the beacon transmitter Place the beacon's ARMED/OFF/ON switch at ON position After two short blinks and delay of 3s, the indicating light comes on and the buzz sounds can be heard constantly for approximately 6s. 10s permanent illumination of the indicating light is for correct operation while 10s blinking condition of the indicating light is for failure self-test.
  • 618.
    JZ-Y8F200W-02 AIRCRAFT FLIGHT MANUAL SECTIONVI AIRCRAFT SYSTEM EQUIPMENT 6-330 June 30, 2012 Blinking frequency indicates the failure source detection: 125ms ON, 125ms OFF (Frequency 4Hz), ELT check integrated failure (software problem) 250ms ON, 250ms OFF (Frequency 2Hz), ELT power failure (UHF/VHF) 500ms ON, 500ms OFF (Frequency 1Hz), antenna connection failure or signal identification missing. After self-test, the beacon transmitter enters the waiting condition for 30s. The indicating light of the beacon transmitter is on for 1.75s and off for 0.25s. During this state, put the ARMED/OFF/ON switch to ARMED position. Note 1) This self-test process shall not be interrupted. If this process is not finished for any reason, a new self-test is performed. 2) Place the ARMED/ OFF/ON switch on beacon transmitter at the ARMED or OFF position within 30s after self-test to avoid distress signal transmission. (d) After the completion of the above check, place the ARMED/ON switch on control panel at the ARMED position, and ARMED/OFF/ON switch on beacon transmitter at ARMED position. Turn off ELT power switch on navigator's right console to finish power-on test.
  • 619.
    JZ-Y8F200W-02 AIRCRAFT FLIGHT MANUAL SECTIONVI AIRCRAFT SYSTEM EQUIPMENT 6-331 June 30, 2012 Operation (a) Turn on ELT power switch on navigator's right console (b) Adopt automatic mode when it is not in emergency and need not transmit manually distress signal. Set the switch ARMED/ON on control panel to ARMED position and the switch ARMED/ OFF/ON on beacon transmitter to ARMED position. Other operations are not needed. When the emergency locator transmitter is automatically activated with the sign that indicating light on the beacon transmitter illuminates and buzz sounds can be heard, there is nothing to do but wait the arrival of the rescue team (c) When the distress signal needs transmitting in emergency, the emergency locator transmitter can be activated manually through the control panel and beacon transmitter. (1) Manual activation through control panel Set the switch ARMED/ON on the control panel to ON position. When the beacon transmitter is activated, the indicating light on the control panel illuminates constantly, the indicating light on the beacon transmitter illuminates and buzz sounds can be heard. (2) Manual activation through beacon transmitter Set the switch ARMED/OFF/ON on the beacon transmitter to ON position. If the beacon transmitter enters the waiting condition for 30s, the indicating light of the beacon transmitter is on for 1.75s and off for 0.25s. When the beacon transmitter is activated, the indicating light on the beacon transmitter illuminates and buzz sounds can be heard. If the real distress signal is transmitted, the indicating light on the beacon transmitter is on for 0.5s and off for 0.5s. Note After the disoperation, press the button RESET/TEST on control panel in time to turn off the beacon transmitter so as to avoid transmitting distress signal. However, do not use the button RESET/TEST on control panel to turn off the beacon transmitter during the self-test process or when the switch ARMED/ON on control panel is set to ON position.
  • 620.
    JZ-Y8F200W-02 AIRCRAFT FLIGHT MANUAL SECTIONVI AIRCRAFT SYSTEM EQUIPMENT 6-332 June 30, 2012 (3) When it is necessary to leave the aircraft, remove the beacon transmitter ADT406AF from the aircraft if necessary. Extend the emergency antenna on the beacon transmitter, and set the switch ARMED/OFF/ON on the beacon transmitter to ON position. Then distress signal can be transmitted. Maintenance (a) Periodically carry out regular self-test to emergency locator transmitter. The maximum frequency is once per day. Usually, the check is carried out during such periodical checks as check A. More self-test will reduce the service lifespan of the battery. (b) The service and storage temperature for the battery is -20oC+55o C and -55o C+85o C respectively. Replace it once for five years. The new battery replaced must be of the same specification as that of the old one and the batteries must be authorized by ELTA or 02N60052 or 02N60053 batteries. Emergency locator transmitter ADT406AF is overhauled once per five years (in special factory), and replaced or checked by ELTA or its authorized agents. (c) During the installation in the aircraft, emergency locator transmitter must not compress and crash beacon transmitter to avoid sending distress signals resulted from the trigger of internal acceleration sensor. Emergency horizon BDP-12A General Emergency horizon BDP-12A is supplied with DC power but operates with AC. Its core component is two-frame gyroscope, used to provide a real and stable vertical reference, and display vividly the pitch and bank angles of the aircraft relative to ground level for pilots through indication mechanism of the instrument. The emergency horizon adopts mechanical pendulous correction system. Even if the power supply for the aircraft is cut off, the inertia movement of the two-frame gyroscope enables the gyroscope to maintain enough precision at a certain time. In emergency, it can provide the reliable attitude information of the aircraft relative to ground level for the pilots.
  • 621.
    JZ-Y8F200W-02 AIRCRAFT FLIGHT MANUAL SECTIONVI AIRCRAFT SYSTEM EQUIPMENT 6-333 June 30, 2012 Installation position The installation position of the emergency horizon BDP-12A is shown in Table 6-43. Table 6-43 Installation position of emergency horizon BDP-12A S/N Nomenclature Type No. Qty. Installation position 1 Emergency horizon BDP-12A 1 Left instrument panel The panel of the emergency horizon BDP-12A is shown in Figure 6-186. 01 2 3 0 0 01 3 2 0 0 Warning flag Scale of decline Scale of pitching Miniature aircraft Adjusting knob Figure 6-186 panel of the emergency horizon BDP-12A
  • 622.
    JZ-Y8F200W-02 AIRCRAFT FLIGHT MANUAL SECTIONVI AIRCRAFT SYSTEM EQUIPMENT 6-334 June 30, 2012 Main technical data (a) Power supply Operating voltage: 27VDC±10% Lighting voltage: 27VDC±10% (b) Consumed current Starting state: ≤1.2A Normal operation: ≤0.3A (c) Starting time Normal temperature: ≤3min High/low temperature ≤10min; (d) Average correction speed: 2o ~4o /min at normal temperature while 1.5o ~4.5o /min at high or low temperature when the main axis of the gyroscope deviates from the vertical axis by not more than 7o. (e) Cutoff correction angle range: 10±2o (f) Caging error: ≤±1o (g) Indicating range for the attitude angles: Bank angle: ±180o Pitch angle: ±80o (h) Indication error: ≤±1.5o at not more than 30o ≤±2o at more than 30o (i) Adjustable range for the small aircraft: ±5o (j) Time for the inertia movement of the gyroscope motor: >9min (k) Weight: ≤1.5kg
  • 623.
    JZ-Y8F200W-02 AIRCRAFT FLIGHT MANUAL SECTIONVI AIRCRAFT SYSTEM EQUIPMENT 6-335 June 30, 2012 Operation Pre-flight When the emergency horizon is locked, turn on the switch EMERGING HORIZON PWR on the left instrument panel, BDP-12A starts to operate. 1 min later, release the lock (see note for information about how to lock and release the lock), the emergency horizon can stably indicate the parking attitude angles of the aircraft within 3 min. After it enters the operation state, the warning flag disappears from the window. Adjust EMERGING HORIZON BRT ADJ on the left instrument panel by clockwise or counterclockwise turning it, the brightness inside the emergency horizon should turn bright (dark) correspondingly. Thru-flight During the flight, usually do not operate the emergency horizon. However, when the aircraft flies horizontally with a certain angle of attack, it is allowed to turn the pitch knob of the small aircraft at the lower right corner of the emergency horizon to make the pointer of its angle of attack point to 0o . The both wing ends of the small aircraft should overlap with horizon. From then on, measure the pitch angle of the aircraft from the position. (a) Determination of the bank angle When the aircraft has bank angle, the angle when the bank mark on the dial aligns with its scale line is the bank angle. The graduation range for the dial is divided from the zero line in the middle: 60o rightwards and leftwards respectively with the increment of 10o , as shown in Figure 6-187 and Figure 6-188. (b) Determination of pitch angle When the aircraft has pitch angle, the angle is the scale where the small aircraft points. The nose-up of the dial drum is azure while its nose-down is brown, as shown in Figure 6-189 and Figure 6-190. Zero line of pitching 1 1 2 2 3 0 0 0 0 0 Pitching scale Miniature aircraft Indication panel of bank Zero line of bank Bank scale Banking of 30 o leftward Figure 6-187
  • 624.
    JZ-Y8F200W-02 AIRCRAFT FLIGHT MANUAL SECTIONVI AIRCRAFT SYSTEM EQUIPMENT 6-336 June 30, 2012 Zero line of pitching Pitching scale Miniature aircraft Indication panel of bank Zero line of bank Bank scale Banking of 30 o leftward 0 0 0 0 1 1 2 2 3 Figure 6-188 Zero line of pitching Pitching scale Miniature aircraft Indication panel of bank Zero line of bank Bank scale 1 1 2 2 0 0 0 0 03 Pitch-down angle: 10 o Figure 6-189 Zero line of pitching Pitching scale Miniature aircraft Indication panel of bank Zero line of bank Bank scale 1 1 2 0 0 0 0 0 3 4 Pitch-up 10 o Figure 6-190
  • 625.
    JZ-Y8F200W-02 AIRCRAFT FLIGHT MANUAL SECTIONVI AIRCRAFT SYSTEM EQUIPMENT 6-337 June 30, 2012 Post-flight Turn off the switch EMERGING HORIZON PWR on the left instrument panel, and lock the emergency horizon to finish the operation. Note Procedures to lock and release the lock of the emergency horizon: pull outwards the knob with hands to the utmost position to lock it. Put the knob quickly without impact to release it. If the locking state needs maintaining, clockwise turn the knob with hands to the utmost position, and pull out the knob. Continue to clockwise turn it until the knob enters the locking groove. When releasing the lock again, pull out the knob from the locking groove, counterclockwise turn it to put it down. Adjust the knob until the small aircraft locates at the zero position on the pitch dial. The knob should be in locking state during the starting and delivering. Precautions (a) Release the lock of the emergency horizon after the emergency horizon is powered for 1 min. (b) When the emergency horizon operates in normal condition, lock it in not more than 5 min after the power is cut off. Otherwise, the operating performance of the horizon will reduce. 310 Aircraft Clock General The aircraft clock 310 is supplied with power by battery. It consists of HF quartz resonator, CMOS integrated circuit and micro-power step motor. It is used to display the TIME, F.T. and E.T. in flight and is a kind of precision timing device mounted on the instrument panel. Its panel is shown as follows:
  • 626.
    JZ-Y8F200W-02 AIRCRAFT FLIGHT MANUAL SECTIONVI AIRCRAFT SYSTEM EQUIPMENT 6-338 June 30, 2012 Panel of aviation clock 310 Composition and installation position Table 6-44 S/N Nomenclature Type No. Qty Installation position 1 Aircraft clock 310 4 On the center instrument panel, navigator instrument panel, communicator instrument panel, electric mechanic instrument panel.
  • 627.
    JZ-Y8F200W-02 AIRCRAFT FLIGHT MANUAL SECTIONVI AIRCRAFT SYSTEM EQUIPMENT 6-339 June 30, 2012 Main technical data (a) Lighting power supply (1) Lighting voltage: 28VDC±10% (2) Lighting current: 24mA Timing precision Average instantaneous error: m≤±1s/d Operation and check Check of brightness adjustment Turn on the CLOCK power switch ZKC-2 on the communicator instrument panel. Clockwise turn buttons CLK BRT on the navigator instrument panel, center instrument panel, communicator instrument panel and electric mechanic instrument panel respectively, the correspondent aircraft clocks turn bright. Counterclockwise turn them, the correspondent aircraft clocks turn dark. Display and adjustment of time The TIME dials of aircraft clocks 310 on the navigator instrument panel, center instrument panel, communicator instrument panel and electric mechanic instrument panel should display respectively the TIME. When the error between the TIME and local time is large, adjust respectively the TIME for each aircraft clock 310. Pull out the F.T. handle on the panel of the aircraft clock 310, the clock stops. Clockwise or counterclockwise turn the F.T. handle, the minute and hour hands in the TIME dial move correspondingly. When the TIME complies with the local time, move the F.T. handle to the original position. The clock operates from the adjusted time.
  • 628.
    JZ-Y8F200W-02 AIRCRAFT FLIGHT MANUAL SECTIONVI AIRCRAFT SYSTEM EQUIPMENT 6-340 June 30, 2012 Starting, stopping and return-to-zero of F.T. Press F.T. handle, the hour and minute hands in the F.T. dial start to move. At the same time, the color of the signal window of F.T. dial is black. Press the handle once again, the hour and minute hands in the F.T. dial stop, and the color of the signal window of F.T. dial is half black and half white. Read the F.T. value according to the positions of hour and minute hands in F.T. dial. Press the handle for the third time, the hour and minute hands in the F.T. dial return to zero, and the color of the signal window of F.T. dial is white. Starting, stopping and return-to-zero of E.T. Press E.T. handle, the minute and second hands in the large dial start to move. Press the handle once again, the minute and second hands in the large dial stop, and the color of the signal window of F.T. dial is half black and half white. Read the E.T. value according to the positions of minute and second hands in the large dial. Press the handle for the third time, the minute and second hands in the large dial return to zero. Note During the measurement of E.T. and F.T., if the E.T. and F.T. states change simultaneously or in turn, the display of TIME, F.T., and E.T. does not influence each other. Power off Turn off the CLOCK power switch ZKC-2 on the communicator instrument panel, the correspondent TIME should display in TIME dials of aircraft clocks 310 on the navigator instrument panel, center instrument panel, communicator instrument panel, and electric mechanic instrument panel. Turn off the onboard power supply to finish the check.
  • 629.
    JZ-Y8F200W-02 AIRCRAFT FLIGHT MANUAL SECTIONVI AIRCRAFT SYSTEM EQUIPMENT 6-341 June 30, 2012 Critical AOA signal system XLG-1A General When the aircraft is at a critical angle of attack during the takeoff, landing and flight, the critical AOA signal system sends out warning signal to warn pilots. There are two operating states for the critical AOA system: takeoff and landing, and flight. The changeover between the above two operating states is realized by the limit switch mounted in flaps extending from 23o to the utmost position. The critical AOA system is composed of critical AOA sensor GLG-1, AOA sensor GGJ-3 and signal control box EF-1C, shown in Figure 192. Ps Pt GLG-1 U1=f U3 U3 =f U2=f (α M) α α Preset α Instant GGJ-3 EF-1C Critical, ( ) ( ) U1 or Setter Preset Changeoverswitch Signal of sound Signal of light Figure 192 Block diagram of critical AOA system
  • 630.
    JZ-Y8F200W-02 AIRCRAFT FLIGHT MANUAL SECTIONVI AIRCRAFT SYSTEM EQUIPMENT 6-342 June 30, 2012 Brief technical data (a) Power supply 27±10% VDC 115±5% VAC, 400Hz (b) Operating range altitude 0~49213ft (0~15000m) Temperature 140o F~-76o F (±60o C) (c) Signal connection range Speed M 0.2~0.65 Connection condition α=10.5o in takeoff and landing state (d) The AOA during the danger signal transmission is shown in Table 6-45. Table 6-45 M value Altitude (km) 0.2 0.3 0.5 0.6 0.65 Takeoff and landing state 0 17o 15.4o 11.1o 10.4o 10.5o 10 15.4o 11.1o 10.4o 10o 15 10.4o 10o
  • 631.
    JZ-Y8F200W-02 AIRCRAFT FLIGHT MANUAL SECTIONVI AIRCRAFT SYSTEM EQUIPMENT 6-343 June 30, 2012 Precautions (a) When the aircraft is at the danger flight angle of attack, the light CRITICAL AOA on the instrument panel illuminates and the sound signals can be heard in earphones. The pilots should control the aircraft to change the critical AOA state, the light extinguishes and sounds disappear. (b) Ground connection heating time should not be greater than 1.5 min. M meter BM1-1A BM1-1A is used to measure the M value in different altitudes, automatically providing the warning signal when M is more than 0.7 (the signal light illuminates when speed is high). The range for the M meter is between 0.5 and 1.0 M, as shown in Figure 6-193. 0.7 0.8 0.9 1.00.5 0.6 M数 Figure 6-193 M meter The comparison between VIAS, VTAS, and M in different altitudes is shown in Table 6-46.
  • 632.
    JZ-Y8F200W-02 AIRCRAFT FLIGHT MANUAL SECTIONVI AIRCRAFT SYSTEM EQUIPMENT 6-344 June 30, 2012 Table 6-46 (Unit: km/h) VTAS VIAS M Altitude ft(m) 54 (100) 108 (200) 162 (300) 216 (400) 270 (500) 324 (600) 378 (700) 432 (800) 486 (900) 6561.7 (2000) 59.4 (110) 188.8 (220) 178.2 (330) 237.0 (439) 295.9 (548) 364.5 (657) 0.55 412.5 (764) 0.64 470.3 (871) 0.73 527.6 (977) 0.81 13123 (4000) 65.9 (122) 131.8 (244) 197.1 (365) 261.9 (485) 326.1 (604) 0.52 389.3 (721) 0.62 452 (837) 0.72 513.5 (951) 0.81 574.0 (1063) 0.9 19685 (6000) 73.4 (136) 146.3 (271) 218.7 (405) 290.0 (537) 0.50 359.6 (666) 0.59 428.2 (793) 0.67 495.2 (917) 0.80 26247 (8000) 82.1 (152) 136.6 (303) 244.1 (452) 322.4 (597) 0.54 398.5 (738) 0.60 471.9 (874) 0.79 542.1 (1004) 0.90 32808 (10000) 92.9 (172) 187.4 (347) 273.2 (506) 359.6 (666) 0.62 442.2 (819) 0.62 521.1 (965) 0.89 39370 (12000) 106.9 (198) 211.7 (392) 312.1 (578) 0.55 407.7 (755) 0.71 407.7 (755) 0.71 583.7 (1081) 1.01
  • 633.
    JZ-Y8F200W-02 AIRCRAFT FLIGHT MANUAL SECTIONVI AIRCRAFT SYSTEM EQUIPMENT 6-345 June 30, 2012 BG-1A Bellows-Type Pressure Altimeter General BG-1A bellows-type pressure altimeter, a kind of emergency instrument, receives the static pressure signal from total and static pressure system to provide the pilot with pressure altitude information. Installation position Installation position of BG-1A bellows-type altimeter is shown in Table 6-47. Table 6-47 Installation position of BG-1A bellows-type altimeter S/N Nomenclature Type No. Qty. Installation position 1 bellows-type altimeter BG-1A 2 One at left instrument panel and electric mechanic instrument panel respectively Main technical data Ambient adaptability Operating temperature range: -49o F~122o F (-45o C~+50o C) ensuring precision; -67o F~140o F (-55o C~+60o C) ensuring operating ability. Storage temperature: -67o F~158o F (-55o C~+70o C)
  • 634.
    JZ-Y8F200W-02 AIRCRAFT FLIGHT MANUAL SECTIONVI AIRCRAFT SYSTEM EQUIPMENT 6-346 June 30, 2012 Operating power 5VDC Light power: 5VDC Display mode Altitude display adopts three pointers and dial mode. Scale character is 1000ft/360o ,which means that when the long pointer rotating a circle(360o ), the altitude change is 1000ft with the shorter pointer rotating 36o and the dial pointer rotating 3.6o . The minimum dial value of the dial is 20ft and the large dial value is 100ft. Barcode on the altitude dial has warning function. When the aircraft is in the low altitude state, the code warns the pilot that that altitude is dangerous, and the pilot should take measures as soon as possible. Pressure binding is displayed by index and dial. The binding range is inHg~30.99 inHg. The large dial value is 0.1 inHg, and the small one is 0.05 inHg. In normal condition, when the pressure dial displays the datum plane standard atmosphere pressure 29.92 inHg, the value in altimeter indicates the current aerodrome pressure altitude. 6 ALT 8 1 0ft 9 100 FEET0 2 29.9 30.0 1 2 3 4 56 37 4 5 Figure 1 The drawing of pressure altimeter panel 1. Short pointer 4. Long pointer 2. Dial pointer 5. Bar code 3. Pressure dial 6. Pressure reference regulating knob
  • 635.
    JZ-Y8F200W-02 AIRCRAFT FLIGHT MANUAL SECTIONVI AIRCRAFT SYSTEM EQUIPMENT 6-347 June 30, 2012 Display error in normal temperature Requirement of display error in normal temperature is shown in Table 6-48. Table 6-48 Display error in normal temperature Altitude measuring point kft 0 1 2 4 8 10 Display error in normal temperature ft ±50 ±70 ±90 ±110 ±130 ±140 Altitude measuring point kft 15 20 25 30 40 50 Display error in normal temperature ft ±200 ±250 ±330 ±350 ±500 ±750 Pressure binding error Requirement of pressure binding error is shown in Table 6-49. Table 6-49 Pressure binding Pressure measuring point inHg 28.1 28.5 29 29.5 29.92 30.5 30.9 30.99 binding altitude value in standard atmosphere pressure ft -1727 -1340 -863 -392 0 531 893 974 Allowable error in pressure binding ±50 ±50 ±50 ±50 ±50 ±50 ±50 ±50 Indication range of pressure altitude 0~50000ft Air tightness Take out the pressure in pressure altimeter until the value equals to that in pressure altitude 15000 ft. Altitude value change caused by housing leakage should not be more than ±300 ft in 1min.
  • 636.
    JZ-Y8F200W-02 AIRCRAFT FLIGHT MANUAL SECTIONVI AIRCRAFT SYSTEM EQUIPMENT 6-348 June 30, 2012 Pointer jumps in ununiformity (sluggish jump) Pointer sluggish jump cannot be more than 45.72m (150 ft) in the range of -304.8m~1524m (-1000 ft~5000 ft); and not more than 121.92m (400ft) in the range of 1524m~914.4m (5000ft~30000 ft); not more than 182.88m (600 ft) in the range of 9144m (30000 ft) Position error (inclination affection) The error for altimeter indication in normal pressure at normal operating position and in any other attitudes should not exceed ±12.19m (±40 ft). Operation Operation method Rotate the pressure regulation knob to regulate the altimeter to absolute altitude based on standard atmosphere pressure 0.101MPa (29.91 inHg) or to relative altitude (airport altitude is zero) based on aerodrome pressure. When the dial indication is 0.101MPa (29.91 inHg) on the ground, altimeter indicates the current aerodrome pressure altitude. Rotate the pressure regulation knob to make the indication be zero, the pressure dial indicates the aerodrome pressure and the altimeter in flight indicates the relative altitude. The range of pressure binding is 0.095~0.105MPa (28.1~30.99 inHg) When regulate the aerodrome pressure to the limit state, the knob is forbidden to be rotated; otherwise, the device can be damaged. Special instruction In front of altimeter, aerodrome pressure binding mechanism locks the nut tightly to lock the unisonous relation between the pressure and altitude. Do not loosen the locked nut in operation, and do not loosen it meanly and pull out the pressure regulation knob; otherwise, the unisonous relation between the pressure and altitude will be destroyed. And the indication error will occur.
  • 637.
    JZ-Y8F200W-02 AIRCRAFT FLIGHT MANUAL SECTIONVI AIRCRAFT SYSTEM EQUIPMENT 6-349 June 30, 2012 Hydraulic pressure gauge General Hydraulic pressure gauge installed on the aircraft includes brake pressure gauge and hydraulic system and battery pressure gauge which are all remote induction pressure gauges. The former is used for measuring brake valve outlet pressure of the brake system, and the hydraulic and the latter is used for measuring pressure of hydraulic system and battery. Installation position There are altogether two sets of brake pressure gauge, including 2 2ZYG-150 indicators and 4 GY150-1 sensors. There are 4 sets of hydraulic system and battery pressure gauges, including 4 ZYG-240 indicators and 4 GY240-1 sensors. Installation position refers to Table 6-49. Table 6-49 Installation position of hydraulic pressure gauge Name Qty. Installation position Right system pressure sensor GY240-1 1 At the right side of frame 28 of main landing gear cabin Right system battery pressure gauge sensor GY240-1 1 Below the floor of frames 8~9 of forward cabin Right system pressure indicator ZYG-240 1 Central instrument panel Right system battery pressure indicator ZYG-240 1 Pilot instrument panel Left system battery pressure gauge sensor GY240-1 1 Below the floor of frames 8~9 of cockpit Left system pressure sensor GY240-1 1 Below the floor of frames 8~9 of cockpit Left system pressure indicator ZYG-240 2 Central instrument panel Brake pressure sensor GY150-1 2 Brake pressure gauge indicator 2ZYG-150 2 Central instrument panel
  • 638.
    JZ-Y8F200W-02 AIRCRAFT FLIGHT MANUAL SECTIONVI AIRCRAFT SYSTEM EQUIPMENT 6-350 June 30, 2012 Main technical data (c) Assembly, scale range and operation range refer to Table 6-50. (d) Power : 36±6%V; Voltage: AC 400±2%Hz.  (e) Operating current: when the rated voltage is AC 36 V, needed current of the whole set of ZYG pressure gauge is not larger than 0.15A, and that of 2ZYG type is not larger than 0.3 A. Table 6-50 Assembly, scale range and operation range S/N Name Type Measurement range PSI (kgf/cm2 ) Operation range PSI(kgf/cm2 ) Indicator Sensor 1 Brake pressure gauge 2ZYG-150 GY150-1 (with buffer QN5277002) 0~2133.495 (0~150) 426.699~1706.796 (30~120) 2 Hydraulic system and battery pressure gauge ZYG-240 GY240-1 (with buffer QN5277002) 0~3413.592 (0~240) 568.932~3129.126 (40~220) (f) Operating temperature range: The indicator should ensure normal operation within the temperature range of -85o F~131o F (-60±5o C~+50±5o C). (g) Within operating range, indicating error of the pressure gauge should not exceed the regulated value in Table 6-51. (h) When operating voltage changes within the range of 36±6%V, added error of the indicator should not exceed error regulated in Table 6-51. 
  • 639.
    JZ-Y8F200W-02 AIRCRAFT FLIGHT MANUAL SECTIONVI AIRCRAFT SYSTEM EQUIPMENT 6-351 June 30, 2012 Table 6-51 Indicating error of pressure gauge Indicator Error under the following temperature PSI (kgf/cm2 ) Type Checking point on the dial 59o F~77o F (20±5o C) 113o F ~131o F (50±5o C) -58o F ~40o F (-45±5o C) -85o F ~-67o F (-60±5o C) Whole set 59o F~77o F (20±5o C) 2ZYG-150 30;50;70;100;200 ±32.002 (±2.25) ±64.00485 (±4.5) ±85.3398 (±6) 0;20;130;150 ±42.6699 (±3) ±85.3398 (±6) ±128.0097 (±9) ZYG-240 40;60;80;100;120;140; 160;180;200;220 ±51.203 (±3.6) ±102.40776 (±7.2) ±136.54368 (±9.6) 0;20;240 ±68.27184 (±4.8) ±136.54368 (±9.6) ±204.81552 (±14.4) Operation The remote induction pressure gauge, also referred as two-wire pressure gauge, indicates pressure of fluid through magnetoelectric (moving-coil) logometer upon the principle of shifting pressure change to inductance variation through the differential inductance convertor.
  • 640.
    JZ-Y8F200W-02 AIRCRAFT FLIGHT MANUAL SECTIONVI AIRCRAFT SYSTEM EQUIPMENT 6-352 June 30, 2012 BWP-2 Exhaust Gas Thermometer General (a) Function BWP-2 exhaust gas thermometer is used to measure mean exhaust gas temperature of engine. (b) Main technical data (1) Measure range 572o F ~1652o F(300o C~900o C) (2) Operation range 572o F ~1112o F(300o C~600o C) (3) Ambient temperature -76o F ~122o F(-60o C~50o C) (4) Operation altitude 82021ft (25000m) (5) Indicating error: When indicator ambient air temperature is 68±9o F (20±5o C), exhaust gas thermometer errors should not exceed specified indicating values in table 6-52. Table 6-52 Allowable errors Scale range o F (o C) Allowable error o F (o C) Indicator Full set 212~570.2 (100~299) 1113.8~1652 (601~900) ±43.2 (±24) ±68.4 (±38) 644~1040 (340~560) ±18 (±10) ±37.8 (±21) 572~642.2 (300~339) 1041.8~1112 (561~600) ±25.2 (±14) ±46.8 (±26)
  • 641.
    JZ-Y8F200W-02 AIRCRAFT FLIGHT MANUAL SECTIONVI AIRCRAFT SYSTEM EQUIPMENT 6-353 June 30, 2012 Note 1) When ambient temperature is more than 122o F (+50o C), temperature additional error should be considered. Additional error in extending connecting wire caused by temperature difference of 18o F (10o C) within the range of 212~1112o F (100~ 600o C) is 0.18o F (0.1o C )and within the range of 1112~ 1652o F (600~ 900o C) is 0.36o F (0.2o C). 2) When performing actual meter testing, ambient temperature of instrument is +68o F (+20o C) (thermocouple, ambient temperature of compensating wire is +68o F (+20o C) too, external resistance of 5.25Ω should be connected (instead of 5Ω). The reason of adding 0.25Ω  is that when testing meter, added value of resistance caused by temperature of extending connecting wire and thermocouple increasing from +68o F (20o C) should be considered and adding additional 0.15Ω  equals to resistance mean added value when thermocouple is heated. (6) External resistance (four thermo-resistances and extending connecting wires, connecting meter wire total resistance): when ambient temperature is +68o F (+20o C), it is 5±0.1Ω. (7) Indicator, thermocouple and extending connecting wire with the same type and group are exchangeable, but when changing extending connecting wire, external resistance should be 5±0.1Ω at temperature of +68o F (+20o C). (8) Uniformity of indicator pointer travel: Indicator pointer should move uniformly and have no obvious impulse and jump. (9) Delay error: Delay errors of indication should not exceed two times of basic errors. (10) Damp: Damp time of indicator movable system should not exceed 2.5s.
  • 642.
    JZ-Y8F200W-02 AIRCRAFT FLIGHT MANUAL SECTIONVI AIRCRAFT SYSTEM EQUIPMENT 6-354 June 30, 2012 Composition and installation position Engine exhaust gas thermometer indicator is installed on the center instrument panel. Exhaust gas thermometer sensor comes together with engine. There are four sensors on one engine, which are equipped at sandwich of engine tail pipe. Four thermocouples are distributed uniformly around the nozzle circumference. Operating principle Schematic diagram of exhaust gas thermometer is shown in Figure 6-195. 3 5 61 2 4 7 RD RP RA RC RB RB Figure 6-195 Schematic diagram of exhaust gas thermometer 1. External resistance 5. Additional resistance 2. Thermistor 6. Adjusting resistance 3. Hairspring resistance 7. Thermocouple 4. Coil resistance Operating point (thermo-end) welded together of thermocouple inserts into engine nozzle to sense high temperature; the other point (cold end) connects to terminal board and then delivers to indicator with wire. During engine operating, temperature in tailpipe nozzle increases, temperature difference between thermocouple and the free end is produced; potential is produced in the free end. For convenient measurement and reliable measurement, 16 thermocouples are divided into four groups to connect in series, which are distributed around engine tailpipe nozzle circumference uniformly to measure mean temperature. Total potential is measured with an electromagnetic millivoltmeter. For total potential is proportioned to mean temperature, so the scale of millivoltmeter that is converted into temperature will become a thermometer and indicate mean temperature of tailpipe nozzle directly.
  • 643.
    JZ-Y8F200W-02 AIRCRAFT FLIGHT MANUAL SECTIONVI AIRCRAFT SYSTEM EQUIPMENT 6-355 June 30, 2012 Resistances of indicator are influenced by ambient temperature to make current values through coil vary while instrument receives the same potential, thus affecting accuracy of indication. Connect in series an additional resistance RD with negative temperature factor in the metering circuit. If ambient temperature of indicator increases, total resistances in coil increase and RD decreases to remain total resistances as a constant approximately, thus making the indication of temperature indicator close to true value. Connection circuit of engine exhaust gas thermometer is shown in Figure 6-196. ZWP-2599 WB12 WB11 - + 596 GR-2A Sensor (Engine 1) ZWP-2599a WB13 WB14 -+ 594 GR-2A Sensor (Engine 2) ZWP-21564a WB28 WB29 - + 1561 GR-2A Sensor (Engine 3) ZWP-21564 WB31 WB30 -+ 1560 GR-2A Sensor (Engine 4) Figure 6-196 Connection circuit of engine exhaust gas thermometer
  • 644.
    JZ-Y8F200W-02 AIRCRAFT FLIGHT MANUAL SECTIONVI AIRCRAFT SYSTEM EQUIPMENT 6-356 June 30, 2012 Engine Vibration G-Load Indicator Description Function Engine vibration G-load indicator is used to measure and indicate vibration G-load values during engine operation (its unit is g). When vibration G-load value is up to allowable limitation, the red signal light illuminates and provides danger vibration warning to aircrew. Main technical data (a) Resonance operation frequency of amplifier 205±1.5Hz. (b) In normal condition, as vibration G-load reaches the specified value in the following table, the red signal light should illuminate. Table 6-53 Value of vibration G-load Actual value of engine first running Signal light and mechanic adjusting value Less than or equal to 1g 3.5g More than 1g, but less than or equal to 2g 4g More than 2g, but less than or equal to 3.5g 5g G-load measuring errors are as follows: Within the range of 1~3g ±0.3g Over 3g ±10%
  • 645.
    JZ-Y8F200W-02 AIRCRAFT FLIGHT MANUAL SECTIONVI AIRCRAFT SYSTEM EQUIPMENT 6-357 June 30, 2012 (c) Indicator sensitivity should be less than 0.1g (d) AC power supply of vibration amplifier 115+2.5 -6.0 %V Frequency 400±5%Hz (e) Current consumption of vibration amplifier is not more than 0.5A (f) When operation temperature of vibration amplifier is -67~+140o F(-55~+60o C)(operation temperature of sensor is -76~+248o F (-60~+120o C)), measuring errors are: Within the range of 1~3g ±0.6g Over 3g ±20% (g) When relative humidity is 95±3% and temperature is 68±9 o F(20±5o C), total errors of full set are as follows: Within the range of 1~3g ±0.3g Over 3g ±10% Composition and installation position Engine vibration G-load meter consists of vibration indicator, sensor and amplifier. (a) Sensor is mounted on the platform at the upper of butt surface of engine compressor casing and gas casing. (b) Indicator is mounted on engine vibration instrument panel at the upper of center instrument panel. (c) Amplifier is mounted on ceiling between frames 11~12.
  • 646.
    JZ-Y8F200W-02 AIRCRAFT FLIGHT MANUAL SECTIONVI AIRCRAFT SYSTEM EQUIPMENT 6-358 June 30, 2012 Description Operating principle of engine vibration G-load Engine Vibration G-load Indicator is that vibration sensor produces induced electromotive force proportioned to engine vibration G-load value. After vibration amplifier amplifying, vibration indicator indicates vibration G-load value. Turbine starter/generator tachometer BZT-1 General Turbine starter/generator tachometer BZT-1 can continuously indicate the rotation speed per minute of WDZ-1's major shaft. Installation position There is one set of tachometer BZT-1 onboard. Each set consists of an indicator ZZT-1 and a sensor GBT-1. The indicator is at the lower left of the central instrument panel, and the sensor is at the lower right of WDZ-1. Main technical data Indicator operating temperature range -76o F~122o F(-60o C~+50o C) Sensor operating temperature range -85o F~365o F (-60±5o C~180±5o C) Altitude 82021ft (25000m) Measuring range 10~105% Operation range 60~100% Allowable error (when ambient temperature is 59o F~77o F(20±5o C), within operating range ±0.5 Allowable error: When the ambient temperature is +20±5o C, +50±5o C, or -60±5o C, the tachometer error should be greater than the value specified in Table 1.
  • 647.
    JZ-Y8F200W-02 AIRCRAFT FLIGHT MANUAL SECTIONVI AIRCRAFT SYSTEM EQUIPMENT 6-359 June 30, 2012 Deviation (delay error) Not more than two times of the allowable error Damping time (indicator acting system) Not longer than 3s Pointer travel regularity The pointer moves regularly and there is no obvious pulsation Operation Tachometer operation principle: converts rotation of the tested shaft to electric signal, passes the signal to the indicator, and converts the signal to pointer angular displacement through the magnetic induction assembly. Indicator scale display method: When WDZ-1's main shaft speed is 35000r/min, the value indicated is 100%. Exhaust thermometer BWP-3 General Exhaust thermometer BWP-3 is used to measure the exhaust temperature of turbine starter/generator WDZ-1. Composition and Installation Position Table 6-54 Element Model Panel Area Access Cover Indicator ZWP-3 214GL④ 214 Sensor GR-3 141 141ML③H
  • 648.
    JZ-Y8F200W-02 AIRCRAFT FLIGHT MANUAL SECTIONVI AIRCRAFT SYSTEM EQUIPMENT 6-360 June 30, 2012 Description/operation Main technical data Measuring range 32o F~1652o F (0o C~900o C) Operation range 1112o F~1472o F (600o C~800o C) Ambient temperature range -76o F~122o F (-60o C~+50o C) Altitude 82021ft (25000m) External circuit resistant 9±0.06Ω Instrument error (ambient temperature: 20±5o C; within the operation range): Indicator ±21.6o F(±12o C) Whole set ±36o F(±20o C) (a) An exhaust thermometer, as a set of thermoelectricity instrument, consists of the electromagnetic millivoltmeter and nisiloy-nickel/chrome thermocouple. Aircraft is equipped with a set of BWP-3 thermometer, which consists of a indicator ZWP-3, a thermocouple GR-3, and compensation wires. (b) When the turbine starter/generator is operating, temperature at the nozzle area increases, and the thermocouple inside the nozzle pipe generates thermal electromotive force, which is in direct proportion to the cool end temperature difference. (c) To improve temperature measurement accuracy, compensation wires at the thermocouple cool end of BWP-3 thermometer is led to the indicator with small temperature variation on the instrument panel. Inside the indicator, bimetal sheet will automatically make the indicator pointer point at the ambient medium temperature to eliminate the method error produced when the temperature at the thermocouple free end varies within -60~+50o C.
  • 649.
    JZ-Y8F200W-02 AIRCRAFT FLIGHT MANUAL SECTIONVI AIRCRAFT SYSTEM EQUIPMENT 6-361 June 30, 2012 BYG-100 propeller torque indicator General BYG-100 propeller torque indicator is used to measure oil pressure proportioned to propeller torque moment to master propeller power. Description Main technical data (d) Pressure measuring range 0~1422.33PSI(0~100kgf/cm2 ) (e) Operation range 142.233~1137.864PSI (10~80kgf/cm2 ) (f) Power supply: Three phase AC, 36 (1±6%) V, 400 (1±2%) Hz (g) Operation temperature of indicator: -85o F~131o F (-60o C±5o C~+50o C±5o C) When rated voltage is AC 36V, needed operation current of full set BYG-100 torque indicator should be not greater than: Not greater than 0.15A (h) In following ambient temperature, indicating errors of torque indicator should not exceed specified values listed in the table. (i) When operation voltage varies within the range of 36(1±6%)V, additional errors of indicator should not exceed specified basic errors listed in the table above.
  • 650.
    JZ-Y8F200W-02 AIRCRAFT FLIGHT MANUAL SECTIONVI AIRCRAFT SYSTEM EQUIPMENT 6-362 June 30, 2012 Table 6-55 Value of indicating errors of torque indicator Check points at indicating scale 59o F~77o F (20o C±5o C) PSI (kgf/cm2 ) 113 o F~131o F (50o C±5o C) -58 o F~-40o F (-45o C±5o C) -85 o F~-67o F (-60o C±5o C) PSI (kgf/cm2 ) Full set 59 o F~77o F (20o C±5o C) PSI (kgf/cm2 ) 10; 20; 30; 40; 50; 60; 70; 80 ±21.33(±1.5) ±42.66(±3) ±56.88(±4) 0; 90; 100 ±28.44(±2) ±56.88(±4) ±85.33(±6) Composition and installation position (j) There are four sets of propeller torque indicators ZYG-100 equipped with aircraft, which are installed on the center instrument panel. (k) There are four sets of propeller torque indicator sensors GY100-2 (with buffer QN5277002) in one aircraft, which are installed on right sides of engines 1, 2, 3 and 4 respectively. OPERATING Principle of propeller torque indicator is shown in Figure 6-197. Figure 6-197 Principle of propeller torque indicator 1. Coil 4. Iron core 2. Rectifier 5. Coil 3. Power supply transformer 6. Movable armature
  • 651.
    JZ-Y8F200W-02 AIRCRAFT FLIGHT MANUAL SECTIONVI AIRCRAFT SYSTEM EQUIPMENT 6-363 June 30, 2012 Propeller torque indicator consists of sensor and indicator. Sensor consists of diaphragm and converter which changes displacement into inductance variation. Indicator is DC two-wire current ratio meter and adds a pair of germanium rectifiers, therefore, instrument uses AC power supply, but actually current in the instrument circuit is pulse current, which can be taken as DC approximately. Operating principle of instrument is to change relative position of movable armature and fixing iron core by using diaphragm deformation caused by fluid pressure, namely changes inductive resistance of two coils at fixing iron cores, thus changing current ratio of two coils at indicator and making pointer indicate corresponding pressure. The two-pointer throttle lever position indicator General The two-pointer throttle lever position indicator is used to indicate the throttle lever angle of the FCU. The scale range is from 0o ~105o . Description Main technical data Indicator scale range 0o ~105o Remote distance transfer error Within 60o ~105o ≤±1o Other scales ≤±1.5o Temperature operation range -76o F ~122o F (-60o C~50o C) Power supply 27±10%V
  • 652.
    JZ-Y8F200W-02 AIRCRAFT FLIGHT MANUAL SECTIONVI AIRCRAFT SYSTEM EQUIPMENT 6-364 June 30, 2012 Composition and Component installation position Table 6-56 Component composition Nomenclature Type No. Panel Zone Throttle lever position indicator ZEG-3 213GL④ 213 Throttle lever position transmitter GE-1M 414/424/434/444BB①H 414/424/434/444 The two throttle lever position indicators are mounted on the cockpit center instrument panel and the four transmitters are mounted at the back of the FCUs of engines 1, 2, 3, and 4. Operation The throttle lever position indicator is shown in Figure 6-198. Figure 6-198 Schematic diagram of the throttle lever position indicator 1. Crank arm 3. Carbon brush 5. Coil 2. Potentiometer 4. Magnet rotor
  • 653.
    JZ-Y8F200W-02 AIRCRAFT FLIGHT MANUAL SECTIONVI AIRCRAFT SYSTEM EQUIPMENT 6-365 June 30, 2012 The throttle lever position indicator operates according to the principle of the DC synchronous transmitting; the sensor consists of three carbon brushes and annular potentiometers, which is connected to the indicator with three wires. The indicator consists of three coil current ratio meters and moveable magnet. The position of the moveable magnet is determined by the direction of the resultant magnetic field decided by the three coils, while the direction of the resultant magnetic field should be synchronous with the positions of the three carbon brushes of the sensor. Because there are pins fixed on the magnet axle of the indicator, the rotating angle is indicated on the scale disc, and the position of the pointer is the angle of the throttle. The throttle lever position indicator is a two-pointer indicator. No. 1 and No. 2 engines share one indicator and No. 3 and No. 4 engines use the other indicator. The angular sensor signal mea