
Recommended
More Related Content
Similar to 382873447-BUILDING-CONTRUCTION1-TAYLORS-UNIVERSITY.pdf
Similar to 382873447-BUILDING-CONTRUCTION1-TAYLORS-UNIVERSITY.pdf (20)
Recently uploaded
Recently uploaded (20)
382873447-BUILDING-CONTRUCTION1-TAYLORS-UNIVERSITY.pdf
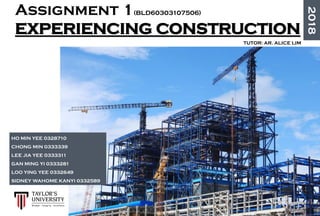
- 1. Assignment 1(BLD60303107506) EXPERIENCING CONSTRUCTION TUTOR: AR. ALICE LIM 2018 HO MIN YEE 0328710 CHONG MIN 0333339 LEE JIA YEE 0333311 GAN MING YI 0333281 LOO YING YEE 0332649 SIDNEY WAHOME KANYI 0332589
- 2. TABLE OF CONTENTS NO. CONTENTS PAGES STUDENTS 1.0 2.0 3.0 4.0 5.0 6.0 7.0 INTRODUCTION OF SITES PRELIMINARIES 2.1 SITE AND SAFETY 2.2 SITE LAYOUT 2.3 MACHINERIES 2.4 TEMPORARY FACLITIES 2.5 SITE CLEARANCE 2.6 EARTHWORK & EXCAVATION 2.7 SETTING OUT FOUNDATION 3.1 DEFINITION OF FOUNDATION 3.2 FOUNDATION ON SITE 3.3 METHOD OF INSTALLATION 3.4 CONSTRUCTION PROCESS STRUCTURE 4.1 GROUND FLOOR BEAM 4.2 GROUND FLOOR SLAB 4.3 COLUMNS 4.4 FIRST FLOOR BEAM 4.5 FIRST FLOOR SLAB WALL 5.1 TYPES OF WALL 5.2 BRICK ARRANGEMENT 5.3 COMPONENTS OF WALLS SYSTEM 5.4 CONSTRUCTION OF WALLS 5.5 PROCESS OF PLASTERING STAIRCASE 6.1 SPECIFICATION 6.2 TYPE OF STARECASE 6.3 MATERIALITY 6.4 CALCULATION 6.5 CONSTRUCTION PROCESS REFERENCES GAN MING YI SIDNEY/CHONG MIN GAN MING YI SIDNEY GAN MING YI LOO YING YEE CHONG MIN / HO MIN YEE LEE JIA YEE HO MIN YEE
- 3. SINGLE STOREY TERRACE Developer: Tahap Mewah Development Sdn Bhd SITE A LOT 3719, Jalan Jambu, KU 10, Mukim Kapar, Daerah Klang, Klang Bandar Diraja, Selangor Dahrul Ehsan DOUBLE STOREY SHOWROOM Developer: AMD Construction Sdn Bhd SITE B PT 7420, Jalan Kim Chuan Pekan Pandamaran, Daerah Klang Selangor Darul Ehsan 1.0 INTRODUCTION OF SITES
- 4. SINGLE STOREY TERRACE Developer: Setia Usahajaya Sdn.Bhd SITE C FACTORY SITE D Persiaran Sungai Keramat, Jalan Sungai Puloh Klang Developer: Devoted Action Sdn Bhd LOT 4333, Jalan Pipit, Mukim Teluk Panglima Garang, Daerah Kuala Langat, Selangor Darul Ehsan SITE E BANGALOW TamanDelina,Kluang,Johor.
- 5. PRELIMINARIES (or 'prelims’) may appear in tender documents, providing a description of a project that allows the contractor to assess costs which, whilst they do not form a part of any of the package of works required by the contract, are required by the method and circumstances of the works. 2.0 PRELIMINARIES
- 6. The site safety is important as unpredictable tragedies are prone to happen in construction sites. Site safety should be ensured by achieving proper operating conditions to prevent accidents or mitigation of the consequences of accidents 2.1 SITE AND SAFETY SAFETY SIGNBOARDS This is basically the first thing you see when entering a construction site. This ensures that the site is not a cause of danger to its workers or members of the public. Examples of the different types of signs are Prohibition signs, mandatory signs and warning signs as shown in the above images respectively.
- 7. PERSONAL PROTECTIVE EQUIPMENT Safety is a major issue for day laborers and skilled laborers. This equipment protects workers against health or safety risks on the job. The purpose is to reduce employee exposure to hazards when engineering and administrative controls are not feasible or effective to reduce these risks to acceptable levels. PROPER SAFETY EQUIPMENT UNPROPER SAFETY EQUIPMENT Hat Normal shirt Glove Boots Safety Helmet To protect head from falling objects Safety Glasses To protect eyes from flying particles Gloves To prevent hands get injured Ear muff To protect ears from excessive noise Boots To protects feet from sharp and falling obejects Safety Vest To protect body Mask To protect face from injury
- 8. GLOVES Glove should fit snugly. Workers should wear the right gloves for the job (Ex: heavy-duty rubber gloves for concrete work; welding gloves for welding; insulated gloves and sleeves when exposed to electrical hazards). FOOTWEAR Construction workers should wear work shoes or boots with slip- resistant and puncture-resistant soles. Safety-toed footwear is worn to prevent crushed toes when working around heavy equipment or falling objects. SAFETY VEST AND HARNESS Safety vests are designed in fluorescent colors such as green, yellow and orange make it easier for workers to see and locate one another. The standard ensures that these colors are up to par for the work environments they are to be used in. Safety vests help distinguish unauthorized individuals within a particular work place. Harness connects body and rope together, is one of the most important parts of fall arrest system. Except of above-mentioned function it is used as gear carrier and when rappelling or just relaxing in the wall it is relatively comfortable and simple chair- like item. MASK A facemask is a loose-fitting, disposable device that creates a physical barrier between the mouth and nose of the wearer and potential contaminants in the immediate environment. SAFETY HELMET Head injuries can come from falling objects; striking fixed objects, such as unprotected ends of scaffolding poles or other projections; or from restricted headroom. Wearing a hard hat can prevent, or at least reduce the severity of, a head injury. Hard hat colors can signify different roles on construction sites. These color designations vary from company to company and work site to work site. LABORER HSE OFFICER SUBCONTARCTOR SUPERVISOR OPERATOR Airbag collar (inflated) Vitals monitor GPS sensor FIRE EXTINGUISHER It is an essential item found in construction sites used to extinguish fires incase of emergencies FIRST AID KIT Injuries often happen in construction sites .A first aid kit is therefore a necessary item in all sites to ensure safety to all workers and to guarantee them a means of first help when injured.
- 9. 2.2 SITE LAYOUT Proposed buildings Changing room Labour Shed Washroom Storage Project signage Entrance Water Utility Fencing Site layout of Site A Legend: Access road
- 10. REINFORCING STEEL BAR BENDING MACHINE It is obvious that reinforcement bars are usually used to straighten the building structures.In construction and masonry industries,reinforcement bar bending machines are necessary.Because they can be used to reinforce the concrete structures to make architectures more safe. TRACTOR A tractor is used to deliver at a high tractive effort at slow speeds, for the purposes of hauling machinery used in construction. MOBILE CRANE Mobile cranes are able to lift thousands of pounds using the simple concept of transmitting forces from point to point through a fluid.In essence,they work by harnessing the strength that liquid under pressure gives. 2.3 MACHINERIES
- 11. CRANE A crane is equipped with ahoist rope, wire ropes or chains and sheaves that can be used both to lift and lower materials and to move them horizontally. FLAT BED TRUCK As the name suggests,its bodywork is entirely flat allowing for quick and easy loading of goods and are used to transport heavy loads that are not delicate or vulnerable to rain,and also for abnormal loads that require more space than is available on a closed body. DUMP TRUCK Used for transporting loose material for construction and is equipped with an open-box bed which is hinged at the rear and equipped with hydraulic rams to lift the front,allowing the material in the bed to be deposited on the ground behind the truck at the site of delivery. HAND FEED CONCRETE MIXER This combines cement,aggregate such as sand or gravel,and water to form concrete using a revolving drum to mix the components.
- 12. 2.4 TEMPORARY FACILITIES Site office It provide accommodation for site manager, provide space for meetings and to provide storage for site documentation Labour shed It is built for labour who work in the construction project stay at site safely. The shed is made at site with essential facilities like water and power supply and sanitation. Water Supply Water is stored in water tank to provide sufficient water supply for the workers. The water comes from a pipe which connected to the city’s water supply line. Electric Supply Our site’s electricity line is connected to city’s power supply line so it has a power box to determine the power used.
- 13. Drainage Sanitary facilities It is built to ensure cleanliness of labour. It is laid in a way which is convenient and within easy reach of the workmen Drainage is the artificial removal of water, both surface and sub-surface. It is necessary to avoid flooding and other damage.
- 14. HOARDING Hoarding is a temporary structure of solid construction, erected around the perimeter of construction sites to shield them from view and prevent unauthorised access. SIGN & NOTICES Provide protection for the public, resist impact damage, resist anticipated wind pressures and adequately lit at night • It show the names and organisations who participated in the contract • Assist in directing plant and materials deliveries • To help maintain good public relations It is made of aluminium and the height is 2.4m Project Owner Architect’s firm Engineering Consultant Quantity survey’s firm Main contractor JKR Approval
- 15. SCAFFOLDING Scaffolding is a temporary structure used to provide a safe working place at a convenient height. Mobile Scaffolds Constructed to the basic principles as for independent tubular scaffolds and are used to provide access to restricted or small areas or where mobility is required. 4 No. corner standards Close boarded working platform minimum plan size 1.200 x 1.200 Toe board to three sides of tower transom Swivel coupler Cross bracing to four sides of tower transom ledger Cross bracing 125mm minimum diameter castor wheel with integral brake and locking device fixed to corner standards Guard rail to three sides of tower 1.050 Double coupler ledger Not less than least lateral dimension Maximum free standing height 9.600(mobile) : 12.000(static) - external Towers not more than 3x times least lateral dimension – internal towers not more than 3.5x the least lateral dimension 1.500 or 2.500 long high tensile steel ledger 1.000; 2.000 or 3.000 long high tensile steel standard 1.270 long high tensile steel transom High tensile steel ledger Connecting pockets to receive blade ends of ledgers and transom welded to standard at 500mm centres Main Component Vertical access ladder securely tied to one face of tower 1minimum 150 min 910 minimum 470 max
- 16. It involves the removal of trees, demolishing buildings, removing any and all old underground infrastructure, and any other obstacles that might affect the construction process in the future or hinder the project to be done. Stage 1: Grubbing out trees and bushes Stage 2: Excavator heaping up top soil Stage 3: Soil Compaction Stress applied to a soil causes densification as air is displaced from the pores between the soil grains. It increase stiffness and therefore reduce future settlement Top soil which contains plant life animal life and decaying matter has to be remove to make soil less compressible and suitable for supporting buildings. 2.5 SITE CLEARANCE Trees are chopped off to empty the site The tree trunks is lifted and transport out of the site
- 17. 2.6 EARTHWORK AND EXCAVATION Topsoil Excavation Involves the removal of the exposed or the topmost area of the earth’s surface which include vegetation, soil, and any other decaying material that could make the land unsuitable to bear structural loads. Reduce Level Carried out below oversite level to form a level surface on which to build and can consist of both cutting and filling operations. The level to which the ground is reduced is called the formation level. Trench Excavation In this type of excavation the length of the excavated area exceeds the depth. Trench excavation is typically used to bury service lines, to install pipelines and sewer systems, or lay foundations. Shallow trenches of less than 6m or deep trenches of more than 6m are done using this type of excavation. The disturbance of soil and removal of earth to form a cavity in the ground. Depth varies from site (usually 150-300mm) Proposed formation level Subsoil Excavation mechanical shovel or bulldozer Roll bar Dumper to move soil Bulldozer for cut and fill operations Mechanical shovel and attendant lorries for cut only operations formation level Backactor- spoil placed alongside excavation or into attendant lorry
- 18. “Setting out” is the process of locating points for site boundary level and other necessary structural parts according to the construction drawing. Errors should be avoided because the whole structure will be build based on the respective setting out. A setting out should be made to full fill the requirements such as length, angle and level. STEP 1: A temporary bench mark or level should be obtained to start the setting out for the whole building. A specific height from a near land or from the road level can be obtained as the reference level point for a setting out. This level point will conduct all over the building boundary area or 1m away from the building boundary level. STEP 2: Use pole to specify distance from boundary. From this point, can continue the setting out related to the given drawing. Setting out site boundary 2.7 SETTING OUT Nail in centre of post 50 x 50 corner post driven firmly into the ground Cord marking outline of building Outline marked on ground with dry lime or similar powder Theodolite A precise instrument for measuring angles in the horizontal and vertical planes Profile board Datum post Main setting-out lines Diagonal checks Baseline Site boundary Telescopes at right angles- swivel up and down- range 3 to 100m Tripod Sight lines to corner posts Plumb rod Corner post
- 19. STEP 3: Take angular setting out. Right angles setting out can be obtained by marking the next columns on a straight line using the Pythagoras theorem. STEP 4: Use a twine to connect the centre lines of all columns with the bench mark reference height to connect all of them. 3-4-5 triangle ( Theorem of Pythagoras) 1. Think of a triangle that has two legs that join at a 90 degree angle. 2. Refer the legs as leg A and leg B. Leg C is the third leg that connects the first two. 3. C squared (C x C) should be the sum of leg A squared (AxA) and B squared (BxB). In other words: A2 + B2= C2
- 20. It is a device for cleaning the tires of trucks when they are leaving a site. It help in control and eliminate the pollution of public roads. WHEEL WASHING SYSTEM Water trough It requires low cost maintenance and very easy to use. It cleans the wheel of vehicle as vehicles passes slowly through the pit. This system is efficient as vehicles does not need to stop for cleaning. Water hose system Water hose is set up at the exit. Vehicles have to stop at the exit and clean their wheels manually. This system is cost effective and able to clean the wheel well. Wood pallets are stacked and placed at the corner. Site storage involves the provision of adequate space, protection and control for materials, components and equipment that are to be kept on a construction site during the building process. STORAGE Bricks is supplied strapped in unit loads and stored on timber pallets. Open storage. It is located near the entrance so that materials can be easily loaded off from lorry.
- 21. 3.0 FOUNDATION 3.1 DEFINITION OF FOUNDATION Foundation is the lowest division of a building – its substructure – constructed partly or wholly below the surface of the ground. Its primary function is to support and anchor the superstructure above and transmit its loads safely into the earth. Deep Foundation Shallow Foundation Shallow Foundation Deep Foundation Feasibility Easier to construct Construction process is more complex Mechanism of Load Transfer Transfer loads mostly by end bearing Rely both on end bearing and skin friction Depth The depth of shallow foundation is generally about 3 meters or the depth of foundation is less than the footing with Greater than shallow foundation Cost Cheaper Generally more expensive than shallow foundation Advantages Less labor needed Provide lateral support and resists uplift as well as carrying huge loads Disadvantages Possibility of a settlement and weak against lateral loads Skilled labor needed and can be time-consuming Employed when the soil is underlying a foundation is unstable or of inadequate bearing capacity. Employed when stable soil of adequate bearing capacity occurs relatively near to the ground surface. Drawing 3.1: Types of Foundation Table 3.1: Comparison table
- 22. 3.2 FOUNDATION ON SITE Precast Reinforced Concrete Friction Piles are used and constructed by Displacement Method. Load Pile Cap Drawing 3.2 : Friction Pile showing forces are transferred to the soil by the entire surface of pile Friction Piles develop most of the pile-bearing capacity by shear stresses along the sides of the pile and it is suitable to the site as the hard layers are too deep. The pile transmits the load to surrounding soil by friction between the surface of the pile and soil, which in effect lowers the bulb of pressure. Reason using Friction Pile on site Displacement Method 3.3 METHOD OF INSTALLATION Drop Hammer Method Drawing 3.3 : Examples of pile cap layouts Drawing 3.4 : Foundation Drawing 3.5 : Drop Hammer It is used to install the piles into the ground. The hammer is raised to a certain height and released to strike the pile. This method is suitable for light-weighted piles and suit best in clay, marl or compact sand. Displacement piles cause the soil to be displaced radially as well as vertically as the pile shaft is driven into the ground. Column Pile Cap R.C. Piles The pile is well placed and ready to be hammered. The weight dropped and the pile is driven into the ground. Continuous hammering until the pile reaches its desired depth. Drawing 3.6 : Method of Constructing
- 23. 3.4 CONSTRUCTION PROCESS 1. Loading Test 2. Setting Out Jotted Lines 3. R.C. Piles Driven Below Ground Using Pilling Machine 4. Pile Cutting ( Join & Cut ) 5. Excavation 6. Formwork Extension Pile Initial Pile Joint 1. Pile load test to determine the ultimate geotechnical capacity of the pile. Land Surveyor set out piling points. The workers measure, mark and jot the points. Once the piling points have been placed, dropping hammer method is used to install the piles into the soil (12 meters deep). Joining of piles with welding when insufficient pile length occurs as well as cutting of piles to fit. 6m +6m to 12m joints The subsoil of the site will be disposed and taken off from the site. The purpose of this is to reduce level for creating the pile cap. Overall formwork will be built by plywood and it is assembled around the perimeter. The height of formwork follows the depth of the pile cap. This is to retain concrete until it has developed enough strength to stay in position.
- 24. 7. Placement of Spacer Block and Rebar 8. Concreting 9. Dismantling of Formwork Put in lean concrete so that the moisture does not absorb into the soil. Next, pre-cast spacer blocks are placed to provide adequate concrete cover for the reinforcement bars to help maintain the proper position. Concrete is then poured into the formwork. Vibrator is used to ensure it has filled all the edges and to ensure that there are no air bubbles trapped. Concreting and hardening. Removal of formwork after the concrete have dried up. Pile cap is done, foundation has completed.
- 25. 4.1 GROUND FLOOR BEAM Ground beam (soil level beam) transferring loads delivered by superstructure above, or expanding soil below, to discrete foundations elements, such as piles and footings. Ground beams at the site are constructed in situ. Ground beams are reinforced concrete beams which support walls, joists and other structures near ground level. Ground beams are either standing directly upon the ground or supported at both ends by piers REINFORCED CONCRETE BEAM It carries two set of external forces (loads applied to the beam and the reactions from the supports) and two types of internal forces (bending moments and shear forces). External forces Internal forces Legend The types of beam that mostly used at the site are Reinforced Concrete Beam (R.C.Beams). It is designed to act together with longitudinal and rebar in resisting applied forces. Steel bars are embedded into concrete which, generating resisting forces which provides extra tensile strength. Advantages • High compressive strength • Superior fire-proof capability as compared to steel • Easily casted • Economical and low maintenance cost Disadvantages • Requires mixing, casting, and curing which can change the final of strength of concrete • Low tensile strength • Shrinkage causes crack development. Connection of ground beam and pile Reinforced Concrete Beam 4.0 STRUCURE
- 26. 2. SETTING UP OF BEAM REINFORCEMENT After blinding process, reinforcement will be tied to the column stump to hold them in position. Reinforcement steel bars used to provide the tensile strength . 1. FORMWORK STRUCTURE To retain concrete, formwork or centering and shuttering is required. Formworks are set at the surrounding of the reinforcements of the ground floor beams together ground floor slabs. Stirrup is used to resist shear and diagonal tension stresses in beam. CONSTRUCTION OF GROUND FLOOR BEAM 3. LAYING OF CEMENT CONCRETE For small quantity of concrete volume we normally depend on machine-mix concrete and filling the beam 4. GROUND FLOOR BEAM CASTED Casting and curing are done simultaneously for beam and slab. The curing period will take around 2-3 weeks. Side of formwork is removed when the concrete are dried up, normally after 3 days. Bottom part is removed after 21-28days. The formworks are usable for up to 3 times at least. Concrete
- 27. 4.2 GROUND FLOOR SLAB Slabs are supported on columns and beams. It is a flat horizontal surface, normally used as floor or subfloor. The types of slab that used at the site are reinforced concrete slab. It is constructed of reinforced concrete poured into formwork on-site or into trenches excavated into the ground. Ground slab are those slabs that are poured directly into excavated trenches in the ground. They rely entirely on the existing ground for support. The load is directly transferred to the ground and ground beam. TYPE OF SLAB ONE-WAY SLAB TWO-WAY SLAB 1-STOREY TERRACED HOUSE TWO-WAY SLAB Two way slabs are the slabs that are supported on four sides and the ratio of longer span to shorter span is less than 2. In two way slabs, load will be carried in both the directions. So, main reinforcement is provided in both direction for two way slabs. TWO-WAY SLAB
- 28. CONCRETE SLAB RESIST COMPRESSION • The concrete mix for ground bearing slab is 1:2:4 ‘GEN 3’ mix. • The floor slab is placed over the DPM • The thickness of floor slab> 100mm • Ensure all the services running under the floor are installed and tested before pouring the slab. BRC MESH REINFORCEMENT-TRANSFERS LOADS AND BEAM DAMP PROOF MEMBRANE HEAVY DUTY POLYTHENE DAMP-PROOF MEMBRANE PREVENTS WATER LEAKING THROUGH • Joints in a Polythene DPM are welted or taped and overlap by at least 300mm. • The DPM must be linked with the DPC in the walls, to ensure that the entire interior of the building is protected from moisture by a continuous, impervious barrier. ANTI-TERMITE SPRAY REPELS TERMITES LEAN CONCRETE PROVIDES FLAT SURFACES HARDCORE&SAND BLINDING FILLS ANY VOIDS IN THE GROUND TO PROVIDE FLAT BOTTOM • The fill material used to make up the hardcore should contain a range of particles so that it can be firmly compacted such as clean broken bricks, roof tiles, concrete or crushed stone. • A layer of sand blinding should be provided over the hardcore before laying the DPM to prevent puncturing from sharp stones.
- 29. CONSTRUCATION OF GROUND FLOOR SLAB 3. Formwork structure Formwork is installed around the compacted hardcore. Welded wire reinforcement is layered on top of the damp proof membrane. 5. Laying of Concrete Concrete class is casted on top of the wire reinforcement with the formwork acting as a mould. The concrete is then spread by until the form is full and even. The ground taxes 1- 2days to cure and after curing of 14 days, the formwork are then removed. 6. Concrete slab casted Strike and remove formwork after 10-14days 4. Setting up of reinforcement Ground beam’s steel bars are tied to the column stump starter bar with link wires. 2. Damp Proof-Membrane Damp proof membranes are required in the construction of all new buildings to prevent rising damp. 1. Anti-termite Spray Anti termite treatment is applied on the prepared, compacted hardcore to prevent terminates from attacking structures by building shelter tubes from the soil to the wood in structures
- 30. 4.3 COLUMNS Column is a vertical member which takes complete load of the beam, slabs and the entire structure and the floor and other area of the building is Column transfers the load of the structure of slabs beams above to below, and finally load is transferred to the soil. Position of the columns should be so that there are no tensile stresses developed at the cross section of the columns. Columns location should be such that it hides in the walls partially or fully. TIED COLUMN A concrete column reinforced with longitudinal bars and horizontal ties 1-STOREY TERRACED HOUSE INDAH FACTORY RCC Columns (Reinforced Concrete Columns) A reinforced concrete column can be defined as a structural member with a steel frame (reinforcement bars) composed of concrete that is been designed to carry compressive loads. This type of column which composes of concrete and reinforced steel bars (rebar) is seen at our site. Steel is embedded inside the columns in such that two materials internal forces oppose each other, resulting in stronger strength when compared with normal concrete. Disadvantages • Tensile strength of reinforced concrete is 1/10 of its compressive strength. • Final strength of reinforced concrete is determined by production process, mixing-casting-curing. • Shrinkage causes section are larger than steel sections in multi-storied building Advantages • High compressive strength • Fire resistant • Long lifespan with low maintenance • Can be casted into different shapes, and still yields rigid members with minimum apparent deflection. Material used in columns • Cement • Coarse aggregate • Fine aggregate • Steel bar • Water • Shuttering Rectangular Column Column rebars Column Stirrups
- 31. CONSTRUCTION OF COLUMN 1. Column layout work Location of columns are determined practically in field. It is done by laying rope according to grids shown in the drawing and mark the location of columns related to rope. 3. Column reinforcement work After making to column locations, we then start to place reinforcement as instructed in the structural drawing. At least 4 reinforcements at 4 corners. Columns have closed lateral ties spaced approximately uniformly across the column to resist shear force and bursting out effect. Hooks are used to resist expansion 5. Pouring concrete into column For small quantity of concrete volume we normally depend on machine-mix concrete and for large concrete quantity we order ready-mix concrete 6. Removal of formwork & Curing Compaction is done by vibrator. Formwork is removed after 3 days. Concrete is moist cured for 7 days to increases the strength up to 2.5times and durabili. Done for 21 days. Gunny bags are used for curing 4. Column formwork It is a term used for structures that are used to support forms and molds for poured concrete columns. Must be leak proof, smooth inside and properly aligned. The floor height is normally kept at 10 feet. If the slab contains beam, then concrete has to be poured up to the beam bottom level. 2. Installation of column stumps A column stump is built on top of a pad foundation which extended from the piling below foundation. It is useful in transferring the loads of a building into the foundation and it acts as a supporter for ground beams and ground floor column construction. Starter bar York Plan and elevation of column formwork sheeting cleat collar bolt concrete Steel bar
- 32. CONNNECTION BETWEEN BEAM & COLUMN Beam Steel bar Ground Slab Steel Bar & BRC Column Steel Bar Starter bar The steel bar intersect each other for better grip
- 33. 4.4 FIRST FLOOR BEAM The types of beam that mostly used at the site are Reinforced Concrete Beam (R.C.Beams). It is designed to act together with longitudinal and rebar in resisting applied forces. Steel bars are embedded into concrete which, generating resisting forces which provides extra tensile strength. Continuous Beam a statically indeterminate structure. They rest over three or more supports, thereby having one or more redundant support reactions. TYPES OF BEAM Simply Supported Beam mainly two supports at beam. The beam undergoes Shearing and Bending depending on the load applied. The ADVANTAGES OF A CONTINUOUS BEAM as compared to a simply supported beam are as follows. • For the same span and section, vertical load capacity is more. • Mid span deflection is less. SIMPLY SUPPORTED BEAM CONTINUOUS BEAM External forces Internal forces
- 34. CONSTRUCTION OF FIRST FLOOR BEAM 1. Formwork structure Formwork were set up to support the steel bar. The formwork is kept in position till the concrete sets. 3. Laying of Cement Concrete After tying all the bars, concrete were poured into to the column 4. Floor Beam Casted, Curing & Removal of formwork Casting and curing are done simultaneously for beam and slab. The curing period will take around 2-3 weeks. Side of formwork is removed when the concrete are dried up, normally after 3 days. Bottom part is removed after 21-28days. The formworks are usable for up to 3 times at least. 2. Setting up of Beam Reinforcement The steel bar of the beam were tied to the starter bar. Reinforcement steel bars used to provide the tensile strength . Steel bar concrete formwork formwork
- 35. 4.5 FIRST FLOOR SLAB 1. Scaffolding The Ledger were set up. Scaffolding were placed under the ledger to act as secondary support. 2. Formwork structure Formwork for slab were installed by using plywood. Cover blocks are provided for slabs and beams. 3. Setting up of Beam Reinforcement Fix in reinforced rebars which are tied and put in grids. Beams reinforcements are fixed and anchored into the column. Steel Rebar for beam is also placed into beams formwork. The rebars of slab will be joint with rebars of existing columns to enhance the strength 4. Laying of Cement Concrete Concrete casted into the formwork that hold the welded wire reinforcement in place. Finally, Concrete is casted on top of the reinforcement and an intermediate slab is formed. 5. First Floor Slab casted, Curing & Removal of formwork After curing process of 28days, the formwork will be removed. CONSTRUCTION OF FIRST FLOOR SLAB
- 36. Non-load bearing Wall •Non-load bearing walls that separate spaces in buildings. •Frame constructions may include insulation to prevent the passage of sound or fire between adjacent spaces. •Framed systems, as wall positions can be changed relatively easily and inexpensively without impacting on the overall structure of a building. Party Wall •A wall that stands on the lands of 2 or more owners or a wall that is on one owner's land but is used by 2 or more owners to separate their buildings. •one half of the wall’s thickness lies on each property. Load bearing wall •Carries and distributes the load from roof and floor from above to structure or foundation below. 5.1 TYPES OF WALLS WALLS ARE PART OF THE 3 PLANES IN ARCHITECTURE [ALONG WITH THE OTHER 2 PLANES‐THE OVER PLANE & THE BASE (FLOOR) PLANE] THAT DEFINES THE 3-DIMENSIONAL VOLUME OF MASS AND SPACE. 5.0 WALL
- 37. COMPARISON BETWEEN BRICKS Clay Bricks Cement Sand Bricks Cost $230.00 - $300.00 per thousand $190.00 - $250.00 per thousand Absorption Absorbs approximately 15.35g of moisture per minute per square inch Absorbs between 40g – 80g of moisture per minute per 30 square inch Compressive Strength 8000 to 10000 psi 3000 to 4000 psi Movement Joint Can be built without movement joints Joint reinforcing steel is required to minimise cracking Advantages 1. Cheap 2. Durable 3. Low Maintenance 1. Good workability 2. Unaffected by termites Disadvantages The high weight increases structural requirements Less resistant to cracking 5.2 BRICK ARRANGEMENT Flemish Bond Stretcher Bond Arrangement Characteristics 1. Each course consists of alternate headers and stretchers. 2. High strength and great aesthetics 3. The cut needed for this brick arrangement is called a queen closer 1. Also known as running bond 2. Consists of stretchers in every course of bricks Advantages Decorative 1. Good workability 2. Economical, widely used. Disadvantages 1. More labor intensive 2. Requires more bricks Weaker bond compared to flemish bond
- 38. Concrete 5.3 COMPONENTS OF WALL SYSTEM A structural horizontal block that spans the space or opening between two vertical supports. It can be a decorative architectural element, or a combined ornamented structural item. Pre-cast In-situ Reinforced cement concrete (RCC) lintels Characteristics Indicates that a concrete lintel has been cast inside a mould, and has been allowed time to set and harden before it is built into the wall. Indicate that a lintel is cast in position inside a timber mould fixed over the opening in walls. Advantages 1. Lintel is placed in position over the opening, brickwork can be raised on it. 2. Less labours are required. 1. Can be position over openings. 2. Less maintenance cost. Disadvantages 1. Too heavy or cumbersome to have been easily hoisted and bedded in position. 2. Higher maintenance cost. 1. Requires a timber mould or formwork and must be allowed to harden before brickwork can be raised on it. 2. More labours are required. LINTELS MORTAR Transfer tensile, compressive and shear stresses uniformly between adjacent bricks, thus spreading loads. Good workability, durable and economical. Shrinkage can be caused if mortar is weaker than bricks, weakening fabric of structure. STIFFENERS Stiffeners are used to provide lateral support to wall system, increase stability, reduce cracks on the brick wall and break down overall size of wall making smaller effective area. Diagram shows vertical and horizontal stiffeners. Vertical stiffeners are placed at per 3m height while horizontal stiffeners are placed at per 4m length/ width. Concrete is poured into the gap after the formwork is casted.
- 39. 5.4 CONSTRUCTION OF WALLS 1. Reference strings are tied to a straight piece of wood to act as guideline for brick wall construction. 2. Bricks are laid accordingly following the reference strings and bonding used. 3. Cement mortar is applied on the surfaces of header and stretcher by using a trowel. 4. Damp-proof course(dpc) or membrane(dpm) is used on the external ground floor wall to provide an impermeable barrier to the passage of moisture. 5. Exmet is laid flat and set in the brickwork- joints, completely embedded in mortar every forth brickwork-joint to enhance the reinforcement. Dowel bars were installed to strengthen the ties between column and the brick wall. 6. Pegs and spirit level are used to ensure vertical and horizontal lines of the wall are in correct angle. 7. Bricks are placed at 45 degree to fill up the remaining raws on the top.
- 40. 5.5 PROCESS OF PLASTERING 1. Brick wall chasing According to the marked path using a chasing machine. Depth should be at least 10mm. 2. Insert electrical conduit Place the conduit into the chasing area and placed it in together with the wire box attached. 3. Water piping Consists of all the piping which carries city water inside the building. 4. Plastering Cover up the space between the conduit with light coat of plaster. 5. Corner bead Protect the edges, often done before plastering to provide a smooth surface. 6. Skim coat Process of applying a very thin covering of joint compound or mud, to smooth out rough wall. 7. Painting Cover up any marks of plastering/skimming.
- 41. 6.0 STAIRCASE(SITE E) 6.1 SPECIFICATION RISER -vertical distance between walking surface TREAD -horizontal walking surface of an individual step WALL STRINGER -the housing on either side of a flight of stairs, into which the treads and risers are fixed. LANDING -The horizontal area connecting one flight of stairs to another flight of stairs which provide for user to stop or rest. NOSING-Projecting rounded edge of a step for safety precautions which also provides extra space as you walk up and down the staircase. HANDRAIL-The horizontal or incline piece of a balustrade system. It is designed to be grasped by the hand so as to provide stability or support and prevent injurious falls. BALUSTER-vertical member that acts as the infill between the handrail. KNEE WALL -A framed wall slightly above the noses of the stair treads with its top running parallel with the incline of the stair resulting in a closed stair. WALL RAIL -A handrail attached to a full or half wall following the pitch or incline of a closed stair. Definition : a construction designed to bridge a large vertical distance by dividing it into smaller vertical distances, called steps. GLASS RAILING SYSTEM NOSING TREAD RISER EXCEL SQUARE TOP RAIL END CAP SQUARE BASE PLATE ANGLED STAIR SLEEVE RISER + TREAD = STEP RISER TREAD WALL STRINGER LANDING HANDRAIL BALUSTER KNEE WALL WALL RAIL WALL
- 42. 6.2 TYPE OF STAIRCASE DOG-LEG STAIRS (HALF-TURN STAIRS ) -Basically 2 parallel flights of straight stairs joined by a landing that requires 180 degree turn in the walk line. -One of the most common arrangement of stairs. Advantages of Dog-Leg Stairs: -Can be constructed within the confines vertical stair well. -Easier to fit into an architectural plan. - Offer some architectural interest. -The landings can offer a resting point part way up the stairs. Disadvantages of Dog-Leg Stairs: -More difficult to build. EXAMPLE INCLINED SLAB STAIR -Constructed when there are load bearing wall around the stair. -The landing is built into the walls as one way span slab. -The flight span from floor to landing and landing to floor. Advantages of inclined slab stair: -Gives more compact plan layout and better circulation than the single straight flight stair. Disadvantages of inclined slab stair: -Wasteful cutting of block to allow the flight built into the walls FIRST FLOOR LANDING UPER FLIGHT ENCLOSING STAIR WALL LANDING GROUND FLOOR LOWER FLIGHT PANEL WALL STRUCTURAL FRAME LOAD BEARING WALL
- 43. ARCHED OR CURVED STAIRS They tend to be on a much larger radius and typically do not make a full circle. Advantages of Curved Stairs: -Often very elegant and traditional -Can equally be adapted to contemporary designs. -Relatively easy to walk up if the radius is large enough. Disadvantages of Curved Stairs: -the most difficult to build of the various types of stairs . -most costly to build. -the handrail presents a challenge due to curvature. OPEN AT 1 SIDE -1 side is enclosed by a wall CLOSED RISER STAIRS -A stair framed so that you cannot see the treads and risers from the side of the stair. -Most often a knee wall is used in this situation. -This type is nearly exclusively used for interior purposes. -More structurally and rigidity sound than open riser stairs. RISER -VERTICAL PART IS ENCLOSED. -OPEN AT 1 SIDE WALL 6.2 TYPE OF STAIRCASE (cont.) TREAD MISALIGNED TURNING OF WAIST SLABS PLAN
- 44. 6.3 MATERIALITY IN-SITU REINFORCED CONCRETE STAIRCASE Advantages: -More durable -High compressive strength -Weather Resistant -Water resistant -Fire resistant -Rodent resistant -Corrosion resistant -non-combustible -It yields rigid members with minimum apparent deflection. -Low maintenance cost -Economical construction material Disadvantages: -Crack happened by shrinkage -Low tensile strength compared to its compressive strength. -High form cost -More skilled labours are required for in-situ construction -construction is slow as elements are cast at the site. - CONCRETE MIX DESIGN OF M25 CONCRETE PROPORTION The process to obtain a concrete of desired quality. CHARACTERISTIC COMPRESSIVE STRENGTH IN N/MM^2 -25 (Group as standard concrete) -It is defined as the strength of the concrete which not more than 5% of the test results are expected to fall. -In simpler terms, if you cast 100 cubes and test their compressive strength using compression testing machines after 28 days, then not more than 5 cubes should fail at a value lesser than 25KN/mm^2. RATIO 1:1:2 (cement : fine aggregates : coarse aggregates) SLUMP TEST -measures the consistency of fresh concrete before it sets. -used as an indicator of an improperly mixed batch. TRUE SLUMP -the concrete simply subsides, keeping more or less to shape. CEMENT SAND GRAVEL COMBINE DRY THEN MIX WITH WATER GOOD ZONE TOO WET TOO DRY TRUE SLUMP
- 45. 6.4 CALCULATION STAIRCASE NUMBER OF RISER CALCULATION: A unit riser height is 150mm Total riser (floor to floor) = 2250mm Number of riser / steps =2250mm/150mm = 15 risers / steps TOTAL RUN CALCULATION: unit run is 250mm for each. Total run= (number of riser – 1) x unit run Total run = (15-1) x 250mm =3500mm TREAD CALCULATION: Mark the outside radius = 4267mm Mark the inside radius = 3048mm since the wide of staircase = 1219mm Mark walk line=300 mm from inside radius Unit run at walk line =250mm Mark 228mm and 457mm on inside radius Pull a line from 228mm to outside radius and move to 457mm That gives a tread layout. LAYOUT 4267 (OUTSIDE RADIUS) 3048 (INSIDE RADIUS) 1219 300 228 457 250 (AT WALK LINE) TREAD LAYOUT UP WALL KNEE WALL TOTAL RUN= 3500 TOTAL RISE= 2250 ANGLE OF STAIRCASE= 40
- 46. 6.5 IN-SITU REINFORCED CONCRETE STAIRCASE CONSTRUCTION PROCESS 1.The area of staircase is calculated and marked with a box 2.Temporary timber formwork is built within the box and scaffolding is added to the bottom to support the load during the construction process. 3. High tensile reinforcement steel bars are installed along the staircase.The steel bars are tied together using a steel wire. This to provide extra structural strength. 4.The stringer and riser board are constructed to create riser and tread of a step. 5.M25 concrete mixture is poured from the to to the bottom into the framework. Concrete vibrator is used to ensure the concrete mixed evenly. A float is used to smooth out the concrete surface .Concrete tested by test cube to ensure its better condition. 6.After the concrete is harden the framework and scaffolding can be removed .The concrete staircase is done. STEEL WIRE STEEL BARS TIMBER PLYWOOD
- 47. 6.5 IN-SITU REINFORCED CONCRETE STAIRCASE CONSTRUCTION PROCESS (cont.) CONCRETE TEST CUBE -Compression strength test machine. -Ensure enough and stable concrete strength -Test carried out for concrete at age 7,14 and 28 days ( first test cube is 7 days, second test cube is 28 days. CONCRETE VIBRATOR -Used on concrete pour site. -Removed free bubble and ensure concrete mixed evenly -Strengthen the concrete -Ensure smooth surface PRESSURE WAVES RADIATES OUTWARD FROM VIBRATOR RADIUS OF ACTION INITIAL VIBRATION LIQUIFIES CONCRETE, PARTICLES SEPARATE CONTINUED VIBRATION DRIVES ENTRAPPED AIR BUBBLES TO SURFACE
- 48. 7.0 REFERENCES 1. Site clearing process retrieved from http://www.reliablecontracting.com/how-site-clearing-prepares-a-construction-site/ 2. Type of excavation retrieved from http://ronmeyerexcavating.com/types-of-excavation/ 3. Type of scaffolding retrieved from https://theconstructor.org/building/types-of-scaffolding-in-construction/11845/ 4. Chudley. R (2004). Building Construction Handbook. London: Butterworth-Heinemann 5. Fondation Poulos, H. G., & Davis, E. H. (1980). Pile foundation analysis and design (No. Monograph). 6. Dobni, D., & Zinkhan, G. M. (1990). In search of brand image: A foundation analysis. ACR North American Advances 7. Coduto, D. P. (2015). Foundation design: principles and practices. Pearson 8. Vesic, A. S. (1973). Analysis of ultimate loads of shallow foundations. Journal of Soil Mechanics & Foundations Div, 99(sm1). 9. Vesic, A. S. (1967). A study of the bearing capacity of deep foundations 10. Xiao, W. Q., Len, W. M., & Lu, W. T. (2004). Study on inner force and deformation of supporting structure for deep foundation pit. ROCK AND SOIL MECHANICS-WUHAN-, 25, 1271-1274. 11. Beam and Column : http://www.basiccivilengineering.com/2015/03/column-and-beam-system-in-construction.html 12. Column : http://www.dailycivil.com/basic-construction-process-rcc-column/ 13. Slab: https://www.celebrationhomes.com.au/the-building-hub/construction/the-slab 14. Flemish Bond vs Common Bond: Pros and Cons retrieved by https://www.doityourself.com/stry/flemish-bond-vs-common-bond-pros-and-cons 15. Running Bond vs Stack Bond: Pros and Cons retrieved by https://www.doityourself.com/stry/running-bond-vs-stack-bond-pros-and-cons 16. Difference between Precast & Cast-in-situ Concrete retrieved by https://gharpedia.com/difference-between-precast-cast-in-situ-concrete/ 17. CLAY BRICKS VS CONCRETE BRICKS – WHAT IS THE DIFFERENCE? retrieved by www.johnirwinchicago.com/real-estate-resources/2016/12/2/rml64qpph7utw93rz6uhubhbteylth 18. Staircase components https://theconstructor.org/tips/components-of-staircase/7534/ 19. Types of staircase https://www.keuka-studios.com/types-of-stairs/ 20. Staircase construction http://www.thisiscarpentry.com/2016/03/11/curved-stairs-no-mystery-just-simple-math/ . . .