This document provides an overview of basic configuration of a router using MikroTik's command line interface (CLI). It covers initial configuration topics like user administration, hostname, IP addressing, default routes, DNS and NTP settings. It also demonstrates some useful CLI commands and techniques like tab autocomplete, taking backups of configuration modules, bandwidth scheduling scripts and more. The document is intended to help users get started with basic MikroTik router configuration via the CLI.
Introduction to MikroTikCLI
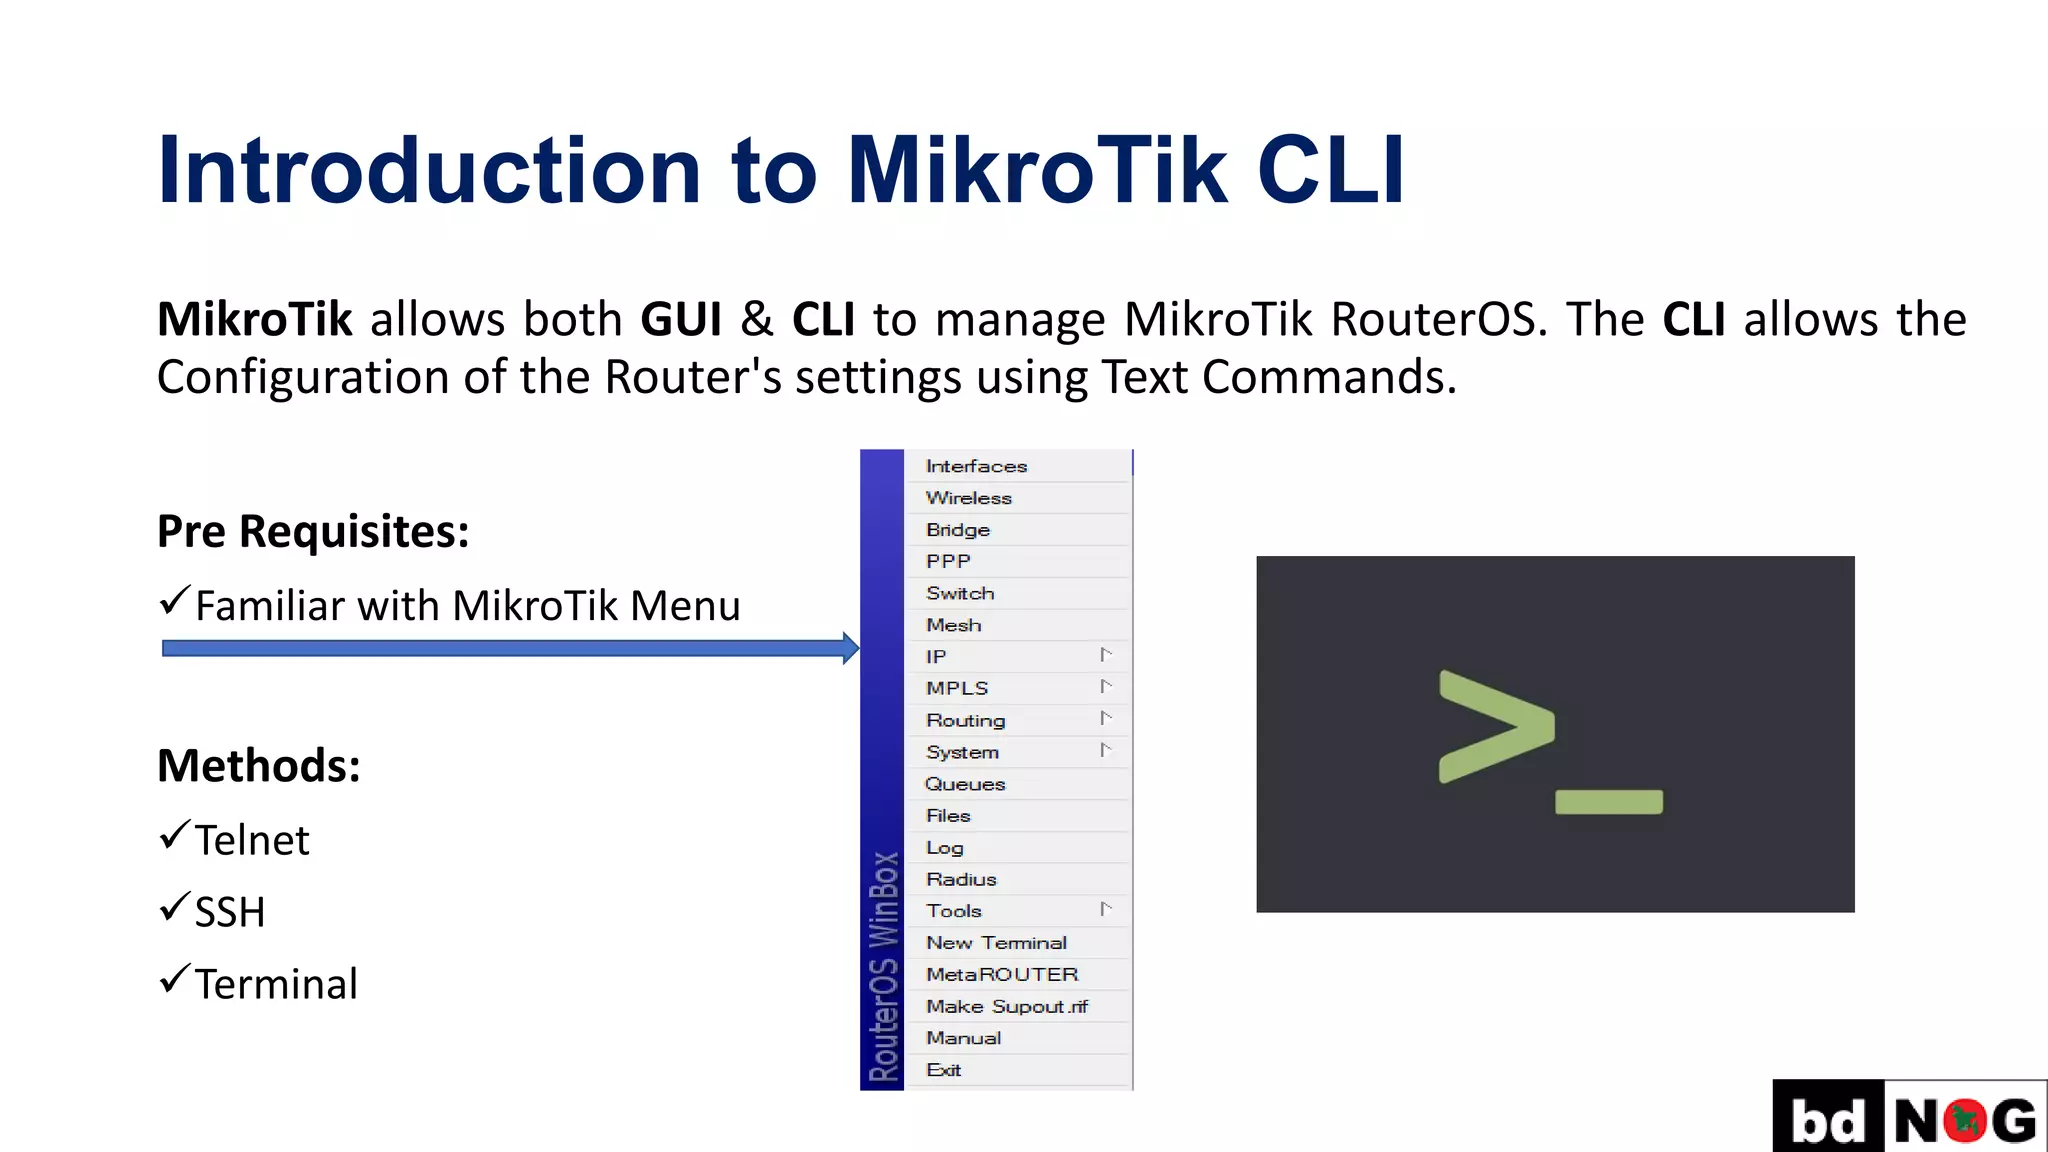
MikroTik allows both GUI & CLI to manage MikroTik RouterOS. The CLI allows the
Configuration of the Router's settings using Text Commands.
Pre Requisites:
✓Familiar with MikroTik Menu
Methods:
✓Telnet
✓SSH
✓Terminal
3.
First time Startupwith MikroTik CLI
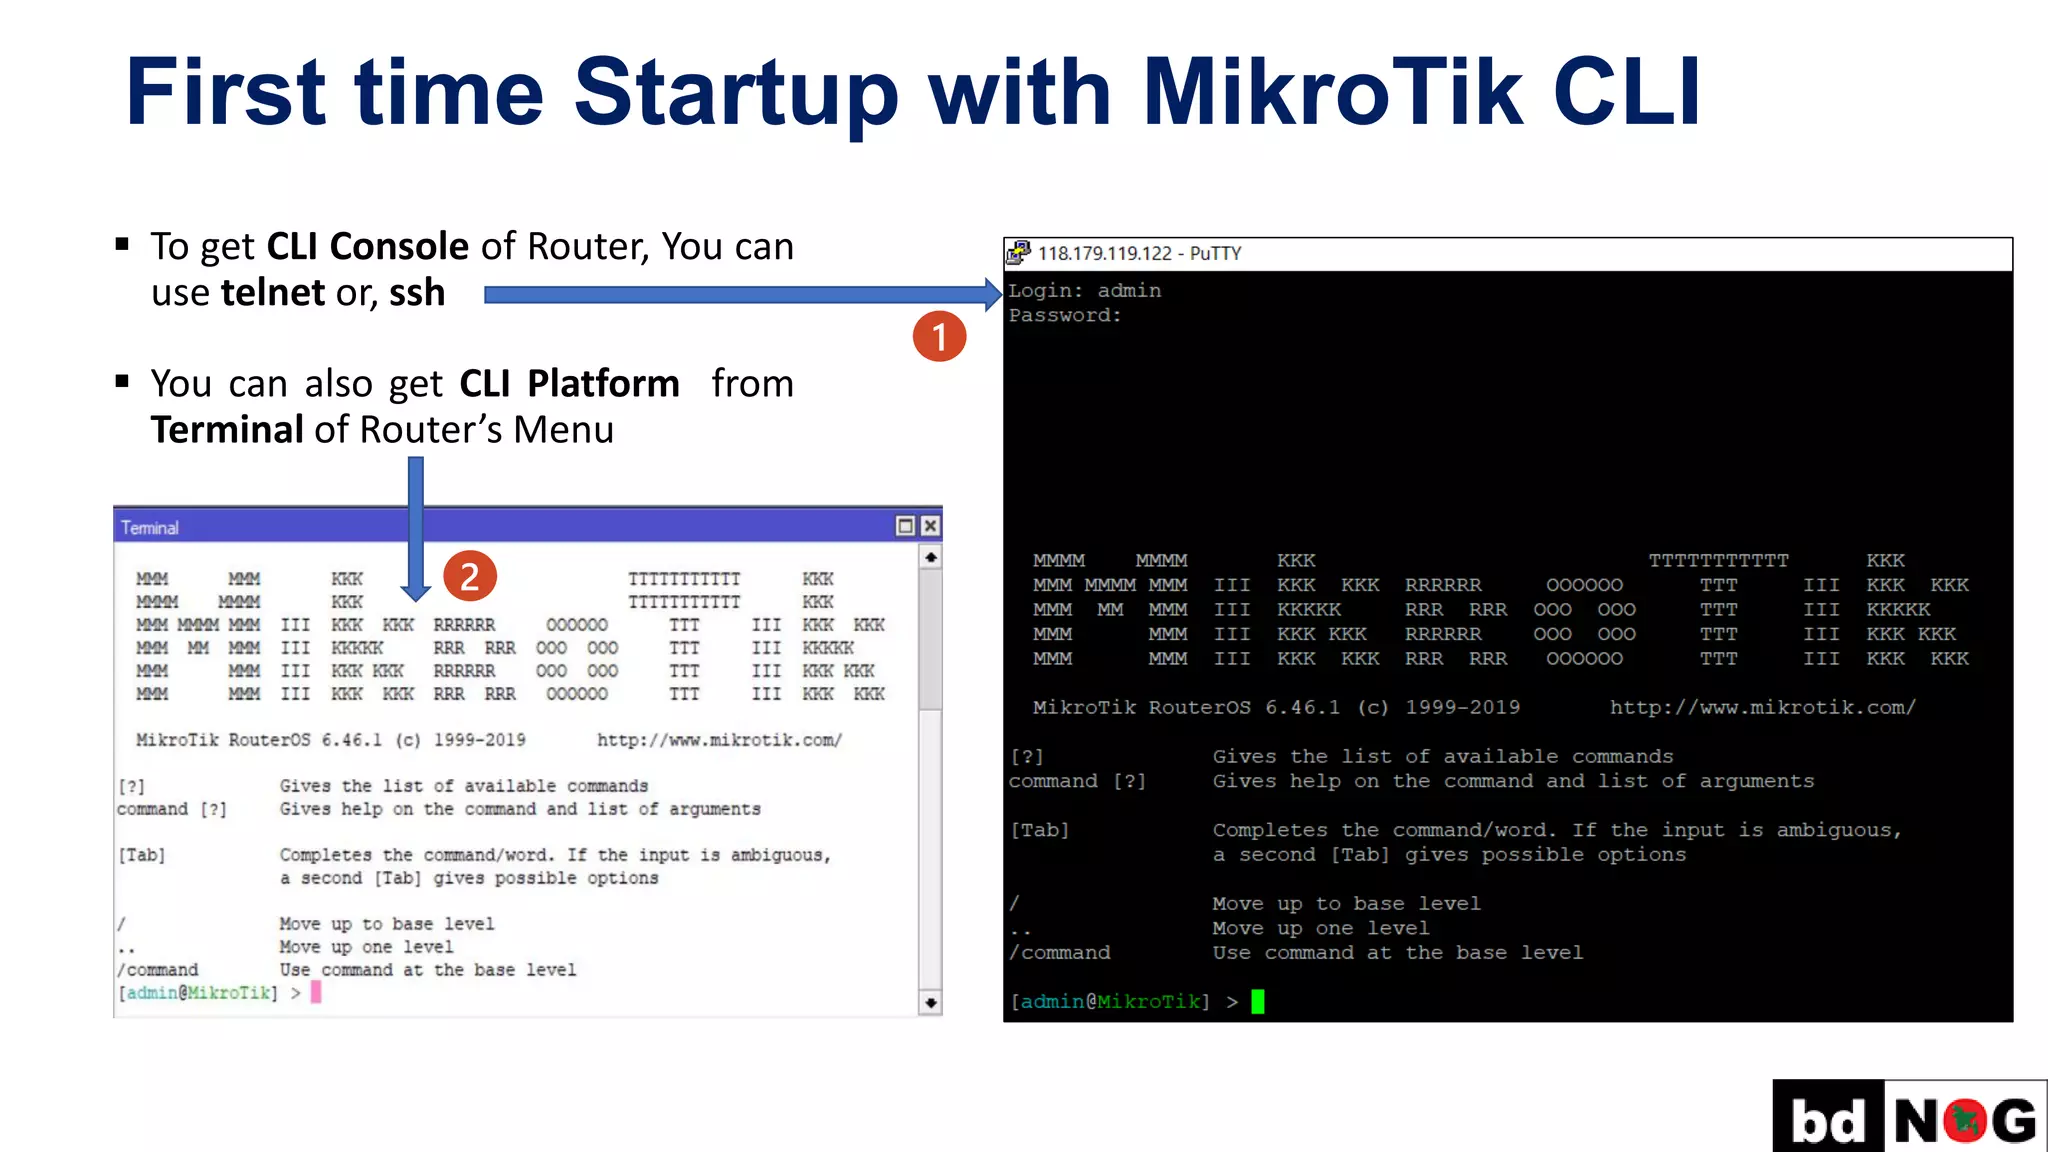
▪ To get CLI Console of Router, You can
use telnet or, ssh
▪ You can also get CLI Platform from
Terminal of Router’s Menu
1
2
4.
Quick Typing!
Use TabKey for Quick Typing!
Example: /inte[Tab]_ becomes /interface _
If there is more than one match, but they all have a common beginning, like:
/interface set e[Tab]_ becomes /interface set ether_
[admin@MikroTik] > interface set e[Tab]_
[admin@MikroTik] > interface set ether[Tab]_
[admin@MikroTik] > interface set ether[Tab]_
ether1 ether2 ether3 ether4 ether5
[?] – display all possible commands | help
5.
Quick Typing! –Example
Another way to press fewer keys while typing:
[admin@MikroTik] > pin 10.1 c 100 si 1500
Equals to:
[admin@MikroTik] > ping 10.0.0.1 count 100 size 1500
6.
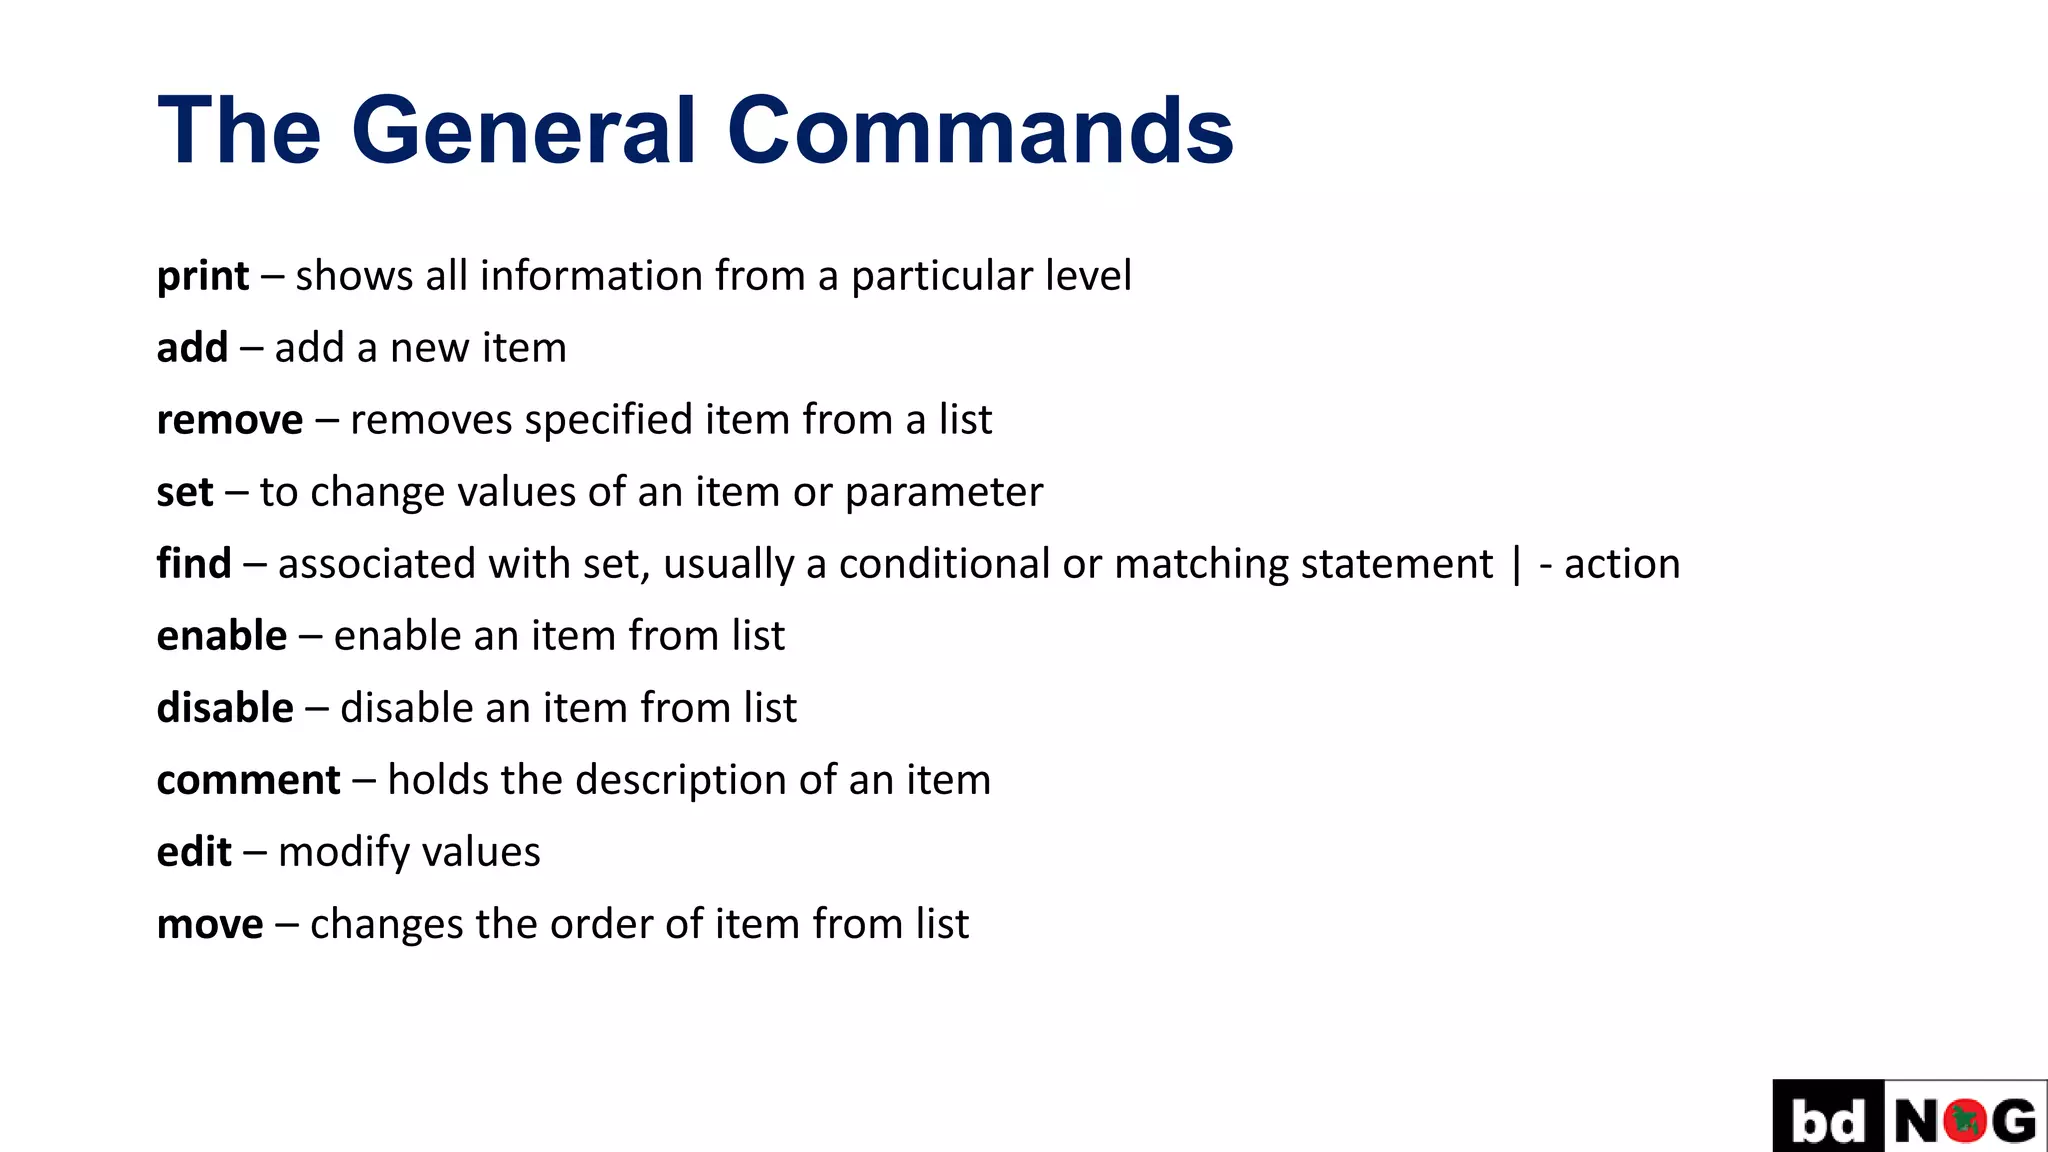
The General Commands
print– shows all information from a particular level
add – add a new item
remove – removes specified item from a list
set – to change values of an item or parameter
find – associated with set, usually a conditional or matching statement | - action
enable – enable an item from list
disable – disable an item from list
comment – holds the description of an item
edit – modify values
move – changes the order of item from list
7.
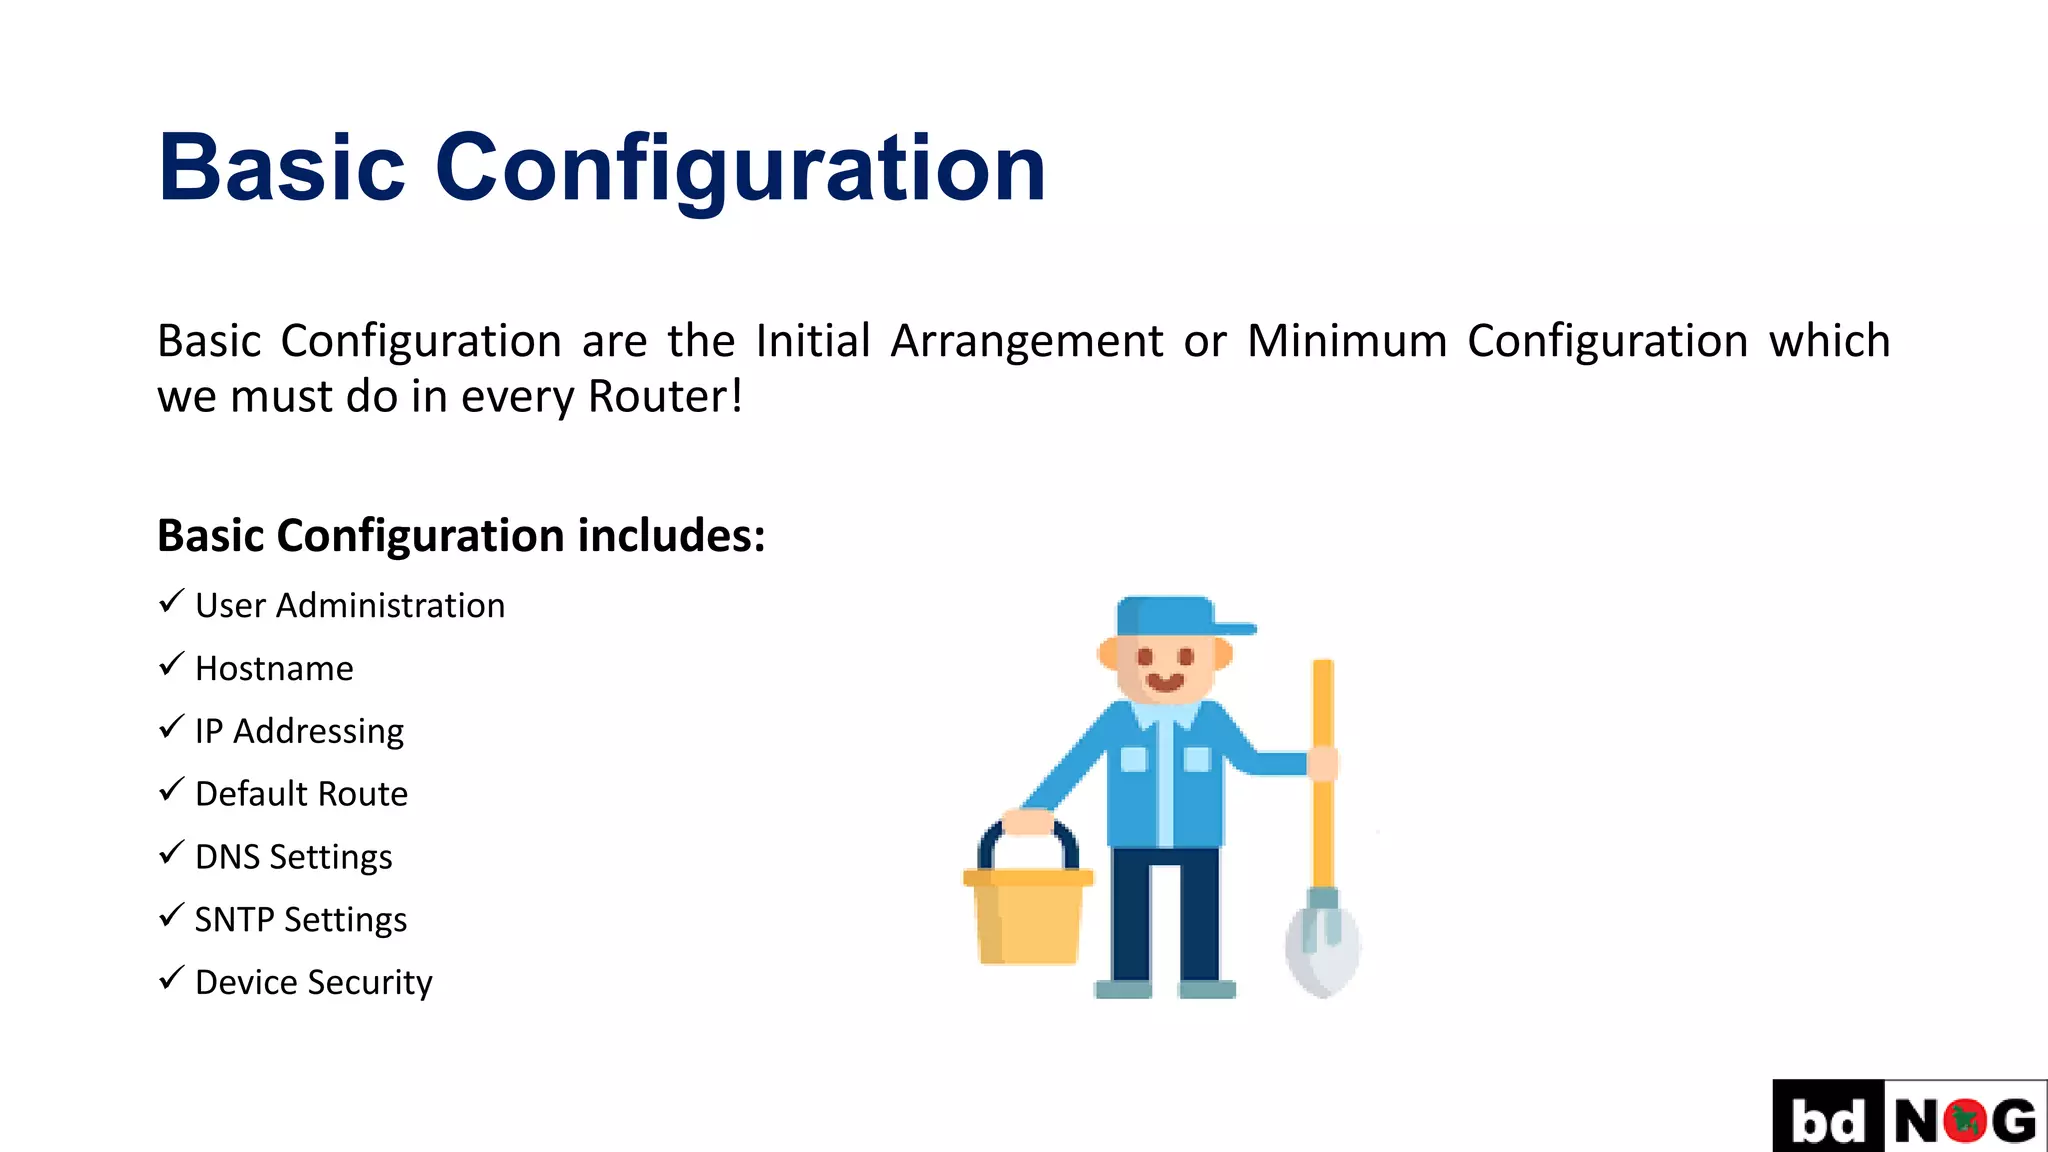
Basic Configuration
Basic Configurationare the Initial Arrangement or Minimum Configuration which
we must do in every Router!
Basic Configuration includes:
✓ User Administration
✓ Hostname
✓ IP Addressing
✓ Default Route
✓ DNS Settings
✓ SNTP Settings
✓ Device Security
8.
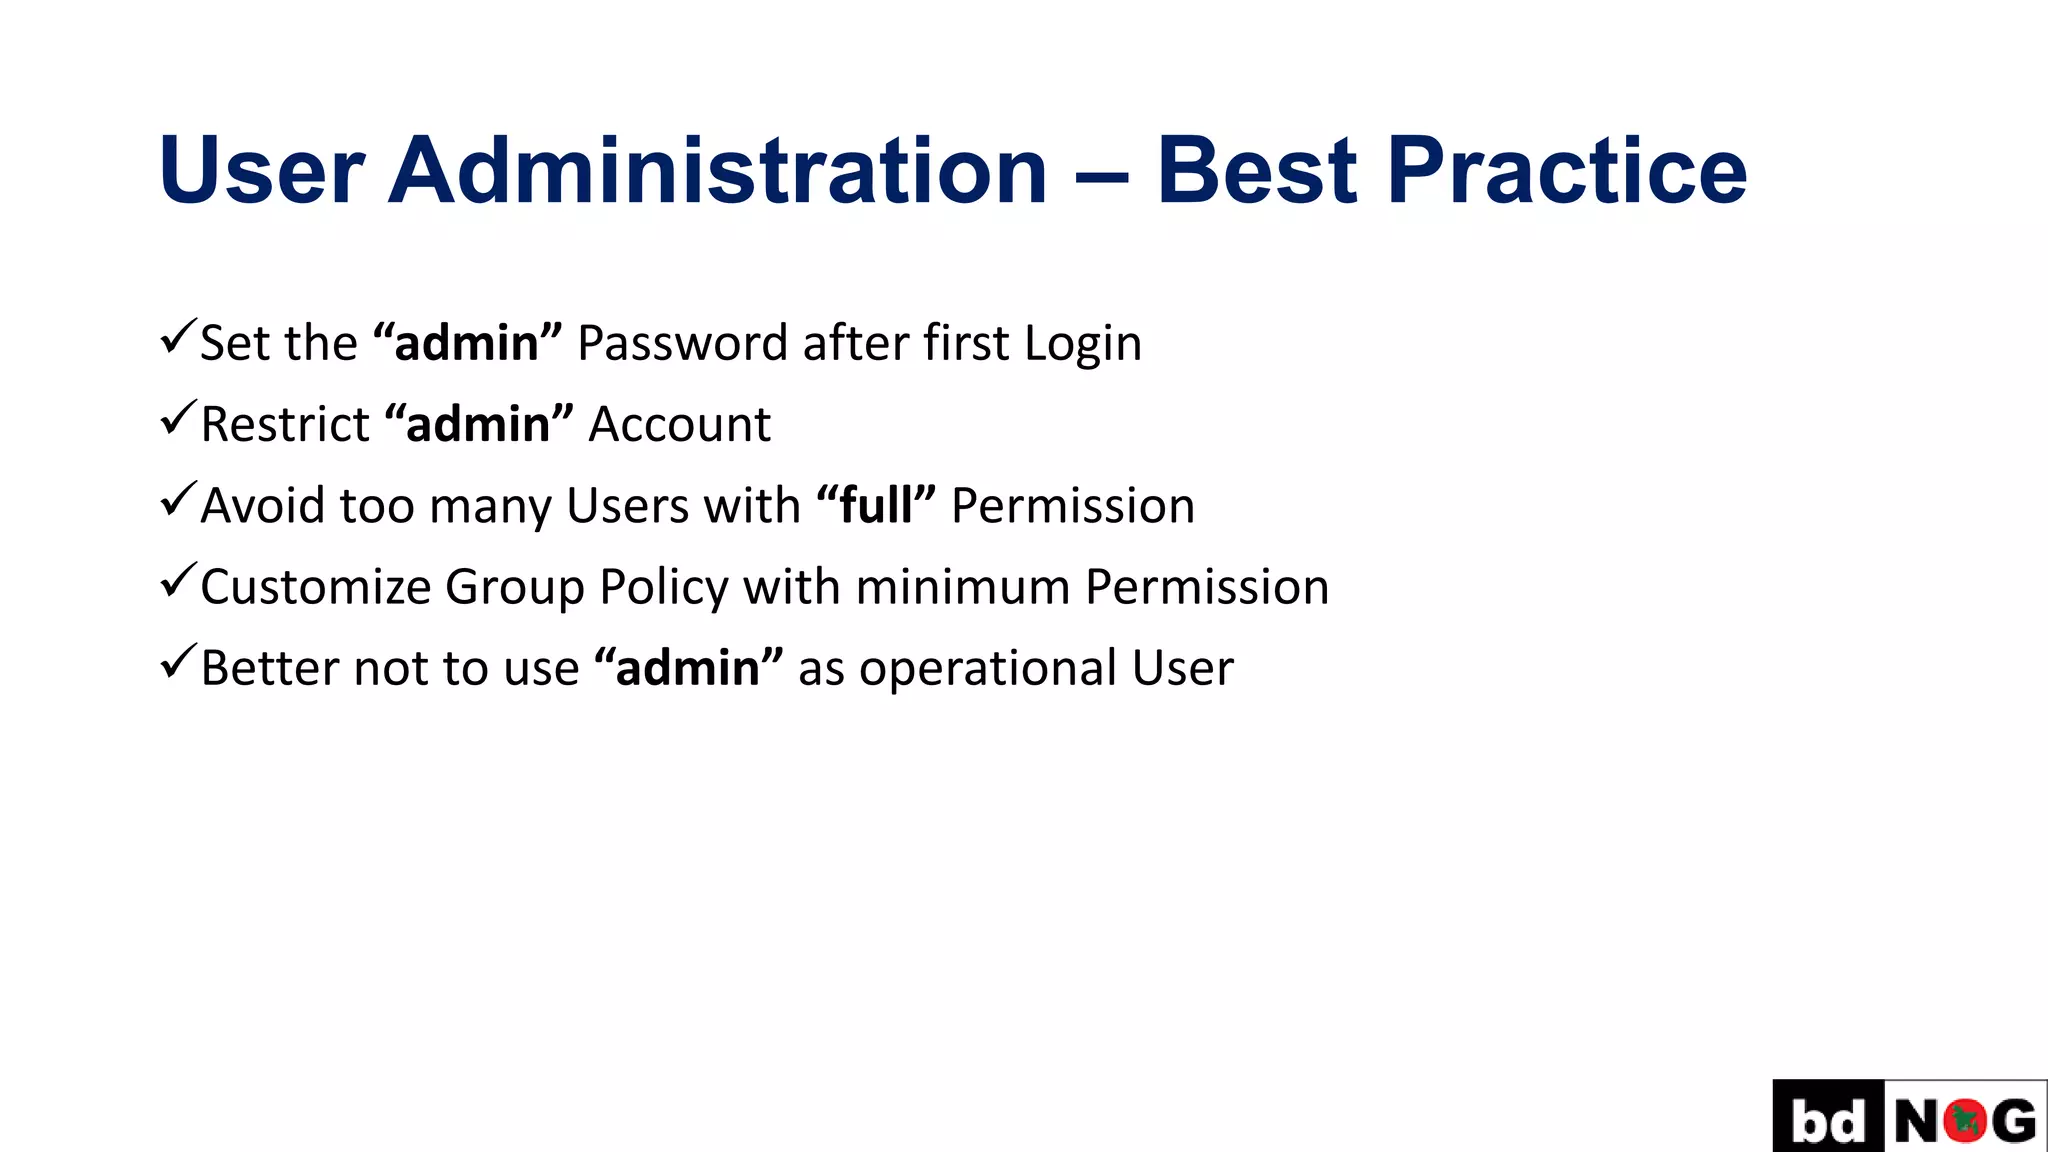
User Administration –Best Practice
✓Set the “admin” Password after first Login
✓Restrict “admin” Account
✓Avoid too many Users with “full” Permission
✓Customize Group Policy with minimum Permission
✓Better not to use “admin” as operational User
9.
User Administration
Set the“admin” Password:
Every Route has a Factory Preconfigured User “admin” with “empty/blank” Password. To set the
Password for “admin” – Issue the Command from Terminal:
[admin@MikroTik] > user set admin password=*******
Creating a New User and New Group Policy:
[admin@MikroTik] > user add name=pavel group=full password=*******
[admin@MikroTik] > user group add name=monitor policy=read,telnet,winbox,local
[admin@MikroTik] > user add name=nmc group=monitor password=*******
User Administration (Cont.)
RestrictAccess for Operational Users of MikroTik by IP Address:
Default Firewall protects your Router from unauthorized access from Outer Networks, it is
also possible to restrict User access for the specific IP Address for more Security!
[admin@MikroTik] > user set 1 address=202.4.100.35,172.16.1.0/24,2405:7600:b:4::2
[admin@MikroTik] > user set pavel address=202.4.100.35,172.16.1.0/24,2405:7600:b:4::2
12.
User Administration (Cont.)
Ifyou want to modify/remove IP Restriction for any Operational User of MikroTik, then
we need to issue the below Command:
[admin@MikroTik]> /user edit pavel address
After issuing above Command, this screen
will appear and you can modify from here!
You should able to login your Router via
telnet or ssh
13.
Hostname Configuration
Hostname ofa device is its Identification. Hostname will say you in which
Router or Switch you are currently working on.
Default Hostname of MikroTik is MikroTik.
Configuring Hostname of your Router:
[admin@MikroTik] > system identity set name=bdNOG11-IPv6
[admin@bdNOG11-IPv6] >
14.
IP Addressing
Configuring IPv4Address in an Interface:
[admin@bdNOG11-IPv6] > ip address add address=118.179.111.2/30 interface=ether1 comment=WAN
Configuring IPv6 Address in an Interface:
[admin@bdNOG11-IPv6] > ipv6 address add address=2405:7600:b::2/64 interface=ether1 comment=WAN
15.
Default Route Configuration
DefaultRoute for IPv4:
[admin@bdNOG11-IPv6] > ip route add dst-address=0.0.0.0/0 gateway=118.179.111.1
Default Route for IPv6:
[admin@bdNOG11-IPv6] > ipv6 route add dst-address=::/0 gateway= 2405:7600:b::1
16.
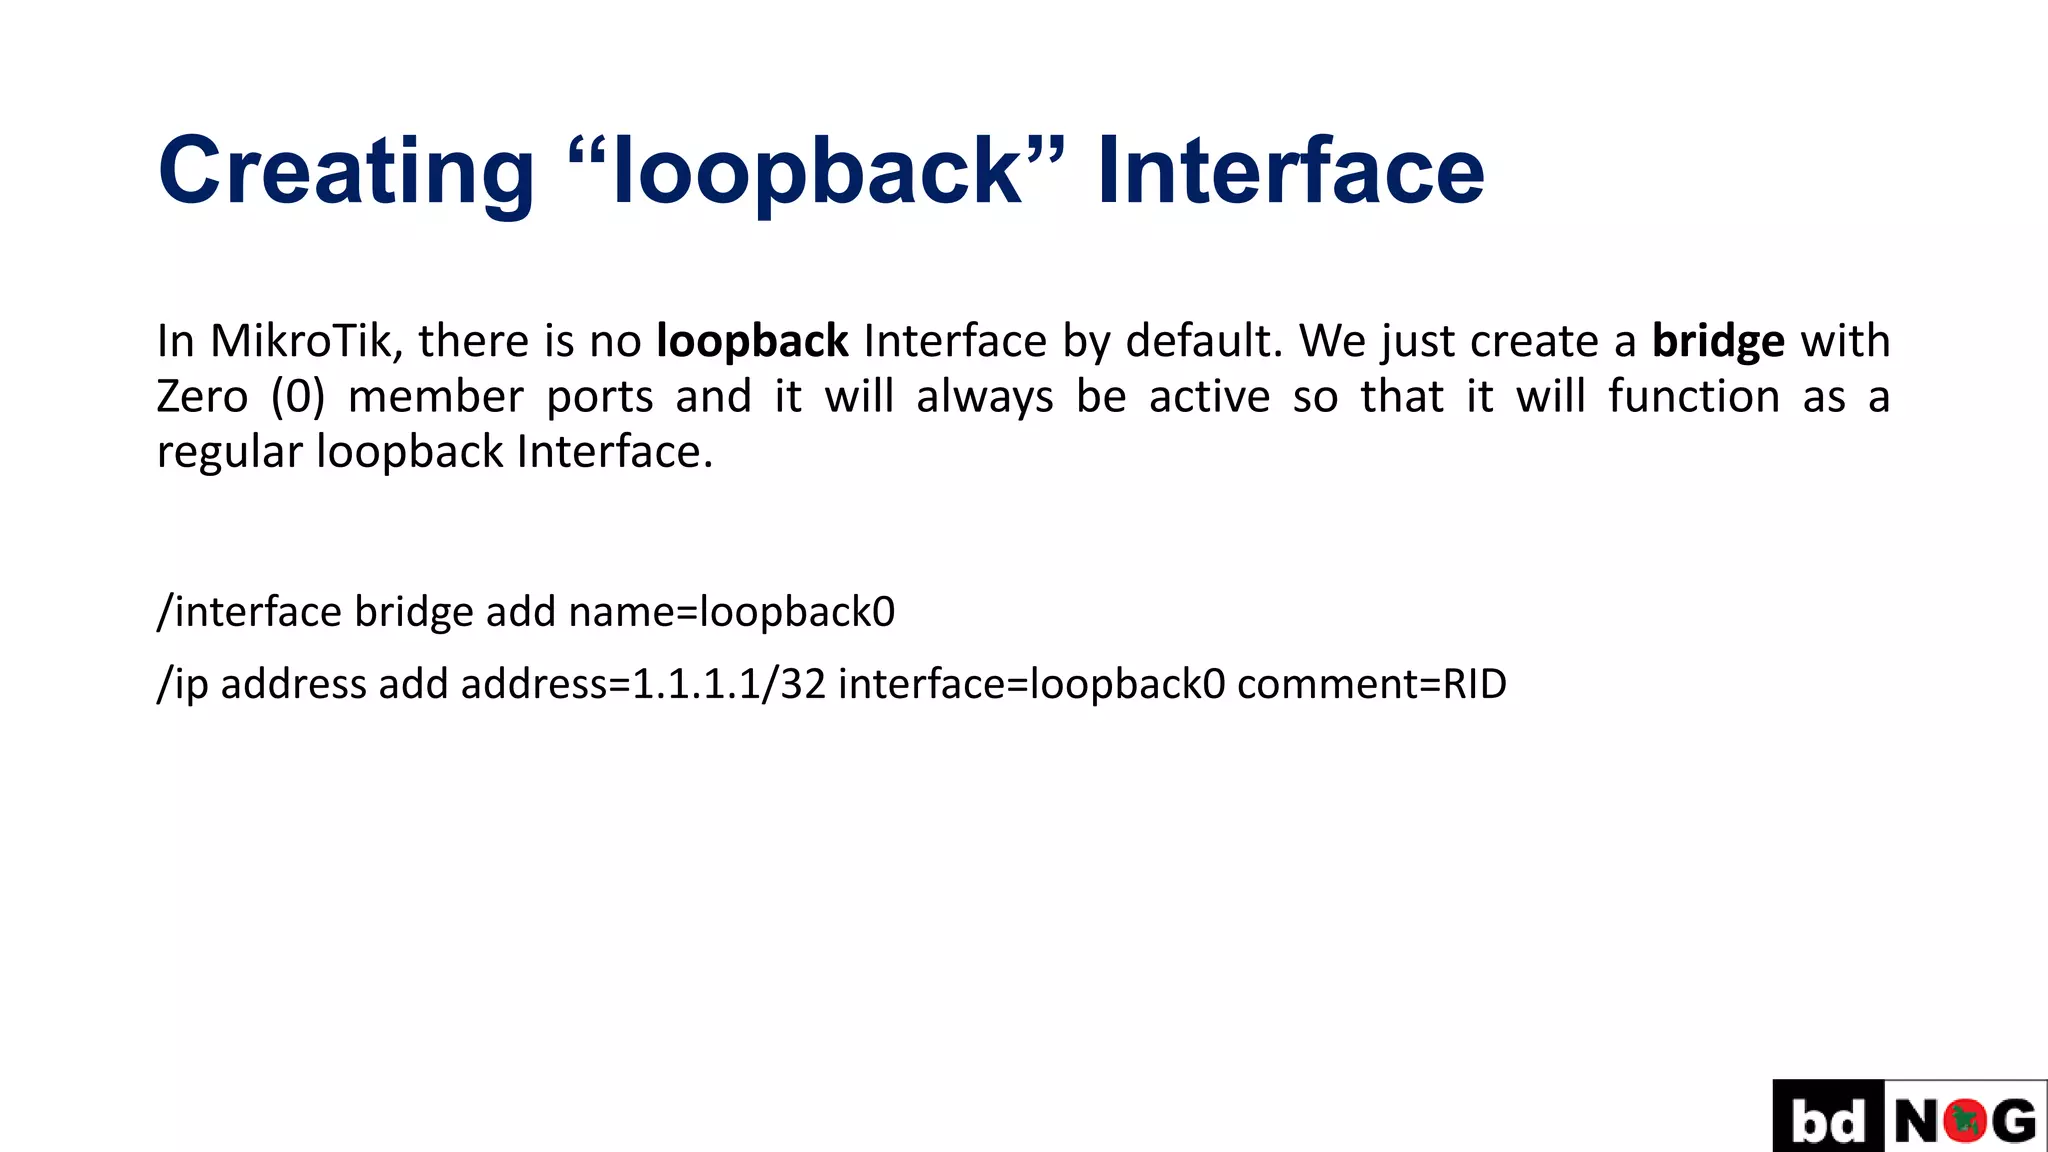
Creating “loopback” Interface
InMikroTik, there is no loopback Interface by default. We just create a bridge with
Zero (0) member ports and it will always be active so that it will function as a
regular loopback Interface.
/interface bridge add name=loopback0
/ip address add address=1.1.1.1/32 interface=loopback0 comment=RID
17.
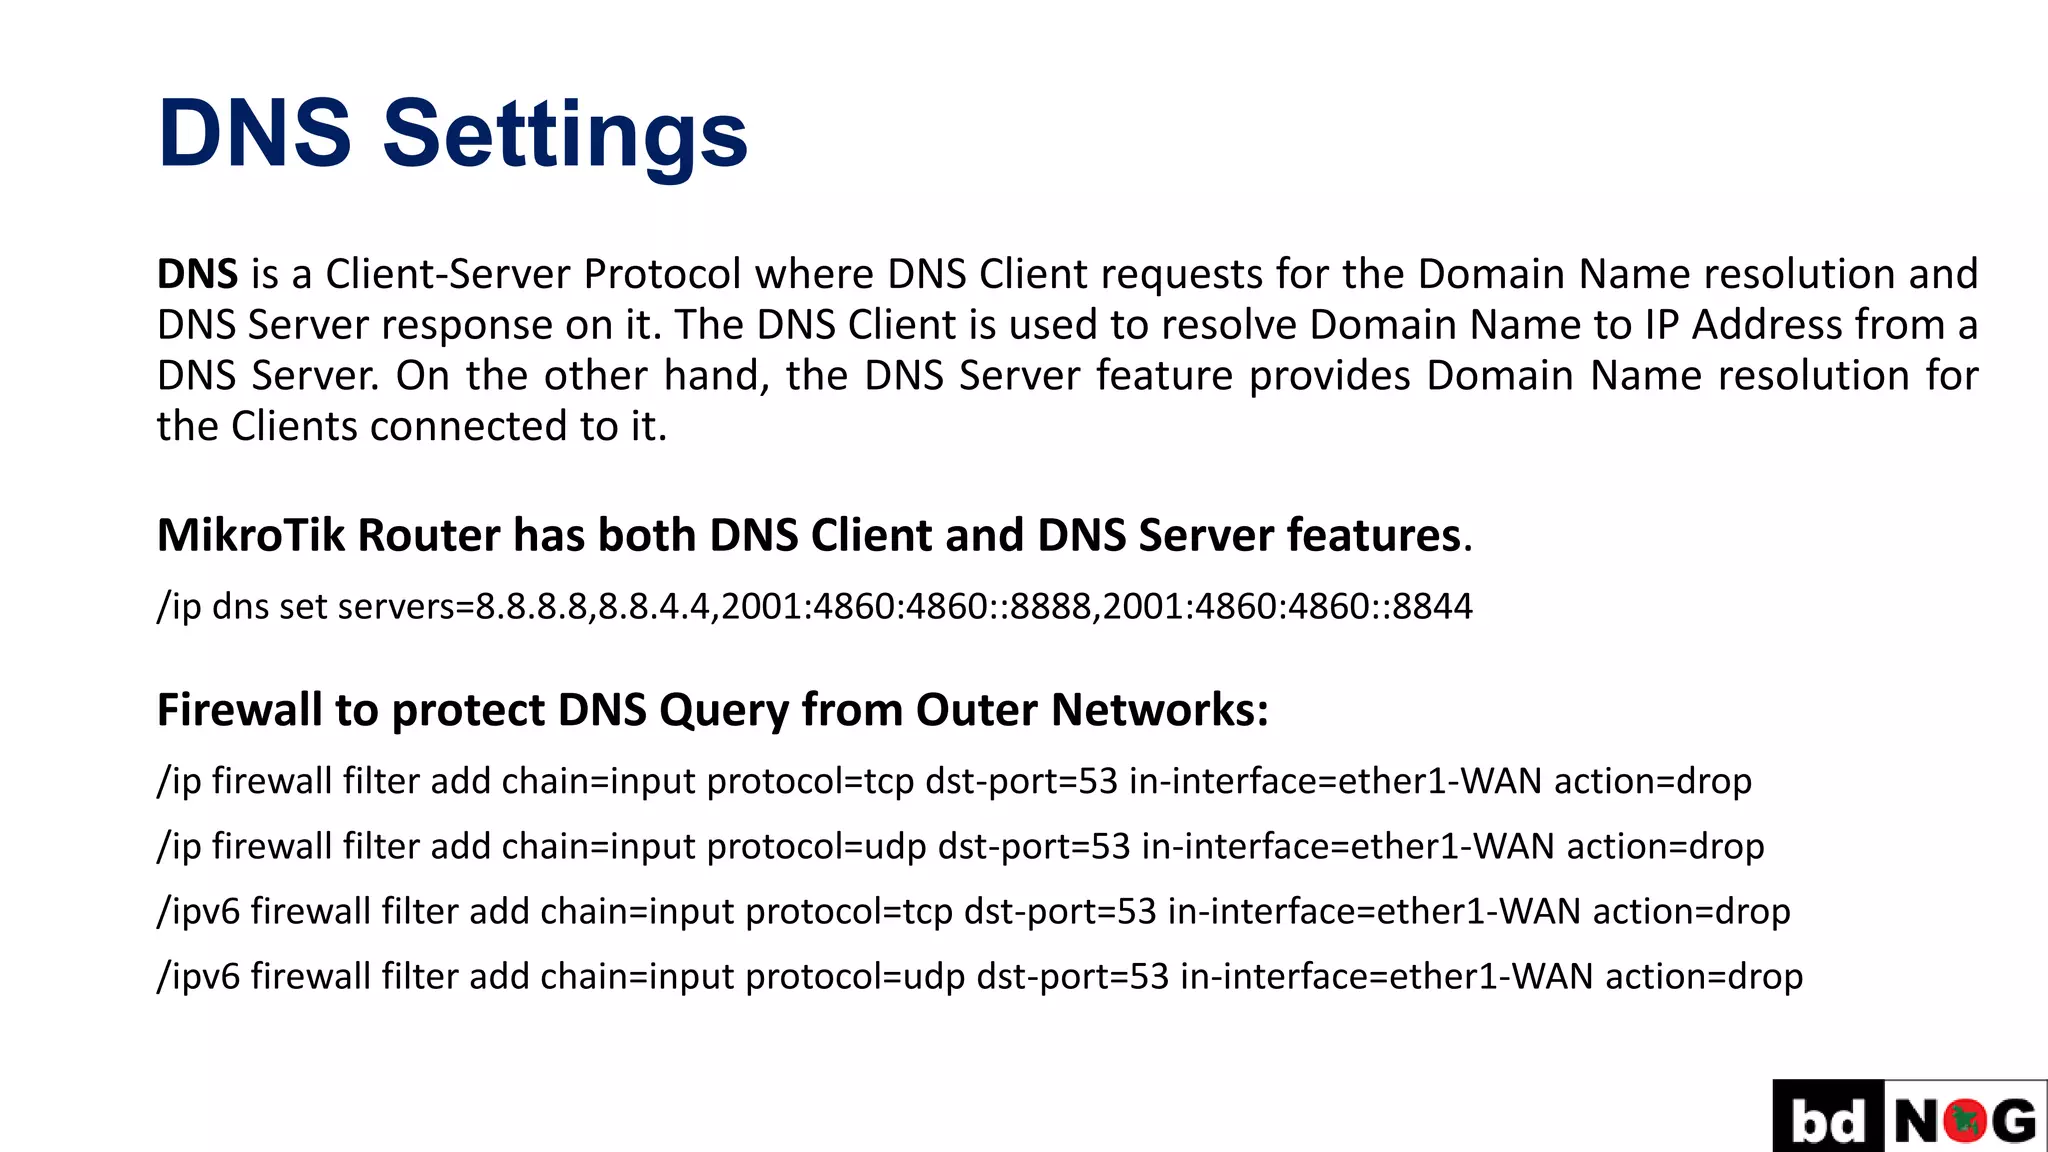
DNS Settings
DNS isa Client-Server Protocol where DNS Client requests for the Domain Name resolution and
DNS Server response on it. The DNS Client is used to resolve Domain Name to IP Address from a
DNS Server. On the other hand, the DNS Server feature provides Domain Name resolution for
the Clients connected to it.
MikroTik Router has both DNS Client and DNS Server features.
/ip dns set servers=8.8.8.8,8.8.4.4,2001:4860:4860::8888,2001:4860:4860::8844
Firewall to protect DNS Query from Outer Networks:
/ip firewall filter add chain=input protocol=tcp dst-port=53 in-interface=ether1-WAN action=drop
/ip firewall filter add chain=input protocol=udp dst-port=53 in-interface=ether1-WAN action=drop
/ipv6 firewall filter add chain=input protocol=tcp dst-port=53 in-interface=ether1-WAN action=drop
/ipv6 firewall filter add chain=input protocol=udp dst-port=53 in-interface=ether1-WAN action=drop
18.
Bandwidth Management Scripts
Day=Regular_Package
/queuetype set [find name=Pkg1-DL] pcq-rate=10M
/queue type set [find name=Pkg1-UL] pcq-rate=10M
/queue type set [find name=Pkg2-DL] pcq-rate=20M
/queue type set [find name=Pkg2-UL] pcq-rate=20M
Night=Double_Bandwidth
/queue type set [find name=Pkg1-DL] pcq-rate=20M
/queue type set [find name=Pkg1-UL] pcq-rate=20M
/queue type set [find name=Pkg2-DL] pcq-rate=40M
/queue type set [find name=Pkg2-UL] pcq-rate=40M
19.
SNTP Settings
Simple NetworkTime Protocol (SNTP) is a Networking Protocol for Clock
Synchronization between Computer Systems. It is a simplified version of Network
Time Protocol (NTP).
/system ntp client set enabled=yes primary-ntp=2001:4860:4860::8844 secondary-ntp=202.4.100.106
20.
Have Fun withMikroTik CLI
Creating Multiple VLANs in a Single Command:
[admin@bdNOG11-IPv6]> :for i from=101 to=199 do={interface vlan add name=("vlan$i") vlan-id=$i
interface=ether5}
Transferring VLANs from one Interface to Another:
[admin@bdNOG11-IPv6]> interface vlan set [find interface=ether5] interface=ether4
21.
Have Fun withMikroTik CLI (Cont.)
Changing ARP Interface:
[admin@bdNOG11-IPv6]> ip arp set [find interface=ether4] interface=ether5
Shifting IP Address from one Interface to Another:
[admin@bdNOG11-IPv6]> ip address set [find interface=ether4] interface=ether5
22.
Have Fun withMikroTik CLI (Cont.)
A Script to add multiple Queues in a Single Command:
[admin@bdNOG11-IPv6]> :for i from=2 to=254 do={/queue simple add name=("PC-$i") target=("172.16.1.$i")
parent=Total-BW max-limit=10M/10M limit-at=5M/5M time=0s-1d,sun,mon,tue,wed,thu,fri,sat}
23.
Backup Restoration
The Backupis option allows you to save a file containing all your Router’s Configuration
Settings, like WAN Setup, Wireless Settings, Port Forwarding, Firewall etc. to a file on
your Computer. This file can then be used to Restore your settings if the Router is Reset
to the Factory Default Settings.
To take the Router Backup – execute the Command below:
[admin@bdNOG11-IPv6]> export file=bdNOG11-IPv6-MikroTik-BKP-11-01-2020
To Restore Backup into a Router – execute the Command below:
[admin@bdNOG11-IPv6]> import file=bdNOG11-IPv6-MikroTik-BKP-11-01-2020
24.
Taking Backup fora Particular Module
You can also take Backup for a Particular Module like Queues, Filter Rules, NAT, PPPoE
Secrets, IP Addresses or any other you want.
Taking the Backup for Filter Rules:
[admin@bdNOG11-IPv6]>ip firewall filter
[admin@bdNOG11-IPv6]/ip firewall filter>export file=bdNOG11-IPv6-Filter-Rules-11-01-2020
Restoring the Backup for Filter Rules:
[admin@bdNOG11-IPv6]>import file=bdNOG11-IPv6 -Filter-Rules-11-01-2020
25.
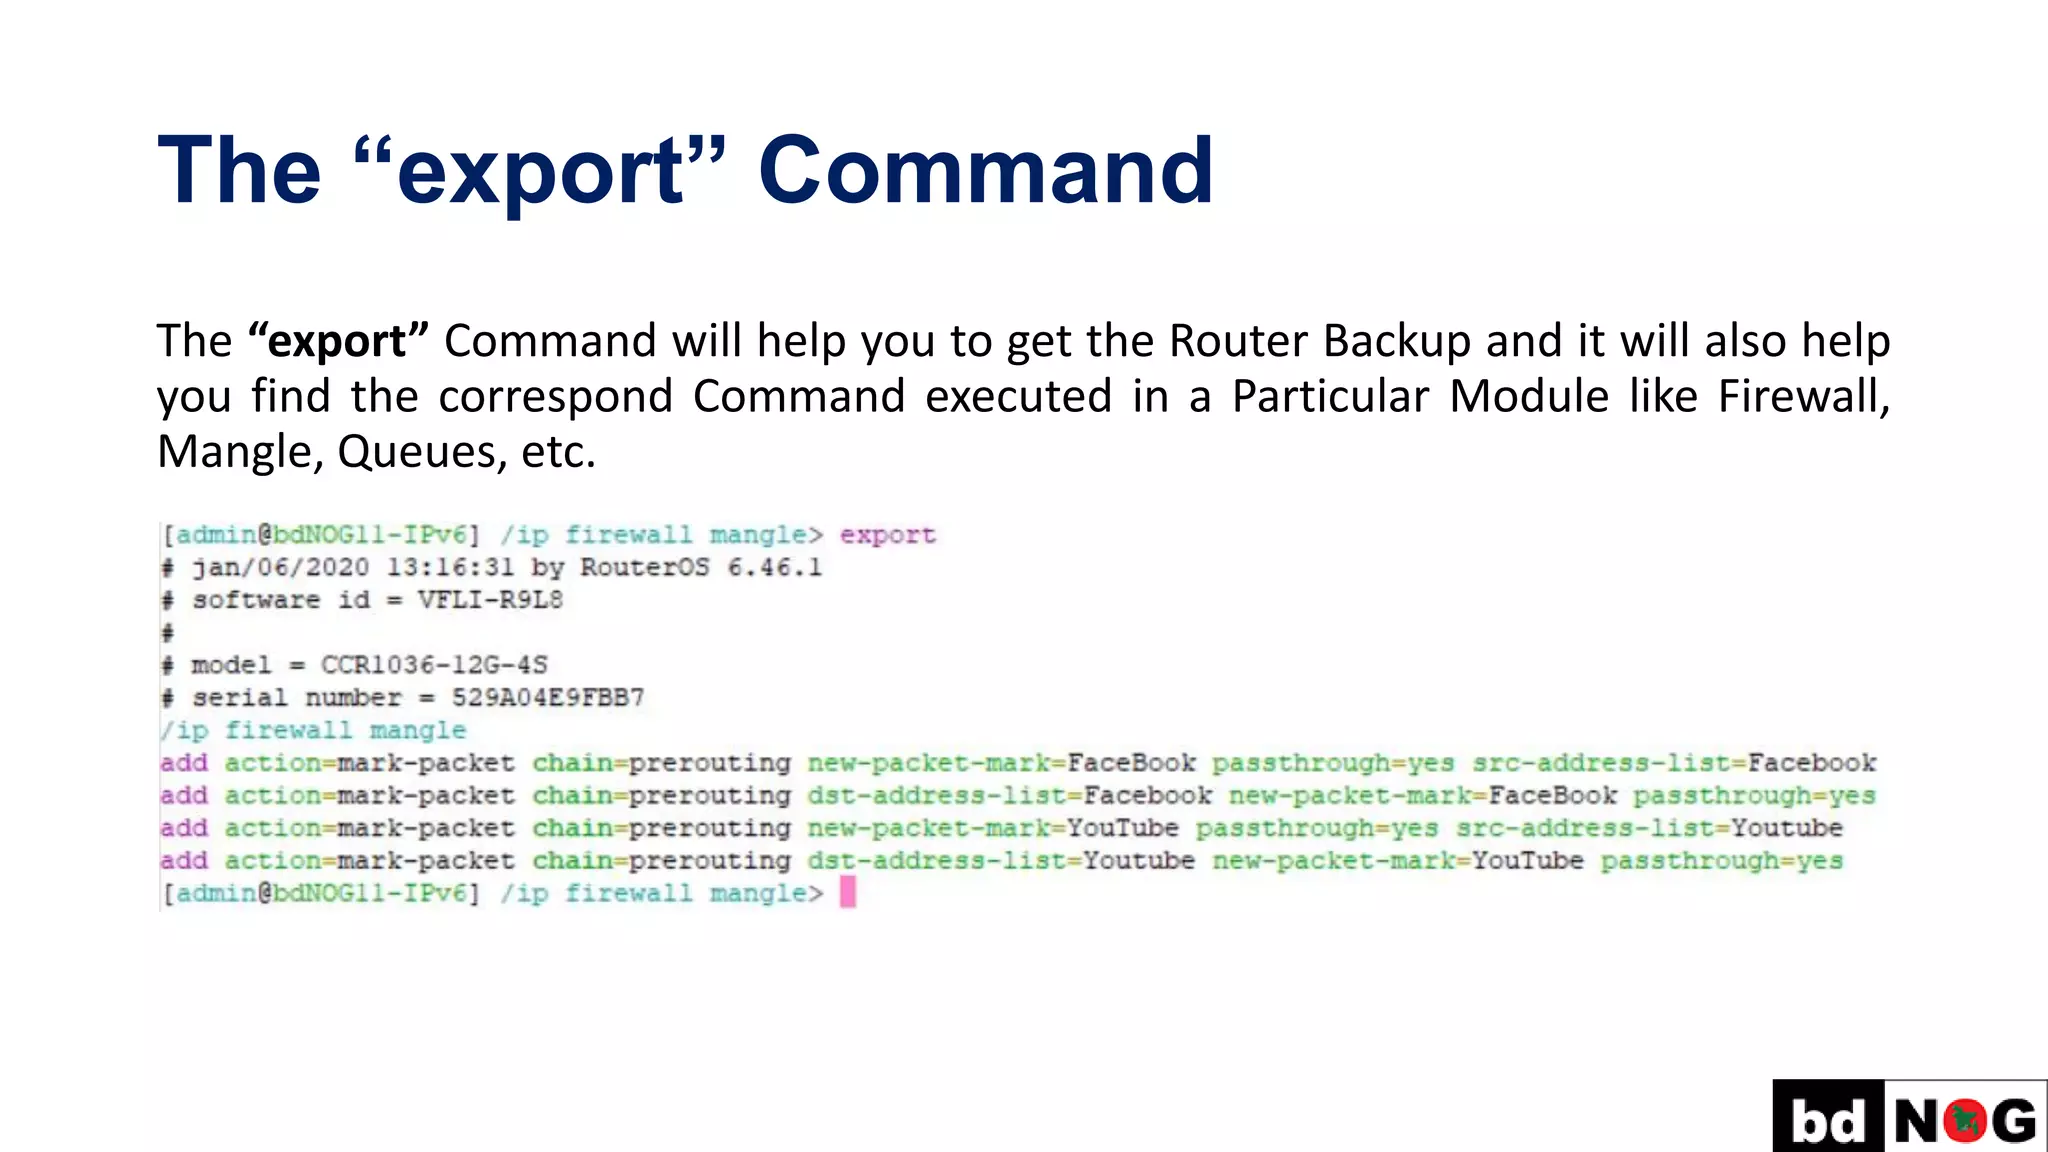
The “export” Command
The“export” Command will help you to get the Router Backup and it will also help
you find the correspond Command executed in a Particular Module like Firewall,
Mangle, Queues, etc.

![Quick Typing!
Use Tab Key for Quick Typing!
Example: /inte[Tab]_ becomes /interface _
If there is more than one match, but they all have a common beginning, like:
/interface set e[Tab]_ becomes /interface set ether_
[admin@MikroTik] > interface set e[Tab]_
[admin@MikroTik] > interface set ether[Tab]_
[admin@MikroTik] > interface set ether[Tab]_
ether1 ether2 ether3 ether4 ether5
[?] – display all possible commands | help](https://image.slidesharecdn.com/1-230605152344-dc6b215c/75/1-4-2-basic-configuration-with-mikrotik-cli-pdf-4-2048.jpg)
![Quick Typing! – Example
Another way to press fewer keys while typing:
[admin@MikroTik] > pin 10.1 c 100 si 1500
Equals to:
[admin@MikroTik] > ping 10.0.0.1 count 100 size 1500](https://image.slidesharecdn.com/1-230605152344-dc6b215c/75/1-4-2-basic-configuration-with-mikrotik-cli-pdf-5-2048.jpg)
![User Administration
Set the “admin” Password:
Every Route has a Factory Preconfigured User “admin” with “empty/blank” Password. To set the
Password for “admin” – Issue the Command from Terminal:
[admin@MikroTik] > user set admin password=*******
Creating a New User and New Group Policy:
[admin@MikroTik] > user add name=pavel group=full password=*******
[admin@MikroTik] > user group add name=monitor policy=read,telnet,winbox,local
[admin@MikroTik] > user add name=nmc group=monitor password=*******](https://image.slidesharecdn.com/1-230605152344-dc6b215c/75/1-4-2-basic-configuration-with-mikrotik-cli-pdf-9-2048.jpg)
![User Administration (Cont.)
Deactivating a User: [admin@MikroTik] > user disable 2
Activating a User: [admin@MikroTik] > user enable 2](https://image.slidesharecdn.com/1-230605152344-dc6b215c/75/1-4-2-basic-configuration-with-mikrotik-cli-pdf-10-2048.jpg)
![User Administration (Cont.)
Restrict Access for Operational Users of MikroTik by IP Address:
Default Firewall protects your Router from unauthorized access from Outer Networks, it is
also possible to restrict User access for the specific IP Address for more Security!
[admin@MikroTik] > user set 1 address=202.4.100.35,172.16.1.0/24,2405:7600:b:4::2
[admin@MikroTik] > user set pavel address=202.4.100.35,172.16.1.0/24,2405:7600:b:4::2](https://image.slidesharecdn.com/1-230605152344-dc6b215c/75/1-4-2-basic-configuration-with-mikrotik-cli-pdf-11-2048.jpg)
![User Administration (Cont.)
If you want to modify/remove IP Restriction for any Operational User of MikroTik, then
we need to issue the below Command:
[admin@MikroTik]> /user edit pavel address
After issuing above Command, this screen
will appear and you can modify from here!
You should able to login your Router via
telnet or ssh](https://image.slidesharecdn.com/1-230605152344-dc6b215c/75/1-4-2-basic-configuration-with-mikrotik-cli-pdf-12-2048.jpg)
![Hostname Configuration
Hostname of a device is its Identification. Hostname will say you in which
Router or Switch you are currently working on.
Default Hostname of MikroTik is MikroTik.
Configuring Hostname of your Router:
[admin@MikroTik] > system identity set name=bdNOG11-IPv6
[admin@bdNOG11-IPv6] >](https://image.slidesharecdn.com/1-230605152344-dc6b215c/75/1-4-2-basic-configuration-with-mikrotik-cli-pdf-13-2048.jpg)
![IP Addressing
Configuring IPv4 Address in an Interface:
[admin@bdNOG11-IPv6] > ip address add address=118.179.111.2/30 interface=ether1 comment=WAN
Configuring IPv6 Address in an Interface:
[admin@bdNOG11-IPv6] > ipv6 address add address=2405:7600:b::2/64 interface=ether1 comment=WAN](https://image.slidesharecdn.com/1-230605152344-dc6b215c/75/1-4-2-basic-configuration-with-mikrotik-cli-pdf-14-2048.jpg)
![Default Route Configuration
Default Route for IPv4:
[admin@bdNOG11-IPv6] > ip route add dst-address=0.0.0.0/0 gateway=118.179.111.1
Default Route for IPv6:
[admin@bdNOG11-IPv6] > ipv6 route add dst-address=::/0 gateway= 2405:7600:b::1](https://image.slidesharecdn.com/1-230605152344-dc6b215c/75/1-4-2-basic-configuration-with-mikrotik-cli-pdf-15-2048.jpg)
![Bandwidth Management Scripts
Day=Regular_Package
/queue type set [find name=Pkg1-DL] pcq-rate=10M
/queue type set [find name=Pkg1-UL] pcq-rate=10M
/queue type set [find name=Pkg2-DL] pcq-rate=20M
/queue type set [find name=Pkg2-UL] pcq-rate=20M
Night=Double_Bandwidth
/queue type set [find name=Pkg1-DL] pcq-rate=20M
/queue type set [find name=Pkg1-UL] pcq-rate=20M
/queue type set [find name=Pkg2-DL] pcq-rate=40M
/queue type set [find name=Pkg2-UL] pcq-rate=40M](https://image.slidesharecdn.com/1-230605152344-dc6b215c/75/1-4-2-basic-configuration-with-mikrotik-cli-pdf-18-2048.jpg)

![Have Fun with MikroTik CLI
Creating Multiple VLANs in a Single Command:
[admin@bdNOG11-IPv6]> :for i from=101 to=199 do={interface vlan add name=("vlan$i") vlan-id=$i
interface=ether5}
Transferring VLANs from one Interface to Another:
[admin@bdNOG11-IPv6]> interface vlan set [find interface=ether5] interface=ether4](https://image.slidesharecdn.com/1-230605152344-dc6b215c/75/1-4-2-basic-configuration-with-mikrotik-cli-pdf-20-2048.jpg)
![Have Fun with MikroTik CLI (Cont.)
Changing ARP Interface:
[admin@bdNOG11-IPv6]> ip arp set [find interface=ether4] interface=ether5
Shifting IP Address from one Interface to Another:
[admin@bdNOG11-IPv6]> ip address set [find interface=ether4] interface=ether5](https://image.slidesharecdn.com/1-230605152344-dc6b215c/75/1-4-2-basic-configuration-with-mikrotik-cli-pdf-21-2048.jpg)
![Have Fun with MikroTik CLI (Cont.)
A Script to add multiple Queues in a Single Command:
[admin@bdNOG11-IPv6]> :for i from=2 to=254 do={/queue simple add name=("PC-$i") target=("172.16.1.$i")
parent=Total-BW max-limit=10M/10M limit-at=5M/5M time=0s-1d,sun,mon,tue,wed,thu,fri,sat}](https://image.slidesharecdn.com/1-230605152344-dc6b215c/75/1-4-2-basic-configuration-with-mikrotik-cli-pdf-22-2048.jpg)
![Backup Restoration
The Backup is option allows you to save a file containing all your Router’s Configuration
Settings, like WAN Setup, Wireless Settings, Port Forwarding, Firewall etc. to a file on
your Computer. This file can then be used to Restore your settings if the Router is Reset
to the Factory Default Settings.
To take the Router Backup – execute the Command below:
[admin@bdNOG11-IPv6]> export file=bdNOG11-IPv6-MikroTik-BKP-11-01-2020
To Restore Backup into a Router – execute the Command below:
[admin@bdNOG11-IPv6]> import file=bdNOG11-IPv6-MikroTik-BKP-11-01-2020](https://image.slidesharecdn.com/1-230605152344-dc6b215c/75/1-4-2-basic-configuration-with-mikrotik-cli-pdf-23-2048.jpg)
![Taking Backup for a Particular Module
You can also take Backup for a Particular Module like Queues, Filter Rules, NAT, PPPoE
Secrets, IP Addresses or any other you want.
Taking the Backup for Filter Rules:
[admin@bdNOG11-IPv6]>ip firewall filter
[admin@bdNOG11-IPv6]/ip firewall filter>export file=bdNOG11-IPv6-Filter-Rules-11-01-2020
Restoring the Backup for Filter Rules:
[admin@bdNOG11-IPv6]>import file=bdNOG11-IPv6 -Filter-Rules-11-01-2020](https://image.slidesharecdn.com/1-230605152344-dc6b215c/75/1-4-2-basic-configuration-with-mikrotik-cli-pdf-24-2048.jpg)


![Number_Guessing_Game_Dsbsbssbzboc[1].pptx](https://cdn.slidesharecdn.com/ss_thumbnails/numberguessinggamedoc1-251206215042-a076fc05-thumbnail.jpg?width=640&height=640&fit=bounds)


