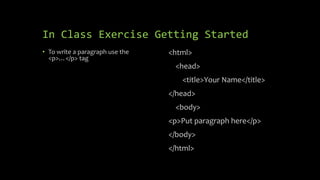
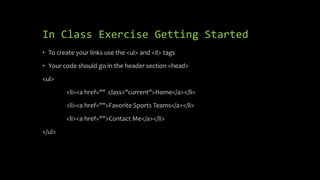
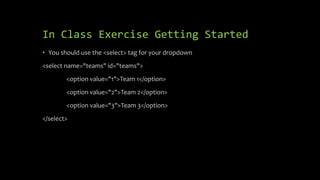
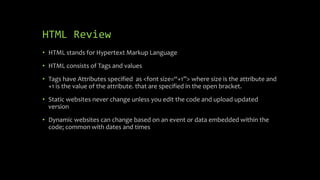
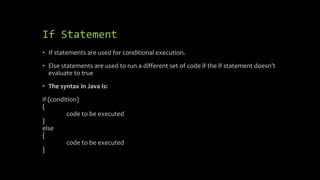
The document provides an introduction and overview for an INFO 2106 Website Design and Management course. It outlines the agenda, including an introduction to the professor and Blackboard, as well as information on grading, academic dishonesty, and how to succeed in the course. It then covers the basics of HTML, including common tags like <p>, <ul>, <li>, and <a>. Examples are provided of how to create paragraphs, lists, links, and tables. It also discusses opening links in new windows, static vs dynamic websites, and important code snippets for building webpages.


![Professor Availability Info
• Before class and After class
• Digital hours available by appointment [via Skype, Zoom, or agreeable
technology tool]](https://image.slidesharecdn.com/1-22-24info2106-240105202251-ac914c3f/85/1-22-24-INFO-2106-pptx-4-320.jpg)


![Academic Dishonesty
• Please see Academic Dishonesty paragraphs on Course Syllabus
• Unless otherwise specified your work submitted should reflect you completed
100% of the work and did not have any assistance from a classmate [i.e. copying]
• You should be able to do all course work based on my instruction and/or similar
walkthroughs on YouTube](https://image.slidesharecdn.com/1-22-24info2106-240105202251-ac914c3f/85/1-22-24-INFO-2106-pptx-8-320.jpg)


![<small> tag
• This merely makes your text smaller without having to utilize the size attribute or
similar attributes within HTML code
• Ideally, you use this tag to deemphasize something [things that are not
important]](https://image.slidesharecdn.com/1-22-24info2106-240105202251-ac914c3f/85/1-22-24-INFO-2106-pptx-24-320.jpg)


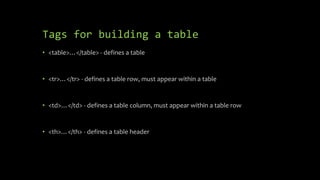
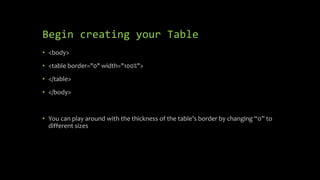
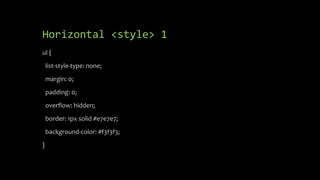
![Building Tables
• Why build a table?
• Easiest way to organize info in an HTML file
• Assuming not using XML or JSON [covered later in the course]](https://image.slidesharecdn.com/1-22-24info2106-240105202251-ac914c3f/85/1-22-24-INFO-2106-pptx-41-320.jpg)


![Visual Table Notes
• Sizes of the cells in each row will change when you replace the code with
actual text
• What do you do if you are taking more than 4 courses?
• You will need to add an additional <td></td> for each section [Course Name,
Instructor, and Number of Credits] until you have enough cells to cover all of your
courses for the table you create in Assignment 2](https://image.slidesharecdn.com/1-22-24info2106-240105202251-ac914c3f/85/1-22-24-INFO-2106-pptx-53-320.jpg)
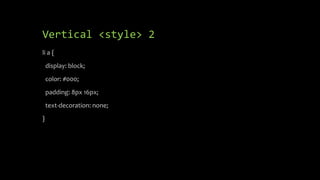
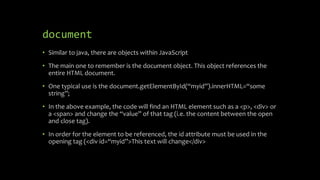
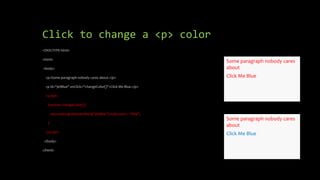
![<div></div> tag
• The <div> tag defines a division or a section in an HTML document.
• The <div> tag is used as a container for HTML elements - which is then styled with
CSS or manipulated with JavaScript.
• The <div> tag is easily styled by using the class or id attribute.
• Any sort of content can be put inside the <div> tag!
• Note: By default, browsers always place a line break before and after the <div>
element.
• For our purpose, it is important to note the <div> tag serves as a break for a
paragraph [<p></p> tag]](https://image.slidesharecdn.com/1-22-24info2106-240105202251-ac914c3f/85/1-22-24-INFO-2106-pptx-54-320.jpg)


![welcome_get.php Code
<html>
<body>
Welcome <?php echo $_GET["name"]; ?><br>
Your email address is: <?php echo $_GET["email"]; ?>
</body>
</html>](https://image.slidesharecdn.com/1-22-24info2106-240105202251-ac914c3f/85/1-22-24-INFO-2106-pptx-81-320.jpg)

![upload.php
<?php
$target_dir = "uploads/";
$target_file = $target_dir . basename($_FILES["fileToUpload"]["name"]);
$uploadOk = 1;
$imageFileType = strtolower(pathinfo($target_file,PATHINFO_EXTENSION));
// Check if image file is a actual image or fake image
if(isset($_POST["submit"])) {
$check = getimagesize($_FILES["fileToUpload"]["tmp_name"]);
if($check !== false) {
echo "File is an image - " . $check["mime"] . ".";
$uploadOk = 1;
} else {
echo "File is not an image.";
$uploadOk = 0;
}
}](https://image.slidesharecdn.com/1-22-24info2106-240105202251-ac914c3f/85/1-22-24-INFO-2106-pptx-84-320.jpg)
![upload.php
// Check if file already exists
if (file_exists($target_file)) {
echo "Sorry, file already exists.";
$uploadOk = 0;
}
// Check file size
if ($_FILES["fileToUpload"]["size"] > 500000) {
echo "Sorry, your file is too large.";
$uploadOk = 0;
}
// Allow certain file formats
if($imageFileType != "jpg" && $imageFileType != "png" && $imageFileType != "jpeg"
&& $imageFileType != "gif" ) {
echo "Sorry, only JPG, JPEG, PNG & GIF files are allowed.";
$uploadOk = 0;
}](https://image.slidesharecdn.com/1-22-24info2106-240105202251-ac914c3f/85/1-22-24-INFO-2106-pptx-85-320.jpg)
![upload.php
// Check if $uploadOk is set to 0 by an error
if ($uploadOk == 0) {
echo "Sorry, your file was not uploaded.";
// if everything is ok, try to upload file
} else {
if (move_uploaded_file($_FILES["fileToUpload"]["tmp_name"], $target_file)) {
echo "The file ". htmlspecialchars( basename( $_FILES["fileToUpload"]["name"])). " has been uploaded.";
} else {
echo "Sorry, there was an error uploading your file.";
}
}
?>](https://image.slidesharecdn.com/1-22-24info2106-240105202251-ac914c3f/85/1-22-24-INFO-2106-pptx-86-320.jpg)


![Have to edit welcome.php
<html>
<body>
Welcome <?php echo $_POST["name"]; ?><br>
Your email address is: <?php echo $_POST["email"]; ?>
Your comment was: <?php echo $_POST["comment"]; ?>
</body>
</html>](https://image.slidesharecdn.com/1-22-24info2106-240105202251-ac914c3f/85/1-22-24-INFO-2106-pptx-92-320.jpg)


![JSON Data Types
• String – {“name”:”Mark”}
• Number – {“age”: 41}
• Objects –
• {
“address”: {“name”:”Matt Marnio”, “email”:”matt.marino@shu.edu”}
}
• Arrays –
• {
“students”:[“Manny”, “Moe”, “Jack”]
}
• Booleans - {“Full-time”: true}
• Null – {“Job Description”: null}](https://image.slidesharecdn.com/1-22-24info2106-240105202251-ac914c3f/85/1-22-24-INFO-2106-pptx-129-320.jpg)
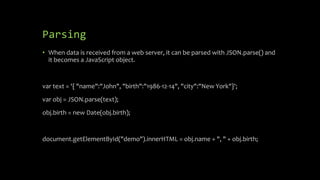
![Accessing Values in Objects
• In order to access the values of an
object, you can use the dot (.)
notation
myObj =
{“firstName”:”Matt”,”lastN
ame”:”Marino”,”age”:34};
firstName =
myObj.firstName;
lastName =
myObj.lastName;
age = myObj.age;
• You can also access the values using a
bracket notation
firstName = myObj[“firstName”];
lastName = myObj[“lastName”];
age = myObj[“age”];
• You can also access all of the values
using a for loop:
for (x in myObj)
{
}](https://image.slidesharecdn.com/1-22-24info2106-240105202251-ac914c3f/85/1-22-24-INFO-2106-pptx-130-320.jpg)

![JSON Example Visual
JSON XML
function showJSON()
{
var xmlhttp = new XMLHttpRequest();
xmlhttp.onreadystatechange = function() {
if (this.readyState == 4 && this.status == 200) {
var myObj = JSON.parse(this.responseText);
document.getElementById("carJSON").innerHTML = myObj.make;
}
};
xmlhttp.open("GET", "cars.json", true);
xmlhttp.send();
}
function showXML()
{
var xmlhttp = new XMLHttpRequest();
xmlhttp.onreadystatechange = function() {
if (this.readyState == 4 && this.status == 200) {
var xmldoc = xmlhttp.responseXML;
var myObj = xmldoc.getElementsByTagName("make");
alert(myObj[0].childNodes[0].nodeValue);
document.getElementById("carXML").innerHTML =
myObj[0].childNodes[0].nodeValue;
}
};
xmlhttp.open("GET", "cars.xml", true);
xmlhttp.send();
}
function show()
{
showJSON();
showXML();
}](https://image.slidesharecdn.com/1-22-24info2106-240105202251-ac914c3f/85/1-22-24-INFO-2106-pptx-134-320.jpg)
![JSON Table
<!DOCTYPE html>
<html>
<body>
<h2>Make a table based on JSON data.</h2>
<p id="demo"></p>
<script>
var obj, dbParam, xmlhttp, myObj, x, txt = "";
obj = { table: "customers", limit: 14 };
dbParam = JSON.stringify(obj);
xmlhttp = new XMLHttpRequest();
xmlhttp.onreadystatechange = function() {
if (this.readyState == 4 && this.status == 200) {
myObj = JSON.parse(this.responseText);
txt += "<table border='1'>"
for (x in myObj) {
txt += "<tr><td>" + myObj[x].name + "</td></tr>";
}
txt += "</table>"
document.getElementById("demo").innerHTML = txt;
}
};
xmlhttp.open("POST", "json_demo_html_table.php", true);
xmlhttp.setRequestHeader("Content-type", "application/x-www-form-urlencoded");
xmlhttp.send("x=" + dbParam);
</script>
</body>
</html>](https://image.slidesharecdn.com/1-22-24info2106-240105202251-ac914c3f/85/1-22-24-INFO-2106-pptx-135-320.jpg)


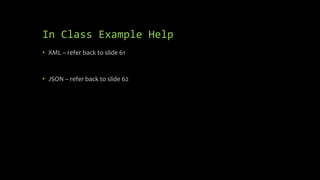

![Echoing Form Data PHP Code (echo.php)
<HTML>
<HEAD>
<TITLE> Echoing Form Data Example </TITLE>
</HEAD>
<?php
// Initialize variables from form
$name = $_POST['name'];
$favcolor = $_POST['favcolor'];
$yearborn = $_POST['yearborn'];
// encode any special characters in these variables
$encoded_name = htmlentities($name);
$encoded_favcolor = htmlentities($favcolor);
print("<body bgcolor=$encoded_favcolor>");
// print the person's name
print("Hello $encoded_name<br>");
$currentdate = getdate();
$year = $currentdate["year"];
// Calculate age using the $yearborn field from the
submitted form
$age = $year - $yearborn;
// print the person's age
print("You are $age years old");
?>
</BODY>
</HTML>](https://image.slidesharecdn.com/1-22-24info2106-240105202251-ac914c3f/85/1-22-24-INFO-2106-pptx-142-320.jpg)
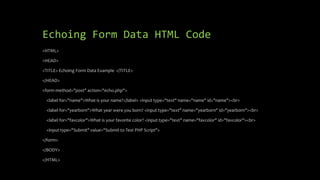
![Writing Form Data to a File on the
Server PHP Code (write.php)
<HTML>
<HEAD>
<TITLE> Writing Form Data to a File on the Server Example </TITLE>
</HEAD>
<BODY>
<?php
// The next line opens a file handle to a file called output.txt
// the file handle is like an alias to the file
// the a in the fopen function means append so entries
// will be appended to the output.txt file
$out = fopen("outputoutput.txt", "a");
// if the file could not be opened for whatever reason, print
// an error message and exit the program
if (!$out) {
print("Could not append to file");
exit;
}
// fputs writes output to a file. the syntax is where to write
// followed by what to write
// $name is the contents of the name field in the sample
form
// t represents a tab character and n represents a new line
fputs($out,"$_POST[name]t");
fputs($out,"$_POST[yearborn]t");
fputs($out,"$_POST[favcolor]t");
fputs($out,"$_SERVER[REMOTE_ADDR]n");
print("Thanks you for completing our survey.");
fclose($out);
?>
</BODY>
</HTML>](https://image.slidesharecdn.com/1-22-24info2106-240105202251-ac914c3f/85/1-22-24-INFO-2106-pptx-144-320.jpg)

![Uploading Files PHP Code (upload.php)
<HTML>
<HEAD>
<TITLE> Uploading Files - place file in
uploads folder </TITLE>
</HEAD>
<BODY>
<?php
$target_path = "uploads/";
$target_path = $target_path . basename(
$_FILES['uploadedfile']['name']);
if(move_uploaded_file($_FILES['uploadedfile']['tmp_name'
], $target_path)) {
echo "The file ". basename(
$_FILES['uploadedfile']['name']).
" has been uploaded";
} else{
echo "There was an error uploading the file, please try
again!";
}
?>
</BODY>
</HTML>](https://image.slidesharecdn.com/1-22-24info2106-240105202251-ac914c3f/85/1-22-24-INFO-2106-pptx-146-320.jpg)

![Vote Example PHP Code (vote.php)
<HTML>
<HEAD>
<TITLE> Recording Vote </TITLE>
</HEAD>
<BODY>
<?php
$out = fopen("outputvote.txt", "a");
if (!$out) {
print("Could not append to file");
exit;
}
fputs($out,"$_POST[name]t");
fputs($out,"$_POST[vote]n");
print("Thank you for voting");
fclose($out);
?>
</BODY>
</HTML>](https://image.slidesharecdn.com/1-22-24info2106-240105202251-ac914c3f/85/1-22-24-INFO-2106-pptx-148-320.jpg)

![Birthday PHP Code (bday.php)
<HTML>
<HEAD>
<TITLE> Birthday results </TITLE>
</HEAD>
<BODY>
<?php
$out = fopen("outputbirthday.txt", "a");
if (!$out) {
print("Could not append to file");
exit;
}
fputs($out,"$_POST[name]t");
fputs($out,"$_POST[month]t");
fputs($out,"$_POST[day]n");
print("Thank you for entering your birthday");
fclose($out);
?>
</BODY>
</HTML>](https://image.slidesharecdn.com/1-22-24info2106-240105202251-ac914c3f/85/1-22-24-INFO-2106-pptx-150-320.jpg)
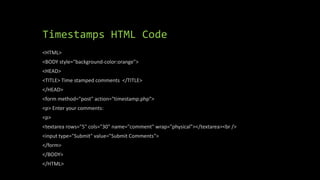
![Timestamps PHP Code (timestamp.php)
<HTML>
<HEAD>
<TITLE> Timestamped Comments </TITLE>
</HEAD>
<?php
$name = $_POST['comment'];
$out = fopen("outputtimestamps.txt", "a");
if (!$out) {
print("Could not append to file");
exit;
}
fputs($out,"Comment timestamp: ");
fputs($out,date("m/j/y h:i", time()));
fputs($out,"...IP address: ");
fputs($out,$_SERVER[REMOTE_ADDR]);
fputs($out,"n");
fputs($out,"$_POST[comment]nn");
print("Thank you. Your comments are
important to us. ");
fclose($out);
?>
</BODY>
</HTML>](https://image.slidesharecdn.com/1-22-24info2106-240105202251-ac914c3f/85/1-22-24-INFO-2106-pptx-152-320.jpg)


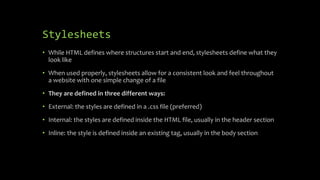

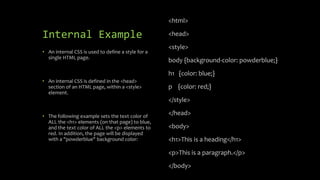
![External Example [Most Common]
<html>
<head>
<link rel="stylesheet" href="styles.css">
</head>
<body>
<h1>This is a heading</h1>
<p>This is a paragraph.</p>
</body>
</html>](https://image.slidesharecdn.com/1-22-24info2106-240105202251-ac914c3f/85/1-22-24-INFO-2106-pptx-161-320.jpg)


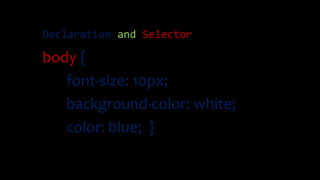
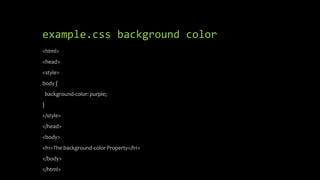
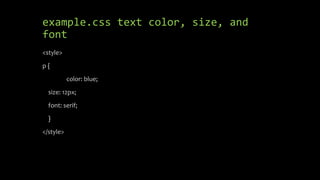
![How Stylesheets are put together
• Each style in a style sheet has three parts:
• A selector
• One or more properties
• One or more values for each property
• Syntax
selector {
property1: value1 [value2 …];
property2: value1 [value2 …];
}
• To associate a style sheet to an HTML document, use the <link> tag within the head tag:
• <link href=“styles.css” rel=“stylesheet” type=“text/css” />](https://image.slidesharecdn.com/1-22-24info2106-240105202251-ac914c3f/85/1-22-24-INFO-2106-pptx-166-320.jpg)


![CSS Linking [External]
• This example uses a full URL to link to a style sheet:
• <link rel="stylesheet" href="https://www.w3schools.com/html/styles.css">
• This example links to a style sheet located in the html folder on the current web
site:
• <link rel="stylesheet" href="/html/styles.css">
• This example links to a style sheet located in the same folder as the current page:
• <link rel="stylesheet" href="styles.css">](https://image.slidesharecdn.com/1-22-24info2106-240105202251-ac914c3f/85/1-22-24-INFO-2106-pptx-174-320.jpg)


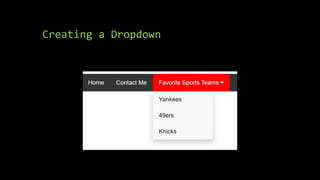
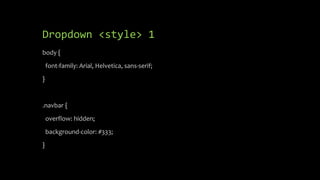
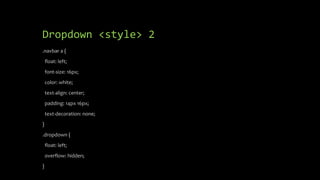


![CSS Assignment
• Create an HTML file called dropdown.html where you utilize internal CSS to
create a dropdown menu AND set CSS parameters [color, alignment, etc.] for
your headers and paragraphs.
• Your dropdown menu should include a Home, About Me, Class Info, and Contact
Me pages listed. Create dropdowns for both the About Me and Class Info
sections.](https://image.slidesharecdn.com/1-22-24info2106-240105202251-ac914c3f/85/1-22-24-INFO-2106-pptx-251-320.jpg)


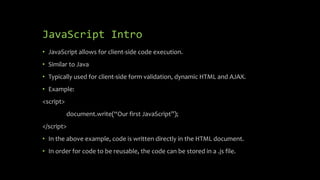
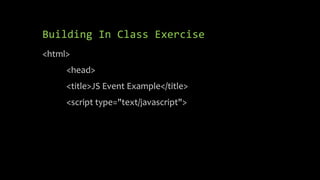
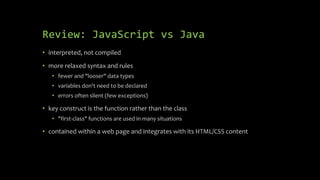
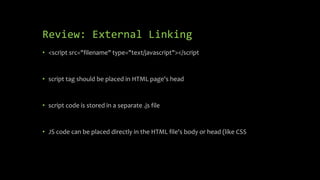
![JavaScript Important Notes
• Like Java [uses functions]
• Interpreted by the browser, not compiled
• Complimentary to HTML, used for dynamic web pages and form validation
• OS and Browser (for the most part) independent
• JavaScript is either embedded in a webpage using <script> …</script> or in a
separate file usually with a .js extension.
• Like stylesheets and css files, JavaScript and js files allows for portability and
reusability.
• To reference an external JavaScript: <script src=“scripts.js”></script>](https://image.slidesharecdn.com/1-22-24info2106-240105202251-ac914c3f/85/1-22-24-INFO-2106-pptx-254-320.jpg)


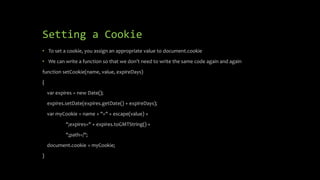
![Getting a Cookie
function getCookie(name)
{
if ((document.cookie == null) || (document.cookie == ""))
{
return "";
}
else
{
var cookies = document.cookie.split(';');
for (var i = 0; i < cookies.length; i++)
{
var cookie = cookies[i].split('=');
if (removeLeadingSpace(cookie[0]) == name)
{
return unescape(cookie[1]);
}
}
return "";
}
}](https://image.slidesharecdn.com/1-22-24info2106-240105202251-ac914c3f/85/1-22-24-INFO-2106-pptx-280-320.jpg)


![XML and JavaScript [HTML file]
<html>
<head>
<title></title>
<meta http-equiv="Content-Type" content="text/html; charset=UTF-8">
<script src="js/scripts.js"></script>
</head>
<body onload="showData()">
<div id="addressbook"></div>
</body>
</html>](https://image.slidesharecdn.com/1-22-24info2106-240105202251-ac914c3f/85/1-22-24-INFO-2106-pptx-284-320.jpg)
![XML and JavaScript [JS file]
function showData()
{
var xml = new XMLHttpRequest();
var addressHTML = "";
var addressbook = document.getElementById("addressbook");
xml.open("GET", "addressdata.xml", false);
xml.send("");
var xmlDoc = xml.responseXML;
var names = xmlDoc.getElementsByTagName("name");
var mails = xmlDoc.getElementsByTagName("email");
for (var i = 0; i < names.length; i++)
{
var name = names[i].childNodes[0].nodeValue;
var mail = mails[i].childNodes[0].nodeValue;
addressHTML += "<li>" + name + "(" + mail + ")</li>n";
}
addressbook.innerHTML = addressHTML;
}](https://image.slidesharecdn.com/1-22-24info2106-240105202251-ac914c3f/85/1-22-24-INFO-2106-pptx-285-320.jpg)


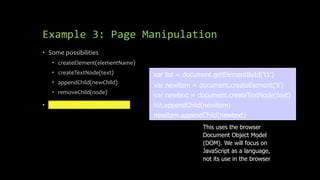
![Document Object Model (DOM)
• HTML page is structured data
• DOM provides representation of this hierarchy
• Examples
• Properties: document.alinkColor, document.URL, document.forms[ ], document.links[
], document.anchors[ ], …
• Methods: document.write(document.referrer)
• These change the content of the page!
• Also Browser Object Model (BOM)
• Window, Document, Frames[], History, Location, Navigator (type and version of
browser)](https://image.slidesharecdn.com/1-22-24info2106-240105202251-ac914c3f/85/1-22-24-INFO-2106-pptx-322-320.jpg)

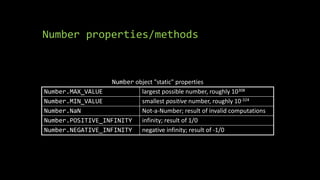
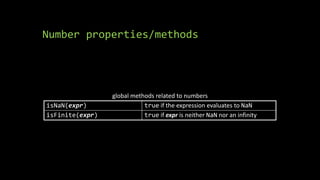
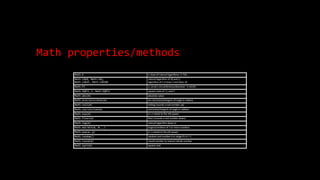
![Number properties/methods
Number instance methods
.toString([base]) convert a number to a string with optional base
.toFixed(digits) fixed-point real with given # digits past decimal
.toExponential(digits) convert a number to scientific notation
.toPrecision(digits) floating-point real, given # digits past decimal](https://image.slidesharecdn.com/1-22-24info2106-240105202251-ac914c3f/85/1-22-24-INFO-2106-pptx-325-320.jpg)
![String methods
String.fromCharCode(expr) converts ASCII integer → String
.charAt(index) returns character at index, as a String
.charCodeAt(index) returns ASCII value at a given index
.concat(str...) returns concatenation of string(s) to this one
.indexOf(str[,start])
.lastIndexOf(str[,start])
first/last index at which given string begins in this string, optionally starting
from given index
.match(regexp) returns any matches for this string against the given string or regular
expression ("regex")
.replace(old, new) replaces first occurrence of old string or regular expr. with new string (use
regex to replace all)
.search(regexp) first index where given regex occurs
.slice(start, end)
.substring(start, end)
substr. from start (inclusive) to end (exclusive)
.split(delimiter[,limit]) break apart a string into an array of strings
.toLowerCase()
.toUpperCase()
return new string in all upper/lowercase](https://image.slidesharecdn.com/1-22-24info2106-240105202251-ac914c3f/85/1-22-24-INFO-2106-pptx-328-320.jpg)


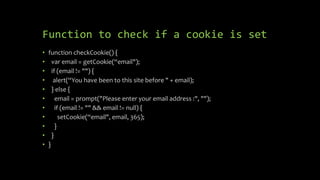
![Function to get a Cookie
• function getCookie(cname) {
• var name = cname + "=";
• var decodedCookie = decodeURIComponent(document.cookie); // Handle
special chars
• var ct = decodedCookie.split(';'); // parse cookies
into tray array
• for(var i = 0; i <ct.length; i++) { // search for
cookie
• var c = ct[i];
• while (c.charAt(0) == ' ') {
• c = c.substring(1);
• }
• if (c.indexOf(name) == 0) {
• return c.substring(name.length, c.length); // return cookie if
found
• }
• }
• return ""; // if not found
• }](https://image.slidesharecdn.com/1-22-24info2106-240105202251-ac914c3f/85/1-22-24-INFO-2106-pptx-361-320.jpg)


![JS Scatter Plots
<html>
<body>
<canvas id="myCanvas" width="400" height="400"
style="border:1px solid grey"></canvas>
<script>
const canvas =
document.getElementById("myCanvas");
const ctx = canvas.getContext("2d");
canvas.height = canvas.width;
ctx.transform(1, 0, 0, -1, 0, canvas.height)
const xArray =
[50,60,70,80,90,100,110,120,130,140,150];
const yArray = [7,8,8,9,9,9,10,11,14,14,15];
ctx.fillStyle = "red";
for (let i = 0; i < xArray.length-1; i++) {
let x = xArray[i]*400/150;
let y = yArray[i]*400/15;
ctx.beginPath();
ctx.ellipse(x, y, 3, 3, 0, 0, Math.PI * 2);
ctx.fill();
}
</script>
</body>
</html>](https://image.slidesharecdn.com/1-22-24info2106-240105202251-ac914c3f/85/1-22-24-INFO-2106-pptx-420-320.jpg)


![JS Vertical Bar Charts
<html>
<script src="https://cdn.plot.ly/plotly-
latest.min.js"></script>
<body>
<div id="myPlot" style="width:100%;max-
width:700px"></div>
<script>
const xArray = ["Italy", "France", "Spain", "USA",
"Argentina"];
const yArray = [55, 49, 44, 24, 15];
const data = [{
x:xArray,
y:yArray,
type:"bar",
orientation:"v",
marker: {color:"rgba(0,0,255,0.6)"}
}];
const layout = {title:"World Wide Wine Production"};
Plotly.newPlot("myPlot", data, layout);
</script>
</body>
</html>](https://image.slidesharecdn.com/1-22-24info2106-240105202251-ac914c3f/85/1-22-24-INFO-2106-pptx-423-320.jpg)
![JS Horizontal Bar Charts
<html>
<script src="https://cdn.plot.ly/plotly-
latest.min.js"></script>
<body>
<div id="myPlot" style="width:100%;max-
width:700px"></div>
<script>
const xArray = [55, 49, 44, 24, 15];
const yArray = ["Italy ", "France ", "Spain ", "USA ",
"Argentina "];
const data = [{
x:xArray,
y:yArray,
type:"bar",
orientation:"h",
marker: {color:"rgba(255,0,0,0.6)"}
}];
const layout = {title:"World Wide Wine Production"};
Plotly.newPlot("myPlot", data, layout);
</script>
</body>
</html>](https://image.slidesharecdn.com/1-22-24info2106-240105202251-ac914c3f/85/1-22-24-INFO-2106-pptx-424-320.jpg)
![JS Pie Charts
<html>
<script src="https://cdn.plot.ly/plotly-latest.min.js"></script>
<body>
<div id="myPlot" style="width:100%;max-width:700px"></div>
<script>
const xArray = ["Italy", "France", "Spain", "USA", "Argentina"];
const yArray = [55, 49, 44, 24, 15];
const layout = {title:"World Wide Wine Production"};
const data = [{labels:xArray, values:yArray, type:"pie"}];
Plotly.newPlot("myPlot", data, layout);
</script>
</body>
</html>](https://image.slidesharecdn.com/1-22-24info2106-240105202251-ac914c3f/85/1-22-24-INFO-2106-pptx-425-320.jpg)
![JS Donut Charts
<html>
<script src="https://cdn.plot.ly/plotly-latest.min.js"></script>
<body>
<div id="myPlot" style="width:100%;max-width:700px"></div>
<script>
const xArray = ["Italy", "France", "Spain", "USA", "Argentina"];
const yArray = [55, 49, 44, 24, 15];
const layout = {title:"World Wide Wine Production"};
const data = [{labels:xArray, values:yArray, hole:.4, type:"pie"}];
Plotly.newPlot("myPlot", data, layout);
</script>
</body>
</html>](https://image.slidesharecdn.com/1-22-24info2106-240105202251-ac914c3f/85/1-22-24-INFO-2106-pptx-426-320.jpg)
![JS More Advanced Scatter Plots
<html>
<script src="https://cdn.plot.ly/plotly-latest.min.js"></script>
<body>
<div id="myPlot" style="width:100%;max-width:700px"></div>
<script>
const xArray = [50,60,70,80,90,100,110,120,130,140,150];
const yArray = [7,8,8,9,9,9,10,11,14,14,15];
// Define Data
const data = [{
x:xArray,
y:yArray,
mode:"markers"
}];
// Define Layout
const layout = {
xaxis: {range: [40, 160], title: "Square Meters"},
yaxis: {range: [5, 16], title: "Price in Millions"},
title: "House Prices vs. Size"
};
// Display using Plotly
Plotly.newPlot("myPlot", data, layout);
</script>
</body>
</html>](https://image.slidesharecdn.com/1-22-24info2106-240105202251-ac914c3f/85/1-22-24-INFO-2106-pptx-427-320.jpg)
![JS Line Graphs
<html>
<script src="https://cdn.plot.ly/plotly-latest.min.js"></script>
<body>
<div id="myPlot" style="width:100%;max-width:700px"></div>
<script>
const xArray = [50,60,70,80,90,100,110,120,130,140,150];
const yArray = [7,8,8,9,9,9,10,11,14,14,15];
// Define Data
const data = [{
x: xArray,
y: yArray,
mode:"lines"
}];
// Define Layout
const layout = {
xaxis: {range: [40, 160], title: "Square Meters"},
yaxis: {range: [5, 16], title: "Price in Millions"},
title: "House Prices vs. Size"
};
// Display using Plotly
Plotly.newPlot("myPlot", data, layout);
</script>
</body>
</html>](https://image.slidesharecdn.com/1-22-24info2106-240105202251-ac914c3f/85/1-22-24-INFO-2106-pptx-428-320.jpg)
![JS Bubble Plots
<html>
<script src="https://cdn.plot.ly/plotly-latest.min.js"></script>
<body>
<div id="myPlot" style="width:100%;max-width:700px"></div>
<script>
const xArray = [1,2,3,4];
const yArray = [10,20,30,40];
const trace1 = {
x: xArray,
y: yArray,
mode: 'markers',
marker: {
color: ['red', 'green', 'blue', 'orange'],
size: [20, 30, 40, 50]
}
};
const trace2 = {
x: [1, 2, 3, 4],
y: [15, 30, 45, 60],
mode: 'markers',
marker: {
color: 'rgb(31, 119, 180)',
size: 18,
symbol: ['circle', 'square', 'diamond', 'cross']
},
};
const data = [trace1, trace2];
const layout = {
title: "Plotting Bubbles"
};
Plotly.newPlot('myPlot', data, layout);
</script>
</body>
</html>](https://image.slidesharecdn.com/1-22-24info2106-240105202251-ac914c3f/85/1-22-24-INFO-2106-pptx-429-320.jpg)

![JS Output Dropdown List Options
<html>
<head>
<script>
function getOptions() {
var x = document.getElementById("mySelect");
var txt = "";
var i;
for (i = 0; i < x.length; i++) {
txt = txt + " " + x.options[i].text;
}
document.getElementById("demo").innerHTML = txt;
}
</script>
</head>
<body>
<form>
Select your favorite fruit:
<select id="mySelect">
<option>Apple</option>
<option>Orange</option>
<option>Pineapple</option>
<option>Banana</option>
</select>
<br><br>
<input type="button" onclick="getOptions()" value="Output all
options">
</form>
<p id="demo"></p>
</body>
</html>](https://image.slidesharecdn.com/1-22-24info2106-240105202251-ac914c3f/85/1-22-24-INFO-2106-pptx-431-320.jpg)


![JS Assignment
• Combine your skills from CSS [onclick] and your JS skills to create an HTML file
called popup.html that when you click an onclick it will open your favorite
website as a popup.](https://image.slidesharecdn.com/1-22-24info2106-240105202251-ac914c3f/85/1-22-24-INFO-2106-pptx-436-320.jpg)


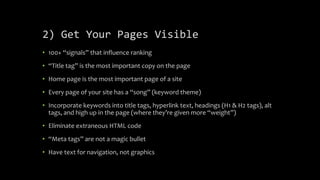
![Purpose of SEO
• To drive targeted traffic to your website [or specific pages]
• Ideally, the traffic drives additional sales
• Most online purchases are made on sites found through search engine listings](https://image.slidesharecdn.com/1-22-24info2106-240105202251-ac914c3f/85/1-22-24-INFO-2106-pptx-450-320.jpg)


![What is CMS?
• Content Management Systems (CMS) are commonly used to create and store
data online
• The most commonly used CMS tools allow individuals to create their own website
without knowing anything about web development [coding in HTML, CSS, JS,
etc.]
• Individuals merely install the CMS software to their website and type in specific
information to create websites](https://image.slidesharecdn.com/1-22-24info2106-240105202251-ac914c3f/85/1-22-24-INFO-2106-pptx-477-320.jpg)