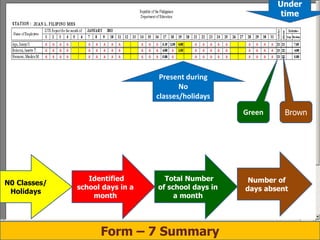
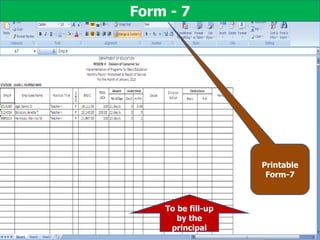
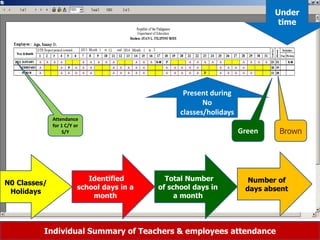
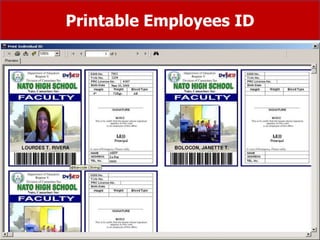
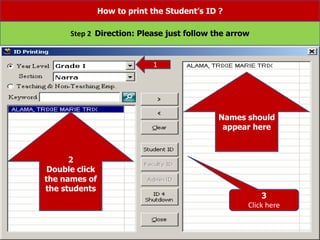
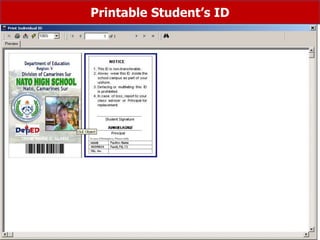
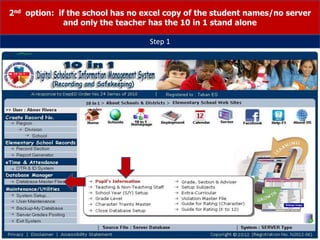
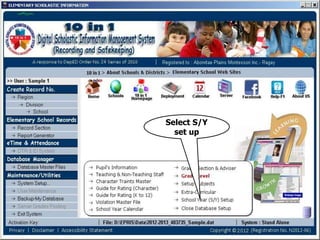
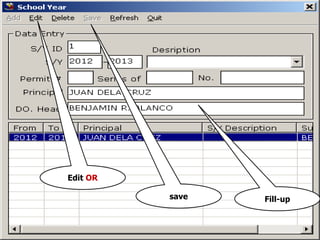
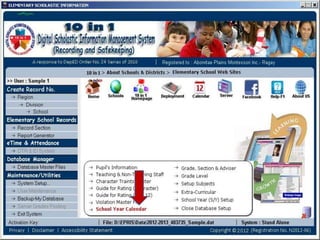
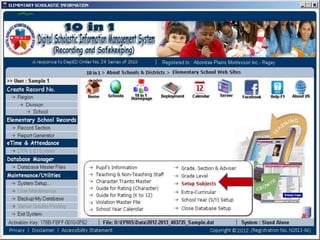
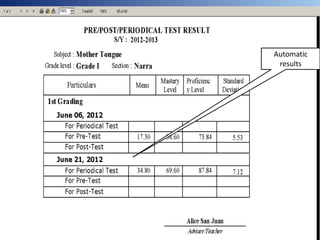
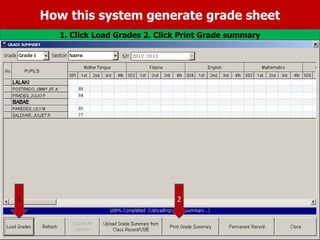
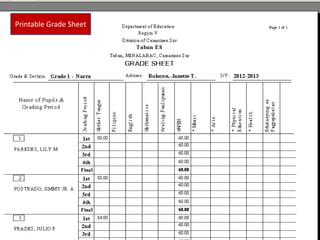
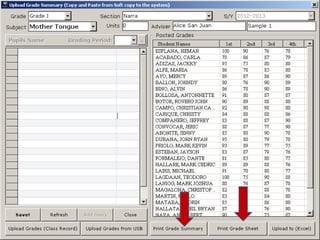
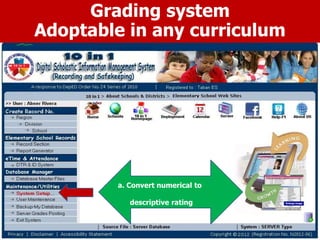
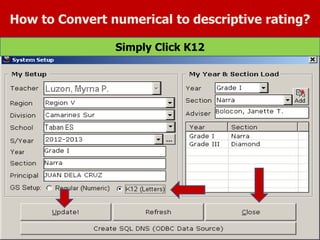
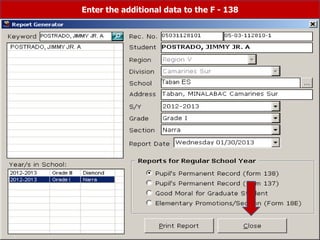
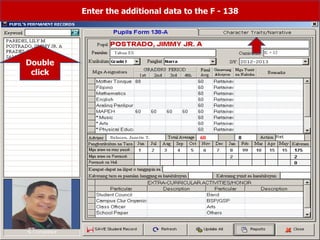
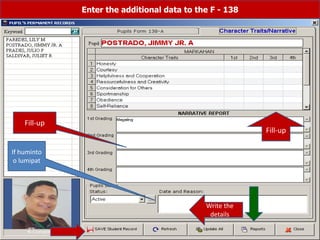
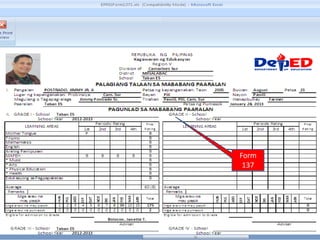
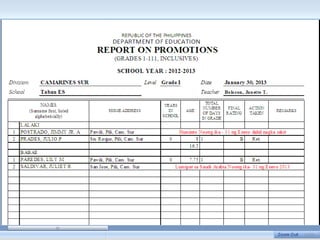
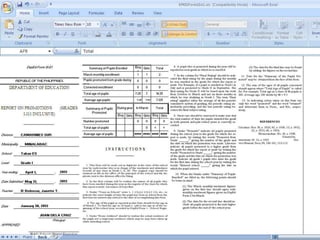
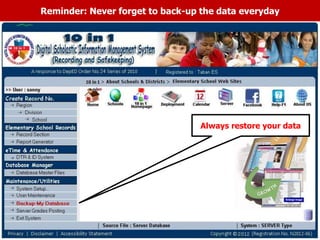
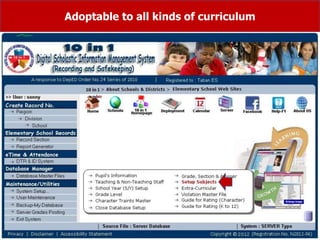
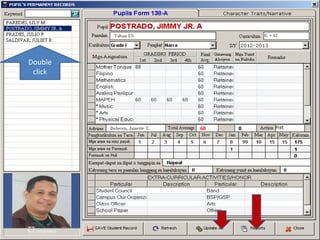
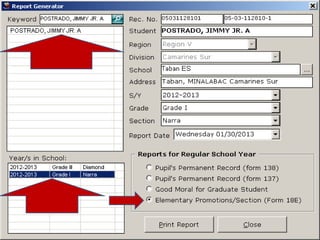
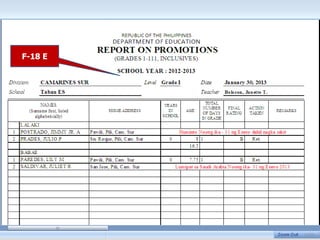
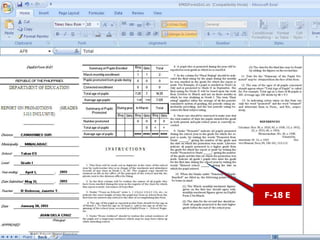
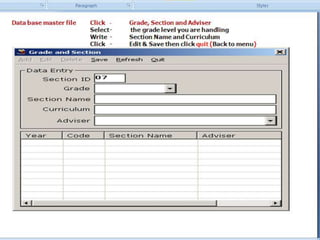
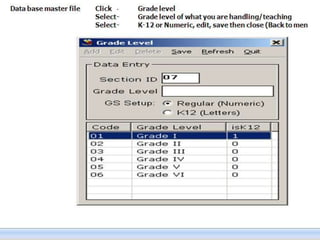
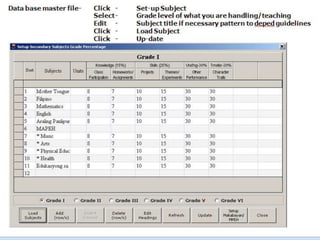
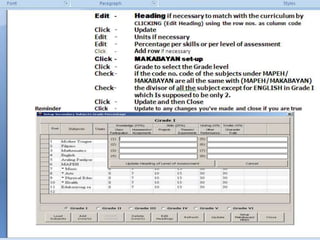
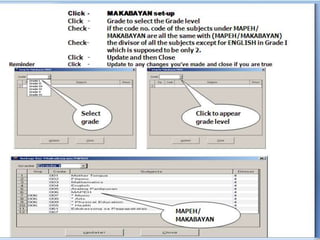
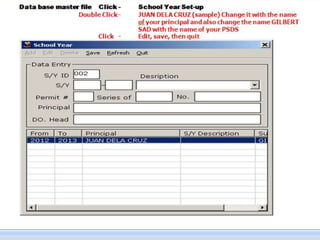
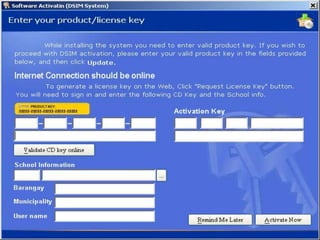
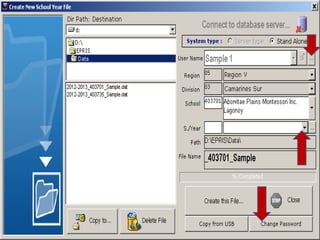
Screen
1
Screen
2
Speaker
Back-draft
LCD
2
LCD
1
1
5
2 4
3
6
Seating
arrangement
Maybe today…..
• It is possible that credentials of
student transferring from one
school to another carries not
the authentic copy of his/her
scholastic records. (Incorrect
LRN)
Issues and concerns
• It is possible that clientele find
difficulty in requesting their
own records from the school
where they graduated/enrolled.
• It is possible that the school will
have a hard time to submit their
student’s scholastic records/reports
to the division offices (Form 18-A)
in due time.
• It is possible that stored
student’s scholastic records
be damaged due to the long
period of time or by natural
disasters/calamities.
Attendance Report
• It is possible that the time in the
Form - 48 does not tally with the
log book
• It is possible that the Form – 7
does not tally with the Form - 48
ID
• It is possible that the release
of student’s and teacher’s ID
be delayed
Session 1
Power point Presentation about
the software
Session 2
Actual Demonstration
using the software
Session 3
Software installation and
hands-on activity
 Printable
 Grade Sheet
 Summary Sheet
 Form – 138
 Form – 137
 Form – 18-E
 Periodical test Results
 Pre & Post test Results
Output
For Secondary
Server type/Stand Alone
It is just a dream before
System Advancement In recording Student’s Academic Data
ELMER
MNHS
JOCY
GNHS
PHILIP
D.O
TISOY
B.I.R.
ARIV SANAGA
4
1 2
3
5 6
8 7
6
9
10
In
1
21
GTS
MAP
Sole Distributor:
ARIVSANAGA INFO TECH SOLUTIONS
DTI Certificate No. 01673343
Overview and Rationale
This software entitled “10 in 1 Digital Scholastic
Information Management System” will fast track
the preparation of an accurate scholastic reports,
monitor attendance of teachers & employees and
will lessen so much expenses for school supplies
and materials.
Savings, can be allocated in-line or related with
similar concern .
Why the School need the 10 in 1 Digital Scholastic
Information Management System Server?
To facilitate the Principal in monitoring the
attendance of teachers and employees in a
very easy way.
To encourage the teachers and
employees to come and leave
the school on time.
To fast track queries/
verification and release or
submission of an accurate
pupils’ and student’ s
scholastic reports.
Why the teachers need the 10 in 1 Digital Scholastic
Information Management System Stand Alone?
It is much easier for the teachers to
prepare and submit their student’s
scholastic reports on due time.
The teacher is assured that aside from arriving to
an accurate computation the conversion from
numerical to Descriptive ratings in the K+12
Program can also be made.
The teacher will use the automated Class
Record where the student’s data will be
transferred automatically to the Form 138,
Form 137 and Form 18A.
A time for our self…
A peace of mind upon leaving our offices
and classrooms
Teacher Anne
What if we remain captive of the old practices ?
Why it is
incomplete
Tsk..
Kulog na
payo ko!!!
Delikadong Late kana naman 2moro maam…
Antok na
me….
Tulugan
ko na ito
sir?….
The DTR’s system
Project watch implementing software
With Locator program
Form 48 Generating system
Form-7 Generating system
Monitor punctuality and attendance
1
2
Enter the name
of the teachers
& employees
1
2 3
4
5
you can
print if
you wish
Please fill-up completely with the necessary
data of the employees.
Pls. Set-up the
school days!!!
1
2
1
2
3
4
Set up new calendar
year
Should be based on
the school calendar
We will hold classes on Saturday
Jan. 5, 2013 (Just check)
We don’t have classes on Jan. 29, 2013
(Just uncheck)
Example - 1
Example - 2
How will the principal monitor
the school employees?
Step 1 Direction: Please just follow the arrow
2
1
How to monitor the Attendance and punctuality
of teachers and employees.
Step No. 2 Direction: Please just follow the arrow (Click month & date first)
3
2
1 Sanny’s registered
picture
Sanny when he
swipe his ID to the
barcode scanner
Time when he entered the gate
Is Sanny’s registered
picture match to the
picture when he
swipe his ID?
No picture will
appear here if the
teacher or employee
is with an approved
locator slip or in O.B
No picture will appear here if the
teacher or employee is not the
one personally swipe his/her ID.
(It is the discretion of the principal
wither to consider or mark
him/her absent)
This is the purpose of
using webcam and a
barcode scanner
How to generate the F-48 & F-7 in such a way that it should
synchronize to the actual attendance of the school employees?
1
2
1
2
1
2
3
4
5
6
7
This will appear when you click arrow 1
Direction: click following the arrow and select the particular month
This will appear when you click arrow 2
Direction: click following the arrow and select name of the particular employee
Printable F-48
Form – 7 Summary
Under
time
Present during
No
classes/holidays
Green Brown
N0 Classes/
Holidays
Identified
school days in a
month
Total Number
of school days in
a month
Number of
days absent
To be fill-up
by the
principal
Printable
Form-7
Form - 7
N0 Classes/
Holidays
Identified
school days in a
month
Total Number
of school days in
a month
Number of
days absent
Under
time
Present during
No
classes/holidays
Individual Summary of Teachers & employees attendance
Green Brown
Attendance
for 1 C/Y or
S/Y
ID generating system;
Teacher Students Employees
Free Pictures
How to take picture for School employees ID?
Direction: Select Name and enter the personal profile of the employee then
click Picture taking
1
3
2
How to take picture for Student’s ID?
Step 1 Direction: Please just follow the arrow
1
2 3
How to print the School employees ID ?
Step 1 Direction: Please just follow the arrow
1
2
How to print the School employees ID ?
Step 2 Direction: Please just follow the arrow
2
Double click the
names of the
employees
Names should
appear here
3 Click Faculty or
Admin
1
Click
Printable Employees ID
How to print the Student’s ID ?
Step 1 Direction: Please just follow the arrow
1
2
2
Double click
the names of
the students
Names should
appear here
3
Click here
How to print the Student’s ID ?
Step 2 Direction: Please just follow the arrow
1
Printable Student’s ID
Pls. Upload list of
enrolment!!!
1
2
Copy Paste here following this template
1 2
Copy paste this to your system by column if not in the
same format with the system template
1
2
Copy
paste
the
LRN
Double click
each Name
1
Pupil’s
information will
appear here
Select the
grade level
You can take
picture
Assigning Sections
Note: It is necessary that the source of the student’s name per section
that will be copied by the teachers must come from the server
1
Double Click
Click all – Names of students in all
subject will appear
Click 1-4 Names of pupils in that
particular year will appear
If you
wish to
check
The list of students per
section
or
The list of your class will
appear
THERE…
2nd option: if the school has no excel copy of the student names/no server
and only the teacher has the 10 in 1 stand alone
Step 1
5
you can
print if
you wish
Please fill-up completely with the necessary
data of the employees.
3
2
1 4
Select the name of
the adviser
Edit Save Sec.
Curr.
Adv.
Select Grade
level
Select K-12
or RBEC
Edit
Save
K-12
Grade - I
Edit Save
Click this If Grade II
is K-12
Edit
Save
Click this If old
Curriculum
Select S/Y
set up
Edit OR
save Fill-up
Step 2
Should be based
on the school
calendar
Set up new
calendar year
Select what
particular grade level
You can
change the
heading
Add Row if
needed
You can edit in
any of this items
You can
change the
heading
You can add row
Click to check the set
up for Makabayan
Subjects
Select the Grade level you
are handling
Copy the code of
the MAKABAYAN if
not set-up
Click update
Place the divisor to
compute the average grade
For K-12
(2 instead of 4)
Click Close
Click
K-12
For Grade I
only
Copy the code of
the MAKABAYAN if
not set-up
Click
Click update Click Close
2nd option: if the school has no excel copy of the student names/no server
and only the teacher has the 10 in 1 stand alone
Step No. 2
2nd option: if the school has no excel copy of the student names/no server
and only the teacher has the 10 in 1 stand alone
Step No.3
2nd option: if the school has no excel copy of the student names/no server
and only the teacher has the 10 in 1 stand alone
Fill-up completely with
the student’s data
This can be done by the teacher during the enrolment
or anytime of the S/Y
Assigning Sections
Double Click
the name
This can be done if only the teacher has the 10 in 1 stand alone
The list of students per
section
or
The list of your class will
appear
THERE…
This can be printed or shared to teachers via flash-drive
How to use the Automated class record?
Step No. 1: In Checking attendance
1 2
1. Click Attendance
2. select name of the subject
3. √ the absent or excuse and save after the roll call
2
3
1
4
Class Record for K+12
Levels of
assessment in the
K+12 Curriculum
Class Record used in the previous
Curriculum
Levels of
assessment in the
previous
Curriculum
How to enter/record the DLL and how the principal
can be able to monitor the lesson conducted by the teacher?
Check the correct Year level, section and grading period.
Note:
1. Click Refresh 2. Click Add 3. Select subject 4. Click Activity
5. Select Activity or enter the particular activity 6. Click Save
DLL will appear
here
3.
4.
5.
1.
6.
2.
Reminder: It is necessary to close the previous grading period
before entering the data of your students to the next grading period
Assessment procedure
1. Click Refresh2. Click Add3. Select subject4. Click Activity5. set the lowest grade
6. set the number of indicators 7. enter the raw scores of each students
8. select what is being assessed 9. Save
3
2
4
9 1
8
7
How can you show the student’s individual achievement
of your class incase their parents wanted to verify?
1. Click logged activity 2. Select the name of the student 3. Click Class Record per student
1
2
3
Achievement of Postrado in Mother Tongue
You can Print this incase the parent wanted to request a hard copy
Achievement of Grade 1 Narra
How this system generate Summary Sheet
Example of pre-
post test result
Automatic
results
How this system generate grade sheet
1. Click Load Grades 2. Click Print Grade summary
1 2
Printable Grade Sheet
a. Convert numerical to
descriptive rating
Grading system
Adoptable in any curriculum
How to Convert numerical to descriptive rating?
Simply Click K12
How to Convert numerical to descriptive rating?
Step No.2
Double
click
Fill-up with the
complete data
How to Convert numerical to descriptive rating?
Step No.3
Double click
Pupil’s information
should appear there
Double click
Descriptive
F-138
With
picture
With LRN
Enter the additional data to the F - 138
Double
click
Enter the additional data to the F - 138
Fill-up
Fill-up
If huminto
o lumipat
Write the
details
To print F-137 & F-18-A
Double
click
Double
click
Form
137
Reminder: Never forget to back-up the data everyday
Always restore your data
Adoptable to all kinds of curriculum
Everything are editable
Adoptable to all kinds of curriculum
How can you submit your F-18A on due time
when the S/Y is almost ending?
Copy/enter your grade sheet to pupil’s grade summary
How can you submit your F-18A on due time
when the S/Y is almost ending?
Follow the direction of the arrow to enter your grade sheet
in the grade summary
Double
click
F-18 E
F-18 E
Step # 1
Please Click
Data
After the installation
Step # 2
Dapat data
This will
appear
Please Click
Step # 2
Please
double Click
Dapat data
This will
appear
Step # 3 Please Click
Appear
sample.. click
Another click
there
Step # 4
What you see there is the word sample
Step # 5
Replace that sample with your name
then continue filling up with your
complete data
Step # 6
You add row if your not the
only teacher handling your
advisory class
Please add the teacher
teaching your Advisory
class in other subjects
Add also the name of the adviser of the class you are
handling if you are the subject teacher
Click
GO BACK HERE
Step # 7 Click
Step # 8 Click
Select your
name
Step # 9
Select
Region
Select
Division
Select
School
Find your school
using the keyword
then select
Step # 10
Click
Step # 11 Double Click
Click
Click
yes
Be sure entries
are complete
Step # 12
Step # 13
Your file should reflect
here
Double click that file
Step # 14
When your file
appeared already there
Click
This is the main menu where
you can find the Data base
master files
Thank you
A mind that is stretched by a
new experience
can never go back to its old
dimensions
By: Oliver Wendell II Holmes Jr

10 in 1 Presentation with annotations and

  • 2.
  • 4.
  • 5.
    • It ispossible that credentials of student transferring from one school to another carries not the authentic copy of his/her scholastic records. (Incorrect LRN) Issues and concerns • It is possible that clientele find difficulty in requesting their own records from the school where they graduated/enrolled. • It is possible that the school will have a hard time to submit their student’s scholastic records/reports to the division offices (Form 18-A) in due time. • It is possible that stored student’s scholastic records be damaged due to the long period of time or by natural disasters/calamities. Attendance Report • It is possible that the time in the Form - 48 does not tally with the log book • It is possible that the Form – 7 does not tally with the Form - 48 ID • It is possible that the release of student’s and teacher’s ID be delayed
  • 6.
    Session 1 Power pointPresentation about the software Session 2 Actual Demonstration using the software Session 3 Software installation and hands-on activity  Printable  Grade Sheet  Summary Sheet  Form – 138  Form – 137  Form – 18-E  Periodical test Results  Pre & Post test Results Output
  • 7.
    For Secondary Server type/StandAlone It is just a dream before System Advancement In recording Student’s Academic Data ELMER MNHS JOCY GNHS PHILIP D.O TISOY B.I.R. ARIV SANAGA 4 1 2 3 5 6 8 7 6 9 10 In 1 21 GTS MAP Sole Distributor: ARIVSANAGA INFO TECH SOLUTIONS DTI Certificate No. 01673343
  • 8.
    Overview and Rationale Thissoftware entitled “10 in 1 Digital Scholastic Information Management System” will fast track the preparation of an accurate scholastic reports, monitor attendance of teachers & employees and will lessen so much expenses for school supplies and materials. Savings, can be allocated in-line or related with similar concern .
  • 9.
    Why the Schoolneed the 10 in 1 Digital Scholastic Information Management System Server? To facilitate the Principal in monitoring the attendance of teachers and employees in a very easy way. To encourage the teachers and employees to come and leave the school on time. To fast track queries/ verification and release or submission of an accurate pupils’ and student’ s scholastic reports.
  • 10.
    Why the teachersneed the 10 in 1 Digital Scholastic Information Management System Stand Alone? It is much easier for the teachers to prepare and submit their student’s scholastic reports on due time. The teacher is assured that aside from arriving to an accurate computation the conversion from numerical to Descriptive ratings in the K+12 Program can also be made. The teacher will use the automated Class Record where the student’s data will be transferred automatically to the Form 138, Form 137 and Form 18A.
  • 11.
    A time forour self… A peace of mind upon leaving our offices and classrooms Teacher Anne
  • 12.
    What if weremain captive of the old practices ? Why it is incomplete Tsk.. Kulog na payo ko!!! Delikadong Late kana naman 2moro maam… Antok na me…. Tulugan ko na ito sir?….
  • 13.
    The DTR’s system Projectwatch implementing software With Locator program Form 48 Generating system Form-7 Generating system Monitor punctuality and attendance
  • 14.
    1 2 Enter the name ofthe teachers & employees 1 2 3 4 5 you can print if you wish Please fill-up completely with the necessary data of the employees. Pls. Set-up the school days!!! 1 2 1 2 3 4 Set up new calendar year Should be based on the school calendar
  • 15.
    We will holdclasses on Saturday Jan. 5, 2013 (Just check) We don’t have classes on Jan. 29, 2013 (Just uncheck) Example - 1 Example - 2
  • 16.
    How will theprincipal monitor the school employees? Step 1 Direction: Please just follow the arrow 2 1
  • 17.
    How to monitorthe Attendance and punctuality of teachers and employees. Step No. 2 Direction: Please just follow the arrow (Click month & date first) 3 2 1 Sanny’s registered picture Sanny when he swipe his ID to the barcode scanner Time when he entered the gate Is Sanny’s registered picture match to the picture when he swipe his ID? No picture will appear here if the teacher or employee is with an approved locator slip or in O.B No picture will appear here if the teacher or employee is not the one personally swipe his/her ID. (It is the discretion of the principal wither to consider or mark him/her absent) This is the purpose of using webcam and a barcode scanner
  • 18.
    How to generatethe F-48 & F-7 in such a way that it should synchronize to the actual attendance of the school employees? 1 2 1 2 1 2 3 4 5 6 7
  • 19.
    This will appearwhen you click arrow 1 Direction: click following the arrow and select the particular month
  • 20.
    This will appearwhen you click arrow 2 Direction: click following the arrow and select name of the particular employee
  • 21.
  • 22.
    Form – 7Summary Under time Present during No classes/holidays Green Brown N0 Classes/ Holidays Identified school days in a month Total Number of school days in a month Number of days absent
  • 23.
    To be fill-up bythe principal Printable Form-7 Form - 7
  • 24.
    N0 Classes/ Holidays Identified school daysin a month Total Number of school days in a month Number of days absent Under time Present during No classes/holidays Individual Summary of Teachers & employees attendance Green Brown Attendance for 1 C/Y or S/Y
  • 25.
    ID generating system; TeacherStudents Employees Free Pictures
  • 26.
    How to takepicture for School employees ID? Direction: Select Name and enter the personal profile of the employee then click Picture taking 1 3 2
  • 27.
    How to takepicture for Student’s ID? Step 1 Direction: Please just follow the arrow 1 2 3
  • 28.
    How to printthe School employees ID ? Step 1 Direction: Please just follow the arrow 1 2
  • 29.
    How to printthe School employees ID ? Step 2 Direction: Please just follow the arrow 2 Double click the names of the employees Names should appear here 3 Click Faculty or Admin 1 Click
  • 30.
  • 31.
    How to printthe Student’s ID ? Step 1 Direction: Please just follow the arrow 1 2
  • 32.
    2 Double click the namesof the students Names should appear here 3 Click here How to print the Student’s ID ? Step 2 Direction: Please just follow the arrow 1
  • 33.
  • 34.
    Pls. Upload listof enrolment!!! 1 2 Copy Paste here following this template 1 2 Copy paste this to your system by column if not in the same format with the system template 1 2 Copy paste the LRN
  • 35.
    Double click each Name 1 Pupil’s informationwill appear here Select the grade level You can take picture
  • 36.
    Assigning Sections Note: Itis necessary that the source of the student’s name per section that will be copied by the teachers must come from the server 1 Double Click Click all – Names of students in all subject will appear Click 1-4 Names of pupils in that particular year will appear If you wish to check
  • 37.
    The list ofstudents per section or The list of your class will appear THERE…
  • 38.
    2nd option: ifthe school has no excel copy of the student names/no server and only the teacher has the 10 in 1 stand alone Step 1
  • 39.
    5 you can print if youwish Please fill-up completely with the necessary data of the employees. 3 2 1 4 Select the name of the adviser Edit Save Sec. Curr. Adv. Select Grade level Select K-12 or RBEC Edit Save K-12 Grade - I Edit Save Click this If Grade II is K-12 Edit Save Click this If old Curriculum
  • 40.
  • 41.
  • 43.
    Step 2 Should bebased on the school calendar Set up new calendar year
  • 45.
    Select what particular gradelevel You can change the heading Add Row if needed
  • 46.
    You can editin any of this items
  • 47.
  • 48.
    Click to checkthe set up for Makabayan Subjects
  • 49.
    Select the Gradelevel you are handling
  • 50.
    Copy the codeof the MAKABAYAN if not set-up Click update Place the divisor to compute the average grade For K-12 (2 instead of 4) Click Close Click
  • 51.
    K-12 For Grade I only Copythe code of the MAKABAYAN if not set-up Click Click update Click Close
  • 52.
    2nd option: ifthe school has no excel copy of the student names/no server and only the teacher has the 10 in 1 stand alone Step No. 2
  • 53.
    2nd option: ifthe school has no excel copy of the student names/no server and only the teacher has the 10 in 1 stand alone Step No.3
  • 54.
    2nd option: ifthe school has no excel copy of the student names/no server and only the teacher has the 10 in 1 stand alone Fill-up completely with the student’s data This can be done by the teacher during the enrolment or anytime of the S/Y
  • 55.
    Assigning Sections Double Click thename This can be done if only the teacher has the 10 in 1 stand alone
  • 56.
    The list ofstudents per section or The list of your class will appear THERE… This can be printed or shared to teachers via flash-drive
  • 57.
    How to usethe Automated class record? Step No. 1: In Checking attendance 1 2
  • 58.
    1. Click Attendance 2.select name of the subject 3. √ the absent or excuse and save after the roll call 2 3 1 4
  • 59.
    Class Record forK+12 Levels of assessment in the K+12 Curriculum
  • 60.
    Class Record usedin the previous Curriculum Levels of assessment in the previous Curriculum
  • 61.
    How to enter/recordthe DLL and how the principal can be able to monitor the lesson conducted by the teacher? Check the correct Year level, section and grading period. Note: 1. Click Refresh 2. Click Add 3. Select subject 4. Click Activity 5. Select Activity or enter the particular activity 6. Click Save DLL will appear here 3. 4. 5. 1. 6. 2.
  • 62.
    Reminder: It isnecessary to close the previous grading period before entering the data of your students to the next grading period
  • 63.
    Assessment procedure 1. ClickRefresh2. Click Add3. Select subject4. Click Activity5. set the lowest grade 6. set the number of indicators 7. enter the raw scores of each students 8. select what is being assessed 9. Save 3 2 4 9 1 8 7
  • 64.
    How can youshow the student’s individual achievement of your class incase their parents wanted to verify? 1. Click logged activity 2. Select the name of the student 3. Click Class Record per student 1 2 3
  • 65.
    Achievement of Postradoin Mother Tongue You can Print this incase the parent wanted to request a hard copy
  • 66.
  • 67.
    How this systemgenerate Summary Sheet
  • 69.
  • 70.
  • 71.
    How this systemgenerate grade sheet 1. Click Load Grades 2. Click Print Grade summary 1 2
  • 72.
  • 76.
    a. Convert numericalto descriptive rating Grading system Adoptable in any curriculum
  • 77.
    How to Convertnumerical to descriptive rating? Simply Click K12
  • 78.
    How to Convertnumerical to descriptive rating? Step No.2 Double click Fill-up with the complete data
  • 79.
    How to Convertnumerical to descriptive rating? Step No.3 Double click Pupil’s information should appear there Double click
  • 80.
  • 81.
  • 82.
    Enter the additionaldata to the F - 138
  • 83.
    Enter the additionaldata to the F - 138 Double click
  • 84.
    Enter the additionaldata to the F - 138 Fill-up Fill-up If huminto o lumipat Write the details
  • 85.
    To print F-137& F-18-A Double click Double click
  • 86.
  • 89.
    Reminder: Never forgetto back-up the data everyday Always restore your data
  • 90.
    Adoptable to allkinds of curriculum
  • 91.
    Everything are editable Adoptableto all kinds of curriculum
  • 92.
    How can yousubmit your F-18A on due time when the S/Y is almost ending? Copy/enter your grade sheet to pupil’s grade summary
  • 93.
    How can yousubmit your F-18A on due time when the S/Y is almost ending? Follow the direction of the arrow to enter your grade sheet in the grade summary
  • 95.
  • 97.
  • 98.
  • 100.
    Step # 1 PleaseClick Data After the installation Step # 2 Dapat data This will appear Please Click
  • 101.
    Step # 2 Please doubleClick Dapat data This will appear
  • 102.
    Step # 3Please Click Appear sample.. click Another click there
  • 103.
    Step # 4 Whatyou see there is the word sample
  • 104.
    Step # 5 Replacethat sample with your name then continue filling up with your complete data
  • 105.
    Step # 6 Youadd row if your not the only teacher handling your advisory class Please add the teacher teaching your Advisory class in other subjects Add also the name of the adviser of the class you are handling if you are the subject teacher Click
  • 106.
  • 107.
    Step # 8Click Select your name
  • 108.
    Step # 9 Select Region Select Division Select School Findyour school using the keyword then select
  • 109.
  • 110.
    Step # 11Double Click Click Click yes Be sure entries are complete
  • 111.
  • 112.
    Step # 13 Yourfile should reflect here Double click that file
  • 113.
    Step # 14 Whenyour file appeared already there Click
  • 114.
    This is themain menu where you can find the Data base master files
  • 126.
    Thank you A mindthat is stretched by a new experience can never go back to its old dimensions By: Oliver Wendell II Holmes Jr