
Recommended
More Related Content
More from Marion Napier
Recently uploaded
Recently uploaded (20)
Using infinite campus
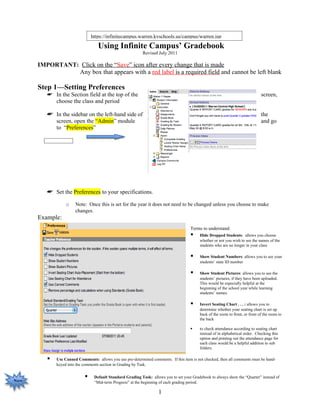
- 1. https://infinitecampus.warren.kyschools.us/campus/warren.jsp Using Infinite Campus’ Gradebook Revised July 2011 IMPORTANT: Click on the “Save” icon after every change that is made Any box that appears with a red label is a required field and cannot be left blank Step 1—Setting Preferences In the Section field at the top of the screen, choose the class and period In the sidebar on the left-hand side of the screen, open the “Admin” module and go to “Preferences” Teacher Set the Preferences to your specifications. o Note: Once this is set for the year it does not need to be changed unless you choose to make changes. Example: Terms to understand: Hide Dropped Students: allows you choose whether or not you wish to see the names of the students who are no longer in your class Show Student Numbers: allows you to see your students’ state ID number Show Student Pictures: allows you to see the students’ pictures, if they have been uploaded. This would be especially helpful at the beginning of the school year while learning students’ names. Invert Seating Chart . . . : allows you to determine whether your seating chart is set up back of the room to front, or front of the room to the back to check attendance according to seating chart instead of in alphabetical order. Checking this option and printing out the attendance page for each class would be a helpful addition to sub folders. Use Canned Comments: allows you use pre-determined comments. If this item is not checked, then all comments must be hand- keyed into the comments section in Grading by Task. Default Standard Grading Task: allows you to set your Gradebook to always show the “Quarter” instead of “Mid-term Progress” at the beginning of each grading period. 1
- 2. “Mass Assign to Multiple Sections” allows you to apply your ‘Preference’ settings to other class sections instead of individually by class section. Step 2---Setting up Assignments Open the “Assignment” module o Note: This module replaces the “Lesson Planner” module in the earlier version of Infinite Campus. This is the only way to enter assignments into the Gradebook. 2
- 3. Edit Teacher Preferences: the same as the preference settings in the “Admin” module. These preferences can be set either place. Terms to understand: Assignments List: returns you to the main Assignments window Validate: allows a teacher to share assignment settings with another teacher teaching the same course Edit Grade Calc Options: (this replaces the features in the old “Lesson Planner” where the Grading Scale and Weighting options were set) Terms to understand •Category: the “umbrella” categories you will set up for your grades (for example: total points, tests, quizzes, homework, portfolio, notebook, class participation, etc.) 3
- 4. Set Grading Scale to “Numeric” in each of the “Term Quarter” and “Final Grade” rows. o Note: If this is not set, then the gradebook will not populate correctly and current grade calculations will not appear accurately in the student portal. Check “Weight Categories” if you want your assignment categories to count differently in your grade calculations Check “Use score’s % value” if you prefer to calculate grades by percentages instead of points. Return to “Assignment List” Edit Categories o Note: Assignments must be linked to a category. At least one category must be created to begin the initial the creation of the gradebook so that assignments can be viewed. Click on “Create Category” Terms to understand: •Weight: how much this will count toward the students’ final average* •Sequence: the order that you want your groups to appear in your gradebook. If you leave everything at a “1”, then the groups will default to 4
- 5. alphabetical order. If you want “Tests” to appear in your gradebook first, give it “1”; if you want “Quizzes” to appear second, give it a “2”; if you want “Homework” to appear third, give it a “3” Exclude the category from calculation: check this option if you wish for the assignment to be viewed but not be counted in the grade calculation. This would be usually used for activities such as field trips, guest speakers, etc. Drop lowest score: identifies the students’ lowest grade in this category and drops it from being calculated in the term grade. This can be checked at anytime in the quarter. Enter the name of the category and its weight for grade calculation. If you want all of your categories to have equal weights, leave the weight set at the default setting of “0”. Under “Sections”, check the course section(s) for which you want to use the newly created category. Under “Grading Tasks”, check ‘Quarter”. DO NOT USE MIDTERM PROGRESS. o IMPORTANT: If “Weight Categories” is checked in the Edit Grade Calc Options and “Weight” is set at “0” when setting up your Category, then the grades will not calculate and grades cannot be posted. Select “Save Category” if you want to set up all of your categories before adding assignments, or “Save Add Assignment” to immediately add an assignment to the category. Click on the “Assignments” tab to return to the Assignments window. Create New Assignment Terms to Understand: Name: the name of the assignment Abbreviation: this is a shortened version of the Name and will appear in your actual gradebook Active: show the assignment in the portal as soon as it is created Hide: keep the assignment invisible until it is actually assigned, or until you wish for it to be viewed in the portal Student Group: rosters can be subdivided so that different assignments can be made to each group. Due Date: the date that the grade is to be recorded Assigned Date: use if you have a long-term project. This will show in the portal for parents to see Total Points: another way to weight the grade; change this factor if you have a grade that is not based on 100 points Multiplier: another way to weight your grades. A grade will 5
- 6. be counted as many times as you set the number in the multiplier. Enter the name of the assignment, its abbreviation, and the due date. These are required fields. (Optional) Click on the “Show Description, Objectives, and References Fields” button. This will allow you to enter information regarding the assignment that would be helpful for lesson plan documentation and links to outside references that student may need to complete the assignment, or that parents might find helpful for understanding the purpose of the assignment or activity. Click on “Grading Tasks” to choose which Quarter, and which category in which to place the assignment, and to set the point value of the assignment. Quarter 1 Quarter 2 Quarter 3 Quarter 4 o (Optional) Check “Marks” if you wish to only grade an assignment on a “Pass/Fail”, “Completed/Not Completed” value Select “Save”, “Save Score”, or “Save Create New Assignment”. o “Save and Score” allows you to immediately enter grades upon creating the assignment. 6
- 7. Click on the “Assignments” tab to return to the Assignments window. Save and Score Window Terms to Understand T : Turned in; allows you to notify parents and students that an assignment has been completed and submitted, but not yet graded M: Missing; identifies that a student did not turn in an assignment. It is automatically calculated with a value of “0” in the gradebook L: Late; identifies that an assignment was submitted after the announced deadline I: Incomplete; assignment turned in but not submitted in its entirety Ch: Cheated; indicates that a student submitted work that was not their own. The original grade will be viewed in the gradebook and the portal, but it will be calculated as a “0”. X: Exempt; identifies that the student is not responsible for the completion of the assignment viewed in the portal and in the gradebook. It is not calculated in the grade. Copy Assignments Click on “Copy Assignments”. In the bottom portion of the window, check the assignment(s) you wish to transfer to another course. In the left- hand box in the upper section, select the course in which the assignment has been created. In the right- hand box in the upper section, select the course in which you want 7
- 8. to copy the assignment. Tree View Show the Categories and assignments in an outline form similar to the previous Infinite Campus version To Enter Grades for Assignments Option 1 Click on “Assignments” module in the sidebar to pull up the assignment list Click on the icon to the left of the name of the assignment Enter grades Option 2 Click on “Assignments” module in the sidebar to pull up the assignment list Choose “Create Assignment” Create assignment; choose “Save and Score” Enter grades Option 3 8
- 9. Click on “Grade Book” module in the sidebar to pull up the gradebook Enter grades Step 3—Using the Gradebook Open the “Gradebook” module The Gradebook will now start to look like the example below. Grade Averages Categories Assignments When the grading window is opened, final averages* will be posted in the center (green) As grades are section. Enter the grades in entered, the far right-hand points and When posting mid- (gray) section percentages term grades, the will averages will not automatically be seen in this be calculated column. in the far left-hand (yellow) *Note: Rounding of section. grades is not always accurate. You may have to manually 9 adjust grades in the “%” column.
- 10. Posting Grades Using the Gradebook Open the Gradebook Right click (Windows machines) or Control+click (Mac machines) in the first empty cell in either of the green columns Choose “Post Grades to other Task” and then the appropriate posting term 10
- 11. Click “Save” NOTE: When posting mid-term quarter grades, the green area will not populate. This area will only populate when posting final quarter grades. Open “Grading by Task”. Choose the correct grading period and section. Manually adjust any averages and fill in any comments. Click “Save” Creating Reports In the left-hand side bar, click on the + beside “Reports” to open the eleven (11) report options. 11
- 12. Aligned Assessments This report allows the teacher to document assessments that are aligned with the state curriculum standards. This report will only generate correctly if the teacher has set up assignments in the Lesson Planner and selected the state standard that correlates with the assessment. Open “Reports” Click on “Aligned Assessments” Select the desired options and students Click on “Generate Report” Attendance Register This report gives a summary of the class attendance in a spreadsheet format with absences marked as excused or unexcused. The report should generate from the attendance clerk’s database. Open “Reports” Click on “Attendance Register” Select the desired grading period Click on “Generate Report” Example: Attendance Summary 12
- 13. This report generates a summary of the students in each class section in a table format. It shows each student’s absentee record by grading period. Open “Reports” Click on “Attendance Summary” Click on “Generate Report” Example: Blank Spreadsheet This report creates a class roster in a spreadsheet format to record miscellaneous information. This spreadsheet is recommended as an addition to the teacher’s substitute folder for the substitute teacher to record attendance. Open “Reports” Click on “Blank Spreadsheet” Select the desired options and students Click on “Generate Report” Example: 13
- 14. Gradebook Export This report allows the teacher to export their gradebook into Excel or html format for inserting into other applications. This report is not one that would have much practical application for the classroom teacher. Missing Assignments This report allows the teachers to generate a list of assignments that students have not completed. In order for this report to generate correctly, the teacher needs to flag the appropriate assignments as “Missing” in the gradebook. This report is useful for parent/teacher and student/teacher conferences as documentation for any necessary make-up work. Open “Reports” Click on “Missing Assignments” Select the desired options, students, and grading period Click on “Generate Report” Example: 14
- 15. Portal Usage Roster This report allows the teacher to see how often during the previous four weeks of the specified date that the students are accessing their Infinite Campus account and checking their grades. Open “Reports” Click on “Portal Usage Roster” Select the desired ending date Click on “Generate Report” Ex ample: Roster Label This report generates mailing 15
- 16. labels specific to the class roster. The report is generated from the attendance clerk’s database. Open “Reports” Click on “Roster Label” Select the desired options and students Click on “Generate Report” Example: Section Summary This report creates a paper copy of the teacher’s gradebook. While Infinite Campus does a backup of data every 24 hours, this report is a good backup for any “user error” mistakes. A report generated at the end of each grading period and filed in a secure location is highly recommended. Open “Reports” Click on “Section Summary” Select the desired options, students and grading period Click on “Generate Report” 16
- 17. Example: Student Summary This generates a report of the students’ assignments, assessments, and scores. This report is valuable for parent/teacher conferences and as a progress report for students. This report can get generate for individual students or for an entire class. Open “Reports” Click on “Student Summary” Select the desired options and students Click on “Generate Report” 17
- 18. Example: Teacher Schedule This report documents a teacher’s class schedule. It is recommended that a copy of this report be included in the teacher’s substitute teacher folder. Open “Reports” Click on “Teacher Schedule” Click on “Generate Report” Example: 18