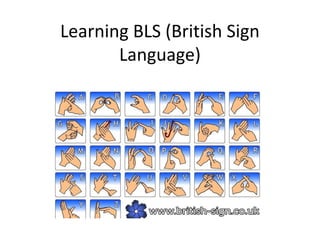
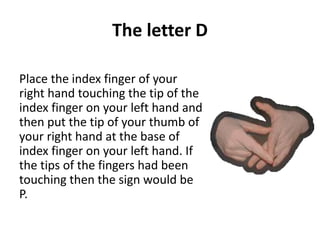
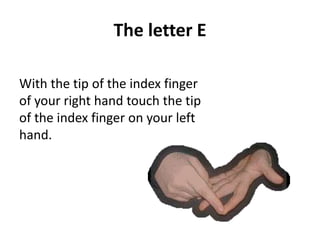
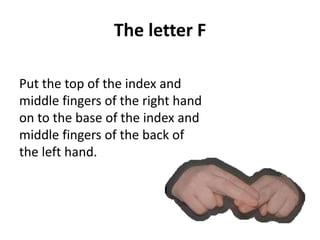
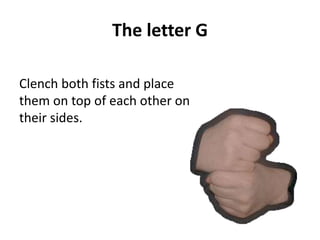
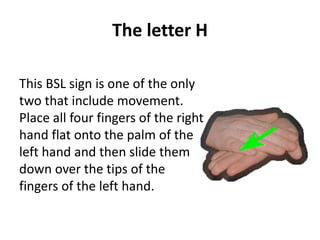
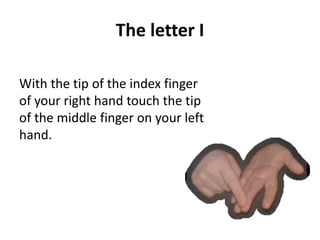
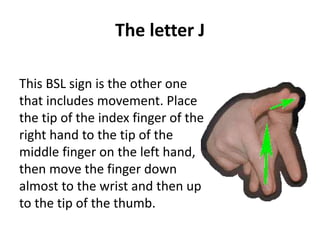
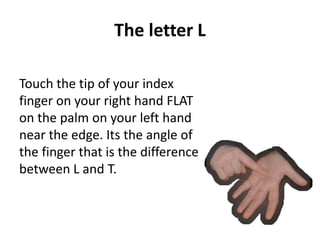
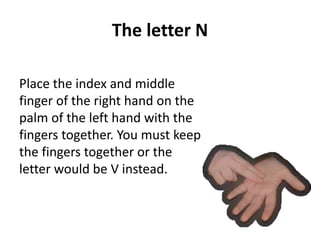
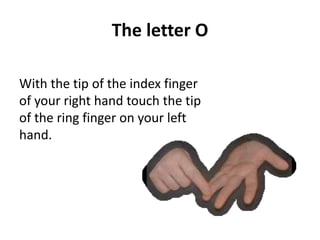
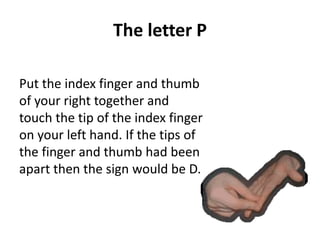
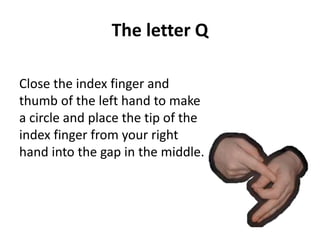
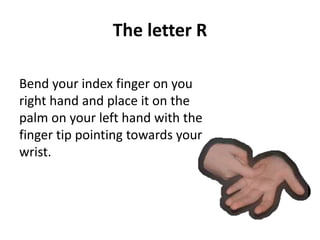
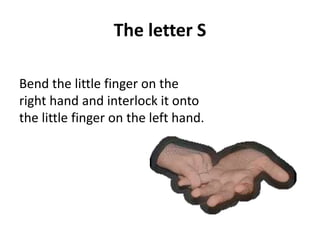
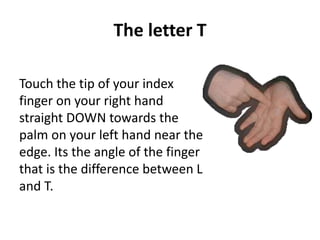
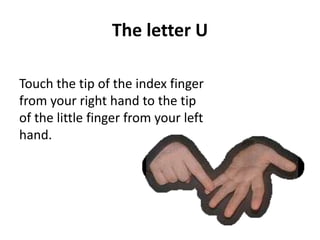
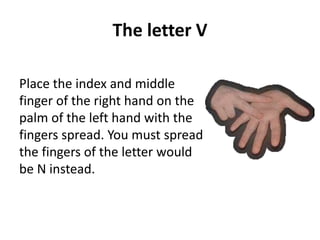
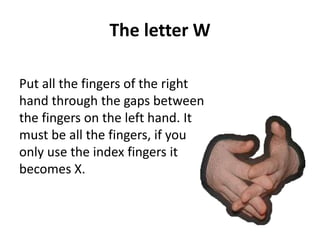
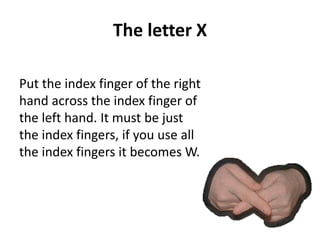
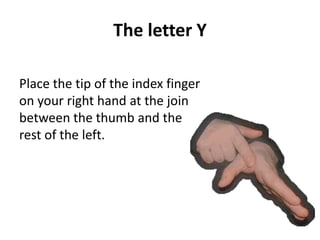
Learning BLS (British Sign 
Language)
The letter A 
With the tip of the index finger 
of your right hand touch the tip 
of the thumb on your left hand. 
Most BSL finger signs are based 
on the shape of the letter, but 
the exceptions are A, E, I, O and 
U as the vowels are done by 
pointing to the tips of the five 
fingers of the left hand.
The letter B 
Put the tips of the thumbs and 
index fingers of both hands all 
together (other fingers are 
optional).
The letter C 
Just hold your hand out as if 
you are trying to pick up a can. 
There is no movement involved
The letter D 
Place the index finger of your 
right hand touching the tip of the 
index finger on your left hand and 
then put the tip of your thumb of 
your right hand at the base of 
index finger on your left hand. If 
the tips of the fingers had been 
touching then the sign would be 
P.
The letter E 
With the tip of the index finger 
of your right hand touch the tip 
of the index finger on your left 
hand.
The letter F 
Put the top of the index and 
middle fingers of the right hand 
on to the base of the index and 
middle fingers of the back of 
the left hand.
The letter G 
Clench both fists and place 
them on top of each other on 
their sides.
The letter H 
This BSL sign is one of the only 
two that include movement. 
Place all four fingers of the right 
hand flat onto the palm of the 
left hand and then slide them 
down over the tips of the 
fingers of the left hand.
The letter I 
With the tip of the index finger 
of your right hand touch the tip 
of the middle finger on your left 
hand.
The letter J 
This BSL sign is the other one 
that includes movement. Place 
the tip of the index finger of the 
right hand to the tip of the 
middle finger on the left hand, 
then move the finger down 
almost to the wrist and then up 
to the tip of the thumb.
The letter K 
Bend the index finger of the 
right hand and put the back of 
it up against the middle of the 
index finger on the left hand.
The letter L 
Touch the tip of your index 
finger on your right hand FLAT 
on the palm on your left hand 
near the edge. Its the angle of 
the finger that is the difference 
between L and T.
The letter M 
Place the index, middle and ring 
fingers of the right hand with 
the fingers together flat on the 
palm of the left hand.
The letter N 
Place the index and middle 
finger of the right hand on the 
palm of the left hand with the 
fingers together. You must keep 
the fingers together or the 
letter would be V instead.
The letter O 
With the tip of the index finger 
of your right hand touch the tip 
of the ring finger on your left 
hand.
The letter P 
Put the index finger and thumb 
of your right together and 
touch the tip of the index finger 
on your left hand. If the tips of 
the finger and thumb had been 
apart then the sign would be D.
The letter Q 
Close the index finger and 
thumb of the left hand to make 
a circle and place the tip of the 
index finger from your right 
hand into the gap in the middle.
The letter R 
Bend your index finger on you 
right hand and place it on the 
palm on your left hand with the 
finger tip pointing towards your 
wrist.
The letter S 
Bend the little finger on the 
right hand and interlock it onto 
the little finger on the left hand.
The letter T 
Touch the tip of your index 
finger on your right hand 
straight DOWN towards the 
palm on your left hand near the 
edge. Its the angle of the finger 
that is the difference between L 
and T.
The letter U 
Touch the tip of the index finger 
from your right hand to the tip 
of the little finger from your left 
hand.
The letter V 
Place the index and middle 
finger of the right hand on the 
palm of the left hand with the 
fingers spread. You must spread 
the fingers of the letter would 
be N instead.
The letter W 
Put all the fingers of the right 
hand through the gaps between 
the fingers on the left hand. It 
must be all the fingers, if you 
only use the index fingers it 
becomes X.
The letter X 
Put the index finger of the right 
hand across the index finger of 
the left hand. It must be just 
the index fingers, if you use all 
the index fingers it becomes W.
The letter Y 
Place the tip of the index finger 
on your right hand at the join 
between the thumb and the 
rest of the left.
The letter Z 
Put the fingers of the right hand 
together and put it on the left 
hand so it sticks up at a right 
angle.

1. learning bls (british sign language) pp for students

  • 1.
    Learning BLS (BritishSign Language)
  • 2.
    The letter A With the tip of the index finger of your right hand touch the tip of the thumb on your left hand. Most BSL finger signs are based on the shape of the letter, but the exceptions are A, E, I, O and U as the vowels are done by pointing to the tips of the five fingers of the left hand.
  • 3.
    The letter B Put the tips of the thumbs and index fingers of both hands all together (other fingers are optional).
  • 4.
    The letter C Just hold your hand out as if you are trying to pick up a can. There is no movement involved
  • 5.
    The letter D Place the index finger of your right hand touching the tip of the index finger on your left hand and then put the tip of your thumb of your right hand at the base of index finger on your left hand. If the tips of the fingers had been touching then the sign would be P.
  • 6.
    The letter E With the tip of the index finger of your right hand touch the tip of the index finger on your left hand.
  • 7.
    The letter F Put the top of the index and middle fingers of the right hand on to the base of the index and middle fingers of the back of the left hand.
  • 8.
    The letter G Clench both fists and place them on top of each other on their sides.
  • 9.
    The letter H This BSL sign is one of the only two that include movement. Place all four fingers of the right hand flat onto the palm of the left hand and then slide them down over the tips of the fingers of the left hand.
  • 10.
    The letter I With the tip of the index finger of your right hand touch the tip of the middle finger on your left hand.
  • 11.
    The letter J This BSL sign is the other one that includes movement. Place the tip of the index finger of the right hand to the tip of the middle finger on the left hand, then move the finger down almost to the wrist and then up to the tip of the thumb.
  • 12.
    The letter K Bend the index finger of the right hand and put the back of it up against the middle of the index finger on the left hand.
  • 13.
    The letter L Touch the tip of your index finger on your right hand FLAT on the palm on your left hand near the edge. Its the angle of the finger that is the difference between L and T.
  • 14.
    The letter M Place the index, middle and ring fingers of the right hand with the fingers together flat on the palm of the left hand.
  • 15.
    The letter N Place the index and middle finger of the right hand on the palm of the left hand with the fingers together. You must keep the fingers together or the letter would be V instead.
  • 16.
    The letter O With the tip of the index finger of your right hand touch the tip of the ring finger on your left hand.
  • 17.
    The letter P Put the index finger and thumb of your right together and touch the tip of the index finger on your left hand. If the tips of the finger and thumb had been apart then the sign would be D.
  • 18.
    The letter Q Close the index finger and thumb of the left hand to make a circle and place the tip of the index finger from your right hand into the gap in the middle.
  • 19.
    The letter R Bend your index finger on you right hand and place it on the palm on your left hand with the finger tip pointing towards your wrist.
  • 20.
    The letter S Bend the little finger on the right hand and interlock it onto the little finger on the left hand.
  • 21.
    The letter T Touch the tip of your index finger on your right hand straight DOWN towards the palm on your left hand near the edge. Its the angle of the finger that is the difference between L and T.
  • 22.
    The letter U Touch the tip of the index finger from your right hand to the tip of the little finger from your left hand.
  • 23.
    The letter V Place the index and middle finger of the right hand on the palm of the left hand with the fingers spread. You must spread the fingers of the letter would be N instead.
  • 24.
    The letter W Put all the fingers of the right hand through the gaps between the fingers on the left hand. It must be all the fingers, if you only use the index fingers it becomes X.
  • 25.
    The letter X Put the index finger of the right hand across the index finger of the left hand. It must be just the index fingers, if you use all the index fingers it becomes W.
  • 26.
    The letter Y Place the tip of the index finger on your right hand at the join between the thumb and the rest of the left.
  • 27.
    The letter Z Put the fingers of the right hand together and put it on the left hand so it sticks up at a right angle.