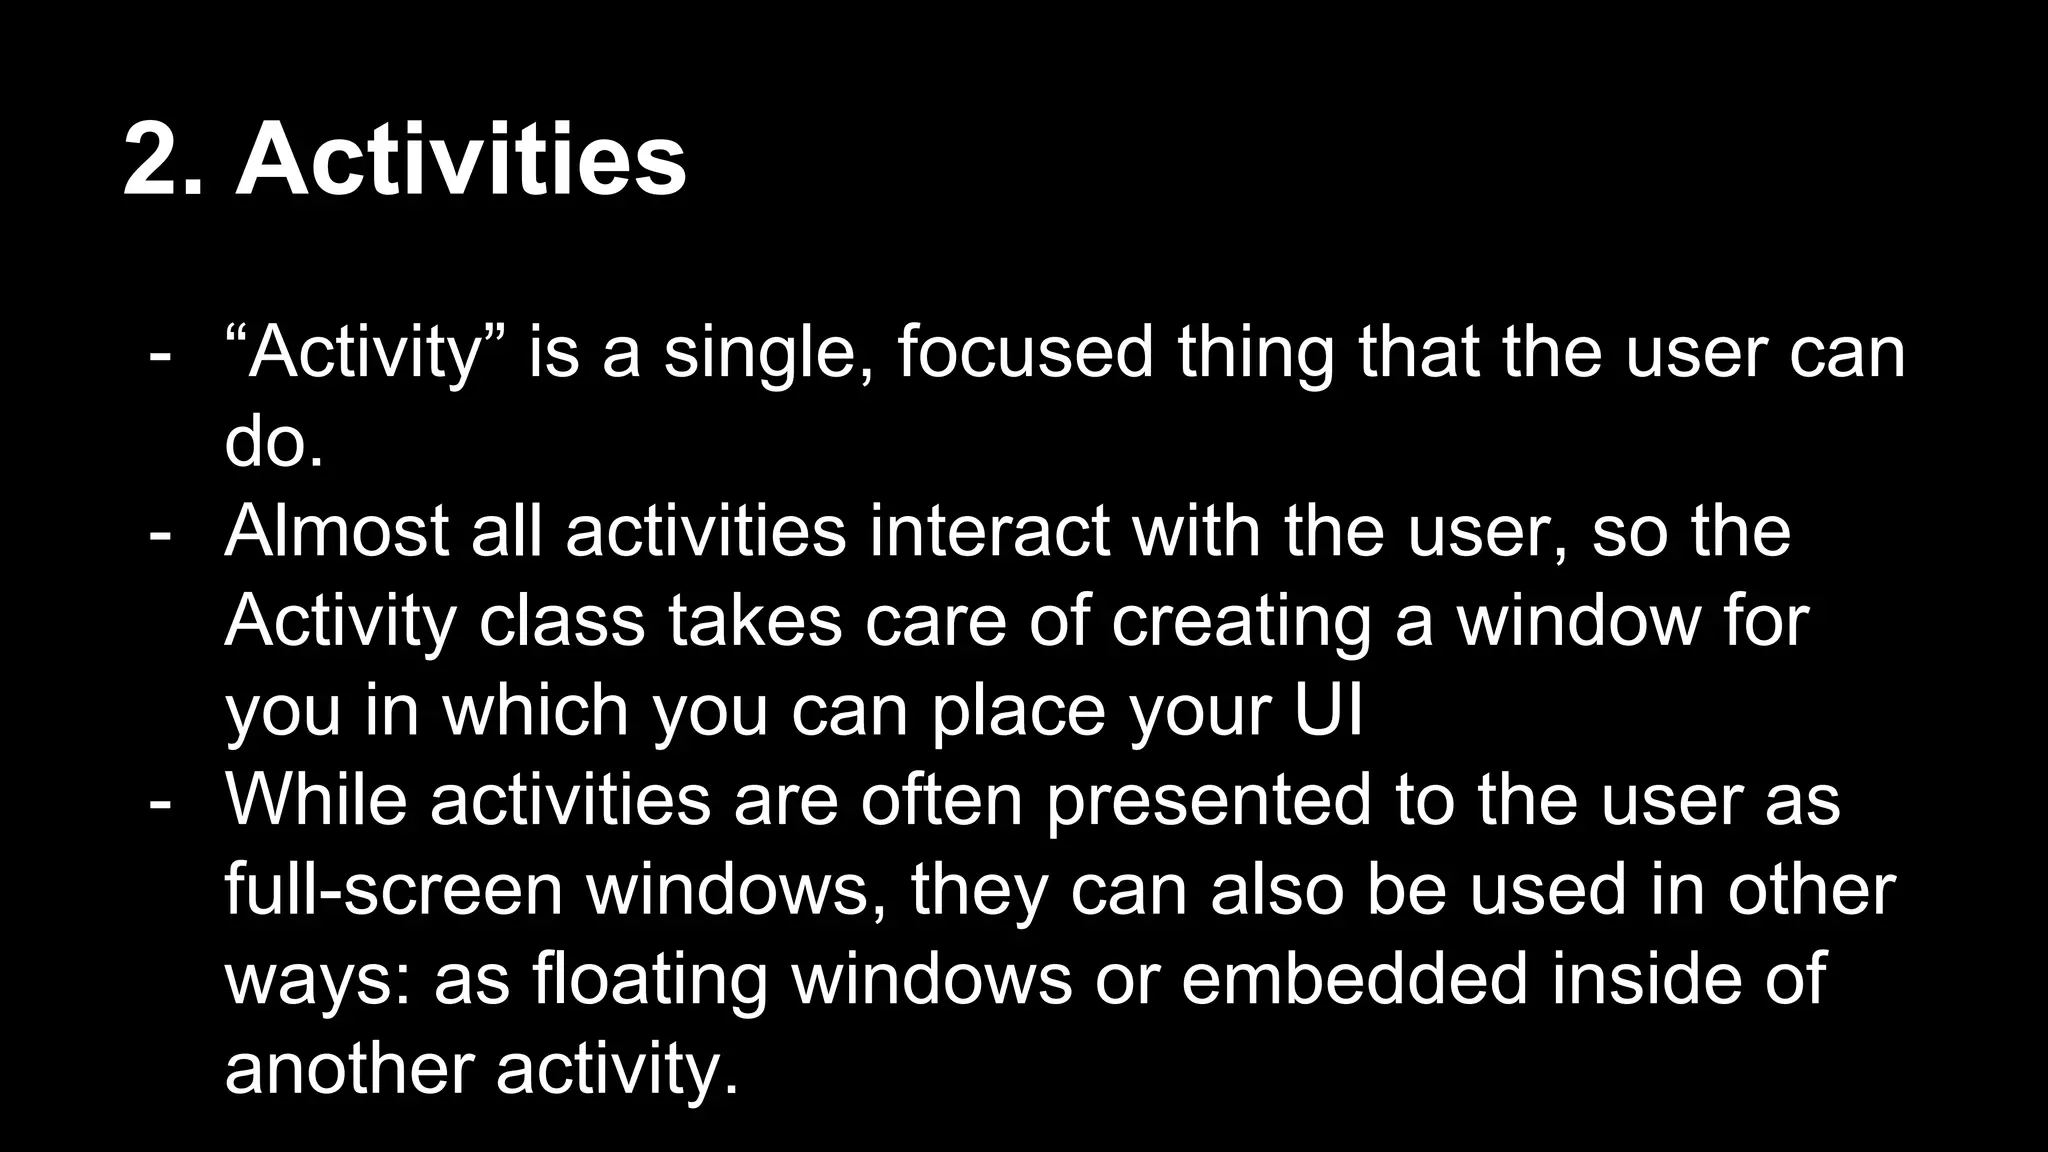
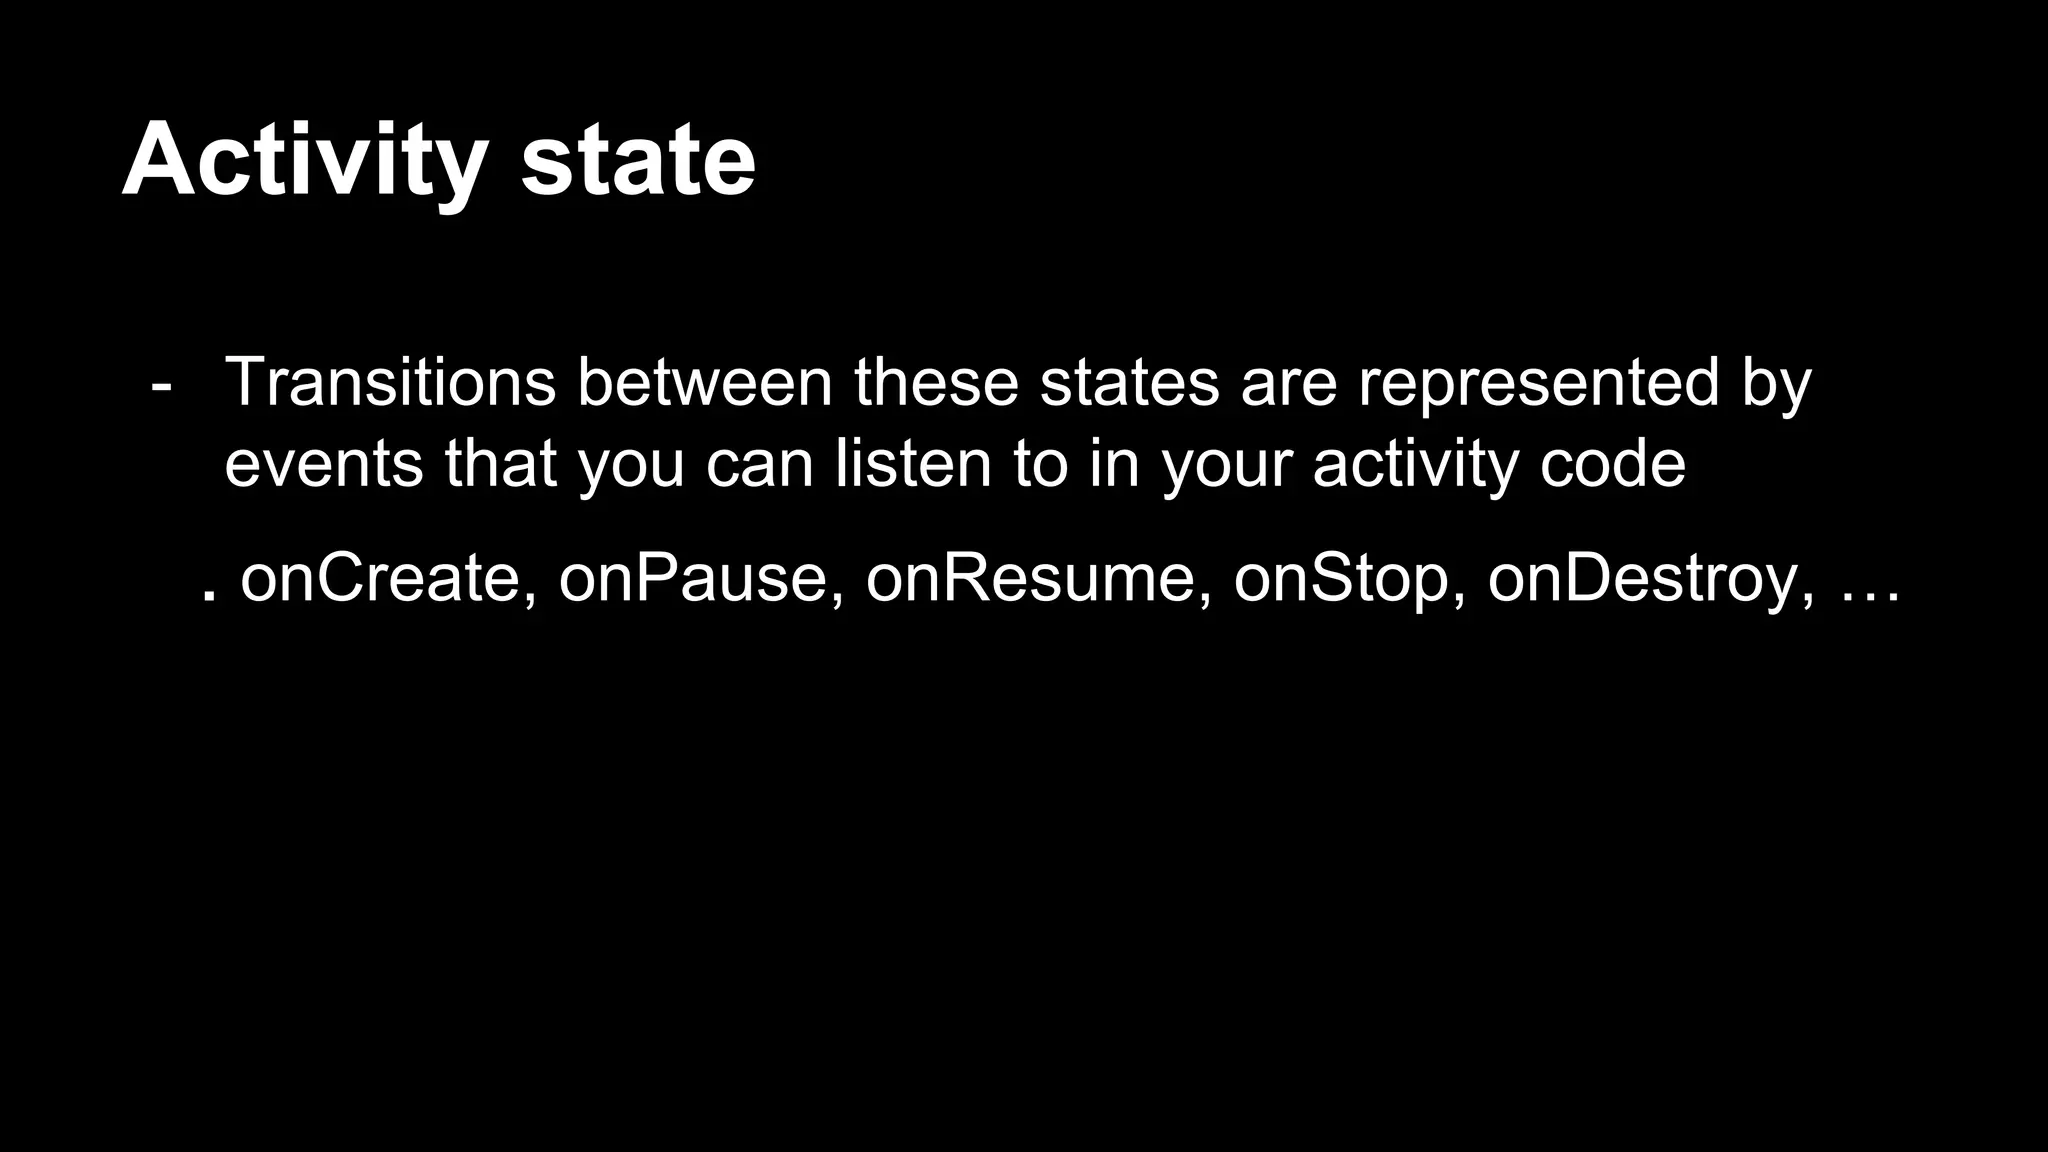
Programmation Mobile
Android
Rabie JABALLAH: jaballahrabie@gmail.com
Slim BENHAMMOUDA: slim.benhammouda@gmail.com
2. Activities
- “Activity” is a single, focused thing that the user can
do.
- Almost all activities interact with the user, so the
Activity class takes care of creating a window for
you in which you can place your UI
- While activities are often presented to the user as
full-screen windows, they can also be used in other
ways: as floating windows or embedded inside of
another activity.
Activity states
- An activity can be thought of as being in one of several
states :
. starting : In process of loading up, but not fully loaded
. running : Done loading and now visible on the screen
. paused : Partially obscured or out of focus, but not shut down
. stopped : No longer active, but still in the device’s active memory
. destroyed : Shut down and no longer currently loaded in memory
Activity state
- Transitions between these states are represented by
events that you can listen to in your activity code
. onCreate, onPause, onResume, onStop, onDestroy, …
Activity lifecycle
The onCreate method
- In onCreate, you create and set up the activity object, load any static
resources like images, layouts, set up menus etc.
. after this, the Activity object exists
public class MainActivity extends Activity {
...
public void onCreate(Bundle savedInstanceState) {
super.onCreate(savedInstanceState); // always call super
setContentView(R.layout.activity_main); // set up layout
//any other initialization code; // anything else you need
}
}
The onPause method
- When onPause is called, your activity is still partially visible.
- May be temporary, or on way to termination.
. Stop animation or other actions that consume CPU
. Commit unsaved changes (e.g. draft email)
. Release system resources that affect battery life
public void onPause() {
super.onPause(); // always call super
if (myConnection != null) {
myConnection.close(); // release resources
myConnection = null;
}
}
The onResume method
- When onResume is called, your activity is coming out of the Paused
state and into the Running state again
- Also called when activity is first created/loaded !
. Initialize resources that you will release in onPause
. Start/resume animations or other ongoing actions that should only run
when activity is visible on screen
public void onResume() {
super.onPause(); // always call super
if (myConnection == null) {
myConnection = new ExampleConnect(); // init.resources
myConnection.connect();
}
}
The onStop method
- When onStop is called, your activity is no longer visible on the screen :
. User chose another app from Recent Apps window
. User starts a different activity in your app
. User receives a phone call while in your app
- Your app might still be running, but that activity is not
. onPause is always called before onStop
. onStop performs heavy-duty shutdown tasks like writing to a database
public void onStop() {
super.onStop(); // always call super
...
}
onStart and onRestart
- onStart is called every time the activity begins
- onRestart is called when activity was stopped but is started again later
(all but the first start)
. Not as commonly used; favor onResume
. Re-open any resources that onStop closed
public void onStart() {
super.onStart(); // always call super
...
}
public void onRestart() {
super.onRestart(); // always call super
...
}
The onDestroy method
- When onDestroy is called, your entire app is being shut
down and unloaded from memory
. Unpredictable exactly when/if it will be called
. Can be called whenever the system wants to reclaim the memory
used by your app
. Generally favor onPause or onStop because they are called in a
predictable and timely manner
public void onDestroy() {
super.onDestroy(); // always call super
...
}
Testing activity states
- Use the LogCat system for logging messages when your
app changes states :
. analogous to System.out.println debugging for Android apps
. appears in the LogCat console in Android Studio
public void onStart() {
super.onStart();
Log.v("testing", "onStart was called!") ;
}
Log methods
Log.d (“tag”, “message”); degug message (for debugging)
Log.e (“tag”, “message”); error message (fatal error)
Log.i (“tag”, “message”); info message (low-urgency, FYI)
Log.v (“tag”, “message”); verbose message
Log.w (“tag”, “message”); warning message (non-fatal error)
Log.wtf (“tag”, exception); log stack trace of an exception
Log methods
- Each method can also accept an optional
exception argument :
try { someCode(); }
catch (Exception ex) {
Log.e("error4", "something went wrong", ex);
}
Activity instance state
● instance state: Current state of an activity
- Which boxes are checked
- Any text typed into text boxes
- value of any private fields
- ...
Lost activity state
● Several actions can cause your activity state
to be lost:
- When you go from one activity to another and back,
within same app
- When you launch another app and then come back
- When you rotate the device’s orientation from portrait to
landscape
- ...
onSaveInstanceStace method
● When an activity is being destroyed, the event method
onSaveInstanceState is also called
- This method should save any “non-persistent” state of the app
- non-persistent state: Stays for now, but lost on
shutdown/reboot
● Accepts a Bundle parameter storing key/value pairs
- Bundle is passed back to activity if it is recreated later
public void onSaveInstanceState (Bundle outState) {
super.onSaveInstanceState(outState); // always call super
outState.putInt("name", value);
outState.putString("name", value);
...
}
onRestoreInstanceState method
● When an activity is recreated later, the event method
onRestoreInstanceState is called
- This method can restore any “non-persistent” state of the app
- Bundle from onSaveInstanceState from before is passed back in
public void onRestoreInstanceState (Bundle inState) {
super.onRestoreInstanceState(inState); // always call super
int name = inState.getInt("name");
String name = inState.getString("name");
...
}
Saving your own classes
● By default, your own classes can’t be put into a Bundle
● You can make a class able to be saved by
implementing the (methodless) java.Serializable
interface
public class Date implements Serializable {
...
}
public class MainActivity extends Activity {
public void onSaveInstanceState(Bundle outState) {
super.onSaveInstanceState(outState);
Date d = new Date(2015, 1, 25);
outState.putSerializable("today", d);
Multiple Activities
● Many apps have multiple activities
- Example : in an address book app, the main activity is a list of contact, and
clicking on a contact goes to another activity for viewing details
- An activity A can launch another activity B in response to an event
- The activity A can pass data to B
- the second activity B can send data back to A when it is done
Activity A Activity B
Item
list
Item
details
Adding an Activity
● in Android Studio, right click “app” at left :
New -> Activity
- creates a new .XML file in res/layouts
- creates a new .java class in src/java
- add information to AndroidManifest .XML
about the activity (without this information,
the app will not find the activity)
Activity in manifest
● every activity has an entry in project’s AndroidManifest.XML, added
automatically by Android Studio
<manifest xmlns:android="http://schemas.android.com/apk/res/android"
package="com.example.myusername.myapplication" >
<application android:allowBackup="true"
android:icon="@drawable/ic_launcher"
android:label="@string/app_name"
android:theme="@style/AppTheme" >
<activity android:name=".MainActivity"
android:label="@string/app_name" >
Activities in Manifest ( suite)
<intent-filter>
<action android:name="android.intent.action.MAIN" />
<category android:name="android.intent.category.LAUNCHER" />
</intent-filter>
</activity>
<activity android:name=".SecondActivity"
android:label="@string/title_activity_second"
android:parentActivityName=".SecondActivity" >
<meta-data android:name="android.support.PARENT_ACTIVITY"
android:value="com.example.myusername.myapplication.MainActivity" />
</activity>
</application>
</manifest>
Intents
● Intent : a bridge between activities; a way for
one activity to invoke another
- the activity can be in the same app or in a different app
- can store extra data to pass as “parameters” to that
activity
- second activity can “return” information back to the
caller if needed
Creating an Intent
● To launch another activity (usually in response to an event), create an
intent object and call startActivity with it :
Intent intent = new Intent(this, ActivityName.class); startActivity
(intent)
● if you need to pass any parameters or data to the second activity, call
putExtra on the intent
- It stores “extra” data as key/value pairs, not unlike a Map
Intent intent = new Intent(this, ActivityName.class);
intent.putExtra("name", value);
startActivity(intent);
Extracting extra data
● In the second activity that was invoked, you can grab
any extra data that was passed to it by the calling act
- you can acess the intent that spawned you by calling getIntent
- The Intent has methods like getExtra, getIntExtra, getStringExtra,
etc. to extract any data that was stored inside the intent
Extracting extra data (suite)
public class SecondActivity extends Activity {
…
public void onCreate(Bundle savedState){
super.onCreate(savedState);
setContentView(R.layout.activity_second);
Intent intent = getintent();
String extra = intent.getExtra(“name”);
…
}
}
Waiting for a result
● if calling activity wants to wait for a result from
called activity :
- Call startActivityForResult rather than startActivity
*startActivityForResult requires you to pass a unique ID number to
represent the action being performed
*by convention, you declare a final int constant with a value of your
choice
*the call to startActivityForResult will not wait, it will return immediately
Waiting for a result (suite)
- Write an onActivityResult method that will be called when
the second activity is done
*check for your unique ID as was passed to startActivityForResult
*if you see your unique ID, you can ask the intent for any extra data
- Modify the called activity to send a result back
*Use its setResult and finish methods to end the called activity
Sending back a result
● In the second activity that was invoked, send data back :
- need to create an Intent to go back
- Store any extra data in that intent; call setResult and finish
public class SecondActivity extends Activity {
…
public void myOnClick(view view){
Intent intent = new Intent();
intent.putExtra(“name”,value);
setResult(RESULT_OK, intent);
finish(); //calls onDestroy
}
Grabbing the result
public class FirstActivity extends Activity {
private static final int REQ_CODE = 123; // MUST be 0-65535
public void myOnClick(View view) {
Intent intent = getIntent(this, SecondActivity.class);
startActivityForResult (intent, REQ_CODE);
}
protected void onActivityResult (int requestCode,
int resultCode, Intent intent) {
super.onActivityResult(requestCode, resultCode, intent);
if (requestCode == REQ_CODE) {
// came back from SecondActivity
String data = intent.getStringExtra("name");
Toast.makeText(this, "Got back: " + data,
Toast.LENGTH_SHORT).show();
}
}
}
Implicit Intent
● implicit intent : One that launches another
app, without naming that specific app, to
handle a given type of request or action
- examples : invoke default browser; load music player to
play a song
Implicit Intent (2)
// make a phone call
Uri number = Uri.parse("tel:98123456");
Intent callIntent = new Intent(Intent.ACTION_DIAL, number);
// go to a web page in the default browser
Uri webpage = Uri.parse("http://www.iit-nau.com/");
Intent webIntent = new Intent(Intent.ACTION_VIEW, webpage);
// open a map pointing at a given latitude/longitude (z=zoom)
Uri location = Uri.parse("geo:37.422219,-122.08364?z=14");
Intent mapIntent = new Intent(Intent.ACTION_VIEW, location);
Activities and Action Bar
● action bar : A top-level menu of actions in an activity
- replaces older “menu” button in past versions of Android
- identifies current activity/app to user
- make common actions prominent and available
- make less common actions available through a drop-down menu
● if your activity is specified to have a “parent” activity on
creation and in AndroidManifest.XML, you will have a
“back” button to return to the calling activity
3. Views and Layouts
A clickable widget with a text label
- key attributes :
Button
android : clickable = “bool” set to false to disable the button
android : id=”@+id/theID unique ID for use in java code
android : onClick=”function” function to call in activity when clicked (must be
public, void, and take a View arg)
android : text=”text” text to put in the button
- represented by Button class in java code
Button b = (Button) findViewById
(R.id.theID);
...
Button (2)
ImageButton
A clickable widget with an image label
- Key attributes :
android : clickable=”bool” set to false to disable the button
android : id=”@+id/theID unique ID for use in java code
android : onClick=”function” function to call in activity when clicked (must
be public, void, and take a view arg)
android : src=”@drawable/img” image to put in the button (must correspond
to an image resource)
ImageButton (2)
- to set up an image resource :
. put image file in project folder app/src/main/res/drawable
. use @drawable/foo to refer to foo.png
*use simple file names with only letters and numbers
ImageView
Display an image without being clickable
- Key attributes :
android : id=”@+id/theID” unique ID for use in java code
android : src=”@drawable/img image to put in the screen (must coreespond
to an image resource)
- to change the visible image, in java code :
. get the ImageView using findViewByld
. call its setImageResource method and pass R.drawable.filename
EditText
An editable text input box
- key attributes :
android : hint =”text” gray text to show before user starts to type
android : id=”@+id/theID unique ID for use in java code
android : inputTyp=”type” what kind of input is being typed; number, phone, date, time,...
android : lines=”int” number of visible lines (rows) of input
android : maxlines=”int” max lines toallow user to type in the box
android : text=”text” intial text to put in box (default empty)
android : textSizes=”size” size of font to use (e.g. “20dp”)
EditText (2)
- other attributes : capitalize, digits,
fontFamily, letterSpacing, lineSpacingExtra,
minLines, numeric, password,
phoneNumber, singleLine, textAllCaps,
textColor, typeface
checkbox
An individual toggleable on/off switch
- Key attributes :
android : checked=”bool” set to true to make it initially checked
android : clickable=”bool” set to false to disable the checkbox
android : id=”@+id/the ID unique ID for use in java code
android : onClick=”function” function to call in activity when clicked (must
be public, void, and take a view arg)
android : text=”text” text to put next to the checkbox
checkbox (2)
- In java code :
CheckBox cb = (CheckBox) findViewById(R.id.theID);
cb.toggle();
cb.setChecked(true);
cb.performClick();
RadioButton
A toggleable on/off switch; part of a group
- Key attributes :
need to be nested inside a RadioGroup tag in XML so that only one can
be selected at a time
android : checked=”bool” set to true to make it initially checked
android : clickable=”bool” set to false to disable the button
android : id=”@+id/the ID unique ID for use in java code
android : onClick=”function” function to call in activity when clicked (must be public,
void, and take a view arg)
android : text=”text” text to put next to the button
RadioGroup example
<LinearLayout ...
android:orientation="vertical"
android:gravity="center|top">
<RadioGroup ...
android:orientation="horizontal">
<RadioButton ... android:id="@+id/lions"
android:text="Lions"
android:onClick="radioClick" />
<RadioButton ... android:id="@+id/tigers"
android:text="Tigers"
android:checked="true"
android:onClick="radioClick" />
<RadioButton ... android:id="@+id/bears"
android:text="Bears, oh my!"
android:onClick="radioClick" />
</RadioGroup>
</LinearLayout>
Reusing onClick handler
// in MainActivity.java
public class MainActivity extends Activity {
public void radioClick(View view) {
// check which radio button was clicked
if (view.getId() == R.id.lions ) {
// ...
} else if (view.getId() == R.id.tigers ) {
// ...
} else {
// bears ...
}
}
Spinner
A drop-down menu of selectable choices
- Key attributes :
android : clickable=”bool” set to false to disable the spinner
android : id=”@+id/theID unique ID for use in java code
android : entries=”@array/array” set of options to appear in spinner (must
match an array in strings .XML)
android : prompt=”@string/text” title text when dialog of choices pops up
Spinner (2)
- also need to handle events in java code (see
later)
. must get the Spinner object using findViewByld
. then call its setOnItemSelectedListener method
ScrollView
A container with scrollbars around a single widget or
container
<LinearLayout ...>
...
<ScrollView
android:layout_width="wrap_content"
android:layout_height="wrap_content">
<TextView ... android:id="@+id/turtle_info" />
</ScrollView>
</LinearLayout>
ListView
A list of items
- an “adapter” is needed to display data
- it supports rows caching to enhance scrolling
performance
Sizing and Positionning
How does the programmer specify where each
component appears, how big each component
should be, etc.?
- Absolute positioning (c++, c#, others) :
. Programmer specifies exact pixel coordinates of every
component.
. “put this button at (x=15, y=75) and make it 70x31 px in
size.”
Sizing and Positionning (2)
- layout manager (java, android) :
. objects that decide where to position each component
based on some general rules or criteria
*”put these four buttons into a 2x2 grid and put these text boxes
in a horizontal flow in the south part of the app
. More flexible and general; works better with a variety
of devices
ViewGroup as layout
- ViewGroup superclass represents containers
of widgets/views
. layouts are described in XML and mirrored in java
code
. Android provides several pre-existing layout managers;
you can define your own custom layouts if needed
. layouts can be nested to achieve combinations of
features
ViewGroup as layout
- in the java code and XML :
. an activity is a viewGroup
. various Layout classes are also ViewGroup
. widgets can be added to a ViewGroup, which will then
manage that widget’s position/size behavior
FrameLayout
● meant to hold only a single widget inside, which
occupies the entirety of the activity
- most commonly used with layout fragments
- less useful for more complex layouts
(can put in multiple items and move them to “front” in Z-order)
<FrameLayout ... >
<ImageView
android:src="@drawable/jellybean"
... />
</FrameLayout>
LinearLayout
- Lays out widgets/view in a single line
- orientation of horizontal (default) or vertical
- items do not wrap if they reach edge of
screen !
Gravity
- gravity : alignement direction that widgets are pulled
- top, bottom, left, right, center
- combine multiple with |
- set gravity on the layout to adjust all children widgets
- set Layout_gravity on an individual widget to specify
itgravity under its parent
- gravity can be assigned for LinearLayout or
FrameLayout
Gravity example
<LinearLayout ...
android:orientation="vertical"
android:gravity="center|right">
<Button ... android:text="Button 1" />
<Button ... android:text="Button 2 Hooray" />
<Button ... android:text="Button 3" />
<Button ... android:text="Button 4 Very Long Text"/>
<Button ... android:text="Button 5"
android:layout_gravity="left" />
</LinearLayout>
Weight
- Weight : gives elements relative sizes by
integers
. Widget with weight K gets K/total fraction of
total size
.cooking analogy : “2parts flour, 1 part water,...”
- Weight is only applicable for LinearLayout
Weight example
<LinearLayout ...
android:orientation="vertical">
<Button ... android:text="B1"
android:layout_weight="1" />
<Button ... android:text="B2"
android:layout_weight="3" />
<Button ... android:text="B3"
android:layout_weight="1" />
</LinearLayout>
Widget box model
- content : every widget or view has a certain size
(width x height) for its content, the widget itself
- padding : you can artificially increase the widget’s
size by applying padding in the widget just outside its
content
- border : outside the padding, a line around edge of
widget
- margin : separation from neighboring widget on
screen
sizing an individual widget
width and height of a widget can be :
- wrap_content : exactly large enough to fit the widget’s content
- match_parent : as wide or tall as 100% of the screen or layout
- a specific fixed width such as 64dp (not usually recommended)
*dp = device pixels; dip = device-independent pixels; sp = scaling pixels
<button …
android : Layout_width=”match_parent”
android : Layout_height=”wrap_content” />
Padding
padding : extra space inside widget
- set padding to adjust all sides; padding top, bottom, left,
right for one side
- usually set to specific values like 10dp
(some widgets have a default value ~16dp)
Padding example
<LinearLayout ...
android:orientation="vertical">
<Button ... android:text="Button 1"
android:padding="50dp" />
<Button ... android:text="Button 2 Hooray" />
<Button ... android:text="Button 3"
android:paddingLeft="30dp"
android:paddingBottom="40dp" />
</LinearLayout>
Margin
margin : extra space outside widget to
seperate it from others
- set Layout_margin to adjust all sides;
Layout_marginTop, Bottom, Left, Right
- usually set to specific values like 10dp
(set default in res/values/dimens.XML)
Margin example
<LinearLayout ...
android:orientation="vertical">
<Button ... android:text="Button 1"
android:layout_margin="50dp" />
<Button ... android:text="Button 2 Hooray" />
<Button ... android:text="Button 3"
android:layout_marginLeft="30dp"
android:layout_marginTop="40dp" />
</LinearLayout>
GridLayouts
● lays out widgets/views in lines of rows and
columns
- orientation attribute defines row-major or column-major
order
- introduced in Android 4; replaces older TableLayout
GridLayouts (2)
● by default, rows and colunms are equal in size
- each widget is placed into “next” available row/column index unless
it is given an explicit Layout_row and Layout_column attribute
- grid of 4 rows, 3 colunms :
GridLayout example 1
<GridLayout ...
android:rowCount="2"
android:columnCount="3"
tools:context=".MainActivity">
<Button ... android:text="Button 1" />
<Button ... android:text="Button Two" />
<Button ... android:text="Button 3" />
<Button ... android:text="Button Four" />
<Button ... android:text="Button 5" />
<Button ... android:text="Button Six" />
</GridLayout>
GridLayout example 2
<GridLayout ...
android:rowCount="2"
android:columnCount="3"
android:orientation="vertical">
<Button ... android:text="Button 1" />
<Button ... android:text="Button Two" />
<Button ... android:text="Button 3" />
<Button ... android:text="Button Four" />
<Button ... android:text="Button 5"
android:layout_row="1"
android:layout_column="2" />
<Button ... android:text="Button Six"
android:layout_row="0"
android:layout_column="2" />
</RelativeLayout>
GridLayout example 3
<GridLayout ...
android:rowCount="2"
android:columnCount="3">
<Button ... android:text="B1" />
<Button ... android:text="B2" />
<Button ... android:text="Button Number 3!" />
<Button ... android:text="B4"
android:layout_columnSpan="2"
android:layout_gravity="center"/>
<Button ... android:text="B5" />
<Button ... android:text="B6"
android:layout_paddingTop="40dp"
android:layout_paddingBottom="40dp"/>
<Button ... android:text="B7" />
<Button ... android:text="Button #8"
android:layout_gravity="right" />
</RelativeLayout>
Nested Layout
● to produce more complicated appearance,
use a nested layout
Nested Layout example
<LinearLayout ...
android:orientation="vertical" android:gravity="center|top">
<Button ... android:text="B1" />
<LinearLayout ...
android:layout_width="match_parent"
android:layout_height="wrap_content"
android:orientation="horizontal"
android:gravity="center|top">
<Button ... android:text="B2" />
<Button ... android:text="Button Number 3" />
<Button ... android:text="B4" />
Nested Layout solution (2)
</LinearLayout>
<Button ... android:text="B5" />
<Button ... android:text="B6" android:layout_gravity="left" />
<LinearLayout ...
android:layout_width="match_parent"
android:layout_height="wrap_content"
android:orientation="horizontal"
android:gravity="center|top">
<Button ... android:text="B7" />
<Button ... android:text="Button Number 8" />
</LinearLayout>
</LinearLayout>
RelativeLayout
● each widget’s position and size are relative
to other views
- relative to “parent” (the activity itself)
- relative to other widgets/views
- x-positions of reference : left, right, center
- y-positions of reference : top, bottom, center
RelativeLayout (2)
● intended to reduce the need for nested layouts
match_parent
below 1, left of 3
below 1, right of 2
below 3
Align to Right of Parent
Relative anchor points
● properties for x/y relative to another widget :
- layout_below, above, toLeftOF, toRightOF
*set these to the ID of another widget in the format “@id/theID” (obviously, the given
widget must have an ID for this to work
● properties for x/y relative to layout container (the
activity) :
- layout_alignParentTop, Bottom, Left, Right
*set these flags to a boolean value of “true” to enable them
- layout_centerHorizontal, Vertical, InParent
*set these flags to “true” to center the control whithin its parent in a dimension
RelativeLayout example
<RelativeLayout ... >
<Button ... android:id="@+id/b1" android:text="B1"
android:layout_alignParentTop="true"
android:layout_centerHorizontal="true" />
<Button ... android:id="@+id/b2" android:text="B2"
android:layout_alignParentLeft="true"
android:layout_below="@+id/b1" />
<Button ... android:id="@+id/b3" android:text="B3"
android:layout_centerHorizontal="true"
android:layout_below="@+id/b2" />
<Button ... android:id="@+id/b4" android:text="B4"
android:layout_alignParentRight="true"
android:layout_below="@+id/b2" />
ReltiveLayout example (2)
<TextView ... android:id="@+id/tv1"
android:text="I'm a TextView!"
android:layout_centerInParent="true" />
<Button ... android:id="@+id/b5" android:text="B5"
android:padding="50dp"
android:layout_centerHorizontal="true"
android:layout_alignParentBottom="true"
android:layout_marginBottom="50dp" />
</RelativeLayout>
The action Bar
Action Bar
● Action bar : top-level menu of app functions
- replaces older “menu” button (which is now discouraged
in Android 3+)
- identifies current activity/app to user
- make common actions prominent and available
- make less common actions available through a drop-
down menu
Support for action bar
● make activity class extend AppCompatActivity to provide action bar
to pre Android 11 apps, or just Activity for higher apis
- write methods : onCreateOptionsMenu, onOptionsItemsSelected
● declare the menu items in res/menu/menu_activity.XML
- decide which items have icons, which have text, which should appear on
action bar, which in “overflow” submenu
- need to place icon image files in res/drawable folder
● handle events
- write code in onOptionsItemsSelected to check what option was clicked
and respond accordingly
AppCompatActivity
public class MainActivity extends AppCompatActivity {
...
@Override
public boolean onCreateOptionsMenu(Menu menu) {
MenuInflater inflater = getMenuInflater(); // reads XML
inflater.inflate(R.menu.menu_main, menu); // to create
return super.onCreateOptionsMenu(menu); // the menu
}
@Override
public boolean onOptionsItemSelected(MenuItem item) {
// TODO: handle clicks on the menu items
return super.onOptionsItemSelected(item);
}
}
Menu bar XML data
<menu
xmlns:android="http://schemas.android.com/apk/res/android"
xmlns:app="http://schemas.android.com/apk/res-auto"
xmlns:tools="http://schemas.android.com/tools"
tools:context=".MainActivity">
<item android:id="@+id/action_send" android:title="Send"
android:icon="@drawable/iconsend"
app:showAsAction="always" />
<item android:id="@+id/action_archive" android:title="Archive"
android:icon="@drawable/iconarchive"
app:showAsAction="always" />
<item android:id="@+id/action_open" android:title="Open"
android:icon="@drawable/iconopen" />
</menu>
● showAsAction can be always, never, ifRoom, withText, ...
onOptionsItemSelected
public class MainActivity extends ActionBarActivity {
...
/* Handles presses on the action bar items. */
@Override
public boolean onOptionsItemSelected(MenuItem item) {
if (item.getItemId() == R.id.action_send) {
// do something;
} else if (item.getItemId() == R.id.action_archive) {
// do something;
} else if (item.getItemId() == R.id.action_open) {
// do something;
}
return super.onOptionsItemSelected(item);
}
}
Fragments
Situational layout
● Your app can use different layout in different
situations :
- different device type (tablet vs phone vs watch)
- different screen size
- different orientation (portrait vs landscape)
- different country or local (language, etc)
Situation-specific folders
● Your app will look for resource folder names
with suffixes :
- screen density (e.g. drawable-hdpi)
*xhdpi: 2.0 (twice as many pixels/dots per inch)
* hdpi : 1.5
*mdpi : 1.0 (baseline)
*ldpi : 0.75
Situation-specific folders (2)
- screen size (e.g layout-large)
*small, normal, large, xlarge
- orientation (e.g. layout-land)
*portrait(), land (landscape)
Portrait vs landscape layout
● To create a different layout in landscape
mode :
- create a folder in your project called res/layout-
land
- place another copy of your activity’s layout XML
file there
- modify it as needed to represent the differences
Problem : redundant layouts
● With situational layout you begin to encounter
redundancy
- the layout in one case (e.g. portrait or medium) is very similar
to the layout in another case (e.g. landscape or large)
- you don’t want to represent the same XML or java code
multiple times in multiple places
● You sometimes want your code to behave situationally
- in portrait mode, clicking a button should launch a new
activity
- in landscape mode, clicking a button should launch a new
view
Fragments
● Fragment : A reusable segment of Android
UI that can appear in an activity
- can help handle different devices and screen sizes
- can reuse a common fragment across multiple activites
- first added in Android 3.0 (usuable in older versions if
necessary thrrogh support library)
Creating a fragment
● In Android Studio, right-click app, click :
New Fragment Fragment(blanck)
- un-check boxes about “include_methods”
- now create layout XML and java event code as in an
Activity
Using fragments in activity XML
● Activity layout XML can include fragments
<!-- activity_name.xml -->
<LinearLayout ...>
<fragment ...
android:id="@+id/id1"
class="ClassName1"
tools:layout="@layout/name1" />
<fragment ...
android:id="@+id/id2"
class="ClassName2"
tools:layout="@layout/name2" />
</LinearLayout>
Fragment life cycle
● Fragment have a similar life cycle and events as activities
● important methods :
- onAttach to glue fragment to its surrounding activity
- onCreate when fragment is loading
- onCreateView method that must return fragment’s root UI view
- onActivityCreated method that indicates the enclosing activity is
ready
- onPause when fragment is being left/exited
- onDetach just as fragment is being deleted
fragment lifecycle
Fragment template
public class Name extends Fragment {
@Override
public View onCreateView(LayoutInflater inflater,
ViewGroup vg, Bundle bundle) {
// load the GUI layout from the XML
return inflater.inflate(R.layout.id, vg, false);
}
public void onActivityCreated(Bundle savedState) {
super.onActivityCreated(savedState);
// ... any other GUI initialization needed
}
// any other code (e.g. event-handling)
}
Fragment vs. activity
● Fragment code is similar to activity code, with a few
changes:
- Many activity methods aren’t present in the fragment, but you can call
getActivity to access the activity the fragment is inside of
Button b = (Button) findviewbyID(R.id.but);
Button b = (Button) getActivity().findviewbyID(R.id.but);
- Sometimes also use getView to refer to the activity’s layout
- Event handlers cannot be attached in the XML any more, it must be
attached in java code instead
Fragment onClick listener
● Activity :
<Button android:id="@+id/b1"
android:onClick="onClickB1" ... />
● Fragment :
<Button android:id="@+id/b1" ... />
// in fragment's Java file
Button b = (Button) getActivity().findViewById(r.id.b1);
b.setOnClickListener(new View.OnClickListener() {
@Override public void onClick(View view) {
// whatever code would have been in onClickB1
}
});
Activity that accepts parameters
public class Name extends Activity {
@Override
protected void onCreate(Bundle savedInstanceState) {
super.onCreate(savedInstanceState);
setContentView(R.layout.name);
// extract parameters passed to activity from intent
Intent intent = getIntent();
int name1 = intent.getIntExtra("id1", default);
String name2 = intent.getStringExtra("id2", "default");
// use parameters to set up the initial state
...
}
...
}
Fragment that accepts parameters
public class Name extends Fragment {
@Override
public View onCreateView(LayoutInflater inflater,
ViewGroup container, Bundle savedInstanceState) {
return inflater.inflate(R.layout.name, container, false);
}
@Override
public void onActivityCreated(Bundle savedState) {
super.onActivityCreated(savedState);
// extract parameters passed to activity from intent
Intent intent = getActivity().getIntent();
int name1 = intent.getIntExtra("id1", default);
String name2 = intent.getStringExtra("id2", "default");
// use parameters to set up the initial state
…
Communication between fragments
● One activity might contain multiple fragments
● The fragments may want to talk to each other
- Use activity’s getFragmentManager method
- its findFragmentById method can access any fragment that has an id
Activity act = getActivity();
if (act.getResources().getConfiguration().orientation ==
Configuration.ORIENTATION_LANDSCAPE) {
// update other fragment within this same activity
FragmentClass fragment = (FragmentClass)
act.getFragmentManager().findFragmentById (R.id.id);
fragment.methodName(parameters);
}
Fragment subclasses
● DialogFragment - a fragment meant to be
shown as a dialog box that pops up on top of
the current activity
● ListFragment - a fragment that shows a list of
items as its main content
● PreferenceFragment - a fragment whose main
content is meant to allow the user to change
settings for the app

02 programmation mobile - android - (activity, view, fragment)

  • 1.
    Programmation Mobile Android Rabie JABALLAH:jaballahrabie@gmail.com Slim BENHAMMOUDA: slim.benhammouda@gmail.com
  • 2.
    2. Activities - “Activity”is a single, focused thing that the user can do. - Almost all activities interact with the user, so the Activity class takes care of creating a window for you in which you can place your UI - While activities are often presented to the user as full-screen windows, they can also be used in other ways: as floating windows or embedded inside of another activity.
  • 3.
    Activity states - Anactivity can be thought of as being in one of several states : . starting : In process of loading up, but not fully loaded . running : Done loading and now visible on the screen . paused : Partially obscured or out of focus, but not shut down . stopped : No longer active, but still in the device’s active memory . destroyed : Shut down and no longer currently loaded in memory
  • 4.
    Activity state - Transitionsbetween these states are represented by events that you can listen to in your activity code . onCreate, onPause, onResume, onStop, onDestroy, …
  • 5.
  • 6.
    The onCreate method -In onCreate, you create and set up the activity object, load any static resources like images, layouts, set up menus etc. . after this, the Activity object exists public class MainActivity extends Activity { ... public void onCreate(Bundle savedInstanceState) { super.onCreate(savedInstanceState); // always call super setContentView(R.layout.activity_main); // set up layout //any other initialization code; // anything else you need } }
  • 7.
    The onPause method -When onPause is called, your activity is still partially visible. - May be temporary, or on way to termination. . Stop animation or other actions that consume CPU . Commit unsaved changes (e.g. draft email) . Release system resources that affect battery life public void onPause() { super.onPause(); // always call super if (myConnection != null) { myConnection.close(); // release resources myConnection = null; } }
  • 8.
    The onResume method -When onResume is called, your activity is coming out of the Paused state and into the Running state again - Also called when activity is first created/loaded ! . Initialize resources that you will release in onPause . Start/resume animations or other ongoing actions that should only run when activity is visible on screen public void onResume() { super.onPause(); // always call super if (myConnection == null) { myConnection = new ExampleConnect(); // init.resources myConnection.connect(); } }
  • 9.
    The onStop method -When onStop is called, your activity is no longer visible on the screen : . User chose another app from Recent Apps window . User starts a different activity in your app . User receives a phone call while in your app - Your app might still be running, but that activity is not . onPause is always called before onStop . onStop performs heavy-duty shutdown tasks like writing to a database public void onStop() { super.onStop(); // always call super ... }
  • 10.
    onStart and onRestart -onStart is called every time the activity begins - onRestart is called when activity was stopped but is started again later (all but the first start) . Not as commonly used; favor onResume . Re-open any resources that onStop closed public void onStart() { super.onStart(); // always call super ... } public void onRestart() { super.onRestart(); // always call super ... }
  • 11.
    The onDestroy method -When onDestroy is called, your entire app is being shut down and unloaded from memory . Unpredictable exactly when/if it will be called . Can be called whenever the system wants to reclaim the memory used by your app . Generally favor onPause or onStop because they are called in a predictable and timely manner public void onDestroy() { super.onDestroy(); // always call super ... }
  • 12.
    Testing activity states -Use the LogCat system for logging messages when your app changes states : . analogous to System.out.println debugging for Android apps . appears in the LogCat console in Android Studio public void onStart() { super.onStart(); Log.v("testing", "onStart was called!") ; }
  • 13.
    Log methods Log.d (“tag”,“message”); degug message (for debugging) Log.e (“tag”, “message”); error message (fatal error) Log.i (“tag”, “message”); info message (low-urgency, FYI) Log.v (“tag”, “message”); verbose message Log.w (“tag”, “message”); warning message (non-fatal error) Log.wtf (“tag”, exception); log stack trace of an exception
  • 14.
    Log methods - Eachmethod can also accept an optional exception argument : try { someCode(); } catch (Exception ex) { Log.e("error4", "something went wrong", ex); }
  • 15.
    Activity instance state ●instance state: Current state of an activity - Which boxes are checked - Any text typed into text boxes - value of any private fields - ...
  • 16.
    Lost activity state ●Several actions can cause your activity state to be lost: - When you go from one activity to another and back, within same app - When you launch another app and then come back - When you rotate the device’s orientation from portrait to landscape - ...
  • 17.
    onSaveInstanceStace method ● Whenan activity is being destroyed, the event method onSaveInstanceState is also called - This method should save any “non-persistent” state of the app - non-persistent state: Stays for now, but lost on shutdown/reboot ● Accepts a Bundle parameter storing key/value pairs - Bundle is passed back to activity if it is recreated later public void onSaveInstanceState (Bundle outState) { super.onSaveInstanceState(outState); // always call super outState.putInt("name", value); outState.putString("name", value); ... }
  • 18.
    onRestoreInstanceState method ● Whenan activity is recreated later, the event method onRestoreInstanceState is called - This method can restore any “non-persistent” state of the app - Bundle from onSaveInstanceState from before is passed back in public void onRestoreInstanceState (Bundle inState) { super.onRestoreInstanceState(inState); // always call super int name = inState.getInt("name"); String name = inState.getString("name"); ... }
  • 19.
    Saving your ownclasses ● By default, your own classes can’t be put into a Bundle ● You can make a class able to be saved by implementing the (methodless) java.Serializable interface public class Date implements Serializable { ... } public class MainActivity extends Activity { public void onSaveInstanceState(Bundle outState) { super.onSaveInstanceState(outState); Date d = new Date(2015, 1, 25); outState.putSerializable("today", d);
  • 20.
    Multiple Activities ● Manyapps have multiple activities - Example : in an address book app, the main activity is a list of contact, and clicking on a contact goes to another activity for viewing details - An activity A can launch another activity B in response to an event - The activity A can pass data to B - the second activity B can send data back to A when it is done Activity A Activity B Item list Item details
  • 21.
    Adding an Activity ●in Android Studio, right click “app” at left : New -> Activity - creates a new .XML file in res/layouts - creates a new .java class in src/java - add information to AndroidManifest .XML about the activity (without this information, the app will not find the activity)
  • 22.
    Activity in manifest ●every activity has an entry in project’s AndroidManifest.XML, added automatically by Android Studio <manifest xmlns:android="http://schemas.android.com/apk/res/android" package="com.example.myusername.myapplication" > <application android:allowBackup="true" android:icon="@drawable/ic_launcher" android:label="@string/app_name" android:theme="@style/AppTheme" > <activity android:name=".MainActivity" android:label="@string/app_name" >
  • 23.
    Activities in Manifest( suite) <intent-filter> <action android:name="android.intent.action.MAIN" /> <category android:name="android.intent.category.LAUNCHER" /> </intent-filter> </activity> <activity android:name=".SecondActivity" android:label="@string/title_activity_second" android:parentActivityName=".SecondActivity" > <meta-data android:name="android.support.PARENT_ACTIVITY" android:value="com.example.myusername.myapplication.MainActivity" /> </activity> </application> </manifest>
  • 24.
    Intents ● Intent :a bridge between activities; a way for one activity to invoke another - the activity can be in the same app or in a different app - can store extra data to pass as “parameters” to that activity - second activity can “return” information back to the caller if needed
  • 25.
    Creating an Intent ●To launch another activity (usually in response to an event), create an intent object and call startActivity with it : Intent intent = new Intent(this, ActivityName.class); startActivity (intent) ● if you need to pass any parameters or data to the second activity, call putExtra on the intent - It stores “extra” data as key/value pairs, not unlike a Map Intent intent = new Intent(this, ActivityName.class); intent.putExtra("name", value); intent.putExtra("name", value); startActivity(intent);
  • 26.
    Extracting extra data ●In the second activity that was invoked, you can grab any extra data that was passed to it by the calling act - you can acess the intent that spawned you by calling getIntent - The Intent has methods like getExtra, getIntExtra, getStringExtra, etc. to extract any data that was stored inside the intent
  • 27.
    Extracting extra data(suite) public class SecondActivity extends Activity { … public void onCreate(Bundle savedState){ super.onCreate(savedState); setContentView(R.layout.activity_second); Intent intent = getintent(); String extra = intent.getExtra(“name”); … } }
  • 28.
    Waiting for aresult ● if calling activity wants to wait for a result from called activity : - Call startActivityForResult rather than startActivity *startActivityForResult requires you to pass a unique ID number to represent the action being performed *by convention, you declare a final int constant with a value of your choice *the call to startActivityForResult will not wait, it will return immediately
  • 29.
    Waiting for aresult (suite) - Write an onActivityResult method that will be called when the second activity is done *check for your unique ID as was passed to startActivityForResult *if you see your unique ID, you can ask the intent for any extra data - Modify the called activity to send a result back *Use its setResult and finish methods to end the called activity
  • 30.
    Sending back aresult ● In the second activity that was invoked, send data back : - need to create an Intent to go back - Store any extra data in that intent; call setResult and finish public class SecondActivity extends Activity { … public void myOnClick(view view){ Intent intent = new Intent(); intent.putExtra(“name”,value); setResult(RESULT_OK, intent); finish(); //calls onDestroy }
  • 31.
    Grabbing the result publicclass FirstActivity extends Activity { private static final int REQ_CODE = 123; // MUST be 0-65535 public void myOnClick(View view) { Intent intent = getIntent(this, SecondActivity.class); startActivityForResult (intent, REQ_CODE); } protected void onActivityResult (int requestCode, int resultCode, Intent intent) { super.onActivityResult(requestCode, resultCode, intent); if (requestCode == REQ_CODE) { // came back from SecondActivity String data = intent.getStringExtra("name"); Toast.makeText(this, "Got back: " + data, Toast.LENGTH_SHORT).show(); } } }
  • 32.
    Implicit Intent ● implicitintent : One that launches another app, without naming that specific app, to handle a given type of request or action - examples : invoke default browser; load music player to play a song
  • 33.
    Implicit Intent (2) //make a phone call Uri number = Uri.parse("tel:98123456"); Intent callIntent = new Intent(Intent.ACTION_DIAL, number); // go to a web page in the default browser Uri webpage = Uri.parse("http://www.iit-nau.com/"); Intent webIntent = new Intent(Intent.ACTION_VIEW, webpage); // open a map pointing at a given latitude/longitude (z=zoom) Uri location = Uri.parse("geo:37.422219,-122.08364?z=14"); Intent mapIntent = new Intent(Intent.ACTION_VIEW, location);
  • 34.
    Activities and ActionBar ● action bar : A top-level menu of actions in an activity - replaces older “menu” button in past versions of Android - identifies current activity/app to user - make common actions prominent and available - make less common actions available through a drop-down menu ● if your activity is specified to have a “parent” activity on creation and in AndroidManifest.XML, you will have a “back” button to return to the calling activity
  • 35.
    3. Views andLayouts
  • 36.
    A clickable widgetwith a text label - key attributes : Button android : clickable = “bool” set to false to disable the button android : id=”@+id/theID unique ID for use in java code android : onClick=”function” function to call in activity when clicked (must be public, void, and take a View arg) android : text=”text” text to put in the button
  • 37.
    - represented byButton class in java code Button b = (Button) findViewById (R.id.theID); ... Button (2)
  • 38.
    ImageButton A clickable widgetwith an image label - Key attributes : android : clickable=”bool” set to false to disable the button android : id=”@+id/theID unique ID for use in java code android : onClick=”function” function to call in activity when clicked (must be public, void, and take a view arg) android : src=”@drawable/img” image to put in the button (must correspond to an image resource)
  • 39.
    ImageButton (2) - toset up an image resource : . put image file in project folder app/src/main/res/drawable . use @drawable/foo to refer to foo.png *use simple file names with only letters and numbers
  • 40.
    ImageView Display an imagewithout being clickable - Key attributes : android : id=”@+id/theID” unique ID for use in java code android : src=”@drawable/img image to put in the screen (must coreespond to an image resource) - to change the visible image, in java code : . get the ImageView using findViewByld . call its setImageResource method and pass R.drawable.filename
  • 41.
    EditText An editable textinput box - key attributes : android : hint =”text” gray text to show before user starts to type android : id=”@+id/theID unique ID for use in java code android : inputTyp=”type” what kind of input is being typed; number, phone, date, time,... android : lines=”int” number of visible lines (rows) of input android : maxlines=”int” max lines toallow user to type in the box android : text=”text” intial text to put in box (default empty) android : textSizes=”size” size of font to use (e.g. “20dp”)
  • 42.
    EditText (2) - otherattributes : capitalize, digits, fontFamily, letterSpacing, lineSpacingExtra, minLines, numeric, password, phoneNumber, singleLine, textAllCaps, textColor, typeface
  • 43.
    checkbox An individual toggleableon/off switch - Key attributes : android : checked=”bool” set to true to make it initially checked android : clickable=”bool” set to false to disable the checkbox android : id=”@+id/the ID unique ID for use in java code android : onClick=”function” function to call in activity when clicked (must be public, void, and take a view arg) android : text=”text” text to put next to the checkbox
  • 44.
    checkbox (2) - Injava code : CheckBox cb = (CheckBox) findViewById(R.id.theID); cb.toggle(); cb.setChecked(true); cb.performClick();
  • 45.
    RadioButton A toggleable on/offswitch; part of a group - Key attributes : need to be nested inside a RadioGroup tag in XML so that only one can be selected at a time android : checked=”bool” set to true to make it initially checked android : clickable=”bool” set to false to disable the button android : id=”@+id/the ID unique ID for use in java code android : onClick=”function” function to call in activity when clicked (must be public, void, and take a view arg) android : text=”text” text to put next to the button
  • 46.
    RadioGroup example <LinearLayout ... android:orientation="vertical" android:gravity="center|top"> <RadioGroup... android:orientation="horizontal"> <RadioButton ... android:id="@+id/lions" android:text="Lions" android:onClick="radioClick" /> <RadioButton ... android:id="@+id/tigers" android:text="Tigers" android:checked="true" android:onClick="radioClick" /> <RadioButton ... android:id="@+id/bears" android:text="Bears, oh my!" android:onClick="radioClick" /> </RadioGroup> </LinearLayout>
  • 47.
    Reusing onClick handler //in MainActivity.java public class MainActivity extends Activity { public void radioClick(View view) { // check which radio button was clicked if (view.getId() == R.id.lions ) { // ... } else if (view.getId() == R.id.tigers ) { // ... } else { // bears ... } }
  • 48.
    Spinner A drop-down menuof selectable choices - Key attributes : android : clickable=”bool” set to false to disable the spinner android : id=”@+id/theID unique ID for use in java code android : entries=”@array/array” set of options to appear in spinner (must match an array in strings .XML) android : prompt=”@string/text” title text when dialog of choices pops up
  • 49.
    Spinner (2) - alsoneed to handle events in java code (see later) . must get the Spinner object using findViewByld . then call its setOnItemSelectedListener method
  • 50.
    ScrollView A container withscrollbars around a single widget or container <LinearLayout ...> ... <ScrollView android:layout_width="wrap_content" android:layout_height="wrap_content"> <TextView ... android:id="@+id/turtle_info" /> </ScrollView> </LinearLayout>
  • 51.
    ListView A list ofitems - an “adapter” is needed to display data - it supports rows caching to enhance scrolling performance
  • 52.
    Sizing and Positionning Howdoes the programmer specify where each component appears, how big each component should be, etc.? - Absolute positioning (c++, c#, others) : . Programmer specifies exact pixel coordinates of every component. . “put this button at (x=15, y=75) and make it 70x31 px in size.”
  • 53.
    Sizing and Positionning(2) - layout manager (java, android) : . objects that decide where to position each component based on some general rules or criteria *”put these four buttons into a 2x2 grid and put these text boxes in a horizontal flow in the south part of the app . More flexible and general; works better with a variety of devices
  • 54.
    ViewGroup as layout -ViewGroup superclass represents containers of widgets/views . layouts are described in XML and mirrored in java code . Android provides several pre-existing layout managers; you can define your own custom layouts if needed . layouts can be nested to achieve combinations of features
  • 55.
    ViewGroup as layout -in the java code and XML : . an activity is a viewGroup . various Layout classes are also ViewGroup . widgets can be added to a ViewGroup, which will then manage that widget’s position/size behavior
  • 56.
    FrameLayout ● meant tohold only a single widget inside, which occupies the entirety of the activity - most commonly used with layout fragments - less useful for more complex layouts (can put in multiple items and move them to “front” in Z-order) <FrameLayout ... > <ImageView android:src="@drawable/jellybean" ... /> </FrameLayout>
  • 57.
    LinearLayout - Lays outwidgets/view in a single line - orientation of horizontal (default) or vertical - items do not wrap if they reach edge of screen !
  • 58.
    Gravity - gravity :alignement direction that widgets are pulled - top, bottom, left, right, center - combine multiple with | - set gravity on the layout to adjust all children widgets - set Layout_gravity on an individual widget to specify itgravity under its parent - gravity can be assigned for LinearLayout or FrameLayout
  • 59.
    Gravity example <LinearLayout ... android:orientation="vertical" android:gravity="center|right"> <Button... android:text="Button 1" /> <Button ... android:text="Button 2 Hooray" /> <Button ... android:text="Button 3" /> <Button ... android:text="Button 4 Very Long Text"/> <Button ... android:text="Button 5" android:layout_gravity="left" /> </LinearLayout>
  • 60.
    Weight - Weight :gives elements relative sizes by integers . Widget with weight K gets K/total fraction of total size .cooking analogy : “2parts flour, 1 part water,...” - Weight is only applicable for LinearLayout
  • 61.
    Weight example <LinearLayout ... android:orientation="vertical"> <Button... android:text="B1" android:layout_weight="1" /> <Button ... android:text="B2" android:layout_weight="3" /> <Button ... android:text="B3" android:layout_weight="1" /> </LinearLayout>
  • 62.
    Widget box model -content : every widget or view has a certain size (width x height) for its content, the widget itself - padding : you can artificially increase the widget’s size by applying padding in the widget just outside its content - border : outside the padding, a line around edge of widget - margin : separation from neighboring widget on screen
  • 63.
    sizing an individualwidget width and height of a widget can be : - wrap_content : exactly large enough to fit the widget’s content - match_parent : as wide or tall as 100% of the screen or layout - a specific fixed width such as 64dp (not usually recommended) *dp = device pixels; dip = device-independent pixels; sp = scaling pixels <button … android : Layout_width=”match_parent” android : Layout_height=”wrap_content” />
  • 64.
    Padding padding : extraspace inside widget - set padding to adjust all sides; padding top, bottom, left, right for one side - usually set to specific values like 10dp (some widgets have a default value ~16dp)
  • 65.
    Padding example <LinearLayout ... android:orientation="vertical"> <Button... android:text="Button 1" android:padding="50dp" /> <Button ... android:text="Button 2 Hooray" /> <Button ... android:text="Button 3" android:paddingLeft="30dp" android:paddingBottom="40dp" /> </LinearLayout>
  • 66.
    Margin margin : extraspace outside widget to seperate it from others - set Layout_margin to adjust all sides; Layout_marginTop, Bottom, Left, Right - usually set to specific values like 10dp (set default in res/values/dimens.XML)
  • 67.
    Margin example <LinearLayout ... android:orientation="vertical"> <Button... android:text="Button 1" android:layout_margin="50dp" /> <Button ... android:text="Button 2 Hooray" /> <Button ... android:text="Button 3" android:layout_marginLeft="30dp" android:layout_marginTop="40dp" /> </LinearLayout>
  • 68.
    GridLayouts ● lays outwidgets/views in lines of rows and columns - orientation attribute defines row-major or column-major order - introduced in Android 4; replaces older TableLayout
  • 69.
    GridLayouts (2) ● bydefault, rows and colunms are equal in size - each widget is placed into “next” available row/column index unless it is given an explicit Layout_row and Layout_column attribute - grid of 4 rows, 3 colunms :
  • 70.
    GridLayout example 1 <GridLayout... android:rowCount="2" android:columnCount="3" tools:context=".MainActivity"> <Button ... android:text="Button 1" /> <Button ... android:text="Button Two" /> <Button ... android:text="Button 3" /> <Button ... android:text="Button Four" /> <Button ... android:text="Button 5" /> <Button ... android:text="Button Six" /> </GridLayout>
  • 71.
    GridLayout example 2 <GridLayout... android:rowCount="2" android:columnCount="3" android:orientation="vertical"> <Button ... android:text="Button 1" /> <Button ... android:text="Button Two" /> <Button ... android:text="Button 3" /> <Button ... android:text="Button Four" /> <Button ... android:text="Button 5" android:layout_row="1" android:layout_column="2" /> <Button ... android:text="Button Six" android:layout_row="0" android:layout_column="2" /> </RelativeLayout>
  • 72.
    GridLayout example 3 <GridLayout... android:rowCount="2" android:columnCount="3"> <Button ... android:text="B1" /> <Button ... android:text="B2" /> <Button ... android:text="Button Number 3!" /> <Button ... android:text="B4" android:layout_columnSpan="2" android:layout_gravity="center"/> <Button ... android:text="B5" /> <Button ... android:text="B6" android:layout_paddingTop="40dp" android:layout_paddingBottom="40dp"/> <Button ... android:text="B7" /> <Button ... android:text="Button #8" android:layout_gravity="right" /> </RelativeLayout>
  • 73.
    Nested Layout ● toproduce more complicated appearance, use a nested layout
  • 74.
    Nested Layout example <LinearLayout... android:orientation="vertical" android:gravity="center|top"> <Button ... android:text="B1" /> <LinearLayout ... android:layout_width="match_parent" android:layout_height="wrap_content" android:orientation="horizontal" android:gravity="center|top"> <Button ... android:text="B2" /> <Button ... android:text="Button Number 3" /> <Button ... android:text="B4" />
  • 75.
    Nested Layout solution(2) </LinearLayout> <Button ... android:text="B5" /> <Button ... android:text="B6" android:layout_gravity="left" /> <LinearLayout ... android:layout_width="match_parent" android:layout_height="wrap_content" android:orientation="horizontal" android:gravity="center|top"> <Button ... android:text="B7" /> <Button ... android:text="Button Number 8" /> </LinearLayout> </LinearLayout>
  • 76.
    RelativeLayout ● each widget’sposition and size are relative to other views - relative to “parent” (the activity itself) - relative to other widgets/views - x-positions of reference : left, right, center - y-positions of reference : top, bottom, center
  • 77.
    RelativeLayout (2) ● intendedto reduce the need for nested layouts match_parent below 1, left of 3 below 1, right of 2 below 3 Align to Right of Parent
  • 78.
    Relative anchor points ●properties for x/y relative to another widget : - layout_below, above, toLeftOF, toRightOF *set these to the ID of another widget in the format “@id/theID” (obviously, the given widget must have an ID for this to work ● properties for x/y relative to layout container (the activity) : - layout_alignParentTop, Bottom, Left, Right *set these flags to a boolean value of “true” to enable them - layout_centerHorizontal, Vertical, InParent *set these flags to “true” to center the control whithin its parent in a dimension
  • 79.
    RelativeLayout example <RelativeLayout ...> <Button ... android:id="@+id/b1" android:text="B1" android:layout_alignParentTop="true" android:layout_centerHorizontal="true" /> <Button ... android:id="@+id/b2" android:text="B2" android:layout_alignParentLeft="true" android:layout_below="@+id/b1" /> <Button ... android:id="@+id/b3" android:text="B3" android:layout_centerHorizontal="true" android:layout_below="@+id/b2" /> <Button ... android:id="@+id/b4" android:text="B4" android:layout_alignParentRight="true" android:layout_below="@+id/b2" />
  • 80.
    ReltiveLayout example (2) <TextView... android:id="@+id/tv1" android:text="I'm a TextView!" android:layout_centerInParent="true" /> <Button ... android:id="@+id/b5" android:text="B5" android:padding="50dp" android:layout_centerHorizontal="true" android:layout_alignParentBottom="true" android:layout_marginBottom="50dp" /> </RelativeLayout>
  • 81.
  • 82.
    Action Bar ● Actionbar : top-level menu of app functions - replaces older “menu” button (which is now discouraged in Android 3+) - identifies current activity/app to user - make common actions prominent and available - make less common actions available through a drop- down menu
  • 83.
    Support for actionbar ● make activity class extend AppCompatActivity to provide action bar to pre Android 11 apps, or just Activity for higher apis - write methods : onCreateOptionsMenu, onOptionsItemsSelected ● declare the menu items in res/menu/menu_activity.XML - decide which items have icons, which have text, which should appear on action bar, which in “overflow” submenu - need to place icon image files in res/drawable folder ● handle events - write code in onOptionsItemsSelected to check what option was clicked and respond accordingly
  • 84.
    AppCompatActivity public class MainActivityextends AppCompatActivity { ... @Override public boolean onCreateOptionsMenu(Menu menu) { MenuInflater inflater = getMenuInflater(); // reads XML inflater.inflate(R.menu.menu_main, menu); // to create return super.onCreateOptionsMenu(menu); // the menu } @Override public boolean onOptionsItemSelected(MenuItem item) { // TODO: handle clicks on the menu items return super.onOptionsItemSelected(item); } }
  • 85.
    Menu bar XMLdata <menu xmlns:android="http://schemas.android.com/apk/res/android" xmlns:app="http://schemas.android.com/apk/res-auto" xmlns:tools="http://schemas.android.com/tools" tools:context=".MainActivity"> <item android:id="@+id/action_send" android:title="Send" android:icon="@drawable/iconsend" app:showAsAction="always" /> <item android:id="@+id/action_archive" android:title="Archive" android:icon="@drawable/iconarchive" app:showAsAction="always" /> <item android:id="@+id/action_open" android:title="Open" android:icon="@drawable/iconopen" /> </menu> ● showAsAction can be always, never, ifRoom, withText, ...
  • 86.
    onOptionsItemSelected public class MainActivityextends ActionBarActivity { ... /* Handles presses on the action bar items. */ @Override public boolean onOptionsItemSelected(MenuItem item) { if (item.getItemId() == R.id.action_send) { // do something; } else if (item.getItemId() == R.id.action_archive) { // do something; } else if (item.getItemId() == R.id.action_open) { // do something; } return super.onOptionsItemSelected(item); } }
  • 87.
  • 88.
    Situational layout ● Yourapp can use different layout in different situations : - different device type (tablet vs phone vs watch) - different screen size - different orientation (portrait vs landscape) - different country or local (language, etc)
  • 89.
    Situation-specific folders ● Yourapp will look for resource folder names with suffixes : - screen density (e.g. drawable-hdpi) *xhdpi: 2.0 (twice as many pixels/dots per inch) * hdpi : 1.5 *mdpi : 1.0 (baseline) *ldpi : 0.75
  • 90.
    Situation-specific folders (2) -screen size (e.g layout-large) *small, normal, large, xlarge - orientation (e.g. layout-land) *portrait(), land (landscape)
  • 91.
    Portrait vs landscapelayout ● To create a different layout in landscape mode : - create a folder in your project called res/layout- land - place another copy of your activity’s layout XML file there - modify it as needed to represent the differences
  • 92.
    Problem : redundantlayouts ● With situational layout you begin to encounter redundancy - the layout in one case (e.g. portrait or medium) is very similar to the layout in another case (e.g. landscape or large) - you don’t want to represent the same XML or java code multiple times in multiple places ● You sometimes want your code to behave situationally - in portrait mode, clicking a button should launch a new activity - in landscape mode, clicking a button should launch a new view
  • 93.
    Fragments ● Fragment :A reusable segment of Android UI that can appear in an activity - can help handle different devices and screen sizes - can reuse a common fragment across multiple activites - first added in Android 3.0 (usuable in older versions if necessary thrrogh support library)
  • 94.
    Creating a fragment ●In Android Studio, right-click app, click : New Fragment Fragment(blanck) - un-check boxes about “include_methods” - now create layout XML and java event code as in an Activity
  • 95.
    Using fragments inactivity XML ● Activity layout XML can include fragments <!-- activity_name.xml --> <LinearLayout ...> <fragment ... android:id="@+id/id1" class="ClassName1" tools:layout="@layout/name1" /> <fragment ... android:id="@+id/id2" class="ClassName2" tools:layout="@layout/name2" /> </LinearLayout>
  • 96.
    Fragment life cycle ●Fragment have a similar life cycle and events as activities ● important methods : - onAttach to glue fragment to its surrounding activity - onCreate when fragment is loading - onCreateView method that must return fragment’s root UI view - onActivityCreated method that indicates the enclosing activity is ready - onPause when fragment is being left/exited - onDetach just as fragment is being deleted
  • 97.
  • 98.
    Fragment template public className extends Fragment { @Override public View onCreateView(LayoutInflater inflater, ViewGroup vg, Bundle bundle) { // load the GUI layout from the XML return inflater.inflate(R.layout.id, vg, false); } public void onActivityCreated(Bundle savedState) { super.onActivityCreated(savedState); // ... any other GUI initialization needed } // any other code (e.g. event-handling) }
  • 99.
    Fragment vs. activity ●Fragment code is similar to activity code, with a few changes: - Many activity methods aren’t present in the fragment, but you can call getActivity to access the activity the fragment is inside of Button b = (Button) findviewbyID(R.id.but); Button b = (Button) getActivity().findviewbyID(R.id.but); - Sometimes also use getView to refer to the activity’s layout - Event handlers cannot be attached in the XML any more, it must be attached in java code instead
  • 100.
    Fragment onClick listener ●Activity : <Button android:id="@+id/b1" android:onClick="onClickB1" ... /> ● Fragment : <Button android:id="@+id/b1" ... /> // in fragment's Java file Button b = (Button) getActivity().findViewById(r.id.b1); b.setOnClickListener(new View.OnClickListener() { @Override public void onClick(View view) { // whatever code would have been in onClickB1 } });
  • 101.
    Activity that acceptsparameters public class Name extends Activity { @Override protected void onCreate(Bundle savedInstanceState) { super.onCreate(savedInstanceState); setContentView(R.layout.name); // extract parameters passed to activity from intent Intent intent = getIntent(); int name1 = intent.getIntExtra("id1", default); String name2 = intent.getStringExtra("id2", "default"); // use parameters to set up the initial state ... } ... }
  • 102.
    Fragment that acceptsparameters public class Name extends Fragment { @Override public View onCreateView(LayoutInflater inflater, ViewGroup container, Bundle savedInstanceState) { return inflater.inflate(R.layout.name, container, false); } @Override public void onActivityCreated(Bundle savedState) { super.onActivityCreated(savedState); // extract parameters passed to activity from intent Intent intent = getActivity().getIntent(); int name1 = intent.getIntExtra("id1", default); String name2 = intent.getStringExtra("id2", "default"); // use parameters to set up the initial state …
  • 103.
    Communication between fragments ●One activity might contain multiple fragments ● The fragments may want to talk to each other - Use activity’s getFragmentManager method - its findFragmentById method can access any fragment that has an id Activity act = getActivity(); if (act.getResources().getConfiguration().orientation == Configuration.ORIENTATION_LANDSCAPE) { // update other fragment within this same activity FragmentClass fragment = (FragmentClass) act.getFragmentManager().findFragmentById (R.id.id); fragment.methodName(parameters); }
  • 104.
    Fragment subclasses ● DialogFragment- a fragment meant to be shown as a dialog box that pops up on top of the current activity ● ListFragment - a fragment that shows a list of items as its main content ● PreferenceFragment - a fragment whose main content is meant to allow the user to change settings for the app