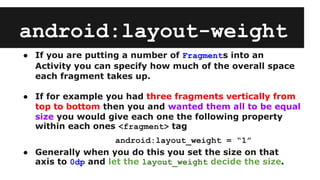
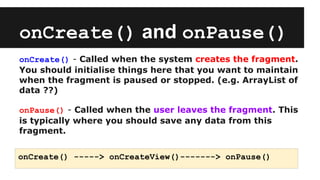
Android App Development
Lesson 4 - Fragments & Multiple Layouts
Today’s Lesson
● String resources
● Introduction to Fragments
● Creating and adding Fragements
● Fragment Lifecycle
Last Week
● You may see auto-saving of EditText / TextView text
regardless of whether you saved to bundle or not.
(Happens automatically in 4.4 but not in prior versions)
● Update : All TextView components (with ids)
automatically save text to the Bundle (editable or not)
● To force it not to save use android:saveEnabled="false"
String resources
● Ideally your Strings (i.e. Labels, Button Captions, Menu
Texts etc) should be in your resources.
● The file to place them in is res/values/strings.xml
<?xml version="1.0" encoding="utf-8"?>
<resources>
<string name="cancelButtonCaption">Cancel</string>
<string name="okButtonCaption">OK</string>
</resources>
Using String resources
To use a String resource in our Activity GUI layout XML
file
<Button
android:id="@+id/button1"
android:layout_width="match_parent"
android:layout_height="wrap_content"
android:layout_alignParentLeft="true"
android:layout_alignParentTop="true"
android:onClick="okButtonClicked"
android:text="@string/okButtonCaption" />
Up to now we would have just hardcoded it like this
android:text = “OK”
Fragments
● So what’s a Fragment and why should we use one ?
● At its most basic level a fragment is its own self-
contained unit which runs inside an Activity
(The Activity is the “context” of the fragment)
● Has its own lifecycle. Can be added or removed while
the Activity remains running.
● It can be re-used across multiple Activities.
Fragments
● Some more terminology... Fragments can be either
added statically (at programming time) or dynamically
(at runtime) to an Activity. Statically is more common.
● For the moment think of a fragment as a self-contained
“pane” running inside an Activity.
● So we are breaking down our screen design into
“building blocks”. Fragments make it easy to reuse
components in different layout.
A Typical Example
Here we see a typical
navigation
encountered on a
mobile phone.
Clicking on something
in a list on one screen,
brings you to the
details about it on
another screen
What are the fragments?
● For the purposes of this example we’ll presume that we
have two fragments
Main Details
What we’ve seen so
far is a phone with
two Activities.
● The first activity
has the Main
fragment
● The second
activity has the
Details fragment
Combining Fragments
● If we have more screen space on a tablet we may wish
to have one Activity with the two fragments.
Working with fragments
● Let’s begin with writing for a smaller device where we
have a MainActivity containing one main fragment.
● STEP 1: Write our fragment Java class (MainFragment).
It must extend android.app.Fragment or a more
specific subclass like ListFragment, DialogFragment,
PreferenceFragment or WebViewFragment
● REMEMBER : MainFragment will be inside our
MainActivity
Our first Fragment
public class MainFragment extends Fragment {
}
● We start with our bare bones fragment class. We’ll
come back to its lifecycle later.
● STEP 2 : Like Activities fragments need an XML layout
file. So we need to create an XML file for our
MainFragment.
Our first fragment XML
● Right-click on the layout directory within resources
(res) and select New -> Android XML File
● No strict rules on name but convention would be
fragment_main.xml
● Now as with the XML file for an Activity you can
double click on the fragment XML layout file and start
creating your fragment in the designer.
Using Fragments
● So we have the following components so far
o Our existing Activity - (Java File & XML layout file)
o A new Fragment (Java File & XML layout file)
● We want to add the fragment as a pane in our Activity
● We add the fragment in the XML file of the Activity
(e.g. activity_main.xml)
● We use the <fragment> tag and put it into the
activity_main.xml
The <fragment> tag
<RelativeLayout xmlns:android="http://schemas.android.com/apk/res/android"
xmlns:tools="http://schemas.android.com/tools"
<!-- The rest of the generated layout and padding code goes here -->
tools:context="com.example.myapp.MainActivity" >
<fragment
android:id="@+id/detailFragment"
android:layout_width="match_parent"
android:layout_weight="1"
android:layout_height="match_parent"
class="com.example.myapp.MainFragment" >
/>
Other fragments can be added here…..
</RelativeLayout>
android:layout-weight
● If you are putting a number of Fragments into an
Activity you can specify how much of the overall space
each fragment takes up.
● If for example you had three fragments vertically from
top to bottom then you and wanted them all to be equal
size you would give each one the following property
within each ones <fragment> tag
android:layout_weight = “1”
● Generally when you do this you set the size on that
axis to 0dp and let the layout_weight decide the size.
Back to the Java Class
● Currently we have an empty Java class. What is the lifecycle
method which “kicks it off” ?(like onCreate() in Activity)
● In a fragment the relevant method is onCreateView()
● It serves a similar purpose to onCreate() in an Activity by
reading the corresponding XML (fragment_main.xml)and
instantiating the GUI components defined in the XML.
● However it does this in a slightly different way using
something called LayoutInflater
onCreateView()
public View onCreateView(
LayoutInflater inflater, ViewGroup container, Bundle savedInstanceState)
This is what reads the XML
layout and “inflates” the
components on the screen
This is what contains the
fragment. More about this
later.
The Bundle for maintaing
state on restarts like in
Activity
This is the only callback method which you must override to
get a fragment working. However we need to be aware of the
other lifecycle methods.
The Code
public View onCreateView(LayoutInflater inflater, ViewGroup container,
Bundle savedInstanceState) {
// Inflate the layout for this fragment
return inflater.inflate(R.layout.fragment_main, container, false);
}
● There are two other lifecycle methods which you should
consider overriding in addition to onCreateView
● These are onCreate() and onPause()
onCreate() and onPause()
onCreate() - Called when the system creates the fragment.
You should initialise things here that you want to maintain
when the fragment is paused or stopped. (e.g. ArrayList of
data ??)
onPause() - Called when the user leaves the fragment. This
is typically where you should save any data from this
fragment.
onCreate() -----> onCreateView()-------> onPause()
A Flexible UI
● So to fully make use of the power of Fragments how do
we get this sort of behaviour
● Solution : Different layout for different screen sizes.
Changing Layouts
● Within resources it is possible to group images,
layouts etc for particular screen resolutions & sizes.
● For layout we do it like this
res/
layout/ # default (portrait)
main.xml
layout-land/ # landscape
main.xml
layout-large/ # large (portrait)
main.xml
layout-large-land/ # large landscape
main.xml
Using this approach with
different directory names is
called “configuration
qualifiers”
xlarge screens are at least 720dp x 960dp
large screens are at least 480dp x 640dp
normal screens are at least 320dp x 470dp
small screens are at least 320dp x 426dp
(measured in portrait)
Typical Screen Widths
● 320dp: a typical phone screen
● 480dp: a large phone / small tablet
● 600dp: a 7” tablet
● 720dp: a 10” tablet

Lesson 4

  • 1.
    Android App Development Lesson4 - Fragments & Multiple Layouts
  • 2.
    Today’s Lesson ● Stringresources ● Introduction to Fragments ● Creating and adding Fragements ● Fragment Lifecycle
  • 3.
    Last Week ● Youmay see auto-saving of EditText / TextView text regardless of whether you saved to bundle or not. (Happens automatically in 4.4 but not in prior versions) ● Update : All TextView components (with ids) automatically save text to the Bundle (editable or not) ● To force it not to save use android:saveEnabled="false"
  • 4.
    String resources ● Ideallyyour Strings (i.e. Labels, Button Captions, Menu Texts etc) should be in your resources. ● The file to place them in is res/values/strings.xml <?xml version="1.0" encoding="utf-8"?> <resources> <string name="cancelButtonCaption">Cancel</string> <string name="okButtonCaption">OK</string> </resources>
  • 5.
    Using String resources Touse a String resource in our Activity GUI layout XML file <Button android:id="@+id/button1" android:layout_width="match_parent" android:layout_height="wrap_content" android:layout_alignParentLeft="true" android:layout_alignParentTop="true" android:onClick="okButtonClicked" android:text="@string/okButtonCaption" /> Up to now we would have just hardcoded it like this android:text = “OK”
  • 6.
    Fragments ● So what’sa Fragment and why should we use one ? ● At its most basic level a fragment is its own self- contained unit which runs inside an Activity (The Activity is the “context” of the fragment) ● Has its own lifecycle. Can be added or removed while the Activity remains running. ● It can be re-used across multiple Activities.
  • 7.
    Fragments ● Some moreterminology... Fragments can be either added statically (at programming time) or dynamically (at runtime) to an Activity. Statically is more common. ● For the moment think of a fragment as a self-contained “pane” running inside an Activity. ● So we are breaking down our screen design into “building blocks”. Fragments make it easy to reuse components in different layout.
  • 8.
    A Typical Example Herewe see a typical navigation encountered on a mobile phone. Clicking on something in a list on one screen, brings you to the details about it on another screen
  • 9.
    What are thefragments? ● For the purposes of this example we’ll presume that we have two fragments Main Details What we’ve seen so far is a phone with two Activities. ● The first activity has the Main fragment ● The second activity has the Details fragment
  • 10.
    Combining Fragments ● Ifwe have more screen space on a tablet we may wish to have one Activity with the two fragments.
  • 11.
    Working with fragments ●Let’s begin with writing for a smaller device where we have a MainActivity containing one main fragment. ● STEP 1: Write our fragment Java class (MainFragment). It must extend android.app.Fragment or a more specific subclass like ListFragment, DialogFragment, PreferenceFragment or WebViewFragment ● REMEMBER : MainFragment will be inside our MainActivity
  • 12.
    Our first Fragment publicclass MainFragment extends Fragment { } ● We start with our bare bones fragment class. We’ll come back to its lifecycle later. ● STEP 2 : Like Activities fragments need an XML layout file. So we need to create an XML file for our MainFragment.
  • 13.
    Our first fragmentXML ● Right-click on the layout directory within resources (res) and select New -> Android XML File ● No strict rules on name but convention would be fragment_main.xml ● Now as with the XML file for an Activity you can double click on the fragment XML layout file and start creating your fragment in the designer.
  • 14.
    Using Fragments ● Sowe have the following components so far o Our existing Activity - (Java File & XML layout file) o A new Fragment (Java File & XML layout file) ● We want to add the fragment as a pane in our Activity ● We add the fragment in the XML file of the Activity (e.g. activity_main.xml) ● We use the <fragment> tag and put it into the activity_main.xml
  • 15.
    The <fragment> tag <RelativeLayoutxmlns:android="http://schemas.android.com/apk/res/android" xmlns:tools="http://schemas.android.com/tools" <!-- The rest of the generated layout and padding code goes here --> tools:context="com.example.myapp.MainActivity" > <fragment android:id="@+id/detailFragment" android:layout_width="match_parent" android:layout_weight="1" android:layout_height="match_parent" class="com.example.myapp.MainFragment" > /> Other fragments can be added here….. </RelativeLayout>
  • 16.
    android:layout-weight ● If youare putting a number of Fragments into an Activity you can specify how much of the overall space each fragment takes up. ● If for example you had three fragments vertically from top to bottom then you and wanted them all to be equal size you would give each one the following property within each ones <fragment> tag android:layout_weight = “1” ● Generally when you do this you set the size on that axis to 0dp and let the layout_weight decide the size.
  • 17.
    Back to theJava Class ● Currently we have an empty Java class. What is the lifecycle method which “kicks it off” ?(like onCreate() in Activity) ● In a fragment the relevant method is onCreateView() ● It serves a similar purpose to onCreate() in an Activity by reading the corresponding XML (fragment_main.xml)and instantiating the GUI components defined in the XML. ● However it does this in a slightly different way using something called LayoutInflater
  • 18.
    onCreateView() public View onCreateView( LayoutInflaterinflater, ViewGroup container, Bundle savedInstanceState) This is what reads the XML layout and “inflates” the components on the screen This is what contains the fragment. More about this later. The Bundle for maintaing state on restarts like in Activity This is the only callback method which you must override to get a fragment working. However we need to be aware of the other lifecycle methods.
  • 19.
    The Code public ViewonCreateView(LayoutInflater inflater, ViewGroup container, Bundle savedInstanceState) { // Inflate the layout for this fragment return inflater.inflate(R.layout.fragment_main, container, false); } ● There are two other lifecycle methods which you should consider overriding in addition to onCreateView ● These are onCreate() and onPause()
  • 20.
    onCreate() and onPause() onCreate()- Called when the system creates the fragment. You should initialise things here that you want to maintain when the fragment is paused or stopped. (e.g. ArrayList of data ??) onPause() - Called when the user leaves the fragment. This is typically where you should save any data from this fragment. onCreate() -----> onCreateView()-------> onPause()
  • 21.
    A Flexible UI ●So to fully make use of the power of Fragments how do we get this sort of behaviour ● Solution : Different layout for different screen sizes.
  • 22.
    Changing Layouts ● Withinresources it is possible to group images, layouts etc for particular screen resolutions & sizes. ● For layout we do it like this res/ layout/ # default (portrait) main.xml layout-land/ # landscape main.xml layout-large/ # large (portrait) main.xml layout-large-land/ # large landscape main.xml Using this approach with different directory names is called “configuration qualifiers” xlarge screens are at least 720dp x 960dp large screens are at least 480dp x 640dp normal screens are at least 320dp x 470dp small screens are at least 320dp x 426dp (measured in portrait)
  • 23.
    Typical Screen Widths ●320dp: a typical phone screen ● 480dp: a large phone / small tablet ● 600dp: a 7” tablet ● 720dp: a 10” tablet