Benefits of MS Word for Organizations
•Download as DOCX, PDF•
1 like•1,575 views

MS Word provides several useful features for organizations, including SmartArt for creating diagrams, inserting charts from Excel, adding hyperlinks to make documents interactive, adding watermarks for protection, using mail merge for bulk emails, customizing headers and footers, choosing from cover page templates, using search and replace for corrections, running spell check, and changing document views.

Recommended
More Related Content
What's hot
What's hot (20)
Viewers also liked
Viewers also liked (16)
Similar to Benefits of MS Word for Organizations
Similar to Benefits of MS Word for Organizations (20)
More from Shubham Agrawal
More from Shubham Agrawal (20)
Recently uploaded
Recently uploaded (20)
Benefits of MS Word for Organizations
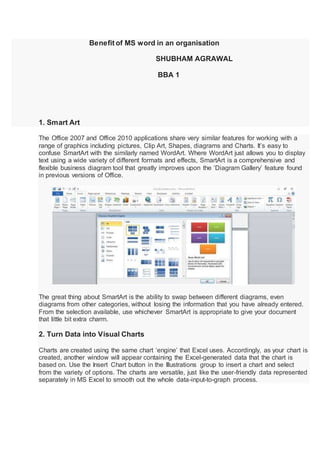
- 1. Benefit of MS word in an organisation SHUBHAM AGRAWAL BBA 1 1. Smart Art The Office 2007 and Office 2010 applications share very similar features for working with a range of graphics including pictures, Clip Art, Shapes, diagrams and Charts. It’s easy to confuse SmartArt with the similarly named WordArt. Where WordArt just allows you to display text using a wide variety of different formats and effects, SmartArt is a comprehensive and flexible business diagram tool that greatly improves upon the ‘Diagram Gallery’ feature found in previous versions of Office. The great thing about SmartArt is the ability to swap between different diagrams, even diagrams from other categories, without losing the information that you have already entered. From the selection available, use whichever SmartArt is appropriate to give your document that little bit extra charm. 2. Turn Data into Visual Charts Charts are created using the same chart ‘engine’ that Excel uses. Accordingly, as your chart is created, another window will appear containing the Excel-generated data that the chart is based on. Use the Insert Chart button in the Illustrations group to insert a chart and select from the variety of options. The charts are versatile, just like the user-friendly data represented separately in MS Excel to smooth out the whole data-input-to-graph process.
- 2. 3. Make Your Document Interactive Where possible, insert hyperlinks on images and text to make your document interactive (by right clicking on the text/image and clicking hyperlink, you can then select where you wish to direct the user to). Useful especially when sending the document online, hyperlinks allow recipients who have opened the file to click on images/text to directly access relevant webpages or other online sources of interest. 4. Watermarks
- 3. If you’re sending an important document or draft sample, you want to be able to protect your content without having to edit much of it. Insert a watermark specific to your objectives via the page layout button. You can also customise your own watermark, and also insert your own picture. This feature is great for inserting your brand logo in reports or any other official document. Don’t forget to ‘Save As’ your file as a PDF document first to prevent anyone else from editing/removing the watermark you have inserted. 5. Mail Merge This feature2 allows you to send out bulk emails with unique, customizable elements. For example, you can produce a series of labels or envelopes for a large mailing list, an email or letter that includes names and addresses and other details normally found in a ‘directory’. Users simply create one document that contains the information that will be the same in each version, and then add placeholders for the information that will be unique to each version.
- 4. If you just want to send a single letter to one of your MS Outlook contacts, there may be no need to use mail merge at all. Word has an Address Book button that allows you to select and insert address details from Outlook. Just right-click in the Quick Access Toolbar and choose Customize Quick Access Toolbar. Select “Commands Not in the Ribbon” and “Address Book.” 6. Headers & Footers It’s important to use page numbers in many types of documents. While at it, you might want to consider adding other related features that will make your document look consistency and professionally done. What many people don’t seem to take advantage of is the fact that they can insert images, such as a company logo or an image reflecting the document’s overall theme in either the header or footer of the document. 7. Cover Pages Use Microsoft Word’s available cover page templates to make your document stand out, especially when it is printed. Click on Insert, then Cover Pages and choose from a variety of default cover pages Microsoft Word provides.
- 5. All the default cover pages allow you to insert the date, author and title, in an existing template that is already set up for you, simply insert the relevant text/date and edit your font accordingly. 8. Search & Replace Have you ever spelled a word or name incorrectly throughout a whole word document? The Word Replace feature can search for all occurrences of a particular word, phrase or set of characters and replace them with the correct or an alternative version. You will be given the option to replace all occurrences or to move through them individually accepting or rejecting each change.
- 6. Clicking the Replace All button will change all occurrences of the term in the entire document or the selected area and then report the number of changes made. Alternatively, Find Next will find the next occurrence of the term so you can use the Replace button to replace it or the Find Next button to leave it unaltered and select the next candidate for replacement. 9. Spell Check If you don’t want to bother correcting spelling errors as you go, or you want to make certain you haven’t missed any, you can run the full Word spell check from the Review tab, Proofing group, Spelling and Grammar button (or press the F7 keyboard shortcut). When using the main Spelling and Grammar dialog box, words in your document which are not found in Word’s dictionary will be listed in the Not in Dictionary box. Suggestions will be presented with the first suggestion pre-selected. The options you have are similar to the right-click options available for corrections as you type. There are two options available: the Change button to correct one occurrence and the Change All button to replace all occurrences of the word in the document with the same suggested replacement. Alternatively, you can double-click the appropriate suggestion to change this occurrence. The AutoCorrect button will add an item to the AutoCorrect list replacing the marked word with the currently selected suggestion. Note that you can still edit your document when the Spelling and Grammar dialog box is displayed, so if none of the suggestions are appropriate, you can make your own correction directly in the body of the document. 10. View Options
- 7. It may sound simple, but the option to change the document View is an underrated feature for many MS Word users. You can change the way you view your presentation using the buttons at the bottom of the application window. Here are brief descriptions of what each view does: Print Layout shows the document as it will look like when printed. Full Screen Reading devotes (nearly) the full screen to the contents of the document and rearranges the contents to improve readability. Web Layout displays the document laid out as though it were in a web browser. Outline displays a view that allows you to restrict what is displayed to certain outline levels. Large chunks of the document can be manipulated directly using this view. Draft displays the document content with minimum formatting and without graphics. Regardless of which view type it is displayed in, note that the vertical scrollbar can be used to move across the document. Alternatively, you can also use the Page Up and Page Down keys or the arrow keys to move through the document.