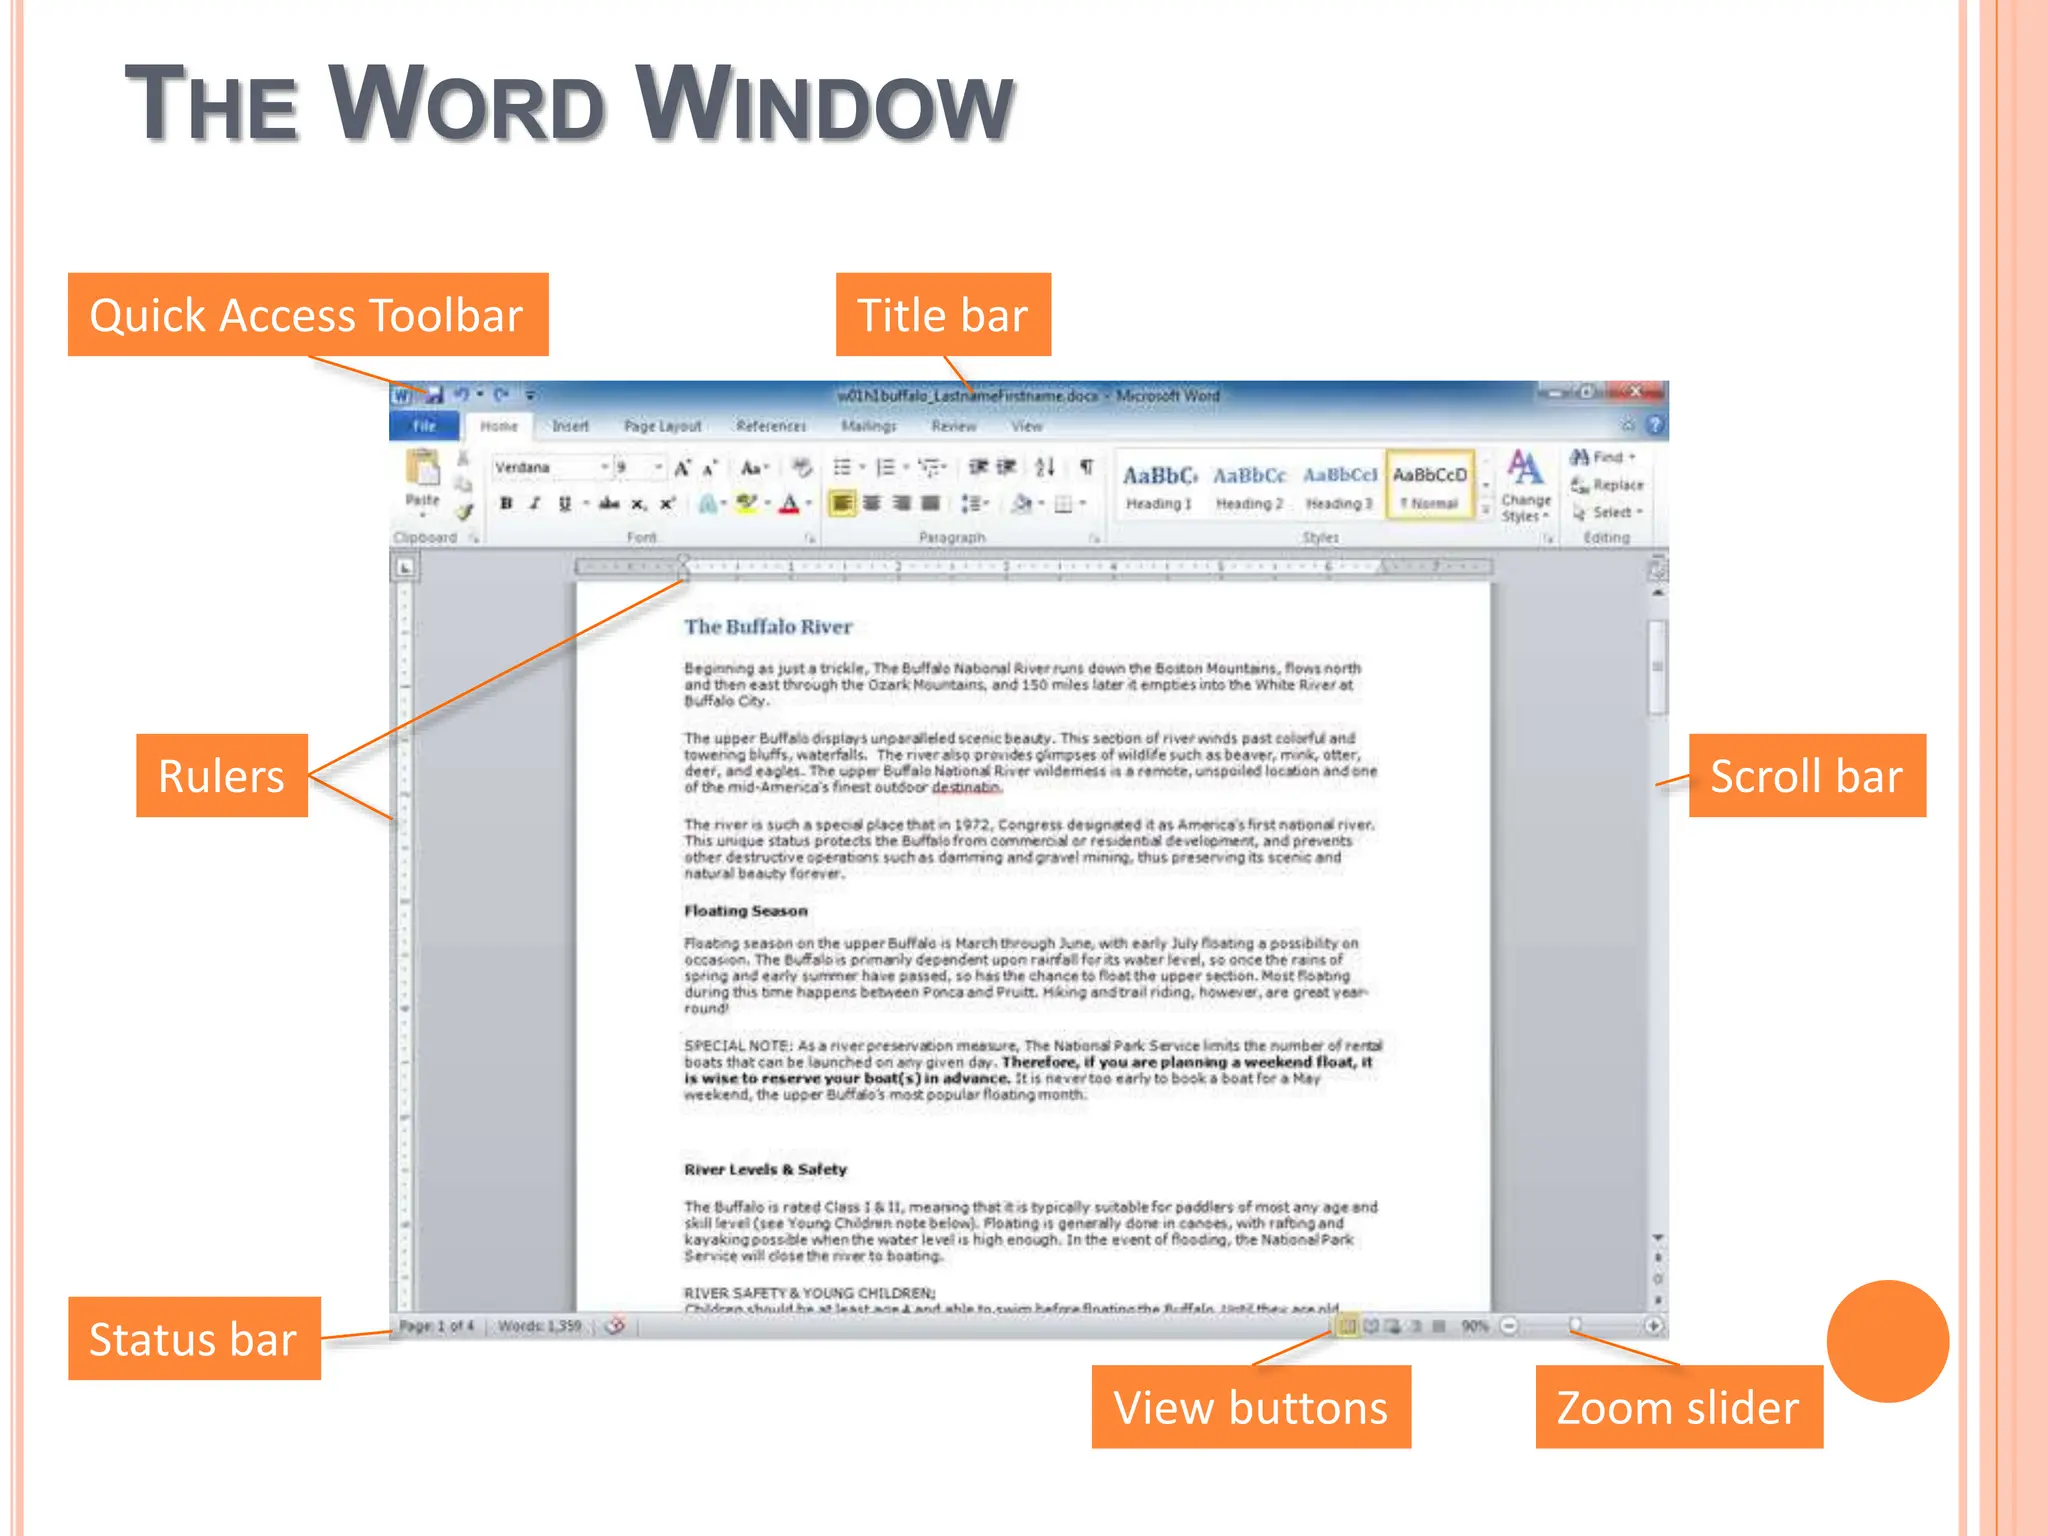
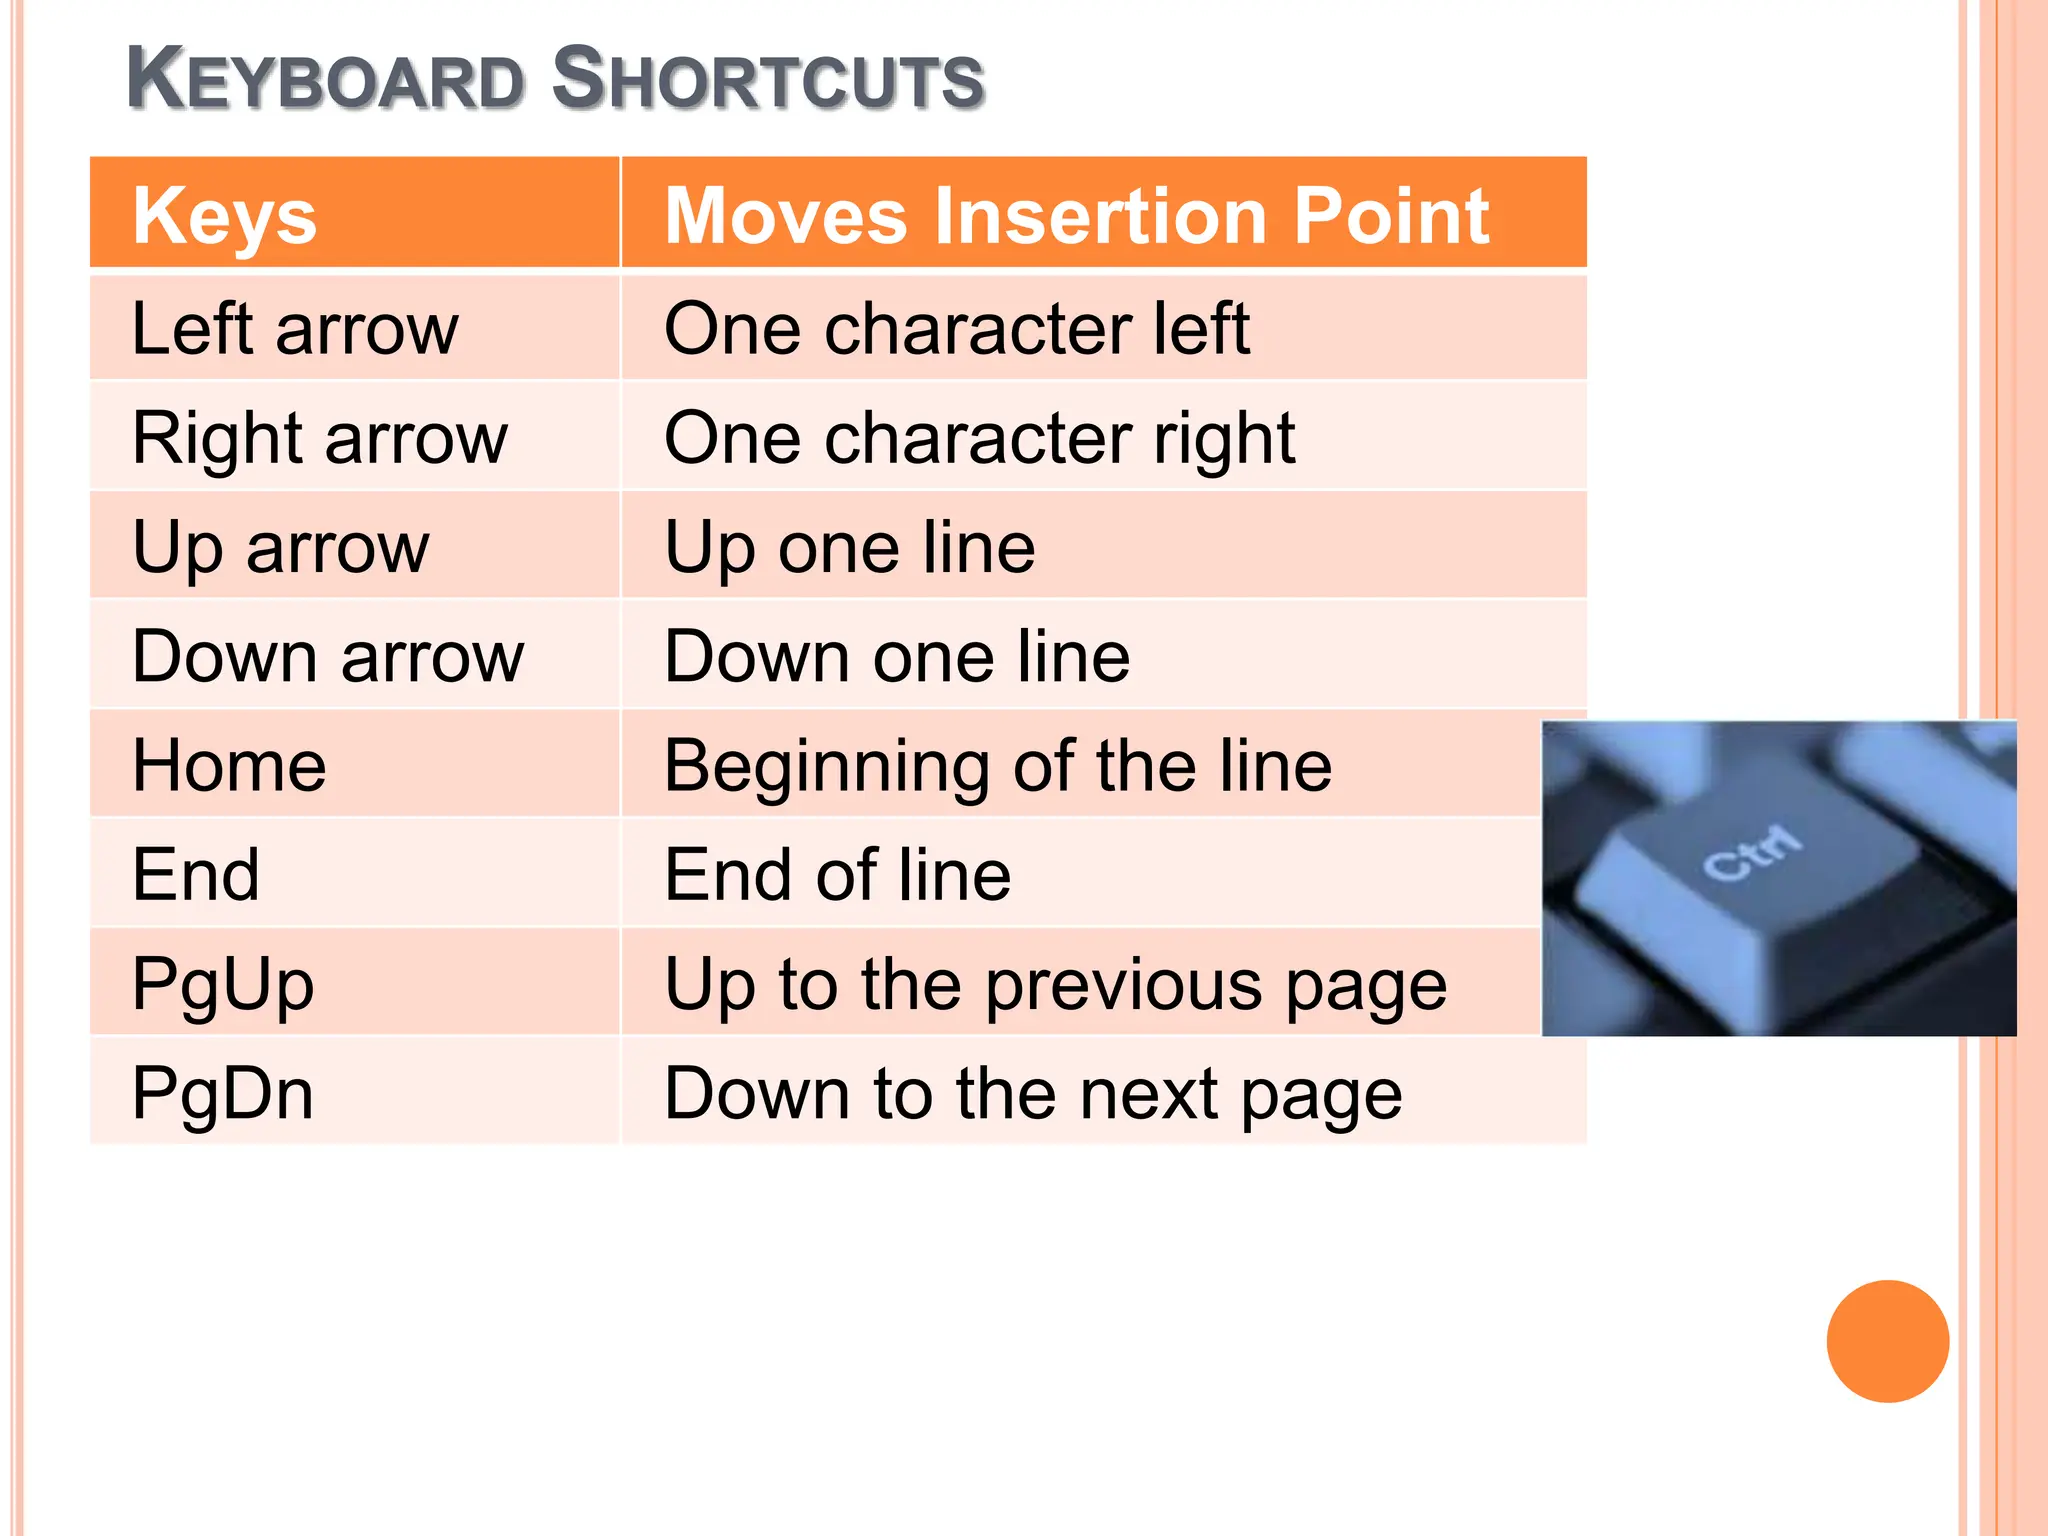
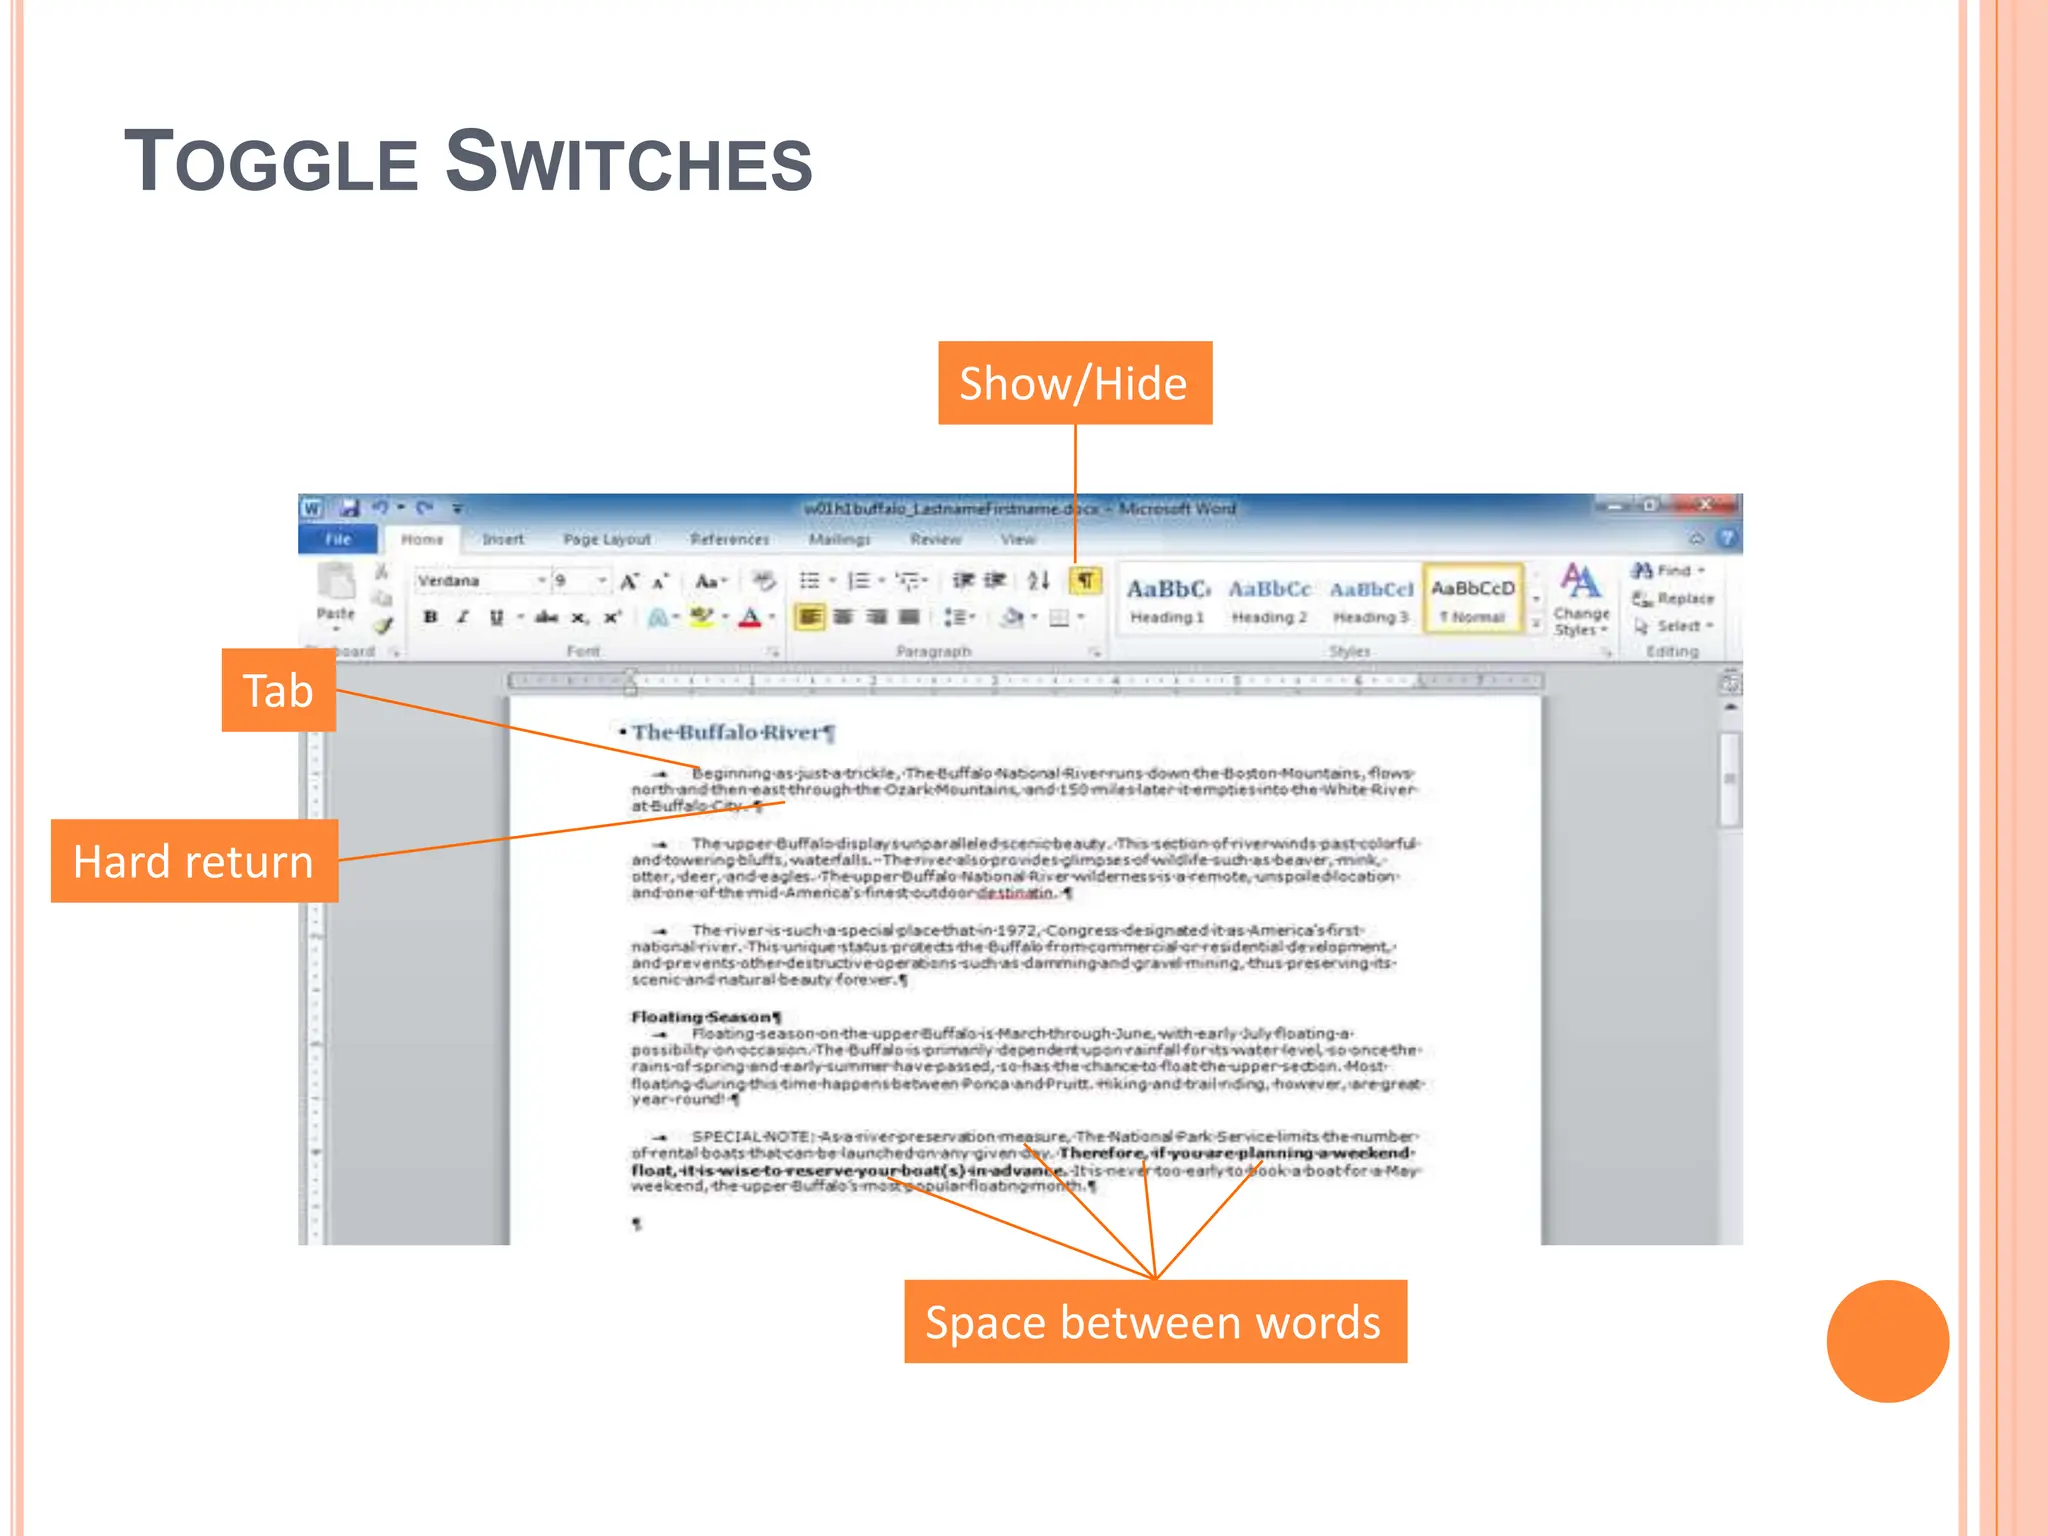
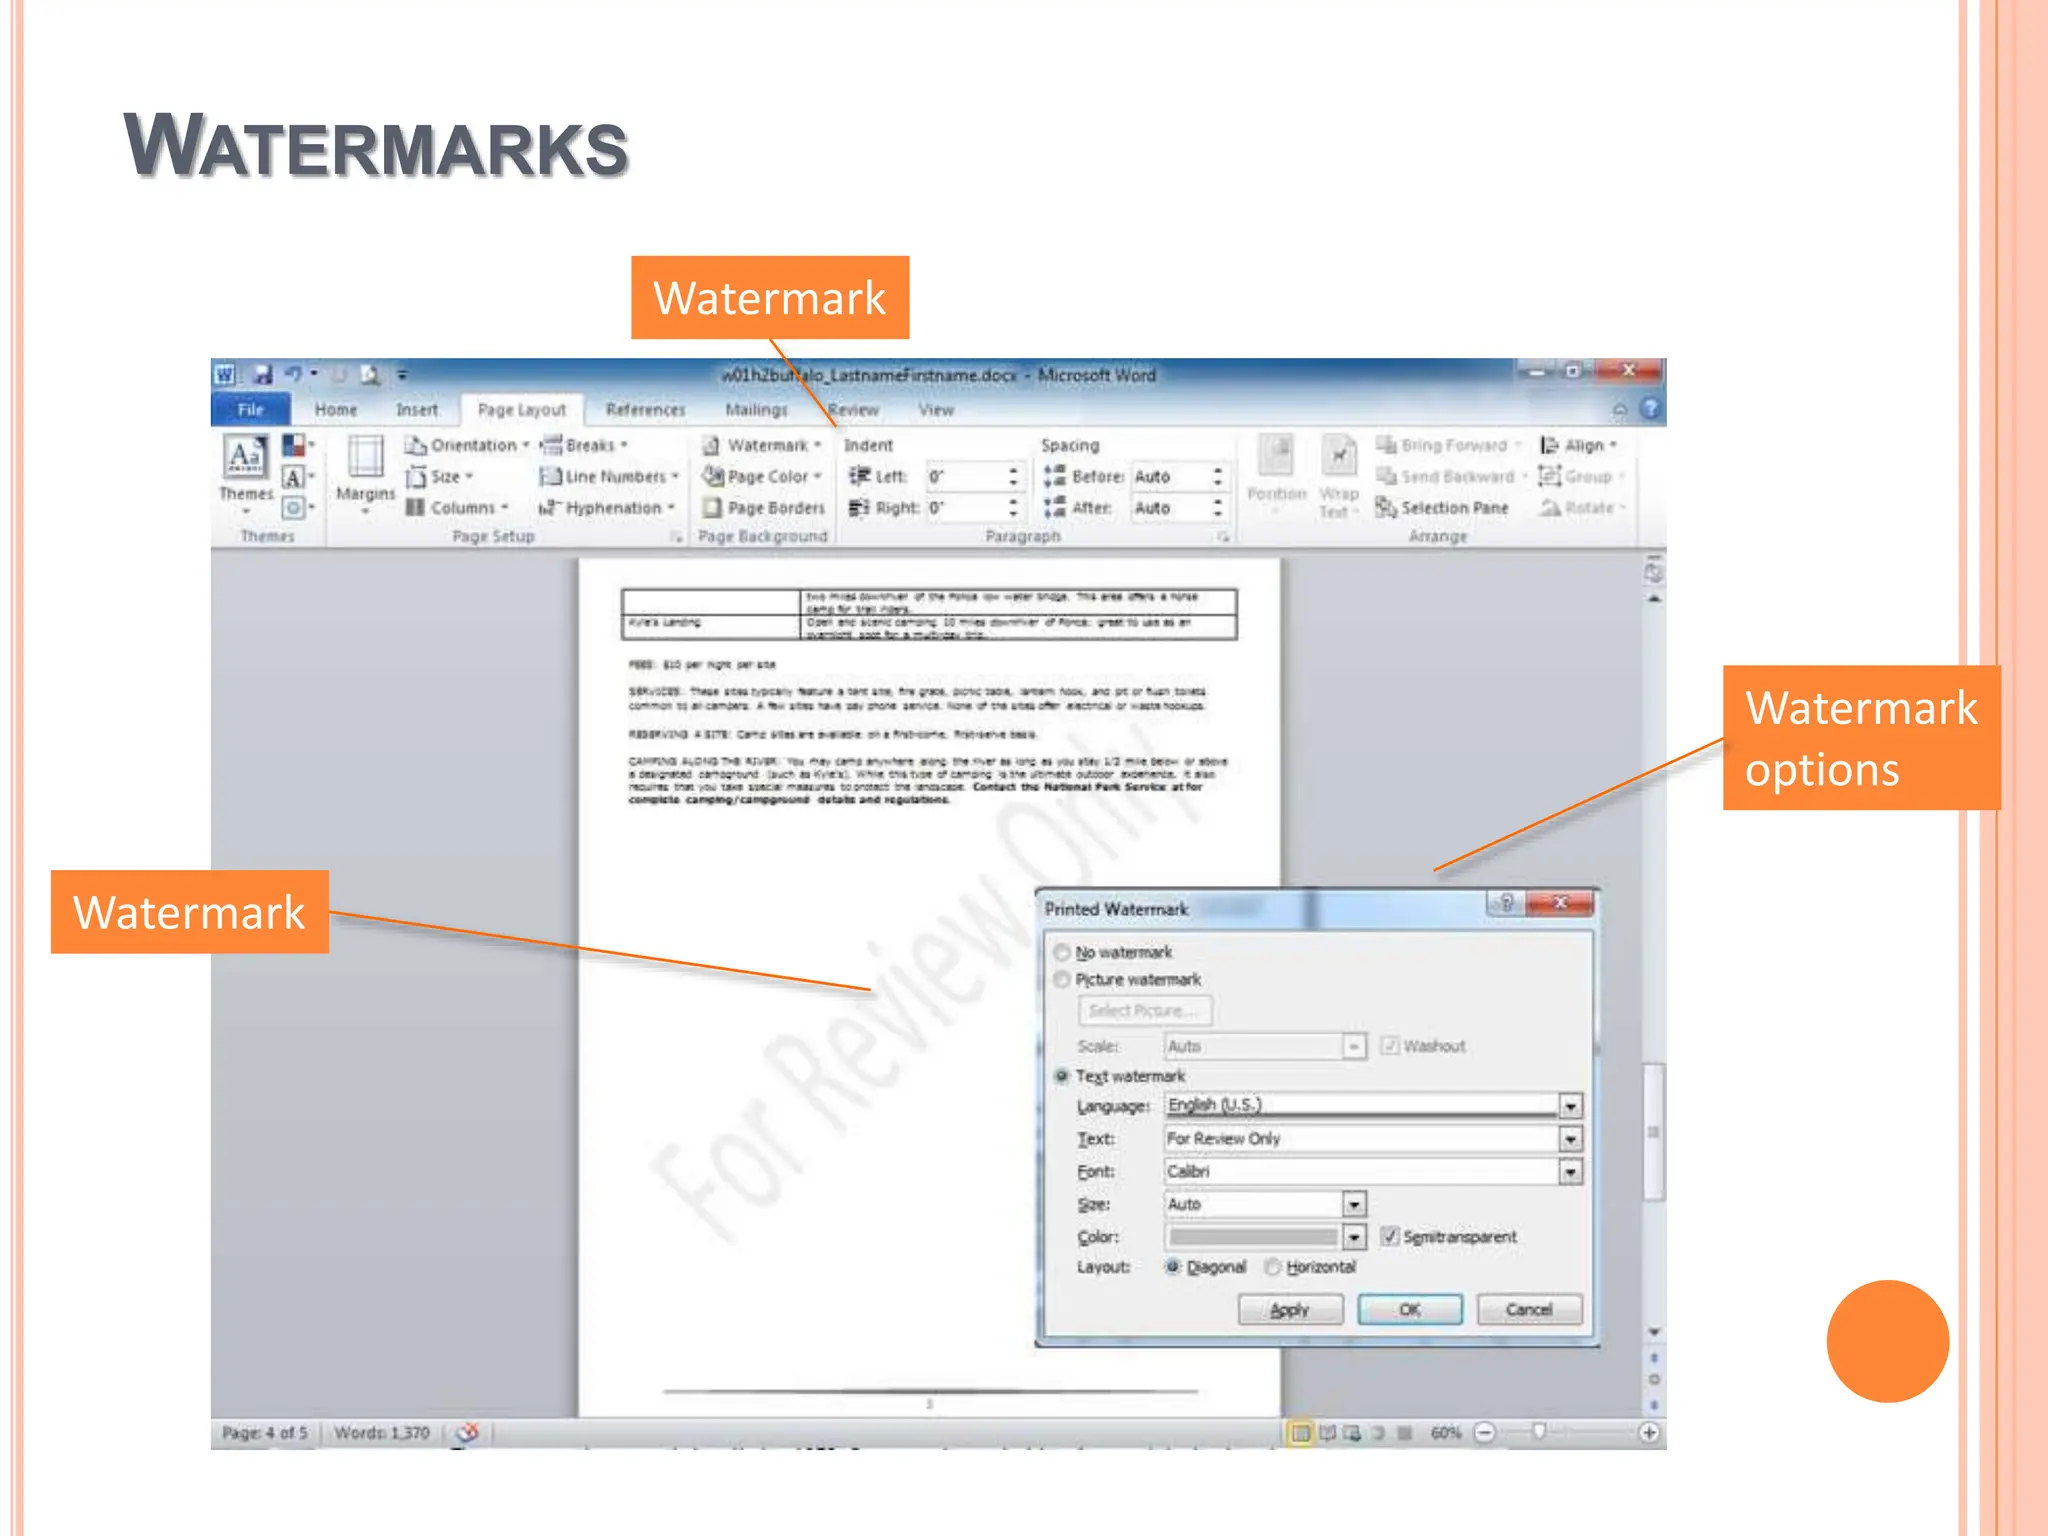
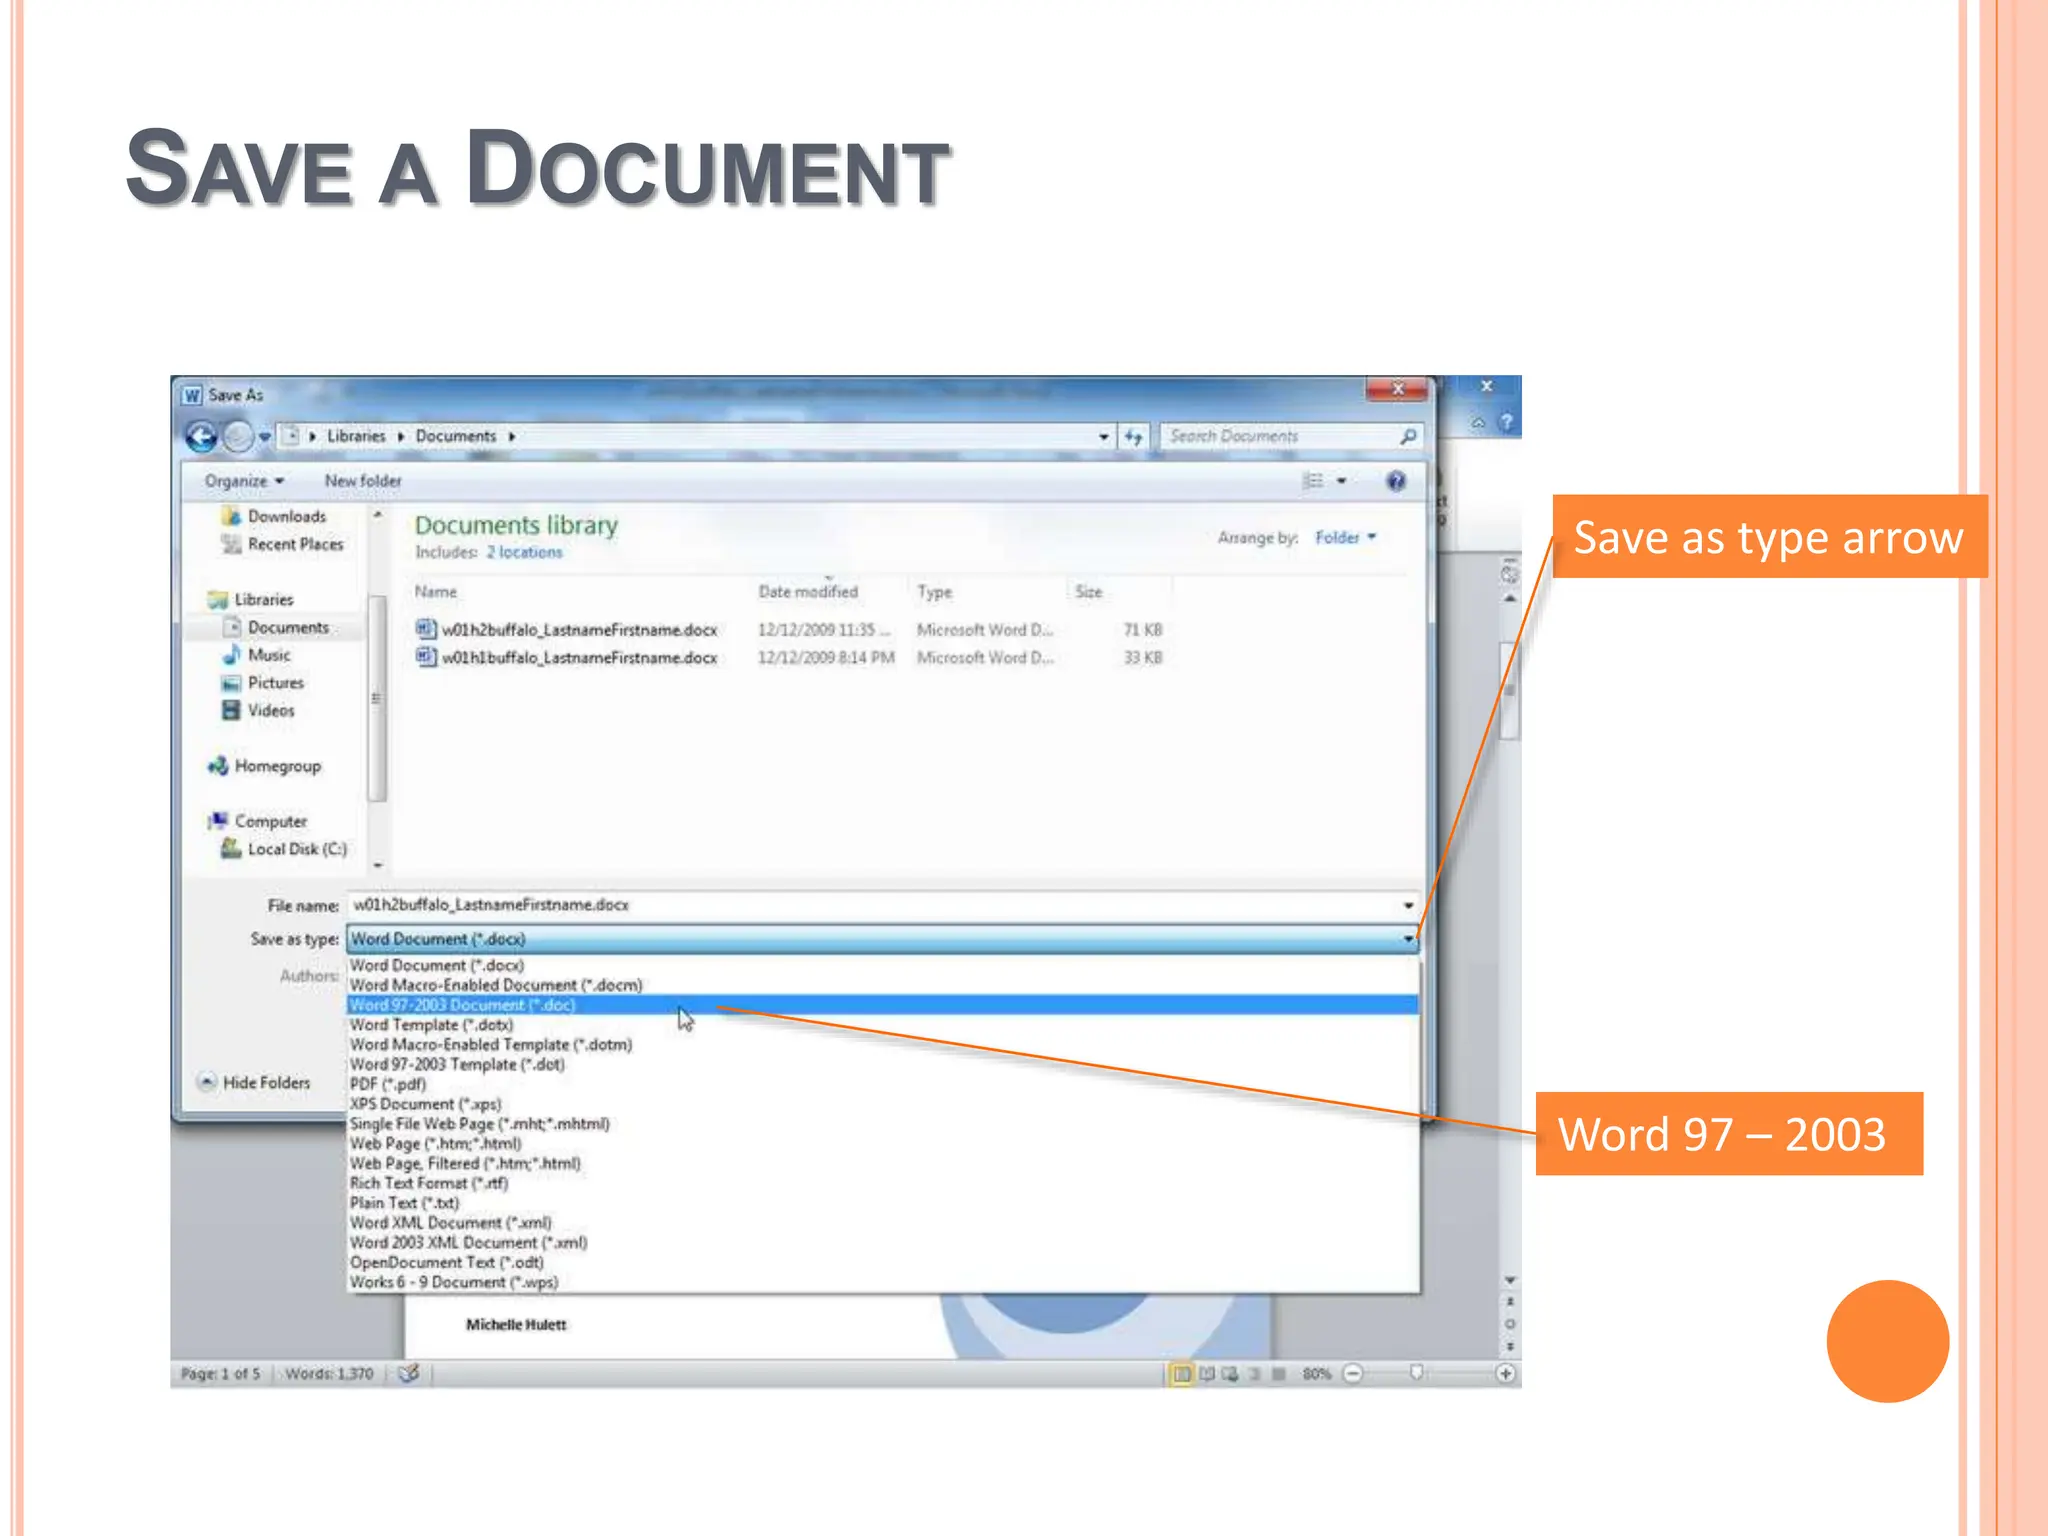
2. MICROSOFT OFFICE 2010
A package of softwares
Word – text editor
Excel – spreadsheet
PowerPoint – presentations
Outlook – e-mail
Access – database
Publisher – brochures, calendars, postcards, etc.
+++
The current versions are Office 2013
which was released on
January 29 in 2013.
3. OBJECTIVES
Understand how word processors work
Customize Microsoft Word
Use features that improve readability
Check spelling and grammar
Display a document in different views
Prepare a document for distribution
Modify document properties
4. INTRODUCTION
A word processor is a computer application used for the
typing, editing, formatting, and perhaps printing.
Example of word processing applications are
Word Perfect
Professional Write
Corel WordPerfect
Open Office.org (Open Source)
Microsoft word etc.
In this course, attention will be on Microsoft word
5. MS WORD
Microsoft Word is a full-featured word
processing program for Windows and the
Macintosh from Microsoft.
It is a sophisticated program with
rudimentary desktop publishing
capabilities that has become the most
widely used word processing application
on the market.
6. It was originally written by Richard Brodie for
IBM PCs running DOS in 1983. With Microsoft
Word you can create professional-looking,
formatted text documents.
Microsoft Word enables you to type all kinds of
documents, edit, add objects (drawings, pictures
etc) and print e.g. letters, reports, articles,
magazines etc
7. VERSIONS OF MICROSOFT WORD
Word 6.0
Word 95
Word 97
Word 2000
Word XP
Word 2003
Word 2007
Word 2010
The current version on the market is Word 2013
8. Microsoft OFFICE WORD 2010 allows you
to create and edit personal and
BUSINESS documents, such as letters,
reports, invoices, emails and books
By default, documents saved in Word
2010 are saved with the .docx extension.
Microsoft Word can be used for the
following purposes:
9. To create business documents having various graphics
including pictures, charts, and diagrams.
To store and reuse ready-made content and formatted
elements such as cover pages and sidebars.
To create letters and letterheads for personal and
business purpose.
To design different documents such as RESUMES or
invitation cards etc.
To create a range of correspondence from a simple office
memo to legal copies and reference documents
10. Word processing software, such as Microsoft Word 2010,
is the most commonly used type of software.
Students, office assistants, managers, and professionals
in all areas use word processing software to produce a
variety of documents.
Common examples of such document include: An annual
report, a supply list, a newsletter, and an agenda.
Word processing software enables you to enhance
documents in a wide variety of ways that you will explore
as you complete this lesson.
12. THE WORD WINDOW
Zoom slider
Rulers Scroll bar
Title bar
Quick Access Toolbar
View buttons
Status bar
13. As shown here, a document opens in a window. Tools are
placed conveniently around the document.
The status bar contains information that is useful. If you
have used other Office software applications, then some of
the tools will be familiar to you.
The basic features of Word are the Ribbon, the Quick
Access Toolbar, the scroll bars, and the status bar.
In Word, the status bar displays the page number where
the insertion point is located, the total number of pages,
and the total number of words.
The view buttons display the document in various layouts,
such as Print Layout, Full Screen Reading, Web Layout,
Outline, and Draft.
14. WORD WRAP
Word wrap is an automatic function in word processing
software. It enables you to type continuously without pressing
Enter at the end of every line. The only time you press Enter
is at the end of a paragraph. This saves you from having to
worry about how much text will fit on a line.
A hard return is created when you press Enter to move the
insertion point to the next line.
A soft return is created by the software as it wraps the text to
a new line. As you insert or delete text, the soft returns adjust
automatically.
15. The paragraphs at the top of the figure shows
two hard returns.
The first paragraph has four soft returns and the
second has three.
When the margins were moved for the third and
fourth paragraphs, the hard returns remained
but the number of soft returns decreased
because more text fits on the lines.
17. KEYBOARD SHORTCUTS
Keys Moves Insertion Point
Left arrow One character left
Right arrow One character right
Up arrow Up one line
Down arrow Down one line
Home Beginning of the line
End End of line
PgUp Up to the previous page
PgDn Down to the next page
18. TOGGLE SWITCHES
A toggle, when pressed or clicked, causes the
computer to switch from one setting to another.
You are probably familiar with the Caps Lock
action on the keyboard. Each time you press it,
the next thing you type will change from
uppercase to lowercase, or vice versa.
A number of features in Word work in a similar
way. Bold, Italic, and Underline commands are
toggles.
19. Another toggle command is the Show/Hide
feature. When active, the formatting applied
to a document is revealed.
Located in the Paragraph group on the
Home tab, non-printing format marks
appear when it is active. This slide shows
the formatting marks for this document
when the Show/Hide feature is on.
21. PAGE NUMBERS
Lengthy documents benefit from the addition of page
numbers. They serve as a reference point for the writer and
the reader.
The Page Number command in the Header & Footer group
on the Insert tab is used to place page numbers into a
document. If you add or delete pages, Word will
automatically adjust the page numbers. You can select to
display the numbers at the top or bottom of the page in the
header or footer areas, and they can be left, center, or right
aligned.
23. Using Word you can customize the format of the
page numbers.
For instance, you may wish to use Roman numerals
on the preface pages and Arabic numbers on later
pages.
You may also start the page numbering on a page
other than the first page, as commonly done when
creating the title page.
Click Page Number on the Insert tab and then
Format Page Number. The feature displays the Page
Number Format dialog box.
25. COVER PAGE
Word 2010 offers a feature that enables you to
quickly create a preformatted cover page for your
document.
Click Cover Page in the Pages group on the Insert
tab to view the gallery of designs. For each
design, fields such as Document title, Company
Name, Date, and Author enable you to
personalize the cover page. If you do not need a
field, you can remove it.
27. HEADERS AND FOOTERS
Headers and footers give your documents a professional
appearance. The header consists of one or more lines of text at
the top of each page. The header might include the name of the
organization, author, or title.
The footer displays at the bottom of the page. It might contain a
page number or the date the document was created. If you use
the Header and Footer features to set up these areas, they
appear automatically on every page of the document. You also
have the option to use only a header or a footer, or to use both.
28. HEADERS AND FOOTERS
Display options
Fields to insert
Header area
Footer area
Formatting options Position options
29. WATERMARKS
Watermarks refer to very light text or graphics behind the text of
a document. It is often used by companies to add the logo to
documents. Sometimes the status of a document, such as for
review only, confidential, or draft is used as watermark text.
Shown here are the words For Review Only as a watermark.
Click Watermark on the Page Background group on the Page
Layout tab to select a watermark from the gallery, or click
Custom Watermark at the bottom of the gallery to set a picture or
other text as the watermark. Watermarks do not appear on
documents saved as Web pages, so you will not see them if you
are in Web Layout view.
31. SAVE A DOCUMENT
It is important to remember to save your document regularly as you
are working on it. By default, documents save as Word 2010 files.
When you complete your work on a document and are ready to
share the document, you should consider compatibility issues that
might arise. Because some people may have a different version of
Microsoft Word, you may want to save the document in Word 97 –
2003 format. Click the File tab, and then click Save As. Select the
Save as type arrow and select Word 97 – 2003. Type a name for
the file in the Save As box. The document will be saved with a .doc
extension rather than the .docx extension of a Word 2010 file.
33. SUMMARY
Word processors have features that make it easy
to create documents.
Consider both the content and look of the
document.
Create copies of documents and back up
changes at every opportunity.
As shown here, a document opens in a window. Tools are placed conveniently around the document. The status bar contains information that is useful. If you have used other Office software applications, then some of the tools will be familiar to you. At this point, just get a feel for how the screen looks and where things are located. The details for using the parts will be learned as you continue your study of Word.
The basic features of Word are the Ribbon, the Quick Access Toolbar, the scroll bars, and the status bar. In Word, the status bar displays the page number where the insertion point is located, the total number of pages, and the total number of words. The view buttons display the document in various layouts, such as Print Layout, Full Screen Reading, Web Layout, Outline, and Draft.
Word wrap is an automatic function in word processing software. It enables you to type continuously without pressing Enter at the end of every line. The only time you press Enter is at the end of a paragraph. This saves you from having to worry about how much text will fit on a line.
A hard return is created when you press Enter to move the insertion point to the next line. A soft return is created by the software as it wraps the text to a new line. As you insert or delete text, the soft returns adjust automatically.
The paragraphs at the top of the figure here show two hard returns. The first paragraph has four soft returns and the second has three. When the margins were moved for the third and fourth paragraphs, the hard returns remained but the number of soft returns decreased because more text fits on the lines.
Keyboard shortcuts enable you to move the insertion point around the document using the keyboard rather than the mouse. This can save you time as a typist. These are some of the basic keyboard shortcuts. Additional shortcuts occur when you press Ctrl while pressing these keys.
A toggle, when pressed or clicked, causes the computer to switch from one setting to another. You are probably familiar with the Caps Lock action on the keyboard. Each time you press it, the next thing you type will change from uppercase to lowercase, or vice versa. A number of features in Word work in a similar way. Bold, Italic, and Underline commands are toggles.
Another toggle command is the Show/Hide feature. When active, the formatting applied to a document is revealed. Located in the Paragraph group on the Home tab, non-printing format marks appear when it is active. This slide shows the formatting marks for this document when the Show/Hide feature is on.
Lengthy documents benefit from the addition of page numbers. They serve as a reference point for the writer and the reader.
The Page Number command in the Header & Footer group on the Insert tab is used to place page numbers into a document. If you add or delete pages, Word will automatically adjust the page numbers. You can select to display the numbers at the top or bottom of the page in the header or footer areas, and they can be left, center, or right aligned.
The gallery shown here displays a few of the options for the placement of the page number in the footer.
The discussion of page numbers continues on the next slide.
Using Word you can customize the format of the page numbers. For instance, you may wish to use Roman numerals on the preface pages and Arabic numbers on later pages. You may also start the page numbering on a page other than the first page, as commonly done when creating the title page. Click Page Number on the Insert tab and then Format Page Number. The feature displays the Page Number Format dialog box.
Word 2010 offers a feature that enables you to quickly create a preformatted cover page for your document. Click Cover Page in the Pages group on the Insert tab to view the gallery of designs. For each design, fields such as Document title, Company Name, Date, and Author enable you to personalize the cover page. If you do not need a field, you can remove it. Additional cover pages can be downloaded from Office.com
Headers and footers give your documents a professional appearance. The header consists of one or more lines of text at the top of each page. The header might include the name of the organization, author, or title. The footer displays at the bottom of the page. It might contain a page number or the date the document was created. If you use the Header and Footer features to set up these areas, they appear automatically on every page of the document. You also have the option to use only a header or a footer, or to use both.
The Header and Footer commands are on the Insert tab. You can format the text just as you would any other paragraph by setting typefaces, sizes, and alignments. Word 2010 offers built-in formatting options that control how the headers and footers display throughout a document. The options are available on the Header & Footer Tools Design tab shown here. Special fields such as author, date and time automatically insert the information when the document is saved. You can select the options for whether the first page will have a different header or footer, whether odd and even number pages have different content, and whether to display the text of the document while designing the headers and footers. You can also set the position of the header and footer by specifying the distance from the top or bottom.
Watermarks refer to very light text or graphics behind the text of a document. It is often used by companies to add the logo to documents. Sometimes the status of a document, such as for review only, confidential, or draft is used as watermark text. Shown here are the words For Review Only as a watermark.
Click Watermark on the Page Background group on the Page Layout tab to select a watermark from the gallery, or click Custom Watermark at the bottom of the gallery to set a picture or other text as the watermark. Watermarks do not appear on documents saved as Web pages, so you will not see them if you are in Web Layout view.
It is important to remember to save your document regularly as you are working on it. By default, documents save as Word 2010 files.
When you complete your work on a document and are ready to share the document, you should consider compatibility issues that might arise. Because some people may have a different version of Microsoft Word, you may want to save the document in Word 97 – 2003 format. Click the File tab, and then click Save As. Select the Save as type arrow and select Word 97 – 2003. Type a name for the file in the Save As box. The document will be saved with a .doc extension rather than the .docx extension of a Word 2010 file.
Word processors are the most commonly used type of software and enable you to create a wide variety of documents. As you create documents, consider not only the content of documents, but how they will look when printed. Protect the work you put into documents by saving often, creating copies, and backing up changes.
As you complete this introduction to Word, be sure you ask questions. You want to understand the concepts so that you can continue to build on them in future chapters.