
Recommended
Recommended
More Related Content
Viewers also liked
Viewers also liked (11)
Similar to Starlight Express, building of the ramp photo evidence
Similar to Starlight Express, building of the ramp photo evidence (16)
Recently uploaded
Recently uploaded (20)
Starlight Express, building of the ramp photo evidence
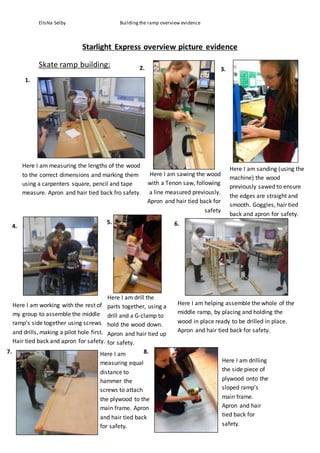
- 1. Elishia Selby Buildingthe ramp overview evidence Starlight Express overview picture evidence Skate ramp building: 1. 2. 3. Here I am measuring the lengths of the wood to the correct dimensions and marking them using a carpenters square, pencil and tape measure. Apron and hair tied back fro safety. Here I am sawing the wood with a Tenon saw, following a line measured previously. Apron and hair tied back for safety Here I am sanding (using the machine) the wood previously sawed to ensure the edges are straight and smooth. Goggles, hair tied back and apron for safety. 4. Here I am working with the rest of my group to assemble the middle ramp’s side together using screws and drills, making a pilot hole first. Hair tied back and apron for safety. 5. Here I am drill the parts together, using a drill and a G-clamp to hold the wood down. Apron and hair tied up for safety. 6. Here I am helping assemble the whole of the middle ramp, by placing and holding the wood in place ready to be drilled in place. Apron and hair tied back for safety. 7. Here I am measuring equal distance to hammer the screws to attach the plywood to the main frame. Apron and hair tied back for safety. 8. Here I am drilling the side piece of plywood onto the sloped ramp’s main frame. Apron and hair tied back for safety.
- 2. Elishia Selby Buildingthe ramp overview evidence 9. Here I am sanding with sand paper the edges of the plywood just attached so that it is smooth and safe without getting splinters. Apron and hair tied back for safety. 10. Here I am removing using an Alan key the caster wheels from the drum trolley to use on the ramps. 11. Here I am sawing the caster wheels off the wooden and metal blocks so that they can be attached to the ramp. Here I am again sawing but to use the wood to make the wheels touch the floor. Hair tied up for safety. 12. 13. 14. 15. Here I am using an Alan key to attach the caster wheels to the ramp. Here I am painting the ramps with a paint brush and roller. Here I am sanding the handles of the ramp as they are sharp and hard to pull the ramp on and off the stage. Stages of the finished piece 16.