1. How did you use new media technologies in the construction and research, planning and evaluation
stages?
Premier Pro
The first technology we used whilst editing our project was Adobe Premier Pro.
Using this technology we used a variety of effects to manipulate the footage we had taken previously.
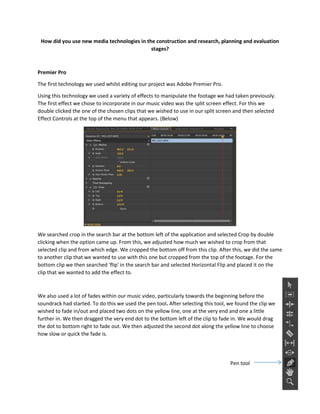
The first effect we chose to incorporate in our music video was the split screen effect. For this we
double clicked the one of the chosen clips that we wished to use in our split screen and then selected
Effect Controls at the top of the menu that appears. (Below)
We searched crop in the search bar at the bottom left of the application and selected Crop by double
clicking when the option came up. From this, we adjusted how much we wished to crop from that
selected clip and from which edge. We cropped the bottom off from this clip. After this, we did the same
to another clip that we wanted to use with this one but cropped from the top of the footage. For the
bottom clip we then searched 'flip' in the search bar and selected Horizontal Flip and placed it on the
clip that we wanted to add the effect to.
We also used a lot of fades within our music video, particularly towards the beginning before the
soundrack had started. To do this we used the pen tool. After selecting this tool, we found the clip we
wished to fade in/out and placed two dots on the yellow line, one at the very end and one a little
further in. We then dragged the very end dot to the bottom left of the clip to fade in. We would drag
the dot to bottom right to fade out. We then adjusted the second dot along the yellow line to choose
how slow or quick the fade is.
Pen tool
2. We manipulated the colour of a lot of our clips as we found some of our footage didn't have very good
lighting. To do this, we double clicked on the clip we wished to edit and selected Effect Controls at the
top of the menu that popped up. We then used the search bar at the bottom left to search for
Brightness and Contrast and then select it by double clicking.
From this, we adjusted the level of brightness and contrast by dragging the dot along the bar right or
left. We did this until we were happy with how the footage looked.
3. We also searched Colour Change in the search bar due to the fact we felt some colours needed desaturating and others needed enhancing. We double clicked on Channel Mixer to select the effect and
we adjusted the levels of particular colours until we were happy with the final footage and we felt that
the colours and lighting looked natural.
For this, we cancelled out the strong red colours and make yellow more attractive.
As the song we chose to do for our music video was very upbeat and has a section where the pace
increases rapidly. For this, we decided to edit our footage to fit the music and attempted to create a
'Strobelight effect.'
4. For this, we placed our selection clip during the time where the music increased in pace. We then used
the tool (screenshot) to add markers on the clip so we can cut on the beat of the music. From this we
then used the cut tool (screenshot) to cut up the footage and selected the parts that we no longer need
a delete them by pressing the backspace button.
Premier Pro was a very useful as it was easy to understand how to use. This technology meant we could
edit the look of some footage that we had included if we were not happy with some of the colours,
which in our case we weren't happy with a lot of shots. It also meant that we could add effects to our
final product in order to link to our narrative and comedic theme but also make the final video a lot
more visually interesting for our audience and encourage them to watch for the duration of it.
Photoshop
For our ancillary tasks, we used Adobe Photoshop to edit the chosen images that we wished to use in
our digi-pack and/or magazine advert.
We used the quick selection tool so that we were able to select Siobhan and copy it onto the same
image as a photo of Brianna. Using the trool, we dragged our mouse over the section of Siobhan, copied
it using Command+C on a Mac and pasted onto the same image as Brianna using Command+P.
We then used Free Transform by selecting Edit > Free Transform.
When positioning the image, we held down the Shift button if we were making it bigger or smaller so
that the dimensions would stay the same ratio.
5. To manipulate the brightness and colour of the images we had chosen to use, we used different tools in
the Adjustments menu. (Below)
We used the Brightness and Contrast toolfor any images that we felt were too dark. We adjusted the
levels of these by simply dragging the arrow along the bar until we were happy with the final image.
We often used the Photo Filter tool.This was so that we could add a golden coloured filter over the top
of the whole image. This method was a lot easier than using the Selective colour tool as this was less
time consuming.
We also used the Selective Colour tool.We used this tool mainly due to the reason we were able to desaturise or enhance particular colours. Such as in some of our images we feel there was red tones that
were very bright so we used this tool to remove the reds and enhance some of the colours like yellows.
We chose to enhance a lot of the yellow colours so that it links to our pop genre.
6. We used the Crop Tool to select certain parts of an image. For example, we saved a bar code found from
the Internet and cropped it down a little as we found there was a too big white border around the edge.
After cropping we then copied and pasted it into our digi-pack template and used the Free Transform
option to position it.
We also used the text tool in order to create a textbox so that we were able to write the name of our
Album, our band name and any other information found on the front and back of the digi-pack or on the
magazine advert.
We also had to rotate a few of our images in order to place them correctly in our digi-pack template
because if we were to print out our digi-pack, the top row would need to be positioned upside down. To
rotate we selected Edit from the main menu, Transform and then Rotate.
7. Photoshop overall was a massively useful technology for us when manipulating the colour of an image.
It meant we were able to edit photos to an extent that we were pleased with how it looked. It also gave
us the ability to enhance particular colours and in our case we enhanced the yellows and oranges so that
there would be a golden-like filter on the image, helping it to link with our pop genre.
Other technologies
YouTube was a very significant technology as we used it to upload our videos, both the rough cut and
final music video. Below, is the YouTube page for our final music video.
8. We then used Slideshare so that we were able to upload Powerpoints and Documents that we have
done research on. Below, is a Powerpoint that I had done previously on existing magazine adverts for
pop artists.
On our blog we were able to make unlimited posts to do with research, feedback, etc. In these blogposts
we were able to add images, embed powerpoints, documents and videos.
Below, is how we simply embedded a Slideshare that we wanted to include in our post and underneath
that is what it looked like after embedding.
9. All of these technologies were very simple to use and took little time to share on it. This meant we could
get on with other tasks almost immediately after uploading a videos or creating blogposts. They were all
hugely useful in helping to share and present our work in a neat and visually interesting form.
Overall, all the technologies we used to create our products and present our research were digital. I feel
this helped us a lot as all technologies were easy to use and weren’t time consuming which gave us a lot
more time to work on other tasks. I believe all technologies worked well together particularly YouTube,
Slideshare and Blogger as we could present our videos, presentations and documents in our blog posts
and analyse them.