1. 6G Pipe Welding
Pipe WeldingAndHowToPass A SMAW 6G WeldingCertification.
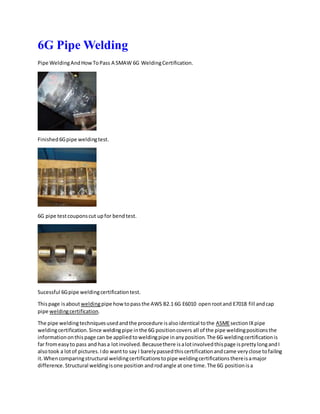
Finished6Gpipe weldingtest.
6G pipe testcouponscut upfor bendtest.
Sucessful 6Gpipe weldingcertificationtest.
Thispage isabout weldingpipe howtopassthe AWS B2.1 6G E6010 openrootand E7018 fill andcap
pipe weldingcertification.
The pipe weldingtechniquesusedandthe procedure isalsoidentical tothe ASMEsectionIXpipe
weldingcertification.Since weldingpipe inthe 6G positioncovers all of the pipe weldingpositionsthe
informationonthispage can be appliedtoweldingpipe inanyposition.The 6G weldingcertificationis
far fromeasyto pass and hasa lotinvolved.Becausethere isalotinvolvedthispage isprettylongandI
alsotook a lotof pictures.Ido wantto say I barelypassedthiscertificationandcame veryclose tofailing
it.Whencomparingstructural weldingcertificationstopipe weldingcertificationsthereisamajor
difference.Structural weldingisone position androdangle at one time.The 6G positionisa
2. combinationof all of the structural and pipe weldingpositions,withafull transitionbetweenthemall,
plusa hard side andeasyside,dependingonif youare lefthandedorright!
Since pipe welderscan(some notall) earna doctorssalary thisisthe most wantedweldingcertification!
So obviouslyalotof weldingstudentswanttohave thisweldingcertificationbefore finishingwelding
school.I hope togive anystudentweldersinterestedaheadstarton gettingreadytopass this6G
certification.The one pieceof advice Ican give aboutlearningtoweldpipe is,getyourstructural
weldingskillsdownfirst.Otherwiseitwill take more time tolearntoweldpipe!
AWS B2.1 SMAW 6G Pipe WeldingProcedure Specifications
WeldingProcess. SMAW
Position. 6G FixedPosition
WeldProgression.Up
Backing. No
Current/Polarity. DCEP
Root Opening. 1/16 to 1/8
Grove Angel. 60 degrees
Material/Spec. A 106
Thickness.(pipe/tube):Groove (in) .280
Notes. Sch.40 Pipe
FillerMetal Class. E6010Rt/E7018Fl
OtherFillerMetal Class. Rt1/8, 3/32 Filler
PracticingTo Passa Pipe WeldingCertification
Whenstartingthiswebsite I hadjust gottenbackto weldingforafew monthswhile workingina
fabricationshop.I wasluckyI got that jobbecause after12 yearsof notwelding,myweldssucked!
Withinabout3 monthsinthat shopI was one of the bestMIG weldersandalreadythe leadfabricator.
A longstoryshort isI was goingbroke workingthere,soIsignedupfor a weldingclasstotake my6G
weldingcertificationandgeta betterjob!Atmy lastjobI MIG weldedpipe andplate withsome
StainlessSteel Stickweldinginall positions.Signingupforthe classI startedpracticinginthe 6G
position.MyprogresswasOK andI feltIwasready to passthe 6G pipe testina weekortwo.At the
time I pokedaroundlookingforworkandgot a few goodoffers.NaturallyIquitmyjobto focuson
school,getmy life backinorder,andbuildthissite asa sellingpointfor myresume.
What I didnot expectistohit a wall while practicingforthe 6G pipe test.Aboutamonthwentby and
my weldsvisuallydidnotgetanybetter(itwasa part time class).I gotdesperate anddecidedtoget
whateverweldingcertificationsIcouldpassthen.SoI didmy 3G MIG cert, thenmy 3 and 4G combo
Stickcert, followedby 3G FCAWcert.
3. BeingunemployedIkeptgoingtoschool andwentback to the 6G pipe test.All of a suddenthe 6G
positionbecame easytoweldin.Iwisedupanddidthe basicsagain.I did 1 through4G plate withan
openroot andfoundmy trouble spots.ThenIpracticed2 and5G openroot pipe weldsfollowedbythe
6G pipe.AfterthatI tookthe testand passedit.
The pointis,if you wantto pass a 6G pipe testpractice the basicsfirst.Don’trush intoit like me.Ialways
say rushingisforfoolsand here Iam one of them!I thoughtbecause Ihave done itbefore Ican still doit
now.If there are any positionsthatyoumayhave trouble with,itiseasiertofindthemonplate,andfix
the problemthere!
How To Bevel Pipe andCouponPreparationforA WeldingCertification
The preparationof the pipe couponswassimple.The wayIreceivedthe pipe couponwasasingle piece
of pipe.The firstthingIdidwas cut itin half ona bandsaw and thenbeveleditona pipe beveling
machine.
4. My nextstepwasto grindoff the oxidationfromwhere the bevel wascut,followedbygrindingthe mill
scale off of the outside of the pipe aminimumof one inchback,thenthe inside of the pipe abouta
quarterof an inchback. Finallycheckingthe bevel angleswithaprotractor.The angle of the bevel was
rightwhere itneededtobe.NextIput mylandon the bevel;Iusedabouta 1/16th land.I useda grinder
to make the landingandprettymuch eyeballedit.AfterIwasfinishedputtingonthe landingItooka
1/16th of an inchthickpiece of scrap metal andusedit to measure the landing.
Pipe CouponBevel Inspection
5. The weldingmachine set-upisacritical part for any
type of weldingandwhenitcomestopipe itis the most important!The machine Iusedforthe 6G Pipe
cert wasa MillerDialArc250. It’s a real simple andnice Stickwelderbutunfortunatelyitdoesnothave a
hot start feature.Whensettingupmymachine forthe 6G positionIdidnotice Ididgetsome restarting
trouble inthe same areas.Besidesthe lackof the hot start feature the machine ranreal nice.
WeldingMachine Set-UpForTack WeldingPipe WithAnE6010
Whensettingupthe welderfora 1/8 E6010 openroot
weldIused90 amps forthe tack welds.Ididthisbecause the pipe andelectrode were notpre-heated
enoughandneededthisamperage topenetrate properly.Onthe actual root I used83 ampsto weldit
all the way out.The loweramperage wasnoproblembecause Ipiggybackedall of mytacks, while the
electrode andthe pipe hadenoughtime topre-heat.If the amperage washigherthe keyholewouldbe
too big.Whensettingaweldingmachine todoan openrootweldyouneedtofindamperage setting
that ishot enoughtoopenup a keyhole fastbutnottoo hotthat the keyhole getstoobig!The main
thingto lookforwhensettingaweldingmachine torunan openrootweldisfor the amperage tobe
highenoughthatthe electrode doesnotstickwhentestingitona piece of scrap metal.The amperage
settingshouldbe highenoughforittobarelyweldwithoutsticking.
Pipe WeldingMachine SettingsFor The Fill AndCapWithAn E7018
6. OriginallyItrieda1/8 E7018 rod and founditwas total overkill fora6” schedule 40pipe,soI turnedto
the 3/32 E7018 electrode,anditworkedwaybetter.The amperage Iusedwas95 ampsand the rod ran
real nice on the hot passand cap! Thissettinginany positionputsdownareal nice bead!!
How To Tack WeldA Pipe ForAn OpenRootWeldJoint
The set-upof the pipe couponswasdone on a V
Block.If that’s whatthe propername of it is.BasicallyIusedan angle ironto laythe pipe couponson.It
keepsthe pipe couponsinline andmakesiteasiertotack.ThenI tooka 1/16 cuttingwheel tosetthe
root opening.Once the pipe wasalignedproperlyIputin the firsttack. Now once the tack cooledthe
pipe wasout of alignmentsoIuseda hammerto get the root openingevenagain.The tackweldswill
mainlyshrinkonthe keyhole sideof the tack.The nexttack was done onthe opposite side of the pipe.I
had to tap the pipe a fewtimestogetit to line upproperly.IkeptrepeatingthisuntilIhadfourtacks.
The firsttack isinthe 12 o’clockposition,the secondinthe 6o’clockposition,the thirdinthe 3 o’clock
positionandthe fourthinthe 9 o’clockposition.All of the tackswere about3/4 of an inchlong.FinallyI
checkedtoroot openingwiththe 1/16 cuttingwheel andas usual the tack weldsshrank.SoI usedthe
cuttingwheel toopenupthe root opening.Thisisone of those tricksthat nota lotof people will tellyou
aboutsettingupopenroot welds.The cuttingwheel willalmostalwaysmake aperfectlyevenroot
opening!Thatisthe maintrick to passinganyopenroot weldingtest!AfterIwashappywiththe tacks
and root openingIfeatheredall of the tacksedgedwiththe same cuttingwheel.
InspectionOf The Pipe InThe 6G FixedPosition
Once I got the pipe couponstackedup,thenI put theminthe arm thatholdsthe pipe inplace.I took a
level andsetthe pipe at45 degrees.NextIsetthe heightof the pipe towhere Iwantedto weldit.I
prefertoweldthe bottomhalf of the pipe on mykneesandthat alsogivesme a more stabilitythen
standing.Once everythingwasinplace andI tightenedthe armandcalledthe weldinginstructor.
The weldinginstructorrecheckedthe rootopeningandthenthe positionof the pipe.He thenmarked
the arm in a fewplacestomake sure the pipe wasnot movedduringthe test.Thiswasdone because
the procedure states:
“Nowthe test will be placedinthe fixedposition.The testpiece will be markedinpositionwithamarker
and the inspectormaysee the testanytime duringthe testing.(DURINGTHETEST, THE PIECES SHALL
NOT BE MOVED IN ANYDIRECTION ANDOR REMOVED FROMTHE TESTING PLACEWITHOUT THE
INSPECTORSAPPROVAL.)”
7. OpenRootPipe WeldingTechniques
The 6G openroot was done witha 1/8 E6010 electrode at83 amps usinga whippingtechnique.Mostof
the time I wasdraggingat about5 degreeswhile pointingthe rodtothe centerof the pipe.If youdo not
alwayspointyourrod to the centerof the pipe andkeepthe keyholecenteredyouwill getalackof
fusion.Inthe eventthatthe keyhole isclosingupyouneedtoleadthe rodat about 5 to 10 degrees.
The hard part of the root isthe bottomhalf of the pipe.
Beloware some basicguidelinesfortrouble shootingopenrootwelds.Aboveall,whenyouare notsure
aboutthe root,STOP WELDING at once!
Keyhole GettingtoBig
Increase the angle of the drag .
Lowerthe amperage.
Start to whipthe rod inlongermotions.
Keyhole ClosingUp
Start pushingthe rodforehandtowardthe directionof travel.
Increase the angle of the push.
Raise the amperage.
Concave RootOr SuckBack On The Inside Of The Pipe
Pushthe rod inside the pipe sothe arc isin the inside whenwelding.The soundof the electrodeburning
shouldbe comingfromthe inside of the pipe.
Slowdownyourtravel speed.
8. Start to use a Verytightwhipthat isalmosta slow steadymotion.Youwantto give the electrode
enoughtime toproperlyfill the root.
Loweryour amperage.
Keepthe keyhole smaller.
Excessive RootWeldReinforcement
Increase yourtravel speed.
Use a longerwhippingmotion.
Pull yourelectrode furtheroutof the root whenwelding.
Lowerthe amperage.
RestartTrouble Or Tie In Lacks Fusion.
Featherall tacksand restartswitha grindingwheel.
PiggyBack all restartsand tie insat leasta 1/4 of an inch.
Pause fora secondonall featherededgestoburninproperly.
Whentyingindon’tstop weldinguntilyouhave penetratedthe tackandcoveredmostof it.
How To Do AnOpenRoot Pipe WeldInThe 6G Position
The firstpart of my root wasfromthe 6 o’clockto the
9 o’clockposition.Since Iammainlyrighthandedthisismyhard side forthe root. What makesit
difficultisthatIam weldingfromrighttoleft,sothe handle andelectrode naturallyblockmyviewof
the keyhole.WhatIdidwas positionmyself inawaythat I can see the keyhole atall times.The down
side isitis verydifficulttostayinthat positionwithoutgettinganymuscle cramps.Tostart the weldI
piggybackedon the 6 O’clocktack while preheatedthe electrode onthe tack.Thenslowlywhippedthe
rod until Iwas on the featherededge of the tack.Once Icould see the weldburningintothe feathered
edge I pausedfora secondpushingthe rodinside the beveltoletthe arc shootup enoughfillermetal to
tie intothe tack properly.AfterthatI wasjusta simple whippingmotionuntilIgotto the 9 O’clocktack.
WhenI got ontothe tack I keptweldinguntilIwaspast the featherededge.
9. The secondrod I usedwasdone on the root fromthe
9 o’clock to the 12 o’clockposition.Before startingtoweldIusedmygrinderto cleanupthe 9 o’clock
tack that was piggybackedfromthe previousweld.Once itwascleanedupI piggybackedthattack and
startedwhipping.WhentyingintothistackIdidnot pause too much.On the upperhalf of the pipe
gravityisin yourfavor.In thiscase itis easyto have toomuch penetrationonthe inside of the pipe.The
technique Iusedwasjusta whippingmotionwhiledraggingthe rodabout5 degrees,andabove all,the
electrode needstoalwaysbe pointingtothe centerof the pipe.Whencomingupto the 12 o’clocktack I
piggybackedhalf wayoverit.
My nextrootpasswas fromthe 6 o’clockto 3 o’clock
position.Itisthe easyside of the bottomhalf of the root if youare righthanded.Thisisbecause youcan
easilysee the keyhole forrighthandedpeople.Onthisside of the weldIusedmylefthandto leanon
the pipe while leaningthe electrodeonmythumbto guide the rod.Once the electrode burnedshort
enoughIslowlytookmylefthandoff of the pipe andwentto holdingthe handle withtwohands.Before
startingto weldIgroundthe 6 O’clocktack from the previouspiggybackrestart.Justlike the other
bottomhalf of the pipe Iletthe rod preheatandpausedand pushedthe rodintothe root whenburning
intothe 6 o’clocktacks featherededge.Afterthatitwas justa whippingmotionandthenpiggyback
ontothe 3 o’clocktack.
10. My final rootpasswas done fromthe 3 o’clockto 12
o’clockposition.BeforestartingIgrindeddownand featherthe edge of the 3 o’clocktack where mylast
weldstopped.Onthisside of the pipe Ihadto sit onthe table toget a goodview,otherwise Iwouldnot
be able to weld90 degreesina single pass.Ihave a bad habitof makinglongweldsevenwhen Ican’t
see where Iam going.Inmost casesshorterweldsare fine aslongas you grindandfeatheryour
restarts.Justlike the othertophalf of the pipe Ipiggybackedthe restart ontothe tack thenletthe
electrode preheat,burnedintothe featherededge,followedbyusingawhippingmotionuptothe 12
o’clocktack. Once I got ontothe 12 o’clocktack I piggybackedhalf the tack.
WeldInspectionOf The OpenRoot
The root inspectionwasdone afterIfinishedthe root.Ididhave a repairthat I hadto grind outand
openitup witha 1/16 cuttingwheel.Ididthe repairbecause there wasalack of fusiondue the pipe
root openingclosingupfromthe weldshrinking.Repairinganopenrootweldisprettyeasyif youknow
whatto do. Firstthe repairarea of the weldneedstobe grindedtothe same thicknessand
approximatelythe same dimensionsof the original bevel.Nextyoutake acutting wheel andreopenthe
defective rootarea.Thenall youhave todo is re weldthe root andthat is it.I will notshow itbecause
that mightmake my rootno longerpassable.ButIwill saythat areawas part of the bendtest!Once I
finishedthe rootof the weldIcleanedthe weldpenetrationupasmuch as I couldusingan electrode to
chipoff the slag.Most openrootweldslooklike theypenetratedproperlywhenthe slagiscoveringit.
It’sone thingto have a nice lookingrootwithslagontop of it but anothertosee the actual weld!The
root wasinspectedthoroughlyusingamirrorlike the dentistusestocheckyour teeth.My root passwas
inspectedandIgot to move on!The rulesforpassinga root inspectionare asfollows:
“The rootof the weldshall be inspected,andthere shall be noevidence of cracks,incompletefusion,or
inadequate jointpenetration.A concave rootsurface is permittedwithinthe limitsshownbelow,
providingthe total weldthicknessisequal toorgreaterthan that of the base metal.The maximumroot
surface concavityshall be 1/16 in.(1.6 mm) and a maximummelt-throughshall be 1/8in.(3 mm)”
11. Hot Pass Pipe WeldingTechnique
My hotpass or fillerpasswasdone usingaweave witha3/32 E7018 electrode.The technique Iused
was to holdthe sidesuntil the weldwashedintothe bevel.The upperpartof the bevel washeldabout2
secondsandthe bottom washeldforabout 1 second.Thisisthe easiestpartof the weldingcertification.
Hot Pass InThe 6G Position
Before puttinginthe hotpass I grindeddownthe rootssurface.Whenitcomesto weldingcertifications
some inspectorsdonotallowgrindingatall but withthe E6010 root theyalmostalwaysallow togrind
downthe root. Most of the time everyonepiggybacksthere tacks,soyouwill have a few lumpsonthe
outside of the rootfrom the restarts.Whenit comesto grindingdownthe rootssurface oncritical joints
it isalwaysallowed.
12. Here is are the picturesof myhot pass.As youcan see the bevel ismostlyfilledandthere isnoslagon
the edgesof the bevel.Whenputtinginafilerpassthe slagshouldcome off prettyeasily!If not,that
meansyouare not holdingthe sideslongenoughandthere isa possibilityof slaginclusions.
Pipe WeldingTechniquesForThe Cap
The cap wasalso done witha3/32 E7018 electrode using3stringersbeadstoputin the cap. The
technique to puttingahalf decentcap inis to spreadoutthe weld.Thatis a verytightside to side
motion,basicallyatightweave.ThisissomethingIdidnotdo inthe beginninganddisagreedwiththe
weldinginstructorwhoconductedthistest.Sincetakingthis weldingcertificationIhave focusedmy
effortsonspreadingoutthe weldwhenusinganE7018 electrode.Ishouldhave listenedtosomeone
whohas made a career of weldingX-Rayqualityweldsisverydifficultconditions.Since Itookthistest
and passed itat the bare minimumIhave come close toa almostnexttoperfectcap.The last6G weld
testI took wasfor Fluorand I wasallowedtotake pictures.Theyare postedatthe endof thispage.
Some basicguidelinesforweldingthe capare as follows:
Keepyourelectrode angle pointedtothe centerof the pipe at all timeswithveryfew exceptions.
Keepyourarc lengthas shortas possible.
If possible,dragyourelectrode slightlynomatterwhatthe positionis.Mostpeople willdisagreewith
thisbut itworksfor me because itkeepsthe slagbehindthe puddle.
Onlymove forwardandside to side withthe electrodeotherwisethe weldwill become rough.
Whenthe pipe getsto hot letitcool downor puton a vice grip to leanon.
13. Make sure youfuse the bevels edge.
Overlapstringerbeadsfromatleast25% to a maximumof 50%. The goal is for the weldtohave a single
profile whenfinished.
The Cap WeldIn The 6G Position
Before puttinginthe cap I cleanedthe hotpasswitha wire wheel andhititwitha grinder.Idid nothave
to use a grinder,butif I can, I will.It’sjustsaferif youare allowed.A lightgrindingof the surface will
expose anytrappedslagorporosity.
14. The cap wasdone fromthe bottomto top.There isnot much to the cap exceptmake sure youfuse the
edgesof the bevel andkeepspreadingoutthe weld.The picturesbelow are of the firststringerbeadI
put in.The weldisa little roughbecause Iwouldsometimespause ormove the electrode slightlyback
intothe weldcrater.Thisis solvedbyonlymovingforwardandside toside.
These picturesbeloware of the secondstringerbead.The weldgotalittle smootherbecauseIwas
spreadingthe weldbetter.Onthe forthpicture youcan see where myelectrode gotstuckonthe top of
the pipe.Ihad to grindthat spot before restartingthere.If yourelectrode startsstickingtrynotto long
arc it.If you do youwill endupwithporosityinthe weld.The bestwaytokeepthe electrode from
stickingisto keepthe rod moving.
15. The last stringerbeadwasdone once the pipe cooleddownenoughforme toleanon it.On the last
stringerbeadI made sure I spreadthe weldoverthe edge of the bevel and intothe secondstringer.
Those are the picturesbelow.
16. Visual InspectionCriteriaForA 6G Pipe WeldingCertification
Thisvisual inspectionisthe hardpart of the test!Passinga bendtestiseasybut the visual partis much
harder.I knowthisbecause Ihave bentsome of mypractice couponsthat wouldnotpass the visual
examination,includingcouponsthatIthoughtwouldfail.Notone couponbroke or openedupmore
than the procedure allows.
To beginthe weldinginstructorconductingmytest
givesnobodyanyslackand goesstickybythe book!This iswhere Igot lucky!He followsthe rulesand
allowsthe use of a grinderto do repairs.Basicallyall of myweldshadtobe exactlywithinthe AWS
acceptance criteria.My bestfriendall of a suddenbecame the grinder.Overlap,arcstrikes,andanything
that islessthanthe procedure statesisaninstantvisual weldrejection.Icleanedupmyweldswitha
1/16 cuttingwheel because itgivestotal control unlike agrindingwheel.The rulesstate youare allowed
one repairafterthe weldinspection,soIcheckedmyweldthoroughlyandcleanedupanythingthatwas
not suppose tobe there.Aslongas youdo your repairsbefore the weldisinspectedthenyouhave one
repairleftif youneedit.Inthe endI passedthe visual basedonthe AWSacceptance criteria.The two
bigcriteriaare no undercutover1/32 of an inch andno excessiveweldreinforcementover1/8 of an
inch.
TestCouponPreparationForA Pipe WeldingCertification
Preparingof the testcouponswas done followingthe AWSprocedure notes.FirstImarkedthe pipe with
a template.The template marksthe pipe fromthe 1o’clockto 12 o’clockpositions.Nextlinesare made
to cut out 4 coupons.The couponsneed tobe a minimumof 1/ ½ incheswide otherwise theywill be
rejected.There willbe tworootbendsandtwo face bends.The rootbendswere at the 11 o’clockand 4
o’clockpositions.The face bendswere onthe 2 o’clockand8 o’clockpositions.
17. The couponsare thencut on a horizontal bandsaw.Some of the couponsdidnot come out even
because the bandsawsvice had a worn outpart that neededtobe replaced.Butagainthe coupons
were a minimumof 1 ½ incheswide sotheywere accepted.
Nowthe pipe iscut intobendable sections.The sectionsare tworootbends,twoface bends,andthe
largerpiecesare the alternate coupons.All of themare markedtoidentifythe propersectionsof the
pipe.Rstands forroot, andF standsforface,and the numberreferstothe positionthatthe couponwas
weldedin.The picturesbeloware showingthe rootof the weldandthe cap of the weld.
18. Once you have the testcouponstheyneedthe centerof the weldtobe markedwitha centerpunch.
Thisis done tomake sure the weldareaisbeingbent.
Finallythe capand root of the weldneedtobe grinded.Whengrindingdownthe weldreinforcement
youare not allowedtogobelowthe surface metal.Onmyroot I had some concavity.Thismustbe left
alone.AtfirstI thoughtundercutandconcavitywill cause the testcouponto fail.Thatis veryfar from
the truth. Soif youare takinga weldingcertificationandhave some undercut,don’tworryaboutitas
longas your weldissolid!The picturesbelow are before removinganyweldreinforcement.
The rest of the pipe isthere foran alternate bendtestinthe case a couponfails.If a couponfailsitmust
be withinthe AWSalternate rulesnotes.The mostcommonallowedfailure isacornercrack that has no
evidence of slaginclusions.
19. Beloware the preparedrootand face bendspecimenswiththe weldreinforcementremovedbya
grinder.Onthe inside of the rootspecimensyoucansee a little undercutandconcavity.The edgesof the
couponsare alsoslightlyroundedwithasander.Thisisdone to keepthe cornersfromcracking.The
rulesstate youcan round the edgesupto a 1/8 inchradius.Now the root and face test specimensare
readyto bend.
6G GuidedBendTestResults
The bendtestingwasa nail bitingmoment.The couponsare putintothe bendtestingmachine andthey
getbent.It’sthat simple andthisiswhere youreallyfindouthow solidyourweldsare!The pictures
belowisof my firstface bend.Thisone passedwithoutanyproblems.
Here is the secondface bendandthisone came out fine too.
20. Nowthe firstroot bendcoupon.It wentthroughandthere isa openinginthe centerof the root.This
couponneedstobe examinedcloselytodetermine if itisacceptable.Atthe momentIdon’tknow if I
passedor failed!
Here is the secondface bendcouponcomingthrough.Inthe thirdpicture youcan see there issome
thingthere andthe forthshowsitclearly.Thiscouponisfine because itdidnotopenupand that is just
some concavityfromthe root.
Thiswas a nail bitingmoment.The instructortookthe firstrootbendcouponthat had the openinginit
and putit undera magnifyingglass.He usedadigital micrometerandmeasuredthe opening.Itcame a
fewthousandsof aninch lessthanthe acceptance criteriaallows.Whentakingthe picture onthe rightI
was real nervous.It’sone of those momentsyouhave nocontrol over.
There itis! The basicsof pipe weldingandthatishow I passedthe AWSB2.1 6G openroot pipe welding
certification.
21. An Actual 6G Pipe WeldingTestForA Job
FluorCraft traingcenterinGreenvilleSC.Alsoknow asGreenville Tech.
TextbookperfectE6010 openrootpipe welddone byme
Excelentexample of a6G pipe weld cap.
22. Since I have takenthisweldingcertificationIhave beenatthe Fluorcraft weldertrainingcenterfora
longtermjob interviewandanupgrade yourweldingskillscourse.SofarI have almostperfectedmy
stickpipe weldingsincetakingthistestandamworkingonmy TIG weldingskills.The testtheygive isa
E6010 root witha 1/8 gap and landing,atwostringerfill,anda twoto three stringercap,usinga E8018.
The other maindifference is,nogrindingallow exceptonthe root.Theydo notallow anyconcavityon
the root or imperfectionsonthe cap!The bottomline isyoumustweldbetterthenthe ASMEcode
allows!Here are some picturesItookat the trainingcenterlocatedatGreenville TechinSC.My welds
have seriouslyimprovedwithjustalittle more practice anditis onlygettingbetter!Thisisagreat
program if youare acceptedintoit!