SlideShare a Scribd company logo
1 of 4
Download to read offline
FF Install – Hobie Revolution Eagle Cuda 242
Ferd Salomon


The project was to install a Cuda 242 FF on my Hobie Revo. I had used the 8 AA battery power
supply before when I rigged an FF on my Prowler, it had worked well and was cheap and easy.
Assuming the batteries are healthy, the eight rechargeables should work fine.

The Cuda pulled 170 mAh with the backlight off, 230 mAh with the backlight on. The AA’s are
rated at 2300 mAh. Doing the simple math tells me that they will last between 10 and 13.5
hours. Eight (8) AA’s, with each rated at 1.2V put out about 9.6V, which is enough to run most
FF’s. Depending on the unit, they will run on as little as 8 volts – I know they say they are 12
volt units, but the voltage regulator in the FF burns off the excess voltage. I have run all day on
an 8 AA battery pack. You can find AA batteries that advertise themselves as putting out 1.5
volts each, in which case you can get 12 volts from 8 AA’s and maybe be more comfortable. If
you are very fortunate, you can find a 10 battery holder and get plenty of volts…Now, if you
plan to run a live bait well or buy a mongo FF with side scanning, color, GPS and enough power
to see a whale carcass on the bottom 6,000 feet away, then the AA solution is not for you.

Still with me? OK, let’s get our parts assembled. Parts needed:
    o ½” sheet of insulation foam            Home Depot
    o 9V battery connector                   Radio Shack
    o AA battery holder                      Radio Shack
    o Rubber cork                            Home Depot
    o Waterproof cell phone bag              Academy Sports
    o Marine Goop                            Academy Sports
    o RAM Mount                              ordered through Key Sailing
Step 1. I cut a piece of foam into the shape you see below, outlined the transducer and then cut
out the outline. The marked lines on the foam block are so I can align it fore and aft accurately.
In the Revo, I planned to mount the transducer behind the sail mast and in front of the drive unit.
.


   Foam block with cutout to match shape of           View looking aft - just aft of the sail mount and
   transducer, then glued in place with Goop                 forward of the Mirage drive well

You can choose to mount it anywhere you want, but I wanted it out of the way of stuff I stored in
the hatch and in front of any disturbed water coming off the drive. I sanded the area where the
block was going to go and then glued it down with plenty of Marine Goop. Ideally, you want
this to cure overnight before the next step.

Step 2. This is probably the most critical step in the install. You want to glue the transducer into
the well created in the foam block such that there are no air pockets between the transducer and
the hull. Rember, the transducer faces forward, flat side facing aft. Check your instruction
manual to make sure before proceeding. I warmed the tube of Goop in a coffee cup of warm
water. This will make the Goop flow easier and greatly reduce the chance of air bubbles. Jam
the tube into the well and fill it up with Goop. I think it is difficult to use too much… Press the
transducer down into the well and hold it until the Goop sets up – about 5-10 minutes. Let it
cure. What if you mess this up? No worries, it can be redone, just peel it off and try again.


 Transducer glued inside the cutout with lots of
  Goop – ensure there are no air bubbles in the            9V Battery connector – Radio Shack
                     Goop
Step 3. Powering it up. Now we need to connect the FF power wire to our power source. I used
heat shrink butt splices (22-18 AWG) and a 9V battery connector, Connect the red wire to the
red wire, crimp well. Same for black to black. I did connect the included fuse in the red line.
Use a heat gun or lighter to heat shrink the connectors. I used a big glob of Goop to make sure
the connections were waterproof and then zip tied the wires into a convenient bundle.


 9V connector connected to FF power wire with         Battery pack placed inside waterproof bag – I
heat shrink butt splices and Goop – fuse included.    did file a groove in the yellow plastic top to fit
  Battery pack of 8 AA and battery holder from                           the wire…
                   Radio Shack

Step 4. Load the batteries into the holder, connect them to the battery connector and you should
be good to go. I store them inside the yak inside a waterproof bag, but you can use a Pelcian
box, a Tupperware or any waterproof container. I hang the battery bag inside the front hatch of
the kayak so it does not lie on the bottom of the hull and stays out of the way.


                                                     Battery bag hung up off the bottom of the hull –
                                                     or you can hang it from a loop on the inside of
Transducer cable coiled and stowed inside hull –
                                                                        the hull.
     note cables running up through cork
Important tip – there will be a lot of transducer cable left over – DO NOT CUT IT. Something
about the cable length being tuned to the transducer or some other electronic explanation. I don’t
know, but cutting the cable it not good. I had an anchor trolley bolt on the side of the yak – I
replaced that bolt with a longer one – about 2” long. I coiled the cable up, put a plastic strap
around it and secured it with another nut on the extra length bolt. OK, I also put a small nylon
spacer in there, but that was not required. If you can’t picture it, here is how it goes:

       Hull – washer – nut - one end of strap - nylon spacer - other end of strap - nut.


Step 5. Connecting the power plug to the control head unit. I ran the power plug up through the
hull just behind where I mounted the FF RAM mount. This is the small 1” ball mount with a
mounting plate that matches the Cuda mount. I would recommend mounting the RAM ball prior
to drilling the hole for the power plug. I then drilled a hole large enough to snugly fit the cork.
I used a black rubber cork from Home Depot, and drilled two holes in the plug to match the two
wires in the plug. Using a knife or razor blade, cut a slit in each side of the cork so that you can
slide the wires into the holes you just drilled in the cork. I sealed the cork with plenty of Goop.
Make sure you leave enough length of wire to reach the head unit throughout the range of
movement of the mount. Voila, you are done…


     RAM mount on gunwale. FF power and
  transducer cable run through rubber cork and              Another view of FF mount location
                 glued in place

Good luck!

More Related Content

Similar to Hobie revo ff install 2

Tuck San's Reefer Workshop
Tuck San's Reefer WorkshopTuck San's Reefer Workshop
Tuck San's Reefer Workshop
Tucker Latimer
 
Hacking the kodak funsaver flash
Hacking the kodak funsaver flashHacking the kodak funsaver flash
Hacking the kodak funsaver flash
MechEProdigy
 
Dish4You Cables and Connectors
Dish4You Cables and ConnectorsDish4You Cables and Connectors
Dish4You Cables and Connectors
spicherheidi
 
Dish4You Cable Routing
Dish4You Cable RoutingDish4You Cable Routing
Dish4You Cable Routing
spicherheidi
 
99 04 mustang accent light install
99 04 mustang accent light install99 04 mustang accent light install
99 04 mustang accent light install
mcqueenpker
 

Similar to Hobie revo ff install 2 (20)

Doc 1010
Doc 1010Doc 1010
Doc 1010
 
Tuck San's Reefer Workshop
Tuck San's Reefer WorkshopTuck San's Reefer Workshop
Tuck San's Reefer Workshop
 
Hacking the kodak funsaver flash
Hacking the kodak funsaver flashHacking the kodak funsaver flash
Hacking the kodak funsaver flash
 
Insructables fm listening bug
Insructables   fm listening bugInsructables   fm listening bug
Insructables fm listening bug
 
DIY Samsung Galaxy S4 Wireless Charging Under $30
DIY Samsung Galaxy S4 Wireless Charging Under $30DIY Samsung Galaxy S4 Wireless Charging Under $30
DIY Samsung Galaxy S4 Wireless Charging Under $30
 
Replacing lightship battery
Replacing lightship batteryReplacing lightship battery
Replacing lightship battery
 
How to fix and replace prime vavle in titan impact 440
How to fix and replace prime vavle in titan impact 440How to fix and replace prime vavle in titan impact 440
How to fix and replace prime vavle in titan impact 440
 
How To Solder V3.5
How To Solder V3.5How To Solder V3.5
How To Solder V3.5
 
Devry ecet 105 week 2 i lab soldering techniques and the electronic die kit new
Devry ecet 105 week 2 i lab soldering techniques and the electronic die kit newDevry ecet 105 week 2 i lab soldering techniques and the electronic die kit new
Devry ecet 105 week 2 i lab soldering techniques and the electronic die kit new
 
Solar Power Basics; Large and small for day to day and survival
Solar Power Basics; Large and small for day to day and survivalSolar Power Basics; Large and small for day to day and survival
Solar Power Basics; Large and small for day to day and survival
 
Dish4You Cables and Connectors
Dish4You Cables and ConnectorsDish4You Cables and Connectors
Dish4You Cables and Connectors
 
Devry ecet 105 week 2 i lab soldering techniques and the electronic die kit new
Devry ecet 105 week 2 i lab soldering techniques and the electronic die kit newDevry ecet 105 week 2 i lab soldering techniques and the electronic die kit new
Devry ecet 105 week 2 i lab soldering techniques and the electronic die kit new
 
Devry ecet 105 week 2 i lab soldering techniques and the electronic die kit new
Devry ecet 105 week 2 i lab soldering techniques and the electronic die kit newDevry ecet 105 week 2 i lab soldering techniques and the electronic die kit new
Devry ecet 105 week 2 i lab soldering techniques and the electronic die kit new
 
Solar Power Basics; Large and small for day to day and survival
Solar Power Basics; Large and small for day to day and survivalSolar Power Basics; Large and small for day to day and survival
Solar Power Basics; Large and small for day to day and survival
 
pioneer_cdj-900_sm.pdf
pioneer_cdj-900_sm.pdfpioneer_cdj-900_sm.pdf
pioneer_cdj-900_sm.pdf
 
Dish4You Cable Routing
Dish4You Cable RoutingDish4You Cable Routing
Dish4You Cable Routing
 
F-F-Fiddle Assembly Instructions
F-F-Fiddle Assembly InstructionsF-F-Fiddle Assembly Instructions
F-F-Fiddle Assembly Instructions
 
BlackVue Dash Cam Installation
BlackVue Dash Cam InstallationBlackVue Dash Cam Installation
BlackVue Dash Cam Installation
 
Rns 510 install
Rns 510 installRns 510 install
Rns 510 install
 
99 04 mustang accent light install
99 04 mustang accent light install99 04 mustang accent light install
99 04 mustang accent light install
 

Recently uploaded

FULL ENJOY Call Girls In Mahipalpur Delhi Contact Us 8377087607
FULL ENJOY Call Girls In Mahipalpur Delhi Contact Us 8377087607FULL ENJOY Call Girls In Mahipalpur Delhi Contact Us 8377087607
FULL ENJOY Call Girls In Mahipalpur Delhi Contact Us 8377087607
dollysharma2066
 
February 2024 Recommendations for newsletter
February 2024 Recommendations for newsletterFebruary 2024 Recommendations for newsletter
February 2024 Recommendations for newsletter
ssuserdfec6a
 
KLINIK BATA Jual obat penggugur kandungan 087776558899 ABORSI JANIN KEHAMILAN...
KLINIK BATA Jual obat penggugur kandungan 087776558899 ABORSI JANIN KEHAMILAN...KLINIK BATA Jual obat penggugur kandungan 087776558899 ABORSI JANIN KEHAMILAN...
KLINIK BATA Jual obat penggugur kandungan 087776558899 ABORSI JANIN KEHAMILAN...
Cara Menggugurkan Kandungan 087776558899
 
Girls in Mahipalpur (delhi) call me [🔝9953056974🔝] escort service 24X7
Girls in Mahipalpur  (delhi) call me [🔝9953056974🔝] escort service 24X7Girls in Mahipalpur  (delhi) call me [🔝9953056974🔝] escort service 24X7
Girls in Mahipalpur (delhi) call me [🔝9953056974🔝] escort service 24X7
9953056974 Low Rate Call Girls In Saket, Delhi NCR
 

Recently uploaded (18)

SIKP311 Sikolohiyang Pilipino - Ginhawa.pptx
SIKP311 Sikolohiyang Pilipino - Ginhawa.pptxSIKP311 Sikolohiyang Pilipino - Ginhawa.pptx
SIKP311 Sikolohiyang Pilipino - Ginhawa.pptx
 
FULL ENJOY Call Girls In Mahipalpur Delhi Contact Us 8377087607
FULL ENJOY Call Girls In Mahipalpur Delhi Contact Us 8377087607FULL ENJOY Call Girls In Mahipalpur Delhi Contact Us 8377087607
FULL ENJOY Call Girls In Mahipalpur Delhi Contact Us 8377087607
 
Call Girls In Mumbai Just Genuine Call ☎ 7738596112✅ Call Girl Andheri East G...
Call Girls In Mumbai Just Genuine Call ☎ 7738596112✅ Call Girl Andheri East G...Call Girls In Mumbai Just Genuine Call ☎ 7738596112✅ Call Girl Andheri East G...
Call Girls In Mumbai Just Genuine Call ☎ 7738596112✅ Call Girl Andheri East G...
 
(JAYA)🎄Low Rate Call Girls Lucknow Call Now 8630512678 Premium Collection Of ...
(JAYA)🎄Low Rate Call Girls Lucknow Call Now 8630512678 Premium Collection Of ...(JAYA)🎄Low Rate Call Girls Lucknow Call Now 8630512678 Premium Collection Of ...
(JAYA)🎄Low Rate Call Girls Lucknow Call Now 8630512678 Premium Collection Of ...
 
February 2024 Recommendations for newsletter
February 2024 Recommendations for newsletterFebruary 2024 Recommendations for newsletter
February 2024 Recommendations for newsletter
 
Colaba Escorts 🥰 8617370543 Call Girls Offer VIP Hot Girls
Colaba Escorts 🥰 8617370543 Call Girls Offer VIP Hot GirlsColaba Escorts 🥰 8617370543 Call Girls Offer VIP Hot Girls
Colaba Escorts 🥰 8617370543 Call Girls Offer VIP Hot Girls
 
March 2023 Recommendations for newsletter
March 2023 Recommendations for newsletterMarch 2023 Recommendations for newsletter
March 2023 Recommendations for newsletter
 
Hisar Escorts 🥰 8617370543 Call Girls Offer VIP Hot Girls
Hisar Escorts 🥰 8617370543 Call Girls Offer VIP Hot GirlsHisar Escorts 🥰 8617370543 Call Girls Offer VIP Hot Girls
Hisar Escorts 🥰 8617370543 Call Girls Offer VIP Hot Girls
 
KLINIK BATA Jual obat penggugur kandungan 087776558899 ABORSI JANIN KEHAMILAN...
KLINIK BATA Jual obat penggugur kandungan 087776558899 ABORSI JANIN KEHAMILAN...KLINIK BATA Jual obat penggugur kandungan 087776558899 ABORSI JANIN KEHAMILAN...
KLINIK BATA Jual obat penggugur kandungan 087776558899 ABORSI JANIN KEHAMILAN...
 
Girls in Mahipalpur (delhi) call me [🔝9953056974🔝] escort service 24X7
Girls in Mahipalpur  (delhi) call me [🔝9953056974🔝] escort service 24X7Girls in Mahipalpur  (delhi) call me [🔝9953056974🔝] escort service 24X7
Girls in Mahipalpur (delhi) call me [🔝9953056974🔝] escort service 24X7
 
2023 - Between Philosophy and Practice: Introducing Yoga
2023 - Between Philosophy and Practice: Introducing Yoga2023 - Between Philosophy and Practice: Introducing Yoga
2023 - Between Philosophy and Practice: Introducing Yoga
 
Bokaro Escorts Service Girl ^ 9332606886, WhatsApp Anytime Bokaro
Bokaro Escorts Service Girl ^ 9332606886, WhatsApp Anytime BokaroBokaro Escorts Service Girl ^ 9332606886, WhatsApp Anytime Bokaro
Bokaro Escorts Service Girl ^ 9332606886, WhatsApp Anytime Bokaro
 
Dadar West Escorts 🥰 8617370543 Call Girls Offer VIP Hot Girls
Dadar West Escorts 🥰 8617370543 Call Girls Offer VIP Hot GirlsDadar West Escorts 🥰 8617370543 Call Girls Offer VIP Hot Girls
Dadar West Escorts 🥰 8617370543 Call Girls Offer VIP Hot Girls
 
What are some effective methods for increasing concentration and focus while ...
What are some effective methods for increasing concentration and focus while ...What are some effective methods for increasing concentration and focus while ...
What are some effective methods for increasing concentration and focus while ...
 
Social Learning Theory presentation.pptx
Social Learning Theory presentation.pptxSocial Learning Theory presentation.pptx
Social Learning Theory presentation.pptx
 
Exploring Stoic Philosophy From Ancient Wisdom to Modern Relevance.pdf
Exploring Stoic Philosophy From Ancient Wisdom to Modern Relevance.pdfExploring Stoic Philosophy From Ancient Wisdom to Modern Relevance.pdf
Exploring Stoic Philosophy From Ancient Wisdom to Modern Relevance.pdf
 
Emotional Freedom Technique Tapping Points Diagram.pdf
Emotional Freedom Technique Tapping Points Diagram.pdfEmotional Freedom Technique Tapping Points Diagram.pdf
Emotional Freedom Technique Tapping Points Diagram.pdf
 
Goregaon West Escorts 🥰 8617370543 Call Girls Offer VIP Hot Girls
Goregaon West Escorts 🥰 8617370543 Call Girls Offer VIP Hot GirlsGoregaon West Escorts 🥰 8617370543 Call Girls Offer VIP Hot Girls
Goregaon West Escorts 🥰 8617370543 Call Girls Offer VIP Hot Girls
 

Hobie revo ff install 2

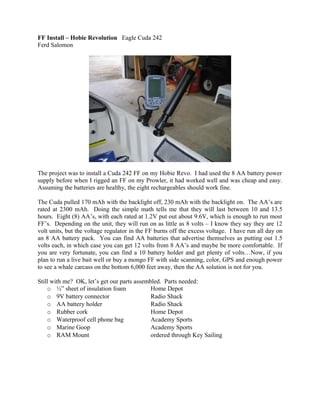
  • 1. FF Install – Hobie Revolution Eagle Cuda 242 Ferd Salomon The project was to install a Cuda 242 FF on my Hobie Revo. I had used the 8 AA battery power supply before when I rigged an FF on my Prowler, it had worked well and was cheap and easy. Assuming the batteries are healthy, the eight rechargeables should work fine. The Cuda pulled 170 mAh with the backlight off, 230 mAh with the backlight on. The AA’s are rated at 2300 mAh. Doing the simple math tells me that they will last between 10 and 13.5 hours. Eight (8) AA’s, with each rated at 1.2V put out about 9.6V, which is enough to run most FF’s. Depending on the unit, they will run on as little as 8 volts – I know they say they are 12 volt units, but the voltage regulator in the FF burns off the excess voltage. I have run all day on an 8 AA battery pack. You can find AA batteries that advertise themselves as putting out 1.5 volts each, in which case you can get 12 volts from 8 AA’s and maybe be more comfortable. If you are very fortunate, you can find a 10 battery holder and get plenty of volts…Now, if you plan to run a live bait well or buy a mongo FF with side scanning, color, GPS and enough power to see a whale carcass on the bottom 6,000 feet away, then the AA solution is not for you. Still with me? OK, let’s get our parts assembled. Parts needed: o ½” sheet of insulation foam Home Depot o 9V battery connector Radio Shack o AA battery holder Radio Shack o Rubber cork Home Depot o Waterproof cell phone bag Academy Sports o Marine Goop Academy Sports o RAM Mount ordered through Key Sailing
  • 2. Step 1. I cut a piece of foam into the shape you see below, outlined the transducer and then cut out the outline. The marked lines on the foam block are so I can align it fore and aft accurately. In the Revo, I planned to mount the transducer behind the sail mast and in front of the drive unit. . Foam block with cutout to match shape of View looking aft - just aft of the sail mount and transducer, then glued in place with Goop forward of the Mirage drive well You can choose to mount it anywhere you want, but I wanted it out of the way of stuff I stored in the hatch and in front of any disturbed water coming off the drive. I sanded the area where the block was going to go and then glued it down with plenty of Marine Goop. Ideally, you want this to cure overnight before the next step. Step 2. This is probably the most critical step in the install. You want to glue the transducer into the well created in the foam block such that there are no air pockets between the transducer and the hull. Rember, the transducer faces forward, flat side facing aft. Check your instruction manual to make sure before proceeding. I warmed the tube of Goop in a coffee cup of warm water. This will make the Goop flow easier and greatly reduce the chance of air bubbles. Jam the tube into the well and fill it up with Goop. I think it is difficult to use too much… Press the transducer down into the well and hold it until the Goop sets up – about 5-10 minutes. Let it cure. What if you mess this up? No worries, it can be redone, just peel it off and try again. Transducer glued inside the cutout with lots of Goop – ensure there are no air bubbles in the 9V Battery connector – Radio Shack Goop
  • 3. Step 3. Powering it up. Now we need to connect the FF power wire to our power source. I used heat shrink butt splices (22-18 AWG) and a 9V battery connector, Connect the red wire to the red wire, crimp well. Same for black to black. I did connect the included fuse in the red line. Use a heat gun or lighter to heat shrink the connectors. I used a big glob of Goop to make sure the connections were waterproof and then zip tied the wires into a convenient bundle. 9V connector connected to FF power wire with Battery pack placed inside waterproof bag – I heat shrink butt splices and Goop – fuse included. did file a groove in the yellow plastic top to fit Battery pack of 8 AA and battery holder from the wire… Radio Shack Step 4. Load the batteries into the holder, connect them to the battery connector and you should be good to go. I store them inside the yak inside a waterproof bag, but you can use a Pelcian box, a Tupperware or any waterproof container. I hang the battery bag inside the front hatch of the kayak so it does not lie on the bottom of the hull and stays out of the way. Battery bag hung up off the bottom of the hull – or you can hang it from a loop on the inside of Transducer cable coiled and stowed inside hull – the hull. note cables running up through cork
  • 4. Important tip – there will be a lot of transducer cable left over – DO NOT CUT IT. Something about the cable length being tuned to the transducer or some other electronic explanation. I don’t know, but cutting the cable it not good. I had an anchor trolley bolt on the side of the yak – I replaced that bolt with a longer one – about 2” long. I coiled the cable up, put a plastic strap around it and secured it with another nut on the extra length bolt. OK, I also put a small nylon spacer in there, but that was not required. If you can’t picture it, here is how it goes: Hull – washer – nut - one end of strap - nylon spacer - other end of strap - nut. Step 5. Connecting the power plug to the control head unit. I ran the power plug up through the hull just behind where I mounted the FF RAM mount. This is the small 1” ball mount with a mounting plate that matches the Cuda mount. I would recommend mounting the RAM ball prior to drilling the hole for the power plug. I then drilled a hole large enough to snugly fit the cork. I used a black rubber cork from Home Depot, and drilled two holes in the plug to match the two wires in the plug. Using a knife or razor blade, cut a slit in each side of the cork so that you can slide the wires into the holes you just drilled in the cork. I sealed the cork with plenty of Goop. Make sure you leave enough length of wire to reach the head unit throughout the range of movement of the mount. Voila, you are done… RAM mount on gunwale. FF power and transducer cable run through rubber cork and Another view of FF mount location glued in place Good luck!