SlideShare a Scribd company logo
1 of 24
Download to read offline
How to Format a Research Paper in MS Word
This information is designed to support and supplement the District 219 Research Paper
Manual, by showing how to use the computer to set up a paper to the teacher's
specifications. The 'how to' information here is for Word '97 for the PC. However, the
concepts apply to other versions of Word, as well as for other types of programs such as
AppleWorks or Word for the Mac. These examples have basis in MLA format. While some
of the details for setting up research papers in pure MLA format, APA format, or Chicago
Style format may differ, the processes for directing the computer remain the same.
Follow your teacher's preferences for the individual style elements of the paper.
Basic Document
Setup
Page Details
Quotations
& Citations
Title Page, Works
Cited, & Other Tips
Margins Page 1
Short Quotes:
less than 4 lines
Title Page
Font Page Numbering
Long Quotes:
4 lines or more
Works Cited Page
Size Headers & Footers
Citing Sources
within the
research paper
Red Hot Tips
Double Spacing Paragraph Indicators
Links, Sources,
& References
Checklist
District Research Paper Manual: This manual is distributed to all freshmen to use
throughout their high school years. It includes additional instructions and requirements
for developing research papers. The Research Paper Manual is copyrighted and cannot be
used outside of Niles Township District 219 without written permission.
Kathy Nagle, Author
Basic Document Set-Up
It is best to set up your document in the program before keying in the contents of a
research paper. If you have already keyed in the text, you may have to highlight the
area(s) you want to effect.
These examples have basis in MLA format. While some of the details for setting up
research papers in pure MLA format, APA format, or Chicago Style format may differ, the
processes for directing the computer remain the same. Follow your teacher's
preferences for the individual style elements of the paper.
Set margins at 1 inch
on all sides
1. Go to FILE>Page Set Up
2. Set Top, Bottom, Left, and
Right all to 1 inch.
3. Set Headers and Footers
to 0.5"
Note: The first page will have an
extra inch for the top margin.
Instructions are on Page Detail
Double Spacing: Research
papers are double-spaced,
except for the long quotes.
1. Go to
FORMAT>Paragraph
2. Under the Indents and
Spacing tab, look under the
Line Spacing pop-up menu
for Double.
3. Leave Spacing Before &
After set to 0.
Fonts: Use a Serif font,
Size 12
• Go to FORMAT>Font
• Choose a SERIF font such
as Times New Roman,
Palatia (Palatino), or
Bookman.
• Use Size 12.
Serif vs. Sans Serif Fonts:
SERIF fonts, as shown in row 2
of the graphic above have little
flares, bulbs, bases, and tops on
the letters called 'serifs'. The
type style used in this paragraph
is SERIF.
SANS SERIF fonts, as shown in
row 1 above, are plain. SANS
means 'without'. So, a Sans Serif
font is without serifs. The
typestyle used in this paragraph
is SANS SERIF.
Serif fonts are more readable
for documents such as letters,
research papers, newspapers,
magazines and books. Use SERIF
for your papers.
Page Details
This section addresses page numbering, headers, footers, how to set up the first page,
and how to set up subsequent pages of a Research Paper.
These examples have basis in MLA format. While some of the details for setting up
research papers in pure MLA format, APA format, or Chicago Style format may differ, the
processes for directing the computer remain the same. Follow your teacher's
preferences for the style elements of the paper.
Page 1: Add about 1/2 extra inch
to page 1.
Use the ENTER key to add the extra 1/2 inch at the top of
the first page. There are about 6 lines per inch when using
most 12 point serif fonts. If you have already set the
computer for double-spacing, then only1-2 extra returns
with the ENTER key are necessary, as in the example shown.
Do not put the title on the first page of the paper. The title
on the Title Page is sufficient.
Note: It can be helpful to see the formatting characters,
such as the ¶ character you see on the graphic. To learn more about them and how to show
and hide them, go to Red Hot Tips.
Alternative First Page Format:
Some formats call for the Writer's Name, the
Course Name/Number, and the Date at the left
margin as the first 3 (double-spaced) lines of the
first page.
In this version, the title is also on the first page.
Note that everything is still double-spaced with no
extra space between the date and the title or the
title and the first line. (Gibaldi, MLA Style Manual)
The title is centered. It can be bold and up to 18
point in size, if desired.
Page 1: Leave the page number OFF the first
page.
1. Go to FILE>Page Setup.
2. Click on the LAYOUT tab.
3. Check Different First Page. This will
remove the page number from Page 1 of
the research paper.
Numbering Pages 2 - the end automatically
Page numbers go in the HEADER, aligned right, following your last name. Look at the right
side of the picture above to see an example.
Be sure you have checked Different First Page from Page Set Up to keep a page number
from appearing on page 1.
In MS Word, you need to VIEW the Headers and Footers before you can INSERT them.
You also need to VIEW them to EDIT them.
1. Scroll to Page 2.
2. Go to VIEW>Header and Footer. Click once in the Header to position the cursor.
3. Click Align Right on the toolbar.
4. Key in your last name followed by a space.
5. Click the icon with the # sign on to tool bar to insert automatic page numbering.
The current page number will be in a gray box. The gray box indicates that the
computer is set to automatically number the pages. Do not key in individual page
numbers. Let the computer do that work.
6. Hit the ENTER key to add a space in the header between the header and the body.
Note: After checking Different First Page from Page Set Up, the titles of the Headers
are different between the Header and Footer of the first page vs. the Header and Footer
of the rest of the pages. Be sure you have scrolled to Page 2, and are working in the
Header for that page for this step.
Note: It can be permissible to have the size of the text in the Header set to 10, instead
of the normal 12 for the body. It can also be permissible to use a Sans Serif Font such as
Arial or Helvetica in the Header. This helps to differentiate it from the body. But,
whatever rules your teacher sets are the rules to follow for that project.
Paragraph Indicators, Word Wrap, & Punctuation:
• Indent the first line of each paragraph 1/2 inch
by using the TAB key on the keyboard.
Computers are pre-set to TAB over 1/2 inch.
• Do not leave extra space between paragraphs.
• Let the computer WORD WRAP. This means do
not hit the ENTER key at the end of the line
unless you purposely want to go to the next line.
An example would be when you want to begin a
new paragraph.
• There should be only one space after all
punctuation (Williams, 12). If your teacher still
has a preference for two spaces, follow that
preference. The important thing is to be
consistent throughout.
• Use the spell checker and grammar checker to help you proofread, however do not
rely on this for 100% of your proofing
Use the Show/Hide button to reveal the formatting characters, including
the number of spaces between words and sentences.
Headers
See the box above for Inserting, Viewing, and Editing Headers.
Page numbers go in the HEADER, aligned right, following your last name.
Be sure you have checked Different First Page from Page Set Up to keep a page number
from appearing on page 1.
Subheadings Within the Paper:
• Use Title Capitalization Rules
• Leave the subheading at the left margin
• Subheading should be bold, but can be both bold
and italic.
• Subheading can be either the regular 12 point size
or can be 14 point. No larger than 14 pt.
No extra spaces before or after the subheading.
Footers, Footnotes, & Endnotes
MLA Format does not utilize FOOTERS. In
other situations where a Footer is required,
the process is the same as for a header:
VIEW>Header and Footer. To get to the
Footer, click on the toggle button in the H & F Toolbar.
MLA Format does not utilize Footnotes for citations.
MLA Format does not utilize Endnotes for citations.
In MLA format, summary citation references are made within the document, with the full
citation source information in the Works Cited section. In other situations, this section is
sometimes called the Bibliography.
It is possible to have sources cited in the Works Cited section that were not utilized for
Internal Citations, Footnotes, or Endnotes.
Citing Sources
Give Credit Where Credit is Due
It is important to inform your reader of the sources of your information in a research
paper. This is called "citing sources." These are called "citations." Citations are made in
two places, and the format is different for each place. The first place is within the
document. The second place is on the Works Cited page at the end of the document. It is
possible to have sources listed on the Works Cited page that were used in the research,
but that were not necessarily quoted in the body of the paper. There are several
conventions, also called "format rules," for citing sources and there are several types of
quotations. This page shows you how to cite sources within a document for actual quotes,
paraphrases, or summaries within a document.
These examples have basis in MLA format. While some of the details for setting up
research papers in pure MLA format, APA format, or Chicago Style format may differ, the
processes for directing the computer remain the same. Follow your teacher's
preferences for the individual style elements of the paper.
Different types of quotations include: (more information on the different types is
available in the Research Manual.
Short Quotations Long Quotations
Partial Quotations Adding to Quotations
The only type of quotation that involves a special computer process is the Long Quotation.
Guidelines and formats for Short Quotations, Partial Quotations, and Adding to
Quotations can be found on page 9:8 of the Niles North Research Paper Manual.
Long Quotations are defined as 4 lines or more
(approximately 40 words). One format calls for
them to be single spaced and indented an extra
inch from both sides. To do this:
1. Make sure the quote starts on a new line
by hitting the ENTER (Return) key.
2. Click and drag across the quote to
highlight (select) it.
3. Go to FORMAT/Paragraph. Change Line
Spacing to Single.
4. With the text still highlighted, click on
the small square of the left margin
marker as shown by the blue arrow. Drag
this margin marker to the right 1 inch. It
should look like the picture on the right.
5. With the text still highlighted, click on the triangle in the ruler of the right
margin, and drag it to the left one inch. The result should look like the picture on
the right.
6. Use the parenthetical citation with the author's name, a comma, and the page
number inside parentheses. There is no space after the left and no space before
the right parentheses. See pages 9:13 and 10:1 of the Research Manual for more
information on proper citations.
7. Because the indentations and single spacing are the signals that this is a quotation,
there is no need to use quotation marks.
Two or more paragraphs in a long quote:
If there are two or more paragraphs in the
quotation, set a TAB marker to indent the first
line of each paragraph a quarter inch. To do this:
1. Highlight the text that will be affected by
this tab. In this case, it will be the entire
long quote.
2. Click once in the white part of the ruler, 2
marks to the right of the margin marker.
Each mark in the ruler represents 1/8 inch. Two marks, then equal a quarter inch.
You can slide this marker left and right along the ruler. Make sure the left part of
the tab marker is on the quarter-inch mark.
3. Click to the left of the first line of the first paragraph to place the cursor there,
and hit the TAB key. Click to the left of the first line of each additional paragraph
to place the cursor there, and hit the TAB key.
Alternative Method for Long Quote Format
Some teachers use a format that calls for
leaving the quote double-spaced. If this
format is utilized, the process for beginning
the quote on its own line and highlighting the
quote to select it are the same as above. Also
the same rule applies for indenting the
paragraph 1/4 inch when the quote includes
multiple paragraphs.
The only differences are that the left margin
marker is sometimes dragged over 1/2 inch
instead of one inch, and the right margin
marker remains the same.
Format for Citing Sources
There are also format rules (conventions) for citing sources within the document as well as
on the Works Cited pages. What comes first: Author? Last Name? What if there is no
author's name available? What is the correct punctuation? What is underlined? What is
italicized? Look on page 9:8 of the Research Paper Manual for additional information for
internal documentation formats. Look in the Works Cited section for sample formats to
cite various types of media..
Follow your teacher's specifications for long quotes in a research paper.
This Web site is only intended to show you how to use the computer to achieve the
desired results.
Links, Sources, and References
This page includes references that support and document this Web site. The links will open
in a new window. For instructions on how to set up and format a Works Cited page in a
research paper, click here. Note the proper format for books in a Works Cited page is
italics, not underscore and italics. On a Web page, however, the books that link to Web
sites are also underscored and in blue.
BC-OWL Links, "An Overview of MLA (Modern Language Association) Format." Bridgewater
College, Bridgewater, VA. DA:
October, 2002. ( http://www.bridgewater.edu/WritingCenter/manual/MLAformat.htm)
BC-OWL Links, "An Overview of APA (American Psychological Association) Format."
Bridgewater College, Bridgewater, VA. DA:
June, 2003. (http://www.bridgewater.edu/WritingCenter/manual/APAformat.htm)
Beeftink, Christine, and Michael Graham and Heather Ingraham, Research Paper Manual.
Niles, IL:
Niles North High School, 2001.
Gibaldi, Joseph, MLA Handbook for Writers of Research Papers, 5th Edition. New York,
NY: Modern
Language Association, 1999.
Gibaldi, Joseph, MLA Style Manual and Guide to Scholarly Publishing, 2nd Edition. New
York, NY: Modern
Language Association, 1998.
Humanities Department, "A Guide for Writing Research Papers Based on MLA
Documentation."
Capital Community College, Hartford, CT. DM: June, 2002.
(http://webster.commnet.edu/mla/index.shtml)
Modern Language Association, "MLA Style, Frequently Asked Questions about MLA
Style."
LA: 5/18/2000. Copyright, 2002. (http://www.mla.org)
Sebranek, Patrick, and Verne Meyer and Dave Kemper. Writer's Inc. Burlington, WI:
Great Source Education Group, 2000.
The Write Source, Burlington, WI, "Electronic Sources MLA Style", DM: May, 2002.
(http://www.thewritesource.com/mla.htm)
Strunk Jr., William, E. B. White, Roger Angell, The Elements of Style (4th Edition).
Boston, MA:
Allyn & Bacon, 2000.
Williams, Robin, The PC is Not a Typewriter: A Style Manual for Creating Professional-
Level Type on Your Personal Computer.* Berkeley, CA: Peachpit Press, 1992.
Williams, Robin, The Mac is Not a Typewriter.* Berkeley, CA: Peachpit Press, 1995.
Williams, Robin, The Non-Designers Design Book. Berkeley, CA: Peachpit Press, 1994.
Williams, Robin, Beyond the Mac is Not a Typewriter.* Berkeley, CA: Peachpit Press, 1996.
*These books were written when there were more differences between word processing
programs when working on the Mac or the PC, and before MS Word became the
predominant program. The appendices refer to the processes for specific programs, which
is why they were published for each platform. The concepts and rules in the body of The
Mac is Not a Typewriter and The PC is Not a Typewriter are the same. The concepts and
rules in Beyond the Mac is Not a Typewriter also apply to both computer platforms. These
books, in fact, were the inspiration for this Web site.
Title Page
The Title Page can be part of the main document, or it can
be a separate document. Since people often do the Title Page
last, these instructions will create it as a NEW (separate)
document.
These examples have basis in MLA format. While some of
the details for setting up research papers in pure MLA
format, APA format, or Chicago Style format may differ,
the processes for directing the computer remain the same.
Follow your teacher's preferences for the style elements
of the paper.
Title Page Set Up
1. Key in 6 extra single-spaced returns (2 - 3 if using
double-spacing) to add an extra inch to the top
margin. (The formula is: approximately 6 lines
equals 1 inch when using a 12 pt. font.)
2. Key in the Title. Use Title Case, capitalizing only
the first letter of the important words. Do not
use ALL CAPS.
3. Key in enough returns for about 4 more inches of
space. (Using the formula, that would be
approximately 28 returns.)
4. On separate lines, key in your name, the name of the course, your teacher's name,
and the date.
The date line should end up approximately 1 to 1-1/2 inches from the bottom of the page.
The 1 inch pre-set bottom margin is included in that amount. If any of the lines from the
bottom section go to a new page, remove some paces between the title and your name.
Word allows you to change case on any selected text. Once you have keyed in the title, you
might want to consider 'verifying it' through the program. Highlighted the desired text,
then go to FORMAT>Change Case... Click the Title Case button, then OK. This will also
correct any capitalization errors.
Guidelines, Tips, & Options
You can use the same serif font (such as Times) as is
in the body of the paper, or you can use a sans serif
font (such as Arial) for the title page. You may also be
able to use a fancy font as long as it is appropriate to
your content and if your instructor allows.
Change the font size for the title to a larger size and
bold, if desired, and if your teacher allows. The title
size can be as large as 36 pt. Try to keep the title on one line. If two lines are necessary,
break the title for the second line to coincide with the flow of the phrasing.
For the information on the bottom of the title page, do not use a size larger than 18 pt.,
and keep it smaller than the title.
Click the Show/Hide button to show the number of return characters
when spacing down from the top and between the title and the
information nearer the bottom of the title page. These characters do not print even when
they are showing on the screen. Click the Show/Hide button again to hide them.
Page Border
It is generally permissible, but optional, to add a page border to the
Title Page. To do this:
1. Go to FORMAT>Borders and Shading.
2. Click on the Page Border tab.
3. Choose a Style and a Width. There are also some choices
under Art. But, it is better, in most cases, to keep your choice
simple.
4. If the lines show up on each of the 4
sides as in the sample shown at the
right, click OK. Otherwise, you may
have to click on one or more sides of
the page to apply the border correctly.
Experiment with some options to see what you
like best. Remember: It is better to keep it
simple.
A Sans Serif font is on the top line.
A Serif font is on the bottom line.
Inserting a picture
Some instructors allow you to insert a picture on
your title page. Others prefer having no picture.
If your instructor allows the use of a picture,
here is how:
1. Click on the page where you want the
picture to go, then go to:
2. INSERT>Picture>Clip Art...: This takes
you to the built-in Microsoft clip art
gallery. It also takes you to the online
Microsoft clip art gallery.
OR go to:
INSERT>Picture>From File...: Use this option
when you have saved a picture from the internet,
are using a picture from a CD ROM, or other source outside the Microsoft Word program.
It may be necessary to remove some of the return lines to keep the rest of the
information at the bottom of the page.
Text Wrap Around Pictures
Once the picture is inserted into the document, you may need to specify how you want the
text to wrap around it. In the case of a title page, text wrap will most likely be Top &
Bottom. To do this, click on the picture.
1. Go to FORMAT>PICTURE...
2. Click on Layout.
3. Select Top & Bottom.
The Works Cited Page
The Works Cited section used to be called the "Bibliography." With so many types of
media sources available today, a better description is, "Works Cited." This is the last
section of the paper, and your last name with the page number in the Header continue
through this section.
• Begin the Works Cited on a
new page at the end of the
paper. To force the computer
to start a new page, make sure
the cursor is at the end of the
body of the paper and go to
INSERT>Break. The default
will be Page Break. If the
computer is not set for Page
Break, click on that circle.
• Leave the computer set to
double-spacing.
• If the teacher's preference is
to add an extra 1/2 inch to the
top margin using 1 - 2 extra returns at the top as with the Title Page.
• Center the words, "Works Cited." They can be in bold, if desired. Otherwise, use
the same 1-inch top margin as the rest of the paper.
• Capitalize only the first letter of both words. Do not use all caps for the title. This
is called Title Case.
• Do not put extra space between the title and the body.
• Indent the second and subsequent lines for a given entry.
In this case, it might be easier to hit
ENTER at the end of a line, then to
TAB in for the second line indention.
If you know how to use Margin
Markers, let the entries Word Wrap,
and use the Hanging Indent process in
the program. Go to the program's online
HELP, and look for Hanging Indent.
For directions on how to organize sources and on how to present sources within the Works
Cited section, refer to the Research Paper Manual.
Red Hot Tips for Formatting Research Papers on a Computer
This page is designed to provide some additional tips and details for formatting research
papers. The information here also applies to all word processing documents, publications, and
even Web pages. The screen shots here are for MS Word 97 for the PC. However, the concepts
apply, and most of the processes are similar to other versions of Word and for word processors
on the Macintosh.
Some of the conventions on this list are relatively new. Since the introduction of the personal
computer in the late '80s, new capabilities have expanded opportunities for formatting. The
ready-access people now have to a PC has brought proportional letter spacing to the desktop,
with the ability to change styles, sizes, and even fonts. The ease of use has changed the old
ways of formatting from the limitations of the typewriter. This is especially true in the rules for
spaces following punctuation, underlining, use of italics, and the use of all caps. MLA and other
national associations are now also supporting these conventions. The word, 'conventions'
means standardized ways of doing things.
The most important thing, whether you utilize the new conventions or the old ones, is to be
consistent within a document. And, if your teacher has certain preferences, follow those
requirements. Go to the "Links, Sources and References" page for this Web site to find some of
the documentation and resources that support these tips. The following topics are covered here:
Punctuation Capitalization Spaces around
special characters
Dashes and hyphens
Abbreviations Underlining Footnotes vs. Footers Footnotes vs.
Endnotes
Headings vs. Headers Widows and Orphans Fonts Show/Hide formatting
characters
Unordered Lists
(Bullets)
Ordered Lists
(Numbering)
Title Tips Subheads
Formatting Characters
Use the SHOW/HIDE button (the ¶ icon) in the Toolbar to show or hide formatting characters
that indicate spaces, tabs, and returns. Formatting characters do not print, even if you have this
option turned on and they appear on the screen. Using this feature enables you to quickly
analyze and troubleshoot formatting issues. Consider using this feature for proofreading the
following tips in this section.
¶ = Enter or Return
An Arrow = Tab
A dot in the center of a line = space
Punctuation
One space after all punctuation: periods, commas, colons, semi colons, exclamation
points, and question marks.
No spaces before punctuation.
Example: This is correct._This is incorrect .
(The underscore is used to indicate the space.)
Word allows the user to define punctuation options so the program will auto-correct them. For
example, if you want to use one space after a period, and hit the space bar twice out of habit,
the computer program will correct it to one. To set this feature, go to TOOLS>Options>Spelling
&Grammar>Settings. There are other punctuation and grammar options here. Check them out.
Capitalization
All caps are more difficult to read. We recognize a word not only by its letters, but by the shape
of the whole word. When text is in all caps, every word has the same shape, so we have to go
back to reading letter by letter (Williams 196).
Do not use all caps for titles, subtitles, or in the body of the paper. Do not underline
titles, subtitles, or subheadings in a paper.
Use Title Case for titles. Title Case means capitalizing the first letter of each word. If in doubt
about which words to capitalize and which ones not to, highlight the title and go to
FORMAT>Change Case...Title Case. Let the computer do it, but take note of the result.
Spaces around special characters
Parentheses and Brackets
No spaces between open parentheses or brackets and the first letter.
No spaces between the last letter and the close parentheses or bracket.
Example: (No space between the left parentheses and the letter N. No space after the last letter
or character and the right parentheses.)
One space after the closed parentheses. This will have special application on the Works
Cited page when needing to correctly format Web site citations.
Some situations use these brackets
[No space between starting bracket and first letter, and no space between last letter or
punctuation and ending bracket.]
{No space between starting bracket and first letter, and no space between last letter or
punctuation and ending bracket.}
<These brackets are often used when quoting all or part of an e-mail before making a reply. The
same spacing rules apply.>
Apostrophes
No spaces before or after an apostrophe unless the apostrophe is at the end of a word.
Then, one space as normal between words.
Example: Don't put a space between letters and apostrophes unless it is at the end of a word
such as, "The Jones' house is up for sale."
Quotation Marks
• No spaces between an opening double or single quotation mark and the first
letter.
• No spaces before the last letter and a closing double or single quotation mark.
• One space following a closing single or double quotation mark because it will be
either at the end of a sentence or at the end of a word.
Note the use of one space after a period and the spacing around commas as well as the
spacing around the quotes in this example:
Albert Einstein once said, "Not everything that can be counted counts, and not everything that
counts can be counted." This quote has many applications.
Headers vs. Headings
A header is the same information that appears on the top of every page. While the actual
page number changes following the word , "Page" in a header the similar information appears in
the same place on each page. Click here if you want to know how to add a header. Most
research paper formats require that the headers be removed from the first page. Click here if
you want to know how to do that.
A heading appears once on a page. It can be a title heading at the beginning of the paper.
Title headings are usually centered. Sometimes the teacher allows them to be in a larger size,
such as 18 pt., and bold. Some teachers will allow you to choose a heading font that is
appropriate for your content, such as a fancy old English font for a paper on King Henry the VIII.
Do not use such a font for the entire paper, though. Use a serif font for the body of the paper.
Click on the link to learn more about serif fonts..
A subheading appears once, within the document to introduce a new section. There are
several ways to format subheadings. Be consistent throughout the paper in the style you
choose. Keep subheads flush left, not centered.
subheading 1: A colon followed by one space (when using one space after all punctuation). It
can be bold, italic, or both.
subheading 2 -- A dash (two hyphens) as shown here. It can be bold, italic, or both. Some
people like to use a space before the first and after the second hyphen. If using spaces, use
them both places. Be consistent. Click here to learn more about dashes and hyphens.
subheading 3
The subheading is on its own line preceding the paragraph it introduces. There are no extra
spaces before the subheading. There are no fewer spaces after the subheading. Just use the
regular, preset double spacing, as shown in this example. It can be one size larger (such as a
14 pt. subhead on a 12 pt. paper), and it can be bold and/or italic.
Footers vs. Footnotes
A footer appears at the bottom of every page. It functions similarly to a header. Some
people put the page number in the footer, either centered or near the right margin. While
the page number changes throughout the document, the positioning of the number, along with
the word, "Page" preceding it, appear in the same place and style on each page. Click here to if
you need to know how to set up or access a footer.
A footnote appears at the bottom of the page where a citation, comment, or explanation is
referenced. A small number or symbol above the base line in the text indicates there is a
footnote. This number or symbol is called 'superscript'.
If there is more than one footnote, they will be numbered or lettered consecutively, with the
number or letter in the body matching the number or letter in the footnote list at the bottom of
the page. Usually, the numbering or lettering scheme starts over on each new page.
MLA and APA formats for research papers do not use footnotes for citations. Citations are made
within the body of the paper and are enclosed in parentheses. This is called, "In-Text
Parenthetical Citations". Click here to go to the Niles North Research Paper Manual more
information about In-Text Parenthetical Citations.
So, footnotes in an MLA or APA research paper will only be used to additional information or
sources related to the paper but not directly included in the paper.
MS Word formats the footnotes and endnotes automatically, including automatic numbering.
You have some options in the number format, such as numbers, letters, or roman numerals. Go
to INSERT>Footnote..., and follow the prompts. Check out the symbol choices and options.
The program will insert the number, and move the cursor to the bottom of the page. All you have
to do is key in the information in the appropriate order. The superscript number and type size
will be automatic. Footnotes are single spaced, and this is also automatically done.
Footnotes vs. Endnotes
While footnotes appear at the bottom of the page containing their reference, endnotes
appear at the end of the document. In a book, they might appear at the end of the chapter.
Or, they could appear at the end of the book. In this case, then, the reference numbers continue
consecutively throughout the section. Endnotes at the end of each chapter would begin with the
number 1 at the beginning of the next chapter. They would continue numbering consecutively if
they are all at the end of the book. Formatting for endnotes is the same as for footnotes. It is
only the placement that is different.
Endnotes are not the same as a Works Cited page. Endnotes make up the list of citations
specifically referenced throughout the paper. The same source might be used more than once.
Works Cited is the list of sources used for the paper. Some sources may not necessarily be
used as citations for specific references within the body.
Endnotes begin on a new page after the end of a research paper. As with a Works Cited Page,
all lines on the page are double-spaced. All references listed in Endnotes must appear on the
Works Cited page.
Fonts
Use a serif font, such as a Bookman type, Times, Palatia/Palatino, or Schoolbook type for
your paper. Size 12 is standard. There are basically two kinds of fonts used in publishing:
Serif and Sans Serif. Serif fonts are more readable for large amounts of text. Books, magazines,
and newspapers use serif fonts. Sans Serif fonts, such as Arial, Helvetica, or Avante Garde are
more legible for situations such as billboards, spreadsheets, and short bits of text in brochures.
For short bursts of text on a Web page, sans serif fonts can be more effective. For longer
passages of text, as with the guidelines for print publication, serif fonts can provide more
readable results. There are examples of serif and sans serif fonts in this paragraph. Can you
spot them? Can you spot the characteristics that make them different? Key in a few words on
two lines of a paper. Set one up in a suggested serif font, and the other in a suggested sans
serif font. Can you tell the difference? To learn more about fonts, click here.
Abbreviations
Abbreviations are usually discouraged in a paper. In body text, spell out Street instead of
using St. . Avoid words like lbs. for pounds or oz. for ounces. Spell out the names of states.
However, if you are going to abbreviate a state, use the correct two capital letter abbreviation,
with no spaces and no periods. Illinois is IL and not Ill., ILL., IL. or I.L. Titles, when referring to
people, such as Mr. John Smith are appropriate. Note the punctuation and spaces. There may
be other cases, such as acronyms, such as EPA for Environmental Protection Agency, are
acceptable. Note that there is no punctuation and no spaces. Be sure that your first use of an
acronym includes a fully-spelled out reference. Examples note the use of parentheses, spaces,
and no punctuation.:
Last year, the EPA (Environmental Protection Agency), conducted a study...
Last year, the Environmental Protection Agency (EPA), conducted a study...
Underlining
Underlining is no longer necessary as it was when we only had typewriters. With
typewriters, the style was to underling a title and put the title in all caps for emphasis. Emphasis
within text was also conveyed using the underline technique. Now that we have computers with
word processors, we have other options to convey emphasis and to format titles. We can
change the size, make it bold, italicize it, or use a fancy font (called a display font.) Click here to
learn more about formatting titles.
In the body of the paper, use bold OR italics, rather than underline. Nothing is more redundant
than bold and underlined, except for italics and underlined, or bold and italics and underlined.
Underline is also appropriate in certain citation styles. Books are almost always still underlined
in citations. Check your teacher's citation specifications.
Italics
Italics are slanted letters like the ones used in the subheadings for this section. Each font
has the option for italicized type. Use italics for emphasis or style, such as the bold and italic
style used for these subheads. Because of the slant, italicized words crowd the 'turf' of the next
letter.
So, when selecting a word or phrase to italicize, also select the space following it. Then the
space will also be italicized, and the spacing will look better.
Do not underline words in italics. See the section on underlining for more information.
Widows & Orphans
A widow is a very short last line at the end of a paragraph. The guideline is seven
characters or less. Rework something in the paragraph, or find a way to delete extra words to
avoid widows.
A widow is also sometimes referred to when there is a single line of a paragraph on the bottom
of the page or columns. Do not leave one line alone at the bottom of the page or column. Go to
INSERT>Break and enter a Page Break just prior to that line. The bottom margin on that page
will be slightly larger, then, but that is OK.
An orphan is the last line of a paragraph at the top of the next column or the next page. Do not
leave a single line alone at the top of a column or page. For paragraphs of four lines or more,
insert a page break so that there are at least two lines on both pages or columns. For 3-line
paragraphs, you may want to do a rewrite to expand the paragraph or combine it with another.
Dashes & Hyphens
For our purposes, dash is two hyphens. In the desktop publishing world, they call it an em
dash, and is actually created with a different set of key strokes. For purposes of a research
paper, two hyphens is acceptable. A dash is often used as a substitute for a colon or for
parentheses. There are no spaces before, after, or between the dashes. Note that the dash
appears at the center of the line of type.
The hyphen key is the lower case symbol located next to the 0 on the keyboard. For
hyphenated words or for line breaks, there are no spaces before or after the hyphen. Like the
dash, the hyphen appears at the center of the line of type. The underscore (SHIFT/hyphen) is at
the baseline of the type.
When using a hyphen between words to indicate duration such as 9:00 - 5:00, or 5 - 7 days, or
June - August, put a space before and after the hyphen.
A hyphen can also be used as a bullet point symbol.
Unordered Lists (Bullets)
Bullet Points are sentences, words, or phrases on lines by themselves that allow a reader
to quickly scan the list. They are not sequential steps, so they can be in any order that the
author chooses.
To create a list of bullet points, key in the first one on a new line. Highlight it and select the
toolbar button with the three vertical dots:
Bullet points should also be indented. Click on the right arrow button once to indent the bullets.
After the first bullet point line is set up, the formatting will follow down the page for the rest when
you use the ENTER key.
To turn off the bullet points, position the cursor on the new line, then click the bullet icon to turn
it off, and the left arrow icon to go back to the original format. Watch capitalization and
punctuation of bullet points. Phrases or words will not have punctuation following them. It is
optional to capitalize them or not, but be consistent. Sentences will have the appropriate
capitalization and punctuation, as usual. Here is what the indented bullets will look like:
• bullet point 1
• bullet point 2
• bullet point 3
Note: You can also just key in each bullet on a new line at the left margin, then, select them all
at the same time, and click on the bullet point button, followed by the right arrow.
Ordered Lists (Numbering)
Ordered Lists are sentences, words, or phrases on lines by themselves that allow a
reader to easily follow them. They are sequential steps, indicating that they should be done in
order.
To create an ordered list, key in the first one on a new line. Highlight it and select the toolbar
button with the three vertical numbers:
Ordered lists should also be indented. Click on the right arrow button once to indent the list.
After the first number is set up, the formatting will follow down the page, and the numbers will
automatically sequence for the rest when you use the ENTER key.
To turn off the listing, position the cursor on the new line, then click on the icon to turn it off, and
the left arrow icon to go back to the original format. Watch capitalization and punctuation of the
list. Phrases or words will not have punctuation following them. It is optional to capitalize them
or not, but be consistent. Sentences will have the appropriate capitalization and punctuation, as
usual. Here is what the indented, ordered list will look like:
1. Step 1
2. Step 2
3. Step 3
Note: You can also just key in each bullet on a new line at the left margin, then, select them all
at the same time, and click on the numbered button, followed by the right arrow.
Title Tips
• Center titles, using upper and lower case letters.
• Do not use all caps or small caps. They are difficult to read.
• Never hyphenate a word in a title.
• Break lines sensibly in a multiple-line title. Look at the flow and rhythm of the phrasing,
and break the line there, not simply at the end of the full line.
• Titles can be bold, one or two sizes larger than the font size in the body, or (with the
teacher's permission) a fancy font that represents the topic of the paper.
• If using a subtitle with a main title, put the subtitle on a new line in a smaller size than the
main title.
Checklist for Proper Research Paper Format
Print this list and check off each item when you know you have completed it, corrected it, or
have otherwise addressed all of the appropriate formatting issues in setting up your Research
Paper. Use the Web site at www.niles-hs.k12.il.us/ResearchPaperWebsite/index.htm or go to
the Niles North Home Page, click on the Resources link, and How to format a Research Paper
to find the details for each of these issues. The site includes more information about each item
and how to locate the appropriate menu items on the computer. If you are unsure what some of
these items on the check list mean, look on the Web Site for an explanation.
Basic page setup for the paper:
__ Set margins at 1 inch on all sides.
__ Add 1 extra inch on the first page.
__ Use double-spacing.
__ Indent paragraphs ½ inch.
__ No extra blank lines between
paragraphs.
__ Put your name followed by a space
and the page number in the header.
__ No header on the first page.
__ Set the computer to number the pages
automatically.
__ Use a serif font, size 12.
__ Format long quotes as specified by the
teacher. Single-spaced, indented from
both sides or double-spaced, but
indented from left side.
__ Use proper internal citation formats to
cite sources within the paper.
Works Cited Page:
__ Insert a Page Break to begin on a new
page.
__ Continue with double-spacing.
__ Go to INSERT>Break/Page Break to
start the Works Cited on new page.
__ Add an extra 1/2 inch to the top
margin using 1 - 2 extra returns.
__ Center the words, "Works Cited". They
can be in bold, if desired.
__ Use upper and lower case, not all
caps.
__ Do not put extra space between the
title and the body.
__ Indent the second and subsequent
lines for each entry.
Title Page (suggest making a new document):
__ Set margins at 2 inches for the top and
1 inch on all other sides.
__ Use upper and lower case, called
“Title Case.” Do not use all caps.
__ Use the same serif font as is in the
body of the paper, unless the teacher
permits a fancy font that is appropriate
to the content.
__ Size can be larger than in the body of
the paper, and bold, if desired.
__ If the title is longer than one line, break
the words at a natural break in the
phrasing.
__ If there is a sub-title, put it in a smaller
size than the main title.
__ Add about 4 inches of space between
the title by hitting the ENTER key.
At 6 single-spaced lines per inch, this
is about 28 returns with the Enter key.
__ The bottom section of the page
includes, in this order: Your Name,
Course Name, Teacher, Date.
__ The Date line should be between 1
and 1 ½ inches from the bottom of the
page. Add or delete returns as
necessary.
__ If adding a picture and a page border
is permitted, see the Web Site for
instructions and guidelines

More Related Content

What's hot

2011 engineering general
2011 engineering general2011 engineering general
2011 engineering generalHemacsulb
 
Creating an apa style reference list guide 7th ed.
Creating an apa style reference list guide 7th ed.Creating an apa style reference list guide 7th ed.
Creating an apa style reference list guide 7th ed.Jonathan Jimenez
 
APA research paper format
APA research paper formatAPA research paper format
APA research paper formatEssayAcademy
 
MLA Format Presentation
MLA Format PresentationMLA Format Presentation
MLA Format Presentationmcardonalebron
 
Ieee rules for paper presentation
Ieee rules for paper presentationIeee rules for paper presentation
Ieee rules for paper presentationffunny
 
Abstract and keywords guide 7th ed.
Abstract and keywords guide 7th ed.Abstract and keywords guide 7th ed.
Abstract and keywords guide 7th ed.Jonathan Jimenez
 
mini thesis template APA example 6th edition AIPX[1]
mini thesis template APA example 6th edition AIPX[1]mini thesis template APA example 6th edition AIPX[1]
mini thesis template APA example 6th edition AIPX[1]Kristina Masten
 
Sample IEEE Paper Format
Sample IEEE Paper FormatSample IEEE Paper Format
Sample IEEE Paper FormatAanand Kumar
 
Axel Davieau - Press Production Guide - Writing Sample
Axel Davieau - Press Production Guide - Writing SampleAxel Davieau - Press Production Guide - Writing Sample
Axel Davieau - Press Production Guide - Writing SampleAxel Davieau
 
How to start a research paper basic formatting
How to start a research paper basic formattingHow to start a research paper basic formatting
How to start a research paper basic formattingEssayAcademy
 
Edu 506 educator preparation/tutorialoutlet
Edu 506 educator preparation/tutorialoutletEdu 506 educator preparation/tutorialoutlet
Edu 506 educator preparation/tutorialoutletTitmarsh
 
Ieee format paper
Ieee format paperIeee format paper
Ieee format paperArif LP
 

What's hot (20)

2017 version of new rules powerpoint for submission and essential rules
2017 version of new rules powerpoint for submission and essential rules2017 version of new rules powerpoint for submission and essential rules
2017 version of new rules powerpoint for submission and essential rules
 
Mla part i
Mla part iMla part i
Mla part i
 
Mac different page numbers inserted in one document
Mac different page numbers inserted in one documentMac different page numbers inserted in one document
Mac different page numbers inserted in one document
 
2011 engineering general
2011 engineering general2011 engineering general
2011 engineering general
 
Creating an apa style reference list guide 7th ed.
Creating an apa style reference list guide 7th ed.Creating an apa style reference list guide 7th ed.
Creating an apa style reference list guide 7th ed.
 
APA research paper format
APA research paper formatAPA research paper format
APA research paper format
 
MLA Format
MLA FormatMLA Format
MLA Format
 
MLA Format Presentation
MLA Format PresentationMLA Format Presentation
MLA Format Presentation
 
Ieee rules for paper presentation
Ieee rules for paper presentationIeee rules for paper presentation
Ieee rules for paper presentation
 
Reports
ReportsReports
Reports
 
Abstract and keywords guide 7th ed.
Abstract and keywords guide 7th ed.Abstract and keywords guide 7th ed.
Abstract and keywords guide 7th ed.
 
Ieee paper format
Ieee paper formatIeee paper format
Ieee paper format
 
mini thesis template APA example 6th edition AIPX[1]
mini thesis template APA example 6th edition AIPX[1]mini thesis template APA example 6th edition AIPX[1]
mini thesis template APA example 6th edition AIPX[1]
 
Sample IEEE Paper Format
Sample IEEE Paper FormatSample IEEE Paper Format
Sample IEEE Paper Format
 
Axel Davieau - Press Production Guide - Writing Sample
Axel Davieau - Press Production Guide - Writing SampleAxel Davieau - Press Production Guide - Writing Sample
Axel Davieau - Press Production Guide - Writing Sample
 
How to start a research paper basic formatting
How to start a research paper basic formattingHow to start a research paper basic formatting
How to start a research paper basic formatting
 
MLA Template
MLA TemplateMLA Template
MLA Template
 
Ieee format
Ieee formatIeee format
Ieee format
 
Edu 506 educator preparation/tutorialoutlet
Edu 506 educator preparation/tutorialoutletEdu 506 educator preparation/tutorialoutlet
Edu 506 educator preparation/tutorialoutlet
 
Ieee format paper
Ieee format paperIeee format paper
Ieee format paper
 

Viewers also liked

Viewers also liked (20)

Portfolio 2010
Portfolio 2010Portfolio 2010
Portfolio 2010
 
Gttttttttt
GtttttttttGttttttttt
Gttttttttt
 
Video production process
Video production processVideo production process
Video production process
 
Part
PartPart
Part
 
Paragraph
ParagraphParagraph
Paragraph
 
clauses
clausesclauses
clauses
 
Berry Gordy
Berry GordyBerry Gordy
Berry Gordy
 
Action
ActionAction
Action
 
Individualist And Collectivist Societies
Individualist And Collectivist SocietiesIndividualist And Collectivist Societies
Individualist And Collectivist Societies
 
Individualist And Collectivist Cultures
Individualist And Collectivist CulturesIndividualist And Collectivist Cultures
Individualist And Collectivist Cultures
 
Functions Of The Counselor
Functions Of The CounselorFunctions Of The Counselor
Functions Of The Counselor
 
Lesson plan Social Studies/History
Lesson plan Social Studies/HistoryLesson plan Social Studies/History
Lesson plan Social Studies/History
 
Detailed lesson plan
Detailed lesson planDetailed lesson plan
Detailed lesson plan
 
Banghay aralin sa A.P. II
Banghay aralin sa A.P. IIBanghay aralin sa A.P. II
Banghay aralin sa A.P. II
 
Masusing Banghay-Aralin sa Pagtuturo ng Araling Panlipunan (Ekonomiks) Ika-ap...
Masusing Banghay-Aralin sa Pagtuturo ng Araling Panlipunan (Ekonomiks) Ika-ap...Masusing Banghay-Aralin sa Pagtuturo ng Araling Panlipunan (Ekonomiks) Ika-ap...
Masusing Banghay-Aralin sa Pagtuturo ng Araling Panlipunan (Ekonomiks) Ika-ap...
 
Masusing Banghay Aralin sa Araling Panlipunan IV
Masusing Banghay Aralin sa Araling Panlipunan IVMasusing Banghay Aralin sa Araling Panlipunan IV
Masusing Banghay Aralin sa Araling Panlipunan IV
 
Research proposal sample
Research proposal sampleResearch proposal sample
Research proposal sample
 
Lesson plan K12 Araling Panlipunan
Lesson plan K12 Araling PanlipunanLesson plan K12 Araling Panlipunan
Lesson plan K12 Araling Panlipunan
 
Basic counselling skills
Basic counselling skills  Basic counselling skills
Basic counselling skills
 
Banghay sa A.P. III
Banghay sa A.P. IIIBanghay sa A.P. III
Banghay sa A.P. III
 

Similar to Resesarch paper format

Preliminary Pages How to Start Page Numbering at a Specifi.docx
Preliminary Pages  How to Start Page Numbering at a Specifi.docxPreliminary Pages  How to Start Page Numbering at a Specifi.docx
Preliminary Pages How to Start Page Numbering at a Specifi.docxLacieKlineeb
 
Use of APA style in academic writing for Avoiding plagiarism_03102020.PPTX
Use of APA style in  academic writing for Avoiding plagiarism_03102020.PPTXUse of APA style in  academic writing for Avoiding plagiarism_03102020.PPTX
Use of APA style in academic writing for Avoiding plagiarism_03102020.PPTXBIDYANATHJHA3
 
Formatting papers
Formatting papersFormatting papers
Formatting papersLR731
 
Apa 6th-edition-template-without-abstract
Apa 6th-edition-template-without-abstractApa 6th-edition-template-without-abstract
Apa 6th-edition-template-without-abstractKim Spivey
 
Complete Guide to APA Format Example to Remember
Complete Guide to APA Format Example to RememberComplete Guide to APA Format Example to Remember
Complete Guide to APA Format Example to RememberAPA Editor
 
APA Student Paper Setup Guide
APA Student Paper Setup GuideAPA Student Paper Setup Guide
APA Student Paper Setup GuideNathan Mathis
 
MLA formatting
MLA formattingMLA formatting
MLA formattingberryt1
 
1 Center for Writing Excellence © 2014 Apollo .docx
    1     Center for Writing Excellence © 2014 Apollo .docx    1     Center for Writing Excellence © 2014 Apollo .docx
1 Center for Writing Excellence © 2014 Apollo .docxShiraPrater50
 
1 Center for Writing Excellence © 2014 Apollo .docx
    1     Center for Writing Excellence © 2014 Apollo .docx    1     Center for Writing Excellence © 2014 Apollo .docx
1 Center for Writing Excellence © 2014 Apollo .docxjoyjonna282
 
1 Center for Writing Excellence © 2014 Apollo .docx
    1     Center for Writing Excellence © 2014 Apollo .docx    1     Center for Writing Excellence © 2014 Apollo .docx
1 Center for Writing Excellence © 2014 Apollo .docxhallettfaustina
 
Word 2010 pagelayout tab, referance tab, mailing tab
Word 2010 pagelayout tab, referance tab, mailing tabWord 2010 pagelayout tab, referance tab, mailing tab
Word 2010 pagelayout tab, referance tab, mailing tabKARAN KUMAR
 
Setting up the MLA format within Word
Setting up the MLA format within WordSetting up the MLA format within Word
Setting up the MLA format within WordMichael Soliday
 
Formatting and Converting Theses and Dissertations
Formatting and Converting Theses and DissertationsFormatting and Converting Theses and Dissertations
Formatting and Converting Theses and DissertationsThomas La Foe
 
Grading Criteria Argument Paper Revised Rough DraftENG200 Vers
Grading Criteria Argument Paper Revised Rough DraftENG200 VersGrading Criteria Argument Paper Revised Rough DraftENG200 Vers
Grading Criteria Argument Paper Revised Rough DraftENG200 VersJeanmarieColbert3
 
MLA 8th Edition Formatting and Style GuidePurdue OWL Sta.docx
MLA 8th Edition Formatting and Style GuidePurdue OWL Sta.docxMLA 8th Edition Formatting and Style GuidePurdue OWL Sta.docx
MLA 8th Edition Formatting and Style GuidePurdue OWL Sta.docxssuserf9c51d
 
Scanned by CamScannerDateMonth Day, Year or mmddyyy.docx
Scanned by CamScannerDateMonth Day, Year or mmddyyy.docxScanned by CamScannerDateMonth Day, Year or mmddyyy.docx
Scanned by CamScannerDateMonth Day, Year or mmddyyy.docxanhlodge
 
Apa Guide
Apa GuideApa Guide
Apa Guideearlese
 

Similar to Resesarch paper format (20)

Preliminary Pages How to Start Page Numbering at a Specifi.docx
Preliminary Pages  How to Start Page Numbering at a Specifi.docxPreliminary Pages  How to Start Page Numbering at a Specifi.docx
Preliminary Pages How to Start Page Numbering at a Specifi.docx
 
Use of APA style in academic writing for Avoiding plagiarism_03102020.PPTX
Use of APA style in  academic writing for Avoiding plagiarism_03102020.PPTXUse of APA style in  academic writing for Avoiding plagiarism_03102020.PPTX
Use of APA style in academic writing for Avoiding plagiarism_03102020.PPTX
 
Formatting papers
Formatting papersFormatting papers
Formatting papers
 
Apa 6th-edition-template-without-abstract
Apa 6th-edition-template-without-abstractApa 6th-edition-template-without-abstract
Apa 6th-edition-template-without-abstract
 
Complete Guide to APA Format Example to Remember
Complete Guide to APA Format Example to RememberComplete Guide to APA Format Example to Remember
Complete Guide to APA Format Example to Remember
 
Using MLA Style
Using MLA StyleUsing MLA Style
Using MLA Style
 
APA Student Paper Setup Guide
APA Student Paper Setup GuideAPA Student Paper Setup Guide
APA Student Paper Setup Guide
 
APA powerpoint
APA powerpointAPA powerpoint
APA powerpoint
 
MLA formatting
MLA formattingMLA formatting
MLA formatting
 
1 Center for Writing Excellence © 2014 Apollo .docx
    1     Center for Writing Excellence © 2014 Apollo .docx    1     Center for Writing Excellence © 2014 Apollo .docx
1 Center for Writing Excellence © 2014 Apollo .docx
 
1 Center for Writing Excellence © 2014 Apollo .docx
    1     Center for Writing Excellence © 2014 Apollo .docx    1     Center for Writing Excellence © 2014 Apollo .docx
1 Center for Writing Excellence © 2014 Apollo .docx
 
1 Center for Writing Excellence © 2014 Apollo .docx
    1     Center for Writing Excellence © 2014 Apollo .docx    1     Center for Writing Excellence © 2014 Apollo .docx
1 Center for Writing Excellence © 2014 Apollo .docx
 
Word 2010 pagelayout tab, referance tab, mailing tab
Word 2010 pagelayout tab, referance tab, mailing tabWord 2010 pagelayout tab, referance tab, mailing tab
Word 2010 pagelayout tab, referance tab, mailing tab
 
Setting up the MLA format within Word
Setting up the MLA format within WordSetting up the MLA format within Word
Setting up the MLA format within Word
 
Formatting and Converting Theses and Dissertations
Formatting and Converting Theses and DissertationsFormatting and Converting Theses and Dissertations
Formatting and Converting Theses and Dissertations
 
Grading Criteria Argument Paper Revised Rough DraftENG200 Vers
Grading Criteria Argument Paper Revised Rough DraftENG200 VersGrading Criteria Argument Paper Revised Rough DraftENG200 Vers
Grading Criteria Argument Paper Revised Rough DraftENG200 Vers
 
MLA 8th Edition Formatting and Style GuidePurdue OWL Sta.docx
MLA 8th Edition Formatting and Style GuidePurdue OWL Sta.docxMLA 8th Edition Formatting and Style GuidePurdue OWL Sta.docx
MLA 8th Edition Formatting and Style GuidePurdue OWL Sta.docx
 
Scanned by CamScannerDateMonth Day, Year or mmddyyy.docx
Scanned by CamScannerDateMonth Day, Year or mmddyyy.docxScanned by CamScannerDateMonth Day, Year or mmddyyy.docx
Scanned by CamScannerDateMonth Day, Year or mmddyyy.docx
 
Apa Guide
Apa GuideApa Guide
Apa Guide
 
2018 submission and basic rules version with electronic signatures
2018 submission and basic rules version with electronic signatures2018 submission and basic rules version with electronic signatures
2018 submission and basic rules version with electronic signatures
 

Recently uploaded

9548086042 for call girls in Indira Nagar with room service
9548086042  for call girls in Indira Nagar  with room service9548086042  for call girls in Indira Nagar  with room service
9548086042 for call girls in Indira Nagar with room servicediscovermytutordmt
 
Beyond the EU: DORA and NIS 2 Directive's Global Impact
Beyond the EU: DORA and NIS 2 Directive's Global ImpactBeyond the EU: DORA and NIS 2 Directive's Global Impact
Beyond the EU: DORA and NIS 2 Directive's Global ImpactPECB
 
Russian Call Girls in Andheri Airport Mumbai WhatsApp 9167673311 💞 Full Nigh...
Russian Call Girls in Andheri Airport Mumbai WhatsApp  9167673311 💞 Full Nigh...Russian Call Girls in Andheri Airport Mumbai WhatsApp  9167673311 💞 Full Nigh...
Russian Call Girls in Andheri Airport Mumbai WhatsApp 9167673311 💞 Full Nigh...Pooja Nehwal
 
microwave assisted reaction. General introduction
microwave assisted reaction. General introductionmicrowave assisted reaction. General introduction
microwave assisted reaction. General introductionMaksud Ahmed
 
BAG TECHNIQUE Bag technique-a tool making use of public health bag through wh...
BAG TECHNIQUE Bag technique-a tool making use of public health bag through wh...BAG TECHNIQUE Bag technique-a tool making use of public health bag through wh...
BAG TECHNIQUE Bag technique-a tool making use of public health bag through wh...Sapna Thakur
 
Introduction to Nonprofit Accounting: The Basics
Introduction to Nonprofit Accounting: The BasicsIntroduction to Nonprofit Accounting: The Basics
Introduction to Nonprofit Accounting: The BasicsTechSoup
 
The byproduct of sericulture in different industries.pptx
The byproduct of sericulture in different industries.pptxThe byproduct of sericulture in different industries.pptx
The byproduct of sericulture in different industries.pptxShobhayan Kirtania
 
APM Welcome, APM North West Network Conference, Synergies Across Sectors
APM Welcome, APM North West Network Conference, Synergies Across SectorsAPM Welcome, APM North West Network Conference, Synergies Across Sectors
APM Welcome, APM North West Network Conference, Synergies Across SectorsAssociation for Project Management
 
Student login on Anyboli platform.helpin
Student login on Anyboli platform.helpinStudent login on Anyboli platform.helpin
Student login on Anyboli platform.helpinRaunakKeshri1
 
Kisan Call Centre - To harness potential of ICT in Agriculture by answer farm...
Kisan Call Centre - To harness potential of ICT in Agriculture by answer farm...Kisan Call Centre - To harness potential of ICT in Agriculture by answer farm...
Kisan Call Centre - To harness potential of ICT in Agriculture by answer farm...Krashi Coaching
 
The basics of sentences session 2pptx copy.pptx
The basics of sentences session 2pptx copy.pptxThe basics of sentences session 2pptx copy.pptx
The basics of sentences session 2pptx copy.pptxheathfieldcps1
 
Presentation by Andreas Schleicher Tackling the School Absenteeism Crisis 30 ...
Presentation by Andreas Schleicher Tackling the School Absenteeism Crisis 30 ...Presentation by Andreas Schleicher Tackling the School Absenteeism Crisis 30 ...
Presentation by Andreas Schleicher Tackling the School Absenteeism Crisis 30 ...EduSkills OECD
 
mini mental status format.docx
mini    mental       status     format.docxmini    mental       status     format.docx
mini mental status format.docxPoojaSen20
 
Z Score,T Score, Percential Rank and Box Plot Graph
Z Score,T Score, Percential Rank and Box Plot GraphZ Score,T Score, Percential Rank and Box Plot Graph
Z Score,T Score, Percential Rank and Box Plot GraphThiyagu K
 
Sanyam Choudhary Chemistry practical.pdf
Sanyam Choudhary Chemistry practical.pdfSanyam Choudhary Chemistry practical.pdf
Sanyam Choudhary Chemistry practical.pdfsanyamsingh5019
 
Arihant handbook biology for class 11 .pdf
Arihant handbook biology for class 11 .pdfArihant handbook biology for class 11 .pdf
Arihant handbook biology for class 11 .pdfchloefrazer622
 
Paris 2024 Olympic Geographies - an activity
Paris 2024 Olympic Geographies - an activityParis 2024 Olympic Geographies - an activity
Paris 2024 Olympic Geographies - an activityGeoBlogs
 
Web & Social Media Analytics Previous Year Question Paper.pdf
Web & Social Media Analytics Previous Year Question Paper.pdfWeb & Social Media Analytics Previous Year Question Paper.pdf
Web & Social Media Analytics Previous Year Question Paper.pdfJayanti Pande
 

Recently uploaded (20)

9548086042 for call girls in Indira Nagar with room service
9548086042  for call girls in Indira Nagar  with room service9548086042  for call girls in Indira Nagar  with room service
9548086042 for call girls in Indira Nagar with room service
 
Beyond the EU: DORA and NIS 2 Directive's Global Impact
Beyond the EU: DORA and NIS 2 Directive's Global ImpactBeyond the EU: DORA and NIS 2 Directive's Global Impact
Beyond the EU: DORA and NIS 2 Directive's Global Impact
 
Russian Call Girls in Andheri Airport Mumbai WhatsApp 9167673311 💞 Full Nigh...
Russian Call Girls in Andheri Airport Mumbai WhatsApp  9167673311 💞 Full Nigh...Russian Call Girls in Andheri Airport Mumbai WhatsApp  9167673311 💞 Full Nigh...
Russian Call Girls in Andheri Airport Mumbai WhatsApp 9167673311 💞 Full Nigh...
 
microwave assisted reaction. General introduction
microwave assisted reaction. General introductionmicrowave assisted reaction. General introduction
microwave assisted reaction. General introduction
 
BAG TECHNIQUE Bag technique-a tool making use of public health bag through wh...
BAG TECHNIQUE Bag technique-a tool making use of public health bag through wh...BAG TECHNIQUE Bag technique-a tool making use of public health bag through wh...
BAG TECHNIQUE Bag technique-a tool making use of public health bag through wh...
 
Introduction to Nonprofit Accounting: The Basics
Introduction to Nonprofit Accounting: The BasicsIntroduction to Nonprofit Accounting: The Basics
Introduction to Nonprofit Accounting: The Basics
 
The byproduct of sericulture in different industries.pptx
The byproduct of sericulture in different industries.pptxThe byproduct of sericulture in different industries.pptx
The byproduct of sericulture in different industries.pptx
 
APM Welcome, APM North West Network Conference, Synergies Across Sectors
APM Welcome, APM North West Network Conference, Synergies Across SectorsAPM Welcome, APM North West Network Conference, Synergies Across Sectors
APM Welcome, APM North West Network Conference, Synergies Across Sectors
 
Student login on Anyboli platform.helpin
Student login on Anyboli platform.helpinStudent login on Anyboli platform.helpin
Student login on Anyboli platform.helpin
 
Kisan Call Centre - To harness potential of ICT in Agriculture by answer farm...
Kisan Call Centre - To harness potential of ICT in Agriculture by answer farm...Kisan Call Centre - To harness potential of ICT in Agriculture by answer farm...
Kisan Call Centre - To harness potential of ICT in Agriculture by answer farm...
 
The basics of sentences session 2pptx copy.pptx
The basics of sentences session 2pptx copy.pptxThe basics of sentences session 2pptx copy.pptx
The basics of sentences session 2pptx copy.pptx
 
Presentation by Andreas Schleicher Tackling the School Absenteeism Crisis 30 ...
Presentation by Andreas Schleicher Tackling the School Absenteeism Crisis 30 ...Presentation by Andreas Schleicher Tackling the School Absenteeism Crisis 30 ...
Presentation by Andreas Schleicher Tackling the School Absenteeism Crisis 30 ...
 
mini mental status format.docx
mini    mental       status     format.docxmini    mental       status     format.docx
mini mental status format.docx
 
Advance Mobile Application Development class 07
Advance Mobile Application Development class 07Advance Mobile Application Development class 07
Advance Mobile Application Development class 07
 
Z Score,T Score, Percential Rank and Box Plot Graph
Z Score,T Score, Percential Rank and Box Plot GraphZ Score,T Score, Percential Rank and Box Plot Graph
Z Score,T Score, Percential Rank and Box Plot Graph
 
Sanyam Choudhary Chemistry practical.pdf
Sanyam Choudhary Chemistry practical.pdfSanyam Choudhary Chemistry practical.pdf
Sanyam Choudhary Chemistry practical.pdf
 
Mattingly "AI & Prompt Design: Structured Data, Assistants, & RAG"
Mattingly "AI & Prompt Design: Structured Data, Assistants, & RAG"Mattingly "AI & Prompt Design: Structured Data, Assistants, & RAG"
Mattingly "AI & Prompt Design: Structured Data, Assistants, & RAG"
 
Arihant handbook biology for class 11 .pdf
Arihant handbook biology for class 11 .pdfArihant handbook biology for class 11 .pdf
Arihant handbook biology for class 11 .pdf
 
Paris 2024 Olympic Geographies - an activity
Paris 2024 Olympic Geographies - an activityParis 2024 Olympic Geographies - an activity
Paris 2024 Olympic Geographies - an activity
 
Web & Social Media Analytics Previous Year Question Paper.pdf
Web & Social Media Analytics Previous Year Question Paper.pdfWeb & Social Media Analytics Previous Year Question Paper.pdf
Web & Social Media Analytics Previous Year Question Paper.pdf
 

Resesarch paper format

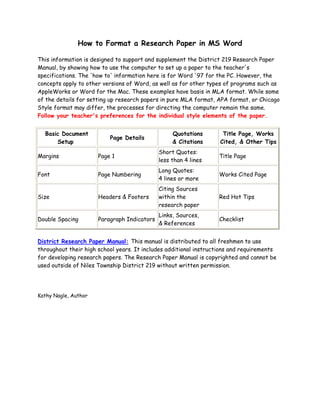
  • 1. How to Format a Research Paper in MS Word This information is designed to support and supplement the District 219 Research Paper Manual, by showing how to use the computer to set up a paper to the teacher's specifications. The 'how to' information here is for Word '97 for the PC. However, the concepts apply to other versions of Word, as well as for other types of programs such as AppleWorks or Word for the Mac. These examples have basis in MLA format. While some of the details for setting up research papers in pure MLA format, APA format, or Chicago Style format may differ, the processes for directing the computer remain the same. Follow your teacher's preferences for the individual style elements of the paper. Basic Document Setup Page Details Quotations & Citations Title Page, Works Cited, & Other Tips Margins Page 1 Short Quotes: less than 4 lines Title Page Font Page Numbering Long Quotes: 4 lines or more Works Cited Page Size Headers & Footers Citing Sources within the research paper Red Hot Tips Double Spacing Paragraph Indicators Links, Sources, & References Checklist District Research Paper Manual: This manual is distributed to all freshmen to use throughout their high school years. It includes additional instructions and requirements for developing research papers. The Research Paper Manual is copyrighted and cannot be used outside of Niles Township District 219 without written permission. Kathy Nagle, Author
  • 2. Basic Document Set-Up It is best to set up your document in the program before keying in the contents of a research paper. If you have already keyed in the text, you may have to highlight the area(s) you want to effect. These examples have basis in MLA format. While some of the details for setting up research papers in pure MLA format, APA format, or Chicago Style format may differ, the processes for directing the computer remain the same. Follow your teacher's preferences for the individual style elements of the paper. Set margins at 1 inch on all sides 1. Go to FILE>Page Set Up 2. Set Top, Bottom, Left, and Right all to 1 inch. 3. Set Headers and Footers to 0.5" Note: The first page will have an extra inch for the top margin. Instructions are on Page Detail Double Spacing: Research papers are double-spaced, except for the long quotes. 1. Go to FORMAT>Paragraph 2. Under the Indents and Spacing tab, look under the Line Spacing pop-up menu for Double. 3. Leave Spacing Before & After set to 0.
  • 3. Fonts: Use a Serif font, Size 12 • Go to FORMAT>Font • Choose a SERIF font such as Times New Roman, Palatia (Palatino), or Bookman. • Use Size 12. Serif vs. Sans Serif Fonts: SERIF fonts, as shown in row 2 of the graphic above have little flares, bulbs, bases, and tops on the letters called 'serifs'. The type style used in this paragraph is SERIF. SANS SERIF fonts, as shown in row 1 above, are plain. SANS means 'without'. So, a Sans Serif font is without serifs. The typestyle used in this paragraph is SANS SERIF. Serif fonts are more readable for documents such as letters, research papers, newspapers, magazines and books. Use SERIF for your papers.
  • 4. Page Details This section addresses page numbering, headers, footers, how to set up the first page, and how to set up subsequent pages of a Research Paper. These examples have basis in MLA format. While some of the details for setting up research papers in pure MLA format, APA format, or Chicago Style format may differ, the processes for directing the computer remain the same. Follow your teacher's preferences for the style elements of the paper. Page 1: Add about 1/2 extra inch to page 1. Use the ENTER key to add the extra 1/2 inch at the top of the first page. There are about 6 lines per inch when using most 12 point serif fonts. If you have already set the computer for double-spacing, then only1-2 extra returns with the ENTER key are necessary, as in the example shown. Do not put the title on the first page of the paper. The title on the Title Page is sufficient. Note: It can be helpful to see the formatting characters, such as the ¶ character you see on the graphic. To learn more about them and how to show and hide them, go to Red Hot Tips. Alternative First Page Format: Some formats call for the Writer's Name, the Course Name/Number, and the Date at the left margin as the first 3 (double-spaced) lines of the first page. In this version, the title is also on the first page. Note that everything is still double-spaced with no extra space between the date and the title or the title and the first line. (Gibaldi, MLA Style Manual) The title is centered. It can be bold and up to 18 point in size, if desired.
  • 5. Page 1: Leave the page number OFF the first page. 1. Go to FILE>Page Setup. 2. Click on the LAYOUT tab. 3. Check Different First Page. This will remove the page number from Page 1 of the research paper. Numbering Pages 2 - the end automatically Page numbers go in the HEADER, aligned right, following your last name. Look at the right side of the picture above to see an example. Be sure you have checked Different First Page from Page Set Up to keep a page number from appearing on page 1. In MS Word, you need to VIEW the Headers and Footers before you can INSERT them. You also need to VIEW them to EDIT them. 1. Scroll to Page 2. 2. Go to VIEW>Header and Footer. Click once in the Header to position the cursor. 3. Click Align Right on the toolbar. 4. Key in your last name followed by a space. 5. Click the icon with the # sign on to tool bar to insert automatic page numbering. The current page number will be in a gray box. The gray box indicates that the computer is set to automatically number the pages. Do not key in individual page numbers. Let the computer do that work. 6. Hit the ENTER key to add a space in the header between the header and the body.
  • 6. Note: After checking Different First Page from Page Set Up, the titles of the Headers are different between the Header and Footer of the first page vs. the Header and Footer of the rest of the pages. Be sure you have scrolled to Page 2, and are working in the Header for that page for this step. Note: It can be permissible to have the size of the text in the Header set to 10, instead of the normal 12 for the body. It can also be permissible to use a Sans Serif Font such as Arial or Helvetica in the Header. This helps to differentiate it from the body. But, whatever rules your teacher sets are the rules to follow for that project. Paragraph Indicators, Word Wrap, & Punctuation: • Indent the first line of each paragraph 1/2 inch by using the TAB key on the keyboard. Computers are pre-set to TAB over 1/2 inch. • Do not leave extra space between paragraphs. • Let the computer WORD WRAP. This means do not hit the ENTER key at the end of the line unless you purposely want to go to the next line. An example would be when you want to begin a new paragraph. • There should be only one space after all punctuation (Williams, 12). If your teacher still has a preference for two spaces, follow that preference. The important thing is to be consistent throughout. • Use the spell checker and grammar checker to help you proofread, however do not rely on this for 100% of your proofing Use the Show/Hide button to reveal the formatting characters, including the number of spaces between words and sentences. Headers See the box above for Inserting, Viewing, and Editing Headers. Page numbers go in the HEADER, aligned right, following your last name. Be sure you have checked Different First Page from Page Set Up to keep a page number from appearing on page 1.
  • 7. Subheadings Within the Paper: • Use Title Capitalization Rules • Leave the subheading at the left margin • Subheading should be bold, but can be both bold and italic. • Subheading can be either the regular 12 point size or can be 14 point. No larger than 14 pt. No extra spaces before or after the subheading. Footers, Footnotes, & Endnotes MLA Format does not utilize FOOTERS. In other situations where a Footer is required, the process is the same as for a header: VIEW>Header and Footer. To get to the Footer, click on the toggle button in the H & F Toolbar. MLA Format does not utilize Footnotes for citations. MLA Format does not utilize Endnotes for citations. In MLA format, summary citation references are made within the document, with the full citation source information in the Works Cited section. In other situations, this section is sometimes called the Bibliography. It is possible to have sources cited in the Works Cited section that were not utilized for Internal Citations, Footnotes, or Endnotes.
  • 8. Citing Sources Give Credit Where Credit is Due It is important to inform your reader of the sources of your information in a research paper. This is called "citing sources." These are called "citations." Citations are made in two places, and the format is different for each place. The first place is within the document. The second place is on the Works Cited page at the end of the document. It is possible to have sources listed on the Works Cited page that were used in the research, but that were not necessarily quoted in the body of the paper. There are several conventions, also called "format rules," for citing sources and there are several types of quotations. This page shows you how to cite sources within a document for actual quotes, paraphrases, or summaries within a document. These examples have basis in MLA format. While some of the details for setting up research papers in pure MLA format, APA format, or Chicago Style format may differ, the processes for directing the computer remain the same. Follow your teacher's preferences for the individual style elements of the paper. Different types of quotations include: (more information on the different types is available in the Research Manual. Short Quotations Long Quotations Partial Quotations Adding to Quotations The only type of quotation that involves a special computer process is the Long Quotation. Guidelines and formats for Short Quotations, Partial Quotations, and Adding to Quotations can be found on page 9:8 of the Niles North Research Paper Manual. Long Quotations are defined as 4 lines or more (approximately 40 words). One format calls for them to be single spaced and indented an extra inch from both sides. To do this: 1. Make sure the quote starts on a new line by hitting the ENTER (Return) key. 2. Click and drag across the quote to highlight (select) it. 3. Go to FORMAT/Paragraph. Change Line Spacing to Single. 4. With the text still highlighted, click on the small square of the left margin marker as shown by the blue arrow. Drag this margin marker to the right 1 inch. It should look like the picture on the right.
  • 9. 5. With the text still highlighted, click on the triangle in the ruler of the right margin, and drag it to the left one inch. The result should look like the picture on the right. 6. Use the parenthetical citation with the author's name, a comma, and the page number inside parentheses. There is no space after the left and no space before the right parentheses. See pages 9:13 and 10:1 of the Research Manual for more information on proper citations. 7. Because the indentations and single spacing are the signals that this is a quotation, there is no need to use quotation marks. Two or more paragraphs in a long quote: If there are two or more paragraphs in the quotation, set a TAB marker to indent the first line of each paragraph a quarter inch. To do this: 1. Highlight the text that will be affected by this tab. In this case, it will be the entire long quote. 2. Click once in the white part of the ruler, 2 marks to the right of the margin marker. Each mark in the ruler represents 1/8 inch. Two marks, then equal a quarter inch. You can slide this marker left and right along the ruler. Make sure the left part of the tab marker is on the quarter-inch mark. 3. Click to the left of the first line of the first paragraph to place the cursor there, and hit the TAB key. Click to the left of the first line of each additional paragraph to place the cursor there, and hit the TAB key. Alternative Method for Long Quote Format Some teachers use a format that calls for leaving the quote double-spaced. If this format is utilized, the process for beginning the quote on its own line and highlighting the quote to select it are the same as above. Also the same rule applies for indenting the paragraph 1/4 inch when the quote includes multiple paragraphs. The only differences are that the left margin marker is sometimes dragged over 1/2 inch instead of one inch, and the right margin marker remains the same. Format for Citing Sources There are also format rules (conventions) for citing sources within the document as well as on the Works Cited pages. What comes first: Author? Last Name? What if there is no
  • 10. author's name available? What is the correct punctuation? What is underlined? What is italicized? Look on page 9:8 of the Research Paper Manual for additional information for internal documentation formats. Look in the Works Cited section for sample formats to cite various types of media.. Follow your teacher's specifications for long quotes in a research paper. This Web site is only intended to show you how to use the computer to achieve the desired results.
  • 11. Links, Sources, and References This page includes references that support and document this Web site. The links will open in a new window. For instructions on how to set up and format a Works Cited page in a research paper, click here. Note the proper format for books in a Works Cited page is italics, not underscore and italics. On a Web page, however, the books that link to Web sites are also underscored and in blue. BC-OWL Links, "An Overview of MLA (Modern Language Association) Format." Bridgewater College, Bridgewater, VA. DA: October, 2002. ( http://www.bridgewater.edu/WritingCenter/manual/MLAformat.htm) BC-OWL Links, "An Overview of APA (American Psychological Association) Format." Bridgewater College, Bridgewater, VA. DA: June, 2003. (http://www.bridgewater.edu/WritingCenter/manual/APAformat.htm) Beeftink, Christine, and Michael Graham and Heather Ingraham, Research Paper Manual. Niles, IL: Niles North High School, 2001. Gibaldi, Joseph, MLA Handbook for Writers of Research Papers, 5th Edition. New York, NY: Modern Language Association, 1999. Gibaldi, Joseph, MLA Style Manual and Guide to Scholarly Publishing, 2nd Edition. New York, NY: Modern Language Association, 1998. Humanities Department, "A Guide for Writing Research Papers Based on MLA Documentation." Capital Community College, Hartford, CT. DM: June, 2002. (http://webster.commnet.edu/mla/index.shtml) Modern Language Association, "MLA Style, Frequently Asked Questions about MLA Style." LA: 5/18/2000. Copyright, 2002. (http://www.mla.org)
  • 12. Sebranek, Patrick, and Verne Meyer and Dave Kemper. Writer's Inc. Burlington, WI: Great Source Education Group, 2000. The Write Source, Burlington, WI, "Electronic Sources MLA Style", DM: May, 2002. (http://www.thewritesource.com/mla.htm) Strunk Jr., William, E. B. White, Roger Angell, The Elements of Style (4th Edition). Boston, MA: Allyn & Bacon, 2000. Williams, Robin, The PC is Not a Typewriter: A Style Manual for Creating Professional- Level Type on Your Personal Computer.* Berkeley, CA: Peachpit Press, 1992. Williams, Robin, The Mac is Not a Typewriter.* Berkeley, CA: Peachpit Press, 1995. Williams, Robin, The Non-Designers Design Book. Berkeley, CA: Peachpit Press, 1994. Williams, Robin, Beyond the Mac is Not a Typewriter.* Berkeley, CA: Peachpit Press, 1996. *These books were written when there were more differences between word processing programs when working on the Mac or the PC, and before MS Word became the predominant program. The appendices refer to the processes for specific programs, which is why they were published for each platform. The concepts and rules in the body of The Mac is Not a Typewriter and The PC is Not a Typewriter are the same. The concepts and rules in Beyond the Mac is Not a Typewriter also apply to both computer platforms. These books, in fact, were the inspiration for this Web site.
  • 13. Title Page The Title Page can be part of the main document, or it can be a separate document. Since people often do the Title Page last, these instructions will create it as a NEW (separate) document. These examples have basis in MLA format. While some of the details for setting up research papers in pure MLA format, APA format, or Chicago Style format may differ, the processes for directing the computer remain the same. Follow your teacher's preferences for the style elements of the paper. Title Page Set Up 1. Key in 6 extra single-spaced returns (2 - 3 if using double-spacing) to add an extra inch to the top margin. (The formula is: approximately 6 lines equals 1 inch when using a 12 pt. font.) 2. Key in the Title. Use Title Case, capitalizing only the first letter of the important words. Do not use ALL CAPS. 3. Key in enough returns for about 4 more inches of space. (Using the formula, that would be approximately 28 returns.) 4. On separate lines, key in your name, the name of the course, your teacher's name, and the date. The date line should end up approximately 1 to 1-1/2 inches from the bottom of the page. The 1 inch pre-set bottom margin is included in that amount. If any of the lines from the bottom section go to a new page, remove some paces between the title and your name. Word allows you to change case on any selected text. Once you have keyed in the title, you might want to consider 'verifying it' through the program. Highlighted the desired text, then go to FORMAT>Change Case... Click the Title Case button, then OK. This will also correct any capitalization errors.
  • 14. Guidelines, Tips, & Options You can use the same serif font (such as Times) as is in the body of the paper, or you can use a sans serif font (such as Arial) for the title page. You may also be able to use a fancy font as long as it is appropriate to your content and if your instructor allows. Change the font size for the title to a larger size and bold, if desired, and if your teacher allows. The title size can be as large as 36 pt. Try to keep the title on one line. If two lines are necessary, break the title for the second line to coincide with the flow of the phrasing. For the information on the bottom of the title page, do not use a size larger than 18 pt., and keep it smaller than the title. Click the Show/Hide button to show the number of return characters when spacing down from the top and between the title and the information nearer the bottom of the title page. These characters do not print even when they are showing on the screen. Click the Show/Hide button again to hide them. Page Border It is generally permissible, but optional, to add a page border to the Title Page. To do this: 1. Go to FORMAT>Borders and Shading. 2. Click on the Page Border tab. 3. Choose a Style and a Width. There are also some choices under Art. But, it is better, in most cases, to keep your choice simple. 4. If the lines show up on each of the 4 sides as in the sample shown at the right, click OK. Otherwise, you may have to click on one or more sides of the page to apply the border correctly. Experiment with some options to see what you like best. Remember: It is better to keep it simple. A Sans Serif font is on the top line. A Serif font is on the bottom line.
  • 15. Inserting a picture Some instructors allow you to insert a picture on your title page. Others prefer having no picture. If your instructor allows the use of a picture, here is how: 1. Click on the page where you want the picture to go, then go to: 2. INSERT>Picture>Clip Art...: This takes you to the built-in Microsoft clip art gallery. It also takes you to the online Microsoft clip art gallery. OR go to: INSERT>Picture>From File...: Use this option when you have saved a picture from the internet, are using a picture from a CD ROM, or other source outside the Microsoft Word program. It may be necessary to remove some of the return lines to keep the rest of the information at the bottom of the page. Text Wrap Around Pictures Once the picture is inserted into the document, you may need to specify how you want the text to wrap around it. In the case of a title page, text wrap will most likely be Top & Bottom. To do this, click on the picture. 1. Go to FORMAT>PICTURE... 2. Click on Layout. 3. Select Top & Bottom.
  • 16. The Works Cited Page The Works Cited section used to be called the "Bibliography." With so many types of media sources available today, a better description is, "Works Cited." This is the last section of the paper, and your last name with the page number in the Header continue through this section. • Begin the Works Cited on a new page at the end of the paper. To force the computer to start a new page, make sure the cursor is at the end of the body of the paper and go to INSERT>Break. The default will be Page Break. If the computer is not set for Page Break, click on that circle. • Leave the computer set to double-spacing. • If the teacher's preference is to add an extra 1/2 inch to the top margin using 1 - 2 extra returns at the top as with the Title Page. • Center the words, "Works Cited." They can be in bold, if desired. Otherwise, use the same 1-inch top margin as the rest of the paper. • Capitalize only the first letter of both words. Do not use all caps for the title. This is called Title Case. • Do not put extra space between the title and the body. • Indent the second and subsequent lines for a given entry. In this case, it might be easier to hit ENTER at the end of a line, then to TAB in for the second line indention. If you know how to use Margin Markers, let the entries Word Wrap, and use the Hanging Indent process in the program. Go to the program's online HELP, and look for Hanging Indent. For directions on how to organize sources and on how to present sources within the Works Cited section, refer to the Research Paper Manual.
  • 17. Red Hot Tips for Formatting Research Papers on a Computer This page is designed to provide some additional tips and details for formatting research papers. The information here also applies to all word processing documents, publications, and even Web pages. The screen shots here are for MS Word 97 for the PC. However, the concepts apply, and most of the processes are similar to other versions of Word and for word processors on the Macintosh. Some of the conventions on this list are relatively new. Since the introduction of the personal computer in the late '80s, new capabilities have expanded opportunities for formatting. The ready-access people now have to a PC has brought proportional letter spacing to the desktop, with the ability to change styles, sizes, and even fonts. The ease of use has changed the old ways of formatting from the limitations of the typewriter. This is especially true in the rules for spaces following punctuation, underlining, use of italics, and the use of all caps. MLA and other national associations are now also supporting these conventions. The word, 'conventions' means standardized ways of doing things. The most important thing, whether you utilize the new conventions or the old ones, is to be consistent within a document. And, if your teacher has certain preferences, follow those requirements. Go to the "Links, Sources and References" page for this Web site to find some of the documentation and resources that support these tips. The following topics are covered here: Punctuation Capitalization Spaces around special characters Dashes and hyphens Abbreviations Underlining Footnotes vs. Footers Footnotes vs. Endnotes Headings vs. Headers Widows and Orphans Fonts Show/Hide formatting characters Unordered Lists (Bullets) Ordered Lists (Numbering) Title Tips Subheads Formatting Characters Use the SHOW/HIDE button (the ¶ icon) in the Toolbar to show or hide formatting characters that indicate spaces, tabs, and returns. Formatting characters do not print, even if you have this option turned on and they appear on the screen. Using this feature enables you to quickly analyze and troubleshoot formatting issues. Consider using this feature for proofreading the following tips in this section. ¶ = Enter or Return An Arrow = Tab A dot in the center of a line = space Punctuation One space after all punctuation: periods, commas, colons, semi colons, exclamation points, and question marks. No spaces before punctuation. Example: This is correct._This is incorrect . (The underscore is used to indicate the space.)
  • 18. Word allows the user to define punctuation options so the program will auto-correct them. For example, if you want to use one space after a period, and hit the space bar twice out of habit, the computer program will correct it to one. To set this feature, go to TOOLS>Options>Spelling &Grammar>Settings. There are other punctuation and grammar options here. Check them out. Capitalization All caps are more difficult to read. We recognize a word not only by its letters, but by the shape of the whole word. When text is in all caps, every word has the same shape, so we have to go back to reading letter by letter (Williams 196). Do not use all caps for titles, subtitles, or in the body of the paper. Do not underline titles, subtitles, or subheadings in a paper. Use Title Case for titles. Title Case means capitalizing the first letter of each word. If in doubt about which words to capitalize and which ones not to, highlight the title and go to FORMAT>Change Case...Title Case. Let the computer do it, but take note of the result. Spaces around special characters Parentheses and Brackets No spaces between open parentheses or brackets and the first letter. No spaces between the last letter and the close parentheses or bracket.
  • 19. Example: (No space between the left parentheses and the letter N. No space after the last letter or character and the right parentheses.) One space after the closed parentheses. This will have special application on the Works Cited page when needing to correctly format Web site citations. Some situations use these brackets [No space between starting bracket and first letter, and no space between last letter or punctuation and ending bracket.] {No space between starting bracket and first letter, and no space between last letter or punctuation and ending bracket.} <These brackets are often used when quoting all or part of an e-mail before making a reply. The same spacing rules apply.> Apostrophes No spaces before or after an apostrophe unless the apostrophe is at the end of a word. Then, one space as normal between words. Example: Don't put a space between letters and apostrophes unless it is at the end of a word such as, "The Jones' house is up for sale." Quotation Marks • No spaces between an opening double or single quotation mark and the first letter. • No spaces before the last letter and a closing double or single quotation mark. • One space following a closing single or double quotation mark because it will be either at the end of a sentence or at the end of a word. Note the use of one space after a period and the spacing around commas as well as the spacing around the quotes in this example: Albert Einstein once said, "Not everything that can be counted counts, and not everything that counts can be counted." This quote has many applications. Headers vs. Headings A header is the same information that appears on the top of every page. While the actual page number changes following the word , "Page" in a header the similar information appears in the same place on each page. Click here if you want to know how to add a header. Most research paper formats require that the headers be removed from the first page. Click here if you want to know how to do that. A heading appears once on a page. It can be a title heading at the beginning of the paper. Title headings are usually centered. Sometimes the teacher allows them to be in a larger size, such as 18 pt., and bold. Some teachers will allow you to choose a heading font that is appropriate for your content, such as a fancy old English font for a paper on King Henry the VIII. Do not use such a font for the entire paper, though. Use a serif font for the body of the paper. Click on the link to learn more about serif fonts.. A subheading appears once, within the document to introduce a new section. There are several ways to format subheadings. Be consistent throughout the paper in the style you choose. Keep subheads flush left, not centered. subheading 1: A colon followed by one space (when using one space after all punctuation). It can be bold, italic, or both.
  • 20. subheading 2 -- A dash (two hyphens) as shown here. It can be bold, italic, or both. Some people like to use a space before the first and after the second hyphen. If using spaces, use them both places. Be consistent. Click here to learn more about dashes and hyphens. subheading 3 The subheading is on its own line preceding the paragraph it introduces. There are no extra spaces before the subheading. There are no fewer spaces after the subheading. Just use the regular, preset double spacing, as shown in this example. It can be one size larger (such as a 14 pt. subhead on a 12 pt. paper), and it can be bold and/or italic. Footers vs. Footnotes A footer appears at the bottom of every page. It functions similarly to a header. Some people put the page number in the footer, either centered or near the right margin. While the page number changes throughout the document, the positioning of the number, along with the word, "Page" preceding it, appear in the same place and style on each page. Click here to if you need to know how to set up or access a footer. A footnote appears at the bottom of the page where a citation, comment, or explanation is referenced. A small number or symbol above the base line in the text indicates there is a footnote. This number or symbol is called 'superscript'. If there is more than one footnote, they will be numbered or lettered consecutively, with the number or letter in the body matching the number or letter in the footnote list at the bottom of the page. Usually, the numbering or lettering scheme starts over on each new page. MLA and APA formats for research papers do not use footnotes for citations. Citations are made within the body of the paper and are enclosed in parentheses. This is called, "In-Text Parenthetical Citations". Click here to go to the Niles North Research Paper Manual more information about In-Text Parenthetical Citations. So, footnotes in an MLA or APA research paper will only be used to additional information or sources related to the paper but not directly included in the paper. MS Word formats the footnotes and endnotes automatically, including automatic numbering. You have some options in the number format, such as numbers, letters, or roman numerals. Go to INSERT>Footnote..., and follow the prompts. Check out the symbol choices and options. The program will insert the number, and move the cursor to the bottom of the page. All you have to do is key in the information in the appropriate order. The superscript number and type size will be automatic. Footnotes are single spaced, and this is also automatically done. Footnotes vs. Endnotes While footnotes appear at the bottom of the page containing their reference, endnotes appear at the end of the document. In a book, they might appear at the end of the chapter. Or, they could appear at the end of the book. In this case, then, the reference numbers continue consecutively throughout the section. Endnotes at the end of each chapter would begin with the number 1 at the beginning of the next chapter. They would continue numbering consecutively if they are all at the end of the book. Formatting for endnotes is the same as for footnotes. It is only the placement that is different.
  • 21. Endnotes are not the same as a Works Cited page. Endnotes make up the list of citations specifically referenced throughout the paper. The same source might be used more than once. Works Cited is the list of sources used for the paper. Some sources may not necessarily be used as citations for specific references within the body. Endnotes begin on a new page after the end of a research paper. As with a Works Cited Page, all lines on the page are double-spaced. All references listed in Endnotes must appear on the Works Cited page. Fonts Use a serif font, such as a Bookman type, Times, Palatia/Palatino, or Schoolbook type for your paper. Size 12 is standard. There are basically two kinds of fonts used in publishing: Serif and Sans Serif. Serif fonts are more readable for large amounts of text. Books, magazines, and newspapers use serif fonts. Sans Serif fonts, such as Arial, Helvetica, or Avante Garde are more legible for situations such as billboards, spreadsheets, and short bits of text in brochures. For short bursts of text on a Web page, sans serif fonts can be more effective. For longer passages of text, as with the guidelines for print publication, serif fonts can provide more readable results. There are examples of serif and sans serif fonts in this paragraph. Can you spot them? Can you spot the characteristics that make them different? Key in a few words on two lines of a paper. Set one up in a suggested serif font, and the other in a suggested sans serif font. Can you tell the difference? To learn more about fonts, click here. Abbreviations Abbreviations are usually discouraged in a paper. In body text, spell out Street instead of using St. . Avoid words like lbs. for pounds or oz. for ounces. Spell out the names of states. However, if you are going to abbreviate a state, use the correct two capital letter abbreviation, with no spaces and no periods. Illinois is IL and not Ill., ILL., IL. or I.L. Titles, when referring to people, such as Mr. John Smith are appropriate. Note the punctuation and spaces. There may be other cases, such as acronyms, such as EPA for Environmental Protection Agency, are acceptable. Note that there is no punctuation and no spaces. Be sure that your first use of an acronym includes a fully-spelled out reference. Examples note the use of parentheses, spaces, and no punctuation.: Last year, the EPA (Environmental Protection Agency), conducted a study... Last year, the Environmental Protection Agency (EPA), conducted a study... Underlining Underlining is no longer necessary as it was when we only had typewriters. With typewriters, the style was to underling a title and put the title in all caps for emphasis. Emphasis within text was also conveyed using the underline technique. Now that we have computers with word processors, we have other options to convey emphasis and to format titles. We can change the size, make it bold, italicize it, or use a fancy font (called a display font.) Click here to learn more about formatting titles. In the body of the paper, use bold OR italics, rather than underline. Nothing is more redundant than bold and underlined, except for italics and underlined, or bold and italics and underlined. Underline is also appropriate in certain citation styles. Books are almost always still underlined in citations. Check your teacher's citation specifications.
  • 22. Italics Italics are slanted letters like the ones used in the subheadings for this section. Each font has the option for italicized type. Use italics for emphasis or style, such as the bold and italic style used for these subheads. Because of the slant, italicized words crowd the 'turf' of the next letter. So, when selecting a word or phrase to italicize, also select the space following it. Then the space will also be italicized, and the spacing will look better. Do not underline words in italics. See the section on underlining for more information. Widows & Orphans A widow is a very short last line at the end of a paragraph. The guideline is seven characters or less. Rework something in the paragraph, or find a way to delete extra words to avoid widows. A widow is also sometimes referred to when there is a single line of a paragraph on the bottom of the page or columns. Do not leave one line alone at the bottom of the page or column. Go to INSERT>Break and enter a Page Break just prior to that line. The bottom margin on that page will be slightly larger, then, but that is OK. An orphan is the last line of a paragraph at the top of the next column or the next page. Do not leave a single line alone at the top of a column or page. For paragraphs of four lines or more, insert a page break so that there are at least two lines on both pages or columns. For 3-line paragraphs, you may want to do a rewrite to expand the paragraph or combine it with another. Dashes & Hyphens For our purposes, dash is two hyphens. In the desktop publishing world, they call it an em dash, and is actually created with a different set of key strokes. For purposes of a research paper, two hyphens is acceptable. A dash is often used as a substitute for a colon or for parentheses. There are no spaces before, after, or between the dashes. Note that the dash appears at the center of the line of type. The hyphen key is the lower case symbol located next to the 0 on the keyboard. For hyphenated words or for line breaks, there are no spaces before or after the hyphen. Like the dash, the hyphen appears at the center of the line of type. The underscore (SHIFT/hyphen) is at the baseline of the type. When using a hyphen between words to indicate duration such as 9:00 - 5:00, or 5 - 7 days, or June - August, put a space before and after the hyphen. A hyphen can also be used as a bullet point symbol. Unordered Lists (Bullets) Bullet Points are sentences, words, or phrases on lines by themselves that allow a reader to quickly scan the list. They are not sequential steps, so they can be in any order that the author chooses. To create a list of bullet points, key in the first one on a new line. Highlight it and select the toolbar button with the three vertical dots:
  • 23. Bullet points should also be indented. Click on the right arrow button once to indent the bullets. After the first bullet point line is set up, the formatting will follow down the page for the rest when you use the ENTER key. To turn off the bullet points, position the cursor on the new line, then click the bullet icon to turn it off, and the left arrow icon to go back to the original format. Watch capitalization and punctuation of bullet points. Phrases or words will not have punctuation following them. It is optional to capitalize them or not, but be consistent. Sentences will have the appropriate capitalization and punctuation, as usual. Here is what the indented bullets will look like: • bullet point 1 • bullet point 2 • bullet point 3 Note: You can also just key in each bullet on a new line at the left margin, then, select them all at the same time, and click on the bullet point button, followed by the right arrow. Ordered Lists (Numbering) Ordered Lists are sentences, words, or phrases on lines by themselves that allow a reader to easily follow them. They are sequential steps, indicating that they should be done in order. To create an ordered list, key in the first one on a new line. Highlight it and select the toolbar button with the three vertical numbers: Ordered lists should also be indented. Click on the right arrow button once to indent the list. After the first number is set up, the formatting will follow down the page, and the numbers will automatically sequence for the rest when you use the ENTER key. To turn off the listing, position the cursor on the new line, then click on the icon to turn it off, and the left arrow icon to go back to the original format. Watch capitalization and punctuation of the list. Phrases or words will not have punctuation following them. It is optional to capitalize them or not, but be consistent. Sentences will have the appropriate capitalization and punctuation, as usual. Here is what the indented, ordered list will look like: 1. Step 1 2. Step 2 3. Step 3 Note: You can also just key in each bullet on a new line at the left margin, then, select them all at the same time, and click on the numbered button, followed by the right arrow. Title Tips • Center titles, using upper and lower case letters. • Do not use all caps or small caps. They are difficult to read. • Never hyphenate a word in a title. • Break lines sensibly in a multiple-line title. Look at the flow and rhythm of the phrasing, and break the line there, not simply at the end of the full line. • Titles can be bold, one or two sizes larger than the font size in the body, or (with the teacher's permission) a fancy font that represents the topic of the paper. • If using a subtitle with a main title, put the subtitle on a new line in a smaller size than the main title.
  • 24. Checklist for Proper Research Paper Format Print this list and check off each item when you know you have completed it, corrected it, or have otherwise addressed all of the appropriate formatting issues in setting up your Research Paper. Use the Web site at www.niles-hs.k12.il.us/ResearchPaperWebsite/index.htm or go to the Niles North Home Page, click on the Resources link, and How to format a Research Paper to find the details for each of these issues. The site includes more information about each item and how to locate the appropriate menu items on the computer. If you are unsure what some of these items on the check list mean, look on the Web Site for an explanation. Basic page setup for the paper: __ Set margins at 1 inch on all sides. __ Add 1 extra inch on the first page. __ Use double-spacing. __ Indent paragraphs ½ inch. __ No extra blank lines between paragraphs. __ Put your name followed by a space and the page number in the header. __ No header on the first page. __ Set the computer to number the pages automatically. __ Use a serif font, size 12. __ Format long quotes as specified by the teacher. Single-spaced, indented from both sides or double-spaced, but indented from left side. __ Use proper internal citation formats to cite sources within the paper. Works Cited Page: __ Insert a Page Break to begin on a new page. __ Continue with double-spacing. __ Go to INSERT>Break/Page Break to start the Works Cited on new page. __ Add an extra 1/2 inch to the top margin using 1 - 2 extra returns. __ Center the words, "Works Cited". They can be in bold, if desired. __ Use upper and lower case, not all caps. __ Do not put extra space between the title and the body. __ Indent the second and subsequent lines for each entry. Title Page (suggest making a new document): __ Set margins at 2 inches for the top and 1 inch on all other sides. __ Use upper and lower case, called “Title Case.” Do not use all caps. __ Use the same serif font as is in the body of the paper, unless the teacher permits a fancy font that is appropriate to the content. __ Size can be larger than in the body of the paper, and bold, if desired. __ If the title is longer than one line, break the words at a natural break in the phrasing. __ If there is a sub-title, put it in a smaller size than the main title. __ Add about 4 inches of space between the title by hitting the ENTER key. At 6 single-spaced lines per inch, this is about 28 returns with the Enter key. __ The bottom section of the page includes, in this order: Your Name, Course Name, Teacher, Date. __ The Date line should be between 1 and 1 ½ inches from the bottom of the page. Add or delete returns as necessary. __ If adding a picture and a page border is permitted, see the Web Site for instructions and guidelines