
Recommended
More Related Content
What's hot
What's hot (20)
Similar to Smart
Similar to Smart (20)
Recently uploaded
Recently uploaded (20)
Smart
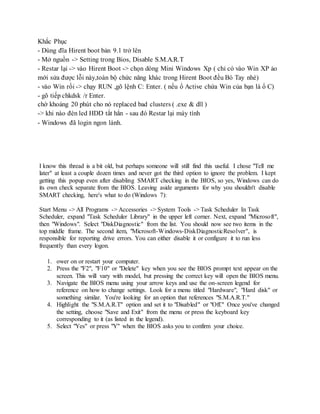
- 1. Khắc Phục - Dùng đĩa Hirent boot bản 9.1 trở lên - Mở nguồn -> Setting trong Bios, Disable S.M.A.R.T - Restar lại -> vào Hirent Boot -> chọn dòng Mini Windows Xp ( chỉ có vào Win XP ảo mới sửa được lỗi này,toàn bộ chức năng khác trong Hirent Boot đều Bó Tay nhé) - vào Win rồi -> chạy RUN ,gõ lệnh C: Enter. ( nếu ổ Active chứa Win của bạn là ổ C) - gõ tiếp chkdsk /r Enter. chờ khoảng 20 phút cho nó replaced bad clusters ( .exe & dll ) -> khi nào đèn led HDD tắt hẳn - sau đó Restar lại máy tính - Windows đã login ngon lành. I know this thread is a bit old, but perhaps someone will still find this useful. I chose "Tell me later" at least a couple dozen times and never got the third option to ignore the problem. I kept getting this popup even after disabling SMART checking in the BIOS, so yes, Windows can do its own check separate from the BIOS. Leaving aside arguments for why you shouldn't disable SMART checking, here's what to do (Windows 7): Start Menu -> All Programs -> Accessories -> System Tools -> Task Scheduler In Task Scheduler, expand "Task Scheduler Library" in the upper left corner. Next, expand "Microsoft", then "Windows". Select "DiskDiagnostic" from the list. You should now see two items in the top middle frame. The second item, "Microsoft-Windows-DiskDiagnosticResolver", is responsible for reporting drive errors. You can either disable it or configure it to run less frequently than every logon. 1. ower on or restart your computer. 2. Press the "F2", "F10" or "Delete" key when you see the BIOS prompt text appear on the screen. This will vary with model, but pressing the correct key will open the BIOS menu. 3. Navigate the BIOS menu using your arrow keys and use the on-screen legend for reference on how to change settings. Look for a menu titled "Hardware", "Hard disk" or something similar. You're looking for an option that references "S.M.A.R.T." 4. Highlight the "S.M.A.R.T" option and set it to "Disabled" or "Off." Once you've changed the setting, choose "Save and Exit" from the menu or press the keyboard key corresponding to it (as listed in the legend). 5. Select "Yes" or press "Y" when the BIOS asks you to confirm your choice.