
Recommended
More Related Content
What's hot
What's hot (13)
Viewers also liked
Similar to Creating a Magazine Cover and Spread in Photoshop and InDesign
Similar to Creating a Magazine Cover and Spread in Photoshop and InDesign (20)
Recently uploaded
Recently uploaded (20)
Creating a Magazine Cover and Spread in Photoshop and InDesign
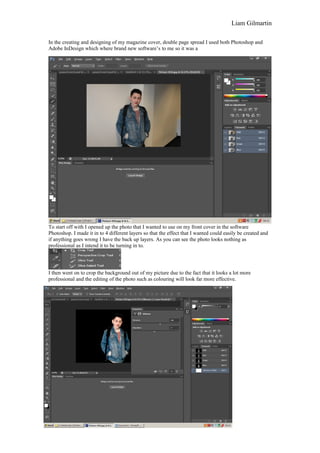
- 1. Liam Gilmartin In the creating and designing of my magazine cover, double page spread I used both Photoshop and Adobe InDesign which where brand new software’s to me so it was a To start off with I opened up the photo that I wanted to use on my front cover in the software Photoshop. I made it in to 4 different layers so that the effect that I wanted could easily be created and if anything goes wrong I have the back up layers. As you can see the photo looks nothing as professional as I intend it to be turning in to. I then went on to crop the background out of my picture due to the fact that it looks a lot more professional and the editing of the photo such as colouring will look far more effective.
- 2. Liam Gilmartin As you cans see the photo looks far better than it originally did and looks a lot more like a foundation rather than just a picture. I then moved on to actually editing the photo colour and properties the first one that I used was vibrance and saturation which I used to highlight the bright sections of the photo such as the skin tone and the areas of the picture that the light are more dominant in. I then moved on to editing the properties to make it black and whit. As you can see the previous edits of vibrance and saturation the skin tone that was affected by the light and parts of the clothing such as the jacket for example and the jumper are white where as the majority of things such as the arms and the side of his face. I then moved on to properties and then mask this meant that I could change the entire layout on top of the ones that I already have made. Adding this on to the top of the black and white that I have previously done makes the picture look as if it is negative and I feel adds a touch of art to it instead of just having the plain picture and the text.
- 3. Liam Gilmartin Once I was happy with the picture that I had I then began to create strap lines and titles, which as you can see above I arranged in different ways and in different colours but still keeping to the colour scheme of the magazine so that it looks as professional as it possibly can. I created them all on different layers so that I was able to arrange and move each one individually. I feel that the use of the barcode and all the different prices help to make it look a lot more professional. I then moved on to adobe InDesign to create my double page spread as this was my first time using this software I had to learn and develop my skills quickly. I feel that this had restrictions on how good my
- 4. Liam Gilmartin final product actually was and if I had more time or past experience using the software the end result would have been of a higher standard. To first start off I placed boxes that would allow me to put the big background photo in as a foundation then the basic text boxes and from then on the foundation was set and I could work around the basics and develop/improve what I wanted as I went on. After a lengthy time of trial and error and editing ideas I have come to the conclusion and the final double page spread has been completed. I’m happy with what I have produced in the amount of time I had but I feel it would be 10 times better if I had longer time and better experience and knowledge of the software.