1. Editing Log
The first decision I had to make was to choose people to be in my group and decide what
roles everyone is going to have. So in my group it was me, Ragwana and Elisabeth. I was
the camera person and the director. Ragwana controlled the lighting and Elisabeth controlled
the sound.
There weren’t enough MACs in our classroom so me and my group went to another
classroom and used their macs. Even though we are in the same group and we did our
filming together. We had to upload our footage and edit everything individually. To do all our
editing and create our trailer, the main application i used was Final Cut Pro.
The MAC I was using did not allow me to screenshot anything so I had to take pictures on
my phone and then import it to my computer.
Firstly we had to create our own folders under our names to store all our film trailer work.
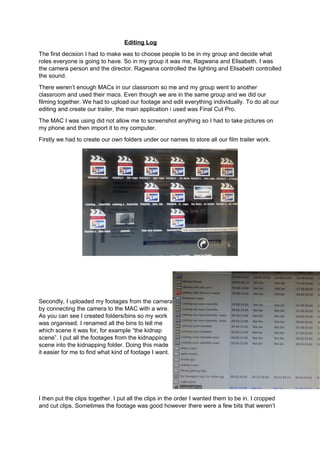
Secondly, I uploaded my footages from the camera
by connecting the camera to the MAC with a wire.
As you can see I created folders/bins so my work
was organised. I renamed all the bins to tell me
which scene it was for, for example “the kidnap
scene”. I put all the footages from the kidnapping
scene into the kidnapping folder. Doing this made
it easier for me to find what kind of footage I want.
I then put the clips together. I put all the clips in the order I wanted them to be in. I cropped
and cut clips. Sometimes the footage was good however there were a few bits that weren’t
2. as great so I cut them out by using tools in Final Cut Pro. I faded in and out by using a tool. I
also marked in and marked out. Final Cut Pro was quite easy to use because everything you
needed was in the tool box.
I then imported this intuitional logo into my
trailer. I put the logo right at the beginning
of the trailer because on some trailers I
saw, the logo was at the beginning. By
adding this logo, my trailer looks more
professional and real, because all trailers
have a logo
I used an application called
‘Motion’. On this application I
created my intertitles, my title,
my release date and my social
media links. It took me quite
some time because my intertitle
was a paragraph which I had to
break down. I also needed to
use different fonts and colours, I
tested out many fonts and
colours and decided which ones
I liked best.
To finish off my trailer I added sounds. I used this music application called “garage band”. I
used iTunes to convert the sound into a file. Then I imported it into the timeline of my trailer.
I used this to
cut and crop my
Footages.
This tool shows
how loud or
quiet the sound
is
3. It took me quite some time to get use to using Final Cut Pro, Motion and Garage Band. But I
managed and ended up creating my trailer.