Recommended

Recommended
More Related Content
What's hot
What's hot (20)
Similar to Everything Teachers Need to Know
Similar to Everything Teachers Need to Know (20)
Recently uploaded
Recently uploaded (20)
Everything Teachers Need to Know
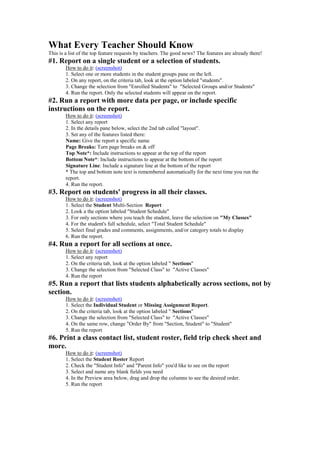
- 1. What Every Teacher Should Know This is a list of the top feature requests by teachers. The good news? The features are already there! #1. Report on a single student or a selection of students. How to do it: (screenshot) 1. Select one or more students in the student groups pane on the left. 2. On any report, on the criteria tab, look at the option labeled "students". 3. Change the selection from "Enrolled Students" to "Selected Groups and/or Students" 4. Run the report. Only the selected students will appear on the report. #2. Run a report with more data per page, or include specific instructions on the report. How to do it: (screenshot) 1. Select any report 2. In the details pane below, select the 2nd tab called "layout". 3. Set any of the features listed there: Name: Give the report a specific name Page Breaks: Turn page breaks on & off Top Note*: Include instructions to appear at the top of the report Bottom Note*: Include instructions to appear at the bottom of the report Signature Line: Include a signature line at the bottom of the report * The top and bottom note text is remembered automatically for the next time you run the report. 4. Run the report. #3. Report on students' progress in all their classes. How to do it: (screenshot) 1. Select the Student Multi-Section Report 2. Look a the option labeled "Student Schedule" 3. For only sections where you teach the student, leave the selection on "My Classes" 4. For the student's full schedule, select "Total Student Schedule" 5. Select final grades and comments, assignments, and/or category totals to display 6. Run the report. #4. Run a report for all sections at once. How to do it: (screenshot) 1. Select any report 2. On the criteria tab, look at the option labeled " Sections" 3. Change the selection from "Selected Class" to "Active Classes" 4. Run the report #5. Run a report that lists students alphabetically across sections, not by section. How to do it: (screenshot) 1. Select the Individual Student or Missing Assignment Report. 2. On the criteria tab, look at the option labeled " Sections" 3. Change the selection from "Selected Class" to "Active Classes" 4. On the same row, change "Order By" from "Section, Student" to "Student" 5. Run the report #6. Print a class contact list, student roster, field trip check sheet and more. How to do it: (screenshot) 1. Select the Student Roster Report 2. Check the "Student Info" and "Parent Info" you'd like to see on the report 3. Select and name any blank fields you need 4. In the Preview area below, drag and drop the columns to see the desired order. 5. Run the report