
Recommended
More Related Content
What's hot
Viewers also liked
Viewers also liked (20)
Similar to Teacher Trouble Animation
Similar to Teacher Trouble Animation (20)
More from kannkarry
More from kannkarry (20)
Teacher Trouble Animation
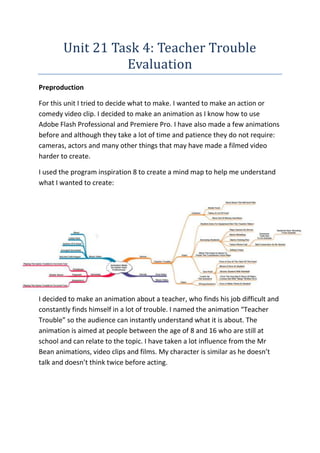
- 1. Unit 21 Task 4: Teacher Trouble Evaluation Preproduction For this unit I tried to decide what to make. I wanted to make an action or comedy video clip. I decided to make an animation as I know how to use Adobe Flash Professional and Premiere Pro. I have also made a few animations before and although they take a lot of time and patience they do not require: cameras, actors and many other things that may have made a filmed video harder to create. I used the program inspiration 8 to create a mind map to help me understand what I wanted to create: I decided to make an animation about a teacher, who finds his job difficult and constantly finds himself in a lot of trouble. I named the animation “Teacher Trouble” so the audience can instantly understand what it is about. The animation is aimed at people between the age of 8 and 16 who are still at school and can relate to the topic. I have taken a lot influence from the Mr Bean animations, video clips and films. My character is similar as he doesn’t talk and doesn’t think twice before acting.
- 2. Production To start my animation I wanted to create an intro to introduce the audience to the main character and his rather small mindedness. I used the program Adobe Flash Professional to start creating my animation. Here is a list of tools and how I used them to create my animation: Selection Tool – To select and move images and drawings Free Transform Tool – To select, move, resize and rotate images and drawings Line Tool – To create straight lines and complex shapes Brush Tool – To create free drawn images, I used this instead of the pencil tool because it has a smoothen feature Paint Bucket Tool – To fill in shapes quickly Eye Dropper Tool – To select a colour already used Eraser Tool – To remove lines I also used the Onion Skin Tool (At the bottom of the screen) which allows you to view multiple frames which is very useful when making frame by frame animations. My animation was mainly made from frame by frame animation which is the longest method but usually looks best. The most useful time to use this method is when changing the facial expression of a character or I if a character is talking.
- 3. Creating A Frame By Frame Animation: Step 1: Select the layer you wish to draw on and draw the first frame of the animation: Step 2: On the same layer, right click on the next frame and insert a blank key frame and draw the result of the action e.g. if you want someone opening their eye draw their eyes completely open:
- 4. Step 3: Drag the second frame to the right, creating a space between and insert a blank key frame. Turn on the Onion Skin Tool and draw what would be between the two frames: Step 4: Continue creating blank key frames between all the frames until the animation is smooth. How To Make A Classic Tween:Creating a classic tween enables you to save time doing frame by frame. The classic tween will fill the spaces between key frames. This is best for limb movement. Step 1: Draw a shape or object you want on a key frame:
- 5. Step 2: Insert key frames and move the shape: Step 3: Select all the frames and create a classic tween:
- 6. Where I have used classic tween:I used the motion tween here to move the hand and click the button the radio: After making my animation in Adobe Flash Professional I exported it as a QuickTime movie and imported it into Adobe Premiere Pro. I then ordered the scenes and imported sound and music. When editing, I used a lot of video and audio effects: Audio: Low pass:I used this to create a sense of perspective with audio e.g. when the alarm rings it sounds different from different angles. High pass: I used this to make a sound effect I had for the falling sound higher which made it sound more appropriate. Pitch Shifter: I used this to create the zip sound by increasing the pitch of a sound effect to make it sound higher. Video: Shadow/Highlight: I used this to create more shadow within the animation. This worked well but would have been better if I had added detail in Flash.
- 7. When I made my animation I wanted it to be as funny as a TV animation such as The Simpsons or Family Guy. To do this I used jokes in quick succession to keep the audience guessing: 1. The teacher uses a gun to start the exam 2. He shoots in the air and thinks he has shot someone 3. The view zooms out and the audience see the blood is really red paint 4. The teacher walks off and a student falls and hits the ground This keeps the viewers in suspense and keeps the humour moving until the end. Strengths: Weaknesses: I successfully used Flash and Premiere Pro Very short I used interesting effects and sound effects No talking The music was well timed with the video. The credits music was also exciting and energetic, to leave the viewer happy and upbeat. There were problems with the animation as some limbs moved off the body and some scenes did not look as good as others Improvements: To improve my animation I would have made it longer and found voices to act out some of the characters. Although the main character was not meant to talk I think it was need through other characters to make him seem more clumsy and funny. There were also some parts of the video that were animated poorly and if I were to do it again I would spend more time perfecting movement, facial expressions and background. The animation was also lacked detail and although it would have taken a lot longer I think now spending more time adding shading and light while animating would have greatly improved this problem.