SUMO simulation CODES AND STEPS
•Download as DOCX, PDF•
0 likes•2,439 views

MADE BY SHRIKRISHNA KESHARWANI 1ST YR ASSIGNMENT MASTERS OF TECHNOLOGY TRANSPORTATION ENGINEERING NIT WARANGAL

Recommended
More Related Content
What's hot
What's hot (20)
Similar to SUMO simulation CODES AND STEPS
Similar to SUMO simulation CODES AND STEPS (20)
More from shrikrishna kesharwani
More from shrikrishna kesharwani (20)
Recently uploaded
Recently uploaded (20)
SUMO simulation CODES AND STEPS
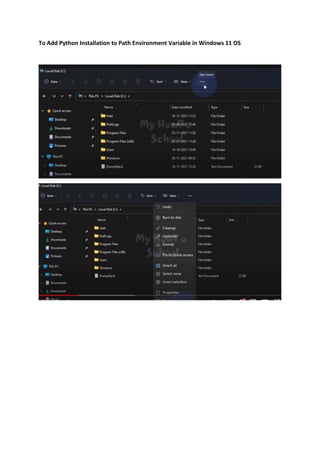
- 1. To Add Python Installation to Path Environment Variable in Windows 11 OS
- 4. Simulation 1 Procedure to build a network and simulate a random traffic in SUMO: 1) Open street maps > select region > export as map.osm 2) Copy osmNetconvert.typ.xml from C:Program Files (x86)EclipseSumodatatypemap into the working folder 3) Go to cmd then type the following code- netconvert --osm-files map.osm -o test.net.xml -t osmNetconvert.typ.xml --xml-validation never 4) https://sumo.dlr.de/wiki/Networks/Import/OpenStreetMap > Importing additional polygons > copy code> save in typemap.xml or copy the code below- <polygonTypes> <polygonType id="waterway" name="water" color=".71,.82,.82" layer="- 4"/> <polygonType id="natural" name="natural" color=".55,.77,.42" layer="- 4"/> <polygonType id="natural.water" name="water" color=".71,.82,.82" layer="- 4"/> <polygonType id="natural.wetland" name="water" color=".71,.82,.82" layer="- 4"/> <polygonType id="natural.wood" name="forest" color=".55,.77,.42" layer="- 4"/> <polygonType id="natural.land" name="land" color=".98,.87,.46" layer="- 4"/> <polygonType id="landuse" name="landuse" color=".76,.76,.51" layer="- 3"/> <polygonType id="landuse.forest" name="forest" color=".55,.77,.42" layer="- 3"/> <polygonType id="landuse.park" name="park" color=".81,.96,.79" layer="- 3"/> <polygonType id="landuse.residential" name="residential" color=".92,.92,.89" layer="- 3"/> <polygonType id="landuse.commercial" name="commercial" color=".82,.82,.80" layer="- 3"/> <polygonType id="landuse.industrial" name="industrial" color=".82,.82,.80" layer="- 3"/> <polygonType id="landuse.military" name="military" color=".60,.60,.36" layer="- 3"/> <polygonType id="landuse.farm" name="farm" color=".95,.95,.80" layer="- 3"/> <polygonType id="landuse.greenfield" name="farm" color=".95,.95,.80" layer="- 3"/> <polygonType id="landuse.village_green" name="farm" color=".95,.95,.80" layer="- 3"/> <polygonType id="tourism" name="tourism" color=".81,.96,.79" layer="- 2"/> <polygonType id="military" name="military" color=".60,.60,.36" layer="- 2"/> <polygonType id="sport" name="sport" color=".31,.90,.49" layer="- 2"/> <polygonType id="leisure" name="leisure" color=".81,.96,.79" layer="- 2"/> <polygonType id="leisure.park" name="tourism" color=".81,.96,.79" layer="- 2"/>
- 5. <polygonType id="aeroway" name="aeroway" color=".50,.50,.50" layer="- 2"/> <polygonType id="aerialway" name="aerialway" color=".20,.20,.20" layer="- 2"/> <polygonType id="shop" name="shop" color=".93,.78,1.0" layer="- 1"/> <polygonType id="historic" name="historic" color=".50,1.0,.50" layer="- 1"/> <polygonType id="man_made" name="building" color="1.0,.90,.90" layer="- 1"/> <polygonType id="building" name="building" color="1.0,.90,.90" layer="- 1"/> <polygonType id="amenity" name="amenity" color=".93,.78,.78" layer="- 1"/> <polygonType id="amenity.parking" name="parking" color=".72,.72,.70" layer="- 1"/> <polygonType id="power" name="power" color=".10,.10,.30" layer="- 1" discard="true"/> <polygonType id="highway" name="highway" color=".10,.10,.10" layer="- 1" discard="true"/> <polygonType id="railway" name="railway" color=".10,.10,.10" layer="- 1" discard="true"/> <polygonType id="boundary" name="boundary" color="1.0,.33,.33" layer="0" fill="false" discard="true"/> <polygonType id="admin_level" name="admin_level" color="1.0,.33,.33" layer="0" fill="false" discard="true"/> </polygonTypes> 5) cmd> polyconvert --net-file test.net.xml --osm-files map.osm --type-file typemap.xml -o map.poly.xml --xml-validation never 6) Copy randomTripy.py from C:Program Files (x86)EclipseSumotools into the working folder 7) cmd > python randomTrips.py -n test.net.xml -r map.rou.xml -e 100 -l 8) Create map.sumo.cfg > contains a. <net-file value="test.net.xml"/> b. <route-files value="trips.trips.xml"/> c. <additional-files value="map.poly.xml"/> map.sumo.cfg file- <?xml version="1.0" encoding="UTF-8"?> <configuration xmlns:xsi="http://www.w3.org/2001/XMLSchema-instance" xsi:noNamespaceSchemaLocation="http://sumo.dlr.de/xsd/sumoConfiguration.xsd"> <input> <net-file value="test.net.xml"/> <route-files value="trips.trips.xml"/>
- 6. <additional-files value="map.poly.xml"/> </input> <time> <begin value="0"/> <end value="1000"/> </time> </configuration> 9) Open SUMO GUI > Open Simulation > Run map.sumo.cfg 10) If you are getting error while running the simulation then just see which vehicle is not having proper route from the code and del. it FOR OUT PUT- First make configuration file- Use this code in notepad ++ and save it as .sumocfg file <configuration> <input> <net-file value="test.net.xml"/> <route-files value="map.rou.xml"/> </input> <time> <begin value="0"/> <end value="2000"/> </time> </configuration> Open and run the simulation in sumo gui
- 7. For floating car data- Use this code in cmd- sumo -c final.sumocfg --fcd-output sumoTrace.xml sumo trace file will open which shows the floating car data. 1. RAW VEHICLE POSITION DUMP sumo -c myconfig.sumocfg --netstate-dump my_dump_file.xml ADD THIS LINE <output> <netstate-dump value="test_dump.xml" /> </output> TO THE SUMOCFG FILE- <configuration> <input> <net-file value="test.net.xml"/> <route-files value="map.rou.xml"/> </input> <output> <netstate-dump value="test_dump2.xml" /> </output> <time>
- 8. <begin value="0"/> <end value="2000"/> </time> </configuration> Now simulate in sumo gui to get output 2. EMISSION OUTPUT USE CODE – sumo –c mynew.sumocfg --emission-output my_emission_file.xml 3. For getting full output use code- sumo -c myconfig.sumocfg --full-output my_full_output.xml open file (warning above gb)
- 9. Simulation 2- Make a <sumo.net> file from netedit. Create a four leg junction as shown below- Save the file to a working folder then copy the randomtrips python file to the same folder Use code in cmd- python randomTrips.py -n test.net.xml -r map.rou.xml -e 100 –l to generate random traffic. <trip id="0" depart="0.00" from="-E3" to="-E0"/> <trip id="1" depart="1.00" from="-E1" to="E2"/> <trip id="2" depart="2.00" from="-E3" to="E2"/> <trip id="4" depart="4.00" from="-E2" to="-E0"/> <trip id="5" depart="5.00" from="-E1" to="E2"/> <trip id="6" depart="6.00" from="-E1" to="-E0"/> <trip id="7" depart="7.00" from="-E3" to="E2"/> <trip id="8" depart="8.00" from="-E1" to="E2"/> <trip id="10" depart="10.00" from="-E3" to="E2"/> <trip id="11" depart="11.00" from="-E2" to="-E0"/> <trip id="12" depart="12.00" from="E0" to="E1"/> <trip id="13" depart="13.00" from="-E1" to="-E0"/> <trip id="14" depart="14.00" from="E0" to="E2"/> <trip id="15" depart="15.00" from="-E3" to="-E0"/> <trip id="16" depart="16.00" from="-E1" to="E3"/> <trip id="17" depart="17.00" from="-E2" to="E1"/> <trip id="18" depart="18.00" from="E0" to="E2"/> <trip id="19" depart="19.00" from="E0" to="E2"/> E0 -E0 E2 -E2 -E1 E1 E3 -E3
- 10. <trip id="20" depart="20.00" from="-E3" to="-E0"/> <trip id="21" depart="21.00" from="-E1" to="-E0"/> <trip id="22" depart="22.00" from="-E1" to="E3"/> <trip id="23" depart="23.00" from="-E2" to="E1"/> <trip id="24" depart="24.00" from="-E3" to="E1"/> <trip id="25" depart="25.00" from="-E2" to="E1"/> <trip id="26" depart="26.00" from="-E1" to="E3"/> <trip id="27" depart="27.00" from="-E3" to="E2"/> <trip id="28" depart="28.00" from="-E1" to="E3"/> <trip id="29" depart="29.00" from="-E1" to="E3"/> <trip id="30" depart="30.00" from="E0" to="E2"/> <trip id="31" depart="31.00" from="-E3" to="E2"/> <trip id="32" depart="32.00" from="E0" to="E3"/> <trip id="33" depart="33.00" from="-E1" to="-E0"/> <trip id="34" depart="34.00" from="-E1" to="-E0"/> <trip id="35" depart="35.00" from="-E1" to="E3"/> <trip id="36" depart="36.00" from="E0" to="E1"/> <trip id="37" depart="37.00" from="-E3" to="E1"/> <trip id="38" depart="38.00" from="E0" to="E1"/> <trip id="39" depart="39.00" from="-E1" to="E2"/> <trip id="40" depart="40.00" from="-E3" to="E1"/> <trip id="41" depart="41.00" from="-E3" to="E1"/> <trip id="42" depart="42.00" from="-E2" to="E1"/> <trip id="43" depart="43.00" from="E0" to="E1"/> <trip id="44" depart="44.00" from="-E1" to="-E0"/> <trip id="45" depart="45.00" from="-E1" to="E2"/> <trip id="46" depart="46.00" from="-E3" to="E1"/> <trip id="47" depart="47.00" from="-E1" to="E2"/> <trip id="48" depart="48.00" from="E0" to="E1"/> <trip id="49" depart="49.00" from="E0" to="E3"/> <trip id="50" depart="50.00" from="-E1" to="E3"/> <trip id="51" depart="51.00" from="-E3" to="E2"/> <trip id="52" depart="52.00" from="-E1" to="E2"/> <trip id="53" depart="53.00" from="-E1" to="E3"/> <trip id="54" depart="54.00" from="-E2" to="E3"/> <trip id="55" depart="55.00" from="E0" to="E1"/> <trip id="56" depart="56.00" from="-E2" to="-E0"/> <trip id="57" depart="57.00" from="E0" to="E3"/> <trip id="58" depart="58.00" from="-E1" to="E2"/> <trip id="59" depart="59.00" from="-E3" to="-E0"/> <trip id="60" depart="60.00" from="-E3" to="E2"/> <trip id="61" depart="61.00" from="-E3" to="E1"/> <trip id="62" depart="62.00" from="-E1" to="E2"/> <trip id="63" depart="63.00" from="-E1" to="E3"/> <trip id="64" depart="64.00" from="E0" to="E3"/> <trip id="65" depart="65.00" from="-E1" to="-E0"/> <trip id="66" depart="66.00" from="E0" to="E3"/> <trip id="67" depart="67.00" from="-E1" to="E2"/>
- 11. <trip id="68" depart="68.00" from="-E1" to="E3"/> <trip id="69" depart="69.00" from="-E3" to="-E0"/> <trip id="70" depart="70.00" from="-E2" to="E1"/> <trip id="71" depart="71.00" from="-E1" to="E3"/> <trip id="72" depart="72.00" from="-E2" to="E1"/> <trip id="73" depart="73.00" from="-E3" to="E2"/> <trip id="74" depart="74.00" from="-E1" to="E2"/> <trip id="75" depart="75.00" from="E0" to="E2"/> <trip id="76" depart="76.00" from="-E2" to="E1"/> <trip id="77" depart="77.00" from="-E1" to="E3"/> <trip id="78" depart="78.00" from="-E1" to="E2"/> <trip id="79" depart="79.00" from="-E1" to="E3"/> <trip id="80" depart="80.00" from="-E1" to="E2"/> <trip id="81" depart="81.00" from="-E1" to="E3"/> <trip id="82" depart="82.00" from="E0" to="E2"/> <trip id="83" depart="83.00" from="-E1" to="E2"/> <trip id="84" depart="84.00" from="-E1" to="-E0"/> <trip id="85" depart="85.00" from="E0" to="E2"/> <trip id="86" depart="86.00" from="-E2" to="E3"/> <trip id="87" depart="87.00" from="-E3" to="-E0"/> <trip id="88" depart="88.00" from="E0" to="E2"/> <trip id="89" depart="89.00" from="-E2" to="E1"/> <trip id="90" depart="90.00" from="-E3" to="E2"/> <trip id="91" depart="91.00" from="E0" to="E3"/> <trip id="92" depart="92.00" from="-E2" to="E1"/> <trip id="93" depart="93.00" from="E0" to="E1"/> <trip id="94" depart="94.00" from="-E3" to="E1"/> <trip id="95" depart="95.00" from="-E2" to="E1"/> <trip id="96" depart="96.00" from="-E1" to="E3"/> <trip id="97" depart="97.00" from="-E2" to="E3"/> <trip id="98" depart="98.00" from="-E3" to="-E0"/> <trip id="99" depart="99.00" from="E0" to="E3"/> </routes> map.sumo.cfg file- <?xml version="1.0" encoding="UTF-8"?> <configuration xmlns:xsi="http://www.w3.org/2001/XMLSchema-instance" xsi:noNamespaceSchemaLocation="http://sumo.dlr.de/xsd/sumoConfiguration.xsd"> <input> <net-file value="test.net.xml"/> <route-files value="trips.trips.xml"/> </input>
- 12. <time> <begin value="0"/> <end value="10000"/> </time> CLICK ON INSPECT MODE> CLICK ON JUNCTION > SELECT TYPE TO TRAFFIC LIGHT > SELECT TRAFFIC LIGHT MODE > CLICK ON THE JUNCTION AND SAVE THE TLS PROGRAMME FILE AS TLS. EDIT> EDIT VISUALIZATION > JUNCTIONS > CLICK ON SHOW LINK TLS INDEX For static traffic light – (File name – TLS) <tlLogic id="J1" type="static" programID="0" offset="0"> <!-- <phase duration="42" state="0123456789101112"/> --> <!-- Green Light--> <phase duration="42" state="GGgrrrrrrrrr"/> <!-- Yellow Light--> <phase duration="3" state="yyyrrrrrrrrr"/> <!-- all red--> <phase duration="3" state="rrrrrrrrrrrr"/> <!--phase 2-->
- 13. <phase duration="42" state="rrrGGgrrrrrr"/> <phase duration="3" state="rrryyyrrrrrr"/> <phase duration="3" state="rrrrrrrrrrrr"/> <!--phase 3--> <phase duration="42" state="rrrrrrGGgrrr"/> <phase duration="3" state="rrrrrryyyrrr"/> <phase duration="3" state="rrrrrrrrrrrr"/> <!--phase 4--> <phase duration="42" state="rrrrrrrrrGGg"/> <phase duration="3" state="rrrrrrrrryyy"/> <phase duration="3" state="rrrrrrrrrrrr"/> </tlLogic> </additional> Run the simulation